Transcripts
1. Introduction: Hi and welcome to this blender and aftereffects VFX course. My name is Ryan
and I'm a VFX and 3D artist based in Cape
Town, South Africa. I currently work in the
advertising industry and doing VFX work for international
clients such as Disney, record, leptin, and
Hasbro to name a few. In this exciting course, you will learn how to create
fantastic worlds by adding 3D objects and characters
into any live action scene. We will begin by going step-by-step through the
camera tracking process. Then we will look
at how you can add objects or characters
to the scene. You will also learn how to
add shadows and R2 match the lighting and new 3D scene
to the live action footage. Next, we will focus on
Render passes and how to render a multi-layer
EX or sequence. And finally, you will
learn how to composite these different arena posters together using Adobe
After Effects. You will also learn how to use crypto mats to easily mosque objects to make
specific adjustments without re-rendering
from Blender. We will do some rotoscoping, look at how to use track mattes. And finally, we will calibrate the shot at some film grain to blend everything together and
render your final VFS shot. I'm including the footage and assets that you are
required to follow along, but feel free to use your
own footage if you wish. I really hope that you will learn a lot during this course and feel free to reach out
if you have any questions, I will be more than
happy to assist ready to create some
amazing VFX shots. I will see you in
the first lesson.
2. Lesson01: Exporting a PNG Sequence: Hi and welcome to
the first lesson. In this lesson, we're
going to look at how we can convert our footage, the MOV file to a
PNG image sequence. Now the reason we're exporting an image sequence is when doing any types
of visual effects. It's always better to use a PNG image sequence or any
type of image sequence. You can either use a turf
or a PNG or even a JPEG. Because then you
don't have to really worry about the frame rate. And it will also
ensure that you are using the correct
number of frames. Now, you can use any
software to do this. You can use Premier Pro, you can use After Effects. You can use the Vinci Resolve, or you can even use
blender to convert a MOV or a video file
to an image sequence. But in this course
we're going to use After Effects to do that. So let's get our video clip
inside of After Effects. I'm simply going to
open finder and browse to my footage, the clip, the MOV file, which is a normal ten ADP file that I
shot with my maverick drone. So it's about us to 6 s clip. And we're simply going to
drag this into After Effects into the project section right here on the
left-hand side. Now yet the topic and see
the details of this clip. This is 1920 by 1080. And it's also, it's
using the Apple ProRes four to two HQ codec. And it's running at
25 frames a second. But that's something
we don't really need to worry about
because we're going to convert all these frames to individual image sequence files, then you don't really have to
worry about the frame rate, which makes everything
so much easier. So I'm simply going to drag this clip into a
new composition, into this icon at the bottom. And this will create a
new composition for us. Now, if we play through this, you'll see this is a
very simple shot of just this building,
drones flying backwards. And that's what we're going
to use inside of this course. Now, let's stop the playback and let's go to composition
right here at the top. And we're going to add
this to the render queue. And now we're going to
set the parameters to export this as a PNG sequence. Now we've got some
presets here at the bottom if I
just drag this up, so we can see this better. You can click on this drop-down and you will find some presets. Now, I've already saved
a PNG preset here, but if you don't see this, you can simply click on this custom to create
your own preset. Now, right here at the
top where it says format, we're going to change
this to PNG sequence. Now you'll see there's
some other options here like JPEG Sequence, open the XOR, or even you can use a
tiff sequence as well. Now you can go ahead
and you can use a tough or a J peg even. But I would recommend using PNG because it's better
quality than a JPEG, and it's also a little bit
smaller than a tiff sequence. So we're gonna go
with PNG sequence. Next, we can look at
the video output. Now for the channels
we only want to export the RGB channel. We're not interested in doing alpha or RGB plus
Alpha because we don't really have any alpha
values inside of this clip. So just leave this on RGB. And you can leave these
settings as default as well. Just below that you'll see
use comp frame number. Now, if you untick this, you can actually specify the frame number of the first frame that
will be exported. Now sometimes you want
to start at zero. I really prefer to start
at frame one because blender starts at frame
one and not frame zero. That kinda just makes it a
little bit easier to work with an image sequence starting
at frame number one. And next we can click on this Format options just
to look at the compression and make sure this is
set to none because we don't want to
compress our PNG file. Next click on Okay, and now you can click on
Okay to save those settings. Now you can see at the bottom it says custom PNG sequence. You can go in and
actually save this as a preset so you can
reuse this next time. To do that, click on this
drop-down and then click on Make Template
right at the bottom. And here you can specify a name. You can maybe call it PNG
sequence or anything you want, and then just simply
click on Okay. Now you will see it will show that preset name right
here at the bottom. Now, let's tell After
Effects way we want to export this image sequence two. So next to output to just click on this not yet specified. And now we're going to browse to the location where we
want to export this to. So I'm simply going
to go to my folder. And I'm going to create
a new folder called this image sequence like that. Click on Create. And now you can specify
how you want to call that or your
image sequence, the file name, basically, I'm just going to call this
clip and then underscore. And then I want to leave
these hashtags in. This will basically
be the frame number, so it's going to be
00001 and so forth. So you can even make
this a little bit less because we don't have a lot
of frames. It's only 6 s. I'm going to decrease the
number of hashtags here too. Let's make it four like that. And that's gonna give us zeros, zeros 010002 and so forth. Now you can also antique this saving subfolder because
if you leave that on, it's going to create
another sub folder. So just like that,
That looks fine. Click on Save. Next, we're going to simply click on Render. And this is going to start
exporting all those frames to the image sequence
or to that folder. So once it's done, we can go into our
folder that we selected and just
to double-check if all our frames
exported correctly. You can see we've got
clip underscore 0001, and that's the first
frame of our video. And if I scroll down all
the way you will see it's going to go up
to frame number 150. So this is all looking good. You can preview them by just kind of going through
the image sequence. But this is looking great. So now that we have our
clip as an image sequence, you can go ahead and
close After Effects. You don't have to save this
project because we just use this to export
that image sequence. So you can close After
Effects and we are now ready to start with a
camera tracking in Blender. So I will see you
in the next lesson.
3. Lesson 02: Camera Tracking Import PNG Sequence into Blender: Hey, and welcome back. In this lesson, we're going
to look at how we can import that image sequence
that we export it from After Effects into Blender. So we can start with the
camera tracking process. So I am using Blender 3.4, 0.1, but you can
follow along with any latest or any newer
version of Blender. Anything really after
2.8 should be fine. So inside of blender, you can delete everything. So just, let's just
delete all of that. And then I'm gonna go
to this little plus right here at the top you
can see all the workspaces, layout, modeling,
sculpting, etc. Right at the end you've
got this little plus. So click on that. And then we're gonna go to VFX, and then we're going to
click on motion tracking. And this will open up
the motion tracking or the camera tracking workspace
that we're going to use. So I usually just like to make this middle
section a little bigger so you can just move this up to make this space bigger. And then we're simply
going to click on this open button here to open or load our
image sequence. So I'm gonna go to
the folder where I exported that image sequence. And here you can see we've got all the images are
all the frames from frame one all the
way down to frame 150. So I'm going to
select all of them by simply pressing a
on the keyboard. And you can see now all the
frames are highlighted. And then we simply going
to click on Open Clip. And that's going to load that whole image sequence
into this workspace. Now we can zoom out a bit
using the same controls, holding in control and kinda
just moving your mouse. So the first thing that I wanna do is you on
the left-hand side, you can set your scene frames. Because currently blenders
using the default frames, which is 250, you can
see at the bottom it's starting at frame one
and ending at frame 250. But if I click this
sets in Frames button, Blender will set the in
and out point to match. Our frames are the number
of frames we have. So now you can see at the bottom it says it's starting at frame one and its ending at frame
150, which is correct. Now, another thing that you
can do is you can click on this prefetched button
right under sits in frames, and that will load all
the frames into memory. So you can see it's
kinda just prefetching at the bottom all
the way to 100. And now if I scrub through, you can see it's playing the
footage nice and smooth. Now you can also press
Space to play back, but make sure your cursor is
inside this modal window. If the cursor is yet the bottom, sometimes like that, it
won't play the video. But if you hover
your cursor over this modal window
and press space, you will see the video
playing back smoothly. Okay, so we have loaded
our image sequence. Let's go ahead and save
this Blender project. So I'm gonna go
to File, Save as, and I'm just going
to browse to a folder and you can
give it a name. I'm going to call
this camera tracking, underscore a one
and click on Save. And now our Blender
project has been saved. So I will see you
in the next lesson.
4. Lesson 03: Camera Tracking Camera Sensor, Lens Focal Length and Color: Hey, and welcome back. In this lesson, we're going
to look at the camera, focal length and census size, as well as the color
management inside of Blender. So it's really
important that you match your virtual
camera inside of blender with the
real-world camera that you used to shoot this footage. If you don't match it exactly, blenders going to really
struggle to try and match the perspective
of your footage. So it's just really
important to kind of get that as close as possible. So you're on the right hand
side in this workspace, you will see some tabs. What you need to do is click
on the track Tab to go into the track settings and you
will find some drop-downs. So first of all, let's
look at the objects under, you will see camera, and that means the camera is
what we are going to track. We're not going to
track an object. We're going to track the
camera movement in our scene. So you can leave
that as default. Now if you go down slightly,
you'll see camera. And if you expand that, you will also see lens. Make sure you expand
lens as well. And you will see
the sensor width, which is the camera sensor size of the camera that you used. And then also very importantly, the focal length of
the lens that you use. Now you'll see by default
the sensor would say to 35 mm and the focal length
is set to 24 by default. Now, they're awesome
presets included in blender that you
can actually just click on these little dots. And you can see there's
a whole list of cameras that you can
actually select from here. So if you maybe used a red
camera or a Blackmagic Pocket, you can also select
that from here. Or what you can do
is you can simply just Google the camera that you used and you can figure
out what those sizes are. Now, I just googled my iMac Pro one because that's what I use to capture the footage worth. And here you can see the specs
of the DJI maverick pro, one, which is the first
Maverick Pro that came out. Now what I'm looking for
is the lens focal length. And you can see here it says
it's a 28 millimeter lens, but it says roughly
equivalent to 35 mm. Now this means that if we use a 35-millimeter census size, this camera or this lens, focal length will be 28 mm. So that means we don't
have to try and figure out how to multiply the crop factor
and all of those things. So always kinda look for
equivalent to a 35-millimeter. Because if we jump
back into Blender, you will see that
the sensor width is already set to 35 millimeter, which is kinda like
the industry standard. So I'm simply going to use 28 millimeter for the
lens focal length. So that's what you can to
try and need to figure out. So I'm simply going to go
to the focal length under the lens and just input
28 millimeter there. So this is basically
the camera that I used. 28 millimeter focal length. When it's on a
sensor worth of 35, it might sound a
little bit confusing, but when you Google
your camera model, you will usually find a 35-millimeter
equivalent focal length for that specific, either camera or specific lens. So it's very important that you try and
just get this right. Just Google a bit and
try and figure out the settings if your
camera is not listed here. Alright, so with
this setting saved, you can just kinda
minimize that. And then there's one more
thing that we need to change. And that's the color settings inside of blend or
the color management. Now, to get there, you need to go to the
render properties, this little camera icon, and then scroll all the way down to color management
at the bottom. Expand that. And we're going to
change the view transform from full
mic to standard. Now keep an eye on the
image in the middle. If I change this to standard, you will see it gets a
little bit more contrast and some details in the clouds
actually show, show up better. So that's just a way to change the look of your
footage as such, it really going to change
anything else for now, but it's just going to
make the footage a little bit more contrast so
you can see better. And it will maybe just
track a bit better as well. Alright, so that's
the only things we need to change right now. You can go ahead and
save your project. And I will see you
in the next lesson.
5. Lesson 04: Camera Tracking Configure Tracking Settings: Hey, and welcome back. In this lesson, we're
going to look at the tracking settings you
on the left-hand side, there's some important
settings that you need to understand before we start
tracking our footage. So if you expand
tracking settings here, you will see some options
such as patents size, search size, the
motion model match, and then also pre-post
and normalize, and then some extra settings
here at the bottom. So let's start at the top. So the pattern size is
basically the amount of pixels that it's going to track throughout the footage. It's basically the size
of the tracking area. Now the search size is the
area around the pattern size. So if you have a
fast-moving camera, then you need to increase
this search size. So that Blender basically
expands the amount of pixels it's looking for that pattern that
is trying to track. So I usually change my
pattern size to around 40 or feel usually that's
a good size to start with. The search size for relatively slow moving footage
like we have here, I think 70 or 71 should be fine. So let's start with those settings for the pattern
size and the search size. Now we get the motion model and currently that's
set to location. And if you click
on this drop-down, you'll see all these
different options, location, location, rotation, location and scale, location
rotation and scale, a fine and also perspective. Now these are the
different models that Blender will try and use to match that track going
through the footage. Now, location is simply up
and down, left and right. Location rotation will
include rotation as well. And location and scale
will basically just be up, down, left, right
and also scaled. So going closer
and further away. And then you've got your
location, rotation and scale, which will be all
of those things, then a fine and perspective. These two are very similar. That is, when you have a lot of perspective change in your shot. So let's say the
camera's panning up or down while moving
in and out as well. So when you get a lot
of perspective change, you will use these models. Now you can change the model for each track that we're gonna do. We're gonna do multiple tracks. And you can set this
motion model for each of those tracks so you don't have to
choose one and then stick with that throughout
the whole process. You can go back and forth
and change it as you like. So for now we're just going
to leave this on location. We can change this
once we actually start our tracking process. Underneath that you've
got match and yeah, you've got two options, keyframe and also
previous frame. Now key-frame means
it's going to try and match that pattern
to the first frame. So even if you tracking all
the way through your footage, it's going to look at
that first frame or that snapshot that I
took on the first frame. And it's going to try and match all those patterns throughout the shot to that first frame. Usually I find that doesn't
work too well because the pattern might change going
further into the footage. So the second option that
we have is previous frame. I always use previous
frame because basically it's
matching that pattern to the previous frame. Frame one it will
track and a pattern. Then frame two,
we'll look at frame one to match it from three, we'll then look at frame two and try and
match that pattern. So I hope that
kinda makes sense. That previous frame
usually works better. I find I've never had a lot of success using the
keyframe option C. I just changed this
match to previous frame. Then underneath that,
we've got pre-post. And if you hover over
pre-post, you'll see it says, use a brute force translation only initialization
when tracking. Now, I'm not exactly
sure what that does, but I usually just leave it on and I get good results will add. Underneath that
you've got normalize. And usually normalize
is only when you have drastic lighting
changes in your scene. So let's say there's
maybe a light that comes on during the shot, then normalize will work. It will not look at the
brightness of the shot, but it's going to
try and just kinda manage if there's any
big lighting changes. Now for this shot, we don't have any drastic
lighting changes. You can see there the lighting stays very smooth throughout. So I'm going to
leave this tick off. Alright, so if we go
down a little further, we get to Tracking
Settings extra. If you expand this, we've got the weight correlation
and also the margin. We're not really going
to use any of these. The margin you can kinda
tell blender when to stop tracking if it gets close to the edge or the
margin of the shot. But I'm going to
leave the settings on default for now so you
can minimize that. Then under the track section, this is where you get all
the tracking controls. So here we've got things like track markers backwards
by one frame, There's a striking all
the frames backwards. There's a striking all
the frames forward and that's tracking
one frame forward. You've got these same
controls over here as well. And then you also have clear, so clear backwards
and clear forwards. We will get to that
a little bit later. And then you also have
refined backwards and forwards and then some
Merge options as well. But yeah, just know that
you've got your controls here. We've got your controls
here at the bottom as well. And we're also going
to make use of the keyboard
shortcuts obviously. So once you've set
these settings like so, you can go ahead and save
your Blender project. And I will see you
in the next lesson.
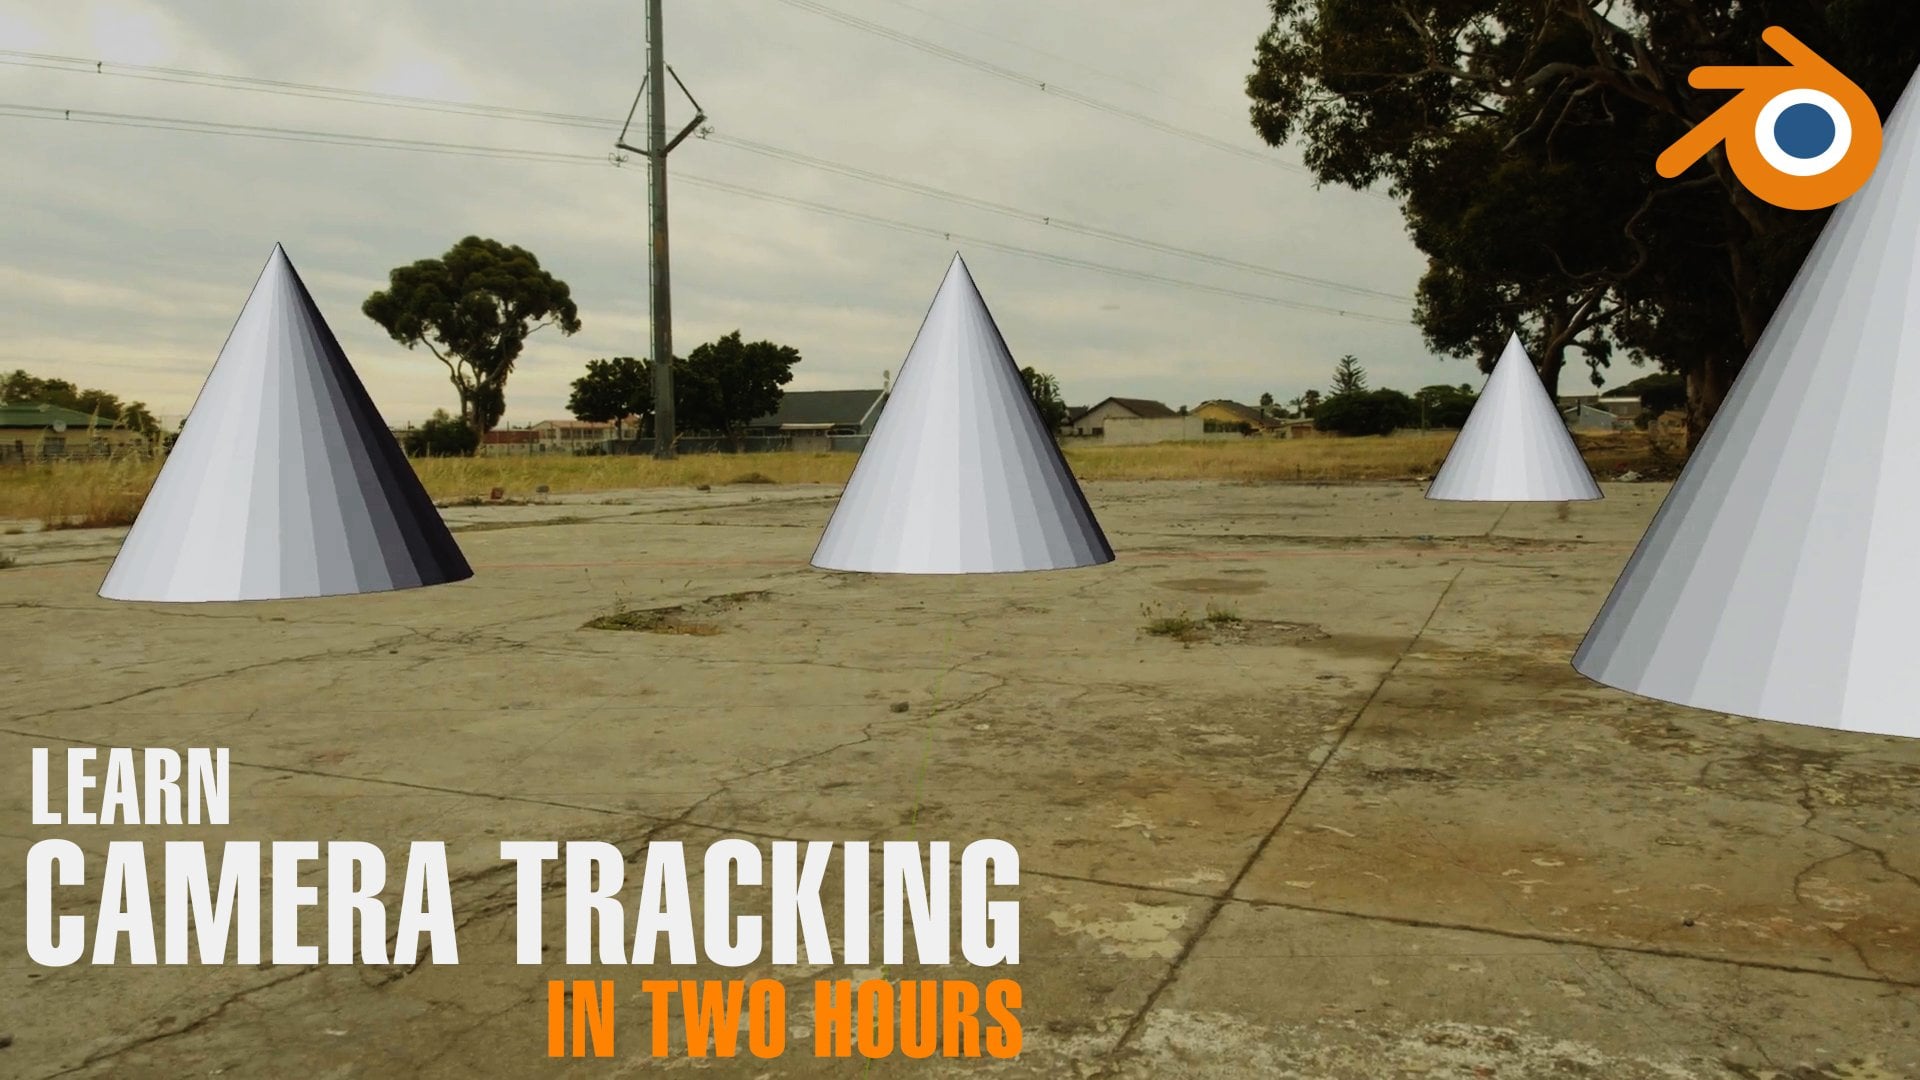
6. Lesson 05: Camera Tracking Adding Trackers and Track Footage: Hey, and welcome back. In this lesson, we're going to start the tracking process. So basically what
we're gonna do is we need to add trackers and track some
features in the shot. Now, we basically need eight good tracks to solve
this camera movement. Now, it's very
important that you get the best tracks that
you can possibly get. If you have, for instance, eight or nine or let's say
you have ten good tracks, but you have one bad track. That one bad track
can actually mess up your camera tracking
results completely. So it's always good to
have rather less trackers, but good tracks than
having a lot of trackers, but you have some bad
tracks if that makes sense. So, yeah, so basically minimum
required tracks is eight. If you think of a cube, the cube has got eight points. So you've got four points at
the top and for the base. And that's basically
how tracking works. So we need some points on the floor and some points
may be far in the distance, and then also maybe some
points closer to the camera. And then we also
want some points that's not on the floor. So maybe on the way the roof is, maybe and maybe some of these windows on the
front section of the Spalding and maybe just some of the corners of
the buildings as well. The more trackers you have at specific points in your shot, the easier it will be to reconstruct the
scene in 3D space. But you will see what I
mean when we get to that. So the most important thing to note or to remember is you need at least eight tracks that's going through
the footage completely. So those 8-tracks must cover all the frames
of your footage. And it's always better
to have less but good tracks than having a lot of tracks that's not as good. And you're looking for high contrast points
that we can track. So make sure that you
are on frame one. You can either just scrub this timeline yet the
bottom to go to frame one, or you can use the
keyboard shortcut Shift and then the left
arrow on your keyboard, and that will jump
to the first frame. The shortcut to go
to the last frame is Shift and the right arrow
key on your keyboard. We're going to use that
shortcut quite a lot. So try and get familiar with it. So shift and lift to
jump to the first frame. And now we're going to look for our first feature that
we're going to track. So for the first track
we're going to leave the motion model on location, but we can experiment
with these other ones as we go through this
tracking process. So make sure there's
a city location. We've got our pattern
size set to 40. Search size is set to 71. Everything's looking good. I'm on frame one, and I'm going to zoom
in around the footage and look for some
thing to track. I think let's start with a point that's on
the floor plane. So on the floor of the scene. And I want to maybe
track this edge of this bolding right here. So maybe this area right there. So to place a new tracker, you simply hold Control
and then just click once. And that's going to create
that tracker for you. You can also go in
and you can drag around to reposition
that tracker, an e on the left-hand side under the track tab here on the side, you can also see the tracker just kinda in a
close-up view here. You can also click
and drag here to do some fine readjustments. The position of that track. Once you are happy
to track forward, we are going to, you can either use the keys here at the bottom
of these buttons. You can press this one that says track the selected markers
forward for the entire clip. But we're going to
use the shortcut keys because it's just
so much easier. Now the shortcut for
track forward is control and T for track. So press Control T on your keyboard and you're
going to see it's going to jump out of view. If we zoom out, you can
see that the tracker is still on that
corner of the Bolding. And if I scrub through here, you can see the tracker is
sticking to that point. Now, we can see in
this top corner, this preview of that track. If I scrub through, you can see the track point is actually kinda
moving a bit there. It's not staying exactly on
that corner of that Bolding. And that's because
the perspective is actually changing a bit. This wall immediately
on the side, you can see that it's actually changing and that's a
perspective change. So for this track, location is not really going to be the
best option to use. So I'm gonna go ahead
and delete this tracker and let's retract it using
a different motion model. So to delete the track, simply click on it or click
next to it to select it. And then press X
and delete track. So now we're going to
create a new track, but we're first going to
change the motion model. And for this one, I want to try either perspective or a fine. So I think for this one,
let's go with a fine. So just select the file name. Make sure you're on
the first frame. Very important. Zooming year and place
the first tracker by holding Control
and click ones. You can see the preview
in the top corner. And I'm going to
track forward again. So pressing the
shortcut Control T. Alright, so now I can see that our tracker actually kinda
changed perspective. You can see if I
scrub through that, that kinda goes from a square to kinda more like
a flat square. Now if you look at this little preview here
in the corner, if I scrub through that, you can see the tracker is
staying on that corner. Exactly. And that's because the
perspective change. So we changed our motion model
to a feed and or a fine, I'm not exactly sure
how to pronounce that, but here you can see it's
tracking much better. So that's a really,
really good tracks. If you go to the last frame, you can see it's
perfectly on that corner. If we go to the first frame, it's perfectly on the corner. And everything
in-between, we have one track That's perfect. Basically, let's
save our project. And I just quickly
want to show you if we drag this down yet the top, you can see all the
trackers year as well. So there's gonna be a list
of all your Trackers here. And you can also see that this first track is
going all the way from frame one all the
way through to frame 150. So this is just an
easy way to see the duration of that track
because sometimes you can have a track that only covering half of the frames may be
that feature goes out of the frame and then
you will only have this a line canal covering
halfway of the shot. Now we need a tracks that's covering the full
duration of the shot. But we can also
have some that only covering certain
areas of the shot, but then we need more
trackers if that makes sense. Alright, so we have one tracker. Let's go ahead and
place our second track. So for this one
I'm going to zoom around and let's see
what we can track. Maybe this corner of this
panel E on the floor, and that's also on the
floor, which is great. And we can see it
stays inside the shot all the way through
the 150 frames. So I'm gonna go
back to frame one, shift and lift arrow. I'm going to zoom in here and I'm going to place a tracker on this high contrast
corner right here. So hold Control. Click once. We've got a little preview
here in the top corner, and I'm going to press
Control T to track forward. And let's check this track. So keep an eye on this little preview here
at the top quarter. If I scrub through this, you can see it's
perfect that stays on that corner and that means
we have a very good track. So now if we look at this
window here at the top, you can see we've got two
trackers and both of them go all the way through the
150 frames, which is great. So here at the bottom we've
got this funny looking graph. And this basically
just shows you the movement of all your tracks. So it basically shows
you that up and down movement of these tracks. And later on you might see
if we have a bad track, it will not follow the default movement
of the other tracks because most of the
trackers in your scene will kind of follow
the same movement. Obviously not exactly the same, but they will, they will
follow the same pattern. And you will easily
see if there's something that kinda
jumps out here. And then you know, that track
is not really a good track, but we'll get to that later. So don't worry about that
graph too much for now. So we've got two good trackers. Let's place our third track. So go to frame one, and let's zoom in and look for our third feature
to track this one, I'm going to try and track this tree right
here at the back. And you can see it's
also on the floor plane, so that's good for now. I'm going to track this
corner right there. Alright, so you can
see the little preview in the top window. Make sure on frame one
and track forward by pressing Control T. Alright, so let's scrub through that. And that looks like
a good track to me. Alright, so here at the
top you can see we've got three tracks and they all the way through, which is great. So let's zoom out and find
more features to track. Now we can also track from the back backwards to the front. So let's go to the last frame. So press Shift and right
arrow to jump to frame 150. And let's zoom in and
see what we can track. Maybe let's track this
little white thing that's also on the floor plane. So I'm going to Control
click on that corner. Now we want to track backwards. So because we're on frame 150, we're going to track all
the way back to frame one. Now, the shortcut for tracking backwards is Control
Shift and t. So remember to track forward, it's just Control T, track backwards,
control shift T. Let's press that now,
Control Shift T. And that's contract all the way
back to frame number one. So we can scrub through this, keep an eye on this little preview window here at the top. And you can see that
track is looking great. So you're in the top window, you can see we've
got four trackers and they are all going
through the shot. I want to quickly show
you what happens if a feature leaves the shot. So you can see, let's look
at this feature right here. If I scrub from
the back forward, you will see that it's going
to leave our shot there. So I want to show you
what happens when we actually track that
because sometimes we don't have enough features in the shot that covers
all the frames. And then we have to track
like little bits and pieces of frames even if
they go outside the frame. So let me show you
how that works. So I'm on frame 150, and you can see we've got
this little high contrast feature right here that I want to track Control and click
to place that tracker. Now we want to track backwards. So I'm going to press Control
Shift and T. And now we're going to see that our tracker actually stopped
here at frame 108. So if I scrub through
year from 150, you can see in this top corner, attract that feature perfectly. And then suddenly
it just went all wonky and weird and then it stopped tracking because
of that feature, it's leaving the frame so the tracker just couldn't
track it anymore. So what we wanna do is
we want to tell blender the lost frame that
that tracker was actually good before
it kinda went haywire. So you can use
your arrow keys to kinda scrub through
frame-by-frame. And if I go backwards
to about frame 110, you can see this is
where things started to kinda go weird. So I'm gonna go forward to
about frame hundred and 12. And now we want to delete any tracking data
going backwards. So we want to keep the tracking data on this
side from hundred and 5,212, but we want to delete
everything going this way. So to do that, we can use either these icons on the left-hand side
or you can use these icons here
above the timeline. And what we wanna do is we
want to use the Clear buttons. Now you'll see there's a clear backwards and also
a clear forwards. And we want to clear everything that's this way
which is backwards. So you simply click
on this little clear with the x and the one
pointing backwards. And now you will see
that it's going to delete all the tracking
data going this way. So this will just
tell blender that the lost good tracking
frame for this tracker was on 112 and there's
nothing before that. So you just need to do that when you're track goes
out of the frame. So now if we look at this
little window here at the top, if I just make
that a bit bigger, you can see that our track
number four is only, this is only tracked on
this area of frames. So it goes from 150, 212, and then there's
nothing before that. So that's perfect,
but this won't count as one of the eight
trackers that we need. If we get another track now
that's covering frames 1-112, then those two
tracks will count as one complete track basically because it needs to
cover all the frames. So I hope that
kinda makes sense. So I'm just going to
move that up again, move this down, and let's try
and look for more features. So let's go to
frame number one by pressing Shift and
the left arrow key. And this time I want to track something that's not
on the floor plan, so maybe something on
the building itself. So let's zoom in
around here and maybe this dark spot
under this window, maybe we can track that feature. So on frame one, holding Control, click right
there to place the tracker. And I'm going to track forward. So I'm going to press
Control T to track forward. And let's scrub through
and keep an eye on this top window to see
if we have a good track. And you can see it's not bad. It's kinda changing a
little bit of shape. But it looks like
the tracker is kinda staying in relatively
the same position. So I'm going to
leave that track. And yeah, I think
that's a good track. So let's look at another point. Also, maybe something
on the building itself. So maybe let's zoom in here, maybe this corner right here. So make sure you're
on frame one, place your tracker
by holding Control, and I'm going to track
this one forward. So Control T to track forward. And that looks
like a good track. Keep an eye on this window. Quickly do a scrub through
and make sure that track is sticking
to that position. Yeah, that's looking good. Let's go ahead now
and save our project. Alright, I also want to track the edge of the building
yet the bottom, just so that we have a
tracking that position. So if we want to rebuild the
Bolding or we want those, those locations in 3D space. It's always good to then
track them as well. So I'm going to track
this corner right here. I'm going to place a
tracker there on frame one, and I'm going to
track that forward by pressing Control T. So you can see that
looks like a good track. If I keep my eye on
this little preview that is sticking really well. So we've got another good track. So now we want to maybe
track something that's farther away in the background. Just to kinda help
blender figure out the perspective and
the movement of the shot. Basically, it's always good
to have tracks that's closer to camera and also further
away from the camera. So let's see what we can
maybe track that back. Maybe I can track, Let's just zoom in here
and see what we have. Maybe I can track this fence. Some people, maybe you want to track that cow in
the background. But always, a very
good rule of thumb is to never track
something that moves. You don't want to
track any animals, want to track any trees
that's maybe blowing in the wind or anything
that's kinda moving. Track people, things like that. You want to track
static objects. So I think let's zoom in here
on Frame hundred and 50. And I'm gonna see
if we can track this base of this fence pole. So I'm just going to
simply hold Control. Click there to place a tracker and let's see how far we get until that fence go
goes out of the frame. So let's just do a
track backwards now. So Control Shift and T. And you can see it actually went all the way through
to frame one. So let's keep an eye on this preview window
and see what happened. Yeah, that looks like
a really good track. Yeah, I'm happy with that. Alright, so let's look
for more things to track. So I want to show
you when you track something where the
background is changing a lot, you might get a
track, a file track. So if we look at maybe
this edge of the roof, this area right here. Now, keep an eye on the
surrounding pixels. If I drag my mouse, you can see that the
surrounding pixels are changing
completely because of perspective and the
distance of the gross and everything
behind the roof. I'm going to try and go to the I'm going to try
and track this section. I'm going to show
you what happens when we have
something like this. So make sure you're on
frame 150, the last frame. I'm going to zoom in here
and I'm going to place my tracker on this
corner right here. And I can see our pattern is basically everything
inside of this box. So it's going to look at
these pixels on the roof, but it's also going to
look at these pixels behind the roof,
which will change. And that's going to basically
confused the tracker, but because the roof is going
to stay exactly the same, but the background
is going to change. So let's see what
happens if we try and track this backwards. So I'm going to
press Control Shift and T to track backwards. And you can see that
our track failed. If I scrub through this, keep an eye on this
preview window, you can see that it
just couldn't figure out a way to keep track. And that's because
of the background is completely changing. So let me show you how to
track something like that. So I'm going to go back
to the last frame 150. Make sure to delete this track. So simply click next
to it to select it, press X and delete. And I'm going to
place a tracker there is again at the same position. So hold control and click there. But now you can kinda use these points to
change the patterns. I'm simply just going to
do something like this. And you don't want
to include any of the pixels at the back. And you can also use
this thing to rotate it. And you can use, yeah, you can kinda just
move it around and maybe reposition these points. This little point
here in the middle, that's actually going to be
the middle of the track. That's that crosshair
right there. So you just want to
kind of move these points around so it's not including those
pixels at the back. So let's see if something
like that might work. So I'm going to track
backwards Control Shift T. And that looks a lot better. So now if I scrub
through this hole, keep an eye on this
little preview. And you can see that as
actually looking perfect. You can also see at the end, the main preview or the video that it's
tracking perfectly. So that's just a really
good tip when tracking things where the
background color changes. So yeah, we've got
a good track there. So maybe let's track
this window as well. So we have some
tracking information where it is in the scene,
which is always good. So let's go back to the
first frame for this one. So Shift and left-click or left arrow to jump
to frame number one. And I'm going to zoom in
here and I'm going to track this corner
of this window. So Control, click, Place a tracker and simply
Control T to track forward. And that's a real
easy track and you can see it's seeking perfectly. Let's go back to frame one. And I think we probably have
enough trackers by now. We've got ten trackers and
nine of them, or maybe 11. 11 of them are going all the
way through all the frames. So technically we do have enough trackers to
basically solve our track. But as I mentioned earlier, it's always good to track
features that you know, you might actually want to use wind rebuilding
this scene in 3D. And that's why I did the
corner of the building, that corner of the building, so we know where those points in space
will be in 3D space. So there's a few more
that I want to add, just that we have
enough tracking points to rebuilt the scene basically. So I want to track
this corner as well. Now we're going to
have a similar issue where we track the roof, where the pixels behind the river's moving quite strangely. Now, if you keep an eye
on this area, here, you can see the background is moving a little
bit different. It's revealing more of the gross and that
pathway right there. So we want to make sure
we track this correctly. So on frame number one, I'm going to place my
tracker on this corner, but I want to increase the
tracking or the pattern, basically this to this side. Maybe they just
move it like that. And then we can kinda
just reposition this. No, I actually want to
place my tracker on the corner like that. But I want to move these points. So it's not looking at
those pixels right there. It's only looking at
these pixels in front. Alright, let's, let's try
that and see if it works. So Control T. And that's something Let's scrub through keeping an eye
on this little preview. You can also look in
the main window here. Yeah, that looks like
a really good track. So now we have the
corner of our building, the front corner,
that one as well. So maybe we need this corner
as well so that we can, we need to, we can then
kinda rebuild this wall. If you want to maybe add
something on this wall, then we have those points in 3D. So on the first frame, Let's zoom in all the
way to this area and in that corner at your
tracker control click. And now we're going to
track forward control T. And that looks
like a good one. Let's keep an eye on
this little track. Scrub through. And yeah, you can see that
is looking good. Okay. Let's look around our
scene and let's see if there's anything else
that we want to track. Maybe we can track one of these electrical boxes
here on this wall. And maybe I want to track just this top edge or this top corner of
this electrical box. So on frame one, I'm going to zoom in here, plays a tracker right there, Control T to track forward. And let's see if we
have a good track. Yeah, that's looking perfect. Can see it's sticking
to that corner. And I think we have
enough tracks now. We've got some tracks
in the background. We've got some trackers on
the ground in the foreground. We've got some on bolding. Maybe we can add one more, maybe just one on
this side somewhere. So we have a point in
3D way, these windows, or if you want to do
something in that area, it's always important
to kinda think of your end result and then play structures where
you want to add objects. Now, I'm not exactly sure what you're gonna
do with a shot yet. But I think if we
have the ground plane and we've got the
basics of the building, then we should be fine. So I'm just going to
zoom in on this side, make sure you on
frame number one. And I'm going to
track this corner of this window right there. So Control T to track forward. And that is looking good. Scrubbing through. Yeah, that's perfect. So now let's go ahead
and save our project. And let's quickly
look at our trackers. So you can see we have
15 trackers in total. And all of them except one, go all the way through, through all the
frames to 150 frames. So that's great. And if you look at the graph
here at the bottom, you can see that
kinda all moving in the same direction
except this one. But this one is that track that we stopped off with
through that wind out of frame. So if I click on this or
just next to this graph, you can actually see
that it's going to highlight that
track in the shot. So if I just scrub
over that area, you can see this white tracker
that's been highlighted. That's the track that's
kinda sticking out there. But it's fine because
we only attracted to it kinda looks a
little bit different. So I think we've got
two really good tracks. So go ahead and save
your project now. And I will see you
in the next lesson.
7. Lesson 06: Camera Tracking Solving The Camera Track: Hey and welcome back. In this lesson, we
are going to try and solve our camera track. So we've placed our trekkers and we have quite
a few trackers. We've got 15 trackers and they're all
looking pretty good. And now we can go
ahead and try and solve our camera motion
or our camera move. And then blend is gonna
give us a tracking score. And if we get a
really bad score, we can refine our
track a little bit, which I will cover
in our next lesson. But for this lesson, we're
just going to look at how to solve our
camera track and how to view the error or
the result error basically. So to do this, we are going to go to this little solve tab right here on the left-hand
side of the viewport. And then you'll see
we've got solve. And then underneath that, we've got all these settings. So there's only a few
things we need to worry about in this drop-down. So first of all,
there's a button that says tripod or
a checkbox tripod. And that is if your camera
was on a tripod and it's literally just a pan left to right or maybe a
pen up and down, but the camera is staying
in the exact same spot. So if you are using
a tripod shot, just tick that obviously this shot was not
done on a tripod. It's a drone shots, so the camera is actually
moving through space. So we're not going to bother
with ticking that. Next. We've got keyframe. Now this is basically the area of your shot that
Blender will look at to try and determine the perspective
change in the shot. So by default it's set to 1.30. So it's only going to look at this small section
of the footage to try and determine the
perspective in your shot. So usually I leave this
on default one to 30. If you get a really
bad solve error, you can always try
and adjust this. The rule of thumb here
is try and select two keyframes in your shot with the most
perspective change. Let's say the cameras
fairly stolen the beginning and maybe
there's a big camera move, maybe between frames 60.90, showing the perspective a little bit better than I
would suggest you change the frame a to
say 60 and frame B2, let's say frame 90. So it's just kinda looking for the most perspective
changes in the shot. And because the shot is very,
very similar throughout, it's not really
going fast or slow, or it's not changing
perspective in a certain area. It's, it's kinda doing the same thing all the way through. So I think a keyframe of one
entity should work fine. Next up we have our focal length and this means that blend, they can actually go ahead and change that focal length that we inserted year under
the camera lens settings. Remember we set this to 28
millimeter focal length. Now, this checkbox
means that blender can actually go ahead and it can
refine that number a little. So if you're not 100% sure
about the focal length, you can always check that box. And as I say, Blender will
try and cannot refund that. But for this shot, we know
the setting should be right. And that's why we
don't want blender to change that focal length. So I'm not going to take it. The same goes with optical center and also
the radial distortion. Now by default, I'm going to leave them
off as well because we don't want blender to change the radial distortion or the
optical center for this. There's cameras for
these cameras settings. So I'm going to
leave them all off. So all you need
to do is click on this solve camera motion button. And now blend is going to go through and
calculate everything. And right here at the top, you'll see it says solve error. It's giving me a solve
error of 0.11 pixel, which is a really, really good result basically. So this number is in pixels, so it's basically
0.11 pixel error, which means there is a slight
error of almost 0.1 pixels. So it's extremely small, which means there's
not a lot of error. You always want
your Solve error to be lower than one pixel. If you solve errors, let's say five or ten. That means that
your camera track is off by OT can actually glide or move around by ten pixels outside of
that tracking area. So always try and get a solid arrow that's
lower than one pixel. Anything above one is not that great and you want
to try and get that lower. So obviously with this example, we've got a great
solve error of 0.1. But in the next lesson, I'm going to show
you how to refine that if you've got
a really bad track. Now just something
quickly I want to show you before we end this lesson. If we look at our
tracks yet the top, you can see they've
got these numbers now next to each track. And this number is the solve error for
each individual track. So you can see this one here at the bottom is going
to solve error of 0.05, which is really small,
which is great. And if you go through
them, they're all really, really great. You can see this one is slightly
higher than the others, 0.10, which is still great. The highest one is
this one at the top, which has got an error of 0.23, which is still way
smaller than one. So it's still perfectly fine. But you can see if I, if I click on this track, it will actually highlight
that track in the viewport. And we can now see that
this tracker is giving us the highest error our tracks. So if we would say delete this track and maybe
track something else, we will get a better
overall school. But for now, I really
don't think we should do anything there because
there's solve errors. Great. But in the next lesson, I'm going to show you
what to do if you get a really bad solve era. So for now, this is perfect. And you can go ahead and
save your project for now. And I will see you
in the next lesson.
8. Lesson 07: Camera Tracking Refining Your Camera Track: Hey, and welcome back. In this lesson, we're
going to look at how to refine our track if we got a very
bad solve error. So let's say you solve
arrow is bigger than one or maybe it's five or ten, then we know we've
got a bad trackers some way that we need to remove. So in our case, we don't have any bad
tracks at the moment. So I'm going to manually create some really, really bad tracks. And then we're going to see
how we can refine them and delete them and to
create a better solve. So I'm gonna go back
to the track to be on the left-hand side
because we're going to add some new trackers
to the scene. Make sure you're on frame one. And I'm just going
to add some really, really bad tracks here
in the clouds maybe, so maybe let's add one here. And I'm just going to track
that forward control T. And you can see it's
actually tracking that. Not too bad, but
I'm just going to break this track manually. So I'm gonna go to
any random frame, and I'm simply just going
to drag this tracker to maybe a new position and just go to another
section, just drag it out. So I'm literally just breaking
this track completely. So you can even see in
the graph at the bottom, you can see some interesting
things happening here. And that is just
showing our very, very bad track that
we are creating here. I'm just moving this around to create the worst
track possible. So now let's see if we go back to our solver tab
on the left-hand side, and I'm simply going to click
on Solve camera motion. Now, watch what's going to
happen to our solve error. Currently we have a solve
error of 0.11, which is great. Now if I click on
Solve camera motion, that number just
jumped up to 1.33. So that means our track has got an error that's bigger than one pixel, which is not great. So now we need to figure out
how we can make this better. We can get a better solve error
basically for this track. Alright, so what
we're gonna do next is on the left-hand side, under the solve menu, you'll see a clean up section. Now, if we expand
this cleanup section, you'll see a few
parameters here. And the only thing you need
to change here is make sure that type is set to select. And that means
it's only going to select the bad trackers. It's not going to delete
them or anything. It's just going to
highlight them for you. And then you can
decide if you want to delete them or if you
want to retract them, or what if you want to do. So make sure that's unselect. And then we're going to click
this falter Tracks button. And it's going to bring up
this little filter Tracks menu here in the viewport
in the corner. And if I expand this, we can now basically
scrub through. And it's going to basically
highlight all the bad tracks. If we started a big number, if we drag this all the way
down to, let's say zero, it's going to select
all the tracks because zero is kinda, it's including a threshold, so it's including
all the tracks. Now, if you slowly move this up, if you increase this number, you'll see it's
going to de-select some of the better
trackers in the scene. So you can see that it's
starting to de-select the trackers because those
are all under this threshold. And if we go bigger, you can see it's still keeping
this bad track highlighted because it's got the
worst error possible, even if I go up all
the way to like 48, you can see at the bottom
it says identified one problematic tracks and that's the one that's
highlighted right here. We can go all the way up to 70, its twilight at 9,000, 105. Let's see, up to where
it actually goes. So here we go. You can see, so it's
kinda selecting it somewhere around here. So 167, bring it down. 165, v can see it's highlighted. So that just means
it's filtering out all the good tracks from the bear tracks and
it's highlighted. So now we can simply
delete this track by pressing X and then
delete that track. And now we can resolve
our camera motion. So look at the solve arrow 1.33. I'm going to click on
Solve camera motion again. Now we can see we've got a great solve error
of 0.11 again. And yeah, that's just a perfect
solve error right there. So the fault attracts basically is just an option to filter out all the bad tracks in your
scene so that you can decide if you want
to delete them and then re-solve your
camera motion, or maybe you want to
retract those trackers. So another way to do
this is to look at the tracks here in
this top window. And next to each
track you will see the solve error for
that specific track. And what you can
do is you can look for high numbers here, anything that's
maybe higher than one with assault error of one, you can simply click on those tracks and it's going to highlight it in the viewport. And then you can
press X to delete that tracker with a
high solve error. So that's just another way to look at your tracks and
delete the bad ones. So what you wanna
do is you just want to get rid of all
the bad tracks. Keep all the good tracks. Resolve by pressing this
solve camera motion button until you solve error
is less than one, then you know your truck is
good and we can continue with building or setting
up our tracking seen. So go ahead and save
your project now, and I will see you
in the next lesson.
9. Lesson 08: Camera Tracking Setup Scene, Orienting the Scene and Set Scene Scale: Hey, and welcome back. In this lesson, we're going
to set up our tracking scene. We're going to orient the scene. And then finally we
also going to set the scale of the scene
that we're working in, a real-world scale,
which just makes everything easier when adding objects to our scene later on. So what we wanna do first is make sure you're
on the solve tabby on the left-hand side. And then scroll all the
way down until you get to this scene setup
section right here. And what we're gonna do here
is we simply going to click on Setup tracking scene. Now, this will create
a camera and also a plane and also a cube
inside of the scene. So if we go back to the
layout tab at the top, you can see now
we have a camera, we have a light area. It also sets up a light, and then a plane, and then also a cube. Alright? And then if we
scrub through our timeline, you can see that
we actually have some camera motion already. Now, our scene is not oriented. So if you look
through the camera, you can see that things
are not really aligned to the floor of our scene and
it's not looking correct. So we're gonna go
back to the motion tracking tab right
here at the top. And now we're going to orient the scene and kinda
tell blender, which is the center
of the scene, whereas the floor and
all of those things. Now, let's look at this
orientation section here on the left-hand side, you can see we've got some
options such as floor wall, set origin, x-axis, y-axis, and also the scale. So we're going to start
with the origin first. We want to tell blender
which tracker is going to be in the center
of our 3D world. Now, if we go to the layout scene and we can
just go out of the camera. Now the center of
our scene is where the x and the y axes
where they meet. That's the center of our world. So let's go back to
the tracking motion tracking workspace. And we're going to select
one of these trackers to set as a center
point of our world. And it's usually good to
use a tracker that's on the ground plane and also some way that's kinda in
the center of the scene. Let's look at our
scene and choose a tracker that will be
the origin of our world. And I think this tracker
right here will be a good center point
for the world because it's on the
floor, first of all. And that's got on the center of a frame and I think it's
just a good center point to have just a tip when selecting any
track is in your scene. Don't click on the track itself
because you can actually mess up the track like that if you click and drag accidentally. So just a tip click next
to the trackers like that. If you want to
select the tracker, you can also lock them. If you are maybe scared that you might move
them accidentally. So you can select all the
trekkers by pressing a and then right-click and
then click on Lock tracks. And that will just mean you won't be able to
move them around. So if I click on this truck, you can't accidentally
just move them around. So that's maybe just a good
practice to do as well. So click next to this tracker
to highlight or to select that one tracker and simply
click on Set Origin. You're on the side. So
that's going to tell blender that point is going to be
at the center of our world. Now if we go back to the layout, you can see we look
through our camera. Now, we just need to
kind of hide the ground. And let's delete this cube
completely by pressing X. Now you can see the
center point of our axes is set to
that point in space. But you can see it's not
orienting the scene correctly. It's still up in the air. It's not it's not
looking aligned. So let's go back to the
motion tracking tab. Next, we want to
tell blender where the floor ease of the scene. So you can see on
the left-hand side we've got a button
that says flow. Now, we need to select three trackers that's on the
floor so that blender can figure out or triangulate those three tracks
and then create the floor plane on that plane. So you can select any three
trackers that's on the floor. But I would suggest you use trekkers that's not too
close to each other. So I'm going to use
this track right here. Let's just zoom
in here slightly. So this drag hold Shift and then click
next to a second track. So I'm going to use
this point right here, and then hold Shift again and click next to a third track. So currently we've got this track on this
corner selected. Then secondly, we've got this
track selected right here. And thirdly, we've got this
track selected right here. All three are on the floor plane of our world, of our scene. And now we're going to
click on this floor button. Now it automatically sets that
plane to match the floor. So now if we go back to the layout and we'd look
through the camera, you can see things
are looking a little better at kinda look at this. It looks like this is
the floor of our scene, but you can see the axes are not matching our scene completely. Alright, so what we wanna
do is we want to select a tracker that's
either on the x-axis or the y-axis in relation with the center or
the origin tracker. Now remember, we set this
tracker as the origin point, the middle point of our scene. So we can either select
this tracker because that's on the x-axis from
that origin point. Or we can select this
tracker which is on the y-axis from
the origin point. So I'm going to select this
tracker because it's on the x-axis from that original
center point tracker. And then I'm going to
simply click on Set x axes. Alright? So now if we go
back to the layout, now you can see
that it's actually matching the x-axis
on that line. Because we told blender that this track on this point is on the x-axis in relation to the center of our world,
the origin point. Now, if you don't
have any trackers, That's exactly on that x-axis, on the y-axis, we can actually manually adjust
this in our scene. So if I go to the
layout section again, we can simply click
on the camera. You can click it in the view on the outline here on the side
to highlight the camera. Now press R to rotate and then press Z to rotate
only on the z-axis. Now, I can kinda holding Shift to do some finer adjustments. And I can see I can manually align my scene to
match the axes. So I'm just gonna kinda rotate
it until I can see that the lines are actually
following my scene. You can see these
lines going back, these grid lines that are following the Bolding like that. This one is kind
of following this, but it's not completely
correct yet. So I'm just gonna kinda
rotate it until it feels like it's in the scene. You can also move the camera
around on the z plane. So if we want to do that, we can press G to move, but we only want to restrict
it to the x and the y axis. We don't want to
move up and down. So to restrict that,
press Shift Z. And that will basically
lock the camera movement now only to move in the
x and the y positions. So you can see I can kinda move this around
if I want to place that center point more
kinda in that corner, I can do so just like that and just click
to position that again. Now if we look through or
if we exit our camera, we can actually delete
this light as well. It's going to be delight. And I'm going to bring also
the floor plan back that we actually hide from our scene. Now you can see we've
got a floor plane, and I'm going to play through
this by pressing Space. Alright, As you can see, our plane is moving with a scene that's obviously
intersecting the building a bit. So what I'm gonna do, I'm
gonna go back to frame one. I'm just going to
scale this plane down. So the plane selected press S to scale and just scale it down. So it's kinda matching
a little bit better. And let's move it into
the corner of this area. Because remember this plane
is now on the ground plane. It looks like it's up higher, but it's actually on
the ground plane. So I can move this in the x and the y axes to position
it into this area. So I'm going to press
G to move it in the x axes maybe to about here, and then press G, Y and
then position it this way. Remember we don't want
to move it up and down. We just want to move it left and right on the x and
the y axis because we know our floor plane is now matching the floor in the scene. So simply just move it on the x, on the y position at some way that we can kinda
see it's matching. And now if I play this back, you will see that that plane is matching the
movement of the scene. And it's kinda
stuck on the floor in this area and this
is looking perfect. Finally, we also want
to set the scale of our scene so that we're working
with a real-world scale. Let's go back to the motion
tracking tab. To do that. What we need to do is we need to find two trackers that we can kinda guess the distance
between those two tracks. Then we can input
that number either in meter or in any other unit
you are comfortable with. And that will just set
up our scene scale to that real-world scale. So I'm gonna kinda zoom in here. And let's say we want to take
this tracker and this track and figure out the distance
between these two tracks. Now, I'm going to
work in meters, but you can work in feet
or anything else that you feel comfortable worth depends how your
blender is setup. But I'm going to
work with meters. So I'm going to guess
the distance between these two points are
probably about 12345, maybe about 6 m, maybe even a little bit more, maybe 8 m. I'm going
to set this up as 8 m. So I'm simply going to
select these two tracks. So click next to the first one. Hold Shift, click next
to the second one. Now here where it
says Set scale, apply scale and distance. I'm going to enter that number that I just guessed
year by distance. So I'm simply going to enter
8 m or eight right here. Then I'm going to
click on Set scale. Just click Set scale,
and that's it. Now if we go back to
our layout section, you can see our
plane looks a lot smaller because our scene
scale has now been set. And if we play this back, you'll see that
it's still matching perfectly with a
camera movement. But our scene is now better
set as real-world scale. You can see these boxes
are basically 1 m boxes. So this will give us
123, 456-789-1011, 12 m for this wall. And I think that should
be pretty close to a, what should be, should be fairly close to
real-world scale. It's obviously not perfect
because I didn't go and I didn't measure
this distance. If you are on that set where
this footage was taken, it's always good to get
some real-world dimensions. Maybe measure one wall and
then you know the distance. If you want to be
really precise. But I think for this, it should be fine. We kinda close to the
real-world scale. So I am happy with that. So go ahead and save your scene. And I will see you
in the next lesson.
10. Lesson 09: Camera Tracking Adding Test Objects and Viewport Render to ensure the Camera Track is goo: Hi and welcome back. In this lesson, we're going
to look at how to add some test objects
into our scene and to then just do a
viewport render to double-check if
the track is perfect. The reason we do
this is sometimes when you do a playback
in the viewport, you might not get like a
real time frame rates. It might be a little bit
stuttering and you won't be able to save the track works
perfectly or not. And doing a viewport render
will just ensure that you can view it in
real time and make sure that your track is perfect. So before we do that, I
just want to show you in the outline here on the side, you will see that
blend automatically created these two collections, a foreground collection and
also a background collection. I don't really use this. I think it's a bit confusing. So I'm gonna go in and delete
both these collections. So let's click on the
background collection, press X to delete it. Click on the
foreground collection, press X to delete that as well. And here in the top
you can also see these view layers here. I usually just delete them
as well and you need one. So this background, I'm simply just going
to rename to scene. So just make sure you've
got one layer at the top. You can name it
anything you want. And I think it's just
easier to work with tracking without all
these collections. So next, you also see that
your footage is kinda, the opacity is not
looking right. Let's fix that quick. So click on the camera and the outliner to
select the camera. And then if you go to
the camera's settings, see on the right-hand side,
expand background images. Just click on that to expand it. And then if you scroll down, you will see the
opacity slider and just slide that up
all the way to one. And you can see that our
image is looking much better. Now, if we play this back, you can see we've got our
plane in there as well. So go back to the first
frame and it's going to duplicate this plane and move it around the scene so that we can double-check if our
track is working perfectly. So click on the
plane to select it. Then press Shift D
to duplicate it. And then press why? Because we only want to
move it in the y axes. So on the y-axis. So I'm gonna move it to
this corner right here. Now, I want to move it on the x-axis so we can place it
on this corner right here. So press G x and then move it. So it's kinda matching the corner of the
building right there. We can maybe move it a
little bit on the y-axis. So GY and then just kinda put it on the
edge of that Bolding, that scrub through
and see what's happening That is
looking pretty good. You can see it's
matching that location. So maybe let's add one more. I'm going to
duplicate this plane, Shift D and then X to
move it on the x-axis, I'm going to place it on
the corner right here. And then I'm going to
move it on the y's. So GY, move it backwards. You can hold Shift to do some fine adjustments.
Click there. Let's just scrub through. And remember, you don't want
to move this up and down. You only want to
move it y and x on the y and x-axis because
they're already on the floor. So that's why we
don't want to move them up and down because
that will just break it. So now you can see that we have these three planes in our scene. And now I want to
render this just from the viewport so we have something to look
at in real time. So I'm gonna go to my output
properties here on the side, the little printer icon. And then we want to
set a output folder. So I'm going to click
on this folder and just browse to a location where
I want to place this. So I'm going to place this
inside the course folder, and I'm just going to
create a folder here and call it viewport render. Let's go in there. And I'm just going
to call this test or test one. Click on Accept. And now we just need to set up the what type of file
we want to render. So I want to render
a FFmpeg video, which is just gonna be an MP4. If you scroll down to encoding, you can change the container. Change this to impact for, because we want to
create an MP4 file and the quality can leave
it on medium quality, but I'm going to put mine
on high-quality for now. And I think that
should be good enough. Now simply go to View
above the viewport. And then we're going to click on viewport render animation. So click on that. And it's going to
quickly just run through all those files
because it's just rendering from the viewport. And once that's
done, press Escape. And now we can go to
that folder where we exported that clip, open it up, and just
look at it in real time. And now we can see
exactly that our track is all the planes are actually
sticking to our footage. You can scrub through it as well and just make sure
everything is striking. And as you can see,
these planes are being tracked into the
scene quite well. They're not sliding around. You can see them, they
matching with the perspective. Everything is looking perfect. Now, obviously, if you've
got some bad results here, then you know your
track is not good. So then I will suggest
that you go back, add more trackers, or maybe delete some of
the bad trackers, resolve your track
and just try and get a better tracking
score basically. Alright, so once you are
happy with your track, go ahead and save your project. And I will see you
in the next lesson.
11. Lesson 10: Adding 3D Objects from Quixel to the Scene: Hey, and welcome back. In this lesson, we're
going to start adding some 3D objects into our scene. Now, you can decide you want to model these objects yourself, or do you want to
download them from one of the many available websites like turbo squid
or all the others, we can find 3D models or you can use something
like quick soul or Quicksilver
bridge to download mega scans from Epic Games. So I really like to use Bridge, which is basically an
application that you can download that connect to
your Quicksilver account. And then you can
simply just import these models into
Blender using an add-on. So you can go to the
website quicksort.com, forward slash bridge to
download this application, which will just make things
a little bit easier. They've got a lot of
information of how to configure it and also the plug-in if you need
to or if you want to download the plugin or
the add-on for Blender, so you can easily just
import those models. So basically what I'm gonna
do is inside of bridge, I've selected some models that
might work for the scene. So here you can see we've got some just some palettes and we've got some
electrical boxes, some sand bags, more
electrical stuff, and then we've got this well
E as well that might work. And just some other
random objects that we can place
into our scene. So let's have a look
at our scene quickly. We've got these planes setup
that we're going to delete. These were just for
testing purposes. So let's start by importing
our first object. So let's start by downloading
these wooden pallets. I'm simply just
going to download some of these because I know I'm going to use these
electrical boxes as well. And maybe some of these barrels
I can download as well, the sand barrier
or the sand bags. Maybe some of these anvils, maybe this plastic drum, maybe some more of these
rusty metal barrels. We can download all of them. And then we can just maybe see where we're
going to place them. Not sure if this well
is going to work. But let's download and see what's going to
download all of these. So as I mentioned, you can
go in and you can find models from any other
websites you want, or you can simply just
model your own models. We can 3D scan your own models
by using something like polycomb that you can just
download on your phone and do your own 3D
scans, which is great. Input those ones. So I'm just using Bridge and quicksort for that
once it's downloaded. And because I've got the
Add-on installed already, I can simply click on
this little plus and that will add it to my blenders
seen automatically. Now you can see we've got
this palette right here. I can zoom in here and
you can see this is our first object that
I brought in an hour, just simply, we need to
position them in our scene. Now, what you can do is in this drop-down, the
viewport overlays. If you click on the drop-down and all the way at the bottom, you'll see motion tracking. Now if I enable this, now we can see our
tracking markers basically in our 3D
scene, as you can see. So if we look
through the camera, so if I click this
little camera icon, you can see we've got all these tracking markers
now in the scene. And that's just an easy way to position our objects
in the 3D space. So you can see if I track
through the footage, you can see that these
tracking markers are sticking to their locations
where they've been tracked. So the only thing to remember now is that our floor plane, our grid, our objects, if they are sitting
on the floor, they must sit on this grid. If we look at our
scene from the site, if you click on
one of these axes, let's say we click on the x-axis and we look at our
scene from the side. And I'll zoom in year two, this palette that we brought in, you can see that it's kinda
sitting on the floor. It's slightly through the floor so we can maybe just
move this up a bit. Maybe just rotate it
slightly by pressing R just to make sure that it's sitting on the floor like that. Alright, so now what we can
do is let's scale it up. And obviously when
you scale something, you need to make sure
that it's still on the floor after you've
done the scaling. So the pivot point for this
object is at the bottom, which is great so
you can scale it and it kinda should
stay on the floor. So now let's look through
our camera and now we can position this and scale it
way we want to place it. So I'm going to scale it
down a bit. It's a bit big. And now we can either move it on the y-axis, on the x-axis. So I can praise Gx to move
around the x-axis and g, y to move around the y-axis. So maybe, let's place this, maybe around here somewhere. You can also press
G and then Shift Z. And then it will move freely in the x and the y axes
without going up and down. So I'm going to maybe
place it around here and I'm going to rotate it, but I want to rotate
it on the z-axis. So I'm going to press R and Z and that's just going
to rotate it like that. Maybe place it like that. Now if we play
through our scene, you'll see that it will
actually sitting on the floor and it's being tracked perfectly
through our scene. So maybe it's still
a little big. So I'm going to zoom in here, selected and just scale
it down slightly. So it's kinda
matching the scale. A little better. You can also bring up the menu
here on the side. And with that object selected, you can look at the dimensions. So I can see the x dimension
of this object is 1.75 m. And you can obviously scale it, but that's not going to
scale it proportionally. So just be a little bit careful. Or I can just simply
scale it and look at those numbers and make sure I'm happy with
the dimensions. So I'm going to set it to
about 2 m on the x-axis. So then I know it's
probably real-world scale. I'm not sure if these pellets or 1 m pellets or two
meter pallets. But let's leave it as that. And you can just hide
this menu by pressing N. Again. We've got our first
object in our scene. So let's go back to Bridge and let's see what else
we want to bring in. So maybe let's bring in
some of these barrels. So I'm going to
click on the plus. And that's going to export
it for me into my scene. And you can see the
barrel is in the corner because it's going to create
it at the center point. And now I want to
move that barrel some way on the ground. So I'm going to press G and then Shift Z to limit
on the X and Y allele. And I can move it around and see where you want
to place this one. So maybe let's place it right
here next to this wall. So I'm going to
zoom in here again. First of all, let's make
sure it's on the floor. So I'm gonna go
out of the camera, look at this from the
side or from this side, and just make sure that your
barrel or the object is on the floor plane and you
can see it's perfectly on the floor right
there on the grid. So let's look through
our camera again. And now we can move it and position it exactly
where we want to. Just make sure you
don't move it up and down because we wanted
on that floor plan. So G Shift Z and then
you can move it freely. So I'm going to place this
one right here by the wall, and I'm going to duplicate it, Shift Z to keep
it on that plane. Maybe let's place one kinda in front of it and then
rotate it on the Z. So Z and just rotate it so it's not exactly
the same as the other one. You can obviously go
out of the camera and can I reposition them
like this as well? So now if we look
through our camera again and we play this back, you'll see that those
barrels will sit on the floor and it looks
like it's kinda in the scene. Obviously these are we
still in solid view. So if we click on Render
View yet the top, you will be able to
see the materials, but it's obviously
very dark store because we have not
added any lighting. We're gonna do that
a little bit later. But just so you know
that these models, they do have textures. So let's go back to Solid View. Alright, let's go back to Bridge and let's see what
else we can bring in. I want to bring in this
plastic drum as well. So click on the Plus
to import that model. And this one, I'm going to place maybe on the side of the
building right here. So make sure it's on the floor. So I'm just going to zoom in and that's perfectly
sitting on the floor grid. Don't worry about these planes. We are going to
delete them soon. So I just want to place
that barrels that's kinda looking at it's next to the Bolding year,
maybe like that. So now if we play
through this again, you'll see that our barrel is sticking to the camera move. Now, let's go ahead and
delete these planes. So I'm going to delete this one, delete this plane yx, delete this plane x Delete. So later on we will add some planes for the floor as well that will
catch our shadows. Don't worry about that yet. For now, we're just dropping in these objects that we want
to place in our scene. Okay, let's go ahead
and save our project. And let's go back to Bridge. And let's see what
else we can bring in. Now, I want to bring in this
sand bag barrier as well. So let's import that one, going to blend and maybe
let's move this to the front. So g and y. And I definitely want to scale
this up a little bigger. And I want to place
it here in Canada, in front of the building, maybe something like that. And always try and rotate these objects slightly
on the z-axis. So just r and z. So they're not perfectly
100% 90 degrees aligned because nothing in the real-world is
perfectly aligned. So you kinda wanna mess
them up a little, right? We've got something like that. If I play that three
can see our sand bags. Maybe we can go to the
last frame and maybe just move them a
little bit forward. Maybe it's like a barrier that's kinda in front
of the building. I want to duplicate
and go on the x, move it on the x-axis, and then just rotate Z and rotate it all the way around so we can see the other side. And maybe just position a
bit closer to that one. Can go out of the
camera and kinda just make them kinda
natural. Maybe. Rotate this one on
the z-axis slightly. Maybe move it backward slightly and closer, something like that. So let's go to our
camera view again, and let's press
Space to view that. You can see they sticking
nicely to the camera move, everything is looking great. Alright, let's see what other
objects we can bring in. Some going to save my project, just make sure to save
every now and then. And let's see what
we can bring in. So maybe let's bring in
this little wooden table. We're going to import that. Let's see where we're
going to place this one. So I'm going to press G
Shift Z to keep everything nice on the floor plane. Maybe let's put it here
in front of the window. And can I rotate
around the z just slightly, maybe like that. Yeah, I think the
scale is looking okay. So let's play that back. You can see the scale is fine and it's matching
our camera move. Alright, let's go back
and see what else we can bring in these electrical boxes. So I want to bring one
of them in and place them on this wall so we can either cover one
of these objects or we can maybe place a
new one next to it. Let's see what works or
what looks the best. So let's go into bridge. Let's import this
electrical box model. And back in blender, you can see we've got
it here by the origin. Now how do we get
it onto the wall? Because obviously, at
this moment we only have objects that's sitting on the
floor plane, on the ground. But now we want to play
something against the wall. So the easiest way to do that is let's move it on
the y-axis first so we get it right
to this wall yet the bottom or to the
corner of this wall. So if we go out of the camera, you can see this is now sitting
perfectly on the floor. You can see the
pivot points there. If we look at this
object from the side, you can see it's
sitting on the floor. So go back into camera view. So now you know the pivot
point is kinda on the corner of that wall with an
object on this corner. I want to rotate it now, so it's kinda flat
against the wall. So I'm going to press R and X and just rotate
this 90 degrees. So you can just type in
90 on your keyboard. Press Enter, and
now we know that electrical box has been
rotated 90 degrees. You can see there. So remember, the pivot point
is now sitting on the floor, not the bottom of this object. Just keep that in mind. So go back to camera view. And now we can move
this on the x-axis. The side of this thing is
aligned with this wall. So G and X just
align it like that. And now we can move it upwards. So I'm going to move
it on the z-axis. So G and then Z, move it up. And now it's actually
sitting against the wall. So I can press G and Z to
move it higher up and then g, X to move it in. Now we can also
scale it like that. And now that is actually
sitting on the wall. So if we play this back, you'll see sticking to the wall. And it's perfect. Now we can just
decide on the size, so it can maybe make
this a little smaller. Now remember our
pivot point is on the back face of this object, which means it's
not going to change the position if we scale it. If that perfect point was not in the center of this object, we might have some
issues where we might need to adjust the position
of that box again. But for this, it's perfect. So you can just kinda play
with the scale a bit. Maybe let's move it down so it's kinda closer to the ground. And yeah, let's just double-check if everything
is tracking stall. I think that's looking good. Alright, so maybe, let's
see what else we can add. Maybe let's add this
wheelbarrow thing. So I'm just going to click on the little plastic, import that. And let's move that out
from this g, y, g, x. And I maybe want to place
it here in front as well. So maybe you rotate on the Z, maybe somewhere around
close to the table. So maybe I can scale
it up a bit bigger. And we want to make
sure it's on the floor. So I'm going to look
at this from the side and you can see that it's
perfectly on the floor. Can see there. That's pretty good. Let's
go back to our camera view. And I'm just going to
move it on the floor. So G Shift Z to limit
it to the x and y only. So maybe let's place it, maybe kinda behind
the sand bags. So now if we play this back, you'll see our wheelbarrow
is tracking nicely. Everything is looking good. Okay, Let's see what else
we can add to our scene. So let's go back to Bridge
and let's see what we have. Maybe some more barrels, some old wooden barrels. Let's add those to the scene. So let's get them out of this. Moving them. G Shift Z and maybe
let's place them. Might be against this
wall right here. I'm going to scale them up
to make them a bit bigger. And then let's just see, maybe if we move
them forward a bit, maybe a little smaller, like that, and maybe
let's duplicate it. So Shift D to duplicate
and then we want to move them on the
x-axis and suppress x. And then click, and then
we want to rotate them so our Z to rotate on the z-axis and maybe just kinda show a different angle
of this barrel. Something like that. Alright. Let's press Space and
see how that looks. Okay, let's maybe
add one more thing. Let's go to our bridge
and maybe let's try this. Well, I'm going to try and import this and see
how this works. Because you can obviously see the flow around it
looks a bit strange, but we can fix that in
the compositing stage. So you can see
there's our, well, I'm going to move it G Shift Z. And maybe we can place this may be next to the
building at the back. So if we scrub through, maybe go to the last frame, zoom in here, maybe we can place it around on this barren area. Yeah, So g, h of z and maybe just place it
somewhere around here. Maybe scale it up a bit. Make sure it's on
the ground plane. So I got out of the camera, look at this from the side. You can see it's on
the floor plane, slightly under the plane, but that's actually fine
because we want to, later on in compositing, we're going to blend this
edge with our floor so it should actually go under the plane slightly,
which is good. Alright, so we've
got our well in, let's play this back
from the first frame. So you can see the
weld will only into the frame at the
end, right there. Okay, I think that's
looking pretty cool. You can obviously go and
you can add some trees, you can add some plants, you
can add anything you want. You can kinda rebuilt some
parts of the buildings. You can maybe extend the
side of the building. Anything you want you
can add into your scene. Let's quickly go back to
Bridge and let's see this. Any final things that
we want to bring in, maybe this anvil is pretty cool, so I'm going to bring
that in as well. And let's just get that
out of the corner. So G Shift Z and maybe let's place we can either place
it on top of the table. Yeah, maybe that's a good idea. So I'm gonna go
out of the camera. I'm simply just going to place
this on top of this table. So I'm just going to G Shift Z, move it to under the
table and then z, g, z, sorry to just move
that up and set it on top of the table. Make sure it's on the table, not inside the table. So maybe just like that. Let's maybe move it to
this part right here. I don't think it will be
on a table in real life, but let's just do that and
see how it looks like. So if we play this back, you'll see we've got our
envelope on the table, we've got all our other objects, and I think that should
be enough for now. You can obviously go
ahead and you can add more objects if
you feel like it, you can add some objects
in the distance as well. Maybe you can add
some mountains. You can add some cliffs, anything you'd like to add, you can go in and do. Once you're happy
with your objects, go ahead and save your project. And I will see you
in the next lesson.
12. Lesson 11: Adding a Mixamo Character to the Scene: Hey, and welcome back. In this lesson,
we're going to add a character to our scene. Now, you can use your
own character or you can model your own character and create a character animation
and bring that in. But I'm going to use Mixamo to download a character and also
some character animation. It just makes it a bit
easier for this course, but you can feel free to use your own character animation
if you want to do that. So, yeah, I am
logged into Mixamo. This is a free service by Adobe, so you just need to create
a free Adobe account. Then you can log in
with your account and download some characters
and also animations. So right here at the top you can click on characters
and this will give you a whole list of different characters
that we can use. And I want to go with
something like a zombie. So let's maybe look
for something. Here we go, zombie goal. And we can just say
use this character. And then it's going to
load that character here in this little 3D viewport. And now we can go to the
animations and choose what animation we want
to apply to this model. So you have all these
different animations. I want to like a zombie walks. I'm going to just
search for zombie. And here we go, we have some options here. So you can simply just
click on one of these. And that will apply that
animation to your character. So let's just zoom
out here a bit so we can see our
character bit better. I want something with a
character is walking slowly. Maybe. Let's see how this
one looks like. This is like proper zombie walk. Yeah, that's exactly
what I'm looking for. And now you're on
the right hand side, you can change some
of the options. I want to increase the frame numbers just
so that we are hundreds. Ensure that the amount
of frames are actually enough for our animation
or our video duration. So you can see
that's a bit longer. So we've got 242 frames, which is actually a bit
too long, but it's fine. It's always better to have
more frames than less frames. Now, you can also do
things like in place if you want to animate the
movement of the character, the character actually
stays in the same position, but I'm going to
untick that because we actually going to use the full motion of
the walking cycle. And you can also change
things here like stride, overdrive and
character arms space. There's will kind change the
way the character animates. But you can go ahead and
play around with this. Alright, so once we are happy with our character
and the animation, we want to download
this as an FBX file. So simply click on
Download yet the top. And this will give you some
options like the format. So we're going to leave this
as default if Bx binary, and then width skin. This is if you want to download the character skin as well
with all the textures, or if you just want to apply this animation to a
different character, then you can go ahead
and just download the bones without the skin. Because we want this
zombie character. I'm going to leave it on with skin and then
frames per seconds. So this is the frame rate. So this doesn't really matter
that much because we can readjust the frame rate of this character
inside of Blender, but choose something
that's kinda close to the original footage. So I know my footage was
shot at 25 frames a second. So I'm going to choose 24 because it's just a
bit closer to 25. And then keyframe reduction, I'm going to leave this
on none because that will just export all
the keyframes for us. And now I can go in
and click on Download. So let's choose where
we want to download it. So I'm going to
create a new folder. I'm just going to
call it character. And I'm going to save it
inside of this folder, zombie Walk, FBX and save. That file is downloading so
we can go back into Blender. And now we're going to
import our character. So let's quickly look
through our camera and see where we want to
import our character. So the idea that I have
is that the character will actually appear from
behind this building. So somewhere the character will stumble out of this area here, coming out from
behind the Bolding. And then we will
see the character may be walking this way. So that's kinda the idea I have. Let's see if our
download is complete. Yeah, it's completed so we can go to go back into Blender. And now we're going to import
that FBX as our character. So go to File, go to Import and
choose FBX or right. And now we're going to
browse to that folder, the character folder,
and we're going to select that FBX file. Now there's a few things
you can change you on the right-hand side
under the settings. The only thing that I
really want to change this, if you go to armature, you will see there
is one option that says automatic bone orientation. Simply click that and that will automatically orient the bones correctly because
sometimes if you don't click that or if
you don't tick that box, some of the bone orientation
might be incorrect. So that's the only thing
you need to check and then click on Import FBX. Now you can see our zombie
woman has been brought in. She is standing right there. And if we play this back, you can see she's walking. And if we look at this from
the side or from the front, you can see she is definitely on the floor,
which is perfect. Scale is also not looking
too bad, so that's great. Let's look at the
camera view again. If you select your character, just make sure that you
select the armature. In the outline,
you'll see there's armature and below that you will have all the different
measures of that character. So just select the
armature and then you'll see all these keyframes
here at the bottom. Now, you can go in and
you can scale this if you want them to kind of
move slower or faster. So let me just
quickly demo that. So if we zoom in here, and if I select all
these keyframes by pressing a and then S to scale, you can see I can scale
them so they are smaller. But if I play this back now, she'll walk pretty fast. Go back to the first frame. Let's just undo that. And if you scale
it the other way. So if you scale the
keyframes this way, and if I play this back, you'll see she'll move
more in slow motion. So let's just undo that
just as the easy way to readjust the timing of
a character animation. So now we want to
move this character so she's on this side
of the building, so I'm going to move
it down on the y-axis, then move on the x-axis. So she's just on the other
side of that Bolding. And maybe we want to
just move it back so she starts behind the building. So maybe right around here. Now if we scrub through this, we will see that our zombie will appear Around frame 60 maybe. Let's just go to
frame 40 and move forward slightly so
she can appears there. Yeah, I think that's better. Let's just play that
back and have a look. Now, obviously you can see
in front of the building, but don't worry about
that because that is something we will fix when
we do the compositing. So then we will rotate out
this part of the building. So this part of the Bolding
is in front of the zombie. Just make sure she is in the correct position and
that she's on the floor. So if we look at this
from the front again, you'll see that our
zombie is on the floor. And that's perfect. Alright, so look through
the camera again. Let's play this back
from the first frame. And let's have a look. Alright, so I think
that looks pretty cool. You can obviously add more
characters to the scene. Feel free to add
holds of zombies or different crowds of people
doing different things. But for this example, I think one character
is good enough. And yeah, go ahead and
save your project now. And I will see you
in the next lesson.
13. Lesson 12: Shadow Catchers: Hey, and welcome back. In this lesson, we're
going to look at something called
a shadow catcher. Now, a shadow catcher
is any object that will receive shadows from
all our 3D objects. So usually we'll use
them on the floor plane to catch shadows that
should be on the floor, but they can also be
against a wall to catch a shadow on a wall
and also on yeah, just different
objects in the scene. So before we do that, let's just tidy up our
outliner a little because it's always good practice to keep everything in that outline
and nice and tidy. So I want to select
all these objects. I'm going to hold
Shift select all of these objects that we
placed in the scene. And then I'm going to press M to create a knee or to move
them to a new collection. And I'm going to click
on New Collection. And let's just call
these objects like that. Now you will see all those
objects will be inside of this Objects
container or collection. So we can do the same
with our character. So I'm going to
select the armature, but here we want to select everything below the
armature as well, like all the different
parts of our zombie. So I'm going to right-click on armature and say
select hierarchy. So that will select
everything underneath it. Then press M to move
to a new collection, and it's called this character. And then click Okay, and that's gonna
move our character into that character collection. Now, our outliner
is nice and tidy. So let's go ahead and
save our project. And now we can create our
first shadow catcher. So if I look at our scene, I know that we will need a
shadow catcher underneath all of these objects in the scene to catch the shadow on the ground. But I also know that for this object that's
against the wall, we will need a shadow
catcher against the wall as well to catch those
shadows on the wall. The same worth this wall
behind the table year. Maybe we want to
catch some shadows of that being caused
against the wall as well. And maybe on this side as well, we can maybe create a shadow
catcher against this wall so that we catch any shadows
from these two barrels. Same with this wall. We would like to
catch some shadows against this wall and
the sidewall as well. For the ground shadow catcher, we can either create one big ground plane and that will be the one shadow
catcher for the floor. All we can create
individual shadow catches. So I think we can
probably get away with one large shadow catcher in
the scene for the floor. So I'm going to
create a new plane. It's going to be created
there in the center. And I'm going to scale
this up super big. So it's covering
all our objects. If you move this plane around, make sure you move it only on the X and the Y axes and not on the z-axis because it needs to be underneath all our objects. Some kinda just position it so it's covering all the objects. We can scale it even bigger. Now if we scrub through this, just makes sure that it's covering all the objects
where we need shadows. Alright, something like that. And I'm going to call
this a shadow catcher. So I'm just going to move
it out of that collection because it dropped it into
the objects collection. So there's our plane and I'm
just gonna double-click and call this shadow catcher. You can really call
it anything you want. Now, to change this
into a shadow catcher, we need to change our render
engine from EV two cycles. So make sure you're on this render options
here on the side, the little camera icon, and then where it
says render engine, change this from EV two cycles. And if you have a GPU, you can change your
device to GPU compute. And now with this
plane object selected, we can go to the
object properties, this little orange square. And then we're going to
scroll down all the way to visibility, expand that. And you will see shadow catcher
and some other options. So if we click shadow catcher, you will see nothing will
happen in our scene. But if we go over
to the render view, yet the top or the
viewport shading, you will start to see
some thing happening. So we don't see our
footage anymore, but now we can start to see shadows underneath
these objects. And that's exactly what we want. So let's go back to the normal viewport
shading or the solid view. And now we can add some of
the other shadow catches. But I want to hide this
plane for now because I can't really see the
Bolding and where I need to place the
other shadow catches. So let's just hide this
shadow catcher for now by just pressing on this
little eye in the outliner. So the second one I want to maybe create on this
wall so that we can catch the shadows from this electrical box and also from this table
with an envelope. So let's create a new plane. It's going to create it in
the corner right there. And now we want to place this plane on this
wall right here. So I'm going to move it forward. So G and Y move it forward
until the pivot point of this plane is on the
corner of this building. Now you can go into wireframe
if you want to be exact. Just make sure that
the pivot point, that little orange dot is on
the corner of that bolding. Basically, the reason
I'm doing that is if I rotate this plane, if I press R x to
write it on the X, you can see that it's
obviously going to rotate around the pivot point. So then we know it's
aligning with the wall. So simply press R and then x, and then we want to
rotate it 90 degrees. I'm going to type in on my
keyboard 90, press Enter. And now we know that is exactly 90 degrees
aligning with the wall, but obviously it's now inside the floor so we
need to move it up. So I'm going to press G and Z, move it up so it's aligning
with the bottom of that wall. And now we can move it sideways. So g x to align it
with a wall like that. Now we can simply go
into edit mode on this plane and just extend that so it's all the
way to the side. So with this plane selected press Tab to go into edit mode. Press two to select this edge. To edge, select mode. Select this one edge, and we're just going to grab
it and move it this way. So press G and X and
then just move it all the way to this side
of the building, the wall. We can maybe move this
top edge up as well. So g, Z just a little
higher like that. And now we have that shadow
catcher on that wall. So what we need to do
with this plane selected, go to the object properties
and then do the same thing. So just tick shadow catcher on this plane as well like that. So now we've got these
two shadow catches. We've got the floor which
is set as a shadow catcher. And we've got this wall that's also set as
a shadow catcher. Obviously you can
play this back, you won't see anything. But if we go into
the render view, you will start to see that
now we have the shadows. You see them against this plane and also
against the floor. Same with a table. You can start to see
some shadows being cast that onto
this wall as well, as well as the ground
below that table. Obviously, the lighting
is not set up yet, so everything is very dark. But you're gonna get the idea. Let's go back to Solid View and let's create
more shadow catches. So first go ahead and
save your project. Now, what I wanna do
is I want to hide this big shadow catcher
again because it's just not great to work
with it like that. And what we can do now is we can either use this plane and extend it to be a shadow
catch on this wall as well. Or we can create a new plane. But let me show you how you
can actually manipulate this existing shadow catcher to catch shadows on
this side as well. So first of all, let's
just grab it out of our objects collection as a
dropped it in there again. This just make sure we're
on the scene collection. Alright, so we've got
this plane which is the shadow catcher of this wall. And what I can do is I
can go into edit mode, press Tab, press two
to select this edge. And now we can extrude
it in the y-axis. So I'm simply going to
press E to extrude and then press Y to just basically
extruding the y-axis. We're going to go all the way
to the corner right there. Then what we can do as well, we can extrude it
this way as well. To catch these
shadows on this wall, I'm going to press
E again and then X to extrude on the x-axis. And I can see things
are not lining up great in this area. So I'm going to
select this edge and this edge and move them
both a little bit forward. So GY and just kinda move them forward just to match the edge of this
pulling a bit better. And I'm going to
select this edge, move it a little
further out so g x just to match the
edge of that building. And now we can extrude
it that way as well. So we're catching the shadow on this side of
the wall as well. So e to extrude y. And then maybe just up to there, we just want to
catch that shadow from this barrel onto this wall. So now we've got all of
this is a shadow catcher. It's going to catch
all the shadows. And then we've got obviously
this ground plane as well. Alright, so we can go out of
edit mode by pressing tab. Just make sure that all
the objects you create, a shadow catches are set as shadow catches at
the bottom as well. Now, later on we're
going to disable some of these options
under a visibility. Because currently these
shadow catches will still bounce light from the sun or from the
HDRI that we will add later that will still
bounce onto your objects. Now, don't worry too
much about this now. But once we set up the lighting, I will show you and then we will disable the glossy option
here on the shadow catches because
currently they are reflecting that light back onto the objects and we
don't really want that, we just want them to
catch the shadows. It might sound a little
bit confusing now, but you'll see once
we do the lighting. So now if we go into
render view quickly, we can just see that we
are now getting shadows on the floor and we're also getting shadows on those walls as well. So you can actually
see it nicely. Next to this barrel, you get that nice
shadow against a wall, same with these ones
also on the floor. And that's all the shadow
catcher is really doing. It's just catching
all those shadows that we will then later on composite onto
our real footage. All right, so once
you've done that, it's just rename this one
as well to shadow catcher. Maybe shadow catcher wall. So we know this
one is the floor, so maybe just rename this one. It's always good
practice just to name your objects correctly. And if we play through this, maybe let's just switch
this to wireframe so we can see our walls and floor. Now if I play this back, you'll see that it's
matching nicely. You can see the walls
are not sliding around, staying in the
correct positions. And that's looking great. I'm just selecting all the
objects by pressing a so you can kinda see them better
in wireframe view. And this is sometimes just
a good thing to do is switch to wireframe
so you can see all the objects a little better and everything is looking great. So go ahead and
save your project. And I will see you
in the next lesson.
14. Lesson 13: Matching the lighting using an HDRI and / or Sun: Hey, and welcome back. In this lesson,
we're going to start setting up our lighting to match our 3D lighting to the real-world
lighting in our scene. So the first thing that
we wanna do is we want to see our scene in
the rendered view. So if we click on Render View, you can actually see
this gray background. But we want to see this
overlaid on top of the footage. So what we need to do
is we need to go to our Render Settings
here at the top, this little camera icon. Then if you scroll down all
the way until you see foam, you can expand that. And then there's a box
that says transparent. So if we click this
transparent box and we go back to render
view yet the top, you will see that
our objects are now overlaid onto our footage. And you can also start to see the shadows against the walls. You can see there's some shadows being costed on the wall. But obviously the
lighting is not graded or super dark or our
objects are super dark, so it's not, it's not correct. So what we wanna do is
we either want to add a sun or a light source, or we can add an HDRI image to our environment that
will light our scene. So if you look at the
lighting in the scene, you will notice that it's
kinda soft lighting. It's very overcast, it's not really super direct sunlight, and that's what we
want to try and match. You want to try and
match the, first of all, the brightness of
the light source. And second of all,
you want to match the direction of
sunlight so that the shadows are going in the correct
direction. Basically. We can do this by adding
a son or an HDRI, or we can do both. The only problem when doing
both an HDRI and a son, then you will have two shadows or too shallow directions
to worry about. It kinda gets a bit complicated. So we're just going to
either use a son or an HDRI. I'll show you both ways. So what we can do is
we can create a sun. So just press Shift a and then
go to light and add a sun. It's going to add a sun in
the middle of your scene. We can just move it up. So brace GZ to move it up. Now you can use this
little yellow dot to change the
direction of your son and he can see the shadows of my objects of following
that direction. So now if we look
through the camera, you can kinda adjust
it like this. And you can see our shadows
are being adjusted. And if we look at our scene, we can see the Sun is let
me just disable the sun's. We don't see those. You can see the shadows of our building is going this way. So we can see, or we know that the sun is
kinda there at the back, shining from that side to the backlighting on the back of the Bolding, if
that makes sense. So let's bring in our Sun again. And if we go into the 3D scene, we can try and
match this to have our shadows of the objects
kind of going forward. Maybe. And you can also change
how long they are if it's straight
down the very short, if you pull the sun this way you can see the shadows
are getting longer. So now you can see we trying
to match it like that. Another way is to rotate the
sun with a son selected. You can simply just
go to this object and object properties
and just change the z rotation to
kinda do it like that. So, yeah, just rotate
the sun until you are happy with the
direction of your shadows. You can also start to see our zombie shadow
coming through there. And next we can also adjust the brightness of the sun
with the sun selected. Go to your light settings here. This is the object
data properties. That little bulb, you can increase the
strength of the Sun. So let's make this maybe ten. Now I can see our
objects is more visible. Obviously with this
shadow catcher, it's blocking a lot of the
light coming from that side, which is realistic because the Bolding wool block
some of that sunlight. And we can scrub through
and you can kinda see how the objects in the scene. So what you wanna do is
you want to try and match the intensity of the
light to match the scene. So maybe this is
a little bright, so we can bring this down
to maybe like eight or maybe even five to kinda
just match it a bit better. You want to try and match
the lighting as best as possible in your
3D application. Before we go into compositing. In compositing, we
can tweak it stole, we can bring it down and
bring it up a little bit, but you want to try and match
it as good as possible. Now the problem with
using a sun is we're not getting the lighting from all the other angles as well. So we're getting a little
bit of bounce lighting going from the floor
back onto the object. But you can see it's kinda
just getting lighting from the one side and not
a lot from the other side. So I want to use an
HDRI for this example. I'm going to go in and
I'm going to delete the sun with the sun selected, press X and delete the sun. And now we're going to bring in an HDRI image to
light our scene. So to do that, go to
this little icon, the world properties, this
little red earth icon. And then you'll see it
says surface background. And then here's a color
which is just gray. So currently it's just using this gray color to light
the scene. Basically. We're going to click on this
little dot next to color, and then we're going to
select environment texture. And that's basically
to say we're going to use an HDRI image. Now you can click
on open because currently you will see
it's turning pink, which means we don't
have a HR I loaded yet. So press this open
button and now you can browse to your folder where
you have HDR eyes saved, and you can select one
to match your scene. Now, HDR eyes you can
download for free from websites such
as HDRI Haven, just Google HDRI Haven, or free HDR eyes. And he can download
many for free. So you always want
to try and find something that's matching
the sunlight in your scene. If it's an overcast
day or if it's bright lighting or if it's
maybe an interior shot. So I'm going to select
something that's quite overcast looking
maybe like this one. And I'm going to click on open. And that's going to bring
in that HDRI image. And now you can see
everything is lead. So obviously this is way too bright so we can
adjust the strength. This HDRI, you're on the side. So just kinda if you
bring this down to zero, everything will be black. If you bring it up to one, everything will be bright. So I'm gonna bring this
down to about 0.5 for now, See how that feels. And what we can also do is
we can rotate that HDRI so that the shadows or that the sun is in the correct
position basically. So to do that, we're
gonna go over to the shading tab right
here at the top. And then in this shading
tab switch over to render view this little
icon at the top. And we want to look
through our camera. And now here at the bottom
where it says object, we're going to change
this to wold so we can see our HDRI that
we've loaded here. That's the strength. So this is the same perimeter
that we changed here. So next what we wanna
do is we want to create two new nodes here. The first one is going
to be a mapping nodes. So press Shift a search and then just enter mapping,
bringing that node. And then one more, press, Shift A Search and just
search coordinates, texture coordinate
places one year. And now we're going to
connect this mapping vector to our vector input on the HDRI. Then we're going to
take the generated an input there on the
vector right there. With this node, we can now
rotate our HDRI around. So if we go to the
rotation, the z rotation, if I start dragging this around, you will see the lighting
changing in the scene. And basically what we're
doing is we are rotating our HDRI 360 degrees around on the z-axis to
try and match our shadows. If we zoom in here
and if we look at the shadow maybe of this object, we can see the
shadow moving a bit. So we want to try and
get the shadow to be on this side of the
object like that. If you get a shadow
that's too harsh, then you need to select
a different HDRI with a son that's not as bright. So that's why it's
important to select an HDRI that's kinda
matching your scene. So let's just have a look
at these objects here. Our character That's
looking pretty cool. These ones, the show, you can see the
shadows on this side. It's kinda falling this way. The same with our barrels. We get some nice shadows
against the wall, but we're also getting
shadows coming this way. And then the same with a, well, you can see there's some
shadows on this side as well. They're not very strong,
so maybe a little bit worried that we don't
have enough shadows. But I think this might work. As I said before, you
can add a sun as well. So I can now go in and I can
add that son back in again. Let's move it up. And maybe this just
drag it around. Now you'll see you have
another shadow to worry about, but sometimes this is
kinda the way to do it. So just want to match the
direction of those shadows. If you look at the zombie, you can clearly see the shadow is going this
way, which is great. So don't worry too much about this sharpness of the shadow. If you are using a son, we are going to look at
how to soften that soon. But for now, just kinda get the brightness of your
objects by changing the brightness of
either the sun or changing the brightness
of your HGRI. You can go into this shading
option or shading tab here, go to the World settings
and then just you can play with the strength
of the HDRI here. And you can also play with the direction of the
HDRI right here. And then once you are happy, go ahead and save your project. And I will see you
in the next lesson.
15. Lesson 14: Matching the Shadows: Hey, and welcome back. In this lesson, we're going
to look at how to match the softness of our shadows to the shadows of
the real-world. So currently we've
got a son and then we also have an HDRI that's
lighting our scene. So first of all, make
sure you use an HDRI that's got a matching
sun intensity. So if it's an overcast
day using a share I with an overcast sudden
if it's a bright sunny day, try and use an HDRI with a sunny bright day
or a bright sun. Yeah, so just try and match
it as close as possible. But now if we look
at our shadow, maybe of the zombie can see that the shadow
is quite sharp. You can see it's not
like soft edges. And this is the shadow caused by the sunlight with
that we added here. So if I disable the sun, you can see that now
it's only leaving that soft shadow
created by the HDRI. But let's say we want to
use a sun in the scene, but you see the
shadow is too harsh. There's an easy way to match
the softness of the shadow. So simply select the sun or any light source
that you've added. If you added some other types of light and then go to this light, setting yet the bottom
on the right-hand side. And setting that you want
to change is this angle. Currently it's on 0.5. And the bigger this number, the softer the shadow will be. So let's increase this
to maybe like three. And you can see that
shadows a lot softer now, if I increase it even more, you can see the shadow
will go almost away. It's just completely soft. So zero will be a
very harsh shadow. So I'm going to increase
this to about maybe two, maybe a little bit more, maybe three, maybe
more, maybe five. We just kinda want a soft looking shadow
that's not too harsh. Let's look at some of
our other objects. If you look at the, well, you can see that
shadow is pretty good. You can see if I bring
this down to zero again, we have this very
hard shadow line and that's something
we don't want. So I'm going to increase
this to about five again, just so that we
have that softness of that shadow which is
looking pretty good. Just go through the
settings and play with the intensity of your
son or your HDRI. And then just change
this angle of your son just to make the
shadows a little bit softer, try and match it as
best as you can. So go ahead and save
your project now, and I will see you
in the next lesson.
16. Lesson 15: Configure Render Passes and Cryptomattes: Hey, and welcome back. In this lesson, we're
going to look at render passes as well
as crypto math passes. Now, what is a render passes? Render passes are
almost like layers, like different lighting
layers that you can use when you are compositing
your footage together. So you've got more control
to add adjustments to maybe just the
direct lighting or just the reflections, or just the glossiness
of something, et cetera. So it will just give
you more options when doing compositing. And crypto mats are also
almost like a layer, but you can specify
crypto match to either be an object or an material. So you can then isolate certain materials in the
compositing process. And it will just
make your life a lot easier when
doing compositing, which we will get
to a bit later. So let's look at the available
render passes in Blender. To look at the render process, you'll click on this little icon that says View layer properties. You on the right-hand side, you will see a whole list of
all these random parsers. So you can see we
have things like combined z must position
all of these ones. You have your light layers or your light parsers which will be diffused glossy and
all of these ones. And then crypto mat right
here at the bottom. So let's go from the
top and see which of these bosses we
want to render. So combined basically means
it's all the layers combined. And that's also called
a beauty pause. And that will have
everything included already, like all the layers combined. So we want to keep
that just to make sure that we have
that if we need it. Now we're not gonna
do a Z pause, but we're going to
do a must pass. Now the midst pause is
almost like a Z depth pass, and that will allow us to add
some missed to the scene. So that or Mr. Hayes, because if you look at
footage in real life, you can see the haziness
of the objects further in the distance and then less hazy for objects
closer to the camera. And that's just something
that we can use in compositing to maybe
add a must layer. So if we have any objects that's further away
in the background, we can use this must pass
to create that hazy look. So that's always a
important pause to include. So we're not going
to include any of these other details here. We're going to scroll down
to these light pulses. So we want to include the fuse, all of these direct, indirect and color for a
fuse, same with glossy. You can take all of them. Transmission, we don't
really need because trans transmission
is only if you have transparent objects in
your scene like gloss or anything like water or
liquids or stuff like that. But we can include them
just so that we have them. But it's not really going
to have any data in them. Because as I said, we don't have any transparent objects
in the scene volume. We don't really need this
if you have any thing like smoke or fire, any volume effects, so you
can add them if you want to. But yeah, as I said, we don't use any of these volume effects. And then for emission, we don't need this
because we don't have any emission materials
in our scene, so we're going to skip that. So the only thing we want
to include here is shadow, also ambient inclusion, and
then also the shadow catcher. It's going to just separate all these layers
for us so that we have full control in compositing to tweak
them separately. Now, let's go down and we'll get to the
crypto math section. Now here we've got
three options, object, material and asset. So usually I only use
object or material. And basically this
will give you like a layer for each
object in the scene. So I'm simply going to take this object and that will
basically just give us a separate layer for every
individual object in the scene so we can easily mosque them when
doing compositing. Let's say we want to create, we want to adjust the
lighting on just one object. This will allow us to do that. So let's quickly look
at this list again. So from the top,
you just want to include combined and must. Then if you scroll down, you want to include all
the diffused bosses or the glossy parses, all transmission that we don't
really use in the scene. And then shadow occlusion,
shadow catcher. And then under crypto math, you want to enable the
object sitting right there. So one thing to note
about the must pause. We can actually specify the distance of the
starting point of the most and also
the endpoint or the furthest away
from the camera. To do that, let's just go
back into solid view for now. And then we want to, once you've activated the must pause here in
the render parsers, you can go to the
wolves settings, this little icon, and then you'll see the most
pause right here. Now, we don't see the limits in the scene yet because we
need to activate that. So to do that, click
on the camera, go to the camera settings, you on the right-hand side. Then expand viewport display. Then you'll see a must tick box. So just enable the
myths tick box. And now you'll see these limits
in the scene right here. You can see a starting
point and an end point. So these are basically the
limits of the most boss. So now what we can
do is we can go to this wold icon again. And now under this
must pause drop-down, you've got your start. You can see I can
configure or set the start position
from the camera. And I can also set the depth or the end where the most
part is going to end. So you can kinda match
this to all the objects in your scene because we only
have objects in this area. So I want my, the
end of them must pass to be behind all of them. Obviously, if I set it to
maybe something like this, that means the mist will
go from very opaque, too. Transparent right here. So you want to just try and get the most boss to include
everything in the scene. The distance, basically, the starting point can be
close to the camera and the depth can be the furthest or further as the furthest
object in your scene, maybe something like that. Alright, let's look
through the camera again and now I can see
we've got those limits. We can hide those limits
again, if you want to, you can go to your
camera settings and just disable this little tick box under View Display
to hide it from the camera view if it gets
a little bit too busy. And now let's just do a
quick render view again. Because I think
there's one thing we just need to
be careful about. So if we look at our shadow catcher and we
just kinda zoom in here, you will see this
edge right at the top where our shadow
catcher basically is. The reason we can see that is because this bottom
shadow catcher, the floor plane shadow catcher, actually bouncing light and reflections onto
the shadow catcher. So what I usually do is let's select our floor shadow catcher. And then let's go to
this object properties, this little orange square. And then if you scroll down to where we enabled shadow catcher, you'll see some other options
here by Ray visibility. And all you wanna
do is you want to disable the diffuse and the glossy on all
your shadow catches. So we've done this now for the ground shadow catcher or
the floor shadow catcher, I'm going to select this
wall shadow catcher as well and do the same. So under the object properties, just as able diffuse and glossy. So we don't get
those balancing or the light bouncing against
our shadow catches. So now you can see we still get the shadows on the wall and
the shadows on the floor, but we don't get that harsh line going across
our wall right there. So go ahead and save
your project now, and I will see you
in the next lesson.
17. Lesson 16: Rendering EXR Sequences: Hi and welcome back. In this lesson, we're
going to render our animation to
an XOR sequence. So let's quickly go through
our Render Settings. So let's start at the
render properties. This little camera icon
on the right-hand side. Make sure your render
engine is set to cycles. And if you have a GPU, set this to GPU compute, then under sampling
we're going to focus on the render section. Yeah, you can
minimize the viewport and the noise threshold
I usually keep on. This will increase the
render time slightly. Maximum samples. I usually set this
to around 256. If I do my final, final render, then I will increase this to about 512 or maybe one or 24. But I think for this example, to five-six should
be enough samples. Then you can also
choose if you want to de-noise your render. I'm going to keep this on. Usually I don't denoise
when rendering, it will just speed up
the render a little and we can always denoise
it in the compositor. And I usually add grain on top of everything
afterwards as well. But I think for this example, we can denoise our
render, so that's fine. You can keep that on. Then
if you go down slightly, you will see motion blur. I'm going to untick motion
blur because first of all, our camera move
is not very fast. So there's not really
motion blur in this scene, but you can also add motion blur back in when
doing the compositing. Now you can take
motion blur out. So I think it's always
safe to not render Motion Blur blender unless it's something very specific that you need that motion blur. But for now, let's just
enable the motion blur. Next, if we go to our
output properties, this is where you can
set the resolution. So obviously we are
using a 1920 by 1080 footage, so that's default. If you want to decrease the size of your
render, the resolution, you can do that
here, but for now, let's keep this on 100. Make sure your frame
ranges are correct. We starting at frame one, ending at frame 150,
which is perfect. Then for the output, we want to specify a folder
where we want to render it. So I just created a
folder called render one. And then we want to give
our render a name as well. So I'm just going to
call it render one. And then I'm going to
place an underscore because it's going to add
the frame number after that. So if you don't
add an underscore, it might look a little bit
confusing and it might not import correctly
into your compositor. So always put an underscore just off to the
filename, like so. And then we're going
to click on Accept. Next, we want to tell blender what type of files
we want to render. So we're not going
to render a video, but we're going to render
an open edX are multilayer. Now the reason we
choose multilayer is that we have all those render
passes that we selected. And then that means
we need to select an XR multi-layer to
include all those layers. Next we have the color depth. Now you've got two options, float off and float full. Now, 90% of the
time float half is perfectly fine because we're going to do
compositing in 16 bit. And if for some
reason you need to do your compositing
in full 32-bit, then you will select
this float full. But for, as I say,
for most renders, float off is more than enough, the file sizes will
be a lot smaller. 16-bit is usually
more than enough. So make sure your settings
are set up like this. And then there's one more
thing that we need to change before we can
start our render. So currently, as you can see, we've got this background image. Our footage is actually
set up in the scene. So if we render it right now, it's going to include this background image of the
actual footage or the plate. And that's something
we don't want. We just want to render our 3D objects with the
shadows and all of that. Now, to disable this
from our render, simply go to the compositing tab right here at the top, the
compositing workspace. And then you simply
untick right at the top it says Use nodes. You want to just simply
untick that box. And now if you go
back to Layout, it's still going to
appear in this viewport, but when we render, it's not gonna be there. So let's quickly just
save our project. And then one more thing
I do before I render, I changed my viewport
to solid view. That will just increase
the render time slightly. Save your project again. And now we can click on
Render and Render Animation. Now it's going to
start rendering all our objects and all
the pauses and everything, all the shadows, et cetera. And it's going to save it in EX, or image for each of the frames, each of the 150 frames. Now you're on the side. You can actually see
all the render pauses. If you click on this drop-down here at the top where
it says combined, you can see we've got
combined must and all these different
render passes. If I click on maybe A0, which is ambient occlusion, this will now show
us the occlusion. Pause in a second. There you go. You can see this is the
ambient occlusion pause, or we can maybe change this to the shadow catcher pause and you can see there we have
all the shadows. These are just showing you all the different render passes. Combined is basically
everything combined, all the layers, so you can see the correct
colors, et cetera. So let us run through. It will take a few minutes, maybe an hour depends on the speed of your computer
and your graphics card. And I will see you
in the next lesson.
18. Lesson 17: After Effects: Import Plate & Render Passes & Setup the correct colour space: Hey, and welcome back. In this lesson, we're going to start the compositing process. So as you can see
in After Effects, I'm using After
Effects version 23.2, 0.1, but you can follow along in any other version
of After Effects. You can also use
your own compositor if you may be preferred to use something like nuclear fusion or even the bolt in
compositor in blender. You can go ahead and
use that as well. Most of the principles
will be very similar to what I'm gonna
do here in After Effects. So let's begin by importing the plate
or the footage file, that MOV file, and
then also the render passes that we
rendered from Blender. So you're in the project
area in After Effects, I'm simply going
to double-click. And then I'm going to
browse to the folder where I saved the footage, which is the footage underscore one underscore 1080 dot MOV. And I'm just going to
simply bring that in. Now if we quickly take a look at the properties of this MOV, you will see that it's
obviously 1920 by 1080, and then you'll see
the frame rate of 25. So that's just something to keep in mind because that's gonna be our final frame
rate for our club. Now this will obviously
depend on the clip, if you're using your own clip, what you shot it at. But for this instance
it's going to be 25. So I'm going to drag this
into a new composition. And then we've got our
in and out Frame setup and everything is the time
and everything is correct. Alright, so next we
can import our EX or sequence that we
rendered from Blender. So I'm going to double-click
to open the import window. And then I'm simply going
to select the first EX are. You can see we've got
all our renders are all the frames here
from frame one to 150. And I'm simply going to
select the first one, render one, underscore 0001. And then here at the bottom,
just make sure to take open XOR sequence
and then click Open. So we've got an image sequence and all we need to do now is set the frame rate of our
image sequence as well. So right-click on
that image sequence, go to Interpret Footage Main, and then just set this
frame right here to 25, and then click on, Okay. Now, before we start compositing this one thing that we need to do inside of After Effects. And that is to set up
our color management to make sure that
everything is going to match and the gamma is correct. So what you need to do is right here at
the bottom it says Project Settings
or you can go to File and then project settings. So let's first go here and
then under the Color tab, what you need to do is where
it says working color space, make sure this is set to RGB. If it's set to none
or anything else, usually it's, I think
by default set to none. You need to go in here
and set this to RGB. And that will just be so that we are working in the
correct color space. If you don't do that,
your footage or the render will look very dark. So just set that up and then also make sure
there's linearize. Working color space is ticked. And then that compensate
should be ticked as well. Alright, and that's all
we need to change here. So click on okay,
too, firm that. And then what you also can
do is you can check that your image sequences or two is also set to that
same color space. So right-click on
the image sequence, Interpret Footage,
and then main again. And then you'll see there's
also a color tab here. And then just make sure that
that is set to sRGB as well. And there where it says
interpret as Linear Light. By default, this is set to
only on four 32-bit comps. So by default this is set to on, but only for 32-bit comps, and we are working
in a 16-bit comp. So change this to On, which means that will be
on for eight bit 16.32. So with that click on, Okay, and now we are working in
the correct color space. Also, you can see here
that our company is set to 16 bit and this is also being set in the
project settings. So you can see there
at C2 16 births, there we've got our color space. And that's all you need to do. So now you're sure that your
project is set up correctly. Go ahead and save this after-effects file or this
after-effects project. And then in the next lesson
we're going to start compositing all those
random bosses together. I will see you in
the next lesson.
19. Lesson 18: Setup Composition - The Comprehensive Way: Hey, and welcome back. In this lesson, we are
going to start with the actual compositing
process to extract all those render passes that
we rendered from within blender and put them together again to form our beauty pause or
the combined pause. Now, before we start, there are a few different, or there are actually
many different ways to composite these pauses together. They are a like a more
comprehensive way where we extract all the
different layers are all the different parsers that will give you
full access or full control to all
the individual things like the specular highlights, the reflection, the
indirect glossy, the direct glossy,
all of those things. And then there's a more easier
way that most people use. So I'm going to show you that difficult or the more
comprehensive way first. But we are going to use the easier way going
forward in this course. So I just want to give
you guys the rundown of the more comprehensive
way first so you kind of understand how to
do that if you need to. But as I say, for most projects, I just use the easy way. And, um, yeah, Many big studios will use a more comprehensive
way and that will give you more flexibility and
more control down the pipeline where
you don't have to go back and re-render
some of the shots. But usually in a smallest
to the environment, you can kind of go back and re-render if you
really need to change, just like this specular
highlights of an object. So let's jump into the
more comprehensive way. So first of all, let's rename our
comp so you can see it's currently called
just footage clip one. So I'm going to rename this
to come pre in comping. Okay? So as I say, this is the more difficult, more in depth way to do things. So we're gonna take our
XR render and we're going to drag it on top of
our footage in a comp. And immediately you're going
to see just a black screen. Now, we need to
extract those pauses individually using an
effect in After Effects. Now, you can go to your
Effects here at the top, and you can find all the effects that to extract these layers under this 3D channel
dropdown box here. So the one that we're going
to use is called extractor. And then later on we'll also use the crypto artifact from here. But for now we're going
to use the extractor. Now, I'm using a plug-in from a video copilot
called FX Console, where you simply select
the layer and then you press a shortcut in
my case control tab, and then you can
simply search for an effect like I can simply type your extractor and I can
choose that effect from here. I'm going to use
that going forward. But as I mentioned, you
can go to the Effect drop-down here at the top and choose that effect from here. You can also just
Google video copilot FX Console is a free plugin
and it's really helpful. It just speeds up
your work a lot. So I'm going to add
that extractor effect to this render layers. So let's just add that effect. Now we will see we get
these drop-downs layers, red, green, blue, and then
also that alpha channel. Now, if you click this
layer's drop-down, you will see all the render
passes that we exported. Things like ambient occlusion,
your combined pause, all the different diffuse
bosses, the glossy parses, the must, all of these, the shadow catches and
transmission as well. So we're going to try and
rebuild the combined pause, because we already have
the combined pause, but we're going to use these
other layers or other render passes to rebuild that pause. And that will give us access to all those different lighting
random process basically. So first we're going to start
with the diffuse color. So you'll see it says
diffn color C 0 L. And that's gonna be our, our first layer that we are going to extract
from this render. And then year where
it says mode. This is where you've
got all your modes like Multiply, Add, screen, etc. We're going to change
this one to multiply. Alright? And then you already see
something happening. We can kinda see
some of the objects, but they very, very dark and
some of them are just black. That's all normal for now. So at this moment, this render pause does
not have an Alpha layer. So you can see it says alpha, which means it says copy. And it's just trying to use an Alpha layer from
this render posts, but there is none. So we need to tell it to get the alpha layer from
the combined boss, which is seeing combined, and then the Alpha
layer, the dot a. So if I select that,
then you can see, we can see now the
rest of our image and these objects are
still looking the same. So that's the
diffuse color pause. So let's just rename
this and call this D. If C 0 L Make sure to save your
project every now and then. Now the order of your layers
are also very important. So just something
to note as well. Alright, so now that we have
our diffuse color pause, we're going to
duplicate this layer. So just simply
select this layer, press Command D to duplicate that or Control
D if you're on a PC. And then we're going to select diffuse direct from
the drop-down. And this time we're going
to change the mode to add. Alright, so now you
will see things are starting to look
a little different. You can see some of
the objects are kinda turning black and some of
them are turning white. But let's continue and
see what we get once we've added all these
different render passes. So I'm going to rename this
layer to diffuse direct. So just the IFFT IR, just to keep track of where everything is in
this composition. Alright, next I'm
going to duplicate this diffuse direct layer. And this time I'm going
to choose Diffuse indirect from the drop-down and then just rename
this layer as well, diffuse IN D for indirect. And this time we're going
to leave it on AD as well. Now what we need to
do is we need to move the diffuse color
layer above these two, Diffuse indirect
and diffuse direct. Now you'll see we get
some color in the scene. So if I zoom in here a bit, you can see the table has got some textures and electrical
box against the wall, as well as these things, they all have color now. Alright, so next we need to add our glossy materials as well. So this time I'm
going to duplicate the diffuse color layer. Alright? And for this one
we are going to select glossy color from the
layer's drop-down, and we're going to
leave it on multiply. But this time we're
going to move it down all the way to just
above the footage. And let's just rename
this to glossy color. Something like that. Alright, so as you can see, everything in the scene
when black again. And this is because the
same thing we did with the diffuse color layer where
we used the combined Alpha. We need to do the same with
this glossy color as well. So on the glossy color layer, just select Next to Alpha, we're going to select the
scene combined Alpha. And that will just use the Alpha from that other
combined render paths. Alright, next we need
to bring in our glossy direct and also the
glossy indirect parsers. For this, I'm going to
duplicate the Diffuse indirect and let's just
move it above everything. And for this one, I'm
going to choose the glossy direct for now. Make sure it's on Add. And let's just rename
this to glossy direct. Alright. And then we're going to
duplicate this layer. And for this one we're going
to choose glossy indirect. Also leave this one on ad, and it's just rename this. Now we can kind of
see that we can basically see all the
objects in the scene. So these objects that's got some glossy materials
or metallic materials, we can see them now. So we can see all our objects in the scene, which is great. Alright, so next we want
to bring in our shadows. So I'm going to duplicate
any of these layers and then move it all the way down
to just above the footage. And let's just rename
this to shadow catcher. And for this one we are
going to select the layers. We're going to select
shadow catcher. Then we're going to change
this mode to multiply. And there we have shadows. So now if I just
zoom in here and I toggle this shadow
catcher layer on and off. You can see we've got shadows. And these are the shadows from the shadow catcher that we added so you can see
shadows against the walls, shadows against the floor. We've got some nice shadows
there against that wall. So we've got our shadows in. And if we maybe just scrub
through a little year, we should be able to see the shadow from our little
zombie there as well. So you can see, definitely
we have some shadows there. Alright, What else can we add? We can still add the
ambient occlusion. So I'm going to just
duplicate this top layer. And let's just rename this to
a 0 for ambient occlusion. And from the layer's drop-down, I'm going to select seen dot A0, which is the occlusion. And as you can see, it
looks something like this. And we need to change the
mode to multiply as well. And then the same again as we did with the other
multiply layers, we need to tell it
which alpha to use. So I'm going to use the
scene combined Alpha. And now we've got our ambient
occlusion in the scene. So now if I zoom in here, you'll be able to
see what it does to maybe to this object right here if I toggle it on and off. So it kinda adds that
internal shadows. You can also see it on these
sand bags really well. Just those shadows between
some of these objects. So as I mentioned before, this is the comprehensive
way of doing it. So if this seems very complicated and very
confusing, don't worry, there's a much easier way
to do this if you can kind of go back and
re-render if you need to. So don't freak out too much if this seems way
too complicated, I just wanted to show
you guys how to do it. Alright, so let's quickly
discuss why you would want to go this route and
not the easier route. Now this will give you full
access or full control over all these different
render pauses like your glossy indirect lighting
or your glossy director. If you have a lot
of reflections, you can actually go in
here and you can add some effects to that
specific layer, like a tint effect change the color of a
reflection may be, or you can change the opacity of that specific layer to just dial in those maybe like just your reflections or
your indirect lighting. So this will give you extremely detailed control to manipulate your renders in after-effects or in
any other competitor. And that means you don't have to go back to Blender to re-render. Let's say you want to change the color of a
certain reflection, then you can don't have to
go back and re-render it. You can actually do it
all in your composite. But as I said, this
is kinda just to show you that this is, this is the way to kinda rebuild it in the more
comprehensive way. In the next lesson, I'm going to show you
the easier way that most people probably use, especially if you are
working on projects yourself or if you're working
for a smaller studio, the easiest, I would recommend just go with it easier way. But this is just for you to know that you can do it this way if you want
that full control. So go ahead and
save your project. You can obviously go and play around with these layers and see what you can do if
you add some tint effect. So maybe switch them off or change the opacity
and see what they do. Kind of get familiar with this, but don't try and memorize this if you're not really
going to use it like this. So in the next lesson
we're going to look at the easy way, save your project. And I will see you
in the next lesson.
20. Lesson 19: Setup Composition - The Easy Way: Hi and welcome back. In this lesson, we're going
to look at the easier way to kinda rebuild our composite
urine After Effects. So let's get started. So first of all,
I'm going to take my MOV or the video clip. I'm just going to drag it into a new composition and let's
rename this one too easy. Camping, anything you like. So now we've got our video clip in and we can play this back. And you can see we've got
our video clip right there, and our frame rate is
correct, everything is fine. So what I'm gonna do, I'm going to drag in the render, place it on top of our footage. Then we're going to apply
that extractor effect as well to extract some
of the render parsers. So I'm just going to load
in that extract effect. And now under the
layer's drop-down, we simply going to select
seen dot combined. And that's basically
going to give us, if I just solo this one layer, you can see it's giving us all our objects and it's
not including the shadows. If I look at this with
alpha layer enabled here, you can see there's no shadows, but it's got the color
information and it's got the highlights and it's
got all that combined. So it's taking the
direct and the indirect and the glossy
and the transmission, all of that, combining
them together. So it's basically just all
those different render parsers combined into one. So let's just rename this
and call the combined. Alright, next we want to
bring in our shadows. So I'm simply going to duplicate this layer, move
it to the bottom. And under layers, I'm going
to choose shadow catcher. And you can see we've got
our shadow catcher in there. And then we need to change
the mode from normal to multiply on the shadows. I'm just going to rename this
layer to shadow catcher. And there you can see
we've got our shadows in. So if I zoom in here again, you can see if I
switch it on and off, we've got those nice
shadows against the walls, against the floor, everywhere
where we need them. All right, so next
we're going to bring in our ambient occlusion. So I'm going to duplicate one of these layers and then move
them right at the top. And then under layers I'm
going to choose seen dot 0. I'm going to change
the mode to multiply. Let's rename this layer to A0 so we know that our
ambient occlusion, and then we just need to
tell it to use the alpha from the combined same
as we did before. And now we've got our ambient
occlusion in as well. So if I just kinda zoom in here, maybe to these sand bags again, we can switch it off and on. And you can see there's a
major difference right there. There's also a must pass
that we can bring in, but we're going to
look at that a little bit later in this course. So for now we only want to
use the amine occlusion, the combined and the shadow
catcher and then our footage. Alright, so now we
can scrub through our clip and you can see everything is
looking pretty good. But in the next
couple of lessons we're going to go in and
I'm going to show you how you can tweak some of these objects to kinda fit
better into the scene. And just one interesting thing
to note here on the side, our little zombie coming out of this side of the building
or behind the building. We don't even need to do
any rotoscoping year. Because I realized we placed
a shadow catcher right here. And when we rendered this, it actually masked out that
part of the zombie already. But what I will do once we get
to the rotoscoping lesson, I will just re-render
the zombie on its own layer so that we can, so I can just show you how we will read a scope,
something like that. If we didn't have a shadow catcher plane on the side that's
actually blocking in which is helping us a lot now. But I'll just show you just
some interesting thing that I noted now. So as you can see, this is the easier, much easier way to combine
some of these pauses together. Obviously, this will not
give you as much control, but as I mentioned earlier, usually you can
get away with just doing the combined
shadow catcher and occlusion and
then we're going to use them must post
later on as well. But it's just so much easier than extracting all
of these layers, which will give
you more control. But yeah, most of the time, this is perfectly fine. So you can go in and
save your project. And in the next lesson
we're going to start tweaking some of these layers to make them feel as if they
are inside of this scene. I will see you in
the next lesson.
21. Lesson 20: Match and Adjust Shadows, Highlights and Reflections: Hey, and welcome back. In this lesson, we're
going to look at how to match our shadows a little better and also the highlights on
some of our objects. So let's have a look at
the shadow of our zombie. I'm just going to zoom in here. We can see we've got the
shadow of our zombie there. Now let's say you
want to make it lighter or darker, this shadow. So I can go to the
shadow catcher layer, press T to bring up the opacity. And I can simply just
toggle this 0-100 and that will make
the shadow lighter or a little bit
darker, or just 100%. And you can see obviously
this will affect all the shadows in the scene. So if we look at this table that will affect those
shadows as well. You can obviously
always duplicate this layer and mask out a certain shadow if
you only want to control the darkness
of a certain shadow. Now what you can do to make them darker is simply I can
duplicate this layer. So if I duplicate
it, then you can see our shadow as much darker. And now I can go in
and I can change the opacity of just
that one layer. And that will give me more control than
just using one layer. If you want a darker, I can just bring that up
to 100 as well. So that almost feels
a little better. Because what you wanna do is
you want to try and match your shadows to the other
shadows in your scene, because shadows are usually the same darkness in one scene. So you can see I'm
kinda trying to match the shadows here
next to the Bolding. So I think that kind
of fields, okay, so we're still going to do some masking year, but later on. But that's just to
control these darkness or the opacity of
your, of your shadows. Now, let's say we want to tweak the highlights of our objects. Then we're gonna go to
this combined layer. So this is basically
just the objects with the combined parsers. And on this one we can
add a levels effect. So if I add a levels effect and if you want to
find that effect, it will be under effect. And I think it's under
color correction. And then you'll find
levels, right? Yeah, yeah. So with the layers effect, It's really easy to make
your objects a little brighter or make them a little darker,
bringing more shadows. Another effect that I often
use is the curves effect. So if I bring in a curves, I can adjust the shadow
values like this, or I can bring up
the highlights, maybe a little more
on this area here. And you can do all
those kind of things. You can also bring in
something like exposure. And then we can adjust the brightness of
these objects by just changing the exposure on
that layer so you can kinda match them to your scene. Later on, I'm going
to show you how you can actually change the brightness or some
values of a specific object. But this is just to take
this combined layer and just try and match it a
little better to the scene, just the brightness
and darkness. So as you can see that I can
play with these values just to make them slightly brighter. Because these objects do feel
a little dark in the scene. These ones are
actually pretty good. I'll sand bags on,
not too bad as well. Zombies also looking good. So yeah, you can just
go ahead and try and match your shadows and also the brightest parts of your objects to the
rest of the scene. What you can also do is change the temperature of
your combined layer. So let's add a
Lumetri color effect to our combined layer. And here under basic correction, you can change things like the temperature if
you want to make them more warm or if you
want to make them cooler, you can drag it this way. This is kinda just
something you will use to match the overall
feel of your scene. That's kinda a little bit
of calibrating that you can do on your individual objects. You can also play
with the saturation. So if I bring this down to zero, you'll see all the objects. We'll just go to
black and white. And if you increase
the saturation, there'll be very saturated. So you will also use
this value just to match the saturation of your
plate off the footage. So I'm gonna leave
this on about 94 now. I think that feels pretty good. And the temperature I'm going
to leave on zero for now. So go ahead and just play
around with the shadows. And also the combined layer, maybe play around with exposure, See if you can get
the exposure perfect. And then also play
around with the color, temperature and the
saturation and see if you can match it as best as possible to the overall lighting
in your scene. And yeah, that's it. Go ahead and save
your project now. And I will see you
in the next lesson.
22. Lesson 21: Blur 3D Elements to Match Footage: Hey, and welcome back. In this lesson, we
are going to look at one effect and that's
the blur effect. Now what we want to do, if we just zoom in a little, we want to match the
softness of our renders. Are the objects in
our scene match the softness to our footage. Because obviously sometimes
your rendered objects might look a little sharp. They might be actually sharper than the footage
that you formed. So you want to try
and match that blur as closely as possible. Now there are a few blur
effects that we can use. So we want to blur
the combined layer. Now if you look under the
blur and sharpen drop-down, you'll see this quite
a few different blurs. Now, I will suggest you use something like a
camera lens blur, which is a bit slower. Or if you want to go with
something more basic, you can just use
the Gaussian blur. So let's go with a
Gaussian Blur first. And you can see by
default it's on zero. And I can increase this. And you can see that we are
going to blur our objects. Now just remember we are not blurring the ambient occlusion. So if I disable that and
if I disable the shadows, you will see we are just
blurring the combined layer. We can also add
that same blur to the shadows and to the
occlusion as well. But obviously this
is way overkill. So let's just bring this blurred down and maybe let's bring
it down to like one. See if I toggle that
blur on an off. We might not even see a difference because
it's so subtle. Maybe let's bring it up to two. Can see that as way too much, can see it's too blurry. So maybe let's try 1.5. Does that even
make a difference? Slight, slight difference. You can see that it's adding a little bit of
blur on the edges. Maybe even something like 1.2. We just want a slight,
slight blur so they are not as sharp. Alright, so that
is basically that. So just add a blur
effect and try and match the sharpness of your
objects to your scene. And before I end this lesson, let's quickly add a camera
lens blur and see how that differs from the
normal Gaussian blur. Now, as I mentioned, the camera lens blur is
a little bit slower, but it does give better results. Let's start at one. And you can see that looks
a little bit too blurry. If we look at these
barrels again, yeah, that's way too blurry. So let's bring this
down to like 0.5, maybe, maybe point to even. So let's toggle that on and off. So you can see there's
a slight difference. So let's make this 0.1. And if we zoom into
800%, Let's see. See there's a slight
difference there. I think that is perfect. So I'm going to delete the
Gaussian blur for now. And I'm just going to
add this camera blur of a blur radius 0.1. I think that looks pretty good. Let's look at our sand bags. If we zoom in here and we
toggle this on and off. Very subtle, but it's
definitely there. Alright, so once
you are happy with the blur on your 3D objects, you can go ahead and
save your project. And I'll see you in
the next lesson.
23. Lesson 22: Crytomattes and what you can do with them: Hey, and welcome back. In this lesson, we are going
to look at crypto mats. Now, crypto markets
are probably one of my favorite things when
it comes to compositing. Because it's just amazing and it makes a lot of things
so much easier. So let me show you
what a crypto math is. So I'm going to drag in
the render sequence again, and I'm going to drag it
on top of our composition, so just above the
amino occlusion. And now I want to add a new effect called
crypto mat to this layer. So you can either go to Effects 3D channel and you'll
see crypto mature and, or you can use the FX
Console and just search for crypto mat and then just
apply that to that layer. Then you're going
to see something interesting happening
here in the Viewport. You can see all of these
objects with different colors. And this means we
can actually extract a mosque from any of these objects and then we can manipulate them using
an adjustment layer. So let me show you what I mean. So first of all, this output, I like to change
this to Matt only. And this will just give us a black and white
map that we can then use with a Adjustment Layer. So if you click
around in the scene, you can now select
different objects and it will create a mask
for you or a mat. You can see I can click
on one of these barrels. Why can click on the floor? Or I can click on the zombie
and you can actually see the zombie has got some
different parts to it. So let me just zoom
in here so lightly. And you can see just
zoom into 200 per cent. If I click on the zombie, me just so you can
see the zombie consists of these
different parts. So I can select the pants
basically holding Shift, and then click to select
that part as well. And if you scrub through, you
can see that it's actually following the
complete animation. That's a perfect map
that we can use. So let's zoom out and see what we can do with
these crypto mats. So let's say we want to change the color of one
of these barrels. Let's say this blue
barrel right here, we want to change the
color of this barrel. So what we can do is let's bring this crypto matte layer back and just click
on this barrel. So it only selects
this one barrel. Now, if you click and
nothing is happening, make sure that this
crypto math effect is actually highlighted. And then you can click and that will then
select that for you. So if we zoom out,
make sure that's the only object that's selected. So if we scrub through, you can see that nothing
else has been selected. And that's all we need. So we need that black
and white mask. So I'm going to rename
this to this layer to barrel mosque or barrel met. Okay, So that's our barrel mat. And now I'm going to create
an adjustment layer, create a new adjustment
layer, place it anywhere. And now you can, which says Track Matte. You can use one of your
layers as a matte. So I'm going to use the barrel
method we just created. And then right next
to the Track Matte, you can specify if the mat is an alpha matte or if
it's a luma matte. Now, if we look at the
math that we created and we enable the alpha
channel right here. You can see this math does
not have an alpha channel. So there's no transparency, has just black and white. This is a luma matte. So just switch off that layer again and then
on that adjustment layer, make sure to toggle
this to luma matte. Alright, so now that adjustment layer is
using the luma matte, this barrel luma matte. And we can add any
effects now on top of this adjustment layer. So let's zoom in here, look at our barrel and I'm
going to add an effect. Let's just see where
to find these effects. So under color correction, I'm going to add
a UN saturation. So now we can enable colorize. I can increase the saturation. And now I can just
toggle through these use and I can change the color of that barrel to anything I want. If I want a green barrel, maybe bring down
the saturation a bit or you can increase
it if you want to. And you can see we can
just change the color of that one item or that
one object in our scene. If we don't want to change
the color and maybe we just want to adjust the exposure. We can do that. So I'm going to add
an exposure effect to the adjustment layer. And now we can just adjust the exposure of that one
object in the scene. Another thing that you can
do is let's add a curves. And now we can kind of
control the shadows and the highlights of that
one object, which is great. You can also go in, you can maybe add a blur effect. If you maybe want to blur
only that one object, you can do it with us as well. So you can see, I'm kinda
blurring that all objects. Obviously it looks a
bit weird now because we not blurring the edges. If you want to blur
the mat as well, I can copy and paste this effect onto
that matter as well. So now you can see
we blurring the mat, which is looking a
little bit weird. Maybe if we add something like a camera lens blur and
we'll get a better effect. Let's copy that onto our
adjustment layer as well. And always make sure
to switch off the mat. You don't want to see the
mat in your composition, you just using it to control
this adjustment layer. You can do things like
that so we can blur it. Let me just remove this
blur from the mat again. And so any effect that
you can think of, you can add it on the
Adjustment Layer and then use that crypto math to kinda isolate that one
object in your scene. Let's try and do something
with these sand bags. So I'm going to delete
all of these layers. And let's just bring in
our render layer again. And I'm going to add a
crypto matte effect to that. Let's change this to match only. And I'm just going
to click around and see where the sand
bags or so I'm going to select this sand bag holding Shift,
click on this one. And if you accidentally selected something else and you want
to de-select the layer, just holding Control
and then click, and that will then remove
that from the mat. So only one out of these
two sand bags like that. And now I want to just
call this sand bag matt, like so then I can switch off this layer because we don't
want to see that mat. Now we're going to add
an adjustment layer. And I want to
change the color of these sand bags to maybe
like a darker brown. So I'm going to add a UN saturation on to
that adjustment layer. And then we need to tell
the adjustment layer to use the sand bag mat. And remember this is
not an alpha matte, but it's a luma matte. So just change that to luma. Now we can go in
and we can enable colorize on this UN
saturation effect. And we can change the
color of the sand bags. So I can maybe do
saturation up a bit just to find the
exact color that I want. Maybe like a brownish
color like that. And then we can bring down
the saturation again, and then we can bring down the lightness and
darkness as well. So I want to bring it
down so it's more like a darker brown,
Something like that. So now I can see if I turn this adjustment
layer on and off, you can see that's quite a big difference and
that's using crypto mats. So now we can just rename this
maybe sand bag adjustment. So you can add more effects
on here as well if you maybe want to do
something else with it. Let's see what else we can add. Maybe if we bring in a levels, we can control the shadows. Only that specific
object in the scene. We can play with the
highlights as well. All these different things
that you can do just by using a crypto mat. So what I'm gonna do if
I look at the scene, this well, looks a little
bit too bright for me. So I want to use a
crypto mat to bring the brightness a little
bit down on this. Well, you're on the side. So I'm going to bring
in my render again. And I'm going to add a crypto
matte effect to that layer. And then I want to change
this to Matt only. And we're going to click
just to select our well. And then I'm just going to
rename this layer to Well, Matt, so we know what that is. Switch it off. Now I'm going to create
my adjustment layer. You can add an adjustment
layer anywhere and make sure that this adjustment layer
is now using that well mat. And let's set that to a
luma matte to alpha matte. Now we can add maybe an exposure control or exposure effect to
that adjustment layer. And I can just change
the exposure on just the well and you can
see what we're doing there, just kinda matching it
with the environment around it and that's already
feeling a lot better. I think the sand bags are
a little bit too dark, so I'm just going to
bring that up a bit. Maybe -40. Yeah, that looks better. And let's rename this top layer
now too well, adjustment. Always good to
rename your layers. So when you come back to it, it's always easy to
see what you're doing. Alright, so that
looks pretty good. I think. Go ahead and add some of these adjustment
layers and create some maths using crypto mats and see what you can do
with some of these objects. Maybe change the color, maybe blur them
slightly more or less. Maybe just change the exposure. See what you can do by
using a crypto mat. And just a really, really easy way to isolate
certain objects and to change the look or values. So go ahead and save your
project and play around a bit. And I will see you
in the next lesson.
24. Lesson 23: Rotoscoping Foreground Elements: Hi and welcome back. In this lesson, we're going
to look at rotoscoping. Rotoscoping is when
you need to have an object that goes behind
something in your scene. So let's say the zombie is
going behind the building. We will have to do some
rotoscoping there. But as I mentioned before, we actually got a bit lucky. And because we added a
shadow catcher plane on this side of the
building that's already masking out our zombie. You can see there it's not really showing up
behind the building. So what I did, I just basically rendered the zombie
on its own layer. And that's just what I'm
going to use to show you. Let's say we had something
that was in the foreground. So I'm going to load this image
sequence that I rendered, just a zombie on its own, just going to set
up the frame rate. Let's say we drop that
on top of our footage and we just load the extractor. And then we just set this to combined so we can
see our zombie. You can see now
that our zombie is visible even behind the Bolding. And if you have something
like that where some of the footage will have to be
in front of your render, then you will have to
do some rotoscoping. So let me show you
how easy it is to wrote a scope,
something like this. So I've got my two layers. Yeah, you can ignore all of these other layers for
now, disable them. I'm just using these two layers, the footage and then also
the zombie layer on its own. So what we need to do is we
need to place our footage above our zombie or a copy of the footage
above the zombie. So I'm going to duplicate
this footage layer. And then I'm going to move
this layer above the zombie. And obviously you will
see that we can't see the zombie anymore
because the footage is now in front of the zombie. What we need to do
is we need to cut out this section of the wall. Basically placed it
on top of the zombie. I'm just going to
zoom in here a bit. And then I'm going
to take the pen tool and then make sure you are on the layer that's
just above the zombie. And I'm going to draw a mask. I'm going to click
here, click there, and just draw a mosque and mask out this area of the wall. Now, if you scrub forward, you can obviously see that that mask is not moving
with the footage. So we will have to add some key frames just to keep that mosque on the
edge of that wall. As you can see, our zombie is kinda creeping up
behind the mask there. So what do we need to do is
let's open up this layer, expanded and then
expand mosques. And you can see this
is our mosque that we just drew on frame number one. Expand that as well, then enable this little
stopwatch next to mask path. And that's going to enable us to add keyframes to that mosque. Alright, so let's just zoom out slightly so we can see
this a bit better. So on frame one we can see the mosque is
perfectly fine there. Then I'm going to
go to like maybe 2 s. And now I'm going to
double-click on this mosque. So make sure you
double-click on the edge and I can move that
whole Mosque around. So I'm just going to align
it with a wall again. If you click on the
edge, you can rotate it. It just zooming
as slightly more. You can rotate it
as well and you can obviously just kinda
align it with that wall. Let's go to about 3 s.
Let's do the same thing. Let's move that mask. You can also move the
individual points. If you just click on
the mask like this, you can just move these
points individually. Sometimes it's a bit
easier to do it like that. And let's just go through
and add some keyframes. So I'm just kinda jumping 1 s ahead and kinda just
masking this out, you can see our zombie
already is out of the way. So these last frame
doesn't really matter. We can just kinda roughly
move it into place. Let's go to 1 s. Let's
align that one as well. Alright, so obviously
you might need to add more keyframes if you have
a more complex camera move. But usually just a
few frames like this. If it's something
like a wall should do pretty well, Let's
just go through. So add as many key frames as you need to mask that object
that needs to be in front. And then what we
need to do is if you look at this without
looking at the mask, you can see there's a
very sharp edge there. You can't really see it here
because it's a bit blurry. But what we wanna do
is we want to blur or feather this mosque slightly. So under the mosque settings you've got this mask feather. And if I increase this number, you can see there it's kinda
blurring the edge of it. So we just want to
place it on like maybe like three pixels for this shot. And if we look at it now, you can see, if we play it back. You can see that's
looking pretty nice. That age is not too sharp, but it's kinda it's
also not too soft. So if you look at this
layer on its own, the one that we masked, that is basically that
layer on its own. So it's just that mosque that's kinda moving around
and replacing that on top of our zombie
layers so they can basically see exactly
what we are doing. If I zoom in, you can see we've got this layer in
front or above, and then our zombie behind it. And then behind that
we've got our footage. And then basically
it's all matching up. So obviously, for our example, we didn't really have
to do anything with the zombie because we had that shadow catcher in the that basically helped us out
with a masking process. So I'm gonna go in and
I'm going to delete these two layers again because obviously we
don't need to do that. But now you know how to
wrote a scope something. If you have something
that needs to be in front of one of your
rendered objects. So maybe you added an object that's maybe behind
something else in the scene. Maybe just play around
and see if we can rotate out something that's in
front of a rendered object. And then you can go ahead
and save your project. And I will see you
in the next lesson.
25. Lesson 24: Using mist pass for adding mist / haze: Hey, and welcome back. In this lesson, we're
going to look at them. Must pause. Now remember, I mentioned the
most positive, but earlier. And then the spouse is actually something that
will help a lot with integrating some
of your 3D objects into your real-world scene. Now, most scenes in
real life you can see a must or a haze almost
in the distance. Like if we look at the
mountains at the back, you can see they are completely behind like a haze or a must. And you can kinda see even
these trees in the background. I also quite hazy. And then as we come forward
or closer to the camera, you can see less of
that hazy effect. Now we can use the most
bars that we rendered from blender to simulate or match that must gradient or that haze gradient going from the camera and further back to the furthest point
in your scene. So let me show you
how we can use that. So I'm going to drag in the
rendered EXOS sequence again, and I'm going to place
it on top of our comp. And let's add the extract
effect to that layer. And this time we're
going to select must. So you'll see there's one
that says scene and must. Click on that. And then you will get something
that looks like this. Let's just solo this
layer for a second. And I want to look at the alpha. If I toggle the transparency, you can see currently
this doesn't have any alpha because the
most layer again, does not have any
alpha information. So we just want
to use that alpha from the scene combined again, and then we get an
alpha layer like this. So now you can see we've got
all the objects in the scene again and they've got this
little gradient on them. So what we can do to
adjust this gradient, we can add a levels
adjustment to that layer. Now you can use
these two sliders to adjust that gradient. So we're going to use this
as a met in a few minutes to kind of place that haze
over our rendered objects. So all you need to know is anywhere where these
objects are fully black. So if I bring this
black value up, anywhere where it's black at, won't have any of
that haze or most in any way where the objects
are completely white. If I bring this in like that, these objects are the
furthest away from the camera and they will
have the most haze. So obviously most of our
objects are quite not. It's not too far away
from the camera. So we don't need a complete black and a
complete white value, because the complete black
and autocomplete black value will be closest
to the camera and the complete white
value will be furthest away where the mountains
are in our footage. So I'm gonna leave it
on default for now. We can kinda play with that
and adjust it as we go along. So I'm going to
un-solo this layer. Let's just rename this too. Must pause or we can call
it must matter as well, because it's actually a
method we're going to use. And we're just going to switch
this layer off for now. So we only going to use
it from in another layer. So just hide that for now. Now we're going to
create a new layer and we're going to choose solid. So it's just gonna
be one solid color that we basically creating now. Now this is going
to be the color of the haze or the
color of the Must. You can either click
on the color and you can choose a color manually. But it's sometimes
better just to use the color picker and choose a color basically
from your scene. So maybe something
in the background, like a light blue,
something like that. And click Okay to confirm. Now you can see
we've got that color completely over our footage. And it's just rename
this to most. Now we're going to use this mat to control the
density of that layer. Alright? So all we need to do is
make sure you switch that off on the most layer. We're going to choose
a track matte. We're going to choose them
must pass, which is this one. And now we want to
set this not to alpha matte, luma matte. We want to use the
brightness of these Matt to control basically
the amount of A's. So now if I take the opacity, if I press T to show the
opacity of the most force, I can kinda play with that and see if I reduce it slightly. You can see kinda the
most effector is doing, like all the objects that's
closest to the camera. If I just zoom in here a bit, you can see they don't have
any haze or most over them. But you can see these
objects further away have a little bit
of a haze over them. So obviously this
is very extreme. So what we can do is
we can also bring the opacity of the mat down. So I can bring
that down as well. So it affects it less. You can see there. If I just kinda play
with that value. Obviously in this scene we
don't have a lot of Mr. Hayes very close to the camera, but this tool a little bit. So maybe if we bring
this down to like maybe like even just ten per
cent or 13 per cent. So if I now toggle this
high as you can see, if you look at
these objects here, maybe look at the, well, you can see, sorry, we need to switch on
this first layer. If I toggle that on and off, you can see there is a slight difference in those objects a
little further away. So play around with
the most pause, see if you can add one that matches the footage quite well, because you just
want that subtle, less contrast on the objects that's further away
from the camera. You will see. If you look at any object in a scene
that's further away, you can see they kinda behind this slight eyes
and that's kinda the effect that you
want to simulate using this must pause. So obviously if you have
objects as further away, it's going to be more visible. But for this example, a very, very subtle most maybe we can bring this
down to even ten. That might just
help to integrate your 3D objects into the
scene a little better. So go ahead and save
your project now, and I will see you
in the next lesson.
26. Lesson 25: Final Colour Grading: Hey, and welcome back. In this lesson,
we're going to look at how we can calibrate our complete shot or
everything together. So what we can do is we can simply add an adjustment layer. So if you go to New
Adjustment layer and place that layer right
at the top of your comp. Let's rename this and call it
C. C for color correction, or we can call it grade
or anything you want. And I'm going to add a
Lumetri color effect to this Lumetri color. This is what you can do a lot of color grading, which
is really nice. It gives you all the
controls you need. So first of all, we
can maybe change the overall temperature
of the shot and this will affect everything below this adjustment layer. So maybe let's make it a
little warmer like this. And you can maybe play
with exposure slightly. Maybe the contrast, maybe let's add some contrast to that. And what we can do here as well, we can go to this creative tab and maybe add some
of these looks. We can maybe go
through this and see how they look at one
looked pretty cool. And you can obviously change the intensity because
that's extremely intense. So maybe just bring this up
slightly like 40 per cent. Let's see how that feels. That looks pretty cool. Let's have a look at some of
these Kodak looks as well. Maybe let's increase
this to 100%, 100% again to see how they look. So there's quite a few, some of these are quite extreme. Some of them are quite cool. So maybe something like that. You can maybe just
adjust it slightly. You can kinda see that's the maybe something
a little less. Yeah, I kinda like that. So what we can also do is
we can add a vignette. If you scroll down all the way to the bottom,
you'll see vignette. Make sure it's active
and they can bring this down to maybe like minus one. It will give you those
nice dark corners. You can kinda see how
intense you want this. Let's just see. So it kinda adds quite a bit. Maybe not that much, maybe like minus
three should be fine. Yeah, minus three is
looking pretty cool. Okay, next we can also add some crop at the bottom and top. So I'm just going
to add a solid, just create a black
solid like that. And then I'm going
to double-click on this square or rectangle
mascot the top. And it's going to
automatically create this rectangle mask for us. Now we can invert
this mosque just by clicking invert next
to the mosque year. And now I'm simply going to
select these two top points. So just click on one
shift, click on the other. I'm just gonna do
a shift down 12. So that's going to
move it down about, I think about 20 pixels. And I'm going to do the
same at the bottom. So select these two points of the mosque holding
Shift and press up, up on the keyboard. Now we've got this kinda
widescreen effect. That looks pretty cool. So now we've got this kind of widescreen effect that
looks pretty cool, I think. So. Go ahead and save your project, and I will see you
in the next lesson.
27. Lesson 26: Matching Film Grain or Digital Noise: Hi and welcome back. In this lesson, we're
going to look at foam grain or digital
noise that we can add over everything to just blend everything
together nicely. Now, if we zoom in and I'm just going to
solo the foot each layer, so we just see the
original footage. If I play through this, you will see it's not
really that noisy. There's definitely some
noisier in the dark areas. You can see there's some noise
going on in these areas. So we want to match
our CGI objects to have the same kind of
noise as our footage. So obviously if we now play
this back and we'll look at some of these CGI objects. Let's look at this thing. And if we play some frames back, you'll see that it
doesn't have any noise. Let me just render
this section years. If I scrub over this, you'll see noise around it, but you won't see a lot of
noise on the thing itself. What we'll have a little bit
of a different noise and we want to try and match the
noise to our footage. Now, there's a few
different ways you can do this on the combined layer. If I just solo that this is
where we can add our noise. So what we can do is
we can add an effect that's called match noise. Let me just see where we
find this. Here we go. So it's called match grain
under the noise and grain. So I'm just going to add
it using FX Console. So simply type matched grain. And now we can say what layer it's going to reference to get the
noise information from. So it is noise source layer. Just select the footage
from that drop-down. And then you can change
this viewing mode to final output to not just be
in that little preview box. And now, if we play this back, if I just play a few frames, you will see that we've got
some noise on this as well. Now, if I toggle
this on and off, you can definitely see a lot
of noise on these barrels. If I maybe just zoom
in here a bit more. And if I toggle that on and off, now usually this
match kinda works, but you still need to tweak the, some of the settings here and it's actually under tweaking. Right here, you'll get
intensity, size, and softness. Usually the intensity is the
only one you need to change. Sometimes you can
play around with the size of the noise
or the grain as well. So what we're gonna
do is we're going to un-solo this layer. And then we're going
to try and match it as best to the footage. I'm just going to play a
little bit of this and see if the noise is too much. You can actually
see the noise is definitely too much
on the 3D objects. So I'm simply going to
go to the intensity. Let's bring it down to like 0.5. And if we scrub
through this now, let me just render a few frames. Okay, Now if we scrub over this, you can see it's
got a bird over. Zoom out slightly. Just want to try and match that intensity of the
noise to the footage. I think we can maybe bring
it down a little bit more. So I'm going to bring it
down to about 0.30, 0.3. So play with these values. If the noise looks a little
bit too big or too blotchy, you can always bring the size
of the noise down as well, but I think it works well
with the current setting. So let's just zoom out here. Alright, so let's have a
look at this in full screen. And maybe let's just play
a little section and see if there's anything
that jumps out a bit. So I think we need to just bring the brightness or
the highlights of our zombie down slightly. Everything else
looks pretty good. So let's quickly go in here
and see how we can do that. So we can use a crypto mat to bring the brightness of
the zombie down slightly. So I'm going to drag in the
render right at the top, but underneath the color grade
and also the black bars. And then let's add a crypto
matte effect to that layer. So we only want to
isolate the zombie. So I'm going to change this
to Matt only and just click hold shift and make sure we select all the parts
of our zombie. So we've got that
math that we can use. And I'm just going to
rename this layer to zombie met, just like that. And then I can hide this layer because we just
going to use it as a mat. And then I'm going to bring
in an adjustment layer. So I'm going to create
a new adjustment layer. I'm going to place this
under the color grade. And this I'm going to
call zombie adjust. Alright. And we want to change the mat or the Track Matte on that
layer to the zombie mat. And then we want to
change this from alpha to a luma matte. Alright, so now we're ready to add our effects to this layer. So I'm going to bring in a exposure control and now we can simply just adjust
that zombie on its own. So if you look at
our scene in full, if I make any adjustments there, it will only affect our zombie. So that's the cool thing
about crypto mats. I want to bring
this down slightly, so let's try minus one. That's probably too
much, maybe -0.5. Now we can also just
control the highlights. If I bring in an
effect like levels, we can just do some. You can see they only
adjusting the highlights or we can only adjust
the shadow values. Maybe the normal exposure
will actually work fine. So I'm going to
delete this levels, but you can use
the levels effect to adjust just the highlights or just the shadow parts
of a specific model. So think if we bring this down, maybe I don't want to
play with that number. I want to bring this
down, maybe 2.7. I think I'm quite happy with exposure as this maybe
let's do a -0.8, bring it down a touch. And I think that kinda works. She might be slightly
too sharp as well, so we can add a blur
effect to this as well. So let's add a camera lens blur. Now you can see we
can blur as well. So let's bring this
down to like maybe one. No, that's too much. 0.3. Yeah, I think that works. You just want to match
the surrounding, maybe even slightly raised, maybe point to just to have
just that little bit of blur. And let's just scrub through
and see how that looks. Yeah, Another thing
that we can do. Let's just zoom in there again. We can try adding a tint
effect to this zombie adjust. So I'm just going to
add a tint effect. And by default it's going
to go black and white. And it's gonna give you
the amount of blitz, bring the amount down to zero. And you can take
this white value, bring it down to
like a darker gray, and then increase
this value as well. So now if you take
it all the way up, it's going to map
the white values to this gray value and
the black values. You can also adjust if
you want to change that. But yeah, now you
can just play with this amount and that will also bring down
those highlights. Slightly. Just don't want to bring down
the black values too much. So maybe let's just
put this on 1%, then bring this up slightly
to probably like 20%. Yeah, I think that works. If I toggle this, somebody
had just layer on and off. You can see that's the original before we started
with this adjustment. Using that crypto
math and hats off to you kinda just
want to try and match the highlights to the surrounding scene and obviously to your
color grade as well. I think that looks
pretty pretty cool. Yeah, I think nothing
jumps out at me. This electrical boxes
looking pretty cool. This table is looking
nice and the shadows, these items are
looking pretty cool. Yeah, everything
is looking nice. Zombies in cool shadows
are looking nice. So play around with this and
see what you can create. And I will see you
in the next lesson.
28. Lesson 27: Final Render: Hey, and welcome back. In this lesson, we are going
to do our final render. So that's very simple to do. We're going to simply go to composition right
here at the top. And we're gonna go to
Add to Render Queue. Now, you can also use the Adobe Media Encoder to
send your render there. But for this, we're just
going to send it to the normal internal
after-effects render queue. And here we can select
what codec we want to use. So you can click on
this preset here, and this will take you
to this settings page where you can choose the format. So let's say you want
to export a QuickTime, you can select it there. Or if you want to
export an H.264, which is basically MP4, you can do this year as well. So I'm not going to
export a quick time. And then under the codec or the format options,
you can click there. And this is where you
set the video codec. So I want to use the Apple
ProRes four to two HQ, which is usually very
good codec for editing. Say if you want to export a VFX clip that you're going
to lay to use an edit. I will usually use this
Apple ProRes codecs. Click on Okay. And we're not going
to export any audio, so you can switch off the audio, leave everything
as default there. Click Okay, and I'm simply
going to export this to a folder just to
the desktop maybe. And click on save and simply click on Render to
start the render. So let's wait for
this to finish. So as you can see,
everything is looking nice and nothing
really stands out. But there is one thing
I would like to fix, and I'm going to include
that as a bonus lesson. So if you look at the well, you can see the edge
of the well is very sharp and it's doesn't
look very natural. So what I wanna do
is I want to add some plants or gross or
something growing around it. So just to cover
up that hard edge. So go ahead and save
your project now and I will see you
in the bonus lesson.
29. Lesson 28: Extra Lesson: Adding grass around the well: Hey and welcome
back and welcome to this bonus lesson where
we're going to fix our well. So as you can see, I'm back in the blender project
and what I wanna do is I want to add some plants or rocks or anything just
to cover up this really, really hard edge of this well in the scene,
because as you can see, it doesn't look too natural to have that very hard edge there. So I'm back in Bridge, in Quicksilver bridge to download some of these
graphs elements. And let's maybe
start with this one. I'm going to import this. Now you can obviously use
bridge as well or quicksort, or you can download some grass elements from
another website if you, yeah, there's quite a few
that you can use for that. So I'm just going to change
this over to solid view. And now you can see we've got this little grass element there. So let's just zoom in here and maybe let's just do something. Yes, I'm going to
scale it down a bit. And let's just select hierarchy. And then I'm going to
duplicate this model and Shift Z just to
restricted on the z-axis, scalar down, rotated on the z. So it's not looking the same
as all the other parts. And let's duplicate
it one more time. Let's maybe move at the site, scale it up a bit. Let's rotate it. Let's
have a look through the camera just to see
what we need to cover up. So maybe if we go
to the last frame, can see we are starting
to cover that nicely. So let's see what
else we can bring in, maybe one of these as well. Let's bring that in. And yeah, let's just go into solid view and move
this one into place. Maybe something like that. Let me just select it, maybe scale it down a bit
and let's duplicate it, move it to the side, rotate it so it's not the same. Maybe scale it down a bit, and maybe one more. So let's see if I
bring in this one, maybe let's bring that one in. So there we go. Let's look through
the camera to see exactly where we need to cover. So maybe on this side, somewhere around here, let's
select everything there. Let's zoom in here. Maybe let's duplicate this
one right next to it. A little smaller, rotate around. And then one year at the back. So I'm going to
duplicate it as well. Maybe bigger a
little further away. And let's rotate that. All right, let's see, maybe we can add one
thing here as well. So I'm going to take one
of these, duplicate it, move it right here, rotated around, maybe
place it there. And let's see how
that looks like. Alright, so what we wanna
do is we want to render these grass elements and the
shadow catcher on their own. So we're not going to render
anything else in the scene. So what I'm gonna do is
I'm going to disable the character and
objects collections. They will not render if you
disable their collections. And let's just see what we can do here because we might need the shadow on the weld that the grass is
actually causing. So what I'm gonna do,
Let's go back into this objects collection and
I'm going to grab this. Well, I'm going to duplicate it. And I'm just going to move it out to our scene collections. So we have that on its own layer or kinda separate object. So now we can disable this
objects collection again. And this time on this, well, I'm gonna go to the
object properties and we're going to set
that as a shadow catcher. So now you can see
that we just getting the shadow that's being
costed from the plants. So another thing
that you can do here is just disabled the fuse and glossy the same as we did with
the other shadow catches. So now you can see we get that little bit of
a shadow behind the grass and see if
I can zoom in here. You can kinda see
it a bit better. So we just get the shadows
that the plants are costing on the floor as well
as on the, well. Alright, so what I'm gonna do is I'm gonna go
back to frame one. So now we want to go in and
we want to render this out. So let's go to our
render passes again. And this time I'm going to
disable all of these direct, indirect because we
don't need that really. We're just going to use the combined random
paths for this. I can leave ambient
occlusion and shadow catcher and also the
crypto math for object. If we want to
select these grows, these plants
individually, we can, we can use that. So the most layer I'm
going to include as well, because we can apply some
myths to that if we want to, and then obviously the
combined layer as well. So let's go to our
Output Properties, make sure that your
frame ranges correct. So from frame one to frame 150, and let's just give it a folder. So I'm gonna go and just
create a new folder and call this render underscore. Gross. Go in and let's just
call this grows one and then put an underscore
because it's going to add those frame
numbers afterwards. Click on Accept. And let's just double-check our
settings here at the bottom. So we're going to render
an open or multi-layer and just a float
which is 16 bit, which is perfectly fine. Alright, so let's
save our project. And now we can kick
off the grass render. Once your project is saved, you can simply go to this render menu and
then Render Animation. And this will obviously take some time because it's
going to run through all 150 frames one at a time. It's going to save
that EX OR for us. So once this is done, I will see you in After Effects. All right, so the render
for our gross finished, so I'm back in After Effects. So let's load that
EXOS image sequence for the grass render
around the well. So I'm simply going to
double-click and I'm going to click on the first the
XOR for the grass render. Make sure you have
opened the XOR sequence selected here at the
bottom and click on open. Now, the first thing
we need to do is just check the frame rate
of the sequence. So right-click,
Interpret Footage Main. And then we're going
to set this to the same as our footage, which is 25 frames per second. Now we can drag
it into our comp. I'm going to place this
below the grade layer. So the CC and also
the black bars. So just drag that below that. And then we need to add that extractor effect to extract
those render bosses. So let's load the
extractor effect. Then I'm going to select
the scene combined layer. And this will give us the gross. If I just solo this layer, you can see we have our
grass in the scene. So I'm just going to rename
this layer to grass. Yeah, that should be fine. So let's see how that looks. So I'm just going to scrub through and look at
some of these layers. It's getting a little slow now. But you can see the growth is in the right position and it's obviously been
tracked correctly. So I think that's looking great. So what I wanna
do first is let's bring in the ambient
occlusion of the grass. Some simply going to duplicate this layer, this cross layer. And then I'm going to select the ambient occlusion pause from this extractor effect and
then you can see we've got the amine occlusion
only for the grass. And remember we need to use
an alpha from the combined. So let's just select that
alpha layer for that one. And they can see we've
got the amine occlusion. And now we need to
change this from normal to multiply or right, Let's just zoom in there
and see what we have. Tonight. Can see the gracias
a little bit darker. So if I just toggle this
amine inclusion on an off, you can see what that's doing. You can obviously
change the opacity of this layer by just pressing T. And then you can
kinda play with that opacity of
the occlusion just to kinda tweak it how
you want it to look. So I think something
like that maybe works. Well. So I'm just gonna
rename this to grass, a 0 for gross, I mean occlusion. And then finally we
still need the shadows. So I'm simply going to duplicate
this grass layer again, place it below our grass. And this time we're going to
select the shadow catcher. So let's just have a look there. So that's our shadow. And this one we also need
to place on Multiply. Now we can see we've got the
nice shadow for the grass. So I'm just going to rename
this to grass, shadow. And obviously you
can also bring up the opacity and kinda play with the opacity of that shadow to match the surrounding shadows. But I think I'm percent
actually it looks pretty good. Now one more thing
that I want to do, the gross feels a little bit sharp if you look at the
surrounding objects. So I want to add a subtle
blur to our grass layer. So let's add a camera lens blur. And I'm going to set
this to, let's try one. That already looks
much, much better. So maybe we can even
get away with 0.5. Let's have a look. So that's with no blur and
that's with the blood. So you just want to
match the blurriness of the surrounding objects and
also the surrounding footage. Maybe we can even bring
this down to like 0.3. Yeah, I think that
looks pretty good. So now we don't see that
harsh line around our well, I think that looks pretty good. So that's just an easy
way to kinda hide any harsh lines or
anything like that, that you can just
play some grass or some plants are
some weeds over it. And that will just
kind of integrate that object into the
scene much better. Alright, so let's have a
look at the final render. So I'm just going to
save this quickly. And then I'm going to export a render and then let's
have a look at it. Alright, so the render has finished and let's have a
look at our final result. Yeah, I think everything
looks really good. Shadows are looking good. So you can obviously
go ahead and apply your own grade to this, see what you can come up with. And yeah, go ahead and save your After
Effects project now. And I will see you in
the conclusion video.
 Ruan Lotter, VFX & 3D Artist