Transcripts
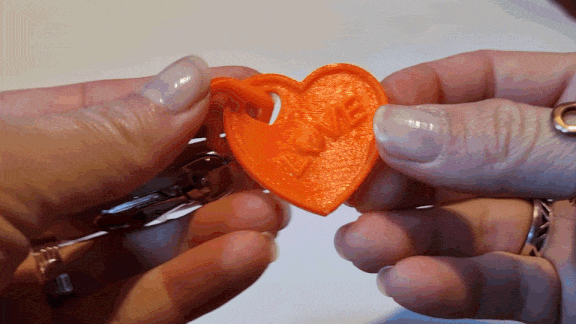
1. Intro: Hello, and welcome
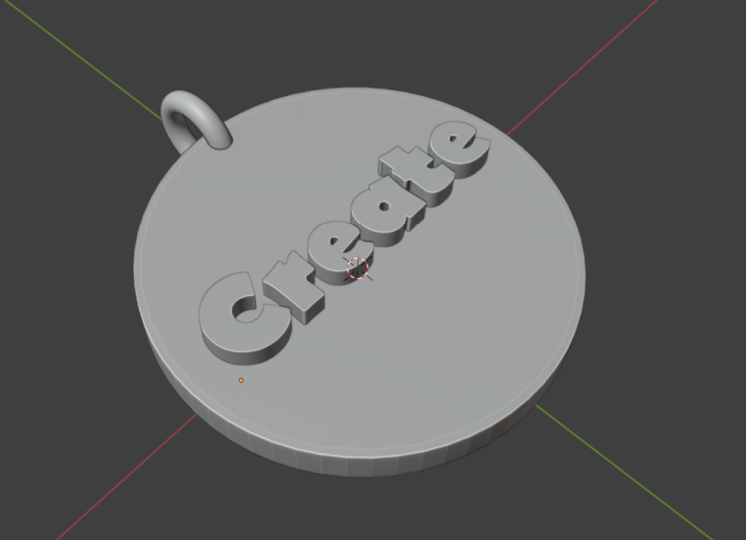
to this class. Today, we're creating a super quick word
charm in Blender. The class project
is super simple. Upload one screenshot
of your finished penant and share a few words
about your idea behind it. Optional bonus, export STL if you want to three D print it. I'm Giza Pickbrenner, Goldsmith and The D artist. Let's go.
2. Project and Settings: Here's everything you need. A small word, personal phrase
or favorite inside joke. Blender, download it on
your system of choice. Go to blender.org and download. It's free always. A mouse and a keyboard, and very quickly, we will change one little
setting in blender. Open up blender,
navigate to scene, set the length to millimeters, and then change
the scale to 0.001 so that we have thousands
of a 4 millimeters. Check the end menu under
item for the dimensions. In this way, your
pennant will have the correct real world
size right away.
3. Your Word: Select the cube
by left clicking, press X and delete it. If you like, press one on
your numpad for front view. You can also use this
little Gizmo up here. Shift A and create
a text object. With seven, you can
change to top view or press the z button
in this little Gizmo. You can zoom in with the
mouse wheel a little bit, and with holding Shift and pressing the middle mouse wheel, you can pan left to right. Tap into dit mode, delete the current text
and type your word. Then in the settings
for the text, you can choose a different font. Bold and simple works best. Thin scripts break
hearts and printers. With contra z, you
can always undo. Under the text geometry, you can add a little bit of extrude and a tiny
bevel to soften edges. Don't make it too flat, but
also don't make it too long. Then tap back to object mode, and you can now scale it roughly to the size
that you want. You can see the size and the
menu and your dimensions, and you can scale with pressing
a and moving your mouse. You can guestimate this. You can change it later to
make it perfect. Optionally, you can now
duplicate a backup with Shift D and right clicking immediately afterwards and
then hiding the backup. In this way, you can, if you like, later
quickly add another word. When you're happy, right
click and convert to mesh. Now we converted the
word into a mesh, which means the letters
are now proper geometry, and you can't change them
easily anymore by typing. You can confirm that this is now a mesh by switching
to edit mode, and you will see
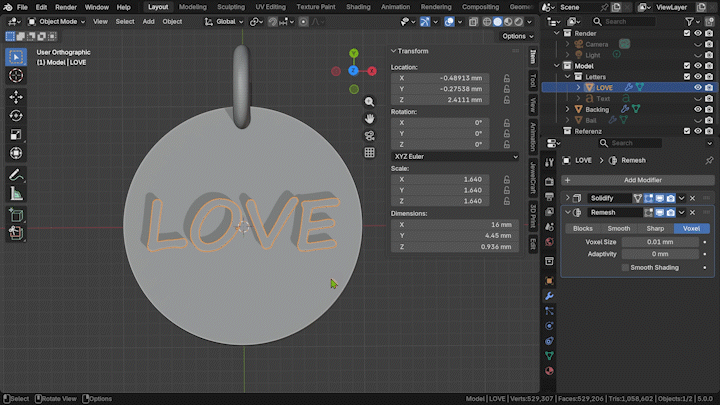
the mesh appear. Add a remesh modifier under
the blue wrench symbol. This helps to get rid
of any mesh problems after converting the
letters to a mesh. Simply make the number slightly smaller until the
mesh looks nice. I've used 0.01 for Vox's size
and 0.01 for adaptivity, but you can also try
0.005 for Vox size. Don't worry about
the exact numbers. Just make sure the surface
looks relatively smooth and without any major
imperfections or deformations.
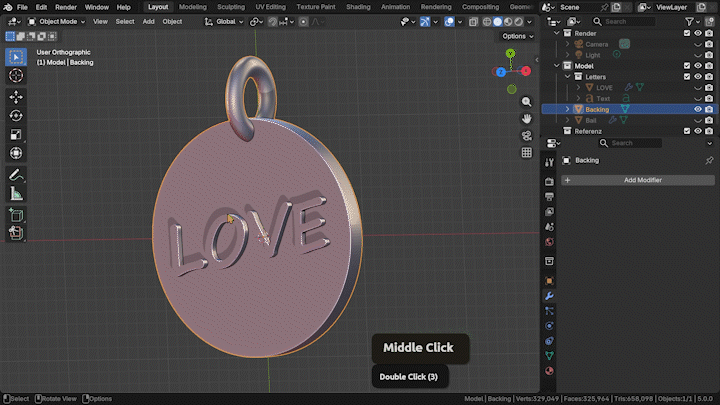
4. Backing: Now, let's create the backing. Go back to top view by pressing seven on your
numpad if you like, makes it a little bit easier
to see straight at it. Shift A, mesh, circle. Choose the desired radios. I Q it at 10 millimeters. Choose the filled type and gon, and this will give
us a filled circle. It is filled with a giant face. Now tab to go into edit mode. Now we can edit
the face directly. Press E and then extrude a
little bit out of the pendant. If the extrusion doesn't come out straight, you can press Z. You should see the
blue line highlighted. You can press 1.8 to
extrude 1.8 millimeters. Once you confirm
with left click, you can also see
the little box on the lower lift where you can adjust your
extrusion further. Now, tap back into object mode. If you like, you
can double click on the circle in the outliner and rename it to Bing
and add a modifier. Click on Ed Modifier under the blue wrench symbol and
create a bevel modifier. For better visibility, go into the viewpoint shading
options and turn on cavity. Then add another modifier
and search for subdivision. This gives your pendant
now a very smooth look. If you want the
edge to be sharper, you can increase the
bevel segments to two. You can collapse both
modifiers to keep things tidy.
5. Bail: Hide the backing. Shift
A, create a Taurus. Give it 24 major segments, and 12 minor segments. This is a nice amount
to keep it easy, but still give the
shape some definition. Major radius is the distance from the center to the
center of the taurus band. Minor radius is basically half the thickness
of the taurus band. If you plan on printing it, and five to two
millimeter in plastic and at least 1 millimeter in
metal is a good baseline. And the opening should be two
to 3 millimeters at least, so that simple card or
chain can go through there. Unhide the backing. With G and Y, move the taurus up
to the top of the pendant or use the move tool
on the left on the T menu. With R, Y, and 90, you can rotate the
bae 90 degrees so that it sits on
the pendant properly, or you can type 90
under rotation. If you plan on printing
your pendant and you want it to lay flat
on the printing surface, then you can also leave the
bay in that orientation. Place it so that it overlaps
the pendant slightly. All the parts that overlap
will be fused together. By the way, in the top, front, and right view, the objects
will only move in two axis. So if you are in right view
with three on the numpad, the object will only move along
z and y when you move it. Add a subdivision mod
to make it smoother. Tap to edit mode, scale with S and Y along Y. You don't need to scale
it, but if you like a little bit of an oval baie,
you can do it like this. If the inner opening needs to be bigger for a change
to go through, you can also scale it along z. Save a version. Call it
your word underscored harm. Then save another, call
it word underscored harm, underscore Boll to make clear that this is the
version where everything gets connected together and becomes one mesh,
ready to print.
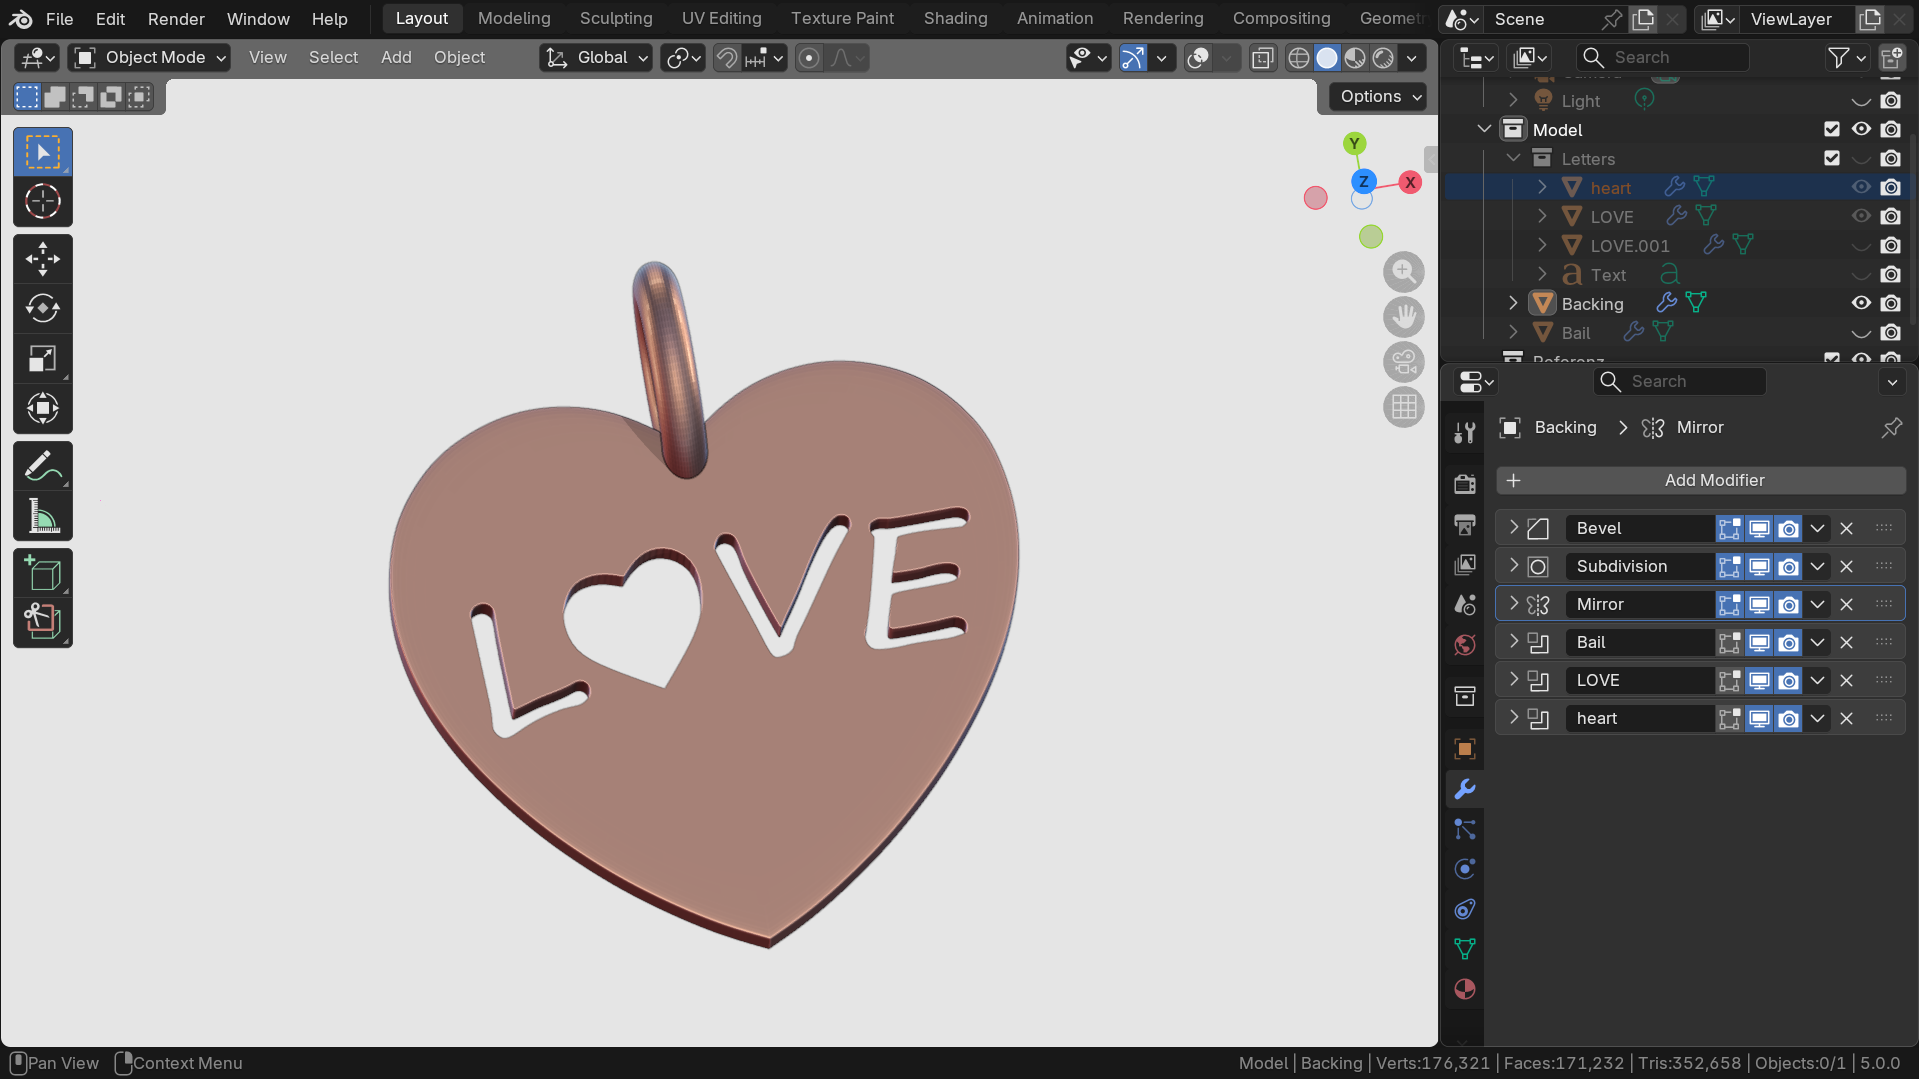
6. Booling: Select the backing. See
the orange outline. Notice how it changes soon. At a Boolean modifier,
set it to Union. Use the eyedropper
tool to choose the Bale or select it
from the drop down list. Hide the Taurus in the outliner. You can see that
the orange outline now connects both objects, which means they are now one. For starters, I'm booling the baale for a
one piece object. If you want to try a variant
with a movable baale, check out the lesson
on variations. Unhide your word object. If it is not visible, it may be behind the backing. We can turn on the
transparency with ld Z. Select your word and move it until it sits inside
your pendant. The bottom part of the letters should sit slightly
inside the backing. Scale and move the letters now if they have the wrong size. You can scale and exclude
that by hitting S and Shift Z or use the menu
points in the left T menu. If you press three
on the numpad, you can have a
better look at how deeply the letters
sink into the backing. Now we'll bool the text
and the backing together. Select the backing, add
another Boolean mode. You can also rename them to keep track of what objects
they point to. This time, my Bool mode
is set to difference. You can use the eyedropper
Tolgan to point at your word. Hide the text object
in the outliner and you'll hopefully
see the engraving. In the viewpo shading options, you can turn on the shadow. This can help to
see it even better. If you like, you can now make any finer touches to
the word scaling, placement or rotation. Make sure to disable the Boolean mod every
time you move the word, or it will be slow. Simply enable the mode
again once you're happy. You can optionally try
setting your Boolean mode to Union to have a relief.
Save once more. Now, select the backing
and apply all modes by clicking on the little arrow and select apply in the modifier. In Edit mode, you should now
see everything as One mesh. In object mode, you should be able to move it all together. By the way, you
can right click to cancel any action you're
currently doing in Blender.
7. Optional: Pre-Print Checks: Some quick checks after bowling. These are optional. They are helpful to make sure
your model prints fine. If you simply wanted to build
something and show it off, you can skip this lesson and go straight into making a cool
screenshot of your model. But if you want to
print, follow along. Tap to Edit mode, press A
to deselect everything. Go to select all by
trade, non manifold. If any edges between the
different objects highlight, there is a problem and you need to repeat the
bowling steps. If nothing gets
highlighted, nice. Let's now select all with A, hit M and merge by distance. Do not touch the slider value. The default is
fine to get rid of any double vertices that sit directly on
top of each other. For me, it removed 64 words. Then hit A once again to make
sure all is still selected. Then press Shift plus N.
This will recalculate the outside in case our previous adjustments cause
some faces to be flipped. There's also a helpful
three D print add on that does many of these
checks automatically. You can search for it
under Edit preferences, add on, and three D. Then you can find
it in the end menu.
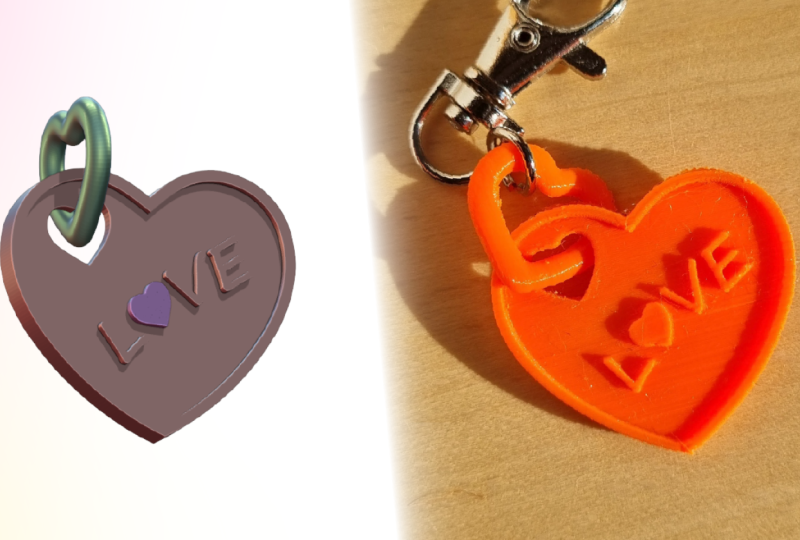
8. Your Project: Under viewport shading, you can choose some material mods, which are great for a quick screenshot to show
off your work. There are many variations. Choose the one you dig. Make sure to create
a screenshot of your model now and post
it in the project. I will reply to everyone. Now, for three D printing,
select the pendant. Go to File, Export SDL, choose a file location. Make sure to check selection only to not export
any other stuff, and you have your
printable file.
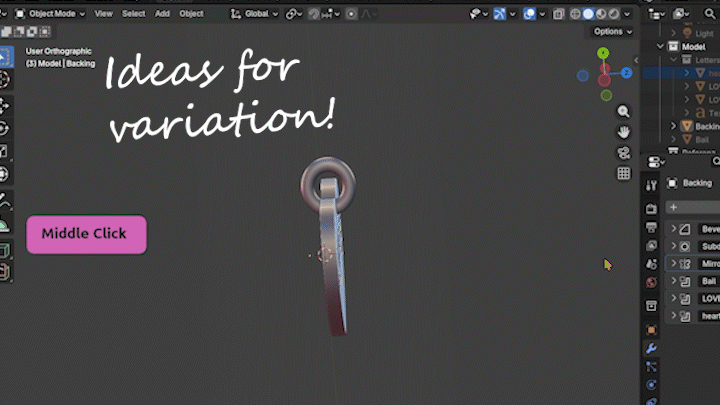
9. Bonus: Variation Ideas: Here are three quick ideas to further personalize
your pendant. This is just a high level tour, not full step by step. If you want me to make a
mini class on any of these, tell me which number
in the discussions. You could remove one of
the individual letters and replace it with
another shape. Quick outline, and died mode, I selected with L
and deleted the O. In object mode again,
I created a new plane. In edit mode, I
merged all vertices into one with M
and then extruded this vertice first into
an edge with E and then extruded this edge until
I had a simple hard shape. Then I extruded this whole shape along that to get a
three D hard shape. I gave it deceptive
mode and crease the edges around the
heart to keep them sharp. You can select edge loops like this by all
clicking on them. You can find the crease function in the end menu under item. Then I moved and scaled the heart until it sat
at the right spot. And added a boll mode to the backing to also
engrave the heart. Simple but effective. It
looks more special now. For creating an edge around
the circle in edit mode, I selected one of
the vertice loops, then hit X, and deleted the
big face in the center. With the edge loop
still selected, we can extrude more faces until we close off
the center with F. Then in face mode with three, I can all click on the
outer face loop and hit E for Extrude once more
to get the outer ridge. If I want to adjust the
thickness of this ridge, I can just scale
the inner two rows of vertices by excluding. Yet another variation
would be to give the backing another shape. Here, I deleted one
half of the circle, gave it a mirror modifier, and then shaped it into a heart. I used proportional editing. You can turn it on with O to
softly shape the vertices. If you want to shape
the Bale into a heart, you could also delete
one half of it. I like to use box select with B and transparency mode
to catch all of them. Add a mirror mode, turn on clipping to keep the
center from separating, and then we can dissolve
some of the edge loops with X and dissolve edge loops. We can also use
proportional editing with O to softly nudge the edge loops
where you want them and avoiding harsh
breaks in the shape. Adjust the influence
of proportional editing with the mouse wheel. You can slide
individual edge loops along the shape with G, G, so hitting G twice. Third, cutting out the
letters completely and also create a movable baale that
can be printed in one go. For this, you simply
need to scale the letters in that until they pug out at the
front and back. For any letters that have inside geometry like
an O, for example, you would need to first delete the inner
geometry and then create a flat face to cut it out completely from the backing and avoid having any floating parts. For the movable bale, I placed the bale on the side of the heart
and scaled it up a bit. Then I created a simple
cylinder object with Shift A to cut the hole
with a boolean modifier. Be careful that the bale and the pennant do not
overlap each other here. Note that the baale also does not need
bowling in this veryiand. Using supports during printing, the bale and backing can then be printed in one go.
How cool is that?
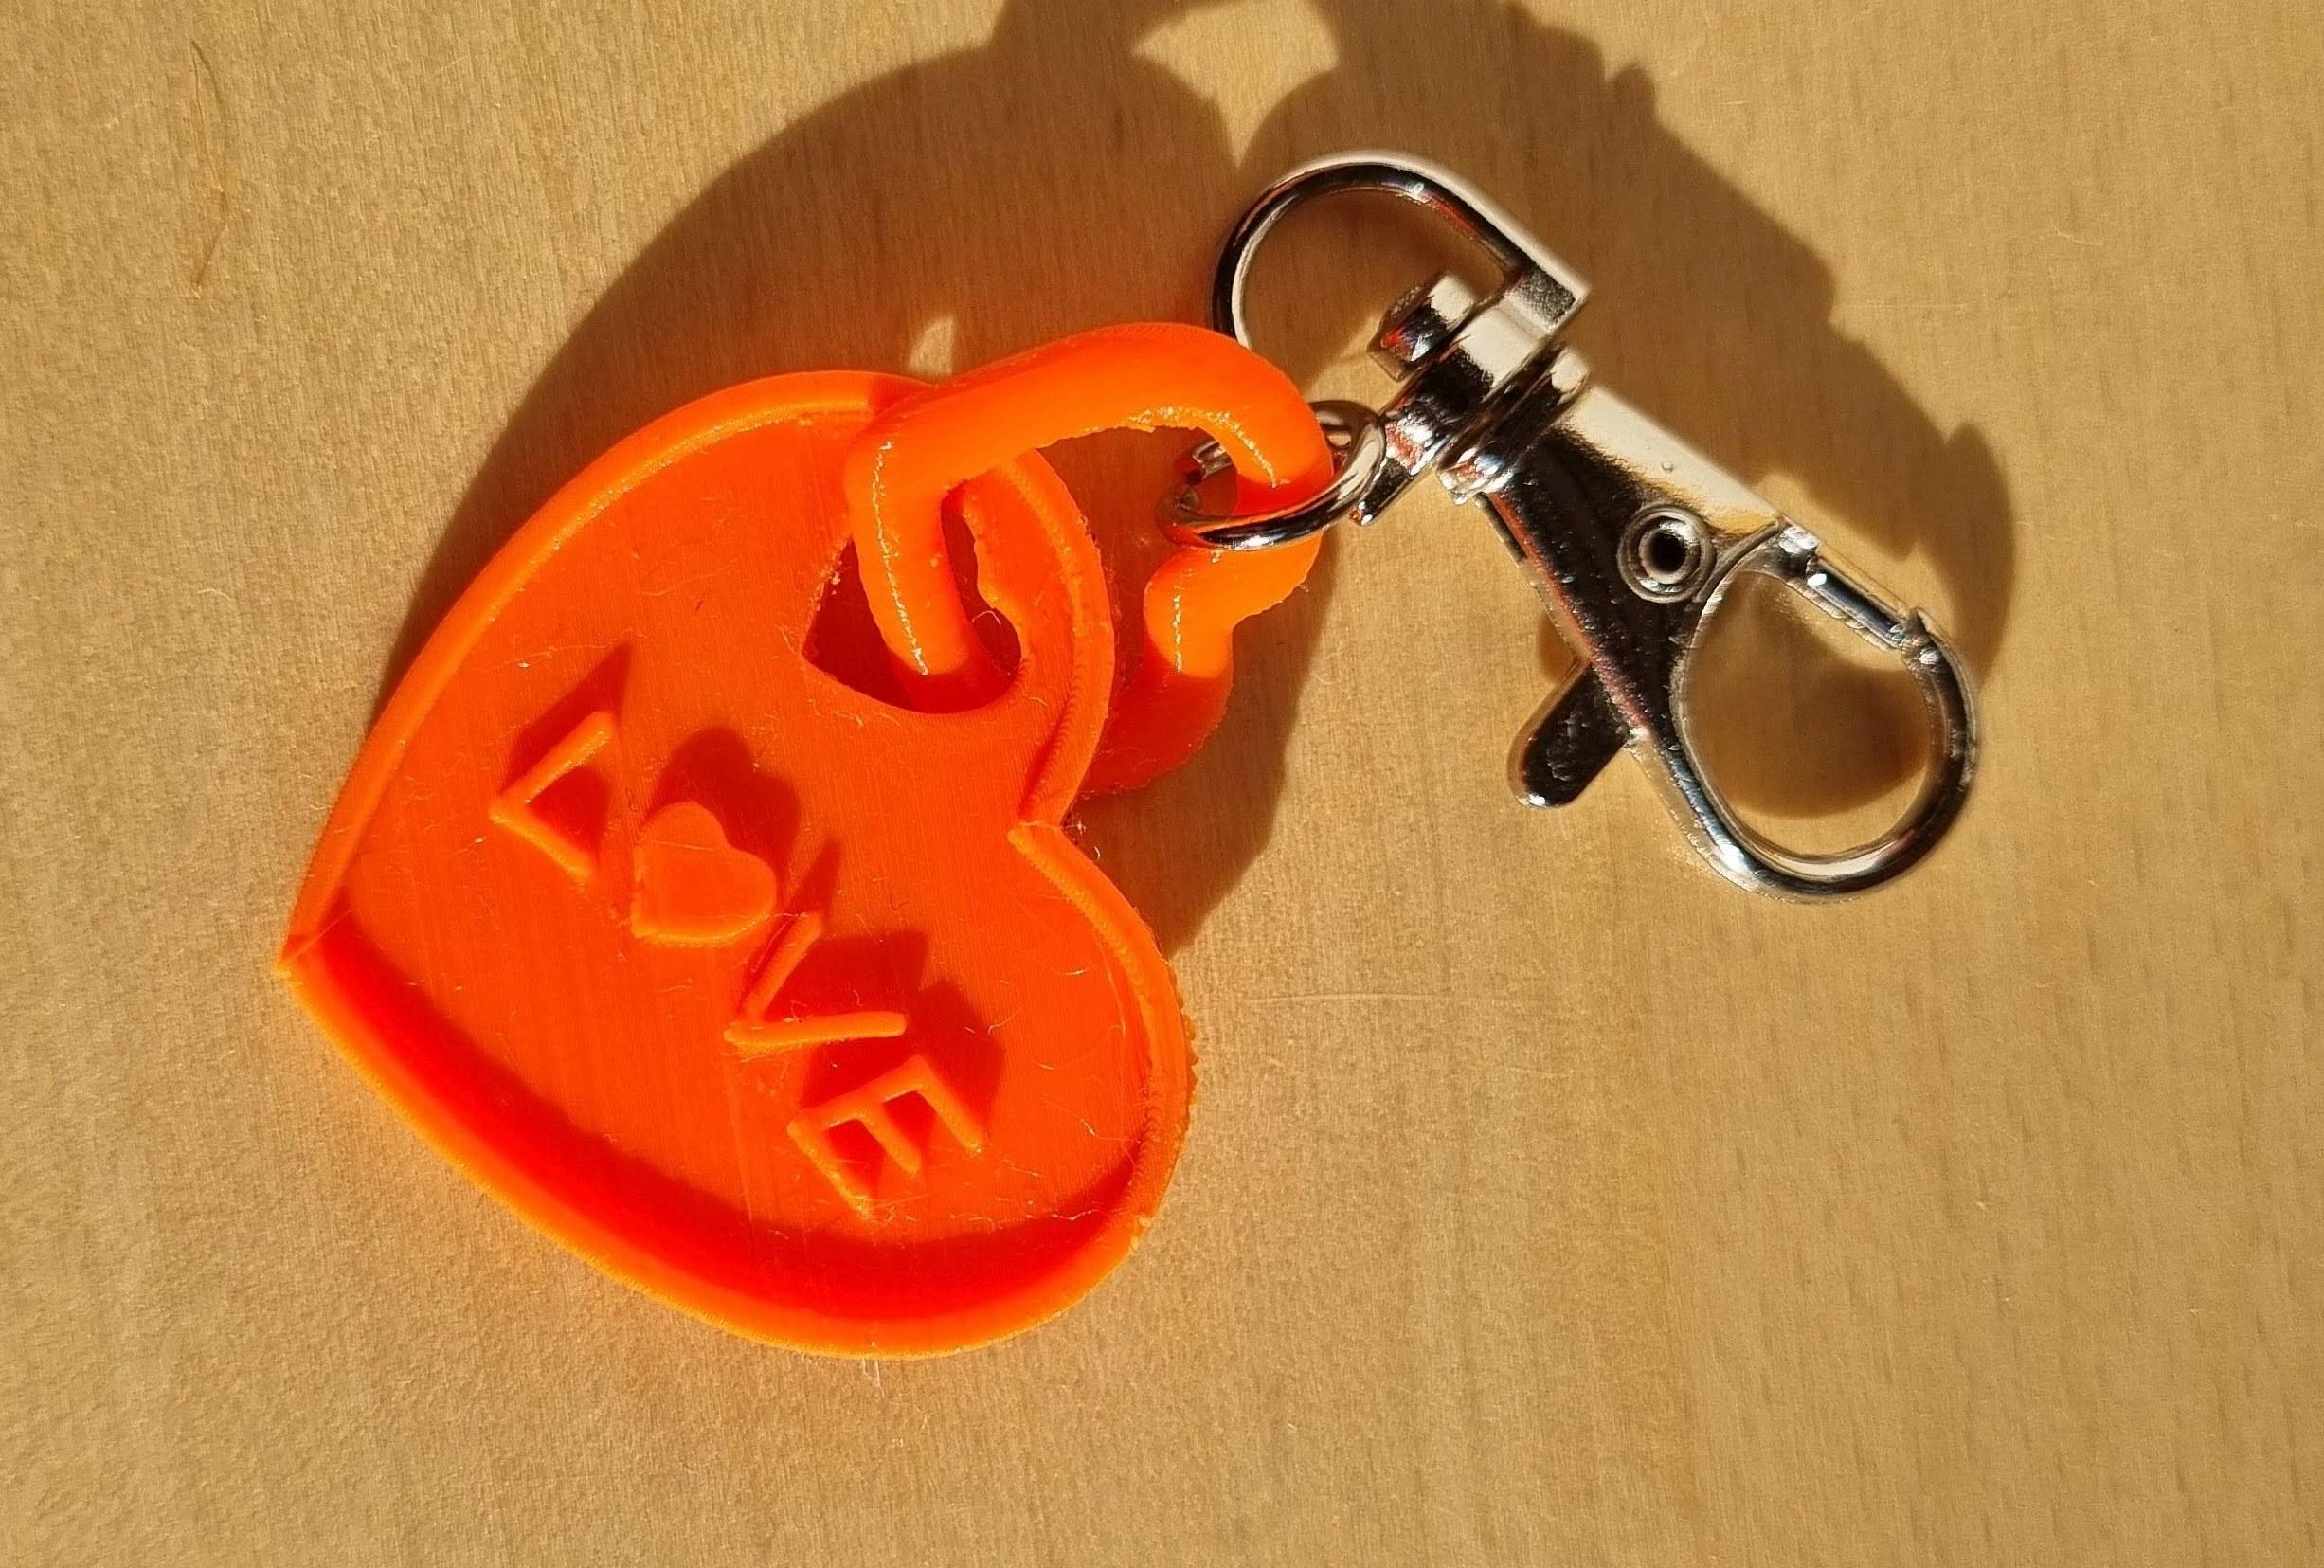
10. Outro: Congratulations. You now have a fully printable three D
model and personalized charm. Post your screenshot,
optionally, your printable STL, and tell us your word, your font, and your
thickness in millimetre. I reply to every project. Thanks so much for
taking the class. If you liked it, please leave me a review and follow
me on Skillshare. See you in the next one.
 Gesa Pickbrenner, 3D Jewelry Artist & Designer