Transcripts
1. 01. Introduction: Hi, I'm yeah. I'm a freelance 3D motion designer based in
the Meadowlands. I've been working as
a motion designer for nearly nine years. And today I'm going
to show you how to animate a looping
scene within Blender. The goal of this course is
to get you familiar and comfortable with the animation
tools within Blender. We will be exploring
different types of animation, and I will be sharing tips and tricks I've picked
up over the years. This course is geared towards beginner users who
are already a bit familiar with the
Blender interface and are getting into
their first animation. But also as an
intermediate user, you might pick up
a thing or two. At the end of this course, you should be able and confidence to tackle your
own animation projects. Would that being said,
let's get started.
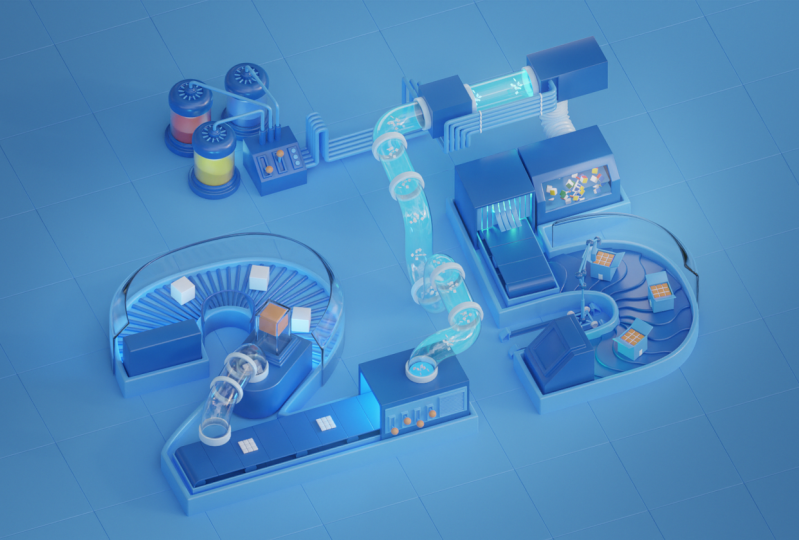
2. 02. Class Project: In this class, we
will be creating a 3D Looping Animation. These are very FUN to create an, a great way to explore all the animation
tools Blender has to all the different chapters I will be covering different
types of animation, ranging from transform based Animation through
modifier Based Animation, all the way up to
Constraint based animation to show you different ways of animating objects
within Blender. Using the techniques from
a different lessons, we will be animating
our objects, adding motion
variation between them to bring life and
character into our scene. Along the way, we
will be exploring the graph editor keyframe handles interpolation and
extrapolation and many markets. In the project section
of this class, you can upload any progress you make for your final animation. And make sure to
have a look around at what others have created. Thank you very much
for joining me in this class and coming on this
animation journey with me. Let's head on over
to the first lesson where we will be talking about keyframing and Looping Animation. I'll see you there.
3. 03. Keyframes & Looping: Before we dive into
our class project and start animating our scene, I briefly want to talk about animation keyframes and
looping for a second. As most of you are already
familiar with Blender, I assume you've placed a
keyframe here and there already. I want to quickly run
over how to keyframe and some useful tools just to make sure we're
all up to speed. By pressing I in the viewport, you will see this
drop-down from where you can select the property
you want to key. You can also hover
over any property and the interface and
press the I key there to insert keyframes. If you want to remove
your keyframes, you can hold the
Alt key and press U again to remove the
keyframes you displaced. Dislike our properties can be accessed in different places, so can our keyframes. You will most likely
recognize the timeline on the bottom of your screen
showing the keyframes, which are key-frames also
show up in the graph editor. And the dope sheet, for example. In each of these windows, we can manipulate the keyframes, so different tools and
for different purposes. I will go into more detail
on that in future lessons. The timeline has a few
useful animation tools, like the auto key function, which you can find next to
the play buttons over here. By turning this on, Blender
will automatically place keyframes whenever you make
a change to an object. For example, in a
simple cube animation, that's just moving up. If I change its
position halfway in, by moving it around the x-axis, we'll see that
blender automatically places a keyframe in the middle. And now my cube moves
left before going up. This is a very useful option, especially when animating more complex objects or
multiple properties. So you don't have to iframe
each property individually. But be careful with this option
because it's very easy to create a lot of keyframes
in a very short time. And your timeline
might get polluted with a lot of
unnecessary keyframes. Another great function
of the timeline is the ability to mark
your keyframes. Just want to change the
behavior of the keyframe. It's only a visual reminder
to what the keyframe does. If we select our keyframes
and press are at a timeline, you will see a drop-down
from where you can select a keyframe style. If you start getting
into animation, you will recognize
these terms like extreme breakdown
and moving hold. These refer to specific Bose's
in an animation sequence. For now, we will ignore
these and just use the marking as a visual
reference for our keyframes. For example, to mark
the start and end of our animation to quickly
identify the looping point. Now looping animation is
what you came here for. And so I want to
quickly brush over the principles of
looping in animation. When something is looping, it essentially means that
something is repeating itself over and over
again, like this. Q, moving from
point a to point B. Many people associate looping with the satisfying
seamless kind, but that does not
have to be the case necessarily. In our loop. However, we will go for a seamless transition
like this one. If I open up the
graph editor here by dragging out a
window and pressing Shift F6 center my viewport. I will press N to
hide the side panel. Who achieved that
seamless transition is in a score quite simple. The start and end keyframe
you need to be identical, as well as the incoming
and outgoing velocity. But more on that
once we get started. As you can see here,
my start point and end point are
exactly the same. And they've used markers
and my timeline to identify the start and end
point of my animation, as well as the highest
point at the halfway mark. I think we're all up to speed
on keyframes and looping. So without any further ado, let's get started animating RC
4. 04. Transform based Animation: Welcome back. Let's get
to work on our projects. You can find the lesson files in the project resources
section to follow along or to give your
own twist to my scene. But it would also
want to encourage you to create your own scene and to experiment for yourself
with the different types of animation we
will be exploring. I have set the frame range
of our scene to keyframes. So all animation
we create will be looping over 50 frames or less. Maybe we will look
something twice within the 50 frames. We will see. We will start by animating
this orange cube within this transparent box. And we will make it
jump up and down. Before placing any keyframes, you want to check
where the pivot point of the object is located. This is the point around
which Blender will apply any movement,
rotation, and scale. So in our case, we want the cube to squash
down at the bottom. So it makes sense to
move the pivot point or the bottom of the cube. I'm going to move into local
mode to have a better view of the objects without any other objects
around it in the scene, I can access local
mode by pressing the forward slash key
on my numpad there. Now you'll see that
only the cube remains. When I go into edit
mode by pressing tab, I can select the bottom
face using the number keys. I can switch between vertex, edge and face mode. So in phase mode, I will select the bottom edge and
pressing Shift and S, I will select cursor
to select it, which moves my 3D cursor to the bottom face and puts
it exactly in the center. And now go out of edit mode. And I right-click
and set my origin. Who the 3D cursor,
my pivot point has moved to the bottom. And now any scaling or moving we do will be applied
from the bottom of the cube. So let's get out
of local mode by pressing the forward slash
in our notepad again. First, let's determine
our start and end point. We want this to be a point
where we can seamlessly transition back to repeat the movement over
and over again. But all the way in
the bottom position seems like a good point for me. But you could also use the
top position if you'd like. I'm going to move my cube
using the G key on my keyboard and pressing the Z key to
constrain it to the z-axis, I will move it down
into position. And let's add in a
location keyframe by hovering over the location
and pressing the I key. And you'll see a keyframe
show up in our timeline. Let's move to the halfway point, which is 25 frames. And let's move our queue up
all the way to the top of the transparent box and insert
another location keyframe. Could also press in
the viewport and select a location from
your properties here. And I want to duplicate
my first keyframe. Pressing Shift D
and a timeline can move my keyframe all the
way to the end to frame 50. And if we now scrub
through our timeline, you'll see RQ
bounces up and down. And as our timeline is Looping, you will see that it's repeating itself seamlessly already. So we could call it a day. But at the moment is
animation is quite boring. So let's add some
life and character to our animation by adding
some squash and stretch. In the bottom. And at the top, I'm going to insert
a scale keyframe. At the bottom, at the top, and at the bottom, I'm going to insert a scale keyframe again. Now I want to adjust my
animation curves and the graph editor to add
some life to the movement, because as it is now the bounds of the cube
looks a bit weird. We're going to open up the
graph editor by dragging out a new window and
pressing Shift F6. Or you can also use the menu and select
the graph editor here. I'm pressing the N key
to close the side panel. And using my control and
holding my middle mouse, I can zoom in, move around. Now for now, I want to
hide my scale keyframes. So I'm toggling the
visibility switches. And I wanted to get rid of
my X and Y location channels because we are not using them. In this case, we're only moving the object along the z-axis. I'm selecting my X and shifts
selecting my Y location. And by pressing X, you will
delete these channels. Now let's have a look
at our current control middle mouse and
drag up to zoom in. The zooming in the graph
editor might feel a bit weird in the beginning it takes some
getting used to, alright, I wanted to start with adjusting the Z location curve to make
the bounce more bouncy, the contact point at
the bottom should not have an ease
towards the end. In the beginning,
like we can see here, when something is
falling in real life, it will not slow down
before hitting the surface. It would only speed up
until it hits a surface. To achieve this, we
first need to change our curve handle type are
actually in this case we don't because it's our first
and last keyframe that is good practice to use the correct handle type
to change your curves. So we select our two keyframes
by pressing the V key. You'll see this menu popup. From here we are selecting the
free keyframe handle type. This means that handle is
not constraint anymore. So moving the right side of
that animal doesn't change the left side of
the animal like it does in this point here. So from here we're
going to drag our curve up to create a steeper angle. Not all the way it is.
That's too extreme. Something like this. We will do the same on the other side. You can use the grid in
the background to align your handles and make sure it's a symmetrical as possible. Alright, as if you
are animation, you can see it's
bouncing more already Now we can maybe make the
top a little broader. So it jumps up faster and it floats in its opposition longer. I'm using the S key to scale. And you can keep your animation playing because that way you can immediately
see the change who you are making and
if it's working. I also want to make my
curve a bit steeper. Alright, I like
where this is going. Alright, now let's
add some more life to our animation by adding
some squash and stretch. What I'm going to do is move
over my location keyframes, one or two frames to make some room for the squashing
and stretching because we want to do happen on the
surface and we don't want to move the cube already as it's still squashing
and stretching. So using the G key, I can move my keyframe and
using that X and Y key, I can constraint it on an axis. In this case, I want to
constrain it on the x-axis. I wanted to move it
over two frames, and I'll do the same
on the last keyframe. Alright, Let's unhide
our skill channels. And we'll have to zoom out
a bit because they're one. And for my skill channels
in the beginning I find it easier to work
and the dope sheet. So by pressing Control tab, you can switch between the graph editor and the dope
sheet in the same window. Pressing that shows
you the dope sheet, closing the side panel
again, pressing the N key. In our drop-down, we
can see our keyframes. I'm going to duplicate
our skill keyframe and match it with the
location keyframe by pressing Shift D. And now I can change our squash and
stretch in the viewport. So pressing S and Z, squashing down the cube. And pressing S and Shift Z will constrain it on
the Y and X axis. Or it will exclude the
z-axis from your scaling. And we can make it a bit
broader to maintain its volume. And we have to
insert a keyframe. From now on we go and
turn on our auto key. Automatically place
our keyframes when we change something. So now we can see
your cube stretch up and then it moves
its final position. And we need Amira this
to other side of course. So and moody original keyframes. Duplicate these keyframes. If we now view our animation, you'll see it has some squash
and stretch. Very cool. Now we can exaggerate
this even further by just seeing our
second keyframe. Have the cube stretch
out that this point. So letting our timeline
to our keyframe, we will scale it
up on the z-axis, and we'll scale it
down on the X and Y-axis little bit to
maintain its volume. And as you can see,
Blender updated the keyframe automatically. Now our queue squashes down, stretches all the way out. And as it moves up, it returns
to its original shape. Then it moves down.
We can duplicate are stretched keyframes
less than mere. To also show that once it's falling, it's
stretches again. It hits the floor,
squashes down. And we loop our animation. There. We have it. Our animation
as a way more weight and character now and it's way
more pleasing to look at. Or you could change
the character of the animation by playing
around with the squash and stretch keyframes
and how much time you will allow the cube
to squash and stretch. So you can look at firmer by
moving to keyframes closer together and have it
not stretch as much. Or you can make it even
squishier by allowing more time for
discussion stretch. But that's all up to you. You could even add squash and stretch in the
top if you'd like. But I'll leave that up to, you know, you know
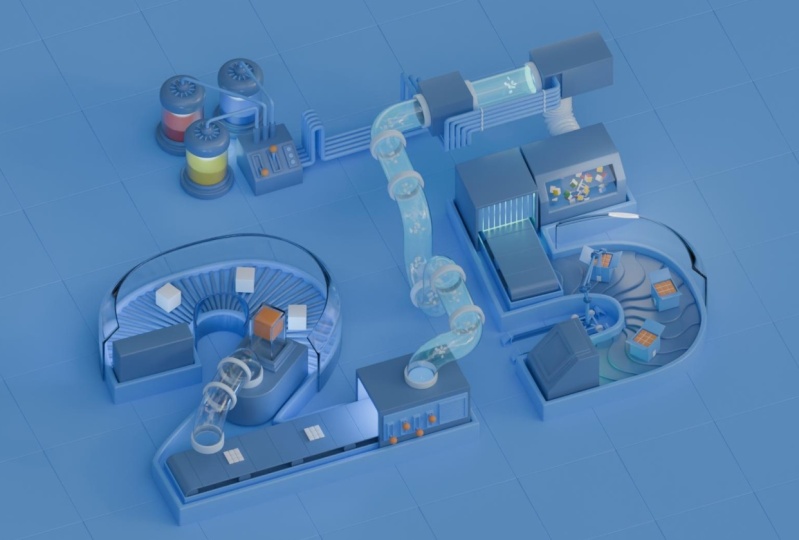
how it's done. Let's move on to the other side of the scene where I've prepared this little robot that will move a box from one conveyor
belt to the other. We're going to animate
this robot using location and rotation keyframes. But before we start,
we want to think about how the separate
objects will have to move in unison to say together as the robot to
make animation easier. In this case, we can
use empty objects as parents for their
robot objects. That way we can use the aunties and the robot
objects will follow. Well, let's have a look at want the robot to slide over these real tracks
on the bottom here. I want the top bar to be able to move up and down in this piston. And I want the top bar to be able to rotate
also around the piston. So I want to separate the sideways movement of the bottom and the
up and down and rotation movement of the top will use to empties
of already set my cursor to the origin point of the top part of
the piston here, using Shift S, I choose
cursor to select it. And now I can insert
an empty using Shift a and single arrow. Now it's quite big, so
I'll scale it down and I will rotate it along the
y-axis by typing in 90. I'll move the arrow up a
little bit around here. Good. And then I will
add another empty, which will be a sphere, which is also way too big. So I'm going to scale
that down as well. We're going to move
that up to around here At apparent anything
to anything, you will select the objects you want to parent, in my case, the bottom of the robot, and then select the objects
you want to parent to and press control V. Now
you can select objects. I want to do the
same for the top. So I'm selecting handle and all the objects associated
with the robots. Well, now I select the empty
and press Control V object. And if we now rotate
over up and down, that everything
follows along nicely. Now I also want to parent the top part to the bottom part. So I will bear and my
spherical empty the arrow. Pressing Control P,
that parent to object. Now, if we move to
see that the objects follow your forget to parents something you can
always add to your parent, like the bottom
part of the Busan, I forgot to parent all selected. I'll select my will
select my arrow. Let's Control P and
at burned to object. Now, everything moves
in unison. Very good. Before we continue animating, we want to lock
some properties of the empty switch will make
it way easier to animate. So in the item panel
here or the arrow, I'm going to log everything
except for it's X location. So using the locks here, I lock everything and
if I now use the G key, I can only move on
the x-axis even without constraining it to the x-axis by using
the shortcut. I'm going to do the
same for the top empty. I'm going to lock the
X and Y location. And the X and Y rotation, as well as all the
scale keyframes. Now, if I rotate, I can only rotate
around the z-axis. If I move, I can only
move up and down. Just like we did with our cube. We want to determine the start and ending point
of our animation. Keep in mind that
we only want to keyframe or two empty objects. So I'm adding in a keyframe
for the X location. By right-clicking
on the property, you can insert a single
keyframe for the empty. I'm inserting a
single keyframe for the Z location and
the Z rotation. Now I will already
open up my dope sheet, six photograph editor Control tab to change to the dope sheet. And by using the
little arrow here, I can change the dope sheet to only view the selected objects. Select the bottom empty. And now I can duplicate
my keyframes to frame 50. Now we only need to
determine the midway point. I've added these two
boxes as a reference. In a later lesson, I will
explain how we can make the robot pick up the box and put it down
on the other side. But for now we'll just
animate over the reference. We still have our
auto key turned on. So Blender will automatically
place keyframes. After we change any
of these properties, we need to rotate our
robot for a bit down. But over everyone to have more control over the
movement you are doing, you can hold the Shift key while rotating,
scaling or a movie. This will slow down
your movement. I think this is more
or less correct. The box widely, always we
can see NR dope sheet. We have some keyframes are good. If we now Blair animation, you'll see the robot move
in not such a robot like fashion that we want to
change our keyframe position and manipulate the curves
for a bit to make it more, more like an actual robot. Alright, let's open up our drop-downs and start
refining our animation. What we want to do is separate the movements we're seeing. So the rotation, movement into separate blocks so that our
robot first picks up the box, then it starts
moving and rotating, and then it sets down to box. But first things first,
we will start by adding a little plateau
to our Z location. I will move over a
couple of frames, and I will duplicate my
Z location keyframe. We'll move up the
top of the robots. Now as we still have
our auto key turned on, Blender will update the
keyframe automatically. Now I want to duplicate my Z location keyframe until a couple of frames
before the halfway point. So as you can see now, the arm moves up and
as it moves over, the height stays the same, which you can also see
by this orange bar. This indicates that the value between these two
keyframes does not change from their head moves
down to put down the box. So now let's separate
the rotation and the movement of the
bottom of the robot. Select our bottom
empty and duplicate the X location that it remains still for the first five frames
of our animation. Now we also need to do
this for the Z rotation And now as you can
see, we've separated the upwards movement
of the robot. So it now only moves up
in the first five frames. Then it moves over or the
Z location doesn't change. But this is where the
rotation happens. Now at this point where the
robot starts moving down, I want to have the rotation
already completed. Some duplicating this
halfway keyframe. I'm doing the same
for the bottom. Duplicate that as well. There from frame 20 to 25, The only thing that's
happening is the robot moving down and putting
now the baggage. You can see we've
now successfully separated the movement
of the robot. The next part I will
speed up because I'm going to mirror
all these keyframes to the other side.
Alright, We're back. If I now play the animation, you will see that our robot is picking up and putting
down the package. But at the moment the
point where the robot puts down the package is quite fast. What I'm going to do
is over them move. I'm already going to lower
edge for a little bit. Let's see, 20. To lower the robot a
little bit already. Don't forget to duplicate your keyframe to the other side. Alright, it looks a
bit better already. It will look better once we
actually pick up the boxes. But I will get to that
in the lesson where we are going to talk
about constraints. Now let's switch to
the graph editor by pressing Control tab. And let's see how we
can adjust our curves. I will start with my Z location. So I'll turn off the rotation
for now by selecting all keyframes using the achy and using the period
key on my numpad, I can frame my selection
digital model a little bit. Alright, so I want certain
parts of the animation to be linear and some parts of the
animation to have an ease. The parse I want to be linear. I'm going to change
the handle type from an automatic handle to a vector handle will
using the V key, I am changing my handle
type to a vector. It makes the keyframe handle points towards the
next keyframe handled. Well, if I now change this, you will see my vector stays pointing towards
to the next handle. If I also change this
handle to a vector, you will see I get
a linear line. I will do the same
on the other side. Vector, after
changing a handle to a vector will almost always
result in, in this bump. And to get rid of
that, we can change this handle type two and
align to handle type, which will align this handle to the animal on the other side. You can do that for
all handles that are connected to a vector handle. And I also want to scale up this middle part so that
when the robot moves down, it stays in the bottom position
just a little bit longer. Alright? I also want to scale
my first and last keyframe. Make sure your origin point
is set to individual centers so that you'll scale from the center of the
keyframe outwards. Right? Scale it up
just a little bit. Now let's have a
look at our rotation or an off our location. Let's select all using the achy and pressing
the period key again. Unless the room or some
unnecessary keyframes, like the one in the middle ear. I tried to always look
at my animation and see, and see what the speed of
the animation is doing. Is the easing Working?
Should it be more? Should it be less? In this
case, I think this works. So we'll leave it as is. I think the same goes for
our bottom keyframes. Select these, frame them. This is basically the same
curve as we just saw. So we'll leave this as well. Feel free to play around
with this yourself. Maybe you want to change
all handled types to be a vector to make the
movements more abrupt. But I'll leave that up to you
now you know how it's done. And I will see you in the
next lesson where we will be exploring modifier
Based Animation
5. 05. Modifier Based Animation: In this lesson, we're
going to see how we can use modifiers to help us animate our scene and
more complex ways than we can do with only
transform properties. Now there are 1 million
different ways you can use modifiers by themselves
or combined. I'm only going to
show you a few in this lesson that I
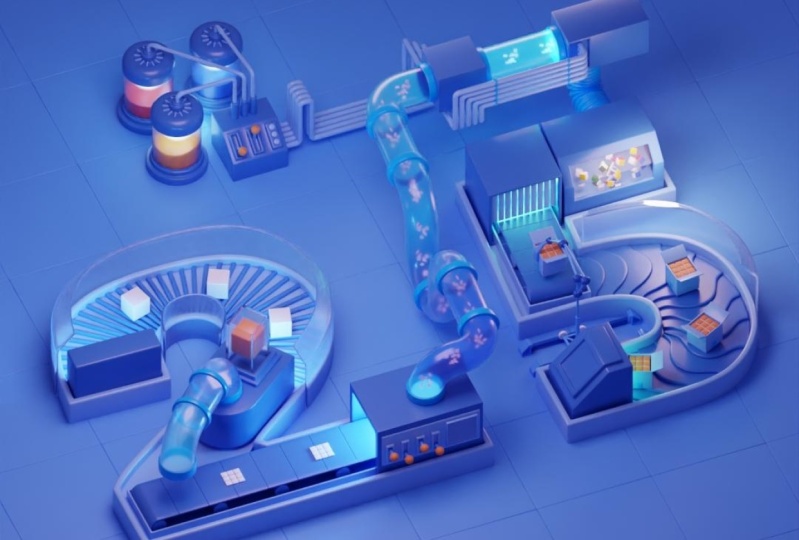
find very useful. Let's start with the conveyor belt in the foreground here, we will recreate the
Modifier setup and animate the belt moving the
pieces from left to right, I will get rid of
all the modifiers and start from scratch. Now as the name implies, a Modifier modifies the
object it's applied to. There are different
kinds of modifiers. Some are mainly
used for modeling like these generative modifiers, and some are mainly used for animation like these
deformed modifiers. We also have Modifier is
that modify our object data. And we have physics modifiers. We will ignore these for now because this is a
more advanced topic. Let's add our first modifiers
from the modifier panel. You can find by the
little wrench icon here. And as you can see, the base of our conveyor treads is
just a simple plane. Let's add our first modifier. We're going to use a
subdivision surface to give it a little more geometry
and we'll set it to simple. Next, I will add a
solidify modifier, which gives my tread
some thickness. And I wanted the extrusion
to happen the other way. So what I'm going to do
is go into edit mode, select all my faces. And then I will press Alt
N to show my normals menu. And I will flip my normals. This will make my solidify, extrude the other way. You could also make this
number a negative number. So it extrudes the other way. But I think it's good
practice to give your numbers a positive value. Next in line is
the bevel modifier to give some smoothness.
Who are objects? We're going to increase
the segments to four. And I will change my
amount to something smaller like 0.0, 025. Alright, let's get out of edit mode and we can
shade auto smoke. And there we have our thread. Very nice. Let's continue. We are going to add
an array modifier, which creates a duplicate
copies of our tread. Now we can increase
the amount of copies to make our
trade a bit longer. Very nice. This is the
basic setup for our tread. Not the only thing left to
do is to tell blender that we want to wrap this tread
around the base here. For this, we need to tell the conveyor what shape
it should conform to. And to do that, we
are going to use a curve and a curve modifier, but let's select our treads. And from the default
menu at a curve, you'll see this icon turn red, which means that the modifier
needs additional input. In this case, we need to
assign a curved object. Now I already have a
curve in my scene, but I'll show you how
to create this as hided For now from
icon various supports. I'm going to extract the curve we are going to
use for the belt. So let's go into edit mode. Let's turn off our
array for now. I'm going to insert an edge
loop using the control arche. You've probably
done this before. I can confirm using
my left mouse button and then I can confirm in
place or right-clicking. Now our loop is still selected and I want
to press Shift D to duplicate and right-click
again to duplicate in place. Now I can separate
this loop or pressing P and selecting selection. So this separates the selection. Now as you can see when
separating the object, it also duplicated the array
data on the edge ring. I'm going out of
object mode back into edit mode by pressing Tab. Now I'll select my
separated edges and I'll delete
the array modifier to make this a bit easier, I'm going into local mode. So with my entering selected, I will select the
various supports and breast the forward
slash on my numpad. So we can see what
we are working with. Alright, let's
select are entering, go into edit mode, and go into Vertex
Selection mode by pressing one and selecting
all our vertices. I want to duplicate
these and move them to the last on
various support. So pressing Shift D,
constraining it on the X, I will move it over holding
shifts. So more control. And now we need to connect
these two circles. So what I'm going to do in side view and in wireframe mode. So I can see clearly
what I'm doing. I'm going to delete the inner vertices by pressing X and selecting
delete vertices. To do the same. On
the other side. Make sure you've got
all the inner vertices, but not the top ones. Delete vertices, and I'm
selecting the top vertices on the left side and the dope
vertices on the right side. And by pressing F, I can
now connect these points. I will do the same on the bottom Alright, let's move
back into solid view. You can also press Shift Z on your keyboard to toggle
between these modes. And as you can see,
we now have an edge running along the supports. I'm going to add in
some more points to match the density
of the curve. You can press Control
R to insert a point, and you can scroll on your
mouse wheel to add points. Or you can type in a number. I'm going to add 100 points and I'll do
the same on the top side. Control are typing in 100 on my numpad and pressing
Enter to confirm. Now the only thing left to do is convert this mesh to a curve, which we can do
by right-clicking and selecting Convert to. Alright, now we have
a curve to work with. Let's get back out
of local mode by pressing the forward
slash on are known bad. And before selecting our
curve in our curve modifier, we need to do one more thing. And that is to match
the origin point of the curve to the origin point
of their conveyor traits. As Blender uses the origin point to deform your transform. These we need to
match exactly I. Otherwise this results
in weird behavior. So if you're ever trying
to apply a groove Modifier to an object and you get
weird results below, check your pivot points. So I will select my dreads, Shift S cursor to select it. Then I will select my curve
right-click Set Origin, origin to 3D cursor. If we now go into our tread and select our curve object
using the eyedropper. We will see that our thread
applies to the curve. Now we need to
adjust the amount of copies in our array
modifier for a bit. Want to add some more until
this matches, more or less. Now we need to fix some
intersections of the tread. Now as you can see, our
tread aligns with its bottom to the curve and I want is
to be the other way around. So we need to rotate
my base object 180 degrees towards the top. So we're clarity, I will turn off the
array and the curve. What I'm going to do is rotate
my object around this way. And by typing in 180 on
my numpad, I'm sorting. It's not going to be wonky. Now let's turn our array
in our group back on. And we can see that
we've successfully created our conveyor
belt. Very nice. Now we need to do some final adjustments because
as you can see, our belt is intersecting
with itself. And to fix that, we can scale
our tread objects slightly. So pressing the S key
and holding Shift, I'm scaling down
just a little bit. And I'm looking at the
other tread here to match the distance between this
tread and the next one. Alright, I think
this looks good. Now we're all go to animate. If we now move our objects along this x-axis to match
the deformation axes, you will see that the
tread starts running. So let's add in some keyframes. Let's insert a keyframe
for our pixel location. Insert single keyframe
by right-clicking. Let's move to the end
of our frame range. And I want to move over and say three or four
threads, one to four. And let's insert
another keyframe. Now we might want to
adjust this later as it's going too
fast or too slow. If we now play our animation, you'll see that we
need to do some work on our animation curves. Because at the
moment it's easing at the start and at the end. Now we want this to be
continuous movement. Alright, so let's open
up our graph editor. Those the side panel. And now what we could do is set our handles to vector again. What we also can do is to change the interpolation over
the whole curve at once. So by selecting
our keyframes and pressing the T key
on our keyboard, we open up the
interpolation menu from where we can
set our curve to linear and then
Blender interpolates between archaea frames
in a linear way. If you play our animation again, we'll see our conveyor belt
Looping almost seamlessly. But we need to do some more work because in this
instance we cannot use the same keyframe for our
start and end keyframe. To make this loop seamlessly, I like to use a bit of visual reference
and align it by I. So let's dope or animation, and let's move to
our first frame. Now I'm inserting plane
is just for reference. And I'm rotating it on
the y-axis by 90 degrees. And I will move it
over to exactly match the scene between
the treads here. I'll move it over on the x-axis. Alright? Now move over
our timeline to frame. Now we want to move our tread in its final position just enough so that the seam lines up
with the reference plane. Again. Let's update
our keyframe. Replace a single keyframe, and now we can delete
the plane again We now play our animation. There will be no jumps editor. It seems as if it's
running seamlessly. Alright, the last
thing to do now is to parent our objects to
our conveyor belt. So Shift selecting
are going variables, pressing Control P to set
our parent to the object. I want to add in an
array on our object to have more of these pieces
lying on the conveyor. And I'll increase the distance. Make another copy. And if we play our animation now you'll
see that we have a problem. Because our conveyor
belt moves forward, but our pieces don't follow, they move in the
opposite direction. This problem is
probably caused by the direction of the
curve we're using. So let's find our curve. Here. We will go into edit mode, select all the points
and under segments, we will switch the direction. Now, if we check our
animation again, we'll see that now
balls are objects and our treads move backwards,
but that's a good thing. Now we need to make
some revisions to have our trends of
work correctly again. So for now we will unapparent our objects by pressing Alt MP, clearing the parent,
selecting our tread, we need to rotate it again
because as we can see now, the treads are switched to
the bottom of the curve. So rotating on our
x-axis by 180 degrees, or in our properties and we know we can set the
X rotation to zero. Now we can see are two
adders moving backwards. We want to do now is we
reverse our keyframes. So in our graph
editor selects are keyframes scale on the
y-axis by minus one. And we can type that in on
our numpad are keyframes switch around and if we play our animation, it moves forward. Now if we Barend our objects
through our conveyor, shift select, Control P object, everything should more fine. It does cool. We need to do some
more work to make our objects a line on
the conveyor belt. Because at the moment when we are a looping our animation, we can see a jump
in the start and ending point of the objects. But what I'm going to do
first is decrease the amount. I'm going to place one less and will increase the distance. And I think we need to change our thread animation because it's going a bit too fast now. We can double-check that by adding in your reference plane. So at the end of our animation, I'm going to place
a reference plane. I'm scaling this
down and I will move this close as I can, frame my selection by pressing the period key on the numpad. And I will align this
with the back of our objects so that it's
protruding just a little bit. Now I moved back to
the starting frame. And as you can see, the
last object is way off. Now I could increase
the distance here. Have it match more or less. If we will now loop,
this would work. But I do believe that our object is protruding through
the box at the end here, which we did not want. It might be able to
get away with this if we keyframe the visibility, but I don't really like that. So what we're going to do is to slow down our conveyor
belt animation. Let's move to the end. Let's add in our
reference plane again. Let's move it on the crease
between the threads. Now I can select my last
keyframe in my graph editor, pressing the G key and
constraining it on the y-axis. I'm going to move
this down until the curious aligns with
the reference again. Alright, This looks good. Let's delete our reference. Now let's view our
animation. Cool. Our animation is a
looping seamlessly. Let's move on to
these paint canisters and the back of the scene here, I'm going to close
my graph editor to give myself some more room. And I want to quickly adjust the viewport display
of my material. In the materials tab, I'm selecting the viewport
color and I am dragging down the Alpha so that we
can see that there's actual inside of
these canisters. And what I wanted
to do is make this seem like the paint
inside is moving. And we can do that by displacing
the top of the paint. And to do that, we are going to use the displacement modifier. This Modifier, let's you displace a surface
based on a texture. So let's add a modifier
from the Modifier drop-down and under are deformed
tab select our displays. They will see that our
object gets displaced. But it's not really the
result we're looking for. At the moment. We do not
have a texture specified. So click the New button to add a new texture and the women can press the far right button
to show the texture tab. Or you can press
the texture icon on the bottom of
our side panel here And because our texture
is black at the moment, the displacement is showing
some weird results. I want to select a texture
from the drop-down here. There's a variety of textures. They all give different results. I usually choose the Musgrave
or the clouds texture. So let's use the Cloud for now. And let's increase
the scale for a bit so you get a bit of
a smoother surface. Alright? I like this. Now we need to make
some changes in our modifier settings before we move on and continue
tweaking our texture. Because at the moment
the whole object is being displaced,
which we do not want. We only want to displace
the top of the object. So to achieve that, we
can use a vertex group, which basically means
we select a group of vertices which we tell
blender to displace, and the other vertices
will remain untouched. We can add a vertex group
in the object data panel, which you can find on
at this triangle icon. And then I know vertex groups. We will click the plus
icon to add a group. Let's call it displacement. Now I will quickly go
into local mode to have some more room and a
better view of my object. If I go into edit mode, I can select the top
of my object. Alright? And I can click Assign here. So now these objects are
assigned to my vertex group. Let's get out of edit mode and back into
our Modifier panel. And at the bottom of
our Modifier weekend, select our displacement
group from the drop-down. And as you can see now, only the top faces
will get displaced. And to prevent any sideways
displacement of our edge, we can set the direction to our z-axis instead
of the normal. Now, our object only gets
displaced on the z-axis, and this is the result
we're looking for. Let's get out of local
mode by pressing the forward slash key
on are known bad. There we go. Let's adjust our
texture for a little bit. Because I want to make
this a bit bigger to have a bit of a
smoother surface. Alright? Now it's
time to animate our displacement to add
some life to the paint. And we are going to do that by using another object Shift, right-clicking to
place my 3D cursor somewhere near the
paint canister. And in the Add menu, I'm adding in an empty. Let's move it up and let's scale it down a little bit in
the empty Properties panel. Cool. Now let's select
our displacement object. And under our coordinates, I don't want to use
the local coordinates, but I wanted to use the
coordinates of another object, which I can then pick
using the eyedropper tool. I'm going to select my empty. Now you'll see that
our displacement changes because it's no longer uses the coordinates
of our local object. So we need to decrease
the scale of our empty. You'll see that the
coordinates of the empty now drive the texture that's
used for the displacement. So let's see more or
less around here. Let's increase our
size a little. And now we face our next
problem because we are using a procedurally generated
texture for our displacement. This means that
it's not repeating. So you can see that we're
animating our paint, which is perfect, but we cannot find a
clear looping point. Now there is a trick
to get around this, and I will show you that in the next lesson because
that involves a Constraint. Before we move on, I
wanted to show you one last modifier we're
going to animate. I want to show the
paint flowing through these pipes into
this machine here. For that we are going to distort the pipe and
give it some kind of bulge as if there's too much paint in the
pipe moving through. Who achieved that? We could
use a displacement modifier. But I want to show
you another trick. This can be done
using a lattice. It's basically a cage
that you can modify and your object will deform
within that cage. Let's add our Modifier under are deformed tab
choose our lattice. And you'll see just like
the curve modifier, our icon turns red, which means there's
an object missing. Now I cannot put in
a mesh or a curve here and need to add in a
separate lattice object. So Shift-click to place
my cursor near the pipe. And I will add a lattice
now to way too big. So I'm going to scale this
down and I will align it with the pipe by rotating and
moving it into position. Make it a bit smaller. Right? When Donald a little
bit. This looks good. So now in our lattice menu, I wanted to increase
the resolution and give this another edge
in all dimensions. And if we now go to our
pipes and Modifier panel and click the drop-down we will see are allowed us to show up. We can select it and
nothing happens. That is because we
now need to add it our ladders to tell the
pipe how to deform. So we can go into edit mode. And we can select the middle
points of our lattice. We can scale these out. And now you will
see a bulge form. Alright? Now I want to increase the
resolution of the pipe because it's quite
blocky at the moment. So I'm going to add in a subdivision surface and this smooths out the Pi very nicely. Now I want to move the
lattice around the pipe. Let's go to our first keyframe. We will move our lattice
using the G shortcut to move and then pressing Shift Z to exclude my Z
location and from my movement. Here, I'm going to
insert a keyframe. I'm moving towards the
end of my frame range. And I'm moving to the
other side of the pipe. Cool. Let's insert
another location keyframe by pressing the I key in the viewport and
choosing a location. And if we now play
our animation, we will see the bulge
running through the pipe. Now there are some more work needed to make their seamless. So let's do that. Let's
select our lattice. And in our timeline we can press the T key as well to pull
up our interpolation menu. And let's editor
linear to give it the same speed for
the whole Animation. Alright. Now we can see
the jump quite clearly. What I want to do to get
rid of that is to keyframe the strength of the lattice
on the pipe that frame one. I want to set the
strength to zero. And I can press this little dot behind this slider to insert a keyframe that I'm going
to move over ten frames. And I'm going to set the
strength all the way up to one. That's answered keyframe by
pressing the little square. Now let's move
over to 40 frames. Let's insert another keyframe. You can see the orange bar
popup and the timeline, which means that the value hasn't changed for
these 30 frames. And at frame 50, I want
to slide my slider back down to zero and
insert another keyframe. If we now view our animation, we can see the strength
animating in and out, which makes our Loop seamless as if the paint is
flowing continuously. Now if you want, you can change the curve behavior
of the lattice. Maybe you want to
add in an ease at the end or at the start. I will leave that up to
you to play around with. I'll see you in the next
lesson where we will be working with constraints
to animate our scene. And I will show you how to loop our displacement Animation
6. 06. Constraint Based Animation: Welcome back. Let's continue our Looping Animation journey. We're going to tackle
the first conveyor in the chain as well now, because this one does
not have moving threats, we cannot parent our packages, so we will have to make
them move in another way. To do that, we're going
to work with constraints. Constraints offer us a way to control an object's
properties by using static values or another object to move our cubes
along the conveyor, we're going to use a
follow path constraint. For that we will need a curve. So let's create that first. I am moving my 3D cursor to
the cube here by pressing Shift S and dragging down to set my cursor
to the selection. Then I'm adding in a Bezier curve and in
edit mode and dope, you will make the curve
follow the conveyor. First, I'll set my starting
and ending points. And by selecting both
keyframes and right-clicking, I can choose a sub-divide
to add in another point, which will make it easier for the curve to follow the
shape of the conveyor. I like where this is add
a marker of properties. I want to change my resolution
because as you can see, it's quite pointy here. And I wanted a smooth curve. So I will increase
my resolution to 32. Now you will see this
smooths out the curve. Now let's select
our cube and add our constraint in
the side panel. I'm going to click
this small Gears icon to go to my Constraints tab. And from the
constraints drop-down, I'm going to select follow path. Now this lets me choose
a target which I want to be the curve we just created. And now my cube shoots
out of the frame. Let's all the way back here. To align this, I'm going
to turn on my snipping. I'm setting this to vertex
or points on a curve. And I'll turn on the magnet. I'm going to move into local
view to make this easier because there's a lot of
points around my curve, will shift select my curve. Let's go into local mode. Now I will select my
cube and if I move close to the curve,
you'll see it snap. Now at the moment it
snaps to a corner. So we need to adjust
some settings. We want to snap with the
center. Try that again. So now our cube aligns with the origin to the
endpoint of our curve. Let's get out of local mode. And let's check
the positioning of our cube on the conveyor. I think it sits quite nice. Can be a little bit lower. Now as we have set our
follow bath constraint, we can move the bath up
and down to move the cube. Let's turn off our
snapping first. Is it snapping onto all
the points in the area? Now, let's move it down a little bit to align it with a conveyor. Cool. Now there are multiple ways to animate your cube
along this path. And I will show you 21 is
the actual correct way to use the tools within Blender to animate an object along a path. And the other one is a bit of a shortcut I
like to take when animating multiple objects along the same curve in a
looping animation. Now the correct way
to animate this would be to add our constraint
to our object. And in our curve properties, we scroll down to
path animation, where we will set the frame
range of our animation. In our case, there could be 50. Now that we had back
to our constraint. And we click the animate bath. Now Blender will
create a relationship between the follow bad
constraint and the curve. And it will keyframe the
evaluation time using a script. So if we scrub our timeline, you will now see RQ move along the curve over a
duration of keyframes, which will work fine
for most animations. In our case, I want multiple copies of the
cube along the same bath. And I don't want to
switch around between my cubes and my
curve properties. I want each cube to
have to keyframes, which I can control more easily. So the way I like to animate
my cubes along a curve is by using the offset
factor in the constraint. I am going to clear my keyframes
on the evaluation time, which gets rid of the
animation on the cube. I'm going back to frame one. Now within the
constraint, I'm going to set my cube to a fixed position, which changes the
offset vector from a number to a slider 0-1. And I'm going to check
the follow curve option, and this will make the object follow the heading of the curve. Now I can control the
location of my cube along the curve by Keyframing
the offset vector. So what I want to do is insert
a keyframe on frame one. And on frame 50, I want to
move my offset vector to a value of 0.25 and
insert another keyframe. I'm going to copy
my cube Shift D and right-clicking to
duplicate in place. Now Blender also copied our
keyframes, which is good. And I'm going to open up my graph editor to
offset these keyframes. Drag out a new window, Shift F6. Those are my side panel. And I want to make
this a linear curve. So I'll press T to set my keyframe
interpolation to linear. I'm going to select
all my keyframes I'm pressing the G key, I'm
going to move them along the y-axis by a value of 0.25, which will offset the animation. So where the first cube ends is the exact location where our second cube will
start its animation. That's also set
the interpolation of our first cube to linear. And if we check out
our animation now, you will see these
loop perfectly. Let's repeat that
two more times. So I will shifted
D the second cube. Right-click to confirm in place, select all my keyframes and
move them up to five units. Do that one more time. Well, if you now check
out our camera view, I'll deselect the cube. They are always cubes
running through. Are there? Very cool. Now you
could of course animate this in the same way
using the path animation, you would have to set your
frames to 200 instead of 50 because we have four cubes
moving along our curve. And if we would track the first cube all
the way to the end, it would take four times as long as our frame range,
so 200 frames. And then in the offset
factor of the Constraint, he would offset
that by 50 frames. Each. Both ways work fine. I like doing it this way
because this gives me a bit more of a visual reference when working with these objects, which are free to choose
the method you like best. Now that we know
how to work with the follow path constraint,
we can animate our pain. Displacement by running are
driving empty over a circle. It moves the paint,
but it will circle around to create
a seamless loop. I will speed up the
process a little bit because these are
exactly the same steps we just did to animate our cubes moving
along our conveyor. Depending on the
size of the circle, you can make the paint
move faster or slower. If I decrease the skill, you will see that the
animation slows down. And if I increase the scale, you'll see that the
speed increases. So it's all about finding a sweet spot that works for you. You get layer this
effect by selecting the empty and adding in
some scaling keyframes. They'll set a keyframe
in the scale at this door to end, at the end. And in the center, I will maybe scale up our
paint just a little bit. An insert, a keyframe. Now not only those
the Bay moved, but the texture also increases and decreases
in a school a little bit, Just to add a little bit of variation in-between
the movement. Now let's work on
the robot picking up the package and dropping it down on the other conveyor belt. What I wanted to do is
to have the package come out of this first machine
or the first column there. And then the robot
picks it up and said, Sit down on the second conveyor. Before we start adding
our constraints though, I wanted to make some
changes to the robot. First, I wanted to add
some rotation to the claw because at the moment as the robots sets
down the package, the clause blocking
the direction of our animation along
the conveyor here. So as the robot moves
over the package, I want to make the clause
rotate by 90 degrees. Let's do that real quick. I'm heading over to five frames. I'm inserting a rotation
keyframe that over to 20 frames. And I will make
our clause rotate by 90 degrees on the z-axis. Let's insert another keyframe. Now we want to duplicate our
keyframes over to frame 30, because that is the point
a robot starts moving over again and then add frame 45. I want to duplicate
the initial keyframe to make it rotate back and
receive another package. Now as it moves
over and rotates, puts down, it's up, MOs back. Cool. Now the next thing I
want to do is actually change the timing of our
robot because I want to have it start and end
on the second conveyor. Now what we could do is change
around all our keyframes, that there is another
way to change the timing of your
Looping Animation, which is way more efficient. To do that, we want to select all the objects we
animated for the robot. So that means R2 empties and the claw because we just
added some rotation to that. Now we want to open
up our graph editor. So I'm dragging out a new window Shift F6 clause, the side panel. And we want to make sure that all our channels
are visible. So I'm going to view
my Z location here. And then pressing the a key, I'm selecting all my keyframes. Now I'm going to press Shift E to show the extrapolation menu. And by using these options, we can tell Blender
how to extrapolate our curve or how to continue our animation curves
after the last time, before the first keyframe. So I want to select make
cyclic using an F Modifier. What that will do,
as you can see, is it will repeat our curves in both the positive and
the negative direction. Now there are some
things we need to check because as I can see, my timing starts getting off. As Blender users, the first and the last keyframe as
it's mirroring point, what we need to do
first is make sure that our keyframes all align
with the frame range And I'm going over
all the keyframe channels to make sure that our first keyframe is at frame one and our last
keyframe is at frame 50. So let's start with our
claw animation will select the claw object and we can see it in our
timeline already. Our first frame is at frame five and our last
frame is at frame 45. So we need to duplicate our first keyframe
and set it to one, and duplicate our last
keyframe and set that to 50. Cool. Now let's move on
to our movement. Or I can see I've
already added a keyframe at frame 50 and a duplicate
keyframe at frame one. So this one is all correct. Let's quickly check our
Z location and rotation. The location as a
keyframe at 150. And our rotation also does. So now we're in a
good place to add. Our Modifier is again, select all our objects. Make sure all our
channels are visible. Select all keyframes. By pressing the a key
and pressing Shift E, we can add our
cyclic F modifier. If you want to see
these modifiers, you can press the
N key to open up our side panel and click
the modifiers panel. And as you can see, all of our channels now
have the cycle Modifier. Now what this allows us to do, I'm going to close
my side panel. If we select all our
keyframes and press the G key to move them and
move them on the x-axis, we will actually
offset our animation. So this way we can easily
read time our animation. So I'm going to
move to frame one. I'm going to move my animation curves and using the graph editor
and also the timeline, I'm going to retire my
animation to make sure that the arm starts halfway
its original animation. Let's play it real quick to
double-check our Looping. Yes, that's working.
Perfect. So now we're good to go on
our constraints. Let's close our graph
editor for now. Now what we want
to do is to parent our box to both our
conveyer and to our robot. But it has to switch
its parent relationship at the moment that the
robot picks up the package. And we cannot do this with the built-in parenting
function within Blender. But there is a very
useful constraint for this exactly operation which is very suitably named
the child off constraint. So we are going to make
this package a child of the conveyor of the robot. So let's add the
constraint by opening up our constraints tab and
selecting the child of. Now I am going to
select the target for our child to
be the conveyor. And I'm going to set the inverse to mark the parenting position
of the package. Now, I can add in some
keyframes to the conveyor. Because if I move the conveyor around to see
that the box is parented, Let's add in some keyframes. I'm going to have it
start at frame one. And I want the package to be hidden inside of this machine. Let's insert our keyframes
for our location. Let's scrub forward. And at the moment
the robot reaches its final position before
it starts moving down, I'm going to make
the object appear. And let's insert it keyframe. I'm going to add in a second
child off constraint. Move forward to the point
where the robot reaches its bottom position,
which is here. And I'm going to set the
target to our robot claw. And I'm going to set the
inverse to mark the position. If I non-continuous
scrubbing through, you will see that
our robot picks up the package and puts it
down, which looks perfect. But if we move backwards now, you will see that the
package has an influence of both the robot and
the conveyor belt. We actually want to
switch between those. So to achieve that,
we need to keyframe the influence of our
child off constraints. But let's do that. At
the very beginning. We only want the
first child of I will rename this quickly conveyor. And the second child is a robot. At the beginning
of our animation, I do not want the robot
to influence our package. So I'm going to drag down
the influence and you'll see the package returned to its original position
on the conveyor. I'm going to insert
a keyframe by hovering over the influence
and pressing the I key. And I will move
forward to frame 25, where I will insert
another keyframe. Now I can see in
the timeline might influence stays at zero over the whole period that
our packages on the conveyor. And at frame 26, I wanted to have the child off
constraint for the robot influence our package again
so that it gets picked up. Now as our conveyor
is not moving after the robot has
picked up the package, we do not actually
have to keyframe the influence of the
first-child off constraint Now we want to make the
package continue its journey along the conveyor
from this point, which is the endpoint
of our frame range. So that would mean that
the animation along this conveyor starts
at the first keyframe. Which is very convenient because
we can use a new package and we won't have to deal with all the constraints that are
already on this package. But what I'm going
to do is to delete the reference package and to use a duplicate version of our constraint package to
create a new base from. So I will shift D to duplicate and right-click
to confirm in place. Now we can apply our constraints by hovering over
the constraint we want to apply and pressing
Control a or in the drop-down, we can select Apply. If we now move our timeline, you'll see that we have
a copy of the package in the exact end frame over
R package animation. Now the only thing
left to do is to add another follow path
along our conveyor here to animate the package moving towards the
end of the conveyor. You know how to set up
all the constraints. The only challenging
part here is to add a curve that starts in
exactly this position. So what I'm going to do is move the other package out
of the wave for a second. Select my new package, Shift S to set the
cursor to select it. I'm going to press Shift a
to add in a Bezier curve. Now if you go into edit mode, select this point and press Shift S and select a
selection to cursor. You'll see that your point
moves to your cursor. But in the operation
we just did, we lost the handles
because they also snapped to our cursor control Z. What we want to do
is select our point and hold Control to
deselect our handles. And if we now press Shift S and select selection to cursor, only the point moves and
your handles to intact. I'm familiar will have to add in a new follow path constraint. Bad eye dropper,
select our new curve. You'll see there are packaged, just jump all the way
to tobacco foreseen. Now, lucky for us, our cursor is still in the
correct position. So we want to press Shift S and select selection tool cursor
to make it move back. It's double-check
with our animation and it's still in the
correct position. The last thing to do for
us as now add some copies along this conveyor and
make the conveyor move. So let's start working on that. I'm going to move my claw out of the way.
Everyone package. I'm going to insert
some keyframes. I checked my fixed
position again. I'm inserting a
keyframe at zero. Let's move that to the
start of our frame range. And at the end, I
wanted to be at 0.333 to motivate about
a third along the way. I don't want to
add in four copies because I think that will
get a bit crowded here. So let's insert a keyframe. And in this instance,
I do not want to check my follow curve option
because you will see that as soon as
I check that Blender will rotate R package
in a weird way. And it's very hard to
rotate it back into position so that
exactly matches. So what we're gonna
do instead is uncheck that and animate our
rotation by hand. So for are starting keyframe, I'm going to insert a single
keyframe for our Z rotation. And at the end, I'm
going to eyeball on watched this should rotate to match the path of our curve. Let's insert another keyframe. Alright. So let's open
up our graph editor. Shift F6, close side panel. I wanted to remove the
easing on my keyframes. So I'm selecting all of them, pressing T select Linear
from the interpolation menu. And let's check our
animation real quick. It looks like that's a
looping, perfectly cool. Now let's I then the copies. But before I'm going to do that, I want to extrapolate my curves. So I still have
all my keyframes. Select it as I'm pressing Shift E and I'm not
going to make them cyclic, moves out Blender, extrapolate
my curve in a linear way. So this means it will
continue the movement. This will make it easier
to add my copies. So let's shift D RQ, right-click to confirm in place and it might graph editor. I am going to move my
keyframes over on the x-axis so that our last keyframe
matches our first keyframe. And because we have just
extrapolated our curves, the movement will continue. So if we now check our loop, the first baggage ends where
the second baggage and begins and it continues
the movement seamlessly. So let's do that one more time. We are duplicating
our second package. Right-click to confirm in place. And in our graph editor, we want to move our
keyframes over the x-axis. But now we do not have
a keyframe to line up. So we need to work
with our frame range, which is 49 frames as we start
on frame one, frame zero. And of course we need to do
that in a negative direction. So G, X and type in -49 Check that real quick. And that is looping seamlessly. Now we only need to animate
the conveyor belt moving. I've already set up
all the modifiers to make the conveyor
move, follow the curve. But we only need to animate
our X location who match the speed of our
packages moving along. Let's insert a single keyframe for its location. Keyframe. Then the end. Let's first
just taking a guess at how far we need to go and
we can adjust from there. Let's insert more or less there. And of course we need to change this to a linear interpolation. Alright. Let's view this. Okay, and we're
quite close already. But as you can see,
our going various moving a little bit
faster than our packages. Let's pull up our graph editor. Just play with a
curve a little bit. Let's pick up our last keyframe and move it down slightly. We are almost there. Let's check how our tread
alliance with the package. On the first and last keyframe. I see there's still a
little offset I wanted to try to be in the
middle of this shape. Let's select our tread, drag down or up,
even a little bit. Now let's align our
dread bit better. Let's check a
little bit further. A little bit. We are in place. Let's check our animation. Very nice. That's
working really well. Before we start Finishing Up, I want to show you a couple of constraints I like to use to add variation to a copy of animation you have
already created. To do that, we are going to use our handle here as an example. I'm going to rotate this
on the x-axis so that it aligns straight with
the surface here. When it's move it over slightly, I'm going to make sure I am
going to apply my rotation. Let's also apply our skill. Now let's create
a duplicate copy and place it in the
slot to the left. In our Constraints tab, I'm going to add a
up your rotation, and I will set the target
to the first handle. Now I do not want to copy
my Y and Z rotation. I only want to copy
my X rotation. If I now rotate
the first handle, this second handle follow. Other thing I like to do
to add some variation is to invert the rotation. So if I move the first handle up and the second
animal moves down, well, let's start
inserting some keyframes. I want the starting
position to be at the dope for the right handle. Insert a single keyframe
for extra rotation. Let's turn on our auto key. And let's move over to
frame 20. Move it down. Let's duplicate our
keyframe to frame 25. And let's duplicate
our first key frame to frame 45 and frame 50. We now play our animation. You'll see that
our handles move. Now the keyframes on
the first handle also control the animation
on the second handle. Which can be very useful. Because MY scene, I
want for other handles which we can also drive using the keyframes on
the first handle. What I'm going to do is
move to our first keyframe. I'm going to duplicate
second handle. Let's move it into the
very first slot here. I'm going to get rid of the
copy rotation Constraint. Going to rotate
this on the x-axis. Let's move in a little bit. Alright? And I'm going
to apply the rotation, and I'm also going to
apply the location. Now applying the
location will reset your origin to the
origin of the scene. But in our case, that
is what we want because the constraint
we're going to add is the transformation
constraint. What does Constraint lets
me do is to pick a target. In our case, we want this to be the handle with the
keyframes on it. And what this constraint
let's us do is to map one of the transform properties
of our target object. One of the transform properties
of our ulnar object, and these properties do
not have to be the same. So I can use the rotation of my target to drive the
location of my owner. To set that up, I'm going
to select map from to be rotation because
I'm mapping from my target to the
location of my owner. And I wanted is to
move up and down. So I'm going to use
the Z source axis as the x-axis from the owner. And to make this
Constraint work properly, we need to set the limits in our targets as
well as our ulnar. Let's check the rotation
value of our target, which ranges from -30, from -35 more or less
to positive of 45. So let's set that here
are minimal value is -35 and our maximum value is 45. Now I want to set the
limits for my Z location. I first wanted to
set my minimum value because at the moment our handle on frame one is
that it's minimal value. So let's click and drag. And we can see our
animal move down. This is going to be a
rather small number and maybe 0.0, 45. Then I can mirror
that to the top. So that's going to be 0.045
in the positive direction. And if we now scrub
through our animation, you will see that rotation of our target is mapped to
the location of our owner. Very nice. Now let's
populate the other sockets. I'm going to move this
over on the x-axis. I'm going to get rid
of my transformation. Now I'm going to add
in a copy location, which basically works in
the same way as we did for our copy rotation on
the other handle here. But now I want to be this
first handle to be my target. Now I only want to
copy the Z location. As we can see. Now our
object moves along. And if we again want
to add some variation, we could invert our z-axis. There have been more than
the opposite direction. Let's duplicate it two more times to fill the
other sockets as well. I'm not going to
invert the third copy. Who have my animation
offset by one handle. Alright, I like
the look of this. Very cool. So now
we have actually animated six handles by
only keyframing one handle. This will make it
very easy for us to change our timing
if we ever need to, because we only have to change the keyframes on
one of the handles. And the other five will
follow automatically. Let's check our animation. It looks from our
camera point of view. I'm going to hide
all the overlays by pressing Shift, Alt and Z. And let's play. Very cool. Our animation is really
coming to life now. The paint moving
in the canisters, we've got the handles moving, objects flowing
along the treads, the robots picking
up our package. Very nice. I will let you play around with the
constraints we just covered. And I will talk to you in the last lesson where we will be fine Tuning are loop and we will be finishing up our project
7. 07. Fine Tuning and Finishing Up: Welcome to the last lesson. I've added some additional
animation using the techniques from
the previous lessons. I will quickly show
you what I've done. I've added an additional piece dropping on the conveyor here, in which I used a follow path to make a travel
through the tube. And then I switch
that to a child off constraint to parent it to the conveyor as
soon as it lands. And I'm switching between
the constraints by Keyframing the influence
at this point. From here, it changes from the follow path to the
child off constraint. Next, I populated
the connecting tube. Who with these loading pieces, I did this in the same
way the conveyers work. I created a bunch of pieces, used an array to duplicate, and then I ran the pieces along
a curve through the pipe. After that, it's just
a matter of keyframe the location along the curve
and making the pieces Loop. Lastly, I added the
single pieces into the assembly unit here to
be assembled into a cube. I animated this in the reverse direction using the transform properties
of each cube. So I started with the
cube in place and then moved back in my timeline
to scramble the pieces. After that, I added
a duplicate copy, and like we did before, I use the animation
curves that I extrapolated using the
cyclic Modifier to offset them and to make the animation loops
seamlessly like that are loop is fully
animated and we can start fine Tuning to get
ready for exporting. There are a couple of
things I wanted to show you before we export
our animation. At the moment are
Looping points mostly aligned with the start and
the end of our frame range, which means that most
animations reach their final or highest position. At the same time, we get a little more variation
into the frame. We can offset some of
these animations to make the Looping points
less apparent entire, whole scene together even more. We can do this by using the
curve extrapolation function we already used in
the previous lesson. So let's offset are
bouncing Q, for example, I'm going to select my cube
open on my graph editor. And I will quickly check if all my channels
have a keyframe on the starting and ending
position, which they don't. Because I have to duplicate this keyframe and this keyframe. And I need to check my handles because as you can
see in the end, get a weird jump. So I will set my last
handled dope stool vector. Now we can select all
of our keyframes, pressing Shift E, make
cyclic using an F Modifier. And I will offset my animation
by, let's say, keyframes. And if we now play our
animation still loops, but are looping
point has shifted. So the Looping of
our whole animation is not as apparent anymore. You can do this for more parts in your scene if you'd like. This, have a look
at your animation and see how that looks from the camera's point of view and decide if you wanted to
change anything else. I see we can add a
little animation to the assembly station here. When the package moves through, I wanted to have the bars
flop out and back in. We can do this using a
simple deform modifier. So let's add that to the
top of the stack so it gets performed before the
bevel and the subserve. That's also add a vertex group. So we can animate only
the bars we want to move. Now in the modifier we can set our vertex group and change
the operation to bend. We want to use an object
to set the bending point, because by default it
uses the origin of the object and that usually
doesn't give the result. We're after using Shift a, I, Madigan empty and I'll move
it to the top of the bars. And the Modifier is select the empty using the eyedropper tool. And if we now move the
slider, the bars fold up. Adding some keyframes
to make the bars flop out and begin lining it
with the package animation. There we have it. All our
details are taking care of. Now it's finally time to
export our animation. You can export as
a viewport render, or you can add some
lights and create a cycles or an EV render
That's all up to you. Before exporting
though, we need to set one more thing
on our timeline. And that is our frame range. Because at the moment we have a duplicate frame
in our sequence. Since our frame
1.50 are the same, that we need to
subtract one frame from our frame range
and set it to 49. And a bottom right
corner of our timeline, let's change our 50 49
and RER ready to render. If you're using my scene, you can turn on the
extra lights collection and add in an HDRI
or a sky texture. Now you are ready to
render your scene. Make sure you've set your output directory and the output panel, and you have selected
the correct file format. Double-check your
render settings and press Control F2 to
start to render. If you want to make
a viewport render, you can use the same way
to specify or output directory and your
file format button. Instead of pressing
control of 12, you add up to View and select the viewport
render animation. And that's it.
Congratulations, you have successfully created a
looping 3D animation. Make sure to share what you've created in the project section. There will be ashamed
as your hard drive is the only one to see
the work you've done. And also take a look at
what others have created. Thank you for joining
this class and coming on this animation
journey with me. I hope you'll take
what you've learned and apply to your own projects. I would love to see what you create using these techniques. Feel free to leave a comment
on what you think of the class or any other topics you will want me to
create a class on. And I hope to talk to
you in another lesson.
 Jurre Spiegelenberg, Freelance 3D motion desinger