Transcripts
1. Class Trailer:
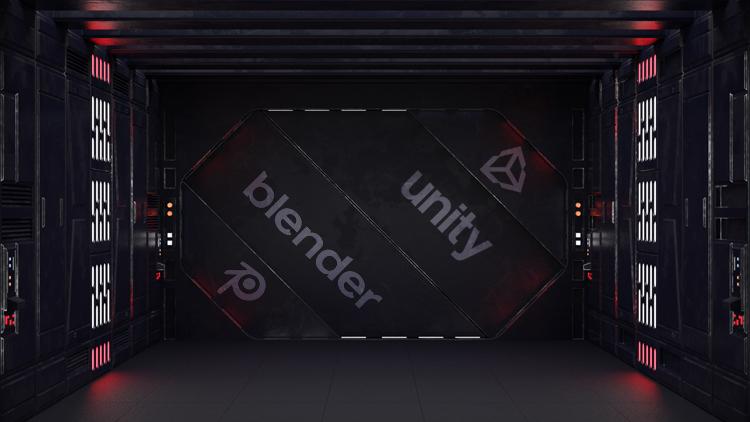
2. Class Intro: welcome everybody. I'm c g i guy. And in this course I will be taking you through the process of creating a Sky five hallway game asset using blender and unity. The hallway we were going to build walls inspired by Star Wars generally fall order. So I took some screenshots and we're gonna use that as a modeling reference. Now let's jump into blender and have a look on what we're going to learn in this course. So here we are in blender and you can see the finished version off the high poly model. So we will start by blocking out the basic shapes for the wall piece, the floor to ceiling and also the door. And then we're gonna start modeling in the details, and here you can see the low poli version off the same hallway. So here we removed all of the details because we're going to use normal maps in order to fake thes Steve House because we need to optimize to mesh for better performance within a game engine And next up, we're going to UV unwrap all Ramesh. Now you be unwrapping It's a process where you lay down your free the object in a to D space in order to apply textures to it. And the next step, we're going to create realistic metal materials using PBR textures, and you can see the finished result up here. So this is the no set up in order to create this Matal look And don't worry, you will learn everything from scratch. After creating the materials, we have to bake them into a new texture file that we can then use in a gay mention. So we will basically baked the alvito texture, the metallic texture you're going to bake the roughness texture needs to be somewhere in here, there this. So this is the roughness texture defining how rough our material is. And we're also going to bake this normal texture here. So this will be used to fake all of the details from the high polling. Toodle, openly object. Then we're going to start reading the door and animated the opening mechanism, and you can see the finished animation right here. And in the end, we're going to import our object into unity and set up the seat. So if you ever wanted to create your own game assets, you will learn everything you need to know right here. So let's get started, and I will see you in the course.
3. Modeling The Wall - Part 1: All right, let's go. We want to start with a fresh seemed by clicking anywhere into the report and impress A to select all default objects. Press X and believe them no press free on the num pit to enter right off a graphic view. And then we want to load in a screenshot I took from the game in order to have a reference for modeling the hallway. So simply don't look the sip file attached to this course and extract the fountains and blender. We can press shift A to bring up the admin. You go to image and choose background now just located the faults, and we will actually load in the hallway on the score to this is a screenshot I took from the side off the hallway and we consume in to have a closer look. Now we just want to move this image up a bit to align the bottom part off the side panel with the Y axis. So the green line here in the background price control shift tab to bring up the snap menu , it will be set to increments snapping by default. And we also want to check the box absolute grid snap. Now we will activate the move tool by clicking on this icon on the site here and now when we hold down control, we will activate the snapping. And let's just click on the set access here and bring this image a puppet. But in order to align it with the UAE excess, we also need to see the grid lines. So with the image selected, we can go to the image tap here, and we will also activate use Alfa. And now the grid will shine fruit image, hold down control one more time and just snap it until you aligned this part off the image with the Y axis. It's kind of hard to see because the images so dark. But if you zoom in, you should be able to align. And just like that, you know, before we started modeling, let's just save all file. So control s to bring up the safe menu and just locate any folder that you want. So I will actually call my file hallway and just safe the blend of file. There we go. Next up, we will bring in a simple plain to start modeling the side panel here. So shift a mash plane and we can enter edit mode right away. Suppress tap and by default, everything should be selected. So let's press are then why? To rotate on the Y Xs type in 90 and head center and that we have old first base mash. We want to press all set to enter X ray, and we also want to activate the move toe in edit mode by clicking on this item. Now I'm holding down control to use the snapping function and just move it up to align it with the Y axis. And there we go. It should align perfectly with the green line here. So do I. Access. Now Let's just pan a bit to Brenda's into the frame here soon the image and also the plane . And we actually going to divide this plane in the center here to start using the mirror modifier because we're only modeling 1/4 off this side panel and the rest will be mirrored across so we can't use the reference photo to a line. All the virt Aziz perfectly because it has a slight perspective to it. So we just using this as a guideline where we should place the versus, but we don't need to accurate Align them with the background image. So let's divide this in the center here. So control are to add a lute cut left Klink and then right click. And now we can start selecting these verses press X and delete them. And we can also just drop in the mirror modifiers to go to the money fires tap here, click on that modifier Drop in the mirror modifier and you want to mirror it across the Y axis and unchecked the x axis. Okay, now, if we start activating, does that access? It will mirror it across the bottom side because the pivot point iss right here with the three D cursors. So first we need to divide this plane in half here, then set the three d origin. Sorry, the origin off the object here and then it will be mirrored to the top. So let's dress hit Control are left wing right here and then right click. It's like these diversities press X and delete them. Just select this vertex here press shift s and choose Curse of two selected tap back to object. Note and then right click set origin to three cursor. And now it's mirrored across the correct side here. So now we just want to go back to edit mode by pressing tap selectees to overseas. Sorry, shifted down these two and just zoom out of it. Now you can start seeing these big Red the units, and we also have to smaller units inside. Right now, our plane here is one big red unit by one Big Ridge unit, and then it's mirrored across to the left side as well. But we want to extrude this or actually just pull these verses to do right by one baker, the unit. So with these two selected hold down control to activate the increments snapping and then just drag on the Y axis to the right until you have another big grid unit here and let's zoom in now in order to see the reference image. But better, we can also press shifts that to end her wire frame mode. Now, as already mentioned, we can't perfectly aligned overseas because the reference image will have a perspective to it. But we're not gonna mess around with aligning overseas directly to the reference image. We just use it to pinpoint down where we should place all overseas. But we don't have to align them perfectly. So by looking at this reference image, we can see we have one panel here. The site. This is also where the lights are integrated. Then we have a panel right here. One more here and one more here. It's kind of hard to see because it's so dark. But we have £1234 in total, and we want to have two equally spaced out here. So because the center is married to elect side, we have to figure out where we should place our loop cuts. But if we zoom in, actually this center panel, he looks like it's a big wider than these panels. So let's just make sure that we add three equally space panels at the side here, and then we're gonna do the loop cut for the central panel, and now we will just start adding the loop cuts in order to create the separations between the panels here. But before we do that, just press tab to go back to object mode, re select the background image and give it to the Image Properties tab because we want to bring down the transparency 2.8. And now I can start to see the grit a bit better. Now, select a plane in the outline er and move the mouse back to before the view port and pressed, Tapped to enter ended mode. Now, press control are to activate the loop cutting tool and scroll up on the mouse. Well, we want to add three cuts like this. Left, click and then right click. No press two on the keyboard to go toe edge selecting hold down, shift and select this edge at the very end on the right side, here to at this edge to the selection as well. And now we need to bring them to the left in order to space down the with off the Senate panel. Because it will be Miral. It will also be doubled in with off course. So we will hold down control and then just snap it to the left. So one time like this and you can see it will start snapping in between the bakery units. But this is actually perfect for this operation. So one step to the left like this to snaps and in free snaps and then release the buttons in order to confirm the movement. And now we have the same space in between these panels and also to send a panel because it will be mirror will have to say with, like, these panels on the right side. Now all we have to do is to add more cuts in order to create all the Virgin sees that we will need to extrude these panels here. Now, I'm showing you this at the top side here because we can see it a bit better without the mesh in all way. But of course, we only have to model them at the bottom because we're using the mirror modifier. So for this small panel here, we will have one big red unit in between. And for this panel beneath it, we will use 1.5 grid units. So just come down to the measure and press control are to add another loop cut, left link and then right click. I'm using shift and middle mouse button to pen and I want to zoom in a bit. Now we will bring this edge down so that we only have one big red unit. Distance between this edge and the bottom edge here. So hold down control to activate the snapping and bring this down. 1234 notches. Now, press control are to add another loop. Cut, left leg and then right click. Now we need to bring this down so that we only have 1.5 grid units in between. So hold down, Control. Bring this down. 1234 Now zoom in because we need to see the small grid units. Hold down, control and bring this up. Five matches. 12345 Just like this. And now we can zoom out again, and there we go. Now we will at the loo Kat at left side here to create another spacer in between the panels . So press control are. And now we need to place this loop. Cut vertical e left leg, and then right click and let's zoom in here and pan to decide. Hold down control and bring this to the side. One bakery unit and we should have 1.5 grid units. Between this accident, we just edit and the very edge on the right side. Here, the next loop cut that we want to place will be Luke cut for this small panel here. So there we will also use one sacred unit. So zoom out a bit. Control are left leg and then right click. Now again, zoom in, hold down, control, and bring this down. And as you can see at snapping and between the small red units. So just bring this down to about right here. Where a reference photos. And now assume out. And actually, we have 123456 smart grid units in between. So assuming a bit more hotel control and bring this up 1234 notches. So now we should have one big ridge unit in between here. So from this edge and the H beneath it all right, now, it's kind of hard to see, but you just have to count these small green units. You need 10 in between. And this will make up one Big Ridge unit just like this. And now we can add the Lucas that we will need for these Santa panels right here. So we will use five big read units. We can easily press control are left, click and then right click. And we just need to bring this up to the center off this big red unit. So let's zoom in here and hold down. Control, bring this up. 123 Now we're at the edge or at the line off the grid unit here, and we will need to bring it up. Five more matches. So 12345 and you can count from the top. So you will need one big red unit, two big red units and and 1/2 off a big rig unit right here. Now let's place one more loop cut for this panel. Here. We will use 1.5 big red units in between starting from this edge here. So control are right here. You want to let plate right click and now pan to decide and zoom in so you can see the small grid units. And right here you can see the bigger ash off the bakery units and then we need to count down five small grade units. So hold on, Control. Bring this down one time. Two times three times and now, it should be right in the center off this big red unit. So we will have 1.5 big red units in between. This act here and this edge here. Okay, Just zoom out a bit and pan to decide. We need to place one last loop cut for now. Said control are and right here. Left, click, and then right click hold down Control and snapped this to noxious one time two times. Now you will have five small off these grid units in between the loop that we just placed and the H beneath it. All right, so this will be the layout for now, and we can start to extrude these pounds.
4. Modeling The Wall - Part 2: so we have to geometry in place to create the outer panels. And if you look closely at the reference photo, you can actually see that these smaller panels at the inside are on top off these outer panels. So we're first going to create these out of panels, and then we will have to geometry to create the inside panels. No, because some off the details on the reference photos are barely visible. I will keep the next steps slow paced so you can easily follow me along and select the correct faces. So let's get started so we can just press free on the keyboard to go to face selecting mood . And now we're going to select the faces corresponding to the panels that we are going to create. And then we're gonna use the inside function off blender to create the geometry that we will need to build these out of panels. There's just one thing we have to keep in month by using the inside function, actually have to select the panels one by one, because if we would select panels next to each other, we can create the geometry that we will need and let me quickly explain what I actually mean. So you don't have to follow me along here. I just want to explain it. So let's say I would start creating this big out of panel here. I would go ahead and select this face shifty down this one, This one, This one and this one. And let's say we also want to create the inside for the panel next to it. So shifty down this one, This one, This one, This one and this one. Now we can activate the inside function by pressing I on the keyboard. And now it will actually duplicate overseas in create inside faces. But you can see that we have a connection in between these panels, so we actually need to have them separated. The only way to do this is to press I one more time. But now it will actually separate each selected face. So this is also not what we want. So the only way to avoid this is by going ahead and Onley selecting panels one by one, then creating the insects for them. And then we can move on to the next one. So let's do this using this method and it will actually be quick and easy. So now you can start following along. So I will press a two times just to de select everything. And now we can start to create this big auto panel right here. So I will recent like this face. Now hold shifty down. Select this one. This one, This one and this one as well. Press I to inset and immediately just used left most button to confirm. Now you will see a pop up menu will appear at the bottom left corner here, just click on it and you will have access to the options here. Now all we have to do is go into the thickness field and type and 0.1 and hit. Enter. Now, this will create this little insect that we will need to create the panel and we just have to make sure that we unchecked boundary and you want to look closely at this edge where actually the mirror will start to take effect here to create the top part of the mesh. If we unchecked boundary, we will actually not have, um, a separation in between this face here. And this is what we want because this should be mirror seamlessly to the top. With this boundary option active, we will actually also have this little face in between here. And this will create a separation so unchecked boundary from this and then we can just confirm this, so we'll just use all s to activate the normal scaling now and again. Just use left most button to confirm and now you have access to the settings here. Now, again, we just need to click into the offset field and we want to type in minus 0.1 and hit enter and you actually can't see any effect. But if you rotate around, you can actually see that we scaled it. The wards that in a part here. So actually, we created the inset, and then we moved it to create the panel. And you can press shift set an all set to go actually back to solid view. And if you go to object mode by pressing tap, you can see that we now created this big panel and desist of technique that we will use in order to create all the panels that we will need. So just press tab to go back to edit mode and also press free on a number to go back to write off for ethnic view. Press shift set to end a wire frame mode and no select the next panel. So this face shifted down this one, this one, this one and this one like before press I to inset left most button to confirm. Click into the thickness field type in point a one and hit enter and again make sure boundaries deactivated, so I actually restarted blender. That's the reason why this was reactivated. If you didn't restart a blender yet, then this should be deactivated because we unchecked it before. Just make sure it's deactivated here, and this will make sure that we have a seamless mirror outside here on top. All right. Now we will activate normal scaling so used to shortcut all tests and then left click click into the offset field for the normal scaling type in minus 0.1 and hit Enter and again you will actually see new effect until you start rotating, and you can also press shift set to go back to solve you. And now you can see the second panel will appear made here. So just press free on the numb pain to go back to write off a graphic and also press shift sent to reenter while frame mode. So now you should know how this method will work out for us. But for a next panel, we will have a little problem. But this can be easily fixed. I want to select these faces quickly. So double press a two decent like everything. Press be to activate box selecting and just click and hold left most button and draw a box around these faces to select them like this. So if we now press I to inset and left, most want to confirm and using the same value like before. Point of one it enter. You can now see, we're not having any separation between the top part here, which is actually what we want, because we want to have it mirrored seamlessly like these other panels. But on the right side, here were later going to connect the door. We actually want to have to inset, just like on the bottom and on the left side here. But if we activate the boundary option off course, we will also have to separation on top here. So that's not what we want. We just wanted on the right side and the bottom and on the left side. So the boundary option will only take effect wherever you don't have connecting verses. So right here on the right side and beyond the top side here we don't have any Vergis ease . So therefore the boundary will take effect. And at the inside, where we have connecting verses, that boundary will have no effect. So become to use the boundary option here because we don't want separation on top here. We just wanted on the right side. But there's a little work around that we can use. Just press control set to undo the insect and press one on the keyboard to go to verdicts, selecting mood. Now, just select this Vertex hold control key down and select this Vertex. Now it should select all the verses in between us. Well, press e to extrude and then why she only extruded on you want excess and pulling the bed to the right here left most button to confirm. So now we have foresees to the right side. So the boundary option will only take effect on the topside and later on we can then delete these verses were just using them to create the insect that we will need. Now just press free on the keyboard to go back to face electing press beat to box elect and select all of these faces here press I to inset and left most button to confirm On the thickness we will use the same value like before 0.1 hit and her and make sure boundaries deactivated. Now, if you zoom in and pan to decide, you can now see because we extruded the right side adversities. We have this insect on the right side like we want to and on the top we have to seamless connection to the Merrill side. Now press all s to start normal Scaling left most button to confirm and type in minus point a one and hit Enter Now we can simply press one on the keyboard to go to verdict selecting double tap a to de select everything press be to box, select and just select the extruded verses on the right side. Here, press X and delete them. Now you can press tab and shift said to go to object mode and out of wire frame. And here we can see we have the trip panel in place. Now, you can start to create these small panels for the bottom and the top part. So just press tapped to your back to ed mood. And we will also press three on the keyboard to enter face selecting mood press shift setter and a wire frame. And we will pan to zoom in on this, um, section here, and I'm just using SoCal selecting tools. So just press see on the keyboard and just paint over these faces here. Now, as already mentioned, we can select the panel next to it. But we can skip this one and also select these faces for the panel here and right click to get out of SoCal selecting. And now just press I two inside left click to confirm, and we're gonna use, uh dot serial one and hit enter. And again, we need to make sure that we have found reactive for this so that we get all the surrounding insects here and then breasts all s left, click and type in minus point a one and hit Enter Again. You can just wrote it around to see that the normal scaling just pushed the inset faces out . And there we have the small panel in place. Now we can simply repeat the step for this panel and dissent a pedal. So first press free and the number had to go back to write off a graphic double tap A to de select everything, and we will pan to the side and using circle, selecting tools, suppress, see on the keyboard, paint over these faces and over these faces, right click to get out of circle, selecting Press I two instead, the left. Most want to confirm type it point a one hit enter and make sure boundaries active. But actually, we're getting a problem for two centre pedal here because here on the left side, we want to seamless connection to the mirror outside. So therefore, we actually can use the boundary option, and we also have to do the same trick. Like for the side panel. We need to extrude these bottom verses. The first press control set to undo the inset Chrissy to circle, select and use middle mouse button to de select This panel here said these two faces right click to get out of it and its first due to insert for this panel. So I to inset left most button to confirm type in point Will want to enter, Make sure boundaries active. We need all the surrounding insects here and then press all s left most button type in Sorry, typing minus point a one and hit enter. And now we just need to press one on the keyboard to go to verdict selecting we want just like these two verses press e to extrude and exit and just pull it down a bit. Left most button to confirm. Now press three on the keyboards to go back to face selecting see to sucker select and just select these two faces. Right, Most button to get out of it. I to inset left most button to confirm and point no one, of course. And here we can now unchecked boundaries who would get the seamless connection to the other side. But again, just because we extrude these verses at the bottom, we are having the separation soda instead right here that we will need Well, cape all s to activate normal scaling left. Most want to confirm type and minus point of one. It enter. You, compress shifts that one more time and just rotate a bit to decide. And he can see we got on these planes or all these panels at the bottom in place. And, of course, because we're using the mirror money fire. Also, the top panels are in place. We can go back to edit mode by pressing tap are actually press tab one more time. We actually where in edit mode suggest stay there and press one to go back to verdict selecting, Select these two overseas press X and delete them. And there we go, and then we can move on creating these Santa panels where also the lights will be integrated. Now, before we move on their swan thing I want to address. So make sure you're in right off a graphic by pressing three on the lump it and zoom out of it because I want to show you that our doorway is only two meters high. You can tell that by comparing it to these big red units on the side because one of thes is one meter by one meter. We have two of them for the height, so this makes two meters in total. And if you look at the reference photo, this door has even the border beneath the ceiling, so the doorway would be less than two meters. To make it more realistic, we just need to scale our object. And we can easily do this by pressing and on the keyboard to bring up the side menu. And under the scaling options, we just want to increase the Y ends that value to 1.2. So just typing 1.24 Why and also for is that and hit enter and this will make it a big more than four meters long and 2.5 meters high. Now we just need to apply these values in order to reset them to one. But the dimensions will be the same like this, so we can press control a and then just apply that scale and this will reset these values to one. This is very important because when we going to texture this, and also if we're going to export it to unity, it will consider these values to be the same in both software's. So therefore, this needs to be set to one, all right. And we can also re snap it to be aligned with the Y axis. So hold down control and just snap it up. Two notches there. We know. And finally, we can go back to edit mode, my present tap. You know, let's at these Santa panels here so shifts that to enter y a frame and zoom in a bit. Now press free on the keyboard to go back to face selecting. Select this face here you consume in a bit closer. You need to press shift and also add this face and this one and press I to inset left most button to confirm point a one hit enter and make sure boundaries deactivated. And now all s left. Click anti Ben minus point a one. Let's do this one more time. Select this face here shifted down This one Press I to inset left. Most want to confirm type in point No one hit. Enter then all s we left most button type in minus point a one hit Enter Now we can press shift set to go back to solid view and just zoom out and have a look at the side panel. So far, so impressing tapped to go back to object Note to have a clearer look your and it looks perfect. So we have all these outer panels in place and we're now able to add the inner panels. And don't forget to save your file control s.
5. Modeling The Wall - Part 3: So in this part, we're going to finish the block out for this part off the hallway, and then we will model the other parts off the whole way, and at the end, we gonna and in some more details. So for now, with this site piece here selected, just press tapped to go back to edit mode, press free on the number to enter rifle for graphic and also press shifts that to go back to, Why a frame mode? Now we want to assume in a bit, and we're going to start blocking out these panels here. So again, it's kind of hard to see with all these grits and also the mention the way. But you can see this small panel that appears at the top here and at the bottom here. Then this is a piece American place, some air ventilation system. And then we have to use all of pounds here, and this will be the same at the bottom. So just zoom in at the bottom here. And now that we have thes separations in between, we can actually go ahead and select panels that are next to each other and used to insert function for all of these panels at once. So I'm just selecting this face. Now. I'm holding shifty down to ed this face to the selection. This one, this one, This one, This one. And also these two here. Now, before we move on, let's press and on the keyboard to minimize decide menu. And now we will just create an inset to place an inner lip. And then we will actually create these exclusions for the event relations and also these small panels 40 other pieces. So press I to inset left most button to confirm. This time we're gonna double the value. So 400.2 in hit enter, and this will create this intellect here. Now, just press see to activate, circle, selecting and use middle mouse button to de select these faces here on the right side and use right knows baton to get out of SoCal selecting thirties. Other faces we can press I to inset left most button to confirm this time we're gonna use point a one like before it enter. And make sure you check the box for individual because we need to separate pieces for these panels here now shifted down piece like this face because here we need to extruded for the other ventilation system. With these other free face is selected. Press off s and left most button and type in minus point. The one like before and hit Enter No, Select this face here for air insulation and you can price shifts that actually to go back to Seoul, view angle the view of it, then press e to extrude and right, most button to keep the extrusion in place. Now click and drag on the red Xs and just pull it in a bit. You don't need to pull it in dead much. We're just gonna play some urban's in the front here and we're just gonna use that so we can see fruit. Ameche, actually, so that should do the trick. So just make this little extrusion here and move it backwards a bit. You can press free and another pit to go back to right side view and press shift set to re enter. Why a frame mode? Now for the next step, we need to pan to this top right corner here and just come out of it. Doubles have a to de select everything and we can press be to box select and I'll select all of these faces here. Press I to inset left most button to confirm. Use a value of 0.2 and hit. Enter Make sure boundaries activated. Now don't get confused by the reference photo. We're now going to create this panel here. So actually this air ventilation peace and it will be at this position on our mash here. And it's just because we're way off with the dimensions off the reference image. But it's totally fine. So simply select this face 50 down this one and press I to instead left must want to confirm use of thickness value off point a one and hit Enter. Now this piece will be a bit smaller than this piece at the body here that we already created. But if you look at a reference photo, it also looks like this is a bit smaller than this piece right here. So this should be totally fine, and we can press each week strewed right mouse button to keep it in place. Now rotate the view and we will now use Vertex snapping the whole town control shift tap this will bring up snap menu one more time, click on birth mix and now click and drag on this red Xs here and just hold down your left Most button. Now also, hold down control. And now move the mouse over the Vertex. You want to snap it on and we want to snap it to this vertex at the bottom here. So this ver ticks off the air in that we extruded inwards. So just make sure that you're moving your mouse over this perfect while holding down control, and this yellow circle should appear, which means that we're now snapped into this vertex and now just release all buttons. And now we push this in the same amount like we had on the bottom here. So I looked at the mention off camera in the thing. We should adjust the height off this Arab and to be the same like this. Bottom one, it will look a bit better and we can easily do this. So first press free on the num pet to go to write off a graphic just pants so you can see the Arab and at the bottom here. And so, like the interface here, sort this one. No. Zoom out and press shift E. This will duplicate your selected face and just move it up to the top right corner here and use life most button to confirm, not pan, and zoom in here. And we still have the verdict snapping active. So we can now easily click and drag on the green excess. Hold down control and you want to move your mouse to this corner. You can even press one on the keyboard to enter Vertex selecting, and now you can see the Virgin sees. Now we'll need to do the same for this. That excess hold down control. Click and drag on the set access here and now Just move your mouse to this Vertex to snap it. Release all buttons to confirm the movement. Now we need to select all of these verses and we need to align that with these yellow overseas so that overseas often duplicated face. So first double tempt A to make sure everything is Do you selected press be to boxing like and Onley slink these verses here make sure you're not selecting this Vertex or this one. Now just click and drag on the Blue Xs and move this beneath these two overseas here Now hold on control Click and drag on the Blue Xs and now snap it to this Vertex and release all buttons to confirm press free on the keyboard to go to thank selecting. Now we need to select a duplicated face. It's not this one. It's not this one. It's this one right here. You need to click and disposition and just will select this whole face that we have duplicated press X and just deleted. And if you press shift said we now just extended the hide off this air bend to be the same like this one. Now let's finish off this bottom panel here, so we need to select these faces separately. So only these two for now, Then press I to inset left most button to confirm type in 20.1 and hit. Enter no press office left most button type and minus point a one hit. Enter and do this one more time, so select this face should be down. This one I two in said left most button 0.1 can enter All s left Most button minus point A one hit. Enter. Okay, now let's work on this l shaped piece. So first of all, I want to select his face. Shifted down this one. Now press I to inset left. Most fun to confirm, like before 0.1. All this left most button minus point along and hit. Enter. Now, before we will do the same for the L shaped panel. I first want to add a little Luca because you can see at the background image right here. We should have a little slight gap in between this piece and the L shaped pound. Now, we can easily do this by just adding an alleged so shifts that toe and a wire frame and zoom in and pen to center. The view on this area here press control are too had another loop cut and just use a left. Most button once. And then you can press e and an F and this will straighten out the lute cut for us and then use left most button one more time to place it on this position. Here. Now zoom in a bit and you can even pan to concentrate on the move tool here. Press control shift tab to bring up the snap menu and change it back to increment. Now hold down control and just snap it to the right and you want Oh, align it with this gray line off the grit. So hold on control and just snap it to their Now the Etch next to it will have to small grid units in between. Okay, so you just want to snap it right here. And there we go. Now, I just noticed that I want the same space that recreated with this absolute and the bottom corner here. Now, to do this, we actually have to use a work around because increments snapping will not work here. So first press form on the keeper to go to Vertex selecting and select this birth next year . Now, press shift each of duplicated and used left most button to confirm. Now drag it to the right by clicking on the green access and we're still in increments napping. So hold down control and you want to move this up three notches. One time, two times three times like this. You want to be too small. Grid units above this Vertex here. Now all we have to do is to select all overseas in this line here and then use Vertex snapping to snap into the duplicated birth ICS. So zoom out and make sure you see this whole line of overseas that would set a to de select everything. Press beach a box like and started the center here and just draw books around these verses on Lee. Make sure that you're not selecting the duplicated vortex. Zoom back in control shift tap, change it over. Ticks for us. G to Grete, that's That's to grab it on, Leon, is that excess? Move it up, Hold down Control Hover around this Vertex to snap it and used left most button to confirm . Now simply select the duplicated Vertex press X and deleted. And there we go. Now we can place a new Luke cut beneath it so control are left. Click and then right Click control shift tab. Change it back to increment breast. Geeta, Grete and set. She only grab it on this that excess hold down control. It will snap one notch to the top and just snap it one more time and another time like this left most button to confirm. Now we should have two small grid units between this edge and a look at that we just placed . Okay, now we can zoom out and pan to the left side. Here. Now, I did some more testing off camera, and it was still need to adjust some of these various ease. Zoom in once more and we actually need to bring it back down One small grid unit. So hold on, control and just move it down one time like this. Now hold down ALD and click in here. This will make sure that we still like all the verses up to the center. Vertex, zoom in and hold down. Shift at this Vertex. This one and this one. Now hold down control and move this down. One small grid unit just like that. It's like this for take shifty down this one. And also bring this down. One small great unit just like that, okay? And no, we're ready to place the l shaped pound suppress free to go back to face electing its like this face shifted down. This one, this one this one This one. These two small faces here and these two press I to instead left most button to confirm type and pointed a one hit Enter then press on this left most button and type in minus point a one hit enter and you can press shift that and they're replaced the L shaped pal. So we should be almost done with finishing off these panels. But there's still something left. So shift said one more time to go back to a wire frame and really will now work on this panel here so we can zoom in and we want to select. What? See, I think we want to select this face here. Shifted down this one and yeah, I think these two for now. Let's see. We can press speech, activate the box, selecting just to get this ah, line as a reference. So we're connected with this edge here, and nothing to should be fine. So Yeah, no way. We also need to select this face here and now we can press I to inset left most button to confirm. And no, that was wrong. Sorry. We need to select all of these faces here first, then press I den left most button and used to thickness off point or to enter And yet we can have the boundary active for this are actually No, it's so sorry. We need to uncheck boundary furnace Off course. All right, now this is correct. At least I think it is. No, it really is. And now let's select these two faces. So this one and this one press I to inset left most button type in 10.1 it enter press old s and left Most button and type in minus pointed. One hit enter. And now let's sit like this. Face shifted down. This one, this one and also this one Here press I to insect. I left most button to confirm. Use the thickness off, pointed one it enter, Make sure boundaries deactivated. Press all s and left most button and type in minus point a one and hit Enter. And now we have these pals in place. Let's just press free and unhampered to go back to write off a graphic and also press shift set to reenter wire frame mode. Now, if you zoom in here, we still need to place these handles on this panel right here and again. We are way off with the dimensions off the reference image. But again, this is no big deal. So we actually going to place these handles right here to get the mirror to the topside? Of course. Zoom in here and we can use the life toe to place diversities that we will need to create these handles. So press k on the keyboard. This will activate the my tool. And we will use this great line off the grid units as a guide and to place the first Vertex . Now, let's say we want to place it somewhere around here, left most button to place the first vortex within this pace and then press see on the keyboard to make sure that you get a straight line for the knife tool and we need to place the next Vertex somewhere around here. Left most button to confirm. And now move it up and you want to get the top edge highlighted like this. Ah, left most button one more time and then hit Enter to confirm the placement off these overseas Now, don't worry about these connecting edges. We're gonna clean atop a later. For now, we want to press one on the keyboard, your to birth like selecting and let's select this vortex shifty down this one and right click and choose Subdivide. Now double tap A to get rid off the selection. Select this Vertex and press control shift tab. Make sure you're set to verdict snapping. And then just dragon on the Y axis. Hold on control and snap it to this vertex right here and release all buttons to confirm. Now we can also hold down shift to at this Vertex to the selection and with these two verses selected press Jay to join them and create this Ach in between. You know, we just need to have these exact same verses on the right side off the panel here. And we can easily do this by just public ating a couple of these verses to use them as a guideline for the correct dimensions. But first, let's also use the knife to on the right side here. So impressing Kate. And you don't have to pinpoint down the exact location because we're gonna use the duplicated vs off the left side to snap them to the correct position. So for now, just left click and press see to get a straight line left click and move it up. Now you can see that we get the top edge highlighted by left clicking and hitting. Enter to confirm. We're also getting this verdicts in between because there's this act going across. But we're going to clean this up in a second, so don't worry about that now. Next up, just press K warmer time. Make sure it's snapping. Do this Vertex left like Cressy move it up to get the top edge highlighted. Left most button and hit Enter. And now we're just gonna duplicate some of these prophecies. And then we're gonna snap these verses on the right side to be on the exact same position, like on the left side here. So we actually on Lee? Yeah, we can start by just selecting this verdict shift. You know this one and hold down control while you drag it on the set excess and snap it to the Zet. Position off these left side adversities here. Now we need to select this vertex and you can deactivate the move tool because it's distracting us here by clicking on the tweak I can hear and now hold down control. And so, like this vortex to get all off these flavors. He selected the press shift e to duplicate and move it up. Now, press s. And then why? And type in minus one. And this will just swap these verses around so that they're now on the correct side for aligning the right side of handle here. Now we can bring back the move toe clicking on the icon here and hold down control while you're dragging on the Y axis. You want to snap it to this? Protects here just like that. And now we can select this Vertex Hope stroking down this one to select all of these verses . Hold down Control Dragon on the Y axis and snap it to this Vertex. And that's like this Vertex called Control Key Down. Select this one dragon on the Y axis. Hold down control and snap it to this vortex and release all buttons to confirm doubles. Have eight of these like everything now, huh? Bergen mouse around these duplicated mercies and press l on the keyboard. And this full select all the connected versus and we can press X and just delete them. And all we have to do is to clean up this mess here and this is pretty simple. So first, select this Vertex 50 down this one and price Jay to join Now press to on a keyboard to go to edge selecting. Now let's select this ad shifted down this one this one and this one press X and choose to resolve these edges and you can see that we're still left with this Etch Press X for more time And now just click on delete this edge and there we go. Now we got rid off all the unneeded connecting edges and we now have this face here and this face where we can place the handle. So let's press free on the keeper to go to face electing its like this face shifting down This one now press I to inset and left most button to confirm Taibe in point a one can hit enter and make sure boundaries deactivated. Now press boldness left most button and type in minus 0.1 and hit Enter And if you zoom in on the right side we can still see We haven't connecting edge here that we can dissolve, suppressed to on the keyboard Select this each year press X and juice. Dissolve edges. And there we go. And by pressing shift is it. We should be able to see the handles in place, but I want to extend them a bit to make them wider. So three on the number to go back to write off a graphic shifts at Zoom in, Press one on the keyboard to go to verdict selecting. Let's just make sure that everything is de selected by double pressing a press beach box elect and select all of these verses here and just moved in down. You don't have to snap it. You just want to make it a bit wider because in reference photos, they're a bit, you know, wider here in the height. So actually not whiter, but they're higher. I don't know if I pronounce this correctly, so let's just move it down a bit, all right? Just like that. And then we go. No, we can start to create this triangle shaped panel and a small panel here, and then we should be finished with the lay up off the pounds, suppressed free on the keyboard to go to face selecting, and we want just like this face shifting down this one. This one. The small face here, this one and this one Press I to insect a left most button type in point to get enter again . Make sure boundaries deactivated and let's see. Now we should be able to place this small piece off the pal here first. So select this face here. Press I to in said a left. Most button pointed out. Want it? Enter All s enter type in minus pointed. One did enter. Here we go. Now zoom in here and let's see. We need on spacer in between the mirrored side off this triangle shaped panel here. You can see there's a bit off a margin in between. So I think we can press one on the keyboard first. Now, let's just press No, I have another idea. So select this birthing should get on this one right click and choose Subdivide double step eight of these like everything. Now select this Vertex dragon on Is that excess? Hold down control and snap it right here to this. Perfect. So now we want to select this verdict 50 now this one right click And she stopped divided one more time. Just like that. We want to do the same here. So it's like this Ever click shifted down this one right click to sub D minds Double Teppei to de select So that this Vertex dragon on this that excess and snap it to this verdicts here we can actually select this phone press X and choose these off overseas. Now select This one shifted down. This one impressed Jay to join them. Select this Vertex shifted down this one right click and choose Subdivide No, let's do this former time right click to subdivide it Now let's like the center Vertex press X and shoes dissolved Mercy's all rights now if these two verses were able to shape this triangle So it's not a perfect triangle, of course, but we need these two overseas to get this shape thumb. I think we can just select this Vertex shifty down this one. Press jay to join select this Vertex and this one not this one. This one here in the corner and press jay to join No press three and a keyboard ticket face selecting select This face shifted. And this one this one this one and also this one for us I to inset left most button to confirm type and pointed. Want it enter press on s left, most button type in minus pointed one and hit and her. Now you can press shifts That and there we go. We have to hold Lay out for the panel in place and we can now move on modeling the floor to ceiling and the door And then we can add some more details. But for now, we can call this finished. So press control s to save to follow and we're going to see us in the next part.
6. Modeling The Floor & Ceiling: So before we start modeling the floor, we can actually push this panel a bit more to decide because our Centrepoint a world origins right here with all the access will intersect. And we will make the hallway 2.5 meters wind, something like that. So therefore we need to bring this sidewall here a bit more to lift and we can easily press seven to go to top you. So seven on the dump it and then hold down control shift. Have to bring up the snap menu, change to snapping to increment hold down control one more time and just snap it to the left and it will align it with the big Red unit to a left here. And so therefore, if remember this across, we would have two meters to be the with off the hallway where actually want to increase this a bit more so impressing control and holding it down, of course. And then just bring it to the left one much to notch three notches So free small red units more to the left. Now we have three small reduce roads and then a big rig unit to the center here And if you're mirrored us across, we would have 2.6 meters in the with off the hallway. And I think this is a good starting point and we can still a justice later. And next up, we're gonna add in the plane and model the floor. So actually, the floor will be the simple plain and the details will be added with textures and normal nous. So we can know. Let's see. I want to press tech with the side panel selected and press one to go to verdict selecting it. Just zoom in and you want to get this bottom Vertex here, this one at the center here in a pan to the right side. Hold shifty down and I'll select this Vertex right here. So both bottom verses here and now we can press shifty to duplicate and left click to keep them in place. Now press P and choose selection. Now we just duplicated these verses and we separated them from the rest off the object. If you press tap and then just click on the side panel one more time selected first age to hide it, you can etc were left with these two overseas, So just select them and pressed actor Inter Edit mode for Reese to press eight to select both of them and impress F to connect them with an edge in between press seven to go to top u N Zoom out. Now we want to extrude him and bring them to the center and then we're gonna use the Mererani fire. So press be to extrude and that X only extruded on the x axis Hold down control and snap it to descend the point here right here in the center and go to the mirror Stap sorry into the money first half here on the side and we actually already have to mirror money fire in because we duplicated them from the side panel So therefore it will also copy the modifier But we need to make sure we unchecked these that access and we want to check the X axis instead and you can now see it's mirroring and across to the left side. But we wanted to have a mirror to do right side. Therefore, we want to select this Vertex here and yeah, we can press shift us cursor to selected go back to object mode pressing tab, right Click said Origin to Freddie Cursor. And now we have had merit to the correct side, and we can bring back the side panel by pressing all age. And that's basically it for the floor. Because, as I already mentioned, we're gonna use textures and normal minutes to create the details, and we can now move on modeling the ceiling, and we can use the same method but instead off duplicating these verses from the side panel . Instead, we're going to duplicate the floor, so just select the floor object note. Press shifty to duplicated and left most button to keep it in place. No press tatter and to edit mode. Press eight to select overseas and press control shift tat changed to snapping back to Vertex. It can even zoom in, and we want to bring it up on dissent excess and snap it to the Vertex off the side panel here on top. So click in drag on. Does that access hold down? Control? It just snapped it to this top vertex here off the side panel and release all buttons to confirm the movement. So now let's just have a look on our reference image suppress free on the lump it and shift set to enter while frame. So we already have two plane for ceiling in place. And we just need to add some blue cuts in order to model the exporters here. So we have 12 free off these big borders. And then there's 1/4 1 next to the door that is a bit thinner. You can actually see it on this left side here. So this border right here now, before we're gonna place the loop counts to create exporters the 1st 1 to bring this whole sealing up a bit because he and the reference you can see that this white everyone is actually stealing. And then we need to extra deuce borders down to connect with the sidewall here. So with everything selected press control shift tap changed to snapping to increment. Just pan to this top corner. Here, zoom in a bit. And now we need to bring this up to big grid units. So hold control key down. Bring it out one time two times. Now zoom in even closer Now we need to snap it to the smaller bird units and bring it up five notches. Hold control Key down. Bring it up one time. Two times, three times four times and another one There we go. And now just rotate the view and we want to place 12 flu cuts in here, and we actually don't need all off them. But we need to place 12 off them so that we get the pattern that we are aiming for. So you can press control are to activate the look contextual. Now, just add 12 cuts. You can look at this bottom left corner here. When you start scrolling up on the mouse wheel, it will give you a notification. How many cuts You're actually half right now. So just scroll up on the mouse well, and look at the bottom left corner until we have 12 cuts and the left. Most button and right mouse button. Now press three on the keyboard to go to face selecting mode. Select this face here. So the second face starting from the center. Then click on the select box I can to get rid off to move tool because it's blocking our way. Hold 50 known. Select this face now skip two faces and select the next two faces and again skip two faces and select the next two faces. No Skip one face and select this one. Go to right side view by pressing free on the NUM pet and control shift. Tap changed to snapping to Vertex, and we're going to extruded and snap it to one of thes foresees on top off the side panel. So press e to extrude and it should start extruding only on these that access. Hold control key down and snap it to one off these verses off the side wall Here left most button to confirm and we go Now we can press shifts that to go out off wire, frame out and pressed to on the keyboard to go to that selecting. Now hold down old and click on this edge in here, and it will select the whole loop like this Now holds shift and bulky down and also at this edge to the selection, rotate the view of it shifted multi down also at this one. No press X and choose the soft edges and now press three on the keyboard to go to face selecting. It's like this face 50 down this one, This one and this one press X and lead these faces. And then no, we have to ceiling in place. Now let's also wrote it around to the other side. And we can also select this face shifting down this one, this one and this one Press X and delete those faces. Now you can see we can see through the mesh here. That's because we need to play. Some will Face is in there so we can press one on the keyboard to go to Vertex selecting. And I would hear some more address that we can believe us. Well suppressed to on the keyboard First, it's like this edge shifted down this one and press X and she was dissolved. Edges, no press. Want to go to verdict selecting Haldol K now and click in here? Okay, this is not working. So sorry for that. It's like this vortex 50 down this one, this one and this one and press F to fill this within face and just repeat these steps for all of these caps here. So So, like, these four verses press active. Phil, it's like these for overseas press f to fill and for the center. We actually also need to extrude one of these verses to create this face. So select this vertex first and now go to the mirror modifier first and check the box for clipping. So make sure that these verses will be merged to send her select this Vertex bring back to move told by clicking on this I can press e to extrude and right click to keep it in place and just click and drag on the Y axis and bring it to the center and you can see at one point it will not move any further because it no merge in the center here. And now we can select this Vertex 50 down. This one this one in this one Impressed, have to fill. Here we go. Now we still need to add another detail to the spores. But first there's also facing decided we can get rid off, suppress free on the keyboard to go to face electing its like this face and press X and believe it Now I want you just like this face shifting down this one this one and this one panto center here press one to go to verdict selecting Hold, shift, get down. And also add this Vertex to your selection and I'll just move it up slightly. We just want to move it up a slight amount. Now press free to go back to face like things like this phase shift down This one this one and this one press I to inset left most button to confirm Use the thickness off 0.1 and hit her and unchecked boundary Now press e to extrude and it should extrude understand access. So hold down control to activate the snapping and snap it to the top off the side wall. Here and now we have this rail for all of these borders in place and all we need to do is to fill in this gap for each border. So go ahead and press one on the keyboard to go to verdict selecting that would have a to de select everything and we can use to socal selecting to select these foresees quickly. So press see and just select these versus here in between and press F to fill. And I'll repeat this step for all of these gaps a two times to de select C two so called select. I have to fill doubles, have a to de select see to SoCal select have to fill and for center here we first need to extrude the Vertex just like before. So this word isi just selected Presti to extrude right click to keep it in place and used the Y axis to snap it to the center. So you don't have to use to snapping because with the clipping option off the mirror modifier, it would all magically stop at the center here. Now let's see to circle select and just at these verses to the selection and press F to fill, and we should be finished with the ceiling. So with all divers is in place and one last thing here on this side, we can get rid off this face. So press three on the keyboard. So, like this face press X and deleted. Here we go. Now we're left with the door. So we still need to model the door. And we also need to finishing off the details off disciple because we need to play some air ventilation systems at this spot here and also at this spot, and we're gonna add some small details as well. And then you can create in the materials. So for now we can press control s and call the floor and ceiling finished.
7. Modeling The Door - Part 1: So now we need to concentrate on the front side, suppress one on the Phnom Penh to your two front off a graphic. And now let's load in the other reference image that we have so shifting Go to image background. And this time we're gonna live it up, be I feed quickly locate the file first. So there we go hallway on the school, one double click and loaded it. And here we have the door from the front side. And again, this image also has a slight perspective to it. So we're not going to concentrate on the dimensions here. We're just gonna block out the shape, and then we're gonna adjust it to fit with our mash here. So let's just add a new plane. So shift a mash plane and press are too rooted than X type in 90 and hit and her press tempter Enter edit mood and want to go to verdict selecting and impress shifts, attitude in tow, wire frame and let's zoom in here. Now we can add a low cut in the center and then used to Mirdamadi fire. So control are left leg right click. Select these two verses, press X and Layton and go to the market for staff and add in mirror money fire. It's already active on the X X is so this is correct and also activate flipping here. Let's press control are one more time. And this time we got at the lute cut right here, left licking and right click control shift have said it to increment and snap it to deride two notches one time two times and actually 1/3 time just like that. Okay, good. Now with this shape and placement, see, we want to add a little cut in the center and we can increase the number of cuts to to so at to loop cuts right here, left leg and then right click. Okay, Now we need the knife to also press cake and make sure it's snapping to dis vertex. Then press C on your keyboard. This will make sure that you can do this cut in a 45 degrees angle and make sure you're gonna pinpoint down the bottom edge here until it's highlighted. Left click, and then press enter to confirm and I Let's do this one more time for the top here. So press Kate. Make sure it's snapping to this Vertex left click Press, See, and make sure the ash highlighted here, left, click and then hit. Enter now press free on the keyboard to go to face selecting. It's like this face 50 down this one and this one press X and delete these faces and you can see on the reference photo we should extrude a border above the door. So press want to go to Burdick? Selecting like this Vertex shifted on this one and this one control shift tap. Make sure snapping is set to increment and press you to extrude and then Zet to extruded on this that excess hold down control and snap at one time two times and let's see three times no, only two times just like that and we can even just pull it up a bit more without the snapping. Just to increase the height off this border like that, there should be fine. And now, before we move on with the modeling, the 1st 1 to fit this door piece to the rest of our mesh. No, Before we're gonna do that, let's just hide the background image for now. So go to the outline er and unchecked the ICANN for empty 0.1 and we can press shift set now. Rotate the view and tap back to object mode. Select the ceiling shifty down, select the wall and shifted down. Select the floor. Press one on your number to go back to front off a graphic press tapped her. Enter edit mode for all of the's selected objects. Double tap A to de select everything. Now press shift set to go back to wire frame for a speed to box elect and select all of these Burgess sees on the left side. Here. Now control shift tap. Make sure you're still in increments snapping and we're gonna snap it to diss big grid line to increase the with off hallway. So hope stroking down. Snap it to the left one. Time. Two times 34567 Here we go. Now press tab to go back to object. Note. We can now select our door piece tear back to edit mode. No press ages like everything and press control Shift tap. Now make sure it's set to Vertex Greg it on these that access and snap it to this corner here, off the ceiling. Now Do the same for the x axis. Click and drag on the X axis and snap it to this corner. Double tap a to de select Everything pressed me to box late. Select the bottom Vergis ease and dragging on is that excess and snap it to the floor right there. And there we go. Now we can press shift set to go back to Seoul of you rotate the view like this. Now we need to snap it to deep every end of all hallway. So we will not press a to select all Vergis is now dragging on the y Xs and you can snap it to the Vertex at the corner here off the floor and release all buttons to confirm the movement. And now we have the door in place here at the end of the hallway. But of course we're not finished yet. So press one on your numb pet, You go back to front view, Zoom in. We can select this verdict shifty down this one, press you to extrude and then x two only extruded on the X axis and make sure you're gonna merge it with the mirror outside here in the center left most button to confirm. Now I want to bring back the reference image. So just click on the icon endowed line or one more time to bring it back. Tad backdrop ticked motes like the image and go to the image properties tap here and 40 white offset. We just want to bring it up here so we can click and drag in the field and just crank it up here somewhere around here so we don't need to scale it because we're not fiddling around with the dimensions. We just want to use it as a reference and we can see here at the bottom. We actually have a slide lived here that will extend above the floor. So just select the door that we modeled tap to edit mode. And now let's like this Vertex gear shift. You know, this one and this one and zoom in real close here, and we can actually angle the view so we can see it a bit better here. Now we want to direct this, actually. Sorry. We also have to select this Vertex shifty down this one, because otherwise we're gonna mess up the angle off our, uh, door piece here. So now we want to move it up slightly, just slightly. You don't have to use snapping for this. Now select this vortex shifting on this one and this one control shift tap. Make sure snapping is set to merge ICS and press each of extra routes and Zet to extruded on these that excess whole time control. And again snap it to the corner off the floor Piece here so that we get this little lip here above the floor. And now we can select this Vertex shifty down the Vertex beneath it and press you to extrude, then right, most button to keep it in place And now dragon on the X excess and just make it merge in the center and release all buttons to confirm. And there we go for the next step. I just want to rotate the BUE bit now press a to select all overseas and we're going to extruded to give it a bit more thickness here. So press you to extrude and then why? To Onley extruded on the Y axis and pull it a bit to the right. Just like that. And again, we're not using any snapping here. So now let's press three on the keyboard to go to face selecting and rotate the view to the bottoms like this. Face 15 on this one. And you can also select this small face here. In between this face this face hand to talk this face, this face, rotate the view, this face and this face here and also this face Yeah, that's correct. And let's see, we can also select this face here at the bottom this well, now press X and believe those faces because we don't need them. And now let's have a little look here, so this looks fine for now. We can leave it like that for the moment and now we should be able to add in some details. So if you press one on the number that you can go to front view and you can see that we have this nice curvature at these corners off the doorway, So there's actually a bevel around these corners and we can add them easily, rotate the view like this and press to on your keyword to go to at selecting mode and select this edge shifted down. This one, this one and this one? No, just rotate a bit and zoom in because we want to concentrate on one of these corners in order to see how much bevel we will need to add and press control big. This won't activate the bell tool and now move the mouse to increase the amount of bevel and just grow up on the mouse wheel to add more cuts in order to make it more smooth, we want to add 2345 cuts and you want a mound of barrel off this size. Left most button to confirm. Now press one on your lump it one more time and compare it to the reference image. And yet I think we're fine with this. Now. You can even adjusted with this pop up menu, and you can call me my values. So half of with off 0.711 and five segments here and there we go. Now we have this bevel in place looking nice. Now press one on your number head one more time because we need to see which details will still need to place and we can see here. We need to extrude three small panels to the inside. And we also have two panels here and we have six panels and total at the bottom. And they will also appear at the top. So know this place. The Burgess sees that we will need in order extrude these pals inwards. So I think we can start with these exclusions in the centerpiece here. But first of all, I want to extend their with off this whole object. So let's press seven on the number two. Go to top you and want to go to verdict Selecting and shift set to enter wire frame, double tap a to de select everything and beat box. Select. Now select all of these overseas and just pull him in. Words are just move them up on the Y axis here and we can press control. Shift tab changed, snapping to increment. Hold down control and just snap it. So we have one small red unit here asked with off this door piece. Okay. And let's see, I want to concentrate on this piece here, so we need to place three small panels here that we don't extrude inwards. So control are to activate to look cutting tool and yeah, think by adding to cuts were fine. So to cuts like this, left clicking and right click No press three to go to face Selecting mood It's like this face shifted down This one and this one now press I two instead and left most button to confirm. And now let's see, we need to check the box for individual and we're gonna increase the thickness 2.24 moments and it enter. And this doesn't look too bad. Now I want to press s and X and then just reduce. No, Sorry. First right, most button to cancel. We need to change the pivot point to individual origins and then press s x NL scale it down a bit on the X X is just slightly like this and left most button to confirm. Now let's rotate them. You like this and we can press e to extrude and then just move it down and you don't have to be specific with the amount. I think this will be fine like this and shift set to see the result. And yeah, I think this is looking nicely, comparing it to the reference image. You. So the distance in the center is a bait. Wider, actually. Then we have the distance here, so maybe we can change that. So let's hold down Shift halt To select all these inside faces here. Sorry, this face and all these inside faces. And right here. Now let's do this one more time. Press s x, and just scale it down even further, like debt. And now let's see. We can drag it on the X axis and just drag it a bit to the right. So this distance understand? Here will be a bit wider, just like on the reference image. There we go now, because we need the same piece on top. We can actually just replace it. So I want to angle a view like this year and select this face on top and press X and delete the face. It was angle of you like this so you can actually see all of these pieces here at the bottom. And, you know, I think we should press one on the num pits to make it a bit easier. Press one on your keyboard to enter Vertex electing shift said to enter wire frame be to box elect and select all of these verses here at the bottom. So all of these, I'm just zooming in so you can see that these are diversities that I have selected now press shifty to duplicate and left most button to keep them in place and just move it up a bit on the side access. And for the separation, we first need to go to the modifier, stab and unchecked the clipping option for now. Now let's press S Zet and type and minus one and hit Enter and this will just flip it around. Control shift tab changed, snapping to Vertex And let's angle the view of it and move it up on the set excess and snap it to one of these verses on top here and release all buttons to confirm. Now zoom in because there's still a slight gap. So drag it up on, Does that access one more time? Hold down control and you can see it will snap with the small gap in between. So we first need to move it up beyond Thies to overseas and then move him back and now used to snapping and again it's not working. So we need to reset the pivot point to median point. And now let's do this one more time. Drug it up beyond these two Burgess ease and drag it back down and use control to snap it. And now it's working perfectly. Here we go. And actually, these two verses here can be removed just like these two. Press X and choose dissolved overseas and you can see dissolving will not work. So press X and just delete these Vergis ease because thes came from the bottom here and we don't need them, actually. And let's check back if we have to. Same problem here Know this seems fine. Now we need to remove double overseas. So press a to select everything than press all temp and choose by distance. And you can see that six doubled verte sees were removed and press shifts that to go back to solve you. And there we go. Now we just duplicated this piece from the bottom and we placed it at the top here and we can move on
8. Modeling The Door - Part 2: so tap back to edit much. And let's see, we need to concentrate on this piece so press control are and add in 12 Yeah, to look, that's like this left leg and a right click three on the keyboard to go to face elect ings like this face shifting down This one this one press i to inset and left most button to confirm We're gonna use the same thickness point to enter and make sure to check the inevitable option and zoom in a bit more. Now I want to change the pivot point back to individual origins press s then Zet, and just skill it down a bit. Just like that. Let's have a little look on the reference voter suppress one on the dump It and I just want to have a look on these. So I think we should actually increase the hide off them. So angle give you one more time, press s Zet, and just increase the height like that's and left. Most button took one for now. Press you to extrude and it's actually aligning to the correct excess. So just put it in a bid and left most button to confirm and tap back to object. Mood. And there we go. This looks nice. And because we're using the merry money fire here, you do not have to do the same operation like for these. I guess they're just in place on the Arctic side as well. Now we need to place these exclusions on this panel here. So on this angled face here also here, here and here. So we have to do this on this side, and then we're gonna use the same technique. Like for this piece. We just call it duplicated and replace it with this piece. And the or aside will be Meryl across. So Suman here and tapped to edit mode control are and at two cuts, or actually we only need one cut here. So left link. Right click free to end her face. Select things like this. Face shifty down this one. I two inside left. Most button to confirm point to it. Enter again. We need to make sure we have in the little active and now we need to scale them down so we can change the transform orientation to normal and then press s why. And just skeleton. Maybe like, so this should be fine. So left most button to confirm. Now you can just angle of you like dance and press you to extrusion and again, it's already extruding on the correct access, so we need to push it in a bit. You can rotate the view just to see if it's the correct amount, and I think this is fine. But we can push it down a bit more and you can see the orientation Points are angle like the faces because we change the transform orientation to normal. So now if this operation finished, we can change it back to global and also change back the pivot point to median point. And there we go. You got next detail in place and now it's duplicated us to attach it to the top s. Well, so before we going to duplicate this for a top piece, let's press control off first and adult cut here, left leg and then right click. So now we have this Vertex here, or at least these two birth sees that we will need to attach this piece and no less press free on the key murder go to face like things like this Face shifty down this one. Press X and lead those faces And let's press one on the number two Go to front off a graphic and press one on the keyboard to go to verdict selecting, then press shifts that to go to a wire frame and doubled. Have a just to make sure everything is de selected Press C two So close elect and select all off these verses here. So all of these right click to get out of it and press shift e to duplicate. Now you can press set and just move it up a bit. No press s set minus one and hit. Enter. This will flip it around and then we can just snap it with Burdick snapping. So drag it up on the set Excess all time control. Snap it to this verdicts in the corner. Here, press A to select everything fault m and choose by distance and again six verses should be removed. Now, if you press one on the num pet, you can also see that we have some of these exclusions here in the front side off the door . So let's place these now we can easily play. Someone cuts here in this area and then create these extra agents. But if you press control are you can see the blue cut will not do beyond this face here. And if I right click to cancel, I can show you that this face here and also this face is an angle. So it's made up of more than four overseas, and Luke cuts will only go through faces connected by full verses. So we actually have to clean this up first, and then we can place the loop cuts. So press one on your keyboard to go to verdict selecting and also press shifts and to go back to Seoul of you because we're only modeling this on one side off the door. Peace and the other side will actually be the inside piece off the door because we're going to mirror this whole piece to the other side. And then in between, we will have two pieces that can slide open and close bag up to create the door mechanism. So just press one on your dump it to stay in front of you and make sure you're in solid view. Now select This vortex shifted down this one. And make sure your selected in this order first this one and then this one. Then press all them to bring up the merch menu and then choose at last. And now it will merge these two verses together. And now we can select this vertex and control shift step. Make sure snapping is set to Vertex and just drag it on Zet access all time control and snap it to disperse checks and release all buttons to confirm. And let's repeat this for the spot in peace. Here, zoom in like this Perfect 1st 50 down this one called M choose at last and select this vortex. Drag it on those that excess and hold control came down to snap into this vortex and release all buttons to confirm. There we go. And now if you press control are you can see the loop. God will go through this piece now, but not for this piece. And that's because we're also having an and gun right here. But we're not going to clean this up. We can just place to look at here and here at the bottom, and then we can use the knife toe or the joining function to join these verses together on this angle in here. So press control are and right here we want to add free loop cuts and left, click and then right click now press to on your keyboard to go to have selecting whole town halls and clicking here to select this whole actual er, press X and dissolved these Andriese and we just edit free Luke cuts in order to space them out of it. And we can do the same for the bottom Control are and free cuts Left leg, right click Autumn Holt. Click in here, and sometimes it's not working because of the move tool you can easily deactivated by clicking on the select books. Aiken, make sure you're selecting this edge and also the little last year at the bottom and press X and dissolved these edges. Now we can press one to go back to a verdict, selecting select this vortex shifty down this one and press Jay to join and do the same for East To There we go, and all we need to do is to add somewhere Luke. It's because we need this panel here, so it's a bigger panel and we have a small extrusion here and a bigger extrusion here and the same will apply for a top side. So let's see Panted aside here I want just like this Vertex shifted down this one Now, right click and sheer something lead and do this one more time. Right? Click subdivide. Now select this vortex 50 down this one. Sorry. Sometimes it's selecting a vertex in the bang, actually So press one on the number to go back to front view a double tap in a to de select everything. I want this for kicks shift you down this one right click subdivide. It's like this one shifted down this one right click subdivide. You know what? We have to join these. So first of all, I want to select this vortex. Now bring back to move Told by clicking on the move to liken Dragon on the set Hold control key down and snap it to this vortex. Do the same for despondent Vertex. Here, Select this one dragging on the set and snap it to disperse. Fix here. Now let's have another look. So we need to select this verdict shifty down this one right click Choose subdivide double tap A to de select. Select this Vertex dragging on the set and snap it to this one. The whole shift. Get down to select this Vertex s well impressed Jay to join these two. And we can do the same for this one. Shifting down this one, Jay to join. Now let's see, We're going to select this one shifty down this one and press Jay to join. Now select its verdicts here. Shifted down this one. Right click subdivide double Take a to de Select. Select this vortex. Drag it on. Does that hold control? You don't snap it to this one. Shifted down. Select these two and press Jay to join. And there we go. Now we should have the bird sees that we will need to create this extrusion here. And also this panel with all the buttons. I just want to increase the height off this little extrusion here. So I want to select this Vertex Hope, Control key down and select the Vertex on the right side Here to make sure every vertex in between the selected as well do the same for these bottom verses. So hold shifty down. Select this one that hope, shift and control key down and select this one to make sure all of these verses that about him here and also these at the top are selected. Now we can pan to center the view press s to scale and and set to only scale it on this that access and just increased the hide off these a little more. Something like that should be fine. Left most button to confirm. Now, if we look back at the reference image, we can see that we need another piece to extrude at the top here and at the bottom. And there's a bit of a margin between this piece and the piece on top and at the bottom. So we need another look cut in here, but we need to place it at the same position, like on the bottom here. The easiest way to do this is to add six Luke cuts in total and then just a leading the look at step you don't need So just press control arm to activate the loop cattle. And right here I want to rent six luke cuts. You can look at the bottom left corner to see the amount of cuts you have the left click and and rightly, and you can also adjust the number of cuts later on with this pop up menu right here. Now let's do the same foot upon control are and at six, Luke cuts in total left leg and then right click. Now let's press two and a keyboard to go to edge selecting, and we want to hold down. Halt To select all of these edges here at the top. Now hope downshifting on. And also add these edges beast these Andes and we're gonna do the same for the bottom. So hold shift in all key. Don't select these edges and move on until you have these extra selected a swell impress X and choose. Dissolve edges and there we go. Now we have our margin that we need and now we can start to extrude these panels in words. So let's press three on the keyboard to go to face selecting like this faith shifty down. This one just want this one in this one. We can angle the view like that. I want to press you to extrude h and then right most button to keep the extrusion in place and not just use the Y axis on the move tool to drag it in. And we don't need that much off the extrusion inwards. So maybe we can even start to see the order extrusion on the side here. So let's just sniping on the same distance like this. So I want to drag it on the y axis. No, I'm holding down control and of harboring my most around this area here, and it should snap like that. And this is totally fine for use exclusions here. Perfect. Now I want to press one on the keyboard to go to verdict, selecting and double press A to de select everything because we can select this vertex and just press X and dissolve this vortex because we don't need it. And if we zoom to the top here or pan to the top here we can see we have disparate takes shifting on this one. If you press g to grab, you can see they are unconnected, so they're not attached to the top face here. So right click to keep them in place. And we need to clean this office Well So I already tried it. And it's kind of difficult because we can't just create overseas on top here and then joined them. This will not work. So first of all, I want to try to convert this into a quote because this is an angle right now, and this will cause these problems with connecting them. So let's say like this vortex shifted on this one right click and choose Subdivide. Now I want to double tap eight to dislike everything and just select this Vertex dragon on the X excess. Hold control key down and snap into this vortex. No, hold shifty down to also at this Vertex to the selection and press change or join. All right, so this is working now I want to press control are and I want to add to Lukens here and left, Click and then right click and it seems like they're on the same position like these verses suppress a to select everything press all m and choose by distance and we can see that we removed these two double overseas. So there's were perfectly if it didn't removed two of these verses and just make sure that you're going to select the verdicts that was created with this move. Cut and use control key to snap it to this Vertex off this piece here benefit and do the same for this one. But just if it's not working like this, But this were just like a charm and no clean this up, and all we need to do is to model the pieces to create the door mechanism.
9. Modeling The Door - Part 3: Now, before we move on modeling the door, peace instead will slide open. Ah, 1st 1 to flip our whole mash around because I want to have to left side mirror across the right side. So under the mirror modifier, make sure that clipping is deactivated and in edit mode, press status like everything. Then press s X minus one and hit Enter. And now just rotate your view around like this and pan to decide here. Now, dragon on the X axis, Hold control key down and snap it to this corner here and just make sure that you snap it to the correct corn. And actually, so there's still a slight gap Soo, we need to snap it one more time dragging on the X all control key down and snap it right to this corner here so that we get a seamless connection here and there we go, OK, and now we will start to model the door pieces that can be animated to slide open so we can press one under, dump it to go to front off a graphic view I want to assume in and just like this, verdicts here this front and shifting down this one. So I'm rotating to view so you can see what I've selected. Selected this vortex here and this one at the bottom here. Now we can go back to front view by pressing one on the lump it and just center your view on this area here. Now press shifty to duplicate and left most button to confirm. Now, press P A juice selection, tap actor, object milk and just select the Duplicated Mercy's and 10 back to Centrum Edit mode. Press A to select both off the expertise and press f to fill. And this will create this wretched between. Now we can change the transform orientation from global to normal, and there can see that the move tool will be angled like this. And we can no press e to extrude and just use right most button to keep it in place, you know, just dragged on the red Xs and pull it out like this. We're not using any snapping function. Just pull it out. Kind of like this amount here now press s to scale and just angle it until you reach the bottom and the site piece off the door frame here just like that. Okay, Now we could select this. Vertex changed the transform orientation back to global and press shifts at to enter wife remote. I just want to drag it on the X axis. Hold Control Key known and snap it to this verdicts here at the left side here. And I want to do the same with this one. So just drag it on the Red Xs and snap into this verdicts here, and we're gonna do the same for this vortex selected and ragged on these that access and snap into this vortex. And now we have a perfect triangle shape. We cannot select this Vertex Press X and shoes dissolved overseas. And there we go. No, we have this triangle shape. You're in place now. We need to press a to select everything. A press shift set to go back to solid view. And just angle that you like this. We need to move this back and we want to snap it to be at the door side here on the back. But you can actually see I don't know why this happened, but our measures angle a bit, so it's not probably straight, so we need to press s to scale. And then why? And then zero And this will straighten it out and then hit. Enter and I just dragon on the y axis at hope. Crooked out. Snap it to the back side here off our door frame just like that. And I want to go back to front view by pressing one on the lump it because we need to increase the size of this triangle shape. So I want to re select this Vertex shifty down this one changed the transform orientation back to normal and just push it out even further. Something like that. Okay, this should be good. Now change it back to global and shift set and one more time re snapped these verses. This one on the x axis to this Vertex This one on these that access to this Vertex s well and shift set. Now it's happened on. Look, I think we should still increase the size a bit more. So let's do this one more time. It's like this vortex 50 down. This one change from global to normal. Push it out like that, change it back to blow. Expect this Vertex shift set make sure only this verdicts have selected and snapping on the X and this one on the set and shifts that to go back to solve you. And yeah, that's totally fun. So we can leave it like that, and we need to give this a bit of a thickness as well. So tap to edit mode, press a to select overseas, be to extrude right click and just drag it on the Y axis and give it a bit off of thickness . I don't want this to be as thick as a door frame, so this amount of thickness should be fine. Maybe increase it a bit more. Just like that. Rotate the view like this press three to go to. By selecting, we need to select this face shifty down the bottom face, press X and delete those faces. And now we have this trying of shape in place here. Now we want to delete the mirror modifier from this triangle shaped piece. So go to the modifiers tap and just click on the X Aiken to remove demonic fire because we're going to duplicate this piece to the upper right corner here, press eighties like everything and one on the num pit to go to front view, Press shift E to duplicate. You can move it to the center and use left most political firm. Now we're gonna flip this around on the X and that access. So press s X minus one it enter. And one of the time s this time. Press Zet minus one, it and her. And then we're gonna snap it on the X axis to one of these verses at the top here and on the X axis to one off these verses here. Okay, there we go. Now we have these two pieces in place, and all we need to do is to fill in this empty space, so just re enter. Added note for East trying to shape pieces and press shift set to enter wife Ramos. Well, press one to go to verdict selecting. Now we can select this Vertex shifted down this one, this one and this one. And you want to make sure that your selected the front overseas and not the backside verses . So this is fine. Press one of the number to go back to front view. Now we can just press shifty to duplicate left most button to confirm no press f to fill and p and choose selection. Now we content back to object mode and just select this duplicated piece here. So this Quandt shaped mesh and turn back to end our edit mode here. Now I want to add in a troop in the centre suit control art left leg and then right click. And now you can select this protects shifting on this one press X and delete those verses. I want to let this Vertex first, then press G twice to activate at sliding. Then we need to proceed. And now it can bring it up to reach or match the angle off this corner here and in, select this vortex Presti twice and then see and then move it down to match the bombing piece here. Now let's zoom in and dragged on the Is that excess and hold control key down. Snap it to this vortex here, pan to the top here and for this vortex here I want to press G twice one more time and then see and just extended a bit further. Now press Kate to activate the knife tool and we need to connect the knife tool to this vortex here, left leg and then press, see, and then we can move it up in a 45 degrees angle and get this at your highlighted like this left, click and then hit. Enter. I'll select this vortex press X and deleted. And now we have shaped this piece perfectly to fill in the gap here. Before we move on, we need to use knife to a one more time because this vertex is slightly off the press cape . And make sure it's snapping to this perfect sear than presi to get a 45 degrees angle and move it down all the way until the bottom actions highlighted left leg and and hit Enter. Now, if you zoom in, you can see that we have a Vertex to do, right? So this was a bit off, and we can now just press X and believe this Vertex and the Rio. Now let's just finish this one piece and then instead of using a mirror modifier, we're just gonna duplicated and flip it around. So for next step, I want to add some thickness to this piece and we can press shift said to have a clearer look. Press A to select overseas. An angle of U bit press e to extrude, and it can just right click and then use the move toe on the Y axis and give us a bit off thickness, maybe the same amount, like this piece here. So I will reduce the with just slightly like that, and we can also get rid off some faces that we don't need. Suppress three on your keyboard and select this face shifted down this one and the bottom face here, press X and believe these faces. Now let's turn around to the front here and now. I want to angle this at ship it in words in order to have a slight hand off to separated door pieces. Because if we're going to duplicate us to the underside, we would have a seamless looking piece because the mesh will look like it's merged with this piece, and therefore we gonna just select this front edge and move it a bit inwards. So before we move this edge to left, the 1st 1 to add a lute cut in between here. So control are, and at a loop cut in the center of your left leg and a right click Turn back to the front side, select this at here at the front and press one on your dump it to go to front, off graphic view. And now we're just using the X access to move it a bit to the left, but just slightly. So just move it slightly to the left. Maybe like so, and this should do it. So if I zoom in, you can see that's just a slight amount to the left here. And then we can press agents like everything press shifty to duplicate. Left most button to confirm no press s X minus one and it enter. And no, let's press s that minus one and hit Enter. And all we need to do is to snap it to fill in this empty space. So, dragon on the X axis and let's see, we want to snap it to this corner Here. Now Dragon on Is that excess and again, Snap into this corner here. Now let's have a look here. So it seems like they're still small gap in between. If you press one on the number, you can see it here. So just select this piece one more time, Ted, back to edit mode and one more time moving on the x axis. Snap it to this quantum. And no, it's actually filling in the gap here, And you can see, because we moved this front edge to left. We now have this slight hint off a gap in between these two door pieces. So that's why I ended DeLuca and move the front edge. Bittern left just to get this light him off to separated door pieces. Okay, perfect. So next up, I want to fill in the empty gaps between the door frame and the door pieces. And this will be pretty simple. First of all, let's select the door frame and tap to editor. Now turn your view to the backside. Here, zoom in and you want to select this at your at the bottom. Now turn your view around like this because we need to extrude it and snap it to this corner here. So press you to extrude and then right. No, Spartan And just drag it on the y axis, hold down control and snap it to this piece here and there. We go now. We filled in the empty gap here, and all we need to do is to fill in this gap and the gap here at the top. So let's start here. Tap back to object, note and select a center door pieces tap to edit mode. It's like this edge. You can press Komaki on the num pet to zoom in on the selection here. Now press me to extrude and then right most button to keep it in place. Dragon on the Y axis and snap it to the backside off the door frame. Here. You know, we just need to repeat this for the bottom piece. Here it's a turn of you around. Select a search and again we can press Comack in the dump it to zoom in here, press each extrude right mouse button, drag it on the Y axis and snap it to the backside off the door frame. And now we filled in all the gaps between the door frame and the door pieces, and I wouldn't want you to do is to hungry mouths around this object or one of thes actress actually, and impress Ellen keyboard. This will select everything that is connected to this piece and then press P and choose selection to make this door piece its own separate object. And then we go. Now we can tap back to object mode. And now all we need to do is to model some more details for the door frame and for the wall here on the left side. And then we're actually finished with the modelling process for the High Poly version, and then we can create the materials. So for now, I want to rename our objects in the outline A here to specify which parts they are, so we can start with the floor and just selected here in the Freddie Report. Now you can see it gets highlighted in the outline. Er here. So just double click in here, and we're gonna call this piece floor and hit. Enter Now, let's do the same for the sidewall. So just selected and go to the airliner and rename this to Walt and hit Enter. Now we're gonna do the same for the ceiling. Just elected an end outline or just rename it to silly and hit. Enter. Now this piece is the doorframe, so we're just gonna call this, uh, frame. Then we have this door piece. So this triangle shaped piece and we can see these are connected as well. So let's first have to edit mode now double tap eight. Just to make sure nothing is selected, hover your mouse around this object and press out to selected press P and choose selection and tap back to object. Note. Now, let's just recently this one and in Atlanta just rename this triangle and we're gonna give this a number. So trying the one it enter this piece here, selected in the freedom reports and rename it to Triangle to and enter, and we have to center GOP's. So I'm just gonna call this center, want it enter and the l A piece is sent her to and hit and her and I can easily detect which measures they are in the old liner. A swell, Okay. And we can do the same for these empties. So this should be the reference image for the side. So image science and empty dot Syria's air one is image front for the front view image. Okay, So last but not least, let's just save the project Control s and we're gonna see us in the next part
10. Modeling Final Details - Part 1: So let's finish it off by modeling some final details. First, we want to start by pressing one on the number two go to front view and shifts that because we want to have a look on the reference image here. Let's sumit support a doll for him. All we have to do is to model this piece with the buttons on it. So let's go back to solid view by pressing shifts that just select the doorframe and we can enter local view. So with all the under objects hidden by pressing, slashing the num pit. But it seems in the newest bundle version this is not working correctly. So we have to press slash one more time and another time. And now we're in local of you. So let's start to add this detail here. Just talk to edit moat and pan to the left side here. Now I want to select this face. So let's press three to go to fight, selecting and select this face here. Okay, Now we can press one on the number that you go to front view and zoom in here Now press I to inset a left. Most button you want the thickness off 10.1 and hit. Enter and let's see. Now we are going to just drag it on the Y axis and we want to hold down control and snap it to this outer piece off the door frame Here and now, Karina, to this shape here and now, we will play some buttons on it to finish it off, So this will be fairly simple. So first, press one on your lump it to go back to front view, and with this face elected, we want to press she s and choose cursor to selected. Now, if we create a new object, it will be placed at this position here off pretty Kherson. Now we can simply press shift A to bring up the admin You we want to end in a circle and now we can change the properties with this pop up menu. First of all, we want to reduce the versus to 24 contender and change the radios to about 0.1. It enter changed the Phil time to end on and align it with the view. So now that it's rotated correctly, we can press s and just scale it down a bit, maybe something like that, and used to set access here and drag it up. Now you can have another look on the reference image, but I'm using Night American Nation to place these buttons here. So with this first circle place like this, we can no price I took in. Said left most button to confirm. We're gonna use a thickness off 0.5 end her and just rotate the view bit and dragon on the Y axis and create this part in here. Now just hover the mouse around here and press l two select everything and press shifty to duplicate left most button to confirm and just move it down to create the second button here. Just like that. All right. And for the buns and abundant, we're gonna use a plane. So press want to go to front view? So one on the number, of course. Then press shift a and add in the plane. We're gonna reduce the size 2.71 hit. Enter. We're gonna align it with the view just like before. And does this weigh too tiny off course? But first, let's just drag it down to about right here, press s and scale it out maybe. Like so Now press by. Two inset left. Most want to confirm thickness point seriously or five. Enter. Rotate the view of it and ragged on the Y axis and you can even use to snapping some holding down control. And I want to snap it to this button here. So this out a piece off the button to give it the same thickness. Likely SoCal a buttons here again Move you mouse to the bottom here and press l shifty less most button and drag it down. Press one on the lump it and then we can simply rearrange them if we want. But I think this looks nice and I will keep these buttons just like that. Now we can go out of local view by pressing slashing the number one more time. And if you want, you can go ahead and add some more details to this button section For this course. I will leave it just like that, and we will now move on to model some details on the wall here. So press three on the num pit to go to write off a graphic and shift said to go to a wire frame mode. Now, if you zoom and we're now going to add the events, we're gonna add the lights here to the center panel. And there are also some buttons here on this piece. And there's a little exclusions in words like these here, and we're gonna place them as well. So we're still in edit mode for door frames. What's pressed? Tap first shifts at select the wall and pressed had to go to edit mode. We're gonna start with adding the air vents, so let's zoom in on this piece here and just rotate the view of it. Now we can press one to go to verdict selecting. That's just like this Vertex here and press Kama kuna. Dump it to zoom in. Now you can see our camera will start clipping fruit and mess your We can change that by pressing and on the keyboard to bring up the side menu. Now let's go to view and the clip start. Just click in here and drag it all the way to the left, and this will reduce the clip start, and now we're able to see it a bit better. here. Now I want to press shift e down to also at this Vertex to the selection, then press shifty to duplicate and left most button to confirm. Now let's press one under. Number two, go to front view shift set press are to rotate typing 45 hit and her and just rotate the view back. You can close to side menu by pressing in shifts. Set now direct us up a bit, maybe like so, zoom out, press you to extrude, right? Most button dragon on the Y axis and snap it to the other side here to one of these verses . Now let's press help while hovering around this extruded peace and press P And she was selection press tab to go to optic note. Just select this piece we had duplicated and we're now using on the right money fire to copy it multiple times to fill in this whole spot here. Now we can go to any modifiers tap here, and first we want to delete the mirror money fire because we're just going to copy this to the other pieces as well, instead of using the ceremony fair. But we want to load India Rey money fire. Now we want to reduce the ex officer it down to Syria and increased use that offset to one it and her. And we want to increase the counts to five like net, then tapped edit mode, press A to select all overseas and just move it down slightly to fit it in right in this piece here. Now let's just apply the rain modifier. We have to apply it in object mode because you can't apply more. Differs in added mode suppressed tab first, then hit, apply and tap back to edit Note. Now, with everything selected, we can zoom out first and press shifty to duplicate it and just move it up on present access and fit it into the top keys Here, zoom in a bit and just adjusted slightly, like so Now press three on the num pent to go to right view for a shifty to duplicate and just move it down and to the right here because we need to fit it in right here. Soon in angle of view, we can drag it on the Y axis and hold control key down and snap it to this corner here with vortex snapping and then just adjusted slightly like before, fitted in perfectly like that. Let's duplicated one more time to fit it into this piece here. Shifty left leg, moving down, angled of you. And yet I think we nailed it already. All right, Back to object mode. Now for the left side, we can now use new mirror money fire. So add the new mayor modifier here, unchecked the X axis and check the Y Xs. And there we go. Now, I still want to add a little bit of thickness to these parabens because we're going to use a note within the material system off blender to detect the edges off these pieces that we have to create some Edgware thirties and without any thickness to this. This will not work. So in order to get a better result with the materials and we're going to create, we want to add a bit of thickness to all of these urban's. We can easily go to the money first tap, add modifier and choose solidify. Now just zoom in here so you can see what's going on. So this morning fire will add some thickness to it. Weaken G o to the bottom Off the money. First tap to see the solidify money fire. We want to check only rim. And we want to reduce the thickness to about point Syrah, syrah, tube and hit enter and just won't just give it a slide amount of thickness like that. Okay, now we can leave the money fire active. And we will now go to right view by pressing free on the number head. Now, press shifts that we're going to create this pattern here for delights. So first we want to place it for Dickerson right here. So activate the free Dickerson. By clicking on this, I can hear and left most button somewhere around here to place the precursor. Now go back to the select box. I can zoom in here, press shift a and and mesh supple. Now we want to reduce the verses to 18. It enter changed Iranians to point what it and her set the fill Type two. Nothing like that. And change the alignment to view, you know, press s and just scale it down and zoom in here. Tap to edit mode. Move it up a bit and you can try to align it with the reference image, so press s and scale it down and moving up. Now zoom in here. We want to double tap a to de select everything press be to box like and selectee spot in verses here. Just make sure the descent of Vertex on both sides is not selected. Press X and lead these verses Press A to select everything shifty to duplicate Left most button now press s Zet and type in minus one His end her and just move it down. Now select this Vertex shifting on this one press after Phil, It's like this vortex 50 down this one and press at to fill. And now we're just duplicating this shape here and rebuild this pattern and this will be pretty easy. So we compress agents like everything impressed, shifty to duplicate left. Most want to confirm and just move it to the right. Now we need to duplicate this one more time and we could do it freehand but I still want the same distance in between these pieces so we can select this verdict shifting down this one press shifty to duplicate, moving up to get it out of the way First moving to the left. Now move it back here. Hold control. Key down. Snap into disparate checks that would have a to de select hover around one of these birds. Sees and press help to select everything. Press shift, E left leg. Move it to the right. Something like that. Confirm. Moving back. All control key down. Snap it to disparate takes and you can see this will not work because we have to bring one of these for Cassie's down first. So we want to bring this to the right. Now select this Vertex and bring it down here. You want to bring it close to this verdicts because this will be considered to align it with this one. Double tap A to de select press else's like this shape mover to the left. Here, hold control key down and snap it to this vortex. And there we go. Now we can select this vortex shifting on this one. Press X and elite thesis foresees. And next up, we want to select this verdict shifting down this one and press F to fill and create an action between because we're going to delete left side to use the mirror Molly file that would have a to de select beat a box select Select All of overseas to left Press X and Elita. Okay, Now all we need to do is to press A to select everything and then press shifty to duplicate left most button to confirm Zoom out and just move it up to align it with these other pieces on the reference image. And we can now simply double tap. Hated the select Beetle box, select and selective urgencies that needs to be adjusted. Move him up. That would have paid to dislike and move onto the next one. And we can just duplicate these and finishing up the pattern here. So I will actually speed up the video because this is easy and repetitive, and you can easily do it without falling along here. And you just have to finish it up until this panel here because this piece here and the piece on top can then be mirrored from the bottom. So we're not using Amirahmadi fired. Oh, we're just going to duplicate them and then flip it around and move it up to fit in here. So I will now speed up the video. See you in a second. Okay, so we should be finished up to this panel here, and the top part can be duplicated and flipped around. But first of all, that's price shifts at the event to solid view. And we need to scale these pieces up in order to fit with the rest off all wall piece here So we can press tap first to go back to object mode and oppress control A. We want to apply the rotation and scale and no press. And to bring up the sidemen, you go to item and changed the scallop values to 1.2. So 1.24 x and you compress tap to flip to the next field. Type in one point to 40 white and 1.2 forties that can hit, enter, and we can press and more of my time to close this menu. And all we have to do is to center these pieces within these panels here. And to do this, we first need to select the wall peace and have to edit note because we need on Vertex within the center for all of these panels. Now for this one this for Texas, right in the center. Because re Eustis for mirroring across to the top. But for this bottom panel and also this one right here, we first need to create a vortex within the center off these. Now, To do this, we first have to claim these edges, so press to on a keyboard to go to f selecting we want just like this edge shifting on this one. This one and this one press x and choose. Dissolve edges. Now press want to go to verdict selecting. So, like, this vortex shifted on this one right click, something might know we have this verdicts in the center. It's like this Vertex shifted on this one right click subdivide. And now we have this one into center. No, we need to tap back to object Note, And we also need to angle of view. So we are able to select our shapes here Now press free in a number to go back to write off a graphic and tapped to edit mode for these. And now we want to assume out. And we're now going to align these top shapes. Your first we can press control shift tab to bring up the snap menu, make sure it's set to Vertex and change to snapping with option to center. And now we can press feed to box select and we want to select all of these upper shapes. Now we can drag it on the set, hold control key down and hovered the mouse around where the Vertex off this wall piece should be in the center here and you can see our selection will be snapped and centered within this panel and we will do the same for the other shapes. And then we're also going to send her it on the Y axis. So first, let's pan to read a bottom here, double template to de select be to box elect and select all of these verses here and again . Just drag it on the that excess hold Contro came down and hovered amounts around this area here metal bird takes should be and it will snap within the center here and one more time. Double tap a to de select be to box select Select all of these dragon on the set and hover your mouse while holding down control around this spot here and snap it to dis vertex. Now we want to press control shift tab to change it back to snap it with the closest press A to select overseas dragging on the Y Hold control came down and hover You mouse around this piece here or this area and we will now send her out on the Y axis as well. And now we can use the mirror modifier to mirror it across to the left side. But first double tap a to de select, be to box like it's like all of these press shifty to duplicate. Left most button to confirm press s Zet type in minus one can hit and her and I just move it up like that and you can just pinpoint down the location on double tough A to de select control shift tab Changed it one more time back to snap it with the center beach box Might select all of the's dragging on Does that hold control key down. Snap into this vortex within the center here double tempted to de select And let's do this one more time for these pieces here, Dragon on is that hold control key down and snap it to this vortex here
11. Modeling Final Details - Part 2: Now, before we add the new mirror modifier, I just noticed that we're not send out on the Y axis, so I want to select everything first by pressing a control shift tab Changed a snapping back to closest and zoom in on the centerpiece here. Now, Dragon, one more time on the Y axis and snap it to the center here and now we're actually centered perfectly. So now let's go to the modifiers. Add modifier mirror. We want to activate why and deactivate the X axis. And we also need to reset the origin of our object. Suman on the spot on Vertex here selected shift s cursor to selected tap back to object mode. Right. Play set origin toe Brady cursor And then we go. Now we finished up this pattern Now for next step we want to zoom in. And now let's activate or apply the mirror. Modify our 40 y access. So first, make sure that clipping is checked and then hit. Apply 10 back to edit Mount Price to trigger to f selecting no re going to select all of these center inches here for all of these pieces and then press X and believe these Address No. Press A to select everything and press f to fill this with an end, um, and press you to extrude right most button and in just drag it on the X excess and give this a bit off death. Something like that should be fine. And now we can use the bullion money fire on the well pieced this abstract this pattern from our shape here. So now before we move on by ending the Boolean modifier to the wall piece, we first need to select everything off our pattern here. So in edit mode, press A to select everything, and we need to make sure that it sticks out on both sides. So we want to angle the view like this and in just push it to back here and make sure it sticks out at the backside and at the front side, off the wall piece. You don't need to center it. Just make sure it sticks out on both sides. And now we can tap back to object mode, select the wall peace And before we at the bullying modifier, we first need to apply the mirror modifier because otherwise the bullion modifier will not work correctly. So we want to make sure that clipping is active so that are sent overseas, are merged together, and we want to make sure that we have t. Why access and is that excess checked and then hit? Apply now click on add modifier. Choose Boolean. Now we can click on this color picker and this will give us the option to select Are created pattern here. So just use the color picker and then left most button to click on this pattern object. And we need to make sure that the operation is set to difference and not just hit. Apply, and this will apply the Boolean money fire to the wall piece. And now we can select out Pattern and press X and elated because you can see that a pattern is now attached to the wall piece itself. I want to make some little adjustments to the pattern, so I'm selecting the wall peace and having to edit mode, no impressing three on the keyboard to go to face selecting and free in the number to go to write off graphic you. I want to select all of the's inner faces off the pattern here so you can use left most button and shift or proceed to soak a select, use a small circle and then select all of these in our faces. Here, off the Petr and I will speed up the video to save some time. So just go ahead and select all of these patterns, and then we will see us in a second. OK, there we go. Now we want to angle the view of it and just make sure that you selected D correct faces. So on Lee, the inside faces and press control shift tab also make sure you're snapping. It's still set to Vertex and just click and drag on the X axis. Hold control key down and snap it to one of these verses at the panel here. So now we made this shape completely flat, so there's no extrusion anymore, but we still have doubled overseas. So before we move on, let's press I to inset left most button to confirm we're gonna use a value off point of one for thickness it enter, then press all s left most button and use a value off minus point over one and hit, enter and now press A to select everything because we have still doubled overseas for the pattern press all m and choose by distance. And you can see that 880 verses got removed because we used the ec faces to snap into the front piece and then we had the stubble overseas. But then we use the insect function to create the inside first before we're going to remove two doubles. Because otherwise we would have to re select the whole parent one more time. So this safe does some time here. Now we can tap back to object mode and you can see we have this nice pattern in place and later on, we're gonna use in the mission Shader to integrate a light source into this panel. Now, if you look closely, you can see these facets at the inset and weaken. Smooth that out by selecting the whole object, an object note and a just right click and choose shades. Move. Now you can see our mesh looks totally weird, but we can fix that by going to the object Data properties tap Here, Just click on this icon. You want to go to the normals and just check the auto smooth option, and now you can see that these incidents are nice and smooth. And if still anything does look weird, you have to adjust the angle. So for this example, on an angle of 30 degrees is totally fine. But if it looks weird at some areas than, just adjust this angle until you find the sweet spot and all we need to do to finish off this wall peace is to add some more details to this piece here. So let's per suffering on the number to go to right side view. Shift set to enter wire frame. Let's just zoom in and I know it's hard to see, but we're looking for details that we still need to place so I can see three small exclusions pushed inwards. So these here on the reference image and actually this piece here is separated at this section here, and we do not have that up here because our peace iss seamlessly connected. But I think we're just fine with having this a bit different than the reference image, but at least we're going to add these free extrusion inwards at this position off the for angle shaped piece here, and we're going to also create ah button section here. So it's you're the reference image and our measures right here, and we're gonna have some buttons on there and maybe some reddish lights on the leaf, and we're gonna make it like a terminal. So we're gonna use some extraordinary here. But let's start with these furry little exclusions here, So three and a dump it and shifts it. Now we also need to tap back to edit mood, and we are going to place the details freehand. But if you remember, we apply into the mirror modifier in order to use the bully and modifier too great these shapes at the centre panels here. But therefore we would have to model the right side and the left side. So I'm actually going to delete the left side off this wall piece to re use the mirror modifier for this. But if you look at the centre pattern here, this can't be mirrored on the set access because therefore, the shapes will not be the same. So we're not using Demerol modifier forties that access on Lee for D y axis. So for the left side here. So press shifts at first to go to wire frame and one on the keyboard to go to verdict selecting. I'm double tapping a to do you select everything impressing beach box Select. And we need to select everything up to the center and don't select all the way through the center because we still need the sent overseas in order to use to Mira modifier correctly. But you can see that we're still missing some verses. Now I will go ahead and zoom out so everything is framed in. And now I'm pressing B one more time, and I'm just focusing on the center Burgess sees. So we do not want to have these verses in the complete center selected Onley diversities that will appear at the left side. So you can see it should go to these diversities and here, all the way through this Centaline and then press X and elite overseas. Okay, Now we can press shifts it and tapped object mode due to the wrench I can at modifier mirror and Giusti. Why? Excess and deactivating x excess And you can see we're now missing The center faces here for his shapes of tap to edit mode and we can create an angling in between these some holding them old left, looking in here to select all the verses inside press F to create an angle all key down left like f to fill and soon and just go through these one by one. Okay, on. We should be finished in a second. Do not have to follow me along on screen. You can do it on your own. And there we go. Okay. And now we can start to place these details, but we will then have to mirror to left side as well. And the topside will look a bit different than the bottom side. So stain edit mode and zoom in. We want to concentrate on these two. Address so press two to go to x selecting. Want to select a bomb image? No press she twice to activate sliding slimed down something like that and left click to confirm. Now press one on the keyboard to go divert, selecting and with east overseas still selected right click and choose something like and increase the number of cuts to six it enter. Gonna do the same forest Vertex shifted on this one right click subdivide six Cuts it. Enter now we need to snap them to y position off the spot overseas because they're kind of off you at the top. So go through these one by one dragon on the wine Holt Control Key down to you snapping. It's knappen on the Y axis to the bottom. Verses here. If the move tool is distracting you, you can simply deactivate it by clicking on the select books I can, then pressing G to grab. Then why? To grab it only on the Y axis and then use control to snap it. We're kind of like to use the move toe. Sometimes it's in the way when you want to select something. But you can just click in debt closer radius off this Vertex and it will still selected. And I kind of like it to use because if you move some verses just like that, I don't want to use G and then the excess all the time. So there for the move to it's kind of handy, So that's why I use it Now. We want to select the correspondent versus at the top and at the bottom and impressing Jay to join. Go through these one by one. Struck both of them. Press Jay to join and we go Now we want to select all of these a presi to self select. Just select on them. Right Click now press s to scale. And then white You only Skillet only. Why we want to move him closer together. Maybe like that. And we want to move him two left. No impressing three to go to face selecting. Let's like this one shift you down this one and this one. And now we can angle of you. We want to press you to extrude. Just put it in and you can decide how far you want to have it pushed in. I will go with a depth off this and there we go Now this will not appear at the bottom. But again, this is exactly how the image looks like. Let's go for another detail on this piece here. So go to edit mode, assume in and we can press free on up it to go to write home about graphic. Of course, Now we're going to use the life tool to get a square shape right here. So let's see. Let's place it somewhere right here. Now, actually, on the reference image, you can see that the panel should be separated into two pieces. We do not have that on our Ramesh. But I will keep it like that because we do not want to copy everything on the reference image. We can still do some own. You make a nation and create new shapes. So I will actually place this little piece here on the whole panel. So we've shift set in solid view. You can press K for a knife tool now I'm clicking right here now impressing. See to make sure that I get a straight line. Now I'm with clicking again to place this detail right here. Andi moved to the left, Left leg. Move upwards. Left. Click in our press seat to get loose off the straight lines. Snap into this vortex Left link and hit. Enter now impressing. Want to go to verdict selecting selected Vertex Dragon on the set Control key Down! Snap into this Perfect. And now we have this little piece here in place. I want to select it so I'm using so called select for this right place to get out of it. And I'm pressing g just to reposition it to the place I wanted to be. Maybe like here. And impressing s to scale it a bit. No impressing high to inset left most button we can use a thickness off. Let's try 0.0 serial five hit, Enter. And I think that's still too much soon using a value off 0.25 and then we can press shift. Artois will redo the last operation. Now we have to insects here. I'm pressing due to go to catch selecting all Get down! Select all of these edges here. No angle of view bit and we compress all this. Left click Let's try a value of minus point Syrah, Syrah, Fife and hit Enter. Actually, we're not using the minor science have just deleted. So value off syrah 0.5 it enter. So push it in words and there we go. Then we place this detail as well and you can still go ahead and go to write off a graphic . Two verdict selecting maybe then press shift sent and just make sure you got all the verses of this little piece shift set to go back to solid. And you can still press G to grab it and re precision it wherever you want it to be on this piece here. All right, Well, keep it right there for now. And we actually going to place the same detail at the bottom. So therefore, because we're not using dimmer money fire actually going to just duplicate this piece and replace the bottom piece. So, in edit mode, we can assume in here three on the keeper to go to face electing first. Let's like, despondent face press X and delete the face. Come up here. Press one to go to verdict selecting. I'm sorry. Just stay in face. Selecting suppress free on a keyboard. Now we're going to press shifts at to enter wire frame and we can use to self reflect. We want to make sure we get these spaces here, including the external panel all the way around shifts that make sure get this whole selection shifty to duplicate. Now we can press s Zet minus one. It enter. So flipping around on these that access and drag it down on the set that we consume in here now, dragging on the set again, holding them control to snap it into place. Press a to select everything all M and choose by distance. And this will remove for overseas. And now we have this piece duplicated and placed at the bottom. No, we still need to create the Toma. So tap back to edit note and zoom in on this piece. We need to press selection and a picture into local view. So we're not distracted by anything else and just assume in one part time press Want to go to verdict selecting and first before replaced the tunnel. I want to increase the size of this piece here. So impressing shifts after and a wire frame I'm double dipping. Eight to de select Beat a box linked. I want to select off these verses here now impressing shift set so you can see these are overseas that I have selected and just want to move them with the move toe left in order to increase the size off this piece here and I want to do the same for the bottom. So three under not pet and doubles have a to de select. We do not have to enter. Why a frame for this? To just process beat box like it's like all of these verses and and moved them up a bit to increase the size off this l shaped so you can always get to object mode on. Just make sure that you're fine with the shape. I kind of want to bring it up a bit further. There we go.
12. Modeling Final Details - Part 3: Now we need to go back to edit moat and zoom in a bit. Now we want to press to to select this each year, then Presti twice to activate that sliding, slide it down a bit. Something like that should be fine. And then press frank to go to face electing. Select these two faces impress I to inset left. Most button gonna use a value of ponder one hit enter and check the box for individual. So we will have these two insects here. Now we can simply select this face here. First impressed I to inset left most button and we're gonna use a thickness off point a one hit. Enter, then press All s a left. Most button in type in point. No one can hit. Enter now. We need to use a minus sign in front of this value. We want to push it outwards. So minus point for one. And there we go. Now we need to place Mother Etch in here So impressing three on the number to go back to write off a graphic, then press K for a knife tool. You want to snap it to this edge here and click with left. Most button. See to keep a straight line left most button again on the other wretch on the left side and hit Enter to confirm. Okay, Now we need to select this face and angle the view, press you to extrude and just pull it out of it. Something like that should be fine. Left most button to confirm three m number to go back to right view press s and and why? And just scaled down on the Y Access something like that. Press two to go to X selecting selectors top edge and moving down to give this an angle. And this looks fine. Now we can select this face here. Suppress putting on the keyboard Selective face Zoom in. We're gonna press I to inset left most button, you're gonna use a thickness off 0.1 it enter now press I two instead, One more time left, most button. And this time we're gonna use a value off 10.25 Then hit. Enter now, press shift Our to repeat, assume in go to X, selecting by pressing two and a keyboard all tied down and select this whole ring off edges . Zoom impress office left most button and using offset off 0.5 and hit Enter. And I think this is kind of too much. So let's trying value of 0.25 like on the inside and you can tap to object notes. And I think that's a look I'm aiming for so we'll keep it like that before value off point C were 0 to 5 for the normal scaling operation. Now, in Arctic note, we can do the same for this bottom face. So impressing three to good face Selecting, selecting the face here I to inset left most button point Syrah Syrah to five it enter Shift our to repeat zoom in. Go to Etch selecting by pressing to all Get down, select the whole ring off edges All that s left most button and you saw off set off point sewer sewer to five and hit Enter! There we go and we placed these panels and we're going to add some button students piece here And also some melodies for despondent piece. So back and edit mode. Let's soon in And before we move on, I want to press three to go to face selecting, selecting this bottom face here, just drag it down on these that access. And I want to snap it to be straight at the bottom. Here, There we go. This looks kind of better. And let's see, I want to also scaled us ended with before we move on. So three on the lump it shifts that want to go to verdict, selecting double tapping a to de select be to box flicked off these verses. And you can press shifts that to go back to solid view and pulling two left a bit for just to increase this piece. And yeah, I think this is coming along nicely, so we'll keep it like that. All right, so let's create the buns for the top piece here. So free on the lump it and tapped her. Enter edit mode now impressing free to select his face than press shift s and choose cursor to selective. Now press shift A and in the plane And we can scale it down 2.1 it enter and we gonna align it with the view and it's pretty small. So let's get love a bit more like that and we want to press you to grab it, and we want to move it somewhere around here. Maybe impressed by two instead left most button that's try a value of 20.5 Hit, Enter. That's a bit too much. So I'm going to use a Valley off 0.25 And now we can just angled of you a bit and just push it forward to create the bottom. Okay, so this should be fine, and we're gonna duplicate this button three times. So that's how around the button and press out to select everything and press shift. E left most button and just move it down and we'll place it like that. And now I'm pressing L while hovering around the first button to have both buttons selected . Then prat, shifty left most button and moved east down amid, and you can go to write off graphic by pressing. Agree on the number, and you can place them wherever you want. You can have another look on the reference image if you like, but I will place them like that and I will go for another detail. So therefore double tapping a to de select now I want to select this bum here. So I'm hovering around here, pressing l on the keyboard to select it, impressing, shifty to duplicate. And I want to move it to the left side here, somewhere around here should be fined and let's see. Now I want to select the face here at the front, off the button and now impressing you to extrude h and I want to keep it in place. So impressing, right, most button. Now I just want to move it in a bit and maybe, yeah, I think we can also just delete this face. So it's just elated, so we don't want to have it extruded. We just want the frame off the button, so to speak. And they don't want to select this face here and the face at the inside. So these two bottom faces off the button and just scale it down or move it down with these That access to create this shape here. You can also just snap it to the bottom versus off this button. Maybe, but I want to have it a bit more longer, so I will bring it down a bit more. Something like that. Now I'm going to overtake selecting by pressing one on the keyboard and we can select this Vertex and now the move tool would be in the way. So impressing, see to SoCal select. We also want to have this verdict selected, then press shifty to duplicate and just move it up. It no press are why and type in 45 hit Enter and I want to press you to extrude left most button and I want to snap it on the Y axis to the other side to create this shape here, and we can now just select the whole object. So therefore, I'm going to face electing by pressing three on the keyboard and just select the whole face . Press p and choose to separated by selection. Now tap back to object mode and just select a piece that we have separated. Go to the modifier, stab, click on at modifier and added on the ray money fire. Now let's see, we need to change the office it for the X axis to Ciro and the Y axis. Let's try to change it to one and hit Enter Now This will duplicated around these that axes So let's increase the counts until it filled up the whole space here on. And I think we need at least 30 six and I want to go to edit mode, pressing a to select everything. And I just want to move it down a bit like that's and yeah, I think that's looking nice. So it's a nice little detail and I will place it like that, and something similar can be seen on the reference image. So yeah, I will just leave this piece like this. And now we will create some led ese for this panel here, and we can use the same shape like we have on these set of panels here, but we will recreate them specially for this piece. So for now, I'm pressing free on the num pit to go to write off a graphic, and I'm zooming in a bit now, recent, like the well, peace and tap to edit mode. It's like the face here and let's see. So we're going to press, shift us and click on cursor to selected to play. So for you curse in the center of this face. Now we want to press shift eight and we want to add in a circle. Now we want to decrease the burgesses to, let's say 14 and hit Enter. We can decrease the radius to point a one kid and her and we want to change the alignment to view. Now let's see. I want to bring the Vergis east down to 12 and hit. Enter. Okay. And it should be enough. Now we can just press one to go to verdict selecting and I want to press g moving to the left side and we want to scale it down even further. Suppress s and skeleton. And it should be really tiny. Something like that should be fine. And I want to move it up a bit, Maybe just scale it out a bit more like that. Okay, now I'm doubled. Having a to de select be to box select. Let's select the bottom half press X and late diversities now hover around these mercies press l to select them press shift e and in press s that minus one and hit enter to flip it around and move it down a bit. Let's connect these two bersih, so select them and press J and you can see j will not work. So let's press f. This should work and create an action between let's do the same forties to select them, impress F to fill. Now let's press l two select all of these verses here for a shifty and duplicated and just place it around this whole face here. And we're gonna also change the size of these to create some variations. And later on, we're gonna use a mission shader to make them glow and give them a red color so they will look like ladies is something like that. So let's press shift e and just duplicate some of these and you don't have to be that accurate. Just try to get the same distance in between them, and we can even go ahead and select, maybe free off them, then press shift e and bring them to the other side. And here I want to double to have 18 de select everything. Be to box select. I'm going to select the bottom vs and just increasing the scale. Maybe like that. Now, in double tapping a B two box legs like all of these shifty and I want to move it down maybe like here, I'm going to duplicate in one more times. Shifty, left, click and then moving to the right. And maybe it will place him, like here. Doubled having a baby to box legs. Anna will increase the scale of these. Now, I think I'm going to double tapping a one more time. Be to box elect like all of the use. 50. I want to bring him closer to these three here, the taller l ladies and maybe place him right here. And at the end, this will look pretty cool with the emission Shader and the red light. So all we need to do is to fill these with an end gone. So I'm going to select all the verses by holding down all 10 clicking in between and then just pressing f to fill them with an end gun. And I will go through these and I will speed up the video. You can do the same on your own. So just hold down all while clicking inside of these circles and and press f to make an angle. Okay? And I think I will go ahead and separate these. So in edit mode, we can simply stay in Vertex electing. But it will press free and the number to go into off a graphic view that I'm personally to box select. I want to select all of these verses and don't go to face selecting. Otherwise you would have selected this whole face swell. So only these patterns did we have created and then also press P and choose to separate them by selection. All right, And we have the next detail in place. We can just select this edge here and just move it down a bit. I don't want that big often angle for this piece here, so I think this will look a bit cleaner. All right, now all we have to do to finish up the wall peace is to adjust the top part off this L shaped panel because here at the bottom, we change the size of it. And because we're not using the mirror money fire forties that access, we have to manually adjust the size off this l shaped panel a top to fit with the bottom piece. So let's just get your head it much and we want to go to a vortex electing by pressing one on the keyboard. Now, this is kind of hard to see because we have a lot of overseas here, but we want to select all of these verses first. So impressing beach box linked and I want to select all of these verses here. Just take your time. You need to select off these various ease. You can also select used to if you want, but it's not necessary. All right, now we want to drag it on the Y axis and you can see we have to overseas at a bottom selected so control set to undo oppressing be to box linked and using middle mouse button just to de select these two verses here, we only want these verses Selected dragon to the left. Hold down control and let's try to snap it to dis verdicts here. And you can press speech a box select. This will give you the straight line and you can compare it with the university's. So we're slightly off. So this vertex is not aligned with this Vertex here, So we need to snap it to this Vertex here So I'm right clicking to get out of box selecting now I'm dragging on the y and I want to snap it on this vortex. Here and again, I'm pressing Teacher box Select. And then we can see that these verses are aligned with the bottom part. So I had to snap it to dis Vertex here. All right. Now, for the height off the L piece we need to duplicate to overseas and then use the verdict snapping. So let's see, I will go ahead and select this vortex shifty down this one. So these two on the L shaped piece and oppressing shifty to duplicate and just press G and moving out of the way first. Now we want to drag it on these that exes, and we want to snap it to the bottom Vertex off the L shaped piece here. So drag it on dissent and snap it to disperse checks. You can also bring it a bit closer here. Now, Donald, have a to make sure everything is de selected press be to box select, and we want to select all of these verses and just drag it on the set and drag it beyond this Vertex. Now dragon back and hold down control and snap it to this per text and you can see that we had to snap this vertex to this one. But actually, these verses are snapping to this one. That's because it chooses the closest Vertex to snapping on. Now we need to bring this vortex closer to this one in order to snap it to the same position on these that access. So I'm actually going to drag this back down. Now I want to select this vortex. This is on the correct position on this that access. So we just need to bring it closer to this verdicts here. And right now it's inside the measure, so you can't see it. So impressing shifts up adults have a to de select beach of box elect and select all of these various ease. Now, one more time, Dragon on. Does that hold down? Control? And now this time, these verses off this line should be snapped to this verdict here. And then we can just select it, shifted down this one as well and press x and believe those overseas now, shift said to go back to solid view on I think we just finished the whole wall. Peace now, of course, you can go ahead and play some more details or get some variations in the patterns here. But I will keep it like that and it's almost exactly like on the reference image. But again, we're not trying to copy it one by one. So we also use some own shapes to our liking. Okay, now we can press slash on up head to go out of local view, and there we are. So one thing I want to adjust is the door piece, because let's press one on the number two go to front off graphic and, for example, let's just select this left side that centerpiece off the door and attack to edit mode and press shift set. Now, if you zoom in, it's kind of hard to see. Think we can see it a top. I want to press slash, to go to a local view. This will make it a bit more clearer. You can see that these verses are not perfectly aligned because we created this lip in between here with that sliding, I think in a couple of parts before, and you can now see that these verses are not straight. So these are kind of moved. Now this is not a big deal because it's not visible at all. But I kind of want to fix it. I want to give you a perfect product here, So therefore, I am actually going to re snap it. And then I'm going to use Etch Sliding one more time to redo this. Left here in between the doors. So let's zoom in and I'm double to having a to de select now impressing seat with so called select and in the wire frame mode, we can select these verses, right click and then just snap it on the What is it, the ex excess. Hold down control and snap into this verdicts. This will give us a straight line back, and we have to do the same at the bottoms. Assume in here. Double tap A C to soak a select like these for receives right click, and now snap it to this vertex on the X axis, impressing slash to go out off local view and impressing, Shift said. Now go to object mood and select the other piece. Step two. Edit mode slash on a numb pit shifts at Suman, and we'll see C two. So close elects like these overseas right click. Snap it to these verses. Get to the bottom Here on. I think we need to snap these verses so don't have a to de select see to soak a select, select these verses. And you think we need to snap that Judy's verses here and there we go. Now we have two straight line back, no press shift set and slash and tap to object mode. We want to hold down shift toe. Also, add this piece to the selection. Now press slash on a dump it to go into local view for these two pieces. All we need to do is to edge slide these center actors one more time in order to give us a separation in between. And so let's see. I'm going to front view and just select them all and tapped to enter added mood. Now press two to go to edge selecting. We want to select this edge here. Now it's kind of hard to select the wretch I'm holding down shift and you can see it's not working, so we have to click in here to select the whole edge off the left side of peace than come to the bottom. Hold down shift and select this edge. Now we have both edges on different side off both pizzas selected. And let's get to front view by pressing one on the lump it no breast, she twice and just slide them a port. And you just want to slide them small amounts. We can hold down shift to go into smaller values. And I think something like that should be totally fine. Now I'm left clicking to confirm. Now let's press shift set And let's just make sure that we have straight lines everywhere and yeah, no, I think this is a line perfectly. Yes, it is. All right now I'm pressing slash to get all of local view and shifts at, and there we go. Now we finished up the high poly modelling process and we can go ahead and create some materials to have a preview on how this full look in the end
13. Final Modeling Tweaks: So before we start adding the materials, we will do some final modeling tweaks. First, let's assume in onto the door frame and you can see that we still need to add smooth shading to this in order to smooth out. Are nice babbles here, so select the door frame and an object. No, just right. Click and choose shades move. We also have to go to the object data properties and activate the office move option. And now just have another look on the doorframe. If you find any weird spot, try to adjust the angle. But for me, a value of 30 degrees is totally fine. And another thing we need to check is the face orientation. So go to the drop down arrow and activate the face orientation option. Now you can see blue and red culls basically everything that this threat should be on the outside. So we have to do some re calculation on Allah Normals. Here we can start with the wall piece so just selected and enter edit mode, press A to select everything and then press all men and choose to re calculate the outside . Now let's do the same for the ceiling. Tap to object mode, Select the ceiling and tap to edit mode. Press eight to select everything for assault and and choose to re calculate the outside and you can see nothing happens. So sometimes Blender is not able to re calculate the outside correctly. Therefore, we have to press old and choose to flip the wrong side it faces. So because everything Waas faced incorrectly, we just could select everything and then press all tend to flip it around. If only a couple of faces are faced incorrect, then press three to go to face selecting and just select the faces that needs to be flipped and then press all then and choose Flip. Now let's go ahead to the doorframe press tab to go to object mode, select the door frame and enter added note press agent. Select everything press all end and choose to re calculate the outside. So especially for this piece we had to duplicated from the bottom. And then we flipped it around and replaced the verses here, and therefore sometimes the faces will be faced incorrectly. So that's why we have to go through these and flip them around and last. But not least we also have these two door pieces to flip around and a little detail here on our terminal section. So first, let's select this door. Peas shifted down. This one we can tap to enter edit mode for both These at once. Press A to select everything, press salt and and choose to re calculate the outside. Now let's tap to object mode and we consume in on this little detail here selected and it's now selecting the Wall P So a consummate any for so well, it strives to selected like this and we can press Komaki to zoom in on Onley this selected object. Now we consume in a bit closer tap to edit mood A to select everything, press salt and just flip the normals here and there we go know everything should be faced correctly like this. So click on destruct on one more time and now deactivate the face orientation. Okay, with that out of the way, I just want to go through these pieces and make sure that the mirror money fire is set correctly. That we have clipping activated and that are well is here for the scaling and rotation are set to one. So remember when we scaled the wall piece an object mode? By changing these values off the scaling options here, we had to reset them. So we actually had to press control a and then apply the scale values to reset them to be one. Because when we exported to another program, for example, if you sometimes you substance painter for texture, ring or unity or unreal and your important commissions, you need to re calculate the scaling or the rotation. So therefore we need to make sure that everything is set to normal. So let's start with the floor selected. Make sure that the scaling is set to one, and also the rotation is set to zero. Give to the money first tab here and make sure that for the mirror money fired, the clipping is activated so that the center of urgencies have merged together and we can check that the X and Y axis are Miral correctly. All right, now let's select the wall peace And again, we want to make sure that rotation is set to zero and the scaling is set to one. Now for the mirror money fire. We only have that mirror attitude. The Y axis we're late are also going to activate the X X is, But for now, just also activate clipping on. We're going to select the shutters off the air bins and again we have to activate clipping off the mirror money fire and make sure that the scaling is set to walk. And remember, we also have this little piece here and we can select the front piece and again make sure that the scaling is said to one and clipping is not necessary for this because we are not centering them with sent overseas. So their way a part of each other so clipping it's not needed here. Also select these little ladies that we have placed and also clipping can be deactivated here, and the scaling values are set to one. So this is totally fine. And let's see, we can select the ceiling. So here developers are set to one that's perfect. Clippings also activated. Let's go ahead and select the doorframe. Activate clipping and make sure that the X excesses merit correctly and the scaling is set to one, and now we just need to go through these door pieces so here they're rotated on the X axis by 90 degrees. Let's make sure that the doorframe is also set to zero. So here we also have a rotation of 90 degrees. So, well, price control A. And it will apply the rotation and scalp and their conceded. The rotation ist back to zero and let's do the same. 40 store pieces control A and applied a rotation and scale. And here we're not using the minimally fire, so this is totally fine. Select this piece, control a applied A rotation and scale, this one control a rotation and scale. Let me pan a bit this one. Control a rotation at scale, and now we applied everything off the rotation and scaling. Everything is said to cereal for irritation and one for the scaling, and we made sure that the clipping option for the mirror modifiers are activated. All right, so in the next step, we can go ahead and rename our measures in order to have a better overview off our objects . So we're going to select the floor and you can see it's highlighted an outline er and we already named this to floor, so this is fine now, Let's just select the wall and you can hover the mouse around the outline here and impress the comma K on the num pet. And this will bring up the selected object. So we also rename this toe wall, so this is fine. Maybe. Let's just go through the outline er and select the pieces that we didn't renamed yet, so we can also go ahead and delete our images. So I'm selecting the image front and the outline er hovering the mouse back to the three D report, impressing X and elated. Let's do the same for the image site selected Anel Finer Goten for your report Press X and deleted. Now we have a triangle of one said This is actually a door piece here and the wall thought serious. Here one are the shutters for Evans. Let's call these shutters one and let's see we have wall don't see or if they were to selected an outline. Er so these are the shutters for our little terminal section, so we'll call this. I shudder to and won't out. Serious error free are the ladies, so we'll call these panty piece and let's see, I think that's it So we got the ceiling center one or two door pieces, I think. Yes, Taylor. And we got the floor frame, the led used to shutters, triangles and the wall piece itself. Also noticed. If we look at the door frame, we still have a gap here on top. Now, to fill in this empty gap, we can select the door frame and then press slash to enter local view. This will make it a bit easier without the Artem ashes and tap to enter edit mode and rotate the view around because we need to model this on the backside off the door frame and you can press one to go to verdict selecting. Let's zoom in and have a look on this topside here. So first also noticed that this vortex shifted down. This one is not attached to this face. If you press she you can see they're not connected to the face. The right click. Then press three to go to face selecting. Select this face press X and just delete the face. Press one to go back to verdict selecting. And now let's select this Vertex shifted down this one and this one press e to extrude, and it set to only extruded on his that excess Hold down control and snap it to the same set position off this vertex. And we also need to great and face in here. So let's like this vortex shifting down This one, this one, this one and this one. Now we have five overseas selected, and with F, we can create an angle in here. All right, Now, if you look at the bottom side, you can see what we did here earlier. So we have this lip created first, and then we extremely diverted sees to create this face here, and this will block out the empty space, and I kind of want the same on the topside. So we'll go ahead and select this vortex shifty down this one, press shifty to duplicate left click, and then just drag it up on the set. So we need these two have a placeholder where we should place the loop cut here to create the same distance off these verses, like on the bottom. So let's drag it on his head all the way until we reached the top side and then just drag it back down hold down control and snap into this verdicts here and now. Let's press control one. This will bring us into back off a graphic view. Now, in order to make it easier later on to the lead. These verses. After we placed all Vertex to the same set position. Like for this one, we want to move it to decide a bit. But with the clipping option active, we can't move it to the left or to the right. So let's deactivated first, moving a bit to the right and then reactivate the clipping. And now I want to select this vortex shifty down this one. Make sure you got the backside of urgency selected and not the front side Adversities control. Want to go back to back view and then right click and choose subdivide. You know it can select this created Vertex Dragon on is that And now use thesis duplicated Vergis ease to snap it to the same set position like this vortex. And now we can select this one shifted on this one Press x and delete these verses. Okay, now we need to zoom and pan so we can see most off this piece here because we're going to use the knife tool to create the cup. And if you know, press K, you can snap the knife tool to this vertex left click. Then press see to keep a straight line moving all the way. Maybe up to this point here, get the edge highlighted green and in less click and hit. Enter now we need to pan to decide here and we need to repeat this one more time. Press k left click when it snapped to this Vertex and impress. See to keep a straight line and go all the way to the right. Get the edge. Highlight that green like this. Left leg and hit. Enter. Okay. And now we can select this vortex here. Now hold control key down and select this one. This will select every vertex in between us. Well, and then angle of you because we need to see the bottom piece and pressed you to extrude. And then why? To only experience on the y axis. Now hold on control and snap it to this verdict on the bottom piece and left like to confirm. And there we go. Now we have this face in place and if you press slash on the dump it you can go out of local view and you can see we filled in the empty gap. But they're still something to do, because if you look on the other side, we're still missing the backside off the door. So therefore, we're going to use the mirror modifier. So we were. Start by selecting the door frame and tapping to edit mode first, because we need to reset our origin. So we want to select this Vertex on the backside because this isn't the center off the whole frame and then press shift as cursor to select it. No tap to object noon and with the frame selected, right click set origin to free the cursor. And now all you have to do is to activate the Y excess for the mirror modifier and that we don't now let's repeat this step for the inner door pieces. So we first want to select this triangle shaped piece here on the left side, off the door. And first of all, let's rotate around and tap to edit mode because we can't believe the backside face so impressing free to go to face electing and just like the backside of face here, press X and delete the face and tap back to object. Note. Right click set origin, frustrated cursor and also add a mirror money fire but unchecked the X and check the Y axis . And also make sure that clipping it's active. Okay, let's do this one more time for this triangle shaped piece here. So right click set origin to free the cursor. Tapped to edit mode you to be back side and select a backside face here, press X and believe it. And then at the mirror money fire on the Y axis and unchecked the X excess and activate clipping. And we also need the inner pieces off the door. So tap topic node Select This one right click said Origin to three The cursor and yeah, we can also delete the backside it face of tapped edit mode, Selected backside at Face Price X and believe the face. And now back to object. Note at modifier Mirror uncheck X activate why and clipping and one more time. So, like this door piece and right click said Origin to pretty cursor tap to edit mode and to lead the backside it face here, all right, and in the mirror, modifier on the Y and activate clipping. And now we also have the backside off the door in place. So when we later going to animate the store to slight these pieces open, we're gonna have another problem and I'll show you what I mean. So let's first tap back to object mode. And let's select this piece here and we can press number. I'd want to go into front view, are actually let's just angle of you. It's a bit better to your have a look on this door riddle. Slight angle to it. So we want to bring up the move tool here, and let's say we want to animate this door and slide it open. So what I suggest is to drag it on the X axis while holding them control to snap it to the Vertex here off the triangle shaped door. Peace. And we want to make it flush on this edge here with the door piece. So destroy angle shaped piece. And now let's say if this is the first irritation off the door opening process than the 2nd 1 would be to also hold down, shift and select a triangle shape peas, and that's also slide this slightly to the left. And I want to drag it on the X holding down control, and I want to snap it to this corner, basically, and I think this would be the opening process. When the door is fully opened, it will look like this and the other parts will slide to the right. Just like these pieces do slide to your left. And now if we would go through the gate here, we can see that there's no mesh behind the opening part here off the door frame. So we still have to block out something right here in order to not have the ability to look through the mesh. Because if we rotate to the back, this will get even clearer. So right here we have no mesh at all, so therefore we would be able to see fruit, So let's just blocked this out. Now. We can just recent like the door frame and tap to edit mode. People angled a view like this and then press two to go to X, selecting now just hold down all and click in here to select all of these edges. And now we want to drag it on the X excess while holding them control. And we want to snap it to this corner here. So the end off the triangle shaped piece right here and then let's stay in this view, press e to extrude, right? Click. No, Drag it on the wine and snap it to this corner here. There we go. And then we will explode it one more time. All the way to the back. Now it will click through this face here off this door piece, but that's not visible at all. So this will be totally fine. So press each week screwed. And then right, click now Dragon on the X hold down Control and snap it to this corner here. So this corner right here, Okay. And now because we have to clipping option off the mirror modifier active, we can press e one more time, then right? Click and just drag it on the way until it merges in the center here. So we still need to add some more faces on the top because this is still in empty space. So we want to select this edge here. Now press each week screwed. And then right click now dragon on the X and snap it to the next. Perfect. So this one right here and press e two exploded among time. Right? Click, Drag it on the X and snap it to this corner. Now we need to place a loop cut in here in order to make it merged with this quality. So press control are then place to live. Luke. Cut like this. Left clicking and right click. Now we need to drag it on the way. Or you can easily press G and And why? If the move to is out of the way, then hold down control and snap it to this corner here. Now let's remove the doubles first. Press agent, select everything all m and choose by distance. Three verses got removed. Now let's select this edge. Come all the way to the right here, press each extrude and then right click now dragon on the X all the way to the back Here. Hold on, control and snap it to this corner. Here press agents like everything, all them and choose by distance and another to overseas got removed. Now we can even get rid off some of the faces at the top here because this whole row of faces will never be seen. Adul. So press free to go to face electing. Just select this face here now will rotate the view. Now I'm holding them control and I want to select this face. So this will select every face in between us. Well, not just hold down shift. And at this face, this one and this one to the selection. And also make sure that you're going to add this triangle shaped face here, shifting down selected press X and believe these faces. Okay? And now we filled in all the gaps and we believe that some unneeded faces as well. Now we can tap back to object melt. And all we need to do is to close the door. So we will slight these pieces back into place. But remember when I notified you that you do not have to delete the backside it faces off thes two triangle shaped pieces. Well, I deleted them so will quickly speed up the video and re at them. See you in a second. Okay, so there we go, and now we can slide these pieces back into place. We'll start with this triangle shaped piece dragon on the X axis, and you want to drag it beyond the door frame here, and then just zoom in and drag it back on the X hold on control and snap it to this corner here, Suman and make sure it's totally flush with the door frame here. Okay, Now have a look on the inside. We need to select this piece. Now rotate. Give you back and zoom out a bit. Now, dragon on the X, you want to drag it beyond the triangle shaped piece? Now press one on the lump. It shifts that and zoom in. You want to look on this position here because we need to grab it on the X and snap it to this vortex here. Suppress G and then X hold down control. Snap it to this Vertex left click to confirm Shift said. And there we go. So because we did some exclusions, we also have to check back on all face of orientation. So click on the drop down and activate the face orientation. So because this block out will never be seen because we're gonna have to wall piece on the right side as well. This is totally fine. But if you look here, you can see that these red colored faces on top needs to be flipped around. So let's select the door frame and tap to edit mode. Now turn the camera to the backside and to top, and we need all these top side it faces that are blue and flip them around. We can turn off the mirror modifier by clicking on the display. Aiken, This will make it a bit more clearer than press free to go to face electing. Now we can even press seven to go into top off a graphic doubles, Have a to make sure everything else is de selected. You know, Basically press be to box select and I want to select all of these faces here than pan to decide, shifted down, select this one press all tend and choose to flip them. And then we go. And we also need to add these faces at the bottom because when the right side off the door will slide open, we can see through the floor. So therefore we still need to at this. So I will bring back the mirror money five first by clicking on the display acting one more time. Now go to drop down and deactivate the face orientation right here. And let's have a look at the bottom here. So impressing slash to go to a local view. And of course, we need to do this and edit mode. So just turned the view to the bottom here. And let's see, what do we need to select? Okay, Yeah, We can start from this angle here. Press to select this edge here now press you to extrude right Click dragon on the X Snap it to this corner here and again you to extrude right Click dragon on the X Snap it to this corner Now like before control are left leg and right Click now press G to grab And then why? And hold down control, snap it to this corner, press a Colt M and choose by distance. Now let's select this edge here, Presti to extrude and right wing and move it all the way. Hold down control and snap it to this corner in the end Here A to select everything all them and choose by distance. Okay, now, one more time. Drop down, face orientation. And these faces are fine like that. Okay. So we can turn to face orientation off, then press slash to go out off local view. In the next part, we're going to create the locally versions of our objects, so we can then also use them in game engines like unity or unreal.
14. Creating Low Poly Meshes - Part 1: so no, we will start to create the low poli versions off our measures. So these will be optimized for usage in game engines and you just have to think off the polling count. So we created all of the's details here and we have a lot of mercies. If we select the wall peace and tap to edit mode and in press one on the keyboard to go to verdict selecting, you can see all of these Vergis ease and that's not too much. But just imagine, we have ah whole Holloway using these pieces over and over again. So therefore the whole account will be high as well. And in game engines we will optimize the mesh by baking the details from the high polling to a low poli object. So therefore we just have to create the low polling object and then we can bake the details to it. So before we start creating the local convergence, we first have to duplicate every mash in a new collection. So we will come up to the Outlander here and we will just double click on the collection that we have so far, and we will call this high Polly. I'm just using a prefix hp for high poli and then left Click no, right click on this collection and choose duplicate collection. And then we can minimize this by clicking on this arrow. And here's the complicated version. I've just renamed this collection to LP for low polling. And now we can just click on this check box here to deactivate the high poly measures. Now, we're only looking at the duplicated versions, and now we will just delete these details and later on bacon. So now we can start with the floor and what I want to do is to apply the modifier. So the mirror money fire, so just that apply. And, of course, make sure that clipping is active and then you can tap to edit mode. And now we can select this Vertex shifted down this one, this one, this one and this one not just press X and choose to dissolve these verses. Now we have only four verses left. And also remember that game engines on Leigh read triangulated meshes so we can select everything by pressing a and then used to short have controlled t. And this will triangulate the mesh Now we have this edge in between an hour Quite face is now made off two triangles. Okay, now this is already finished so we can move on to the wall. Piece of tap to object, milled, selective, all peace. And now we will press slash on a number head to enter local view. And again we have this park where it's not bringing us to a local views impressing splash on the number had multiple times until I only see the selected object like this and then press free on the number Digo to write off a graphic. Now let's just go to edit mode and we will now start removing some of these details and later on, when we bake the high poly details, we can then take them to the low polling object. So we want to press free to go to face selecting and double tap a to de select, then press seat to circus like and we will start by selecting these faces here. And make sure that your Onley selecting the main faces and not the faces in between here. Okay, Now do the same Authorities, bottom faces see to circle select these to these faces here and these faces here. Okay, Now we can press control. Plus, this will extend the selection That student another time, Control plus and control Plus and now press after Phil and this will now create an angle in there. We can also select the L shaped piece that will have a to de select see to circle select. It's like the L shape and this one next to it. We can also select the L shape at the bottom here. Just make sure you're not selecting any face in between and press control plus once and press f to fill now at the terminal, we can select this face shifty down this one. Press control, plus once, twice and 1/3 time and then press after Phil. Okay, Now for these exclusions here, we need the mercies in place because we can't fake any 90 degrees angles by using a normal mint Onley where we have this slight angle to it. So now we will go ahead and select the handles press control, plus once and after Phil, no press number three to go to write off a graphic press be to box linked and we want to select this whole panel here. So we also have to select this small face here at the top and at the bottom here. Just make sure that you're not selecting this face here or to face here on top. So only the big panel here. Then hold down, shift at these two faces to the selection, hold down, shift former time and select these two as well. Press control. Plus once, twice and 1/3 time. And then press after Phil. Okay, Now let's go ahead and select this face here and a small one at the bottom. So these two small faces control plus once, twice and the first time and then press after Phil. No, But so, like this shape, your first all of these faces here, control plus ones have to fill. It's do the same for this one. Selected control plus active ill. No. Select this one at the bottom here, Control Plus and after Phil. Okay, So because we have a slight angle that can be normal baked, But here we have a 90 degrees angle that camping all big. We have to do a work around. What? I will do this first. Let's select this one in also press control plus and then have to fill. And let's try to get rid of some of these verses by using the limited dissolve option. So a to select everything purse at free typing limited and click on limited this off and this will get rid off any unneeded vertex. So now we have a clean a look here, and we can now select this face. So this is an end of a now, So don't worry, this is one face here and hold down shift at this one and this one. Okay, Now just drag it on the X axis and you want to snap it to make it flat. So actually, we have to angle the view. I want to snap it to this corner. So dragging on the X, hold down control and snap into this corner, and this will basically make a totally flat. All we have to do is to select this face here now shifted down this one. So now we've got the whole big panel selected and do the same dragon on the eggs. And now we can snap it to this vortex here in discordant. And this will also make it totally flat. But our exclusions will be messed up. So what we will do well just recently them and then dragon on the X and I will snap it to the same depth off these air winds that we have created earlier. Like that and again, agents left everything every a limited dissolved. Now, this will look a bit weird, but we're gonna clean this up in the end. Now, we can also select this face control plus F to fill and the one that the bottom is already removed. So that's fine. Now we still need to work on these pieces here, and we can also do the same for these pieces. So we will select this face 50 down, this one and this one. And let's do the same for a bottom piece. 50 down this one and this one. And just dragging on the X and make it flat by using the snapping function, The verdict snapping. Okay. And let's work on do centerpieces, so we will remove them from the local object. But we still have to duplicate these shapes here because later on, we're gonna add on a mission Shader to them to use them as a light source. So what we will do? We will select them all and then duplicated into a separate object. So number for you to go to write off a graphic. And that will quickly speed up the video. Just go ahead and select all of the's inside shapes here. Okay. See you in a second. All right. Now, just press shifty to duplicate left most button and then press p and choose selection. Now, just select the duplicated piece in the outline. Er it's wall about Syria, Zero to double click on it and rename it to lights wall and it end her. And that's also click on the I. Aiken to hide it in the report. Now we have to re select these shapes one more time, so I will speed up the video. Okay. Now zoom out. Press control plus three times one time, two times three times and then press F to fill. Now I want to use the limit. A dissolve function, one more time A to select everything at free. Limited. Dissolve. Okay. I also noticed that we still have this panel here in place, so let's go ahead and select this face. Shift down this one. This Make sure you got the whole panel dragon on the X and snap it to make it fled. And I think we can use the limited is off another time now. So it seems like everything. Every type in limited and click on limited dissolve. There we go. Now, if you press one to go to Burdick selecting, you can see there still a lot of overseas that should be removed. But we have to do this manually. We will start with the center line here, suppress number free assume in double tap eight to these late And we just want to keep the top Vertex and the verdicts at the bottom. But we can select this one. No, just pan to the bottom. Hold down control and select this one. And this should select any verdicts in between us. Well, press X and juice dissolved. Bird sees now We can't just do the same for these overseas because otherwise we will lose some off the geometry that we still have in place here. So therefore we need to exploit them on top of each other and then we can remove the double verses afterwards. But we have to do is carefully because if we get overlapping anxious, we will have a lot of art effects and it will be a mess to clean it up. So just take your time and follow me along carefully. I want to start on the right side here and just like these two first and impressed to twice to slide him and slide them all the way to the right. And there we go. Left click to confirm. Now let's like this one. G twice lined it up. It's like this one G twice. Slide it to the right and let's see with this Vertex here G twice sliders to left. No, select this one G twice slide it up and another one here G twice, slide it down and left click to confirm. Okay, Now let's have a look on this messy part here. So this one is easy selected G twice slide it all the way to the right. Left click to confirm. Now I want to select this one G twice. Slide it up. Let's like this 12 twice. Slide it up now. We need to create a connection in here before you can get rid off. This protects. So I want to select the Vertex in this corner here where the extrusion is shifting towns like this one and impressed Jay to join. Now you can see we get an artifact because we have overlapping edges. But this should be fine. Now let's first like this one G twice. Slide it up. Left click to confirm. Now let's select this one and press X and choose to resolve this Vertex. There we go. So just looking fine. No, let's like this one twice. Slide it to the left and let's have a look at bottom piece here. So do you say we're going to be problematic as well? So let's first go ahead and select this one press to twice slide all the way to the right and do the same for this one twice and to the right. Now let's have a look here I want just like this one Now G twice slide to right. Left click to confirm. Now let's see. We want to joined these here. So select this one and this one Jay to join. Now let's like this first G twice slide it down. It's like this 12 twice slighted down. And we need another match to connect this Vertex first before you can get rid off these two . So I want to select this. Protects here and let's see. We want to join it with this one in the center here on the top. Suppress Jay to join, and we should be able to select this one. Shift down this one, press X, and choose to dissolve these verses. Now it's like this one, Press X and these off overseas. There we go. Now it's press ages like everything and press off them and choose by distance. And this route removed the doubled overseas. All right, it's no. Let's have another look. There's still one at the terminal, so let's press G twice slided down a to select everything, Then press all them and choose by distance. All right, so I think this is perfect. So what we can do is still apply in a mirror modifier as well, so it's first tapped to object mode. Make sure it's only active on the Y axis, and also the clipping is activated, then hit, apply and tap back to edit mode. Now I also want to get rid off these two verses in the center because we don't need them anymore. So first we need to select these two and impress straight to join students. Same in the bottom like these to impress Jay to join. Now we can select this Vertex shifted down this one, come up to the top 50 down this one and this one. Cross X and shoes dissolve urgencies. And there we go. So this will be the low polling version. All we have to do is trying related, just like before with the floor. So we can press three to go to face selecting and make sure everything is t selected. Then go to this button here, click on select and go to select all trade faces by sight, and here can set it to select every face that is greater than and we're going to reduce the number 23 So every face that it's not in triangle will be selected. Now just press control tea and it will automatically triangulate the mesh. And there we go. So we created the low polling burn off the wall piece de facto object mood and let's move on to the next piece
15. Creating Low Poly Meshes - Part 2: So we have to press slash to your out off local view, and then we can select the door frame and press slash again, and I want to work on this without the mirror mourning for her active. So we want to be activated by clicking on the display. I can hear, then tap to edit mood, and we actually do not have to bake any normals here. We could beg the Normans from the panel here with the buttons on it, but it wouldn't be worth the effort because we wouldn't save much geometry here. But instead we're going to use the limited dissolve function, and we also do some manual clean up to safe some verses here that we don't need. So with everything selected, we can press at three and I have to type it in again. So we want to search from limited dissolve, just click on it, and now we can press one to go to verdict selecting, and we'll do some further cleanup here. Now let's start at the upper corner here and select this Vertex no press to twice and slide it all the way to the left and you already know the drill, so we'll just go through the mesh and searching for murder sees that we don't need, for example, this one or this one. And just edge sliding them on top of each other and make sure you're not getting any overlapping verses. And basically, here at the inner part, we'll have a lot of problems because of these small panels we first have to joins in verse Eze to create some connections, and then we can delete the unneeded verses in between. So I will go through the easy ones first, and I will not comment on every single step here because it's repetitive and you know how to do it. So just select them one by one, press G twice and slide them on top of future. And later on, we're gonna press all them and remove the doubled verses. So let's continue with the easy ones here at the outer side, and then we're gonna focus at the inside. So let's continue in this up, Akona here, select its Vertex, then press G twice and slide it up. Now select this one. Press she twice and slide it up. So before remove two doubles, we have to connect this vertex with this one. So selectees to and then pressed Jay to join. If you do not do this and then remove the doubles, you will actually create an overlapping Angan in here that will overlap, are extrusion. If that ever happens, then just press control said to under and first creating connection in between verses to maintain the shapes. Now let's make our way down. So we want to select this one at the bottom here, press to twice slide it out. Now select this one, Presti twice and slide it all the way down. Select this one and slide it up. Okay, Now, this is looking fine. So let's have a look at the inn apart here and we can select these two pressed you twice slight Ament, and like this one shifted down this one G twice. Slide him in. Now, if the move to a less blocking you and just deactivated select the select box I can hear. And now we have a cleaner working space here. So with this one selected, I want to press do twice and slide it back. And I want to check if everything is all right. So far so select everything by pressing eight and press all m and choose to remove the doubles by distance. 11 birds He's got removed And just make sure that the shapes are still there. And yet we're totally fine. So let's move on. Several. Look here and I want to work on this one shift. Get down! This one We can just press X and use off them. But this will also delete the edge in between This Vertex shifted down. This one said we have to select these two and unprecedented to join And there we go. Now we fix this corner but the Verte sees are also removed and we can continue with this one. Pressed you twice and slide it over this vortex here and here on this side. We can now select these two and press X dissolved in. And this will be another tricky part here. So let's take care fixing this one so we can Onley clean them up one by one and we will start by selecting this one first, then pressing G twice, sliding it down now press a to select everything all them and choose by distance. Now, just recently, this Vertex press to twice and moving all the way up. And now we need to select this one shifted on this one and then pressed Jay to join. No, we can select this one, pressed you twice and slide it all the way down. Now let's like these two and prostrate to join. Re select this one. And first we have to remove the doubles. Suppress A to select everything all them choose by distance. The recent like this one pressed you twice and slide it down and again A to select everything, all them by distance. And now we clean this up. And without these connections in between, we would have overlapping faces. Okay, now we can move on to the top. Here. Let's like these two first Presti twice slide him all the way to the other side here. And we have these two in between here, so let's just try to select over them. Now let's press g twice and slide him all the way down like that. So they're kind of flipping because we've selected both of them, but it should work. Find it is just slide him over. These two here now, before we removed two doubles. I want to select this one shift. You know this one? Press jay to join and do the same for east to press Jay to join press agent, select everything, Then press all them and choose by distance. And it worked nice. Now all we have to do is to clean up the top piece here. So I will just wrote a view like this and it started with this one. Let's just press g twice and slide back and then rotated view. We want to select this one shifted down this one press X and is off these verses. Now we have to select this one shifting on this one and impress J two joint. Let's also selectees to press Jake, then selectees to press J and one more times like these two and press J select everything. Then press all them and choose by distance and one more vortex got removed. And this will finish it up for cleaning off the door frame and just found one more vertex that we can dissolve. So I'm talking about this one, but first we have to select this one shifted down this one and that breast Jay to join and now we can select this Vertex shifting on this one and then press X and dissolve these verses. And no, we actually finished the doorframe. We still have to triangulate it. So let's do that. We want to press free to go to face selecting, then go to select, select all by trained faces by sites, reduced the number of overseas to three and set the type to greater then okay, now we can press control t to triangulate the mish and let's tap back to object. Newt. We can also turn on the mirror money fire by clicking on the display Aiken and then press slash in a dump it to grow out of local view, and we will continue with the ceiling. So let's just select it. And first we want to apply the ceremony fire 40 x and Y Xs and make sure clipping is active . Just hit, apply and then tap to edit Note. Now, with everything selected, we want to press every, and it will type it in again. I want to search for limited this off and just click on it to get rid off these verses going through to center off the mesh. And because we don't have any triangle on this mansion, all we can simply have everything selected like this. And then just price control t to triangulate the mesh, and we just finished the ceiling. Now let's step back to object mode, and now we will work on these shutters. Also want to apply the mirror money Fire 40. Why excess? And we actually don't need the clipping option because there are no birds. Ease into center so we can just hit apply for the y axis. And we also want to apply to solidify modifier. And now just tap to edit mode press agent. Select everything and then press control t to triangulate the mesh. No te back to object mood and let's zoom in on the terminal Because we also have this piece here said these little shoppers on the total section. Now we also want to apply de Meira money fire for dinner. Why access? So it apply here and we also want to apply the remotely fire it apply no tap to edit mode. Make sure everything is selected by pressing a and then press control teach. You're trying too late. The mesh that back to object, note and less. But at least we also have these led us here. Now, if you can select them because they're totally flat, you can also go to the outline er and just select led is thought Cyril Cyril. Now everything's elected. Its first applied the mirror money fire for the Y axis tapped to edit mode agents like everything and then press control t to trying to lead a mish and tap back to option note. And we just finished all of the objects. So this will be the low polling version. Now, before we move on with the next part. I also want to mirror the wall piece to the other side. So just selected an object, Newt, and you can see our origin off. This object is right here where the move to a list and we need to reset the origin to the center. So let's first bring the Frieda cursor to the world origin. We have to press shift s and then click on curson to world origin. Now, if there will be selected in object note. Just right. Click set origin to free Dickerson. Now click on at modifier and choose Merrill and it should be checked on the X axis, and it will mirror it across perfectly. We don't need clipping and temporarily, I just want to deactivate it to have a better overview off our hallway. So let's just play on the display Aiken to deactivate it, and we want to leave it like that. For now. Let's also re select the doorframe, and we want to unchecked you y xs on the Mira modifier. So just will be the backside, and we want to apply the ceremony. Fire 40 x excess and make sure clipping is active. Just hit, apply and just won't basically give us a unique you re space if we were going to unwrap the doorframe. So therefore we will have a unique pattern off the texture from the left side and the right side. Otherwise, it would share the same UV space, so therefore we would have the exact same texture pattern on the left side and on the right side. So therefore, we just want to apply the mirror money her on the X axis. Now let's just add a new 1 40 Y X is to go to mirror and uncheck X and activate. Why Axis? Which will be the backside. Okay, also, activate clipping. And now we will move on to the next part where we are going to unwrap our measures and we're going to create the materials safe your file by pressing control this.
16. UV Unwrapping: Before we get into this part, I want to explain what's going to happen. So first we're going to unwrap the low polling mesh unwrapping. It's a process where you lay down your Freddie object in the two D space so you can actually apply textures through it. We're also going to do the same for the high poly mesh because we're then going to create the materials on the high polling miche and then bake it to the low polling mesh. And then we can save it as a PNG file. And then we can use these textures in any other freely software and also in game engines, so it's going to be a lot of fun. Let's get started so we will start to unwrap the locally mesh. But first I want to select the wall piece because we have to uncheck the camera. I can off the mirror money for her, because otherwise, when rebate the textures, the mirror multi fire will actually block the banking. So just uncheck the camera and we have to do the same for the doorframe and all of the inside door pieces, so just select them one by one and unchecked the camera. Aiken often Merrill, Money, fire and they were going. So just one more thing we need to do. Though we can actually delete the object for the allergies on the tell mule here because we don't need it. We're gonna bake delight information from the high polling into a texture, and then we can apply into the locally so therefore, we can save all of these verses for this pattern here. So I want to selected an outline. Er just select led start 001 and impress X and elated. And remember, we also have flights wall hidden currently, so just click on the icon to bring it back. Now we want to move this pattern to the high Poly collection so we can select it in the Outlander, then come back to the freely report. Now press em to move it and just click on the high poly collection. And now it's inside this one instead off the low poli and also make sure that the High poly collection is still unchecked because we want on Lee the low polling versions this point. Now let's just zoom out. And now we want to expand the timeline by dragging it up here. And then we can also change the timeline to image Editor. And here we will set up a test pattern to be applied to the mesh after we unwrap did to make sure that the unwrapping worked out so we can click on new and then just name this test and hit Enter. You can leave it with the default resolution. Just uncheck Alpharma and change it from blank to call a grit and click. OK, and now we want to switch from the image editor to the UV editor. It will basically look the same, but here you can also display the UV islands after unwrapping. Now we want to come back to the city report and then press a to select all objects. But you can see that no object will be active, so they're all selected. But if you're press tab, nothing happens. That's because we have to hold down, shift and then click on the floor, for example. Now you can see it's outlined yellow, so now the floor is the active object. If you know press tab, you can end her edit mode for all of these selected objects at once just double tap agency select. Now we want to press to on the keeper to go to edge selecting. You know, there's a function of blender that will detect any sharp edge on your mash automatically. So let's go to select and then click on Selector of Edges. And now all we have to do is to press control e and then mark this as a seem. Then press control you one more time and mark this Trump s well. Now press A to select everything and press you and click on Unwrap and you can see what happens in the UV editor. So this will be our mesh displayed in teary. And we have to change the method from angle based to conform. Oh, no, it's not stretched anymore and perfectly straight. And we will increase the margin 20.3 and it hit Enter. And here you can see a perfect UV layout. No. In order to display our test pattern, we will come to this drop down here and change it to shader editor. Here we can work on materials, So first click on new and just call this test can hit. Enter Now you need to have your mouse into the note editor here and then press shift A and you want to search for image and click on image texture. Now playing on this, drop down and choose the test pattern that we have created and just connect the color with the base color off this note here. Okay. Now, to display this, we have to go into render view so played on this I can hear this will bring you into the e V render. This is using an HDR image to light the scene and you can see the test pattern is only applied to the object that we have selected manually before we entered. Edit note for all of these objects. So now we have to select the other objects and copy the material to them. So tap to object. Note. Now, you just want to make sure that the object with the material applied is the last selected object. So it needs to be outlined Yellow. So therefore the floor is already the active object. Now I can go to the materials tab and I can click on this drop down and choose copy material to select it, and this will apply it to all the other mashes. And now, if this test parent applied, we can have another look on the mesh to see if anything is stretched or distorted. But this looks perfectly straight, and you can also see that these patterns will have the same size on all objects. So when we apply the rotation and scale, this will make sure that everything is the same size, also the texture in. So this was a very important step, and now we can simply unwrap the high poly version just like we did with the locally. And then we will basically great the materials on the high polling miche and then bake it to a texture that we can then apply to the low pull the object. So now let's come to the outline er and Heidi Low polling collection by clicking here and then just check the high poly collection that's also come back to normal. The A poor trading. By clicking on this, I can hear okay, now we also have to select a wall peace and reset the free origin to be in the center. The curse is already in place, so just select a wall, right Click said Origin Freed cursor. Let's also come to the modifiers tap here and applied your y axis mirror modifier, and we're gonna do the same for the frame. So selected doorframe unchecked the Y axis and then hit Apply. Now let's come to the door pieces and unchecked the camera Aiken. Just like we did with the locally objects. Okay, Now we can also select ceiling and make sure that you applied a mere money fire 40 x and Y axis as well and do the same for the floor selected and applying to mirror money Fire for X and y axis. Okay, Now we will change trader editor back to UV editor and then press a to select all objects and tapped to edit mode. Now double tap a to de select everything and make sure that you're still in edge selecting moat. Then press, select and click on select Sharp edits press control and you want to mark seem and control e mark shop. Now we need to do a manual cut for the doorframe because already tested it and we will have a distorted your V layout for this one. So what I want to do. I want to tap to object mode, then just like the doorframe. Now let's press slash in the dump it until we enter a local view. So I have to press slash three times to end a local view. And you can tell me that it's not a buck. So blender, please get this fixed. Okay, so we will enter edit mode and then press want to goto vortex selecting double tap eight of the select Everything we want to press shift said to enter wire frame assume in a bit closer. You can also just practice down to have a better working space here and basically we want to select all descended verses here. So press b for bak selecting and select the whole center line off verses, then press control. Mark scene. You don't want to mark this and so sharp edge because we just want a scene here and no sharp edge. Okay, now we can tap back to object note and then press slash to go out of local view. Now let's press a to select all objects one more time shifts at Step two. Edit mode eight to select everything and impress you and unwrap. Now you will see we get a messed up piece here. So this edge here on this line is from one vertex here, and I don't know what's happening here, but we can easily change the method to angle based, and this will fix it. And make sure you used to say, marching like before zero dot cyril Cyril free. And this layout should be totally fun. So it's just quickly changed that you be headed up back to Shader Editor and click on this . Drop down and choose the test material that we have created earlier than tap after object milk and go to the E B. Render up by clicking on this Aiken there can see it's only applied for the doorframe, so make sure on objects are selected a swell, and the object with the material on it is selected at last, so it needs to be outlined within yellow color, then comes in and materials tap, click on the drop down and choose copy material to select it. And now let's check back if anything is distorted or stretched. But again, this looks perfect. And don't worry about the flickering for these patrons here that we're going to use as a light source there just flickering because they're overlapping. But it's no problem. Also, these allergies are totally fine. And then we go. Now. We also unwrapped the hype holding version, and now we will create the materials.
17. Creating Materials - Part 1: now because we're already using the test material on all the hype holding meshes Regal just modified us to be the final material and rule Start off by just renaming it to meddle and I will also direct is up in order to put everything off the notes that up into frame. So let me zoom in, and I will also press and to close the side menu here. Now it's just unconnected this note first, because we're not using color texture to drive the color off our principal note. Instead, we just picking a random color here or actually a color that we like. And we're only using textures for the metallic Look for the roughness and also, for the moment, inflammation. So what I want you to do, I want you to duplicate this note here two times, so press shift e and placed them under me shifty. There we go. Now, I want you to click on the folder Aiken to open a new image texture. Now, you already downloaded the sip file attached to this course. You will also find a resource folder in there, and this will contain the textures. So let me just locate them on my drive here. So it's on. The resource is and then textures. So these textures were downloaded from polling on dot com, and you can sign up for a free account and don't know these free textures as well. If you want to use them for commercial projects. If you want to use it for personal project, you can use the Texas included in this city file. Now we want to start off with the metal corroded heavy. Just click on it and you want to go to the metal misfolded. Oh, and it's a four K resolution texture. So let's click on this folk a folder, and this one right here is the color texture. We're not going to use that. We will start off by using the metallic this texture, so just double click, and this will load it into this note here. Now, in order to preview our notes, we will activate a very useful blender it on. It's maybe the most use blender edl adult, so you want to go to edit and go to preferences. Then just go to the Adams tap and under the search bar, you want to type in note and you want to search for node Wrangler already have just activated. So just click this check box and then click this pie menu and click on safe preferences and just will keep the adult active every time you restart blender and just close this window here and what you can do is to press control shift and then click on the note. And this will give you a preview in the preview part here. So make sure you're in the TV renderers and you can see what this texture actually this place. So this will drive the metallic look off our object. So what we have to do to connect this is to drag the color output from this note here and put it into the metallic input from the principal note. Now you can press, control, shift and click on the principle note Teoh, display the results off this note so every texture will go inside principal node and then the output off. This one is a combination off all of the's texture MEPs combined. So now you can see that we get a shiny look. So this will drive the Mattel nous off our object. Now we also have to set the color space to non color Because we're not using color information from this texture, it only contains black and white information. Now, for this note here, I want you to click on the folder s well, and it's kind of annoying, but we have to relocate the texture folo. So I'm just going to resource is textures metal corroded heavy metal nous for K. And this time we want to play on the roughness of double click it and drop the collar output to the roughness Input here and again, Set this to non color. You can press control shift click on this nude and you can see this image contains black and white information as well. And this will drive the roughness off our material. And for the last nude, we want to click on the folder and relocate the texture photo and you wanna click on the non moment now there to normal MEPs in here, a really big one with 90 and bees. But we want the metal corroded having normal four k. So the smaller file actually and now we have to put this into the normal input and also set this to non color. Now, in order to make this work correctly, we also have to drop another note. Between here, it's a press shift, a search, and you want to search for normal and you want to click on normal men. Now it's attached to the mouse. Just move it above the connection that already exists and in the use left most button to place it inside here. And basically, with the strength, we can now decide how much detail we want to have displayed. So if you press control shift tap on this note, you can see that it actually seems like we now have details popping out off the mesh. So this is what the normal meant thus, and later on, we also going to beg the high pollen details to the local, the object, and therefore we're also going to use this moment. So this is what the normal met does. It tells the software to fake details in the death often object, so these details aren't there, but it actually looks like these are scattered around the mash here so that there are scratches and bumps, but they're actually not there in verse. Eze So we're just faking it. Using an image texture and with the strength thier we can adjust how much detail or how strong it should pop out off the material. You want to leave it at one for now. Now, if you also want these curvy connections instead off the straight lines, then you have to go to edit and preferences. So I changed my theme setting for the note editor. Just scroll down here and you will find an option noodle curbing. I think the default value is zero. So maybe you have these straight lines here Enough thing it's better to set it to 10 because thes Kirby connections will give you a better overview off your notes set up. So just change that and make sure that you're going to save your preferences as well. If you want the Kirby connections here, okay, so now we can move on building this material so I will press control shift cleaning on the principle note just to see what we have so far and again, you can just click on the note and drag it to move it out of the way. Now I want to go ahead and scaled use textual stand of it with the note Wrangler and on Enabled. We can simply select animus, texture Newt and then press control teeth and just will set up a texture coordinate and the methane nude. Now we just have to put the vector into every texture that we are using because they should be the same size and then just changed the scaling 2 to 4 x y and set. Actually, it's set. It's not driving anything because the image texture only has X and y coordinates. But just make sure everything accepted to, and we also want to make sure that we're using that you ve from the texture coordinate, and this will scale it down. And I think this looks way better. So because we're not using an image texture to drive the base color, we can just click on here and choose our own color, and I will go for dark, blank tone. I will not bring it down all the way, maybe like so for now, and also want to decrease the normal men strength. So just click in the strength build off the normal member and it will actually bring it down 2.3 it enter and this looks way better. I think so. What I want to do is I want to create another color and mix it with our principal output so we can press shift A. We want to search for a diffuse be STF note. Click on it and place it somewhere around here. Now we want to mix this color output with this color or put off the principal note. So price shift a search mix and you want to go for a mix. Shader not drop it onto the existing connection between the principles and the material output. Now also directly color output from the diffuse into the shader. Input off the mix trader here and we will change the color to darkish blue tone and also reduce the saturation. So we just want a slight hint off a bluish tone. And by reducing the factor, we can bring back more off the principal note. So I will bring it down to point free, and this will give us a nice bluish shine on the metal. And maybe, let's just decrease the factor. 2.25 Yeah, I think I will leave it like that. This looks nice. All right. Now, in the next step, I want to add another note that will detect any exposed edge. And then we can add some scratches and basically wear and tear to the exposed panels here. So in the real world, any metallic object that is exposed to an environment will gain some wear and tear around the exposed address by the time. And we will do the same with all panel cedar. And someone on the YouTube created an amazing note that we can easily import into our own file. So with the resource is down, you will also have to Splenda file in there and also a link to the YouTube channel from the guy who made it. So if you want to check it out, you can simply go ahead and do that. So for now, we just want to go to file and click on the Pent and then just locate the resource is folder. So let me have a look here. I need to go to my desktop. Resource is, and it's under the notes folder and you just want to click on Mosque Newt, don't blend and you want to go into material and click on mass base material. And now we can press shift A and search for mask and just dropped that in. So this note waas created by a YouTuber, and we can easily use this to detect the edges and at the wear and tear. Now we just have to adjust some of these values in road to get a nice wear and tear. But in order to display the output of this mask note, we have to switch to render an engine from TV two cycles because this edge detection is not working anyway. So we want todo to the rendering settings here, and we want to switch to render engine from E V two cycles. Also, make sure that you changed the device from CPU to GPU. Okay, now we have to click on this. I can hear this will give us the rendering from cycles, and it should take some time to set it up. And actually, you can see it's totally pitch black, so that's because we're not using any lighting information. Now what I want you to do, I want you to go to the World properties tap here, and we want to set up an environment texture for this. So click on this circle here next to the color field and change this to employment texture and just click on open and relocate. The resource is folder. Go to HDR Industrial Hole and give for the first final double. Click it and this will basically load in HDR image and this will be used to light up the scene. Now we have to increase the strength in order to give us more liking, and I will bring it up to 25. Hit. Enter now. This should give us enough lighting to have a premier off the material. Just zoom onto these sandal panels here. Now we will have to adjust these values, so I want to display the output from the mask so press control shift and click on the mask no two times one time two times and it will basically now give us the edge mask output into the view of note. So now we will go over the settings off the mass note in order to give us a more realistic look because right now these lines are way too thick, so let's zoom in on the mask note here and its first turned down to scaling to about two and hit Enter. Now it will take a second for the cycles runnerup to show you to change and that we have nice, thin lines here. So let's also add some distortion by increasing the noise, the edge, scratches and the edge frequency. Now, by increasing the edge noise, we can start to blur out these lines that we already have. So let's zoom in even closer so you can see the effect and go to the Nationalists. And we want to use a value of 1.8 and his enter. It's American. See, these lines here will get blurred of it. Okay, so a value of 1.8 40 edge noise Now, we will also add some scratches by just increasing devalue off the edge stretches, and it will bring it up to about point free. Five it enter. Okay. And this will give us a nice, distorted look on these white lines. By increasing at frequency, we can add interruptions between the lines. So let's bring this up to about 0.5. And there we go. Now, this will be our set up for the warren edges, and we can now use this mask as defector to mix a new material with our already created material. So we will basically have a civil metal underneath the paint. And by using the mask, we're going to reveal the silver metal. Now what we will do is pretty simple. So first we want to select the principal note and then press shifty to duplicate and place it on the left side off the mask. Note here. Now we're just gonna set this note up to be a silver shiny metal. In order to preview this, we can press control shift, click on it, and now it's also switch back to the TV renderers because this will be faster for previewing our material. Let's bring up the metallic 21 and it's turned down the roughness to about 210.15 and it's also changed the base color to a slight raged home, and this will give us a nice shiny metal. Now we just have to mix this and using the Mass as defector. So what we will do is let's first create some space in between these notes, so I will bring down the diffuse note and just bring the material output to the right to have some working space in here. Let's select this mix trader here, then press shifty to duplicate and place it somewhere around here. Now we want to get the H mask output from the mask. Note into the factor off the mix. Traitor. So remember, by just changing the fact of value off a mixed note, we will just tell Blender how much amount from one material should be mixed with another one. But by overriding the factor with a mask, it's just using it's black and white information to define which material should be revealed. So let's just connect these notes in order to see the result. So what we have to do is we want to get our first mix shader output, and we want to put it into the first socket off the second mixture. Now get a new principle be SDF output into the bottom socket here and now, let's just connect the second mix. Shader with all material will put self is here and again. The scratches will not be visible in TV because the mask can't detect these edges. Been TV. Switch back to cycles renderers, and he can see the effect. So we have nice born edges, But instead, off this flat white color off the mess note, we're now revealing our shiny civil metal, and this will give us a great warren edges effect here. All right.
18. Creating Materials - Part 2: I also want to add a slight amount of travel to our engines, because in the real world, even the object with the sharpest, agile half a slide babble on it. So that's what we're going to add for all panels here. And there's a note a blender that we can use so it will be pretty easy refers to have to create some space in between our normal MEPs set up here and no press shift. Aim here to search, type in bevel and select the Bell Newt and just drop it between our normal men and all. First principle note. And we can now increase the samples to 16 and we have to decrease the radios 2.1 hit and her and you can no press control shift. Click on the bevel Newt to get a preview, and if you zoom in, you can see that we have soft edges here and between. If you're control shift, click on the normal map you can see without the battle. We have thes really, really sharp edges here, so it's more realistic using the bevel note in combination with our normal meant texture. So now we have to control shift Click on the second mix, traitor to get our complete material into the material output. And now we have the bevel added to these address here. So it's just a slide change, but it will make the difference in the end. So there we go. So this will be our final note set up, and we're gonna do some slight changes for the ceiling and the floor, but for now, we can call it finished. I just want to increase the readability off our notes set up by adding in some frames. So we want to maximize the notes set up window here, and we can press shift a and go to lay out an ad in a frame here now, just dropped it in and press and on your keyboard to bring out the side men you know, under the label. We're gonna call this textures, so we're gonna place our text her set up into this frame here. We're also going to activate a color here and just pick a color you like and go to the properties and just increase the label size to 50. And now we can actually read the label on it Now I just want to select all of these texture coordinates mapping and texture notes, and then drop them into the texture frame. So just click on the texture. Coordinate, hold down shift, click on the mapping and all of the's three texture notes and click and direct them and drop him right into the frame here and there you go. Now we have a intuitive frame here, and you definitely know all of these notes. Define the texture set up, and we're gonna add some more frames for our Edgware and base color. And maybe also the mix traders. Sopron shift a layout frame. Just rub it in. This time, we're gonna call it base color and also activate the color and just change it and increase the label size for 50. Now I want to select the principal shifted down the diffuse note. Just click and wreck and rub it into the base color frame here and just bring it back to your left here. And let's add one more for Edgware set up here. Shift a layout frame dropping in. We're gonna call it Andrew where activate the color here, just change it and increase the label size to 50. Now I want you drag it to the upper left corner. Here. It's like the principal shifted down the master node and drove it into the Edgware frame Here and there we go. Now we have a nice, readable notes out, and you can add one more for these mix traders if you want, or the normal maps here. But I will actually leave them because these are the main notes and these are just for mixing all of them together. So there, for I'm gonna leave it like that. And now we can create the material for the floor and the ceiling because this will be slightly different. And then we will also end the emission shakers to create some light sources within our panels. So let's bring back the Freddie Report dragging this down. And now I want to zoom out and just select a ceiling. So we want to go to the Material's Properties tab here. And by clicking on this number, we can basically make a new instance off our already created material. So if we now change anything in the note editor, it won't affect this base material because this is now duplicated. We just want to rename this to metal ceiling because we're only using this for the ceiling here. So we just want to remove the Edgware because on the ceiling you wouldn't expect warning. And just so come to the note editor here and you just want to select the whole frame, then holds 50 down. Select this principle node the mask nude and this mix traitor here and impress X to believe it and just reconnect the shader output from our base mix. Traitor with the surface input here and there we go. So we have toe same material for the ceiling mud without the warn edges. Now I also want to add some light sources onto the ceiling. So first, let's go to the normal report, shading here and then tap to edit mode, press string on the keyboard to go to face selecting, and we want to select all of the's upper faces here. So we're not using the mayor money fire anymore, So just select all of the's faces one by one, holding them shift. So all of these, these are not these border faces, but the whole upper faces here off the ceiling. Then for the materials you want to click on plus and then create a new one. We're going to call this lights white and hit. Enter now changed the principal by clicking on the circle to emission and just increased the strength to 15. Now all you have to do is to hit a sign and this will basically assign this second selected material to all of the's selected faces. If you now go to disciples rendering tap, you can see that we have an emission Shater, which will emit light to the scene. And this is just apply it to the ceiling here and this is a nice method to add great light sources. So we will do the same with these small entities on the total. Oh, and these sandal panels here. So let's expand the high poly collection here and we want to select the lights wall first, go to the materials tap here and now you just have to click on this, drop down and choose the lights white that we have created. And there you go. Now I want to add a variation on the top part and the bottom part. So let's go back to normal. Report trading slash on the number two and a local view and tap to edit mood. Now zoom in double template to de select everything and not just slink these free bottom faces and the three faces on top here. Now let's step back to object mode. First click on Plus again, go to the drop down and choose alights White. Now click on the number to make a new instance. Rename this to lights. Rhett it enter now, changed the color to a red color 10 back to edit mode and hit a sign. No tap back to object. Moot slash on the num. Pit your back to the rendering view and they would go. Now. We also have a red light source for these faces here and these faces on top next up. Also want to add in the mission shader to the buttons on our terminal and also at the Dole frame here. So go to the normal report, trading first and maximize the Brady report. Then select the wall Peace and let's zoom in here. So let's first create a new material. I will just click on the plus sign to create in your slop and it just picked the lights red for now. And we want to click on this number to create in your instance. And we're gonna call this lights button, and we're gonna go for a blue color for this. So I'm gonna name it light spotting blue and just changed the color to your slight, bluish tone and reduce the strength to five. Now, we need to go to edit mode, of course. Then slinked these two faces hand to the other side and select this face and this face swell. And then pick the new created light spotting blue Material and played a sign. Now we're gonna do something similar for these buttons here so we can select these two and also these two here. Now let's click on the plus sign again and we're gonna change it to light spotting blue for now than tap back to object Note Click on the number here and we're gonna change the name to orange. And of course, also changed the color to an orange color and maybe a darker one that's almost rep maybe like so and then also go back to edit mode and hit a sign with these full faces here still selected, and you can go to the rendering tap just to see the result. And I think this would give us a nice well, look here on the terminal us. Well, so what we also need to do is to add the emission shadow for these led is that we have created. So let's pick them up in the outline on here and you can see the metal materialise assigned right now. So we want to change that to lights, rent, and again just click on the number and we're gonna call this lights led and just decreased the strength to about five. And then we go Now, this should also be applied to the other side because we do not have to assign it an edit mode. And let's also adjust the lights on the doorframe so we'll go back to normal in your poor trading for now. Then, just like the doorframe tapped to edit mode and we want to select this face shifted down this one and make sure you got the other ones as well. So this one and this one and I wont basically assign the orange button color to these So let's click on the plus sign. Select the light spotting orange and little sign. And no, select these two. And also these two, of course, Go back to object. Note For now, click on the plus sign. We're gonna pick Allied spotting orange, but then click on the number to give us a new instance. And we're gonna change this to light spotting whites and just go for a white tone here, go back to edit mode and hit a sign back to object newts and let's have another look in rendered view. So there we are We created all of the materials that we need we half on the mission Shader to all lights and the centerpiece here and also at the top on the ceiling. And we also added mission traders to our buttons and these elegies underneath Mettomo. So last but not least, we will adjust the material for the floor. So now just select the floor here and direct a shader editor up to it was a better working space here and first we need to create a new instance off the metal materials. So click on the number and we're going to call this medal from or it entered. And we'll just press the end key to close this side menu and then select the frame off the end where shifted down the principal noon. The mask note and the second mix trader and press X and deleted. Now reconnect the mix. Shader here with the material output into the surface input socket. And what do we want to do? First, we need to, um, change. D textures also included them into Does it fall? So you want to go to a resource is and into the Textures folder, and then we need to pick the textures from the metal panel rectangular fola here to the mental nous and four K folder. And first we need to load intimate Tell nous. So double click on that. The 2nd 1 is the roughness and make sure you're in the right folder. This is still the metal corroded, so let's go back here. We need to go to panel rectangular metal nous four K, and we're gonna pick the roughness, and the last one is the normal maps. So click on the folder here, make sure you're in the right folder, said Textures, metal panel rectangle Oh, metal nous for Kate. And we're gonna pick the normal met here, and you can choose the small file size so there to normal maps. But we can go with the smaller file, so pick this one. And now we also need to reset the color space to non call up for all of these notes. And now we should have rectangular. Pamela, look on the floors. Let's have a look here. And I just want to go back to the E v renderers because this will be rendered faster than the cycles renderers. And because we're not using the Edgware mask weaken, simply display the material here. So this doesn't look too bad, But I want to change the size off our textures in order to increase the visibility off these panels here. So let's come down to our mapping note, and we just want to increase the scale off the X axis to 4.4 and 40. Why? We want to bring it up to four. And this will just re scale the inspector for us. You can also click on this icon to Heidi Blender, overly giving you a more clearer look on the floor Let's also increased the strength off the normal men here, and this will basically give us a better visibility off the separated panels. So let's come down to the mapping note and just bring the strength up to one. And there you go. Now we're just using a totally flat plane. But it was the normal meant. We can fake all of these details. Now all we need to do to finish this up is to work on the Knoll map strength off our base metal material as well, because I think it's still too overpowered. So I want to recently the wall piece. And it's also make sure did you select the metal material here and just bring to strength down 2.1? And this will look way better. And we also have to do this for the ceiling because we removed the Edgware from the ceiling and therefore we had to create a new instance. So let's select the ceiling, select a metal ceiling material and bring the strength off the normal met down 2.1 as well . Okay, so, disciple, finish it all up for creating the materials. And don't worry about this flickering this is only visible in E V. If you go to the cycles runnerup, you can see that there will be no flickering at home. And what we're going to bake the texture street all low, pull the object. We have to do this and cycles as well, because TV does not bank and all. So let's continue with the next part where we were going to bake all of these created materials to our low polling mashes.
19. Texture Baking: So before we can start with the baking process, we have to create the texture files that we were going to bake our materials to. So you will come down to the shader or note editor here and just change it to image editor here to create a new image. We will go to the much button and then just click on Newt so we will first create the color texture file and the color texture are also known as El BDO. So let's just call it albedo and I will go for a four K resolution texture. So just multiply this by four, tap to the next field and multiply this by four as well and hit Enter now we don't need an Alpha Channel. So uncheck alfa and in just click OK, and this will basically just create a new blank image here. And by the way, we can switch to the evil renderers in order to keep the view port responsive. And now that's also safe this fall as a PNG to go to image and then click on safe s. I also included and folder in the zip file attached to the course called Bakes ml We'll just save all the textures in there. So this is the 1st 1 for the color texture called LBO. PNG. Click on Safe as image. The next one will be the metallic image texture. So go to image. Click on new justice already set up like before. We just have to change the main to metallic click OK, and give image save ass and safer. That's metallic PNG into the bakes Fuller. Next one, image new. Now we have toe roughness and click OK image save us roughness PNG and another one new And this will be normal. Now call it normal. Click OK, image save ass Mama Talkin g. And now let's go to the outline Er and just hide the high polling collection and, um, hide the locally collection by clicking on this check box here. So right now we're using the same material like on the High Poly. But we have to change this. So let's select the wall in the outline or here and then go to them, Gerald Stab And we just want to click on this number to create a new instance off the metal material. And we will just call this fake and then change the image editor to Shader editor. Zoom out of it and we can basically delete most of these. So I will select the cage here off the Edgware shifted down the principle to mask and both mix Traders also select the bevel, the normal man, this diffuse map and you can also leave the mapping and the texture. Coordinate press X totally lip. Now we're only left with the textures here, the base color of principle node and the material output. So let's just reconnect the principal gsdf with the material output selfish and we need one more texture note. So well, copy the 1st 1 so shifty and move it above. And now it's just connect. He's so the 1st 1 will go into the base color. The 2nd 1 should be connected to do metallic. The third note should be into the roughness, and the fourth note should be in the normal input here. And yet we also need shift. A normal men off course dropped it in between here. Okay, so now also make sure did you select the first note? So when we're going to start the baking, it will bake it to the selected image note. We also have to change the texture it's using. So right now we still have the metal corroded textures in here. So let's change it by clicking on the drop down. The 1st 1 should be DLP do that we have created the 2nd 1 will be the metallic. The 3rd 1 should be the roughness of Just search it in here and the last one should be the normal. Okay, now, this will look totally weird. But don't worry, we didn't bake anything yet. And now we just created the set up for the baking. And let's continue first, we need to apply this material to all the other low polling mashes. So press a to select everything and you can bring back the overlay off blender by clicking on this I can hear. And no, make sure that the wall pieces the last select object. So the active object and you can tell that by just looking at the material tap here. So it's already with the baked material and we can just click on the drop down copy material to select it. And this will copy this material to all the locally objects Okay. Now, before we move on with the baking process, I want to reactivate the high poly collection because we want to select the ladies than hold control king down and also select lights wall. We want to move these two objects into their own separate collection because I decided not to create in the mission texture for them. Instead, we're going to expertise objects with our low Paulie version off the hallway. And then we're gonna add the emission shater within unity. And this will make it a lot more easier, actually. So with these two selected, we want to press em and then click on new collection. Just call it lights and press OK. This collection will be at the bottom off the outline er here and we can deactivate it for now. And now let's focus on the baking process. So now let's go to the rendering properties here again. You need to make sure that you're in cycles and that you are using your GPU. Then expand the options for performance because we need to look at the tiles here. By default, Piece will be sent to 64 by 64 but this will slow down the baking process and we need to increase the towels to the same resolution that we're using on our textures. So let's change this to 5096 by 4096 and this will drastically reduce the baking time. So keep that in mind here, then scroll all the way down until we see the baking options here and expand this drop down . And here we can change the baking types so we will bake the diffuse. So our albedo texture we're going to bake the glossy 70 metallic texture and the roughness and also the normal texture. Here we will start with Diffuse. Now we need to deactivate the direct and indirect light. We just want to bake the diffuse color here. We also need to make sure that we're baking selected to active, which means that we first need to select the high poly object and then we're going to select the low polling object and then we can start baking from the high polling too low poll. You need to expand this dough because we also need to increase the rate distance and we will change it 2.5 here and This will basically give us a margin between the race that will be fired from the high, pull it to the locally, and this will actually be the baking process behind the scenes, so to speak, so make sure you're a distances, said 2.5 and we're going to reduce the march into eight pixels. This marching will be added to debate on our texture, and if we have it on 16 pixels, we will have overlapping details on our texture, So reduce it to eight pixels and now we're set to start baking. So what we want to do, we want to come up here to the high Poly Collection, then select the high polling ceiling, scroll down to the locally collection, hold control key down and select a low police ceiling. And this will be the process of bacon. So we'll going to bake the objects one after the owner and we have to select a corresponding low polling object as the last object. So first, select the high poly object ceiling and then select the low polling object ceiling about 001 Now make sure that you're looking at the Shader editor and you need to select the correct extra Newt, so we're starting baking the diffuse albedo texture. Therefore, we need to make sure that we're also selecting the albedo note here in our Shader editor and all we have to do now is to press bake now. This process can take some time. It should be done within five minutes, but if it takes a little longer than that's just how it issue, have to wait until the biggest on. So now that's just click Bank and I will skip the video until the bank is finished. Okay, so the first part off baking process is finished and you can check back by going to the image editor and then choosing the alvito texture from the drop down here. And you can start to see the details from the ceiling. Rich are now back to our texture. In order to save the baking progress, we want to go to image and then just click on safe. Now come back to the Shader editor and we will continue with the next object. So now come back to the High Poly Collection and select the center one object, which is a piece off the door. Let's go down to the low public collection, hold control key down, and select a corresponding object. Here. Center 1.1 Okay, Now come down to the baking settings and we need to make sure that we uncheck the clear image option because otherwise it will override are already baked information from the ceiling. Okay. And now again, make sure that the albedo notice still selected. And then just click on bake. See you in a second. So now the second bake should be done. And I will go back to the image editor just to have a look on the progress so far. And then go to image and click on safe. Go back to the Shader editor and we will move on with the next object. So by now, you noted real and I will basically skipped through the whole process when Althea BDO textures are finally baked. So all you have to do is to come up to the high Poly Collection, then select the next object center too. Come to the low pollen collection. Hold control key down. Select the corresponding object in this collection here so center to 0.1 You just need to make sure that clear image option is deactivated and that you're still selecting the albedo note here in the Shader editor and then click on bank after a process is finished. You to the image editor. Safe your progress. Come back to her Shader editor. Select the next two objects and click on Bake and just continue until you finished the wall piece, which is the last object that we need to bake. And then we will continue creating the metallic texture. So see you when the process is finished, so the final object is spake. Now let's check back in the image editor If everything went fine and we're still selected the albedo texture and you can see all the details are finally baked here, and we can now do a quick, say, Firdous texture to image safe. And this will be the final safe 40 lbd texture. So now let's go back to Shader Editor. Now we need to select the metallic note and we also need to switch the bike type from the fuse to glossy, and now it's the same process. We will go through these objects one air from the Arctic. So start with the ceiling, hold control key down and select the low Polly ceiling and then click on baked. Now, if you go to safety image, you need to go to the image Editor, of course. And then select the metallic texture here now minus already baked. So don't worry, huh? Went a hat and continued with all detectors. So you will basically just do the same. So due to the shader editor, make sure that the Batalik Newt is selected. And for the first bake, you can check the clear image option. And if you move on to the second and the other objects that make sure that a clear image is deactivated and, yeah, just go through these objects just like before and I will basically skipped one more time until we finished baking all the objects for the metallic picture. And when we're going to start with the roughness, we will continue. See you in a second. So welcome back. And how quickly switched to the image editor to happen? A look on the metallic Dexter and you should be ready as well. Then give this a final safe by going to image safe switch back to the Shader editor. Now select the roughness. Note. Changed a baked type from glossy to roughness. And again, you can have clear image for the first bake active and then deactivated for the second and the other objects. And let's move on, selecting the ceiling, holding down control, selecting the low police silly and then click on big and again, I will skip the video until everything respect into the roughness. Texture. Okay, so all the objects for the roughness texture are baked, and we can go back to the image editor than selecting the roughness map. You're from the drop down and then giving this a final safe by going to image and then clicking on safe. And now we need to go back to the Shader editor. And last but not least, let's select the normal map. Note. Here. Switch debate type from roughness to normal. Come down to declare image option and activated for the first bake, and again, you need to make sure that you've deactivated after the first bank is done. Now let's go for the high Poly collection. Select the ceiling, hold control key down and select the ceiling from the low Polly Collection. And just like before, click on Bake and after the first Bake unchecked a clear image option and continue until you finished with the wall. Peace and I will skip the video one last time. See you in a second. I just finished baking the last object for a normal men. Now let's go to the image editor and just a normal from the drop down here. And let's give this a final safe as well. Now let's get back to the Shader Editor and change the color space for the metallic note to non color. Do the same for the roughness and for any normal men. We're only using s er GB color space for the LBO texture here. So now let's go to the airliner and just uncheck the high polo collection to hide it from the Freddie Report. So we're only left with the low polling objects. Now let's expand the freely report by dragging just down. Let's have a closer look here now. I already noticed that we're missing the Edgware on our panels here. So remember when we added the Edgware using a custom nude from external blender file? Well, it seems like Blender was not able to bake these informations to our textures, so we could easily add Hegeler by using a program that substance painter. But because it's paid software, I will not included within this course. So therefore, we will just keep it like that without the antler. And I'm kind of sorry for that, of course, because it would add more realism. Toe are objects, but were kind of limited here with blenders in tow options, and it will still look awesome in the end when we have all the light sources in place. So let's just continue by mirroring across this world peace to the other side. So all we have to do is to go to the money first, happier and and activate the ceremony fire By clicking on this display. Aiken and I don't know if it's important to keep the rendering active for exporting the file. It's later on. So therefore, I will just activate the rendering Aiken s well, and let's do the same for the doorframe, because here we also need to activate the camera. Aiken, let's do the same for all of the's inside door pieces here. Okay? Now what? We also need to do is to bring up the lights by checking this box here. Now let's select the ladies, and you can see we stole miss them on the other side. So let's also activate the X excess mirror modifier. Now you can see they're not mirroring across to the other side, so we have to reset the origin just right. Click set Origin to Freddie Cursor. Let's do the same. Select the lights wall and activate the X X is then right click set origin to free cursor. Now we also need to separate the buttons from the war, peace and the doorframe because we're going to add the emission shader within unity and therefore we need to separate them into their own separate object. So I will start by selecting the wall piece, having to edit mode and let's soon in here and no select one of these faces and press that Komaki on your number to zoom in now, shifted down. Make sure that you are selecting all off these faces here, so they're all trying dilated. That's the reason why we have to select two faces here. Let's come up to the artist side, hold down shift and select them a swell no press p and choose selection, and this will just separate them into their own object. And let's go to object mode first, then select them Now that's renamed, then too. LTD's buttons wall could enter and press M and moved into Delights collection. Now let's do the same for the doorframe. Select it Tech to edit mode. Now we need to select these circles. I will press one on the number to enter front off a graphic. Now it's kind of hard because they're already trying delayed it. Double tip A to de select, then press see to circle, select and just increase the radius. And, yeah, just make sure you're on Lee selecting these circular faces. And if you selected anything else than just use the middle mouse button with the circle selecting tool to these. Elect them. Let's do the same with this circle here. There we go. Now I will just decrease the circle selecting radius and at these faces as well. Now pan down here, shifted down. Select these two faces and these two. Let's come up to the other side as well. See to circle select select all of these faces here, like that kind of sloppy. So let's just the selectees using the middle most button pan into the bottom. Here, let's continue selecting these faces here and again. Middle. Most want to de select. Yeah, we dio. And we also need to select this face, this one, this one and this one. So we should have selected for circle of faces or at least thes circle of shapes. So there are a lot of more faces because they're trying related, of course. And also these square faces here. Now again, press P and choose selection. Ted, Back to object. Newt. Just select the separated objects renamed into elegies frame or ladies button frame to keep the same naming like these other objects and then press M and moved into delights collection. Okay, so there we go. And we need to do the same for the ceiling because thes shiny faces are missing the texture and they don't need a texture, because again, these are the light sources. So we will add the emission shader within unity, select the ceiling and you can press slash on the number it a couple of times until you're entered. The local view. Then enter edit mood and just select all of the's shiny faces here. So hold down shift and made your way through just like that. Finally selectees to then press P and choose selection. Tap the object known no holding. Select the separated objects, press them to move them. First, let's press slash to go out of local view and then press em. And then she was the lights collection and just rename them two lights ceiling and you can remove the numbering here. There we go. All right, so we have all of these lights in the lights collection and we mirrored across the wall piece to the other side. Okay, Now I think we're almost done. So in the next part, we're going to create the animation for the door, and then we're going to start exporting to unity.
20. Rigging & Animating The Door: Now we have to create and Rick for our animation first. So what I want to do, I want to go back to normal report. Shading and this Able Delights collection were only concentrating on the low polic collection. Now I want to select all the inside dole pieces and make sure that you select the door frame as the last object because we want this to be the active object. Now we can price controlled chain to join all of the's into one object. You know, this price slashing the number had to end a local view for this. So now let's go to the outline er and select the low Polly collection, then press shift a and you want to add it an armature. You need to make sure that this is set into locally collection here. Now go to this tap and you want to go to report this plane and we want to display this assess stick and also check in front and activate the names. Okay, No tap to edit mode. And I want to snap it into the center off our girlfriend. So let's do this. An object notes, so I will go back to object mode. Now drag it on the Y axis and hold down control to snap it through to send the line off the door frame here. Okay, so because we have to in front, option checked, we can see the bone through the mesh. Now let's tap to edit mode. And I'm pressing one on the number to enter front view now, impressing ages like everything. And I want to press shift said to enter wire frame. So let's rotate this bone by 90 degrees. So impressing our and in minus 90 and hit enter, let's like this Vertex or this end off the boat and want to bring on the move tool here. Now let's first practice whole bone down to this bottom line here. So a to select everything, dragging on the set and just snap it to this bottom line here. So it's kind of hard to see, but I want to select this end of the bone, dragging it on the X, and I want to snap it to this corner here off our center girlfriend peace and I will actually drag it one more time because we need to snap it to this corner Okay, Now, let's see. We want to select this end dragon on the X and snap it to this corner here, where it connects with the triangle shaped door piece. So now we will rename this. So go to this bone tap here. And with this bone selected, we can just click in here and rename this. So this is the centre door piece calling the left side. So we'll call it center left. Now let's press shift E and first move it up a bit. Now a dragon on the X and you want to snap it to this corner here, off the triangle shaped piece. Now select this end off the bone dragon on the X and again snap it to this corner here where it intersects with the centre left dull piece. Select the bone and rename this to triangle left. Now, I also want to drag it up on, does that excess and zoom in here because we want to snap it to this upper corner off the trying to shape piece. Now let's duplicate this by pressing shifty. Move it over on the x X is and snap it to this corner off the second triangle shaped piece . And now zoom in here. We want to snap it to this position on this that access suppress G and that's that. Hold down control and snap it right here. Now let's rename this to triangle right now. Select this centre left bone here. Price shifty to duplicate. Moving all the way up. We want to snap it to Does that position here and the dragon over on the X zoom in here, press G and then acts. Hold down control and snap into this corner right here. Okay, Now let's rename this to send her rock. Now we need to parent thes center bones with the trying of loads. So if the centre right selected, let's help downshift and select triangle right press control peak and make parent with keep offset. Let's select centre left, Shifted down triangle, lift press control P and do the same. No, we can tap back to object. Mood and press shift said to go back to solid of you here. So let's select the doorframe now Hold down, shift and select the bones press control peak and we want to turn them a swell with the option empty groups. Okay, Now I want to select the doorframe. Give it to the Mahdi First Hap. And for now, we want to uncheck the discipline Aiken to hide the mirror money fire. Now go to edit mode and we're going to select the gold pieces one by one and assigned them to the corresponding boats. If you go to the object data properties, you can see all of the bones are within the Vertex groups here. So I want to start with the left side here. So go to the face. Selecting mood. Select this face off the triangle shaped piece. Now just hold down control and Price plus on the num pet a couple of times to make sure that everything off this triangle shaped pieces selected You can also press G to grab it and just make sure that you have to hope he's selected right click to keep it in place. Now we want to select the triangle, left Vertex Group and just hit a sign. And now we want to select this face off this door piece, then hold down control and press plus on the number a couple of times, press G to grab, make sure the whole door pieces selected right click to keep it in place. Now select the centre Left Vertex Group and hit the sign. Let's just do the same with these pieces. Select the face holding down control pressing plus on the number. Had a couple of times and press G to grab to finally make sure that everything is selected right click to keep it in place. Select center. Right. Hit a sign. Select this piece control plus a couple of times G to grab everything is selected. Then right click juice triangle right and hit a sign. So we finished creating to Rick, and we can now start animating tap back to object mode and select the bones. Go to to drop down and shoes. Post mood now changed a shader editor to timeline So click on the drop down here. What is going on? Here we go Timeline, and you can expand it a bit. Now I want to press a to select all bones and make sure that the timer is on frame one and then press I on the keyboard and choose location. This will insert key frame for the location off these boats. Now let's click and hold and practice timer to frighten 30. And here I want to select the centre left bone first and just two minute bit. Now activate the move tool here. And if the move tool is not on this side off the bone but on this side, then you have to select the whole bone press our entire been 180 to flip it around. But this will result in a problem because it's actually already parented to descend the object. So let me just explain what I mean. So if the move tool is not on this side off the bone but on this side, then you can't snap it like we wanted to for the animation. So therefore, you want to go back to edit mood and first select the bone and press are type in 1 80 to move it around or flip it around. And if you then go to the post mood, you can see they moved to us now on the other side, off the bone. But this was just fine, like before. So we'll press control set Just to undo this is just to inform you what's going on here, and we need to have the move tool when selecting the bone on the right side. Here. Now, with the marker on frame 30 we can easily just tracked this bone on the X axis. Now hold down control and use the verdict snapping to snap it to this corner off the triangle shaped piece. Now we can activate cavity by going to the drop down activating cavity here. This will give the shapes and outline and will make things a bit more visible. All right, now, with this in place, we can price I and insert another location. Keep frame. Now zoom out and select a triangle left bone and with the mark on friend 30 press I and insert a location key frame. Now just direct us marker to frame 60. And with the tryingto left, been selected dragon on the X X is and you want to hold down control and snap it into this Kona right here. Then press I and insert another location key for him. No. By clicking and dragging on the timer, you can know, see, the animation will play. So we will have the centerpiece sliding into the triangle shaped piece and then both of these objects will slide all the way to the left, and we will just recreate this animation for the right side adult pieces. Now let's select a center right bone, and then we can see that we have to move to on the right side. But we need to have to move toe on the left side in order to make it snap with this triangle shaped piece. So impressing one on the non Pettigrew to front off a graphic and then go to edit milk press are to rotate. Type in 180 hit. Enter now go back to pose mode, angled of you and direct a timer to frame 30. Zoom in here now direct is built on the X Hold down Control and snap it to this corner off the triangle shaped piece. Press I and insert and location key frame. Now select a triangle right bone, and this is also on the wrong side. So press one on the num Pitt cute edit mood are to rotate, type in 180 hit enter, go back to post mode and make sure that the timer is still set on friend, 30 press I and insert location. Key frame. Now direct the time all the way to friends 60 angled view and rectus bone on the X axis and snap it to this corner here and press I and insert the last location key frame that we will need to complete the animation. Now I will also go into the infield off the timer and reduced us to 60. Because our animation is only 60 frames long, you can click on this button to go all the way to the starting point. And if you had playing, the animation will start. And there we go. Nice. So we'll pause it and just give back all the way. And yet this is basically and so we richt the whole door frame or the dough pieces and we finished the animation in the next part. We're going to prepare to MASH to export it to unity. I just forgot to add a route boon for aesthetic parts off the door frame. So we need to have a root bone which will be used for the parts on the door friend that are not moving without it. Unity will mess up the animation. So we're still in post mode for the bones. Let's switch to edit mode. And by pressing shift, they will simply place another bone here selected. Go to the bone tap and rename this to Root. And I will also drag it on the wine and snap it within. Dissenter off our door frame here. Okay, Now we can tap back to object. Newt selected doorframe shifted down selected bones. We need to parent them again. Control peep and choose with empty groups. All right, now we need to tap to edit mode for the doorframe. And now we need to select all off the doorframe parts that are not moving. So the best way to do this is to double tap a first to de select now press L on the keyboard while hovering around the frame, and we have to press control or hold down control and then press plus on the num pet a couple of times until we selected everything off the frame. And we also need to select these pieces off these buttons because they're not connected with the frame. So what I will do impressing one to go into front off a graphic, then press shift set and a wire frame. And I'm just using the box electing to add these buttons. Student selection. Make sure you got the right side as well. No press shift set and it will press G to grab just to make sure that we have all the aesthetic parts off the doorframe selected. Okay, Right click to keep it in place. Now, go to the object data properties, select the route from the Vertex groups here and hit a sign. Okay. And now we finished rigging and animating. Okay, So press slash to get out of local view and we will move on with the next part.
21. Exporting From Blender: So before we jump into unity, let's prepare to match for export. And when I tested things in unity, I also noticed that the flickering that we have when going to the TV render up. So when we activate the lights collection, we can see that these light sources will flicker through the mesh and we will have the same problem immunity. So I want to fix this road quick. And we can easily do this by selecting delights Wall holding down control and selecting the L E. D s right here. So we want thes slides here and these elegies selected tap to edit mode. No press A to select everything and impressing one on the number to go into front view. And let's activate the move toe. We just want to move them out slightly. So what I will do, I will hold down shift. This will make sure that we move the object within every small units, So just hold down, shift and move it to are actually control set. You have to drag it on the X and then press shift. Okay? And it's just slightly moving outwards, So I'm moving it to two right here and it's just rotate back and we can still see some flickering. So maybe let's just angle of you like this. Step two Edit match Dragon Hold down shift and just moved slightly. Okay, Go back to object, moot and make sure that the flickering is resolved. And the thing we're fine, but I want to move it slightly more just to be sure it's a dragon. Hold down shift and there we go. Now, this will just make sure that we don't have any flickering within unity now because we're going to set up the light sources within unity. We also have to separate these buttons because we want to have different colors on them and immunity. We only can assign a new material to the whole object. So because thes four buttons are inside one object, we have two separate two of these bonds in order to get a new emission Shader in unity placed on Onley two of these bums So sorry for these confusing steps, but yeah, if we want to have a unique result in the end, we just have to do this so I will jump into edit mode and let's see if we're still using the mirror money fire for the other side and and actually seems like we're only mirroring the X axis. So what we have to do? We will just select these two top buttons here, come to the artist sign and select these two as well, and then press P and shoes selection time back to object. Note. Then we're going to rename this to led Spartan Wall, and we're gonna have balloons. Let's just call it blue and the bottom buttons I will just call them. Led is button wall orange, and we will do the same for the doorframe. So let's select these separated button objects from the doorframe tapped to edit. Moot. Now just zoom in here and impressing one on the lump it to go into front view. And let's just select these square buttons because it will be easier and make sure you got the other side as well ended. Press P and choose selection back to object mode, and we're going to rename these score buttons to melodies, button frame. What, and I want you call the led spotting frame Sudi circle of buttons Rhett at the end, because we're going to make them appear. Rhett and I want to separate these faces from these exclusions to analyze source to them as well, because otherwise the whole doll for him will be pretty dark within unity. So what do you want to do? Let's just select the frame press slash on the lump it to go into a local view. And there's still something else in the screen. So will press slash a couple of times. There we go. No, let's tap to edit mode and we're just selecting these faces here at the inside where we have thes extrusion. So I will deactivate the move tool and just make your way through selecting all of these. All right, and I will also select these upper faces here and still some more. Let's just select them all. All right now Press P two selection and Tampax object. Milt. Now let's just select thes separated objects and press the Kama Kuna. Dump it while hovering around the old liner to bring up the selected object, and we're going to rename this to, let's say, a lights frame trump slash bottom and we're gonna make them white. And let's just press M and first get out off local view, suppress slash in a dump It then press em to move it into delights collection because we want to have a nice overview. So all of our lights will be in the lights collection. Now, I want to jump into day frame edit mode one more time, so select the frame tapped to edit mood. And we can stay in this view for this and just like these faces on the side. And yeah, also these faces here. And of course, we need the other side as well. Okay, Make sure we got all of them are still something that this spot here. All right, Now let's press Pete juice selection again. Tap back to object. Moot. And we just want to select the separate pieces. And I'm going back to the old line or pressing the Kama kuna Numb pet. So let's just rename this to lights frame and because these are angled, I will just call it angle and we're gonna make them Rhett a swell, Okay, and then press m move it into the lights collection and it looks like it's still here. Maybe just because of the armature here, and I know Why does this still mentioned here about think it will be no big deal? And I also want to do the same for these on the side here. So select the frame that to edit mode and select all of the's and, well, basically, just join them with these auto lights that we have already separated from the top and the bottom. So just like them all like that and press p choose selection and no te back to object mode . Now we want to select these pieces. We have just separated. Hold down, shift and select the other pieces here and then press control J to John. All right, so now let's have a look on the lights collection. One last step. Let's select this lights object tapped to edit mode. Now I want to separate the top and the bottom pieces because we want to have white light sources, forties patterns and right light sources for the top and the bottom. Therefore, we need to separate them into two objects as well, so we'll just go to face selecting mood and it will just like these faces here, holding down shift, selecting the bottom faces. Now press P and shoe selection. And let's just rename lights wall two bites wall white and lights wall. Rhett. And just make sure did we have to correct naming here? All right, so it is. It's fine. Okay, now, because we have a lot off lights objects, and we need to identify them immunity later on because we're assigning different emission materials to them. I will rename them one last time. And actually, we can combine some of these into one single object, but therefore, we have to make sure that we first apply all the mirror money fires. So we'll just go through these objects and applying all of the mirror money fires here so that we can easily combine them. Okay, Just make your way through and apply all the money fives here, and you can see because we extracted or separated these objects from the frame. We can also the lead the armature modifier here and do the same for this one. Applied a mirror money fire and removed the armature modifier. Okay, Now, this one applying modifier. There we go. So all the mirror money fires are applied, and now we can just go through them and combine the similar pieces. So I will basically select this light source here now Just come to the frame, hold down shift and select piece as well, because thesis will have the same emission material impressing control, change to join. And now let's just make sure we have object in the outline or selected here, and we want to call this lights. What? So l ladies are these little melodies and I will just rename them to led is ready now we got the melodies button frame, Rhett. I will just rename them to L E D's button. Rhett, we got the ladies button frame White just removed a frame from this naming. So we have led is button rent led is buttoned white, and it will call these elegance button blue and button orange, so we don't need to combine these because thes will have different colors for all of them. No, these threats the light ceiling will have maybe another intensity than the slide sources on the wall and on the frame. So we will leave this to light ceiling, white lights, frame angle, red suit. This will be the same intensity like these pieces, so I want to Combine these two so you can select it in the Outlander, holding them control, selecting lights wall red as well and press control. Change your joint and we will just call it Lights red. And I think this will make it a bit easier. So we have the LAPD's button blue but orange button, red button white, all different colors. We get the led threat and I think we can also combine these with the led spot in red because this book be the same material. So let's just select. Led is Rhett then hold down Control Select Led is button red and press control. Change of John. All right, so now we also have the lights ceiling white. This will be another intensity than the lights, wall and frame. So therefore, we have not object for this and we're not combining them, and I think this should do it, actually, So I know this kind of confusing, but I just want to make sure that we have a nice over you by giving us correct name ings for all of these light sources, and it can be difficult to apply all these materials and unity, so therefore we should make sure that we do everything we can to make it more readable in the end, when we have all of these objects imported. Okay, so this will finish it up. And now we're going to export this whole low polly collection. So the low polling collection with the hallway and the light sources, and then we're gonna import it to unity. And I kind of want to have this one selected because you can see it's still parented to the frame. So let's press all p and we want to clear parent, and you can now see it will be removed from the amateur here. All right, so now this should be finally done. What I want to do make sure that the high polo collection is deactivated and we have Onley deal. Oh, Paulie and Delights collection active. We also need to select the frame. So I will just where is it? Actually, I mean, just selected pressing the Kama kuna dump it to zoom in. Oh, it's under the amateur. Okay, so here we want to delete the mirror modifier because it will cost problems within unity. And we actually don't need backside because we can just use another instance off this hallway and flip it around and then attach it to the back side. But for these pieces here we already apply T mira modifier. So let's just press seven on the num pet, then enter edit mode and shifts that to Goto. Why a frame of just using box selecting to select all of these? Because we can delete them. So X verses back to object Moon. Now select these edit mode talk, select and expertise and there some objects left here. So let's like these shifted down these and tap to edit mode. Now they're barely visible. I'm talking about these pieces here, BT Box Elect Just like these x and believed overseas. And there's still something left. So back to object. Note. Select this piece. Edit mode box Select Selected X and Vergis ease. All right, now, one last thing. We also need to mirror across these shutters here because they're still missing on the other side. And also these Travis here are missing. We have to add a mirror money fire on the X, and we don't need clipping. But we need to reset the origins. Right. Click set origin to Freddie cursor and do the same forties are shutters and money, Fire mirror and right click said Origin, too freaky cursor. Okay, and now, finally, we're totally ready to export. I'm just pressing one on the number two going to front view, and I want to collapse thes collections. Just make sure that they are still active. Now press A to select all objects and now go to follow export Fbx. Now I'll just select my project fuller, and there's a folder inside called FB Acceptable Just exported to this folder. That's call it hallway. Don't fbx and you can leave all of these options checked. But we also want to activated selected objects. This will make sure that only the selected objects will be expert. So because the high poly collection is deactivated, we don't have any object from this collection active or selected. So therefore, we will make sure that we only select the Low Polly collection and the light sources and then just click on Export Fbx and in the next part, we're going to jump into unity. See you there
22. Importing To Unity: all right. So started my unity hop, and we just want to create a new project for this. So click on new, and we'll just name this Holway for now, and it's going to be afraid of project. So selective free template and then click on Create. Okay, so unity is up and running, and we can start importing the hallway first. So go to asset and import New asset, and then we're just gonna locate the export fbx file from Blender. So I will select my project folder. And if the X and load in the hallway dot fbx filed. There we are. So then we have the hallway prefab here in the assets folder immunity. So now let's just drag and drop it into a scene here. So we're just want you drag it moving over here in Tennessee and just drop it in there. Now I want to position the camera so that we're facing the hallway from the front and that we're looking inside the hallway. So what we can do? I think we will just rotate the whole hallway so selected here, and you want to go to the transform options and let's check the wire rotation, and I think that's the correct access. So type in 180 on the ROI access to flip it around and you can hold the left most button to rotate your view, and you can hold down minimal spartan to pan. All right, now we're looking inside the hallway from the front and next up, I want to import our textures. So what do we want to do? You can just go to your Explorer window and that will quickly do that. And we'll just open my project folder swell and you to the Banks folder. Or actually, you can just click and back and drop it into your assets window here in Unity. And now we have the bakes fuller inside here, so let's apply it to the hallway mesh so you can see under the hierarchy. We have the hallway object right here, and I just want to select it in here and and go to the base folder, and I think we have to go into the base for the first and then select the hallway under tow hierarchy here. Now you can see the L B do Dima telling the normal and the roughness texture. We just want to drag and drop the Alito texture on top of our mesh, and it seems like it's not applying it to the complete hallway. So we have to drag it onto every piece off our hallway so you can click on the drop down to expand the hierarchy. Here and there you can see all the peace. Instead, we named in blender, so we will basically just dragon drop the LBO texture to all of these. And of course, we're not applying this material to the ladies already lights. So skip the allergies and lights, and but you still need to apply it to the shutters and shared us, too. And I think we're finished applying the material. OK, so now let's select one off these objects here and you can see on the right hand side. We have the LBO material plight. Now click on the drop down because we also need to drag and drop the metallic into metallic sloth. But this will then apply it to all the other mashes as well, and also drag and drop the normal into the normal mint slot here. Now there should be a notification this texture is not Marcus annulment. So we need to click on fixed now. Now, one thing we're missing immunity is a slot where we can place our roughness texture. Unity is searching for an Alfa Channel within the LBO takes her and there should be the roughness map integrated. So a problem like substance painter would do this automatically. But here we have to do use a work around. You can see we have a smoothness lighter and we want to reduce this movements 2.55 And this will give us the roughness that we're looking for now. It's not that accurate because detector is small, accurate as it's calculated on the mash as well. And here we can Onley use a slider and this will apply to everything and you can see on the roughness met. We actually have black and white well use which will define how rough certain areas are. But here we're just using a work around with the slider here. So if you go ahead and trade your own materials in the future that make sure that you search for article may, I can find the information on how to apply the roughness map into the Alfa Channel off the LBO texture. But for this course we can easily get around with this slider here. Now, by default, these textures will be sent to two K, but we have four K textures. So let's just select these textures and we want to change the size to four K and change the compression to high quality and then hit, apply and just repeat this 40 metallic and in a moment we do not need the roughness. So therefore, we don't have to adjust the values for a rough in this map. So go to the metallic change this to four K changed equality to high quality and hit apply and now finally do the same for the normal men. So before we can start to create the emission materials also need to mark our meshes as static mashes. So you will just go to the hierarchy here, and it's just select the armature holding down shift and select everything off this prefab . So the hallway prefab and then come up to the right hand side and just click on the static box here and you want to apply it to all Children so click on Yes. Okay. And now we're ready to start creating the emission materials. So just go into the materials folder here at and right click go to great and shoes material . Now we want to rename this to a light white it and her. And now just activate the emission check box going to the HDR field, and we will start with the light white. So we need to set this to be a white color and we will bring up the intensity to five. And we can still find Hyun this later on and just close this window and make sure that the global elimination is set to baked. And now let's create the recipe light materials, and then we're gonna assign them. So just right, click great material. And we need to call this light Brett it enter then activate emission. Go to the HDR field and changed us to be a red color here. And for this one, we're gonna set it to a new intensity off to for now, click X and we need another one. Create material this time. Gonna start with the led so called us led ease or just led breath and we want to activate a mission. HD are said this to be Retz and we want to bring up the intensity 2.5 for now and we need another one. Create new material. SST led. It's called It's Orange activated Mission. Change it to be orange, maybe. Like so For now. Bring us up to intensity off 0.5. Close it. Let's create a new one led blue emission change it to be blue and we can just pick a random color. So not a totally random color. Of course we want to have a blue color here, but we can still find you in this later on. So for now I just want to great thes presets for the materials and bring this up 2.5 And the thing we need Another one. We have led spot in blue orange, red, white. We have led blue, orange red. We still need white to create new material. Led white emission Change it to be white and intensity point fly flight before and there we go. Now let's make sure that we have all the materials that we will need. So we need led blue, orange, red, white, then we need lights, white lights red. So Oh, I think we need a new one for the ceiling white. And then we're done because we want to have the ability to adjust the intensity on Lee for the ceiling. So therefore, let's just create lights, ceiling white, create material lights or light ceiling white. And for now, I want to set this to be white, of course, and give this an intensity off four for now. And I think we have five for the other white light. So let's just set it to four, and we will find unit after we assigned these materials to the corresponding mashes. So now, pretty simple. We will just start with led blue and drag and drop it on elegies button blue and do the same for the orange now led Rhett led white. Now we need delight ceiling white dropping onto light ceiling white. Then we asked library and lead white. There we go. So no, we have to. Material supply two dimensions, but they're not admitting any like it, so we have to go to window, go to package manager now wait a second because it's still loading some more packages and you can start typing in post into the search field because we want to install the post processing package here, click on install and just wait for unity to finish the installation. So we finished the installation of the post processing peckish. So let's close this window. No excellent. Still lagging. All right, There we go. No, select the main camera and click on that component and search for post the 1st 1 to add the post process later. To click on that, we want to change the layer two are actually person knew, pause processing layer. So let's just leave it at nothing for now. And we also want to add a new component while you post process William. Click on that and we want to check is global. And now under the profile, click on new and you can See it will just create a new main camera profile here, and I think we have to set this one here. So the layer from the post process layer to a new layer, actually, but so I'm not using unity dad often, so sometimes I have to figure out how to do something. We want to go up here where it's a slayer and go to add layer and just click onto you the layer eight here and we will call this post processing hit. Enter now, Just select the main camera one more time and let's change the layer to post processing. And now we can also change this layer from the post process layer to post processing. All right, now we want to, let's see add components, and this time we're gonna add blue. I'll start add effect and then unity and then choose blue. So do not go to add component, but just click on add effect and then juice bloom. Now click on the drop down and we want to activate intensity and threshold. We want to set the intensity 2.1 and the trusty old 0.25 and hit enter. And there you can see it will start to emit light, but actually this is just a bloom effect for now, so we still have to do something else. So you want to come up here to window, then gives you rendering a lighting settings. Now this pop up should appear. Now we first want to deactivate the skybox, so click on this little circle and choose none. And the directional light Do the same Click on this little circle and choose not Florent. Now we want to click onto the ambient color field and changed us to a pitch black because we don't want any other lighting besides our emission shavers. Now scroll down here. You need to make sure the baked global elimination is active. And we want to set this to bake indirect. And we want to change the light member to progressive GPU and I think everything else is already set. So now we want to uncheck also generate. Then click on the drop down and clear baked data, you know, just reactivate all to generate. An American CIA baking process will start at the bottom corner here and now that process is finished and our light is baked into a new texture. You can go to bank like maps to see the result here and now we can start tweaking our commission materials and it will apply to change in real time. So now we can close this window and we want to select this lamp here in the center and just deleted. And no, we will find you are emission shakers, so we will start adjusting the lights materials, and then we will concentrate on the allergies. And I think I didn't apply the correct material to delight. Red object here in the hierarchy. Sold Dragged Eli Bread on 30 lights. Rent object here. And yeah, I think there we go. I think the led red will supply to the lights red, which is incorrect. So you want to apply the led materials to the led Object and Delight material studio light objects. Of course, Now let's start with light ceiling, and the first have to correct the color because we want to have this to be white. And now let's just play with the intensity and it can take a couple of seconds in order to calculate the lights so an intensity or four doesn't change anything yet. So bring it up even more, and he can see that the light is now admitting more into the hallway, so I will bring it up to five. Well, think and let's just leave it at five for now. And now let's give for the light red click into the HDR field here on the right side and bring up the intensity, and I think I will bring it up to about seven like that now. We also have Allied White here, so let's make sure that we bring up this one as well. And maybe let's bring it up to about six. Okay, now, let's start working on these led sellable Just use left most button and middle most button to make my way closer to the buttons here and let's see, where are the Blue buttons? Actually. So, yeah, let's start with led blue, quick into hdr field and bring up the intensity. And then we can see that the blue light is coming through. So I will also go for intensity off five year and there we go. Now go with your led orange, and I think I will bring it up to five s well, because it's not available with the SPO values. So bring it up to five now, led Rhett Little just in the same. Bring it up to five, and I think that will do it. But the problem is that it's not admitting enough light to the scene at all, because in blender it looked totally different. But we don't have the path tracing rendering engine from blender cycles here. So we have to trick this to get somewhere to similar look. So maybe we'll have to use fake lights or we will just play around with the rendering lighting settings. So go to window rendering and then lighting sex. And I think a simple fixes just to go into the sky box material here and just reset this to the default skybox. Now this is just a fake light, but it will actually do the trick here, and you can also go ahead and create in your game object light and play with these lights that are available in the here and place them around the hallway now to finish it all up. Let's have a look on the animation so we can go to the main asset directory and then click on the hallway Object. Now make sure that you're inside the animation tap here and at the bottom you will have from extra window, and if you had play, the animation will start to loop. Now it will look a bit weird in my case because I actually didn't remove the merit money fire from the doorframe, but you're should be fine. And yet this will finish it all absolutely completed creating the hallway game asset. And I think you can figure it out yourself. How to create multiple instances off this object and close the front part with another door , peace and so on. So thanks for making it all the way through. If you want to support me, you can leave a review for discourse and more are about to come. You can visit my home page to stay updated for the future, and, yeah, had a pleasure, and I will see you in the next course. Bye bye.
 Merlin Peppler, 3D Artist