Transcripts
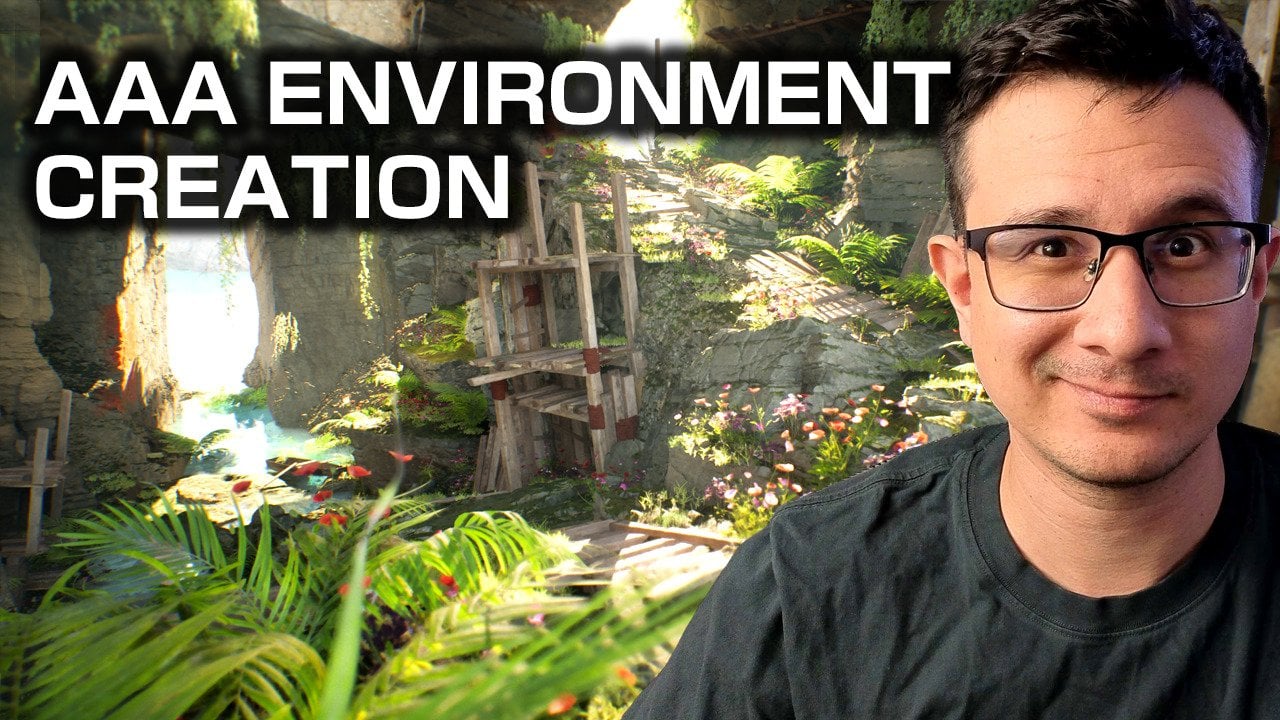
1. 00 - Course Trailer: Course will take you through everything you need to
know to get started with the basics of the
unreal engine and experience just a small part
of what it has to offer. As Epic continues to
grow unreal beyond being just a game engine and making it a multi media tool
for animations, automotive and architecture
visualization, and, of course,
virtual production. There's never been
a better time to get started learning
this powerful tool set. Be taking you step
by step through the process of learning
the core features of the Nerl engine with a focus on the best practices and
improving your workflows. Together, we'll create this
stunning cave environment, explore lighting and atmosphere, create our own materials, implement our own
blueprint code, and have these
events triggered in our final cinematic animation. My name is Rob, and I
have over a decade of experience creating
desktop and mobile games, virtual reality,
augmented reality, and training experiences in a range of different industries. I'm an authorized instructor, and I've been creating
educational content online for years for some
of the largest providers, including pleural site,
and even working with Epic on their official
Unreal learning portal. By using a hands on process
to get you creating early and completing challenges to cement what you're learning, I look forward to taking
you through the process and getting you comfortable working with the Unreal engine.
2. 01 - About the Class and Projects: Hey, and welcome to
this class overview. I just wanted to go through
some of the details of what you'll be learning
as we go through this class, some of the useful things
to keep in mind as you go, and also where you
can share the results of the project that you'll
be making as we go through. So this class will
be focused around creating this final
project, which, for myself, was this
stunning cave scene stuck in the middle of
an ocean somewhere, so we had plenty of opportunity
to play around with different features and plug ins in the unreal engine
from the terrain, the foliage system, and even the newly added
water plug in. Now, one I will suggest as you go through the class
yourself, feel free, you are welcome to make a similar kind of scene to what I have here,
the cave system. I'll be showing you all of the
places that you can easily access assets just like this
from the Quixel Mega bridge, a completely free built in plug in with the Unreal engine. But what I would suggest
is if you wanted to get even more creative
flow on the go. What I tried to
teach you is more of a concept and structure to
your workflow so that you can take a similar set of assets or completely
unique ideally using those concepts that
you're being taught and then adding that into
your own levels. So essentially, your
project could be absolutely anything
from a desert scene, and urban sprawl,
anything like that. So that would be the first
thing that I mentioned is do feel free to remake this
if this is easier for you, and you just wanted
to get to grips with the Unreal engine and go
through step by step as I do. But if you did want
to take a side step somewhere and change
the environment, the setting, and
things like that, then definitely feel free to
make your project your own. To get to this stage
of the project, this class will be
teaching everything from the basics of
the Unreal editor, so you know exactly what to
press, what's available, and how to use the Unreal engine and the features that
it has to provide. We'll take a look at
structuring your projects, creating and managing
new projects, adding and obtaining assets to various projects
and keeping them tidy by using the
migration tools and separating out the things
that we just want to use, working with the
foliage systems, the terrain, creating our
own custom materials, particle effects, sound will all be added into this as well, along with some blueprint
functionality so that we can have an
interactive scene at the end, and you can add your own
logic to allow people to jump in and play the
experience that you're creating. All of this will
be packaged into this one cool takeaway
project that you can then re use these features on future projects and
ideas that you have. When it comes to sharing your project One
thing that you will find with the Unreal
engine is that the file sizes do
get fairly big. So we won't be sharing the
Unreal engine projects around. These will be several
gigabytes at least in size when you're working
with the Quicksall assets. What we can do,
though, is we can take some really
cool screenshots. Whichever system you're
working on will have a screenshot
functionality built in. Just go into your tool set. If you search for things like snipping tool or screenshot, you'll find an option
that you can use on your desktop to take a screen grab of the
image that you have here. So this will be one
way to share things is take a really nice
looking screenshot. Share that down below on Skillshare and get some
discussions going around that. You could also record
something so you can download something like OBS completely free of
charge and take a quick video recording of a little bit of kind of a pan through of your
level or something, if you want to show up
a little bit more of the information and
a few tips for you. When you are inside
of the unreal engine, you may want to come back
here a little bit later as a recap when you're more
familiar with the engine. But if you press into
the viewport here, and all of this will become more familiar and make sense as
you go through this class. But inside of what is called the viewport, we'll press F 11. This will put you
in full screen. This immediately gives you
a really nice big setting for the capture that
you may want to take. And then I'll click
into the background here so we don't have
anything selected. And then I'm going to press G on the keyboard, so G for golf. And then this will just get rid of what are called the widgets. So now we don't have anything. You can see these
little images here, which are telling us
where different assets are in the world, so
we can hide those. And now if I go into
screenshot mode, I can just take a nice big
picture of the whole thing. I may need to go into a
video editing software to get rid of this
top panel up here, but this will give
you a nice simple way to share your projects, and when you've
got something set dressed and looking
really nice like this, we can easily come in and take some nice screenshots of things like this just with a
simple snipping tool. Well, like I said, we can even use this
snipping tool here, so just another example, we'll say to take
a new screenshot, and this will give us
the same option here. We can just cut this
and we can even see the result that we get then, what our final screenshot
would look like. So this would be an ideal way to begin sharing
your project work, and again, dropping
this in the discussion, letting people give
you some feedback, give other people
feedback as well, and maybe share some tips and
tricks as you go through, because that's another
really nice way to reinforce the things that
you've been learning is not just to ask
the questions, but try and answer other
questions of things that you may have seen or tricks that you've
picked up along the way. The final thing is if you wanted to share this on
your social medias, be sure to act me at the link on the screen here and use
the hashtag provided, and we can get a nice
thread of all of the project work being
shared and put out there. I'll provide these hash tags and links in the
description below, so you can easily copy
and paste these onto your social media platforms
and just share those along with some videos or the screenshots that
you've been taking. So just a quick recap really
for a quick breakdown of the way that I think you'll
make the most of this class. Follow the step by step
to get familiar with the unrelenting and the features provided throughout
the class as we go, but do try to make
the project your own. Add different features,
extend past what I've shown, or make something
completely new. This is where the learning and that knowledge will really be a foundation which
you can build up. And then of course,
the final thing, be sure to share the
project work as you go. And don't just wait
until the end. If you're gray boxing or
just mapping things out, before you even get
to the final project, begin sharing your
projects then as well, just so that we can see the
progress as you go through. Again, if you're
doing this early, people can provide feedback. You can give that
feedback to other people, and you can improve your project before you get to
that final shot. You don't need to
be precious about the projects that
you're working on and only release the images and footage when it's
fully complete. If you share and provide some progress shots
along the way. People are normally
going to be quite happy to give you
some feedback or suggestions on how to improve the lighting or the composition
and things like that. And the most important
thing. Have fun. It's a really, really big
system to get used to. There's a huge amount
of frameworks and features provided in
the unreal engine. But if you're having
fun with it as you go, all of this will quickly
begin making sense, and you can make
something really cool.
3. 02 - Epic Launcher Download: Before we can jump into
using the Unreal engine, we first need to
download something called the Epic Launcher. This is our entry point and
management software for our different versions of the
Unreal engine that we can begin installing to
our local system, as well as some of
the assets, packages, and examples that we
can learn from and work with to get our
ideal project started. Started, we have a number of
different ways that we can access or obtain
the Epic launcher. I'm just going to
run through the generic approach as this has been changing somewhat
frequently over the years. The easiest way, of course, is to use your search
engine of choice and simply look for the download
of the Epic launcher. The top results will normally take you to the correct place. At the moment, we
can find this on the download the
Epic launcher site, so it's store Epic Games. Again, this is one of
those things which has changed in the somewhat
recent months. But what we're looking for is somewhere that we can access here the download to the
Epic Games launcher. We click on this.
We should be given an option to save or
open this somewhere. So save or just directly open that to begin the
installation process. Follow the simple steps to
install the Epic launcher. And if you haven't
already make sure that you sign up for an Epic account, they are completely free, but they will be
required to sign in to the software
to get started. The other option is to go to the official un ng in.com site, and again, we can see at
the top right hand side. We have another place
that we can access the download option to
find the Epic launcher. We'll get some options
here to get the launcher. Follow the installation process if you needed help with this, but it is very, very simple, and we can just install
this to our system. When you're getting
started, this is another thing which is currently in the midst of changing in
how the licensing works, it used to be that there was a flat percentage
if you're making over a certain
quarterly earnings with your nngin projects. This is about to change where
there's going to be a split between whether it is a game
project, in which case, that remains with
the standard license where you have
that earning limit before you begin sharing a
5% royalty fee with Epic. We now have a custom license
for non game developers. But again, you can see
here that even if you are working in a non game
development environment, for educators,
students, hobbyists. We can still use the
standard license and access the features
completely free of charge. It's just one of those things
where I don't want to give a blanket statement here because they have
been making changes. So it will be worth just
to come in check here. And if you ever
start making money, and you're worried about
what you may owe Epic or need to pay towards
a subscription, depending on your use cases
with the unreal engine, then just be sure to come back into their official
documentation and their sites to keep up to date with any changes
that they're making. After you've installed
the Epic launcher though, you should be greeted
with something that looks a little
bit like this. Again, the layout, depending on when
you're watching this, can change from version updates, but the general layout
will be the same here. You'll notice that
you need to sign in, if you haven't ready, you should be greeted
immediately with a request to sign
into your account. When you have that
done, we're ready to go with the next section
where we'll be looking at the different parts of the Epic launcher and what
we have available to use.
4. 03 - Epic Launcher Overview: Now take a quick look at the different elements provided
within the Epic launcher. Generally, as developers,
we'll only be using a couple of
these more frequently, but it's useful to understand the general layout
of what we have. Some of this can be
confusing as well. For example, when it comes
to the confusing points, on the left hand side, I just wanted to bring the
attention over here. Have our store, library
and the Unreal engine. Now, by default, you're hopefully selected on
the Unreal engine. Again, this is the more
relevant part to developers. You may have a different
layout though if you were to start on the store or
the library section. Now, the epic launcher is a collection of pretty much
everything unreal related, and that includes the
gaming section of what is provided by Epic unreal
or unreal developers. The store that we can
see here, this is where you'd be finding
things like Fortnight, Rocket League, many other
games which have been released through the
Epic launcher here. So if you did have
a game collection, this is where you'd
be able to either find or buy further games. Games that you already own will be stored in your library, and this is one of the
first confusing points here because if we then click
down to the unrelen tab, this brings us over to
the development section, and you can see there's
another library here. Now, these two, the
library at the top here, and the library on
the left hand side here are not the same. So the first two tabs,
these are your store, so the games and content that you've purchased
through the Epic store. Then everything under the
Unreal engine tab down here, the library included are separate to the development
specific things to your unreal engine that you will be working on
to make content. So one thing just to
keep in mind, here, I just wanted to
mention really that if your view does
look very different, just make sure that
you've selected the unreal engine tab on the left hand side
at the bottom, which is more relevant
for us developers. Then a very brief
overview of what is provided within the Epic
launcher for developers. The first tab you're
normally greeted with is our news tab here. This is great for finding
any updates or features, new releases that
might be coming out. Any free packs as Epic quite often provide
sample projects. For example, we've recently had something called
crop out provided. This was a really nice
cross platform example of how to set up a project, to deploy to mobile, desktop, console, and so on. So it can definitely be
worth keeping up to date and just dropping in
here every now and again to see what's
been provided again. More featured free under
ending content provided every month and we
can get information of that just here as well. One tab across, we
have our samples page, very similar to what I
was just mentioning. All of this is
completely free to use. You can download any
of these packages. Most of these are
projects, again, with working examples
so you can have a look through here if there's
anything that you wanted to learn more
on, for example, With virtual production, we
will have a broadcast sample, so we can see exactly
how the project would be set up to work with
big LED screens. All of the plug ins that
would be available, ideal map and level
setups, and so on. If you wanted to know
more about games, you have different
game projects, your content examples is a
really good place here to find individual almost working examples acting
as documentation, where in the content examples, each feature set,
whether that be physics, particles, some
blueprint and code, all have their own
individual maps. So you can open the map specific to what
you wanted to learn about and kind of reverse engineer the content
they provide. There's, much more you
can go through again. More with cameras, with the new introduction of unreal covering things
like virtual production. The automotive features, CVs, and things like that
are all included. You can get some
really good examples through the sample section. And just to highlight
again that all of this is completely free to use. Next up, we have
the marketplace. This is one where you may
want to check in monthly. The first week of every month, they release a free
for the month pack, usually five different
packs of different types of assets that you can add to your account for free
and keep forever. Will be useful things like we have here a modular
medieval town. These are all of the
assets that you can see that went into creating
this town here. Really good if you
wanted to start building up a collection of tools to use for your
current or future projects. Beyond that, we can come into the brows option at the top, and this is just where we will look for either feature set, whether that be code features or visual features like asset
packs to add to your project. If there's something that
you can't do yourself, and needed to buy something
like your visual assets, your particle effects,
sound effects, code, all of that can
be found just here. You can filter by the different types of things
that you're looking for. So as I mentioned, code would be things like blueprints,
your code plug ins. You can find your two
D or three D assets. Props for levels will be one that people will
use quite often. So another thing which
is worth checking in on from time to time to see
what is available here. What you can potentially
be making use of. There will be some coverage in the upcoming topics on
exactly how we can use the different types of
assets and plug ins provided through the marketplace because some of them work
in slightly different ways. But this is just a
brief overview of what you can find here and why
this is going to be useful. And then the final
thing that we'll be looking at is our
library tab up here, so going over to the
library section. This is where we'll be managing all of our unrelenting versions, as well as any projects that you might have currently
in progress, and the vault down here, so this section under the
vault section is where you can find all of the
different assets and plug ins that you've
added to your account. I currently have this
filtered to show nothing, but I could show
just the blueprint assets that I have access to. These are all of the
things that I've either purchased or
that we're included in the monthly free content at some point that are now
bound to my account. Again, if I toggle
on everything, this will be everything
including the visual assets, the sound, and so on. This will be the
core area where we manage most of the important
things to our development, such as the projects
that we want to work on the engine versions
that we're using and the assets that we
have available to us. Then we have one
final option that you can see at the top
here, the twin Motion. We won't be going too
much in stepth than this. This requires another piece
of software to be installed, so third party software
called twin motion, and this allows you to work, as it says here with
Bim or CAD models, or things like architectural
visualization. So those heavier, higher
quality models and get real time back and forth between the Unreal engine
and twin motion. A little bit too specific for what we're
going to be looking. Potentially useful to know
about if that kind of workflow is something that
you may be interested in.
5. 04 - Engine Versions: You haven't used the
unreal engine before. One of the first things
you'll need to do is install a version of
the Unreal engine. You can see at the top here. Under the engine versions, I have several
different versions, I've got 4.27 all the
way up to 5.4 preview. This is just because I work
with different clients and do a range of different work where I've needed to
keep different projects. Hopefully, you'll often have fewer versions of the
unreal engine installed. As we can see here,
they do take up a fairly hefty size
on your system. If you've been playing around between videos
and you're not seeing the same layout anymore and you've forgotten
how to get here. Just remember, we need to make sure that we are clicked on the left hand side on
the Unreal engine tab, and then specifically
the library tab at the top of
the page there. You won't see this
tab if you're in the library or the store
section on the left. If you don't have any engine
versions installed at all, the first thing we
need to do is we have this small
plus button here. We can click to add a
new engine version. Will default to the latest version that you
don't have installed. So depending on when
you're watching this, you may need to watch
out that you don't have something called
a preview version. We always try to use the most recent stable version
of the unrelenum. So at the time of recording, that would be 5.3
that we could see here would be the
ideal version to work with as the 5.4
version is in preview, meaning that there's still
adding and tweaking features, and some of that
could be broken. All you need to do is select
from the drop down here so we can go all of the way back to the early
version of 4.0. But again, ideally,
we're going to work with the most recent
stable version. You find the version that
you want to work with, we just need to click
the Install button here. And before going ahead and choosing the location that
we want to store this, I'm just going to
show you a very quick tip on a way
that we can save some space on the system by removing features that you
may not need installed. If we select the options
button just here, we have a few things which
can be quite useful, especially when you're
getting started, just to provide some
starting points for your new projects. So I would recommend keeping the templates and
feature packs installed. These will be things
like the game templates, the first person or
third person templates, so we have some mechanics and features to work
with straightaway. Similar things are
provided for the ACFs, automotive, and VP
projects as well. These templates and feature
packs can be very useful. Starter content is one
that I never used. These have some
outdated materials, textures, particles,
and sound effects. Quite often, these aren't used. My personal preference
is to remove this, but as you're getting started, you may want to keep this
ticked just so you can get that experience of at least
what is provided for you. If you're intending to work with just blueprint to begin with, we can keep the
engine source and the editor symbols for
debugging unticked. We won't need this until
you go a little bit more heavily into the C
plus plus side of things. And then scrolling
down. These are the ones which can really
help save some space here. Depending on the projects that you have in mind to work with, you can safely untick
these and add them again later if your plans for
the project change. So for example, I
know that I never work on any mobile devices. So we can untick the
Android and IOS or IOS to save that sort of
ten, 11 gigabytes there. I've also never
deployed to Linux, so I can save
another 10 gigabytes by removing the Linux
option as well. As I mentioned, if you ever do want to come back and
add these back in, we can add these
at a later date. We can see that we've cut down the required size
now by quite a lot. If we hit apply and then
press install here, that will be the final
steps and you'll have the unreal engine installing
in the background. I'd recommend going ahead
and doing that now. It can take a while, and you
can continue with some of the upcoming topics whilst that is processing
in the background. In hit cancel as I don't need that version of the
early 5.0 installed, I'm just going to
remove this so that we don't have that
lingering any longer. And just to very quickly
demonstrate what I mean by being able to add in those options that we've currently disabled, if you do decide in the future
that you need them back, as an example, I'll go
to my 5.32 install here. We can drop this down,
find the options setting, and we can see here
what I currently have installed for this
version of the engine. We'll just scroll down
a little bit here, and we can see that
I've uninstalled, as I've just mentioned,
the Android, Apple, Linux, and
TVO S. If I did decide that I needed to package something to the
Android platform. Can simply come in here,
tick this on, hit, apply, and that will install
everything that's needed to work with Android into
the Unreal engine. That's what I mean,
it's very simple, and we can save space up front by not installing things that
we potentially don't need, and we can come back
and add those whenever. One final thing is if
you're working between versions and you do end up with a bunch of different
versions here, you can see we have the
option to set the default. The one that I've been using
the most at the moment because just most of my
projects are in 5.21, we can see is highlighted
here with this yellow ring. That means if I create any
new project, we have the launch option up
here, we can see that this will default
launch to 5.21. We can drop this down
and we can change the default to 5.3, for example. So now whenever I
create a new project, it will use this
version just here. But if you wanted to launch
in a specific version, we can just click the
launch button here, and this is how we can
either create or find projects created with
these different versions. And the final thing I
wanted to mention very quickly is just below in
the M project section, if you've worked on a number of projects on a local system, anything that you've worked on locally will appear down here. Had to filter this
out just to show a project that I know
is safe to demonstrate due to the standard NDA and confidentiality
restrictions you get when working with some projects. I can't show some of the names of the
things I'm working on. But this is where
you would access projects that you've
worked on in the past. You would just double
click on this, and that will open
the project for you to begin working with again. So this is what I meant
a little bit earlier, that you'll find yourself
working in this environment of the Epic launcher fairly
often as a developer, as you can manage everything
from your engine versions. You're currently
in work projects, and the assets and plug
ins and features that you have for the engine can all
be found in this one section.
6. 05 - First Project: Now that we're familiar
with the core features of the epic launcher, we can begin looking at
creating our first project. As with many things inside of the Unreal engine ecosystem, there are a couple of
ways that we can do this. So just very quickly
make note at the top right hand side of
the screen here, again, just to recap in the
library section, specifically with the Unrel
engine selected here. Top right hand
side of the screen here holds our launch button. This will launch a version
of the unreal engine in the default engine install
that you've selected here. So we can drop this
down and we can change this here. We
can tell which version. If you have multiple versions, as you can see just here in
the engine version section, the one with the yellow outline is the one that you've selected or that is defaulted to be
your default engine version. Where possible, it will
try to use this for any new projects that you create regardless of where
you create them from. We can launch through
the top right hand side, or we can launch
through the engine version that you
want to use here. I'll be using the most up
to date stable version, which will be 5.3 at the moment. Just to mention that
if you wanted to change your default,
we can drop down here, we can set this to
current, and now 5.21, you'll see is now the
default engine version here. I'm just going to set
that back to 5.3, and I'll just chooe to
launch this through here. After a moment of processing, this will open a
new window here, so this is our unreal
project browser by default. I've just needed to make
the same change again. I'm filtering to
a project that I know that I can
safely show off here. If you have more projects already created
or in the future, when you've created
a few projects, they will all be
outlined here in a similar way that they were outlined in the
Epic, to be honest, I'm not too sure where we
have two different places to take a look at our projects, but if you wanted to load one, you can do it from here as well. Generally, though, the
workflow will be that you manage your projects and open them through the Epic launcher, and this will just
be a place that will actually use the other
options just here to the left hand side to create our new
projects that we want. Instead, what we want to use is on the left hand side here. We have a bunch of
different categories holding different
templates that we can use to have a starting point for any
of our new projects. As I briefly mentioned
in a previous topic, with the Unreal engine
Branching Act to cover many more different industries
now from games to film TV, architecture, automotive,
and simulation. Different templates
are being made for all of these different
types of projects. So just to provide a
very quick overview. As an example, if
we go to games, the classic version of what the null engine
would have been used for, we have different templates
that we can start with, such as a first person template, third person, top
down, and so on. These will come with the assets, some basic code effects, signs and things
will be relevant to these projects just
to get you started. You can also start from a
completely blank project if you already know what
you're going to be aiming for, and you don't need
to use any of these. Similar way for virtual
production, for an example, we have a virtual
production template, as well as something
showing off how to use end display
and things like that. For architecture, we have
some arc iz templates. Similar again from
automotive showing how to use the new kind
of fancy material laying that you can get
for different types of reflection and car properties for the materials provided now. Then again, for simulation,
we have things here. For virtual reality, handheld, the whole kind of X R
situation going on. Example, I'm going
to go to game just because it has a nice blank
project that I'll be using. Generally, what
I'll do is I will create most of my projects
from a blank template. Simply because
once we have that, if we wanted something like a third person template pack
to be brought in later, we can very easily add this
as in when that need arises. Starting with a blank
project gives you a completely blank
slate and you're in full control over
the type of assets and the amount of data that
your project is holding, just to stop your projects
from getting bloated and having things in them
that we may never use. So I'd recommend starting
with a blank project now. I will show you
later how to bring different templates into
the project anyway. That's selected on
the right hand side, we have a couple
of options here. We'll keep this to
Blueprint for the moment. If you wanted to get more into the C plus plus side of things, you can have a look at the C
plus plus templates as well. They have the same
templates here. It's just the way that the
character, for example, in the third person project
will be structured will be through the C plus plus code rather than
the Blueprint code. You can make that change now. Working with C plus plus will require a bunch
of extra setup for things like visual studio and other types of SDKs that
you'll need to get ready. That may be something
that you want to hold off from just
for the time being. Go to stick with blueprint, we'll make this a
blank project again. Then a couple of other options we have on the right hand side, we have our target platform, we can leave this as desktop. If for example, you
know, you want to be deploying to the
mobile platforms, we can set this to mobile. I'll just make some changes to the default rendering
pipeline to make sure that everything
is optimized to be a mobile project out of the box. But we can stick to keeping the higher quality settings
here with desktop. Then in a similar way, we
have our quality presets, and we can make this scalable, which will lower everything to a much more manageable
quality preference. If you're targeting a less
powerful piece of hardware, or if you're working on some older or less powerful hardware, then you may want to
make this scalable. If you have a newer system, we can leave this at maximum. We just get slightly
higher rendering settings, shadows, and so on. Then we have two options below that, we have the
starter content, which I will leave unticked
for now. As I mentioned. This has some
fairly dated assets and using systems that aren't
really covered anymore. So often not the kind of best
packs to be working with, but we can easily add
this later if needed, and then tracing, which is
just the lighting option. We can take this on in
the project if we wanted, but we'll be looking
at things like lumin and Nunite instead. So we probably won't need
the tracing to be enabled. Last two things before going. We just want to make
sure that we have this in a location
on your system, which is going to be accessible
and that you'll remember. So for myself, this
is going to be in my projects forward
slash Unreal, and that will be perfectly fine. And then we want to give
the project a name. So by default, this
starts as my Project two. I'm just going to change
this to be named boot camp. And with that done,
we can hit Create. And this may take a few moments, but this will begin
creating your project, setting up any shaders, and
materials that are needed, and automatically launching
the unreal editor for you. Okay, so that almost
loaded immediately for me, depending on the engine version
that you're working with, that may take more or less time, just because as of 5.3, Epic have included a kind of
build what you use system. So it knows that when we
launch the editor initially, it only really needs to
account for the shaders that visual information related
to this terrain piece here, so it built a few
shaders and unloaded. In some of the older
versions, unfortunately, I would precompile
pretty much all of the shaders that it knew
the project would hold, even if you're not
opening it straight away, which does mean you may
be stuck with a window showing you that
you've got a few thousand shaders ready to build. You only need to do that usually once the first time you open it. And then in the future, anytime that you make any
big changes to the project, you may need to do it again, but the good thing
is that once you have that project
made initially, you won't have to
keep waiting every time you want to
reopen the project. Just to say that that
could take a little while, you're not frozen
if that is taking a while to get that
first project open. But once you have that done and you're greeted with
something similar to this, that is the first step done. You've now potentially made your first project
inside of the unrelenum.
7. 06 - Editor Basics: With our project loaded
and open, ready to go. We're going to start
taking a look around the key features, the core elements of
the unrelenting editor. In future topics, I do have it outlined and planned
that we're going to go through tweaking and
updating some of the settings and
project defaults. Once we're more familiar with the editor and what
exactly we're changing. I didn't want to jump
into that straightaway, just because we wouldn't
even know what we're affecting without looking at the editor for a little while. That in mind though
there are a couple of changes that I want to
make now very quickly, just because the unreal engine
notoriously is somewhat heavy when it comes to performance and
specification requirements. I can already hear mine
worrying in the background just to have a mostly empty
level like this open. So we're going to make some
very quick changes here, especially for those
of you who may be on systems or hardware, not quite able to keep up. The first thing to be aware of is that when you
open the project, even if you aren't doing
anything, as we are right now, I just sat here with
the editor open, it is trying to run everything happening in the background
as a simulation. If we did have things like
particle effects, for example, dust or rain that we may want to visualize, it would be
trying to run that. For that reason, we're already having quite a big
performance hit. We can very easily
turn this off. In the left side of this big window here
that we're going to, this is called the viewport. If we click into this little
settings button here, we just want to
turn off real time. This is what is trying
to force this to simulate a kind a live update even when we're
outside of play mode. It's going to turn
that off and I can already hear that my PCs calmed down just a little bit to the side there. That's
the first thing. And then to the right
hand side of the screen, we have another settings
option over here. This is our project
and editor settings. If you do have any issues, if it's already quite stuttery, we can see at the top, I've got a frame rate indicator here. If yours is lagging or a little bit stuttery
at the moment, then what you can do is
we'll just go down to the engine scalability by default because we chose
the maximum settings. It will have this set two
Epic, which is trying to Keep everything looking as crisp and have the shadows as
detailed as possible. Cinematic, we tend to use
more for final renders. We often won't put
this even in games. You won't often use the
cinematic settings. But then if you do need to
tone things down a lot, we can make this
low medium or high, and you can see here
that this will just default set everything
for the texture quality, the shadow quality, everything which is going to have
a big impact here. We can lower that immediately. Going to keep mine
epic because it's actually fine on my
system as it is. The main thing is just turning
off the real time for me. But I just wanted to let
you know that you do have options to change these. I wouldn't play around
with them straight away. If your system is
fine, changing this, and I will force the system potentially to do a
complete recompile, because if you are
making these changes, some of them can
have big knock on effects to those shaders
that I've mentioned, so it may need to recompile
a few thousand shaders. So unless you
absolutely need to, I would avoid using
these right now. Just want to let you know
that they are the options just before we start
looking through the editor. With that mentioned
and out of the way, hopefully everybody
can now follow along comfortably with their system not trying to self destruct. We can now look at
the core features of the editor that we're
currently presented with. The unreal engine notoriously
is somewhat cluttered. People do find the
interface to be a little bit overwhelming
when they first open this. There are a lot of
different buttons, a lot of different sections. We'll just go through
this step by step to get you comfortable with
what we're looking at, and you'll find
that it's actually much less intimidating than you might think at first glance. So the first and
most obvious thing that we have here
is our viewput. So this has our level
currently being displayed, which at the moment is just
made of a simple terrain. We can move around this,
and we will get to the button layouts and things like that a little bit later. But at the moment, just
know that this is where we would be building our
game. We can come in here. We have live access to
drag and drop things in and really start fleshing
out our different levels, production set you
might be working on, whatever the goal
is, you'll have a viewput that you'll
be working in, and this is where the
core content that you'll be creating will kind
of be managed and housed. Above this, we have
our main tool bar. So everything up here is
class as the main tool bar. The important things
that we'll find here, we have a creation mode, so we can quickly add new objects into our
viewports through here. For example, if we wanted a cube to start
blocking things out, we can select to
have a cube created, and we can start placing
these objects in the world. And moving them around.
On top of that, we also have things
like our play and stop mode options here. So if we wanted to come in
and play and simulate things, this will give us the option
to come test the level, move around, and
see exactly what the process would look
like during run time. We have different
options here that we can drop down regarding
how these play, whether we want to
play in the viewport that we're currently
selected in. We can open up a new
window if we wanted to see exactly what the
resolution would look like in certain presets, so we can somewhat simulate a packaged game mode or deployment that
you may be giving to a client, for example. Then on top of that, we have the option
from here as well to package our projects to things like the Android platforms. We can do a windows build here. We'll have some cool options. If you have all of
the Android studio and the setup included, we can connect this directly
to a device and get this to debug and play through the
device from options like this. Some of the other things you'll find in the main tool bar, we have our file options, so your standard
creation of new levels, new objects, saving everything, and so on, can be done here. Of the project and
editor preferences we'll see through
the edit option, and other very
similar things that you may come to expect if you're working with even two D software like Photoshop,
your Adobe suites, and things like that, or other three D tools
where you'll have your application and
window specific tools and options available
all up here as well. Obviously, we don't
need to be aware of and understand all of these when we first getting started, just to let you know
that these do exist. That's one of the things I
think can make this much less daunting is just try and take things in as and when
you start needing them, we can start looking
at different parts of what the NRL engine
provides for you. Next core thing we have to the right hand side is this
box here called the outliner, so we can see we have
something called the outliner. There's another tab just below this that we'll
get to in a moment, but the outliner is this
specific box just here. This is essentially a list of all of the objects in
your current level. This allows you to select, hide, delete objects, and
make these changes very quickly in real time. And everything is
synced essentially from your viewport to the outliner. So what I mean by that is if I select a chunk of
terrain just here, the landscape, That chunk of landscape has also been
selected in the outliner. Obviously, vice
versa, if I select a chunk of landscape
here in the outliner. We can come and have a
look in the viewpoint, and we can see that that's this section in the distance
that I've just selected. So these two, you can work kind of hand in hand
with each other. It can especially be very
useful in bigger projects. When you have many
more objects in this, you may not be able to
select something which is included by a bunch of landscape or
buildings or something, but you can find it
in the outliner. We can set things up to tidy
this up for us as well, so the landscape, for example, is all nested under the
main landscape object. Then, likewise, we have
folders or grouping for things specific to
your lighting setup, the levels of detail, and so on. So just another
quick example here. We have a directional light, which is responsible for all
of the light in this world, which is this object just here, and we can select between
these in the outliner, and you can see that
the widgets are being changed here depending
on what I have selected. Next up, we have the
details panel just below the outliner is
our details panel. If you're really paying
attention there, you may have noticed as
I'm switching between these different objects
in the outliner, or even in the viewport, that information is being updated in the details
panel as well. So this is just another element which kind of works in
tandem with the other two. What we have in the viewport, just try and kind of bring
this back into context here. In the viewport is
a visualization. Of our entire world. All of the objects that
are making up our world, level map, whatever
you want to call it, are all here for
us to work with in real time to quickly make
changes and visual updates, and we can tweak
things as an example, when I say live updates, we can change light here
to completely change the settings of the
light properties that we have in our world, and we do that
through the viewpt. All of the objects which
are in our viewpot, for quick and easy access, we can get these
from our outliner. And then the details about
the individual objects. So the properties that make
up the objects that we're working with can be found
in our details panel. And this contains things
like information about, let's have look
at our sun again. It contains information about
where it is in the world. So the location, the
entire transform, which is the location,
the rotation, and the scale of this object. If I were to move
this up in the world, and we can see here,
the information, the details about the
location is being increased or decreased as I
move this through the world. Every different
object that we work with will potentially have
different properties. Things like our
directional light here has information about the
intensity of the brightness, and we can change all of that through the details panel here, the color of light
that it's casting. And many other things like that. And of course, as you're switching through objects
that you're selecting, either through the
viewport or the outliner, the information
that you're being presented in the
details panel will change to reflect the object that you currently
are interacting with. And the final core element
of the editor that we'll be working with quite
often is our content draw. So it's currently
actually tucked away in hidden in the bottom left
hand side of the screen. Can see here we have something
called the content drawer. If we click this,
this will pop open, and we can drag this up just here to make this
larger or smaller. And this is where we will hold
all of the content that we either import have provided through templates or bring
into the project ourself. At the moment it's
saying that this is empty because we haven't, at this point, created anything or imported anything
to our project. Remember that I
said, we'll start with a completely blank project. Have a folder just here
showing the engine content. This is probably
only switched on for me because of changes I've
made in other projects. If you are seeing this, it's not something that
we need to look at. It's basically a lot of different folders
that we have here of all of the stuff
that just comes pre packaged with the
engine by default. So this always exists, but we don't really
need to see it. Do have this shown
and you want to get rid of it because
it just takes up that extra bit of space and
can kind of confuse things, especially when you're
getting started. I'm just going to go over
to the right hand side of the content drawer here
to this settings option. And this is one thing I'll just take a very quick
break away here. One thing to be aware
of with Unreal engine. They do use the same term
and sort of buttons, but it's quite often contextual. The settings button
that we have up here is different to the settings
button that we have just here. This one is contextual to
our project and editor, the overall kind of layout and project that we have going, whereas this one is contextual
to this window here, the content drawer
that we're in. It can be very useful.
Having everything being contextual is obviously
going to be very convenient. I just think it can confuse new developers. So
do be aware of that. But we'll drop this down. We'll
drop down these settings. We're going to go to
our show options here. And what we want to
do is we want to untick the show engine content. So we just untick that. It keeps everything nice and
clean and tidy. We can get rid of those things that we won't be using for now, and we can always turn
this back on a little bit later if we do want to make
use of the engine content. One thing that I will
also mention is if you do have that enabled
and you can see these, do not change or make any
edits to the objects in here. Don't delete any of these. Don't make any
changes because we can come into, for example, what is called a
material instance here, and we can make changes to
the properties of this. This engine content is shared between every project that you make in this
version of Unreal. For me, this was 5.3, and this is going to be what
the engine is using as the core properties for all projects made in
that same version. So having access to this is
very useful to take reference from things or we can make duplicates and
copies of these, but we do not want
to make any changes the actual content inside
of the engine folder here, which is another reason
I find it's quite nice just to keep this
switched off for now. Just to wrap up the
content drawer, this is where we'll be adding all of our content
as we go through. As we start bringing in assets
to build out our levels, as we start creating
our blueprints, to house our code. This is where we'll be finding
and storing all of this. One other thing which is
really useful here is we have a shortcut to hide or
show the content drawer, which is holding
control and space. So I've just pressed it there and that will make it go away. And if I press it again,
that will pop that up. So control and space will show or hide
the content drawer. If you're familiar with
the Unreal engine four, or if you're seeing content made with the Unreal engine four, you may be familiar with a view which looks more like this. The content drawer
used to be docked, but it just takes up that
extra bit of screen space, that real estate,
which is otherwise useful for the viewport here. Some people who are more
familiar with Unreal Engine four still prefer having
this available, so that it's always here
ready to work with. So there is that
option. I just wanted to mention if you did
want to dock that. If you just made
that same change, we can just press the x button here and that will
get rid of this. And then that just
leaves us with the hiding and
showing option here. So we've got the option just to do that a little
bit more slowly. The option here to
dock in layout, if you wanted that to
be here permanently, if you decide otherwise,
we can remove that, and then we can just toggle
this with control in space. Is a useful shortcut
to commit to memory early because you will
be using that quite a lot. Every time you wanted
to access something or create something new,
you hit control space, you get to your content
drawer and you provide a location or find the location of the object
you're looking for. The final takeaway
just to mention here is that everything is
very customizable as well. So if you're not happy
with the layout, if you come from a
software package where maybe everything's
similar, but inverted, For example, Unity has a lot of these windows on the left
hand side of the screen, that's more than
possible to achieve. So we can grab the tab here, where you've got the
x. This is our tab. We can drag this across, and you see it has
a grid formation that it tries to adhere to. So we can drop this on the
left part of the grid, and we can make the
same changes down here with our details and world settings
and things like that. So we can tuck all of these
back over with each other. So it's not very similar, but it's just inverted
where these are. If you wanted it more along
the top for whatever reason, we can do essentially
whatever we wanted with hour outliner here. If you're making these changes and the
reason I wanted to mention this now is I'd recommend just playing around with some of these seeing the
different options you have available
between the videos. Just take a break five, 10 minutes to play around
with the different outliners. See if you feel more
comfortable with the content drawer being dragged up and held open or docked, just kind of get comfortable essentially with the
different options available. Make mistakes now, it's fine, we have a completely
empty project, very easy to get
back to this stage, so this is a good time
to make those mistakes, but also it's easy
to fix everything. So it can be a little bit easier when
you're starting out with something to follow along with the content as is
shown in the videos. So if you wanted to
get everything back, if you're making these changes,
we can just go to Window. We can go to load layout, and we can change this to
the default editor layout. Also, just to recap there, like I mentioned, if you do have experience with the
Unreal engine before, and you wanted it to look
more like it did in the past. We had this place actors
option on the side there. Everything looks very similar
on the right hand side, and then that constant content
browser at the bottom. That was achieved by
just going to load layout and the UE four classic. What I'll do those is, I'll just press the default
editor layout here because I quite
like working with the new unrelentin five layout. So this is the one
I'll be storing. But that was just to
show you that it's very easy to make these changes, test things, and then if
something goes wrong, just revert it to how
it was previously. If you're missing
windows as well, another thing to keep
in mind is we can toggle these on and off in
the window setting here. So for example,
just a moment ago, I had some information
about the world settings. If you want that back, we just need to look for the
World settings option here. We'll click this, and it'll create a new
tab for us over here. Just to say that if
you did something like close the
outliner entirely, and you weren't sure
how to get that back. To return the outliner,
we just go up here, go to O Outliner one, and we'll have one of those
docked back up here for us. And that will happen for any of the windows that we
can see by default. So we've got the
outliner, the details, world settings, and so on. And just like I
mentioned a moment ago, if you're not sure what these
are and you wanted to see, then just play around, click on the levels, see
what that gives you. If you don't need it,
you can remove it. If you're not sure how to get everything back
to how it was. Just remember, load layout,
default editor layout. So that's the basics of
the Unreal engine editor. As I said, it can
look quite daunting, but it's actually quite
easy to work with. There's a lot of information, but we don't need to know
all of it right now, and we'll be picking up much much more on exactly what
all of the features are, what we have available, and how to use them as we go through.
8. 07 - Navigating The Editor: Now that we've seen the bulk, the main element of the
unrelenting editor, we're going to focus in
just on the viewpot, because you'll be working
in this section quite often when building out your
levels or just in general, making tweaks and changes to your experience that
you're working with. This is something which will be, very useful if you spend that time to just
familiarize yourself and get comfortable working inside of the viewport as
soon as possible. So the core features that we
have in here at the moment, if we click into the window, so most of this is kind of sensitive or
context sensitive to having something your mice clicked into the viewport area. So I'm holding right click, and this is going to be our panning motion to look
around the level itself. So the most simple thing here is right click and pan
to look around. With the mouse still
in the viewport, I'm just scrolling
the mouse wheel, so this is how we
can zoom in and out. So what you will notice is that whilst we are
zooming in this way, it's not always the fastest or most convenient
way to move around. So another thing that
we can do is if we hold the right mice button
and then left click, we get a kind of sideways
movement here or up and down, depending on then where we drag the mouse. I'm just dragging
the mice forward backwards, left and right, and we can actually control
the camera this way. And then the final two
things here, just the quick, simple things that
we can work with with something
selected in the world. So I'm just going to grab a
chunk of terrain down here. Any of these will
work, so just left clicking to grab
something down here, and then press the
F, F for focus, and that will focus in on
the object you're selecting. Then with the ult key held, if we left mice click
and drag the mouse, this will orbit the object that we currently have selected. It's a nice way to
come in. We can have a look at something here, and we can orbit around and take a proper look at the elements
that we're working with. Looking at something
a little bit smaller, if we grab a skylight, which is not really
a visual object, but it does have a widget so that we can just
visualize where this is, so we can get much
closer to this object and see exactly where it is and what it's
doing in the world. They're the most basic
fundamental options for moving around
in the viewport. Are the kinds of
things that you may be more familiar with coming from three D packages
like Blender or Maya, three D S Max,
that type of thing provide very similar
key bindings, shortcuts, and things like that. I just thought I'd mention
those first of all. Now, the next thing to be aware of, and this is very useful, and this will be a lot
more comfortable to gamers is we have a first
person fly through mode. It's kind of activated
automatically. There's nothing that we need
to do to get this mode. We just need to right click
into the viewport again. And then when we're
looking around, we use W A S&D, so the WASD movement,
we can move forward, backward, left and right, or right and left, depending on the keys
that we're pressing. So, as I said, very much like a first person
movement type of game. If the camera is
moving a little bit too fast, we can move up here. Mine's currently set to
a camera speed of 8.5, which is quite high,
and then we can just move this to be
faster or slower. And then when I'm flying around, that will change the speed. Also, with the right
mouse button still held, and just moving in a direction, if you scroll the mouse
will back or forward, You can see that the
camera speed is also being controlled and
changed as I move around. So a nice quick way to
change the speed of the camera as you're
flying through the world. So this is a nice quick way
to navigate and move around. It's very much like a
ghost cam type thing in first person games. Another thing which
can be useful, so W A S and D and holding the right mast button will let you move forward backwards, left and right, Q and E. Will let you move down and up depending on what
you're pressing. So in a similar way, we can just just lower the
speed here again because I don't
want that to be too obnoxious as I'm
demonstrating this, but yeah, we can go down, and up with Q, for down, E for up, as long as you're holding the right mouse button. So you'll find
that this is quite often how you'll
navigate a scene. For example, I'm wanting to look at this landscape
piece over here. So I'll select it, I'll
press F to focus in. I can orbit around to have
a better look at this. Then if I wanted to get up
close and have a look at it a slightly different part of
the landscape piece here, you'll have your right
mist button held down, and then you'll use
the fly through mode to just fly around and
get a little bit closer. It just gives you
a nice level of precision when
navigating the viewpot. Next, we can take a look at the transformation tools
inside of the viewpot. Kind of alluded to
this a moment ago, we have our tool bar section at the top right hand side of
the viewport just here. So this first section
here is our transform, which is our movement,
rotation, and scaling. But I'm just going to go back to one of the objects over here. I'm going to grab our
directional light again and just press F to focus in just so that I'm a little bit
closer to the ground here. Just using the middle
mouse button is another way that we can I
think this is called dollying. We can move around the camera, down left or right, depending on the direction at which
you move the mouse. Just that I can get quite
close to the floor. We're going to come
over here and I'll add a basic shape into level again. So this is our object
creation tool here. We can grab a shape and just drag the cube
onto the floor. One thing to be aware of
here is if you're holding this and you click and
then drag into the world, you have a kind of a
movement mode option here, and this will try to
snap to a given surface. So we can just drag these onto the floor just for some
quick demonstrations. By default, you can see
if we click on something, we get these arrows, which means that
we're in move mode. Move mode is indicated by
this blue button just here, saying that we're
in move mode, and that will give us
the option here. With these widgets,
we've got up, forward, left and right. So in rail up is
classed as the Z axis, which is the blue arrow
that we have just here. It's going to go to
the details panel. We can see that the
Z has this blue pip just here in relation
to the blue arrows. As we move this up and down,
that value will change. Forward is usually
defaulted to x, which is red, so this
is our forward back. And then green will be our y, which is left and right. With this widget, we also have a kind of a more
free form movement, so you can see that
it's highlighting here. It's turning this
yellow depending on the arrow that
I'm about to select. If I hover over this
double line here, this will actually move us
in the Z and the x axis. So you can see it's highlighting
both of those arrows, which just gives
us a little bit of freedom and easy movement here. Likewise, we can do
that for the two arrows on the bottom or the two
arrows on this side. Then there's also a little bit harder to see a
sphere in the middle, which gives us complete
free form movement depending on the direction at
which the camera is facing. We can move this in any direction whilst
holding and dragging. Now, the sphere isn't going to be the best thing to
show the next thing off, so I'm just going
to delete this one, so I'm just pressing
the delete key. I'll now move to the cube. I'll move the cube up
a little bit here. And I'm just going to
go to our toolbar. I'm going to select and change this to be
our rotate mode, and you can see the
widget changes. I'm just going to press
F to focus in again, and the rotate option,
as you would expect, allows you to rotate the
object in the given direction. This is classified
again in a similar way, we've got the X, Y and Z
or the we pitch and roll. In the same way
that we can change the values here by moving
this around with the widget, we can always come over
to our details panel. If you wanted to reset this, you can simply use
the arrow here, the back arrow is your undo, or we can set this to
be a specific value. We could say a 45 degree
rotation here on the x, and we'll get something
looking like this. We can plug numbers directly in here as well if we wanted. Then finally, we have
the scaling tool, so we'll press the
scale option here. And more like with
the move option, we've got the center option, which will scale this
on all of the axes, the X Y and Z, or we can scale this just
in one direction, so we can make this taller
or wider on either side. Again, if you wanted
to undo all of that, we just press the undo button, and we'll get that
back to our uniform one on the X Y and Z. Now one thing which
is really useful here is as we hover over these, you may notice that we have an indication of their
shortcut buttons, and it's going to
become really useful to remember these as
quickly as possible. This is another thing
you'll find you're probably going to be
working with quite often and switching between movement, rotation, and scaling. So remembering these shortcuts
will just save you from constantly making a change over here and then coming in
clicking these buttons. They're nicely placed at the
top side of the keyboard. So we have W, E, and R. And you can see that
as I press those keys, it will change which of these
options we have selected. Whilst we're looking at
the movement, rotation, and scaling options, have
three different things here, which are all related to those. So these three options
with the blue icons just here are the snapping
properties for each of these. So you may have noticed that
as I kind of scale things, it does have a snapping
property to it. So this is scaling in
increments of 0.25. If we rotate it, it's rotating in increments
of ten degrees, as we can see here,
and if we move it, it's moving in units of ten. So you may or may
not want snapping. If you don't want
snapping at tool, we just click the buttons here. When they're grade, we
don't have snapping. So now we have
complete free movement of where the object is moving. If we wanted to
increase the distance, we can press the button here. We get a drop down,
and we can move it in bigger or smaller increments. So we're now moving
in increments of 100. And we can do a
similar thing for rotation and scaling by changing the rate or range at
which we are allowing the rotation to happen and
the scaling, of course. So I just wanted to
mention that we do have that option enabled by default. So as I said, if you find that the snapping is not useful, if it's a little bit
too restrictive, we can just turn
this off altogether, or if you do find it
is somewhat useful, but maybe just a
little bit too strong, or a bit too weak, we can change the amounts at which these snapping properties
are happening. I already mentioned
this just a moment ago because the camera movement
was a little bit fast. But again, if you want
to change how fast the camera is moving when
you're in the fly through mode, that's the option that
we had just here, so we can increase or decrease
the camera movement speed, and you can do this by a
scalar parameter as well. So essentially just multiplying the camera speed
that we have here. So if you can't
quite fine tune it, then we do have the option
to increase or decrease the speed by a very
high amount, if needed. And then finally, we have
these two little buttons here. So we have one which
is control over how we snap an
object to a surface. So if we enable this
and we drag this, you can see we just move
in a little bit closer. With that enabled, it
is now automatically trying to place the cube when
I let go onto a surface. I don't use this very often
because as you can see here, it is a little bit finicky, so I'm just going
to move this back. I'm going to untick
this, bring this back. But you can see that if you accidentally have
the mouse selected over a little bit of
geometry a bit further away. It won't always put the
object where you wanted it. One thing which might
be quite useful though, if you just want something
to end up on the floor, let's say that we have
this cube in the air, we can press the end
key usually above the numpad or in that general
area on your keyboard, the end key, and that will snap. The object to the surface below it if there's something with
a collision just below. The final thing when
it comes to snapping, I don't want to overload
you at this point, but one other thing that
people do find quite useful, I'm just going to click and then drag the
move widget here. So I've held the left lt key. I've clicked the move widget and then I've dragged this out, and this will create a
duplicate, so this is a nice shortcut to duplicate objects. I'm just going to very quickly give this a different scale. It doesn't really
matter what this is. I just need it to have a
decent kind of surface area. And then with the smaller cube selected, I'm going
to move this over. And then if you hold V, we'll get vertex snapping. So V for vertex. And then
if we move the cube here, you can see these
little blue dots appearing. This is the vertex. This is trying to
snap the cube two. So we don't unfortunately have anything similar to where we press end and snap
this to the floor. Don't have anything similar
to that for side surfaces, but we can press V, and at least snap it
to the nerest vertex on the side like this or
on the ground or so on. So just to let you know, we do have a vertex snapping option. Hold V and move this around, and it will try to snap that to the nerest vertex that your
mouse is hovering over. Finally, to not let
this go unmentioned, we do have this button here. This is a little bit
harder to describe. This is our transform gizmo. It changes the coordinate
system that we're working in. By default, we are
set to world mode. You can see here, we can change that in the tooltip there. We can change that
to local mode. World mode at the
moment, the world has a context of its transform. The world up down,
left and right, for example, X Y and Z. Z in the world is up, which
is our blue arrow here, X is forward, and y green is left and
right, as I've mentioned. Best way that I can think to
describe this is if I give the cube a small rotation
on the green axis here. So we're rotating this
around the Y mainly here. Then I go back into mood mode. If we move up in the
world transform, the world coordinate, regardless of how
the cube is rotated, we're still going up
on the blue, the Z. Now if we toggle this to local, so this will be local to the object that
we have selected, and we'll now see
that the widget has changed what it is classing
as up for this object. So locally to this object, the up transform or the up direction is relative
to how it's rotated. So now if we move it on the z, that will move it diagonally
up based on the rotation. I rotate it a little bit more, we can see that up for this is now kind of
classed over here. If you envision this is like someone's head on the cube here, if there was a head at
the top of the cube, it would kind of
be trying to move it more related to where the head is facing the top of the head rather than
globally in the world. As a character
turns to something, they may be gliding or flying
in a different direction, which may be where
this will be useful. Having a stream of different
objects all move kind of relative to something else can be useful at different
times in development. So just to say that if you wanted to move
something based kind of on where it's rotated or
it's local transform, Then we just want to
toggle this here. If we go back to world mode, then we're going to
move up and down, left and right forward
and backwards, based on the global
context of the X, Y and Z axis. So they are the core features,
and this is another one. There's a challenge
coming up, but also in the topics
as we go through, there will be some write ups. So any of those shortcuts
that you find will be useful, as well as some that I
haven't mentioned in the video, other general, useful shortcuts, I think will be worth knowing will
all be written dow. So if you wanted
to take notes or read through those
or practice them, this is going to be something which is really worthwhile doing early on as you're
getting used to the Unreal engine and
the editor in general. It's one of those
things, as I said, you will potentially spend a
lot of time in the viewpot, moving things around,
changing the level layout, and customizing things
to your requirements. The earlier and faster that
you can improve your skills, navigating and working
with the viewpot, the better your experience with the Unreal engine will be. So set some time aside, and I would definitely
recommend playing around. Now, for me, personally, and this is another
thing to mention, I find that shortcuts are
really convenient for me. So I've memorized
very quickly the W ENR because I was using
those all of the time I will automatically
switch between those kind of off of
muscle memory now. If I wanted to come in
and quickly scale this, I'll press R, move this around, W to move this back
up, and so on. Now, others, I know that don't get on with shortcuts
quite so well. So do spend some time just
with those considerations in mind and see what
you find most useful. If you find yourself falling
back here quite often, and that's just better for
you, that's perfectly fine. But just get familiar with the different combinations
of looking around, moving around, flying through focusing in,
orbiting, and so on. These are the core things that can save you a lot of time, as well as appreciating that sometimes like
I've mentioned, you might end up really,
really far out in the world. You may be looking at
the terrain as a whole, and it's just making
sure that you can get that connection that if you wanted to come all the way back down here and look at something, if you didn't have a
big cube like that, just remember where some of
these other objects are. If you want to be back in the center of the
world, for example, we'll grab the
Skylight, press F, and that will bring
us back down. And it's just this
familiarity and comfort with the editor and the viewport and
getting that somewhat automated early on
in your workflow. We'll just improve how
efficiently and quickly you can make the projects and the ideas that
you have in mind.
9. 08 - Creating Levels: Now that we've had a look
at the unreal interface, you're hopefully
getting more familiar and comfortable with the busons, the shortcuts, and
just generally navigating the interface
that we're presented with. So far, we've been working with this somewhat large
example of terrain. It's one of those maps which take a little bit
more performance and the slight amount
of extra time to load each time we
enter the project, if you've been closing
down the editor and loading back
into the project. The moment, this
is an unsaved map. So if you have been
trying to make changes, and you're expecting this to be remembered and show the next time that you
enter the project, do make note that if
we have a map up here, so this is our tab showing the
current map that we're in. If that says untitled, that means it's a level, which has been unsaved. This is created by default
when we open the project. We haven't told the Unreal
engine to do otherwise. And that does mean
that your changes will be lost between sessions. So what we're going to do now is we will look to address this. We're going to have a map that
we have full control over, and as we make our changes, our new features, and start working with things
as we go through. That can be the map
that we load by default every time that we
enter the project again. Before diving into that,
I want to keep a focus throughout the entirety of this course on just
general good practices, good naming conventions,
good coding standards, keeping things
performant and easy to work with and update
as we go through. So with that in mind, before
we create our new map, we're going to look at
our folder structure. This will be done inside
of our content drawer, and what I want to do is
follow the recommendation of creating a sub folder
in our root content here. So the content folder
is our root folder. Everything that we have in
this project will go in here. What I'll do is I'll create a new folder with the
name of our project. The project name you can see at the top right hand side
here, minus boot camp. I'm going to create
a new folder by pressing Control shift
in N is the shortcut, n for new, or we
can right click, and we can go new folder
and create that here. But just again to get
familiar with the shortcuts, Control Shift in N, to
create a new folder here, and I'll just name
this one boot camp. Now, the reason that we do this is a little bit forward
thinking at the moment, especially in the early days, but just to get you into
that good practice early on, the main reason is
that if you start working with multiple
projects and you have some code or materials or assets that could be reused between your different projects, to avoid naming conflicts with
things with the same name, but potentially doing different
jobs between projects. If we move things across
to different versions of our projects nested inside of a project specific
naming folder, we won't get any of
those collisions. If we have another project
called first person shooter, it will do everything
by directory, and the base material in
first person shooter won't collide with the
base material in boot camp folder if we're
moving things across. Thus the main reason
that we do this. Something that the Unreal engine developers of recommend
and do internally. Also when you're
submitting things to the Unreal engine
marketplace or when you're downloading things from
the marketplace as well. You will notice that this is a standard approach which is taken when working
with other projects. For exactly that reason,
it makes working with these asset packs and
plugins and things very easy because there's never any name and convention conflict because the content
is then always nested in their subfolders. Then to organize things a little bit further,
inside of boot camp, I'm now going to
create another folder, so control shift in N again, and this will be
our Maps folder. Anytime that we create
a new map now or level, we're going to put this
into our maps folder. Just to mention that
as I go through, if I do switch between
the word map and level, they both mean the same thing. They're just holders of data, the objects that create the information that we can
see in the background here. Unfortunately, I guess,
with different developers going through and working on the Unreal engine
over the years, maps and levels are
used interchangeably, so it's just something
to be aware of. Sometimes the Unreal
engine will ask you to load a map or give
information about a map. Other times it'll ask you to provide a reference to a
level and things like that. Just be aware that they're
both the same thing. Example, if we come
in here and we right click to
create our new map. It's actually called level here. But if we're going to
the project settings, which we'll look at
later where we set what our default
level or map will be, it will tell us to provide a
level to be the default map. So it can be a little
bit confusing, but just be aware of that. Now, I wanted to show
you a different way that we can create a level here. So we can just select to create a level
by right clicking, finding this here, and this will create a new object
in our folder. I'll show you that quickly, but I will be
getting rid of this. The reason for this is that
if we take this approach, it doesn't allow us to predefine what type of level or map
that we want to create. Instead, if we come
in here and we press control in n inside
of the viewpot, Control in n again for new, and we're creating a new map. We get a few different
options here. By default, every time we
open the project so far, we're being provided
this open world map. It's a little bit big.
The terrain section, you can see has a lot of different chunks that
need to be loaded in. What I like to do is start with a slightly
more empty level. We do have the option
for fully empty levels, so they have
absolutely nothing in. Just to get something
visualized, but to also save a little bit of time in performance when
we're loading the project. I'm just going to go
from the basic map here. It comes with a floor,
some stuff in the sky. It gives us something to look at with all of the lighting setup, but it's much more empty than the one that we're
currently working in, and it's just easier to load. So we'll create one of these. I'm going to say, we
don't need to save anything that we've
done just here. I'll come back into
the content drawer. I'm just going to get
rid of New World. We're not going to use this
one, so I'll get rid of this, we'll delete and get
rid of that entirely. Again, just keep an eye up here on the top
left hand side. This currently is still
being called untitled. Means that this new map
that we've just created our basic map still
hasn't been saved. So if we press control in S
that standard save shortcut, this will bring
up a window here. It will ask us to find
a location that we want to store our map
that we're currently in, so we're going to go to maps. We change the name from new map, and I'll call this one main. We can hit save on this. We can check inside of our
content drawer, and we can see we have a main
map is being created here. And the name in the tab
just here so this is our map tab indicated
by this Orange icon. So if you're ever wondering when you've got multiple
tabs opening, which one is related
to what, keep an eye on the naming and
the icon just here. So this is our map icon. So we now have a map
stored that will exist in the project every
single time that we close the project
and open it back up. It won't be the one which
is loaded by default. I'll show you that
in just a moment, but it will at least
exist between sessions. Now, just to further
tidy things and highlight what we have
inside of our basic map. Going to go through
a few details in the outliner to
the right hand side. So inside of the
lightings drop down here, that folder that I've
mentioned that we can create. The unreal developers have
already nested everything related to the environment or lighting in the lighting box. So we've got the directional
light, as I mentioned, is responsible for
lighting up the level and trying to recreate approximately what the real sun would do. Depending on time of day
and things like that, the direction of
this can be changed. Have the exponential height fog. If you're ever wondering again, what these things are doing, just as you're getting
familiar of things. If we turn this off, we can
see that the lighting will be removed if we hide what
this is responsible for. So toggle the visibility will also toggle what they're
responsible for. If we keep the light on,
but we move things I'm just right clicking here
to refresh the viewpot. If we now turn off the
exponential height fog, we can see that we lose a
little bit of the background. It was responsible for some of the data
going on down here, the coloring below the horizon is being controlled just there. If we then take off
the sky atmosphere, we can see even more
information in the background, including above the
clouds has been removed, and of course, the
volumetric cloud would fully remove the
clouds there as well. We could talk back on
the sky atmosphere. If you wanted something
more simplistic without the somewhat realistic
looking clouds, we can get rid of that. The other thing that
we have here, which is kind of a leftover remnant from the Unreal engine four
days is our sky sphere. So you'll notice
that this doesn't look as though it's
actually doing anything, and that's because
it isn't anymore. This used to be used and provided as quite a
flexible blueprint. So if you open any Unreal
engine four project, By default, it will
have a sky sphere, and it had a blueprint
attached to it, which would allow add things
like stars and clouds. And everything like
that was managed through this one core blueprint. In Unreal engine five, that's mostly been removed
because these three objects, or these four, in
fact, the height fog, the skylight plays into it and the volumetric cloud
all work together to create a more dynamic and interesting and realistic
looking background. So what we can do nowadays
is I tend to just come in, and I'll just remove
the sky sphere. Just one big sphere
surrounding the world, and it's another
option that we have to change some visuals and
update things like that, but you do find that it's not used very often
anymore because we have all of the flexibility through these
components just here. That's the only thing
that'll change. I'll press Control in S, again, we have the asterix and
the top left hand side in our map tab just here, meaning that something has
been changed and unsaved, so I'll press Control
in S to save this, just to make sure that we're
tracking all of the changes and updates that we want to
maintain as we go through.
10. 09 - Working With Geometric Shapes: Going to start working with
some basic geometric shapes to just get some ideas
together and again, really focus on getting
comfortable with the editor and the input systems in the
way that we just interact with the viewport and moving
things around the engine. We're not going to be aiming
to make anything fancy. It's just a case of
repetition until we get more familiar and comfortable
with the key mappings. Before jumping into that, I've closed the project
between recordings purposely to show what might happen if you've
saved your new map, but as I've said, it
will not be the default. A really easy way
that we can update this and I will be
showing you that, but I wanted to make a point of not doing
that at the beginning, because this is one of those silly little
things that really catches new developers and
students I've worked with, I catches them out quite often. I've actually seen people completely remake
their projects, thinking they had
a glitchy project, because they had a messy
folder structure going on. They forgot where
they saved their map. They thought that
the engine kept losing the maps and the
progress they're making. They made multiple
projects, not knowing the core features of what
Unreal is trying to do for you. So whenever we finish
working on a project, we close it down
and come back the next day and reopen
that project. What it will do
is it will create a brand new untitled map unless you tell it
to do otherwise. So that's the first
thing to keep in mind, and that's exactly what
we're seeing here. This big terrain named untitled, and this is what I've
seen students do. They're like, Okay, I will
lose yesterday's work, and I'll just redo that today. Make their progress
again, they'll save this, press control in. I'll ask you where
to save the new map. And again, this is
where folder structures and naming conventions
really come in handy because the reason
they weren't able to find their maps is they were just putting them anywhere. Turned out they might have had a couple in the content drawer. They had loads of folders and subfolders and plug
ins already installed, and they're just putting
maps everywhere. They just couldn't find
where they had them, and they thought that
they were lost or gone. What they might come
in and do is save another new map inside
of folder somewhere, hoping that this day's
work will be remembered. And then again, Rinse and repeat tomorrow
they'll come back, think they've lost their work,
redo it, or as I've said, in some cases, just create
entirely new projects, thinking that the previous
one was bugged out. So this is why I wanted to
really hyper focus in on this, and it seems like a really
insignificant little thing, but you can get
tripped up on this. So if this is something
that you're experiencing, just remember, we've
created our maps folder. Inside of maps is
our main map here. We can just double click on this and this will bring us back in to the map that we
created a moment ago. To stop this from
ever happening again, we is going to find
the project settings. To do this, we're going to go to edit and project settings.
We'll click on this. I'm just going to
dock this up here. So this tab starts off floating as with any tab in
most applications, and now we can grab this, and
we can dock this just here. I'm going to dock this to
the left of main because this is something we'll be
coming back to quite often. This houses all of
the settings and information related to the
project that we're working in. There's a good chance
we'll need this again. I'll keep this just
here in the top bar. Side of the project settings, we'll go down to the
Maps and Mode section. This is where we changed
the information about that start up level that we have
created at the moment. So you can see here in
the default Maps section, we have something called
an editor startup map and a game default map. So the editor startup
map is the one that loads as soon as you
launch the editor. We're in the Unreal editor. The game default map is the
option which will load. If you've packaged the game, if you've got your
project working, and you want to ship it, send it off to friends, family,
colleagues, or whatever, that will be the map that they first see when they
open the project. Quite often, this will be
something like a credit map, a main menu map,
something to just get them started before
entering your main level. So what we want to
do is at the moment, we just want to control
the editor startup, what we see, every time
we launch the project. So from this drop down, we'll choose the only map
that we have here, which is main. That's it. It saves everything
automatically, so we're now done. So the important thing here is every time that
we open the project, now, we can make
all of our changes, save whatever we do
in the main map. Close the project,
come back tomorrow, and would be
automatically loaded into the map that we're
currently working with. And of course, you
can see, hopefully, it makes sense here that
if we started working on multiple different levels and you've completely finished up your work in one of the levels, and you need to move on to level two or level three or whatever
project you're working on, you can see the
use of this, that we may want to change this a little bit later in
development so that we don't need to keep
switching between them. And every time we
load the project, the one that we know that
we're most likely going to be working on will be
the default one to open. So a fairly long aside, but as I said, I've seen so many people
get stuck on this. It seems like such
a simple thing, but people really
do get stuck here. I just want to make
sure that people aren't recreating or losing projects or progress and
things like that. With that done,
though, we can move back on to the main topic, which is making those
geometric shapes. We're just going to start
throwing things together. I'm just going to aim to make a really small simple structure just from the different shapes
that we have available. Way we don't need to
bring in any assets, that will be something that we look at a little bit later, different ways to source assets and plug ins and
things like that. But remember that I've
mentioned that we have this add object option, a quick add to the project. We've got our geometric
shapes just here, and we've got a few
different things that we can work with. So I'm just going
to get started. I'm going to run
through and in my mind, what I have is some
kind of Greek colosseum looking or more open exterior
structure type of thing. And we can make this with
a combination of cubes, cylinders, spheres, and even cones, if you
wanted to add them in. So to get started, I'm just
going to click and left drag into the world here
so that this will snap it to a surface
that we already have. We do already have a floor. I'm going to keep this one
as the default larger floor. But using this cube,
I'm just going to create the floor for the
structure that I have in mind. And you don't need to
follow along exactly. I just want to run through
this at least partly so that I can recap the buttons that I'm
using and the shortcuts. This is for you to get creative with and come
up with your own ideas, create something that
you wanted to put together using geometric
shapes into your level. The floor though, the
way that I'd approach this is we'll grab
our cube over here. I'm going to move
into scaling mode, which is R on the keyboard. I'll just scale this
down a bit on the Z because I want this to be
longer than it is wider, I'll just use the
widget just here and just drag the site and
then the same just here. And that will be a
fairly decent kind of platform for the rest of
the structure to sit on. I'm going to press end, which will snap
this to the floor. And as I said, the key
thing here is just getting familiar with those shortcuts and the options that
you have available. This doesn't need to be
resting anywhere specific, and then just pressing F to focus in so that I can
orbit around this. And just get a good idea of
how this will start looking. The next thing is
we could probably do with a couple of pillars, so something to have
this standing on. So let's go with
maybe some cylinders. And again, I'll make this float above the floor just a
little bit to begin with, and then in scaling mode. So R for scaling mode and you can see this will be
changing up here. Just drag this up on
the Z to make this taller and then move this
along the x and the y. Using this little
part of the widget here to move this
on the x and the y, but specifically not the Z. If you do move it
on the Z, again, just a recap end to drop
this to the ground. And then I'm going to
press ult and drag on the widget here to pull
this out to the other side. One thing I'm noticing here
is based on the height, this is possibly looking
a little bit chunky. So I'm just going
to grab the widget on the scaling option
in the middle here, just to make this a little bit thinner and maybe a
little bit taller. In fact, I think
I want this to be scaled down on all of the axes. I'll just grab
that in the middle again. Make this smaller. Again, just tweaking and
playing and if you're not getting the right scale because the snapping
might be too high. Just remember that you've got the snapping options up here. You can make this smaller or turn the snapping
off altogether. I'm Just going to hit end again to drop this to the floor. Or get rid of this
one. Then I'll lt and drag to copy
this one out once more. So just that we've got a
good starting point here. With that done, I'm going
to grab both of these, so just to recap what
I've done there. We'll click one, we'll hold
shift and click the second, and then I'm going to lt
and drag in the direction. I want these to move. I'm going to move
these up a little bit. I think I'm going to
give this a little bit of a slope on the roof. And then with both
of these selected, I'll just press the widget
to scale this up on the Z, hit end, and then
drop those down. It could be a little bit
too much of a slope there, so I'll scale that down a
little bit more hit end until that looks
around about right. Grabbing the floor.
I'm just going to ult and drag up on the D again, and we can give this a
little bit of rotation, so we haven't rotated
anything yet. And this is one of
those things again, I can immediately
see the snapping is going to throw
that completely off. So I want this to somewhat look like it's resting at the
top of both the cylinders. So I'm going into the rotation. We can maybe turn this down to five degree increments,
see how this goes, and see if we can
get this looking as though they're
resting on each other. Don't need this to look perfect. People won't know that this is technically inside of the roof
that I've just made here. But the main thing is, we
don't want big gaps like this. Obviously, if we pull
this down too far, we will see this
poking at the top. I want to avoid it
poking at the top, and I also want to
avoid these gaps here. That does mean, in this case, the increment here is too big. I'm just going to
turn off snapping altogether just
so that I can get a slightly smaller change
to the rotation increment. And you can see that's worked, so it looks as though
everything's kind of flush and resting on
each other properly. I think just for visual appeal, what I might do as well is we will scale this in sideways, so it's not as wide or
as long as the floor. And if you remember the local
and global movement space that we had, when
we remove mode, One thing I didn't mention before is that whilst we can
toggle this in move mode, so we could move this forward a sideways based on the
rotation of the object. If we're actually
in scaling mode, you'll see that we don't have anything to toggle between here, but the useful thing
is that we can scale, and this will be relative to how this is rotated
in the world. So we can still get this looking pretty decent in flush here. But what I might want to do is move these arms back
a little bit there, which means we will need to change a little bit of
the rotation again. If you're doing a lot of
this, and you're trying to get this into the viewport. Again, F will focus
you in and you can orbit around
this quite nicely. If that's still
not quite enough, we can change this
from perspective mode in the top of the toolbar here, and we can go to a
left or right view. In this case, I've actually
angled this the other way, we're going to go
to the front view, and that will give
us a wire frame. We're just going to
right click to move around here and then
select the object, and this will just
give us a better look of how things are lined up. We can see there that's much more flush. As I've mentioned. People won't know that this is slightly inside
of the roof here, but it does stop us
having some obvious gaps. Just go back to perspective
mode, and again, if you find yourself switching
between these quite often, it might be useful
to start learning that Alt G is perspective. And then we've got top, bottom, left right front back,
Shift J, K, shift K. All of these with
ult held in front of them will be your
shortcuts for these. Okay. So as I said, I'm
just going to make sure, again, the main thing is from
top of, I think, ideally, we don't want the
roof to look as though it's the same size
or that close to the floor. Looking here, I doesn't
need to be perfect, but they just look a
little bit too close, a little bit too far
away from the corners. This is the main thing
is just play around with things until you start getting something that
you like to look of. There's no real goal here. We're not going to be
rendering this site. It doesn't need to
be a final product. Just come up with an idea that
you have in mind that you want to see put as
a final result, give yourself half an hour to an hour just to get comfortable. The more that you're repeating the simple procedures
of creating an object, grab a shape, drop this in, and then play around with the
different transform tools. That's the main goal
here. You don't have to make anything super specific. The important thing
and the takeaways here are really going to
be like I've mentioned. Anything that you
use quite often, if you work well with shortcuts, try to start memorizing those. Anything which has a shortcut, if you hover over things, so remember these transform
tools up here. They show you the
shortcuts just here, so W E and R are
highlighted there. Likewise, anything
over here that may have a shortcut would
be highlighted as well. With the different
perspective views. It shows you that to
the right hand side, so going between top bottom left as I just said are
all shown just here. Then we've got different modes, and again, this is just your time to play
around with things. You can't get things wrong. We can always revert back and just get the project
back to how it was. So this is that time
to make mistakes. So we've got different modes that you can look in as well. Default, we're in lit mode. We can go to unlit, which will just take
away the lighting, and we can see the shapes
if we had materials. We could give these different
colors that we'd see. We can view the wire
frame and so on. And again, there's no problem with
just looking between these. We can just set it
back to lit mode, and if you do start changing things beyond kind of
remembering what you've done. And let's say that you've
made some changes and you do turn a bunch of things off
and you're in the wrong mode, and you forget how
you get this back. We just go to windows remember. We can go to load layout, and we can get the default
editor layout back. And that would bring us
back to where we were. So we haven't lost anything. We just go back to
everything as it was before. Another thing you may want to start considering
as you're going through this is you can name the individual
objects if you want, you will find that gets
tedious very quickly, and often we'll be working
with specific mesh assets and things to work with from three D artists or
asset packs and things. No have their own
specific names. Because we could at least group these like with the lighting. So I've got a fairly
simple structure here. If I grab all of these, and we can move this here. So I'm just clicking on one
of these shift selecting like any other software package
to grab a number of them. Right click on any of these
that we have selected. We're going to go to Move two, and we can create a new folder. Which I will call structure. So we just need to click
on the new folder. We can press F two
to rename something, and I'll call this
one structure. Just so that I
know what this is. It does mean as well
that we can hide the whole thing straight away if we wanted to
get rid of all of that. But the nice thing is that we
can drop these down and it just keeps the outliner
nice and tidy. We can't select all
of this as one, but it does make it easier
to find things at least. So the folder itself doesn't actually have any
transform information. We wouldn't be able to
move the whole folder and everything within it around
the world in one go. But it's more of a visual
housekeeping tiding type thing for the outliner here. Then the other thing, when
it comes to the outliner, kind of in line with what
I've just mentioned, is if you did want
everything to move in relation to another
specific object, what we could do is I'm
going to grab the floor down here I've set as the cube
that I've set as the floor. I'll rename this one, so I'm going to rename
this one to floor. So it's clear at
least which part of these different
shapes are the floor. And what we could do
is if we shift select a number of these
different objects and then move this onto the floor. What I've done is I've
just nested all of these objects onto
the main object here. So this one does actually have that knock on effect
where now because these are classed as child
objects of the parent object, it does mean that wherever
the parent object goes, the child objects will follow. So with this selected,
if I move this around, you can see the entire structure I follows along. If you did
want that kind of behavior, you can either choose an
object that you have. Some people will make
an invisible object is like an origin
point if you didn't want the floor
specifically here to be the one which is being moved around, but just an example. Likewise, if you wanted to
keep it somewhat structural, you could have multiple
nestings here, so we could grab a number
of the cylinders and we could say that this is
the main parent cylinder, which then allows us
to also nest the roof. This means that we can move
everything on the cylinders or those stands as well as the roof without the floor
needing to move. But then of course, if we
move the floor as well, because everything is still
a child of the floor, we just have these different
hierarchies going on. That's something else to
play around with until it makes sense and become familiar with what you're doing. This can be quite useful when you are just tweaking
things like this, and you may not want to keep grabbing a whole
bunch of things, but already know that wherever
the stands are going, you want the roof to follow it, and then likewise,
wherever the floor goes, you might want everything to follow that in a different way. It doesn't just work
with the movement. If we went into rotation mode, everything will rotate
with the floor, and likewise, it's going to have a weird kind of scaling
thing going on here, but we'll also scale
with the floor. But unfortunately, it's relative to the original
size of the floor, which is difficult
to kind of describe. But because we have a
scaling going on here of almost seven, 11, and 0.25, just
around those down, it means that these
will be kind of scaled relative to that initial offset because everything that doesn't have a base start point of one, which is why you get this weird warping scaling
going on where it's much taller or getting much taller than it is
longer or wider. So just be aware
of that. It's not a process that you'd
normally take anyway. This isn't a very standard
level design work flow. Where possible, we try to
keep fairly uniform scaling. If you imagine you're getting
a proper static mesh of a fully modeled, lovely kind of architectural Greek
pillar podium going on, you're not going
to scale that more on the y axes than
you would the X, because it's going
to completely throw off the artist's
original design. We're only kind of doing that here because we're
just working with basic geometric shapes
and trying to make them look a certain way
just to get a final result. Another thing that just
came to mind to have this, we could do something again, just getting more familiar
with the scaling and rotation because I've done a lot of movement at the moment. I just thinking we
could make this into a Zen oc or a rock can, I think they're
called don't they. So just something else
that if you wanted to play around with more than just
creating a structure. Come up with other little
ideas of things that you could potentially do with
these different shapes. So we have a sphere, but with a little
bit of scaling. And again, this is
one of those things. It's immediately
making me realize that having the snapping is
a little bit restrictive, so I'll just turn the snapping off and just get comfortable working out a good workflow for what you might
want to achieve. And you can very quickly
throw together something like we have here with a fun
little rock structure. We can just drop a few of
these on in different places. They normally balance in some interesting
ways, don't they? Have that one a
little bit wider. And again, I'm already noticing
the movement is now a bit restrictive because
we're working on such a smaller scale. Things are starting to
become a little bit restrictive with how the
snapping is coming into play. These are the things I just
want you to get familiar and start noticing early on. Again, I'm just going to
be forced to turn that off so that we can get a little
bit more freedom on there. And from a place of
physics and balance, this probably has absolutely
no way of working. But I, that's quite often the case when you're looking
at these structures, you do wonder how
this together anyway. The final thing, as you're
playing around that, if you do find all
of that's very easy, all of that's become
second nature to very quickly. That's perfect. Maybe spend some
time playing around with things like the
lighting as well. One thing that you could
do to just familiarize yourself with getting
comfortable with trial in error, which is a core concept of getting into this
type of development. Ready know that most of the visual information
we're getting from the background
here is controlled from all of the content
within the lighting. So we can do things like playing around with
the directional light. As I've mentioned, the location
of this doesn't matter. Wherever this is, we'll get
the same level of brightness. Nothing changes based
on the location. It's trying to
replicate the sun, so its position because it's such a bright light force doesn't actually make
any difference here. But what we can do
is if we rotate it, we can change the time of day based on the direction
of this arrow. So play around of
things like that, we can change the brightness, so you might want this to
look a little bit darker, more of a kind of a night
scene going on here. If you wanted it to be less
of a pure white light, we can change the color, so we can make this a
little bit warmer, a little bit cooler, and so on. Again, if you're not sure
what all of this is, you don't need to remember
it straight away. But if you're just curious, this is the type of
thing I know that new developers are going
to be interested in. It's the visuals, making things look a little bit more custom
to what you're aiming for. Just have a hover over
these different things, and it will tell
you what they do. Some of them not so useful. But for example, we get a lot of information here about
the source angle, based on the source
angle that we have here. It will change things
like the softness of the shadows or
the hardness, how clear the shadows are just here. We can do things like using
the temperature as well as just controlling
the color directly. We can come to the temperature
scroll option down here, and again, as we go lower, it gets warmer, higher,
it gets a bit cooler, essentially moving between
the yellow and blue spectrum of color there and then
do other things as well, play around with the
exponential height fog. The skylight you don't need
to wear about too much that won't make any very
obvious changes right now. Sky atmosphere, you can
change a lot of information, which will be very clear and give some nice immediate
feedback here, and likewise with
the clouds as well. Just a case, again,
just to emphasize no solid outcome that
we're looking for here. Just get comfortable
with different elements of the editor and the different features
which are coming in. We'll have a whole
section a little bit later on lighting and setting up a level using all of these in more specific and
structured ways. But I just want you
to get familiar with some of the options
that you have available.
11. 10 - Challenge Answer: Okay, so we are looking at the first main challenge
of the course. As I've mentioned previously, these challenges are
really, really important. I think these are one of the
most important things that you'll kind of get
from these types of structured courses are proper
challenges that at least somewhat set you in a direction to source the answer
for yourself. A lot of the questions
that I've provided are within the content that has already
been covered just to allow you to recap and make
sure that the topics are making sense and solidify
some of that information. So for example, the first challenge that
we're looking at now, P one was just creating
some new projects. One thing I'd mention
is if you have created a bunch of new projects. The goal there was
to get you looking at the different templates and other options that you may not have otherwise considered
that you have access to. Obviously, be sure to tidy those up if you know that
you're never going to use them, do go back and delete them.
Find way you've stored them. They can start taking up a
fair amount of space as well. But just things like that
to get you familiar and comfortable working with the Epic launcher and
revising what we've done. Challenge for what
we're looking at now is the physics
part of the challenge. This is something that I haven't covered in the
topics, and again, I've purposely included
those just to get you thinking and trying to
discover things by yourself. You won't always be given a task or be trying to do something
which is documented. Most things unreal,
unfortunately not documented, but it might be outside of
the remit of tutorials or things like that, you can
find and source online. So you will need to get
comfortable problem solving certain aspects of
what you're looking to create. So the answer to this one, I
didn't want to leave people completely stuck if this
didn't make sense, though. All I was really saying is
that we're going to create either a new structure
or a part of the structure or a shape
and apply physics to it. Again, this was really to show how simple this is
to do in unreal. One of the reasons
I wanted to create a curved roof here is this gives us a nice
way to test this out. So I'm going to come up here, we'll create a new shape. A nice one to test would be a sphere because we'll be
able to see this rolling, and I'm going to move
this up a little bit. We'll press end to
drop this down. And activating physics inside of Unreal is the core element of
what we're looking at here, very, very simple, which
is going to scroll down. We can see here, we
have something called simulate physics, and this
is one of those things. If you don't know
where you're looking for something or how to do it, everything is contextual
inside of unreal. There's a search bar on any object that
you're working with, and we know that we're looking
for a couple of things. So we want physics
to be enabled. So if I was a new
user and I knew that I roughly had an idea of
what I wanted to achieve, but I didn't know where it was, we come in here, we'll
search for physics, and we can see that we have the simulate physics
tick option just here. If true, the body will
simulate physics, if not, it's fixed,
it's not moving. So everything at the
moment, if we come and press play is not moving. So we can see that's exactly
what we have to start with. So we want to change that. So if we simulate the physics here, and we press play. We can
then see what happens. I can see, I can just make
out up there that the ball is indeed rolling down. That's
all we needed to do. And we now have a ball
which simulates physics. You found out how to do
that hopefully by yourself, just to get you comfortable
with looking for things. And with that, you may have
also found that you can do other things like
changing the mass, the linear damping, and things
like that so that we can control how it reacts
against things in the world. So with more mass, it
would look as though it's falling faster as it
would be heavier, different damping options,
we can change how quickly it comes to a resting
point and things like that. We can add locks to this, so we could have it
only roll in the Z, which means we wouldn't
allow it to move forward, back, left or right, and something to do when
you're testing this. So if we allow this
only to move in the Z, for example, it will fall down. But obviously, it
won't then roll down the roof because we've told it not to move in
the x or y location. And if we wanted to
view this and we didn't need to keep flying
around in view mode, we can press the cssings
option just here. We'll go to simulate
rather than play So we've got the play
and selected viewpoint, which would lock us
into playing in here. Play and editor. So this is
that new window that pops up. But we do have the
option to just simulate, which will play from
where we're looking, and it makes it much easier to quickly gauge the changes
that we've just made. And we can change
things at runt as well, so we can untick these That should, we might need
to give this a little bit of a jolt that will
then allow it to start rolling in
different directions. So just to get used to that. Another thing that new
developers can get a little bit stuck with when getting
started with Unreal, is if you do press
play, and you're wondering why you're not
able to move around, you do need to click
into the window. It's not very clear.
But when we press play, we still have our
mouse hovering around. So until we left or right
click into the window, we won't have control to
have that WSD movement. So just be aware of that.
As you can see here, another thing that this
has just jogged my memory. This is that playground experimental time
that I want you to start figuring out
all of these quirks and features of unreal, which will be useful just
just to be aware of. So one thing I've done there
is I was in play mode. I have turned off, if you remember, I
turned off the lock. I'm going to look into this very quickly to demonstrate
this again. Just going to press F to
focus in on the sphere again. I'm going to come up here and
go back into simulate mode. And if you remember that I was in play mode a moment
ago, so at runtime, we've got the stop option,
which means we're in runtime, and I gave you the option
to lock the x and the y. Unticked that,
moved this around, and the sphere
started moving again. So quite useful to be aware of. Although that works now, do note that as soon
as we exit this, I've pressed escape to exit, this lock is reapplied. That's just taught me that
if I was new to unreal, that's just taught me that
anything that I do at runtime isn't saved
when we leave runtime. So if we wanted to unlock the position on the x and the y, we need to do that outside, so in editor mode, go back into play mode, and then
that will work again. So just little things
like this, I want you to start picking up on and
getting familiar with.
12. 11 - Importing Assets: With our first project created. And hopefully we're getting a little bit more
comfortable at this point navigating the Unreal engine or the Unreal editor interface. We're now going to want
to start looking at bringing in some
custom content into the projects for us to
work with and begin building out and fleshing
out our projects. We'll be looking at
the most basic and one of the most common
uses in this video, and that will be importing
assets directly. This will be the sort
of thing that you'll be working with if you
create your own assets, if you're working with
three D modeling in packages like Mya three
DS MAX or Blender, or if you're creating
two D images through photoshop or affinity suites
and things like that. Need to take the assets, the content that
you're creating in those packages and bring them
into your unreal project, and that's what
we'll be doing now. The next step that
we're going to take, I would highly
recommend, we're going to create a new project again. This is one of those
good practices that's worth getting into
in any project. This happens quite often in
the development environment. You try not to have all of the assets and the things
that you may be working with in your core
project because that will bloat things
out very quickly. Instead, what we
do is we'll have a somewhat throwaway project
that we'll create now. This will be a holder
for your asset. We can test things out in here, and then we can move the assets that we actually want to keep across to the project that we
want to work in and deploy. Keeps your main
project much smaller, easier to maintain, and
just easier to work with. I'll just run through
the process of creating a new
project very quickly, just to show you that nothing will be different
from previously. So we'll launch the engine
version we want to work with. I'll take the same
approach I did previously, so I'm going to go
to the game section. I'm going to leave this
as a blank project. We can leave all of
the default properties as they are. We don't
need anything in here. This is just a holder
for our assets. Make sure that you've
provided a project location, and I'll name this one
Bootcamp asset holder. Just to indicate exactly
what this project is for. We'll quite likely
get rid of this later when we've decided
what we want to work with. I'll show you how we can take just the select few assets that we want from one
project to another. Potentially, this can
save you from having tens of gigabytes of data
in your core project. If you only wanted,
let's say, for example, we're using a HD
environment asset pack, and we just want a couple
of trees from that. We don't need the whole
landscape and all of the foliage and
the water details. We can take just that tree and the information related
to it into our project, which may be just
megabytes opposed to the gigabytes of the rest of the package. So that's
why we do this. I'll create this and get
the new project loaded. With this loaded,
I'm just going to take a very quick
approach to get back to a similar place
what we have with our other more
permanent project. I'll come down to
the content draw, create a new folder in here. Call this one boot
camp asset Holder. And now any content that
I'm responsible for creating or bringing in manually
will be placed in here. Any plug ins that we get from the marketplace that we'll
look at a little bit later, they will all have their
own folder structure. And again, this
will just help to visualize and show how
naming conventions and folder structures
will actually be a very, very
useful consideration. In this case, I also
want to get back to a similar state that we had previously, mostly empty maps. I'm going to press Control in N. We'll create a new basic map. Then if we press control ins to save this inside of
our boot camp holder, I'll create a new folder here, I'm just right
clicking, creating a new folder called Maps. We'll double click in here to make sure we're in
the right folder, and we'll name this map main. Then a similar thing
easy to forget, but we can go to edit
project settings, so everything that we've
seen before, maps in modes, I'll just dock this
over here as well, and we'll go to the editor startup map and
make this one main. Very similar to
the project we're working with our
geometry shapes, and we'll come back
to that one later when we know what assets
we want to work with. But this is just a
nice way to set up a project because again,
when we come back in, bring in new assets,
close the project later, open it back up, we'll be
in our default main map. Okay, so that was a
brief aside just to reinforce the importance of keeping your project somewhat
separated, if you can, keeping a tidy folder
structure and making your projects that
you want to work with potentially for
months to years, that much more maintainable, easy to dive back in, find
what you're working with, and just keep some semblance
of control in what can become quite a manic and
frantic work environment. Jumping over to a
web browser, then. The next thing is
we want to actually find a way to source the assets. So on the assumption
that you may not be a two D or three D artist, you may not have the skill
set to make your own content, and you may not have
any colleagues or other developers
that you know who are able to provide
assets for you. Another option that
we can take is to go to websites like it dot IO. We also have options like
Sketch Fab or art station. There are many third
party asset sites which you can access and download paid or free content to use
within your project. Just going to show
off it dot IO here. It's a nice easy
one to work with. There's some good
quality things, and it's very simple to find some free assets just
for testing purposes. So let's say that we wanted to work with some three D assets. We can go to browse at the
top left hand side here. We'll go to assets, which is our asset location
for game development. Obviously IO is known
as a game website, so you can download games
here is the core feature, but it has started branching out into providing assets
and things like that. So if we go to the
asset section, the first thing I've just
mentioned is that we may want to work with
some three D assets, so we can go down to styles. We will search by three D. And also, I don't
want to pay for this. It's just a testing ground that we have
going at the moment. I just want to see the process of getting these assets
into the project. So I'll also go to the
free section here, so we'll filter by
three D and free. That way, anything
that we download now, we won't need to pay for. You may need to sign in and sign up if you don't
have an account, but the accounts here
are free to use. And then it's just a case of finding something that
we want to work with. So we've got things like
our character packs here. So vehicle packs, different types of prototype
impacts can be very useful. Pretty much anything,
just find something that you think looks
interesting to work with, and you can download this and just test this in your project. This is the reason that we're making a somewhat
throwaway project, is that you may find that
a lot of these don't work. They're not created in a usable way for the project
that you have in mind, or they just may
not look as good in engine or have the features
that you expected. So it's very simple
to just throw those away or get rid
of the project a little bit later when we're done with our prototyping and
gaining the asset stage. All you'd need to do here,
let's say, for example, the K Kits are pretty
good. We can come in here. We would go down to download. Find the pack that
you want to use. K does provide a few
paid versions as well. But if we go down to
the download section, and you can choose
your tier just here. If you choose free, we
can just say no, thanks. We'll take me to the downloads that will give you
the free version, which just provides fewer
assets in the pack. We'll download that and
store a place to use this. Now, the K kit, they are
pretty decent assets, but they're not rigged or set up very well to work
with the unrelen. So, for that reason, what
I'll do is with this course, I'll package some
assets that I know work in a more ideal
way for our projects. It is actually provided by K. It's just some of the
assets from one of his kits. I've needed to make
some changes to the scaling and
the object types. I'll give you a
zip called assets. Just be sure to unzip that folder, and
then inside of here, we'll have some meshes, sound, and a texture just for
demonstration purposes. This isn't really meant
to be a topic about formatting or updating the assets that
you're working with. Hopefully, we're
getting something which is usable anyway. This is more about getting
this into the unreal engine. So I just wanted to provide this so you can
easily follow along. What I'd recommend is if you wanted to try and
get things from it or sketch ab or wherever you're comfortable
downloading things from, feel free to give that a go. But also consider just using this asset pack that I'm
providing just so that you can very quickly follow
along and see the core elements of getting
this into your project. Back inside of the
unreal engine then, this is the main and final step, and this is how simple it can be to get assets
into your project. What I'd recommend is with the asset pack that I've
curated just to set things up, as I've mentioned, in a way that I know works
well with Unreal. I'm going to be in
this folder here where we can see
the assets folder. And what we can do is if we
go to the content drawer, make sure the content
drawers open, and then we can just drag
the assets folder inside of our boot camp asset Holder
folder structure just here. So our custom content that
we'll place just here. This will bring in
all of the assets. It will also keep them inside of their folder structure
that I've set up. All of the meshes will
be in a mesh folder, signs will be in
assigned folder, and the texture will be
in its texture folder. In the background, what
you may not have seen is a small pop up window
has just appeared, and this is just
asking if we wanted to make any changes to the FBX. So these are the three D meshes. We can do things like telling it that they're skeletal meshes, which would be incorrect
at this moment because skeletal meshes
are essentially meshes, but with a bone structure. We can change the
default scaling, the uniform scale, the
provide a translation offset. We don't want to do any of this. Generally, I think
99% of the time, unless you have a very good reason and you know
what you're doing, we tend to just leave
this as default. So what I'll do is I'll
say to import everything. I'll just let
Unreal handle this, and you can see that
it's bringing all of that into our project. We'll get a small pop up window here confirming that's
all been successful. We can just close
this because it's exactly the same as
the content drawer. There were some
warnings there just saying that it didn't
have smoothing groups and some
other issues were off with the three D meshes. They'll still work
perfectly fine, but this is one of those things. It's more of an artist's
topic to go into their three D
package and fix and update those to work
properly with a game engine. Not really what we're looking
at, but just be aware, those were just warnings, and everything will still
work perfectly fine. And then the main thing here, we have a nice folder structure. So inside of our custom
project based folder, we have our assets, and
then we can easily find our meshes, sounds or textures. That's it, so you
can see with that. We now have everything
brought into the project. If we shift and
select these three, for example, this is a nice
dummy that we have here. In fact, I'll grab all of
these with the word dummy. They all have the correct
transform offset. If I bring this in,
it will actually create one single structure. But these are multiple meshes all placed together to make
a cool training dummy here. If we double click
into any of these, this will open up a
static mesh viewer. What I'll do is, I'll always take this tab that appears here, and I'll just dock this
at the top part of the view just so that everything
is nicely lined across, and this just gives
us some information about the static mesh. The material that it holds, the thing which is
helping kind of visually represent this object, and then some other information we'll get to a
little bit later on things like collision and how this will interact
with the world. So this is our
static mesh editor. If we go into the signs just to make sure
that these work, you'll know that
these signs have worked correctly if you can play them and provide a demo of these signs
in your editor. So that's all come in
correctly as well. And this just allows
us to press play here and we can test what this
sounds like in engine. And then the texture,
this will be the colors and the
information which is passed along to
the material again to help visually
represent the assets. One final thing
before wrapping up. If you're using this
asset pack that I'd recommend playing around with just because as I've mentioned, everything is set
to work properly, and I've tested this to make
sure that everything works. I'll give you a very quick
sneak peek in two materials. We'll go into this in
much more depth later, but we can stop the assets that we bring in from all having this plain boring white
color based on them. So can bring in a barrel. We've got our dummy just here. Let's look at this table
of detail as well. All of this is
looking pretty cool, but it is just currently white. Now, one thing to note is
that all of these down here, we can see in the right hand
side in the details panel, they are indeed
sharing a material, which is great because
it means if we update this material to show
the correct information, all of the assets will
work properly as well. Way that we can do
this. I'm just going to double click on this
material like on here, and this will bring us
into the material editor. If you wanted to know
where this is in the content drawer,
we can go to meshes. And when we imported this, you can see a prototype texture, which is actually a material, is just the default
name they used. This was created and
applied to all of the meshes for us because
the Unreal engine knows that all of the meshes need at least a basic material to work with to visualize
the information. Get a little bit more specific. The reason this is called
prototype texture is because in the three D modeling tool that K would have used
when creating these. He just simply
named his material slot prototype texture there, and that's been brought
across to the Unreal enum. Now the way that we can
change this at the moment, we have a plain
white color here, which is exactly
why this is showing white in the examples panel. If we double click into this, we can change this to
a different color. If we make this purple,
we'll hit apply, we'll go back to Maine,
everything is now purple. That's really all the
materials are doing. We're providing it some
visual information, and it's mapping that
across the meshes. Very quick thing that we can do here to make this
look as we intend, though, is we want to base
the colors from the texture. So we'll go into
our texture folder, we'll grab our texture here, and we can just click and drag this into the
material editor, and this will be some
texture information, which has been mapped again in that three D package
across the meshes, and Unrel engine
understands how to work with that
information to line up the correct part of
this visual texture with the three D unwrapping, called a UV map of the meshes
that we're working with. Really, all that we want to do at this point is we're going to replace this
flat solid color, so we can actually
just delete this. We're going to replace it
with our texture information. So if we pull from the
red green and blue, and we plug this
into the base color. This little pin here,
we can pull from this and plug this
into base color. You can see this sphere now
has that texture information, that image wrapped
around the sphere, and it'll do that for our meshes that we're working with as well. We can, if we wanted, pull
information from the red, the green or the blue
channels individually. But in this case, we want
the combination of that, which is making up
the full texture. We want that to be wrapped
across our meshes. So if we hit apply
and we'll just save this to make sure that
everything's been stored, we'll go back to Maine,
and you can see that that information has
now been mapped across. And again, we will go more in depth into what
textures are doing, the term I used UV
mapping and materials and how lot of that comes into
play in a later topic, but I just wanted to give you a quick insight there because if you wanted to start working and playing around
with these assets, they're now all
kind of fully set up to work and look as intended. And it was a very quick
change that we can make.
13. Fab: In this topic, we'll be taking a look at the new fab store. So this is the replacement for the Epic unreal marketplace,
just for clarity. I wanted to mention
that this is being included post the
completion of the course. So the course was fully recorded whilst the marketplace was the main and only storefront provided by Epic for
the Unreal engine. Most of the content in the upcoming sections will
still be relevant. There will be some things where we mention the marketplace. And you'll just need to replace that with navigating
over to Fab. In this topic, I'll
be showing you how to work with and navigate Fab, showing you some of the
differences and how you can still gain assets in
a very similar way. I just wanted to
mention, as well, some of the assets that
were made fully free and available have also unfortunately
been stripped back. It doesn't mean you
won't be able to follow along with
the course content. You may just need to rework your scenes and maybe try to customize them
a little bit more. To be honest, though,
that is really the way that the
course is intended. You'll get much more
from this if you are working from your
own concepts and trying to create your
own ideal outcome for the environment that
you're trying to create. Trying to work
more from your own inspiration will allow you to do a lot more trial and error and really learn things
much, much faster. But I didn't want to
leave you in the dark. So we're going to go
through fab and I'll show you the new working processes. If you do need to come
back to this later, when I'm mentioning things
like the marketplace, I'll go into as much
depth as possible now, so you can always come back here later and see where the
overlaps would have been from the original approach to now working with
the Fab storefront. So the first thing is inside
of the Epic Launcher. We now have this
fab tab at the top. This used to be the marketplace. This was actually where
you would have browsed the marketplace in
the Epic launcher. The only option that we have now is to actually start exploring, you can see down here,
taking us to the webpage, and this will take us
to the Fab storefront. So click on this and it
will take you to Fab. With the fab page loaded, just a few things which are
now slightly different. So we still need
to sign in to make sure that you've signed into
your account at the top. This will still be with
your Epic store account. Some of the things to note down here one of the
things that Epic is trying to do is make
this a somewhat kind of global marketplace, covering things like Unity, the Unreal Engine, and Fortnite. It will also be including assets from places like Sketchfab directly as they've purchased
Sketchfab and ArtStation. So you'll see a lot
more generic assets working or available
to purchase, as well. You can scroll through
this as usual. You have your
different categories that we can look through. You can also search
specifically based on the engine that you want
your assets to work in. Some things which have
been mentioned in the past were the monthly free rotations. This has now been limited to a limited time free rotation. I believe this is at the
moment every two weeks. So do come here, similar to previous approaches
that would have been mentioned in some of
the upcoming topics, you simply come into the
asset that you want to store on your account
permanently for free. So once you've added
this to your account, you can use that indefinitely. You'd come to the section
on the right hand side, add this to your account, purchase it for $0, essentially, and then that is yours free to keep and use in your projects. So that's just to say, do come back here and check
this every couple of weeks to see if there's
anything that you may want to use and add
to your account. And then beyond that, it's
a very simple process. There are a few extra
hoops to jump through with the new fab store front approach compared to the marketplace, but it's still relatively
simple to work with. So as an example, if I wanted the shrine of free props here, the first thing that we
always want to do if we want this to sync directly
with the UnreLEngine, we just want to make sure it has this symbol here,
so the unreal logo. That will ensure that
it's set up and ready to work with our unreal
projects immediately. We can come and we can click the add to my
library button here. That's now been added
and saved to my library, and I can view this
in the launcher in the same way that
you'll see again in the upcoming content. So this is really the main
big change here is that we're storing the assets to
our online account, so we now own this,
but to make use of it, we're going to want to back
on over to the Epic launcher. So back inside of the launcher, we now want to go to library, and we may need to if you don't already see it in your
library section down here, so where all of your
assets are stored, we may need to click
this fab reload button, so allow us to refresh Fab. This is just synching all
of the content that we have stored in our account and making sure that it's accessible and available to work with
in the epic launcher. So the thing that I've
just downloaded or added to my account was the
shrine Sci Fi Props. So I'll just see if I
can find that here, and we can see it's
now synced over. So the Sci fi shrine
props is available. And we can add this
to the project in the same way that I've shown you with the other processes working
with the marketplace. So as an example, we just
click the add to project. Find, for example, our boot camp project and then tell
it to add this into the project that we want to work and because that has
been confirmed to be specifically
created to work with the Unreal engine marketplace or the Unreal engine projects, all of the textures
and materials and things will already be set
up to work as intended. So that's why when we're
working from Fab, ideally, we'll be trying to find things
with the unreal logo here, just making sure that
it's unreal ready. We can, of course, if we
go back to discover or search through things
we can, of course, add non unreal engine
specific projects to our account, which
is perfectly fine. It just means that you'll
probably have to download this locally to your desktop or somewhere local
to your system, and you'll need to go through
the process of manually importing the assets or the
content into your project. And then you'll probably
have to set things up like the textures and the materials by hand. So it's not
the end of the world. It's just it'll take
a little bit longer, but it does mean the
positive that we do have a lot more access to a wider range of assets and features potentially that we can bring into our projects. The final thing that I
wanted to mention is what I found to be the best way to work with this is, for example, if I knew I wanted something
which was unreal ready, so something I could just download and would work
immediately inside of my project. I'm going to click this
big Unreal button here. That will automatically add a filter so that
it's only going to show me things
which are ready to run inside of an unreal project. You'll notice that we
can find Quick Assets. So this is another thing
which has changed, and I'll go through
that in just a moment. But we could go into the
Quicksassets, again, add this to library,
and it will show in exactly the same way
as I've mentioned before. Another thing which
may not have been clear from what I've
just run through, if you're adding this to
your library digitally, so on the fab storefront, if it doesn't have
the unreal logo, because it hasn't been made to work with the Unreal
engine specifically, it also will not appear
in your fab library. So if you're ever wondering
why something isn't appearing here in
your epic launcher, it's because it
probably wasn't built to work with Unreal, just
so that that's clear. But to go back to the filtering, the other thing that we could
do is we could search for things like unreal
specific assets, and we could search for
these based on free assets. If you're just
looking for something to flesh out a project, and let's say that
we're looking for something for the environments. So we can find all of
the three environments which are built to work with
the Unreal engine directly. So it's still a fairly nice,
easy way to look for things. As I mentioned,
just potentially a few extra steps to go through, but it's still relatively simple to work with.
So that is Fab. That is the Fab
marketplace through the web browser and linking
that to the epic launch. Just to put things
further in context, when I've mentioned that you're adding things to your
account to your library, if you go to the M
library section up here, this is essentially
what I meant. So although you can have all of the assets stored
in your library, so they're linked to you and your digital account,
as I mentioned, certain things may not
be unreal compatible, which means you'll only be
able to find them here, and you'll have to download
them manually and work with them that way rather than
through the epicormchair. Jumping over to the
Unreal Engine project, you'll see a lot more of this as you go
through the course. So spoilers alert. The main change that you're
going to see here, though, is that if we go to Window, I'll be showing you how to use a little bit later on
the Quixle Bridge. So this has changed
a little bit, too. In certain versions, it seems like this has
changed completely. So you can still browse
the Quickle bridge here, but it seems to want to take us over to Fab in
the end anyway. So you can still find things like certain assets
to work with. And you can try and add these
to your Quickle account, again, download them and
add them to the project, as you'll see in some
upcoming content. Depending on the engine version that you're working
with, though, this may redirect you to Fab, in which case, it's a
very similar process. You can just
download it from Fab instead and add it to the
project through the launcher. Now, I don't want to
go too in depth in these processes right
now because this has quite literally been changing on an almost biweekly basis
where the workflow is changing quite
quickly as Epic are making changes to the store
front and how it's all work. So what I would recommend is depending on when
you're watching this, it could have changed
another three or four times. Just have a lookout for some of Epic's most recent
announcements and maybe documentation or tutorals
that they're providing on how to use Quick and fab based on when
you're watching this. But these are just some of
the changes to look out for. Now, another thing you
may have noticed is that I have a fab button here. If you don't have
that at the moment, what you want to do is come to the Edit tab here
and go to plug ins. Search for the Fab plugin. And this is very
much how Quickle used to work where we just had a bridge from our project
to the Quickle site, and we could get things
in automatically. This is kind of like a
fab bridge, I suppose. So take the fab plugin on, let the project restart, and then you'll have
the same option that I have just
here under Window. So we're going to go to Window
and open the fab bridge. I'll call it that for now.
This is very similar to that web browser version that
we saw just a moment ago. The main difference is
that we can now kind of bypass the whole epic
launcher side of things. So as an example, if I find
some of the content that would work with my projects maybe something
relatively small, we can go to this drop
down section here, go to all of the content
inside of my library. And I can find, let's say, those Sci fi shrine props again, just because I already
have those and it won't take up too much space. Now what we can do
from here is that this will be keeping context of the project
you've opened it in. So in this case, it would
be my boot camp project. And if I say add to project,
this should bring this, you can see here is downloading it and
bringing it straight in to my active project.
So nice and simple. So again, that somewhat
streamlines the process here, as long as you're
happy to go through this fab bridge
launcher type thing on a per project basis. And what we should see is
we're going to have a folder, for the sci fi shrine
props hopefully being spawned just in here to the
left hand side. There we go. So we can see SF shrineeV
five and all of this, just to really reinforce
this because it's made to work directly
with the NRL engine, as I mentioned, all
of the textures and the materials are
set up and ready to go. And as soon as I drag
this into the world, it's looking as expected.
So nice and easy. Depending on how you
wanted to approach working with the
new fab storefront, it can have more or less. Steps involved to getting this working. But these
are the main things. So as I said, you may
need to come back here for sort of
higher context when we introduce things like the old marketplace and how you may get assets from that into your account and then
into your project. So you may need to come
back here a little bit later to bring this
back into context. And as I said, you may
have to kind of rework the assets that I was recommending we work with
to build out this cave. Some of those may still
be available for free. Some of them may have been
removed, unfortunately. It won't mean you can't
complete the course, but you may just not end up with the same scene that I have, which, like I've
mentioned before, is actually probably
the better way to approach these
types of courses. It will force you to really consider what you can work with, trying to source
the best assets to fit the goal that
you have in mind, and just get you much more
hands on with some extra trial and which will get
you learning and understanding the Unreal
engine that much faster. So this is just a very
quick rundown on Fab. As I've mentioned, there are some other features that
are probably worth knowing, but I'm very conscious
that within a week or two, those features may
have been removed, moved somewhere else, and the video would be irrelevant
and outdated again. So just to say, if any of the interface or buttons
are in a different place, try and keep up to
date with what Epica announcing on their official
pages, the documentation, and things like that
for a deeper insight into fab Quixle if that
gets moved somewhere else, because it feels like
that is moving as well, may be somewhat shifting for the upcoming few months as they're trying to get
fab working properly.
14. 12 - Unreal Marketplace: Well now look at another
common way that we can bring assets into the projects
that we're working with. And that will be using the
Unreal engine marketplace. So I'm back inside of
the Epic launcher. I'm just going to move over
to the marketplace tab here. And as we did previously, we'll get some
three D assets just because they're the easiest
thing to visualize, but we can do this with
pretty much anything, and we'll start with
the free content just so that anybody
can follow along. So do keep in mind,
as I've mentioned, in the introduction section, it's worth checking
in here every month, just to see what has
been made free for the month that happens in the
first week of each month. And if you add these
to your account, just remember, you do get
to keep these for ever. So even if you don't
need them right now, they may be something
useful to work with later. I won't use these just
because people may be following along at
different points, though, and if they exit
that free rotation, they will be paid assets
again in the future. So if you don't get
them when they're free, they will be chargeable
in the future. So what we'll do instead
is we'll move up to the top of the
marketplace window here. We're going to go to
the free section, and I'll just navigate down to the permanently free collection. So these are assets
that at some point, epic have potentially paid a kind of royalty
charge to the creators, and they're now just made
freely available forever. So that means that you
can come in and you can get these
whenever you wanted. As well as showing some examples of the more visual assets here. If we just scroll down a bit, we can also get things like VFX. For example, you can
get some realistic starter VFX packs here. We can come in and all we want to do is if you
don't already have these, it will just tell
you to buy this. It will add this to
your account for free, so you're still
kind of buying it, but you're gaining
access to it for free. And then once you've
taken that step, we just tell it to add
this to a project. In this case, I've just
filed down to asset holder. This is where I'd
want to place this. We will click on this
and we will just t it to add this to the project
that we're working with. Remember, at the
moment we're putting this inside of the asset holder. So we'll just had it to
add this to the project. I will do that automatically. Then if we jump back on
over to our project, what we should see is we'll have a new folder down here called Realistic starter
BFX PAC volume two. Way that you tend to
work with assets from the marketplace is there's a very strict rule set
they have to follow. Again, the naming conventions
are brilliant here because if we get used to
doing this in our own project, it will be very
easy to work with other plug ins or projects
that are in development inside of Unreal
because a lot of people have adapted these
recommendations. For example, we can see here, we have a folder with the
name of the asset pack. This gives us a name space specific to the assets
we've downloaded. Inside of this, we
have a meshes folder, very similar to what
we've got here. We have a particle
folder, a text folder, it's very easy to navigate
because we're getting used to that framework
that set up already. Then like we've created with
our maps folder as well. We have a maps folder in here, and this is quite often in
the plugins or the assets. This is where you
can have a look at an overview or the example
map of all of the assets, the meshes, audio examples
that may be set up, and in this case,
the VFX examples which have been set
up in a demo level. I'm just going to
save the changes that I've made to my main map so that we can keep this if we want to come
back a bit later. But we can take a quick look at the overview of the VFX here. This is just a bunch of particles all laid out
for us so that we can see at a quick glance
exactly what they're doing and how they're
working and if we wanted to work
with any of these. If we go back over for
another quick example, just going to go
back one page here, so we'll go back to
the free forever. Let's quickly add in some
sound effects as well, so I'll add the
interface sound effects. We'll just add this to the
project in the same way. Again, I've just filtered out so that only one project
is showing here, so we'll look for
the asset holder, and we'll add this to
the project as well. Then if we go back
one more time, I'm just going to
pick an environment. Now, I know just from trial
and error, that this one, although it looks quite nice, doesn't currently work
in Unreal engine five. So what I'll do instead
is I'm going to take the stylized Egypt just because I know this
currently works. All of the materials
and the shaders are fully updated and
working for 5.3. So again, I'm going to click
to add this to the project. Go to the asset
holder example here. And then we'll just add
this to the project again. All of those changes
made, I'm just going to hop back into the project here. We can start closing
down the windows if you have these at the top and
you're not using them. I'm just middle
mouse clicking or clicking the Mouse
W to remove these. And just to demonstrate again, what we are left with
no very clearly here, we have the folder
that we're responsible for named after the project
that we're working in, and then we have all of
the assets that we've just imported laid out inside of
that same folder structure. So inside of stylized
Egypt, again, we have a maps folder and
inside of the maps folder, we can come in here and we
can look at the example of the level laid out and set up and kind of
ready to work with. These, of course,
are going to be great if you wanted to
come in and see how levels like this
are built is using what is called a
modular approach. So every part of this is mostly made of small chunks
of reusable meshes. So rather than having
specific structures, which you could only
really use once. You can very easily
take these because they're modular,
duplicate the mit, and have something
looking slightly different in different
parts of the level. So a nice way to just start
familiarizing yourself with how these processes and levels like this
may be constructed. Then another thing
that we can look at is our sound effects, just to see how these differ a little bit from the
more visual options. So, in this case, they
haven't provided a map. There's no walk round. Some of them will
give you a walk round where you can walk up to spatial audio and
things like that to see how they would
work at runtime. With these, they're just
simple cues or Wab files. And again, we can
press the play option here and we'd be able to listen to these playing in the
editor if your signs enabled. So that's how we can
find the assets. If you don't already have
anything added to your account, that's how we can
use the marketplace, find some assets, add
them to our account, and then add those
to our project. I'm just hopping back
over to the Epic launcher very quickly for one
other demonstration here. So everything that
I've found there just happened to be project specific. So you can see here we've been
doing things like clicking them and telling it to add
it to a specific project. So they're project
bound asset packs. And most of these will say add to project as
you can see here. Some of them will actually be
an example project itself. So for example, this one, the accessible
design with Unreal tells you that we're going to
actually create a project. So what this will do,
if we click this, it will create a
brand new project at the location that you specify in the Unreal engine version that
you tell it to work with. So this will be a
brand new project with a full kind of feature
set ready to go. So that is one other option.
An option here as well. The UI navigation, for example, is installed to an
engine version. So if we click on this,
we get a drop down and we can tell it which version we want
to install this to. The way that this one works is that you install this once, and then any project
that you create, you would have access to
make use of that plug in. This one doesn't actually support the version
that I'm using. As an example, to show
how this would work, I'll add the achievement
system instead. This is another install
to engine version, so we'll choose 5.3. We'll install this to 5.3. We'll let that do its
thing. If that done, we don't really get any
other heads up or anything. But if we return
back to our project in the same engine version
that this is in 5.3, we can go to edit plug ins, and we can see the
ones that we've installed here under
the installed section. What we should see is the
achievement system here. You can see some of
the other plugins that I've installed
to the engine, and all we need to do is just
tick these on restart now, and that would install
that to this project. Do that because I think
I need to restart the project for that
new one to show here. Okay, so I've just restarted the project that
we're working on. You can see there that
Installed is now showing six, do be aware if you've
got your project open and you're installing something
to an engine version, you will need to restart the
project for that to show, but we can now see that the achievement system is
ready for us to use. Lot of the engine based plug
ins work in different ways. For example, the
one that I've just enabled here, darker Nodes, this will actually change the visuals and
how Unreal looks. This is more of a visual update. It is like a theme applied to the general editor and
the blueprint notes, whereas the achievement system will give us new
functionalities and features that we can access in blueprints and C plus plus. With these, you'd
always want to take a moment to read through
the documentation, just to see how these different
plug ins are working, but that's all we
really need to know for now is that we have
different types of plugins, some which will be added
directly to the project, some which will create
a new project for us, and some which are installed to the current version of the
engine that we're working in, and we can access these
in any project as long as we enable them through the
plug in option just here. As with anything, take some
time between topics now. You've seen how to bring in assets that you're
responsible for, you may be creating
these yourself, or you may be getting given them by colleagues or
other developers, you know, and you've seen
how to source content from the unreled
marketplace officially. So have a browse through
the marketplace, see what's available and start bringing in different assets, and take some time to get
comfortable with working with some of those assets
to see what you can make.
15. 13 - Migrating Assets: We I'd be taking a
quick look at working with Unreal and
migrating content. So this is something
that Unreal provides a very useful tool built
into the Unreal engine. This is what I alluded
to earlier where we can take just the core assets from either an asset
pack or a bunch of content we already
have inside of our project and move just the important things to
another project. As a quick aside, we do have
other options on getting things out of a project and
storing it somewhere else. But if you know that you
want the asset to be moved from one project to
another inside of Unreal, then migrating is always
the safest option. Just to show you a quick
example of the other ways that we do have to get
things out of Unreal. Let's say that we really liked our dummy that we
have just here. We can find this back
in the content drawer. I know this is in meshes. We can go to the dummy, and we can right click on this. We can go to asset actions, and we can export this. This will ask us where we
want to export the file. The file is a type of FBX, so we'll end up with an
FBX file on our desktop or a selected place on the windows or operating
system of your choice, you'll have that file
that you can use back inside of Blender,
Myer, and so on. And that will work
with everything that has initially come from a third party
package like Photoshop, via two D images, Blender Myer, three DS 43d, your audio files, all of these
standard file types, so we can do the
same thing here, we can go to an audio
file, assets actions, and then export these, and that would give
us a dotWAV file. And then, likewise,
if we do the same here for the texture. If we export this, that would
give us a tiger file TDA. It won't work with
things like blueprints. We're unable to because
they're binary information. So when we get to coding
a little bit later and we create our
first blueprint, anything which is
unreal engine specific, so created in and for
the Unreal engine, we usually won't have
the option to export these because nothing else would know how to
use that anyway. When it comes to
migrating though which is the core topic here. As I mentioned,
the main thing is that we're using this
as a testing ground. This is our project to
play around with things, see what works,
see what we like, and then we can use just
the content that we want to work with permanently
in our main project. We can move just that across. So as an example I just gave, let's say that we've looked
through all of K's content. Everything in the here
is looking great, but for whatever reason, we only need or want this test dummy. Rather than bringing
over the hundred assets or whatever are
currently in here. We don't need all of the tables and things
like that again. What we would do
is we could grab. So I'm just clicking and then shift selecting all of these, the core elements
of the dummy here. We're going to right
click on this, and we'll go to
asset actions again, and we're going to tell
this to migrate the asset. And this is where
the magic comes in. It's telling you here that the five static mesh pieces
that we want to take across are also
linked to a texture. And our material. So Unreal is aware
that if we move these across without those
two other assets, then our dummy isn't going
to look as intended. So this is really handy. But what it does also
do is it stops us from needing to bring across
all of the other assets. You can see that we're going
to get a folder structure. We're going to get the
texture, the material, and the five measures
that we wanted. So this is the minimal amount
of content that we can work with to have everything
still looking correct in our other project,
which is pretty cool. So what we can do is we do want all of this to be included, so we'll say, here, that will pop up a new
explore window here. And what we need to do is
navigate to the other project. So this is our original
project that we created. Mine was called Boot camp, and remember we're currently
in boot camp asset holder. So you need to navigate to the other project that you want these assets to be moved into. And then very important here.
You need to remember this. This is very, very
important is that this migrate process will be looking for the content folder. So always make sure that
you're moving things into the content folder inside
of the other project. So at the moment, I'm in
the boot camp folder. We want to double
click into content, and this is where we want to store the content that
we're moving across. Again, very important.
If you don't do that, you can potentially have things not being migrated properly. Certain assets might be
forgotten or lost because it is looking for that specific
folder structure for you. So making sure you're
in the content folder, we'll click on
select folder here. Then that will do
the magic for us. So we saw something
pop up very briefly, and that was it migrating
the content across. And to check that that's worked, all we want to do is we're
going to go back into the Epic launcher and find the other project that we've
migrated that content to. O, of course, if you know
where that is on your system, you can just click on the U
project and open it that way. Just demonstrate that
because I don't think I've mentioned that
up to this point. So if you know where your
project is on your system, mine is in the projects
Unreal Ford slash courses. Inside of the root folder
of the Boot camp project, you have this dot U
project icon here. It's kind of like a dot.
It just runs everything. So we double click on this, and this will open the
project for you. So if you don't like
opening the Epic launcher, it's not the quickest piece
of software to open up, you can start
managing and finding all of your projects
locally on your system, and that will open
everything for you. So opening the other project, what we should be expecting is there will be another
folder structure, and again, just another
kind of recap in reiteration on the importance
of folder structures here. It's now very clear
what we have. So we have our boot camp folder, which is everything that
we want to be working with specifically
in this project. And then we have our assets and plugins and things like that they've come externally in
this second folder here. In this case, what I would do in a production environment is because we've already confirmed, we've checked that these
are good quality assets. These are looking and performing as we want them to
in our project. What I'd actually do in this
case is I would move this assets folder into
my main folder here, so I'm just going to
drag and select that. We'll say move here and just
move everything across. This is just a nice way again to make sure that everything
that we want to be production ready and in the final product will be in our main folder
structure here. And then we can start getting
rid of the assets and the bundles and
things like that that we have either tested
or brought in. And we just know
exactly what should be packaged in the
final version them. But the main thing was just to test that
these are working. So with that moved across, we can shift select,
all of these again, drag this into the world. And we now have a
cool looking dummy s inside of our
structure just here. Mentioned that change
that we've made to the material,
adding the texture. All of that's been brought
across successfully as well. This is the the magic
with migrating, is it means that we can avoid missing data and errors while still keeping the
amount of content being moved from one project
to another to a minimum. One thing I'd probably
do here as well, if I was being very particular is inside of the assets folder, I'd create another
new folder here just because you
will have noticed we have a material
nested among our meshes. So I'll create a new
folder named materials, and then from meshes, I'm just going to drag that
prototype texture here. We can see that's of type
material at the bottom. We'll just drag
that across here. So it's in the correct
folder structure. So now we have our meshes in the meshes folder, materials, in the material folder, and textures in the texture folder. Nice and tidy, just
easier to find things, and we didn't want the
incorrect asset type sneaking away with the other assets
here. Okay, and there we go. So that is migrating. We've seen the three main types. We're going to look at
Quicksall in the next topic, but we've now seen how to import our own
customer assets into a project with the
consideration on how we maintain a good
kind of folder structure, keeping things tidy and well presented and
easy to maintain. We've looked at
obtaining things from the unreal engine
marketplace, and again, bringing that into a
test project so that we don't have everything
cluttered in our main project, and then how to migrate just the content
that we want from our test project into our
main production project.
16. 14 - Quixel: So the final way that
we'll be looking at bringing assets into unreal is the use of
Quixel megabridge, or megascans, using the
mega bridge plug in. So this is something that Epic somewhat recently acquired. So if you have an Epic account, you have free access to a bulk majority of the
megascans content, and we can access this
directly through our project. So if we go into 5.3, we'll have this
installed by default, If for whatever
reason you don't, we can go to plug ins
and just search for Quiksil and just make sure that you have the
bridge plug in enabled. Again, whenever you're enabling or disableling your plug ins, it will give you a heads up down here if you need to
restart the project, so do that if needed. But as I said, in most five
point something versions, you should have bridge
installed by default. So with that enabled
and ready to go, we can go to Window, scroll down to Quixel bridge
and just click on this. Haven't used this before,
it may ask you to sign in. So this is, as I've mentioned, all linked to your Epic account. Because Epic own Quick now, this is why we have
access to the majority of all of these really high
fidelity mega scans. So if you haven't
already signed in, just come up here
and sign in using the same account that
you've used to sign up to the unrelen in to get access to the Epic
launcher and things like that. The way that we use
this is we can now start searching for
specific things. If you wanted to work
with assets individually, we can find piles of bricks. You can search exactly for
what you're looking for, so we can find the
different wallpieces that we would have access to. And you can start mixing and matching and bringing
these into your projects. We also have things
allowing us to search by specific genres or categories like a historical category here. And we also have the
collections option, which is really useful
if you wanted to get a specific environment,
and again, you've got things like
urban environments, natural environments, so a lot of different things that
we can work with here. Bring these into a
project, all we need to do is we'll find one that
we like the look of. So as someone from the UK, where it's always
gray and rainy, Tropical Beach is
standing out to me. That one always looks
quite appealing. And we just simply come in
here and we'll pick the assets that we want from this
tropical beach scene, and we can bring that
into our own project. As mentioned, if you
haven't already, you will need to sign in. So I'll just quickly
sign in so that I can demonstrate
the process here. And then quick cut
two being signed in. So when we are signed
in, now you should have a view which looks a
little bit more like this. So I'll say download, and we
can add this to the project. So let's say that we want to grab what looks cool from here. So we'll grab some
chunks of ground, some nice rocks on the ground. So we'd first need
to download this. We can change the quality. Medium, I think is fine.
I think that's up to like two k. So we'll
download this one, and you can see that
this will start downloading to your
account and your system. And then we'll need
to tell this to add it to the
project a bit later. In fact, it's done that already, so we'll add this
to the project. And you can see that we've got again Nested in a new
folder here and mega scans. This is actually
from our project. It's not very clear because
the windows here in the way. But if we go to the
content drawer, we go to mega scans. Just move this out
the way again, everything does start floating around and getting
a bit cluttered, which is why I like to
dock things up here. Otherwise, we just
have hundreds of floating windows by
the end of a session. We'll go down into
the content browser inside of megascans, three D assets. Ti Bach. We now have this
wonderful chunk of high fidelity rock
setup going on here. Can do the same thing
for many other things. If we wanted some details, we can get different starfish, maybe another type of rock, and then some tree
stumps to go with it. I'm just going to
control and click on the different assets that
I've just been downloading. Then we can tell these to add themselves to the project that we're
currently working in, and we can see those
being added over here. It's a pretty quick, painless way to get these
into the project, and these are all
now ready to go. They do have a ton of
different subfolders, one thing that might
be quite useful if you wanted to access just the meshes because they're all put in a single folder. Can go to our three D assets
megascans folder here. We've got a filter
option just here, so we can drop this down, and we'll filter just by meshes. The other term for
them is static mesh, it's actually just in this
category at the top up here. In the top section, we'll
tack on the static meshes. That means that we can be in the root folder for the
megascans here, and we can have
access very easily to all of the meshes that
we might want to work with. We can shift select
all of these, and then just drag
this into the level. Then it's just a case
of dragging the tree, we'll move this over here,
this rock surface over here. Again, this is where
getting comfortable with the input systems and just the general navigation
will save you a lot of time. We can come in and look
at these tiny starfish by focusing in over here. Again, we can move this around, we can play around
with the scaling, so we can have some giant
starfish down here. And this is how we will then begin mapping out our levels. So we'll have all of
these different assets that we can bring in which can be much more kind of catered and tailored to
what we want to work with. And just putting all of
these things together, you can very quickly get some fairly cool
looking results. They don't need to mix
and match perfectly. You can see that even though the scaling here is very different, putting these together, They
somewhat merge quite nicely, even though we've got
a bunch of overlap. They feel like they go
together quite well because they've got the same color
and texture applied, so you can get away of
things like this to make somewhat unique
looking assets. Then, likewise, we could
do stuff with this one, so we can make this much bigger, make this a little bit like a large rock that these are
somewhat combining into. We'll get much more into designing levels and tweaking
needs to look correct. But again, at this stage,
we're just looking at different ways to bring
things into the project. Bridge is very,
very handy because this way we don't
need to bring in the entire beach scene or an entire several gigabyte asset pack from the marketplace. We can just start sourcing individual assets that
we think would look good and be useful for
the scenes that we want to work with
and start creating. So just at the risk
of this map getting a little bit too cluttered,
I will come back in here. Start deleting some of these. We don't need everything that we've just been working with. It's probably a starfish
somewhere down no as well. So we'll just get
rid of the starfish. And for now, I'll just
keep it that we have these low poly simple
assets to work with, if you wanted, just as a
starting point for this level. But that is the core concepts
of importing assets. We've the main different
ways that we get assets into our project and how to keep
these maintainable. You will notice with things
like the Quixel bridge, it is unfortunately not quite as tidy as we've been trying to
make everything previously. So we have the MS
underscored presets as well, which come along
with the mega scans. But again, this is going
to be another very, very strong argument for having everything in
a separate project. Your asset holder project, and then moving that
across on migrating it to the main project when you're happy with the
content you have. In this example, what we
could do is we could move just this rock formation
to our main project, so we'll do the asset actions
and migrate option again. And you can see here
that it cuts down. If we're going to the MS
Underscore or the MS presets, we get all of these folders. Not all related to a bunch of
the different things here. When we take this approach,
at the very least, we can see that we only need this one default material
to be brought across, and then different assets
related to the rock formation. So again, we're just
saving a lot of space and additional kind of folder structures and
things that we don't need. So just an example of
how we could use that. And just before wrapping up, if you have your filter enabled and you wanted
this to go away, we can either click this here, which will remove the
static mesh filter, so we can see everything again, but you still have this
new window docked here. Want to get rid
of that entirely, then we'll just untick
the static mesh filter, or we can add or remove the
common filters entirely. So that was a filter window
that will only appear if you have at least one of
these filter options enabled. Then if you want to get
rid of that entirely, just make sure that you
have all of these unticked.
17. 15 - Materials Overview: So we're going to begin
working with materials. Before creating
materials of our own, I just have an example
in the background here. I'm just going to run
through the core concepts, the terminologies that
we'll need to know, just to make sense of what we're looking at and what
we'll be working with. So a quick rundown of
what we have on screen. I've created a
brand new material, which I've called M
underscore example. I'll be showing you
how to recreate something very similar
to this in a moment. On the right hand side,
this is our output note. So this is all of the information
which is being gathered to the left that we're in
control of setting up. And providing information on how this material
should be rendered. So we have our final
output node just here. And then we have the information
that we're passing in. In this case, we have
information for the color, the metallic, the specular, and the roughness details. And these three are
just information on how the material should be
presented in this case, to approximate real world
lighting and behavior that you'd expect to see
on real world objects. Have other things that
we can pass in as well. The missive color, for example, would allow us to provide a glow to the material just
here, and likewise, we can provide
normal information, which would be things like
baking dents and cracks without actually adding any of that information to
the static mesh. To the left hand side,
we have a viewport, which is just demonstrating what the material
will look like. And we can visualize this
in a few different ways. So we can basically just change the shape here so that we
can see what this material would look like wrapped around smooth surfaces and
harder surfaces. And just a quick tip here. If we go to the content drawer, find the static mesh that we know that we
have to work with, I'll take the head of the dummy, and I'll just select this. And with a static mesh selected
in our content drawer, we'll come back on over here. And if we use this
brick icon here, this will preview the mesh
that I've just selected. So now we can see what this will look like on our dummy head. I'm just pressing the
same key mappings that we had in the
other viewport, the main viewport over here. If we press F when
I was zoomed out, that will focus back
into the object. And again, I'm just panning and zooming in pretty
much the same way. Then in the details
panel, finally, below, we have other similar options here for the material domain, so whether this is going
to be on a volume, a post process effect, which is a more
technical thing we'll look at later in the course. In this case, we just want this to be wrapped around a surface, and we can provide information on whether this should
be masked, translucent, and also whether it
should take lighting into account or we can have things
like an unlit material, which means it doesn't take any information
from the lighting. Instead, what we do
is we lose a lot of information about the metallic
specular and roughness, but we can just
make this a flat, unlit, almost completely
missive material this way. A number of different
things that we can do. Now, in general, the workflows that we'll be working
with will be creating something called a physically
based rendering material, a PBR material. This, as I mentioned,
is trying to approximate the real
world lighting, taking away any reliance
on artistic intuition. We want something which
is a brushed metal. We can literally look up the properties of a
brushed metallic surface. We can see how metallic
that property would be, how much specularity
it would have, and how much roughness. We can plug that in here, and we can get that
information fed back. As an example, if I
wanted to make this a completely metallic
orangy gold, I would take the
metallic value here, we set this to be
one, and we will have a metallic property set on this. If I wanted it to have a
slightly rough polish to it, I could set the roughness
to something like 0.3, and we'd see we get a kind
of brushed rough metal. I set the roughness
all the way up to one, then we'll have a
completely rough surface. So that's all these are doing, and this is how we make a
PBR material super simple. It just needs three
different properties, which is the metallic
specular and roughness, and also the fourth one, which is just driving
the base color. But to technically
be referred to as a PBR material, we
just need these three. And then just to
mention, some of these values are clamped 0-1. This isn't applied to all of the values that
we can work with. For example, if we make
something missive, this can have an emissive
strength of ten, 50, 100, whatever you wanted
that to be to really bump up the multiplication
of that missive property. But when it comes to the
metallic specular and roughness, these are clamped 0-1. So for example, if I have
the roughness at 0.5, and then make the metallic, let's say, 100 times
more metallic, you'll see that nothing actually changes because this
is clamped 0-1. So one is as metallic
as a property will get. If we turn this
back down to zero, then we just set back to a
completely rough material. And if I set the specularities to one just to show
what this was doing, this provides a kind of
plasticy specular sheen. So by default, if we
unhook all of these, properties tend to have at least a basic specular
property to them. Again, this is just
based on what we find most often in the real world. It's fairly unlikely that we see something which is
completely rough. By default, you'll see this
does come with a bit of specularity because
without seeing it here, this does have a specular
default value of 0.5, a default value of zero for
the metallic, and again, a default roughness of zero, unless we override that
with our properties here. So just keep that in mind.
18. 16 - Creating Materials: Now that you've
seen the basics of a simple material
being put together or at least the outcome of a material that's already
been made for demonstration, we'll dive into creating
a material of our own. We've already seen the material
that comes by default or is automatically generated with our measures when we
brought those in. We had the prototype texture, which is a type of material, and I've created
a very simple one to demonstrate in
the previous topic. To create a new
material, though, what I'd do is I'd
recommend being in your primary project here, so this isn't the asset project because we can
probably build upon the material that
we'll be making now as we go through and
make it more complex. So I'm inside of
my main project, the Boot camp project, inside of the materials folder, I'm just going to right click, and I'll create a new
material just here. So it's quite a common asset, so it's in the basic asset
category at the top here. So I'll create a new material, and the naming convention
is M underscore. And then the thing that
it's responsible for. In this case, this will
probably just be representing a flat color as in no visual information like
the texture that we had here. So what I'll do
is I'll just call this M underscore
flat color base. Again, it may seem kind of frivolous at this point
in your development, but these naming conventions
really will come in handy. When you start bringing in a
bunch of different assets, and they may all be called
very similar things, you'll have a static mesh
for your characters, for example, so you may
have a mesh character, and then you may have
a character material and some character textures. It becomes very useful to have these prefixes to
very quickly and easily see and also search for and find the type of asset
that you want to work with. You may be jumping from working with the character mesh to the character textures back
to the character material. If we can just search for
things with these prefixes, so we can just search in
the project for all of the M underscore for all of the materials that
we might be looking for. So it's kind of a
convenience thing, but also, as I've mentioned,
if you'll start working with teams or
other people's projects, it's a nice thing
because you'll find that this recommended workflow is shared in the majority
of unreal projects now, so it just makes it easier to integrate and work with
existing projects as well. In the background
here, I've just double clicked to open the new
material that I've made. I'm going to dock this
at the top just up here. And inside of this graph, we just right click to
move the graph around, and I'm just going to
move this output node to the right hand side so we
can start working on things. The material by default comes
with a 0.5 specularity, so we can see some specular
sheen on the material here, and we haven't
provided it a color, so it starts with
a somewhat gray. I think it's like a 0.5 value
on the color spectrum here. That's another thing to mention, the color is also clamped 0-1. So if you're familiar with two
D packages like Photoshop, which would have a
red green and a blue, and they go 0-255 on
the color spectrum. I unreal, we'd change that 0-1 on the red green and blue
to get the same results. We can start by
giving this a color, and what we want
to do to provide a base color is we're going
to use a vector three. We can right click
in the graph here, and we can search
for constant three. Or constant three vector, so this is a variable, a constant variable,
unchanging at runtime with three
floating values. And that's how we
can drive the red, the green, and the
blue from this. You see this will provide
a pin for the red, the green, and the blue. Even though it's
technically a vector, often described in X Y and Z, they line up and provide the
same information for us. So if we drag from our pin here, like we did with the texture
previously and plug this in, and then we can double
click on this to open the color w. Or we
can come over here, drop this down, and we can
change the properties here. Like I said, this is where
it's important to be aware that if you wanted
something fully red, it only really goes up to one. I say it only really
goes up to because we can drag this as far as we want. But as soon as we get
past that value of one, we have the maximum redness we can provide for
this material. This will be a red material. We can give this a
little bit of green, and then give this a
little bit of blue, and you'll see how the stack to provide the
colors you'd expect. Obviously, unless you have some specific color properties
that you're aiming for, then using the color will may be easier and just faster to
work with in these cases. Another way that we can bring
these constant variables into the graph is we have a
palette window over here, which is currently dropped down, and we can see that the
constants, which are often used, so the most common ones, again, will be quite close to the top of any window weight
you'd use them. And you can see we
have a few options. We have a single constant. A constant two vector, the constant three
vector that we've just used for the color and
a constant four vector, which is similar to
the three vector, but it also has a fourth
float value for the Alpha. If we have something like
a texture that we want to represent or
some transparency, we can provide that through
the opacity option just here. We won't be working with that
kind of material just yet, but I just wanted you to be
aware that is an option. What we tend to work with
is our constant one, so I'll drag one of these in, and we can plug one of
these into the metallic, and this is all I did earlier. Have a constant float value. A value, again, they're called constants because they're
unchanging at runtime, which is an important
thing to be aware of, which means we have
to set all of this up before applying it to
the model that we want to put it on and make sure
that we have the final results before we press play
and test our results. Then when we're in runtime, we won't be able to
change anything. We do have options
which will ally that, and that will be a topic
for a little bit later. But let's say that we
wanted to make this a somewhat metallic
blue object here. I'll make this 0.5 on
the metallic property, and you can see that starts
adding that value here. We can drag on this as well. So if you click and drag on the value with this
node selected here, we can click and drag to change and test the different
metallic properties. Now, as I mentioned,
we want to make this a fully PBR valid material, which requires the metallic specular and roughness
properties to be plugged in. So what I'm going to do
just to save a bit of time is begin to introduce
the shortcut keys here. So you may have noticed
with the palette open, on the right hand side,
we have one, two, three, and four outlined next to these, and that's because they
are the shortcuts, the keyboard shortcuts to quickly create these
different constant values. If we move down, we can see
some of the other things which are quite often used
the textural coordinates, the panor options to move things around, creating
material functions. Some of these will also
have other shortcuts. Again, always look
out for these. If there's a shortcut
and you find yourself using this type of
node quite often, it's going to be worth
trying to learn these. To create a single
constant value. I'm just going to
hold the one key. On the keyboard and then
left click into the graph. I'll do that twice
to create one for the roughness and one
for the specularity. And then we'll just
plug these in to the right hand side
on the output node. And there you go. Now that we've overridden
the specularity, we can see that this
also had a knock on effect of changing how
metallic this look. So we now have a nice kind of chrome ball look going on here. And if I add some
roughness to this, again, we can completely
control this and have a brush messel
effect instead. Other thing as with
anything inside of unreal. If we select something,
press control in D, that will duplicate this for
us. This would be useful. If you had three of
these single constants, you wanted to duplicate all three of them and reuse
them somewhere else, then control in D is another shortcut to get
more of these nodes. Something else that I alluded to previously is we
have other options. This is now classed
as a PBR material. We could use this for a
number of different things. I'm going to show you
a cool website to play around with different
properties in your challenge. But just to give you
an idea of one of the other things we have
easy access to here, is, as I've mentioned, we can make this a missive
if we wanted. If we, for example, press three to get another
constant three value here, I'm going to give
this a reddish color. And I'll plug this into
the missive color. You can see that on top of being a kind of shiny blue ball, it also now has an missive
red property to it. If we wanted, we could
have just reused this, so I'll drag and pull from the blue and put this into
the missive property. So now it's a kind
of shiny blue ball with a blue emissive color. Another thing that we can do, if we want this to be much more emissive is we can do some
simple maths on these. So I'm going to press M and
left click for multiply, and we can multiply this color, so we'll take the red color, and we'll multiply
this by a strength. That we'll plug this in here. And at the moment, we already
had a strength of one, that was the default, of course, we're just plugging in a color. There was no
multiplication going on. But if we increase this
to something like ten, we should see this one
actually start glowing. That's very very simple to get something glowing and
missive inside of Unreal, which is very, very useful. You could use this
for things like turning on a light
bulb on and off. I'll show you how
we can make this editable at runtime a little
bit later in the course. And then you can very
easily come in and you could have a red light bulb, which when it was off
would look like this, it may have a kind
of residual glow. Then when the user turns it on, we would just up the
emissive strength to get an emissive light bulb. We can get some really
cool effects very simply with the unreal engine material
system that we have available. The other things
are a little bit more complex than what we're going to be going into just
for the simple PBR materials, but we could also
use things like the anastropy properties here. Adding normals will
come in a little bit later when we're
working with textures. We can do things like
offsetting the world position, so faking where the
verts are being shown. Ambient occlusion, again, is another one that we'd need
textures for ideally, but we have a lot of
different control. Over how we work
with our materials. But now, feel free
to play around with the emissive properties. I would recommend just ult clicking on the pin if
you followed along there. If you click on any of these
pins that will unhook them. So if you wanted
something to be removed, then it's as simple
as doing that. You don't need to
delete the nodes. The emissive thing is going
to be fun to play with. But for the challenge, the challenge is
outlined just to work with PBR materials. So just to get you started
at the right position, this is essentially the setup
that you'll want a color, your metallic, specular,
and roughness properties, and you're pretty much good to go and tackle that challenge. Just before leaving you to go through the
challenge material, just wanted to mention, this is the web page I'll be
directing you to. There's one tip that I mentioned in the written outline anyway, but just make sure that
in the top left hand side here, it's very easy to miss. There's an engine drop down, and make sure that
you've selected this to the unreal engine. Different engines will have
slightly different property. Setting for how PBR
materials are rendered. It's a very common thing
nowadays to have that option, but they still process them
in somewhat different ways. For the Unreal engine, this will provide the colors, for example, for a standard banana, would be this on
the color range. And generally, what I want you to do is just go through create several
different materials. This is just getting
you comfortable with creating different
materials and setting up a few completely
unique material outcomes. So the first one, let's say we add a banana, we
would take the color. Unfortunately, we will need
to manually input this. We unfortunately don't
get the correct values if we copy this
to the clipboard, but it's easy enough
to plug these in. A banana, of course, has no metallic property and a
default specularity of 0.5. If the specularity
doesn't appear over here, then assume that we need
to turn this to zero. So let's look at brass. Instead, what we get with
brass is we'll assume that the specularity is zero
because it had that line. Indicated there and a
metallic property of one. Unfortunately, they never
show you the roughness that might be something
to play around with and just see
what works well, how rough a banana material
should be, for example. This is the trial
and error process. You can't get this wrong. It's just a cool way to see how this PBR concept can be brought across with some simple replicatable properties
and how we can try this. Also, I do note that things like the relative
luminant doesn't really have a specific like
for like property in unreal. Generally, we're just
going to ignore this. We're going to focus on the
metallic, the specular, and again, working out the
roughness for ourself, and we get the colors provided. I'll make a few of
these materials and just see how that comes out. Again, a couple of other things. Working with liquid is going to be a little bit harder
because it requires some information
which doesn't fully map across to the unreal engine and working at translucency in some pasition, and
things like that. The final thing that
you can do just before I let you go away and
start with the challenge. If you drop down here, you've got the download material x. If we drop this down and copy
the unreal engine snippet, Hop back on over to your material and just
press control in V, this will provide some
basic information. This is probably the quickest
way to get the color. As I mentioned, if we copy
it from the clipboard. It doesn't account for the
fact that we don't have an individual place
that we can just plug in the values and we get something that
looks like this. So you can see it provides all of this completely
unfiltered, and unreal doesn't
know how to read that. So it just gives up and
provides a transparent color. But we can copy the
entire thing here. It gives you an idea of
what the metallic would be, the specularity,
and the roughness. And here we go, we
have a material that shod somewhat
represent a banana. I would say that might be
a little bit too specular. So maybe we could up
that on the roughness. And then if you wanted to
apply this to an object, we're just going to hit, apply, and save, go back
into the world. And we can just drop this
onto a surface here, and we can see exactly what this would look like on some of the objects that we've
been working with. Banana, not too
interesting there, but you may find some
more interesting results with the brass and different types of steel and
things like that. A play around and the
idea is to create several completely custom
and unique materials. It'll be a case for coming in, duplicating the
material that you have. We'll just right click on this. Duplicate. Call this the name for whatever other type of material that you
wanted to create, and then add those
properties here. Try not to make
it too cluttered, that was easily
getting quite messy. The idea is that we
end up with our color, metallic specular and roughness, and each one will have its own individual PBR based property.
19. 17 - Texture Material: Okay, hopefully you had
fun with that challenge. It was just a case of making a number of different materials, which I think is a
pretty fun way to get involved with the material
system inside of Url, especially since we have access to a PBR pipeline
out of the box, we can get a lot of different interesting results very easily. Just before jumping
into this topic, which is creating a
texture based material, I'm just going to
make some changes and tidy things up a little bit. Inside of the flat color. I'm just going to remove these. You may notice these
were given a name, which is jumping a
little bit ahead here. So I'm just going to remove
this and get this back to where it was previously with
a constant vector three. And then our three
constant values here. Plug this into the
specular, metallic, and the roughness again, and
then likewise for the color. So this is where we
essentially wanted to leave off previously with
our flat color. Just give this a color and apply this so that we have
something working here. And then coming back into
the content drawer, again, I'd just like to
keep the project somewhat tidy and
easy to maintain. I'm going to get
rid of that example that I created a moment ago, so I'll delete the
second flat color here. We can either create
a brand new material inside of the material folder for our texture based material. Or in this case, I'm just going to control D to
duplicate this one. I call this one
Underscore texture base. And this is going to be our
texture based material. And the reason I've duplicated this is we can come into here. We still want the properties for the metallic specular
and roughness, and all I need to do
is delete the color. So we have a good
starting point here. Now, when it comes to
working with textures, we had a little bit of a jump
ahead earlier when I showed you how to get that working
for the example meshes. So we have seen part of
this process already, but we can now dive a little
bit deeper into this. I don't have any other useful textures to work
with at the moment. For testing purposes,
to show off things like how to work
with normal information, so those fake cavity details that you can bake
into a texture. This texture is
very, very simple and doesn't have
anything like that. What I'll do instead is we'll come back into the material. We'll just start by creating
a new texture node. We're looking for something
called a texture sample. So if we search for
texture sample, we would want this
one just here. This provides a
visual representation of a texture in our graph. The shortcut for this, you'll
probably guess is holding down T the texture and just
left clicking into the graph. So again, another
very useful shortcut, you'll probably find you
using that quite often. And then finally, we
just want to plug in this red green and blue into
the base color just here. Now we will be provided
with an error because we don't have a texture for it
to render at the moment. So what we can do is
we can drop this down, and because we only have one in the project at the moment, we're going to go onto the
settings tab just here. And I'm going to tick on to
show the engine content. If you remember, I previously
mentioned that quite often, we want to keep this left off, just because it provides a lot of different pre
provided assets, which are inside of
the unreal engine, they can be useful, but they can also provide a lot of clutter. You can see there's just
a lot of different like noise based textures here or gradient offsets
and things like that. But in this case, we do have
a few examples which will be useful to provide
a diffuse texture, which is our albedo or the color representation,
essentially, as well as a normal map, which goes along with
that same texture. So if we type underscore D, that will be the
naming convention for diffuse type textures, and what we're looking for
is something like this. So we have our base tile which will be fine to
work with for now. So this will provide
a texture that we can map around our sphere. So that provides
the color for us, which is a great starting point. And then I'm going to just move things around a little bit, just keep things somewhat
tidy and easy to work with because we'll
need a little bit of space down here
in just a moment. I'll press Control and D
to duplicate this one. And what I want to do is I'll plug the result of
this down here. Into our normal pin. We don't want to work with a diffuse texture for
our normal information. So we'll just use
this drop down, and we can find the same
so we want the base tile, but we can find the normal
information for this. No normal texture, and it's actually this one down
here that we want, sorry, the base tile
underscore normal. Normal textures normally have
this blue and purple color. If we double click to just navigate to what
this looks like, if you're not familiar with
working with three D to two d pipelines where you
have your three D model, you quite often take a bunch of more high quality
detailed models and bake those into
different types of maps, essentially so that we can have a completely flat sphere
like we have here. But using some faked
normal information, essentially providing
the lighter colors and the darker colors will
provide fake visual offsets. To our mesh and also
allow lighting to work and react more realistically
with very flat, simple object. And that's
what we're doing here. So you can see it
somewhat highlights the darker cracks when we
have the normal applied. But we can do things like now controlling the
metallic property. Again, this being
a rock probably will have some specular
properties to it. So if we give this a
specular value of 0.5, that actually shows
off the normal map and what that's doing
much better now because it looks like the
rock is somewhat wet around those kind
of notched areas. So if we remove the normal You'll see that we don't get
any of that information. It just looks like a
completely smooth marble. I should have done that
earlier, but there you go. That is showing off what the
normal map is doing for us. It's providing that
somewhat fake information on a completely smooth sphere, and then different
properties like our metallic specular
and roughness properties can really start
doing their work with that extra information
that we have access to. If we wanted it to look more like a ball of
metal of some sort, Then we can use our
texture information here, and then just
playing around with the different properties by
making this more metallic. It now looks more like
a metal ball object, whereas if we remove
that, we have something looking
like a wet rock. So just a case of playing
around with things until you get a result that you're
somewhat happy with. Again, no defined outcomes
here, just playing around, seeing what these different
properties do and getting comfortable with
the material editor. So we've already
somewhat looked at multiplying a texture
against a result. I'm just going to
move this down again further so that we can
make some changes to our main color here
because we can apply that to our diffuse
color as well. A couple of the main
options that we have available would be to
use either addition. So if we hold A and left click, we'll get an addition
node or multiplication. M and left click and we'll
get a multiplication node. If we use multiplication, we will be multiplying
against the saturation here, so we'll get a darker or
lower color as an outcome. So what I mean by this is, let's say we wanted
to give this rock a reddish hue to it, so
we'll move this over. We will plug in a
multiplication node here. So we're taking our texture, we're multiplying
this by something and then taking this outcome and plugging it into
the base color. The thing we want to
multiply against, if we just make this 0.5, we're just taking away the
color properties essentially, so we can make this zero, we'll get a gray rock. This
is going to be easier. I might be easier to
work with when we take off our roughness
and specula for. So you will need to switch
things around a little bit. So if we multiply this
by a much lower number, then we're taking away a whole
bunch of that saturation, so we'll get a
much darker color. If we make this a higher number, then we're going to get a much brighter color coming out here. So we're just multiplying each pixel against this
value essentially. Now we can do this with a color, so I'll press three and left click to get that
constant vector three, and we'll plug this in instead. If we make this a color of, let's say, a light red, then we're going
to get a slightly darker but red tinted rock here. So this is how we can
work with changing the color properties of
the rocks that we have. And again, if you wanted
to come back in and play with the specularity
and the roughness and so on, you still have those
options as well. So that's how we would multiply a color against our texture. We can do a very similar
thing with addition. So I'm just going to
plug these two up first. So we're doing the same thing.
We're taking our texture. We're adding our texture here to a color or we're adding
a color to our texture. And then we want to plug in
the result into the base pin, and you can see that we're
still getting a blue, but the addition works
in the opposite way. So this is taking all of
the individual pixels, and it's adding that
brightness property, that saturation to the
texture that we have. So we end up with a
brighter blue rock instead. So in this case, that might be a little bit too strong now. We might want to take this to a much more toned
down version of this. Everything's actually
looking quite bright in this situation. So just to be aware that
you will need to change up the workflow depending
on what you're looking to do. But there we go. We can now change the color
or we can at least offset the color of our original rock with these detailed
properties here. And again, this is
just some time to play around with different
options and outcomes. One thing that may have come to mind for some of you is that we can make a mix match
of different things here. When you're trying to make
a banana, for example, in the flat color option of
the material that you had, it may have been nice
to have some speckled offset to the texture representing the
flesh of the banana, which we could very easily do. I'm just going to come
in here. I'm going to copy the texture sample, and then I'll paste
this over here. Even though we've got a mostly
flat colored sphere here, we can still throw an
unrelated normal map onto our materials. So that's not really
looking like flesh. We'd want something which
is maybe more just noise. So the use of noise is
actually quite helpful here. If we were to make
this yellow again, we could start having something which looks a little bit more like a kind of the
flesh of a banana. Another thing that
we can do is we would provide an
offset to the UV. So this is the
texture coordinate. This is how many times this image is being mapped
across the surface. We do this with something
called a UV coordinate. If you remember, we saw
that a little bit earlier. Texture coordinate
or the UV coordinate here is U for the shortcut, or we can just drag
one of these in. So another one you'll
see quite often. And if we plug that in here and then set with this selected, you can see we can set how many times we want this to tile. So the main problem with this is that it definitely
looks very obvious, where this is repeating,
it's very kind deep and kind of
large crevices here. So we might want to make this
tile just a lot more often, and we have something which
is then spread out because this is being mapped across the sphere that many more times. In fact, maybe it would be
a little bit harder than I expected to get
something looking like the surface of a banana here, but we can keep
trying to tile this. You get to a point
where you're tiling too often and it becomes
somewhat visible. But we're definitely
getting closer than just using the base
property here. Maybe from a distance,
that might look okay. So we can apply this, we
can come in and maybe just put this on
one of our meshes, so I'm just going
to move down here. We can grab one of these, and we'll just apply that miss. Going to be quite hard to
see. There's definitely this might have actually
ended up working better as a type of sand, even though banana was in mind. For the Zen Rock thing
that I had going, if I made a cylinder
around this, because we have this nice ring
appearing from the tiling, that could look like some
pretty good sand around this. So we can make our
own results even in some basic materials which don't have a whole lot
of texture information. Just by using things like
noise and normal information, merging those together,
offsetting necations, and things like that. We can use this same
property so we can take our texture coordinate
if we press U, and we'll use this again. We can do the same thing
for our rock just here. We can make this
tile twice as often. So you can see when I displacing some of
that information, we will want to do
the same thing. I'm just pressing
control C control V, and we'll do the same thing
for the texture up here. So now that texture
is also displaced. So it looks like
we have a lot more information inside of this rock. Obviously, we want these two to line up because it's
quite useful to have the same normal map
and the same texture, obviously offsetting
at the same points here to give that
level of detail. But just something
else that we can do is to use our texture
coordinates to provide some extra information and just mix up the level of detail
that we're working with. As I mentioned previously, I'm going to keep these
as tidy as possible. Since we're not
using the multiply, at this point, I'm just going to get rid of the multiply node, and I'll just move things back
around a little bit here, just to take up there are an individual space
in the graph here. Then the other thing
that we want to do, if you're done working
with the engine content, just remember to turn
the engine content off. We can do that pretty much
from any In this case, we can go back to one of the places that we're
using a texture. We'll drop this down.
We'll go back to the settings option and just
untick show engine content. Again, just to keep things
a little bit easier to find just the assets that we are purposely trying to work
with inside of our project.
20. 18 - Material Instances: The final topic on
an introduction to materials then we'll be working
with material instances. So I alluded to this a few
times in the past where I said that we could make
our constant variables. Those things which are
unchangeable at runtime, we set them here and then
we're unable to edit this once we've placed this on an
object and we hit runtime. These are easy to set up, but then harder to work with and would
require you to make a material for every
different type of surface that you
wanted to work with. That was part of
the reason that I set that challenge
to get you making several different types
of materials based on our different PBR based material examples
from the web page. It was a somewhat cruel
task to get you to see just how tedious working in that type of
workflow could be, which will make you appreciate the material instances
just that much more, because that's essentially
what they'll be doing for us. They will save us
time and effort. They allow us to expose a
core set of properties, which not only allow us to have these updated and
changed at run time, but they just make our life
as developers easier as well. Working with a
material instance is actually very, very simple. What I'm going to do is
I'll start by showing this off on our flat color base. We're going to come into
our initial material that we made with just
a color sample here, and I'll remove the
texture for now. The first step to make this a material instance is
we want to change these properties
from constant values to something called a
parameterized value. For the color, we can do this by simply right clicking
on the vector three. And we can convert
this to a parameter. And if you remember
when we copied in those properties
from the web page, I said they had some
named properties which were a few steps ahead
of where we were looking. That was essentially providing
a parameterized value. So for this one, I'm just
going to call this one color. So we now have a property
called color that we can reuse inside of
our material here. Nothing's really
changed. It still looks exactly the same, but this is now just the
difference of having a parameterized variable
to a constant variable. If I apply this, we'll
come back and we'll take the rest of this
process in just a moment, but I'm going to
apply and save this. And then we're
going to turn this into our material instance. So if we go back into our content drawer, I'm
going to right click, and I'll go to the option
just at the top here. Create Material Instance. If we select that,
you'll see that a new object is being
created down here, and the name and convention
for these is generally MI, so material instance,
underscore, and then the name of
the thing it does. So we'll call this one MI
Underscore, flat Color Yellow. So we're indicating that
this is going to be an instance of the
flat color material, and this one's going to be
responsible for being yellow. We can come in here
and you can see that this parameter that
we've just named color, if we tick this on, we
now have full control, and we can get a
live update of this. And not only do we see a
live update of this here, but if I press okay, we'll come back into the map, and I'm just going to drop our new material instides
onto the roof here. The really cool thing about this is that we can drag this window. We'll go back into Maine
with a floating window here. If I change this
through our editor, we get live information,
live feedback. In our map as we're
using this as well. So it makes it really handy for prototyping, quickly
visualizing things, and you may have noticed one of the tedious things
when you are making multiple different materials to work with different
types of PBR properties. There is a very small
but notable lag from when as an example. We come in, we'll
change the color here. One thing is you don't get
that immediate update. I'm changing the color will, but nothing is updated
until I let go. And then there's a bit of a lag, depending on the system
you're working on, it may need to re
render something. We also get that initial pause when we're changing
things like the textures. It's just a faster workflow working with our instances here. That's the first thing
is that anything that we parameterize can be seen
inside of our instance. You'll notice that we can see the metallic specular
or roughness properties because we haven't yet
parameterized those. That's going to
be the next step. We're going to take these. We can right click
on one of these. We'll convert this
to a parameter. This one's hooked up
to the metallic pin, so I'll just call
this one metallic. To see this in action,
I'll hit, apply, save. We'll go back on over
to our instance, and we can see we now
have a metallic property. So this name is exactly what
we're calling it just here. And this will be
important to remember later because when it comes
to working with code, which will be a little
bit later in the course, but with that example of turning
on and off a light bulb, we need to know the name of the property that we
want to address in code. We could say metallic
equals zero here, but metallic equals five now. Also useful for things like
making something look wet, we can change the specularity at runtime if it goes through a
water volume, for example. But we need to know the name of the property that we want to change in code. We
can come back in here. Again, we can make this
slightly metallic, and again, we get that
immediate feedback. If we go back into
the main world, it's a little bit harder to see, but you can see that's now reflecting because
it is metallic. If we turn this all
the way up to one, That immediately
updates here as well. So I'll just keep this as a fairly basic yellow material as the name would suggest here, and we'll do the same thing
for the last two properties. Now, rather than
right clicking on these and going to
convert to parameter, another thing which is
useful to be aware of. Remember that we have
our one, two, three, and four hot keys
when we left click to create our constant
variables, like so. These are our constant
float vector two, vector three, and vector four.
We have a similar thing. We have hot keys for
these as well because parameterized variables will
also be used quite often. For a parameterized color, we just hold the V
key V for vector. And we get a vector four
parameterized color here. So this would be the same thing. So let's say that we wanted
one for our missive property, we could have a color emissive. We'll plug this in over here, just need to make sure
that we give this either a black color if we don't want any
emissive property at all, or we can then give this a specific missive color if
we did want this to show. And we can do the same
thing for our float values. When we turn these into
parameterized values, they're then called
scalar properties. So if we right click
and search for scalar, We have a scalar parameter. This is just a float,
which has been turned into a
parameterized variable, so you can see it's
exactly the same. I'll use this one and
call it specular. I'll delete this one because
we'll be replacing that, and then we can plug this
into our specular property. Then the final way because
it is a scalar parameter, we can hold a S, left click, and we'll get a new
scalar parameter. So just a few different ways
to get to the same result. Essentially, we're just
taking a float value, and the reason it's
called a scalar value is because we can
scale it at runtime. We can change this dynamically when we want to update the look of this during gameplay
or the runtime editor. The final one, of course, is going to be called roughness. So we'll provide a
roughness value. Again, we'll delete the one that we're not using any longer. And we will just plug this in
to the roughness property. We'll here apply and save, and we now have a
fairly simple but flexible default
material to work from. If we go to the instants, with all of those saved, we
can now tick all of these on, and we can change things
like the roughness, specular, metallic, and so on, straight away, and we get
that immediate feedback. We can also make this missive, so if we change the color here, we can get some
missive properties. You can start seeing it's
them very simple to come in. We can add a
multiply node again, and we'll add another
scalar property. This is just multiplying
the strength of our emissive value, which
is what we did earlier. We'll call this one
emissive strength. And we'll plug this in here. And again, the result of
our emissive color will be the color that we
have multiplied by the strength that
we want this to glow, and we'll plug this in here. Here apply and save. And we're perfectly fine to
leave this at zero and black. It just means that
we don't have any emissive property at all, which is perfectly
fine by default, because we can very
easily come in here. We'll turn up the
emissive strength. We can make this
really, really bright, and we can give this a
completely different color. And we now have full control over an missive rooftop here, which may be just a
little bit strong. So do be aware of
what you're changing, but just fun things to play around with and get comfortable with the different options and features that you have
available. And there we go. So we now have a roof, which is somewhat yellow with an emissive
glow applied to it. In this case, I'm just going to turn this back down to zero. I won't have any emissive
strength on this one at all, and we'll just have this left as a somewhat yellow golden ball. And as I said, when it
comes to naming things, we just want to
make this somewhat representative of what
they are responsible for. And again, if I was being really particular in my own project, I would come into
this one as well. Prototype texture isn't very
good. It's not a texture. I'd call this one M
underscore prototype texture just to indicate that
the whole reason that this specific material
exists is to hold the information of
that prototype texture from the example pack. Like so. But of course, we've also been working
with textures already, so we could also
come in here and start parameterizing
some of these values. So you can do the
same thing with the properties we already have, so we convert all of these to parameters would
be the next step. We can also do that
with textures, so we can right click
on our texture. We can convert this
to a parameter. And I'll just call this
one Albedo texture is a normal name for
this or diffuse. I think they're used
interchangeably. I'll do the same
thing for the normal, so we'll right click on normal, convert this to a parameter, and we'll call this
one normal texture. And then a small task
before getting on to the next challenge
view is just to convert all of these
two parameters as well. And what we could
do is we can then start reducing the number of base materials and
instead make use of more material instances.
So we could come in here. I can get rid of the
prototype texture in a moment by making a
material instance of this. Create material instance. We'll call this one MI
Underscore prototype texture. And in this case, we would have a problem where we
have this normal map, and there's no way to
just get rid of this. But I think in this
case, it could actually look quite cool to apply this to our
model down here, and it would give some sort
of fake bumped information to our little guide dine here. So if we apply this material, not quite as cose a had in mind, actually, because of the way that this is wrapped
in the three D tool, there's some stretching
going on here. Although that will be because
we have our UV tiling. So we'd also need to
account for things like how we're
tiling the UVs here. Just a bunch of the different information that you
need to account for. At least we can get the colors
back in the right place. I think that
wouldn't look great. That's one thing to be
aware of is with textures. What I mean is if we
clear this entirely, because we have
normal information being passed into
the texture base. It's going to at least provide this default option
because you can't have a texture node plugged in without a texture
assigned to it, remember, we need at least some information
to pass through. What you might actually
do in this case is if you didn't want this
normal map applied, you would have two
different base materials. This is just a great example of how you consider
base materials. We'd have for any textures that wouldn't have any normal
information on them a tool, and instead, we'd make
this a material instance, and then we could make our
changes to that version. Then we'd have one where all
of the properties are shared between having these normal maps and the UV offsets
and things like that. If we did want to
keep the UV wrapping, just another handy tip here just to get you going and playing
around to different options, not everything is able
to be parameterized. So if we right click on
the texture coordinate, which is controlling
that UV offset, you can see there's no
option to parameterize this, but we can very easily
multiply this against a value. So if we multiply this
and plug this in here, and let's say that
we make this ten, you'll see that this will
map a lot more often, or less often depending on the number that
you plug in here. We can take a scale of value, so we'll call this
one a UV offset. We'll plug this in here,
and what we want to do is I'm going to
duplicate that over here, so we'll get the
same result twice. So we've got our texture
coordinates multiplied by our UV offset because
it's the same name wherever we update this value, this value will also be updated. So if we make this one, you can see that's applied
down here as well. So it's a nice way
to control both of these from one single value. But the really useful
thing is that we can come back into our instance,
and of course, we can see that if we
change the offset in here, than that is being applied
to the whole material. The normal and the texture offset are both being
applied at the same time. So just different
ways that you can start thinking about how you can work with these
and see what's happening and how to
really expand on these. And again, other things
you might want to do here is if you like
the color offset, promote this to a
parameterized variable as well so that you can
control the color offset, make sure that these
are parameterized. And just to give you
a little bit more of a technical insight of why and where we might use a material versus a
material instance. So the obvious option for the material instance that
I've mentioned already, is anything that we want or need to be updating at run
time would need to be an instance because we need these named variables to access in code and
make a change. But also, more than that, there is a performance gain from using instances
where possible. So generally, what
you'll try and do is you'll try and find
the biggest number of use cases of all of the assets that may share
similar properties. So all of your rocks and
bricks and ground pieces, for example, would all have
very similar properties. They will all need a texture. They will all need
a normal map to show the crevices and
things like this here, potentially wanting
a color offset, metallic specular and
roughness to make them PBR. So that would be a really
good use case to have a let's call it a rough
surface material base. And then your rough
surface material base would have several instances,
one for the bricks, one for the rocks, one
for the floor pieces, the wall pieces, would all be their own
individual instance, and all you're changing then. Through the instance would be the texture which is
being applied to it, and they may have slightly
different surface properties. Now, the really good thing
about this when it comes to a performance impact is the
way that the compiler will kind of match these
together is all of the core information is
held in the base material. So this is kind of compiled
and computed once, and then all that the
processor needs to check at run time are the small minor
changes to the instance. So it's kind of
to simplify it to a bit of an extreme You're
not quite doing this, but essentially, it's
like compiling it once, but using it 100 times. There is more of an
overhead than that, but it's much cheaper
where possible to try and let the
unreal engine batch all of these instances together. Use the core information from the base material just once, and then all it
needs to check is it knows that all of these
materials have a roughness, they have a metallic, and all it needs to check
against is what is the value, which has been
assigned to that or the texture, which has
been plugged in here. So it's much cheaper
to run hundreds of instances than it is
hundreds of base materials. So there's a performance gain
that we get here as well. But of course, the
main thing for us as developers is it's
just going to be much faster to iterate and test things and we get
that live feedback in the editor when
we're working with our instances versus working
with the base materials. So the challenge for you no, very similar to the
first challenge. I want you to go back
to the same web page. So our physically based
database of materials here. And if you've made five
specific materials in the previous challenge, I will try and recreate those, but instead now using instances. So remember, we want
to base this off of a core base material. And then what you have is five material instances instead. And again, the main
thing is just to get across how much easier
this is to work with, how much quicker it is to test
things and update things, and just to get that work flow somewhat ingrained
and get you seeing the differences between
the base materials and the instance materials and how we can work with these.
21. 19 - Importing Assets: We now have our main
project ready to go. As I've mentioned, we're
going to be keeping an eye on just good maintainable
project structure, as well as general
good practices that bigger teams will
use in production. And this scales perfectly down to individual or
small teams as well. In this case, what
we're going to do is create an asset holder project. This will hold the tens of gigabytes worth of assets
that will be downloading, and what you tend to find
is that you may only use several hundred
megabytes worth of the assets or maybe
a few gigabytes, but definitely not that ten, 15, 20 gigabytes that
you have downloaded. What I'll do is I'll
show you a small trick a little bit later
that will allow us to create a map inside
of our asset holder, discover what we want
to use and keep, and we'll migrate
just those assets across to our main
development project. Before jumping into that, I also wanted to show you the
concept art that I'm going from because this is the
point where we want to start thinking about the assets
that will be downloading, what we want to look out for, and generally the layout of the project that
we'll be working with. These are some of the
assets that I find. You by no means have
to follow this. If you wanted to follow
along more directly, if you're getting started and you're completely new to this, then following along
with the same assets and the same general goal may help but you can create
anything that you wanted. I was looking for
something which would be quite contained so that it was just
a smaller area or to implement the important
key features of a game project with
some simple mechanics or logic that we can add to it, whilst also providing a range
of visual information and a way to set dress and use all of the features
such as the landscape, mega scan assets, and foliage,
and things like that. I came up with this.
I'm going to go for kind of a cave opening
looking out onto the sea, which will allow us to work with the new unreal engine
five water features, some foliage in the background, but the cave setting is going to be quite nice and contained or the features and the
mechanics that I want to include can all be
tucked away in there. I've got a few of these. This is going to be the main one
I'll be working from. I find some other things. I like the idea of
this hidden garden inside of the cave as well. I was thinking that once you've
developed the front part, the external part of the
cave and the bit of sea, we might have something tucked
away if we wanted to add some interaction between
different classes just to show that type
of functionality, we could have that
leading to maybe like a hidden internal fancy style cave or
something like this. This may be a little bit
too far out of scope, but these are just
the ideas that I have early on before we
start developing anything. What I would recommend,
as I've mentioned, is you can follow along with the content as I'm
providing it if you wanted. But if you wanted to
try and get creative, find some concepts
looking for things like concept art of the prompts
that you're looking for, get some of those stored. Again, this one catches M,
that looks pretty cool. A small oasis on an island
with a rocky outcrop, it gives you a lot of
things to work with. I'd have something
like that ready to go. Save some of these either
on your system or there's a really useful app called PureRef. Pure RF
looks like this. You can download that
for free online, and basically all you'll do, let's say that we wanted
this is our main image. I will copy the image here. I'm going to go to Pure REF,
and we can paste this in. And basically, this is just a really useful holder for different images that
we want to work from. So I'll get another couple. The hidden cave would
be the other part. I think I'm going to try and recreate this as
close as possible. It doesn't need to
be one for one, but we'll keep
this fairly close. And then I'm just going to
have a few random ideas, so things like that
one caught my eye, and we'll just paste
this into Pure REF. We can scale these
down to keep them all somewhat similar in size. But you've got essentially
an infinite canvas here. So as we keep adding things, this canvas can expand, and we just kind
of scale things. If we press control shift and A, the useful thing, is that
will always now be on top. So as I go around,
that will stay here, and what we tend to
do is just tuck this away in the top
corner somewhere, or if you've got a dual
monitor on the other screen, so that's always just
kind of there so you can look over and
get your references. This one, I ought also
looked pretty cool. I'll take one of these as well. And this is one of those things where when you're
working with concept, especially if it's not a concept that
someone's made for you, you may want to get several of them or as many as possible, that all kind of go
towards your final goal. In fact, this one keeps
standing out to me as well. So we'll get this
one. And that way, you're not just kind of
sealing one person's idea. It's a case of mix and
matching and trying to come up with something that you like the idea of based on a bunch of different
reference points and things. In fact, anything with these trees are really
standing out to me, I'm going to get a couple
of these with the trees, and these can just
be rough ideas for the inside where we add maybe some of the mechanics
a little bit later. The main thing I'll be
coming back to when we start out is this
cave face just here, and this is just
going to give us a good idea of what kind of assets to look for on
the marketplace as well. So jumping back to that
with that in mind, I'll go back to
the Epic launcher. I'm going to move this
off screen for now, but we've now got an idea
of what we're looking for, and I'd recommend as I said, if you wanted to come up with
your own concepts entirely, there may be look
for similar things, but in different
environment types or maybe an urban setting,
whatever interests you. But the main thing is we can
go to the marketplace here, so we'll go to the
marketplace tab and in the search panel here, we'll look for the
goddess Temple. If you went to the Quicksall
Mega scans provided here, everything is free to download. And the good thing
about these packages is that they come
with a bunch of sort of custom assets as well as just the assets that you
can get from mega Scans. So they've actually tailored
some of the content to make it just much more usable
and quick to get together, and I'll show you what
that means a little bit later when we have
the project open. So another one that I'll be
using is the Nordic Coast. We've also played around with the Qary collections,
which is quite good. But the main thing
is we can just come in and we can use
these for free. So I'm just going to go back to the Goddess Temple though. That's the one that I
want to get first of all. And the reason that
I'm starting with the goddess Temple is
because this is one of the asset packs that I know requires you to create
an entire project. This doesn't just import the assets into an
existing project. So what I'll do is I'll use this part of the process to have this created as my
asset holder project. So I'll just press
Create project. We're going to go in here. I'll set the folder, so this is the directory.
I want this to be stored. I'll rename this to asset holder or beginner asset holder, so it's clear what
this is related to. We'll make sure that this is selected with the
correct engine version, which needs to match your main project that
you've created. So for me, that was 5.3, and then we can press Create, and this will create an
entirely new project for us. Of course, if you're going from an asset pack or you're not
interested in this pack, and you're using
one which doesn't create a new project for you, what you'd want to do is
take the same process we've seen previously create a whole new project
as we did originally. That one a name, such as the asset holder and
then import all of the assets that you'll
be working with into that new project
that you've just created. I'll show that step
in just a moment. For context, in the background,
neither this is finished, creating that project
with the goddess Temple, what I'd also like to make
use of is the Nordic Coastal. The Nordic coast is the part, I think is going
to look most like that cave that I found
the entrance for. So I'm going to go back to
the Quicksal Megascans asset. We'll go to the Nordic
Coast, which is just here. And this is one of
the asset packs, which is different, in that it doesn't create an
entire project. Instead, it needs to be added
to a project that exists. So instead, we'll make use of the add to project button here. And then I've just
filtered down to find the beginner asset holder
project that was just created. So that may be the step you
need to take separately, which is to create
another empty project, which will act as your
asset holder for me. That was using the
Goddess temple, so that has now the goddess
temple assets in there, and it will now have the
Nordic assets as well, so I'm just going to
say Add to project. And again, that's going to
work away in the background. We'll add the
Nordic coast assets into that existing project. Then I'm going to have
a fairly bulky project with a lot of different assets. What I'll be showing
you is that we can very easily make use of the same asset over and over from different rotations and
scales and things like that. We'll make one rock
set potentially look like multiple
different variations. Again, this is something you'll find done in production quite often because you're limited to the number of assets
that you can use, and also there are
performance boosts that you can get from not using
hundreds of different assets, but instead using ten
of the same asset, but in different ways to make them look like new variations. That will save you performance, it will save you space
and memory and so on. So I'll be showing you some
of those tricks as well, which means we may
have an asset pack with 20 different rocks
in this Nordic set. We may use two of
them, but we can make it all look very
unique and interesting. And that's why we don't
need these gigabytes worth of the full packs, and we'll be moving
just the stuff that we use back into
our main project. I may seem like some extra
steps at this stage. It would be great to
just get straight into the landscape stuff and start carving away at things and
making things look pretty. But this is one of those
things which will honestly be so useful and save
you so much time and effort in the future
when it comes to managing and structuring
your own projects, just getting started with
some good structure in mind to make things more maintainable and easy to keep in
check as you go. And there we go, so
you can see, again, in the background that's
I finished processing. So that project that
we've just created when I have all of the assets that I currently
want to work with, we'll come and get
some extra foliage and looking at the PureRef, I'll probably get some trees
or something later as well, just to keep the ideas
somewhat in line with these concepts I'm
going to be going from. Keep this as well. If
you do download PRF, and you start
creating an artboard, this is essentially an artboard. I'd recommend using this
it's really useful. Then like with any other
kind of file type, you can press control in S, and you can save
this artboard as a pure board to come
back to load later. So when you come back to
your system next time, you can load PR, load
this exact same artboard. You have the same concepts to go from when you start back up. I'm just going to jump back over to the library and from here, I'm just going to go
into the asset holder and open that new
project we just created. Again, I'm just
going to find the beginner asset holder here, and we'll double click and open this. This one may take a while. We now have a lot of
different assets in there depending on what
it thinks it needs to compile and have ready. We may have a lot of
shades going on here. The actual opening of the
project didn't take too long. It's doing some shade compilation
in the background here. Because I created this
as the goddess temple, we can see it's the Goddess
temple opens up first of. So again, we're not going to use the bulk of all of
this information. It's a really nice
looking level. It's just overkill for what we're looking
for at the moment. And we wouldn't be able to set up a good kind
of camera render or any game play or
anything through this just because a lot of this is only really intended to be looked at from a distance, and you can very
quickly see the cracks and things appearing with some of the background information, which isn't even there
and stuff like that. So not a problem,
just a nice way to hold that content for us. And then the other content
we're going to be looking at, if we go to the
geometry, for example, in assembly, we have the cliffs, so this is from all of
the Nordic asset packs. Many of the mega scans
do this type of thing. This is what I was talking
about that it leans into having that
visual representation of what I was
trying to describe. If we were to go to the
Quicksall mega bridge, and import the
assets individually, there are some really
useful things, but it can take a little
bit of extra time to create some custom assets and get things looking as
we want them to. When we use the full
packs in this way, though, we get these
things in here. So if we go back into our
assembly cliffs as an example, this is a really nice one to use or some of these are really, really large, which
means they cover a big area of space
very quickly, and it means that we can very quickly get our ideas going. The main thing is just having that kind of visual
noise in the background. People won't be paying a
whole lot of attention to it. But if we click into
these you'll notice, they're not just static meshes. These are not just the
individual assets. These are called
packed level actors, which are essentially
a collection of instanced meshes
that the designers from Quick have put together, and we can reuse these to
quickly implement our levels. It also provides some performance improvements
for us because they're using something
called instant static meshes, which are slightly
different to static meshes. These can be batched and
rendered all at once, so you can have several
different types of meshes all batched
and processed. At roughly at the same time for a much lower performance hip
to oversimplify a topic. But that is the essence of
why we would use these. You can see if we go
to the viewpoint here. We actually have is a number of much smaller meshes and
assets all placed together. Now, the nice thing about
this compared to using the Quicksall mega bridge plug in directly and bringing in
the assets individually, is that most of these are
only actually one sided, which means if we just use
the assets as they come. So if we go and find
some of the megascans, three D assets, we can find Any of the cliffs will
pretty much be the same. It doesn't matter which
pack they come from, but just as an example, we'll
stick with the Nordic pack. There will go Nordic
coastal cliff. If we drag one of these in, you can see as much smaller. So even though it's a cliff
is still quite small, and that one actually goes directly against what was
trying to show there. We'll find another bigger cliff. This is the kind of cliff
face I had in mind. Just get rid of the one I
brought in a moment ago, hide the content drawer, and what we'll find here
is that they're one sided. So these are quite difficult to work with just
because you need to do a lot of playing around
to make sure that this invisible side or
the side that doesn't exist isn't going to be
viewable from the camera. If you're not great,
a level design, I'm by no means an artist or a level designer as will
probably come across. It does make it quite
difficult as well. Just trying to mix and
match things to get two or three different cliff faces looking as though they
belong next to each other, whereas if we use this big pack, which is already
provided for us, someone with a much
better skill set than myself to do that
has put these together. From a distance, even up
close a lot of the time, they look believable and acceptable to just
litter around. That's why I'd recommend
going through that and then we'll move just
the assets that we want across to our project to still save a
little bit of space. The final thing before
wrapping up this, I just want to get
these looking correct. You may notice we have some
visual issues going on here. Now, this seems to be
an issue with some of the new versions of
real five when we're working with
different asset types in some pre made projects. You may have noticed
we had a warning at the beginning complaining that the SM six Shader
wasn't set correctly. What we want to do,
if you're having the same problem is just go
to the project settings. You should have this
tab here open ready. If not, we just go to
edit project settings, and that will bring you in here. In the search bar, I'm just
going to search for SM six. I'm just going to
turn on the windows, the d3d 12, and we'll turn on the bulk and target
to Shaders as well for the SM six shading. This will expect you to
restart the project, so I'll just tell it to
restart, save any changes. Quick cut away here.
Just wanted to show that after restarting with
that SM six update, this has started to resolve. You can see it still
preparing some of the measures and
shaders down here. You can see that's resolved some of the assets not being visible, though due to these
shader issues. I know that this has
been quite a setup just to get started before we even begin creating our level, but I realize that there's some issues and
things that could catch people out in the
current versions of unreal. Just wanted to
cover this in case anybody else did
encounter the same issue. But that's pretty much
it. I'm just going to let that finish rendering
and get everything set up. You're doing the same when all of that's done,
when I ready to go. When I begin implementing the terrain and the water
systems and getting all of that fun stuff on the go
and start building out our cave or whatever environment it is that you're
looking to build.
22. 20 - Terrain / Landscapes: Moving on to the next step then, we'll be looking
at our landscape. So we're going to
now start building just a platform that we can add our level designs
from our concept arts onto. To do this, I'm just going
to go into a new map. In fact, this is going to be a very similar process to
what we've taken previously. So I'll press Control
in N when inside of the viewpot. Click
into the viewpot. Control in N for a new level. Empty level create. And I'm just going to
take that process again where we go to
window environment, L light mixer, and we're
just going to click each of these buttons to get a
general kind of visual going. So just a useful process
to get used to anyway. And it will actually
be inside of this project that
we do the bulk of the level design
because we want to test here which assets
we'll be keeping. I'll also take that hiding
step where we shift select each of these assets,
right click, select, move two, and we'll
create a new folder, click the folder, press F two, rename this 12 Lighting. Nice and simple, so we're back to where we
were previously. Now when it comes to adding a landscape, this
is nice and simple. We go to the top
left hand side here. We change from selection
mode, so at the moment, we can grab all of the
objects within our viewpoint. This is what we'll
be doing when we get to the actual level
editing portion of things. But we now want to drop this down and move to landscape mode. Inside of landscape mode, I'll leave the details
here as their standard. We don't want to make
the landscape too big. If we increase the
size of this too much, it will become quite slow
and difficult to work with, and this is actually
relatively large as it is. It doesn't look big,
but when we press play, and we jump the character
into this area. It's actually going to be
quite a large landscape. So we'll hit create, and that will create a landscape for us. With the landscape ready to go, I wanted to run through the tools that you have
access to very quickly. I won't be making much use
of the landscape tools in this project just
because most of the terrain will be
built from the meshes, and it's relatively flat. There's not a whole lot
that I can envision the cave needing to have
variants and things, but I wanted to give you an idea of the tool set you
have available. So I'll run through some
of these with you now. Main things you want to consider are the sculpting tools here, so you'll be in sculpted
mode immediately. If we come in a
little bit closer, I'm just right clicking and
using the W AS&D movement, so up down forward
and backwards, based on where you're
looking in the viewpot. If things are a
little bit too fast, I can see I'm zooming around a little bit
too fast when I move. If you hold the right
mouse button and then drag the mouse scroll
wheel either toward you to slow down the
camera or away from you, so forward to speed
up the camera. You can see up here, the
camera speed is updating. I want this to be somewhere
closer to like 1.5 in. That's a fairly decent
movement speed. If that's too slow for you, then you can go all the way
up as high as you want, and you can see that
just controls how fast you fly around
the viewpoint there. If you didn't want to
use that shortcut, you can also select
the button here, and you can just control
the speed of this manually. As I said, I want this to
be closer to sort of 1.5, 1.6 was fine around that
speed for movement. That's what we need to
do, we'll fly around the landscape and we'll
make some of our changes. The first thing will
be in sculpted mode, we have the sculpted brush selected here inside
of sculpted mode, as you would expect it
sculpts onto the landscape. This is how you'd start creating your hills and mountains
and things like that. You can change the
tool strength, so the higher the strength, the more immediate
effect that we have, so you can see that's going
to give much sharper, larger hills
immediately based on the brush size and the fall off. So if I zoom out much further, the brush size is, of course, the brush that we have in here. And the fall off is
that inner ring. So how much strength we have? If we have a fall off of zero, then it's as strong around the outside as
it is in the middle. Whereas if we increase this, it's going to give
you a bigger value a stronger strength being
painted on in the middle, and you can see it
kind of tapers off towards the outside there
based on that fall off. So that's the sculpted mode, just going to control Z to undo that to get back
to the flat landscape. One thing we can also play with here is we can add layers. So if we right click in here, we'll create a new layer. This is actually quite useful, especially for demonstration
purposes like this. If I were to come in and
make a bunch of big changes, we'll increase the strength and everything like this
and playing around, and you decide you
didn't like that. You've still got your base layer of the landscape, and in fact, we can change the strength at which this layer
is taking effect. So if I wanted to
completely undo that, I can just set the strength
effect that this has 20. For people familiar with
things like photoshop, this will be familiar to working with different
layers, generally, what you want to do is sculpt between different
layers because that way, if you completely mess things up towards the end
of the landscape, looking how you wanted it, you can just undo, revert, or remove entirely that layer
that didn't go very well. In this case, I can play around, we can come in, we can
flatten some of these, and just playing around
with the different tools is the main thing if you wanted to use these just to get comfortable
with what these do. Of course, smoothing things
will smooth things off. We can flatten things entirely. So if you wanted a raised base here and then smooth
around the edges, what you might want
to play around with as well, kind of
feathering this. Change the brush fall off and change the tool
strength as well, and we'll get a much smoother lighter effect
bringing this in then. So we're not losing as
much of that shape. You've got things
like your erosion. A ramp is a tool
where you actually have to place two
different things here, so we'll place a point here and a point here and
we'll move this. We need to add the ramp here, and that will just create
some landscape in between. Again, very useful if you wanted to create
an actual path or something like that in
between different parts of your terrain without
sculpting it in manually. This is very much
what you'll be doing. Once you've got that
path, for example, we could come back in
and then we'll just want to smooth the
outsides a bit. I'd need to bring the strength
and the tool size down, maybe make the path a
little bit wide because we don't have enough
information there. As I mentioned, though,
the level that I have envisioned isn't going to
use much of the landscape, but I just wanted
to let you know that those tools are available. They're very easy to work with. And you can, of course,
just arrase things as well. So if you wanted to get rid of some of
what you've done here, you can use that as a tool
as you would usually expect. For my landscape, I will leave this completely
flat for now, so I'm just going
to delete Layer one entirely just
because as I mentioned, we'll keep this
flat, and then I've got my base layer
to work from here. So a couple of other things, we do have the managed tab here. So this will let
us do things like adding new landscapes entirely, so not affecting
the current one, adding a new landscape,
importing existing ones, resizing and things
like that generally. Again, we tried to make a good estimation of what
we need when creating the landscape originally and not updating it mid production
where possible. But just be aware that those options are there
if you need them. And then finally,
is the painting, which is going to require
a custom material. We're going to create
a landscape material, and we can paint that on. At the moment, we have
a checkerboard effect. Of course, we don't
want this checkerboard. So we're going to create a very basic material to allow us to give a base layer
to the entire terrain. Before doing that, I just wanted to come back into select mode. And just keep in mind that we want to click
into the viewport. The map again is untitled, meaning that it hasn't been
saved as well as the Asterix. Just double confirming there that we haven't saved this yet, so I'm going to press
control in S again. This time, we already have a somewhat cluttered project just from all of the
assets in a general setup. We do have a maps folder though. I'll just double click into the maps folder to make sure we're in the correct
folder here. Rename this one again to Maine. This will be the
main map that we're working from with that updated. We can press save, and
we now have the terrain, the lighting and everything
ready to work with.
23. 21 - Landscape Material Basics: To make the terrain look a little bit more
interesting then, we will need that landscape
material that I mentioned, then we can begin
painting things on. The way that these
generally work, you can think of
things as in layers. So we'll give it two, maybe
three different types of texture information, image information, and we can layer and paint
between those layers. So the ideas that you have
in my mind at the moment, we're going to have
a base sand layer, and then on top of
that, we can paint some pebbles and rocks
and things like that. So it can sid complicated, and some landscape materials definitely do get complicated. These are actually
quite easy to set up. So we're just going
to go to the content draw the materials folder. If you don't have a
materials folder, I'd recommend creating one. Then inside of here,
we're just going to create a standard material. Just right click inside
of the content drawer, create a material,
and I'm going to call this one M Underscore
Landscape base. So this is our base
landscape material. Naming convention
with M underscore just to keep things
nice and tidy there. Everything that I do,
as we go through this, will be working with the
naming conventions and the recommended conventions for creating and managing
your unreal projects. And again, these seem
like small things, but if you would
to start working with a team or in the industry, these kind of conventions are the things which are
already in play, and it will just make you
onboarding and getting into other projects and working with other
people so much easier. So for material and
landscape base. Inside of here, we need to
make a few different changes. So by default, we have a material with a
material domain of surface opaque for
the blending mode and default lit for
shading. This is all fine. This just means that
we're going to take in the light from our surroundings. We're going to have no
capacity or transparency, so the material or final results will not be somewhat
see through, and we can provide the metallic specular and
roughness properties to create a PBR of physically
based rendered materials. So trying to some accurately recreate the kind of surfaces you'd expect
to see in real life. So this is perfect. What
we want to do over here, I'm just right
clicking and dragging on the graph to move around. We need a little bit of space before we come
over to this side. We're going to right click,
and we'll look for something called a landscape layer blend. So we can see here,
landscape layer blend. We'll click on this and add
one of these to the graph. Now, depending on
how much you wanted to flesh out and build
upon your material. The next few steps will
be quite repetitive. But once you know how to do it, it's very simple to just
add more and more layers. We want to keep this
somewhat toned down. We can only manage a
certain number anyway. And of course, as you
add more information, they'll become more performance intensive as well. So
we'll add two or three. What we want to do is with
our landscape layer blend. We've got an option down
here in the details to the left hand side to
create additional layers. And this is what I was mentioning earlier.
So we'd have one. This one, for example,
could be for the sand. This one could be for the rocks, and then we'll paint
between those. When it comes to naming these, I'm actually just going to
use L one, L two, and so on. And you can see
that gets reflected over here in the node. If we did call this
sand, for example, it would say layer
sand, and so on. Now the reason that I'm
sticking to L one, L two, potentially L three is that if we wanted to
switch between these, we don't need to account for the material which is
being placed in there. So we may think that the sand
might be the base layer. After some testing, we may
want to change that to gravel, and of course, we need to keep updating the names
and things like that. So we're going to make
this quite universal. The next step is to
actually provide some texture information to
plug into the layer blend. So we want to
provide that visual information to switch between. So I'm just zooming in
with the mice we're here, just in case you're not familiar
with the movement here, so I'm zooming in to
just get a little bit of a better focus on
what we're working with. And the next thing we want
to add is a texture sample. So I'm going to press and hold the letter T and then left
click into the graph, and this will give
us a texture sample, which can provide the
visual information that we want to
plug just in here. Because we don't
have any textures that will be useful
to work with here. We do get a bunch
of them provided with the plug ins that
we've been using. None of them really work for the ground that we'll
be looking for. They're all mostly based
around the geometry and the static meshes
that have been provided. So textures more specifically for the static meshes and
things like we can see here. What we want is
something which is tileable and will work
across a landscape. What we're going to do
instead is we're going to go to the Quixel mega
bridge plug in. If we go back into the main map, when we're back inside
of the main tab here, we want to go to Window
and then Quixel Bridge. We have the Get content option category
and Quixel bridge. This is where we can easily get those meshes and things
that I mentioned earlier. We've already got the packs
which combine them together, as I said in a more
useful and workable way. But if you wanted to get meshes individually, you could
definitely come in, search for three D assets and add these individually
to your project. It's a little bit
more time consuming, and I just prefer
working in reverse here. So we get the full packs
from the marketplace, and then we take
across just the assets that we want to our
individual projects. What we're going to be looking
for though are textures. Instead of looking
at three D assets, I'm going to look at surfaces, and I know that I want
some sand to begin with. So I'm just going to go to the search bar and look for sand, and we can just find all of
the sand available to us. So this will provide
some materials, which included within
these materials will be the textures
that we're looking for. At this point, it's
just a case of looking through which one
do you think look good. So maybe some rippled sand. We're going to
want some sand for the general areas of the cave entrance and
things like that. We might want some wet sand towards the coastline
that we're going to add. And then maybe some shingles and the little rocks and pebbles that you get in
certain parts as well. So maybe three materials
here would be quite good. Now, as I'm scrolling through, I'm just thinking of
the different colors and everything that we're
going to be working with. So bringing up the
concept again, one thing that catches
my eye here is that we could potentially have
some brighter yellow sand, more like the patch here,
but further in the cave. Then we're going to
have some nice splashes of green, the gray rocks, and then the gray rocks in the background might all
contrast quite well together. I'm not great with color theory, but that is what
currently comes to mind. So, in fact, what I think I'm going to do is I've
used this before. So I'm going to make use of the rippled sand because
that has quite a nice bright yellow and then
we can change this and we can tweak the colors
in engine anyway, and then find some
other similar sand that would go
together with this, just to add that
variation to it. There's actually quite
a lot of sand here. So another way that
we can work this in is I know that the rippled
sand here looks pretty good. It tells you which assets are related, and we can
go to some of these, and we can also
find if there are any packs which come with these. So we can look for coastal
packs or beach packs here. So if we go to collections, environment, and then the
natural option down here. We can find different packs that work quite well together. So this is another
much faster way to find the assets that
you want to work with. So I'm going to go
to tropical Beach. This is why I think I
found these before, so we can find the
record sand here. Maybe some flat sand, so I'm just going to
shift click into these. And then I want
something which will provide the kind of
rocky look as well. So we're just going to go with
three different materials. And I think that should
be enough in this case. I'm not finding it
from this pack, so what I'll do with
those two selected? If you haven't already done so, you need to download
the asset first of all, so click on that and wait for the asset to download. If
you have the green arrow. And if you have
multiple selected, you have the green
arrow over here, so that will download
all of them. Then once you have
those downloaded, you need to press
the plus button, and that will add
all of the assets that you currently have
selected. Into your project. So you can see that
we've now added under the Mega Scans folder, the Tie Beach assets
into our project. So I'm actually just
going to go back to the Nordic Coastal Cliffs
collection as well, which is the other
one that we're using. And I think this is the shoreline
that I was looking for. It was from the Nordic pack. So this is one I've
used in the past, and I'll just use this
a little bit deeper into the water just to give
it a slightly darker look. We're not going to see
much of it anyway, so it doesn't need to
be super detailed. Again, if you haven't
already downloaded them, download this and then
add this to your project. So that will be everything.
We basically we just need these textures available
for us in our material. With that done, we can
close the browser, close bridge for now,
and we'll come back into our landscape material and we can start
making use of these. The way that we're
going to build these to avoid wires going
absolutely everywhere, we basically want a bunch
of three different types of information for each layer that we're going to
be working with. The way that we can do this
and condense these nodes a little bit is if we take
all of this information here, we want to fill the important
things are the base color, metallic specular and roughness and some normal information. So we can collapse all of this information
and have this be built from our layer
blend just over here. To do this, we're just going to click on this node
that I have selected, so the big output node on the left hand
side in the details, I'm just going to
tell this to use a material attributes pin. So this will collapse all
of this into one thing. And then we can use that
material attributes information to build
our image act. So we'll right
click in the graph. Search for material attributes, and we want to use the make
material attribute node. So this is now
looking very similar. This is essentially
the same information we've just collapsed over here. But this is what will allow us to plug this information here. And then whatever's
being blended from our different
layers will create in a moment can be passed into
the final material render. We'll get the first
layer working to begin. So inside of the texture
sample, select this one, drop down the texture
information and look for a sand texture. So we've imported
a few of these, the one that I wanted
is the Tai beach sand. We then have a bunch
of jargon next to it. And the thing at the end, the underscore D is for diffuse. Diffuse and albedo are
often used interchangeably, and it basically means color. So this is our color texture. We can plug the red
green and blue, so all of the channels making up this color can be plugged
into the base color here. And at the moment,
this won't change anything because of
the material type. But if we right click on
our attribute node here, and start previewing this, right click and select
start previewing. We can see on the
left hand side, what information this
will actually pass out to our landscape. So at the moment, we
have a very flat, somewhat smooth looking plastic key sand material going on. That's because we haven't
passed in information for the metallic specular
roughness and the normal. So if we select our
texture sample, press control in D to duplicate, so D for duplicate, we're going to drop this
texture information down again, and we'll select the next one, which is our kind of
bluish purple color here. And the important thing is at the end of the name,
we have underscore. Which is for normal. So this is our
normal information. Normal information is
basically just going to provide some fake
offsets and make things look as though
they're presenting more three d information than we actually have on our shape. So if we plug this in, so again, from the red green and blue pin, we're going to plug that
in to our normal pin here. And you can see the light
reflection there, especially. You can see it's looking a
little bit more cracked, a little bit more like
you'd expect sand to look, and that's from the
normal information. So it's just taking
different heights or colors from within
this image and offsetting and
actually affecting how light is bounced
off of this surface. Then the final
thing, we now need some information for the
metallic specular and roughnes, so we'll press
control India again. To duplicate this once more. We use the drop down here, and there should be one final
Ti beach sand texture here, which is not under rippled. So because of the
naming conventions, Ripped has kind of taken
the wrong order here. And the one we're looking
for is this one here with the name underscore
OR DP at the end. So that stands for occlusion, roughness, and displacement. So if we select this, I'll show how we use that
in just a moment. So the important thing
is in order of where those letters are showing is the order that
we plug these in. So the OR and D are spread out in the two D texture package that would have created these. To the red, green, and
blue channel separately. So we don't use the RGB combined here.
Instead, what we do. So for the occlusion,
for example, will come from the red channel, and we have an ambient
occlusion mask just here. So this is our
occlusion information. The next one that we
want to make use of is the roughness
channel, from the green. So again, in order, we're
going to go from the green. Put this in the
roughness channel, so that will now make
this less shiny. So we're getting the
value of how rough this should be from
that texture sample, and then the displacement, which is the world
displacement information we can use can be
plugged in down here. Now a lot of the time, I find
that people don't use this, and I'm just going to
keep that unhooked for n, so I've just pressed t
and clicked on the pin, and we'll leave out the
displacement for now. It will also give us a little
bit less repetition to do. This isn't now going to start looking like a much
better material, and the next step is
to recreate this. This is why I said
it gets a little bit repetitive because
we're going to need to take this step for every
different layer that we may want to paint
onto our landscape. So I've actually got
the three layers. Remember, I've got
the sand here. I've got the rippled sand, and I've got the pebbles
from the Nordic Beach. So I'm actually going to
come into our layer blend. We'll add in a third layer, and I'm just going to
call this one L three. Something else that we'll probably find that
we want to do. Before moving on to
the next layer is controlling the UV
layout of our textures. So what this means is we've got this UV
information just here, and this is providing
information about how big or small the
image should be wrapped around our mesh or in
this case, our landscape. Now, by default,
if we apply this, it's probably really tiny, which means we'll
see a lot of tiling, which means it'll be
very obvious that there's a kind of a grid
shaped pattern going on. To control that,
we'll use something called the UV offset. To manipulate and manage
this information. So what we can start
doing is we could begin to actually apply this
to see what this looks like. If we hit apply and save, we'll go back into Maine, we'll go to our landscape, and I'm just going to
click in here and set the landscape material to
be Underscore landscape. So I've just selected
the landscape in the world in the
details panel to the right scroll down to a landscape material and
find M underscore landscape. Or landscape base.
We'll apply this, and everything will go black,
and that is perfectly fine. The reason is is
because we haven't yet provided it the
information that it needs to map that information
across the landscape. So if we go back
to landscape mode, so use the drop down here, go landscape, and go
to the paint tab, so this is what I
mentioned previously. And you can see here it's
now trying to work out what to do with
that single layer that we've begun
providing for it. We use this drop down, we
can see that it doesn't have the type of asset
that it's looking for. So what we can do is create something called a layer
information asset. So if we allow it to
create one for us, we can press this plus button, we'll create a weight
blended layer, and we'll just tell
it to put this into the materials folder. So if we select this, we can
see what's happened here. We've got our landscape
material that we've created, and then this layer
information asset, which is just about the
information contained within the blending and how this is applied to our landscape. We'll need one of these per
layer that we're creating. But you can see it's
really easy to make. The main thing I want to
show here is that tiling. So it's very very obvious. I'm just going to
lower the brush size here, but it's very obvious. We've got this small grid
shaped tiling going on, and you can even see if
we get in close enough. You can even see the
pattern is super obvious where each part of the texture starts and
the next one begins. So if we press play, and we go down this is
roughly head height, and this is what
you would be seeing when you're walking
around the level. So very, very obvious, we've got these rows
and that's what we want to get away from here. So to solve this,
we're going to go back into our
landscape material, and this is where
we want to offset the information in
the UV section. So to do this, we use something called a texture coordinate. So I'm going to press and hold U and then left
click in the graph. This will provide a
texture coordinate. You can find all of
these if you want. Anytime that I'm using
the name of something, you can right click
and search text Card. It's just a case that you
would need to know what these are called and what
the search functions are. Where possible, I'll give
you these shortcut keys. With the texture coordinate
node selected though, we can go to the details panel, and if we turn this down to, let's say 0.5 on the U
and the V for the tiling, and then plug this in
to the UV information. You can see that that's changed
the way that that looks. So with this already plugged in. If I changed this to two, again, you can see that's changed how
that image was spread out. So if we press apply, that means that this
is now trying to pack two times the information per tile that this is
going to be spread across. So this is actually
going to be much worse. We actually have much
smaller tiling going on now. So what we want is we want
to make this a lower number, but it's trying to
find that sweet spot between being too detailed and showing too much tiling or being too largely spread apart, and then looking
grainy and bitty. I think 0.5 will
work fine on here, so we'll hit apply and save, we'll go back down and
take a look at this. So ale bit of information isn't coming across
because what we ideally want to do as well is
just plug these in to anywhere else that these
textures are being used. At the moment, we're only really accounting for the color, but we're going to be seeing
a lot of information in the way that this is passed back through the normal as well. So we'll hit apply and save. And there we go,
we can see that's looking a little bit better. I think if we make
it too much bigger, that's the problem
as I mentioned, is it is going to look a
little bit less detailed, and you can really start seeing the pixels and things coming across because we're just spreading out the
information so much more. Although from down here, I think that looks
better close up. Because it's less obvious at a glance that
we've got tiling. A lot of this is
going to be covered by the assets and the
meshes that we bring in, and we're not going to be looking at it from
up here anyway, but just to give an idea
of what this is doing. So this will be another
important part of our material as we go
through and change this. You can really see this is
getting a little bit messy. The other option
is that we could duplicate these and then just use one per texture
sample that we want here. But the problem,
of course, is that we want these scaling to be the same for each of
these different textures. We wouldn't want this one
to have a UV offset of 0.5, and this one have a
UV offset of two, because if you look
at the textures and what we're
working with here, these textures are
actually exactly the same. So the divots here
is what this is kind of trying to
show from the normal. This lump, for example, will reflect differently to
this more dented part here. But we do have that lump
and the dents dine here. So usually a normal texture is just a texture with these
specific color offsets to indicate to the render
how to bounce light in a more correct way across
these usually flat surfaces. So for that reason, we want our UVs to be the
same on all of these. And what we'll do
next, is I'll show you a little bit of a in depth, but much tidier way that
we can start managing our materials to
make it just more flexible and faster
to work with.
24. 22 - Landscape Material Improvements: Okay. This is one
of those processes. The initial setup is
going to be longer, but it will make the rest of the process much less painful. What we're going to do is we're going to unhook
these for now. As I mentioned, the one
thing that we first of all know that
we want to do is to make this a uniform UV mapping for all of the
texture information. And we also want to make this a little bit easier to update and expose to work with the material that we'll be
creating a little bit later. What we can do is I'm
going to pull from here and I'm going to find
a multiply node. So we're going to multiply
the number that we have here. We'll keep this at a
standard uniform one for the U and the V. Then
we'll multiply this by number, which will offset this and then plug that in as
the final result. The number that we
want to plug in, what we want to multiply this value by when we
get to this node here, we can expose this as something called a
scalar parameter. I'm going to press S and
then click in the graph, and I'm going to
give this a name. I'll just call
this one UV scale. With that parameter created, we have this variable here, which at the moment we can only access from within
this material. If we plug this pin in here, we now have access
to this elsewhere, I can very quickly and easily change the scaling value
of our texture coordinate. If I make this 0.5
as I had before, that will of course be
multiplied by one and one, one and one multiplied
by 0.5, is 0.5. The outcome here is going to be that 0.5 that we're looking for. If I multiply this
by two, same again, multiplied by two is going to be two, but the
outcome will be two. And because we have
two values, our U, and our V, that will be applied to both of
those coordinates. In fact, I think I
said it was more like 0.25 was preferable here, especially when we're
close up to those assets. Then the other thing that
we know that we need to do is we want to
use this another time. We don't actually want
to plug this into the occlusion or
roughness because they're just scalar
parameters are not based on the actual size
of the texture, so we'll leave that
as it is, but we do want to use that down
here for the normal. Instead of having these
wires going everywhere, we're going to pull
this back a little bit, and going to lt and
clicked unhook these, pull from here and we'll find something called a
named reroot node. So we'll add a
named reroot node, and we'll call
this one UV scale. Same as the parameter.
That's perfectly fine. And really, all this is doing is allowing us to
call this by name, find what this value is,
and plug it in anywhere. So if we now right click
and search for UV scale, you can see we've got a named reroot node option
coming up here. We can plug this in. And
this is just as I said, a handy thing where we can
just now duplicate this. I've pressed Control
indeed to duplicate, and we can use this wherever
we need this information. So especially because
as I've mentioned, we want this and this to always have the
same texture size. We can control that
with the UV scale here. And means that we can kind of tuck this away in
the background. We won't need to
update this again, but wherever we want the value, we can just use this
named reroot node. A reroot node, by the way, if we pull this and plug this in here and double click on a wire, you get this little pin,
this little circle. That is a re root node. Just again, it allows us to
keep the wires nice and tidy. We can move these around,
avoid other wires and things. All this is a named
version of that that we can call as
a reusable feature. So that's the first step of
improving our work flow here. The next thing
that we want to do is we can just grab
this information. We want this information to
be pumped out two more times, one f layer two, and
one f layer three. So I'm going to press Control in D with all of those selected. We've got another
set of nodes here, and we can move this
up, and then we'll move this one over here,
and we can plug this in. The outcome of this
attribute, the material, the make attribute
node that we're using here will be the
result of Layer two. So we're going to
come down here. We'll need to select each of these texture samples
individually, and we'll need to set them to the relevant rippled
sand information. So we're going to go to
the texture drop down, search for rippled sand. In fact, we can just start typing ripple, and that
will find it for us. We want the diffuse
first of all. Remember the underscore D
goes into the base color. I'll do the same
again for the O RDP, so this is the ORDP. And then the final one again, the rippled sand for the normal. So that will now
be our layer that we can paint the
rippled sand into, and that will be our layer two, and we want the same thing
one more time for the gravel. Now, the way that I
would speed this up is I'm going to grab this
information again. I'll right click on
any of these nodes, and I'm going to tell this
to collapse the nodes, which will give us another
hidden graph here. This one, I'm going to
select and press F two, and I'll call this
one flat sand. I'm going to take
that same approach, so I'm going to select all
of these, right click. We will drop this into
another claps nodes. Again, I'll select this,
press F two to rename, and I'll call this
one rippled sand. We can move this up here. And basically, all
we've done here. We still have the
same information. If we double click into this, we can see all of
that information in here is just kind
of hidden it away. When you double click
into that, you'll be in your collapsed version, so we just need to click here to go back to the material graph. And then with these created, I'm just going to select either one of these, it doesn't matter. Press control indeed
to duplicate. I'll rename this one to pebbles. I'm going to plug this in so we don't need
to come back here. Just line this up a little bit, and then double
click into pebbles. And what we want to do is just make that image
change one more time. The texture here, in fact, they're not called pebbles. I
forgot what they're called. I think it's like shoreline. Is that what we're looking
for? Shoreline rocks? Yeah, Shoreline rocks. This is going to be the one
we're looking for. So we'll come back in just here. And in fact, some people
like this workflow, so I'll just show
what you can do here. I find this a little bit fiddly, but you can come in. If you select your texture, bring up the content drawer. I need to make this a
little bit smaller. You can then drag
the diffuse texture that you want into
this slot here. So this is the pebbles
for our color. We need to do the
same thing again, and then we'll get the O RDP, and then we'll
drop this in here. Then again, we'll
select the normal. We can come to the
content drawer, get the normal, and
drop this in here. So you may like or dislike that approach,
just to you know, you can just drop these assets
into the relevant slot. And with that done, if we go back to
the material graph, we now have three fairly
tidy little nodes here. One for the sand, one
for the Record sand, one for the pebbles, going
into layer one, two and three, and then that information
is all being combined, and then we can
paint between these to make our final
landscape color. Then the only thing we have
to left hand side here is our information to keep our texture coordinate
nice and tidy. And of course, because we
want this to look pretty much the same between whichever
layer we're painting on, we've made use of this
UV scale information, and we're just passing that
into the texture ample size, essentially being able to
use that information once and use it anywhere
inside of our material. So I'm just going to
press Control Shift and S to save everything because we've changed a few
different things now. So Control Shift and S
will save everything. We'll close these
down, and that is the material pretty
much ready to go. We need to go back
into our landscape. So we now have the information. We have these layers available. So what I can do for
layer two and three, I'll take that same approach
that I did previously, so we'll click the Plus
button for layer two. Add this into our
materials folder again and press Save here. So we now have layer one
and two information. And then finally, you can probably see whether
this is going. We're going to go to Layer
three, press the Plus button, wait blended, go to materials, and press save here again. That isn't looking
correct for you. I think although I press
save, I didn't press apply, this material hasn't
yet been updated, so we'll just press
apply to make sure that all of this
information is saved. I think previously, I only had the information
about the flat sand. Then if we go back, you can
see this is all updated. The way that this works, we now have our different layers. By default, everything will
be painted with Layer one. If we select Layer two, though, inside of paint mode, increase the tool
strength a bit, and then just paint
a patch down here. You can see what we can do and this is what I was
saying earlier, is that we kind of like with, again, photoshop
and layer painting. We can now paint between
these different layers. So as we get maybe
closer to our shore, we may want to paint more of this darker kind of sand
color with some ripples. And then as we're
actually in the water, we can maybe paint some
pebbles and so on down here. Maybe not quite that strong, so you can change the strength and the opacity and the fall
off and things like that. But this is what
you would normally do with your landscapes, as you can just
dot this around to give that extra bit
of information. So again, I'm just
going to Control Z a bunch of times S so that we have a blank
slate to work with. So with the information
about painting ready to go, something to play around with and start
designing as you want. The next thing I just want to
show very quickly is we can make one final improvement
to our landscape material. As I said, these can
be quite simple, but they can also
get quite complex. We've exposed one
variable here, though, which is the UV scale, and we can make use
of that through something called a
material instance. So at the moment, we'd
still need to come in here. If I wanted to see
what this would look like with a bigger value, I'd need to come
in, press apply, save, go back and check
what this is looking like. It can be a little bit
difficult to remember between switching in
how this was looking. Using a material
instance, though, we can get a live update. So I'm going to come into
our materials folder, right click on our
landscape base, and I'm going to create a
material instance from this, and I'll call this one
MI Underscore landscape. Again, just using good
naming conventions here, we've got M four material, MI for material instance, just so that we know what
they're responsible for. So if I double click into this, this will open our new instance. You can see we've got one
variable exposed over here, which is our UV scale. So anything that we've named as a scalar parameter
in our material, which is kind of like our base now for all of the information driven here will be exposed in the instance
when we're using it. If I click to enable this, and then just drag this as
a floating window for now. What we can do is we can
get some live information with our material if we
apply it to the landscape. I'm just going to
need to go into selection mode one more time. So the drop down here,
we'll go to selection. We'll make sure we have
the landscape selected. And then instead of using
the landscape material, we're going to use that new
instance we've just created. This is the other good
thing about naming conventions is if we search MI, and then underscore, we'll only get the instances
in the project, and then we know that
we want our landscape. It makes it nice and easy to find what we're
working with here. Not too sure what this
is. Maybe QuickSel has provided one for us by default if you wanted to
look into that one. So just taking a quick look
at this opening it up to see if that is something
we were responsible for. This is definitely provided
by Quiksil as I said, other landscape materials can get much more complex than
what we're working with. But this will just
give you a bunch of different properties. So there material instance
is again, much more complex. Now is all of these different
properties that you can edit for real time feedback. Fino, I'll just close that one, keep things nice and simple. We're going to drop
this back down. We're going to go to our
MI underscore landscape, which is our SA.
Drag this back over. And the key takeaway here is that if I change the scaling, we'll get that instant
feedback as soon as I let go, we'll get immediate feedback on what this scaling
is looking like. Again, if we drop down, we can
see that's far too grainy, so we'd need more information. But as we change this, we can see we're getting less of that obvious tiling
as we go over. So with a combination of this, if we go back into
landscape mode, I'm not too sure why it lost the layer of information there. If yours does, just make
sure that you always have the correct layer of
information in the dropdown. And then in paint mode, we
can just paint this on. And again, this is
going to be useful, maybe to see a couple of the different layers
together as well, just so that we can get an
idea that as we're scaling it, whether this is working for all of the different layers too. I think at the moment
this is all looking fine, I think they're
going to be scaled in a fairly similar way when it comes to the texture
being provided. So it should work just
as well on all of them. Some of them look really
bad with the tiling, so the rocks are a really good example of where
we wouldn't want to use the standard one by
one for the U and the V, instead, we'll just make
this a little bit bigger. Yet, just a case
of playing around. That's a nice thing with
material instances, and that kind of
parameter that you can expose there does give us a
bunch of freedom like that. I'm just going to get
rid of that though. Paint back the normal
sand layer just here. Just make that
really big. We can get rid of everything in one go. And that gives us a
good starting point. As I said, we'll
come in. We'll do some layer painting and painting with the landscape a little bit later when we've
started set dressing with the meshes so that we know where things
are going to be going.
25. 23 - Water Plugin: The next thing to
give us an idea of the scale of the level, already the core focus
that I had in the concept. In fact, now's a good time to probably bring the
pure ref back, just oom into the one that
I'm thinking about most, which is going to
be the focal point of the concept
we're working with. Again, I'm just going to press Control Shift and A to make this stay above the other
layers on my screen. Control Shift and A
will disable that to allow you to click on and that will kind of
disappear into the background. But the main thing
is having this around so that I can keep in mind what we'll
be looking at. So the main other key point here is going to be the water. We can add the background from the assets we brought
in a little bit later. If we go back into
a selection mode, we want to use the
new water plug in, and this is actually a plug in, which isn't enabled by default, so we'll go to
edit and plug ins. We're going to search for water. We don't need the
extras, as it says here, just maps and things not
intended for shipping. Just some examples. What we do want is the
experimental feature, the water feature here, so
we'll just tick this on. Just get a message at
the moment telling us this is experimental,
perfectly fine, just for playing around
and seeing how it works, and getting a good kind of
initial test project going, so we'll say yes to that. And then when you add plug
ins through your project, you will need to
restart the project. So just hit restart, and this we'll load the
project back up for you. If you've made any changes, make sure that you say save
selected when this pops up. When the project load, you
probably just need to get rid of the plug in window here. And you will have
in current versions at least a message about some collision issue with the collision profile for the water. Perfectly fine.
It's not actually a error, which will
break anything. Just press this button here
and it's just going to add some information to the.in file that is already
in your project. That's perfectly fine.
We can clear and close. One other thing
you may have been met with if you've
closed the project up to this point and come back is you will be
in the wrong map. So this is a good
time to look at this. At the moment, I'm back
in the default map, which for this project, because it was from the goddess Temple was
the Roman cave. So what I want to do is just
go back to the Maps folder. We'll find the main
map that we created, double click to open this and we'll be back in the map
that we saved earlier. Now to avoid that
happening in the future, every time that we
open the project, we need to do the same thing. I'm just going to go to
the project settings. We'll go to maps and modes just here on
the left hand side. We'll just move this
out the way for now because we're not doing
anything artistic. In the default map section here, in the maps and modes,
we want to change this from Roman cave to Main. This just means every
time we load the editor, our main map that
we're working in will be the one which
is loaded by default. The game default map here
would be the same thing, but if you were to package
and build the project to give it to a friend or family or
put it up on HIO or whatever, this would be the
map that the player would see when they first
open your packaged game. In this case, we can leave that because we won't be
worrying about that. The main thing is for us, every time we come into the editor, we want this to be our main map. Back in the main map, we're just going to go back
over to this tab. We can start working
keeping this in mind on what we wanted
to create here. We've got half of the core
feature from this concept, which is the beach kind of
sand inside of the cave. We're going to get the cave
assets a little bit later. But now, we're just going
to use this quickly add to project button we
saw a little bit earlier. And again, remembering that we can just search for things here, I'm just going to
type the word water. We can see here, we've got loads of
different types of water, body of island, Lake,
ocean, river, and so on. The one that we're looking for obviously is going
to be the ocean. So we'll just click Ocean, and that will
create this for us. Now, for whatever reason, this has created this at
a really weird height. We can see with the
water selected. So anything here, if
you haven't already select this main darker
part of the water body, and that will let you
see the details and the details panel over here
about this, for some reason, it started -12,970 on the I'll just click into
this and press zero, so we'll zero that back out, and it's now the same
height as our terrain. If you're unsure on that, I'll just move this out the way. Just select the landscape, and we have the Z
axis over here. So this is the place in the world that the
landscape is placed. This is currently
zero, which means if we select the
water body ocean, we want this to be zero as
well. That's all that was. If we change the height of this can give some
interesting effects actually, which are
worth looking at. If we increase the
height of this, then we're going
to get some dips like a valley down here, and if we make this much lower, then we end up with a pyramid. That's all that was doing.
The other thing you can see, we're quite far over here,
so I might just place this cave somewhere
more in the middle. So I'm just going to move
this water volume over here. Using the widget there. What I've just
done is making use of the section in
between the two arrows, which means this
will move across the horizontal planes
and not the vertical. So it's not going to
move up and down. It's just going to move it
freely across the horizontal, which is x and y. Now, if you want to
be really particular, you could try and get rid
of this little crease here. You can see it's just
where it's trying to work out where to merge in
with the landscape. By just slightly moving
this up and down. Again, it's not too important. We're going to have
so many meshes and things overlapping this. That doesn't need to be perfect. And if you do try and
get that perfect, you may end up with issues where the water then doesn't
look quite as good. I'm actually going to leave
that exactly the same height as the landscape for night. So this gives us a good
idea of where we'd start building our meshes from here. We know that we
want to be looking out somewhat in this direction, so we're going to have
our cave front over here, which is why it's
just nice to have this lying around as
a point of reference. So I'm going to keep this
on my second screen just so it's not getting in the way for people
following along. Now, one other thing to
keep in mind is again, this might look quite small. But if we were to
come down here, we can see, for example, we've
got this different color, which is just like a sort
of background noise, so this is very low detail, much cheaper to render than this one specific block
that we have here. I might move this back
a little bit actually, just because we're not going
to see the back of the cave. And for that reason, we can get much more distance on how far we see the more
detailed bit here. The core thing to
remember is that this is actually really, really big. So another thing that
we're going to need a little bit later is if we add another item here from
the drop down and search for something
called a player style. With that selected, I'm just
going to press the end key, which will snap
that to the floor, and I'm going to
press F to focus in. So you have to
remember that this is roughly the size of a character that we're
going to be controlling. So our camera, when
we're moving around, would be roughly
around about here. So you're not going to see
that fire in the distance. And as I said, that landscape
is actually quite massive. So we're not going to make
use of most of the size here. We're going to be
building our cave, maybe about a quarter of the
size of the way around this. So do keep that in mind when
it comes to scaling things. This might be a good
point of reference just to get an idea of how big the character is
going to be when we press play, or what
we're building for. So when we zoom out, we can see that's a very small asset there. Another thing you might want
to do is bring in a cube or something because that's
not very easy to see. I'm going to press
the ad option, again, we're going to go to shapes, drag in a cylinder,
might be a bit better. We'll just drag this up here. I'm just going to
make this a little bit thinner and a bit taller, so it's about the same
size as our capsule. So if we select both of these, that's probably about
the right size, it doesn't need to be perfect, just to get a very
rough approximation, roughly 2 meters towards kind of what we're
looking for here. So when we're from a distance, we can see like that would be a person on the side of the
shore when we come down. So it just gives
us a good idea of the scale and scope of things
that we're working with. And since we've just added it, but I haven't really
mentioned what it's doing, just very quickly cover
the player start here. All of this is kind of
a spawn point for us. So if we were to press Plano, we will start directly
by that cylinder. So this is now our starting
point in the level. Previously, before we had this, we would have just been
spawning a random point. It was basically spawning
us when we press play from the point that the camera in the viewport was
currently placed. Just to prove that
that is happening if I move the cylinder
in front of us, so we've got a point of perspective here, and
I'll move this back. We press play, even if
I'm all the way out here, we'll press play,
and we'll start looking directly
at the cylinder. If we come in and
rotate this as well. So I'm just using
the shortcut keys, W E and R to switch between
move, rotate, and scale. So if we rotate
round, press play, we can see that
we're now looking in the same way that that
player start was rotated. That's all that's
responsible for. So getting back to our C
that we've just created, we can see that the waves here are possibly a
little bit extreme, at least for the ideas
of what I wanted to kind of get in
the camera views. So what I'm going
to do is select the water volume again,
the body of ocean. And then in the details
panel, we can scroll down, and we should find
something called the wave attenuation that we're just going to play
around this slider. We'll raise that all the way up. We can have a somewhat
charmer sy just so that when we do get to adding the cliffs and
things in the background, they're not going to be
quite so obscured by giant waves when our viewpoint
is all the way down here. Now, one thing that you
may remember that we did quite early on is we've
turned off the real time. You can see that every time I make a change to this value, it will try to render
the waves out. So if you wanted
to see that just in real time to make
it easier to update, just remember that was in
these settings up here. We're going to tick
on the real time, and that's essentially
what that was doing. So this is one of
those things where even if you're not in play mode, real time we'll try to have that rendering and stimulating, which can take a lot
more processing power. Quite useful for times like N where we may want
that to be here, so we can see exactly what
that's doing very quickly. We can then set this to be roughly what we'd
want the waves to be. And then when we're
happy with this, I'm just going to go back up and turn off real time again. Now, if you wanted, now that
we have the water here, this is quite a stylized look to the coloring and everything
they've given this. So if you wanted to come in
to change this information, we're just going to
go to the water body again and scroll all the way down in the
rendering section. We've got the water material. And if we double click on this, this will open up
a new tab for us. I'm just going to dock
this in the top window. In fact, this one might
be on those things, which is quite useful
to keep over here. And similar to what
we created earlier, this is just a
material instance, so we can change any of
the information here and get live feedback
over in the editor, which is quite useful
because we don't get a display image or
anything down here. So it's going to be
quit nice to have that live feedback
as we make changes. So we can change
information about the normal settings
on the water volume. Fluid simulation will be the movement and the foam and things like that, we
have control over. All I'm really looking
for at the moment are the vector parameters. So if we scroll down rather than just dropping
everything down, this will be controlling
the color for us. The absorption, we
can change here. And we can see how
turning that to orange completely changes the
effect that we see. We've got the foam scattering and things like that as well. So you have control over
all of these properties, and it's one of
those things that's worth just playing around with and getting familiar with the options that you
have available to you. Now, in this case, I
actually quite like the supertylized very sort of turquoise bright blue
look of that ocean. But we can come in
and play with this. Again. This might be
one of those things that you want to tweak
later in the project. When you have everything
put together, depending on how the
foliage is coming together, the look of the rocks
and everything, we may find that a brighter
or darker blue looks better in contrast with the the rocks and things
that we end up with. So I'm going to
leave that for now. I just wanted to let you know that there is an option
that you can play with, and if that immediately
just looked off to you, you can come in and
play with all of this information through the
material instance just here. One other thing to mention, I've just been reminded
looking at it there, because I've been playing
with this in another project, the test project I have going. The properties that you set
through this plug in in the materials will be saved
from one project to another. One thing I've had to increase
is the anastrophy here, and that is just
because the shadows sits off at a much
lower value, 0.1, and on bigger objects, it's going to be more
noticeable when we get to adding the rocks and
cave surfaces later, but you get some
very weird shading. I can try to recreate
the problem. So just to kind of
exaggerate the problem. This is what you
had without this, so you get two shadows. You get the smoother shadow
going under the water here. And with the lower anastrophy, you may have a shadow
appearing on top of the water, which if you do
find that in yours, just come in here
and you can see that as we increase this value here, that kind of fades away,
and we just get left of that nice smooth
underwater shadow. That's when my value,
I think was about 1.4, so just so you're aware of that. So just something to
play around with. Keep in mind that if you do
get we're shadowing, no, just come back into
this material instance and play around with
the anastrophy value. Again, we might see that
a little bit more later when we come to adding
the larger form assets, the rock faces, and
things like that.
26. 24 - Level Design Pt1: As it stands, our cylinder
is currently looking a little bit lonely on
this big empty island, staring out into the sea. To solve this, we
can begin adding those meshes and assets
to populate and just decorate the island that we
have here to make that cave outcrop and the final kind
of idea that we had in mind. So again, this is where the pure RF reference is
going to be useful. The next steps will
be trying to recreate this around where
our cylinder is. So we already have
the core part here, the shoreline brushing
up against the sand. The next thing is
to add what I would say is the main
visual point here, which are these rocks, that kind of cove covering or whatever
you want to call that. So I'll just move
this out the way so that I have all
of the screen, but that is on my
second monitor, and I'm just going to be using
that as a reference point to try and get something
looking somewhat similar. Fore starting, I'll just drop down the lighting section here. And as we're going
to start adding a bunch of different assets. I'll take a similar
approach that I did with the lighting assets. I'm going to shift
select each of these, so everything to do
with the landscape and the water body. I'll get rid of
the player start, so Control select to
deselect that one. Right click on one of these. We'll navigate down to
the Move two option. Move this to a folder, and
I'll just rename this one, so F two again will rename, and I'll call this
one landscape. Encompass the water as well. But just to keep things
easily searchable, and what you will find a little bit later
is we're going to have potentially hundreds of assets going through
our outliner, and it will become a little
bit more difficult to find individual things or
just filter through them. So to start adding
things. I'm going to go through the process of the general button prompts
that you want to use, some quick hints and tips, and then we'll put a bunch
of this into a kind of speed design type thing as it's going to become
somewhat repetitive. And once you know how
to do the basics, you'll be able to keep up and
then add your own ideas in. I'm just navigating through
the content browser here, going to find our
geometry selection, the assembly, which is I know the main assets that I want to work
with will be fine, just to let you know that you
can hold control and mouse will forward and backwards to change the size of
the icons here. If you wanted to get a
better look at what things are going to look like before dragging them
into the world, then you can make these
icons a little bit bigger. Now the way that I'm
going to approach this, I'm just going to drag the
core things I'm looking for at the moment are the
initial big rock faces. Remember what I've mentioned before is we want to try and use the minimum amount
of different assets, which is why we're
showing you how we can reuse these and have just one or two assets do the bulk of the
heavy lifting for. To make sure that we're getting something that
we can work with. I'm just going to have a
quick look through and find the ones which are
sticking out to me. Remember, we're looking for this kind of shape ideally here that we can merge some of the meshes together to
get these initial walls. I'm just going to
drag these into the world and see what
they're looking like. This is more of a
far away boulder, so we're going to
get rid of that one. And it's just a case
of bringing these in, see what they're
looking like, and if they're going to be usable. All of these at the
moment are more like floor surfaces and further
away out crops from the cliff. The ground, of course, is not going to be what
we're looking for. I know that these
are quite high, so these might make some interesting information
for the backdrop, so we'll keep in mind
that these exist. Inside of the hoodoo folder. Rock pillars, some
nice decoration there. And I think the cliffs and boulders might be what
we're looking for. So the boulders again, they look a little bit long and flat for what I
currently have in mind. But it's just a case of having
look through what we have available and picking
some of the best options. So I think maybe the
cliffs are going to be what we're
looking for initially. And there's a few
things that we'll need to look out for in a moment. So again, actually
this immediately is what I think I'll be using
for the backdrop, actually. Even though I said there was something in the Hodo folder. That is a really good shape in comparison to
what we have there. So if we imagine, we'd
put this out in the sea, and I'm just going to
go into scaling mode. So there are shortcut to
go into scaling mode, or we can change
between move, rotate, and scale up here and just
grab the center point here. So on this widget, you
have the different axes. You can scale this in
any single direction, but I want to keep this uniform, so I'm just going to
drag that middle block, and that will scale
everything uniformly and that would be this that we're creating kind
of in the backdrop. And then just moving
this into place. Trying to keep in mind, again, roughly the size
of the character, where this cave entrance
is going to be. And this is really the
process we'll be taking. So I'll leave that
there actually as a point of reference
and we can come back here and add this is more of a decoration thing
a little bit later, but just to get the idea
of what's going on. And I've just noticed there's a nice rock face
over here as well. So maybe something like this
one because it's quite flat, and that looks like it's
quite a straight edge. We could potentially
move this in. So it's not a case of being completely stingy with the
assets that we're using here. But what I was kind of getting across is in each
of these folders, there might be eight or
nine different assets, and we don't need to use
every single one of them. So from this folder,
I'll probably use these two for the backdrop, so just to get an idea
of how this would look. That this might be the entire
backdrop for the scene, and that's just using these
two assets from this folder. And then for the
cave, we might have one or two assets that
we use from this folder, and you can see
we're cutting down on the bulk of the
things we'll be using. I'm just going to press
the cylinder here, and press F to
zoom into this one just to get a a good point here. You can see ready that's coming together for the backdrop. We can maybe duplicate this out later to add these extra
points of interest up here, and we'll come in and get
some foliage going as well. Again, all of that comes down to decoration and that will
be a little bit later. What I want to do at
the moment is just get the general scene map tight. Inside of the cliffs folder, I really want to focus on
the cave at this point. I think we're really going to struggle to get something
that looks exactly like this, so it's going to be a bit of mixing and matching
different assets together. I'm just going to move
back because that is placing the asset
there in the water. So I'm just going to
use our cylinder here. It is going to be my
kind of return point. Every time I want to get
back into a rough area. I'm just going to
press the cylinder and press F to focus in just a quick way to
get back somewhere. And there we go. These
assets are now looking, in fact, that is pretty perfect. For this section.
Fire far too small, so it's going to scale that up again using the
middle option there. We can scale this up, maybe a little bit bigger,
and there we go. We've got something
which is looking like a pretty good cave
entrance there. And this is one of the
tips and tricks that I figured that we'd end up
using. I wanted to show you. So we could, if we wanted, just try to duplicate this. I'm going to hold lt
and drag the site, which will automatically duplicate the object
that you have, press E to go into
rotate mode and just rotate this
around the z axis. What we could potentially do. In this case, this
just being rotated around is perfectly
fine because one of the things I mentioned
previously is the nice thing about these asset
packs and using the full pack from the
marketplace rather than those individual
assets which only have one side of
the mesh showing. This does have most of the full 360 turnaround fully covered with a mesh,
which is really handy. There are some though.
I'll just trying to find one as an example
where this may not work. For example, this one, I
know is a bit of a problem. If we were to try and
do that with this, we have different parts which
are floating in the air, and you would see some of
this wouldn't be visible. In that case, what I
might be tempted to do is I'll just delete this
one as a quick example. I'll grab this one again, drag the site with the
ult key selected. And if we see the scaling dine here is currently 2.7 on the x, I'm just going to drop a
minus in front of this. And you see what
that does is it will invert the scaling
along the x axis, and we've essentially
just flipped this to get a nearly symmetrical asset into our levels. So you can see that matches
up really, really well. If you needed something
to look a little bit more symmetrical and reuse
an asset that way. This is actually quite useful something we'll be doing
later if we get to adding things like pathways and level pieces like
that into our scene. So just another quick
example of this. If we go down to the mega scans, I think it's under the
Icelandic sections. So the Icelandic cliff, for example, we have
this asset here, which is a nice straight path
or a nice straight asset, and I think maybe
it's the other one, so it's the second one. What we could do here is
if we just rotate this, I'm just lt and rotating, so the same as lt and
moving something, we'll duplicate the
asset. And you can see a quite line up because
the point down here is a little bit
higher than the point over here when we've rotated it. What we could instead
do is we could use that same option. So I'm
just going to move this out. Again, I'm just going to
scale this to minus one on the x just there and then if we rotate
this round instead, obviously, you can see the two points here are symmetrical, they line up
exactly, which means we just get something
a closer height. We can move these together
and we'd have a kind of a walkway or a path or a
floor that we could make. And of course, we're
going to have a seam that we'd cover with
different assets. You get something a little bit more snug and
symmetrical this way. Just a useful thing
here, and essentially what you want to think of,
just get rid of those, but what you want to
think of this as is a way to reuse the
assets where possible. This one asset could essentially quite
easily become four. If we drag this out and
move this over here, we have one asset
looking this way. If we just rotate this, have a second asset
because of course, from the player's perspective or the camera's perspective, this second side is
completely new to us. We haven't seen
that yet, so that would look like a second asset. Then if we drag this out again, maybe rotate this or just do
that flipping trick here. We'll just flip this to
minus two just there. At a glance. Obviously,
we know this is just a symmetrical
version of this asset, but at a glance, the
rocks are jutting out at a completely
different direction. When you're just playing
through, or you're just quickly looking at something with a camera pan through
or something. You probably won't
notice that these are the same two things just
facing the opposite way. This is another trick that
is often used in production. We're going to try
and make use of the same asset as many
times as possible. You've also got
the other options. Obviously, we've not seen
the sides of the asset yet, so we could use these in
different areas as well. And then just simple
things like scaling it, making something much smaller, turning it around,
flipping it symmetrically. It starts looking completely different to the one over here. So this is what
you'll see me doing when we go into that kind of speed design where I'm just
putting the assets together. I'm just going to pick one
or two different assets. I'm going to be
scaling them, rotating making them symmetrical by
flipping the scale over here. And that's essentially
what I'll be doing to create the entire cave. In this case, I think
actually, again, this is just trial and error
that I wanted to include. I think the first
way that I had this, when this wasn't symmetrical, I'm just going to set
this back to 2.75 and then just rotate this in so they're both
looking at each other. Again, we're essentially
seeing the front of the asset and the
back of the asset. But that is starting to create
that cave entrance for us. Just move this more
in place. And again, we're just going to keep
looking trying to get an idea Of how we can make
this look more closely resembling our
concept we have going here. So if this is our character, this is the kind of height
that we would be at, which is making me realize that maybe this is a
little bit too big. We'd want to move this
over to the sides again. I'm just going to
need get rid of this. But we'd want to move
this over to the side to try and keep that more
in line with the concept, where only a little bit of that cave is jutting
out from here, or I should say the cliff side, not the cave, where in the cave. Yeah, this is essentially
what I'll be doing. So I've got my concept
on the other monitor. I'm trying to get
something looking somewhat close to the
cave that I have there, just making use of these
assets duplicating, moving things around rotating, and so on that we've just seen. Quick pause in throwing
things together here. Just notice that we're now
going to be encountering something that if
you're new to level design or just getting started, you may have started
noticing that the approach I've
taken here has left. One of the things
that I was mentioned, we want to kind of
avoid these sections, where they're fine
from one side, they're going to be
obviously not looking as great from the other side.
So we will get to this. They're not all going to
be working perfectly. Some of the assets will only look good from one
side and so on. But we can still make
use of them in this way, so I've just made a very
rough approximation of the shape that I wanted
in the cave front here. So then the next step is what you'll be doing
for the most of this. And we've got the same
issue here, in fact, where if we were to have
the camera pan around from this side or if the
character was able to move around and
see this section, obviously, that's not
going to look great. So this is the next part
of what we'll be doing, and this is actually creating
the inside of our cave, and it's essentially taking
a very similar step, pulling out some more pieces. And with one thing
to mention with nanite and Lumen and everything that we
can leverage here, can get away with
pretty much as many of these pieces as we
need within reason, of course, especially
because these are all using instanced
static meshes. As I've said, they're
using some of that tech wizardry
in the background, which means we can have a
bunch of these rendering or costing much lower
on the draw cool. So we can just kind
of move these around. And what we're going
to want to do to finish the internal part of is duplicate these and
just be rotating them to create like a bit of
a wall and the ceiling. And what you'll find is that the issue points
that you can see up here, will start to be covered
by the rest of the meshes. As long as we have
these overlaps, it's surprising how
because there's just so much information in the rock faces
and everything, they merge together quite well. They actually look as though they are like an intended
mesh that we have here. So that's just something
that I figured people might start
wondering about as I was going
through that section or that part of the process, is that we had some
very obviously unpleasant geometry
sticking out here. So just to make sure that we don't see that in
camera renders, if we're doing a
sequence render, or if the player can
walk to this bit, if you have a player
moving around, we just want to cover those with the different meshes
that we can bring in here. Some things to be
aware of That's going to be the next
part is now just getting what the internal part of the cave might look like. This is going to be something
we'll have to make up. The concept obviously
only goes so far. But then this is the other
reason that it's useful to have these other
reference points. We might want to make
something like this, or we've got a long tunnel looking cave option that
we could have here, so something a
little bit smoother. Or like I said, the idea of a hidden garden looks really
cool or appeals to me. If we want to
choose the archways and the things like that that come with the goddess temple, then we have those
assets ready to But that could mean that the next step is just getting creative
at this point. So we've got a nice
starting point with that main reference. I think if I was to take an
initial sort of selling shot, something to grab
people's attention, it would be that
initial concept. When we get the foliage and some extra design work in here. That would be my
main screenshot. Then we want something
in the background, a cave that the camera
can pan around or we can walk around if we add
a playable character. We want that to look interesting
and pretty cool as well. Pausing the level
design again quickly. Just wanted to mention
what just happened there. I deleted a bunch of these because they were
starting to look a little bit too same when I pulled the camera out a
little bit further. One thing that after just playing around with what
I mentioned earlier, just dragging some of the
assets into the level to get an idea of what
they look like and if there's anything
that would fit better. A lot of these are quite
jagged and pointy, either jagged and
pointy or very flat, so more of a cliff face rather
than the inside of a cave. This one is really large, so I'll need to scale
this down potentially, but this has some nice
smooth surface here. I think that could work quite well as the core
part of the ceiling, and then also some information
on the other side. To act as the walls if we move
this around for the walls. Again, just thinking
of how we can use one or two core assets. At the moment, I think
all of this is just one asset flipped and rotated. We can add a second one here for some variation and then some
details in the background. Again, we're getting to like four or five different assets, and I could see that making up the bulk of the main
part of the cave, the backdrop, and
the main level. Just to mention is you're
going through as well. I just had the issue
there where the scaling, the snapping was
automatically enabled, and because this is
quite a large asset, we've got 0.25 snapping
increments for the scaling, ten degree increments
for the rotation, and ten unit value
movements for the moving. So when you're moving
something around, it's snapping sizes of ten. In this case, because this
is quite a large asset, going up and down in 0.25 increments was either
way too big or way too. What I've done is if you have
this little blue icon here, that means that
snapping is enabled. We just click that to turn it
off and you can see you get complete freedom over
the size of this asset. So I'm just going to rotate
this around a little bit. Scale that down, so it looks
a little bit different. Again, this is just a
symmetrized version of this one, just minus the scale it so that the other side
of this rock face, and it merges
together perfectly, and it's very difficult to
see it's the same thing, and just making it a
little bit smaller changes the level of detail that we're seeing between the
different assets. You can come down as well, move this below
the ground surface if you want to
hide some of this. But again, we're going to
be adding a bunch of meshes and detail a b in the
decoration phase. This doesn't need to be
perfect at this point. We're just trying to
get a level map tight. I might want to do
the same s thing, but maybe to this piece, maybe it's a bit
smaller on this side, on the other side of the cave. And I think just
was adding this in. At first, I had the idea
of a more rounded cave, but I think for some reason, this path stuck in mind, so I've started
making a longer path here. We'll see how that goes.
27. 25 - Level Design Pt2: Okay. So I'm getting
pretty happy with the results from the
inside of the cave here. You may have noticed I
spent a bit of time there. At the end. I've got the
general shape and the layout. I was going to cover
the entire roof, and then I saw this long kind of rock sticking out
completely accidental there, and I just figured
that from the bottom, that's quite a nice kind of
silhouette that you get. And I like idea of having
one section here when we get to the lighting and playing around with the environment
and everything like that. This will give quite a
nice potential to have some interesting shadows and a lighting effect
happening here. But the main thing I've
been doing is just looking around and
going into play mode, so we get the spectator
pawn where we can kind of fly around and get a view of what it would
look like in game, and just looking out
for areas like this. So it seems a bit more obvious
when you're in play mode, that's going to be very visible. So we want to try and
hide these sections here. So those bits where
it's one mesh, which was meant to be on the
floor and because they've used it as part of a wall,
it kind of sticks out. So where we can. And I don't think I can
on this one because it's the main part
of the cave wall. I've just been trying
to hide those. So a lot of the
time, I've just been able to push them kind of back in like this to another part of the
wall and hide them. But this will probably just get a small kind of rock face
or something a bit later. We could look for
that now, in fact. So I'll show the
approach for this. So we're just going to look for something of a similar color, similar shape, but just smaller. So maybe the rocks rather than the big cliff
faces and everything, so they're going
to be too small. But we have so many different
assets to work with. We'll definitely be able to find something just want to hide
the obvious things like that. The things which would be closer to the camera or the player. We just want to make sure that we can do
something to hide that. In fact, I think something like that could
look pretty good. It's just a little bit too big and takes to hide
it properly there. We take up a lot of
space in the entrance. We could always do
that. There we go. I think that looks
pretty cool actually. So it gives a little bit more of a form and shape over
here to the entrance. We're going to paint a
bunch of moss and foliage around here anyway
to make it look a little bit more
interesting later. It's just a case of
trying to get this in a decent place here
where it covers it, but it's not taking
up too much room. It just gives slightly more unique looking form
to the entrance here. So like I said, it
doesn't need to be one to one with
the concept here. These were just
purely for ideas. I mean, there are some rock
formations over here anyway, so kind of approximating
what we have going on here. Then we've got
this outcrop here, which could be the
outcrop we have here. So sites look fairly similar, just kind of accidentally there whilst trying to hide things, and we're going to paint
things on to merge these in. The main thing is just
trying to get rid of those really obvious
sort of geometry issues. I remember there was one over
here, I think is that bit. Is there a way that we
can just move this back? Is just the same thing again, because this was meant to
be flush with the floor, but we've rotated it to use
this more for the ceiling. We can see quite evidently that there's
an invisible bit there. And because this is where the cave ceiling
is ending anyway, I'm going to want some different
light shafts and we can get some god rays or something
cool coming in here. So few gaps here won't be the end of the
world, same on this side. The other gaps I
was trying to fill, you may have noticed. I just added a few
extra pieces over here. And again, you're not going to see all of this
from the outside, so this is perfectly fine. But I just wanted
to make sure that I think we'll try and keep this
part of the cave dark so we can get some dark lighting
going on if that makes sense to get some really nice
shadowy effects and things. And then we're going to keep this side a little bit brighter. So for that reason, I
want to make sure there's no holes and we're going to
patch everything up here. And then just also playing
around every now and again. Just trying to keep
in mind again, the concept is very useful
here so that we can see roughly how big
we're going to want these cliff faces in
the background to be. And the lighting,
we're going to ignore this for now, it looks terrible. We will get around to
fixing all of this and really improving the
lighting quality, the colors, and everything
that we have going. But at the moment we just want that general shape and form. I think we're getting
close. We've got a nice big cliff on either side. If we look out, we can
imagine some rocks and painting some of the
foliage on the floor and stuff to get
the extra detail, that noise, which is
added to a scene to make it look more organic
and believable, we're going to paint
all of these rocks in and everything rather
than placing them by hand. So at the moment, we're just looking for
that form and shape. So that's what I'd focus on now. It's just getting a level that
you can either set up for a good camera shot
or for the player to run around if we wanted
players and things like that. But just to get the general form and the layout at the moment. Now, though I say that we're going to ignore the lighting, one thing that is kind of hard, and I think this is because
of the auto exposure is trying to correct the way that the light is
being picked up. Making this look much
worse than it should, which can be just harder
to flash things out when you also have to
kind of ignore how bad the general lighting
is at the moment. If we go to project settings, I'm going to go
into the search bar and look for exposure. We've got this option
here, Auto exposure bias, and I think this is
what's causing the issue. It's trying to somewhat simulate what happens
when your eyes go from being closed or in a
completely dark room for a while to having that
immediate flash of light, and it's okay, but it doesn't
always work very well. And you end up with
this washed out. Ideally, what we would want is something that will
always look the same That regardless of where
we're moving around. So just going to try and
get that to be correct. In fact, rather than turning off the bias, I think that
was wrong thing there. We're just going to untick the auto exposure. There we go. So now the idea is
that it's not going to be constantly trying to correct
and update the lighting, which just gives us
when we press play, all of that is kind
of worked out anyway. So it gives us a better.
It's not perfect, but it gives us a better
idea of what we would be working with when
we're rendering something out or in play mode. So that would just
be a little bit easier to work with as
well and the inside of the cave is now looking darker and more gloomy as
we kind of wanted. And if you are new to
software in general, doesn't really matter which
application you're using. I should have
mentioned, press save. Control S, press that often to keep the work and progress that you've made
so far. I've been lucky. I haven't had any crashes, but I think I've only remembered
saving once or twice. Definitely something
that at this point. You want to make almost a nervous twitch where
it just keeps happening because you will probably have the editor give up
on you at some point, and you don't want
to lose all of the level design work
that you've been doing. Just another quick
word for me here. So this turned out being a
little bit different than I expected different
than the processes taking a lot of the
rest of the cave. So I just wanted to mention
my thought process here. I remembered that
we had some kind of flat cliff face type assets. I just quickly looked for those, partly because I was
thinking that again, while we're in the level
build, the viewport here, it looks like quite
a small space, but remember that the camera that we're playing
through or recording a sequence animation th will
be more at this area here. If we did a full turn round, it would look
actually quite big, especially if you wanted a character to walk through this. It's going to be quite
a lot of traversal, and also means that
it's a lot more for us to flesh out and
add that detail. And I really hate that process. Adding all of the fine detail, the rocks and things
that will add on the floor, I'll
definitely be doing that. But I'm just thinking
that I can cut this down. If I add some really
big walls here. This takes up another big
chunk of visual information. A nice big bit of space. It has taken up now
separating this off. It gives us more of a kind of different lighting
opportunity. Keep everything dark
in the first half. And then all we need to
worry about is doing something interesting
with the second part of the cave here. So I think I'm
going to keep this. I just wanted to mention
why this appeared. It wasn't part of
the original idea, but I think that that's taking up a nice
chunk of space now, and I'm going to look
for another way to take up a big chunk
of space out here, just that I have to do less of the foliage painting and the fine detail and
stuff like that. I think it's a nice divider for what is quite a
large cave space, and it's going to, again, forward thinking a little bit, open up the opportunities for different interesting types
of lighting, god rays, all of that will
now be much more possible and easy
to make look quite impressive just
because of all of the different angles and shapes that it has to bounce
off of and traverse through. I'm just going to finish this
off at the moment, again, just getting that core shape, making everything
look somewhat tidy, but it doesn't need
to be perfect. I'm just trying to make
sure we don't have any of these really big gaps here because you can see like underneath this rock face here. I'm just going to make sure this is flushed with the floor whilst also not leaving
a big gap the ceiling. And we could even looking
at this now, actually, we could even make use of
another of the water features, so we've already used the ocean. We could add a small river or I think maybe lake, I can't
remember what they're called. If we use the adoption,
we'll search for water, and we have the river is just going to be
the long stream, obviously, as a river would be. So what we want is the lake, and we can place that
somewhere around here. Again, I'm just thinking that
this would be another way. We don't need to paint all
of the information in here. This is way too big, but that's fine. We can pull this back. It doesn't need to take up. We don't need to
actually be able to access or see the back here. In fact, that's kind
of what I want to avoid is seeing the
whole back side of this. We could have a
little pool of lake, which is just built up here, thinking of a back
story for my cave. And if That's actually looking okay. I'm thinking we could have
this blocked off as well. But either, again,
always thinking both gameplay and rendering sequences and things like that. We could have a cinematic sequence where
something happens, and maybe Indiana Jones style, boulder or a large part
of rock that would be covering this is actually a
doorway and animate site. So just thinking of ways that we could hide this
off to begin with, because I think it'd be
quite interesting if we have a big rock door or something rather than having a passageway
there to begin with. That would make the
entire cave here dark. We'd need to do some
lighting to make the internal lighting look
pretty interesting here. We could have a sequence
with the cinematic or if you're playing with a
character walking through, you could have them
pick something up, and then that
doorway would open, letting in a big shaft
of light in here, opening up a completely
different looking area in the background over here. So I think that's actually going to be quite an interesting idea. Just want to make sure the water isn't taking up too much space. And one thing with the water
volume here, what we can do. We have this spline,
so you can see this fairly thin white line. If we grab one of these
notches, it has a few notches. Along the spline point, so this is what's making
up that shape. If we press lt, so again, just duplicating something t and drag the widget to make
another spline point. We can see we've now
got four of them, and we can move these around to control the shape of where
the water is interacting. So we could even give this like a bit of a curve so it doesn't
go all the way around. And you can add as many of
these splines as you want. I'm going to lt and drag again. Move this one, the
original one back over. So I still want it to take
up a fair amount of space, but we can just give
it maybe a bit more of an interesting shape like so. Again, nothing is set
in the ways here. We're just playing around,
seeing what works. The thing to be
aware of you've got these long purple wires. We can grab one of these. This is controlling the
intensity of that curve, so we can make this
sharper and we can give it a little bit of
rotation and round that off. So if we wanted to change
the shape as well as just changing the location of this, we have full
control there. And already, that
looks a little bit more interesting
rather than just being a completely flat
shoreline for the lake. I don't know if you have
shorelines in the lake. There's probably a
proper term for that, but that's just looking a little bit more
interesting to me. I'm just going to drag
this back out as well, just so we've got a nice
curve going both ways. And then it's going
to be, I think, just a round this off, so we're just going to
do that initial pass. I'm not going to be inside of
the rocks from I'm talking. We want that initial pass to get the silhouettes essentially is what
we're looking for here. If we go into unlit
mode or shadow mode, or whatever would work, the idea is just getting
those core shapes, something and it looks
interesting without all of the detail and the
foliage that we'll be painting in a
little bit later, and just thinking like
the story that you'd tell through a cinematic
or through gameplay. See what's happening. So this is really what we're trying
to do at the moment. We don't need anything to be looking super polished
at this point. Just want this to
be the main parts of our level will be in place. We can add
to them as we go. But this is definitely
look much more interesting in coming together compared to what
we had previously. Even if we didn't
add the passageway, if we had a render from here, for example, it's not very
visible of the water. As I said again,
I think I've made this maybe hit a
little bit too big. It's quite a big distance
to travel there. But it's quite nice to look
from the other side of the cave and you have
interesting archway. And then you can see
that whilst you're all covered in here,
there's clearly, like an open space above you in the other side of the cave.
So yeah, I'm liking that. And similar to what we
did with the seawater, the waves here a
little bit extreme, so I'm just going to search for wave with the water
selected here. Put this back into real time. And just drop the stone. So as the other way
is that you want to turn the
attenuation down here, I'll turn it up to make
the waves less extreme, especially for a lake
or something sort of an internal pool here might not be given quite
as much motion. So I'll just make that look
good. I'm happy of that. If we right click from
here onto the floor, we can select play
from here just so we don't need to fly
through the whole cave. If you wanted to test
a certain section. I definitely wish I'd
made this smaller. We could probably change that. I think I think the inside of the cave here is
probably about right. When we start filling this out with rocks and other detail, it's just the fact
we would need to do full fly through for a cinematic
to see the whole thing or have the character
have a character which is sable to walk
around and interact with things. That's
fine, though. Just gives us plenty of
space and room to play around with and make look
as interesting as possible. One final thing, I think
that add before wrapping up. I don't know. I've not looked at this reference for a while. But I think maybe in
the back of my mind, this was still playing a part here where
we've got this lake of water and something kind of sat in the middle of it.
I might add that as well. We don't have any folige yet, but we can obtain that. We just need the platform for
and something to work with. The one problem with
the water body, just to be aware of is that if you go into landscape mode, so if we select the landscape, what might be tempting
is to come in and paint like a platform
to raise through here. Unfortunately, we can't
paint through the water. This is doing something
quite clever to cut away automatically at the landscape to allow this water
body to exist. But it does mean
for that reason, you can see there's
this boundary, where if we sculpt
on the landscape, it doesn't affect anything within a certain range of
the water, which is fine. But it's just to say
that you wouldn't be able to paint
that directly on. So what we would do
instead is we're going to find some ground assets, maybe something that was
quite around platform. Now we could go for
something like that, and you're not going to see a
whole bunch of this anyway. So Doesn't need to be super
accurate obviously. Why is there grass and mud
inside of this sandy cave? We're not going to ask,
and we're not going to see this from any sort of
close up vantage point. But this could just be a
nice point of interest here. Then we'd surround this with
things like some rocks, obviously says this
isn't floating, a nice rock formation there. Although maybe
that is a bit big. In this part of the cave, perhaps we don't have
quite enough space. So again, we can just very
easily tweak things here, grab all of these walls. The one thing that
came to mind is the first section of cave
felt a little bit big. It felt like quite
a long distance to see what was
happening back here. So, but then this bit
was feeling a bit small, so we could grab our water body, we could bring that forward, and then that means that this will have much more
space and can be bigger, and we can make this more
of a focal point here. So it's just trial in now, see what's working
well, and there we go. That's actually more
of what I had in mind. So if we were to look out here, that's a pretty cool view, we can turn around and you
can see there's something else going on straightway
over here in the background. So I think that would
look pretticol. And this is really the process. Just travel and no,
see what's working, use some references
where possible. And yeah, play around with the results
until you're happy. The final stages here really just going to
be grounding this, so finding some
rocks or something, and maybe feel free to play around that might not
even be the best option. So I'm just going to drag in a few of these
pieces to see if we have a better option for the ground piece to work with. They all look pretty
much the same. Remember we've got scre as well. I don't know if screw
would look any better. Again, we're probably not going to put the camera
directly on here, or if we have a character, I wouldn't allow them
to walk on here either. So this, I think would
be perfectly fine. From a distance, we're going to paint a bunch of
foliage on here. Some more tropical plants or something are coming to mind, and maybe some palm trees
or something like that. So you're not going to see a whole lot of the
ground anyway. It's just going to be
a nice focal point. All we really want to do
is we're going to find some rocks and see how we hide. I keep forgetting
that the rocks are just ground pieces.
Do we have any? No, so this is really just
ground surface stuff. Want something partly flat. Maybe boulders would be
quite useful here actually, and we can drag these
into the water. It looks as though
this is just like a nice outcrop from
the water down here. We'll just make
this big enough to make sure you can clearly see its part is connected
to the ground down here. We can find some
different top pieces to merge this in better. But at least we've got some
rocks underneath to give the idea that this is not just floating randomly in space. Give this a slightly
different rotation. I think that was pretty
good how it was. Yeah, if you Do look
through the water. You can see. It looks ash it's actually part
of the ground at least. I'm just going to grab both
of these shift select. Press rotate, so ea rotate
mode t and rotate this around, and then we'll get both
of these duplicated. And I can just stick
these behind as well. So we've got something
popping up from behind. Again, you definitely
won't see this bit, so not super important. But just a passing glance it doesn't look as though it's
just randomly floating. And we can see if there are any other pieces which
would work well. The other side, but
I think I might just just going to make use of that one
piece and just keep rotating and flipping and
scaling it around because we need some edge pieces
as well, like so. We can actually make this lower. Again, some of this not being completely flush
isn't a problem. The main thing is we're
just trying to hide the fact that
otherwise this will be a floating platform and
we want to give away the idea that it's a raised
shelf for some reason. I think actually
this is too high, and we're not going to
see that side anyway. And what I would
do is I maybe get some other rock surfaces
or something just to somewhat hide that because there may be a point that we can see that one sticking out a bit at the end, so
we'll get some screw. I think that's all going
to look equally bad. Maybe we do want to
make use of this rock. Maybe this one could just do with being inverted
on the scale. I'm going to go to the details and we'll scale
this by minus one, or just put a minus in
front of that top that and get a symmetrical
symmetrical shape there, rotate that round, just trying this from different
directions, really. I think we're learning that
one is not going to work. Maybe we will make
use of this one just because I can
see there we go. So that actually stick
site just the right mind, whilst also showing
that we've got this rock information
going on underneath. That's pretty good. Can
even rotate that bit. We're not going to
see from this side. The bit I'm most concerned with here is we're going
to have this bit just this edge and actually another edge over
here where you can see, it's kind of there
isn't anything there. So I might look for
some smaller rocks. So maybe we will make use of one of these There you
go with these combined. It's not obvious anymore that there's any
clear gap there. Then just double
check if there's any way that we'd see the
problem on this side. But we'll need to
move this out just a bit very difficult to get
this one side lined up. Then just find another rock or something to merge in over here. Definitely not going
to see this back side. Although just in case, it won't hurt just to
grab another of these, rotate it round, scale it down. Just making sure that we
don't see inside the water at least will save
any issues here. Bring that back up. In fact, I'm just going to grab this
rock because we've got the same sort of issue over
here. Just to hide this. We can rotate it a bit, move it. Then it just looks like we have everything covered and
a proper platform, which is going to have some nice information
painted on it anyway. Just wrapping that up now from something which I wasn't
expecting to add in. If we had a camera or the player was immediately looking here, that's not quite able
to see straight thug. We could potentially
move these around. Also remembering, we've got the same parts on
the other side. We want to grab these as well, and then move this to the side, just seeing if
there's any kind of good shot where you'd
see a little bit of everything if
we wanted to show that off like a quick
render or something. There you go, so that
could look quite cool. Also, I still I'm not great with level design and
the artistic eye. So I definitely have that issue where I go for symmetry
quite naturally. I put that walkway
directly in the middle, which is quite
uncanny and weird. That probably looks a bit
more believable as well. You've got your cave
entrance here and another random outcropping
wouldn't necessarily be directly in the middle of the cave or directly
in front of you. Somewhere over here
would look quite cool. Then we'd see the palm
trees and the foliage and some light shafts coming down here when we get to
the polished stage. I think That is now
looking pretty impressive. I'll leave that as
my initial outline and the initial design. We can come back and tweak
things if you wanted to. But I think this will be
a good starting point, and we can start
adding those points of detail and
information to really polish this up and make it look much more interesting,
organic, and believable.
28. 26 - Landscape Paint: Our next focus, we'll be taking another quick look at the
landscape painting tool. Again, we're not going to
dive it deep into this. I just wanted to
add some detail, essentially around some of the shorelines and just
to provide a little bit of variation between
the types of sand and potentially pebbles that
we have on the landscape. We're not going to
see much of it, so we're not going to
spend much time. I just wanted to really show off the features
a little bit more to let you know what you
can do with some of the different
landscape or tyranals. Before that, I just
wanted to mention that between the recordings, I was playing around
with a little bit of the visuals just to
see if I could get things looking or feeling
a little bit better. And I just wanted to cover a few of the things that
I've done offscreen. Very, very minor changes, but I just wanted
to mention them. One thing that came to mind, I couldn't quite pinpoint why I didn't like some
of the general shapes and designs going on. I realized that we
had a lot of flat, solid quick stops between
the wall and the ground. Whilst I think this in a
lot of places like here, you can say I've still left
this is perfectly fine. What I've ended up
doing is I find some of the areas which looked
the worse to me, and I've just added some different static
meshes down here. You can see down here, I
have a piece of screen. I just went into
the content drawer inside of the geometry, the assembly Remember we had the screen folder here and
just use several of these. A couple of these, in
fact, drag these in, rotate them around to fit, and all these really seem to do is they are mounds of rocks, rubble and different
rock shapes, but they provide a more
organic natural looking ease from what would be a flat
wall into the ground. In places like this, it would just ease that d. I
don't think we want this everywhere because then
it's going to look like the entire cave
is falling apart. Which is why I think a few of these flat surfaces into the
ground more than acceptable. But in some places like
these harder corners here, you can see that I've just
added that in it also merges between when you've got two
very different surfaces, this flat rock face and then this more rugged
worn away wall, it just makes that look a
little bit more combined. I think that was one thing
that just stood out to me. Then whilst I was
doing that, I did notice if you've taken a
similar approach to me. All of the cables that
I had around here were flush with the terrain when it was just
one flat terrain. When we added the
water, remember that gets the terrain will
then be knocked down. Some of the caves are actually quite visibly like
this one, for example, was quite visibly
floating somewhat above, and if you look
through the water, you could see that
it's just hovering. I have moved some of
these down and then in a similar way for
the same reason, I've added some more screw
around these edges as well. So just a very
similar approach of just rounding out
some of the edges. That's really all I've
done completely optional. Just wanted to mention more from a design or the artistic
side of things, just a few very small
tweaks I've made, if you noticed that things were different between recordings. Other than that, the level
remains entirely the same. No new features or
anything added, just wanted to recap. So moving back on to
the landscape painting, we have all of our material
and everything set up for us very much
forward thinking early on, and also because we needed
at the least a kind of sandy texture that we could just apply
across everything. But we can now make use of those different layers
that we've added. One of the things I want
to do is make the sand closer to the shore
a darker color and then add those pebbles. So we're going to go
into our landscape mode. Move on over to the paint tab. And then remember
inside of here, all we want to do is just grab
the different layers that we're going to work with and paint those onto our surface. I'm just going to make sure
that we're selected on layer, which is our terrain, water
is obviously the water layer. And then we just want to paint this with a much
smaller brush size, so just test this out quickly. We can have a much
bigger fall loft here. So again, the inner ring, remember is where you have the strongest effect
painted onto the train. And then as you get
towards the outer ring, everything will be smoother, a little bit more
faded between those, so it'll add a
nice natural blur, then we're just going to
paint these details on. So what I think I'll do
is, I'll come over here. We're going to paint
mostly on this side, and I'm just going to start with our layer two information, which is our darker
rippled sand. I'll just paint some
layers down here. We can paint somewhat
around here. We don't need to get
all of the way around. We're not going to
see a lot of this. I think some of this might
not be quite soft enough, so I'll add a little bit
more brush faller and then just paint back in here
to try and smooth this side. That's another thing we
can add some noise in between these if
we want to so play around with some of
these different options. So we can try and
smooth between these. I don't want it to be a really obvious hard break
between those lines. I think that's working
pretty well there. As we get further
out, and again, we're really not going to see
much of this information. But I just want it to look a though we've got
some shingle that pebble going on at the
front of the beach here. We're just going to
grab this layer. I'm just checking this quickly before going ahead. I
think that's looking okay. Again, very nice, smooth, natural transition. I
really do like that. I'm just going to go
back to the front as I said, we want this
pebble information, which we're not going
to see a whole lot of, but I think it'll make
things a little bit darker and we'll have
some nice detail there. Making sure that you're
not still in smooth mode. If you did change, we need
to go back into paint. Make sure you have the
correct layer selected, and then we can just paint down here in the sea and again, you're not going to see a whole
lot of this. So we can be Somewhat rough and
careless with all of this. We're not going to see
a whole lot of detail. It's just that when we do
look out to the sides, we want to make sure there's
some information there. And again, we're not
going to see very, very deep past this
kind of coastal line, but just to show that it doesn't
just magically disppear, we'll paint down here as well. And we do have a little
bit of a hard edge here, so we're just going to smooth
some of this out as well. We can also improve this
with a little bit of the static some form of screen
or rock static measure, I think I remember
seeing before. So just something
I'm going to do. Again, this is that
I think as you here, you can see it gives
it a nice gradient, if you were to come in
a little bit closer. Obviously, this is
what we'd be looking at is actual rocks and pebbles, that shingle that you get
closer to some shorelines. If you wanted to bring
that a little bit closer, again, you definitely
could, again, just remember, you may
want to smooth things off, so it's not too obvious. Sometimes as well, it may not be as perfectly straight
as I've got there, so it may be that it's been
washed up in certain areas. You can really play around with the designs
that you wanted. I think when you do
that, it just starts looking all that
much more natural. So going to turn
the tool strength down actually and just move
the site a little bit, so I've started liking
the look of that up here. And that's the kind of
look that I'm going for. So I'm just going to hop on over to this side of the cave, and we can probably do something very
similar around here. So we can paint in some of
the harder detail here. Again, we can go in quite rough, get the foll strength
to begin with, and then we can tone
this down and tweak things around as we go. So that nice kind of iterative
trial and error process. Yeah, give that go again. We're going to keep the tool
strength a little bit lower, and then we can just
smooth some of this out. In fact, before smoothing, I'm going to go back into paint mode and we will lower the strength and because we're working in quite a small zone, just going to lower the
size of the brush as well. Just remember to paint some of this rougher sand closer to where we've got some
of the water over here, we've got some of damp looking sand essentially
is what we're going for. We're painting
this dine in here. You get some nice
shadowing, you get some nice different variation
and stuff like that. You really won't see a whole
lot of this from a distance, but it just adds those
different layers of detail. And some of that to
me is just looking. I think that's come a
little bit too far, so I'm just going
to brush further than I want on purpose here, just that I can kind
of smooth it back with a lower tool strength and add some not perfectly straight
lines all of the time. We don't want it to
be completely wavy. But again, we've got a nice
curve to the shoreline here. I'm going to keep calling
whatever that is a shoreline. And then we can kind
of emphasize that with how we smooth these
back out and paint them in. So from a distance, you
really won't see very much. When you're down here, you
might notice a bit more. But the main thing is if
we saw anything down here, we just want to make
sure that things like these pebbles are going to be
a little bit more visible, and we've got some
nice detail here. Again, we can add new
static meshes and things. To really flesh this
out if you wanted. I guess it makes more
sense to have this painted closer to where
all of the rocks are. Again, we're just insinuating
really that kind of pebbled information
is going to be closer to different parts of where
those rock formations are. It's still all
looking quite flat. We're going to get
to this very soon, playing around the lighting
and tidying things up. But I just wanted to
cover some of that. If you wanted to, I guess, maybe certain areas
in here would benefit from a little
bit of rippled sand, so we can bring in
the tool strength, and we can just again just
insinuate that some areas are get maybe a little bit damp around the corners of the edges. Let's move this back out so it's not so clearly really strong. In the because you will get essentially what
we're avoiding, when I say, not too strong
and smoothing things out, is we want to somewhat avoid a really obvious
circular kind of brush stroke going on in these
areas that we're painting. So we're just going
to come back in and smooth between
the different layers. So it will just
look a little bit more natural and organic. That's the great thing
about this process. Is very much, you can kind
of add as much as you want, and it's very very simple
to then take it away if you realize that
you've overdone things or you want to just
completely remove it. Just go back to your other layer and you
just paint over it. So you can't really go
wrong and mess things up. It's just a case of a
little bit of trial and error and playing around until you get the look that
you're happy with. I think with this side,
I'm going to purposely not paint too much of this in
the darker rippled sand. We're getting a lot
of sunlight here, so we're going to assume that the sand here would
probably dry up faster. Maybe it's only where we've got some movement around
the shoreline here. We might see that. Inside,
a little bit darker, makes it look nice and
damp in some areas, a little bit colder in here. And again, I think that's
just looking pretty cool. So I'll leave that there as
far as it goes for painting. You can take this as
far as you wanted. If you had a lot more ideas that you wanted to do with this, if you've got extra layers, feel free to spend that time and really make the
level your own. But for me, I just
wanted to again, really show off what
the tools can do and the options and the ways
that you might use this. Flesh out some of the design of what we
already have going.
29. 27 - Foliage: We can now begin adding
some of the detail to the inside of our cave or the level that
you're working on. Myself this will include
adding things like the rocks down
here on the floor, some of the moss over these rocky areas
that we already have, and then the climbers and
things like that here. We'll also be
painting the detail onto the caves in
the background, as well as the back of
the cave over here. We'll have some foliage
and just again, adding things in for
that variation in color. Just a couple of
things I wanted to mention before getting
started on this. So that I didn't need to
go through the process. We've seen this a few times
and I working with Bridge. I already have a few new
plant assets in here. You don't need to use
all of the same things, but I just wanted to
mention that I have included some things like
the IV for the creepers. So we've got creeper IV here. I'll likely be making use of
some of this a bit later. Then also, I'll be painting
in the rocks on the ground, making sure that
you've got some rocks, climber IV and things like that. It's just a case of
going to bridge. We can go to three D plants, and then just searching for
the things that you want. I also have some
aquatic plants as well. I think I got something
from the tropical pack, so you can see have these
the Tundra tornado. If we just click on these, we can see where they come
from the Tundra pack. So you may see me using
some of these assets, as well as things like
the different types of creepers and climbers. I'll just see which ones work
better as we go through. Then of course, the ferns
looked pretty good as well, which I'll be using
inside of the cave. Just to mention that you may
want to get some of those ready to go very simple process. Just wanted to mention
that between recordings, I have installed some of
those in the background. We diving in. Again, this will be mostly just
a speed design. I'll go through the steps and processes that I think
are most important. But I'll run you
through the very basics of working with
the foliage tool. It's actually really simple. I'm just going to go outside of the cave so that we have
a lot of space to work with just so that I have a piece of ground to demonstrate
a few things. To begin working with and
get into foliage mode, we just want to go up to
the selection mode tab, the drop down we've used
before to get to landscape, and this time, we're just
going to go to foliage. To get started here, we want
to go to our content drawer. I'm going to begin
with the rock, just because at the
moment, I think the inside of the cave
is just looking very empty and probably
the part which is just looking to me the
worst at the moment. So I'm going to go to
three D assets instead. I'll drop this down for
night to give some space. I'm just going to use the
filter tool just here just so that we see
only the static meshes, and we don't need
to go through the folders then in order. So if we drop this down, we'll go to filter
static meshes only, and you can see here, this just lines up all of the meshes that we have inside of
the three D assets. Want to pick a few of these
that I like the look of, and what we need to do to
get these foliage ready. We're just going to
drag the assets that we like over into this
section just here. If I find a few rounded, just to bring in the
reference again, we're looking for these smaller smoother kind rounded rocks. I think we have a few here
from the Nordic Bach. These will work perfectly fine. We can change the
scaling, we can randomize things like that.
We'll see this in a moment. And I think I'll we'll ignore
the jaggedy ones for now, and we'll start with shift selecting just a few
of these rounded ones, and this one down here
looks pretty cool as well. Going to need to move the
content draw down a bit. Then, as I've said,
we're just going to select and drag these
into the foliage section. With that done, you can see
these are all ticked on. We have a brush in
here, similar to the painting tool based on the brush size and the density, and we can just start
painting these on the floor. And that's really what we're
doing with the foliage tool. We're just painting this
like we have previously. Have similar shortcuts where
if we press shift and click. Instead of painting,
we will start raising, so you can very easily erase the things
that you have here. And you can see that as we
paint things in or raise them, we're getting a tally in the left hand side of how many of these assets
are being used. Now, foliage is quite
cheap to render, but we don't want
to go over the top, so we will try to cut this down and not use too
many where possible. We don't want to go over kill with the foliage
that we'll be having. We have a lot of these
at the moment because the paint density is quite high. What we could do is we
could lower this dine. I'm just going to erase these, and then I'll paint
in here and you can see sources with a
lower paint density, and then I'll paint over here
after lowering that again, and you can see the difference
that this is making. We're getting a lot fewer of these rocks being painted in. That's really what
we're going to be doing. It's just playing around
to these different values similar with the
landscape painting, the material painting just
until we get this right. I'm just going to
bring this back up and erase these out again. That was just a
quick demonstration. A few other things that
will be useful to know, and then you can pretty
much just go wild and play a round of this
and it's really just a tri and an
error type thing. If you select all
of these rocks. If we have a selection of these
grabbed at the same time, I'm just shift selecting those. We can do things
like we can change the maximum and
minimum x scaling, which is basically
going to give us a uniform scale over the
meshes being placed in. If we make some really small as a minimum and then maybe
really large as a maximum, just as a demonstration, this may not actually look very good. So we'll make the smaller
size we'll get a 0.25, and the largest will be two. We can paint these in,
we can come down here, and we can see we've got
some really tiny rocks and then some much larger rocks. That does actually
look pretty good. Again, if we maybe make that less dense, so we'll
just erase this. We now have that
random scattering. They rotate randomly, they
are being scaled randomly, and it just looks a little
bit more natural than what we would get if we
were placing this by hand. That's really what
I'm going to do inside the cave
with these rocks. Just to give it some
visual information, look a little bit more
organic and natural. It'll be a very
similar process when we get to the plants
and things as well. Just to show you that process, if we come back into
the content drawer, go to the three D plants. I'm not going to keep these, I'm not too worried
which ones I pick. I'm just going to select
these three down here, and we'll drag this back into the foliage section as well. And what you can do with
the rocks still selected, we'll just untick these, and then we'll just double check that the plants are ticked. So basically, we're
only going to paint things which
have been ticked here. So if we now wanted to paint just this one plant,
this one here, we can untick the other two, and we're now just going to get just that variation
of this single plant. Likewise, when it
comes to erasing, we can only erase the
things we have ticked. If I shift select and
click over these, you'll see they're
not being removed apart from that one plant
that I still have ticked on. So if we press control in A, we can grab everything here, I'll tick all of these on, and then we can just
erase everything. So very simple as I said, You can't really get this wrong, very much trial and error, and just getting
comfortable with the tools. So I'm just going to untick the phones again. We
don't need these for no. We'll go to the rocks and
just making sure as well, you keep in mind that if I were to come in and change just
the details on this rock, Let's say that we make the density of this
one really high. We'll just get a lot
of these painted in. So this is the density per unit, so thousand unit one
by 1,000 unit area. This will control the number
of instances placed here. This is the overall
paint density based on the brush size. Like with the other
brush sizes as well we could lower this and paint in just a much kind of smaller path or something if you needed to. So you will want to tweak from time to time the
different values here. Again, we're not going to
use anything this heavy, but I just wanted to show
these options are available. But like I said, we want to
keep these counts as low as possible whilst
getting the detail that we're looking
for painted in. What I was going to show is
if we change these details, I've got a really high density
here on this one rock, but then we select all
of the rocks again. You'll see it has
multiple values, which means that
these three rocks will be painted in at
the 100 unit density, whereas this one is painted in at I think it is like
6,000 something. So yeah. Just be aware of that. If you want to make
the change globally, you'd want to select all of the assets that you're
looking to change. Make those value updates, so I'll set this back
to 100 on all of them. And then also change
things like the scaling and those different options down here if you want to
play around with that. Generally, when we're
painting on the floor, we're going to be
looking at things like align with normal, just means that where the
floor is painting up, we want the rocks to be painted facing in line with the floor. So no strange rotations
or things like that. We'll look at this
a little bit later. I won't go into too
much straightaway, but we can also
paint on the walls, which will be useful a bit
later for the climbers, but I'll pause the video and cover that when
we get to that topic. But you can play around with things like the random scaling. By default, I quite
like uniform. Just because if we put
this on free form, it means that you may have a
really long, but thin rock, which in a lot of cases
clearly looks like it's been stretched rather than
just having a kind of randomly sized asset. So I quite like to
keep this uniform, but allow random scaling on a
uniform grid there instead. So I think that's
the main kind of crash course that you need with the foliage tool
with that in mind. I'm just going to go through. I'm going to do the rocks. I'll do the plant foliage inside the cave and also
in the background because it's a very
similar process. I'll just be painting different
leaves and things like that on the rocks
in the background. And then I'll pause and
come back and show you some of the other tricks
that we can use to get things like the
climbers and some of the V inside of the cave on
the forward facing walls, the vertical walls, opposed
to the horizontal floor, which is the standard place
that you'd be painting. And really, what you
will find is that most of this is just going
to be me tweaking, which assets that
I have selected, playing around to some
of the densities and the scaling to get the
look that I'm going for, keeping the concept out. This is reminded this one, open on my other screen, just so I can reference back and get something looking
roughly like this, a bunch of smaller rocks
here to start with, and a few of these
randomly big placed rocks, and we'll come back and we'll
hand play some things for the moss and a more interesting detail
a little bit later. One final thing I have just remembered before
jumping into this. Do be careful as well,
that by default, the paint on static
meshes will be enabled. So if we were to come in here
and do this as an example, I could paint up here and
you can see that we get a lot of random little rocks. I just look a little bit
strange in some places, painted over static meshes. In this case, I'm going
to get rid of those. I'll untick this, and it
just means that if I wanted to quickly paint around
this big rock fixture, it's only going to
paint on the landscape, keeping everything
here kind of free of these small scattered rocks. So just something that I thought would be useful to
mention as well. And also come in and
take a quick look here. I think this gray rock is
sticking out a bit much. I'm not sure which one of
these that is coming from, but you can definitely come
in mix and match and pick the assets you think
are going to work best or your design as well. So I may get rid of those just
because it seems to stand out against the
color of the sand, although looking at some of the background information here, we do have darker
gray rocks as well. So we'll see how it goes.
I may end up keeping in just something that came
to mind though I'd mention. I. At this point, I was actually quite happy with the random sizes
that I picked the really small 0.25 and two
for the minimum and maximum. I've scattered those
throughout the cave, and I just realized that it
would be quite nice to have a slightly more
dense selection of stones inside of
the water volume, roughly where those pebbles were painted in the
landscape painting. So that's all I've done here. I'm just going to
the brush density, just increasing that a bit
and lowering the brush size, just so that we
get more stones at the same size painted
in a smaller area, just for the kind of the
shoreline, the coastal bit. And that's the main change
that I've made there. At this point, I have all of the smaller scattered debris everywhere that we'd want it, so you can see me playing
around with a minimum, maximum size for the scaling x. The thought behind it at this
stage is that I wanted to get just a few of those larger
clumps of quite big rocks. I'm playing around with what a good kind of scaling would be, playing around with what
rocks I want to appear there, so I'm using the same ones as the pebbles, just
making them bigger. To do this, I'll also
be doing things like reducing the brush
size even further. Again, maybe lowering
the density as well, so that in a smaller range, we'll have less
stones appearing, looking for that to 4 stones
in the patch appearing. But still without needing to
manually place them just to avoid the very easy to to
hit human made filter, where I might line
up in too much of an organized manner or
similarize them or do something, which just makes it clearly look like it's
placed by a person. It's quite a nice
thing to still be able to use the
foliage tool for this. Let the randomness come from the tool and the
algorithm behind it, but still hitting the same kind of style from the concept. That's the thing
you'll see here. I goes on for a little whi. It was just very difficult
to hit what felt like a good spot for the minimum
and maximum scaling, getting them to be
far enough away and still looking somewhat
unique and interesting. Overall though I
think by the end of this part of the process,
that did also work, and it looks pretty cool, similar to what the concept provides with the
clumps of larger rocks. That pretty much wraps up
the rock portion of this. I'm going to be moving
on to the ferns. I've got the collection of ferns I chose a little bit earlier, making sure that
they're enabled playing around with the
scaling again and making sure that they are
painted onto the static meshes. We want to paint
this onto a mesh, not the landscape at this point. I'm also coming down and making the scaling a little bit bigger because I want these
to be in the distance. I don't want to
have to paint them too densely to fill the space. We're not going to really
see what they look like. They're just going to be here to and that visual information
in the background. So I'm making these a little bit bigger than you
might otherwise just to fill the space with less
of them being required. This is very simple,
just going to paint them on all of the
kind of flat surfaces, leaving some gaps in
spots that doesn't look as oughy' appearing
absolutely everywhere. But I think immediately,
it shows a very, very nice contrast in the color. Of course, doing
the same thing for the cliff on the right
hand side as well. Then finally, with
the same tool, same plants still selected. I'm just doing the
very similar thing on the other side of the internal part of
the cave or the bit, which is still part of
the cave but exposed. Just again to add
contrast in color. So we're going to add
these to the rock faces. Also filling a big bulk
of the central piece, so it looks less rocky, and it's very nice. I think the idea behind
this having this one out of light and water providing the chance of this life to grow and
flourish in this one area. I just think that's a
really cool kind premise. I'm going to go that That's
the main thing here. I will also put some in the entrance again, just assuming, got a little bit of that
light coming through, something might grow
in the entryway, even in the kind of
more sandy area. Quite happy with the
initial pass there. I think that's added some
information to the background. Again, just bringing
the concept across. The main thing is that
when we're looking at this kind of cave entrance, we've got these
different colors. It just brightens things up. It's one of those really
nice greens that off yellowish green combo that I think looks really
nice for foliage. So we've got that on the rocks. Put some of that in the doorway. I know here is more of a moss, and we will add that
assets a bit later. But I think that just livens
things up a little bit. We're going to get these
climbers in a moment, which is why I've stopped
to come back in here. Then I figured for a similar
in view through here, where we're getting
some light coming in. We'll make use of this as an opportunity to add a bit
more color here as well. On the basis that
we're seeing light, you would expect that things might be growing where
the light is showing, so put this over some
of the rock faces. The nice thing is if you're not getting too close to these, you won't necessarily see
what type of plants they are, but they just give that
different color variation in the contrast that
we're looking for. Just notice the waves are a bit big and they're coming
through the beach. I'm going to go back
to the water settings. Remember that we can tone the waves down in
the water settings. Just something to look
out for as we're going through and polishing and
tiding things at the moment, just some foliage
right now, though. And the same thing
how I've added a few of these the front, I'm going to add some
water foliage in a moment. For the bits down
here, we'll add a slightly different plant
inside of the water. But the main thing before doing that is we're now going to
look at these climbers, which is going to be a
slightly different approach to what we've taken so far. Making sure that I
turn the ferns off, we're not going to want
to paint knees anymore. Although I think
Looking at this, we might make use of a phone
or two, maybe at the top, just because I'm not
sure what that is, but it's a bit more leafy than just some IV or
climbers coming down, and I think that might
look quite cool. But mostly we'll be
looking at these climbers. So we'll go back into
the content drawer. We'll go to our three D plants, and as I've said, I've already got a range of
different climbers. I know that some comes under IV. And just to let you know
that if you get this issue, where you're not
getting a demonstration of what the asset looks like, if you just press shift
A to select everything, and then just move it slightly
and then move it back. It's really strange, but
that seems to go away. It kind of refreshes the editor to let you know that
we want to see this. Think these are odd shapes
and would stick out. Maybe it wasn't the
IV I was looking for. Maybe it is the creeper. Just do the same thing again, Shift A, move that
over, move it back. That could be the creep IV. And yet, under creep,
we have these here. So we've got creeper IVs or
just creepers in general, maybe it's not the IV
that we're looking for. This lightly colored one
is what I'll be using. I'm going to grab just a few or several of these
slightly thicker ones. We do have these
smaller branches, but I think that would
just mean that we're going to need to paint
more of them on. We're going to try and
use the least amount of these foliage
tying up as possible. Again, we're just going
to drag this over, make sure that
these are selected. Know for a fact, we're going to want to increase the size of these and also make sure that you have static
meshes ticked on, so we're going to set this to something like five
and ten as a range. Just give this a quick
go, and that looks okay. So this will take up a
fair amount of space. I just controls Ed to
get rid of that one. Then as I've
mentioned, initially, this is intending to work on somewhat flat
surfaces so we could paint it along these
perfectly fine. It's going to again
just get rid of those for now. But
we want this to go Like here, more across the vertical pieces of
wall in some places. So we can do that really easily. We just scroll down here. We're going to go to
the ground slope angle, and we'll just increase
this somewhere past 150 in. And you'll see that this previously where
that wasn't working, we can now paint
directly onto the wall. So that's just a quick example. I get rid of that one
because we may want to lower the density there just a little bit. Maybe
the size as well. We'll see how this looks. Now the other thing
is this doesn't give quite as nice of a
contrast as the other ones. This is the other thing I
thought I might need to show. Before I go back into
speed mode painting, I'm just going to show how
we can get this color to look more in line with the other foliage that we have here. So grabbing any one of the assets that we're
using here because I think they're going to be using a
shared material instance, which is going to be
really useful here. So we can just click to
select one of these creepers. I'm going to double click
to open this asset. And then if we just dock this at the top. I will come in here. This is our material
instance that we're looking for. So
I'll double click this. I think this is the shared one, and this is where
we can make use of those exposed parameters. So we've got a overlay
intensity set to one, which is fine and
an overlay color. So if we tick this one on, and we'll come in here
and we'll give this more of a greenish yellow, and you can see the change
that's making over here. If you want to make
that more obvious, we make that red, and this is the way that we can
overlay the color here. We'll come down here, give this a yellowish green and maybe move the value up a little
bit here. And say, Okay. It's going to undock
this actually, just because we want to see this in relation to the level
that we have open. So going back down to
that same color value, I think it's still a little bit off of the colors
that we have here, and it doesn't need to be exact, and it's probably going to be nice to have some variation, but we'll get a
little bit closer so that it really
pops and stands it against the backdrop of
these gray and brown rocks. We're just playing
with the different values and the hues
there and that is I think looking much closer and that's
really good actually. So I'll leave that. And then if we paint
more of these on, you'll see it starts
is the other color. But actually when it does
completely rest in place, we're getting the color that
we wanted, and as I said. Although we've applied
that just to one, I think you can see
as we click these, they're all change in color is because they share that
material instance, so we've made that change once, and it will apply
to all of the IV. And already, we're
getting quite a nice kind of going overc this b. I think I prefer the look I have here just to really
lay it on thick, because we're getting
some nice contrast here. Otherwise, it was
looking very dull and colorless at the moment. Now one other thing, I'm
just going to get rid of the majority of this.
That was just to test. The colors more
than anything else. I think the density is actually looking okay, because again, it's nice to have that really painted on thick at the moment, and also the scaling is working fine as well. I think
that'll be okay. But what I wanted
to show is going back to what I mentioned
a little bit earlier, where it wasn't quite as
relevant because we've just been painting
on flat surfaces, but this aligned to normal. If we take a quick look
at what this is doing, in some cases like this, we may not want this to
align to the normal. We may still want this
to sort of dangle down. So essentially, we have two different ways we can
look at this at the moment. Unlike the rocks, which are
just made to be sat there, these climbers are
made to kind of hang and drop vertically. If we align this to
the normal, though, what this is doing is if we imagine that this rock is
facing this way to the right, it will try to
rotate the climber, so that it also rotates to the right or we'll
wrap around it more. If we wanted something,
for example, where we have some of
this foliage here, which is dropping
down and hanging, then we can definitely
achieve that. It just means that
we need to come in, select the ones
that we want here and just stop this from
aligning to normal, and you can see we
get those hanging dropping IV branches here. This is making me think
that some of these may be a little bit too big,
but like I've mentioned, We'll use some of
the bigger ones just to fill in the space, so we don't need to paint in thousands of instances
to cover a surface. Then I'll probably come back in lower the size
of some of these to get the hanging dropping IVs like we've got there
or the creepers. Just a quick example of what the line normals and
things like that means. You can play around
to different things, play around and see how you got in with the average
normals as well. All of this will work different depending on the
type of surface, the face that you're
trying to work with. But it's just to say
you can definitely a, even though this is made more
for painting on the floor, you can definitely
achieve the different looks that you
might be going for. The different parts
of your level. So that was just
a quick new tool that I wanted to provide
for your arsenal. Then again, that will hopefully
let you build and design the rest of the level
with the different types of foliage that you
now have available. So when it came to
the vines here, I did find that they're
actually a little bit too big. I thought the size
was going to be okay. They were poking
through a bit too much and just taking up a
bit too much room. So I've came in and scaled
those down a little bit. They'll still fill the
space really well. They just don't need to
be quite that large. Playing around with the
different aligned to normal and average
normal as well, just to see what was
kind of working best. When these were being
painted to the walls and kind of to get them hanging down was the main
main key point here. Think after some trialin error, although I was thinking
of having them mapped mostly as kind of climbers
stuck to the wall. I realized that having
them dangling looked cool. I think that was the
slightly nicer style. It gives a better
shape and just makes the rocks look at b less
repetitive and dull. So I went quite heavily
and leaned on that, and just painting some
on the outside as well, so it looks as though it's not
just coming from one side, even if we only see the
cave from the inside, having a clear kind
of level of depth. And just showing that the focus was there that we're
considering that the outside may also
have some climbers and you can see that we've
got different layers, different sides that
they're appearing on. Taking the same approach here, so I want to I really liked the results from
the front of the cave, so I've just hopped over to the exposed area of the
outside part of the cave. And I'm just doing
that same thing in the parts of the rocks that
caught my eye earlier. Remember, I mentioned
that there was a really nice outcropping
from the ceiling. So I'm just putting
some climbers or IV to dangle dime
from there as well. The creeper sorry, just again to just make everything look
a little bit more busy, a little bit more
interesting to look at. And again, adding that contrast, that color contrast is popping in front of us, from the side, above, below, is just
coming from everywhere now, which I think has a
really good look to it. Now at this point, you may
have noticed that as we move further from inside
to outside the cave, we're getting this color
variation going on. It was a level of
detail thing going where different
parts of the vines, the creepers show through
at different distances. I noticed this previously when I was originally
showing you how to change the material
and the instance color. It did have two instances,
two different slots, meaning that there
are two materials, one for each individual part of the static mesh,
making the creeper. A I've done is I've just
opened the second one, the instance that we
didn't change earlier. I'm just making that
same change there. I'm making it
slightly more yellow. I think this is more
of the ny stick part of the plant here rather than the leafy
part of the creeper. But again, it's just
giving it that same color so that when we're moving
from the forward to the back, it's not quite as
obvious of a change. Also, we're just making sure
that we've got that very vibrant yellowish green on
all of the plants in here. Pretty much the final
things I wanted to paint in were those plants
from the Tundra pack, the tropical Tundra,
or the tornado tundra. They look to me a little
bit like seaweed. I'm pretty certain
they're not seaweed, but they've got a nice
set of color variation. I figured it'd be quite nice to scatter these along
with the rocks in the very shallow part of
the water along the coast. Again, you're not going to
see a whole lot of that. But if you just take
a brief glance, it's going to add a little
bit of density down there, a little bit of color variation. And you can see how I'm just testing the size very quickly. I'm not going to paint
it inside of the cave. I'm just getting an idea of
how big they are and how big I need to make them and I am painting them inside
of the water. So that's the only
thing I'm doing here just adding a few extra. Can see I'm just
doing that quite lightly. They're
not super dense. We don't need it
to be bunched up, but you can see something
just swaying in there, just looks a little
bit more interesting. Adds a few extra colors, a few nice reds to go over all of the greens
that we have at the moment, and a lot of gray and
brown in the rocks. Okay. With all of that, I think we are pretty much
done with the foliage. We have a lot more contrast in just interesting
looks going on now. We've got a lot more detail in the floor and things like that. We could bring in some
more static meshes, maybe some other kind
of rock detail to bring in and stop the being
just so and flat. But again, we've added
all of this color, which I think looks
great at the moment. So different
information in the sea, so we've got some kind of sea
looking stuff down there. The other thing from the
concept that I want to bring in are these rocks with
some moss on them. Tried in the past.
This is really hard to get with foliage. So we're actually just going
to use some specific meshes. And then for this garden
over here, similar thing, the mega scans foliage is more plants and small shrubbery. There's nothing like a big tree, and I wanted a really nice
focal point tree here. So we'll probably take
a look at that on the marketplace just to recap some of the other
options that we have. So that will be just
outside of the foliage, that will be part of the
polish and tidy up past. But I think at the
moment this now gives everything a
much better shape, a much better idea of the different colors
we'll be working with, which will be quite
important when it comes to focusing on things like the environment and the lighting and getting all of that to work together as well because at the moment this is still
looking quite flat, and there's a lot more that
we can do here with things like fog and the atmosphere
colors and things like that. But they are the main tools.
You're now able to go around and flesh out
your own level with the different assets and
the things that you wanted based on the design that
you're looking to implement.
30. 28 - Additional Set Dressing Polish: So this will be a perfect time to go through the polish pass. We just want to
get those trees in the background, a
tree for the garden. We might add the cable there. I did think of the idea where
we have something which might move away or just
block this initially. Well maybe think about that one. We also want some assets down here to add a kind
of mossy rock, and we can download those
with the moss ready attached. If we wanted to spend
a bit more time, it's more of an
intermediate kind of topic, but something that is
possible is that we can make some materials where we could paint or vertex
paint onto existing rocks. But we're getting
to the point where it'd be nice to wrap
this up and get the final scene or
gameplay or whatever the goal would be
in your project together and ready to go. So to do this, we can start with the main point we can finish
this cave face off, maybe. We'll go to the Quixel bridge and we'll just get
those rock assets. Going to go back
into selection mode. We won't be foliage
painting anymore. We'll go to window,
Quixel Bridge, and we'll just find
something with some moss, as I've said, already applied. It doesn't matter too much
how the rock looks as long as it somewhat fits the theme
that we already have going. So we're going to go
to three D assets. I think up here, I'll just
search for the word moss. We can see this is the type
of thing I'm looking for. We've got some nice
Nordic as well, so we've got some
more nordic rocks. We could maybe use
a few of these. And bring these in and
see how they work. We want to make sure
that we're avoiding things with this
kind of red mud. We don't have any of that
anywhere else in the level. So this probably would
stick out a bit too much. This one would fit
with the other assets. So that's really what we're
looking for at this stage. And just several
of these so that they don't look too repetitive, and we can put them
either side of the cave. Just where it looks like
it's going to be damper, but still getting that light, we'll have that moss growing. After a quick brows, I'm just
going to pick the boulder, and then there are a couple
of others up here again, we're avoiding these
more red rocks here, just because they will
stand out as they're not part of the same kind
of environment or pack. Can maybe see what a
big ledge looks like. We've put this Nordic forc. We have this rounded
forest rock here, and then we probably don't
want to use the cliffs. I don't know how they're going to look in
the smaller assets. Maybe a couple of
these larger rocks here, and that should do so. Just several new assets. We'll download these. We need to let this download, and then we can add
this to the project, and we can start with that one. With all of these
still selected, now that's downloaded,
of course, we just need to add this
to the project as well. So the fun thing now
is we're going to have to go through and try to track down the assets we've
just added to the project. We now have quite a lot of different assets in
our folder structure. So we'll probably assume
the one which is called Moss is going to be one of
the ones that we want to use. I'll just drop this in here, and I'll just start making
a little bit of a collection down
here that we can work with so that they're ready
to go when I find them. So we're just looking out for all of the different
assets right now which have the Moss applied to them, so
we've got these two. If you've done this
one and one go, one thing you can look out for is the ones with the asterix, which means they're
new to the project. You can see this one
fail to install. So I guess this is the
one which is broken, and we just couldn't
get the material or the texture or
something, which is fine. Going to get these three
because I can see they will have mos applied to
them, so we'll drag these in. So again, they're ready
to go. You do get some interesting colors going on here as well when
working with Quick. All these will work perfectly fine when you're in play mode. They just look a little bit odd in the ditive for some reason. I guess that is all of
the assets I've just downloaded for the moss assets. And the textures are looking a little bit blurry right
now just because we have the shaders
being prepared at the bottom here. See if
we have the cluster. So I think that was
the one I was missing, so we'll just add
the cluster rock in as well. So that
should be all of them. As soon as this
finish compiling, we should see a bit more of
the color and everything come through when the textures
and shades are ready to go. Quick recap. Really,
all we're looking for is just a few rocks
like this down here. So we're just going to add
a few of these to the side, just covering what we have here with the completely clean rocks, just to get a little bit
more of that detail. So I'm just going to take
that process quickly ugh. Get these laid out just to get things looking a little
bit more interesting, and then we can move on to
the next part of the polish. So I'm fairly happy of that. We've got some extra
information at the front now, we can move on to the other parts like
adding the larger trees, and then also working
on the atmosphere, which is going to really change a whole bunch of the
overall look of this. So I just wanted to mention, if you want to get rid of
this filter, at this point, we can untick the static mesh, that will let us view anything inside of any of
the folders again. And if you want to get
rid of this little window that's popped up entirely, we just go to the
filter dropdown and just untick the static mesh, just essentially saying that we don't have any
filters whatsoever, and then that we'll get rid of that new window compartment. For the tree that
I'll be using over here as the focal point, I'm just going to go
to the Epic launcher and open the marketplace. Whip the marketplace open. I just want to go again
to the free section. I'm just going to
look for trees. Just a case of finding
something you think will fit. I quite like that, again, I think because the
color of the green. I know that we can
change this, but I think these would look quite striking. So I might go with the decagon
Old West as out of theme, but we're mismatching
quite a lot of things at this point, so it shouldn't matter too much. The other ones just look
a little bit to stylized like the tropical ones
would fit thematically, but the style of them just
looks a little bit cartoony. I've looked at this before. I think this will
work quite well. I'll add these to the cart, and then once I've
put that through, I'll import that to the project. Same processes previously, we just select the Ad two project. We'll find the
beginner asset holder, and then we'll just add
this to the project. We're here. There's a
couple of other things that I know that we'll
need a little bit later. I'm also just going to go
back to the free section. We'll remove the tag for trees, and instead, we're going
to look for Niagara. We're going to
look for some free effects that we can use here. There's not a whole lot of
them that we have available, but we can add some flames
and fire just to get used to the particle system so that
I can demonstrate that. So we'll come in here. And again, if you don't
already have this, purchase the asset
pack for free, and then we'll do the
same thing again. We'll just add this
to our project. So we'll find the
Beginner asset project. Select this one add to project. That way we have some new assets and also some particles
to look at later, just to add some
lighting, and add a little fire into the level
of something like that. Just to make things look a
little bit more interesting. Whilst all of this
is downloaded, that's just reminded me we need something else inside
of the project. So I'll open up the Quixel
bridge one more time. That's all kind of working where in the background anyway. So we'll go to Window. We'll go back to the Quixel bridge. One thing that I thought
was included inside of the Goddess temple is
a bunch of pillars or lamps just to kind of act as
somewhere to hold visually the fire to make
it look somewhat believable or have a
reason for it to be there. So we're going to find those
instead because they weren't included inside of
the Goddess temple. I think it's under
the Japanese category or one of the Japanese packs. I'm just going to
search for that. And yet, it's the
lanterns, not the lamps. So looking for the
Japanese lanterns, just somewhere that
the fire can be held. And again, really more
of a reason just for us to look at different
features than anything else. We could also go the
lanterns like this if you wanted to have something
hanging from the ceiling. These are the ones I've
played around with before. And I think what
idea is, I'll just grab a couple of these and we'll just download these if you haven't already and add
them to the project. So what I'll do is, I'll put
these maybe at the front of the cave doorway
that I'm thinking of. Maybe it'll be a case that we
have that turned on before the big boulder moves
out the way just to get an idea of some simple
blueprint logic. Ws also looking at things like adding sound
effects when it happens, and then the particle effect can be ignited at
that time as well. So the assets that we're
using aren't too important, but it just kind of stitches
everything together, so the flame isn't just floating around randomly or
something like that. So with those added to the
project, we can close bridge. Just go back to the
marketplace and see if everything's ready to go, so this seems to have been
added to the project, which I think means
the decagon tree pack should probably be
in here as well. So we've got old West, volume seven, meshes, and there we go. We have a bunch of
trees. So all I really wanted is one
or two of these, maybe something
quite interesting. If we just drag this in. This
won't be foliage because these are just going to be
like our key focal point. So we're just going to
have a couple of these really large scaled
up trees like this, making it look
somewhat magical and just a little bit strange that these are all in one place, and that's perfectly fine just to make it stand out and
make it somewhat unique. Dragging things at the moment to see which one stand
out the best. So we won't need the bush, but we could make this
more of a hero asset, so I'll just click out
to get rid of the riser. Make this much
bigger because this will be one of our focal points. And this is what we'll
be seeing kind of from a distance when we're
first looking in here. And we can grab a few of
these, put one behind, move them around, put it in
the ground just a little bit. I think I dragged another
one in just a moment ago. There you are hiding down there, so we'll make this
one bigger as well. And you can see I kind of
had that in mind earlier, so I've purposely left a little bit of the
patch here less crowded with the shrubs and things
that we're painting in just so that I could place something like this in manually, and it'd have a little
bit of space around them. Make this bigger, maybe
rotate it so that the key places that the player
will be seeing or the camera. Have a more interesting
kind of view there. So if we go back into
the cave, there we go. So again, if you just
imagine that if we have a big rock or something
that moves out the way, the first thing you'll
see is that will open up, and we've got these
interesting looking trees, just want to make sure they're framed in a nice way as well. They don't all necessarily need to be right
next to each other. You could probably add a
couple more in or something and just have this one
really large tree here. In fact, I think I might add
a couple more of these in, just scale them around.
Move them a bit. Just take up a little bit
of space in the background around the main kind of
key focal tree there. It just looks a though we've got this one area where everything's growing out quite nicely. I'm happy with that because
then if we come through here, we've got a bunch of interesting things
we can look at here, a lot of information that we can present to make look
pretty interesting, with a fly through or even a character being
able to walk through and explore little parts of our cave and this tropical
tundra area outside. So the last few things, I'm just going to grab a few
more static measures. We can get rid of this cylinder and we won't need this anymore. I just wanted to grab a few rock pieces I remember seeing earlier which look as
though they're more manmade. I specifically wanted
to add those in. I'm just going to come in
and add that filter again. For static meshes. If you remember we had
those rock collections, I think actually, they
weren't in the mega scans, where they probably won't
be in static measures, so we'll just need to
remove that filter. I think they were in geometry, and they were part
of the assembly, and we had those rock pillars. So these are some
more blueprints. Again, they're the
packed level actors that we've worked with before. And it's just so that
we've got something we can suggest that people
have been here before us. Something which would not
necessarily always appear completely naturally and just a few interesting
manmade things. And I just think they
look really cool. I always like these. And again, just to
give that same sort of suggestion out here.
We'll have a nice big one. Just to suggest that people
have been here before, even if it feels like it's the first time that cave
entrance has been opened, just to say that people probably have been here, and
they were bored, stranded or whatever
in the cave and made some pointless little
rock statues like so. So they'll hopefully just
grab some attention. We might need to make
sure that they're in a more kind of visible place or we light them
up or something. And this is how you just come to interesting designs as realizing that you may want to cast light in different
places just to grab the the viewers attention and really make sure
that they're seeing this information you're placing. And then the final
things, so we will go back into our mega scans, three D assets one more time. We'll make sure that we have
those lamps ready to go. I think they were
called lanterns went so if we
search for lantern. And I'll just drag
each of these in. I'm not sure which
one I'll work with. I'll probably just use
one of the assets, but if we put them side by side, we can see which may be the
better one to work with. This is interesting looking as a little bit
overkill, though. There's nothing else
which is kind of built up apart from a
few rock statues. I think that's too detailed, also a bit too large. So I'll get rid of this one. One is not going to have much place for the
flame to show. I think the clear winner here is if we have
a couple of these, and we can just place them, I won't put it in just yet. I think we'll make
this a blueprint a bit later instead to show off the communication between different classes
calling events, but we're going to have
a big boulder here. We'll place this as a kind of an entrance thing
to grab your attention again, and then we'll have both of these light up, and
when they're both lit, that will be when our
other blueprint event will be called to move
something out of the way. We'll look at this
a little bit like a door entrance and just blind these up
and put them in place. I needed, if they do turn
out to be a bit small, we can always scale
them up as well. But I think the camera will probably see it more from
this kind of height. But we can have these
show something off, have something open up there, and then expose all of this. So again, just ideas of how we'll be set dressing
this a little bit later. And I think that's it for
the meshes and assets. As I've mentioned in the past,
if you wanted to come in, we can go to our
geometry, our assembly. Remember that we
had that screen. So if you're still thinking that the floor is looking a
little bit plain and basic, we can find some of
these floor pieces. I think screen seems
to always be angled, so maybe we want the rocks. And if you just wanted
some extra information, in fact, that does
look a bit better, just to break up what would otherwise be kind of very
flat surfaces everywhere. We can move these
around as well as having the foliage everywhere. So it's just more of that trial and error,
seeing what work, seeing what you like, and placing those pieces around.
That was the other thing. We obviously have a folder
here called ground, which would probably be
more ideal for this. We don't need to
see all of it, so you can wedge this in the floor, and then we'll just get
these chunks that you'd see. We probably want something which looks a little bit less grassy. I think all of this is meant
to be more in the forest. So we may not be able
to make use of this. But just ideas I
think I'll leave. This is all perfectly fine. We've got a lot of
information in detail here, but just to show off some of the things that
we could have done. I'll leave that one. So I
do like the look of this. Maybe scale it dine
and then scale it out, and then down again, so it's not quite as
tall. There we go. We've got a nice big chunk breaking up some of the
floor over there as well. Merge that in more over
here. There we go.
31. 29 - Lighting Atmopshere: And that leaves the final topic, which are just some
quick changes that we can make to the environment. So the final part
of the polish is really changing up
the background here. We've left this at the
complete unreal kind of default with the atmosphere
and the lighting. So the first thing that
would really bring, especially this
back area to life over here is we can add
some volumetric fog. We go into our lighting. Make sure that you have, if you put everything
in the folder, we've got our
lighting folder here. We're just going to grab the
exponential height fog here. In the details panel, we
want to scroll down and search for our
volumetric fog tick box. We take this on
and we already get some extra information
being added here, you can see everything got colored with the
fog immediately. And then we have some control over scattering distribution. So if we increase this
or decrease this, we can see how
that's going to be affected based on where
the light is hitting. So immediately, we're just getting in
a little bit more of that atmospheric effect
coming through there. And this is one of
those assets which tie directly into another asset, and that is the
directional light. So if we select the
directional light up here in the lighting section, and we want to scroll and find our volumetric
scattering intensity. So this is how much the light
will actually be affected. Through that volumetric
fog that we've just added. And you can see this
is where we start getting things like
those god rays, and it can start making,
especially this kind of area look quite interesting. It just makes everything look a little bit more interesting. And I think this
will definitely be a focal point of a final render, just because this looks much more interesting now
than the front does. Because the light is coming
essentially from over here. So the way that the
directional light works, we can see the sun is over here. The way that this
works is we do have an object in the
world if we press F that is just down
here in the floor. As I've mentioned,
it doesn't have any relation to where
this is actually placed, but it does have relation
to how this is rotated. If we rotate this around, we will get the
light being updated, and we can see that's
controlling more where these god rays
are going and the time of day that this is kind
of recreating here. So there's not going to be
any real way that we can get the front and the back looking interesting
at the same time. Making this a little
bit darker, though, does help tone the front down
a little bit and just look less fake and sort
of bright that way. Another shortcut,
which is really useful here is control in L, but you need to hold control. Press L and then keep hold of the control button
whilst moving the mouse. And this gives you a kind of free rotation of
the light source, as long as you hold control
down and move the mouse. So you can see this
is rotating in all of the different directions
as I move that around. If you lose that, just
press control in now again, holding control afterwards,
and then you can rotate the The directional light, essentially what we're
doing here is just rotating that directional
light object with the mouse. So you can very quickly that
way from different places. You don't need to always be holding the directional light. The main thing is we
can come over here, do the same thing and see if it looks better from one
direction than the other. So we could get a pretty
cool here actually if we had the light in this direction. But then, of course,
we're going to lose all of that interesting lighting
in the back over there. So I'll probably render
this height twice to get some interesting
screenshots, once, maybe of the light over here
because then makes it look much more interesting than when the light was around
the back over there, and then I'll probably
do another render with the lighting
set the other way. You could even have this type of thing where you've
got a sunset and that really cool stream of
light across the ocean there. So it's quite impressive the
changes that can be made just with the way that
you've got the lighting and some of that simple
volumetric fog setup. So play around that, get
things lit as you wanted. Then we have a few final
things that we can change You can go much deeper
into all of this. But just to get a sense of the final style
that we could go for, we'll go to our volumetric
cloud would be the next one. This is going to be
easier if we're outside, if you're inside of a cave
or something like that. This is controlling the Cloud, remember I said that before. We can just hide the things
if you're not sure what is responsible for the
different areas and which one you
want to affect. If you're not liking the clouds, we can change the
altitude of these, lower them, raise them. We can make them
thicker, thinner. Again, all of this will come in on how things like the lighting. Or the rays are blocked
and things like that. So you can play around with
various settings like this, as well as where
different parts of this sky atmosphere class
is starting or ending, and just again, tweaking
these values to see what happens and the kind of results that
you're looking for. And just to say as well,
a combination of these, if you wanted the clouds
to pretty much disappear, you could start lowering
the layer height, the bosom altitude
and things like that. And you can see the Do you become a bit grainy. If you want them to
be gone altogether, we just lower these and we can get rid of the clouds entirely. I quite like the look
of this, though, so I'm going to leave this
pretty much as standard. Just wanted to let you know that you do have full control over the clouds through these different details
just down here. So there are all of the
different options that we get with our lighting, the atmosphere, the general environment that we've created. Another way that we
can very quickly tweak the color grading
and a lot of information. More on mass is using something called a post process volume. So we're going to add one
of those in to wrap up this kind of polish
and tidy topic. We can add one of these
from the quick add to project option up here. We're going to search
for post process. And with all of these are exactly the same so we can
grab any one of these. It doesn't matter
where we place this. We won't actually be
seeing this in the level. I will put this inside
of the lighting note. It's not really a
lighting asset, but it's part of that
same kind of process. So we'll put this into
the lighting section. And the first thing
that I want to do is, I will move this up just to
show you that by default, This will have a box, generally, only things inside of this box, the cameras inside of this
box will be affected. This will allow us to do things like add really strong bloom. If we turn bloom on
and increase this, you can see the bloom value has been ramped all the way up as
long as you're in the box. If I fly back out the box,
then we turn this off. If we wanted this to be applied globally, we can scroll down. If we go into the details panel, scroll down and we can find the option somewhere
near the bottom, this infinite extent unbound. If we turn that on,
now, wherever we are, we'll have all of these effects,
turned on automatically. So now we don't
need to worry about where that post
process volume is, will get those effects
regardless of where we are. Again, you can see these
effects will very quickly start making your scene just look much more refined and polished. So the bloom being quite that high is maybe a
little bit intense, but we could
definitely add to this and bump it up to get
some nice results. We've got other things as well, so the mobile depth of field not relevant for what
we're doing here. We can change the exposure, and people who are more
familiar with cameras or doing your cinematic edits and color grading for TV and
film and things like that. You'll be much more
familiar with this. But we can add
different features like chromatic aberration is
quite a popular one, not for this type of scene, but is that outlining
effect you get going on. Just say that we do have a
lot of different options that we can play around
with and tick on here. It's one of those things. I'm going to add a
few of these now, but it's mostly going
to be trial and error, playing around with
what's available. If any of this
makes sense of you, then you'll be nice
and comfortable to come in and play around
with this type of thing. I quite like adding a vignette
through the image effect. Is that black ring that we
get around the outside? Maybe not too intense. It's quite a nice kind
balance to the bloom, so we can make things look brighter in the
middle of the camera, and then we get that nice
vignette around the outside. In the final core
feature you may want to look at
things like adding a temperature to your
level so you can do an overall override of the
temperature that we have here. If we turn this on, we can play around and make this
a warmer kind of scene or cooler depending
on what you're looking at rather than changing
the color directly. In this, I think a kind
of a warmer yellow would fit quite well
here because we're inside of a somewhat
tropical cave. And again, that just
makes the outside here just looks that much
more interesting to me. That would be an overall
temperature balance change. We can come in as well,
change things like the colors that the
shadows would pick up, so we can add more or less
saturation to the shadows. We can have all of the shadows in our level look a bit more blue or green and adding this
kind of effect to these. And that was select
on global, sorry. That was like a global
color override there. What I meant to be showing was the shadows there
I said the shadows, so we could, as I said, make the shadows
have different tints and colors applied to them, changing how strong the contrast of the, things like that. Any of that if
that's of interest, and if you're familiar
with that type of thing. Again, like I mentioned, Those
people more familiar with film and TV edits may be more comfortable
with this type of thing. But you have all of
these different options available under the
post processing volume. With things like the
ambient occlusion, notice that's now working. I didn't used to work in some
of the versions of five, but we can accentuate
the detail that we get from the shadowing by bumping up the ambient
occlusion inside of this, and that immediately brings
us out a lot as well. So I'll leave that
there for this part. This is one of those where
you've now got a huge toolbox of different things
you can tweak and play around with or your environment, your atmosphere, your lighting, and this overall post
process override as well. Play around with some of these,
maybe pools the content, make sure that everything
is looking as close to final product as you envisioned. You have so many
different options here to make the scene
look just how you want to take that time just to refine things and make it
look as good as possible.
32. 30 - Migrating Assets: With the bulk of the
level fleshed out. This is going to be a perfect
time to swing background and look at the feature where we can migrate the
content that we want. So everything that we've put
inside of this main level. We can move this over
to our core project. Before doing that, I
just wanted to make sure that we have absolutely
everything that we might want. So I'm just going to
go through the assets. I'm going to add in
some placeholder stuff, the lanterns we already have, I'm going to build out the wall, which will act as the
door, which will be a blueprint a little bit later on so that we
can put code in there, but for now, it will just
be a simple static mesh. So we'll get some of these
from the content drawer inside of the three D assets and our geometry folder here. I was also thinking as well that before moving
everything over, we could tweak a
few final things like playing around
with the landscape, building in some different
levels of detail, some small mounds or
something like that, just to make it look a
little bit less uniform. I was, in fact, thinking
it might look quite interesting to build
a mound here so that you'd actually have to go
up the hill before you see the bulk of what is behind in that kind of hidden
away part of the cave. To get started, I'm just going
to go into landscape mode. I'll make that change first and sculpt a little bit
of the landscape around, so it's not just a
large flat area. So we'll have the
train selected, we'll go into landscape. Changing the brushes
in the tool strength, so it's not quite as
strong or big so that we have a little bit more
refined control here. And this is just going to be a case of sculpting
a few things out, smoothing it down and maybe
flattening it back off. These are going to
be the main tools I can see myself using. So I'll just do that
quickly, first of all. Keeping in mind
before I get started, that we won't be able to paint or sculpt anything
out over here, so this will be
quite a flat area. Remember that we
have this area which we are unable to paint on
because of the water volume. But that's perfectly fine,
something to be aware of, and I think we've
got enough detail, and we want this to be quite flat anyway where
the water may have been a little bit more init
and just leveling that off. So you will notice here that as I'm going over the foliage, any of the foliage we've
painted onto the landscape, not the things we've
placed by hand, but the foliage assets themselves will raise and
lower with the landscape. So we do have that
flexibility as well, a very nice kind of automated,
appreciated feature there. And where I have buried things like the lanterns and
some of the rocks, we can come back and we can tweak those a little bit later. And then you can
see here. I'm just using the smooth tool,
like I've mentioned, and the flattened tool, just to get rid of some of the sharper creases and just to smooth things
out obviously. Also lowering the platform
down a little bit. I've kind of purposely
over sculpted and then flatten that back down to
a more reasonable level. Also able to flatten things out like the crease
that we get between our water is affecting
the landscape because of the boundary that I've mentioned before
that we can't paint over. We can flatten that
in together, though, so there's not a lip or
whatever you would call that. Then just making some
final tweaks and adjustments here just to
get this looking right. Just playing around
of the camera. What I'm noticing is I do think this is going to be quite
a good direction for this because not only will this take up again a
little bit more space, make things look a little
bit more interesting, but we also are now
directing the eye, the only thing which is
really standing out in here, especially when we
put the wall in, everything's just
going to look like one big wall at this stage. The eye will naturally be drawn towards this one single hill
in the middle of this cave. So it'll be a nice
focal point to just set the viewers
gaze towards. And then when we have the door and the lanterns lighting
up and the door animating, I think that'll just
look pretty cool. So then the main tweaks that I wanted to make with the
sculpting tool there, we will need to come back
in and just move some of the hand placed
static measures around, but that's perfectly fine. We've gotten rid of that
little ledge between the water boundary and
the landscape there, just double checking
everything on the other side is looking okay. Thing we could
probably do is put some assets in here to act
as like steps or something. Again, just to show that maybe there's a reason that
this mind is here, maybe it's covering something, and there's some kind of man made intervention going on here. But I think that is going
to be well leaved there. It just looks that a little
bit more interesting than it did previously with
everything just being flat. Back in selection mode,
like I've mentioned, what we want to do is we'll add maybe some rocks here
or path or something, so it looks as though this has been built up at some point. And then also the
cave rock wall kind of door thing, whatever
this is going to be. So, in fact, I'll start
with the doorway. I think this is going to
be one of the key points, and we're basically wanting
something quite specific. It's going to be a large rock, but also preferably we'll be looking for something
with two sides. And I think there are a few of those in this pack,
just not many. Could stitch one
piece together and give it those two
sides, but preferably, I'm pretty sure I remember
something like this, having an option which had
both sides automatically. So we'll make use of that if I can find this one.
And there we go. It was this one that I had
in mind, the coastal cliff. It does definitely have two
sides, somewhat symmetrical. We can play around
and flip this around. We'll probably need a couple
of these in the blueprint. We'll just kind of
approximate that for now. As I said, this is very
much just very quickly, roughly getting things in place. So that we know
that we have all of the assets that we want
to be taken across to our other project
and just making sure it kind of
works as intended. We can probably flip this one, that it's more like that there. And then if we drag this up, we can maybe flip this the other way and flip
it around as well, and maybe make this one larger just to take up the
rest of the space. As with everything else, this
doesn't need to be perfect. You won't notice the small discrepancies
like that, and in fact, if anything, it will make
it look a little bit more natural and believable, which
is what we're going for. We just want
something which will completely fill the
space just here. So we might need to
make this one bigger as well to do a bit
more of the work. Main things we don't
want any light poking through to begin with. We'll make sure that we
push this back far enough. And this is very
much how we'll be creating the blueprint based
on these assets as well. Just making sure it
does the same job here. So it does stand out a little
bit, but as I mentioned, the main thing is
if you were to just take a quick glance
around the cave, that hopefully wouldn't
stick out too much, but having this sand mound, this kind of hill going up, will draw the attention here. Just give you
something to look at as one of those kind
of key focal points. The other things that
we've lost, I'm just going to search in
the outline here, we can find any of the
items we have in the level. We're going to search
for a lantern. They have indeed been buried, so I'm just going
to select both of these and drag these up. We can either reposition these or maybe paint
a little bit more of a mound to meet the floor of these depending on which
way you wanted to go. I think in this
case, I'm just going to go back into landscape mode. And I will raise this just
a little bit to meet those. Though, again, they
can be a little bit buried, that's
perfectly fine. And if we flatten this
down, let's move this out. It's just a case of
playing around with this to get things and then smoothing this just a
little bit more so it's not fully hidden away,
and there we go. Back in selection mode,
just move this one across. That one is now looking just
a little bit out of place, not quite in line
with the doorway. So these are the type of
tweaks that we want to make before finalizing things and
moving everything across. The other idea that I
had in mind is we could potentially just move
this one as well. Just going back and
forward between the landscape and the assets quickly just to finalize this, using the fall off point there
to make some more kind of gradual increases there before
smoothing that back down. That gives it quite a
nice mound actually. So again, it's just
looking less symmetrical, a little bit more how that the sand might naturally
move around or fall, so we'll leave that perfect. What I was going to say is
that we can also look at adding something
extra with foliage. So if we've got any stones, I think the goddess temple comes with some pathways and
stones and things like that. We only have one of them is
called Roman stone floor. That's perfectly fine.
We can bring this in, and yeah, that's the sort
of thing I'm looking for. What we can do is we could
either place these by hand. Quick tip if you
wanted to do this, as I've already unticked the snapping for
rotation and location. If we use this option here, we can add snapping
to the surface. Then if we go into
movement mode, so W on the keyboard for the shortcut and drag the widget around with
this small circle, this will snap that
to the surface. So it's a little bit easier
than rotating it by hand. We will need to
make some changes. But what we could do is we could place several of these
just to make it look. I'm just pressing lt and dragging to do the
quick duplication. We can rotate things
around and then just drag it again
back into place, letting the snapping do the
bulk of the work there. And what we'd want to do is probably place these
somewhat under the ground, so it looks as that
they've just been sort of buried and
covered over time. We can maybe rotate
some. So again, they don't always
look so perfect. Maybe make the gaps a little bit bigger as we
get further away, so it looks as though it's more kind of built together
as we get closer. To the main focal point again. It's just something doesn't
need to be perfect. This is just again grabbing the viewers attention over here. Making sure we
probably don't have this poking through
rocks and things, so we may need to come
in to the foliage tool. And you could make this foliage if you
wanted to paint this on, but I think in this
case, I'm just going to use a few so we can
get away with that. What I probably will do, though, is going
into foliage mode. I just select everything
to be quick here. Take all of them on and just
make the brush really small. And these are just
the refinements, just to make sure nothing really obvious is poking through here. I'll make the brush
even smaller. And just here where we've got a rock poking
through our ground, I'm just going to hold
shift and click to raise, make it even smaller again, just to get rid of a few
of these little rocks. So the ones in the
sand perfectly fine, the ones which are
overlapping because I do like where the floor pieces have
found themselves there. So we'll have something looking
a little bit like this. That's perfect again. You can make a few tweaks if you wanted, so I notice this one's
ever so slightly hovering. So if you wanted
to come in, rotate this around, and as I said, maybe dig this a little
bit into the ground, so it looks as though overtime is worn away. Into the sand. Just being careful, we don't have anything happen like that, where it becomes
really obvious that one side is completely
poking out. But I'm more than happy of that. At this stage, I think we can safely say that would be all of the assets that I would want
to use in the core project. The other thing that
we will need to bring across will be the
particle effects. We haven't added those just yet. We could look into this if
I untake the static mesa and just make sure
that we only have maybe the fire effect
that we want to use. We can then edit that
and use that a little bit later again in
the core project. Other than the fire
effects, I don't think there's anything else that
we're going to need in here. So we're going to make use of these as blueprint a bit later. We've got all of the foliage and the assets that we want
in this side of the cave. I'm not going to decorate
this with anything over here. These floor pieces will
be the new parts here and just everything decorated inside. I'm going to do that. We're going to take
a very quick look at the particle pack that
we've installed earlier. To do this, I'm just
going to save this map, make sure that we've
got everything updated. And we can jump into
our demo map inside of the VFX volume here.
Going to go into maps. And specifically, I've
just realized what the naming convention is for
those of you not familiar. We used to have a
particle system in unreal called cascade, that is going to
slowly be phased out as epic have replaced it with
something called Niagara. So I've just noticed here
we have N Underscore. So these N underscore map names
are the Niagara versions, the ones before the older
versions, the cascade. So we'll try and use
the newer version, which we'll see a lot
more of going forward with versions of Unreal
five, especially. So we're going to go into
one of the Niagara maps. And this is just a quick
demonstration map, which will allow us
to very quickly. We can come in. We can change the play mode up here
with the settings option. And instead of going
into selected viewport, which will drop us into a live kind of
simulated game mode, we can just tell it to simulate, which leaves us in the editor, but it forces everything to start running in the background. Very useful to
seeing things like this with the particle effects. So we still have full control over the viewpot and the editor, but we can see everything start playing as though
the game is running. Okay, so I had to
recompile some shaders, but here we can see
the examples here. This is the side we have the examples of
the directional fire, so being affected by wind, not something we're looking for. You could always add something
cool like a big fire pit. This would be perfect
for that type of thing. I just want some really small flames that will look more like candles than anything to put
inside of those lanterns, and we can see that over here. So we're not going
to do anything fancy with direction or
anything like that yet. So we can just use one of these. These look a little
bit too controlled. We could potentially make use of this one, tone it
down a little bit, make it smaller, and I
think that would fit the lantern almost perfectly. So what we want to do here, now we know which
one we want to use, we can exit play mode. Just drag this over a
little bit so I can see. There's this one here specifically that we
want to work with. I've just double clicked to
specify it out of this group, which one I wanted
to interact with. And we can see just here, if we scroll down
in details panel, we have our Niagara element, and it's not telling me which
system this has applied. I'm just going to go
and click off of this, click back into this asset to make sure we've got the
correct part selected. And you can see, in fact, if you scroll down the way
that this asset has been provided is this
is an exposed property. But the main thing is
that this is where we can find which Niagara
asset was being used. So we can now use
this shortcut here. So this folder and the
magnifying glass is a shortcut to find the
asset we want to work with. We can drag this into the map. And again, if we just press simulate just to double check. Yeah, that is
definitely the one that we want to work with,
so that's perfect. And all of that was
really just a quick way if you're ever wondering
where something is, especially when you're in
a project where you've got a ton of different
folders like this, and you just want to know where the asset is inside of
your project structure, that's a quick way to find it. So if you can find an example
of it in a level or a map, and we can use this magnifying glass to just kind of quick jump to
where this is in the project. So we now want to
keep this one open. Keep in mind that we
want to be inside of Niagara reference and Torch. I'm going to need to jump
back into my main map, the one that I've been
working with so far. So inside of the
maps folder here, mine was called Mine. I'm not going to save anything that I've changed in this level, and all of that
was really just so that I can come back
and find where it is. This is in the torch folder, the one that I'm interested in. You may be working
with something else, whichever one you found, and just drag this into the level. We're not going to keep it here. The main thing is that when
we migrate to this map, it's going to look
for everything which is being used
inside of this map, and it will bring that
across to our other project. We just need to make sure
that everything we want to keep is inside of this level, and we'll tidy up and use all
of this a little bit later. In the final demonstration. So that's the main
thing we can save this. That is everything
now in the level that I want to bring across
to the other project. So when it comes to migrating, the main goal of
this entire topic, what we want to do
is very simple. We're going to go to
our content draw. We want to find our map that
we want to move across, and this will work for any type of assets, but in this case, I'm using it for the map
that we've been working on. You could, if you wanted
migrate just a fire particle, for example, from one
project to another, It would work in the same way. But inside of the maps folder, I'm going to right
click on the main map. We're going to go to
the asset actions, and we're going to choose
the migrate option. We do have options
to export things. We could copy and paste this
through the file browser in windows or whichever operating
system that you're using. It's often recommended not
to do that just because the migration does a bunch of extra clever stuff behind
the scenes for us, which will ensure that no
references are lost for things like which materials might
be using which texture. And any cross reference stuff will all be brought
across as well. So we're going to
select migrate, and this is what I mean by that clever stuff
which is happening. So it's by default, chosen everything
that we've used. And as I've mentioned,
anything that it knows that we've used which
is referencing another asset, whether that be a material, a texture, whatever it is, will also be brought across
to the other project, just ensuring that nothing
is going to come across broken or causing any problems inside of the other project. So you can still see
we do end up with quite a lot of assets which
will be coming across, but this is still a
lot less than if we had all of the assets that we've been trolling and testing
and playing around with, had we not taken these
additional steps. So just confirming you
think that looks correct, making sure that
nothing is glaringly missing that you know that
you've used by default. This normally works without any customization or anything. With that confirmed, we
can just press okay, so we'll let that
default to what it has, and we just want to find the file directory of the
project we've made previously. So our main project, which at the moment, is pretty much empty
with just a main map. So we'll say, here,
and then for me, this is going into the T
underscore boot camp folder, so this is the name
of my project, and this is the really, really important step here. You cannot miss this,
get this bit wrong. It can break the process if
you get this step wrong. Just for reference, the folder structure that we're in at the moment inside
of our project. I'm just going to
close that down as a very quick takeaway because
this is really important. You can see that
everything nests inside of something called
the content folder. If we drop this back up,
everything disappears. All of this, these folders regardless of what we've
brought in, what we create, goes inside of the
content folder, and this has to be
the target point of the other project that we want
to bring the assets into. I'm just going to need to go back and take that step again. I'm going to go to
my right click. Assets actions migrate,
and then we'll say okay. And then this is that
really important step. So back inside of
the file browser, I'm inside of the
boot camp project. So T underscore boot camp
is the name of my project. I then want to make sure
that I double click into the content folder so that this is the final file directory that we see when we're
bringing this across. So this is our
target destination. Very easy to get
that step wrong. And if you do, then you will get a warning
saying that some of the links or references may
be lost in the transfer. It will try it, but
it usually fails. So just make sure that you have this in the content folder. We'll say select folder here. And then this is going to
migrate all of those packages across and make sure that everything works when it
gets into the other project. So just as a quick recap, the goal here, what we have
is our tester project. So our asset holder
is where we've been doing all of our
trial error, testing, bringing things in,
getting it quite mucky, and not worrying too much
about what we bring into this. Probably several gigabytes
at least in sides now, and we're taking all of
the content we will be using across to our main project that we made a
little bit earlier, which is currently
pretty much empty. It just had a main map
that we've created. And this can be useful
for many other things. I tend to use it for
things like this, where we'll have big projects, where we'll have
an asset holder. Throwaway project that
we're not worried about losing later in the
development process, and then the main one
which will be keeping backed up and stored
on the repository, and we'll just migrate
things across safely from the test projects
to the other projects. The other use cases
for this, though, might be that you've had several projects on
the go over the years. If you've got some really
cool blueprint features, some components or
assets that are very reusable and can be shared
across multiple projects. It's another really
perfect example where you can migrate
those from one project to another just to get
those core features or those core elements
that might be reusable from past projects
that you've created. Depending on how much
you're transferring across, that may take a little while
to get everything going. The next step will just be testing or checking that
all of that worked. Navigate to your other project, the core main project that
was empty a moment ago. You can do that either through the Epic launcher or
the file browser. In this case, I'm
just going to go to the directory where I know
the project is stored, and we can open this up from the U project and just make sure that
everything's moved across. We can see here that it looks as though all of that
has been brought, so we've got the water, the old west, and the things that we know that we've
been working with. We just want to make sure
that there are no issues. We may have to recompile, something you see
quite a lot with unreal projects is
recompiling shaders. We are obviously going
to need to do that. And then we just want to
make sure that there are no broken water features or that the terrain is all
working as expected. Back in the other project
with that migrated, there are a couple of
things to look out for. If you haven't already taken
the migration process, one thing I forgot
to mention is that you will want to make sure that your other project has all of the same plug ins
already installed. In this case, for me, I hadn't installed the water plug in, just as a quick example, going into the plug in section, I just needed to come back
in here and tick on water. Didn't cause any major issues. Everything was mostly
still working. All of the content
has come over. But what you may find is if you don't have all of the
plug ins installed, which are required for certain assets and features to work, in my case, the main
map just wasn't here. So I just had to pause things. I enabled that, restarted the project all offscreen just to save a
little bit of time. So that is the first
thing to keep in mind. Assuming that you have all of the same plugins and
features enabled, everything should
look like this. So we now have just
the content that we want to work with
inside of our project. I also had a quick look
because I wasn't sure how much space we'd be saving when we get rid of
the asset holder. I said several gigabytes. My current project
is actually at 94 gigabytes for
the asset holder. And this new project that
I'll be working from with the main project
is at 4 gigabytes. So this is the kind of
difference we're looking with and what it could be
worth taking this process. So the next step is
going to be opening the map just to a test that everything is working correctly. And this has
actually highlighted something else, which
is really useful. Otherwise, I wouldn't
have thought about double checking this. And that is the fact
that this project, the one that I
want to work from, has lumen enabled correctly, so we can see that
everything is lit here. It's quite bright, a little bit brighter than I
kind of intended, but this is looking pretty good, especially when
we look out here, this is really, really bright. Just going back to the
beginner asset holder, so this is the other project
we've been working from. So far, you can see the lighting
is very, very different. And I wasn't aware that when I created this
project for some reason, if I go to the project settings
and search for L lumen, for whatever reason,
Lumen is disabled. So what I would
need to do is if I come in here and search
for global illumination, I'd need to change
some things here, so dropping it down to do
some form of ray tracing or lumen in this case to get the lighting that I
was kind of expecting. So this is working
without Lumen enabled, which is one of the nice real engine five features
we'll be working with. So again, not a problem, it's just something
that we'll need to consider and tweak when we go
back into the main project. We don't need to have this
one looking perfect anyway. It was just to get a
good starting ground. We'll be doing all of
our refinements and the final features
in the core project. But that was just to mention
jumping back over to this, you can see it really
does look very different. I think this looks quite nice. We're going to need to tone
down the colors here and the brightness just because the lighting is just
so very different. The first thing that I
want to change is going back into the
project settings in the new project and just double checking that auto
exposure is turned off. I can really see that it's not, which is why it's getting quite so bright in the cave it's bouncing the light around
where it really shouldn't be. So we're going to
untick auto exposure. Then when we come back
in, we're going to get a much darker cave.
Perfectly fine. We can fix this easily. But this is more of what we wanted to be working with here. And then just to double
check, as I said, if we search for lumen
in the project settings, you'll know that you have lumen enabled by default because you already have the dynamic
global illumination, the default method
will be set to lumen, and you'll notice that
in the other project and I demonstrated this, if you type lumen,
just nothing came up. So these are the main
things to consider. All of the remaining content has come over correctly, though. If we look at things
like the post process, if we hide the post process, we can see that it's
retained all of the correct color
treatment that I've provided the temperature update, things like the vignette, and everything is still
being applied correctly. And likewise, we can see
that we're getting all of the results that we want
from the directional light, the height fog, and so on. So all of that's working fine. The other side is actually
still looking pretty good, especially with
the new lighting. It's just the case
that the cave is now looking somewhat dark. I'm going to quickly fake this. I'll just show you
a few quick tips we can use with some wreck lights, just to add a little bit
of vibrance to the cave. We don't want it to
be fully lit up. I did mention a few times. I was expecting this to
be a little bit more of a darker gloomy cave and that would really
accentuate the other side. We're just going to add
a bit of light so that when the cameras going through or the players going through, we'll have something at least we can see the bare
minimum of the cave. We'll also get rid of
this flame in a minute, but just to say that's
also gone through, so we have our particle
effect to work with. So the main thing here, I'm
going to go to the add item. I'm going to search for
the lights down here, and we're just going to
drop in a wrecked light. Drag this up and just turn
this around at the moment, if we look at where this arrow is facing forward on the x, we want that to be
facing into the cave, so I'm just going
to flip that round. Drag this back a
little bit because I want it to look like
essentially we're going to be faking a little bit more sunlight coming
into the cave just in the entrance and at least to show off some of
the key points up there. And all I want to do is I'll just increase the
radius a little bit, so it goes a little bit further. And if that's not quite enough, we can also increase
the brightness. Again, just pull this back
so it looks as though it's not just a light
hanging in the doorway. We're just adding essentially
a fake layer of light, which is meant to look more like the sun still. If we
come back in here, Just to see how
much that's lit up, so it's not quite enough, but if we disable this, we're definitely getting
some illumination from this. We can bring that
aroundabut here, and we still get the
correct shadows. We can bump up the attenuation
radius as far as needed. And if we wanted to soften some of the shadows this
is casting down here, we can increase the source width and the source height to get a little bit more control over the shadows because it shouldn't look like
a light source, which is right next to
any of these objects. And then what I think I might do is we might be able
to duplicate this. I'm going to drag another
one of these into the cave. We're going to
rotate this around, just because we
can't see anything at all inside the cave, might make this one a
little bit less bright, just so it kind of looks as
though the light is at least bouncing in here and then bouncing a little way
through the cave. But again, we want to
be careful with it, it doesn't look as
though we just have a hovering light up here, we can do a few tricks to
mask that in a moment. But this way, there we go. So we're getting some
information over here, at least, which will look a little bit
more interesting as well. And one thing which
will make the standard, you can see we've got
this effect from the fog. So if we go down to volumetric, if we just search for volumetric when we have the
wrecked light selected, You can see here, the bolumetric
scattering intensity. We just want to turn
this down to zero, and that stops it looking
as though there's just a light clearly
just sat up here. And then may be tucking
this a little bit further into the wall so that it doesn't look asth shadows are
being cast from over here. It's going to look a
lot more at a glance, at least as though light is
bouncing off this core area. We're getting some
light over here. And it can just be a case of playing around with
the intensity as well, but we can increase the
intensity of one of these to make one have more
effect than the other. And that way, so if we
imagine the camera might have a nice look at here or the player may be
looking out here first, and then you turn around,
you've got a key point, which is drawing
your attention over. But at least we can
see other parts of the cave as we go through, still making it
look quite nice and gloomy in certain areas. We've got those tiles to
grab your attention as well. Just make this a little
bit less bright. Again, the goal of
this one is more just to light up some of the
inside of the cave. So they were the main things. Some tweaks that you may need to change because I didn't realize the project settings
were not set up correctly in my demo project. I've been working on a slightly different basis
than I'd expected. This is now just looking a
little bit nicer anyway. I think we've got some
better lighting here. We might need to tweak and
play around with some of the brightness settings if we go to the directional light. We may want to bring down the brightness of the sun here because that
is now just a very, very intense light with the
changes that have been made. But overall, I
think we're getting a much nicer general lighting and environment set up with
those tweaks and changes. And we're ready to go now,
where in the main project, we can start adding
the final touches and some of the logic and getting
everything wrapped up.
33. 31 - Working With Audio: We'll now be taking a look at audio and how to get
this into the engine, few things to be aware of and a few recommendations
on how to get started if you don't have
some sid effects or music to get you started. The first thing is I'll be using some side effects from
the website Free signed. This is just one
of many options. You can get a lot of copyright free and
open commercial use from a bunch of
different websites. You've got things
like Pixel Bay, and Free sign, which I'm on now are a couple of
popular options. Just a simple search
on Google for free side effects for games or movies or whatever
you're looking for, and you'll get a
bunch of results. This is just easy to
use and I've already found a few that I
can demonstrate here. Now, when you download these, you may get them in
the wrong format. So we're specifically
looking for dot WAV as Unreal engine only accept and works with wave and OGG files. One of the ones
that I'm going to be using is an MP three. I'll also show you how we can convert that and export it back out into a file type that
Unreal engine will accept. To do that, what I'd
recommend downloading in the background is
getting udacity ready. If you don't already
have a version of udacity, you can come here. Again, this is completely
free software. It's a really powerful tool
for customizing, editing, and even just converting
your audio files to work as expected
with the Unreal engine. But you can use it just as a converter from MB
three to Wab file. But I'll also show you
some really quick tips as we don't want to stray too far away from the Unreal
engine topics, but just some tips and
tricks on how we can add some base and change the pitch and things like that to the sound effects so that they may fit the theme
that we are going for. So come here, get the installer
for your current version. If you're working
with unreal engine, you're probably on a 64
bit version of windows, and just download the version
that you want to use. The two sound effects that I'll be wanting
for this project. Mentioned this a
few times already, but I'm going to have a somewhat exaggerated
flame effect. Of course, when
you light a flame, you don't actually
have a big rush, usually, especially
for something like a small torch like this. But as we're just going
to have a cinematic or something further
away from where the viewer or player is looking, we want to draw their attention with some kind of sound effects. I'm going to have a rushing
flame wohing sound effect. When these two lanterns come on. That's going
to be the first one. And then when this big
cave door is moving up, I want this to make some kind of grating scraping sound
effect of rock on rock. That's what I'm going
to be looking for, and we'll get all
of this ready to go so that when we start adding the logic and functionality
into the classes, those audio files
are ready to go. For this, I've just
gone to free sign. I've searched for something like flame wish or fire Wooh
as you can see here, and I've downloaded
one of these I like. You can come over
here and play these. I won't keep playing these
through the browser, just in case some of them
are a little bit annoying, but you can do a
demonstration play here, and that will play the sign
that you're looking for. If you find one that you like,
click on the audio file, and that will just take you to a download option, and
you can download that. You may need to sign up for some of these, but it's
a free account. Then a similar thing
for the scraping noise, so I've just searched
here for grinding stone. I found a really good
one where we have a few different
examples down here, this concrete block moving. We can stitch a few of these together to make
it sound longer, and I'll show you
how we can make some of those changes
to the pitch, so it's a little bit deeper and closer to what
I had envisioned when I was coming
up with the idea of the rock door scraping open. So that's all I've done.
I've downloaded those, I'm ready to go, and I'm going
to jump over to audacity. When you have
audacity downloaded and installed, you should
have something like this. This is a completely blank
untouched version of audacity, so it should be
looking the same. It's a very simple editor. You can literally drag and drop the audio file that
you want to work with. I've got my file browser open. I'm just going to drop
the audio file in here, and you can see here
we have the wave form. So the flame sound
effect that I found, I'll give you a
quick demonstration. You can see that it's kind
of a lighter clicking on and then the wohing sig. I'm only interested
in the wohing sign. We don't want the lighter.
So this is one of the initial things that
we'll use audacity for here. We can come in and we can make a quick cut to the audio
that we want to remove. So if we just grab this selection of the
bar and press delete, that will get rid of everything
we don't want there. And then, likewise,
there's a lot of empty sound afterwards and
we can get rid of that. After listening to
that, I can get rid of a little
bit more as well. Just making sure we're
not getting rid of any of that kind of key key
information that we wanted. Now, this one, I think
this is probably okay. So we could play
around to some of the audio here with
the different effects. I'm just going to
press control in A to grab the entire timeline, and we can go to effect, go to pitch and tempo, and we can change
the pitch because it did sound a little
bit too high pitched. We can play around this and then we can preview the change. So you can see we get two
very different signs there. So we do have control
over things like that. I'm just trying to clean
it up a little bit. So I think somewhere
around that value is okay. We're here apply. And you can
do a bunch of other things. If the sound that
you bring in is too loud or too quiet by default, and you just wanted a
more standardized volume throughout all of
your sound effects, you can come in and add some volume or compression
to this as well, adding things like
delay and reburb, all very similar
kind of editors. We're going to bring up a bar, play around of the sliders, preview the changes, and
apply what you wanted. Just for demonstration purposes, I think this is sounding
perfect for a flame. So then it would just be
a case of coming to file. We want to export the audio. You don't need to see this. So we're just going to
export this to the computer. Find a location that you're
happy for this to save, and then make sure that we have the format set to
Wave Microsoft. As I said, you can
use OGG as well. I just find that WAV is going
to be a little bit better. The main thing is
not using MP three. If we try and import an
MP three into unreal, it's almost like
an unknown file. It won't be able to play
or use that in the editor. So we'll give this a name. We can leave this at the
default sample rate. Again, Unreal is okay
with some sample rates. It doesn't actually
go this high, so we can't turn these
values up super high. 48 k, Y default is fine. 16 bit is also accepted in unreal so
that will be perfect. And then with all of the
changes that you need to make, we can hit export and save
that to our desired location. That done, I'm just going
to do a very similar thing. I'm going to press control
in A and just delete that. In fact, we can get rid of the whole track if we're
done with that one. And then I'm just
going to drag in the other sound effect,
which is the concrete. So as I said, we have a few
different noises there, which we can merge together, or we could probably just
use this longer one here. So what I think I might do
is the same thing again. We'll just cut everything
leading up to that. And one thing which
might be useful here, there's actually a lot
of background noise, so this could be a useful
thing to demonstrate. What I want to do is maybe
get rid of some of that. So if we select just this
section here, in fact, I'm going to cut this out and this because I want this really
long section of silence, and we're going to
tell it to find anything that sounds like
this background hum. And with that, I'll just
play a little bit of so to try and show the white noise
that I'm talking about here. So you can hear it's just
like a general hiss hum, kind of background noise. If you listen out for
it, it definitely comes across whilst the
stone is scraping. So we're going to
try and remove that. It's actually quite simple. We just want to grab all of this silent portion here or the bit that we
want to be silent. With that selected,
we'll go to effect, noise removal repair, and we'll go down to
noise reduction. First thing we want to do is we want to get a noise profile, so that's going
to be very quick. It's now stored what this
section sounds like, and this is what it's
looking out for, we will need to go and
select everything, and then we're going
to go to effect again. I've just hit Control in A
to select the whole track, go back to effect, do to
noise removal repair, back to noise reduction. Now we can preview this. I think by default,
the noise reduction at six is going to be a
little bit too low. If we try and preview this. We can see even in the empty
portion at the beginning, there's still quite a
lot of white noise there and it's still coming
through in the background. If we bump this all the way
That's definitely worked. We can hear at the beginning, there's absolutely no noise now. It's probably made the
main noise a little bit, the actual scraping
a bit tinny, though. So we don't want to remove too much of the
noise information. We could probably come somewhere just in the low double figures. I'm just hearing it
come through there, so maybe a little bit higher. And there we go. When
there's no noise at all, it's almost completely silent, and then it doesn't take any of the noise away
from the scraping or add any kind of tiny effect
to the core sound there. That's perfect. We're
just going to say, Okay, we'll run that and it's very
quick, but that is now gone. Yeah. So there we go pretty
much completely silent, and we're not going to hear
that through the scraping. We can then get
rid of the intro, and we can leave a little bit of the tro there. That's
perfectly fine. So just some quick ways
that you can effect and change the sound effect.
I'll also come back in. Well maybe add another effect again to lower the
pitch on this one. So we'll change the pitch, and if we can just
lower this a tiny bit. Well, that seems pretty
cool. I like that one. We can change things like if you wanted it to take longer
and sounds slower. We can change things
like this, as well. I think actually making it a bit slow is going to
sound quite good, but maybe not quite that
slow. So I'm happy with that. We can keep that change as well, and you can play around with all of these different effects. I'm not going to go
too deep into this. But as I said, it's a very, very powerful free tool if
you haven't used this before. You can make a lot of changes before we even bring
this into the editor. But the main thing is that
we can now save this again, so we're going to export
this in the same way, so we'll export audio. Save this to a location
on the system. We give this a better name. Call this one rock
grinding or something. Again, making sure
we've got the WAV file, correct sample rate, and
then we can export this. With that done, we can now head back on over to
the Unreal engine. You should have your
sid files ready to go, and we want to bring
these into the engine. Keeping the conscious approach
on our project structure. I'm going to go back
into the main folder, so the folder, which shares
the name of the project. We have our main map in here. At some point in the future, I will want to move this map over to our main
folder structure. We're unable to move maps whilst we are actively
in them with them open, so we'll think about
this a little bit later. That's perfectly fine for n.
What I do want to do though, is I'm going to create
a new folder in here, I call this one assets. So these are the assets that we're responsible for importing. I'll create a new
folder inside of the assets folder called Audio. Inside of the audio,
I'm just going to find those two sound files that I've just saved and
I'll bring those in, and we can do that by
simply grabbing them, dragging and dropping, and we can bring those directly
into the project. In here, we know that this has worked if we have
this playback option. And we can hear that play in correctly through the
editors. That is perfect. Brilliant. Just as an example, I'm going to go to
a different folder quickly because we'll get
rid of this in a moment. I'm dragging in the
original flame MP three, so just a different file type. And you can see here that we don't get that playback option. It knows that it's a media file. It's not too sure what to do
with it, and we get this. So this is essentially
what you want to avoid bringing into the project. This is actually fine
for things like MP four, but for sin files, we want to make
sure we don't have this media file type created. Instead, we want to
make sure we have something like this where we
get the playback options. So I'm just going
to get rid of that. I just want to show you what to look out for and what to avoid. As far as audio goes, though, that's pretty much everything
that we needed to do. We've converted them
to the correct file. We've tested that they work. We could expand
upon this and use different file types to
get some randomization, but we're only going
to hear this once, so we don't really need to worry about customizing
this in editor, and that would be a slightly
different topic in itself. So we'll leave these as just
the default sound waves that will be perfectly
fine for our use case, just to be aware that
there are things like sound cues and meta
signs that you can look into if sign is
something you're more interested in and wanted
to dive much deeper.
34. 32 - Niagara Particles: Next up, I'll take a
very similar approach to just getting our flame
particle ready to go. So just a few small changes,
again, like with assigned, we're not going to
take a deep dive into particle
effects or Niagara, that would be its own topic
and subject by itself, but it's going to be useful
just to understand how to navigate and work with some
of the basic features. So what we have here is
called a Niagara system, and I just wanted to
first of all demonstrate, if we bring this
up to the lantern that we want to use it
with, I know for a fact, this will be a
little bit too big, so we're going to want
to make some tweaks and changes to the size
of the particle. I'm just going to hold
the left shift key and move the widget here. What this is doing, it's keeping the camera in the viewport
in line with the flame. So I don't need to move both
things around individually. We can obviously just move
this where if we wanted to go, but this is just a
nice quick shortcut if you haven't stumbled
across that one. And what I wanted to demonstrate is if we
put this in here. So when we create the blueprint and get
everything together, this is what we want this
to kind of look like. And you can see immediately, the initial problem
is that we have these flames poking
through the outside here. If you press G on the keyboard, so G for golf, this will
hide all of the widgets. So this is somewhat
approximating what the in game look of this scene would provide without any
of the editor widgets. Another shortcut
when we get closer to visualizing things
would be F 11, and this will put you
in full screen mode. So again, apart from
these widgets up here, and this loading message, which hasn't gone
away for a while, this is much closer to what we'd get in the full realized scene. Of course, F 11 will
tog U back out, and G will put the
widgets back on. But this is just to get
this somewhat in place here because we can see
it's not quite central, and we just want to
lower this a little bit. So we can get away with lowering this a little bit
into the lantern, but we're still getting some
of these flames poking out. Overall, though, that's the kind of look we're going
to go for when we add all of this into
one combined blueprint. With that in mind, we can make these tweaks to the
fire effect now, so it's ready when we have that blueprint that we
want to work with. So as with anything else, we can select this
in the editor. If we double click on
the icon down here, this is the Niagara
asset we want to change. We can double click on this and this will open the asset for us. And these can look
quite daunting. There's quite a lot
of information that goes into creating this fire, but we're just going to
look at the very basics. I go to pulls the playback here by just pressing space
on the time frame, and we're just going
to look at the very basics so that we can get somewhat familiar with the different parts of this system. So inside of any Niagara system, the system is the thing that we can drag into the world here. All systems are made up
of at least one emitter, and some of them have multiple. For example, this torch system has these five
different emitters, all doing slightly
different things. We've got three
different emitters just for the torch,
the flame itself, and then one emitter, which is controlling the members
coming off of this. Like with anything,
if you untick them, you'll go back into play mode. You can see exactly what
they're responsible for. So as we untick these, we can see the detail of
all of this is going away. One thing we could
probably do actually because the member
is the main thing, which is causing us a problem. Coming through the lantern, which could look a
little bit strange. We could simply come in and
just turn off the numbers. We probably wouldn't notice, and then we have that
problem resolved. In this case, I will
keep this on so that we can play around
with different things like the scaling and trying to control a bit more
of the flame itself. So what we want to do
here, essentially, just make this maybe
fatter but shorter, and all of that information
can be found through these different emitter modules and the information
found within them. So some of the core
things to look out for, if we go to our spawn rate, this will can control how
fast these are spawning. We have things as well, such as the type of spawning
they're doing. Burst instantaneous
here, we can see means that we're just spawning
a bunch of these at once. Under the particle spawn, so these are
different categories. The update is what's happening throughout the life
of the particle. The spawn is what
happens when we first start trying
to create this. This will give you just
a general indication of where to look to
update different things. Some of the names are
very obvious like if we wanted to change
the color of this. We would do that through
the color property. Things like the initialized
particle section here would allow us to control how long the flame will last. Generally, we randomize a lot of the particle information, and this is randomized
from a minimum lifetime of 1.5 seconds up to 3 seconds. Changing things as
well at random. All of this is made of
individual sprites or images, and we can change things like the minimum and maximum
size of the sprite. So if we wanted to make this,
as I said wider, thicker, we could change things like that through the Sprite information. I think what I want
to focus on is just making the members a
little bit smaller. So if we go over to
the member emitter, the one thing that this
is doing is it has a linear velocity
being applied upwards, so we can grab this property, and we can just change
how high this goes. So the moment is going
a minimum distance of 20 units and a maximum of 60. So let's say ten and 30.
And see how that looks. And we can see that way
the ember is stopping a little bit closer to
the top of the flames. That hopefully won't be
going through the lantern. It does make it look
a little bit strange. So we could maybe make the flame a little bit shorter as well. If we go to one of the
torches here where we see other velocity
information, so pretty much everything apart from the initial torch here, which is a billboard of images, and we might want to reduce
all of these to the same. Generally lowering these seems
to be doing the job here. And that way, we can see
that the embers now, they're still going
above the flame, it's just that the
flame is shorter. So if we compile this,
we'll go back in, and we can see some of
them are going through, but only because we
have that selected. If we leave this, we
now won't see any of those embers leaving
the lantern. So just some very
quick changes here, and this is one of
those things that when you're just getting
used to the engine, as I mentioned, this would be
an entire course by itself, just becoming proficient
with the Niagara system, there's a lot that
you can do with it. But we can make very easy tweaks just by reading roughly
what's happening here. So we could also do things
like if we wanted to change how and where these are appearing.
We've got information. So if we just mute some
of the noise here, the visual information, or
disable everything else. We can see what this is doing
now, and we can change, for example, how this is
spawning in a sphere. If we wanted this to
be wider or thicker, we just change the
sphere radius, and you can see that
is now much bigger. If we increase that a lot, we can see that this
is now spawning in a sphere in a much wider radius. That's all that was
doing So it can become quite easy if you
look at things that way. It can become quite easy to make the changes that you want
to existing example, Niagara systems and
things like that. It's just getting familiar with reading through
what this is doing, playing around of
the properties, and seeing the
results that you get. I'm just going to turn
all of those back on. I think that change
that we've just made to the flame
is pretty perfect. The main goal there was just to make everything a
little bit shorter and fit within the confines
of our land in there. Again, from a distance, I
think that's pretty perfect. It's going to Just a nice, interesting focal
point for the scene. We don't need to
set this up now. As I've mentioned, we could just for demonstration purposes, see what that will look
like in both of them, but we will be completely replacing those with blueprints, which make things just
much more reusable, and will allow us to
put some code and that reusable functionality
in them as well.
35. 33 - Blueprint Lantern: With all of our
effects ready to go. We can now move on to
creating some blueprints. We're going to have
one for the lamps, so we're going to replace
these static mesh and individual pieces
with a blueprint, and also the door rather than having a
couple of different static meshes lying around. We're going to combine this
into a single blueprint, which will be able to house
some logic as well for the animation of the door moving upwards and that
sign being played. To do this, we're going to
go to our content drawer. We're going to go back
into our main folder here. The folder showing the
name of the project. We'll right click again, create a new folder here and I'll
call this one Blueprints. Inside of the blueprints folder, we're just going to
create our first thing. If we tackle the
lamp, first of all, I'm just going to get rid of
this filter again, as well, so we'll just untick the
static mesh filter here. And then we can right
click to create a blueprint class because it's something that
we use quite a lot. It's in this basic
asset section here. We do have a bunch of different options for
blueprints as well. So slightly more unique and
lesser used blueprint types, but we can use this
generic option at the top. And from this dropdown, there are a bunch of
different options that we get when working
with blueprints, all with their own custom unique functionality
and features. The classes that we're going to be working with
are actually very, very simple, and all we need is something which can
exist in the world. It has a transform and is able
to be placed in the world. We can see here, just
by that description, we have this thing
called an actor class. This is an object
that can be placed or spawned in the world.
Perfect for what we need. Anything above that, and
we're looking at things like the pawn or
character types, which are more for what
you're possessing, and then we have a bunch of
other things like components, which are usually
individual parts that you would
attach to an actor. We don't need any of
these. We're just going to want the actor class
to begin with and the naming convention when
it comes to this is going to be BP underscore
all in upper case, and then the name of the thing
that it's responsible for. This, in this case, is going to be responsible for
being a lantern, so I'll call this one
BP, underscore lantern. Nice and simple, with that done, we can double click
to open this. This will be our
first blueprint. We have a few different
tabs, we have a viewport, which will show us
what the elements or the components
within the blueprint. We have a construction script. This is fired off
and is able to run functionality or
logic in the editor, and then we have an event graph, and this is where we're going to house the bulk of our logic, which is the content that
can be played at runtime, allowing us to make dynamic
and real time updates and provide feedback whilst rendering
something out or whilst the player is interacting with a game or that
type of thing. Just as a couple
of examples there. So what we want to
do, I'm going to go back to the viewport for now. The goal is to replicate
what we have here. So two components, we have a static mesh lantern and
a Niagara particle effect. We want all of that to be
inside of a blueprint. So the first thing
is if we press the ad component here
in the left hand side, and we're going to search
for a static mesh actor, and we'll just search
for static mesh. So you can see if
we type static, we get a few options here. We want the static
mesh option here. We can see a new
component has been added. We get a widget,
but at the moment, the mesh hasn't been filled. So we're just going
to use the drop down on the right hand side, and we'll look for the lantern
object we've been using. We can see we have the
Japanese stone lantern. And if we fill that in, that's going to be
the first step. We now have our visual
representation for the lantern in our game
inside of our level. The next thing, remember, I
said, we want two components, one for the static mesh, one for the Niagara particle system. So selecting the default
scene root here. This is kind of acting as
a parent in the hierarchy, wherever this moves, everything
else will move with it. So as a quick example, I'll select the
static mesh instead. I'll duplicate
this, and then I'll nest this second one
below the first one. I'll just give this a little bit of a rotation so
we can see this. So we can see where
I got two meshes. This is mesh one that
we have here rotated, and just standard mesh
is here stood upwards. When it comes to
parenting and hierarchy, if I have this one selected, and I move this around, we can see that
wherever this goes, the child component
will go with it. So that's all the default
scene route is going. It's kind of keeping
everything in check for us. It's acting as our pivot point, the parent in the
hierarchical chain. So that's something
just to be aware of and get used to that
because it will be useful to make sure that we have everything nested
where we expect it. So I'll just controls
d, all of that. We can revert the location, we want this to be
back where it was. I'll delete this component.
We don't need this one. As I've mentioned, if we
select the default seam roots, we'll press add for
another component, and we're going to
search for Niagara. So we want the Niagra
particle system component, a bit of a mouthful. And with this one selected, the Niagra component
we've just added, we'll do the same thing again in the right hand side
in the details panel, we'll drop this down to find the particle system that
we've brought across, which is our Niagara torch that we've been working
with, and we can see here. We just moved this out that that is the one that
we've just updated. So all we want to do is
we just want to move this in place with our static mesh. In fact, now I think about it, taking this
opportunity to hammer home the hierarchy topic. If we grab the
Niagara component and actually put this on
top of the static mesh, This now means if we did need to move just the static
mesh anywhere, the flame component will move with it, which
in this case, makes a lot more
sense because we want the Nagra component to always be inside of this
little outcrop here, so it's always inside of
this window of the lantern. And I'm just going to move
this down a little bit, so it's now relative to the
point within the static mesh. Just check that's looking okay. We can add one final component, which I think will look
pretty good as well. So if we grab the static mesh, we'll add a light component, which will also be relative
to the mesh, the lantern. So if we press add, we'll search for a point light. So we'll have the
point light option. And you can see here this is
just going to add a light. So when we turn the lamp on, we'll turn the flame
on and we'll also add a little bit
of light as well, because the nigra particle
effect isn't actually casting out any light that will be bounced
around the level, so this will just add we can add a nice orange hue
or something here. So Using the arrow just here, we'll just zero the
location back out, we can see it's got a little
bit of an offset over here. So we'll just Put this
back on zero, zero, zero. We can then just grab
the widget and we can move this up
inside of the lantern, so this will be where the
light is coming from. And we can play around to
the attenuation radius. This is probably a little bit big for just a small
flame to be casting. Maybe if we have this pone, and we'll see how it goes. But we'll use the
attenuation radius here, which will make this cast a
light in a shorter distance, and we'll change the color
to be a kind of RNG color. So we can see that color is being reflected on
the inside there. It's a little bit hard to tell right now
because we don't have any background or anything to really show this off against, but this is the property we
want to update just here, so we'll get this a
nice warm orange. One way that we could
test this is if we go and compile,
we'll press save. We'll go back into our level. I'm just going to grab both
of the torch fires here, so control selecting
both of those, and I'll just delete those,
and a quick trick for replacing things that we've had just kind of as placeholders
in the world for now. If we select one of the lamps, we'll go into the
content drawer, making sure that we have
our blueprint selected. We can then right click
on the lamp here. We can choose this option here, the replace selected
actors with. It will find the
thing that we have selected in the content drawer, and we can automatically
replace that with the blueprint equivalent. So this is what this
would look like now. If we were to turn
all of this on and have this
running, by default, we'll set it all
of this is turned off by default so that it
won't be lit up immediately. But then when we have the camera or the player looking at this, we'll have this turned on
through blueprint at runtime, just to make it look
that much cooler, that it's happening whilst
we're actually playing the simulation and having some dynamic feedback
through the code itself. But this is just to give us an idea of what
this would look like if we needed to make the
attenuation a bit higher, change the color, and
things like that. I'll take the same
approach over here. We'll right click on this one. We'll say replace actors with, and then we'll replace
this with the lantern, and we'll get the
same option there. This is already showing that
some things like having the light directly inside of the lantern might not be ideal
here because we're getting some very sharp lighting
effects going on here, as well as maybe the intensity being a little bit
high is so high, in fact, we can't even
see the particle effect. So maybe we could do with turning the attenuation
radius back up, so it goes out further, but maybe turning the
intensity down instead. That we have a wide reaching, but less powerful
light being emitted. And that's still quite high. So if we come here, I'm just
going to drop this down. We want to make sure that we're changing all of these details, the properties in the blueprint. This way, of course,
we're changing it once, and it will populate
across to everywhere that we're making use of
this blueprint asset. So if we tone this back
down, there we go. So we want this to be at a point where we can see the flame, but also have some nice
light in coming out. You might want to increase the
source radius here as well just so it's actually casting
a little bit further. It doesn't need to be
completely realistic, I think, in this case, it's quite nice to have
more of an effect going on, even if it's somewhat
seeping through points where perhaps
it wouldn't otherwise. Again, if you're
finding that the color might be just slightly off, then we can change the
color here as well. So just making these changes
going to be much easier. Now that we can see it lined up with something in the world. So this is actually
looking a little bit nice, and I think still a little bit difficult to see the flame. But at the same time, I think if we keep lowering this too much, we won't see much of
the lighting either, and it's going to be quite
nice to have some light cast on the outside of the cave. I think that will do,
again, at a quick glance. We're not going to be paying
too much attention to this. But the next thing is we
want to make sure that we're compiling and
saving our changes, I'll just dock
this back up here. And as I mentioned, when
we start the experience, I want this to be
switched off completely. So I'm now going to keep an eye on these
values that we've made So let's just say we've got an intensity of 1,400
to round this done. That will be our target
that we want this to hit when we activate this through
blueprint code a bit later. But by default, we're
going to set this to zero, which means we'll
have no brightness. And then if we select
the Niagra flame, we're going to come and
search for something called auto activate in
the details panel, and we'll just tick
this off as well. So now, if we compile
and save this, this is what the cave will look like when
we first hit play. So this gives us some time to get the player's
attention around the cave, see everything unlit, turn the flames on a
little bit later, enable those lights and then
have the door creep up. Just going to be
a little bit more interesting than everything
just starting on, and we can see then the
difference as well at runtime in all of these
effects being made. So that's going to
be a little bit more totive of the
blueprint logic. We're just creating the
blueprints at the moment. So that will be one of the
next upcoming few topics. So we'll leave that for now. We'll compile and
save this, make sure that we have the
lantern ready to go. And then we can move
on to our cave door.
36. 34 - Blueprint Doors: The process for the cave door is going to
be very similar. Now, there's one thing
that you can do. I will introduce this tube, but it's not a
process that I like taking when it comes to
creating new blueprints. We can take an object
in the world, in fact, to avoid messing
anything up and going to create a new
object very quickly. We'll create a new static mesh, which will be a cube, and
with the cube selected. What we can do is we can
convert something that already exists into a blueprint.
The selected. If we go to the little icon
just here next to add, this will convert
what we have selected into its relevant
type blueprint. By default, just now, I showed you how to create an actor. This would make a static mesh
actor because it knows that the core component that this blueprint would hold
would be a static mesh. That's one of the
things I don't like. We don't have full control over the hierarchy of our own class. But basically, we could
do this if we wanted. We can press select, and we can see here that
what we have is a static mesh as the
default components. Now, the problem is that where is our
lamp or our lantern, if we just look at this quickly, comes with a default scene
route, which if we wanted, we could override, this is
not able to be overridden. Where it says edit
and C plus plus. This means it's part of the
Unrel engine source code, and we wouldn't
be able to remove or change this component type. So it just becomes a little
bit more restrictive. You can see as well that the top right hand
side of the lantern, the parent class is defaulting
to the actor class, which is one of the most basic, kind of rudimentary, simplistic
classes that we can use. And for our current use
case, that is perfect. Was with this one,
it creates this as a static mesh actor, which is just an actor class, but with a static mesh
attached to it by default. So I just wanted to
mention that as an option. You may come across that
approach in the future, and may be wondering why
I didn't mention it. It's just because I don't
really like the process, but I do want to
mention it as possible. But I'm just going to delete this and just so that we have full control over how
our Cave door is set up. I'll take the same
process that we have with our Lantern,
right click in here. We'll go blueprint
class, create an actor, and I'll call this one
BP Underscore Cave door. We'll double click to open this. This will open this
in the cave door. Again, we have a standard
actor class now. And when I say that
we could change the default scene route, all this is is something
called a billboard, which means wherever
we look at this from, it will rotate to
look at the camera. And the reason that we have these is sometimes you'll have an actor class which doesn't have very much in it
apart from some code. In those cases, it's quite useful to have this scene route. Because if we have the
widgets switched on, it means that we
can at least see, find and click
this in the world. That's really all this is doing. It's just a nice visual
kind of waypoint for us to find this component, if we didn't have
other things added. We do have things
to get rid of this. So if you didn't want the
billboard, for example, with our lantern, we can still see that billboard
at the bottom here. It doesn't really matter
because the players will never see this
when we're in run time. This is all hidden anyway. But if you really did
want to get rid of this, I'll show you a
quick way that we can achieve that inside
of the cave door. If we go to add component and just find something
called a scene, This is a very similar thing, but without the billboard. So if we click this here, we can see it has a transform. It can exist in space, but it doesn't have any
visual representation. I'm just going to zero
the location back out. And then if we select this and drag it onto the
default sine route, can see that is now removed, and we have absolutely
no visual kind of waypoint inside of the class. It can be useful if
you don't want all of these billboards littering
around the level. You can imagine as
you start adding a lot more things and
a lot more classes, you will start seeing a lot of these billboards just poking
through different areas. Either way, it
doesn't really matter in most situations because
like I've mentioned, as soon as you press play
or render something out, those billboards will be hidden. It's more for us as editors or developers just to
have that flexibility. But at the very least, remember, I mentioned previously, that when working with actor classes, we need at least one
component to act as the root, for all other things
to be attached to. So what we're going to
do now is we'll make a very similar update to the class that we
did with the lanterns. We're going to take
these static meshes, and we want these two big
Nordic coastal cliffs to be placed inside of the
blueprint es static meshes. So I've just navigated
to this in the folder. Remember that you can use
the magnifying glass, and there's a reason for that. So make sure that we
have this one selected, and it will just save us a little bit of
time in a moment. Just to mention as well, that we're not going to be
using these meshes. We will get rid of
these a bit later. We can see here there's
a few refinements. We'll need to make
there's some cracks and gaps in the doorway. This is really just
to get a visual idea of what the end result
would look somewhat like. But we'll make the
final tweaks and changes through our
blueprint class, and these were very
much placeholder. So inside of the cave door,
we can close the lantern. I'll just get rid of
that to avoid confusion. Inside of BP
underscore cave door. I'm just going to add
a new static mesh. And you can see here
that because I have the Nordic coastal cliff
selected by default, it will actually
default to creating the static mesh with that field. So I just wanted to show
that that would just save a little bit of time and make things a little bit easier. If you make sure to
hit compile and save, we can just go
back into the map, and this time, what I want to do is just double check here. Remember, I dragged
the cave door in as an example
just a moment ago. I just wanted to
make sure how this lines up with our
current door here. So at the moment, it's
just a little bit small. Now, where possible, we try to keep the scale of our actor, so the blueprint class. At a uniform one on the scale that we have
down here, where possible, just because when it comes to working with code and
things like that, it makes it a little bit
easier if we know that we're applying a scale
to the default one. So what we're going
to do instead, we'll drag and drop this over, and I'll make a very
similar kind of change as I did with the Lantern
a little bit earlier, where we'll make the changes to the static mesh when we
have this open here. So this will just
give us a live update by having this window open, and I'm just going to make sure that we have the
static mesh selected. Just quickly checking here. The scale that we've applied
to get this to roughly fit the doorway is 4.5 on the x Ys. So we already know there's a bit of a gap, which
we want to avoid. So I'll make this
a tiny bit bigger, and we'll just call this
five on each of the axes. So if I press the
lock button here, that means that I can
apply that change once. I I apply this just to the x, we'll say this is going
to be five units. We're locking that to
be the same on the X Y's and you can see that's changed there
for the ins Z as well. And you can see in the
level, we now have a really, really big cave door. So I think that will definitely
fill all of those gaps. So that's going to
be our first step. And then just to quickly demonstrate again,
I'll drag this back up. So what I mean here is
we have a static meth, which is the thing
that we want to be adjusting and tweaking the size, location, and rotation of. But then the actual
blueprint in the world. So this here, the BP
underscore cave door. You can see that
if we select this, it still has a uniform
scale of one, one, and one. So when we apply our
code in the blueprint, we know what we're
working from, so that's what I was trying to get
out a little bit earlier. So if we start moving
this in place, in fact, what I think I'll
do is I'll begin getting rid of the
existing placeholders, so we can see how
much space we're left with and what we
need to fill exactly. I think I've just
lost my cave door. So I'm going to find the BP underscore cave door by
searching in the outliner, and then we'll just
bring this up. But I think rather than
rotating this one. I think this will
look okay, actually, if we have this facing up
in the right direction, we definitely have a
bit of a gap up here. And then if you imagine
when we animate this open, we're going to have something
like this happening, which I think is going to
look really impressive. And this is just a case of tweaking things and set dressing until you get the
look that you like. So this is why
we're going to drag the cave door back down
here and just play around. So one thing that I did
previously, I remember, I grabbed the static mesh and rotated that, we may
want to do that here. We may want to default this
to be rotated at 180 degrees, and it's just a case of
seeing if that looks better with the door
facing this way. We do then get those issues, where it's going to be much
harder to fill this space. So I think because the bigger
gaps are in the middle, in this case, I'm going to
leave this not rotated at all, which means what
we want to do is, if we imagine the door is
going to start down here, just want one more piece, which will be just
above us here. So if we make this a
little bit bigger, I'm going to press
Control and D, or we can right click, so Control and D or right
click and duplicate. I just want to duplicate
this rock piece. I think what I'll do is I'll grab this second piece
that we've made here. We'll drag this one
up in the viewport. And then if we zoom
out a little bit, it's getting a
little bit cramped, but it's really useful to be able to see
what's happening here. If possible, I'd
normally put this over on a second monitor, so it's not quite as cramped, but we're working with this
just for the recording. And yet, we're essentially just trying to make sure
that we can fill that space. I'll drag this up. I
will rotate this one, so we'll give this a
180 degree rotation. Drag that back up there
because that's going to take up a nice chunk of space. I think if we flip,
this the other way. It won't look quite
so obvious that we're reusing the same piece,
and there we go. I think that is now
filling everything. So we won't get
any light seepage. We may want to bring this over to the side just a
little bit in the level. The main thing here is
just looking to avoid any light seepage or cracks,
because like I mentioned, I want this to initially
look at quick glance as though this is a fully closed
off inner part of the cave. And then when we get
to adding the logic, this is going to slide up and reveal a really pull
back drop here. That's it. So some
nice simple changes. Again, the core takeaways here
just to hammer this home. We're making the
scaling and rotation and kind of set dressing the asset that we
want to be reusable. We're doing that inside
of the blueprint. So again, you can see the static meshes are the things which have got the
scale changed. And then the blueprint itself, we're just going to drag this in and use this in the world. And this is going
to be here pretty much as a stationary object. So if we come in press plate, we can come over,
and we can see, as I mentioned, a quick glance, you hopefully wouldn't be paying too much
attention to this. And it shouldn't look as though anything is going
to happen to this, which will make
it that much more interesting when that
suddenly starts sliding open, the lanterns turn on, and all of the cool stuff will happen through the code that
we'll look at next.
37. 35 - Lantern Functionality: It is finally time to add
some logic to our blueprints ready for our fly
through and to work into the sequencer
cinematic we'll be making. Before that, I've just
restarted the project, and I just wanted to
swing background and make those changes I've
mentioned previously about the map because we're
now in our new project. So I'm just going to go
to the content drawer. You can see here this is
opened into the untitled map, meaning a map which has been automatically generated
when I open the project. That's just because
I haven't set the project defaults
in this one. To begin, I'm just
going to make sure we have the boot
camp folder open, and I'm just going to go from our maps folder here and drag the main map into the maps folder inside of
the blueprint directory. Because this has been
referenced in some of the config or any
files in the project, it's just giving us a
warning that this will be lost if we move or rename
this perfectly fine. And remember, the main
reason I couldn't do that previously is that I
was in the main map, so you're unable to safely move your map from folder to folder if you already
have it open. So this was a perfect example
just to make that change. It's in the right
place, and we can start getting rid of
things that we don't need. And then the other
change I'll need to make is just going back to
the project settings. We'll go to maps and
modes and then down here, rather than having this create
an unnamed open world map. We'll just change this
one to our main map. The good thing about
making that move first is if we navigate to this, it we'll now know exactly
where this is in the project, so it's not going to get lost with lost references
or anything like that. And then we can also set
the default map to be our main map if we were to package the game
and deploy this. The final thing, of course,
is to go back into our maps. We will go to the boot
camp, our maps folder. We'll just double click to
open the main map to make sure we're inside of the map
that we want to be using. And then we can jump
into our blueprint. We'll start with the lantern. This is going to be
a little bit easier to implement with some
very simple logic. We're just switching
two things on or off. So if we select either
one of these shortcuts, if I didn't mention it
in depth previously, is that we can very easily access the blueprint
we want to edit. You can see anything which
is a blueprint here. We can just click into this and this will open
the blueprint for us. As with a few other things here, we're not going to
take a super deep dive into blueprints, covering every aspect
of what things are. This again would be a slightly more intermediate
to advanced topic, but we'll definitely
cover enough that you can create some simple blueprints
and code yourself, or if required tweak and
update blueprints that exist. So inside of our BP
underscore lantern, we already know that we have
our viewpot set up with everything looking as we
want in the correct places. We came in previously
and we disabled the Niagara particle
and the light. So by default, if we come in in press play
during runtime mode, these will automatically be off. What we want to do now is
create some functionality to toggle that so that we can turn those back on at runtime. Inside of the event graph, this is where the core
of your logic will go. Anything you want to happen
in runtime will be in the event graph or an
extension of the event graph. Just to tidy things up and make a little bit of room here.
We can get rid of this one. We won't use the actor
begin overlap at tool. We will look at the begin play, which is the function. It's an event which is called
as soon as you press play. This will automatically be run, and this is a great
place to test things or to set your logic if you know that something
has to happen. When you first start
playing the game. And then the event tick here, this is run constantly, so this is updated based on the frame rate
of your project. This will run 60 to 120
to whatever your FPS is. This will run a set
number of times based on your frame rate,
your frames per second. So if you're running at 60 FPS, this will be called
60 times per second. When it comes to adding
the code that we want, we can start with a really
simple one to begin with. If we grab our point light
from the viewport and we just drag this into
our event graph here. So you can see I've
selected the object, we can pull this in, and this will get a
reference to that object. The useful thing about this
is almost anything that we see on the right hand side
in the details panel, when we have an
object or a component selected will be
editable in code, as long as we know the name. In this case, we're looking
to turn the intensity back up to simulate this being switched back on or having
the light appear. We've set the intensity to zero, and Unreal provides some really useful context
sensitivity searching. So if we pull from this
pin here and drag out, this will give us
access to the variables that we're looking for
inside of this component. So if we let go of this
in the event graph, this will give us a search bar, and we can search for the
word intensity because we know that that is what we
want to manipulate in code. So this is really
just getting you thinking about how we
would approach doing this. And like I've said, just
getting you comfortable with doing some of the basics and
problem solving yourself. If you have a
blueprint that you're given that already has
some code or logic in it, and you just wanted to make
those tweaks or updates, but you weren't
sure where to look. The context sensitivity and the searching helpers
are really good here. We can see here that
what we want to do is literally given
to us in text. We want to set the
value of the intensity, so we would know
that it's probably this one that we're looking
for, so we'll click on this. It did give us
another reference to the point light. We can
get rid of this one. That was just real trying to be helpful in that way with
the one that I selected, providing something we
didn't actually need there. We've already got
the reference to our point light,
which is over here. And then to get this to be called to have this
functionality updated. We're just going to take from
this execution pin here. Plug this into the
execution pin here, and like with the materials. It's essentially calling
one thing to happen next. When this is called, as I said, which will happen automatically
through the engine code. When you start the play button, this will automatically
be called. The next thing to
happen from left to right will be the
intensity being set here. You can see that we have a
float value for the intensity, the point light selected, the float value by
default is zero. I think I said we wanted
this to be 1,400. For the strength when
the light is on. So if I end to 1,400 here, what we should expect is if
we compile and save this, by default, the light
will still be off. But as soon as I press
the play button, the begin play will be called, and the light intensity
will be set to 1,400. One thing I'm going to do just because at the moment
when we press play, the player start is looking
out into the s. I'm just going to rotate this so that
we can see that immediately, we're going to be
looking at the torches over here or the lanterns, and we should see that
get lit immediately. So I'll just press
play, and we can see the results.
And there we go. So we already know that we've manually turned
the light off. And that code is
obviously running and it is updating that as expected. Nice and simple, we have
a quick example of how the begin play works and how we can update code at runtime. Just to give a quick example here of something
running on the eventi. I'm going to run some
very simple maths. You don't need to
follow along with this, but it's just to give some visual representation
of what this is doing. I'm just going to increase the intensity of the
light over time. Something you probably
won't need to do, but it's just a quick
example of some maths, how this will come together, I'm watching something happen at runtime because
that was quite hard to see that anything happened just because it was
already on automatically. Just very quickly, somewhat
break down the code, as I said, we won't go
through this in depth. This isn't something we'll
use or even that important, but it does show off here that
using the same reference, so this point light reference, as well as setting the property, we can also get the intensity. That was done by simply
searching for get intensity. This will return
the current value, the current strength
of that intensity, which provides this value. Then using the Delta seconds, which is a very small
value providing the difference from the time between one frame to another. So this allows us to smoothly animate things
because we're just multiplying a very small value by a random value I've
chosen here of two. So over time, as this is constantly called,
we're going to be adding. We're using the
addition node here to take whatever the
current intensity is, add two multiplied by a
small value like 0.003, to keep things nice and smooth
and slowly incrementing. And then we're going
to set that value, so the return from this will be the new value that we're
passing into the intensity. So if we compile this,
I'm just going to come over here and rather
than flying around. I'm just going to
press simulate. So this is still
playing as I said, This will turn all of the game the real time functionality on. But it just means
that we don't need to go into the editor and actually play with the
character and fly through. And you can see here we have
a very gradual increase to the lights being switched
on or the intensity growing. If we wanted to increase
the speed here, we could just come and maybe
make this much faster, or make this five multiply
by Delta seconds, press simulate again, and we can see that that is growing. Much faster, so more
than twice as fast. Another thing that
we could do here, which is really useful
for when you're getting familiar
with blueprints, is introducing the concepts of something called
a print string. So if we pull from
here and search for print string,
We'll select this one. And because we've
grabbed this in between two execution pins, Unreal again is smart enough to know that we
want this to be hooked up. So now going to on the
event tick, every tick, we're going to print
something to the screen, which at the moment would
just be the word hello. So if we come in and
again, we'll press play, we can see it as just
printing hello 60 times per second for as
long as this is running. What we could do is
we can plug this in, so if we get the intensity, we can plug our
float value here, so a decimal point value. Into the in string and
it'll do a conversion, making that number
readable text. So if we hit compile again, come and press play, we can see that value being
increased over time. Now, that would tell
us that this is actually increasing
really slowly. We wanted this to be
about 1,400 before it was visible enough to
really make a difference. So I'll just come back in again. And we'll increase this to
maybe 50 times Delta seconds. Then if we hit compile,
we'll go and save, come into main, and
again, we can find this. We can see that's now
increasing much faster and providing a lot more of that impact on the level around
us because of how quick, this is getting closer to that 1,400 value that we wanted. Again, this was really
just a somewhat pointless experiment
or example here, but it was just to show
the way that we can add different functionality and some simple code into our blueprint to debug
and see what's happening. Left it running there
just so that we can see the brightness really
ramping up and you can see the difference
that is making and the light which
is being cast out from that as it gets
much much higher. As I said, the main
thing though was just to show that we've got a
few different options. We've got our
function, for example, which is called automatically
when we press play. Then we've got options
of things that if we wanted something
to run constantly, in the background,
we have our eventi. You want to use this loosely because as
you can see there, that will be running constantly. In this case, that mass equation
is being run constantly, and it will start making things
a little bit more costly when it comes to the performance and the hit that I'll
take on your system. So I'm just going to
get rid of this code. We won't be using or
keeping this, as I said. The main thing that we want
to do is set our intensity. Now, another thing that we could have done is if we come from the begin play and we'll search for something
called a delay node, We can choose this one here. We can give this, let's
say a three second delay. So if you ever wanted to stop something happening
for a period of time, we can throw a delay on here. And if we come back
in and simulate, we now know that this
is going to take 3 seconds for this to reach
the value that we've set. Now, I've just remembered
as I was talking. I haven't set a value
because I hooked up the math nodes that has
defaulted back to zero, so I'm going to
set this to 1,400 again and we'll hit compile and save Go back in and then just to demonstrate this
is definitely working, 3 seconds later, we'll
have some lights appear. So just another
way to show all of these useful features
that you have in Unreal. And if you ever not sure if something exists or
had to do something, Google is your best friend, and you can see that
Google mixed with all of the context sensitivity and the helpers that
the Blueprints provide, you can get quite a
lot done quite easily. Now, the final
thing to wrap this up is we don't want this
to happen on begin play. We want something
to be called from our sequencer to activate. The lights being switched on. So, as I've mentioned,
in my mind, what I think we'll
do is we'll start with a nice camera
shot from over here, and then we can
slowly kind of rotate around until we're looking somewhat at this
point of interest. Maybe have a glance
around the dark and cave, come back over, and
I think I'll have a fly through happen and
roughly when we get here. So when we've got that point
of interest more in camera, I one lantern to switch on, we'll maybe leave
it half a second, get the other lanterns
switch on so we get those nice wohing noises
one after another. And then once they've
both switched on, the camera can start moving and have that focal point where the cave door will
then also have a function to make it start
raising and animating up. So with all of that in mind, that's the target goal
that I have in mind, that lets me know
that the begin play solution isn't going
to be what we want. We could try and fake a delay, but again, that's going to be
a little bit hit and miss. I don't know how long that
animation path will take to get from the panning and the animating through
with the sequencer. So what we're going to
do is we're going to use something called a custom event. So if we right
click down here in the event graph and
search for custom event, We can see here, we've got the option
to add a custom event, and it will give us an
option to name this. So this is very similar to the event tick and
the begin play. It's an event, or people
who might be familiar with other programming
languages would be familiar with things like
functions or methods. It's just something that
we can create that can be called at the time that
we want it to happen. And for the naming of
this one, I'll just call it light on or turn light on. And that name is
something that we can then call in other
parts of our code. So if I come from
the begin play, we'll pull from the
execution pin here, and we can call the turn
light on function or event. And you can see here
that custom thing that we've just made
is now callable. If we double click this,
it'll take it down here, which is showing us that this is indeed going to call the
thing that we've made. Again, just for testing when you're getting
used to everything. If we throw a print string on, these are incredibly useful. We'd know that when
we press begin play, what we'd expect to happen is immediately because we
don't have a delay anymore. This will call our
custom function, which will print lighters
on to the screen. If we just come in, simulate, and we can see that's called. It's a nice and simple there. And just in case
you're wondering, the reason we got two of
those is because this is happening for both of the
lanterns in the level. If we were to drag
out a third lantern, I'll just duplicate this,
we'll get three messages. This is why we use blueprints. They're heavily reusable,
very convenient, which means that we can
program all of this once. And each of the blueprints
will do the same thing, even though we've
only had to code, that I'll set this up
once, which is why, as I mentioned, we weren't
going to use static meshes and individual lights and
particle effects and things. Instead, we're just
going to house this into a nice
reusable blueprint. Okay, so the final
thing is we know that we want to have
our turn light on function called
through our sequencer when we're playing
the camera animation. We don't yet have that, so we're going to leave this
on begin play for now just so that we can test
and see things working. I'm going to throw a
quick delay on here. So similar to what
we had previously, I'll pull from here
and search for delay. And let's just add back in
that two or three second delay will be perfectly fine
just so that we can let things load the lighting
and have time to view through the camera quickly before
anything is called. And all we want to do is I'm going to get rid
of the print string. We've got half of the
functionality here, which is to turn on the
intensity of the light, and the thing that we've
currently missed is to turn the Niaga particle
system back on as well. So once again, I'll just
drag the Niagra component into the event graph so that we can get a reference
to this component. And all I want to do
is we've told this to be not activated by default. So we're just going to come in here and we're going to search for a functionality to
activate this again. So we can see here, we
have the option for if we just search for
active or active ate, sometimes you might not know
what you're looking for, so you may need to
switch up the words. But by just typing active here, we can see we've got
a function called set active specifically for
our Niagara component. So I'm just going to say
yes and select that one. Same thing again,
it's just created a reference that we
don't need here. So we only need one of these. So we can delete the second one that's
tried helping us with. We'll pull this over,
and we're going to say that the new
active state is true, so we want this
to be active, no. When this function is called, we're going to turn
on our point light. And we're going to also activate the Niagara flame particle. So if we hit compile,
we'll come back in, we'll wait those 2
seconds, and there you go. So it is definitely
very difficult. There's definitely a problem
with that light where it's really masking the flame. So we may need to do
something about that, but if we get nice and close, we can see the flame was
correctly activated. It's just the case we can't really see it unfortunately
with the point light. So that might just
be something to tidy up and improve in
the polish stage. But at the very least, we know that those two
things are working. And then the last thing
that we want to add here, so the third step, is utilizing those sound effects
that we've brought in. So this is really
simple as well. We don't have a component
here to use for the sound, but what we can do is make use of the built
in functionality, a function called play
sound at location. So these two options do
exactly as they would suggest. Play sound two D
is a global sound. It doesn't matter where you are. It will have the same volume. It will come through both
ears at the same intensity, whereas play sound at
location is locational. So if you're facing
away from it and only your left ear is kind of in the direction of
where the sound came from, It will sound louder
than in the right here. And of course, as you get
closer or further away, the intensity or the volume
will be louder or quieter. So we'll make use of this
nice three D sound option. We'll use the play
sound location. The location that
we want to provide, we'll make use of
something called the default player pawn. The thing that we are possessing
when we're in the world, even if we're in a camera,
we still have an entity, which we're viewing
that camera through and we can find that with
two simple searches, so we're going to
look for something called the G player pawn. So this is what Unreal creates for us by default
behind the scene, just to give us something
to view the world through. And then we can get
information from this, so these pins at the
end here are all of the information
about the properties within that object
or that actor. In this case, we want
to know where it is, and we know that we want
something called a location, so we can pull from
here and we can finally get location or get
actor location. So we'll find the
location of the actor. Again, I mentioned previously, you'll see this
terminology a lot, the actor of something, that's just because it is the first type of class that
we can place into the world, which has information
about the transform, and the transform includes the location,
rotation, and scale. So if we find this, we
can plug this in here, so we can find where
we are in the world, where we're viewing
through the camera. We'll get the location of that, and then this will
tweak the sound. So as I've said, be louder or quieter based on how far
away we are from the thing, which is playing the noise. And then the final
thing that we want to do here, we'll
drop this down. And we've got the fire sound. So a bunch of examples have come across is either
called fire or flame. So to filter those out, we'll just search for
the one that we want. This is the one
that I've shown how to quickly make some changes and make sure we have
the correct format. So I know that's the one
that we want to play. And now when we press play, just do a quick test
again with the sound on. And there you go. You could see that as well as the light and the
flame being activated, that sound is played, and you can hear
that coming through. And as I've said,
we will rather than have both of these
cooled simultaneously, we'll do that with a
slight delay between them so that it just feels a
little bit more impactful. But as I said, it's actually some really
simple functionality, and a lot of this
will just come down to getting familiar with what the engine provides and being comfortable with searching for things that should be available, and you'll just
need to find what the name of the
function you might be looking for or the
feature is called and dropping that
into the event graph. Just a reminder here,
we'll leave this for now. We want this to be called
on the begin play so that we've got something to
demonstrate or test. We will be coming
back at a later time when we've got our
sequencer ready to animate, and we will be
removing this call from the begin play and
we'll be controlling when this function is called manually through the animation. But for now, this is the
lantern ready to go, so we can compile and save this and move on to the
next blueprint.
38. 36 - Door Functiolity: Taking a very similar
approach with the cave door that we've just
taken with the lanterns. I'll do the same thing in fact, we can grab it from here and open this through the outliner. Now, we're going to
take the same approach here is where we
actually won't need the event tick or
the begin overlap, so we can get rid of these. We'll make the
same demonstration test functionality
of the begin play. But again, we're going to create a custom event that we'll be cooling through the animation when we have that
sequence so ready to go. The first step will be to create that custom event
that we want to use. If we right click down here, and again, we'll
search custom event. We'll call this one something
logical like open door. When it comes to naming things, we just want the functions
or the event names to describe as succinctly as possible what they're
responsible for. If you're ever interested
in guessing more into code and the programming
side of things, the general rule
of thumb is that your code should read
somewhat like a book. You can step from one
thing to another and know what's happening without
really looking at the code. But just by reading the descriptive function
or event names, it should tell you exactly
what the process is doing. So in this case,
we could kind of say that we'll have that
because on begin play, we're going to call the
function open door, and we'd expect that function
or event to open the door. So we'll call open door
from here just so that we can test this nice and easily. Again, let's add a quick
delay here as well. And we'll make this one a little bit longer than the lanterns. Just to get a very
rough idea of what will be happening when
we do animate this, we'll have the lanterns
turn on first. When they've lit
up, a second later, the door can slide open. Nice, simple stuff there. And a lot of this will
be somewhat repetitive. We've now had a
good look at what the Blueprint editor provides and how we can utilize
some of these features. We essentially just want to reuse a lot of that same stuff. The first thing is going to
be the play sound location. We want that grinding
sound to start playing. We'll do the same
thing again. We use the play sound location. We want to get the location of the pawn that we're
looking through, so the position of the
camera essentially. And we want to get the
location of that pawn. We can plug this into the location pin here as
we've done previously, and then we just want
to set this to be our rock or grinding
sign that we have. Mme is called rock grinding, and that will just start
that playing as soon as this function
is called up here. I do apologize. I keep going
between function and event. The term is used fairly
interchangeably. There are some
differences. We can create things called functions
here to the left hand side. Again, a little bit out of
scope for what we're covering. But the main thing is just
to know that these are named features that can be called and will trigger something
to happen afterwards, which is why they're
called events. They will trigger an
event to happen when the name of this is called and used as we're doing up here. The main difference as far as you'd be concerned
at the moment between a function and event is all of our events go in
the event graph. Where is if we create a
new function over here, we could call this
again, as with the events, we would
call this anything. I'll just call this
one D T. If we pull a print string from here and
just type the word thing, we can find this by name. If we go back to the event
graph, and as I've said, the main thing is
that the function gets its own little graph, so we can see that
nothing else is in here apart from the
logic for this function. But if we go back
to the begin play, just double click
on the begin play there to return to
the event graph. I'll move this aside. I'm
going to call the D thing. So we can see here, we can
just call this by name again, and this is before the delay. So if we hit compile,
we've got one door, so we should expect the word T to show just once
when we press play. So I took a little bit
of time to load there. With faster loading, you can see the word thing
appeared straightaway. So we know that this is coming in is calling the
function do thing, and it's acting very
similar to an event. It is just to say, as
I mentioned, they're, for the most part,
very interchangeable. To keep things simple, though, we're just going to
work with events. So I'm going to get rid
of the do thing function. We'll get rid of
the cool here as well. And then just
hook this back. Just wanted you to know they're
available is very easy to lapse into using those terms interchangeably because they
do very similar things. So back on our open door event, we now want to have that animation happen
of the door sliding up. So it sounds like this would be a little bit more complex. But again, this is actually
made very simple by some of the default functionality
provided by the Unrel engine. So if we pull from
here, we're going to search for something
called a timeline. We want this option
at the bottom, which is add timeline, and this is essentially going to provide us a small
graph where we can tell it to animate something over a
given period of time. We can come in and name
this if we wanted. So if we press F two to
rename this timeline, we'll just call this one
door animation timeline, just to keep things
nice and tidy because you'll see it did create
a component over here, which is currently
just called timeline, which is a little bit
vague and ambiguous. We don't know what that would be when we return to our code. So we'll call this one
door animation timeline. Or door anim timeline
for shot is fine. And then we can plug this in. So the one other
thing that we want to do here, by default, this hooks us up to play, and we want to make sure
that this always plays from the start of the animation. These different options
just allow us to do things like pick up
from where we left it, if we were to pause
it or reverse it. We can pick up and play from
the timeline previously was because we only
want this to play once and we want it to
play the full animation. T to be sure we'll
tell it to play always from the start point and
finish at the end point. The next thing we want to do
is double click this node. As I mentioned, this actually
has a graph feature, so this will bring us
into the timeline, and we can add a track up here. So I'm just going to
add a float track, and this is our graph
that we can work with. And quite simply, we can
hold a shift, so left shift, and then left click and
you can add these points. So this is our animation graph, and essentially, we would animate the location
of the door. And offset it by these points. That would obviously be quite a jagged up and down movement, we'd probably want this to a
little bit more like this. We'd be going from a start
point to an end point. I'm actually only going
to use two points. I'll just select all of
those and delete those. The other thing is
that by default, this will have a
length of 5 seconds. I'm going to normalize this and just turn
this down to 1 second. If we press and select in here, we'll say one and
then hit Enter, and we can see the length of our timeline is just decreased. Then all I want to
do is I'm going to shift in left
click once here. And then shift in left
click once over here. I'm going to select
this first note. I'm just dragging and selecting, and we'll give this
a time of zero, and a value of zero. So this is the very start of our animation when
nothing has happened. And then the end result of
our animation will be here, and I want this to be a value
of one and a time of one. So at the end of that second, the door would have
fully animated into its resting position. Now, a really cool feature is that we can select
both of these. I'm just drag
selecting both points. Right click on
either one of them. I'm just going to tell this to have an auto interpllation, and it just gives us
a nice bit of easing. We can select either
of these if we wanted. If you wanted it to really have a quick sort of animation out and then ramp off to closing or to hitting its resting point,
you could do that. To change the kind of
animation that you're getting. I think the default
interpolation there is going to be quite nice. It just makes it look
a little bit less flat and rigid, so we'll
keep it like that. And then the other thing here before leaving this graph
and making use of this, I'm just going to
select this word that says new track zero. I'm going to press F two again, and this is something
else that we can rename. It wasn't super clear there, but this is the
variable that will be provided by our timeline
we've just created. I'm just going to call this
one Alpha because this is the difference between where
we start and where we go, often referred to as the
Alpha or the Delta value. In this case, it
will be the Alpha, so we'll press and
compile and save that. Go back into the event graph. And you can see what's
happened now is that we have this Alpha value,
which has been created, which is from when
this is called, this will play the full timeline over the duration of 1 second, and that value will
be getting changed. 0-1 will be the value being
returned over that 1 second. So around about halfway
through the animation, we'll be getting the
value of 0.5, down here, we'll be returning the
value of 0.15 and so on. And we can use that to offset the animation
of the door moving up. So the way that we do this
is surprisingly simple. We again, similar to what
we did with the player p where we have the context
of the actor's location. We can do that from inside of
our own blueprint as well. So we can find the
actual location of this door in the world. So if we just right click
in the event graph, and we'll search for the
word get actor location, This time because we're not
telling it to get the pawn, the context that
it's looking for, it knows that we're
probably interested in the location of the object that we're calling
this function from. If we press that here, we can see that the target is self, so we're going to
get the location of our self, nice and simple. And what we want to do is we want to set the end
location as well. So again, we're just going to right click in the event graph, and we're going to
search for set Atcation. So you'll quite often
find that if you can get the information
about something, you can set it and vice versa. So we're going to set
the act to location. Again, the target will be self, so we're updating the location of where we are in the world. Really, all we want to do
is over the duration of this timeline playing or
animating. We want to update. So we're going to use this
update execution pin. We want to update the
location of ourself, essentially just
animating up the screen. So nice and simple. So at the moment, we
only have one thing, which is the new location. We want to animate this from the start location
to the new location. So we actually need two
different vector points A and B, essentially the start
and the finish. You'd expect, real has some functionality built in
ready for us to do that. If we pull from
our new location, and we're going to
search for the term Lp, short for interpolate. This is a linear interpolation
between two points, essentially meaning doing a smooth animation from point A, two point B, like
I've just said. The reason we have
this value is we want to tell it how fast or how much to move between these two points over
that given time, which in our case is a second. As I mentioned, this is by default quite often
called the Alpha. We already have one
of these properties exposed and ready to go with, so we've already
created our Alpha, so we can plug that in here. And then the only
other two things that we need to fill in for this to kind of tell it
what we want it to do. We want to get the start point,
which we currently have. The start point is where it
is now and the end point. B, where is in the world
at the moment would be A and B would be
however many units up. On the Z axis. So
we're essentially just animating this
value over here. To make this nice and
simple to visualize, we're going to do some code
altomation in a moment, which is a little
bit more complex. So to get the very
simple example done, we're just going to hard
code this at the moment. You generally wouldn't
want to do this, but I just wanted to show the core concept before
diving in any further. So we're going to take the
values we have at the moment, which is our X Y and Z, and we're just going
to copy those by hand into the X Y and Z
respectively inside of A. So a little bit time consuming, as I said, you normally
wouldn't do this. This is just to show the
core concept at the moment. And then with that done,
we're going to take the x and the y because we know that
these are unchanging. We're not moving side to side
or forward and backwards. So we can copy these into the x. And the y of the target results, where we want the
door to end up. And then the difference that we want is to see how far
we want this to go. So this is something we can
quickly check out in the map. So if we grab this
and move the door up, it depends whether we
want it to go all the way through the ceiling
or if it's going to look nice just to have a
sort of a halfway opening so that's not fully exposed and that way we need to go
through the doorway. This is something
that we can tweak. But the main thing is seeing roughly what the
difference is here. So we know we're starting at 94, and then let's say
that we want to animate it just up here. We're going around
about 1,000 units up. So let's call this 1094. That could be our
animation end point. If we come back in here,
if we simplify this, if we just turn this into 94, we can do some really
cool stuff with unreal. We can do some simple equations at least I quite like
this and blueprint. So if we say 94, plus 1,000. If you've got a more
complex number, this might be useful. This will give us 1094, just something to
make you aware of. You could have just plugged
in or typed in 1094 as well. As I said, if you wanted
it to be more precise, then you can add it to the decibel point value or whatever. But what this will
now do, hopefully, the visualization before we hit play is kind of
starting to make sense. Over the space of a second, this will go from
our initial location to our end location, which is essentially just 1,000 units up on the dead axis. So we can have a quick
look at this if we come in press, Controls Ed. I'm just getting that
back down on the floor. That will also remove that that's undone the changes
I've made in the blueprints. I'm just going to need
to come in quickly and type 1094 again, hit compile and save, just so that this was back
where we wanted it. And then if we simulate this, remember that we would expect
the lamps to come on first, and then that will animate up. Over the space for a second. Nice and simple, that's really
all that we're going for. And then, as I mentioned, we can rather than
hard coding this because we want to make this
as reusable as possible, the door may not always start
and end in those points. So we're going to
use some code to track where we want this
to animate between. The first thing we want
is we know that we have a starting point that we
want to remain unchanged. We already have the
start of this over here. We have our get at location. Now, if you think about it, if we plug this in here because this will be
animating over time, the point A would be
changing as the door raises, which would give us a kind of
a buggy unwanted animation. Because each time
that this is called, it's kind of like a temporary
tick or an update function, the atication is being updated, so we're not getting that smooth interpretation that we wanted. So the first thing we
want to do is we're going to Pull this over here. We'll pull from the
vector pin here, the location value, and we're going to create something
called a variable. This is just a value which
can change over time, or it can just be stored
as a placeholder. You can see we've got the option here to promote
this to a variable. And when we create one of these, this will be in our variables section to the left hand side, and we just need to
give this a name, and I'll call this
one Start location. So again, we just want to give
this a clear concise name. This is the location
that the door starts. We just want to make
sure that we hook this up to the execution pins. So we need to actually store this as a variable,
and to do that, we need the execution
pins to make sure that this functionality
is cooled. And then just to recap, essentially what's
happening now is when we call the
door to be opened, is going to play the
sound, is going to store the current location of
the actor or the door. Something called
the start location, and then we begin to
get the variables that we need to run the
animation over here. If we select and drag the
start location into the graph, we'll get two
options, because we can get or set the value, we just need to tell
it that we want to currently get the value here, because we want to use this, we want to read that information, and we'll provide that
as the argument for A. So we're going to start
from the start location, and then to make this more reusable, we can duplicate this. I'll press control in D to
duplicate the start location, and we can do some really
simple maths here. If we pull from
here and say plus, So we can add to our vector. We basically want to say
that we don't want to make any change to the x or
the y because again, remember we're not moving
forward or sideways. We're just moving up, but
we can say that we want to have the door end
100 units higher. Than the start location. So the start location, remember is essentially when
we press play, it will be this value
here, so 94.610, whatever. So we're saying that the
end location will be 94 point plus 1,000. And that's where we
want to animate two. The first example was
just to show you what was happening to get the concept
of the animation across. Generally, we don't want to
hard code things because the really good thing now is
if we come in in press play, that will work exactly
as it did previously. So we have a nice
smooth animation there. But the really good thing about this is remembering
that previously, we were hard coding everything, so this was our start and end point plus the sizing that we were putting in by hand. Let's say that we do some
reworking of the level. We want to keep everything
exactly the same, but we just want to
move the cave door over here and we move all of
the messes around with it. But this now has a
new start point. So we need to go back into the class and re
hard code all of that based on the designer or the level editor making
some changes here. With our version now, it's finding that information
through this function cool. Setting whatever the designer or level designer has changed,
storing that in code, and then we're just
using that with some simple maths here to add 1,000 units
to be the offset. Now if we press play. That will animate from here and do
exactly the same thing. So the core functionality is still working
exactly as intended. So it just controls ad that back so that it's
in the right place. That was really
just to get across the point of why we would
put this in a blueprint and how making this more of a dynamic code situation is going to help us
in the long run. And then just moving
things around to keep the code somewhat tidy in things like this is
not that easy to keep things neat
and easy to see, but we can double click
on the wire here, and this has created something
called a re root node, just so that there's not
quite so many things overlapping in all directions. The main thing again, just keeping it readable
and easy to see. So we know that we're storing the location that
the door starts. We're telling it to play the door anim timeline,
so the animation, and we're telling it to update the location of the door
and interpolating it, so smoothly animating
it between two points, which is the start location plus the start location plus
100 units on the dead, so 1,000 units higher. That's it. Really that simple. Now one other thing
that you may find is perhaps the door is
moving too quickly, so it's only taking
1 second to go up, that may be faster or shorter than your sound effect
is actually playing. We can make a really
simple change to our animation timeline play rate to have more control over
how long this takes. Just turning the sound effects back on so we can
quickly test this. And I think the flames actually
sound really good there. I think that's a nice effect
when everything lights up. But of course, we can see
that our sound effect is playing for probably two or 3 seconds longer
than the animation. So we want to tweak that.
Now, we can come in here, so we'll find the
rock grinding sound. We'll search to this. We
can highlight over this, and we'll see that the duration
is actually 6 seconds. It's quite a long sound effect, I think because I
slowed it down, so that's something to be
aware of, so 6.6 seconds. So we want to make our
animation at that long. So what we could do
is we could come in, and we could change the
length there to 6.6 seconds, and we'd have to move this. But of course, this
is very similar to the movement situation where if through play testing and showing it to the designers
or the sound engineers, and they decide actually, that sound effect
is far too long. We want to speed that up and change the
pitch or whatever. Again, that means that
you're going to get a task or request a little bit later that now actually the
sound is 3 seconds long, so you need to come back in
and change the duration, change the timeline, and
everything like that. So we want to make
this dynamic as well. And that's why I always set my animation timelines
to a length of 1 second, which is a uniform
normalized value, and then we know
that we can multiply this or divide this by a certain value to
either increase or decrease the length
of the animation. So that would make a bit more sense when
we go through this. I'm just going to move
this over to the side. I'm going to grab all of these and move
them to the right. If we drag in our
door anym timeline, we can get a reference. Again, we're going
to get a reference to the door anym
timeline, which is this. What I want to do
quite simply is set something called
the playback rate, the speed at which this plays. So it's called play rate. I'm just going to use the
set play rate function here. I've just searched
rate to find this one. And then we want to make sure that from this execution pin, we hook this back up, so
execution to execution. Remember that if there's ever a dead link between these,
then this wouldn't get called. So always remember to hook
back up your execution. The best way to
think about this is this is your command from
here to do the next thing. And then from here, once this is done to do the next thing, if that chain of
command ever stops, then the next thing
won't be done. Very easy for new developers
I find to overlook that. So always make sure you're keeping an eye on
what's happening and also remember you're always
running from left to right. So all of this
won't be called or processed until this
is complete or done. And then the play rate is essentially how
fast this is playing. So if we say a play rate of two, this will run two times faster. So if we hit compile,
we'll come in, press play. You can see that only
took half a second. So what we want to do is we want to work out some
kind of conversion here. If we made this 0.5,
then obviously, it would take 2
seconds and so on. So we want to set our play rate here so that this takes
roughly, I think, what was it 6 seconds
for the duration here, so you can see the duration of the audio file is 6.62 seconds. So roughly around about there
will be perfectly fine. This way, we just get much
more flexible control here. If people do start
playing around with the sound effects or they
want you to change this. We do still need to come
in and make that change, but it's much easier to change just this one variable compared to always coming into
the animation timeline, we need to change the length, the different variables
within the graph, and this is a really
simple graph, but they can get more
complicated in this as well. This means that you can animate just once, you can
leave this alone, and then we'll just change
the play rate to match the effects or whatever's
going on in the background. We're aiming for 6.62,
if we just call it that. So we're going to
divide one by 6.62, which is 0.15 something. So we can probably just
round that to 0.15, and it will animate for roughly the correct
period of time. So that should take about
6.6 seconds to update. In fact, we can pull
in a calculator. We just double
check here, 6.624. So if we plug in
those variables, we've got 1/6 0.624. So just over 1.509,
which will be fine. Again, we're not going to need to match this up perfectly. I think the sound
effect, especially because the sound
effect I've used, is not going to sound amazing
with the rock moving, is not quite the
correct sound effect, but it's just to give
that suggestion. Ours, a sound engineer would do a much better job and provide you some
proper sided effects. But if we give this a
quick play and then we can see if it at least
roughly matches up. I mean, that was pretty
spot. So I'm happy of that. As I said, the main thing, we've got the time
to be correct. The sound effect. It
sounded like a stone being dragged across concrete rather than large
boulders moving across. We could probably make
that more basic deeper. Again, I'm not a sound engineer. If you have a sound engineer on. They could really do probably a really
good job with that. Just to say, we're just guessing the ideas across at the moment, and that is a really nice
quick way, as I've mentioned. The great thing about this is if somebody does come in and change this and you
hand this over to sand engineer and they
say this is far too long, we need to make this
shorter, deeper, whatever, you come back with
a three second long clip. You're just going to come
in here, nice and simple, double what that value is, or whatever the case may be. And remember, it's nice simple
one divided by whatever the target time is because we've set this to a uniform one value. So that wasn't picked at random. If we normalize this value, it makes it much
easier to update the play rate to match how long we want
this animation to take. Again, remembering that
we will be coming in and removing this from the
begin play a little bit later. But hopefully, you've seen how useful it can be just to set some of these debug
testing situations up, so we can easily
come in, press play, let the things do their stuff, test the sound
effects like that. Just a click of a button, and the next thing
we'll be moving onto is the animation
and the sequence. We can look at how we can
trigger these events from external classes or areas
inside of the unrelenum.
39. 37 - First Person: This point, we have our lanterns and the door blueprints
pretty much ready to go. We will need to make some
tweaks to these a little bit later just to get them
fully interactive. Now, I've mentioned a
couple of times that we could have been looking
at using the sequencer. In this version of the course, we'll actually be going through a more kind of gameplay
oriented approach, and we'll be making the different blueprints
that we have, the lantern in the doors
interact with a character, so a character that
we can actually control with the
mouse and keyboard, run around and have some feedback based on
what the players doing. So to get that
ready, we will need a first person character just to keep this
nice and simple. You can choose to import
the third person character. I'll show you how
to get all of these into the project in a moment. And that will also
provide us with the opportunity to
look at how we can get some of the core classes set
up for a game based project. So to get started, we're
just going to go down to the content drawer to bring
things into our project. I have mentioned this very
early on in the course, that as well as importing the assets from the
marketplace and manually. We can also bring things like the templates into our project. So as long as you
have the templates installed to your
engine version, which you'll need to do
through the Epic launcher, if you don't already
have that through the options that I've shown before to add the extra features
packs and the templates. With that installed, we can go to the Add button just here. We're going to add a
feature or content packs. So these are the things that are installed per engine version. And we're going to add
that to our project. And these are the options
that we have quite simply when it came to
choosing whether we wanted a blank project or a project based on a
certain game type. In this case, as I've mentioned, we've got things like the
vehicles, the third person. I think it's going to be easier to work with first person, making sure that we keep this as a blueprint project up here. So select first person, and then just tell it to
add this to the project. So nice and simple, that was
done almost immediately. And that's what I was saying
earlier on in the course is that it's quite nice to
start with a blank project. You're then in full control over what you're bringing in,
what you're working with. But it's super simple
to add things like this into the project if you decide that you need
them a little bit later. Some of this is going to be much more in depth and would require a much more detailed
explanation than we're going to be going for in this completely
introductory course. But what we can see
here is that we were automatically opened into
the first person folder. So again, in a similar way
that we've kind of given ourself a name space with
the boot camp folder here, when we've imported this has created a first
person folder so that we know that everything
that we've just imported for this template
is going to be in here. And that is all of
the blueprints, and we won't be looking
at all of these, as well as some
inputs, which again, is a little bit more of a kind of technical in depth topic. Which I will be
including and covering fully in future
courses, but this one, we're just going to
make use of what we are provided inside of
this template pack. And then if you wanted,
you could also go into the first person map. So if we just jump
over very quickly, we'll have a look
at what this is, we'll close these down for now. But really, this is
just a nice kind of playground where
you can come in, shoot things, pick up the gun, shoot these physics
objects around, and just experiment with the
first person controller. We won't be using a lot of this. We're just going to keep our focus on the first
person character. So if we go back into
the content draw, I want to do just to keep
things nice and tidy. I'm going to go into the
first person folder here, into the Blueprints folder. And I want to take our
first person character, the player controller
and the game mode, because these are the only
classes that we really need to bring across
to our project. We won't need the
projectiles, the gun, or the weapon component, because it doesn't really fit what we've been
creating so far. You can keep these and use
them if you want to, though. But I'm going to go to
the Blueprints folder inside of our boot
camp folder here. So we'll go to Blueprints. And this is where we want
to take those three assets. So that everything that we know we want to keep working with, will always end up in
our own named folder. So back into the
Blueprints folder for the first person project, we'll grab these and then
just move them over. And we'll do that now just
so that we don't have any redirector issues or kind of lose the classes in transit when we start making
changes to our project. Going back into the map that
we've been working from, we'll just go to our boot camp, the maps folder and open
the main map just here. I just wanted to show that if we press play at this stage, we still have our floating pawn, so something which
will just fly around. It doesn't have any
collision, we could easily go through the different elements here that we don't want to. So that's going to be one of the first things that
we want to change. And this is what I mentioned. This is going to introduce us to those gameplay
framework features and allow us to manually manipulate the core elements in
classes for our project. And really, the main goal at this stage is just to make
sure that when we press play, the first thing that we want to control is no
longer this default pawn. Remember, if we press play, if we press F eight to
eject, we can see here, we're controlling this thing
called a default pawn, because we haven't
told unreal what to use when we press play. We haven't given it a specific class type for us to control. It's just creating this
gray floating sphere, which can fly around
the level kind of like a spectator in
first person games. So that's what we
want to change, and we can do that very easily. So if we go into the
project settings, which if you don't
already have that open in the top left hand side here, we can go to edit and
then project settings. We'll navigate on over to
the Maps and mode section. So we've seen this before
when we're setting our map. As I've said, this will
be used quite often, and we can see here that
we're using something called a default game mode or
just game mode base, which is our default game mode. If we drop this down,
the selected game mode, we can see all of
this is grade out, meaning that we cannot change
any of these properties. So what we want to do is we're
going to leverage the BP, underscore first
person game mode. So it's using the same
naming convention that I've recommended before. Another reason that I've
kind of been reiterating and making heavy focus on
the naming conventions. As I've said, epic themselves and the templates and
everything like that, we'll all use this naming
convention as well. So if we change this, we can see a few other changes
have been made. So it's changed the default
class from our default pawn, which is what we were
controlling before to the BP underscore first
person character. And that's what we
want to control is the first person character
which can walk around, pick things up and
interact with the world. It's also changed the
player controller to be the BP underscore first
person player controller. And really, again, this is
much more in depth than we need to be looking at in this completely
introductory section. But the way that you can
think of the character or the pawn versus the player
controller is the pawn, the first person character
is the thing that the human, the player is controlling. It is the player's direct
interaction with the world. Whereas the player controller is the first thing
that receives input. It's kind of like the brain or the sole for the character. It receives the
physical inputs you're passing into the
keyboard or the mouse, whether you're
telling the character to move forward or backwards, it's the player controller, which picks up that
information and passes that down to the character
or the pawn classes. So that's why we have these two, one to receive the input, and then one to act upon
that input in the world. So the main change that
we'll see now is if we go back into our main
map, we press play. We can we can still move around when we click
into the window, we can move around and or
look around with the mouse. If we look into the right
hand side in the outliner, you can see that rather
than default pawn, the game has indeed spawned in the BP underscore first
person character, which is exactly what we wanted. The main changes on top of
that is if we press Q and E, we're no longer
floating up and down, which is confirming
that we don't have a spectator pawn anymore. This is a grounded
physical character, working out the standard physics constraints
that you'd expect, meaning that if we were
to walk off of a ledge, we would actually drop, whereas the other pawn would have
just been floating in space. And if I press W AS and D, our movement
bindings, you can see that we're moving forward
back left and right. Again, we can do things like
walking up the hill here. So we're taking into account
slopes and things like that. We just have no your bog standard first person
character input, which is what we wanted. If we press space, we'll jump, and you can come in
and add things like sprinting and crouching.
All of that is possible. Slightly past what
we need to do. We just need something
where we can walk around and interact with
the world around us. So that's the first part
of the goal complete, and just a very
quick overview here. You can look much further
into this if you wanted to, but just to have a quick
idea of what's going on. If we go into the input folder inside of the first person, we should probably bring
this across as well. But what we have here in
the IMC underscore default, this is using the new
enhanced input mappings under the mappings folder here. The reason that we
can move, look, and jump is because
we have all of these bound to certain keys. So when we press space,
that will make us jump, and the reason that
this is useful to know without needing
to go full in depth with blueprinting
and creating your own character is we can
quite easily come in here. We can press the
ad button up here, and we can add a new binding. So if we also wanted to
make something strange, let's say Z to be jump as well, we can press this
button just here. We can press the ZD key, and now if we come in and press play and press the ZD key, the character will
jump, like so. So nothing fancy, but just to say that these
are kind of set up ready for us to go and very easy to
customize and tweak. Likewise, we already have
the up down left right, as well as WAS andD and the
game pad set up for movement. But if that wasn't enough,
you could come in, you could add some
more bindings here, and we could have
different things moving the character around. So this is where
we'd go to change the input settings
for our character. And the way that this
is working using a bunch of different
action classes here, to say what type of input the jump action
should count as. We're just bring
in the jump here, just saying it's a
digital Boolean, which means it's either
on or off in comparison. We have things like
the move action here, which is a two d vector, meaning that it will track
forward back, left and right, and the values kind of going between those between
minus one and one, essentially, whether
something is pressed in a positive
or negative value. And then just to show
where this is all used, inside of the blueprints folder, inside of the player controller. You can see here quite simply, it's taking the enhanced input. It's binding the
input to this class and anything controlled
by this class. So this is what it's saying now, this is literally taking that physical input that you're providing to your
mouse and keyboard. It's binding and sort of
checking for that here. It's mapping your keys to this default input
mapping context, which is what this counts for the IMC is your input
mapping context, and it's using the default one, which is the one that
we've just looked at, if we just quickly go back here. Taking all of the jump,
move, and look inputs. And then because the
player controller passes that information across
to the player class, if we open this one, the
first person character, we can see here,
we've got bindings to the look, the move. And the jump. Now, this is the sort of thing
it would be much nicer to go through in a kind of step by step
to recreate this, but I really wanted to just get the core concepts
of blueprints, class communication and
some basic features and functionalities
across at the moment. So I want you to be aware
that all of this exists, and in future courses, we will go in depth, and we
will tear all of this apart, and we will make
this from scratch. But for n, just be aware that
you can research into this. You can read back through
what's happening here. You can recreate this type
of thing if you wanted. We just know that this is
where this is located, and we have something
working for us just to get our initial tests and
features up and running. So the final thing, before
wrapping up this topic, I'm just going to go back into the first
person folder here. I'm going to grab
this input folder, and I'll move this back into our boot camp folder as well. We won't need the map. We
don't need that demo map, and we won't need
unless you wanted to. We won't need the rifle, the weapon component,
or the projectile. Quite simply, if we bring
this into the level, this is just what allows
us to walk over this, and the character will
attach this gun to them. And we can fire projectiles
around the world this way. Now, again, you
can probably see, it doesn't really fit too well with the theme that
we've had going. We're not going to
have any enemies or anything like that in
here just at the moment. So I'm just going to
choose to remove those. And just to keep things
as tidy as possible, I'm going to come in because
I won't be using those, I'll remove the weapon
from the level, and I'll get rid of the first
person folder just here. I'll right click and
we'll delete this. And we can tell this to force delete all of the
relevant assets here. There won't be any conflicts or anything being used
or overlapped. Likewise, for the same reason, we now don't need the
visual assets that came along with the weapon
or the weapon class, so we can get rid of the
FP weapon folder here. So they were quite simply
the textures, materials, and the static meshes which were related to visualizing that gun. The first person arms
will probably be useful because we do have
this when we press play. If we look down, we can we
might need to move here. But you can just make
out at certain points, the animation will
be happening that the arms are moving around,
so we can keep these. That gives us something to at least look at if we look down, and we see those come into play. But what I'm going to do again is inside of our assets folder. I'm going to move the character, which is our mesh materials and texture and the animations, and we'll just move this
into our own assets folder. So again, we're just
making sure that the things that we're
working with and that we want to keep are
going to be inside of our custom boot
camp folder here. And then that way, we can
come in and we can get rid of the first person items. And then everything
else is going to be a little bit overkill to
try and tidy this up just because we've been getting
so many different assets and folders from all
of our plug ins. But that template
project was nice and kind of condensed and
easy to tidy up a little bit, so I was happy to spend a bit of time there to fix that up. And then if we just
press play, again, just to make sure everything's
still working as expected, you can see that
actually when I jump, the items kind of come in
at the side of the screen. Everything works, even
though we've moved everything into its
correct place now. We still have everything
running as intended. With just a few small changes, we've now imported the
first person template, the character, the game mode,
and the player controller, all of the movement bindings, and we have that
ready to go to walk over and start triggering
these different effects with the lanterns and get
the door open based on a few kind of gameplay related requirements
and mechanics.
40. 38 - Flame Pickup: So the next thing is
we're going to get the character interacting with the items around the world. And I wanted to make this
somewhat like a very, very simple puzzle game. If you think about
something like Tom Rader, where you would need
to pick an item up, and then only once
you've picked those up, could you go and interact with the other items
around the world? A way that I think would
be quite nice to show off different types
of class interaction, which is really one of the
core concepts that you need to learn to be able to start
fleshing out your own ideas, which is how one class, either reference or check
information in another class. The way that I
think we could make heavy use of the few
different classes we have available is that
I'm going to create one new pickup, which
will be a flame, and the character
will need to be holding that flame,
not visually, but just having it noted
that they've collected it before they can go and
light the two lanterns. And then only when the two
lanterns have been lit, will the door open? That means that
the door needs to check that both
lanterns have been lit, and the lantern needs to check that the character
has the flame. If you've never done
any programming or blue printing
like this before, that alone can sound like
it would be quite complex. But I wanted to show you that the programming logic and the concepts behind this
are actually really simple. The first thing that
we need to do, if we break this down in a list of problems to solve
The first thing that we don't have is a pickup. So that's going
to be this topic. We're just going to create
another blueprint class, very simple, something
that when it's overlapped with the
player will be collected. So I won't spend too
long in this process. The actual creation of
the class will be very similar to what we've seen with the lanterns and the door. So we're going to go
into the content drawer. Boot camp, Blueprints,
right click, and we'll find the
blueprint class. Again, we just need the
bog standard actor class, just something which
exists and can be placed in the world,
like it says here. Remember, if you're ever
not sure what you need, have a quick read
of the descriptors, and they will probably point
you in the right direction. Naming convention,
we want to make this clear and concise
to what it does. It is going to be
the flame pickup, so BP underscore flame pickup. And then inside of this, I just want two
different components. Now, the first thing you
probably know that we want to add is a Niagara flame, so we're going to go to
add the Niagara component again or the Niagara
particle system component. We'll head on over
to the details panel and we'll set this
one to be our torch. If we hit compile, we
should see that come in. And then the other thing, so
this is the thing which may not have been quite
so obvious if you haven't done this
type of thing before. But we want a bound an
object of some sort, which we'll be checking on
whether it's been overlapped, so whether it's in the
same physical space as the character. And we do that with
something called a collider, and we have different
types of colliders here. So if we just type coal to
start finding collision, we have the box, the capsule, and the sphere collider,
they all do the same thing. They will just be checking
if something ever enters the same physical
space as itself. For things like this, I quite like using the sphere collision, just because it
means that you can approach this from
any direction, and it kind of feels
as though you're getting a fair kind of
pick up bound here. It can be quite hard to notice, but you will see that
things like using a cube collider or box collide It can be quite
obvious sometimes when you've walked over an edge
or something or a corner, and it can make the player
notice things like this. I'm just going to go
for a sphere collider, regardless of where
we end to this, it will be the same
distance from the flame. And then the main property
that we want to change here is how close we
want the player to be. So this thin line here, our sphere representation,
the player needs to touch this before the pick
up will be collected. We can control on
the right hand side with the sphere collected. In the details panel, we can change the radius by increasing or
decreasing this. If you wanted this to
be quite forgiving, we could give this a
much bigger radius, and the player
would need to be at a much further distance before this class
is being picked up. If you want the player
to be right on top of the particle or
the flame here, then we just need to make this radius a
little bit smaller. So I'll give this
quite a small radius. And then just considering how
we might want this to work. I'm actually going
to grab the sphere. And again, this is going back to reintroducing the hierarchy. I'm going to grab the sphere, place this to be the new default scene route or
the new scene route, so we'll make this
the new route, just because in my mind, I'm thinking that we
probably want to bring the particle closer to the
bottom of the pick up here. And then wherever
this sphere goes, we want the particle
effect to follow that. We now have control
over how big or small this is with the sphere
somewhat in the middle. We can place this
manually on the floor, so it kind of sits
snug on the floor, or we can have this hovering.
That's not too important. But the main thing is that when we bring this
into the world, What we want to ensure is that wherever we move the sphere
or the object as a whole, that flame is going to
be following it around, and we have that
full control there. Another thing here with
that kind of thing in mind, if we move this down a
little bit, and in fact, it is a little bit difficult to see or guess where
this particle might be because we can't really
activate it before we come in and hit simulate
or press play. What we can do instead is if I move this right to the bottom Of our collider here, so maybe just up a
little bit from that. That gives us a good
idea that as long as this collider is
flush with the floor. So if we just press end, I'll move this over, move
this up, and then press end, as long as that is
flush with the floor, we know that when
we hit simulate, that will look as though it's just a flame
sat on the floor. I Doesn't make sense, but again, we just need something for
the player to pick up. So that's perfectly fine. And these are just
the considerations I want to get you in the habit of making when setting up your classes
and things like that. There's no right or wrong way, but this is just how you
would kind of approach. This is essentially
teaching you how to think about solving the
problems that you're given. So that is the setup of
the flame particle done. The next thing is
we just want to add that interaction with the
player when it gets picked up. So in some tutorials, you may see, in fact, a little bit too
often, I find that you see a lot of the logic being
done in the character, so the character class is always checking on
whether it's opening a door or picking up an item or being hit by an enemy
and stuff like that, and you end up with a very cluttered complex
character class, which has got too much going on. Now, the way that
we want to approach this when coding ideally is each class should be responsible for as
little as possible, but for very specific things. So in this case, the pickup should be responsible
for being a pickup, checking whether it
is being collected, and then whether it has been collected and then
destroying itself. That's really all a pickup
should be concerned with. And then the character should really only be concerned
with moving around. It's there to receive the
input and interact with the world based on simple physics and movement
from the character, which is where we get
that weird overlap. So essentially, what I'm
trying to avoid here is having the character do pick up
things and vice versa. With that in mind,
we're going to go back to our spare cliide. We'll scroll back down to
the collision settings here. And we just want to make sure
we have a collision preset, and this gives us a bunch
of different information on how this object perceives
other objects in the world, whether it physically
blocks things. So we have two
main options here. We have block and overlap. And this is saying whether
something should be allowed to pass through it, which would be our overlap, but it will track that something has passed
through the same space. So I always like
to think of this as your checkpoint
in a racing game. Obviously, we want to know when a car has gone
through a checkpoint, but we don't want to block them. Obviously, if you're playing
a racing game and you go through a checkpoint
and it's physical wall, that would be quite frustrating. And then that's the second option is that we have blocking. So this is when something is
in the same physical space, and we want to stop it from
proceeding any further. So in the racing game, that
would be your boundary walls. We don't want the cars
to be phasing through what looks like it should
be the floor or sndd walls. So these are the
main two options, we can either overlap something, which in unreal means that a
message will be updated or senti saying that
something is now in the same space as me,
but I'm not stopping it. Or we have blocking,
which is hitting, and unreal will pass
that message back saying that something's trying to be in the same space as me, and I'm trying to physically stop it from getting
any further. We have the third option
as well, which is ignore. Very similar to overlap, where it doesn't stop the
object from passing through, but it also doesn't
send any messages. It does as the name
wouldn't suggest, it ignores the
collision entirely. So for the pick up,
what we want to avoid, we don't want the player
to be pushed away or blocked or stopped when
they're trying to pick it up. So we want to make sure that
this is set to overlap. So I'm just going to set this to overlap rather than
overlap dynamic, and we can see that
the object type here is set to static, meaning it's not going
to be moving around, or this doesn't stop the
object from moving around, but it stops the processor from tagging this as an object which is expected
to move around. And then it's just set
everything here to overlap. So it will overlap with everything in the
world, including, and most importantly, this
option here called the pawn, which is what we will be
controlling a type of pawn. Specifically called
the character class. So with that done, if we
hit compile and save, we're just going to want
to go to the event graph, and we can show this off in
a really, really simple way. So with the sphere
collider still selected, we're going to
scroll down a little bit further in the
details panel. And we will go to the
events section just here. And we can see we
have a bunch of predefined event dispatchers
set up by Unreal, essentially allowing us to
bind when one thing happens, we can bind a call to something else being
followed up afterwards. Similar to the event begin play, the event tick that
we've seen previously, we can press the plus
button on any of these, and then bind some
new functionality to happen if any of
these are called. So in our case, we know that we're looking for something to happen when we overlap
the sphericider. And you can see here we have the on component begin overlap. If we hit the plus, we'll
get a new event created. And basically, when anything now overlaps this, this
will be called. And what we want to happen
here, quite simply, we want to let the player know that they've picked
the flame up. And as we've said, the only other thing
the pick up needs to do is to be visually removed. So we can do that step straight away. We can check
something here. So we get a bunch of
information about things like which component
has overlapped us, which actor has overlapped us, so the other object
in the world. We can get if we right click on the sweep result,
this is a structure. This is just a holder
of information, so we can choose to
split the structure pin, and this gives us a bunch of
other information as well. When this happened, the
location that happened, things like the name of
the thing that hit us. So we can get quite in depth
of this if we wanted to. If you needed more
information to find out who hit you
from where they hit you, like applying knock backa or physics and things like that. You can get all of this
information from here. For now, we're going to
keep this super simple, so we're going to right click, and we can recombine the
structure pin to hide all of that information just because it was a little bit too
much information. We won't be using
that for something. Quite this simple. What
we want to do, though, is to make sure that
nothing else in the world can pick up the flame. Because remember, other things could
potentially touch this. The floor could touch
this, other objects that we may have placed
around if this was moving, if we had the flame
moving around, could also overlap or touch
this bounding zone here. So we want to make
sure that a rock isn't picking up the flame. So what we can do
is we can check here from the other actor, and we can pull from this pin and use the
double equal sign. So we're saying if
the other thing is equal to a specific object, Then we can use this
conditional check, which is essentially giving
a true or false return. And then if this is true
on what we're looking for, we can tell it to do
the next set of logic. And quite simply, all we want to check is whether
the other actor, so the thing which is
overlapping us is the player. And nil, again, has a really useful helper for
this called player pawn. So we can get the thing that the human is controlling
the human player. This is returned through the
GT player pawn function. So when we are in
control of the FP, the first person character, this will be classed
as the player pawn. So this will return
true if the thing overlapping the flame
is our character class. So from our execution pin here, we just want to find
the branch node. A branch is a kind
of if statement. So again, that true or false, and that's how we
use this Boolean. So the Boolean returns A
or B or true or false, depending on the equation
housed just here. Another way to look
at this. So we can make use of our Boolean
variables here. And then if this is true, so this is nice and
easy to read here. If the result of
this check is true, this is when we want
to do something. If it's false, then
that could mean that we've just
sensed that the floor is nearby or a rock has rolled past us or a wall has been touched or
something like that. So we wouldn't want
to do anything. So what we can do
here off of true, we're just going
to call it another inbuilt function called destroy. So we're going to find
this one specifically under the actor category, we want to call
the destroy actor, and the actor that we want to destroy is ourself.
So nice and simple. We're just saying, again, if we just try and read this, as you would, some text, essentially, we're checking
that when we've overlapped, so on component
begin to overlaps, and when this sphere has
overlapped something, we're checking if the
other actor is equal to, so this is just
saying if it's equal to specifically the player pawn, so the thing that the human
player is controlling. And then if that's true, so
just a simple branch check, if that's true, then we're
going to destroy ourself. So we can come in,
we can press play, making sure that we're in the selected viewport or
the play and editor, either of these will be
fine, just not the simulate. Come in and press play, and then if we walk on over to the flame, you'll see that as we get
close, and we overlap that. So maybe the clod was a
little bit too small, but as we walked over
that, it did that check. It found that we were indeed overlapping with the first
person character, which, in its simplest form,
is the player pawn, the thing that we're
controlling, and then it destroyed itself. So nice and simple. And then the final thing is we want to pass that information. Across to the character class. So this will be our first
form of class interaction. So I'm going to leave
that for its own topic. It is then becoming a
little bit more complex. But again, I just
wanted to mention it's not a difficult concept. It's just something
that will take a little bit of trial
and error in practice. Once you've set it up in
a few different ways, you'll get that kind
of a ha and clicking moment where this all
starts falling into place. But fornight, we'll
keep this nice and simple where we're
checking for an overlap. C hecking, it's the thing that
the human is controlling, specifically here,
the character class. Then if it is, we're just going to destroy ourselves for now, we'll come back a
little bit later, and we'll need a little bit
of functionality in here. But we'll need to set some stuff up in the character
class first of all, which will be our next topic. As always, just remember to
hit and pile and save or just press control shift S to save everything
before moving on.
41. 39 - Flame Pickup: With our flame ready to pick up. The next step is adding that information into
the character class. So we want to track in the character class if and when they're holding
the pick up flame. I just wanted to mention that there will be better
ways to do this, especially if you
have a more kind of complex inventory system where you may be picking
up multiple items, that would probably
require and be justified to have an inventory
manager of some sort, because as I've said, We do want to try and
keep the amount of logic different classes are doing to very specific things. In this case, we will
cheat just a little bit, just to keep this as friendly as possible to people completely
new to programming. This isn't a course designed to teach you the
indites of programming. I want to try and keep a good folks on that where possible, but this is just getting
you comfortable with the unregin as a whole. We'll have follow up
courses that you can look at taking and
following along with if blueprinting
and code and getting kind of good clean code base is something
you're interested in. That will be something
to look out for. But yeah, just to say that this isn't going to be the
cleanest approach, but I will make it as clean
and maintainable as possible. With that disclaimer,
just because my coding instinct
kicked off there. We're going to go into
the Blueprints folder again and inside of the
character class this time, so we'll just open up the BP underscore first person
character class. We'll keep the pick
up open as well. We will need this a
little bit later. And what we can do is we can
create a new variable here, just a very simple way to track whether we have
something picked up. So we're just going
to make use of a similar thing
we've seen already, which is our Boolean,
so true or false. Inside of the character class, we can go down to
the left hand side in the variable section. And with the plus button here, we can create a new variable. The naming convention
for a Boolean is B, and then the name of
the thing is doing, and I'm just going to
call this one Torch Held. So no underscore or
anything like that. Be torch held, and this is whether or not we're
currently holding the torch. If we hit compile, this
is really important. We need to hit compile first. Otherwise, we won't see
the variable change. And then in the right hand side, with our torch held
Boolean still selected, we can see that we have
this tick box here, whether this is true or false. At the moment it's false,
which is what we want. We want to ensure
that this begins as false because we're not holding
the torch at this point. And then when we
pick up the torch, we're going tog with
us on essentially to look like this where it's true. And this is really simple to do. So we'll make sure that we save the changes
we've made here. Again, this is one
of those things where in an ideal scenario, we wouldn't be
editing and tweaking a variable manually from
one class to another, but this is a nice quick way
to kind of visualize things. One thing I will do is, I'm just going to
reimplement inside of the character
class our event tick. So you can see
that's been removed because it hasn't been
used inside of this class. So under the event graph, we've only got the
input settings here. So I'm going to right
click in the event graph and we'll search
for the event tick. We're just going to make
use off of the event tick here of the print string
that we've seen previously, so we'll pull from
the execution pin and search for the print string. And then from here, rather than printing hello or
something random, we're going to control drag, so remember we can get the
variable immediately if we hit control and left drag
this into the event graph. If we hit lt and
left click and drag, then we'll set the variable. So this allows us to
change and tweak this. This allows us to read
the current value. And what we want to do
is we're just going to print whether this
is true or false. So whether we're
holding this or not. This gives us some
information about how long we want to print
this to the screen. So by default, we
have 2 seconds. And because this is
printing, as I've mentioned, 60 to 120 or whatever
the frame rate is, this is printing a lot
of times per second. If we press play,
that's why we have this scrolling down
the screen so fast. What we can do to avoid this rather than
having a long list of the same thing printing act is I'm just going to
set this to zero, and that means that
this will last for such a short period of time
that by the next frame, when that next frame happens, it will replace it with
a new version of this, which means it will
always look as though the text is on
screen, if that makes sense. Now it looks as though
it's just always saying false at the moment, rather than scrolling all
the way down the screen. A really simple
thing to do here. If you're running something
on the event tick, and you don't want it to run
all the way down the screen. And the reason that
we're doing this, I'll just get rid of
this very quickly is that we can now move
back to our flame pickup, so I'll hit compile and save to make sure that's
well updated. We'll go back into our pickup. And from here, before
we destroy the pick up, what we want to do is we want to communicate with our BP underscore first
person character. We want to find this variable, and we want to set it
to be true to tell it that you are now
holding the flame. So this is again,
nice and simple. We'll move this to give us
a little bit more space. We're going to duplicate. I'm just going to grab
the get player pawn because this isn't providing
quite enough information. We can see that this is just a default pawn reference here. So the most basic version of a class that we can control
is known as a pawn. And the character
class, in essence, is a type of pawn, in the way that everything
is a type of actor. Every character is
a type of pawn, because that is just
the most basic class which can receive input
from a player controller. What we want to do is
we want to specifically make sure that the pawn is also The BP underscore first
person character. So I'm going to press control
indeed to duplicate this. And the way that we check a specific type of class is through
something called casting. So from here, we're going
to grab our return value, and we want to search for
something called a cast, and then we want to cast to the BP underscore first
person character. So we can see if I
start typing that here. Another good reason to use naming conventions is that that filter out all of the different things that
we can cast against. Because we are
working specifically with our own blueprints, our BP. If we finish that
off with just BP, it will filter down
the things just within our project
or name spaces. So we're going to find the BP underscore first
person character. And what we want to do is
make sure that we hook up the execution pin from here to make sure that
we have this cat. And then we have two
different options here. Kind of like the branch almost, we have a true and a false. Here, we have a
success and a failed. So if this cast is successful, meaning that we check against
the return value just here, and if that is indeed the
class that we're looking for, then we'll get a success, and if it isn't, then
we'll get a failure. So in a similar way,
we could look at this very similar with the
actor overlap here. What we'd be saying is
that if we cast against a floor or a wall or the C, that isn't going to
be a character class. That is going to be an object, a visual representation
of something. But if we do walk over
this with the character, then it will be a
success because it will be looking for that
right type of class, and then this will be called. So, the other
benefit that we have on top of this is that you can see that we
have this return pin, and this returning
specifically a reference to the type of BP first
person character. And from this, we
can grab all of the information
inside of this class. So that means that we could find information on things like
the capsue component, the are different
components that this holds, as well as and more importantly, the variables that this holds. So just as a quick example, we know that the character
has a capsule component, a mesh, a first person camera, and a first person mesh. So if we search for
first person camera because that's quite specific,
we can pull from here. Search for first person camera, and you can see here that we've got all of the information in the different things that we can do to the first
person camera specifically in that class. And just to kind of cement
what's happening here, that's not just a generic thing that already exists
inside of unreal. If we rename this to something
like boot camp camera, I compile and save so that
those changes are made. If we pull from here and search
for first person camera, you can see we don't find anything anymore because there's now nothing called first
person camera in there. We do have boot camp camera. So we now have the
same components, but with a different name. So we can search for
things specifically in this class because we have a reference to the thing that
we've just cast against. As long as it is the
right class type, which in this case, it
will be because we only have one type of character that the
player is controlling. But of course, you can hopefully
see where this is going. What we want to do is
we want to come in, find the information about
whether the torch is held, and we want to set
this to be true. So if we pull from here, we're going to find the torch held, we can see here get torch held. We don't need the B for Boolean. A clever thing that
Unreal does is the naming convention to
prefix it with a lower case B, but unreal knows that
that isn't really needed, so it actually
removes it for us. So we can just search for the term that we're looking for. So from here, we can
call the set torch held, so setting the value type, We will plug this into
the execution pin. We want to say that
this is now being held. And then after that, we'll do the thing that we're
doing previously, which is to remove that torch so we can't pick it
up a second time. So if we hit compile and save, and this is another thing when
it comes to blueprinting, you want to try and start visualizing what you
think might happen, even if you're not 100% sure on the process that you're taking or what you think
you might be doing. All of this is new, and it
takes a while to learn this. If you try and read
through the code, we can kind of get a kind of an assumption of what
we expect to happen. So when this sphere
is overlapped, we're checking whether
we're overlapped by something controlled by
the player, the human player. We're then checking if that's specifically the thing that the human player is controlling, whether that is the first
person character class, and if it is the first
person character class, we're going to set the
torch held to be true. Now the knock on event from
that is that we should expect this print string to
change from false to true. So that's one assumption
that we can make. And then we should expect
the torch to disappear. And we already know that
that happens because we've seen the destroy actor
get called before. So if we come back in
and we press play, We'll come over and
walk over the touch, keeping an eye on the
top left hand side, where it's currently
printing false. And then as soon as we walk
over that it's printing true. So the character is now
technically holding the touch. We don't need a visual
representation, but we can see that that
change has been made. And in the character class, that is being tracked
as a character, which is holding a touch. And as I said, if we move back, the torch has been removed because we've called
the destroy function. So just another
little exercise is these little things kind of
guessing or not guessing, but trying to somewhat assume what will happen based on the code
that you've written, rather than just especially when you're going
through tutorials, rather than just
following along and blindly just seeing the
changes being made, before you've even press play, just stop and think, why
have they done this? What would the
knock on effect be? What would I expect to happen from my current understanding? And that will help
you just pick things up and learn a
little bit faster. But all of that means
that we now have a pickup that works a character, which can be tracked,
is holding a touch. And the next thing is to do
some very similar stuff. But now, When we come and
overlap the lanterns, we want to check if the character is holding
a torch and if it is, then we're going to
allow these to be lit. And then the final
step, remember, we're breaking this down
into individual problems. The final problem after we have the lanterns lit
is for the door. To be told that two
lanterns have been lit, so we'll make this very
specific because we have two lanterns in the level
and their individual assets. The door will track wether
both of them have been lit, and then only when they
both have been lit doesn't matter which order,
then the door will open. So they're the last
two problems to solve. I'll provide a write up
for the next challenge, but your challenge is to get
these lanterns in a state where they can overlap
with the character in a similar way, check this value. So see if the torch is
currently being held, and if the torch is being held, only then do we we already have some
of this functionality, but only then will we allow the turn light on to be cooled, if the character is
holding the torch. So of course, meaning that if
we walk straight past this, if we come over run
straight up to the lantern, I need to make this
level a little bit smaller or make the
character move faster. But if we come
straight over here and we're not holding anything, then of course, we don't
want the lantern to be lit. So that's going to be your
challenge. Just go ahead. Some of its repetition,
some of it you will need to piece together and see if
you can get that going.
42. 40 - Lantern Challenge: To recap and round
off this challenge. The core goals were to have
the torch be collected by the human player through
the first person character. We're already tracking
that, so we have part of that process
ready and going. And then the core goal of the actual challenge was to make sure that we
have that Boolean poggled to be true
and only allow the lanterns to be switched on or activated if
the torch is held. As I've mentioned, the bulk of the core concepts of
this, we've already done. It's just some simple class communication that
we've seen before. And your main goal was to add a little bit of extra
custom logic to get you thinking about some of the basic code and syntax
that would go into this. So I'll take you
through these steps so that you can see how you
could have approached this. Hopefully, you've
given this a go. Again, the challenges
are super important. I really want you to be
trying them for yourself. And if you haven't already and you were thinking
of skipping ahead, I would highly recommend
that you just pause it here, give it a quick go, and even if you don't get
it fully working, it's nice to see and have that kind of understanding
for yourself, how you may have approached it, because you may take a
slightly different approach, whether it'd be better or worse than the one that
I will show you, and at least you'll have
something to compare against, and you can kind of compare contrast and learn
from that as well. So these challenges, I think are really going
to be important. So assuming that you have taken the time to go
through that process, I just wanted to do a
couple of things here. So the first is I'm
going to grab the torch, and I'm just going to
move this a little bit closer to the lanterns
that we have over here, just so that there's less moving and walking around to do. And for a similar reason, I'll take the player start. And again, I'll just
move this over, so I'm holding the left shift and moving this so that
the camera moves with it. And essentially, I'll
just put this so that we start directly in
front of the torch, directly in front
of the lanterns, just to save a
little bit of back and forth whilst testing. Now, for the core part
of the challenge, the first thing
you probably would have noticed is at the moment, the lanterns don't
have anything in them, which would allow us
to interact with them. There's nothing tracking whether the player is within range. So again, we've seen
this logic before. We already have our
sphere collider here. So we just want to do
something somewhat similar inside of our lanterns. So I'll just click onto
one of the lanterns here. We'll go into the edit
BP Underscore Lantern, and this will open
the Blueprint class for us automatically here. And the first thing is we want
to have a colliding bound, a volume of some sort, in which we can
have the character tracked and
overlapped with this. So we'll go to the
ad components. I'm going to search
for collider. And this time, I think
I'll probably use a capsule collision just because it's a
little bit taller. Again, we still get
the benefits here that this is somewhat
kind of rounded. It won't matter which direction the player is coming from. It will always feel as
though we can approach this from the same distance to get the result
we're looking for. In this case, I probably won't make this the
root component. Instead, I'll make
sure that this is just nested along with everything
else in the hierarchy. This allows us to raise this
up somewhere in the middle. And then in the details panel, we can increase the half height, which is the height
of the capture. And the radius so that we can be a little bit more
lenient and flexible with how far away the
player needs to be before they would be classed is
interacting with the lantern. Again, I'll just make that same changes we've done previously. We'll go down to the
collision presets, just making sure that
we have this changed to overlap all instead
of overlap dynamic. The main thing is that the
object types the type of object this will be
classed as will no longer be classed as
a dynamic object. It's not a huge difference. But because we know that the lantern won't be moving around, we can change this to overlaple, and you'll see that
that's changed from dynamic to static, but all of these
remain the same. So we're getting the
same interaction checks against other classes. So that's the first
main quick change here. If we go back into the main map, you'll see that applies
to both, so again, just reiterating and reinforcing why it's quite useful to try and think of things as
reusable blueprint classes, because we can make
this change once and use the benefits of in
multiple different places. So the next step of the problem, and this is what I probably
should have done, actually. I've mentioned this a few times. We kind of receive
problems as programmers, and we are then kind of required
to break these down into their subcomponents and consider how we would approach and solve those on a case by case and problem by problem basis. So for this, the main things that we
know that we want to do, we want to have the
character overlap with the lantern and have that
fire the first event. That event will then
check if the character is currently in possession or class is being in possession
of the torch, and it will do that
through the Boolean check. So we'll need to use
that casting logic to have this happen, and the final part of
the problem is then just to activate the tern. It's only really a
three point problem, and we already have
that functionality. So if we tackle stage two, we've now done Stage one with the capsule through
that capsule. Stage two is just binding to the begin overlap, and again, we've seen this previously, and we want to do some
very similar logic here. The only thing that we're
really going to change, and we can come back
into our lamp here. The only thing that we're
really going to change, if we come back into the flame pickup that
we had previously, we'll open that from
here as well or you could find that through
the content drawer, if that's easier in boot camp, blueprints, and we just
wanted to open the flame pick up because we have the bulk
of that code already here. We want to do the same
thing essentially. So on overlap, we want
to check that we've had the currently possessed
pawn walk into us. We want to check
specifically that that pawn is the first
person character, and we're going to do something
slightly different here. So I'm going to copy
just these nodes here. So the equals the
branch and the cast. With that copied,
we'll just paste that into our lantern class, and we'll do the same thing here by just hooking these up. So if the other
actor is equal to, so checking here that
the other actor is equal to the currently
controlled pawn, and if that currently
controlled pawn is specifically the first
person character, the main difference
here, of course, is we don't want to set
whether the torch is held. We want to retrieve that
information and check it. So we'll pull from here. We
will find the torch held. As I've mentioned
before, we can quite often either get
or set the value. Getting, will read
the information. Setting allows us to
change the information. So we want to use the
GT version to find out what the state of the
torch held currently is. And if we pull from here, we can search for a branch node. And again, that branch node
is just allowing us to check whether or not
this is true or false, and only if that's true, so only if the character is currently classed as
holding the torch, then we will allow that
to light the lantern. And this is really the third
part of the problem now. And we've already
kind of solved this previously up here
with turn light on. We already have the
functionality to do this. So we can just hop
back down here. If true, we can call the
turn light on function. And remember that we have
this function because this was a super
easy thing to check. We could implement this
very quickly just to get some cool visual feedback
and that kind of early win when we were first
looking at blueprints. But now we can throw this
into some actual logic and part of a kind of a core system of a really,
really simple game. So if we hit compile
and save this, this small change is
the challenge done. And that will now
have the Lanterns actually interacting
with the character, checking whether a certain
condition has been made. So this is where we get some blueprint
communication going on. And then using the
functionality that we've already implemented
in previous topics. So if we come in, press play,
we can have a walk through. We'll come in and grab the torch pick up when that's
been picked up. Remember that we've turned
the event tick there to change the text to say
that we have this as true. So we now have the pick up being tracked correctly through
the character class. And then if we come
over to the lantern, we can see that we can now
light this as expected. So we've turned that
on. That's one thing I have noticed is that we can
walk through the lamp still. We can fix that really easily. Then we can come
over here and just check the same thing.
Will happen again. So I think that
looks pretty cool. It's very clear
that the character is responsible for that change. So a couple of small
things to fix here, but that's perfectly fine
and very simple to do. So the first main thing I want to change is
just making sure that we cannot kind of phase through the lantern.
That seems a bit weird. And I think we probably
have the same issue, in fact for the door as well, and we'll fix that
a little bit later. And then the other thing that
of course reminded me of is if we go back into
the character class, we now know that the
logic is working. So if I open the correct class there,
we'll go into the character. We no longer need this eventi. We know that the
torch held Boolean is being toggled
correctly because we've been able to
turn on the lantern. And just to double check, if we walk around
the pick up here, and go straight over
to the Lanterns, of course, that event is
still being fired off. We know that that is still being triggered when we
walk through this. But of course, the lantern isn't being switched on because
that variable is false. I'll show you something
very, very quickly, which is really jumping ahead in the complexity of what we
really want to be looking at when blueprinting outside of an actual programming
specific course. But if I go back into the
lantern class very quickly, I'm going to come into our on component begin overlap here. I'm going to press the
F nine shortcut key. This will add a little
red.in the top left, and this is called
a break point, and this is for programmers when we're looking to debug through things and get a better idea of what's happening in our code. It's just a slightly
more complex topic to fully dive into, and this in itself would be several videos worth
of useful information, which will be covered,
as I've mentioned in previous topics in
future courses, more in the programmers
path rather than the kind of general getting
to know real stuff. But what this will do is
when this event is fired, because we have a
break point on here, this will pause play and
let us step through and see exactly point by point what is happening when this
is being processed. So back in play mode, what I need to do is walk
out of range a little bit here and then
walk back into that range, making sure that we have no
debug object selected here, because it was trying
to specifically find a certain object in the world that I
wasn't overlapping with. So we'll come back in.
We'll try this again. And when I walk over this, anything which is having this called will be broken into
and stopped as I said. So we've had gameplay
momentarily paused. Just in case you're
trying to site, just be aware this is I paused. We can't click back into
this on move around. That's perfectly fine.
That's expected. But what we can do is we can
use these buttons up here to step into or through
the code as it runs. So I'm just going
to click to step into the next node,
which is our branch. And we can do some
really cool stuff here. We can hover over
some of the details. If we hover over this, this will give us some information, and I think because of
my recording software is getting a little
bit twitchy here, but this gives us
some information on what we've overlapped. So the other actor, we can see here is indeed the
first person character, and we can also
confirm, as well. By hovering over this pin, we can see that
the other actor is the first person character,
as we've just seen. And the player pawn is also the first person
characters we can see here. So, of course, because
there's the same thing, and we're checking that
these are the same thing, that will also return true. So we can see here the
Boolean return is true. So we know that in this branch, that will now go through
to the next execution. So I'm going to
choose to step over rather than in
because this is like a small function. We don't
want to go inside of that. We want to go to the next node. So I'm going to press
to step over here. And we can do the same thing
here. So we can check. We already know that
the player pool is specifically the BP underscore
first person character, and we're casting here to check that that is
indeed the same thing. So, of course, again, we know that this
will be a success, so we can step over this. And then the next thing
we want to check. Whether or not our character is classed as holding the touch, and we know that we
haven't picked it up. Again, just trying to
think ahead a little bit, we should expect this to be false if we hover
over the value. If we hover over
the boolean here, we can see here
that the character indeed is not holding the touch. So of course, that
means the next thing when we go through this branch, this function will
not be cooled. This pin, if we had something
hooked up, would be cooled. So you might want to put a print string or
something here saying, character not holding touch,
something simple like that. This is a really simple
overview of how we can use our debug mode and going into break points
and stepping through the code of line by
line, essentially, or node by node p. If you
wanted to go back into play, just remember that we will need to come
back on over here, and I'm just going to
select this again, press F nine so that we don't break into this
every single time. And then if we press
the resume button, that will put us
back into play mode. And of course, if
we go back down, grab our torch,
walk one back over, that will not work as expected. So just a really
quick overview of some debugging and
break points there. Now that we know for sure
that this is working, we can go back into the
first person class. I'm just going to remove
the event tick altogether. We won't need this anymore as
we know that that variable, the Bolan here is being
updated correctly. Close the first person
character again, making sure that I've made a
save to all of the changes. And the final thing
that I said that we want to do is make sure that our lantern has some collision
to block the character. So I think the issue here is just that some of
the assets that we've brought in from mega scans didn't have any collisions
applied to them. If we go into the lantern
and go to our lantern mesh, if we scroll down to
the collision section, we can see this has been set to block everything,
which is what we want. Remember anything set to block, if we go to the
collision presets, It is set to block the pawn. So what we should expect because we know that
we're controlling a pawn, and we know that this is
set to physically block us. From that information alone, we know that there's probably
something gone wrong with the asset and
the assets collision. So we can test this
if we come back into the main map and use this drop down here
where it says lit. We're currently in that lit
mode that we've seen before, and we have those
different options where we can change
this to be unlit, so we're not taking in
any lighting or shadows, but we have a really useful one, which is player collision. So anything which would block
the player will be showing up in this kind of turquoise
bright color over here. We also have
visibility collision, so we can see that
these will turn different colors
because they will block different
visibility channels, but not the player channels. We don't have any of
that bright coloring, which means that these
won't be blocking anything. And we can make some
really easy changes. I'm just going to change back to this few access a little bit
uncomfortable to look at. But I'm going to go back
into our mesh here, and I'm just going to
quickly navigate to this. I'm going to grab the
lantern mesh and then use the shortcut button here that folder and magnifying glass. That will take us to the
content drawer location. Double click to open this. And all I'm going
to do is give this a really, really simple collide. So at the moment, if we drop
down this collision option, you can see we don't
have the option to delete or remove collision. And again, this is just further
cementing and reinforcing our assumption that the
asset just doesn't have any collision details or
properties applied to it. We can use these options here. We can give these
different depths of precision for that's
DOP depth of precision, or the collision that we have. If we give it a high
depth of precision, it will try to more accurately cover the colliding
zones of this lantern. If we drop this back down again, because this now does
have a collision, we can tell it to remove this. And if we give this something
really simple like a box. It will just provide
a very rough outline of the bounds of this mesh. And I think in this
case, actually, that will be perfectly fine because it will
cover the space that the lantern is in and stop the player from
walking through it. And that's really all
that we need to happen. So with that change, I'm
going to press save. So all I've done is
I've come in here, given this a box
simplified collision, and that's provided
a rough shape to stop the player
from walking through. So we can close this back down. If we wanted to check
this, we can go back into our player collision. We can see that now has
this purple colliding bound over any time that we
use this mesh in the level. Even if we just drag in a
standard mesh by itself, that would now block the
player at that point. So going back into the
lit view mode here, we can come in and
we can press play, and we can just double
check that we can now no longer walk through that, so a little bit better there. It just doesn't feel quite
as weird of being able to phase through because a lot
of the rocks that floor, everything else we expect to work does have the
correct collision setup. I think from memory,
because these were probably meant to be used
as background information, I think there were
cliffs or something, I think these also
don't have collision. So yeah, we can walk
through the door, simple to fix, a very
similar process. We'll go through it a little bit later when we get
to the door topic. But I think that's
the main thing, so we've now solved that problem. We can come in, pick up the
torch, light the lanterns, and we can make sure
that we don't just phase through and walk
through the lanterns. And the final thing is now when both of those
have been lit, we want this door to play the
animation to open the door. So a little bit more complex, but I'm actually
going to give this to you as a second challenge. Similar thing again, break that down into
small sub problems. What do you need
to do to approach having the lights
being tallied up, so checking whether one or more lights have
been collected. And then when that happens, how do we relay
that to the door, or how do we get the door to read that information and then open when that specific
criteria has been met? So trying to think
of it that way. I'll give you a bigger problem, which is just open the door. But then trying
to think through, what do I need to do to make
sure that this is happening? And as a little bonus, just see if you can recreate
those steps to make sure that you no longer are able to
walk through the door. That's an easy one to fix. But just make sure
that we try and make this as feature
ready as possible. So this is just another
quick challenge. And again, I think
we've seen the bulk of the class communication and how we can get things
like that working. The main thing for
you to figure out at this point is how to start tallying the torches
being lit and how to relay that
information to the door.
43. 41 - Door Challenge: Okay, so final task, and that is to get the
door acting as a door and opening when a certain
criteria has been met. That criteria is having both of the lanterns lit
at the same time. And only opening at that point. Now, there are a
number of different ways that you can go
about doing this. As more advanced
topics like having the door be a listener. So listening out for
certain things to be triggered and then
responding when they happen, essentially subscribing to
the lanterns being lit. We could do things like kind of a manager pattern where something
else is tracking all of the different subtasks that can happen and firing off when certain things are registered as a criteria being
hit there as well. In this case, I'm going to show the really simple
approach again, just trying to
keep things simple and easy to grasp as we get in. So it's just to say that there are different ways to do this. Some may be better than others, we're just going to take a
nice, simple approach for now. And again, it's just a contrast
to see how you approached it when you took the time to run through the challenge
before watching the video, and then you can compare whether your approach was faster, easier, more efficient, or
whatever the case may be. The main thing is
just to get you thinking through the
process, and even if you, as I've mentioned in
the previous task, didn't manage to finish
it, that's perfectly fine. I just want to get
you thinking at this stage and trying to
start problem solving. So again, the main
issue that we're trying to overcome at
this stage is that we want the door to
open specifically and only if both of
these have been lit. The first thing is we
want some way to pass a message from the
lanterns to the door. Or vice versa, as I've said, if we went for a
listener pattern, which is a little bit
more complex than we would be diving into here. Instead, we'll just pass
a message directly from the Lantern to the door
when something happens. If we open the door
class first of all, I'm just going to
create a function here, and this is a really
nice way actually to introduce functions
versus events. So we've already used a
couple of different events. They're doing very
similar things. If we now create a function
in the left hand side, and we'll just call
this one Lantern lit. When Lantern lit is
called, all we want to do. This is where we're
going to be tracking how many of these lanterns
have been lit. So that tells us we're
going to need an integer, something to start tracking
or tallying a value. So if we come over
to the variables, we'll create a new
variable here. It defaults to Boolean,
but we can drop this down and turn this
to an integer. Integers are just whole numbers, so one, two, seven, and so on. And I'm just going to call
this one Lanterns lit. If we hit compile and make sure that we have
lanterns lit selected. You can see that defaults to
zero, which is what we want. At the start of the game, no lanterns should
have been lit. And then what we want to do is whenever this
function is called, we want to add one
to this value. So if we lt and then
left click and drag in, so Alt is our shortcut
to set the value, and then we can control
and drag this in. So we're going to
get that value. What we want to do is we want to find out what this currently is. So the first time this happens, it will be zero, and we want to say we're
going to add one, so we're going to find
the ad symbol here, and we're going to add one to the current value
of lanterns lit. So a nice simple mass thing, we're going to take
what this currently is, which is zero plus one,
which would be one. We then want to check if this is hitting our
current target, which we know is two,
so we're going to make another integer here. So if we press control in D, that will duplicate the
value that we have, and we'll just call
this one something like total lanterns. With this one still selected, again, we'll hit
compile, and this one, I will set manually because
we know that we have two as the goal of the total number
of lanterns in the level. And all we want to do, just another really simple
conditional check here, a conditional check just being our branch that
we've used before, if we've hit a certain
criteria or condition. And what we want to
check is whether the number of
lanterns that we've lit is equal to the total number of lanterns
that we have in the level. So we're going to control
drag the lanterns lit and then control
drag the total lanterns. I'm just going to
rename this because I realize I had a typo there. And what we want to do is we're going to do our equality sign, so if this is equal
to this value here. So if these two are equal, so the number of lanterns lit
is equal to total lanterns, we're going to find
another branch And then we can
plug these in here. And like we've done in the past, if that's false, we
won't do anything. We're just not worried
at this stage, nothing needs to happen. But if this is true, then we're going to come back
in and we're going to call our open door function here
or event specifically. We'll come back in here and we'll call our open door event. Okay, so nice and simple. So that's all of
the logic that we need inside of our door. We're updating the value. We're checking the new
value against our goal because we knew we had
that pre defined goal. And then we're cooling
the open door function if that criteria is met. So we've actually
kind of completed the end of the challenge there. If I was to break that down into the kind
of sub problems, I'd probably class that
as sub problem three. That's the end thing
we need to do. So we're now going to
backtrack a little bit, and we need to get our lanterns interacting with the door. Now, this is really
nice and simple to do. Back in the lantern class here. I'm just going to create
another variable. I've shown you how
to create really simple variables so far, integers, Booleans,
and things like that. But we can actually
create variables of the type of another class. So if we create a variable here, as I said, it defaults
to a Boolean, we'll drop this down, and we're going to search
for BP underscore cave door. We can see here, we can create an object reference type
variable of cave door. Now, this is very, very
similar to casting. This gives us all
of the information about the other class. So it's kind of skipped
this stage here. We don't need to
do this anymore, because inside of this
variable, we already have. So if I can control drag
this into the graph, from this return
pin, we already have all of the information
about Cave door. So remember, that would be
things like we could find out information about the
Nordic coastal cliffs. We could find out information
about the Lanterns lit. So just as a quick example. We can come in, we can
search for Lanns lit, and we can find the information just here from the
other class because this is a direct reference of a class type holding
all of the information. Within this class just here. So before we start
acting upon this, I'm just going to
come back over here, selecting the variable
that we've just made press F two so that
we can rename this, and I'll just call
this one cave door RF as is just holding a
reference to our cave door. Then after we turn the light on, so if we go to our
events just here, when we turn the
light on, we can probably add another
little bit of logic here. I'm just going to cut, control in x to
cut that variable, control in to paste
that down here. And what we want to do, when our light has been turned on, we're going to set this
Niagara event to be active. We're going to play the
sound at the location. And then we'll do
one final thing, which is to let
the cave door know that the lantern has
just been switched on. So remember that
we've just created this function
called Lantern lit. So from the lantern,
we will come in here, and from our cave
door reference, we're going to find that
lantern lit function, and we'll just call that. We don't need to update
the variables manually. We'll let the door
handle that side of things and all of the checks
and everything like that. We're just going to
pass it a message to say one of the
lanterns has been lit. That will cool this function, and then the door can do all
of the checks that it needs, which are relevant to whether
or not it should open. So just make sure that
you remember we need to hook this up on the
execution pin here, we'll hit compile and save. And that's pretty
much everything. There's now one very important final step, super important. I'm actually just
going to come in here and I'll press
play because this is so common that people overlook this or just
forget this sep. I'm going to make a really
big deal about this. So if we come in and press
play, We can walk over, we can get our flame, so we now know that
has been collected. We can walk over one
of the lanterns, and it doesn't look as though
anything's happened yet, and of course, the
door isn't opening. As I mentioned, we
have a big problem, so I wasn't expecting
that to open. But if we press escape
knife to stop playing, we're actually going to be
throwing some errors here. It's telling us that
during runtime, the class has tried accessing something called cave door ref, which is that thing
that we've just created in our lantern class. So in the lantern lit function, inside of the lantern class, is tried accessing cave door, but it was returned
with the value of none, meaning that we didn't
have a reference. There's nothing there or
to cool our function on. There's a really nice way
we can visualize this, so back inside of
the lantern class, I'm going to use this icon
down here, which is an i. And if we turn this on, the Cave door ref, it
can pile and save, this has just made
that variable public, which means that we can access this in the level
through the editor. If we come back in and
grab one of our lanterns, we can see that we
now have a new thing called Cave door reef
that we can see here. And we can only see that because we've made it public
here, so again, just to reiterate
we'll turn that off, compile and save, and
that variable disappears. Okay? So that's just a
nice way that we can make this visible outside
of the blueprint. Now, what that tells us
if we turn this back on. Again, just making
the eye visible, making cave door rep visible. You can see here it actually
says the value is none. There's nothing
selected in this slot. Andre is really useful here
because we've told it that we only want this to be
a specific class type, and that specific class type
is BP underscore Cave door. We can see it's only
letting us fill this with one specific actor, and that is the cave
door just here. If I select this, if
we tell it to select the object in the viewport with that shortcut there,
it will select this. We know for certain that the reference that
this lantern is holding to the cave door is specifically this big cave
door that we've made here. Again, just to show if we select that, this
is the reference. Now, what this means, again, step by step going through this. When we call this function, we're going to call a
function on Cave door ref, which is this one
here, and we're going to call that
lantern lit function. It will do the
check on the number of lanterns that have been lit. If it's equal to two, then
it will open the door. We just want to make sure
that we take that same step. And really, all this is doing, it's called setting a reference. We're making sure
that we're telling our lantern classes exactly what they need to be
communicating with, because at the moment, it just doesn't have
anywhere to send that message to cool the
lantern lit function. So we're going to do
the same thing again. We want to make sure that
in the cave door ref, we're going to tell it to send that message to this cave door. And now if we do the same thing, this will actually all work. So we're going to pick up the
torch. We'll come on over. We'll light the first one here. So that message has been
sent off, but of course, we know that that is currently
only adding up to one, and we can come on
over to this one. And then as soon as we
light that second lantern, we can see that same
message has been fired off. It's updated that to discover that two doors
have been opened, and then that animation
has been played. So hopefully that's
all making sense. Some fairly simple logic there. The main thing is just starting to grasp and understand
what we're talking about with references
and how we pass messages from one
class to another. So just to try and put
it all into context now. We've seen a couple of different ways that
we can do this. So if we go back
into the blueprint, this is one type of class communication where
we're finding a unspecified kind of
unknown entity at run time. Confirming exactly
what that entity is, and then communicating, so essentially finding
the information from this reference and communicating with that class or the variables within
that class this way. Then inside of the lantern, I just wanted to show
you a different way, which is taking a very
specific hide set reference. So we're filling this manually. We know this before run time. We're specifically
telling the lanterns that the door that you
need to interact with is this one just here. And we're doing that through the references that we're
providing just here. And then with that reference, we can just pass
this message to call the lantern lit function and let the cave
door do its thing. So that's the
challenge, essentially, the core concept of
challenge met just there, which is having the multiple
classes communicate, having the door track how many times the lanterns
have been lit, and then only if that's equal to the total number of lanterns,
which we have just here. Then we'll tell it
to open the door. Now, there's some other
really useful things that we can start looking at. So again, this is
currently hard coded, which is useful if you know that you're
only ever going to have two lanterns in the
world at any one time. But let's say again, we are working with a
designer and they decide, actually, you want
two on each side, so we're going to
have two over here, and then two over here, and we want all four of
these lanterns to be filled before the
door is opened. This means that we're
going to need to come back into the cave door. Come back down here,
update this to be four, and then they decide
again, actually, two was probably
the right number, so you're going
back and forth with what other members of
the team are wanting. So we've got really
useful features and functions that
we can use here. We could come in to our event
graph, and on begin play. I'm going to show you one quick function call we can make here. And that is to
search for and find all actors of a very
specific class. So it's called G A
actors of class. We'll finally get all actors
of class function here. The class that we want to
find are the lanterns. So we're going to search for BP underscore lanterns
or just lantern. And then we should only have
one of those results here. We'll plug this in,
and we can see that this function is returning
something quite specific here. This little icon
is indicating that this pattern of squares
is indicating an array, which is essentially a list or a collection of the
same type of variable. In this case, it's providing a list of all of the
lanterns that it found. So, in this case, it's going to find four different lanterns, and it will have a
list at size four. And we can make use
of this information. So if we pull from
the array pin here, and we can find the
length of this, and how many items
are in this array. So if we just search length and we'll do a
quick print string, so we'll pull from here
and do a print string, And as we've done previously, I'm just going to
hook this up in here. This is converting our integer, so the number of lanterns that
it's found into a string, and again, it's
just going to print that to the screen for us. So if I press play, we can see that it's found
four lanterns. A really quick test here, is if I delete one of these, we'd expect this to
print three lanterns. So it's finding
three, and this just helps us automate the
process a little bit. And this is one of
those things we want to think about if we're
working with other people, and then we think they may
want to be making changes, we'll just take steps like this. So instead of setting the total number of
lanterns manually, we can just drag this in, and we can set this
variable to be the result of the length of the total
number of lanterns we find. I'm just going to delete
the print string, and then we'll move this over here just to tidy things up. So now total number of
lanterns will always be equal to however many
we have in the level, which means if someone
wants to keep coming in, adding and removing them, Then we don't need
to worry about this because the cave door, the function is still
going to be the same. The lanterns lit function is always going to
be checking against how many lanterns
have been lit so far against the total number
that we have stored. So if we come back
in, we'll press play, we can see that we
can come over here. If we like just two, so
we'll like this one, and then this one, which
was the previous goal, the cave door won't open. And then if we like
the third one, we'll get that
functionality working. So just a nice way to automate some of the
logic that we have going. So I just wanted to show that, again, none of these are
the right or wrong way. There will be trade offs
where people class, this is a somewhat
expensive call. This isn't going to cause any
performance issues as such, unless you're doing too
much of this on begin play. But it's just to
show you some of the other tools that you can add to your arsenal to streamline
the process of things. So we no longer need to
set this value manually. We can let this be updated based on the number of
lanterns in the level. So in this case, I'm
going to come back in, I'll remove that one as well. We only want the
two, some symmetry going on there. We
can come back in. We've not needed to
change any of the code. And that now works the
same way as we wanted. It's nice and simple there. So hopefully, things
like that are quite interesting to
see and just have a peek into some of the
capabilities of blueprinting. And then the final final
thing is we have that issue where the cliff doors are
not providing any collision. So we can confirm this again
in the player collision. We don't have any of that
bright neon shading, meaning that this simply doesn't have a lider applied to it. So if we come back into the
cave door, grab one of these. Navigate to the content
drawer through our shortcut, and we'll double click
to open this one. We can see, again, if
we drop this down, we'd expect this to not have any option to
remove collision, simply means it doesn't
have any collision applied. And maybe we can give this
one a little bit more of a accurate collision box here. So it's still not
precision perfect, but this will do the job
that if we press save, it's still not overly expensive. This is one thing to keep
in mind is that there are ways to get more
accurate collision, if we wanted something
as a hero asset, where it needed to
be almost vertex precise in where the collision was lining up with the visuals. You can see we've
got some big gaps and things here being filled. But as you get that extra
complexity with the collision, you will get more of a
performance hit, as well. So in this case,
I think this will be a perfect trade off. It doesn't need to be
incredibly precise. The player won't know that their invisible capsule
isn't colliding specifically with
each crevice and nook inside of this mess just here. But if we come back
in, we can see that big purple Clyide
has not been added, so we will indeed be blocked, so if we come in impress
play, just run back up here. At the very least,
we're unable to walk through the wall just here. So that kind of runs
everything off. We now have a game where we're
stuck in this small room. We need to come in and
pick up the torch. We need to light
both of the lanterns before we can do anything.
We get the door opening. We get this really cool kind of visual given to us here with this hidden garden and
we can come through and have a little walk around
and see what's happened. Nothing too fancy, but
it's shown us a lot of different features
and functionality that we can do with
the unreal engine. The next thing is if you
wanted to take this further, we'd be adding things like you could potentially
find some assets for spikes or an arrow or something like that
and have traps as well. Have a look at how you could
add a simple health system, that if the player walks
on the wrong thing, then they receive damage and set something like a dark
trap off or something. We've also got the option. This is super simple
to keep things nice and short and condensed. But you could even start playing around with level
design concepts. At the moment, everything's
all in one place. But if you think about
how we set dress this, we might want to
move torch over here into a slightly less
well lit place. We'll put this on the floor, and then we'll just
move this back on over a little bit
more into the corner. And if we place the character, we'll get the player
start, and we'll just move this back as well. Maybe turn them around,
so we'll make them look back out the
front to begin with, and again, I'm going to
hit end to drop this on the floor. Press play. So we'll start with a nice
view into the open sea, but we can see that
we're completely stuck here. We
can't go anywhere. We can walk into the
sea partially at least, but we're pretty
much blocked off. From a gameplay perspective, that's going to drive
us back into the cave. There's not really
anywhere to go. We get something
interesting up here. But if we walk up here, which is our main focal point at this stage, there's
nothing that we can do. But then we'll notice
back in the cave here. We've got this well lit thing. So this is just how we kind of set dress things in
a really simple way. What's this flame do? Can I
pick that up or interesting? I'll go back to the
other point of interest. And then we can see we've got some basic interactions
taking us through. So you can start doing some even with a really simple
level like this. We've got some
basic set dressing. Driving people's kind
of focus and attention down certain avenues that we
want the player to focus on. Of course, and this is where you could maybe set some traps. So make this a
little bit darker, have the flame in a dark corner, but add a pressure plate or
something which will trigger something if they go just slightly too far,
things like that. So just things to
really get you thinking whether you're interested
in programming, level design, or
whatever it might be, ways to flesh this out. And that will be
your final challenge for this introductory course. Just add some extra features. Any other ideas
that have come to mind as I've been going through this that we may
not have covered. See if you can take any of the concepts and the topics that we've gone through and
just make this level urwe. Add some unique features, functionality, or
assets to the level, and be sure to show
off any extra results and features that you add
in the discussion forums.
44. 42 - Project Wrap: Hello, and congratulations
on getting to this point. So if you're here, you've completed the entire
class at this point, and you have your project
wrapped up and ready to go. As I've gone through,
I've shown you the complete process to
get from an empty project. We've focused on keeping the project tidy
and maintainable, sharing out the assets that
we're not going to use in two spare projects and keeping just the
assets that we wanted. This one, along with a bunch
of other useful features, tips, and functions that we've seen that the Unreal
engine has to offer. Hopefully, you've taken some
extra steps or sidestepped completely with the
project that you're making to create something
unique and interesting. And this is the point
where if you haven't already been sharing things
I did mention in the past, that it would be useful to have some update and progress images or videos of the
projects as you go. But if you haven't had
chance to do that, this is your time to
take that final render, the final screenshot,
a video, a sequence, whatever you wanted to
do, but begin providing the updates and share
the progress that you've made with the Unreal
engine and the project, and show of what you've
been able to create through the process of
completing this class. So remember, we can do this
in the form of a short video, some screenshots,
whatever you think is going to be best to show
off what you've created. Especially if you've added
some custom functionality, videos may be a nice
kind of snippet to see exactly what you've added
with the functions provided. Just keeping in mind, as I said, in the previous
video on this topic, the project at this point may be upwards of your single
digit gigabytes. So we probably won't be
showing around the projects, even though that
could be quite cool. So we're going to stick
with images and videos. So remember to drop
that in the discussion, below, submit your project to
the skill share pages here. Also, remember we've got that
hashtag and you can add me on the social media platforms
with the links to the side. And we can get more people
into the discussion about the content
that was covered in this class and what
you've been creating. Get that feedback
on your project, and remember to get involved and give other
people some useful, constructive criticism,
feedback, what they can improve, or especially what
they've done well. I'm sure that we have loads of really cool and stunning
projects by the end of this, and I'm excited to see what
you've all been creating.
 Dev Enabled