Transcripts
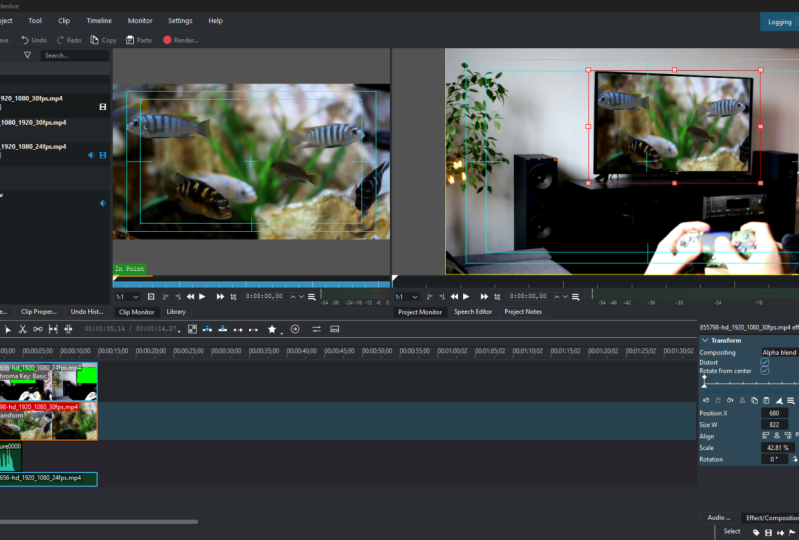
1. Course Intro: Hi everyone and welcome. My name is Robert, and in this course I'm going to show you the basics of what you need to know to get started editing video using the free and open source k1 live software package. Now, before you start the course, I want to go over two important questions. Who is this course for? And why are we using k1 life? First off, this course is for people that are new to editing videos or people that may have a little bit of experience, but it's in a different software package and they're looking to transfer over to Kate and life. So if you've been editing videos for years and years, There's probably isn't the course for you. You might find it to be a little bit slow paced and you might be familiar with a lot of the concepts. But if you're a beginner, if you're a newbie or if you're coming from another software package, then this course is designed for you. We're going to take it slow. We're gonna go over everything in detail and I'll be here to help you understand all the concepts. Now, why are we using Tate in life? K1 Live is a great free and open source software package that I really like for a variety of reasons. Number 1, it is not a trial, so this isn't something that you can use for 10 days and then it locks you out. It's not something that will only let you edit five minutes of video. It's not something that will put a watermark on your video. It is free and open source software. What you see is what you get. You can use it as long as you want. You can edit whatever length videos you want. Obviously, keeping in mind your system hardware requirements, of course. But it's a really great package and it's something that you can learn and you can grow with. You can start with k1 live in Azure skills increase. It has the features available that you can keep using it and improving your skills as well. So with that being said, the first step is going to be downloading k1 live, and we're simply going to k1 live.org. Click on Download. And here's another reason I like Kate in life, it is cross-platform, which means you can use it on Linux, Mac, or Windows. So if you have different computers in your house, if you have a different system at work than you do at home, you can use k1 live altogether, all on the same system. So we simply have Windows. We're simply going to double-click on that, download it, save it, and just like any other program, download it, install it, click through all the steps and then open it up and you will be on the main k1 live screen. So with that being said, we're going to go ahead and we're going to pull up Kate and live. And when you see k1 live for the first time, you should basically see a blank screen that looks like this. You're going to have different areas. And when I first started, it was a little bit intimidating, seeing everything going on at once. So before we start editing video, I want to break it down and show you what everything is. Depending on your operating system, you may have a couple other windows that I do not have. But the basic Windows is your project, then that's where all your files are going to be. So if you have an audio image of video file, a picture that you want to add, that's where they're going to be stored. You can simply drag and drop them onto your timeline. Next, we have the effects and compositions. So if you want to transform, you can simply type in transform and it'll bring up the effect you're looking for. Here is our preview window. So as we're editing clips, we can actually see those edits that we're making in a real-time preview. So we don't have to render the file each time to see how something is going to look. So that's kinda the basic overview. You can adjust. You can move things simply by using this little slider bar. If you're looking at more detail, you can bring this down. Or if you're dealing with a lot of tracks and you want to see all your different tracks, you can leave this up. It's totally whatever works for you. And if there's something that you're missing on your screen or something that you want to add it you don't say you can simply add it by going to View and then whatever else you want to add and you can simply click. So I can add in an audio mixer, I can add in a histogram. I can add in a variety of different things. Now, this is kind of my standard setup. Feel free to do whatever you want. However, for the purposes of this tutorial, it might help if you kind of have the same layout as made just so we're all on the same page, but not a big deal. Customize it, set it out however you want, get familiar with it. And then in the next video we're actually going to go into some basic editing, getting clips indicate in life so that we can actually work with them.
2. Basic Trim and Render Video: Hey everyone and welcome. In this video we're finally getting into your very first edits with k1 life. So the first thing that we have to do is get a clip or an audio file or an image indicate and live so that we can begin working with that. And there's two ways of doing that. The first is by going to File open. And when we click on Open, we can simply click on whatever we want to bring in. Or the way that I generally prefer to do it is I simply find the file and I can drag it and drop it. So let's actually do one from this class. Let's go with this k1 one and show and you're simply going to drop it into your project bin. You'll see that it has a little timer. I'm kinda like a little progress bar and that's the progress it's making towards importing eclipse. So we can see the important clip here. And to actually work with it, we need to move it onto our timeline. So this is just the very basic first edits. So right now, it doesn't matter where you put it later on, it will matter. But for right now you can put it in either of these slots that you want and what you wanna do when you drag it onto the timeline, you want to make sure that it's dragged all the way to the left because if you drag it and it's not all the way to the left when you do your preview and when you render your video, you'll have a bunch of black there. You whitespace at the beginning that your viewer is going to be wondering if their video didn't load or what's going on. So make sure it's all the way to the left. And whether you would click on the next YouTube Megastore or Sydney. And let's suppose that we did this clip. We really like it so far, but at the end of the clip, we made an autopsy. We kept going longer than we wanted to go. So what we could do, we simply watch the clip Linux. And let's suppose I made a mistake right here. What I can do is I can cut out that portion of the video. So let's suppose I wanted to stop talking. I would have to do wherever my slider bar is. I'm going to go to this scissors icon and I'm simply going to click Snap. All right, so that has broken my clip into two separate parts. When I cut, I need to change tools if I want to move a clip. So this little arrow is our selector. So the scissors are cutting tool. This is our selector, so I can move this. Let's suppose that I did my intro and then I realize I forgot to say something that my beginning of my video, I could actually switch this around so that my end is at the beginning of the video. So that's really helpful. Sometimes I'll do that when I'm doing a video all do my intro and then I'll be like, You know what, I forgot to tell him something, so I'll do it at the end of my video, then I'll move it right back up to the front. But for this purpose is pretend that we really wanted to stop the video here. We don't want this clip. All we gotta do is simply press Delete on our keyboard and it will go away. Now, let's suppose that we know we made a mistake and we're not sure exactly where it is and we want a little bit more control right now, I'm zoomed out on my timeline. If I want to zoom in, I use this little slider down here at the bottom. So if I go to the left, it zooms out more. You can see now that I'm looking at about 46 minutes on my timeline, I'm going to zoom in and it zooms centered around your timeline. So it is see this little bar gets zoomed, centering around that. So right now we're only looking at a space of four seconds. So this is really helpful because sometimes I have a habit if I'm talking all throw in an OEM, right? So I'll say this cryptocurrency project. And it can do this, right? So what I can actually do is I can look on this wave form and I can see where my is and watch this. I can clip out my aha, remove that, press, Delete, and bring my clips back together. So that's a general overview of the basic, most basic editing that you'll do is simply slicing out a portion of the video you didn't want. So I showed you how to slice something out at the end. And then I showed you how to slice something out in the middle by making two cuts, deleting that middle portion, and then bringing them back together. So not only do we want to make some cuts, but at some point we're going to want to actually turn this into a video file, the finished product. And to do that, we simply go to project. We're going to click on Render. And we're going to click on this output destination by default, you can save it on the default, but just know that you're going to have to go looking for it. If we want to save it to a specific location, we'll click on desktop. Let's go ahead and put. We'll go ahead and put test video and click Save. Now when we click Save, it's going to give us a variety of different formats to output 2. So web m, I never really use that. I pretty much always use mp4. But if you do want some kind of different format, it's available for you. If you want to export specifically as an audio, it's available for you. 99% of the time I simply do mp4. And unless you're really trying to save space, I just go ahead and crank the quality all the way up. So click Render to file. It's going to tell you that it's waiting. We've got about two minutes and 30 seconds, so I'll fast forward through the video. But what I really like is it shows you how many frames per second it's rendering and it also tells you what frame it's on. So obviously, the stronger your computer is, the quicker you're going to be able to render this if you're just doing it on something like a budget laptop or even a Netbook. It can take awhile. So keep that in mind. A lot of people, sometimes it'll start rendering and they'll say, Hey, it's a 10 minute clip, but it's gonna take me an hour is something wrong? No, you just, video rendering is just a very computationally intensive process. It requires a lot of CPU power. So if your computer is not that strong, it might take a little bit longer, but don't worry, k1 live, we'll go through it will do everything for you. And that's another reason I like k1 live compared to open shot, which is another free software program that I do use. I have noticed that k1 live tends to crash a little bit less. And it also seems at least to me, a little bit less buggy and a little bit quicker render times. Again, open shot is great too, but k1 live, in my opinion, has a little bit more features that make it better for you to learn and grow. Alrighty, So we see our video has finished rendering. It says finished rendering and the job queue. So you've already done it. You've got your first video edit out of the way, a simple slicing of a clip. But hey, that's something that's progress. It allows you to, if you kind of have a trail at the end of the video, you can cut that off, you can delete it. If you press record on your camera and then it takes you a minute to get in position. You can cut off that at the beginning of your video so you're already making some progress. In the next lesson, we'll learn a little bit more. We'll keep building those skills up. So I'm excited to see you in the next one.
3. Adjusting Contrast/Brightess: Hey everyone and welcome back to the course on video editing with free and open source k1 live video editing software. In this video, I'm gonna be showing you how to adjust and possibly fix some of your clips using the brightness and contrast effects and k1 live. Now the first thing I want to say is that good lighting is the number one thing you can do to shoot good video. If you have bad lighting, you can do all the editing you want and it's going to be very, very hard to fix. So you want to have good lighting. And I know this isn't a class on shooting video, but I do want to give you this tip as a beginner, it's always best to have a lighting source, then your recording device, and then you, so you should be looking into the light right now you can kinda see from the reflection on my hand, I've got a light behind the camera. It's very hard if you've got a light behind creating that glare. If you're more advanced, you know what you're doing, go for it. But as a beginner, it's easiest if the light source is something that you're looking into. So with that being said, I've created a clip here where I have deliberately overexposed with too much light. And then later in the clip I have deliberately underexposed with too little light. So the first thing that I want to show you is that if I tried to adjust this clip by adding brightness, I can drag and drop it onto this frame. However, what you're going to see is that if I adjust the brightness in this clip that is underexposed, then when I go back to the part that was overexposed, it is going to be even worse. So that is a key thing to know about k1 live. When you edit a clip, you edit the entire clip. So what we really wanna do is get rid of that effect. And we want to split this clip into two parts. The part that is underexposed and the part that is overexposed. That way we can be working on them separately. So let's start off with this one that is too dark, as you can see from this one that's too dark. It's very difficult to tell what's going on. Now we can make some minor changes, we can make some adjustments, but it's never going to be a perfect clips. So let's start off with a brightness adjustment. Simply drag and drop that onto our clip. And then what we wanna do is we can move that up. We can move that down. Now what you're going to see is that as we move it down, yes, We actually, before we do that, let me, let me delete these effects. I'm going to copy and paste this clip just so that you can see a before and after. So we're duplicating the clip so we can see if we're affects made it better or not. We can increase the brightness just a little bit. And we see that we see the background a little bit better, but we're also getting this weird kind of gray film everywhere. We can change the contrast as well, CONT or AST. And we can drag and drop that. And we can try to play with it a little bit. We can get rid of that gray just a little bit. So here's before or after. Here is before. So it is a little bit of improvement. Like I said, you really can't do a whole lot. What brightness and contrast really shine is by helping you with clips that are already good. So this is actually a clip that I shot when I'm recording this lecture series for you all. So what we can see is that I have pretty good lighting. I've still got a little bit too much on me. My skin's very reflective, so I'd like to turn that down just a little bit. So I'm going to turn down the brightness on this and you're really going to be able to see it here when we get a lot better effects. So simply turning down that brightness really decreases kinda that shine coming off of me and makes the whole clip seen a little bit more crisp and clear. So it's ideally suited for adjusting video where you already have good lighting. You can also use brightness and contrast on an image. So here we have Paris. We can adjust the brightness of Paris by turning it up. We can also adjust the contrast. So this is not a photo editing course. However, just know that for the purposes of this, k1 live treats your photo as kind of a form of video. So let's adjust the contrast here. And we can kind of just play around with that to make it seem, say that to me looks a lot more sharp than we were and that is just using k1 last features that is not at all even using any kind of GIMP or other photo editing package. So just with that, you can kind of customize, you can repair some of your clips and then Eclipse that already are good. You can just make them a little bit more crisp and clear. So I hope you all found that video useful. Come back in the next video and we're going to keep learning more about video editing with k1 live.
4. Fade Audio In and Out: Hey everyone and welcome back to the video editing course using k1 live, which is free and open source video editing software. So in today's video, we are going to be working with fading in and fading out audio. So audio can really add a nice touch to your videos. And especially if you're doing some kind of a presentation, a slideshow where you just have a length of pictures. It can get very boring without audio. So let's suppose that we simply have these pictures. We're showing a highlight reel of all the different places that we've traveled. Pretty boring without any kind of music. So let's suppose that we want to add in Putin's lullaby. And this is just free and open source music that I got. It's music that you can use for free. So that really helps. So we're going to cut out the blank space. And what I want you to notice when I start this clip, it's going to be very harsh. It's just going to come in all at once. So I want to show you it coming in all at once. And then I want to show you us doing a proper fade in and a proper fade out. So with that being said, let's start the clip. Pretty cool, pretty cool so far. And what you'll notice is that it's also going to stop abruptly. So we don't really want that. We want it to fade in, we want it to build up and then we want it to gradually fade out. So exactly the same when we were doing the images or when we were doing in the videos, we're going to go to fade. We're going to auto audio correction fade in. Remember, the bigger the green triangle is, the quicker at fades in. So let me show you once with a very fast fade. It sounds pretty much the same as no aid at all. And then let's make the fade a little bit bigger and watch how it builds in a little bit more slowly. See how it slowly builds up. And we can do the exact same thing with the fade out. We can put it here and we'll kind of let that trail off and listen to how this fade out sounds. See how it gradually fades out. That's a lot better for ending. Then just simply making a quick cut off. So That's an overview of how to fade in and fade out audio. In the next video coming up, I'm going to show you several sources where you can actually get those free audio to use, free images to use. It's a little bit harder to get free video, however, there are a few sources that you can still use. So come back in that video and I'll show you how to do it. Thanks for watching.
5. Fade Video In and Out: Hey everyone and welcome back to the course in video editing with the free and open source k1 live video editing software. So in this video we're going to be really taking things up a notch and spicing up your videos by adding photo video and audio, fading and transitions here video. So I know it might seem like a lot, but it's actually going to be really cool and you're gonna see the point of all this. So to start off with, what we're going to suppose is that let's suppose that I'm a travel guide and I'm trying to tell people, Hey, you could go visit Berlin, you could go visit Paris, you could go visit Amsterdam, right? And what I wanna do, instead of just telling people about this, I want to fade in a clip of me showing them, right? So I want to add, not just me talking, but I want to add clips of the different places that they could visit. So this is pretty easy. And if you remember doing the picture in picture video, the process is very similar. So first what we're going to do, let's just listen to our baseline clip as it is. And I'm going to turn up the volume here so that you can hopefully here this. So some of the top travel destinations that people are going to these days are Paris, Amsterdam, Berlin. So I say you can go to Paris, Amsterdam or Berlin's. So instead of just looking at a screen, let's go ahead and spice that up. So when I say Paris, Let's put a clip right about there for Paris. So that way whenever Paris comes up, we're going to see an image of Paris to kind of set the scene for what people can expect if they travel there, Paris. Now what you'll see is that the problem is this is still full screen. So if you remember from our previous video, we can transform that and cut it down to the size we want simply by dragging and dropping and re-scaling using these arrows. So that's going to show us a picture of Paris for our audience to look at. However, let's suppose that we want to add some other. So we say Paris, we have Amsterdam and we have Berlin. Now, typically, you're not going to have this many tracks. So if you need to add more tracks, simply right-click, Insert track and add audio video tracks. We're going to need two tracks because we also want to add in Berlin and we want to add Amsterdam. So I think if I remember right, Amsterdam comes next. So we're going to want to fade it in there. And what we're gonna wanna do is transform Amsterdam. So just quickly resize this here. So we've got Paris, we've got Amsterdam. And then let's listen for when we say Berlin or dam or, and there comes Berlin. So let's add in Berlin, once again, transforming it and cutting it down to size so that it doesn't get in the way. So what this is going to do with each time that we say something, each one of these separate videos, Harris, Amsterdam, or Berlin, each one of these pictures is going to appear when we say it now, That's pretty cool. However, it's very stark. So when I say Paris, boom in Paris, when I say Amsterdam, boom Amsterdam. So let's suppose that I want to fade things in and make it a little bit more gradual, we can go to fade in. And we're simply going to drag and drop fade in. And what you'll see is a little green triangle. Now, the bigger you make this, the slower it's going to fade. And so what I'm gonna do is I'm going to let Paris fade in very quickly. I'm going to let Amsterdam fade in very slowly. And then Berlin is going to fade in very quickly as well, so that you can see. Different. So let's go ahead and play that clip again. Paris, Amsterdam, or Berlin. So with that, you can see how Amsterdam, even though it's second, isn't even fully on the screen before Berlin and gets in the screen. So that's fading clips in slowly. But now let's suppose that we wanted to fade the clips out. So let's suppose that when I say Paris, I want Paris to be onscreen. But then by time I get to Amsterdam, I want Paris gone because we're not interested in Paris anymore, we're interested in Amsterdam. So what I would have to do for that, I would first have to cut the clip down to the correct length. So let's suppose that I'm saying Paris, I'm saying Amsterdam and Berlin. So what I would want to do is find when I say Amsterdam, Amsterdam. So where I say Amsterdam, I'm going to cut the Paris clip. I'm going to get rid of the portion that I do not need and I'm going to go to fade out. So let's drop fade out and we're probably going to have to zoom in a little bit. Because you can see that there's a red arrow is for the fade out, and that green arrow is going to be for the fate. And so what I wanna do with my little mouse is makes sure that I grabbed the red arrow and I want to drag it back. Now the smaller, the quicker it's going to fade out, the bigger it is, the slower and more gradual the fade out is going to be. So just for right now, let's go ahead and get rid of Berlin. We don't need that. And what I'm just going to show you is that we have Paris is going to fade in. And then when I say Amsterdam phase all Phaedrus, Amsterdam, see how it fades out. And we can do the same thing when I say Berlin. So let's go ahead and cut here. Let's get rid of Amsterdam, and then let's add Berlin. And let's make sure that Amsterdam is going to fade out before Berlin comes in. We want to fade Berlin in. So put motion fade in, go ahead and make it a quick Fade, and then a fade out as well. And let's make sure that this ends right about when I stopped talking. So the final clip, you'll see one fade in, fade out, one fade in, fade out. That way our audience is only seeing the city and the destination that we are currently talking about. So let's watch that clip because they are Paris, Amsterdam, or Berlin. So that's how it would work. Obviously, we did not resize Berlin. We could transform it and scale it down to the size we wanted. But that's just a general overview of how to fade in, fade out those different clips. And remember, it's a lot easier to do if you add a separate track for each clip, you could do the exact same thing with video as well. So let's suppose that instead of saying Amsterdam, Paris, or Berlin, let's suppose that I have an interview with some guy that's telling me how much he enjoyed going to Paris, Amsterdam, or Berlin. I could do the exact same thing. Just cut that down to the size I wanted. And same thing, fade in, fade out. Well, I got that backwards Fade Out, Fade In and, and transform it down to size. And again, you could do this with anything. You could have an interview of someone talking about where they traveled. Or you could have someone walking by the Eiffel Tower, right? You could show whatever video or images that you wanted to kind of drive home that point. So that's an overview of how to fade in, fade out, show different pictures all coming in and out at different times. In the next video, I'll show you how to fade in and fade out audio if you're wanting to add a backing track or something like that to your video. So come back in the next video and we'll learn some more.
6. Add Multiple Video Tracks: Hey everyone and welcome back to the course on a video editing with free and open source k1 live video editing software. So up to this point, we've been doing some basic edits and you all have been doing really good cutting your clips, speeding up your clips slowing down or collapse. But in this video, we're really going to start combining features and making our videos really pumped. And I'm going to show you how to get that picture in picture or talking head effect that you see in a lot of videos, or as you've seen with these tutorial videos. So the first thing we want to have is a base layer. So let's suppose that I'm recording my game or I'm recording a tutorial on my screen, such as showing people how to edit videos. That's going to be my base layer. Now, your base layer is always going to be closest to the middle. So if I zoom out a little bit, what you'll see is that I have three separate tracks. Whatever is in the middle is like the bottom layer. So if I want to have a talking head effect, I'm going to drag that clip on top now I can put it in track 3, Track 2, it doesn't matter as long as it's on top, it's going to be displayed above of that other layer. So just to show you whatever's on top and that's what's displayed first. So I want the talking head, but I don't want it to take up the whole screen. The way that I can adjust this is by using the transform effect. So TRANSFAC or m. And I simply hold down my mouse, drag and drop. Now once I click on my clip, what we'll see is there's a little red box that comes up. Now, I can simply drag and drop this using the resize handles or I can adjust it using these clip properties that come up. So if I want to adjust it that way, it gives me a little bit more control. It's a little bit slower, but it gives you more control so I can set it to exactly 25 percent of its original size. And then I can align it to the left. I can center, I can align right, I can align to the bottom. And the cool thing about this is it puts it perfectly at the bottom of your frame. If you want to adjust it manually, you can do that. So to get rid of an effect, we either click the trash can or we right-click and we delete effects and that's going to take us back to our starting point. So now we want to drag and resize using the handles, hold down, click, drag and drop, and resize using these handles. So with this it can be a little bit quicker. It kinda gets you close, but it gives you a little bit more control. So, so maybe I want to crop out this portion of the whiteboard here. I can just slide this off of the screen and whatever's off of the screen will not be displayed in the final video. So two separate ways of basically doing the same thing. Sometimes this little red box will, for whatever reason it won't appear. And that's because this sometimes gets unchecked. So if you can't resize it using the red handles, make sure you check that whichever way it it'll work out the same. So that is how to resize clips. That's how to get the talking head effect. But now let's suppose that we have the background and we have ME talking. And let's suppose that I'm talking about some news article or some cryptocurrency that's happened. And I want to say, I want to share a screenshot of a news article or a tweet, right? I can add that on top of me talking. So all I have to do for that is simply drag when I went onto the top layer. And wherever I drag this, that's where it's going to appear in the project. So let's suppose that right about here, I'm announcing something. I say crypto XYZ had a 100 percent gain. I just knew this to the location where I want it to appear. And if I want it to stay on the screen longer, I simply move my cursor to the edge and drag it longer. Or if I just want a quick thing, I drag it and make it a little bit shorter. So a couple seconds is going to be fine. And again, it's going to appear, It's going to be in the middle of the screen. We simply adjusted any exact same way with a transform effect. And if it's something like this, it's usually fine for me to simply drag and resize it. So obviously this isn't a good example because it's red and it's not really contracting with my background, but I can move that wherever I want it. So that's a general overview of different levels of tracks. The main takeaway from this video is whatever track is nearest the middle is going to be on the bottom. Whenever tracks are farthest away from the middle, are going to be on top. And transform is probably the number one effect that you're going to use for the vast majority of the time. So that's an introduction in this video. In the next video, I'm going to get to sinking audio between the tracks because as you can see here, we've got some audio that is not sync up and we want to make sure that gets linked up. So come back for the next video and I'll show you how
7. Green Screen Effects: Hey everyone and welcome back to the course and video editing with the free and open source k1 live video editing software. In today's video, we're getting to one of my favorite topics, which is green screens. And green screens are awesome because it allows you to shoot a video in the comfort of your own home and then transport yourself to the Eiffel Tower, the middle of the desert, the middle of outer space. So it's something that a lot of people want to do. But unfortunately, people think that it can be kind of complicated, which in K1 live it is very easy and you'll be able to do it in just a few minutes. So the first thing you need is green screen footage. Now, I showed you in a previous video how to download stock footage from Pexels, which is what I'm going to be using in this. But if you're recording at home, you can easily make your own green screen. You can use a solid colored curtain, you can use a solid colored bed. She in fact, I've used a black bed sheet as my green screen for a while. So you can really make do with what you have. Just know that when you're looking for a green screen, you want it to be the same color and you want it to be a color that contrast with you. So green is best, but other colors will work as well. So what we've got here is a lady with the green screen footage. And remember when we're entailed in live, whatever is closest to the middle is going to be the bottom layer tracks. So if we put Berlin on the bottom, we won't be able to see it because she's there. If we put Berlin on top, we won't be able to see her. So what we wanna do is we want her to be the top layer track and Berlin on the bottom. And we want to remove all of this green area that we don't want. It is incredibly easy. All you gotta do is type chroma, and it will bring up chroma key, basic and advanced. We will go with basic. Simply drag and drop onto the timeline here. And what you'll see as it comes up with a little eyedropper, click that, and it's going to automatically remove all of that green so far, What was that ten seconds and you remove most of the green, however, what you'll notice is that it's not perfect as if we zoom in, we'll see just a little bit of green still on her hair. And that comes down to our variance. So variant says, when we use that eyedropper, we're telling that programming look for this specific color. Now the variant says, okay, in reality, everything's not going to be exactly that specific color. It might be a little bit lighter, a little bit darker, a little bit more green, a little bit less green. So the variant says, how close do you want me to remove for that specific color? So if we have a very low variance, what you'll see is that it only removes that very specific green, even though the rest of this is clearly green to our eyes, it's not to the computer when we have the variance that low. On the flip side, if we crank up the variants really high, it's going to grab everything. Even though we can clearly see that she is not green. We have our variance so high that it's grabbing everything. So we want our variance somewhere in the middle where we remove all of the green, but we don't remove any of her. So somewhere around 237 and you can kind of drag and drop it to get an idea of where you want to be somewhere around two 37 for us is looking pretty good. Let's get that. So that's pretty good. However, we still notice two problems. First, she's covering up this monument that we want people to be able to see. So if you remember, we simply can go to Transform, drag and drop that. And we will move her into more of the corner so she can be giving a presentation without being on top of the scenery there. So there she is, she's giving the presentation and we have one more issue. When you download images, you'll notice that they might not always be the right size. So here Berlin is not 1280 by 730, so there's black bars on the side of this, which we want our video to be able to fill the whole screen without these black bars. So you have two options of doing this. The first is resizing the image before you import it into Kate in life. So you have GIMP, you can simply resize to 1280 by 730. However, an easy way of doing that directly within the program is by typing re-scale RES C. A is going to rescale and watch this. All we're gonna do, we're going to drag it and drop it onto Berlin. And this is like magic. It's immediately going to resize it to fit the screen. So that's pretty cool. I think both of these were important to cover in the same video because a lot of times when people do a green screen, they're wanting to do it on top of some form of an image, right? So that's the basic idea how you do the green screen. You could do the exact same thing with a green screen, but instead of a image, you could have a video. So if I had a screen cap of my computer going, I would do the exact same process. So green-screen effects, super cool. Less than five minutes, you all learn how to do it and k1 life, so that shows you how powerful it is and how much you all are learning. So thanks for watching this video come back in the next one and we'll keep learning even more.
8. Add A Voiceover: Hey everyone and welcome back to the course in video editing with the free and open source k1 live video editing software. In today's video, we're doing really cool things, which is adding a narration or a voice-over to some of our video tracks. Now, you could have a variety of reasons for wanting to do this. Maybe you are watching a huge ship come into port on the beach and you're sitting there, you're recording it with your phone and you're trying to do an aeration, but the wind is blowing in your audio quality is terrible. You've all heard that sound right when it's really windy. So we're going to shoot our video, then we're going to come back and add a voice-over. Or maybe you're showing someone how to do pottery or build a park bench. And there's a lot of slow steps as you're having to screw in each bolt or you're doing something and you want to speed up the video clip, but you still want to have a nice slow narration. So that's what we're going to be learning in today's video. So the first thing is I've got some stock footage here. And this is just of a bulldozer moving back and forth, kind of doing what it needs to do, loading this dump truck up, doing some construction. So this clip is going to be, let's suppose it's going over the course of several hours and we want to speed that clip up. We don't want to sit there for several hours, but we want to add our narration. What we can do, super-simple, go to view. We want to go to audio mixer and we will see that it brings up two separate mixers. Now, if we click on A1 and record, it's not going to let us. And the reason for that is there is already an audio track that could be present with this video. So if we want to record, we have to go to an empty channel here, which in this case is going to be audio too. So let's suppose these bulldozers are moving around. Hey, this is just a quick audio narration and I'm going to speed this up so that you all can see these bulldozers moving around and then we click Stop. And what you see is this captured audio appears here. Not only does it appear there, but it's automatically added to the audio track where we recorded it. So Let's turn this volume up and I don't know how well you'll be able to hear it since we're doing two mikes here. But let's just see if you all can hear this. Hey, this is just a quick audio narration and I'm going to speed this up so that you will. So the advantage of directly doing your voice-over entailed in life is that you can watch the preview of what's going on in your screen and you can exactly match up your voice over two what you want to say. So you don't have to do a voice over and then try to match it up. It's automatically going to be added. It's automatically going to be sync up for you. So that's how to add a voice over while we are on the subject of voice. There's two other things that I want to cover. I have a pretty good microphone. It's not the greatest, but it is pretty good. So typically my voice quality is pretty good. However, you can do a little bit of noise correction even within Audacity. Now, a full featured program such as Audacity would be better than k1 live, but you can still do a little bit in here. So what we're gonna do is we're going to collapse all of these menus. And we're simply going to go to audio correction, where you will see all of the available features. Now we've already covered fade in and fade out. We will also have gain. So what I want to do is I want to record a very quiet audio track here. Necessary. So I've recorded a very quiet audio track, and let's turn this volume up to about 30 and see if you all can hear it. Maybe you can hear it a little bit, but maybe not that good. So what we're gonna do is we are going to amplify that. We're going to go to volume and we're going to drag and drop that onto the audio clip. And then I'm going to leave the volume on my computer the same, but I'm going to crank this up by 30 decibels. Press play, and hopefully you all be able to hear it a little bit better. So even within, I can turn up the volume, I can turn down the volume. Now turning down the volume as usually a little bit better because you can reduce it. Whereas with turning it up, you start running into issues of distortion and things like that. So this is not a audio editing software package on Udacity is much better for that. However, I'm just trying to show you that it does give you a couple small features. One other feature that you may use from time to time is normalized. And to do that, you simply drag it and drop it onto the waveform. And this normalizes the waveform, again, not an audio editing class, but if you just want to make some very quick audio edits, in general, I found that normalized and does help that sound a little bit better. And then of course, volume, if you have a very wild audio piece that you're working with. So a lot of times if you render stock footage that has built-in sound effects, it will have very crisp, very clear, but it just might be too loud. And you can turn that down simply by using the volume. And I usually go with anywhere from 10 to 12 decibels on the reduction. Play around with it. Find out what works best for you. But that's really it. So k1 live, not an audio editor, but it does offer some great ways for doing the voiceovers and then turning down the volume, turning up the volume and normalizing your audio. So I hope you all found this video useful. Be sure to join me in the next one where we will continue learning more about k1 life.
9. Where To Get Stock Images/Video: Hey everyone and welcome back to the course and a video editing using the K1 live, free and open source video software. So in this video, we're going to be covering something very important, which is where do you get those images, music and videos that you need to spice up your video. So in the past, I showed you how to add an image of Paris or Berlin or Amsterdam. I showed you how to add in some music. And whenever you're adding these things, and it's important to make sure that you have the legal right to use them. Now, I'm obviously not a lawyer and more importantly, I am not your lawyer. So make sure whatever sites that you use, you have the rights to use them. However, what you can generally do is use Creative Commons attributed things in your videos basically. So you can use music, you can use videos, you can use whatever is licensed under Creative Commons. You can generally use, again, it's important to make sure, but that's the general case. So with that being said, a couple of places to find free music or free PD. So with free PD, we can get kind of feature length songs. That's actually that I used in the clip where I show you how to do different travel destinations. They've got a couple of different ones here. Kinda more solemn, somber sound effects, if you will. So you can get a lot of different stuff here. When it comes to video, video is typically a little bit harder, in my opinion, is the hardest of anything to come by because it's just really hard to find stock video. The only place that I really know of is Pexels, where you can find a variety of free video to use. There is another one called vivo, but they do it really weird where they mix in free stuff and premium stuff and stuff where you have to attribute the author and stuff where you don't. So my opinion, it's best to just save yourself the trouble. I don't really even use it, but if you want to, it's an option available for you. When it comes to images, you really have two different choices. You have what we think of as photography and then we have kind of clip art. So when it comes to photography hands down, the best site is Unsplash. Now with Unsplash, you can basically get pictures of absolutely whatever you want and they are free to download, free to use. You do not have to give attribution. Obviously it's nice if you do, but you don't have to. So any of these images that you want to throw in your videos, you can generally do that. If you were looking for more of a clip art or a cartoon type image, you can get those through free SVG and you can search for whatever you want. You can search for rich. And it will pull up all the images of someone being rich or related to rich in one way or another. So, couple options for you. Again, it's always important to make sure you have the rights to use whatever you're using. However, the sites in general have worked pretty well for me. So in the next video, I'm actually going to download some stock footage from Pexels and we're gonna get started editing with green-screen effects. So that's going to be something really exciting. Stick with me for that one, I think you're really going to like it.
10. Animate Clips: Hey everyone and welcome back to the course on video editing with free and open source k1 live video editing software. In this video, I'm excited to get into animations now, animations are a great way of making your videos really popped, make them more interactive. And the first thing I want to show you is that they can be really useful for if you're wanting to show emphasis. So this is actually a video from my YouTube channel where I'm talking about a cryptocurrency. And I'm talking about this huge price change that's going on. So instead of just talking about this price change, it might be nice to add an image where I'm talking about this price. So the thing is if I simply drag and drop the image, we know that I can transform this image, but we see that it just appears on screen and it's not really that attractive. So let's just go ahead and transform it. We can cut it down to size and we can move it wherever we want. But that's not really still that interactive because it's just going to kind of appear on the screen and then it's gonna go away. What we want to do is we want to have it zoom in, stay for a little while, and then move out. So what we're gonna do instead, let's go ahead and delete all these effects. Get back to the baseline. Wherever we want this clip to come in. As always, we're simply going to place it there on the timeline. We're gonna go to transform, and this is our starting point. So when we're starting a small, then we're going to expand and contract when we drag and drop that very first transformative effect onto the clip, that is going to be our starting points. So let's suppose we want this to start really, really small. And we want it to expand and get really big. We're going to start with that transform really small. Now here's the key thing to doing these animations. See this little line up here. You see this little diamond shape wherever you double-click. This represents the duration of the entire clip. So if I would click here, it would add my transformation at the end. So I'm going to add my transformation just a little bit after it starts. And what you see as a little blue dot appears here. Now, between these two is how long it will take the transformation to occur. So right now you can see there's not a lot of space. If I drag and drop this watch how quick this transformation occurs when I do the clip, it basically instantly occurs. Now let's suppose that I want that transformation to take a little bit longer time. What I can do is I can move that clip. I can drag and drop it either up here or down there. It doesn't matter either way is the same. And what you're going to see is that that clip, we'll zoom in a lot more slowly. So that's pretty cool. What if I want to zoom the clip out? Can I just double-click and drag another one and move that? Well, yes, I can, but it's not going to give me a pause. So it's going to zoom in and immediately zoom out, which is not what we want. We want it to pause on screen for just a little bit. So let's go ahead and let's just see if we can control Z to get rid of that. So we've controls IED to basically get rid of that effect. So now we have a zooming in and it's going to stay there now we don't want it to stay there the whole time. We want it to only stay there for a period of time. So what we're gonna do, we're going to double-click and drag, drop another diamond marker and that's just going to leave it there. So between the second and the third, that since there's no movement is just sitting still now if we want to zoom out, we double-click and we can do this. So between the first and the second marker, it's going to zoom in. And between the second third, it's going to remain stationary. And between the third and the fourth, it's going to zoom out. So this is how it's going to look, zoom in, stay for a little bit, and then go ahead and zoom out. So that's really cool. You can really do so many different things with this. Obviously, I'm showing a cryptocurrency highlight there. If you were doing in our previous video, the travel example, and you're talking about Berlin, Paris, France. You can have them go across the bottom of the screen. So let's just do that. So instead of pretending that this is a cryptocurrency tweet, let's instead pretend that it's a picture of Paris or France, or it could even be a business logo. Maybe we're doing a presentation on some new business a, and we want kind of a business logo to flash across the bond the screen. We can do that now remember, wherever we move this when we first drop the Transform effect, that's our starting position. And let's suppose that across the length of this clip, we want it to transform from one side of the screen to the other. We can simply set that there, set our ending point. And what you'll see is that over the course of that 5 second clip, it is slowly going to move from left to right across the screen. So you can really do this, however you wanna do it, you can play around with it. There's so many different ways of using the animation. The key thing to remember is that wherever your diamond shapes are, and that is the space between which you're effect is going to take place. So that's, that's pretty much it. Animation is a great way to add effects, add a little bit of pop and interaction your video. So I hope you enjoyed the video and thanks for watching.
11. Course Conclusion: Hey everyone and welcome. I just wanted to close this course out by giving a big heartfelt thank you to everyone that not only enrolled in the course, but that stuck it through all the way to the end. That did all the exercises, that watched all the videos and hopefully you got something out of the course. I know, especially when you're busy, especially when you're learning one of these new skills, it can be hard to want to stick with the course. And that's why I tried to make this as short as possible, but I realize it's still an accomplishment. So congrats good on you for making it to the end of the course. With that being said, I'm always working to get better at creating these courses for you also, if there's anything that you all want to see in the course next time, if there's any specific topics, if there's something you liked about the course or some that you didn't like about the course. Feel free to let me know so that hopefully I can improve it, make it better experience for future learners as well. So with that being said, once again, a big thank you for the course. I hope you found it useful and I hope that you continue your learning journey.
 Robert Reed