Transcripts
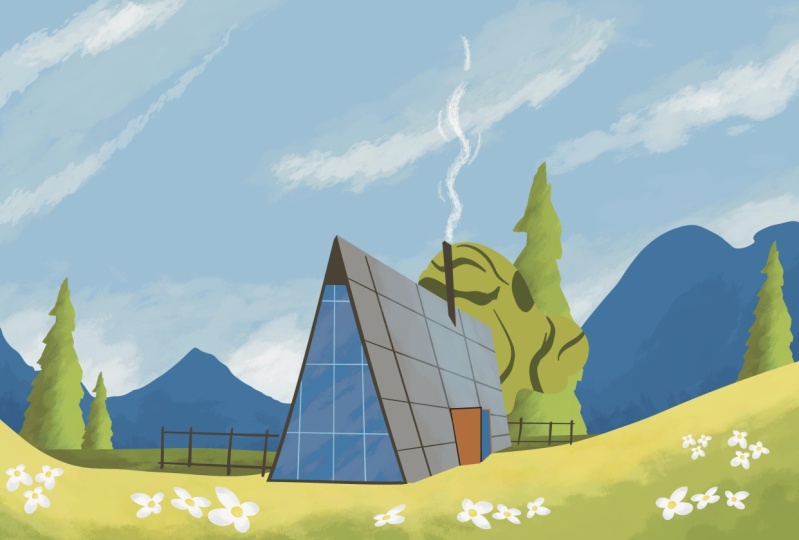
1. Welcome : To another beautiful class
where you will learn how to make this cozy
mountain landscape. Alongside learning how to
make this gorgeous landscape, you will also learn about
composition, colors, and, of course, all of the procreate tools that
are used in this class. Hi, my name is
George, and I've been a professional
artist for 11 years, five years I've
fallen in love with teaching both online
and in person classes. With over 20,000 students
all over the world, I've developed
this wonderful way of teaching that focuses on the project and having fun
while learning art concepts, such as drawing shapes, illustrating textures, and,
of course, color harmony. This class is specifically
designed for beginners. It will guide you
through step by step, teaching you
everything you need to know about the tools and, of course, about how to make
this wonderful illustration. All you need for this
class is the Apple Pencil, the iPad, the Procreate app. And in the resources
page of this class, you will find a free brush
and a free color palette. Let's go into the class.
2. Color palette and brush: For this beautiful class, you will need to create a
canvas by going here on this beautiful plus
and the plus below it. Click on the first width, go 6,000 by 4,000,
pixels, 250 DPI. This will give you
about 18 layers depending on the iPad you have. You don't need this many. You will be able to do
this illustration with about seven or six
different layers. Okay. Once you've done that, on the resources
page of this class, you will find two things.
You will find a brush. That is called silky, and you will find a
beautiful color palette that is called landscape. And once you've downloaded
those things onto your iPad, you should go onto the
brush right over here. Click on Plus, click on Import, then navigate where you've downloaded your beautiful brush. Click on the brush. Once you've clicked on the Brush,
click on Done, and you will have
the brush over here either on the resins or
where you've imported it. It's called silky. For the color palette, you will need to navigate over here on the palettes.
Click on the Plus. Make sure you already have
it downloaded in your iPad. Click on New from File, Navigate to wherever you
have it, click on it. And once you click on it, you will have it
something like this. And that's all you need to do
before we start this class.
3. Sky color and texture: For the first step, you will
need to go on the brush, select the silky brush. Once you've selected
it, you can go onto the beautiful landscape palette. Click on this blue
right in the corner. Once you've done that,
zoom a little bit out, and then start right over
here, making some mountains. Notice that the brush
is at about 17% size, and we can go and make some beautiful mountains
by going lower and higher. Don't make them like this, okay? Make them a bit more jaggedy. Make them very, like, varied like this and
going down and then up, and then a bit higher. Okay. Perfect. Once you've done that, you can drag this color on the bottom of the landscape and a cool trick that you can do right over here. You can go on this
beautiful tool, the move tool, go on to warp, and you can create a bit more organic shapes by dragging these
mountains a little bit, making them bit nicer
and positioning them a bit lower and making a
beautiful middle over here. Once you've done that,
you can go ahead and select the second
blue over here. Okay, and drop it over the top. Okay. Perfect. Now with
the selection tool, this is the selection tool. And with automatic, you can select the
beautiful mountains. Well, if this happens to you, you can click Undo
with the two fingers. Click with the pen just once, and then drag to the left until just the bottom
half is selected. Now, click on the brush. Perfect. And now let's
go on to a darker color, this one, and select under artistic the leather
would brush. It's over here,
and we have it at about 10% size and 15% opacity. And let's make well, the size needs to
be a bit bigger. So let's put it at 35 and the opacity needs
to be at around 7%. I know it's not really visible, but we are making
a little bit of a shadow onto the lower
part of the mountains, creating some textures can also increase the
opacity to about 20%, so you can start to see them. Perfect. Just like this, don't worry too much,
on the lower side, just add some of
this beautiful color until it looks kind of like
this. Doesn't really matter. It's just a little
bit of texture. Okay. Once you've done that, you can go onto the
selection tool once again. This time, selecting the top. Okay, go onto the brush. Now onto the beautiful
white over here. You already have the
leather wood brush. And with this brush,
you can create some beautiful sky clouds starting from the
bottom, with one pass. Notice that I'm not
picking up the brush, going outside of the
canvas, going in. Notice how beautiful they look. And then when you go
to the second pass, you create a bit more depth. Okay. Perfect. You
can go back to the beautiful blue
if you want and create over top of them a
bit more depth this way. Okay. And that's all you need
for this beautiful step. Let's see how it looks. Let's zoom in a little bit. This is how it looks. Beautiful.
4. Ground layers : Now we need to create
a beautiful new layer. This will be the
layer of the ground. You'll need to select the
inking silky brush once again. And let's select this wonderful
color right over here. Okay. With that beautiful
color selected, you can go over this
plane like this and make a little bit of a line that is going down and then up a bit. Then drop this color on top. Perfect. Go on to this
wonderful green over here. In fact, let's add another green from over here
because it looks better, you will already have
that green over there. Leatherwood brush and
another cool trick that you can do is
on top of the layer, go onto the Alpha lock. This will lock, and you can only draw wherever
you have color. Like, notice that if I go
over here, nothing happens. But if I go over here, there's a lot of
things happening. Okay? And just going
and adding a bit of this texture at the bottom
of this beautiful ground. Well, this is the
color, actually. So let's undo those textures. Perfect. And let's
go with some of this more vibrant
green at the bottom. Once you've done that, you
can increase the opacity, go to a darker green
from over here, and add a beautiful
green just like this, we are at about 60% opacity, as you can see over here, and we can go back to the yellow green that's over
here and add a bit on top, creating this lush dark color
and light color on top. Let's go back to the dark to create a bit more
depth, perfect. We need this dark because
we are going to make some flowers underneath
this beautiful valley. Let's go onto the movement
tool and go on to warp. And let's warp this, make
it a bit more of a valley. That's just because this
time you're going to undo the alpha lock and let's go onto the selection tool and select this empty
space over here. Perfect. Once you've
selected that, go onto the brush,
select the inking brush. We are going to make a
beautiful darker plane behind this like this. Okay, to create a beautiful
line over on this side. Perfect. And now we are going to add some
textures to that. So let's select just this one. Notice how it's
grabbing everything, so we need to go to the left until just
this color is selected. Go on to the artistic
brush leather wood. Go on to the darkest green
over here and add a bit of texture just down at the bottom, creating
some separation. Perfect. And that's all
you need for this step.
5. Pine trees: This next beautiful step, it's very important that you click on the first layer and add a plus so that the layer created is in between
these layers. That makes it that when
you draw something, let's go onto the inking brush. When you draw something,
it's behind the layer that is above and above the
layer that is below. Okay? Let's clear
that beautiful layer. And with exactly this
color from over here, let's create one single tree, and then we will clone
it over and over again. Okay, starting from the top, you can make it quite big. Okay. Just going like this and going down
with some lines, and then going down with
more lines and then going on this side. Okay. And over here at the bottom, if you undo this layer, you can go something like this so that you can
drop in the color. Okay. Let's make it
a bit more pointy. And you can go over
onto the eraser. Make sure you have
the silky brush. Make it a bit smaller
to about 15%, and you can zoom in so you can delete some of
these areas a bit. You can make the tree nicer. Go onto the brush and start
adding a few more branches. You can press a bit
harder to create some more definition and
close some of these gaps. Okay, let's go lower. Okay. Perfect. Once
you've done that, let's make another one over here and make it
a bit more long. Wonderful. Once
you've done that, you can go ahead and
alpha lock this layer. Go on to the darker
green over here. And let's add a shadow
just onto the left side, going from the inside, maybe making the brush a bit thicker to about 40
something percent. And let's go add a few lines. Notice how it's
only drawing onto the tree so it
doesn't go outside. Don't go overboard with the
textures onto the right side. Just a few textures is enough. Keep it a bit clean.
So not like this. Notice how you can
calm it down a bit and then make
just a few lines, calm it down, make
just a few lines, and then go over. If you don't like something,
like, for instance, this bulb over here,
go back to the color. You can also select
the color by holding your finger onto the tablet, or you can just go over
here and select it, and then you can go back and erase some of this
beautiful color. Okay, maybe a bit less. Perfect. And another
line over here. Maybe it's too big, so
let's make it smaller. Wonderful. Once you have that, let's put back the
wonderful ground, go onto the movement tool, you can distort this tree a bit to make it nicer
and more organic. Once you've done that, you
can duplicate the layer this way by going to the
left, duplicating it, go on to the movement tool, move it over here, go onto the warp and change
the size, just a tiny bit. Okay. Then you can
merge the two layers. Perfect. And you can go on
the movement tool first, go onto the uniform, make them smaller, and
position them like this. Perfect. Okay. Now, let's
duplicate them again, and now you have four trees
Notice how easy it is, go onto the distort. Go over here, make
this one smaller, make this one smaller yet again, position it like this, maybe
making this one bigger. Okay. And once again,
let's duplicate it. And move it towards here maybe overlapping
this tree as well. Notice how it's creating a
better, beautiful thing. Don't worry about that tree. It's just going to get deleted
once you go over here. Notice how it's just one tree. That's all you need. Right now, let's squeeze these
layers together, and now they are one layer. That's how easy it is to create a few trees super, super fast. If you want, you can also
go onto the eraser and maybe erase some of
the pointy bits, making the trees a
bit more different. Notice how these don't have
the same ending anymore. Let's erase a bit more
over on this side. Okay. And over here, making the ends a bit more
different because that's the things that stick
out and get noticed. And you can even go a
bit lower if you want to erase some of these areas and make the trees a
bit more different. Like, notice how this
is very distinctive. This arm, we can make
it a bit shorter. And now it's not
really there anymore, so they look very,
very different. Perfect. Now, let's go
into the next step.
6. Fowers: This next wonderful step, you will need to create another layer this time on top of the layer
with the ground. Okay, because you will
be making some flowers. Okay. Go on to the silky brush. Make it quite big because
we're going to make these flowers quite big and
then position just one, duplicate, and move them around. You will need this color over
here, this wonderful white. Okay. And let's make a few
petals by going like this. Notice how big this
flower is. Okay. Go over this side, going over here,
and the last one. Now, let's drop in the colors. Perfect. This is
just a simple flower that has a few petals.
Super easy to make. Okay. Once you've done that, you can go on to
the silky brush, go on to this beautiful yellow. And create a circle inside, maybe a bit smaller and
drop in this color. Make sure it just
covers this side. Okay? Wonderful. Let's
select the yellow with the beautiful
automatic tool, the selection automatic, select it maybe a bit more until
it's blue completely. Go onto the brush, go onto
artistic leather wood. And let's grab this
color over here, this orangy, beautiful color. Make the opacity to about 5%. The size needs to
be about eight. And let's add a bit of a
shadow onto this flower. Okay. Just at the bottom
of the flower just a few times until you can start to see a bit of a
shadow developing. Okay, now let's go
on to the white. And with the color
next to the white, let's add a few textures onto
the bottom of this flower. I know they are
not very visible, but if you zoom in, you will see the textures can increase the
opacity to about 9%, so you can see the
colors a bit better. Okay, don't go overboard. Now let's just move
this from over here, make sure you only
have the movement and not the selection tool. Let's make it smaller. You can also distort it a
bit if you want, like this. But I'm just going to make
it smaller with the uniform. Okay. Quite small. Position it right
here on the corner. Let's zoom out a bit so you can see the
bottom of the canvas. Okay, with this tool selected. Okay, now let's
duplicate this layer. Select the flour. Let's zoom in. And we're going to distort and wrap this flower so it
looks more different. I'm going to zoom in
so you can see it. I'm going to start warping
it like this and like this, and maybe from over here. Doesn't really matter. You're
just making flowers, okay? You can now duplicate the two. Let's first duplicate the
first one once again. And move it and make it smaller like clicking on the movement
tool and on uniform. And we have a smaller
flower next to it. Now, let's beautifully warp it. It's the easiest way to
make it more different. Okay. Perfect. Notice how
beautiful these flowers look. I know they look very, very out of place because
they are so white, but it doesn't matter
at this point. Let's merge the three
beautiful flowers. Okay, now duplicate
the layer once again and let's move them
to another location. Just going over here. Right, over here. Let's
distort them just a tiny bit. Okay. Perfect. Now
for the next one, let's duplicate it again. But this time, you are going to do something
more interesting. We are first going to move
them with the uniform tool. Okay? And now with the selection
tool with the free hand, selection tool, go
from over here, select in between
and select this one. Once you've selected,
these flowers go onto the movement tool and you can now move just these two flowers. You can also make them smaller. And position them
over on this side, maybe rotate them a
little bit like this. Perfect. Okay. And let's
select this one over here, make it also smaller and move it in between
these flowers. Perfect. Now, pick this layer, duplicate it once again, and let's move it more
towards the right. Perfect. And now let's duplicate the one that has the
flowers very far apart. And let's move it with
this one right over here, very close to this area. Selecting this flour
from over here and moving it on top right over
here, maybe a bit higher. Okay, perfect. Notice how beautiful
these flowers look. Now, let's merge
all of the layers, and now I'm going to
teach you another trick, which is just to select with the selection
tool and the free hand, you can go in between
the flowers like this, select them, and
then copy and paste. And you will already have
a layer just over here. So you can select that layer. Move it and create some
flowers just over here going outside of the canvas and notice how this gap over here on
this side is quite big. So you can grab these two
flowers from over here, by first merging the layers, grab them with the
selection tool, copy and paste, and
then straight on to the move and put them over here. Perfect. Okay, let's merge everything, these flowers first, and going onto the color, this color over here, and Alpha locking the layer, making sure you have
the leather with brush. Now you can integrate
these flowers a bit by going over
them with this color. You can increase the
opacity to about 20% and make sure you just go onto the bottom letting some of them. Maybe we should pick up this
color. It's a bit better. Okay. Perfect. Notice how they
get a bit more integrated. Notice how these ones
are super white. And these ones, once you touch
them a bit once or twice, they just become super nice
and beautifully integrated. You can take it a step
further if you want and add a bit of green like
this beautiful green, but lower the
opacity to about 7%, and you can put some of
this green on top of them, so they look even
more integrated. If you lost them, you can
always go back to the white, increase the opacity,
lower the size, and add a bit of
white on top of them. Okay. Notice how much
more beautiful they look. Let's undo that
and just add it to this middle flower at the
edge and maybe this one. Perfect. Now, over here, and over on this
one and this one. Look at how nice and
beautiful these flowers look. You only had to
create one flower and the duplicate it
over and over again, exactly the same way
you did with the trees. You've learned how to
add some textures. You've learned how to make
these wonderful trees, some darker shadow at the
bottom, the mountains, also the textures
and the shadows of the mountains and
the beautiful sky. Everything in just a few steps.
7. Big tree : The next step, you will
need to add another layer. And for this layer, you are going to do something
very interesting, which is to go on
this color over here. And with the silky
brush selected, let's go and make
a beautiful tree. You can make it
bigger if you want. I like to do it
something like this, and then maybe a little bit
like this and over here. Okay. Once you've done that, you can drop in the colors. You can also erase some of the things that are a bit
too wide or different, or you can just add a few
more things like that. So you can change
the shape. Okay? Let's pinch so you can
see the beautiful tree. You can also go
onto the Worp tool, the movement and the Worp
and change its shape. So you can make it
a bit more organic. Notice how much
better it looks now. It's a bit bigger,
a bit more lush. Perfect. Once you've done that, you can go ahead and
create another layer. Go on the layer below,
go on selection. Go on automatic and select
the shape. Perfect. Click on this beautiful brush, and this is a very
important step. You should go onto
the layer over here and then grab a
darker color, this one. And start making some
beautiful shapes like these, very snaky, beautiful
shapes like this. Okay. And you can make it thicker on this side,
drop in the color. That's exactly why we made
it on a separate layer. It's so that you can drop in the colors and fill in colors. Beautiful. And you
can also change the shapes near
the end. Perfect. And right now, let's make a
beautiful shape like this. And going from here over here, let's make a beautiful,
snaky shape like this. And these ones that are very
snaky like this look very, very interesting if you start to get and add some
thickness to them. Okay, and let's drop in the
color and this one as well. Maybe we add some
thickness to this one. Let's add it like this. Okay. And let's add a few
more lines at the bottom. Maybe on this side, just
adding another one over here, and over on this side, just adding a few
lines like this, one, and another one, and then
wavy lines over here. Okay. Perfect. I don't like this one, so let's erase it. Perfect. Now, that looks
absolutely gorgeous. It does have some
imperfections like over here. So we can erase some of that
imperfection if you want. It's not necessary. Look at how beautiful
this tree looks. And now for another
reason why you've done it this way is so that you can go
on the other layer, and you can alpha lock it. You can also undo the selection. Remember to alpha lock, go on to a lighter
tone of this color. This one over here, go on to
artistic for the brushes, Leatherwood, drop
down the opacity to about, let's say, 6%. And let's increase the size. So you can start to see this beautiful highlight
on the Right side. Just do it a few times. Notice how much more
interesting it looks now. You can also do the same with a darker color on the left side, thus creating a wonderful
light and shadow of this tree. Don't worry about
the positioning. We can also add this beautiful color like this color over here
on the layer above. Let's alpha lock the
layer and add it to the right side so that it becomes a bit more interesting
on the right side as well. Okay, perfect. And once you are happy
with the result, you can merge the two layers, and now we can play
around with it, make it a bit smaller, and position it
wherever you want. But for now, we need to go into another step because
the position of this tree will be dictated in the next step where you
will be creating a cabin.
8. Cabin roof and shape: Okay, let's undo
this beautiful layer and maybe the trees as well, just so you can focus
on the beautiful cabin. Okay, let's add
another layer on top, going on the beautiful
color that is this one. And on the right brush, which is the silky brush, and let's start by making
a rectangle this way. Hold down the pencil so you
can make a straight line. It doesn't matter how small
or how big you make it because you will be
editing this shape. So let's do another
line over here. Hold down the pencil, move it. Notice how it's sloping
this way, sloping this way. The next line on the right needs to be
parallel to this one. Okay, maybe make
it a bit thinner. So let's not press that hard. And the next one needs to
be this way. Too long. So let's do it again. Okay. Perfect. Now, let's close this shape so that
you can drop in the color. Perfect. Notice how it's
skewed this way too much. So that's where distort
tool works in your favor. You can always make it with uniform and make it
bigger or smaller. But at this point, it does
not matter that much. All that we need is
to make sure that this corner over here
slopes that way, and this one actually
slopes that way. And notice how now it seems as if it's going back into
a perspective that way. Perfect. Okay. Now we need to add a beautiful line over here and another
line over here. Okay. Let's do that, and you're going to do that with this color over here,
this brown, okay? You can go outside a little
bit and put it over here. Remember, you can always
click over here and edit the line so you get
it closer to the shape. Perfect. Okay. Go back on this, and let's do it
this way as well. We need to make
it a bit thicker. Okay. And this time, let's edit it, but
not go over this way. Perfect. Make sure it's long
enough on the lower side, and maybe we can make it a bit closer to this
line as well. Okay? And for the last line, let's go from here to here
and connect it this way. Let's edit it and
rise it just a little bit from here and now
going onto the eraser. And a cool trick
that you can do with the eraser is exactly
the same thing. You can hold your pencil
down, go onto the line, and then you can erase the line, make it straight by
holding down the pencil. Okay. And once you've done that, you can click outside and
erase the end like this. It's a very neat trick
that you can use, like, for instance, over here. Notice how if I go like
that, it's very bad, but if I go and edit the line, can slowly erase and
control that line. So it's perfectly aligned. Okay. And let's go over here. You can also go like this. Doesn't really matter that much. Doesn't need to be perfect. It's very important
that it's more organic. Okay? And let's erase this
one and erase this one. And now let's go and erase the last line over
here on the left. Okay. Perfect. Once you've done
that, the last thing you need to do is go on this blue over here and drop in the color
over on this side. And that's all you
need for this step.
9. Roof perspective lines: Okay, let's start this
step by making sure that this cabin is
distorted properly. So let's make it a bit longer. Cabins a frame cabins like these look very nice
if they are very tall. And let's slope it this
way, slope it this way. And from the middle,
let's warp it, actually. Make it a bit more bowed. Looks better like that.
Perfect. Once you've done that, we can also distort
it quite a bit, not warp, but distort it. They said distort it. Perfect. Let's distort
it a bit over here. Perfect. Maybe skew it. You can also move
it like this, see. Play it around with
it a little bit until you feel like it's perfect. Wonderful. Okay. Now, with the selection tool and the
automatic, select this color. Remember, if everything
gets selected, you can press with
the selection tool. Come on. Not like
that. Like this. And go to the left, so you lower the threshold, so you only select
this part of the roof. Perfect. Now, a cool trick that you can do is go
onto the silky brush, lower it down to about 8%, and let's take a darker color, which is this one right
over here, I think. No. It's not that one. Et's take actually
this color over here and lower the side the
opacity to about 22%. And let's draw some
straight lines going down. Remember to press down and hold, and then you can edit the line, so it's parallel to this one. And let's go one more. Let's edit it a little bit. Perfect. And let's do it again. So you now understand why
we did that selection. Let's make it a bit thinner. Perfect. Let's edit the line. Perfect. Okay. So you did that
selection in order to have these beautiful lines just draw on the shape
itself of the roof. Okay? Now let's go with
some lines like this. Okay, let's move it a bit higher and position it
better and a bit higher. And just perfect. Okay. Now let's go
with another one. Remember to hold down
the pencil and edit it, put it higher, make
sure it's parallel. Well, it can be skewed a
bit. Let's do another one. Hold down the pencil.
Editing. Perfect. And the last one, I think, we are going to make another
one or two. Let's see. One. Let's hold down the pencil
until it snaps and edit, Lower it down from here. Perfect. And for the
last one over here. Gorgeous. That's just perfect. And that's all you
need for this step.
10. Cabin entrance : Okay, for the next step, you already have this selection. So you might as well
just add a bit of this color on top with the
artistic leather wood, but you need it at
about 6% opacity and start adding
some of this color so that the cabin
gets integrated. If you don't have the selection, I think 5% is way too much. Let's drop it down to about 3%. Perfect. 3% let's
add it over here. And you can also add
some of this color as well that will make it
a bit more interesting. Okay. It will just integrate
this beautiful cabin into the background a
bit more because let's add some blue
because you add some of the blues back in, and you are basically adding some reflected light onto
the shape itself. Okay. And with the lighter
blue, let's go on top. Let's go over here
with a few more lines. Perfect. Let's focus in on the edge because that's where
the light will concentrate. Perfect. Okay. And now let's add another
beautiful layer on top. Once you've added this layer, select this color over here. And with this color,
you are going to create a beautiful door
over on this side. Okay, let's go on to
inking, silky brush, and let's draw in with
the full opacity, a line that goes
straight up like that. Perfect. And because you
have this line over here, you can lower well, actually select this color over here and draw in a
line going down, and then another line
going down like this. Perfect. Connect them together with another straight line. Then drop in this color. Oh, no. It's open somewhere over here. Drop in this color, so you
make an opening like this. Now we need to make
a beautiful line over here. Over here. Let's add this end over. Perfect, and going down. And over this way, it's a very simple shape. And once you've done that, you can add a darker
line with this color. You can select it
with your finger, add it underneath here. It's the shadow of the roof. So we make a clear shadow. And now we can go onto this color and drop
it in over here. I know it doesn't look
that well, that good, but it will look very, very nice soon enough. Another thing that you can do is select this color over here. Go back on the layer
with the house, lower the opacity
to about 14 or 15%. The size is quite big. And you can draw
in this triangle without lifting the
brush. Let's do it again. Okay. And then you can
erase the bottom from over here so you don't have anything showing up
on the actual ground. Notice how it looks like
a beautiful shadow. We can also add an alpha lock to this layer and do a bit of a shadow on
this side, as well. Maybe make it a bit
darker. That's wonderful. And in the next step,
you will be making some shadows onto the door
and onto the windows.
11. Windows reflections and lines: This next step, you will need to merge the two layers down. Perfect. This is
so you can select the blue of the windows
and the blue of the door. Remember, if your selection
looks something like this, you can go back and just
hold with the pencil down and go to the left until you move the threshold and you only select the blue. Too much. Let's
select just the blue. And the blue over here. Perfect. Once you've done that, you can go on this
dark color over here, go onto the brush and
artistic leather wood. We have it at about
10% with 21%. Let's add some textures onto
the dark, beautiful door. The door needs a few more passes just to make it a bit darker. Okay? And the window needs
some lines like this. Notice how beautiful they look. Wonderful. Once
you've done that, you can go back to
this color over here, lower the size of the brush to about 9% and draw in
some lines like this. Okay, and another one over here. This will make it seem
like a window. Perfect. Okay. And with this
selection added, let's change the brush to
the inking brush silky, and let's add opacity to about 50% and with
this light color, you can draw in some lines. These are very,
very thick lines, so size 20 way through
thick let's go 7% perfect. Hold down your finger, so you make it
straight, edit it live, and move it right about here. Can also change it because the perspective is a bit skewed. Okay, let's move it over here. And let's click on the brush and draw another
one over on this side. Edit it, go a bit
more to the left, so they are symmetrical,
a bit symmetrical. Perfect. And we need to draw two more lines,
one going this way. And another one below it. Perfect. Okay, we can
also make another one in the middle just so we make the beautiful line
a bit more pretty. The beautiful cabin
a bit more pretty. Perfect. Just make sure
it's in the middle. You can extend it a bit more
if you think it's too thick. You can extend it on the bottom so you can
make it a bit nicer. And look at how beautiful
this cabin looks. Perfect.
12. Cabin details : Okay. And now let's go
on to the silky brush, make it 100% opacity, grab this color over here, the brown, and let's make a wonderful line going this way. Okay. Make sure it's straight. Make another one next to it.
Make sure it's straight. This time edit it. Make it
a bit longer on the bottom. Just a bit longer. Perfect. Let's now connect
them at the top. And over here being
a bit more careful, do it a few times until
it looks kind of perfect. Drop in the color. The same exact color. Doesn't look the same over here, but we can draw it
over with a brush. Okay. Perfect. And we can also erase the
top just a tiny bit, so we can make it nicer. I think this line
is a bit curved. So we can add a bit of a line. Let's lower the size and
add a straight line, edit it so we can make
it a bit straighter. Like that, go in to the
brush and draw in the rest. Look at how beautiful this
wonderful cabin looks. We need to do a selection for this beautiful horn or
however it's called. And let's do this bit as well, maybe a bit lower
of a threshold. Perfect. And this one as well. Go on to the brush
with selected, diselected and the
A frame selected. And let's do some textures,
artistic, leather wood. And let's go first a bit
darker for the bottom part. This one over here. Let's
make it a bit darker. Remember to leave on
some textures like that. They look so much better. And with the lighter version of this color from over here, you can add a bit of
texture onto this horn, as well as the A frame. But it doesn't look
like an A frame, so we need to add with this
color, let's select it first. Let's add another line over
here with the correct brush, this brush over here. Okay, make sure it's straight by holding down the pencil and then
drop in the color. Well, once again,
let's drop it in. And we can draw in the rest with the brush or just
drop in the color. Like this, it does make some
textures and some lines, which makes it look a
bit better, actually. Perfect. And let's add a bit more over here because
we've drawn over it. Once you've done
that, you can do the tree once again
and position it. Let's position this tree. Let's go on the
layer with the tree, actually, and let's
position it over here. You can also rotate
it a bit if you want. I'm going to actually
rotate it this way. Look at how nice it looks. Just a few more things to add, and the illustration
will be complete.
13. Finishing details Thank you: For the next beautiful
step and the last one, you need to go onto the layers, add another beautiful layers, so you can add some
fences and some posts. Let's go on to this color. Make sure you have
the inking brush called silky that
you've imported. Put the size to about 5% and start adding some
straight lines over here. You can draw straight
lines by drawing the line, holding it until it straightens, and then to do it,
another beautiful trick is to hold your finger down. Notice how if it's here, if I hold my finger down, it just jumps at perfect amounts until it perfectly horizontal. Let's draw in some posts. Can do the same with the post. Notice how now it's
completely straight. And now let's do it again. Straight, now another
one straight, perfect. Go with the eraser and erase these posts so they
have the same height. Okay, perfect. And over here, so it seems
like it goes behind the house. Actually, let's move them a bit. You can also distort them
and move them a bit higher. Just so it's actually
behind because if these posts are
lower than this corner, they cannot be behind the house. That's a little bit
of perspective. Okay. Let's duplicate
this layer. Okay. And let's move
it over on this side. This time, we are
going to move it and also rotate it
a bit like this. Make it a bit bigger,
not with the uniform, not with the distort, but with the uniform tool. Let's make it a bit bigger. I know they are not visible, but once we duplicate it again and move this over on this side, let's make sure these posts
align almost perfectly. Okay. And now we can add these layers together so that we can play a little
bit with this perspective, make sure it looks
something like that. So it seems as if it's in front. Now you can actually
merge the two layers with the posts and go
onto the Alpha lock. Click on the layer,
go Alpha Lock. Click on the brush
Artistic. And leather wood. Go on to a lighter
version of this color, which is this one over here, and you can add just
a few touch ups. Let's increase the
opacity and add a few of the beautiful passes just so the color looks
more beautiful. Perfect. You can go back to a darker color if you
want in some areas. Perfect. Okay. And
the last thing that you can do is go onto the house and with
the distort tool, you can play a little bit with it just so it looks
a bit better. Let's zoom out quite a bit. We can make it a bit smaller. I think that looks much more
interesting and beautiful. Let's make sure these
boats are behind. These ones are in front. Perfect. And now let's add the layer back with the
trees in the background. Perfect. Notice how beautiful this illustration looks and
how easy it was to create. You've done some beautiful
textures for the background, some beautiful colors
for the grass, for the beautiful mountains
in the background, and also for the skies. You've added two colors together with the
leatherwood brush. You've done the same
with the trees. You've learned how to make
these abstract shapes on the tree behind
the a frame cabin. You've also learned a bit about perspectives,
and of course, you've learned so many
things about all the tools, the selection tool with the automatic, with the free hand. You've used the
free hand to make the duplication of these
flowers and also of the trees. You've learned about
the movement tool, the free form, the uniform, the distort, and the warp. You've learned about
how to make layers, how to duplicate them, how to use the alpha
lock over here. And, of course, you've learned
about textures and colors and how to draw a beautiful cabin and
a beautiful landscape. Thank you for watching. And
if you are gracious enough, please leave a review. It will really help others know that this class
is for them as well.
 George-Daniel Tudorache, Together we will create amazing things.