Transcripts
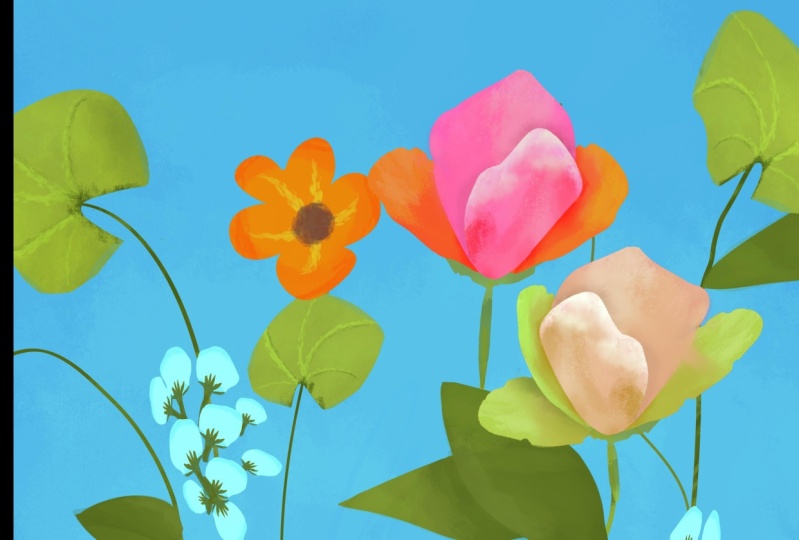
1. Welcome : Welcome to this Floral Procreate Illustration
class where you will learn how to
make this composition with flowers and leaves. Don't worry if you haven't
illustrated before. This class is specifically
designed to guide you step by step and encourage you to create a
successful project. Hi, my name is
George, and I've been a professional artist
for over 11 years. Five years ago, I've fallen in love with teaching
both online and in person with over 20,000
wonderful students, I've developed this
interesting way of teaching that focuses on the project and learning all
the tools of illustration, such as color
harmony, composition, textures, and, of course, all the tools of Procreate. If you are ready, let's
grab the Apple Pencil, the iPad, the Procreate app, and jump into the class.
2. Importing brushes and creating a canvas: For this beautiful class, you will need to create a
canvas by going here on the plus and over here
below it on the plus, and you need a
canvas that is 4,000 by 6,000 pixels
and a DPI of 250. This will give you
about 18 layers. In case you have an older iPad, you will have about
ten or nine layers. It does not matter because
you don't need as many layers to create this beautiful
flower composition. Now, for the brushes on the project resources
page of this class, you will find this brush, and you need to download
it on your iPad. After you've downloaded
on your iPad, click here on the brushes. Click on the Plus,
go on In port, navigate to wherever you've downloaded the beautiful brush. Click on it. Once
you click on it, you are going to be prompted to this screen, and
then click Done. I'm going to click
Cancel because I don't want to create
another brush. Perfect. This is the
brush called Silky. It's an inking brush,
very beautiful. And for the Color Palette. This will be the color palette, and you will find it
on the same page, the project and resources
page of this class. Click on the plus,
New From file, navigate to wherever you've
downloaded on your iPad, click on it, and you will
have it something like this. Okay, let's jump
into the next step.
3. Background softness: This step, you will
need to click on the layers and the
background color over here. Click on this color
in the corner, this wonderful blue, Cerlean
blue, amazing color. And then you're going to
be on the first layer. Go on the brushes, artistic, leatherwood brush, and
select this color over here. Make sure the brush
is quite big. I think 40% is good enough
and about 18% opacity. This is opacity. This is size. And we are going to add some textures
into the background. I think the opacity
is way too high, so let's lower it down
to about 9% or 8%, and the size should be a
bit bigger at around 63. Notice how it's
much more subdued. Let's add some textures onto the middle over here
like this size, and then add a bit more
just in the middle. Just a bit closer to the
midpoint of the canvas, and that's all you
need for this step.
4. First leaves: This next beautiful step, let's create another layer
by adding it on the plus. Let's select the
green color from this corner over here
and the correct brush, which is the silky brush, and let's create some leaves. Let's go and do an S shape just going like
this and like this. Once you do that, you
can go right over here and add a bit of a round shape
and connect it at the top. Don't worry too much
about the shape. Drop in the color by dragging it from here and dropping
it over the shape. Make sure that the
shape is closed, something like this, and over
here, something like this. And then drop in the color. Now, if you don't
like the shape, notice how this leaf
is not so beautiful. We can go and click on the movement tool and
then on the warp, this over here, and we can make this seem a bit
more like a leaf. Notice how just by
pushing from here. So from here, just pushing it
up and then down from here, maybe up a little bit, and making it a bit shorter. Made it seem more like a leaf, and it also changed
the shape quite a bit. Perfect. Now, this
shape is quite big. It needs to be a bit smaller. So let's click on the
movement tool and now use another tool
from over here, which is called uniform. We can rotate this leaf to make it a bit
more interesting, as well as make
it a bit smaller. So you rotate from
this green dot, and you make it smaller
from here from the corner. If you make it smaller, from any corner or any point, the uniform tool will not
really distort the shape. That's why you have this shape this tool over here,
which is the distort. Notice how it's distorting
the shape differently. Okay? Let's undo that by
clicking with two fingers and making sure that it's positioned a little
bit nicer, okay? And once you do
that, we can click on the layers to check up on the layers and duplicate
the shape just once. Okay. Now with the movement
tool, let's rotate it. Make it a bit smaller
with the distort, make it a bit smaller
and with the warp, we can change the shape
even more to make it seem like it's a
different leaf entirely. Okay? We can go back onto the
movement and the uniform. And notice how these layers
are on top of each other. Now, this will be the
layer that's on top. So the first leaf, it's
not really visible, but the first leaf is on top. The first leaf over here
is on top the small one, and the other one
is on the bottom. I would like to change that by clicking on the layer,
and dragging it down. Now, let's change
the position and put it over here just because
it looks much, much better. This will help you
in the next step, the positioning of the layers. And you've learned a little
bit about the tools, the movement tool, the distort, the move, the warp, as well as how you duplicate layers by
swiping to the left, clicking on Duplicate, and then moving and
warping the shape. Let's go into the next step.
5. Shading of the first leaves: This next step, let's
introduce another tool, which is called the Alpha lock. You click on the layer,
go on the Alpha lock, and now a checker
board has appeared. That's the indication that
the alpha lock is on. Let's do it for both. Okay. And now let's
go on the brush, and I'm going to show you
what the leather would brush in combination
with a lighter color, this lighter green over here. The size should be
at about maybe 9%. The opacity, I think
it's okay at about five. And let's add, make sure you are on the
first layer below. The one that's below and
add a bit of this texture. Notice how it's
only drawing onto the leaf without going
outside the borders. That's exactly what
the alpha lock does. If it was not on, this is what would happen. Let's make it a
bit more apparent. You would draw
outside of the shape. If it is, let's undo everything until we have
the alpha lock on again, and let's go with the opacity
a bit higher to about 23%, just so you can see
some textures as well as the change in color. Okay. Let's add
some of this color to the top of the leaf,
the one on the top. Okay. Notice how much
more beautiful it looks, and we need to add a
bit of a shadow on the one below with
the darker tone, this darker tone over here, just adding a bit of a shadow. And on the one that's above, let's add a bit of a
highlight just over here to make it much more
interesting and beautiful. Okay, that's all you need to know for this step to be over. Let's go into the next step.
6. Duplicating leaves: The next step, we are going to duplicate this layer and make a few more leaves just going around and adding
a few more leaves. Another trick that you can
use is go over here and flip the shape as
well as warp it. You can warp it as much as you
want and change its shape. We have one more leaf
without working that much. We can duplicate this
layer once again, go on to the
movement to uniform, change the rotation,
maybe make it this way, and let's put it just over here so it goes
outside of the shape. Okay. Let's also teach how to merge layers by
pinching down two layers. These are the first two layers. We can pinch them down,
duplicate them. Okay. And now we have two leaves. We can actually flip them
horizontally, vertically, I mean, and going
on the Warp tool, just changing them a bit so
they come from this side in. Perfect. Now we can duplicate this layer over here since
it has just one leaf. Go on the uniform tool, rotate it, and
place it over here. Let's warp it and
make it smaller, since we don't have so
many smaller leaves. With the warp tool, this will
change the shape as well. That's perfect. You can also use the eraser and erase some
of the shape if you want, and you feel like
it's not really looking that appealing. Perfect. Now you can merge all of the
layers by pinching down, and you will be done
with this step as well.
7. More duplication: This next step, you will learn
about the selection tool. The selection tool, you
can find it over here, and it has a few
interesting options. The automatic just selects where whatever you click on
by color and texture. Notice how it's selecting
both of them like this. But we are interested
not in the automatic, but in the free hand. And if you have
more than one leaf like this on the layer, you can go with the free hand
and circle the two leaves, click on the circle over here, and then copy and paste. This will create
another layer with just these two
leaves that you can now move with the movement
tool and the uniform, and now you have
two more leaves. I've done it this
way, just so you know about this tool as well, because it's super,
super useful. Let's actually put it on the bottom over here,
flip it like this, make it a bit smaller and
make it seem like it's coming from the bottom on the
inside of the canvas, just to open the
composition a bit more. You can now merge
the two layers, go onto the selection tool, grab this leaf over here, copy and paste, go onto the
movement tool, uniform. Rotate, and we can now add another leaf over here
coming from this side. Notice how here we have three points that have
opened the composition, and now we have another
one over on this side. Perfect. Now let's
merge these two layers. It's a bit harder to
merge two layers. It's easier if you have
three or four or five. Okay. And that's all
you need for this step.
8. Vines and contrast: This next step, notice how these leaves seem
way too copy paste. We need to add a bit
more texture to them. By grabbing this
color over here, remember they already
have the alpha lock on. If they don't, you can add it. And of course, let's go on to the artistic
leather wood brush, and let's add some of this
color onto the middle ones at the end at the tip of
the beautiful leaves, you can add a bit more just
to make it a bit different. You can also add it over on
this side, just a tiny bit. Notice how it's creating some contrasts without
a lot of work, and it's creating also
a lot of texture. You can play around, and
if you don't like them, you can go back to
this color and just go over and smooth it out, and then going to the darker one and adding a darker color. And now you are back at that beautiful leaf that was
before or you can just click Undo until you have done the beautiful textures
that you want. Okay? And of course, let's talk a little bit about
layer positioning. Notice how there are two
layers over here if I click over on this
layer and add a plus, it will create a
layer in the middle, which means this layer, layer number three, will
be below the leaves, below the layers layer two. That translates. Let's go on to the brush, silky brush over here. You're okay, and select
the correct color, which would be this dark green. And notice how if I draw
a line going this way, it will be behind these leaves. That is very, very useful. Let's undo that and do it once again by zooming out a bit, just so you can make a
few more changes and make the line a bit thicker at the bottom and
thinner at the top. Perfect. Once you do that, you can go over here behind these leaves and
over on this side, going this way and going
over on this side. Notice how it's much easier to create a thick line if
you start from here. So let's undo that and go from here down and maybe
this way this time. Perfect. Okay, and
create a few more lines. We need one in particular, just going from this over here, maybe it maybe zoom in a little bit and make
it something like this. It needs to go the
opposite way from about here and over merging
with this line. And in order to
make it seem like it's a bit more
nice and natural, we can add a bit more
thickness where they meet. So notice how I'm adding
a bit more thickness, and that creates and
makes the illusion that this branch just creates another beautiful
branch going that way. And of course, we can do
the same over on this side. Remember to just go from the
outside towards the branch. Okay. Perfect. And of course, we can add an alpha lock. Notice how these lines
are super, super flat. We can add an alpha lock. And once you do, go onto the
brush artistic leather wood, go onto the lighter color. And let's add some textures
over these sticks. Perfect. Okay. You can always just undo the alpha lock and create as many
sticks as you want. Another trick that you can do and use is duplicate the layer. That's a super nice
way to just create a few more branches
just like this. Notice how easy it was. You can always just
warp it if you want. Just warp it down until it goes outside of the shape and
whatever branch you don't like. Like, for instance, I don't
really like this one. I'm just going to erase it completely just because let's
make the eraser quite big, just because it's
on another layer, and before we merge them down, we can erase what we
don't like on this layer. We didn't like that, the one on the left, and
the one on the right. And this stick right over here, let's go on to the inking brush and have the darker
color. Perfect. And let's make another stick from over here going this way. Wonderful. Just a
few more sticks with just a few more clicks. Let's merge them down. Remember to alpha lock, go on to the lighter
color and add a few more textures
with the correct brush, which is the leather
wood, and add a few more textures
wherever you want. Okay. Perfect. Let's add
some over here because branches that are thinner
tend to be a bit more bright. Okay. Perfect. And you've learned how to
duplicate more layers, make some beautiful branches, and also create
some textures onto these branches and also
about layer positioning. Let's go into the next step.
9. Leaf variety: This next step, you will
need to create another layer over the layer number
two which is at the top. Let's create another layer. Make sure you have
the inking brush, the silky inking brush, and let's pick this middle
green color over here. And let's create some
more interesting leaves. This time, these leaves will be maybe we should make the inking brush a bit bigger so you can see
what we are doing. Notice how these leaves
will be a bit angular, just like some beautiful
hexagonal shape. Let's drop in the color by picking it from here,
dropping it in. And we can go onto the eraser, make sure it has one
of the inking brushes, preferably the same one. And let's erase and
make the corners a bit more round on
some of them. Okay? This leaf also needs wherever you can find
the space and it fits, you can delete and make a
sort of like jump inside. Notice how it's looking a
little bit like a liti pad, and that is the leaf.
It's quite big. So let's make it a
bit smaller by going on the movement tool on uniform, making it a bit smaller. Also, putting it right over
here over this branch. Perfect. Once you do that, you can go ahead and
add an alpha lock. Okay, let's grab
the texture brush, which is the artistic
leatherwood brush, and let's draw in some lines
with this light light color. The opacity should
be quite high. Okay. And the size, let's
make it to about 7%. These lines should come
from somewhere around here. Maybe the size should be a
bit smaller to about 2%. Perfect. And let's go
from the outside in Okay, and going in like this and like this and adding a new one over here and the
last one over there. Perfect. Now, going
with a darker tone, just adding a darker tone and doing some lines
over on this side, maybe dividing this corner over here and adding some more
lines going from the outside, not on all of them. You can also go over here, and I think three of them
is more than enough. Okay. Now, let's increase
the size of the brush to about 24% and lower
the opacity very, very low to about seven, and let's add some
textures on top, just so it doesn't seem
so textured these lines. We can also go to
the lighter version of discolor and
just on the edge, just adding a little
bit of discolor, creating some more textures, and a little bit more of
an interesting shape. Okay? Now, let's play
with the distort. We haven't played that
much with the distort, but distort is a very
cool and interesting tool that can help you
create perspective. Notice how we are actually
angling down or up this shape. So let's drag this corner, drag this corner,
drag it a bit more. Until it looks like
it's going that way, we can also just rotate it a little bit and make it seem like it's going
into perspective. That looks perfect. Okay. Let's make
it a bit bigger. I was zoomed in quite a bit. So let's go on uniform.
Make it a bit bigger. Okay. Go on warp. Let's make it a bit
more round over here. Perfect. And that's all
you need for this step.
10. Duplicating new leaf: Next step, let's go ahead and duplicate this layer by swiping to the
left. Duplicate it. Okay. Let's flip it horizontal. Click on the uniform tool. So we are on the movement tool. Notice how it's a bit
crooked on this side, so let's warp it and change
it a bit like this, perfect. And we can make it
a bit more big, just a bit bigger and move it
outside over on this side. Notice how this is
drooping down quite a bit. Let's make it a bit more round. Perfect. You can also add a bit of texture with this
lighter color if you want. I do prefer to add some darker colors where
the shapes meet the edge. So notice how these
in the middle have a lot more light than
the ones on the sides. Okay? Let's duplicate
it once again, the layer below it, so
not the leaf that is cut. Okay. Let's go on
the movement tool, uniform and move it
right over here. Let's zoom in so you can see
what's going on. Distort. Let's distort it quite a bit. We can also flip
it horizontal warp and make it a bit
more round this way. Perfect. We can also rotate
it by clicking on uniform. Rotate it a bit, and
that looks quite nice. Okay. Remember, it already
has the alpha lock, so we can click on the
brush on the leather wood. We already have the settings. The settings are quite low. The opacity is at 6%, and just adding a bit of this
dark green color over it. Okay, maybe that's too much. So let's add a bit of this
green onto the right side. Okay. That looks
nice and beautiful. One more time let's
duplicate it. We can also merge the t on top and the last
one on the bottom. We can move it to about here, let's say, that's looking
nice and beautiful. Let's make it a bit
more round by going on this corner and
on this corner. That's perfect. Now,
let's add a bit of texture with the
green over here, just a tiny amount of green. That's too much. Let's undo until it feels right.
That's perfect. Okay. And let's not forget
to merge everything down, all of the leaves, and
also the branches. Perfect. And that's all
you need for this step.
11. First flower: Can see, so far, we've
done the simplest things. That's just so you
get familiar with some tools and some
ways of drawing and the settings that you
need for layers and the brushes as well as it's easier to just start
with the simple stuff. Let's go on the layers
and create another layer. This layer will
have a few flowers. Very, very simple flowers. Let's go on the silky brush. Pick this color over here. Let's actually pick the orange, and let's make a simple flower. Just going like this and like this with some
beautiful round shapes. About five would be perfect. Okay. Let's drop in the color, make sure that the shape is completely closed before
you drop in the color. Okay, let's go on to our
favorite tool, the Warp tool, just so we can drag in the corners a bit
more to the outside, just so we make that
middle and the flower a bit more of an
interesting shape. Notice how if we click
on the movement tool, this was how it was looking
before. Way too simple. Now it's a bit more complex. Okay. Perfect. Remember to alpha lock the layer whenever you want to add some textures. Let's go on to the brush,
the leatherwood brush. Let's increase the opacity just a little bit to about 24%. Let's go on this red over here and let's add some red onto the outside petals,
onto the outside. Okay. Just a few times
just circling around. Let's decrease that opacity to about 10% so we can
circle inside the middle. Softening those textures
on the outside. Going back to higher opacity and lowering the
size to about 14%, we can add just the
last few steps, the last few dabs of paint. Okay. Now let's go to this
beautiful yellow over here. Make sure that the brush is
quite small to about 8%. I think 8% is way too big. Let's put it at three, 2%. And the opacity a bit
higher to about 76. And from the middle
of the flour, just going to the outside. Well, actually, let's go
from the outside in a bit thicker on the brush, we need the brush to
be about 4% or five. And just go, five is too much. Let's put it to four. Let's go from the
petal to the middle, petal to the middle,
and going this way, notice how they are a
bit curved and they have a beautiful end that is pointy. Okay. Once you do that, let's go on this
brown over here, lower the opacity, and let's
start to make a middle. Don't raise your brush yet, your pencil. Now you can do it. So three times every time trying to make the
circle a bit smaller, just so there is a softer edge in the middle of the flower. Notice how it's a bit softer. Let's zoom in and
do it over and over again until the yellow
kind of disappears. Notice how the flower is
not looking that appealing. What you can do is go onto
the movement tool, rotate it, and warp it just a tiny bit until it feels
a bit more natural. Okay, and let's make
it a bit smaller. Okay. And position it
br over on this side, maybe making it even smaller. Let's zoom out to see. Nope, a bit bigger. Perfect. Okay. And that's
all you need for this step.
12. Multiplication of the first flower: The next step, you guessed it. We need to duplicate
this beautiful flower by duplicating a layer over here
and moving the beautiful, wonderful, gorgeous
orange flower towards the left side going
outside of the canvas. That looks quite nice. Let's do it once again with the flour that's
not really cut yet. Okay, and move it
somewhere on this side. Okay. Perfect. Now
let's go on to a layer with the beautiful
foliage and sticks. And let's go on to
the inking brush, silky pick the middle green. Let's go with a
stick from this one. Oh, the alpha lock is on. So let's undo the alpha
lock and let's go from here towards
this shape over here. You can click on the
selection tool on the automatic and click
on this green, and then move the pencil
to the left until only this stick is selected. Then click on the brush, go on to artistic leather wood, change to a darker color. And we can add a bit of
texture onto this stick, so it doesn't seem so flat. Perfect. Now, we've added just a little bit
of a stick over here to make this flower seem like it doesn't just
grow out of nowhere. We can also move it
just a tiny bit, just so it doesn't seem like the stick just
goes inside of it. That's perfect. We can also warp it just a
little to make it nicer. Perfect. And once you do that, you can merge the layers
with the flowers, and that's all you
need for this step.
13. Small blue flower: This next step, you
will need to create another beautiful
layer on top of every layer that you have
on your illustration. Let's select the inking
brush, the silky, beautiful brush, and let's
go on this color over here. Okay. This is going
to be a very simple and easy, beautiful shape. Just going a little
bit like this, make it a bit more wavy. Okay. Perfect. Once you do that, let's move on to this color over here, which is this green. And let's create just a stem.
That's going like this. And then this one goes
towards the flower like this. Maybe the brush should
be a bit smaller. So let's create a
smaller brush and then going and creating these
little fingers Perfect. Okay. Just going and
making them a bit thicker. Perfect. Notice how this can
be a bit more streamlined. Okay. That looks gorgeous. Now going on to the selection
tool to the automatic. Click on this blue over here. And, of course, going onto a darker blue. Go
onto the brush. The brush should be
the leatherwood brush. Make it quite small, 1%. Let's add some blue
at the bottom. Maybe make it a bit bigger, 2% opacity lower, 15%. That looks gorgeous, and three times is
absolutely enough. Okay. Let's go onto this
lightest blue over here and add a bit more towards
the top side of this flower. Okay. And now let's go
on to the selection. Select the stem if
you are selecting everything with this
um just like that, you need to undo it by clicking with two fingers
and then going and clicking on the
stem like this and dragging it to the left until
just the stem is selected. Perfect. If you don't have enough room to move to the left, you can go and
move the zoom out, the canvas, click on it, and move it to the left until
just the stem is selected. Okay. Now let's click
on this darker tone. Okay, the brush so that
the selection is made, click on the brush and
adding some textures onto this just a few times
more towards the flower. Okay? You can also add a few
lines onto the stem itself. Perfect. Now notice how this
flower is a little bit big, needs to be a bit smaller. Let's undo the selection
first and move over here and go on uniform, make it a little bit smaller, and that's all you
need for this step.
14. Bunched up flowers: The next step, you will need to duplicate this a few times. That's going to make it
easier so you can move them and create a
bouquet of flowers. Do it five or six times until you feel like
there is enough flowers. Okay? The first one
should stay in place. The second one should
move towards the right. Don't forget to
add a bit of warp. You can always zoom out. Add a bit of warp to it just so it looks a bit
different. Perfect. Move towards the top, one above the one
you had selected. Click on the movement tool. Remember to click on Uniform, rotate, move right over here. Maybe this one overlaps the first one and is a bit smaller. Notice how it's looking
way more interesting. Perfect. Now, this one, let's move one up and
move it right over here. On this area. Creating some
overlapping, not too much. Let's move to the
warp tool and make it a bit smaller by
just warping it down. We can even make it a
bit more triangular. That's perfect. Maybe
not on this side. Okay. Moving another layer
up and duplicating it. Well, it's already duplicated. We need to move it
with the uniform tool. Make it a bit smaller,
getting over here. Don't worry that this
stem is going over. It's just the layers on top. Let's move it a bit higher, actually, and flip
it horizontal, rotate it, maybe
distort it a bit, just so it looks a bit nicer. Perfect. And towards
the left, it goes. Okay. And the last one. Let's make it a bit smaller
first with the uniform tool. Okay, and move it
right over here. Okay. That looks just
about perfect. Okay. All it needs right now is
some smaller versions. You can merge the layers
below and grab this one, duplicate it, and make some smaller ones by
going on over here. Let's actually position
it behind these flowers. Perfect. And let's duplicate it once again just because
it's smaller already, and we can just move it over
on this side over here. And of course, we can duplicate it once again,
the one below it. Move it a bit higher
behind this one. Okay. And it seems like it needs a bit more
towards the right side. So let's duplicate
it once again. Move it over here. Okay. And we need one more that is a
bit more of a mid size. Okay, mid size
over on this side. It needs to be on
top of everything. Okay. Perfect. And let's rotate it over like this just
so we can hide that stem. Okay. In case you want to change a little
bit of the shapes. Notice how this is quite big. We can go on the eraser after you've pinched
down all the layers, can go on the eraser and
make it a bit smaller. Let's make the eraser
smaller first, and we can play around
with it a little bit, making it much
nicer and smaller. Can even add a bit
of a line over here, and now it's a bit smaller. Okay. You can also now
play with the full shape. If you zoom in a bit, you can make it a bit bigger, a bit smaller, or just warp it, which I'm going to do and
make it a bit taller. They look nicer if
they are taller. Okay? And a bit thinner. Perfect. That's nice. We can also erase a bit of this distorted flour over on this side, just a little bit. And just like that,
you have some nice, beautiful flowers, some
fluffy, beautiful flowers. And to do it one more time, let's move it with
the uniform tool, make it a bit bigger, and place it right over here on this stem. Notice how it's
integrating a lot more because it comes
out of that stem. Another trick that you can do
is duplicate it once again. Flip it horizontal, and by
horizontal, I mean vertical. Warp it just a tiny bit, just so it's a bit
more different. Okay. And let's go on uniform. Once again, let me get a bit bigger and place it
right over on this side. Let's warp it towards
the left a bit more, so it comes this way. Okay. And that's all
you need for this step. Let's merge down the layers, and let's go into the next step.
15. Creating a petal: Okay, for this step, we will need to create another layer by clicking
on the plus over here, and let's create a
wonderful tulip. Let's go on the colors. Pick this color over here. Make sure you are on
the inking brush, and let's draw a
beautiful petal just going like this and
maybe like this. And that's the beautiful petal. Make sure it is closed over
here and drop in the color. We can warp this shape by
clicking on the movement tool, warp it quite a bit so that it seems a bit more interesting. Okay. We can also add a few
more shapes to it if we want. Sort of like this,
sort of like this, just to create a bit more
of an interesting shape. Okay. And maybe over
on this side as well. Just adding a bit more
pizzas to the shape. Okay, let's drop in
the color over here, and now it looks nice. You can delete this
small little knob. Okay. And remember to alpha lock the layer before you
do any other textures. Let's go on to the brush. Okay, artistic leatherwood brush and select a darker
tone over here. Let's add it onto the Let's increase the
opacity to about 82%. And the size to about 5%. Let's add some textures. Notice how these textures
are way more visible. Don't raise the pencil, draw in the colors on the sides. Okay. Let's pick this
color over here. And add it to the middle. I think we should
pick this color. Yeah, it's picked.
Let's add it to the middle of the shape
without picking up the pencil. Try to make a pointy
color over here. And for the last color,
this one over here, let's add just one line actually going from
the inside out. Perfect. That's one petal, just a few more to go
in the next steps.
16. Multicolored petals: For the next step, you
will need to create another beautiful
layer going onto the brush, inking, silky brush. It already has 100% opacity and the size it's at about 8%. Let's actually drop
this down over here. And draw in the shape behind it. Let's first select
the correct color, which will be this
one over here. Well, let's actually
make it orange. Okay. And let's
draw it over here. Make this beautiful petal. Make sure you close the shape. You can undo this layer so you can see if
the shape is closed. Okay. Drop in the color. Put the layer back.
Zoom out quite a bit. Now, let's make this
a bit more curved so that it's making
a tulip shape. Okay. Just going this way. Maybe a bit less
pointy. That's perfect. Before you do any textures, Alpha lock the layer. Go on to artistic
leatherwood brush. And let's go to a
beautiful red like this. Lower the opacity to about 56%. And let's add a bit of
this color at the bottom, and another beautiful layer, just a few lines of
textures over on this side. That looks nice. Now, let's
decrease the opacity. Notice how it's so much more different than
the first one, and it needs to look just
like it's a whole flour. It needs to be part
of the same flour. The way you do that
is by lowering the opacity to about,
let's say, 5%. Or 6%, increase the
size of the brush, make it to about 60%, wrap this color over here, and let's add a bit of
texture, a bit of color. I know it's not making
a difference right now, but the more you pick up and
you brush this color over, the more it goes
towards the same color. Now, another cool
trick is going back to the red and adding just a
bit of red at the bottom, increasing that beautiful color. Let's decrease the size and add a beautiful
orange at the top. Okay. Notice how the
textures are not so intense. We can make them a
bit more intense by increasing the opacity to 52%, 4% size, going to the red, and adding just a few
textures at the bottom. That looks much nicer, and that's all for this step.
17. Stacked petals: For the next layer,
you will need to create it on top this
time because it's going to be a petal that sits right over here
on top of this one. Okay. Let's pick this
color over here. Well, let's actually
undo this layer just so you can see what
type of petal it is. Let's go on to the correct
brush, the inking. And let's make a beautiful
petal just going this way. Don't worry too much
about the shape, make it a bit more
round on the bottom, wavy and a little bit of a point that we are
going to delete. Just erase just some of it. Now let's redo this
layer over here and start warping this shape
so that it's a bit smaller, and it covers this side of that petal, the
petal on the back. Notice how it's becoming
a bit more interesting. Okay. And let's make
it a bit longer on the bottom before you add any
textures to the alpha lock, go onto the artistic
leatherwood brush. Let's go pick up
some of this red. Let's add it over on this side, and a little bit on
this other side. Now some white. Let's pick this white over here. Let's add it on the sides, and you can go over
the red a little bit. Remember not to pick
up the brush except at the top where you can add a bit more textures like this. Can also add a beautiful line in the middle if you want. Okay. And let's pick this
color over here. Remember, let's add some size. 30%, I think it's enough. Lower the opacity to
about three or 4%. Let's add a bit of
this pink over top, just so it blends a bit more. Okay? And now let's pick that beautiful yellow white
again, increase the opacity. Let's just add maybe
lower the size first. Let's add some
textures at the top. And with the red, let's add just a few more
textures at the bottom. Okay. That's nice.
And, of course, we can go into the next step, adding the last beautiful petal.
18. Special flower: Okay, now let's just cheat a little bit and duplicate
this layer with the orange petal and
flip it horizontally. Go on uniform, move
it right over here, go on to warp, make
it a bit smaller with the warp and a bit thinner. Make sure it goes
behind this one. And maybe a bit taller. We can always delete
that pointy shape. Let's actually
delete it and make it a bit more wavy on this side. That looks super nice. All it needs right
now is for us to just pinch these two together and click on this beautiful
yellow over here, make sure there is a checkerboard
behind these petals, and we can add just a
touch of this yellow on top with the Leatherwood brush,
I think that's too much. Let's undo it and a bit more. Nope, a bit less. That's perfect. Okay, I do think that this needs to be
a bit more different. So let's go onto
the selection tool. This time, use the
freehand selection tool. Let's go over here and
select this petal. Make sure you are on the
layer with the orange petals. Go onto the movement,
and let's warp it. Just a tiny bit like this. Maybe over here and a bit lower. Let's see how that works. Perfect. That looks a bit nicer. And I think that that
is the beautiful tulip. All it needs right now is
for us to merge the layers, click on the layer
below it, add a plus, and let's add a beautiful
Beautiful round shape with the silky brush. Let's add a shape
right over here. Okay. And the stem
going out of it. Perfect. Make sure you make
it a bit more organic. And let's alpha lock this layer. Of course, let's
add some texture to it with the artistic
leatherwood brush. Let's add some
darkness near the top. And I think that's
more than enough. I know it's not connected, but we can always draw
a beautiful line and a beautiful stem so that it goes right where
the tulip is going. Let's actually make it that so that the
stem is connected. Let's merge these
layers together. And also, now we can
warp it just a tiny bit, making it a bit more different, as well as position it
just over on this side. Perfect. Once you do that, you are done with
the first tulip.
19. Special flower magic: And you've guessed it. We now duplicate this layer just because we
worked so hard on it. Let's flip it horizontal and notice how it's
so flat on this side. So let's warp it
just a tiny bit. Just warping it like this. Now it looks so much nicer. Okay. And let's position
it a little bit better, which means moving
it with the uniform, maybe making it a bit smaller. And I think that's
just about right. Now, a cool trick that you can do is go onto the
selection tool, select with the
automatic, actually. Let's select with the automatic, only the flower.
Leave the stem out. And let's go on to adjustments, which is this beautiful
one over here, hue, saturation, and brightness. This will only affect
the beautiful flower. And we're going to play
a little bit around with these colors so that we make this flower a bit
more interesting. Maybe make it and
get a bit more blue. Let's desaturate it a
bit, and that's perfect. Okay. To make it a bit
more different still, let's grab the eraser and start erasing some
of these shapes, making them a bit more
interesting. Okay. That's just about right. And over here, let's go and add a bit of a bump and
over on this side. Okay. Another cool
trick that you can do is go onto
the selection tool, freehand selection tool and select just this
petal over here. Make sure you select it
just about straight away. Don't go into this other petal. You don't have to be perfect. Click on this circle over
here, copy and paste, and then we can have another layer that we can place on the bottom
of this flower. Just so it's behind.
We're going to go on movement uniform and place
it over here onto this side. Oh, no. Let's place
it over here, rotate it a bit more,
just so you can see it. Okay. And we can warp it. Okay, making another
beautiful petal. Just going outside from here, making it a bit nicer
and a bit more thick. Okay. Let's make it
a bit more round. Okay. That's just about right. We can always delete
some of the shape. Notice how it was not
going towards the stem, and of course, we can
add some waviness to it. Okay, look at how much
more different it looks. And, of course, let's
merge the two layers. Well, the ones above first, and that's all you
need for the step.
20. Last touches Thank you: We are at the last
beautiful step. You've learned so much
about layer positioning, about how to use the alpha lock, how to duplicate things, how to create textures, how to create a beautiful
abstract background, some leaves, some
simple flowers, some more complex flowers. And now you will
add them together, and let's just duplicate this layer over here
with the flower, and let's move it uniform. Make sure you grab
the layer below. And let's move it a little bit, make it a bit smaller, just a tiny bit smaller, and place it behind this flower. Okay? Just over here, maybe making it a
bit more like this. Remember to warp it
just a tiny bit, so it looks a tiny
bit more different. You can warp it quite a bit
and make it smaller. Okay? Notice how much more
different it looks, but we need to go to hue, saturation and
brightness and move this a bit more
towards the right, so it becomes a bit more
like this flower over here. Okay? And another cool
trick that you can do, since it already has
the alpha lock on now, let's go on to the brush. Leatherwood. Let's grab
this color over here, this blue and drop down the opacity quite a bit to
about maybe seven or 8%. And let's add a bit of
this color onto the flour, making it a bit
brighter and nicer. Now going onto this red over here and adding
it on the bottom. Creating a bit of color
harmony over there, brightening up the top and changing the color
just the smidge, so it's a bit more different. You can go as deep as you want. For instance, you can
go onto the top flower, which is this one over here, go onto that beautiful blue, decrease the size to about 6%, and you can add a
bit of this color. Oh, no, it doesn't have
the alpha lock on. Let's go alpha lock the layer. And let's add a bit of
this color over here. Notice how it's creating
a beautiful edge. That is making the flower
a bit more different. You can always go on this one over here,
this beautiful color, and add just the
highlight over on this petal and this
one over here. Just creating small
differences to change the colors of the tulips
or beautiful flowers. Okay. And let's go on this
layer over here. Okay. Well, let's actually
add another layer. If you don't have enough layers, you can always just smirch down these layer,
pinch them down. And over on this abstract shape, notice how much more of
a difference it makes. Let's add one more layer. That's just so we
can add some lines from this beautiful flower at the top with the silky brush. Remember to pick this
green over here. And let's start from here. Making a stem and going down. Okay. And from here as well, and maybe from here as well. Notice what's happening if you don't actually select the green, well, the flower first, and you change the hue,
saturation and brightness. It changes the stem as well, and it makes it a bit
more red or blue or whatever color you just
went with towards. Okay. And now let's alpha
lock this layer, of course. And for the last thing
that we need to do, let's add some textures
on this stick over here just so it doesn't just becomes so
much more apparent. Now, we can merge
this down towards the beautiful leaves
if they want to merge. Perfect. Okay. And now you
have a final composition. You can move things
around if you want, just by selecting every single
layer and moving things just with the warp to make the composition just
a bit more refined. Just a few small tweaks. Okay, let's see how that
looks before and after, a bit more interesting. If you use this trick, remember to just push the sides just a bit to the outside because
if you push them in, you will create an edge. Okay, let's undo that. And that's how it looks. I hope you had a lot of fun and you've learned
quite a bit about Procreate and about how to do this beautiful
flower composition. Thank you for being
part of this community. And if you are gracious enough, please leave a review. It will really help others know that this glass
is for them as well.
 George-Daniel Tudorache, Together we will create amazing things.