Transcripts
1. Introduction: Hello. My name is Anisha, and I'm the instructor
for this course. Thank you so much for
choosing this course and I'm very happy
to welcome you here. This is a beginner friendly
course and you will just need some basic tools and
supplies to get started. In this course, you
will get introduced to the tools and supplies
that are required, and you'll learn how to use these tools to make some
basic quilt shades. Then you will start
learning to make three beautiful
paper quilt earrings with clear step by
step instructions. Since these earings
are made out of paper, you will also learn how
to water approve them. Towards the end of this class, you will have more ideas to create your own
personalized jewelry. Come on, let's get started.
2. Tools and Supplies: In the section,
let's see the list of tools that are required
for this project. The first one is a
slot a coiling tool. This is the basic
tool that you'll be using for almost all
the coiling projects. This tool has a slit
at the top wherein the paper has to be inserted
and then rolled to a coil, and you also have
a handle to hold. This coiling tool comes in different lengths so you can choose the one
that you like. Next would be a pair
of sharp scissors. This is used for trimming
and cutting the paper strip. Next one will be a
pair of tweezers. You can either use
straight or angle tweezes. I personally prefer
to use angle tweezes, as it's easy to lift the coils
from the template board, and you can also
use the tweezers to position the shapes in
the QL the projects. Next one is a very
useful template board. This is available in
different sizes and shapes. For this project, I'm going to use the circular template board. It has circles ranging from
the largest to the smallest, and for each size, you'll have multiple slots. This is very useful in
situations where you have to create
identical sized coils. Next is this fine
tip glue applicator. Generally, for coiling projects, you need only a tiny bit of glue to stick
the paper strips. This nozzle helps in letting out only a little bit
of glue at a time. And you can fill
this bottle with the craft glue that
you're going to use, and it also comes with a lid, which prevents the glue
from getting tried. This is a useful tool. But if you don't have it, you
can also go for toothpicks. You can just spread the glue in a palette and you can
use this toothpick and pick a little bit of glue and you can use that to
stick the paper strips. As we are going to
make some earrings, you will also need some
jewelry tools like pliers. I'm going to use both flat
and round nose pliers. You would also need a clear
top coat nail polish. Instead of this, you can also
use mod patch with a brush. This is just to give
some waterproofing. Finally, you would need some jump rings and earring hooks.
3. Paper Types: In the section, let's
see the type of paper strips that we will
be using for this project. For all the three earrings
that I'm going to make. I've chosen three MM
white coiling strips. The colors are
completely up to you. You can choose anything
that you prefer. These coiling strips comes in
different sizes and width, like three MM, five M, seven MM and ten MM. I have chosen three MM, but you can even choose
five M if you want to. These iling strips
are available in multicolor packs or
single color packs. You can go for either of
them as per your preference.
4. Basic Shapes: In the section, let's see how to use the tools to make some of the basic shapes that we'll be using for this urings project. I'm going to take a single
three MM it coiling strip. Insert the tip of
the coiling strip in the slit at the top of the tool. Hold it tightly
and start rolling. Just slide your fingers down the paper strip
as you keep rolling. Continue to roll till you reach the other end
of the paper strip. As the coil gets formed, you can place it in between your fingers like this
and continue to roll. Do it slowly and. Now we have reached
the other end. Hold it tight like
this and slide your fingers through the
tool and take it out. Hold it well and apply a
little bit of glue to the end. And seal it. Just hold for a few seconds and it will
be stuck. That's all. This is called a tight coil, and this is the basic
shape that we'll be using in almost all
the coiling projects. The next one is going
to be a loose coil Is the tip into the and start rolling as we did
for the tight coil. T. Continue to roll
till the other end. You have a tight coil now. Slide the shape out of the tool. I'm going to make a
loose coil first. For this, I'm going to
use the template board and place it in one of the slots and leave it to unwind and then I'm using this angle
tweezers to take it out. This is how a loose
coil will look. I'm just securing the
end with a bit of glue. And you have a loose coil. This is a tight coil and
this is a loose coil. To convert it into
a tear drop shape, I'm just holding it in
one hand and pinching at the corner and you have
a tear drop shape. I have another loose coil now. The loose coil will be the base for making almost
all the shapes. Let me show you how
to make an eye shape. I'm just holding it and pressing
it at the opposite ends. You have an eye shape now. See how to make a triangle.
I have a loose coil. I'm just making a tear drop by pinching one of the corners. I'm just placing it against my fingers like this
and I'm pushing it down and you have a
triangle. That's all. Next, we'll see how to
make a square shape. I'm just placing it
in between my fingers and I'm pressing the
opposite ends to create an eye shape and
turn it like this, and you have to press the remaining two, two
opposite ends. Now you have a square. Now we'll see how
to make hard shape. For this, you'll need two
identical sized loose coils. I'm just taking one now
and I'm holding it and pressing at one of the corners
to get a tear drop shape. I'm going to do the same thing with the other
loose coil as well. Just to get a tear drop. Now we have two similar
tear drops of same size. Now I'm applying glue to one of the sides
of the tear drops and I'm going to
fix the other one. Just hold it tightly
and press it. Continue to hold
for a few seconds, so that it remains in place. Just press the tip, and now
the heart shape is ready. These are some of the
basic shapes that we'll be using for
making the earrings.
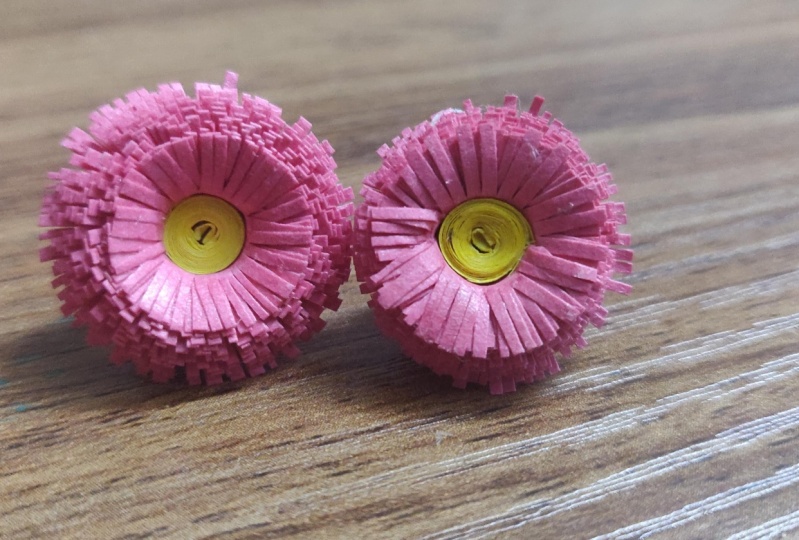
5. Lotus Earrings Project 1: In this section,
let's see how to make a simple and elegant
lotus earrings. For this earrings, I'm going to use a pink color iling strip. It's a three M white strip. I've taken one strip out of it. I'm just going to
cut it into half. For this, I'm just folding it and bringing the ends together. Mark the center and cut it
down with the scissors. Let me show you how
long this one measures. The half cut strip measures
around 22.5 centimeter. The whole strip will
be 45 centimeter long. You'll be needing five of
these half cut strips. I have taken one, and I'm
going to insert the tip into the slit at the top of the tool and I'm going
to start rolling. Continue to roll till
you reach the other end. Hold it tightly and slide
it out of the stool. Apply a bit of glue to
the end and seal it. Just hold for a few
seconds. It will be stuck. Now you have a tight coil, keep it aside, and I've taken another half that paper strip. Just insert the tip into the equ tool and
continue to roll. Once you reach the other end, hold it and slide it out. Now I'm going to place it
in the template board. I'm placing it in the size
two of the template board. Leave it to unwind and use the tweezers to
take it out and now I'm going to apply some glue
to the end, and seal it. You have a loose coil now, and then hold it and press at the opposite end to convert
it into an ice shape. This will be a petal. I'm going to repeat the same for the remaining two coils as well. Just apply some
glue, seal the edge, and place it between
your fingers and press it at
the opposite ends. And for the last one.
Seal it and press it. For now, we have
made three petals, but for each hearing, we need to make five petals. So we have to make
two more petals. I've made all the five petals ready and I have the
tight coil as well. Let's start gluing the
petals to the tight coil. And just applying a little bit of glue to one of the
ends of the petals. Tick it to the tight coil. Continue to do the same
for all the petals. Just apply glue to
one of the ends. And stick it close to
the previous better. For the third petal, I'm going to apply
glue to the end and also to one of the sides. Just reposition it when
the glue is still wet. For the last one as well, like to the sip end
to one of the sides. That's all done, and the final petal is going
to go in the center. I'm going to apply glue on
both the sides of the petals. Just place it at the
center like this. Leave it a dry for some time, and you would also need to make another one of
exactly the same way. To seal this earrings, you can either use
a top nail polish or you can use mot patch. Both of them will have
the same purpose. If you're using mot patch, you can apply it with
the help of a brush. Before applying the top coat, just place it on top of
the polythene sheet, and I'm just taking
the clear nail polish. Apply it generously
on both the sides. Make sure you cover
all the surface, even the tips
corners everywhere. Just flip it over and do the same for the
other side as well. Make sure you cover
all the places, so that it gets
sealed completely. It's almost done now. Leave it to rest on a
polythene sheet and repeat the same for the
other earrings as well. If you're using pot, you have to do the same way, but with the help of a brush. It's all done on
both the sides now. I'm just going to apply
it on the corners. Once it's completely dried, you could see the firmness and you could get
that shine as well. If you prefer, you
can even apply another coat of
this clear varnish. But I'm sticking
onto just one coat. Now let's attach the earing
hooks to the earing base. I've taken jump rings
and also earing hooks. You have to use
the pliers to open the jump ring and insert the jump ring through the
gaps at the top of the petal and take the earing hook. T and insert the loop of the earing hook into
the jumping and close it. Close it and make sure there is no gap in the opening
place of the jumping, close it tightly,
and it's all done. You have to do the
same process for fixing the earing hooks to
the other earing as well. Just open the jumping, insert it in the gap at
the top of the petal. Attach the earing
hook. And close it. That's all beautiful pair of
lotus earrings is now ready. You can either make
this in single color or if you prefer to go for
a lighter shade of pink, you can also use that color
to make this earrings. I hope you liked it. Let's move on to the next earing project.
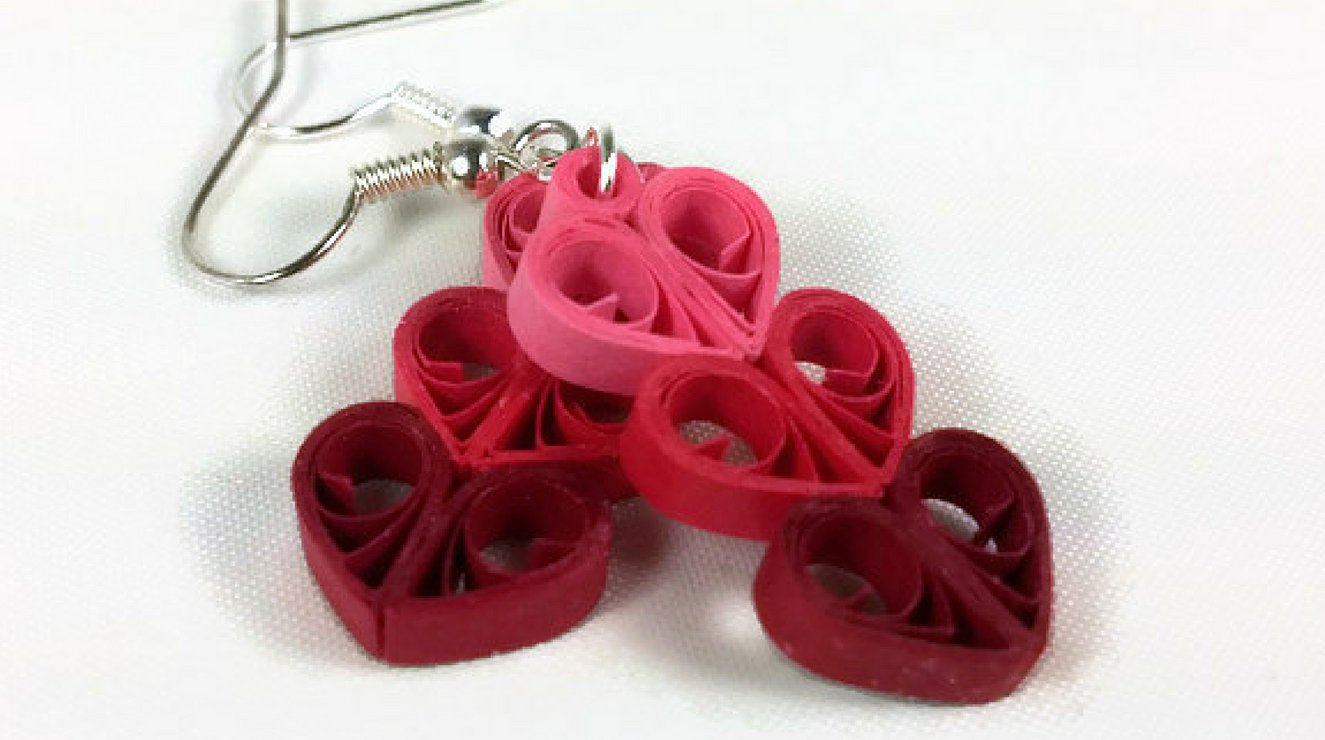
6. Hanging Hearts Earrings Project 2: In this section,
let's see how to make a beautiful double
colored heart hearings. For this, I've taken a
salmon pink color strip and also a maroon color strip. Both are three M
white ailing strips. I've taken a salmon pink strip and I'm just inserting the tip of the coiling strip into the tool and I'm
starting to roll. We have to roll till you reach the other
end of the strip. Hold it tightly and take it out and we have to place it in the template board size two of the template board
and leave it to unbind. Make a tight coil with another salmon pink
color coiling strip. Take it out and place it on the exactly the same size
two of the template board. Let it unwind. I've taken a maroon color coiling strip and I'm going to roll it
into a tight coil first. Take it out and place
it in the next slot. Place one more maroon color
coil in the next slot. All four coils has
to be of same size. That is why we are using
this template board and take one of the coils and apply some glue and secure
it and hold the coil and pinch at one of the corners to make a tear drop shape. Take the other salmon pink
coil and do the same by applying the glue and
seal the edge and press to get a tear drop shape. Repeat the same process for the remaining two maroon
colored coils as well. And make a tier drop out of
this final maroon color coil. Now we have four
tier drop shapes, two in each color. Apply a little bit
of glue to one of the sides of the tier drop and take the other tier drop shape and bring it together and press. Press it firmly and hold it for a few seconds
till it gets stuck. Now you have a
beautiful art shape. Make another heart with the two maroon color tear
drop shapes, the same way. Just apply a little
bit of clue to one of the sides and bring
the other tear drop, press it and hold it firmly. Till it gets stuck. Hold it there for a few seconds. Now the maroon hart
shape is also ready. I've pick on salmon pink
color coiling strip. I'm just folding it and I'm
going to cut it into half. I'm going to do the same for the meron colored strip as well. I'm just folding it and
make a cut at the center. I'm just going to glue the maroon color strip with
the salmon pink color strip. Each of them is half
cut coiling strips. I'm just gluing them together. Now, insert the edge of the
maroon color coiling strip inside the coiling and
roll it into a tight coil. When you reach the
end, take it out, and place it in the size
two of the template board, leave it to unwind. Use tweezers to take
it out and apply some glue to the end
and seal the edge. Now you have a loose coil. You have to press at one of the ends to make it
into a tear drop. This is a double
colored tear drop. Now, once everything is dried, we have to assemble, have taken a maroon
color strip and have applied some glue on both
the edges of the tear drop, and I'm placing the salmon pink color
hard shape on top of it. Apply some glue to the
tip of this tear drop. And attach it to the bottom
of the maroon color ut. Make sure it's all straight. Leave it undisturbed for some
time till it gets dried. In the meantime,
we have to prepare a tiny tight coil with a
salmon pink color strip. I've taken a half
cut strip and I'm just cutting into another half. It's like one of
a coiling strip. I'm just inserting into the
tool and making a tight coil. Apply some glue and
secure the edge. Tight coil is ready. It has to be attached to the top of the pink color hard shape. Attach the tight coil here like this and let it dry completely. In the same way, make
another earring, exactly the same size. Here, we are going to seal
it with the clear varnish. You can also use mod watch, as I already said, apply
generously all over. Turn it over and do the same
for the other side as well. Need to apply around
the edges to make sure all the parts of the earrings are completely
covered with this varnish. Once it's all done, let it
rest till it gets dried completely and repeat the same for the other
earing as well. Always make sure to use
some polythene sheets for placing the coated earrings. It's all completely dried now. You can see the nice
shine on these earrings. I've taken two jump rings
and two earring hooks. You have to insert
the jumping into the tiny tight coil at
the top of the earring. Just open the jumping and
insert it at the center. Put in an earring
hoop and you have to close the jump ring. Make sure there are no gaps. Just close it as
tightly as you can. And it's done. Do the same for the
other earing as well. I'm just opening the jumping. Insert it into the
tight coil at the top. Attach the earing hook and close the jumping. All done. Another beautiful pair of double colored heart shaped
earrings is ready. I hope you enjoyed making
this earing with me. Let's move on to another
interesting earring.
7. Circular Earrings Project 3: In this section,
let's see how to make a beautiful and vibrant
circular earrings. For this, I'm going to
use two color strips. One is a teal color, the
other one is yellow. Both are three MM white. I'm going to take three
te color paper strips. I've taken three. Just apply glue to one of
the ends of the paper strip. I'm just going to
attach all these three together and bring in the
other paper st and attach it. And get to the end of this
paper strip and apply some glue and fix the
third coiling strip. Just glue it and press
it for some time so that it gets
stuck. That's all. Now, we have a long teal
color coiling strip. Get to one of the ends of
the strip and insert it into the coiling and start rolling. Keep rolling. It's going to
be a big sized tight coil. You have to roll till
you reach the other end. Once done, take it out, and apply some glue to the other end and press it and hold it for some time and you
have this tight coil. Next, I've taken two
yellow color paper strips. I'm just folding it into half and I'm cutting
it at the center. Now I have four half
yellow color strips. I've taken one of it, and I'm going to roll it into
a tight coil first. Once you reach the other end, hold it and take it
out of the tool. Glue the end. Just hold it for some time. It's all done. Repeat the same with all the remaining three
half cut yellow strips and make tight coils. Take another full length
yellow color paper strip. Insert it into the tool and roll it till you
reach the other end. Take it out and seal the edge
with a little bit of glue. And that's all you
have one big coil and just pressing it
to get it to a te. Apply some glue to the rounded
edge of the tear drop and attach it to the teal
color coil like this. Now we have to fix these
tiny yellow color coils. Apply some glue to two points. Make sure one of the glue
point attached to the, the other one attached
to the tear drop shape. Do the same for the
other one as well. Use ases if you find it difficult to handle
it with your hands. Attach the last
yellow color coil next to the another
tight coil like this. I've taken a color strip and I'm going to
cut it into a half. Roll it into a tight coil. Take it out and glue the end. You have a tiny tight coil. Apply some glue and fix it exactly at the opposite
end of the clear color coil, opposite to the tear drop. Leave it to rest
for some time and make another earing
in the same way. I'm going to the v. Just apply it generously all over on both the sides
and around the edges. Just make sure you cover the entire surface of the earrings with
this clear varnish. Once it's all done,
leave it to rest on a polythene sheet and do the same for the
other earing as well. Cover all the sides with this varnish and again,
leave it to rest. Once they are completely dried, you can attach the earing hooks. For this, I've taken two
jumps and two hooks. Take the and with the help
of the per, just open it up. And insert it into the
hole at the top of the tight coil and attach the earing hook and close the jumping with
help of another player. Just close it without any
gaps, and that's all that. In the same way, insert the jump ring into the
tight coil at the top. Insert the earning hook
into the j and close it tightly. That's all. Our double colored and vibrant looking circular
earrings is now red. I hope you like this design. You can however use
colors of your choice. You can either go for
double color or even triple colored or you can make with a single
color strip as well. The choice is completely. With this, we have come to
the end of this course.
8. Conclusion: We have come to the
end of this course. Thank you so much
for joining me here. If you have any questions, feel free to ask and keep
practicing more and more and enjoy the process of making
your own quill jewelries. I hope the instructions were
clear and easy to follow, and it would be great
if you could take some time to leave a review. Happy illing, and
I'll see you all again in another
interesting project. So then take care bye.
 Anusha Rajendran