Transcripts
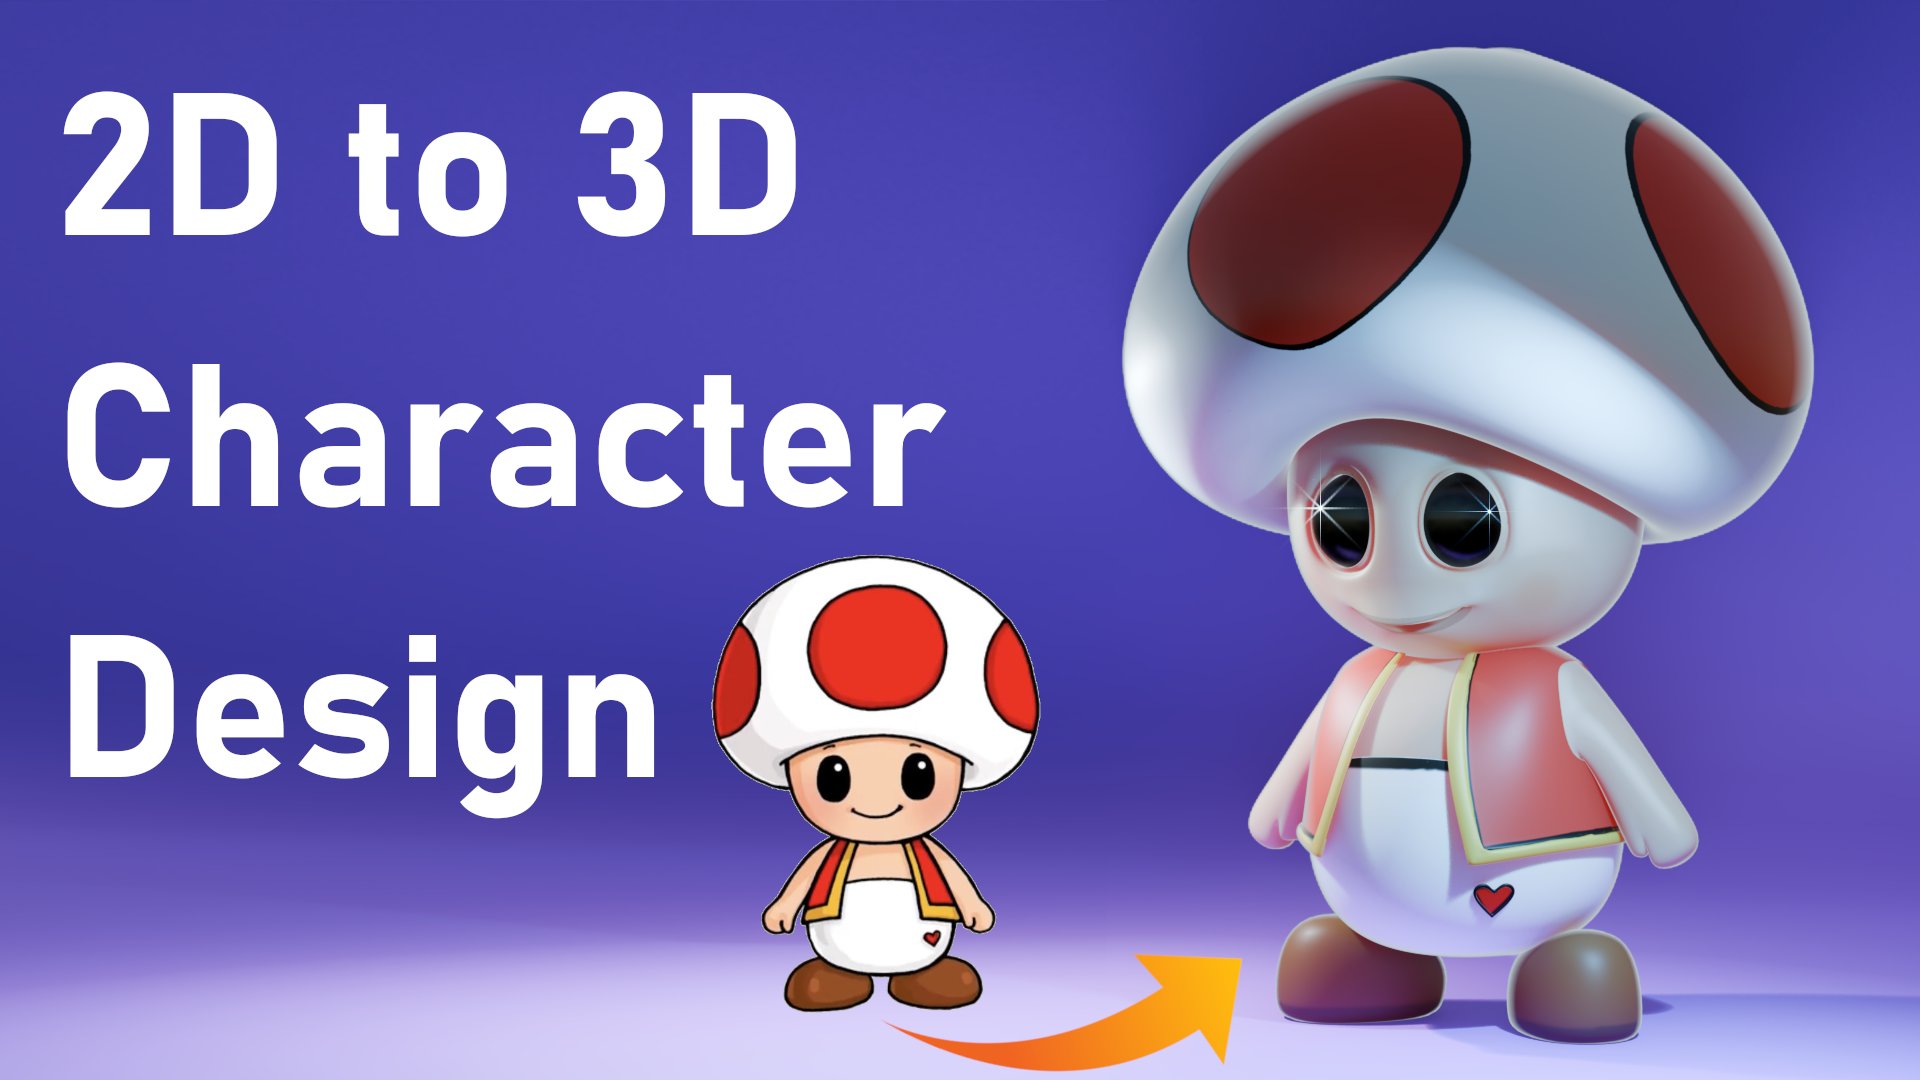
1. Welcome to the Course: Welcome to this exciting journey into Tu Di character creation. In this course,
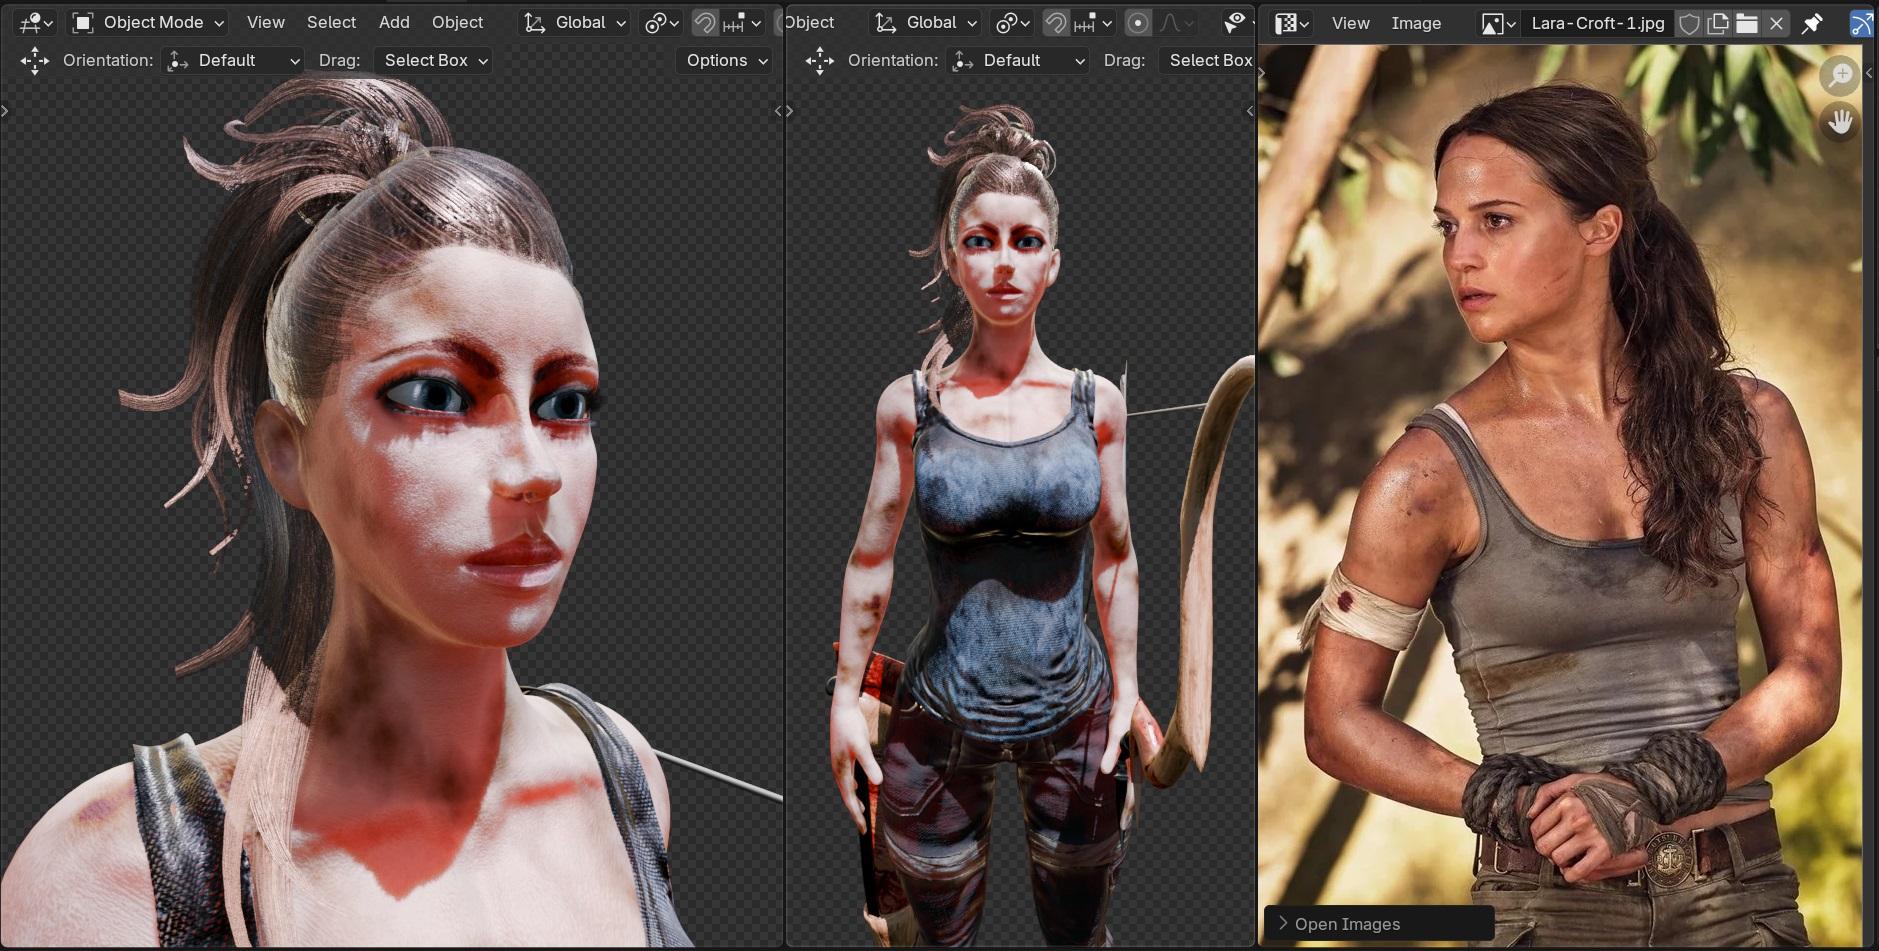
we will transform a real movie reference
into a stunning, realistic Tu D character
in Brander from modeling and texturing to
rigging and animation. You will create a
game ready character inspired by the Tom Brar game. You will learn how to design
your character and make it playable in both unity
and real engine. In section number one, we'll start with the head modeling. We will shape every
detail from the eyes, nose and mouth to creating a
well defined face structure. You will learn the essential
techniques to make your character look realistic
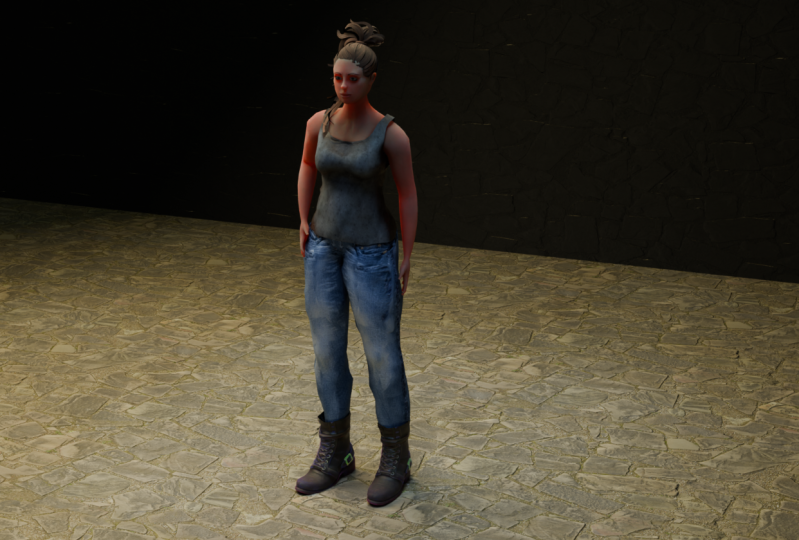
and ready for gaming. Moving on to Section two, we'll focus on modeling the body, starting with the torso, extruding the shoulders
and arms section. Next, we'll refine our
character with sculpting, adding the final details
to bring it to life. In section three, we'll
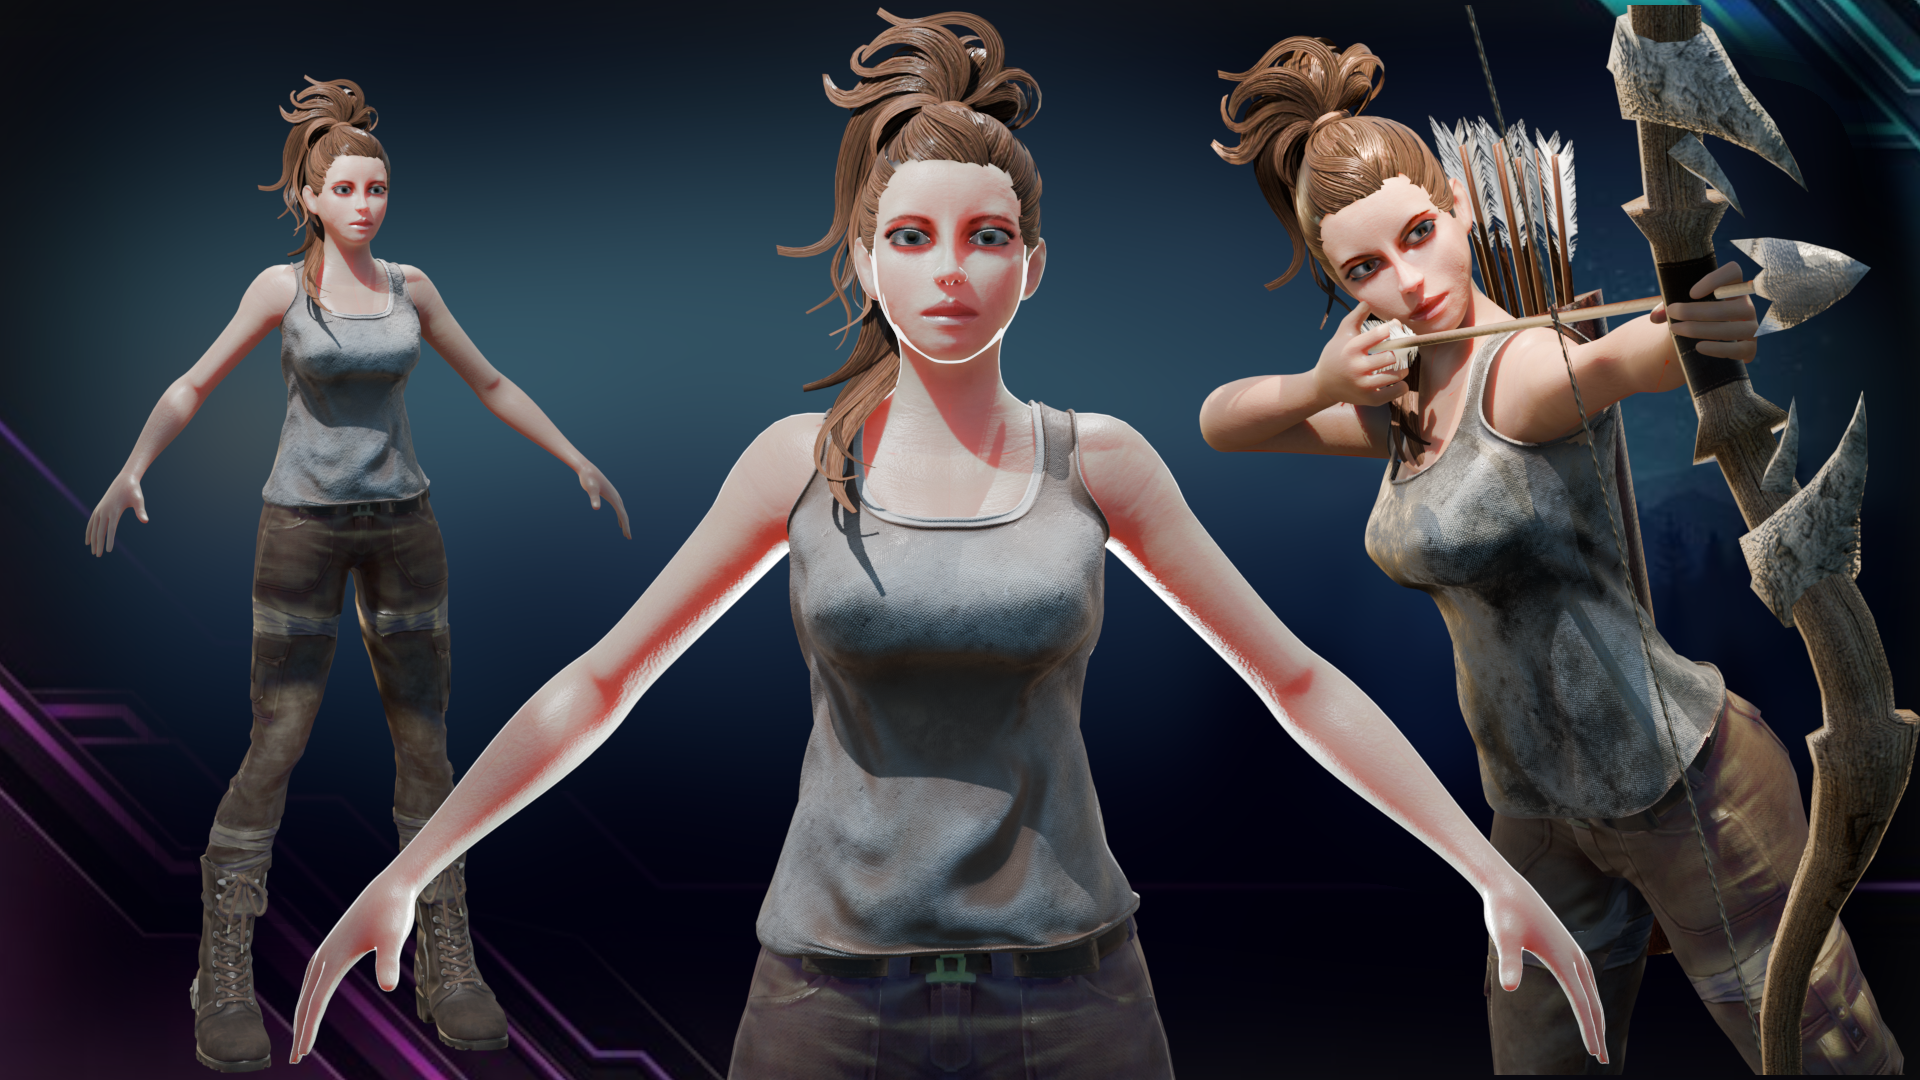
explore clothing design where you will learn to model the iconic Tom Braider
character outfit, making her look exactly like the character
from the movie. Next, in Section four, we'll dive into text ring where we'll bring our character
to life by painting a realistic skin we're going
to be adding dynamic dirt to our character skin to make it look like the character
from the reference image, and we're going to
also add some dirt to other elements like
the undershirt here. We will refine the materials
to make our character look stunning in any
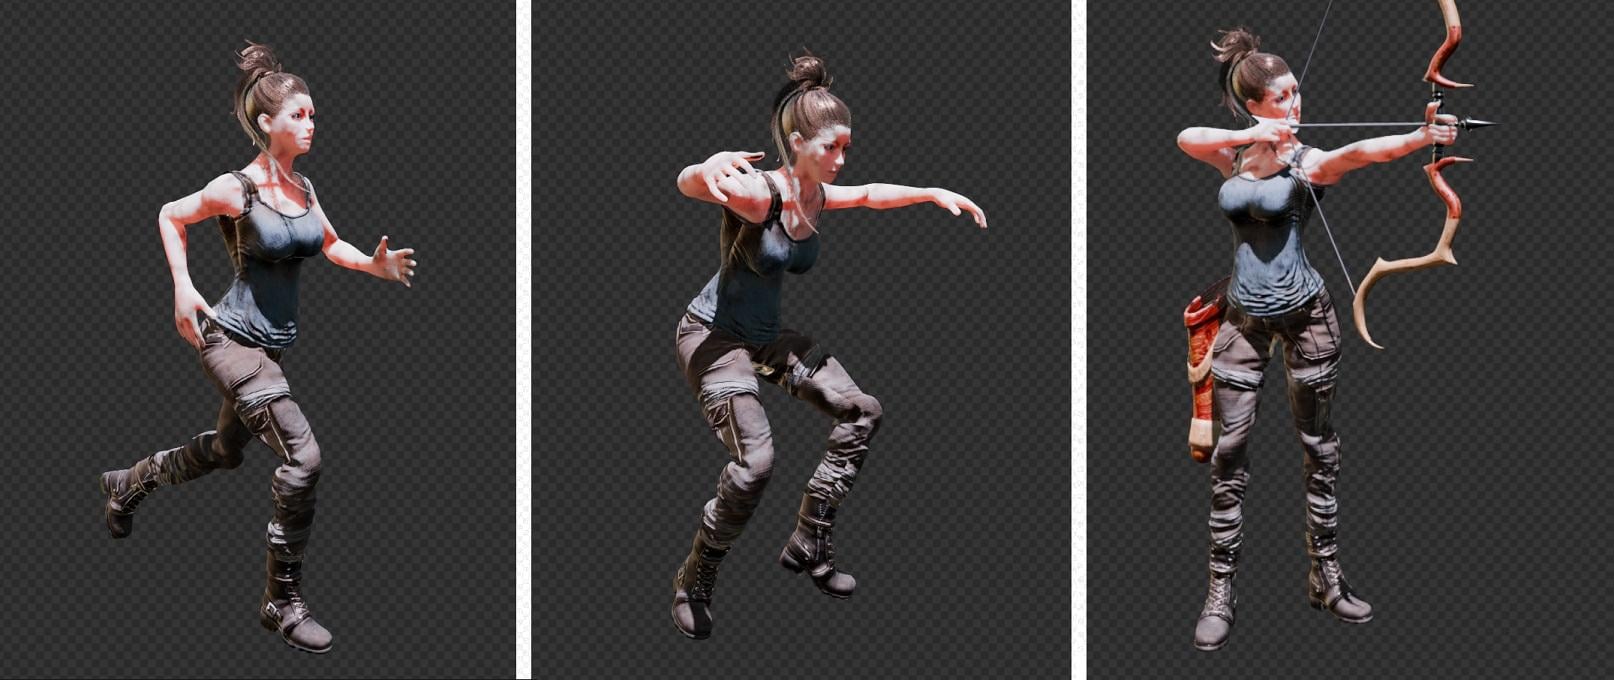
lighting condition. In Section five, we'll enter the world of rigging
and animation. You will learn to create
smooth natural movements, including running, jumping,
and ideal animations. Also learn to animate our
character shooting a bow. First, we'll model
the bow from scratch, modeling a row and the quiver, then we'll animate the bow
using the shape keys to create a realistic ball release and
also the vibration effect. Finally, we'll link the bow to our character and create
the shooting bow animation. So now that our
character is ready, it's time to build
our game environment that our character will explore. In Section six, we'll design an amazing game environment
with multiple assets in it, like the trees,
the wood bridges, the fences, the rocks, and so much other stuff. Finally, in Section
seven and eight, we'll bring our character
into NRL engine and unity. You will learn how to
set up game controls, animations and interactions with the game environment
we've created, making our character fully
playable in both game engines. By the end of this course, you
will have a fully modeled, textured and animated
game ready character, along with a stunning
environment to explore. If you're ready to
take your three character design skills
to the next level, join me on this amazing journey, let's bring our
character to life.
2. Why Character Modeling is Hard : So character modeling is one of the most exciting yet
frustrating skills to master. That's where most
beginners struggle. It's easy to end up with
those odd proportions and natural shapes and
spending hours of frustration. But what if I told
you that there is a simple step by step
strategy that we can follow to make the process much more easier,
especially for beginners. That's my mission here is to
help you get the first steps right to create well
designed character based on any reference
image you have. Not just creating the
character, but we will use it. We're going to be using
the character for making animations and
for building a game, a playable game that you can
play on both PC and Android. This quick
introduction, I want to discuss with you the
problems that prevents beginners from achieving the
good results when modeling a character and how can we overcome them with
our example here, our charcuter that we're
going to be designing. The first mistake
it's going to be not using the reference images. Many beginners just jump right in without using
any reference image. Modeling their character
just from imagination, which lead to incorrect
proportions and natural shapes. The key here is to always use reference images
for your character, especially the front and the side views. They
are really important. This ensures accurate
proportions and helps maintain consistency throughout
the modeling process. A great police to find
reference images is pinterest. I personally use it not only
for gathering references, but also for getting
inspiration. You can also check other
sources like the R station for high quality concept
art for Caracblueprints. The bottom line is always use character references
before starting before you can start
modeling your character. Moving on to the second mistake, which is over complicating
the geometry. Many things that
adding more geometry will make their
model look better, but in reality,
does the opposite. It makes the model
difficult to edit and as a result, bad modeling. The solution is to
simplify your model. Actually on those first
in those early steps, you should always go
with the minimum amount of vertices needed. For example, in
this case, I remove this edge because it wasn't
serving any purpose. If you notice without
this particular edge, there is no big change that disrupts the geometry or
the edge flow of our model. Always simplify your modeling. Keep it simple, keep it clean. So the third mistake
is going to be do not follow the edge flow. I'm sure you've seen a
topology phase map like this. These phase loops are
here for a reason. Without these loops,
our character will struggle with the
formations when animating it and we will have some bad stretching which will affect the overall
look of our character. We have to model
our character with the proper edge flow around
areas like the eyes, the mouth, and the face. This ensures good character
modeling and also don't expect good results from the beginning from the
very first attempt. You have to keep
practicing, it's here. In this first section,
we're going to be focusing on the face. The face is the foundation
of our character. If we get it right,
the rest will follow. I'm going to be breaking the
process of face modeling into small manageable steps
that you can do with ease. For step one, we're
going to start, we're going to
begin with I edge. We're going to be
simply creating a curved shape that acts
like the foundation. I'm going to be using
the example of a ship to make the e edge
easier to create. From there, we're
going to be expanding outward, extruding those edges, adding loops one by one
to form the eye socket, or as I like to call it
the Zoro mask because it looks like that mask that
Zorro puts on his face. Next, we're going to be
working on the nose. For the nose to make
it easier to model, I did extrude only two edges, one from the top here and
another one from the side. After that, I merge
them together. Then I filled the gap with an inset to form the nose wings. As you can see, we're
going to be ending up with this nice form that contains the eye socket
and the nose combined. In step number four, we're going to be
modeling the mouth, adding one layer at a time, ensuring proper
proportions and shape. Finally, we're going to
be completing the pace, filling in those
missing areas of the face with a smooth
and natural edge flow. This approach is going to remove the guesswork and frustration, making it easier
for you to model any face with the
proper anatomy. Let's go ahead and start
modeling our character.
3. Setting Up Character Reference Images: Welcome to Blender. Let's
begin by optimizing our workstation by deleting everything regarding this scene. We can select everything, including the leaf
cube by left clicking, then you can press X
to delete everything. Next, I'd like to
simplify our interface. Since we're going to be
needing the timeline for the animation for now, so
you can just collapse it. You can do Right click on the
edge of the timeline panel right here and you can
select join down areas. This way we're going to be
merging with the review port. You can adjust the
right panel so that you can give
yourself more space. Now it's time to set
up a reference images. I'd like to explain the
TRviewp how it works. In the True Review port,
we have two main views. We have the perspective view
and the orthographic view. You can switch
between the two if you press five on the num path. The perspective view mimics
the real word death. The objects that are
further away will appear smaller,
just like in real. On the other hand, the orthographic view
flattens everything. There is no deep. This
view is perfect for precise modeling
and we're going to be using it to place
our reference images. So to switch between the views, you can press one
for the front view. If you press three,
you're going to be jumping to the right side view, and if you press
seven, you're going to be on the top view. The final short that
I'd like to show you is to control all skew. If you press it,
you're going to be switching to the quad view. This will split the
viewpoint into four panels, the top view, the front view, the right side view, and
the perspective view. So this way we're going
to keep an eye on your modeling from all angle. Also if you want to
exit the quad view, you can press again
the same shortcut which is Control skew. The next step is going
to be to download the two reference images,
the front and the side. Inside the course content, you're going to be find this
tab resources, click on it. Inside this, you're
going to be finding the two reference images, the front reference image and the side reference
image of our character. Actual should
download them both. Now let's drag and drop the front reference image
directly into the viewport. We can drag it and
position it by pressing G. G is the
shortcut for Grab, so you can center it right here. If you want to move
it along the X axis, you can hold G and X so that you can move your reference
image sideways like this. If we select an object by left selecting on it and
if you press G, G, we're going to be
grabbing that object. If you want, for
example, to move it only on the X axis, we can press X. This way, we're
going to be locking the movement on the X axis. If you want to lock it on
the Y, you can press Y. Same thing for the Z axis. The G is a shortcut
for the move tool. You can click on the move and you can do that
manually like this. The next step is
going to be to drag the side reference image. To do that, we have to switch
to the side view so you can hold three or press three so that you can jump to
the right orthographic. Now we can simply drag and drop our second reference image, which is the side view and we
can position it right here. So make sure that the
feet are touching the green line or
the green axis. You can double check
the alignment by toggling between the
front and the side view. So the front, you can press one and the side you
can press three. Also, to make the
reference images visible in the perspective view, as you can see they are hidden, you can select each one of these images and we can jump to the object that's
a properties right here and we can
enable perspective. Show in perspective. Now we're going to
these references are going to be visible
in the TDview porch. We can rename the images for clarity, the front
reference image, you can call it front
and the other one, let's call it right reference. Also here we can adjust
images position so we can move the side
image slightly to the left and the
front image slightly backward to make some room for the modeling at the center. Let's review the setup so the front and side
reference images are aligned and centered. Now we are ready to start
modeling our tree character.
4. Modeling the Eye Edge: In this tutorial, we will
begin with the I edge, which is the foundation
for our character face. The first step in
modeling the face and specifically the e is to create a well
defined eye socket. To make it easier,
we'll start by shaping the I edge into a form
that resemble a ship. This will serve as the base for the eye socket and set the stage for the
rest of the pace. In order to enhance
the modeling, we'll be using a built in add on called extra Mesh Objects. We can go on the top here, you can go to Edit and let's click on preferences down below. After that, you can click on Get Extensions tab and
on the right side, we can search here for the search part extra mesh
objects. Let's search for it. We're going to be
fine this add on, so you can click on Install to have it installed just like. Now if you press Shift A in the two D viewport and
if you jump to mesh, you're going to be seen that we have more options
that's going to allow us to quickly create
complex page measures. In our case, we're
going to be using this single vertex right here to create the face
or the eye socket. But before we can do that, let's press one first
so that we can be facing the front and let's use the treaty course to
spawn our single vertex. The TD cursor in Blender is a reference point that
used for adding objects. It serves as the location
where new objects will appear. To move the three D cursor, we can press Shift and right
click on your mouse in your TD view port so
that we can spawn the TD cursor in the
location of our mouse. From there, we can press Shift A and we can add any
object that we want. That new object is
going to spawn at the location of the tree
Dcursor that we put. Let's go back to our arc,
our reference image. I'd like to put the two decursor exactly at the I sections, but we can add our
single vertex. After that, we can press Shift A and go to mash and let's
choose a single vertex. You will see a single
vertex appears. From here, we can
extrude this vertex. We can press E to
extrude it and shape the vertex into the
shape of the I. We can continue the loop all the way till the
end, just like this. Once you've completed the loop, you can select the last
two vertices and we can press F to fill the gap. For this modeling, we can divide the T D view porch into
three different panels. Basically, I want to keep
an eye on the front view, the side view, and the three
D view at the same time. To split the three D Ve porch, you can hover your mouse
cursor over the palm left. You will see this plus sign. If you left click
and drag right, you will be splitting the three D view port into two panels. You can also split
the right panel again into two
additional panels. For the bottom panel,
we can press three on the NAM pad so that we can
switch it to the side view. For the left panel, we can
wobble the mouse just a little bit so that we
can be in the T D view. This setup will allow
us to keep track of our progress from three
different angles, the front, the side, and the T D. Also if you'd
like to get rid of a panel. For example, let's get
rid of the bottom panel. We can click here, right click and we can click on Join down. This way, we can be
overriding the bottom panel. We can do something that's gets rid of the
right panel here. We can do right click
and join right. This way, we're
going to be having only the three D viewport. I'd like to keep an eye on the carature from
three different views. We can split our
scene by clicking on this button and you
can drag sideways. I prefer to cut it
into three scenes. We're going to be having
the side down below. On the top, we're
going to be having the front and on the left side, we're going to be
having the perspective. Now to push the top
edge of the eye. Let's select these two verses
that we got here and we can activate the proportional
by clicking on this icon. So let me explain
this amazing tool in blender called the
proportional editing tool. You can find it
here at the top of the view port right next
to the snapping option. Basically, we use this option, this tool to make smooth and natural
adjustment to our mesh. In this example
that you have here, we have connected
list of vertices. Let's say, for example,
we want to create a wave. If we do it manually, if we try to move these
vertices up one by one. Everyone is going to be
creating a perfect effect. This is when the proportion in this in tool comes to play. To activate it, you
can either click on this icon or simply press
the shortcut which is O. Once it's on, you can select the parts of your mesh
that you try to move. You will notice a
circular affluence zone, which you can resize
dynamically by scrolling the mouse
will up or down. This radius of
affluence controls how far the effect spreads to
the surrounding geometry. After that, this
will allow us to smoothly move the
vertices forward. You can adjust the proportion influence radius as needed by scrolling the mouse
up or down to keep the shape balanced and
visually appealing. You can do the same thing
for the bottom here. We have to push the top
further away from the bottom. You need to add
that extra distance to make it different
from the bottom. Also jump to the top by
pressing seven and we can take, for example, this side and drive it a little bit backward. The right side of that edge, we need to push it even
further than the left side. For the left side, we
can try to spinach. We can try RZ so that you
can spend it on this Z axis, and we can tweak these
vertices to keep a good flow.
Basically we got it. We got edge, the I edge. Next, we can add new modifier, you can go here to search
for new modifiers. It's going to be the
subdivision modifier. This we're going to be making
our I edge look smooth.
5. Modeling the Eye Socket: The next step is going
to be to extrude out the eye socket. On the mode, I'd like to
select everything we can press A to select
all these vertices. We can press one to be facing the front and I'd like to
press E to extrude it. You can press E and S to scale it up just
a bit like this. After that, we can try SZ to
scale it only on the Z axis. On the side here,
let me just zoom in. I'd like to push this
area backward like this. So this way we're going to be
forming the shape of the I. The next step is going to be
to exclude the second layer. Let's press E again
to scale up and we can click and try S Z
to scale on the Z axis. Sound like this.
Now for the top, let me just select the
top vertices and we can push them outside and
let's leave it like this. Here for the side, just
push them sideways, just take these vertices and drag them a little
bit backward like this. We can also check the cage so that you can see the
geometry even better. Let's select it first.
Check the cage. On the edit mode,
you're going to be seeing those vertices
even better. In this section right here, we have to push this
area outside like this. If you were having some kind
of a sharp adn like this, the reason why is
because of the normal. We can select everything
by pressing A and we can press shift and N
to flip the normal. Now the normals are flip. Let's explain the issue
that we have in here, why we have this sharp edge because we got two sharp edges. It has to do with the normals. The normals are the
direction of a face. If we select this
object and if we go on the top here
on the overlays, and if you check the
pace orientation, you're going to be seeing
that everything is red except this part right here. The direction of these faces that we got here are flipped. Can see that on
the backside hue. We need to do is to press
Shift N on the edit mode, you can switch to edit mode. We can select everything
by pressing A, A like this and we can press Shift and N to flip the normal. Now you can see
everything is smooth and we don't have
any sharpness here. Also here we can push
this part outside. The next step is going
to be to extrude the inner edge of the eye so you can press old right here, we can press E and Y to
extrude it on the Y axis. This is for the first edge, we can add the second edge. We just print it outside here, you can press E Y and
go another time inside. Finally, this edge right here, we have to push it
outside on the edit mode, we can select this vertex and we can drag it
a little bit up. So like this. This one
you can take it even up. Now we got a basic shape
or a nice shape of our.
6. Finishing Eye Modeling: The next step is going to be
to finish up the I section. Let you do this mode, we can select these three verses s and we can extrude them. Let me just check
here. The noise, we can extrude by pressing E Y, and we can spin them
so we can try R X because we need to scale it or suspend it on the
X axis like this. Let's skip this one,
skip press in three. Here for the front,
we can simply drag those vertices
slightly to the left side. Here we can add an extra edge, so you can try EX and extort
it for the last time. Here we can push it
outside just a bit. To keep that curviness
here for the nose. Also here at the end, we have
to flatten these vertices, so we can try SX and
let's press zero. Let me explain to
you this scaling on a specific axis using
the zero value. For example, we have this
edge that we got you. Let's say we want to flatten it. We can do that
manually by selecting each vertex and i
it with another, but there is shortcuts. We can scale it first we
can press S to scale. We can specify which axis. In our case, we need to scale it on this axis, which
is the X axis. I'm going to press X next. This way, we're going to
be scale right after that, you're going to
notice that if you get closer to the
center point you, you're going to be
flattening that edge. But if you press zero, you're going to be doing
that automatically. Let's press zero on the
Nampa and let's click. This way we're going to be
having a completely flat edge. You can do the same thing on
each one of these axises. For example, we can flatten
this edge on this axis, which is the green axis, the Y axis, so we can
try S to ski it first. We can press Y, second, and can press zero. This way we're going to be
flattening it on this edge. So here if you
want, for example, to get rid of this pump
and make the plane flat, so we can press A to
grab everything got, and we can try and now the axis is going
to be the Z axis. Let's press Z, and
we can press zero. Let's click and this
we're going to be flatten up this plane. This is exactly what I
did with the nose edge. We're not seeing it flat because in the subdivision surface, we are keeping the
corners curve. So you can do, we can click on Advanced and here in
the boundary mood, we can click on and we
can choose keep corners. This we're going to be having
sharp corners like this. The next step is going to
be to work on the top, so we can select all
these versicesO the top, you can keep holding shift, select them all, and
we can exude them up. Let's press E Z to hold the exclusion on the ZX
and it can go up like this. You can check here the front and we can direg it
outside just a bit. And let's investigate this. For example, here we have to push this part
outside a little bit. You have to flatten
the forehead, this area to prepare it for the forehead. Let me
just select them all. We can try S, Y, and let's press zero
so that we can have it flat on that top section. In this area, we have to
push these versus outside. Let's push them like this.
Can take these back. And push this area outside,
something like that. Let's continue our turn. Here, I'd like to
select this vertex. We can drag it, we can hold G, G as grab and we
can slide it here. Same thing, we need to
keep an eye on the side, so I'm going to just
push it backward and we can press E to extrude
those vertices. That's the first extrusion. This is the second
and the third. We have to keep
an eye on it from front to, something like this. Let's select these
two vertices and you can keep pressing F three times. This way we're going to
be filling this area. Here we have to push or to drag these vertices a
little bit backward. We can push them outside
just a bit, sent in here. Something like that can be fine. Let's continue our turn. Here I like to
select this vertex. We can press E to exude it, and continue that edge
loop just like this. Let's check it from the side. The side seems to be fine. You can just drag these
little bit backwards so that they can match the last vertex can match with this
one on the top. Next, we can select again
the true vertices and keep pressing F four times
to fill that gap. Finally, we can select
this vertex and exude it two times
first time here. Strike it a little bit
up and finally here. As you can see matching
perfectly with the nose curvature,
can stop right here. Let's select these reverses
pF to fill those two gaps. By doing so, we have that mask. I call it the zero mask,
this section here. We can easily add the subdivision
or the mirror modifier. Let's go to the modifiers here. We can add a new modifier. It's going to be the
mirror modifier. So here the center point
of our face is not right. When using the mirror modifier, you need to determine
the center point on which the symmetry
will be based. In our face example,
this center point is typically the middle line of the face. This line right here. Any vertex here is going
to work for our case. So to set the center point, we can select any
vertex on this line. After that, next, we have to assign the dcursor
to this point. We can press shift as and you can choose the
cursor to select it. Let's switch to
the objects mode. We should not be on datas mode. After that, you can
go to objects here, set origin and origin
to the T Dcursor. Now if you model one
side of the face, the other side will
automatically update itself, making the process
faster and more precise.
7. Modeling Character Nose: If you pay close attention
to our model here, we can be finding that
this edge here is sharp. You can see that
here. This has to do with the order
of the modifiers. Here blender applies the modifiers from
the top to the par. First, we are subdividing subdividing means
we are smoothing, and check out so that you
can see the difference. Basically we are smoothing the geometry and
after smoothing it, we are applying the mirror, so it should not be the case. We have to apply
the mirror first, then we can smooth
out the geometry. On the right panel
on the right side, we have this dot, these dots that we got here. These are to grab. You
can click and drag up. I'm going to drag to the top. Now we have the mirror
and then the subdivision. You can see that this
plce here is perfect. I'm going to just
reverse back by pressing Control Z so that you
can see the difference. This is with the subdivision first and let me just
control Shift Z, and this is with the
mirror modifier first. Now I'd like to work on
the nose of our character. Here, I'd like to
take these tics, make the nose a
little bit smaller, the front area or the
left area like this. So you can just keep tweaking these vertices and after that, we can select these two vertices on the bottom and we can
press E to extrude them down. Let's press E. First keep
an eye on the right panel, press E, and let's
continue that churn. We have to keep extruding those two vertices until we
reach the bottom of our nose. Also, we have to keep an eye on both the front and the
right reference image. We're going to be
adding a hole here, so I'd like to make it smaller, the bottom part of the nose. Next step is going to be to drag these vertices that are
above or below the I, a little bit toward the nose. We can grab this
edge by switching to the edge mode and you can
keep extruding it down. We can press S to scale it down. You have to keep an eye on
both, again, the right side. Like this, you can move it
a little bit to the left. You can spin it and continue. Also here, I recommend that you spin around the edge by pressing R and you can keep extruding until you reach the
bottom of the nose. Here we're going
to notice that we can go beyond the center point. If you want to fix the problem, you can check it clip in
in the Mirror modifier. This way, the geometry will
stop right at the center. After that, we can select this vertex that we got here and we can extrude it
a little bit down, try to push it backward
toward the face, and we can start
filling these faces. We can select every two vertices and we can press F
to fill the gap. Now for the nose, this part, I like to create an inset, so you can press I to form an inset and you can
push it outside like this. Also, you can spend it on
the Z axis by pressing RZ so that you can push
it only in the backside. As you can see our nose
start to get in shape. You can keep smoothing
these vertices here. You can reshape the nose
just like you want it to be. There we go. We got
our nose going. We can push this part
a little bit outside, just like that. There we go. Now I'd like to
work on the hole. If we kept it like
this, we're going to be ended up with a big
hole for our nose. Instead what I'd like to do,
I'd like to make it smaller. We can start from this
vertex and we can extrude it to form a new shape, new hole for our nose. We can stop right here. We can select these four vertices, press F to fill it, and finally, we can select, let me
just push this vertex. We can push it
backward and we can select the last four vertices and we can press F to fill it. Now we have only a small
hole right at the center. You can just tweak
these vertices around. After that, I like
to press old in left click so that you can
select the entire row and we can exude it up so easy to exude it up and we can
scale it down like this. Let's extrude for the second
time, you can press E again, Z, and scale down, and finally we can press
F to fill that gap. By doing so, it be generating
or create in your nose. If you want to see
the final result, you can do click and click on Shade Smooth so that you
can see your progress. But in my case, I don't
recommend proceeding with the shade smooth because
you are going to be able to see the topology
of your face. So I just do Right
click and shade flat until later until
we finish modeling our
8. Constructing the Mouth: In this tutorial,
we're going to be working on the mouth
of our character. For that, we're going to be
using two reference images. We got the front and the
side reference image. I'd like to drag them into the TD viewport so
we can zoom back here until we can see the
back of our reference image, and we can simply drag here
the front and next to it, we can track the side
reference image. So just a quick shorts cut that I use a lot is the
control space. For example, if you have
on any layout here, if you press control space, you're going to be
maximizing this layout. This will make it easier
to focus on your task. If you press control
space again, you're going to be going back to the default default layout. After that, we can
press Control space to maximize this window and what we have to do is to make these
two reference images, give them the same height. Let's use here 7 meters
for each one of these. To that we can select
them both and we can try to scale them down to fit the size of the mouth inside the reference image that we got, the main reference. Let's just keep scanning
them down like this. For the side reference image, we have to spend
it on the Z axis. We can type RZ and that's side 90 degrees so that you
can spin it by 90 degrees. It's modeling our mouth. On the edit mode, I'd like to
select this single vertex. We can press Shift D to duplicate it and
let's put it here at the top of the lip of the mouth and we can keep
pressing E to excude it. I'm going to be following
this edge that we got here, this obvious blue edge, and we can keep extruding
that edge to finish the loop. Also here we can hide
the subdivision. I'm going to just check it from here and let's
continue the loop. Also on the right side,
here we have to keep an eye on the modeling from both sides. Here by mistake, we are using the proportional editing tool, so we can just scroll
here at the top using the mouse and we can remove
it by checking this box. Let's continue aligning
these vertices for the right reference image. Finally here, we can extrude
and dig it to the left side. Same thing here at the top, you can finish that loop. We can align this
vertex right here. The next step is going to be to create the second
loop of the bow. I'd like to select
these vertices and we can extrude them down
by pressing E Z, and we can go down and
we can align them with the reference image
edges like this. We can keep aligning them. Same thing we have
to keep an eye on the right reference image, and we can select this
vertex and press in E to exude it along that
reference image edge. We can continue until we finish the second round or the
second loop of the mouth. Here we can fill those
faces by selecting every two vertices and
you can keep pressing F to fill the entire loop. This is another angle of filling those faces if
you want to see that. We can select these two
vertices and we can press F and this way
we're going to be automatically filling
the next phase. You can keep pressing F
to fill the entire loop. This is what I did here. If you press old and left click, for example here,
we're going to be selecting this entire edge. After that, if you press E, you can be extruding
that entire edge, we can press, for example, S to scale it on the Z
axis and we can do this. This is what I did
here. From here, you can align the
new extruded edge with the reference image. Just keep aligning those
new vertices to match the same reference
image vertices or the vertex positions until
we reach the end like this. For the inside, we can
do the same thing. Let's select that inside. We can press E, again to extrude it and we
can push it inside. And then we have it so we
have the mouth so we can press Z to switch a solid so
that you can see it better. Back to the editing mode, we can select these two vertices and we can press M and let's merge
them at the center like this. I'd like to explain how
merging works in Blender. Let's say, for example,
that we want to merge these vertices right
at the center here. We can select them
both and we can press. The shortcut is for merging. Click at merge at the center. This we're going to
be merging here. For the second option
that we got here, let's say we want to
merge these two vertices, but here at the first
selected vertex. We can select this vertex first. Shift select the second vertex, we can press M, and we have to merge at the first,
just like this. Here let's do the third option. Let's say we want to merge them at the last. Let's
select this one first. Shift select this vertex. Let's say we want
to merge them here, so we can press M and we
can merge at the last. This is the way to
clean up your geometry using the merging in blender. When working with the
subdivision surface modifier, you don't always want
everything to be smooth. Some parts in your
model like for example, the lip edges of our
character mouth, it needs to be a
little bit sharp. That's where the
mecrease comes in. To keep edges sharp, let's
select first the lip edge. We can left collect and
left collect to select the entire loop and you can also select this part
here, you can include it. Next, you can press Shift and E. This way we're going to
be adjusting the value. If you want to manually adjust this value, you can press N, and here in the item, you can have this increase
value downside here. A value of zero keeps the edge smooth while one makes
it completely sharp.
9. Forming the Face Structure: In this atoral we're going to be working on the
structure of the face. You got the mouth, the
nose, and the eyes. Now let's finish our face. So at this moment,
I'd like to grab this single verteal
that we got here and let's extrude it outside. Basically what I'd like
to do, I'd like to create an extra
loop for the mouth. So you can just keep excluding this vertex and align it with the right reference image
as well as the front. When modeling a face in blunder, creating edge loops around the mouth is crucial for
having a good topog. These loops make the
animation such as talking, smiling, pretty much smooth
and not looking weird. After you finish
exuding that vertex, you can select these
two and you can start pressing F to
fill those gaps. But here I miscalculate
the number of vertices. Basically, the second
loop needs to have the same amount of vertices
as the first loop. That's why here I'm pressing
Control R so that we can insert a new vertex right
in between these two. Be just keep pressing F, select two vertices and keep
pressing F to fill the gap. Now for the chin, we can select the bottom
vertice that we got here and you can try
E to exude them down. Let's just move them
a little bit up. Can press E to exude
them down and let's keep following the
right reference image. After that, I'd like to work on the fourth loop of the mouth. We can select this vertex, extrude it, and let's
continue the loop. This lookop needs to
be connected with the bottom chain of
the face like this. Let's keep tweaking
those vertices. They should be around
around loop like this. Now we can start
filling. Let's select two vertices and we can start pressing F to fill the caps. Here I'd like to
merge these vertices, we can press M and merge them, and we can press F
to fill the cap. There also we can see that the phase is start
to get in shape. Here we can inflate this
part, we can push it outside. Like this. Next step, I would like to get rid of
this edge that we have on top of the nose so we can press left click and click
on Dissolve Edge. After that, we can
select this part. Also, we can merge it at the
last, these two vertices. We can grab this vertex below the I and keep
extruding it down. This look is going to take from the eye all the way to the chin. Next, we can select
the two vertices, keep pressing F until
we reach the bottom. You can keep tweaking
these vertices. For example, I push
them outside like this. Here we have four
vertices to fill. I'm going to just get
rid of this edge that we got here so that we
can make the selection easier and let's fill those four vertices and
we can move the chain. We can pop up the chin
a little bit down. Now we can jump to the top
forehead for our aracure. So here on the top, we
have these vertices. I'd like to push
them a little bit up so let's just drag them up like this and we can set the
flow to have nice flow. I'd like to select
these vertices, these two vertices and we can press RZ to spin them around. We need to have a nice
curvature at the top. For example, these two verses, we can push them a little bit to the left and this one too, let's push it forward like that. Now we have a nice
curvature in the forehead. So on the front,
I'd like to select these vertice that we got
right here and we can extrude them up so we can
press E Z to go up like this. This vertex that we
got on the corner, we can drag it to
the right center for the one next to it. Here we can take it a
little bit up to have that curviness on the
top of the forehead. This corner vertex, we have
to take a look at it from the side reference image as
well as the other like this. We can just drag them sideways. All this one we can
push it inside. This part a little bit up. After that we can grab this
vertex and we can extrude it. We can start pressing
E to extrude it down. Let's keep extruding. On the side here, obviously, we have to push these
vertices to the right side. Here we can fill these faces. Let's fill these
faces by selecting the two vertices
and keep pressing F. Here I'd like to
extrude this edge. You can exude this
here. Let's select these four vertices
and fill them. This vertex we can drag
it a little bit up, push it a little bit forward. On the right reference I measure we can keep
extruding it down. On the front, let's
better align it. Let's keep the extrusion process
until we reach the chin. We have to add a new vertex for every other vertex that
we got that we already have in the previous
loop so that we can have a match when we're going
to be filling those gaps. The side of the face
looks a little bit wide. What we can do, we can select
let's switch to edit mode, can select these verstes and we can track them a little
bit to the left side. We should not leave
a white face. Something like this looks nice.
10. Building Character Neck: In this tutorial, I'd
like to show you how can we create the neck
of our character? This is the first
start to create head. It's my approach for making
the head creation easier. Let's get down and create
the neck of our character. I'd like to extrude the
face a little bit outside. On the edge, I would
like to press old right here and we can
extrude it on the Y. Let's press E Y like this. Take it back. After that, we can press SZ get it on the Z. Should not be using the
proportion edge neutral, and try SD and we can
drag that part up. On the top, it's matching. Can take it even up like this. Here on this section, we can fix the positioning
of these vertices. Let's just push them outside
like this. Align them. Now they are aligned. You can double check the
shape of the face. It looks nice. Let's go ahead with the second extrusion.
Let's press Alt again. We can press EY and let's
reach the I error level, this error level
that we got here. Let's do the same thing,
try SZ, ski it up. You can take it up a
little bit like that. All right, so let's
double check. We are on the right track,
so we have this little bump. At the top, we can simply fix it by taking those vertices up. Now it looks nice. The next step is going to be to
create the neck. On the Edge mode,
I'd like to select these vertices and we can
extrude them down like this. If you spin them, you can
press R to spin them sideways, and let's extrude
them again here, can press R to switch to spin around and
we can go down like this. That's for the neck,
the start of the neck, can double check it
here. I looks nice. After that, we can
create that face. We can select this
phase that we got here, and we can extrude
it around the neck. Let's press E extrude. We can keep an eye on the front. Something like this, you can
scale it a little bit down, extrude for the second time, push outside,
extrude again here, here, we can start tilting
a little bit through the left side and exude for the final time and
let's collapse it. We're going to just
take it all the way till it's connect. You can see the shape of
the neck that we got you, it's a little bit
flattened on the back and here it should be
a little bit roundish. Let's select these vertices and try to make them a
little bit roundish. Something like this. Not
cubicle, but roundish. Push them even outside.
That's a good start. After that, we can select these vertices and
extrude them down. Here. After that, we can select these four press F
to fill that gap. Here we can try to push
this outside like this. We can get back later and
continue with the neck. The neck here it's not right, so it should not be
this curvature here, we're going to be
fixing that later. Next or like you do, we can insert a new edge loop here and we can
fix the curvature. Let me just push it
outside so that you can have a nice curvature
at the back of the neck. Something like that
is going to be right. Let's continue with the top. I'm going to be selecting
again these edges or these vertices and you
can exclude them up here. We can select these two
edges and press F to fill that gap. So now we got it. You got the neck. I'm
going to select this drag them down. That's good. We got the neck
of our character.
11. Developing the Head Shape: The next step is going to
be to extrude the head. I'm going to be selecting
these vertices that we got here and you can start extruding them around the
edge of the head. Let me also pick this one
too and we can extrude here, spin around pressing R,
extrude, spin slightly. You can check the shape, it should not be going
straight like this. So we can do, we can
start scaling on the X or we can move
it outside just a bit. To the left side.
That's extrude again, spin sideways, track a
little bit to the left side, and we can continue like this. Extrude here. Also, you can try SX so you can scale up all those vertices
and let's continue off. Spin round, extrude, until we reach the end here. We got that. The top here, for example, these faces, I would like to drag
them a little bit down. Let me just select these faces
and we can drag them down. As you can see, we have
a nice curvature at the top of the head,
which is good. Next step, it's going to
be to drag these down. I would like to select switch
the verte to the edge mode. I'd like to select
these three edges and you can exude them down. It's here on the front, we can extrude like this, we can try to scale it bit down, push it backward like this
and extrude once again. I'm going to keep extuding
here with a scale down. Going to scale this
bar down like this, push it downside,
and exude here. In this area, we're going
to be having the ears. I'm going to just
leave this area empty. On the side, you can try to
push these vertices outside. Select them, push them outside. Next step we can do, can start
to merge these vertices. Let's select these two
press, merge at the center. Same in here, these two, and let's keep merging
them at the center. We got that part. It looks nice. Now let's go ahead
from the bottom. I'm going to select
these vertices, extrude them again up, scale down like this. Exude once again, go up here, we reach the bottom
of the ear again. I need to push them outside, spin them on the Z, RZ,
spin them like this. You can scale them down,
drag them sideways. After that, we can add a new
edge loop right about here. Select these two, press
M, merge at the center. Same thing here, M,
merge at the center. All right, we got that
it's going continue here. Going to select these two,
press M, merge the center. Insert a new edge loop. Select these two merge at the center and let's
continue like this. Merge at the center. Let's
continue on the top. On the top, we have
too many vertices here, how can we fix that? To achieve this level to
connect between these, I'd like to insert
more edge loops here. I need to check the shape
so you can see the shape start start looking weird here. But we're going to smooth
that up back later. For now, let's go ahead and
start filling these gaps. G to select these two press, merge at the center, and
let's continue like this. Keep doing that in order. These two it's the Megan
press merge at the center, and let's continue this way. All right. We are
on the right track. So on the back, you don't
have to worry too much about the back because we're going
to be adding hair anyway, which is going to cover
the back of the head. In this area, I'd
like to select these four versus and you can
press F to fill that gap. We're going to leave
this part for the ears. But here I'd like
to smooth out this. Here we have some kind corner. W we can do, we can
smooth it out by using the edit tools so we can press
N, jump here to the edit. You're going to have this relax. In order to have access to these tools that
you can see here, you have to be enabling this add on called the loop tools. You can go here to
the edit preferences and inside the gate extensions, we can search here
for loop tools. You're going to find
this tab right here, so it's already installed. In your case, you're going
to be seeing a button here called install just
like this, click on it. If you go back to
the three, post, if you press N,
you're going to be seeing this new tab called Edit. You can click on it, and you're going to have access
to these tools. I'm going to be selecting
let's start from here, you can select these
vertices, I can relax. This way we're going
to be relaxing them. I want you to do the sameing
for all of those vertices, keep relaxing them. Let's see. That looks good.
12. Modeling the Ears: In this story, we're going
to be working on the ears. Let's go ahead first
and fix this gap. We have a big cap for the ears, so it should not be like this. What we can do, we can fill
this space that we got here. We can press Tab to switch the edit mode and we can
switch the vertex mode. I'd like to grab this
single vertex and you can press E to exclude it down. Here we have to let me
just select this part. We can select these four
vertics by pressing Shift and left click and we can
press F to fill that gap. You can take this vertex, a little bit inside to keep the alignment,
the head alignment. On the right side
here, we have to insert a new edge
loop so that we can have a vertex here
to fill this pace. You can press Control R, and we can drag it a little bit up. And we can select these four
versus Cs and we can press F. Now we have a small gap
that's going to fit the ear. The next step is
going to be to use reference image for the Rs. As you can see the r in our
reference image is not clear, we can see the shape, the overall shape,
but no details. Let me just go back here
to the object mode. I'm going to select the
back reference image. I'm going to just hide it. I'd like to bring a new one. This one right you're going
to find it in the resources. I'm going to simply drag
it and drop it here. Let me just press
S to scale it way down till it fits the shape, you can press to switch to the Y frame, keep
scaling it down. So next steps be to selects
one of the edges we got here. Let's switch that mode. We can select this edge. We can press Shift D to duplicate it and
let's put it here. We can press R to spin it
around and let's sce it way down so it fits the starting
position of the ear. After that, we can start
exuding. Press each exude. Every time you
exude, you have to press R to spin it around. If so the k here,
press R, scale up. And keep extruding
spinning like this. For example, here we can drag
it manually to the left and continue the extrusion and the alignment with
the reference image. This part here,
let's push it up, scale it a little bit up
and keep the extrusion. Let me just spin here, go all
the way to this location. Scale it a little bit down. This one, we can
drag it sideways. Here we can start
making pig scale. Let's scale up to fit a
large portion of the ear. Same thing here we can
scale this part up. Actually, the end, let me
just make it like this. Here we can scale this part, scale it a little bit
down and scale it up. A's look at it from here, we can press D, so it's a solid. Let's press L to select all in this unit. We can
push it outside. On the side here,
what I'd like to do let me just move it down. Obviously, we have
to scale it down. The reference image
is a little bit big, so I'm going to just
scale it here down. I'd like to spin
it first on the Y, so we can press R Y, tilt a little bit like this and we can also spin
it on the Z axis. Let's press R Z, and you
can tilt it like this. Little bit on the
Y. There we go. Now we have a perfect
here on the side. But like I said, it doesn't
align with reference image, so let me just select
the reference here. We can ski it down and
try to push it up. Here we can also
spin it sideways. There we go. The next step is going to be to extrude
the edge of the ear. Here, let me just select our ear, switch
to the edge mode. We can switch here
to the edge mode. We can press to grab
the entire edge. We should not be including
this part here so we can press Shift and left collect so that we can select these parts and we can press here EX since you can
go inside like this. And after that, we
can press E again and scale down, scale inside. Now we got the depth of the U. We can fix a little bit head. Let me just maximize
this window, control space to maximize it. We can switch to the solid. I like to drag this vertex
a little bit inside, so we can press O to activate the proportional addition tool, C jug inside, but we should
not be affecting the ears. What we can do, we can
check this connected only. Since the ear is not
connected to the head, it's going to be affected. We can just push
this part inside. Just a bit like this. Here for the bottom, I'd
like to fill this space, you can press Control arc
and search a new edge loop. You can select these
three edges and we can press F to fill
that gap on the bottom. There we go. Next, I'd like
to select this part here. Let me just press all can
push each outside just a bit. And we can press F to fill it. We have to fill that space. For this phase here,
we have to delete it because the connection is going to occur from
this position. We can start making
the connection. Let's select this vertex. This one here,
Shift select this. We can press M and let's
merge at the center. All right. Let me just
push this edge outside so that you can see
these two vertices even better and we can
select them both. Press, merge at
the center again. Here we can connect this part altogether by pressing
F. After that, we can also fill,
I don't think so, obviously, but we have to
do, let me just revert back. This part needs to go with this. You can just press F
here to fill that gap. There is a lot of room
for improvement here, you can do it in a lot of ways. The ears are a little
bit difficult to build. Expect to have some
differences here. Here you can just press
F to fill that gap. Same thing here,
I'm going to keep pressing F to fill those gaps. There we go. Can select
these parts again. This vertex, we can
drag it up without the proportion to, drag it up. It's like these two press
M, merge at the center. You can press again here, or actually just merge these. You can press M, merge
them at the center. These parts can be
dragged forward. Just like that. From here, I'm going to just be
filling the gaps. Let me just select these
four versus, press F. Here we can press F
again to fill that gap. Let's continue this. I'm going to select
this entire porch, press F. Same thing
on the part, press F, and finally, we have this part, you can press and press
F to fill that gap. Next step is going to be
to work on the details. Before I can do that, we can
smooth out the geometry. This part, I'd
like to smooth it. I'd like to apply
some basic sculpture with our mesh selected, we can go switch from the
object mode to the sculpt mode. Here we have all the brushes. I'd like to smooth out this part here. This is a smooth brush. If you don't find it, you can
just click here and you can search for smooth here and
you're going to find it. After that, we can press F to increase the
size of the brush, increase it to this, and we can just smooth out this part. Just a little bit of smoothing. Now it looks better. We
can also try to grab this party so we can hold
or press G. G for grabbing. Now the grab tool or the
grab brush is selected. You can just push this
part outside like this. Give it a little
bit of definition. That's been done.
Now let's start working on the inner details. I'd like to go back
to the object mode and let's start working on it. For details, I'd like
to give it that edge. Let's start with the
frame edge of our ear. I'd like to press
control space to go back to the full layout. I'd like to bring
this reference image. I'd like to bring it here. Just split our view
port or this layout, you can splat from
the bottom like this and let's switch
it to the image editor. From here, if you
click on this icon, you're going to be finding
on the images that we got, I'm going to just use the ear. This way, we're
going to keep an eye on our reference from here. Like I said, I'd like
to create this edge. Let me just use annotate. This edge right here,
I like to create it. This is how can we
define the ear? We have this edge
and this Y shape that we got on the inside. This is what we're going
to be trying to do. Let's start first with
the out this edge here. The edit mode, I'd
let me just release, push this one, do
a little bit here. I'd like to press K. So the K to bring the knife tool and
we can start from here. Let's click. Let me just find that point.
It's hard to find it. We can just hide the
subdivision for just a second. You can go to the modifiers, then click on the
screen so that you can disable the subdivision. And from here, we can press
K and we can start going up. I'd like to circle
up around the ear. Or actually, let
me just control Z. We can stop here and let's connect it to the last
vertex like this. You can press no and after that, I would like to bridge
between these vertices. Let's press K and we can connect them like
this, sent in here. And the last one at the bottom. Let's press Enter to
confirm that creation. After that, and after that, I'd like to bring back my
subdivision like this. Next, what we can
do, we can select these vertices by holding shift and left click and
we can push it inside. This way, as you can
see, we're creating that edge, the edge
that we got here. As you can push it a
little bit to the right. So this way, it looks better. The last step is going to
be to add that Y section, this Y that we got here. So to create it, I would like to start from here so
we can press K again. Let me just press
Alt A. I'm pressing the A to make sure that
everything is selected, you can press K and let's actually we
cannot select it well, I'm going let me just press escape and you can hide the
subdivision from the screen. After that, let me just
press K and we can create that Y shape here.
Something like that. The good thing about
ears, they are flexible. You can create any
shape that you'd like and you're always going to have a big
problem with it, we can do the same thing here. Press Enter. Let me just activate the subdivision
so that you can see, and I think we going to
need to add another edge. Let me just add
it. I can press K again. Et's create
something like this. Let's press Enter and
we can either push. I've just push this one outside this a little
bit to the right. You got that first frame. You can do the same
on the other side. Let me just hide the
subdivision again, press K, and we can create this new edge and we can bring the subdivision again in here. You can push these
two versics inside and the outside. Like this. Finally, we can add this
part here, this turn. On the edit mode, we can press K again without the
subdivision, of course. Let's press K and we can
press Enter like this. This vertex, I'd like to drag it down here and we
can push it inside. Let's see how it goes
with the subdivision on hold G to grab that vertex
down and let's push it inside. Can take the top vertices up. We got that Y shape, probably we push those vertices
way too much. Let me just push them
outside or relax them. Let's go back to
the object mode. We can select our mesh. We can do right click in
Sheet smooth and also I'd like to increase the
subdivision level to two. This part here is a
little bit tense, so we have to stretch
it a little bit. Let me just relax
this part like this. You can keep relaxing
these vertices down. It's double check
so there you go. We got that Y shape
and it looks great. For the back of our ears,
here we can fix them. I'd like to thin out this part. So I'm going to just push
these vertices inside. Like this the new,
let's select these two, can push them inside
like that and we can select the vertices at the top
and we can push them back. This we're going to be creating
a nice curvature here. Basically, that's it for
the ears of our character.
13. Final Touches - Refining Face Structure For Realism And Appeal: So before we can move
on to the next section, I'd like to apply
some improvement through our head here
including the face. I'd like to keep a duplicate. Let me just select my head here, Shift D to duplicate it, can direct here to the left just so that you can see
the difference we apply. So I'd like to start
with the eyes. I don't want to
keep them stretched backward and up like this. What we can do, we can
select this portion here and you can activate
the proportion in this jule. I'm checking disconnected only, and we can drag it a
little bit down here. All right so that looks better. After that, for example,
this portion here, I'd like to take
select these vertices, push them a little bit up here. Same thing for
these top vertices, we can drag them a little bit down and a little
bit to the right. After that, we can select Shift select these three
vertices and we can press F to fill that gap.
That's the first step. After that, I'd like
to work on the nose. Let's move on to the nose. For the nose, it's
a female nose, so we have to scale it down. On the edit mode, I'd like
to select these two faces. We can activate again
the proportion and the joule connected is checked, and we can press S
to scale it down. Something like this and after that, we can
drag it to the left. Now we made the nose smaller, you can see the difference
between here and here. For example, here at the bottom, can tubicate a little bit. Just take these a little
bit to the right. Nice. Also here we can drag this part. A little bit to the left
to tighten up this nose. Let me select my
head control space. We go back to the default layout and here I'd like to increase the subdivision up to two and we can select it right
click and shade smooth. We got that. Now
we have the nose, you can see the shape of it,
it looks small and cute. Let's carry on for the mouth. The mouth, the proportions
are not right. The chain or the
distance between the chain and this part
here are not even. What we need to do
on the edit mode, I'd like to switch
the face mode, we can press here, shift, and we can drag this part up. Have to activate the
proportionaty tool and you can just drag it
a little bit up here. Probably too much, a little
bit down, there we go. That looks better and we need to define the mouth even better. I'm going to just get rid of the proportion
in the jewel for now and we can tweak to make
it look like a female nose. Just drag these vertices down. This part here, we can
drag it up. Same in here. Let me take these vertices up. This part, we can push
it a little bit right. Now it looks more female. A to the next step. I like we can push
this part outside. Let me just select
this vertex and we can push it a little bit forward. Same thing here, we can push this part forward a little bit. Probably a little bit too
much, let me just revert back. Something like this looks
fine, and we can select this vertex and we
can do the opposite. I like to push this part inside. Someth like this and
we can drag it a little bit up to give
it that nice smile. Just a bit, not too much. Next, we need to
smooth out this cheek, you can see it has some
bumps ups and downs, so we have to smooth it
to make it look better. So it's selected, you can go to object and switch
through the sculpt. I'd like to use
the smooth brush. This is this model.
Actually, this is the one small brush. The short cut it
is if you press S, going to be selecting
the smooth brush, and we can reduce the strength down to something like 0.2, and we can start collecting
here just a bit. To smooth out that edge.
Here for the jaw line, let me just switch here
to the object mode. We can use the paint. Basically, we need
to create a softer, more rounded joon
ine rather than an angular and squared
stone line like this. The rule here is a
muscine jaw line tends to be more angular and squared and on the other hand, a feminine jawline is
softer and rounded. This is the difference between
male and female joon ine. That's the difference
between the two. Let me just press control and we can get rid of all these. All right is continue, I'd like to select
this, switch the scalp. You can press as a
little bit here. That looks better. You can double check from
the other side, smooth out this part too. Some few collects here. There we go. Final steps, let me just smooth out the back of the head, this portion here. So we can do, we can select
our head on the edit mode. I want you to
select, for example, this vertex, press Control and let's select
this vertex here. This where we're going to be selecting everything in between. After that, we can press
N and let's jump through the edit and you
can click on relax. G be relaxing these vertices. Let's go ahead and do the same
thing to all these edges. You can just keep relaxing them. Same thing for this edge,
we need to prepare it for the next coming section, going
to be reaching the torso. Let me just press
all. We can relax it, relax it like this. That's good. I'd like to take this
part a little bit up so we can press O to activate the proportional addition
tool and you can simply drag it up like this. For the front, we can push this part a
little bit to the left. Same thing here, we can
lift this part even up, push it a little
bit to the left. In the next semi
lecture we're going to select these four vertices and extrude from here the
shoulders and develop the arms.
14. Creating the Character Torso: Mm. Our next step is going to be to develop
the body of our character, so what we can do, I'd like to press one on the edge mode. I'm going to be grabbing these vertices that you
got on the side, these three, or even four. We can use these four vertices. We can press one and
we can extrude them to the side until we reach
this shoulder level. After that, we have to smooth this edge so we
can select it all. Let me just select the
press all grab this edge. We can press N and I'd like to use the smooth,
the relax button. You can see that these vertices
are relaxed right now. You can do the same on the back. Let's just relax them.
That's the first step. After that, we can define the arms or the
shoulder section, the arms jatonT part right here. I'm going to select this
vertex on the side here. I'm going to start extruding it. One, two, three, four, make sure to not use
too many vertices because you're going to be overwhelmed later with
the modifications. You can press in
here. Next step, we have to align
them on the front. Here let me just collapse. If you join here this area, I'm going to be
selecting these vertices and I'm going to
spend them on the Y, R Y and push them
to the right side. This is the right end of it. After that, we can
start extruding down. I'm going to select
these vertices that we got here on the front, and we can extrude them down. That's extrude.
Here we can scale, little bit up to keep an even distance
between those vertices. In this part here we're
going to be working on the character or female
character breast. Going to just lift this part up like this, create that turn. I'm going to select the middle here and I'm going
to extrude it down. This extruded like this. We can keep an eye on the front. You can just push them
outside a little bit, extrude for the second time here for the third and you
can start making that loop. Something like that. Let me just push
them outside here. Same thing here, extrude, and we can continue down. Let me just push
this entire part. This entire section, we can push it outside this part here. That's good. Now let's continue. I'm going to select this
part, extrude it here. I'm going to select the top
here, try to drag it down. I think it's better to
insert a new edge loop, can select these four verses, press F and another F here. After that, what we can do, we can finish the churn here. Let me just extort the
and for the third time. All right. Extort the press F, and for the final time, let's set the
verses and press F. We got that loop. I'm going to select
this verse X, Extrude Ns press F. But we have to
push them outside. Let's push these vertices
outside like this. We got that edge. On the bottom, I'm going to select
these vertices and try to extrude them down. Let's extrude them down like
this. Let's check the front. Send like that, extrude
for the second time, and here we can try
to fill these spaces. It's a little bit messy, but this is the
way that I found. Here we can select this part
press F. We got the front, you can double
check it from here. Obviously, we have to push
this vertex to the left side. Here we can push it outside. This vertex needs to be
relaxed, push it back. All right. In this area, I'm going to select these three and we can
extrude them down. Extrude scale, spin around, extrude for the second
time and for the third. Before we can continue,
we have to fill these spaces. Let me do this. I'm going to select this
vertex with this one plus, merge at the last. Sat in here, we can merge at the center here. That's fine. Merge at the center. Same thing here. All right. We are
on the right track. We forgot the back, so
let's talk on the back. I'm going to select these
versices and extrude them out. First time, second, third,
before can continue. I'm going to fill the other
spaces that we got here. That's nice. And let's
continue can extrude. Like I said, we should not
be following this curvature. It's too much of a curvature here for
the body, for the back. Something around here
is going to be fine. Let's select these
two press double Fs. Here for this breast section, it looks a little bit huge. What we can do, we
can scale it down. On that is mode, I'd like to
select the entire edge line. We can, for example, select these two verses, track them up. We need to scale that circle the breast circle
a little bit down. Can do right click and she's smooth to check everything else. Here on the back,
I'd like to push this center point a
little bit inside. Something like that to
define the back better. Also here we can
press old and let's smooth out the entire section. You can click on relax.
Sent in here, double relax. Another relax here. And we can push them
back these vertices, just a bit so that we can
define the back better. Here I suggest not
going outside here, what we can do, I'm
going to push it inward. We're making our own find
our own reference image. On the back, you can
push it outside. Something like this, it's
going to be accurate. Also you can track the
front here I'd like to push this part inside like this. Here, I like to drag it down
or we can extrude again, extrude, and push
outside. There we go. That will make a good torso. But here we can try, we have to push this part
inside a little bit. Sounds like that. Here we
can insert a new edge loop, take these vertices,
push them inside. We're going to have a bump here. Push inside, outside
and inside once again. We got the torso of our body.
15. Adding the Chest Section: Now it's time to
work on the breast. So we can do, we can grab this part by pressing
old and we can exude it outside by pressing E Y. Exude like this and we
can start scaling down, but we have to push
down like this. Push inside. That's for
the first edge line. Also, we have to spin it
on the X. I'm going to spin it first on
the Z to make it horizontal and we can
spin it on the X. Sounds like that.
Let's lift it up. For the second time
scale way down. Then you can exude again
and scale away the ong. You can push this bag backward. Skee way down, extrude, exude for the final time, exude again and scale way down, press F. This way, we're
going to be closing that. As you can see, we're
going to have our boobs. You can try to shorten it out. I'm going to try to take
this part, push it here. Also for this layer,
you can push it here. Just make it, make
sure that it looks circular and not don't
give it a weird shape. We got the boobs
of our character. They are ready.
16. Modeling Character Arms: In this trial, I'd like to work on the arms of our cacture. First, I'd like to select
this edge line as we got right here and we
can exude it twice. The first time needs to be right here and the
second time here. We need to define
the shoulder first. Here we can jump to the edit and we can switch
it to a circle. Can we use the circle
tool to make that edge look like a circle and we can better align it with
the reference image. For the previous edge loop, we can scale it up on the
Z axis so that it can fit the reference image and
we can spin it sideways. Basically, we got the shoulders, which is the first part
in creating the arms. Next step, you can work
on the biceps section. I'd like you select this
edge that we got here, the parm of the shoulder
and I'd like you exude it all the way
till the middle of the arm exactly like this and you can scale it to
fit the reference image. After that, we can add
another loop by pressing E to exude it and scale
it a little bit up. Here we can add a
middle edge line by pressing Control R to
insert a new edge loop. It should be at the
center. That's why I'm checking the
subdivision here. For the biceps, I'm going to be selecting this
part and we can insert an inset by
pressing I just like that. On the bottom section,
I would like to left or push these
three edges outside. Here for the corners,
we should not leave them like this sharp. We can make them a little bit curvy by simply
dragging those up. You can select one
vertex and double G to slide on its own edge line. Here I'd like to push the
biceps a little bit outside. On the back of our arm, we can define the triceps even better. I'm going to select
these two faces, push them a little bit backward and we can spin
them around so that we can pop up the bottom
section of the triceps. So the next steps can be
to work on the elbows. I'd like to select this part
that we got here to grab it, left click and you can extrude it on the front reference image. We can extrude it here. Let's just push it
back a little bit. We can scale it up to cover
this part of the arm. And after that, we
can press E again to extrude the second layer. Here on the side,
I'd like to move it forward because the arm
should not be 100% straight. You have to tell this a little
bit, the elbow section. Here on the back
for the elbow bone, we can press I to
create that inset. You can create that part
and we can push it. You can select
these four vers Cs, scale down to have
a roundish center. Here they just pop
up this part like this so that we can
have, that elbow bone. We can ski this part
up a little bit to have bigger bone.
Sounds like that. Let's continue with the elbow. Let's press right here and we can exude it on
the side reference image. We can stop here. Let's
press S to scale it down. We can exude again until we
reach the wrist right here. That's it for the
arms of our cases. In the next tutorial, we're going to be working on the hand.
17. Modeling Realistic Female Hands: This tutorial, we're
going to be modeling the hand of our
character step by step. This guide will work you through the entire process from creating individual fingers to crafting the palm and connecting the
hand to the character body. To make the learning
experience easier, I've included blender files for each stage of the process. You can take a look at them
as you work on the hand. Just like a quick notes,
we're going to be modeling the hand separately
from the body. After that, we're
going to be connecting it to the character later. Model our hand,
we're going to be relying on reference image. I'd like you press
seven to go to the top and we need to drag
this reference image. You can use any reference
image that you'd like. First step is going to
be to model the fingers. Let's go ahead and model this middle finger
that we got here. I'd like to press
Shift and right click right here and we
can press Shift A, Cu mash and we can
start with the cube. After that, I'd like
to switch or click on this X ray total
so that we can see through our cube and
on the edit mode, you can press S to switch Edit mode, we can scale it down. Schele until we reach this level and we can push it up here. After that, we can select only the top vertices
and push them up. You can take them all the way to this point and after that,
we can scale them down. I don't want to push
them to the right. I want to keep my
fingers straight. Next, I'd like to split my
TD view port into two parts. From the left here, you can just split it to the right side. Now we got two windows. Here I'd like to move freely
like this in the TD space. Xcepts going to be to add
more edge loops so we can press Control R here at
the center so that we can cut it from the health here I'd like to select
these vertices on the side and you can
push them down like this for the other let me just switch
it to the edge mode. It's going to be easier to do the selection
with the edge mode. Also here, let me just
put screen cast here. You can select the
bottom edges and can try SX and scale them down. Probably you can
push them also up. That's the shape of the finger. After that, we can
select this vertex and we can push it outside.
Can select them both. Try to push inside a little bit. Select these vertices
and push them back. The next step is going to be
to add the finger segments. Our finger here has two
segments, one here, and another one back here.
We need to add them. I'd like to move my finger
to the left side so that you can see the joints parts
or those segments parts. Or actually what we
can do, we can move the reference back
to the object mode. Let me just select my reference. We can use the move
tool and we can just move it slightly to the left. Now we're going to be
seeing the segments and another joint here. Let's select our model, Control R, strike that. At this point, we can
select this vertex, double G to slide it on
its own edge like that, you can see what we create in here. Let's do the same thing. Control R right here. Next, what we need
to do, we need to bevel them a little bit. But before we can bevel
them, we can give them. We can til them a little bit. Let me just select this
part here, just push it up. Just a bit up like that
to have that curvature. After that on the added mode, we can select this entire
part and we can drag it down to make it align
with the start. Just push it down like this.
Also contract to spin. Now we got that curvature, nice curvature,
finger curvature. Next I look to these
edges that we got you. Let me just switch
back to the edge mode. Can press all here, can
press Control B to bevel it. I'd like to insert one
edge loop on the middle. If you scroll the mouse, you're going to be inserting that edge. I'd like to select this part, push it a little bit up inside or the bottom needs to
be pushed up as well. I'd like to drag or
push press all here, drag this one a little
bit to the right, center for the other
edge on the left. We need to give it some space. I'd like to do the same
thing through the part you so we can press Control B, spell it like this, and we
can drag these two edges up. And the ones on the bottom, you can push them inside. Something like that looks fine. So for the nail. For the
nail, I'd like to select, we need to insert a new
edge roof for the Nall, it needs to be around here. You can press Control R.
Let me just track it down, something like this,
and we can select. Here I was going to be using that X ray toggle because it's a little bit confusing with the other vertices.
Just keep it like this. We can select this part
and we can press I I to form inset like this and
you can push that inset out. Okay. After that, let me
just select this edge. Two edges, you can
push them a little bit backward and just a bit inside here. All right. For the nails, let
me just select these two vertices and you can push them a little bit outside. Select all the three,
push them back. You can control how much you
want to have for the nails. Now in this part,
select it if we select our finger and if we
add the modifiers, we're going to be adding the subdivision
surface modifier, this one right here. All right, guys,
you can do shade smooth and I'd like to do
some tweaking to my finger. First I'd like to get
rid of the back face. You can just select them,
X, delete those faces. I'd like to tweak this
part a little bit. I like to tweak it even more. Here on the subdivision,
I can check the gage since we can see
our geometry even better. Now let's tweak this
part even further. You can press we need to
make it a little bit sharp. Let me just select these edges and you can press
Shift and E. This way, we're going to be
increasing the increase up, making that part sharp. You can do the same thing
here, select this part, shift E to sharpen it like this. Can push this part forward. There we go. We even let me
just push this one back. We can try to insert your new
edge loops so you can press Control R right here. Now we define that
finger even better. But for the side, we have to just try to
scale it on the X. You can just press, shift
old to grab all these edges, and you can try to
scale them on the X. Same thing here,
you can press Alt and scale it on the x axis. There you go. We got our finger. Let me just press control space. We can reset the zoom
by pressing period on the numpad so that we
can better check it. We can make the nail a little bit straight at the
start or at the front. Push this part like this, this part can be
pushed backwards. Same thing here for
the bottom vertex push it a little bit backward, we cut our fingers, Ile to insert or to increase the
subdivisions up to two, just so that you can current
cap the level of details. For this part here,
let me just select it. It can be pushed a
little bit backward. And we got our fingers. That's the first step
in creating the hand. Next step is going
to be to generate the five fingers out
of our finger here. We can press seven to go to
the top and this one here, this finger, I'd
like to save it. You can press Shift
D to duplicate it, so let's use this one here, and this one can just
press H to hide it. We can get back to it if
we messed up our progress. With this finger selected, this one is the index,
we can just skip it off. A little bit and we can
try to spin it can try R, Z, and let's spin it
sideways like this. Next, let's duplicate it. We can press Shift D again to duplicate it and we
can put it here. We can press R to spin it and
press S to scale it down. T're going to be having the
index finger. Let's continue. Shift D to duplicate
this and let's put create our third finger, the ring finger and we got the middle or
the little finger. Shift D to duplicate,
put it here, press R to spin it and
a to scale it down. So we got all the fingers, the next steps can be to
join them into one part. Also here we didn't add this
one, the thumb fingers. Let me just select
the middle one. Shift D duplicate
it and here we want going to it all, we need to do, going just cut
this part here, X, delete those vertices, switch back here to the solid
and what we need to do. First, I'm going to try R Y, and let's spin it by 90 degree. You can just type 90. Let me just put it, for example, here we can press R to spin
it sideways. Like this. On the it mode, we can
press at the bottom, and you can scale this part
up, push it like this. We're going to get back to it
and improve it even better. Now let's join all
these fingers together. Let's select all the fingers, Control J to join
them into one piece. After that, we're going to
be filling these spaces. Let's select every two edges and you can press
F to film them. Same thing here
at this position. Let me just select this part here and you can press
F to fill that gap. But here we need to
insert an edge loop. Let me just press seven to go to the top and let's
take a look at this. We are on the right
track, there is no need to add more edges. So that's being done.
In order to have a better and palm,
which is sporty. What we need to do, we have to drag the fingers a
little bit down, so it should not be keeping
them straight like this. We can switch to the edit mode. I want you to select activate the proportion editing
tool and we can press Lefklk oldio and we
can drag that part down. Something like that.
Also, we can do it to each finger on that mode, we can check disconnected only. This going to be affecting
only one finger here. I'd like to drag this
part a little bit down. You can do the same thing here, drag these fingers down. Basically, the idea is
not to keep it straight. We can, for example,
lift this part here, press old so there you go. Now they look pretty
much natural. Same thing here, we
can lift this part up. All right, so that's good. Now we're going to be
having a nice palm of the hand, this part here. The next step is going to
be to extrude this part. Let me just press seven
to go to the top. As you can see here
for the little finger, we have to push it up. We're way off the
reference E so we can switch to the edge
mode to the is mode, and let me just press Z set D frames so we can
see our jumps even better. A D selects anything
that is selected, so we can press old A. Make sure that
everything is selected. We can press C and let me select the bottom part of this finger and we
can push it up here. Same thing for this part, can just press G to grab it and
move it a little bit here. Let's continue. Now I'd like to extrude this part outside. To do that, I'd like to select the top vertices that we got here and we
can push them down. Here, can stop right here. After that, we can
start filling. Here you can see if we count how many vertices
we got, we got one, two, three, four,
and we can press F and we can continue like this. Press F again and continue. So this we're going to be having an optimized palm hand with
not too many much vertices. All we got that, let
me just drag this up here. That's good. After that, I'd like to
insert some edge loops here, Control R so that you can define the top of the shoulders of the
fingers even better. Next, I'd like to drag the
vertices here and we can push them down and we can take the other
vertici and push them up. This way we're going to be defining the bones even better. You can also try,
let me show you. Going to try to
select these edges. Shift E, and try to make them
a little bit sharper up. So Let's continue at the top. Actually press seven, you can select this part extruded
way back, scale it down. In this part, while experimenting with the
geometry optimization, I accidentally
deleted these edges. In your case, you will notice more edges extruded in this
area. Don't worry about this. I will restore the deleted edges in just a moment for now. Let's do another
extrusion, press E, again, and here we need to drag it
down. All right. We got that. Here on the side, we can just fill this pace and
on the other side, you can select this edge, extrude it all the way to this point, and
exude once again. Here you can select this edge, press F twice to fill
those missing gaps. Here we can just drag this. There you go. A here, I'd like to select
these four vertices and press F to fill
that's cap at the top. You can press seven to
go to the top and let me align it better with
the reference image. Obviously, this part needs
to be pushed to the left. Syth in here. There we go. In order to extrude, let me try to improve
these bones a little bit, this part it needs to
be pushed outside. But we cannot do that
because we don't have enough omsres we can
press control R. Let me insert some edges here
and we can push them. We can push these parts inside,
even down a little bit, and we can select the other
vertices and push them up. There we go. That looks
much more better. You can drag them a
little bit backward. Probably that's a
little bit too much. Let me just select this
part and push it forward. I'm going to be
selecting or filling. Let me just press seven
to go to the top, so we have to fill this space. We can drag this vertex down this space here
needs to be filled. Let me select this vertex
press each extrude it, select the four vertices
plus F to fill that gap. Extrude again down. You can select four vertices, press another F. I continue
like this. Same thing here. Extrude this vertex,
select the four press F, can push this one to the right, actually, let me just
leave it as it is, going extrude another one. Here, what I'd like to do, I'd like to make a bridge between this edge and the last edge of my little finger,
this part here. Let's go ahead and do that.
I'd like to press seven or actually Control
seven to go to the top. If you want to spin your hand, you can press six, keep pressing six like it
is to spin it around. All right. After that,
let me select this part. You can press E,
extrude it, press R, spin it sideways, scale
a little bit down, and continue the extrusion. Like this another time. There we go. Here at this area, let's
make the connection. I'm going to just press five
to exit the orthograph mode. You can select these
four versus Zs, press F to fill that gap.
Let's continue filling. Here I'm going to be selecting. You can press F
to fill that gap, but actually here, it's
a little bit tricky. I'm going to press to
get rid of this edge. And we can fill this part
by pressing F. From here, let's go ahead and fill
the rest of our hands. Here we have these four vertices and we can press F to fill it. Now for the fingers, I'd like
to drag these fingers down, and just select
the middle part of the fingers and you can
push it down like this. After that, I'm going to be selecting these two
edges and fill them. Select the first edge, shift
select the second edge, and we can press F to fill them. But also here we
need to make sure that this edge
here is connected. So let me just show
you. I'm going to press Control R, insert
an edge group here. Take this vertex, we
can push it backward. Here we having two vertices, this one here and the new one. We can select them both
and we can press M and merge at the center.
Let's continue like this. Let's select these
four, press F, Control R, select this vertex, push it down, and merge
with the other one, we can press M,
merge at the center, and finally, you can do
the same thing here. Select these four press
F to fill, Control R, drag this vertex down, select these two press
M, merge at the center. Now we got that part covered, I'd like to push these vertices
on the Y axis up here, sat for this vertex. This one, two, up like that. Now all we have to do is
to fill this inner space. Let's find a way to do it.
I'm going to be switching to the edge mode and we
can select these edges. Well, actually this
one I'm going to just select it shift and Let's coct deselect it and we can
press E to extrude down. We have to smooth
out this extruded edge so we can press N, go through the relax,
inside the edit, the Look tool, you can
just click on Relax. Now it's not that harsh, smooth. You can select Shift select these three edges and
press F to fill that gap. And we can continue.
Let's select. Actually, I prefer to work on the vertex mode so you
can select four vertices, press F to fill that's gap
and continue like this. Here we need to insert
more edge loops, but let's find a better way. Let me work on the other side. For example, this part here, let's select the four vertices, press F to fill that cap. Select this part, can push it up here and we can push
this part outward. Here let me just select the four vertices and press
another F to fill that gap. For this edge needs to be
pushed to the left side. Yo. Same thing here, can just selex that
vertex through the right. Let me just press
one to be facing the top and let's
take a look at this. Obviously, we have to smooth out this end so you can press here and let me press N
and click on relax again. There we go. Can press seven again and let
me just exclude it. We can press E extrude it. Scale it a bit down,
push it up like this. If you're going to get
back to this part later. For now, we can try to scale
it so we can press S, Y, and let's scale
it down like this to smooth it or making it flat. Let's continue the filling, so we still have
some missing gaps. So on the edit mode, let's
find a way to do the mixing. We can select again four versus. Here we cannot do that,
cannot select four. Let me try another way. I'm going to try to
push these up on the Y, and we can select these
four press F to fill. I'm going to have another four here. Let me just take them up. This parts can be pushed a little bit backward,
one, two, three, four, can press F to fill
those gaps. There we go. We filled the face. I filled the palm section of our hand. We have to smooth out this
part, for example, here, we can select my hand and let's switch to the
sculpt mode and we can press S. The S is the shortcut for the smooth brush,
and we can collect Q. C press F to
increase the size of the brush and we can
smooth out large portion. There we go. You don't have
that dot, still have it. Let me just press F. And
smooth it on a bigger angle. Also, here we can use
the blood brush to push it out. There we go. The blood works even better. There we have it. Now we
finished modeling our hand. So let's go ahead and
save our hand model. You can just go to File, Save As, and you can
save it as hand model. In the next coming lecture,
we're going to append this hand model and
connect it to the body.
18. Attaching the Hands to the Character: When it comes to
character modeling, hands can be one of the
trickiest parts to get right. They take a lot of time
and press to model. Unlike the face, hands don't need to be unique
for each character. We don't need to model them
from scratch every time. Instead, we'll use
a pre made hand and seamlessly connected
to our character. This is a common workflow used by the artists to save time. In this utorial, I will show you how to adjust
the proportions, fix the topology, and bend the hand smoothly
with the arm. But first, we have to bring our hand model into our scene. Inside our blender
en we can go here to file and click on a pen. And I'm going to have it in
the downloads right here. You can download this
file from the resources. It's called a hand point
blend. It's a plant file. You can double click on you and you can jump
to object and you can be finding the hand
mesh. Double click on it. You got hand here, all you
have to do is sport it here. I'm going to first
scale it way down. Press one to be
facing the front. I'm going to press
control space to maximize this window and spot it here. I'm going to try to spend it
on the X, spin it on the Y. On the Z also, and let's
spot it in the right place. Here, we have to
spin it on the X, but we have to
invert it on the Y. You can try a Y and minus one. This way is going
to be inverted. Let's press three and we can
spin this by pressing R. Try to align it with the reference image.
Something like this. Spin it on the Y, press
one to be facing front. There you go. Something
like that cannot do it. Next step is going to be to
connect it with the arm, what we can do. I'm going
to select it first. Shift select the body, you can press Control
J to join it. Now it's connected
and since we are using the mirror, it's
going to be doubled. On the edge modifier, I'm going to be
pressing all right here to check the statistics. We have ten vertices here. So in case you are not seeing these statistics to
make them visible, you can scroll at the top here until you see the overlays, this overlays icon,
you can click on it. And here we have the statistics. You can just click on it. And this way you're going
to be seeing all the data about your aracure
or about your mesh. On the hand, you can press
all here. We're having eight. We need to add more edge loops. You can press Control R. Here to insert the double edge loops. Now we have here ten and
here ten. The match is good. We need to have a
match. Let's press Shift all to select them both. We can press Control E and
let's choose bridge edge loop. So now it's connected.
After that, we can get rid of both
of these edge lines. Let me just switch back to the vertex mode to the edge mode, you can press all X
dissolve that edge. Also here, X dissolve that edge. Now we got the hand, it's connected to the arm. So we can switch
press A, everything, we can press shift in to make
sure that the normals are flipped and now
everything looks nice. We got arms hands, I'd like to scale
them up a little bit. I'm going to select this part and we can scale
it up just a bit. By doing so we can have
the arms for character.
19. Modeling Mid Section: In this story, I'd like to work on the mid section
of our character, this part right here,
including the butt section. To do that, I'd like to select my character, switch
the edit mode. I'd like to select
these two verses that we got on the back and we
can start extruding them. I like to follow
this edge line that we got here and connect
it with the front. Let's press E and continue
the extrusion down like this. Keep extruding, making the turn, extrude once again here. And we can stop right here. After that, we can select the front vertices
and we can press F. We can do some better alignment. Let me just drag this part
a little bit forward. By mistake, we are activating the proportional editing
goal, just remove it. And let's push this
part outside like this. Also the size of this part needs to be small,
so what we can do, we can drag these vertices inside like this in
a nice easy way. Sent in here on the
back, Strack them backwards. Just like this. Here on the front, we can bring this part
outside a little bit like this while bringing these
back. Something like that. We got that section first. So here I'd like to
maximize this window. We can press control space so that you can
see things better. The first step in shaping
the mid section is to select the inner vertices
and you can push them inside, just like this. You can keep doing
that in order. Make sure that all these
versictes that are inside are pushed really inside,
just like this. A little bit here on
the front. There we go. After that, I'd like to switch the edge mode and we can
select this edge that we got on the bottom and we can extrude it to the left side. We're going to be
defining the butt section in a circular way. Here on the side or
actually on the front, let's keep extruding that
in a nice circular way. Let's keep extruding up. All right here, let's exclude once again and let's connect it. We can ski it up a little bit and connect it
with the top by selecting the two edges
and press F. This way, the butt section is defined. But we have to push
it to the right side, so we can select these faces and we can push them a
little bit to the right. Also we can spin them around. After that, I'd like to
select these edges and also align them a little
bit to the right side. On the front here, we can select these three edges and
we can exude them down. Let's press E, exude
them. Press E. Let's better align them
and we can press Egn to scale them down or
to exude them down. The arms here are blocking
the view, we can hide them. Let's press Alt left collect to select here we can press L to select that ji unit and
we can press H to hide them. If you want to bring
them ma you can press Alt for height and Alt H should bring back
the hidden object. The mid section
here needs to be, we have to push that section
outside the As section. Here we can fill those gaps. Let me just select these faces and we can keep pressing F. On the inside, we can
grab these vertices and exude them down to
finish the leg shape. Here we can select these two, keep pressing F
to fill the gaps. You can drag this one up. Exude again down. Let's fill the remaining faces. Drag this part and
fill that phase. On the backside, we can select these vertices and we can
them down, fill the side. Here, let's select this part, press F to fill it. So on the side
reference image here, I'd like to select the
bottom loop and we can press SZ pre zero so that
we can have it flat. We can do the same thing
to the previous edge loop, a Z and press zero. After that, I'd like
to use the loop tools, the circle, so that we can
make those loops circular. Same thing here for
the previous one. We got a problem
here at the center, so it's connected by
mistake so we can uncheck the clipping in
the mirror modifier. So now we can bring one
can have any clipping. You can drag these
sideways like this, the legs to match
the reference image. Can push it back a little bit. Here we can scale this edge up a little bit and we are
on the right track. On the front section right here, we have to give or
we have to align these vertices to give our
character that V shape, the V front shape. Just keep aligning
those vertices in a form that resemble
to a V shape. Now let's work on
the butt section. On that mode, so let me
select my mesh here, we can switch to a mode. I'd like to select the top
two vertices right here. Let's select these two vertices, we can switch to the right reference image and we can press
E to exclude it. We have to pop up
that butt section. After that, we can fill the side select every
two vertices and we can keep pressing F. Also here we can do the same thing, let's press F. On the bottom, you can fill that section two, and just select the four
vertices, press F to fill it. On the left side,
we can also select. Let me just select
these three vertices, can press F to fill it. And continue the filling process until you reach the bottom. Press F, and also here, it's like four vertices press F, and we got the butt section, but we can improve it
to make it look better. Here we can select these
vertices and we can drag them to the
right side like this. Make sure to not go too
much because it will collapse due to the
mirror modifier. Let's keep dragging these
vertices to the right side. In this area over
here, I'd like to take these vertices
and push them up. This way, we're
going to be defining the butt section even more. The front section
that we got here looks a little bit elevated. So we can do, we can keep
dragging that part down. I'd like to activate the
proportion in this tool so that we can affect a
bunch of vertices, not just one, and we can drag it down. Here
we have a problem. This area is not smooth,
so what we can do. We can select this part. We can use the loop tools
to relax loop tools. Let me just select
these three vertices. Include that one on
the inside, press N, and let's relax them like this. We can do the same thing here, so let's keep relaxing
these vertices. Also in this area, sent in here for this area, can relax these vertices that we got the mid section
of our character created.
20. Modeling Legs: In this tutorial, I'd like to work on the legs
of our character. Here on the bottom section, you can exude it down. Can select it, press E, and excude it until we
reach the knee level, right here, can spin
it down a little bit. After that, we can
extrude it for the second time around here. In order to pop up
that knee bone, we can select these faces. We can press I to form the inset and we can push
it outside like this. After that, I'd
like to switch to the edge mode and we can
press all on the bottom of the foot you can select that entire edge and we can
press E to extrude it down. For the knee bone
that we got here, the side of it, we have
to not make it square, so we can select these edges and scan them down to have
that circular shape. Also we can switch
the face mode, we can select these faces and
we can push them outside. Also we can spin them on
the X axis a little bit. On the side or image, we can drag this part
and push it backward. Same thing here for the
knee, can push it back. We can also spin it on
the X just a little bit. Now for the curves section, we can insert new edge line, control R, new edge
loop right here. And we can select these vertices on the back and you can push
them outside like this. You can insert another
edge loop right around the center and we can push it back and we
got that sclf section. This part of the leg,
we can ski it a little bit up to inflate it like this. This way we're
going to be fitting better reference Image. Sinking here, we can inflate
this part like this. Drag it a little bit
to the right side. Sending here, you
can bring these to the right side like this. A
21. Attaching and Refining the Feet: The last step in our modeling
process is to add the foot. We're going to be
using the same model or the same track
that we use in hand. We're going to be
loading our foot. I'm going to put the cursor
right at the center here, so shift as cursor
to selection or actually cursor to
the word origin and you can go here to file, append, and inside my downloads,
I have the foot here. The butlik go to the object. And double click on the foot. This we're going to be
loading it right here. Right now we have big foot, so we have to scale
down the foot down. Ski it like this to fit the boots inside the
reference image. Something like this makes
sense, on the front, we can press one to
the front and we can drag it sideways like this. Also here, I'd like
to spin it on the Y, so we can press R Y, spin it sideways like this. This we're going to be having a perfect match with the leg. So we have to check the number of vertices that
we got at the top. On the edit mode,
you can press Tab. You can press Alt right here. Here we have 11 vertices, press Alt at the
top, we have 11. If you have more, you can just
get rid of these vertices. You can select, for example, this part here, press X in delete edge,
continue like that. Or you can add more, you can press Control R to insert more. Now I'm going to press
Alt here, Shift Alt, Control E, and we can
use bridge edge loops. You cannot select or
we cannot connect between these two because
they are not connected. If we go back to
the objects mode, the foot is separated
from the body. What we can do, let's
select the fudge first, Shift select the body. We can press Control
J to join them. So you can see, we have them on the other side because
the Mirror modifier applied for the body. Now let's press Control
E and bridge edge loops. We can go back to
the objects mode. Here we can see that
we have this cut. It has to do with the normals. Here if we check the
normals on the overlays, if we check face orientation, you're going to see
the difference here. On the edit mode, I'm
going to be selecting only the foot section that
selects it like this. You can hold C and select all the faces
here I'd like to press, switch a white frame so that we aren't going
to miss anything. This part should
not be included, so we can press C and hold Shift to deselect instead
of selecting. Let's go back to the solid. We can press Shift N. Now the normals are flipped and we don't have
any problem here. Let me just get rid of
this avatar character. Just check the face orientation. Basically, we got
it, we got the foot, but here we have to scale it
a little bit up, look small. I'm going to just
scale it a little bit up and push it sideways. We got the foot
of our character.
22. Adjusting Body Measurements for Accuracy: This new section, we're
going to be improving the anatomy of our caracure
going to be sculpting the details of our female body even better to give
it more definition. The problem that we got is that our main reference
image that we are following doesn't respect
the female body anatomy. We have bad proportions here. For example, the size
or the height of the legs is too much
compared to the body. We have long legs and
some parts are not good. For example, this arm here, we have to adjust,
we have to fix that. For that we're
going to be relying on a new reference image. This one right
here control space to maximize this window. This reference respects
the female body anatomy. We're going to be
following it to make adjustment to our body here. Let's get to work. First of all, what
you do it actually bring the right reference image. This is the right anatomy of
the female, the proportions. I'm going to be
simply dragging this. We can keep it at the front. We can simply drag
our reference image and let's put it here. After that, let's align it with reference image
with our character. Can scale it down a little bit, make sure that the face
so something like this, we might ski it up because
we have a heel here. Scale up just a bit. There you go. Now it looks good. First, if you notice,
you're going to find that the proportions or the legs are way too much way
too long, the legs. If you compare the legs
position here, for example, the midwaist it's
far too much away. What we can do, we can select our mesh, switch to edit mode. We can press right here and we can activate the proportion
editing ule by pressing O. Let me also activate
the squinaks and we can simply drag it down. Here, I prefer to work
using this toco X ray. You can just drag
this part down. Here we're going
to be destroying the Geomet limages select, for example, the part
and we can drag it down. This line here needs
to be reaching, so we still have to
push each little bit down, something like that. That's a good start. From here to the knee, let's
calculate that. The knees here, we have
to push them down too. You can just drag
this part down here. So we reach the knee level
like this and for the legs, they are all good. All right. We got that part right. Now for the top, the top,
it's going to be a mess. Looks like our
character is stretched, stretch, but at least
we got the legs right. Here for the top, we have
to work on it a little bit. I'm going to be
switching to the WiFi. All HD select everything
we can select only the arm here and let me just
also select this part. We can push it or bring
it to the right side. Like this but we should be
Let me just try that again. I can reduce the circle
here, something like that. Now we do have that V shape, start having that V shape, making the shoulders
a little bit wider. Next, what we can do, we have to work on the breast or the mid section here,
the chest section. The chest here is too small, so we have to increase
the size of the breast. I'm going to be
selecting this part here and we can
try to sce it up. Let's reduce the size of that proportional addition tool and we can scale up and push it a little
bit to the right. Let's scale up again. We can double check
from the outside, let's push its way out. Here on the back,
I'm going to be selecting just select these
two and we can push it down. A little bit on the top. I can push that part up. Okay. Also here, we can push
this one even further out. Not that much, but
something like that. You can drag this down. The anatomy start to get better. Here for the Midwest, I actually increase its size, so we can select these two and we can
push it to the right. Something like that. We're
going to fix the other. But at least now we got good proportions. These
are the shoulders. We might want to drag the
shoulders a little bit down. Same thing here. In the mid this section here, we can try to push
it a little bit to the right, something like that. Now we got a good anatomy. We can switch to a side. Let me just select the reference. We can press Shift
D and spin it, we can spin it by RZ nine degree and we can switch the
side here. That's CF. Also we can switch it, we
can press S Y and minus one. This way, this
character is facing the same character here and
we have to fix the butt. The butt we have to push it up. We can push it up
here. All right. This section here, I'd
like to push it outside. There we go. Stick a look
at the overall shape. We're going to fix it with the sculpt Now I'm
just trying to give our character
the measurements. Drag that down,
push this part up the boops Centner Well, let me just server it
back, keep it like that. All right. So for the butt, we can push it outside. Sting like this. And we can
push this part to the front. Not that much, but
somewhere here. All right. We have
to fix the legs. Here the curvator is really bad, so we can switch
to the edge mound. You can press Alt right here
and we can push it forward. Should not be like that. Here to fix this problem,
you can select everything, press shift N. So
reset the normals. Here we can press Alt
X and let's get rid of that edge to keep everything straight. Let's double check. So now the anatomy makes sense. The next step is going to be
to switch to the scalp mode. But before we can switch to the scalp mode, what
I'd like to do, we can press control space
and I would like you to add I'd like to apply
first the mirror. I'm going to just get rid of the subdivision here
for the mirror, we have to fix all the
problems with the mirror. Make sure to check the
clap in and also get rid of the proportion two and we can make sure that
we got no gaps in between. Just push out here. Let's press and drag
everything to the right. Everything needs
to be connected. Here we don't have a problem. Let me just take
this part. Just get rid of the Calipan and we
can just take it outside. I should not be on
the other side. All right, something
like that. I'd like to add another type
of subdivision. It's going to be the
Multi resolution. Let's search for the
multi resolution here and we can subdivide twice, first time and second. We got the proportions right. We got the shoulders
in the right position, the boobs or the breast, the butt section, the pot is in the right place
and the knee level, they are in the same place. Remember that this is a heel, so that's why if the feet
or if the foot is straight, it's going to be here,
just like our character. In the next semlecture
we're going to start the sculpting process.
23. Sculpting the Shoulders, Back, and Arms: Let's start the
sculpting process. I would actually select
my character here and we need to
start from the top. I would like to switch
the sculpt mode. Here we have let me just make
sure we have the mirror, we didn't activate the mirror. Let me just get rid of
the Multi resolution for now and we need to
apply the mirror. Next, we can add that
multi resolution, modifier and we can
subdivide twice. Now we can switch to the sculpt mode and we
can start working first, I'd actually work on the top. Here we do have a bone.
Let me just show you that. I'm going to be using the blob or actually
let's use the clay, Compress F to reduce the size of the brush and I'd
actually be brushing in a symmetrical way just activate the X merin because my character
is on the X axis here. If it's on the Y, if it's like
this, you can check the Y. Here at the top, I'd like
to create this bone here, shape this bone and it's
going to go down like this. Okay. Let me control space. We can sub divide again so
that we can get more details. We got that. We can press S to switch
the smooth and we can press F to increase the size and we can
smooth out this part, the top and let's continue
with the blob or actually, we use the stray, the clay. That's too much. Let
me just refer it back. We got that level here. Next,
we need to add the knee. We have a muscle here, we have to define it's going
to take from the top, let's press F to
reduce the size. It's going to go like this. Later, we're going to be
smoothing out everything. For the first part here, you can press S again to
smooth out the edges, S something like that. That's the first step
here at the end, we should take this bone, spreasFter its size,
should take it like this. I needs to be on the
top of the shoulders here. That's the first step. After that, we can define
the shoulders too. I'm going to be using
here this crease polish Compress F to increase
the size and we can try to define a little bit shoulders
going inside like this. Don't go crazy with this
because it's going to make the character
look muscular. Let's go ahead to
the blog and we can boost the spot we
can press Control. If you press control,
you're going to be reversing the effect. If you collect here, you can be extruding out. If you press control, you're
going to be pushing inside. Here I like to push
this part like this. For the bottom of the triceps, I like to push it outside. Let me just press F to
increase the size here. You can push this part outside,
needs to be like this. Here on the front,
same thing here at the bottom of the
triceps, can push it out. A little bit here
and we can press F or S again and
we can smooth out. The shape should not
be strong like this. Here for the back
of the shoulders. I'd like to push
this part outside. Since we are here, I'd like
to define the back muscles. Here I'd like to first,
we can use the grab, let's use this grab and we can push this
part back like this. Also here we can grab it
backward. Same thing here. I can grab that part backward. We got a muscular shape, but we're going to be
smoothing it later. For now, let's just
get anatomy right. Here for the back, so
we can use the clacon. I would like to create
something like this. The back muscle is
going to be like this. You can just go this way and smooth that to the bottom and we can
fill the inner side. Just a little bit like this. We can press S
again to switch to the smooth and we
can smooth out. I just want to keep
something like this. This edge here is
going to be nice. That's it for the
back. After that, we can work a little
bit on the forearm. To boost the forearm, we can use the blob brush
and we can push this part. You can exude it a
little bit down. I just press F to increase the size and we can
boost this part. This is how it should look like. Okay, so now it looks better. You have to push that part down. You can press again and we
can slightly smooth it. That's good. So we got the
top part of our character, including a little
bit of the back.
24. Defining the Abdominal Section: Next step is going to be to
work on the mid section here. For the mid section,
I would like to work on the abs or
the abdominal section. Here, I'd like to press
G so that we can use the grab tool and I'd like
to grab this part up. We need to give it
that V shape first. Just drag it up and
give it this shape. Here we can make it a little
bit closer like this. After that, what we can do, we can use again
this grease polish, I'd like to press one and
can reduce the size of that. I'd like to create the last abdominal
section that we got here. We can start brushing
down like this. For the top, there
is only to do that. We can just smooth
out the top here. Just keep this one. Decreased polish, press S
F to decrease the size. Actually, we use decrease
polish, not the smooth. We can create this. You can go on the
edge like this. We can press G again or G, and we can grab this part
up the G, the G brush. Next step, it's going to be
to push this part outside. I'd like to use the blob brush and we can press F to
increase the size, and we can just push this
abdominal section outside. All right. What I'd like to do, I'd like to add the hole here. On the dis mode, we
can create a hole. Let me just press K and we can create some kind
of a hole like this. Can press Enter and I'd like to select these four faces and we can press E to
extrude them inside. After that, we got some massive, we need to press Aster
switch this mode and you can just colect here to smooth out this part here. We have to smooth it right and we can switch through the blob and right
here at the center, we can press control, and this way we're going to
be forming that hole. Probably it looks too much, we can use the grabs
let me just press G to bring the grab tool and we can make it push it together. Something like that looks right, probably a little bigger. Nice. Here at the bottom, we have to smooth out this
part. Let me just press S. I have to increase the
size of that and we can smooth out that area. Here also let me just use increase polish and we can define this part up the top
of the abdominal section. C press, smooth it just
a bit, and we got it.
25. Sculpting Legs & Calves: I like to work on the legs. The legs, they are messed up, so we have to work on them. First, we have to give
them the right size. I'm going to be using
the blob brush, and we can push this part. I'm going to extrude this part, same diner on the inside. Also here on the
front, we have to push those legs outside. After that, we can smooth out
the shape let me just press S and we can start the
smoothing process. Here we can define this apps or the squat,
the leg muscles. Just define them
like this, sit here. Track those lines to the bot. This part here looks very small, so you can do on the edit mode, I'm going to be pressing
old right here and you can try ax to push it outside. Let me do that with the
proportion didial enabled. You can scale it up
like that. That's good. But before we can
reach the bottom, let me just check the butt from the back and
we have to fix it too. I'm going to be using
the Crease polish and we can define that
butt section even better. We can press G to
grab and we can grab this to the bottom. Let me check. That looks good. We can press or we
can switch the blob. We can push this part outside. Here we can press Control
to reduce its size. Also here, I'd like
to push this part. Can just push it
outside a little bit. Let me just press S F
to increase the size, and we can smooth that out. We had a push. That looks good. C just smooth out that part. We got the legs here. Let me just also push this part.
Let me just use the blob. Can push this part on the side. Looks like a body builder. But later we're going
to be smoothing out all the details to make
the character looks cool. Here I like to use the
grab and we can try to push to create that
reproductive system. I don't know if I
have the right to spell multiple points to
spell the things here. We got that, let me
just check the back. Here we have to push
this part down. Let me just press G and we
can grab that part down. Press S, can smooth out
that part just a bit. It's for the calls. The calls, we have
to work on them. First, I'd like to use
the blob brush and we can push this part outside. Don't worry, we're going
to be smoothing it. It looks huge right now. Also here on the back. Let
me just press S because I start to probably a
little bit too much. We can continue
inflating this part. Say we reach the bottom. So for the legs or
the foot, it's small, so we have to scale it up, so I'm going to just ski it
up and push it to the right. Same thing here, we have
to push it forward. Let me just press three
to switch the side. Here I'd like to do,
I'd like to select this part here and you
can spin it so we can press RX and let's spin it like this and we can
push it just a bit forward. Let's double check that
anatomy. Now it looks better. I'm going to just keep
inflating this part here. Here we can press control,
verse inflation process. We need to have a smooth
turn here or smooth. Here, let me just
reverse back control so that we can push that inside. Let me check for the front. That looks good. We can define it a little bit
using the crease polish. For example, here, also here,
we forgot to smooth it. Let me just smooth
out this part here. I'd like to use this
crease polish and we can start defining
this section here. You can see that probably a
little bit to the left here. You can see that
here, it looks nice. Same thing here for
the back, for the end, you can find the
calves even better. That's the right thing. But we have to smooth it, so
I'm going to press S. Smooth this because this
is a female, not a male. But we got some nice legs.
You can see that here. Anatomy looks way better right
now, better than before. We can increase the
size of the knee. Let me just boost it up. It's good to have this middle
cut right in the middle. Probably a solid
which exaggerated. So then you just press S
and smooth out the bottom. Basically, we got our character.
26. Refining and Smoothing Muscle Definition: So our charac looks
too much muscular. It looks like a body builder. I'd like to smooth out most
of those muscle details. So you can you can press
as to the short cuch for the smooth and we can start smoothing all the
details that we got here. For example, the mid section, the top, you can just keep
smoothing all those muscles. Same in here for the shoulders. Also the smoothing
can help us to reduce the size of those muscles. Let the triceps and
biceps, the forearm. We can just keep tweaking, keep smoothing all
those details. A little bit here for
this apps section. Also, I'd like to switch the
shading viewport so we can switch it to the Mt cap and
the type, we can use this. This shows more shows those definitions of our
cacture even even better. This one is called
the studio lite, the Mt cap studio lite. We can continue. For example, here at the center, we can smooth out this part
a little bit at the bottom. We can smooth the entire
section like this. Also here we can press G so you can use the grab and
we can grab that up. We can redefine that edge
by using the crease. There we go. That looks better. For this hole here, we
can switch the edit mode, it's in the right place, but
let me just use the grab. You can grab it through
the outside like this and send it on the top, and we can press a to switch to the smooth and we
can smooth that out. It's a little bit difficult. We can smooth it 100% and send
it like this on the edges, and we can use the blob. We can press control here so
you can reverse effect so that you can go inside and we can push that hole
inside like this. Now we got it and it
looks way better. For the top, we can refine
that abdominal section, the top section like this.
Let me just revert back. It looks a little
bit too strong. We can leave it light like that. A little bit here for the arms. You can push that out by using the blob and pressing control so that you can
reverse the effect. There we go. We can also smooth out that
abdominal section. For the foot or the feet, we can use to smooth out edges. Same thing here
for the main legs. As you notice, using
the smooth brush will help us to reduce the
size of those muscles. Oh we can check the back so we can smooth out the butt section like this. We can use the blood brush to push these areas
outside like this. There we go. We gave it a better definition. Basically, we got it.
We got our character. It looks way better right now. We reduce the amount we
reduce the scale of muscles, we smooth them out to make our character looks natural. A.
27. Modeling Undershirt Clothing Part 1: This new section I'm
going to be creating the clothing of our
craft character. I'd like to start first
with its undershirt. First, I'd like to bring
the reference image so that you can follow
it this one here. We got this undershirt. We have the wrinkles,
we need to sculpt them. We have some you can see
that details that we got here seem on the
left side and so on. We want to be extracting the undershirt from the
shape of our mesh here. First, we actually
do, I'd like to increase the resolution
of our mesh. But before I can do
that, let me just rename this is our character. We can double click here and
let's rename it character. Let me go back to
the object mode. With it selected, we can
press Shift D to duplicates. I'd like to keep
this one as a copy. In case we messed up this one, you can go back to the previous. Here, let me just
call it clothing. We're using this
cct of clothing. I'd like to hide on this
I to hide the main, save it in case we want to. Backup our charcuter. Here I lecture do, we're
going to be using a mass to give that undersure the same design as we got
in our reference. But before we can do that,
I'd like to increase or subdivide the
resolution if more. Let me just click
here on subdivide so that you can
have more details. Four is perfect. If your computer
can't handle four, you can revert back to
three. It's not a big deal. Let's select it and we can apply here the multi
resolution modifier. After that, we can use
the mask so that we can extract our undersures. Actually do with our
character selected, we can switch to the scult mode. I'd like to be using this mask. You can just click
here. By default, is going to be set
to this box mask. You can just click here and
choose the second option, which is the lasso mask. That's being done, let
me just press one to be facing front, and also here, I'd like to just hide
my reference images, and we can start giving
similar design to this. Taking from the shoulders
all the way down to the breast section, something like
this and we can go down and create some a circle. It's going to be here. Let's go all the ways at the top like this. There we go, we got it. It's going to take some
practice to get this selection easier because it's a
little bit difficult here, I'd like to include
this part two. Something like that. You can add that part two. There we go. We're going to be improving it later when we're going to
be remsin our outbreak. Let me just check
it from the back. The back seems perfect. I'd like to press one and this continue on the
bottom here so you can just select
this portion here. Go to God we're including here a little bit
of the butt, but that's fine. After you finish this selection, we can jump here to
mask and I want you to click on this mask extract. Click on it, I'm going to keep the same settings and let's click on Extract. There we go. We got that mask selected. If we hide, for example, here, our cactual clothing, we're going to be ending up with shape that looks like
this undershirt. I don't like this, modified
it's got by default. Let me jump here to the modifier we got this geometry extract. G just get rid of
it to keep it flat. We got the main shape
of our undershirt. But the problem is that it's extremely high poly, so
we have to remash it. If you want to rematch our
objects, we can select it. Let me just go back
to the object mode. We can jump here through this object that's properties
and if you scroll down, you're going to be
finding this option. This is one of the
greatest options in Brando. The remash. It's going to allow you
to reduce the amount or reshape or recreate
a different version, but you can control the
amount of vertices you want. For example, here we have
almost 60,000 verses, which is crazy
amount of vertices. So we have to reduce it down. So it's selected,
we can jump here to the remash and the types
is going to be quad. We need to have a quad
vertices or faces, and you can click on
Quad flow remash. I prefer I'm going
to be checking this preserve mash
boundaries boundaries so that you can
keep these corners or these edges, the boundaries. For the number of faces, I'd like to stick to something low, something like 750 and
you can click on remash. But you can see this message, so the quadrat flow, the mesh needs to be manifold. So it has some problems. I can see we got a problem
here with our mesh. If you check, let me just select my mesh here and
if you switch it in mode, you're going to be
finding some problems. So I think here, this belly button, it's the
one that give us trouble. Let me just press Alt A
to deselect everything. You can see how the
geometry is doing here. It's really messed up. What we need to do, you
can delete this part here so we can press
let me first press Z, switch the why frame, and
we can select this part. O and we can delete these pass, press X, and let's delete them. Let's give it another choice. I'm going to go back
to the obst mode. We're going to be fixing this
gap once we do the remas. Let me just press
E, so it a solid. It's selected, we can click on this rematch again, 750 faces, and let's click on remash see in processing and the
remachin is completed. You can see the
final result here. So we reduced
amount of vertices, only 700, 900 here,
it's not 700. It's I think 800 faces. But that's fine. Not a big deal. As long as we have the shape,
we kept the shape good. It actually delete some faces
here, you don't want them. Press X and the litu I prefer
to use the mirror modifier, so we can press L to grab the left edge and you
can press X and delete it. After that, we can add
the mirror modifier. But for the mirror,
we need to make sure that the center
point is right here. On the Edge mode, I'd like to let's select this edge
here or this vertex, press Shift, cursor
to select it, and we can go to objects
such Origin true cursor. After that, we can jump to the modifiers and we
can add a new modifier. It's going to be the
mirror. We got the mirror. Now if you apply any changes, you're going to be seeing it to the other side, the
symmetrical editing. Let's go ahead and start
the editing process. Here I'd like to take this one. Let me just check the clip in in the mirror so you can
stop right at the center. I'd like to press Alt and grab this entire part
to the left side. Can press Alt here. Drag it like this.
Let me just verge back. Actually, that's fine. Let me check the
back. You can press all again and drag
everything to the left. That's good. You need
to apply some smoothly, let me just press
control space and we can double check the shape here. So here we can smooth
out this edge. Let me just switch to edge mode. We can press old
to grab that edge, we can press N and
inside the edit, can just click on relax. Make sure that this
add on is enabled, the loop tolls, it's a built
in add on inside blender. I think we went too far with that. We'll just
leave it like this. As what we can do, we can
jump to the sculpting and we can smooth out
those harsh parts. Well switch to the edit
mode, the sculpts mode, you can press S, shortcut
for the smooth brush, and we can start smoothing. This part like this.
There you are, we got some better results here. Let me check the bottom. Looks good. A little bit here. You can smooth out that edge
a little bit on the left here. There we go. That looks acceptable.
From here, we can work on this part. Let me just extrude it. We can use the blood brush and we can extrude this part just a bit because it should
not be flat like that. It's an undershot, not skin. Can press S again to
smooth out the top here. No, I want to smooth that. That looks acceptable. Here for this strip, we have
to manually work on it. Here we can press K.
Let me just press K and we can go like this. We can press Enter
and we can keep adding those loops like this, press K, press Enter
and after that, we can just get rid of these
faces or edges in between, slack them all, press
X and dissolve edges. There we go. Same thing here. Let me just press, Shift Alt, X, get rid of those edges. Just doing some
optimizing on our own. Sending here, X
and dissolve that. There we go. Press, a
bit of smoothing here.
28. Sculpting Undershirt Details Part 2: The next is going to be to add more details to our undershirt. I'd like to go back here, press control space, just
stay on the sculpt mode. Here you check, keep an eye
on our reference image. You can see these
wrinkles that we get. First, we'd like
to do, I'd like to add the multi
resolution modifier. I think it's time to
apply the mirror. You can just apply it from here. Next, we can add the
Multi resolution. Modifier and we can start subdividing two times.
Two times is good. First, I'd actually
use the cloth brush, so we can just scroll here
until you find at the end. Here we do have the cloth
brushes. So we're good. We can use this drag cloth
and we can start dragging up. That's a little bit too much. Let me just reduce the strength. Down, we can also
press one with in the front and we can
start lifting that up. Also here, I'd like
to do race click. Let me just go back
to the object mode, can do Right click
and sheet smooth. Go back to the sculpt and
we can keep sculpting. Here we are using the mirin. Let me just check that check the merin so that we can have
some random effect here. Going to track that down
sideways like this. Let's add the wrinkles
in these areas. For example, here,
we can frack that up and don't go crazy with this because it's going to look good
if it's too much. Just a little bit
of wrinkles here. You can see that that here, even though we have
a lot of wrinkles. But if you check, for
example, let me just go pack. If you check here
other references, for example, the
game references. This one here, let me
just double check it. Yeah, we do have some
rain calls here. Let me check another one.
This one here we can drag it. There we go. Here we
don't have too many. I like this because
in the animation, one's going to C.
These wrinkles, the one is going to be animated. That's why it's good
to keep it low. Keep low wrinkles, just a bit so that we can make it look like an actual cloth and not a body. Here we can press S
and we can smooth out S and we can smooth
out this part here. Let's go back to the
cloth drag cloth and we can drag up
a little bit here. There we go. We can create some horizontal
wrinkles like this. I'm going to be using
this pinch folds cloth and we can reduce the strength real down to something like 0.2. Let me just press F
to reduce the size of that brush or actually
have to increase it. Let me increase it up. Something like this here,
it's going to be good. Also you can pop
up. Let me just use the blob and we can
bring this part outside. A little bit out. There we go. Let me just double check. Can use the cloth drag and
we can drag a little bit up, for example, on the side
here, something like that. After that, I'd
actually add the seams. Inside in our undershot
on the side here, we have a seams like this. I'd like to use this
crease sharp brush and we can press three
so that you can switch to pressing three on the numpad. Here you can press F to reduce
the size of that brush, and we can start brushing. Let me just increase
the strength. But it doesn't look that good.
Let me just revert back. What I'd like to
do, I'd like to use the stroke so that
we can go easy. We need to stabilize the stroke. This way, you're
going to be creating a smooth turn or smooth
cut, smooth seam. But before I can do that, I'm going to be subdivide again. Let me just increase here
the level view port to two and we can
subdivide once again. Something like that
and we can go ahead and create that seam. Sounds like this. But we
forgot to check the X marine. The seam is symmetrical.
Let me just reverte back. Here we can check the X marine. The X because I'm on the x axis. If you are on the
Y, you can check the Y axis instead
Y instead of the X. Here let me just press
three and we can start sculpting again like
this to have that seam. You can do that twice.'s continue all the way
to the bottom here. After that, we can
use the magnify. Let me show you the other brush that we can use in this one, the pinch magnify,
just click on it. This we're going to be
bringing the sides together. We just press F to
increase the size of it and we can start brushing. See how that seam is
getting together right now. Sounds like this. We got a nice seam here. Let me check the top
or the other side, we carry it on the other side. On the top here, we need
to add the same thing. We need to add another seam. Let me just use it again the sharp crease sharp and
we can brush like this. Probably that's a
little bit too much, let me just go back and
reduce the strength down. Let me just see. Actually before we can do that, Actually, before we can
add the seam at the top, I'd like to add this edge. We have an edge
here. I'd like to add it before we
can add the seam. To do that, we can use, I'm going to show
you this clay brush. This is really good,
this clay brush, and we can start to
brush it like this. Even though it's not strong, but as you can see,
it's adding that edge. Let me just revert back. We
can press control space to maximize this can increase
the strength to 0.45. Let's work on this. And we can continue like this
until we reach the top. Just take your time with it. I'm doing it here quick. In your case, just take
your time with it to create good. Also here we can. Let me just check
that stabilized stroke so that you can go
perfectly on the edges. Let me just do that here. You can continue that churn. It's not like that. Next, the next step
is going to be to use this grease sharp so that you
can sharpen the edges here. Also, let's make sure
that we are using this stabilized stroke and
we can go inside like this. Let me increase
strength up to 0.4. This way, we're going
to be magnifying or making that edge
look even better. Here we can increase
the strength up. Push it down and continue
until we reach the end. There we go. Centene
for the second edge. That's good. We got
that edge over there. You can add the same
thing at the bottom here. Let me jump through
the clay brush and we can start
to brush and again here to add that frame. Let me just go back. You can press control
Z and redo that anytime you made a mistake. After that, switch crease polish and we can polish
this part here. All right, so let's double
check from distance, it looks very good. We can use that as
our undershirt. Let me just go back to the
object mode and we can exit. Let me just press
control space to maximize this window
or to go back to default layout and you
can bring back myCarctermin, and let's see how it
goes on top of it. Obviously, we have to push it, exclude it a little bit out. Here I'd like to switch through the scope mode again and we can use this blob brush so that
we can push details outside. Let me just press F to
increase the size of the brush and we can
start colicking here. Okay. Here we go. Here we can press G so you
can grab this part and we can push it down
and just press F to increase the size
of those brush. Here we can grab it
to the other side. All right here on the
front, let me just use agdablob and we can push
this entire part outside. A little bit here
on the shoulders. There we go. We got
our undershirt. Probably here we have a big gap, just use the G so you can grab and can push this one down. It needs to be on the skin. You can just use the grab
and the blob to push out or to push in the geometry. Here we have to click just a bit to push
that out, sat in here. Basically, we got
our undershirt. In the next commutorial, we're going to be working on the second piece of
clothing, which is the pens.
29. Modeling & Sculpting Pants: We've got the undershirt, so
the next step is going to be to create the pens
for our character. Let me just hide under shirt
and you can bring back our character
clothing so that you can extract the new element, which is the pens. Here we are on the local space, so let me just press slash so that you can bring
back our character. And after that, we can
press one to be facing front and I'd like to switch
through the sculpt mode. Here we got that mask. We can press to
deselect everything, and we can start again. Let me just here, use
that last one mask again and we can start sculpting
or creating the mask. Here we can just go down
like this and then we cover the sport and can continue
the selection toil we reach the bottom here.
Something like that. Let me check. Let me just
reverge back and do that again. So we can stop here. With that being done, we can
jump also here on the pack. Let me include this part too. It's good to have it. We can
delete it later. A big deal. After that, we can jump to sculpt and we can
actually not sculpt, but mask, we can click
on mask Extract. Let me just keep
it as a default. There we go, we extracted. I'm going to just hide my character clothing
and let's work on this. The next step it's
going to be to recreate or regenerate geometry. I'd like to rematch my
pensive so as you can see, they are dense in geometry, so it's completely hard
to work with this way, so we have to improve
it, reduce the polycunt. First, I'd actually do Atax get rid of this modifier
that we got here. You're going to use
it and we can jump to the object data properties right here with our objects selected, you need to be on
the objects mode. If you scroll down
here, you're going to be find this
option this remash. This is one of the best features in lender is going
to allow us to regenerate or reduce
the poly count of any object in a better way. I like to use the quad here. We want to have quads,
which are squares. And we can click on this
squadron flow remash you can set the number face. By default, it's going
to be set to 4,000. I set it here to 2,500 and make sure that
you are checking this preserve mash boundary so that you can keep the
boundaries of our mesh. From there, we can
click on remash. Because we got some problem
here, so quadra flow, the mesh needs to be manifold it's not working because we have some problems
with the geometry. If you select our pense, if we switch it at this mode. I'm pretty sure that
the belly button is the one that give us trouble. You can see on the bottom
here, we have a mess. If in your case you
don't have this mess, that remash is going
to be successful. I'd like to do, I'd like
to delete this portion of the map of the pants
can just press old right here to select that edge and you can press X to delete those face. After data, I'd like
to press L to grab this part and you can
press X to delete it. We're going to be
filling it later, going to be easier if
we do the rematch. That's been done, you
got that ugly part out. Let's select our
object here and we can try another time the remash. Let's click here, keep
preserving the mash boundary. Sept for the number phases,
the solutes remash. As you can see, it's in
progress and there we go, we got it. Now it's working. We don't have that
problem anymore. From here, we can continue. Let me just fixed problem
that we got here with, we can just delete this pace. You can press Alt at the top, right here X delete it. We can select the
top and X deleted. Also here for the left side,
you can press X deleted. With this one selected, we can activate or we can
add the mirror Multifle let's work on this. We can continue
filling this space. Let me just drag these two
edges to the right side. Press O, you should not be
using the promotion Jule here. I'd like to press
E X to extrude. Here we can check
the clipping so that you can stop
right at the center. Press Control R that edge loop, can press F and
select this edge and press F to fill the
gaps. All right. I think we should
not let me just delete these faces here. Just leave this one here,
this part. That's enough. That's been done,
let me select Mimsh. We can do rice click
and Shade Smooth and we can touch walk on it. I'd like to switch
to the sculpt mode. We can press S so that
you can switch to the smooth brush
and we can start smoothing the details here. Not that much, but let me sch back can reduce
the strength down. But also here we
can use the blob so that you can
inflate the part. Let me just inflate
that section. Also here on the bottom,
we can press X delete, press L here, X delete. You should leave that
part empty or open. Can press Alt here
to grab that edge, can press O to activate the proportion edgele
and we can ski it up. But I'd actually scal it
without affecting the Z, Z axis, we can do can try S Z, and we can skit it like this. We can do the first time here, Shi D again ahi D, and we can scale up
for the second time. Let's see. Probably that's too much. We can press S
again to smooth out actually a so you can
smooth out that shape. That being done. Also here, let me smooth out this. We can press G that you
can use the grab and we can take the sport up. Because we're going to
be adding the belt, we need to have some space here. Let me check the back so the
back we have to smooth it, so we can press S and start
smoothing the top here. That's so much. Leverage
back, only the sport. We can press G so you
can grab and push up. On the edit mode, I'd
like to push out. Let me just get
rid of the mirror. Sending for the proportion
title and we can bring. Let me press N to
hide that panel. Here we can just push
these vertices outside. Let me just press O to activate the proportion tool and we
can push this part like this. We're just trying to see
which one's going to fit. Let me just better align
them. They need to be smooth. Something like that, and let me just bring
back the mirror. There you go. That looks
better. We can use this. For the back. From here, we can use some basic
brushes for the cloth. You can just scroll here
until you find grab cloth. What we can do here,
you can simply rack up. Let me just reverse back. I don't think we cannot do that. We can do that. Let
me just press one or actually control
one so that you can go back to check the back and we can zoom in and
try to push this part up. Something like
that, same in here. We need to give
it cloth filling. Yeah, we can drag it
from here, push up. You can see those nice
wrinkles that we got here. Same here for the front.
Let me just press one. You can push this part up. Probably we're going
to be doing that later with the sculpting. Here if we add, let me just
apply here the mirror. I prefer to keep a copy here. Let me just keep
this one as a copy. We might get back to it. I'm going to try let's move it to the right side,
can get back to this. Here we're going to be
applying the mirror and let's add the multi
resolution modifier. From here, we can subdivide
twice. Let's start. We can switch to
sculpt mode and we can start using those cloth brushes, starting with the grab tool. You can just push this one up. There we go. We got
those wrinkles. We got to do it here. But before we can do that, we have to smooth out this part. Let me just press S, and we can smooth out the geometry here. I don't like it. We can
increase the strength up something like that. Also you can grab
the parts outside. Can use the blob brush and
we can push these parts out. All right here for the top,
let me switch the datas mode. We can select this vertex and with the clipping
or actually, there is no we have no mirror
modifier applied right now. So you can do, you can just push it here or select them both. We can press M and
merge at the center. Here we can press S and
smooth out the top. You now it looks better. From here, what we can
do. Let me just go back to the wrinkles here, the drag cloth and
we can track up. That's so much, we
can track from here. Let me press one and we can reduce the strength way down
and let's take this one up. There we go. Actually, I
don't like this part here. It looks weird. Yeah, we don't
have good geometry here. Let me just delete delete
this phase Deletes. Let me go back. You can
go back here to the previous and you can
uncheck the clipping. You can just take
these vertices, so we don't have
the clipping here. Why we cannot move that? Let me just also unuse X merin. There we go. Double
G to slide that up. Here we can press
Control R to add some geometry at the top and
let me select these two. Press merge at the center,
here, I'm not sure. Let me just set both press M, merge at the center.
We can go with this. Let me just delete
this one here, can go back to this
pens shift D to duplicate drag to the right and we can apply
here the mirror. Let's add the multi
resolution modifier. You can subdivide it twice. Selected, switch to the
skus mode and we can press S here for the top,
you can smooth. It got that problem again. It's these two verses
press M merge at the center and I'd like
to use the cloth brush. This one here, the drag
and we can drag up. Also here, I'd like to activate
the X merin There we go. That looks good. But I advise you to not go
crazy with this cloth brush. You want to have some
clean animation later. For example, any part
that has the wrinkles, yes, you can add them.
But not everywhere. For example, here we have
to push this part outside. It doesn't make sense here. Let me just select this verse X, we can press O to activate
the proportion in the jewel and we
can push it out. That's good. A little bit of wrinkles here. Also, I prefer to reduce the
amount of the sculpt to one. We've got the major wrinkles
here for the front, the level of sculpting
here if you set it to one or two, the level matters. Here we set in it one. On going to have
those small details. We're going to be
sculpting big details. Here, let me just
take this part down. You can take it from the side. A little bit here at the top. No, we're going to be destroying
the geometry this way. Let me reduce the strength down, you cannot do anything here. Let me check the back here. There go. We got some basic
ring cons here. Looks good.
30. Finalizing The Character Assembling Clothes, Hair, And Accessories: This story I'd like to put all the elements
that we created. We got under shirt and pants together so that we can
finalize our cacture. Here, I'd like to switch
from the sculpt mode back to the object mode and you can press Old H. Let me
just activate here. The screen casks so old H, so that you can bring back
all the hidden parts. Or you can just do that manually by clicking on the eye here. Eye shot means that the
object is going to be hidden. If you make it open, you're going to be seeing
that object here. We got the pens, let me just
take it here to the right. We can press to give it the right side or
the right distance. We are moving it on the x axis. Let's give it here, for
example, three on the X. And let me select
here the ender shirt. For the ender inside the multi as we got the sculpt
mode set a tree, so we need to also set a level view port. C
just increase that up. That we can see all the details
that we sculpted earlier. After that, we can move
it to the right side. So here I think we
gave it 3 meters. Let's give it the same in here. 3 meters on the X axis. Now it's going to be
matching perfectly the pens. Position. After that, we
need to bring our character. The character clothing,
we use it for extracting those cloth masks. So I'm
going to just delete it. So let's press X and delete it. And this is our caracter main. On the bottom here
we have the pens. We kept it as a backup. I'm going to just delete
it X, delete that. We got the main, this mesh
here, it's the undershirt. Let me just rename it
so we can double click and let's call it undershirt. The other one is
going to be the pens, double click and
let's call it pants. All right. It's good to keep
everything organized here. For example, this one here is the front Front reference
image, front anatomy. And this one is
the side side at. All right. So here I'd
like to select Mcaomin. I'd like to duplicate
it because we're going to be making some changes. Shift D to duplicate this and we can move it tu meters
on the X axis here. Let me just press N to hide
that pen so now I got it. The next step it's
going to be to delete any parts that's going to
be headen by the cloth, by the end the shirt and the pen control space to
maximize this window. These parts here of the body, one's going to be
seeing them anyway. I'm going to just
delete them. Let me just select my character here, can switch the ddt mode,
switch to the Y frame. We can use the face mode, Alt A, to make sure that
everything is deselected and we can simply
drag down like this. You can press the
C and let's keep selecting all those faces. Even though for the foot, we're going to be
replacing it with boots. Load it in just a second. Let me just select
all these faces, and you can press
X and delete them. Press Z, switch the solid and let's double
check the geometry. All right so that's
good. So even for the breast section,
we can delete it. Let me try to delete this. X, delete those faces. We start having some gaps here. We need to be
careful, we'll just subverge back and
leave it as it is. For example, this X delete it. Compress to grab
that entire faces and you can press
X to delete them. All we got only the top part of our character
and it looks nice. You can see the character here. Next step is going to be to import all the
assets that we got. We got one for the hair. Let's jump to file.
You can click on a pen and you're going to find this in the resources. So the hair here. Let's double click on
it. We can jump to object and double
click on this mash. By doing that, you're going
to be importing the hair. Let me just press one to be
facing the front and we can drag the hair and put
it in its place here. You can press to scale
it up like this we can press three so that
you can switch through the side or
the right to graphic. Let's drag it up, scale it even up to make it fit the head. Let me press one to
be facing the front. I can drag this like this. Probably scale it a bit down, track up something like that. Now we got the hair of our
character, and it looks good. Next, we can add the eyes. For the eyes, let me just
switch the dis mode here. We can be on the edge mode, press old so that you
can grab this edge, Shift S and cursor to selected, and you can go back
through the objects mode. Shift A, go to mesh, and we can use UV sphere. Let me just to rise
click Set smooth. We can scale it way
down on the dis mode. Until it fits the shape of the aisle, we can
push it inside. Were the one's going to need the proportional editing
tal for now. Let's push it inside, we
can spend it on the X. X, let's spin it by 90, which is 90 degree and we can push it a little
bit to the left. After that, a little bit up. Probably a little bit
outside and what we can do, we can select our
mesh and we can start working on those vertices. We can push this part outside. Let me activate the
proportion dial and we can push it
outside like this. You can scroll the mouse. Same
thing here for the bottom. There you all, here it
can be pushed back. Here forward, and that's nice. Little bit forward here. There we on, we got the Is
we can try to take that up. Also for this triangle,
I'd like to fill it. Select these three vertices
and you can press F to fill it. There we go. Since we are not using
the mirror modifier, so we have to do it to
the other side too. Let me just select
these two reverses, press F to fill that gap. As a last step, you can select our I and we have
to duplicate it. Let me check my meshes. Control space, let me jump. We don't have any Mirror
modifier. Here is a trick. You can select first
face or our cacture. We can change the
cursor position from the I to the center point.
This is the center point. Shift S and cursor to select it. For the pivot point, let's switch it to
the T decursor. If we select the I,
if we duplicate it, so shift D to duplicate the I. Now I would like
to try to scale. We need to scale it on the X. And we can try minus one so that we can flip
it to the other side. You can see that
here at the top. Minus one, one, not 12. This we're going to be having
the eye on the other side. So there we go, we got the eyes. Let me add the eyelashes so
we can add eyelashes here. Here let me just fix this part here by
dragging it a little bit up. You can switch the pivot point back to the medium
points and we can drag this part up just a bit so that we can
have nice curvature. Nice. Next step is going to
be to add the eyelashes. Let's go to file, append, and let me just go back here. Just get rid of this, go back to the resources,
and we have the eyelashes. It's going to be in
the resources too, double click on it, object
and bring the eyelashes. These are the eyelashes.
Let me just press one. Should be facing the front.
We can hold G so that you can grab it and
let's put it here. Try to scale it way down. Actually, I'm going
to leave only one. W eyelashes selected, where
is it? Yeah, this one here? Let me just push it
forward on the dis mode, Alex delete the one on
the left, X deleted. Let's work on this one first. You can go to
objects such origin through the geometry so that you can grab it here from the
center. Let's put it here. Let me just press one to be
facing the front and we have to align it probably
scale it a little bit up, something like that. On the dis mode, you can press
Tab to switch it dis mode. Let me bring this part up. Something like that, we
can drag this one down. We have to match the same
eye curvature that we got here and we can keep
doing those alignments. Here probably we have
to push it outside. Let me just drag it out
on the outside like this. Let me select the entire
unit and push it here. Scroll the mouse. That's better. Now let's work on the bottom. Let me push it forward first, drag it to the right and align
these versus even better. Tack this one a little bit up. Same thing here. We can
bring that back like this. We got the eyelashes, probably we need to
track them to the left, scale down or actually we
can scale them on the Z. As Z, scale like this. Now it's time to duplicate them, so we're going to be
doing the same trick. The cursor is still
at the center. Let's switch the pivot point to the two dcursor and shift
D to duplicate eyelashes. Can try S X, and minus one. And you're going
to have that span on the other side
of the character. The last element that
I would like you to do or port is the boots. Let's go to file, append, and let me just go
back to my resources. We got the boots here.
Double click on the object, the boots. All right
let me press one. You got the boots at the center, you can hold G to grab it, spreat here, and we
can sketch way up. It's hard to sketch
because the pivot point is still at the dcursor
so let's switch it back to the median point and you can sce that up like this. Let's push it a
little bit down here. We can switch it aside, you can see the geometry,
reference image instead. We have to keep it here. Keep in mind that
this is a hell. Probably you can push
it a little bit down here because it's a big boot. Next, what we can do, you can select our mesh and
switch it at this mode, press all at the bottom, and we can activate
the proportion digital and we can
scale it inside. You can either scale it or delete it. You can
delete that part. Probably we have to
scale the boots. They look huge.
Scale it like that. Let me check can
compare it to the hell. I think it's acceptable.
We got that. You can push it a little
bit to the left here. Let's make sure that
we have no clapping. It got a little bit of clapping. On the dite mode, we can select this vertex and we can
push it to the right. At the top, you can press
old and we can scale that up down so that it's
going to fit better. Depends. Here we can push it
a little bit to the left. Just take your time with it, make sure that you
have no colpin. As a final step, I would
actually duplicate my boot to the other side. The cursor is still
at the center here. If it's not, you can just
select your mesh and select any vertex that we got on the middle and can press Shift
S and cursor to select it. Next, we can select our boot
Shift D to duplicate it. Let me check. Yeah,
we didn't do that. Shift D to duplicate
it, the piv points going to be the dcursor
and let's scale it. SX and minus one. Now we got it spawn
on the other side. We got our caracure. Here,
let me just reduce that view, the focal length view
from 100 to just half 50. Now it's good. You got
the main character. In the next coming
section, we're going to be adding the accessories
like the belt and here we're
going to be adding some arm bandages,
similar for the leg.
31. Unwrapping Character Skin: This new section,
I'm going to start the texturing process
of our catcher. We finish the modeling, we put
all the elements together. Now it's time to
start texturing. Before we can start, I'd like
to optimize my layout here, Compress control space to go back through the four layouts and we need to make
some adjustment to make the texturing easier. We want going to be
ding neither the front or the side of our
reference images. I'd like to switch the top
here to the shader editor so that we can control or add the materials of our character. On the bottom here, I'd
like to check the UVs, so we can switch it to the UV
editor so that we can keep an eye on the UV maps of all the elements
of our character. On the right here, I'm going to just
collapse this window, right click and join down. First, I'd like to
start with the skin. I'm going to be
selecting this part only here and what
I'd actually do, we can press the slash so
that you can highlight it only by switching to the local mode and we
can start working on it. If we switch through at this mode by pressing
Tab, if you press A, you're going to see
the UV map that we got here is
completely messed up, so we have to recreate it. Before we can do that, it's
time to apply the mirror or the multi resolution modifier because we don't want to
go low poly like this. But at the same time, we
don't want to go high poly. If you apply this
multi resolution, let me just show you that. We're going to be ending up
with extremely high poly mesh because with this amount of
polygons that we got here, our game is going
to be optimized, so we have to be careful here. I'm going to just reverse
back control Z so we got our motile as
modifier and what are do, I'd like to save two copies. The low poly copy, that's what we're going to be
using and the high poly. We're going to be using
the high poly to get all these details
and we're going to be making them as normal map. Don't worry about
that. We're going to be doing that later. For now, what I want you
to do is to do two copies. The first one here,
let me just call it main and we can add here high poly and I want
you to duplicate it. Shift D to duplicate this part, this piece of characture
and we can call it low poly. Low poly. Right now we're going to be
working only on the low poly. I'm going to just
hide the high poly and let's select low poly here. I would like to reduce this levview port to
something reasonable. I think one is going to be fine. You can see with one and
without. It's a big change. Same thing here for
the scope details, let me just set it to one
and we can apply this. Now if we switch data have reasonable amount of versus Es. As now it is some to start
unwrapping our character. Basically, unwrapping
means creating a better UV map
that we got here. It's going to be allowing us to texture our
character even better. This UV map we going
to be able to properly texture our character
here. We have to fix this. Let me start with the head. We can unwrap the head. I'd like to switch here
to the edge mode and, for example, can stop ratio. Let me just press
old. After that, we can press Control E
so that you can access this panel and we can
click on this Mark Sam. This we're going to be having this red line that we got here. By doing that, we
created a cut in the UV mapping process. After that, I like
to lay flat my head, what we can do, we can select, for example, the top
here, this edge, and we can create a cut all
the way till the end here. This is the back, can press
control and left click. But we didn't have that's good. What we can do, let
me just serverg pack. We can go part by part. Let me just press Control here. We can continue around the head here until we reach the end. Let's continue like this till we reach this position or
actually not that one here. We got that loop, we can press so that we can show
you what we're doing. We created a cut for the
neck and a cut that's going to take from
the forehead all the way to the back of the neck. After that, we can
press Control E, and let's mark another seam. The final scene that
I'd actually do, I'd actually add it
here for the chin. What I'd like to do,
I'm going to be left clicking here and press Control, tell the lip and we
can press Control E, and let's mark another seam. I check this out, if we
press L to grab the head, so the SIM is going to be preventing us from
selecting everything, but you need to be
on the face mode. If you press U N and wrap, you can use the minimum stretch. As you can see, our
head is going to be laid flat in the UV map. This way, we're going
to be perfectly able to texture our character
or the head, at least. Let's go ahead and
do the same thing through the rest of the body. I'd like to hide the head here. We can press H to hide it, and let's continue
with the body here. Let me just get rid
of the hands first. We can press old right here. Let me try to even if we check the XM we're going to be able to duplicate this
selection, but that's fine. We get that here and let's add the seam on the other side. Shift old and left
collect right here. You can press Control E, and
let's mark those two seams. Right now, let me just select the torso and you can press H to hide it so that you can
focus only on the hands. For the hands, the best way to unwrap them is to cut
them into two parts. We need to have the top
and the bar separated. To do that, we can press Alt, for example, here, or little
bit down. There we go. This we're going to be having
that edge shaking from here all the way through the
fingers to the other side. From here we can press
Control E and let's mark C. So that's perfect. Let's do the same thing
through the other hand. You can press right here, Control E, and mark C. Right now, if we select
both hands and if we press U, unwrap minimum stretch. This we're going to be
enwrapping our hands perfectly like this and
we have four pieces. So, the bottom, the
top of the bottom. All right let me just press Alt H to bring back
all the hidden parts. Now it's time to texture
only the middle. I'm going to press Alt H
to the selects everything. Let me select only
the torso section. You can press L to select it, you can see the UV mapping that we got, which
is really bad. I'm going to press
Control and I. This way we're going to be
reversing the selection, I as inverse and we can
press H to hide the rest. Now we got only this part here. What we can do, we can
cut it into two parts. Let me just press here. Do the same thing
on the other side, Control E, and let's
mark those two seams. Now if we select this
part by pressing A, we press U and wrap
minimum stretch, you can end up with
this even though it's a little bit stretched. Let me just see this
is the next section. It's perfect. We
can go with this. We don't have any
stretching whatsoever, so that's good. What
we can do right now. We can press old H to bring back all the hidden parts and what we can do with
everything selected, we can press you wrap
a minimum stretch. There we have it so that
everything is clean and perfect. But I'd like to do some
optimizing for the maps here. Let me just press control space. The head is the most important
thing in our character. We have to give it a big map. So that's the reason why we're
doing this is because we want to have high quality
texture for the head. Let me just select
the hands here. We can push them
sideways for now. Let me just uncheck
the proportion in le and we can select the head
and actually scale it up. That's a little bit too much. We should not be having
any clapping here, for example, yeah, we're good. Let me just drag it down here and let's figure out
a way to put the hands. Let me select this
one, put it here. Select the second hand
by person L and press G so that you can
grab it and move it and you can put it,
for example, here. Alt A to disecx everything,
you can select these two. Let me just put them here,
we can scale them down. Alt A L to grab that part. Let's put this one
here for this one, let me just find it spots
it's a little bit Yeah, I think this is
the best position for the second part of the hand. Here we can just play a
little bit with this map. You can scale that
hand, just a bit up. There we go. We can do the same thing here. Let
me just scale this one. Can put it here and let
me take this one and push it up. Here
we have a problem. We are outside the boundaries of the map one is going to be good. We should not be going outside the boundary of the
maps so what we can do. Let me just press R to spin it around and we can drag
it down. There we go. We got it. Let me check here if we are outside
the boundaries. No, we are good, controw space. Basically we got it, so we got the skin of our
character unwrapped. In the next time lecture, we're going to
start texturing it.
32. Texturing Character Skin: In this story, we're
going to be texturing the skin of our character. To do that, we're going
to be using a texture. Let me just show you this
one here, the head skin. You're going to find
this in the resources, so just download it
and let's work on it. First, I'd like to do we
can maximize a little bit this window like this on the bottom or actually
on the bottom, but here we can switch
from the oblate mode to the texture faint. Now it's pink because we don't
have any material applied. Here, what we can do,
we can add a new Image. Shift A, let's search for Image. Check, sir. Let me just put it here and you can connect the colors to the base
color and after that, we can click on you
call for example, this image capture skin. For the width and height, let me just select them both. We can do left click
and drag down. Let me just press the right row on the keyboard and we
can multiply it by four. I want to have a four K
image reference or texture. Let's just click on you. Now it's completely black
because this texture that we created is black.
Let me just show you. If we take this one
all the way to white, if you press F to decrease
the size of the brush. If you start painting,
you're going to be seeing that you can see the
amount of detail that we got here is completely
good. It's not sexeltd. Let me just press
Control Z to verge pack and let's start painting. Our Texer. I'd like
to bring it here. Here at the top inside
the Texaor tab, you can click on it and let's
add new can click on you. By doing that,
you're going to be seeing the texture
properties on the bottom. Click on it and let's load
that image so we can click on open, headscan that texture. The click. So now
we have it loaded. In order to see it here, what we can do, we can
jump. Let me just find it. Texer instead of going to be changing the mapping from the viewplane to the stencil. Now we're going to be
seeing that image here. If you want to move
it, you can do right click on the image and you can
drag it anywhere you want. If you want to scale
it, you can press shift and right click
to scale it way down or scale it up based on the size of your cacture. Here I
would like to zoom in. We can press Z and
let me just switch to the meter preview so that we can see our character
even better, can see the definitions of it. We just press Shift and scale that up and we can put it here. Let's start with the I here. Let scale it a little bit up. You might want to
spin it just a bit. We can press Control, right click to spin it
down just a bit like this. Get it even up until the I
matches the reference image. Something like that.
Also here I want to check the marine so
that if we paint here, we're going to be seeing
that on the other side. Make sure that
marine is checked, and the final step is
going to be the color. The color needs to
be completely white. Otherwise, one's going to work. If you, for example,
make it red, you can be painting with
red. Check this out. You can painting with red. We don't want that, so
let me just control Z to g let's make the first color
completely white like this and also for the saturation,
let's set it to zero. For the value, let's
skip it to one. The use to zero. After that, we can press
F to increase the size of the brush and we can
start painting like this. By doing that, we're going to be painting the skin of our
character like this. Let me just press
one. Actually, we lost lost the measurements,
but that's fine. We can redo that and we can take it a little
bit up like this, cover a little bit of the nose. We can cover the maximum.
I can even go down. After that, we can
work on other areas. As you can see the
nose doesn't fit this, so we have to do, can
just change its position. Actually, we can go to the
bottom here and let me just place the hole here that
we got exactly right here. We can press control
to spin it around. You can press shift
to skit it up. Something like this,
a little bit spinach, a little bit like this and
we can start painting. Let me just press F to decrease
the size of the brush, and we can start
painting the nose. There we go. That is
perfect. We can spin around. Let me check here. We have to increase the size
a little bit up. Press F to decrease the size. We made a mistake
here. Let me just redo that for the
top of the nose, Let me just press after increase the size of the brush and we can collect here. We got it. A little bit here on the
side, press right click. Can repaint that. Same
thing here at the bottom. Or it's enough for the
mouth. You got the nose. This part looks stretched
so you can repaint it. Let me just take a look. That looks great.
Now for the mouth, we can press one to be
facing the front and let me place the lips on top
of the character lips. Something like this
can scale that up and we can start painting. There we go. We got the lips. We can just paint the chin, a little bit of the chin here and let me just double
check my aracure. So far, it looks really good. A little bit here on the eye, so it's dark, so we have
to fix that problem. Let me just spin around, can place this one right here and
we can repaint this area. All right. Actually we messed up that we have contrast here.
Let me just converge back. I'm going to just
leave it as it is. Here it has to do with the
shading or the lighting. If, let me just
switch the solid, you're going to see
a different pace. We are on the right
track. Let me just press, go back through the
material preview, and you can continue
here with the cheeks. C press Control, scale that part down, scale it even down. You can spin it around and
let me paint this area. Here for the top, we need to cover a little
bit of the hair. Let me just start painting here to cover the
hair part like this. Don't worry about this part too much because later
we're going to be adding the hair
to our character. Here a little bit for the ears. Let me just place this
one correctly like this and we can paint
here for the ears. Or you can spin around and we can texture
the back of the ears. Also here we can press Shift
and race click to scale that up and we can start
painting the hair. A little bit up.
Just take your time with it. Jet something good. We can go to the side here
and repaint that area. Let me skit it up so that
you can pick our angle. Go to the side and
let's repaint that. The back of the head looks
a little bit messed up, but like I said,
we're going to be covering it with actual hair. Here for the bottom, the neck
and the bottom of the chin, let me just scale
this part down, can zoom in, and we can
paint the bottom like this. A little bit here on the side. Let's continue to cover
the breast section. Let me press control
space to maximize this window and we can
work on it even better. Let me just keep painting
that skin details. Same thing here for the arms. We can press control
to spin it around. Because we don't want
to have any details, any face details on the arms, can take that down here and continue painting
all the details. All right on the bottom, so it's a little
bit lacking because the texture is four K, I guess. Here for the fingers, you have to make sure
to not miss any parts. You can see if we
switch the view here, cannot be seen that we
have some dark spots. Let's continue
painting on the arms. A little bit here and the
neck, the back of the neck. All right, so there
we go. We got it. We have to work a little
bit here on the ears. Let me just fix
these areas we can press after reduce
the size of the brush and let me fix this All right, so we
got it. Here, let me just repaint
this entire part. We got some contrast, let
me just try to fix it. There we have it. Here, let
me just fix that problem. This is a trick. You can just keep working on it this way. Here, let me just recover the
hair section at the bottom. By doing that, we're
going to be ending up with our character. Let me just press the
slash so that you can exit the local space and you can see the details here.
It looks really nice. We are on the right
track through text screen our full character. As a last step, you have to save that image that we
created, so consort space. Let me go back.
This Cacure scan. If you don't save it's
going to be a last. This caracter scan. This is how we're texturing
our caracter. You can just click on
image and save as, and you can save it anywhere
you want as caracter scan. Now it's saved.
You can also go to File extra data and you
can pack the resources. This way, you're
going to be saving it to your blender file. Is going to be a last.
33. Texturing Undershirt: Next step is going
to be to texture the undershirt of our character. Let me just select it first and we can add a
new material to it. Inside the shader editor, we can scroll up and here
Idle to click on you and let's call this new
material undershirt. All we got the material. The first step is going
to be to bring a texture. We're going to be
painting or using a texture to texture
our undershirt. This one right here,
this dirty undershirt, you're going to find
it in the resources and simply drag it
and drop it here. I'd like to connect the color to the base color or we got it, so we're not able to see it
because the UVs are not set. If we search at this
mode by pressing Tab, if we select everything, let me check the UVs. We can switch
through another map, for example, this dirty image. This dirt undershirt. We one's going to be able to see the UV, so we have to unwrap it. In order to unwrap it,
let me just select press slash so that you can
switch to the local space. So, in order to properly
texture our undershirt, we're going to need
to add UV seams that match the real
undershirts stitching. In most undershirts, the seams
are typically on the side, right here, and also on the top. For example, here we can select this edge that we
got right here. Let me just press Alt
and etc Q selects it. And we can also
select the top like this and we can do the same
thing through the other side. The press shift old. After that, we can press
Control E and we can click on Mark C, the next step, we can press A to
select everything, the entire mesh,
and we can press U wrap a minimum stretch. By doing that, we're going to be unwrapping our undershirt. This way we can
see that texture. But the problem is that
this texture is small, it looks low quality. So what we need to do,
we need to scale it up. To scale it up, we're
going to be using two additional nodes
connected to this texture. So you can press Control and
T with this one selected. So this we're going to
be adding the mapping and the texture
coordinates automatically. But in order for the
shortcut to work, you have to be enabling
the node wranglar. You can jump here to edit
preferences and inside add ons, you can just search for
node wrangularT node ratio, so make sure that it's checked. This we're going to
be having access to those shortcuts
like the Control T. From here, we can
increase the scale of our undershirt texture. I'd like to increase
it to four here. You can see that now
it looks better. You can also try
to spin it around. Let me just spin the Z. We can give it 45 degrees. There we are. The
last step to do, I'd like to add some
dirt to our undershot. I don't want to
keep it like this. I want to improve it
a little bit better. For that, we're going to
be using the ambient to collusion node. Let me show you. Shift A, we can search
for ambient occlusion, this node here to
show you this node, how it works, we can disconnect our texture front just now, can get back to this later, let me work on the ambient
to collusion node. First, adecu connect
it to shift A, can add curram so that
we can control it. Let me just press control
space to maximize the shader editor and we can work on these
here at the top. We got the invinci collusion
and the color ran. I connect the color
through the factor here and the color to
the base color here. After that, I'd like to feed this invinti collusion texture, so it's going to be the noise. Shift A search for
noise texture. This one right here
and after that, we can connect the
factor of the noise sextorth the distance
of the bench occlusion, not just through the
color but this distance. Now let me just press
control space so that we can see the fact here, so we're not seeing anything. Let me try to tweak
the color ramp. You can track the black
handle to the right side. You can see that we are adding some dirt on
top of those wrinkles. Let me just check it
even further like this. It's for the color, we can
just reduce its color here. I should not be completely dark. You can give it some dirt color. The last step is
going to be to fill the white surfaces with our
texture that we created here. To do that, we're
going to be mixing between these two nodes. Shift A let's search for mixed
RGB or this mixed color, and we can drop it here. The first slot, we're using
our image exclusion mask. For the sacking, we can
use our undershirt. We can tweak the mixing type
Alex switches from mix to let's use the
multiply and we can take this factor value
all the way to one. This we're going to be
mixing between dirt and that undercharge mask or
texture that we created. Or it's an to tweak
the other channels, so let's tweak the roughness. Here we can press control space. Let me just organize
this even better. On the bottom, we have our
texture and on the top, we have invent collusion,
which is the dirt. You can just put them like this. So after that, I like to
work on the roughness. We can press Shift A and let's search for
color amp again. Let's put it here and we can take the results
of the multiply, which is the mixer, and you
can connect it to the factor. Same thing here, we can
connect it to the roughness. Let me press control space
to go back and let's tweak these handles to
achieve better results. Now it's glosses,
makes no sense. I like to drag the
white handle a little bit to the right,
something like this. All right, but probably
that's a little bit too much, can just drag it even to the left side to
make it less glass. Last thing is going
to be the bumps, shifts at bump node, and we can connect
the results again to the height slot and the
normal to the normal. Let me reduce the strength
down to something like 0.25. Now we got those bumps.
Can see that here. Also as a way of cheating, we're going to be increasing
the metallic value. I found that this value here makes the undershirt
looks really nice. Increase it up, can see
the difference here. I makes our undershirt
looks even better. I really like this effect. Probably reduce it down
to something like 0.75, but with the metallic, the undershirt looks better. Basically we got it,
we got our undershirt. We can just press the
slash so you can exit the local space and we got the skin and undershirt
of our character.
34. Texturing Pants Jeans: This story, we're
going to be texturing the pens of our character
and for the pens, we have some flexibility here. What I did first is
I did research on pen textur and you can see you're going to find
plenty of texturs here. You can just choose
the one that you like. The same process applies through all the genes or all
the pen texturs. In my case, I'm going
to be using two taxors. We got here the genes
and the utility pens. You can just choose which
one you want to go with. After that, let's
get down to it. I'd like to start
with the genes first. This is our character here. First step it's going
to be to select the pens here and I'd like
to create a new material. Can scroll up here and the new material and
you can call it pants. Let me just find
those two nodes. If you can find
it, if it's lost, for example, here,
if it's hidden, you can press A to select all the nodes and you can
press period on the numpad. This we can be resetting the Zoom in the
Shader Editor next, I'd like to add an image texter. We're going to be
doing the same process we did previously with the skin. We're going to be adding
a Texer here and we're going to paint on that image. Shift A let's search for image, exer and I'd like to connect the color to the base color and
let's click on you. Here we can call it exer pens. Down below, we can increase the width and
the height to four. Let me just track
down by left clicking and drag and we can add
the multiply sign by 44k pen sexor let's click
on image. Now we got it. The next step is going to be
to work on our pen sexor. We have to load whether
it's going to be the genes or utility pens. In my case, I'm going
to be using the genes. With our pen selected, we can switch from the objects
mode to the texto pine. I'd like to hide the
rest of my capture so we can press the slash
again so you can jump to the local space and
we can switch from the object to the texto if you scroll
down here to the right, you can be finding this
texter properties, we can click on you and
let's open that texter. Going to find it
here. This one here, the genes texture,
double click on it. Now it is loaded, let's go
ahead and start painting here. At the top, let
me just scroll up actually on the
second panel here. Let me just find texture and
it's already loaded here. For the mapping,
I would actually change its type
from the viewplane to the stencil so that you
can see our gene here. Now we can start painting and it's going to be
displayed on the genes. But also, we need
to make sure that the meroin is enabled. Let me just check that on the X here, and now we are good. We can press one. We just
press one to be able to paint here and
we can scale up. Basically, the scan is by
pressing shift and Right click. Let me check the
color so the color needs to be completely
white here, completely white, and
let's start painting. So I'm not seeing anything. Missing new visa, we
forgot to unwrap our pens, so that's important thing. Let me just go back
to the objex mode with our pens selected, we can switch the edit mode. We can press Alt
on the edge here. Let me just press supersed solid so you can
see our unwrapping. We can do the same
git side Shiftt left click and we can do
that on the inside too. Shiftlt and click here. These are the cuts that we
have actual in the pens. In every pens, we have cuts from the side and cuts from
the inside like this. And press Control E and let's mark Sam and we can press
A to grab the entire pens, press U, wrap and
minimum stretch. Now we got the textured here. Now if we switch
to the text paint, we're going to be able
to paint on our jeans. Let me just start
here from the middle. We can start painting,
there we go. Now we are able to paint. Probably, let me just fix that. Press one, drag this one
through the left side, we can spin it around and
we can start from here. But at this location, I don't
think we're going to be ing the X Marin at the center point. Let me just texture this here. Take it a little
bit to the right and let's texture out like this. After that, we can activate the X meriin and we can
drag the texture here, can press F to
increase its size, and let's start painting. All right let me take a
look at our progress. Probably we have to
scale up the texture to cover the pockets just retexor like this and we
can start taking down. I have some lagging because I'm recording and at the same time, I'm working on a four k texture. Here for the side, we
can use the seam here. It's important to use this
seam that we got here. Let me just scale down the
texter heck right click. Can press Control
to spin it around a little bit. And we
can start painting. Let me just press F to reduce
the size of the brush, and we can start
painting that side, press F to reduce it even down, and we can continue painting
all the way to the top. Can press F to reduce size. Let me just take a look at that. Good. I got the seam here
and it looks perfect. Same thing here on the inside. I'd like to put the other
seam, which is this one. I can press control to
spin it around just a bit. C press F to
increase the size of the brush and we can start
painting once again. Okay, a little bit here on the inside. All right. So we got the front, but here
it doesn't look that good. Let me just redo that. Can press F to increase
the size of the brush, and we can start. Let me check. We can reduce the size
of it a little bit. There you go. So
that looks better. Now let's work on the
back for caracter. We need to add these pockets. Just scale this
one down like this and Let me paint those pockets. Can scale up the texture. M. Here at the center, we can add this seam. Let me just paint
with that seam. Actually, you should not
go all the way to the top, you can stop right
here. Let me check. Probably we have to
scale up the pockets, the back pockets,
something like this. All right. We got those pockets. But at the back,
they look stretched. Let me just fix that here.
All right, so we got it. You can reach these
portions. That's great. Here for the side, let me
just grab the right place. Can use this one
here, for example. Let's fix the belt first. And we can continue painting
one step at a time. There we go. We've got that. Let me just go back
here to WH mode, can press D, search the preview, and let's take a look at it. You can fix this problem here. Let me just switch
to the text or paint and we can collect here. No, actually, that's
not the right way. We have to find similar
spots. This is the back. Obviously, we have to
use place from this. Smeting on the inside here, let me just re texture that. Basically, we got it.
This is the genes. You can do the same
thing for the A texter, which is the utility pants. But here, I like to work on it. I like to work on this
material even better so you can make sure that
we are in the met preview. First, I'd like
to add the coram. Shift A serve for
carmak the roughness. You can bring this
one to the side and let's connect the colors to the factor here and the
colors to the roughness. I'd like to weak
the roughness here, we can drag these two
handles and play with them. There we go. That
looks interesting. But I don't like
this shininess here. You can just take
the black handle and we can make it less black. There we go. Now it's less shiny and final step
is going to be to add bump. Shift A, search for
bump no and we can connect our pants are to the height and the
normal to the normal. For the strength, we can reduce
it down to something like 0.25 or even down 0.15. Basically, we got
our undershirt, let me just press the slash
so you can bring back all the hidden parts
and we got the genes. You can also try to increase
the metallic value. Let me just show you control
space with it selected. At the top here, we can take the metallic all
the way to 0.75. Let me just take it
up on the way to one. This way, it looks better.
35. Texturing Pants Utility: All right we got
the first example which is the genes pants. I'd like to do next
is to duplicate this and create
the Utility pants. Shift D to duplicate
our pants here, can track them to the right side and I'd to create a
new material here. At the top, let me just I'm going to just get rid
of this material here. Pens, we can double clic N, let me call this one
gens I'd like you to delete it for the second pens and we can add a new material. It's going to be pens,
underscore, utility. Now we're going to be
using the second taxer, this one right here. What like do, I'd like you to
simply drag it and drop it in the shader editor like this. I can connect the color
to the base color. From here, all we have
to do is to fix the UVs. On the bottom here, I'd
like to switch this dug in the short to our pens. The pencils we are using here. This one and on the edit mode. I prefer to better wrap them because they are not that
good related to the texture. What we can do, let me just
select the front face, this one, right here, and
we can press U and wrap. We got that angle based. From here, I'm going
to be skiing it, so let's ski it down like
this. But you know what? We can do another trick. I'd like to separate
this from the middle. What we can do, we can switch
back to the edge mode. You can press old here. Let me just switch to R frame to make sure that we are
selecting everything. On to select that entire edge, and you can press Control E and mark C. From there we can do, we can select this
portion, press, as it's already unwrapped, can press U and
wrap angle based. Now it's complete
stretch after that, which we can do, we can
track it and put it here. This is the pocket. We have the packet here. Let
me just put it here. To see our material, we can press and switch
the mary preview. As you can see, it's a
little bit difficult to edit the UV map with geometry
on so we can do, we can scroll at the
top and I want you to uncheck this overlays. This way we're going to
be seeing the geometry on the left side and we can
freely tweak the map the Up. Also for the roughness,
we can check it all the way to
one so you can keep an eye is going to be
distracted by the shininess. In here, I'd like
to spin this one around and it a little
bit to the side. We got the pens
here, the packets. We can sketch a little bit
on the X and we can move it. Let me move it a
little bit here. There we go, we got
that. Next, let me select the other unit, press. Let me just go back
to the overlays. Can select this one by
pressing L, press U, and wrap and angle based.
We can do the same thing. Let me just drag it
to the side here, can press R to spin it around. Something like that. Now
we got the other side. Next, we can tweak the back. Let me just press L here. You can press to select
them both, press U, and wrap them based
on that angle based, let me find the back. The back is here. Let me
just drag this one here. Also, feel free to use the proportion editing
tool can activate it. For example, you can
straighten that up. Press s at the bottom and
drag it to the right. Same thing here. Let's
not leave that out. Can just push it inside. All we got that, let me
just select the other part. They are both in the same
position, which is perfect. No. Got the other one here and
it's at the back here too. We're trying to match the same proportions that
we got here with the UV. Or let me press at the bottom
and drag it to the left. Here, take a look. If you want to fix this problem, for example, at the middle, let me just select we
have to find it first. Can we just press to
select them both. I'd like to disable
the overlays. Let me find this position
here at this point. I think it's this one here. Yep. Actually,
it's not this one, but the other map can just
drag it actually the left. By doing that, we're going to be getting rid of that edge. Basically, we got our utility
pens we can do from here, we can tweak it by
adding the normal map. Shift search for bump, bump node, and we connect the color to the height and the
normal to the normal. You can reduce the strength
down to something like 0.25. Or 0.35 and after that, we can add the roughness. Shift let's add culeamp
to tweak the roughness. Let me just take it here
because I don't want it to be on top of these lines. Let's just connect the cut to the factor and the cut
here to the roughness. We can tweak these
handles We like this. Here we can take the black
and make it less black. Basically, we got it, so we got the jeans and we got
the utility pans. Pick what you want.
36. Lighting Your 3D Character For A Professional Render: So our three D character
is fully textured right now and it's
time to make it shine. So to probably showcase
the final results, we're going to be setting
up a quick license setup in the render or
the IV render mode. So good lighting enhance
the details, the materials, and the overall presentation, making our character
look more polished and professional. So
let's get down to it. The first step is going to be
to change the render mode. I'd like to be using the
IV so we can jump to the render properties
and make sure that the render
engine is set to EV. After that, we can press Z
and switch to render mode. As you can see the
lighting is really bad, it's completely dark, so
we have to improve it. Here at the bottom, I'd
actually split my scene layout up like this and we can switch the bottom to
the shader editor. Now we also going to be
tweaking the materials, but instead we're
going to be tweaking the overall lighting
or the word lighting. You can switch the shader
type from object to the word. Here going to be
having the background connected to the
material output. This is the background,
you can tweak it to change the word lighting. But instead of line
on this background, we're going to be
using sky node. Shift A, let's search
for sky tuxur node, this one right here
and we can connect the color to the color.
We have the sky lighting. We can tweak it settings
here or the next I'd like to reduce the
strength of this sky texture. Here we can set it to
something like 0.2. We need to have just subtle
lighting here, not much. A I'd like to hide
my background here. I don't want to see it. In
the rendered properties, you can scroll down
to find the film, and here you can check
the transparent. Just so that we can focus
only on our character here. After that, it's time
to add some light. We can press Shift A and I'd actually use these spotlights. Let's add the first one.
Let me just drag it up. To the side and we can point
it toward our cacture. Can press R Y, and we
can point it like this. Probably, let me just
move it forward. Press RZ, and let's spin
it toward our cactu. In order to adjust its strength, we can jump here to
this object properties and we can increase
the power here to let's say 1,000 or actually
1,000 Jomar 500 watts. We got that. We are
showcasing our caracter from the side. Something like this. After that, we can press
Shift D to duplicate that lamp and I would like to have some lighting
from the background, from the back of our character,
something like this. You can also tweak the
color of these lamps. Here we can give
it, for example, warm color, give
it warm or bluish. I'm going to just go with
the warm color here. Basically, we cut it so we got
quick lighting setup here. You can add the camera so that you can point it
toward our cash. Shift A, let's add camera and we can switch the camera
view by pressing zero. So we have to reset the
position of the camera. If you like, for
example, this side, we can press Control
and just reverse back. Control Alt and zero. This way you're going to
be pointing the camera at the exact same view that
we are seeing here. Basically, that's it. This is the quick lighting setup for
showcasing our character.
37. Add Skin Dirt: Make our character
look more realistic, we're going to be adding dirt and grime to our
character's skin. As you know, this
Larcraft character is an adventure and it can
be cleaned for too long. You can see that in
the reference image. We got some dirt here on the arms and on the
skin of our character. We're going to be using
procedural texturing in render by combining the noise texture and
invent collusion. Can create a natural dynamic
dirt effect for the skin. This approach gives
us flexibility compared to painting
the dirt manually. For example, this layer of
dirt is easy to work with. If you don't want it, you
can just remove it easily. So let's go ahead and add
the dirt to our skin. The first step to
improve realism of our skin is to add the
subsurface scattering. This effect allows the light to penetrate the
surface of our skin, making it look more
natural and lifelong. I prefer to work on
the render mouse. You can press Z and so
we should render it here and you can see the
skin how it looks like. It looks like a doll, doesn't
look realistic at all. We can select our skin here and we can jump through
the skin material. If we check the principle PSDF you're going to find
this subsurface. Expand it and down below, we're going to have to re value. The first value controls
the red scattering. So here we have the
green and the blue. In our case, we're going
to be using the red. Let me just increase
that in my settings. I prefer to set it to five and we can increase the weight
all the way to one. You can see the change here
that we got in our character. Now the skin looks
much more that. You can see the
differential, this is without and this is with. This effect is really good. It makes the lighting
penetrates the skin. Let me show you an example here. We can add a light right here. Shift A can go to light. Let me add a point and we
can put it below the hand. Let me just put it in the
right place. There we go. You can see how the sub
scaring here works. It mimic real life skin, as you can see here in
this real reference image. So now for the first
layer of the dirt, I'd like to select my skin here. Let me just scroll back. We got our calculus
skin texture. Let me just maximize our shaded editor so that
you can see the nodes. I'd like first to
start by adding the ambient seclusion notes. Shift A and search for
ambient occlusion. This one right here. Let me just put it
at the you feed this distance noise taxa
so you can just simply drag like this and let's
add noise texture. First one right here, connection is from the factor. Let me just expand
this a little bit so you can see the roughness
and on the other side, we can and on the right side, we can connect the
color to color ramp so that we can have control. This one right here,
the color ramp. Let me go ahead and connect this cutter to the base color. Be overriding this texture, but we're going to
get back to it later. We're going to be doing
the mixing between our character skin and
this ambient coll effect. But first, we have
to set it right. I'd like to drag
this black handle to the right side. Let's see. This is the fact
that we're having, we're adding dirt in those
dark areas of our character, below the eyes, below
the chain here, in the ears, that's
going to be good. But we have to tweak a little
bit this noise texture. I'd like to increase the scale up so you can see the change that we
got here on the bottom. I want to have some
noisy details. It's increase the scale
to 25 and for the detail, we can increase it up. Let's give it, for example,
ten and for the roughness, you can just keep it as 0.5. After that, I would
actually change this black handle color. This one right here. I'd like to give it
a different color. I did research to
find the right color. I'm going to be
using this one here. This X code, d29 985, let me just copy it from here. You just use the same
code and let me go back to the card rep. You
can select this handle. Let me just click
here and we can switch or click on
this x on the bottom. Let me just click
the lats and we can replace it with our x code. Let me just press
Enter and we got it we got that scan over there. That's the first
layer of details. Can see that on the bottom here. We can even make it a little
bit darker if you want. Let me just make it
a little bit dark. Just a bit like that. Now let's go ahead and mix
between because we can't see the final results unless you mix it
with this taxo. You can press Shift
A and let's search for this mix color and I'd like to drop it on top of this line like this
and for the bottom, we have the A, which
is Abn seclusion. For the B, we're
going to be using our caracter skin taxo. Let me just connect
it straight to the B. For the mixing type, I'm going to be using
the multiplier. I'll be multiplying both values and we can take the factor
all the way to one. You can see the change that we got here. It looks really nice. A ben seclusion on its own, its giving us good results, but if we mix it with
our cacture skin, you can see how it
looks like right now. Let me show you without
this ebentoeclusion. If you connect our
character skin directly to the base color, so we are removing the ambient seclusion layer.
But let me just keep it. You can see the different
series adding a little bit of dirt or darkness in
those dark areas. But here I prefer to
stick to that skin color. No need to make it dark. Let's keep it like
this. The next step is going to be to add dirt here. Let me just we can
press Shift A. Let's search for noise texter, this one right here, and we can mix it with the final
result that we got here. We can mix it with
this mixer here. Shift A, actually, I'm going to just
duplicate this one here. Let me select Shift D to duplicate and we can put
it on this line again. For the B value, we're
going to be using our noise texor like this. But we need to add the cor ramp so that we can control
this noise texor. Shift A, let's
search for cuoramp. Can drop it here. After that, I'd like to tighten
up these handles so that we can get
those puddles, those skin puddles like this. We can also try to increase the scale up. Let
me increase it up. But here it looks a
little bit weird. I'd like to change the way we are projecting
this noise textar. This texter selects,
we can press Control T. This way we're going to be adding the mapping and
the textar coordinates. Make sure that the nod wrangular is enabled to have
this shortcut, the node wrangular,
this node right here. Instead of using the generated, I'd like to go with the objects. Here we can have even puddles. The shape of them,
something like that, and here for the scale, I'd like to increase the
scale a little bit up, something around eight
and for the details, we can increase the details. I don't want to
have smooth edges, so we can take the details
up, something like this. Finally, for these handles, let me just tweak
them even better. Can take this one like this. I prefer to change this
color here. Let's give it. We can use that same skin color here and we can make it dirtier. There we go. Now we got some reasonable dirt should
not be completely black, something like this
and there you have it, we finished adding
dirt to our skin.
38. Baking Character Textures: You spot the difference
between these two characters. At first glance, they look
pretty much the same, but there is a huge
difference under the hood. This one on the left has
over half million vertices, while this one on the right
has only 16,000 vertices, which is less than 3% of
the high poly character. This one on the left is too
heavy to handle for rigging, for animation, exporting to game engines. It's
not optimized. Can't export it, it works
only here in blender. While this one on the right
can be easily exported to any TD software or game engines and will run completely smooth. This one here on the left
relies on multiple materials. You can see that with
complex node setups which only work inside blender. For example, this
dirt node setup we're using in Blender is only
understood by blender. Game engines like
Unity or NRL Engine, or even other three
software like Maya or TDS Max won't support
these psidal materials, the way we put them
here in blender. Meanwhile, the one on the right uses a single baked texture, making the character compatible with any other three softwares, including so how do we
achieve this transformation? The answer is baking. I like to think of
baking as packing, packing the high poly
details into low poly model, baking the complex node
materials into single taxor. This process makes the
model much more lighter, efficient and easier
to work with, especially for game engine. Take, for example,
our undershirt wrinkles that we got you. The left model, the wrinkles
are real sculpted geometry. But on the right side, they
are just a normal map effect. The actual geometry is flat. You can see that if we
switch to the solid mode. The normal map
creates the illusion of depth without
adding extra polygons, making the model much more lighter for animation
and game engines. The first step in the bacon
process is going to be to generate a low poly
version of our character. I'd like to do here, I'd
like to press and let's switch at the solid and we
can select our character. We're going to be extracting the low poly version
from the high poly. Let me just select all the
elements that we got here. The boot is already optimized
one's going to need it, just the skin, the
shirt, and the pants. You can press Shift
D to duplicate them, and we can move them
to the right side here. Let's work on them. First we got the skin,
let me just select it. I'm going to just
get rid of this Multi resolution modifier from now and we can press
the edit so that you can switch Edit mode,
and this is what we got. So far, we got 31,000 vertices, which I believe, which I believe a little bit
Truma we can do. We can press Control E, and we can click on
this and Subdivide. Just keep it to two here. As you can see, we
reduce it down to 8,000. I think 8,000 is reasonable for the skin because the skin is really essential
for our character. You can take it one step ahead, so you can press again, Control E and sub
Divo once again, but we're going to start
losing the details here. Our characters
start to look bad. I'm going to just reverte
back and keep it here. Let's keep it like this. The next step is
going to be to check, let me check my undershirt. I'm going to just get rid of this multi resolution modifier. But I think we s
too much details, then you just refer Control Z, and you can just bump
down the level Viewport. I think one is going to be fine. Sent in here for the skull
details and the random model. We can just click here and apply that multi
resolution modifier. Which at this mode,
we got 3,000, which is reasonable upon 8,000. Now the last object is
going to be the pens, let me select the pens here. We have 20,000, which
is really high, Control E. A, let's
click on and subdivide. Now it has only 5,000. That's really good. What
I'd like to do right now is to combine
them all, so shifts. Let's click to select all
these elements and you can press Control J, J as join. Now it's one piece.
Also for the center, we can go to objects such
origin to the geometry. So you can have the center ratio at the center
of our character. So let me switch
to the edit mode. Let's see the total count. We have 16,000, which is pretty much reasonable compared
to half million. So here we can just hide it. You can see that 590,000 100,000 vertices
that we got here. Let me just press old to
bring back the hidden parts. This is the first step
which is to extract the low poly mesh out of
the high poly version. Step number is going to be to unwrap new our low poly
character because we lost those seams that
we got here you can see that with the subdivision, we lost those seams. What we can do, I'm going to press A
to select everything. We can press Control E and
let's clear the seams. We need to start fresh. Let
me start with the head. I would like you to
switch to the face mode. We can press L to
grab only the head, and I would like to
press Control and I control I as inverse, and we can press H
to delete the rest. This way we're going to
be having only the skin. The skin is really important. We need to pay close
attention to it, especially in the UV map. Here I actually have UV map at the bottom
here, the UV editor. We can just switch to another image so that you
can see our UVs even better. Can you just use the nd results. For the skin, let me just press control space to
maximize this window. We're going to be doing the same and wrapping that we did before. Let me just select
the forehead edge. We can go to the top
here and keep pressing old so we reach the neck. So hoops, let me just
revert back and continue in the same line in keep pressing control so we reach
the end here. We can press Control E
and let's mark that seam. Next, we can add a
cut for the head. Let me just press
Alt right here, Control E, and
mark another seam. Next, we need to
cut also the chin. Let's select this edge
here, press control, and select the second
edge, Control E, and mark C. Now we got the head. I don't think we're
going to be needing this edge so let me
just select this one, control this, the last one, Control E, and let's
clear those seams. We're going to wrapping the
shoulders in a different way. Next we can select the
head and we can hide it. Let me just press bell
to grab only the head. Basically, I'm on the face mode so you can grab that part. We can press H to hide it and let me switch back
to the edge mode. You can press Alt right here, Shift Control E. I'd like to get rid of the
hands that we got here. Let me just press
Alt right here. S on the other side, shiftld. You can press Control
E and let's mark SIMs. After that, we can
switch to the face mode, select the mid section
and we can hide it by pressing After that,
unwrap the hands. We can press Alt right here. Need to have edge let's go
through all these fingers. Let's do the same thing through the other hand,
press shift holds. There you go. They
are both selected, Control E, and let's mark SMs. Can be having the top alone and the bottom of
the hand alone. It's old to bring back
the hidden parts. Let me only select
this part here. Control I to reverse the
selection, high the rest. Let's work on this one alone. Here actually press right here, shift old on the other side, press Control E, mark Sims, and we can cut the bottom two. Let me press all
here, shift old. Control E, and let's
mark SEMs again. Old H should bring back
all the hidden parts. We got the skin covered. Now for the undershirt. Let
me select my undershirt. We can press a gain control I, H to hide the rest and we
can select this edge here. Shift select the left
edge, Control E, mark those seams,
and going to need to add the seams at
the top right here. I'm a little bit rushing
this enrapd process. You can check the tutorial
where we did the end wrapping. It's the same nwraping
that we're doing here. We got that. Alt should
bring back the rest. Let me select the pens. For the pens, we can press
Alt on the edges here, shift lt and same in
here on the inside. Shiftld to grab that. Control E, and let's mark seams. Now we mark all the
seams so what we can do, we can press A to side edit in. Let me just reverte
back control space so that you can check our UVs, can press U wrap,
and angle base. We can see the UV map here. Let me just switch the image, can switch it to another image. Let's use, for example, actually can create a new one. Let me just create a
new image texture. You can go back here
to the objects mode. In the material properties, I'm going to get of
all these materials. We're going to be just
replacing it with one material. Let's add it here.
We can click on you, and let's call it
baked baked aracure. Taxo or something like that. Caracter baked or
baked character. At the top here you can
create our new image. Shift A, let's search for image, Taxer and we can connect the color to the base color and here we can
create a new image. Let's call it baked
caracter, dash, caracter. For the width and the height,
I'd like to multiply them by four so that you can
have a four K taxa. So fork is going to be
better for quality reasons. For the color here, in order
to see the UVs even better, I suggest making it white. Let's click on U Image. Here we can pick that
baked character. Let me just search for
it, so bake character. This is our image texture. That's where we're
going to be baking all the details here into it. If our character
selected, we can press Tab to switch edit mode, so you can see the UVs that
we it's not optimized, so we have to improve them. We have to improve them based on the priority of these elements. For example, the face here,
we need to give it a big map. Let me just get rid of that
proportion disent tool, can press A to grab everything, GX let's push it outside. Let's reset the order here. I'm going to press L to select on the head and let
me just put it U. We can spin it, let's press R, and you can type 90 and I'd
like to scale it rear up. The head needs to take a
big portion of the UV map. Next, we have the body. Let me just press L to
grab these two units. You can press G so that you can grab it and let's put it here. I'd like to ski it to
cover the full size. The more you scale up, the UVs, the better the outcome or the better quality
you will have in the texture in the
final texture. For the hands here,
I'd like to put them. For example, here, we can
maximize the use of this space. Let me select these two, and we can put them
on the bottom. I'd like to scale them because I believe we have the space needed to scale up these textures
or these UV maps. Same thing here. Let me
just scale this one up. There we go. That's good. Let's do the same
thing to the top. Let me select them
both and we can scale them up. That's good. We can select this
one, try to spin it sideways and scale it up. Every scaling up is a win, we're maximizing the
use of our taxer. Let me just reduce
it down like this. Now for the do shirt, let me select this portion here. We can put it here
and we can ski it up. Just a bit, we're going to be running out of
space for the pens, but we're going to
figure out a way. Let me just spin this one
like this, scale it up. We should not be going outside the boundaries of our image, something like this can be good. Let me just take
this one up GI to move it up and Alt A to
deselect everything, can select only this part
and ski it a bit up. Now for the pens
for the pens we can unwrap them even differently,
we can add some seams here. Control space, let
me just go back. We can add a seam
right at the middle, press Alt like this,
we got that edge. We need to continue on
the top, shift old Again, we can press shift right
here to cover that edge, Control E, and let's
mark C. After that, let me just press L
to select this unit. We can press U and
unwrap it once again. Now they are in pieces
like this, four pieces. They are taking less space. They are taking less
space right now. Let me just press A
and we can move them outside and we can press A to select all the
elements of our character. Control space to
maximize this window, scale it down and let me
just try to place it here. It's a little bit
challenging to find the. Position of it. But the pens are
really essential, so we have to give them the
right size in the UV map. Let's find a different
way to organize the UVs. I'm going to be selecting
the scan with the hands. We can spin it by nine degree and we can push it down here. We can scale it a
little bit down. Like this. Let me just
push it to the left. GX, we can push it here. Let's find place for
the pen so we can select each unit on its own. Let me just put it
here at the top, you can scale it a
little bit down. That's the first
part. Second part here. We can try to spin it. Let me just press R and spin it and we can put it up here. After that, for
the third element, you can press R to spin
it and let's put it here. But we have to scale
it a little bit down. Something like that, and
finally, this piece write. So members press G and we can put it while skinning it down. Press R, and let's
put it like that. A so there we also,
we got our UV map. It's completely clean. Just take your timid you
can find better way to organize all these elements to control space. Let
me just go back. Now we are ready for the
next step which is baking. So now let's start
the baking process. First, we have to
put the low poly on top of the high poly.
Let me just drag it. You can press one to be
facing the front and let me just make sure
it's on top of it. I'm holding shift to go
slow here, exactly here. Control space, let me
just maximize this. We can just delete the
background images. No one's going to
need them anymore. Also, I'd like to delete any
part that we don't want. For example, here we have
high poly duplicated. Actually, this is the low poly. Let me just rename
it to low poly. We have another
one, this one here. It's called low polym. I'm
going to just delete it. Let me just rename
this. For the pens as we got here, let
me just press LDH. I'm going to just
hide everything. I'm going to delete the
belt that we got here. I'm going to keep only
the utility bands, so I'm going to just delete the genes or let's
select the scan, Shift select the
undershirt, the pants. Here we can press Control
and we can select the low poly scan or
the low poly cacture. After that, we can jump here to the rendered
properties and we need to be on the cycle
mode. The first step. Here for the device, I
prefer to use my own GPU, and we can scroll down
till we find the render. For the render the samples, we need to reduce
them, otherwise, it's going to take longer. I'm going to just set
them to 25 samples. If you want to have
higher details, you can just increase
this value up. Let me scroll down until we
find the bake this tab here. First, I'd like to start with the diffuse, which
is the base color. And I don't want to have any contributions
contribution HB light. I don't want to have any direct
or androsk contributions. I just need the color. Should check it is
selected to act, and finally we can increase this extrusion up to
something like 0.1 meters. This extrusion is the height of how much we want to cover
with the baking from here. 0.1, I think it's going
to cover everything. Or scroll down and we can
start the baking process, click on Bk. The
baking is complete. Let's take a look at
the final results. The problem that we got here
is with the bent collusion, making the skin looks
like if it's burned. What you do, I'm going
to be selecting my skin, so the high poly scan. And we can get rid of this ambient collusion control space. Let me just maximize this. You can use this
setup for blender, but outside blender, I'm going
to just exclude this node. I'm going to be connecting
this character skin color straight through the
A of the multiplier. This way we're going to be
excluding the ambient clusion. Let me just disconnect
it from here. You can get back to this later. Control space, let
me go back and we can recreate or
redo the selection. The skin selects first, shift select our undershirt
and shift select the pants and we can
press Control and let's select the low poly skin here or the low poly character. And you can click on Bake again. A to the ios, we got the first channel, which
is the base color. We got it baked and
it looks really nice. You can just check out the skin so the skin doesn't look burned. We have the dirt here. For the clothing, it
looks really nice. So the next channel
that we need to bake is the normal map. The normal map is really central for having those
sculpted details. The bake type, let's
switch it from the diffuse to the normal and
we can click on Bake again. We got second channel,
which is the normal map. Let's go ahead and
save it. Can save as, let me just call it here. We got first the bis color, so now we got the normal map. The final channel to bake is
going to be the roughness. We can switch here
to the roughness and let's go ahead and bake
for the last time. So there we have it, we have the final channel,
which is the roughness. I'm going to just go
ahead and save it. Go to Image, save as, and you can save
it as roughness. Now we have three
channels or three maps. We have the base color, the
normal, and the roughness. Let's just save it.
Now I'm going to be hiding all the
components here. All the high poly components,
we have the undershoot. We can just hide it, the
low poly going to keep it. We got the skin,
press H to hide it, and for the pens, going
to press H to hide it. Now we got only the low poly
version of our character. From here, we need to jump to the shader editor right here, control space to
maximize this window. We need to drag and drop
all those three channels. We got the base color.
Let me just drop it here. We got the roughness and
we got the normal map. I'm going to just delete this
baked character texture. For the base color, it needs to be connected to the
base color right here. Let me just expand
this a little bit like this. Second map can be. This one here is the
roughness because it's the last baked texture, so that's why it
has the same name. If we can just redo that's just double click
on the roughness here. Let's go ahead and connect
the color to the roughness. Finally, from the normal map, that's connected through
a normal converter, this normal map strength. And we need to connect
the normal to the normal. Instead of having the normal map connected to the strength, it needs to be
connected to the color. Here for the type
or the color space, it doesn't need to be RGB, so it needs to be non color for both the normal map
and the roughness. Let me just switch
that to non color. Control space,
scope back and can press Z to switch back
to the material preview. Basically, we got it so we
got our character check sort. I'd like to increase the
bumps so that you can see the details even up here for the strength,
let's give it 2.5. Now we increase the level of
details that we got here. You can press this, which is the render mode, and
let's take a look at it. This is our final character and it's ready for
the next step, which is rigging and animation.
39. Rigging Character: This new section,
we're going to learn rigging and animating
our character. In this new lecture, we're
going to rig our character, so we got it here, so we need to rig to be able to animate it. I'd like to optimize
my layout here, so I'd like to collapse
these windows. You can just go to the
middle right here and you can do right click
and join down. Same thing here, we can do right click and
let's join right. So now we got our character. Also, I'd like to
hide the lights here so that you can focus
only on our character. The first step,
I'd like to check the size of my character
so we can press N, jump to the item, and let's
select our character here. It's 3 meters high, which is really high. We
have to reduce it down. Let me just select my
character like this and we can start reducing down the
size of my character. If you want to be precise about the size of your character,
you can just do research. L are crafts. Eight.
Let's check that out. Here for the original story, its height is 1.8 meters. But in the boot
story, it's 1.68. Anything between these two
values going to be fine. I'd actually set it to 1.75. That's going to be reasonable. Here we forgot the eyelashes. Let me just reverse
back by pressing Control Z and we can
select the eye lashes. Let's make sure we are
selecting everything. And so the last selected
object needs to be the skin or the
character itself. Let me just select the boots. But you know what let's mix, I like to mix the boots
with my character. Let's select the boots
first, shift select my body, and we can press
Control J, Js join. Now it's one piece, so let me
just select the hair first, shift select the body, and we can reduce the Z. The Z is the height. We can just press S and start
scaling it down, so we forgot to
include eyelashes. Let's select the
hair first, shift eyelashes, shift the body, and we can start scaling it down until it reaches that size, which is one point I think
1.75 is going to be perfect. Let's press one to be facing
the front and we can drag my character down until
it sits on that red line. GX just a little bit. So we got the size
of our character, the height, cart
reasonable or realistic. Next step, we have to check the normals before we
can start the rigging. Let me just go here to the
top which is the overlays, and we can check the
face orientation. So everything needs to be blue. So one of these boots is
flipped this part ratio, so we have to flip
it to make it blue. Instead of red, it
needs to be blue. It's on the edit mode. We can press Alt A to deselect everything
and we can press L to grab only this unit
and we can press Shift and N. This way, you're going to be
flipping the normals of our not have the same problem, but if you're having any thin
red, make sure you spin it. For example, here the
head or the hair. The hair is just one face. For example, this pace here, can press to grab it. On the other side, it's blue. So it's not a big
deal for the hair. For example, let
me try to do this. I'm going to select
random pieces here and we can flip them. This one too, we can
press Shift N and we can access this petal on the bottom and we
can click on inside. This way can be
inverting those colors and inversing the normals
and making them blue. Same thing here
for this eyelash. Let me just press L to
grab these two units, Shift N, and you can
click on inside. Actually, we have to
do it one by one. Let me just select the bottom. Press shift N and you can I actually need
to click on inside. So let me check my model. Everything looks good, and now we are ready
for the rigging. Let me just get rid
of that overlays. But the last substitute
is going to be to apply the scale and the sation
of our character. Let's select our
Cac. You can press N. Here inside the item, we need to have for the zation. It needs to be zero for
all these three axes. If it's not the case,
you can just press Control A and apply Dzation. Same thing here for the scale,
it needs to be set to one. You can press Control A,
and let's apply the scale. In case the scale
is not applied, we're going to have
this problem here. The rig is going
to be misplaced. It's going to match the same
bones of our character. We have to make sure that the scale is applied as
well as the rotation. I'd like to do the
same thing for the hair. Here it's
not set right. Control A, and let's apply the scale and for
the rotation here, I'd like to change this equron
to just the regular XYZ. Now we are ready to start
rigging our character. Let me just press shifts. I'd actually put the cursor
in the center of the word. We can press Shift A and
cursors to world origin. I think my caracter
is not centered. Let me just select
my character here. You can press N and let me
just set the Y to zero. Same thing for the
X, let's give it zero and for the Z can
just keep it like that. Same thing here, just
give this value zero. Se we might need to push
it back. Like this. Here I think the
eyelashes are duplicated. Going to just get rid
of this duplicate X and just get rid of
it. Let's add mature. We can press Shift A and go to mature and you're going
to find this Rigifi. If you don't see
this Rigifi it's because you need to
enable an add on. It's called Rigifi.
Can jump here to edit preferences
and inside add ons. You can search for the top, you can search here for RigiPi you're going to
find this add on. You can just check
this box here. If you do that, you're
going to have access to these bones. Shift A, go to mature
and Rigifi human. There we go. We got a rig. Let me just press one
to be facing front and I'd like to scale
it down like this. In order to see it better, we can check this box,
can make it in front. I'd like to go to the
object data properties. If you scroll down, let me
just expand this one up. Going to find this
viewpoint display. Down below, you're going
to check this so show. So inside this show panel, you're going to click
on this in front. If you check it, the
bones are going to be in front of our character.
Now we can see them better. So what we can do right
now, we can press tab to switch it mode and we can
start placing our bones. Let's start with the foot here, feet can drag it to the right. But here, I don't want to
do the same move twice. For example, I don't want
to move this one here and the right bones
through the left. Instead, we can check the
mirin here at the top. Let me just reverse
back, Control Z, serverse back like this and we can check this X mirroring. Now if you move these
bonds to the right, the other ones are going
to be moved automatically. Let's suit same thing
for all the bones. Here for the knee level, and just push these like that. Here, can select
this entire part and push it up
here for the hips. But here we should not be
having a small bone here, let's just divide that
space on all of them. So like this. For the breast
or the chest section, let me just select this
bone and can press G to grab it and
let's put it here. Actually, we need to
select the entire bone. You can just put it
here at the center. Let me check the shoulders. Let me just select the
shoulder here and we can put the joint of the
shoulder right here. Right, same thing
here for the elbows. Let me just select this
bone and put it here at the center for the hands, let me just place them here. Can just press R
to scan them down, or to spin them, and let's
put them right there. Next, let me just
place the face bones. We can start on by
the I. Let me just select the I here
and put it way down. Here. After that, we'll need
to select this entire part. Et's check. Yeah,
that's everything, including this part tip. You can press G to move, beside the ear, you're going to get back through the ear later. Let me just press one and we
can scale these bones down. I push them down here. Track them here to the center. Scale a little bit up.
Something like that. It seems accurate. Can
also push them back. All right, something here,
press L to grab this unit, so this is for the nose, can just place it here. For the eyes, let's
push them back. Press three to
switch at the side, and we can drag them
backwards here. For the ears, the same thing. Let me just press three,
can switch a dY frame. Scale it down. Let's
press one to be facing the front and let's push
the ears to the right. We can press RZ, RX or X
RY, spin it like that. All right, we got our wreck. For the face, I must say
that it's not optimized, but we can get back to
it later and redo it. Here. Let me just
tick this part up. This bow here or do or it's
do. Let me just press F two. It's teeth, it should be
inside the mouth here. You can just spin it
up and put it inside. For this bone here, let me just check its
name for the nose. The back of the nose
here, the nose. This one here, the teeth. I think the top, this is
the top and this one, if it has the B,
it's the bottom. So the bottom
teeth, and the top, here the top, and
these are the bottom. There we go. Here
we can press F two. It's the I. Yeah, it's good. Let me just press
one and let's keep checking the positioning
of our bones here. They are all well placed. We have to press three so that you can switch the side and we have to place them
here correctly as well. Let me just select the bottom and we can
push it to the right here and we can continue
placing our bone. For the hands, we have
to push them forward. Let me just select this
part here of the hands. We can press to switch to the side and let's
move it forward here. We can press R to
spin it sideways, push forward or to the left. Let's continue here.
For the shoulders, we need to push them back. Same thing for this bone. There we go, and
the spine bones, we have to push them back. Here we can press A to
D select all bones, and we can press L to grab these bones and
we can push them. I don't see the move here. We can press G and X so
that you can move them, actually, not on the X,
but we are on the Y. If you are on the
Y, you can press G and Y and we can push that back. But here we have an inner bone. Let me just if you switch to the Y frame,
we have one hidden. We can press Shift
and select it as well and we can just
push them to the right. We got the placement here of
the bones, except the hand. The hands, we need to work
on them a little bit. This is the difficult part in the rigging process,
the fingers. We have to align
this bone with hand. Let me show you my trick. We're going to be using the
tree decursorF example, if you select, for example, this bone, switch
it at this moment, f place this bone
like this, the tail. This one is the tail and this one is the head of the bone. If you try to place
it like this, we can press GI to push
it back. Like this. But if you spin around, it won is going to be accurate, placement won't going to fit. So it fits from this angle only. It's really difficult to
get it right this way. Instead, I'm going to
show you a better way. So we're going to be using the trad cursor show shift right click, going
to be using it. We can switch to the
edit mode and we can press Shift and right click, so that you can put that
td cursor over here. This we're going to be putting
it on top of the finger. Next, we can select the tail
of our bone and we can press Shift S and selection tracursor. We can continue like this. Shift or is click here,
select this bone, shift as selection to cursor and you can
continue like this. Here we can put
shift to race click, shift as selection to cursor and we can
continue this way. Shift as and
selection to cursor. After that, what we need to do, we have to push them
inside these bones. You can just select them by
pressing and we can push them inside. Something like that. Here, I prefer to keep a
curvature for the bones. I prefer to keep them like
this. Give them this shape. For example, here
we have to re boon, so this is the first bone,
second, and the third. This way, when we're going to
be generating our hand rig, we aren't going to have
any weird movements. So just follow this rule here. Let me just press Control and we can delete the drawings that we got here. Let's carry on. Same thing here for this finger, Compress shift and is
click on that this mount, shift as selection to cursor, and let's continue like this. Here we can select them both. Shift as selection to cursor, and we can select this toy
part and push it inside. Back a little bit here
and back using the Y. There we go, it's
inside right now. AcronF this finger,
the middle finger, let's select the tail and keep using that shift right click and snap the cursor or the tail of the bone to the cursor position. Same thing here.
Finally, right here, let's select post bones
shift as selection to cursor. Continue here. All right, so we got our bones. Here we have to
push them inside, we got that for the
thumb and this index, so we have to do the
same thinging for the middle finger and
the other fingers. Can just push them inside
a little bit like this. Same thing here. Can also select the tail of
that bone and we can push control to reverse back and we can push it inside
a little bit to the right. Finally, for this small finger, we forgot I always forgot
to select that bone. We just push it inside a
little bit to the right. Basically, we got it, so we got our bones and with the
help of the marine, we have the same alignment
on the left side. Next step is going to
be to generate a rig. If you scroll down here,
you're going to find this generate rig, click on it. And the rig is generated. But here as you can
see, it's misplaced. The reason why it's
misplaced is because of the positioning of the scale of our bone, it's set to 0.8. That's why we need to
always apply that scale. I'd like to just delete
my rig here X and delete it and we can select
our mature here. We can press Control A,
and let's apply the scale. So after that, we can try again. Let's regenerate the
rig there we have it. Now we generate the rig
and it looks great. It's matching the geometry. I'm going to just
hide my metal rig here, don't delete it. We can get back to it
and generate a new rig. For example, if we misplace
the face or any other parts, just hide it for now and we can use our new
generated rig. This way, it's
going to be making the rigging much more faster. Even though here
we have a problem, you can see the
misplacement of the face, so we have to back to that
later. Let me just see. Yeah, I think we have
another problem, which is the position
of the character. Let me just revert
back to the reg here, just it press one and they
need to be on the same level. You can select them both and GZ, and let's push them down so
they are touching the feet or red line and we can
select the reg control I. We can press Control I and
let's apply the location. Same thing here, Control I,
let's apply the location. So now, let's go ahead
and generate the g. So there you go, we got great
alignment right now, so I'm going to just hide my metric and we're
going to use this. First, I'm going to be selecting my character here
without the hair, and we can press
shift and select. Well, actually, let me
just select the hair too. The hair as you can see it
needs to be dropped down, so we can just push it
down like this and we can Control A, let's
apply the location. Let's select the hair first,
Shift select our body. Shift select the mature last. Control P, can press
Control P to set the parentin and we
need to set it to amature D form with
automatic weights. I just click on this and
let's wait for it to finish. So the go. We got
some problems here the bone heat weighting
is not stright. Let me select only
the character here, Shift select the bone, Control P, LS Parngei
as automatic weights. Their probably is the
problem that give us trouble so the go the rig is completed,
we have no problem. Let me select my rig from here. We can switch to the pose mode. We can select the
skew let me just try to drag it down as you can see it's
working just fine. Let me check the fingers. So here we have to scale them on the median or the
individual origins. Scale them like this.
There we go. They are working just fine. Can
check this on too. Good. The next step, let me just check
the other bones. C press r Y to spin it sideways. There we go. Working just fine. Hips, the legs, let me
just push this leg up. We got that, we
can press all G to reset the default position. Same thing here. We're
good. The hip section. So now we have to rig
our hair, make it part. Oops. What we got here? So it's better to keep
it with its hair. It looks weird. Let's select the hair, shift select mature, and we can press Control B, and let's pn with somt weight to C. She was going
to be working. Let me try here to see what's
happening with the hair. On dit mode, you can
select everything, press M, merge by distance. You can see it's not optimized. We have 336 versus Cs removed. We can also try to get
rid of the triangles. You can jump to let
me just find it. Here inside the face, we can
switch the trace to quad. So let's give it another
try. Select the hair first. Shift, select the
armature, Control P, sit amg with weights,
same problem again. I'm going to do
different method. Let's select our hair, shift select our
armature, Control P, and we can use the bone or actually the relative
bone relatively. Now if we try to move our rig, so the hair is going
to be moving with it. But the problem is
is that if we spin, right, so that's good. The hair is working. Let me just try to spin it
sideways, but that's fine. We got our character
rig and now it's ready for the next step,
which is the animation.
40. Create Running Animation: We got our character rigged so next step is going
to be animated. I'd like to start with
the running animation. Basically, the run
cycle consists of four main poses that
define the movement. Let's go through
them one by one. First, we have the context pose. 1 ft touches the ground while the other one
is extended forward. You can see how the
boot here is stretched. The front of the boot
is stretching to mimic that ground touching. For the body here,
it leans slightly forward to create the momentum. For the arms, they
always swing opposite through the legs for
having the balance. Next, we have the left pose. The cature pushes itself off the ground and it's
completely in the air. The back leg extends
behind while the front knee start
lifting and for the arms, they continue swinging in sync with the legs, the opposite way. Third pose is the stretch pose. Here the legs are wide
apart from each other. The front leg is fully extended preparing for
the landing and finally, we have the landing pose. The front foot
makes contact with the ground, absorbing
the impact, and as you can see, the
body heat compress itself down as a leg bends
for the landing. As a guide, we can be following this running reference image. Going to show us four stages
of the run animation. Let's go ahead and drag this reference image into
the Tree deviewport. We can simply drag it. You
find it in the resources, can just drag it here and
we can press N to access the transform and I'd
like to reset the X here. Let's set it to 90 degree. For the while let's keep
it at zero and for the Z, we can give it 90 degree. Let me press then
to hide that panel and we can press three so that you can switch it aside and
I'd like to align it down. This is the first pose,
you can just drag it here. We can scale up the
reference image just a bit to make it match
the character. A little bit down. There we go. Now I'd like to
select my character here and we can switch
to the pose mode. This is where we're going to
be animating these bones. But after that, we need
to bring our timeline. Here on the bottom, you can
click on this plus sign, and you can drag up here. For the bottom panel
or the layout, I'd like to switch
it to the timeline. To hide this panel, you
can press N to hide it. Here we can just
collapse just left click here and collapse
it to the left. I'd like to start with
frame number one. We can press shifts
and rest click so we can freely move in the timeline. I'd like to go back
to frame number one. Can also set it here. For example if you
want to jump to frame ten and just write
it here, frame ten. In my case, I'd like to
start with frame one. Now we have to
follow the same pose that we got in the
reference image. I'd like to start
with the front foot, let me just select
foot here and you can push it forward
and let's se it up. You're not up, but
also make sure that you are not
using the marine. First, I'd like to drag
this cube, the heaps down. For example, here, let me take the front foot and put it
down. Same thing here. Let me just drag
this one even down. So like this, can push
it a little bit back, take this cube up and
for the second foot, let me just move it way
back and let's move it up. Here, a little bit to the right and we can
press R to spin it. We can spin it like
this. After that, we need to bend
our cacti forward. You can see that the angle of the torso that we
got use let's select this cube and we can press R to spin it forward like this. For the head, it needs
to be straight up, so we can press R for
this bone, actually, not this one, can select
the top bone and we can press R to spin it upward. Now our character is
looking straight. Now for the hands, let me select this hand that we got here. We can press R to
spin it around. Can push it a little bit back. But also here we need
to keep an eye on the right or actually
on the front. I'd like to split my window
here into two parts, two windows, and here we can press one to be
facing the front. You can see the misplacement
that we got here. I'd like to drag this
one back like this. We can press R to spin it around like Probably release it
down here, close to the hip. You can do the same the
through the left hand. Can just move it
here, drag it down, you can press R to spin it sideways in here, I
like to push it forward. You can press also R here, spin it up. That's a good pause. For the legs here, I'd like to take the foot, drag
it to the left, and select this arrow that we got here and
you can press R, to spin it outward, not inward like this. Same thing for the backfoot, can push it inside and select this arrow and we can
press R to spin it outward. Okay let's double check, we can press control space to maximize this window and let's double check
the first pose. It looks acceptable. From here, what we need to do
we have to save all the positions of our
bones that we got here. To do that, we can
press A to select all the bones and you can do collect and insert key frames. The shortcut, if you want
to do that, is to press I. But before we can do
that, let me show you control space and let me
expand here the timeline. Keep an eye here, what's
going to happen if we insert these keyframes.
So you can press I. So this way we're
going to be adding these diamond shaped shapes. This way we're
going to be saving the possessions of each
one of these bones. Let's move on to
the second bows, which is the left. Now our character
needs to be flying, not flying but up in the air. It's going to push itself up. All right let's do that. Here we need to jump to
frame number three. I'm going to just use my
right row on the keyboard. Now we are on frame three, can just type it
here if you want. Let's create a second
pose, which is the left. The front foot, you can move it forward like this
and we can spin it, we can press R to
spin it like this. For the back foot, it needs
to be stretched even back. But I think this is too
much for stretching this. What we can do, we can go back to the first frame and we can take it a little bit
to the left so that we can have room in the next shot. Let me just take it up,
something like this, and we can press I to override the position and the rotation of this bone, which is the foot. Now let's jump to frame tree. We're going to have some room if we move that back like this. C also press R to spin
that around. There we go. For the front leg,
let's stretch it even forward and take it a little bit up and you can
press R to spin it. Strach it a little
bit down like this. For the hand here, I'd like
to select my hand and we can push it back a bit
back like this. We can press R to spin
it around like this. For the other hand, we
can push it forward. Press R just to make a
little bit of a change. Now we got the second pose, we can press A to
grab all the bones and we can press I to
insert the key frames. Or now if you press
shift in race click, if you go back 1-3, you're going to see the
change that we got here. But here we forgot something we forgot to push our character up. Here we need to select this cube and take
it a little bit up. Same thing here for this leg. Let me just tick it up just
a bit, something like this. After that, we can press A, Ls press I to override
the new position. Now if we press shift right click, going to
see the change here. It looks like if it's backward, but we're going to
fix that later. So it was up and it's
going to go down. Now for the third pose,
we need to jump to frame six. Frame six here. From here, we're going
to be using the stretch. We're going to be mimicking
this stretch pose. Let me just go back here
to the objects mode. We can select our stretch
and move it here. You are matching the
left, you can see that. Now we're going to be
using the stretch. We can also do this. Let me just move my
character right here and we can try to
work on top of it. Here let me just switch again to the pose mode and
let's work on that. Here for the foot, can press R to spin it
around like this. For the other leg, let's
keep it stretched. Like this, we can press R to
spin it around like this. For the hand, it needs
to be pushed back here. Let's press R to spin that
around and this hand, we can take it up. We got it. Let's press A to grab
all the bones and we can press I again to insert
all the keyframes. Now for the last pose,
which is the landing. I'd like to jump to frame
eight and let's work on it. I'd like to jump to
the object mode here. Let's select the reference
and we can push it here. Let's work on it. Let
me select my rig and we can switch to the pose mode and let's follow these
reference images. The leg on the
other side needs to be touching the ground. Let me just put it
here, we can spin it spend it sideways. But here, our act is landing, so we need to drag
this cube down. Okay, let me take
this one even now. You can press Z and
let's switch to the white frame and we need
to select this inner bone, this red bone that we got here. If you press R, you're going to be stretching the
boot like that. For the other leg,
let me select it from here and we can
press G to move it. Can put it here. After that, we can press R to spin it
around, something like that. For the hands, let me just select this hand and we
can drag it down here. Same thing here, we can take the other arm down and
we can press A to grab everything and we can
press I to insert the new bones positions
and rotations. Let me give it a try.
There we go, it's running. Here I don't like this, it's
fixed. The height is fixed. I should not be like this. He is changing its height,
but here it's fixed. We can take it
down a little bit. At six, let me just
select my cube here and we can
drag it down just a little bit and we can press
I to create that q frame. There we go. We got
it. Now it's smooth. Today we we got these four
essential key frames or poses. From now, we're
going to just use some tricks to finish
the animation. First, I'd like to
set the duration of the animation to 24. Let's set here the
end to 24 like this. As you know, to make
the animation seamless, the starch and the end
needs to be the same. Which we can do,
we can press A to select all the bones and
we can do right click, let's copy the pose
and we can press shift and Right click to jump
all the way to frame 24. You can do click and
paste that pose. We cannot do that here,
so we can do it here, so we can do write
click and paste pose. We got it, we paste
the same pose that we got in frame number one. After that, we can
press I to insert. Now at 24, we have the same pose that we
got at frame number one. You can see that here.
They are identical. The next step, it's
going to be the middle. For the middle
here, which is 12, so we have to use
the same keyframe, but it needs to be flipped. For example, if this
leg is forward, we need to have the opposite. We need to have the other leg which is going to be forward. We can jump back here to 12. We can do race
click and let's use the space X, flip pose. Now we got the other leg
which is stretch forward. From here, we can
press I to insert it. Let me show you the
difference. I'm going to press Shift race
click at the end. They are the same, but
they are inverted. It's the same pose,
but it is inverted. We can press space
so that you can play the animation
and let's see. So we got the first part, but this part here, we
need to fill it. But the problem that we got
is that our animation is going backward. It's backward. It needs to go this way. What we can do to fix this problem, we can jump here to frame
12, which is the center. We can press A to select all the bones that we
got here and we can try, X and minus one. So this way we're going to be flipping them all the way to the other side and we can
just move them by one frame. We can press G to grab them and we can
move them to the right. Now the other half is good. All we have to do is to
work on the first half. So now we have to fill the
first part of our animation. So to do that, we're
going to be just pasting these poses
that we got you. This is the first,
second, and third. We need to flip them
here, paste them here, but they need to be flipped.
Let's start with the first. First we need to calculate
the number of frames that we got 13-17,
which is four. From here, we can
do right click. Copy bows, and let's calculate
four from here, one, two, three, four, we can do t colic and let's
paste X, flip pose. After that, we can press I
to insert the keyframes. We got this one
flipped now we need to get this one. Second pose. You can press Shift and
t colic to jump to 19. The difference 17-19
is two keyframes. From here, we can
do red colicpyPs let's jump back to
five. Let's add two. It's going to be seven. We can do colic and let's paste X flip. And after that,
we can press I to insert the new keyframes. You can see the change
that we got here, so we are on the right track. The last pose to add is
going to be this 22. You can just copy it, right,
copy pose and we have to calculate how much
keyframes we have here 19-22, which is three. Let's do that one, two, three. Stop right here. You can do right click and paste X flip pose and you can press
I to insert the keyframes. Now let me just press space so that you can
play our animation. Let's see. That's good. Let me just hide the
reference image. Also you can press to hide
the bones, and let's see. It's good so far, but
we have to improve it. First, I see this harsh
up and down here. I don't want that. Let me
just stop the animation. You can press H to bring back all the head and bones and
let me just investigate this. So here we don't
have an up here. So for example, here
at frame number five, we can take the cube
a little bit down, so you can just drag it a
little bit down like this, and we can press I to insert the keyframe, and
let's check that out. There we go. So
it's better right now. So here it's going down. Now it's going up and after
that it's going to go down. But from here, it's fixed again. So we have to drag that
cube a little bit down. Just a little bit down and we can press I to
insert keyframe. Let me check. It's going
down, it's going up. Let's press space to see that. Now we don't have that
harsh up and down. I'd like to improve
my animation a little bit better for the shoulders, they are not moving at all. Instead, I'd like to
twist them a little bit. For example, when the arms
are twisted like this, I'm going to be selecting
my shoulders and push it or spin it through this side. You can press R, Z, and you can spin it a
little bit like this. Just a little bit of a twist. At frame number five, here we have the arms
are twisted 100%. Spin, we can press R, Z, and let's spin it
by -15 degrees, so we can type -15. Press Enter and we can
press I to overwrite the new position or
actually the new rotation of the shoulders bound here. Now we have to find the
opposite pose to the five, which I believe this
one right here is 17. You can see that the arms are
twisted to the other side. So from here, we have to twist the shoulders to the other
side by the same amount. You can press R Z and let's spin them by
minus or actually by 15. Here it's going to be just
15 degrees and we can press I to override the new rotation.
Let's check that out. 1-5, we are twisting. But for these key frames in between, we have
to delete them. I'm going to just
select them like this. Keep in mind that I'm selecting
only the shoulder bone, not all the bones, and we can press X and
delete key frames. We have to simplify
the shoulder animation so that we're going to
have good animation. Same in here, I'm going to
delete these two keyframes, press X and delete them.
Here we have minus. We are twisting the shoulders by -15 and here the
other side by 15. Let me just press
space and let's see. We are twisting the shoulders
and it looks good here. You can see that here. If you notice here, we're having a slight lag in our
running animation. That's because the first
and the 24th frames are identical because
in a brief pause when the loop resets
itself every time. To fix this problem, we can
simply set the end frame to 23 and set of 24 because
24 and one are the same. This way, the animation flows seamlessly without repeating
that same frame twice. Let me just press space right now and you're going
to see the difference. Now the animation looks
fluid, it looks small.
41. Fixing Rig Deformations with Weight Painting: So in our animation,
if you check, the butt section, we're going
to have this problem here. We have a gap here,
we have to fix it. To get it fixed, we're going
to be using the weight map. Let me just go back here
to the objects mode. We can select our character here and add switch
to the weight pane. The bones that are
responsible for this problem are
the thigh bones. So you can do it in press
control space and let's go back and inside the object
properties right here. At the top, you have
this vertex group, so we need to search for it. You have to search
for the thigh. Here, let me just click. We should be having an
option here to do research because we're having
too much Vertex groups. We don't have that
unfortunately. You can do, you can
just click on the top. First Vertex, and you
can keep scrolling down. Actually, we reach the thigh. There we go. We got
it here, the pelvis, this is the left here so we can fix this one first and
we can fix the right one. Basically here we have to detach the rig from this part here. What you can do,
we need to paint with zero so that you can page blue and we can
start painting only at the top here like this. This way you're going to
be making that connection. We are getting rid of any
kind of rigging in this part. You can see that we are making
the connection over here. Let me just keep painting
like this on the left, I and there we have it. Now we fill that space. You can press Z switch to
actually on the solid, if you go back to
the object mode, that's gap is filled. We don't have that
problem anymore. But if we switch, if
you play the animation, we're going to be having
it on the other side. Here at frame, I think the
climax of it is eight. What we need to
do, let me just go back again to the weight paint, and this is the thigh left. That's fine the thigh right. I just go down here.
This one, the right. You can do the same thing.
We do weight set to zero, you can just paint with
the blue here at the top. This way, you're going to
be filling those gaps. Oxygen animations or verge
back, keep it like this. Let's go back to
the object mode. Let me just select MRC. We can press H to hide
it so you can play the animation without
any distraction, control space, and
then we have it, so now we have a perfect
running animation.
42. Baking Animation Making It Ready for Export: So in this story, we're going
to be baking our animation. So why we need to bake
our run animation. So simple answer is to make the animation
easy to explore. Here in Blender, we
are using the Rigify add on to rig and
animate our character. But other software
like Unreal Engine, Unity or any other TD software, one's going to
recognize this add on. Baking solves this by filling
in the missing frame, creating a keyframe
for every frame. So this makes the animation
easier to read by any other three D software without relying on
Blenders rigging system. So let's go ahead and
pick our animation. So inside Blender, I'd
like to set the panels. This creates a new panels here. Let me just expand the
timeline up and you can split it again from the
bottom, upward like this. The second panel, I'd like
to switch the dope sheet. You can just click
here and let me just choose the dope sheet
here and for the type, it's going to be action editor. On except, you can press A to select all the bones
of our character, all the animated bones, and we can jump here
to pose animation. One here and we can
click on bake action. The starting frame
is one all the way to the end frame which is 23. I want you to check
this visual key to apply all the modifiers. Let's click on
Okay. There you go. Our animation is baked
and as you can see, we are filling all
those empty keyframes. We are adding a keyframe for every frame here
and this is baking. For this action,
I'd like to call it Cacure running. Let
me just call it here. Cacure Run, can press Enter
and we can push it down. But before we can push it down, I'd like to add my
non linear animation. We can just split again my
scene or my layout up like this and we can switch it to
this non linear animation. This is where we're going
to be saving our animation. Here you can just
click on push Down. Where we're going to be
cleaning our timeline and making it ready for
the next animation. On the bottom here inside the non linear animations,
we have it saved. Or I'm going to just
uncheck this box, this running animation here, so now we don't have
any animations applied. To reset our character
position and rotation, just press control space
here to maximize this. We know we can press Alt G to reset the locations and ltr
to reset the rotations. Now we are ready for
the next animation.
43. Create Idle Animation: The next animation to work
on is idle animation. I'd like to press
control space to go back to my default layout. Here we can expand
or we can drag these layouts down or I can
just focus on the timeline. Let's jump to frame
number one here on 16, we can just type one so that
you can jump to frame one. Let's give our character a
rest pose or an idle pose. I'd like to drag, for
example, this forward. This also this cube, we
can push it forward here. After that, I'd actually spin this foot so you can press R Z, since you can spin it
on Z axis like this. Center for the other leg, we can press R Z and let's
spin it the opposite way. After that, we can track
this cube a little bit down to relax those legs. For the hips, let me just select the hip here, we
can, for example, press R to spin it on
the y axis like this. I think that's a little
bit exaggerated. Let me just spring back the
leg a little bit backward. There we go. Something
like that. Looks good. Let's continue for the hands. For the hands, I'd
like to or the arms, I'd like to release them. Let me just select the
hands here and we can push this one here
and drag it down. This is a rest pose. From here, we can press R, and let's spin it like this. Can also spin it on the X, RX. Let's keep it relaxed like this. We can do the same thing
through the other hand. Let me just select it from here, drag it to the right, release it down and we can press R Y. To make it like this. We got the hands. They are touching the hips,
which looks good. Next, I'd like to
press A to select all the bones and we can press I to insert all the key frames. For the idol animation, I'd
like to make it really long. Let's give it 200 frames. You can jump to the
end here. Let's give it 200 like this. And from here, we can do slick, let's copy as pose and we can jump all the way till
the end, which is 200, we can just type it here, 200, press Andrew and we can
do res click and paste pose and we can press I
to insert as key frame. Next step is going to be
to add the breeding cycle. It's going to be really essential
for the idle animation. I'd like to select
this bone here. It's called the chess.
We can press F two. Check its name, it's called
chess. So we did selected. I'd like to press N to access the transform, can
jump to the item. Also here we need to
be on the first frame. Let me just set here one. Let me find that we have to
spend it on the X, like this. Going to be creating a cycle, breathing let me show you. You can hold shift and
let's take this one little bit back. Can
make it look like this. So for the chess,
we're going to be targeting this X rotation. Let me just separate my timeline into two parts, two
layouts like this. Sec layout is going to be
for this graph editor. Let me just expand
it even further. Here we can expand
the chest until we find the X in the rotation. Let me just scroll down. This one over here,
the X quaran rotation. In the modifiers, we
can add the cycle. Cycle before can do that. We have to animate one cycle. Let me just press to hide
that panel and from one, we already inserted
this keyframe, we can jump, for example, to frame 15 and we can push that's a little bit back or I think it's
going to be back here. 0.01 is going to be fine. 0.1. And you can do risk
colic from here and you can insert single keyframe. After that, we can
jump to frame 25 and we can take this value back to the default value,
which is zero. This is one breathing cycle, ras click and insert
single keyframe. We have the inhale
and the exhale. You see that here. Let
me just inhale exhale. I think we have to
0.1 is too much, let me just press the up arrow so that we can jump
between frames, the up arrow and then row to go back up arrow to go forward. Here at frame 15,
let me just give it 0.75 collect insert, replace that single key
frame. Let's see that. Good. Now let's add the cycle.
Let me just revert back. We can press N, and
I'm selecting it here, **** it rotation
and we can insert or we can add the cycle and we can add the cycle modifier. Or for the count, let me
just increase that up. Also here we can press
A and press period on the Napads so this we
can reset the Zoom. Also for the other bones,
we can just hide them. I'd like to hide the
chess here you can make the extortion visible,
only this extortion. You can see the cycle
here. We have one cycle, but actually the cycle
here needs to start from here, not at the end. To fix this problem,
you can just delete the last key frame
that we got here. Can press X and delete it. Now we've got a cycle that
is close to each other. Let me just press space
so that you can see the animation or the breathing. It looks a little bit intense, so what we can do, we
can select, for example, the exhale or the inhale, this one is exhale and we can press Gx and let's
drag it forward. We're going to be having
inhale and exhale. Let me just press space
so that you can see. We can do the same thing
for this one here. Let me just press Gx and
let's move it to the middle. We can also charge you drag
it down so you can press G and let's drag
it down like this. There we go. We got
that breeding cycle. You can check it from the
back here, and it looks good. Let's continue with
the other animations. I'd like to add twist a
little bit, the arms. For example, a frame 50. Let me select this hand and we can push
it a little bit back. You can press I in search key frame and for
the other hand, we can push it forward
and up a little bit. Let's press I. Let's check that. There we go. That looks good. We can jump again to frame 100 and we can do
the same reverse. Let me select my hand. We can spin it on the Z, push it a little bit forward, press I here, even
drag it up, press I. Same thing here,
can push it back, press R, spin it a
little bit down, and we can press another I. You can see how the
arms are behaving. They look pretty much
natural. Let's continue. At framework at 50, you can give it different pose. You can take it forward,
press I here, spin, drag down, press Ig overwrite those
position and rotation. Same thing here, you
can drag it up forward, press Igs press space you
can check the arms movement. So they look really good. You can check from the pack. Nice. I'd like to
animate also the hips. Let me just select this
bone that we got you. For example, let's frame 50. You can spin it just
a bit like this. You can press I and
let's jump again to frame 100 and we can spin it, for example, like this, press I and RY to spin it like
this. We can press I again. There we go. We got some
movement over there. And it looks good. For example, here at frame 150, we can tilt it to the other side like this and we can press I. That's nice. Is looks good. Next, we
can work on the head. I'd like to make it
spin around like this. What we can do,
let me just press N and let me find the rate. Not this one, but I think the Y, we have to affect
the Y in the sation. Let me just select first this Y inside the
rotation for the head. This one here, the Y rotation, and we can press N to
access this panel here. You can just expand this
if you don't see it. Inside the modifiers,
you can add the noise. Now we have some
noisy movements. If you press space, you can
see how noisy our head is. To fix this problem, you
can increase the scale up. Let me just increase it to 25. Now our character is going
to be in sideways randomly. But I'd like to
reduce the strength down to something like 0.5, for the scale, let's
just take it to 50. So we're going to be having
some random look around. There we go. That looks nice. We can also try to move
this cube a little bit forward and backward, like this. I should not be fixed. Let me just go back
to my time line here. For example, at frame 40, we can push it a
little bit forward, press I to insert those
keyframes and at frame 100, we can take it back here, press I again and
continue like this. At frame 100 at 60 can push
it again forward and press I. Express space so you can
see those movements. Here we're going to be
having some overlapping. At frame 40 here, we can select the hand
and you can spin it. You can press R Z and
let's spin it like this. Let's press I to
override that rotation. Here we have the same problem. At frame 50, we have to spin
it again like this and we can press I two and
search the new position. There we go. We got it. Let me just take a look at
it from here from the pack, control space to maximize this window and let's
take a look at it. We got the breeding cycle. The hips, they are moving. The hips, it's moving and everything is working just fine. This is the Ital animation. For example, we can also
animate the shoulders as we got here on the
Y axis like this. I'm going to be using
the noise again. I it selected. Let me just
find the rate rotation here. I think on the Y. No, this one here, on the Y. We have to add the
noise modifier through theorization on the Y. Let me just go back to the graph editor and
let me select the Y. This one right here, and we can add to it the
noise modifier. Press space, you can see the noisy details that we got you. I'm going to just
increase the scale to 25. Or even 50. I think
50 is too much. Let me just set it to 15 and we can set the scale
or the strength to 0.2, but it still looks strong, so we can reduce the
strength to 0.1. For the scale, we can
increase that up to 30. There we go. That
looks acceptable. We got our idle poise. The last substitute
is going to be to save our idle animation. Let me just press control
space to go back to my layout and we can just press space
to stop the animation. Let's take the timeline
up and we can bring our action editor and our
non linear animation. Let's press A to
select all the bones, and we can go to pose animation
and we can pick action. The idle animation is starting from one
all the way to 200. I'm going to check
the visual key in and we can click on Okay. Digos we got our idle animation
pick here for the action, let's call it caracter, Idle and we can push that down. Now we got two animations, we have to run and
we have the idol. Last step is going
to be to reset the position of our characters, we can press the Old G to reset the position and Alt
R to reset the rotations. Now we are ready for
the next animation.
44. Create Jump Animation: In this story going to be
working on the jump animation. I'd actually break it down. I'd actually break down
the jump animation and explain its main key poses. First here, we have the idle
pose or the starch pose. The casual is going to be just standing in a neutral position. After that, we have
the crouch pose. The caurer will bend the
knees and move downward. For the arms, they will swing slightly backward
for anticipation. They will anticipate the jump. If you notice here the
difference between the crouch and the
landing poses, it just the arm position. In the crouch pose, the
arms will swing backward. While in the landing, the
arms will swing forward. To make it easier, we will be just copying the same crouch pose and adjust it just only the arm position
for the landing pose. After that, the take off. The cature here pushes itself upward and preparing to
fully extend the legs. The arms here will swing
upward for balance. Next, we have the apex, which is the highest point
of our cacture will reach. This is the highest
point, the peak height. The legs will bend in the air and the arms
will adjust for balance. Next, we have the descent, so the cacre is
falling down right now and arms move
slightly backward. After that, we got the landing here the feet hit the ground, the knees will bend downward
to absorb the impact of the jump and arms will
swing forward slightly. Finally, we got the recovery, our cacture here will
recover from the jump and it will return to its idle pose. Let's go ahead and create
this jump animation. Digo, we got our cacture
here in the ibd pose, so we're going to make the
jump from this Idd pose. I was going to be
pressing Alt G and Altar to reset the locations and the rotation, just
keep it like this. I'd like to collapse these panels so that we can
focus on our animation. I'm going to keep the
timeline like so next, I'd like to jump back
to the object mode and we can bring our
reference image. I press three to
switch at the side here and we can simply
drag this guide, the jump reference animation. Simply drag it and drop it here. You can press F to ski
it up until the size of our character matches
the reference image. Here we have to ski
it a little bit up, smooth it up like this. Something like this
is going to be fine. This is the first pose,
which is the idle pose. We already have that. Next we're going to
have the crouch. Let's create a crouch pose. I'd like to select my rig
here and let's switch to the pose mode and we can
jump to frame number one. Let me just set here, write one, press enter. This is the idle. I'm going to press A to select all the bones and let's press I to insert this I here
to insert the key frames. The shortcut for it or
actually the shortcut is I. If you want to do it, you can do write collect and
insert keyframes. Or it's enough for the crouch, I'd like to jump to frame 13, shift in rice click
and let's jump here. So frame 13 and let's
create the crouch pose. I'm going to be selecting
this cube and let's drag it down. Drag it down here. We can spin it on the X R, X, let's spin it forward. Here, I'd like to lift my head
a little bit up like this. It's going to look
better. Let me check the legs you can
see the legs mass. I'm going to be selecting
this arrow here and press RZ and let's spin them outward. Like this. Let's check
that from the back. Same thing here for the arms, we need to not keep them
stretched like this. We can press R X or actually
RY. I'm pressing RY. We can expand them
out. Same thing here. Let's say this one here. We can also starch spin it, let's press R to
spin it like this, same thing for the other arm, can spin it select this row
that we got at the top, RY, and let's relax
this a little bit. Let me press three and
we can double check. We can take the hand a
little bit down here. Also for the fingers,
we can join them. Let me just select
the finger ring. And you can press as to scale
them inside, scale down. But here for the scaling, you need to be on these
individual origins. Otherwise, if you are
on the median point, this is what's going to
happen. I don't want that. We want to scale each
bone on its own. Here using these
individual origins, we're going to be having that. Let me just scale
that down like this. We can do the same through
the other fingers, just select them,
scan them inside. There we go. You can also
try to crouch the back, so it should not be like
this, we can select. We can press to switch to a frame so that we
can select the inner. I think this one, actually
it's hard to select it, but let's find it.
This one we you. Just push it back or
actually let me just try. We can crouch it like this. This bone here, let
me check its name. If you can press F two,
it's called the spine FK, can just also spin it a
little bit like this. For the head, we
can spin it down. Now we've got this pose. Let me try to improve it a
bit, see what we can do. We can drag this bar down, even down sentinre let's
see what we can do. We're going to
crouch the back even down. That's being done. It's good we have this bending for the foot he looks good. We can press A to grab all
the bones and we can press I to insert this key frame.
This is what we got here. Let me just go back from
the one frame to 13. You can see that. This is the
crouch pose. I prefer here. Let me just make the head upward O X and let's
keep it like this. Our car is going to
be keeping an eye on its target like this.
Now it looks better. I like this crouching the neck looks a little bit stretched. Let me just take the
head a little bit back. Same thing here, we can
take this part backward. I don't want to stretch
the head too much. Check it from here.
Now it looks normal. Let's press A to select
all the bones and we can override this position by
pressing I sometimes inserted. Let's move on to the next
pose which is the takeoff. The takeoff, I'm going
to jump all the way to 25 and let's go ahead and
create it ectuPress three, and this is what
we need to create. I'm going to be
selecting this cubicin. Let's se it way up. We can
spin it. Spin it like this. The legs, they need
to start lifting. You need to start lifting
the leg so you can just push them up and we can press Z to search the dY frame
and I'd like to select the front and we can push it down and we
can push this bar down. Let me just see can try to
spin it. Something like this. We can select this bone here and try R X and spin it around. We can do something for the
other leg or the other foot. Something like this. Can drag that down, spin it sideways. Now it's touching the ground. Let's zoom back and
let's continue. For the head, I'd
like to tilt it forward and for the arms,
we need to work on them. We have to take the arms upward. Can spin that like
this, select this bone, and we can try to spin it, so we can press spin it
backwards like this. Select the hand, move
it forward, spin. Let's send it to the other arm. I'm going to select
my hand here, push it upward here. Forward spin by pressing R and we can straighten up the
arm by spinning this a row. R could just spin it like this. Let's keep an eye on
the reference image. We can press three to be
facing the there we go. Here for the wrists, you can see that we need to make
them look like this. Let's select my hand. We can
press R to spin it down. It's actually not from here, let's select the main hand bone and relax it like
that. Same thing here. You can try R Y to spend it on the Y axis. Let me check here. We can work on this part
a little bit better. We're still stretching the back. I'd like to branche back
so we can press RX, spin it like that, for the hips. I'm going to try to
stretchen that up. We can press R, and let's
keep it centered like this. For the back, we
can push it inward. We're going to try let's see how it's going
to go like this. We can press A to select
all the bones and let's press I to insert
those key frames. You can always go back and readjust if something
is not right. Let's try that and
let's see. From one. We got the crouch and
this is the landing, not the landing,
but the takeoff. Now we need to make
our character flying. Let me press three.
Here you can see that our character start
flying, so what we can do, we can select all the bones
except the background bone. This one, the main
one, we can press C, shift, and let's deselect it. I cannot be deselected. We can press B, shift, and Diselect the bottom, and we can lift
it up just a bit. Here. But here we're going to have
a problem with the hair. You can do it that way because of the hair
source you can do, you can just select this and
drag it up and the manually. We just select the
foots and push them up here, let's keep
an eye on that. We need to check those foot a little bit up and we
can spin them down. Let's take the hands even up, can push them upward here, send them for the other hand. I can press one, I can actually three and let's push that
hand also up like this. For the back, we have to
make it look like this. I'm going to be selecting
this bone, press R, spin it outward, and
the other bone here, we can spin it forward. Let's select all the
bones and we can press I again to override dispose. Let's try that
again and let's see the length crouch take off. Let's go back from take
off back to the crouch, so the foot it's not
behaving correctly. So for example, at 20, you can stretch the
legs a little bit down here and you can press I. Let's see if it's going to be
better or not. There we go. So now it looks better. We
have a smooth jump or next, I'd like to work
on the Apex post. This one right here,
I'd like to jump until 35 or 349 frames. From here, I'd like to select the legs and we can push them up here and we can take
our character even up, it's going to be
reaching maximum height. Let's select both legs and
push them forward like this. For the head, we can
spin it forward. Actually this is the head, can press spin it and let me select tans and push them up. Can I see the scap that we got? You're going to fix it later
and using the weight map. Let me just take the hands up. Let me track the
hands position here. She's straighten up the wrist, same thing here for the fingers, we can stretch them. Let me just select
fingers here and we can scale scan them up.
Something like this. Make sure that you are using these individual origins
when scaling the fingers. Let's select them again
and scale up like this. I think we need to push the
hands a little bit backward. Let's see here, just a bit back. Let me select hand, push back, drag down. Same thing here. Let me try to take this
a little bit down here. So we still have to fix
this gap that we got here. Here I'd actually
press A to select all the bones and
we could press I to insert the new pose.
Let's spread that out. The hands here from here
to this position to 20, it looks a little bit too weird. I should not be fully
stretched like this. You can just select these
bones and you can press R to relax them a
little bit down. Let's select them
both and we can press to insert the
new keyframes at 20. Let's strch that
again. We got that. I'd like to spin the back
a little bit forward here. Press I to insert that Nuke frame and let's stick the hands a
little bit forward. Press IgM. We got the apex here. The next pose, it's going to
be, let me just check here. This one here is the descent or the one before the landing. This one. But here, I'd like to add a new pose. For example, we
can jump to frame 38 and here what we can do. We can just take our
character just a bit down. Let me just select this,
drag it down here. Center for the legs, can
just push them down. Let me press RY, pin this one down like this, select hands, push them down. We need to keep our character
in the air for a bit. Same for the other hand. Let me just push it back should not be
stretched like this. Select this, press RY, and cannot relax
it down like this. Let's select all the
bones and we can press I. Let's see the difference here. Archacure will stay in the air. 34-38. So let's jump
to 43 43 right here, and we can create
the descent pose. Can press three here. This
pose that we got here. I'm going to select the foot and the cube, and we
can drag it down. Here, center for the hands. You can push them down.
Or you know what? I'm going to be switching
through the object mode. Let's select my reference
and we can push it to the other side. Or we can take it up. Let's
follow this reference image. Select the rig, go
back to the pose mode. For the foot, let me just
stretch them down like this. For the hands, I like to relax them little
bit down so you can press RY or actually
RX. Let's see. Down like this, sent it for the hands. Let's
stick them down. For the back, I would like to it should not be crouching
the back like this. Let me just push it upward. Same thing here. We can
left that back forward. Here we can spin the
hands this direction. Same thing for this row, I can just spin it like this. Let's select all the
bones and we can press I insert that key frame again. Let's press three and
let me double check. Action needs to be
crouching a little bit. You can select this cube and drag it a little bit down here, probably spin it forward, and for this leg can push
it a little bit back. Let's select all the
bones and we can press I again to override
these keyframes and let's double check There
we go. That's good. Now we got the landing,
I'd like to jump to frame 50 and let's create the landing. Like I said earlier,
the landing is just like this take off. We're going to just
copy the same pose. Back here in the take off we
can do race click Copy pose, make sure that all the bones are selected and you
can jump to frame 50 and we can do
race clock here and paste pose and we can
tweak it a little bit. For the hands or the arms,
they need to be forward. You can select this,
try to spin it, it here, relax it down. That's the difference between
the landing and the crouch. Let me just spin this
one down, fix the hands. Let me press reach to
switch to the side and check that out. Okay. So for the head, I'd like
to spin it downward here. For the hands, they
need to be pushed down. Let me select hands,
push them down here. Same thing for the other hand. Push it down like this. Here are Z to spin those outward. Selects all the
bones, we can press I to create the insides, press three to switch the side, and take a look at it. Probably we have
to take this cube a little bit backward here. Move the hands
backwards as well. Let me select all the
bones and you can press I to override that 50th frame. Finally, we got the idle pose,
which is the first frame. I'm going to press Shift click and let's go back to
the first frame here. You can do write
clock, copy pose, and we can jump to frame
70 and we can do te click and paste that pose and we can press I to insert
the same keyframe. To play our animation,
I've actually set the end to the same end that we
got here, which is 70. Press 70, let's press space
to play the animation. There we go. We can
see that we have a slide in here,
let's see, 43-50. What we can do, we
can either push, I'm going to push the foot
a little bit backward here. Let's press I to override
that. There we go. Now it looks better. Let's
check the fall elevation. We've got the jump. If you
check the arms 34-35 on 38, we have a big change here. That's not good. At 38, I'm going to copy this. Let's select the hands and the arms and we can
do click copy the pose, you can jump back to
34 and you can do race click and paste
the pose and you can press I tort
those keyframes. But the problem here again, we can have them still. They will be locked 25-38. We can do, for example, eight, we can track them down just a bit like this and we
can press Is play. So now we don't have those
weird arm movements. I'd like to straighten
up the waist. It doesn't look good
for the jump animation. We can select it and we can
keep it straight like this. We can press I to insert that keyframe and we can
do race click copy pose. We need to have
the same position or rotation of the
waist on the end. Otherwise you can be
facing a problem. You can see that twist at
the end of the animation. To fix this problem,
you can jump to frame 70 and we can do is click base the same pose of the waist and you can press
I to insert the keyframe. Source breath space and we
got our chump animation.
45. What We’ll Create In This Section: In the previous
section, we focused on the fundamental
character animations, such as the idle animation, the jump, and the run cycle. Now we're going to be taking our animation skills further by introducing an interactive
prop, which is the bow. The character will use it in action packed
shooting animation. In this section,
we're going to start by modeling and
texturing the bow. After that, we're going
to be rigging it using the shape piece for
smooth movements. Finally, we'll
import the bow into our character scene and set up everything
for the animation. By the end of this
section, you will have a fully rigged bow ready for dynamic interactions
with our character.
46. Create & Model A Realistic Bow: On a new blend ce, I'd like
to get rid of everything we got so we can press
A, X, and delete. After that, I would like to
press one we can be facing the front and let's go ahead
and drag my reference image. This reference that has
the bow, the arrow, and the back of arrows, can just drag it here,
let me just align it. We're going to be working
on the arrow first. Let's just have it centered
here. There we go. To model this bow we're
going to be using the curve. Let's get started. I would like to press
Shift A, go to curve, and we can start with a
path, we got it here. I'd like to spin
it on the y axis. We can press. Actually, we
need to be ons mode so you can press Edit to switch edit
mode and we can press R, and let's spin it like this. You can type minus
90 and we can start aligning these vertices with
our bow, the shape of it. Like this, let me just
drag these vertices. You can just push them up here and let's continue
working on it. This curve is going to give us a great curvature when
creating our bow. Drag this one right here
and continue like this. You can also select
the bottom one, it up. So a little bit down here and
we can continue down below. Also here, we can try to select this vertex and extrude
it so you can press E and keep extruding
along with that shape. Something like this,
take a look at it. This is the shape
that I got so far. Let's carry on press one. Next, I'd like to
extrude it or if it's some thickness, not
just a line like this. We did select it, we can jump to the object that are
properties that we got here. Let me just maximize this and
we need to find the bevel. Inside the geometry,
can scroll down. We have the bevel here round. We can increase that
depth a little bit up, something like
this, we can press to supper Y frame and let's see. Probably a little
bit down, 0.06. We go, that looks great. Next, let's start
the alignments, for example, here at the end. We need to scroll or
to scale it down. So we can do on the mode, we can select the last
vertex and we can press S. This way we're going to be scaling that curvature or that curve at the
end of it like this. We can press this, which
is a solid, there we go. Now we have a sharp end. We can also try to just make the curvature a
little bit better. There we go. Same thing here. Also at the other end, as to scale that down like
this and we can push it here. After Tax, you add these last, we got these sharp
metallic pieces, so we need to add them, so we
can select the last vertex. Press Shift D duplicates
and we can press EX and let's move it
here to the left. But at the end or
at the first end, let me just select
this part so you can drag it down. Let
me select this end. We can press alts, scale
it a little bit up, and the other end Alt
to scale it down. This one right here,
we can drag it, for example, here,
Alt to scale it. Up needs to be bigger
than this end. We can do the same thing here at the top sold as
to scale that up. Whatever you do, we can select so if you select this one and if you
press Shift D to duplicate it, if you press each excluded, we are going to have
that curvature here. It's going to be
difficult to get it. So As we can do,
you can press L, X, delete as part and
we need to select at least three of
these vertices. Shift D, and let's
put them here. You can press S to
scale them down, and let's put them at the top, scale even down like this. Press s to make them thinner.
Same thing here at the top. Old as and let's make
it completely sharp. There we go for this one
too, can move it forward. This one letters backwards
to have a nice curvature. Ask to scale it a little bit up. Then we have it, so
we have those ends. They are pretty much sharp here. Next, we need to give it those nice sharp curvatures here. Sharp ends. What we can do, let me just bring
here my reference image to keep eye on it because we are blocking the view
with our model hue. For this second panel, we can switch it to the
image editor and inside this and we can collect on this bow reference. Now
we can keep an eye on it. So now I'd like to add these sharp ends that
we got exactly here. To do that apply
we need to switch between curve into
an actual mesh. With our objects selected, we can go to objects here, convert into an actual mesh. After that, we can
switch Di mode by pressing tab and
I want to select, for example, this column needs to be sharp, this one here. We need to be selecting
the last one here. Let me press one to continue
on the front and we can activate the proportion
ggenleF the type of it, it doesn't need to be smooth. I'm going to be
using this sharp. After that, we can simply drag
this one down and you can reduce that circle
by scrolling down. There we go, can drag it down. Now we got that curvature
here, that sharp curvature. Take a look at it from
different angles. There we go. We can do the
same thing again here. Let me select this vertex and
we can drag it to the left, left a little bit up,
scroll a little bit up like this, and then we have it. Finally, we got another one
right here on the edit mode, let me select this
vertex and we can push it to the right.
A little bit down. There we go. We got
all those sharp ends. You can see that our
object here looks like the deer's horn and
that's the goal here. The next step is going to
be to work on the handle. This is where our character is going to be holding the bow. You can do, let me press one
and we can start from here. Let me just select the bottom
vertex that we got here. Can press one, shift D to select that vertex and let
me put it here. You can press B to separate selection let me select this vertex and let's
continue working on it. On this mode, we can select it and let's start extruding it. I'm going to just get rid
of the proportion tool for now and we can extrude
it to follow this edge. Here we can go inside,
extrude, once again, go down, and continue like this, continue extrusion
along those edges. Here I prefer to
not keep it sharp, so I don't want to do
something like this. I always want to bevel
these edges here. That's why I'm extruding two vertices in
these sharp corners. Here we can start extruding like this. Is going to be fine. Now I like to show you how
can we make this edge revolve around a center point to create a similar
shape like this. Now we need to set the center
of origin of this piece, which is around here. This is not the
center. As you can see it's tilted a little
bit to the right. You can press Shift and rice
click here at the center. After that, let me
just go back here to the objects mode
this object selected. We can go to be origin
to the tree decursor. Now the origin is
here, we can try RZ, R Z, and let's try
to tilt such around. So there we go. Let me just
try this RZ, spin it around. This is what we're
going to be creating. We can jump to the modifiers and let's search for the screw, screw modifier, so we can
collect and then we have it. So now we generate that
shape from this edge alone. Basically, we are
revolving our geometry, this edge around
the center point, which is the cursor by
an angle of 360 degrees. You can see that here
if we set, for example, just 180 degrees, we're going to be covering only the
half of our piece. In our case, we want to go, let me just control Z to reverse pack or actually can
just type here 360. We got our piece.
Next I would have to add the subdivision
modifier to make it smooth. For example, these, we have some sharp edges
here. I did selected. Let's add the subdivision
surface modifier. Now it's completely smooth
and it looks better. Here for the top, we can
just drag it a little bit up inside the bow,
the body of the bow. That's been done,
the last step to do, it's going to be to duplicate
our bow downside here. We're going to be using
the mirror modifier. But first, we have to
apply these modifiers. I'm going to just apply
the screw modifier. The subdivision two, can
just apply it from here. Let me check the top, there
is no modifiers here. You can just merge
them together. Let's select the bow first, he select the handle and
we can press Control J, J to join them together.
Now it's one piece. Next, if we go to the modifiers, let's see the center point. The center point
is exactly here. If you go to the modifiers
and if we add the mirror, we're going to be
mirroring our bow, but we don't want to
mirror it on the X axis. Actually, we want to
mirror it on the Z axis. I'm going to just
uncheck the marine and we can enable the Z merin. There we go, we got our bow. The last step is going
to be to add the string, the bow string, this one right here. Let's
go ahead and add it. I'd like to press one
to be facing front, and again, we can select
a vertex from here. It needs to be at the center, not this and not
this, the center one. You can press one to be faced into front and let's press Shift D to duplicate this vertex
and we can exude it down. Let's press E Z
and go down here. All right. Let's take it down. Here we can check the clap in so that we can stop right
at the middle here. This way on going to
exceed this point. After that, we can
grab this edge. Let me just switch to edge mode. We can select this
edge. We can press P, separate selection so that
you can have it alone. After that, let me just
apply this mirror modifier. I'd like to switch it
to a curve so that we can give it some depth so that
we can bevel it correctly. I did selected, we
can go to object, converge into a curve. Here in the curve settings or the objects that
are properties, we can scroll down until we find the bevel and we can
increase this depth. Let's give it 0.01. There we go. That
seems accurate. You can press one to
be facing the front. Yeah, the size is good. But here at the end,
I'd like to give it. I'd like to make it
interesting at the end. Also here we can do t
click and shade smooth. On that this mode, I'd like
to select this vertex, Shift D to duplicate it and we can track
it down a little bit. Let me press E to
extrude and Z to go up. Sounds like this and after that, we can press L to
grab this bag that we just created and we can
press S. Basically, we got it, so we got that piece. For example, this mode, I'd like we can
select this vertex, activate the
proportion, this tool, and we can drag it a little
bit to the right here to push that inside. There we go. Finally, we can duplicate this piece because we're not using the mirror
multifer for this string. We can press L to
grab this part. Let me get rid of
the proportion. Shift D to duplicate this
piece and let's drag it down. Let me just press one
to be facing front, and we can drag it all
the way down here. Then we have it,
so we got our bow. In the next come lecture,
we can add a row.
47. Modeling Arrow: The next step is going
to be create the row. We're going to be
using the same trick you used with this handle. The screw modifier to define it. On the top here,
we can press shift right click at the corner
of our reference image, and we can press Shift A, go to Mash and I'd
actually start with a single t at single verte. From here, we can
start the extrusion, so let's extrude it
all the way here. Extrude extrude the gain here, and we can continue
following that edge. At this position, I'd like to separate the head of the
bow from the body of it. What we can do, we can
exclude, for example, inside here and we
can press Shift D to duplicate that vertex and
we can put it on the top. Now it's going to be inside the head and we can extude
it all the way down so you can press E and Z to keep it
straight and we can drag it down until we reach the end
of the bow. Which is here. For this piece at the
bottom of our row, one is going to be including
it in the screw modifier. I'm going to just stop
right here and after that, we got the center point which
is here, which is great. I this piece selected, I'd like to go to the modifiers and we can search
again for the screw, screw modifier, and then
we have it, so we got it. Probably this part here
looks a little bit thin. Let me just press L to
grab only the body of our bow and we can drag it
a little bit to the right. So this way, we're going to
be increasing the size of it. You can take it even down,
something like that. For example, here, we
can tweak these verses. Let me just press Lu let me just switch to the edge
mode and we can select this part and
push it outside. And there we go, so we got it. For this part right here,
we can add a plane. Let me just press Shift
and click Shift A, we can go to mash and
let's through the plane. After that, we need
to spend it on the X, so we can press R X
and let's type 90. We can press tab to switch the edit mode and we can ski it really down like this. On the edit mode, actually we are already on the edit mode, so we can switch it to
Vertex mode and we can select these vertices and give them the same shape
of the reference image. We can press to switch a R frame so you can see our
geometry even better. Drag this one up, this
one down like this. You can press L to
grab this unit, Shift D to duplicate it. Rise click and let me
just drag it down here. Finally, for this
piece or Shift D, again, we can track it down
here and let's work on it. I'll let you select this vertex and you can drag it
all the way down here. Same thing for the other vertex. Here we can insert an edge
loop so you could press Control R like it is and we can select this
vertex and drag it up. For example, here. After that, we can
bevel this section. We can press Let's click to grab this edge and you can press
Control B and let's bevel it. We can insert two
edge loops like this. Now we got that nice
curvature at the end. C just drag it.
Let me just select these versus this and drag
it a little bit down. Good. We can also add some curvature here
on the right side. Let's press Control R. And we
can push this part inside. You can press to activate
the proportion dual so the type needs to be smooth and we can push it
inside like this, press d, Control B, and
let's spell all that. All right we got
that curvature here. Next, what we need
to do we have to duplicate this piece
to the other side. The center point needs to be the center point
of the arrow. Let me just select it from
here, select my arrow. We can press Shift S and
cursor to select it. Let me go back and select
my piece here and I'll actually make the pivot
point this tree dcursor. Here for the pivot point, we can collect and switch
the tree dcursor. Now we got it here, we can press shift D to duplicate this piece. If you press R Z and 180 degree, we're going to be
perfectly duplicating this part through the left side. From here, we can just
join them together, shift, select this piece, and press
Control J to join them. For the pivot point,
it needs to be back to the medium
point and there we go, we got our row.
48. Modeling Bow Bag: So the last piece to
create is going to be the, the arrow pack
that's going to hold all these arrows. Let's
go ahead and create it. We can press one to be facing the front and add lecture
press shift and rise click here in the center of
the pack can press Shift A, mesh, and you can
start with the cube. You can press E, switch
to the why frame on the Edit mode
by pressing tab, you can ski it down
here and we can start aligning it better. Here we can drag this up, select these two versus Cs, and we can press E to extrude and let's
se it up like this. The top needs to be here. Same thing here for the bottom. Take this part to the left, and this one to
the right, and we can select again these two
vertices and extrude down. We can extrude three times. Here at the end,
we can press R to spin it round and let's
scale it like this. Take this one here to the left. We can push it down
here by pressing G, G is for grabbing. And we can continue like this. Now we got that piece, let me just go back to
the solid and from here, what we need to do, we can
press A to select everything and we can make it a little
bit smaller on the Y axis. As Y, let's make it
small like this. After that, I'd like to add
the subdivision modifier. So here on the modifiers, we can add the subdivision modifier. And the top, it needs
to be open this mode, we can switch the face mode, you can select the top face
X and delete that phase. Now we got something that
looks like the back, can do right click
and sheet smooth. And I'd like to give
it some thickness. I don't want it to be like this. What you can do, we can add
the solid five Multifier let's add here, solid the fi. This we're going to be
adding some thickness to it. You can increase
that thickness up. Sometime 0.02. There we go. Same in here for
the subdivision, I'd like to increase it up to two to give it more details. Now let's work on it. I'd
like to add this edge here, this frame at the
tops on this mode. We can press Control R. For example here and after that, we can press Alt on this
edge to grab that edge loop, and we can press E. Extrude it, we can press right click and then we just press
S to scale it up. We got that edge. Here we can, for example, make it
a little bit sharp. Let me just switch
the edge mode. We can press the bottom. We can press Shift and E, and we can scroll
a little bit up. This way we're going to be
making this edge sharper. We can do the same
thing to the top on that mode, let me press Alt. Here left click Shift E, and let's make it sharper. Nice. Also here
we have to smooth out this shape so we
can select our objects, right click and sheet smooth. Now it's sharp, it's smooth. Nice. Let's add the
other component. I'd like to add this hook that's going to be
on the right side. So let's do that. On that
mode, we can select. Let me select these, these three faces
that we got here, Shift D to duplicate them, and we need to scale
it on the Y so you can try S Y and let's
scale it like this. All right we got that edge. At the end of it,
let me just select the end here and actually, that's not the end of
it. Let me just select. We can select our back by pressing L and
press H to hide it. Let's just work on this hook. Compress one for
the top and we can extrude it sideways down below, now it looks like the hook. You can scale up if you want, you can scale up the back
to match the reference, but it's not a big deal. Just keep it small next, I'd like to add these strips. This strip is going
to hold this hook. What you can do, you
can select our objects. Alt should bring back any
hidden part and I'd like to select this frame here we can press Alt Shift
D to duplicate it, and we can drag it
a little bit down here, can try to sket it up. There we go. Select
the front face. You can push it to the right. We can try to spin it to get
rid of this clip in you, so you can press R, Y, spin it like this outside. Let's make sure that
the top is fine. If you want to
make it look good, you can just select
the back here, the back face, and
you can drag it down. Also before we can do
that, we can insert an edge loop right here, same
thing on the other side, Control R, and now we can select the backface
and drag it down. This way we're going to be
having this nice curvature. Also here we can push it
to the right. There we go. We got that hook. We can do the same thing
here for the bottom. Let me just press Alt
to select this edge. Shift D to duplicate it and let me just
select the back face, push it a little
bit to the left. Same thing here for the
front, we can select the front face and let's push
it outside for the edge. Something like that,
the other edge to, you can push it out
and we got our back
49. Texturing Bow & Arrow & Bag: This new lecture,
we're going to be texturing our collection here, the bow, the arrow,
and the back. Let's get down to it. I'd
like to split my scene here. I'm going to first, I'm
going to just collapse this timeline, can do right click and
join down and we can split it vertically like
this into two parts. The left panel is going to
be for the shader editor. I'd like to press N
to hide this panel, and let's start
with the main bow. We can select it from here
and let me press E so it to the material preview
so that we can see the materials
applied here at the top, I'd like to scroll up
and you can click on. Here I'd like to call it wood. You can start with
the wood material. I'm going to just zoom in here and I'll actually bring a text, wood tax that we're
going to be using. This one right here, this wood. I'm going to simply drag it and drop it in the
shader editor here. After that, we can connect
the color to the base color. So I can see it
applied to the bow. We need to tweak
it a little bit. I'd like to increase its size along this axis
along the Z axis, which we can do, we can
select node our texture here, and we can press
Control The control T is going to be
adding the mapping and the text for this
shortcut to work, you need to be enabling the node wrangular inside
the preferences, add on, can search for node wrangular make sure
that this box is checked. Once we have this
add on enabled, we're going to have
access to the shortcuts to control T shortcuts. Next actu, let me just
experiment with Y. Actually I'm going to
be scaling up on the X. You can just scale
up the X by five. Five is a little bit too much, so let's try three. There we go. That looks better. We can work on it even better. I'd like to work on the
reflection of our wood. The reflection going to be
tweaking the roughness. If you take it down,
it's going to be glassy, if you take it to the right
side, it's going to be rough. Instead, I'd like to use a cut ramp so we
can press Shift A, search for cloram this
note right here and we can connect our wood texture to the factor and the color
ramp to the roughness. From here, we can tweak
these two handles. Let me just tweak them. You can take the white
handle to the left side. There you go, and you can
take the right handle a little bit to the
right, just a bit. This we're going to be having
some nice variations here. You can see that. I'm going
to just go with this. I want you to be a
little bit shiny. Not that much, something like this. Now for the second part. For example, this party, we
can give it a different wood, axu this part here. What we can do, we
can select the bow and we have to
duplicate our material. I'm going to scroll
down here until we find the materials and we can
add a new material here. It's going to be
exactly the wood. You can just select
the same wood. These are the same materials, but here we have
to duplicate it. If you click on this button, new material, so we're going to be duplicating our
material here. For me, you can just call
it the second Wood two. And from here, we can
work on it a little bit. You can give it a
different taxor, not taxor but
different feelings. Here we can use the contrast. Shift A, let's search for
contrast, brightness, contrast node, and
we can drop it between the wood taxor
and the perciple BSDF. Here we can tweak
it a little bit. For example, for the brightness, we can give it -0.1. Let's see. We're not seeing anything
because we didn't apply the second material
to this piece, actually to this piece
here, not the bottom one. On that this mode,
let me just select. Compress old, shift
old and continue selecting this part
we reach the end. From here, we can press,
switch to why frame, and we can press
C. This way we're going to be making this
selection much more easier. Or pressZ switch back to the misty preview
and we can apply the second wood material like this and there we
go we made a difference. Now for the handle,
for this handle, I'd like to make it metallic, just like the reference image. Let's select our bow and we
can add the third material. It's going to be metallic,
metallic like this. Actually Metallic is
written like this. On the edit mode,
I'd like to press all A to the selects
everything and we can select only the handle and we can assign the metallic
material to it. On the left side, we can
due I'd like to take the metallic value
all the way to one to make it metallic
and for the roughness, can drag it a little bit
down to make it shiny. Also for the color, I'm going to be making it
dark a little bit. Here we need to work
on this string. I'd like to add a new material. Let's call it string,
and we can give it a dark color and it
needs to be rough. Can just take the roughness 2.6. There we go, we texture the bow. Now let's move on to
the second element, which is the row. Here I texture it like this. For example, we can give it the same material that
we gave the handle. Let's just use it here. We can use the metallic and
we can add a second material. It's going to be
the same string, symetry we used for the string, and we can apply to
the body of our row. You can just press L here. At you touch selected you can
press Z, switch to Y frame. How can we select this object? Actually here we are still
using that screw modifier. What we need to do
we need to apply it so we can jump here to the modifiers and we can apply the screw modifier for our row. Now if we press L
here at the middle, we're going to be
grabbing the body of our row and I'd like to apply
to it the string material. Can press Z, switch back to material preview,
and there we go. This part here is shiny
and the body is rough. Now for the bank, let me select the back hue and we can assign
to it the wood material. Something like this, I
prefer the second wood here, just like the reference image. But here we have to work a
little bit on the UV map. First, I'd like to apply the subdivision modifier
that we got here, you can just apply it and apply also the solid f modifier. On that mode, we can select
everything and we can press U and wrap and we can try
this Smart UV project. Let's see how it goes. Not bad. Probably we need to sce
it up a little bit. Let me just split my shader
editor here into two windows. The bottom is going to be
let me just scroll here. You can use the UV map. On the edit mode, we can try
to scale up all these UVs, so let's press A
and scan them up. But actually the UV
map is not that good. What we can do, let me try different method of
unwrapping our bag. I'm going to be using
here, switch to the edge mode and we
can press left Alt here to grab that edge and we can press Control
E, and let's mark C. This way, we're going to be
cutting it from the half. Let me just press L, press U, wrap and angle base. There we go. Now
it's two pieces. And the texts looks
better right now. So now it looks
better. We can try, for example, to
scale up the texts. On the edit mode, we can
scale up these two parts. There we go. For these parts, we can give them a different
color or different material. On the material properties, we can add the second material, it's going to be the wood, the regular wood that
we got here and on the edit model to
deselect everything and we can select
only these strips and apply to them
the second wood. Finally, for this hook, it needs to be metallic,
so we can add here. The third material
is going to be the metallic and on die mode, old you deselect everything
and we can press L to select only the hook and
you can click on a sign. And there we have it,
so we texted the bow, the arrow, and the back. As the last step, I would like
to work on the normal map. I would like to add
some bumps to my wood. Let me select my wood
control space to go back to the
default layout and we can select the first wood here and I'd like to
work on it a little bit, let me just drag
this to the side we can keep an eye
on the wood here. I'd like to press Shift
A and we can search for bump node and I'd
like to connect the output of my wood texture to the height slot of the bump. And after that, we can connect
the normal to the normal. There we go, we got some bumps. I'd like to reduce the strength down to something like 0.15. Basically we got it, we got
some realistic bumps here. Let's do the same thing through
the second wood material. Shift A and let's
add the bump node, and we can connect the output of the wood texture to the height and the normal to the normal. For the strength,
let's set it to 0.1, and we got it also here. Since we are using the same
materials for the bag, you can see that
we have the bumps applied to the bag too.
50. Baking Bow Asset (Make It Game Ready Model): In this new lecture,
we're going to be baking our bow model textures
to be able to export our assets outside blender into game engines
like NREL and Unity. If you don't want to export
this asset outside blender, you can skip this
lecture and move on to the next rigging lecture. We're going to be
rigging our bow asset. So let's go ahead
and bake our model. Before we can start
the baking process of our acids as we got here, we have to join them
into one piece. Basically, we need to
bake all the materials into one single taxer, not a taxar for every
component here. That's why we need to
join everything together. Let me just make
sure that we don't have any modifiers applied here. We don't have any
here for the row, for the bow, here we
have the mirrors. We'll just apply
the mirror here. For the string,
everything is good. Now I'm going to just join
all the pieces together. Just select them all and
we can press Control J, J as join. We cannot do that. Let me just try
again, Control J. We cannot do that
because I think the string is still a curve. We cannot join all the
pieces together because the string is not a mash,
it's still a curve. Let me just select my
string here and we can go to objects,
convert into mash. Now let's try again. We can
select all the components, press Control J, and there we have it, now it's one piece. Same thing here, we have to join this part two. Control J. Good. But here we have different
material for this part, let me just fix or give
it a white material, so you can jump here to
the material properties and let me add a new material, it's going to be white and
you can assign it to it. I'd like to keep it white like this at the end of that row. Next step is going to
be the end wrapping. I'd like to select
the bow collection here and we can press
shape the to duplicate it. This one is going
to be the baked on. Here the bow, let me just
call it original and this one here it's going
to be the bowed bow baked. For the bake, we can
select the bake. I'd like to delete all
the materials that we got in the
material properties. Can just delete them by
clicking on this plus here. We can hide, for example,
the origin for just now, that's completely
white, the bake, so we have to give it
the proper wrapping. On this mode, we can select all of them by pressing
A and we can press U and wrap and smart UV
project. Let's see how it goes. There we go. This looks
better. It's all cleaned. Control the paste to go back
and we can roll with this. Now we need to add
a new material, so the single material. Let's add it We can
call it bow, bathe. In the shader editor, I'd
like to add an image taxer. Shift A can search for Image taxer let me just put it here on the side and you can connect it
to the base ccutter. After network can click on you, let's give it a four K taxer. Here it's going to
be the bow texter. For the width, you can just
left click and drag and we can add the multiply sign by four and we can add new image. Now we are ready, you
got the taxor here, so make sure that it's
selected like this. Let me just bring
back my original. You can select first
the bake and we can press Shift and select
the bow original. You need to keep an eye
on this bow Texere. After that, let's
jump to the settings. Here in the render
properties, first, we need to be on the cycles because the EV doesn't
support baking. For this device, I'd
like to use my own GPU. Let's scroll a little bit down here for the render settings. I'd like to limit the max
sample to just 25 because 4,000 is going to take ages to bake and we can scroll down until you find the
bake settings here. You can start with the diffuse, which is the color,
diffuse color of our bow. Down below, I'm going to
uncheck these contributions. I'm going to keep
only the color. Let me just check
indirect and direct. This might be the lighting. If you have some lighting
and if you want to bake it, you can just check the direct
and indirect lightings. Also here, I'd like to check
the selected to active. This is the selected
and this is the active. For the extrusion, we can
increase it to just a bit up, something like 0.1, avoid having any problems
with the baking. Now we are ready, so let's
go ahead and click on Bake. All right, we also bake
the base color of our bow. What we need to do
we have to save it so we can click on Image, save us, and save it
here as base color. Base color. Save us
and the next step. The next step is going to
be to bake the roughness, here, the glossiness of our bow. Let's click on bake The baking is completed
for the roughness map. I'm going to just go ahead
to image and let's save it. Can save it as roughness. Click on Save as image. The final channel to Big is
going to be the normal map. For the big type,
you can switch it to the normal and let's
click on Bike. All right to the Rios,
we got the normal map. I'm going to just go
ahead and save it, save it as normal. Top click and normal
here. Save as. Now let's go ahead and put everything together,
all the textures. I'm going to just hide my
original ball's going to use it anymore and we can focus
on the baked version. Here you can press
control space to maximize this window and
start working on it. I'm going to just delete
this texture here. After that, I would like to drag and drop the base clor first. After that, we got the roughness and finally we got
the normal map. You can just drag
it down. So let's go ahead and connect them
through the right salts. For the base color, it's
going to go to the top. The roughness can go
to the roughness map, and finally here
for the normal map, compress Shift A and let's
add a normal converter. Normal map, this second vector, and we can connect the color to the color and the
normal to the normal. For the normal map
that we got here, this space color that
we got at the bottom, so we have to switch it from
the S or GB to then color. Now let me just press Control
space and double check, check the final results.
Basically we got it. We got our bow, it's now baked and ready to be exposed to
any game engine.
51. Rig & Animate Bow & Arrow Using Shape Keys: This is going to be
rigging our bow. First, what I'd like
to do, I'd like to separate each unit
alone on this mode, you can press A to
all the elements and we can press L to
grab only the bow. Let's not forget
these sharp corners and string and these
string holders. After that, we can
press G to grab it so that we can make
sure that nothing is left. We can press B and
separate selection. After that, we can press
search wife frame. We can select the row, and press B, separate selection. Now each part is separated. We have the bag, we have the row, and
we have the bow. I'd like to reset their names so we can press control
space to go back here. Just so for the original
hearing, we just delete it. We want to keep only
the baked version. The first one is the back
we can double click and let's call it bow B. After that, we got here the bow and finally,
we have the row. Here let's just keep it as back. For the reference
image, I'm going to just delete it X
and the deleted. Let's press E, switch
back to solid. I prefer to work on
a different shading. Let me just collapse
these windows. Sent in here, you can do
right click Join left. For the shading, I'd like to
switch it. Let me show you. You can switch it to
the Mt cap first and we can use this one here, the studio light. I
really like this one. Next, let me select my bow. You can drag it a little bit to the right and let me
select the arrow. We can reset the origin
from here to here. You can go to objects, set
origin to the geometry, and we can spin it around. We can press R Y, and let's spin it by -90
degree. You can put it. Let me just press one
to be facing front, and we can put it here. This is it's correct position. We actually let me just
push it forward here. So we have to grab it
from here and push it. Let me select the
back. We can just hide it for now and let's
go ahead and rig this. I'd like to join them both together so we can
press Control J, join them together, and we can press N. Let me
access the item. The scale is such a one
as well as the rotations. If it's not the
case, we can press Control A and apply the
rotation and the scale, just so that we
won't going to have any problems with the rigging. Next step, it's going to
be to use the shape keys. Let me just maximize this
window here for the bottom, can do s colic join down. With our row and
the both selected, we can jump to
this object that's a properses and here
we have the shape key. First we're going to
need to add the bases. This one, there's no
need to touch it and we can add the new state
or the new key shape. I'd like to call
it pole Release. You can add release. With this state selected, we can increase its value
w one and on the s mode, I would like to select
the row elements here. We can press L to select all these units and we can
push them real back here. This is the maximum state. We got that. Next for the row, you can switch I frame. We have to select
only the middle part, this part here of the
string and we can push it real back. For example, here. After that, we have to deform a little bit the
bow, this part here. So we can do, we can select. Let me just select this edge. Shift select the same
edge on the bottom, shift select this part here, and we need to drag it backward. But we have to drag it backward with the proportional
Edison tool enable. We can just enable it here and we can drag it a
little bit backward. Let me just increase that circle up something like
this. Check this out. If we exit the edit mode,
go back to the optics mode. Let me be on the solid. If we take this
value back to one. This is what we're
going to be having. We're going to be
pulling our bow here. That's the first
state. After that, I'd like to add the
third shape key. It's going to be the shooting. Let's add it here, can
call it shooting a row. Let me just take this one
all the way to zero here. You can select this shooting
row and on the edit mode, I'd like to select
only my arrow here. You can keep
pressing L to select all these units and we
can push it forward. For example, I'm going to
be pushing it forward, but without the
proportion adding tool, you can push it for example
here. Let's give it a try. You have the polar
release, we're going to be pushing like this, releasing it like
this and after that, we're going to be
shooting the row forward. This is how we're going to
be doing the animation. If you'd like to take our
animation even further, we can add the string vibration. Once we're going to be shooting, here we're going
to be pulling and once it's going to
be shooting here, we need to add some
vibration to the string. So to do that, I'd like to add a new state or a
new shape key here. Let's call it string, vibration. I'd like to put it above
the shooting arrow. We can just drag
it up like this. We did select you can its value all the way to one
and let's animate it. One's going to be using,
not the row here. A HD select everything and I'd like to select my strength here. You can switch to the
Vertex mode and I'd like to select these
vertices that we got here. We need to have them
vibrate like this. I'd like to take
it a little bit to the right, a little
bit like this. All right. Let's see that. We're going to be
moving it like this. Now we need to animate it to
be fluctuating like this. Now we got all
these key elements, so next we need to start
the animation process. I'd like to split my
scene upward like this and for the bottom, I'd like to switch
it to the timeline. First, we need to pull just press N to hide
these panels we got you. This is the normal state,
but for the string, let me just take
it back to zero. Let me select the polar release. Shape key first,
we can animate it. We can insert this value
here, which is zero. You can do race collect
and insert keyframe. At the first frame, we have the polar release
shape key set to zero. After that, you can
jump to frame 15. Let me just zoom in
here. 15, you can do Shift and race collect
to move in the timeline. I'd like to take it
all the way to one, going to be pulling
it down like this. Let's insert that
second keyframe so you can see the
difference here. 1-15, we are pulling backward. Again, the shooting is
going to be at frame 18. We can jump to 18 here and let me just take
this one back to zero. Can race collect
Insert that key frame, and we can jump to frame 25 and I'd like to be
shooting my arrow, so we can just take this
value up to, let's say one. Can race colle insert
that key frame. I'd like to set the
end of my animation to 25 so you can collect
here and set 25. Now we can press space
to play the animation. So we didn't enable or we didn't insert the key frame
of the shooting row. Back to 15, I'd like to increase it down or take it down to just zero. C R ****, insert that keyframe and let's
play the animation. There we go. So now we got it. The last step is
going to be to add the vibration once we're going
to be shooting our arrow. For example, 15-2018
or even to 20, we can add the vibration. Back to 15, we can animate this. We can just increase it up. Or actually, let me
just do as click insert a keyframe at 15 at frame 15. After that, to keep fluctuating our string vibration like
this, which we can do. I'd like to split or switch
my scene from the timeline to the graph editor so that you can have more control
over our animation. And for the Kizi
I'd like to select the string vibration and we
can add to it a modifier. Here on the right, we
have these modifiers. I'd like to add the
noise modifier. Now if you press space, you can see that our string
is vibration here. But we can work on
it even better. Here for the scale, I'd
like to increase it up to 1.5 for the strength, I'd like to give it 2.5. Let's play, there we go. We got that vibration. But we need to
limit the vibration only once the string
is already released. At the start here, we have also the vibration,
to make no sense. What we can do on the
bottom of our noise, we have this restrict
frame range. We can just check it here
and let me expand it. We need to start
once we're going to be releasing our row, for example, at 15. Let me start at 15. At the end, it's going to be 20. Let's end here to 20. You can see that this
part here is noisy 15-20. Let me just play. Again, that's
probably we need to increase that to 25 the end. We need to have some reaction after the shooting
after the shooting. But if you notice we
have some sudden stop, you can see that here. We need to have
some smooth noise. It should not start
sudden like this. We can do, we can use this blend in. I'm going to increase it up. There we go. Ww we
have smooth start, can increase that to five
and sent in for the end. Here we can set it to five. This way we're going to
be having a smooth start and smooth end for
the vibration. We just press space
and let's take a look. Basically, this
is the animation. We animated our ow
shooting a row.
52. Import Bow Asset To Character Blender Scene: So here we are back to
our character here. So here we have the
jump animation. So this is where we left our work for the last lecture
of the previous section. So from here, we're going
to be printing our bow and we're going to be animating
it with our character. But before we can do that, we
need to clear our timeline. So I'd like to save
my jump animation. We didn't do that in
the previous lecture. So what I'd like you to
do, we can call it here. So let me just call it Caracure. Dash jump, and we can
simply push it down. So now we cleared the timeline. Also here, let me just expand the non linear animations
at the bottom, and let's take a
look at what we got. We got three animations so
far. Let me just zoom in you. We got the jump, the
idol, and the run. I'm going to just check all these boxes so that
we can start fresh. So now we got only this pose that we got here,
which is the id. That's time to bring
our bow model. Let me just collapse all these
panels that we got here, I'm going to just
leave the timeline. Here, let me just zoom in to reset the number of
frames that we got here. Next, I'd like to bring my bow. I'd also to switch back
to the objects mode. We can press Shift
S and cursor to the world origin we can
bring the bow right here. After that, we can go to file, append, and here we have
the bow, which is animated. Let me just double click on it. We can go to object and I'd like to bring both
the back and the bow. Can just click on a pend. And there we have them, we have them here. Let's work on it. I'm going to just take
it a little bit to the right and let's
take a look at it. I press space, we got our
bow and it's animated.
53. Mastering The Rig Creating Bow Shooting Pose For Character Animation: So now that we got the bow
asset with the aracure, it's time to create
the shooting pose. Let's go ahead and
rig our character with the bow asset together. From here, let's get to work. I'd like to spin it around. We can press RZ, and let's
spin it by nine degree. We can press three to be facing actually this is the
front or yeah the right. I'd like to scale
it down and put it close to my character. I think this is a
reasonable height. I'm going to just put it here. Also on the front, we
can push it sideways. As a guide, I'd like to use a reference image of
our character here. Let me just show
you. I'm going to be using this one, the game cover. Let me just print that reference image here on the right panel, we can just split our
panel up like this and we can switch the new
one to the image editor. After that, we can simply drag this and drop here, you're
going to find this. You can do quick research, Tom Brad game cover, and
you going to find this. Let's get to work. First,
I'd like to select my rig here and we can switch
to the pose mode. I prefer to start in
frame number one. From here, we can
select the cube and I'd like to spend
it sideways here. It sounds like
that. For the leg, we can spin it a
little bit sideways. For the hips, we can press RZ and let's spin them
a little bit like that. Let's continue. For the head, obviously, we have to spin it. We can press RZ and
let's spin it like this. Now for the position
of the arms, H. Let me just
take this hand up. You can press R,
spin it like this, R Z. There you go. Same thing for this
row that we got here, you can press RX or
RY. Let's lift it up. We can take this hand and push
it here, it upward, here. This hand is going
to be grabbing the row from the bottom
of it and the other hand, it's going to be
grabbing the bow from the handle position. Let me just select
the other hand and we can push it up and up here. Also make sure that you are
not checking the marine because our pose here
is not symmetrical. Let me just push my hand here, we can press R to spin it
and push its way forward. It needs to be
completely stretched. You can see that here. We are on the right track here we can
press R again to spin it. That's good. Let
me just go back to the object mode so that we can
be able to select the bow. You can press three or actually control three
to go to the other side, and let me press G to grab the bob and we can put
it in the right place. This position right here. Also, let me try. I'm
going to try to pull. Here for the pool release, I'm going to just take
it all the way up here. And this way, we can
select the rick again, switch to the pose mode, select the right hand
and let's push it up. Here. Let's take a look at that. We are on the right
track. After that, here we need to set
the fingers right. They need to be holding our bow. For the barn fingers, I'm going to select this bone, press R. Spin them or
bring them all together. Select this bone here, press
G, and let's scare them up. This one can press R
to spin it downside. After that, let me select
these two bones and you can press R Z and let's
spin them invert. Let's see. So like that. We can select these two handles and we can press S to
scale them inside. For this one here,
you can press R, spin it a little bit
downside. Same thing here. For the top two fingers, the index and the middle finger, I'd like to select
these two handles and we can scale them down.
There we have it. Now our character is
going to be holding. For example, you can
fix that clip in, you can press R,
spin it like this. There we go. Now it's
holding that row. You can try to scale
these handles even down. To make that tight,
holding tight. For example, here
we can spin it on the inside. There we go. We got the right hand correct
for the right position. Now for the other hand, which
is left, the left hand. For the left hand, I'd like
to let's first spin it. We can press R Y,
spin it like this. We can press R X, and let me just take it a
little bit at the side here. We need to make the fingers
spin around that bow. That's the first level. Let me select second. Here we can press Z, switch
through the Y frame. So let me select this level. You can press RZ and let's
bring them together like this. But for here to make the
fingers look better, I'd like to bring
them all together. This part, tries to push it up. Let's take a look at
the fingers here. For example, the index or the
thumb, this is the thumb. You can press RY or actually
X to push it back Y. It needs to be around
around this handle. Can push that forward
a little bit. X to push it down. There we go. For this index here, I'd like to work on it a
little bit so you can press RY to spin it
down. Same thing here. You can push them a
little bit backward. I think we have to
scale these fingers a little bit down.
They look huge. You can just push them backward. Same thing here, push them
back here and this one Let me try to flip the
end of these fingers too. Sounds like that looks right. So we got our pose, so we can press A to select all the bones and
we can press I to insert that keyframe.
Now we got it. We can tweak a
little bit the pose. Let me try to spin
around this cube. Or for example, you can take the legs a little bit
backward and for the hips, you can try RY, spin that outward to make the
pose a little bit sexy. There we go. We got
it so we can press A and press I to insert
all the keyframes. Now if you press E, let me
just switch to render mode. We already set the
lighting, I believe. Let's take a look at this.
We don't have any lighting. I think I'm going to just
bring back these spots. For the head apex
utility is a little bit downside, check this out. If you press RY, if you spend it like this,
it's going to be even better. Let's press I to overwrite
that new position for head, and there we have it. Now we got the shooting pose.
54. Rendering Cinematic Shot Character Shooting Bow Position: In this tutorial,
I'd like to render a nice shot of this
shooting pose. We're going to be
adding a camera and rendering this image. Let's
go ahead and do that. I'd like to start by adding
a camera so we can press Shift A and let's go to Conscroll down until
we find the camera. If you press zero,
you're going to be switching to the camera view. We have to point
our camera toward our character so we can
just find a nice pose, for example, pose
like this and we can press Control Alt and zero. This way we're going to
be blocking the camera through the three
view port view. So we can press G to grab it and let me just grab
it up a little bit. For example, here actually, we can track it down and try to spin it upwards.
Let me just press N. We can access here item. Let me press shift in
middle mouse so that we can move my scene here the camera and we can spin up the camera a
little bit like this. Let's keep an eye on this. You can probably push it
a little bit backward, something like this,
probably down, there we go. For the resolution of my camera, let me just work on it here. So we can scroll up define these render
properties, scroll up. Actually not the
rendered properties, but the output, this one here. In the outputs, I'd like
to set, for example, the X resolution to
the same as the Y. You can just copy this value, which is the 80 and let
me just pase it here. All right so there we go, we can drag that camera a
little bit down. Nice. We can push
it even forward. Sounding like this. I'd like to spin a
little bit my camera. Let me try this or
actually the other side. You can give it 15 here. Next step, I would like to apply some improvement to
my character here. For example, the hair.
I found a cool trick. Let me just select
the hair here. On the left panel, we can switch the three DV part here to the shader editor and I'd like to show you some cool
tricks that we can apply. Let me just zoom in here. This is the node
setup of the hair. First, I'd like
to increase this. Let me just find it
first, the Alpha. We can decrease it
down to just 0.5. So there you go. You can see from distance the
hair looks better. This is without, it looks completely flat
and non realistic. 0.5 looks better. Let me just give it here 0.5. We're making the hair a
little bit transparent. That's what we're doing here. Next step, you can
increase this metallic. We're going to be
cheating a little bit, but it's going to
be better because the hair is not metallic, but I like to increase it up. Can see the result
that we got here. It looks way better. I think something like 0.6 is
going to be great. Now the hair looks
much more better. For the skin, I'd like to
improve it a little bit. Let me select my
characterre here. I'd like to add a contrast. Between the base color
and the base color, we can press Shift A, let's
search for contrast Node. This one or you can
drop it in between the structure and
these principle SDF, and for the brightness,
I'd like to reduce it a little
bit down to -0.1. Now let's press
Enter, there we go. We increase that brightness and the character looks
better right now. It looks a little bit burnt. Let me just find
a better way can increase this up would
actually have to decrease it. For the contrast, let's
try zero point -0.1. Okay. Let me just see. We can select this and compress to mute it. We can see difference here,
increase the contrast. For the eyes, I'd like to
work on them a little bit, let me just go through the eyes material
that we got here. I'd play a little bit
bit this IOR value. I'd like to decrease it down to something like one. One
is going to be better. Let's go ahead and
give our scene and render so we can jump here to render and render image. All right so the Vos
we got our render, so we need to work
on it a little bit. Here the bow seems
a little bit off. Let me just select the bow here. So I think it has to
do we didn't save thatas key frame here.
Back to frame one. Let me just jump through
this object of properties and actually we are already
animating this pot release. What we need to do, we need
to overwrite that position. For example, here
we can do raclck and replace TAS keyframe. Let's go ahead and
give our scene a render or so there we
go, so we got it fixed. But I to work a little
bit on the light. So the lighting
seems a little bit off. Let me just select. I'm going to be selecting
these light sources as we gave you, and
let's work on them. This one on the back,
I'm going to just get rid of it, so let
me just delete it. We can work on this one here. I'd like to not make it blue, so let's make it. I'm going to just keep it white. We can increase its part to
1,500 a little bit better. We can also try to
switch it to a sun. But here for the strength, let's give it only 150,
even that too much. Let's go with 50 here and we can tweak its
position a little bit so we can press RX and let's find
a better Bose here. The lightning is
really important here. You can try RX or actually
RX on the other side. Now we need to be having
some shadow on the face. Sounds like this looks better. You can click on the
color. Let me just give it a better color here.
What about the blue? I think I'm going to
go with this purple. Let me just go with the blue. This blue here seems
fine. Let's press zero. We can also increase
the strength. Let's say 75 and let's give we can
render the second shot. There we go, we got our render. All you have to do, we can work a little bit
on the compositing. Let me just jump
here to composite. We can click on use
notes and let me just press N to hide that banal and let's work on it here. First, I'd like to
bring my render to put it on the background
so that you can see it. I'm going to P press and
Shift A, search for viewer. Viewer node, spot it here and you can connect
the image to the image. This way you're going to be seeing our image
in the background. We can press V, if
you want to zoom back V. I'll let you start by adding some glare
so we can press Shift A. Let's search for glare node, and we can drop it here. Also, I'm going to be connecting the same glare to the viewer
so that we can see it. We got that. Let me just switch the type from streaks
to let's see ghost, just to see the changes. What about the fog
low? We got some fog. Especially here, I really like
the fog that we got here. I'm pressing old and middle now so that you can
zoom right here. Like this fog. We can increase that size to let's say
nine and for the quality, we can keep it at high. Let me press V to zoom back. There we go. I also like
to fix this problem that we got here with the
finger, this part here. Let's go ahead and fix it. Back to the layout,
you can zoom here. Let me select the rig. You can switch the pose mode, and for this finger here, we can press RX or actually
R Y and we can drag it down. Same thing for the other fingers can relax them a
little bit down. Or at least press A to
select all the bones and we can press I to override
the new positions. Also for the camera,
I'd like to give it some depth of field. I
got to show you that. Let me just go back
to the object mode. We can select the camera. Let me just scroll here to
find the camera settings. I would like to check
this depth of field. You can see that we have some blurriness in the background. I like to fix it,
we can just tweak this something like this. I'd like to make the face clear. There we go. Hands are
a little bit blurry, but all we need
is just the face. Also, you can choose an object
to set it as the focus. Here for the focus on Object, we can just click on this
eyedropper and we can pick, for example, the
character. Now we got it. The other parts are blurry. You can also here
tweak this F stop. Let me just press he so
that you can go slow. And I'd like to track it down. A little bit of that depth of field makes the shot realistic. Let's go ahead and render
our shot once again. All right so there we go,
we got our final shot. We can also add another
node in the composite. Let me show you. Shift A, we can search for color balance. Color balance, this node ratio, let me just drop it between these two nodes and we can
connect also to the viewer. This balance can allow us to change the feeling
of our render. For example, if you
want to make it warm, you can just choose lighting, choose this yellow light. On the other hand, if you
want to make it cold, you can just choose dark blue. For example, color, you can
see the difference here. You have a nice difference, but I prefer to go with this bluish. I really like the bluish here. As a final step, all we have
to do is to save our render. You can go to and save as, and let's save it
as shooting pose. Render. We got the shot. In the next coming lectures,
we can animate a video, a shooting video of this row, not just a particular shot. I'm going to see you in
the next came of lectures.
55. Make Your Character Holds Objects In Hand In Blender: SticsueH can we make the character holds
objects in its hand? When animating our character, it's going to be really
difficult to keep adjusting the position of objects
based on the rig. For example, you can
take the hand up and we need to readjust
the position of the bow. Instead of what
we can do, we can connect the bow to the
hand. Let me show you that. I'm going to be selecting
first the bow here. Selected Shift select the rig, and we can switch
to the pose mode and I want to select this bone. We want to connect it to
the hand and we can press Control P and sets
parent to bone relative, the relative check this out. If you select the hand,
if you try to move it, our character is
going to be holding the bow anywhere it goes
and it's really useful. For example, you
can drag it down. Also if you spin the hand, if you press R, spin it. You can see that the
hand position here, let me just zoom in. The bow adjusts the position and son veins on the hand movements. I'd like to do the
same thing for the bag that we got here. Let me just go back here
to the object mode. We can select the bag and let me just put it behind
my character here. You can go to
objects such origin through the origin
of the geometry and let me just connect it or link it to the back pocket here. Just ski it down a little bit, drag down, push it a little
bit, forward it here. Okay. I think that's
the best spot for having the back of our rows. With this one
selected, we can press Shift select our rig and we can switch through the pose mode and lift select the relative bone. I think the waist is going
to be the best this way. So we can press
Control P and let's sits parent through
bone relative. Now if you try to spin
around the waist, so it's going to
be moving with it. Let me try to lift the foot, backbones are going
to be affected if we move up the legs and
that's what we want. Let me charge you spin around
the cube. There we go. Because the cube spin
everything inside it, including the waist
and the element. Now we got it. This
is how you can make your object hold
stuff in its hand. In the next hemlecture going to start the animation process.
56. Animate Character Shooting Arrow Using Bow: In this lecture, we'll be
animating our character, shooting in a row using a
bow, the bow as we created. Below here, I've
outlined the sequence of key poses needed
for this animation. First here we have
the idle pose. The character in the
idle pose begins by holding the bow in
a relaxed position. This pose is flexible. You can adjust it as you feel. Then we got the ready pose. In this pose, the
character lifts bow and reaches for the
row from the quiver. The quiver is the
end of the row. The body here leans slightly forward to prepare
for the shooting. Also here for the legs,
this is important. The legs will be fully
stretched to make the body stable and to keep
the balance of the body. The third pose is going
to be the draw and aim. The character here pulls the bow string backward
with the arrow, of course, as our character
as she draw the string, her left hand aims
toward the target. So here our character should reflect focus and concentration. For this pose, you're going
to be freezing it for just a while to
create a tense scene. We should not rush up this part, so this is really important. After that, we have to
release the fire in row. Here the character will
release the arrow. The left hand bounce
back slightly a little bit to emphasize
the release of the row. Finally, we got the
recover back to idle. Here, after the release,
the character lowers the bow and returns to
a more relaxed pose. Let's go ahead and create
our shooting row animation. Here we are back
to our character. I'd like to optimize my
layout so we can just do calc here join left to
maximize our review pot. Same thing here on
the right, just take it a little bit here
and let's get to work. As you can see here,
the pose that we got already is the release. Let me just check.
Is this one here, the third pose? Pole. This pose needs to be the third. I'd actually drag it
from the first frame. The first frame, you need
to put the idle hue. We need to put it
all the way to 45. We can jump here we can press shift and race collect
to jump to 45. What we can do, we can drag these frames or these diamond
shapes all the way to 45. We can press A to make sure that all the bones are selected. And here, in order
to select them, you can just press
Alt and left click. This way we're going
to be selecting all these keyframes
and we can press G to grab and we can move it
forward here by let's say 44. It was at 11 plus 44
is going to be 45. We got that pose. Let's go
back to frame number one. We can just click
here and Enter one, press Enter and we can
create the first pose, which is this one
right here, the idle. Let's go ahead and create it. I'm going to be
selecting the left hand and drag it down here
in a relax pose, we can press R,
spin it sideways, and we should not be having
any clapping with the body. Let me just take it here. We can press RX, spin it sideways, Y, and tilt it a
little bit like this, probably a little
bit RZ, there we go. We got that pose. Now
for the right hand, let me just check
its position here. We're going to be just
relaxing it down. Let me just select my hand
here and drag it down. Can push it a
little bit forward, press R to spin it
downside like this. We can relax these
fingers that we got here. Let me just select
them from here. We can press R to
spin them outward. RY or actually RX. Something like that
it's going to be fine. Next for the legs, I'd like to push them
a little bit down, we should not be
stretching them like this. We're going to be stretching
them in this pose here. Let me just track them
a little bit down here and we can select this row here and press RZ to spin it around. Same thing here.
Something like that. Also let me just select cube. You can press RZ spin
it a little bit. Downside. For the head here,
it needs to be straight, so we can press R Y, let's keep it
straight like this. A little bit spin it downside. For the right hand, we
can relax even down. Okay. Here we have
some clipping with the chest so we can just
select the left hand. This is the left hand
and we can press R X or actually R Y, and we can tilt it
a little bit down. We got that for this here. Let me try to spin it
outward like that. You can press A to select all the bones and let's press
I to insert the keyframes. I think here we went
too far with this cube, let me just lift it
a little bit up. Something like that,
we can press I again. This is the first pose. We can press zero to switch
to the camera view. There we go. That looks nice. Let me just press zero
to exit the camera view, press to select all the bones, and let's work on
the second shot or the second pose,
which is this. Here for the string,
as you can see, it's pulled back, it
should not be like this. Let me just go back here
to the object mode. We can select the
bow and we have to reset all these key frame. I'm going to be doing
cel here on the value. We can clear the keyframes
and let's just relax it down. We still have that
clipping over there. Let me just select my
hand and we can press R, spin it like this, probably
a little bit forward, RY there we go. Something like this. We can press A to
select all the bones, press I to override
the new key frames. Also here for the
bow, we have to animate this bot release. Let me also select all
these other elements. We can just clear clear these values, we
need to start fresh. Let's we select the pot
release and on this value, you can do colt and
insert Keyframe. At the first frame we should
be having the row like this. Next step, I would like
to jump to frame Turkey, C press shift and
jump to frame Terje here and let's work
on it even better. Let me check what we got here. Collection needs to be grabbing the row from the back of it. Let me just select the hand. We can switch to the pose mode. Let me select the
right hand here, can push it forward
and take it up. And a little bit
here to the right. You can press R Z and
let's spin it like this. A little bit forward downside. For this here, we have too much clapping here
let me just press R Y, can take it a little bit up. Same thing for the shoulders. Let me just select
the shoulders. We can press R Z and tilt
it a little bit like this. There we go. Let's selex
all the bones by pressing A and we can press I to
insert the new key frames. Let's take a look
at this. This is the relax bows Here going
to be grabbing the row. But here we having some
clapping with the chest area. We have to do some
correction to the hand. For example, here, they're
going to be selecting my hand and we can
push it a little bit outside and we can spin
it so RZ, spin it like this. You can press also R X or RY. Check it like this. Let's
select all the bones. We can press I to
insert the nuke frame. Let's see that's correction if it's going to be working or not. There we go. We don't
have any clap in here. We got the idol. We
got the standby, which is 30. We got the pole. Here we're going to be polling. From the standby to the pole, we have to animate our bow. Let me just switch
the object mode. We can select the bow here.
Let's see first position, which is around 30. Here at select the
shoot in a row. Now, not this one,
but the polar release we have to work on
this polar release. Fire we need to do Right
click in insource keyframe at zero and from zero
all the way to 40, you can just increase
that value down. Something like 0.5 here. Rask insert ski frame,
take a look at it. Yeah, we have to pull until
we reach 45, not just here. Let me just go back shift
and race to go to 40. You can do race here,
the Lita ski frame, and let's jump to 45. And we can push
that back. I think this is the best spot here, right click and
insert key frame. Let me check here. At 30, we have to be grabbing the row, not from here, but actually
from this position here. Let me select my hand. We can switch to the pose mode, select the right hand and
let's push its way forward. Here, rack it a little bit down. Press RY. We need to be
grabbing two elements, the strength and row. Push it a little bit
here. There we go. We got it so we can press I
to override that position. Let's see. Now we are
grabbing it from the size, the right position and we
are pulling backwards. But at frame perch, we're
having a big clap in here, the arms and the body. What we need to do
we have to tilt, let me just select this
bone and we can press RZ, and let me just
spin it like this. We can press I to
insert that ki frame. Let's try this out. There we go. Now it looks much more better. All right. Let's take a
look at the next pose. It's going to be the
shooting. Here we need to be shooting our row. From 45 all the way to 60, I'd like to freeze
up this animation. At 60, I'm going to be selecting
all the bones and we can press I again to insert
the sake frames. Can see that. Now
we are freezing. We're going to be fixing
this freezing later, but I'd like to keep
it steady like this. Capture is going to be
aiming in this part here 45-60 and let's
jump to the release. The release is going to
be happening so quick. I'm going to be adding
only two frames at 62, let me press I to insert all the keyframes and we can work on the hand a little bit. The hand, we need to
have some bouncing back. Let me just track the hand backward here and
a little bit up. Here we can press RY
to relax that down. Let's press A to
select all the bones, press I, and let's see that. Yeah, that's going to look good. This pullback, this bounce back. We can take it even
further at 62. Let me just take it
or it's a little bit back like this and we can press I to override
that position. Needs to be sudden. Now
let's animate our bow. I'd like to go back
to the object mode. Let me select the bow. At 60 here, we need to insert the same value
here, the pool release, R colic inserted
and let's jump to 62 and we can take all
this value back to zero. Click insert as key
frame. Check this out. There we go. Polling we're pulling here and here
we are releasing. For the arrow, we
can, for example, jump to 65 and we can
animate the shooting arrow. Let me just actually
we have to animate it first at 62, you
can do Right click, insert that value, and at 65, you can increase that value
up all the way to one. It's going to be really fast. So we can play this. Let me just press space and let's see. Grab, pull, release. So far so good. Let's continue. Last we have the recovery. For the recovery, I'm going
to go back all the way to 75 and let's take a
look at the pose here. This is the recovery. The hands, they will be
relaxed a little bit. Let me just select the rig and we can switch the pose mode, select the right hand, put it let's switch
backward, downside. We can spin it RX,
spin it like this. We can take it a
little bit down here, let me spin it on
the, you can press RY, salt it like this. For the right hand, I'm going to just take it down. Let's relax it down like this. Push it a little bit outside. We can select all the bones, press I to insert
that key frame. Also here for this cube, can relax the body a little bit by dragging that
down just a bit. We can press I to override
that position and for the head I'm going to just
make it straight again. You can press I to
insert that keyframe. Also here, I'd like to increase the end to 75 so
that we can cover this keyframe and let's press space so that you can
see our progress. Nice. Probably we're
going down here too fast. Let me just lift my cube
just a bit up and press I. Let's press against
space, Ball nice. The final pose is
going to be the idle, so that we can
make our animation loop perfectly or smoothly, you can see that we
have an abrupt end here to make it smooth, we can just select the same pose that we got here so
eimi just press shift. Right click, go back
to frame number one. You can press A to
select all the bones. We can do click copy pose
and we can jump to frame 90 here and we can do Rs click based pose and we can press I
to install those keyframes. Here let's set the end to 90 and we can press space again
to play the animation. Well release, go back to ID. Nice. In the next
coming lecture, I'm going to show you
how can we improve it to it looks robotic right
now. You can see that. All the movements are robotic. In the next lecture, I'm going
to show you how can we use the noise modifier to make
these movements organic. See you in the next
coming lecture.
57. Improve Shooting Bow Animation & Make It Realistic: In this lecture,
we're going to be improving our shooting
bow animation. If you pay close
attention to it, it's going to be going
to find it robotic. These movements are
completely robotic. They don't look
organic and natural. Let's work on them and make
them natural and realistic. We're going to be using
the noise modifier to add some noise
to all these bones. For example, here we can
just add some wobbling on the Z axis to make the head the head
movement looks realistic. Here here I'd actually switch my window from the timeline
to this graph editor. I'm selecting the ta boon. Basically, I'm on
the pose mode here. If you expand the head here, you're going to find all the
keyframes that we inserted. Let me just press N to show you. All these keyframes are here. We need to find the right one. Obviously we should not
be using the location. We're going to be using
the rotation here. Let me just this
one here, the Y. We have to trip the Y. I'm going to be selecting
the Y rotation here. If you click, if you press N, you're going to be accessing this panel on the right side. Here we have for these jabs, we have the modifiers,
we can colt. Let's add new modifiers it's
going to be the here to hide everything and keep only
this Y quitar in rotation, can just hide them by clicking on the O. I
can show only the Y. You can see it here. Now we
have some noisy patterns. You can just press A
to select everything and let's press period
to reset the Zoom. So now we can see
that noisy details. Let me just press space,
but we don't want this. We need to tweak
it a little bit. For the scale, I'd like to
increase it up so we can increase the wave to
something like 35. I can see that we have some
nice organic movements here, but we have to
reduce the strength. For the strength, I'd like to
reduce it down to just 0.2. We just need to have some
minor movements for the head. Can see them here
if you zoom in. There we go. Minor, not fixed. This is without the noise. The head is fixed and
it looks robotic. I'm going to be keeping
this noise so that we can have those
slight movements. Now let's work on other bones. For example, the hand, I'd like to take this
hand here and work on it. This is the left hand. We can move it, for example,
let me try this. We can move it not on
the X or not on the Y. Let me try this Z, you can
move it on the Z or on the X. X is going
to be great here. On the X like this.
Let's do that. I'm going to expand my rig here. Let me just hide everything and select only the X,
the X location. You can click on it and let's add the noise modifier to it. Press space and let's see. We have some noisy pattern here. I'd like to scale it up,
let me just scale it up to 25 for the strength, I would like to reduce to
0.0 0.25. There we go. Now we have some
slight movements, but we have to restrict
the movement here. When our cactre
will be shooting, we should not be
moving on the y axis. If you expand the noise, they're only going to be seeing this restrict frame range. Let me just click on
it and expand it. We need to start the noise from zero and we need
to end it at 45. 45 is where our cactre
needs to be steady at 45. You can just set
here the end to 45. Let press A period to reset the zoom here and
you can see it here. We're having the wave, let me just check the noise.
You can see that. Now we're having the wave. But if it's going
to stop right here at 45, it's going to be steady. Let me just press space
and let's see that. We got some wobbling here, but this part here looks a little bit
weird. You can see that. We need to have it blended. We need to make it smooth. For the sex frame, if you scroll down,
you're going to be seeing this blend in. The blend in we're
going to be effecting the first part here and
this is the blend out. I'm going to just
increase the blend out up, something like this. Now we're going to be
having a smooth curve. Let's keep an eye
on it. There we go. That's good. Here it's steady,
and it's going to relax. We can also add noise on the X. Let me just show you on
the X rotation here. But once we're going
to be dropping it down. Let me just show you. I'm going to be
clcking on this X, quatrain rotation and we
can add the noise to it. Splay. We didn't add that.
Let me just add the noise. Let me just check the I, make it open, and let's add
the noise. There we go. Now as we can press A period to reset the Zoom
and for the scale, I'd like to increase it up
to 15 and for the strength, let me just set it to 0.5. Now let's place. Now we
have some ups and downs. But again, we need to restrict that movement here 45-6062. This is what we're
going to be shooting our arrow, needs to be steady. We can scroll down
and let's check this restrict frame range
and let me just expand it. The start needs to be zero and the end, it's going to be 30. Let me just set
you the end to 30. Let's play an now we got some wobbling at the
start, which is good. And here it's going
to be steady. Also we're going to be
using the blend in to make this curve smooth,
actually the blend out. There we go. Now it's smooth. Let me just play my animation. Nice. We can also increase the strength up to
something like one. Let's play again. Nice. But also here I'd like to add some noise, so it should not be
steady like this. So here it looks
too much steady. So what we need to do, we
can add another noise. Let me just add another
noise modifier, and it needs to be I'm
going to just reduce the strength down to
something like 0.1. For the scale, we can
increase it up to ten. And let's see. So we have some slight movements here which makes it realistic. So we can decrease that up
by 0.0 75 or actually 0.05. Mm. All right let's
check that out. There we go. We got
some wobbling here. It's not 100% steady, which makes it looks good. Next, I'd like to add
the noise to the torso. The torso here looks
fixed. We did selected. Let me just find
the right angle, the Y actually the Y going
to be using the Y again. Here, let me just hide
everything and keep only the Yroation can select it and add to
it the noise modifier. Let's press space. There we go. You have to increase
the scale up to 25 and for the strength, we can reduce it down to 0.6. So I got some movements
along the animation. It's not fixed. You
can see that now, the animation looks
more realistic. It's not robotic anymore. For this arm here, I'd
like to work on it too. Let me just find a
good angle here. We can work on the wire. Let me just select the Y rotation and let's
add the noise modifier. We can increase again the
scale to 25 and let's play. There we go. We got
some ups and downs here for the arm, can
increase the scale. Let me try two. That's good. For the scale, we can reduce
it down to let me try 15. We need to have more movements. We can reduce the strength
down to just one. There we go. That looks better. I prefer to delay
this part here, the shooting or the aiming, this part here, I'd like
to delay it a little bit. So we can do, you can
select all the bones. Here let me just go
back to the timeline. It's going to be easier to do it the timeline. Let
me just find it here. And this part here between
the 45 and the 60, I'd like to take it a
little bit to the right. We can press Alt here to
select the entire row. All left collect shift. All left collect. Let's strike
them all, select them all. We can press G to move
and let's move it. We can type three,
zero, Thi frame. Here we can add Let
me just add Thi. It's going to be 120. This we're going to be having
a long aiming here, but we need to do
the same thing for the bow because the
bow is separated. So the bow at 60, we can select these
three frames and we can try G and times three and zero, you can move it by three
frames. There we go. Now it's syncing. After that, I'd like to work a
little bit on the hands. Let me just select the
hands here or the rig, can select both hands. Check this out if
you move it down, you're going to be changing the aiming position or
the aiming angle. Also, you can try to spin it
on the X, let me just try X. Actually, for the pivot point, it needs to be the median
point, let's try X. There we go. But
it's going to be great if we set this hand, the right hand as
the pivot point. Let me select my hand here. You can press Shift,
cursor to select it. I'd like to switch
the pivot point. It's going to be
the treaty cursor. This is the pivot point.
Let's select the first hand. Shift select the second hand. Now if you charge a
spint if we try RX, you're going to be
spinning our angle here and it looks
really good this way. You can also charge to select the head and include
it in the process. Trow space to see
that. There we go. You can also charge
a spine, RZ, Nice. In my case, I'd
like to just move my hands ups and
downs, up and down. Let me just select
the hand here, for example, at 45, you can just take them down. For the pivot point, I'm going to go back to
the median point. We can drag that down a little
bit like this, press I. We can jump, for example, to frame 60 and we can
take that part up. Here, I can press I again. Since we got some movement Nice. You can also here try to move it a little bit
down. Let's try RX. Move it down like this,
press I, and let's see. There we go. That looks
much more better. This makes a good
aiming animation. It's aiming toward the
targets and shoot. Let me press control space to maximize this
window and we can play the full animation
and let's see. The animation is not
perfect, to be honest, we have here some
wobbling should not be having any problems here
or any wobbling with hand. Let me just do some
minor correction. Going to be selecting
my right hand Let's say that this part
here is acceptable. But here we're going to
be having some problems. Let me just press I to
overwrite that position. We can jump to frame 40 85
and we can take it down. We need to correct that position and we can
push it a little bit. Or actually let me just
keep it like this. We can press I again to
insert the new position. Now the hand sticks
with the bow. Now the right hand
sticks with the bow end. Nice. Let me just
go back and we can play our animation. Let's see. Shoot. But here at the start, we're having some weird
movement for the bow. I'm going to just
relax it a little bit. Let me just go back
to the object mode. Let me select the
bow and we need to switch again to the graph
editor and let me see. Or actually, it's not the bow, but the movement of the hand. This hand, I think the rotation
on the X, this rotation. So let me just select
the X quaran rotation. I see that we have
a big wave here. So this is what gives
us the trouble here. So we can do, you can just
move the offset a little bit. But actually, this offset
is for the second noise. Previously we added two noises. Let me just select the top
one or the first noise. And here for the offset, let me just find you can just
take it a little bit here, sunk like this, but
also for the strain, we can decrease it down to 0.5. So now we also
going to be having those harsh movements.
Let's play. There we go. Now the animation looks more organic
and more realistic. To make the animation
look properly, we have to make the start
and the end the same. The starting post,
we can just try shift left a row
on the keyboard. This is the first frame.
You can do shifts and row. This is the last frame. You can just keep
switching between them. You can see that there
is a change in between, so this is happening because
of the noise modifier, so we have to smooth the
noise modifier at the end. Let me just check here
the equatorial rotation. I'm selecting this left hand. I'm going to just here
the noise and let's see the difference. Right
so this is the one. We have to smooth
this one because this is what's make the
difference. You can see here. At the starch, it's a little
bit different than the end. If you zoom in here you
can see the difference. We have to smooth
out the starch. Let me try to use the offset. We can just push this part
a little bit forward. We can, for example, try
something like this. This we're going to be
having a smooth start. Let me just zoom
in here, increase or decrease the offset
to something like this. Let's see the difference. We can do shift and write a row. We got slight difference here, but I don't think
it's going to matter. Let me just give it
a try. There we go. Now it seems smooth. The animation is
a loop right now.
58. Animating Camera Movements: In this sori, we're going
to be animating our camera. Our camera is still static, doesn't have any
animation assigned to it. Let me just press zero
so that you can jump to the camera view and press space. The camera here is fixed.
We need to work on it a little bit to make the
animation look interesting. I'd actually go back
here to the Oblig mode. Let me select my camera and
let's start animating it. I prefer to work
on the timeline, not on the graph editor, so the timeline is
much more easier. Let's go ahead and start
with the first frame. We can press shift
and right click. Let's go to frame number one. Here I'd like to find a
great spot so we can just press N. Here inside the view, we can set the camera to view. Now we're going
to be locking the camera through our view. Let me just drag
it down, can press shift middle mouse to drag
the camera down here. I really like this pose here, it makes the character
looks heroic. You can press I to insert these keyframes and I'd
like to jump to frame 50, for example, here, and we
can go down a little bit. Like this or actually we
can keep it like this here. We can press I and
at the first frame, you can take the camera a little bit up. Sounds like this. Now we've got a nice shot here. The row is at the
corner of the camera. You can just press I to
override that keyframe. Let's press shift the
right click and we can go from this pose to here. You got it. 50-80, I'd like
to spin around my character. Let me just jump to frame 80
and we can turn around here. Sounds like this.
We can press I to insert T key frame, and
let's take a look at this. Our character is
going to be here. Alright there you go. So this
is our camera animation. Here, I'd a to jump through the pack of my character,
for example, here. Let me just add
one single frame. You can just use
the right arrow on the keyboard and let
me just go back here. To cover this angle
and we can press, let me just take it
down like this and we can press I to insert
the key frame. Now we're going to
be switching from this pose from this
view to the pack view. F 81 all the way to 100, you're going to just wobble be wobbling the camera a
little bit to the side, then we can press I to
insert those keyframes. Let's see. Probably that's
a little bit too much. Let me just stick it to the side like this,
press I again. Need to have slight
movements like this. Finally from 100
all the way to 120, I'd like to copy the same
frame that we got here. You can just do right click. Actually don't have
that copy pose. What you can do can
press left glock here, we can press Control C to copy these keyframes and we can
press Shift and go back to frame rather than 80
and you can press Control V. This way we're going to be pasted in the same
pose that we got here. Let me just press
space so that you can play the animation and
let's take a look at it. Spinning around,
shooting and go back through the idol. Nice. Now I want to show
you how can we make the camera animation
looks even better. It inside the constraint, you can just search for
object constraint properties, click on it, and we
can add the tract. This tracture constraint is
going to lock the camera to a certain object to focus on. I'd like to press shift
and we click so that you can add the cursor right here
and you can press Shift A. We can add a cube. Let
me just ski it down. For this cube, I would
like to call it focus. You can call it anything
that you'd like. I'm just calling it
focus to make it easier to retrieve. You can
select the camera. We get the track through constraint and here
for the target, let me just search for focus. This way we're going to
be focusing on that cube. Check this out if you
play the animation. Going to be focusing on
our character all the time because the cube is
inside our character. Now, as you can see the
camera looks even better. It's focusing on the character. I'd like to select
my cube here and it should not be visible
in the render. Let me just select it. You can check this box
here so that you can make it so that you can
disable it in the render. Basically, we got it, we
got our animation here. As a bonus step, I'd like
to show you how can we make our character look at
the camera all the time. Let me just switch here
to the render mode. So we can select the rig and let me switch
to the pose mode. If we select the tab bone, which is the headbon,
this one here, we can add a new
constraint to it. It's going to be the track. Going to be reversing
the effects. First we set the camera
set to this cue, we're going to be
doing the opposite. The head is going to be
a locked to the camera. Here for the target,
it's going to be camera. Let me just search
for the camera here. But actually, which we did, we added the constraint
through the entire object. We need to remove it from
here and add it to the bone, the bone constraint, not
the object constraint. C just click here, let's add
the tract here let me just search for camera.
We got it flips. We can just flip this
axis so the minus Z, I'd like to switch it to the Z. You can see that our
character is looking exactly at the camera
and it's a cool trick. You can also control it. For
example, here at the start, we can make the caster look
at us and for example, at frame 40 here, we can save this influence. We can do Right click insert
that keyframe, which is one. One means the character
is looking at the camera, for example, at frame 45, you can just decrease
that down through zero. Is the keyframe. The character
is going to be looking at us like this and 40-45 is going to be looking
at the target and it's going to be shooting
For example, here at frame 110, we can insert that key
frame and at frame 120, we can make our
cactual look at us. Again. Let me just
insert that keyframe. Compass space and let's
take a look at this. Shoot and look at the camera. You can just press A to hide all these bones and also
you can press N. Here, I like to unlock the camera because if
you zoom pack or in, you're going to be
affecting the camera. Let me just check this
box, camera to view, and let's take a look
at our animation. This is just a trick. You can just remove it if you
59. Rendering Final Animation: Now I'd like to show
you how can we render our animation as a video
so that you can watch it? Let's go back here to the render properties
or actually the output. This is the resolution
that we got. I'm going to scroll down until
you find the output here. Let me click on the output, and you can choose any
output that you'd like. And just click here
on videos and let's add new follow less
scroll it animation. Inside, let's double
click and accept that. Now here for the format, you can just switch the file. I'm going to just
keep it at BNG. After that, we have to check
the render properties. Let me just go up here. Here for the render
engine, I'm using the EV for the render samples, it's 64, which is good. We can increase or let me just check here
the rate raising. The rate raising
is better. Let me check the hair here.
Yeah, it looks better. You can also enable
this motion blur. The motion for example, if you are moving, you're going to be having
a motion blur. You can see that, which makes the animation
looks more realistic. But we can affect, for example, we can control this
shutter amount. Let's try for example.
Let's see here if we have how this render
is going to look like. We should not be having too
much of that motion blower. You can see that we have some
motion blurry on the hands. It looks fine on the hands. We can reduce that down
to something like 0.35. Let's try once again,
render that image. That looks good, acceptable. Let me just go ahead and start the animation.
Here we have the film. Everything is good,
so we can jump to render and render animation. So as the rendering goes, we're going to be having all
these keyframes saved to this folder that we set
earlier inside the animation. Once it's done, we're
going to be combining them all in one single video. I'm going to just
wait for the renders complete. Now it's 34. C just wait for it to reach
120. Or there it goes. We got all the
keyframes rendered, this is the first one
all the way to the last. What we need to do
right now is to combine them into a video like this. To do that, we're going
to be using agen blender. I'd like to jump into
a new blender scene. Let me just delete
everything we got here. On the top here,
I'm going to just scroll my mouse and
we find this plus, click and go to Video Editing, video editing here again. Here we can edit our videos. I'm going to click on AD
and add image sequence, and I'm going to be
choosing that folder where we saved all
our animations. Our keyframes here, you can
press A to select them all. Let's add Image strip. If you press Shift and s click, you're going to be seeing
our animation here. So the stop is 120. Let me just at the end here is 120 and for the start,
we're starting from zero. Let me just press
shift and click. Actually, we are
starting from one. So one all the way
to 120 like this. This is the start and this is the end. Now for the settings. Let me for the
resolution, set it, we set the Y, the same as
the X. I just cops value, control C, spaces at the top, like this to match the
same resolution that we give earlier that
we gave earlier. After that, we can
scroll a little bit down to define the output. Seven, the output
needs to be a video. We can just choose the
same here animation. Let me just add new
fools call it video. Double click on
it and accept it. For the file format, I'm
going to switch from PNG to this FF PG video. Let me just for
the encoding here, I prefer to keep it as G four and for the encoding
speed, let's make it. Let's keep it at the good
and for the quality, we can increase that
up to high quality. For this keyframe interval, I prefer to increase
all the way to 500. This way, the size
of our video will be low since we don't have any
video here, so we're all set. I'm going to just
go here again at the top to render and
let's render animation. We can call it, let me just
call it something we can call it final render animation. Let me just fix this here, press Enter, go to render
and render animation. Or it's no back to
that same folder. Is the video folder. You can just double click on it. Then we have it. Now we have our final
animation rendered.
60. Conclusion: Congratulations. You've made
it to the end of this class. Now you've got the fully rigged
and animated red cacture. Whether you choose to
create the running, jumping or the bow
shooting animation, you've gained the valuable
skills in modeling, texturing, rigging and
animation blender. Tonight it's time to
share your work with us. I'd love to see your final
renders and animations, don't forget to upload them
in the project gallery. If you have any questions
or want feedback, feel free to post in
the discussion section. I'm happy to help. Thank you so much for sickd with
me in this course, I hope to see you in future
projects. Take care.
 Abdelilah Hamdani, 3D Photorealistic Designer