Transcripts
1. Intro to Buttercream Cake Decorating: Hi, I'm Cali and welcome
to cake decorating. Today, we are going to be decorating a beautiful
buttercream cake. I have prepared
one here earlier. I'm going to show you my
hints and tips to leveling these cape is the exact recipe that you have in your booklet. You've already
been sent through. It's exactly the
same as in there. Also be showing you live how
to do make the butter cream. So you've got icing
sugar and butter, small container for the
water that will have later in terms of tools, we've got our meat, so
here I'll stand mixer. We've got scrapers, so a
smaller one and a larger one, depending which you
prefer to work with and also the height of
your cake at all. A cake you need a
larger scraper. We've got a spatula, a nice, this is a bread knife
from my kitchen set or you can get larger canines. I cranked spatulas is
also called a spatula, but it's either a cranked
or an offset spatula. We're working on a cake board. So this is a tin inch cake board which you can get
from any cake store. Other things we've
got here to fix, which I'll reveal
why in a little bit. We have colors and
flavors not necessary. But if you wanted to
color and flavor, I'll go into more
details about these, but this is a Joe color and we've got some oil flavorings, so we're gonna get prepared. We're going to start
with our butter cream and we're gonna get cracking onto
our cake decorating.
2. Thanks for watching!: If you've enjoyed the class, there is a Facebook group to join for more hints and tips. And I hope you enjoy eating your cake as well. Happy caking.
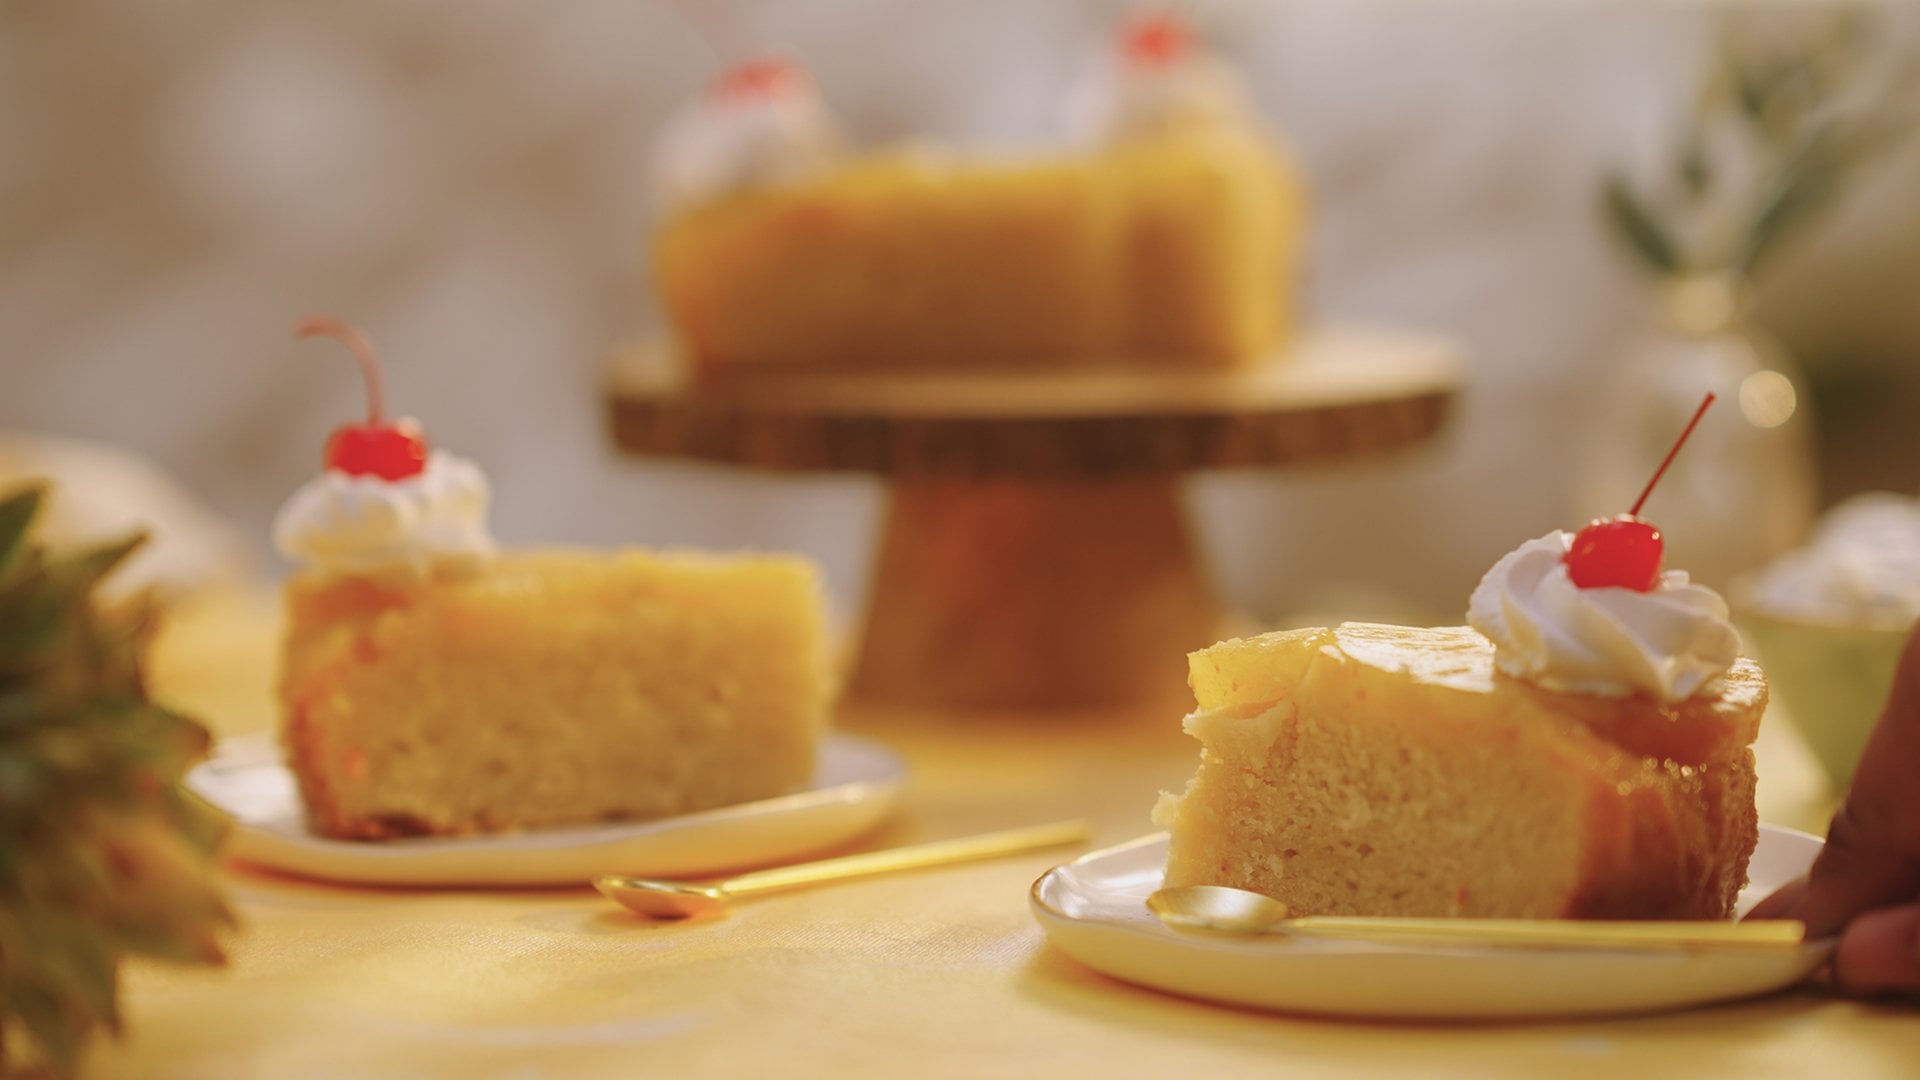
3. Buttercream decorating: Okay, So we've got
here two cake layers. This is one recipe from
your booklet baked into 26 inch teens to
give us two layers. When we're talking about cakes, if we're stacking up
several layers to make one kite that will be served three layers in a
cake, in one tier. And then if you've got
different heights, are really large one
and the small one, that's called a two-tier
cake, just for reference. So yes, this is one recipe
baked into two different tins. What you will notice with my, so I'm not going to spend too
long took map baking only give you a couple of
simple hints and tips. First one, drop your
oven temperature, but at least ten degrees
when you cook something, sorry, bake something
for the first time. That's because every oven is completely different
and we don't actually tell when things are baked by the time it's there for a guide. There are other ways to
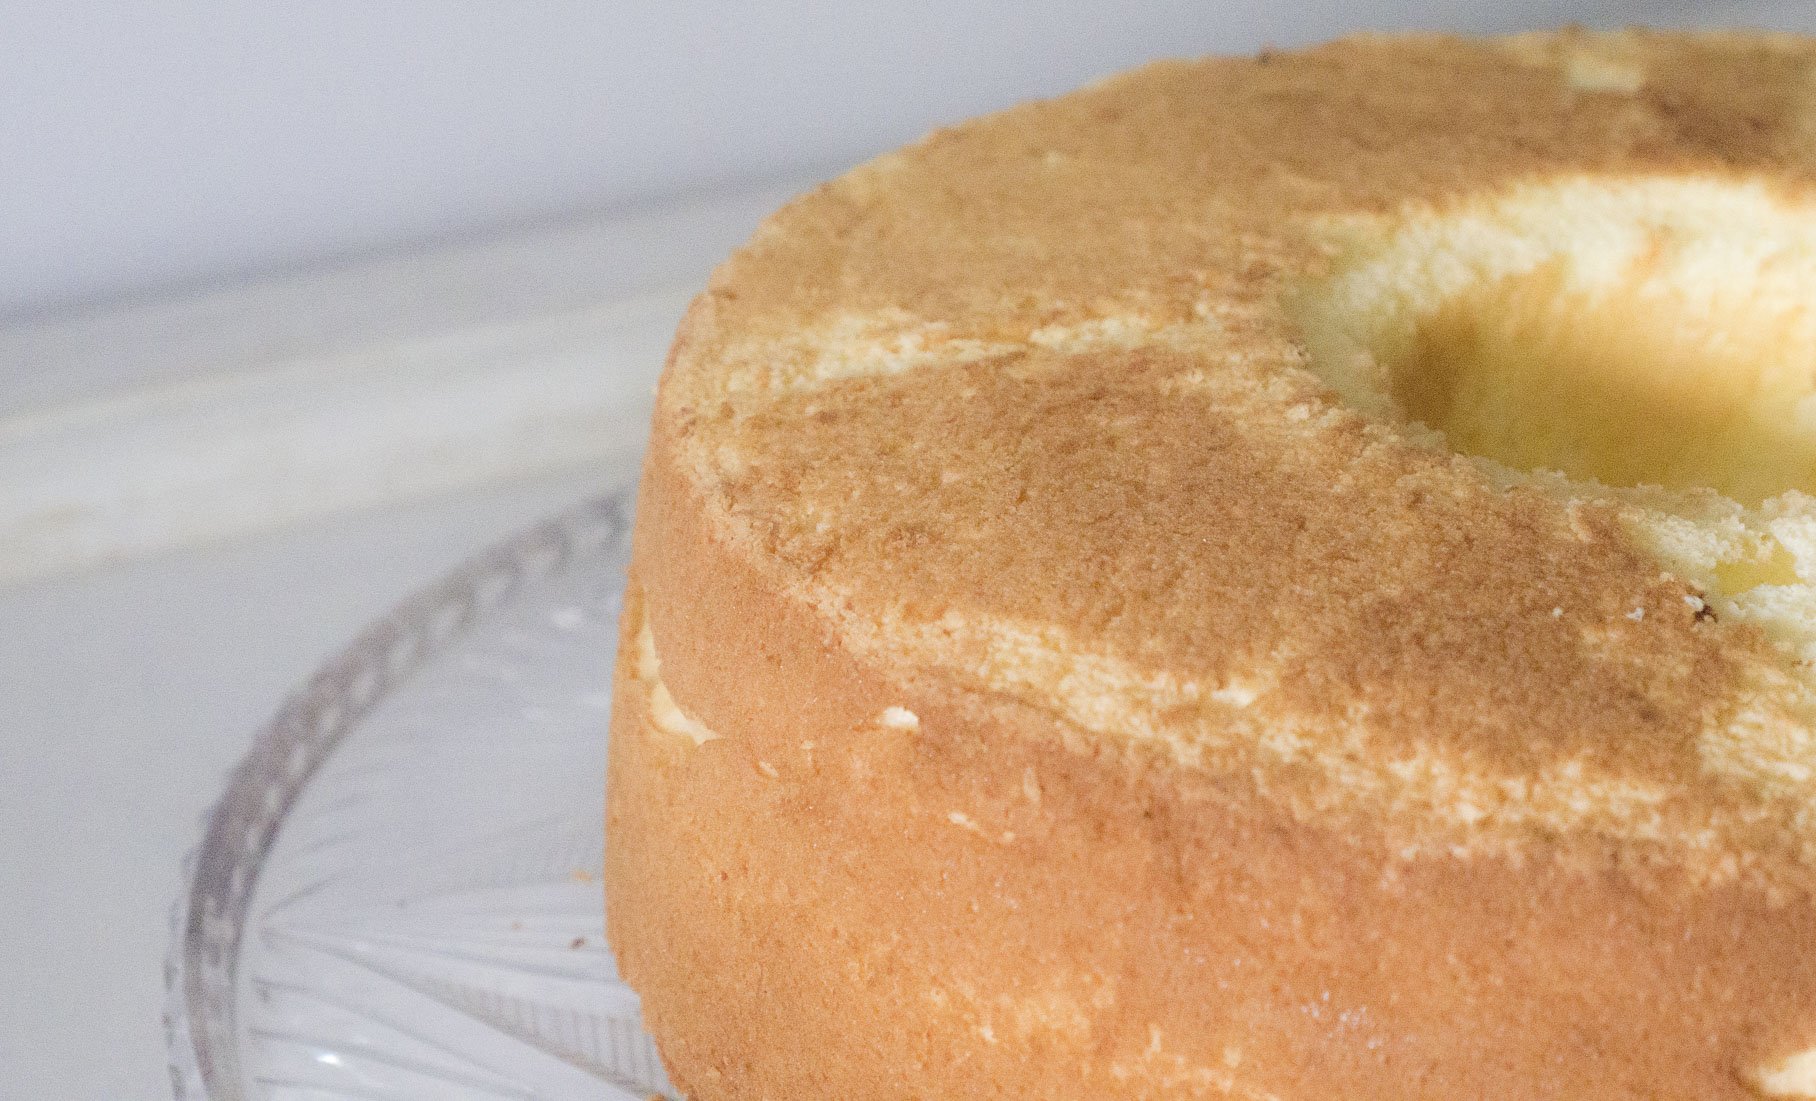
tell when things are baked. So that is, if you've got your
tin, you've prepped it in. So even if it's a non-stick
t and you do need to spray it and put baking PayPal. So the cheek to that is grab your team could overpay
the baking paper, trace around it with
a pin, a pen, sorry, and then cut around it that will form the
base of your tin. And then you grab another
piece of baking paper and line that non-state spray and baking
paper to line your teams. But the way we TO when
things are biked is they shrink away from the sides
just slightly on the tin. And when you press the top, it comes back, it springs back. What we end up with
ease and nice flat cake like this when we
bake low and slow. So we crank that
temperature down, particularly the first
time you bake a recipe. The other thing that
we're going to do is if you're baking on two
different shows, you're going to swap
halfway through. So not only are you going to
swap any levels in the oven, The also going to turn
them around as well. So your oven is likely
to have hotspots, no matter how Fen dangled it is, your oven will have hotspots. So by rotating the tins and swapping them
from top to bottom, if you baking on
different shelves, it'll give you a cake
the best chance of cooking evenly and
rising evenly. If you've ever had a cake
that is domed a lot, what that tells me as
your oven is way too hot and the ingredients
have combined and activated too fast and then
shot up rather than baking low and slow will give you
these beautiful flat tops. That's hints and
tips for baking so low and slow, rotate them. An extra low and slow. Okay, so we're gonna
cut the tops off these, there's not much there to
cut off, which is ideal. We don't want, or if you might want extra
cake scraps to eight. But the idea is that we don't actually need to cut
much off at all. It means the, all the
ingredients are in the cake themselves and we're getting
more out of that cake. But when we do go to cut it off, so let's get rid of our PayPal. What the aim of what we're doing here is to
cut the top off. You might be wondering,
well this level, why we actually bothering
to cut the top off. This here is in
secret ingredient, which I will tell you about. It's not in your recipe book, but I will tell you
about it and it will just hang
tight for that one. What we're doing here is we are finding the lowest level across all the tiers
that we're working with. We're going to unwrap
this guy as well. And across both these layers, we are finding I will
keep that one for a second until you, I'm sick. We are finding the lowest level
across both these layers. You might need to get down
nice and low and have a look at the lowest level is going to be on
this side here. I need to grab myself
some toothpicks. So four will do for us. I will say If I mentioned
today anything about perfectionism is not a
dirty word in this kitchen. It's about working with
your personality type. So I'm a rustic bakery. I do things fairly rustic if you tend to like
things more perfectly. I'll give you some hints and
tips to make that happen. So what we're doing
is we're finding the lowest level on
both those tiers. And we're going to put in
a toothpick where that is, the lowest level is there. And what we're gonna do is
we're going to measure. So if you're a rustic like me, what you use is that's
roughly two fingers and a little bit above that
gap there that we've got. Otherwise, grab your scraper
that has a ruler on it. And it'll be able
to measure exactly how high that point is. What we're going to do
here is put in to fix. So north, south, east and west or the clock if you prefer
to do it like that. Two fingers and a
little bit of a gap. So go to the other side, fingers and a little
bit of a gap. That's where we
put the toothpick. I'll do it on the back and I can't see it but two fingers in little gap and then two
fingers and a little gap. What we've done there. Is created a basis for our
knife to guide around and create a level cutting surface off the top so we can
cut that off nice. And even, as I said, if you, someone who tends to be
more of a perfectionist, you may either want to
stick more toothpicks in, so you have eight
of them in total. That's a good number. Otherwise use a ruler
or the ruler on, you could use a normal
plastic ruler or the ruler on your scraper. Anybody able to get
the same effect, so mark exactly where it is and that will get
you nice and level. So this one is side, bring this into the center. And what we're gonna do here
is the knife that we've got. Ideally, the knife is
bigger than your cake. So if you're working
with a larger cake, so a standard size t and
that you might have at home is a 20 centimeter cake
or an eight inch cake. What we want to do
is make sure that our knife is big enough to go through the other side so we
can see where we're working. Because what we're
gonna be doing is scoring around the edge using these two
pizzas are guides. So it's important that our
knife does reach across them. And using that as a guide. What I mean by that is by going on top of the toothpick
where that sits. We've crossed over to this one. We're scoring just their scoring over these ones that
moment we're just creating a very lot score. And we're reaching
with that toothpick is I haven't quite reached
where he is there. We're using these
tweets mixes, God. Then we can start
to cut a little bit deeper and cut through to
where those toothpicks are. We'll get rid of our scraps. And we've got
they're not perfect. Again, I'm a rustic Baker. I'm completely fine with this. If you are use your ruler, the important thing
is that you're holding your knife
flat at all times. You're not bending it
up or bending it down. So it may be that you'd be better off getting down nice and low to your cake and
living out through. If it's not perfect, it really doesn't matter
at this stage, the variation is going to
be a chromosome, right? The variation is gonna be
so slot that you won't notice it and we'll
be able to compensate with buttercream to make it up. In a way I would do the
same with this guy. Now, the lowest
level that we were working on was two
fingers and a little gap. So do the same here. Two fingers and a little gap. Fingers and a little gap. This cake in general is
a little bit higher, so we will be chopping
a little bit more off. Hopefully that makes sense. They're not exactly stripe. At this point is
crumbs everywhere, it doesn't matter. We
will clean them up. We're scoring across where those toothpicks are,
twisting our cake. There's also a reason I'm not
doing this on my turntable. And my cake board is that it will become a little bit oily
if I leave that on there. This is a butter cake, so it's a heavy,
heavy on the button. Now we're cutting through. We have got fairly level layers. So this is Slot
differences in them. We won't see them and we
actually put the cake together. That is cutting and
leveling your cake. I will say there are some cake cutters that you can get the old arch type
one with a string. I would just throw
that into bins to be honest because they're
not very useful. There are KV cutting something through very light
like a sponge. But in what we're working
with is butter cake. It's between, I'm sure
you ate one before, but it's between a
sponge and a mud cake. We want something that's fairly dense to be able to stack it. But not too dense that
the white of the eye, not too dense that we need
something heavier than butter cream to hold it up
because the cake is so heavy. Mud cakes and
normally stacked with ganache because ganache is a heavier substance and it
will hold those layers up. We can stack a butter cake with butter cream because that
white ratio is okay. We've got our two layers. I'm going to show
you the sacred. So you're probably wondering
what this is here. This is sugar syrup. Sugar syrup. No, there's no recipe
for that in the booklet, but sugar syrup is
something that will help to preserve your cake
and keep it longer. So you might be thinking
why adding more sugar to a cake is already a decent
amount of sugar in the cake. Yes, that's completely true. But she'll get in
this instance is acting as a preservative. So it will prolong
the life of our cake. And sorry if you hate the word, but it will make it moist. And that will mean that your
cake would last longer. So what we are doing is, I prepared this the day before because it
does need to be cool. So the ratio is a good idea, would be half a cup of
sugar, normal white sugar. Half a cup of water, put that in a small
source pan on the stove and bring that to just before it starts to
bubble and boil over. Set that aside and let it cool. Once it's cool,
you can pop it in something like this,
a squeezy bottle. Alternatively, you
can just use it from a container and use
a pastry brush. The idea of this is the
way adding a small amount. So roughly a
tablespoon per layout, each depending on the size
of your layer as well. We're not drowning our cake. We're just putting a
bit of sugar syrup to act as that preservative. I'll show you what I mean. And I would typically do this. So if you've had your
cake wrapped up, it would typically do
this over the Glad Wrap. Because what we don't want
to do is accidentally drown our cake and see the sugar seer running out
at the bottom of the cape. That will make it
difficult when we transport it to the board. Because you will say
some waiting out the edges so we don't want to add too much
that that happens. We're really just
adding a small bit. You can see here there's
not a lot in here. This is plenty for
what we need today. We're going to drizzle it on. You can either do it across or probably what's better
is to do a circle. So I'll do this one in a circle. It's going around. And that is plenty for
what we're working with. We haven't actually
used that much at all. Roughly a tablespoon
per per cake. And what that does, it
will give you an extra day or two with eating your cake. Beautiful mouthfeel as well. And it doesn't
make it taste much sweeter because you really
haven't added a whole lot in. Our cakes are now
ready to stack. What we're gonna do
is we're gonna make our buttercream
clean up the bench. We've got our cake
is ready to go. We'll make our butter cream, and then we'll start
stacking things to get out. So clean this up and
come back in a second. All right, Well, we
have here our icing, sugar and butter
and our warm water. Quite hot actually. So boiling is fun. You would say this is our thinks sugar mixture
and this is salted butter. The reason for the icing
sugar mixture is that it's got started through it and
makes it a little bit easier. We don't need to sift it. You can also check your
sift it in the bin. We have salted butter. Salted butter is not going
to use the fact that salt in there is not going to hide the amount of
sugar that we're using. But what it will do is
help to disguise that. So it's Thyestes
a little bit more balanced and doesn't
Tice overly sweet. The important thing here is
that we have 500 grams of butter and one kilo
of icing sugar. So the ratio is one to two. So one part butter double
the amount of icing sugar. That's the ratio. You also notice that these
are home brand from bullies. I think I haven't noticed a huge difference in
quality compared to the home brands and
the brand names. That's a complete that's
completely up to you. That is your choice, what you prefer to use. But yeah, just my note, I haven't noticed a
difference in quality at all, so I do use these ones. I'm a business, so I try
keep costs down where I can. That's the reason for that. I will buy like the icing sugar if it's on special
with the brand name. Otherwise, I'll
stick to this one. In terms of brand names. I haven't particularly
noticed the difference between COLS and
will ease either. Either are, either, either
got here our butter, working with butter
at room temperature. What does room temperature mean? It means if you've got
a packet like this, that it is a bit squishy. You shouldn't be able to stick your finger right through it, but it should just
have a bit of squish. If you're using it
straight from the fridge. One, you're going to
have lumpy butter cream TO YOU might hurt you pour mixer
because it's gonna be really hard for that
to mix it through. You're going to have lumps. We want to cut this guy up. Again. We didn't want to
stick a whole brick in there and my comics, so work super hard. Use our cutoff for this one. We're gonna cut it
into smaller amount, so just roughly chopping it up. Now this is a lethal bit
code, but that's okay. And I can feel that it's
a little bit cold because these sticking a bit
as I'm cutting it, the outside might be squishy, but the core is still
a little bit cold. So all we're doing
is chopping it up. I did mention that I'm rustic. This isn't supinate. It
really doesn't matter. It's just to help your
negative a little bit. Heat goes in. But it's gonna go in
first for this one, we want to make sure that our budget is at the
right temperature. And the best way we can do that is to put
the battering first. So if we need to beat
it just that little bit more, we can do. Once you've got the
icing sugar in there, it makes it a little bit harder. This is very uneven shopping, but that's all right. Goes in. The recipe in the booklet, calls for list
broader than this, but you're always better
off having more working with a ratio of one
to two or one packet. One packet is much easier
because if you've got leftover, you can just store
that for next time. I'll talk through storage towards the end in
our last chapter. We've got chopped up. Let's go on into our bowl
that can go on to the mixer. As I said, it is a
little bit cold, so I'll pull this
mixer into the center so you can see it a little bit better as we work on
our butter occurring. Him, pull him in. Now. But occurring, anything
we're mixing, to be honest, is going to be on low
quite a lot of the time. I'm gonna stick him on low. Gonna get a little noisy in here because his body
is a little bit cold. I am gonna wizard just
a little bit higher, so it will go on a higher speed. But generally we always mixing on the lowest speed available. But for now I'll stick on low, you can hear that and then I'll stick it on higher and
you hear that too. All right. That's on large. Just going to stick
them on high for about ten seconds, max. Get wild in hand. Just so you can hear
me over that rattling. That's about as high as
my buttercream will ever go for about as long
as it will ever go. That's allowed because
I'm gonna do that again just to double that. The idea is that butter
is always beaten on low. We are not, sorry,
it's mixed on low. We're not beating it and
we're not creaming it. We are putting it on low. So even when it went too high, that was still any like
half the max capacity of this machine. If I went any higher, it would probably rattle off
the whole bench. So we're not going to do that. I'll stick it on
back to where it was for about
another ten seconds. The other part of that is everything that is
stuck to the Betas. So there is a bit
of butter stuff to the beta. Let me show you. If we visit up, the faster it goes, it's going
to flip that off as well. And it means I don't
need to scrape it down because I'm slightly lazy. So let's do that again. That has helped to make sure our butter is a
little bit warmer. Every time that paddle
touches the button, it is adding hate into there. So that's why we don't
whip our butter on high, because if we did that
continuously for 1015 minutes, we'd have buttercream
suit and not buttercream. We always want to make some low apart from me for a
couple of seconds, you wheezing the mixer
to get the butter off. So I'm actually going to strike, strike came off the Beta. Now, I'll put that on, back on low again. And makes him a little
bit further before we start adding our icing sugar. Sugar we want to add in stages. So if we're doing a
mix of one bag or one packet of data to
one bag of icing sugar. What we want to be
doing is roughly putting in these eating and about five increments into
spacing that with our water. So I'll pour about a fifth of
this in roughly 200 grams. The reason we don't
do it all at once. The reason why I
don't do it all at once as many methods
of doing this, I don't want to assume sugar
explosion in my kitchen. And I find it easier to work in smaller increments
and check it often. The whole recipe
is going to take about five minutes
max to make anyway, so it's not along recipe. And putting in that water
will help to dampen the icing sugar so
there's no explosions. Now, how much water
do you put in? It's roughly for the
one packet of butter. It's roughly a tablespoon of water per 200 grams of
icing sugar, roughly. I say that because
the thickness of your buttercream is going to depend on a couple of things. The main one being temperature. So if it is warm
outside and you know, you need a stiffer
buttercream, if you know, your cake is gonna be
sitting outside in a park, you don't want to slightly
stiff or buttercream, sorry, sitting outside
in a park in summer. If it is winter and buttercream can maybe a little bit
stiffer to work with. You might want a
little bit more water in there to make
that buttercream easier to work with so that
it's not as stiff on you. The other reason that I'm using I've got greasy fingers
which are quite annoyed me. The other reason that
I am using water and not milk is as a
commercial kitchen, I'm unable to use
fresh dairy product. You're probably
wondering, hang on, but I'm using butter. How is that not a
fresh dairy product? That is technically
show stable from the sugar that makes it stable, but the fresh milk hasn't been process as
much as butter has. And so therefore, home kitchens are not
allowed to use fresh milk. So water is a great alternative. If you think about
again, if you've got a cake sitting outside
in a park in summer, you don't particularly want
fresh milk in that cake. Water is a great alternatives. That is why I use water. So we've got about a fifth
of our icing sugar in there, roughly one tablespoon of water and we'll be
able to adjust that. One is we're mixing
it will see it. And also depending on how thick or runny issue we
want our mixture to come out. So we'll put that on low
again and let's get going. I will show you this as we go along so you can see
it come together. This is not very exciting parts. Once it comes together, that is a little bit exciting. Start with add roughly
another fifth in there. Another tablespoon of water. Also. I will show you
this when we get about halfway through to save a difference in how
it's coming together. But you can also hear how
it's coming together as well. How it's combining. The other reason I stop at
every time isn't so we're not having icing sugar going
absolutely everywhere. Put water in. Show you now how that's
coming together. We have got a big chunk of
butter stuck on our Beta, which is okay, we're pushing
back in and before I add anything extra or mixed
that again, so it combines. This is how it's looking at the moment starting to come
together as butter occurring. So at this point I'll give it a lot scrape around the edges. It's our butter cream. Back on our mixer. Just scraped him down
here on the Beta as well. We've got most of it in there. And always it up again before
putting anything else in. Just to make sure all that
butter is combining through. But occurring more icing sugar. I mean, not, not the most exciting
part at all. I'll show you this
again in a second because there's a point
where it suddenly comes together and it goes
from looking like a yellow, a block of butter to coming together and starting to
look like butter cream. And it's like, oh,
dance coming together. In nearly there. We've got our last slot
of icing sugar to go in. This is also the point
where they can judge, do I need to put water
in at this point? Do I need to put extra
water in at this point? I think we're on track for the economy of thickness today. That's looking quite good. And put the last asking
shouldn't big lot. There. I'm going to put just
another tablespoon of water. Get a final without. Then I will show you
what you've in the ball. Kind of your lowest to your next lowest depending on your
mixer and what you're using. You probably tell by the
rat Odysseus as high as I will be going
on this bench. But also how high be going on in a wall kitchen bench as well. Maybe stuffing. He's getting older, he's come together nicely. Give me two seconds and I will show you what he looks like. And our butter cream
should be doing this. He is light and fluffy. This could go a little longer. So put him back on. But he is lot and fluffy. And he's able to hold like this. That is ideal but occurring. It is not moving too far at all. That is perfect. So I'm going to scrape
this bowl again, put him back on, actually. Give them a scrape. Ulcers, show you what he looks
like at the moment. That's our butter cream.
And butter cream. Keep the older
goods scraped down. Water out the way. The reason it was scraping it down is to make sure it caught any unmixed bladder
that is in bottom. These faders really good that it goes to the bottom of
the bowl and I will catch if your mix it does not, then just make sure
you are stopping. You can stop it as
often as you need to, to make sure that
everything is in there. Again, this is what
we're aiming for. Nice solid butter cream. That he's not gonna
move too far. If you think you're stacking
your cake in layers, you want a fairly
solid butter cream so that your cake is not
going anywhere either. Your buttercream is too sloppy, generally comes from the
butter being too warm. You're not gonna
be able to stack a cake because it's gonna be too sloppy and run
out everywhere. Get the rest of this off here. Give it a good mix. I'm going to stick this back on the beta for just
another minute or so. You can say that
whole recipe took about 34 minutes
to come together. Go to rat alone, sped up. I'm going to stop at there
before I get motion sickness, but we've got a nice
light butter cream. So the question I
get asked a lot is how do I get really
brought what buttercream? I have to remind you what
color that butter wars when we started
really deep yellow. This is now what we've achieved. If you want a wider
butter Chrome, there's a couple of
things you can do. One, you can bet it longer, the longer you beat it, the water will get. However, that is
temperature dependent. If you are baking in
the middle of summer and your house is not
cool, or alternatively, you are baking in the
middle of winter, but you run a fireplace
or heating if you treat that as if you're
baking in summer conditions. So when I talk
about temperature, you're always thinking about the temperature of your house and the temperature outside
as well, or influence things. So the longer you beat at
the whiter you will get, but you can't always do that. So for summer, for example, you can't, you can't do that. In winter. You can bet it for longer. In summer. You can beta for a
little bit longer. There's other things
that we can get this color that we have here. This is obviously a turquoise. You can also get this
white and you can add a white coloring
into your buttercream. There's limitations on
that because the amount of liquid that you add to your buttercream is going to make your buttercream softer. So we could stop
out a little bit of water for the amount
of Joe that we need. But if we were to try and make this whole thing brought watt
more like the packet here. It's gonna take a lot of
color to get that white. What I recommend is only making the outer
shell of your cake. So we're gonna be
doing a chrome layer, which will be stacking the cakes and coating it
with a thin layer. And then we're doing a top coat. So I recommend only coloring
the bit that you need. For the top coat to
be bright white, you're gonna be
using list coloring. Because the more current
use you can also get a mouthfeel which tastes quite discussing
what you can feel, a filmy feel on your tongue, which isn't pleasant at all. If you use say, this color butter cream
to stack and crumb coat, and then you're very top layer, which is what I would
do for wedding cake to top layer is bright or white. I wouldn't try and color
these whole tub of butter cream watts
because you're gonna be using so much
which you will feel. You can use a Joe's, but there's also
something else called titanium dioxide powder. So what you do to get
that as a powder and you add a little bit of
water to make it a liquid. It's very similar to
the JOS that is more concentrated than the jails and that will make
it white as well. Again, I only recommend
doing that for the top coating of your cake. No one's really looking
inside the cake to see how bright white
the butter cream is. I would save yourself the
hassle of trying to do that. I bought a crime is
still sitting here. It is absolutely perfect. So it's still sitting here. Note that he is quite a warm day here where we have filming. This is great that it is
not moving whatsoever. Again, if you think
about stacking your buttercream layers, you want it to be nice and
sturdy so that your cake hold up the weight of
the layer above it. But occurring about
occurring is good to go. What we're gonna
do is we're going to tidy up these bench
a bit, got icing sugar. I said no explosions, but I've had a little explosion, but that here, they're
going to tidy up the bench. We will come back
with a turntable and we're going to start
sticking our cake. Okay, so our buttercream has
come together beautifully. What we're gonna do now
is crumb coat our cake. We're gonna crumb coat it
in the creamy white color. I will show you colors
and flavors afterwards. But for this purpose, we're just gonna crumb
coat in the watt. So we've got our
sturdy turntable. We've got our cake board, which is also sitting on
a bit of non slip mat, makes your life much easier. What we're going to use is
some butter cream at to act as our glute. We're
gonna pop that down. And we're going to
add our first cake, gonna squish them down.
Roughly centered him. You know that you have
something going on the board decorations or a name or a clock or candles,
something like that. You may deliberately want to off-center it to allow for that. But today I'm gonna put him
smack bang in the centre, pressing down so that
glow kind of adheres. What we're going to do. I'm just going to walk
my hands actually because that feels revolting. And we're now gonna
stack outliers. We're gonna scrape apps and buttercream more than you
would think you would need. So we're aiming for here
more than that. Two scoops. What we're aiming for
here is for hours, but occurring hot
in-between our layers to be roughly half a centimeter to three-quarters of a centimeter. It's all about the ratio of cake icing and we don't
actually want too much icing. So you know what? I've seen the same
thickness as the cake. It's gonna make it harder stack, it won't set very nicely and
be more prone to blow out. So roughly half a centimeter
is what you're aiming for. At this point, I'm
going to swap over. So I've used my plastic spatula to scrape, that's much easier. It's got a bigger surface. Use my crank spatula. So the way that we're
holding this one, I find it easiest is to put my pointer finger up like this. It gives me more control and the hand he's holding it
more towards the base. This is, I think
it's a 15 centimeter or 17.5 centimeter
cranked spatula. What's it saying? No, it doesn't say you can
get these smaller or larger. These intermediate size I find really good
for working with particularly the size cake
I feel like the shorter it is that you have
more control over it. The larger ones are
good for bigger cakes, but they actually end up being a little bit floppy
towards the end, I find this a bit more solid. So you've got your pointer
finger on your crank spatula. And what we're doing
is we're working with our risks here to
glide from side-to-side. What we're aiming to do is put our buttercream over
the edge for these, for the purpose of this. So at buttercream, we want
to be a nice flat surface, but we want it to go right to the edges so that it hangs over. So I'll show you what I mean. So we're gonna start
gliding this app, moving this out, pushing
it out and over the edges. So we really want to focus on getting it right
out to the edge. Say have created a fairly
flat surface there that he's gone over the edge of that buttercream.
So it's hanging on. It's doing its thing
because we've got quite a fairly stiff
but occurring. It's not going to drop
down on the sides. If it does for a crumb coat, that actually doesn't matter
because we're going to use that to mask our cake. It created a fairly
level surface. If you're ever unsure, actually get down to the same
level as your cake eyeball. It is the easiest way to say
whether you've accidentally held your spatula
on an angle at all. We want to make sure
that it is super flat. Sorry. Gone right
over to the edge. We eyeballed it. It's fairly level. We're gonna stick our
other layer on top. We're going to flip him over. And I'll tell you why. It's easier to work with the call at the
bottom of the cake, the bomb of the cake, rather
than the other way up. You've got less crumbs this way because this is how it's
baked into the pen. The idea is less crumbs. The crummy beat has
gone into the middle, so it's sandwiched in
there and that will contain more of
the crumbs again. So I'm feeling like
this is a bit wonky. I can see that it is
higher on one side. I'm simply going to press that down and that makes
it level across. If you have an
edge, just push it down and it's much
easier to do it at this stage than lighter on beat, harder to control at once
the crumb coat has set. We've got our sandwich, two layers here with lots
of butter cream overhang. Absolutely perfect
for what we want. I'll move this out of the way. Because what we're gonna
be doing here is spreading all the buttercream around
the cake to mask it. The idea of the crumb
coat is that we are fully trapping in older crumbs. But the other thing
is doing is creating a seal all around
and over your cake, particularly brought down to the board to stop
the air getting in, which means it will deteriorate. If we trapped all the air out, it can't get in and it
can't deteriorate appetite. We've also used
as sugar syrup as a preservative inside a cave, He's gonna stay
lovely and moist. There's a couple of ways you
can do this and a couple of ways it'll depend on how
you feel comfortable. I'm sorry. I'm gonna be doing it so
you can see what I'm doing. But think about it,
whether it's more comfortable for you to be doing a different action closer to where you can see
it on your side. What I going to be doing is
going up and over my cake. So I've got that position here, the pointer finger on
your cranked spatula. You're going to be going
up and over the cake. And working on this
edge over here. This is a position
I would normally do for cake decorating anyway, regardless of if
this side of it, regardless of if
people are watching. But obviously this
is the easiest way for you to see what I'm doing. What I'm doing is smearing all these buttercream
around the cake. It doesn't need to be
perfect at this stage, it will be messy and crummy
with all the crumbs, that is perfectly fine. They're going to be trapped
in that buttercream. Now the other way that
you can do it if that doesn't feel very
comfortable with the tools. The other way that you can do it with the buttercream that's hanging over is an
up and down motion. Whether that's on
the side like this, how I'm showing you, or whether that feels
more comfortable doing it towards you up and down here. What other works basically
to get your whole cake covered all the way around using that
excess butter cream, we might need to grab some
more in a second. Sorry. Then we can start scraping around the entire cake as well. If you have excess, put that back onto the cake. Again, it will look messy at this point, that's totally fine. They're really
important bits that I'd love you to concentrate on making sure right down
to the base of the cake. See here there's a small
gap down the bottom. We want to close that off. We don't want air getting in. That's the bit I'm really
love you to concentrate on. No gaps down the bottom at all. Then we're going to
smear across the top. This is crumbled a little
bit, which is fine. It makes it a little
bit harder to work with because it is crumbling. If you're finding
that's a problem with whatever recipe you
are working with. You can chill him
for a little bit, so chill your layers in the
fridge for a little bit. It will make it one cooler, but it will trap
the buttercream in. Sorry, I'll put
butter cream, it will trap the crumbs in and you might find that easier if
you are having a hard time. So again, we're
concentrating on the bottom. I'm making sure it
is all sealed off. So a couple of things. My cake has moved off center. I'm gonna move him back
the way I'm gonna do. I'm gonna do it now
before we go any further. The way I'm gonna do is
just use two fingers to push it over to where it needs to be. As simple as that. Then go back over and make sure that you've
still got that seal. You will need to
go over it again to trap in the bottom from
where we've moved it. If at this point you notice that your TAs are looking
at bit off as well. There may be not slightly
centered the Y2, correct that if that happens, is holding two
fingers on one side, chipping it on the
other and gently squish it back to
where it should be. That's how we solve that one. We're not gonna spend
too long on this. No one is going to. There we go. We've got some nice
crumbling going on there. We'll use any extra butter
cream to put him back in. Pat him back down. This buttercream we've
got on is essentially holding all these coding
all the crumbs in. Does this need to be perfect? No. We want it to be fairly centered and we want it
to be fairly strike. He is actually a
little bit wonky. Again, get down nice and low. Check on your cake. Easiest way to do it. If you do tend to
like things perfect, you could use your
scraper as well. And go around at certain points
and make sure it is nice and even that it's
more to your liking. You describe most
of the excess off. What all we're doing here
is creating that layout. You might have a
little bit less, you might have a little
bit more buttercream. I would suggest less is best, as long as you've
got a theme covering over the entire, entire cake. Looks really
 Carli Allen