Transcripts
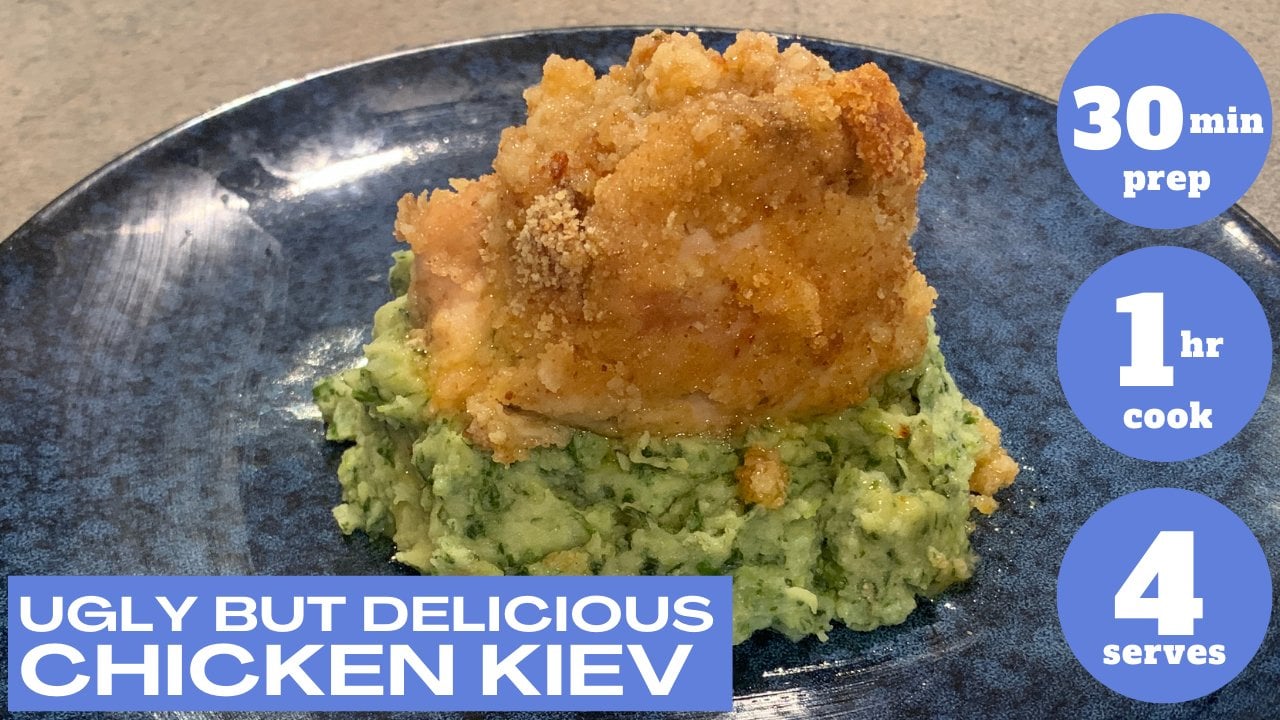
1. Introduction To Bakery Busting Custard Tarts: Welcome to the course bakery
busting custard tarts. This is one we prepared earlier because with the
magic of the Internet, you get to see what we've
made before we've made it. But why bakery busing
custard tarts? Well, when I was a kid, I used to go to the
bakery whenever I could, whenever I was
allowed to and get a cost of Tylenol devour them. Now, unfortunately for
me, fortunately for me, we've got a recipe to make custard tasks
that are as good, if not better than the bakery. So you'll be able to put
them out of business or at least refrain from
giving them your money. Absolutely delicious
with circuit, with a bit of group
came this recipe, what we're going to
show you in this course will teach you how to make this. As you can see, it
doesn't look super sexy, but it will taste
absolutely incredible. Now, as you click off to
the side or down below, you'll see the PDF to this
recipe that'll give you all the ingredients lists and the workflow and all
that sort of stuff. So you can read
along as we do it. The whole point of
these recipes is taste. And I'll tell you what I, the
first time me and my mom, Maria, behind the
camera then made these. I ate at least six of the 12 serves that you maybe bring it down to
maybe a healthy 123. But look, I wouldn't graduate if you ate the whole square off. Absolutely, incredible,
absolutely delicious. And that's the key point. Bakery busters. Maybe we can make more
recipes in the future going through the
rest of the bakery so you can really put
them out of business.
2. Sort Your Ingredients: So you want to make
sure that you've got all the
ingredients laid out. There's nothing
worse than starting your recipe and realizing
you've forgotten something. So we're going to
quickly just do it once over the recipe itself. You can check the PDF. It will have a list
of the ingredients and the amounts and all
that sort of stuff, but we'll go through it. But the main thing I want
to suggest to you is get the puff pastry out defrosting about 20 minutes beforehand. We're going to use two
sheets and also the oven set to 160 degrees pre-heated, so it's in there and
the timing's work. Well, just bring it in, Mama Maria, we've got some
puff pastry, like I said, defrosting some eggs, some milk, some cinnamon, vanilla extract. And what we are saying
that the vanilla extract, you want to make sure it's
not the fake stuff, right? Yeah, you can get
vanilla essence, but it's usually
like a sugar syrup with some vanilla
flavoring in it. Whereas that one is,
doesn't have sugar in it. It's like the action is actually vanilla vanilla flavor out of the thing without
adding more sugar into it? Yes, and it's stronger, I guess. Just check your ingredients. Extract, not essence. It's going to taste
a lot better. Be nice at all of
that good stuff. Yeah. I mean, if you've
got the essence at home, he could use it. But we want it, we want to
make it easy for yourself. Nutmeg, some cream, some sugar. I, silicon baking tray. Now, if you don't
have a silicon one, we like it because when we make the tarts, you can pop it out. But you could use just
a regular baking tray and put either
baking paper down or oil and some sprinkled flowers. I want to talk a little
puppy pop it out. We're going to have a
whisk for this one. But if you don't have a
handy-dandy new whisk, this is actually
a new fancy risk. You can just use a fork. Couple of measuring both. Get it all set, I
get it all ready. And then you're ready
to go and you're not scrambling because I know
that for me personally, I like to have things
just worked out. So I know I've got it
all without having to sort of make shift. That said, there are ways we can substitute things
in to make it work. If you do miss play
certain ingredients.
3. Prepare Your Bases: Once you've got your
puff pastry defrosted and sort of quite floppy, we're going
to start chopping it. So we've got a cake
tray that has 12th. Obviously, if you
have different sizes, you've got to
chocolate differently. But for all intents and
purposes when it was sheer, where you've got 12,
just bring it in. If I've got 12 and cut once down the middle, twice across, it doesn't have to
be an exact science as you see when I
will put it into the silicone tin,
they're baking tray. It's a cold. Let's call them silly. Come back and try it. We can do I can try
and look at that. We've got the
correct terminology. It doesn't have to be perfect. Have looked at the ones
we've already done. It's gonna look a
little bit like this. The main thing we wanna do is make sure that there's no holes. The lip is fully covered. We're not going to win awards for super super consistency, but as long as we
can get it in there, and I can sort of push
it in, move it around. And as long as the puff pastry is over the edge and there's
no holes, we are good. So just keep sort of
putting it in there. No holes consistent. Push it in there. Doesn't
matter if it's over the lip. And just continue that way. For every single one.
I'll do another one. A bigger piece to just
keep going that way. The main thing if
there's a hole, so like let's say I've
made a hole here. Just do it on purpose. But let's say I
left a hole there. When we put the cost
of tarp mixed into it, it would go down and underneath. I don't stuff up the baking. So just when you're
looking at them, you want to make sure you check
so that there's no holes. If there is, you can
sort of moisture in to fix that little gap. And you could always
just grab a little bit my surplus area and put it
over the top if you need to. Okay, So once you've put all your puff pastry into the baking tray,
just bring it in. We're going to want to
do just a couple of them pokes with a fork. And what this does, this is the puff pastry is going to puff, so it's going to pop up. And what may happen is
if you don't do this, it will pop up and then your tasks at the
end will be sort of this shape as opposed
to the nice shape. You can whack it down and if
it happens will show you. But to avoid all of that, just a couple of little pokes on the base of each
one. And we're good. If you just look at how some of these are
overlapping here, don't stress about that. Just when we're popping out, you just break them
apart a little bit. No stress, no factor. Okay, so we're going to do, is pre-cooked the basis. The insights take a little
bit less time than the basis. And if you put it
altogether in the oven, what you'll find is that either the insides are overcooked
or the basis or undercoat. So we're going to do is
put these in the oven at 160 for about ten to 15
minutes and pull it out. And we're gonna be looking
for a little bit of roundness will show
you once that's done. But we want to make sure that
whilst this is pre baking, we're saving our time
by making the insides. Then.
4. Prepare The Filling: Okay, so we're going
to make the inside. So what we're gonna
do is Krakow eggs. I use the one hand crack, but yeah, stuff up. I'll probably start up. Chuck it in nice and easy. The third egg though, we want to have the just bring
it in for me. I'm not sure. You want to just have the yolk. So if I can do this,
sorry, I decide. I'd probably got some good work. Half a cup of milk. If you have a buddy to cheer
you on when you try to crack that the guy,
yeah, that's good. Cream. Now it's a
full cup of cream. Make sure it's 250 mils. Just check where you are because a cup is different
depending on where you are. We go three
tablespoons of sugar. If you want to do something different instead of the sugar,
you could use monk fruit. It's a it's a sugar
replacement, one for one. So three tablespoons of sugar or three tablespoons
of Mike fruit sweetener. We're going to use
the sugar today. We've got heat to
not eat on these. It's not that it isn't a level. Okay, here we go. Hate dads are home. And they had some
vanilla extract. And it was one teaspoon. That's a teaspoon, isn't it? Yeah. You want to extract
and that's it. We whisk vigorously now. Looking forward with
the whiskey with him, I'm wondering what Oh, the egg to be fully
incorporated. We incorporate the important on-site or fancy
technique for Augustine. We just discard it. Just get comfortable with why it is that there's
no fancy technique. I like to add a bit
more of an angle, but I feel like English. Yeah, I think it's more
comfortable filling up like a subset. Let's
have a little look. Have you got any
streaks of aging? So we want to get rid of all of the egg yolk and
a white straight. So it's fairly consistent. That seems pretty all
right to me actually. Yeah. Yeah. I just saw some UIC bit more. Because otherwise
you get a streak of megawatt three-year capsid. I saw. Now, you could use a fork. Obviously, if you
don't have a whisk. Yeah, but I haven't
got the fork. It wouldn't be as quick. Still be consistent.
But just it's not as you use the appropriate tool, but it's not, it's
not a 100% necessary, but just makes it easier. Same thing with the silicon
baking, baking trays. It's easier to pop them out, but it's not a 100% necessary. You could use whatever
you've got and we're choosing to
do 12 little ones. You could do one big one, like it's quite free
with what you do. You have the tool, use
the tool basically. That's alright. Alright, so with precooked
the basis, just bring it in. So this isn't fully cooked, but it's looking a
little bit see-through. And it's sort of hard to explain exactly what
we're looking for. But 15 minutes at 160 is
roughly where we want to be. It's not fully cooked, but it's definitely
partially cooked. And that way when we
put the insides in, it's going to then put
it in to bake again. It's gonna be cooked enough. Are we concerned about these
sort of popped up bits? Yeah, no problem. All right. So we'll bring it
over, we'll pop them, and then we'll add the insights.
5. Fill & Cook: So we're just going
to prepare the basis to make sure they're
ready to be filled. Just bring it in as a
couple of things we need to make sure we just check if there's a little bit that
sort of out and sort of pops puffy there. We're going to just pop
them just like that of men. Men, men, men over here
have a look at this one. This one's sunk down. So we're just going to sort
of bring it back up, squeeze. We want to make sure that
it's still the full way around not to sinking down so that when we
put the filling in, it doesn't go off
on the backside. Will pop up and down. And other than that, they're
looking pretty good. Now to fill it out, just gets off a ladle, get it in there, a little bit in each of them, and just make it sure that you fill them all
relatively evenly. I would like to preferably do a little bit and all of them and then come back and sort of Rigo. But if you have a different
method, It's all good. It's some are bigger,
some are smaller. We're not too
concerned about making them all exactly
the same imperfect, but we want to make sure
that we get 12 decent ones. Filled them out. Nice and neat. We concerned about the
droplets coming over there. Not too much. Cool, cool. That'll be
fun to see this one here. That's sort of sunk down a bit. We didn't do a good enough
job of picking up that lip. So that's as bad as full
as we can make that one. Yes. Perfect. So worst-case, it'll dribble down
and get underneath. But then you've got a pie that has a little bit of custody
on the outside underneath, but it's still yum. The taste is what we go forward. Without all the
recipes we do here, we won't taste over everything. And trust me, when
you are eating this, when kids are eating this, they're not going
to be complaining. There's a little bit of
custody on the bottom. No. Divi it all up.
Fill them all up. Look up. Perfect. That that one-on-one is and you
can feel it right up. So that one is the one we're going to use
for the modelling. We go, alright, so the
15-minute Tom has gone off. We're going to just rotate
out custard tarts around. So they're getting
closer to being done, which will just turn it around, put it back in ten minutes,
and then we'll check it.
6. Dress & Set: Alright, so last step
of the cooking process, we've taken it out of the oven. It might be a bit
risen, but that's okay. It will come back down. We're just going to sprinkle
some cinnamon on top. If you can get a
little sprinkler. Obviously it's to taste. I'm quite a fan of cinnamon. Some of that will go a bit
more than maybe you would. That's okay, but just
not too much nutmeg because that can
be quite strong. Just nice little sprinkler,
sprinkler sprinkle. Happening. There we go. Then some some not
like it says a pinch, but obviously
managing how to get that would be quite interesting. I would actually do
a little tiny pinch, just consider it, makes it
a little bit easier for me. Now. Technically the cooking is done. We've got to let it cool down, then we're going to cover it, put it in the fridge for
half an hour or a day. Okay. So you could put onto a
baking tray if you like. But that's not necessarily, necessarily for
something like this. Just cover it with
the tea towel. Let it cool down. What school? In the fridge for half an hour.
7. Serve!: Okay, So to serve, obviously, you can just
eat it as it is there. Absolutely delicious
when you want to get a little bit fancy stuff, some whipped cream I've
straightened out and Australia on top or on the side and just
nice and clear. And you'll find that you can
eat it simply aids together. Some of the crust is a
little bit too crusty. You've now got some more
screen to put it in there, but looking quite
nice and fancy. And maybe if you
had like a sprig of meat, you can
put that on top. We don't have the fanciest
forgive me, but has a
8. Class Project: Okay, class project time. As with all of the coding stuff, you're going to make
the customer, let's just make the cost of tarp, take a picture and
send it in and let us know how you went, how it tastes all
of that good stuff. It's a place that you
can ask us for advice, issues, all that stuff. So for example, if
it's a bit runny, if it came out,
wasn't quite cooked. It goes into some
troubleshooting issues just posted there. We can give some direct feedback for exactly what's happened. A little bit of a back-and-forth and then we can make it so that the next time you do it,
they absolutely perfect.
9. Quick Recap: Okay, quick recap. Time. Just a couple of things. Remember, get you get all
your ingredients prepared. Gate Avenue free,
hated the one cc, get the puff pastry at a
manipulative or temperature. Just bring it in
just briefly here. We're not aiming for
perfect symmetry. You could, if you
wanted to get a knife and cut off all of the edges
and make it look all fancy. That's up to you if you'd like, but it's not going to really impact the flavor that match.
And we're here for flavor. If these bits are
a bit connected, you could pop, or as you pop
them out, they'll come upon. A couple of things to
remember when you put in a tough place
your data, remember, push it all the way
down so there's no like sort of bulging
bits and no holes. You got to push it around
the outside so that the lip of the past
pastry goes quite high. And you can do with the fork
to step, put in the oven. Remember, precooked the basis so that it all comes together. Okay, and you're giving
yourself play with what works, but we're getting
that translucent look so that you know where
to put the inside, filling in, save yourself
some time, get that done, and then in the time that that's in the oven for that first bit, that's when you can prepare the insides so that
you're saving time. You're not sort of preparing it all and then cooking it all. Again. Cook, prepare the basis, then do the filling. Take the base is out
there pretty cooked. Put the filling in, then
put it in back in the oven. Once it's in the oven, remember after that
15 minutes you're going to turn it around,
put it back into it. You make sure that
it's all cooked evenly and you just can't
bring it out and checking. When you do check it, make sure that it's not too
gooey and running. If it's running, you'll
notice that the, you see the cost
of here sticking. If it was guilty, it would
sort of fall and run out. We don't want that.
Just put it in for another maybe couple of
minutes, maybe five minutes. Now, if you look up or on
the side or somewhere, it's going to say write,
review this course, please do. It helps us to know
what we're doing well, what we can improve on,
what more you want. Well, you need all
that good stuff. Pops out. Follow us for more Skillshare
courses on cooking. We're gonna be
doing a collection, a variety of different things. And if you, like I said, if you want the PDF for this recipe is available,
just click the link. And there's a whole
bunch more recipes up on medium that Marcia has
been making and doing. So quickly go over there
and you'll be able to get recipes like this that
we're going to eventually, hopefully turning to him
or Skillshare courses. But it's been
lovely, like I said, do the class project, let us know how
they tasted it and give you some
feedback on that one.
 Zachary Phillips, Counselor | Coach | Author | Meditation Instructor