Transcripts
1. Overview: Hey guys. In this class we'll be going over how to shade in light a basic Carson. I will teach you how to create carping shaders core about creating glass, incandescent tire and metallic shaders. I'll explain how light works in octane render and we'll go over how to light our first Carson with aria lights and rise. So let's get started.
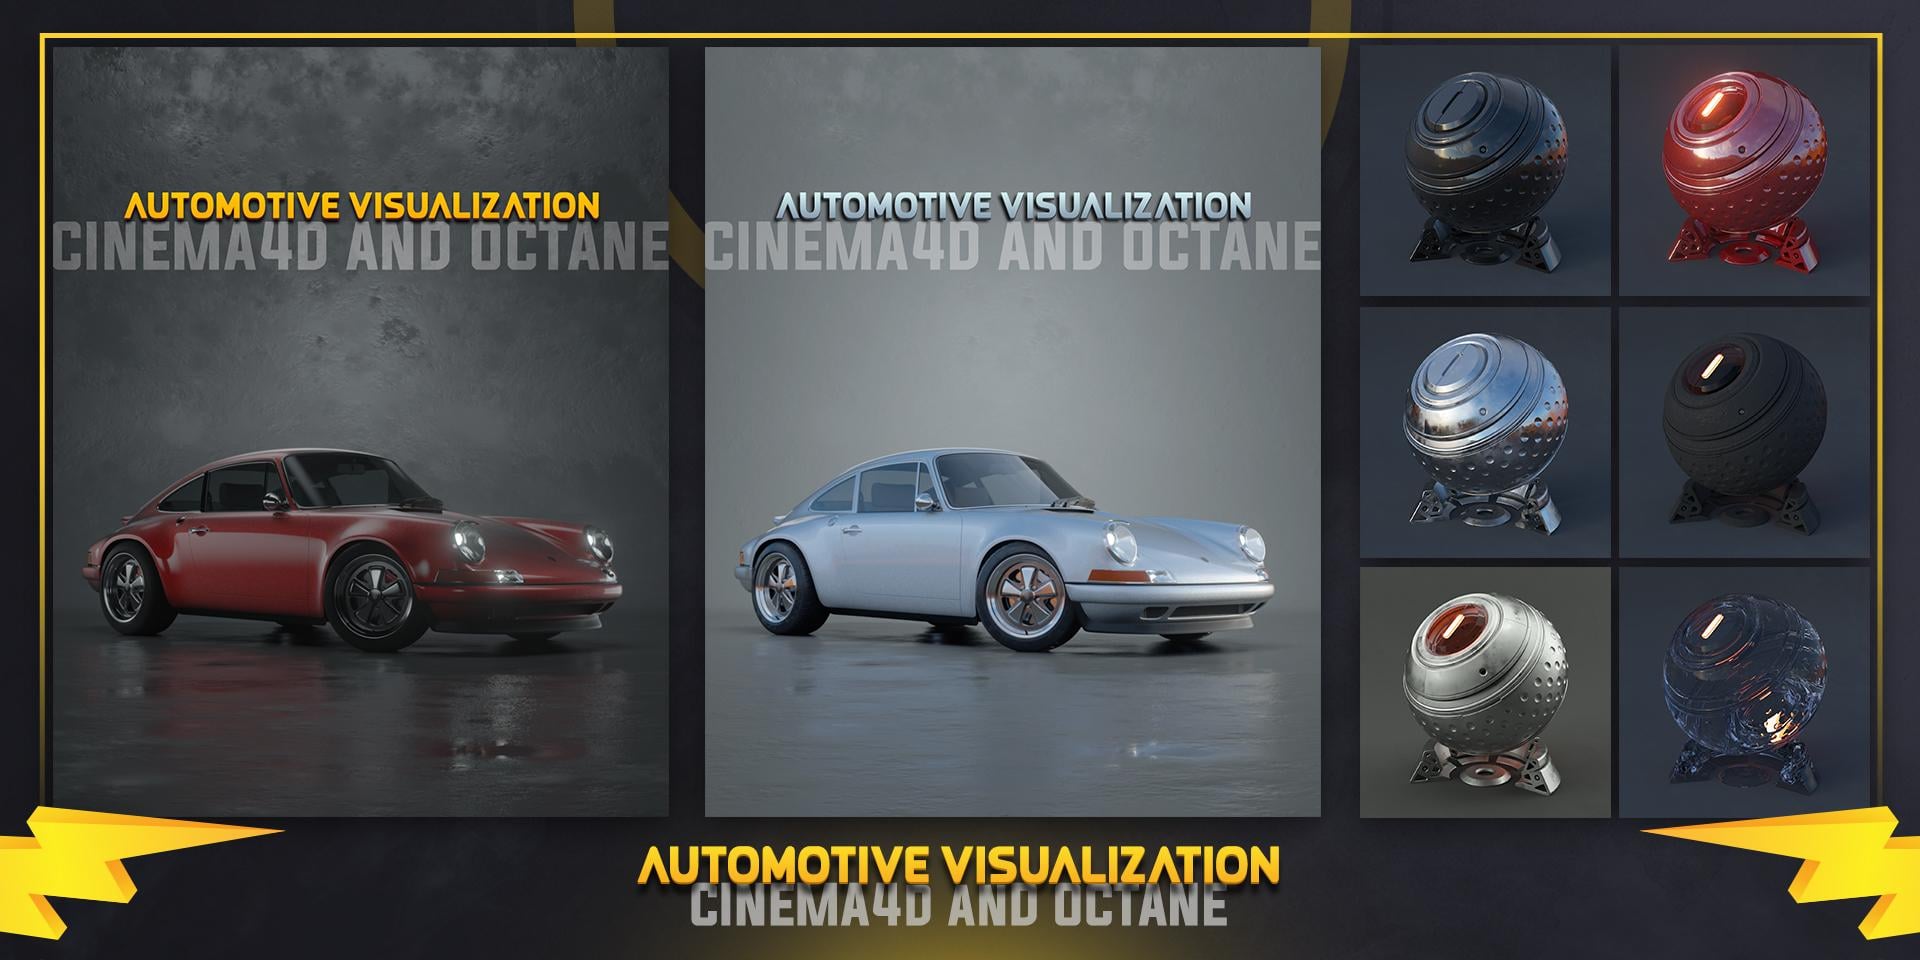
2. Carpaint with-composite material: Okay guys, let's start our class. Let's see what's inside of our See. I have a basic HD, right? And they should ripple for our materials. We will be creating our first carpet material with octane composite material, which is a new addition to obtain 2020. So let's go to the note editor and create our two materials. Instead, one and the second one. Our second material will change to metallic and respite. So it doesn't shine so much. Let's put the first material. It's going to be a glossy material. Let's up the index so it can be more metallic and not plasticky. Let's go like 3.5. Ok, let's plug our RGB spectrum to get coloring to our first material and get like a reddish color. Let's duplicate our RGB spectrum and plug it into specular. So we situate our highlights also with some color. And now we're going to create our image texture for our flakes. Let's get an image texture and plug it into a normal map. Let's choose our flakes texture. And also edX our transform my prediction sliders to our texture. Let's change our prediction to books and transform our texture to be smaller than it is now. Also we're going to add the wrong both foreign materials. Next thing we're gonna do is apply your material tour a shooter wall. So let's choose our parts of the sharable and just assign our materials here. Let's click our renter button and see the result. As you see, our teacher is far too big. So let's go back to note editor and just get, get it to be more smoke. Are flex, look good. Now we're going to mix both of our materials with a float for texture. And we're gonna go like 0.2 or something like that. We can make our flicks texture or smaller. I'll Carpenter and it looks pretty decent. This is one technique of creating copyright materials.
3. Carpaint with-universal material: Okay guys, let's continue with our carping sugar and we have the same scene. We're going to create her or my favorite new material. It's a universal material. And we create universal materials. They're always Chrome like we need to reduce the metallic function if we want, turn it into something else. But in this case, we're going to just apply your material to our attributable. And you see it's like pure crop. Lets just to add some color to red again. And we're going to up the roughness to about 0.25. This is a basic our peace coating and let's add a coating on top. Coating behaves like second material were created in the composite material. But we don't have to blend them. Let's situate our highlights in our specular and ed our flakes in a normal channel law. Again. Let's use a box for ejection and transform our flakes to be a lot, lot smaller. You don't want to texture. And we're going to see the result. It's a pretty nice I'm going to reduce the size of the temperature a bit. If you just forget, it looks nice. Now, as you can see with our coating layer, we can affect how our material is. So let's change the camera angle to see your material from up-close. And that's it because this is our carping cheater.
4. Glass&Incandescent materials: Hello guys. Let's continue with our shaders that we're gonna be creating a glass material now with the octane specular material in main thing in our class is to reduce the refraction, so refraction index. So it's not going to refract our interiors so much in our cars. Let's also turn on about fixing those and turn on thin wall. Depends on your scene. Let's introduce some transmission color in our glass, maybe a little bit of blue. And let's editor to our shader. Let's click on Render. And let's use render region and see what it looks like. It looks okay. By testing, I'm going to turn off our thin wall and just use the default refraction. But I'm gonna reduce the index of it. Okay, let's move on to creating our incandescent light. And let's create it. Okay, diffuse material and apply it to our she didn't want. Next to go to the Emission channel and Edit Texture emission. We are going to use the surface brightness and go to the code editor. Let's use RGB spectrum and plug it into our texture and distribution. Let's go with yellow color for texture. And I am going to use a more darker color for the distribution channel. It's reduced the power of it. And after sampling grade, the smaller your light is, you need to add more samples to octane. For octane to resolve it more faster. It's tick the double-sided also and check our postfix in our camera settings. Let's go to the main here and the output a bit. Or our light material looks whiteness. Okay guys, see you in the next chapter.
5. Metal materials: Okay guys, let's continue with our metallic material. This video will be more of a walk-through tutorial. Lets apply our metallic material tool, shareable, and tick the render. Like universal material, metallic material also is pure Chrome when you applied to something. Let's go to note editor and restrict some basic settings, which will help us get it more of a good luck. Let's up roughness a bit. And we can change her specular mapper to get more of a Ireland look. With basic spectrum specular, we can change the color of the metal, splay with some colors. We can even add a thin layer to get some weird nice-looking effects with reflections. Let's go back to our original core. And of course you can add roughness, map, image texture into a roughness, and get some cool glossy effects. Let's get back to default settings. And as you can see, our methyl looks quite nice. Let's say some Shin. For more of a shiny look. The age is it doesn't change much from this angle, but you'll be more shinier when light hits it from different angles. Let's it. Metallic materials, pretty straightforward. That's it for this video.
6. Tyre-Rubber materials: Okay, you guys, let's continue and create our rubber sludge tire material. Let's create a universal material and apply you apply tore shareable. Let's go to our code editor and turn off the metallic channel. Let's go to albedo and go with a dark color. Let's put an image suture to roughness, channel and choose our tire mix texture. They said Our you transform and financial projections and go with the box and decrease our texture size. Let's set the color correction. So we can change the brightness of the texture. If we need to. Check our material. It looks OK. And said gradients to our color correction output and plug it into our specular channel. Let's change the white color to be more gray. And push it to the left side. Let's change all black card. We more gray as well. So we can change our specular color. Let's add another image texture. And we choose our tire bump. Let's see, we transform it also to be books and decrease in size. Let's create a mixed material, mix texture, and plug it to fog or bump into the second texture and the flag or gradient into the first one. Let's plot Goal Flow sexual into amounts and go with 0.2. Let's plug this into our bunk channel. And it starts looking like a rubber immediately. But the bump is a little bit hard. Let's duplicate our gradient and the plug our Bump texture into it. So it can decrease. Do. Let's play with the colors. Let's go with more light color. Gradient colors again were darker. Let's say you transform our first texture to be small in size and our materials looking better now, we see all the bump and the first texture reflecting go right and play with our gradient again. It's looking quite nice now. The forum tire shader.
7. Basic area lights: Okay guys, let's do a quick overview about lights and obtain. Let's say the marine lights and let's assign a target tech to it. Let's put our shareable until the target. Let's jump out of the camera and decrease the size of the array light. Let's fire up our render. You can see the islands don't have follow-ups. So we need to create a form affinity distribution channel. Let's go to obtain and the fall of man can control the amount of the follow-up to get a more realistic results in lighting. This is the basic thing in Ru, lights in octane. To get more realistic lighting, we can control our temperature course and change our color of the night. Let's create a basic studio lighting with three lights. Is duplicate our light and put it on the right side. When it's duplicated it once more and you turn the other side. So have a basic three-point lighting, but we don't have any key lights or secondary lines. They are all the same. Let's up the temperature a bit. Where lots to be more cold. I'm going to turn off the opacity so the camera can see writes someone half the sampling rate a bit. And then when I use the following map into our texture channels also, to get more realistic follows from our textures. Let's check it out, but I don't think we can see it in the review. Let's increase it a bit. And let's change our temperature again. For lights are full of NAEP is the basic thing for getting more realistic lighting from RED lights generally. That's it for this video. See you on the next one.
8. Lighting our car with area lights: Okay guys, let's start to break down our scene and recreates the lighting. Let's check out our lights. We have like 505 lights on our Korean two lights on our big round. I separated them with a light pass mosque. I'm lighting the background separately. I'm done lighting the car separately. Okay. Let's turn off all lights and start to notice things. Let's create an octane light. We're gonna target on it. And now I have an object which is positioned in the front of the car and it's put it in our target. Let's high dollar lights viewer. Let's get this slide to lead our side of the car. Is all main light. I'm going to use the full of technique, again, increase or minimum value to decrease our lights power. Let's increase our width of the night and decrease the power. Symbols again. This income gonna decrease the power again. Let's site director light. I'm going to delete the target and position my notes by hand. And I'm going to increase the height of the light tend to rotate it to this side of the car. Something like this will work. I'm gonna use a gradient Tino texture. So lights will follow from the side of our car. Let's check if our gradient is mapped properly and it's upside down. So let's invert the gradient and lets and increase all look portion of the gradient tender. Let's take hold me to point to the load side to be one of the great. Let's duplicate our light. I'm going to change your gradient to be a simple gradient. And this light is going to be on top of the car. So let's position or light. We need to get a good highlight on the windshield. Let's put two light somewhere above one hour car. Find a good spot for all highlight. Let's decrease the size of the light and narrow it a little bit. This looks good. Let's duplicate our light again. And this slide is going to be lighting or bad side of the current. It would take like every white. We need to position it to catch a little bit of highlight tone on top and actually light tower interior also clearly gradient from the texture. Just to and it'll be done. And it's lighting up our interior as well as the site of our car. Let's duplicate this slide and the front side of the car decrease the power of it. Position we like to highlight frontal for car. Rotator light, jumping to another lights on our fun tire. To get a little bit of highlight points also. Let's decrease the size of the lightened position into near the ground. Let's decrease the power over a bit. And let's decrease or minimum value also. Lets solo it. It looks OK. And that's it goes, this is basic. And I increase the sampling rate for all of my lights and check that's my light heavy passes one so it won't like my background. Let's check the background texture is the same texture we used for old tire is just going to or roughness channel and bombshell.
9. Lighting our car with HDRI: Okay guys, let's continue with our second setup. We're going to be using rhyme with this setup. Let's reuse our lights, will use the satellite and the car pack light. Let's delete the other lights. Let's make our background more, more of a light grey and change our carpet material to bluish gray color. Let's add NHGRI. Let's decrease the power of it and change the rotation is in our map. And let's decrease our exposure from our camera settings. Let's increase the highlight compression and decrease the exposure again. 3.5. should be fine on the sea. Let's increase the power of our HD right. Now, going to texture the front panel and made the black material to it. Let's decrease power of our HGRI AND increase the cholera sidelight a bit. And of course we can play with our car paint colors and test out some somewhat more blue war greenish colors. That's it for our class. Guys. Thank you for watching, and I hope you enjoyed it. And we'll bye. See you next time.
 Aleksandre Makashvili, Thy raven wings