Transcripts
1. Course Introduction: who welcome toe this course on art. Okay, in this course, you will learn or took it from basics toe advanced level. Gotta get is a computer every design software that architects, engineers and construction professionals rely on toe career, precise toady and 30 joins. It is used to choreograph and added to regiment tree and 30 models with solids, cell faces, mesh and objects. It is features like and order trends with texts, dimensions laters and tables or took. It has additional and want NATO customizing with no naps, and FBI is the main content off. This course is divided into five models. In the first more deal, you will learn about Jodi Sketch Woodling. After that, you will learn about annotations and then layers and blocks. Then you will learn about 30 morning and creating it really design. My name is Praveen and I am the instructor off this course. I have a masters in mechanical design engineering. My area or specialization is care designed and performing. They see a analysis. I have more than 80 years off experience in this field, and I had worked for many projects related, token and design. Currently, I'm working for Model T Suzuki, which is one of the biggest auto mobile company in Asia.
2. Intro to 3D Modeling : welcome to all you got to do is in this tutorial we will start a new model. That is it hurting modeling. Till now, we have learned about totally morning. We have learned how to care the so the sketches and drawings. Now we will learn how to convert those Toti drawings into 30. So to start with daily first we have toe go totally environment more so There are several ways to goto This one way is that we can directly open a template. So I go to this menu here. Here I go to this new and here we can find the template sale or look at it. Really Don't dwt. That is a pretty find time late in or located. If you want template in I s o standard, we can also find their order get Ah, yes. So the Toledo dwt So ice like this oughta get 30 and click open and we can find that our view has 10 to 30. We can see X y Z coordinates that Terry coordinates, but we can not see anything in the leaven menu or to make a tent. We have to change our workspace more, which to work space. Go to this application status bar and we confined here. Terry, basics click on this. And now we can see our 30 everyone menu here I go to his home tab and there are some panels . The first is creating the 30 objects we can find the common hair extruded. They will love soup. After that, we can find a details. 30 Edits graceful union subject intersect then drawing the totally objects. They're lions polygons circles, etcetera. Here is the modify panel for 30. Move, Copy, raise 30 minute sector. Here we can see the free that option. This is very helpful in 30 object. While selecting the object here, we can find the coordinate system here and there over layer properties. We can also change our views from here. Currently it is showing in the customer you here I click on this and here we can choose to overtake review. Southwest views southeast noticed not rest. Usually in this course we have you southeast view because it is more general view. While watching the objects. It's like the Southeast view and we can see how our views that change now, Before starting the 31st I would like to open an objective go to this menu open and like this projection, object and open. So But I don't know if this great Rispoli to have better view And here we can see it till the object We have used the rectangle Come on and then military give it the height. But the main objective off this object is showing the views in Turkey we have two reviews No view front of you and light of you. And these views are according to our coordinates we can find that that is a y Coordinate X coordinate and that coordinate they say card coordinate. And all these reviews are copper nickel to each other. If I see this object from this top or from this why excess we I will see only the stove you so we can switch to overtop you from here Here I will see only this part of the object. It is that all of you If I was like this front of you, I will select only this part of you and this accent y coordinate similarly for the light view. So, while growing the 30 object we have to keep in mind this Terry views no friend and light. So after landing about these views, we can close it to over 30 modeling.
3. Different views in 3D: in Mr Doyle, we will learn about skating in different views in all. Agha 30. You know, one Mr Doyle's. We have learned about different views in order. God, as we know that our Terry basic views stop friend and right wheels and in 30 solid modelling in order. God, it is essential to have a clear concept off all these reviews so we can find these views here. Go to this view here. Top bottom, left right, friend Back and hate are reviews Southwest southeast noticed, not rest. So as we know that in this course, we have basically used southeast of you So I like the Southeast and we can see that all great had change. According to our southeast view, it is now showing in 30. If I select different, we're here or w supporters like it of you. We can see our grid has changed. Tow it to review and we can see here over coordinates. All use years are showing accent by only. It is similar for friend and flight views. Now suppose I dro some scat in this friend of you. I select a circle here and all this circle air Give it some value, Then go to Southeast view. Now, suppose if I doe this get in this door view, I select the top you from here and we can see this time the circle is showing as a single line because we are viewing this circle from this top. And on the top we will see only the line. Take the circle somewhere away from this line to have a better view. I draw the circle and then I go to this southeast view and this time we can see all good that we are in two D View. And now we can find the difference in these two circles. This circle we have career did in the front of you and this article we have created in the no view when we extraordinary circle, it will go in this direction. I'd like the circle enter and gives the direction either left one or light. Would I give it rightward? Similarly, if I like the circle second circle press enter, it will explode on this upward vertical o donnell direction. So that is their defense off creating these sketches in different meals. So we have to keep in mind in these views while growing the trees catches to give it a more practice. Let Medo some more sketch, I abandon head. Then I select this our care from a design point Supposed toe This endpoint does a mark. Okay, this is the art we have now. We want to draw a circle whose plane should be perpendicular. So this arc So the plane off this hunk if we directly does the circle here, see the difference here? If I It's like this point and though the circle it will create circle on this plane on the plane off This are Kale, but we won't the circle toe the plane perpendicular toe this ark So to create the circle we have to once again make use off this view, Zale. And from here we can find that if you want to create a puppet declared geometry, we have toe either work on the plane, right? All different plane because light plane will create this cat here we will work conference plane so I select this friend plane or we can't like the Flint plane from here front and we have to go to over Scott here toe view the sketch properly. We can select their toady wire frame Ward. That is our sketch here. Then we can draw the circle from this end point, draw the circle. And once again we will go back to our southeast view. And then I zoom in and we can find the difference in these two circles. Now that is the perpendicular. Also, we can create this circle with respect to the right plane. I select the right plan here. There is showing light and zoom in on this. That is the point we have. And then I have to go circle. So I take this center as a reference. So we have dodo this circle. I select this circle on this point and then goto Southeast view and we can find the circle here. These two circles are perpendicular to each other. So that is a thing we have to keep in mind while doing a 30 modeling
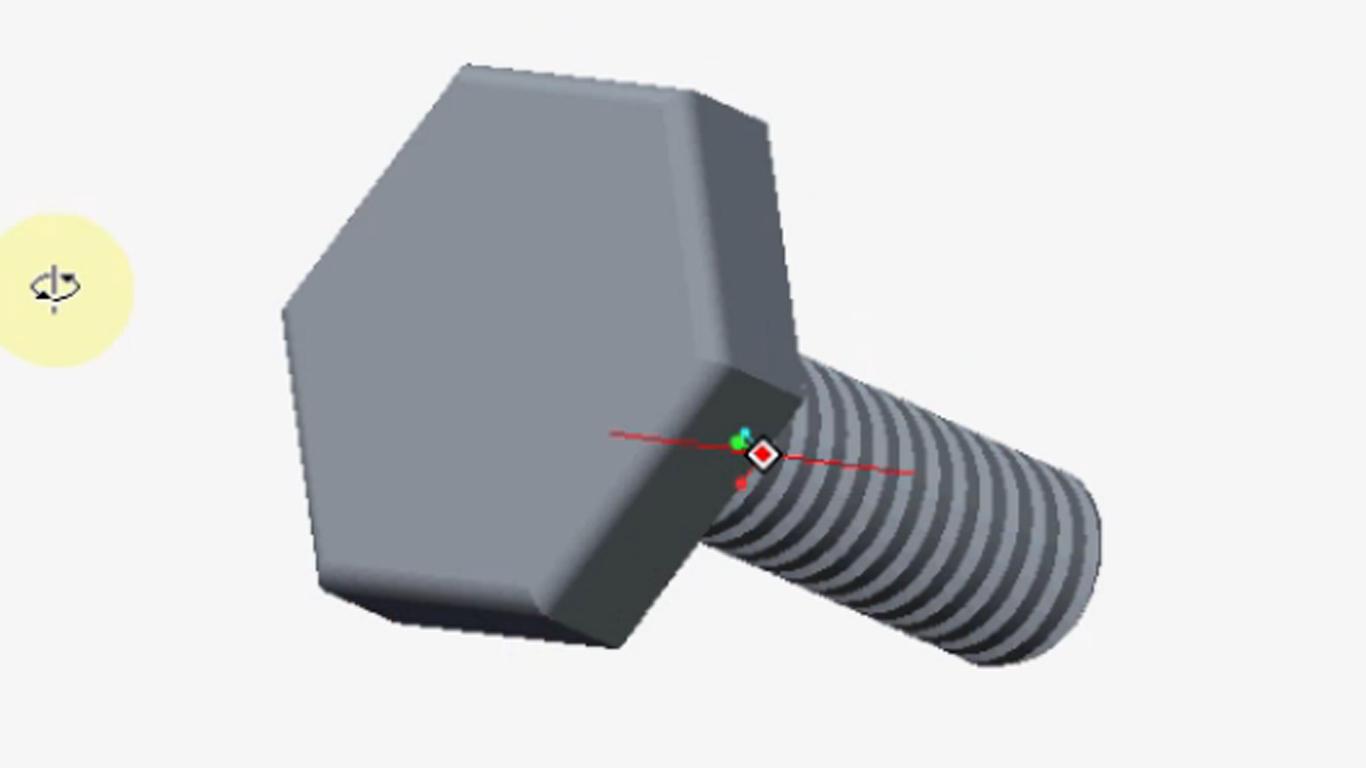
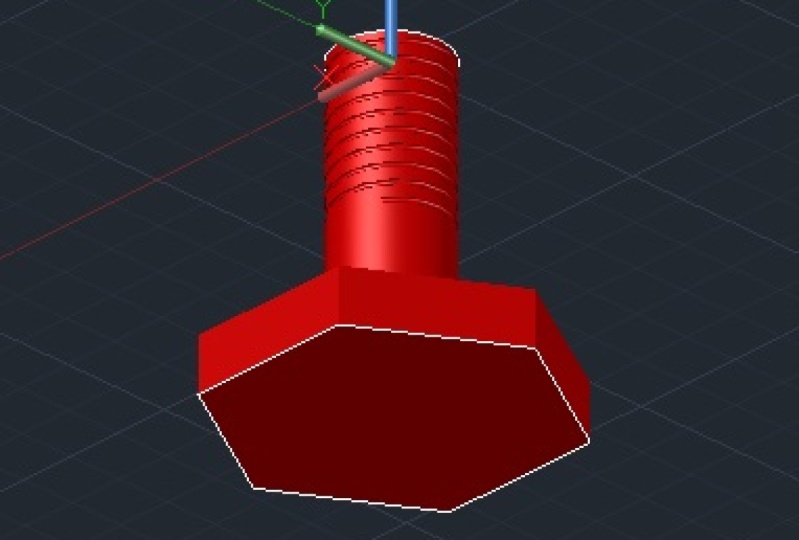
4. 03 Presspull_1: In this tutorial, we will know about our first command in detail remodeling. So as we know, we have to a planetary template. And we have those ways to over 30 basic view from air workspace, switching and the 30 basics we have just, like, view from their southeast view and currently over uses. I can are showing in this model so we can also shift to them. We have to type in there. Come on. You see it? Aiken and breath ender. Support eyes, lettuce. No agent grandly, And it will show toe on this left. And I assume we know this view. We can find the common hair press pool and it is showing in the preview that Howard clears eternity the way to the object. It gives the height that are dimension. Let us for dro Italy Profile. I take the rectangle here from the same point to this end point rectangle of any dimension . Then I select passport and here it is showing select object or bounded area. So I take the car sold. So this object and we can see it is showing this object selected So we have to click somewhere in this object And then we have to give this height, Specify the height value end of one and best center, and we can see here over object has now converted to 30 and press escape to exit. We can also create really off the circle. I draw a circle. It will create this. Linda, give it some value radius Then it's like baseball Technicolor inside this object. And given the height Suppose I give the I two and percenter. So that is the basic way off. Creating literally object. Now we can also created object on there surface or any existing their friends. Suppose I want to cadet this te really object or this Linda on the top off this que Boyd profile. I know this is still in their hair. I want to bid slender on this top first to be held toe selected Their friends Suppose I want the circle owned it center, so we need center here. So the way is that minuto dough. The center. We have no copy these ages to its midpoint, So we can not likely you this copy command from here because it will copy the complete object. So in 30 we have another common good. The separate object off copy there Did this only dated So type in the common solid. Add it plus centers. So we have those like the reference We need eight here and we need to cooperate. So like this age, if we can find the age here, go to the selection, fell down and go to this age. Now it will only serve the ages. I select this age presenter. We are just like the base point as a reference. I suppose this is the base point and take this today Midpoint. They'll listen midpoint and exit two times as it this way. We have cooperated. We have to copy once again. So I type in common Solid added It's like this age GOP. It's like this age press enter best point. So this midpoint a copy and then escape Right click Enter exit an exit. This way we have copied the ages. Now we're We can grow the circle here It's like the circle. Give it some values of what I give this points on fire And of these two lines we have grown our reference land no weaken. Delete them. Soto, select the lines from here the good way is that we have to goto wire frame. Would I selected by fame or from here we can easily select the lines. So these two lines and it is then she's too over shaded with age. Is it then, to like this place? Pull select circle ear and gave it the height to press. Enter right click enter and this will be have created the object. This time I've owned this object on the bottom side. So I know this press pool here. It's like this personal once again. So like this. And this time, while not taking this aboard, I take this culture to the downward direction and like this and escape this way, it will create this object on this Donald direction. Now rotate this object. We have to go. Maybe use off this orbit panel here and this all but we have pain option and another option . Is that all? But click on this orbit? No. By holding the left click off mouth, we can drag the mouse and loaded Totally view and breast escape All exit. This way. We was displaced full. Come on,
5. 04 Extrude_1: in this tutorial, we will continue over 30 more link and we will learn about the common that is extra. So extra command also used to create the totally from a toady sketch and we can find the extra hair in the period section here. This extra would let us first sketch drawing ice like this rectangle from here and from the same point grow exact angle. Then it's like this extra command. So it asked us toe select the object to extrude I select this rectangle, then press enter Then we have to give the height off this that stool So what I give the height to and percentile and this way is it has grated the s toad now in extrude their some different ways. So once again let me draw Elect angle from this point and then I select extra ord It's like this object press enter and then this time you don't give it hide we just likely care And here we can find some options direction, part taper angle expression We can explode this value or destroy minutely to a specific. But also we can give or define depart from here we can in certain expression. Mathematical expression. Inhale. So this time suppose we give this air Taper angle ice like this table And then we have to specify the angle value. Suppose I insert really 15 degree and press enter Then we're toe give the height off. I stewed once again I give this high to and enter And this time we can see here it has created a tape, ultimately 15 degree angle with the vertical. So really, we can do the extraordinary to a specific part. So let us draw some sketch meal. I select an ark on this point from this point. So the same point. Okay, we can take our cover. Any profile it's about This is the ark On this card we will draw a circle on this point. So we have to change our views for references to draw the circle. I take this friend of you for a male. Okay, let me change our views there. I like this wire frame here. We have to draw this article on the end point. This is Dicle VL We can go toe wire frame would and we can see the car rail. I select So So like this endpoint give this circle with 2.5% of and then goto over southeast of you and looming on this sketch air I select this extra load we have. So it's like the objects like this circle presenter, right click give the part and this extraordinary This arc is the party And so show this properly we go toe this shaded view and we can see Hill. Our circle has been asked road on this part here. This way we could hear the extrude.
6. 05 Presspull vs Extrude_1: till now we have learned about some basics off 30 modeling. We have learned how to create the 30 family toward the object and we have used to commands for this extraordinary and press pool. Of course, one question comes in mind that both commands are very similar. So what's the actually defense in press, pool and extra? So first, let me go. Some sketches. I zoom in this I draw two circles the circle and the circle. Okay, Once, against alcohol, I gave this press pool this region select and gave it some height. Right? Click, enter and then give it this extra hail lady circle and give it some height and we can see that both the friend as we have created are almost same. So they're saying you know, their geometry and all the parameters were defined. They're both of the same. So their defense in both command lies is selecting the region. If we go back, I under this here. When I select this press pool and let the area it shows select, object or bounded area, then we take the Couser in the area. It will automatically show the foreseeable area that we can press pool and then I click here and give the height right? Click enter. Then I select this extra hair in the extrude. It asked us to select object. So we have to manually select the object toe career the extra just like guys like the circle and then presenter and give the height. So that is the basic difference. So next thing comes that how can we visualize this thing off selecting the object? So I banned in here. Let me draw two circles. I select a circle, some bigger circle, then another circle that is concerned tech circles. So so the center of the circle. Now we have to create the 30 off this. But the condition is that we have to clear 30 off this in between bounded area, not this internal circle only in between area. So if I select the extra hair and then try to do the 30 we have to select the object. If I feel like this bigger circle and make it to a T, it will create a charity off this complete circle. So we cannot do this so I can sell this once again. I said this has tool, and if I try to do the extra load off this indolent circle and presenter and gave it the height so it's still can could hear the extra off this bounded area. So we cannot do this by extrovert Common. So let me let us go Toe place people. Come on. Hey, we have those leg a bounded area, nor the object when they take because of inside it will select the bounded area only inside this circle It is showing the circle in the daughters. It mean that is a bounded area. Similarly, we can take all council outside this circle. When I drag our mouth in between the search circles, it will show the visible area here that is bounded area in between these two circles. I click here and we can see here We can see the whole here. So I give it some height Here. Right click enter and then ice like this or with and then darted this and we can see here. There's a hole in this. So that is the basic defense in both press. Pull an extra two. Come on in selecting the object
7. 06 Revolve_1: In this tutorial, we will know about the wall comin as an in protest. We can drivel. It's get all entity with offense too. Any reference line. We can find this drivel common in this period Section hill and end up review. It chose that How could have through the wall. We can see there are two objects one and 21 is over object that we have do evil and two is over reference line And in the light side, we can see preview off this level so we will clear the similar the wall. So let us go to our southeast view. And then on this automotive we will go a series of sketches. So let's go toe top view and then draw the lines state line and from the same point go a vertical line. We are not worry about the dimensions. Take someone in them dimensions. Then I take it to leftward and go this sketch like this Once again I draw some more lines on the leftward right world and we can go any sketch like this From this point then we are definition So the same point and we have What is this? This is the point and click on this and right click Enter. Then I go to this Saudis drew here I select the wall Command and first thing we have to select it. Select object or evil were just like the object that we want. Tokyo do the wall. So I hold down the left click and select this complete profile. Then press enter. After that it asked us to specify access, start point or define excess. So we have so specify two point off our reference access. This endpoint will be our first point. It's like this point and then we're does specify excess second SS point and this and will point will be our second reference click on this and here we can see the level. So I don't know off this good display to have a better view and then we have to specify angle off rotation. Here are some options here. Starting, weaken Specify either by start angle or the what direction or by some numerical expression . So let us specify the angle 3 60 degree and press enter and I leave all this like this, albeit and ordered this and we can see how always get the wall. We can take more references in creating the wall. It's about this time I take some off that line, as is our friends. So I know this very well here once again, a new. So we have created the sketch. Then I type in the common offset we have to specify distance about. I take the stance to It's like this line. This is the line and upset on it. It only light or direction, right click and a Once again it's like this The wall. Come on And it's like the object. So ice like this complete object. But I don't like this line here because this line will be over reference. No day object. They're nice presenter. We have to specify two offenses now over references and will be and points off this line. It's like this first point. It's like this second point and one second in this middle way. We have to specify the angle of rotation. I turned off this great display once again. I can specify this 3 60 degree to have a completely audition and percentage, and here I devoted this and we can see the difference sale this time. There is a whole here, the whole that is created. Because off this reference, because we have created a reference that have some offset distance, we can create a revolver off any solid Demetri, all surface. So I select this complete object and delivered this and don't believe and go toe southeast view and unknown this great to display. This time I select a line from this end point unknown this automotive and from the same point draw a line radical agenda. Also, I will select a narc. I select our care. Praise this endpoint from this endpoint. Suppose to its end wine. Here you can take some mark. Okay? This is the other we have drawn. And then I select the wall. This art will be over Abject. It's like this are for a center. Then it's like this line as a reference and give it the angle. 3 60 and presenter. I turned off this good and when I loaded this, we can see this is a whole low profile. It means this is a surface. We can easily see it from here. So why it s created this whole face Because the geometry or scared to be have begun. It was an open sketch and we can find it here. I exit from this. I know this and that is we can see here. This arc is an open profile. It is not closed. If you want to make it close, we have to go draw some lines here. So I type in common line from this end point. So this point draw the line once again. We need line here to this point from this point. Now, this is a closed entity, so I select the wall. It's like this complete object plus ender. Give it the transpoint and specify angle to resisted A very presentable I don't know this great display and daughter this. Now we can see this is a solid model, so it could hear solid because that was a closed entity. So that is the difference in the world commands
8. 07 Sweep_1: in Mr Royal, We will know about sip common with the help of sleep Common, we can create the sleepover in existing gross section on a particular but so to use the civic. Come on, let us first go a part. I select our care. Okay. First I select all reviews. Saudis view. Then I select Arc. Come on, zoom in on this. And though is he's a FARC. So it was from this end point to at this point, though, the ark also I wonder, though another so one take intellect are common. And from this end point in this election, this time take the ark. We can't go any profile. After that, we have a great a processional area which will be over sleeping object. So I goto this friend of you here Slightly wire frame to revive him. And here let me go The profile office circle Take this article on this end point, Take some dimensional circle and go toe southeast to you. We can see here the circle is it centre off the CEP line. Then we can sweep this I select sip common here. First thing it asked us to select object OSI so our objectives. This circle bless Endo. And then we have those like the sleeping part. Select three part ice like this are care and it will clear the street. We have no during the arts. So that is why it clearly sleep on this thing. The lark. You can join them to quit this rib on both the arts. So I go toe here shared view to have a better view. I turned off this great display and here we can see So I under this goto this under. We have some more options to pay the sweep. And first I joined these two arcs I type in the command join select both the art and press enter Now it will clear the sweep on both they all simultaneously. Then once again, I select three. Come on, we have those like object press enter Now we have some options in sleep. I right click here and we can see alignment based point scale twist. These are the four options. Let us first like this to its tail. So as the name suggests, we can add the twisting angle. So this girl section so that it will when it really great asleep. It will also load it on this ark on or on this part. It's like this twist. So we have toe entered a twisting angle. Suppose I insert this angle 15 degree Press enter then we have just like the part, this artist all part. And here in this preview, we can see the twisting here. See, these are these are twisted All we can find here tending their view The twisting here because it is circular cross section so twisting will not show properly. But we can understand it from here and we have more options in 31 2nd I undo this and like the sweep like the object presenters, right click and we will find alignment here. So I select this alignment And here it does a line sweeps object perpendicular to the part before sweep that we want to align our sleeping object Normal. So they part. So I select this yes. And then to like this sweeping part. And here Goto shared view. I don't know this good display and noted this and here we can see the different. If I zoom in here, we can find that this part and the object are no perpendicular to each other. So that is the advantage toe having the alignment. So I like clicked exit here. And until this toe the nice like sweep slacked object percenter like click hair. We can find the base point option. I slept this base point with help off this point, we can give more ref lands as this sleeping object. Like this based point We are just like the base point air. So this intersection off the arts is the best point here. And then there it was like the part and we can say in this preview it has also take dealer friends on this point in normalcy command. It takes their friends on this friend point or this endpoint. Now it has also take as a reference on this base point also. So there is a difference and we can find more consistency in this sweep.
9. 08 Loft_1: in this video villain about love command. In our previous tutorial, we, Helen, about seep common in safe common. We have created the blend off a particular course section to an existing but lost command isn't and once common, to save common in love command, we can clear disip in vernal. More part all if we have one or more object or co sections are given, we can cleared them, blend on a single part Here we can find the love common in this gear section. And in the preview it showed that we have to the object and how it has got to do blend. So first we will goto southeast of you. Then I zoom in on this type in the common zoom and select all I select rectangle From this end point toe hairs go exact angle in this leg tingle inside this grow another leg tingle these two rectangles Once again we dough a circle Inside this the detainee objects We have grown off some random dimensions. Then we have to move them So I select Move. Come on, turn on the auto mode Select this rectangle. So what a rectangle. But I send does and give it height on the upward direction we can give any height. This is just for reference and then once against, like, more common. It's like the circle press enter because this point and move over, cousin toe the upper world now I will select loved common. It is asking us select gross section in lofting order. So we have those like Dick go section in the order which we want so over order this force this big elect angle then this circle and then this smaller rectangle. So first ice like this rectangle bigger then the circle and we contend the purview It is creating the loved also this rectangle and then right click Enter here It will ask us toe select guides part conception only entire things. If we have more than one guide we will strike guides if we are given more But we will select but don't leave. It was like close extent only and begins like realistic view and we can see the lot. We can also create the love if we are given more than one cross section as their friends So we will draw some sketches first. I goto friend of you and select the line. Come on. Maybe show that also modest, unknown and brought no lines. Doyline here and then it was on the line. Likely candle. Give it some length. We are not worrying about the We'll lose overland. Take somewhere number lose Then add deflating this I select for let come on. It's like this first object, right click radius Give Some readers will lose support. I get 0.5 presenter and like this second line and then we have to doing them. So type in common, joined and like all three IVs and press enter Then go toe saltiest view. So this will be over but And then we have to go create to grow sections on which we will create. The loved one girl section will be on this line here and one will be on this line. We have to go toe toe view Filmmakers like this w and we will select wild framework. And I don't want this. I select circle common on this point. Give it some welly was about this time I give it 0.5 and enter. Okay, it is much bigger. So I undo this and this time give some lesser value. Let me give it the value going toe and enter. Then go to Southeast View and we have locate When most are clear, this circle will be on the right plane. So we have those like they like here. Andro, another circles. This article will be off some different videos. We can take same radius or we can take different radios for more understanding off this common eyes like 0.1 here and Goto southeast Rio. This circle is on this in the section point. So we have to move this. I slept. Move. Select The circle is a difference. Percenter center will be based point. So this and pointed this way we have created over profile. Then we will add the love tale. I select bluffed We are so select the cross sections here this circle and the circle rest ender We have to select poppin and this will be all part and we will goto realistic view. And we can see in this preview that how it has created Beloved now the gross section Here it is smaller construction and here it is a larger core section. So that is the advantage of this but loved common Similarly, we can create the loved if we are given one or more guides. So I drove rectangles, though to let tangles from this end point to this point once again go another, do the same point. Then I moved a smaller rectangle. It's like move this object presenter and make sure that automotive zone and give this the height. Give it some height and then we have to go Schedule d guide goes so I select the line Come on from the made a point So this midpoint Brody line Right click enter. So we have no dough Same on all the four sides once against liked line on this midpoint toe x midpoint It do the same for hair What point toe This midpoint also here. So these lines will be our guide for the loved. So I select loved We have just like these two rectangles Rest ender and I select guides and these lines will be guide. It's like these four lines because in guidance we can give multiple guide and select all four and presenter. This way we have created the love to using guide. Another option in beloved command we can find is the love settings. So we have these two rectangles I select, loved and select body profiles, Rest, render. And here we have option settings, go to the settings and here we can find more options regarding the surface control off the loved. We can create a little surface. It's smooth surface, and here we can give the continued E. This continued is helpful. When really create some Bandy's office, we can create normal cell faced. We can also air dear draft angle own over surfaces. So I did off there. We will give it some starting and multiple five degree and angle also the five degree. And here you can see the change in this profile and click OK, so this way we can at it the sections or diesel faces.
10. 09 Union_1: In this video, we will know about Bolivians in auto get 30 brilliance are editing tools in the 30 mode. Here are three brilliance in order guide one is union subject and in dissect. But we will know about this union union basically helpful in combining two or more solid object. It can also combine. So I did some faces. It's our face to religions and comported totally objects and we can see in the preview here they're two objects one end toe given here both Allen different colors. When this black and one is green, these are two separate objects. But when be applied the union common here, it will turn them into a single object. On this light side, we can see the lenticular object It iss single object not too different doctors. So that is the advantage off union common. So to use this command lettuce for door. Some 30 bullfights There I take elect angle I turned on this autumn owed from the same point. So this rectangle off some dimensions then I select stressful common. It's like this region. Give it some height. You can give any height hair with some white likely enter then I eat changeover display mode here. I select realistic to have a better view off this or weekends. It's like this shaded with ages. It will also show this it is off this model. Then I will create another section on this existing rectangle. So I select circle here and grow a circle on its dope. But we can know directly trace its top center here. So I right click and like Canzler I select don't view here and draw a circle on this does the circle and then go to southeast view. I go toe totally via frame and loaded this and we can see that this circle is on this top surface. That is what we wanted. So I right click exit here and go toe shaded view once against like, this press pool. It's like this circle and give it some height. And this way we have grown to objects. Now these two objects are too defend object. We want to convert them into a single up there so I select the common their union All we can also type in union. We are just let object between Wando Union. We can't let you all more than do a project. This will be the first object and into the second object and press enter and it will create the union on the these two objects.
11. 10 Intersect_1: in this video, we will know about intersection common to see the total 1,000,000,000 in order. Get 30. With the Intersect, we can create a solid off two overlapping objects. When we apply the Intersect in command toe those object, it will only select the intercession. But a little bit between these two object and the last option material will be the mood. So to use this. Come on, let us open a growing vile. I select opening and select Intersect with one file and click open. So this is the base file we have. Then we are too great. Another solar part here. So let me select. They lie to you like this. Like view. I select a narc. None of this automotive from supposed from this end point to this point. Grow some arc. No, this this kind of FARC. Okay, here's more slow Pia. And then goto Southeast view. When I ordered this, we can see here. This arm is on middle side, so we have to extort it on the both directions. Okay, The night like exit, I don't know. Good display. The next, Like extra would. It's like this ark afterward. First I asked her on it Own light direction rightward then one second extra Would like this age and er that stood on this leftward direction. No, These two surfaces are toe defense and faith. So we have to make them one. So we have to apply the common Union I've been. Come on, Union. It's like these two surfaces press enter. Then it will ask us to continue or cancel the common. Because these to us our faces, we will select. Continue. And then it is her face profile. So we have to go get a solid offered. So we will take it. I type in the commands taken the I C K in taken, then weirdo select surface. Okay, it is not likely. Come on, we want to give me. I will die. Taken select surface press enter specify its thickness. I give the tech Nissa balls to presenter and we can see here I'd order this. It has created a solid part off this and then I will extra order Also this profile Click exit. I'm the nice like passport like this. And today give it the height and loaded this tow this view right click exit. And then I reflect in the sector. Common weirdos like toe overlapping objects. And these two objects overlapping each other select this object. It's like the second object and then press enter. And here we can see the resultant object. This object was for that object. Now this object has a slope like were created off this in this arc. So that is the odd one. Date off this intersect. Come on now we can hire de lamenting over the eyes like this object Also we're just like these objects. Light click Goto isolate here, Hide object Also hide these two objects circled also right click Isolate, hide! And this way we use this intersect common.
12. 11 Subtract_1: in this video, we will continue over three billion and we will learn about subject. Come on. As the name suggest, it is used to subtract all the movement tail from a really profile to a lot of friends. Object. I goto this common there and we can see in the preview read Issuing their two objects now 10 and number two. So number one is over reference object and number two is ah object with which we have to subtract So after a playing the operation separate common in the light weaken See the result? The part Oh has been subjected all trimmed from the part one. So that is what we are going to do. First we will go a rectangle, draw a rectangle, give it some height like press pool. Like this object you have to draw some section on this toe subject we will select simple Iraq's are clear on its dope Go a circle once against, like press pool like the circle And if we would give it hide on the other direction it will not intersect the existing model and it will not the moment ill. So we have to give a direction in the downward direction. So I go downward here and like there and we can see it has removed the material. When I loaded this, we can see that it has created a hole in this. So that is the automatic bullion. But in complex design, automatic bullion does not work all the time. So we have to apply d separate command in those cases. So I died. Click exit and then I under this and on this friend I will go some sketch select friend to bewail on this friend I select once again rectangle from the same point toe this point here I drove this act angle and goto southeast view. Select passport. Select the rectangle. Give it extraordinary, Lou. Something like here it is good. We can order this to have a better view. And then we will apply the subject bullion here I slept Subtract So we have to select the object. This is the object presenter and the second object. And here we can see it is subtracted from this existing rectangle geometry So disliked angle is currently showing here. So I liked like exit here and it's like this rectangle. Glad click Goto, Isolate and we can go toe, hide, object. And we have Haider this rectangle This way we used the subplot command.
13. 01 Selection Filter_1: In this tutorial, we will know about object selection. Frontal. We can find the selection folder in this home time and selection panel. We have some options calling here. We can find filter. If I click on this arrow, we will find no filter. Gore, Tex It face solid history, Growing view component and ahead of this weekend. Fine, Mujic. More water did more scale. Logic. More section filter is very helpful while attracting the object and 30 more. So to understand this, let's make a drawing ice like this rectangle and draw a rectangle like this. Then I was like passport and give it some height. Right click Enter. We can go toe shaded view shaded with it just so the advantage off selection filter is dead . If you won't go select a single piece or the single part or any age or your face off this object, it is very difficult to select, so But I want us like the face off this object. So if you want to select the face, you're selecting this complete object. And if you want, just like the eight, it is once against, like, this complete object, so it is ready inconvenient especially when we work in Some complex models were toe select a particular part. So in those cases, the selection filter is very helpful. Suppose I want to select any age of this, so I will select. I'm just a little it and it will know only is like the ages in this model. So we know we can't like this eight. It is highlighting now we can't like mortgages such as this age and this age sector toe. Similarly, we can select any point on this and any face. If I select Vertex now, it will only slight the points on this. So this is a word X point on this and another word text point here. And this is vortex point this way and this way begins like the word X point. Similarly, we can select the faces. If it's like this face now, it will only slight difference. So this is a tough face. It is no selecting it is highlighting. We can see began like the other face such as this face on the face. And if you want to go show the hidden views off this, we can turn on this culling more. It showed that control weather object that I hidden from view I highlighted when you know love with them, we can turn it on if you want to use this feature. Another feature we have is a dig more with the help of object with just Jigme. Oh, we can apply the modified commons to object or any part of this object. So support this move big moist on. Then we will have to select a part off the subject So I will select any eight. Suppose I like this age all begins like the complete object. If you like this complete object, it will show treated more We can t Extradition is showing in this. Yeah, lenticular the wide action is showing. Isn't this going Glor and a Jedi showing interest blue color. So if I pick up this jig mo and Greg this it will move this object So that is the advantage off this move. Dig more similarly, we can move in divide direction If I pick this dig mo, it will move on this relation and in the similar way we can slightly jet direction, legendary direction and move it on the upward and in the similar way we can use the law to dig more. I said the Lord of the More Now it is showing the trajectory things the blue color bring issuing direction perpendicular to deejay to deplane off the jed similarly didn't close showing they were plane off. Why there is perpendicular the way direction and in the similar way it is showing in the extraction. So two loaded this object We just have to pick up an Egypt more just a nice like this blue tick more Then we have to insert the location, will you? So what? I insert this 5 billion% and we can see it has lauded the subject the so we can use this slaughter Tecmo and in a similar way we can use this skeleton more if we don't want this way you At least we can collect Nordic more this way we would this object selection fertile
14. 02 Move and Copy in 3D_1: in this tutorial, we will no about modify Panel in autograph 30 in modify. We have some similar commands as we have seen to remodeling you again. See more upset. Copy it is. And on this Addo voted scale X factor. And here we can find through the middle through the line and 33. So we will know about daily move and telly copy. So far, let me draw Elect angle from this end point and grow some rectangle and select press pool and give it the height this object to recreate, Then escape. And then I select the come on move and in move as we know first we have those like the object. This is the object press Endo, We have those leg a base point. So based point will be a corner point or the maid point. It could be any reference point. Suppose I take the base point at this bottom point or the endpoint flat there. And when I'd like the castle, we can see over Really model is it moving and rotating with over Castle supposed I can't know this auto so that it will create the move in horizontal and vertical direction we can insert the valley off distance. If he won't suppose I won't distance fire and enter and it will move this and a d So five, a member or five unit distance. We can also move in another direction. I select this move. Let this object placenta and like the this point. And then we can also shifted to the A poor descend downward direction or left wonder light . What wherever we want Another way of moving is that we can move the object without selecting the base point or without having a best point as a reference. We just have toe entered the distance value ice like move. Come on. It's like this object president of No, I'm not selecting any based point. And somewhere outside this model, click outside and move because her and we can see the model is moving with the castle now became the cleanser Devalue! Suppose I want this value 10 and presenter and this way does move the object in the similar way. We can copy the object. We can find the copy. Come on, Dale. Copy like this here really does like the object. Bless Ender. And we have to go specify the base point. Let us support This is the base point. I give this endpoint of the base point and then copy this object. Who is this? Base point Right Click Enter This way we have corporate this object. We can also corporate this multiple objects. I select copy Select Board the Objects presenter And then it's like this endpoint and take it to a different point. Right? Click enter. This way we can create multiple copies off the objects. Now another thing in GOP. Is that what we want? Toe copy Any age off this rectangle. So I know this and that is a pretty that tangle profile we have. I want o copy the ages. So if I was like the copy command from here when I tried to go select the ages it will not like the ages. So I go to this filter here I select eight and like this age then press enter. We have to select a base point. Let us about This is the base point. And when I dragged the castle, we can see our object is also moving with this age and we can specify the second reference point right click enter so we can know directly. Copy the eight. So in those cases we have toe you some another command and that come on, we call Solid added So let me first under this I type in the common solid added and we can find the common Dale here We have some options face eight body. So we have to select eight year and there are some operations copy, color or undo. We won't go copy this latest copy. Now we have just like the age. So it just currently selecting this complete object. So we go toe object filled out here and to let the age. And then it's like this a jail press enter. Then we have to specify based point and give the second reference for this base point and then it will ask us to exit exit and once again, exit Detective second time This way we can create the copy off the ages
15. 03 Mirror and Align 3D: In this tutorial we will continue our modify panel in 30 more ling and we will know about the commands telling with her entirely align. So we know about mirror common that we can meal and existing entity all geometry do any reference to clear the replica All the same Copy off that object So letters grow some object there I select don't view from on the stove you I like land. Come on and I turn on the automotive and go align Suppose I gave it the lend three percenter. Then another line I'd go This time I give the land toe and once again I don't hard line that is I give the value one So the objective Why I drove three separate lines because I want to go It's all clear. I select circle in the second line We have repress its midpoint and draw a circle off radius one and then doesn't let him. Come on. It's like there Francis, press enter. I trimmed this how portion of the circle then escape or likely dental. And also I like this line right Like it is this way. We have created a geometry. Now we have toe join them. Type in. Come on, join. It's like this Complete object Press Enter now we have toe upset them so I type in common offset than oxide distance. Suppose I take 0.5 presenters like this object and upset. I want this a poor direction here. Then we have to go make a close entity Desire open corners So I select land Come on from the same 0.0 10 point Draw the line once again we need another line here on this point and in the end we have to join them Once again I slept type in the common join and like this complete object then breast. And this way we have completed over sketch Now I goto this southeast authority view Then press pool this object Give it some height Suppose I give the height too Press enter So that is the object we have created Now we have no middle It I go to this mirror command first we have just like the object This is the object we have breath sender Then we have no select three Their friends point in Todi modeling re select toe the offense point But entirely we said we have to select reader Transpoint. So first, let me don't know disagreed. Display all the three points must not be colonial. Suppose I said like three points. This is the first point. This is second point and the sister point. So it shows the air in here that three point circle in hell. So these three points must not be calling here. So does it is our first point. There's the second point. So the point should be in another lane. It's about the Taliban. Dydek. This is the time where this is there. It's like this endpoint. Then it will ask us. Toe I believe so. Subject Yes or no? I select No. And here we can see, the object has been middle. We can also middle These object on other direction. I said 30 middle. So the doctor ties, like both the object press enter and then especially my dear friends, is I don't date it from here because I want to specify the difference here is it? Then specify three. The reference point. This is first point, second point and tell a point. The live so subject? No. And here we can see, the object has been well now to make them a single object were Do apply any common union. I don't like the objects like this Complete object and presenter. Now they are the single body. Another common in modify panel we can find is the really a line. And if I go to this command, we can see in this preview that we have two separate objects that are shown here in the yellow color. And we have to apply some reference and constraints and only died. We can see in the red color the objects now align with just friends to each other. So this is what we are going to do. So we have our mirror object tail. So first I have to separate them. So I select more common like the second object presenter and move it. I moved some at some distance. So now all objective is to align the boat object. So I use like the common 30 align And in here first we have those like the object the city a reference object presenter. Then we have to specify base point to the base point. Suppose this is the first best point, This bottom and then we can specify very another base point here. This is the second best point, and we need our best point. And that is that is the power base point. And we can see here that this entity is now moving with over cattle. So we have no specify the destination. Their friends point so over deft destinies and objected this one. So let me lotr this view. I go to this whole bit and noted this Yeah, exit and on this destinies. And we have to specify Terry offense point just as we are done earlier. This work, this is the first reference point and this the world is a second reference and it'll one here total difference and recon. See, the objects are no aligned properly. Now to make them a single off one object, we can apply the Union command like this union. It's like both the object and press enter this way. We used 30 align
16. 04 Fillet and Chamfer: in this video, we will learn about for let and terrible command in 30 modeling, we have learned this command in Dooley. So these are similar N 30. You can find this command here and this edit Click on this at all we confined for. Let it and temper it. Let me first draw a rectangle. My date is there tangle and specify the points. Enjoy rectangle like this Then press pool, give it some height. Some I'd like this and then goto this edit and select for Let it inflate eight first were to select select an aide all we have some options Chain look radius So we can backless like the age Unspecified alias. Or we can specify the ladies right click and specify ladies. Well, you suppose I give this latest 0.5 0.5 presenter Then we're does like it like this like this age and we can see there is showing the preview off this Valette So I pressed enter and one second percentile And I goto this realistic view and we can see the flat tail this ages now around we can select more ages Once again goto this related right click radius Give some red easily 0.5 Suppose we can also select multiple ages at one time. Like I said, this age this age befit which our age I want to select Then place enders and then acceptable you by pressing the enter inflect we have some more options. So let me first Ondo these fillets, you have a good year did and then I select for lead. Come on. And here's our two options Jane and Loop. So I like licking an ice left in I slept in did breast and uh, specify the it is Will you point five and ended and then one second presenter and it will clear the for lead on the complete in similarly we can create for late on the loop. I even do this for Lep And here we have so select a loop ice like this loop And then I select an eight, they said, and it issuing the preview off this loop aerial. You can see the loop. If we don't want this look, then we can select their next. Then it was like they this loop because this Lopez is just in tow. The age we have selected the night is like this except and we can see the preview right click under. Then we can inserted areas. Well, you 0.5. Suppose I take 0.5 and the one taking press enter This way we can clear d for let in some little way we can create jam for So I undo this from here and go to this addict and select Jim Put it as we know in Denver you have to give to distances so I like click here It's like distance. We have to specify distance 1.5 i dick press enter Then we're to specify distance to We can take both the distance and Miller or the similar according to over the corners. Suppose I like this distance 0.75 and enter then we have just like the eight on which we want to create Dick Temple like this it and we can see in the previewed is showing the temple there and we can select multiple ages at a single time. Like some bullets like this age here and select moded and press enter and once again presenter toe a separatist And here we can see it has created the temper This way we head for let Ngentle
17. 05 Array 3D: In this tutorial, we will know about 30 Every we have learned about a in our doughty morning. They are basically two types off very rectangular, early and polar very in the angular. Every we could hear the area off object with friends to a rectangular shape or we can say in rows and columns. While in polar area we cleared the area off the object in circular form. So let me first grow, elect angle from the same point Then I right click here Goto dimensions give the dimension then and with also 10 specify its location here. Then bless, pull and give it some height. Let me give the high toe and enter. And here I used to like this shaded with edges. Then we have to select another profile so we can go a circle A circle On this age this will lose support. I take 0.5 percenter then press pull this and height I take one not told differentiate both the object we can specify The friend Kaledin boat I slept this rectangle shape, right click and go toe popper days here I can specify some color. Let me give it regular and this clinical part we can give some different color. Let I let I give yellow and then I select 30 de Eddie head. We have does like the object. This Liniger part is our reference object. Then press enter and it will ask us to. It's like the type off today We want rectangular or polar. Currently I won't just Toby rectangular area. So I slept rectangular And first thing we have to specify is the number off those Suppose I won't number flows to the and bless and the then it will ask us to slugged in number off columns We can enter Number of columns three. Once again Press enter then number off level. I want 1% and we have so specify distance between the laws. Let me take the distances Gobind, Fire presenter and distance between columns. Once again I take this distance 2.5 and birth center And here in this preview we can see the and it and next type off at eight. We have polar Eddie. So to use this polar today we have created an object here. You can totally blow this while in your project files Days is hope living on this days A circular cylinder. So we have no added this I go toe 30. Eddie, It's like the object. This is the object we have. Then press enter and here Select Fuller Eddie number off items in this airy suppose I won't number of items six Press enter then we have dough. Specify the angle. Do feel now if we want to specify Loaded this on this complete circular thing Weirdo specified the angle 3 60 the center Then it is ask Loaded added abject ice Like this? Yes. And then weirdo Specify center point of the area in the center. Off this point all these circles will be over centre pond of the area. I was like this central point Then second Centrepoint will be sent out of this second circle So we have to let me trace this. This is the second center ahead. We can see the object has been added. This way we can create the polar every
18. 06 Helix: in this video, we will know about how to cleared the profile off a spring so we can career this spring by using the Alex Common. So we have Don't type in the common hell ICS and breast ender in hell. ICS. First, we have to specify the base point for the central all of this circle, all the basic all let me take this point as a base point. We can specify any point and then we have to specify the basic ideas. All we can specify it by diameter. So the hideous Suppose I take full presidental Then we have to specify the hope of ideas. No weaken Specify the ideas off the same value or we can specify it by different value. Suppose I also take this Top Radius has full but I center in the spring as we know there are certain parameters. Better value know Madoff turns height Interesting. If I likely care, we have we can find these options access any point. We can give the reference point for this access number off stunts. Then hide and twist. Let first I take number off. Penn's like this turns and I take number often. Sten and press enter. And then we also specify the hide So hide let me take height is 20 and presidental and here we can see helical Spring has been formed and ended spring We can have more parameters. Leg middle Once again, More spring, I select Alex. Come on, Presenter Spacey by based Point Let me date this point as far full and this time the top radius I'd victory some little value so we can see in this preview it is creating a table the spring displaying this table from inside. We can also get paper in our direction by giving the larger value. Then we can specify its parameters. Likely care and, like done height, Specify distance between the tongue So distance between the tents. Usually we Collette as pitch value. Let petrol use 2% and then specify the height, height. Suppose I take 20 presenter and this way we can said the perimeters off a hell expiring. Here we can see the diameter off these wires or the spring wears is very less so. It generally it's not this spring, just a health profile. So how can we make this spring from it so clear that we have toe make a circle. I slept circle on this point Guys. Uncle, we take this, will you 0.25 and handle That is a very small circle. And then type in common sweep all we can like this We problem Great Reynolds like the object. So this article is over Object presentable, then sweeping part. This helical part is the stripping part and we can see here it is now transform into a spring like profile because we have created the sweep off their circle on do that spring or the helical profile This way we cleared the hell ICS in order get 30 modeling.
19. 07 Shell: in this tutorial, we will know about Shell Common Shell Command basically used to create the whole apart off a 30 solid object. So to create this whole apart, let us let us create a 30 part. I will select a circle on this point, draw a circle off some value and give it the height. This is the height support I give. Then we can select a realistic real to have a better view off this I will Don't know. They're good display. Okay? I was like treated with a view. Then we have to clear the shell of this. So I will type in the common solid. Add it So we have to select it. They option from here. Face it body. So shell is usedto create on their body. So we have to select body and then we can find the common shell. So we have just like the 30 object or that really solid. It's like this. Then we have no right click on this hands like head once again, right, Click the move. Then we are does like the face. This is a top face I want to remove. And if you won't do the movie Bottom face. We can do this. Just order this and then like this bottom face also and press enter. Then we have to insert d take nous Braley off the shell All it showed the opposite value. Suppose I entered this also totally one and press enter and exit and exit When I loaded this we can see the soldiers through The sindical part is now converted into a hollow part . So that is the use off this shell common.
20. 08 group: welcome toe Auto Get tutorials. In this tutorial, we will know about group Common and we can find a good common in this home tab and go toe group Enel. We can find some commands such as a group, a new group group, edit group selection or no. So grouping is just a collection off object that I manipulated as a single object. So to use this group Come on, let's open up a drawing file. I go toe open, open so we can grow up one or more object into a single object. Then we can apply, defend, modify operations such as the Lord did scale copy pays to move. Except so to create the group we first were to select group from here. Then it does is to select the object. So we have to select multiple objects which we won't. Okay, it a group supporters like the circle and also this arc and also this ark And we can select more objects and then press enter. And this is done. We have created a group and here we can find unnamed group has been created. And if I select the circles now, they will select as a complete circle here we can see a boundary which shows that these are boundary off a group. Now we can apply different opticians Select copy. So we have to select the best point. I'd like this based point and now we can copy this this way it like like and, uh, similarly, we can use more commands such as the Lord did move scratch scale, etcetera these modified commands In this group tab, we can find more options such as group added. If I was like this group, I did, Then I will goto the group or the object which we have created a group. So I was like this object. And here we can see some options and object limb object, so even select add object. Now I can add more object in this group Just like I like this circle and press enter. Now we have added another object in groups. Similarly, we can remove the objects and this panel we can find one more Commander this group selection on off. So it is just usedto 10 only on and turn off the group selection. If I click on this so we can find two options group manager and group bound limbo. If I can. Off this group bounding both, it will not show the bounding box on the group such as Ice like This Group, and now there's no boxes showing. So by default we was lived on it own. Here is a group manager. If we have created multiple groups, then we can assign a name and added the groups in this group manager after we finally than the grouping and more defined over growing so we can select here on group like this and group and all the object will be the turn duty or is no object. Here. We can find that there is some similarity in groups and blocks Soto defense shit in groups and blobs. I want to show you some slides, so this is the basic definition. Often group and blocks collection off objects manipulated as a single object, but the difference in between groups and blocks lies in creation. Started and use go to next light and here we can see the defense's. There's a group and block. If you want to create it them Betty use only. We will use the groups shared with many drawings. Then we will use the block. Also we have more options like added in the result component. So that is a important thing in this group that we can added the objects and we will use group in this and more options. No individual editing stole and foreign at the bills Don't penitential table. In those cases, we will use the block.
21. 09 3D to 2D conversion: In this tutorial, we will learn how to convert a 30 solid object in tow toward the object converting Toto. The object means we will create the auto graphic projections off a 30 model projections such as though view side view, front view except er so don't do this. We have to open your 30 file. So go toe open and open this model. So we have already created this model entirely back to smuggling. Now we will clear the projections to create the projections. We will use the command that is called flat short. So before going toe command, we have to goto a to review. This is currently stoutest. View the visitor review. We will go toe dove you This is a code review now type in the common flat short F l A T and we can see the common flat short. Here are some options. First, it asks us to select the destination in such as a new block, the place, existing block or exported file. So we will select insert a new block, Then we will go toe fall Ground lines we can select is definite color or specific color for the lines. Suppose for the stove. You I will select deadlines. Then we have those like line type. We was like this country this line Then they deciding full obscured lines, obscured lines are hidden lines and in dispute we don't want to show their than lines. So I will uncheck this then click create. It is also one more option that is include tangential ages. If we have some round ages, we can check this I was like create And then we can see with all council They only geometry in the red color that is, it drove you off this 30 model so we have to place it somewhere. Suppose I place it here Then it asks us to select a skill factor for the X direction I was introduced Skull Factors one, then one second birth center. Then it asks us to specify the rotation angle. I was like this angle Do your degree and press enter And this way we have created to stop view Similarly, we have toe cleared the views such as friend view and light view. So we will go toe friend of you once again type in command flat shot and then we have those leg a different color. So? So I just support This time I even select your local er And this time I want to show it the hidden lines. So I will take this obscured lines. I will give it the same color yellow, then create. Now we can see the hidden lines inside this model. I would place it somewhere then scale factor one press enter and then devotedly noticing angle. And in the last, we will go to lie to you and we have toe do the similar flat short. This time we will give it some different color separates like this blue and also in hair blue and then create and place it then scale factor and artisan Ingles. This way we have greater day. All three projections. Now we can go toe a charity view southeast view here we can see our projections. So these two projections are intersecting. So we can a play the different modify command such as move, copy, load it as secular toe, align them properly. And first we we don't need the 30 more than now. So I was like this right click. Okay, We have to selected properly then right? Click and like this hide, object and I will goto friend view And in this front view, we will properly align these objects As we know internal projection. The view is on the top of the object and blow this We have different view and only light. We have decided you So we will drafted according to the cardinal projections. So this regular is that all of you So we will place it on the top off this one Do so we can apply the move. Come on, it's like this Mo, Come on. It's like this object press enter this base point and I don't know this Baltimore and place it in a line. So this friend view this where we have aligned it and similarly we have to align this light We also so I was like move lay this object crescendo like this based point Align with this friendly so we can take it dies of their friends And now we can go toe southeast view. So these views are now aligned in their direction. But their rotation angle is not a line, so give them rotation. We can use this location, Jigme. Oh, here we can find it all this engine more all we can slightly loaded drink more and then we have to select the object ice Like this stove you And then we have to properly daughter this object auditor to review. So we know that we have a daughter This object in the plane off this Jed access So the angle of 90 degree. So I have to pick up this X axis rotation angle. I will take 90 degree presento Similarly, we have a lot it This is light of you in 1980 So I will send this object. The rotation angle we need is 90 degree and now we appear up a little. Get this And after these order thing, we have to one second aligned them in their views. So once again we will goto front view and we have to align this dove you properly So move like this View press enter We can turn on this auto mode and give us some height Now These are not intersecting and we will go toe right of you In this light view we can see this object are not properly aligned. Soto align them properly. He will use more common. It's like this object presenters. It's like this base and take to the offenses. Okay, I will not notice automotive and then try to take their Frances this way. Now, these two views are currently properly aligned. And similarly, we have toe a line right view side view. So it's like, move and like this view and likely aligned it. It's based through this base. And now now we can go toe southeast view and once again we will have to go to a friend of you these two intersecting. So I was that move like this object presenter I don't know this auto mode and move this and we have to move the friendly also move like this friend real press center this point and we're to align it on this view. And this way we have created this projection and we can see all the reviews are aligned properly. Now we can add the dimensions So these views so I can go to front view and then type in Come on dimension and slide the objects as we do they die mentioning like its end point. Once again this endpoints we can also dimension Does you also decoupled standpoints Okay, Right click canceled once again typing come on them and then collect the references. Also, we can drop this fight into military. We can draft on this side of you and we can do more damage. Inning. This way we can What? Tito two d views.
 Naveen Veer, i am a mechanical design engineer