Transcripts
1. Introduction: Hey there, thanks for
dropping by and welcome to the dotnet six authentication
and authorization course. My name is Patrick guards. You may already know me from my YouTube channel where
I mainly talked about web development with dotnet and blazer and also Angular
React and so on. So maybe if you don't know the channel already, you
may want to have a look. Thank you very much
for considering, but of course you can also
just stay with me here because in this authentication
authorization course, you will learn how to create
a user in a database. So registering a user, logging this user beg in width, username and the password. We will use a password hash and the password salt for that. And then we create
a JSON Web Token. So this is one important thing of the authentication process. Also, additionally to
the JSON web token, we will use refresh tokens. So if the JSON web
token has expired, then we will have a look at
the refresh token and how you can refresh the JSON web token
with that refresh token. And on top of that, of course, we will
have a look at road. So this is n, the authorization
part where we will use a claims to give a user specific roles and only
with a specific role, the user is able to call
a certain endpoints. So this is what we
are going to do. You are now fired
up and want to join this course because
it's not that long and in this
short period of time, you will be able to do
all this with dotnet six. So I hope to see you
in the first lesson.
2. Class Overview: Thank you so much for
joining this course now, first, a real quick overview.
What are you going to do? It's about JSON Web Tokens, refresh tokens and roles. And of course, the
very first thing we need for that, our users. So we will start by creating a user model
and also a user DTO, meaning a data transfer
objects so that we will send username and password in
plain text to the Web API. And from that we will create password hash
and the password salt. And then we will,
this is important. We will store the complete user with the username
and ID password, hash, password salt in database. All right, so this is what
we're going to do first. And after that we would
try to lock this user in. So again, we will use
the same user DTO, send the username and
password for the log n. It's the same that we used
for the registration. This DTO then will be
used in our web API. We will again create the
password hash with the help of the salt that is then
stored in the database. So this is what you're going to do and when everything
is correct, so the username and
the password match in with the staff we saw or
we stored in the database. Then we will create
the JSON Web Token. So this is the very first step. After that, we are also able
to create refresh tokens. And after that, we will
also have a look at roles. So now user and JSON Web
Tokens, Let's start.
3. Create the Project: We're here with Visual Studio 2022 and now let's
create a new project. I assumed that you have already installed the dotnet six STK. So this is of course
requirements. So please, if you
haven't already look for the dotnet SDKs with
Google for instance, and then just
install this thing. And after that, open
Visual Studio 2022, of course, this is
also a requirement, but I think you
already got all that. And then we create an ASP
NET Core Web API project. So just backend in
this class here. And now let's call this thing
authentication web API. For instance,
authentication web API it is location is totally
up to you. That's fine. Again, dotnet six is the
framework we want to use. We don't need any
authentication type. We do that manually this time. We configure for HTTPS,
That's all right. We use controller, so we're
not using minimal APIs here. And we enable open API support. This means, see it
here that we can use swagger to test our API. So let's create
our project then. All right, and as you can see, we've already got
our example project here with the weather forecasts. I assume you already
know that stuff. So this is not for the
absolute beginner here. So I won't go into deep here regarding the
example project. We will start right away. So the first thing we need is after creating
this project, we add some models.
4. Add the User Model: The very first thing we
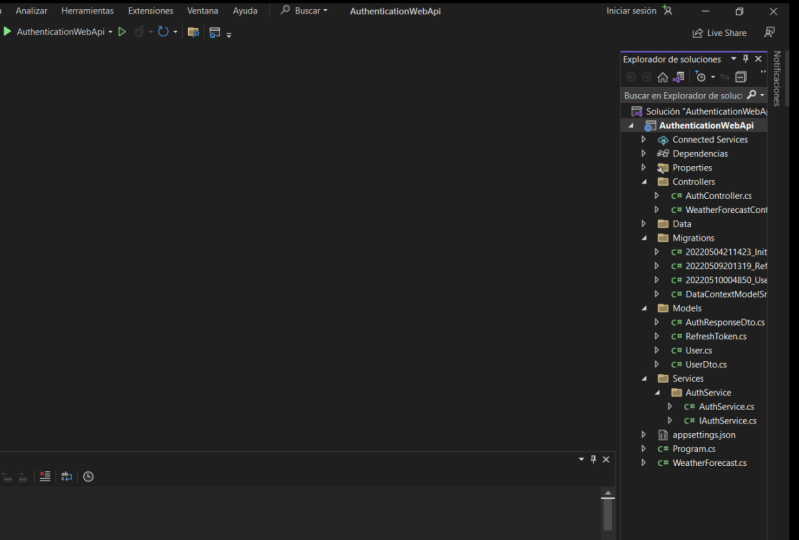
need is the user model. For that. Let's create a new folder
first and call this models. Now in here we add a new class
and this will be the user, and this will also be the entity that will
store in the database. So let's give this thing I D. What I'm doing here is
typing prop for property, hit Tab twice, and then we can already enter the next property, which is the username. And this is an empty
string by default. And other next thing, this is already
interesting and important. We are storing a password hash, the password salt
in the database. So not what is suggested
here by IntelliJ code. We will store byte array, which is the password hash. And we can actually give this a default value
like byte array 32. That's okay. But on very important for us
could be actually also now. But that way we don't see these green squiggly lines then. So just stay with me here. I think this is totally fine. Now this is the salt. And again, let's give this
thing byte array by default. All right, so this
is our user model, and in a couple of minutes we will also store
this in the database. But first we will do this, meaning registering
a user without a database and only when we implemented this and you
already got the idea of how registering and creating
a password hash works. Then we will store this
also in the database. So this is our user model and we already need
one more thing. And that would be the data
transfer object for the user, meaning we need another object, another model where we
can transfer the username and then the real password in
plain text to the web API. So let's add another model here. We add a class and
then say user D TO. Of course, you could also
use different folders here. You could call this folder
entities, for instance, and just put the user here
because this is an entity that is also then
represented in the database. And then another
folder for the DTO is the data transfer objects and
just add the user DTO here. This is totally up to you. The thing with a user DTO
now is that we will use this thing for
registering a user and also logging the user n.
You may wonder why not use a user register request object and the user login request object
for instance. Well, we can use this DTO
here for both use cases. So let's just enter the
first property which is a string actually
the username. And by default to be sent
this to string empty. And now in fact the password. So this time, this
is correct, okay, Now these are all the
models we need for now, the next step is already we add the authentication
controller. So let's do that next.
5. Add the Authentication Controller: The authentication
controller, we right-click the controllers folder and then controller simply the
first menu entry here. And then we get
some suggestions. We don't want to use
an MVC controller, we want to use an
API controller. You see it here we've
got an empty one, we've got one width, read and write actions already. So this will then provide some generated code for
all the crud operations, create, read,
update, and delete. And we already got this thing here using
Entity Framework. So lots of code already
generated for us. In my opinion, it's always
best or almost always best to use an empty
one because then you can build anything
from scratch. You've got all the
control and you know what is actually done here. And you can, Well,
you have most control over your code for
learning purposes. Of course, an empty one
is also pretty neat. So let's create an
empty API controller and we simply call this thing now off controller
for authentication. Here. Now what I already
want to do is write the method for registering user. So what we can do is
simply public async task, then actual result, I actual result would be
enough, is totally sufficient. But if you want to see the actual models
represented in Silva UI, then you have to use
an actual result and then define the exact model
that is returned here. And now bear with me, we will return the user
with a password hash. And now in production, of course, you would not
do something like that. You would just send the
text maybe bag or just a success status code 200, okay. Where the application, the front and then knows
everything went right. But in our case to just see for now what is actually
happening here, we will return the user. This is really just
for learning purposes. And we need another, we need a using reference here, using directive, using
authentication, web API models. And since I'm a lazy
coder or I just want to use the new
stuff of C-sharp ten. Let's use a global using
here in the program CS. Now, we already know, also know the model here in this class in the
Earth controller, although we have no reference
edit here, Isn't that nice? Now let's call this
register user. Here it is now the user DDoS
our request objects in here. Now we can just
create a new user. Again, this is just for now. In a couple of
minutes, we will store this thing in the database. But for now, let's just
see how this looks when we create a new user
with the given username. And then we return, okay, So status code 200
with the user here. Alright, so this is our method. And now the last thing
that's important, we need an HTTP request method. And for that we will use the post method identifies an action that supports
the HTTP post method. Now let's save this
and already run it and test this a little.
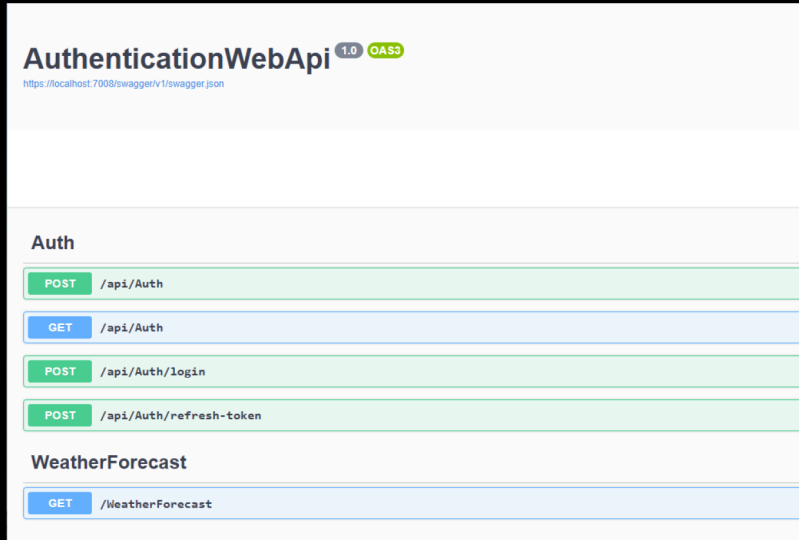
6. First Test with SwaggerUI: So here's our application or the Swagger UI so that we
can test our new API. And now let's just use this off method here you
see it already. The user DTL. So the request is a
username and password and we expect a user
object, that's the one. And we also see our models here. So this is the user and
this is the user D TO. All right, so let's
just write out. Maybe we can do
something like Iron Man, password, pepper, hit Execute. And what do we see? Id is not as 0. That's correct. When we use a database, then this will be different. The database will do
the work for us here and add an ID 123 and so on. Username is I remained. So we see that this
actually worked. And these hash
values here are the, well, the initialized
byte arrays. So it did not do anything with this password
here, of course, but we see that our
API already, it works. Now the next step I would
like to do is we want to use dependency injection
because when we have all our logic
here in the controller, then this is a PHET controller that's not the best practice. So let's change that a
little and the next lesson. And we add the auth service
and then put the logic there.
7. Add the Authentication Service: Now for the auth service, recreate a new folder
and call this services. And also another folder
called this off service. Right now we create
an interface for that interface called this I of service and also an implementation class called
this thing of service. And of course we implement
the AI of service here. And when you hit Save, yes, we want to rebuild and
apply all our changes. And now to be sure that dependency injection
we will work, we have to register this
service here in the program CS. We write building
services and go. It's a scope service of the type specified in service type to the specific
service collection. All right, and now we put our
eye off the service here. I have to write it properly
serve this off service. And of course we add the
using directive and also add the global keyword so that
our controller in a minute, we'll also know where
to find this service. Now this thing is registered. This means we can inject it in the Earth
controller in a minute. But first, let's put
our register method here in the interface. Task user. Call this register user with the user DTO again and
call this simply requests. Now save this. And of course, I
saved it too early because it is not
implemented yet. But with control period, we can implement the interface
at the async keyword. Now in essence, we can copy this line here off
the controller here, and simply return this user. And we are done with moving the logic from the controller
to the author service. And the next thing
is we have to inject this service and put
everything together. So let's do that next.
8. Inject the Service (Dependency Injection): To inject this thing, we go
to the off controller and add a constructor here first with CTE OR and
then hit Tab twice. And in here now we
say I of service, call this thing off service
and also with control period. Now, we can create and
assign this field that this service is available everywhere in this
controller now, and I'd like to add
this underscore here. And now down here
in this method, we say, for instance, viral response weights off service registered
user requests. See that? So now
we've got this logic, moved to the author service, and the controller only forwards the request to the service
and returns the results. In our case, this would
then be the response. Now we can save everything, test it again and the result
should be exactly the same. Here we are. Again. This is our endpoint. We try this out
again with Iron Man. And this password
here hit Execute. And this is exactly the same we've already seen
when we are not, not use dependency injection. But the great thing again
is now that you can inject the service and the logic wherever you want in
your application. And it is definitely
a better practice. Alright, so this is the
first boilerplate code. And now the next thing is to actually create
the password hash. So let's do that next.
9. GitHub Repo: Real quick before we write the method to
create the password hash, until now we already
did some stuff, so I think it is good to push
this to a Git repository. I did so. And you can now get
the code right here. So if you do not want
to write it yourself, now is a good time to just grab the code here from
my GitHub repository. See the URL here, github.com slash Patrick got a slash authentication web API. So this is where you will find the complete source
code off this class. This just for a short hint. So again, if you do not want
to write the code yourself, although I really
recommend doing so, because that's the
best way to learn. You can get the code here
or if you have any trouble. Again, you can
also get the code, of course now on GitHub.
10. Create the Password Hash: Then I'll create
the password hash. So what we do now
is we go back to the auth service and
write simple methods. So this is a private void and we call this create
password hash. This thing now gets a password. So this is the password and plaintexts and then
two out parameters, and these would be the
password hash byte array and the password salt out bites password hash and also
bytes, password salts. Now how to do this? It's not much actually. We first create an instance
of a cryptography algorithm, and in our case we
will use HMac 512. Again, we need a
using directive here, using systems security
cryptography. And in here now, when we have this instance, we already have a
password salt and I will come back to the
password salt in a second. So that would be HMac
and then the key, this is our salt. Now to get the password hash, we say compute hash and then system texts encoding UTF-8 get bytes and then the password. Now, what is actually happening here with the create
password hash method, we generate a salt. Now this is as it states here, a key that is used in
the HMac calculation. And when you combine the
salt with the password, you get a different
password hash, although you use
the same password. Now to better see the whole process here I
would say we just test this. Let's use the create password
hash method already. And then you will
see when we use the password pepper
several times, we will get a different
password hash value. That's because of the salt. But if he would always
use the same salt, the password hash
would be the same. And the problem with
that is that someday, very smart people will crack the cryptography
algorithms and then they can see a password hash. And from the password hash, they can get to the
plane text password. But this is not
done with a salt. Meaning if they
don't know the salt, they are not able to get the
password, the real password. All right, So let's just
try this and then you will see what I mean by that. So first when we
register a user, we say we create
the password hash. So, so create password hash. This thing gets
the password here. And now the password hash, the password salt
that are returned. Sense. Here. We get this thing and
also the password salts. All right, so now we've got
our hash and salt value. And now here for the user, what we do is we not
only set the username, we also set the password
hash to password hash. Down here, we set the password
salt to password salts, okay, and then we
return the user. So let's try that now. Restart the application. Again when we use Ironman. And what do we see now? We see this crazy string here, or by an array for Bx and so on. Now when I try this again, looking different and again
also look into different. Now let's do this
a bit differently. So let's say we give this
cryptography algorithm already assault like
new byte array 32. So this then will be the
key that is used here. Alright, see it here. There's one overload
the one, the, the instance without
the key or the salt, and the instance
with this salt now, meaning this, means that now
in this compute hash method, the algorithm will use this salt here every
time we do this. Let's save this
again and restart the application just to be sure. We try this again. Try it out. Man. No pepper. We hit Execute for M MPH and execute again
for MPH and so on. Every single time. The same you see in this
is why we need a salt. The salt is the same and the plain-text
password is the same, then we get the same hash
value every single time. So it's the same if you
would not use a salt at all, meaning that a specific
password always results in the same hash value and vice versa and essence. And now when we remove
this again and really use a new randomly
generated key as a salt, we get a different password,
different password hash. Every single time we
use this algorithm. All right, see it here. This is why we use salt. I hope you got the idea. This is how we create
a password hash. And now before we continue with logging the user in and then
creating the JSON web token. I would say we add our database and
store the user with the password hash
and the salt and so on in this database. Let's do that next.
11. Add the DataContext & Entity Framework Core: All right, So we want to
use Entity Framework Core here and also a
sequel lite database. This time I use
different databases throughout my classes
and tutorials. This time let's use a
SQL light database. This is cross-platform and
pretty simple to create. The very first thing now
before we can actually use this database is we
need a data contexts. So again, we create a new
folder called this data. Here. Now we add a new class and we call this
class data context. And this thing here uses
the DB contexts class. It's not known here. So with control period, we get some suggestions. And we want to use this
thing here, install package, Microsoft Entity Framework Core, find and install the latest
version already done. Now it's done. And again, we can use a
global using directive here because we need this
thing in several places. So let's do this like that. And now we've got
DB context here. With this DB contexts, now, we are able to access the
users from our database. And you see it here. It says a DB context
instance represents a session with the database and can be used to query
and save instances, instances of your entities. Db context is a combination of the unit of work and
repository pattern. Regarding the
repository pattern, it's similar to our
Auth service because now we can inject this context, for instance, in our Auth
service and then again access the users
in the database. But we still have to do some
thing to be able to do that. Finally, the first thing
is the constructor. Again with CD OR we
again our constructor. The argument here is now
the DB context options. This thing here with our class. And we call this Options. And we also have
to call the base constructor with base options. So this is now the
constructor we need. And the last thing to be
able to add the users, or to be more precise to add the users table in the database, we need a property here. And this is of type db
set with user class. We call this then users and this will be the name of our table. So usually you would just pluralize the name
of this entity. So users would be
totally sufficient. And I think this is a
good name for this table. That's what we have to
do to add this table. And if you don't like this
green squiggly line here, you can already say this is
a set of users like that, and then you get no
warning anymore. Okay, let's save this. And now the next step is to use code first migrations
to create our database. But before we can do that, we of course have to install the Entity Framework Core tools. So let's do that next.
12. Install EF Core Tools: Install the Entity
Framework Core tools. We opened the package
manager console. You can open this thing also here under view other windows and then you get the
Package Manager console. And there should be also
a shortcut for that. And in here now the first
thing we have to do is we need to be in the
correct directory. So we have to go to our authentication web API
directory. There we are. Then we have to stop
the application. So just close the terminal here. And now we are able to install the EF Core tools
and then the migration. So please make sure to stop
the application because otherwise we are not able to run the code first migrations, but first the tools for that. We say dotnet new
install and then dash, dash global, and
then dotnet dash EF. Now in my case, I already
got it installed, so let me just uninstall
it real quick. So we can do this together here. Uninstall dotnet ef. You see it here, version 6.3. And now if I run the
install command again, I get version 604. And with dotnet E F,
We can double-check. And there are the
Entity Framework Core dotnet command line tools. So this thing I
was installed and next we use code
first, migrations.
13. Utilize Code First Migrations: We are in the correct directory. We've got the command
line tools installed, we've got the NuGet package of energy framework installed, but there are two more NuGet
packages we have to install. And this is the
design package and the SQL lite package of
energy frame a core. Now, the design, you
will see it in a minute. Let me just open this. So right-click the project,
Manage NuGet packages. And then we just say design and I think
we already get this. Then make sure to use
the browse tab here. There it is, Microsoft Entity Framework Core Design shared design time components for
entry from a core tools. So this is important for us. Click Okay, I accept and then Entity Framework
Core SQL light. So when you want to use
a SQL light database, you have to install this SQL database provider
for Entity Framework Core. If you want to use SQL Server, then it's an essence just
Entity Framework, Core dot SQL Server and so on. So please install
this thing now. Okay, I accept we've got our NuGet packages so
we can close this. Now the next step is to
register our database contexts. So again to the program CS. Now down here we say build
services and then add D B contexts with
data context class. And this thing. Now first we have to add
another using the erected here. Again, let's add
the global keyword. So now we've got
our data context, and this gets an option. Let's say options. Options. We want to say that
we want to use SQL light and we can add
a connection string here. Now usually you would store
the connection string, for instance, in the
app settings JSON file. You can still do this or the quick and dirty way since this is just a SQL
light database, quick and dirty way is to just enter the string here and the connection string for
a sqlite database. Let me put this in a new line, is simply data source and
then for instance, of dot db. So the file type is then DB
and it just call this off. This is totally up to you. You can use any name you want. And this is how we
register the DB context. With that, then we can use
the code first migration to create our database
with the users table. So we go to the Package
Manager console again, make sure to be placed in
our project directory. So authentication web API, authentication web API,
it is in this case. And then we can
just say dotnet ef. Then let's have a quick look. We've got three Commands, Database DB, context
and migrations. And to add a migration, well, we use migrations, so dotnet EF migrations
and then adds, and then let's simply
call this initial. It's building, but
it's succeeded and it's essentially
already done. What we get now is a
Migrations folder here. And here you also see what will happen when we
run this migration. We will create a table, use us with an ID set
to auto increments. So we've got the
id 123 and so on automatically got
the username as a string or a text type. And the byte arrays will then
be used with the type blob. And we already got
a primary key here. And if I remove this
migration or role, the role, this migration bank, then we just drop this table. And now we do not have
the database yet, right? So what is now
happening when we say dotnet EF database update
it is not only update it, it will also create
this database. Okay, so you see here
all the commands, but it succeeded and there
is now a create table. This is just for Energy
Framework, the migration system. And also where is it
Here the table users. This is done. And here we see this off DB file and actually be able to open this
file and have a look. We download one more thing and this would be
the DB browser, the database browser
for SQL line. So let's do that next.
14. Open the Database with the DB Browser for SQLite: And this is the thing you
need to just Google forward TB browser for SQL lite
or go to SQL browser.org. This is how it looks. So just go to
Download and then for your operating system,
get this thing. My case, I don't know
it and installed the DB browser for sequel light, the standard installer
for 64-bit Windows. So please get this thing and
then you should get it here. This is how it looks.
And now we are able to open the database. There we are. This is our folder, this is the off dB. So let's open this thing. And you see here we've got our user's table
with these fields. And we can of course select it and then go to Browse Data. And here we see that
we've got no user. So the next step is to
store the user finally, upon registration
in the database. So let's do that in
the next lesson.
15. Store User in the Database: In Visual Studio, we go
back to the off service. Now. We add a constructor first
because if you remember, we wanted to inject
the data contexts. So CTO are it is of the service. And here now we say
data context. Context. Again, we create and assign
the field and an underscore. Now we've got our
data contexts and the next thing is
we say contexts, users, you already see it here. We've got our user's table, Add User Entity Framework nodes that you want to the
user, but we're not done. We also have to
save these changes with a weights context. Save Changes async, alright, and this is everything. So now let's run this app again. And I would say
we add two users. Here we are. Again. We try this out
with, for instance, iron man pepper that executes. This is the result. You
see now the ID is one and when we go to our browser, there it is, we
refresh the data. Is Iron Man with id1, password hashing, password
salt, blobs and all. Let's add one more. Just for fun. Batman password,
maybe it executes. We've got id2 and the same here. All right, so this works. Now finally, the next step is to create and return
a JSON Web Token. So let's do this next.
16. Add an AuthResponseDto: It will be four. We can actually create
the JSON web token. We have to prepare some stuff. One thing is that we have to verify the password on login. And this already
tells you that of course we also need
a login method. And then the third
thing is that we need another DTO to return the
JSON web token in the end, well, it's not totally true
that we really need this DTO. But in the ends of this class, by the end of this course, you will have the option to return a JSON Web Token
together with refresh token. And this is then just
for the front end. So there is data then
in this response TO that is helpful
for the front end. So that's what
we're going to do. First we create
another model here. Right-click the models folder, add a new class, and now we call this
thing of response d t. Now, this thing gets
some properties. The first property, maybe wondering why the heck do we
need something like that? Well, I call it success. You can call it a successful. For instance, this will
tell the front end if this request was successful, and we will use this
to tell the front end, for instance, that the password was wrong or that the
user does not exist, or that everything is fine. And in this case then
this flag is set to true, but we initialize
it with faults. With that information,
the front end can do other stuff together
with this property now, which is the message like that. And this is by
default string empty. And additionally, if
you don't want to return this auth
response in DTO, we can also say that the controller does
anything with that. So for instance, if we use the controller
again to forward the request to the service and the service returns this
DTO, this object here. And we see that the success is, the success flag is set
to false and we've got a message like a
password is wrong, then we can also decide to not return the complete object. We can just say that we return a bad
request for instance, or an unauthorized say
whatever you want. So you'd just more flexible
with that kind of object. Now, the last thing for
now, finally, the token. Let's remove this space here. And this is also
an empty string. First, okay, So this is our author response DTO
with a success flag, the message and the token. And next we will write
a method to verify the password before we can then finally implemented
login method.
17. Verify the Password: It's to verify the password. We go back to our
wall of a service. This is again a private methods similar to this thing actually. So we can copy and paste, at least try to copy and
paste this method here. And instead of creating
a password hash, we now want to verify
the password hash. So let's just enter verify here. Again, we get the plane
passwords as a string. And now also the password
hash and the password salt, but not as our parameters. We get this from
the log-in method. And now in here we
already did this. Maybe you remember, we can give this cryptography
algorithm, this H mix sharp 512 instance. We can give this thing
a salt and that salt. Then we try to compute the hash based off the
given password, right? So now we say our
computed hash value is this thing with the given password salt
and the given password. After that, we return computed hash sequence equal
and then Password Hash. Since these are byte arrays, we have to use sequence equal. Of course, we changed
our return value here to Boolean value. So we have to use sequence equal because these
are byte arrays. If you would use the
just the equal signs, computed hash is equal
to password hash, this would not work. So please make sure to
use sequence equal. Says it here, determines what the two sequences are equal
by comparing the elements, by using the default equality
compare for their type. And in our case, that's
the bite and type. So a byte by byte, this will be compared
in this method. Then we know if the
password is correct or not. Now, let's implement
the login method next.
18. Implement the Login Method: For the login method, again, we go to the interface
here and we return a task. And now you see it with
the author's response. In DTO. We call this login with user
DTO again as a request. And I'll back to the
implementation class. We can automatically
implement the interface. And down here is the methods. Let me just pull it up. Let's do it here, maybe. There it is. Now the first thing
is we need the user. So let's say var
user is now Waitz. Contexts seem that as soon as I, as I typed awaits, Visual Studio has edited
the async keyword here. That's pretty nice. So remember if it didn't, you have to add
the async keyword. Now contexts and now we
can access our users. Then we say first
or default async. And here we say U for user, where the username occurs, the Request Username, and
in case the user is null, then, now we can return
and you all corresponds TO the success flag
is false by default. But we can also
add a message like user not found for instance, right now the
controller knows that. And also if you
return this object, the front and knows
that as well. Now the next step if
we found the user, is to verify the password. Again, we start with an if
and then exclamation mark. So we check if the password is not correct, It's not verified. You give this method
request password. And then we found the user. So we use the password hash of the user and also the
password salt of the user. Now, if this is wrong, we again return a new
auth response DTO with another message,
like Wrong password. This is then checked and now
if everything is correct, we return a new
author response, D20. And let's just say the
success flag is set to true. For now. That's it. We did not create a token. We first in this step
for learning purposes, just want to check if the login with the username
and password works in general. And to be able to test this, we now need another
endpoint, of course. So let's go back to our
off controller. Again. Let's just copy
this method here. We call this now simply login. We also call here
our log in methods. And now let's say if the
response is successful, we can return OK response. All right, so we return
the complete response. And otherwise we can decide, for instance, we could, we could also return an
okay with the response. And then in this
case, the front-end has to check if the success is true or false and then show
the error message or not, or we can do something else. We can say bad requests
will return a bad request and simply add the
in response message. Again, as I said earlier, when we created
the auth response TO this thing here is
totally up to you. If you think you've
got a front end and you want to send a 200 okay. Back. In any case with this
okay, or return, okay. And then response,
then the front then has to decide what to do, then please do it like
that in any case. So you don't have
to check here with this IF clause here if this response is
successful or not. And then you can just reach on the response in the front
and does all the work, or if you want to do it like that and this is really
totally up to you. There's no better practice
in my opinion here. It really depends on the
application you want to build. But for our testing purposes, for learning purposes here
I think this is okay. We check if the
response is successful. In this case, we return
the complete thing. Otherwise we see a bad request
just with the message. And now the last thing we have to do, you can see it here. We've got an post method here and also another
post method here. So this would not work. These are two exactly
the same endpoints with exactly the same routes. So just API and then off
for the control an aim. So let's change that
and we can change this here with HTTP posts. And then in parenthesis, we set the route to login. And this is just another way to write something like this. We can also add another
attribute here, the route attribute, and then
just remove the login here. This is in essence
exactly the same. So let's just combine the HTTP post attribute
with the route attribute. And then we've got
our endpoints. And now I would say we save
this and test this already. All right, there we remember
we already have our users, Iron Man and Batman. So we can actually directly
test the login method here. So try it out. For instance, let's
just test it. Test it with a string, string we can execute and we see the correct
message user not found. And you also see the
status code 400 here. Let's have a look here in the
Network tab for instance, let's try that again. Hit Execute. If you see it again. This is the status code 400, which stands for a bad request. So this is exactly
the same stuff here. And now let's test
it with Iron Man, but the password is string. We hit Execute, we get
a bad request with the message wrong
password, that's correct. Now, enter the correct password. We see our Auth response
DTO with success, true, no message, no token. But this is what we
will change next. So now finally, we will
create the JSON web token.
19. Create and return a JSON Web Token: All right, So back
to Visual Studio. And now the very first thing we need is actually a secret. Because with that secret, the back-end can check if the JSON Web Token that the front end or the
user is sending to, the client is sending to the
backend is actually valid. With that secret, we recreate the JSON web
token and we will also use this secret to verify the JSON Web Token and only the backend
knows this secret. The secret is not available in essence
in the actual token, then only the backend knows the secret and
width that secret. We can verify the
actual JSON Web Token. This is very important and there are several
ways to do this. Of course, you can edit in
the auth service directly. You can edit in a store, or the easiest way here, in our case in this class, would be the app
settings adjacent file. So we add another section here, we call this app settings. And then we just enter token. And this can be
anything you want. Any kind of characters
can be used here, any sequence of characters, like my top secret key, just make sure that this
has at least 16 characters, characters in it, right? So minimum length should
be 16 characters. And with that, we can now access token secret key and
create our JSON web token. With that, now let's
generate the token. But we also have to insert
some NuGet packages. But this time let's just
do that along the way. Back to our off service. Let's go down here. We create a new method,
private string, Create Token, and we
get the user here. Now the first thing, the claims lists claim and
we need another namespace for that system security claims. Now this is called claims and this is a
new list off claim. Here. Now we already
sets some values, so let's add a new claim. With claim types
name identifier. This will be the ID of the user. So user ID, and then set this to a string
or transfers to a string. Let's also add another one. So new claim, claim types name, and this will then be
the user username. This already is a string, so let's just add the component or we
don't need a comma here. Not, not yet, not yet. Later when we add the roads, we add another claim here. I can already tell you
that what are the claims? Well, in essence, these
are information off the user data will be stored in the JSON web token
and we will have a look at the JSON web token, then see what is actually
stored in there. So that just so far
for information, well, the claim
represents a claim. So here you can store anything, in essence any
information you want. This is what we want to
store in the JSON web token. With that, the client
that knows, okay, what is the idea of the
currently authenticated user or the username and so on. Right? Now the next thing is a key, a symmetric security key. So let's create this
thing with var key, new symmetric security key. And we already need
another reference here. This time. As I already said, we
installed the package Microsoft Identity
Model two tokens, find and install the latest
version if you don't see it here in the
context menu, please. Again go to Manage
NuGet packages and then install this
package here manually, or do like that. So it should be installed. Let's stop this. And there it should be. We've got the Microsoft Identity Model is
token namespace. Let's just move
this one real quick to the program CS because I want to make this global bank here. And now here we add
this namespace. Great, so let's go
back to our method. We've got our symmetric
security key, but it gets some arguments. First thing is now first
and only thing to be more exact is our secret. With our top secret key, we can create this
symmetric security key. So let's answer System text
encoding, UTF-8, get bytes. And now we have to
access configuration, which is the app settings JSON. So we have to make use
of dependency injection. And we do this up here. So what we need to inject this, the eye configuration. Call this configuration. Again, create an assign
the field configuration, the underscore here, like that. Now down here we can say
configuration section. And these are now, these are now
settings from that, the token from that. Now we want the
value, close this. And we've got our
symmetric security key. With this key, we can create the sign-in credentials also
necessary for our token. Let's call this credits. Now it's pretty complex, but that's just the way to
create a JSON web token. I hope you're still with me. It's not a good time to be in
multitasking, for instance. So please come back to me if you want to write
the code along with me. Now knew signing credentials
with our new beautiful key. And we need an algorithm. And now let's use the
security algorithms. I want to actually
use the HMac SHA, Mac shot 12 signature algorithm. All right, so that's the one. With these credits. Now with these
sign-in credentials, we can create a JWT
security token. So adjacent web token, security token, var token. Now a new JWT security token. We need something else here, system identity
model tokens JWT. Again, please install
this package. Then again, we need to
add some arguments here. First the claim, so this is then stored in this new token. Then we have to set
an expiration dates. And let's say this thing
is valid for a day, so datetime now and days one. All right. The next thing now the signing credentials
is set to credits. And let's remove this
stuff here and V are done. So now this is our token and
also get the final string, the final JSON web token. We call var JWT, new JWT, security
token, a handler. Here now we say token with the token and then
we return the JWT. Take a deep breath. I know it is complex, but that's how it's done. Important thing is that we
store our claims in the JWT. We set an expiration dates and also the sign-in
credentials. This is here for
our top secret key and the app settings
token section. Again, here it is. This is our secret key. And now it's time,
of course to call this thing back to
the login methods. There we are. Let's just say string token. It's now create token
with our user. In here. Now, we set the token, token, safe everything, okay, and I would know, say, Let's test this, let's
just double check because I think I
saw that earlier, so let's save that again. And I think this would
otherwise lead to an error. So let's add the comma here. And now let's test
the application. Let's try to login again. Try it out again with Iron Man. If you hit Execute, there it is. This is our adjacent
and Web Token. This is how this thing looks. Now there's a beautiful sides called JWT. Oh, there it is. Where you can paste
your JSON Web Tokens. Just have a look
what is in there. And as you can see here, the first part to the first
here, the first period. We can see the algorithm
and the token type. We've got our h mixture
of five-twelfths. Algorithm token type
is a JWT token. And now the payload
of the claims, we've got name identifier. This is the user ID and
also the expiration date, which is well, the
next day and 09:14 PM. Now here we could
verify the signature. So this is very neat,
the secret key, but as you can see, it is not available here, only the back-end nodes
of this secret key. And let's have another
look with Batman. Batman and fret. We hit Execute, copy this, paste it here and you see
something has changed, which is the name identify, of course this is now id2, as you can see here
as well, ID 12. And now we've got one minute later is now the
expiration dates. All right, so this works. We've got our JSON web token and now what
should we do with that? Well, let's create
another endpoint that is only available
to authorize users. I'd say. Now with that endpoint, then it is totally
necessary to add this token to the header
of your request. And only then you can be able, or you are able to
access this endpoints. And I would say,
Let's do that next.
20. Add a Secured Endpoint for Authorized Users: Okay, so back to Visual Studio. Let's create this endpoint now. And I just do it here in the off controller nor
service implementation. Actually, we just want to check, is the user authorized and
able to call this thing. So now we just create
a getMethod with HTTP. Again, this is now our
HTTP request method. Let's just use a
public action results. So now no task, no asynchronous method here
and we just return a string. And let's call this Aloha
because I love how Y. Then we can also return. Okay? Aloha. You are authorized. Okay, great. So this is our endpoint, meaning if we call this now, everyone should be able to access this message
or get this message. So let's test this real quick. There it is, the
getMethod here, API off. We tried this out, we
hit Execute grades, although ha, you're authorized. Everyone can do this. But now we want to
secure this thing. And the easiest way
to do that is we just use the authorized attributes. So authorize it is, It's not known yet, so we have to use the namespace, Microsoft ASP NET
Core authorization. And that's it. Great. Well let's test this first. So back to vaguer. I hope it rebuild. Let's just do it manually
here to be absolutely sure. Ok. Now it did the
getMethod here. Now we hit try it out, execute, and we get an error. Well, I expect that there is no authentication
scheme specified. So you see to be able to
use the JSON web token, we need an
authentication scheme. So let, let's add
this real quick. We go back to our programs, yes. And now down here we have
to write some stuff again. First builder services,
then add authentication. This thing. Now, getting
again a bit complicated, we want a JSON Web
Token bearer defaults. This is not known, so let's have a look. We can install the
package Microsoft ASP.NET Core
Authentication, JWT bearer. This is what we need because
this is a bearer token. So find and install
the latest version. When this thing is installed. We can then use an
authentication scheme. Of course, we
stopped the app and now it knows what's
going on here. Default value is used
by pair authentication. Bearer the term bear. Maybe
you already heard it. It's just a bearer token in
essence is just a string. It can be short
string along string, adjacent Web Token,
anything else? It is just called bearer and you will see in the
header then we will also add the value bearer space and then the JSON web token. But we will see
this in a minute. For now authentication
scheme in here. Now we say add JWT Vera
with some options. Of course, these
options look like that. So first, we've got options, token valid parameters, which are new token
validation and parameters. Again, these get some values. First, we validate the
issue signing key. This is set to true. Then the issuer
signing key itself, What's that again,
are top secret key. So a new symmetric
security key again. And again system
texts encoding UTF-8. Then get bytes. Here. Now build a configuration. Get section settings, token, and from that again, the value. All right, Now the last
two validates issue. We can set this to
false actually and also validates audience also false. And we close this
here, and that's it. Format this little hope. And now we've got our
middleware, in essence, the logistics service, or just a services required by
authentication services. So now let's test
this thing again. Rebuilt. Let's just have a look. We
try this out so it executes. And now great, we get
an unauthorized bank. So for 01 means authorized. Again, we can double-check. When we say execute off for 01, we get this bag. This is the response, no
message, nothing like that. This is just the status code. We are not authenticated
and not authorized to get this or to access
this endpoint. This is great because we did not send any header with this. Again, we can have
a look here at the network tab
you would execute. And you see the response
set as the request headers, nothing with authentication
or authorization. So this is what we
have to do next. We have to set the authentication header to
our requests, to our call. And for that we have to, well change this vector
u i a little bit. So again, we have to do some
stuff in the programs, yes. And also we have to add
middleware to make this work. And then we will be able to use our JSON web token with
Swagger UI and x's, the endpoint, the
authorized endpoint. So let's do that next.
21. Use the JWT with SwaggerUI & the Authentication Middleware: Back to the program CS
in here at this line X, vaguer Jane, we have to
add some more stuff. It's bigger. Jen gets options. Regarding these options, we say we want to add a
security definition. Let's call this OAuth2. Then set a new open
API security scheme. Let me remove this. Just add another namespace
here. And in here. Now we can give this
thing a description like standard authorization
header using the bearer scheme,
for instance, game. That will be then, as I said, bearer and then
the actual token like that. This would be the description. Then we can is set
the parameter in. So where do we want to
set this or put this? Parameter location
is the header. Then the name is off. The type is security
scheme type, API key and order to
be able to set this, we have two options. Operation filter, then security requirements, operations filter. And for that, we have to install another package,
its operation filter. Here, install package,
swash buckle. We stop this. I think it's installing now. There it is. Now this was a bit fast swashbuckling
ASP NET Core filters. This is the package we need
with that now we're not done. We also have to add another
middleware down here. That'll be AB, use
of authentication. It says it here as the Microsoft HP recall
authentication middleware to the specified
application builder which enables authentication
capabilities. That's great. And now let's run
this one more time. We go back here now first, you see it here already we
got a new button authorize. This is where we can
add now our token. Uh, let's log in first here with Iron Man and then
pepper and execute. We copy the token. Now we can set this here, bearer and then the
token bearer space, and then the token we
can authorize close. Now we try to run
this, hit executes. And voila, we get
our message back. And here we can see this is the authorization
header we've said. Let's just double-check
here in the Network tab. Hit Execute again. We've seen in our request
headers, we said authorization, the authorization header,
bearer and then the token. Now everything works. We created the JSON Web Token, were able to use it and get an authorized get access to
an authorized endpoints. Great. This is in essence
the first big chapter, and the next chapter now
is the refresh token.
22. Refresh Tokens Introduction: Now this already worked. This is perfect. But the question is now, when you've got your
JSON web token, it is expiring soon, or it might be the case
that there is an attacker. And with that attacker, your JSON web token is
not secure anymore. So this attacker grabs your
JSON Web Token and then uses this thing to authenticate yourself and
you don't want to do that. So this is why we use shorter expiration dates for our JSON Web Tokens like
15 minutes for instance. When we do that, to get a new JSON web token, we need a refresh token
because otherwise, if adjacent I've
tokenism valid anymore. And you as the user, still want to use
a web application with the JSON Web Token, this would not work, but what you can do then, and this is an essence, the responsibility
of the front end. What you can do is you
can use a refresh token that is valid much longer, for instance, a
week, seven days. So it's harder to get
this refresh token, so it's not that easy
for an attacker anymore. And also when you use
this refresh token, we will not only refresh
the JSON web token then, but also the refresh
token itself. So everything is new then. And you as the user, don't notice anything over that. But you are still authenticated. Also authorize maybe
everything is secure, right? So let's have a look at
refresh tokens next.
23. Add Refresh Token Data to the User Model: All right, now the
first step for our refresh token is we want
to store the refresh token together with the
date and the time when this token was created
and when it expires. Want to store that in the database together
with the user. So the first step is, well, to extend this user model here, we add another string, which is the actual
refresh token. Getting this can be an
empty string like that. And then to a date
time a properties. First one is a token
created and the next one, daytime, then token expires and you want to store this or add another migration
to the database. So let's do that. If your application is running, please make sure to stop it. Just close the terminal and then we go to the
Package Manager console. Where are we? Well, we have to
change the directory. Okay, and now we enter dotnet EF migrations at refresh
token data for instance. Let's have a look at
the migration file. There it is. We see a
new columns will be added to use as a table. And if we roll back
the migration, will they get deleted? So that's okay. We update the
database with dotnet. Database updates. Alright, let's open
the database again. The open, and now we
already see it here. We've got the refresh
token and the dates. And here also the
structure of the table. Great, So this is done. We've got our refresh token data together with the user data. And the next step
is to create the refresh token on Login.
24. Create the Refresh Token on Login: Now to create an also
return the refresh token, the first thing we
need here is, well, we can extend the
author response DTO and at the
data here as well. Here now you can
see why it makes sense to create this
auth response DTO, we cannot only send
the success flag with a message and
the JSON web token, we can also send the refresh token and some data together with that
refresh token. Because then it's the
responsibility of the front end to decide when to refresh
this refresh token. But we will see this
in future lessons. So let's first just
add the properties. So the first thing again is
the actual refresh token. By default again, this
is a string empty. And now also, let's
add the expiry date, So token going to expires. And now another thing that
makes sense and makes our life easier is to add
a refresh token model. We will not store
this in the database, we will not return this. But in our logic, we will use this
refresh token model to put the data here. And then you use this data
to do some other stuff like setting the refresh
token in the cookie. So let's create
another model here, another class and call
this now refresh token. Here we say prop string. Refresh token is
an empty string. Then we say date, time, creates it, and let's
call this token only. Now also, datetime expires. All right, Now back
to the auth service. And in here now we can create our method to create
the refresh token. So again, it's another
private methods, private create refresh token. And it also returns
a refresh token. See now it already makes sense to use the refresh
token model here. And this thing now, of course, a new refresh token. And in here we just say token
convert to base 64 string, then random number generator
bytes, and then 64. And this is how we create
our refresh token. You see it's simply a string
of several characters, so nothing fancy like
the JSON Web Token. This is our refresh token, and here this will be valid
for a week and it is created. Now, at the end, we return this refresh token. Okay? Now when we got this, we can use this
method on logging in. So up here in login method after creating
the JSON web token, we can now say our refresh token is create a refresh token. Set this thing here, of course. So maybe we can format
this bit differently. We say the refresh token, the refresh token token, and the token expires, date is refresh token expires. Now we save this and test
it real quick with swagger. There we are. Let's login. Try this out, man, pappa and executes. And there it is. We've got our JSON web token and also now the refresh token. So this is how this thing looks together with the
exploration date. Perfect. And now
the next step is to store this token in the database
together with the user, and also to add it to a cookie. So let's do that next.
25. Set Refresh Token in Cookie & in the Database: Now to set the refresh
token to a cookie, we need the request and the response object off this whole process
here off the Web API. And to be able to
access this thing, we need the http
context exercise. So we wanted to access
the HTTP contexts, would use it in the controller. Right here. It would be
already available in here. You already have
the HTTP context. And with that, you can
simply access the response. For instance, seed
here response headers, and then also request
headers and so on. So you can do that here already. But since we want to
use the service here, we first have to inject the
HTTP contexts exercise. So let's do that real quick. Up here in the
constructor we say I HTTP context exercise. Let's call this also
http context exercise. And again, we create these fields and an
underscore here and here. And we also have to register this thing and we do that by, let's maybe let's just stop
the application first. Okay, and now in the
program CS, down here, we can just say
builder services and then add HTTP context exercise. That's the one. Okay, so with that, we've got our HTTP
context accessor and we've registered this thing. And now we can create
our method to set this token in the cookie and
also in the database. So down here again,
another private method, Async this time, but we return nothing
refresh token. And this thing gets
the actual refresh token objects and
then also the user. So that's what we need. And now we start
with the cookie. And a cookie needs
cookie options. So first, the cookie
options, new cookie options. And in here we say this
is an HTTP only cookie. This means that it can only
be accessed via the request, via the calls and not via
JavaScript in the browser. That's important. And this is the only place
where we need this cookie. And we can also set
the exploration stage to refresh token expires. This is already
the cookie options and now with HTTP
contexts exercise, and then it could be null. So here we can access
the HEB contexts. And from that now we
set the response. And here we can
access the cookies. And here we just said, we just say depends. The value is called
refresh token. Then the refresh token. Token, this is the value. And also we give this thing, the cookie options,
and that's how we set the cookie
in our response. The next thing now
is also the user. So the user refresh token will be set to
refresh token token. Then we've got user
token created, which is refresh token created. The last thing user token expires is refresh
token expires and in the end we say Wait contexts
and then Save Changes async. Okay? And again,
we now use this in our login method. Up here. After we create
the refresh token, we say set refresh token with our refresh token
objects and the user. Let's save this and
again, test this thing. All right, there we
are. And now let's already open the console here. Because I want to
show you something in the application tab, you see our current application
localized seven O eight. We see that here we can access the actual cookies,
but let's have a look. The Network tab,
we tried to login. Again, let's say with Iron
Man pepper, we hit Execute. And you see what we get back. And now here first we
see in the headers, in the response, we see this
thing here, set cookies. So this is our actual cookie is, it is now set as an
HTTP only cookie. The refresh token is set
as an HTTP only cookie. And now we can also find this in the application tab
here. There it is. Let's make this a bit bigger. Maybe we've got
the value refresh token and the name
refresh token. And now here also the value. And the great thing is
now that automatically this thing is sent
with every request. So if, say for instance, you want to get this here, say try it out, it executes, go to the Network tab. Of course we are not authorized, but we see that in
our request header, send this refresh token. This is important now
for the next steps because we are able to
set the refresh token. When we create a refresh token, we set a refresh
token in the cookie and also here in the database. Now we can see this
complete refresh token. Now the next step is well to refresh the refresh token and also the JSON Web
Token, of course, because the important thing here with the refresh token
is that as soon as a JSON web token expires or a couple of seconds or
minutes before it does. It's the responsibility
of the front end to call another endpoints that then enables the user to
refresh the JWT, the JSON Web Token, and
also the refresh token. And even when the JSON
web token has expired, it's not valid anymore
with the help of the refresh token that is
valid for a longer time, we are able to create a new JWT token and a new
refresh token so that the user is still authenticated and authorized
and the user does not need to authenticate again with the
username and password. So this is the great thing
of the refresh token. But for that we need
another endpoint where we can refresh the
complete package. So let's do that next.
26. Refresh the Refresh Token (and the JSON Web Token): Again back to Visual Studio. And in the interface we
create this new methods, task off response DTO. We call this methanol
also refresh token. And it has no
arguments whatsoever. Yes, we rebuild, but we will
get an arrow of course, because this is not implemented. But let's do that
now real quick. Implement the interface, whereas our methods probably down here. Yeah, let's put this up. We've got the register user. Now let's go down here. There is our refresh
token method. Again, if you skip the
end of the last lesson, it is important
that the front-end, front-end calls this thing. So as soon as the JSON web token is expired or shortly
before or after. Then the front-end has to
call this endpoint here. Well, this is not the end point, this is the service method, but of course the
endpoint will be created in the
controller in a minute. But now with that method here, we can refresh everything. First thing we need is that
current refresh token. So I told you already that
with every request now, the refresh token
will be sent with our context exercise,
HTTP context exercise. Then the HTTP contexts. We can access the request this time not the
response to the requests, and look for a
certain cookie value, and that would be
the refresh token. After that, with the
refresh token retry to get the user with
the refresh token. So var user now Waitz contexts users first
or default async, where the user refresh token
is now the refresh token, the given one from the cookie. Now if you don't find the user, we say return new
auth response with the meth message,
invalid refresh token. And another option, of course, is if you find a user, but the user token has expired. So talking expires is
smaller than a datetime. Now, in this case, we again return new auth
response DTO with message. And this time the message
is simply can expire. In that case, the
user would have to authenticate again with
the username and password. But if everything is valid, we have a user token
is still valid. Again, we create a new token. That's the JSON web
token with our user. Then we create a
new refresh token. Create refresh token. And also set this thing. Set refresh token, new
refresh token and the user. In the end, we return again
a new author response, DTO. With success set to true. The token is the
token, refresh token. New refresh token, token. And we set the token expires to new refresh token expires, that was already and
that should be it. Again real quick, this line
here is really important. We grab the HTTP only
cookie value refresh token. And from that we tried to
find the user this time, not with the user ID, but with the refresh token, because this is a token
only for one specific user. And if you don't have the user, the refresh token is invalid. If the token has
expired, then well, we return another message where the token is expired and
success flag is false. Otherwise again, we set the, the JSON Web Token to create the JSON Web Token
similar to the lock-in, we create a new refresh token
and set this thing and then return the complete package. Alright, so now we
need the endpoints. So to our controller, Let's edit here maybe. So again, an HTTP posts with although a
GET would also work, but let's use a post
here and refresh token. And the method now I'm lazy, so let's copy paste this task action result
and then a string. We call this here now, refresh token, no arguments. And we call refresh token
no argument because again, the refresh token comes
with the request cookie. If it's successful, we
return OK response. If not, we return
a bad requests. Well, I would say it's time to test this again.
Let's run the app. All right, Here we are. I removed the cookie here
from the Application tab. As you can see, a
cookie is empty. We have no refresh token set, and also the Network
tab is empty. So let's test this again. We go to login, try this out with Iron Man pepper for
instance, and executes. Everything is fine. We get our JSON web
token, the refresh token. We also see it here in
the application a tab. And now when I try to run the refresh token
endpoint here or call this print out and execute. This works, we get a
new refresh token. You see it here in
the value changes. Now what happens? By the way, of course,
in the database? We can also have a look. Let's just refresh this. Here we see the
exact same token. And now when I remove the nine here and hit Execute, again, we get the correct
error message, invalid refresh
token, put it back, and now it works. And what about the date? We've got this new
token here and we see expires is set to May 16th. So let me just change
the date on my machine. Change it, set this now to
denote 20th, maybe change. I tried to refresh
the token again. It says token expired. Okay, great, So this
endpoint totally works. And again, this is the
responsibility of the front end. I cannot state this enough that the front end or
the client has to check. Is there adjacent Web Token that expires or already is expired. In that case, we have to grab
a refresh token and call the refresh token endpoint
to get a new refresh token. All right, and with
that we're done with the refresh tokens and
the last chapter now, the roads and the big
topic, authorization.
27. Roles Introduction: Now these are the endpoints
now for the registration, for logging in, for
the refresh token. And now the last part
should be the role. We've got our user
object in the database, but it has no role yets. But now this will change. So what we're going
to do next is we will add the role at a new migration. So this field is then in the database the
role of the user. And we will also use the claims to add this role in
the JSON Web Token. And then when the
user tries to call a certain endpoint
and the user needs to be authorized
for this endpoint. Then we can check that in the web API
with another attribute. For instance, maybe you've got the typical user
or customer role, but then also an
administrator role in only the administrators are able to call a certain endpoints. So this is what we're
going to check next.
28. Add Role to User Model: The first thing,
again for our roles is adding the roll
to the user model and adding a new migration. Here in the user model, we add a new property. This would be then a
string simply with the row and an empty string. By default, we save this and now we run
another migration. So dotnet EF migrations
use row for instance. Alright, now we see this thing here in our
migrations folder. We just add a new column. That's fine. So let's
update the database with dotnet EF database. Now let's have a look. Here are our users. We refresh the data, we see the new row here, and of course we can change it. For instance, we can
now say that Iran has the row user we hit Apply. And if you change
something here, make sure in the DB browser for SQL light that you click
this button here, right? Changes. Now these changes are
written and saved. Okay, So this is now the new
role and the user model. And next we add the rule S
claim to the JSON web token.
29. Add Role as Claim to the JSON Web Token: So we go back to
the auth service and then where we
create the token here, we can simply add the
row now as a new claim. So we just add a new claim and then
claim types and then row. Here, it's suggesting
already the correct thing, user row, that's the
one. That's already it. So now we can already tests
if the current role of the user is available
in the JSON web token. Let's have a look. There's our app. Let's log in again. By the way, if you
are still locked in or you have the refresh token in
your cookie available, then you can use simply the refresh
token endpoint here to get the new
JSON web token. That's the great thing
now with refresh tokens, you do not have to
login again like I have to because I removed
everything from my cookies. So in that case, you could just use the
Refresh token endpoint and get a new JSON Web
Token. You just look in. And now here we see
the JSON web token. Let's grab this thing. Have a look here,
we paste it again. And we should see, yep, there it is, the role now, which is the user. Great, so this already works. Now the last step already
is we have to use this row for the
authorization so that only specific users with a specific role can
access a certain endpoints. So let's do that next.
30. Use the Role for Authorization: Now let's just use the
current situation. We try to get a new
JSON Web Token here. This now works because we
already got a refresh token. Again, we check this thing here and you see the role user. Now go to our getc called
here and click, Try it out. You see for one or you're not authenticated or authorized. Now we add the JSON
web token here. Hit Execute, we're getting
aloha, you are authorized. But what if we only
want administrators, for instance, use this endpoint. So the role admin, for instance, we can change this real quick. The off controller. Up here, we see where is it There it is
not up here. Down here. We can simply add
in parenthesis rho. Then admin for
instance, we save this. Just restart the application. So now we're locked out again, but with the help of
our refresh token, we get a new JSON web token so we do not have to
log in manually. Let's authorize again. Hit Authorize, close. Now we tried to get this
thing here and we get a 403. Now 403 Forbidden. So this means we send an
authorization header. We sent a key JSON
Web Token here, but with the wrong row. Now let's change our role
in here instead of user, we now say admin, it apply and write the changes. And now again, let's
refresh the token. All right, so let's copy
this thing hearing again. We have to use this token here. Now we click Authorize and now 1 seventh aloha,
you're authorized. Great. So now as administrator
with this specific role, we are allowed to get this information here or
to access the content, the information
of this endpoint. Now the last thing many users, many students ask is what about several roles
when you have, when you want to authorize
more rods than just one. Well, just enter
user and then Admin. And this works as well. Let's restart the app
manually just to be sure. Now when we use the
same token here, we click Authorize, still works. And last test, let's say again, we want to give this
user, the user row. We write the change. Again, we get new token. This is now the user
token you see here. This is now a user. And we hit Authorize a logout, Berra, close, execute, and we still get
otherwise, you're authorized. This is now how the roads work. And with that, we are
done with this class. Congratulations.
31. Closing Words: Alright, and that's
it already in a short amount of time you
learned how to register users, lock them and create
JSON Web Tokens. Also use refresh tokens and you've added
roles to that user. So now I think you already
know all the fundamentals for an authentication
process with dotnet six, I really hoped you
learn something and it was useful to you. If so, I'd love to see a review. Thank you very much for that. And maybe you want
to dive deeper into dotnet and blazer and other staff regarding
web development. And in this case, I
would love to see you on my YouTube channel. So again, thank
you very much for your time and thank you
for joining my course. And I hope to see you in the next course or on
my YouTube channel. Take care.
 Patrick God, Teaching code in a simple and fun way.