Transcripts
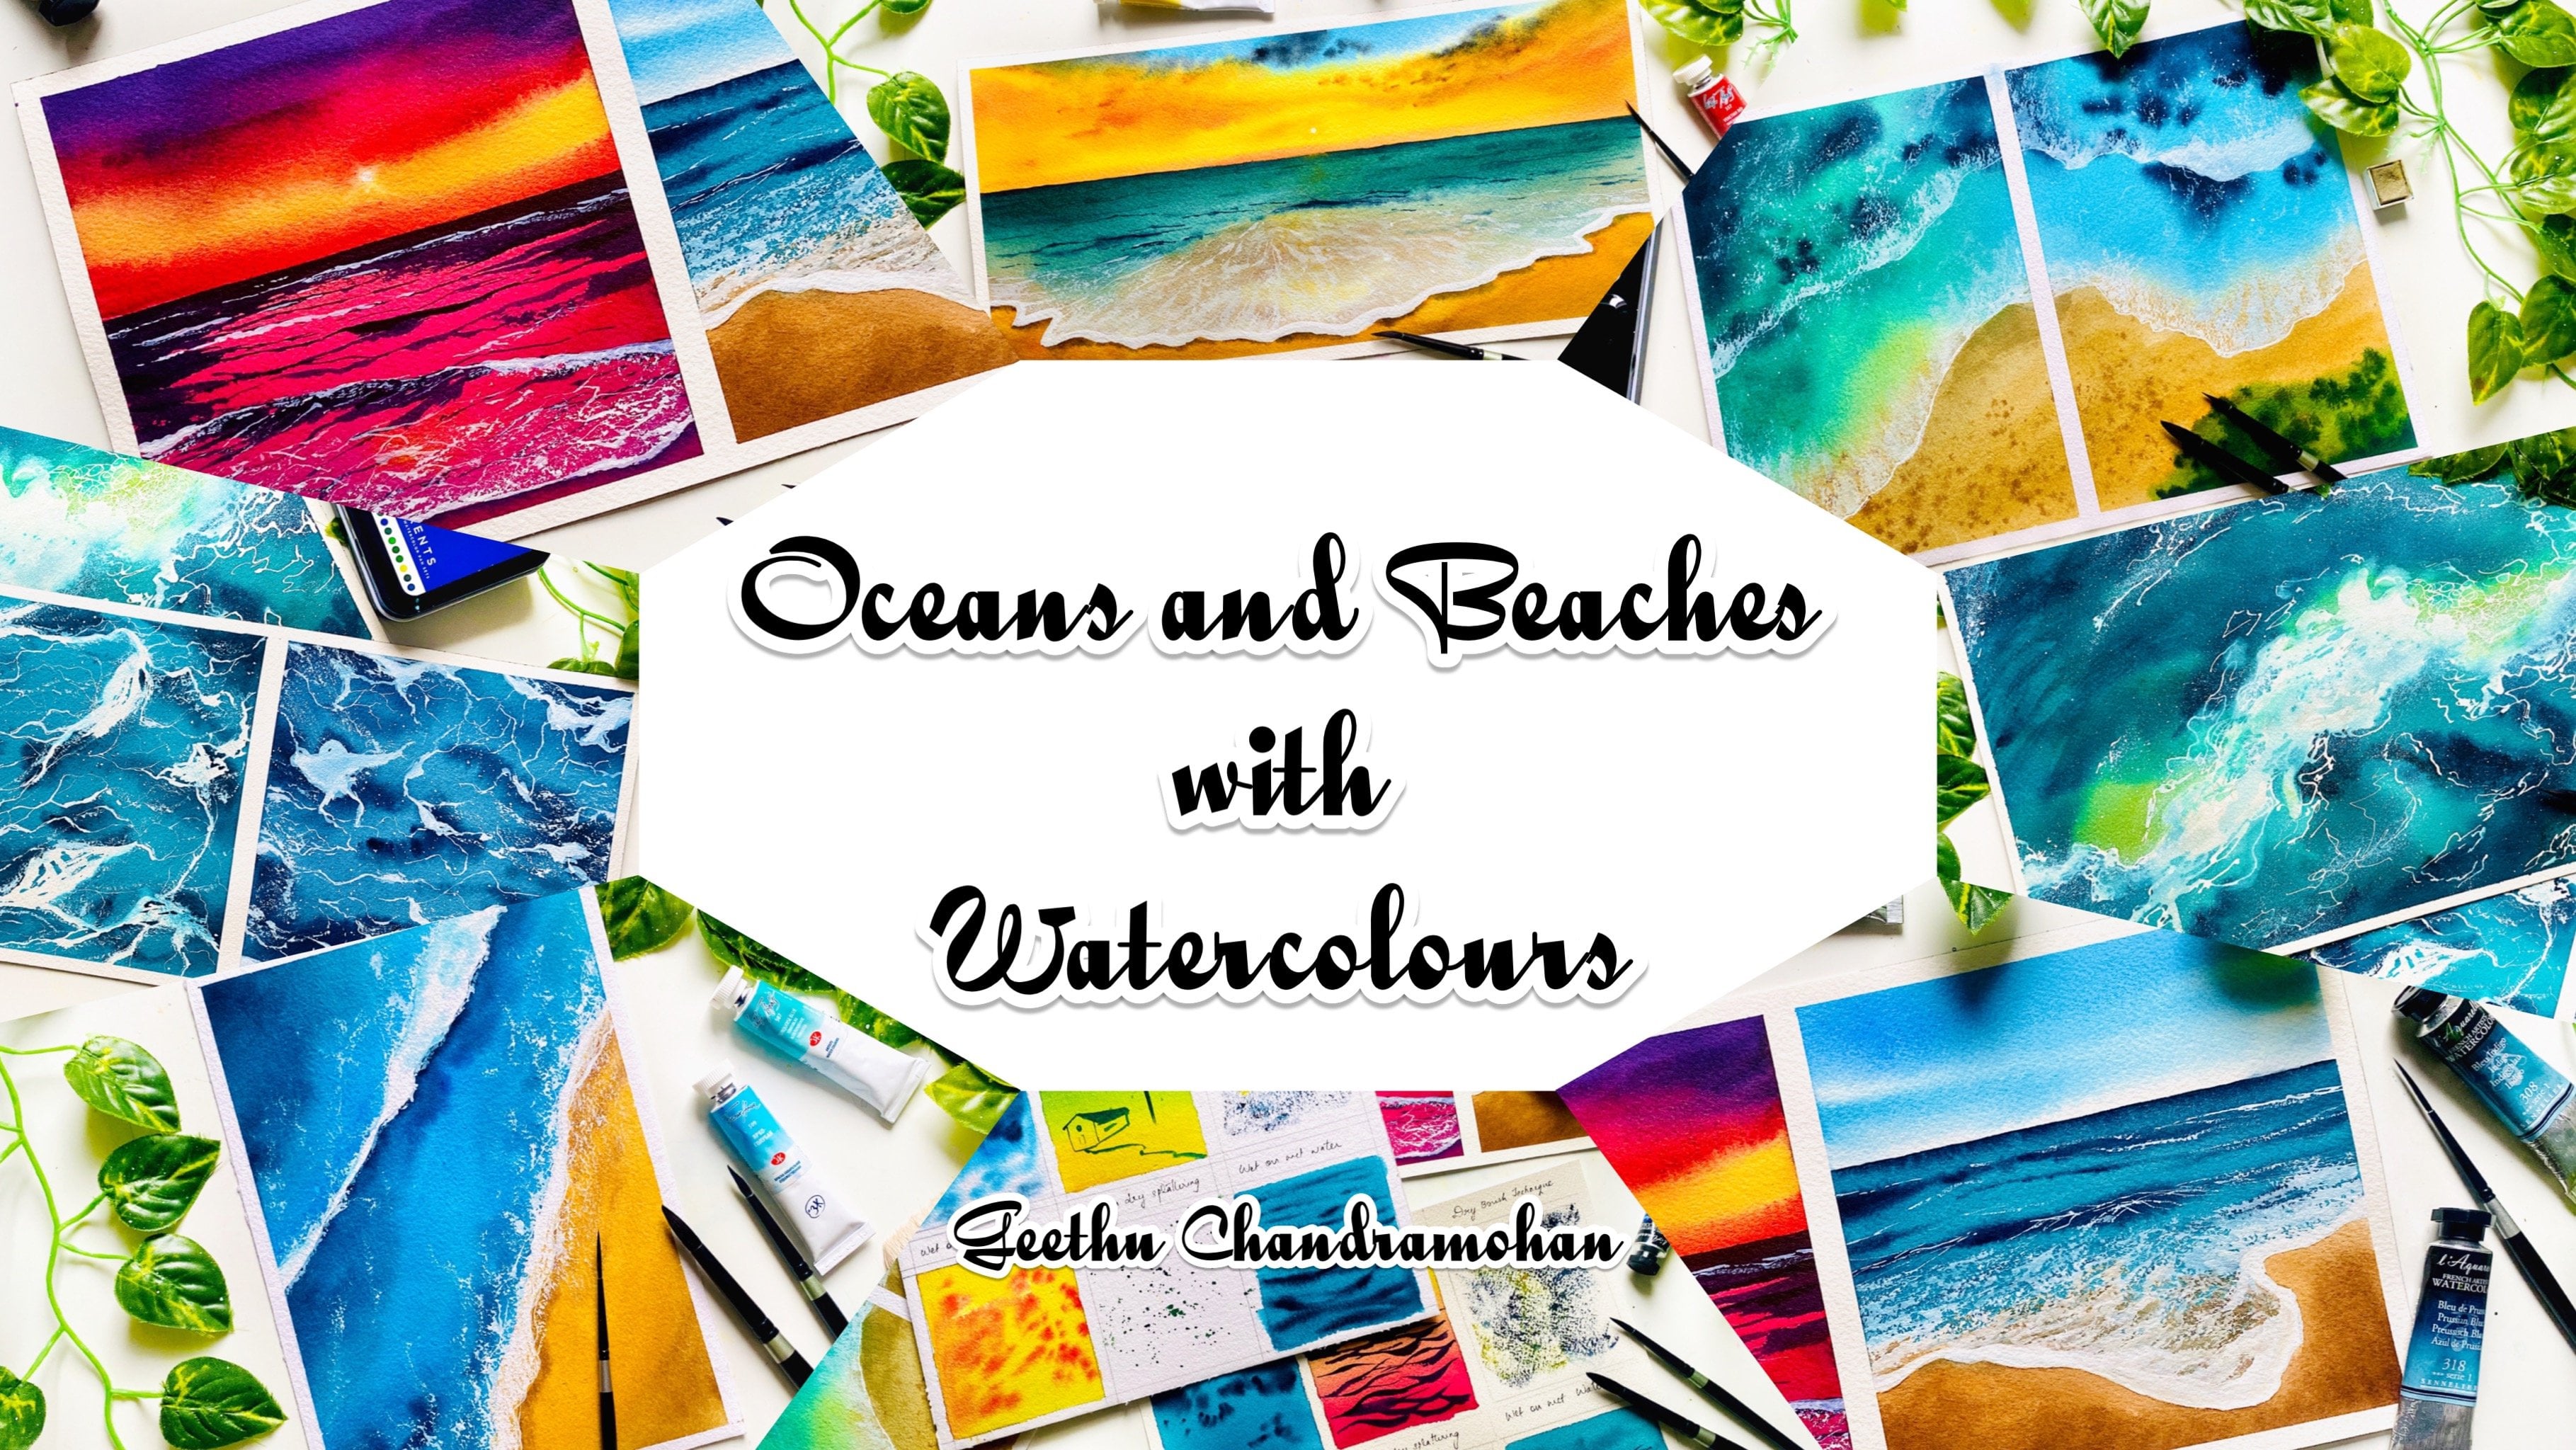
1. Hello and Welcome Back: Watercolor is one of the most pleasing
mediums to paint with. Right from when you apply
water to the paper, watch the colors
blend seamlessly, and the moment you peel
off the masking tape. Watercolors give you
immense satisfaction, in every step of the process. Hello everyone. I'm Geethu, an
aerospace engineer by profession and a watercolor
artist on the creative side. Watercolors have always been my favorite medium
to paint with. I started teaching
watercolors when I realized that I could impart my
knowledge to the outside world. And that painting is a skill that you can
develop over time. Skies and clouds are one of the most fascinating subjects
to paint with watercolors. It is an integral part of
every landscape painting and the variety of moods
that it presents to us is worth exploring. Welcome to 30 days of Atmos. That is, getting to know
your atmosphere by painting beautiful skies with
gorgeous clouds all around. I started out as a beginner with watercolors
four years ago and my journey up to now
has been remarkable. Learning about
watercolor pigments and how they affect each and every stroke in a painting was a turning point
in my artistic life. For this reason, I wanted
to share every ounce of that learning through teaching to paint
with watercolors. In the 30 days of this class, we will explore cloudy skies, sunset skies, and night skies. We will learn to add beautiful
clouds into the sky and explore the various
ways to paint different kinds of skyscapes. I will be explaining all the techniques needed
to paint skies with contrasting colors as
well as the methods to create fluffy and soft
clouds in the sky. I will also show
you how to break down a reference
image and how to upload it in your own style to paint it effortlessly
with watercolors. In 30 days, you
will have mastered the most important element
in a landscape painting. That is, the sky, as well as to create
your own sky paintings from any reference image. This glass is suited for
all levels of artists because I will be discussing all the colors in
advance and also explaining how to mix the same from colors in
a basic palette. Even if you are a beginner, you can join this class with the most basic supplies
that you have. Are you ready to dive into
Atmos for the next 30 days? Join me now for a
fun-filled 30 days of exploring expressive
skies and clouds. See you all in the class.
2. Materials We Need: Let us have a look at
all the art supplies that we would need
for this class. First of all, we need
watercolor paper. We need watercolor paper
that is at least 300 GSM. GSM is the weight of the paper. We need the paper to be thick so that it can withstand the watercolor washes with water that we're doing on the paper. It is highly recommended
to use a paper that is at least 100 percent cotton
paper and cold pressed. This here is the paper that
I am going to be using. This is from a brand
called Saunders Waterford. It is 100 percent cotton, 300 GSM, and cold pressed paper. You can see, it's
got a nice thickness as well as nice texture to the paper that
is cold pressed. It's medium textured. The size of the sheet is
10 inch by seven inches. Since that is slightly
larger than A5, I'll be cutting
this into half and that is the size that I'm
going to be painting on today. Here, I have cut the
sheets into half, so it's approximately
five inch by 3.5 inches. That is the size that
I will be painting on. It is slightly smaller than A5. You can go ahead and use
any size that you want, even if it's a square,
it's absolutely fine. Square, Polaroid, A5, A4, even a larger format such as A3, you can go for whatever
size that you want. This is the size
that I'll be using. Next, we need watercolor paints. I'll be using watercolors from various brands such
as White Nights, Sennelier, Daniel
Smith, and Schmincke. I'll be using paints
from tubes and I'll be squeezing them
out onto my palette, which I will show later on. I will also be discussing all the colors that is
there in my palette. We need watercolor paints. It doesn't matter
if your paints are in the tubes or in
the cakes format. Just go with whatever watercolors
that you have with you. Next, we need
watercolor brushes. You don't need a large
variety of brushes, all you need is a large
and a medium flat brush. Whichever larger size you
have, it's absolutely fine. The larger size is for applying the water onto the
paper so that it covers a lot of surface area when you're applying the water. I have this one here which
is a size 18 from Escoda. I also have this
3/4 inch flat brush from Silver Velvet series. Then we also need medium-sized
pointed round brushes. This is a size eight brush, and this is the size four brush. I also have this
smaller flat brush which I will be using in
some of the paintings, but it doesn't
matter if you don't have a flat brush like this one, you can go ahead and use a size 4 or a size 6 brush
for the same. I will be also be
using this size 6 round brush from Daler-Rowney. This brush is a synthetic brush. I'll be using this
for strokes that doesn't need a lot of
water on my paper. The main reason is that the other two brushes that I have are natural hair brushes, and this holds a lot of water. If I'm trying to paint
some dry on wet strokes, this will still have a lot
of water on the brush, whereas if I'm using a
synthetic brush like this one, I can perfectly get the
dry on wet strokes. Don't worry that you need
fancy brushes like these, you can go ahead and use
any brush that you have. I would also be using this
liner or script series brush which has long pointed hair
like this for detailed lines. You can go with a
detailer brush or a size 0 or size 1
brush for the same. You will need two jars of water. One for washing of your paints
and cleaning your brushes, and the other for applying
fresh water onto your paper. Next, we'll need a palette for mixing our paints and colors. This plastic palette is the
one that I will be using. As you can see, I have
already filled it up with the colors that
I will be using, which I will discuss later on. You can use any
palette that you have, be it plastic,
ceramic, or metallic. Then we'll need a
board or surface which we can use to
tape our paper onto. This is mainly because
it is useful if you have something other than the table that you're using
to tape your board, so that you can always
lift it into your hand and move it around for the watercolors
to flow on the paper. Next, we'll need masking tape to tape your paper
onto the board. You can use any
tape that you want. It doesn't matter whichever
tape you're using, so long as the paper you're
using is a good one. You'll also need
some tissues to wipe off the extra paint
from your brushes. You can either use paper towels or a microfiber
cloth like this one. Lastly, we also need
some white gouache. I will be using this
permanent white gouache from Winsor and Newton. You can just go for any
white pigment that you have, be it watercolors or gouache. We just need it to be opaque. Check for this square
in your tube of paint. But don't worry if you don't have something that is opaque, most white watercolors, even the basic sets are
opaque. It should suffice. You can use a hairdryer to quickly dry your paintings
in-between layers. This is just for the sake of easing up the drying process. It's absolutely fine if
you don't have a hairdryer and you would rather wait
out for the paper to dry. Now, let us have a look at
all the colors in my palette.
3. Colours in My Palette: This here is the palette that I will
be using for this class. I have already filled it up
with the colors that I want. Let me show you
all these colors. The first one here
is Naples yellow, that's Naples yellow, and it is a beautiful
opaque yellow color. Then I have got perihelion. It's again, it's semi-opaque. It's not as opaque as
the Naples yellow, but it is a beautiful
bright yellow color. The next color
that I have got on my palette is transparent
yellow or Indian yellow. This is a beautiful
transparent yellow and I cannot live without
this on my palette. This is my most
favorite yellow ever. The next color on my
palette is Naples yellow-red or Naples
yellow-reddish. I know that many of you may not have this color,
but as you can see, it's a mixture of orange
and white together, so if you don't have this color, then you can mix up orange
and white together to get this beautiful Naples
yellow-red shade. This is again an opaque color. The next color in my palette
is transparent orange. That's a beautiful orange. Next, I have Queen Rose. This is Queen Rose or
quinacridone Rose. You can go for any
Rose that you have. The next I have scarlet. You can go for scarlet or
crimson or any red shade. Even Alizarin crimson
would do fine. Next, I have transparent
brown or burnt umber. You can either use transparent
brown or burnt umber. Next is violet. It's a transparent violet shade. This color that I
have on my palette is Berlin violet so it's like
a reddish-brown shade. Next, I have Payne's gray. The last color on this
side is neutral tint. As you can see, I don't own
any blacks in my palette, but rather I use neutral
tint and Payne's gray and stocker stone whenever I'm using the black color. Then on this side, I
have yellow ocher. Yellow ocher is
an earth pigment. Then I have lavender. Lavender is another color
that's always there in my palette and it's very
beautiful for use in skies. This is burnt umber. This color here is shell pink. This is again a unique color
like the Naples yellow-red, and you may not have it. But as you can see,
you can easily mix up this color by mixing a
pink shade with white. Now, on my palette, you
can see here that it consists of a lot of
greens and blues. That's because this
is a palette that is catered for painting skies. You can use a variety
of blues in your skies, although I try to resort
to only few of the blues, but then I love to have
all these blues in my palette because this is also perfect for painting oceans. This here is cerulean blue. As you can see, it's a very beautiful light blue
and it is also opaque. Then I have royal blue, which is another beautiful
blue from Sennelier. This here is cobalt blue. You can see it's just
different shades of blue that I have. You don't need all
these different shades. You can go for one single
shade if that is all you have. Next, I have ultramarine blue, which is of course granulating. Then I have bright blue so
bright blue or yellow blue. It's called bright blue from
the brand White Nights. Then this color I have is
Taylor turquoise green, which is like a
beautiful turquoise green shade from Sennelier. Then I have the dark-green
from White Nights. I love this dark-green
from White Nights and it is always
there in my palette. [NOISE] I don't have a
sap green on my palette because if you mix this dark-green and this
yellow together, you get a beautiful sap green
and that is all I need. Then I have got olive green. Here is a beautiful olive green. The next color that I have is also very similar
to olive green, but it is Serpentine
Genuine from Daniel Smith. It's a beautiful color. I think I might have mixed up. This is the Serpentine Genuine
and this is olive green. I can clearly see it from the granulating
property of this one. All the pigments have
separated and that's why it is there in my palette. This is Serpentine Genuine
and this is olive green. Then I have horizon blue. This is again
another blue color, but opaque and very nice
for mixing in with skies. If you don't have this color, what you can do
is you can mix up your blue with white and add a little bit
of green to it and you get this beautiful
horizon blue color. But you don't need this horizon blue color because I'll be explaining to you how are the other mixtures
that you're going to use to get the colors
that I'm using. The next color on my
palette is turquoise blue. Lastly, the last
color on my palette here is indanthrene blue. It's almost similar
to Prussian blue. I have also added up a
little bit of indigo here on my palette because I love to use indigo for certain
dark mixtures. Here is indigo, but
mostly for dark mixtures, I'll be using this
dark blue here, which is indanthrene blue
rather than the indigo, but you can also use
indigo for the same. There you go. These are
the colors in my palette. We'll be creating
various mixtures with these colors but I
will also be telling you alternate options to mix every color that I'm
creating in this class, so don't worry if you're
using a basic palette because you'll know exactly
how to mix these colors.
4. Before You Start: As I have explained in
the material section, I will be using this Saunders
Waterford watercolor paper. It is 100 percent cotton, 300 GSM, and cold pressed paper. As you can see, the paper
part that I'm using is 10 inch by seven inches. I have cut it into half. The size of my paper is approximately five
inch by 3.5 inches, which is slightly
larger than A5. You can go ahead and
start using either A5, A4 or even a square or portrait format,
whichever you prefer. You don't have to exactly
use the same that I'm using. You can see I've already cut
the papers and got it ready. I want to tell you how
you can be prepared each day before you
start so that it becomes easy for you to go into this lesson each day
without any hassle. It would be a good thing
for you to have your paper ready on your desk every
day before you start. That process actually
begins on the day before. If it's into the class already. But for day one, obviously
you'd have to do it at first. What you can do is, right after you've
finished this lesson, you can have your paper ready
and date for the next day. Also, how you tape your paper onto the board is
extremely important. Because if you want to
have cleaner edges, and if you don't want your paint to be seeping through the edges, this is really important. I'm using this masking tape, which is a normal masking tape
that I bought off Amazon. It doesn't really have
any big brand names, so it's called workzeyt, I don't even know
how to pronounce it, but this is just some
normal masking tape. You do not need
extremely high-quality masking tapes for
your tape to work. From my experience, I
have observed that it is always the paper
that is the culprit, if your tape is
tearing the paper. Any tape would work fine. You just need to make
sure that you stick it up properly onto your paper. Let me show you how. What I usually do is, I leave a half a centimeter gap between the edges so that I get a nice clean border
for my painting. Stick all four sides together. One step that I always
do after sticking my tape is to make sure that
I have stuck it nicely. I use a ruler mostly to make sure that
I have taped the edges. I run my ruler on top of the tape to take
out any air gaps. As you can see there, I'm running over the tape
and any air gap there is, I'm taking it outside so that my water or my paint
would not seep outside. This is something that I do always before I
start any painting. If there's a time that
I have not done it, I've seen that's my paint seeps. Maybe it's bad
quality masking tape, but I'm not worried about using any branded masking tape because as soon as
I do this method, I've never had a problem
with my paint seeping out. But if you're so concerned and you would like to get
the perfect masking tape, I've seen that the
Tesa Perfect or Tesa Professional masking
tapes usually do work. It's a really good branded one that does not tear your paper or does not let the paint
seep out of the paper. But this is quite expensive, so you can just go with any normal masking tape and follow this process
that I'm doing. Some other things
that you need to take care of is
make sure that you clean your water every day
because we don't want to be using the dirty water from the previous day
for the next day. Also, if you want, you can clean out your palette. I usually don't
attempt to clean out my palette unless
it is absolutely necessary because I
hate wasting paint. You can see my palette already has all these colors mixed, but I wouldn't want
to waste them. But if there is
literally no space and I need to use or
mix a new color, then that's the time that
I would clean it up. Otherwise, it's completely fine. Also, do remember to take
care of your brushes. After every use,
make sure that you clean up your brushes
and get rid of any residual color
or pigment from your brush hairs because that's how you can take
care of your brushes. Because there are some colors or pigments which have a
high staining property. For example, teal blue or teal
green is highly staining, and stains the brushes, so you might have to
watch it multiple times. After cleaning it up, make sure that you keep the pointed edge of
the brushes as it is. This is how you can take care
of your brushes so that you use it for a long
period of time.
5. Techniques: Let us now discuss about the opaque and transparent properties
of watercolors. This is really important for this class because we have two methods of
painting the skies. You can either go for the transparent method or you can go for the opaque method. I will explain these two now. Opacity and transparency are
properties of watercolors, which allow light to pass in. The opaque watercolors allow
little light to pass in, whereas transparent
watercolors allow a lot of light to pass in. The transparent watercolors are easy to mix and do not
appear muddy or chalky, whereas the opaque watercolors
are exactly the opposite. That is they are chalky in
texture or appear muddy. But they both have their various uses. Let
me just show it to you. This is Indian yellow and
this is cadmium yellow light. The cadmium yellow
light is opaque and the Indian yellow
is transparent. You can know this from the dupes that you're using or from the information that came
along with the watercolors. In tubes, this
information can be found if you look for it, it appears in a box here. This one says that
it's an empty box, which means that
this is transparent. In opaque, the box will
be completely filled. For example, this one,
cadmium yellow light, you can see that
the box is filled, which means that it
is completely opaque. We also have semi-transparent
and semi-opaque. For example, this
olive green here, you can see that the
box is half-filled, which means that this
is semi-transparent. Let me just show it
to you what this means when applying
on the paper. The first I'm going to show
you is Indian yellow here. Here is my Indian yellow. It's a transparent pigment. When I apply it on the paper, you can see that the black line is seen clearly through it, which means it goes
beyond the black line. That is, it allows the light of the black
line to pass through. That's what. Now let us see
how the opaque pigments work. I don't have this cadmium
yellow in my palette, so let me take that. Let me show you exactly what it means by blocking the light. Here is a nice amount
of cadmium yellow. I'm going to paint on top of the black line and
you can clearly see that it has masked
out this black line, which means that it appears
on top of even black. This is almost like gouache, but because it is watercolors, it is not as perfect as gouache. But this is what opaque means. This is an opaque pigment. You can check this by doing the exact same
method by using some dark black lines
and try new paint on top of them to determine
whether they are opaque or transparent? Let me show you some other colors that are
opaque and transparent, so here I've got this violet. And as you can see, this violet is transparent color and so it's this orange because it's a
transparent orange, and you can see it doesn't
block the black line. Let me try some
other opaque color. For example, this horizon blue, which is opaque because
as you can see, it doesn't allow the black
light to pass through, and then another opaque
color is this shell pink. You can see how opaque
these colors are. This is the difference between transparent and opaque colors. Now let us see how these
apply to painting these guys. Here I have a paper
and I'm going to apply some water
onto the paper. I'm going to take
some opaque paint, so this is shell paint and I
will apply it onto my paper. You can see because it's
water, it's spreading out. The paint is spreading, and I'll also take some
horizon blue and apply it. When you're mixing two
opaque colors together, you'll see that they do
not blend together easily. They do not blend together to create the color mixture
of those two colors. It is good to use the
opaque watercolors when you want to
be in skies that have two contrasting colors. Now, let us see what
is the difference between using a
transparent color? For example, here is my transparent yellow
or Indian blue. Then as soon as I apply another
transparent color, such as this pink shade. You can see that when I mix
this on top of each other, they do not mix to
form a color, rather, when you mix the Indian yellow
and they rose together, you can see that it
created a red sheet. Transparent colors mix easily to form the mixture of colors, whereas opaque colors
do not mix easily. Then how does it apply
to in the use of skies? Like I said if you
have a sky that has really contrasting colors, then it is better to use the opaque watercolors to
paint those layers in the sky, or those clouds in the
sky because they're not going to mix together
and spread out a lot. But rather if you were to use the transparent watercolors, then they're going to end up
creating a lot of mixtures on the paper itself if you're using the wet-on-wet technique. Now, how do you create
these opaque watercolors? One easy way to create
opaque watercolors is to simply mix an
opaque pigment with it. For example, this yellow is transparent but if I
went to make it opaque, all I need is to mix it
with another opaque color. Here is my Indian
yellow and if I were to mix it up with
my Naples yellow, this mixture would
now be opaque. This is because when you mix an opaque pigment with
a transparent pigment, it turns up into an
opaque pigment itself. You can never get a
transparent pigment mixed an opaque pigment with it. This means that in order to
create a transparent pigment, it is very, very easy. All you have to do is mix it
up with an opaque pigment. I know that many of you may not have these opaque watercolors, which is why we can easily
mix our pigments with whitewash or white watercolor in order to get the
opacity that we need. Keep a tube of white
gouache or white watercolor which is opaque in hand so
that we can mix all these. I will be discussing
the mix of each of these colors in the
respective lessons. You can see this tube of
gouache has a filled square, implying that it
is an opaque tube. Now that you know the
two different methods which we will be using to
paint the different skies, let's jump into the
first day's lesson.
6. Day 1 - Colours & Image: This is the first sky painting that we are going to try. Let us have a look at how we
can break down this picture. This is already added in
the references section. You can go ahead and
download the image. Just remember that in order to access the reference
images in Skillshare, you'd have to open
it up in a browser, which means either in
your phone browser or iPad or laptop browser. It doesn't open in the app. That's the only thing that
you need to remember. This image, as you can see, it has got a lot of blues. There are some mountains in the background and some
fluffy clouds in the front. These clouds at the top, I think we can go ahead and
use a lighter tone of blue, such as ultramarine
blue or cobalt blue. It is a very medium
tone of blue, not too bright and
neither too dark, so I think we can
use cobalt blue. This is cobalt blue. You can see that
loop is perfect. Or even you can go
for ultramarine blue. Let me just show you
ultramarine blue. If you have ultramarine blue, you can use that as well. But the only reason
why I am not using ultramarine blue is because ultramarine blue is granulating, which means the pigments are going to separate
once it does settle. If you have an angle on your
paper then the pigments of ultramarine blue are
going to disintegrate. That's the granulating
property of ultramarine blue. You can see the difference
between the two pigments. This is the reason why I'm
not using ultramarine blue. Then, now for the base here, we can see that it's
got some darker colors. This blue here and this blue here is
definitely different. Also, there are some darker
blues here this side. It's not as dark as indigo, so we can use indigo. What we are going to do is
we're going to mix that blue. I think that if you can
use a darker blue such as indigo and mix it with the lighter blue
that you already have, then you'll get this version. That means this cobalt blue, mix it with a blue like
indanthrene blue or indigo, you'll get that color. Here, I am mixing the cobalt blue with
indanthrene blue here. You can go ahead and mix
it with indigo as well. There, it's a slightly
lighter version. When you apply
water to this blue, it's going to get lighter.
Let me show that to you. That's the blue that
we have painted with. But then when you
mix it with water and paint lighter dots, it's going to match that blue. Then we also need the blue for the strokes
on the mountain. These strokes on the mountain, I think you can go ahead
with this darker blue that we already
applied at first. Then we have this
darkness at the bottom. So for that, it's very easy. We just go with some darker
tones such as Payne's gray, or you can use a mix of
Payne's gray and indigo. Here, Payne's gray
and my dark blue, that would be the dark
blue that I'm using. Then we also have the darker
strokes on the mountain. Again, I think this same
blue would suffice for that. Now that we know the colors
that we're going to use, let's see how we can
break up this painting. This sky, as you can see, has sought a softer image. The clouds are softer and
so other clouds here. But the mountain part is
where it has got sharp edges. That means that for the sky, we're going to be using
the wet-on-wet technique, and also for this as well. First, what we will
do is we'll paint the whole of the sky with
the wet-on-wet technique, and then maybe some of these loose strokes on the mountains can also be with
the wet-on-wet technique. But it's not as loose as
the clouds and the sky. It needs to be semi-wet or
semi-damp on the wet paper. I'll show you how it is. I'm just trying to break down
the steps so that you can understand how we can paint from a reference
image on your own. Then we have the darker strokes, the sharp lines on the mountain. For that, we have to use
the wet on dry method. It means that after
painting the whole of the sky and after the sky
has completely dried, we need to paint these sharp
lines on the mountains. Once that is done, this painting is complete. That is all there is. All of these extra
additional details here on the clouds to
get that depth is somewhat like an advanced and takes a lot of
time to achieve because you would have to use multiple layers to paint that. But let's not go into
that much detail today. Let's focus on the
simplest part here. Let us go into the
first painting.
7. Day 1: Now that we have seen the
colors that we're going to use and how to break
up this image, let us start painting. There won't be any
pencil sketch. Let us just start directly
onto the painting. We're going to be using
the wet on wet technique so let's apply water
to our paper first. Use a large brush if you want to cover a large surface
area of your paper. Otherwise, just use
whatever normal brush have. You don't need a
large brush itself. Apply water onto
the paper evenly. You need to make sure that
the water that you apply is even and that it does not form any large pools
of blobs of water. Also make sure that you apply
the water multiple times in order to make your
paper stay wet for a longer duration of time. This is something
that I always say, especially if you're not using
100 percent cotton paper, then you need to do this
process multiple times so that your paper can
soak up that water and the water gets
into the fibers of the paper and it can stay wet for a long
duration of time. Just make sure that
you apply the water evenly and multiple
times as well. I'll say this because
today is a day one. Another trick is to apply
the water onto your paper, wait for 5-6 minutes
until the water dries, then reapply the water. Do this multiple times. For example, maybe 2-3 times. That would make sure
that the water on your paper stays wet
for a longer time, as in when you apply
for the third time, then it's going to stay wet for a longer duration of time. Let us now start
with cobalt blue. We're going to be
using cobalt blue, mix up a nice amount of
cobalt blue on your palette. Here is my cobalt blue. This is another
thing that I have noted that makes
sure that whenever you're taking your paints
from a pan or even from a tube where you have squeezed it out
onto your palette, make sure that after
you dip your brush in the palette to rub it against the palette space
because that loosens up the pigments
rather than having it concentrated at one
point on your brush. That's really important, that you rub it along
on your palette after picking up from the tube or your pan, whichever
you're using. Let's just go ahead so you can see the water consistency
that I'm using here. We just start, so there. You can see it's spreading around because
there's water on our paper. Going to start painting
in this direction. Also we're going to
leave some gaps. Let those white gaps be. Whatever you want,
leave those white gaps. I have left white gaps. Now I'm going to dab my brush on my tissue so that I get rid of all the excess water as well as any extra pigment because now I want some lighter strokes. You see these strokes
that I am going to apply is lighter as opposed
to the stroke on the top. This is because we now need
the strokes to be lighter. As light as you can. There it's very light. Keep going with lighter
strokes towards the bottom. We can have some darker strokes
towards the bottom again. Like I said, it doesn't exactly have to be
like in the picture. We don't want to be
copying the picture, but we just want to use it as a reference to make
our own sky painting. Now, I'm taking more of
my cobalt blue and I'm going to apply it
at the top so that we get a nice darker
color on the top. Also apply onto the top of the areas that you've
already added. You can mix a little bit of
indigo or indanthrene blue. Here I've mixed a little
bit of the dark blue color. I want to apply it at the top. Since we don't have an
angle on our paper, this is now just going
to spread randomly. We also have paintings
where we have an angle on our paper,
not for this one. Let me get darker colors onto
the corners and the top. You can see the rest
of the areas we've left it as white and
let it remain white. Then now we'll go
with a darker color. I'm just picking up the
darker indanthrene blue color one that I teared
off my palette. Here it is. That I'm
going to add to the base. Just adding that to the base because I
want it to be a little darker there on the base. Then we also use the tip of our brush to just
add some little strokes as we see in the picture
and to the base. That's it. There are clouds covering the mountain
in the front so another few strokes that
we're going to add, some there and some there. Now what we need to
do is we need to make the fluffy clouds. We need to make sure
that we add the clouds there on our sky region. Also, another thing
that we can do is to try to get rid of these
hairs that are forming. For that, you can use a
brush that is somewhat dry and just rub it
onto your painting. Make sure that you dry your
brush nicely on a tissue. Then just rub off along the edges of those lines
that you have painted. That would spread the hairs around so that it doesn't have
much hairs and each time, just make sure that you wipe your brush so that it
removes any extra color. I'm going to leave it at that. Now, let's go ahead and
add those fluffy clouds. For that, I am going to mix a little bit
of Payne's gray. Here is my Payne's gray, a little bit of Payne's
gray with my blue. It's like a nice darker version of the Payne's gray with
a little tint of blue. But we need the brush
to be really dry because the paper
is also starting to dry so we have to
be very careful. Here, I'm drying my brush and I'm using my brush to add some random
strokes into the sky. Also leave a lot of
white spaces because those are the bright
spaces in the clouds. There, just adding here. maybe is up here Just added some nice strokes. Again, let us use our dry brush to remove
all those extra strokes. That is the hairs that are forming because the
paint has spread. Let's use a brush
to remove that. Also, let us use our
dark Payne's gray to add some darkness to
the bottom here again. If your indigo is
not dark enough and you haven't got
that dark color, you can use that at the base. There like I'm using here, adding my Payne's gray to the bottom on top of
the dark blue color. I think that's good enough. Now what we'll do is, let us add the mountain. At first, we just
add it lightly. Here, I'm going to go
use my blue paint, the dark blue,
indanthrene blue paint. We're going to have
a mountain here. Just going to add some strokes. I'm using my
synthetic brush here, which means that the brush
doesn't hold a lot of water. Make sure that you
dry your brush nicely on your tissue so that there's no extra water on your brush, when you're doing this. We're just adding
some dry strokes now, not really drying, but the brushes are almost dry, it's like semi damped brush, but your paper is wet. Then it's going to create some beautiful strokes
on the mountains. There, just created
some nice strokes. Let's create some here. I think that's good enough. Now, what we have to do is we wait for the whole
thing to dry so that we can just add
some nice strokes, that is the details on the mountains and then the
painting would be done. Here, so our painting
is now completely dry. We'll go ahead and add the
details on the mountain. I'm going to use my
synthetic brush again. I'm going to pick up
the dark blue color. Here is the dark blue color. I'm going to mix it with a
little bit of Payne's gray again so that we get a
nice shade like indigo. I'm not using indigo
on my palette. This is the reason why I'm
mixing these two colors, but if you have indigo, you can go ahead and
use that as well. Now for the details, we need some dry strokes and make sure that your
brushes dry again. Dry it on a tissue nicely. Just dry it. Dry it nicely, rub it along, because we
needed to be some dry strokes. Then see how the
strokes are dry. Let me show you too up close. See, it's really dry stroke, and that's what we need. Some dry strokes. We have some nice other dry
straws here as well. It's like the
mountains continuing, but it's got to mist and
the loud on the top again. To the same, to the side. Just add it on the top
of the blue that we did, not all the places, but just some places so that it looks as though
this mountain has some texture and then clouds
are crowding the front part. See? So now that looks already
very nice, isn't it? Let's have some this side. Now, what's missing is this
top part of the mountain, doesn't look as though it's
covered by the clouds. Let's try to make it that way. Don't worry, it's
not that tough, it's just a sky that
we're trying to focus on. This is really not
at all important. That is, this part of the
painting, is not important. Getting the sky to look
like this and the clouds to have that fluffiness is what is most important
in this meeting. If you're not getting
these dry strokes and all of these strokes on
the mountains, don't worry. Also, I have a
class on mountains, and also my class on watercolor techniques
would explain how to paint all
these dry strokes. You can go ahead and check that. But like I said,
this class is not focused on those things,
but rather the sky. What I have done is, have taken some
little blue tone. We're going to paint outside
of the mountain area. Outside of the mountain area, a little bit of blue tone. Let's just add some strokes
outside of the mountain. Outside, towards the top side. You can see what
I've done there. That stroke has
got a harsh edge. I'm just going to use water to soften that part of the edge. There, so I have soften that. Let's soften just some areas of this here as well so that it looks as though it's
having some fluffy clouds. I think that's good enough. Let's go ahead and
add a little bit of the dry strokes to
the top here as well. I think that looks good enough. There it is. It's done. The most important thing is
to get these nice strokes, leaving the white
gaps and getting these fluffy clouds
at the bottom, and also trying to get rid
of those hairs by using a dry brush to remove
and soften those hairs. I hope you like this.
Let us remove the tape. Here is our first painting.
I hope you like it.
8. Day 2 - Colours & Image: Welcome to Day 2. This is the reference
image that we're going to use for today's painting. You can see how we have
a nice blue sky with some nice fluffy clouds and
then a mountain background. For this blue here, I can see that it
looks like a bit of nice gold blue color. So we're going to be
needing a blue color. Let's see. This is my
bright blue color. If I'm using my
bright blue color, you can see that it's
a little bit more cold than it already is
on the reference image. I need to make this a
little bit more warmer. What I'm going to be using
is I'm going to mix my bright blue or pale blue or [inaudible] blue
with my cobalt blue. If I mix it a bit with my cobalt blue and then
add it onto the paper, I think it best
matches that blue. Then we're going to be using a mixture of cobalt
blue and light blue. But it honestly doesn't matter that you have to use
the exact same color, you can go for any
blue that you want. All we need is to understand
the strokes to create this beautiful
reference picture. Then we have some clouds
in the background. We have the shadow
of the clouds. For the shadow of the clouds, we're going to be needing
some Payne's gray, but a very lighter
tone of Payne's gray. I added a lot of water into the mixture to create
that lighter tone. Then we have the mountain
in the foreground. The mountain is like
an olive green color. Here is the olive
green that we can use. If you don't have olive green, don't worry because olive
green can be easily created by mixing a
little bit of green, that is sap green
and brown together. If you have sap green and
you mix it with brown, so this was brown here,
and here's my green, but my base green
is really dark, so that's why you have a darker version of olive green here. If you don't have sap green and you only
have a darker green, you can get olive
green by adding a little bit of
yellow to it as well. Here is my yellow
and I'm going to add a little bit of yellow to it and then brown there. I've added brown, yellow, and green together and add it, so that's the olive green. You can see it's
slightly different because I need to
add more yellow, but that's how you can mix those colors if you
don't have those colors. Then I can also see some green strokes
here on the mountain. For that, we're going
to be using green. So a nice green, sap green or dark green or
whatever green that you have. Then we also need some brown for some of those
dark brown strokes. Those dark brown strokes, you can see that dark brown. How did we get dark
brown? What we can do is we can mix it a
little bit of the brown with Payne's gray so that we get a
color like sapphire. If you have sapphire
you can use that directly or you can mix
your brown with black, Payne's gray or lunar black
or any dark color to get that nice sapphire color and
there's that darker shade. We'll also be needing
that brown as a whole for adding on top of this
front area here. That's the brown
color and we also need the darker
version of Payne's gray for these mountains
in the background. That's Payne's gray. Now let's see how we can break
up this reference image. As we can see, it's
got a nice blue sky. We're going to be
painting the blue sky. These clouds have a not soft, not hard either edges. It's in-between the soft
and the hard edges. What we're going to do
is we're going to use a tissue to dab off the paint from the
papers that we get some white space on the paper
and we create those clouds. First, we paint blue then we create those clouds
by using tissue. You can use several methods. You can go for the wet
on wet method as well. You can go for wet on dry method as well but if you
use the wet on dry method, your clouds are going to
have really hard edges. If you do the wet on wet method, it is going to have
too soft edges. Which is why we can use
for the dabbing method, but it's totally up to you. When you look at this image, you can clearly see that the mountain is in
the foreground. The sky is in the background. But this mountain is still in the backward part of our picture because this here
is the foreground. We're going to need
to have to make this mountain a little
bit softer than this part if we need to apply the aerial perspective
into the picture. That is how we're going to
approach this painting. That is, we paint the sky part
first and as you can see, there are some
bluish tones here. Which means that if you apply an even coat of blue all the way down here by making your stroke lighter and
lighter as you go down, then all your strokes here at the bottom are
going to be lighter, but still, you'll achieve some bluish tones
here and there. Then, because your tones are
lighter here at the bottom, you can still paint
the mountain on the top and then the foreground at the bottom. That's
going to be simple. There you go. For
these white spots here in the foreground, you can add splatters or
you can totally ignore it. I'm going to totally ignore it in this painting
because the focus of our painting is the sky
and not the foreground. I hope you liked this picture. Let's now get to painting it.
9. Day 2: Let us start with
our next painting. As I said, for this, we're going to need
some tissue so keep that ready in your hand. Before we start painting, let's quickly add a pencil
sketch for the mountains. Just some random strokes roughly where you want the
mountains to be. That's it. That's going to be the front. That's it. That's going to be the sketch for our painting. Let us start by first applying water to the whole of our paper. Apply to the whole of the paper, it doesn't matter, even the
mountains in the front, so we'll just apply water
to the whole of the paper. Make sure that you
apply the water evenly without forming any large
pools of lots of water. Also, if you're not using
100 percent cotton paper, make sure that you apply it
nicely such that your paper stays wet for you to work on
your wet-on-wet technique. Make sure that you
run your brush in even direction so
that it stays wet. Also if you want, you can hold your
paper at an angle so that the water will be
uniform throughout the paper. Next, I'm going to
switch to my flat brush to apply the paint
onto my paper. Let us prepare the
color that we need. We are going to use
cobalt blue and mix it with a little bit
of bright blue or pale blue so that we get a nice, beautiful blue for our sky. That's cobalt blue and
pale blue mixed together. We're going to
apply it to the sky in a flat manner,
as you can see. Hold your paper at an angle
so that all the water and everything would flow down but then it'll be lighter
towards the bottom. Whenever you're picking up the fresh paint
from your palette, make sure that you start
applying at the top so that only lighter
strokes would flow down, so we want it to be lighter
towards the bottom. Can you see how these
strokes are flowing down? That's exactly what we want. All the darker
strokes should be at the top and the lighter
strokes at the bottom. There we have darker strokes at the top and then I'm moving my brush downwards such that I get lighter strokes
towards the bottom. Let's do it all the way. Although here you can see
I've skipped some parts such that my strokes leave
some white spaces there. Let's just go over
it one more time. Just remember that when
you're doing this process, you have to go through
it all the way down. Don't stop midway because
wherever you stopped mid-way, that's the point where
you're likely to get blooms or where the water is going to spread
out the paint. You can see how this
has turned out. It's a flat wash. Now the next thing
that we need to do is before this
whole thing dries, we need to create the clouds. I'm going to use my tissue here and using the tip of my tissue, so I've just bend it
such that I get the tip. Using the tip of my tissue, I'm going to just
dab off some cloud. Can you see how it has
created the clouds? The next time we have to use a different part of
the tissue again because that paint is otherwise going to go
back into the paper. Just use the tissue to create
whatever shapes you want. We're going to do this
multiple times and get all the different shapes
that we want for clouds. This is basically just dabbing off the paint
from the paper. You don't exactly have to
follow as in the picture but just go according to what you think you
can make the shapes. I'm just basically
using different sides, different corners
with my tissue, and just dabbing off all
those paint from the paper. You can see the way
I've dabbed it, I'm getting those white spots. Still more at the bottom. If you want smaller clouds, just leave a dab, touch a little bit, that's it. It's just basically the way you move your tissue on the paper. You could also do this
with a dry piece of cloth, a cotton cloth, or whatever, but just make sure that you're able to
lift off the paint. This is one of the
lifting techniques where you can use to lift off to form these
beautiful clouds in the sky. At the bottom, we're
creating smaller clouds. Now you can see how this
whole thing has turned out. We've got a lot of
clouds in the sky and we've got the
darkness of the top, so I'm just going to dab off all the paint from
these regions as well. Because we've got
larger clouds there, we need to add shadows
to those clouds. Don't forget that. This is how the main cloud
is going to be like. Make sure to move to
a different place of the tissue each time because otherwise the paint
that you've lifted off, you've got to put it
right back there. Now we've created the clouds, let's go ahead and
paint the mountain. It's just somewhat wet, not too wet, but
it's somewhat wet. I'm going to be using olive green so pick up a nice amount of olive green. But make sure that your
brush is not too wet. Do not have a lot of
water on your brush. Using olive green, we are
going to add the mountain. If your paper is too watery then this is
not going to work. Also, you can have your paper at an angle like this
towards the bottom. I actually forgot that
mountain in the background. Let's paint that first. Painting that mountain
in the background, we're going to be going
with Payne's gray, so here is Payne's gray. That's Payne's gray,
and you can see how dry my brush is. Also, you can dry it
more on your tissue, and then we have part
of that mountain there. Then we have a little bit here. You can see the
paper is almost dry. This is the reason why
we're still able to paint, and though it hasn't
completely dried up. Also, your brush needs to
be semi-dry or just damp, not a lot of water. Here, this is the consistency of the paint that I'm using. We're going to create
those mountains. The reason why we're going with this wet technique is just
that because we don't want any sharp borders for
those mountains because those mountains
are farther away, this ground here is what
is in the foreground. We need a flat line where
the mountain is ending, and basically, we
can fill it up with the olive green paint, and we'll add the details
on the mountains later on. First, let's just add
up the olive green. You can see because
these strokes here, that is the blue strokes
here were lighter, we can add the olive green
on the top and it doesn't matter that you've had
the blue underneath. But if your blue was darker, then this olive
green will not going to come perfectly
on your mountain. Let's just fill it up. I've filled up the
mountain. Now we need to make sure that we make this mountain to be in the front and the other
in the background. We are going to go
with more olive green and add to the top, and you can add a little
bit of dark green to that mix of olive
green so that you get a different shade of green. You can see, I've
added that to the top. If you don't have dark
green, don't worry, you can mix a little
bit of indigo with sap green and you'll
get the dark green. Here, I'm mixing with
that dark green with the olive green,
and then adding. We'll also add it
to the mountain, at some places, so that we create some details. The olive green that I
painted on my mountain is just wet, still wet, so this is the
reason why when I'm adding these green strokes, it appears nicely on the top. Now you can see that
this mountain looks as though it's in the front,
but we're not done yet. You can see some
brown strokes on the mountains as well
so we need to add that. For adding those brown strokes, we're going to go with a
nice dark brown shade. Again, we need to
have those strokes in a slightly damp brush, and not too wet because
if you introduce a lot of water into this mountain right now you're going
to create blooms. Remember water control always. So that's a very
important lesson that is to control the water that
you put to your paper. The paper that you're working
on is just slightly wet. Can you just see how wet
it is? Just slightly. If you add any more water than there is already
on that paper, then you're going to ruin it. So that's why we need to dry your brush after you've
picked up the paint such that your strokes
are completely or almost dry when you put it. Now I'm adding
those brown strokes and it's not ruining it, it's just blending inside
that olive green shade. Just going to create some
random lines and some strokes to the top of this mountain. Now we have got that. Those brown strokes, I want to soften them so I'm
going to take a little bit more of my olive green. Just blend it along with
the existing olive green. Now that it's much better. This mountain, let me
connect the brown line. Now we can see that mountain looks as though if
it's in the front. That's exactly what
we wanted to achieve. Let's paint the ground below. For the ground below,
we can see that it's almost semi-dry and it got those white flakes which is like snow on the ground. We're going to make
it exactly like that. So let's pick up olive green, and we need our stroke
to be dry again. The reason, I'll just show you, we're going to use
a dry version of mint green and just
add those dry strokes. When you're creating
those dry strokes, can you see it looks
as though it's got those white spots in between
so it's like the snow. But because we're doing with
semi-dry strokes it helps. Make sure that you
create your strokes dry. Here, I'm taking olive green, and then I'm also
drying my brush on my tissue so that all the water is
absorbed from the brush. Then we use that to
create those lines. Let's just keep at it. You can see how dry my
strokes are getting. Then let's add a large
dry stroke here. There, it's a very dry stroke. Now you can see how
it's turning out to be looking like that lake
picture, isn't it? Think towards the bottom. You can go ahead and add darker
stroke of the olive tree. Now you can use more water
and paint the bottom part. We've used more water and adding the olive
green to the bottom. I think that looks much better. Let me dry off my brush again
so that I get dry strokes. I'm going to add some
more dry strokes here. It need to be more dry. You can see how dry it is. Now the next thing is to
add that little tone of brown onto the olive green. Let's pick up brown. Again, make sure that your brush doesn't have much water than there is already
on the paper. Adding that little tint of
brown in certain areas. Add some here, speaking of that brown. Then I'm also going to add
piece to this mountain here with the brown
but loose strokes. Don't make it a straight line. You can see how my strokes are loose and also it's
got at some places, don't make it like dash lines but just try to make it loose. Just drag your brush long. Try to create some
loose strokes. How do you think
that has turned out? Let's add some brown strokes
here in between as well. You can see how dry my brush is when I'm
adding those strokes. We're done with that part. Now, if my sky is dry, we can go ahead and
start adding the clouds. That is the shadow on the clouds because
it's not done yet. For the shadow on the clouds, what we're going to do
is we're going to use a very lighter tone
of Payne's gray. You can see how
light it is because I've added a lot of
water into my paint. The more water you add, that means it's
light, very light. I'm going to absorb all
that extra water because I don't want to be adding too
much water on my paper. Then just going to add those little strokes
to get some darkness. Just below each of these
clouds, not all of them, but just like here, this is a larger cloud, so I'm just going to
add to the base of it. We need to work quickly here because I've added to the base. Now, what I'm going to do is when I use my brush
and I'm going to spread out those
Payne's gray strokes that I just applied. I just spread out the
Payne's gray stroke using water or soften. This is called as
softening the edges. Just use your brush, rub it along the edges, along the harsh edge
of your stroke, and you'll see that your
stroke has softened. I just touched that
little bit of olive green and it's spread,
that's all right. I'm just running my brush
over, softening those clouds. If you're not using a
100 percent cotton paper and your paper is
drying out quickly, and you're unable to soften
the clouds then make sure that you paint each
cloud one by one, try not to add all of these shapes altogether because then you might not be
able to soften it. Let me show you another
method where you can add these shadows. Just apply some water first. So this might be actually an easier method because
you are applying the water first and
then you don't have to go through that
softening process. Taking a little bit of Payne's gray and I'm going to add it. I added water first
and then I added the Payne's gray
so it's softened, although I think I
didn't add water here. It's more softened look now. That's it. I hope you like this. I'm going to skip the white dots on this olive green part. It's not necessarily,
it's completely not needed for this part of the painting because we're
focused on the sky here. So let's just skip that. After our paper dries,
let's remove the tape. My paper has completely dried and I'm going to
remove the tape. There you go. This is the final painting.
I hope you like it.
10. Day 3 - Colours & Image: [MUSIC] Welcome to Day 3. This is the sky that we
are going to paint today. Isn't it gorgeous? Let us have a look at the
breakdown of colors first. We see the bluish sky with some white clouds and
it got some shadows. By looking at the
shadows itself, you can see that it's got
a tint of Payne's gray, that is, a lighter
tone of Payne's gray. Obviously these shadows are going to be a lighter
tone of Payne's gray. Then the rest of the
areas are white and then the sky is obviously
a dark blue. But if you look at it closely, you can see that it's got
a tint of green on it. Not too much green, but a little tint of green to blue and that's how
you get that color. Let's see. We need
a darker blue. It could be either
Prussian blue, or indanthrene blue, or even Indigo for that matter. Then I've mixed it
with a little bit of phthalo turquoise green to
get that greenish tint. Here are the
respective color mixes after mixing it with
the blue that I used. This is the indanthrene
blue mixed with the phthalo green and this is
mixed with the indigo. As you can see, this is the perfect color
that matches because this indanthrene blue or even Prussian blue
would work perfectly, is the color that looks
almost like this, because indigo in
such a dark color so you're going to get a
darker version of the mix. But if you want it to be quite
like the color in the sky, you can mix it a little
bit with ultramarine blue or cobalt blue, and
you'll get this color. But obviously, again, you do not need to
be painting with exactly the same color as
in the picture because you can totally neglect
the fact that it's got this bluish-greenish tint and just go with your
favorite color, for example, you
can just go with one single blue and
paint the whole thing. It's totally up to you. Don't worry if you
don't have this phthalo turquoise
green because you can use either viridian
or emerald green, whichever color you have
and mix it with your blue. Just makes sure that if you're actually
mixing those colors, try to get that greenish tint and not make it too much green. Then obviously, the next
color is Payne's gray, not in this darker version, but as a lighter tone here. Now let us see how we can
break down this image. In fact, I tried this
image three times just to see how we can paint
it. There you go. These are the three
versions that I painted. As you can see, this has got a different color because
this is the one where I used indigo and these two
are the indanthrene blues. I'm going to be teaching
this method here now today. Let me explain all these three techniques
that I have used. The first one is
wet-on-wet technique. Then I applied the lifting
technique using tissue. Using a tissue, I lifted off
some of the areas to get those lighter areas of
the clouds in my picture. Then this one is completely wet-on-wet
technique in a single layer. Just I applied the water and then I painted
the whole thing, left white areas and
in the right areas, I added the Payne's
gray shadow tones. You can just go with whichever
technique you prefer. You don't have to follow
exactly the same. Then this one is in two layers. I applied the water
first and then I painted the shadows first. In the plain paper, I applied the shadows first
and then I let it dry. In the second layer, I reapplied the water and
then I painted the sky. Both of these techniques
are good to go. You can just go with whichever
techniques you prefer. In fact, even this one as well. It's totally up to you which
method you want to go. I'll be showing you
this two-layer method because that's the
difficult one. The single layer is quite
easy because we just have to apply the whole thing
in a single layer. Let us get to painting.
11. Day 3: Let us start painting. We're going to start
with applying the water first onto our paper
for our first layer, which is going to
be the shadows. Let's apply the water. Since this is going
to be the first layer and we're going to
quickly do the shadows, we can just apply the
waters as a start. There is a little sheen
of water on the paper. As in, you don't have
to apply multiple times because we don't want
it to stay wet longer. We need to quickly
dry it as well. Here I have just quickly applied
the water onto my paper. Then I'm going to
switch to my size four brush and we are going to apply the
clouds onto the paper. For that, we're going
to be using Payne's gray and a very lighter
tone of Payne's gray. Here I have Payne's gray. As you can see, it's very
light that I'm using. That is what we're going
to add to our paper. Just added a little bit of clouds there. I'm
going to start. It's not that clouds,
it is the shadows. Let us just start. I'm going to have some shadow here and a little
bit of shadow here. Just like in the picture,
which of course, you can find in the references. Don't forget that. Then we move on to the next one. The shadow of the cloud
at random places. That's what we're trying
to add at first now. Just add it. I think we're
good. This is just it. This is the first layer and
that's it for the clouds. Some of them are a little
bit more because I want this shadow here to be a
little bit more dominant. Whatever you feel
because obviously, watercolors are going to
get lighter after drying. If it's too light, then you are nearly
not going to see it. This is the reason I'm just
adding onto top again so that these clouds' shadows will be seen after the
first layer dries. That's it, we're done. Let's now completely dry this up so that we can
add in the second layer. While you're waiting
for your paper to dry, what you can quickly
do is you can premix the colors if you're mixing
up your colors, for example, I am mixing up my
dark Indian green, blue, white, the
turquoise green. You can do that as well. Mix your colors ready
so that you would be ready when your paper
is completely dry. Here now, my paper
is completely dry. I'm going to apply water
for the second layer. For the second layer, again, I'm going to apply
water on the top. Because we only had
a lighter tone, it's not going to wipe off that. Also, it is just the
shadows, we can let it be. Just apply water
onto your paper. This time, we have
quite some time to work on our paper so make sure that you
apply the water nicely. You only can apply
the water after the first layer is
completely dried, otherwise, you're going
to move the paint off. This removes the pigment off
which we do not want to do. Here, I've pre-mixed
the paints already, that's dark yellow turquoise, green, and my dark blue. You can also use Prussian blue or any dark blue that you have, even indigo, like I said. Let's start applying
to our paper. I'm going to start applying. I want to create an
angle on my paper. Notes, it's going to
flow so I'm just going to let it flow in the
direction that I want. But the angle that I'm creating
is mainly because it is a little bit of extra water
here that has accumulated, which I always say
we shouldn't have those extra water but
then that's extra water, I'm just going to let it
flow towards the bottom. I think that's good.
Now I need to go, my strokes at the top again. Now we're going to create
the shape of our clouds. The perfect shape that we want. There is this here. There's any extra
water on your brush, make sure that you wipe it off because we don't want
any extra water. Just keep applying
these strokes, just like you want as
in around the cloud. This is like painting with
the negative technique, where you were painting
around the clouds. It doesn't have to
be exactly like in the picture so don't
stress about it, that you're not doing
exactly like in the picture. I'm using my
smallest size brush, that is my size four brush because these are
really delicate areas, I have smaller
strokes that I want. If you use a larger brush then your strokes
are going be larger, you won't be able to get
these smaller, cloudy shapes. This is the reason why I'm going with the smaller size
brush that I have. Obviously, as you can see, I'm not also doing entirely
as in the picture. That is not what we want. That was complete accident. My brush dashed but then
it's completely fine. It's just all right. Because it would just turn
out the way it wants. Now we're going to
strengthen the strokes. Here I'm mixing more, but you can see in
my palette there is very little water because we
don't want a lot of water. We're going to
darken our strokes. We got to start with the
areas that we painted first because it's more
likely to start drying. Because these areas we just
painted, it will be wet. But the other areas that
we painted at first, you need to go at the
top over and again. This time when you're
going over the top, don't go towards the edges
of the blue strokes. Stay within the boundaries of the blue strokes
that you did at first. You can see this
is the boundary, I'm not going near the boundary, but leaving a slight
gap in between the boundary so that towards the edge of the clouds
I'll have lighter strokes. The inside, I'll have the
darker parts of the sky. Go and trace the steps
that you did at first. This was the last that I did, I'm going to go at it
last because otherwise, your paper would stop drying so trace the steps that
you did before. This was the step I did
after painting these areas. Just repainting this
area because I feel that it's a little bit lighter and
I wanted to make it darker. Now, let's go back to the top. There we are. It's almost done. We can leave it as that. Because now we have the clouds, we have the shadows, we have the sky as it is. There is nothing else to do. This painting is
almost complete, now all we have
to do is wait for this whole thing to dry so
that we can remove the tape. Everything is now completely dry and our sky looks perfect. Let us remove the tape. There you go, I hope you
like today's blue sky.
12. Day 4 - Colours & Image: Welcome to day four. This is the painting that we
are going to be doing today. This is the reference
image for it. I know it looks tough, but it is not that tough. This is where we're going
to use the property of opacity to get the sky to
blend together nicely. Let us have a look at the
colors that we are going to use for this painting. You can see that it's got a
nice tint of orange here. It's got a pinkish touch
or a violet touch here, a little bit of blue here, and a lighter orange here. Obviously, don't mind
too much about the sea, which is not the focus
of our painting. Then it's got some
clouds on the top. Let us see how we can
create those orange shades. For creating the orange shade, we are going to be
using Naples yellow. That is Naples yellow. You can also mix it up
with a little bit of orange so that we get
that nice sky shade. But let me explain. This is not Naples yellow, this is Naples yellow reddish. If you don't have
Naples yellow reddish, you could go ahead and mix
your orange with white, and you would get exactly the same color and
it would also be opaque. Make sure that you're
using opaque white color. Here is my orange and if you were to
mix it up with white, you would get almost exactly the same as the Naples
yellow reddish. You can go ahead and use that. Then the next color for
the pinkish touch we are going to be using alizarin
crimson or quinacridone rose. This is quin rose, but we don't want it
to be as too rose like this because
we want it to be opaque and this is a
transparent color. In order to make it opaque, we are going to mix it with
a little bit of shell pink. Shell pink is another
opaque watercolor. Mixing it up with
shell pink would make it as lighter like this. But again, the simple solution for you to get that
color would be to mix your transparent pink
with a little bit of white. You would get almost
the same color as mixed with the shell pink. Then we need violet
the next color. For violet, we have two options. We can go for lavender, which is our pretty
straight first pigment, and it is opaque as well. Most of you may have lavender. In case you don't have lavender, you can mix it up
easily by mixing your violet with white paint and you would get
the lavender shade. Mix it up and you get
the lavender shade. That's violet and
white together. This is the violet that
I'm talking about. Now, to get shape
for the clouds. What we're going to do
is we're going to mix this mixture of the pink and the shell pink
with the violet. That would be this mixture, but I have mixed this mixture
of the shell pink with the violet so that we get a nice shade that we
can use in the sky. Then the next thing, of course, is we have a little
tint of blue there. But again, the blues
that we have might be transparent and we
don't want to be using straightaway
transparent colors. Here, I'm going to go for
horizon blue which is a nice little tint of green
in there but that's fine, but it's a nice blue
color which is opaque. Obviously, you can
easily make that by mixing up your blue with a little bit of white
and you'll get that. But it's not exactly the same, but you can go with that
which is the opaque version of that color that you can
go for the sky like here. These are the colors
that you can use today. I've suggested all the
alternative colors that you can go and use for the colors
that I have used today. Here is the picture. To break this down it is going to be quite
easy because as you can see these strokes are
blended into each other, which straightaway implies that it is going to be a
wet-on-wet stroke. All of these base strokes are going to be
wet-on-wet strokes. Then we have the clouds on the top which are
going to be again wet-on-wet on the top but
in a very soft manner. This is how you can
break down this image. Then obviously, the sea
is in the foreground. Once the whole
background has dried, you can apply with the wet-on-dry method on
the top for the sea area. This is how we can
break down this image. I hope you understand
and like it. Let's get to painting.
13. Day 4: Let us start painting. We are going to apply water onto our paper first for the
wet on wet technique. Let's wet the whole of our
paper with water evenly. Since we need this guy to stay wet for a longer
duration of time, make sure that you apply
the water multiple times. While we let the water
soak into a paper, let us mix our colorless. I'm going to be using
Naples yellow-reddish. Here is my Naples
yellow-reddish. I'm using a smaller
flat brush to paint, there my Naples yellow-reddish, which I've mixed in my palette. Then the next color that
we are going to use is a nice pink shade so here it is. You can either go for
Alizarin crimson, quinacridone red, or whichever
pink shade that you have. Again, Alizarin crimson
is like a crimson, reddish shade, but it's got
a nice pinkish touch to it. You can either add that. To my Alizarin crimson. We will be mixing it with, either the Naples
yellow-reddish, or you can mix a little
bit of shell pink. You get a nice opaque
color with that. Then the next color
that we are going to be mixing it with is violet. We also need a little
bit of violet tone. Here is my violet paint. Whoops. Here is my violet paint. To the violet, we will be
mixing it with a little bit of shell pink to make
it opaque will also mix a little bit
of crimson or pink. Do it so you can see
as soon as you mix the violet with the shell pink, it does a little bit
lighter and it turns into the opaque shade that
I've been talking about. But we needed to be having
the violet, pinkish shape. Here I'll mix it
with the pink shade. There we get a nice pink
shade pinkish violet, but it is opaque because we have used the opacity of the colors. Then the other color
that we're going to use is Torquoise blue
or Horizon Blue. Here is Horizon Blue. Don't worry if you don't
have Horizon Blue mix your cobalt blue or
bright blue with white. Like I explained, these are the colors that
we will be using today. Let us start with our
Naples yellow-reddish tone, and we'll start at the bottom. Here I'm adding my
Naples yellow to the bottom and going over
until around the middle. This column, like I said, you can either use orange
and mix it up with your whitewash or white paint to get the stone so
don't worry about that. Just add it to your paper. Then we also added
from the right and make some slanted strokes. The words from one corner
to what this corner, but slightly above that corner. There, you can see
how the strokes are. You can mix a little bit
of orange to it to get that nice orange tone as well. If you've already mixed it
up by mixing it with orange, then just add more orange
to it to get that tone. There then we just add more and create some
stroke suite lines. We need to create more so we create another
slanting stroke here. Mix it up nicely
again and create nice slanting strokes. Now that you've mixed and added your orange strokes will
go with our next stroke, which is going to be with
the pink that you made, so that will be in the middle in between the two orange
strokes that we applied. Just on the top and add the pink strokes and also you can add it just
in the form of some lines. There and let's go and add it to the top as well. And here as well,
just some lines. This is how we're going
to add it to some lines. Now that you've added the lines, let's go with our next color, which we're going to add
some bluish tones there. For that, I am
going to be taking the Horizon Blue that we mixed. So here is the horizon blue. I'm going to add a
slight bluish tone. We needed to be very light. We don't want the blue
to be too dominant. We'll make sure that
it's really light. You can see it's really light and if you got too much pigment, just drop it off on your tissue or fluid,
whichever you're using. You can see there it's a very lighter tone
that we have added. As you can see, it's forming hairs because it's got
a lot of pink in it, but we can just mix it up by rubbing our brush along
and clearing it up. You can see I've just cleared up that being pinkish
shade, which had hairs. Now we need to add in
the violet strokes. Here I have my violet and
we're going to add it to the edge and blend
it along in the sky. This is going to be like in some lines towards,
from this edge here. We'll just add it in
the form of lines. You can see it looks like lines. This is the reason
why I'm using a flat, smaller flat brush, but you can also paint
this with a nice, small, rounded brush as well. Towards the left
is where we need these violet strokes while
it's stroke that we mixed. There and then let's
have that nice violet screw all the way towards the
top and just blend along. Now we need a lighter
tone of that violet tone. We're going to add
some nice clouds. Smaller clouds in the sky. Just very lightly
pick up the tone. We're just going
to add or you can also add it with lavender. Here is lavender. You can mix up lavender and create those clouds
strokes as well. There it's lighter. Lavender works
perfectly on the top. Now we're going to add some strokes
here with lavender. You can see it requires a
lot of wet on wet technique, which is why we need
our paper to stay wet. These are just some strokes
and as you can see there is literally no
water in my brush. Look at my palette when I'm
mixing, it's almost dry. This is the trick to get
your paint to blend in. Otherwise what you're
going to do is you're just going to create
blooms on your paper. In order to afford those
blooms you need to be working with a dry brush
on the wet paper. Here I'm just going to create some cloudy shapes just
like in the picture. Here, maybe I'll
add a little bit of the violet there and
in here as well. Then let's go back
to adding violet. Each time I wash my brush, I make sure that I dry my brush and then
pick up the color. Here I've dried
my brush and then I'm picking up the
lavender stroke. We'll add more lavender strokes. We can see the clouds look like lavender
strokes and we'll also add some to the sky region there and we can just mix it up. We've added the clouds
nicely onto the sky. Now you can add as much as you want or you can stop
working right there. Sometimes we tend to
overwork the picture, but we don't have to
body much so long as you get the clouds to look
as fluffy as possible, or the sky to look as
smooth as possible. The trick to that is to
obviously make sure that your pigments blend together and not to create any
blooms on your paper. You can clearly see
how the sky looks now. It doesn't have too much and
dully as in the picture as I always say it's
totally up to you how you want to create
those strokes. I'm just going to add
some violet strokes here. Now we wait for this
whole thing to dry so that we can just add
something at the bottom, that is the sea at the bottom, which is not the focus of
this painting of course. My painting is now
completely dry, so I'm going to add in
the sea at the bottom. First I am going to add it with the Naples yellow and
the orange mixture. Let's take Naples yellow
and here is the orange. That's Naples yellow and orange, because we need to
have the colors of the sky in the water as well, which is going to
reflect those colors. There, starting with the Naples yellow and I'm just going
to draw a straight line. We take up the orange nicely. Let's fill it up. Now that we've filled it up, it's completely orange and
it's looking weird, isn't it? But don't worry, we'll add in the violet shade
that we mixed. Here is the violet shade. Let's mix it up nicely. Spit of lavender as well and that is what
we'll add on the top. When you add it on
the top like that, you'll see that it's got a
tinge of orange as well. Just go ahead and start
filling it up with that color. Just leaves the tinge of
orange here and there. Which is exactly what we want, just some tinge of orange and maybe a little bit
more violet towards the bottom to create some
depth for the ocean. There, I've added
the violet tinge. Now let's just finally finish off with
adding some lines on the ocean to give it
some lines of the ocean. This is not at all important. You can actually stop at
this step, by the way. There, I'm just using
my smaller brush and adding those lines, which is completely
optional of course. I think that's good enough
and painting is complete. Now, let's wait
for everything to dry so that we can
remove the tape. Our sky has now
completely dried. Let us remove the tape. Here is the final painting.
I hope you like it.
14. Day 5 - Colours & Image: Welcome to day five. This is the reference image that we are going
to be using today. Let us first look at the
colors in this picture. If you look here, you see some yellows, some oranges and then we have
a sky with a little bit of pinkish-orange and
then some brown tones and then we have some
darker brown clouds here and in the foreground, we have the darkest elements. Let us first see the
colors that we're going to use for this. Because it's got
a lot of blending and lots of clouds
in this picture, we are going to be using
the opacity technique. First of all, for all
of these yellow areas, we are going to be
using Naples yellow. You can see it's a nice yellow. You can go for any
yellow that you have, just remember make sure that it is opaque and if
it's not opaque, you can go ahead and start
to mix your white with your existing yellow and in order to make it
look like yellow, because as soon as you
mix it with white, it's going to get lighter. Mix a slight amount of orange to that mixture so that
you get a perfect yellow. That's Naples yellow then
for these orange shades, I'm going to be using
Naples yellow red. That's again, it's like a
lighter version of orange. We've already seen that Naples yellow red in
the last days painting. Naples yellow red, you can mix your orange
with white and you get the Naples yellow red. Then we'll also mix
the Naples yellow red with orange to get a
darker version of that. If you were mixing
up your orange with white and just mix
more orange into that mixture to get
this Naples yellow red with orange color. Then we also will be needing a little bit of
red mixed with orange. That's the red and
let's mix it up with Naples yellow red
so that means you'll be mixing it up with your
orange plus white if you don't have Naples
yellow red obviously. That's the red tone that
we are going to be using. Then obviously, we have
finished with all of these, reddish orange and
yellowish tones. Now, let's see how we can
get this brownish tone. At the top of this painting, all of these is almost like a lighter Naples
yellow red color. But on these brown areas,
we need it to be brown. But can you see it's got
pinkish hue or maybe it's got like an orange hue in that brown because it's
not a perfect brown. What we're going to do is, we're going to use a brown. This is the brown that I have. It's transparent brown. What I am going to do is, I'm going to mix
that transparent brown with a little bit of pink. Transparent brown mixed
with a little bit of pink and I get like a
pinkish brown shade. That's what we're going
to be painting in the sky and then once you mix it with more of the brown, you'll get a darker and darker. In order to make it more dark, you can mix a little bit of
Payne's gray to that mixture. This is the brown that I
used and then I mixed it with pink shade. I'll
show you the pink shade. Then I mixed it with
more brown and then I mixed it with Payne's gray and I've got this darker color. Pink shade that I have used is Queen Rose and you can see it's a nice beautiful
pink shade. That is the color
that we have used. As you can see, it's
turned out to be a nice mixture of all these colors that
we want for the Sky. It's just these colors that
we're going to blend and mix in an even manner on the paper such that we get
the blend to be correctly. Now, let us see how we can
break down this image. Again, this is very simple when you look at it
because it's got the sky then it's got some clouds in the front and then
even in front of that, we've got the foreground, which is these lands and bushes at the bottom part
of the pictures. For the sky, we obviously need to have it
blended perfectly. We're going to be using
the wet on wet technique. Then on the sky again, these clouds are again going to be either wet on
wet or wet on dry. You can go with both the
methods because as you can see, these clouds have got
somewhat sharper edges. So it's absolutely fine
if you go with the wet on dry method as well. Then once that is
completely dry, you just add the foreground on the top with the
wet on dry method. When you look at this picture, you can see that it's
quite easy to break it out into smaller steps. Let's get to painting.
15. Day 5: Let us get to painting. We are going to
work with a wet on wet technique so let's apply water to the whole of our paper. I'm just using my
flat brush again to apply the water to
the whole of my paper. Make sure that you
apply the water evenly without forming
any large blobs or pools. Also it is better to create an angle so that all
the water would flow down without then accumulating at any place and
creating any blob. I'm just going to keep my tape underneath the paper so that
my water would flow down. I'm going to let my paper
absorb the water a little. In the meanwhile, we can mix
the paints that we need. We're going to be needing Naples yellow deep, Naples
yellow reddish. If you have Naples yellow, mix it with red, like I said. That's a nice amount of
Naples yellow reddish. Then we'll also need
Naples yellow light, or the Naples yellow yellow
without the red tone in it. That is the Naples yellow light. We need that. Then we also need to mix our Naples yellow with a little bit of orange
and brown for the sky. Let's get to that. That is the Naples yellow. There I've got the Naples
yellow ready to mix. On one side I'll
mix it with orange, and on the other side
l'll mix it with the brown to make the
color that we need. I think our paper has soaked up the water
that we applied. This process is because my paper stays wet for a
very long duration of time. But if your paper is not 100 percent cotton paper
and you wait this long, then your paper might
be completely dry. You have to work according to the paper that you
have in your hand. Here's my flat brush. I have drained almost
all the water, but I'm just going
to run it along, to strengthen the
water on my paper. I'm not adding any
more extra water. It's not dry. But just rubbing along so that I cover every inch
of it with the water. But very lightly, because now we don't want running
water on our paper. That's good enough. Now let's get to painting. I'm going to switch to
my smaller flat brush. This is what we will be using. Let us start. Like I said, we'll start with beautiful Naples yellow
for the sky region. We're going to
apply to the left. Then we leave a large gap. Then we'll apply it
to the right as well. That large gap is where it's
going to be the sunlight. I'm going to remove the tape now because I don't
need an angle. Because if I keep the angle, everything is going to flow down and I don't want it to
be flowing down too much. There is the Naples yellow. I'm just going to
add it, the hole at the bottom because
it doesn't matter. We'll have darker colors
on the top of it later on, but now let's just focus on getting those
colors onto our paper. There have the Naples yellow. That's the Naples yellow added. Now we need to add the
orange on the top. For adding on the orange, you can either mix it with
the Naples yellow red. Here I have Naples yellow red. You don't need to
do this process because if you're
using Naples yellow, the color there is already opaque and you're going to be painting
on top of it, so it's absolutely fine. Here just adding that
nice orange spots. Adding to the top and
on this side as well. Applying it in a straight line. Do the same on other side. Just a little bit on that side. Now I'll switch back to
using the Naples yellow red. Going to use to Naples yellow red and add it. I'm going to leave a large
gap of white there again, and then apply the
Naples yellow. For adding the Naples yellow, we are going to add it
to the whole top region. Let's just go ahead and start
adding our Naples yellow on the top on the
whole of our paper, where we could use
a larger brush to cover the large surface area. This brush is too small.
But that's all right. I'm just going to keep and
use this single brush. Try to use a single brush
for the whole painting. Let's see. There I've managed to add the
Naples yellow. What we'll do now is let's just add some more lines
on the top here. Towards the top again to get that color to appear nicely
because now it's very light, as you can see, it's too light. Let's make it more. Now I've applied
the Naples yellow. Now we need to go and
start adding the colors. We'll start by adding a
little bit of cadmium red. A bit of cadmium
red and I'm mixing it with the Naples yellow red. You can mix it with
cadmium yellow or whichever opaque
red that you're using. But make sure that
you mix it up nicely. Here is Naples and mixing it up. Then very lightly, we are going to add
some reddish strokes. It's going to be very light, so we'll make sure that
you make it lighter. That's it. This, we will cover
it up later, but for now, let's just add those reddish
strokes into the sky region. It's just a matter of using all those colors
which you deem fit. It doesn't have to be
exactly what I'm using. All we need to learn is the process of how you
break down that image, which is very important. Here, Naples yellow, red again. Now to that we'll mix the brown so that we
can paint in the sky. That's the brown and there we've mixed it up and
now we start applying that. I don't need extra
water on my brush, so I'm going to
absorb all that water while I'm adding those strokes. You can see just some few strokes and
on the top here as well, and on the right side. Now, I'll go and
start adding those brown and Naples yellow
strokes to my sky region. Now we need to blend
that into our sky. You can see how I'm doing that. It's just a swift left and right motion with
your hand to get that nice step and then leave as much gaps as you can to get that nice stroke
in there ready. We already have the
Naples yellow underneath. So when you're adding
the brown on the top, it would just appear nicely
and beautiful on the top. But make sure that you
mix it up a little bit with the Naples yellow
so that you get that nice color and you
get that opacity to work. Here again. Now I'm applying on the top. Now we've got the brown. Now I'm going to make it more
brown at the top regions. We need to pick
up more brown and start adding at the top. Through with the brown, what we can do is let
us add a little bit of pink so that it gets a
little pinkish touch. There's the pink and I've
added it to my brown. You can see the color
that we have made. It's like a pinkish brown color, which is what we're going to use again on the top of the
already existing brown color. All of this is just going
to be like a mixture of all these variety
of tones in the sky. There, and now just getting a little brown and adding to the top. Let's wash off all the
paint in the brush and try to blend it out to
make a smooth mixture now. There, just going to blend that region into a smooth blend. Now let me get that
pink brown again, and I'm just going to add
in these other places. I'm going to add on the top right here
again, just few lines. We don't want to be
copying the exact picture, which is why we're going
with our instincts as to how to paint
this whole thing. Whenever you see that you're
getting any harsh line, just use your brush
to blend along like I'm just doing
now, you can see. I felt that it was not blended, so I just use my brush
to blend that region. You can do the same
with any of the regions that you're seeing and
it looks not blended. I needed a lighter tone there, so now we've got the
lighter tone there. Let's get to adding
the brown here. Added a nice little brown. Now we need some more brown and we need to get
it towards the base. Now we're done with most of the parts of the top
region of the sky. Let's get to adding these
regions here on the right. Adding a little bit of pink
again to that brown mixture. Because this region of the
paper has started to dry, I have to make sure
that my brush is completely dry and it's
just a damp brush. I've absorbed all
that extra water. As you can see here
what is happening, my paper is dry but I'm still
painting in that region, mainly because we have some
darker clouds there that is going to mask this color
setup that we've just done. Let us go ahead
and start painting those clouds now and it's fine
even if your paint is dry. But what we can do is we can have a little
spray, use that, and just spray some water there so that it doesn't
spoil our painting. Let us pick up
some of that pink. If you've spread unevenly
and it created blooms, what you can do is you can
just run your brush along and get rid of any
of those areas where the paints has spread out. I think that is much better. I've cleared out any water
spray areas that had formed. Let's go back to taking
that nice pink shade and adding it to our brown. This is like a
permanent brown color when you're mixing a brown
with either pink or red. Then I'm also mixing it with a little bit of Payne's gray or black so that I get
a darker shade. I think that's really good now. It's like mixing your sepia
with a pink or red shade. That's why we mixed it
with the Payne's gray. This is what we're going to
use in making the clouds. Try and create these
random shapes. Then just go around to
create the beautiful shapes. I'm just using my brush itself. Let's cover up the whole
of the base because that's entirely
covered in the clouds. That region is covered all the way up to
here, up to there. We have some more
colors at the bottom. We'll add that afterwards. For now, let's just go ahead and start filling up
the cloudy region. We want the edges of it to be a little bit softer which
is why I sprayed the water. But trust me, it doesn't
have to be soft. You can make it as
hard edges also. If you're afraid to
spray the water, go ahead and not spray it, you can just go
ahead and directly add the clouds without spraying the water because you just
don't need the softer edge. That's absolutely not
necessary. It's just optional. There just added to the whole, I've added the dark clouds. This is now the base painting. What do we have to do now is
wait for the whole thing to dry so that we can add in
the things in the front. The painting is now dry. I thought I'll paint the whole painting with just the flat brush but the inside, I'm going to be
needing this smaller size brush after all. We are going to
create the front, the foreground details and make those smaller strokes in the form of some
foliage in the front, just make some dotted
edges and some plants, or just some bushes and things. Then moving into the
whole of the inside. I'm using Payne's
gray here because that's what I mostly
used for my black paint. You can go ahead and use the
black paint that you have. My Payne's gray have darkest value or darkest
tone looks like black. That's why I mostly use that. Looks good. Adding in this side as well. Here, in this side as well. So this is why I said
on the left side don't bother too
much because we're just going to be having
a lot of plants there. Let me just fill
that whole thing. Filling up that
whole thing inside. We've got the black. Now let's just finish off with some nice plants
as in the picture. But like I said, you don't have to do that. This is not at all
important in this painting. What's important was to
get this sky correct. I know it's really
tough to get it to look exactly like
what I've done here. But just try to, first of all, what do you need to try
and achieve is to get those strokes to blend together without
creating any blooms. That's what's most important. Adding these dotted lines
because where the sun is, we need to have it glowing
and bright, that's why. We'll get to using that
darker brown color that we created. It's almost like sepia with the tint of pink in it
and that's what we'll add. Using the tip and adding. This brush is still too large. I probably need to
get a smaller brush than that to get those thinner
[inaudible] the lines. I'm going to go with
a size one brush. Let's add, picking up the color. Let's just add. Make sure that you add
your strokes towards the outside. That's ready. Just like in the picture. Like I said, this is
absolutely optional and you don't have
to be in this part or you can just totally
skip this and add another structure or something of your own in the foreground. This is just me trying to show you how I would've
painted this picture. Make sure that you
remember that and maybe try to add elements
of your own if you wish. Lastly, I'll finish
off with this side. I'm done with that. Maybe if you want you can add some different plant
to the right side. I'm just going to add
another palm tree. The look of a palm tree there. I think that's it. I know that's not
clearly visible because that's already in the dark area. Look at this, we're almost done. I hope you like it. We'll remove the tape after the painting is completely dry. Here it is completely dry now, let us remove the tape. There you go. I
hope you like it. You can see how we have tried to get that blend of
the sky correctly. It doesn't need to match
exactly as in the picture, but try to make it as close as you can or try to get
those blends correctly, that is what is the most
important. There you go.
16. Day 6 - Colours & Image: On to day six, here is the reference image that we're going to use today. It looks beautiful, isn't it? So let us have a
look at the colors. We can see a lot of
blues, some oranges, and something in the sky, and then the foreground which obviously looks
like a black color. Let us see what are the colors that we are
going to be using. For the sky here, we are
going to be using blue. So I'm going to be
taking up a bright blue. This is bright blue, it is
also known as Taylor blue. This is from White Nights. This bright blue,
I want it to be having an opacity technique
again so to the bright blue, I am going to be mixing
up my horizon blue. Just going to make it slightly
lighter. There it is. Now you can see there
are some darker strokes as well as these darker clouds. So to that, I'll mix
a darker color such as indigo and I'll get
the darker version. So it will still be
opaque because it's got the horizon blue
mixture. Don't worry. Just mix your white with the blue that you're going to use and then mix
it up with indigo, that's how we can use it. This is the indigo
that I have used. Let me show you the
horizon blue as well. So this is the horizon blue, but like I said, don't worry, just mix up your blue with
white paint and you'll get it lighter and have the
opaque technique then mix it up with indigo
to get that darker stroke. Then the next thing
is we need to have that orange-pink shade. So for that, I'll be
first using the Naples yellow and I'm going to be mixing it up
with the Queen Rose. So mixing up Naples yellow and Queen Rose
together will give us a nice orange-pink shade that
is required for the sky. We also need to have the
pink shade at the bottom. So to that pink shade, I will add a little bit of
shell pink to get it opaque, so just make sure that you
mix it with white, that's it. There, that's the opaque shade that I will be using for that. Obviously those are
just the colors in the sky as you can see. Then in the foreground, we have the dark black color. But I won't be using black here, but instead I'm
going to be using a darker version of the
blues that we have used. So that would mean I'm
going to be using indigo, and I'm going to be
mixing indigo with a little bit of paint gray so that we get it
like almost black. You can see this is
almost like black, and that's the color
I'm going to be using. Let us see how we can
break down this picture. It is very easy as you can see. It's almost like the painting
that we did yesterday. It's got the sky and
it's got the foreground. So the sky is obviously going to be in the
wet on wet technique, and we've got a lot
of plans to make. Then we have these
smaller clouds, which we're going
to be painting with a smaller size brush because as you can
see, they are so tiny. So if we use a
larger size brush, it's going to spread out a lot, so we need a smaller size brush. In any painting,
what we need to find out is which is the background
and which is foreground. So this whole thing, the sky is the background and this thing in the
front is a foreground. So the background obviously we're going to do
with the wet on wet technique and
then the foreground will be with the wet
on dry technique. That is as simple as that for
breaking down this picture. Let's get to painting.
17. Day 6: Let us start painting. First, we will
start with applying the water on to our paper. Let me just keep
this underneath so that I have an angle for
the water to flow down. I'll take my water and apply
it evenly on the paper. Make sure that you
apply the water evenly. Even if you're using
a smaller size brush, keeping an angle would
help because then your paper is not going to have any accumulated
pools of water. While the water gets
soaked into the paper, let us mix the paints. For that, we're going
to need the blue. For that, I am
going to mix bright blue and opaque blue
such as horizon blue. You can just mix your
bright blue with white and you'd get the
light blue that we need. That's bright blue. Then, I'm going to mix
it with Horizon Blue. I'm just mixing it up with a lighter version
of the blue itself. But you can always go
ahead and mix it with white and you'd get the same
beautiful blue that we need. That's the blue. That's the blue that we need. We don't need the
darker version of it but we will mix
that later on. Then the next color
that we need is obviously to get that
pinkish-orange shade. For that, I am going to be
mixing my Naples yellow. Here is my Naples yellow. Let's mix it up nicely. Add this Naples yellow. Now to the Naples yellow, let's mix up the pink shade so that we get the beautiful shade
that we're looking for. If we add more Naples
yellow reddish. This is Naples yellow
reddish, don't forget that. In order to get this color, you can mix your pink, orange, and white together and we
get this beautiful shade. Then we also need to get that pink shade so
that'll be this, the pink shade in this corner. I'll mix it with the shell pink. All you need is to just
mix it up with white. These are the colors
that we need, we have mixed and
got them ready. Now my paper has absorbed
all that extra water. Now I'm just going
to [inaudible] it up with a little bit
of water again. This time my paper will stay wet for a longer
duration of time. That's what I'm going to do. Here, is my flat brush. This time I'm using a smaller
flat brush because it won't hold as much water
as the larger flat brush. This holds a lot of water
and this holds lesser water. Now we don't need too
much water on the paper but it will stay wet for a longer duration of time
because we already have the first layer of water that
we applied and now this. Let's have our brush movement to have the even amount
of water on the paper. We've got that covered. Now I don't need the angle because, if we have the angle when I'm painting the sky then
the whole thing is going to flow down
which I do not want. I'll go back to using
my smaller flat brush and we'll start with
the sky region. Here I have my flat brush and
I'm taking the blue paint. We're going to start at the top. There, we start at the top. We're just going to paint. I left a little bit
white there because I'm going to add
the orange color. There as well. Wherever I feel that I
need to add the colors, I am leaving a gap. Let us keep adding. Fill any other gaps
that has formed like these corners here, you can see. Then again here at the bottom that we
need to add the color. Now that we've added
the blue tone, let's go ahead and add
the pinkish-orange tone. Here is the pinkish-orange
but I think, I'm going to have to add a
little bit more orange to it. That is the Naples yellow red, to make it a little
bit more orange-ish. I'm going to have to absorb all the extra water because we don't want to introduce
any extra water. That looks much better. That is what we're going to add. We have to be very
careful because there is a likelihood that this is going to create a muddy color
but that's all right. We just have to apply our paint and make sure that there is no
too much extra water. Absorb that extra water
when you're trying to add those strokes. Now let's get back to
painting these regions. You can see that at the bottom, there is that slight tint
of gray shade as well. It's absolutely
fine if it turns to a little bit of gray
in that region. Now let's cover up the whole
of the bottom with that. Then we'll go with a
nice bright pink shade as well at the bottom. You can add just some
extra pink here and there. This is just me adding
some extra tint of pink at certain places to
make this look beautiful. You don't have to do
it but I think that it adds some extra beauty
to the painting. There, we've added that. I'm going to go
back to taking my blue and filling up
the areas that has turned lighter like
these areas here. I can see that
it's turned light. Now that we've added the blue, I can see the paint
flowing down here. Let me just remove the flow. Now we need to get to add the
darker version on the top. For that, we can get our
darker blue or you can use just indigo and
mix into the same. Here, let me dig up a nice
amount of indigo and mix it. We still need it to have
the opaque version. So I'm mixing up indigo
with a horizon blue and the bright blue
mixture that we have here. Let's actually switch to
a different size brush, a smaller size brush because we want the clouds to be tiny. I've switched to
my size one brush. We'll pick up the paint. Let's start with the
tiniest areas here. Some clouds there. Then we have some here. You can see how they are forming because we're using
a smaller size brush. We get the smaller, smaller clouds in the sky. Obviously, my orange strokes are not exactly the same
as in the picture. But that's absolutely fine. Let me remove all
the extra water before I try to
add in the clouds. Extra clouds there, then let's go with some lines. There now we've added those lines and added
in the clouds as well. Now if you want, we
can go ahead and start our nice blend at the top, because at the top
you can see that it is somewhat darker, so we need to get that blend in. I'm using the same mixture, I've added a little
more blue to it, and add that to the mixture
and blend in at the top. When you blend in, you
can see now this side, we've got that little darkness, and we're going to do the
same to the other areas, so all of this before
the paper starts to dry. There just take your brush, and blend along, sea, so dark at the top and then just blending it into the
lighter blue region. Now it's darker there at the top and lighter
at the bottom. Now, what do we need
to do is make sure that it doesn't have
any hairs so what I'm going to do is I'm
going to dry my brush completely and just go around those smaller clouds to try and remove any hairs
that has formed. If you want, you
can also use it to add some extra clouds. Now we've added the clouds, let's go ahead and
add few strokes on the pinkish region as
well so we just blend nicely and create some
small cloudy shapes because it's not entirely
pink in that region, you can just try to
get some nice strokes, that's it. Let me dry
my brush and try to blend in all of those strokes so that
they don't look dominant. Now that we're done, we can wait for this whole thing to try
to add in the foreground. The whole thing is
now, completely dry. Let us go ahead and
add in the foreground. For adding in the foreground, I'm going to use
a darker version of indigo and Payne's
gray mixed together. I know it looks like
black but we are not going to use black
because there is always distinct that
whenever you're painting something in sunset scene, rather than using black, if you use the
colors that are just similar to the colors that
you've used in the sky, it looks more attractive
in the painting, so that is the reason. Here I'm mixing indigo and
Payne's gray together, so that's indigo and
Payne's gray together. Let's just go ahead and start adding all the foliage details. You can see it looks
almost black itself, but then it has that tint of indigo when you
look at it closely, so that's what we want. Just some plant shapes randomly. Let's spread it up and
get a nice tree shapes. It's almost looking like black, will just fill up and try
adding some small shapes. Then at the end, this side here let's have
the edge of the palm tree. There I added a tree there, so maybe I'll add part of
another palm tree here, I think that's good enough, we can leave it at that, and that is all
for the painting. You can see we've added
in the background sky, the foreground everything
looks amazing. Now let's wait for this thing to completely dry so that
we can move the tape. It's completely dry now, let us remove the tape. Here is the final painting.
I hope you like it.
18. Day 7 - Colours & Image: [MUSIC] Welcome to Day 7. This here is the
reference picture that we are going to use today. Let us have a look at the
colors that we need to use. We can see some orange, pink, and violet is here in the
background, in the sky. Then the foreground
is definitely just a black dark color. Here in this image you
can see that it is a transition from orange to pink and then to
the darkest violet, and then it's got some
darker clouds on the top. In this image, you can actually go for transparent
watercolors or in fact, any pigments because it does not have any contrasting colors, such as a blue and
a yellow together, or a blue and a green or a
yellow and a pink together. As long as there are
no contrasting colors, which creates muddy mixtures
or creates darker grays, you can go ahead and use
any pigments that you have. Which means that for this, you can go and use any of the base colors that
you have with you. Let us see the colors, how we can make them
or directly use them. We've got orange here at first, and we can go ahead and use our normal orange
shade directly. Then we've got a
nice pink shade. We can use a pink shade as well. Then we have a violet shade. That would be a
nice violet shade. Blending these
colors would give us the beautiful sky as it is. Now, we need to get this
color of the clouds. It's not really black
as you can see. It's not a Payne's
gray color either, so it's got that touch
of violet and the pink from that sky being
reflected onto that clouds. We need to create a color such that it is a blend or
mix of these colors. What we're going to
do is we're going to mix a violet and
the pink together. There's the pink. There's the violet together. Once you mix the violet and the pink together.
Let me show you. That's the pink and
that's the violent. It's going to create
a more purple shade. It's going to create
a purple shade, but we want it to be darker. In order to make it darker, what we'll do is we'll mix it up with a little bit of Payne's gray that would make it purple or violet
mixed with rose. Then little bit of Payne's gray. When you add that, you get a darker shade. This is definitely darker, but it's got that touch of violet and the pink shade in it, which gives the perfect
color for the sky. Obviously, for the foreground, you can either go and use a
black or even Payne's gray, or even you can use
the same mixture in its darkest value. You can add more Payne's
gray to that mixture. Add that, so it'll be the best for the foreground
because it's dark. About breaking down this image, I hope it is pretty
much clear, isn't it? When you look at it, it's got the sky as the background and it
got the foreground. The background is
obviously going to be with the wet-on-wet technique and we'll add in the clouds on the top with the
wet-on-wet itself. Once it's completely dry, we add in the foreground, which is going to be in
the wet on dry method. This is quite easy
to understand. Let's get to painting this. [MUSIC]
19. Day 7: Let us start painting. We're going to start with
applying water onto the paper. I'm going to use my
flat brush to apply a nice even coat of
water onto the paper. I'm using my flat brush. This is the smallest
size flat brush. If you want to go ahead and
use a larger size brush, or whichever brush you
have for that matter, to apply water onto your paper. [MUSIC] Here I have applied a nice coat of
water onto my paper. Then, I'm going to
switch to my size 8 round brush to start painting. We're going to start with
the lightest colors first. The lightest color here is at the bottom where
we have the orange. Here I have my orange shade, and I'm going to
use my orange shade to apply onto my paper. I'm going to start and apply. There I have applied my
orange at the bottom. Then, towards the top we want it to be a bit
lighter, that is, this area as it goes
towards the top, we want it to be lighter. That's why I'm taking it light. Then we have some dense
oranges here in this region. Let's add that. We can go with that
dense orange there. We can add to the
bottom as well. The main reason being it'll
be covered by the foreground, so it's absolutely fine. Use your tissue to absorb any extra water on
your brush if it's too much that's disturbing and adding extra water
onto the paper, so you can just absorb
it off with the tissue. Now we've added the orange. Let's go with the next shade, which is the pink shade. Here is a nice pink shade. I'm going to leave a slight gap when applying my pink shade. There, leaving that slight gap and adding the pink shade. But here, we need to have it
joined towards the orange, and you can see it forms
into a nice reddish tone. But towards the top, we only want it to be
the pinkish shade. Here like I said, we are not using the
transparent colors. It's not necessary mainly because there is
no color that is too contradicting and any colors that will create a
gray for that matter. This is the reason
why we are free to use any color that we have. That is something
that we need to look at the picture and
always understand if there are colors that has too much of a
contrast such that it is going to create a
multi-color in the picture. If it's not, then we are safe to use the transparent
colors itself. Here, I have to blend
those together nicely. We'll add a little bit
of violet there as well. But first, let's go
ahead and start painting in the top region with violet, as in the picture. We'll start adding
the violet tone. As you can see, it's
very dark at the top. We'll start adding that. There I am blending it
into the pink region. Every time you pick
up a fresh violet, make sure that you apply
it to the top because we don't want the darker
colors to be at the bottom. Then once you apply the
darker color to the top, then just swiftly go
with your brush and add those brush movements
to transfer those little violet strokes
towards the bottom. Whereas, if you pick
up the fresh paint and you add it to this area,
it's going to be darker. This is the reason after each time I pick up
the violet paint, I go over the top so
the dark is at the top. Then I'm just transferring the lightest tones on
my brush at the bottom. That's what we need to do. There we can see, you just got the violet shades and we're transferring them. We got those nice violet shades and we're blending them
nicely into the sky. Add more dark violet tone towards this corner because
it needs to be darker. [MUSIC] Picking up darker tone of
violet and adding to that side. I'm just using, as you can see, swift brush movements like that. Now once we have
added that violet, let's go ahead and start adding the smaller
clouds and everything. I'm switching to
my size 4 brush. Now we'll go ahead and
start with our pink. We need to add more pink
shades here in the sky. As you can see,
there is more pink. Trust me, all of
these sky paintings, they're going to
take a lot of time and practice to get them right. Just add some nice pink strokes. As you can see, each time
when I'm picking up my brush, I'm not adding any extra water, but rather just taking
up the paint so that I am free to add those strokes. We're adding some
nice pink strokes. Keep adding those
beautiful pink strokes right below the violet. You can see it creating
a nice blend in the sky. [MUSIC] To create some more,
and I'm just adding some lines and nice strokes. [NOISE] Added the pink. Now let's go back to adding
some nice orange strokes. We don't want extra water, so make sure that you absorb all that extra water and then I'm just going
to go over and add the orange stroke on the top then adding
orange strokes. Now that we've added
all the orange strokes, now we need to go ahead and
add those darker clouds. For adding those darker clouds let us mix the color
that we mixed, so that is going to
be a bit of violet. Then we're going to mix it
with a little bit of pink to get it a slightly pinkish
shade. There's the pink. I'm mixing it with
violet and you'll get such a nice purple shade, but we need it to be darker. In order to make it darker, we're going to mix
it with paints gray. Here is paint gray. I'm going to mix
it up with that. [MUSIC] Now. I've mixed up a nice color
that we need for the cloud. Before you apply it
onto your paper. If your brush has
a lot of water, then it's going to
ruin the painting. Make sure that you absorb
that water from your brush. There you can see I've
absorbed all that water. Now, I'm going to make
those cloudy shapes and make sure you use
a smaller size brush. [MUSIC] Just go ahead and
create nice shapes in the sky. [MUSIC] Nice shapes, smaller, smaller shapes. [MUSIC] In all the places. [MUSIC] Small. [MUSIC]
As you can see here, here's my sky has
almost dried up, so I'm getting clouds
that are not too soft. I'm going to try
and make it soft. What I'm going to
do is I'm going to pick up my flat brush, remove all the extra water, and then just trying to
soften the edge there, so that I get softer clouds
rather than harsh edges. But make sure that
you don't have too much water on your brush. Because if there's
too much water, then you're not going to be
able to soften those strokes. [MUSIC]Going to add some here then where else. We have some darker
strokes here in the sky. Let's add that. [MUSIC]Here, more darker strokes. [MUSIC] You can see that our darker strokes separating
each of these places [MUSIC] lets go ahead and start adding more
at the top region here. [MUSIC] We've got a nice
clouds, the sky. [MUSIC] All of these clouds slanting to the right
[MUSIC] and joining. [MUSIC] Make sure that you
don't have any harsh edges, any there is, you
can just soften them up with a brush that is damp. Just use a damp brush to soften the edges there so the
background is now complete. Now what we can do is
wait for this whole thing to dry so that we can just
add in the foreground, which is going to
be really simple. [MUSIC] Here my background
is completely dry, so I'm going to go ahead
and use paints gray to add in that foreground. I'm just mixing it up with the same mixture
that we used for these darker clouds
because it doesn't matter. Just go into add some
mountain shapes. [MUSIC] Some weird shapes. Just add whatever shape you want and add in the foreground. [MUSIC] Keep filling it out. This is the simplest
of the foregrounds. [MUSIC] I've added
the foreground. Now, I'm just going
to add in some trees, like in the picture. [MUSIC] The branch of the
tree is not to be seen, but maybe we can add that. [MUSIC] Just added that tree there. We'll add something to this
side as though like a bush. [MUSIC] Like in the picture. [MUSIC] I'm just going to add a few
empty branch there as well, just so that it doesn't
look too much weird. [MUSIC] Some here maybe I'll add like a
four or something. This is me adding some extra
stuff into the paintings. [MUSIC] It's not there in
the foreground of the image, but I don't want it to
be lying there empty. This is the reason [MUSIC] they're added like
maybe an electric line or maybe it's part of a fence. Don't know, but just
added something. [MUSIC] It's done. Once this is completely
dry I'll remove the tape. [MUSIC] It does completely dry. Now, let us remove the tape. [MUSIC] Here is the final painting. I hope you like it. [MUSIC]
20. Day 8 - Colours & Image: [MUSIC] Welcome to day 8, so here is the picture that we are going
to be using today. Let us see how we can
break down the colors. We already have
painted something similar using colors
that are similar. If you remember correctly, we had painted this one where the colors
are almost similar, so let's see how we
can paint this one. The colors are going to be almost exactly similar
to the other one, so it's going to be easy
to make those colors, because you already learned
how to make those colors, so let us see. At the top, we're going to make that nice dark blue
shade, so for that, we are going to be
mixing bright blue and horizon blue and
the dark Prussian blue, or [inaudible] blue or indigo, and we'll get a darker
shade somewhat like this. That's this darker shade here, so don't worry if you
don't have this color, because what you
can do is you can mix your blue with
white and then with a darker shade of blue to get this color or
with black even. The reason why we're going with the opaque technique here
is because as you can see, it's got two contrasting colors and we needed to stay opaque, if you don't want your paint to spread out and
create multicolors. Then obviously we have the
other colors in the sky, so for here, we're going to go with a slightly different
color than the other day. The other day we used
Naples yellow red, but today we're going to use Naples yellow for
the yellow here, and then we're
going to mix it up with orange to get
the orange sheet. Then what we're going to
do is we're going to mix the Naples yellow with the pink, and we'll get a nice
pink shade like this. The pink that I'm
using is Queen Rose, and basically that is
the colors in the sky. So for the cloud, we will use the exact same color that we used for the
top part of the sky. If you want, you can
mix up a little bit of Payne's gray to it, and then we have the building and the
foliage in the foreground. For the building will
be using indigo, and then in the foreground, the plants will be
using Payne's green. To break down this image, again you can see
it's quite simple, the sky is the background
and the buildings, and this foliage
is the foreground. The background sky will be painting it with the red
[inaudible] technique, and the foreground
will be painting it with the red on right
technique, obviously. But it can be painted
in two layers because if you look closely, the building is one color
and the foliage is in the front of that again
with another color, so that's why we're
going to paint the buildings with indigo and the foliage
with a darker tone. So let's get to painting this. [MUSIC]
21. Day 8: Let us start painting. Let us first start with applying the water onto the paper. Here I'm using my flat brush to apply an even coat of water
onto the paper. Make sure that you apply the
water evenly because that's really important when
painting the skies. Let us start painting. We will start with
the blue color. We are going to mix
the blue again. That's bright blue or pale blue and then we'll mix it up with an opaque color to
get the opacity. I'm using horizon blue, you can mix it up with white. Now we need to make this darker, so will be going to
mix it up with it. Mix it up nicely. Once you have mixed that up, you'll get the darkest color and that color will
start applying. We'll start applying
from the top, and we'll basically apply in the areas where we
want this color to be. Some lines there then some strokes here towards the right side. Now we have to make sure that we strengthen
those strokes. Let's add more on the top, and right here we're going to add
in an even manner. We've added the blue strokes, now let's get to adding
the other strokes. We'll start with the
lightest tone now. We have yellow, so we'll go with a nice
Naples yellow shade. Here is my Naples yellow and we'll start
adding the Naples yellow. Adding the Naples yellow to the sky on the
bottom right side. Now once that is added, we'll mix it up with a
little bit of pink to make that gorgeous orange
pinkish color there and we'll add that. Let's add that and that's
what we'll add at the bottom. That's going to be
Naples yellow and pink together and
we'll add that. That's what we are
going to be adding at the base of the blue
and at the top. We need to be working
quickly in order for us to get the
blends correctly. There and here on the
left side as well, taking more pink shade, adding it at the bottom. Let's take some orange as well and start
adding at the top of the Naples yellow so that
we get some orange sheets. Because we're adding it on
top of the Naples yellow, it's going to be fine, it's not going to
be transparent, even though the
orangish that I'm using is transparent orange. More of the pinkish shade, absorb all the extra water if
there is any on your brush because it's
absolutely essential that you don't
introduce extra water. We have some pinkish used at the top, and some areas there at the top, although it can be
orange as well. Let's go with some orange shades here and some orange lines. Now that we have added all those strokes, let us go ahead and add in the clouds before
the paper dries. Let me tell you one
thing, remember this. If your paper has completely dried and you're not getting
those softer clouds, then what you can do is wait
for your paper to completely dry and then re-apply the
water to get in the clouds. That is one method
that you can use to get the clouds on
that wet technique. What you have to do is wait
for the holding to dry, and then reapply the
clouds. Let us see. Here is the dark
tone that we mixed. Start at the base, and start adding in
those fluffy clouds. Just using my smaller
size brush to get in those beautiful
clouds in the sky. Some clouds here on
the left side as well. Here it's absolutely fine in whatever method you
paint because it's going to have the buildings in
the front so it's fine. Let's go ahead and add some
darker colors on the top, that'll give it a nice depth. Then before this region dries, I need to get the
other clouds there. Just adding. I've added some nice clouds there. Now what I'm going to
do is I'm going to add some orange clouds as well. Let's go ahead and take
our Naples yellow and mix it up with the pink shade. We're just going to
basically add it towards the top region here. That is going to form
the clouds as well. You can see some nice orange
shades to the sky. Let's blend it up.
Let's mix it up. I'm going to add some
clouds of my own as well just to create
some beautiful effects. We've added those clouds, but I need to soften
these because they look like
having hard edges. Let me just soften them. For softening them,
we wash our brush, make sure that we dry
our brush completely, and then just run along
so that it gets softened. Let's go with this
darker tone again on the top and try and get
those beautiful clouds. Before it dries, I
need to soften them. Now, we've got the nice, beautiful clouds in the sky. This may not be exactly like in the picture but like I said, our aim is to get as
close as possible and to get all these things into our painting without
forming any looms. Now that we're done with this, let's wait for the
whole thing to dry so that we can add
in the foreground. Our painting is now
completely dry. Let us add in the
buildings in the front. For that, I am going
to add it with indigo. Let me take up indigo nicely. There is Indigo and let's
just add in the buildings. We're going to add it randomly
with our brush itself, we don't need to create any
pencil sketch for that. Let's just go directly
with our brush, so that and then another building
there. That's it. Then let's paint inside. Painted the inside
of the building. Let me just add that
ladder-like structure. We added that as well. There are some dotted
lines here on the left you can see towards the inside. That's it with the buildings.
Maybe there's a bold here. Now, we have to wait
for this thing to dry to add in the next foreground, which is in front
of the buildings, which is all these
foliage in the front. It's dried so let's go ahead and paint that thing in the
front and for that, I am going to use Payne's gray, which is almost
as dark as black. You can go ahead and use
black at this point here. That's dark and just creating
some foliage shapes here. Later on, we'll add details
for any plants sticking out. Let me create the base. Some plants or bushes, or trees whatever that is. Here as well. It's
like a palm tree there and some other
tree here as well. This is the reason why we first used indigo because the Payne's
gray or the black that we're painting with now
is darker than the indigo so whatever details we're adding right now we'll
be able to see it. Let's go and create
some more tree shapes. Another tree or palm
tree structure here. Then we'll have a larger tree
here like in the picture. We're going to be needing
to use the pointed tip of our brush and create those
small foliage for the tree. There you go. I think that's good enough and once this
is completely dry, we can remove the tape. Here the painting is
now completely dry. Let us remove the tape. Here is the final picture.
22. Day 9 - Colours & Image: [MUSIC] Welcome to Day 9. This is the image that we're going to try and finish today. As you can see, the analysis of this image
is going to be really simple because it's got
a nice cloudy sky and a foreground
with two mountains. The sky again, we're
just going to paint directly with the wet
on wet technique, and then the foreground with
the wet on dry technique. But the trick here
is to try and get these little clouds
here at the bottom. For that, you can use the lifting technique
with a tissue, with a cloth, or even
with your brush. You'd have to leave a lot
of whites-paces to get these whites-paces in the sky. Then also you need to get these blends of the
darkest blues together. If you look at this whole sky, you can see that
it's a single blue, but then it's got very
shapes of that single blue. That's what we need
to understand, that there is a
little different blue in this corner here, which we need to use. Let us see the different
blues in this picture. First of all, for the main blue, we will be using bright
blue or pale blue. It's a very nice bright blue. Then of course we'll be using the different shapes of this bright blue to get various
parts of this picture. If you use a darker
version of the blood blue, you can see it's dark,
it's the same blue. At the same time, you can
also go very lighter with it. If you have a lot
of water in it. For example, see this is
the lightest version. All these three blues, they're exactly the same, but you can see by
weighting the tone of it, you're able to get
different colors. Then for this top area, you can either go
for ultramarine blue or even cobalt blue. That's totally up to you, so whichever blue you want. But I think cobalt blue matches more to this blue
here on the corner. Then to get these darkest tones, we'll go with indigo of course, that's for the darkest spots. That's it for the
colors on the sky. Now for the mountain, obviously will paint it with Payne's gray because
it's darker. But if you look at this
mountain in the front, it's got a background of brown. For that, we will
use a nice brown. You can either go
for brown amber, transparent brown or any
dark brown that you have, even with [inaudible]
brown or Sepia. Then on the top, we need to be adding
these floors. Here is the most difficult part. Which is if you've painted
with a darker tone and then you need to apply these
lighter colors on the top, you need to have
an opaque color. You can either use cadmium red, cadmium orange, or
cadmium yellow. These cadmium pigments,
like I've explained before, they are opaque pigments. When you apply it on the top, it will come on the
top of darkest colors What we're going to
do is we're going to use darkest colors, such as cadmium red or even Naples yellow
because these are opaque. To paint this front region, we're going to mix the
cadmium red and we put yellow together
to create a nice, beautiful orange shade that
we can apply in the front. These are the colors that we'll be using for this painting. There you go. Let's
start painting. [MUSIC]
23. Day 9: Let us start painting. We'll start with applying
the water onto our paper. Let us apply an even coat of water onto the
whole of our paper. This main thing is going to
be quite easy, I believe, because we've just got
two colors in the sky, more or less two or
three colors in the sky. Let's just go ahead
and paint it. Let's paint the whole of
our paper with water first, that is, apply the
water onto the paper. Here I'm going to apply the water multiple
times because I want my paper to stay wet for
a longer duration of time. I've applied the paint. Let us start with our
beautiful bright blue shade. This is bright
blue or halo blue. You can see how
bright the blue is. Let us start applying. Start applying from the top, and which is going to
create some random shapes. Actually, let's switch
to a smaller size brush because I'd like
to get the clouds to be in the shape that I want. If I use a larger size brush, the whole thing is going
to spread out a lot. That's why let me switch
to my size 4 brush. I'll use that to add the clouds. There. I'm going to add that. I'm going to leave gaps
as and where I want. Like I said, don't
to much bother about having the exact
look as in the picture. Just try to apply the
paint onto your paper, such that you're able
to create some strokes. Some nice darker
strokes to the left. Then some nice darker strokes
to the right side as well. Then I'm going to go ahead and start adding some
more darker strokes now on the top of our existing
clouds that we added. This way, we're going to get our nice dark clouds in the sky. The first thing that we
applied, it was lighter. Now when we're applying
these darker strokes, it'll be more darker. Adding some nice lines, and adding those colors. Now that we've added those
nice colors in the sky, let's go ahead and
switch to our next blue, which is going to be ultramarine
blue or cobalt blue. Here, I'm going to be
using ultramarine blue. We'll add that to the top so that we have that little slightly different
blue at the top. You can either use
ultramarine blue or you can even go
for cobalt blue. Here is my cobalt blue. Let's use my cobalt
blue and try adding at the top and getting that
different shade of blue. You can see it's a different shade of blue than the blue that we were using. Let's get that over to the top. There. Now, let's get to adding the darkest of the
tones into the sky. This is going to be
liquid and easy. Here is my indigo. Let us take a nice amount
of indigo on our brush. We're going to add
it to the sky. There, added it in
a straight line, then we'll add some
there as well. Adding the indigo and blending
it towards the sky region. Just adding some
strokes here and there. There's a little here. Just to get some nice darker
strokes into the sky. That's what we're trying to do. There, now, we have the
darker indigo strokes. Now what we'll do is we'll
pick up the bright blue again. We'll try to blend some of those strokes so that we can get rid of
any hairs that has formed and blend it nicely. I got my blue, and I'm going to add
it into the sky again, at the top of the existing paint and blend it to the
already existing blue, that is the indigo. I've blended that whole part so you can see how it looks now. Now, I'm going to
use a dry brush or a semi damp brush to just run over and get rid of those hair-like structures
that has formed. The hair, I've got rid of that. Now, the next thing
we're going to do is we're going to use some lifting technique to
create some nice clouds. Because bright blue is
array staining color, it's going to be
really hard to lift off much of the paints, but what we need is just to create that
lighter tone in the sky. There, just going
to dab my tissue. You can already see there's
a lighter tone there. We're going to do the same
to most of the places to create that lightest clouds. Nice clouds there. Then what
else do we add the clouds. Some straight lines,
can you see that? Let's add some more. We've added some nice clouds. There, I think
that's good enough. Let's not do in this. Now what we can do is, we can wait for
this whole thing to dry so that we can add
in the foreground. Here our painting is
now completely dry. Let's go ahead and start
adding the foreground. The foreground, as
I have explained, it's got these black mountains with some nice
flowers on the top. You can either approach it
with the opaque technique, or you can add some gouache
or actually paint on the top. If you don't have either, you can just go ahead
and start painting with your pink or whatever
color that you have. Rather than going for
the opaque technique. I am going to go for
the opaque method. What I'm going to
do is I'm going to create the mountain shape. There, that's the
mountain shape. I'm going to paint inside. But I'm going to paint such that I leave space for
the front mountain. It's going to be like
that. This area inside, I'm going to paint. This is Payne's gray
that I am using. We filled the area of the mountain
with Payne's gray. Now after it has completely dry, we'll add in the flower
areas on the top. For that, I am going to be
using a nice cadmium red. You can see how red it is
and the color is opaque. That, I'll apply on the top. You can see that it appears on the top and gives
it a nice tone. Just going to add
that at the top. Let me take more
of my cadmium red. This is the cadmium red and I'm just going
to add it to the top. Now you can see how
clearly it's coming. The one in my palette
doesn't seem to work, so maybe it's not the pigments gone bad because
it's been there on the palette for a
very long time. I'm just going to
draw these colors. I'm going to get some
pink in there too, but this paint that I'm picking
up is really Quin Rose. But then I've had my Payne's Gray in a lighter
tone here on this side, so it's still going
to be visible. Let me spread that around and add. Now we have the red tones on the mountain, and I will go ahead and start adding the
foreground mountain. For adding the
foreground mountain, I'm going to be adding
it with brown at first, so that's a transparent brown and I'm going to paint
the foreground part. Like I said, this is not the important
part of this lesson. This is the reason why you
don't have to focus much on this part of the painting because if you don't
get this, it's fine. What we're trying to learn
is the sky part now. If you're absolutely
done with the sky, then you can skip
this and just create a nice cloudy sky and that's it, and just maybe create some
dark black mountains at the bottom and leave it at that. That's totally up to you, you don't have to get
this exactly like this. Now I've added the
brown in the front. Now, I want to go ahead and I'll add some lighter
tones on top of it, but first I have
to wait for it to dry so that I can get those
nice strokes on the top. It's now completely dry, so I'm going to start
adding on the top. Here, I've got my cadmium red. To that, I'm going to
mix a little bit of Naples Yellow so that
I make it lighter and slightly orange or pinkish shade,
that's what we want. Here is the Naples Yellow, and let me mix it up and
take a little bit of pink and that is what
we'll add at the top. You can see the orangish
shade that we have created. That, you can just add it
in small details like that, such that it looks as
though it's flowers. Let's go ahead and start
from the top so that this mountain stays
separate from the top one. You can see that
my brush is almost dry when I'm trying
to apply this because we don't
want the strokes to be too watery because if it's too watery then you'll not get it in this consistency. This is a bit of
time-consuming process just because we're adding
these tiny details. But like I said, if you
want to totally skip it, it's fine because this is not what's important
in this lesson, the important part was
to get the sky painting. You can leave some brown
spots in the middle just to show those areas that doesn't have the flowers don't cover the whole thing up
with this paint. There, I'm done with that. It's not there in the picture, but I'm going to make this
a little bit interesting. What I'm going to do is
I'm going to pick up a little bit of Naples Yellow and I'm just going to add on
the top in-between, just some smaller dots. This is totally neat, you don't have to do it. I'm also going to
add a little bit, a teeny-tiny amount of red, so there is the red paint. I'm going to take a
teeny-tiny amount and add it at the top at random places. It's like red flowers
and some mixture of some orange and some
yellow flowers. Actually, that's it, we're done. Now all we have
to do is wait for this whole thing to dry so
that we can remove the tape. Everything is now
completely dry, let us remove the tape. Here is the final picture, I hope you like it. I love the blues in this one, halo blue is one of
my favorite colors just because it's so bright. I agree why they've
called it bright blue, it's just so beautiful. There you go, guys.
24. Day 10 - Colours & Image: Welcome to Day 10. This here is the image that we're going to
try painting today. But I'm going to change
a lot in this image, mainly because all
these days I've been showing you how to
paint from an image, but now I want to
show you how you can make your own changes and try and incorporate different
colors into this painting. Let us see how we can do that. What I'm going to do is
I'm going to increase the amount of yellow
and orange such that it goes to at least
half of the painting, and then a little amount
of blues in the sky, and then obviously these clouds. It's going to be definitely
from this image itself, but with a lot of changes that we have
incorporated into it. Let's first see the colors
that we will be using. I'm going to go with
all transparent colors because I don't want
to paint it opaque. First, I am going to be
using my favorite color, Indian yellow, then
we're going to mix it up with a nice orange shade. That would be
transparent orange. Then we can also use
a little bit of pink here and there to
mix into the sky. That will be queen rose it
or any pink that you have. Then at the top region, these darkest spots,
I am going to be painting it with indigo. That is the dark blue color
that I am going to use. Then these clouds in the sky, I'm going to be painting
with Payne's gray. Obviously, the foreground again is going to be
with Payne's gray. These are the main colors
that I am going to be using. Now, for breaking
down this picture, it's again very simple, just background and
the foreground. The background is going
to be with a wet on wet technique and the foreground with a wet on dry technique. The only change that we have added is to have this
yellow region go up a little bit
such that the area of the blue region reduces. All of these clouds in the sky are going to
be with the wet on wet techniques so we
need to make sure that our paper stays wet for a
longer duration of time. This is absolutely necessary. Here, these little
clouds at the bottom, you can see you can
paint it with a wet on dry method as well because they are some dark and they
got a [inaudible]. Whereas these clouds
[inaudible] so they definitely need to be with
the wet on wet technique. Let us get to painting this.
25. Day 10: [MUSIC] Let us start painting. We'll start with
applying the water onto the paper just like usual. Let's apply water to
the whole of our paper. Make sure that you
apply the water evenly. We don't want our paper to be drying in-between our strokes. We have those wet on wet
clouds to add on the top, so we definitely need
a paper to stay wet. Now that our paper is wet, we'll start with
the first color. We're going to start
with Indian yellow. This is one of my favorite
colors and I just love it. I'm so sad that sometimes I
don't get to use it so much in all the sky
paintings that I do just mainly because
it's so transparent. Indian yellow is also known
as transparent yellow, Indian yellow lake, and many other names
in different brands. Let's use that and
I'm going to start at the bottom and start
applying this yellow. You can clearly see how
beautiful this yellow is. Let's just take the
Indian yellow and start applying in straight
lines like these. Just take up the yellow and
just add some straight lines. There we've added some
nice straight lines, so we'll go with
the next stroke. We're going to use orange. Let's take up a nice orange, that's transparent orange again. This painting, we're
going to be using a transparent colors
for all of them. Again, we'll just start
adding in the form of lines, and let me add to
the base as well. For the base, it's going
to be completely orange. Like I said, I'm not
going to be following, and using the exact
colors as in the picture. I'm going to slightly
change it to make it more vibrant and bright, added that. Now, I need some more yellow. I'm going to take my
Indian yellow and add it in the areas in between. Now, I need to create
some white space, so I'm going to lift
off some color. From this area,
I'll just lift off the paint and absorb
it in my tissue. Then repeat the
process so that I get a lighter shade in that region. You have to do it multiple times in order to
get that lighter shade. Now that we've done that, let's go ahead and move
to the top regions. At the top obviously, we're going to start with
the darker indigo color. Here I have my indigo and I'm going to
start applying from the top and I've applied
the indigo tone. Then I want to take a bit
of my pink and mix it with the orange and along
with the yellow as well. So I get like a
nice golden shade. Like I said, remember
we're changing the colors. I'm applying that in that region and apply it
there at the base as well, and then I'm going to go back
with my indigo at the top. But I'm not going to
touch the regions where I applied
the golden paint. I'm going to apply
this indigo paint in the other regions. You can see that when your
indigo touches that yellow, it's creating a
slight greenish shade and it's absolutely fine. Because we'll have
the clouds on the top which is going to cover
those greenish shades. Here is your indigo blue
and we add that on the top. So you can see that
whenever I'm picking up fresh indigo paint, I am adding it at the very top because that's
the darkest place and the other regions, I don't want it to be dark, so I keep it light. There. Now that we've
added the indigo paint, let's go ahead and start adding the darkest
clouds on the top. For adding the darkest
clouds on the top, I'm switching to
my Size 1 brush. I'm going to pick
up my paints gray. Obviously, I need
it to be lighter. But when I'm making it lighter, I'm adding a lot more water, but we don't need a lot of
water in our your brush. We make sure that
we dry it up in our tissue and we add it. Then, we add the
color on the top. You can see, just add
nice strokes in the sky. Each of the strokes, we have to make sure that we are applying them
in a straight line. Keep applying those strokes, and we have more. Here, this is the region where we have
more of those clouds. I'm going in a
crisscross left and right motion with my brush. That's how you create that, and we have more clouds, and here at the top, again. Now, we'll go with
smaller clouds. These are smaller clouds. We need to make them
slightly darker. Trying to get them in
different directions. Add as many smaller clouds, and create just
these random lines. It's just these random lines
that I'm creating such that they create these cloudy
forms in the sky. You can see the shapes
are totally random. More random shapes. Now, we'll create some
darker clouds at the bottom. But these are obviously going
to be wet on dry manner. Somewhat wet and somewhat dry. Even if your paper has
dried, it's absolutely fine. You can go ahead and start
adding these clouds. You can see adding these
clouds at the base. We've added those clouds. Now, what we can
do is we can wait for this whole thing to dry so that we can paint
the foreground. Here our paper has
completely dried, so let's go ahead and
add in the foreground. We're going to be adding
that with paints gray. It's just going to
be simple shapes for the mountain
or the foreground, whatever that is there. Just neatly fill that base part. There, we've filled
up the foreground. Now, let's just add some nice
trees in the foreground. That's one tree,
that's another tree, so it's just a fine tree. Just add some nice
shapes onto the tree. I've added two pine trees there. Let me just add
another one here. I've added some
pine trees there. Let's just add some more here at random and
make them smaller. I'm just adding some strokes
on the foreground area, so it's a fine foremost. I'm adding more plants and pine trees than
there is already there. I think that's good. Let's just add another here. I think that's good enough. Now, we just wait for
this whole thing to dry so that we can
remove the tape. Everything is now
completely dried, so let us remove the tape. There you go. Here is the final painting.
I hope you like it.
26. Day 11 - Colours & Image: Welcome to Day 11. This here is the
reference picture that we are going
to paint today. Isn't it absolutely gorgeous? I chose this reference
image because I wanted to show
you that you can actually have green colors
in the sky. Look at this. There's just so many colors, so many trauma in the sky, and this is what we are
going to be in today. In this picture, the sky is just a tiny part and the rest of it is water and its reflection. We're not going to do that part. I'm going to extend
this guy to the bottom, spread it out a bit, and just focus on all of the colors and to achieve
some of the trauma myself. We're going to move
this whole line to the bottom and we're not going
to paint this man as well. Let's just try and paint this. For the colors, let's see what the colors are. Starting in the middle here, which is a nice bright
area where the sun is, we have a nice yellow color. That yellow, I'm going to be painting with
my Indian yellow. Then moving towards the left
we have oranges and reds. Then trump student orange. Then I'm going to be
adding red on the top. You can either go with
a nice red such as Alizarin Crimson or red itself but what I'm going to
do is mix my red by mixing Queen Rose
and yellow together. Queen Rose and yellow together will give
me a nice red shade. That's the beautiful red
shade that I'm using. I created that by mixing my
Queen Rose with this yellow. That gives me a
beautiful red shade and that's what I'm using. Then obviously again, when
we go to the top regions, we have more of orange. Then we have a
different yellow here, which is in-between the
orange and the yellow. You can either mix
your yellow and orange together to create
this beautiful orange, or you can just paint
wave yellow ocher. I used yellow ocher
and you can see that this is a different yellow. It works out fine
for this color here. Then again, we have the
greenish-blue color on the top. For the greenish-blue color, I'm going to be making my
greenish-blue color by mixing my bright blue and
yellow-green reddish. That would give me a beautiful greenish-blue
color like this. Then to get the darkest version, I will simply add a
darker blue to it. You can also add a color such as indigo to that and you'll
get a darker version. Here, I've added darker
blues such as Prussian blue, or denetra blue, indigo. Any blue that you have,
which is really dark. I call it the darkest version. Then, now for these
clouds in the sky. If you look closely they
have a reddish hue to it. In the borders of these clouds, it has a reddish hue to it, which means that it's
not essentially gray. It's a violet shade. Let's mix that violet shade. I will be using
ultramarine blue. That's my ultramarine blue. Then I'll mix it
with my Queen Rose, which is this and we'll get a nice purple shade like this. That's a mixture of
these two colors and we get a nice purple shade. Now to get the darkest colors, we can actually mix it with a
little bit of Payne's gray, and we'll get it as a
darker violet shade. Now if you look at this closely, you can see that it has
a pinkish hue and that's how it looks a bit
like the violet there. Can you see that? It's got a little teeny
tiny tint of pink. Those are all the colors
that we need, isn't it? Let's look closely.
Are we done yet? Yes, that's all we need. Obviously towards the
bottom, if you want, you can either use Payne's
gray or you can use the same mixture by adding more Payne's gray to it
so that it gives a nice contrast and matches
with the entire painting. There that's been gray mixed with this color
that we have made. Those are all the colors that we'll need
for this painting. As far as approaching
this picture goes, you can clearly see
that the sky is just absolute blend of colors, which means that
we're going to be using the wet on wet technique. On top of the wet
on wet technique, we'll be applying these clouds, which will be again
wet on wet because we want these clouds to
have softer edges. If you have a paper that is not 100 percent cotton paper and it doesn't stay wet for a
longer duration of time, you can first paint
the whole of the sky with one layer that
is within one layer. Then once it is completely dry, you can go ahead and reapply
the water on top of it and start painting these clouds on the to in the second layer. You can either approach this
in a single layer method, or in a double layer method. It's totally up to you. This is what we'll
be painting today. Let's get straight into it.
27. Day 11: Let us start. We'll start with applying
the water onto our paper. Let us pick up clean
water and apply it onto our paper and even go to photo,
that's what we need. Once we have applied
the even go to photo, we can start painting. This is absolutely essential that we apply the water evenly. Applying the water is what needs the most patience when it comes to painting
with watercolors. Since we have applied the
water, let us start painting. I want to start with a
nice Indian yellow sheet. Let's pick up a nice
amount of Indian yellow. That's Indian yellow. We're going to start applying in the center where we want the
sun to be shining brightly. There we have that
yellow in the center. Then we'll go with
the next color, which is going to be orange. Let us pick up a nice
amount of orange. Here I have orange in my brush and that's what
I am going to apply. Applying my orange. Apply at the bottom as well. Then here on the left side. Then here at the top, we'll go with a nice red shade. I'm going to mix my green rose with yellow to get
that nice red shade. Here's my yellow and green
rose and I'm mixing it up with my yellow to
get a red shade. I'll start applying
that on the top. Here's my pink shade. You can see the nice red
color that I have mixed here. That is what I'm going to add
at the top and some here, some here, and some to
this base area here. Let me just flatten this region out because it's forming hairs. Just want to get rid
of the hairs and leave that nice
yellow region there. Now we'll go back to adding
our orange at the top. I'm just going to reapply
the water in some of these top regions because
it's starting to dry. But I'm not going
to touch any region that I've already applied, just the other areas. It's always the corners that dry faster so that's why we
have to reapply the water. Let's get some nice
orange shades. Now that we're done
with the orange, let's get in some nice
yellow ocher at the bottom. Maybe some nice yellow ocher
shades there, at the top. Some nice yellow there. I picked up the wrong yellow , that's yellow ocher. This is just basically us trying to add those smaller strokes. This is the reason
why I have used my size four brush,
which is small. Added those nice strokes. Now that we've added
those strokes, we'll get to adding the
greenish blue color. For that, I am going
to mix my bright blue with a little bit of green and we get
that beautiful shade. I'm going to mix it up with halo green so I get that beautiful turquoise color and that's what I'm
going to apply. You can see I'm applying
it at the top there. That's where we have
the beautiful color. Then we'll start to apply
it in the areas in-between. But obviously the dense dark
color needs to be in the top and also these lines. In this painting,
obviously, like I said, we don't have to worry about our strokes getting or
turning into green. Because as you can see there's so much of green in our picture itself so let it turn into
green if it's turning. This is one such sky where I wanted to
show you that, yes, there could be greens when
you're taking the picture at some angles and because of the reflection
of certain things. It doesn't necessarily
mean that you can never have a
green in the sky. That's something that
we need to understand. Slowly, the small strokes
towards the inside. Then here we're going to go with lighter
strokes at the bottom. I just washed my brush
and I'm going to spread this paint to get
those lighter strokes. There we have. My red is almost gone, so I'm going to go ahead and add some more red at the bottom. Let me mix up my red
by mixing Queen Rose, and Indian yellow, and we'll add that at
the left bottom side. Here on the right side as well
we have a nice red shade. Now that, that red is done, we need to quickly
go ahead and start adding our clouds on the top. For that we're going to mix the violet shade.
Let's mix that up. We're going to use our
Queen Rose and a nice blue, so let us pick up
ultramarine blue. Picking up ultramarine blue and mixing it up
with the Queen Rose. You can see the nice, beautiful purpletry that we have obtained. Let's pick up more blue. There. We're not using
the violet because we want the colors to separate, all the pigments to
separate. That's the reason. We can mix a little bit of
paint gray to that as well so that we get a darker
mixture, there. Now we have to make sure
that our brush does not have a lot of water so dab off the extra water
from your brush. Now we'll start
applying the clouds. Starting here then lots at the bottom and blending
it into the side. Either you can prepare the
colors in advance or you might have to mix it up in between. There. Let's go ahead and start applying in these regions. There. Let me take off
all that extra water, which is very dangerous if we introduce it into our paper. Each time you pick up the
paint from your palette, make sure that you dab off all that extra water
using a tissue. Let's add it to the sky. Then at the top. You added those nice clouds, and we're leaving a
lot of white space their just like in the picture. We've added that.
Another thing to do is we need to add some
depth at the corner, so let me mix up that same
color that we mixed up. That's light blue,
yellow, green, and then I'm going
to mix it up with a darker blue to make
it slightly darker. Then let me absorb
all that extra water, and I'm just going to blend
it towards the inside. See and blend the color inside, and this corner as well. Then let's get that
darker shades in, that's going to create
some clouds as well, and some clouds with that color as well. There's a lot of drama
in this sky here, and same to this
region here as well. Before this region hardens up, I'm going to use my brush
and soften the edges. I've washed my
brush and I'm using my damp brush to soften
these edges here. My brush is just
damp as you can see, I've taken all of the extra
water using my brush. Then now I'm just
following along, so that would just blend the colors without
introducing any extra water. Now, we have a beautiful
set of clouds in the sky, and I think it's good
enough for the background. What we need is to wait
for this whole thing to completely dry so that we can just add something
in the foreground. Here, the background
is completely dry. What I'm going to do
is I'm going to use that exact same
color that we use to mix our violet and
add that to the base. That's Queen Rose
and ultramarine blue together mixed with a
little bit of Payne's gray, so that's our darker
violet shade. Let's use that darker
violet shade to create that space at the bottom. As you can see, I'm not using
a straight line but I'm just creating some broken lines. Then maybe some
broken lines to left, and you can add some
rocky shapes as well, some dots and some lines. Again, some shapes which would be some
drops in the water looks good. We've added
some nice strokes. What we just need to do is to
add the lines in the water, leaving this area here so
that it looks like water. What I'm going to do is I
want to pick up a red shade, and here is the red. Now, we need to use
the absolute tip of the brush to create
those red lines. They need to be
very light as well, and not in all the places
just in some areas. Let me show it to you up close. Can you see the tiny red
lines that I have added? They need to be absolutely tiny. This is the reason why we are
using a very small brush, so switch to a size zero or size three slash zero
brush if you want. I have a very good point in this brush which is why
I'm going with this, but if you don't have, make sure you use a
smaller-sized brush for that. Just running along my brush
to create those water effect. Nice water effect. Then let me wash my brush, and I'm going to do the
same with this color. The documentation of that color, I'm going to add
some darker strokes on the top towards the
right side as well. Because that also is water
and it's green there, so we need to create
greenish lines in that side. I think that's enough , so we're done. Let's just wait for some
of these strokes to dry, because I don't want to be rough and have my paint spread out. Everything has now
completely dried, let us remove the tape. Here is the final picture,
I hope you like it.
28. Day 12 - Colours & Image: Welcome to Day 12. This here is the image that
we're going to try today. This is my favorite of all, mainly because this was
the image that I tried out first when I was
planning of this class. I just loved painting this one. You can see, I tried
it out multiple times. I was actually checking
the colors just to make sure that the
opaque technique works, and what if you don't
have those colors, then you'd have to
mix it differently. This is with the colors that
I have on my palette here, and this is totally
using whitewash. I will explain that to you now. The colors here that I will be using is for this sky here. I will be mixing bright
blue, horizon blue, and then the Phthalo
green shade in order to get an opaque shade
that looks like this. It's almost like this color, but then I've mixed it up with horizon blue
to get this color. I wasn't sure whether
all of you would have this horizon blue color and I wanted to help you out, so that's why I tried out
this painting multiple times. This one is with
the horizon blue. This one, what I did was I
mixed up whitewash with it, so white paint and bright
blue and the Phthalo green, and then created the color. It turned out to be
exactly the same color. This is what I was saying. You can even use the
white paint instead of these opaque colors
that I'm using, so it's absolutely fine. Then the next color for the sky I will be using is
Naples yellow reddish, and then orange, and then I'll be mixing the
Naples yellow reddish and orange together to create a
nice opaque orange version. Here we have those orange
shades and I tried the same. This is with Naples yellow
reddish and orange together, and this here is by mixing my orange with white instead
of Naples yellow red. Then I got almost
the same technique and the same texture
as you can see. I skipped out the yellow here, but let's add a teeny
tiny amount of Aurelion or any nice opaque yellow
for the middle part. The glow in the painting. We can see here, there's a nice glow that we need to add, and then now the
clouds in the sky. With the clouds in the sky, we can either mix Payne's Grey or neutral tint with white,
or any opaque color. I'm mixing with lavender, or you can even mix with
the same horizon blue. As you can see here, I've tried here by mixing
it with white. This is by mixing
it with lavender, and this one is by
mixing it with white. You can see here both these
look absolutely similar. Don't look at the
shapes of the clouds, that's completely different,
but it's absolutely similar. I didn't want to try
it out horizontally because that would limit
the space on my paper. I know I could have
done that and try it, but I was just trying it
out in a different manner, so today we'll be painting it horizontally in the
landscape mode, of course, but you know now
that all of this works. I've tried it out myself, and it's most certainly works. Breaking down this main thing, I don't think there is much to explain because you can
just clearly see that the sky is going to be
with the wet-on-wet technique with the
clouds on the top again, wet-on-wet because
these clouds have a softer edge and has these
bottom parts with orange. These bottom parts with orange, we'll be adding it on top
of the existing orange, so we need a darker
orange on the top. Then at the bottom we
have the foreground, but as you can see, there's
a lot of clouds there. The darker clouds there. Then we also got the foreground. Here today, we can paint the foreground with
the wet-on-wet itself, but after the paper
has nearly started to dry so that it doesn't spread
too much out into the sky. You can either go with
the wet-on-wet or the wet on dry method for this. It's totally up to you, but you see how we can
approach this painting, so let's get to painting this.
29. Day 12: Well, let us start. We'll start with applying
the water onto our paper. Let's apply water to
the whole of our paper. Make sure that you apply
the water multiple times. We need our paper to stay wet for a very long time
because we also have those wet on wet
clouds to add on the top. Make sure that the water
that you apply is really even and also that your
paper is able to stay wet. While my paper soaks in that water, I am going to mix my paints. We're going to start
with light blue. In order to make it opaque, I am going to mix it with
nice amount of horizon blue. Here's my horizon blue
and I'm mixing it up. You can see the kind
of blue that it has made, it's opaque now. Make sure you mix it up nicely, so that is a nice opaque blue but I need it
to be darkness slightly. I'm going to be adding a little amount of
phthalo green to it. Add a little amount
of phthalo green. Now you can see the
gorgeous shade that it is. That's horizon blue. Don't worry if you don't
have horizon blue, you can even mix your gouache white or even your watercolors, white paint. That's blue. The gray together, that's created a
nice gray mixture. We also need neutral tint. Let us mix up neutral tint. I am going to take neutral tint. You can also use Payne's
gray if you want. Either Payne's gray. Here
is my beautiful paint gray. To that, you can add a nice mixture of either
lavender shell pink, horizon blue, or any color for that matter to
make it opaque. Here I'm taking lavender, mix it with my Payne's gray to create that
gorgeous gray color. Now that we have
mixed the colors, we can start painting. But let me just reapply the
water on my paper so that it might be pretty
easy to handle all that wet on wet
technique that I will paint. I will start with a nice amount of
pavilion in the middle, the bright sky,
the yellow region. Then once you've
got your yellow, we'll get to painting
with enables yellow, red and add in those
orange shades. There's the Naples yellow. Let's add it, that's the lightest tone
that's going into the middle. Now, we'll take up
the orange shade. We can start by applying
it at the bottom. All the orange starts
at the bottom. On top of the yellow
as well in the form of streaky lines and at the top, we do it the Naples yellow. We'll add some nice lines with the mixture of Naples
yellow and orange. Here I'm mixing my Naples yellow and adding some nice lines. Something here. This is a typical method of how we using the opaque property
is very important. Here at the base, we'll
add more oranges. Now that we have got
all the orange shades. Let's go ahead and start
adding the blue mixture. Here is the beautiful
blue mixture. We will start adding
that to the top. You can see how
opaque that mixture is and we'll be adding that
in the areas in between. Let's go ahead and start adding
in the areas in-between. All the darker colors, make sure that you start
applying at the top because the top can be
as dark as it can be. But then when we come
towards the bottom, we need it to be lighter. Here, as you can see, my strokes are
getting lighter as I move towards the
middle region. It's lighter. Let's mix
a little bit more of the green to that mixture
and start adding at the top. We've added that nice
gorgeous color at the top. Now I'm going to switch
to my synthetic brush to add in the clouds. Here is my synthetic brush, and here is the gray
tone that we have mixed. Here I'm taking up the paint but I want to
make sure that my brush is completely dry and does
not have extra water, water from my brush, and then I'll start
adding in the clouds. Nice clouds, nice cloudy shapes
we have to create. There you can go for smaller clouds as well, just some smaller lines. Let's go with clouds in
the middle of the sky. Nice clouds like this fill out towards the left side. You can see how we're applying the clouds. Towards the base,
we'll start adding those clouds in a lighter tone. Same color, same
gray we're using, but we are adding
lighter strokes. Now let's go ahead and start
adding some depth to it. Here, I've mixed a darker tone, and I'll go over the top
with this darker tone. Going over the top
with the darker tone. Now that we've done that, let's go ahead and start adding some orange
towards beneath. Here is my orange, but we need to mix it
with Naples yellow. Here is my Naples yellow and the orange and make sure that our
brush is completely lighter with no water. Adding those orange
tones to the base you can see how it makes
the whole thing glow. Adding the orange to the underside of all
of those clouds. Now what we need is to get rid
of those hairs. I'm just using my damp
brush to go around. Just mix those into
the sky such that I get rid of all those
hairs that have formed. Make sure that you wash your brush to move all that excess
paint that you've taken. Let's go ahead and start adding some darker
clouds on the top. Here I'm taking
paint gray again. Now I add on the top. You can see how we're
adding the darker clouds. We'll add it right
above the orange. Those are the smaller clouds and towards this side as well. Then we also need
some Payne's gray to add some nice dark strokes in the sky at the bottom region. Those are darker
clouds in the sky. Now what we'll do is let's go ahead and start
adding our foreground. But this time obviously you
can add the foreground with the wet-on-wet technique itself. Or if your paper has completely dried at the bottom there also, it's going to work,
it's absolutely fine. I'm just going to add it. Right below, those clouds. You can see it's
not spreading too much because my paper
has almost dried up. It's just going to add some
smoothness to it as well. rather than making it too dark. There, now we've added the base. Now that we've painted our
clouds and everything. Let's wait for this
whole thing to dry so that we can
remove the tape. Here, everything is
now completely dry, so I will let us
remove the tape. Here is the final picture.
I hope you like it.
30. Day 13 - Colours & Image: Welcome to day 13, so this here is the image that
we will be painting today. As you can see, this paint
is in the portrait mode, so I'm going to change it
into a landscape format. This is another thing that
we learn how we can convert one painting or a picture that's in the portrait or landscape
mode into the other. As you can see, it's got two nice pink clouds and
then it's got a blue sky and then a darker blues strokes at the top and then some
foreground here. But as you can see,
the foreground doesn't have any clear boundary, so we are going to paint that
with a wet-on-wet itself. The whole thing is
going to be with the wet-on-wet technique,
even the foreground. For the colors that
we are going to use as you can see,
it's pretty simple. We'll go with a
nice rose shade's, you can go with any row shade, I'll be painting with
the queen rules. Then for the dark blue sky, I'll go with my
Indian throw blue. It's a dark blue, you can either go for
Prussian blue or indigo but I'll also be adding indigo at the top for the darker tone. There, that's my indigo, so if you're going to be using indigo for the darker tone, then what you can do is you
can mix up your indigo with ultramarine blue
or cobalt blue to make it slightly look
like Prussian blue. Here is my indigo mixed with a little bit of ultramarine
blue or cobalt blue, and you can see it's lighter, but definitely not as
dark as the indigo. Let me add a little more
so that you can see. Now that's more lighter, isn't it, and more
close to this color. Then at the bottom, we have these foreground. For that, I will be
using olive green. You can see it's a nice
olive greenish color, so I'll add olive green, and then on the top of it
we have some round strokes. For that I'll use my
transparent brown, so you can either go
for burnt umber or set clear or any dark
brown that you have, and those are the colors that
we'll be using for this. Then we also need some white
paint for these stars, so well just keep your white
paint ready that's it. There you go, and let's
get the painting.
31. Day 13: We'll start with applying
the water onto a paper. We'll apply the water evenly because we have a lot of wet on wet clouds
to add into the sky, so let's just add
the water evenly. Now that we have
added the water, let us start adding the clouds. Here, I'm going to start
with my queen rose. It's a beautiful
pink as you can see, and we'll start
adding it to the sky. I'm going to add some strokes, some streaks, streaky lines and I'm using
my flat brush as you can see. Just adding some strokes. Let me just hold my brush and take off all
that extra water from the center off with my paper because there's
just too much water there. Now taking my brush and
adding some nice strokes. Like I said, we'll be
adding these on our own because we've changed the whole orientation
of the picture. You can just use your brush
and have these strokes. You can see how I'm
doing my strokes. I am just adding these swift
left and right strokes. Added a lot on my own. Just going to drop some
smaller clouds here. Now that we have done that, let's go ahead and
start with our blue. This is one of the easiest
paintings that we will do. Trust me, it's going
to be super easy. We'll start with a dark blue. This is Indian themed blue, you can also use brushing blue or any dark blue such as indigo. But here I'll be
using indigo as well, so if you are using indigo, then just try to mix
a little amount of cobalt blue or the normal blue to get this lighter blue first. When I say lighter, I
mean lighter than indigo. We will apply this at the top and the areas
in-between the pink. Obviously, as you can see, it's going to turn
slightly violet. That's absolutely
fine but we'll get to adding these tones
first at the top. Let's get the color
there onto our paper. Then we'll go and start adding
to the areas in between. Go and add to all the
areas in-between. Keep taking our strokes and
adding now towards the base. As you can see, I'm going
lighter and lighter. We will make it completely
light to make sure that you don't use any dark
pigment towards the bottom. We've added that. Now let's start
adding darker tones. We will start adding the
darker tones towards the top. Each time you pick
up fresh paint, make sure that you
apply it towards the top because we want our strokes at
the top to be darker. Here at the top
needs to be dark. I'm going to go create
further dark color. This time we are
going to take indigo, so we get a nice amount of indigo from my palette. It's on right side of
my palette but I'll mixing it here so that
you can see it clearly. There, that's indigo, and I'm going to add
indigo to the top and as you can see
blending it to the blue. Added indigo. Then now you can see
it's blending nicely. Now that it's blend nicely, I need to add a little
bit more of the pink, so I'm going to pick
up the pink and start adding at the top of
our existing stroke. That is going to flow on the top. Remember we had some
nice strokes here, so we need to add that
on the top again. We've got those nice strokes
there at the bottom, now let's go ahead and start
adding in the foreground. Here in this image, I am going to add in
the foreground with the wet-on-wet technique itself because I
don't want it to be not having a border. If you look at the
picture closely, you will see that it doesn't
have a clear border, so that's what I'm trying to do. We will take a nice
olive green shade and that's what we will add. This olive green is going
to mix up with that blue there in the
the background, and it's going to create a
darker green, don't worry. We can still add
the olive green on the top and you can see
the blend it's creating. It doesn't spread
out too much because our paper has already
started to dry, but we need some darker
colors on the top, so we're going to take
a little bit of brown. There's brown, and I'm just
going to drop it on the top. I'm using the side of my brush, don't worry, it will have
to use a flat brush itself, so I'm just using the side
of my brush to drop in those darker lines
on to my painting. Because the olive green that
we just applied is wet, it appears nicely and
it blends smoothly. You can take the brown and you can see
that nice blend of colors and we'll
also add some of these strokes in the sky region. Just at the top right
below the pink. Those are going to be
with the brown shade. There, now we have added that. All we need to do is wait
for this whole thing to dry so that we can add
in our white clouds, but let me see if I can
blend some more of my indigo here at the top because it
started out to be lighter. Taking up some nice indigo and
blending it into this sky. That works. Nice and smooth. Don't go for the
blending process if your paper has dried because
it's going to create tones. I can still see that my
paper is slightly wet, which is why I am going
for this blending method. If your paper is dry, please don't apply
any more strokes. It would be dangerous
to do that. Let's now dry this
whole thing up. Our painting is now
completely dry, we'll finish this off by adding
some stars into the sky, so pick up your nice white paint in the smallest brush because we want those
dots to be tiny and cover up the rest of the
painting because we don't want any extra stars down
at the bottom parts. Let's go ahead and start
dropping in some nice stars. As you can see, I'm using the smaller brush so the
stars also going smaller. There, now we've got
the stars in the sky. We don't want too many
of that, just a little, that's why I used my smaller
size brush and dropped it in the top regions
and there you go. This painting is done, so let us remove the tape. Here is the final picture,
I hope you like it.
32. Day 14 - Colours & Image: Welcome to Day 14. This here is reference remains that we are
going to use today. Let us see how we
can paint this one. There's a lot of things here at the bottom which we do not want. So I'll be cutting short this image into
something like this. That is, we're going to skip this split region because
is not the focus, the sky and just a little part of the bottom part is the
focus in our painting. Let us see the different
colors that we will need. We have this nice
blue on the top. As you can see, it looks like
nice, bright blue shade, but it's got a little
bit of opacity to it or you can see it's got
a nice brightness to it, so you can either add
your white to the bright blue or like I do, I'm going to mix
my horizon blue, with my bright blue and
I'll get that shade. More horizon blue and
bright blue together, I'll get that beautiful shade. Then for these clouds here, obviously we'll go with
a bright blue itself. Then to create some darker
tones for these buildings, we'll have to use
the same mixture. But let's first see the clouds and this bottom part of the sky. On the bottom part, we
have some pastel shade, so we'll go with shell pink. Don't worry if you
don't have shell pink, you can mix your pink with
white and you get this nice, beautiful shade or if
you have pastel shades, go ahead and use them. This is the moment to
use a pastel shades. Then also have this
Naples yellow, reddish, which is like pastel
orange shade. You can also mix a little
bit of orange with that to get the nice orangish
pastel color, then I would also mix a
little bit of yellow. I'll mix both Aureolin and
Naples yellow together. You can see how different
these two yellows are. So I'll mix them
together to create the nice yellow
glow in the middle, then I think all the colors
in the sky are now complete. Now, we just need to add
this line in the foreground. For that, I'll be adding with indigo and I'll be mixing
it with the mixture that we used in the sky
and this is the color. Then for the buildings
in the background. If I add more horizon
blue to that mixture, it turns somewhat lighter
like a grayish tone, matching the color of the sky. The reason why we're
using that same color, is we need to use the same contrasting colors
that we used in the picture. We painted the sky and those buildings in
the background has a nice reflection of
the colors in the sky. This is the reason I'm using the same mixture to create
that grayish stone or the bluish great tone for the buildings as well as
the water and everything. That's what we need to
understand about the colors, statistic color harmony
in the picture. Just because it uses
gray with our eyes, we can't just go
ahead and start using a gray color out of the palette
because we need to have some harmony in the picture
and that is achieved by using the same colors that we
have used in the painting. Like here we used blue, so make sure that you mix that
blue along with your gray. You'll get that grayish tone. Just don't directly start
painting with any gray color. That's what we
need to understand and since we're not
painting this part, we don't need to look at that. There is the breakdown
of that picture. Obviously, as you can see, we're just going with
the wet on wet method. We leave a large
white gap and then add these clouds on the top with the wet-on-wet technique. Then let us get
to painting this.
33. Day 14: Let us start. We will start with applying
the water again, of course. Let's apply water to
the whole of our paper. Here I have applied the water
to the whole of my paper. While that soaks in, I am going to mix my paints. We want to start
with bright blue. Here is my bright blue. I'm going to mix it
up with horizon blue to make it opaque and
make it slightly lighter. Here is the thing that we need. Based on colors, obviously, I want to use my Naples yellow red for the orange pastel shade, and then a little
bit of shell pink, which we'll go into the
lighter pink shade. Let me make sure that
there's no extra-large pools of water on my paper. Spread the paint nicely. We always start with the
lightest of the colors. Now that we have applied the water evenly, let's start with the
lightest colors. We're going to start
with our shell pink, which is, of course, very light. That is the pastel pink
shade that we'll be adding. Taking my beautiful shell pink and adding it to the sky
from the right side. Just add these strokes
from the right to left. Then on the top, we can add the
Naples yellow red, which will give us
slightly orange. If you want, you can mix it
up with a little amount of orange to get it to look darker. Then add it on the top, bit of orange on the top. There it has that
slight orange tone. A little amount of yellow as well. I'll take my uranium
or you can go for Naples yellow light and just add few strokes of
yellow at random places. Make sure that there
is no too much water on your brush, otherwise, it's going to spread out a lot, which we don't
want it to happen. There's the orange. Some more orange and adding those orange strokes
into the sky. Added those base
two shapes nicely. Now let's go ahead and
start adding blue, which is going to
be easy, of course, because we'll start at the top, and start adding the
blue into the sky. We've added the blue. Now what we need to do is
make sure that we leave enough space for
that white areas. Don't touch any of
these base two regions. Just keep that region lighter. I've created the border where the cloud region is going to be. The rest of the areas, let me add in the strokes. Make sure you add
these strokes in one single direction because it helps out a lot in the way your painting turns out in
the end because the strokes can always be seen like
a flat line I'm adding. It will always be a flat
line and it will be seen. Here adding it in a stroke such that it's
facing towards the inside. Then here as well. We have more strokes to add. Add those nice strokes. As you can see, the
whole thing is white. Now let me just dry
my brush quickly. We need to dry it more because you only
need a very lighter tone. Now I have a lighter tone in my brush and that lighter tone, I am going to mix
it into the sky. You can see, just
pull out the paint, make sure that you
dry your brush, and pull out the paint from the top and start dropping
it into the inside. You can see how
that's turning out. It's coming
gorgeously, isn't it? If you pick up fresh paint
anytime from your palette, make sure that you
add it towards the top or the right
side, or the left side. But nothing in the gap
that we have created. I've washed my brush, doesn't need to make
this region here light, so I'm just going to
absorb some things, and create some
lighter tones there. I'm going to create
some lighter tones by absorbing some paints towards the right side
as well, like that. We have all of these strokes extending towards the inside. It's looking so beautiful and we have the lighter areas there. Now, we'll go ahead and start adding the nice blue
clouds on the top. Here I'm going to use
light blue itself, so it's bright blue
or phthalo blue. We'll first add that
in the sky region. Add some nice tones. Some nice blue clouds there. Let's get those paints nicely. Make sure that your brush is really dry when
you're doing this. Let's start adding
those cloudy forms. There I've added the
nice cloudy forms. Because I'm taking the paint
on the brush each time, I have to dry my brush on my tissue or the cloth
that I'm using here. Then I'll add some nice
strokes into the sky. Nice strokes here. All of those places where you want to
add those strokes, add them in smaller, lighter, and whichever kind of
strokes, doesn't matter. Just plant them
into your painting. Now that we have added
all those clouds, now we need to
soften every edge. Here I am taking off all the
extra water from my brush. I'm just going to go
around those clouds and removing any hairy
structures that has formed. Each time, make
sure that you wash your brush or remove that paint. There, cleared that, clearing that. I think it's good enough. Now all we have
to do is wait for this whole thing to dry
to add in the foreground. Everything is now
completely dried, so let's go ahead and start
adding in the foreground. For that, I'll mix
up a nice amount of indigo into
that same mixture, and going to create the
nice foreground line. It's going to be
a straight line. Then on the top, we're going to have
some nice shapes. I'm just using my flat
brush again and using them in different angles
to get the shape. Don't worry, you don't need
to use flat brush itself, you can go ahead and start
using any brush that you have. I just wanted to try and use a single brush for this one, and I think so far it works. Now we've added that nice line. Now what we need to do is
add in those buildings. For adding in those buildings, I'm going to mix a little bit of that horizon blue
with my indigo again. Here is my horizon blue, mixing it up with the indigo, so that my color is
now lighter tone. This lighter tone we're going to use to add
in our buildings. Just you can see, creating my buildings
by using this color. You can add them in
various heights. You see just adding
the buildings. Add them in various heights. Another thing is we could have
added this first and then added our dark blue
line on the top. It's totally up to you
which way you want to proceed with this. See, just buildings
here and there. This is the reason why I'm using a flat brush because I can just draw a vertical line like this and it will
just create a building. This is a smaller flat
brush that I'm using. I added those buildings nicely. Now we need to get
the water area done. I'm going to take my bright blue and mix it up with that same mixture to create that color that we
had on the top. We are going to
paint the bottom. I've just added that color. Then I'm going to use my brush to blend it in
towards the right side. Just use your brush and
blend it to the right side. There, blended it
to the right side. Blended that blue in
to the right side. Then I'm going to
take some more blue, and then add it immediately
below that region, because that's what the
reflection is going to be. Leave a gap when you add
the reflection line. You take the paint again and start adding
those triple lines. This is not the important step. As I always say, when we're painting the sky, that was what was
most important. Here we're just adding
this for extra beauty. Just using my flat brush to
get these lines in the water. There we have added
that nice strokes. As you can see, I've shifted the whole image up
because we didn't want to add in that bridge in the water because that is not
the focus of our painting. But there it is, we've completed our painting. All we need to do is wait for this whole thing to dry so
that we can remove the tape. Here our painting is
now completely dry, so let us remove the tape. Here is the final painting. I hope you like this one.
34. Day 15 - Colours & Image: Welcome to Day 16. This here is the reference image that we're going to paint today. You can see here that there's a nice glow of white
in the middle, and some sun rays
extending outside, and few clouds, and
then the water. Because the water area is not
the focus of this painting, we're going to shift
the entire water to a little towards the bottom, so that we get more of this guy. That's how we're
going to paint it. As far as looking at
how to paint this, you can clearly
see that it is all going to be with a
wet-on-wet technique. It is better to use
a flat brush for paintings like this one
where there is sun rays, because when you
use a flat brush, you get those strokes
where you can have those sun's rays
extending outward, or even inwards in the picture. That is something that you
can learn from this one. Then the clouds on the
top are going to be with the wet-on-wet
technique again. To make them softer, make sure that your
paper is still wet when you're
adding those clouds. Then obviously, the water
will be the foreground area. We'll have the water
ripples also painted with the wet-on-wet
technique itself, but don't stress too much
about painting the water because that's not the
focus of this painting. Let's first have a look at
the colors in this one. We have this color on the top. This is almost like
the colors that we have used in the previous days, which is going to be
a mix of bright blue, halo blue, the horizon
blue to make it opaque. Then a darker color
such as splashing blue or indanthrene
blue to make it darker. We'll get a shade somewhat
similar to this one. You can see how that
is quite similar. In order to make it darker, you can add more
darker blue such as splashing blue or
indanthrene blue, or even indigo to it, and you'll get a darker shade. That is the blue that
we're going to use. Then at the base here, we have a nice
pastel pink shade. For that, I will be
using shell pink. Don't worry, if you don't
have this pastel pink shade, you can mix your pink such as queen rose or
any rose with white, and the more white you mix, it'll look like this shell pink. Then obviously for the clouds, we need Payne's gray, but we can't have it darker like this and we need
it to be opaque, so we'll mix it up
with either lavender, but I would suggest we mix
it up with the shell pink itself so that you have a
color harmony in the picture. But then if you're
mixing up your shell pink by using a
pink and a white, then it is better to go
ahead and directly mix it with lavender if you
have a tube of lavender. If you have any opaque color, mix it up with the
gray paint so that you get a nice gray dull like that, and it would be opaque. I forgot to mention, we need to add in some orange
tones to that pastel area. Here I will be using
Naples yellow-red. I'll be mixing it up with a
little bit of orange shade, and we'll be mixing
that together with the shell pink so that we get a pastel orange
and pink shade, somewhat like the peach color. Those are the colors that we will be using
in this picture. Let's get to painting
without any further ado. [MUSIC]
35. Day 15: Let us start painting. We'll first start with applying
the water onto our paper. So I'm going to use my
flat brush, as usual, to apply the water
evenly onto my paper. So let's apply an
even coat of water. Now that we have applied
an even coat of water, let's go ahead and start
with our first color which is going to be shell pink. If you don't have this
color, you know what to do. Mix your pink color
with a little bit of white so you get this
beautiful pastel shade. That is what we're
going to start with. We're going to start
with it at the bottom. I'm going to add these strokes. Let's go ahead and start taking the shell pink nicely on our brush and start
adding the strokes. Then we're going to leave you
a nice amount of white in the center where the
sun is going to be. Since we are going to have
that ocean somewhere here, that light source is
going to be there. Let's get our strokes here
on our paper until there. Now we have our strokes. I'm going to go and start adding the shell pink in angle
directions like that. From the center, make it
go towards the outside. You can see where I've
left that gap of white. Go and start adding. Now we'll go ahead and start
adding some pastel orange. So here I want to go with Naples yellow-orange
or Naples yellow-red. Here it is, and I'll start
adding that on the top. You can see it gives a
slight tint of orange. We only need a slight
tint of orange, there. Now that we have a
slight tint of orange, let's get to adding
nice blue shade. Here we have the blue
shade that we have mixed. Make sure that you
remove all excess water and we'll start at the top. At the top region, that's where we'll start
and we're going to add it towards the center like this. Make sure that all your strokes
are towards the center. Here, all your strokes are towards the center of the
paper where the sun is. Now, let's add some
darker shades on the top. I'm picking up my
dark blue and adding it to the top edges because
we need it to be darker. This is the reason why we are adding it in
an angle because we want all of those
strokes to look as though they have
the sun's rays here. Pick up your blue shade and start adding them
towards the center. I think I'll mix a little bit
of green to that to give it that nice greenish touch
because it looks really blue. There I've added the
blue-green shade. Let's get that to all
the regions of the top. Now that we have added, we have the blue-green
tone on our paper. Now we need to add the
clouds on the top. Let's go ahead and start
adding the clouds on the top. Let us mix up our gray. I am going to mix it
up using Payne's gray. Here's my Payne's gray and
I'll mix lavender with it. So here is my lavender shade. You can also use
the same mixture, as in you can use
the shell pink. Actually, let's do that for the color harmony
in the picture. If I mix it up with
the shell pink, there is my Payne's gray and already mixed
it up with shell pink. Then we'll start
adding on the top. We'll start at the
base because that's what we painted first. We want the colors to be lighter and also before
our paper dries, we need to get
that on our paper. We have some nice smaller
clouds here in that light. Then now, we have
darker clouds there. This side, adding in the clouds, then we have some nice
clouds, fluffy clouds here. Make sure that your
paper is wet, otherwise, you won't be able to get
these fluffy clouds. Use the corner of your brush and try
adding in the clouds. You can see these strokes are almost not soft because my
paper has started to dry. We actually need to work very fast in order to
get our strokes. Some strokes here, let me try
and soften those strokes. I've cleared all the water from my brush and I'm just
going to run around the edge and try and
add to soften there. It's actually working
because I've dried my brush and there isn't
extra water on my brush. I've taken rid of all the extra water and
I've added those clouds. We can do the same by adding some smaller clouds
in the center. Some lighter clouds
in this region. Make sure that the gray
that you're using is very light when you
reach this stage. Lighter, make sure
that it's very light. Now that you've added that, let's add some nice strokes
beneath those clouds. We're going to go back
with our shell pink and going to add it
to the region below. But you can also mix it
up with a little bit of Naples yellow-red
and a bit of orange. Because we want it to be having
that glowy orange shade. So the pink, orange, and Naples yellow-red then
go with it under my clouds. Again, we have to make sure that our paper is still wet while
we're doing this. Because we want our
strokes to be wet. We need to get the
wet on wet nicely. That's why we're applying this. Make sure that you absorb
all the extra water. Absorb all the extra
water before you start applying any
strokes otherwise, it's going to create blooms. Going with my nice shell pink. Pick up a nice amount of the lighter pastel shade and
start adding on to the top. All of those places where you want to have those
lighter tones, that's where we are
adding the shell pink, but you can see that it picks up some of
the existing paint from the paper also,
that's absolutely fine. Just create some nice
glowing shades on top. Let's back and add
it on the top. If you've created any blooms, you can go ahead and
try and soften all of them with your brush here. Like in this region, I'm trying to soften
it with my brush, and then I need to
soften this cloud here. Just make sure that they don't form any blooms on the paper. I think we've got
that correctly. Now, all we need to do is
wait for this whole thing to dry so that we can add
in the foreground. Everything is now
completely dry, let's go ahead and add
in the foreground. For that, let us mix up a nice amount of
turquoise blue shade, so here is the mixture of the turquoise blue shade and let's just
directly apply it. First, I'm going to create a border with my brush,
a straight line. I hope that's straight. I'm just using my brush itself, I don't want to be using
any ruler, that's why. Let's go ahead and start filling up the
whole thing with color. That is the ocean part. Let's take the darker
tone, darker blue, and mix it up with this mixture so that we
get a nice darker shade. I'm going to absorb all
the extra water from my brush for adding
in the ripples, so there just going to
add these ripple shapes. You can just add these lines onto the water. Farther away, try making
the lines as smaller lines. You need to absorb
all that water. You can see at the top region, the lines that I'm
adding are smaller, and try to space them apart. Then as we come
towards the bottom, we can start adding
it in more detail and as we less
have these shapes. Don't worry about getting this part correctly
because the water is not the most important
focus in this painting, so don't worry and don't stress. You can just totally just
add some few lines and not do it as detailed
like this at all. Just added some nice strokes. Mixing my indigo to add some
darker strokes to the bottom or maybe I'll mix a bit of
Payne's gray and add it. I've just added a lot of these water ripples,
so don't worry, don't stress about this,
this is not important, this is just adding
the foreground. Let's add some lighter areas
onto the water as well, so here let us go with
shell pink again. Here I'm mixing my shell pink, but I need to make
sure that I absorb all the extra water
from my brush, and then we'll start adding it into the water right where
the glow of the sun is. It's right there, so that area needs
to have a nice glow, and let's add some
ripple shapes there as well and some lighter tones. Add some more. Added some nice lighter tones. You've added some
nice lighter tones visible on the top. We can finish off by adding some lines or maybe something on the top of the water area like farther off
land or something. I'm not going to do it
for the entire length of the water although it's
there in the picture, so let's just go
with just one area. It's going to be
really tiny and small, maybe that flag-type thing on the left side and
add it to the right. I think that's
absolutely enough. Now, all we have
to do is wait for this whole thing to dry so
that we can remove the tape. Here is the final picture.
36. Day 16 - Colours & Image: Welcome to day 16. Here is the beautiful
reference image for today. I hope you like this one. We are going to
approach this with the transparent colors
because you can see that there's a gorgeous
yellow, gorgeous orange, and a nice blues there, and they're not literally
touching each other too much, so we can actually perceive this with the transparent colors. Let's have a look at the colors that we're
going to be using. Here next to the sun, we have a nice beautiful yellow, so I'm going be
using Indian yellow, which is a beautiful
transparent yellow. Then next to it we
have a lot of oranges, so I'm going to be
using the orange, which is transparent orange, then if you want, you can mix a little amount
of red in that area, so either crimson or
alizarin crimson, but you can totally skip that. Then we have the blue
sky so for that, I'll be using my bright blue. You can see all of these are absolutely transparent
colors and it's just going to
make it beautiful. But make sure that, when you're adding the yellow
and the blues to the sky, you have to keep a space in-between them and they
do not flow to each other, otherwise they're going
to form the greens, okay? The blue, then dark
blue for the clouds. So here I'm using Prussian blue or inventory in blue minus indenting in blue. You can either go for
Prussian blue also. Then at the base of those clouds you can see some violet tones if
you look closely, so I'll add a little
bit of violet as well, and then in order to give it a beautiful glow effect will
mix in some pink as well, so pink rows here, so that would give some nice glow there
along with the orange. Then at the base here, we again have the yellow and then we'll add
the orange on the top, and then for these
darker reports, we are going to add orange on and then on top of
it will add brown. This is burnt umber
or transparent crown and then for these buildings
in the background, we'll add it with a darker
tone of paints gray, okay? I think that's all the
colors that we can use for this painting
in the sky and then we also need some
white gouache to get these white sun and its
reflection in the water, okay? Now, as far as
painting this goes, you can totally see that the sky is going to be on wet method. Here we're going to add in the clouds on the top in
the same layers as well, and we have to do
it as quickly as possible before the
paper dries because we want to have soft edges and we also need
to make sure that the blue and the yellow doesn't mix together
to form any greens. There's a lot of drama
here through the water, but since our focus
is only on the sky, we don't have to work
on the water too much. Just a little bit
off dashed lines is what we're going to
do and we're going to totally skip this bridge, okay? Let's get to painting.
37. Day 16: Let's start. We'll start with applying the water onto the
whole of our paper. Let's apply an even coat
of water onto the paper. Here, I have applied an even coat of water
onto the paper. Now, we'll start with
applying our first color. We start with the top. We're going to start with
a nice shade of bright blue at the top, and we're going to bring that towards the center
just until that much. If you want, you can
just tilt your paper so that all the darker colors
accumulates at the top region. You can see actually there's a mixture of water on my paper, which is why I always say don't have these water
accumulating on your paper. Let's get rid of it. Let's
just absorb that whole thing, because we don't want any
extra water on our paper. Rolling up ending if we do have. Here, I've gotten rid of
all that extra water. Then we'll add the paint
nicely on the door, and move lighter as we go down. Let me absorb all that
extra water from my brush, and then pick up the darker
tones to add at the top. Here I have added
the darker tones. As I move downwards,
it's lighter. Then I'm going to pick up
a nice shade of yellow, and that's what we
apply at the base. Starting to apply the yellow, but make sure that
you don't touch the blue region with the yellow which is
really important. Just pick up the yellow
and stop right there. Then the next state that
will go with is orange. We add in the orange, and we'll add it right above the yellow region where it's supposed to
join with the blue. Also add in the orange down
the left and the right side, towards the yellow but leaving
that yellow in the middle. That is the first part, now we need to add in
the clouds on the top. For adding in the
clouds on the top, I am going to take my dark blue in color which is
indenting blue. I'm going to start adding
in the shape of clouds. Just pick up the nice blue shade and start adding on the top. You can see it's nice and dark, so you need to get
that in this region where it's joining
the orange as well. We'll have some here in
the form of the lines. Now, we're going to add
some violet tones to it. Here, to the area below, adding some nice purple tone. But in order to get that
little glow of pink, we'll add some pink
shades as well. Here, I'm taking my queen rose and I want to
add it at the base. It won't be seen too much, just at the base slightly. Get it to blend with
that beautiful blue. It's going to look
like violet itself. We need to create the
glow under the clouds. Let's go ahead and
take the orange again, and we're going to apply
right below those clouds. There below the clouds, and we'll add some nice clouds
with the orange as well. The left side. Now, we have added all
the clouds in the sky. Let's wait for this whole
thing to completely dry so that we can add
in the foreground. Here everything is
now completely dried, so let's go ahead and
add in the foreground. For that, I am going to
be using my Payne's gray. Here is my gray, and we're going to add in
the line for the full cloud. I hope that's straight. That's not bad, it's
straight enough. Then we have the buildings
in the far away area. We're going to have to
create some nice shapes. I'm just going to
create some shapes, and then I'll add the
color inside later on. You can see I'm
concentrating nicely into adding those building
shapes in the background. I have added those shapes, now let us fill in
these buildings. Add more Payne's gray and
fill up the buildings inside. This is a bit
time-consuming, isn't it? To go and keep filling up the
inside of these buildings. Anyway, it's optional, you could actually just add a different foreground
and be done with it. I was just trying to mimic
the picture this time. Although I don't usually like to paint exactly
as in the picture. I have filled up the
entire buildings, now let's go ahead and
start adding in the water. For that, we're going
to start out with a nice orange shade, and we'll start
adding in the water. We have the sun here over
there is the yellow. Right next to that, we will start with the orange. First we're going
to have a line, a separation where the
land and the water meets. Then we have all
those smaller lines. Here the smaller
lines of the water, and as you've gone
towards these, you can have the
separation of the lines, larger and larger gaps
between the lines and also darker lines
towards the base. Darker and larger
as well, in fact. Separation line
between buildings and land that is the
land and the water area. Let's go ahead and start getting those smaller ripples
towards the top. This time we're just adding
several lines for the water. Towards the left side, we need to have more
darker lines, so first, let's go ahead and start
adding these orange lines, and then we'll add
darkness and depth to it. Now we've added a lot
of those orange lines. Let's go ahead and start taking our next color on the top. I'm going to pick up
a nice red shade. I know that there's no red, but that's like a darker version, so we'll mix it up with
the orange and try to get some nice dark red
shade towards the left. Then we will go with
the next darker shade, which is going to be ground, so either burnt umber, transparent brown or any
dark brown that you have. I'm using burnt umber for
transparent ground here, and that's what we'll
add at the base. At the base, I'm going with a
dark brown color. Adding these brown ripples, smaller ones to the right side, and closer to the
buildings I want to have more of those dark brown rocks because we want to have the
deflection of the buildings. Then make sure that when you're
adding those reflections, you try to somehow
get it in the shape of the buildings
on the top region. That is, if you have a peak, a taller building there, try to have some larger lines. Towards the left side, the left side is
going to have four of those darker lines because it's further away from the
sun area, so that's why. Let's again have the reflection such
that it follows the shape of the
buildings, somewhat. Shape of the buildings. Adding more darker tones towards the left side and just extending it
towards the right side. It's like the reflection of these darker clouds are going to be really dark here
on the left side. That's why we need to add it as a darker version without any lighter colors
on the left side. I think that's good enough. Now what we can do is
we can finish off by adding a little
sun in the image. I'm going to take my
gouache white paint, I'm going to add the sunset here is where I have decided
to have the sun, so here is the nice glowing sun, and then we're also going
to have the yellow part, and the glow of the
sun in the water. Here, just add the reflection. It's going to be white, and then some small dotted
lines towards the bottom and there that is just the sun, the glow, everything to add it. Now all we have
to do is wait for the whole thing to dry so
that we can remove the tape. Everything is now
completely dry, let us remove that tape. I just love how this
one has turned out, especially with the reflection
of the sun and the water, but I know that
that's not the focus, even this guy is just
so gorgeous, isn't it? So there you go.
38. Day 17 - Colours & Image: Welcome to day 17. This here is the image that
we're going to paint today. You can see it consists
of just the sky and the fluffy clouds. We need to get
this on our paper. Let's look at this
closely. What do we see? We see two contrasting
colors and as you know, if you mix these two colors, they're going to create
a gray on the paper. We won't be able to paint
the whole of this in a single layer with the
wet on red techniques, we might have to go
with multiple layers. What we're going to
do is we're going to paint this in two layers. The first layer, we'll paint
the turquoise green color, the light turquoise blue color. Then the next layer, once it's completely dried, we'll go with the orange sheets. That's how we can
approach this picture. Now we know how we're going
to approach this picture. Let's have a look at the colors. Obviously we need this
turquoise green color. What I'm going to do is I'm
going to mix my phthalo green or turquoise green with my
horizon blue, which is opaque. That's my horizon
blue and mixing them together will give
me a nice light, turquoise green color like this. You can see it's got that bluish tint and everything because
this is horizon blue. Don't worry if you
don't have this color, what you can do is you
can mix your blue, green, and white together
to get a nice opaque color. Makes sure that the white paint that you're
using it's opaque. I don't have to tell you that. Then we have these darkest
regions of the same color, so for in order to make it dark, I'll mix a little
bit of indigo paint. That's the indigo paint. Often mixing indigo the
whole thing becomes opaque and a darker
version like that. Then, now, what do we have? In the second layer we are
obviously going to have to paint with the orange tones. For that, first we'll go with a nice Naples yellow, reddish. This is my Naples
yellow, reddish. You know by now you can mix your orange and
white together to create that beautiful
Naples, yellow, red tone. Then we have that
orange on the top. In order to get the
orange on the top, I need to make it opaque because what I have is
transparent orange. You can actually
use cadmium orange because that is really opaque. What I'm going to do
is I'm going to mix up my Naples yellow and
my orange together. Mixing my Naples yellow and my orange
together will give me an opaque version like this. It's almost the same it's
just that this is opaque. Then as you can see, it's like a peach color
is not exactly orange. In order to make it peach, we need to add a little
bit of pink to it. Adding that pink
color will give us that peach tone,
something like this. You can see it's that peach
color that we have created. You can mix your orange, pink, and white together, and a
little bit of yellow as well. That would give you this
beautiful peach color. Then now we have to get
some darker regions. In order to get to
the darker regions, so I'll be adding
the burnt umber. I'm going to mix it up
with my Naples yellow, red in order to make it opaque. You can mix it up
with a little bit of orange and white together
to make it opaque. Then in these darkest
regions obviously will go with the brown paint itself. Then we also need the white pigment
in order to get some of the whiter areas. That's it going to
be for this one. Let's get to painting this.
39. Day 17: Let us start painting, you'll start with
applying the water onto the paper for
the first layer. Let's go ahead and apply
an even coat of water. Both the layers are
going to be wet on wet, so this is the first layer. Let's just apply the
water onto the paper. Here I have applied an
even coat of water. Let us go ahead and start
applying our first color, which is going to be the
light turquoise green color. I'm picking up the light
turquoise green color in my brush and I'm going to slightly apply it onto my paper. Just in the middle portions
and in the top region, but in top region we
need it to be lighter. As you can see, I'm getting
my strokes lighter. I didn't need to
mix this much of the paint, it's such a waste. Anyways, so there, mixed a nice amount and added a nice amount of that dark
turquoise green shade. Let me get that up to the
bottom and some here. Here at the bottom, I need it be slightly darker, so I am going to mix the
whole thing with indigo. There is my indigo, I have mixed it up. You take more and
mixing it up with indigo so that I get my
strokes to be darker. Let me absorb all that extra water
from my brush, because it's dangerous
to introduce any extra water because the whole thing is just
going to flow, and I don't want
it to be flowing, but rather I want it to
stay wherever I'm applying. There, now we've got a
nice darker strokes. Let's get that darker stroke here at the bottom
as well on the top. Green, put in some here. Now that we've applied the nice
green-ish tones, that is the turquoise
green tones. This is the first layer. Let's now wait for this
whole thing to dry completely so that we can add in the orange
tones on the top. Here everything is
now completely dry. Let's go ahead and reapply water on the top for
the second layer. When you are
reapplying the water, one thing that we need
to be careful is that your first layer needs
to be completely dry. If you're using a hairdryer, you'll be able to understand
it because the paper is going to be hot if
you're using the heat. Otherwise you just have to
wait for a long time because even if this thing is slightly wet and you reapply
the water on the top, it's going to move
the underlying layer. If you don't want the
underlying layer to be too much disturbed, then you need to wait for
the whole thing to dry. Also, when you're
reapplying the water, try to use a larger
size brush you have, because the more movement
you have on your strokes, the more it is
going to come out. Because obviously it's
watercolors and you're able to reactivate them even
if it's on the paper. Let's just make sure that
we do not react with them. Here I'm going to
use my flat brush, largest flat brush that I have and I'm going to
go over quickly, on the top and as fast as I can because you can
see slightly already that I am moving some paints. You can see here this area
I have moved some paints, so we just need to be careful. Dry and reapply the water. That's just too much water, let me just tilt my paper so that all the
water would come down, that is, the extra water
would come down and they can absorb it with my towel. That has got an even coat of
water on my paper, so I'm going to start. We're first going to start
with Naples yellow reddish. Remember this the
lighter orange shade. I have the turquoise
green in my brush, so it's mixing with the
Naples yellow reddish to form gray color, so I need to clear that up. We'll start applying on the top. Picking up my nice
Naples yellow red. Premix your colors
if you're going to be mixing it up using gouache. Here, let me put yellow red and let me start applying
it onto the paper. We need to make sure that
our paper doesn't dry, so do this process quickly and start applying
into all the areas. Let's get the paint
onto all the areas. This is like the underlying, firstly part of the layer
for the orange clouds. Let's get to this side, so don't let any part
of your paper to dry. We need the whole
thing to be wet, so the center portion and everywhere where there
are those tiny clouds. Now that we've applied the first part of
the second layer, not the first layer, sorry. Anyways. Now we've applied the first part of
the second layer, let's go with adding
the next part. That is adding the nice, beautiful orange
shades on the top. I think we need it to be
slightly peach a color. I'm going to mix a little
bit of pink, like I said, to create that beautiful peach
color into this mixture. There's the pink and
here I've mixed it up. I think we need more pink. Now it's turned into
a gorgeous red shade. I need more yellow. That's Naples yellow
and adding that. It's a time-consuming process to create that exact
tone that we want. This is why I say premix
your paints because otherwise if your paper is
not 100 percent cotton paper, it's going to dry out. Then you won't be
able to work on it. You'd have to wait for
the whole thing to dry again so that you can reapply the water and paint. There, I think I've got
the color that we want. Now we'll go ahead
and start applying that gorgeous tone
on the top there. This again, is going to be
the wet-on-wet technique. Let it sink in on the top in random areas where you
want it to have that gorgeous, beautiful peach color. Then here on the left side. You can add all of this in
as many layers as you want. Here, now this is
our second layer. It's totally up to you how
many layers you want to add to get this painting done. Now we've got that
gorgeous color in there. Now let's get to adding
some more dark colors. I'm going to pick up more of my paint and mix it up
in the same mixture. You can see it's now
a darker mixture. Now this is what's
going on the top. That's going on the top
and getting blended in. In order to make it blend, we obviously know that
the whole thing has to be wet because if it's dry, it's not going to blend. Let's get that paint on the top. Now, we've got that darker tone. Now we need to get in
more darker tones, so we're going to go with brown. That's burnt umber, also
known as transparent brown. To make that opaque, I'm going to mix it up with
my Naples yellow, reddish. You can mix it up
with a little bit of white and that would
give you the opacity. That's what's going on the top here and in the darkest areas. Here on the left side, obviously and in
some areas here. Now that we have added
all of those colors, let's soften up everything. Make sure that you dry
your brush completely on a tissue or a cloth,
whichever you're using. Then let's just blend the whole thing evenly
without forming any hairs. If it's starting to form hairs, just try to get rid of the
hairs by just going over with your brush and blending the
whole thing onto the paper, like here I'm doing. I want that brown area to
be blended in smoothly. We can go over
some of the areas. Now I've got paint in my
brush and I'm going over it to create that gorgeous
shapes of the clouds. We can pick up some
more of that colors because now this whole thing
is starting to dry up. When we add more
color on the top, it's not going to
spread out a lot, but rather it's going
to stay in that place. There, let's do the
same to this side. Let's soften up all the edges. There. Now we have softened
up all the edges and we have darkened up the edges where we want it to
be darkened as well. Although I think I want
to add a little bit more brown to the side on the left because
it's really dark there. Because I'm using this brown and not any transparent mixture, it's going to create a
weird combination here, but I'll soften that
up using my brush. Here I've absorbed
all that extra water. I'm just going to
soften that whole thing and blend that brown
into the background. There, I've blended everything. Another thing we can
do is to get some of the white areas in
this top region, so we can go with
some white paint. If you put some white
paint in your pallet, I'm using this white gouache. You know by now which
paint I'm using. Let's get that. If I take a little bit of the white paint and I'm
just going to drop it in that region in the form
of some fluffy clouds. Then I'm just going to blend
it into that background. This is one way that you
can get those fluffiness. See, just added
those fluffiness. You can see that now there's that little fluffiness
there and the whiteness. Let's do the same
on this side here. Let's just create those
shapes with the white. But your paper still needs to
be wet because if it's dry, you're not going to
get that fluffiness. The whole thing is going to just not blend and your white
is going to stick out. If your paper has
completely dried, what you can do is you
can wait for it to dry and add this
in the next layer. That's very important. You go ahead and start
adding in other areas, wherever you think
that you want to add in the fluffy clouds. I think this region
has completely dried. I'm not going to
ruin it by adding anymore or too much
of the white colors. Understand that these white
tones are going to get lighter after the
painting is dry. You can go ahead and start
adding some nice tones, but don't make it
too white as snow. I just want it to be lighter. We've got those light tones and we've got those
fluffy clouds there. Let me add some
more to the bottom. Now we have mixed up
those white regions. We can see how gorgeously it's
created those fluffiness. Now the painting is complete. Let's dry this whole thing up so that we can
remove the tape. Everything is now
completely dry. Let us remove the tape. Here is the final painting.
40. Day 18 - Colours & Image: Welcome to Day 18. This is the reference image that we're
going to use today. As you can see it's
a beautiful paste of the sky with a lot
of pastel colors. Let us have a look
at the colors first. You can see that this is a
beautiful pastel pink shade. I'm going to be using
my shell pink for that. Here is my shell pink. You can see it clearly
matches that pink shade. Don't worry, if you
don't have this, you can just mix your pink shade with white and you'll get
this lighter pink shade. Then for these
clouds in the sky, we're going to paint
with lavender. You can clearly see that
it's a lavender shade. You also need to create
some darker shades to get that depth of the clouds. For that, I'll be
mixing my lavender with a little bit of violet. This is transparent violet. We mix it with lavender
to make it opaque. Then we had this beautiful
peach color in between. That peach color, I'll be
mixing it by mixing up my pink, orange, and the
shopping together. I'll get this beautiful
beach color like this one. This is a mixture of this pink, orange, and they're
shopping together. You can mix your pink, orange and white together, and you get this
beautiful peach colors. That's what we need for
these areas in-between. I think that's it for the colors that we're going
to need for this main. When you look at this,
what do you think? How we're going to paint this? Obviously, I think it's clearly
obvious that it is going to be in our wet on wet method because we
have the softer clouds. We're just going
to paint this in one single layer and
we're going to have the shopping and all of
it just spaced apart. You can approach
this in two methods. One is to apply the shell
pink all over the paper. Then on top of it paint with the peach and
the lavender color for you to get the softer skies because that's the simplest method. I don't want to go with
the simplest method. I want to show you
different ways that you can actually do this. The second method is
to have the shell pink in areas that's not
covered by the clouds. You're going to have to follow the negative painting technique, which means you're
going to paint in all the areas that there
are no clouds and add the shopping first
and then go with the peach and the lavender
colors with the clouds. That's what I'm going
to be doing today. Don't forget the other method. We can simply add shopping
to the whole of your paper, then add the peach
and allow undertones on the top with the same
wet on wet technique. Let us start painting.
41. Day 18: Let us start painting.
We'll start with applying the water onto
the paper as usual. Let's get that water onto
our paper evenly using my flat brush here and
applying it onto the paper. Let's make sure that
our paper can stay wet for all the times we're painting with the wet
on wet techniques. Make sure that you apply it
multiple times if needed. I've explained this
so many times, so I'm sure that
you know it by now. Then we'll start with
our first color, which is going to be shell pink. Here I have my shell pink. You can use any
pastel pink shade and we start applying
that onto our sky. Here, we're going to apply it to the sky and what
we're going to do is, we're going to paint
around the areas where there is the violet. It's easier to paint the
whole of the sky with this shell pink and then paint
with lavender on the top. But then let's just
leave space for that lavender so
that that lavender goes into the paper on
the top layer itself. This is like the negative
painting technique where you paint around the areas where you
want the lavender to be. We want the sky to go there
and then we have shell pink strokes there
and there in the sky. This is like going around the areas where we want
our pink shade to be. Then some of the
areas where we've skipped and it's going
to have the lavender. We can add it on the top. But this is just like
the outside areas, the main bigger clouds where
we want it to have this. This is mainly
because when we're adding in those orange shades, it's going to be difficult
to add them on top of the lavender already
being shade, so we want to avoid that and get our shades onto the paper first. Now that we've added
that base through beautiful pink onto our paper, let's get to adding that
orange or peach colors. Now if you have the peach color already, you can use that. Let me mix up that peach color, so what I'm going to do is, I'm going to take my
pink and then I'm going to mix it up
with a bit of orange. Mixing it up with orange. I've already got a
darker peach color now. Now I need it to be lighter, so I'll mix it up
with the shell pink. Then give me a
lighter peach color, here is the lighter peach color and I'm going to apply
that into this sky. This we are going to apply in the areas where you want
that pinkish tone to be. You can pick up
more of the pink, the orange, and everything
and make it lighter. Then I have some strokes here, some strokes here underneath. Just drawing with my strokes
and then we have some here. Here we are going on top because our shell pink
spread onto that area, but that's absolutely fine. It's lighter, but I'm still going to go
and make it vibrant. We have some here at
the bottom and then we have some dots and
specs here and there. I think we've got all
that pinkish shades in and now we go with
our lavender on the top. Let's get our lavender. Here is my lavender shade. We need to make sure
that our paper is still wet and also
to dry your brush and remove all extra water before you add in all
these extra steps. Here, I'm going to
add that cloud there. Then some small specs
here and there. The cloud that was
here at the top. Then at the top again, so we can go over some of
that beautiful peach shade. But make sure that you don't go too much over
it because then it will create a very
muddy gray color, so we need to avoid
that at any cost. We'll just add it here. We want all those colors here, some nice large cloud here. Just go with the flow
and start adding. You don't even have
to draw exactly as in the picture
like I always say. You can just go ahead and try getting some
of these shapes. Got this nice one and extending, and some small specs here
and there smaller clouds. Now that we've added a lot
of these smaller clouds, let's get to adding some
more darker tones onto these beautiful violet clouds. We need to make them darker and in order to
make them darker, we'll mix them with
violet like I said, so here is my violet. Mixing that with lavender so that will make it dark and
we'll add that to the top. Not in all the areas, we just need to be
blending smoothly, so make sure that
your lavender paint is still wet while
you're doing this, otherwise, you're
going to end up with a huge mess because it's
not blended together. There you can see when we add
the nice violet on the top. Now that we have
added all of that, let's go ahead with our
lavender again on the top. Get it to blend smoothly, but if it's not blended you can blend it
smoothly by picking up more lavender and
adding it to the top. You can see this area, it was not blended
but then I added more lavender to it and look
how that's softened up. The same here and
these areas as well. Here, you can see
it's not blended. I think that's good enough and now we can wait
for this whole thing to dry. Everything is now
completely dry, we can remove the tape. This one was quite simple. I think the only difficult part in this painting is to get
these shades correctly. If you don't have
the pastel shades then it's going to be
hard to mix them up. Here is the final painting for today, I hope you like it.
42. Day 19 - Colours & Image: Welcome to Day 19. This here is the reference image that we are going to use today. Let us have a look
at the colors first. As you can see there's
a lot of blues here, some darker blues here, and some purple
and violet shades, and a little bit of orange here. I've already mentioned all
the colors that we have. I am going to be using bright blue or phthalo blue
for this blue here, and then to get the depth
or these darker shades, I'll be adding Prussian
blue on the top. Then for creating
this purple shade, as you can see, it's got
a nice purple shade. So what I'm going to be
doing is I want to be mixing my quin rose
with this bright blue so that I get a nice
purple shade like this one. That's a purple shade mixture of this quin rose and this
bright blue together. Then for creating violet, I'll add more blue to it
and there I get a violet. So it's just a mixture
of these two colors. Whichever blue you're using, mix it up with pink to get
a purple and a violet. Then a tint of orange there. I'm going to be taking up
orange and adding a tint there. I think that's all the colors. We'll also need
some white paint to add these lightning strokes and some white strokes
on the clouds. So let's see how
we can paint this. This looks a bit tough, but let me tell you one thing. You can paint this
whole thing with the wet on wet technique
and on a single layer. You obviously have some
[inaudible] so let me explain. The wet on wet technique where you would be
adding all the blue, the violet, and
the purple strokes and you'll add these
darker tones on the top. You'll be adding
these darker tones such that you cover the
edges of the clouds. Can you see these edges here? We need our paper to be wet but not too wet such that all your
paint is spreading around. It'll be such that
in a damp stage when you apply this blue shade, it will not spread but it
rather stay in the raise. Then this blue shade again at the edge and then you
blend it out into this region using the same
blue that you used for painting the background
in the first place. These colors are simple because you just have
to add it on the top. Because when you add
purple alongside the blue, it's already going to
create that violet shade. You don't have to
mix it yourself. You don't have to mix this
because it's going to mix by itself and create that violet shade when
it goes alongside the blue shade then
adding some oranges here. Once the paper is
completely dry, you can go ahead and pick up some white paint
and paint around the edges of these clouds and then soften the
edges of those whites. So when you do that, this will bring out this
cloud here to the front. That means it's going to look as though that cloud
is standing out. That's what we're going
to do with this painting. Let's get to painting this.
43. Day 19: Let us start. We'll start with applying the
water onto our paper. Let's apply the water evenly. Make sure that you really
apply the water evenly without forming any large
pools on the paper. You can actually
tilt your paper to get that water evenly. You can tilt your
paper like this, so that the water flows down. I mean, any extra bit of water
on the paper flows down. Now, that we have
applied the water, let me mix up that
beautiful purple shade. It's going to be queen rose and the bright
blue together, and now we have
the violet shade, we need more ink to make
it purple, so there. That is the purple shade
that I want to be using. Let us get to painting. Let's go with our first color, which is going to
be bright blue, and I'm just going to
add it to my paper. Let's go ahead and start
adding the bright blue, and we add starting
from the top, and on the left side,
as you can see, it's clearly covered with a whole lot of
bright blue shade. There and then coming
to the left side. The whole of it is
just bright blue. Let's get our blue
paint on the top. Start applying, so all the way up to the bottom. You can see that
it's bright blue. Get the bright blue up all
the way towards the left. The darker colors we'll add
on the top, so don't worry, first let's get these
colors in the sky. Then we have some more of the bluish tones
on the right side. Let me get that in there. Now, we've got our blue
tones on the paper, so let's get our purple tones. Here is the purple. All you need is
to mix the bright blue and the purple together, the pink together, and you get this
beautiful purple shade. That is what we're going to add so let's mix that up more, that's pink and the blue together to create a
beautiful, nice purple shade. We need it to be lighter, so make sure that you pick up a light amount and also
make sure that your paper stays wet and when it mixes with the blue
already on the paper, it's going to create
some violet tones, and that's absolutely fine. That's nice violet clouds. We'll have the purple
violet clouds on this side as well and some
of the purple tones there. Think we need more pink in our mixture because
there's already a lot of blue on the paper. So you get that and there. I've added a lot of
these purple tones. I can see it's really dark in the areas
that I've painted, so I need to make them lighter. I'm just going to go
around with my brush and soften most of it so
that it's lighter. You can see it's now very, very light because the mixture
that we made with darker, but then when we go around and start adding on the
top, it gets lighter. There, making it lighter, then we need to add it
to the base as well, but at the base, I'm going to go
with a teeny-tiny amount orange and give it a nice beach shade as well
and blend that thing. We have a lot of
white space there, so let it be and
these areas as well. Let's just make sure that
we blend the whole thing. I need some lighter area there, so I used my brush to
create that lighter area. Now, let's go with
the darker paint and start adding some
dark, cloudy forms. The rest of the areas
are now darker. Let's get the blue
in to the mixture, so adding more blue into
the mixture and then I'm going to go with a nice violet shade of
clouds nodes here. You can see it's violet and
I've added the violet shade. We add that here in all the areas and get
some nice violet shades. Now, we've covered
that right side, now we need to make sure that we add more of the
darker clouds left. For that, I'm going to
pick up my Prussian blue, and I'm going to mix it
up with my bright blue. Taking my Prussian blue and mixing bright blue together and then
we'll start applying. So here and then I'm going to create these rounded shapes, that's what going in, rounded shapes and we're
going to paint the whole of the inside of those
rounded shapes. Now we've added
some nice clouds. Let's add more to these edges, to the right, then there's
some here at the top. We need to be working quickly in order to get
all these colors. Otherwise, we're
risking creating blooms or even hard edges. That's something that we
have to work quickly on. Here I'm going to create some
nice clouds there as well. What I've done is we've
added the clouds there. Now we need to make
sure that it's blended into that region. We'll pick up some
nice bright blue. Go back to the light blue or the blue
that you are using, make sure that you absorb
all that extra water, and then blend it. Taking the blue, and then blending it to that
region. Can you see? Now the dark areas there, and this area is now lighter, and it's around the
other cloudy form. We make it even lighter. What we're going to do
is we're going to take some nice white
paint and add it. Let's pick up some
nice white paint, make sure that the absorb
all the extra water. It's very important that you
get rid of all the water. Then adding that white
paint on the top. With bright blue,
you're going to have to pick up a nice amount of white paint in
order to be able to put it on top of
the bright blue. If you're using bright
blue or the halo blue, because it is really
staining pigment, and it's very hard to get
white tones on top of it. There. We can add the white color on
the top and get it to blend nicely into that
light bright blue region. There. Go ahead and pick up more of the white
and do the same. I need some white
tones there and some white tones
here at the base, and maybe some more
tones on the right side. I've added all
those white tones, and you can see it's
standing out white. But what we're going to do now is we're going to blend them in along with the
other blue shades, so it looks as though that area is just a
brighter blue shade. Can you see? It
looks just right, and the same we're going
to do with this side. That is probably good enough. Let's go back to taking our Prussian blue and add
it around this white. The reason I'm adding
the blue again is because now it looks as though
the white is on the top, so we need to make
sure that we bring out the blue to the front. That's the reason why
we're doing this. When we apply the
blue paint again, know going to look as
though the blue paint is what's above in the picture. See? It stands out. The same with light blue here. I added some nice blues. We just need to make sure that
we blend the whole thing. I think this is good enough. Now what we can do is wait for the whole thing to
try so that we can try add in our lightning. It's now completely dry. Now what we need to do is, let's go with the
smallest size brush you have, with a pointed tip. I'm going to use my liner brush, and I'm going to take a
nice amount of white in my liner brush and use the pointed tip of my liner brush to create those gorgeous
lightning strikes. There. Just creating some
nice and lightning shapes. We need to make
sure that the white that you're using
is really opaque. Otherwise, it's going to
get lighter, so that's why. Then make them smaller. Make sure that you
use the pointed tip of your brush because that's really important if you want to get a beautiful lightning shape. I want to extend
this to the top. There. We've got some nice
lightning shapes there. I think that's enough
for the lightening part. Now what we can do is, I want to try and
bring out some of the white and the background a bit. I'm going to take my
white paint, a little, and going to try
apply it at the top, and we're going to try apply
it in such a manner such that you are creating
the shape of the clouds. Can you see? Just created
a shape of the cloud, but what we need to do is
we need to take our brush and soften out the edges. Can you see? I'm using my brush, and I've softened out the edges. Use your brush and water and make sure that you soften it out
towards the outside. This is, again, like a
negative painting method, where you're softening out. We're softening out the clouds so that this cloud looks as
though it's in the front. We just need to do it only
for the right side here. I think the other
areas are forming. Make sure you do it multiple times or that you ensure that it doesn't
create any bloom. This process can only be done when your paper is
completely dry. Otherwise it's going to
create blooms on the paper. Also don't use a brush
that has a lot of water, so make sure that you absorb all the extra water
from your brush. Now that we have completed, we only painted on
the inside areas and just the lightning, we can remove the tape. Here is our lightning
image for today. I hope you like this one.
44. Day 20 - Colours & Image: [MUSIC] Welcome to Day 20. This here is the image that
we are going to paint today. As you can see, this is
in the portrait mode, so we need to be changing
it into the landscape mode, that is, to rotate it. Let us have a look at how
the sky is structured. It's got these darker
clouds in the top then comes down to a blue, pink, and then
gradually lightens up to an orange and yellow
shade towards the bottom, and then the foreground. Obviously, the sky
is going to be with the wet-on-wet technique, and then the foreground
on top of it. But before we add
the foreground, we have these lightning
strikes which we have to add because, as you can see, it's
behind the foreground. It'll be first the sky, then the lightning strikes, and then on top of
it, the foreground. When we rotate it, it
means that all of this is going to be compressed
into the landscape mode. If you look at the colors, there is a possibility
of adding them into the sky gradually using the transparent
version, that is, you can go for darker
colors at the top, and then gradually lighten up, or you can go from the
bottom up, that is, start with yellow and then
orange and then pink. These are not too much
contrasting colors, there's only a contrast here, between the yellow and
the darkest version here. Then as you can see, it's joined by
dark brown clouds. Then yellow is not going
to mix up with the black, and create any greenish tones, that is, it is not going to mix up with the dark blue to form
any greenish tones. You can just add the
brownish tones here. We'll go with the transparent
method on this one. Let us have a look
at the colors. First, we have yellow, which is obviously the
transparent yellow, then we'll add some
transparent orange on the top, then we have this
beautiful pink sheets, but as you can see, it's
also slightly purple sheet, so in order to create that
slightly purple sheet, I'll go with mixing it
with a little bit of blue, so I'll mix it with
the bright blue, and then here we
have the orange and the pink mixture which we can mix it up using these two
colors while painting itself. Then as we go towards the top, we have the darker colors, so we can either use Prussian blue or we can even use indigo. So there indigo, and then for these dark clouds, we'll go with burnt umber or burnt brown or transparent
brown, whichever brown. Then we have white for these
foreground lighting strikes. Then on top of it, in the front, we'll have the darkest
version of the foreground. I'm not going to be using black, but rather I'll use my brown itself and
its darkest value. Because of that, you'll
have it shining through. Also since our focus is
not in the foreground, we're going to skip
the light regions in-between the foreground. That's it. Let's get to painting
this. [MUSIC]
45. Day 20: Let us start. We'll start with applying the water on our paper. Applying the water onto the
whole of our paper to make sure that it stays wet
for all our strokes. Now that we have applied the water, let us
start painting. We'll start with a beautiful
Indian yellow shade and we're going to apply it in the middle and
all the way down. Somewhere in all
of these regions, that's where we're going to
apply the Indian yellow. Make sure that you apply it
nicely so that it's clearly visible and also on the
left up until here. Now that we've applied the Indian yellow let's go with the other
beautiful colors. We have orange and it's going to be some orange shades here. It's going to be a mixture of this orange and the
Indian yellows. That's why I'm applying on top of the Indian yellow here
and you can see that it's clearly mixing to
a beautiful shade and then we start going up. But as we start going up, we're going to start it
with a nice pink shade. Let's get that beautiful
pink in the sky there. That's the pink shade. There is just too much water here because it's formed
a bend in my paper, so I'm just going to absorb
it and move it around, that's quite simple, isn't it? Just move around
the extra water. This is where I always say
don't form any large pools. I'm not listening to myself. Anyway, there is the pink shade. Start applying that on the left side as well, forming a nice thread
shade at some places, and then we'll mix a little
bit of the blue to it. There'll be mixing up indigo
so when you mix up indigo, you can see it creates
a nice purple shade. There's the Indigo
and I'm mixing them. It creates a nice purple shade and that's what's
going to go over the top regions and here
towards the left side and here. At the bottom, you can
see that it transitions into a little bit
of brown shade, which is exactly what
we want, and there. I think that's good enough
there and we'll add some more nice strokes and here it transitions
into a brown shade in these yellow regions. Now, we'll go first with orange and add
some nice orange on the top. There's deep orange and adding the nice
orange on the top. Just at certain places, don't add in all
the places because we want that yellow to be seen. You know where the lightning is you can clearly see the yellow. Then we go with the brown shade. Here is transparent brown. Using transparent brown, I'm going to add on the top and get those darker
shades in the sky. Here is the brown and
get it on the top. Perhaps some nice
loose strokes there so we need to keep that
area slightly lighter. Then go with the brown shade at the top there
again you can see. You can see the gap of
yellow that we've created. Then go with the brown
shade at the top. This brown is what
is going to separate the yellow from the blue shade. Otherwise, we create greens. You can just see we
can blend all of this. Now, let's get the blue, so the dark blue indigo. There's the dark blue indigo and that's what we're going
to apply here at the top. Get the dark stroke on the top. We can also top it up with
a little bit of Payne's gray if you want it to be
absolutely dark at the top. I'm topping it up
with Payne's gray at the top and
these regions where it's brown that's
what mixes up with the blue so that we don't create any
green with our yellow. Here, let me take
up that brown again because I want to blend
it up in that region. Can you see it's blended up, and then we'll create the nice cloudy forms with
the darker brown shade. Why am I saying wrong colors? Anyway, now let's pick
up more brown and now we need to add darker
clouds on the top. This time you can go
for CPR if you're not getting this dark color. You can see how I'm adding these darker clouds
on the top with my brown shade and some
darker cloud here as well. Let me mix up that pink shade again that purple shade
again so there it is. But I need to make sure
that I don't introduce any extra water while
I'm doing this. There and then mixing it up into that region and getting
it to blend smoothly. There we got that smoothness. We need to get this
region a bit smooth. I think that region is smooth, what I need is a little
bit of orange there. Let me absorb all the water and a bit of orange
shades there. Even here at the bottom and
towards this region as well. We want it to be slightly
having that orange shade. Here I've mixed my yellow with orange shade and
blended it along. We can see how the
whole thing is being blended and got beautiful
clouds as well. Let's get some blue on the top. Here is my Prussian blue, and I'm going to add that
Prussian blue here at the top, just to get nice blue. You can also go with bright blue so we try my bright blue. That was too much water, so I need to absorb it, and there, I've added
nice blue strokes. I think this is good enough. What we can do is now wait
for the whole thing to dry so that we can add in the
lightning and the foreground. Everything is now
completely dry, so we're going to use the white gouache paint to
add in the lightning strikes. I'm also going to
use my liner brush because that gives
me thinner lines. Go with the smallest
size brush you have and make sure that the
tip is pointed so you can see how pointed the
tip is and that's what I'm going to use for adding
those lightning strikes. I'm going to start
in this white zone, where we're going to start this white region and
add some shaky lines. Nice and shaky all the way down and again another
joining that one. Then we will have branches
coming out of each of them. Then branches coming out of this. Then we'll have some here. Let's add in the lightning
strike here on the left side. Then let's have the
smaller branches. We have added in
the nice branches. I'm adding a small light source here just to make it brighter. Now what we need
to do is make sure that this is completely dry. I'm just going to show
you a little trick. This region is now
completely dry. Now what I'm going to do is, observe closely, this is like a trick to get that lightning. Using my flat brush, what I'm going to
do is I'm going to apply some water on the top. That is going to make all of those white paint to spread out. You can see it's causing
the white paint to spread. But don't let it
spread too much so we just need to make sure that
it's somewhat lighter. Also, we need to soften
our strokes because if we keep that line of water, then it's going to get messed up so just blend
out that water area. I've just blended
out that water area. Or you can just use a tissue as well or a piece of cloth
to make sure that you absorb all that
water from the edge of your lightning
source or the paper. Now you can see that it's
slightly lighter on that area. Let us dry this up. Now that it's completely dry, we are going to re-add
those lightning strikes. This trick was because we wanted those lightning strikes to have like aura or
what do you say it, like a soft edge to it but then have that
lightning strike in the middle so that is why
we did that spreading. But trust me, if it's not
possible and you're afraid that it's going to ruin your
painting because your paper is still wet or because your colors are
going to come loose, then don't attempt it. Otherwise, you can go ahead
and try it on your own. Forgive me if it
ruins your painting. There I've added those
lightning strikes. Now you just need to
add in the foreground. For adding in the foreground, let's go with a beautiful brown, the burnt umber shade, and we just add the base. Let's fill up the base first. I'm going with a brown
shade and not black. We need it to be a
dark brown shade. You can go for sepia or Van **** brown and color it as such. But make sure that you don't use black because
we wanted to have that little brightness along with the yellow shade
that we've added. We're going to have some
trees and some trees here. Let's add the tree
shapes on the top. Just adding some random
shapes. You can see that. This is the reason why we
painted the lightning first and then the trees
because we wanted the tree shapes to go on top
of the lightning because lightning is behind those trees. Adding some more shrubs and bushes to cover
this bottom part. I think that's good enough. We're not creating exactly
as it is in the picture. Just covering up something at the base so that we
do have a foreground. I think that's it. Let's wait for this to dry so that
we can remove the tape. Everything is now
completely dried. Let us remove the tape. Here is the final painting.
I hope you like it.
46. Day 21 - Colours & Image: [MUSIC] Welcome to Day 21. The next 10 days, we don't have any
reference image, but we'll be painting
different beautiful skies, night skies, as well
as the day skies. Today's painting is
going to be this; it's fluffy clouds in the
sky on wet technique. Let's just go ahead and see what are the colors that we need. We'll be using Payne's gray, a nice version of Payne's gray, but we need a lighter tone. We'll be mixing it with water to create a lighter
tone like that. Then we'll use a
little bit of indigo. Again, we'll use a lighter tone of the indigo by mixing it with amount of water and
creating those lighter strokes. Then for the foreground, we'll add olive green. To get some of those
darker strokes, I'll use a dark green
and mix it with the indigo to create
this darker green. These are the colors that
we're going to be using today. Let's get to painting this. [MUSIC]
47. Day 21: Since there is no
reference picture, let us go ahead and
start painting. We'll start with
applying the water onto the whole of the paper. Let's apply the water evenly. You can tilt your
papers slightly, that is your board slightly
so that you have an even coat of water and doesn't
form any large pools. Here I have applied the water. Let us start, we're
going to have some darker clouds in the sky. For that, we'll start with a nice and beautiful Payne's gray. Here is Payne's gray. We're going to use a
lighter tone effect. Slight lighter tone of the Payne's gray and we'll
start at the top. We're just going to create some beautiful strokes like that using the
side of the brush. If you want, you can
tilt your board again so that these strokes
would flow down. That's optional, you
don't have to do it. We're doing with my
Payne's gray again and creating those
streaks or strokes. Pick up more Payne's gray
and let's keep adding. I want the darker
softer strokes to be at the top and there. I've added these
streaky strokes into the sky and then I'm going
to go with my indigo. Here is my indigo. I need a lighter tone effect. Here I'm taking a lighter tone by adding a little
bit of extra water to it and that's what we
add to this left side. We have these bluish
tones in the left side. Some blue, nice beautiful
blue clouds to the left side. Here is my indigo and
we'll apply it to the left side and some
towards the middle as well. It's going to be a mixture of this indigo and
the Payne's gray. It's just adding
these tiny strokes. Let's go back to adding a
little bit more Payne's gray. Here is the Payne's gray, adding that at the top. As you know, when
watercolor dries it's going to turn lighter, so we need to make sure that we are able to add more color in such that it stays a little
bit more darker that is, if you want it to
look like this, you need to apply
it one tone darker. Only then you'll be able
to get that colors. Here I'm using the
tip of my brush to add in those clouds and leave as many
white spaces as well. Here, going with
my indigo again, because I want the darker
colors to be on the top. Mix that blue and
black together. Let's have those smaller clouds, we're going to add the smaller clouds
here at the bottom, just dropping some paints. I think we've added the sky enough, now let's just wait for
this whole thing to dry or I think let's just go around with the foreground directly. Here I want to take my olive green and I'm
going to add to the base. Yes, I think it's dried and it's not going to spread
too much to the top, so we'll just go directly. Here I'm taking my olive green. You can see that it creates a beautiful and blended border. It's just like there's the end far away and gives that
softness to our foreground. If you want foreground
that is a bit soft, then we go for the red
on red technique itself, but make sure that
it's not too much red because otherwise it's
going to spread out a lot. Here I've added the
olive green at the base, but then we're not done yet, so let's just go ahead and pick up some nice
dark green now. This is a dark green. I'm going to mix it up
with a little bit of indigo in order to make it more dark and I'm going to
add it at the base. I need more indigo and
adding it at the base. That has made it more darker, more darker at the base. I need to get it darker
at the left side as well so I'm going to pick up a little
bit more Payne's gray. That's my Payne's gray. Let me get rid of extra water and then I'll go at
the edges as well. That means this edge here
I want it to be black. That's why we go with the olive green again and try and we will
learn this in. I think that's
good. Now we'll go with the darker green again to create a nice dark element
in the foreground, some further off trees. It's just some bushes
and some bushy edges. You can do that, just some touches here
and there and because that region is still
wet and we're still working on the wet
on wet technique, you'll get those
softer and not harsh, but make sure that it's
not too much wet and also you don't introduce a lot
of water using your brush. Your brush needs to
be having less water, if there's too much water, just make sure that
you touch your tissue to absorb that extra
water from the brush. Mix a bit of Payne's
gray as well. It doesn't need to be black, it just needs to
be darker green. That what we're trying to get, there that's it like
a very nice dark green and make sure that you create some gaps so that it
just looks like some trees. Just added some
different trees there. I think that's enough. Let me get a little bit
more depth to this one. I think we are good enough. Although this part here
is not what is important, what's important it was to get
the sky to look like this. Can you see how fluffy it looks because of the wet on wet technique and the whole
thing just blowing around. I think we're done, let's go ahead and try this whole thing up so that
we can remove the tape. It's completely dry, let us remove the tape. Here is the gorgeous sky. I hope you like it.
48. Day 22 - Colours & Image: Welcome to Day 22. This here is the sky that we're going to
be painting today. I just love all the colors
that I have used in this one. Let's have a look
at all the colors. We start with my
favorite Indian yellow. Then we move on to the next color using
transparent orange. Then we also add
some rose color. You can see there's
a red shade in this, but it's actually not red. It's rose that I used. Here is rose. When you add this rose on top of the yellow and the orange, you get a nice red shade. That's how I have got this. Then in the sky, I have added up a brown color. What we're going to do
is we're going to mix up that yellow and rose together and we get a
beautiful red shade. Let me show that to you. Here's my yellow and
here is the rose. Mixing that gives a beautiful
red shade like this one. We also created a beautiful reddish-brown
shade by mixing this brown and the rose
together and we get a nice reddish-brown shade. We can also use Payne's gray, but I think that's enough. These are all the colors that I have used for this painting. Without any further delay, let's get to painting
this beautiful sky.
49. Day 22: Let us start with applying the water onto the
whole of our paper. Make sure that you
apply the water evenly, which is really important, without forming any pulls. Again, onto the
whole of the paper, we'll apply the water there. Make sure that the
water is even, and you can tilt your paper
or the board that you're using so that the
water stays even. [MUSIC] Let that water soak into the paper so that it can stay wet for
painting your sky. [MUSIC] Now that we have
applied the water, let's start with
our first color, which is going to
be Indian-yellow. I'm going to start at
the bottom and add it in the form of
these streaky lines. Let's just add those
beautiful streaky lines, and also fill it up in the base. Wherever there is
these white spaces, it's going to be the brightest
region where the sun is. There's that glow there which
I'm not going to paint. We're adding that
beautiful glow of yellow, and we'll do the same
all over up to the top. You can see my strokes, how I move my brush like that. This painting is
completely from my head, you've already seen it. Since I'm painting this now, let's see how this turns out. You've already seen it, I don't know now
while I'm painting. It's just so weird, isn't it? You've seen it, and I know that I'll be editing this and know how it turns out. But right now while
I'm painting it, we have no idea how this
is going to turn out. [LAUGHTER] Anyways. There's all that beautiful
yellow added into the sky. Now, I'm going to go
with the next color, which is going to be orange. I'm going to pick up a
nice amount of orange, and then I'm going
to add on the top. Here, I'm just going to add
some nice streaky lines. [MUSIC] There, adding those streaky lines, and towards the
top I'm just going to make it more darker. It's to the base that I'm adding these just little streaks of white. [MUSIC] Now that I've
added the orange, I'm going to go with
the next color. I'm going to take a
little bit of pink, and I'm going to add
that into the sky. You can see that when
I'm adding the pink, because it's on top of the
yellow and the orange, it's going to turn into a
nice beautiful shade of red, and that's exactly what we want. There, just giving that
gorgeous pink shade. I'm not using red here, but I'll go with
the pink shade so that it creates a
red on its own. Then at the top, I'll go and add
these darker clouds. Going with a nice, stronger version of
the pink at the top, and towards the base, I'll just go with
smaller strokes. Just some smaller
strokes here, that's it. Maybe a little
here on this side. I don't want too much there, so let me just flatten that
out slightly and blend it. I think that is much better. Now we're going to go with
the next darker shade, so that'll be brown, so I'm going to
take my dark-brown. This is transparent-brown. There's the transparent-brown, mixing it up nicely, and then I'll add that on
the top of the pink shade, so that I have some of those
darker shades in the sky, and then on the
left side as well. We go with my rose and I'm
mixing that up with my brown, so that I get a
reddish-brown shade. That is what we'll apply. There's the brown, and there's the rose shade. Mix them together and you get
nice reddish-brown shade, and that reddish brown
shade is what we need. Then we're going to apply
it in random areas, and create some of
those gorgeous clouds. You can add more pink. [MUSIC] There, I've added those
beautiful strokes. [NOISE] I think I'm going to take a bit more
orange and add it here. I need to get rid of the extra water in my brush before applying
it onto the paper, and adding those
beautiful clouds. [MUSIC] Maybe a little of those
brown clouds here. [MUSIC] I've added some of those
beautiful, nice brown clouds. I think I need some
more at the top here, and cover up these region, and get it blended. [NOISE] Now that we're done, I think we'll go with the wet on wet itself
for the foreground. For the foreground, I want to go with my darker-brown shade, so picking up my
darker-brown shade there, and I think these
regions are now dry. Because it's dry,
let me go ahead and add in the foreground
using my darker-brown. Here is my dark-brown shade, and just adding a straight line. I've added the base
for the foreground. Next, I'm just
wondering what should I add in the foreground. What else can we add? Maybe we can add in
some nice plants, but I think we need this
to be completely dry, so let's wait for this to dry. [NOISE] Here, everything
is now completely dry, so let us pick up some
nice dark-brown shade. I'm using my liner brush so that I can get
some thinner lines. Using that, I'm going to create
some branches like that, some small branches
in the foreground. I'm just going to blend it up
in that foreground region. Maybe we'll create
some bushes as well, so some bushy shapes
there like that. Use the tiniest brush that you have for adding these shapes, and blend it into
the foreground. We need to blend it
towards the foreground, the main reason being
the strokes that we applied for the
foreground was wet on wet, so it's going to be
slightly lighter. If we need it to be darker, then we need to
re-apply on the top. I'm not applying in
the center region, I want that to be
slightly lighter, so I'll apply only towards
the left and the right. [MUSIC] That there, so let's go and add in
some more tree branches. Some tree branch, another bush or a
different tree here. [MUSIC] Another tree here. [MUSIC] That's nice drawings, [MUSIC] and some nice branches at some places, there. Just using the tip of my brush to create these branch shapes. [MUSIC] I think
that's good enough, I don't want to be
going into detail of the foreground because
that's not what's important. The important part was to
get this sky correctly. I'm just going to
wait for this to dry, and then remove the tape. It's completely dry now, let us remove the tape. [MUSIC] Look at how gorgeously
this has turned out. I think this is my
favorite of all mainly because of all
the colors in this one. I just love painting
using all these colors that we've just used in
this one. There you go.
50. Day 23 - Colours & Image: Welcome to Day 23. This picture here is what we
are going to paint today. As you can see, it's a moonlit beautiful night sky with some trees in
the foreground. The whole thing has been painted with the wet on wet technique, that is these clouds
and the background, and once it's completely dry, we add the foreground trees and a little moon with
the white gouache. Let us have a look at the
colors that we have used. We start with a background of Indian yellow and then we move on to adding a
little bit of Indian gold, so it's a beautiful
golden shade which can easily mix by mixing orange, yellow, and brown together. Then on top of that, we add in a nice
light brown color, so you can either go
for permanent brown, or a light burnt umber, or a reddish-brown color. For creating that
reddish-brown color, I mixed my transparent
brown with a little bit of rose and I got a beautiful reddish-brown
color somewhat like this. You can see it's a beautiful
reddish-brown color, it's lighter than the
dark brown that I have. Then I used dark brown
on top of it after that, so you can either go for a sepia or any dark brown that you
have like Van **** brown. Then lastly, we'll
make it even more darker by adding Payne's
gray on the top. Then in the center, we have these little
clouds, so for that, we need a lighter tone
of Payne's gray like this for the clouds
and that's it. Those are the colors that we
have used for this painting.
51. Day 23: Let us start with applying
the water onto the paper, let's apply the water evenly. Here I have applied the water
and I'm going to start with my favorite
Indian yellow first. Here is Indian yellow. Picking up a nice amount of the Indian yellow in your
brush, let's go around. We're going to start
along the edges. It's a beautiful night sky, but we need some
gaps in-between. Then again I'm going to
keep applying in circles. Here in the center
is where we want to leave a large white space, so around that area, we'll paint with
our yellow paint. Let's go with darker colors towards the
edges but towards the middle, let's leave blank spaces, and also let's do some
strokes like that. That is the space that I
have left in the middle. Now that we're done with that, let's go with the next shade, which is going to
be Indian gold. I know I didn't
mention this when I was mentioning the
colors in my palette, I actually forgot that
it's there in this corner, but that's all right,
you can mix your orange and yellow together to get
a beautiful golden shade. Add a little bit of brown
to it if you want to get it to look exactly like gold. We'll apply that but
leave some yellow space, don't go towards the
edge of the yellow. Here, I'm taking my golden
shade and applying it, but as you can see, I'm applying it away
from the center portion because I don't want it to
spread into my white area. Here and there. We've applied the
nice golden shade, now let's go with
our next color. For the next color,
I'm going to be creating a beautiful
brown shade. Here is my transparent brown. To my transparent brown, I'm going to mix a little bit
of pink so that it becomes like a nice reddish-brown color. Here transparent
brown is really dark, so that's why I'm
mixing a little bit of pink to it there and I have this beautiful brown color and
let's add that on the top. Now we'll add it in the form
of these cloudy shapes, but towards the outside, you can actually cover it up. There, let's mix it up again. We've already used this color in one of
the paintings before, I can't actually remember
which one, was it yesterday? I think so. Anyways, we're just going to keep adding, but leave a lot of these
yellow gaps in-between. Let's get our cloudy night sky by adding these darker strokes. Now that we've added all that gorgeous shades, now we'll go with
our dark brown here. Here I'm taking my dark brown, which is the transparent
brown itself without anything in its mixture and
now I'll apply it on the top. We're gradually going from
one color to the darkest, you must have understood by now. Picking up my dark brown
shade and going over the top. Keep going over the top. Just a little towards the
center, not too much. Make sure to go with this swift left and right action with your brush, that's how you would
get those strokes. I know that when you add
all these on the top, you're wondering the Indian gold that we applied at first
it's not even seen, but then it does
contribute a lot in this painting as in it
is there in this mixture. That's what we need
to understand that these underlying
colors have a lot of role to play in
the final picture, even though it's not
seen at the end. Now we'll go with the next color on the
top, which is sepia. In order to create sepia, you can go ahead and mix
your Payne's gray with brown and that's exactly
what I'm going to do. Let me take my Payne's
gray or you can mix black. Taking my Payne's gray there and I'm going
to mix it up with my brown shade there, make it as dark as possible. That's now really dark and that's what I'm going
to apply on the top. Make sure that there isn't
too much water on your brush because then you won't be
able to get these strokes. Make them such that you're rolling your
brush on the paper. Like that, so it'll form
some fluffy, cloudy shapes. You need to keep going. I've added nice
contrasting colors from the light to the dark. Now, what we'll do is, we need to add some nice fluffy, lighter clouds in the center and we're going to do
that with Payne's gray. So pick up your Payne's gray or the gray color
that you're using. Here, and I need
it to be lighter. So there, picking up my Payne's gray but I don't
need extra water so absorbing all that water on my brush and then going
to add it into the sky. Here, I think I need more paint. There you can see, so that's the Payne's gray and adding it around
the center area. Payne's gray is
going in the center. We've covered that center
area with Payne's gray. Oops, I did a mistake; I went outside and
then picked up that brown sheet and brought
it inside to the center but rectified it immediately by absorbing it with my brush. Anyway. There, so now we have that covered. Now what we'll do is, we'll wait for this
whole thing to dry so that we can add
in the foreground. Here, everything is
now completely dried, so I'll add some
foreground elements and I want to do that with my brown, dark dumb shade. So here is the brown. Let's just add some nice
trees in the front. Actually, I'm going to mix
up a little bit of sepia, as in Payne's gray, into that mixture
to create sepia. That's what we're going to use, so it's just going to be some trees and it's
going to go all the way to the top and this is wet on dry because it's dry
and we're using wet paint. You can have some
branches on that. We'll add more. Just adding branches,
you can see that. Let me do one on
this side as well; let me go sideways at an angle. Use the pointed tip of
your brush to get it nice and pointed,
don't forget that. So, we've added
some nice branches. I think that's enough, I don't want to add
anymore and ruin the whole thing
because that's not what's important in
this, it's this sky. So there's just one
last thing to add into the sky and
let us add that. It's going to be a moon in this center portion
for the night sky part. So here I'm taking my white gouache because
we need it to be really white and we add it towards
this center region; just a circle with
our white paint. It's nice and bright white
in the center and that's it. Once this whole thing is dry, we can remove the tape. It's dried up completely, so let us remove the tape. Here it is, the beautiful night
sky for today.
52. Day 24 - Colours & Image: Welcome to day 24. This here is the beautiful
Northern Lights night sky that we are going
to paint today. Let us have a look
at the colors first. At the top we have the
darker indigo color, and then at the
bottom of it I've added a dark blue color. We'll go with brushing blue, or Indian [inaudible] blue, or any dark blue that you have. If you don't have a
dark blue like this, you can mix your
cobalt blue with indigo or black to
get this darker blue. Then, there's this
beautiful green here. This green here, if you
have hooker's green, you can go ahead and
use that directly. But what I did was
mix this green. I mixed it up by mixing up my beautiful bright
blue or Taylor blue. Here is my Taylor blue shade, and I mixed it up with
my Indian yellow. After mixing up my Indian
yellow and my bright blue, I got this beautiful green, which is almost the
same as hooker's green. If you have that green,
you can use that, or if you don't have, you can use sap green as well. But what you can do is just
mix a little amount of blue along with your sap green and you should be able
to make it lighter. Try and experiment how to
get that bright green color. You can mix your yellow, blue, and green together
to get that colors. Then the foreground mountain, obviously I added with a
darker tone of faint gray, and some dry strokes with my white paint
on the top of it. These clouds are with a
mixture of indigo and the dark blue color,
and that's it. The whole background is with
the wet on wet technique, with the clouds on top of it, and then once it
is completely dry, we just add in the
foreground mountain. That's it for today.
53. Day 24: Let us start with applying
the water onto the paper. Apply an even coat of
water onto our paper. Here I have applied the water, now we're going to mix
a beautiful green. If you have Hooker's green, then you can use that
directly but I'm going to mix that green just using
the colors in my palette. I'm going to mix up light blue here with a nice amount
of Indian yellow. That is going to give me
a nice beautiful green. Look at that beautiful green
that we have just created. This is the green that I
am going to use in my sky. I'm going to start applying
in the center here. Can you see, like that,
I start applying, I think I need more yellow in the mixture to make it a
little bit more lighter. As I said, if you
have Hooker's green, then you can apply that. Here, I'm mixing that green and applying it
towards the bottom side. I pick up more yellow,
more bright blue, more yellow and add it to my sky and here at
the top as well. I have applied almost until the halfway point on my paper. Now at the top, I'm going to apply indigo. I'm going to pick up a
nice amount of indigo. It's there on the right
side of my palette. Then I'm going to apply that
indigo towards the top. Here, I have applied that
indigo towards the top. Then I'm going to
take my dark blue, which is Prussian blue, and apply it where it
is joining the indigo. I'm going to apply. Also note, I'm holding
my paper here at an angle so that all
my water would flow down and it would create
hairs like this and mix into the green that I've
already added on the paper. I'm taking my blue
and adding it. Can you see it's forming
those beautiful gray hairs? Towards the top, I'll add
the darker indigo and it's just going to blend by mixing into the green by
forming these hairs. If your paper is still wet, then it is definitely
going to form these hairs on the paper. Make sure that your
paper is really wet when you're adding the sky. Let's get to adding
the blue tones. Now that you've got those hairs, what we're going to
do is we're going to add the beautiful
clouds into the sky. In order to add those clouds, we pick up the dark blue paint, mix it with a little
bit of indigo. You need a darker
blue like this. I think we can
actually also give it some twirl around
so that strokes can mix nicely on the paper rather than all
accumulating at the bottom. Just give it a nice
twirl around your paper. This is the most fun part with watercolors whenever
you're painting because you get to add all
these beautiful strokes by just twisting
around the paper. Now I have this darker tone, I'm going to add clouds. I'm going to add on the top starting from the
right side and using the pointed tip of my brush and going and adding
these smaller clouds. Can you see that? It's just using the side and
tip of my brush, we create some beautiful
clouds in the sky. Let's go ahead and keep adding. Just use this left and right
movement with your brush. Let's get more in the sky. Can you see those beautiful
clouds getting added? You can go towards the top
as well and just add more. Let me come down to the bottom
and attempt smaller ones. What I'm going to do
is I'm just going to fill up at the base and add some darker tones like that and blend it
towards that green. That green at the bottom
is still slightly wet. This is the reason
why we're able to create that beautiful,
gorgeous blend. This is the reason why I say
you need your paper to be staying wet for a longer
duration of time. There, now we have darker green base and we
have the clouds in the sky. This is a beautiful
Northern light sky with some nice beautiful clouds. That's it for the
sky background. Let's not wait for
this to dry so that we can add a little
bit of foreground. It's completely dry now, let's go ahead and add in the
mountain in the foreground. I'm going to use Payne's
gray and just create a nice mountain shape in
the center like that. Let me fill that up. You can also go
ahead and use black. I'm using the darkest
version of my Payne's gray. That is the darkest tone
of my Payne's gray. I'm going to create
a nice point. There it is. Now let's create some
snow on that region. I'm taking some of my nice white paint and I'm just going to
add it on the top. It's going to mix
up with my Payne's gray to form a grayish tone. I'm just going to
create that gray. I'm creating a split
on the mountain so that it looks as though
there is a valley here. Every time you pick up white, you can wash your brush again. Otherwise, when you go back to your palette to
pick up more white, it's going to be a gray mixture. Just wash off your brush and try adding your white
strokes on the top again. There I've got a nice gray, I've washed my brush and
taken more of the white now. I'm adding more. As you can see, it's nice and white. In fact, more grayish. Now, I'll do the same towards the right side but not
on all the places. I will just apply
the white dunes at random places because we need
it to be slightly black. There, I just added in
some of the places. Now what we have to do is
we'll wait for this to dry so that I can add in
more white tones on the top. Here, it is completely dry now. You don't have to go
through this process of adding all these
details on the mountain, you can totally
skip this and add just a simple mountain if your focus is just
going to be on the sky. But I always like to work on the details
on my painting even if my topic is something
else so that in the end, you have a beautiful
picture in front of you. Here is my white gouache, I'm going to take a dry brush because I want some
nice dry strokes. Here, I've taken
my gouache paint and filled my brush
with dry paint. Let me try if it's
dry, yes, that's fine. Then I'm going to go
over on the top of my mountain and add
some dry strokes. Can you see those
stokes are dry? I'm going to do the
same from the top. I'm just adding some dry
strokes at random places. We don't want it
to be everywhere. Just where the split
of the valley is, we'll add some nice dry strokes. The strokes are dry, meaning there is no
water on my brush. I completely dried my brush before taking up
the white paint. That's absolutely important if you want to get
those dry strokes. I have this trick where I always used to check if my
brush is completely dry. After picking up the paint, try rubbing your brush along a different surface so that
all the water goes there, and then what's remaining is just the dry brush and then you can apply
that onto your paper. That's what I always do. Let's get it on that paper. Let's get some of
these white strokes on the right side as well. I think that's good enough. Let me just add more here. I'm just adding some
now darker strokes with white just to some areas. It doesn't all have to be dry. I think that's enough detailing
on this painting now. I'll just quickly dry up this white paint here in the end and then we
can remove the tape. Here, it's dried. Let us remove the tape. There it is, the
beautiful Northern lights painting for today.
54. Day 25 - Colours & Image: Welcome to Day 25. This here is the painting that
we are going to do today. As you can see,
it's a mixture of beautiful clouds on
a nice blue sky, and we have some sunlight
buildings at the bottom. The whole thing was
painted wet on wet, and even this was wet on wet, but the paper had dried by the time I started
painting these, so these looked like
the wet on dry method. Let's have a look at the
colors that we're using. This yellow will go
with Naples yellow. Then we have cobalt blue for the clouds so this
is cobalt blue. For the darker areas at the top, I have mixed a little bit of Prussian blue or
[inaudible] blue. That's what it's in my palette. This is almost the
same as Prussian blue. This cloud here, I did
not use Payne's gray, but rather, I have made it
up using the primary colors. I'm mixed cobalt blue and then Naples
yellow and then mixed my permanent red along with it to create a
beautiful gray color, which is something like this. That's the gray one
I have created, and then I mixed
my Prussian blue as well into that gray color to create a darker gray
color like this one. Those are the colors in the sky. Then for this lighter area here, I used my transparent brown. You can also use burnt umber. My transparent brown I mixed
it with Naples yellow. I mixed my transparent
brown with Naples yellow to create a lighter
tone of brown. These are the colors that I
have used in this painting, so let's get to it.
55. Day 25: Let us start with applying an even coat of water
onto our paper. Repeatedly, move
your brush across the surface of the paper to
have an even coat of water, which is absolutely necessary, because we're painting with
a wet on wet technique. Going to start with
Naples yellow, here is my Naples yellow. Then I'm going to
mix my cobalt blue. Here is my cobalt blue. Then I'm going to mix
a darker blue into my cobalt blue for
some dark areas. That is my darker blue, so that's my Prussian blue and I've mixed that to one end of
the cobalt blue. Now let us mix a gray. Here I'm going to mix
a gray rather than use the gray that's already
there on my palette. So I'm going to mix it up using the three primary colors, any blue, yellow, and red. I'm taking cobalt blue. Then I take the Naples yellow and then I'll mix it with
some of the red alizarin. We need to keep mixing to get the gray color that we want. That's nearly there. That's the gray. Now that the waters all
soaked into the paper, I'm going to start painting. I've switched to my
smaller flat brush and we're going to start
with Naples yellow, so I'm going to start with
Naples yellow at the bottom. Just going to add some
nice lines at the base. Lines using the flat
side of the brush. We're going to leave
a lot of white space here at the bottom, so just let it be
these white areas and the top region is what we will paint with the Naples yellow. I've applied these strokes
and now I'm going to go over to the top
with my Naples yellow. Let's take it to the top and
apply some nice strokes. Again, you can see I've just
applied some random strokes with my Naples yellow. Now I'm going to go over
with my cobalt blue. I want to go over with the
cobalt blue at the top. Taking the cobalt blue
and starting at the top, filling the top
region and then now we'll go with the cobalt blue onto the areas in between where we've added
the Naples yellow. There's the cobalt blue, I'm going to go
over it on the top again and then slowly
bring down my cobalt blue. Those yellow regions.
Let it be there. As you can see, I'm just running my brush over these areas to have those strokes on my paper and as
I move downwards, my cobalt blue is really, really light, you can see. The top is where we
need it to be darker, so that's where we'll
add this mixture of Prussian blue towards the top. If you take the mixture of Prussian blue and add
it to the top regions, mix your Prussian blue
with cobalt blue to get a nice darker blue shade
and that is what we'll add. Now that we've added
the blue oral round, let's go with a gray shade. That's the gray shade
that we have mixed and we need to start at the base because it's already
starting to dry. Let me absorb all
that extra water. Then I'm just going to
create these cloudy forms. We're going to be doing it
right next to the yellow. If you've accidentally created
any green on your surface, cover it up with
these gray clouds. Any ideas where you've
created green on your paper, you can add the gray on the top and cover
it up as a cloud. That's exactly what
I'm doing here. I'm looking at areas where I see a little tint of green on my paper and I'm covering
it up with these clouds. Let's go over the top again. Done that. Now, I'm going to
go over towards the base. Towards the base, I
need my clouds to be lighter and smaller as well. There you can see all of
these clouds are smaller and I'm putting in really tiny clouds using
the side of my brush. You can see they're all very tiny and you can add various strokes to get your clouds and have some
action on the paper. I think that's good enough. The first layer is almost done. If you feel that your
colors have lightened up, you can go ahead and
darken them again, but I'm not going to
touch them because I think that this
is already dried. If I touch them, it's going
to ruin the whole thing. Now let's add in the base. I think I'm going to go for
a software base itself. For adding the software base, I am going to mix
up the gray again, this time, a darker
version of the gray. Here I'm going to
take the cobalt blue, mix it up with a little
bit of the Prussian blue. Then take the Naples yellow, mix it with red and then
I'm mixing it up together, I need more blue. Trying to create a
nice gray color, a dark gray color, so that's why I'm
mixing a little bit of Prussian blue as well. Here we've got a
nice dark gray color and that's what I'm going
to add for the base. For the base, I'm going to
go for some building effect, going to add that. But what we're going to do is, in order to get that
building effect and we have some lighter areas here, I'm going to get that
area lighter as well, so here I'll add
the darker strokes. We need it to be light, the air. What we're going to do
is we're going to pick up some transparent brown. Let's mix it up with
a little bit of Naples yellow so that we get it as light and then that's what we're
going to apply here. Some building here, those buildings are lighter. Then we go back with
our great tone, so you can have them
mixed together. Can you see just one
side of it we've mixed together and the
base of it as well? We'll have it in the
form of some buildings. Whatever shapes that
you want to create, tower or buildings
or whatever shapes. You see. I've created nice buildings. Then you can also go
from tree shapes. Will be a pool or a tower, green, something like that. The same goes here. We have a nice brighter area there and the darker
area towards the sides, so that's where
this light area is, so that's why we added a mixture of that
brown and light, so it's just the sky
lighting up those buildings. That's it. I think this was the
quickest we have done to [inaudible] it and
so the answer is simple, but I know how these
strokes in the sky can be so tough to achieve, especially if your
paper starts to dry. So I'm going to dry this up so that we
can remove the tape. It's dried now, so
let's remove the tape. Here is the final painting.
56. Day 26 - Colours & Image: Welcome to Day 26. This here is the painting
that we're going to do today. There are a lot of colors
here in the sky and the whole painting
has been painted with the wet on wet technique. But what we need
to understand in this painting is that
your painting does not have to look
exactly like mine because the whole thing
was with wet on wet, and there was a lot of
spreading of the paint. The paint that you apply, that is a pigment when
you apply on the paper, is going to spread around. You can't predict how the
paint is going to spread. Don't be fast or upset that it's not exactly
the same as mine, but rather go with
the flow and enjoy the process of creating
this one because you're going to enjoy and love watching the pigments
flow in the paper. Let's have a look at
the colors first. The yellow that I've
used is Naples yellow, then the red that I've used is I needed it to be opaque
to mix along with the Naples yellow so
what I've used is Alizarin Crimson and I mixed it with my Naples
yellow-reddish. Let's find Naples yellow
reddish and I mix it together. You can either mix
your white paint along with your red and add
a bit of yellow to it in order to make it more opaque and look a bit like red
because the more white you add your red paint, it's going to turn
lighter and lighter. In order to avoid that, you can add a bit of
yellow to that mixture. Here is the opaque
mixture that I used. Can you see that? It's
like Naples yellow-red itself but slightly with
a mixture of red in it. Then I have used
the same gray that we used in yesterday's lesson, so I mixed it with Cobalt blue, this Alizarin, and
this Naples yellow, and we get a beautiful
gray tone like that. But for the sky here at the top, instead of using cobalt blue, I have used cerulean blue. Don't worry if you don't
have all these blue, you can just go ahead
and use the cobalt blue itself it doesn't have
to be cerulean blue. There, cerulean blue. For the darker area, I have
used the Indanthrene blue. These are the colors
that I used for the sky. Now for the base, I mixed a dark color
again by mixing my Payne's gray with these colors
that we used in the sky, then I also mixed
a little bit of brown along with my Payne's
gray to get the sepia color. These are the colors that I
have used in this painting. Let's get to painting this.
57. Day 26: Let us start with
applying an even coat of water onto our paper. Take your time to apply
the water, as usual. Once we have applied the water, let's wait for that
water to soak in. While that happens, we
can mix our paints. We need Naples yellow. Here is Naples yellow. Then we're going to need
a nice opaque red color. Here is my Alizarin crimson. To make it opaque, I am going to mix it with
my Naples yellow reddish. Here is my Naples
yellow reddish. You can also mix
with Naples yellow, if you want, or you can mix with your whitewash and
you can make it opaque. Here is my Naples yellow reddish
or Naples yellow orange. I've mixed that
together. That's that. Then the blue that
we're going to use today is Cerulean blue. There's Cerulean blue. You can use any blue you want. It doesn't have to be
Cerulean blue itself. I'm just using
Cerulean blue today. Then we have a nice gray
tone mix. Let's mix a gray. The gray that I'm going to use, I am going to be
mixing it up using my cobalt blue, my red, and my Naples yellow, so it's almost the
same as what we used in yesterday's painting, so I've got that
mixture here already. That would be a mixture
of cobalt blue. Here's cobalt blue, a bit off red, and then a bit of that yellow, a bit more cobalt blue so that I can make it
nice and grayish too. There you go. That's
the gray color that we are going to use today. Now, I think the water has
soaked into our paper, so let's get to painting. Here, I've taken my
flat brush and we are going to start with a
nice Naples yellow. Here's my Naples yellow. Let's just add. We're going to add it and add some lines to the
paper at the base. Let's add the same
to here as well. You can see, added the Naples yellow. Let's add some to the
top here as well. Now that we've added
in Naples yellow, let's go ahead and add the red mixture
that we have added. I'm going to be adding that
in some areas in between. As you can see, because
our paper is wet, this thing is going to spread. That's fine, let it spread. Just some beautiful strokes
and some lines at places. We want it to have a nice color, so make sure that you
mix it up nicely. You can go over it multiple
times if you think that it's starting to lighten up. Like here, I applied that
it's starting to lighten up. I want to reapply on the
top of some of these. I think that's good enough. Now, I'm going to go
with my cerulean blue. Here is the cerulean
blue mixture. I want to go over at the top, getting my cerulean
blue on the paper, and mixing it up, adding some beautiful strokes
with the cerulean blue. I've added the cerulean
blue all around, in the areas in between those reddish and yellow
strokes that we have added. Now, I need my cerulean blue to have some darkness at the top, so I am going to mix it
up with my Russian blue, and add it to the top
of my cerulean blue. There at the top region, and then we're going to
create some beautiful fluffy, cloudy shapes, and make sure that we blend
the whole thing together. Let's get back to the cerulean blue and blend everything
together on the paper. Now that we've blended that, I'm going to go back with my
yellow paint and add some more of those beautiful
Naples yellow strokes because as you can see, it's all gone and spread around. I know that this
one is quite tricky because there was that
little extra water on the paper and it spread to create these gorgeous clouds. It's going to be quite difficult because it is wet
on wet technique. It doesn't have to look
exactly the same as mine. That's what's important and
what you have to understand, because we cannot
predict the way that the water flows on the paper. Whichever direction your
board or surface is facing, that's how it's going to spread, and let it spread like that. Don't be fussed about that your painting is
not looking exactly like mine and that it
spread in a different way. Don't worry about all of that. Let me mix my Naples red, yellow-reddish
again with my red. Because I want to create
some more nice red strokes. As you can see,
they've spread around. I'm going to just
strengthen those strokes. There's the red. We need to
go and add our gray tone. Here's the gray mixture. Make sure that you absorb all the extra water because now, your paper is starting
to dry and we cannot afford to have all those
water on the paper. Then you can go ahead and start adding some cloudy shapes, especially in those areas
if you have messed up and you have created any dims on the paper with the
yellow and blue. These are just fluffy
clouds that I'm creating. Just some nice and
fluffy clouds, we can create them
in areas above and next to our yellow
and red strokes. There's the strokes. Some more
clouds here at the bottom. Let's get that color again. I've mixed it up with the gray, and we're going to go for
some darker red tones and starting to
apply onto that in Naples yellow-red
and red mixture, so for some darker tones. Now that we've added that, let's just quickly add
something in the base, because whatever is there in the base is not that important. I'm just going to go with
my dark brown shade. Let's mix a little
bit of Payne's gray and make it like sepia. That's sepia. I need to make this
into an opaque color, so I'm going to mix a little bit of Naples yellow
to that mixture. Better. Let's just
apply it at the base. It can be like a bushy area. As you can see, it's wet, so the whole thing is just
going to create a softer edge. There. Let's just
fill up the inside. This is totally out of my mind, so that's why we can just
go ahead and start adding. I'm taking some brown now that I'm just
adding to the base. Just need some colors in the
depth that is at the bottom. Towards the top, it can be lighter because we
want it to be soft. You can see how it's
created those softer edges. Then I'm going with my
Payne's gray at the base. Here's my Payne's gray
at the base region here. There, I've added the colors, and you can see how
soft it is at the base. Now, all we need
to do is wait for all of these to dry so that
we can remove the tape. Here, it is dry now, so let's remove the tape. Here is the final painting.
58. Day 27 - Colours & Image: Welcome to day 27. This here is the painting that
we are going to do today. It's a simple night sky with our tiny wound and
some foreground. But the main thing
that we need here is these create clouds in the sky. That's what's the
most important. Let's first go through
the colors in this one. The sky, I used Payne's gray. I usually use my Payne's gray in its
darkest tone for black. If you have black, you
can use that as well. You don't need to go
with the Payne's gray. But I prefer to use Payne's gray mainly
because I need to get these lighter tone of gray
in the center as well. But I think you can
achieve that with a medium tone of black. That's Payne's gray. For the sky, I
have actually used only Payne's gray
and then I used my white paint to get these strokes with
the wet on wet sky. The whole thing is
completely wet on wet. We'll see how we'll print that. The moon is wet on dry, but the foreground
is also wet-on-wet. But by the time I
reached the foreground, it had started to dry. Then we get these dry
strokes like that. For the foreground. I've used olive green. Here is my olive green. My olive green, I've mixed
it with my brown shade, which is my transparent brown. Here's my transparent brown. Used my transparent brown shade, mixed it with my olive green to get that beautiful foreground. Those are the only three
colors that we've used in this painting actually, there. I hope you enjoyed this one. Let's get to painting this.
59. Day 27: Let us start painting. We'll start with outlining an even coat of
water on the paper. Let's make sure that
we apply evenly, such that it doesn't form
any foams on the paper. There you go. We've applied an
even coat of water. Now, we'll start painting. We are going to start
with Payne's gray. Let's take Payne's gray. Here is Payne's
gray on my palette. We need a nice and dark
consistency of the Payne's gray. There. I want to apply
to the whole of the top. We need it to be nice and
dark. This is the reason. Make sure that you take it
in a nice dark consistency. You can also go
for a black paint there applied to the top. Now, we'll start applying
to the bottom side. Gradually bring your
strokes downwards. Now, I'm going to go on a lighter scale
towards the bottom. This is because we don't
want any white on our paper. We want the whole of
our paper to be dark. It's okay for the bottom part. Now, we can add the
foreground later on. Just now, go with a whole of
the Payne's gray background. Make sure that it's lighter
towards the bottom. Let me just hold my board
at an angle like this. I'm going to apply the
color again at the top because it's flowing down. Then slowly, we can pull down the paint like that so
that for the bottom areas, we'll have a lighter tone, and just no white of the paper. Now, we've covered the entire
thing with the gray paint. Now, we need to make it
look like the night sky with a nice little moon in it. Now, I'm taking my Payne's
gray in a darker consistency. Put my board flat down back on the table so that it
doesn't spread anymore. I just put it first at an angle so that all
the paint would flow down, and I would get an even blend on the paper, a nice gradient. Now, that I've got
that gradient, I'll go back to
adding my Payne's gray by laying my paper
flat on the table. Now, I've got my strokes, which I need to add
in a nice sky format. It's all black, you can see. Any lighter clouds
that you want to make will be with the
gray tone itself. That's why this lighter gray
tone that's already there on your paper will serve
as that gray clouds. But all towards the left side, let's not add any clouds. Always when I'm doing clouds, this is my brush movement. You can see, this is how I do
my brush movement. Here, I have added a
lot of those clouds. That's the center area, where we want those clouds. The rest of the areas, let's go ahead and start painting. Here, I'm taking
more of my paint. Now, I'll reduce the paint. I won't to pick up
any more paints because I want it to be a little bit lighter gray than what
I have at the top region. There just adding more, but now I'm going to just
slightly tilt my board here at the base because I want
to get that nice shade. Because I don't want those
stroke marks to appear. This is the reason why
I've kept it like that. But if I pull it too much, then all of these paint here is going to flow down,
which I don't want. Since we want our
foreground to be there, I'm going to skip painting this bottom part, the sky part. Now, I lift up this
center portion. Let's light it up some more. I'm just going to
take our black paint or the Payne's gray
that you're using. Make the other areas darker, so the areas that you want it to be light will look lighter , like these areas. I'll add paint to the left side. There. I'm going back in the top corners, and these other regions in the center. We need a thicker and dark
consistency of the gray paint. This is because I'm
using Payne's gray. If you're using black,
then it doesn't matter. Because if you're using black, then it's going to be
really darker than this. I'm using Payne's gray. I need to make it really dark, and I need to add
multiple strokes on the top to get it as
black as I want it to be. I could use black, but I don't normally have
a black on my palette. The one I have is Lunar Black, which is granulating. I
don't want to use that. There we have added
those strokes. Now, what I'm going to do is I'm going to start using
some white paint. Before this starts to dry, let's go and pick up
some white paint. I have white paint on the
right side of my palette. I know it's not visible. Here, I've about
white paint there. This is what I'm going to add. I'm going to add small strokes
and some cloudy forms. We've never used white, and added these cloudy
forms in the sky in any of the paintings yet.
Now, we're going to do that. This is the moment where
you need to make sure that your paper is really wet. Also, make sure
that you take off all the extra water from your brush because
you don't want to form any blooms and any weird
shapes with your white. Here, using my white, and adding onto my paper. If you've taken my
100-day project, we had a galaxy painting, in which we had the whole black. Then we painted with
white on the top. This is somewhat similar, where we're trying to get
the white clouds on the top. You can see some nice shapes. This white color that you're
picking up from your palette will mix with the black
on the paper itself, and create some amazing grays. That's why you want
to let it blend on the paper itself rather
than on the palette. That's what we're
trying to create. We don't want to create
a gray on the palette, but rather we're trying to
create on the paper itself. Some nice notes that
we have added there. You can actually go back with your black paint
or Payne's gray in my case and add some details on the top or some depth again, if your paint is getting lighter because I think my Payne's
gray is getting lighter. Obviously, watercolors tend to get lighter once
they start to dry. Here, I'm picking up my gray again and adding on the top. Going with my gray again
on the top in these areas. Some of the edges of these white I'm trying to soften them. You can just go with your brush and knowing you've
touched them it's going to turn into this
beautiful gray color and you'll get softened. I think I dropped a bit of water there. I don't
remember when. You must have seen it. I didn't, but that's alright because the foreground
is going to come there. Now I'm going to
paint the foreground. I'm not going to wait for
this thing to dry up I'm just going to paint the foreground
on the front itself. I'm going to go with a
nice olive green shade. Here is olive green
on my palette here and I'll take that and
I will apply it on the top. I want to mix in a
little bit of brown to my olive green so that I get a warm version of olive green and that's
what we're going to apply. There goes my water bloom. Which accidentally I created. All the way towards the left. Because we want it to be
dark and it's a night scene. This is the reason
why I said that even if the bottom part is filled
with gray or black paint, it's fine because we're going to paint on top of it
and it will just be absolutely fine because we actually want
it to be darker. There. Let's pick up more olive green and the brown mixture
and add it to the top. Now we can see it's a
really nice dark painting. We've added the olive green but now we need
to add no further detailing to make this
look like a night scene. What I'm going to do is
I'm going to pick up my brown and I'm going
to add it on the top so it's transparent brown and I'm going to
add it at the top. I think I'll pick up a little bit of Payne's gray as well and mix with that. You can go for
sepia if you have. I just want to get
a darker tone. I'll add some more darker tone. I'm going to add
such that there is a horizon here and we having
some field-like shapes. Not at all important because this is the foreground and
the sky was the focus. Focus on getting your white
strokes and the black part correctly and the rest
will fall into place. If you don't want to paint it in this detail
it's absolutely fine. Just dropped in some of those
nice tones, black tones. Added all of those
nice black tones. We let it be there. Now I think we can dry this
up so that we can add in a nice moon and some
strokes on the foreground, wait, I think we can
just go ahead and start adding some little strokes
on the foreground. I'm going take my
Payne's gray again. There's my Payne's gray. I need to get rid
of all the water on my brush because I know
there's a lot of water. I'm just going to dry
it up on my cloth. Then I'll just add some shape
here on the right side. Then maybe like two drops of something there, maybe it's like a tree or
something and I'll add few spots on this side as well. Looks like a further off three. Something there in
the foreground. Just add another
slight line there so it looks like there's
some grassland or a little bit of height level
there and maybe dropping a little bit of Payne's
gray on this area as well. Now let's quickly dry this up so that we can add in the moon. It's dried up so I'm going
to quickly draw a moon. For that, I'm going to
take my white paint again, and using my white paint, I'm going to create a moon
shape right in the center. That's why we have
this area as dried and not as dark as the
rest of the areas and you can see how subtle
the clouds are after the white has dried. I didn't want it to be
as really white, white. This is the reason
why we applied it on top of the
black so that it would to this
grayish-white tone. Then now we got
to add that moon. I'm going to roughly draw
the round shape which I know that I can
adjust with my brush itself if it doesn't turn
out to be perfectly round. Not bad. I've got it. You can use a circle or something if you want
but I like to push my limits and try out things
like this on my paintings. Now, I've just washed
my brush and there is water on my brush
and using that water, I'm going to pull inside all
those paint, can you see, towards the inside and
created that inside wet area? Now, because the
inside area is wet we can drop in more
paint, the white paint, and create some shapes
like for the moon and leave some areas with the Payne's gray
underneath so that it looks like the
shadows on the moon. There. That's it for the moon. Now let's just add just
some final detailing on the front area here. For that, I'm going to switch to my liner brush and using my
liner brush and black paint, Payne's gray, or whichever
black paint you are using and mix it up with a
little bit of brown. You can use a sepia
if you have that. You don't need to mix up
the colors like I'm doing. Just because I
haven't got sepia on my palette that's why I'm
mixing up this color. Here that's a dark paint. Let's get that.
I'm going to just create strokes like this towards the right mimicking
the shape of grass. Like that towards
the right side. It just increases the
aesthetics of the painting. This is absolutely optional. It doesn't have to be included. Just towards the right side, all of those strokes. They needn't to be even
we're trying to add something like the grass
shape on the front. We're done. Let's just dry this up and we'll
remove the tape. Now, let us remove the tape. Here is the final painting. I hope you like it. The
most important part is this gray clouds
here in the sky.
60. Day 28 - Colours & Image: [MUSIC] Welcome to Day 28. This here is the
beautiful sky painting that we are going to do today. As you can see, the most
important part here is this glow here on the right and this
darkness here on the left, and then this random background. Let's have a look at the colors. The first color
that I have used is my Indian yellow or
transparent yellow. Then we have used orange. This color here on the top is orange and then on
the top of that, I have used burnt sienna. For this whole class, I think this is the
first time that I've used burnt sienna, actually. Then on the top, I have used my transparent
brown or burnt umber, then we can actually
mix it up with a little bit of Payne's gray
if you want to get sepia. I've used my Payne's
gray here and I've mixed my brown and my gray together and
I've got a sepia color. Here's my sepia which
is darker brown. If you have Van **** brown
or sepia, you can use that. Then these foreground
trees here actually, I've painted it
with my dark green. This dark green is my favorite
green from white nights, it's really dark and I
wanted it to be more dark. In order to make it more dark, I mixed it up with indigo. Once you mix your
green with indigo, you'll get it even more darker. If you can't get it to make
it more dark like this, then you can go ahead
and mix it up with Payne's gray as
well, or even black. If you actually
look closely here, you'll see that tint of green, which is what we want
on this painting. We don't want it to
be black, but rather, we want it to have that tint
of green on the foreground. About painting this,
we actually go with the approach of negative
painting method where we first leave these
whitespaces so that we know that those spaces are the spaces that we're
never going to paint. Then slowly, gradually we build
up the colors on the top. First, we start
with Indian yellow, and then we gradually
add the colors on the top and make it
darker towards the left. Once you've added
these colors here, you will see that the
paper starts to dry because you're not adding
any more strokes on the top. Then that means you
will never go back to that area and add any
more colors because if you add any more colors
then you're going to create bloops. That's it. Then the foreground is obviously just wiped on dry technique. Let's get to painting this. I hope you enjoyed
this one [MUSIC]
61. Day 28: Let us start with applying
the water onto a paper. [MUSIC] We need to apply an
even coat of water. Make sure that the
water flows down. That's why I have
an angle like this. As in we don't want
any large pools to accumulate on any part of
the paper, so that's why. Here I have applied an
even coat of water. We'll start with
our first color, which is going to
be Indian yellow. Using a nice amount
of Indian yellow, which is transparent yellow. You can see the consistency
of paint that I am mixing. It's really dark inconsistency, as in it is not loose. We'll make sure that
you have to paint nicely and concentrated
amount of paint, that's what I
meant, not diluted. Concentrated Indian yellow. We're going to
start in this side and we're going to approach it with the negative painting
method like I said. Here, I'll apply
the Indian yellow and I'm going to leave
like a huge gap. The paper is not too wet. If it's too wet, then the whole thing
is going to spread. You need to be careful when
you're applying your strokes. Going apply my strokes
here and then again, leaving some white gaps. Let me leave some
more white areas. Then I'll leave
another big chunk of white here and some there. Now we can dilute the paint a
bit and spread it outwards. Those areas of white that we wanted are
what we will reserve. It's here, here, here, this line, and
somewhere inside there. Then now the rest of the areas, you can actually paint
the yellow itself. Those areas that we
have left white, we need to leave it
as white itself. I've just added some
paint to that side. Now we'll go with
our next color, which is going to be orange. Here I'll take my orange and I'll mix up the
orange on my palate. We needed to be bright,
beautiful orange shade. Again, make sure that there is no too much water on the brush. We'll go over the areas, the negative painting itself. On top of the yellow. We go back to adding the orange on the
other areas as well. Leave a little bit of
our yellow seen-through. That means we're
not going towards the edges when we're
painting with the orange, but rather staying
in the outside. You can see this area
here that we applied The yellow has spread and the white is almost not
to be seen, but that's okay. There with my orange. Now I'll take more orange and I'm going to go
towards the left side. We can have the paint
diluted and add. The paper is starting to dry, but because I'm adding a nice
diluted amount of paint, it'll get watered again. There. You can see we're
watering it up again. That area. This is why you use a diluted amount of paint when we are going to the left side. But towards the right, we wanted to maintain
these strokes as they are. [MUSIC] Now we've covered
all of our orange strokes. Now let's get to adding our nice golden shade
or brown shade. Actually, we can go
for burnt sienna. If we take a burnt sienna
and go over the door. Again, so now we leave a huge gap between
the yellow-orange. Don't go towards the
edges of the orange. Taking up my orange and adding some nice strokes
of burnt sienna. [MUSIC] Let's apply the burnt sienna towards the left side and as well as some
to the base here. I'll cover it up the
base on the right. This is like us gradually increasing the color
density that we're using. Here, I'll go with burnt sienna. I'm going to fill
up, not fill up, but leave some gaps and
add the burnt sienna. We've added the burnt sienna. The left side, we're going to have to add
more darker colors. That's why it's such a
random stroke for now. Then next is we'll go with
a nice transparent brown. Picking up transparent brown. Now we go over the top of the
burnt sienna that we added. Now we can leave
gaps of orange and the burnt sienna so that it's
seen through the ground. Let's add it on the
top. More brown. Some round strokes
towards the right. Make sure that you make
these rounded strokes. Now we're not going to touch
this area here which is already lit up light. That's the lit area, which we don't want to ruin. Just some brown areas here. I mean, the orange
area seen through it. Can you see that? Rest of the areas will add
with the brown. Now we'll add brown on the top. Let's get some more brown and this time let's make it sepia. This here is already
a sepia mixture. Let's add some more brown to it. There I've added
more brown to it. I'll mix a little bit
of paint's gray to that to make it dark
and like sepia. Now I'll apply that at the top. Towards the left side, I'm making it more
darker and darker. [MUSIC] Let's pick up more. Add it. Towards
this bottom area. I want it to be nice and dark. It's a nice, dark, cloudy
area here on the left. Maybe dropping a little bit. Drop the paint so long as only when your
paper is still wet. We cannot touch the right
side anymore because, in my paper here, this right side is
completely dry. If I add any more paint on the top, it's
going to ruin it. It started to form
hairs here because that area was starting to dry. So I'm just going
to soften it up with my brush like that. Going over the top and removing any extra paint and
softening those edges. Make sure that you dry your
brush and then run over it. [MUSIC] I think the
same here, there. I think that's much better. Otherwise, we will
ruin the whole thing. [MUSIC] Now, all we have to do is
we're going to wait for this whole thing to dry so that we can add in
the foreground. The background is now dry. We can go ahead and start adding some details in the foreground. I'm going to shift my size four brush because it's
got a smaller pointed tip. I'm going to be
using my dark green. [NOISE] I'm going to mix a little bit of indigo with it to make it even darker. [MUSIC] We want our green to be as dark as possible
to mimic the darker sky. So here, I've got my darker green and that's
what we're going to use. I'm going to add a big
huge tree in the front. We've not added any larger
foreground details until now, so I just thought, let's include one painting with a
large foreground. It's like a tree or something
like part of a pine tree, so just adding some strokes. [MUSIC] Can you see the strokes? Just moving my brush in random movements like
that on my paper. [MUSIC] As I go towards the bottom, I'm trying to increase
the width of the tree. [MUSIC] I think that's good enough. Now I'm just going to
add in like a mountain here at the background
and the tree, let's make it so that
it's sticking out. For the mountain, what I'm going to do is I'm going to do this pointed tip method
where I'm going to do these movements with
my brush such that it creates some detailing or
grassy forms on my mountains. Can you see that? Just go
like that with your brush. [MUSIC] Use the pointed tip of your brush when
you're doing this. Okay, there, cover that. Now what we'll do
is we'll fill up the inside because we
want it to be correct. I'm using green here, my dark green so it looks black now, but when you actually
look at it closely, you can see that
it's got a slightly greenish tint and
that's what we want. [MUSIC] It's an evening painting. Even though it's a
3D dark painting when you come closer
and look at it, you should be able to see
that dark green color, so mix a dark green
color for doing this. [MUSIC] There, mixing my dark, dark green and adding. So you can see how concentrated
my paint is when I'm adding this dark
green on the top. This is why I have to
return to my palette each time because
I want my paint to be as dark and concentrated. [MUSIC] I've added. Just make sure that you cover the entire area and to blend in these brush movements so that they don't look as
if they don't stick out. They look natural and realistic. I think
that's much better. Now can you see it looks
like it's more realistic and connected to the lines
that we added at first. This tree is now in front of it. Don't worry, it's
going to be having the same color when this dries. I know this looks
lighter for now, but when this area dries up, it'll have the same color. Now this region is still wet, which is why it
shows up that color. Let us just try to add one or two trees more and then stop. I'm going to just
add another tree here on the left side on the top [MUSIC] I need to get the darker indigo. [MUSIC] There, I've added that tree. I think we can stop here unless you want
to add any more details. I think I'm just
going to add some more pointed tips here to show it's some smaller
trees, smaller pine trees. Just making it pointed and make sure that when you
do these strokes, you move your brush upwards. I guess, if you move
from the top-down, then your thickest portion
is going to be at the top. That wouldn't look
like the treetops, so you want to have an
upward movement like that. Then it looks pointed towards
the top. Can you see that? Now it's starting to dry and
you can actually see that greenish didn't
shade here again, can you see that? This
is what we wanted. To get that greenish tint. Now you can look at the sky
and you can see that this has got some bright sunlight here. It's started to get dark towards this side and it's got some dried nice beautiful
clouds in the sky. It's looking much better when this whole thing starts
to dry and it comes out. [MUSIC] Let's dry up the green. [NOISE] I think we can say
the painting is complete. Here the painting
is completely dry. Let's remove the tape. Now we can see that glowing
greenish shade here. It's lighter and
towards the left, it's actually more darker. That's how we want it
because the light is here, so the greenish tint on the right side needs
to be lighter. [MUSIC] [NOISE] Here is the
final painting.
62. Day 29 - Colours & Image: [MUSIC] Welcome to day 29. This here is the painting
that we're going to do today. We need to get these
beautiful clouds in the sky. First of all, I need
to tell you my tube of Alizarin crimson
was actually bad, it starts to spread
out the pigments, so that's why this
looks a bit weird. But overall, I'm happy
with this painting. Let's see the colors
that I have used. I've started with a
beautiful tone of indigo. Then I have used
Quinacridone Rose, Quin rose at the bottom, then I have gradually come
down to using orange. Orange on my palette. Then at the bottom here is yellow that's Indian yellow or transparent yellow,
which is my favorite. Then at the bottom
here is Payne's gray. That's Payne's gray. Then the clouds on
the top is with red, Alizarin crimson, this is
what I was talking about. It's not that great
because it spreads out the pigment in on
wet on wet technique. That's Alizarin crimson. Those are the colors that
we've used and then I've used some white
paint for the sky, for splatters and
for the technique. This whole thing is painted
on a wet on wet technique. Coming to think of it
actually how this is, the clouds stay on the
top because it looks as though it's coming
out of the picture. That's the painting that
we're going to do today. Let's get to painting this. [MUSIC]
63. Day 29: Let us start. We'll start with applying an even coat of water onto our paper there. Apply the coat multiple times
because we really need to work on the wet-on-wet
technique because we have a lot of clouds
to add on the top. Make sure that you
apply the water evenly. I'm going to tilt my paper
because I don't want to have the water accumulated
on any areas of the paper. Here I have applied the water. Now let's get to painting. We're going to
start with indigo, so we're going to go top-down. Here is my indigo paint and we'll start at the top. First enter a line and
fill up the indigo. Now I'm going to go with a
slightly negative method again and covering up the areas where I want
my other strokes to be. We're going to go
with a nice shape. Make sure that the top
regions are really dark. Each time you pick up a
darker version of indigo, make sure that you
apply it at the top and then you can come down and
have the strokes lighter. You can see as I'm going down, my strokes are lighter. See the strokes are lighter
towards the bottom, you can go lighter and
lighter all the way down and here again. Applying my indigo and
applying such that I want these areas to
remain white for now. Picking up our
indigo and applying the fresh paint at the top each time because I want
it to be dark. Then as I move downwards,
it'll be lighter. It's like creating a gradient
in this right region here, as well as a little
bit here on the left, creating a nice gradient here. Now, we'll switch
to our next color, which is going to be pink. Let us take a nice pink shade and add it to the sky region. It's towards this left region, we'll have a pink shade
and as you can see, we'll blend with the indigo
to form a nice purple shade, which is absolutely fine. Now after the pink shade, we'll go with our next color, which is going to be orange. The orange and pink shade
will blend together, can you see? They
blend together. It's like a transition
between all these colors. There, the orange again. Lastly, obviously you know
we need the next transition, which is going to
be with the yellow. My yellow is actually
contaminated with all the indigo that
I have on my brush, so I need to clean it up nicely. I think I need to
clean my brushes. There, that is the
yellow at the base. We've got a nice transition
of colors there. Let's get that towards the top. Each time when
you're doing this, make sure that you do
it from the bottom up because the lighter
colors are at the bottom. Here, adding my yellow and
then I'll go towards the top. There is my pink and as
I go towards the top, my indigo will mix together
and create an even blend. Can you see that? Because
if you come top-down, the indigo is going to flow
down into these regions, which we do not want to do. Now before everything dries, let's get in our darker clouds. I'm going to go with
a bright red shade, that's alizarin crimson, and this is what is
going in this region. We'll add our alizarin crimson and fill up the area
where we left behind. That is what is going
in that region. Use any red shade that you have. In my case, the alizarin
crimson is what is going into these blends here and into the white regions
that I have left. Then we're going to pick
up more and we're going to create some nice shapes
on top of these. In these indigo regions, when you add them
is going to mix up slightly and form
our purplish shade. This is why we wanted
this indigo to be lighter here otherwise the color
will not be visible at all. Here now I'm adding
another layer on the top, so that'll give the effect of depth on the clouds
as well. Can you see? Because the first
part of the red that I applied sunk into the paper. Now the second part that
I'm applying will give me that nice effect of depth. Now on the top, at
the bottom here, we're going to add
it in the form of these smaller lines and maybe
some strokes like that. Now that we've added that
beautiful red shade, let's get to adding the darker clouds and that we're going to
add with Payne's gray. Here is Payne's gray, mix up nice amount
of Payne's gray. But make sure that your
brush doesn't have too much water because
our paper is not really starting to dry and we
cannot afford to have all this water on our paper. Here is Payne's gray. I'm also going to dab off all that extra water
from my brush. Then going to apply the
Payne's gray right below my red shade in those regions
and in some areas here. You can see how soft our strokes need to be
because our paper is starting to dry and we need
our clouds to be softer. Any cloud shape that you
apply now needs to be softer. Because you need that soft
edge to each of your clouds, so make sure that
your paper stays wet. I think that's enough. I'm not going to add
anymore and ruin that. Now we'll add in the foreground. For adding in the foreground, I'm going to go with
Payne's gray again. We'll go with the
wet-on-wet itself. The reason I actually go
for wet-on-wet is because the focus of the painting is the sky and not the foreground. This is just a quick
way to get around and finish painting
the foreground. It'll give us a beautiful
softer edge as well and we don't have to stress too much about
making it perfect. That's the Payne's
gray and just adding. You can just use it to add different shapes
at the bottom. There. I filled up
that bottom part. Now what we're going
to do is let's just add some tiny detailing on the foreground
just to make it look not that bland
as it is now. Just maybe some
strokes like that and make it look like a
tree or something. You see? Just added a tree form, branch. All of these are still
soft. I think that's fine. Now I think we can dry this
up and the last thing is to add some splatters in the sky because this is
like a beautiful night sky. Here it's all dry now. I'm just going to cover
up this bottom region where I do not want the stars to be and we'll drop in
some splattering. I'm going to take
my Size 4 brush and a nice amount
of white paint, which we're going to
splatter the clouds with. I'm going to splatter the sky, so I'm just going to hide out these clouds as well because I don't
want any splatters there and we drop in those
splatters into the sky region. I think we're good,
just a bit here. I think that's perfectly fine. We've got those nice splatters. Now all we did was
add some splatters. Let us remove the tape. There you go. This is
the painting for today. I wouldn't say it's perfect
because I can actually see how the pigment from the
alizarin crimson spread out. That's a problem
with the tube of alizarin crimson that I have. If you're using a
different red shade, it shouldn't be our problem. I think I need to throw out that alizarin crimson tube because somehow the pigments in that are separating and I found that. Anyways, but I'm happy with how this picture turned out
overall, so there you go.
64. Day 30 - Colours & Image: Welcome to Day 30. Can you believe we're
on the last day? This is the last
painting for this class. Let's have a look at
the colors first. For the sky, at the top, I have used Prussian blue or you can use indanthrene blue. Then coming towards the bottom, I have mixed a little
bit of my violet shade, you'll just see where it is. Then I've brought down and used my transparent
orange again, then my transparent yellow. Those were the colors
in the background sky, and then on the top
for the clouds, I have actually
mixed my queen rose, and my cobalt blue together. Actually that's the
mixture that I created. Wait, that's the violet shade because it has to
pigment on the top, let me see, this is
the cobalt blue. What I actually did is I
mix this pink and this blue together to create a
nice purple shade. Again like this, and I kept fading the tone of
that purple shade, so if I add more pink
into the mixture, it becomes a red purple shade, and if I add more
violet into that, it becomes like a violet shade. That's what I have used for
this clouds on the top. Those are the colors, as far as painting this goes, it's a simple gradient sky with a little tint of violet
color on the right side, and then gradually bringing
down all these other colors. Then using the wet method itself to add the
clouds on the top, so let's get to painting this.
65. Day 30: Let's start. Let's apply water
to the whole of our paper. Apply the water multiple times ensuring that the water that's on
your paper stays wet. For all our wet-on-wet
techniques, your paper needs
to stay wet under the last stroke of
wet-on-wet that you do. This is why we need to make
it stay wet like that. So keep applying the
water multiple times. This is the hardest
part, I know, and it's the last painting, so just go with the flow. Apply multiple times making
sure that the paper get soaked in with the beautiful
water. Now we'll start. We're going to start
with Prussian blue. We'll start in the
top right corner towards the left side. So from the top right corner
towards the left side. Then apply these left
movement with our brush. Then as we gradually move down, I'm going to paint my brush with a little bit of
violet. Can you see? I've taken violet and then
I'm going to mix that up. That's what we're applying. Then it's all lighter
strokes towards the bottom. All those darker
strokes needs to be at the top and then as you
move towards the bottom, let's make it lighter. Watch the right side. What I'm doing is I'm just touching my brush on the
violet so that I tint it with a little bit of violet and that's what I'm applying towards
the right side. Can you see? Just
touching a bit. Violet that I had is a very
highly pigmented violet. That's why I need to be careful. I need to only touch
it if I want to make sure that this thing
doesn't spread out a lot. Now I'll go with a lighter
stroke towards the bottom. Now I'll go with my next shade, which is going to be yellow. I'm going to just apply my
yellow here at the bottom, and what I'm going to do is, I'm going to create
like a sun here. That's what I need. I have the sun there, and my yellow is going
to be all around it. I'm not touching the blue
region because if you touch the blue region you're
going to create greens, you know that, so just outside. Then I'm going to pick up
a little bit of orange. So a very lighter tone of orange. That's what we're using. Using that lighter
tone of orange, I'll just go at the top. That orange when it mixes
with the blue it's going to create a gray shade and
that's absolutely fine. Blending with that orange
will go into a grayish tone. Now we have that little tint
of yellow at the bottom, that light, that
orange, everything. Now I'm going to add a bit more blue because my
blue is very faint. I'm going to keep adding
more blue at the top. Let me go over the
top region again. This time I'm going to tilt my paper because I want
my water to flow down. It's absolutely fine for this sky today to have
your water to flow down. Here is my Prussian blue and I want it to be dark at
the top right corner. That's why I'm picking up
a darker tone of paint. Can you see? It's a
darker tone of paint. As I go towards the bottom, obviously, I'll pick up a
little bit of that violet, tint my brush with a
tiny amount of violet there and move downwards. I'm going to wash my brush
because I don't want to ruin the orange, yellow area. Now I brought down this paint. Let me do the same
here on this side. I'm just trying to
get this whole thing to blend perfectly. Here I've just taken my brush and using my strokes
I am blending in. We need to make sure that
it blends in without creating any posh edges. The right side is where we need that little tint of violet. Then we're going to bring down and we're going to brush there. We have that. Now, since the whole of
the paper is wet, let's add in the
beautiful clouds. For adding in the
beautiful clouds, what I'm going to do is I'm
going to mix up the color. I'm going to take my pink and I'm going to mix
it up with my blue. Let's take cobalt
blue and mix it so that we get a nice
red purple shade. That's what we want. Using
that red purple shade we'll add in the clouds. Can you see? Just
adding on the top some beautiful strokes and just adding some cloudy forms like that using this
brush movement again. This is the best brush movement when
you're painting skies. I'm going to add some here
on the right side as well. A little bit here, mixing. The reason why I'm
mixing with my pink and blue is because I want to create varying
shades of purple. If you mix more pink with it, then you'll get a red
purple or pinkish purple, and if you mix more
blue to that mixture, then you'll get a
dark violet shade. This is what we want.
We want to vary the amount of violet
that we are using, that is the color that we're
using. We want to change it. Now I'm going to shift to
a bit more violet tone. That violet tone is what's going in that area where the blue is separating the
orange and the yellow. We've got nice amount
of clouds there. Let's add some more. You can see because
I've added more blue, the violet tone is
completely different. We can also add the same to the areas right next
to the other ones. For example, I think
I'm going to add a huge cloud there, and maybe some here. I'm going to drop in some smaller ones. I'm using the tip of my brush so you can
see how small that is. It's almost like being in shade. I think that's good enough. Let's not ruin it anymore. You can soften the edge of the clouds if they're not too soft and are forming hairs, but I think it's enough. Just going to apply
some paint here because the orange that I
applied is almost gone. I've picked up a little bit more orange and applying
to that region. There, taking a bit more
orange and I've applied. We need to make sure
that our paper is really wet, otherwise, all of these strokes are
going to create harsh edges. So here. I can see some harsh
edge on this cloud here. Let me dry my brush
completely and I'm just going to run my brush
along and soften it. I've softened that edge. Anywhere that you create
harsh edge just use a dry brush to soften that. I think we're good to go. Let's not ruin this anymore. There's no foreground. This is all for the sky. If you want to add in
some foreground, you can. But since we've drawn the sun
here at the extreme base, it means there is no
foreground to be added. That's it for this painting. We've completed the 30
days, can you believe it? Let's just dry this and
we'll remove the tape. Here the painting is now dry, so let's remove the tape. Here is the final painting. The at most final painting. The last painting. There you go.
 Geethu Chandramohan, Colourfulmystique - Top Teacher, Artist