Transcripts
1. Introduction: Are you a creative
who's excited to get your Art out onto products, but you're uncertain
where to start. Or maybe you're a
surface designer looking for a new outlet
for your patterns. Or perhaps you're an abstract
or watercolor artists looking for a Fun and
affordable products to put your designs on. If so, then I think you
might be interested in my newest class
and Artists Guide to Design and Sell
Tea Towels with Printify Print on
Demand. Hi everyone. I'm Kari Barnes and I'm an
artist, designer and teacher. I've created this class as a
follow-up to my first class, the Artists Guide to Printify, Print on Demand using your
Etsy or Shopify Store. If you're brand new to
Print on Demand and you're just starting to explore
the possibilities. I would suggest checking out
my first-class first in it, I go deeper on the basics
of Print on Demand, why I chose Printify as my
first Print on Demand partner. And how to quickly set up your Printify account and get your first products created. In this class, we're going
to do a deep dive on how to design and sell your first
Print on Demand tea towel. Tea towels have gained a lot of popularity in the
last few years. And it's really easy
to see why they are beautiful and
functional pieces of Art. They allow us to add some
personality and pops of color to our kitchens and
they make great gifts. I think they are the perfect
starting point for getting your artwork onto products
and out into the world. In the past, creating
your own line of custom tea towels will require
a lengthy research to find a manufacturing partner
sample requests to check quality and costly
investment in inventory. And all of this before, you've even discovered which of your designs really going to resonate with your customers. But now through the magic
of Print-on-Demand, you can focus on the
artwork and print your own custom
tea towels without the costs are hassles of
traditional manufacturing. First, we will get an
overview of the types of towels that are
offered on Printify, the materials that
are available, and some of the pros
and cons of each. Next, we're going to
dive into the three ways that I enjoy designing
my tea towels. And this would include arranging
the elements manually in Canva using a repeat pattern
block as a starting point, and using Printify's
pattern function to turn a single motif
into a repeat pattern. Then after discussing some
design considerations for each of the towel styles, we will discuss how to
price your tea towels, including researching
the competition and some mark up considerations. By the end of this class, you'll know not only how
to turn your designs, patterns and motifs into
beautiful functional tea towels, but you also have an
understanding on how to price and offer your
tea towels for sale. All I recommend that you
have with you as you watch this class is a notebook and something to write with. So let's get started.
2. Choose Your Printify Tea Towel: The first thing you'll need
to decide is which type of tea towel best fits your
needs and you're brand. So here we are at the
Printify homepage. And if you don't currently
have an account, it is 100% free to sign up and I provided a link for you in
the Class Resources Guide. Printify currently offers over 800 products to
choose from there, adding more all the time. And you'll find the tea
towels in the home and living category under towels. So here you see they
have an assortment of different kinds of towels
from a beach towels. They have the kitchen towels, hand towels, a rally Towel. They're all different sizes. There are many
different providers. And the first thing
you're going to want to do is select a target market. Printify is not a
single provider. They're actually a
network of providers. So you're going to want to select a target market that is, so that they have a
fulfillment center that is close to where you are. So I'm in the US, so I'm going to click here. And that will filter it for
providers that are in the US. And as you scroll through here, you can see there
are several options that would function
as a tea towel. They've got the soft tea towel, something called a
kitchen towel down here. There's a hand towel and then
just the regular tea towel. For this class. We're going to focus on
two of my favorites. And they both happened to have
tea towel in the name and that would be the soft tea
towel from district photo. And then down here,
the what's just called the tea towel
from printed mint. So let's click in and
just take a closer look at what each one of
these towels looks like. So let's start with
the soft Tea Towel. Soft tea towel is 16 by 25 ", so it's a good size. It is a one-sided Print. If you click over here, you can see that it
is an all over Print, which means that the design
goes from edge to edge. Has a son in care label. The blanks are
sourced from China, but it is printed in the US. And the material here you'll
see is it's a microfiber, So it's 85% micro polyester
and 15% poly amide. This microfiber material is a very absorbent and dries fast. And let's take a look at the
tea towel from printed mint. Now this is a larger towel. It is 28 by 28 " square. It's 100% cotton. This towel is more
of what you would consider like the
flour sack tea towels. That design is only
printed on one side. However, if you
click up over here, you'll notice that
the Design actual, the actual printed design area is not the full
size of the towel. And you'll see this a little bit better as we go
through the lessons. But this towel is designed
so that when you, the towel is folded like in thirds and hanging
over a holder, that the design is then
displayed that way. I really like both of these
tea towels and it depends on what your preferences
are and what you feel is right
for your brand. What I would recommend
is that you order some samples for
yourself so that you can really
experienced the size, the texture, and the
observability for yourself. Once you've found a towel
that you really like, then it's time to
start designing. Join me in the next lesson and I'll give you an overview of the three methods that I like to use to design my tea towels
3. Overview: 3 Design Methods: Whether you're
inexperienced designer or you're just getting started
on your Art journey. There is a method for designing
tea towels in Printify. That's right for
you. In this class, we're going to be covering
three different methods to design your tea towels. Now, I use all of these methods
depending on my artwork. But if one of these
appeals more to you, feel free to jump right
into that lesson. In this lesson, I'm
gonna show you how to use Canva in combination with the provided template
file to easily Arrange various elements
into a pleasing composition. This method can be used with Canvas stock
design elements, or you can upload your
own design elements. The next method we're
gonna go over is to start with a
repeating pattern block. Now, I love to create
seamless repeating patterns in Adobe
Illustrator and Photoshop. And while creating
these patterns is beyond the scope
of this class, if you're an
experienced designer, I'll be showing you how to turn your existing repeat patterns
into beautiful tea towels. The third method we're
going to go over is to use Printify's repeating
pattern function. This is really an amazing
option as it allows you to turn a single motif like this
sunflower stem into many variations of
a repeat pattern without having to learn all the ins and outs of building a true repeat pattern block. In the upcoming lessons, I will go into depth in
each one of these methods. So join me in the next lesson
on designing in Canva, or feel free to jump to the method that
speaks most to you
4. Method 1: Arrange in Canva: One of the easiest
methods to designing a tea towel using different
elements are motifs, is to arrange them
manually onto a template. Now, there are lots of software available that
you can use for this. But today we're going
to be used in Canva. So here we are in Canva. And I like Canva because
it's affordable, it's very easy to use. And it also offers a library of royalty-free elements that
you can use in your designs. The first thing
you'll want to do is to locate and download the Canva template file from the Projects and
Resources section. I've created two for you to use. One is for the 100% cotton, flour sack type tea towel, and the other one is
for the soft tea towel. Today I'm going to
be designing one of the flower sack towels
for this method. So to start with, we're going to
create a new design. So we go to this purple box in the upper right-hand corner. Click Create a design. We're going to
choose Custom Size. And we're going to do 3,600 by 4,800 pixels and click
Create New design. The next thing I'm
going to do is locate the template
file that I've downloaded onto my computer
and upload it into Canva. It's very simple to do this. There's going to
grab it and drag it over right here where it
says drop files to upload. And now we have the template
you're going to want to do then is to take and
grab it and you click, click and drag. And you want it to pop in
its full size like that. If you simply click on it, it will not be the correct size. It won't be the full
3,600 by 4,800. Okay. Undo that. Again, we're going to
click and drag and make sure it goes into the
background just like that. So this cream area
here in the center is representative of the area that will show when
the towel is folded. So this is the part
of the design. If you were going to
put some words in your design that you're going to want them to be
nice and centered. When I first started
designing this tea towel, I didn't have this
template and I would have to go
back-and-forth and guess where I needed to put the
words for my designs. I hope you'll find
this kind of handy. To start the design
on this tea towel. I'm actually going to grab some topography that I've
used in another design. So I'm just going to
click on this element. It is grouped, so I'm going
to click Command C to copy, hop back over into
this document. And Command V to
paste it in there. And so you can see
where the center is. If you slide this back-and-forth where that
purple line shows up, then you'll know you're centered
on the bigger rectangle. And I think I'll put
it right about there. So just to illustrate, if I were to stop
this design, right, we're at and uploaded
into Printify. This is what our tea
towel would look like. This you can see
what the template, I left the template on there so you can kinda see
how it fits in. I did leave a little bit
of a white border around. You can go all the way
to the edge there. And you probably will with
the rest of your design. But I like to keep the safe zone right there in the middle where
I where I have my text. Now it's just a
matter of adding in any other elements
around this text, filling up the entire
remaining white area. So I'm since we're done
with centering the text, I'm not too concerned about how the other elements will
relate to the text. I don't really need
this guide anymore, so I'm just going to click on the background
and hit Delete. Then I don't have to
worry about turning that off when I'm all
finished with my design. Now, it's just a matter of
adding in the elements. And I have some of my
leopard sunflower designs. So I'm just going to quickly add you can re-size by grabbing the
corner handles like that. Will just quick fill this in. Kinda want to pay
attention to the edges. If you want to
rotate and just grab this middle handle here that with the two arrows
and you can turn. And we'll just
really quickly place this, place these around. I'm sure you get the idea. Something like that. So when you're happy
with your design, make sure you go up
here and title it. Say leopard,
sunflower, flour sack. You're gonna hit
the Share button. Click on Download. I like to use a PNG. And I'm gonna hit
transparent background. If you have a
colored background, you don't need to do
that and hit download. And once it's downloaded, then we're going to hop
back over into Printify. And you're going to select the tea towel that
you want to design. Click scroll down and click the green start
designing button. At this point you're going to upload the PNG that you
just created in Canva. And you can do that either
by clicking on my device or you can click and
drag onto the canvas, which is what I'm going to do. And then if you want to
see what you're finished, tea towel is going to look
like you simply hit preview. And it will generate
several mockups for you, as you can see here. Looks good. This is what it's
gonna look like. Folded. It looks nice and centered. Nothing is cut off. A nice thing about
Printify is that you can take these mockups. And if you go to the little icon down here and
the lower left-hand corner, it says download mockup. And you can download
that and you can use it to promote your
new tea towel. Before you leave here. In order to say this into
your Printify catalog, you want to click Save product. Join me in the next lesson
where I show how to use a repeating pattern block
to design your tea towel
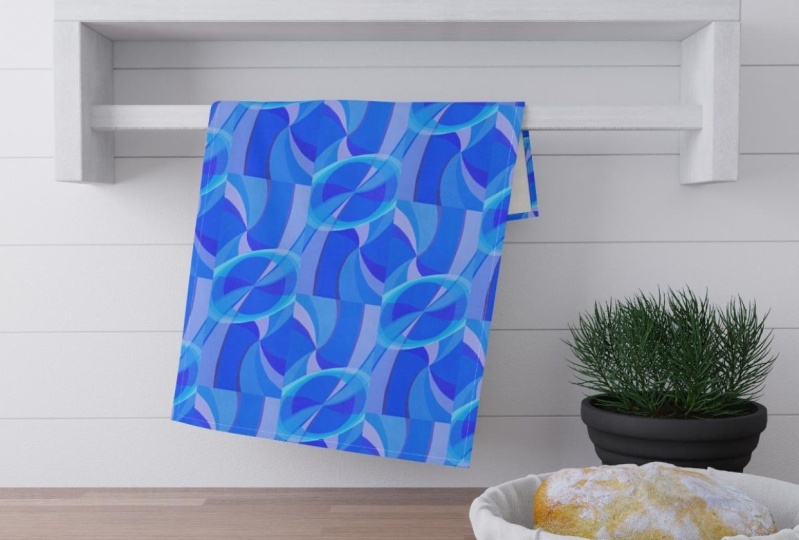
5. Method 2: Repeat Pattern Block: Repeating pattern block is a design file that when
placed next to each other, creates a seamless
overall pattern design. Now creating a seamless
repeat pattern is beyond the scope
of this class. But if you're an
experienced designer, you can easily use those repeat patterns that you have to design your tea towel. Okay, so here I am in
Photoshop where I've created a repeat pattern that I
called petals on the prowl. And it's a 12 inch by 12
inch tile and it's 300 DPI. And you can see that it repeats when we talk
about repeating. If I show the Pattern
Preview mode, which I love in Photoshop. But you can see that it repeats seamlessly edge to edge
as far as you want, which makes it really
great for filling in areas or printing fabric
or things like that. So that's a repeat pattern. Take this. You may have created
your pattern in Adobe Illustrator or Procreate
or even Affinity Designer. And that's fine. But what you'll want
to do is export the file out of your software as either a JPEG or
PNG or an SVG file. As those are the only file
types that Printify excepts. Then they also suggest that
your file be a minimum of 200 DPI for a nice
clear quality Print. Now, as I mentioned, this tile is 300 DPI, so it's a little more dense. And I just happened to design the majority of my repeat
patterns at 300 DPI. And that just gives me some
more options for scaling. And I'll show you that when
we jumped back into Printify. Here we are back in
Printify and we're going to choose the soft
tea towel this time, That's the microfiber towel. So I'm going to click
here, start designing. Then I'm going to
find the file that I exported from Photoshop
and bring it in here, either by clicking on my
device and finding it on your computer or you can drag onto the canvas
as we did before. And that's what I'm
going to do here. Emily's. So as you can see,
Printify tries to re-size and fit the tea
towel onto the canvas. As I mentioned, this
tile actually it has a higher resolution
than is required as 300. So Printify tried to expand it and take it to
the edges of the canvas. So what I like to do, how I like to start is I know my tile was designed
at 12 by 12, so I change the width
and the height to match the size of my
tile as it was designed. Then I click and drag right up to the
corner here of the canvas. And one thing I did
want to show you before we go any further is if you click on this little
I for information, they give you some
designing guidelines that are very important. And for this template,
for example, they say double-check
the bleed area of the design and make sure your design covers the
entire Print Area, which includes the
area marked in grey, which is the bleed area. Otherwise, some of the sides of their product could be left blank as things can shift
in the printing process. And then you want
to keep all any important design elements
if you're going to put any text or anything
within the safe area, which is the dotted
line, the dashed line. Ok. Ok, So Now here's where
the magic happens. You go down here to the
right panel where it says create pattern and
simply toggle it on. And just like magic, it fills in a tiles your design and fills in
the rest of the canvas. Now, if I scroll down here, we're going to play around
a little bit more with these settings that you see
here in the next lesson. But for a repeat pattern, which you want to just
make sure is that your horizontal and
vertical spacing is set at zero so you don't have any gaps
between the tiles. Because as you can see, if the horizontal
spacing is moved, you can see the gap there. The other really nice
feature about using a pre-designed
repeat pattern tile is that it's super
easy to scale. If I go over here to
the scale and say I wanted to make it 50%. I want the sunflowers to
be a little bit smaller. You just type in 50% and it
adjusts everything for you. Now scaling down, if
you're starting with a file that's the minimum
DPI is not a problem. The thing you want to
watch out for here is, and they'll tell you
what the resolution is is if you're scaling up. So say I wanted these
sunflowers to be huge. Say I did 150%. Now they're giant obviously. But if you look up here, it says the resolution
is only 133 DPI, which is lower than the
recommended resolution of 200s. So I would not print something that had a resolution
of lower than 200 DPI. We're going to put this back to, let's see, let's do 50%. And as before, you can
hit Preview and check out the mockups and see how your
design looks on a finished mock-up. There you go. And of course, don't forget
to save your product. Join me in the next
lesson where I'll show you an easy alternative
to creating a repeat pattern
in Printify using Printify's and built-in
repeat function
6. Method 3: Printify's Pattern Function: If you don't know how to design a repeat pattern as I showed
in lesson four, no worries. Printify has an amazing
repeat pattern function that allows you to create
several basic patterns using a single motif
without having to learn all the ins and outs of creating a true
repeating pattern. So for this lesson, I'll be using my
sunflower stem motif that I have created
in Photoshop. And I have export it as a PNG with a
transparent background. And we're also going to choose
the soft tea towel again. And select start designing. Again. I'm going to import my
sunflower stem motif either by going to my device or by dragging
it onto the canvas. And as before, Printify has stretched it to the
size of the canvas. So I'm going to scale
this back down. And as before, in lesson four, we're going to bring our motif up to the upper
left-hand corner. Oops. Over here. Toggle. Create pattern on. Okay? As you can see, there are three different choices
for creating a pattern. You can do a regular grid, which we're seeing here. You can do a brick horizontal
or a brick vertical. And in addition to those three, you can change the spacing either horizontally
or vertically. And you can also
change the angle. So we could make space these out a little
bit and change the angle. Something like that. To start. There's a brick horizontal. And then one of my favorites, which is the brick
vertical or half-drop. Let's just adjust
these a little bit. Yeah, I like that. So in addition to playing
around with this spacing, you can also add a
background color. It defaults to white. But if you click here, you can see that
they have a bunch of different stock
colors, if we will. Most of these colors
I find a little harsh and not really in my, what I usually would design with the black,
looks kinda cool. But the good news is
that you can enter a hex code number right here and put in your
own custom colors. If you're not familiar
with hex codes or where are you can find them. Let me show you a really
easy way in Canva. So here we are in Canva. And if you click on a text element and then
click up here on text color, you'll get this panel
of default colors, colors that it's
finding in a photo, some brand colors and
things like that. And if you mouse
over these colors, you will see the hex codes. So you can pick any one of
ones that you've already used. If you want to find a
completely new color, you can simply go up to
here to the color picker. And you can move this
little eyedropper around. And as you can see, it's changing the color of the texts here so you
can see what it is. And it's also giving
you the new Xcode. For example, I'm going to type in that
midnight blue color, which will be 162 13d. There you go. But let's go back to white. And another nice
thing about designing this way is that you don't
have to do just one layer. So in addition to
this sunflower stem, we could add a
background pattern or texture or another motif that would fit in-between if
we change the spacing. So let me show you
how that works. So I'm going to add
a design on the back and I have a cream
colored leopard. Repeat. Now this is a repeating tile, like we talked about
in lesson four. So again, I'm going to change
it to the size of my tile. Put it up here in the corner. Toggle create pattern, so you can create a
pattern for each layer. Now, obviously, if I
click off of here, you'll see the two layers. And obviously I want the
sunflower stems to be on top. So you just these six dots
here, click and drag, and they will change order. Then of course you can hit Preview and see what that
will look like in real life. So let me show you another
example of the layering. Here's another tea
towel that I've created called
painterly daisies. And I just kinda want to
show you how I put this one together as another
example of layering. So let me rearrange these
so you can really see. So I started with this purple watercolor splotches that I got off of
Creative fabric. And I included a link to create a fabric
in your resources. Downloads. It's a
really great place to get different design elements that you can use
in your projects. And so I downloaded this purple watercolor and I titled it kind of arrangement. So they're a little
bit overlapping. And then I added on top this little daisy that
I created in Procreate. And then I adjusted the
spacing on the daisy. In originally, the
background color was white. And obviously that looks pretty bad with
those gaps in there. So I picked a
coordinating color, which I'll enter in here
now. Put that back in there. So you have that kind of
a steel blue behind it. And let's just take a look
at what this one looks like. On a mock-up. There you go. I think that looks really cute. Like if you're a
watercolor artist or an abstract artists, you can take all those
little elements that you have and layer them
on to a tea towel. I hope you've been inspired to have some FUN and play
around with this. Because between the layering and the spacing options
and the background colors, the opportunities
really are endless to create something that
is truly unique to you. Now that you've seen
the three ways that I like to design tea towels. Please join me in the next
lesson and I'll show you a close-up view of the two tea towels that
we've been designing with. And we'll talk about some
design considerations for each
7. Design Considerations: For this lesson, I
thought it would be valuable for you to see up close the differences
between the flour sack, tea towel and the microfiber, one that we've been
designing with. So this is the microfiber
towel and it is 16 by 25 ". So you can see there. And it is printed on one side, so the other side is white and it has a bit
of a texture to it. The flour sack, tea towel
is quite a bit larger. So this is what it looks like. Folded. And unfolded is a
full 28 by 28 ". So it's quite large and it has, but it's still has quite a large Print Area, which I like. The soft tea towel
is an overall Print. The flour sack tea
towel is designed to feature the printed
design when folded. I really liked them both
for different reasons. I really liked the absorbency
of the microfiber towel. It really seems to soak up a lot of water and
it dries quickly. The flour sack towel
is also very nice. It's a nice wait, I don't
feel that it's too thin. Some people like the idea
that is 100% cotton. The other thing
that I really like about the flour sack towel, and I will show you this even closer up in a
couple of photos. I like the clarity of the Print
On the 100% cotton towel. As I said, the soft microfiber
tea towel is textured, as you can see in this photo, and some of the
detail can get lost. If you look at these prints
on the cotton towel, you can see that the detail
is rendered very clearly, even down to the
delicate shading on the bee's body and the wings. And here you can see
the difference in how the sunflowers Look when
printed on each Towel. So when designing for
the microfiber towel, I would make sure to use boulder prints as small
details can get lost. You'll also want to make
sure that you're using enough contrast in your designs. For example, I applied a light leopard print
background to this tea towel. And because there was
not enough contrast, the Pattern got absorbed in
the texture of the towel, which was really not the
effect I was going for. Now that we have our tea towels Design and please join me in the next lesson as we go over some pricing strategies
for selling Your Towels.
8. Pricing Your Tea Towels: In this lesson, I'd
like to share with you some basic research
and pricing strategies that you can use to
price your tea towels. Now as a creative, I know that talking
numbers can make a lot of us hit
the snooze button. But I hope you'll stick with me because by the
end of this lesson, you'll have some
great strategies for pricing Your Tea Towels. The first thing I like
to do when considering a new product for
my product lines is to do a little research
on the competition. I like to find out, is there any competition to
start off with? And if there is, what are
they selling the product for? I want to make sure that
I'll have enough markup to make designing
these worthwhile. And while I don't need to price my items like the same or
even below my competition. I do want to be able to be in the ballpark to
start my research. I of course, start where
any good research starts, and that's with Google. So did a Google search
here and I searched for microfiber tea towels
because we're going to use the soft tea towel from district photo
as our example. And there was a lot of
results that came up. And it's, you'll see we've got some big players come up first. We've got Target and
Amazon and Walmart. But I would advise you
to steer away from comparing with these
big box stores. We're going to be positioning our tea towels as
like artisan crafted. And these big box stores
really goal for volume. They have huge buying power
and they can solve for a low price and it's really hard to compete with them on price. And you're really not competing
with them because you're turning your unique
Art into tea towels. Instead of being part
of the mass market. And you'll be offering these
tea towels hopefully to following that really
enjoys her Art and wants to follow
and support you. As we scroll down
a little farther. There's Wayfair, that's
another big one. I tend to ignore these little ads here to there are often just from Amazon. But as you get down a
little bit farther, you'll start to see some
of the smaller brands. And we're just going
to head down here. We've got like so chic boutique, they're actually selling company reselling accompany
called geometry, which we'll be looking at. Here's moss and Marsh. There, a higher-end brand. Go down here. It's a lot of ads here. Here's the ad for
geometry house. More ads. And what I found as
you get to the bottom, they have some of these
smaller brands like Bloom towels and
Kentucky made and more. Erisa made this these are more like artisan
forward brands. And that's kinda who I was
thinking that I would want to compare my brand to and who I'd be selling
against, if you will. Let's click into a couple of these and take a look at
what they're offering. So here we are at
geometry house and let's click into shop there.
There are big company. They are very artisan
forward as you can see, and they offer a
microfiber tea towel. You want to make
sure that you're comparing apples to apples. So you wouldn't want to compare a microfiber tea towel
with a flour sack. Obviously. This is a microfiber tea towel. I like to check the size. This is an 18 by 30. They're selling it for $17. And when I check
on their shipping, they do have they do
charge for shipping by per piece and then they offer
free shipping over $75. So you definitely want to
take into consideration, make a note of the price. And also if there
is shipping added because when we look at what we get charged
from Printify, we're going to have to take
into consideration both the product and the
price for shipping. So that's geometry house. Let's click into another one. This one is called Bloom towel. And they also do
microfiber towel. They're unique in that they
have two-sided Towels. The ones from Printify
are just a single side. Let's click in and
see the detail here. They are selling their
towels for 16 99. Again, it's an 18 by 30 inch. It is a microfiber towel. You can see at the top here they have flat rate shipping of 549 and free shipping over $70. So we'll make a note of that. Let's look at another one. Here's Kentucky made and more. This is a microfiber
kitchen tea towel, $17 that all matches up. Again, this is another
one that's 18 " by 30 " and I believe they
did also charged shipping. Now as you're doing research and gathering
research for these, I would also suggest that
you obviously check out Etsy Especially if you're
considering on Selling On Etsy, is a very important to do
your research On Etsy, since that's gonna be your
primary source of competition. I found that with Etsy, there is a huge range. You can see some of them on
the screen here that are popping up based on what my research that I was doing
before recording this class. And you find a wide
variety anywhere $1099-18. I saw some for more than that. So you also want to look at consider what you're going to be putting
on your tea towel. Is it going to be like
stock graphics like this with some phon words are funny sayings and
things like that. So this is Clara's
craft boutique one. And she sells these
tea towels for 1099. And I believe there's
shipping, yes, $4 shipping. Then we have more of an
artisan type brand here. This is printed water. And she does all of
her own artwork, as you can see here. And you can definitely
see an artistic style. And she has a very clear
artistic brand going on here, and she does charge more. She charges $20 for hers. So it's checker on her shipping. She charges for 88 to ship. On top of that, you have
to decide on where you want to fit in here with the tea towel market and what kind of look you're
going through four. And take all these factors
into consideration. I took all of some of
the research that I had done and I created
a summary page. So let's take a look
at that right now. Okay, so here's a
little summary page that I've created based on. Let's see, there's
seven companies that I took data from and you can do more or less whatever you
feel comfortable with. And I just kinda like to see them all side-by-side
like this just makes it easier for me
and I like to record the company and the website in case I want to go
visit them again, the towel size, the price, and then if they charged
shipping or not. So as I was looking
over this and trying to figure out a ballpark
price, that would be good. The first thing I did was I
added up all the prices here. And when I did that, I took, divided it by the
number of companies here and I got an average price of
about little over $800. So like 18, 26, I think it was. So that's just something
to keep in mind. Then I noticed that the
lowest one was 1099, that was clear as cross
boutique that we looked at. And the highest one
that I found was $28. That's from that Marsh
moss and Marsh Company. The largest number
there was a four out of the seven that were
priced around $17. The top three there are $17. And then crafts
unfair Hill was $18. And it looks like all of them charged something for shipping, although they varied in
the shipping amounts, they all charge
something for shipping except for crafts on Fair Hill, which offered free shipping. So that's also something to
take into consideration. After taking all of these
factors into consideration. And also the companies
that we looked at and the style that I am going for
and things like that. I'm going to pick my
ballpark price that I would feel comfortable
selling at around 17 or $18. So once you've identified a target price and
one that seems to fit in with the competition. The next question you need
to ask yourself is based on the prices that we
get from Printify. Are we able to compete
and be competitive and make a nice profit
based on that? So let's jump back into
Printify quick and I'll show you where to find the pricing and the
shipping costs. So here we are in
Printify and we're using the soft tea towel from
district photo as our example. So let's click into there. And if you scroll down, you're going to click on
this more details button. And what pops up here on the
first tab are the pricing. And you'll see there are
two prices listed here. One is 858 and the other says 661 for Printify premium price. Printify premium is a
subscription that is optional and I think
it's around $30 a month And when you subscribe to that
and pay that monthly fee, you get the benefit of usually
a slightly lower price on most of the products
that you get from Printify. If you look here, you'll
notice that if you take the difference between
those two, it's about $1.97. So when you're trying
to figure out if you want to subscribe to
Printify premium. You like say you
were only offering the tea towel and you knew
that for every tea towel, you would save $1.97, you would need to sell or be Selling around 15 tea towels a month in order to break
even on your subscription. So that's just something
to keep in mind. But we're going to, we're
going to take both of these prices and we'll run it through our little
calculation coming up. And then if you click
here on shipping, it'll give you what
they're shipping. Costs are too. All these different
parts of the world. Let's just take a look at
the United States here. The first item shipped is $4.50. If the customer orders
and additional item, they would only be charged
$3.40 for the next item. But for this example,
we're going to keep things simple and just do the 450. So let's take these
numbers and see what our profit margin
looks like when we plug in our ballpark price that we chose based
on our research. We've done our
research and we've identified a ballpark price. And then we jumped into Printify and grab the product cost
and the cost to ship. So let's quickly calculate
what our profit would be and see if it makes sense to
produce these tea towels. On the screen here, I've
plugged in the numbers that we just got off of Printify. I have the Printify
premium price. The product cost is 661. Cost to ship is for 50, for a total cost of $11.11. And the standard price at
58 plus 450 is $13.08. So that is the total amount that you're going to be charged when a customer places an
order for a single Tea Towel. Now, if you'll remember,
our ballpark price was 17 to $18. So if we charge $18
and then I put for 50, shipping on here, $4.50
to ship is pretty low. And most of the companies
that I researched did charge additional shipping. So $18 plus 450 would
give us $22.50. That would be the
revenue that we would get from a customer. Then we subtract the Printify
premium total cost of 11. 11. Our profit if we were subscribed to Printify
premium would be $11.39 for each tea towel sold. Or if we just use the
standard pricing, our profit would be $9.42. If you look at percentages, if you are subscribed
to Printify premium, you're going to realize
a 50% profit margin. And if you're just using
the standard pricing, Your looking at it,
42% profit margin. Either one of those, I
think is really good. My goal when looking at products through Print
on Demand is I'd like to make 35% or more in order for me to move
forward with it. And this is well
within that range. Now, obviously, this pricing model will not
work if you're looking to wholesale your towels and have other stores sell them for you because there
just isn't enough markup. So if you look over
here at these two, what Printify is charging us? That's the ballpark of where
stores are going to want to. That's the wholesale cost that stores are going
to want to pay. Because what they
do is they take their wholesale
cost and double it. And if you took this
858 and doubled it, you're around 17 or $18. So there's no way
we can obviously sell a tea towel to a store for the price that we're getting it from Printify. If that is something
that you want to do, you do want to wholesale in
order to get your costs down, you are going to have to go to the standard manufacturing route where you outsource
your manufacturer, you create them yourself or your own inventory and
that kinda thing. Okay? But if you're happy with
selling direct to the customer, you are excited about getting
your Art onto products and into the hands of people
who really enjoy your Art. I think this is a
great way to go. You can make a decent amount
of money and you don't have all those extra
manufacturing headaches. Now that you have an idea on how to price your tea towels, please join me in the
next lesson as we talk about some of the options that you have available
for selling them
9. Selling Your Tea Towels: Once you have your tea
towels designed and price, you have several
options available to you for selling them
through Printify. First of all, it
is possible to use Printify without
connecting a Store. But it will require
you to manually submit any orders
that you would take. Another option is
to connect a Store, which will end up
automating much of the selling processes,
including orders importing. And that is ultimately going to save you a lot of time and help you focus on maybe creating more Art and scaling
your business. Printify integrates with many of the popular
selling platforms. And I've listed
them here for you. And there are quite a
few to choose from. If you'd like to dive deeper
into setting up an interface through either the Etsy
or Shopify platforms. You can check out
my first-class, which is the Artists
Guide to Printify, Print-on-Demand with your
Etsy or Shopify Store. And in that I go into more detail on how to how
to get those connected. Another option has
recently become available that may
appeal to beginners. That is the Printify
pop-up store. The pop-up store is an
all-in-one solution from Printify that
allows you to easily create your own shareable
online store with a unique URL under the
Printify dot me domain. So let's take a look at an
example of their demo Store. So here's the example of
Printify's pop-up store. And it isn't really
nice, clean design. It allows you to have the name
of your store and a logo. Up here in the left-hand
corner you can see the URL would be
something custom. The name of your store,
dot Printify, dot me. Then you can just add in
all your products here. In another nice thing about this option is that after
the order is placed, Printify takes care
of everything, including the customer service, which is a really amazing. So this could be a really
easy way to get your started. Whether you want to enter
your orders manually. Get started with a pop-up shop, or even create a fully integrated online
shopping experience. You're sure to find
an option that gets your beautiful tea towels up for sale and out into the world
10. Wrap Up & Class Project: Thank you for enrolling
in my class today. I hope you feel
inspired to design some beautiful and
functional tea towels for your home or business. To complete the class project, simply design a tea
towel in Printify and take a screenshot of one of the mockups
that they give you, then you can upload that mock-up to the project and
resources tab below. I can't wait to see
what you create. Feel free to comment below and the discussions
tab if you have any questions or comments on things that I've
covered here today, and you can always follow me on Instagram at kari.barnes.art. If you found this
class valuable, please follow me
here and you'll be notified when I
launched my next class. I'll see you next
time. Bye for now.
 Kari Barnes, Abstract Artist / Surface Designer