Transcripts
1. Introduction: There is nothing more calming and cozy than
watching the sunset, except we'll be painting them. Hello. I am Shivani Chalawan. I work in the city's
concert and during the day and I love
painting at night. I'm also a mom of a toddler, so you can imagine I
keep myself very busy. I have been painting
almost all my life. Since it's continued to be
my most favorite subject, irrespective of the
medium that I'm using, I feel like we are
the perfect blend of cool or warm tones. For the past five years I've had the pleasure of
teaching art online. Join me as I teach
you how to create these vibrant and
beautiful sunsets. I will be covering
everything in this class from the materials
that you will require, how to blend colors, how to create these
beautiful clouds, how to create the sun
when it's setting. I will walk you through
the entire process. We will also be covering some optional elements
of a sunset landscape like a sunset at the lake
or sunset in the mountains. We'll almost be covering all kinds of sunset
that you can imagine. You'd be pleasantly surprised at how painting sunsets can
not only be therapeutic, but sometimes also help you come out of this
creative block. If you do enjoy
painting landscapes, but are often intimidated
by the details, this is the class for you. I'm confident that
you will be able to paint any landscape
after this class. They say sunsets are proof that endings can be
beautiful as well. Are you ready to get
started? Let's go.
2. Class Project: This is a project-based class. In order to submit what
sunset you want to paint, there are a couple of
things that you can do. Either you can paint the
ones that I have painted in this class or you can choose any sunset from
your phone gallery or from a vacation that you went recently or maybe even attempt the sunset
from your house window. But I would advise
you to make sure that you practice practice
all the techniques that I have covered
in this class. You will be a lot
more assured and have a better concept on how to
approach this painting. I'm really excited to see what
you create in this class. Enjoy painting and hope to
see you in the next lesson.
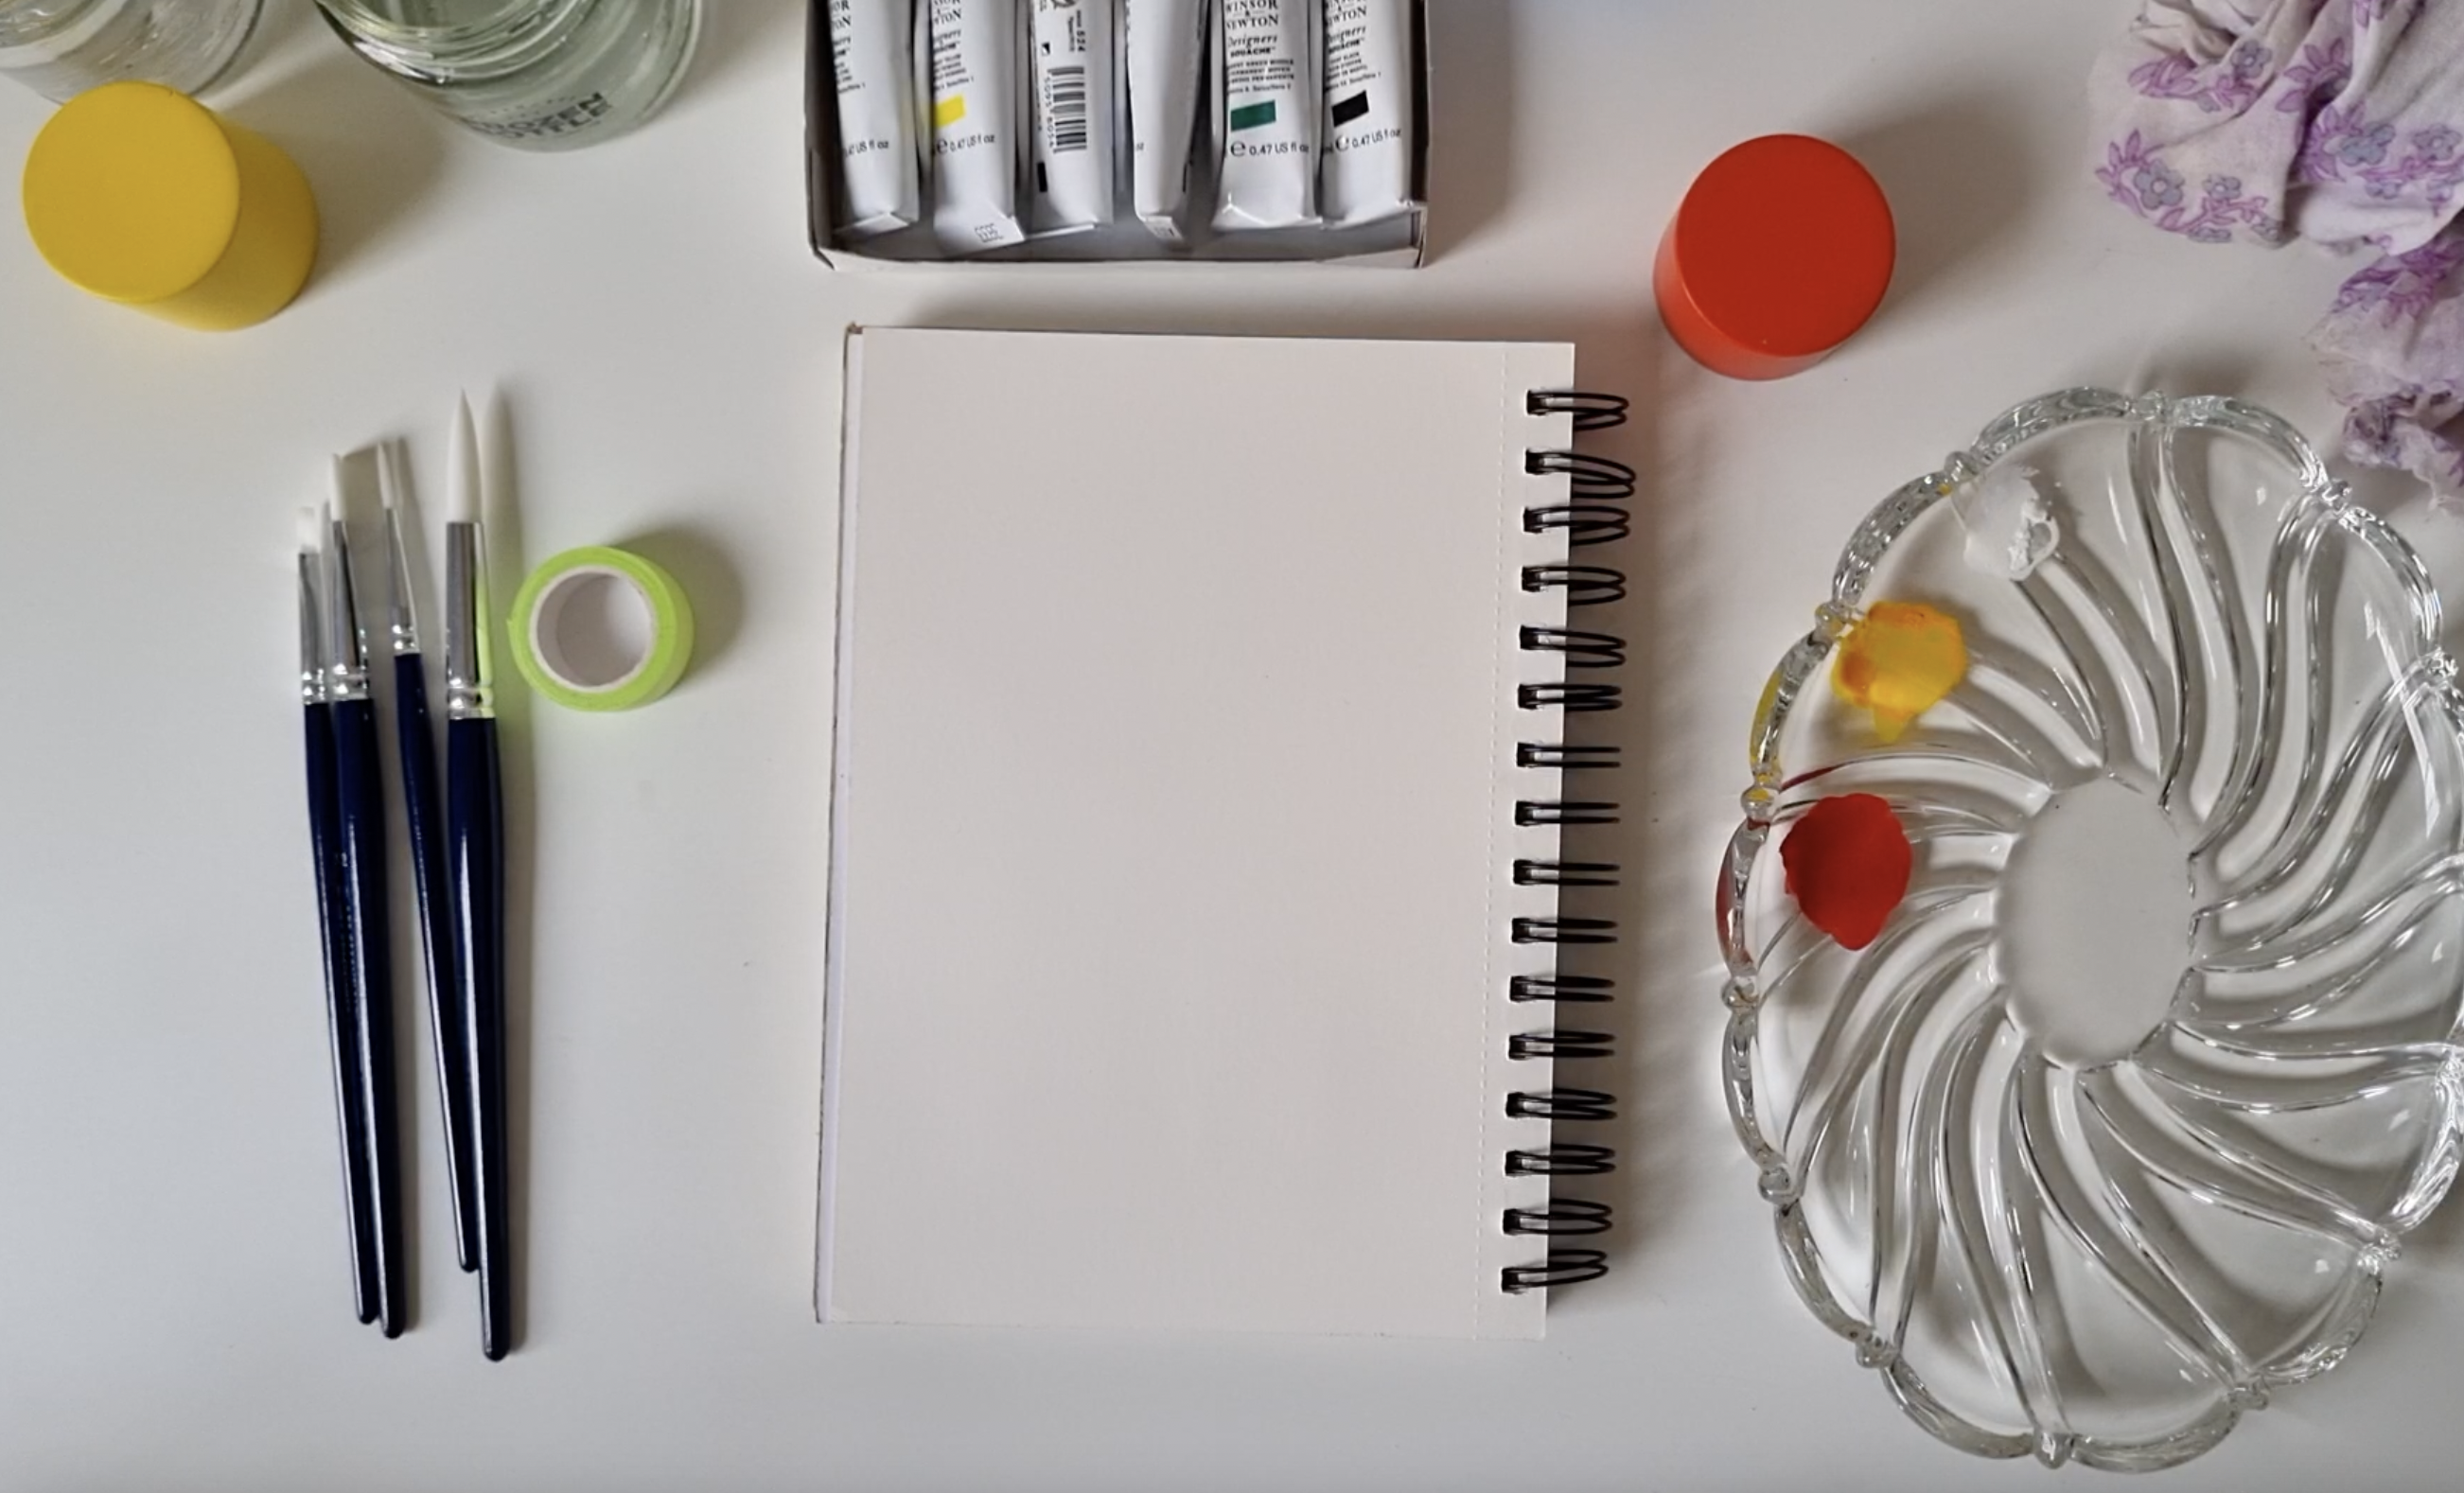
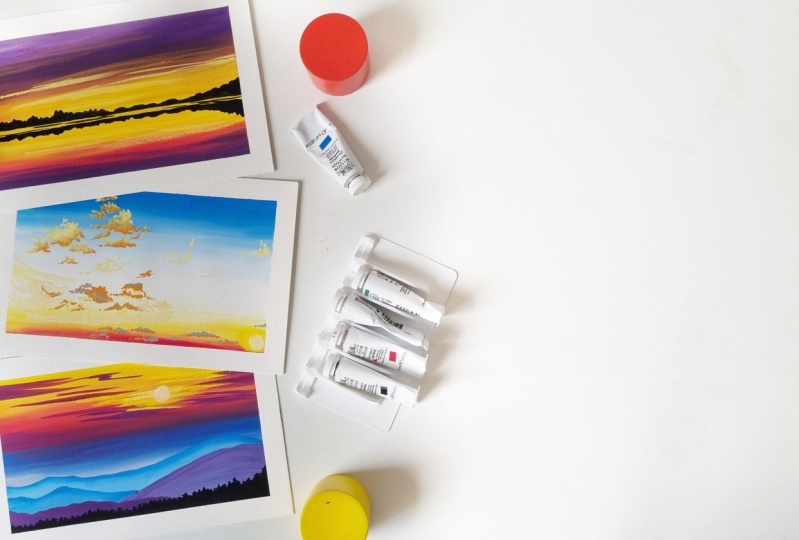
3. Tools for the Class: I will be using gouache
colors for this class. The brand that I'm using
is by Winsor & Newton. For the paper, I will be using this mixed
media sketchbook, which is 300 GSM acid
free cold pressed paper, you can use anything
that is about 170 GSM. A color palette. I'm using
approximately five brushes for this class but in case you even have three brushes
that's more than enough, you just require one flat brush, one round brush, and
one detailing brush. Then we will need
two jars of water. This is very important. Optional is a masking tape
and of course, a cloth rag. Let's start the class.
4. Oh my Gouache: I will be using Winsor & Newton designer
gouache for this class. You can see the swatches
of the colors here. All the paintings in
this class are done just with the primary
colors, black and white. All the shades used
in this class I have created them using
just these colors. To give you an understanding
of the finish, the first painting is gouache. You can see the
finish is very mad. The second painting is acrylic, the finish is glossy. The third painting is watercolor which is done
on textured paper here. Let's start by
understanding what are the ways to use gouache. I'm starting here with
the primary red color. I have started swatching
it on the paper. The initial swatch
is just the color., I have not added
any water to it. Gradually as I keep
increasing the swatches, you can see I'm adding
more and more water. The result being
with added water, the color starts getting
more transparent. It loses its opacity. You can see it has a
very similar texture, light watercolor, if you
keep adding water to it. Now let's see what happens if you add white to
the gouache color. I'm starting with primary blue. I have first swatched the color. I have not added any water or any other color
with the first swatch. Then I will gradually
start adding a little bit of titanium white with
a primary blue color. You can see a very
beautiful gradient of color starts building. Please note that I'm not
adding a lot of water. I'm only adding water so that the brush is able to
glide on the paper. You can see when I'm only adding white and not much of water, the finish of the
color is very mad, very creamy and thick. Ideally, this is the consistency we should aim for when we are painting landscapes or rather
anything with gouache. Here is a close-up of
both the swatches, one with water and the other
by adding titanium white. Now let's see how
to layer gouache. First I have created this black
line with my black color. Once the black color completely
dries up on the paper, I will be taking primary yellow color
in a very dry brush. Make sure that your brush
does not have any amount of water and I will create these single strokes
on top of the black color. You can see how the yellow color almost covers the black color. Now, I will start adding
a little bit of water to the yellow color and
again do the swatching. As you can see, the black and yellow
colors start blending. We need to keep this in mind when we are layering gouache, make sure that your
top layer is dry. You do not add a lot of water and the second
thing you need to make sure is that you do
not use multiple strokes. If you use too many strokes, it will end up in
a similar result. Here is an example of a
painting where I have added the lighter green color on top of the darker green hue. Next, we'll see how
to blend gouache. I'm starting with adding a lot of water to my yellow
color on the palette. You can see how
runny the color is. I'll also add a lot of water to this orange shade on my palette. Just make sure that your
yellow color is still wet when you're trying to blend, so it blends up really
smooth as you can see. I'll show you a
close-up of this. The finish is very
similar to watercolor. Now, let's see how to blend gouache maintaining particular
consistency of the color. I've again started with the
same color, yellow and red. I've added yellow first and then I'm mixing the
primary red color. I'm adding a little bit of
yellow below as well to show you how the blend
is very smooth. Again, I'm not letting
the colors dry here. This is a very fast exercise. Here is a close-up of the matte finish that you get when the colors
are really thick. Now, let's see what
happens if you wait for the colors to dry before
blending them together. One exercise I'm doing wherein the consistency
of the color is thick. First I've added
the yellow color with a thicker consistency, then I've added water
to the yellow color and it is a little
watery consistency. Similarly, I'm adding primary red with a thicker consistency. Then I'm going to add a
little bit of water to the primary red and again
create these brushstrokes. Now let these colors dry, then we'll take a
wet brush and start trying to blend the colors where the consistency was thick. You can see it's
much easier to blend the colors where the consistency of the colors was higher. If I'm trying to blend the colors that have
a watery consistency, you can see it's not very smooth and it does not
give a good finish.
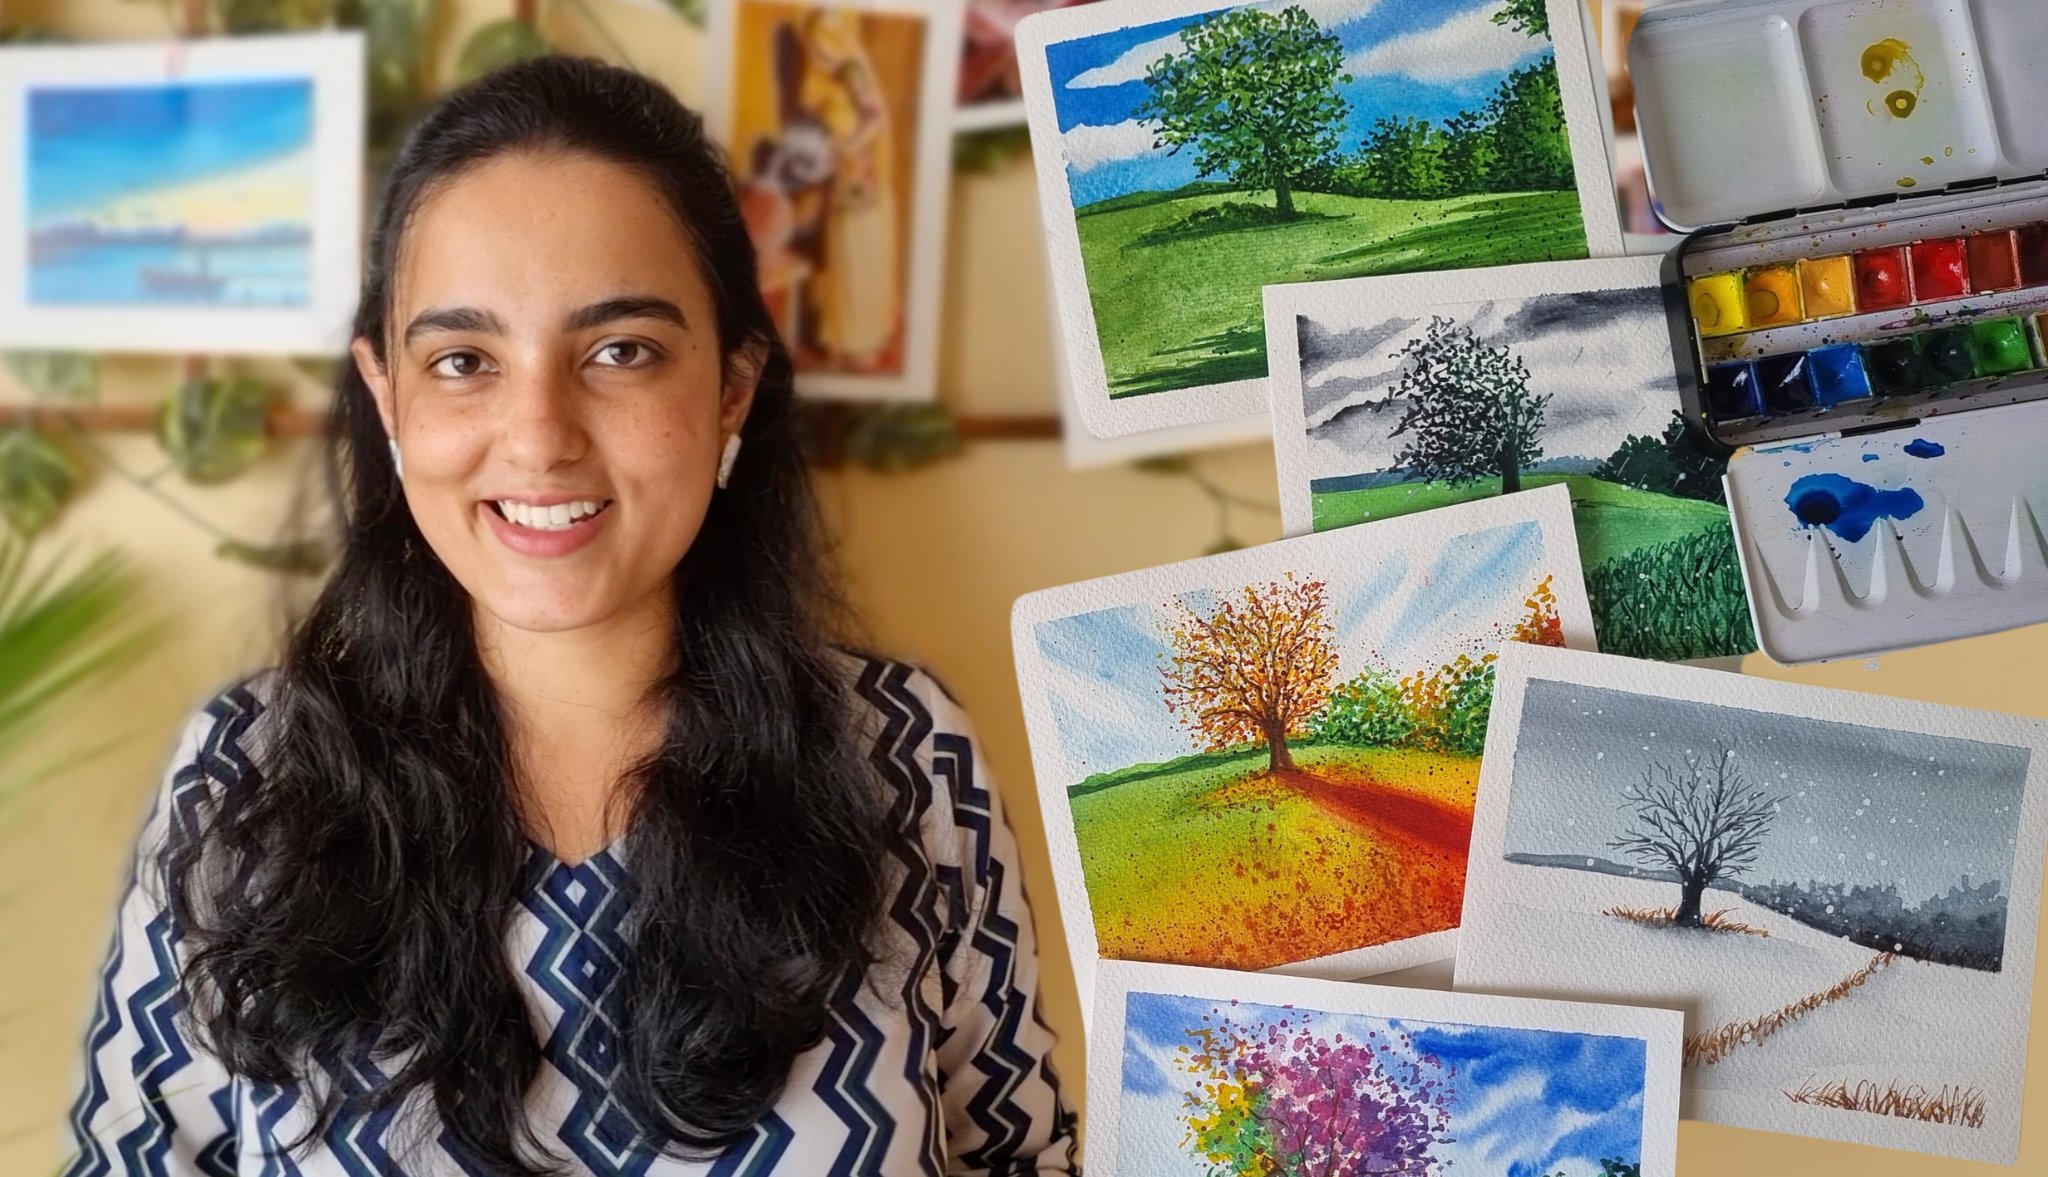
5. Clouds and Colors: In this lesson, let's understand how to create beautiful clouds, which are basically
the basic element in a sunset landscape. We will cover how to
paint the sky and clouds. I am taking primary blue and
adding titanium white to it. I am going to create
these three buckets of blue so that we can practice
three kinds of clouds here. Feel free to cover a
full page if you want. I'm just creating
these three sections. First, we'll look at how to create these very
commonly seen clouds, which are basically clouds
that you'd see from far away. You have to take titanium
white in a round brush. Make sure that you
do not add a lot of water to the brush
or to the paint. We'll create these cloudy
patterns with a dry brush. There's no right or wrong way of what kind of patterns to create. Just go with whatever
naturally feels right to you. Make sure that you
create these clouds of all sizes and shapes so that
it looks much more natural. After I have created
these patterns, now we'll be adding a
little bit of shadow to these clouds that would
add a lot more depth. I am adding the shadow at the
bottom of all the clouds. This will create a
more wholesome image. I am just leaving some
of the clouds gray. Next, we'll see how to
create these fluffy clouds, which are more of a
close-up of the cloud. So I am starting with
the shadow first here. I will first be creating
the shadow of the cloud and then start adding
highlights to it. Again, emptying the
same gray color, I have added a little bit of
black to my titanium white. Here again, you don't
need to be very particular about the
shape of the cloud, just create something
freehand cotton candy like now with a dry
brush, dry round brush, I am creating these
patterns of highlights with a lighter gray
color bearing I've added a little bit
of more white to it. Now I'm adding
more highlights to the cloud and I'll make
sure to blend this. Please do keep in mind, I am not adding a
lot of water to my brush while
creating these clouds, or else the
background blue color will end up mixing
with the clouds. We don't want that. Next we'll see how to create
these wispy clouds, which are very
common at sunsets. These are the most easiest
ones and my favorite. You just have to take a
round brush and create these dry and create these clouds using the
dry brush technique. I have highly added
any water to my brush. I hope you enjoyed
creating these clouds. These are a couple
of examples where I've added similar
shaped clouds. You can see in the
first painting, the clouds are very similar
to the first pattern, and the second painting
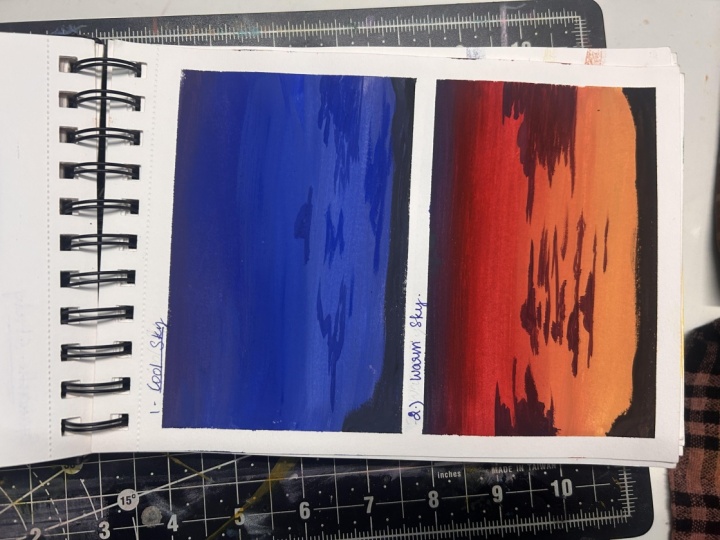
has more wispy clouds. Now let's create
short landscapes. One with a cool tone and
another with a warm tone and understand how to add clouds in composition
in a landscape. I am starting by mixing the primary red and primary
blue color in my palette, getting this gorgeous while it. After adding that on the paper, I am then mixing it with
the primary blue color. Gradually giving a gradient
of white at the bottom. Make sure that you blend
the colors really well. Make sure that you
blend the colors while they are
still a little wet. Don't let them completely dry. So while I wait for the cool
toned landscape to dry, I'm starting with the
warm tone landscape. I have started here
with my primary red. I will be adding primary
yellow in the bottom. Making sure to remember the
same points here again, don't let the colors
dry out completely in case you are a beginner and
you find this difficult, one trick is, you use a smaller area to cover, so you can start creating smaller landscapes and then
move on to larger ones. At the top of the
warm tone landscape, I have added a little
bit of blue to give it a feel where the night is fast approaching
after the sunset. Now let's start with
adding the clouds. I am taking a small
flat brush and creating these patterns with the
same whitish blue color. There is no right or wrong way or no formula to
create these clouds. Just go with what
feels natural to you. Then I'm just going to add this simple silhouette at the bottom of the
cool toned landscape. For the warm one, I am again adding these
highlights where I've added a little bit of blue to my red. I'll be creating these clouds that are more wispy in nature. Again, adding the silhouette
here as well at the bottom. This is how you create this
composition with clouds.
6. Silhouettes and Sun: In this lesson, we will see
how to create silhouettes. These are really crucial to bring the composition
of the sunset together. They make it feel complete. First we'll start with creating
this very easy silhouette which is very common
and you don't really need a lot of practice. The next we'll see how to create the cityscape
silhouette which is basically when you
want the background of the sunset across
the city buildings. We will first create this
horizontal black line, and then we'll paint these building-like structures
with a detailing brush. You don't really need to
be very precise here, you can feel free to create
whatever shapes you like. In case you would
like you can also add a little bit of light
in these structures as if they are lit and you can use a small detailing brush
to add those highlights. The next we'll see how the
silhouettes for mountains are. The more far away a mountain is, the lighter its shade. I'm starting with this
really light gray color wherein I've added a little bit of black to my titanium white. Gradually I will keep
increasing the quantity of black to this shade. Again, you don't
really need to be very particular in terms of the
shape of the mountains, feel free to go freehand here. I'm adding a little more
black to this shade. If you create silhouettes
in your sunset landscapes, it usually brings the
composition together. These are not crucial, not necessary, of course. The closest mountain ranges
that we will create, those will be the darkest, so I'm using almost
the black color for the ones that
are the closest. One thing that you need to
keep in mind is make sure that the previous layer is completely dry before you add
the new layer. Now, I will remove
the masking tape to show you how it turns out. Next we'll see what
is the silhouette in case you want to give a
background of the forest. Very similar to the mountains, we will start with a very
light shade of gray. I'm adding a lot of titanium
white to this black color. Don't bother about the shape, just go with the flow. I'm using a flat brush here
to create this forest field, but feel free to use a
round brush if you feel so. Again, these are very
random patterns, and we just need to remember
that the previous layer has completely dried out
before we add a new layer. The more layers you add, the more depth you
can create and make it look like it's a
really lush forest. Now we'll see a
silhouette of pine trees. These are the most commonly used and something that
a lot of us love. We'll create a
small hilly ranges, and now with our
detailing brush I will start adding these
pine tree-like structures. In this example I have
only used the black color. In case you would like
to add more depth, you can go with the previous example and
add multiple shades. Now we will see
grassy silhouette or something that is
usually seen near a lake. I'm taking a
detailing brush here and adding these freehand
grass-like brushstrokes. Again, I'm only taking
the black color here. Feel free to take multiple monochrome shades in case you want to add more depth. A technique that I really
enjoy while creating such grass-like patterns is to hold the brush 90
degrees to the paper. Now we'll see how to create these coconut or
palm trees that are usually seen in a beachy
sunset next to the ocean, so I'll start with the bark of the tree and then
I'll start adding these branches and leaves. These silhouettes cover
almost all the types of sunsets that we usually see. I think this will help you understand how to
add these details. Please remember
these are optional, you don't necessarily
have to add this, but it always helps to know
in case you're interested. Another type of
silhouette that we see in a beachy sunset are just these
leaves of the palm tree. Here I have added this branch
and then I'm adding leaves. Again, I'm taking
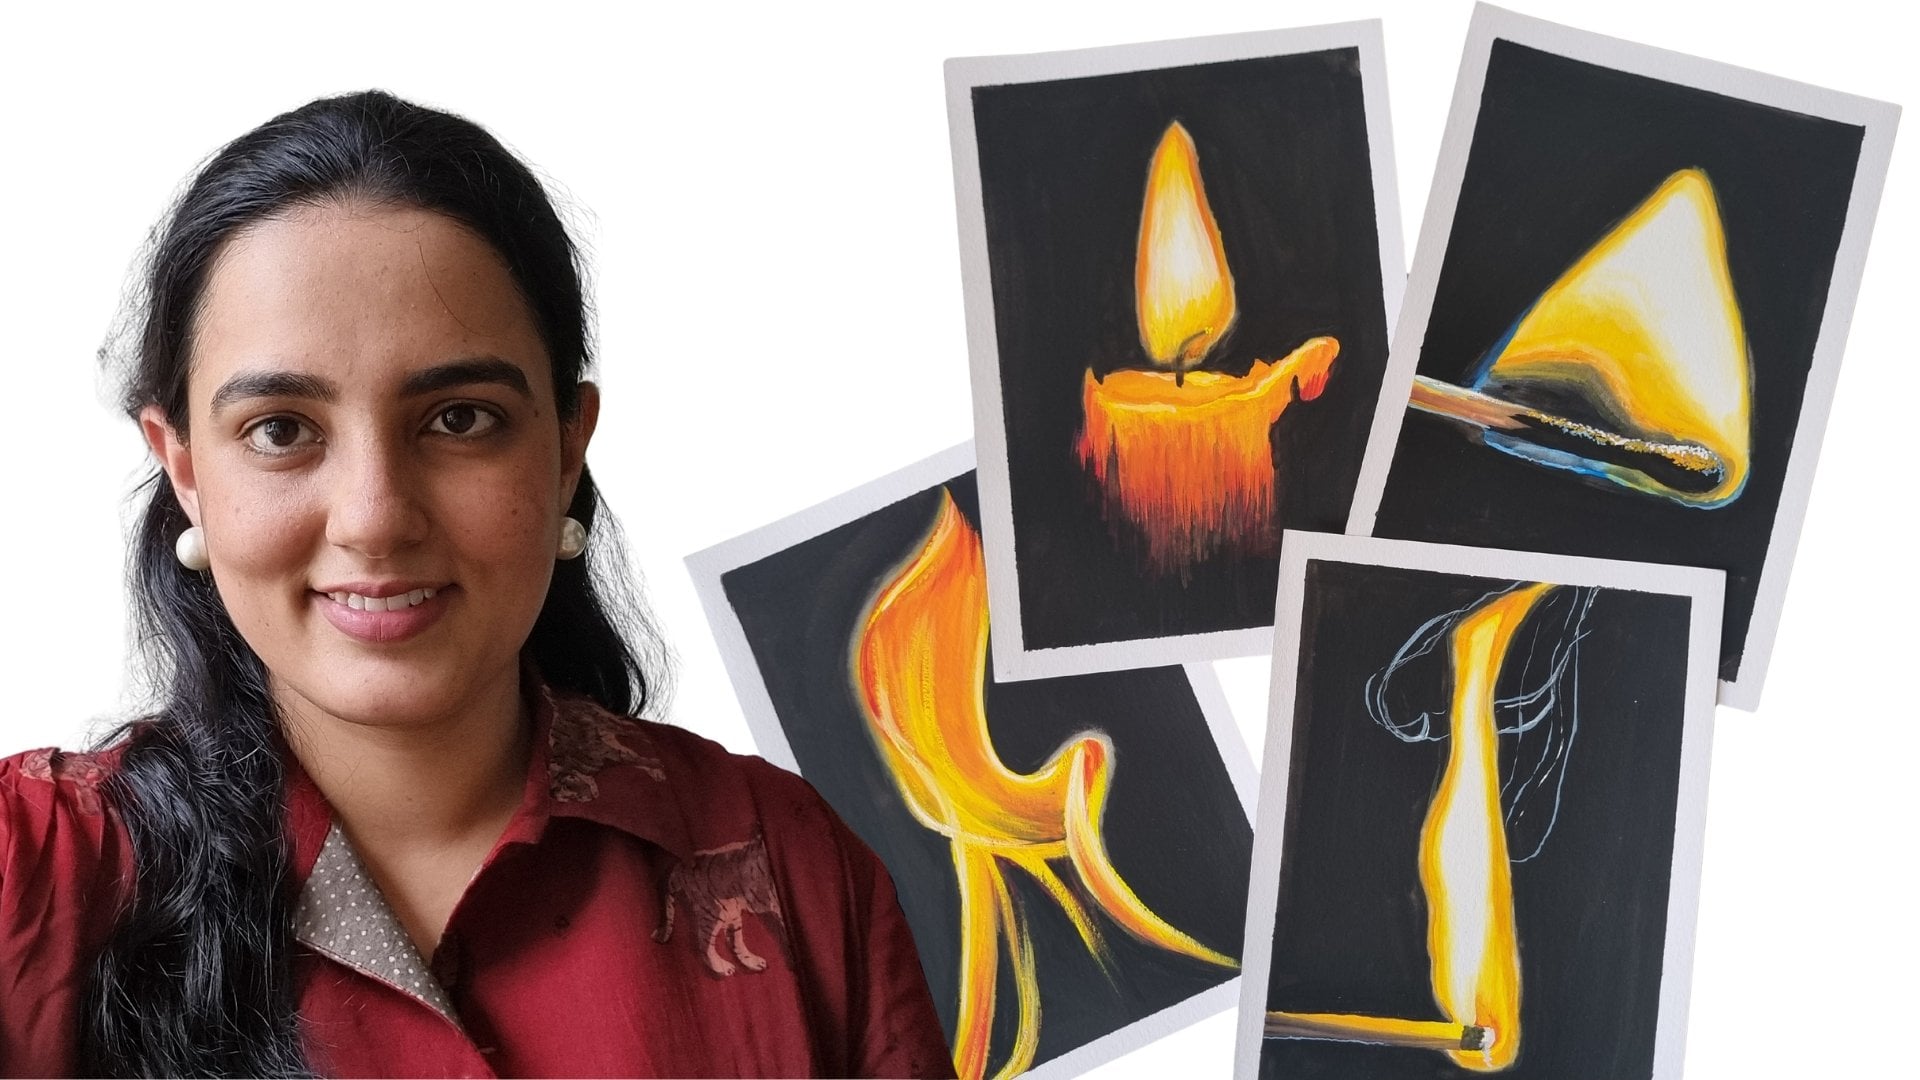
thin detailing brush. Now we'll see the finished thing after removing the masking tape. In case you want to create a sunset painting with the sun, this is the way you do it. I'm starting with
the primary red. I have covered
almost three-fourth of the section with primary red, and then I will be adding a little bit of
blue to my primary red on the palette and blending it with the
red on the paper. While I wait for it to dry, I will add primary blue in the other landscape and blend it with titanium white. At the bottom of the
landscape I'm adding a little bit of yellow and blending it to the
white and then ending it with a little
bit of primary red. Make sure that you really blend all these
colors together well. Don't let them completely
dry out before blending. Once the landscape
is completely dry, all the colors are dry, I'm going to add
these highlights with a flat brush of primary yellow. I'm just adding these single
strokes with the brush, and then I'll create this small
circle depicting the sun. One of the tricks
to paint the sun is to add a little bit of yellow to it as the
first layer and then gradually keep
adding white to it. That way, the sun
looks really bright. If you just add white it
will look very artificial. To make it look more natural, add a little bit of yellow
to it and let it dry. Again, I'm waiting
for the sun to dry. I've added the silhouettes
in both the landscapes. Now, I'm adding the sun
in the second landscape. I'm starting with the red because it's very
close to the horizon. It's going to have the rays falling out onto the mountain. Here I'm making sure that
the black was completely dry before I start adding these brush strokes with
the primary red color. Then I'm going to take
the yellow color, and once the red is dry I'm going to add the
yellow color on top of it. This is how the
landscapes turnout, but you can see the sun
is still not bright. At the last I'm going to add a little bit of yellow to white. I'm going to paint the sun. Now you can see how bright the sun looks and
it's standing out.
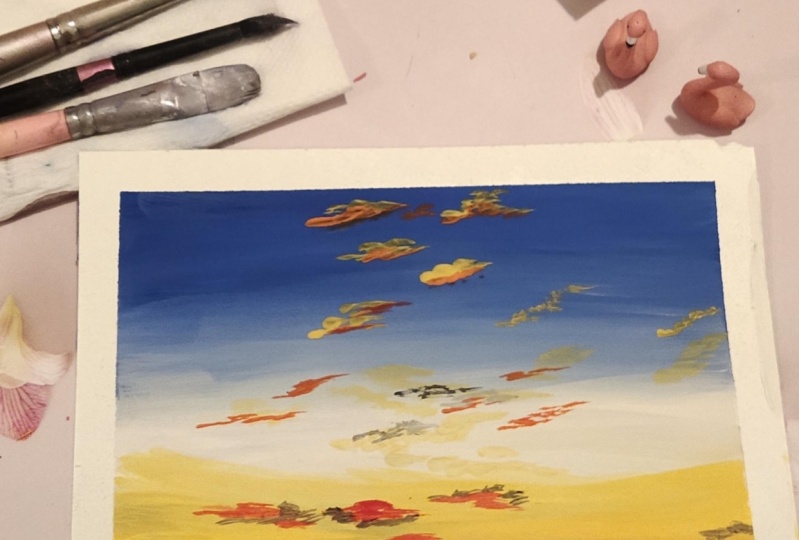
7. Sunset in the clouds: Now that we have
covered all the basics of creating a sunset landscape, let's start by creating this beautiful sunset
in the clouds. I am starting with the
primary blue color. I'm just going to cover a small section at the top
with the primary blue color. Then I am going to add titanium white and blend them
together on the paper. The most crucial part about any landscape is making
sure that the blending of the colors in the sky is done properly or else it can create
these bricks in the sky. Now at the bottom of the sky, I am going to add primary yellow and blend it
with the white in the middle. Then a small bit of primary red at the most bottom
part of the page. This is where I will
be adding the sun. I feel like the blue is a little less and it's
a little lighter, so I am again adding
a little more primary blue at the top and
blending it with the white. I have been using a round
brush for the blending. Now at the bottom right corner, I will add the sun, so I'm going to add this yellowish red
circle at the bottom. I am now starting
with the cloud, so I am going to
add a little bit of wispy clouds here
for this landscape. I'm starting with
adding a little bit of titanium white to
my primary yellow, and creating these
patterns of the clouds. Make sure that you start
adding clouds only after the blended colors
are completely dry. Now, I am going to add a
few gray clouds to the sky. To create the gray color I have taken titanium white and added a little bit
of black to it. To add the gray clouds, I am taking the small
detailing brush. I will be using
the same brush to add these smaller clouds. Now, mixing primary red
and primary yellow, I'm going to create this
orange shade, and again, add a few more highlights
and shadows in the clouds. Make sure that you use
a small detailing brush in case your clouds are
also small like mine. In case you are
creating bigger clouds, you can use a
bigger round brush. Remember to make sure
that your bottom layer is completely dry before you start adding another layer on top. As you can see, I'm adding these shadows at the
bottom of all the clouds. The shadow is orange
because the sun is setting and it's giving a hue of
orange in the whole sky. Now, I am going to add a few wispy clouds with a little bit of yellow
added to titanium white, which creates a very
light yellow color. I'm going to add
these wispy clouds at random places in the sky. Again, the movement of the brush is very
similar as you can see. I will use this
lighter color again to add a few highlights in the
already created clouds. Now, adding a few long
wispy clouds at the bottom, closer to the horizon. I'm also creating the sun with
the lighter yellow color. Now we'll remove
the masking tape and with a small
detailing brush. I've just wet the brush. I have not added
any color to it. I am going to try and blend these orange
and yellow shades. This is an optional step. You don't necessarily
have to do this, but I felt like it would
look a little more prettier. Here is the finished painting. Let me know what you think and I hope you enjoy creating
this cloudy sunset.
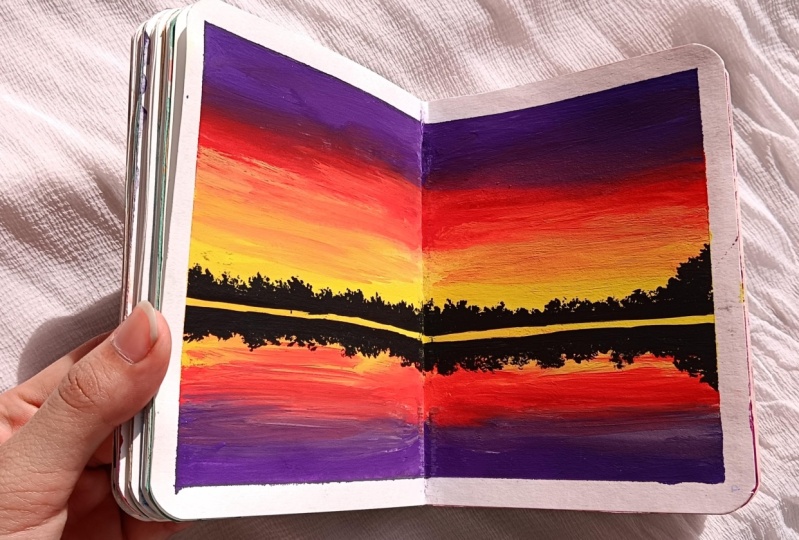
8. Sunset over Water: The next sunset that we
commonly see is over water. It can be over a lake or over
a river or even the ocean. I am going to paint this
sunset scene over a lake. I am starting with
this violet color, which I have created by
mixing a little bit of primary red and primary blue. I'm using a round brush
to cover the paper. Then I will be mixing a little
bit of light yellow color and creating these strokes
on top of the violet color. To create the light
yellow color, just add a little bit of
titanium white to yellow. Next, we'll mix the primary red with the violet color
that we have already added. As the violet color
was dried up, I am going to add a few more strokes on top of the red color so that
it blends together. Now the blend is
much more smoother. Next I'm going to add the primary yellow
color below the red. I want only a tinge of the red color to be
present in the sky. I want the sky to be
more yellow and violet. Now, this is the part that is below the horizon,
basically the lake. Usually in case of a landscape, where there is water involved, the water reflects the sky. I am repeating the order of the colors as it
was for the sky. After yellow, I have added
the primary red color. I'm going to blend
these together. Then I'll add the violet
color at the bottom. You can see in case
there is a middle placed in the center
of the paper, it almost feels like these are
reflections of each other, which is what we wanted. Now, I am going to take
the light yellow color, which is basically a
little bit of primary yellow with titanium white and add these
highlights in the sky. We are not going to be painting very structured clouds for
this particular painting. I'm just creating
these brush strokes with a thin flat brush. You can also create these with a round brush just replicating
the same at the bottom. Now we will create the horizon. I am taking the black
color on my brush. You can use a detailing
brush for this, or you can use a
round brush for this. I'm using a round brush. First, I'm going to
create this line. Then I am going to add these smaller bushes
with the black color. Again, it's not important to be particular about the
shape of the bushes. Just create them freehand. Whatever feels natural to you, make sure that they
are small because we want to depict that it's further away from
our point of view. This is creating a little bit of details of trees with
the detailing brush. Now remember, the reflection
of the horizon is always a little lower than
the horizon itself. You have to leave a
little bit of gap between the reflection and the horizon, this is because the area directly below the horizon
will reflect the sky. Then the horizon and then
the rest of the sky. I hope you get what
I'm trying to say. Then, I'm just adding
these brush strokes with the black color as it is water. As this is a lake, it is
not a moving water body. In case you are
creating reflections in a moving water body like a wave make sure that your brush
strokes are smaller, like in this
particular painting.
9. Sunset over Mountains: For this lesson,
we'll see how to create a sunset landscape
over mountains. These are one of
my favorite types of landscapes to paint. We are starting
with a round brush. I am taking the
primary yellow color and starting by painting it
at the top of the paper. I will then blend it with
the primary red color, making sure to not let the yellow color dry so
that the blend is smoother. Next, I will take primary blue and add it
below the red color, this is going to make sure that both these colors blend
well on the paper. I've taken a clean dry brush to help me blend them together. Now, I'll be adding a little
bit of white at the bottom. This is to give a more
foggy feel to the mountains so as the sky meets the mountains if you paint
it a little bit of white, it will give you nice foggy
feel caused by the clouds. Now I'm starting to
paint the mountains so as we had seen in the
silhouettes lesson, I'm starting with a lighter
shade of blue and giving it a highlight with a darker blue
and mixing them together. The lighter shade of
blue is basically adding a little bit of
primary blue with white. Now, I am adding a little more blue color so that it's a little darker
and repeating this exercise. The closer the mountains
are to our point of view, the darker they will be. I'm adding a little bit
of red so that I can get a quality tinge with the
mountain that is closest. To create a darker tinge
of the same color I'm mixing the primary
red and primary blue and then creating this highlight is going to blend them together. This just gives a lot more
definition to the mountains. This is not essential step, but it will really bring out the mountains
in your painting. Now, adding mountains in
the background again, repeating the same pattern here. The mountains that
are the closest, I am creating this
dark violet color, mixing primary red
and primary blue. The last mountain that are the closest I am
using the black color to create the silhouette
of those mountains. Adding a few details of the trees with
the detailing brush. I love these blend of colors where the warm and cool
tones mix together. Now, picking the
same round brush, I am going to add these
cloud patterns with the violet color that
we have in the palette. You can also use a flat
brush to create these. Again, make sure that you
don't need to necessarily paint the clouds
exactly the way I am. Please feel free to paint them whatever
comes naturally to you. Now, I am taking a
little bit of yellow in a small detailing brush
and creating the sun here. I made sure that the background colors are completely dry before
adding the sun. Again, creating the
clouds that are closest that are hiding the
sun in the same yellow shade. I felt like adding a few more
cloudy patterns to the sky so I'm again adding these. Now I have taken a little
bit of yellow and added it to titanium white and created this light yellow so
cool for the sun. We'll remove the
masking tapes now. I hate it when I am not able to get hold of the
masking tapes. You didn't see me struggle here. This is how the
painting turns out, I am now going to add a
little bit of light yellow, which is titanium
white and primary yellow for the sun
and that's it.
10. Final Thoughts: Hello, again. I hope you learned
something new today in my class and most importantly, I hope you had a lot of fun. A couple of things
before we end. In terms of the materials
that I'm using in this class, please feel free to use whatever medium you
have available. You don't necessarily need to complete this class just
with gouache colors. You can also do
them with acrylics. In case you are
using watercolors, just make sure that
in terms of layering, it would go from the
lightest hues first and then you gradually increase
the intensity of the hue. Make sure that you
are not layering them in a similar way like
I showed for gouache, it would be the opposite. I have covered sunset over
the mountains, over the lake, and also a simple
cloudy sunset in this class but there are a couple of other
things that you can add with the
silhouettes that I have also taught
or you can also create a beachy sunset [inaudible] with the
background of the sunset. I hope this class is really
informative and you have all the essential as
well as option elements of the sunset and you
can put them together in different propositions and
create beautiful landscapes. I hope the techniques
were easy to follow. I usually end up going a
little fast when I'm speaking, so please feel free to reduce the speed while you are
watching this class. Make sure that you connect
with me on Instagram, I keep posting there, not regularly, but often enough. While I have been teaching
online for a long time now, this is my first
Skillshare class and I have beat excited as well as a little bit nervous
about teaching here, so let me know how I have done. I hope to see you in my
next class. Bye-bye.
 Shivani Jadon, Gouache & watercolor artist