Transcripts
1. Introduction and Supplies You Will Need: Hi friends, how are you? I hope you're having
a great day today. I'd like to introduce
you to this course. This is a drawing and
watercolor painting course that was designed
especially for kids. Students do not need to have any drawing or
painting experience. To be successful in this course. I will guide students
step-by-step through all the steps they need to take to create wonderful artwork. In this course, we
will create artwork inspired by the work
of famous artists. I'm excited to teach
you how to draw and paint concentric circles, inspired by Wassily Kandinsky. Sunflowers, inspired
by Vincent van Gogh. Fruitful in the cubist style, inspired by Pablo Picasso. And a cat and bird painting
inspired by Paul Clay. Let's talk about
the supplies and the materials that you will
need for this entire course. The first thing
that you'll need is a piece of watercolor paper. For each of the projects. You will need a set of watercolor paints and a bowl
or a cup with clean water. You will need a ruler. You will need a paintbrush. You will need a pencil with an eraser and a
permanent marker. Permanent means that the
marker will not spread around. If you add water to it. You will need a set of oil
pastels or a set of crayons. You will need a set of markers. And you will also
need a paper towel. I hope that you have a lot
of fun creating with me. Let's get started on
our first project.
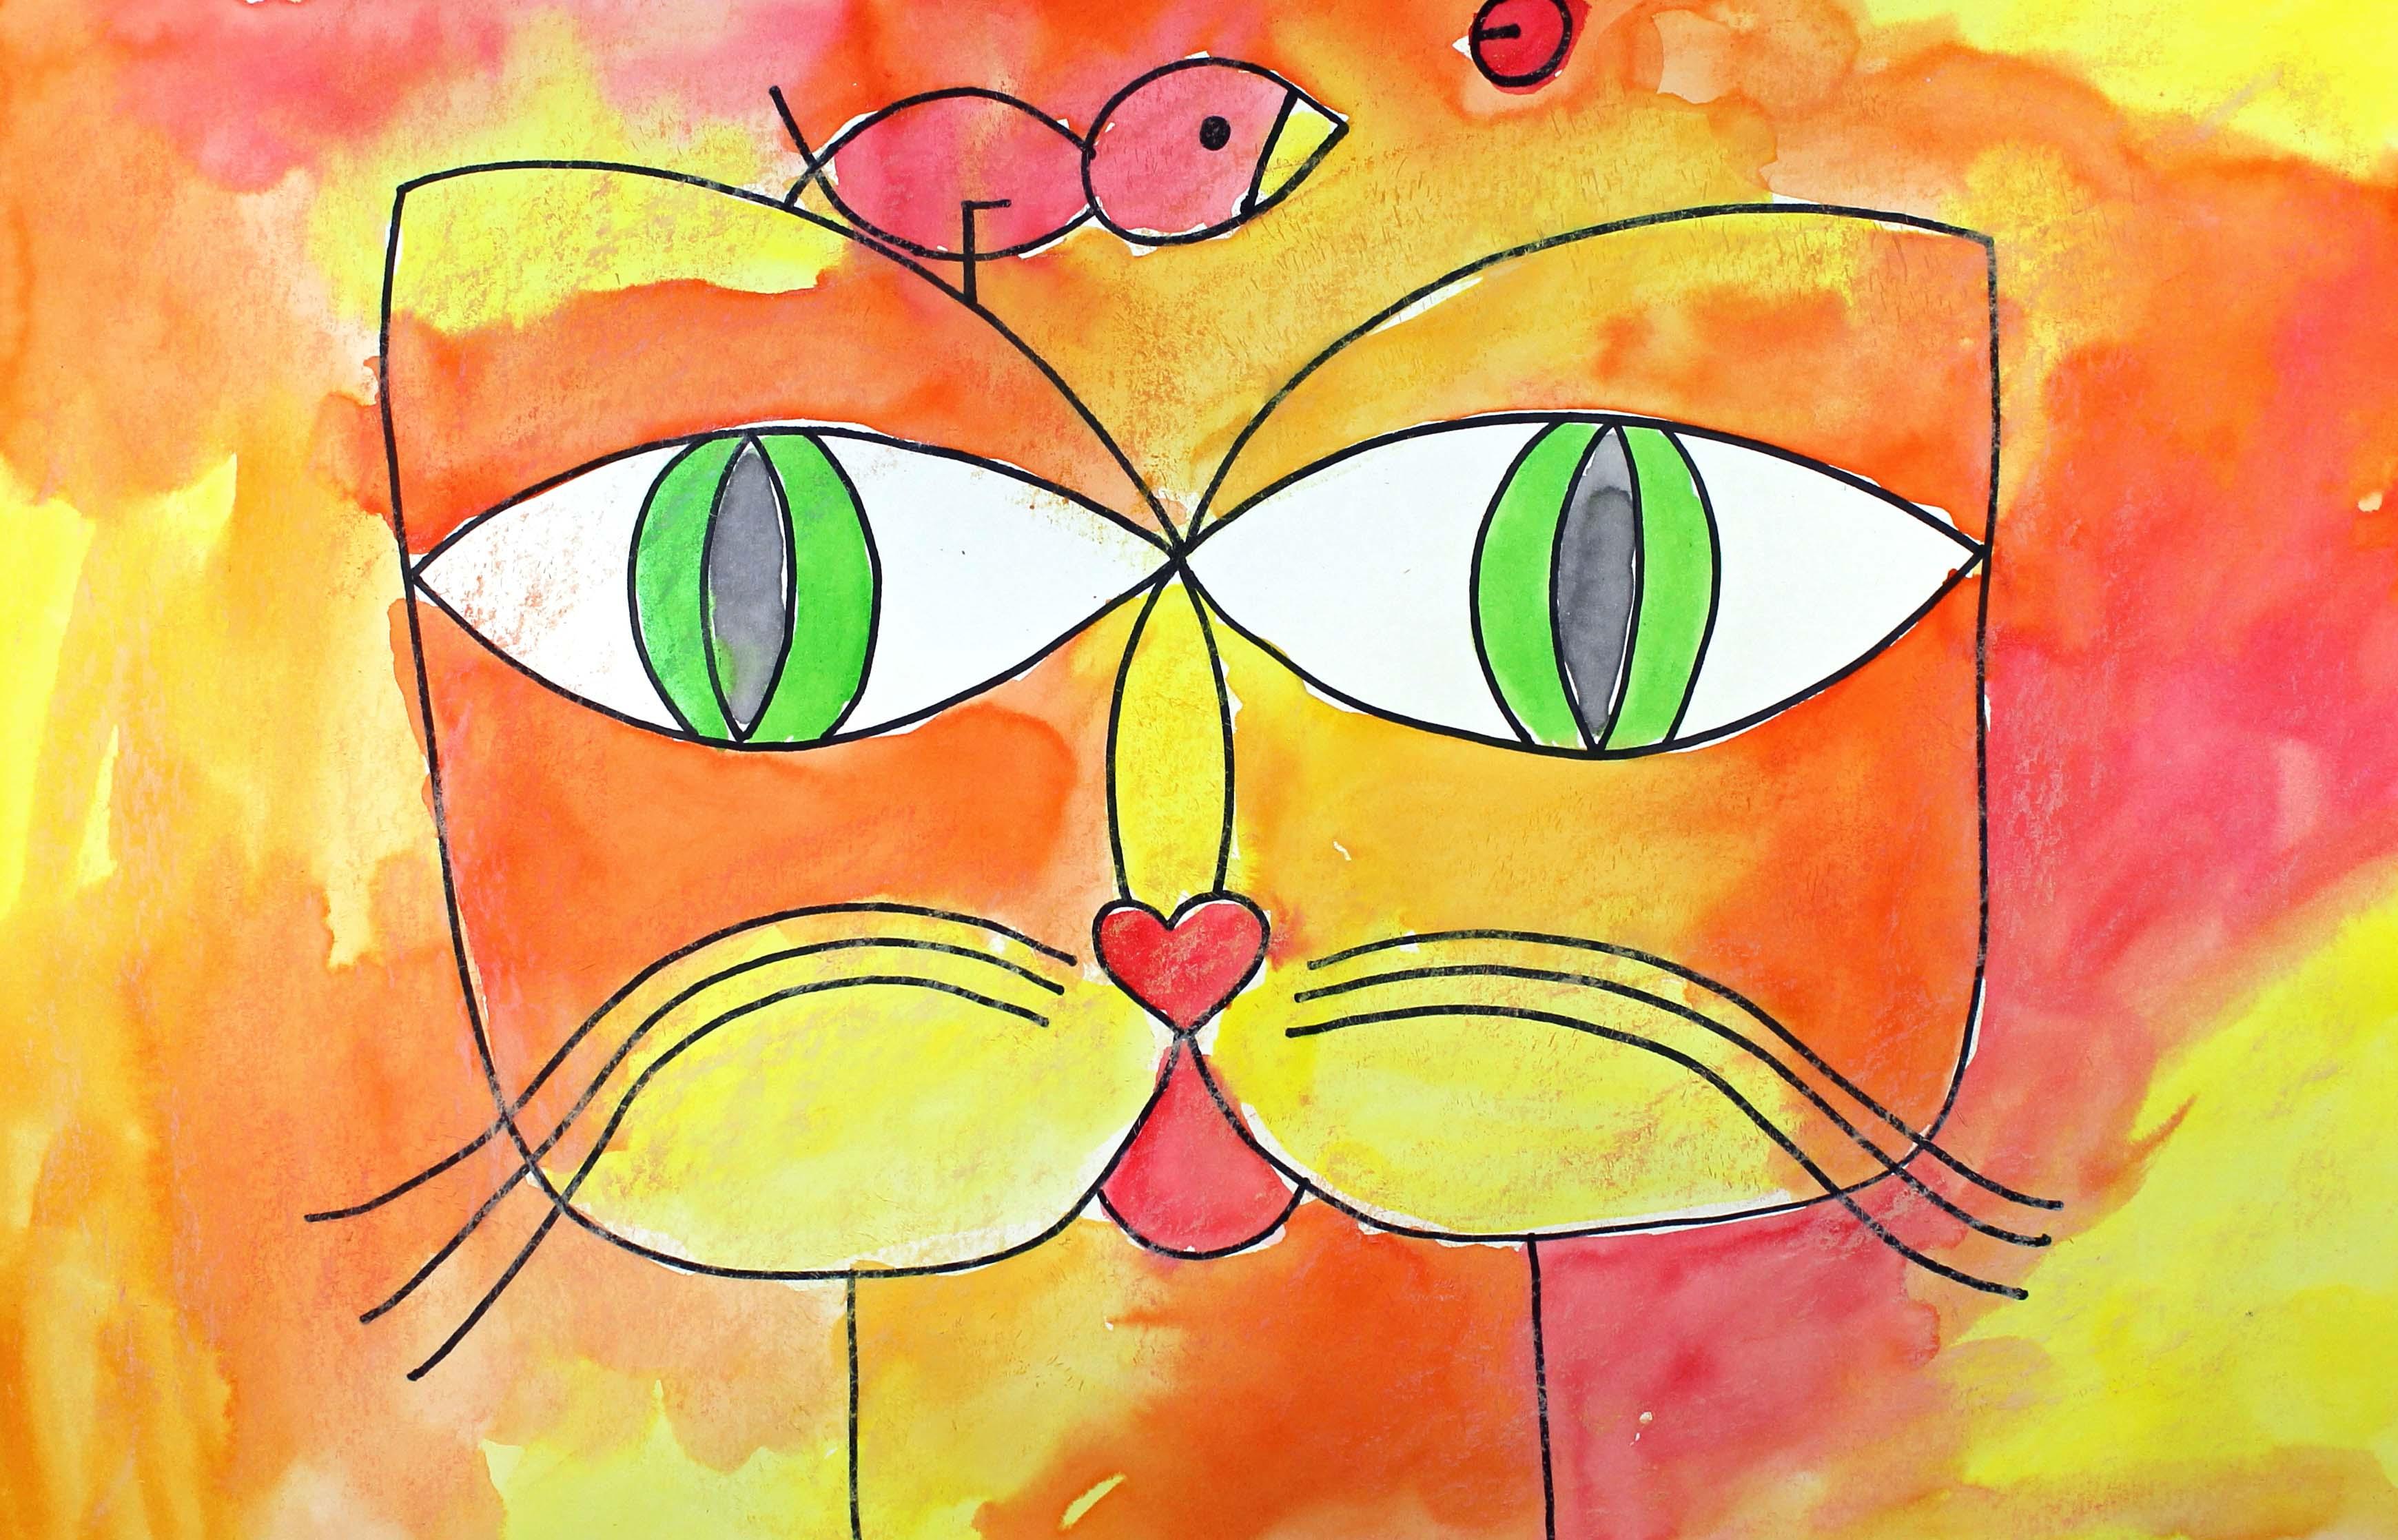
2. Paul Klee Inspired Art Project: Let's Draw and Paint a Cat and Bird: Hi friends, how are you? I hope you're having
a great day today. I'm excited about sharing
this project with you. This is a project
called cat and bird, and it is inspired
by artist Paul Clay. Paul Clay created cat in
bird in the year 1928. I hope that you have a lot
of fun with this project. Let's get started. Let's talk about
the supplies and the materials that you will
need for this project. The first thing
that you'll need is a piece of watercolor paper. You will need some
watercolor paints. You will need a paintbrush and a cup or a bowl with water. You will need a
permanent marker. Permanent means that
the ink will not run around if you
add water to it. You will also need a white
oil pastel and a paper towel. So go ahead and gather all of
the supplies and materials. And I'll see you back
here in the next video. In this step, we will draw
our cat and bird design. So let's get started. The first thing that
we're going to do is pick up our marker and make sure that you
put the cap on the back of your markers
so it doesn't get lost. And we're going to find the
middle of our piece of paper. So my middle of
my piece of paper is approximately right here. I'm going to go up just a
little bit from that point. And I'm going to make a dot. This will be a guide dot
for our eyes and our nose. So what we're going to do is start at this dot and
we're going to make a large eye coming out this way and then a large eye
coming out this way. We want to make sure
that the eyes are really big and wide,
not very small. The eyes will determine how
large our face of our cat is. We want to make sure they're
really nice and wide. Let me show you what I mean. So the first thing
that we're going to do is start on our DOD and make a curve
line about that big. That's pretty big, isn't it? But we want it to be
very, very large. Then I'm going to do the
same thing over this side. About the same size
if they're not exactly the same
size, That's okay. No problem. Now we're going to go back to that dot and we're going to make another line that comes down
like this, a curve line. And we're going to meet up
where that first-line ended. Then we're going to do the
same thing on this side. Now that we have
our shapes here, we can fill them in with the iris and the
pupil for the cat. So let's start with
this one on the left. We're going to make a curved line starting at the top and going
to the bottom line. And then do the same
thing on the other side. And then inside here, we're going to do
the same thing. Curved line and
another curve line. This is the pupil and
then this is the iris. And then we're going to do
the same thing in this shape. Alright, now that
we have our eyes, what we're going to do
next is we're going to create our nose. And our nose is going
to come down here. So what we're going to do first, so we can have a little
guide for our nose is we'll come down probably about
three inches, about this far. That'd be about 4.5
or five centimeters. And we're going to
make a small heart. This is going to be the
tip of our cat's nose. Now we're going to go
from this initial dot. We're going to come down to the heart and meat
it right here. Same thing on the other side. This is the nose for our cat. Now what we're going to
do is we're going to come back up to the
top and we're going to make the top of the
cat's head and his ears. So let me show you how
we're going to do that. So we're going to start
over here on this side. And we're going to
go up a little bit, probably about three inches, maybe about 4.5 centimeters in. We're going to come up and
stop about right there. And I just Get gave myself a little
visual and I want to come about the same distance
with that line, then I'm going to do the
same thing on this side. If things aren't perfect, you'd really don't need
to worry about it. Especially when you're creating artwork that's inspired by Paul Clay because he like
things to be not perfect. Okay, now what we're going to
do is we're going to create this side and the bottom
part of our cat's face. So let me show you what
we're going to do. We're going to start here, income, alright, to that line. And then we're going
to do the same thing on the other side like this. Alright? Now we're
going to come down here and we're going
to make his cheeks. And then we're
going to meet back up at the bottom of this heart. So we're going to come down, come over, and come back up. And then we're going to do the same thing on the other side. Come down, come over,
and come back up. Now that we have this part, this lower part of
our cat's face, we can add a little
bit of detail. Let's put a little
curved line down here for as little tongue. And then also, let's
give him some whiskers. So they're going to be
curved lines that come down. Now, do you see how I just
followed that initial whisker? I followed it along so it would just be pretty much parallel. Now I'm going to do the same
thing on the other side. Now that we have our whiskers and our detail for our face, what we're going to
do is move down here to the neck and we're going to just make two straight
lines coming down from those bottom
of those cheeks. In some of your next
might be a little bit thinner or thicker. This is just where I
chose to put my neck. Now that we have our
cat's face and his neck, what we're going to do
next is we're going to put a bird up here at the top
of our piece of paper, on top of our cat's head. So what we're going to do is
we're going to make a bird. I'm going to make a bird
that looks like this. And then if you'd like a
different type of a bird, go ahead and make the
type that you'd like. So I'm going to make his body right here coming down this way. And then up this way. It's kind of like
a stylized bird. And then his leg
will come down this way and it will touch the
top of my cat's head. If you would like
your bird to be more in the center right here, go ahead and put
your bird there. But just make sure
that it's on top of the head of the cat somewhere. I'm going to give my bird
and i so he can see, and I might even put some details right
here for his beak. Now the last thing
that I'm going to do is I'm going to make a circle. Because if you look
at the painting that Paul Clay created, there's a circle with a
line in it like this. Okay? Alright, friends. When we come back
in the next step, we will start
watercolor painting. In this step we are going
to paint our design. So let's get started. The first thing that we're
going to do is we're going to place a drop or two of water inside
each pan of paint. That way, the paint will
be ready for us to use. They will soften up. They will dissolve a little bit. So go ahead and take
a moment to do that. Now that our paints
or softening app, let's turn our attention
to our drawing. Paul Clay used the warm colors, mostly with this artwork. So that's what we're
going to do today. We are going to put a little
bit of green in there, which is one of the cool colors. But for the most
part we are going to just make sure that we put the warm colors on
our piece of paper. So the warm colors
are yellow, orange. Red and we can also use some pink that's a
warm color as well. And then Paul Clay like to
use green for the eyes and a little bit of detail in
the outside of the cat. So we will be using
the warm colors today. What we're going to do
is we're just going to start with our lightest
color, which is yellow. And just put spots of yellow in different places on
your cat's face. So I'm going to go into, put some yellow here, some yellow down here. Remember these colors are going to mix together
a little bit. So what that means is
they will run into each other and it will create
more of a dreamy type look. I'm also going to put some yellow in
different splotches on the background because I noticed that Paul Clay did
that with his artwork as well. Mine my artwork is
not going to look exactly like Paul
clays and that's okay. We want your artwork
to look like your artwork and my
artwork to look like mine. Alright, I think I'm finished
with the yellow actually, maybe I'll put some yellow on his nose and I'm going
to move on to orange. So I'll use my orange. So what I'm going to do
is go ahead and do this. I'm going to just put the colors down on
the piece of paper. And I am going to encourage my colors to blend
together with each other. So it does create
that dreamy luck. Alrighty friends. So now I'm finished
painting my cat, my bird, my background, and my eyes on my cat. The last thing that I'm going
to do is I'm going to paint the pupils on my cat's eyes, in my cat's eyes. And I'm going to
use black for that. So watered down black, so it's not super dark. And I'm going to try to
be really careful so it doesn't go into that green. Alrighty friends, I'm
finished painting. We have one more step
for this artwork. And that is going to be to apply a little bit of our
white oil pastel. So what we need to
do first though, is we need to allow
this painting to dry completely so that we can
add our white oil pastel. So let's do that. I will see you back here
after your painting is dry. In this step, we
are going to add some white oil pastel
to our painting. And what this will do is it will add a little bit of texture. We're not going to add a lot of oil pastel just a little bit. So go ahead and make
sure that you are oil pastel paper is peeled off. And what we're going
to do is just use the side of the oil pastel
like this on a piece of paper. So go ahead and find the side of your oil pastel
and just start rubbing your white oil pastel
around on your painting. It doesn't have to cover
the whole piece of paper, but just rub it
around a little bit. And what this will do is it will add a little bit of texture. Alrighty friends, I'm
finished rubbing the side of my white oil pastel
around on my painting. I think that it
looks awesome and it adds a little
bit more texture. I hope that you had a lot
of fun with this lesson. I will see you next time.
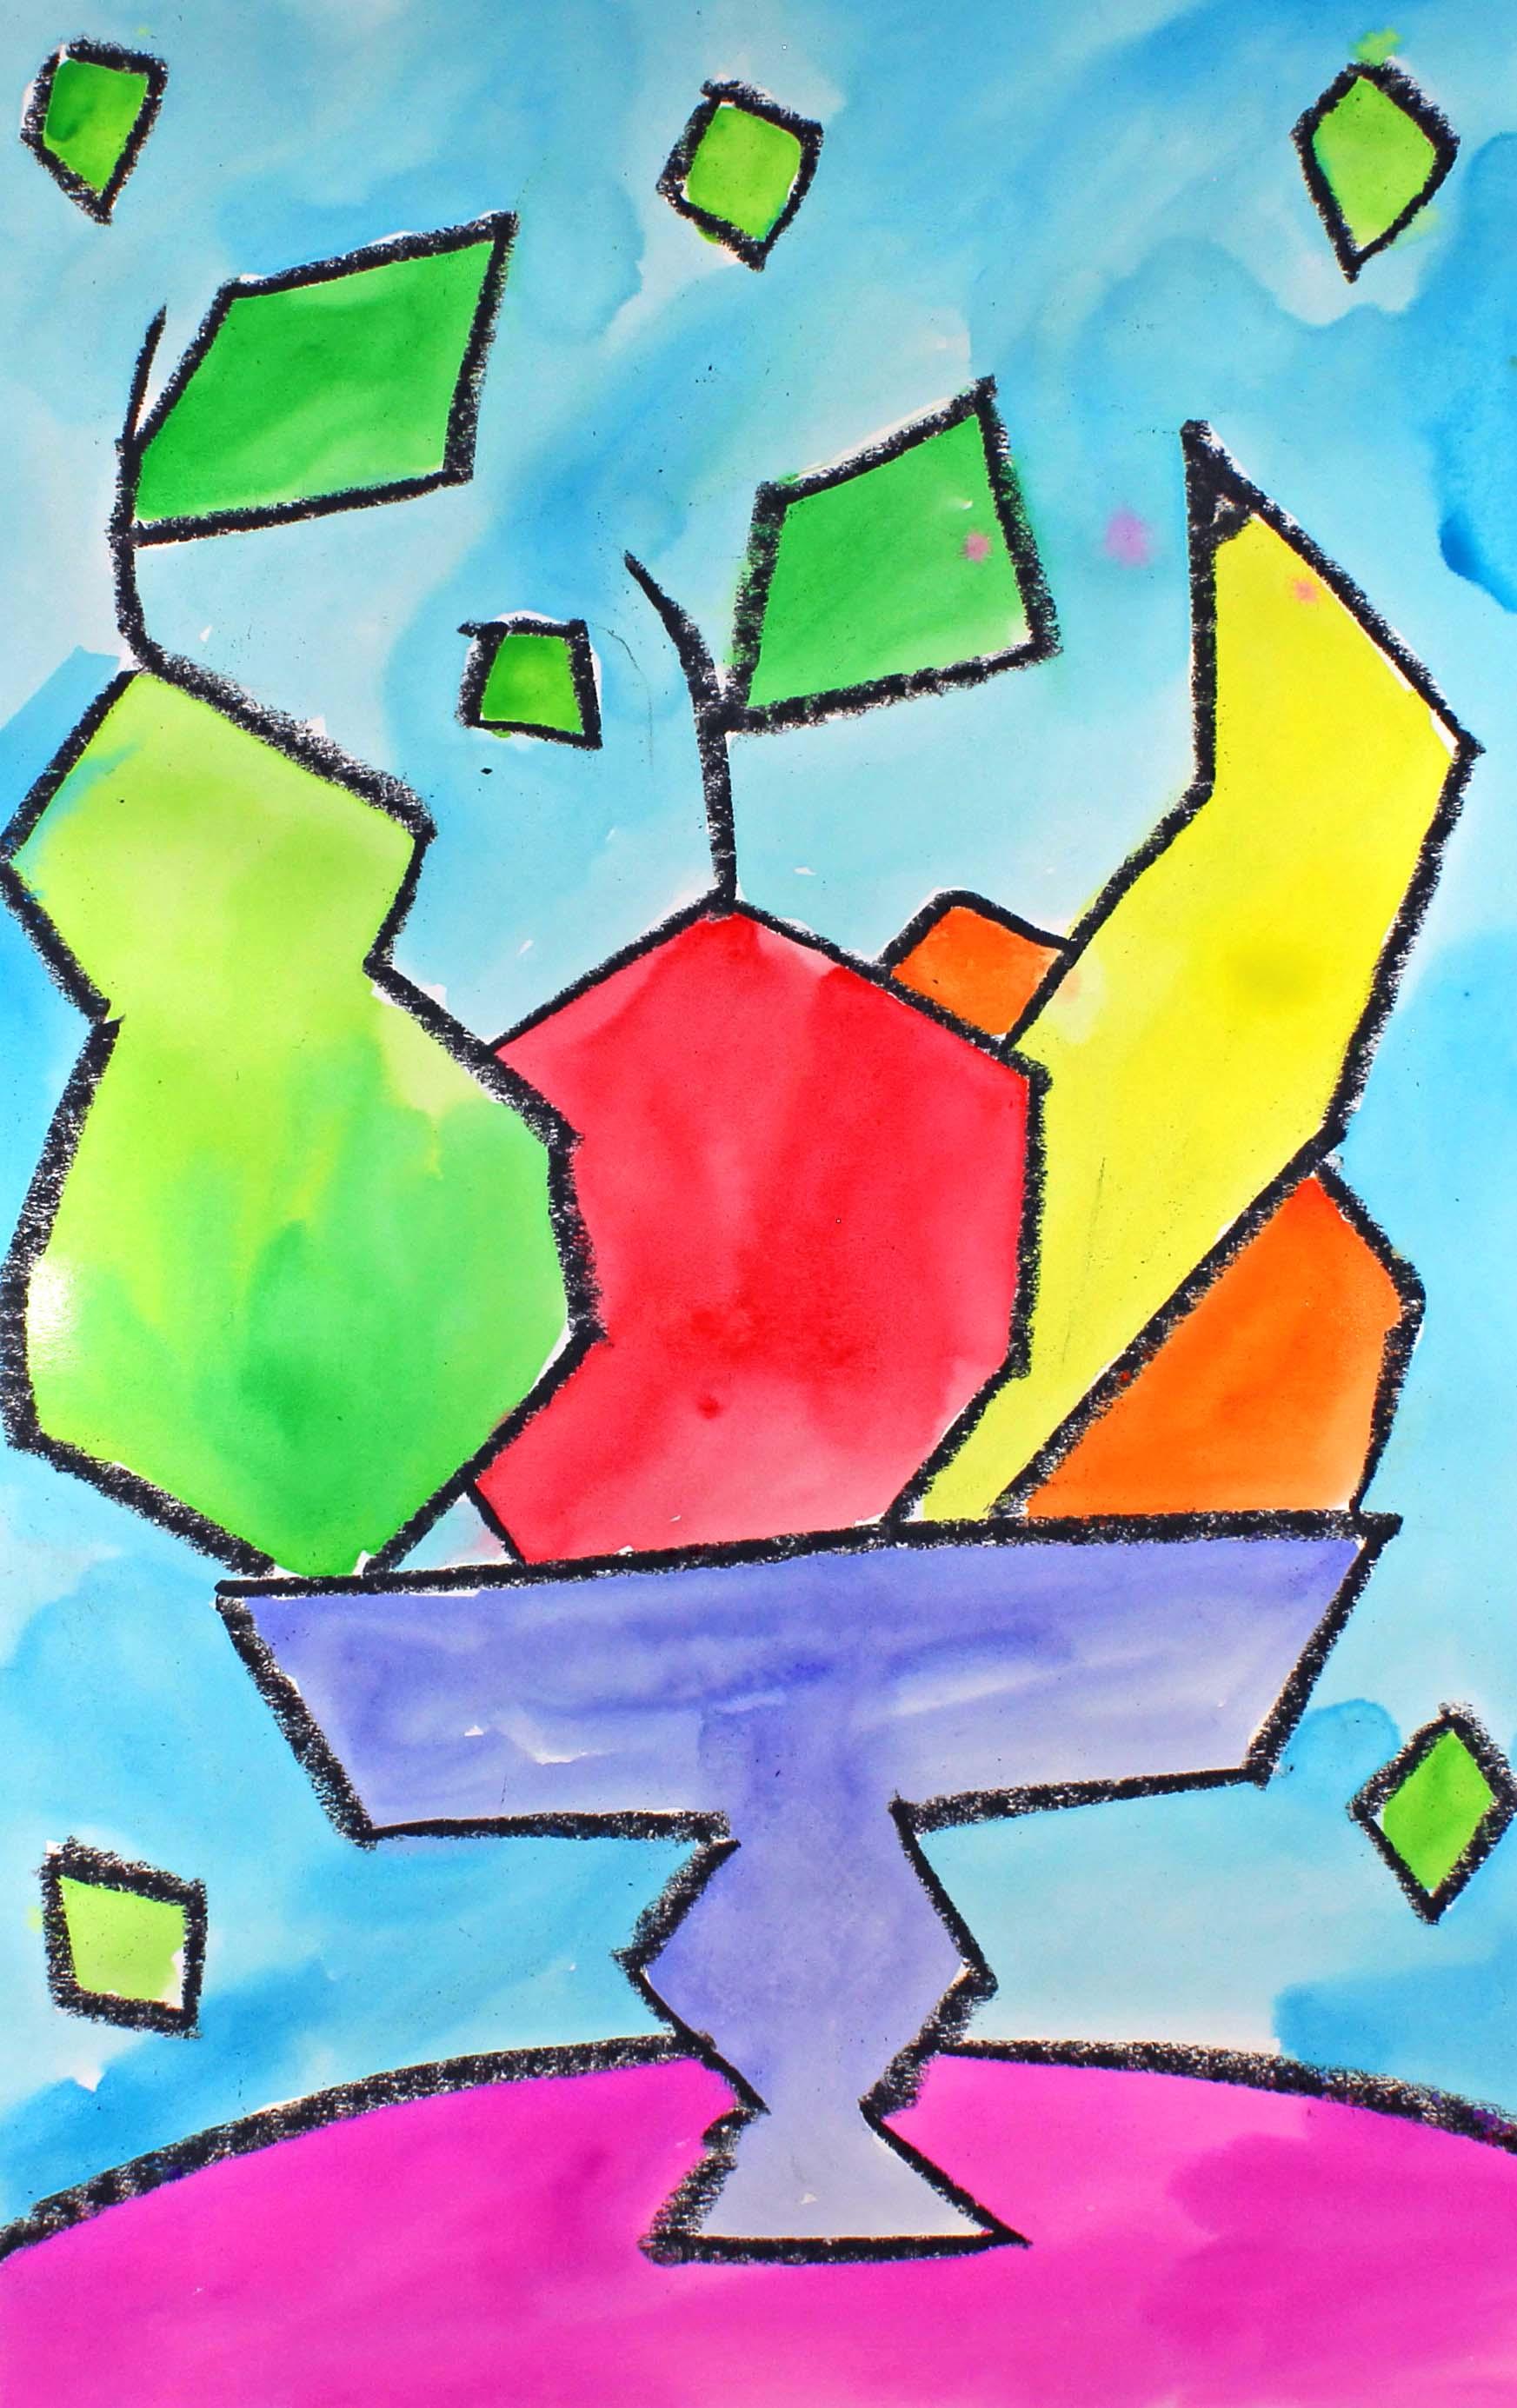
3. Pablo Picasso Inspired Art Project: Let's Draw and Paint a Cubist Bowl of Fruit: Hi friends, how are you? I hope you're having
a great day today. I'd like to introduce
you to this project. This is a drawing and
watercolor painting project that was designed
especially for kids. You do not need to have
any drawing or painting experience at all to be
successful with this project. I will teach you
step-by-step what to do. This project was inspired by the Cubist artist
Pablo Picasso. And what we're going
to do today is talk about the supplies and the materials
that you will need to be successful with this project. The first thing you'll need is a piece of watercolor paper. You will need some watercolor
paints and a paintbrush. You will need some clean
water in a cup or a bowl. And you will need
either an oil pastel, a black one, or a black crayon. And the last thing that you'll
need is a paper towel just in case you need it
for a quick clean-up. So go ahead and
gather your supplies and I'll meet you back
here in just a minute. So today we are
going to be creating a fruit stand with
some fruit on it. A fruit stand is kind
of like a fruit bowl, but instead of it being a bowl
that holds all this fruit, it's just a standard that's
more flat at the top, more of like a plate. Alright? So what we're going to
do is create that in this style of Pablo Picasso. So what we're going to do
first is we're going to take our crayon or oil pastel. We're going to find the
middle of our piece of paper and then we're going to go down a little bit from that. So it's not going to be directly in the middle of
your piece of paper. You're going to go down
just a little bit. Alright? And what
we're going to do is we're going to create
a straight line. We're not starting at the very
end of our piece of paper. We're going in just a
little watch what I do. Remember if you're
working with oil pastels, they can get kinda messy. And especially black,
but that's okay. That's what happens
when you do art. And you'll want to
press pretty hard. So go ahead and make a line across your piece
of paper and then stop. Maybe a couple spaces, a couple of fingers
spaces from the edge. So make a straight line. Now we're going to make two
slanted lines coming down. Then we're going to make
some more lines coming in, but we're not going to let
them touch each other. Let me show you what I mean. So I'm going to make a
line coming in this way. And then I'm going to make
a line coming in this way, but we're not going to
touch in the middle. Alright? Now we're kinda come down with a diagonal line on each side. Then we're going to come in. Then we're going to go out. And then we're going
to close that up. That is going to be the
plate for our fruit, or fruit is going to
sit up here at the top. Now, our fruit stand is
going to sit on a table. So you can either make a round
table or a square table. It's up to you. I think I'm going to
create a round table. So I'm going to
make a curved line. And then once I
touch my fruit bowl, jump over it and come
out the other side. So it looks like my fruit stand is sitting
on top of the table. Alright, the next thing
we're going to do is we're going to
create some fruit, like a big pile of fruit. So think about the type of
fruit that you like to eat. Do you like to eat bananas? Do like to eat pairs. Do you like to eat
apples, oranges, grapes? It's up to you. You get to
decide what you would like to put on your fruit platter,
your fruit plate. Alright, when we're
creating this fruit, I want you to keep in mind
that if you'd like to make your fruit look a
little bit more cubist, which is the style that Pablo
Picasso love to paint in. We're going to use more straight lines as
opposed to curvy lines. Let me show you what I mean. I'm going to make
a pair over here. But instead of a round pear, I'm going to make
it more angular, meaning that I'm
going to be using straight lines as
opposed to curve lines. Let me show you what I mean. So to make my pair, I'm going to go a little
bit above my platter, a little bit above my plate, make a straight line. Make another straight line. Make another straight line
coming down on either side. You know how pairs are a little bit thicker at the bottom. So I come out with my lines. Then I come back in. So it doesn't look
like a real pair, but it's more a pair
in the cubist style. Alright? We have more lines, straight lines as
opposed to curve lines. I'm going to put a
stem at the top, and then I'm going
to make a leaf, but my leaf isn't going
to be a rounded leaf. It's going to have
some angles to it, like this, more of a diamond. Alright? So you go
ahead and try that. If you need more time, simply raise your hand and
let your teacher know. That way she can
pause the video. I think what I'll do
next is I will put an apple right here
in the middle. And I think what
I'll do is I'll have my Apple be a little
bit behind my pair. So you can see when
I'm drawing it, you can see that it is behind my pair in my parable look like it's in
front of my apple. Let me show you how I do that. I start here at my pair
and I'm going to make my apple a little bit
more cubist style. It's going to be more
similar to my pair. I'm going to go like this. Going to make a line here, here, here, and here. Alright, and then
maybe even one here. So it's not a super round apple, but it looks like it's
more in the cubist style. Alright, and then I'm going
to make something else here. I think we'll make a banana. Alright, so I'll make up the
banana sticking up here. So I'll come in with a
line up, down like this. So the banana is kinda
tucked behind this apple. You know what I forgot to do? I forgot to put a
stem on the apple. So let me go ahead and do that. And then I'm going to make a diamond shaped leaf like that. So right here, what
can I put here? Maybe like something small, maybe an orange and
it'll come out this way. It will peak out a
little in the back. Alright, I'm going to put
a little bit of how on, on bananas they have that
little black area at the tip. Going to put that there
because there's no leaf on a banana. Alright? Now that I have my, my platter, my plate, and my fruit, if I have
any space in the back, I'm going to make some
geometric shapes. So I'm just going to make
some little diamonds if there's a different shape
that you would like to make, go ahead and do that. Take a minute to do that, and it'll just add a
little bit more detail to our painting, to our drawing. Perfect. Alright, When we come back, we will start
painting our drawing. Right, friends, I'm back. So in this step what I'm
going to do is I'm going to start painting my drawing, my platter or my plate
with the fruit on it, the background, the
leaves, and the table. So you can paint your painting any colors
that you'd like to use. We're not going to be using
brown or black today. We're going to use
really bright colors. The first thing that
we're going to do is we're going to put a drop of water inside
each pan of paint. And what that does is it
wakes up your paints. It gets them ready
for you to use. It dissolves the
paint a little bit. So it's ready to go onto your paper a little
bit more smoothly. Alright, so we're going to
leave that for just a minute. So let me take a
look at my drawing. I think I might
make my pear green, my Apple ran, my banana, yellow, my orange, maybe orange. And then I'm not sure about my table and my platter or
my plate in the background. I haven't I haven't
decided on that yet. So you can watch me
paint for just a minute. I'll speed up the video
and you will be able to see me paint and
get maybe some ideas. And then you can get started
on your own painting. I'll see you back here
in just a minute. Already, friends,
I'm back and I love my artwork that I've created and I'm excited about seeing
your artwork as well. I hope that you had
fun with this project, and I hope that you
have fun painting. So I'll see you next time.
4. Vincent Van Gogh Inspired Art Project: Let's Draw and Paint Sunflowers With Markers: Hi friends, how are you? I hope you're having a
really good day today. I'd like to introduce
you to this project. This is a project
that was inspired by Vincent van Gogh, sunflowers. And it was designed
especially for kids who do not have to have any drawing or
painting experience at all to be successful
with this project, I will take you
step-by-step through all the steps that you need
to take to be successful. I'd like to go over
the supplies and the materials that you will
need for this project. The first thing
that you'll need is a piece of watercolor paper. You will need a
permanent marker. You will need a couple of
clean water and a paintbrush. You will need a set of colored
markers and a paper towel. So go ahead and gather those
supplies and materials, and I'll see you back
here in just a minute. Already friends. So
let's get started on the first step of our
sunflower art project. Let's move our little
supplies to the side. Grab your sharpie marker, make sure it's your
sharpie marker, the one that's a
permanent marker. Take the cap off of your marker and put it on the back so it doesn't get lost. Then I'd like you to find the midpoint of your piece
of paper, that's the middle. So my middle is
about right here. I'm going to go an inch or
two underneath the middle. And I'm going to make a really wide you or a curved
line about right here. This is going to be
the top of my vase. Alright? Now that we have the
top of our face right here, we're going to remember
that we're going to create our sunflowers up here. Interface and table are
going to be down here, okay? If you want to put one of
your sunflowers down here, so it's kinda like
droopy a little bit. You can go ahead and do that
as well. It's up to you. We're going to start out with some sunflowers
here in the front. So I'm just going to pick
some really big circles. Remember Vincent van Gogh loved those really
big sunflowers, the ones that look like son's. Alright, so I'm going to make
three, three big circles. If you want to make more or less than that, go
ahead and do it. But we're going to do
it. We're going to draw them right above
this curve line. After we make those
sunflowers circles, then we're going to
make some petals. Sunflower petals are a little
bit pointy at the end. So it's curved, line
point and then come down. So I'm just going to make some petals going all
the way around here. And if I go off the edge
of my piece of paper, that's okay, that actually
creates a lot of interest. I'm going to take a
minute to do that. And then you can do that as well or you can watch
me, it's up to you. Alrighty. So as you can see, some of my petals look a little bit funny in a
little bit different. When I went upside down it, I really had to think
about what I was doing and this one looks a little bit
crazy, but that's okay. Some of your petals might
look a little bit funny, but when you look at flowers, they're petals aren't
always perfect. They don't all look like this. Alright, so I tried my best and I'm just going to be
happy with what I have. Alright? As you can see, this sunflower looks like
it's in front of this one. And the way that we
can tell that is that this area right here, in this area right
here in this one, it looks like it's
behind this one. So this area is
behind this area. Same right here. Now that we have our sunflowers
in the front, we can go ahead and
mix some more circles. I'll make one up here. Alright, I chose
to make four more because I thought that that
might look really good. If you want to make three
or four or five more, go ahead and do that. And now what I'm going
to do is I'm going to take my time and I'm going to make petals for
the sunflowers up here. So I'm going to go
ahead and do that. All right, friends. So I feel like I can use one
more sunflower right here. So I'm going to go
ahead and make that. Sometimes I'm going
to make a small one. Sometimes if you look at your
drawing or your painting, sometimes you'd like
to add something, and that's what I'm going to do. Okay, now I'm finished
with my sunflowers. Wow, that's a whole lot
of sunflowers, right? What I'm going to do now
is I am going to start at the back with my sunflowers and I'm going to add some stems. And the stems are going to go directly into this
base down here. So I'm going to make sure
that they hit this line. Let me show you what I mean. So I'm going to start
with this back sunflower. I'm going to come
down and stuff. Some flower stems
are pretty thick. So we're going to come down
and this one will go about right here. Like that. Do you see what I did? I started here and
then I came down because I feel like that stem
would be about right here. So that one's done.
This one will hardly have any of
its stem showing. I don't even know
if it will have any of its stem showing. Let's see, down, maybe just
down here at the bottom. So that stem has
finished. This stem. Maybe here. So I've
done that one, that one, that one. Let me do this one right here. I think this stem will go here. So it looks like just a bunch of stems down here
at the bottom. I've done all of those. Oh, I haven't done this one yet. Then that can just be
a part of that one. This one right here
has this stem. This one right here
can share this stem. And then the stem right here. I think that looks awesome. Now that I'm finished with my flowers and my stems
and the top of my vase, I'm going to make the
bottom part of my base. Now Vincent Van Gogh's
face was a little bit wider here at the midpoint. So I'm going to come down. Then I'm going to come back in, come down, and then come back in and then
close up at the bottom. Alright, then I'm going to make a table that my base
is going to sit on. A table coming over here, going across coming
the other side, right? The last thing I'm going to do is I'm going to make a line here because that's what Vincent Van Gogh's
face look like. Alright, so now I
have my flowers, I have my stems, I have my base, am
I have my table. Take a look to see if there's anything
else that you'd like to add to your drawing
at this point? I think I do want to
add one more thing. I want to add some circles in the middle here to create
more interest in detail. You don't have to do this part, but I'm choosing to do it
because I think mine will look great with this extra details. I'm just going to take
a moment to do that. I'm going slowly and carefully
so I do my best work. Alright, one last thing that I'm going to do now
that I notice it, I'm going to close up the
back of this face like this. I'm going to put a line. So it almost looks like my stems are coming down into this face and then
there's a back to the base. You can do that if you'd like or you don't have to
if you don't want to. Already friends,
when we come back, we will be adding some color to our Vincent van
Gogh sunflowers. Alrighty friends.
So in this step, what we're going to do is we're going to add some color with these markers to our drawing,
our sunflower drawing. So let's scooch this aside. And what we're going to
do is we're going to think about some flowers and
the colors that they are, which are brown, a little
bit of orange and yellow. So I'm going to stick with those colors for these
particular sunflowers. And then green for
the stems when it comes to the base and when
it comes to the table, you can choose any
colors that you want. But in the spirit of
Van Gogh's sunflowers. Let's keep our
sunflowers, those colors, orange, yellow, and
brown with green stems. Sound good. Okay, so let's
get those colors out. So we have orange, yellow, brown, and green. We go. So I'm going to
start out with my brown. And I'm going to put my brown
right here in the center. And I'm going to
use a thick line. And to make a thick
line with your marker, you hold it a little
bit horizontally. That means you hold
it to the side. A bat. Not straight up and down. Okay, It just makes
a thicker line. Now we're not going to
color in our spaces because we are going to add
a little bit of water later. And what will happen
to this marker is it will turn into
watercolor paint. Alright? So we're going to, that's going to be
the next step though. So we're just going to focus
on making sure that we get a brown outline without
spilling in all of our space. We're just going to be filling
in the space right next to our sharpie line. I'm going to go
ahead and do that. Alright, now that
I've done that, I'm going to switch
to my orange. And I'm going to go along this section with
a thick orange line. And remember I'm not coloring
in my space like this. Filling it in. I'm
just going right along the edge of that sharpie
line that I made. And if I have to go over it a little bit, that's okay too. Like this because I
want a nice thick line. Okay, So I'm going to
go ahead and do that. Alright, so now that I
have my orange finished, I'm going to move to yellow. And I'm going to outline the
petal lines with yellow. This might be a little bit more challenging for you to see. Remember I'm not coloring
in my whole entire space, my whole entire petals space. I'm just going along that line
with a thick yellow line. Alrighty friends some. Now what I'm going
to do now that I'm finished with my
actual sunflower is I'm going to add some
green to the stems. And I'm going to
do the same thing, a thick line along
the sharpie line. Alright, now I'm going to
take a look at my drawing. I want to see if there's
any space that I forgot to fill in on
the on the outline. And if there's not, then I know that I'm ready
to start my next step. So in the next step, what we're going to do is
we're going to start adding water to our drawing. See you back here in just
a minute. Hi friends. In this step what
we're going to do is we're going to apply some water with our
paintbrush to our drawing. And what that will do is it will dissolve the marker
that we have placed on our drawing and it'll turn into watercolor,
watercolor paint. So I'm excited to show
you this technique. And what's neat about it is, even if you don't have any watercolor paints
at home or at school, you can always turn markers
into watercolor paints. So let's get started. The first thing I'm going
to do is take a look at my drawing and decide which
color is the lightest. In this case, I've decided that the lightest color
that I have on my piece of paper is the yellow. So we're going to want
to start with yellow. After we put our
water on the yellow, then we'll move
to orange because that's the next lightest. Then we'll move to green, then red, then brown. Alright, so take your paintbrush and get a little bit
of the water off, and then just start applying
water to your yellow. And what you will notice is that it will turn into
watercolor paint. Just go along the edges and pull that water into the
center of your petals. How cool is that? You don't have to dip every
time you do a new petal, you put water on a new petal. And remember if you have
a little bit of orange here at the base of your pedal, you can pull that in as well. All right, friends. So I'm finished with my painting and I think
it looks really cool. As you can see, things are starting
to move around. The paint, which
is really marker, is starting to move
around the flowers. And that's the
look that we want. Okay, what happens with watercolor paint and
markers with water on them, is that things move around
and they mix together and they create these
unexpected designs. So I love mine. This might be one of
my favorite projects. We're keeping the
background white so those flowers really pop out. And it's kind of a surprise
what they're going to do in the end as far
as the color goes. So I hope that you
enjoyed this lesson. I'll see you next time.
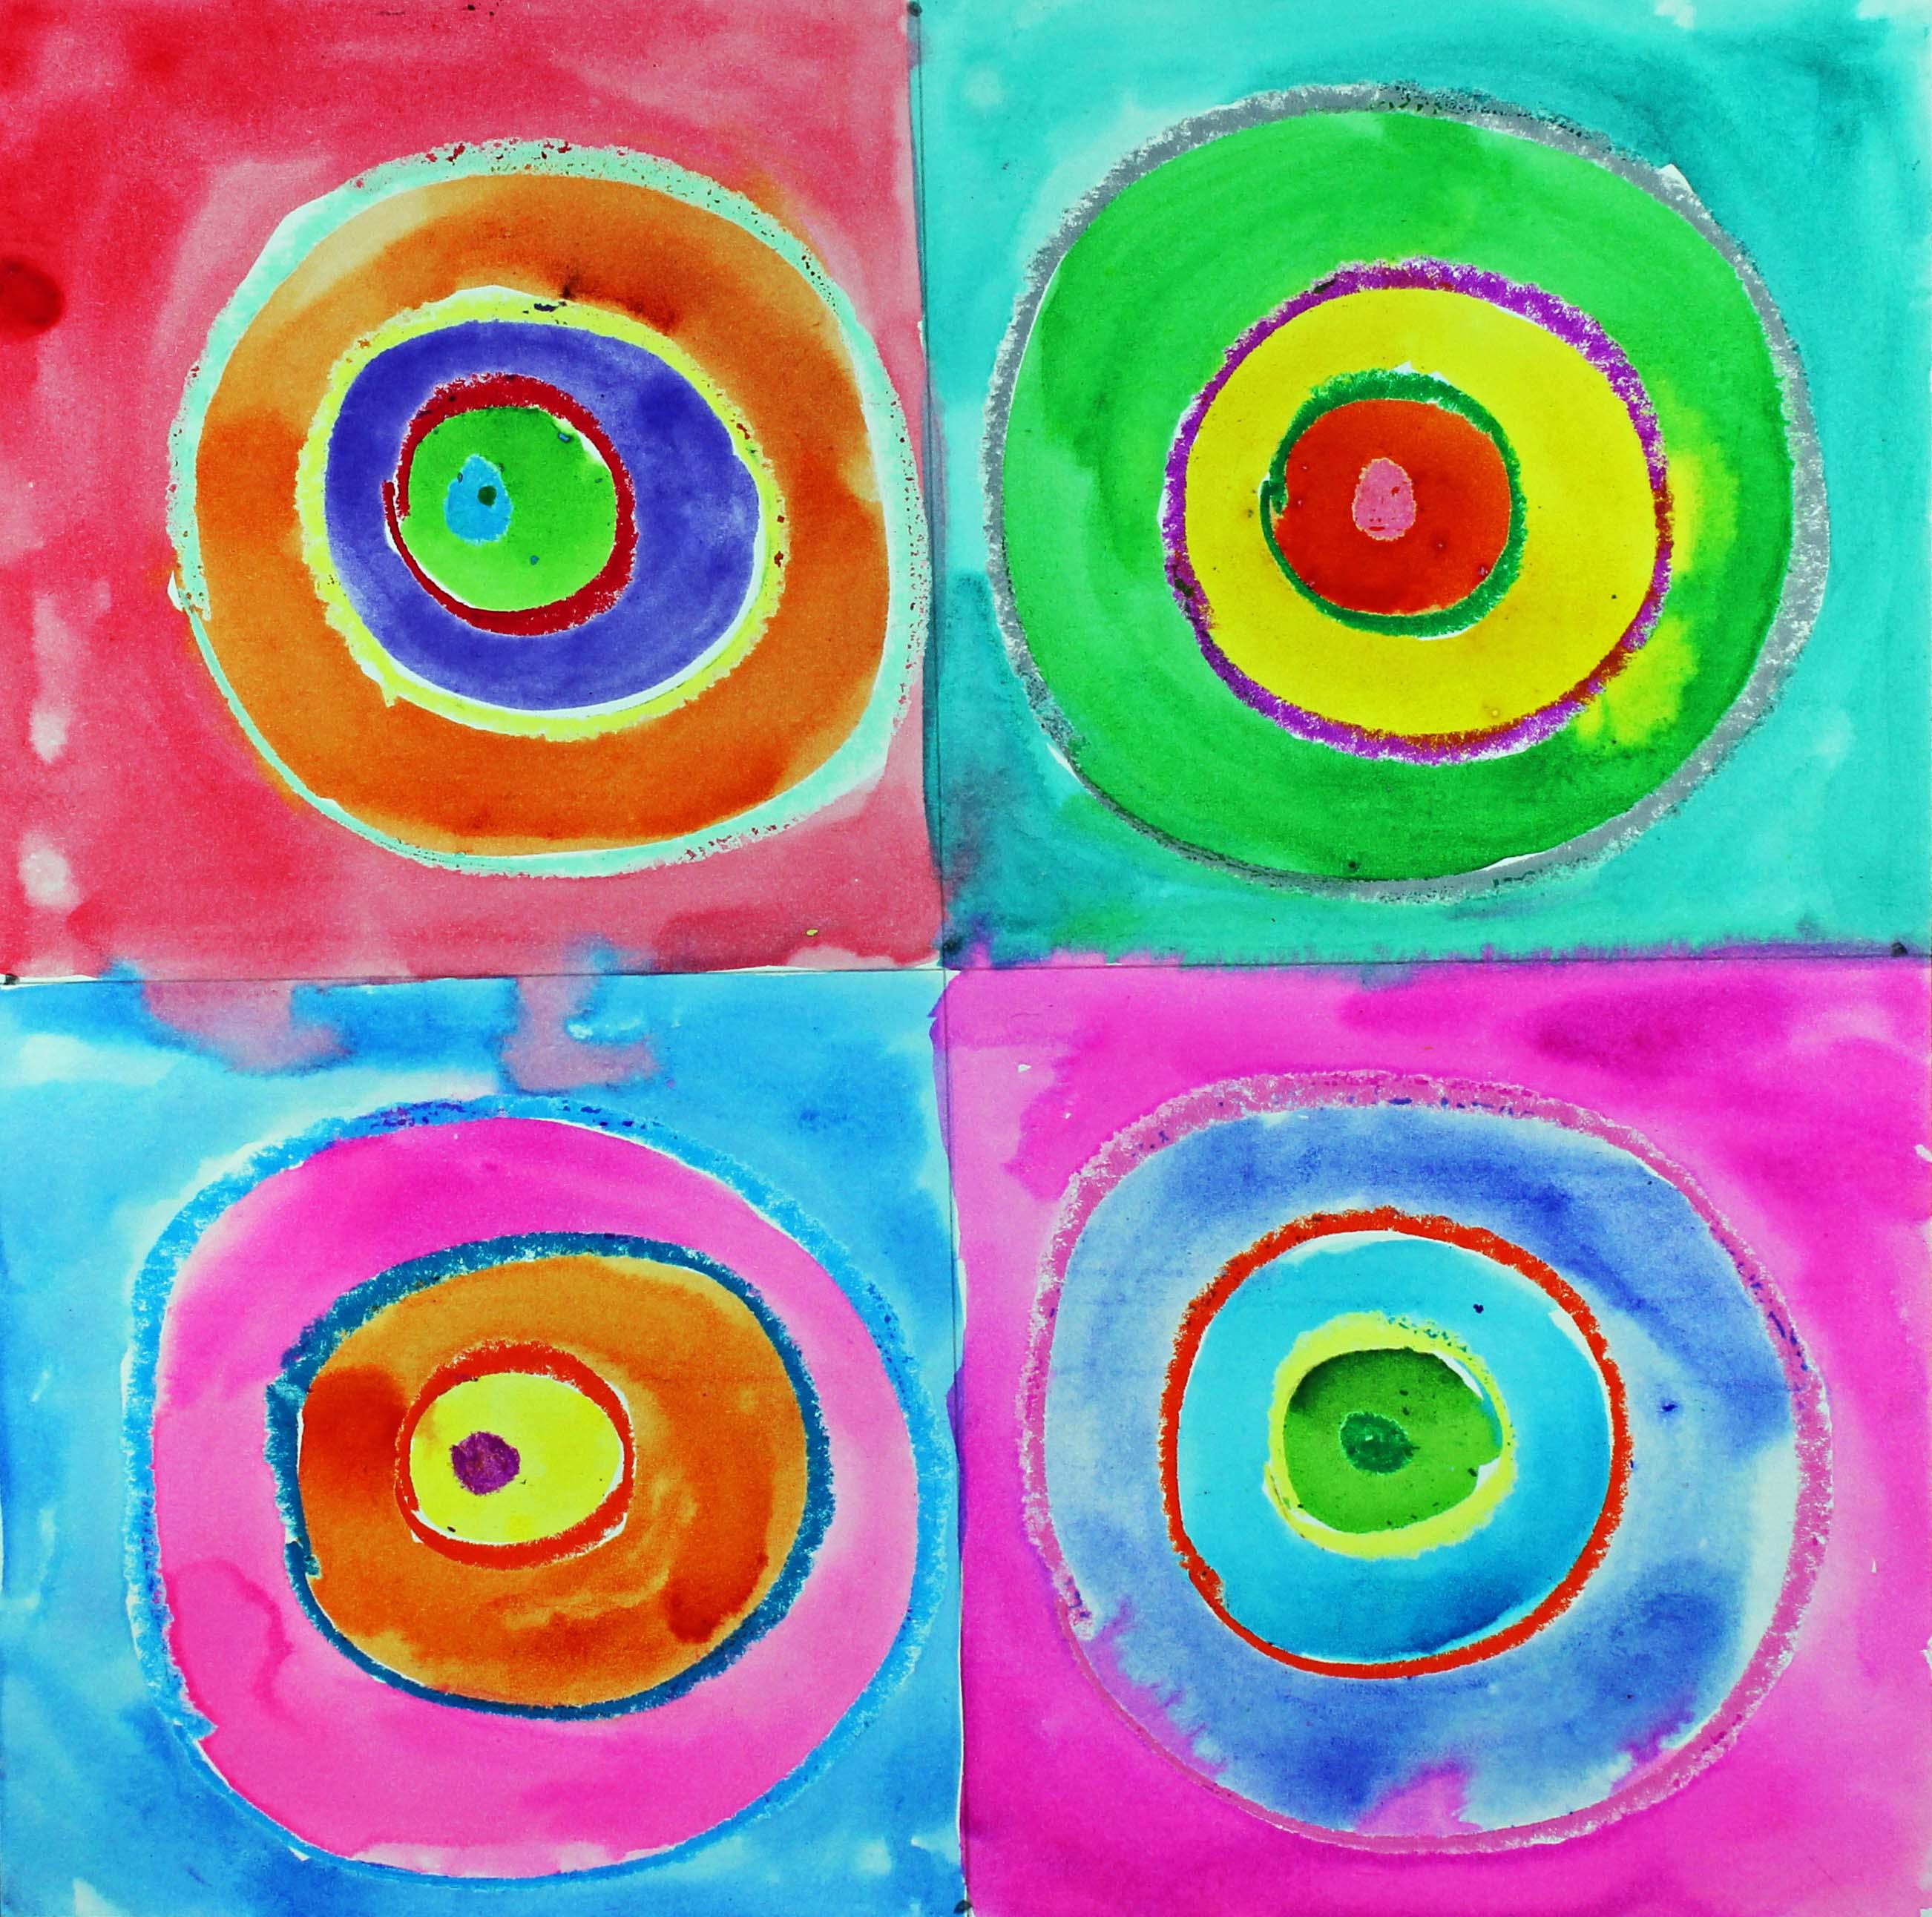
5. Wassily Kandinsky Inspired Art Project: Let's Draw and Paint Concentric Circles: Hi friends, how are you? I hope you're having
a great day today. I'd like to introduce
you to this project. This is a drawing and
watercolor painting project that was inspired by
Wassily Kandinsky. I designed this project
especially for kids. You do not need to have
any drawing or painting experience at all to be
successful with this project. I will teach you step-by-step the steps that you need
to take to be successful. I'd like to go over
the supplies and the materials that you will
need for this project. The first thing
that you'll need is a piece of square
watercolor paper. You will need some
watercolor paints. You will need a paintbrush and some clean water in
a bowl or a cup. You will need a pencil with an eraser and a 12 inch ruler. You will need some oil pastels. And then you will need a paper
towel for quick cleanups. So go ahead and gather those
supplies and materials, and I'll see you back
here in just a minute. Alrighty friends. So what
we're going to do in this step is we are going
to create some lines, some straight lines with
our pencil and our ruler. So what we're going to do
is we're going to make some straight lines going
this way and going this way. So we're going to end up with
four squares that we are going to put our concentric
circles inside of. Let me show you how to
go about doing that. So I have my ruler, and I'm going to find about the middle of my piece of
paper at the very, very top. And I'm not going to
do any measuring, but I'm just going to
measure with my eyeball. And I'm going to put
a small dot there, not a big dot, but a small dot. You might not be able
to see my daughter. I'll make it I'll make
mine a little bit bigger. I hope you can see that dot, but if you can't, it's
just a small dot. Now what we're going
to do is we're going to come to the bottom of our piece of paper and
try to find the middle. You don't need to measure, but just with your eyeball, try to find the middle and put another small dot
just like that. Now let's go to this side and
we're going to do the same. We're going to try
to find the middle. I think my middle is
about right here. Then on the other side, on the right-hand side,
we're going to do the same. I think my middle area is
probably about right here. It doesn't have to be perfect. Okay? The next thing that we're
going to do is we're going to take our ruler and we're going to put it down on our dots so we can use our dots as
a guide for our ruler. So I have my dots
here and remember, if your lines are
a little bit off, like see how my lines, it's going a little bit slanted like this, but that's okay. It's definitely okay. So we are just going
to go with it. Sound good. The way that you hold
a ruler is this. This is the best way that I have found when I'm
holding a ruler. Because I'm right-handed,
I always use my right hand to hold my
pencil when I'm using a ruler. And as far as the ruler goes, that's going to be held
down by my left hand. So I spread my fingers out. I don't hold them like this because if I hold him like this, then what can happen is
my ruler can slip around. So I want to spread my fingers out and I want
to push down pretty hard. That's a lot to think about
when you're using a ruler. But it's important and
important skill to have. Alright, so I'm
spreading my fingers out and I'm pushing
down pretty hard. Then with this hand, I'm going
to make a line like this. Alright? Now what
you do is you hold your pencil against
the edge of the ruler. And then you just push
along until you get to the bottom of your piece
of paper. Sound good. Okay. Then as you can see, I have a straight line. Alright, now I'm going to do it again with these two lines. I am going to spread
out my fingers. I'm going to make sure that they line up the ruler lines
up with these two dots. I hold that ruler down
and really firmly, I take my pencil and I rested against the
edge of the ruler. And I go along that ruler. The ruler is a tool
that you can use to guide your pencil along the paper to make
a straight line. There we go. So you might be thinking,
Well, Ms. Merritt, these, these aren't perfect
squares and that's okay. Remember what I said
in the beginning. They don't have to be perfect. It's nice if they're close, if you can tell that
they're little squares, but they definitely don't
have to be perfect. Sounds good. Alright, now that we have
our lines from our ruler, in the next step, what we're going to do is we're going to draw our concentric circles. Alrighty friends. In this step, what we're
going to do is we're going to draw our concentric circles. And we're going to draw a circle in each
of these squares. And they're going to have concentric circles
on the inside. Remember, concentric circles are circles with the same center. Alright? So what I'm going to do on
all four of these is I am going to use different colors of my oil pastel or my crayon. If I don't have oil pastels, I'm going to use
different colors to create my concentric circles. So I'm going to start out with a dot inside of each square. Alright, so here's my square. And I'm going to make a dot
inside each of my square. So I think I'm going to
have a purple dot there. I'm going to have
a blue dot here, maybe a green dot here. And oh, pink, pink dot here. Alright, so I have my
four dots inside of my Foursquare's and I tried to get as close to the
middle as I could. The next step is
we're going to take more colors and we're going
to make some circles. I'm going to press
pretty firmly. Alright? So I have orange
here, maybe red here, maybe green here, and
maybe yellow here. Alright, perfect. Now what I'm going to do is I'm going to keep going around these circles until they get bigger and
bigger and bigger. But I don't want them to go outside of their little square. So you can watch me. I'm going to speed up the video, but I'm just going to keep doing the same thing with
the different colors. And my circles are going to get bigger and bigger and bigger. So I'm thinking
that I'm going to maybe make three circles. I think that's how
many I can fit on my particular piece of paper. You might be able to
fit more or less. Alrighty, So I'll see you
back here in just a minute. Alrighty. So I'm finished with my four concentric circles. As you can see, each circle shares a center point with
the circles inside of it. That's what a
concentric circle is. What I'm going to do in
the next step is I'm going to start applying
paint, watercolor paint. So I'll see you back
here in just a minute. Alright, so in this step, what we're going to do
is we're going to apply watercolor paint to our concentric circles
and the backgrounds. Alright, to get our
paints ready, however, we are going to take
one drop of water and put one drop of water
in each pan of paint. Each color has its own
little pan of paint. And we're going to
put a small drop of water inside each pan. What that does is it dissolves the watercolor paint and gets it ready for us to use. Alright, so while that's softening up and
dissolving a little bit, let's talk a little bit about
what we're going to do. We're going to place a
different color in each, inside of each concentric circle and inside of the background. Alright? So make sure that
if you put yellow here, then you use a different
color other than yellow here. Alright? And then you use
a different color other than this color here. That's what Kandinsky did. Okay? So I'm going to take
maybe a yellow and I'm going to fill in my first
small circle with yellow. It looks to me like I got a
little bit too much paint. So if you'd like to take your handy-dandy paper towel or your tissue and
just touch it lightly. That will take a little
bit of the paint off. Remember, if you want
your colors to be more vibrant than
you'll use more paint. If you want a softer color, then you'll use more water. So a stronger color, you use more paint
and a softer color, you use more water. So during this step, I'm just going to look
at my circle and then decide on the colors that
I want the circles to be. And I'm just going
to start painting. I'm going to try to stay in the lines as
much as possible. If I go outside of the
lines a little bit, that's okay. No problem. Let's see, maybe I'll take some blue for the outside here. Alright, as you can see, or oil pastel is resisting our watercolor
paints a little bit. It's pushing the paint away. When you get to the edge. We're not going to go
outside of that square. We're going to try to stay on
the inside of that square. And we're going to try to keep our colors from
mixing at this time. During this lesson. See how I did that. Okay, nice. So our first concentric
circle is finished. Now you can move on
to the next one. So I'm going to
speed up this video. You can watch me and
I'll be right back. All right, friends.
I'm finished. And I wanted to point out a couple of things
I really like, first of all, how
mine turned out, is mine going to turn
out exactly like yours? No, we want yours
to look like yours. We don't want yours to
look exactly like mine. Also, you can see here that the watercolor paint is
spreading a little bit. That's just what
watercolor paint does. That's, that's the
cool thing about it. It has a mind of its own. So I'm just going to let that be and it spread a little bit here. So if that happens to yours, just, just say, that's cool. That's a cool design
that it has made. Alright, so when wet
watercolor touches each other, it starts to spread
around and you don't even really know what
it's going to do. Thank you for watching this lesson and I'll
see you next time.
6. Thank You for Enrolling in This Course!: Thank you for enrolling
in this course. And if you enjoyed this course, please consider leaving
a review because it really helps my Skillshare
channel to grow.
 Em Winn, Teacher, Art Instructor, Artist