Transcripts
1. Introduction: Hi everyone, my name is Valerie Mercier. I am an artist and educator from Ottawa, Canada. My path had led me to study visual arts, graphic design, and photography. On one hand, I'd been teaching arts for the last seven years in classrooms, art galleries and museums, including the National Gallery of Canada. On the other hand, my collages have served as illustration for web and paper media. Art and design have been in dialogue through history and we find inspiration from so many different sources. I think you should think about visual arts as one of them, whether you work in the field of graphic design, illustration, or concept art, I think there's something for you in this class. In this class, I will teach you about artistic movement you should know. You'll learn about the techniques, the ideas, and the artists involved in these artistic movements. The best part is that practice will join theory, as I will teach you how to make your own paper collage based on these key moments in Art History. I personally find collage is an amazing way to stimulate creativity. It's fun, it's quick, it's simple, it's inexpensive, and it allows you to experiment with colors, compositions, and shape super easily. With all that being said, I'd love for you to discover some new artists and techniques and I can't wait to share my passion for arts with you. Let's dive right in.
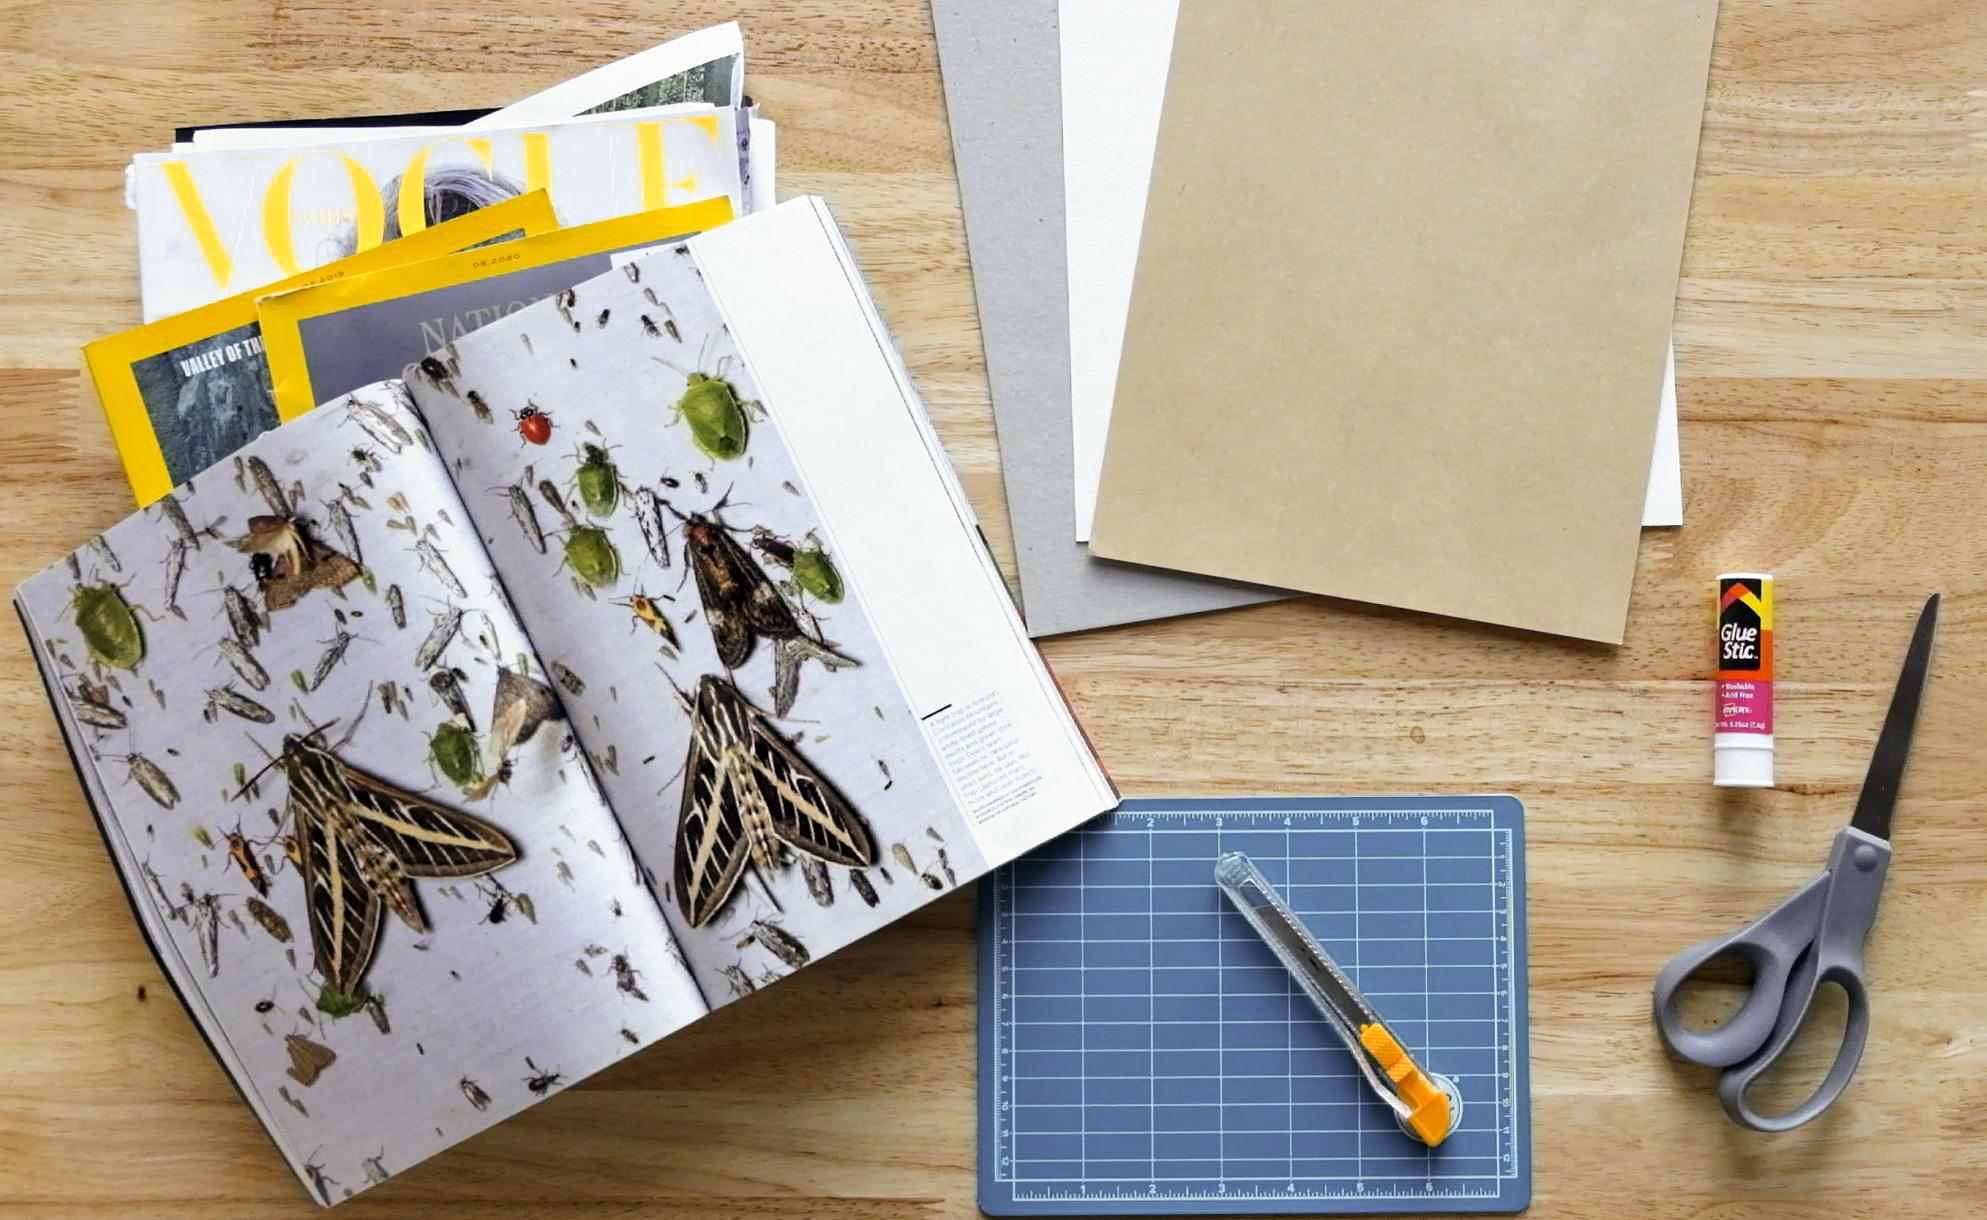
2. Get ready to make a collage.: Welcome to the class. Today you're going to learn about an important woman from art history. In your work, you probably use visual ways to communicate, like brand name, illustration, graphic design. That's why this class is going to focus on moments in art history when the fundamentals like colors, shapes, representation, and composition had been questioned or radically changed. I'm going to tell you about the impact in influence of these moments. There are visual characteristic and artist associated with these moments. By the end of this class, I hope that you will be able to identify artistic movement more quickly. You'll learn about key artists from modern history. You'll know how to make a paper collage, and I hope that it will bring you new ideas and inspiration in your own creative process. This class will be divided in four chapters. The first one is color. Second one will be cubism, followed by abstraction, and the last one is surrealism. I believe one of the best ways to learn is to try your hand at it. For every chapter of this class, I will show you how to make a paper collage. This means you'll be able to experiment with different elements and principles of design. I chose this project because collage has been part of my own practice as an artist for many years. By the end of my studies in photography, I was seeking a more tactile process, and collage was exactly what I was looking for. Making collage is at the core of my artistic process, but I love how you can also use it occasionally to stimulate your own creativity. Before we dive deeper in both theory and practice, you're going to need to gather a few supplies. You're going to need old magazines. I like to take whatever is around in my home. If you are someone that doesn't have a lot of magazine at home maybe ask a friend or check your local thrift store and look for a magazine with a lot of images and photography in it. The other thing that you'll need is something to cut with, so a pair scissors works very well. Or I also like to use a craft knife with a low cutting mat. Some people like the precision knives, I like the snap blade kind. You're going to need some paper to glue your collage to. It could be some cardboard or just a nice thick paper. The last thing you're going to need is some glue sticks. If you have these supplies with you, you're ready to create. What I love about collage is that, it gives you so many possibilities. We're probably all going to end up with different images at the end, so please make sure to share it in the Project Gallery. I really want to see your final results. Let's get started. See you in the next chapter.
3. Learn: Colour: Our first chapter is on color. I think one of the best ways to start talking about color is to mention one of the precursor of some artistic movement that revolved around color. His name is Vincent Van Gogh. Vincent Van Gogh was the post-impressionist painter who add a significant influence on modern art. He had a career of about 10 years, but in these 10 years, he produced close to 1,000 paintings. He tackled a variety of subject, including portraiture and self-portraiture, still lives, and landscapes. Vincent Van Gogh used paint to express emotions, which was a rather new idea at the time. He developed an absolutely unique style by opting for bright colors and expressive brush strokes. His exuberant paintings combined both observation and subjectivity. In other words, he was painting what he saw, but he was also adding his own personal touch, his own personal interpretation of the world at the time in his art, which brings me to discuss our first official art movement of the class, Fauvism. Fauvism was an art movement led by Henri Matisse, Andre Derain, and Maurice de Vlaminck. They were young French artists looking to depict nature in a more energetic way. They were inspired by a few post-impressionist artists, including Vincent Van Gogh, Paul Cezanne, and Georges Seurat. By post-impressionist, we mean artists that painted a little bit inspired by the impressionist values, but follow their own path. In the summer of 1905, Matisse and Derain experimented with bright non-naturalistic colors, which they applied in dabs or short strokes and left some spots of the canvas bear to act as an additional color. They gave their painting an energetic look. In the fall of the same year, their art caught attention at the Salon in Paris and they made their mark as one of the first avant-garde movement. It was Louis Vauxcelles, an art critic who saw their art and coined the term Fauve, which means wild beast, to describe their style. While the Fauve did not adapt the style for their entire career, it remained an influential one. Fauvism was characterized by combining all these dabs of pure and bright colors, which created a bit of a flattened perspective. By pure color, I mean, colors that were used right out of the tube, not necessarily mixed with another shade. At the same time, in Germany, something interesting with color was also happening. German Expressionism is an artistic movement that encompasses visual arts, architecture, performing arts, and literature. There are two main groups of German expressionists. The first one is Die Brucke, which was led by Ernst Ludwig Kirchner. The second one was Der Blaue Reiter, which was led by Wassily Kandinsky and Franz Mack. The art of Die Brucke was inspired by the works of Vincent Van Gogh, Edvard Munch, and the German Renaissance art. Recurring themes included portraits, nudes, and the Berlin City life. What makes it unique is its combination of strong brushstrokes, outlines, distorted shapes, and non-natural, very saturated palate. All these element combined, gave the art edginess and luminous. Artist of the German Expressionist movement, put their emotional and personal response to a subject at the forefront of their creation. Art did not aim to depict a subject realistically anymore, it was much more about the feeling it provided for the creator. In 1933, the German avant-garde unfortunately saw an abrupt end because of the rise of the Nazi Party, who labeled them as degenerate artist. Let's make a quick recap of the important things to know about this chapter of color before we start our collage. Bold and bright colors can bring energy or expensive edge. Colors are not always used in a realistic way. The raw background can be used as an additional color. Focusing on colors and textures might mean that perspective look flatter. Some art was characterized by an emphasis on the highly personal, and the emotional response of the artist to the subject, not to the subject itself.
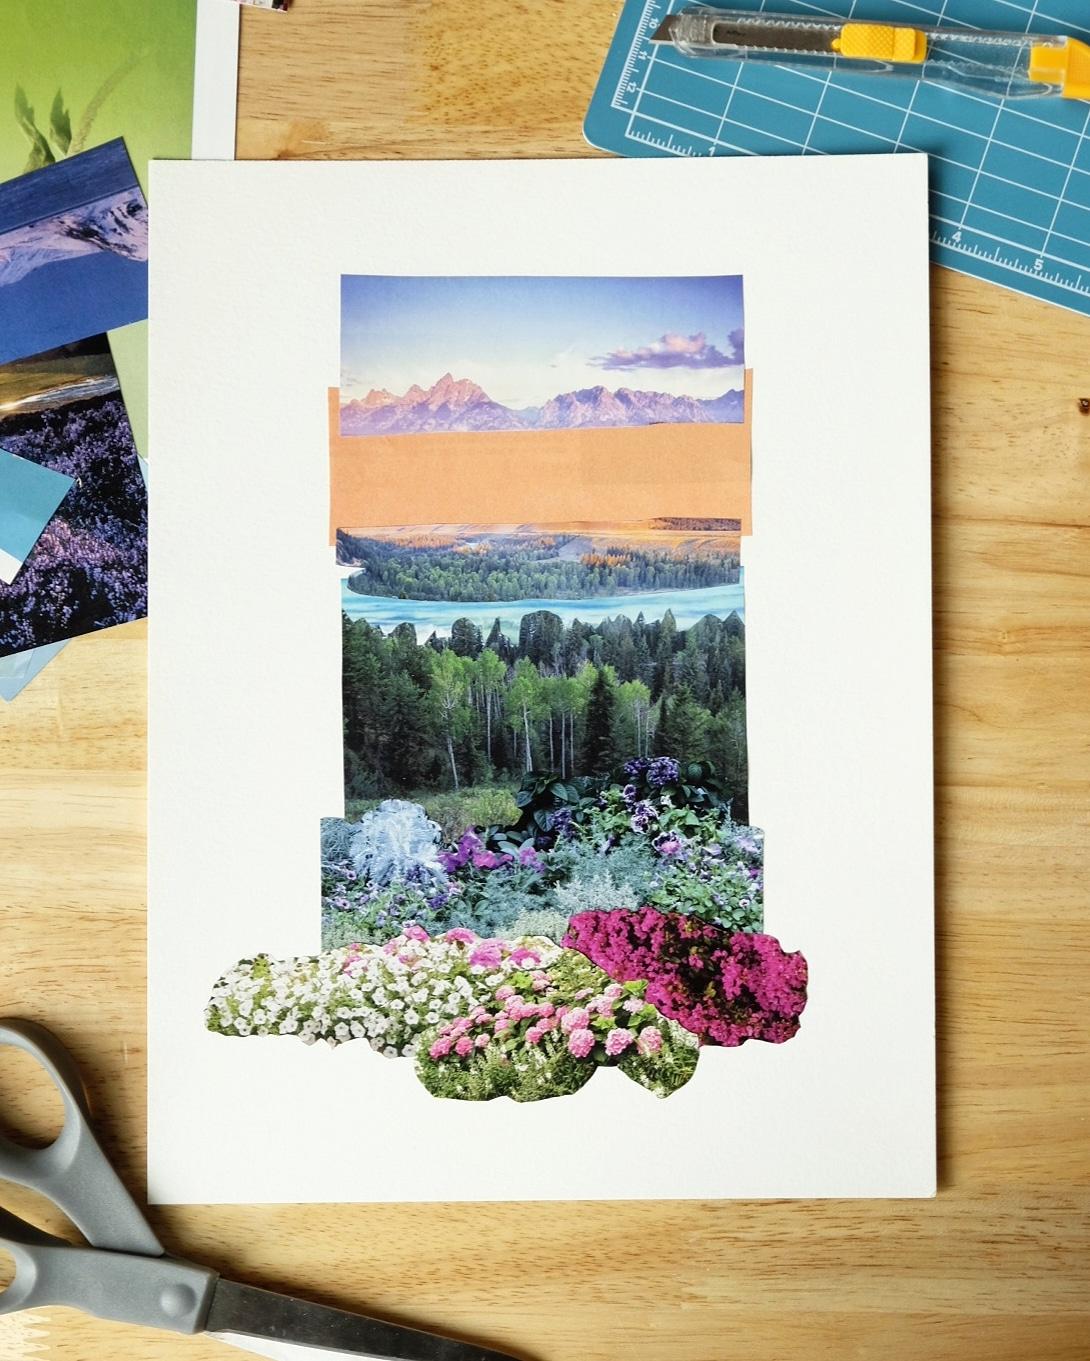
4. Make: A colouful collage: One of the first thing that I'm going to do is to obviously go through the pages of the magazines that I have. Every time I see something that is compelling, that is visually interesting, I simply remove the page and make a stack. After that, I go through what I have, the selection that I have, and I'm going to maybe narrow down to a few image. You don't need a ton of images to make a collage. Sometimes, you can make a really effective composition even with four or five different images. I'm going to be mindful of the background that I use. I can go for something that has some color in it. I have this craft paper, I also have a gray paper, but I decided to go for the white one just because some of the images I use have some white in it, so they are going to compliment each other. Usually, we're really drawn to specific elements in a picture. I know a lot of people are like, "Oh, this is nice. I have this climber with this rock. This is interesting. I'll take this page for a collage I'm going to make." But I also want you to look at pages that might have a lot of negative space, because these big chunks of color, they can become textures or color blocks in your collage. Fast forward a little bit, I've already removed a lot of pages that were really exciting, really stimulating from different magazines, and I've narrowed down my selection a little bit for this first collage. This collage is on a theme of color, so I was really drawn to images with very saturated and bold colors. The first one that really got to me and it dictated the selection of the other images was this little landscape here. I think this will be the main piece I'll start with in the collage. The way I personally would like to incorporate more colors into a landscape is by cutting the foreground, middle ground, background out and expanding it. This is what we're going to do for this chapter on color. I'm going to cut right at the line between the orange and the purple, separating the hills from the mountain. Find the tool that you're the most comfortable with. Even for small details, I tend to go for scissors instead of the craft knife. Because we're making a colorful collage, nothing stops you from checking your chromatic circle to know if you are building a strong harmony of color or if you are making interesting contrasts between the colors. The colors that I choose are mostly cold with only a little touch of orange here to brighten up the whole thing. The way I glue things together when I make a collage, it's going to vary a little bit, but the big rule is that I try not to glue a piece entirely to the piece of paper until I'm completely satisfied with my composition. I'll often assemble some pieces of the collage together and then combine them until I'm ready to glue them on the paper. Most of the time, I leave the corner and the edges of the different pieces of paper I've used bare without glue so that I can tuck in a last minute low piece of color. Here's our first collage completed.
5. Learn: Cubism: Let's start this chapter of cubism by talking about the modern artist whose most often quoted to have had influence on other artists. That artist is without a doubt, Paul Cezanne. In the late 19th century, Cezanne was preoccupied with how to represent the three-dimensional world on a flat surface of the canvas. He experimented with the arrangement of elements in a picture, but most importantly, he developed a unique style in which depth was created by applying subtle variations of colors and tilting shapes. This was quite unconventional at the time and by doing so, he paved the way for cubism and even abstract art in Europe. With all that being said, what is cubism? Well, cubism is a term used to describe a specific type of art made in the early 1900s. Around that time, artists were more and more exposed to art made outside of Europe and they started to introduce new aesthetic, like for instance, art from Africa. It was the case of Pablo Picasso and George Braque. This combined with their admiration for Cezanne's work brought them to paint in a new style and to establish the cubist art movement. Cubism was all about experimenting with the ways subjects in space was represented. One of the key characteristic of this artistic movement, is that many points of view and angles of the same subject were combined in one image. The cubist would rather focus on shapes and death, which meant their work had often a more restricted color palette. Sometimes paint was even replaced by collage. In the span of only a few years, cubism broke many conventions that dominated the Western art since the Renaissance. A handful of young artists living in Paris provided the right condition for bold innovation and art for the next few decades. As the year went by, the style of these artists, it kept evolving and some became a bit more abstract, some had more expressive style. Before we try our hand at a cubist collage, let's have a quick recap. Cubism is characterized by having many points of view and angles of the same subject in one image. A focus on shapes and depth rather than color. Cubism is concerned with representing the three-dimensional world on a flat surface.
6. Make: A cubist collage: It's possible that a fashion magazine might come in handy. What I decided to do personally, is to look for many images of the same subject or the same model. It's easy in a fashion magazine, because you might have a photo shoot that takes a few pages of the magazine. What I like about that, is that it will allow us to play with this idea of the multiple points of view and many angles of the same subject in one collage. The other thing is, I want you to maybe allow yourself to have a more restricted color palette for this collage. I have a lot of tones of blues and grays, so I decided this time to go for a cardboard as my background, that is a bit similar in tone to the images I picked. Limiting yourself in your color palette, is not necessarily a bad thing for a collage, especially if you have a lot of magazines, you might feel submerged in this abundance of inspiring images. So when you choose something a bit more monochrome, then you already narrow down your selection. I could've put one of those characters upside down. You can go a little bit crazy with cubism. After all, we're looking at different angles, so why not upside down as well? But for this time, I decided to keep things horizontally in this composition. But if you find many images of the same face in one magazine, it would be great. You could do this very classic, kind of cubist composition, that Picasso was famous for. When I glue things in my collage, I like to leave the edges without glue until the very end, so I can tuck in one last little piece here and there, to make the final touches. There you have it, a cubist collage.
7. Learn: Abstraction: The next chapter is all about abstraction. But before we start, it's important to know that abstraction can be seen and has existed on art from all around the world for centuries, if not more. Many geometric elements can be seen in designs of a variety of indigenous cultures. For the purpose of this class, we will focus on the emergence of abstraction in European painting and its development in America. In the field of painting, a few artists, surprisingly, we're on the verge of abstraction even before the 20th century. A great example is J.M.W. Turner, who painted in an almost abstract manner in the 1830s and 1840s. He offered atmospheric seascapes and landscape with elusive details. So far we've seen that by the early 1900s, artists started to break conventions around color and to use it subjectively. Cubists have challenged the way we represent the three-dimensional world on the flat surface of the canvas. In other words, the art world was bursting with experimentation and innovations. Visual artists started to tackle the next logical step, which was to remove entirely the subject matter from their art. Some turned to music for reference. After all, music is an arrangement of abstract notes, and when combined effectively it generates emotions and sensations. [inaudible] representations soon made space for canvas covered with lines, shapes, some organics, and geometric. Artists like Wassily Kandinsky, Kazimir Malevich, and Piet Mondrian found limitless creative possibilities in abstraction. Before the Second World War France and Germany were cultural hubs, but after New York became a key place for artistic innovation. Art described as abstract expressionism, dominated the American artistic scene in the 1950s. It was roughly divided in two categories. The first one being action painting, which was all about the act of painting, movement, and self-expression. The second one was color field painting, which were carefully constructed with an almost minimal composition. Color field paintings like the ones of Barnett Newman and Mark Rothko, were often huge in side. Composed of large sections of colors. These paintings attempted to make the viewer feel immersed in the color and to provide an opportunity for a contemplation. A decade later some painters develop new techniques, like hard-edge painting or a dipping your canvas in color. These abstractions were characterized by a straightforward composition. We're going to try our own abstract collage, but before we do that let's do a quick recap. One of the core value of abstract art is to remove entirely the subject matter from the art. Some artists were inspired by music. It's an art with an emphasis on nothing but colors, textures, lines, and shapes, whether they are organic or geometric.
8. Make: A abstract collage: All right. This one might be more of a challenge, but I think it's going to be an exciting one. Personally, I like to look this time very much for the textures, and those big negative space in pictures that you find in the magazine because they might provide me with color blocks for abstraction. I have a really good example here. It's an image that has a lot of big blocks of colors, but the details are so small that they simply become a texture, and it's really, really hard to recognize the subject matter. For me, it has the potential to be abstraction for a collage. I hope in this page here, sometimes you have full bleed images. This is a beautiful image and I can't wait to use it for this collage. When it comes to abstraction, you're focusing on colors, on shapes, on lines, and you want to remove the subject matter. So be conscious of your selection of images. I've already trimmed many pieces and I'm going to put them in different groups by color, just to have a bit of a better idea of the possibilities that I have for this collage, and then I'll see if I need to cut anything more. By choosing to start with either the colors or the shapes, it gives you a direction to simplify the process of building an abstraction. In this case, I'm especially drawn to a few rectangular shapes. They will be my point of departure to build this abstraction. This will determine whether I need to cut more shapes. I find it sometimes easier to base my collage on something I recognize like the shape of a flower, a landscape, an animal, whatever, so abstraction can fill a bit more intimidating. But maybe we can do exactly like artists did a few decades ago, and based the abstraction on music you're listening to. So don't be shy and put on some music. When you think you have a pretty good idea of the collage you want to make, nothing stops you from taking a picture of it with your phone as a reference before you start glooming it. To overlap the shapes more easily, I only glue one side at a time. Here is the final result.
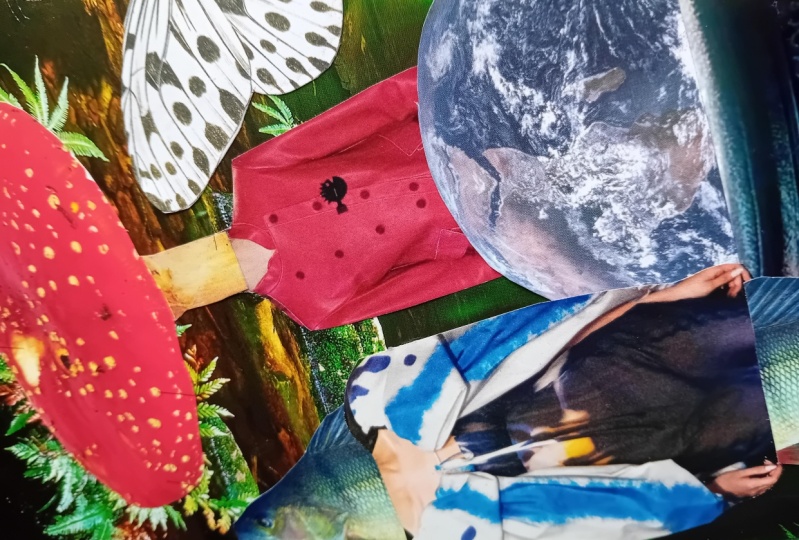
9. Learn: Surrealism: Our last chapter is on surrealism. Surrealism was an artistic, literary, and philosophical movement. It started in Paris when writer and poet, Andre Breton published the very first surrealist manifesto in 1924. Surrealism gained an international interest really quickly. One of the reasons for that is because it rejected many artistic convention of the time. Andre Breton and his peers were influenced by the theories of the unconscious mind and they wanted to free their imagination. Some artists produced dream-like imagery celebrating the irrational and the unexpected. It was the case for Paul Klee, Salvador Dali, Max Ernst, and Rene Magritte. Other surrealists turned to process of free association, also known as Automatism. Automatism is a process where one freely writes or paints whatever comes to mind without holding back. Joan Miro or [inaudible] are artists associated with this technique. One thing you have to remember about surrealism, it is not so much an art movement with a common aesthetic or style, it is mostly driven by the process of freeing the imagination and to create unexpected associations. This is exciting, it's our last collage, and it's going to be all about surrealism. So let's do a quick recap before we start. Surrealism is an art movement born from the desire to free the imagination and to tap into the unconscious. Sometimes it was composed of a dream-like imagery. It's all about unexpected associations. It is a creative process driven by free association, also known as Automatism.
10. Make: A surrealist collage: This chapter on surrealism is much more process-driven for the selection of images that I have heard this collage. I went for things that personally felt a little bit more dreamlike. I have, images of these weird islands or rocks on the sea, some very interesting butterflies and moths. Any images that have almost a mirror effect or asymmetry might be interesting. I want you to think outside of the box for surrealism. I want you to question what is in the image. For instance, I have this image of eggs, but if I cut them and remove a part of the image out of its context, it might look like a planet, like a moon. This is maybe the way I'm going to use it this time. When it comes to surrealism, allow yourself to just create without thinking too much and to have fun with the associations you make. Because we are on the team of surrealism, I'm going to allow myself to question what the image is really about. If you have animal and human pictures, nothing stops you from combining them to create hybrids. The craft knife came in handy for a few details in this project where I wanted to remove a shape in the middle of a piece of paper. This is a kind of collage that I love. I can just go and play with a lot of elements and because we are in this automatist type of process, I decided not to limit myself to the elements of composition that I liked the most at the beginning, like the two deers, I ended up doing an entirely different image at the end. Instead of cutting entirely the horizon line here, I decided to simply make a slit with my craft knife to insert the rock. It makes it easier later when I want to glue the whole thing together, I don't have to be super precise and to glue this guy back to the land, they're already together. When it comes to surrealism, I invite you to question the meaning of an object or an element in your composition. Nothing stops you from making a cloud out of rocks or making a planet out of eggs, like I do in this case.
11. Final thoughts: This conclude already this class, I hope you had fun and you were able to create something. Let's do a quick recap of the important topics and subject of this class before we go. The first thing is that you have to remember that very rarely in art history, something came out of the blue. It's usually a succession of artists who experimented with their medium and influenced the next generation. A lot of artists in modern art were also less concerned with this illusion of reality, death, and volume in their work. After all, photography is now widely distributed and accessible. Artists used paint in so many other ways than to copy paste reality. Another thing is that many artist presented in this class does not limit themselves to only one style or one art movement. They were associated with many of them throughout their career, they kept evolving and experimenting. This is it, this is the class. I hope you enjoyed it and please make sure to share your project to the project gallery. I'm really excited to see what kind of collage you came up with. Before we finish, make sure to follow me on Skillshare to know more about my latest class or upcoming resources I'll be posting. If you want a daily dose of inspiration, you can also follow me on Instagram. Thank you so much for following this class. I hope it made you, and see you next time.
 Valerie Mercier, I make stuff, and love arts.