Transcripts
1. Introduction and Supplies You Will Need for This Project: Hi, friends. How are you? I hope you're having
a great day today. I'm excited about sharing
this project with you. This is an oil pastel
drawing project that I designed,
especially for kids. Students do not need to have any drawing experience to be successful with this project. I will guide students step by step through all the steps
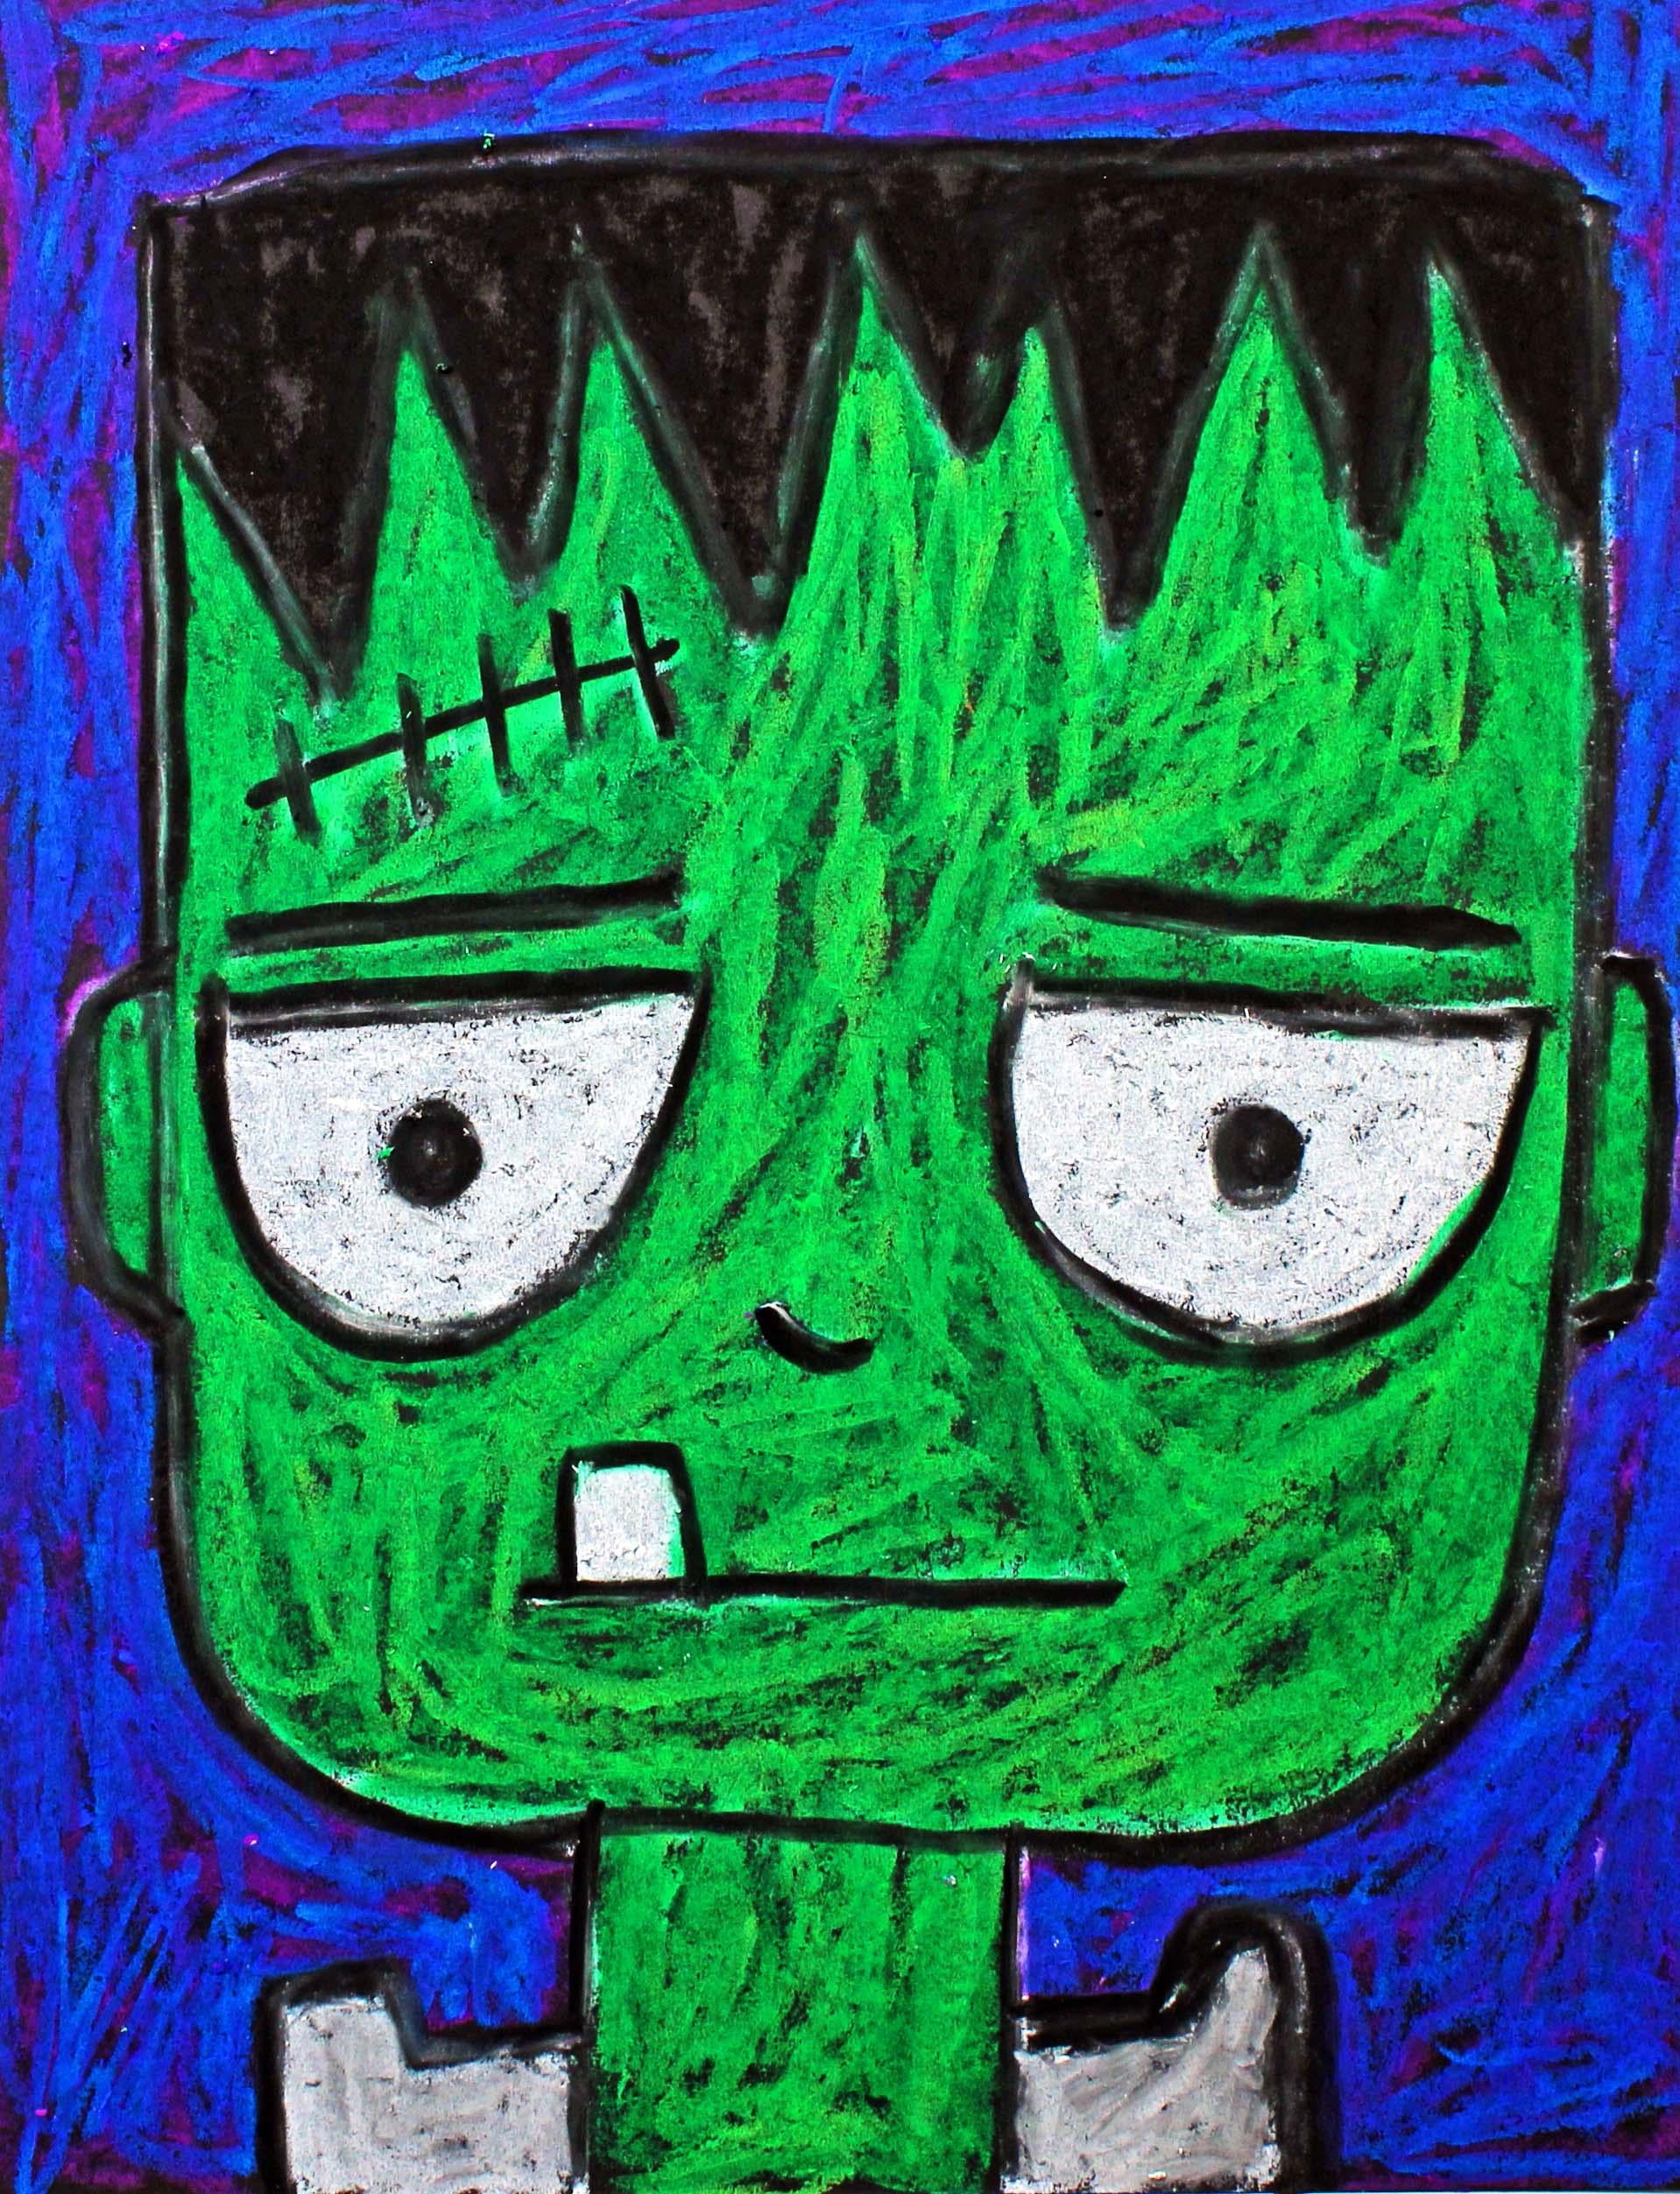
that they need to take. Today, we are going to be creating this cool Frankenstein. Let's talk about
the supplies and the materials that you will
need for this project. The first thing
that you'll need is a thick sheet of black paper. You will need a set
of oil pastels, and you will also
need a paper towel. So go ahead and gather all of those supplies
and materials, and I'll see you back
here in the next video.
2. Step 1: Draw Frankenstein: In this step, we
are going to draw a portrait of Frankenstein. So let's get started. Go ahead and pick up
your white oil pastle. And what we're going to do
is we're going to start pretty close to the top
of our piece of paper, but not all the way to the top. Alright? So about right here, that would be about one
or 1.5 " from the top. That would be about
3 centimeters. What we're going to do
is we're going to make a really big letter U
on our piece of paper. And what we're going
to make sure is that we use up most of the space
on our piece of paper. If we made a really tiny
face for our Frankenstein, that would be really cute. But we want to be able to see this face from
across the room. Okay. So let's start
about right here. We're going to come down. If you want your U to be
a little bit more boxy, you can go like this
and then come back up. So see how these corners right
here a little bit square. Now, what we're going to
do is we are going to close up the top of our U, and we're going to just
make a straight line going across and then connecting
those two lines. So this is the actual face
for our Frankenstein. Let's come down here and make Frankenstein's neck
if you have space. So we're going to
make a neck here. And then if you'd like to
put some bolts in the neck, you can go ahead and do
that. If you have the room. If you don't have the
room, that's okay. You can just make as much
of the bolt as you can, or you don't have
to have a bolt if you can't fit the
bolt in this space. So these are my two bolts. And as you can
see, you can't see the bottom part of the
bolt, just the top. Alright, let's go back
up into the face, and let's make some details. Alright? Let's start out with
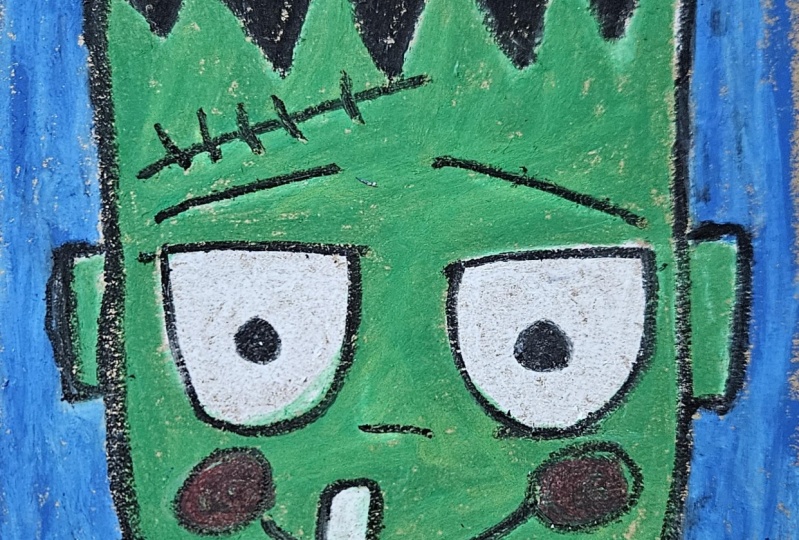
some hair here at the top. And Frankenstein has
some pretty spiky hair, so we're just going
to go up and down. Spikes aren't going
to be the same size. That creates a little bit
more interest like that. So I just went up and
down with a zigzag line. Now what we're going
to do is we're going to create some eyes. So I'm going to go about halfway down the length of my
lines for my face, and I'm going to
make a line here, pretty big line, and
another line here. This is going to
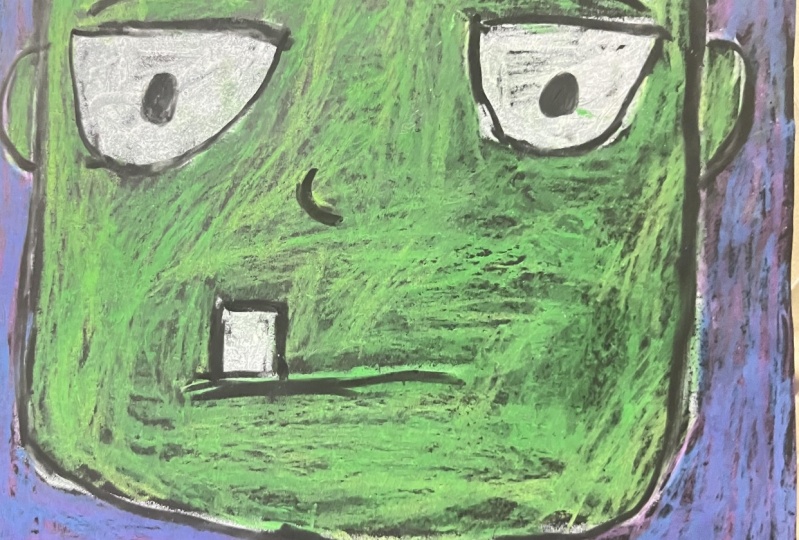
be the top part of our eye for Frankenstein. And then underneath, we're
going to make the letter U and then fill in with a little dot
and then seam on the other side with a dot. Now, if you'd like to
add some eyebrows, you can go ahead and do that. I'm just going to make some
straight eyebrows like this. And then if you'd
like to make a scar, if you have room,
you can make a scar. Sometimes you'll see Frankenstein
with a scar like that. Alright, let's make a mouth now. I know we're skipping
over the nose area, but we'll put that
on after the mouth. So I'm going to just
make a straight line. Frankenstein usually
doesn't look that happy, so I'm going to make
a straight line with a tooth coming
up from the bottom. If there's a different type of a mouth that
you'd like to make, like a smiling mouth or a surprised mouth, you
can do that, as well. Then we're going to
just make a small nose. Oh, one last thing
I almost forgot, we need to make ears for
Frankenstein so he can hear. So just make some small ears coming out right
next to the eyes. There we go. Alright,
let me take a look, make sure I have everything. If there's anything else
that you'd like to add, you can go ahead and
do that right now. You can add that right now. And we're going to put
our white oil pastel back in its little box. In the next step, we
will start adding some color to our
Frankenstein design.
3. Step 2: Apply Oil Pastels: In this step, we are going to apply some oil pastels
to our design. So let's get started. I have a box here
of oil pastels. Your box might look a little bit different from mine,
but that's okay. Just use the colors that
you have available to you. As we know,
Frankenstein is green, so we are going to be
using the color green, either a light green
or a dark green for our Frankenstein's
head and neck. For inside of his eyes, we're going to use white. For the tooth, we
will also use white. And then for these
bolts down here, I'm going to use
white for my bolts, and maybe I'll put a little bit of black in there as well. We're not going to use black oil pastels until
the very last step. So we're going to hold
off on using the black. After we're finished applying some oil pastels to our
actual Frankenstein design, then we will move on
to the background. That's that area that's
not on the face or neck, and you get to choose
the color that you like. I might choose maybe
purple and blue, maybe a combination of those, but you can choose
whatever colors you like. Would you like to use orange and yellow or just yellow?
It's up to you. Alright? So I'm going to
start out by starting with my white oil pastel, and I'm going to start
coloring in my eye area. And if I don't give
every single space covered up, that's okay. Notice I went right
over that pupil because I'm going to cover that a
little bit later with my black. So I got that eye
covered in with white, and I will move on to
this eye right here. And remember, it doesn't
have to be perfect. Now I'm going to color in my tooth and
then also my bolts. Down here at the
bottom, remember, you may or may not have
bolts because they're at the very bottom of
our piece of paper. Okay, great. Now I'm going to
move on to my green. I'm going to choose color green, and I might add a little
bit of the lighter green. At some point, I'm
going to go right over that scar because that's going to be covered with
black at the very end. I'm going to go right
over those eyebrows, but I'm not going to go into the eye space 'cause I want that to stay
very nice and white. So, this might take a minute.
This might take a minute. You can go a little bit over that white oil pastel
if you want to, because we're going to outline
that with black, anyway. So won't even be able to
see the white in the end. U Alright, there we go. I think I might add a little
bit of this lighter green. So now what I'm going
to do is I'm going to add some color
to my background. I really think that I like
to use the color purple. So I'm going to start
here at the top, and I'm just going to make sure that I don't go too far into the green of
my Frankenstein. Awesome. Oh, my hand is kind of getting
a little bit tired. Whenever my hand gets tired, I go like this. I
stretch it out. Alright, I think I'm going
to add a little bit more. I think I'm going to
add some of this blue. I wanted my blue to show the
purple through a little bit, so it's not completely
covering with the blue. The blue is not
actually covering every part of the purple. Okay, the next thing
that we're going to do is we are going to take
a look at our design, see if there are any
other colors that we'd like to add besides
the color black. And if you feel pretty comfortable with the way that your artwork looks right now, we're going to stop right here. And when we come back
in the next step, we will start adding
our black oil pastel.
4. Step 3: Outline the Design: In this step, we
are going to apply our black oil pastel
to our design. So let's get started. So here's my black oil pastel. It broke because oil pastels are really soft and it's
common for them to break. If your oil pastel breaks,
no problem at all. Just take the broken piece
and put it back into your little box and
carry on, right? So we are going to cover up
all of our white lines with our black oil pastel to create a little
bit of an outline. So I'm going to
start by doing that. I'm going to go
slowly and carefully. So I can do my best work. Means to be covered a
little bit more, right? There we go. Going to slowly and carefully cover that white
line with my black line. If you need to go over it a
couple of times, that's okay. There we go. I'm going
to outline that ear. Outline this ear
over on this side. Then I'm going to
outline the hair. Notice I'm having to go
over it a couple times because I want to make sure that I cover up that
white oil pastel. Now I'm actually going
to fill in the hair with my black oil pastel. There we go. Remember if you need to
exercise your hands, go ahead and do that because
working with oil pastel, it will build up your muscles very well because you
have to have a lot of muscle strength
in your fingers and your hands to
use the oil pastels. Alright, now I'm going
to move on to the scar, and I'm going to
outline that scar. And then the eyebrows. I have to go over that
a couple of times. Eyebrows are neat because they provide a lot
of expression. They tell you how
someone is feeling. Now I'm going to
outline the eye. And the other eye And then I am going to add
a pupil here in the center. And then in this eye, as well. Got a little bit of
extra oil pastel there that I'm going to take off with my handy dandy paper towel. Cover that a little bit more. Alright, now I'm
going to move on to my mouth and my tooth. And then down here, I'm going to apply some black oil
pastel to my neck. And the bolt Uh oh. Did you just see what
happened? Look at that. My oil pastel broke again, so I'm going to say, no problem. Put it there into my box, and I'm just going to be
using this little piece. I'm going to carry on
cover up that bolt. And then the other bolt. Now, I think what I'll
do here is I'll add a little bit of black just
on the side right here. And then on this one, as well. Because remember, I don't have silver in my set of oil pastels, so I want to create a
little bit of silver. And I think what
I'll do now that I'm finished with my black is I'll rub that black in just
a little bit, like that. So it looks kind of silverish. Now, as you can see,
I have quite a bit of oil pastels on my hands. And, oh, wait a minute. I'm missing something. I
know what I'm missing. I am missing my nose. How could I forget that? My Frankenstein
will not be able to smell if he doesn't have a nose, so I'm going to add
my own little nose. There we go. That's better. That was close. Okay. So what I was saying is on your hands, they might be a
little bit messy from this project because oil
pastels are very soft. They're made out of oil,
and they do get messy. But that's part of the
fun of creating, right? Is getting a little bit
messy. So there we go. He looks really cool and he
looks like Frankenstein. I'm really happy
with this project. I hope that you
had a lot of fun. I had a lot of fun teaching you. I will see you next time. And
 Em Winn, Teacher, Art Instructor, Artist