Transcripts
1. Introduction and Supplies You Will Need: I Hi, friends. How are you? I hope you're having
a great day today. I'm excited about sharing
this project with you. This is a drawing and
watercolor painting project that I designed,
especially for kids. Students do not need to have any drawing or
painting experience at all to be successful
with this project. I will guide students step by step through the entire
creative process, so they will feel
comfortable at all times. Today, we are going
to be creating this cute, sleeping fox. Let's talk about
the supplies and the materials that you will
need for this project. The first thing
that you'll need is a sheet of watercolor paper. You will need a set of watercolor painting
and a paint brush. I like to use a paint
brush this size, but just use what you
have available to you. You will need a cup or a
bowl with clean water, and you will need a black
crayon or a black oil pastel. Either one will work great. The last thing that you'll
need is a paper towel. So go ahead and gather all of those supplies and materials, and I'll see you back
here in the next video.
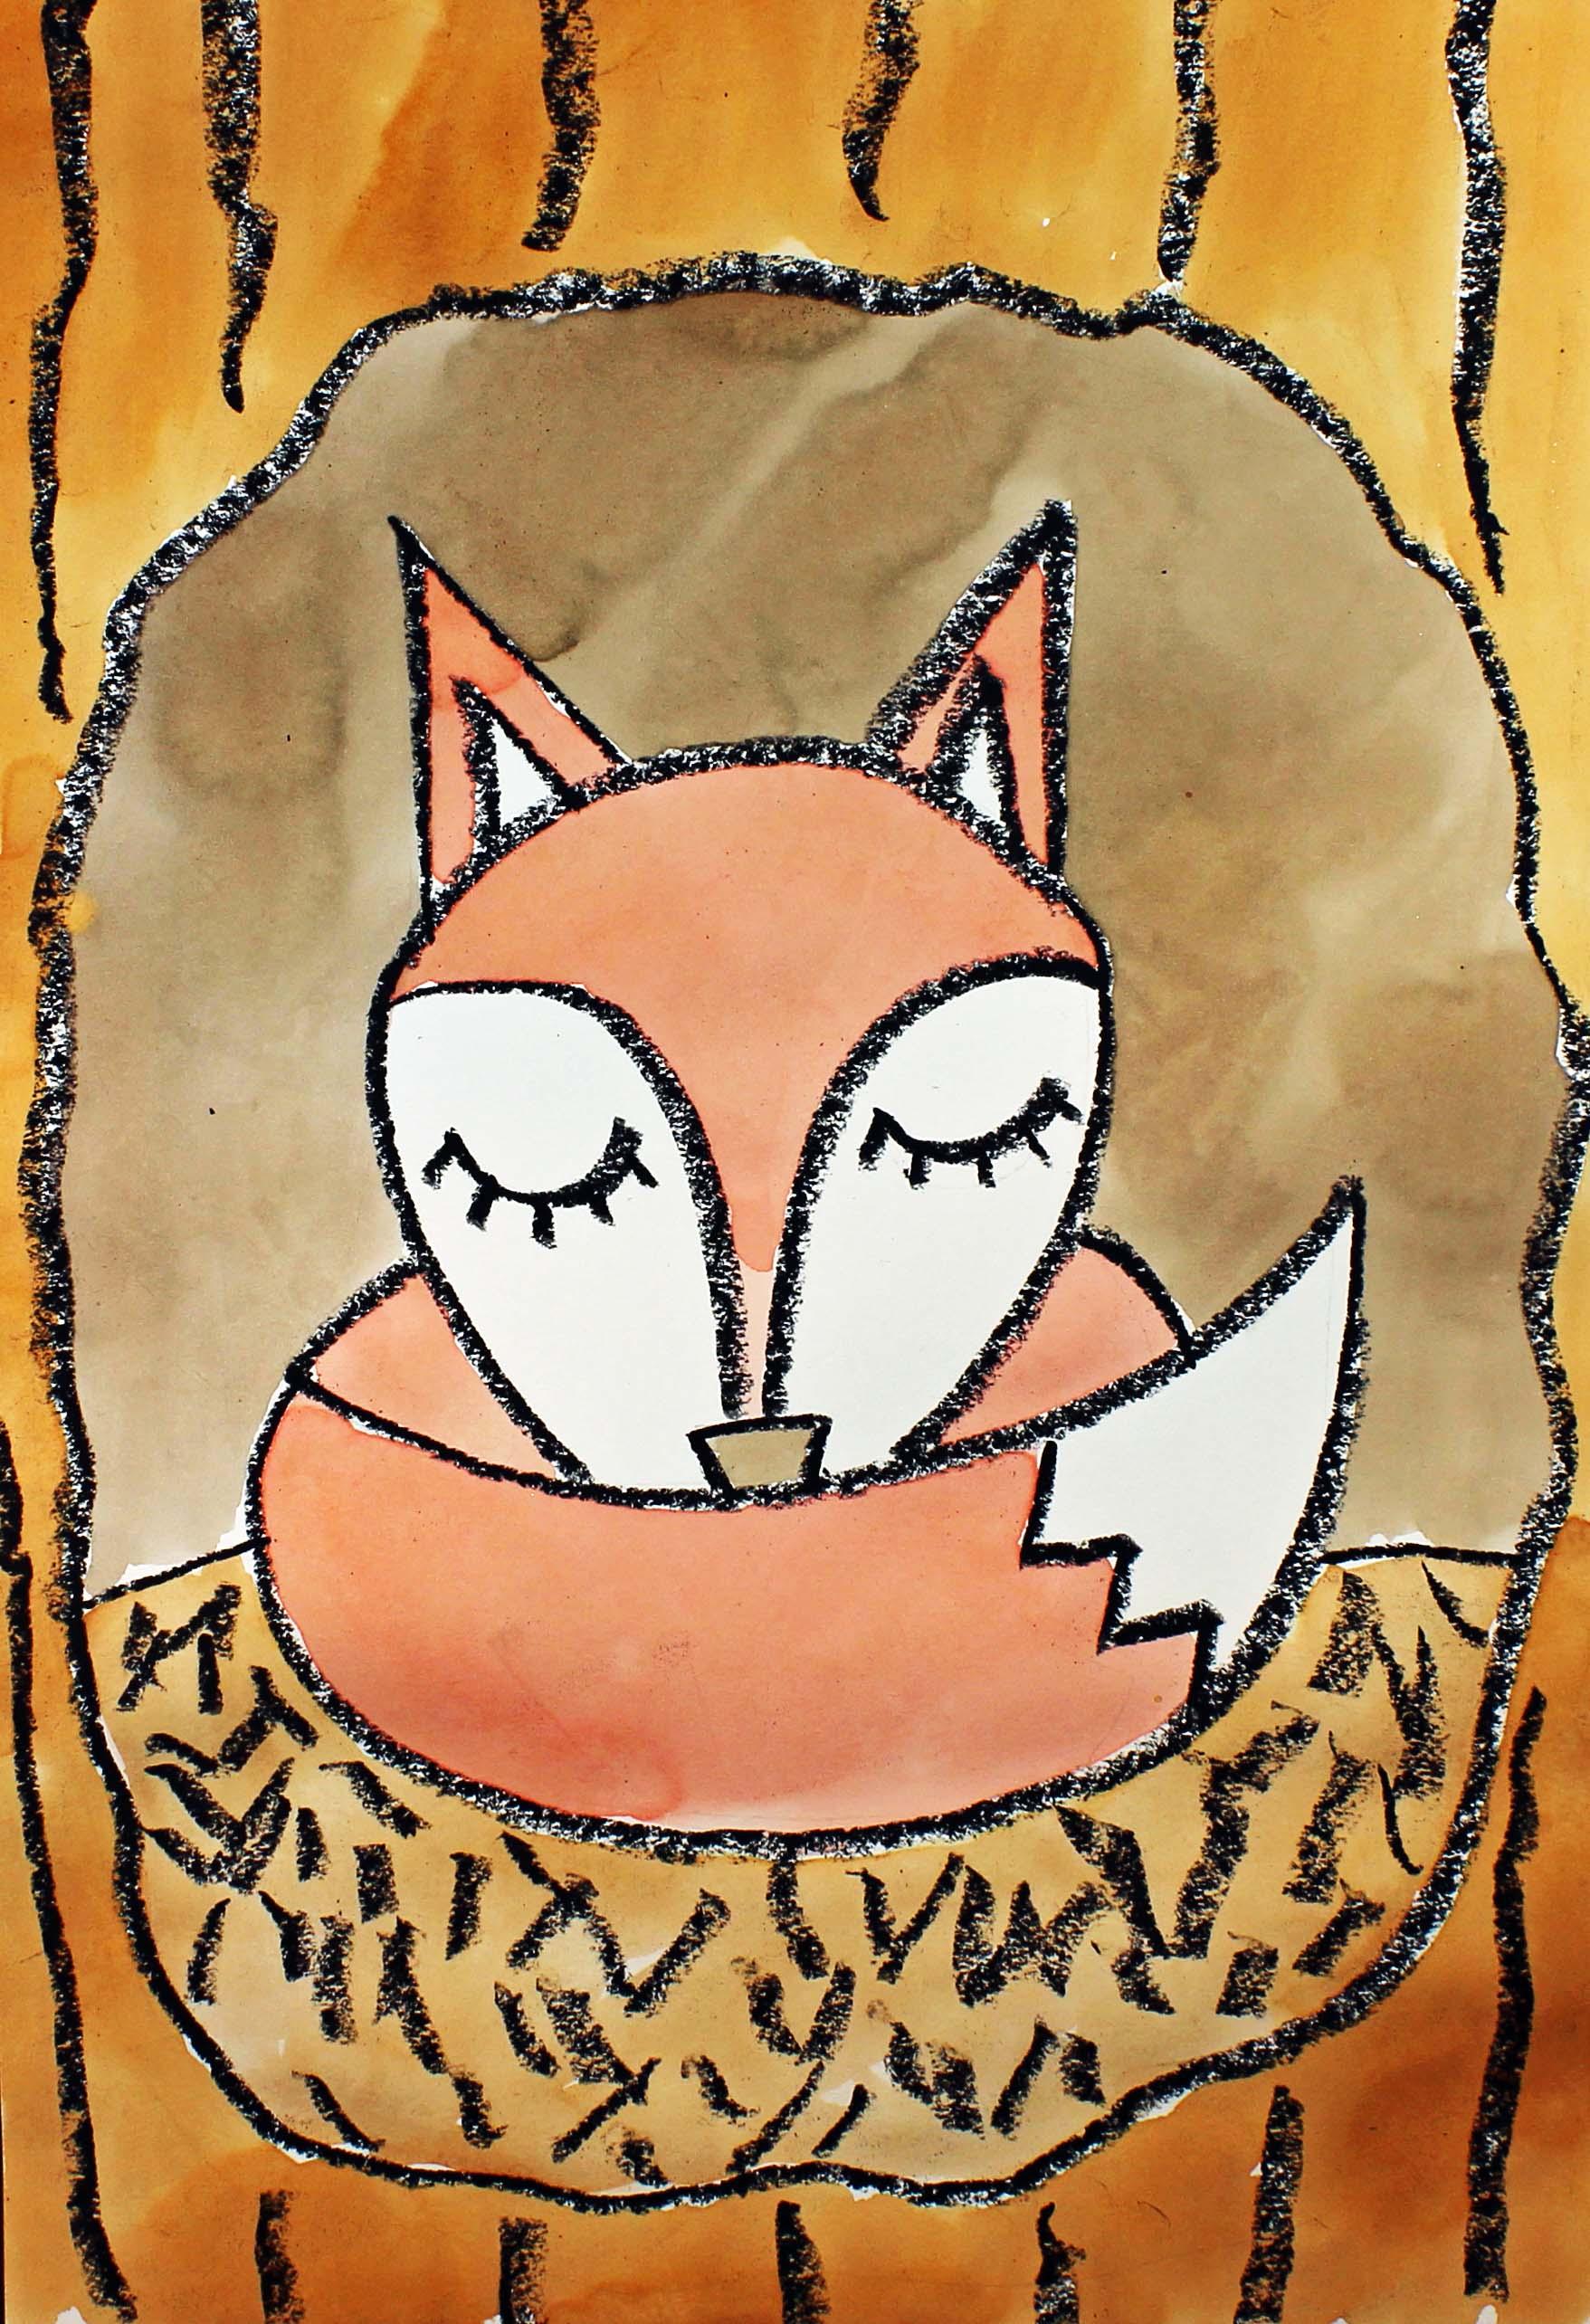
2. Step 1: Draw a Sleeping Fox Design: I in this step, we are going to draw our
sleeping fox design. So let's get started. So our sleeping fox
design is going to be about right here in the middle of our
sheet of paper, and then the tree is going
to be around the fox, okay? Because the fox is
going to be snuggled in the hollow or
the hole of a tree. Alright, so go ahead and pick up your black gran or
your black oil pastel. I'm going to use the
black oil pastel. And the first thing
that we're going to do is we're going to make a curved line
about this big. So I came a little bit up from the middle of
my piece of paper, which is right here, and
I made a curve line. Let me make sure that's a little bit longer because I want it to be about the same
length on each side. Now what we're going to
do is we're going to make the sides of
our fox's face, but we're not going
to go all the way down to the chin because the chin is going to be
tucked behind the tail. Okay? Let me show
you what I mean. So I'm going to start here. I'm going to bring my line down, and then I'm going to stop, and then I'm going to do the same thing on the other side. Bring my line down, and
then I'm going to stop. Alright? I'm not
going to close up the face or the head of my fox. Alright, friends, so
now I have the top and the side of my fox's
face and head, and what I'm going to do
now is I'm going to make the tail before we add any
details to the fox's face. So I'm going to go about right
here and about right here, and I'm going to make a tail, the top part of the tail. And let me show you
what I'm going to do. I'm going to start
about right here. I'm going to touch that line, and then I'm going
to touch that line, and then I'm going to stop a little bit above
where I started. This is going to be the
end of the fox's tail. So this side is going to be a little bit higher
than this side. Alright. Now what we're going
to do is we're going to go back up to the fox's
head at the top, and we're going to make
two slanted lines, and these are going to
be the ears of the fox. And then we're going to put a triangle inside
each of the ears. That will add a little bit
more detail to the fox's ears. Now what I'm going to do is I'm going to come down
here to the bottom, and I'm going to
make a small line that's right above
the top of the tail, and then two slanted
lines coming down. This is going to
be the fox's nose. And then I'm going
to make a line from this area right underneath
the ear on the side, and I'm going to go to the nose and touch
it in the middle. So curve line, and then the same thing on the
other side. Curve line. Now I'm going to make
some eye lashes, and these eyes are going
to be closed like this. So I have two curve lines, and then I'm going to
make some small lines for the eyelashes. If you do not want
to make eyelashes, that's okay. You don't have to. Alrighty. Now what we're going
to do is we're going to go from this line right here
to the cheek of our fox, and then we're going to
go from this line right here in the middle to
the cheek of our fox. Now what we're going to do
is we are going to come back over here to this corner, and we're going to come
around with a curve line, and we're going to
end up right here. Let me show you
what I mean. So we start here, we curve around, and then we close up about like, T. This is going to be
the tail of our fox. Let's add a little bit of detail to the tail, some zigzag lines. Nice. Now what we're going
to do is we are going to have the fox inside
of a hole in a tree. So we're going to make
the whole of the tree. So we don't want it
to be super straight. We don't want it to be a
super straight circle. We want it to be a little bit
more like a natural hole. So more of an organic
line like this. Do you see how now the fox
is inside of this hole? Now let's put a
little bit of fluff. So sticks and some leaves
underneath the fox, so I'm going to make a
line here and a line here. And then I'm just going to
add some sticks and leaves. And if they overlap each other, that's okay. That's
a good thing. There we go. So now we
have our sleeping fox, and we have the fox on a nice cushion of
sticks and leaves, so it's like a
little bed. Alright? So what we're going
to do now is we're going to make the
bark of a tree. So we don't want this to
be super straight, right? We want these lines to be more crooked because we want it to look like the
bark of a tree. So I'm going to make
these lines coming down. There we go. So there's our fox
inside the hollow of a tree who is taking
a little snooze. When we come back, we
will paint our design.
3. Step 2: Paint the Design: In this step, we are going
to paint our design. So let's get started. The first thing
that we're going to do is we're going to add a drop or two of water into
each of our pans of paint. And what this will do is it
will soften up our paints a little bit so they will
be easier for us to use. So I always encourage
students to go ahead and take a moment
to take this step. Now that our paints
are softening up, let's turn our attention
to our design. So here we have a small fox who's sleeping inside
the hollow of a tree, and we have a little bit of fluff down here
at the bottom. So it creates a nice soft bed. So what we're going to
do is we're going to start by painting the fox. I'm going to show you how
to make a rust color red. It's a combination of red and brown and we see a lot of
foxes with that coloring. Then when you think about it, the inside of the
hollow of a tree is going to be darker
than the outside. So we're going to make this area right here a little bit darker, and then we will
make this down here, a brownish color, and then
the tree will be brown. Alright, sound good. Let's start with the color
mixing for the actual fox. So I'm going to add a little bit of water into one of my wells, and I'm going to
add some red paint. And then I'm going to add a
little bit of brown paint, not too much brown, just
a little bit of brown. Then go ahead after
you have a color that you think might be
a good color for a fox. You can test it out on the ear. I like that color for a fox. Perfect. It's a rust color red. I'm going to go ahead
and paint my ears. I'm going to paint the top
part of my fox's head, but I'm not going to go into this area right here
where the eyes are. I am going to keep this area white on the fox and the
tip of the tail white, as well, because we see those
white markings on foxes. So I'm going to go ahead
and keep those areas white. Alright, now we have
our fox painted. If there are any puddles
on your piece of paper, you can go ahead and soak those up with your paper
towel if you want to. The way that you'll do
that is you'll just hover over the area that
you want to soak up the paint and touch it
gently and then lift up your paper towel and that
area will be soaked up. Let me put some pressure there. Okay. So now we're going to paint down
here at the bottom, this little bed of little
pine needles and leaves, and we're going to make this brown Alright. Now we have the brown little bed that the fox is sleeping on. Now the next step
is we are going to paint the bark of the tree. That's the outside
of the tree here. So I'm going to go ahead and make a little bit
more brown paint, maybe a little bit darker
than this color right here. So I'm going to go ahead and I'm going to
paint up and down. I'm going with the bark. I'm going with the
grain of the bark. So I'm going up and
down with my painting. Alrighty. The last thing that I'm
going to do is I am going to paint this area right
here inside the hole. And remember, this area is
going to be a little bit darker because there's a
lot of shadow in there. So we're going to make
some more brown paint. And then what we're going
to do is we're going to add a little bit of
black to this paint. And when you are adding
black to this paint, make sure that you add
just a tiny bit of black. And the reason why is because black is a
very powerful color, and we want to make sure that it doesn't overpower
the brown too much. Oh, that's a nice
color right there. See how it's a
little bit darker. Alrighty friends, I really
like this color that I made with the brown and a
little bit of black paint. I think it turned out great. I painted the nose of the fox, as well, this same color
because I liked it so much. And I was going to paint
the inside of the ears, but I decided not to
because I like them white. So I hope that you had a lot
of fun with this project. I will see you next time. I
 Em Winn, Teacher, Art Instructor, Artist