Transcripts
1. Introduction: Hey there, welcome to Animation in less than an
hour using Canva. In this course, you'll
learn to craft animations. Picky. I am wrikki like you need a freelance graphic designer
and marketing PhDs doing it. And I'll be your guide. We will explore creating Animated Scenes,
adding text music, and even using a AI-generated
voiceovers all in Canva. By the end of this course, you'll have the skills
to make animations that are stunning and captivating. Along the way, I will
share tips and tricks to help you create truly
amazing animations. Keep in mind that
the video you're watching was made by me using, well, a glimpse of what you
will soon be able to do. Let's start this creative
journey together
2. Setting Up Canva: Hey everyone, Welcome to a
new lecture on Animation. And today I'm going to
introduce the software or service that we will be
using for creating animations. It's called Canva's. Some of you may have
heard about it. Some of you may not have. So for those who have
not heard about it, I'm going to show you how
you can access the service. So click on Canva and the first search
result is canva.com. Click on the first
search result and you can sign up for free.
Click on Sign up. You can sign up using
Google or you can sign up using your work e-mail or you can continue another way. So you can also download the Canvas app from
the Mac App Store, from the Windows App Store, from the iOS and Google
Play App stores. But for this goes for
all leads and purposes, we will be using the
browser version of Canva. So sign up, I'll see you
in the next lecture.
3. A quick introduction to Canva: Hey everyone, Welcome to a
new lecture on Animation. And today I'm going to
show you around Canva. So this is what
your landing page looks like after you've
signed up and logged in. On the left-hand side,
you have to whom? Option your projects. You can see your projects. You've templates, brand and you have the abs that Canva has, that Canva has a lot of apps. And some of the apps are
meant for VoiceOver. For instance, some
of the apps are meant for some other function. And we will just
take a look at what we need for animation because Canva has a ton of
different options. As you can see over here, it can do many things
that can create dots, white boss presentation,
social media, videos, print
products, websites. And you can click on, create a design over here, read a new design. And as you can see
down over here, you can do a ton of
different things. You can create videos, then you can create
Instagram, post, posters, documents,
Resumes, Etc. So I'll go to the search
bar over here and click on and rather
search for videos. And as you can see down below, you have an option for videos. So it's gonna give you
templates for videos. And Canva has recommended
some templates, as you can see, a ton of
different templates over yet. Since we'll be
creating animation, I would suggest you start
with a blank template, so I've clicked on
plank and it's loading. Then as you can see, we
have a blank template, which has a 16 by
nine aspect ratio. That is what you need for creating videos that
you can Upload to, let's say YouTube or
some other place. On the left-hand side over
here, you have a panel, a toolbar, where you have
an option for design. So you can choose
different templates. You have an option for elements. You can choose lines and shapes, graphics stickers for dose,
videos, Audio, etcetera. You ever have an
option for text, you're going to add a text box. You can add a heading
subheading, etc. you have some brand
related stuff. You're an option for Upload. So you can upload
videos, audios, images, and you can drag
media here to Upload. Can connect your Instagram
account and stuff like that. Or you can upload
your files using the purple button over here. And then you have an
option for drawing. And you have different
pens over here. So you can draw on the canvas
like this if you want to. And you can undo this by
clicking on the back arrow. And you can redo
this by clicking on the front-facing curved arrow. That is what you can do. So I'm going to undo these things. And you can take a
look at your projects. And you have an option for apps, you have a variety
of different tabs, such as text to image. Did AI presenters, that is something that you can use
to create AI presentations. You have options for jars
for those boats, Audio, background, videos,
translate, etcetera. And then you have text to image. All of these apps you have. That is what
interface looks like, that is what the
workspace looks like. And we'll be using this blank template to
create presentations. And down below, as you can see, you have an option for
writing notes over here about your presentation. Just need to click on the
Notes button over here, which has a pencil on it. And then you can decide on
the duration of your scene. And you can drag
your scene outward. So select the edge of the scene and drag it out for
us to increase this length. Or you can drag it leftwards to reduce this length and
then you're the play head. You can move the playhead around and you play button where you can wish you can use
to play your scene. And you have the Canva
assistant over here, which helps you find stuff. For instance, helps
you find apps are different things that you
might need and your insights. And you have the total length
of the scene over here, and you have the
share button finally, which you can use to
download your video. So that's all about
the workspace. The place where you will create you animations
and edit you animations. So I'll see you in
the next lecture when we start on animations, we'll look at the good stuff from the next lecture onwards. Thank you so much
4. Creating Animated Characters and Backgrounds in Canva: Hey everyone, Welcome to a
new lecture on Animation. And today we are going to
create some animation. The first thing I'm going
to do is I'm going to show you the option for creating
background colors. And is the button right over
here with multiple colors, as you can see, background color and you can choose a background. Let's choose light
blue because we want to mimic the
sky or less you, the gradient for the
sky because sky is not plain light blue at
kind of looks like this. So we have chosen a background. Now what I'm gonna
do is I'm going to reduce the length of the scene two 5 s. I might increase a
defined need to later on, but for the time being,
I'm going to reduce the length of the scene to 5 s. And using the plus
button over here, you can add another scene. So as you can see your pitch to over here and your
page one over here, I'm going to delete the scene. I'm going to click on the
three dots over here. And then I'm going to
click on Delete page. Now that we have a
background for the scene, Let's start doing
some animation, click on elements, then
go down to graphics. Now it's not showing graphics in the different options
though it has shown graphics and click on graphics. As you can see, you have a ton of different graphics over here, and we will be using
graphics for animation. You can also search for
graphics using the search box. Search for graphics,
and click on Enter. And when you search for
graphics using the search bar, you have this option to the
right of the search bar, which is basically three
dots or three lines, three horizontal lines, parallel lines with
three dots on them. Click on it. And what you can do is you
can go down and click on Animated and click on
Free as the price. Because I'm showing
you this exercise or this entire process of making an animation on the
free version of Canva. I have a bit version, but I thought showing you on the free version will
be more convenient for you because most of
you will like to try out the software before you
decide to get a subscription. So we have selected
Animated and price, and over here you can
select color too. But I'm going to
unselect color or rather let me select color
for the time being, and click on graphics again. And now you're back to the
menu and it's loading. What we're going to search
for is urban buildings. Buildings. That is what we want. Buildings, city buildings. And we have all these
options for buildings. So I'm going to select this particular option
and drag it over here. Now it's abroad options, so you need Canva pro to remove watermarks over
yet has a watermark. But let's not worry about
watermarks for the timing. Let increase the
length of this image. We have city buildings on.
What we can do is we can copy this image,
control-click or right-click. Whichever computer you're using. If you're using a Mac
than control-click, using a Windows, right-click, copy it, and then paste it. And we have two
buildings right now, two sets of buildings. Let me make this smaller. Two sets of buildings. Let me make sure that
these images merge. They have merged. So like I said, I can
copy this and paste this. Now we have a city with
buildings and we have the sky. Now that we have
the city buildings, let's search for
birds. Birds flying. And we'll use this image. I'm going to copy this again using the Copy Paste
menu and I'm gonna paste it two sets of birds right now. Now, what I'm going to show you is one bird which is blue, or rather purple
and white in color. So I dragged and dropped
it on the canvas. As you may have noticed, let me delete this. Let me bring up the
copy paste delete menu. What I'm doing is I'm
going to click on this, or I'm going to drag and drop this on the Canvas like I did with
the other images. So I'm gonna make
this bird smaller. And what I need is
I need some grass, small amount of grass And the grass, I'm going
to use this, this one. I'm going to drag and drop
it or you can just click it. I want to make it smaller. I'm going to copy this. Is this again. These this place it where
I wanted to be placed, which is right at the bottom. B. This again, I'm going to
drag and police arrived at the bottom and paste this again. We have some grass. So we have a city, we have
some grass over here. You have some buildings, some grass on birds flying. And now we have a scene setup. Now what I'm gonna
do is I'm going to animate the black birds. Click on the black birds. And I'm going to
click on animate. And I'm going to click
on Create animation. You can also choose
basic animation, such as the ones that have
been recommended by Canva. So you can choose drifted, in which case the birds, as
you can see, are drifting in. If you look at the
image carefully or you can show pop and the
birds are popping in. Or you can show why.
I'm going to create my own animation's,
I'll click on query. What we need to do is
we need to click on the image and move it
around to give it a path. In the sense that we have to specify to Canva which
path the birth date and Canva will automatically create. An animation based on the path, will do the same with
the other birds. So click on Create
animation, then. This does not look good. So I'm going to click on delete path by going down
to the bottom of the menu. And I'm going to click
create a new path for them. Like this. Same thing
for the other ones. I'm gonna go back
when I click on this, click on custom animation right on top Piazza because
you have customer animation. I'm going to delete the path. What I'm gonna do
is I'm going to track them downwards like this. And click on Done. What you can also do is
click on Custom over here, up top right over here, Custom. And you can reduce the
speed of that animation is. So the birds are moving slowly. Same thing I'm gonna do for the other animation for
a second set of births. And I'm going to make
the movement styles to the birds are flying. Or you can select
some other movements. Diet points to steady,
whichever looks good. That's about it.
I'm done with this. Now what I'm going
to do is I'm going to animate this
purple white plot. But I'm going to
click on animate. And I'm going to create
a custom animation. And this bird, I'm going to
click on the bird, the image, or rather the graphic
for the bird and assign an animation by dragging it along the path
I wanted to take. And as you can see,
it has been Animated. The bird is moving
out of the scene. I'm going to delete this path. What I'll do is take
the bird over here. I'm going to delete
the path again. I'm going to go, I'm going to go back to position
or crop or whatever. But go back to position. Now I'm going to take the bird right to the edge of the scene, to the right edge of the scene, then click on animate, then click on Create animation. And the bird is going apply. Moral less a straight line. As you can see, the
bird has been Animated. Let's assign smooth
animation to the bird. You can add some other
motion effects down here. You can add flicker, false. Let's add a pulse. Perfect click on Done. And let's click on play. But I'm not happy with
that animation for the Bigger birds, so I'll
click on Custom. What I'll do is I'll delete
the path and I'll assign them another part right out
of the frame. That is a path. I'll assign them. Click on Done, I'll click on the
other set of birds do. I'm going to click on Custom
over here, up on top. And I'm going to click,
I'm gonna delete that bar. And then I'm going
to assign a new pop right out of the scene. Well ticked, click on, Done. Now, click on Play. Birds are moving too quickly. We'll go back. I'm going to
click on position over here. And I'm going to
click on the birds. The first set of
birds click on Custom again and reduce the speed. The same thing I'll do
for the other birds. Will click on the bird. I'm going to increase
the speed a bit. That's about it. Click
on Done. Click on Play. Now I want to add some clouds. I'm going to search for Clouds. And the cloud I'm going to
use is the white cloud. I'm going to place a cloud right over here and reduce
the size of the cloud. Copy this, paste, paste it. And then we'll have to Clouds. We can resize the
Clouds like this. Now the thing is, the Clouds are appearing
over the birds. So the Clouds them is
superimposed over the bus. So the way we can change this, we can click on the Trout's, either right-click
or control-click and a menu comes up and
you can layer it. You can leather
Clouds in the sense that you can send them backwards or send them to the back, or send them forward
or to the front. Same thing I can do by
clicking on position. So I can align them to the top, middle, bottom, left,
right, and center. So let's check out all
the options I have. Align them to the top. You can align them to the bottom or the middle of the top. So I'm going to
keep it at the top. Same thing I'm going to
do with the other cloud. And I'm going to
move it backwards. I'm going to click on
backwards over here. So I'm moving the layer
of clouds backwards. And if I want to
move them forward, I need to click on
the birds and move them backwards and the
cloud is forward again. I'm going to send the Cloud. I'm gonna go to
layer in this menu and send them backwards. Perfect. Like I said, if I want
them to move forward, I'm going to go to the menu option over here
and bring them to the front. But I need them
behind the birds. So I'm going to keep
them behind the words. But I missed a quick trick. I missed what? I forgot to animate
this, these Clouds. I'm going to click on animate. I'm going to click
on Create animation. And the Clouds are going to
hover kind of like this. I want to click on the
other Cloud, two or both. Then I'm going to move the
second picture downwards. Click on the Cloud, click on position, or
rather click on animate. And I'm going to create
a custom animation. I'm going to move it like this. As you can see. I'm assigning a movement and I'm going
to reduce the speed of animation to almost not
want to reduce the speed up the animation on the
second Clouds to almost not done any meetings. I'm going to move
the birds upwards. Move the second set of birds upwards so that they
are over the Clouds. And I'm going to click on Play. Perfect. Now we have a scene that is my friends how you
animate using Canva? I'm going to animate
the grass a bit. Let's say it's windy. So I'm gonna just add a custom animation which
will be kind of like drift. And I'm going to
reduce the intensity, which is again a pro option. I'm going to cancel this and you can assign the
direction of animation. But what I'm gonna
do is I'm going to remove that animation for, because it does not look good. I'm going to click
on Create animation. And I'm going to
just assign it the small but click on Done. Let's see how it looks. I'm going to remove the
animation from this now. And we have a scene. We haven't animated theme. Now what we can do is we
can add a second scene with the background
remaining the same. So I am going to copy and paste these things
to show you how to read. A second thing is I'm going
to keep the background, the steam as it was. But you get the point. So I can copy and paste all of this. I can copy and paste the Clouds. Do. And again, I can add custom
animation to the Clouds. And as you can see when I
copied and pasted the Clouds to Animation For the
Clouds has been copied to. So I'm going to delete this part and in this case
I'm going to add, Add a distinct, a different animation to
the Clouds like this. But I don't want
the second scene because I think
you'd get the point about how you can
create multiple seeds. What I'm gonna do is I'm going
to increase the length of the scene 2 s, and I'll leave it at data. So we have created
an animated theme. In the next lecture, I'm going to show
you how you can start with the VoiceOver process for your Animated Series. Thank you so much
5. Adding Text to Animation: Hey everyone, Welcome to a new lecture on
Animating using Canva. And today I'm going to
show you how you can add text to your
animation to do that, head over to the
left-hand side panel over here and click on text. You can add a text box, you can add a brand font, you can add a
heading subheading. I'm going to add a heading. And as you can see, I
clicked on Heading 1s. I can even click and
drag it onto the canvas. But I'm not going to do that because I already
had the text box. What you can do next is you
can move the text box around, double-click on the
text in the textbook deleted and name
this Animation bird. And he mentioned simplest. And you can resize and reshaped the text
box if you want to. Kind of like this, pulling
the edges outward or inward. And now I have the
text and non want to see how I can format the text. So I'm going to click on the Text Box and
highlight the text. Then what I'm gonna do is I'm going to choose a
different font. Let's choose something that can stand out less juice,
Archivo black. So I've changed the
text formatting, change the font to
archive of black. I can increase the font size using the option
right over here. You can plus twice. And the font size
is known at four. And I can change the
color of the next. I can make it white. I'll leave it at black. Then. What I can do it, I can
change the alignment, I can change the spacing. Let's increase the
lattice spacing a bit. Stretch it out. So I've increased
the letter spacing and stretched out the text. I can change the alignment. I can make it right align, left align, justified, etc. as EBIT center align, I can add an effect,
I'll click on effects. And as you can see
of different ethics OLED yet you can add shadow, you can add lift, you're
going to add hollow. As you can see, the text
has become following here. You can ask splice outline. You can increase the
thickness and all of that. Once you click on the
different Effects, it'll ask you to increase
or decrease in density, increase or decrease thickness. All of that. Want to choose the neon effect
because I like it. Increase the intensity of
a Neon effect to make it stand out a bit perfect. So I have changed the
text, formatting. And what we can do now as we can click on the text
and click on animate. And I can choose a
animation or I can create an animation just as we did for the birds
and stuff like that. So what I'm gonna do is
I'm going to try out a couple of animations
and we'll click on rice. Don't like it. You
can have it rise on N or an exit. I'm going
to click on both. Still don't like
it. I'm going to click on pan. Don't like it. So I'm going to create
my own animation. I'm going to click
on the text box and then drag it around so that
it hovers over the picture. Perfect. And let's click on
Done. Let's click on play. And the text box
is hovering above. You saw. Now what I can do is I can
click on the textbox. And now right now the textbox is appearing
over the entire Animated. See, what I can do
is I can send it to the background,
click on position, and even change
the position dark, middle, or bottom in the middle, and also change it
to left or right. So I'm gonna click
on the text box. I'm going to put a list. And let's see the different
layers over here. So we have different layers
as you can feel yet. We have the background, we have the different images
that we have selected, the different graphics
rather which we Animated. And we have the
different layers. What I'm gonna do
for text boxes, I want to send it
the Clouds, right? I wanted to appear on top and I wanted to send it behind
the clouds and the birds. I'm going to click on text box, click on position again. Then I'm going to go to Arrange, and I'm going to
move it backwards. We click on moving
backwards off to the back. So let's see what it has done. As you can see right now that text box has been
moved to the back. Let's now move into
the front again. So you can work with
layers like this. You can move images to the back, to the front,
etcetera, etcetera. You can move less back
forward and do all of that. I'm going to on
the textbox again, Xboxes right at the
back right now. I'm going to go to
position again. Moving forward. Let's move to
Cloud back to where it was. A smooth refers back to regular. Still not not right
to the front. And what I'm gonna do
is I'm going to take on the textbox control-click
or right-click. Bring this menu up. And I'm going to bring it
through the front. As you can see right now, it gets boxes appearing
over the animation, over the picture,
over the graphic for the flock of birds and
all other Cloud graphics. And I'm going to move it
back to where it was. So that is how you
add X to Animated. See, you have different less. You can send the leg
backwards off the back. Send the leg forward
out to the front, just like I did with the textbox and the Clouds and
the flock of birds. So that's all for this lecture. I'll see you in another lecture. Thank you so much
6. Adding Audio and Music to Animation: Hey everyone, Welcome
to New Left john, how to use Canva for Animation. And today we're going
to take a look at how we can add music to assay. For that, go to the
left-hand panel over here. Now what you can do is you can click on
Upload right away. And you can upload a music file that you have already made
in some other software. But if you don't want to
do that and if you want to use Canva's library, then what you need to
do is go to elements. And the elements menu has appeared and there are bunch
of elements over here. For instance, lines, GIFs, stickers, videos,
etcetera, etcetera. What we need is music and it's not displaying
music at the moment. So I'm going to
search for music. And I'm going to click
on music background. I'm going to click on Audio and the list of
options over here, right over here, audio. And as you can see, Canva's proposing some music
and some of them are free, some of them are pro ROAS and you need a
subscription to use them. So what I'm going to use it,
I'm going to use the magical background crack that I can click and then drag and
drop it below the scene. Or I can just click on it once and it'll be
added to the scene. And now we have added
Music to the scene. Let's hear the music. You need to be certain that
you're using music that suits the particular animation
that you've created. So it should match the team. Female bad animation, maybe
sad, happy, exciting. Or maybe someone getting angry
to the music should match. The scene should reflect what is being shown
on the scene. So you happy you
knew discretion. But for the time being, let's just add this music
track and it sounds kind of compatible
with the scene because you're just the
scene is all about the book flying across the
sky. That's about it. So let's listen to it again. Sounds kind of haunting
and kind of kind of new music track that
you would probably hear when you are doing some guided meditation
or something of that. So the scene is kind of placid. So this sort of attract
kind of suits this here. But I wanted to reduce
the volume of the track, so I'll go to the edge
of the track over again, there are three buttons, as
you can see, 3-white buttons. I'm going to click on it. And I can add audio
effects, I can adjust, I can reduce volumes. So I'm going to reduce
volume of it and make it a bit softer. So I'm done with volume now. And you can use the
Mu symbol to mute. Want to make it a bit softer? Perfect. Then I'm going to click on the three red dots again
and go to audio effects. And what I'm going
to do is I'm going to make the music feeding. So it's going to
take 3 s to paid-in and it's going to fade out
near the end of the track. So 3 s from the end is
going to start fading out. Less. Listen to the music again. Let's start from the beginning. Perfect. So now we're done with the
music track for the scene. So you have now
learned how to add music your Animated scene. So that's all for this
lecture. Thank you so much
7. Writing a Script for a VoiceOver and Connecting Murf AI: Hey everyone, Welcome to
a new lecture on how to use Canva, creating
awesome animations. And today we're going to see
how we can do a VoiceOver. Now, instead of
doing a VoiceOver where I am speaking or I am recording something or someone else's regarding
non-human this recording, we're going to do
a VoiceOver that will have artificial intelligence
narrating something. Now what will artificial
intelligence narrative? That's the most
important question. So you should have a Script
that suits the team. For instance, let's say
in this particular scene, we have the bird
flying across the sky, but birds can be
unless of course, they are part of
an Animated see. What I'm gonna do is, I'm gonna click on notes
down below over here. And what I'm gonna do is I'm
going to write a script. So I had written as prayed
before I deleted it. So I'm going to
write new Script. So the bird is saying, I am happy bird, but I am not real bird. I am. You degenerate. It. Can be the cause of the power of due diligence. Because I appear almost human. This is the Script
for the narration. This is the Script or artificial
intelligence generated. Narrator is gonna narrate, how do we do that? How do we access an artificial intelligence
generated VoiceOver? Thing we have to do is
we have to go to apps. First. Asked you to search
for Murphy I mu RF, which is an external
app or plugin. So I'll click on Murf AI. And what Murf AI is
asking me to do is connect Murf AI to
my Canva account. So you have to open
a Murf AI account. It's free of cost, so open
that accounted connected. So I'll click on Connect. As you can see, you can
sign up using Google. You can sign up using e-mail, sign-up using Microsoft, etc. etc. so sign up and connect
Murphy, I do Canva. And then the next lecture
I'll show you how to add a VoiceOver that is generated by artificial intelligence.
Thank you so much
8. Adding AI generated voiceovers to Animation using Murf AI: Hey everyone, Welcome to a new lecture on
Animating using Canva. And today we're going to
see how we can create an artificial intelligence
generated VoiceOver. So I'm in the Murf AI
workspace over here. And you have a few
options over here. So the first thing you can do is you can select the language. So you can select if
you want English, UK, Australia,
India, fringe, etc. German, all of that. Let's take to English,
USA and Canada. You can select a voice. So there are a few
voices over here. Some are free,
some are not free, and you need paid
subscriptions for them. So I'm gonna select, I'm going to sample
the voices first. At some point in life, we have all want, Hi, I'm late. I'm one of the friendly and
relate to I liked this voice. I like neat. So I'm
going to click on neat. And then we have to enter
the text over here, the text that the narrator
is going to narrate. So let's click on notes over here and let's
copy this text. And let's paste in Murf AI. I'm going to be is
the text and Murphy. And then you can even choose
a conversational style. So let's choose narration, and you can choose the speed. Let's make it a bit slow. Let's generated VoiceOver. I am a happy bird, but I am not a real bird
in or does not sound good. So I'm going to increase the
speed back to where it was. I am a happy bird, but I am not a real bird in computer generated
and can speak. Let's change the style to conversational
instead of narration. I am unhappy bird, but I am not. Let's add a hey. Okay folks. Let's generate the
VoiceOver ligand. Hey folks, I am a
happy birthday, but I am not a real bird. I am computer-generated
and can speak because of the power of
artificial intelligence, because of AI appear
almost human. So now I can add this VoiceOver
to the design down below, as you can see, you get 9 min of wise generation for free. And beyond that you have to pee. You have to be for the service. And I'll let you decide if you wanted to pay
for the syllabus. But this is one of the best
artificial intelligence to speak generators out there,
especially for animation. And I'm going to click
on Add to design now. And it has added innovation
to my animated clips. So I'm going to move on this particular narration
around a bit. I don't want the narration to start right from the beginning. I wanted to start
after two or 3 s. We want to move it
a bit to the right. Then I'm going to increase
the volume of the narration. And I'm gonna do
that by clicking on this particular
button over here, which has three dots.
Display it on it. And I'm going to increase
the volume a little bit, make it 120 per cent. Perfect. Now let's listen
to our animated clip, or rather watch and I
am a happy birthday. Real burden. I am
computer-generated. Speed because of the power
of artificial intelligence, because of AI appear
almost perfect. So we now have an and immediate scene and
what do we do with this? Well, we go to Share, click on Download, and
download it as an mp4 video. Thank you so much. That's all. In the next lecture
I'll talk about the final project.
Thank you so much
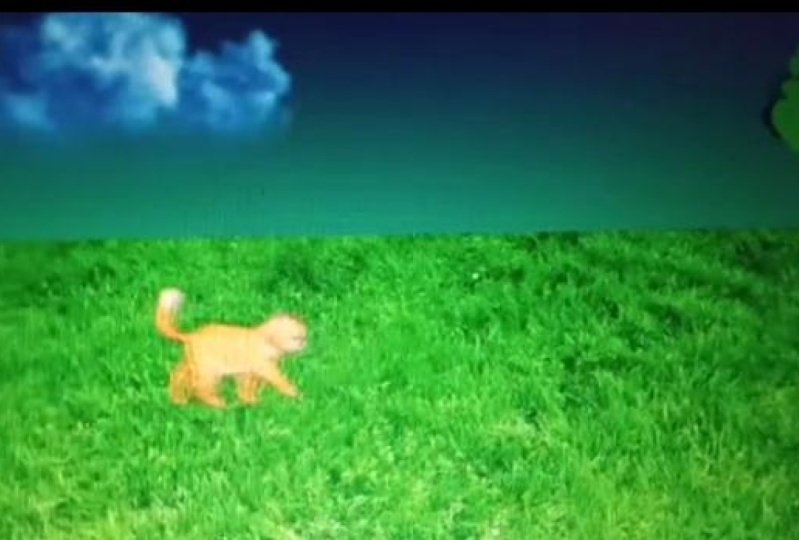
9. Final Project Instructions: Hey everyone, Welcome to the final lecture
in this course. And today I'm going to talk
about the final project. For the final project, you have to create an animation scene which
will have the following. A field with grass on it, Clouds in the blue sky, a cat moving around
in the field. And appropriate
background music track and AI-generated VoiceOver
with the following text. This is my final project. And once you're done
with the scene, you have to Download the
scene as a mp4 video, and then you need to Upload
the video to this platform. So that is the final Project. Best of luck, I hope you learned a lot and
enjoyed learning. Thank you so much.
 Ricky Lahiri, Content Creator, Writer and Marketing Researcher