Transcripts
1. Class Introduction: What's our people
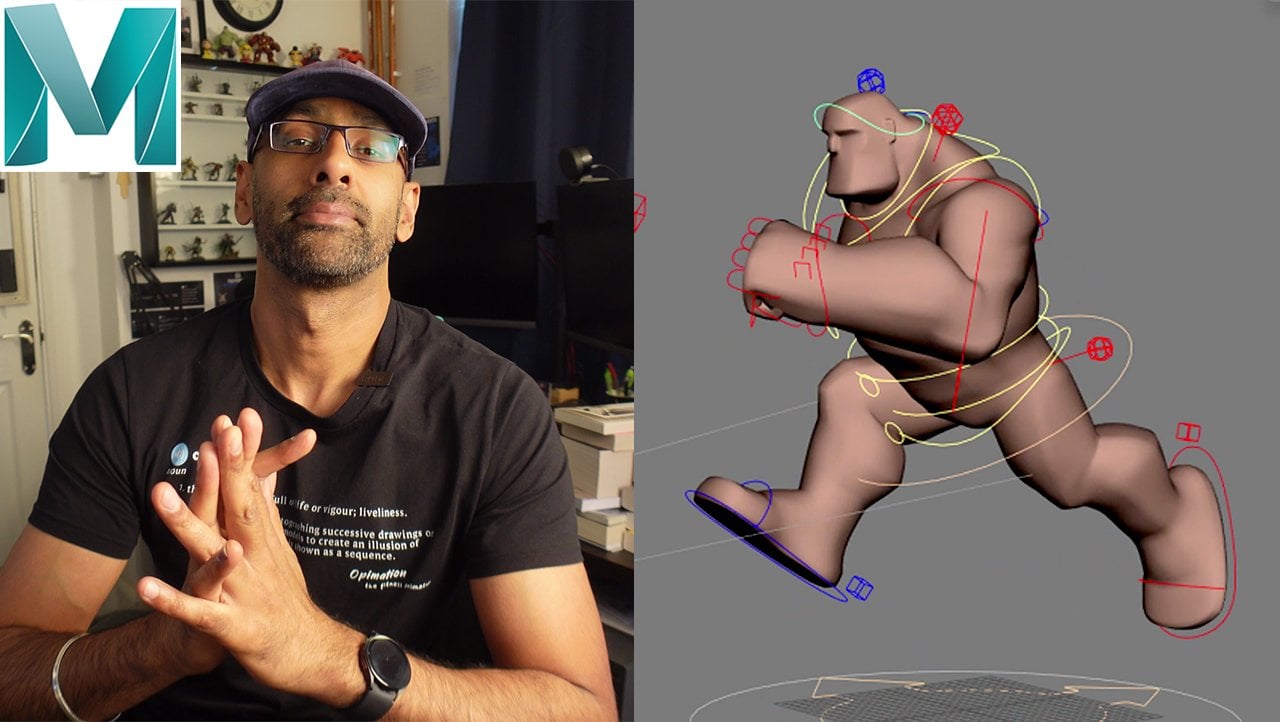
we're going to be animating a run in this class, and it's going to be
a simple vanilla run, but we're going to
be concentrating on the muscle jiggle when we come
to polishing and the hair, and we're really trying to
bring the character to life. With just those little bit of extra details that really bring the animation
up to the next level. So without further to do, dive into this course and
let's start animating.
2. Blocking Part 1: Guy us r, the first
thing we'll do we'll get welcome by the way,
welcome to the channel. We're going to There's a
guy called Modern Day Jo, and I thought we'd use
this as a reference because the size is pretty
similar to this rig. What we'll block out the
whole poses in this video. And then slowly, slowly, we
have a four part series, where we'll do a blocking, binding, it is all practice, just animate along with me. It's always good to
keep going over these. I'll be animating for Properly, I would say the last ten, 15 years, ten years. Even though I've been in
the industry for 18 years. Properly, I would say since animation mental 2007
is when I graduated. It's always good to keep practicing and keep
doing different runs, different sizes,
different weights. Let's go ahead, get your
twos, get your cup of tea, wherever you want to, let's just start animating pose
this character. First things first.
Let's start black. What we'll do or just
select everything. That's geometry. Let's just make a layer here, call it go. And add it in here, and then put that to R so that
we don't select that. Even this top one,
we can add that in the Geo. There you go. Now if we select all
the controls, is faces. We don't want to key any of
the geometry or the R is. That's fine. Select everything and just
put a key frame at the first. Everything is key frame there. Now, going to Ma, let's just make sure
we got it on stepped. Tangent stepped. Everything is
blocked out. Now we just go and get that reference. My reference here, I'm going
to have in the other screen. The first pose is the contact. The contact is we get this I see the grid is I
think the grid is then yes. All right. From the
reference here, I can see that his right leg is forward and his left leg
is back up in the air. We can rotate this rotate. And this one is, does
it roll Hill roll? Yeah, we've got the
hill roll there. Okay. And now we want to do, there's a general lean forward, so we'll just rotate his energy
is going forward, right? So let's bring it down a lot
more like that, forward. Okay. And we'll keep this there might be a
stretch option here. Auto stretch. If we move this, auto stretch, I wouldn't
even use this to be honest. Messes everything up. We'll just leave it this. Every rig is different, we'll just put it like this, and then the back pose or this one is right up
in the air like this. This. All right. Now, naturally, what we'll do with the hips? We'll use the hips to
go left and right, but we'll use the
control in the middle. As you can see the front leg, we'll use that to the front leg, you want the leading leg. Obviously you want it to go up. And down because it's leading, it's moving forward and then you can move
this forward a bit, so you can get more length. We don't want to
lock out completely, you want a little bit
of a bend because then you have like a pop happening. You don't want to do that. You
want to try to avoid that. Obviously, this
leg is in the air, naturally, the hip is
going to be in the air. That's why we're rotating
upward like this and of course, in the y. We've got that pose. What we can do while we're here, naturally, the other
thing we can do is, let's go to the other
arm, let's make it F K, so it's all going together. I just went here, pressed arm, as you see on the rig review, previous video, and check out the previous video for
d and learn about the rig. Basically, for now,
we'll just have the chest going in the
opposing direction. It's going to go like this.
Got the rotations and also we can I this is rotating Which way go it that way yet. This would also be
the opposing way. What we would do is in the front view because
this is like this, the spine will be
in a C shape that. You want to get and
the other step, it would be the
other way around. So you're getting that contrast. We shift we shift,
which we'll talk about. We can just give
give it a bit of a rotation that way too. Then we can come
back and work on the middle bits to just
sort out the shape, but we'll get into main bits. That's the first frame. Pre
select everything just key, and then we'll move
to the down position. Let's go to three. From here, we can go down. What we'll do we just zero. And then bring it down, and
then bring the hips down. There's a bit of a
bend in the knee. That's what we want. That's
where the weight is. Yeah, we'll just
have the foot here. Maybe a bit more forward there. Then we can see
that the back foot comes in a bit and
it's a bit lower. Maybe rotate in as well. We could always polish
this later at the moment. Control vectors, we
can move this out. It follows the toe.
That's the main idea, you want the knee to
follow the toe basically. Otherwise, it gets
awkward. Step. We get everything and key. That's the downward pose, and then there's a
passing. The passing pose. Come here. So we put the foot in the middle and slightly goes up, but it's not straight,
it's just slightly. Then obviously, this is
the leg which is passing, hence the passing pose,
and it's just passing. And then what we'll
do. I passing through Then we don't have to worry too much. What we'll do with
the rotation here. Is this starting I mean when
we have the other contact, we can sort the hips out then,
I tell you what we'll do, we'll leave this
for now and just get noses in the
I block this out, make sure everything is stepped. Sometimes it goes down
and then the next pose, this is the passing pose. We go up. This is where we
go up or this leg goes back, and then we can ball roll. Goes stretching back, goes up. I guess we could just bring
it down a little bit. And we could bring this down
a bit. Then it goes up. Then the next one
just goes forward the foot. We're just
trying to get that. Basically, we're trying
to get that tri shape. H that line going
through the force. And then we'll key that basically Another trick we can do here is if we
select everything, go to the first pose, middle click that
to 12, copy it. But we want to basically
bring this back. This wants to be zero, and we want to rotate this basically the same position
as the other foot. If we can go to side of you, some people have the
copy and paste two, which you can use it saves time. But I've just always done
it old school like this. Then the other foot, you
just bring that down, you bring it down, rotate. In fact, we can zero that, and what did we have
ball rolled it? We ball rolled it.
And then go to y, zero that out, bring it forward.
3. Blocking Part 2: Ooh. Down up. Okay. That's the same as
that, the hips are the same. That's right. I
see what's wrong. Let's check out the ball role. It was Let's put it at five. Let's go to the
other one, put it at five. It is minus five. Now the reason why I start
that is because the hips. If we go to the hips, any
value we got here was copied, obviously wanted the opposite. Basically, we just
go in here to y, go to the start and
put a minus in. Go to the start, press home, put a minus in, and it
will do it the other way. And the ball. All right. Okay, let's see here.
Maybe. Was it hell? I was, of course. I'll get it. Then you can
move that forward there. Then of course, this is also opposite, it
says minus there. We'll put 24 there. We've got the
opposite happening, got the line going like that. If we select everything, K n, six, and then let's go
to sometimes it's blind. We'll just block
it out like that. We've got the first cycle there. I know it's a bit block it
like that, but don't worry. That's how it's meant to be. The legs are cool. Now what we're going
to do zero that out, and then bring it back a bit, and then we know there's
a down position, and we know this
foot comes do a bit. Let's look at the reference, Always checking out the
reference, comes down a bit. And then we can just copy that. We're just work it on the hips, and then there's a
passing position. Then it comes up. We're
looking the side of view. Passing position here. Goes up and of passing position. C heck in the knees out to, make sure they're
facing the right way. This one is a bit in,
have that coming out. That as well looks a bit
awkward there, doesn't it? That one to looks a bit awkward. We can polish this later,
but it's good to get it. Good to sort it out while
you're doing it as well. He comes in, pass
in position 21, we're going to have
a reach at the back. He goes up a bit. Ball roll. Try and get as much of
that ball roll as we can. Then obviously,
going forward there. We've got that energy
going forward. Actually, if we come
back to this pose, let's see we can
do it a bit more. Let's move this back a bit. It's always good
to push this pose. That's good. Then if we get
everything, key key key, and then less stepped because sometimes it doesn't
step for some reason, I don't know if it's
Mo or what it is. But we've got a little
cycle going there, and then all we have
to do now because we've got all the poses in, just get the first pose, copy it to the end, and now you've got a bit of
a cycle go in there. We've got a little
blocking happening there, and we've got the reversals
happening. Now what we can do We can get there, for
example, the shoulder, so let's check out the shoulder,
the y on the shoulder. Let's say let's flatten this. We know what we can do here is, we can just move these up a bit. Step. We know it's
like step step, step, so it's going
to be like this. But basically, we're
just trying to smooth out the
animation in blocked. I don't know why it's taking
so long to do as well. Sometimes shouldn't
take this long. Anyway, there, we've got a bit of a
step thing going there. We can use the graph here, the graph lines to equal it out. So here too. Out there. Now if we flatten this, if we go here and flatten it, it is going up and down. That's what we're trying
to get. You don't have to do that in the blocking, but why not why no. Bring that down.
Bring this down. We're just going to
bring all these down. In fact, let's base
it out a bit more. No a bit more evenly like that. I didn't bring that
here. We've got a bit of if we look now, it's a bit more smoother, the same thing we can
do with the hips. We get the hips
here. Same thing. You go, keep it. Keep it sweet, this. Bring it down, don't know why this is a bit
slower than normal? Maybe it's the gogometry. Why don't we geo level? Let's p to zero. Maybe that
might make a difference. We got it on zero.
Let's have a look. Now it's not because
of that. Never mind. If we flatten this now, you can see it's equal. Ie have to be doesn't
have to be exactly yet, but we've got it roughly there and then the
same thing here, we can bring this down. Take this up. Bring this up a, bring this up a bit. You'll just get a better idea
of how the running looks, the animation, and
move this in a bit. I testing out my new mic, has been a bit low
here and there, but trying to make it setting
so it's working properly. It's meant to be a good
mic, but let's see. Now you can see, it's the
mechanics, the rotation. There's a few things here. This leg is too high. We can come down or
actually it's not to, it's the knee, bring it out. We bring it down a little bit. You've got a bit
of that happening. And what we'll do. Just make
sure everything is blocked. Yeah. Let's check out the distance. That's fine. We've got a bit of
cycle happening there. We come back here, you
can see the knees out. We need to bring that in
a bit. Bring that in. Then we're just going to
go through That's fine. Bring this in. There
you go, that's fine. And the same thing
with the other one, if you come here, That's fine. We can always check
that in the front view. We can have a look, I was thinking may need to be
out a bit a little bit there. We got that blocking.
That's all blocked out. The other thing we
can do is now that we've got the blocking and
we've got it moving properly. Remember, when we said step, then take the Step, take the weight, we'd
have to go too far, but we know the weight
is taken there. Then we come back up,
step, take the weight. Then the weight has to go on the side where the foot is
because it's taken the weight. Because if the foot is here, and our weight is this way, is off balance,
because look at that. Doesn't look right. There's
no weight on there. Then we'll go in
and fine tune these hips as well because
when the legs going up, obviously the hips
is going up with it. But at the moment we
got this, we can do, we got the hip selected. Then we go in to translate and the same thing
here, you see, you just come here, bring it up. You can bring this one down. Bring this down to.
And bring this up. There you go. Again,
if you go to flat, you'll see, now you can see there's a weight shift in there now and he's running. Guys. That's the
blocking 25 minutes, quick what you're
trying to do with this one is trying
to get a solid foundation that
you can work from. The most important thing
with this blocking is, you're just making sure
the mechanics are right. Because if that found if
that mechanics isn't right, it might look good in blocking,
but when you take it out, balance will be off, everything the hips aren't
rotating properly. Yes, you can go on
and polish blind. It might look all good, but in terms of being polished
and smooth animation. But are the mechanics right? When you Is a step weight
shift up in the ear. Step weight shift, is
it going the right way? Sorry, the center
line is that correct? Is the C shape in
the spine correct. You know all these little
twists that are going on.
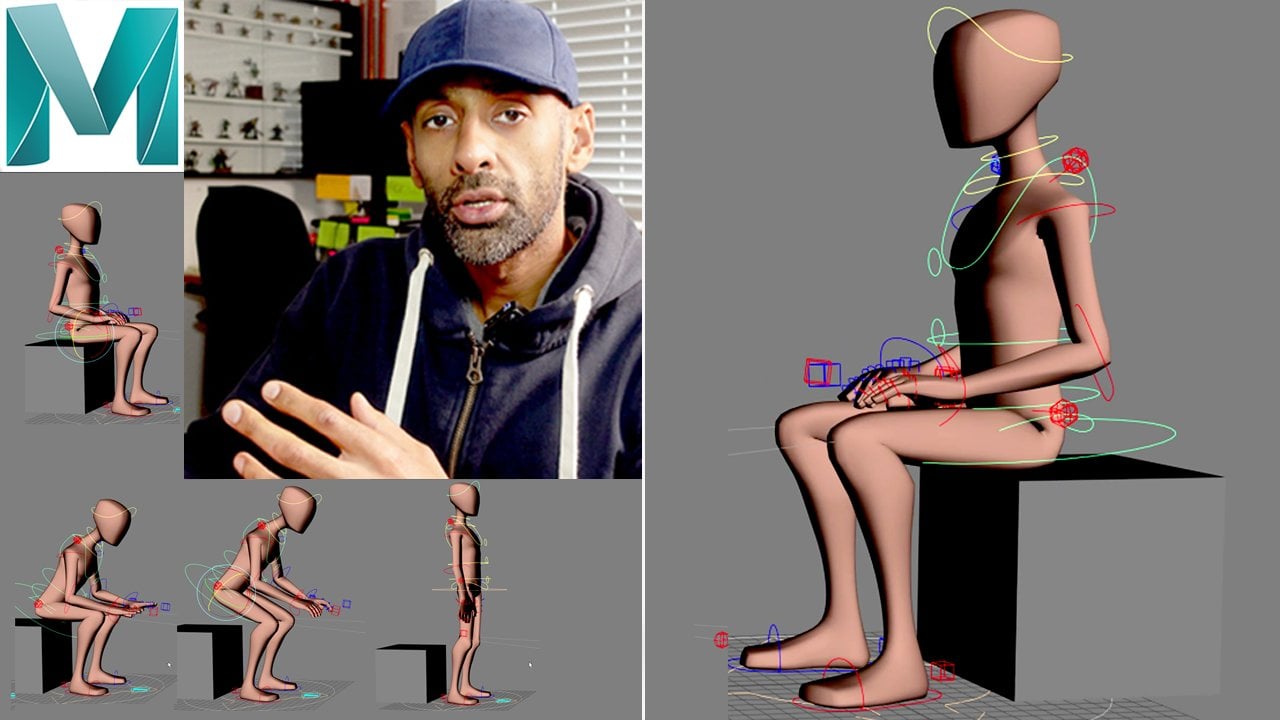
4. Splining Part 1: There's almost this line
here that comes across. And then when he lands, there's almost the line which is kind of
like this, right? Now, that is key for adding a bit of compression
when we're running. When we're running,
there's always just compression
happening like this. Ph. And you want to that. We talked about it at the front. You know the front view
with the sea the shape, the alternate C shapes. Then we got that one and
then we got that one. These are they're not
really compressions, but they're just showing
the different C shapes. What we want to do in the
side view is what I'll do is, that one, and I think we
could use that as the K, and then we've got the top. What we do is when the character is in
the passing position, there's going to be compression. When it's up this in contact, there's going to be a
extension, if you like. What we want to do here is, we want to put we want to rotate in x and then get
the hips that is, and get the out the upper body, rotate that in x as well, and the middle one here, we could just move it
forward a bit like this. So that we've got a shape in the spine, which
is going like that. Following that line of action. Now, I'll I'll select
that control the hips. And key everything
there, the hips, middle control,
and the shoulders, and then copy that to the last frame because that's
what we want. When he lands, when
it's compressing, we want to do the opposite. We go with the hips
and we could be like, Okay, let's rotate
it forward a bit, and then rotate that
forward, and then this one, we just check the curve of
the back, have it back. Another way you can check
it is we'll just see here. I was going to say we get
this, get the mirror. We got that got the mirror
control and the shoulder. Now we want to key
everything there. Basically, we want to go to the next contact and
then weight shift here, and we basically want
to copy it here. We just go from this one
mirrle click it to 18 copy it. There's that little bit of compression
happening there, right? It's like from there, compress, and then up, that's
it. We also want. We've got the same
controls selected, and we also want to
copy that there to 12. We want to copy that to 12. Yeah. There. I'll copy the end. There's a little bit of a twit. Let's see. There's a bit of. We want the opposing side. We want the x
rotation be the same, but what I've done, I've
copied the y and everything. What we'll do, we'll come
in here. I'll get it. The x stays the same. But we just take the minus
and take the minus of. I copied the same pose
basically. I copied that. If you look now. It's a bit exaggerated because we're getting
that compression. But what you can do, we can
come in here to the top one, and then go to
basically go here, and then we can just tone
this down a bit yet. As you can see here, this
is coming down a lot, so we can bring this up to four, and we could even get all of these and then rotate it down a, keep it a bit lower.
Now if we look now, You see, is very small there. Obviously with
this, which was Z. We can see here Z. O is going
down quite a bit there. All we have to do is
just bring this up to the same amount here,
so four squares. Then we can just scale this.
We just scale this down slightly. We don't
want it too much. The compression is there,
but it's very slight, but it doesn't matter
because we need it, you'll feel it here as
well, what we can do here, we can just move these
Actually, I'll move it up. It's very subtle. But you're getting
that compression. Then we can always
scale that as we go. Now, we've done that, now what we're going to
do, we can start, sorry. That's my phone. Put that down. Now, what we can do now. We get everything.
We're going to sp. We get everything come in here, graph editor, and we
can start spliting. What we'll do is just
grab everything, spin it, and then I'll just cycle everything.
Everything cycling. That's what we just press
these two buttons to cycle. This one and this one. That's for infinity. This is the ones you want cycling,
not the infinity one. I cycles on the spot. Now you can see
what's happening. Still a bit of blocking
going on there, isn't it? Now, what we're
going to do, we can clean up. We'll just clean up. We go to the hips, we come here. First thing with, we're just going to go
through each one. We can more or less see here. We can get rid of these keys because
they're a bit redundant. We can start cleaning
up and it flattens. When I press this I flatten it, I got a shortcut called
OF on my keyboard. But You can do it by just going up here to flatten,
but I've got shortcuts. I'll do a video on that,
how how I've done that. I'll get this point
here and what is it? 3.9? Let's go to minus four and let's make this
four just to make it even. That's cool. Clean the
tangents at the end. You don't want them like
this. You want them matching. Then we'll go down to the y, and the high on the y is
here, so we move this up. The low is here. We know that. This is going to be the zero. All of this is going
to be zero, we know. We can just level that up and
we'll just match all this. Obviously, we can copy
this here on this pose. I might even let's clean it up first then
we'll have a look. The hips is rotating That
shouldn't need any rotations. So we can leave that how it is. That shouldn't have any
rotations on it really. The y. Yeah, that shouldn't
have any on it Eva. Sometimes these
rotations. I don't know. Because, I did choose the hips. Yeah. You see those hips. These are still. Let's sup this out. Everything's not sped
out yet. Don't know y. Let's select this button
one, that seems all right. Let's go to the hips.
Now, let's work our way up. Then we
go to the hips here. The, no rot no translations,
which makes sense. We'll just cycle these. The y. We can just
get rid of these. That shouldn't be there.
Maybe this should be here. Yeah, that should be like that. Yeah, that makes more. That makes more sense.
But we can do with this. We'll just put this as what 15, and that's going to be -15. We've got that happening there. Then we can that because
as we come here, we can always adjust it a bit. Had a key frame. All right. Now now we've
got the keys in here. Normally with this, you
want to delay it a bit. So Come here. That's the key f,
the key F there. Yeah, that's fine. We just
want to delay it a little bit. As it comes. In that one, this one is the Z. Let's see what the
Z is up and down. Go in that. Should be more
like that. That's it. I think the hips was
the only one. I get it. The hips was the only one
when I copied the pose, this bit went to the top. That that's right. I get it now.
That's. That's fine. That middle one, basically
that middle one, which was up here, this
is the right trajectory, so this just need to just
bring it down. That's all. I'll just copy this
value and put it here so I know the opposite
value is equal there, and then we can just bring
these down to match it. Bring these up. And then you've got that.
We're working on that. We're just working our way up, so let's check out this K. Is that the IK? Yeah,
that's the one. So this seems fine,
the way it's going up. We'll just put
these all at zero. Match these. Match
these at the top. And then down. Oh,
let's check this out. That. What we'll do, we'll just clean this for now and then when we
come to polishing, we'll come back
and polish these. Trying to add a bit more
of that up and down. But at the moment, this is fine. To be honest, we don't need
these curves in between, and even for this one, we
don't need them there. But let's check this
out note point. Let's make this minus
note point there. Let's equal. The other thing we can do is, let's go back to the hips. See what I want to do here is, I want to add a bit
more of an impact. I want this to come down sharp. And then there's a
bounce coming down. I'll delete this. And
this is all right. I just want this to
come down sharp. In this one, I want this
to come down sharp. Because I want the hips to
come down with that weight. And then it pops back up. And we could delete
this key as well, but for now, never look down. Okay. So what we can do. Let's bring it down. So that the knee is not locking.
5. Splining Part 2: Okay. Got that cycle
working, Save your files. I've just saved it now. Don't forget to
save. Let's move up. Now we're working
our way up from the central gravity to
cog, we're moving up. Let's go to the shoulders
so you can see here. Actually know what. Let me
just bring this in a bit. Aspect of like that. Now, let's go to. That's fine. All of this is fine.
We don't need to. We're not going to
add nothing on that. All right. This is the x compression,
we're talking about. I can see is it.
Okay. So it's 3.49. We'll copy that to the top. And then we'll go to the
We'll just cycle every day, move this up, move
this down a bit. And then here as well.
We can move this up. Match this. Now if we have a look. I just cycling more
smoothly there, and we're getting a
bit of that impact. If we look here,
we'll go back here. There's that impact happening
in the hips, going down. Let's check these hips
out for a minute. That's fine. That's fine.
Up and down here, right? You getting that impact. Now the other thing we can
do is we look at the foot. Playing with the foot. You
see here, automatically, we'll just flatten
this, flatten it. We're going to cycle. We can
bring this down like this. If we break the tangents, and then have it like that would be the impact coming down. It's going to stamp down. Then what we can do here. The next frame,
obviously ball roll, which just heal roll is plus
zero, so it stamps down. Boom. Then we can
add we'll do that. And then we'll just
flatten these. That's fine going up or let's shut this out.
We'll flatten it here. Bring this down a bit. Bring that up a bit, clean
these curves up a bit, Then then we'll start
playing around with the because you can
see when he lands. It's a bit more we could move it a bit more like this, so it's
more smoother. But we can always polish
that, do that when we polish. And we're going to make it
cycle a bit more smoothly. At the moment it's diplning,
we're trying to do. I obviously hear
rotation, same thing, we're just going
through, then we're just cleaning these up a bit. Yeah. Then you can see a
bit of flick at the end, we're going to
smooth all that out. We're just get in the s
blinding done at the moment. Arms we can do later as well. We can do a layer approach.
You can do together or later. It doesn't matter
anyway you like. Then let's check out all
these other controls. We've got this control layer. This is a ill control. It goes and then from there,
flat, that's perfect. All this other stuff, we haven't got let me get the
other control. Same thing. Flatten flatten all of this. We can also make this
the same as well. This is going to be
the same value as this because the foot
is still on the floor. Oh, sorry, this is the
wrong one. What am I doing? I thought this was we can leave it there and
then the next one, I guess we could have it
going down like that. Up, we want it like that.
We want that cover shape. Then we go to translate.
See here, you can see. When I'm doing it,
it's stopping a bit. You see how that
foot is stopping. That's because of this bit. When we come here
and we go here, I guess we could leave
that where it is, and then the next one, we can push that back a bit,
so pushing back. And then we can just
cycle that bottom bit. We're getting
that's pretty cool, but again, there's a big
pop at the end and there. So we'll add a few
more key frames in here to make
that go smoothly. But we're going to
do that at the end. We're just trying to get all of this working blind.
Front looks all right. Let's check out the po vectors. P vectors. Let's check this out. Just make sure these are cycled. Then we come in. That's fine. Coming up. Just want to make sure they're
following the same path. Cycle this. That seems fine. This seems all right too. This is fine. That is not
the same as the end of that, so we'll just copy that over. I just want to see
how the Here you see. We'll just bring it out. And
that seems to be following. Yeah, the knees are not popping that that's wicked. That's fine. Bring that down. And then
out slightly at the knees. That's fine. That's working. And we can always match these
at the end. That's fine. I left foot, let's go back
to this left foot here. We missed out the
ball roll. Yeah. Flatten anything that's
overshooting, just flatten those, because then that's
basically making it go past the floor or
past this pose. We don't need that now. But for example, we come here, and we go this foot. Let's put that a zero
after the contact, zero. There's a bit more of a
slap happening. Okay. All right. Let's see
how was looking. That's all moving out. Getting that motion, the ss
in the back happening there. The compression is
It's there slightly. I think we'll add
more compression. When we polish,
we'll start adding a bit more compression
like this, that will add a bit more of
a weight to the character. Then obviously, we'll
start working on the neck and the arms. But we're getting the
mechanics right first. As you can see, step, we could, if you wanted to, just exaggerate this
more to the side. Let's go to six. Let's go to minus six and six. O. Okay, let's check this out. Yeah. So there's a bit
more of the sideways. Bang goes weight shift. We get here has bang
bang, weight shift. Yeah. Yeah, that's it. We can see it the
shifting on both sides. We're looking for that. Then we can start offsetting. Let let me check this out. Let's check these
values out. They look. This one and this one, they all. This is fine. We can do, get rid of these. We
don't need those. They make much difference and that we can get rid of that. We've got this happening now. We got the compression stretch. Compression stretch.
That's cool. That rotation We've
got that working. We've got it all blind, seems to be smooth, working all right. Then this top view
as well seems. You've got that side to side movement happening
and the impact. I'm just thinking about
this impact on the hips. Now, what you could
do is we delete this. That's the same
thing. We'll keep it there, we'll
keep it like that. Up in the air, he's not going
to be too much in the air because it's a heavy character. We'll leave it that,
we're spling that out. That's all spin the head staff
will check that out later. In fact let's go in here. Let's check out. Is
that the rotation? Yeah. Let's put in just Let's
check on the side view. Let's leave the
head view it is x, and as it comes down,
take the impact. Take the impact and up. Wait, take the impact. And then up. Yeah, we can
add a little bit in there, a little bit of head movement
in there just to get it in so that the whole body is connected working properly. Arms we can sort out after. But, guys, that's
basically the spling, we're just sorting
the curves out, getting the curves and the
hips working properly. Then now we've got a basis and we're getting
more clean animation. We'll start adding
layers and we'll start bringing this character
really to life, with all the weights, the skin, jiggling, all of the stuff
that brings all the fun stuff, that brings everything to life. But we still got a
lot of work to do. We're going to polish
it a bit more. Well, come out of sorry slining. I think the next
stage we'll do we're kind of just tracking arcs, polishing a bit more, as well. And then the very last video will be where we
add those fingers, skin, jiggle, facial expressions here and all this kind of stuff. I'm really looking
forward to that. I'm having fun with this rig. This really cool rig. And we yeah, we'll see you in the next video,
my friends. Take care.
6. Animating The Arms Part 1: All right, guys, welcome
back, welcome back. So starting with the shoulder. Obviously, wants to be opposing, so we're going to
have this going back. Let's push this back a bit. Let's try and push
the poses first. Remember the arm the shoulder is driving the arm
and everything. Yes, it's all coming
from the shoulder. Even when you punch man, you get in that power
through the ser, the transfer the energy is transferring all the
way down to the fist. Let's get this before we
start, I know what we'll do. Let's these hands out. Let's get all these controls. I like about these
controls, man. You can select the and you don't have to worry about
selecting anything else. The sticking out in
space, which is nice. Let's just get a simple fist, sometimes I test just
to see how we do it, and then we put it back. All right. Let's just get it
roughly like this on top. That's fine. A guy. The other thing we'll
do is actually, let me just select all of this. The good thing is you can select all of this and de select the list that wrist. Now we've got keys everywhere. Obviously, let's
just delete these, so we want that to
just stay the same. We can add a little
bit movement. You want to see it, but I guess it's something that
just looks believable, so we can add that later. I will do the same
here, go to frame one, select everything. In fact. Let me see if I rotate. We could do that. O
should bring this out. Bring it across.
Yeah. That's fine. We've got a bit of a really, we want that thumb
to be over that. That's fine. We'll
just roughly leave it like that for now and the other one is a bit more
that way to that here. Select everything.
Well you can select the wrist to key everything, and again, delete the
rest of the keys. You've got a still working on this.
Actually, you know what? Let's get all of these
controls on the arms and the wrist on this side too. And let's delete everything. We've got a clean clean set
of clean slate as they say. Now, let's pose this arm here. We want it to obviously
be like a pushing energy, so the fore arm will
keep in that direction. It's just one axis right. It can't go that way that way. And this is the one where
we can move around. We can move it back a bit down. And want to get shape. It's going to be let's keep
it a bit lower like that. That's pretty cool.
Suits the character. I don't want to break the rig but the skinning and everything. I don't want to do it too much. That's a nice little
angle there we got and then we can
refine it later. We just I believe
this is all keyed, but we'll kay,
delete these here. In this one, we're just doing the opposite. We're
just going forward. As come as it comes forward, it slightly up so we know
we can do it slightly up. And we'll just bend this. That's it. See how that looks. Might want to rotate
this a bit more outward. That's better, isn't it? Bring it in a bit. Have this
risk to going up of it. Says that, have. Two going two. That's pretty cool, isn't it? Move it outward like this. Move this one outward slightly. That's better isn't
it a bit out. We could sort the fingers. We could sort these out later, but Yeah, I guess we could
move these out as well. Yeah. Yeah, we can position that
later, but we can do that. Boring me that thumb, but
we'll sort it out later. What's this I sort
this out. This habit. Let me zero this out. See how it looks. Let's
just do it like that. That's fine. Yeah. That's it. Happy with that. This one
to, let's zero this out. And then we'll just
bring it back. Across. Yeah, that's fine, it goes across, isn't it? We just want to make
it across like this. Yeah. Yeah. Okay. That isn't it the thumb It comes over the top one comes over
the top one, right. We'll leave it like that. We've got this pose
this and the wrist. We'll key that at the start. That's all keyed.
Now, what we'll do? We've got those
control selected, we'll select all of these ones, and we'll just copy that to
the end, 24 is the same. And then when we get to 12, basically doing the opposite. This is going to come forward. This shoulder comes
forward and rises. Then this comes forward as all, maybe slightly up. Move this up. Okay. So we've got that
kind of pose happening. What's that one? That one is out a bit more, isn't
it? That's all. That's out a bit
more. He's out there. Yeah, similar. Then this one, we push him back. We want to push it back. So we get in that kind of curve. We'll get in the polishing. We'll do a figure eight kind
of push happening right. Sorry, arc going on. Then we bring this
back. Let's go back to the other one.
What's this look like? Then we'll just try and match it and then this
we'll bring back, and then here we
can bring it in I guess because it's a bit
inward, isn't it? There. Then we compare it to that, it's a bit more in, isn't it? We can bring it in a bit
that a bit more inside. As you can see there,
the tricep tricep. We're just trying to work out the negative spaces at the end. I know you can copy
it, but I do it. We've got a little
movement going on there, which is not fully cycled yet. That's something
we can work with. Now, the other thing we
can do is this is also. Now we want to do. Let's get all these controls
again, the arm ones. There is a picker for this rig, but the controls
are good to get. So we've got all
our controls here. What we'll do, We'll just cycle and then we'll
flatten it cycles nicely. If we look now, it's just
cycling a bit more smoothly. What we'll do now, we'll leave the shoulders
where they are. But let's go to the
lower ones here. Actually, let's select both, so we'll select left
and right controls, and we'll just select
everything and move it one. Move it. There's no snapping. Where is the snapping? We I want to snap. Keys
7. Animating The Arms Part 2: All right, guys, we found it. I was this snap time snap on
add it off for some reason. We do Move this by one. We could move it two, but
let's move it by one. Let's see how that looks. Move that by one, two, then the wrist, we can move by three. You're off in each
one as you go, one, two, three. Let's have a look. There's a little bit
of an offset there. We're getting it.
Now what we can do, we can select everything. Select everything here, or the control
right to the wrist. If we get everything
and move that by one. And move it by another. We can see there's a bit of an offset more of an offset
p. Let's leave it up there. What we can do now, we
can try and offset. Let's get the fore arms, and let's offset those by one, and then let's get the wrist and offset those by another one. We're just trying to go back
and forth and check it out, have a look, see what works. We've left arm and
shoulder and you can start seeing there's a bit happening in the
wrist there now, isn't it? All right. So there's
a little bit of that. Bird of that movement. Now we can push it a
bit more if you want. You've got this stuff
happening here, which is fine on the shoulder. But what we can do. Now that
we've got it all working, we can even start, for example, push this back a
bit more. That's. If we come in here to the, we could rotate a bit.
Have you look at it. Actually, that pace is
right. You're keeping it. Yeah, I think that's all right. You can see the shoulder
moving first, driving it. That's fine. Let's
play with this. Let's check this out. Here, I think here what we
could do in the middle, we could even try and
rotate it in a bit. Yeah. It looks a bit more. Obviously,
these are being offset. What you can do is
you can come in here. That's the red ones.
And go in here and you can be like t's move it in. Let's move it in a bit
and maybe even Yeah. There too, I think, here. I think we can move this
in a bit about that. Move it in and in here. Maybe up. Now, we'll
keep that down. Better. Yeah. You're getting a bit more. Maybe it's a bit Let
you bring up slightly. Because it's normally quite narrow, isn't it
when you're running. You do I'm just thinking maybe
you do need it in a bit. That's in. And when you
come here in the middle, you could Yeah,
there's a bit more, that seems a bit better. Even here, you come
here to the end. The rotation bring it in a bit. All right. Let's bring it in. Yeah, bring it in
a bit as better. Bring this down a bit. You could even bring this down a bit, go. Bring bring these down a bit. We bring in this one that is. So we bring this down as
well as he's coming up, you're raising it as
you're coming down, the sh comes down, right? A right. Let's check it. You know what? You
could even start exaggerating with
the graph editor. As he's coming back, we can
have him going back a bit. So it's just got a
bit more of that. Maybe not too much because
you don't as better. You got that You got
that happening there and then you could even
start trying to offset. You get what's that? We're looking at the y
here. Here what you can do. As it's playing, you could be getting a bit of
a drag in there, then you can be push
it down a bit more? How's it? Starting to get that bit of that drag
coming through, isn't it? L? So it's a bit of weight
to that, is it, isn't it? And you can do the same
on the other side. So when you go on the
other side, then you can just play around
with these values. But you don't want it too much. You want to keep
you want to keep in the speed of the run as well. So again, graph
editor will get this as it's moving, you
can move this up. Then as it's coming back, we go about moving it back. That might be a bit too much. We can always tone that down. Then as a to it's
always good to. That seems right. Then
we can get the wrist, same thing with the wrist. Start offsetting that. The rest Actually, what we'll do because I ain't
got no keys on this one. Move it back to zero. Was five. Move all the keys back to zero. Let me just come here
on the th and how? We wanted it going back
going back like that. And then this was forward. That's fine and then
copy that over. Then we cycle that so
we've got keys on it now, and then we move that
one, two, three, four, five, and I believe
it's the green one. Then what we can do here, we can start playing and seeing how that's a bit too much. We can raise it up, go to the top, raise that
up, have a look. You can exaggerate
that as much as you want to see it feels, obviously. You might want to
leave it like that, so we could have a
little bit on there. We look at this run now. There you go, it's got a bit
of momentum going on it now. We've got the arms working. So it's going we can refine it a bit more
when it comes here. You could even narrow bring the arms in. But you know what? That's okay. There's so
many variations you can do. This is just a vanilla run we're doing just to
see the mechanics. But yes. It's pretty coos hips. Everything seems to
be working all right. All right, guys,
so that's the arms and we'll start. What we'll do. I know you've got these fingers and everything that
we're going to s out. But But yeah, that's the arms, and then we'll start working and then later on when we
get into the polishing, we can polish it a bit more, get the arm shapes we
can bring these again, like we're saying when
this arm comes here. We could start bring. If we don't like this shape, we can even start bringing
the arms in if we want. We can keep it a bit tight. Bring the arm in,
or even rotate it. Even here. We could
be like this. Then we can start, but we
can start messing with that, but this is fine,
man, how it is. If you want, you could
even rotate this up. Have a look at this.
There's so many variables. Then if you come back, we
could even and push it back. You could even do it like
that, push it even more back. There's so much you
can do, and then we can sort at the
forearm as order. But at the moment,
we'll just leave it. Yeah, that's fine. We'll leave it like that, a little run. Then we can sort out
the elbows later, bring them in because yeah, I think maybe upper torso
so big, thought it. But it shouldn't be a problem. We can sort that out.
We can start checking out the arc and everything
in the next video. Y, that's how you're
blocking the arms and get all that working popin
offsite inside slightly, and then we'll start checking out the arc in the shoulder, getting figurate.
All right guys,
8. Leg Polish 1: Hi, everyone, and welcome to
the next part of this run. We'll go in the side view here. And what I'll do? Let me just turn off the
grid here. H better. So we've got a clear
view, or what's going on? Put the mic around here. Me. All right. First
thing we're going to do. We're in animation. Let's
get our edible motion troll. All right. You see
the curve there? Not looking too pretty, is it, but we'll sort that out. Normally, I go for each frame and just key it,
make it all nice. You'd have to do every frame
but This is polishing now. This is a contact and you've
noticed it slightly bent. I don't do it too straight
because then it creates the pop in the leg. I try what you do
trying to do here? I, keep it slightly bent. We're trying to do
here. We're trying to just even out the spacing. You can see from the
points, the spacing. From there to there,
I might just start moving these keys around. I just come try and make
it a bit more just a bit more even We could come here. We it really flips out is there. You see that big
jump? That's massive. From here, we could
push it back. We could start pushing
it back a bit now, trying to get then we come here. And then here.
We'll push forward. Then we can adjust this
to get a nice curve. And start bringing
this one in a bit. Yeah. So we're just
starting to get it. I mean, this, we could, I guess, let's this out. It's coming I would say here, the ball roll, we could
zero that out, rotate. Bring that in. Then down. Could even Let's
check this ball room. Hill. That might be
better we get the hill. Actually, let's start
that again from there. Bring it in slightly. Let's play with the
ball here a bit. I'm not really happy with that pull happening.
So what we'll do. From here, we'll
just have it up. Let's check out. Let's
check out the curves. The curves are not looking good. A. So we come here. This is fine. I'm just thinking, maybe we could
break the tangent. Yeah, that's better. Have this coming forward. Yeah, I got a bit of a
curve happening there. I'm just thinking here. Then it comes up. A bit of a foot roll. Yeah, we'll just zero that out. Even, that was a
bit of a foot that. What's this what's going on? Yeah, we just rotate that we
just ended up rotating that. You getting a bit
of a cycle there. Now it's happening. It's a bit like smooth
there, isn't it? Then when you get there,
when we get to the front, what we could do with this one is just move this one in a bit. We don't have to
have it all the way. And then this could be the
same, bring it in a bit. Bring Yeah, bring that in
space this space it out a bit. Goes pushing off, pushing off. Then we can also do
what's this ons. What we'll do we'll get. This is the toe, so the tos will still be up, and then that goes
down over z that happens after to zero. Then bit of a curve
there as it comes up. You can start pushing
it back a bit. Even here, we could have it
going back, still dragging. Still dragging. There
you get in that little. Even here, you could even
have it still pushing off. Then it flaps. There
you see it flaps. I would even calm that
down a little bit. So you getting
that weight shift, and we'll do the same
on the other side. We'll get this motion
control motion handle. Then we could even just
go on the other side and copy the motion handle so. We can get this and
just do the same thing, visualize, and you can see there, it's done
the same thing. What we'll do. We
can just sort that out, bring that down. You can bring that
down. Bring it down like that to
that point there. Copy that to the end. Then the next point,
we could bring it bring it up here. Oh, let's just Let's go away. Well, let me delete. Okay. And better. The hell up and there. This has matched this up, so it's roughly the same. Okay, that's fine. That's
fine. That's fine. That's fine. All right. We could sort that out later that stuff. Then
we come in here. E get these little things done. And the next one. Forward there. All right. So we roughly
got it how we want it. And then what else? I guess here we could do what we did with the
other one like that. We want the foot to shoot off. So We've more or less got a similar
cycle happening, but we'll just polish it now. Let's see what's wrong here. As it comes back, I
reckon the f zero that. And, zero that. Then we can just
move it in a bit. And then we'll saw out
all of the curves. You can see the
curves of bit mess there, but that's okay. I can bring that in a bit.
9. Leg Polish 2: Copy that to the start. So up too much there. Let's go to the grapher
it and check it out. Flatten that. I need to
make it shoot up like that. Then we've got this happening. Maybe it needs to
be easing Yeah. Okay. Check out. Okay. We've got a bit
of a cycle there. Copy that to the start. This out. All right skin there. Need to s. I don't like this stretch, man. I too much. It's the only thing. Yeah,
that stretch is too much. But The the think that. Let's check out
this. Yeah, there is a nice curve
at the back then. That's what we're trying
to get. All right. Let's do it. So we
go back here again. So we're just trying to get
a curve going like this. Let's cycle that All right, get in there,
get in there slowly. Get in there. Just need to find the spacing. W, that's too much. We need
to delete this, delete this. From here to here, there's
got to be a nice curve. Let's check out the curve. That's it. Man, why don't I just do
that in the first place? A Okay, so we got that working,
which is cool. I'm just thinking maybe it'll be A, let's do the tos now.
Got the in the end right. So this is going to be back. Copy that. And zero that. And then when it comes back. Here, we can just make sure
it's still on the ground. It's kind of coming off. And then still then it's off. Okay, and the other
one, let's check out. Yeah, that's it. I think here, when
you get there, you still want it
up and then zero. Okay. Even here. Copy that 100. And you can tone that
down heavy you what? Okay, let's check this out. Let's just move just move I'm just moving this curve down, and then that represents
Obviously represents that. Okay. Maybe we'll rotate
that a bit more. Key that the start here. So there's a bit of a Then out, maybe we want to move
this forward a bit. Okay, so we got that working,
we got the legs working. There's just a
little jiggle there. Let's check the curves.
Something don't feel right. Th it might be. Let's flattens out. C. Let's have a Okay. Let's see. There's a bit of
a insistent knee locking there. Is
doing it for me. I looking. I doesn't feel right. What if we zero
that out the ball? Does better. So now we
finally got it priming. It's smoother now. It just feels it's actually of So you get that push push. And then you got
that classic line of action going down here. You got that classic. And that pose. That's what
we're looking for. Okay. So we got that working.
All right let's check out. Let's check out the arms. Normally, with the arms, I'll select the wrist and
do a visualization. And that's looking pretty good. Se you've got nice curves happening so we can
chill with the arms. We can make some of the arms are figure
eights, but these seem. They're clears. We'd have
to really worry about that. Alright, guys, so we've
got that. Oh, sorry. So we've got that all working. The arms and legs, so
it's all polished.
10. Animating Muscle Jiggle: We don't need those. On. We've got this is
for the body right. When there's a bit of an impact. Okay, that's cool.
We've got it here to let's get these. And back. Let's select all of these key at the
start at the end. Impact over i and then copy the first
frame to the second. And copy the first frame here. Then down and then copy that
middle frame so it down up. Okay there. Let's see. Let's bring it down
as much as we can. You can feel a little
bit there, right? There's a bit of volume squash. Maybe we could make
this a bit higher. Copy that to the end and
copy it in the middle. And copy it, this. You can feel that maybe
not as much here, but that's it, maybe you feel it you're feeling it
a little bit more. It's just something there that wouldn't be there otherwise. Now what you can do,
you can start I know, get and maybe coming to your graph makes cycle and offset that by
one cycle this. T offset that by two, one, two, then the bottom one, two, three, one, two,
three, cycle that. Then you're just getting
that bit of an offset. Nothing is moving
at the same time and you're getting that bit of that volume. You
can tone down that. First one, if you want, if
you think it's too much. You can always turn that down
in the chest. I think it's. And the back two, you can
just play around with that. Obviously, you've got
the legs as well. I The legs can be
the same. Let's see. Adding a bit of volume. You've got the leg key. You could even raise it up
slightly key to the end, and I guess key in the middle. Impact. And then copy that
first key impact reset. Copy that impact. And then copy that
pose over reset. I don't know. I guess it's something you don't feel,
but you see, right? So buttock. Maybe it's still going up
and then it comes down. Yeah, so there's
a bh. It goes up. If we look at that,
you can see that. There's a bit more volume
to the butt there. It's going up. That's the
same thing with this one. It's a good control
here. Key hair. Let's go. Naturally, the butt is going
to be in the air there. And. Landed. Copy that middle pose to 18. You'll get in that little
bit of a movement there. Also with the legs,
same thing here. Grab these legs, then you
can add a bit of movement. Especially here. Key that. So it's
coming back up. So you've got something like you just got some volume
in there, right?
11. Animating The Hair: The last thing is these
controls at the top. They move rotate. What we'll do, we're
just going to rotate. What we do I delete everything. And then we'll just come
in here and we'll be when it lands, when it lands. We'll have it go up a bit, copy that to the end
and when it lands, it comes down and
then in the middle, we can bring it back to 12, and then when it
lands in the mile, and then, so you get in that. Movement there. Now the thing is because we've
keyed everything, this is a quick way of just
getting some bit of overlap, flatten all of this,
and next cycle. This is one way you probably
have to go in and refine, but move that by one, select the next control down, move that by one, two, get the next control, move that by one, two, three, and then
the last control, we're going to move that
by one, two, three, four. Now you should get
a bit of a offset. Yeah, you'll get a
bit of an offset. Then you can select them all
and do an overall offset. You see the all offset
from each other. As it is playing, we could
be like move it again. Move it again. Move it again. I would say there.
Select everything, you can even scale it a bit. O blim mass too much. We can't scale that, what
if I did this, move this? You can start adding some more
volume What should I say? There, that's it. And then you might want to
start offsetting that a bit more. Okay. And then just check that out. Yeah, there's a bit
of a hang time there, right? Then it's coming down.
12. Animating The Knees Jolt: H and then with the legs, you can even here, it's
coming straight down. You can add a bit of
arc to it as well. What I mean by that is here. So if you go to visible
motion trail top view, the, as it's coming here, you could do the
foots coming back and then it comes out and then comes back in, so
it is arc to it. You can add that to
when it's coming back. This is all straight here. But this is a vanilla run. But normally you would add it. There's a little arc coming in. If you want to go a
little bit further, you see the get rid
of this motion trail. You've got the knee
controls here. You can do when it lands, you can key and then rock
and then it rocks back. There's a rock
back, and then you can do the same on the
other side, get the knee. Again, it comes a
lands rock lands, rock, and then back. I just creates that bit of pressure that have you
can tone it down a bit. I actually let's go back
here and let's do that. From there, I would say
when it comes up here. You could even just do like a little curve. Yeah. You can add a little
curve like that going up, and when you do that coming up, you could even start
rotating the leg out and you can just polish it so many ways you can
just polish it a lot more. But the knee jolts are there to just give the cheat code for doing adding a bit of weight. We've got the
perspective view here. And then you've
got the side view. That's what you're
looking for lines. You're looking for those
lines of actions like that. There. You see that,
you're looking for that classic run going down, coming forward, overall triangle shape. That's what
you're looking for. Then you can just
keep polishing it as much as you want and
then is the front view. You've got the weight shifts happening there left and right, and in the top here. All right, guys, all
right, my friends.
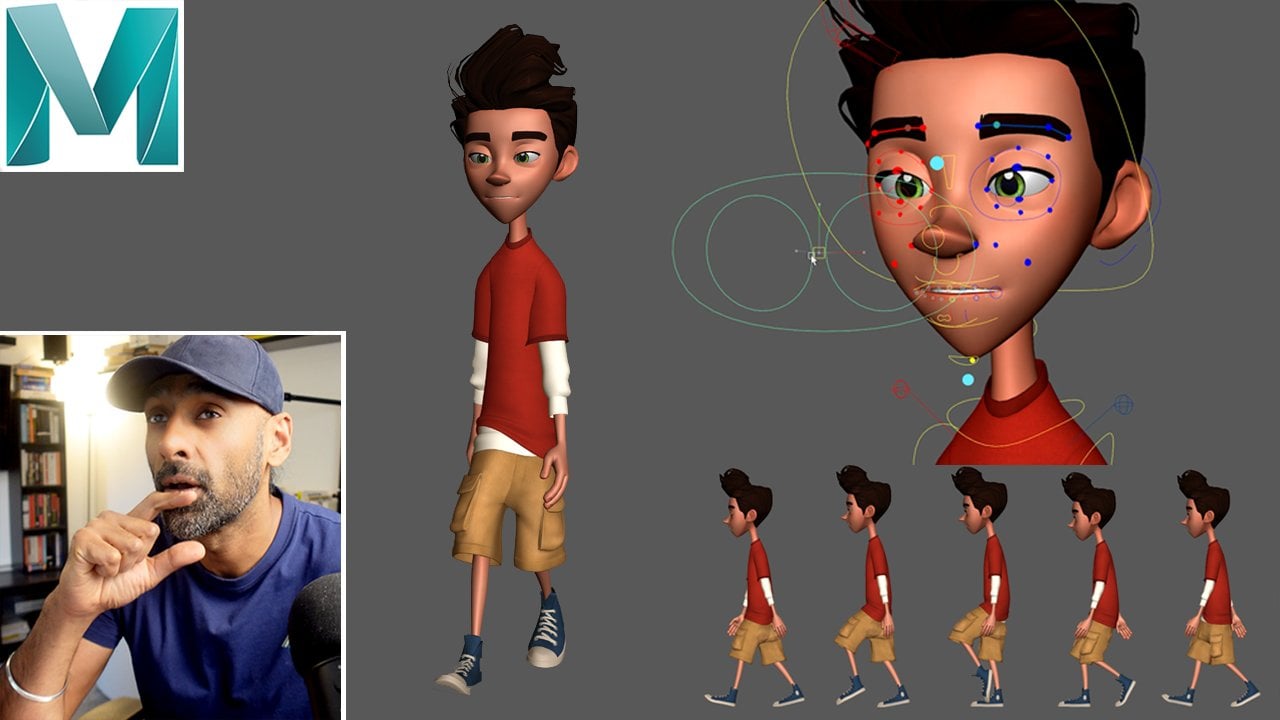
13. Animating The Face: So on the face, Okay. Face we go. On always stay on. Yeah. What we'll do? We'll
just have at the start, we could have key frame here. As he's running,
so when he steps, there's a little bit
of a stop and then c out and then cush back in. Move that zero to 12. I move 12 to six, make
sure that's matching. Maybe it should be open,
maybe it should be open. Yeah. Pen down. We'll just copy these over here, so we get in the same cycle. And then copy that
last pose to 24. If we look now, we know there's a bit of a breathing,
if you like. Then you can always come
in and be as too much. You can always tone it
down, tone it down a bit. You can always come back in a. Maybe move this up a bit. B too much, that's better I like a little
bit of breathing there. I play around, man, you can
get your desired effect, you have to play
around with it a lot more. You know what? I'll just cycle that
and offset it by one. It just happens after the fall. The same thing
with, for example, you got the eyebrows. You could do the same thing
one trick that I do is. You got this, or did we do? This jaw line. I'll
just copy this. You could even delete
these actually. Yeah. You could copy those. We come back here and copy it. And go to the eyebrows
and in the y direction. We just key at the start. If we come here, y direction, just paste, and we
can just cycle that. If you look now, way too much. What we do, we
just tone it down, select everything,
move it up. That's it. You can see there yet,
you can move it up. You move it to zero, but it's probably going to
be a lot going down, so you just bring
it a little bit. But you can see it's
matching with the jaw. When it's an impact,
and then you can also delay that
by one. It happens. If you really want to, you can see it's adding a
little bit more life, lovely textures on this model. Then if you want to even go further, you can
select all the. If you select this, it
adds a bit of squash. Bit of volume. That's what we want. We'll
just get all of these. Again, key, y. If we go one, two, three, paste, it's going to be all
messed up because it's not a one cycle this, move it up. Now if we move this point down, we can see how much is down. Is it down quite a bit? Have a look, play, see it feel. I think we can bring
it up a little bit. Let's move it all the way down and see how
it looks extreme. We'll bring it up. Bring
it up a little bit more. I like that man. Let's
go back up there. It's giving it a bit
of effort, isn't it? Then what you can
do, you can offset the bottom one,
select everything, offset it by one, then
get the bottom control, offset that by one, two, one, two, one, two, it. That will give you an overlap. If we look now, there's
a bit of a delay. Overlap. And then
what you can do. If you still think it's too
much, just come in here, grab it all, actually
just grab the bottom, and then bring it up a little
bit and now have a look. It's still there, but it's I think that's just
about right, not too much. That's how you do. Let's
see what else we go. We've got some other things
that you can really go in and start playing
around with everything. But what we can do, let's see. Same thing. We can get key
hair come in here paste. Move this up to one cycle. This will probably
be extreme too, so bring it up a bit. But you're, you're
just adding to it, and then you can cycle
and offset that by one. Then it's just that little
bit more believability that's in there that
wouldn't be there otherwise. Then you can go in
and start working with all of these cheek muscles, which we can do as well,
if we select these. Key, and then I don't
know which one is it. Y, one, two, three,
same thing here, just paste, make
sure it's cycled, move it up, and you a as well as probably really extreme
when it comes down. Then we've got the ability
to bring it up there. Then you can just play around with it's a detail
that wouldn't be there, wouldn't be there otherwise. Again, bring it up.
You can cycle this. And then see how
low it is there. And then you can even
offset this by one, one, and then this by two. One, two, do the same
on the other side, offset that by one. You're just getting
a bit more one, two, just going at one
after the other. And y, you can play that. Oh.
14. Conclusion: Okay, guys, so congratulations. You have just finished doing
an animation for a run. And in this course, we have learned about blocking all the poses,
contact, high pose, low pose, taking the
weight side to side, where the weight is
on the character. And also, at the end, we've really tried to
polish the whole character and use the controls on the rig in terms of
the muscle gigs, jiggling, sorry, and also and
you got the hair as well. So this tutorial is all about
adding that extra detail, which you know about
to bring your polish up to the next level, you know. Polishing isn't so
much going into the graph editor and
polishing the curves. It's more to do with, you know, adding that little bit of chest
breathing and then adding that extra detail in the fingers
in the jiggle as we did, and also the hair
and the facial, you know, little movements. You know, that is the level of polish you're talking
about where you're bringing the normal blocking to a kind of just pushing
it up a little bit more. So there's something there that wouldn't be
there otherwise, when you look at all the
subtle squashes and stretches. Okay, guys, so, I'll see
you in the next class. I've got other classes on here. You can check them
out on Skillshare, and I'll see you in
the next classes. So see later, happy
animating, stay consistent, persistent and
disciplined as well, and go out for a walk and get away from
the screen as well. But you can also check
me out on YouTube. I've got tutorials
on there as well, where I help people out, and I just put tutorials out there. And also advice on
fitness and creating habits and productivity
and all that kind of jazz. Alright, guys, so enjoy
your animation journey, and most importantly, have fun.
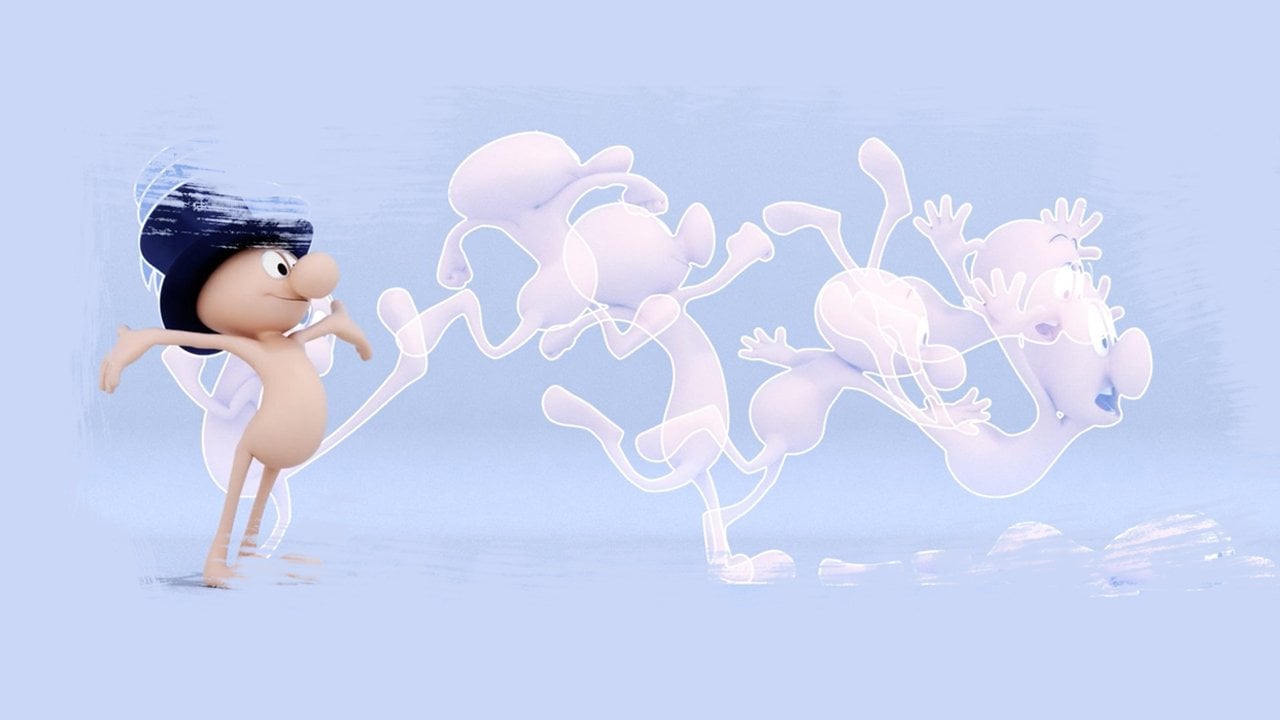
15. Maya Animation Mastery: Hi, everyone. Congratulations. This
is just something after the conclusion
that I just wanted to put into all my courses. If you're really serious about leveling up
your animations, I have a brand new course
that you can enroll in. It's called Maya
Animation Master. This course, I've redone
it with four K Good Audio, came out in January 2024. And this course is
designed in a way how I would have liked to be taught animation when I started. So It basically gets rid of all the pain pain
pressure points that I had when I
started animation. So I want to get rid of those
frustrations and give you a direct line to what that aha moment was for me when my mentor Steve Gagnon Kati taught
me about animation. Something just clicked, and
I teach that in the course. So if you're interested
in enrolling, you can go to the about
me page where I'll have a link there called
My Animation Mastery, and you can go
through the webinar. Then the course breakdown.
You can check that out. And then if you decide, you can enroll, if
not, that's fine. There's a private
Facebook group. There's a link in there
about me for that as well. You can join that
where we get feedback, and there's a nice
community there. And also, when you enroll, there's a private
Myers Mya animation Mastery inner circle
group where it's just exclusive for students
where we give feedback. So, have a look at that webinar and let me know your
thoughts as well. If not, you can join the Facebook group to
the private group. Obviously, the inner Coco group is for people who have enrolled, students who have enrolled,
but check it out, and it's just for
leveling up, and really, it's got all the
theory and practical, heavy on the practical
stuff, video game stuff. If you want to learn
about how to get a shot from reference to
blocking to splinding, to polished, show real level. It goes
through all of that. And also, I talk a lot about networking and
how to get jobs and context that I have within the industry that I can
ph your work out there so at least it's in the right
hands and people can see and at least consider
you for applications. F of my students who
have already got jobs in the industry going
through the course, so have a look at it. And yeah, let me
know your thoughts. So enjoy your animation journey, stay healthy, and
I'll see you around. I'll be around on the
Internet on YouTube and a giving tutorials as
usual. I'll see you later.
 Opi Chaggar, Senior Animator + YouTuber