Transcripts
1. Introduction - Let's get started: Hi. In this class, I'll show you how to animate a two D smoke effect
with a simple trick. I'm Julia, an animator and illustrator and today
we'll be working on top of a video footage to bring a smoke effect to life with two D frame by
frame animation. I will be using procured
dreams and along the way, I will share tips
you can apply to other software, projects
and situations. A few months ago, I
animated a scene for a local museum with multiple
fires, flames and all. We're going to use
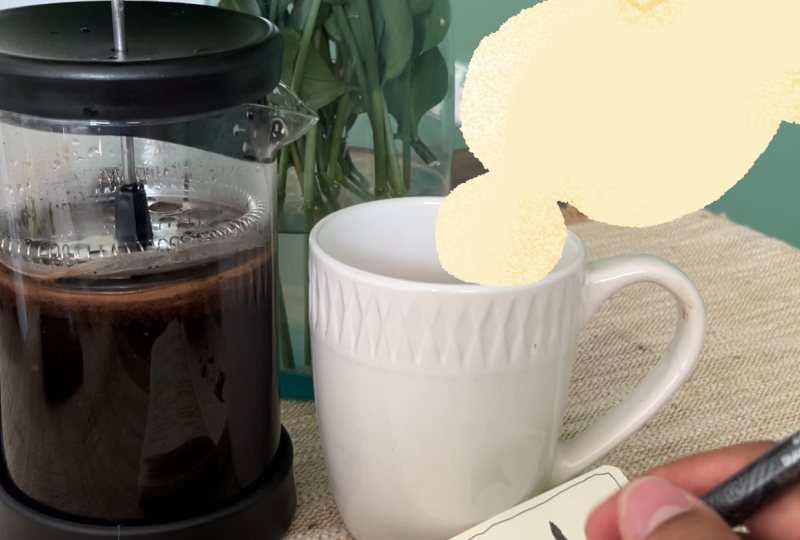
the same technique, but today we'll keep it simple and focus on just the smoke. For the purpose of this class, I'm creating a still
life on my desk and animating a mysterious
steam rising from a mug. By the way, this technique in effect works very
well for smoke, steam or even clouds
in some cases. Since we're animating
over real footage, you will need a stable video. That means using a tripod or finding a way to secure
your camera or phone. No tripod, no problem. You will find a ready
to use video in the class resources and you can even work from a
photo if you prefer. Take some time to set
up a little scene on your desk and snap a
photo or a quick video. Five to 10 seconds
should be enough. I've also included a Procreate
dreams project file in the resources so you can jump right in. Let's get started.
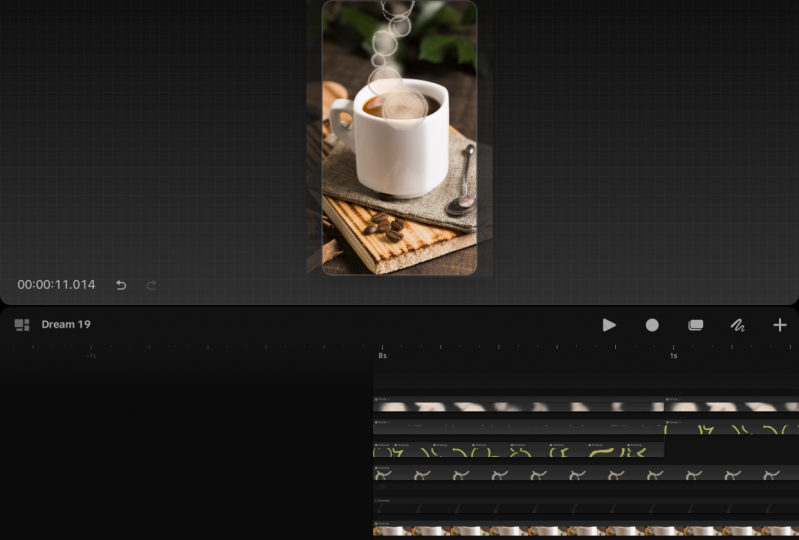
2. Rough Animation: Let's prepare our
Procrit dreams project. I set my project
with wide screen, eight frames per second, going to properties frame per
second and choosing eight, and I import my
footage or photo. My goal is to achieve
this cloudy look. To create the steam, I break the shape down and
draw a series of circles. The fewer the circles you use, the simpler the
animation will be. I'm making each circle
a different color to keep track of them during the first rough
stage of animation. The goal is to animate the steam effect
rising from the mug, drifting upward and
out of the frame. To make things simpler, we will make it a loop. We will have to mask the
Mug later, but for now, don't worry about a perfect edge or where the animation starts. By the way, this same
effect works great outdoor, for example, from a house, chimney, or even a volcano. If you want to create a loop, your first frame should
match your last. Just copy the first frame and paste it at the end as a guide. I will put it for now
at around 3 seconds. We will adjust the timing later. I will animate all my circles on a single layer to
keep things simple. During the animation, the
circles can grow, shrink, or merge, but these changes
need to happen gradually. In my case, I decided
to let the circle be small when they come out of the mug and gradually grow. I will start now with the
black circle at the bottom, animating it frame by frame upwards until it disappears
outside of the frame. It can help to fully animate one circle from start to finish before
moving to the next. As you can see, the
steam moves slowly, move the circle just a
little bit between frames. Turn on the onion skin to
see the frames before. This helps you see where you're going and how much
the circle has moved. It can be useful to keep a
reference underneath to remind yourself where
we're going and in which direction the
steam is moving. As you can see, now the
onion skin is telling me that the next frame is
already the final one. The first one we copied
to create a loop, remember, but my black
circle is not done yet, so I need to add a
couple more frames until my black circle is
completely out of the frame. It's important to
draw the circles until they are
outside of the frame. We really need to let them
go past the frame edge. Now that the first
circle is animated, we have the timing of our loop. You can play your animation
to see if you're happy with the speed and it
should be already a loop. From now on, we will draw
the other circles in the same frames we already
created for the black circles. As I said before, all
the rough animation of the circles is going to
be on the same track. Let's move to the next
circle, which is purple. While doing this,
check the circles, stay connected, and keep in mind the general
direction of the steam. Now that I animated
the purple circle from the initial position to
the outside of the frame, I still need to animate
the way it exits from the mug in order
to complete the loop. To do so, I will
start this time from the last frame and go
backwards like this. We need to do this process
for all the other circles as well to complete their loops because they have to reach
the starting position, aka the frame we copied
and position at the end. Now we move to the next
circle, the blue one. As you can see with
today's animation, we're animating straight ahead, meaning we're not using
key frames or key poses, we're just flowing
frame by frame. It is the beauty of
this technique and it also makes it
unpredictable and unique. Let's proceed like this with
all the colorful circles. Yes, it is repetitive but
it's also meditative. Welcome to animation. There's There's First. First First First There's There's There's
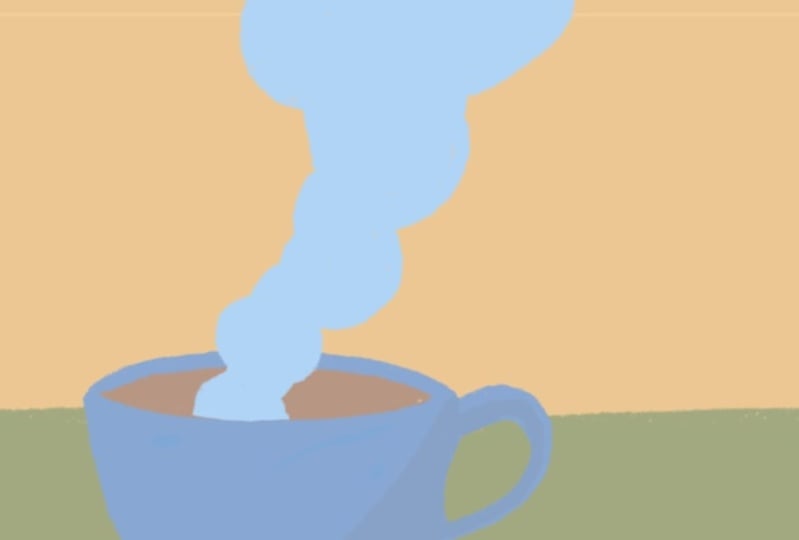
3. Adding Color: Once the rough
animation is done, you will see how the
steam rises from the mug. You can play and
check how it looks. This is the time to spot and
fix anything that feels off. It's messy now with all
the colored circles, but you will get an
idea of the movement and once we will fill
them with the same color, it will make more sense. Pay attention now. We have to
duplicate your rough layer, the one with the colorful
circles before cleaning it up. This rough pass will be your reference when
adding details later. Next, let's feel the shapes. Pick a color that
fits your scene. In my case, I will go for a green taken from
the background to make my animation
blend better with the surroundings and into
the live action scene. In Adobe Animate, which is the software I used to
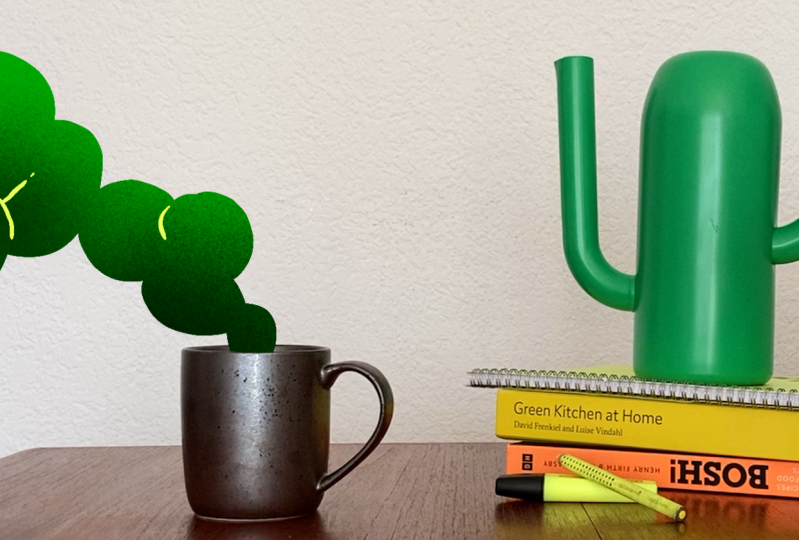
make the fires animation, coloring is a little faster. You can in fact select all
the frames strokes at once. In Procrit dreams,
you will need to drop color into each
circle manually, which takes a bit more patience. But I found a fast trick. Simply open the circles with one stroke of
the rubber tool, then fill the inside
of the circles, create a second layer, then clip a mask and just
drop the color in there. This is our steam silhouette emerging from the messy rough. And now let's do it for all the other
frames. But careful. Don't touch the last
frame which only serves as a reference and which
we will be deleting later. Mm There's so. There's so. There's so. There's so soon.
4. Details: Linework: Now we have this colored
steam animation. It already looks
pretty well as it is, but let's add a bit of details. I'm using the rough
layer as a reference. Remember, we duplicated
it for a reason. I'm dragging it on top of all my tracks and I set the
opacity to a lower number. In this way, I can
see it a little bit and as I said, use
it as a reference. Then on a new track, I will add simple line work following the curve
of the circles. The goal is to
make it appear and then disappear with the
motion of the circles. Because we're making
a loop, remember, even the details must match in the first
and the last frame. Exactly as before,
I'm going to copy and paste the first frame,
put it at the end. For the details,
I picked a color that fits the stream
and the shot. In particular, I pick this
light yellow from the scene. As before, I animate
straight ahead, following the rough circles and their evolution and gradually
making the lines disappear. Then I animate backwards from the last frame the way they
appear to create my loop. In the end, I added some extra lines in
the middle as well, making them appear
and then disappear. M.
5. Adding a Gradient: The animation could
be done here, but I always like to show you some ways to
push it forward. We could add a gradient or
even an animated texture. The possibilities
really are endless. This is the moment to
delete the last frames of the loop and also
any reference layer or truck you don't need. To add a gradient, create
a new truck on top. For the gradient, I use the
medium nozzle brush from the spray paint set to make a shadow at the base
of the animation. Then make the truck into a
clipping mask and tata Look, what a difference such a
simple trick can make. Then I even tried using a blending mode to achieve
this final look and color.
6. Let's Mask the Animation: Look at this effect. Nice work. Now, let's mask it
so it looks like the steam is truly coming
from inside the mug. Group everything once more, and then on a separate layer, create your mask, pay attention to the clean
edge of the mug, and then apply it as
a mask layer mask. Here you go. Your steam
is flowing from the mug.
7. Conclusion: Here we are at the
end of this class. Once you're happy
with the animation, export your video and share
it in the project section, together with anything else you feel like sharing
from your process. I hope you had fun with this
animated effect and that you will be able to use it
in many other occasions. I can't wait to see
what you've created. Thank you for taking this class and being with me
until the very end. If you'd like to stay in touch, consider following me on social media to see all the
other things I do over there. I'm always happy to connect. Happy creating. How
 Giulia Martinelli, Animation Director / Illustrator