Transcripts
1. Introduction to AI Image Enhancement: Hi, I'm Jake a digital
ist with 20 years of industry experience and over
30,000 students worldwide. Welcome to my course
on Magnifique AI. The game changing
tool capable of transforming your design
portfolio effortlessly. In this class, you'll learn
how to upscale, re, relocate, and transform your images, creating stunning
masterpieces in seconds. Whether you're a
photographer, digital artist, or designer, magnifique AI will transform the way you work. It leverages cutting
edge AI technology to enhance image resolution
and add incredible detail. It's an essential
tool for anyone serious about improving
their portfolio. Here's what you achieve
by the end of the class. You'll improve the realism
of your digital images, scale your images to crisp
high resolution masterpieces, apply stunning style transfer
from reference images, change the lighting and location of your images with ease. And each lesson is hands
on and practical designed to be beginner friendly
with user friendly tools. If you're not using AI
tools, then you should be. But whether this is your
first one or your 100th, I'm sure you're going to
find value in these lessons. Imagine filling out
your portfolio with incredible images or delivering multiple versions of
your work to clients. AI is transforming industries, and this course will help
you embrace these changes to boost your creativity
and productivity. I'm passionate about integrating this new wave of AI
tools into workflows, and I'm sure you're going to see a massive benefit to
using them in yours too. I can't wait to see what you'll
create with magnetic AI. Join me in this
journey, and let's start transforming
your images today. Ready to dive in. Let's get started with our first lesson.
I'll see you in there.
2. Class Project: Transform Your Images with AI: Class project is to
enhance and manipulate a set of images
using magnifique AI. This project allows you to apply the skills you'll learn
throughout this class, reinforcing the knowledge
through practical experience. Experience is more valuable
than knowledge alone, and just like you can't learn to juggle by merely
reading a book on it, hands on practice is essential
for mastering any skill. T step one is
selecting our images. We'll choose a set of
images for enhancements, so you can use your
own or you can find free images on sites
likepexels.com. Then we'll enhance the images, so we'll apply the features of Magnifique to your
selected images, experiment with upscaling, style transfer, and relighting. Then we'll compare and review. So we'll compare the original
and enhanced images. We'll reflect on any
improvements made and any challenges we
faced during the process. And then you'll
share your project. So you'll upload your images
to the project gallery, and this can be a screenshot of the before and
after comparison, or separate uploads of the
original and enhanced images. Provide feedback on other
students projects and engage with the community to learn from their experiences. Completing this project, you'll gain practical experience, using magnific AIs features, enabling you to confidently apply these skills
to your own work. And one of the best
techniques I've found and what I've found works best for me is to watch the whole class
all the way through, and you can even speed it
up to 1.5 or two times take notes and then
watch the class again to complete the
practical exercises. And this method helps to retain the knowledge
effectively. Now let's get into it and start
transforming your images.
3. What is Magnific AI?: Welcome to lesson one. Today, we're exploring
magnifique AI, which is an advanced
image up scaler that uses generative AI technology to improve image
resolution and detail. It's designed for photographers,
graphic designers, digital artists,
and anyone needing high quality high
resolution images. This tool can upscale images, enhance textures,
apply style transfers, and relight images. These features help bring more detail and realism
to your projects. Magnifique offers
various settings to control the level of
detail and enhancement. So whether you're restoring old photos, enhancing digital R, or creating high
resolution textures, Magnifique is
incredibly versatile. Example, it can be
particularly useful for enhancing the realism of
frey people or vegetation. The main reason I use it
is it can significantly speed up the process of
making an image look perfect. So typically, the last 20%
of work where you tweak the sentence to
make the image look super real, take the most time. And magnifique reduces
this time drastically, making my workflow
much more efficient. So in the next lesson,
we'll dive into applying these features
to your own images.
4. Upscaling: Enhancing Image Resolution: Welcome to this lesson
on scaling images. In this lesson, I'll
demonstrate how to enhance an old free Die render
using magnifique AI. For your project, it doesn't need to be a free die render. It could be a photograph or an illustration you've created. The first thing we'll do is
head over to magnifique.ai, and you'll need to sign up
if you haven't already, and we can either just drag
and drop our input image in here or click on Upload
and upload your image. And the scale factor determines how much you want to
upscale this image. For now, we'll use two times, and you can see the
output size down here. For Optimized four, I'm going to use film
and photography. There's a downloadable
PDF that shows a difference of each settings
linked in the resources, and there's no hard
rule for this. So explore and see, which
gives you the desired result. I ended up using film and photography because
it's a free die render. I really wanted to make it
feel more like a photograph. And I also added a prompt, so I'm going to write a
white range discovery in the desert. In terms of creativity, you can see here it says that
turning this up is going to allow the AI to hallucinate
additional details. So this will achieve
greater realism, but it will move away
from the original image. I'm going to just
pump this up to ten as I know that
we're going to bring this into photoshop and mask out any areas that we don't like. But if you're going to
use the image as is, you may want to use
something a little less. You can also just put it
onto scale try four scale. And this is what I
did in beginning just to see how much
creativity I'd like. And there's also a
resemblance setting. So increasing this will make it resemble
the original image. So this can also help
maintain the original image. But as I said, let's
put it on ten, and then when you're ready, you can hit upscale, and this
will take a few minutes, and this is what we got back. Now, we can see that it's up
scaled and it's not perfect. And then obviously, Using a creativity of ten,
we've got hallucination. So we've got loads of
little cars in here. But it's okay, we're
going to mass these out, and this is obviously a balance with the creativity
hallucinating. But for now, this is actually going to be fine
for what we're doing. As I said, you can lower
the creativity and up the resemblance if you don't want to go as extreme as this. When it comes to
downloading your image, you'll see we get two options. We can have JPEG or PNG. So PNG will retain more details
and these are lossless, and they are great for
high quality enhancements, whereas the JPEGs are more compressed and they
may lose some detail, but they are smaller in file
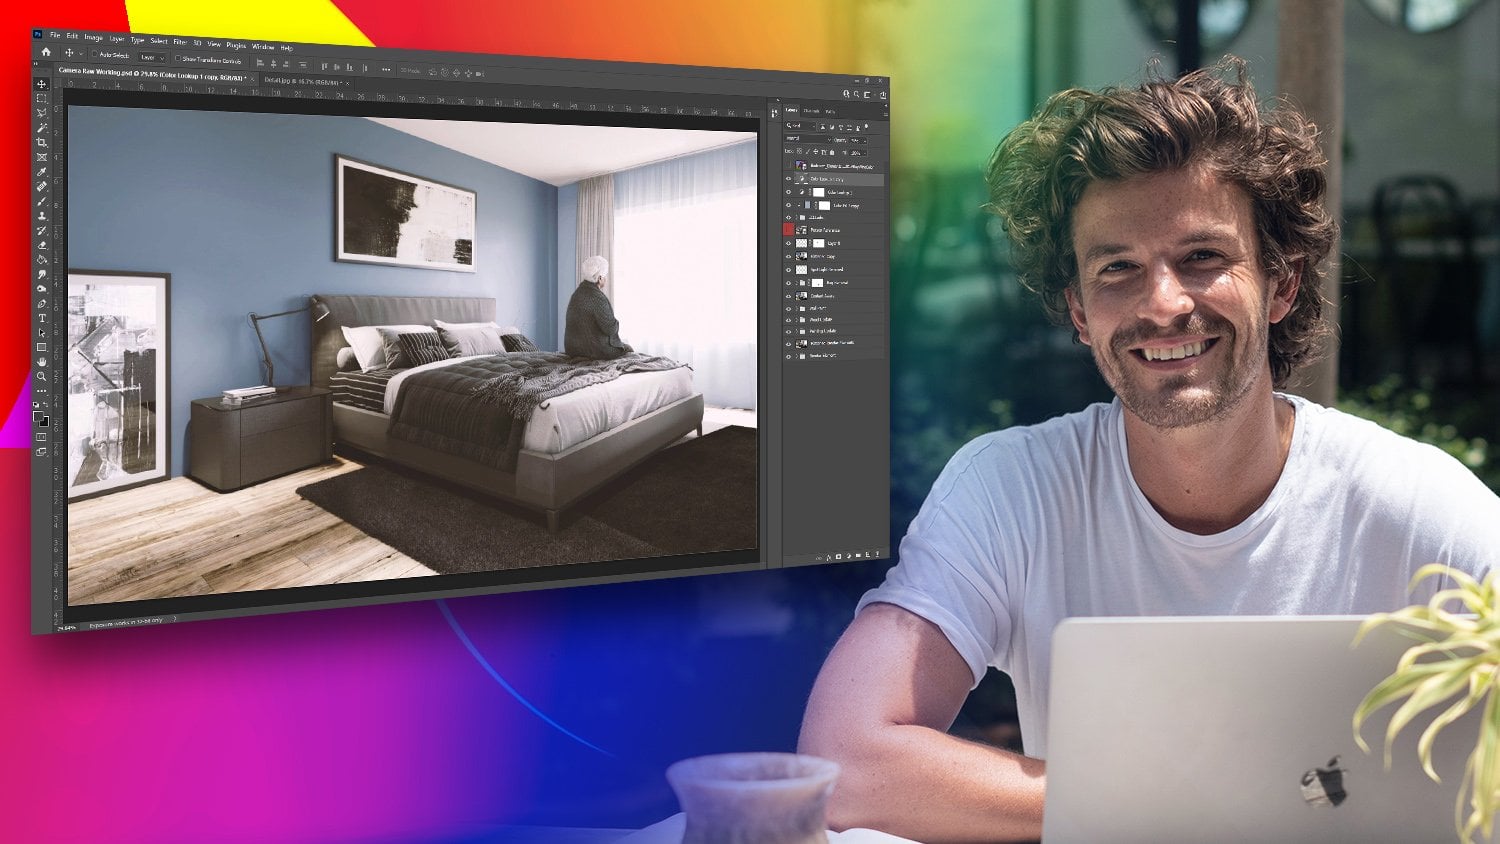
size and faster to process. So if I can, I'll always use a PNG. So click PNG to download that. So over in photoshop, I dragged and dropped
a new PNG image on top and added a mask, and then I could go in and just paint out areas that I
didn't want in here. Here is what I ended up with, so you can see the areas
that I masked out. One other thing I did was use generative field to
mask out that tree as I didn't actually
want it anymore, so you can easily
do that by just selecting and hit
generative feel. And you can leave it empty
and just hit generate. Photoshop is going to
generative feel this area, and there we go, that's gone, and you can actually select
if you have a preference, or you can hit generate again, but I think that
looks pretty good. And one last thing
I want to do is, I think this would be a
great print campaign, so I actually want
to expand the image, so I can do that if
I zoom out a bit, and let's make that kind of the size of a
double page spread. And you can see that
we have generate here, so I'm going to hit generate, and that should generative fill the environment for
us. And there we go. And again, we can select
from the various outputs, but these all look really good. And I can see like
the text up here, saying discovered the world
and drover or rain drover. And just before we go here is each setting, you
can download this. I don't know how clear
this is on screen, and this can help you
make your selections, rather than having
to test each one, so you should be able to
find that in the resources. And in the next lesson,
we're going to dive into some relighting
techniques, so stay in.
5. Relighting: Changing Time of Day: To this lesson on relighting. In this lesson, we'll explore how to switch the time of day in your images using either
photoshop or lumina neo. So you may know that photoshop has a built in sky
replacement tool, and feel free to use that. You can find that under
edit and sky replacement. However, I do prefer to use lumina neo because it offers
better quality and results. So once you have
lumina neo installed, you can go to filter
and lumina neo. And then in here,
we'll go to edit. And you'll see Sky AI here. So if we click this,
and you'll see that there are a variety of
skies we can choose from. So just by clicking this, it's going to replace the sky. And you can see there's some pretty
interesting ones here. So you can go through and
select the ones you like. I quite like this
dramatic sunset. And just one thing to be aware
of is the sky orientation. So you can see our shadows
are hitting the ground here. So we just want to
keep that in mind when we actually
posits in our sun. So let's make sure that
that's in a nice spot. Clicking this eye dropper, well shows the before and after. And Lumina also has some
really great features. I really like this accent AI, and you can see that that
really makes the image pop. There are plenty of
other tools in here, and I do have lessons elsewhere that go over lumina
in a lot more detail. So do feel free to
check that out. So far, we have used luminao to improve
the image quality. And then we've used photo shops, generative feel to
expand the image. And now we have used luminao to create
another time of day. I really can't wait to
show you what's next. And in the upcoming lesson, we're going to dive
into style transfer, so we're going to change the
weather, so stay chained.
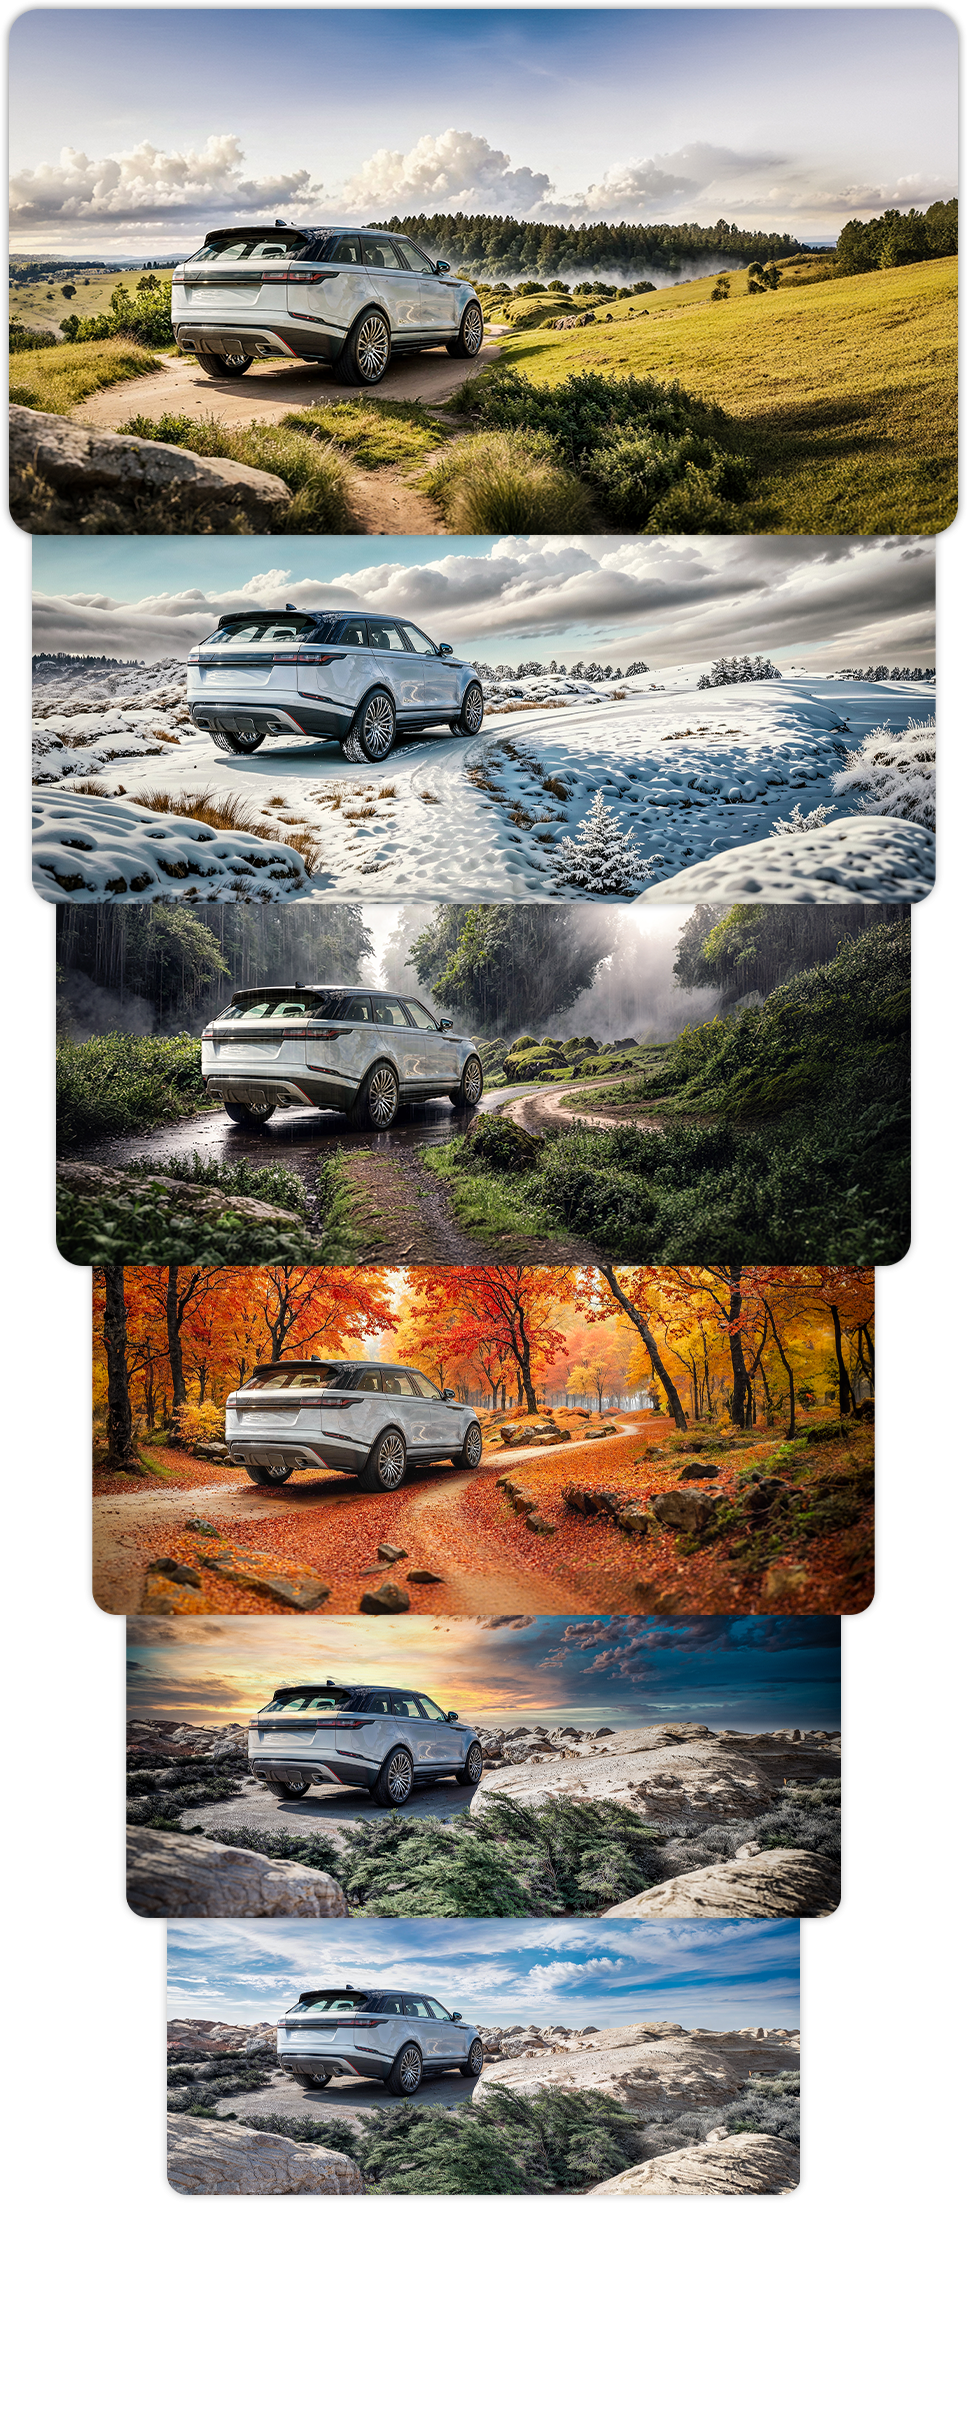
6. Style Transfer: Changing Locations: Welcome to this lesson
on style transfer, where we're going to be
exploring how we can showcase the car in various
weather and terrains. We've already turned
a single image into another time of day. In this lesson,
we're going to scale this up to multiple images. But first, let's transport
our car into the snow. We'll use our originally
expanded image for this, as I think it's going to
work better as it's got a more natural base with
less stylized lighting, colors and shadows than
our sunset version. So this time, we're going
to click on style transfer, and we're going to have our
original image in here, so this scaled version. And then for the
reference image, I'm going to use
this snow scene, and all we need to
do is drag and drop that into the
reference image slop. And for the prompt, you
can see I've written a white range over
discovery car in the snow. So that's going to help
guide the style transfer. The style strength
allows you to go from your original image
texture and colors at 0% to a fully transferring the style of
the reference to 100%. That will also be
guided by our prompt. Let's put style strength on 100. And then for structure strength. This allows you to maintain the general structure
of your image. So for this, I'm going
to leave it on 50%, and we can see how
that turns out, and we'll just make sure that portrait isn't on and we'll have faithful and balanced as
our flavor and engine, and then we'll hit
transfer style. Once that's done, we will see
our car in the snow scene. And as usual, the car isn't
looking particularly great, but the rest of the scene is. So what we're going to do now, before we move over
to photo shop, what we can do is go
back to Magee scalar. And this time, you can
see this reuse bur. Let's reuse the final image. So let's going to
bring our snow image into the up scalar. We'll upscale it by two, and we don't want
any prompt in there, and we're also going to put
the creativity to zero. So all we're doing is
upscaling this image. We'll hit upscale, and this is the result from the
upscaled snow image, you can see it's a lot Crisper, and this is what we'll
use in photoshop. So we'll download that as a PNG. We'll jump over into photoshop. All right, so now in photoshop, I have dropped our snow image
on top of our base image. And one of the first
things I'm going to do is with the paint bucket
selected and holding. I'm going to select
a shade of white, nothing too aggressive,
but something like this. And what I did was create
a solid color and holding, just making sure that only
affects our base layer, and then I put it onto color. I'm actually going to
turn off the snow image, so you can see what's happening. So we've just attached
this color layer style, and I'm just going to
turn that down to 20, and you can see that that's just slightly changed the color of our car and
that's what we want. We'll go back to the snow
image that we generated. On here, you can see
already have the mask, but you'll hit select subject, and what that's going to
do is select our car. You can refine this using
the selection tools. So once you've done that, just mask out where
your car will be. So you can see now we
have brought our snow in. And then I put a color
lookup table on this. So I put the Kodak 5205. If I turn that on and off, you can see just refining
the colors on that. And then finally, I
ran a camera raw. So we can see what I did here. I believe I used Auto and
then tweaked from there, D up the vibrant and the
saturation a little bit, and also the clarity and put a vignette and
a little bit of grain. So if I hold, we can see what we had, and we ended up moving
the car to the snow. Something else
that's really nice is if we go back
down to this layer. You can see I actually
masked in or masked out some of the snow on the tires just to help it fit into the
image a little bit more. And achieving
something like this in Fredy or even photography would be incredibly time consuming
or even impossible. So that's how we can move our
range over into the snow, and this obviously
demonstrates the power and flexibility of magnetic
AI for creative projects. But stay tuned, we're going to explore some other
locations next.
7. Exploring Various Locations: Welcome to this lesson on
exploring other locations. So now it's your
chance to choose some locations and get
created with magnifique AI. So first, we're going
to take a look at some examples that I've
prepared that can inspire you. So starting off, we have
this spring version. So, as usual, I put our original image
through Magnifique, and this was the reference
image that I used, and we got back this. And much like I did
with the snow version, I used the color
overlay technique, this time only on 10%, but you can see that
it is a greener color. I also played with the color balance to get
it more in line with our image and also reduce the saturation
a little bit as well. And then mast in
our original car. And you'll also see
this layer here, which I've called windows. And I've actually
I've just grabbed sections of the image. So if I go here, let's
put this back up to 100%. This was just for the windows. I'll bring that back down. And you can see that was just for the glass out the front. And then again, for
the reflections, I did something similar, so I just fit in the image, kind of like what we did with
the snow on our last image. And then I applied a color
lookup table this time, 500 D, and again, applied a camera raw filter. These were the
effects that I added. And this was our outcome. So again, we went from
this to this version. After that, I wanted to try something a little
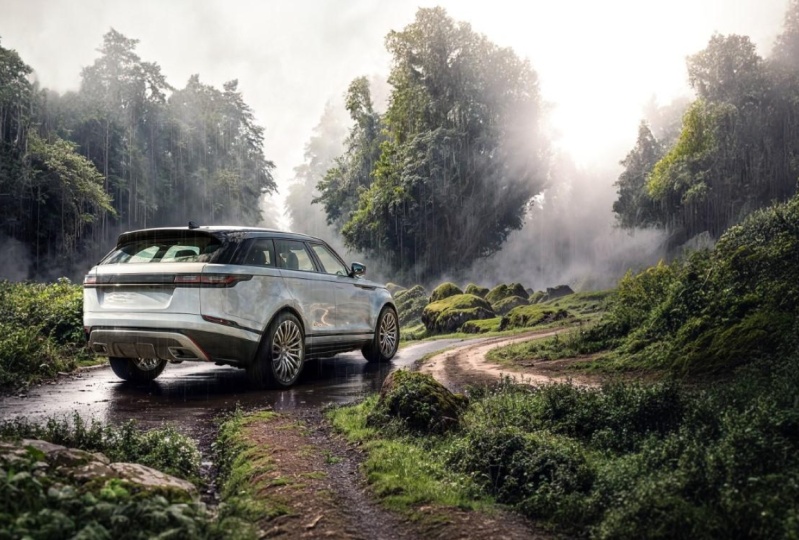
bit more different, and that was a rain version. So again, our original image. And this was the reference
image that I used, and we got back an
image like this. I applied our usual
color overlay, and this was a color balance. And again, front windows, and let's mask out
our car again, so you can see the windows were just a hangover
from the original, and then some
reflections on the car. And then this time,
I actually put a rain layer over the top. So if I just put
out on to normal, you can see some
pretty heavy rain so I actually just grabbed that
I think from over here. And then levels, another color look up table
this time crisp warm, and I applied a camera raw. And again, as usual, I normally just hit auto and
then correct from there, it kind of gives you a
good base to start with, added a tint to get, I think it was overly
green at that point, and then some slight clarity. So we went from this
image to this one. And finally, a full image. So as usual, started
with our base, and this was our
reference image. And this time, again, a color balance, and then
the color overlay, as usual. And then brought the car in, and then the car
needed quite a lot of reflections and the
windows sorting out, so you can see a
lot of that work was just done on the windows
and a bit of reflection. And then also this time, apply to vibrancy using this mask. So if you've got
a mask selected, you can just control, click, and it will select it and
then add your vibrancy here. And I added another
reflections layer because there's quite a lot
going on with the trees, and we've got another
color look up, which was drop blues, and then a camera raw. So let's have a look at
what we did in here. So as usual started with
an auto and just worked our way from there up the vibrant and
clarity on this one. And then, unlike the others, I actually selected the
car and did the levels. I was having a tough time
getting this to fit. I think we got there in the end. But yeah, we went from this
original image to this one. So by making these slight
tweaks in photoshop, you can get your image to sit
a lot better in the scene. So that's your turn, choose some locations, you'd
like to experiment, use magnific AI, and whether
it's a different season, weather condition, a
unique environment. You could also think about aging your environments if you
were doing architecture, but let your creativity flow, and I look forward to
seeing what you create.
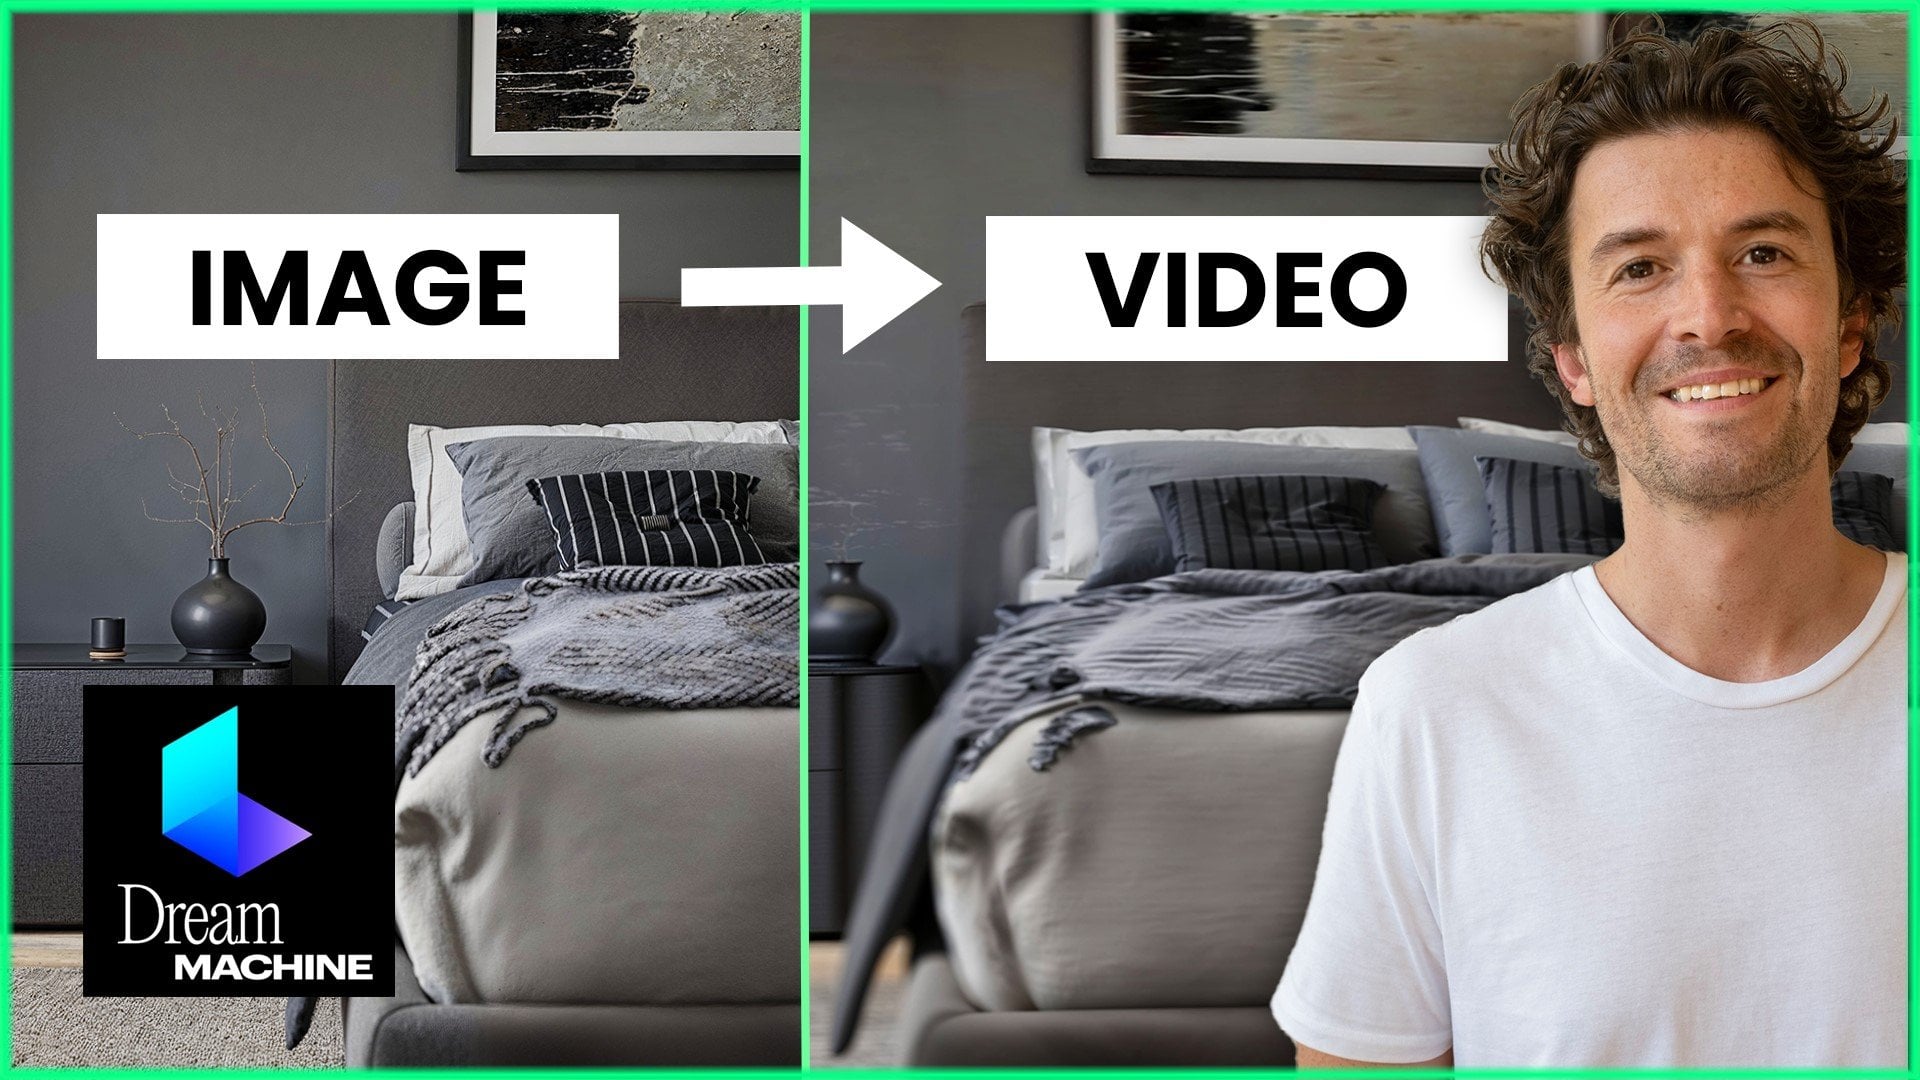
8. Bonus: Adding Animation to Your Images: Welcome to this
bonus lesson about adding animation to
your steel images. The creative AI landscape
is constantly evolving, and I'm here to help you stay up to date with
the latest tools, and adding animation to your
steels is no exception. So today, we're going to explore Lumina AI's Dream machine, which is a powerful
AI model that creates high quality realistic
videos from text and images. So the first thing you'll want
to do is head over to Luma labs.ai and go to Dream machine and sign up
if you haven't already. And what you can do is upload
one of your images here. And I found the more detailed
the prompts, the better. And a great way to generate
these prompts is to head over to Claude
or Chat for GPT, and I actually
uploaded my image, and I asked it for
a detailed prompt for lumina AI text to video. After a little bit
of conversation, it came back with quite
a lengthy prompt. Then what you can do is actually just copy and paste
the bits you like. And then all you have to
do really is hit generate. And this will take
a good few hours. But once processing is done, you will end up with
something like this. And I think this is pretty
incredible for what we input. Maybe the last few frames are getting a little bit strange. But this is developing
all the time. I know they've just released
first and last frame. So if that's something
you're interested in, then definitely drop me a message or let me
know in your review. And as you can see, if you're doing it like interior images, this is also great
for walk throughs. So I hope that's helped. And as I said, this creative AI landscape
is constantly evolving. A good way to stay
up to date of this. A little plug here is for
my weekly newsletter, which you'll find in my bio. But there I'm constantly
finding tools like this and sharing what
works and what doesn't. I hope you found
this bonus lesson useful post your your
creations in the project.
9. Conclusion and Next Steps: Congratulations on
completing the class. Let's quickly recap
what we've covered. We introduced magnifique
AI, explored its purpose, capabilities, and
benefit, and you learned how to use up scaling to
improve image quality. Apply relighting techniques
to switch the time of day and enhance images using
tools like Lumina No. You utilize style transfer to transform images by applying different styles and locations. Explore various locations
and the settings, showcasing adjustments
in photoshops. You've learned a lot
of powerful techniques and tools in this course, and the best way to master these skills is
through practice. Class project, use magnifique to enhance an image
of your choice. It could be a free di render, a photograph or an illustration. Experiment with the
different features and settings we've covered, and share your enhanced images
in the project gallery, provide feedback on
other students' projects and engage with the community. Learning from each other is a great way to
improve your skills. Thank you for
joining this class. I hope you found it
valuable and inspiring. If there's one thing I hope
you take away from the class, it's the confidence to enhance your images with
the power of AI. Don't forget to share your work, follow me on Skillshare and
socials and labor review. Your feedback helps me improve and create
better content for you. Happy creating, and I'll
see you in the next class.
 Jake Denham ⭐, 3D Artist | Official V-Ray Mentor