Transcripts
1. Introduction Video: Hello and welcome. My name is
Aldin and I'm here to tell you forget what you know about designing because
AI is taking over. You don't need to be
designer or artist anymore to create designs
that are awesome. With the help of AI, we can create almost anything. In this class, I will cover everything from
start to finish. First, we will go over the
most popular platforms out there to create
our AI designs. Later on, when we learn
how and what to create, later on, we will go and use those images
into a Photoshop. Into a Photoshop,
I will show you step by step how to
prepare document, how to save document, and how to get your design perfect and
ready for printing. After we learn all of that, we will go over those platforms out there that you can
sell your work to. I also want to
mention is I created project files for you so
you can use those file to practice or you can
create your own and upload your work so we
can share what you learn. Do you need any help
and similar stuff? I will be here to
guide you through your process of learning and we can learn
from each other. That's it for me in this video, S in the next one.
2. Introduction with Ai tools: Hi, everyone, and welcome. In this video, I will
introduce you with some of the most popular
online tools that we currently have to
create text to image. Basically what we are
going to do here, we are going to create designs
using AI, basic designs. Then after we get
the perfect results or if I may say almost
perfect results, then we will take that
design and bring it into a photoshop and add
final touches to it. Maybe some texts colors
and stuff like that. But basically what is
important here is to know how to create design
using text using AI. Let's get started. First of all, let me show you with which tools you can generate
a lot of designs. For example, Canva
is really good. We also have Leonardo AI, we got Kittle, we
got Imagine dot art. We have Adobe
Firefly and recently hGPT also bring that
option up here. So what we are going to do? Of all, we need to focus on one niche because when we
create our online store, our online shop, it's important
to have specific niche. Later on, if we want to
advertise our store, we need to know which
people we are targeting. Basically, for the
sake of this class, I will go with something like cyberpunk team or
something like that, some futuristic stuff,
something like that, and we will focus on that. We will focus on
cyberpunk stuff, some modern designs,
some futuristic designs. That's it. Right now, what we can do from up here, we can go and find
some design like that. Basically, we are going on Leonardo AI and just
going over those designs. For now, we can go check
this one also and we can go take this girl or we can
go find something similar. It really depends on the style
that you are looking for. Imagine you told
someone ten years ago that something like
this would be possible. Let's just say, we
want some design. Give me a second. I'm trying
to find the perfect one, but let's go with
something like this. It's not important for now. In this video, we will
just see couple stuff. What is important to know what is important to
know is those prompts. For example, someone
typed this prompt to get the results on Leonardo AI. What we can do with this, we can go bring that up to our be Firefly and go text
the image and from up here, let's go change that prompt. Copy the previous one
and hit Generate. Let's see what Adobe
Firefly will create for us. We can do the same
way the Chat GPT. For some reason on a chat GPT, results are getting really slow. I don't know why,
but you see what we got here on Adobe Firefly. We can use this image. We can go download it. We can go even
upscale this image. Because we are getting
better resolution of it and once that is done, we can go and use this image. But basically, this stuff. This is how you can create
anything using this AI. We can go so we can go and
do the same thing up here. We can go image studio and write a prompt
and hit generate and we can do the same
thing up here kettle but what's important is to
know what and how to create. Basically, that's
it. In this video, I just wanted to show you one of the most popular stuff that
you can have to play with. What I want from
you in this video is go open every one
of those and have fun. Go explore type random stuff, try different things
and get familiar, simply get familiar with
every one of those platforms. And in the next video, we are going to create
one specific design that we are going
later on to improve, edit, stuff and stuff like that. That's it for me in this video. I hope you learn something
new and see in the next one. Bye.
3. Creating First AI Design Using Adobe Firefly: In this video, we
are going to create our first design using AI, how we are going to do that and what we need to know
before we start. Basically, before we start
with our designing process, we need to know on which niche we are going to
create that design. For example, we are choosing some modern robots cyberpunk
team, something like that. And you need to know what you are going to
create before you start. You don't just go out there, create random stuff to
upload on your shop. You need to be specific because you cannot go
and create a page, create designs, for example, for cat lovers,
then next design is about motorcycles
or I don't know, some brndom stuff
like I don't know. For example, pets,
robots, sport, those things don't go
together really well, focus on one thing and build
the shop around that thing. That's it. The next
thing that we need to know is where to find
inspiration for our work. Example, a lot of designers
are you will get in a phase where you don't know what
your design should look like and there you need to
go and find inspiration. I usually go on
Google or Pinterest or Instagram to find
inspiration for my work. And for example, right now, what I did is I go up here at the Pinterest and I
found this image. For example, you will just
go type, I don't know, something like cyberpunk design for T shirt and stuff like that. How you can use this design is basically you will
save this image. Then you will go up
here at the hat GPT, upload that image
and just tell him, give me the prompt to create
design from this image. This is the prompt
that we can use. Control C to copy this prompt and let's go to Adobe Firefly, Control V and hit
generate from up here, we can go atimagine dot. We can go and choose model
cyberpunk anime and give him the same prompt and you will see what results should we get. I use free version, so this is something
that we cannot use. Now, this is really bad. Let's go see what
Adobe got for us. So basically, this
is not a bad design. We can use maybe
something like this. Now this sort don't look real. I think this one
is the best one. What I'm going to
do is I will go to edit and generate similar. Right now we should be able
to see similar designs and Let's see what reference and give him a movement
and we will go cyber punk and color I will leave that lighting also. Let's go with multi
expsure and hit generate again to see the
difference between those two. So this design, it's not bad. This one is also okay. Uh This is much better. Let's go up here, upload this as a reference and hit generate again to see what results
we are going to get. This is much better. Basically, we can
go with design like this let's go with this and go generate similar to see what we are
going to get once more. Those sorts are
looking really funny. Okay guys, this is it. Let's just say this is design, this is something that
we are satisfied with. What I'm going to do right now is I'm going to hit upscale. And once when we get
upscale this design, I can go and use it. I will go download it. But this is still a
really small image. Let's just say this is
our design for now. This is how it looks. What we can do
right now is we can go up here at a free
AI image upscaler and try to get it in
a larger resolution. Okay. And we can go download that one. Now we have a bit
more quality image. Not bad. What can I
do one more time? I will go up here again and
try to upscale this image. We will see before and after. I will go and download that one. Now we have our image ready. Basically what we did here, we got design from
Adobe Firefly. We use that image, we upscale it, we got decent
resolution of our work. This is important because
when we print that design, we don't want to have
those nasty edges around colors between any
change of colors, for example, between those two or between any other color. So we want our
design to be clear. Basically, what we did here, we got pretty decent design that we are going to add
it a couple more times. We are going to add more stuff. We are going to remove
a couple of stuff, a couple of stuff from
design, and that's it. Now when we have
our design ready, we are ready for a next step. The next step will be editing
this design in Photoshop. We will add text, we will correct some color and some details and
that would be it. What we learn from this video. In this video, we learn how to how to get prompt
from anything. Basically, all we need to do
is go up here at the HAGEPT, upload that image and ask for a prompt for that
specific design. We will get some similar
design that is unique for us. Once we get that design
ready, we upscale it. And once when we have a
decent image to work with, we will go and add
that image into a Photoshop and edit it into a Photoshop at text
and different stuff. Later on, we will save that as a file that can be
used for and later on, we will add that design as a PNG or we can save it as any
other format you like, and finally upload
it to our store and later on advertise and
sell that specific design. That's it for me in this video. And if you have any questions, let me know and see
in the next one.
4. AI + Photoshop Design 1: Here we are at Photoshop
ready for our design. What's important before
we start in Photoshop? When we create a new document, we will go with some resolution
like this or even higher. For the purpose of this video, I will go with this one. What's the most important
thing before we start with Photoshop
is this thing up here, resolution pixels per inch. Basically, the higher
number here it is, the better quality design
will be when it's printed. So if we usually
images that we use for web or everything that
we see on a screen, we go with 72. When we want to print something, we put the higher value
up here, 150 300. Basically, leave at 300
here and hit Create. Great. Now that's it. What I want to do next is bring my design
up here and hit Okay. Now, what I want to go and do is we can go and click up
here, remove background. Pretty nice job. I
don't want to do that. I want to leave these
purple things up here. What I want to do is up here, I will go right click, find magic eraser tool. Once I click up here at
this black background, it will ask me, the smart object must be rasterized
before processing. Do you want to go? I will go. But before that, we can just in case duplicate this
layer and close. Make sure you have
your layer activated, bring your magic eraser tool, rasterize that layer, click once and you will get
something like this. This is something
that we want to have. It doesn't look nice yet, give me a couple
moments to show you. The next thing that
I want to go and do is go find your brush tool. Once you find your
brush tool, go up here, click at this icon at the
at the brush settings, go and find some
brush like this. If you don't have brush, it's super easy to
install custom brushes. You just go online, type free brushes for Photoshop, download, and it will be
automatically up here. What I want to do
is I want to go and grab some random brush like this and I want to increase the size
of it a bit more. Let's just say
something like this. Now I want to create a new layer and I
want to bring color something like let's go
with dark with the black one and I want to
paint on a new layer. What I want to go and do is
I want to go around my girl. To get this dramatic look, I want you will see in a
second why I'm doing this. Just to bring
something like this. Now I want to move this layer, you see, grab and hold it with your mouse
and put it below. Now we got this smoke effect. It's super nice. What I
want to do is I want to go again and pick some
different brush and increase the size of it. To something like
that. Now I will click Oce up here and take
a sample of a color. I want some bluish color,
something like this. Once more, I will create a new layer and we
can go paint again. To get this dramatic
effect, great. What we need to do, again, we will go do the similar stuff a couple more times till we get the effect we
wanted and right now, I need to be super careful because what
I want to do now is I want to go with black color and I want
to go on top of it. You see, we can change
direction of our brush. That's it. One more time. I will bring this one at
the top, increase the size. Control Z to go step
back, and that's it. Great. Now, let's just say I'm satisfied with
the current look. I want to go and
select all of those. I will select the first layer, then I will hold shift and it will select
everything in between. When all those
layers are selected, what I want to do is I want
to add them into a group. So basically now everything
is inside of this group. What I want to do is when
my group one is selected, I want to decrease the size
of my design just a bit, make sure it's on a middle. Great. Now we can go and add some text. What I want to do is I want to go and type something
like cyber girl. Sorry about this keyboard. It's super noisy. And now we want to change a font and let's go
find a font that is. What do you think
about this one? Let's change that one
to something like this or even like this. We are just messing around, finding the right
for our design. What I did wrong is I put those
two words into one layer. I will go and fix that, control X to remove
that and I will bring my text again and I will just control V to
paste this one. Don't get confused about that. Now let's go select this one and change a color of
it, just like that. What we now want to do is
increase the size of this text. For example, I will just drag it around let's just say 80 points, cyber girl and we will increase the size of that one also
to something like that. Yeah, it's okay. Now let's go right
click on it and go to go to blending options. What we want to do now is add a stroke and what
we want to do also is our glow with some
color like this. We don't see it because it's
white background, control. Let's bring my paint bucket
and fill background with black color so we can see this
effect. This is too much. Now I want to go
and change that. I want to bring opacity
and I want to spread it just like that and I
want to change color to the same one spread size spread. What I want to do is increase
the size of my just a bit. We can go and take this color. We get this effect.
This is too much. I don't think I like this font, so we will probably
change that font. Let's go change that font. Let's just say this
looks better than the previous one and let's go do the same thing
here for this one. For that, we are going to
do and repeat this one. Blending options,
we are going to add a stroke with this purple color, and we want to go at a gluing effect but with
different it's messed up. I like it. Okay. So what I want to go and I want
to add this into a group, group one and background, I want to align
that on a center. Now I'm sure this is aligned. Let's go increase
the size to 80. Now I want to do the
same thing. That's it. Now what I want to do is I
want to add some text below. How we can do that,
we will just go bring our type tool and I will drag until I get
something like this. Upon release, we will
see something like this. Now Control V type your
text or paste your text and get this smaller because
it's super large. Let's just say that's
the text that I wanted. I want to put it below and I don't like this
font for this text. I'll just go use
a different font and increase a size Great. That's it. If you don't
like those effects, for example, I don't
like it right now, I can go and change
it at anytime. What I'm going to
do is I want to go with with something simple. For example, something like
this and for this girl, I want to go remove that We can increase the size. And what I want to go from
up here to blending options, I just want to add a stroke with black color, and that's it. Basically, guys,
this is our design. Later on, we can
add final touches, but this is how you can edit
and add stuff in Photoshop. I hope you learn something new. If you have any questions, please let me know. Let's create one quick version of this design with other image. You will see how
simple and easy it is. We use this image, we improve the quality
of it and that's it. So let's go try
to use this image on our design in Photoshop. Basically, upscale it,
download, that's it. Now let's go into
a Photoshop to see how we can go and change
this image in a second. Basically, this is our design. 90% done. What can we do? We can go and choose this image just drag
and drop it up here. I will just go close
everything up here. I don't get you confused. What I want to do,
let's go increase the size of what I want to do is I want to go up here and create Object Selection tool
with Object Selection tool. I want to select this girl. Now Control J to create
this on a new layer. It's not a perfect selection. Don't worry about it.
We will still use it. And that's it. What
I want to do now is I want to go up here and
use magic eraser tool. This is messed up
technique I know, but just remove this
purple version. Leave it like this,
leave it like this, just remove this purple. That's it. Don't worry, we are not done. I just want to bring eraser tool with hardness and
the size small, so I can delete only this area only those pixels just
like that, that's it. Now what I want to do is I
want to play with this image. I will go up here with pick
my brush tool and I will open this and I want to play
with those colors. I will create a new layer below and increase the size to play
with it, just like that. Excuse me. I didn't I
selected the wrong layer. What I want to do is I want to go and do some random
stuff like this. Great. Now let's go choose some other brush and
do with some blue. Let's create a new
layer below that one. You see how simple
and easy it is to add some extra effects to your
design, just like that. What I want to do is I want
to go pick another brush, increase the size of it, and I want to pick this color. So you see our selection
is not that important. Right now, all I want to do is I want to move
this design below. Now what I want to do
is I want to bring this text up here and I
will put it on the top. What I want to change up
here is a couple of things. Let's just say we are not
satisfied with how this looks. We can go double
click on the effects, go to blending options. Before that, let me show you this go to fill
and remove 100-0. You see nothing now. Don't worry about it,
go to the effects or right click blending options and write up here
from the stroke, change color to something
like this or even this, hit Okay and maybe
increase the size. What I want to go and
do next is outer glow. If you see other color there, you just pick the same color. For example, we don't
want blue color here, we want same color,
and that's it. We can do the same
thing with this girl. We can use let's just say font, the same font here. We can increase the size
or leave it like this. Or let's say I want to
create something like this. For that, I'll need to
see the exact size. I will copy this one
and I will paste Great. Now, all I need to
do is align that. T. Let's go fill to
zero and go to effects, open those effects and change color of our stroke is this one and outer
glow is the same one. Now this is our design. We can go at this
text, and that's it. We can increase this text or get it smaller or get it below, or we can totally delete
it and do stuff like that. Or we can go place
this girl below this. This is also nice and that's it. For this area up here, we can go and remove the
purple things, so it You see, we can go and do that. So our effect is more so
we can see it better, but let's just say I want
to go with this one. I like it like this.
This is how easy and simple it is to add
different image to your design and
add stuff like that. We can also add this to a frame and later
on edit it more. But for example, you
saw how simple and easy it is to add different images and manipulate in Photoshop. That's it, seeing the next one.
5. AI + Photoshop Design 2: Hello, everyone, and
welcome in this video, we are going to create
another cool design using KI tools and later on edit it in a Photoshop in
a couple of minutes. Basically, for this design, I want some background
that is around cyberpunk, Tokyo at night,
something like that, and we can find inspiration
in each one of those, it's really not
that big of a deal. Each one of those images
looks really nice. Let's just say I want to
create something like this. I will just drag
and drop this image or save it and later on edit it. What I want to do is I
want to go drag and drop that image and ask Chad GPT to give me a
prompt for this image. And now we got prompt and I will just copy
that one and later on we can go at that prompt up here a here just click Generate. Let's see what results
we are getting. Those are decent. Let me just go browse. I will pick this as a
reference movement cyberpunk. Let's go generate again
to see the difference. I like to use Firefly, if you have or like any other AI online,
you can use that. It's really not
that big of a deal. Let's just say I like this one and I will go and upscale it. Give him a second
to do that for us. Let's just say I'm
satisfied with this design and I want
to go and download it. Great. Now when my
design is ready, I want to go and bring
that into Photoshop. Basically, this will
be quick tutorial. This is my design. I will just make
it a bit smaller. Now what I want to do is I want to close this one
and I want to find a font that I think
is nice for my work. I just want to type
up here Tokyo. Mm. Great. Great. Now what I want
to do is I want to go and increase the
size of my text. I can go and do that by selecting my text and
increase the size from here, or I can go just make sure
my layer is selected. Control T and just
drag it like this. Until with my smart guides, I'm sure it's on a middle and upon
release, I can do that. But now what I want
to do is I want to make this just a bit larger. I'm going to do
that on this way. Now what I want to do is
hit and now I want to increase the size of them just
like that, and that's it. Now I want to increase
the size even more. You will see in a second
why I'm doing this. Now, just by holding
out or option key, we can do stuff like this. Make sure your text is below your image and
by just doing that, we can get this effect. This is pretty cool effect. And we can also add
more stuff to it. But let's just say I'm satisfied with this
effect and below that, we can go and add a
couple more stuff about Tokyo or some symbols of Tokyo. Let's go try that on. This is mean real time
trying stuff like this. We can go and see on
Pinterest, stuff like this. We can go and add Japan on
the top and below that, we can add just stuff like this. We can go on a new tab
and type something like some type type
something like Tokyo Tokyo symbols to see what we can work with. I don't know anything about this culture or I know
really little about, so I don't want to
mess with that. What I want to do is I want
to go and type something like the land of the
rising sun and on the top, I will just type Japan and
that's it for our design. How we are going to do that, how we are going to add that to our design, simple and easy. Or we can go and add
something like this. This is not bad, but
it's not for a shirt. That's why I'm going to let that we can go and type
something like this. It's really up to you
what you want to add. What I want to add is I want
to add Japan on the top. Let me bring Let's go fill this background with black
color so it's better for us. Now what I want to do with
my design is I want to create a new layer
on the top and I want to type
something like Japan. Make it with some other design, with some other text. We can go with this. No, that's not the font
I was looking for. Let's go with this one. We can select those two and we can go select those two and put
it just a bit below. Now I want to select
my Japan layer. Make sure it's on the middle rate and we
can do stuff like that. The land of the rising sun. I think it was
something like that. Let's go check it out. And of the rising sun, yeah. Sorry again about this keyboard. It's super annoying. This I will make it smaller. What I want to do is
spacing between those two is I want to bring
that a bit closer. Okay. Now with that, we can bring
that up here and what we can do is we can go and add
some black black outline. Just go on a landing options, add a stroke, this should look nice and this Japan should go below
this Tokyo layer. But how I'm going to do that
is I will add this into a group and I will move this
Japan below my Tokyo layer. What I want to change up here, I want to move this on a
to get it on a same level, get it smaller and that's it. Basically, this can be our
second design or we can add, we can go and change a color of this to something like this. We can go do the same
thing with Japan. We can use the same image, same color, and we can outline
this with any other color. But I think it looks much better with white
color for some reason. And that's it, guys. What we can do and add also, we can go up here and we can maybe go to
blending options, go to stroke and fill
this with white color. So to get this effect,
it's really up to you. Do you wish it like this
or something similar, or we can even try
to fill the land of the rising sun with black color and outline it with
the white color. Let's try that on. Double click on the effects. Let's go to stroke and try
to fill it with white color. This also looks decent. Let's try the same thing
with Japan, make it black, and let's go to blending
options and add a white stroke. This is not bad. We can work with something
like this also. What we can go and do here, we can go and increase spacing to get
something like this. This is nice and that's it. Basically, we can play in
Photoshop however we like. And I think this
design is decent. We can use it for our image. We can use it for our
shirt, and that's it. I hope you'll learn
something new in Photoshop. This tutorial should be
super easy to follow. If you have any questions, any problem, just let me know. All we did, the hardest
part was here creating a clipping mask to a
layer below to this text. We connected this image
to this specific layer, everything on this
image will be only visible on this Tokyo layer. If I go and move it like this, we can see we move
this image below. We can go place it
like this or this, it's really up to you
how you prefer it. And that's it guys
for me in this video. See you in the next one. Thank you for watching and Bye.
6. AI + Photoshop Design 3: Hello there and welcome. In this video, we will
create another design. But before we start with that, I just want to mention
a couple things that I think are
really important. First of all, in this video, we will create another
design and after that, we will be done with this
part where we create designs. Why is that with only
a couple of designs? Well, basically, we can create 100 different designs
using similar techniques. So it's really up to you after
you got your image ready, how you want to put
that into Photoshop and which niche you are going to focus on,
that's really up to you. What I want from you
is to share your work. I don't like those classes
where teacher only shows what to do and everyone
listen and that's it. Let's go on another thing. I want to get
interaction with you. I want to see what
you accomplished. Basically, you can
show me your work. Maybe I can teach something
from you or I can show you, I think you should change that. I think you should do that, do that and stuff like that. Let me see your work. That's it. Enough talking. In this video, we will create easiest
possible design. So with the easiest and the prom that is
super easy to type. Basically, we will create
another design on our niche. Let's say we want to create
robot girl Let's type it in. Robot, girl, full body. Black hair, Black hair, and what we want to in cyber punk team, and what we want
to another thing, let's say, on a
white background. So let's see what
we are going to get Let's say we can use
something like this. Let me see. Reference, let's go with something
like this movement, Cyberpunk, let's
hit Create another. I like this one better. Let's go upscale it. Yeah, that's decent design. Let's go download. And bring that into Photoshop. Now what I want to do is
we can go from up here and click Object Selection
Tool and just like that, it should create selection of
our object just like that. Control J to create it on a
new layer and it's amazing. Those results are super nice. Let's get this girl
a bit smaller. Okay. Now what I want to do is I
want to type cyber behind her. I will use this font. We can go increase
that by a lot. Let's say something like that, but put it below. Now let's go create
another layer and let's find some
font that is similar. We can go with that.
I don't know why, but for some reason, I really like this font. No. Not for this one. Let's stay with this fund. What I want to do is Yeah, we should do
something like this. Get it smaller 85, nice and spacing between
something around that, what I want to add. I want to make those
smaller 150, even smaller. Yeah. I think we should
go with zero and space in between should
be even smaller. Much better and
decrease the size to around 100, maybe 110. Now, what I want to do is I want to add a couple more stuff. Let me just click those four and bring my move tool and
align them on a middle. Now I'm sure this is right
on the middle of my design. Great. Let's go create a
new layer and from up here, what I want to do is we can go use rectangle tool to
create something like this. And fill it with white
color. This is nice. What I want to add up
here is I want to add some random stuff,
just like this. With holding alt, I can go and duplicate this just like that. Let me zoom in to
see what I'm doing. Nice and Great. Now when I got those selected, I can bring them up
here, make it smaller. Maybe we can go
and duplicate this Make sure everything is
aligned, great. Go back. Make this a bit smaller. Those two align, we can use Great. Now, I think you understand what
I'm trying to do here. Great. We can go and
duplicate this one on another side or we can go
and do something similar. Let's just say we want to go and duplicate this right up here. Nice. We can go up
here from ellipse, make something like this, and move this layer below. Don't get confused with
a lot of those layers. We can add them in one group. I can go do stuff like this, put it behind her and create
another one right up there. Nice guys. Now what I
want to do is I want to add one more stuff
and we are done. Basically, what I want to
do is I want to select all of those and put
them into one group. Basically, that's
all into one group. What I want to do
is I want to bring those two layers now a bit more there and Great. Now what I want to do
is I want to add text, something like beyond
the boundaries of humanity and we are done. Let me just go type that on. Basically, guys, this is how we created another
design in Photoshop. I think it looks really nice. We can go play with colors. We can change the
color of our font, of our text, and we can
change stuff like that. But this is just me
showing you the basics. We won't go super
into details because this class would take a lot
more time than it should be. What I want from you
is to give you idea, to give you a concept, how you can create it on your own later on through
the practice, through stuff like that. Later on, you should be able to know the details
what should go with, what, what to avoid, what to add and stuff like that. If you have any questions, please let me know. I will be here to help
you through that. This is super simple to
create in Photoshop. I show you the easiest way to do designing part in Photoshop, and I hope you like it. See you in another video.
Thank you for watching.
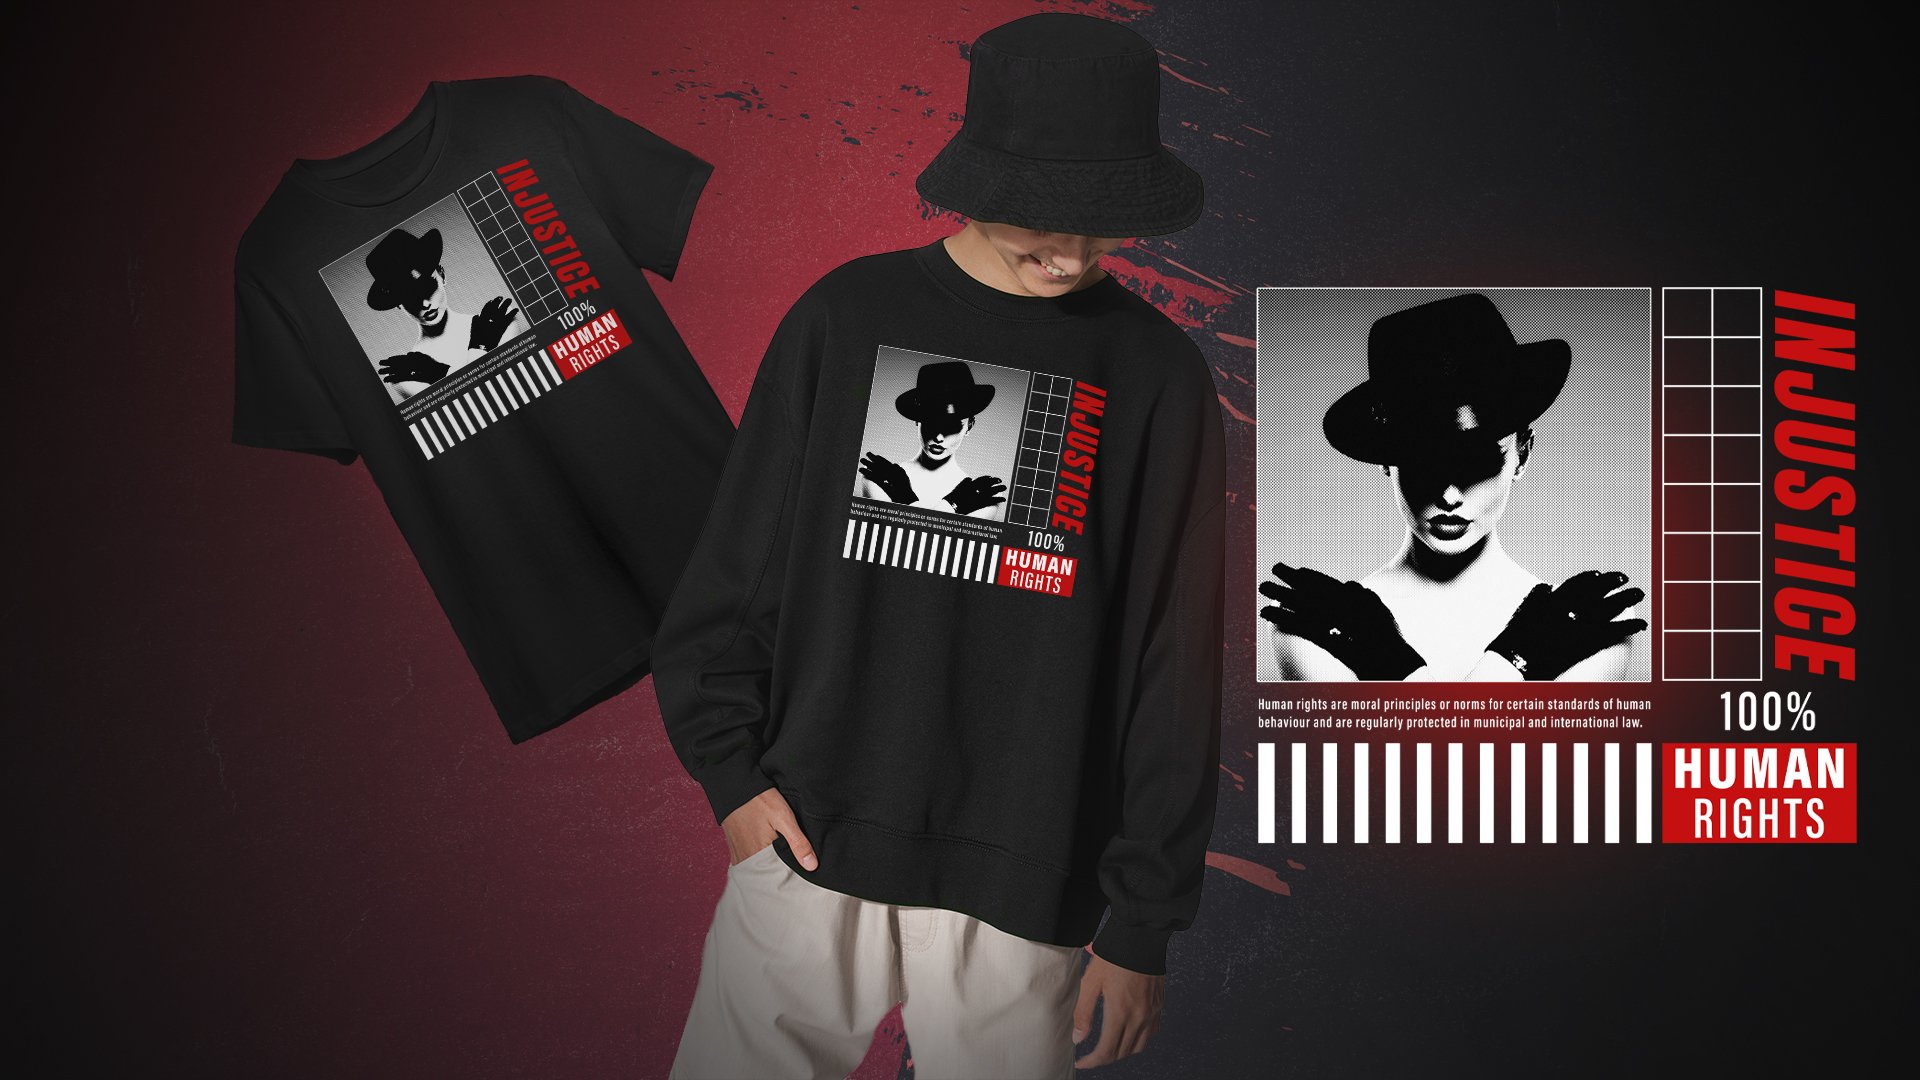
7. Each Design Need Extra Work - How to Fix : Hi, everyone, and welcome. In this video, we will summarize what we did in Photoshop. So basically, before we start, I will tell you I did something wrong with
each design on purpose. That's because I want
you to try to figure it out which part is
wrong with design. At the end of this video, in the last minute, I will show you what's
wrong with each design, but I will leave that part
to you so you can change it. In a project section, you will have each PSD file, so you can download it, each one of those images
of those projects. And what I want from you is
to give it your best work, best edit and
upload it so we can see what you came
as a final result. So that's it about this
design, this, and this. What I wanted to mention what's important
with those designs. Why are used images
like that, like this? Basically, we created one
super realistic girl. This is it. This design
is super realistic. It's like the regular girl, and maybe no one could get it
an AI, or maybe they could. But I think design like this, if you try to sell design
like this on a T shirt, it will be, let's
just say, hard. Why is that? Well, basically
people buy simple stuff. For example, in my experience, the more simple and right
to the point design is, the more sales I get. For some reason, it's
simply like that. We can go with this
design or this. I'm not sure which one of
those could sell better. For some reason, I'm giving
a chance to this one. I don't know exactly why, but it's this combination of colors could go on a lot
of different backgrounds. For example, if we go with red, let me fell it can be
really nice on the red. We can go with
some yellow color. Let's see. A nice. We can go with green. A nice. You get my point. So basically, you can sell
this design on any background, on any color of your
shirt, just like that. That's why I think this
design will go well. If we try that on
with this design, let me just show you nothing. I think this one
doesn't look good. Or if we try with some blue, maybe maybe blue can go maybe. You get my point. And this one basically is like this girl. I think it can go with a lot of different color of a shirt. That's why it can sell good. And it's simple clean design. I think I think this design
can also do really well. And now it's time for my reveal, big reveal, what I
want to show you, why I did stuff on purpose. Basically, what I suggest
you to always avoid always avoid to have stuff like
this on your designs. You see those glossy edges
when we print stuff like this, it can be really messed up. And what's the second thing that is really messed up and
won't go really well. Won't probably get one
seal is this part. This text is really messed
up. No one can read it. The point on a shirt. The point is to have clear
design with readable text. This is not readable,
no one likes this. And that's why we should
remove this text or at the one sentence that is readable that is suitable
with this design. So what I want from you as
a project for this class is to give me your version
of this design, okay? The same one, the same
stuff will go with this. What I want to change, what would I change
with this design? You see this is really a stuff that we
shouldn't have on our design, on our AI, stuff like
that, stuff like that. We need to fix
that or delete it. We can basically
delete it or fill it with the same background. Okay. And another
thing that I want to change that I would change with this
design is, excuse me. Is this text. This text is super nice. I would change this
or this one below. Combine in your designs, combine two maximum three
different fonts on your design. When it's one font
on the whole design, it really depends, but
it can be super boring. This design should this design could look much better if
we use different font, maybe up here or up here
or combine something. This is super boring, and this is also the problem. So fix that as a project. This is your job now. And the last one is also
This is the easiest. What you can do up
here is basically just change a font of Japan and
the land of the rising sun. So that's your project file. That's your project
for this class. So I cannot wait to see
your final results. Please do your job,
give it a try. Don't worry, just
upload your work. I cannot wait to see it, and don't be mad on me
because I did this.
8. 4 things you need to know: In this video, I
just want to share a couple advices with you
that can be super helpful. One of those advices would
sound something like, don't expect too much from
one design or ten designs. Basically, if you're going
out there on a marketplace, and sometimes on
your own designs, if you advertise them, if you put money into ads, sometimes you think this design would bring tons
of money for me. You spent even money on advertising it and you get
almost nothing in return. So what I want to tell you is don't expect
too much from one design. This is a world where
a lot of people do similar stuff like you and I, and we need to put a
lot of effort into it because some variations
in a design. We can create ten different
designs around this stuff. We can maybe add
different color of her body of her, I don't know, her hair color or
we can change text, we can add different
font, stuff like that. What I would suggest to you is create collection
for consistency, create similar from one design, create five, ten
different variation, and upload them all. Maybe one of those
could bring you money. The second important
thing is something like resolution and the
size of your designs. Basically preparing your designs for
different marketplaces. Usually on a merged by Amazon, resolution is something
like this with orientation. This is the size of
a document that I use on my designs
for merge by Amazon. It really depends from
platform to platform. Before you start designing, basically, before you start
with your designing process, go on that platform and see which resolution
they recommend, which size and stuff like that before you start
designing later on, your design could
look messed up. That's the second thing and
the third thing is pricing. About the pricing, it really depends from platform
to platform. As I mentioned in a previous
video or some of the videos, you need to do your research. It really depends from
platform to platform, but discover so that's something that you need
to do by your own. You can go on social media, see experiences
from other people, what they suggest for what platform to do
and stuff like that. The last thing that I want
to mention is copywriting. This is really important. Before you start designing
for any specific platform, go check out do they allow using AI designs
or similar stuff. Always be careful, especially
on a merged by Amazon. Merge by Amazon is super
careful about those stuff. They can ban you like this. In a second, it doesn't matter. I know a lot of people
with 10,000 designs live, they ban them like
they are nothing and people who are earning
1020 per month, they got banned just like that. Be super careful on
Merged by Amazon. Also on Etsy ATS is also super careful about
stuff like that. Usually, what that
means is doing research super important for every platform out
there and that's it. I wish you good luck
with your store, with your work, with everything, and that's it for me anymore. I don't want to take
your time anymore. I wish you all the
best and see you in the next class or
something similar. Bye.
9. Marketplace or Solo - What Should You Choose: Hello and welcome.
In this video, I will show you
the best platforms out there that you can
use to sell your work. Before we start, we need
to know difference between marketplace and the regular
shops, the regular platforms. For example, ats
could be Marketplace, Red Bubble also and merged
by Amazon or Marketplace. What that means.
Basically, that means the if we sell a
T shirt for $20, our profit will be around $2, maybe three at max if we
use those marketplaces. Why is that? Basically, that's because they advertise for us. We don't need to spend any money on that part and in return, we get small portion
of each sale. That's how we can
sell on marketplace. But there's a catch. We cannot control
almost anything. Can control the look of our
shop on Etsy on Redbubble. We cannot do that even
on a merged by Amazon, but Amazon is really strong and big company and you
can get promotion for free if your designs
shows really well, if your designs do really
well on that platform, but there is no
guarantee about that. If you want to control and know how much money it really
cost you per shirt, how much is your profit, how much it costs you to
bring a new customer, then you need to do a
couple extra steps. You need to go and create
your your Shopify store, connect that store, for example, with Print full and choose
from those products. For example, we can
use our designs and upload them on women's
clothing, men's clothing. We can go upload it to
accessories, home and living. It's really up to you
which one you choose. For example, we
can use our store. We can use our
design and upload it on a and something like this paper poster or we can go and upload them to
mug or stuff like that. You see how many
different products there it is to
upload our design. One perfect example for
that is this website. Basically, you see how
many different AI images are up here and what we can do. For example, let's just say
I want to buy this one. You see this is some shop and it will cost us 50 bucks
49 to be precise, to get this product. You see, there is a magnet,
there is a picture, a metal frame and below that
is another another images, similar images from up here, we can see how much it
will really cost us. You see, there is a
discount and there are some information about
that and that's it. We can choose different options. But people behind this website are spending money to advertise. They are probably connected
their Shopify store with some Print full printfy or some platform that
is print on demand, you don't have to
store anything. Once someone purchase your
item from your website, automatically
Printful will connect that purchase through your
store and it will cost you a lot less than if you get
the same seal on for example, let's just say merge by Amazon. Merged by Amazon T shirt
will cost you 16, 17 bucks. For example, you can
get that shirt for $7. If you spent three
or $4 on an ad, you still have a larger
profit with each sold item. But for that, you need to do a couple extra steps,
as I mentioned. Let's go over every platform. For example, we have ats. It will cost us $0.20 with
each design we upload on AtSi and I think it was like 90 days or 120
days. I'm not sure. We have that design live and once it gets sale
from that design, they will charge us
another $0.20 to re upload that design or
relaunch it on our store. But the cost of your shop
to have your shop on Etsy will cost you
nothing and they have a lot of monthly visits like millions and what's important if you want to
get noticeable on Etsy, you need to have good looking
shop with cool description, cool images, and
stuff like that. Same thing is basically
for every marketplace, the red bubble is the same. I used to upload a lot of
designs on a red bubble. For me, for me, it's not that big of a deal, it's not that profitable. For some reason, my designs did the best on a
merge by Amazon. Merge by Amazon is the
greatest out there, but there is a catch
with Merged by Amazon. It's extremely hard at the beginning with
merged by Amazon. Because they put limit
each time on your shop. For example, on your account, when you got accepted, before everything you need to apply to be part
of that platform. You need to apply and
if they approve you, you can upload designs
on merge by Amazon. But only at the start, you can only upload ten designs. Once you get 1010 sales, they will rank up your profile, and you will be able
to upload 25 designs. Once you get the 25 sales, they will upload you. They will rank you up to
100 250 or 500, I forgot. Then 1002, five, and stuff and you go up and up as much your designs get sales. Why is that hard?
Basically, when you have only ten designs, merged by Amazon is
extremely tough to compete with to compete
with someone like me. For example, I have 2000 live designs on
merged by Amazon and you so my designs
are probably going to be more noticeable
because I got 2000 of them. You only have ten designs. So the beginning
is extremely hard. But as you rank up your account, then merged by Amazon is
the best platform if you have time and patience to
wait and build slowly. You will build Merged by Amazon, on a long term, you can get maybe the best sales
on merged by Amazon. But at the beginning, if you have I spent
I think almost two years to get
some real money if I can say like that on a merged by Amazon on another platforms that I did really well is ATS. In this video, I just want to go over the basics
over those stuff. What I suggest to you, let me break down this for you. If you have time
and you don't need money and you want to
build this slowly, you go with platforms
like merged by Amazon, Etsy and later on Red Bubble. It really depends,
but what is good, you can upload same
designs everywhere. So that's up to you. But if you want to build
something that you can control, that you can build the way you like it and if you have money to spend on ads and also
have Shopify store, Shopify is I forgot
how much is it 50, 6,200 bucks per month on a
Shopify after three months. And you'll need money for
it to run it basically. If you have money and
you want to control your business and you want to
charge as much as you like, you go create Shopify
store connected with any print on demand
platform you like, and you start
advertising your store. But if you want to go
slowly without any risk, if you want to build
any passive income, you can do that on
a merge by Amazon, Red Bubble, or at sea. You can also spend
money on ads on ATS. There is also a lot of
different marketplaces, but I spend a lot
of time on them. Those are not worth mentioning. For me, that's my
suggestion in this class, I want to go step
by step showing you how to build your
Shopify store or how to build or merged by Amazon business because
if you go on my profile, you'll see I have
different classes going step by step
doing stuff like that. I have separate class
about Merged by Amazon. I have also separate class about how to build
your Shopify business, how to connect your store, how to design for your store, and I covered
basically everything. I don't want to
repeat myself again doing the same stuff only
for a different store. So that's it. Basically,
let's summarize, if you have money
and you want to spend it on ads on your shop, you want the control,
go with Shopify. If you want to build slowly
but surely passive income, you go with the marketplace. Like Merge by Amazon, red bubble, or ATS. I would focus on
ATSI right now at the first place later on when I get accepted onmrge by Amazon, I will focus on Merge by Amazon until I get 100
designs at least, my main focus would be on ATS. Later on, you can try on red
bubble and you can go on Google and type marketplaces for selling t shirt
or stuff like that. What I like to say is what
my friend once told me, do your own research. Basically, that's really the
best advice I can give you. Do your own research, do research on each one
of those platforms, find which one best suits you. After that, when you decide, focus on that, put your
work and that's it. If you need help,
just contact me. I'll gladly help you with
my knowledge, my time, and everything I have, I will gladly share with you. That's it for me in
this video and see in another one. Thank
you for watching.
 Aldin P., Designer