Transcripts
1. Introduction: Welcome to this Affinity
Publisher for principals class. I'm Monique, the Affinity Girl, and I'm so excited to
bring this class to you. I love using Affinity
Publisher to create printables products
such as affirmation cards, calendars, habit
trackers, planners, coloring pages,
and so much more. But why Affinity Publisher? Firstly, because
it's much easier to use than other design
programs I've tried. It's fast and intuitive. The tools are great, and it's
a pay once pricing model. Designing principles
in Affinity Publisher is not only easy
but fun as well. It's a powerful program, and I really love it. In this class, I'll
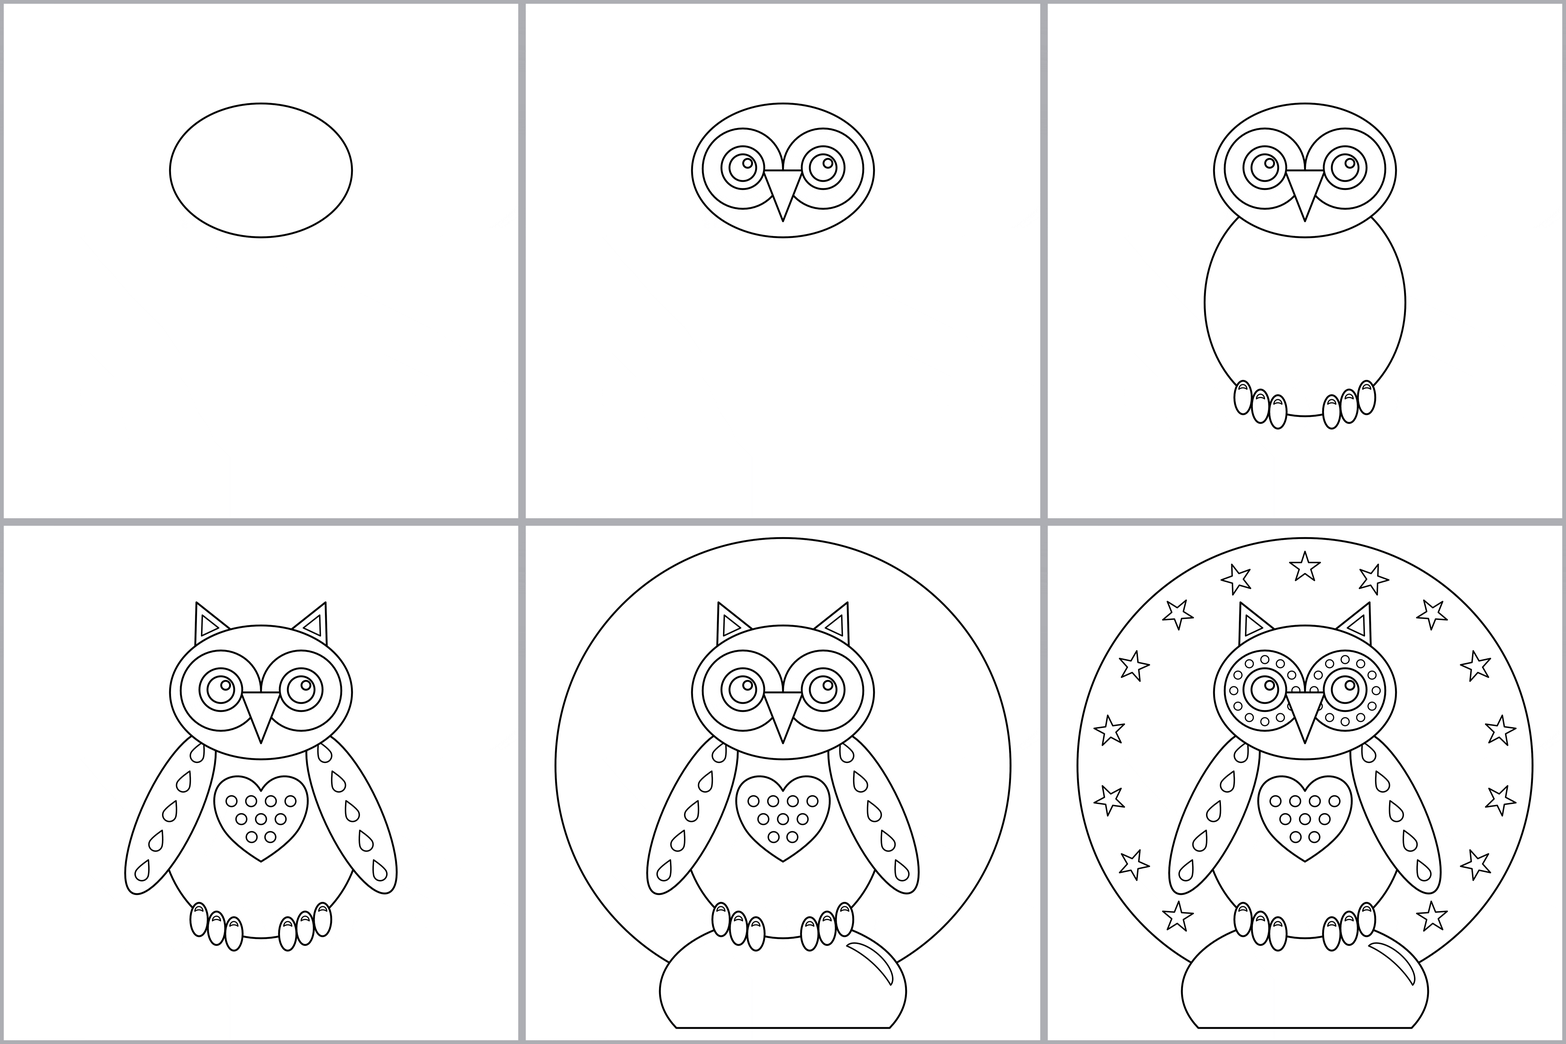
show you how to design a fabulous O colouring page
using Affinity Publisher. You'll get to see
my thought process when designing a principle, as well as learning a bunch
of publisher tips and tricks to take your design
skills to the next level. You will learn how to
download and install Affinity Publisher two with
a seven day free trial. Set it up so it's easy to use. Use margins and guides to
figure out where things go. Explore the versatile
shapes tool to create all the
different parts of your A, learn how to use strokes to add definition
to your design, and use layers and groups
to keep things organized. You'll also learn how to rotate
elements in your design, align elements easily,
duplicate and flip elements, and the power of
the snapping tool. Included in the course are easy to reference
class resources, which will help you confidently design your out from
start to finish. If you want to
learn how to design principles in
Affinity Publisher, then join me for this class for an over the
shoulder adventure. It's going to be fun
and I can't wait to see what you create. Join me.
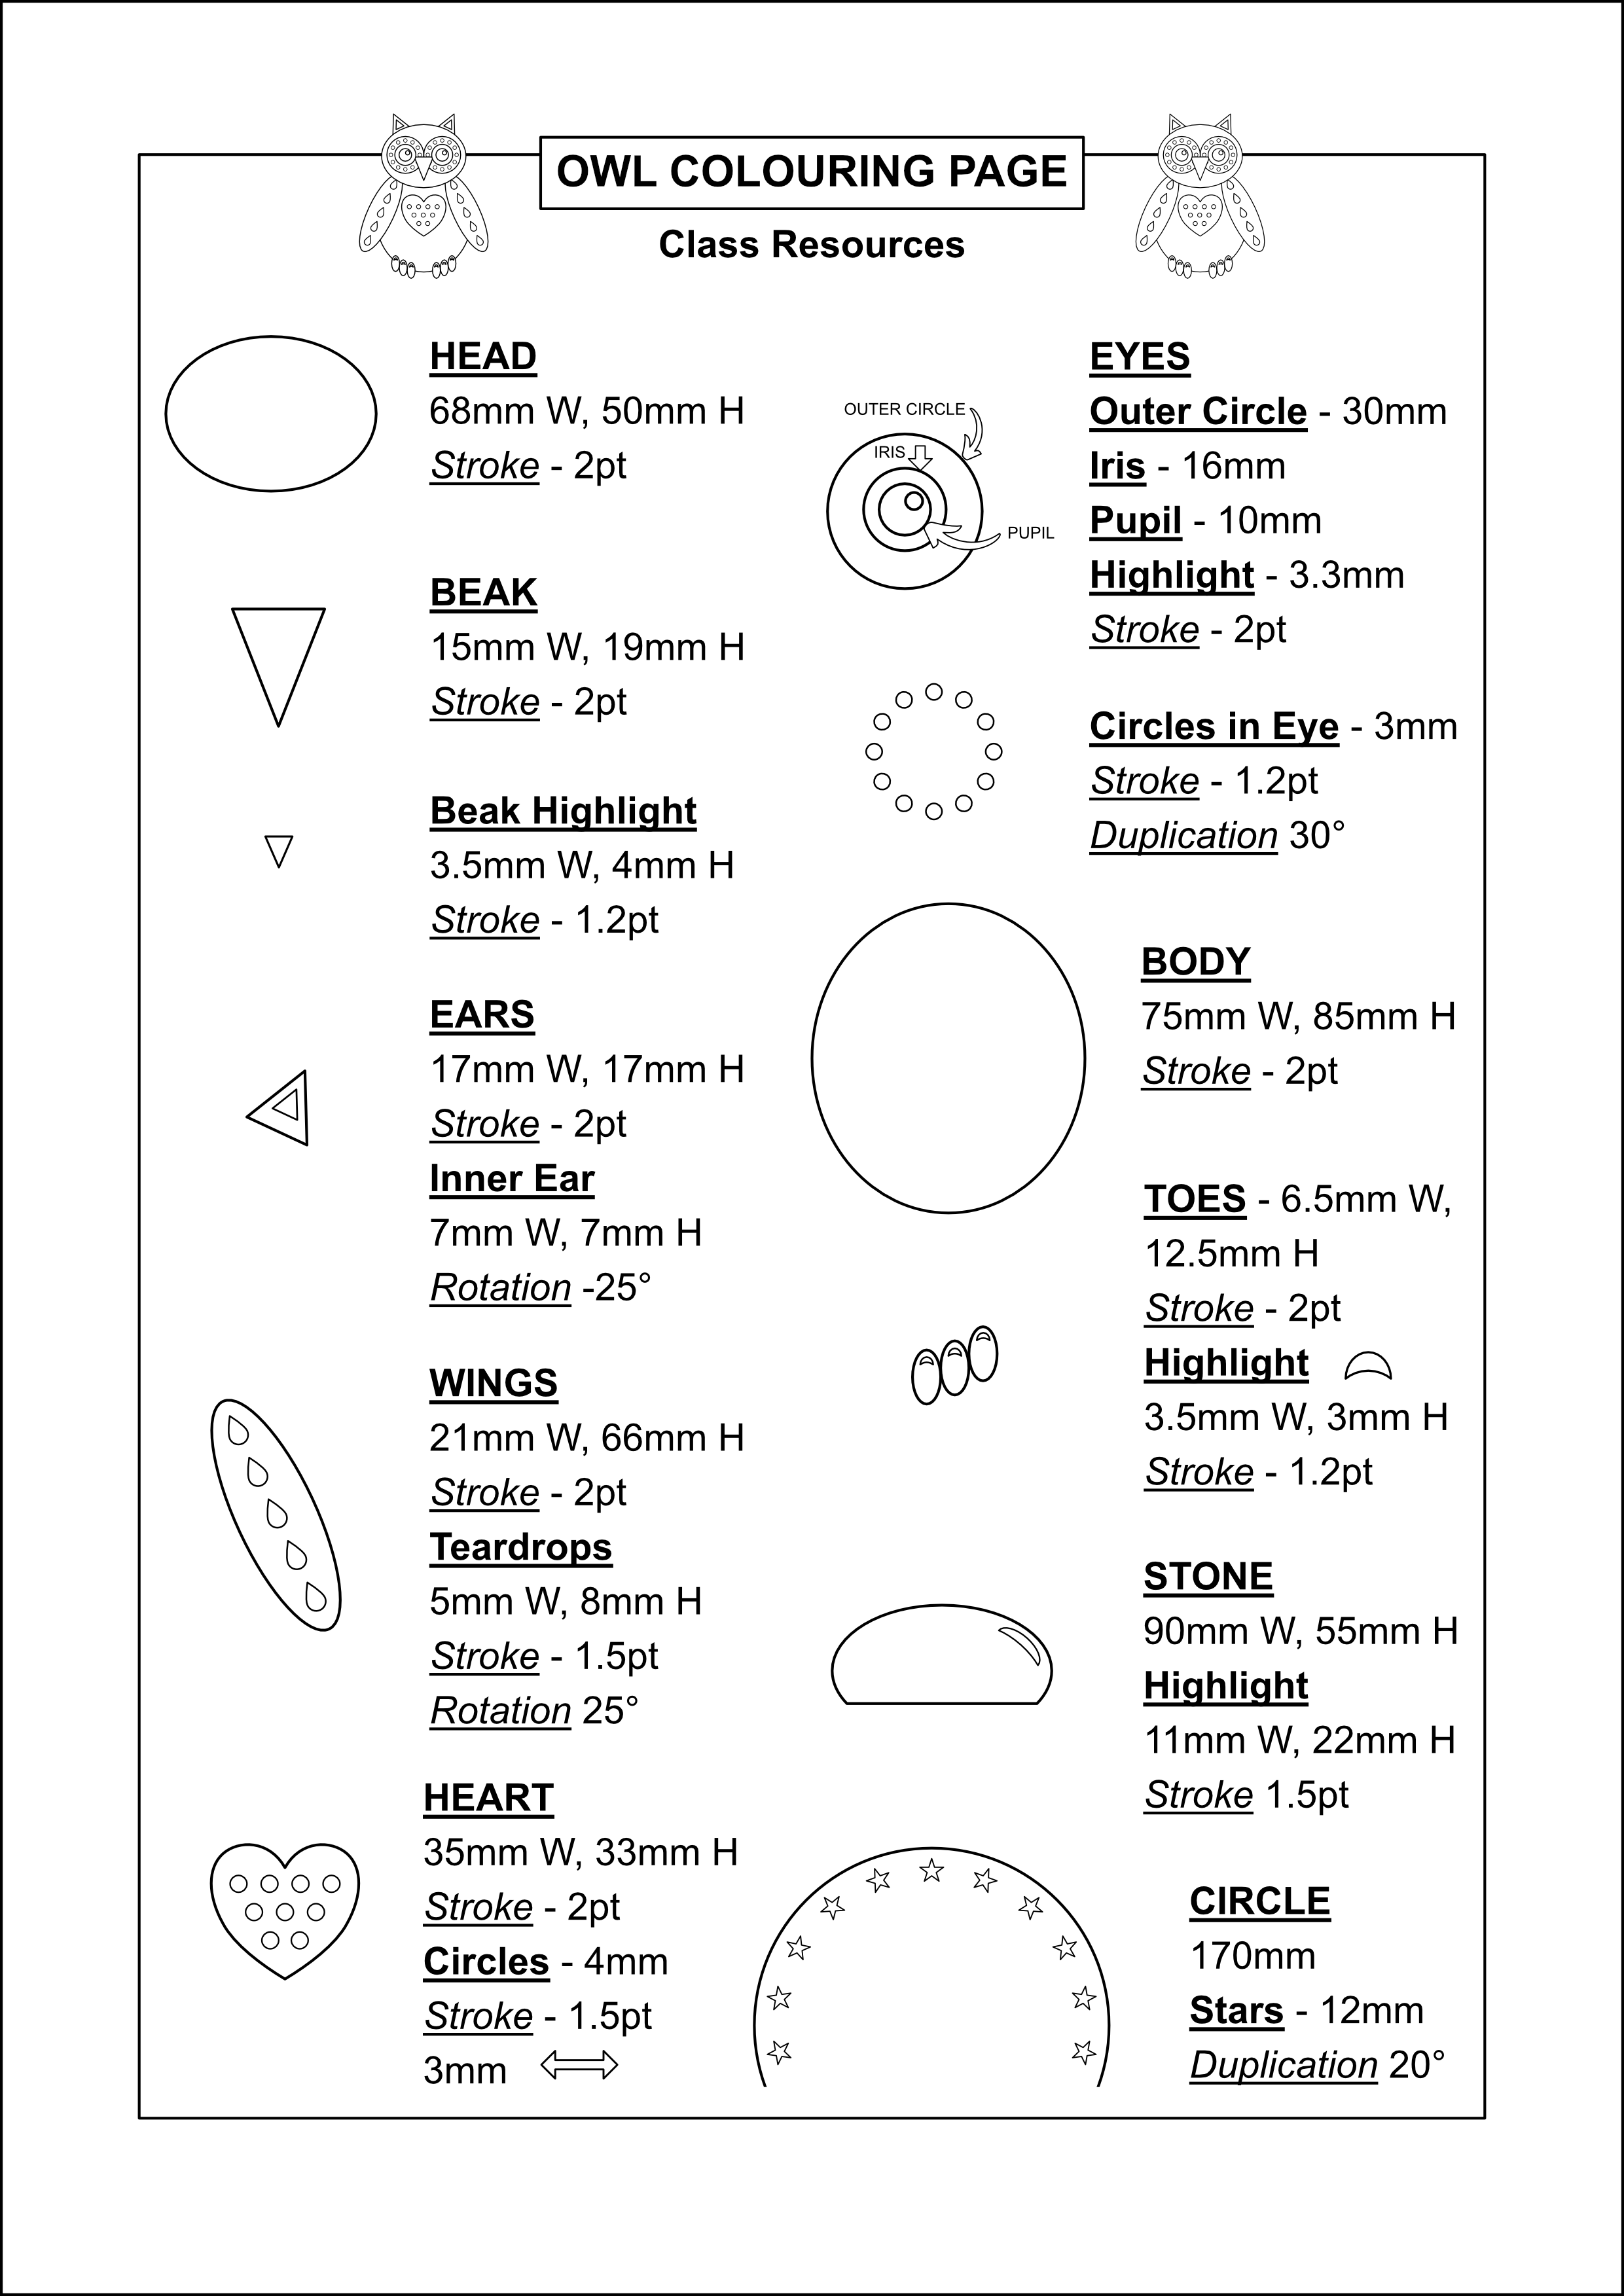
2. Class Resources: I have created some
class resources to go along with this class, which give the exact dimensions
of the owl I create. You can choose to use these
and follow along with me, or you can create your
owl in your own way. Both options are great. I just want you to have fun and be proud of what you create. Also, if you get stuck at
any point in this class, please reach out
to me as I'm here to help. Happy creating.
3. Getting Affinity Publisher 2: In this video, I'll
show you how to get Affinity Publisher two,
how to download it, how to activate the seven
day free trial if necessary, and also how to launch
it for the first time. Okay, the first thing
you'll need to do is you'll need to go to
the Affinity website. So I'm going to launch Chrome. I'm going to type
in the URL up here. So affinity.serif.com. Takes you to the
Affinity homepage. On the Affinity homepage, you'll need to go to the button
up here in the middle of the screen that says
Publisher. Click on that. You'll then need to go
to the big green button on the right hand
side that says B now, and that will take you to the Affinity Publisher two page. If you scroll down, you'll see that you've got the option here to actually
buy the software. I'm in the United Kingdom, which is why it's in pounds. If you scroll down a
little bit further, you'll find there's
a box that says Affinity version to
Universal license. Down here, there's
a little button that says try for free. Affinity offer you
a seven day trial, seven day free trial, which allows you not only
to download publisher, but it also allows you to
download Designer and photo, which are the other two
pieces of software. They're all fantastic. I use them all for different things. But for this course, obviously, you will need to
download publisher, but you do have the
option to download the other software if
you fancy trying it. So you'll need to
click. Try for free. Seven days doesn't
sound very long, but it's actually long
enough to do your principle, and it's also long enough to hopefully fall in love
with the software. I love Affinity software. It's changed
everything that I do, and I'm hoping that you'll
grow to love it, as well. So we've got to this page. We need to enter our email. Made a typo there. Put the
email address in correctly. Click get my email. You see my email
is already added. I now need to create an account, so I need to put my
details in here. You need to enter a password. Make it nice and strong. You can then decide
if you want to stay informed or updated
about Affinity offers. You need to tick the terms and conditions box and you need
to click Create Account. It shows you now that
you're signing up for the free trial for the
Universal license. You've entered your email and you've got your
account details in there. You then need to click the
big Green button that says, get my download link, and you'll be taken
to this page. One last thing you've got to do. You can sign up here again if
you didn't sign up before, but you need to verify
your email address. This box here, it
says you need to give Affinity consent that they
can actually email you. So I will be right back with you when I have
verified my email, and I'll show you
what happens next. Okay, I'm back with you. I've verified my email. I've
gone into my email account. I verified the email that
was sent from Affinity, and I'm now going
to show you how to download the software. You can either just refresh
your page or you can go to the little button
up here that says account. Click on that button. And if you go down to
download and product keys, it will take you to this page, which is the same
page it will take you if you refresh your page. There's lots of options here
to download the software. You need to find the software and the platform that
you want to download. So you've got Affinity
Designer on Windows, Affinity Designer on Mac, Affinity Photo on Windows, Affinity photo on Mac. You've got Affinity
Publisher on Windows, Affinity Publisher on Mac, and you've also
got the option to download all the
software onto iPad. I'm on a Mac, so this
would be the button that I click to download. Which
is what I'm going to do. You'll see that it
pops it up into the downloading books up here,
one downloading progress. It takes a second to download. Will it do its thing,
it it catch up? I'm just going to minimize
that for a second. I now being on a mac, it's going to be
slightly different if you're on a Windows computer, but on a mac, I have to pop that into my applications
folder like that. And then tells me that it's copying it into the
applications folder. I'm going to close that,
and I'll be right back with you just before I'm
about to launch the software. Okay, so I've
launched my software. It then gives me
a message saying, It's an Internet app.
Do I want to open it? Am I sure that I want to open
it? You just click Open. You may well be asked to verify your seven day trial to activate your
seven day trial. If it gives you that
option, just activate it. Is telling me I've
got extensions there. Activate the seven day trial, and then Affinity
Publisher will open. This is how Affinity Publisher
opens for the first time. You'll be greeted with
a black user interface, which I will tell you how
to adjust in a minute. And also, we need to
change these panels here. But I will show you how to
do that in the next video. If you've got any problems,
reach out to me and I help you make sure
that your software is downloaded properly. M
4. Setting up Affinity Publisher 2: In this video, I'm going
to show you how to open Affinity Publisher
for the first time, how to launch it properly. I'm going to show
you how to change the color of the user interface, and I'm going to
show you how to set up the panels to make it as easy as possible to design
your colouring page. First thing we need to do is
launch Affinity Publisher. It's down here in my dock. When you open it
for the first time, you're going to be greeted with a page that looks
something like this. This is a dark user interface. I tend to work with the
Light user interface. So I just change
that by going to the Affinity
Publisher two menu on the left hand side up
here. I go to settings. In the box, I look for user
interface on the left. And then there's an option
here that says I style. I've got the option for
dark, Light default OS. I'm on a Mac, which is why I've got the default OS option. I change it to light
user interface. I tend to work with the
light user interface, no matter what
program I'm using. I just find it
easier on my eyes. I find my eyes get less tired, and I also actually find it easier to find things
on the screen. Next thing we're
going to do is we're going to change
out these panels. You can see that there's lots
of options in these panels. We're not going to use
all those options. So I just put in the options and the panels that I'm
actually going to use when I'm designing
my coloring page. You access them through the
window menu at the top here and you'll see there's lots of options ticked. We
don't need all those. The easiest way I
found to actually start again is to close
the panel groups. So close panel group by clicking on the
three little lines, closed panel group,
closed panel group. Then we go back into the
window menu at the top. All we need to design our
colouring page is pages, which pops over on
the left hand side, it automatically
goes to the left. Layers, which will go straight
to the right hand side. Stroke, Satches you'll probably have less options
here for swatches. I tend to collect colors
as I'm going along. I really love colors and
enjoy working with them, so I add them to my
swatches menu as I go. And the last one we
need is transform. Now, you'll see
that transform goes straight to the bottom
right hand corner. There's a really good reason
for that because when we're working with shapes
and elements on a page, it actually is so much easier to have this
open all the time. You've got the options
for width and height down here and you've also got
the option for rotate, it just makes it a
lot easier to be able to see what's
going on on the page. To open these panels up here,
you have to click them. Same with the pages
and the master pages, which we will get onto
in another video. And Transform, as I said,
is open all the time. Okay. You've got Affinity
Publisher two set up. I'll see
you in a minute.
5. Getting Going with Affinity Publisher: In this video, I'm going to show you how to open
a new document, set up your margins
using guides, and how to work with
master pages and pages. To open a new document, just go to File in the top menu, go to New, and it will
bring up this box. You have a long list
of options down here. The list goes on and on. I tend to work with the A sizes because I'm in the
United Kingdom. You might want to work
with US letter size or another size if you're
in a different country. First thing you need to look
at is layout down here. This gives you the
dimensions of the documents, check what you want them to be. DPI is dots per int. This is the resolution that
the document will print on. If you want to print, 300 DPI is a great resolution to use. Don't worry about
default master. Document units are here. You can change it to
whatever you want to. So millimeters,
centimeters, inches, pixels if you're doing
something completely different. And don't worry about
image replacement. You go to pages.
There's the option here for facing pages. Publisher can be used to
design magazine layouts, so that's where facing
pages comes in. We're only designing
one document so you can uncheck facing pages. Don't worry about
a range because that's to do with
facing pages as well, and we just want one page. If you go to color, when you open Affinity Publisher
for the first time, you'll likely find
that this is on CMYK. I always change it to RGB eight. There may be times also
there's an option here for transparent background that you actually want a
transparent background. Generally, if I'm designing
principles or coloring pages, I have a white background,
which you can see here, but there may be times if you're designing something like a PNG, where you need the
background to be isolated, you can actually
remove the background. I'm going to have
that ticked for now. Margins, this gives you the option to actually
put the margins in here. We're going to create our
own margins with guides. So I untick margins and bleed. Again, you might well have something already
in these boxes. If you need to
change them to zero, because bleed is
only to do if you're having the document
printed professionally. Other than that, you don't
need to worry about bleed. So I make sure this
little button here, which is link bleed, I make sure that is checked. There's two little box. It looks a bit like a bracket sign. That's when it's unchecked.
That's when it's checked. And that means then
you can change the size of the bleed
if you need to, or you can change it
to zero all in one go. So if you notice I put zero back in there and click Return, it will change
everything all at once. I then click Create. Brings up our lovely
new document. Now I'm going to show you how to draw your margins using guides. If you have a look in our
panel on the left here, we've got the option for
master pages and pages. First thing I want
you to do is to click Master Pages down. At the moment, we've
not got anything in master pages because we've
not created any master pages. First thing we're going to do is going to create a master page. Go to a little button here
that says add Master. Click it, give your
master a name. We're going to call
it guides because we're going to put the
guides onto the master page. I'll explain why
in just a second. There we go. You can now see
that we've got a Master page because it's under the
Master Page panel, and we have a page. The reason I put my
guides onto a master page is because then I don't run the risk of moving
them accidentally. Master pages are great
for when you're designing documents if you want to have the same thing on every page, but you don't want to put it
on every page separately. What you can do is you
can create a master page here and you can then
apply it to the page, which I'll show you
how to do in a minute. I'm going to double
click on my MasterPage, my Guides page to make
sure I'm actually on it. When there's nothing on
it, it's quite tricky to actually see what page
you're actually on. I'm then going to show you
how to access the guides. They're actually hidden within the rulers on the left hand side and on the top of the page here. I'm going to grab the
guide out of the ruler. You literally just have to press the mouse key down and you'll be able to grab a guide out. I'm just going to drop
it on the page there. I'm going to do the same
from the top to show you. You can bring these guides anywhere you like
on your document, and I will show you
the easiest way to actually get them into place. I want our guides
on our new document for our coloring page
at 20 millimeters. If you move that guide about, you can see that Y is
now at 20 millimeters. I'm going to take our
vertical one across as well. And get it to 20 millimeters. If you're really struggling to actually get it into place, hover above the guides so
that the little cursor changes and double
click on the guide. You will then bring
up the guides menu. You can now see our
horizontal guide is at 20 millimeters, which is what we wanted, and our vertical guide is at 20 millimeters, which
is what we wanted. That little box is
really useful if you can't get your guide in
exactly the right place. I want a guide on the
other side as well. So I'm going to drag it across. I'm going to work
out where I need it. I know that our document
is 210 millimeters wide, so I know I need it at 190. It's a bit tricky to get it. There we go, 190. I also want one 20
millimeters from the bottom. I'm going to grab that down. I know that my A four page
is at 297 millimeters, so I know it needs to be at 277. If I can't get in the right
place for any reason, it doesn't want to
snap at all today. I'm going to double click on it. I'm going to look for
the horizontal guide. I'm going to double
click on that. I'm going to delete the number that I don't want
and change it to 277 because I know that's
what I need our guides at. You also have the option
to remove all guides here, which is really useful if you've got loads of guides
on your page. But I'm also going to
show you another way to actually remove your
guide. It's really simple. Hover over the guide, wait
till the cursor changes, pick it up and just
grab it off your page. I'm just going to pop that
back in there just so that I can show you what else
I need to show you. That's now sitting on
our guides master. If I double click on our page, you'll notice that the
guides just disappear. There's a good reason for that. We've created our master here, but we haven't applied
it to this page yet. So you need to hover
over the page. I double click on it and make sure I'm actually on that page. I right click and there's an option here for apply master. It brings up this little box. You have an option
here either to have no master applied
or to have guides. If you've created more masters, then you will have a list here, but you need to find the master that you want to
apply to that page. So I'm going to click Guides. And there's a little box here
that says replace existing. That's really important
if you have got more than one master because sometimes you need to
layer those masters up. And if you don't
untick that box, what you'll find is
that the master that you're trying to apply will take all the other masters out. So if you uncheck that I do
it as a matter of habit, you'll find that
you'll be able to apply more than one
master to the page. I'm just going to click
Okay, now what you'll see, I'm just going to zoom in
and show you what you'll see now is that our
guides have appeared, but they are a dotted line. If I now hover over the top, my cursor doesn't change, which means I actually can't
move those guides about. The reason I found this to be really good
is because when I'm working with elements on my page, sometimes
inadvertently, I can actually
pick the guide up, and then I end up getting things wonky on the page because the guide is not where
I thought it was and I'm not putting things where I thought I was putting them. That's the very reason that
I use the Master page. I've just clicked back
onto the MasterPage again. I know I can now move the guides again because the
cursor changes. I know they're in
the right place. I check that they're
showing up on my page by making sure that I've applied them by right clicking
and going to apply Master. This is just a
really simple way to set up your margins
using guides. It makes it much easier to
do it on a master page, and once you've applied
that master page, it means that your
guides are actually going to stay where
you've put them. I look forward to seeing
you in the next video.
6. The Head, Beak & Eyes: In this video, I'm going
to show you how to start designing your gorgeous
Au colouring page. And we're going to start
designing his head, then his beak, and
then his eyes. So this is our document
that we opened. It's our document that we saved. I saved it under the name
of Au very original. On our documents, we
have our master page, which is here and we have
our page which is here. When we click on our page, I want to draw your attention to the layers menu over here. It tells us that we
have a master applied, and I know it's a master because it has a green line
down the edge of it. If you hover over, it also tells you that it's the guides master. It will actually give you
the name of the master. On the actual layer
there. But only masters have that green
line against them. You know, if you look
in your layers panel that you'll be able to see any masters that you've
actually applied, which is really useful. I'm going to add something to our master page to
our Guides page. You can tell I'm
on the page here, not the master because
the lines are dotted, our guides are dotted. Whereas if I click back on here, we know that they are
solid and you can see that the cursor changes as you go over them so you
can actually move them. I'm just going to add in
a central vertical guide. I'm going to grab it
from the ruler again, I'm going to drag it across and I'm going to drop
it in the middle. I know it's the middle.
I'll show you that again because it goes to
a solid green line. There we go solid green line. I also know that the middle
of an A four page is at 105 millimeters. I'm
going to let that go. Now on our page, that will
now come up as a dotted line. I've now got the margins in, so I know not to go over
the edge of this box here. And we've also got
a central line. I normally put a central line in because I just find it
easier for lining things up. I'm also going to show
you how to line up the shapes on the page using the align tool layer menu up here. So we're going to go
down to alignment. I'm going to go to align center, but I'll show you that as
we're actually going through. Okay, so my class
resources page, first thing I want
to do is I want to create an ellipse that's 68 millimeters by 50 millimeters high with a stroke of two point. So if I go back to
my document here, I'm going to remember to save it as I go along because
otherwise you can do a whole load
of work and you can end up losing it
halfway through. I'm going to go back to my page, make sure I'm double
clicked to my page. I'm going to go to my shapes
tool on the left hand side. Because the last tool that
we use was a rectangle, it's telling me that
it's the rectangle tool. I need to click on that
little arrow there and go to the Ellipse tool because that's the
tool that we now need. I'm going to draw
an ellipse that is 68 millimeters wide and
50 millimeters high. I'm going to start
drawing that in. I never know when you get
exact the first time. I'm going to go down
to my transform tool. I know that this is
selected already. But you can also make sure that you can move it
about if you need to. I'm going to press the V tool or you can go to the
move tool up here. I'm going to go down
to my Transform panel. I'm going to uncheck this
because at the moment, if I change the
number at the top, the bottom number, the height is also going to change and
I don't want to do that. I'll show you what
happens if I do it if I try and make it
the exact size. If I put my 68 millimeters
in here and change it, because that is maintained, it's going to change
both of those, and that's not what I need. I'm going to uncheck
that, which means now that I can change
the height to 50. That gives me that lovely
shape for the owl's head. Now I've just clicked off it. It looks like it's vanished. The reason it looks
like it's vanished is because I haven't
put a stroke on it yet. If we check on our
class resources list, the stroke needs to be at two. I'm going to find my shape. I can often find it. If I'm lucky, there we go. I managed to click on
it. But other than that, go to your layers menu. Go to the ellipse. I get into the habit of actually
renaming my layers, so I'm going to call
this head straight away so that I know exactly
what I'm dealing with. I'm going to click
off there so that it's now registered
that I've named it. I'm going to click
back onto the layer. I'm now going to
give it a stroke, which means going
into our stroke menu. You can see here that
the stroke says zero. I'm going to drag that up and I'm going to give
it a stroke of two. We're going to our
Swatches menu. This open circle
here is our stroke. So you can see that it says
that our stroke is black at the moment and at the
moment we don't have a fill. We will be using
the fill later on. I'm going to do principal, my coloring page in black
and white because I'm going to be printing it out and I'll see how want
to color it in. But you can easily fill it. If I show you what it looks like filled, there it is filled. If I decide that I
don't want it filled, I just put the line
through the stroke. It says, set, fill none. Therefore, I turn the
fill off in there. We've got our
rectangle on our page. I now need to get it into
the center of our page. You can either drag it across
and when it's lined up, if I zoom in for you, you
can see that a bit better. When it's lined up, the guide
goes a solid green color. I now know that
it's in the middle, but there's also
a really easy way to make sure it's
center aligned as well, which I showed you earlier. I have it wherever you
want it on the page. Go into layer, go to alignment, and click Align Center, and that has automatically aligned it with the
center of the page. We've got our head in.
Fantastic. First part of our out is done. I'm now going to save this. I save it as I go
along so you can either go to file, save. Or you can do Command S or Control S if
you're on a Windows computer. But I now know
that that's saved. As I do a little bit more work, you'll see that there's
an M that appears here, which tells me that
the document has been modified and it means that it needs saving if you
want to save the changes, the modifications
that you've made. I'm going to check what
we need to do next. We're going to create our beak, first of all, 15 millimeters
wide by 19 millimeters high. So I'm going to kick
back. I'm going to uncheck that because I don't need that highlighted
at the moment. I'm going to go back
into my shapes tool and I'm going to go to the
triangle tool this time. And I'm going to draw
myself a triangle. I'm literally going to click on the page and I'm going
to drag it across. You'll see that the
triangles you create, they are always that way around. They are always in
that orientation. We are actually going to
need to turn it outside down and I'll show you how to spin
it around really easily. Just going to check
back on the dimensions. 15 wide, 19 high, 15 wide. So I'm going to come
down here 15 wide. And 19 high. Now we've got a
lovely beak in there. You can either
spin this round in two ways. I've got three ways. You can either spin it around. You're going to need to
spin it around 180 degrees. That can be a bit
tricky actually trying to get it exactly 180. I'm going to undo that
with Control or Command Z because I actually want
to show you another way. You can see my cursory
is still across. That means I'm still
in drawing mode. I actually need to put
it into Select mode. I'm going to go back
to my MO tool here. I'm going to click that
and I'm now on Select. Other way you can
shift it round. There's a little button up here that says rotate clockwise. That will allow you to spin it around in 90 degree increments. If I click it, it goes around clockwise and if
I click it round again, it's gone around 180 degrees. Every time you click it, it will go around 90 degrees. If you want to go around some reason the other way around, rotate anticlockwise, it
will go back the other way. But I want my beak upside down. The last way you can do that, if you actually
want to do a very specific amount
that you rotate it, I'm just going to
take that back. To how it was when we drew it. That's how it is when you draw it. I'm going
to click on that. If you're selecting a shape, you need to click on
the edge of the shape, the edge of one of the lines. You can go down to
the rotate option here and you can
put in 180 degrees, click it and it will turn it
around for you 180 degrees. I will rotate at 180 degrees. We now have our beak, I'm just going to store
our beak up here for a minute because
I'm going to get all the elements before we
start putting it all together. Next thing we are
going to do is we're going to create our eyes. The eyes have got
different parts, if I show you here, I'll
just zoom in for you. So we've got our outer circle, we've got our iris,
we've got our pupil, and then we've got
our highlight. Our outer circle,
our biggest circle is going to be 30 millimeters. Again, each of these has
a stroke of two point. So I'm going to go back.
Remember, I was talking about showing that the
document has been modified. Here it is, it says O
and it's got an M by it. I'm just going to
quickly save it, go to file, save, and then the M disappears. That now means the
documents saved. Now I've forgotten
the dimensions for the Is, 30 millimeters. This time we do want it
to be a perfect circle. We don't want it to
be ellipse like this, so a squash circle, we actually want it to
be a perfect circle. I'm going to go back into
the shapes tool here. We're on the triangle
because we did the beak. We go into there, click the ellipse tool and I'm
going to hold down shift. You can see that it's in drawing mode because the
cursor is across. I'm going to hold down shift, and I'm going to drag
my mouse out to 30. Sometimes I can get it exact and sometimes it doesn't
want to get exact at all. When you come down
to the transform tool on the right hand side, you can see that the width is 30.9 millimeters
at the moment, and the height is
30.9 millimeters. We want to maintain
this aspect ratio. We want the width and the height to remain the
same when we change it. So we can actually
activate that again. I'm now going to change
that to 30 millimeters. If I press return, it will
change the height as well. So we now know that we've got a perfect circle
of 30 millimeters. I'm going to click
back on my move tool. I'm going to bring this
down into our head. It looks huge, but there's a
good reason for this because owls tend to have the big
part around the eyes, the big circles
around their eyes. Now, as you move it into place, you will see if you
move it up and down, I actually want it just above the middle line of his head. So that's the middle
because you can see there's a solid
red line which tells me that you're actually in
the middle of the head shape. But I actually want
it slightly above. Need to make sure the right
one is selected there. I actually got the
wrong one there. I actually got the head. So I'm going to move it just above that, just a
couple of clicks. And it's snapping all the time. Remember this is our
snapping tool up here. If it's white, then
nothing will snap, and you can just
move things about, and it won't snap to anything. But I tend to have
snapping on all the time unless I'm doing a really
precise measurement, and then I actually
take the snapping off because then you get
these lovely lines, and they really help you. So that's sitting in
the middle of the head because you've got
a solid red line, but I'm just going to
lift it up a couple of spaces and drop it down. Might need to bring
that down a little bit because it's a little
bit too close, edge. There we go. Perfect. I'm
going to save that again. So I'm going to go Command S. I tend to use a
lot of shortcuts, but you can go up
to file and save. I'm going to check the
dimensions for the iris. The iris is the
next circle inside, and that's sitting right in the middle of the outer circle. Theiris is 16 millimeters. I'm going to click on this one because we already
have a circle on here, so we don't necessarily need to go back to
the Shapes tool. You can go back to
the Shapes tool, but I've already got
a circle on here. I'm actually going to rename these layers so I know exactly
what I'm working with. I'm going to rename that beak. Just by clicking
on the layers and then double clicking on the layer and it will open up the box where you can
actually type into it. I'm going to call
that outer circle I because then I know
what I'm working with. What I'm going to do is
I'm going to duplicate the outer circle I and I'm going to change the
size of the circle. I find this a really
easy way to do it. As I said, you can go
back to the shapes tool, but often if you've got shapes here that you're already using
and that you already need, you can just
duplicate the layer. I'm going to show you how
to do it in the menu. You go to edit, you go to copy. Click off, Edit Paste. You can also do
that as a shortcut. On a mac, you can go Command C, Command V. Command C is copy, Command V is paste, or
if you're on Windows, it's Control C, and then
Control V for paste. Now, it doesn't look like
we've got very much here. It's already selected, if I actually click on top
of it and drag it away, you can see that we've
created another circle. You can also see
in the layer here, layers here, that you've
actually got two circles. I'm actually going to name
this top circle Iris. And because we're designing
the iris at 16 millimeters, click on the iris
and I'm going to change the dimensions down here. Change that 16. We need that
aspect ratio still clicked here because if
you watch it will change the height to 16 as well. There we go, we've
got a perfect circle, 16 wide, 16 high. I'm going to drag that back over the top of the eye and I'm going to try and find the
solid green line and the solid red line. That tells me that
that circle is now in the middle of the outer circle. Fantastic. We've got
the iris in there. I'm going to save it again, Command S. I just keep
saving as I go along, and then I don't lose anything. Back into our class resources, I'm going to look for the pupil. Our pupil is 10 millimeters. We're going to duplicate
the iris because again, we already have a
circle on the page, so I'm going to use what
we've already designed. I'm going to go Command C, Command V. You can see that it's created another layer here. I'm going to rename
that layer to pupil. I'm actually just going
to leave it where it is because I don't
need to move it out. I know it's there,
it's in the layers, and I'm just going to change the size to 10
millimeters this time. You can see that it's
changed top and bottom, the width and the height.
I'm going to get hold of it. Again, I'm going to use
those solid green line, the solid red line
to get it into the middle of the circle that we've already
got on the page. Okay, we're doing really well. I'm going to save that again? Try and get into the habit of saving whenever
you think about it because it does
just save a lot of heartache if, for example, the program crashes
or if your computer crashes or if there's an earthquake or something
equally interesting like that. Just keep saving your
work because then it just means that
anything you've done, you've not wasted time because
you lose a load of work. Have a look at our highlight. Our highlight is
3.3 millimeters, our highlight is this
little.in the middle. It just gives our
some character. Again, I'm going to use the
circles that we already have. I'm going to click on the pupil. I'm going to go
Command C, Command V. I'm going to
change this to 3.3. I'm going to zoom in. I'm going
to call this I highlight. I'm going to have to
zoom in quite a bit because sometimes it's
really hard to grab a shape and it wants
to grab anything else apart from the shape that
you actually want to grab. I'm just going to move that into a position that I think
looks fairly good. You can actually see I've got the green and the
red line there. I'm going to drop that down
and I'm going to zoom out. We have a fab looking eye
coming together already. Now what I tend to do
with these layers, Because I don't
want to end up with loads and loads and
loads of layers, what I do is I group the layers. I'm going to click
on the bottom layer. I'm going to click on the top
layer that I want to group. I'm going to right click and I'm going to go down to group. You can also do that by doing Command G or Control G,
if you want to group. That now means this
little button here is really useful
toggle visibility. If you want to see that
you've actually got all the layers grouped
together properly, I'm going to turn that
off. It's still there. I've just turned it
off so I can't see it. I'm just going to
open up that group so that it's labeled
group there. I'm going to give
it my own label. I'm going to call it I. I'm going to open up the layer here. I want to show you what it looks like that it actually
does look like an I. If we go to our pupil,
go to our swatches, I'm going to fill that temporary just to show that it
actually does look like an I. I want to show
you something here. Only the stroke is
on the highlight. I actually looks like the
highlights disappeared. I just want to have a check and make sure it's
in the right place. I'm actually going to
fill it with white. There you can see we've
got our highlights. We've got our pupil, we've got our iris, and then we've got the
outside of our owl's eye. Perfect. I know that's
exactly what I want, so I'm just going to go back in. I'm going to turn
the fill off on the I just tend to
check things and make sure that I've actually done them correctly and done them the way that I want them and that they're looking how I want them. I'm also going to go back
into swatches and I'm going to turn the fill
off on the pupil. Okay, our eyes are
coming along, fantastic. Go back to our layers menu. I want the other eye to look exactly the
same as this eye. I'm actually just going
to rename this layer. I'm going to rename
it to right IR. Because I know I want the other eye looking
exactly the same, I'm actually just
going to copy and paste this eye again
and rename the layer. I'm going to go
Command C. Again, you can just go
to edit and copy. You can then go to Edit
and paste and you can see the shortcut there is Command
V. I'm going to paste it. You can see that we now
have two right eyes. Well, two right eyes
isn't a lot of good. I'm going to just rename
that top one to left eye. I'm going to click
back on the page. I'm going to hold
down the Shift key, and this is a
really nifty trick. If you hold down the Shift
key and drag it across, you'll see that it doesn't
actually move up and down. I can't actually
move it up and down. All I can do is move it across, which is fantastic, it means that it stays in the
same orientation. I'm still holding Shift down. I've dragged it across. You can see that when it hits the center line, the
line goes green. I'm going to let go of both the mouse and the
shift key and click off. And you can now see
that we have two eyes. We have our left eye,
which is that one, we have our right eye,
which is that one. And they are now sitting exactly
in line with each other, both on the center line, and they're both in
the right place. You can also check that they're lined up, which I often do. I'm going to click
on our left eye. I'm just going to
quickly drag guide down. You can now see that the red line is hitting
both of those objects. So it's hitting this
object, the left eye. And if you click on
that one, you can see that it's all
lined up beautifully. I often just use guides to make sure that everything's
lined up properly. Get rid of the guide, grab
it and drop it off the edge. Okay, last thing I want to do in this video is I just
want to place the beak. I go to drag the beak over. I'm just going to zoom in again, and I'm just going to line it up where I think I might want it. Now what I'm actually
going to do, I'm going to do
something clever with the layers because I
actually want the beak. First of all, I'm
going to fill it with white so you can't see
the eyes behind it. I'm also going to tuck it
if I zoom right in for you, I want to tuck this
beak behind our iris, which means we're going to have to rearrange
some of the layers. That's okay. Don't panic. It's really easy,
but it will just give a better effect when
you actually print it out. We're actually going
to have to fill some of these shapes on our owl because otherwise
you're going to have the lines of the shapes
underneath coming through. I'm going to open up the
panel for the right eye, I'm going to open up the
panel for the left eye. First thing I want to do is
I'm going to fill our beak, so I'm going to go to
our swatches menu. The white, dark gray and black color is always on
this little box here. You can also cut the fill
out as well if you want to. I'm actually just going
to fill it with white. I've filled the beak with white. The reason it is
not showing up as filled is because it's actually sitting underneath
these two layers. It's sitting underneath
the right eye layer and the left eye layer. What I've got to
do is I've got to move the position of the layer. Now you can either
go into layer and go to a range and go
to move to front. There we go. It's jump
right up to the top. You can see now that we have
a solid white fill in here, which means it's actually
covering up part of the eye, which is exactly what we wanted. I'm going to show you
another way to do it. If I do something wrong, you can either go to edit
undo clear selection, edit, undo move nodes to top. There's a much easier way. You can just go to
Control Zed or Command Z and it will undo whatever
you've just done. You saw there that I had to undo two actions because the
shape was actually selected, and then I actually had
to undo moving the layer. There's another way
to move your layers. Click on the layer here. Hold the mouse key down and let you drag it wherever
you want it. So I'm going to drag it
right to the top and you need to have
a thin blue line. If you have a thick
blue line like that, you're actually
putting it inside another layer if I do that. This time it actually works, but a lot of times it doesn't actually disappear
inside the layer. Ghold of the layer, get it
to the top or get it to wherever you want it in that
layers panel and let go. You can now see that the beak is sitting on top of our eyes. Now, I grouped all these because it makes it
easier to work with. It makes it easier if
you want to move them about like we did before we
got the left eye in place. But I said to you, we need
to actually change where this beak is sitting in relation to some of these
elements on the page. You're going to have
to work with me just for a second as I work out where the beak needs to go. I'm going to see if it will sit in between and see if we can
get the effect that we want. No, that doesn't work either. I'm going to open
these layers back up. Sometimes it's a case of just playing with the layers
that you've got to actually see if you
can get the elements sitting in the place
that you want it. I know that the beak, I'm going to have to
move actually some of these layers from
these groups here. I know that we want
the eyes at the top. I'm going to put the
eyes together here. I'm going to put the
pupils together. You see, I've got the eye highlight and the eye highlight. If I rename that to
left eye highlight, rename that to right
eye highlight. That's the left pupil. This can seem a bit monotonous
renaming our layers, but it just means that you can easily see what
you're working with. I can see now that the beak is still not in exactly
the right place. What I'm going to do is
I'm going to see what happens if I drag it down here. Not an awful lot. I think it
needs to sit under our iris, which means it needs
to be under here. I'm going to move the iris
up from the right eye. I'm now going to move our beak down. Let's see what happens. I'm going to zoom and see if we can get it in
the right place. I'm going to drag that
down underneath that. We're still not quite
there at the moment. I'm going to fill the iris
which is here. There we are. It's done exactly what
I wanted it to do. I want it to look like it's
sitting underneath the iris. If I show you again, I'm
just going to undo that. When I filled the iris here, the right iris,
just rename that. And the left iris. We want it to look like it's just sitting
underneath this iris. So we've got to fill
this iris with white to give the illusion that the beak is actually sitting
underneath it. So go back to our swatches
menu and fill it. And you can see
now it looks like the beak is just popping
underneath that iris there. I'm gonna do that
the other side. We're also going to
fill the left iris. We're going to go into swatches. We're going to fill,
and there we are. We've got the beak sitting
exactly underneath the iris. It's just a small detail, but it just makes it look a
little bit more interesting. I'm now going to bring this
outer eye up to there, and I'm going to show you something that
happens when you've finished with a group that
you're no longer using. So this little I think
it looks like a camera, but it's actually
telling me that the group is no longer needed. So I can click on there because I've basically taken
all the elements out of that group and I can
just hit the delete key, and that deletes that group. This is actually now
not the left eye. It's actually the eyes, so I'm going to rename that. If I close that up and I just toggle it on
and off for a minute, you can see that the
whole of that eyes, it's actually eyes in the beak, so let's rename it eyes. And beak. So eyes
and beak disappear, come back on again, and then our head is in the
head layer here. So you can see how
we actually had to play about with the fill for the irises to make it look like the beak layer is
actually underneath. It's a really handy tip, and it's one that we're
going to use throughout designing our principle
because what we need to do is give the illusion that the layers are on top of each other and sometimes you
actually have to fill, and that's the only way
that you can do it. Last thing I want to add in
is a little beak highlight. I'm going to save this,
which I've just done, so it's not modified anymore. I'm going to go to
class resources again. I'm going to find our
beak highlight down here. Notice that the stroke is different because we
just want a thin line. We don't want a thick
line like we've had for the eye and for the head here. We're just going to
have a thinner stroke, so I'll show you
how to change that. But we're going to have
a beak highlight of 3.5 by 4 millimeters. Gonna go back into our
shapes tool over here. I'm going to find the triangle. I'm going to zoom out slightly, swiping on my mouse pad. I'm going to draw myself
a little triangle. Remember, it draws the
triangle, the wrong way around. I say the wrong way around it, it draws it so it's upside
down from how we need it. It's popped it in
underneath this layer. I don't want it in
underneath this layer. I actually want it
above that layer, so I'm going to drag it
and pop it in at the top. Alternatively, you
could actually go to layer alignment alignment, arrange and go to move to front and that will pop
it right up at the front. It just means it's
easier to work with and I'm not grabbing anything else that I shouldn't
be grabbing. You can see the
cursors on across, which means we're still
on our drawing cursor, go to our move tool. You can see that because
the last shape that we drew and we were modifying has
actually got a fill in it, it showed me that we have a
fill on our little highlight. I'm just going to rename
that beak highlight. I'm actually going
to take the fill out because we don't
need the fill. It doesn't really
matter in this case, but I'm just going
to take it out. I'm going to resize our beak highlight
to 3.5 by four high. So it's highlighted,
it's selected. 3.5. I'm going to
take that off so it doesn't change the height as well for us because I
want to put the height in. Four. I'm going to change the stroke on this
because you can see the stroke looks very thick. When you make smaller shapes, the stroke always
looks a lot thicker. That's why I adjust
the stroke thickness. I'm going to go into
our stroke menu here. I'm going to toll
that down to 1.2. You can see that it's
either at one or 1.5. What you actually have
to do is click in the box, highlight it, delete the five, pop a two in, and then you can press return. You can see that that
stroke is now thinner. I'm going to click
back on it. I want to spin it around 180 degrees. This is the tool that I
find it easiest to do that. I'm going to rotate
it, rotate it. I'm going to grab hold
of it and I'm just going to pop it onto our beak. I just do it by eye. I line it up until
it looks about even. There we go. It's
actually sitting on the central line,
which is quite nice. And there we have our's head. We have our e that we created
that we then duplicated. We've got two eyes that
are exactly the same. We created our beak, we created our beak highlight. We made sure that our beak was sitting in the
position that we wanted to sit in and everything's
looking pretty good. I'm going to save this again. File safe or Command
S or Control S, we're going to move on to
designing the rest of our. Hope you've enjoyed this video and I'll see you in a minute.
7. The Body & Toes: In this video, we're going
to give our owl a body, and we're going to give
him some little toes. We're going to give him some
highlights on his toes. I can't decide if
they're toenails or not, but he's going to
have some little highlights on his little toes. So we've got our owl head, eyes, and beak that we designed
in the last video, and we're now going
to carry on designing our fantastic owl
colouring page. I'm going to check back on
my class resources pay. So it's 75 by 85. Obviously if you're
working on US letter size, you can work in inches. I find it more
comfortable being in the UK to work in millimeters, but there's nothing
stopping you converting these 2 " if you wanted to. But if you do work in
millimeters like I'm working, the size that we're creating
the O will actually fit easily onto a US
letter size document. So you can actually
work in millimeters, and it will still fit
actually on your page. So we're going to go back
into our Shapes tool. We're going to find
our Ellipse tool, and I'm just going to
draw a shape on the page. I'm going to go
into the move tool, which selects our shape. I'm going to zoom
in a little bit for you. Just move it up. So 75. We don't need the
maintain aspect ratio on this time because
we don't want it to change the height as well. I want to be able to
change the height by 85. I'm just going to check
I've got that correct. 75 by 85, and we need
a stroke of two. I'm already in the stroke menu here and you can see
that because we've been working with a stroke of 1.2,
that's not quite enough. I'm just going to
knock that up to two. You can either use
the slider here or you can actually put the
exact number in there. You can now see that we
have a lovely body shape. Also got a lovely thick stroke. You go back into my layers
menu. We now need to work out. In fact, I forgot to do
something in the last video. I'm actually going to
put our beak highlight inside that layer. I'll show you that again because there's two
ways you can do that. You can either open up the
layer like I did so you can either open it up and
drop it in there. Again, have a thin line. Otherwise, you're
actually going to drop it inside a layer that's
already in that layer. Or if that layer is closed, then grab hold of that
layer and actually drop it. That's when you do want
a big thick blue line, that would actually
drop it inside that layer and you can now see that it's at the
top of that layer. There's two ways that
you can actually move the layers and
tidy things up. I'm going to rename
this layer to body. I'm now going to click
on it to highlight it. I'm going to bring it up to the w. I'm going to make sure
it's center aligned. Now I've taken it up the center
guide, but just to check, you can make sure that it's centralized by
going into layer, alignment, and aligned center. Then you know exactly that
it's on that center line. I'm actually just going to
move it up a little bit more because I want him to
look a little bit plumper. You can just I've just
taken off the center line. You can actually just play
about with it until you think it looks proportionally right. Now, I want this
underneath the head. The only way we can do that
is actually to fill the head. I'm going to open up
this layers here. I'm sorry in the
wrong layer there. I'm just going to go
to our head layer. Going to go into
our swatches and I'm going to fill
that head layer. Now the reason you can
still see the body there sitting over the top
of the head because it's in the wrong order
in our layers. I'm going to click on body,
I'm going to drag it down underneath our head
and you can now see that his head
looks like it's disappeared underneath his body, which is exactly what we want. That's our body done.
We might have to adjust the position of
it to make him look either really stodgy
and short and fat or to make him look
a bit more elongated, but we can play
with that as we go. Go back into my class resources. Next thing we're going
to do is we're going to give little chap some toes. Now there's a few little
bits in here to do. First thing we're going
to do is actually just design one toe and
then we're going to duplicate the toes three times and then we're going to put most of
the other side as well. 6.5 wide, 12.5 high. We're going to go back
into our circle tool here, our ellipse tool. I'm going to zoom
in because we're working with quite
a small shape here. So I'm going to draw
6.56 0.5 by 12.5 high. So 6.5 by 12.5. Remember, the maintain
aspect ratio is off because otherwise it changes both
measurements for us. And we've now got a
little toe shape. If I zoom out, just going to
check the stroke on here. We want a stroke of two. Stroke of two. Excellent. I'm going to select
the shape by going to our move tool and I'm
going to drag it down. I'm going to pop it on top of our body. Somewhere
around there. And I'm not giving you exact
positions for this because I want your out to
become your creation. But you can see roughly
where I'm lining things up. Now, I'm guessing that we've
already got a fill in that because I can't see the line of the body coming through that. So let's go back to our
swatches, you go to our layers. You can see that that's actually
filled, which is ideal. If I turn that fill off,
that's not what we want. We don't want the
line of the body coming through
that if I zoom in. We don't want the line of the
body coming through that. We actually want it to look like the toes are in
front of the body. So I need to select the shape. I need to put that
fill back in again, and I can check in the layers. Okay. Perfect. We now need three little toes
for our little chap here. So what I'm going to do is
it's already highlighted. It's already selected. I'm going to go control, sorry, Command C and Command B. We have our second
little toe there. Going to zoom in again,
and I'm just going to drag it to sit somewhere next to his other toe. I think that looks about right. I'm going to do the
same thing again. Command C or in the menu, edit, copy, edit paste. I'm going to drag
that one out as well. I'm just going to see
where I think and you'll get lots of
lines coming up. That's telling me that the middle of that toe
is actually in line with the top of the
far left hand toe. That looks pretty
good to me. I'm going to zoom out, see
what it looks like. Excellent. I'm going to group these toes together and then I'm going
to name the layer. I'm going to click on the bottom layer, click
on the top layer, Command G or again, you can go right
click and group. I'm now going to name that toes. I'm not going to name it
right hand toes or left toes at the moment because we need to put some toes on this side. I will rename the layers when I've actually duplicated
the set of toes. I'm going to click on the layer, or again, you can
click on the page. I'm going to do Command C, Command V, and I'm
going to drag it away. Now, what you'll notice,
his toes look a bit funny. What we actually need to do
is we need to mirror them. We actually need to
find a little button up here that says flip horizontal. Imagine there's a line
going down the middle of that tool and you're effectively
mirroring the shape. If you do it that way around, it will flip it vertical, so the line that you
would mirror across will be going horizontal. Whereas this one,
you actually want the line going down
the middle of it. If you watch carefully, if I press that button,
it flips it round. Really, really useful
tool, Love that tool. Makes things so much easier. In fact, also believe
if you go into the layer and let me
find it where it's gone. There we go. It's in transform. It's not often like I
use the menu up there. I tend to use a little button there because it's actually
on the screen. But you can flip horizontal if I flip it back again. There we go. Or layer back into
Transform, flip horizontal. You've got two choices. I always tend to use
things on the screen. I just find it a lot
easier than actually having to go back into
the menu at the top. Now if you drag this over,
again, I'm going to zoom in. And we want it to be sitting
in the same orientation. Now, I'm struggling
here to actually get it to sit the same distance. So here's our center line. I want to get the same distance
from there to there as I do from there to
there to make sure the toes are in exactly
the same place. I'm actually going
to create myself a little measuring box. I've already got
my guide in here. I'm going to bring
another guide in to sit against the
edge of these toes. I'm going to select these toes. I'm going to bring a guide in. You can see that it's
gone green if I zoom in. You see, as I drop that
guide against the edge of the toes, it
actually goes green. I know it's snapping to
the edge of those toes. I'm going to go to our shapes
to our rectangle tool. This is often how I
design a lot of my stuff. I make sure that
things are lined up with each other and this is just the easiest way
I've found to do it. The cursors on a cross, so I know that I'm
still in drawing mode. And I'm going to select it. I'm going to bring it
over to the middle. What I often do, I'm going
to move that up to the top, so I know I'm working
with the top layer there. I go to swatches and I just make it into a
completely different color. So maybe pink
because I know that I need to delete it before I actually carry on working with
the rest of the document. I can see the documents
being modified up here. I'm just going to give it a quick save so we
don't lose anything. I've lined this shape up
with the left hand guide, you can see the left hand
guide has gone green. I'm going to drag this in. We're not worried
about measurements. What we're actually
worried about is creating a shape the same size as the distance
between these guides. And then going to
move the shape. I'm going to make sure
that the right hand side now is lined up
against that guide. I'm going to draw another
guide in this side. You can see the
little green notes there so I know the guide
is in the right place. I'm going to delete this shape because
it's done its work. I'm also going to make sure that we get the bottom
of our toes here, make sure that they're lined up. I've highlighted the toes again. Oops. Don't mean to drag
the document there. That's what happens
if you get ahold of the document rather
than a guide, it actually moves the
whole document out. You just drop it back in alignment with the
other document here. Get ahold of a guide,
not the whole document. When it's lined up, you
get that solid red line. Now I know this guide here
is going to allow me to line up the edge of the
toes here and this guide here is going to allow me to line up the
bottom of the toes. Let's bring it in. There we go, you can see that if I zoom in a little bit more,
make it a bit clearer. As it snaps in, the
vertical guide goes green and the horizontal guide
goes red. If I now let go. Super, I'm just going
to zoom out and you can now see that the toes are
in exactly the same place. I'm going to get rid of the
guides that I don't need. I'm going to drag those off. Drag that one off and
drag that one off, so you click on
them and drag them. I actually want to see
what our little guy looks like without
any guides on. This is a really handy shortcut. If you go to the Command
key with a semicolon, command and semicolon, you can actually
turn the guides off. They go. I've turned them off. On a Windows computer, it will be Control
semicolon key. I'm just going to put them
back on again because you can actually go to
the menu up here. You can go to view Show Guides, and that will also
turn it off as well. So if you want to put
them back on again, view show guides here. And it will turn
them back on again. Often you want to talk
with them off and on, particularly if
they're getting in the way of what you're
actually looking at. I just do the shortcut
command semicolon key. You can see that our little guy is coming along.
He looks lovely. I really like him so far. I'm going to save our document. I'm going to put our
guides back on again, we're going to do his little
highlights on his toes, if I show you in
our resources here. The way that we create
the highlight is by using the crescent tool. Go to our crescent tool. And the zooming
because we're working with a tiny shape now. Because we created
our measuring box, we've got a pink fill, so I'm actually going to turn
that pink fill off. I'm going to change
the stroke to 1.2. I'm going to go straight into
the box there and put 1.2. I'm also going to
spin this shape round because we want it so that it's actually facing
downwards like that, so I'm going to use the
rotate clockwise tool. I'm just going to check
the dimensions again. So 3.5 by three. 3.5 in our width. And our height is three and we've got a tiny
shape to work with now. I'm going to click
back on our move tool. Now, this is where selecting
the layers comes in really handy because
actually, to click on that, sometimes you can do it, but often I make a big old
mistake and I actually end up grabbing
something or not even being able to select
the shape at all. So I will rename these
layers in a minute as we create the highlights
for their toes for his toes. But I'm now selecting
this layer. I am going to zoom in a
little bit because I'm going to bring them down to a
bit closer to our toes. We've got our highlight for our toes and you can see
that it changes to a arrow. If I actually click the
mouse down on that, it's actually going to change the dimensions of our crescent, which is not what we want at all. I'm just going
to undo that. Command Z. Take it
back to what it was. You see that I keep managing to select the body
shape as well. I'm going to click on
there and I'm going to go to the center
of the shape. Sometimes you actually have
to zoom in loads to be able to move it because it's such a tiny shape that
we're working with. But what I'm going to do is
I'm going to line it up by e. I can see that it's got a
green line down the center, which means it's
in the middle of the toe. Zoom out a little bit. I'm going to click
back on our layer. I'm going to go Command
C, I'm going to copy it. I'm going to paste it. I'm
going to move it across. Again, you can see where
the center of the toe is. Line it up by I give you a
little libitter character. I don't have to be
exactly placed. Control C, Control
V or Command C, Command V, and I'm going
to drag it across. For some reason that's not
giving me the center line, but I'm going to
do it by I again. I'm going to give him
three little toenails. I'm going to go into
our layers panel. I'm going to highlight
the bottom layer, highlight the top layer,
I'm going to group them. Command G or group, right click and group. I'm going to duplicate those. I'm going to flip them
over again and they will fit beautifully onto
our toes on the other side. So I'm going to go Command C, Command V. You can now see
in our layers menu that we have another group of little toenails. I'm
going to pull it down. I'm going to flip them over
here, flip horizontal. You can see they've
changed orientation. I'm going to grab that layer of three little toenails there, and I'm going
to bring it up. I'm going to zoom in again. I think actually it's
almost in the right place. Now you can see the reason I've zoomed out is
because as I bring them up, you can see that I'm
in the center of the toes because I've got
the green vertical line. But it's actually telling
me now if you find that solid line,
that solid red line, it's telling me that
it's in line with the other toes the other
toes on the other side. So there we are. R has
some little toenails. He also has his toes
and he has his body. I'm going to tidy
up these layers. So I click on the layer and find out which layer
I'm dealing with. So that's the right toes, so I'm going to rename
that right toes. I'm going to rename that left toes. Let's see
which one that is. That's the right toenails. I'm not going to rename
that at the moment. I'm just going to drag that into the right toes layer and I actually want it
inside the layer. If I open up that layer, you can see that you've got the three toes on the right hand side and you've also got the little toenails. I want this group, which
is the toenails on the left hand side to be
inside the left toes layer. I'm going to drag it over
the top and I'm going to drop it if you open the layer, you can see you've got the
little toenails and you've got the three toes on
the left hand side. Just go to check everything
else is still in order. Perfect. So we've
given our owl a body. We've given him three toes
on the right hand side, three toes on the left, and
little toenails on each toe. Fantastic. You are
doing so well. I'm looking forward
to seeing how your owl is coming along, and I will see you
in the next video.
8. The Ears & Wings: In this video, we're
going to give our owl some ears and some wings. Well done on your
progress so far. This is a fantastic project, and I hope you're
enjoying designing it and seeing your
little o come to life. Okay, first thing
we're going to do is I'm just going to check my
class resources list here, and we're going to make some
triangles for the ears. Triangles for the outer
ears are going to be 17 millimeters high,
17 millimeters wide. We'll come back to
this in a second. I talked about maintaining
the aspet ratio. You can do it with circles, squares, and also
triangles as well. We're going to go to our triangle tool on
the left hand side. I'm going to hold down shift to maintain that aspet ratio. And I'm going to
create some ears. Remember, it says, 17 for the ears and seven
for the inner ears. I'm going to select because my curtor is on the cross there. I'm going to go back
to the move tool. I'm going to select this. We now see it selected
because of the arrow. We do want to maintain the
aspect ratio because we've already created a beautiful
symmetrical shape, click the maintain aspect ratio, and then we know
that the width and the height will both change
in the same proportion. Change that to 17
and click Return. If I move it over
here, you can see that the ear is at the
wrong orientation. It's going to move up a
little bit and zoom in. What we actually need
to do is we need to actually create
a rotation on this. I don't think I've got
the stroke, right. It's not looking
quite thick enough. No, it needs to be
on a stroke of two. And the way that
you can do this, you can either grab the
top and you can rotate it. It needs to be a
rotation of -25. I find that really tricky
if I zoom in even more. Sometimes you can get exactly the right amount by toggling it, but it can take a
moment. There we go. It's at -25. It's far
easier way, though. I'm going to undo that. Control ed, commands
Eed to undo. I'm just going to type it in
here into the rotation box. So -25, make sure you've
got the minus in. Otherwise it will
flick the wrong way. They're going to drag our here over to here and they're going
to line it up where I think it looks about right. We had the same problem
here as we had before. I want this ear sitting
behind the head. The only way we can do
that is to go back to our layers here and we're going to need to change
the position of the layer. I'm going to drag it down
underneath the head. Immediately, it looks
like the bottom of the ear actually
disappears behind the head. If I show you that again,
just undo what we did. The triangle on the top, I'm going to rename
that to right here. You see that layers at the top, we need it underneath, so we're going to take it down, take it down, get
that thin blue line, which tells you that it's going underneath the layer,
not into the layer. Click it there and it's now
disappeared behind our head. I'm going to move
it over slightly. Not quite decided where
I want the ear yet. I think that looks
about right. I'm now going to create the inner ear. I'm going to highlight the
ear that we already have. I'm going to duplicate it, so I'm going to command C, command B because I want
to make another one. I'm going to double
click on the layer here. I'm going to call
it right inner ear. Click off it so that it
registers on the layer, what you're naming
it, reselect it. I'm going to come down to here. I'm going to change that seven. Because it's the inner ear, a bit like we did the
highlight on the beak here, we want it as a thinner stroke. We want it at 1.2. And I'm just going to offer
it up to the ear, and I'm going to see where
it looks about right. There's no wrong or
right with this. You could have it sitting
up nice and high, or you can have it
sitting in the middle. And that's about right. If you zoom out,
you can see that the little guy has an inner ear, as well as an outer ear. I'm going to come back here. I'm going to highlight
the right ear, I'm going to highlight
the right inner ear, and I'm going to group them. You can highlight both
layers, right click group. That now means that if
we move this about, it will move both parts,
not just one part. We can check that both
the layers are in there. I'm just going to
call that right ear. We're now going to create the
left ear, not surprisingly. We're going to click on
the right ear layer. I'm going to duplicate
that layer, that group. So I'm going to
command C, command B. I'm going to rename
that left ear because although it
doesn't look like it at the moment, it's actually there. And I'm going to drag it away. I'm now going to reverse. I'm going to flip it over, so it's mirroring the layer that we've already created here. So we want the right ear and the left ear to be
mirrors of each other. So I'm going to
flip it horizontal. And if you have a
look down here, I'm just going to
open up this layer. Going to rename these
to left inner ear. Remember, double
click on the layer if you need to rename it. I'm going to click on
the left ear and you can check the rotation is at 25, not -25 because we're
now on the other side. That's the inner
ear is also at 25. Close that layer up, click on the layer and I'm going
to bring it down. We know that it's sitting behind the head because it's actually underneath
the head layer. But I am now going to
see if I can get it in the same position
as the other ear. That looks about right. But what I'm actually going
to do is I'm going to do the same as we did with
the toes here. I'm going to just create myself a little measuring box and put some guides in
so that I know that the distance from here to
the edge of the ear is the same as the distance from here to the edge of
the ear over here. You can, of course, do it by eye if you
don't want to measure, but I just make sure
if things lined up, otherwise, you end
up with a wonky ow. I'm not sure how you'd
feel about that. Click on the right ear. Draw a guide in from the left hand side and wait until you see the
little green nodes, and we now know that that
is in the right place. Doesn't matter if you can't
see the edge of the ear down here because
the ear comes down and the edge of the
ear will actually be hitting where that guide is. I'm going to draw myself
a little measuring box. I'm going to go to the shapes
tool, the rectangle tool. I'm going to draw myself
a box here, a square. I'm going to fill it. Have
a lovely purple this time. I'm going to highlight
and select it. Drag it across here, line it up with that
central guide here. Drag that in till
it hits the guide, and it's telling me
it's 8.6 millimeters. As I said, the size
doesn't actually matter. What you're doing
is making sure that you've got this distance
in between here. I'm going to grab the shape. I'm going to line it up with
the center guide again. I'm going to draw another guide in from this left hand side. Make sure you got the
little green nodes. Just zoom in again. When I draw that guide
in, make sure you've got the little green nodes on
the corner of the shape. I'm then going to
delete our shape because it's done its job again. I'm going to grab our
layer for our ear. I'm going to put one
more guide in actually, to make sure that
we get the top of the ear sitting at the
same height as that ear. So I've selected the
ear, the right ear. I'm going to draw a guide
down to sit it on top of that ear. I'm going to
bring the guidance. I'm going to row
not the guiding, I'm going to bring the
ear in and offer the ear up and get it sitting
in the right place. It needs to be against
this, the vertical guide, so it goes green and
against the top guide, so it goes red, if I now let go. I'm going to toggle
the guides on and off. So command and semi colon key. And you can now see
that everything looks very much lined up, okay? The ears are sitting in exactly the same place on
each side of the head, and it's starting to
look really rather good. I'm going to put
the guides back on. So command and
semicolon key again. I'm actually going to get rid of the guides
that we don't need. Otherwise, I end up
with loads of guides on my page that I've finished using and they
just get in the way. So I'm just grabbing them and just dropping them off
the edge of the document. I can see that the document
up here has been modified, so I'm going to
save our document, Command S. Remember,
you can go into Edit. So we're on our Edit
going to file and save. Going to make sure
that our layers are doing exactly what they
should be doing here. I right here and I left here. They're all lined
up beautifully. We're going to give this
little guy some wings. We're going to be using
the rotation tool again. We're going to go back
into our class resources. We're going to design our
wings upright to begin with, and then we're going to
put a rotation on them, and then we're going
to mirror them and we're going to flip them vertically to make sure that the wings on both sides
are exactly the same. Our wings need to be
21 wide by 66 high. So they're going
to our lips tool. They're quite long and thin. We will take the fill
out of that in a minute. We're going to take the
maintain aspect ratio off. So 21, and I think
it was 66 high. 21 Oops disappeared. So 21 and 66. And it's going to give
you a long thin shape. I'm going to turn
the swatch off. I'm going to highlight
it, select it. I'm going to make sure that
the stroke is correct. We know that for all
the outer body parts, the stroke is always at two, so I'm going to knock
that up to two. And I'm going to offer
it up to his body. Make sure it's about
the right proportions. Looks pretty good
to me. I'm going to check back on off resources. So the stroke for the teardrops, we know that the stroke
for the outer part of the wing is at two because everything is at two on the
outer parts of the body. And for the details, we're actually going to
have the stroke at 1.5. It's a little bit thicker
because they stand out. I want them to stand out
just a little bit more than I do for the highlights
that we've put in before. So the stroke is
going to be at 1.5. We're actually going to rotate when we have put
the tear drops in. I'm going to show you how
to do the teardrops next. We've got our wing here. We need to go back
into our shapes tool, and we need to go down
to the tear tool. And I'd like you to draw
some little teardrops. The teardrops need to be 5 millimeters wide by
8 millimeters high. So I'm going to zoom in because again,
these are pretty little. Make sure the maintain
aspect ratio isn't on here. So 5 millimeters
by 8 millimeters, and you get a very sweet
little teardrop size. I'm just checking 5 millimeters
by 8 millimeters high, and the stroke has
got to be 1.5. You can slide that down because that will
actually register 1.5, select again using our move
tool, and bring it down. Now the reason we haven't
rotated is because it gives us the lovely guide that shows us that we're in
the center of the shape. What I want you to do
is I want you to bye, work out where you
want the top teardrop because we're going
to do something very clever with the alignment tool, which is a little tool which isn't highlighted at the moment. Draw your teardrop. I want you to select it. Command C, Command V, we are copying and pasting. If you now hold Shift down, you can drag it down. It doesn't matter where you
drop them at this point. The only ones that matter
are going to be the top one and the bottom one. We're going to put 51, two, three, four, five, we're going to put
five teardrops on his wing. We've
copied and pasted. We're going to copy
and paste again. If I go into lays, you can see it happening as we're doing it. Command C, Command V, copy and paste, Hold Shift
down and drag it down. Do it again. Command C, Command V, drag it down. Command C, Command
V, and drag it down. I said to you, it
doesn't really matter. It's going to start
telling me how far things are away
from each other. But what I want you to
concentrate for now, is the top tear drop and
the bottom tear drop. Get those tear drops in the place where you
actually want them sitting. I think that looks about right. Now, what we're going
to do is we're going to align the rest of these shapes with the top
and the bottom shape. When you go to the layers menu, I want you to select
all those layers, so now you can see that all those teardrops
are now highlighted. I want you to go into this tool up here that says alignment. Click on the alignment tool. There's three options here. There's a line horizontally, which will take it this way, align vertically, which
will align it that way or see up and down
and make the same, which you don't need to
worry about at the moment. What we actually
need in this tool is the align vertically. Space vertically, if you
hover over the end box here. There's four boxes here. You need to hover over
the right hand box that says space vertically. You can also go into the
layers tool here, alignment. You can also do it through the menu here, space vertically. But we're going to do it
through this tool here. Click the tool, go into
a line vertically. If you watch what happens to teardrops as you
press the button, they jump into lines. They are now spaced vertically. Fantastic tool. Absolutely
love this tool. It makes things so much easier because you got to try
and line things up or draw little measuring boxes or draw guides of any sort. You can literally just
get all your shapes in a line and make sure
that they are all vertically lined up and then you can press
that tool and it will actually then align them so that they're an equal space
between each one. Click Apply. I
then click off it, I have a look at
it and make sure it's looking how we want it. I'm now going to group
these teardrops together. So you can either do Command G, Control G, or you can do
right click and group. I'm going to drop
these inside the wing. I'm going to drag
it over the top. I want that thick blue line, and I'm going to
drop it in there. I'm going to check that
it's in the right layer. You can see now that we have
the group of teardrops. If you unclick that group, if you open that group, you will see that we've got
the teardrops here. We've got a group
within the wing. I'm going to close
that back up again. I'm going to name this Wing. I'm going to zoom
out a little bit. We now know because
this is all grouped together that we can move that about and none of the
teardrops are going to move, and the wing and the teardrops are all
going to stay together. I'm going to check back
on our class resources, and we've got a rotation of 25. I'm going to save what
we're doing so far, so Command S or going
into file and save. I want to rotate this, so I'm going to click
the rotate tool. Down here, I'm going to
put in a rotation of 25, and you can see that his
wing is now in some kind of orientation that looks like he's got his
little wings flapping. As you saw when we move
that over the top, you can see the line of the body underneath
or through the wing. There's one more
thing we've got to do before we can actually
place the wing on the body. I'm going to click
the wing layer open. I don't want to go into
the group at the moment. I actually want to be on the
top layer that says wing. I'm going to go
into the swatches. I'm going to fill
that with white. You can see it's filled with
white. Obviously, we're on a white background so you can't actually see that it's done it. But if you now go
back into the layer, the teardrops aren't filled
because they don't need to be because they're sitting
on top of the white wing. But, the actual shape of the
wing is actually now filled. If we now test it over
the top of the body, you can see that you can't actually see the body
through the wing anymore. Now you can see that
as we offer it up, the wings actually
sitting over his face. You could have it like
that, but I actually want the wing sitting
underneath his head. Again, like we did
with the beak up here, we've just got to shuffle the layers about
to make sure that we get the wing
underneath his head. I'm going to close that
layer up and I'm going to drag the wing down
underneath the head, and I'm going to see whether that actually does
what we need it to do. Brilliant. It does. So if you now click
off, you can see that his little wing has now
disappeared underneath his head. Go to make sure that I
can seal the teardrops. I'm just going to drop
the wing down like that. We now need to create
the other wing. So I'm going to click
back on the wing layer. I'm going to duplicate it, and then I'm going to
flip it vertical again. So Command C, Command
V, copy, paste. You can see we've got
a wing that looks exactly the same
as the right wing. I'm going to drag it away. It's on the wrong orientation because this is at 25 degrees. If I remind you there, it's on 25 degrees. This one has got to be at -25. I'm going to click down
in the rotation box and I'm going to add a
minus in front of the 25, which now flips it over. I'm going to offer it up and see whether it's sitting
underneath the head, which it is because you can
check in the layers menu. It's actually sitting
underneath the head layer. But I now want to
make sure that we get that in exactly
the same place. I'm going to click on
the right hand wing. I'm going to rename
that right wing. Rename that left wing so that we know what
we're dealing with. I'm going to click
on the right wing, and I'm going to
draw myself a guide. I'm going to wait until
it touches the top of the right wing, and
I'm going to let go. I'm going to draw that guide until it touches the left
hand side of the wing. If I zoom in, you see it's touching the
left hand side because it goes green and create
my little measuring box. Because it's just
a measuring box, I'm going to color it in to make sure that I
delete it afterwards. I'm going to go to the MO tool. I'm going to select it. I'm
going to drag it across, make sure it's lined up with the left hand if I can't
see sometimes bring it in. Left hand guide, there we go. It's gone green on
the left hand side. Stretch across to
fill that space. Make sure it's snapped in
place. Move it across. Make sure the guide in
the middle goes green, the center guide goes green. Drop it. Draw that guide in, line it up with the edge
of the measuring box. I'm going to delete
the measuring box because again, it's
done its work. So now we know that
the corner of the wing here corresponds to where we want the corner
of the wing here. We've brought our guide
into the edge of the wing. I'm now going to select this
wing Ops and not delete it. Command at that. I'm going
to select our wing and I'm going to draw it
in. Zoom in again. So I know that the
edge of that wing and the top of that wing are going to be sitting on those guides. So the top needs to
make the guide go red, and the right hand side of that wing needs to make
the guide go green, which is exactly what I've done. There we go. If I now click off it and zoom
out a little bit, you can see that his wings
are looking pretty fabulous. I'm going to get rid
of the guides that I don't need, so grab them, drop them off, grab them, drop them off,
grab and drop off. I want to have a look at
how without his guides on, so I'm going to go command and semicolonk I'm also going to
save the document as we go, save our, so command
S or file, save. I think he's looking great. I'm really liking how
he's looking so far. I'm going to put
the guides back on. So in this lesson, we gave him ears, and
we gave him wings. We gave him inner ears, and we gave him the teardrops, which are obviously on a
slightly different stroke. He's got his eyes in,
he's got his beak in, he's got his toes and his body. In the next lesson,
we're going to take him even further and make
him look even prettier. I'll see you in a minute.
9. The Heart & Stone: In this video, we're
going to give our owl a heart and a stone to sit on. Every good owl needs a heart, and you need something
to stop him flying away. First thing we're going to
do, make sure you've saved your document so that you save all the hard work
that you've already done. You are doing so
well, by the way. You need to go into
the shapes tool, and you need to scroll
down to the heart, which is almost at the bottom
underneath the tear tool. I'm gonna check what size
our heart is 35 by 33. Give yourself a little bit of space and draw yourself
a lovely heart. I'm going to take
the fill off that. Remember, we've got
the cancel fill here. Go to change it down
here, 35 by 33. And the stroke on the
heart will be two because it's the outer shape. When we do the circles
in the middle, the strokes going to
be a little bit less. 35 by 33, fabulous. Change the stroke here,
change it to two. I'm going to select
we've got the cross on, which means we're on
the drawing cursor. Select the heart and I'm going to bring it up and position it. Again, you can decide where
you want to position it. It seems very happy
to position it there. It seems to be lining
up with lots of stuff. I'm going to check on here. You can see that
the heart, which I'm actually going
to name heart, although it had already
named the heart because it names the shape that
it's just drawn. I'm actually going to
name it heart layer. I now want to put some circles, just as a little bit of
decoration in the same way that we've put the tear
drops down the wings, we're just going to
put some circles, and I'm going to
zoom in for this. I want our circles
to be 4 millimeters. I'm going to go into
the shapes tool, go to the ellipse tool. You've done this
lots of times now. Give myself a little
bit of space down here. Going to hold the
shift key down, and I'm going to
draw out a circle. That is 4 millimeters. I didn't get that exactly
correct because we've got a perfect circle. I'm going to maintain
that aspect ratio because we've got the same
numbers here top and bottom, so we want them to
change in the same way. Four, I'm going to select it, and I'm
just going to move it. I just going to zoom
in a little bit. I'm just going to do it so
I can see the heart here. I'm thinking we're going to have four circles going across. Then three, then two. I'm going to line it up
roughly where I want that. Circle sitting about there, I think, I'm going to
duplicate the circle. Command C, command V. I'm going to hold Shift down and I'm going to drag it out. 3 millimeters. You can
see where it says three. That means it is 3 millimeters away from the previous circle. I'm going to let go
of all the tools. I'm now going to
duplicate it again. Command C, Command V. I'm going to drag it
the other way and I'm going to try and
get it so that it is 3 millimeters
away. There we go. 3 millimeters. I'm
going to let go again. Don't worry about the fact
that it's not lined up. We will line it
all up as a group. I'm going to command C, I'm going to make sure
that circle is selected. Command C, Command V, hold Shift down again, and drag it out. There we go. You can see now
all those circles are now 3 millimeters
away from each other. Going to let go Shift,
let go of the mouse. We've now got four circles, all 3 millimeters apart. I'm going to highlight
the layers up in the layers panel and
I'm going to group them because they're
in exactly where we want the places
that we want them. I'm going to right click group. I'm going to change
the stroke to 1.5. Now I want to make sure
that the group of circles are sitting down
that center guide. I'm going to grab the group,
I'm going to select it. It's already selected,
I'm going to grab it and I can
then move it about. I'm just going to position
it where I think it looks about right. There we go. Perfect. I now want to create
a line of three. The easiest way I found to do this is I go back
into that layer. I grab one of the circles.
It doesn't matter which one. I Command C, Command V. Now this circle here is actually still in
this layer, this group. I actually want
to drag it out of that group and pop
it up at the top. You still see that
the four circles from this group are in
this group here, but we now have an extra circle. If I bring that down, you
can see the extra circle. I'm going to start off by lining it up on
the center guide. It will want to put it
where it thinks I want it, but you can line it up where
you want. There we go. That's now in the
center of that heart. Just notice the hearts not sitting down that central line. There we go. The hearts now
done on the central guide. I circle, which I
just select again, that's sitting on
the central guide. I want to now make sure
that there's a circle, this side 3 millimeters and a circle this side
3 millimeters away. I'm going to copy and paste
it Command C, command V. Hold Shift down because
that keeps it in the same orientation and I'm going to drag it out
until we get to three. There we go. I'm going to go
back to the center circle, select that again,
Command C, Command V. And I'm going to get it
to 3 millimeters again. There we go. Now we know there's 3 millimeters between there and 3 millimeters between there. I'm going to make
that into a group, highlight and select the bottom layer,
select the top layer. Right click group or Command G. I'm now going to
name these layers. I'm going to say top circles. Double click on the
ire. Middle circles. And I want to drop in two
circles at the bottom. There's a couple of
ways you can do this. You can either draw or copy and paste one
of these circles, bring it down and line it up so there's 3
millimeters between, or you can actually
cheat and use the two middle circles from this layer, which
is often what I do. I open up that group there and I find the two circles
in the middle. Now, strangely, these
are in the wrong order, so I'm just going to change the layer order so that
I know that again, that's in the wrong
place, move it up. Sometimes you have
to shift them about. It's all in complete
wrong order. There we go. That's
now the first one, second one, third
one, and fourth one. That's the second one, and we
want the third one as well. I'm going to select the layer. I'm going to hold down Shift to select more than one layer. I'm going to select
that layer as well. I'm going to command
C, command V. I'm going to hold Shift down again and I'm going
to drag it down. Now you're watching
for the lines but tell you how far apart these
layers, these groups are. I'm going to let go of
shift and the mouse key. I'm just going to double click on these two circles again. I can see here that they're now in the middle of our group. To grab both those layers, I'm going to type
them to the top. I'm actually going to
group those two together. I'm going to call
them bottom circles. I now want to grab
those three layers. I actually want to move them up slightly into the
center of the heart. And I'm going to group these
three groups together. Right click, group. And I'm just going to
call them circles. I'm now going to
put these circles inside the heart layer. You can see them appear there. And if we click down, we've got all our different
groups in there. It's perfectly okay to
put groups within groups. It just keeps everything tidy. If it means that if you
need to go back in and edit anything, you
can easily find it. I'm going to save our document. So file, save. I'm
going to zoom out. I'm liking how he's looking. I'm going to toggle
the guides off, so command and
semicolon key just to make sure that he looks
how we want him to look. I'm going to put those
guides back on again. And I want him to
now sit on a stone. Go to check back in
the class resources. The stone is 90
millimeters by 55. You need to go to the shapes
tool here and we need to find the crescent tool. Sorry, the segment tool. Bit of a strange tool this because it draws
really weird shapes, but it's ideal for creating
a stone for our owl. So 95 quite a big shape, this one, 90 by 55. So 90 by 55. We know that it's
an outside shape, so it's got a stroke of two. And then we can offer
it up too and see where we want his
feet to actually sit. Make sure it's lined up down
the central guide again. And we now need
this segment to be sitting behind his body
and behind his toes. So I'm going to bring
it right down to the bottom and drop it. Now I can see we've
got a problem. I can see the top of this
stone through the body. I now know that
we've got to fill our body with a color with white to make sure that it appears that stone is
now sitting behind. You can now see in
the layers menu that the body shows
as being filled. I think that's
looking pretty good. It looks like he's actually
sat on top of that stone, which means he's not
hovering in midair anymore. In this video, I showed
you how to do the heart. I showed you how to do the
dots and line the dots up, and I also showed you how to sit our little guy on a stone. We're getting really close to the end of designing
our coloring page. The next thing that I
show you is fantastic. It shows you how
to put shapes into a circle and space them
evenly. Fantastic tool. I look forward to seeing
you in a minute. Well done.
10. The Circles, Stars & Eye Details: In this video, we're going to make our owl look a bit fancy. We're gonna give him a
gorgeous halo around him. We're gonna fill the
halo with stars, and we're also going to give his eyes some little details. He's gonna look really
special by the end of. We're nearly there.
In this video, I'm going to show you
how to finish off your out to make it a really exciting colouring page to colouring in. We're going to use a fantastic
tool called duplication. There's a few things
you need to remember when you're using the
duplication tool, but I'll talk you
through that as we go. Also going to show you how
to use duplication tool to make his eyes look just a
bit prettier than they do. So let's get on with it because we're so
close to finishing, and I'm so proud of you. First thing we need to do, go back to our Shapes tool again. FinipsTol if you're
not already on there. Hold the shift key down and drag yourself a
lovely big circle. We need to make sure that the maintain aspect ratio
is actually on here. And we need to have 170 I was nearly there, 170 millimeters. And you see that it's changed
the width and the height. You're well used to
doing that by now. I'm going to select by
going to our move tool, and I'm going to drag
this to where I think we might want our circle to sit. Make sure it's lined
up with the guides, and you can see
that it's filling this space between
our margins exactly. That's great because
it means that we're using the most amount of
space possible on the page, but it also means that this
shape will actually owl and his circle will fit onto
a USEa size page as well. So you can work in
the millimeters. You can work with the dimensions that
we've been working with, and it will actually work on
a USEa size page as well. If you are working on
U set a size page, I suggest that you change the
dimensions to millimeters, which you can actually
do in the rulers here. If you right click, you
can actually change the dimensions of
the document size without having to go
into the document. So you can actually just
change it to millimeters, work with millimeters,
and then you can pop it back to inches
when you're done. Okay. We've got our circle here. Don't worry about the
fact that you can still see it sitting in
front of the stone, not important at the moment,
because in a minute, when we put the stars in, we'll throw it all
behind the stone. I think I'm going to
move that up a little bit because I don't
think there's gonna be space above his ears. So let's move it
up just a little. There we go. I'm going to check back and see how
big our stars are. Our stars are at 12 millimeters. Go back into our shapes tool, go down to Stroll. Hold Shift Down.
Again, it doesn't matter where you are
on the document. Hold Shift down. And if you can get to 12 millimeters, great. If not get as close as you can, I just always check
in the box over here that I've got the right
size at 12 millimeters. Make sure that the
stroke is right. So the stroke for our
stars is correct at 1.5. But I just want to check
that the stroke on our circle is correct because that needs to be
at two, which it isn't. So pop that up to two. In fact, you can have
it even thicker. If you want it
thicker out of line, just to give a bit of effect. You can have it a bit thicker,
if you want it thicker, have a play about with that
and see what you think. I'm going to put it
to two. I'm going to bring our star
into our circle. Now, be really careful
because it's a smaller shape. And if you just
grab it like this, what you'll end up doing is
moving the little crosshair, the little target shape
out of the star shape. That's not actually what you
want to do at the moment. You will need to move that in a minute, but not right now. So I'm going to
click back on that, and I'm just going to undo that so that our
little cross hair ends up back in our shape. And I'm going to
actually just grab it somewhere apart from in the
middle and move it across. Now what I want to do
is I want to line it up so I think that it's
going to miss his ears. If I bring that round there, I might actually need to move the circle up a little bit more. I'm going to move the circle
up just a little bit more. Give me a little bit more space. And I'm going to click
back on our star again. I'm just going to move that up. You can also move
the shape by using the arrow keys on your keyboard if you want to get a little
bit more exact movement. Okay, I'm going to
leave the star there. I want to show you
something that's really important for using
the duplication tool. Click back on your star shape if it's not already selected. You can do that in your
layers menu as well. Up here, there's a little button that says enable
transform origin. I always use the
button up here because it's in this nice selection
of tools up here, and I just find it
easier to use in here because I need to see what's going on on the page as well, rather than loping
one of the boxes, the dialog boxes or
the menus up here. So click on your star, and you will see once
you've clicked this tool, that little cross hair
appears, if I turn that off, you'll see it disappears, and if I enable it again, you see that little
cross hair appears. That's really important for
using the duplication tool, particularly in the
round like this. If I just explain what this tool means, enable transform origin, what we actually now need to do that cross hair will allow us to put the origin of the
duplication anywhere we fancy. We're actually going to put
that little cross hair, the origin for the
duplication in the middle of this
great big circle. So unselect the star, select the circle, and you can see there's a little node here on the right hand side. We know that the middle
of the circle is already sitting on that center line
because we lined it up. Draw yourself a guide down and see if you can find
the center of the circle. You need to make sure that
the guide goes a solid red. If I click off and I zoom in, you can see that that guides
actually sitting through the middle of that node.
So that's fantastic. We've now got the
center of this circle. Click back on your star. I
zoom in a little bit so that I can still see the middle of the circle that
we've just located. Now you do need the cross
shape for the cursor. Click down on the
mouse and drag. I've actually got
underneath my mouse here, I've actually got that
little crosshair. I'm going to bring it down here, and I'm actually going to drop it where I think the center, and I know that's not
gone on the center. So I'm going to zoom in.
I'm going to grab it again, and I want it
actually sitting so the horizontal guide goes red and the vertical
guide goes green. I then zoom right
in as far as I can, to make sure it's
actually sitting in the center of the vertical guide and the horizontal guide. It's looking pretty good. So I'm going to zoom right out again. Sometimes you need to
zoom in to actually make sure it's sitting in the place that you
need it to be. You can now see that our star
up here is still selected. Now comes the fun part. We now going to use the
duplication tool. Making sure that that start is selected either in the
Layers menu or on the page, I want you to press Command J. It will be Control J
on a Windows computer. So press Command J, and you will see in the layers menu that it
creates another start. I don't want you to do anything
with that at the moment. I want you to come
straight down to the rotation menu here. And click it so that
it's highlighted. What we're now going
to do is we're going to tell the star how many times to
duplicate around the circle by using degrees. I normally choose a number
that goes into 360. So if I decided to
do a duplication of, say, for example, seven degrees, because it doesn't
exactly divide into 360, all these stars are not
going to be evenly spaced. And when you get
back up to the top, there's going to be a big mess. You need to find a number that
divides exactly into 360, and I know that 20 does. So we're going to use a
duplication of 20 degrees. So in our rotation box
here, I want you to put 20. I want you to press return, and you will see that
that second star that was created when we press Command J has now duplicated
at a rotation of 20. This is when the magic happens. Continue pressing
either Command J or Control J until you have got stars going all
the way around your circle. This for me was absolutely
magic when I found this. I love using this tool so much. Okay, click off. Have a look at it,
see what you think. I actually think that this star, these stars are actually
too close to the ears, and sometimes you just have to play about with things just to find what you
think looks best. So what I'm actually
going to do is I'm going to do it
again and I'm going to show you how the
tool works again because I'm not quite
happy with that. I'm going to select the stars that I actually want to delete. So I'm going to start
with that star. I'm going to select that. I'm going to select the
rest of the stars in that group. I'm going
to delete them. I'm going to go back
in and I'm going to move our start up
just a little bit, take it a bit closer to
the edge of the circle. I'm going to zoom out. Really important
thing to remember, if you move the original shape that you want to duplicate, make sure you change and
move the cross hair as well. Otherwise, the origin
will not be in the center of the shape that
you are duplicating around. So if you move this shape
up here for any reason, make sure that the
cross hair is still sitting in the center
of the circle. I'm now going to do it again. We've got our star here. It's selected, I'm going
to press Command J. You can see it's
duplicated another star. Going to go back down
to our rotation menu. I'm going to put
20 back in again. It creates another star at
20 degrees duplication, then I'm just going
to keep duplicating it around the edge
of the circle. G to keep going until
it gets to the top. And there we have stars duplicated around the center
of the circle. I love this. Zoom out a little bit. I'm going to get rid of this guide here
because we don't need it. I'm also going to top all
the other guides off just so I can see how it
looks, and I love it. It's perfect. That's
just how I want it. I'm going to put the
guides back on with the command semicolon key. And what I'm going to do is
I'm actually going to group all these stars because we still got all the other
stuff in our layers menu. Otherwise, the layers
start to get a bit unruly. Oops, I only managed to select two layers there because I was pressing command and not shift. So select the bottom
layer that you want, press Shift, and that will allow you to select all the layers.
I'm going to right click. I'm going to group now you
can see at the moment that the circle and the
stars are sitting in front of our stone that
the owl is sitting on. The reason for that is that it's at the top of our layers list. We need to get it underneath. So what I'm actually
going to do is I'm going to put these two
groups together. We've got the ellipse here,
the circle, and the stars. I'm going to put those together. I'm going to drag that
group into the circle. So now you can see
the group of stars. I'm going to actually
rename that stars. So we know what
we're looking at. And this is the big, the huge circle that
we've got going round R. We now know that stars the group of stars is
inside that circle. And I now want that
behind the stone. I can already see a problem, but I'm going to pop it
down behind that stone. And he doesn't look like
anything's happened. Well, we know it's
happened because we've changed the layer order. But what we need to do now is
we need to give the stone, which I've forgotten to name. Let's name that stone. We actually need to give that
a fill because then it will appear that the stars and the circle are actually
sitting behind the stone. So go back into
our swatches menu. And we fill it. There we go. It now looks like the
stars in the circle are actually sitting
behind our stone. He's looking really good. We're going to do the
same function again, but we're going to
do it in his eyes. Okay. We now need to
work on his eyes. We need to find the
eyes and beak layer, and we need to find
the outer circle. I've forgotten to layer
this left and right, let's call that left outer
circle. Right outer circle. Sometimes when you're
working with so many layers, you just forget to name
them and you just go back in and work out what the layer is and
just give it a name. So I want to start
with the right out of circle I. I'm going
to zoom right in. Now, you can see there's four little nodes
on this circle. That's depicting the
middle horizontally, and that's depicting
the middle vertically. Now, we're not working with
the central guide anymore because we are actually away
from the central guide, so we've got to put our
own guides back in. Make sure the
circle is selected. I'm going to drag
a guide across, and you'll find that it will
snap to the center of that. It will go green. So snap it to the center of that
circle and snap the other guide that you
pull down from the top. Going through the
center horizontally. And there's a cross
hair in the middle that actually helps you as well, so you can make
sure it's actually sitting through the middle
of that cross hair. Right, we now know
that we've located the center of this circle here. I'm going
to zoom in a bit. We're now going to
create a circle in this space here that we
can duplicate round here. You can use any shape.
I've done stars. I've done teardrops. But for this time, we're going
to use a circle. I want it to be an exact circle, so I hold down shift and
I draw myself a circle. And I think I put on
the class resources. We go up there. The
circles in the eye, we're going to make
them 3 millimeters. 3 millimeters, we're going
to make the stroke 1.2, and we're going to make
the duplication 30 this time instead of 20 because we know that 30 goes into 360, so we know that it will spread it around the circle exactly. But the circles in
the eye are going to be 3 millimeters
and the stroke is going to be 1.2 because otherwise I actually
look overwhelming. So let's change the stroke on that while we're
thinking about it. Click on there, 1.2. I'm going to select it again and I'm going to move it there. I'm going to make sure it's
at three, which it's not. So I'm going to maintain
the aspect ratio so that we change the width and the height together and
change that to 3 millimeters. I'm going to position just by moving our circle
up and down until I think the circles in about the right place, and
you can actually do it. So those cross guides, the little lines that it
brings up showing me that it's sitting right in the
center of this space here. So I'm going to try duplicating it where it is just there. You can see, because we've got our enable transform
origin selected here, you can see that we've got
the cross hair in the circle. If I deselect that, the cross hair disappears, and if I select it again, you can see that it reappears. Remember, we've got to
move that cross hair down to the place that we want the
origin of the duplication. That sounds very complicated. Basically, you're just
telling it where you want the shape to duplicate around. So grab that cross hair. You need to instead
of having the arrow, which selects the shape, you actually need to
select the cross hair, drag it down, drop it in there, so wait till the guides go green and red
at the same time. I then zoom in, make sure
I'm on the right place. I go back to my layers menu. And for the purposes
of working in the eye, I'm actually going to remove
that right to the top. So I've dragged it. So I grabbed it and dragged it. I'm just going to undo
that for a second. You can actually also go to
layer arrange move to front. That will actually
take it actually takes it to the
top of that group. I actually want it to
the top of our layers, so I'm just going to grab
it and take it right up. We know our crosshairs
in the right place. We're now going to
do a duplication on this circle to go
around the eye. I'm going to go Command
J or Control J. You can see that it's
duplicated a shape. It's duplicated one of our
circles we've just created. I'm going to come down to
the rotation box here. I'm going to put 30 in
there and press return, and you can see that
it has now duplicated a circle around this
point at 30 degrees. This is where the
magic happens again, keep pressing Command
J or Control J, and you will have a circle of circles, which is fantastic. If I zoom out, you can see how suddenly our ow takes on a
whole different appearance. I'm going to cut right
back up to the top. I'm going to select
all these layers. I'm going to click
on the bottom layer, I'm going to press Shift. I'm going to select
all those layers. I've now selected all
these circles here. I'm going to right click
and I'm going to group. We've now got to
pop these back into the I underneath the beak. This can take a little
bit of fiddling with. I'm actually just going to
rename that to I circles. And I'm going to find where
we actually need to drop that to get it sitting
behind the beak. It's certainly going to
have to be underneath beak. There we go. Actually, if you just
bring it down from the top of the layers and you drop
it in behind the beak, you will find that it actually
hides in behind the beak. It's looking so good.
Really excited about this. What I want you to do now, I want you to click on that layer. I want you to copy that layer. Command C, Command V. I
want to paste it again. You can't see anything
at the moment. You can see that you've
got another layer, another layer of eye circles
in the layers panel. I'm going to click on the
bottom one because we know that's the one we created first, and I'm going to call that
the right eye circles. I'm going to drag the
layer above it across. And you will find
if you get it in the right place that you've actually got the cross
hair going vertically, which shows you
that it's lined up with the center of
that bigger circle. And it's lined up
because I'm holding Shift down as I move it across, so I can only go
across and not up and down, and I can let go. And we can see that it's in
exactly the right place. I'm just going to rename that
layer to left eye circles. I'm going to deselect
it. I'm gonna zoom out. And I'm really excited to say
that our owl is finished. I'm just going to remove the
guides that we don't need. I'm actually going to take
those guides off completely. Oh, I've forgotten
one little thing. We've got a little highlight
on our stone to do here. So we've done our circle
here with our stars. We've put our circles
into our eyes. It's going to go back here. And our little stone here
has got a highlight. This is just the last
thing we need to do just to make it look
a bit more realistic. The highlight is 11 by 22. I'm going to save this
before we go any further. Command S. We need to go
back into our shapes tool, and we need to go into
our crescent tool. Bit of a strange tool,
this. We used it for the little highlights
on his toes. I'm going to hold
the shift down, and I'm going to draw, and I'm going to make it much
bigger than I actually need, and we get a lovely
crescent shape. I'm going to check
the size again. 11 by 22 high. So uncheck maintain
aspect ratio. Going to make that 11 by 22. And what we actually
need to do is we need to spin it around 180 degrees. So go back to our tool here. Rotate clockwise,
rotate clockwise. I'm going to select it. And I'm going to bring it up and
what we actually need to do. It's not actually
going to work if we've rotated it just by 90 degrees. I'm actually just going to drag it round until I think
it looks about right. So I normally line the back of the shape up here
with this shape here. But you can actually pop it
wherever you want to pop it. And I'm going to zoom out. And now our owl is finished. You have learned so many
different skills by doing this, by doing the whole class. I'm so excited to have been
able to share this with you. Please share what
you've created with me. I'm looking forward
to seeing what you've done and really, really well done.
Thanks very much. Bye bye.
11. What You Learnt: Before I disappear, I
just want to remind you about everything
that you learn in this class because
the list is long. You learn how to get publisher if you didn't already have it. You learn how to open
it up and set it up properly to make it as easy
to work with as possible. You learn how to create new
documents, margins, guides. You learn how to work with
master pages and pages. You got to know your
shapes tool very well, as I promised you you would. You learn how to
work with strokes. I'm sure you became best friends with your layers
and groups as well. You learn so many more
techniques, rotation, alignment, duplication,
flipping, snapping. But all these tools that you've learnt and these techniques, they will help you if
you decide to go on and design more coloring
pages and more principles. I'm just so grateful
that you stuck with it because what you've
designed is fantastic.
12. Final Thoughts: Well, that's a wrap. Thank you so much for joining
me for this class. I have so enjoyed taking
you on this journey and showing you a
little bit of what I know about Affinity Publisher. I hope you've
enjoyed this class, and I hope that you will
take the skills that you've learnt and start to design
your own principles and start to design
more colouring pages because not only are they
the most fun to design, they're also the most fun
to colouring in as well. Make sure you check out
the class resources because I've included
a bonus page in there, showing you different
customizations that you could do for
your our principle. Have fun colouring it in, but also be inspired by it
to try different things. There's no right or wrong. Just have some fun. So glad you joined me through to
the end of this class. I'm looking forward
to seeing you again soon in the future. And I can't wait to see what you've designed and
what you've created. You've done so well, and
I'm so proud of you. I look forward to
seeing you soon. Take care. Bye bye. If you'd like to
know what I'm up to and any future classes
that I'll be releasing, please sign up for my
email newsletter on my website at
www.theaffinitygl.com. I'd love to connect with you, and I look forward to
hearing from you soon.
 Monique Green, Graphic Designer