Transcripts
1. 1 Introduction: Hello and welcome
to this course on vintage monochromatic
poster design using a famed designer. My name is Ben Nielsen. I'm immediate design
educator and I will be your instructor
for this course. I've done other courses on poster design and
vintage design before. The difference this time
is that we're going to be using just one
color to create it. That's why it's monochromatic. This is a bit of a
different style and it's going to be really
useful for you to learn. What can you expect to
learn in this class? Well, first off,
you're going to learn about the design process. We are going to take
this design all the way from a picture of the thing
that we want to make, a post-stroke all the way to
a finished poster product. That's really going
to help you learn how to work through
the design process. The second thing that you'll be learning is how to
use both vector and raster graphics together to create a finished product. Particularly this is useful when you're trying to create
a vintage project that has a really used or
lived feel to it. Third rule, let me
learning about color. We're going to be learning
how to take one base color, turn it into a palette
of tints, tones, and shades to create a
poster that has highlights, mid tones and shadows. This will be a very useful
exercise to you as you learn how to work within a
constraint of a single color. If that's a little confusing to you right
now, don't worry, we're going to talk a lot more about that in another video. But by the end, we will have
combined these things to design process how to
use vectors and rasters, and how to use a single color to create a stunning
vintage poster. What do you need to already know in order to
take this course? Nothing. You don't
have to already have taken any of
my other courses or other courses on design or other courses on Affinity
Designer, take this course. We're going to start
from the beginning and bring you all the way forward. Now that being said, if you have already taken some of
my other courses on a theme designer
and particularly the course is about
vintage design. Some of this may already be
familiar to you. That's okay. Repetition is one of the best
ways we learned and we sell them fully get something the
first time that we learned. If you do already feel really comfortable with vintage design from some of my other courses or other courses that you've taken or projects
that you've done. Feel free to go ahead
and skip around within this course to find the
parts that are new to you, just make sure that you
understand everything that you need to do in order to
complete the project. Remember that you can always ask questions in the discussion
tab for this course, and I'm happy to do my
best to answer those. I would love it if
you would go there now and introduce yourself to the class and to
me so that we can all get to know each other
a little bit better. In the next video,
we'll go ahead and talk about the project
for this course.
2. 2 Course Project: The project for this course
is going to be to create a monochromatic
vintage poster design. I'll be doing a travel
poster for my project. And I would suggest
that you also select occasion that
you've traveled to to kind of be the inspiration for the poster that
you're going to create. If you follow along
with the assignments at the end of each video, you won't have any
trouble having a finished poster by the time that we're
done with this course, that you'll be able to upload into the project
section for this course so that we can all see it
and learn and grow together. I'm happy to provide feedback on those projects if that's
something that you want, there's a few things that
you'll want to keep in mind as you are creating
your project. And don't worry,
these will all be covered in detail
throughout the course. So you don't have to
worry too much about understanding them
right at this point. The first thing is that
you'll want to make sure you're using vector shapes in order to create the base
layers of your poster. And we'll be going
over how to use the pen tool to
create those shapes. The second thing is to make
sure that you are using just one base color and then using that color
to create tints, tones, or shades in order to create all of the colors that you're going
to use a poster. We won't really go more than 14th tones or shades of
that color in this poster, it was a very limited
palette and don't worry, we'll be talking more about
that in the next video. The next thing to remember
is that you'll be using raster textures to create that vintage feel
on this poster. So that's what kind of takes
it from a very modern, clean aesthetic into more
of a vintage aesthetic. And we'll be going over
how to do that and the tools that designers
specifically has in order to make it
easy to work with raster graphics and
vector graphics together. And you can use any textures you want in order to
complete this project. You don't have to use
the ones that I'm using. There are many textures
and brushes available for free online that can help you to create
this vintage feel. The last thing to
remember is that your poster will need to
have some text on it, something about the place
that it is representing. If you want to make sure
that you follow along in the video about adding text. Lastly, when we are
done with our posters, we will export them
as JPEGs and then upload them into the project
section for this course, please do take the time to make sure that you do export it and upload it because that is really the best way
for you to learn. And I'm so excited to see what you all are able to create. Think about the place that you want to create a poster up. And in the next video,
we'll start talking more about what monochromatic
designers.
3. 3 What is Monochromatic: At this point, you might be
wondering more about what this monochromatic
design actually is. Monochromatic just means mono one chromatic
color, one color. We're going to use one
color in the design. And it's really helpful to see some examples
so you can start to figure out where it doesn't
start thinking about how you might like to use this. Let's go ahead and
take a quick look. I have a poster here
by John H. Clark. This is great basin and it's just a poster for
that national part. And you can see that it
just uses blue tints, tones, and shades of blue
in order to create it. Now, you might be
wondering about white. White is of course, a tint of all colors
because it is the last color as you go
lighter in the tenth. And of course, black
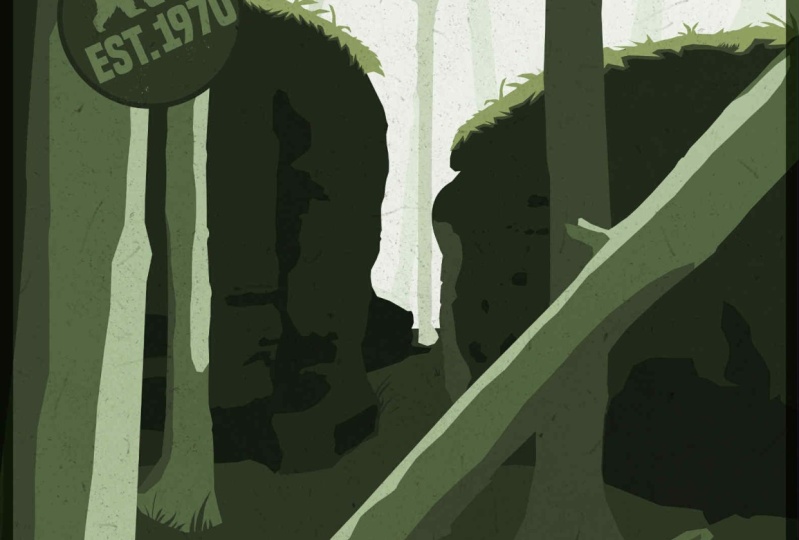
on the other hand, is a shade of all colors. White and black can pretty much always be used if you need to. Although posters can
be a little bit more interesting if you keep a little bit of the color in that care is another
one of Clark's. I find his travel posters
to be quite inspiring, but this one is done all in red. So you can see he is
using some white, but that dark is
not actually black, it's actually a dark red. Let me not come through
on camera super well, but it is definitely actually still maintain some
of that red color. And that's how he's
creating his shadows there. That gives you a little
idea from Clark's work, how you do this
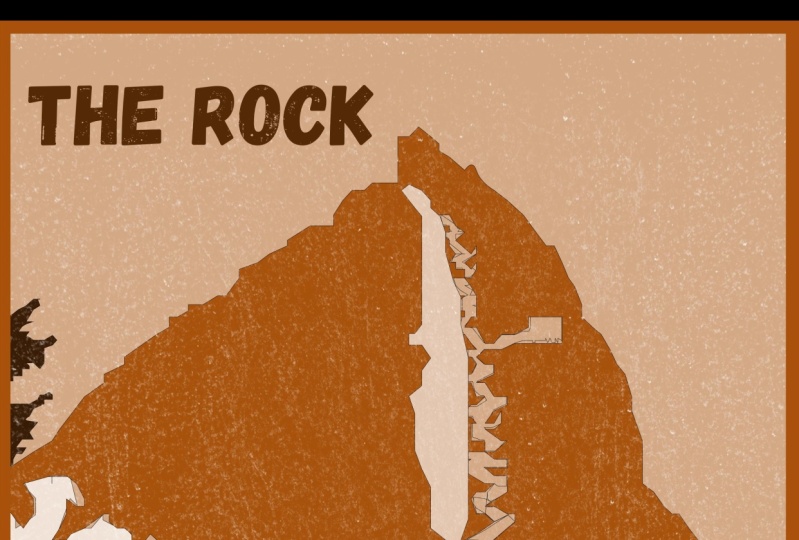
monochromatic designing using just those very, very simple color palettes. There's a lot of variety
you can do here, even within these constraints. So let me show you a couple
of ones that I've done. And we'll be following
along with my style, of course, for this class. But you're welcome to take this whatever
direction you want. You'll see I use a lot
more texture in mind. I'm going for more of a
vintage used feel in mind. Let's go ahead and take
a look at this one, which is all TLRs blue. This is the Matterhorn
and it just uses tellers blue for
everything in it. And you can see where there's been some texture applied there. Next, let's look at
one that is yellow. This is actually tomorrow. And so you can see that
I'm using a very dark, dark shade of yellow
here and then a light tint of the
yellow right here, and then this base
color of the yellow. So there's really
only three colors in this entire poster, and yet you're able to get a very distinctive feel from it. Hopefully that helps
you understand. You're going to take
this base color, create tints and tones
or shades from it, and then use that to translate into your mid tones,
shadows and highlights. That's really important part to understand is that basically we are translating the
mid tones, shadows, and highlights from
the picture that we've taken off the place into the poster colors and
just simplifying them down so that we create an
iconic representation of it. Now I know that it
can be a little intimidating when you're
first starting out to think about working in a very limited color palette because it can feel like a creativity has
been constrained. But hopefully you've seen
from these poster examples, but there's actually
a whole world of creativity found inside
of these constraints. But you do need to really
commit to doing it. And you have to wait until you finish it to actually
see what it looks like because it
might look bad in the beginning as you just have these very blocky
colors together. But as you add in
shadows and highlights, and then you add in texture, it becomes a much
more rich experience. Let me just show you
one more example here. This is a WPA poster which inspires all of
this vintage designs. So you can see that this is for Jenny Lake and museum at the
Grand Teton National Park. And it's just blue. It's all blue in there. That's what's going
on with this poster. And that's kind of the
historical perspective. This is where it's coming from. These old travel posters that were done with
limited resources. And there wasn't a lot of options in necessarily printing. So you kind of had to
work with what you had. So it's a great creative process to be able to go through this. I hope that you will
actually commit to using just one color and your poster because you will learn
a lot by doing that. Even if you decide
that this isn't necessarily your style
will really help you to learn something
about the way color works as you
try and do this. Now that we kind of
know what direction we're headed with,
with the color. You can go ahead and pick
what color you would like to use for your base color. It just needs to be one
of the basic six colors. Just, just choose whether you're going to use red, orange, yellow, green, blue, or
purple as your base color. And then in the next
video, we'll talk about choosing a reference
photo for your company.
4. 4 Choosing a Reference Photo: Now it's time for us to select a picture
that we're going to use as the reference
photo for our poster. And there's a couple
of things to consider when you are choosing
a reference picture. The first one is, do you have more than one
picture of that place? Because if you only have
one picture of that place, then that's what you're
going to go with. Now, it could be
possible for you to go online and find a
picture of that place, but for my own
originality and also to make sure that I'm not stepping on anybody's copyright. I always like to try and use my own pictures that
I've taken at the place, which of course only works if
you've actually been there. So these are some
pictures that I have from Disneyland and a continuing with the
theme that we set up using the Matterhorn
and Tomorrowland, I'm going to add another
poster from here. Now. I want to do
one of main street. And if I come over here to some pictures that I
have from Main Street, I have this one of City Hall
and then I have this one of the pumpkin leaning
into Main Street during the Halloween celebration and that's pretty
much all I got it. Main Street this time. So there isn't that much
for me to work with. I have to choose which
one will give me enough detail that I'll be able to draw that out into my poster. And in this case, I think it's gonna be City Hall.
That's pretty iconic. It'll go along well with
the other posters that I've done previously
in this series. And so I think that's what
I'm going to go with here. The thing to recognize when
you are looking at these, this isn't a
photography contest. This is really about having
a picture that you can use to be able to
create the poster from. So it doesn't need to be the
best picture in the world. This is not a really
phenomenal picture. I just shot this with my phone, but I'll be able to
take it and pull out the relevant
shapes that I need. One thing if you have
multiple pictures to consider is how much space
do you have around it? So for example, if I wanted
to do a poster of the castle, I have a couple of
Castle pictures here. When we look at this, this one has a lot more space around it, whereas this one
is much tighter. Both of these pictures may be useful for creating a poster. It's just this one's
gonna be a lot tighter and I'm going to
lose detail on the side. So it depends on what kind
of poster I want to do. Whereas on this one I can always crop in on it as I
make the poster, but it's going to give me
more area to work with, especially this area up in the top where I could
put some words. I've got a lot more of that here in this area down
in the bottom where there's this pavement space that would be dead if I
wanted to put words in there, this will just give me
more options for that. So as a general rule, wider is normally better
when you considering these reference pictures
for posters of a place. But it really depends on what
you want to highlight and how much detail you want
to be able to draw from. Because obviously I'm
going to have more detail here in this closer
one than I am here. I'm just gonna be
able to discern more detail in the castle there. Another thing to
consider is just if you have good contrast between your highlights
and your shadows. Now this was a very sunny day, so I have some
pretty deep shadows in some pretty
bright highlights. In fact, there might
be too much there, but it's good to have that differentiation
because remember, we're gonna be dealing with a
very limited color palette. And that's where this has
the building all in shadow. There isn't going to be as much there to work with just because you can see where the
position of the sun was. It's coming from
behind the backlog. Not best, but I can work with it and figure out where
the shadows would be. I think I'm going to go
with this one of City Hall, but you can go ahead and select whatever
picture you want. And in the next video we're going to talk
about sketching out our posters so that
we can start to get our ideas out on paper.
5. 5 Sketching: Alright, so now
that we've decided on our image that
we're going to use as our underlying
concept for our poster. We're going to go ahead
and we're going to sketch out what we want our
poster to look like. And we already have
a pretty good idea because we have that image. But we wanted to
lay out like maybe where our text is going to
go from that kind of thing. Anytime you start
any design project, you want to do some sketching before we actually
get into making it. So let's go ahead here. I just have my sticky
notes in my little pencil. And we're just going
to go ahead and draw it and it doesn't
need to look good. It just needs to help
you get your ideas out. So I'm just going to draw
kind of a rough poster here. And I know that there's gonna be a building here with a flag. Again, it doesn't
need to look good. It just needs to give me the
idea that I know is there, I know there's a tree over
here and some tracks. I've got that and I
know where things are that I want to just
start laying out my text. So I'm just going
to go City Hall and I'm using real letters here, but you don't even have
to use rule letters. You can just even block
out the text down here. I'm just going to put something
in like Main Street USA. I have this one concept
but then I might go ahead and just peel
that sticky note off and then I'm going
to another one so I can do as many of
these sketches as I want and I should
probably try and do a few before I actually
get started. So again, just kind
of what we have here, building the main ideas. And then we're just going to try out some different
configurations. So I might try putting the, all the texts down here. Then I might put some
dates down here. I don't know what the dates are, so I'm just going to
fill that in with just number of signs, but I might have like an
established date there. So that's one idea. You can see how sketching
doesn't need to take a long time for you to
get a bunch of ideas out. Here. In this case, because I'm working with the same
image every time. I've just sketching out the same basic
parameters each time, then trying out different
things with it. So it doesn't matter if your size and
isn't exactly right. So obviously this is
going to go off here. I'm just trying
out these concepts that just lets me know if
I had liked that or not. Not necessarily if this
particular thing works. I know there's some
distraction down here, so that's helpful
in thinking about what kind of texts
could I put down there? Mainly we're gonna be
working with texts, but there's other concepts that we can work with as well that might hold text like
a ribbon down here. And these are just
simple shapes. But then I might try
putting the date of establishment in the ribbon
or something like that. These sketches are going
guide how we design as we head into actually working
in Affinity Designer. So go ahead and make
some sketches and then we'll jump in and wash
to start making this.
6. 6 Document Setup: Now that we have a good
sketch of our idea, we need to go ahead and make our document so that we can
start to make our design. This is a pretty simple process. We're just going
to be here. And if scene designer go up
to the File menu, which you can't see me
just because of the way the screen recording
works on mine, but it's just gonna
be at the top of your screen and
you'll click File. And then we're going
to come down to New, and we see the new
document menu. Now this may pop
up right when you open a famous designer for
the first time as well. If so, that's fine. We're going to select Print
for this because we're probably going to
print less poster out and we're going to come
down and choose letter. You can see that
our layout is now 8.5 inches by 11 inches. And our DPIs 300, you can leave it at 300. That's great for printing. That's very high-resolution
for branching. And then we have document units. I have these set to inches, but you can select whatever
you feel comfortable with. You won't want to go with large things like feet or yards. So that would be more
if you were designing banners or billboards
or something like that. In this case, we're just
going to go with inches. That'll be much simpler. And then you have
your orientation, which we want set to portrait. And then you have this
important box right here, which is create art board. I like to always check
that box because I like to work with art boards. If you don't check that,
then you have to go through a couple of extra hoops
to make art boards later. So just make sure
that you've checked that because we're going to do multiple iterations
of this poster. And so we want to
be able to create multiple art boards of it. So just make sure
that's checked. We have image
placement policy here. The option is to prefer
Embedded or prefer linked. In this case, I'm
going to choose prefer Embedded just
because there's basically only one image that
we will be adding to this, that is going to be
the city hall image. And then we will
also be adding in some things that would be
considered image files, which will be used
for our textures. And you don't want those to
end up getting separated. But it's not such a
huge document that it's gonna be a problem to have
them inside the document, which is where I would
choose preferred linked. That's more if you're
working on something like a newspaper or magazine or brochure with a lot
of images you might prefer link just to keep
your file size down. But we're going to go
through for embedded here are color format. You can choose whether
this is going to be RGB or CMYK, in my case, because I'm not
going to be printing this on a commercial
printer because I'm going to probably just print
them out on my home printer. I'm just going to
keep it at RGB. These other things
we don't have to worry too much about here. We can either do
margins or lead. We don't need any
margins for this poster, but I am going to go
ahead and just add in a quarter-inch of
bleed around it. And that's just so
that we know how far off of the document to place our objects so that we can have a full edge to edge print. If we're printing
with a printer that can do edge to edge printing, I would set that to 0.25, just a quarter of an inch. And if this is linked here, then the bleed will be
all the way around. If you unlink that, then you can change which side had bleed. But most of the time
you really want that to be the same all
the way round. Let us go ahead
and click Create. And now we have
our document setup and you can see it
says Art board one. We have our art board. With this. Let's just go over
the interface of Affinity Designer
really quickly in case you've never
used it before. Along the top, you have your
options for your personas. So designer persona of pixel
persona and export persona. That basically it
will change the types of tools that you have
available to you. And then you have a toolbar with a lot of different options. We'll go over the
options that we need as we go
through the course. So don't worry too
much about what all these buttons do right now, on the left-hand side,
we have our tools. These are the things
that we're going to use to do things in our document. We won't use every
tool that's in here, but we'll go over the ones
that we need for this course. And then over here on
the right-hand side we have the studios. This is where we handled
the details of our work. We have things like our color, our stroke, my brushes. There's a lot of
different options that can be found over
here in the strokes. One of the really
important ones is the Layers panel over here. So we want to make
sure that we are paying attention to
that as we are working. But again, we'll go
into the pieces of this that we need as we work our
way through the course. But that's the basic setup of the interface where
different things are. Okay, now that we have
a document ready, we can go ahead and place our image and we'll do
that in the next video.
7. 7 Placing the Image: Let's go ahead and
actually place our image that we will
be using for reference. That's the first step
that we need to do. We're just zooming out a
little bit so that I can see my whole art
board for placing it. You zoom by holding
down Option on your keyboard and
scrolling with your mouse. That's the easiest way
to zoom in and out. Let's go over here and
about halfway down the toolbar will find
this place Image tool. When we click that,
it's going to take us in to find our pictures. You just need to navigate
to wherever your pictures. I'm going to scroll
down until I find that picture of the city hall
right here and click Open. You can see that now my cursor has this little
download arrow on it. Now we can go ahead
and place this image. So I'm going to click and
drag to place my image. And it doesn't matter if he gets cropped off a little
bit, that's fine. I'm just going to
drag until it fills the entire art board. That's how you place an image. And of course this is embedded because we chose,
prefer Embedded here. If we need to resize it, we just need to make sure we're selected on our
move tool up here, which we were automatically after we chose to
place our image. And then we can click and
drag from the handles. If we wanted to just move it, we can just click in the
middle and drag it around. And that's all there is
to placing an image. In the next video,
we're going to go ahead and talk
about how we use this image to find the
highlights and shadows.
8. 8 Finding Shadows and Highlights : Now that we have our image gear, it's gonna be good
to kind of determine where our highlights and
shadows are in the image. And this isn't going to
determine everything that we do. We still have a lot
of creative freedom. It's just good to get this
down as a guideline in your layers studio over here and make sure that you are
selected in the image. And one of the nice things
about working in FEM designers that we have all of
these tools available to us from raster programs like offending photo or Photoshop
right here in the program. And that's very helpful. It doesn't have every
tool that fame photo has, but it does have a lot of the basic ones
which help us to be able to work with these photos as well
as our vector objects. So what we're going to do
here is we're going go ahead and we're going to make
this black and white. So if you go down to the
bottom of the layers panel, you're going to find where you have your adjustment layers. And you're just going to
choose black and white. Black and white to begin with, starts to give us some sense
of the tone of this image. We're not going to worry right now about adjusting
anything with the black and white
image where we could actually adjust how
the colors play out. We may do that later
if we need to, but for right now
I'll just click X. So now you can see right here, there is this black and
white adjustment layer and it's being
applied to the photo. And it's important that
it's applied to the photo so that it doesn't get
applied to everything. But if we want to
see the photo and color which we might want to do, we're going to go ahead
and uncheck that. And then boom, we're back to where we weren't.
We can turn it back on. Now selecting on our photo, we're going to go
ahead and apply a, another adjustment layer. And this one is
called the threshold. So go down until you find
threshold, click that. And this one is actually
going to find the black and white in the image. And so this can be
really helpful in seeing where our highlights are and where our shadows are. And you can adjust the intensity here by going either to the left or the
right on the slider. So if I drag it all
the way up here, you can see it puts pretty
much everything in shadow. And if I go all the way, then it just becomes
completely black. And if I drag it to the left, everything becomes
a lot brighter. And it's basically
just adjusting the threshold for what's
black and what's white. If we just double-click it, it will return 250%, which is the baseline. The reason we want to do
this is just so we can get a vibe for where
our highlights and our shadows are as we are working on adding in
the vector shapes that will help us
determine which of our limited color palette
we're going to be able to use. Adjust this until you feel
like it's in a good spot, but don't do anything
too extreme. Because this isn't
adjustment layer. We can of course always come
back and deal with it later. So just like black and
white, we can turn that off and back on. If we turn either of these off, it's going to adjust
the other one. Okay, so that's how we
can find shadows and highlights by using our
adjustment layers on this photo. Now that we've done that, our
next step is going to be to go ahead and make our
monochromatic color palette.
9. 9 Setting up the Color Palette: All right, Now it's
time for us to go ahead and set up
our color palette. We're going to basically only
use three or four colors. And remember, this style of
design only works if you really commit to this very
simplified color palette. Let's go ahead and get
started with this. Makes sure that you are on your swatches studio right here, and we're going to make
a new color palette. So click on the menu
in the top right, and we're going to
choose to add a palette. Now there are three different
kinds of palettes here. There's application
palette, that means it will only be inside
of a frame designer. There's document
palette, which means it will only be in this document. And there is system palette, which means you could
use it anywhere within this system,
meaning your computer. So you just need to choose
which one is right for you. For me, I'm just going to
choose add document palette at this point and we're going go ahead and make sure
that we rename it. So we're going to click up here and choose Rename palette. We're going to call this one. In City Hall. Currently
there's no colors. Obviously, we need to go
ahead and add some colors. And if we click this
little Add button here, that's add current
fill to palette. So whatever is in
our fill circle will be added into our palette. There's other option
here is to add the current color to the
palette as a global color. Global colors are
colors that you can adjust later for us, we're not going to do that. We're going to make our
selections and stick with them. So we're just going to need this add current,
fill the power. But first we're going
to need this fill to actually be what we
want it to be though, if we double-click
on that, we're going to get our color chooser. So if you've determined
what color you want, you can actually put in the
code either RGB or hex, or HSL or CMYK right here. You can also use this
color picker to choose. Now, picking colors at random often doesn't work very well. So you want to pick something
that really works for you. So hopefully you decided
at the beginning what colour of the six main colors
you would want to use. Now you can go ahead and pick a starting
point from there. I'm gonna be using red and
I actually have a hex code. So I'm gonna go ahead
and put that in. So I've got this reddish
orange color there, but as long as you
choose a color that works with your
subject matter, it's fine. Whatever color you choose
because we're going form all of the other
colors off of it. So all the other colors that we form will work in
harmony with it. Whereas if you're doing a
more complex color palette, you want to make sure
that you're using some type of color
theory behind it. That's one of the
beauties of going with a really simple color palette is it's really easy to work with. So we're going go ahead and
click Close on this and then we're going to choose
add current fill to palette. So now we have this
color right here. And when the next
thing that we want to do is go ahead and make tints, shades, and tones from it. So if we right-click
on our swatch, we're going to get this
create color code. We want tints,
shades, and tones. So we just need to create
the color chords for those. So we'll do tints and we
get a bunch of tints. And next we will do create
color-code for shades, and then we will also do
create color code for tones. So tints are basically
adding white to the color. Shades are adding
black to the color and tones are adding
gray to the color. This is a great
place to start with now obviously we
have way too many. We do not want to
use all of these, but this is where
we will start from. We'll use these to select the three or four that we will use. Remember, we're primarily
dealing with highlights, mid tones, and shadows when we're making a
poster like this. So three is pretty good, but sometimes we'll want
a fourth one which will normally either be
white or black or very close to it if we're going to add in a fourth
one so that we can either really draw highlights or really deepen the shadows. So that's how we go ahead
and make our color palette. But we're not actually going to use that right away because it's best when we're working in this kind of environment
to just design using gray. So if you click here, just go ahead and choose grace. And that's what we're
going to use to do our initial designs
because then we'll be able to translate those
grays into the color later. So go ahead and switch
over to the gray. And in the next video
we will talk about using the pen tool to
create our shapes.
10. 10 Using the Pen Tool: Now that we have
our document set up and our adjustment layer
is put over our photo. We're going go ahead and
start actually building out the vector illustration
using the pen tool. I know that the pen
tool can be a little intimidating if you are new
to vector illustration, but just know that
as you practice, you get better at
understanding it. And after you have created the shapes for one
of these posters, you will have had lots of practice with the
pen tool because we are going to create
a lot of shapes. The other thing to know about
the Pen tool is you can always come back and
edit the points later, so nothing is permanent. If you make a mistake, you can always come
back and edit it later, even if you don't
catch it right away. I'm gonna go ahead and just
start with the basics. So let's go over and
get the pen tool. Just looks like a little
fountain pen over here. The first thing that we're
just going to do is the sky. And this is basically
just drawing a square. So go up to the top
left corner and your point should snap
into place there. If not, make sure you turn on snapping by hitting
this magnet up here. So he's snapping to place there. Click that's going
to drop a point down from which you can
then continue to draw. I'm going to hold
down shift as I do. So you'll see that that
line becomes straight, so I can't get off of axis here. I'm just going to go right
over to the corner and click. That's going to
drop another point. And I'm just going to go down below where this guy disappears. So down below this
kind of treeline here, I'm still holding down Shift
to make a straight line. And then I'll click and
they'll go across and click. And I can see that
I might actually want that to be farther
down because when I add in some of these
highlights or cut away part of the vector shape that makes the tree up later. I'm going to want the
sky to show through. So I'm going to go ahead and
hit Command Z. I'm gonna hit Command Z twice so that I'm
back to this point up here. And then holding down Shift, I'm going to go down further. Then I'm gonna go across
still holding down Shift. And I'm going to come back
to the top and click. Now that I've got
that you can see over here in the layers panel
that I have this curve, That's what I have created
and I'm going to go ahead and just give
that curve a color. So I'm going to click on white because we're
just going to use a few gray tones as we mocked
up this image, the white. Now I have this blank
white shape on top. I'm going to go ahead and
turn that off by unchecking its visibility so that I can continue to see the
image underneath. One thing that you will often see me doing as I'm
working on this is turning on and off this
threshold adjustment because I want to use the threshold adjustment to
see where the highlights, the shadows are, but I also want to be able to pick
out those mid tones. So I'll turn this off
and see what's going on. And I want to see which
things go together. Using both of these
in tandem can help us to get the
right amount of detail. Alright, let's go ahead and just do this pavement down here. This is just a little bit trickier than what
we did before. We're going to click to set
our point at the bottom, come up here to right
where that curve is click. And then going over here
to where the curve ends, we're going to click there, but we aren't going to let go. We're going to click and drag and that's going
allow us to make this curve as we drag out with this what's
called a Bezier handle, were able to set that
curve to be the curb. And remember we aren't going
for photo realism here. We're just going for
kind of the basic idea. Now, once we've created
that Bezier handle, we have this curve here. Let me zoom in so you can see
that a little bit better. There's a curve instead
of a straight line. But we want to get another
straight line coming down. And if we try and do that
right now it's gonna be hard because this other handle that comes out here
that we dragged, that's going to create a curve
coming out the other side. So let me just
show you what that would look like if I click here, I've got this curve
and I don't want that. I want it to be straight. So I'm gonna hit
Command Z to undo. And then when come back here, hover over my anchor
point and you'll see there's little
slash by my pen tool. That means I can get
rid of a handle. So when I click that,
that other handle goes away and now I can draw a straight line down and
then a straight line over. And I'm going to give this
just a 50% gray right now. If I turn back on
our other curve, you can see that this
is what we have. Not much so far, right? But this part is the simplest and he's
gonna get a little bit more complicated from here. Also, what I can see
right now is that both of these have black
strokes around them. I don't want them to
have black strokes. I'm going to select
both of them by holding down Shift
and clicking on them. And then up here in
my swatches studio, we'll click on my
stroke and choose this white circle with
a red line through it. That means no stroke. I don't want to make
sure that I put my fill back on top by clicking on it. So now we know
basically everything we need to know about the Pen
tool to continue doing this. So I'm gonna go ahead
and uncheck these. And then we can go
ahead and we can start drawing out some of the
more complex shapes. I'm going to start with just the basic outline of
the building here. A lot of this side will
be obscured by trees. So by lines don't matter too much on this side
because I am going to put that tree and
we just have to be kind of the idea of
the building here. But on the other side is
going to matter a lot more. And remember that as
you go through this, you can choose how much detail
you are going to add in. So for example, this
railing up here may or may not be
important to you if, if we turn on our
threshold layer, we can get an idea
of how much detail comes out in the
highlights and shadows. And you can see it's not much. So we might choose
to not put that in. Now you might have
noticed in those posters from John Clark that
I showed you earlier, he does a lot of detail in his drawings and I tend to
do less detail in mine. It just depends on what
you are going for. You can make that
choice yourself, but I'm just working with just a basic shape
here right now, and we'll add in detail later. I'm choosing to ignore
the railing for now, but if I decide I want it later, I can always come
back and add it in. Okay, So we've done straight
lines up to this point, but now we have a curve. I'm not going to
pay any attention to the light bulbs
along the top. I don't think that's
gonna be important. So I'm going to go ahead
and just click right there and then curve this just
like we did before. If I want to move
that a little bit, I can hold down Command on my
keyboard to be able to get my direct selection tool
and drag that a little bit. So if I wanted to just
reposition it, just do that. Remember I click on it again to get rid of my second handle. Going to come in here, zooming in with Option and scrolling. Just come in here and get a
little bit of this detail. I don't like my point,
I just hit Command Z. Now we have another
fencing thing here, and this one I
think might be more important than the other one. It's hard to say. But for right now
I'm just going to block it out and I can come in and erase parts of the
shape later if I want to. Here we have two curves. So I'm going to just
set my point here at the base of the first one. Just curve it out a little bit. Just my points. Click on that. And then curve this one out. From time to time,
I will zoom out just to kind of get a feel for the overall shape
that I'm going for to decide if the amount
of work I'm putting into the detail is
really important, or if it's not even
going to show up. I'm not planning
to put any figures in my image, any people. So I'm just going to ignore these people and
just try and follow the line of the bottom of the building as
closely as possible. When I get back over here, I'll see that I probably want
to include this planter. So I'm going to keep
going over to here. Then just back to my
original point there. Let's go ahead and just fill
that with black for now. So that gives us our outline. Let's turn on our
other images here. And as you do this,
you can kind of see it start to take shape. And when you turn
it off, you can kind of start to
see what's missing. Obviously, I'm going
to add in the flagpole there because that seems to be a pretty distinctive feature. And I need to do something
about the sidewalk down here, so we'll have to work with that. Okay, So there's gonna be lots and lots of these shapes
that need to be made. So I'm going to
go ahead and just speed this up so that you
can kind of see me work, but you don't have to watch the whole thing
happen in real time.
11. 11 More Pen Tool Timelapse: Okay. Good. I think I've just about half the main stuff blocked out here, which is kind of where we
want to be at this point. And you'll notice
that I rearrange things over here in
the layers quite a bit because how the layers are stacking is really
important so that the right things are behind
in the right things are in front so that you have
the proper layering. So at this point we're
going to go ahead and start adding in a lot more of the detail work with
the highlights and the shadows will go ahead and
do that in the next figure.
12. 12 Highlights and Shadows: Okay, So as you
make these posters, you can always go back and
change things, of course, but now we're going
to move on to mostly focusing on
highlights and shadows. And this is where the threshold adjustment
layer is going to come in really handy because
we can start to see where things are, it really bright
and where they are really dark and where we might want to add in
highlights and shadows, but we won't use that
exclusively because some of the details can get
really lost in this. And so we'll also
continue to use the black and white
photo to find out where we want those
highlights and shadows to be. And we'll be turning off
and on our layers a lot. That's just part of
what you have to do in order to see where
you want to be. So I can see that obviously I'm going to
want to add in a highlight around this lamp because I made the whole thing
black and I'm going to want those to be bright. And I can also see
that I'm going to want a shadow right here on the curb so that it
creates separation with the curb and
the sidewalk there. So we're going to add these in exactly the way
that we did before. The difference now is
basically just that we're working a lot smaller
objects most of the time. Switching to my pen tool here, I'm going to go ahead
and create just a, another round shape to
it here from the side. And when you're doing
these round shapes, if they're fairly symmetrical, you don't have to do
the click to stop the handle here because that's going to be
basically the same. So when you click over here, you wouldn't get mostly
the same shape there. Now, highlights in this case are normally going to be white. Then we'll use whatever
our lighter color is. When we go back to
our color palette. Then I'll just turn off the
photo which I've put in front now to be able to see
what we have down here. And then we can go in and
we can make adjustments. If we hold down command, we'll get our little
direct selection tool. Even while we're
using the pen tool, we can just make
a few adjustments based on how we would
like this to look again, I'm just holding down command to get this direct
selection tool here. Then when we ready to
move on to the next one, we'll turn back on the photo. And let's go ahead and
get the curb here. For really long
curves like this. You may have seen
this when I was doing the railroad track for
really long curves, you want to kind of zoom out so you can have plenty
of room to drag out because these long
shallow curves can be a little bit
tricky to get right. And you need enough room
to drag your handles out. And of course, shadows
will be primarily black. Will just want to make sure
that we match this up so that we don't have a little bit
of gray showing out there. So you can see how these start
to add in more dimension. And you'll be doing
a lot more of these, but you'll be making
them smaller. And of course placement
is going to be important. Just keep turning this
off and back on again to kind of see
where my highlights are at and where I
want to go ahead and emphasize those or
emphasize the shadows. Do you want to go
ahead and bring in this shadow of the tree
that's going to be important. Now, there's a lot of
highlights in here as well, which I may trace some of them, but I also may just
use a texture mask similar to what I'm going do on the tree to bring in
these highlights here, not all your
highlights and shadows have to be with the pen tool. You can also use a texture mask, which we'll get to
in another video. Just trace around this. This is a really large shadow. Normally, shadows are
actually pretty small, although they do tend to
be larger than Highlights. Highlights tend to
be pretty small. To just convey that idea of light glinting
off of something. I'm not being too careful here. Just basically giving the
idea of the tree's shadow. I don't need an exact tracing
because this of course, would be very specific
to the day that I was in this location based on where the lighting
was and everything. So it's not important
that this be exact. Just important that we
give the idea that yes, there would be a
tree shadow here. There's just a lot of drawing, a lot of clicking, adding
points during this whole thing, but especially during the
highlight and shadow phase, we're just going to
be doing a lot of little lines and paths. You may look at
something and be like, I'm not sure if I
like that, but leave the shape that I don't
go ahead and delete it. You can turn it off if you decide you don't like the way
it looks because right now, I feel like there
isn't a connection between this tree up here
and the shadow here. But we might be able to
make that happen when we get it back into
the coloring of this. If you don't like that
shadow right now, go ahead and just
turn it off for now, may look better when we
add texture to it as well. And just keep working
through this. It is time-consuming and not
particularly a lot of fun, but it can make your work look a lot better
in the long run. So go ahead and find out where those shadows need to be and
go ahead and put them in. Obviously going to speed this up so that
you don't have to watch me put in every single
one of these shadows, which will take a
long time to do. If you find yourself
just not feeling like you can put in the
time to make this happen. You can go ahead and
just tell yourself, I'll just do one shadow and then I'll go and I'll
do something else. Then just come back and
do one more shadow. And eventually after you've
done that a number of times, you will actually have
something which is pretty cool. So it just takes
a little work and some people don't love to sit there and do it for a long
time, that's totally fine. You can break it up into
multiple sessions if you want. Go ahead and speed
this up. You guys go ahead and work on your
highlights and shadows. And I will see you
in the next video.
14. 14 Subtracting Shapes: Okay, So I have the basic shapes and the highlights and
shadows where I want them, but I'm sure I will make further adjustments
to him as I go along and as they
start to bring in color and see how it
takes ship that way. But it's really good
to kind of get this done in grayscale first so that we figured out exactly how the shapes should look. And then if we need further
shadows and highlights later, we can always come
back and add those in. The next thing that I want
to show you is just how to cut something out
of another shape in case you don't know
how to do that yet. So if you look here at the top, you can see the flagpole should
be showing through here, but I need it to be
behind the black. And so I've added
in the highlights on here to make the terrorists, but I really want to see
the flagpole come through. So I need to subtract these highlights from
the overall black shape. So let's go ahead and
see how we do that. I'm going to come
here and I'm going to select all of these curves. Now they have them all selected. We're also going to go down
and we're going to find our main black shape,
which is right here. And I'm going to hold
down Command and click on that so that I have
that selected as well. The next thing that
we're going to do is go ahead and subtract them. So if you look up at the top, you'll see your
geometry operations and we want to subtract
those from the black one. So we're just going
to hit the minus one, but I'm going to hold down the
option key on my keyboard. They can make this a
non-destructive action. When I click that, what we
get is this compound shape. And if we click down,
you can see we have all of these curves
inside of here. So all of those curves are
part of this lattice work. And I can then come in and
I can still adjust them. Whereas if I didn't
hold down option, it would have been a
destructive operation. So it's just a good idea
to hold down Option so that you can change
it later if you need to. Now if we go ahead and
we click off of here, you can see that these are now creating holes and we can
see the flagpole between it. So that's a really good
skill to know how to do. In the next video, we're
going to go ahead and learn how we can change
the color on here.
15. 15 Adding Color: All right, Now it's
time for us to go ahead and add color
to this poster. And you can see I'm selected on my city hall color palette here. And of course I'm only going
to use three or four of these colors in order
to make my poster. And the next thing
that we need to do is duplicate our art
board so that we still have this grayscale
version over here in the layers panel where
it says Art board one. I'm going to go ahead and
click on that and then click again so that I
can change the name. I'm going to change
this to grayscale. Now with that selected and making sure that I'm
on my move tool, I'm going to go ahead and hold down option on my keyboard, click and drag to duplicate. And if I want to
keep them in line, I can just hold down Shift. Then when I let go, I will
have a duplicate version. Now of course I want to
change this name to be color. And I'm probably will
have multiple colors. So for right now I'm just
going to call it color one. When we want to change
the color of something, we want to use the
Select same command, and it's a little bit
tricky and we have to do a workaround to
make this work correctly. So just make sure you're
following me here first, I want to go ahead and
change all of my grays, my mid-tone colors
to my main red hue. I'm going to go
ahead and click on one of my gray objects. I'll just click on
the trees here. And then I want to go up to my top menu and you
can't see mine, but it's right up there where it says Select, click on that. And then you'll see this menu. Then you want to go to Select
Same and choose Fill color. This is going to
select everything that has the same fill color. Now you will notice that it
has now gone across onto the art board whose
color we do not want to change in your layers
panel, scroll over, find your gray scale art board, hold down Command
and click on it that will select the
entire art board and then click on it again, which will deselect
everything on that art board. Now we just have our
color one art board selected and only
the gray objects. Then as long as we have our fill selected here in swatches
so that it's on top. We can go ahead and we can click on our red and everything
will become red. Alright, let's repeat
that for our blacks. Clicking on black, go to Select, Select Same Fill Color. It's selected the
grayscale art board. So we want to hold down
command on our keyboard. Click the art board
in the layers panel, click it a second
time to de-select. And now we have just our
black objects selected. Now we can go ahead and select one of our darker red shades. So we don't want the one
that's pretty much black. We want the one
right next to it. I'm going to click that and
now I have dark red shadows. Next, let's go
ahead and click on one of our white objects. Then go to Select,
Select Same Fill color. Now of course we're going
to hold down Command, click Grayscale, click
it again to de-select. And then we can add when
one of these tints, I'm going to go a
couple of pins down from pure white and
put that in there. Now you can see that we have easily just add in our colors. Now we want to do
some iterations. We might want to change
up some of these. So I'm going to go ahead and select this artboard Color one. I'm gonna hold down Option to duplicate it again
while I click and drag. Now I think that I
might want to actually go a little bit lighter
on some of these. Just to brighten up my
highlights a little bit. I can actually see down here
where I have a problem, where there's actually some of the art board
showing through. So I need to come back here, grab my selection tool
and pull that up. I'm just testing this out to see what I like and which
color like better. And if I need to tints
there or just one K, We also want to try and
create some separation here. So this might be a good
place to add in a tone. This would be a
fourth color for us. Forgot to change these. Let's go one tint lighter there. They're just barely pink. And then this might be a
good place to add a tone because you see we have the
main red overlapping care, which we don't really want. So let's go over in our tones and let's just see if there's anything good here
where we can come up with a fourth option. We've got pure gray, but then if we back
it up a little bit, you might find something else. Let's get there. I'm just experimenting with a
few different things just to see what I get here.
16. 16 Adding Text: Alright, now let's go ahead
and add text into our poster. We're going do this using
the Artistic Text tool. So if you go down along the
left-hand side and the tools, you will find the
Artistic Text Tool. And the reason we're using
the Artistic Text tool instead of the Text Frame tool, which is right
here, is because we want to be able to adjust
the size of this on the fly. We don't want it to be
bound to a frame size. We want to just be
able to adjust it to fit whatever we
need it to fit. So let's go ahead
and come up here and we're just
going to click and drag out to size that we
think is going to be good. And then we're going go
ahead and change our font. We're going to change
our font to something that's kind of an old style. Now, I have a lot of
different fonts that are more retro and you may or may not have fonts like
this just depends on what's on your computer
and what you may have bought. So I'm going to go ahead
and I'm going to be using one called Gothic
outline shaded. This is from the
wild-type revival set. So I'm going to come
here and there is Phil, distressed and regular
I want distressed. Let me go ahead and
hit distressed. And then I'm just going
to type in my text, which in this case is City Hall. The reason I'm using
a distressed font is just so that it gets these imperfections in
it here that you can see that just makes
it seem more vintage. Let's go ahead and
expand that out. I wanted to just kind of
sit around the flagpole, go ahead and turn on
my magnet here to make sure that's close to centered. I'm just going to drag it over a little bit just so
that it's centered on the flagpole instead of
being centered on the page. And then for color, I'm going to go ahead and
choose my darker shade here. Looks pretty good. I'm going to go ahead
and make another set of text down at the bottom, grab my Artistic Text
tool here. Select parlor. And then I'm just going
to put Main Street USA. I'm just going to
make that bigger. We might try a
different color here. And now we've got
Main Street USA here. Okay, so that's how you go about adding text and make sure that you add in some texts that will be meaningful onto your poster. And in the next video,
we're going to talk about adding a border to this poster.
17. 17 Adding a Border: Next to finish this up, before we come in and
add in the texture, we're going to add a border. And we're just going to do
this by grabbing a rectangle, going up to our top left corner, clicking and dragging
across the entire thing. Now obviously we don't want
to fill on it right now. So we're going to
go ahead and just hit the little white dot
with a slash through it. Choose our stroke
here from the top. And then we just need to add
in a color for the stroke. And I think in this
case we're going to try and go for that
tone that we're using. Let's go ahead and select that. And then in the Stroke Studio
right next to the swatches, we're going to go
ahead and drag up to get more of our
stroke coming out. And we want to make sure that we align this to the inside. So going to where
it says a line, we want to align the stroke to the inside so we get the
full stroke coming in, probably go up to around ten and we get to
decide if we'd like that color or we can try
one of the others as well. I think I liked the main
base colors the best there. So now that we have
a border around it which you can choose whether
you'd like that or not. Now we're gonna go
ahead and add in texture to the poster itself.
18. 18 Adding Texture: Okay, So I made a
couple more tweaks to the text here before
we got to this video, but we're going go ahead
and add in some texture. There's a lot that you can
do with texture and you can find free textures online
or you can pay for them, or you can make your own. But adding in texture
is really important, I think to really
giving the vintage feel that you want out
of a poster like this. We're going go ahead and we're going to duplicate
this art board again so that we can add texture but still
have a clean version. So let's go ahead and duplicate this artboard
by selecting it, holding down Option,
clicking and dragging. And then we're going to call
this one color to texture. And the first way that
we're going to add texture is by using a raster image, but we'll also learn how to
add texture by using a brush. So let's see how to do it
with a raster image first, right here in my Finder, I have open this folder called
dirty surface textures. Now these are some free
textures that you can get online and I'll go ahead
and leave a link for them. These are Pharma
created are called Spoon Graphics and boom graphics does some
really great tutorials on vintage design. And he also has these textures that he
gives away for free. He also had some for
sale, of course as well, but these are free ones that
are dirty surface textures and I'm going to leave a link for those if you
want to use them. I have lots of textures
that I've paid for it, but I wanted to show you
some that were free as well. Let's go ahead and we can
look at these on a Mac. You can just hit Spacebar
to open these up. And the important thing to know about working with texture is that you're going to use
it as a mask in this case, because we want to
create a print field where you can see
things behind it. And so that means
that anything that's white will allow stuff
to show through. Anything that's black will
hide the layer that it's on. We're obviously going to
want more white than black, but these are more
black than white. So we're going to invert them when we get
into the program. So just looking for one of
these that might be useful. A lot of good ones here,
I'm going to go with, I think number ten,
just as an example, and I'm just going to
click and drag that out onto here and it just places it on the page just to show
you how this works. Let's go ahead and we're going
to drag this down to right above our kind of our
main building image here. So just that curve right there. We're going to drag
it down on there. And we'll want to resize it just to make it big enough to
cover the whole thing. And then we need to invert it. So we're going to use
an adjustment layer. They just went layers look like a yin-yang symbol down here at the bottom
of the Layers panel. So go ahead and
click Adjustments. And then if you scroll down, you're going to find invert. What inverts going to do
is it's going to flip the whites to black and
the blacks to white. And we can use it
to make our mask. Let's go ahead and
click on this layer, then right-click on it and
choose Rasterize to mask. All right, that is currently masking everything
down beneath it. But what we want is just
to mask this layer, looks like we are in the
wrong spot for that. Sometimes it can be hard to keep track of all your
different layers. We want this
compound layer here. So let's go ahead and drag this down to the correct spot
of our compound layer. And now we're going to mask it. So we just want
to drag that onto the thumbnail of that layer. Now it is clipped
to just that layer. You can see, if I zoom in here, you can see how that texture is allowing what's behind
it to show through. That's one way for
us to add texture. Let's try and do that again. But this time we're going
to make a group of all of these base colored
objects that are on that particular piece. We're going to take all of these window objects
and these ones. Want to make sure
that we get them all grouped together here. And we may have to do
some rearrangement to make sure that
everything is in the right spot because we want this white facade to be on top, but we want these orange ones to be on top of that white one. So it can get a
little bit tricky, but you just have
to kind of keep track of where you're at. So I'm going to group
them together and it looks like we might have
missed a couple of them. So let's click on these and we're going to drag
those down into the group. Open the group up like these, and drag them inside the group. Now that we have all of
those grouped together, we also want to add in this one because it's sitting
against that same piece. And the problem with moving
that behind is we need to get these guys and put them back on top so these guys cannot
be in the same group. We move those out, create a separate
group with them. Now let's move this back
piece into this group here, and then we will move
this facade on top. Right now we want to apply
a mask to this group. So let's go ahead and
grab another texture. Pop that there and we want to do the same thing that
we did before. So it looks like we left one
of these out of the group. So there's always a
little bit of going back and forth here to get
these in the right spot. All right, so let's go
ahead and invert it. I'm just showing this to you
guys again so that you can remember it and be able
to use it again later. Rasterize to mask. In order to mask this group, we need to turn this group
into a compound shape. So let's go ahead and
select everything in the group when
we come up here, just like we did
when we were making the compound shape for the
lattice holding down Option, we're going to click Add, and that's going to turn them
into one compound shape. We then want to
make sure that this group is not here anymore. So let's go in and ungroup it. And then we'll go ahead and
we will take this mask. We will just clip it into
that compound shape. And then you can see how
we've got this texture, which is allowing the dark
part to show through. Alright, so that
works pretty well. Now let me show you what I
wanted to do on the trees. I want to try out on the trees
a little bit more texture. Let's go ahead and grab
another one of these. I wanted to do one that
has quite a bit on it. I might need to switch to a different texture
pack for something a little stronger if we can't find something that
works well here, that one has quite a bit there. We'll go ahead and
drag that out. And then we want to go
ahead and grab these trees. Of course, we're going
to group those together, make sure that we've
dragged those up on top. And then with this
dirty surface texture, we're going to try
and apply one of those threshold
adjustment layers to it that we used previously. So we're going to go
to this threshold. And when we do that,
you can see we can select how much is black
or how much is white. So we want to make sure we
have quite a bit that's white. And this is just
trial and error, figuring out what works first, let's take our group and
let's turn them into a compound shape
and ungroup them. Then we're going to
rasterize this to a mask and clip it
into our trees. And it looks like
we need to adjust its placement a little bit. What you can see there
is we don't have enough. There wasn't enough that
was white on there. And so we'll need to do an
invert on that as well. Let's get back to here and we'll go ahead
and we'll get rid of the threshold adjustment. And there's just a lot
of trial and error. Let's reposition
that right there. And then let's go ahead
and get our invert. We've inverted to this and let's see what
that looks like. We might want to apply another
threshold adjustment if we need to rasterize, to mask, and there's
just not quite enough coming through here. We want to get more
texture in these, just so they look maybe a
little bit more tree-like. So let's go ahead and hit Command Z to get back
to where we were. And let's go ahead and apply another threshold
adjustment layer. We're going to want to
find a happy medium between the white and the black. And what we may want
to do is use more of this bottom part where there's a little bit more
texture going on. Selecting our mask and
using our move tool, we can adjust which
part we're using here. We can rotate it to try and get the right amount of
texture in there. You could spend a lot
of time looking for the right texture to make
those feel like trees. I'm not gonna do that right now. I just want you guys
to get basically the idea of this
and how it works. So those work pretty well for kind of bigger blocks of color, but for smaller things like maybe this lamppost
or places where we want things to not
be quite as even It's good idea to use a brush. So let's go ahead
and learn how to use a brush to add in some texture. Let's select the lamppost here. I can see we actually have a problem where these
trees need to be brought forward above the
facade. Sorry, there we go. That looks better. Let's
look the lamppost here. Let's go ahead and group
it with its bulbs here, so that we have a group. And now we can go
ahead and we can apply a mask to it. On the mask. If we paint with a brush, we will be able to
apply a texture. So we'll need to switch to
our pixel persona for this. So up until now we've been
in the designer persona. In the top-left,
we're going to switch to the pixel persona, and then we're gonna get
our brush tool here. So here's our brush,
and you can see our brushes on the side here. So there's lots of different
brushes that you can get. I've got a bunch of
different ones here. I think a good option is either the textures or
the sprays and splatters. Those come with Affinity
Designer so you can use them. But just to kind of show
you how this works, when we have a white mask,
everything is showing through. But if we want to apply
some texture to it, then we can go ahead and
brush black onto it. So let's try the
grainy air brush here and just see
what that looks like. And we're just going to
switch our color to black, so make sure that we're
painting in black. And then let's zoom in here. And when we come through you can see
how that's masking it. We don't want to mask
it that much though. So let's go ahead and turn down our opacity significantly
on this brush. Okay, I don't love that particular texture,
so that's fine. We can just go ahead and delete this mask
and add a new one. Make sure you're
selected on the mask, right-click and delete. You can add a new mask by
clicking the Mask button again. And let's try a different brush. Let's look at our textures
here and see what we got. Try this grunge pattern. You can kind of see how that is applying a different texture. And the nice thing about the
brushes is you can really select where that
texture gets applied. Whereas with just a
mask using a file, you can't do that as much. So we just apply the
texture that way. Experiment with
different brushes and experiment with
different texture files. If you can't find any
texture files, again, I will leave a link for that
pack that I've been using. But also if you can't
find any texture files, you can definitely go
ahead and use the brushes. You just need to spend some
time really adding texture because texture is
going to give them much more authentic field
to your entire poster. So I'm gonna go ahead and
keep adding in some texture. We're using both
files and brushes, and that's going to
finish up the poster. So in the next video,
we will go ahead and talk about exporting the poster.
19. 19 Exporting: You can spend a lot
of time putting on texture and it is
worth it to spend a significant amount of time figuring out how you
want the texture to be because that will affect the
overall feel of your poster. But once you have it
where you want it to be, then it's time to go
ahead and export it. The way we're going to
export is go up to File, which is on the menu that you can't see because it's
outside the window. But once you click
file in the top left, then you can go ahead
and choose Export. When you export it's
going to pop up. And there's some
different options here for different things. You might want to choose a PDF, but in the case of a
Skillshare project, you do want to choose JPEG because Skillshare your handles JPEG better than it handles
other kinds of files. So I have this
here where it says Color to texture.
That's the area. If yours is set
to hold document, you want to make sure
that you go to Color, to texture or whatever
you've called your final art board because
you don't want to export the whole
document as a JPEG, that wouldn't work
out very well. So make sure that it's
on color to texture. Then you have this quality
slider right here. You can choose to adjust that based on how big
you want it to be. You can see down here
the file size changes for submitting to Skillshare. I would try and keep it around
two or three megabytes. You don't want it to be
too large and they can't get big depending on how many of those raster textures
you've gone ahead and added in the two to
three megabyte range is good for Skillshare, I will still be able to see it even if it's a little
bit lower quality, you just don't want to
go down really low, like less than a megabyte
or a megabyte and a half, because then things
can start to get a little bit wonky and pixelated. Just around two
megabytes is good. Then you're just going to
go ahead and click export and then choose where
you want to save it to. I'm going to save mine as
City Hall and click Save. That's it. You've
now export it as a JPEG and you are ready to go. All you need to do now is go
to the project section for this course and upload
your project as a JPEG. In the next video,
we'll go ahead and talk about the next steps
you might want to change.
20. 20 Next Steps: All right, now that you
can play your posterior, you might be wondering
what are the next steps you should take in
your design journey. And really the most
important thing in any design journey
is to practice. You need to put into practice what you're learning
and you need to practice a lot in order
to improve as a designer, designing something
that comes with learning principles
and practicing. And so it's not just
going to descend upon you one day you
need to practice. I would say go ahead and make another poster like
this to really get some practice or
keep iterating on the poster that you've
already created. If you do make new posters or new iterations
of your poster, I would love to see those in
the project section as well. If you're ready to do something new from monochromatic
poster design, you can go ahead and check
out my other courses. I have lots of courses on the affinity programs within
Designer affinity Publisher, and if any photo that
you can check out. I also have some basic courses on the principles of design. Those principles of
design will help you improve your
design as you start to recognize them in the
world around you and as you start to practice
them in your own work, if you are really interested
in the theme designer. Besides my courses, I
also suggest you check out the courses of
day week to Minsky here on Skillshare
because he has really good courses
that teach you a lot about Affinity Designer. Don't forget that
you can also follow me on YouTube at Ben designs in order to get weekly videos
about design topics. Thanks so much for
watching and I will see you in the next homework.
 Ben Nielsen, Good design is the beginning of learning