Transcripts
1. Overview about the course: you don't know why isometric designs us so popular because they look more realistic. I am printer on an instructor of discourse in the schools. I will teach you how to create isometric designs if we will be learning how to set up isometric, how to understand the planes and understanding the colors and strokes and some basics off Afinitor designers. And at the end we'll be creating a realistic 2.53 laptop design, so let's start learning.
2. How to setup isometric workspace in affinity designer: in this session live alone how to set up an isometric overview. An affinity designer. So we'll start with new document. You can select your own, but for now I'm just setting it toe 2000 pixels and 1800 pixels. But see 100 db I and I'm just selecting this. So this is our design mock space No, to settle. I so make to go of you. You just need to goto view section my view and go to the studio And just here isometric We just have to select this by left clicking here. As you can see, a small isometric tab is being arrive now Why do you have to do is do more defy grade Just select this. As you can see, it is Graydon snapping access manager So we have to as you can see this, right? No blank. So we will first select this show brig. Now it is showing degrade and make sure that I sooner triggers selected here. Now, one thing we will do is you can just just this pacing off this great lines. No, If you want to more converted, I need details or a big environment. You can just choose less pacing. But if you want to just create a one or two prop whatever. No design element. So you can just increase this pacing for better mend off of you. So I'm just choosing this too. 17 day down. Okay, this seems go to me. So all you have to do we just started I selected is like this. Now you can close this.
3. Learn how to deal with planes in affinity and create a cube: So in this lecture with study about the plane, suffice on a drink. And how do men is them and easily create isometric shapes. So, as in the previous lecture, the started with I submitted dashboard oi Semitic interface and just now we are creating a cube to understand the planes and how we're going to work in advance. So let's start no on the left side. As you can see, we have different tools in which will select rectangle tool. And I'm just clicking this and creating a rectangle tool. So as you can see right now, it is just a Plano of you always see. No. So let us suppose we have to create aside off the rectangle. So what we will do, we'll create a rectangle and go to side facing. As you can see, the blue highlighted side is de design, which will be created if you'd like that, like here, in different like friends will look like this and the top will be above or the below. So let's creator side first. So by selecting this shape, I'm just clicking on side and stick to plain. Make sure you have to select this so as you can see now you can go do the top over you. So better understanding. So now you see that this is this side interface. This is this side design off your cube so we have greater decide Now it's time to greater friend overview. So like this this is friend. So again we have to create a rectangle. So for select different and then create a rectangle Don't worry about back Now you have to just predicted to plain select this and now you can adjust this easily. Let's zoom in by control. Plus so just I'm just make it like hell in exchange Nicholas likely so better understand that. So I'm just putting into sight. So going up whichever you want You can prefer that So Ok, now we're good. So we have side facing. We have front facing now we need to create a Yup. So we will follow this step We will go to the top as we're already here Now we will create a top. Okay. Seems good. Now what we have to do Just select freak Too plain As you can see, it is automatically in the top and now evil Good with this and just create this so slightly . Change the color so you can see the difference. So our cube is ready. So in the advanced lectures, we're going to proceed with this technique. So you have to understand that how it is going to work. In order to create the site, you just have to create a shape and click the plain more as you want, like front, plain sight, plane and stopping. And after that you just have to click click to the plane like a dog and for side recuperating like side. And for friend, we just have to select front and then picked a plane. So that's how it is that easy and you can do it. So this is for the lecture. And in the next lecture, we will understand colors and strokes and some shapes. So thank you.
4. Learn how to color and strokes : in this session, we learn about how do color shape or how to add some nice green and some opacity and strokes, which would be beneficial for advance creation off these designs. So let's start without previous design for select, moved all and then select a plane. As you can see, we have created a que in the previous lecture. Now let's add some colors, so I'm just adding some dark yellow Okay, like this. So how you can add colors, just select the plane and go to the television. Or you can choose anyone like sleigh does boxes. But I want you to just choose B because it is very easy as you conduce anything you want. You can also choose from scratches, but I prefer this because always cleared some awesome for us. No. Another thing. I want to tell you that if you want to just copy the same color that claim, what do you have to do is select this plane and just click here, call a pickle and choose any color you want. You can choose and nickel in the design book space, so if I need to color this here, so I need to just select this as you can see, but we'll do a little James so that we can. Different shared that. It's a cube off through the space, so I'm just, let's add No, let's mix likely later. Okay, Now it's good. Now it's time to quality top. So no, cut it up and you can also select a color picker from here. You can also select your previous color, like as we selected with the color picker tool. So now let's again to do practice by selecting this click here color picker do. And just like this. So now we can just add under. Okay, Dad's good. So this is a cube. As you can see, it's a three dimensional. That's what I submitted. Do it 2 to 2.5 day images or designs, which would be really interesting to see. So let me show you what it's talks. So I'm just creating a plain, simple plain and one more thing if you have selected an eagle and you will do their design sort of greater designer, same color that you have selected so you can just changing color. So as you know, I have created this and now you can see that day doesn't know Stroke here are not visible stroke. So how you contain this stroke? Hello? Or how you can make your strokes visible so that would be achieved for select. Here you go to move, tool and go to strokes on the left side, on the right side. So as you can see here we have a different kind of strokes. So right now, a stroke with the zero. So it is not visible for us. So legs increase the size here and you can see as you can see the black stroke. As you increase the size, the stroke increases. You can also see in the stroke like daughter will and make some adjustments as you want. Let's through this body for it and just select this. So this is the stroke. Now I will tell you how to change colors So this color is for playing color and the other one is black, which is stroke. So in order to change the stroke alone, you just have to click this arrow. Look here. As you can see, the yesterday's don't know Swiss don't right now and then we have changed. Nikola Belgian Niccolo So let's make it pink just for reference. And Jim Nikola So that's how you change the stroke? Simply. If you want to change the stroke alot, it just has to switch this and pick any color you want for your strokes. An eagle you want and just changed her, Adam. And you can also lead your strokes. Let me tell you how so to believe the stroke. You can just may God, Zito are a better way which we are going to use in the coming lectures is dead. Just look here and like this to believe the stroke, right? No, a stroke is nor diligent. This selected colors diluted So Jane Vietto And now you can see our stock is deleted. So that's how we will work now if you want to just remove the color off the plane, not the stroke, so you can just see indicator She's Diego back looking. You select this. You can also is dygalo and the plane for the strokes and foot pain. So that's how we color and that's over. Deal with stocks. So this is all about the lecture
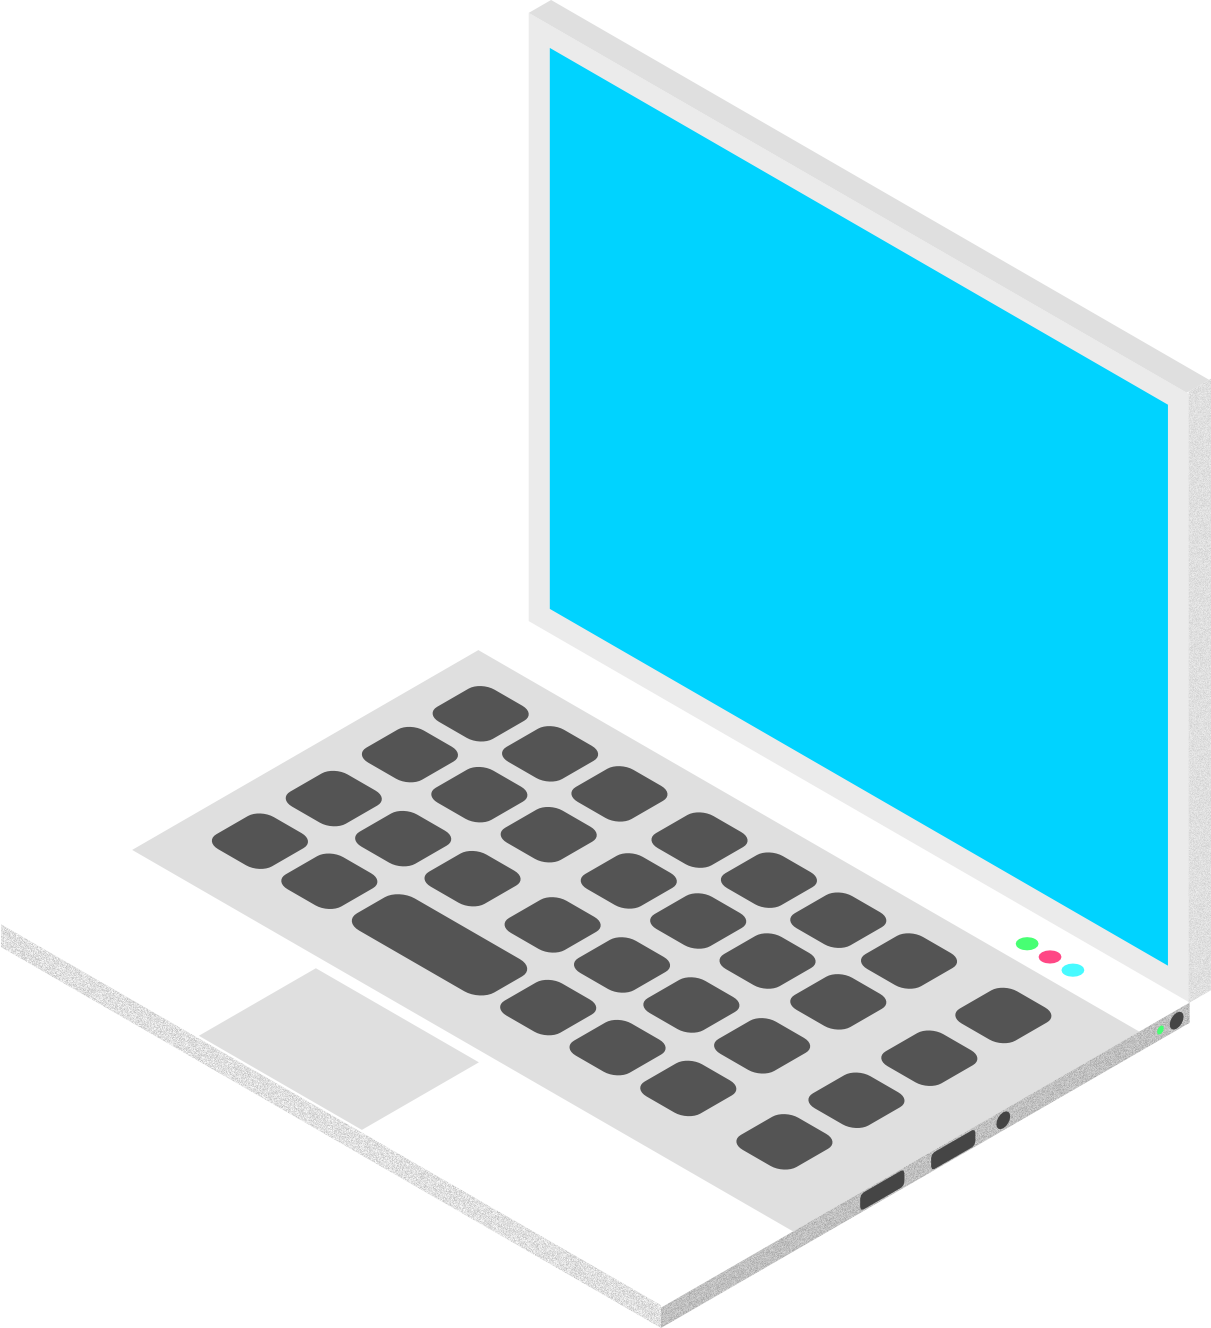
5. Project : laptop designing part 1 : it's finally time to create a force project by creating a isometric ship off a laptop. So let's start right now. No, we have to start isometric design workspace in order. Introduce. So we have to go to view and studio in Studio Reactor Such I so much ink and select this. No, as I Semitic tab appears Now you have to modify addicted. Select this and you are here. Now go step show. Great. And as previously we have selected the space in 1 71 You gonna just out. So let's make it 1 50 toe. Okay, that's cool. And we're just closing this. No, we'll start creating laptop. So let's zoom in by controlled plus first. Like me creators sample design. So I'm just selecting Elector a rectangle. And for us first, let's creator background so that we can better deal with white or silver shapes can just adding ordinance culo and with ginger cleared and I'm just locking this design so it won't more by pressing this notes long. One more feature, I will tell you that if you don't want this design or any design to show you just select this. It's gone and against like this Expect so not we can't move this. So it's better Drew designed right now. So let's start. No, we knew direct angle and create a sheep by selecting force white color. And now we need to designer dogs space because we are designing the bottom of the laptop. So after selecting top select efecto plea. Okay, Now let's I'm just reducing these two, okay? Well, that's good. No, look like that. Okay, this seems good to me. They're zooming for more precision. As you can see, this will be d bottom on the left. Now let's cater top. So for select sighing because leftovers facing like this this will be the bottom. And this will VD face or the scream off the laptop. So this create a plane and click by selecting the side plain and Lichty picked a plane. No, you I can understand that. Why have been this just to create a screen? Su Okay, good. Now I'm just changing the color slightly off so we can differentiate the colors. Okay. And now we have basic shape. Off laptop like this will be the screen and this rebuilding keyboard section
6. Project: laptop designing part 2 : Now let's create indeed Ayla Keyboard section. So select the top. As you can see, it's on the top and just select this and press control plus J, it will greater duplicate control policy or command blazy for Mac users. So you can just reduce this and slightly introduced from here. An air last like silver color. Okay, just a little bit like this. Now we're going to eggs and keys. So Lechmere justice here or just weaken? Put it right here because we're not too quiet colors right now. Okay, So I'm just selecting a long red rectangle to to create a keys. So let's zoom in. Controlled, plus or command. Bless for Mac users. Okay, this will be they. You can press shift to create a perfect scratch ship around rejecting them. Well, it's square ship, but around rejecting that led occurred just with this now click freak. Too plain. As you can see, it is here now and we're just moving this in selector Kikyo seems good to me now. We will creator keyboard. Who slightly? Okay. Is there resuming? It's likely that he was decided slightly. Okay, Dad, School. Now let's create a duckies by using controlled busy duplicate this and under suppression shift and just moving here. Why press shift? Because it will movie keys in a street manner and just Okay, that's good. You need just likely moment, nards. Good. Okay, normally, select these three and you news d control minus zooming and again controlled. Busy. So how many you are selected, then it will create a copy of this tree like this. No, we need to just select all and will be a leg Sat on a level so that you would be work for us. Okay, now we're good. Now we need to just select all shapes and make a group. You can also grouped them. So just making a group and controlled by D do and using shift. And most do making the adjustment. As you can see, just use shift to build with preseason and straightness off that design. It will live really very helpful. So again, I'm going to select and control J or command J for Mac users to duplicate. And this spacing them using shift. Now we need to ride Amando. Keep pregnant. So that Okay, that's good. So let's make some adjustment with keys. So if you have group this, You can see if you select this, all these elements are selected. So in order to select a particular element, you have to just double click here or you can scale it or reducing or delete it. Right now I'm believing this. The reason is that I need to create a space. But so that's why let's do this again, Control. Plus. And as you can see, in order to select a single element, I have just double click here and selected this one and just scaling here so that it will look better can. Now we need to just and a single keys here so that they will be good. But this now select the last, true and on group this and select one element and control J. Because we need to fill the last true I'm just Agnes pacing here and control J. Okay, that's good. Control J again using shift again control J and just shifting into here. So we are done with keys. You can add more president, or you can have your next to the skis using this same pattern. If I Semitic, as you have told you, Well, let's try adding on X and birth next year. Hey, let me select white color because it will we miserable please. Now, Alert said next by selecting this extrude clicking here and I need space. As you can see, it is not reasonable or it is behind the layers. So we need to just move to friend in order to move to Frank. Here we just select this, you know, just forward one Leah, you have to just forward. And if you want to make your design, go to the back side force to go to the back. Leo So you had just moved to back or single backward. So now I'm just selecting move. Different As you can see, it is visible now. Now I'm going to select this and understand the plane, which is stop playing and like, freaked a plane. Now any disaggregate and how your date You just have to say, place your cursor here and just change it. Okay, Just controlled. Said is very helpful in designing. As you can see, it is not suitable right now. So when you do, just adjust this and tried to give it this Okay, This is having some issues with that. Okay, now it's good you can just recent tales, so like this. But right now I'm Lord, adding any text you you can just like these two arrows will help you to skewed these next skew. So right now, I'm just deleting this and we'll proceed for the So let's add some shapes, do our design. Okay, I'm just selecting a rectangle here. And they told me No. Let's create a boundary here. You and we have to understand the plane, which is side plane in this case, and I will click for two plane and just place it here suggesting this shape and who was in vehicular, which is similar to debt so that we'll have a slightly open five. We look or on isometric look so just selected boundaries. Okay, Now we're good. Now, let's create side boundaries. So I'm going to duplicate this by using control and J and just dragging it here and selecting the plane, which is front playing in this case and victor plane. So this is almost next is alarming to see deeper season right now, it's good in this case. Okay, now it's good. Now we need to just like letting the color because it's gonna show the light and shadows and a nice on the trick. We're dealing with this sort and use this size. Now, as you can see, this looked like as a box. We can reduce the depth off this. Don't make it more slimmer like this. As you can see, we have reduced the debt. No, We need to add some boundaries over here and here. Before doing so, we need to create the screen. So I'm just selecting this plane and replicating this by using control G form accuses. Just use command, Angie, and I'm just changing the color two black. Okay, this is better, Lis, but we need to just, like please in the color. Okay, that's good. As you can see, this look like now a laptop. But we need to just a minute. Dragsholm boundaries here, so Okay, you know, it's OK. So this is a registered and just putting it here and just select a rectangle tool and create a shape here and select a sheep like this. John DeCarlo on just breast. Put it here. Just be lent and understand the pain, which is the okay, friend. Plane is good in this case. So I'm just changing and zoom in who are just Tikolo. Okay, this is good. Next reviews decides nickel and just changing color. You can also move the plane using all designs using you turkeys and also use shift for precision. So now we are ready with this. And now we need to just other top plea. So I'm just selecting this and control J To duplicate and clicking on the top and then Victor plane have you Okay now we're good at this. Let's make it slightly precisely. Hmm. This is good. This is also weirdo right now, so we have just created a basic shape. And as you can see, if I go to group citing and one select the show grid, you can see the shape right now. As you can see, the you have just created a depth. You can reduce your debt for your laptop or your any design you are going to create. So in the next lecture, we're going toe, create act, some detailing toe that design. And we re like some features to that
7. Adding details to the laptop: So let's start to relax and read eels to our design. So I'm just zooming my control. Bless. No, we need to read a little most bad here. And I'm just selecting around rectangle do or you can select directing a rule here. So let's choose anyone collects to this and just basic here. And we are going to understand that it will work on the top line. So I'm just selecting Victor plane on the So let's third used to size and place it here. As you can see, it is dirty. No, we re like some more features here. Alerts justice here. Can I need to just make it like this? Okay. Nard school. So let zooming and I know USB or section. So we needed on rejecting good and when you differently. So let's just create a rectangle here for I use people and just select front and Victor plane keeping you for justice. And then you go zooming by control Plus and we need to just likely reduce the size and justice. Now you can change the color two black, which is obviously black. You're gonna have to choose more taco. Let me zoom out and see that? OK, this is good. Didn't we just likely reduce this now? We will duplicate this bike and told J and we will create a circle for I used to be audio already. Report. What are you, Jack? Seeing color front plane effectively. That would be good. Okay, now this good. And we need another panel over here for the charging port. So, like screwed this address in the plane. And one more benefit. If you want to Just agitator design. You just have to click a dude in a brain and your gator design that easily like this. And I need to just create a small circle to show the color, which is green in this case because the batteries charge right now. And I'm going to add three circles here. You showed the caps lock and are dead things which is bothered or something like that. So let's add some more dealings. So I will click on the top section and added in the plane here my second ship, you can create a perfect circle like this and James e. You can use control plus J or create a new circle. So long just wasn't gonna here and again conduct buggy to Arizona. Dodo like this. Let's for justice and make it some spacing here. You can. Now we need to add some retailing to the screen. So I'm going to choose noise here. Slightly noise, noise will egg some grains or some roughness. Do your design. As you can see, it is more for no on. Just use this sort of get a better connection. And I'm going to do the same in the edges and corners. I will increase the noise so it will look more ago. An edgy again. Select this and how you can darling noise. So by default it will show as a capacity here. Now you have to just select this circle and sweets to noise. And you can control the nice percentage here. Okay, This seems enough. No. The regions in Bagram forced Rivers selector and create a group. So we can what design? Very easily. So after creating the design, we will drop this. Now it's a group and we can move this easily. Knowledge cities, I'm direct some adjustment toe a background. So first, unlock this by clicking here and doing this. Now it's time to go to bed setting and two standard rather than isometric. So we get back to one normal overview or normal designed workspace by selecting standard and the moving the show. Great. Okay, we are done with everything. Now we're like some background there are designed, So there will be getting a triangle on creating like this and for the orange circle, you need to just select this and great rectangle like this. Okay, nonverbal. Make our triangle moved back. And just just some colors. You can. I just like this. Now I'm going to replicate this triangle by control J and flipping it. You can adjust your flip like vertical horizontal also so you can choose black and my combination. And you can remove the noise here cause you don't. I don't need nice, So I'm just selecting a color combination here which may be so table and not being here. Poeple like you. You do something like that. Gillard Symbol denies green here and I know an eagle. You can adhere it is that easy. So that's how you create a design. Now, in order to export your design, you have just goto note storming and see your design post. So you can make any girl adjustment here. Always remember when dealing with isometric. Don't use strokes because even junior effects we're designs. So be prepared colors and shapes, and you can deal with more precision while dealing with isometric. So in order to export your design, you have to just go to file and exposed. You can select your for mitt. I would prefer if you are just creating, opposed or something like that. Use PNG. And if you are going to animate that this design, you have to go toe GPS or for better brakes, use GPS and just like this and you can just use whole document. And if you just want, export this laptop on it and select this and go to file export and just select without background. So that's how we create isometric design. Hope you have learned something new, and I would like you to create some isometric shapes and also, if you like, you can create this project. Thank you
 Pranav Singh, Founder of THINKING HOW