Transcripts
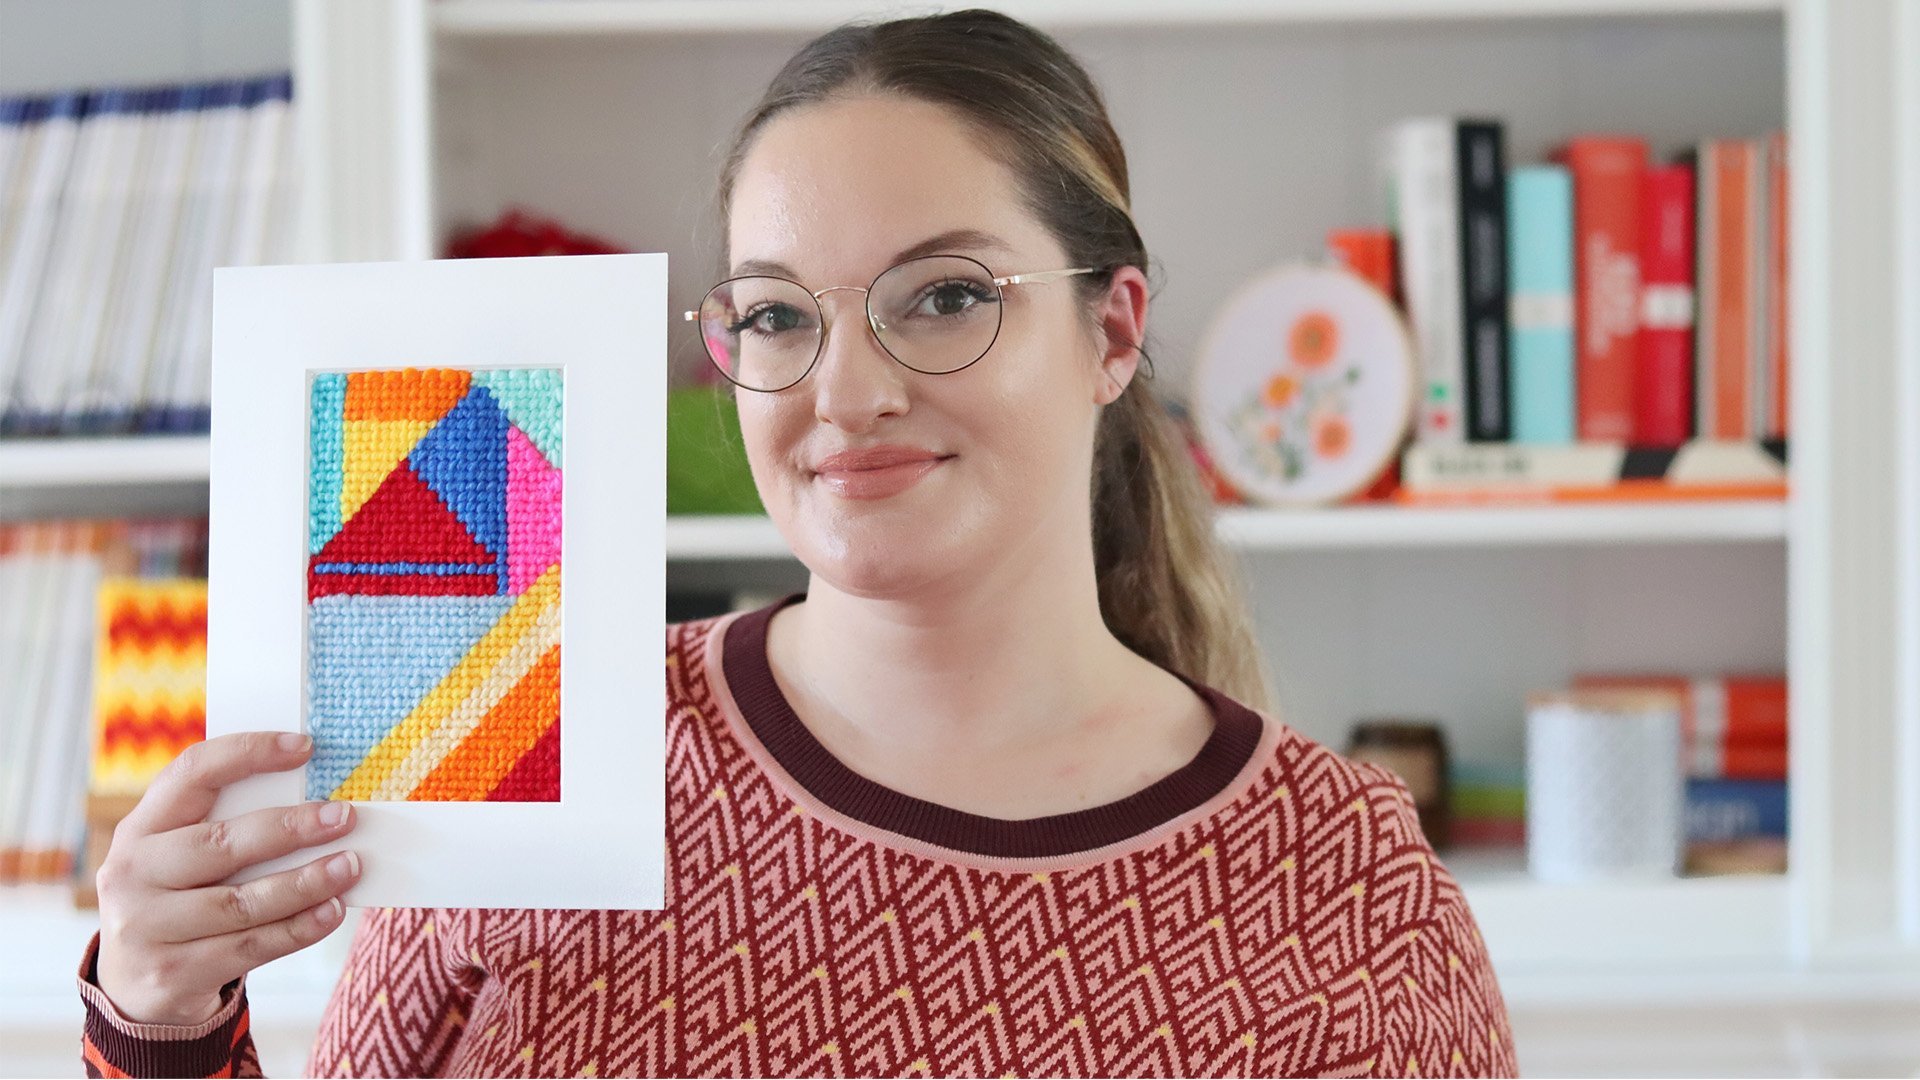
1. Introduction: [MUSIC] Punch needle is in
my opinion one of the easiest things
you can do with yarn. It is one of the oldest
class that you can learn in no time.[MUSIC] Hi, my name is Flora and I'm an
embroidery artists and I love everything that has to
do with fiber and textile. As long as I don't have
to count or measure, then I will give it a go. In this class, I'm going to show you the basics of punch
needle with yarn. We are going to make a simple abstract piece and
frame it for a modern look. You will learn all the
basic materials you need and why you need them, [MUSIC] and make your own
punch needle framed art. Something that would be
finished before you know it. This class is for
absolute beginners. You don't need any
experience with punch needle or textiles. This class is great
if you have some yarn laying around and no
idea what to do with it. I hope you feel inspired
to try something new and join me in my
punch needle class. Let's get punching. [LAUGHTER]
2. What Is Punch Needle?: [MUSIC] Let's start with what punch needle actually is and what you can do with it. Well, punch needle is when
you use a needle with a small bezel in it to create loops with yarn or
embroidery thread. Because the fabric will
be stretched in place, it means that the
loops will stay in place and will not come out. With punch needle, you
can create pillows, rugs, and cute wall hangings. You need to get the hang of it, but once you do it is super easy and you can create
something in no time. Now you know what
punch needle is, let's go to our class project. [MUSIC]
3. Class Project: [MUSIC] In this class we are
going over the following, the materials, what kind of
punch needles are there and what kind of yarn do you
use for what punch needle. That also includes fabrics, what kind of fabrics
do you need for a punch needle and what can
you use for warp project? When we know what
materials we need, we are going to look at
stretching our fabric. The loops you create with
punch needle is made with the tightness of the fabric
to hold it in place. It needs to make
sure our fabric is tight enough to punch needle. I'm going to show
you two ways of stretching your fabric
and we are doing this with an embroidery hoop and
the wooden part of a canvas. Once we have the fabric
stretched and ready, we are going to start with
our punch needle project and tell you all
the tips and tricks to make it more interesting. When a project is finished, we are going to frame our
piece and it is ready to hang. For our class project, I want you to have a
look on Pinterest. I made a board that you can follow and where I have lots of inspiration for
abstract shapes and inspiration for your own
punch needle project. Try to look at your
interior and have a feel of what colors
you would like to use. You can also use
different colors of white and make it very natural. First, make a plan of
what colors you want to use and the shapes is
something you can plan, but you can also just go
with the flow of whatever you want when you're actually
doing the punch needling. In the project section, I have a document
you can download and where you can find
everything you need, what we talked about
in this class. Everything, all
the materials and I also added some frames
that might be fun to use. I really want to
encourage you to make this little project and
add some fun framing. Don't forget to upload it in the project section for all of us to see how you
approach your project. We are all set to start with
talking about our materials. [MUSIC]
4. Materials: [MUSIC] I'm going to show you all the materials
you need to start your punch needle project. Everything that I talked about, you can find in
the PDF download. Let's start with talking
about the punch needles. Here we have some different
kind of punch needles. Let me start with
the biggest one. Here we have a size 10. You can see it here. This one is from a DMC. This one is the biggest
one you can get. It is rotter chunky. It is all about the
hole that you see here. Now, you can see that this
hole will fit this yarn. This is a really chunky yarn. This will fit in there. Then you will see if I try
to put some embroidery, this is embroidery floss, and I want to put that in there, now it goes everywhere
and it is way too big. This is also a big one. It is not a size
10 like this one. You can see clearly that
the hole is smaller, but it doesn't
have a size on it. I bought this on Amazon. Lots of time when you
buy something on Amazon, there will be no size and you
just have to figure it out. So not always you will
have a size on it. A lot of time when you
have a cheaper one like this one from Amazon, it will not say size. It is slightly smaller,
but there you go. Not always a size. I must say that quality
wise, not much difference. In the project section
of this class, you will see everything
where you can get everything with links, and you can see the price
difference because this one was quite pricier than this one. But here you have
the number on it, it is what you prefer. Now that we have these ones, the yarn ones, [NOISE] we have
the smaller ones. This is all from this box. I don't know how
to pronounce this, I think you say Boye. [LAUGHTER] I don't know. I don't know if I'm saying
it correctly, but Boye. This is a set, and this is adjustable length punch needle. This is a set with
different sizes. Here we have the smallest one
that is 1.26 millimeters. [NOISE] You can see that the
point is very, very thin. This is the biggest
of these three, and that is 2.20 millimeter. Here you can see that you can adjust this, it's very clever. You can see that it has numbers. Why would you want
this to be adjustable? Well, first of all, you
want it to be adjustable, just an economical
thing that it could be that you don't want
to punch it really deep. But you want to have your own control over how
deep you want to punch it. Second of all, if you have
an adjustable punch needle, that means that if you want to use the
backward punch needle, you can use the front to
display or the back to display. It means that you can
make the loops bigger, smaller, you can choose
whatever you want. [NOISE] Unlike these, we have just one size. We cannot adjust them. This is the size we have. This is size we're working with. [NOISE] You can see
here that there is no way [LAUGHTER] I'm
going to fit yarn in it, but you can see that it
does fit embroidery thread. This is just a matter of finding out [NOISE]
how and what. Because you can see that it will not fit all the threads, obviously with the
smaller ones you're using embroidery thread, but you have to
determine yourself a little bit how many
strands you're going to use. Now for instance, if I look at the [NOISE] manual for
this punch needle, then they made this
little pattern here and then you see
suggestions thread. It's like 1, 2
strands, 3 strands, 6 strands, and they
say, it's suggestion. Now for our DMC 1, we have a fancy little tool here that we can
also use for this. [NOISE] We can use it
for boats, chunky ones. I like to always make it
really flat with my nails. [NOISE] But what is also really handy is
if you make it flat, [NOISE] cut it, and then you have some good
grip to wiggle it through. It did not work. This is just something that takes always a couple of times to get your
thread through. It never really goes the
first time. That is in. I take my punch needle, and then I push it through. [NOISE] Then I'm not
quite done yet because it needs to go
also through here. That is how you thread it. You loop it from the
back to the front, and then you make sure that
you go in that other hole. Now I can also use a these with the one that
I got from Amazon. But imagine if I didn't have this and I
didn't have anything, what you can do is you
can use one of these. This one is very thin but you
can also get thicker ones. Maybe something you
already have at home. I take the two split ends, the ends that I cut off, and I put it in here. [NOISE] At one point we will see here that
it's coming out. Also here and you
can just pull it up. This a really simple way of [NOISE] turning your
yarn or your thread through that punch needle. Then of course it needs to go, I guess, and then
it is threaded. Now, let's go over to
[NOISE] our other needles. How do we do that? With this, it came
with a string so they already gave me something
that I can use. You can see that it's
basically the same principle. With the small ones,
it's better to go from the needle point upwards
towards the top. Because this hole is smaller and it's easier to go from
that way than that way. Putting my thread here, I'm getting my tread out, like this and then you just pull. For our project, I'm going to use some chunky yarn because I
just like the look of it, I like to chunkiness of it. But this is also something that [NOISE] is your own choice. Do you like chunky? Do you like it more
delicate, more finer? This is up to you. This is
really just a personal choice. I like it chunky and I
like to choose acrylic. Why? Because it is affordable. When I make a class, I want to choose things that are affordable because then you can see how it looks
with an affordable item. But you can make it as expensive
as you want of course. You can do this with Merino
wool, whatever you want. They have it also in chunky. But for this project, I'm going to use acrylic. Also, going to use some yarn that I just
have laying around. Now, if you are using one
of the more finer needles, then you can use
embroidery thread. Then you can make
much final lobes. You can make finer lines, whatever you want,
and you can choose how many strands you
would like to use. Have a look at what you
think you would like. Next up, we have our fabric. I'm first going to
talk about fabric for our chunky yarn because you need different
fabric for that. You have monks cloth. This is the most common used
product for punch needle, [NOISE] especially with
the bigger punch needle. You can see that it
has all these squares, and you can easily
put your needle in that without
damaging the fabric. So it has just enough of a looseness in it that you can punch your needle in-between. You have this in
different sizes. This is a 13 count, 13 per inch. What does that mean? That means that we have
13 squares per inch. Take an inch and there
will be 13 squares. I think this is a nice, just overall good
count, the 13 counts. I must say that with
this needle, this works, the 13 count, I don't damage the fabric. If you look closely, you can see that
I can go in with my needle and the
fabric is not torn. But [NOISE] if I go
in with my size 10, that is already a
bit more difficult. I'm going to use [NOISE] this needle punch with
these monks clothes. For the smallest punch needle, you can use just a plain
fabric or you can use linen. You can see that I already made a little example of
what it looks like. I do want to show
you what kinds of fabric you can use with it. But in this class,
we are going to use a big punch needle
for the chunky yarn. Here we have a linen. This is a very fine linen, but depending on the
size of your needle, you just have to look what kind of linen
you'd like to use. But I would recommend a fine linen when you work
with these smaller needles. Feel free to experiment with whatever fabric and yarn
you have laying around. You never know if it might be a good fit for your
punch needle project. Show in the project section what materials you
are going to use, and why you have chosen those particular materials for
your punch needle project. We have the materials and there is not only one thing that needs to be done before we
can start with our project, and that is stretching
our canvas. [MUSIC]
5. Stretching Our Fabric: [MUSIC] In order to make the loop stay, we need to make sure that
our fabric is tight. But you can do this
with wooden frame, or you can use an
embroidery hoop. I am going to show you
how you can stretch it around a wooden frame
to make it secure, or how you can wrap
your wooden hoop so the fabric doesn't slip
around is any hoop. First we're going
to make our project and afterwards we're
going to frame it. But you need something
to make your piece in. This is important
because you create the loops of the punching by
the tension of the fabric. The tension needs
to be very tight so the loops can be created. If it's too loose then your loops will not
be as neat and tight. Now, the first method you can
use is an embroidery hoop, but an embroidery hoop slides
very easily to the fabric, will slide between those hoop. What you can do to
prevent this is to wrap your embroidery
hoop with some fabric. What you're going to
do is you're going to wrap that around. I'm going to make sure
that it is secured. Wrapping it around itself. You just wrapping it
around your hoop. You can just use some old
cloths that you don't use anymore to use it for this hoop. Now I wrapped the whole hoop, I am going to secure
this which is going underneath here and then I'm going to do that again. Then I'm going to cut this off. Don't worry too much if
this is uneven here, stick it in there. Doesn't matter that much. You're going to make
it really tight, so really push, pull
on all those sides. Make sure that you
cite in the screws up. Good. Keep pulling and
keep twisting this thing. You want a drum tight like. Side as a drum. It's tight. Now it is super tight and you
can use it to punch needle. Now, this particular hoop with this fabric is great for
the smaller punch needles. We're not going to
use this fabric, we are going to use
the other methods. Pretty next project where
I want to make something with the big hook, the big punch needle. I want to use this
method of putting it into frame and then
punch over it. We want to make sure
that it aligns. I'm first going to
start with this sides. You can use pins, you can use also one of these. This is a staple gun, a very simple one,
a handheld one. Now that we've done that, you can see that the ends
here are pretty rapidly, so they tend to want
to unravel a bit. What we're going to do
is we're going to take some tape and we're just going to tape these down
so they don't fray anymore. You can also use
normal tape for this. It doesn't matter what
kind of tape as long as you have it in
your way anymore, so that you can pick
it up without fraying. Now we have our canvas
that we can work with. Don't worry too much about
how it's looking now. Because eventually where I
will frame it into this, so then it will look
quite different. Just make sure that these ends
are tied up that it cannot go and unravel more. I am curious to know what
technique you like better. Do you think you
would like to use the hoop or the wooden frame? Show me in the project section what method you are going to use now that our
fabric is stretched and ready to go a week
and start punching. [MUSIC]
6. Punch Needle Project: [MUSIC] For our Punch Needle Project, you can draw on the fabric
to make your designs. I personally like it when it's
more abstract and you can look at my Pinterest board
for inspiration. Let's start. It's always handy to have a
little bit more room around your Canvas because we are using such a small Canvas
to frame it in. I'm going to draw a
line of where I want to have my cutoff and this doesn't need to be perfectly
straight because this is going over the Canvas. I'm just using a regular
pen to draw on the fabric. You will not see lines
once we punch over it so don't worry, it
doesn't matter. The design that
I'm drawing now is not going to be a final design. I'm just making some lines
as a reference with what I think I'm going
to end up with. Usually, I just go with the
flow when I'm punching with whatever will look good while
I'm doing the punching. I never really stick to my own design when
it's so abstract. This is a yarn that I found
somewhere very random. Just a leftover yarn that I
found somewhere in a closet. I'm going to start here. But as you see when
I'm starting here, you can see that my knot doesn't go any further
and that's because we, of course, have our
table underneath it and you don't want
to punch your table. You have the choice of putting something underneath it so you can punch it with not
having to hold it. But personally, I
just like to hold my frame and punch it like that. Once you thread with
your punch needle and you made your first punch, you're going to pull
that thread out at the back and just
leave that hanging. With punching, it is
very important that a thread is always
behind the needle, otherwise your loops will
not stay in the fabric. You are working away
from the thread. When you are punching, make sure that the needle
is as close as you can to the fabric when you
go up and down. It's also important
that you punch your needle all the way
through the fabric. One of the reasons when
you are punching and your thread comes out is because the wool is
not loose enough, so make sure that your yarn is slack while you are
working with it. Make sure that your thread
is always very slack. You see that my needle barely
goes up only a little bit. You see now at the back
that we are creating loops and don't worry about
your line being too straight. This line will not be visible
anymore after we're done. Now we are going to
turn our Canvas. When you are punching and
going a different direction, you have two options. You can keep your Canvas
straight and move your needle around and
then work sideways, or just simply turn
your Canvas around and keep working in
the same direction. I'm turning my Canvas
around so you can see that you can simply just work in the same direction and just simply turn your
counters around. If you want to be
very particular about your stitches being
the same length, you can count a hole. You can do like, every two holes I'm going to do a punch. I also did that in the
beginning, but after a while, you will get the hang a fit, and then it will
just go automatic. With your second line, it is important that you are as close to the other
line as you can get. Try to be as close to the other stitch that you
made with your punches. Again, we're going to turn it around and we're just going to go all the
way around like this. Now we have a situation where I want to remove the thread, just going to cut that off. I want to remove the
thread because I want to start here again. Now what I do is I just cut
it off and let it dangle there and just go back into punching here.
When you are done. You just do that again, cut that thread off, and
just let it dangle there. I did the same with whites. You can see that
I'm not following any lines that I drawed earlier. Then again, I'm doing the same thing with the
pink and as a last color, I'm using a dark green. Then I'm going to
turn it around and you can see the right parts, so the part we actually want to see that
we're going to use. Because this part is
going to be visible, I'm going to cut off the
threads here as short as I can so they are
not visible anymore. I want to make this
piece a little bit more interesting with
adding some textures. First, I'm going to cut this
a bit more off because it's not that needed anymore so we can be able to see
more what we're doing. Now, what I want to do
is I want to create a little bit more texture
and how I'm going to achieve that is with cutting
all these little loops. This would take a
while because it's difficult to really make sure
that you get all the loops. Just take your time. This is how it looks. It is all fluffy like a rug. We're going to sculpt
this in the end. But first, I want to show you
how you can take something out and add something new. After that, we will use our sculpting scissors to make
this all the same length. Now that we've finished
this and for instance, you are not happy with it, or you are happy with it, but you want to
change something, you want to make a
different color in it. How do we do that? How do we take that out? First, I'm going to cut
this off a little bit more so I can see
better what I'm doing. Because when I look at it, I think I want to make here some circle, half a circle because now
it's like line, line, line. What I'm going to do, I'm
going to cut these loops. Because if I just
pull on this thing, it will not work because
then it will go over here, over there and we don't want that because it
will go all the way to here. I do want to keep this here. Also, want to do a little
bit of the whites. Here I'm just first going
to puzzle which one I can get out. I'm carefully taking
out those loops. With white, this is as
far as I want to go, so I'm just going
to cut this short. I know til where I want to go. You can see that it's easy
now because we created all these loops on
the back that we cut. I think this is a
nice little shape, maybe a little bit more here. I'm going to cut this off. Because remember,
this is the back. This is the front. I actually want to have
it a little bit more. There's a little bit difference. For this, I want to
use a mustard yellow. Here we go again. Starting here. Making sure this
comes at the back. Make sure that you go to the very last end
of the other stitch, the other punching
unless go around where you last started
with the other punching. We're just going to go around it till we hit
that other stitch. We're just going
to continue with making this all the way around. Now that I feel like it's done, I'm going to cut off
this excess threads. These are scissors that you can use for specific projects
like this is really to make those ends that you want to cut off so you
can be really precise. Make sure that all
those fibers are not going onto this whites, which is difficult
because it stays there. Now I really have this
cool texture created here. You see is really like a
bit of a shaggy effect. Because I really
like this effect, I think I'm going to do that
also here to make it more interesting with the
fibers going around here, so we have this nice
little overlap here. I'm also going to cut all those. This takes a long while, but it is so much fun to just feather around with your project and just do these things. I love doing that. You can see that here I also did all the loops and now I'm going to cut it
again like I did here. Now that I am happy
with my piece, I'm going to take it
out of the frame. I'm just going to cut around all these stitches that I made. All these pins, I'm just going to cut around it. What you're doing is you
basically like you see it here, it hangs on by this threads and we're just going to
cut off these threads. But I also want to point out
we're going to frame it in this small Canvas so
don't worry about that. You can also just cut
it off just like this. Just really get it off the frame because
it doesn't matter. It is big enough and
our piece is off. You can of course
get all of this off and you can use it
again and again. The nails are easy to
get off and you can just use this as your frame
for needle punch. Now it's time to
frame our piece. The punch needle
project is done. You now know how to make your very first punch needle and also how to make
interesting textures. Don't forget to show your punch needle project
in the project section. Let's have a look at how we can make this look even
better with framing it. [MUSIC]
7. Framing Our Piece: [MUSIC] Framing can make whatever piece you make
look so much better. Lately, I've seen
so many images of those wooden canvas
floating frames, and I really wanted
to try it out myself but they were pretty expensive. I got a bunch of small ones from Amazon with some small canvases. You can find all
the materials in the project section
for you to use. Now what we first are going
to do is we're going to make sure that these things
that are from the back, that we make them short so they don't stick out that much. That is enough. Now we make sure that
we're peeling off all these tape that
we used before. Here's the tape, gone. On the top, there's
a bit of tape. One more check and
all the tape is gone. I'm going to turn it around with this little frame
that I want to use. I'm going to put that over it. I want to make sure
that it's nice and even, turn it around. What I'm first going to do, I'm going to get
some black thread. It doesn't matter really
what color threads you are using because you won't see it. I'm going to use all strands
of the black thread and I'm going to tread
that in my needle. I'm going to sew this together. The reason why I'm doing that is because if you use
needle and thread, you can really make
it tight together. I'm going to make sure that
this is on the inside. I'm going really far in
because we don't want it to unravel on the edges. I'm not really using any
sewing technique here, I'm just going back
and forth making sure that it will be tight. [MUSIC] Now it is ready to frame. What I've done is I've took this little square wooden frame and I used some stainer to stain the wood just to make it a
little bit more interesting. You can always use this wood
and stain it with something. Everything I use is in the PDF that you can download
to see what stainer I use, and what we're going
o do, you don't need any glue or anything. We are just going to put it in this frame
without any glue. It will sit there nice and
snug and it will stay there. How cute does this look? You can really see
how much framing does with a piece like this. Show me what you did over your finished piece
and how it looks like. Let's go to our final
fads of this class. [MUSIC]
8. Final thoughts: [MUSIC] I hope you enjoyed
this class and that you now know how easy it is to make a punch
needle project. Don't forget to
share your project, and if you have any questions, please do so in the
comments section. If you would want to
give me a review, then it will be
very appreciated. If you are on Instagram, then don't forget to
tag me in your project and I will make sure to
share it in my stories. [MUSIC]