Transcripts
1. Introduction: Photoshop has been the gold
standard for photo editing, retouching, and
manipulation for decades. Until recently, you had to have a desktop or laptop
computer to use it. The mouth, you can also create stunning composites,
retouch your images, and apply effects while on the goal by using
Photoshop on the iPad. This course is
perfect for you if you are just starting
out or if you are settled and
aiming to learn to do things more effectively
and professionally. I am Martin per eniac, certified Adobe expert
and instructor. Besides using Photoshop
for over a decade as a professional graphic
designer and researcher, I have to thousands of
people in classrooms, webinars, online tutorials,
courses, and live streams. Thanks to being truly
passionate about both using and
teaching Photoshop, I am proud to say that I
was officially voted as one of the top ten Adobe
instructors in the world. Taking this course can be the perfect
introduction to create an image editing for
anyone who owns an iPad. The refined modern interface and support for Apple pencil
makes this robust, creative tool easier to
master than ever before. Throughout this course,
I have carefully selected each example to make sure you get clear explanations
without wasting time. Even why we explored
complex techniques. Having worked for clients like Disney, Cartoon
Network, Nickelodeon, and BBC, I have
ensured this course will help you to start using
Photoshop on the iPad. Just like a creative
professional. Thanks to Cloud documents, there is a seamless
handle where between devices and most of
the techniques you will learn from this
course will also apply on the desktop
version of Photoshop. By purchasing this course, you will get all the examples as downloadable exercise files. So you can follow
along and practice everything in your own pace. Take the next step in your creative career AND
rule for this course now, and let's master Photoshop
on the iPad together.
2. How to Use the Exercise Files?: To make the most of this course, I highly recommend to download
all the exercise files. You will find everything that
I'm using in the course. So you will be able
to follow along and replicate all the
techniques that we cover. Now, there's a couple of
ways that you can get these files onto your iPad. First of all, you
can use a desktop or a laptop computer and download
the compressed zip file. You need to decompress
this and then you will get these six folders, one further for each chapter. Once you go into any
of these folders, you will find that
additional files, both jpegs and PSD files. You will be able to then use
AirDrop to move these onto your iPad if you are using a Mac computer or if you prefer, you can also copy them into a Dropbox or Google
Drive folder. If you prefer not to
use a desktop or laptop computer and you would like to do everything on your iPad. You can use the mill
anode board for which the link is in the
lesson notes for this lesson, now this is going to open
a page in your browser. And from here, you
will again find all the files organized
into these columns. Each column
represents a chapter. All of these files
can be downloaded by double-clicking on them and then choose download original. Or if you see a link
under an image, you can also click on that. And from there you can download a high resolution
version as well. These images are coming
from Unsplash and we can't guarantee that they
will be available at the time you're
watching this course. However, the lower
resolution version will always be available
from the malonyl board. And also once again,
if you download the zip file that will include all the high
resolution versions for the Unsplash images as well. When it comes to downloading the Photoshop documents like
this one, giant turtle PSD. You can do these once again
from the anode board on the iPad and then open these files in
Photoshop on the iPad. Or if you downloaded the file
on the desktop computer, you can open them there. And once the file
opens on the computer, you can choose File, Save As and make sure you
save it as a Cloud document. That way it will become available straightaway
on your iPad. So once again, if
you prefer to follow along the course and
practice everything, you will be able to
use these files. However, I also recommend to try the techniques that we cover on your own photographs or other images that you find
inspiring to work with.
3. New Features: Photoshop for iPad is frequently updated
with new features. Whenever these come out, that will be an
additional lesson added at the end of this course
in a separate chapter. You will be able to follow along and learn these new methods. In some cases, I might
also need to update some lessons from
the core chapters. And also if you find anything that you feel like
is outdated or it's not working the
same way anymore as the way you are currently
using it on the iPad, then please let us know on info at yes, I'm a designer.com. That way you can help
us to keep the course relevant and always up-to-date.
4. Signing in: Here we are in
photoshop for iPad. The first time you open the app, you will have to sign in. Now, if you have an Adobe
ID, you can use that. And if you already have an active Creative
Cloud subscription, you will be able to use the
app without any limitations. Now currently you can also use the app for free for 30 days. So there is a free trial. But after that,
if you don't have a Creative Cloud subscription, you will have to
choose either having the full subscription or
choose one of the other plans. Currently, there's
one called telegraphy plan and the Adobe
Photoshop single app plan. Now Photoshop on the iPad is included in either
of these options. The pricing night vary depending on where
you are based and also it might change compared to the time of recording
this video. Now once you sign in,
you will be greeted by the home screen where you will mainly see your
recent documents. And you can also of course, start new projects by importing or opening
existing images. You can also choose
Create new here at the bottom if you want to
start with a blank document. And I will walk you
through these options in more detail in
the coming videos. But just in case you
want to get back to this home screen at any point while you are
working in the app, remember that there is
this little icon here on the top left, the home icon. So by tapping on that, you can always come back
to this starting point.
5. Create a New Document: In case you would like to start a new document from scratch, you can use the Create
New option here on the bottom left in the
dialogue box that comes up, you will have three
categories with standard sizes for print, screen, and film and video. Now these are really
useful because you already have the
pixel dimensions, but also color modes
and resolutions setup for you to work
in those standards. I am going to switch to
print and I'm going to start to read an A4 size. And on the right side
I can already see that the size is
setup accordingly. I have the unit set
to millimeters, but this can always
be changed to inches or whichever measurement
I prefer, like pixels. I can also change
the orientation very easily by just tapping
on these icons here. And I can also change
the resolution, which would be important
mainly when it comes to printing this document. So the 300 PPI here is a
standard that we use for print. It means that there
will be 300 pixels per inch printed on the A4 paper. The background color can
also be changed from white to black or transparent. And of course, you can
choose other colors as well at the later stage if
you want to adjust it. But one important thing that
I wanted to point out is that you can't change the
color mode at this point. Now, once again, this might
change in the future. They are already saying
here that they are working on this at the moment, only available
color mode is RGB, eight bit color depth. Now if you're familiar with
color modes and printing, you probably know
that for print, CMYK is more recommended and RGB is used more for
screen and video. But as I said, CMYK most
likely will be added in a future update now before
creating a new document, It's also worth noting that we can change the
name up here so we can give it a name and then tap on Create on the bottom right. So this is the
brand new document that we created with the name here visible on the top
center part of the screen, the workspace itself,
I'm going to explain in much more detail
in an upcoming video. But first I wanted
to show you that if now we want to go back
to the home screen, we can find this document
being the most recent one. And we can always come back
to it by tapping on it. Or if we want to rename
it, duplicated or deleted, we can click on the
little dot-dot-dot icon next to the name
of the document.
6. Import and Open Images: When it comes to using photos, you can either place them into an existing document
or you can also start a new document based on photo that you
have on your iPad. Now in this video,
I'm going to show you both of these techniques. But first let's start with
the import and open option, which we can access
either from here on the top or on
the bottom left. So once you select that, you can choose from
these three options, Camera, Raw files or camera. So you can even
take pictures with the iPad while you
are using Photoshop. Then the image that you
capture it will be placed directly into a new
document inside the app. Instead of that, however, I'm going to use camera roll, so I will pick an
existing recent photo. Now first when you do this, the iOS is going to ask for permission to
access your photos. You just have to say Allow, and then you can pick the image that you
want to work with. So let's just pick this one and immediately it's
going to generate the full resolution
version of the image inside a new Photoshop
Cloud document. The name of the
document is going to be based on the name of the photo. And on the right you can
also see a percentage, and that is the zoom ratio. So if I zoom closer, you can see is going up and a 100% is the actual pixel size. So if you are zooming
any closer than that, you might start seeing pixelation until you
get really close. And then you start to
see also the pixel grid. The maximum sustained zoom
level in photoshop for iPad is 25,600 per cent. So you can zoom in really close. And if you quickly want to zoom out and see the whole
image together again, you just have to
simply double-tap on anywhere on the canvas
with the pinch gesture, you can also zoom further out. And once again, double-tap
is going to zoom back in. And when you already have the
Canvas fit to your screen, a double-tap in this case, is going to take you straight to the 100% view or the
actual pixel size. So double tapping away is
a quick switch between these two useful zoom ratios. There are a lot of
ways to get more productive with
photoshop for iPad. So I'm going to talk more
in detail about gestures, touch shortcuts, and also keyboard shortcuts in upcoming
videos in this chapter. But before we move on, I would like to also show
you how you can place in an image into
an existing document. Let's say we go back with
the home screen here on the top-left to the empty document
that we created earlier. So I tap on that and then
once we are inside here, we can use this icon here on the toolbar on the left
to place in images. And the same options
will come up as before, apart from an additional
feature called libraries. Now this again, I'm
going to explain in a separate video, but for now, let's choose the
option that we already are familiar with, camera roll. So I tap on that, Choose recent, and then let's pick
another image which already comes in fit
to the documents size. And because we placed it
into an existing document, the aspect ratio
might not match. And that's why we are seeing those white gaps on the
top and the bottom. So when you are
placing in an image, you might need to fit it to
the size of the document. And if I want this to fill
the canvas completely, I can adjust the size by
dragging these corner points. And then once I'm
happy with the result, I can tap on Done. Now the good thing about
placing in an image is that you're not losing
any of those details. So they are just simply outside
of the canvas boundaries. But by using the selection
tool or move tool, you can still reveal them
as you can see it here. Now both starting a
new document with an image or placing
an image into an existing document will allow the following file
formats to be used. Psd, PSD, tiff, JPEG, and PNG. Above me you can see a little bit more detail
about these file formats. And of course, you
can also place additional file
formats like PDFs and even Illustrator files if you have them in the
files on your iPad. But these will all
be rasterized, so they won't be kept
in a vector format, at least at this point of
recording this course, maybe in the future that will be support for additional
file formats as well. But this already
gives quite a lot of flexibility in the way you
work with photoshop for iPad.
7. Tour of the Workspace: Workspace or user
interface of Photoshop for iPad is very similar to
the desktop version, but if you are completely
new to Photoshop, it's actually the best
place to start because here everything is simplified
and easier to find. All the menus are contextual, which means that
they will only show up when you actually need them. So one example is
the tool options, which will come up once
you select the tool. So for example, if I select the brush tool from the
toolbar here on the left side, it will give me the
brush tool options in these additional
little palette, which by the way, I can
always move around. So if I prefer it here
on the right side, I can place it there or
I can just move it back here and snap it to the
bottom of the toolbar. This I would consider a duct
position from which I can always undock it
and move it around freely on the workspace. Most of the time when you
see the little three dots, that means there's
additional options. So the same thing
happens here as well. If I tap on this, I get
even additional settings. Sometimes these settings are replicated a couple of times. And just like before, if I
make a change here and I tap anywhere on the screen,
it automatically disappears. So we already talked about the toolbar and
the Tool Options. But apart from that, we
have the header bar on the top and the task
bar on the right. Now in the header bar, you have the undo redo options
here, these two icons. So for example, if I want
to go back one step that will remove the image we just placed in in the previous video. And then I can redo that stamp. If I use the other icon, I'm going to cover
the other icons on the header bar in
another lesson. But I would like to
show you a little bit more about the task bar, which is similar to the panels
on the desktop version. So by default you
see your layers as thumbnails here
on the right side. But you can hide
this by clicking on this icon or show it again. If you want to see
more similarly to the Layers panel on
the desktop version, you can tap on this other icon. Once again, this is a
toggle so you can hide it. And then there's also the additional Preferences panel which you can show
and then Hide. Once again, I'm going to
cover all of the options and features here in the taskbar
in upcoming lessons. So by the end of this course, you will know exactly
where to look for them. Now, there's one last thing on the workspace that
is very specific to Photoshop on the iPad and you wouldn't
find on the desktop. And that is the touch shortcut. I'm talking about this little transparent circle
here on the left. If you tap and hold on it, you can also move this
around and reposition it. So if you are
left-handed, for example, you might want to move
this on the right side. That way you can
have the stylus in your left hand and use your right hand with
the touch shortcut. This is again a way to customize the interface
and make it more comfortable to work
when switching to portrait mode
while using the app, it could also be useful to
move the touch shortcut to a more convenient and
easy to reach position.
8. Using CC Libraries: Cc libraries is probably the
most crucial feature for the integration between all the Adobe Creative
Cloud applications. Now this applies not only to
the desktop applications, but also for the mobile apps
like photoshop for iPad, you can see the feature coming up when you are
placing in images. So libraries from here is the same feature
that you would find in the desktop applications where
it's sometimes called CC libraries or libraries currently
in photoshop for iPad, only, the images
can be imported, whether they are coming
from Adobe stock or whether they are just essays that
you saved into a library. But in the near future, we
can expect even more types of assets that will be compatible
with photoshop for iPad. So let's see how it works when I select an asset from here, let's say I go into this library and pick one of these
images from here. Let's start with a photograph. Let's say this one. Now, each time you
select an asset, you will be warned
that the image will be rasterized and flattened. So if the asset was originally a multi-layered
composition, it will be just a single layer. And also if it was vector-based, it will be rasterized. This is different to working on the desktop
version of Photoshop. But once again, this feature might improve in the
future and it might be possible to keep them as vector smart objects
or smart objects. For now, we can just
say please flattened. And as you can see,
this actually is an Adobe Stock
photograph which is currently still
water mark because it hasn't been licensed. When I'm happy with
the placement, I can just tap on done and
I can continue working. So we can check now
that I have two images, it will be two separate layers
here on the right side, just as test this out
with a vector graphic, I'm going back to
the same option, choose libraries, go back into the same CC library that I used. And from here, I'm going to
pick one of these images, maybe this tent,
once again choose place flattened and
the artwork comes in. This one is not watermark because it has already
been licensed. So I can decide on the size
of it and also the placement. But once again, remember, once you hit Done, That's going to
rasterize the asset. And even though it was
generated from a vector file, it's going to be using
the resolution available. So to make that clear, if I place this
tent in this size, I'm just going to
make it much smaller, hit Done, and then I'm
going to place it in again. So select the same asset, 2's place flattened and I'm going to keep it may be a little bit smaller but relatively
big on the canvas. And then he'd done then the difference between
these two assets is that the one I placed on second time is a much
higher resolution version, so I can use it in
much larger sizes without any pixelation. Just to prove that to you, if I select the
other layer that I placed in the smaller
scale version, and then I use the transform
tool from the toolbar, which we will take a much
closer look at later and start dragging
the corner point. Once I reach a similar
size to the other asset, you can already see the
pixelation around the edges. So this loss in quality is currently something you
have to really keep in mind when working generally
in photoshop for iPad, mainly because there is no
support for smart objects yet. Now if you want to work with libraries and you don't want to switch between the iPad
and the desktop computer. I highly recommend to download and use the Creative Cloud app. So with this one, you
will also need to login with your Adobe ID. And then you will be
able to access a lot of options, including libraries. So from here on the top, if we select libraries, we can go through all
the existing libraries, but we can also create new ones by tapping on this icon
here on the bottom right, and then choosing
create a new library. Once I tap on that, I just have to give
it a new name. I'm just going to call
it P S for iPad create, and it will appear
here on the top-left. So if I go into it, it will tell me that
this is currently empty. But at this point, I
can add assets into it, either from my iPad so I can take or upload photos
are also upload files. But what's also cool
is that we can go into Adobe Stock and
search for assets. So let's say I'm
searching for mountains. Just hit Enter without leaving the Creative
Cloud application, we can already find all
of these assets here. And if I find
something that I like, maybe this one here, I can save a preview of it into that new library
that I just created. If I'm certain I would like
to work with this image, I could even licenses straight
away here on the right, as long as I have
credits available. Because access to Adobe
Stock assets is not included even in the full
Creative Cloud subscription. It's something that you
need to pay for separately. Once again, there's various
options how you can get the credits in bundles or
packs or individually. But for now, I'm just going
to tap on Save preview and choose the library from this dropdown that
we just created. So there it is, PS4 iPad. Now that it is saved, we can go back into Photoshop, jump back into the same document that we had opened earlier. I'm going to place an image from the library
that we created, which is right here, P S for iPad. And within that, we will have the asset which we can place in, once again, as a
flattened layer. Now the good thing about using Adobe Stock assets is that you can experiment and see whether they work in
your composition or not, and then later on, license them. Once again, there is
a difference here compared to the desktop
version of Photoshop. The asset that you
place in is not going to be connected
to the Cloud, so it won't be able to refresh once you license this asset. So the best thing to
do is to just have a quick mock-up experiment
and see whether it works in your composition and if you
like it before you apply, changes, adjustments and
making Selections and Masking, you should purchase the full
high-resolution version and place that into your composition and
continue working with that. So just to show you
how this works, I'm going back to Creative
Cloud and I'm going to choose a license
asset from the right. And you probably noticed
that one credit was removed from my available
credits on the top right. But now this means that the full high-resolution
version of the photo is available
to work with. So let's jump back
into Photoshop and go through the same steps. Chooses the image from the
library's photoshop for iPad. But this time is
going to appear in full high resolution and also the down the
watermark on it. So just to compare, if I hit Done and zoom a
little bit closer, you can see that this is a very clear
high-resolution image. And compared to this, the watermarked version was
much lower in resolution. So to summarize,
creating and using CC libraries is a great way to integrate photoshop for iPad to your mobile and desktop. Adobe workflows.
9. Lightroom CC Integration: The best companion
app for photoshop for iPad has to be Lightroom CC. Lightroom has two
separate versions. One called Classic, which is
only available on desktop. Lightroom CC is a Cloud-based
version which is available both on desktop and mobile
and even in the browser. If you're not familiar
with Lightroom, it is a cataloging application which also includes
all the camera raw, editing, and
developing features. Now if you'd like to work
with your own photographs, I highly recommend to
use Lightroom CC to prepare them before you take them into photoshop for iPad, it is a more professional
workflow to keep things organized here
in Lightroom and also prepare and develop
the images before you start compositing them in
the photoshop for iPad app. So to show you an example
here I have a collection from some shots I took in
Kew Garden recently. And if I just select this image, this is the original image
unedited from my iPhone. And here on the right side, I can choose a couple
of things like go into light and maybe reduce
the highlights, increase the shadows a bit. Maybe also make the
blacks a bit darker, and then go into effect increase texture clarity may be a little bit
of D Hayes as well. Then reduce the vignette, which will make the
coordinate is darker. And then just
generally I will make the whole image a
little bit brighter. Now if I want to see
before and after, I can tap and hold on the image. And that was before. And this is after, once again, before and after. And if I feel like this is
still not sharp enough, I can go on the detail and I can increase sharpening there. Now, if I'm happy
with the results, I can choose Share here
on the top, right. And I can choose the option
open in which we will prepare and render this
image in full resolution. And then I can just simply
choose copy to Photoshop. If you don't see Photoshop
showing up here, you might need to go
into the More Options and you might need to find
it from the suggestions. Since I already
placed it up here, I can just select it and
it is going to open up as a completely new document
within Photoshop. So let's take a look at this
workflow one more time. I'm going to switch
back to Lightroom, switch back to this album, and I will select another image, let's say this one here. Then I choose Share, open in and then choose
copy to Photoshop. Once again, it created a brand new document
for this image. So this is the only layer on it. But what if I want to combine these images and place this
into the other document? And luckily, there
is a way to do that. All you have to do is to go to the additional options
here on the right side, and then choose Copy layer, then go into the other document. And within that, again, go into additional
options and choose Paste. Now we have two layers
on top of each other. And with the move tool, I can just reveal
the one underneath. In the next video, I'm going
to show you how to extend and reduce the canvas size
by using the crop tool.
10. Cropping and Straightening Documents: Cropping images currently
in photoshop for iPad is a destructive method
where you might end up losing details
from your layers. So just to show this to you, I have this image here that
we created earlier on. And I'm going to
use the crop tool and maybe crop this part here from the right and also crop a little bit from the
left, something like that. Then if I tap Done, now, notice that the thumbnail also
updated on the right side. And if I choose the
crop tool again, next time those
details and now gone. So I won't be able
to recover them. Unlike the desktop
version of Photoshop, where you can decide
whether you want to delete details or not while
using the crop tool. But apart from losing those
details that you crop, it is actually a very handy tool and you can do a lot
of things with it. For example, you can
also straighten images. So if you feel like an image
is not straight enough, you can use the little
rotation option here at the bottom and find the
right angle for you. Increase your crop extends beyond the original
image boundaries, is going to create
transparent pixels. So if I click on done, you will see here on the
top right and the bottom left is going to
have transparency. But if I go back to the
other document that we created earlier on where
we have two layers. We can also use the crop
tool to extend the canvas. So if I select the tool, I can just extend the canvas
to something like this. Hit Done, zoom out a bit, and then using the
selection tool, I can move this image on
the right so I could create enough space for
both images to be next to each other within
the same document. Now let me select
the crop tool again because I would like to
show you one more thing. If you are cropping, you would like to keep the original aspect
ratio instead of having it completely
free like this, you can hold down the touch
shortcut on the left and that's going to constrain the
proportions of your crop. Similarly to this, while you
are rotating your crops, if you hold down the touch
shortcut once again, it's going to snap to
15 degrees increments. It's also quite handy
that if you do, you're cropping in
multiple steps. You can actually undo each individual step while
still being in the crop mode. So here on the top right, the undo and redo
features will work. So I can go all the way back, all the way ahead until I'm happy with the result that
I created at any point, of course, if you
don't like the crop, you can cancel out from it by using this option
here on the top left.
11. Working with Cloud Documents: I already mentioned in an earlier lesson that
all the work that you do on photoshop for iPad is
saved into Cloud documents. You might be wondering what
happens if you are offline. So if you don't have
access to Internet, but you still would like to
use the app in these cases, what happens is that all
the documents will be saved and stored on
the iPad storage. And once you have
access to internet, it will automatically
synchronize and upload those documents and make them available on all
your other devices. Having this format,
the Cloud document, allows a very easy
handover between mobile and desktop
workflows and makes it really convenient to start
your work on the iPad and then continue it on
the desktop or vice versa. So let me just demonstrate what happens if I don't have
access to the Internet. I'm going to turn off the Wi-Fi. And then immediately here
on the top-right corner, this little cloud icon tells me that I'm currently
working offline. So it just explains further exactly what I
mentioned earlier, that I can still work and
access all the features. Not only that, but
I can also access all the other documents that are used already on this iPad. So I can go back to maybe
this other document. And again, I can access
everything and edit the image without
any interruptions. Once I connect back
again to the Internet, the cloud, I can switch
this back to being active. And it's going to tell
me that now I am online. It's worth mentioning that in the home screen on the settings
here on the top right, you have an area on the
account where you can see how much free storage you currently have in your
Creative Cloud account. By default, you get
a 100 gigabytes included in most plans. But if you run out of space, this is something that
can be extended by paying for some extra storage. So to summarize, you can
use photoshop for iPad, both online and offline. And the cloud documents will
allow you to easily access the same documents both
on desktop and the iPad.
12. Export Options: In the previous
video, we already discussed that cloud documents created on the iPad can be accessed from the
desktop computer, but there's also other
ways to export and share the work that you created
in photoshop for iPad. So the icon that you
need to look out for is this one here
on the top right. And within that
there's two options, Publish and Export
and click Export. Let's choose first
Publish and Export, where we can see the four
available file formats. So we have PNG, JPEG, PSD, tiff. Once again, above me you can see a little bit more details
about each of these, but I'm just going to go
through quickly each of them. So you can see the
settings below. Now, I recommend to save
your file if you want to use it for social
media as JPEG or PNG, if you wanted to
save it for print, is best to use tiff. And if you want to save it for offline work on a
desktop computer, I would recommend
to use PSD for now, I'm just going to stick to using jpeg and read this file format. You can control the quality which you can set the
12th being the maximum, but that will result in
the largest file size. So in case you are planning
to email this image, it might be a
little bit too big, so you can always reduce
the quality that way. You will also reduce
the file size. The format can be set to standard, optimize
the progressive. Most of the time I would
just stick to standard. But once again,
this can result in slightly different file sizes. This doesn't really affect
the quality though. So once I select Export, it's going to ask me what to
do with the exported file. I can add, drop it, send it to any of
these applications. I can print it, I can save it into my camera roll or to the
files and so on and so forth. It really depends on what apps you have installed on your iPad. What's the available
features here? But just like before, if you don't see an application that
you would like to use, the exported image of it, then you just tap on more here
on the right and then find the required app that you're looking for from the list below. Since I mentioned
emailing earlier, I'm just going to choose Gmail. And without even
leaving the app, I can decide who I'm
going to send this to, can add the subject,
but the image is already placed
into the contents. Now you might recall
that that was also a Quick Export option
that will get you straight into saving a JPEG with the default settings without
asking any questions. So it results essentially
in the same steps, but without having the option to choose from the file formats.
13. Settings: In a previous lesson, I
already mentioned that with the little cog wheel on the
top right in the home screen, you can get to the settings. But in this video
I'm going to take a little bit closer look at all the available
features in here. Now, the first tab is the General tab where you can change between
the color theme. So you can choose the dark
mode which I'm using already, or you can switch to light mode. There is no option to
switch between the two or to adjust the colors. These are the two extremes
that you can switch between. I prefer to work in dark mode because I just find
it easier on the eye, especially if you are working in a low lit environment
under the Input category, you will find options for touch, gestures and keyboard shortcuts. Now under touch, There's a
couple of options you can decide whether you want to
have enabled or disabled. I like to use the settings
you can see on my iPad. So I prefer, for example, to use only the
stylus for painting. So I don't want to end up
accidentally drawing or painting with my finger
while I'm using the app. But this obviously
only makes sense if you have a stylus available. The Touch Indicator
option is quite useful, especially if you are planning to record videos like this one, because that will always show where you are tapping
within the screen. So now that I removed it, you won't see me
where I'm tapping. But once I turn it back, you can always see the
little blue light showing an indicating where I'm tapping and what I'm doing
within the app, the touch shortcut is actually
something you can take off from the screen if
you disable it from here. Now I wouldn't
recommend doing this because it's
actually very handy. And in the next
video, I'm going to show you a couple of ways that you can use it while
working in Photoshop for iPad. So let's keep that on. And then there's also an
option for stylus double-tap, which you might recall
when we doubled tabbed, we managed to zoom
into a 100% for you or to fit the
document to the screen. Now this functionality I prefer not to use
with the stylus, and that's why I
have it disabled. Because I have preferred
to use my fingers for zooming in and out and
generally changing the view. In the next video,
I will come back to this tab because
we will be looking at all the productivity features like gestures and shortcuts. But let's just move on
to the account tab, which we've already seen. Most importantly here you can see how much space
you already used up from your Creative Cloud account and how much free
storage you have left. But in case you are
sharing an iPad with another creative and
you need to sign out. Again, that's the place
to do it and that they can sign in with their
own Creative Cloud account. Of course, in this case,
the Cloud documents that you created under your account won't be visible once they sign in
with their account, and also vice versa. You want to see their files only yours once
you sign back in. And finally, there's also
the About tab where you can see exactly which version
of the app you are using. And also this is the
place where you can leave a review for the app, which I'm sure that
developers would appreciate. They're working really hard and constantly developing
and improving this app. So by leaving a review, you can help their work. And if you're interested, you can also find out more about the contributors or the people that were on the
app further down. And by the way, since we are
talking about the feedback, you can also suggest features by tapping on this option here on the right
in the home screen, where you can see already which functions developers
are working on currently. But if there is something
missing and you feel like it would
be great to have, you can just simply tap on, suggest a feature here.
14. Timesavers: Similarly to the
desktop version of Photoshop on the iPad, there's also a lot of
ways you can be more productive here besides
using a stylus, which I highly recommend
to be more accurate, you can also use gestures, touch shortcuts, and
even keyboard shortcuts. If you connect a
Bluetooth keyboard while working on the iPad, the best place to find
out more about things is within the settings on
the Input category. So for example, if we
tap on view gestures, we can see a list of all
of the available ones. Now there's not that many and we already covered some of them. One thing that I didn't show you yet and something
that is very important is how to
quickly undo and redo. As you can see,
undo it two-finger tap and redo the
three-finger tap. So let's just take a look at
this video in a document, you might recall that we've been doing some cropping
on this image. If I use the two finger tap, I can go back one step, 23, and then with three finger tap, and I can go forward all the way until I get
to this version. Now there's one very
important thing to remember, and it is actually quite similar to the way it works on desktop, that the history is not preserved when you
close the document. So on the iPad version, there's actually no need to save your document
and there's not even an option for it because it's constantly saving it
in the background. When I go back to
the home screen, that basically means that
it's going to finalize that image and all
those steps that I had available to be able to
go back to next time when I open the same document
won't be available anymore. So I start with a
clean, fresh history. And the easiest way
to see that is that the two icons here on the
top-right are not active. So I can't undo
or redo anything. And I can also try using
the touch shortcuts, but it's not going to work. So why working in a document, you will be able to go back and forth easily in the history. But once you close the app or you go into another document, the history will always
be cleared out to free up some memory on the iPad. Just as a reminder, from the home screen go into settings and under the input, spend some time going
through these shortcuts. But besides gestures,
we also have touch shortcuts and
photoshop for iPad. Now with this feature, there's actually two states, the primary and secondary
state of touch shortcut. And for example,
with the move tool, we can see it here that the primary mode of the
shortcut is going to constrain the movement to be
horizontal or vertical via the secondary mode
is going to work to duplicate the selected layer. So most of them has a primary and secondary function while using the touch shortcut. And it can also be used to
select multiple layers, which once again, I'm going
to show you right now. So if we come back to
this document and I have this layer selected with
the selection tool. I can start using
the touch shortcut by simply holding it
down to constrain the movements of this
layer so I can move it vertically or horizontally. And also diagonally. That's going to be constraining 45 degrees angles when
I don't hold it down, of course, I can have no constraints and move
the layer around freely. But then if I hold down
the touch shortcut and drag to the sides of it, notice how it switches between the primary and secondary state. So when it's completely
filled with white, that means it's in
the secondary state. But also there is a hint on the top right corner saying that now is going to duplicate. So that means if I
start moving the layer, it's actually going to
create a duplicate. Now, we will be using all of the available touch
shortcuts and also some keyboard
shortcuts later on. So I highly recommend
to check them out from the settings and start
familiarizing yourself with them.
15. Layers Basics: One of the most important
things to get used to in Photoshop is to be able
to work with layers. Now in this chapter,
we will take a closer look at
all the functions available in photoshop for iPad when it comes to
working with layers. And just as a reminder, is something that we already discussed in the
previous chapter. We have these two icons here
with which you can show either the compact or expanded
view of the layers panel. But also don't
forget that you have the Layer Properties panel, which can be used in
combination with either the expanded or the compact
view of the layers. For now I'm going to
hide layer properties, but we will come
back to it later. And first I wanted to show
you how you can interact with the layers when you
are using the compact view. So here you can switch between the layers by simply
tapping on them. And then using the Move
tool, for example, we can see that now the currently selected
layer moves around. While if I select another layer, I can move that around. And then also the same goes
for this one in the middle. Now if I want to move multiple
layers at the same time, I can hold down the
touch shortcut on the left and select all
three layers in this case. And now I can use the
move tool to move them all together
at the same time. To take a V, one of the
layers from the selection, I would use the same
shortcut, again, holding down the touch shortcut, clicking on one of these images. Now, I will be able
to move only two of them at the same time when you move layers on top
of each other, you will also notice that
there is a stacking order. So whichever layer is on
top is the closest to us. So if we want to change this, we can drag the layer
thumbnails up and down. So for example, if
I want this image, which is currently at the bottom to be all the way on the top, I can just drag it up like that. And now we can see that it is indeed on top of the
other two layers. If I want to have it in
between the other two layers, I can also again just drag it and drop it in between there. Now it's going to move
between the two of them. The layer visibility
can be controlled easily with the icon
on the right side, which will hide or show the currently selected
layer or layers. And if you have the
expanded view visible here, you will have an eye icon
next to each of your layers. So it could be even easier to show and hide them in
the extended view. You can also see the
names of your layers. You can also rename
them easily by double tapping on either of
them and rename it. And of course, in extended view, you can still move the layers up and down in the
stacking order by just simply dragging and dropping them wherever you want
them to be placed. Last but not least, you
can also delete layers. This you will find under the additional
options, Delete layer.
16. Working with Layers: In the previous video,
we've seen that we can select multiple layers by using the touch shortcut and selecting them here
on the right side. That way we can move them
together at the same time. But once you have them
selected like this, where you can also do is to
link them to each other. So there is this
little link icon here with which now
they will be linked. This means that if I select
one of them next time, it will automatically move
the other layers with itself and it will affect also the transformations are
applied to these layers. So once again, when I choose the Transform tool and
start making changes, you can see even though I
had only one layer selected, because the linking, they
will all be transformed. If you want to remove the
link between the layers, you can again use
the touch shortcut, select all of them, and then Unchained
or unlink them. Another way to combine layers, and the one that I prefer
to use is grouping them. Now once again, I have
all of them selected. Then I can click
on this icon here, which is going to turn
this into a layer group. Now under layer
group is selected, of course as expected, all of the layers
we'll move around and also transform at the same time. But the good thing about
layer groups is that you can double-tap on them to
enter the contents, to see what's inside the group
or see the contents of it. And then you still have
the ability to select them individually and also to make changes to
them individually. So layer groups is probably
the better way of keeping more complex
compositions organized and easier to work with when you want to
get out of a group, you just have to tap on
the little arrow up here. And I'm just going
to show you in the extended view layer
groups look like this. You have a little arrow
on the top with which you can open or collapse
the groups contents. At any point, of course, you can decide to remove
layers from a group, simply drag and
move them outside. This way, this layer is not connected anymore to the group. If you decide that you don't
need the group anymore, you can also select it from
the additional options. You can find ungroup layers. If you want to permanently
combine layers together. For that, you can use
the Merge Layers option. So I'm going to select all
three layers and go to the additional options,
choose Merge Layers. And as you can see, this is now a single layer, and of course it moves together and also
transforms together. But the main difference
here is that this is a bit more destructive
method because now we lost the independence of
the layers and we have to work with it as a single
layer whenever possible, I would recommend to separate your layers
as much as you can, even if it gets complex. Because the whole
point of having layers is that it gives you more flexibility and ways of
editing your compositions. So I'm just going to undo this merge by using
two-finger tap. And besides combining
your layers, you can of course,
also duplicate them. Now, if you have a layer selected and you decide
you would like to have a duplicate of it
within the same composition, you can go again to the
additional options here at the bottom and then
choose Duplicate Layer. Now, this is going to
create an exact copy, and now we can
start working with both of these independently. Another way you might
recall to be able to duplicate is by
using the Move tool, holding down the touch shortcut, moving it to the
secondary position, and then dragging the
currently selected layer will also create a duplicate. One last thing I would
like to show you is how to lock layers. So sometimes you might want to make sure that
layer is not moved around and also you don't accidentally paint
over it for this, or you have to do is to
select the layer and then go again into the additional
options and choose lock layer. So this will make sure that you won't be able to
move the layer around. You get the little
hint on the right that you can't make any
changes to this layer. And the same thing
would happen if I tried to paint over
it looking a layer, however, it doesn't
prevent it to be moved around in the
stacking order. So you can steal,
drag it up or down, and you can even move it within a group or outside of a group.
17. Opacity and Blend Modes: We talked about toggling
the visibility of layers by using the little icon
here on the taskbar. But what we can also do is to
change the layer's opacity, which basically reduces its
visibility on a 100% scale. Now, to find this, you have
to open the Layer Properties. And within that you
can move the slider left and right to
adjust this value. Now to see what
actually happens, I'm going to move this layer
on top of these other two, and I'm going to zoom
a little bit closer. So now when I'm
reducing the opacity, you can see that it
becomes see-through. We can actually see
more of what's behind. But opacity is not the only way you can
blend images together. For this, we have
the blend modes and there's a big list here, and these are all
organized into groups. So first we get the blend modes that will
make the result darker, like multiply, color,
burn, linear burn, darken. They're all slightly different. But essentially the result
of the blending will always be darker than
the original image. On the contrary, if you
go to the next group, any of the blend
modes from here, from lightened to
lighter color will always result in a brighter
image than the original one. And then the next category is add a little bit more tricky to define its best to experiment
and see what they do. One tip is that overlay is a very useful blend
mode and it's almost like a mixture
between Multiply and screen, which is great for a lot of
different techniques and we will see it used in a couple
of projects in this course. So you will learn
how to work with it if you're not
familiar with blending, I encourage you to give it a try and go through a couple of these and see how they work once you start overlapping images. And also don't forget
that you can combine, blending and changing
the opacity of a layer. And this is the beginning of starting to combine
images together. And you can already
see that this feels like a double
exposure photograph. But of course, in the
next couple of chapters, we will start learning about Selections and Masking
and also retouching, which will make our job
much more interesting. And these compositions
more exciting.
18. Transformations: In this video, I'm going to
talk about transformations. For this, we use the second
tool from the toolbar, which has a couple of modes. The first one is the
free transform mode, with which we can make changes to the size of
the selected layer. Now, you can drag the corner points to
keep it in proportions. Or if you drag the side points or the one
on the top or the bottom, you can also scale without
keeping the proportions, essentially the store
thing, the layer, if you want to do the same thing from the coordinate points, you can also achieve that by holding down the touch shortcut. That's going to result
in unconstrained scale. Apart from scaling, you
can also do rotation. Now why rotating? You can hold down the
touch shortcut to snap to 15 degrees increments in both direction while being
in transformation mode, you can still undo and
redo either by using the touch shortcuts or the
arrows on the header bar. And if you want to quickly flip horizontally or vertically, you can also use these icons
here on the top right. But this is not all
because you have also the additional three modes to which you can switch
here on the left side, you can select skew with
which you guessed it. You can skew the image either, again, horizontally
or vertically. The third mode here on the
left is called distort, with which you can drag
individual coordinate points separately by
keeping all the rest of the points in place. This almost feels like a
three-dimensional distortion. So it's a quiet cool effect. I'm just going to undo this
and show you the last option, which is the
perspective distortion. Now it's quite similar
to the previous option, but here we move pairs of
coordinates at the same time. So we can reduce or increase the distance between
these two points. Or we can do the same thing. If we start dragging
it down or up, We will increase or
decrease once again, the distance between
these two corner points. And now of course, once
again, the biggest difference between iPad and the
desktop version of Photoshop is that we don't have currently smart objects
here on the iPad, which means that all of these transformations that
we do are destructive. That means that once I click on done and move on
and make changes, and especially when I get out of this document and
come back next time, I will lose the information that I had originally
in these layers. So when you distort
scale or rotate layers, just remember, they are all destructive methods of editing. Of course, it doesn't
mean that you should stay away from them. It's just something that
you have to keep in mind before we move on
to the next lesson, just one last shortcut
that I wanted to show you. When you are resizing a layer
in the free transform mode, you can also use the secondary option
in the touch shortcut, which will result in scaling to the center point
of the current layer. So you can increase
or decrease the size, but essentially keep the
center point in place. And one more thing,
if you want to rotate that layer to a specific angle, you can also type it in here
in the additional options. So rotation angle,
let's just say 65, then done will result in
a 65 degree rotation. And just to prove what I
explained before about working destructively when we
are making transformations. When I go back and select
the transform option again and go on to
the rotation angle. Notice that it won't remember
the angle that we use. So it will again start from 0
until we are smart objects. We just have to work around these minor limitations
of the app.
19. Adjustment Layers - Black & White: If you want to change the colors or tonal values of a layer, you need to work with
adjustment layers. You can find these in the
Layer Properties panel and the feature is called
add clipped adjustment. Once you tap on that, you will see the seven currently
available adjustments. Now, most of the important
ones I already here, maybe apart from curves, but from all the
other adjustments available on the
desktop version, I'm sure more will be
introduced in future updates. In this video, I'm only
going to use one adjustment. Mainly focus on the
aspects of clipping, which is a very important
concept and you need to understand in order to be able to work in more complex compositions
with adjustments. So let's use black and white, which is probably the
simplest adjustments. Once I tap on that, notice that it is
only going to affect the layer directly
underneath it. So here in the layers panel, I can see the adjustment layer. So that's the one up here. And there's a little
arrow pointing downwards indicating the clipping
between these two layers. Notice that there is also a little white rectangle next to the thumbnail or icon
of this adjustment. That is a layer mask. Now that can be a
confusing at this point. So I'm going to actually
remove it by going to the additional options here
and choose Delete Mask. This is a feature
that automatically generated whenever you
add an adjustment layer. But as you can see, we can remove it and it didn't change anything on the
appearance of the effect. So we can see that the image
is turned black and white, but by hiding the
adjustment layer, I can see the original colors. So I mentioned earlier that it's a non-destructive effect and we can easily turn it
back and forth. Now when an adjustment layer is selected in the
layer properties, we can see the controls
for that specific effect. And in case of black
and white adjustment, we can control the brightness of individual colors because
this image was quite warm. So there's a lot of
red tones in it. We can increase and decrease most of the colors
with this value here. But there's also additional
colors like yellow, which we can also
selectively control. In the next video,
I'm going to show you more adjustment layers. But for now, let's see what happens if we remove
the clipping. So I'm going to
zoom out a bit and we can see all
these three layers. And if I tap on this icon here, I can unclip the adjustment. Notice that the little arrows so at disappeared from here. So now it's unleashed
in a way and it's affecting all the
layers underneath it. So if I move it just
one layer down, what will happen is
that now it's affecting the two layers here
on the left because they are underneath it
in the second-order. But it's not affecting the
original image that we started with because that
is now positioned above it in the stacking order. Since I have the
adjustment layer directly above the
layer in the middle, if I now use the same icon that we used before
for unclicking, now is going to clip it back, but now onto the
layer underneath it, which is this image
in the middle. So in this case, the
image is on the right and the left are in their
original colors, and only the one in the middle is turned
into black and white. Now to complicate
things further, you can actually clip Adjustments on to
layer groups as well. So if I move this adjustment
layer all the way to the top and I select two layers, Let's just say the two
ladies on the sides. So I can select them too. And then use the icon
here on the right to turn that into a layer group. Now, I can select the adjustment
layer and use clipping. What happened is
that now once again, we limited the adjustment layer, in this case to the group or
the contents of the group. So the image in the
middle, once again, is unaffected visually, it is indicated the
same way as before. So the little arrow here
indicates that there is a clipping and this other arrow indicates that it's on a group. However, if we switch
to the compact view of layers that shows it a little bit better
what's happening? So we have the
adjustment layer and then underneath we
have the group. Now I mentioned before that
adjustment layers are great because they allow you to
work non-destructively. One of the aspects that I really like is that when
you select them, you can also control their
opacity with which you can practically fade them out or
bring them back in again, you can even use blend modes
with adjustment layers, which will again
give you a lot of variations and
options to play with. But if you decide not to use
an adjustment layer anymore, instead of just hiding it, you can also delete it from
the additional options. You will find Delete layer.
20. Adjustment Layers - Tonal Values: In the previous video, we've already seen
how to work with adjustment layers and
how to handle clipping. So now we can focus on all the other adjustments
that are currently available, starting with brightness
and contrast. So once we select
that, once again, it can drag to the
right so we can see its icon here in the
layer properties, we can see the two values. It's a fairly
straightforward adjustment. So we can increase or
decrease the brightness. And then we can also increase
or decrease the contrast. So maybe if I reduce
the brightness a bit, increase the contrast, that creates a little bit
more dramatic effect. In this case, we
can turn it off, turn it back on, and
we can see the result. I'm going to hide this adjustment layer so
we can try another one. I go back to select
the layer and then choose Add Clip adjustment. By the way, I don't know
if you notice that when you have an adjustment
layer selected, you don't see the option to add an additional
adjustment for that. You always need to have
an image layer selected. Once we have this one, we can choose Add Clip
adjustment this time, let's choose exposure,
which is a quiet, similar effect to
brightness contrast. But instead of brightness, we have here a value
called exposure. Now with this one, you
have to be very careful. Increasing, decreasing will make lot of difference on the image. You can also try to work
with offset and Gamma. But to be honest, this
is something that I don't often use in
my compositions. Instead, for changing
the tonal values, I actually prefer to work
with levels or curves. Now unfortunately,
curves we don't have currently in photoshop for iPad, but I'm going to show you
how to use levels instead. So I'm going to hide this effect as well and then go back to the image at clipped
adjustments and choose Levels. Now with this one, we get a histogram in the
Properties panel. And there we will find
the black point and the point and also the midpoint. Now, the mid point, I'm going to keep on one and I'm going to just increase
the black point. What happens here is
that we add clipping or the shadows and whatever force to the left of the black point, we'll turn completely black. So what was originally
just very dark? Now it's completely black. But by reducing the tonal range, we are also increasing the
contrast of the image. So let's do the same thing
here on the right side, dragging the white
point to the left, we again are increasing
the contrast and bleaching the image a little bit because all the bride details
are turning white. We sometimes we also referred
to as burned out details. And that's not necessarily good. But if you are
subtle with the way you do this and don't
drag it too far in. It's actually again
going to end up creating a really cool effect that
creates a very dramatic look. So let's see before and after
without levels and levels. Now, if you want to increase or decrease the overall brightness, you can also start moving the mid point to the
right or to the left. Notice that by moving
it to the left, we are increasing
the brightness. And by moving it to the right, we are decreasing it. And if this wasn't enough, you can also selectively adjust the histogram for
each color channels. So at the moment we are on
the RGB composite channel, but we can switch to
reds, greens, and blues. So for example, if
we are on the blue and start increasing this value, you can see how it's going to affect the colors in the image. Now I wouldn't recommend messing around with this
most of the time, it's better to stay on the RGB values and concentrate
on this histogram. But still, it's worth exploring these additional options once you start working with channels. So this was levels my favorite adjustment to
work with tonal values, once again, without it. And we did applied
on this image.
21. Adjustment Layers - Colors: We've seen the adjustment layer is affecting tonal values. This time we will take a look at the ones affecting colors. First, let's start with my
favorite one, hue saturation. So just like before, I'm going to use add clipped adjustment and I'm
going to pick Hue Saturation. I will drag the thumbnail to the right so we
can see its icon. Here on the right
side, we can see the three options or values
that we can control. First of all, we have hue
with which we can change the colors and create these
interesting variations. Now we can also
control saturation, dragging that down to the left, we can turn it into grayscale, which is almost
the same as using black and white
adjustment layer. Or we can drag it all the way
to the right with which we can over saturate the
image if we go too far. And last but not least,
we have lightness. But I would normally avoid using this because
it's almost like bleaching the image is not
actually increasing it as nicely as levels or
even the exposure effect. Still sometimes
this can be useful, but for now, I'm going to keep that somewhere
in the middle. And instead I'm
going to show you another really cool feature
within this adjustment. And that is the colorize toggle. If you turn that on, it's going to turn
the image into a monochrome effect where
we have a single tint. You can select from the view. And then once again you can apply higher
saturation or lower. And also you can increase,
decrease the lightness. So when you are using colorize, lightness actually
makes more sense. Now whenever you are using
an effect like this, don't forget that you can
always adjust the opacity. So you can always reduce the
intensity of your effect and innovate almost becomes
like a filter in Instagram. So that was before and
after Hue Saturation. Now let's hide this adjustment and I'm going to
select the layer and choose another
one called vibrance. Now, this is a very smart way to increase the intensity of colors without over saturating the already existing
strong colors. Notice that within this
adjustment we actually have both saturation
and vibrance. But this saturation
already works differently from the one that we've seen in
hue saturation. So if I increase this
all the way to the top, it again still feels a
little bit over the top, but still not as bad as 100 per cent used in hue saturation. So much more intense colors, but still the skin tones
don't look as bad. However, if I reduce the saturation back to 0
or somewhere around there, and then increase the
vibrance all the way to 100. Notice what happens
here is that we get a much more subtle effect. Still intensifies colors, but it concentrates on the VQ colors. So it tries to
balance things out. So let's see before and after. Notice how the less
saturated colors get more intense and the already
existing saturated colors stay roughly the same. Normally, what I
would do is to use a quiet high Vibrance value if I need to intensify colors. And then if that's not enough, I would add a little bit
of extra saturation on it. So this is usually a
quite good balance. Now, let's hide this
adjustment and go back again to the layer and choose
Edit clip adjustment. And this time let's
pick a color balance, the last one that we
haven't seen so far. Now this is again a very
useful one with which he can control balance between
certain color pairs. So these pairs are the
complimentary colors. On the right side we can
see red, green, and blue. That's all RGB
colors are made of. And then on the left
side we have cyan, magenta and yellow, the
complimentary pairs. And by dragging these values
to the right and left, we can control which one gets more intense on the desktop
version of Photoshop, Color Balance has even options to selectively control
the highlights, shadows, and mid tones, so that can make it
even more specific. But here we only have one additional option and that
is to preserve luminosity. If I turn that off by
changing these values above, you might end up having a brighter or darker image
than what you started with. So if you want to maintain the brightness levels
or the tonal values, you can keep the option on. So Preserve Luminosity
can be quite useful. Now if I play around
a little bit further, I can come up with a quiet, nice coloring for this image. And once again, when I
turn off this adjustment, we can see before and after. Notice how the original image now feels much more greener. And it's funny how our eyes
can deceive us because this is something that you might not notice when you first
starting with the photograph. Only after you start
making adjustments. You might notice this. And this is once again why
adjustment layers are so useful because we can
always go back and forth, hide and show them
just so we can see and compare before
and after results. And also we can
refine and fine tune the details or values that we used in the properties panel. So color balance, vibrance, and saturation are the
three adjustment layers to work with colors. And if I wanted to have all of these three adjustments
used at the same time, of course I can do
that just simply by turning back the visibility
on all three of them. So notice now in
this case we have O3 adjustments clipped
onto this image. And in these cases
sometimes it can get quite complex to see
what actually happens. But still, by changing
the stacking order of your adjustments
can also result in slightly different
final effects. So to summarize,
adjustment layers are crucial to be able to work non-destructively
in Photoshop and to make sure that you get
comfortable working with them. Later in this course, we will
have several other examples where we will be applying
them to our compositions.
22. Filters: Besides the adjustment layers in desktop version of Photoshop, we have a lot of filters. There's dozens of them. Now, unfortunately, in
photoshop for iPad, it's quite limited currently
we only have two of them. So we have Gaussian
Blur and invert. Actually invert is
considered an adjustment. So I'm not a 100% sure
why it's placed here. It probably will end up being together with the other
adjustment layers. For now we have it here, and it's a very simple one. So once you select it, it simply just
inverts the colors. And then if I go back
and choose Invert again, I can invert them back
into where they were. So essentially this just shifts all the colors to the opposite
side of the hue wheel. Now the other filter
is more interesting. Gaussian blur is one of the effects that you would
use very often in Photoshop. And with this, you can
control the blur amount so we can completely blurred details out or we can reduce it down. The only issue here
is once again, that this is going to be a
very destructive effect. Because once I apply it by pressing down here
on the top right, It's going to change
the contents of the layer and it's going to
lose the original clarity. So on the desktop
version of Photoshop, you would be able to use
a smart object again. And then this
filter would become a smart filter which is
completely editable. Let's hope that
this is going to be available soon on the iPad. But until then, we have to just remember that using
this feature, we will end up having
a destructive effect applied on our layer to avoid losing the
original details, what you can do is to duplicate your layer before
applying the filter. So by selecting the layer, I can go into the additional
options and duplicate layer. On this duplicate, I can
apply Gaussian blur. Let's just increase the blur
even more than press Done. And now I can show the original simply by
hiding this layer. Or I can also create
interesting effects by going into the
Properties panel and change the blend
mode to something like lightened or overlay. And you can see without
and with the effect, we get once again, a quite
interesting and distinct look.
23. Creative Project 1 - Realistic Shadows Part 1: It's time for our first more complex project in this course. And by the way, each chapter
is going to have some of these projects where we combined all the techniques that
we learned so far. This time, we are going to
work with this example, which you can upload onto
your iPad and follow along if you haven't seen how to work with exercise
files already, there is a separate video about it at the beginning
of the course. So make sure you
check that out if you want to follow along and
use the same example. With this project, we will
practice mainly working with adjustment layers, blending,
and transformations. But we will also use a
couple of new techniques and features which will be covered
in the following chapters. So without any further
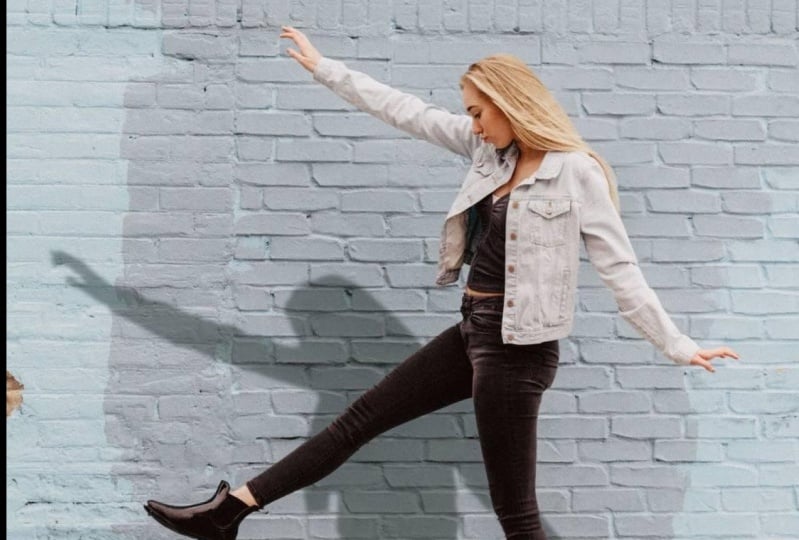
delay, let's get started. Now, this project's goal is
to make it look like it was a sunny day and there is a strong cast shadow
in the environment. So basically, we want the
cast shadow behind the girl, which is reflected
or cast on the wall. And to be able to achieve this, we will have to do
a couple of things. But one thing that I prepared
already here and that is that the girl is separated
from the background. So once you open this file, you will see that there
was originally one image, but I separated it just
to save some time for us. Of course, this is
something that we will be able to do later on once we learn about
selections and retouching. But for now I just
found it easier to prepare this first step. So we have two separate layers. We have the background
and the girl. Now, what I would like
you to do first of all, is to make a selection
based on this layer. This is already something
that we haven't done before, but it's very simple. Since we have a layer
with transparency in it, we can just go into the
additional options in the taskbar and then
choose load as selection. Once that's done, we get this marquee around the
outlines of the layer. And to be able to use this, we will also need to
create a new blank layer. So the way you do that is by simply tapping on
this icon here, notice that it created
that empty new layer. Now while we still
have our selection, I would like you to select
these to the paint bucket. And with this we are going
to feel the selection. So the color that I
would like you to use is a darker blue color, which you can set from tapping
here in the Color Swatch. And if you want, you
can also sample a color from the image by using
the eyedropper tool. So you can select the
color from the background, maybe something like this, that's like a shadow color, but we can make
this darker as well by dragging it further down. Now you can even use
these color-code that you can see here on my
screen if you want. But it doesn't
have to be exactly the same is going to
work just as well, as long as you get it somewhere close to what you can
see on my screen. So let's switch back to
the paint bucket and simply tap inside the selection. So now we have this
new layer filled with this color and we can actually get rid of
the selection now. So you choose the
Select from the bottom. And just to test it out, I'm going to use the Move tool and move this layer around. So that's exactly what I wanted, but I would like to have
this behind the girls layer. So I'm going to drag
it down here within the layers panel and just
place it behind the girl.
24. Creative Project 1 - Realistic Shadows Part 2: Now, before we go any further, I would like to show
you a few references to make sure that you understand how this cast shadow
would work in real life. So when you have a person
standing in front of a vole, you technically have
two planes to consider. You have the floor and
you have the wall. Now, the shadow would
be split between these two planes and
you have to match the perspective well to
make it look realistic. So here we can see the strong sunlight is going to create this
shadow behind the girl, which is first going to
be created on the plane, on the floor, and then it turns 90 degrees and goes
up on the wall. So when the person stands
close to the wall, normally the shadow
doesn't get blurry, so it stays quiet sharp, but still it's probably
a little bit more blurred on the wall
than on the floor. The closer the shadow to the person or object
that is casting it, the sharper is going to look. So we have to pay
attention to that. And we also need
to pay attention to the color of the shadow, which can't just
simply be black. Again, that won't be natural if you pay attention
to this example here, you can see It's usually
a darker color or dark shade of whatever the color of the object that is cost on. So in this case, on the wall, it's darker blue
around the bottom, and then it's a darker yellow or almost brown here further up. Now here's another example, slightly different
perspective, but still again, the same principle applies. The shadow splits and it looks sharper on the ground
than on the wall. And then one more example here, because there is a
little bit of a gap between the floor and the wall, we lose some parts
of the shadow. That's again can complicate it further if you work with
backgrounds like this. But once again,
because here the wall is even further away
from the person, the shadow gets much more distorted and also more blurred. The distortion, by the way, really depends on the
angle of the light source. So in this case, the sun was probably coming from
this direction. And that's why we are getting the shadow here on
the bottom right, using references like these
and observations are really key to be able to create realistic and believable
compositions in Photoshop, especially once you start combining multiple
images together. Okay, So back in Photoshop now, we know what we need to do and to be able to
create that look, we first need to go into the layer properties
for our shadow layer. And I'm going to
reduce the opacity and also change the blend
mode to multiply. This is going to create a much more realistic
representation of how a cast shadow would
look in this environment. And now that we have that setup, I would like to divide this
shadow into two parts. So we need one that
will be on the floor, the other one that will
be cast on the wall. So for this, I'm going to use the rectangular marquee tool. By the way, any tool that
has a little arrow next to it means that there are
additional tools under it. And in the next chapter we will cover all these selection tools. For now I'm just going to show you when I double-click on this, here are all the tools. So you might have
maybe the Lasso Tool selected instead of
the marquee tool. In that case, just double-tap
and select this icon. Now, all you need
to do is to make a rectangular selection
around here on the bottom. If you change your mind, you can always tap on, de-select and then make another selection has just say something like
this will work. So this is going to be
used for the floor. Now what I'm going to
do is to duplicate the layer before I
make any changes. So go to the additional options here and then choose
Duplicate Layer. Now, don't be surprised
if you see that the color got darker because we have the multiplier effect on it essentially combines
the two layers. And that's why it looks darker. But that will disappear soon. Because what we will do with this selection that we created is to delete this
section from one layer. So all we have to do
here at the bottom, we just choose Erase that deleted the selection
from this layer. And also notice that the
current layer thumbnail updated showing that
the removed the legs. Now I'm going to select
the other shadow layer, and I'm going to invert my selection again by using
this icon here at the bottom. So that's going to
select everything else apart from the
original selection. And now that we've done that, we can again just hit erase. So technically, we
divided the legs and the upper body onto
two separate layers. Now, we can choose the Select. And just to show you
with the selection tool, There's one layer and
there is the other layer. That looks great. Now we can decide where we
want the cast shadow to beam. So essentially we are thinking
about the light source. Let's say the light is
coming from the right side, then the shadow will be
somewhere here on the left side, maybe something like that. Let's just move it all
the way down here. Yeah, that makes sense,
something like that. And then let's select the shadow layer and move it close to where the person is standing,
something like that. And now it's time to use
the transform tools. So I'm going to select Transform and first with the
Free Transform, I'm just going to
stretch it down, so drag the top edge down
to something like that. Then let's switch to skew and then drag it all
the way to the left, the top edge to the left. I ordered it looks quite good, but maybe we can also use a little bit of
distortion on it and just drag it further out to the left just to add that
perspective distortion. And I think that
looks quite good. Maybe we can also match it here on the right side slightly. And then when I press Done, can zoom a little bit closer
and see how it looks. I think that looks quite good. Now we can also apply
a little bit of distortion on the upper body. So the one on the wall, I'm going to again use the transform tool switch
straightaway to distort. And then I'm just going
to stretch it out a bit around that direction. Once again, if the light source
was coming from the left, we would get more
distortion this way. But because it's
coming from the right, we will get the distortion
in the other direction. Something like that, I
think looks quite good. Okay, so let's press Done. And then we can also just
move it slightly to the left.
25. Creative Project 1 - Realistic Shadows Part 3: And remember what
we said is that the shadow on the floor needs to be less blood than
the one on the wall. So I'm going to zoom closer, make sure I select that
layer and from the filters, choosing Gaussian blur, but
with a very low amount, probably around one pixel. Yeah, I think that looks okay. Let's just press Done. And while I'm disclose, I can also see that I will need a little bit more
adjustment here just to make it fit perfectly. Yes, something like that. I can always suggest distorted a little bit
further just to make sure it matches the layer
above, something like that. Okay, so now that we
have the blur here, we should also add that the blur on the other shadow layer. So I'm just going to select that and then choose Gaussian blur. This time we can go higher. So I'm going to go probably
to around three pixels. Something like that
looks quite good. Maybe slightly less. Okay, let's hit Done. Now if we see before and after. So this was before, very sharp edge
and this is after, looks much more realistic, especially when we look
at it from a distance. But there's one issue here still that I would like to fix. So if you think about it, the original composition
didn't have any cast shadows. Now how can that be? Well, the only way
that can happen is that it was a very overcast, cloudy day and then wasn't any strong light source that
could create the shadows. So that means that we have also the colors a little bit
washed out and quiet blue. In a strong sunny day, you will get much
warmer tones and also a lot more brightness. So to be able to make
it more realistic, we should add a couple
of adjustment layers. To fix this. I'm going to select
the layer on top, which is the girl. And I'm going to choose
Add clipped adjustment. And from there I'm going to use brightness contrast with which I can increase the brightness a little bit, something like that. Just probably around
25 is enough. But I would like to have this apply to the whole composition. So I'm going to also get
rid of the clipping. Remember the way you
can do this is by clicking on the icon or thumbnail of the
layer and then click on this option here to
remove the clipping. Now let's see without and
with this adjustment. So it already looks much
more like a sunny day. But what we can also
do is to go back to the adjustment
layers by once again selecting the girls
layer and add clip. That just meant now this
time I'm going to use color balance and I'm going to again make
sure it's not clipped. So select the icon and
remove the clipping. Then I will increase the reds in this image a bit and
also the yellows. So something like that. Now if we just hide this
layer that was before, very blue and cold, and then we get a much
warmer tone in there, once again without
the two adjustments. And the two adjustment
looks like this. And we can also see it
without the shadow. So now that we have this bright warm tones
edit to the image, It actually feels strange
not having the shadow. So putting back the shadow looks already much more realistic. There's just one additional
thing that we could do. It is to change the color
of the shadow on the floor. Because notice that
that is obviously a completely different
color from the wall. And we referenced the wall color when we created our
original shadow. So what I will do is to select
the shadow that is used on the floor and then add another
adjustment layer on this. This time, I'm going
to use Hue Saturation with which I can very
quickly adjust the color. And I'm looking for
something closer to the floor like this brown color, maybe reduce the
saturation on it a bit. And we can also increase the lightness to
something like that. Now once again, let's
see, without this, if we have everything blew, it doesn't look that great. But now that we match the
color of both surfaces, It's going to look again
much more realistic. And of course, if
you feel like that the shadow is a little
bit too strong, you can always go back
into the properties and adjust the opacity so we
can always reduce it. And the same with
the background, we can reduce it. And that way it's not going
to be as intense as before. We could also adjust further things, refine
the transformation. We find the colors, even the
blur until we get it right. So this was just a
glimpse into what's possible with
photoshop for iPad. And as we learn more in
the following chapters, you will be able to create even more exciting and
complex compositions.
26. Making Selections - Lasso Tool: Selections are crucial in
Photoshop because they allow you to create compositions made up
of multiple images. Now this chapter is going
to be all about selections. And then eventually we
will also talk about masking or how to turn
selections into mosques, which will allow you to use your selections completely
non-destructively. I have this image
open that we already used earlier on in the course, and I'm going to start
using the Lasso tool. Now, if you don't see this tool, you can double-tap on it because it's a group
of selection tools. And from this we
need the first one. So with that tool, you can start drawing around this guy and make a
selection like so. Now let's say I made
some mistakes here. I intentionally left
out some details. If I want to go back
and add some details, I can use this mode which is going to add
to the selection. By the way, if I don't have that selected and start making another selection is going
to remove the previous one. So I'm just going to
undo this last step. And it's important to have
that mode selected if you want to add to your
existing selection. Now if I drew, notice that it's going to be
merged into the selection. Also, this foot I can
add to the selection. And then if I want to remove or subtract
from the selection, I can switch to this
second mode with which I can again draw over sections
which I can remove. And again here I can remove
and so on and so forth. Now, of course, this is
by far not the smartest, quickest way of
selecting a person. For that, we will have
much smarter methods, which we will go through
in the next video. But remember that
the Lasso Tool is a very quick and
easy way of making selections by simply just
drawing over details. And of course, you can be
very accurate with it. If I zoom closer, for example, around here, let's say I
have it set to subtract. I can go much closer to details, especially using the advantage of working with
the Apple pencil, I can get really close to
the details that I need and keep subtracting and adding to them as I trace
over around the edges. Now if you have a
Bluetooth keyboard connected to your iPad, There's a very useful
shortcut that you can use whenever you are
working with selections. And that is the F key with which you can toggle
through different views. This one is the Quick Mask
view in which you will see all the details that
are currently in your selection in full color, while everything else
that's outside of your selection in a red overlay. Now this can be very helpful because here you can see it much better if you are missing some
details around the edges. And the great thing is
that you can continue working with the same
setup as before. So for example, if
I zoom closer here, I can just paint over this area. And because I have it
set to subtract mode, I'm removing from the selection. So more and more
details are going to have the red overlay. I can do the same
thing here as well. And then if I zoom out and
maybe go closer to the head, I can do the same
thing here as well. Just going to paint over here. I'm just going to go
up this way as well. And then zoom out. And I can do these bigger
sections much faster. I don't really have
to be that accurate, but you can see how
much easier it is to refine the edges
by a painting over because I can immediately
see what's going to be removed and then what's
included in the selection. If you press F on
the keyboard again, you can toggle to yet
again another view. Here we see everything with a black overlay instead of red, which might be useful
if you have a lot of red details in your selection. Then when you press F again, you get a white overlay. And then at the end you
get the mosque view, which is going to show
the selected details or selected areas in white and everything else
outside of it in black. Now, we will see how
masking works later. For now I'm going to switch
back to the original view, which is also referred to as marching ends for the selection. And I'm going to show
you the last mode, which is called intersect
here on the left side. So if I select that
one with this, if I paint over an area,
let's say up here, it's going to keep the already existing selection within that area that
I just painted over, but it removes everything
else from outside it. So it creates an
intersection or common area between the previous selection
and this current one. Now whenever you
want, you can also move your selection around as long as no active modes are
selected on the left side. So if I remove the
intersection and then start dragging
the selection around, This is the way I can
reposition it and move it into a different place
and don't get confused. This is not going to move
any details from the layer, is just simply moves
the selection. If I wanted to call those details out and move
them to a different place, I would use the Move tool for that while having
the selection. Now I can extract details from the layer and move
them somewhere else. And this is something you can
even do between documents, which I'm going to show
you in the next example. When we take a look
at the marquee tool.
27. Making Selections - Marquee Tools: Another very useful and
essential selection tool is the marquee tool. There's actually two of them, the elliptical and
Rectangular Marquee is both of them you can find in the same group
where we found the Lasso tool. So this is the
rectangular marquee, and next to it we have
the Elliptical Marquee. They work almost
exactly the same way. So I'm going to focus on the
rectangular marquee first. And notice that it also
has the same modes or selection modes we've seen
earlier with the Lasso tool. So we can use it in the first
mode where every time we create a selection is going to add to the existing selection. Or if we remove that each
time we create our selection, it will start a new one. And then there's
also the subtract and intersect just like before. Now this time we will make
a selection on this image, extract some details, and
place it onto another image. And this is where things
get more interesting, where we start to combine
images and create compositions. But before we do that, I just wanted to mention that similarly to the marquee tool, if you want it to
select the whole image, you don't need to struggle making a big
selection like this. You can just go to the
additional options in the taskbar and then choose, select all from there. Notice how we get a selection around the whole
canvas this time, I'm going to de-select this
because I would like to have a smaller selection
using the marquee tool. I'm just going to start
drawing over this area here. And let's just try to set
it up, something like that. Now, if I feel like I need to
reduce the selection a bit, I can switch to subtract and still using
the marquee tool, I can highlight that section
on the left side and also maybe a little bit
here on the right side. Just want to make
sure that there's no yellow wall details
included in the selection. Let's zoom a little bit
closer and I'm just going to go over this section
one more time. Yeah, that looks better. And to add those little details that I left out at the bottom, I'm just going to use add, zoom a bit closer once more, and then just paint over this part and then this
part here as well. Now of course you can combine
selection tools as well, and that's very important
to get used to. So you might start with
the rectangular marquee, but then to be able to select those little diagonal details, I would switch back
to the Lasso tool. And with that, I can also
use add to the selection. Simply draw over
that section there. And then this little section
here on the left side. I can also refine the
selection if I see any details that should be
removed, something like that. And maybe even here
in the middle, I can go over this
little section. So the reason why I chose to combine these two
selection tools this time is because it was
much faster to select the general shape of
the gate or door. But then I could refine those little details much
faster by using the Lasso tool. So now that we have
our selection, we can go into the
additional options in the taskbar and just
simply choose Copy layer. You might think it's
going to copy everything, but because we have
already a selection, this will prevent anything
else outside to be copied. So we have that
ready now we can go into the other document
which I already prepared. So this is the other
image I want to use. And then here all we
have to do is to go to the taskbar again and then
just simply choose Paste. So the great thing is
that the door comes in with the selection
that we created, and at the moment, it's huge. So what I'm going
to do is to use the free transform option
and make it smaller. Now, at this point, of course, you can start to be creative and you can make the door
much bigger than the person, or you can make it tiny, and so on and so forth. In this case, I'm
going to make it quite big, something like that. Let's hit Done. And then we can refine his
position when we zoom closer. Should be somewhere around here. Yeah, I think that
looks quite nice, but let's not stop here. We can be even more creative. Let's see what happens if we
remove one of these doors. So again, I'm going to use the rectangular
marquee tool and just make a selection of this side. Yeah, something like that. Then I'm going to cut this out. So I'm going to use the
additional options and choose cut and then create a new
layer and paste it in there. So this way we are
not going to lose it. It's hearsay for us. I'm just going to
place it where it was, but I'm going to hide
this and instead, I will bring in another
image which we will place behind this door to make it look like we
can see through it. So from our previous images, I'm going to choose this one, make a rectangular selection around the details that we need. So maybe around this part here. Yeah, I think that will work. So we go once again
to copy layer, then switch back to the
document we already created, and then once again paste. This also comes in
as a separate layer, and I will just make
sure that this is behind or underneath
the door layers. And then if I place
it down here, we just have to make it smaller. So use the free transform
tool, reduce the size, and align it to the
area that we need. Something like that. Don't forget that
we can also flip with the transform
tool here on the top. I can flip it horizontally, check which part of the
image is more interesting. And I feel like
this rock formation is a bit more dramatic. And also there's a little
bit more sun on the top. So that adds some contrasts,
which looks nice. So I'm going to just hit
Done and zoom out a bit. Now you can see how
quickly we managed to put together this composition
from three images. And pretty much solely relying on the most basic
selection tool, the rectangular marquee tool.
28. Making Selections - Smart Selections: Now you might recall this
example that I created a selection of the girl and separated her
from the background. Now the V I've done this is by using the select
subject feature, which is probably the most
amazing and quickest way of creating selections
of complex details. So the way you can get
to it is by again, double tapping on the selection
tool that's currently active and there is the
select subject underneath it. Now in this video, I'm going to concentrate on showing you this feature and also to
other smart selection tools, the object and the
quick selection tools. So let's see what happens
if I tap on Select Subject. There is the selection
and an amazing job. Now at first you might be
skeptical that it will only work if the background is very
different and very simple. But I will show you
some complex examples. But even this I would say, is fairly complicated because we don't only have like
a neutral background, it's actually a pattern
in the background and also different colors on
the floor and the wall. But let's see another one. If I go into maybe
this one here, this would be much
more complex to do because usually it's
selections are based on color. But the tool that we're using select subject is
much smarter than that because it is based on the artificial
intelligence built into photoshop for iPad, which is also called
Adobe Sensei, actually recognizes what's in the image so it understands
what it's looking at. So if I choose Select Subject, even though the girl is wearing blue and the
background is blue, is still managed to create
a perfect selection there. Now of course, there's a few
details like the gap between the arm and upper body
should be removed. But I will show you
soon how to do this. First, again, let's take a look at a couple of other examples. Let's see if it
works with animals. So here's this cute
alpaca or lama. I'm not sure which one it is. If I choose, Select Subject, we can see it's again going
to make an amazing selection. Let's take a look
maybe at a plant. Once again, let's
choose, Select Subject. And here you will see that it makes a selection
of the plant, but not the pot. So this proves that you can find images where it will be
difficult for Photoshop to tell what to select as the subject and
what not to select. Been. In these cases, you can start combining
your smart selection tools. So it's time to introduce
object selection tool, which is this one here, the second one from the
Selection Tool Group. So once that's selected, it works very similarly to the Marquee Tool and
the Lasso Tools. So it has its modes. And because I don't want to lose the selection of the plant, I am just going to draw
a big rectangle around this part here and notice how
it snaps onto the object. And if there's some
details missing, I can just paint over it
again or draw over it again. And it's going to find
the edges really well. Now when working with the
objects selection tool, there's actually an
additional option for changing the style
of it from rectangle, which is like the
marquee tool to lasso. So we could even use it in
less so mode and also switch to subtract to remove some
details like this one here. And I don't have to be super accurate and it will
find the edges for me. I can also go inside here and notice how it
finds it quite well. If I feel like there's
something missing, I can just switch to add paint over it and it will
find those edges. But there is also another tool with which it's even easier to paint over areas that you can include or remove
from the selection. And that is the quick
selection tool, which is like a brush
for selections. So if I select this
third one here, this has a brush size
which you can change by just dragging up and down on this number here
on the left side. And I can make it smaller,
something like this. Switch to add to selection. And then just simply
paint over these details. And immediately again, it will snap to the edges
because it continuously analyzes the edges and finds those contrasting details
that define the object. So just like before, the smartest thing to do is to combine the selection tools. In this case, we combine all three smart
selection methods. So we started with
Select Subject and then refined it with the object
and Quick Selection Tools. Now let's challenge
ourselves and find an image that might be even
more complex to select. Maybe this guy here, which we've seen before and
we tried with the lasso tool. Let's see what happens if we use the subject selection here. So let's choose, Select Subject. And it will do a
really good job. So we can have a look at it
with the Quick Mask view. I'm just pressing
F on the keyboard. And I can see it
works quite well, but we're missing a few details. So what we can do
is to switch to the Object Selection and
keep it in add mode. And then just simply draw
over this detail here. So the foot to be included also the heel here was missing. Maybe paint over
it one more time. That's it. And then these details here around the body
should be removed. So I'm going to switch
to the Subtract mode. Paint over this detail, paint over these details here. And the same around here, and also around here and here. This is still not perfect, but we improve this
selection a lot. And we could already
start working with this and refine it
at a later stage. So even when you have a more complex detail
that you want to select a in front of a complex
background is still works. But in some cases, you might think that the
subjects select will struggle. And it actually does an almost perfect job like
he had once again, we have quite a complex subject and also the background
is quite complicated. But let's see what happens
if we choose Select Subject. Once again, thanks to the
artificial intelligence, Photoshop does a brilliant
job on the section, Let's see with the Quick
Mask or a white overlay. Yeah, I think this is
almost a 100% perfection. So having these smart
selection tools in Photoshop for iPad is a huge time-saver and
it makes it really fun and enjoyable to
combine images together.
29. Making Selections - Refine Edge (Coming Soon): Now you might recall
this funny llama and the selection that we created with the subjects select feature. And although it does a
brilliant job when it comes to soft edges like hair, grass leaves for, it's going to take an additional step
to refine the selection. So if I switch to the mosque
view now and zoom closer, you can see that it's
already created a quiet, good edge, but this can be
improved further and made much softer and more realistic using a feature called
the Refine Edge. Now this currently
is only available in the pre-release version
of Photoshop for iPad. By, by the time you are watching this course is most likely going to be available in the
public version as well. But don't worry if you
can't see it because it's definitely going to
be added very soon. So when you have a
soft selection like this and you would like
to refine the edge, just go to the More
option here at the bottom and
choose Refine Edge. Once you click on
that, it opens up a completely separate
workspace within which again, you can change the viewing mode. So we can set this
to see it on black, on white, or overlay, or even black and white. So see the mask
itself and we get a lot of additional options
here on the right side. But most importantly,
we have a tool, a brush with which we
can refine the edges. So what you can do is to
simply paint over around the details where you can see that there's
more for visible. And I am going to
switch to black and white just so you can see
it better what's happening? So when I'm painting
over around the edges, notice how it's
introducing more of those details that
we started to lose. So makes it much softer
and more realistic. Zoom a little bit closer.
So this was before. This is after. Once again, if I just
do the same thing here, paint over it, we can see
how it gets more refined. But the good news
is that you don't necessarily need to
paint over everything manually because
you actually have an edge detection radius
here on the right, which you can increase to maybe, let's say in this case
around 20 pixels. And that immediately refines all the edges
around this animal. So this was before, and this is after. You can even choose
Smart Radius, which sometimes improves
it even further, that usually works
better if you have a combination of
soft and hard edges. For example, myself, the
hair would be soft edge and all of this outline of the shirt would be a hard edge. So that could work
better with portrays. What we will see more examples of this later in the course. And there's a lot of
additional options here on the global
refinements with which you can further
adjust your selection edge. But since I'm happy
with the way it looks, I'm not going to make
any further changes. I just need to
decide what I want to do with this refinement. Do I want to set it
back as a selection? Or I want to create a new
layer based on the selection, or maybe turn this
into a layer mask. Now, that's going to
be the best option. To use. A layer mask means save your selection
non-destructively. But because we haven't
started using masks yet, I'm just going to stick with the selection option
and I will press Done. So back in the
document we can see that we have our
selection and we could easily copy the Lama
into another composition. Let's just say Copy
layer and open another image like this one from where we can choose Paste. And there we go. We have a llama buddy
here next to the girl. So we can see how amazing
this selection is. So if I zoom closer, we can check all of those
little subtle details that we managed to add with
the refine edge option.
30. Making Selections - Select Similar: Sometimes you might
want to make selections based on a distinctive
color in an image, like in this example, we might want to select the
t-shirt and change its color. So the feature that
we will be using for this is called
select similar. And it's very much like the color range feature in the desktop
version of Photoshop. So all you need
to do first is to indicate which color
you are after. And what I'm going
to do for this is to use the Quick Selection Tool. So the brush with
which we can create a selection and just paint
over this section here. It's a good section because
it already includes some shadows and
also the highlights. So it should be able to find all the similar
colors even if they are not connected
directly to this section. Because notice there's
a couple of details disconnected because of the
hair and also those stripes, The White Stripes
around the shoulders. So let's see what
happens if I go to the More option here at the
bottom and choose, select. Similar. As you can see, it did a
brilliant job and it even found all of those small separated details of
it in the counters, of the letters in the logo. And also it found most of the details around the
hair here on the left. Now of course, if I wanted
to add a little bit more, I could just use the Quick Selection Tool and
go through it. And also I could refine
it even further, but I'm really happy with this. So now I can use it together
with an adjustment layer. And this is also something
we haven't done so far, combining selections
and adjustments. What's going to happen is that the selection will be turned into a layer mask
for the adjustment. So let's see this inaction. All I have to do is to tap
on Add cleaved adjustment. And for this I'm going
to use hue saturation. And that we can just simply start changing the hue around. And you can see how easy it is to adjust the color
and maybe set it to something that works
with the background or something that stands
out a little bit more. And if you look in
the layers panel, you can see that that is the layer mask that was
created from the selection. So each time you create an adjustment layer while
having an active selection, you will always selectively target only those details
inside the selection. But the good thing about having a layer mask on an
adjustment layer is that you can refine the adjustments area by
using the brush tool. And this is a typical masking
technique that we will talk a lot more about
later in this chapter. But just as an introduction, I'm going to show you here. So I'm just going
to zoom closer to this part where the
selection wasn't perfect. And I will double-check that
I have the mask highlighted. So once again, this is the adjustment and
this is the mask. If we are looking at
the compact view, we can just drag
left and right to switch between the mask
and the adjustment. And once we are certain that
we have the mask selected, we can switch to the
brush tool and make sure that we adjust the brush
size to something smaller. So just like changing
the brush size for the Quick Selection Tool, we are doing the
same thing here. We are dragging up and down
here on the left side. And we can also increase, decrease the hardness of
the brush for masking, I prefer to use a hard edge
brush and also the opacity. I prefer to set 200 per cent. So that's the third icon here in the middle that I also increase
all the way to the top. Now if I start
painting with black, that's actually going to
remove the adjustment because black is for hiding
details inside the mosque. White reveals and
black hides details. So if I switch to
white either here at the bottom of the toolbar or here in the Tool Options area. I can paint over that
section again and you can see how quickly
we restored it. Now let's try painting over these details between the hair. And once again, I
can very quickly tidy this up thanks to the mask. So it's very similar
to a selection method, but I don't even have to be in the selection view to
be able to do this. And I'm literally just painting
over these details and it makes it so much easier to refine this more
complex section. So we created a very
quick selection by using Select Similar and an initial selection
that we created. And then once we
have our layer mask, we can refine the
selection further. I'm not going to
finish this example, but you should take your
time and practice using the brush tool inside the mask
of this adjustment layer.
31. Making Selections - Feather: There is a feature
called feather, which can be applied to most of the selection tools in
Photoshop for iPad. And this can help us to create more software selection edges. So just to show you this, I'm going to select
a detail first. The Rectangular Marquee Tool. Let's say something like that. And I'm going to press
F on the keyboard just so we can see the
edge of this selection. So as you can see, it's
a hard edge selection. But if I choose, de-select and before applying the
selection again, go into the additional options. I change this Feather value
and increase it higher, and then I make a
selection again. Notice that we will
immediately get a softer edge. Now unfortunately, this
is not something you can adjust while being
in the selection. So you have to always
start a new selection. But if I increase the feather, maybe all the way up to 300
and start a new selection. You will see once
again the difference. So we get an even softer edge. Now, why is this useful? Well, there are several
ways of using this. And in this case, I might
want to add an extra glue to this lantern to create an
even more magical atmosphere. I'm going to deselect this. And first I create an additional layer which is going to be used for the glue. And then instead of using the
rectangular marquee tool, I'm going to switch to
the elliptical one, and still I'm going to
double-check my feather value, probably set it all
the way to around 400. Now, I can start dragging from
the center of this object. And there is a very handy
technique if you want to start a selection from
the center of the object, we have to do is
to just hold down the touch shortcut in
its secondary state. So notice when I drag it
all the way to the edge, now, I can create the
selection like this. And it's also going to constrain it into
a perfect circle. So that works quite nicely. Something like that. If I want, I can also drag this around and find the
best position for it. So I'm going to keep
it somewhere here. Just so you can see I'm
going to switch back to the normal selection and I
can still move it around. By the way, when you are
using the marching ends view, you won't be able to
tell whether you have a soft or hard edge selection. That's why it's convenient
to use a keyboard and toggle between the
different selection views. So now that we have
this selection ready, we can fill it in with
a color and the color, I'm going to pick
the eyedropper tool. I would like to
sample something from here within the flame. So that's quite nice color. Now let's select the
paint bucket tool and just simply tap inside
this selection. Now before removing
the selection, I'm going to create
another empty layer. And I will reduce the
size of my selection. So I will go to more
transform selection is another feature we
haven't used for so far. So this is not going to affect
anything in the layers. This is just simply going to re-size the selection itself. So I can start dragging
one of the corner points. And just like before, if I also hold down
the touch shortcut, drag it to its secondary state, I can keep the transformation centered so I can make it
roughly around that size. I will press Done here
on the top-right corner, and we can fill this
with a different color. This time, I'm going to make
it even brighter, yellow. And maybe also a little bit closer to vide,
something like that. And then tap inside the
selection one more time. So flames usually get
brighter as you get closer to the center where
it burns the hottest. But what we have
to do to make this more realistic is to reduce that opacity and probably
also apply a blend mode. Now, I'm going to turn
off this color first and just select the bigger glow. Now I'm going to
reduce the opacity to around 50 per cent. But more importantly, I
will change the blend mode to one of these options
in the overlay category. I think hard light is going
to work quite nicely, but we can check these
other ones as well. Pin light is also really
nice actually in this case. So maybe I'm going
to go with that to see how it was before and after. I can just turn on
and off the layer. And yeah, I quite like
the way it looks. We can just reduce the
intensity by reducing the opacity once again,
before and after. I quite like this. And of course we can still use the Move tool and
move this around. And also we could use the transform tool if we feel like it's a
little bit too big, but I think it
works quite nicely. So now it's time to do the same with the other glow effect. So this one again should be centered and then we
will reduce the opacity, but then we will also
use another blend mode. This time, we can check
these other ones, like lighter color is
usually also quite nice. But once again, we can try
pin light or vivid Light. I actually feel like pin light, once again is the best. So I will just
reduce the opacity. And this time I'm going to
make it slightly smaller. Once again, using
the secondary state of the touch shortcut, I can keep it in the center, maybe align it a bit
and then press Done. So let's see without the two glow effects and
read them both applied. So even simple features
like feather can make a big difference when you are
creating your compositions. And it's completely up
to your creativity, how you are going to utilize it.
32. Layer Mask Basics: Now that we learned
all the various ways of creating selections, it's really time to
learn about layer masks. So because the best thing
to do normally is to turn your selections into mosques to keep them non-destructive. So let me show you what this means and why it
is so important. Here we have a really cool
image with this skull. And thanks to the
subject select feature, it will be a breeze to
make a selection of this. So I'm just going to
choose, Select Subject. And I mean, just look at that. It's almost a 100% perfection. Maybe there's a
few little details here in the middle
that we can refine, but I'm actually
happy with this to be used as a layer mask. So all I have to do is to tap on this icon
here on the right, which I call the Japanese flag. Or you can remember
it also has a piece of paper with a hole
in the middle of it. Now, what happened is that we hit all those details outside of the selection and
we can only see whatever was inside
the selection. But nothing is permanently
deleted because they are all just hidden
away by the layer mask. So what we can do is
to select the mask here in the layers panel
and then zoom closer. And by using the brush tool, if we start painting
over details of v, The black, I'm just increasing the hardness and
opacity of the brush. So if I start painting
over details with black, I can hide them. If I switch to paint with white, I can reveal them again. So once again, black hides. White shows. So that's very handy
and that really shows the non-destructive
aspect of this technique. So I can get really close
and refine these details, can zoom really close, reduce the size of my brush. And I'm using the
pressure sensitivity of the Apple Pencil, which makes it much easier to get a nice refined edge here. So I can just paint
over the edge, get rid of these details
and so on and so forth. So I'm not going to spend
too much time refining this. But you probably get the idea with simply painting
with black and white. We are refining the
mask and deciding what should be visible and
what should be hidden. Now at any point, if you
want to see the mask itself, you can double tap on the
thumbnail of the mask, which can be useful to check
the edge of your selection. And if you want to return
back to normal editing mode, just double-tap again
on the Mask icon. There is also a way to
hide the effects of the mask by using the mask visibility
icon here on the right. So with that, I can hide
it or show it again. And that is a great
way usually to prove the quality of your mask because it can get
difficult sometimes to notice or spot certain mistakes, especially once you have multiple layers on
top of each other. So the best thing is that
once you have a mask, you can refine it as much as
you want at, at any point. So even if you leave
this document or take this layer into
another document, you will still have
the same mask save. So just to see how this works, I'm going to use the
Copy layer option. Then I will go to the home
screen and find an image, may be this one
with the mountains, and then choose paste, which will bring in both
the image and its mask. So I can just resize it by
using the transform option, make it a little bit smaller. Place it somewhere
here in the middle. That's a quite nice backdrop, works quite well
with this image. But now, if I zoom
closer and let's say I just wanted to refine this
section here of my selection. All I have to do is to
double-check that my mask is selected and that I use the
brush tool with the black, which is going to
hide the details and just simply paint
over this edge. And then if I decide to remove
this little detail here, I can go over it with black. But then if I change
my mind, don't forget, you can always switch to
white and then you can reveal any details that
you removed earlier. Once again, I switched
to black and just refine the edge one more time
until it gets perfect. Alright, so that is
masking in a nutshell, but we will learn
a lot more masking techniques in the next lesson.
33. Layer Mask Techniques: We've already done
quite a lot with masks and adjustment layers, but this time we will take it further and we'll
learn how to invert a mosque and also how to use the gradient tool
inside the mask. So we have a beautiful
landscape photo here, but it is really overexposed and most of the details
are just too bright. So sometimes that can
be a deliberate thing that we create a high key shot. But in this case, I
feel like a lot of detail is lost and also is just lacking that
drama that we could achieve with a better editing. So what I'm going
to use first of all is to adjustment layer. This time I'm going to use brightness contrast and I'm going to reduce the brightness. And immediately you can see how much better
the mountains and the sky look with
the adjustment. And I can also play
around with the contrast. Probably just keep contrast
close to the center. Just maybe slightly increase
it to something like this. So let's see, without
the effect and with it, it looks already much better. But notice how the
details on the left side, the mountain and the trees
are getting a bit too dark, so we will have to resolve that. And the best way to
do it is by using the gradient tool
inside the mask. So I'm going to select
the gradient tool, which is by the way, is combined with the paint bucket tool. So you can switch
between these two. Or if you use the keyboard, then you can press G and Shift
G to switch between them. And once you have the
gradient tool selected, just double-check that you have the layer mask highlighted. And then you can click
and drag over the image. Now what happens is that
you are controlling what's visible and what's hidden
from this adjustment. So as I'm dragging over the image in
different directions, we are always getting
a different effect. So what I want you to
achieve is to concentrate the adjustment on the sky and also to the snow details
here on the right side. But try to keep it as they from the river and the mountain
on the left side. So for this, what I'm
doing is I'm using a diagonal line starting from the sky and going
towards the mountains. Something like this. The good thing is you
can keep redrawing the gradient and see
what works best. But just so you can see what
we created inside the mask, I'm going to double tap on
the thumbnail of the mask. And you can see that
the white part of the canvas is where the
adjustment is visible, so why it shows and
then the other side, the black parts are
the hidden details. There. The adjustment is
completely out of use. If we go back to
the composition, we can check this by hiding
and showing the adjustment. So really it is now
a local adjustment instead of being applied
on the whole image. Now to further Brighton details on the trees and the mountain, I'm going to add another
adjustment layer, going back to the
background image, choose Add clipped adjustment. This time I'm going
to use levels. Once we have that selected, all I'm going to do is to drag the mid point towards
the left side. And that looks
quite good already, Let's see, without and red. But the problem is
if, once again, if I use this adjustment
on the whole image, it's going to again go
back to where we started, that everything just
gets too bright. So instead I just would like
to target those dark areas. And to be able to do that, we can use the
invert option from the filters and adjustments to turn the mask completely black. So once I do that, notice how the mask is
now completely black, which means that it's not
used or not active at all. But then to locally
use the adjustment, I'm going to select
the brush tool, maybe reduce the
brush size and with a soft edge brush and
white color selected, I can start painting
over the details where I would like to
see more brightness. So simply just go
through the trees here and also the
mountain up there. Now if I want it to
be more accurate, I could create a
selection first. But with this soft edge brush, it's actually okay to go over some of the details in
the background as well. It's not going to
make much difference. And there you go. I think that's all
that we need it to do. So now we can check without the levels adjustment
that we just created and we did together. We can also check
the original image without either of
the adjustments. And then once again, brightness and the levels
added back onto it. And there's one last technique I wanted to show you
in this composition. And that is, you can also detach the mask from an adjustment
layer or also from an image when it's applied on it
by selecting it and then choosing this little mask
with the chain icon. Once you tap on that, it's going to detach it. And what that means is now if I use the selection
tool or move tool, I can actually move this
gradient around within the composition so we can see exactly where the
border line is. I can refine it and maybe
drag it a bit further down or further up until I
find the perfect spot for it. Although it's a good thing
to be able to do this, I highly recommend to attach the mask back once you are
done moving it around, because you might end
up moving the layer and accidentally the mask is going
to be moving separately. So just to avoid
these accidents, get into the habit
of attaching it back once you are ready
with the movement.
34. Clipping Mask: We've already seen how
to use layer masks both for adjustment
and image layers. This time, we will learn how
to work with clipping masks. Now you might have already
heard this term when we use an adjustment layer and
connect it to the layer underneath it that
we call clipping. But it can also be used between two image layers to demonstrate how the
clipping mask works, I will first of all need to
make a selection of this pot. Now, you might
remember that we use this example and I
showed it to you that if I choose Select
Subject in this case is going to select only the
plant, but not the pot. Mainly because the plot
is very similar to the background color and it almost blends into
the background. So that's most likely why
it's not getting selected. So we can't really rely
on this selection method. So instead of that, I am going to try to use
the object select tool, and I will make a selection
around this area here. Now, it did a fairly good job, but we just need to add a little bit more to the selection. So by having the
mode set to add, I'm just going to select
this section here, a little bit more there,
and that looks good. And then also a little
bit further up here. So you can see we
can very quickly get a very accurate
selection on the pot. But I actually want, need the top part of
the pot, only the side. So to remove from this, I'm going to again switch
to another selection tool, the Elliptical Marquee Tool. And I will have it set
to the Subtract mode. So that's the second mode there. And then I can just draw over it and remove this top section. Let's say something
around there. So once again,
this example shows that combining
selection tools is usually the most
effective way to get to a selection that
you can work with. So I would never rely on
a single selection tool. It's always a matter of coming up with the best combination. Now that we have our
selection ready, I would like to
copy these details from this image onto
another new layer. And the way we do that is by going to the additional options in the taskbar and then
choose Copy layer, and then create an
empty new layer, and then choose Paste. If I now turn off
the original layer, we can see that on that
new layer we just created, we will only have
those details that were included in the selection. But to create a clipping mask, I will also need another additional empty
layer on top of that. So I'm going to add
one more layer, and I will use this new
layer and the layer underneath it to create
the clipping mask. So there's a handy shortcut
here on the right side. If I tap this icon, is going to connect them to each other and the arrow
pointing downwards. It's the same icon,
what we already seen with adjustment layers, but all we have to
remember is that if we work on this
empty new layer, which is clipped to the
layer underneath it, it's going to only
allow the details to appear within the boundaries
of the layer underneath it. So it might sound
a bit complicated, but it's easier if
I show it to you. I'm going to use the brush
tool and just simply paint over this area here and
also go a bit further down. So you'll see what happens is that although we are working
on an empty new layer, It's visibility or
it's active area is restricted by the
layer underneath it. So with this method, we can very easily trace
around the edges here as well. Just under section. Nicely. Decorate this pot.
And then once again, maybe just draw one more
line here at the bottom. The best thing about this is it's completely
non-destructive. So we can separate
the layer that we use for painting and also we can remove the clipping
if we decide to with the same icon
that we use earlier, we can take the
clipping feature off. That way the two layers get completely independent and see how these lines are now completely free and not
restricted anymore. But once I clip
it back on again, then they will be
connected there. Also, if I decide to
move this layer around, I can use the Move tool and
simply move this layer, but not affecting the boundaries which is defined steel
by the layer underneath. We will see several
other examples of the clipping mask in
the upcoming chapters. So by the end of this course, you will get really familiar
with how to work with them.
35. Creative Project 2 - Flying Turtle: Now that we've covered
everything you need to know about Selections
and Masking, it's time to practice. So in this lesson
and the next one, we will combine multiple
images together to create creative compositions. First, we will start making
a selection on this turtle, which will be quite simple with the subjects select option. So let's just choose
Select Subject. And it does a really
good job on here. There might be a few
details that we can refine, but I'm happy with this to start working
because what we will do is instead of separating our selection from this image, we would just turn it into a mosque to keep it
non-destructive. So we'll just click on the Japanese flag icon
here on the right, which turns the
selection into a mosque. We can see our thumbnail
here on the top right where the layer is and
everything is ready. So we can actually copy the whole thing
into another image, which I'm going
to do by going to the taskbar and
choose Copy layer. Then going back to
the home screen, I will open up this
other image that I had prepared and I'm going
to paste the layer in. The best thing is
that it comes already together with its layer mask. So if I make this smaller, we can see better
what's happening. I'm also going to rotate
the image around the bed. It gets slightly smaller
and I think around that size will work maybe
a little bit smaller. So the whole idea of this
composition is to make this look like it's a
giant flying turtle. So I'm going to press Done. So now that it's set
up, first of all, we need to make sure
that the colors match because of course
the turtle was underwater. It looks a bit weird
at the moment. We need to make it look
like it's in the sun. So first, I am going to use
one of the adjustment layers. I think the best one to start with would be color balance. So let's select that one. It automatically
creates the clipping. So it will only affect the layer of the turtle and
not the background, which is perfect for us. So I'm going to increase the reds and also
increase the yellows. And probably that's all we
can do with this adjustment. But then let's add
another adjustment layer. Don't forget, you
have to always select the image which you
want to effect. And then choose again
at clip adjustment. And this time I'm going
to use hue saturation. And with that, I am going
to turn on colorize, set the hue probably
a little bit closer to these warm tones
here on the left side. And I think the saturation and lightness is actually
fine the way it is. But of course this is a
little bit overpowering. So I'm going to
reduce the opacity to something around there. I think that looks quite nice. Now, maybe one
additional adjustment withheld because now by
using this latest one, the hue saturation, I feel like the details are getting
a bit washed out, so we are losing a
bit of contrast. And to make sure, again, it matches well the background, we need to also match the
contrast, not just the colors. So I will again select
the image layer, choose Add, Clip the adjustment, and then choose levels. And to increase the
contrast with levels, or we have to do is to drag
up the black point and drag the white point down,
something like that. Maybe a little bit more
on the black point. And it's starting to
look really good. Now I can just go back to
hue saturation and maybe increase the saturation
a little bit there. Or so. Maybe we can go back to color balance and further
adjust these colors. Maybe a little bit less yellow now and a little bit more red, and also maybe just a little bit more magenta,
something like that. So what I normally
do is when I have multiple adjustment layers
is to check each of them. So that effect, turning
them off one by one and checking what I
achieved with each of them. And you can see how important
that levels adjustment was. One other thing that you
can also check is what happens if you change the
order of your adjustments. So putting levels on top of the other two adjustment layers makes a huge difference
as you can see it. But I think it was better
where it was originally. I actually prefer this setup. It works quite nicely and I think it almost looks perfect. Now, there's one last
thing that I want to add here and that is
the cast shadow. To make it really look
like this turtle is flying or hovering
above the beach, we need to create
that nice cast shadow on the beach and on
the water surface. So for this one I'm
going to do is to select the mask which was
created earlier on, and then go into the
additional options in the taskbar and choose
load as selection. Once we have that ready, we can create a new layer. And I will put this layer
above the beaches layer, but below the turtles layer. So here I will generate
that new layer, and I will also
rename this shadow. And then Viola have
the selection active. I'm going to use the
eyedropper tool to pick a color from
the background, something that's similar to
the shadows of these trees. And then once we have
the color ready, I will switch to the
paint bucket tool and fill in the selection. And we don't see it yet
because it's under the turtle. But I'm going to tap
the select and use the Move tool to be able to reveal the shadow
that we created. So that looks great,
but don't forget, we need to set this
layer to multiply, to blend well with
the background. So from the blend mode,
we choose multiply. And I will also probably reduce the opacity a bit,
something like that. And then to emphasize
the distance, I'm going to also
add a Gaussian Blur, blur out the shadow. You might remember
when we created the cast shadow for the girl
in the previous chapter, I already explained
that the further away the shadow gets from the
objects is casting it, the more blurred out it looks. So for that, I'm going
to use Gaussian blur, and I will probably use
around maybe 20 in this case. I think that looks good. We can increase it even further, but I think that it's
going to work quite well. So I want to make sure
it's still visible, but much more blurred out. So I can now press done and I can just find
a good place for it. Of course, we
should also observe the current shadows
in the background, so that should be
our reference point. But in this case I feel like if I put the shadow this way, might not work the best, but I quite like the way
it looks on the water. So I'm just going
to leave it here. And that's all I wanted to
achieve with this composition. But most importantly,
everything is set up completely
non-destructively. And that means if I want to, I can go really close
and refine my selection. So for example, if I
select the mask that we had created with the
Select Subject option, now we can check whether
it is accurate or not. And I can see around the neck, it's not actually
doing perfect job. So we can refine that by going back to the mask itself and use the brush tool with white painting over
this section here. And then I can use also
the touch shortcut to temporarily switch
to painting with black, which I can remove
these sections. And now once again, let's check the mask and now it
looks much better. And maybe around
the head as well, we can refine it a bit more. So I'm just going to paint
over this section here. Zoom more closer, holding
down the touch shortcut, and maybe making my
brush size smaller just to allow me to
work more accurately. I can refine these edges. And you go, that's all
sort it looks better now. So that's why working
non-destructively and especially using masks
is so important. Since you don't have to refine your selections
at the beginning, you can always do it at the very end once you are
happy with your composition. So this can save
you a lot of time and allow you to experiment with different compositions
and only fiddle around with small details and
time-consuming refinements. Once you are a 100%
sure that you are working with the right
combination of images.
36. Creative Project 3 - Floating Island Part 2: In the previous lesson, we've seen already how
we can combine images together and come up with
a creative composition. This time, we will combine
four images together to create this cool floating
island composition. To get started, I'm
going to select the image which is going
to be our background. And then instead of copy
pasting other layers into it, I'm just going to use
the place options. So select the image icon from the toolbar and choose Camera. Roll. Select the image with the
mountain and the forest. And I'm just going to
make it slightly smaller, something around this size and think it's going to
work, then press Done. And now that we have it placed
here in this environment, we can already start
working with this. But just to make things easier, I will already bring in the other images
that we will need. So I will need the balloon, which we can also make smaller. I'm just using both of my
hands, so we gestures. It's easier to
quickly make things smaller just by pinching it. And then I press
Done, that's there. And then one more
image we will need. And that is the lighthouse. Once again, it can be smaller, reduced in size,
something like that. Now, since we have the quick
way of making selections, select subject, I'm
going to already use that here on these
two images on top. So I will go into
Select Subject, which should do a
really good job on selecting this lighthouse. Then I just tap on mask
here at the bottom. We can also use the
icon on the right. It doesn't really
make any difference. And then I will just
put this to the side. And then from the layers, I'll select the balloon. Once again, select
subject and Mask. Alright, but what I
will do is to swipe the mosques to the right so I can see the image thumbnails. And I will actually
hide these two layers. So currently, I will
mainly work with the image where we have the
mountains and the forest. Now to create this
imaginary floating island, we will invert the landscape and move the mountains
underneath the forest. So first of all, we need
to make a selection. And once again, I will
use Select Subject, which most likely will select the majority of the mountains. And I think that's already good. Maybe we can just increase it a bit with the objects
selection tool. I'll just select
this section here, maybe a little bit more of that. And we can also use the quick selection
tool to just paint over this section so we can
include more details. I think that's good. And we don't need these details here on the
right so I can hold down the touch shortcut and remove these sections by just simply painting over it by holding
down the touch shortcut. Now we can turn
this selection into a mask by clicking on the
icon here on the right. But then I will
also need to make a duplicate of this layer, which will be used
for the forest. And to be able to do that, we need to swipe again, have the image selected, and then go into the
additional options, choose Duplicate layer
on this new layer, however, I will swipe
back to the mask and go into the filters and adjustment options
and choose invert, that is going to
invert the mask. So if I move this around, you will see it shows
everything but the mountains. So that is great. But what we need is to
only show the forest. So what I can do very quickly
is to use the brush tool, set the color to white, increase the brush size two, fairly big, and then just very quickly paint over the sky. And these details
here on the right. So this way we have
the forest on a layer, and underneath it we have the
mountains on another layer. What I'm going to
do now is to use the transform tool and flip
the mountains upside down. Then press Done. And now we can just start
aligning things to each other. So let me just zoom
out a bit and then select the forest,
move that down. And I think that's a
fairly good alignment. We can probably make this
slightly bit smaller. I'm just using again, pinching, resize and a line press Done. Now to make things easier, I'm going to move the forest
underneath the cliffs layer. That way I can align it
a little bit better. Something like that will work. I want to make sure
we can still see this tree here in
the foreground. But then now, to
make things easier, I'm going to switch to the
expanded view of the layers. Now I can select the mask for the forest layer and
using the brush tool, I am going to refine the edges. So first I will paint
with black so I can hide the details,
something like that. It's just refine the size. Okay. Around that detailed looks okay. Then here on the
right side as well, we just hide a bit
more of the forest. That the background. Yeah, That's roughly
what I need. I want to create an
interesting shape, but then I will switch to the other mask with
the mountains. And I'll start to remove some details here
in the foreground, just so we can reveal a
bit more of this grass. And then holding down
the touch shortcut, I can go back and
forth Removing, adding just to create an
interesting edge detail here. Yeah, something like that. Looks good. Or so. I will remove a bit more
details here on the left side. And then once again switch to the other mask or so
removed from that. Trying to create a realistic
edge here on the left side, just trying to define
that tree line. Okay, So that looks quite good. We can once again do the same thing here
on the right side. I will just remove a
bit from both layers. And then we'll forget
that working with mosques is completely
non-destructive. So we can always
come back and make changes if we don't
like some details. The beauty of working this way and working
non-destructively. I quite like the way
it looks already, but let's not forget
that we need also a mountain in the middle of
this island, floating island. And that's actually something
that we can reveal from the forest layer by simply
painting over it with white. I can find that detail that we can use
here in the middle. So this mountain detail will be perfect for us,
something like that. And since it's comes
from the same image, It's doesn't even
need color correction because it's already
matching the same colors. And it's generally
a good idea to try to limit the amount
of images you use in a composition and also try to match the
lighting conditions. So don't try to combine images when some of them were at night, some of them are doing the day, or some are in rain,
others in sunshine. You will struggle a bit
more to combine them. While here you can
see I already have a really good match with both the background
and these details. Especially because
these two layers, the forest and mountains, are originally from
the same image. So all I have to do up here
is to use the touch shortcut. And then very quickly paint over the sports just to get rid
of that white detail there. And maybe with a smaller brush, I can refine the
edge a bit more, make it more
interesting thing that looks quite good on the sides, I can introduce some
more details once again, make it a little bit more
believable around the edges. And it's really fun to
paint mountain details. You can really be
creative with it. I think that's fine. And then maybe on
this side here we can introduce a little
bit more of the trees, once again, building
up this terrain. And on the left side, I can remove a bit more of them once more just to create
a more interesting edge. Add a bit more
rocks on this side. And let's see from a distance. Yeah, I think that
looks quite nice. The only thing I'm a little
bit worried about is the left side looks a
little bit weird here. So I'm just going to add
some more Three detail back. And even maybe some
more detailed here. Just to balance things
out a bit better. Yeah, that looks already better. Now we need the lighthouse
and the balloon. So let's turn on
first the balloon. That one is the easy one. We can just simply move
it here on the left side and maybe make it a
bit smaller like that. Now we could always move this behind the mountains
and the forests, which would be also an
interesting composition, just to show you, we can
move with behind it easily. So that could add some additional depths
in the composition. But I actually prefer it
floating somewhere around here. But then let's bring the
lighthouse in the composition. I am going to flip
it horizontally with the transform tools
because I feel like that lighting works better, mainly on the clouds
in the background. I can see that the light source, so the sun is on the right side, plus also the shadows
here on the mountains or these rocks at the
bottom or on the left side. So on the lighthouse,
we should also try to match that
lighting direction. But what we also need to
do is to select the mask, use the brush tool, and just very quickly paint over these bottom
details with black. Now, what you can
also do to create a more interesting edge is to switch to a different brush. If you double tap on
the brush tools icon, you will be able to choose all these default brushes that come with
photoshop for iPad. And what I think would
work quite nicely here is the mixed splatter. So let's select that. I will zoom closer and make
my brush size smaller. So when I start painting, you can see how different this looks compared to the
previous techniques. And I tried to replicate
how leaves would look like. So you get a more varied edge, then be the hard edge
brush, something like that. So let's take a look
at it from a distance. I think that worked
quite nicely. Maybe a little bit more
detail here on the left side.
37. Creative Project 3 - Floating Island Part 2: Now to make this
composition look more realistic and believable, even though it's
a floating island that we're talking about, we should try to integrate
these layers to each other. Now to make this
work, first of all, I'm going to select
all of these layers. So I'm holding down
the touch shortcut, selected all four
additional layers, and I will put them
inside a layer group. Once the group is created, we can add an additional
layer mask on it. And this is going to be a shared mask between all
the layers inside it. Now you can't have
multiple layer masks on a single layer, but you can have additional
masks by using layer groups. So this way, we could have our individual layer mask and this shared mask on
the layer group. And you will see
why this is useful. Once I zoom a little
bit closer here, I can use the same brush
that we used before. So this is the mix
splatter brush set to black color and probably
a bigger brush size, something like that. I can start painting
over these buttons, details and see how
immediately if feels like the clouds are coming
in front of these details. So I can do a little bit
more here on the right side. And maybe over here, just to create the illusion that this island is really
floating in the sky. Now the reason I use the
separate group mosque or shared mask for this
effect is that it can easily be deactivated
independently from the mask that we have
on the mountains layer. Using this type of
techniques of multiple masks affecting layers can really
make a huge difference, especially once you get to these more complex compositions. Now, let's turn
the mask back on. And to make things
even more realistic, I'm going to include one adjustment layer
for the mountains. So I will select that layer at the bottom and go into
additional options, add clipped adjustments
and choose levels. And what I'm going to
use this for is to add more shadow details
because the mountains, regionally we're above
the landscape, not below. And since now they are below, they will get less sun. So the shadows should
be much more darker. And generally, all
these rocks should be darker than what we can
see here on the top. So what I will do is to
increase the dark levels and also maybe reduce
the output level to something like that. Let's just see how this
looks from a distance. Yeah, that definitely
looks better. Maybe we can also move this mid point a little
bit to the left side. So this was before. And this is after. Definitely more realistic. But I feel like not everything
needs to be darker. It's still good to show a few highlights
and brightest spots here because they
are still above the clouds so they
should get some sun. So what I will do is to
have the mask selected, use the brush tool. And maybe this time I'm
going to double-tap and go back to the
original hard brush. And using black with
a smaller brush size, we can start painting over some details that might be
a little bit still too big, and also maybe a softer
brush will work better. So that way I can just add some highlights
here and there, especially details
that are closer to the ground level,
something like that. So this side, I think
especially this edge here can be with so brighter because that's where
the sun is at. Even all of these parts here. And I think that's
already much better. And just as a final touch, I am going to add some
additional Cloud details on a separate empty new layer, which will be on top of
all the other layers. So I'm just going
to call this one clouds and switch back to the same brush
that we used before. So it was the mixed splatter. And then sample a
color from the clouds. And then start painting
over these details here. Maybe make the brush
a little bit smaller. Yeah, that will work. It's a really cool cloud
brush or it works really well for drawing or painting
clouds as a one cloud there. And then we can maybe have one behind a lighthouse as well. I'm really playing with
the depth here just to build up more depth and to make the clouds
more realistic. I will also sample colors
from the bottom of the clouds in the
background by using the secondary state of
the touch shortcut, I can switch temporarily
to the eyedropper sample, a color like these
more bluer tones. And then I will paint a
bit of blue tones here, just underneath the cloud. And then also the same
for this other one here. So that just adds a little
bit more volume to it, makes it more realistic. But then of course we can
also once again sample a little bit more
brighter details and just go over
it one more time. So this is without one of
the clouds, other cloud. And altogether, if
I hide my panels, this is what we
created by combining four photographs into a
creative composition. And the real fun
of using photoshop for iPad is still yet to come, because in the next
chapter we will learn about retouching images.
38. Spot Healing Brush Tool: Photoshop is probably best
known for retouching images. And photoshop for iPad also offers the most important
retouching tools, the Spot Healing Brush and
the clone stamp tools. Now in this first video, we'll take a look at
the spot healing brush, which is probably the
most intuitive tool that you can come across when
it comes to retouching. So the first thing I'm
going to do is to create a new layer on top of this photo that we
will be working with. And the reason for creating these blank layer is so that I can keep my retouching
independent from the photo. This is the non-destructive
way of retouching, which allows you to
see before and after results of your
work at any time. And it also makes
it much easier to refine the details
that you retouch. So without any further delay, let's zoom a little
bit closer here. And although I love this photo, I would like to get rid of
these distracting details, the wires and cables
and maybe a couple of additional details here further down on this empty new layer, I am going to use the
Spot Healing Brush tool. And this tool has a
couple of options here, the size of the brush and
the hardness of the brush. Now I prefer to use a
soft edge brush and also a fairly big brush size
when I'm painting with it. But also make sure you check
the additional options. So of course, if you are
using an Apple pencil, you would want to use the
pressure for changing the size, which will allow you to work more effectively and accurately. And then also make sure
you turn on sample or layers that is required to be able to work on
a separate layer. So now that we have
all of this setup, we can start painting over these details and the changes will appear once you let go. So you will have to wait a bit and then you will
see it updating. So we can go over
these details as well. And you can see how
quick and easy it is. Of course, here with this image, we have a fairly
simple background, almost like a completely
blank white wall. So it's a good way of
practicing this technique, but sometimes it can get
more trickier than this. And we will see a few more
examples in this course. So you can see I very quickly got rid of
all of those details. And while I'm at
it, I'm going to also paint over this one here. And maybe one more time. Sometimes this can happen that a detailed doesn't disappear
straight away here. So you might need to go
over it a couple of times. And then also this detail here at the bottom, we can remove. And I think that
all looks perfect. Now let's see,
without the layer, if I just turn it off and
turn it back on once again, before and after, definitely
looks a lot better. And whenever it comes
to refining photos, I recommend to do the retouching
first and after that, apply the adjustments that
you wouldn't normally use. But in these cases when you have an extra layer which
you use for retouching, you just have to be careful not to use the clipping option. So let's just see
how this works. If I go into the additional options and I
choose Add Clip adjustment, then maybe let's pick vibrance. And with that, increase
the vibrance level. Notice how this is not
really affecting the image. Only the retouch
details to fix this, all we have to do is to
remove the clipping. I'm going to click
on the thumbnail of the adjustment layer and then remove the clipping
with this icon here. So now if we increase maybe a little bit the
saturation as well, you will see exactly
what this did. And I remove it and put it back, we really improve the
intensity of the colors. And then on top of
this I'm going to use another adjustment layer. So once again, go back to selecting one of
the image layers, choose at clipped adjustment. This time I'm going to
use levels and once again select the icon and
remove the clipping. Now I can adjust the
white point just to make all the details on
the world much brighter. And then also the
midpoint we can move probably a little
bit further to the left. That also cleans up the wall
a little bit even more. So now we can see
once again without levels and we'd levels together. So my recommended
setup is to start with retouching and then add your adjustments
without slipping. Or you can also select
the both of the layers, the retouching an image, put them in a group, and then you can clip your
adjustments on the group. This is also a good setup. It doesn't really
make any difference. It might just keep
things a little bit more organized this way.
39. Clone Stamp Tool: The clone stamp tool works very similarly to the
spot healing brush, but instead of
automatically sampling and replacing details that
you are painting over, you will have to sample a certain specific area and then paint over the unwanted
details with that. So it's almost like
a copy paste brush. So let me show you
how this works. Once again, I'm starting
with a new layer, so let's just create that. And it's good to get into the habit of naming your layers. Normally I would call
this retouch or changes. And now that we have
the layer ready, we can double-tap on the spot healing brush and select
the Clone Stamp tool. First of all, in the
additional options, make sure that you
have all layers selected or current and below, if you have additional
layers above, you're currently selected
layer and you don't want those to be included
in the sampling, then you can use
current and below. But most of the time I would
stick with all layers, is basically going to copy and sample whatever is
currently visible. Now you can decide to use the pressure for
size and opacity, or just one of the two. The size is definitely
recommended, but opacity is
also quite useful. So the harder you press
the pencil on the iPad, the faster the sample
details are going to appear. So besides these options, we have the brush size, just like before,
which we can adjust. Then we have hardness
for the brush. Again, I prefer to keep
the edge soft because that just blends details better
into the background. And then we also have
opacity for this brush, which I'm going to keep
100 per cent for now, if I zoom a little bit closer, I can sample from this image by using this little icon
here on the tool options. Let's say we set the sampling on the head
of this little lamp. Then I'm going to go
a little bit to the left and start painting. So what happens is that I can paint a clone here
on the left side. Now notice that the main
giveaway for this image to be manipulated
is the background. The details of the graphs
that I sampled are more brighter green then on this
part here in the back. So what I can do is to reduce the brush size and
start painting again. This time, I will be
a bit more careful not to go so quickly
or what you can do. And this is why the pressure
for the opacity is useful. You can paint over very gently, just so you can see which are
the details that you need. And only after that you can zoom closer and paint
over one more time. Because the good thing about the Clone Stamp Tool is that
once you started painting, the reference point
and the new area that you started painting on is
going to stay connected. This record aligned cloning, which you can actually change
in the desktop version of Photoshop here currently
in photoshop for iPad, there's no way of
changing this behavior. But most of the time you would work with this technique anyway. I'm just going to go
over these parts here. And you can see that it looks
much more realistic now. And we don't have all
those different colors around the lamp. Now you can also
sample by holding down the touch shortcut and just click on an
area in the image. Then go over here and I will start painting over Islam
to make it disappear. So cloning obviously is not
only for duplicating details, but it's also for removing
unwanted details. And when you are sampling, you have to always
make sure that you align your sampling. And it's always good to
sample from an edge, even when there's
no visible edge, you can always find a detail. Here I would sample from an area that's relatively
free of any details, but also on that
very edge where I can still see the
grasping sharper. So that way I can
align it here on the right side and start
painting from that point. I can even paint a
little bit harder here, just so I can see how
it's going to look like. But notice that it's starting
to copy the other anymore. So if I paint further, you can see what's
happening there. Now this is why it's
so useful to work on a separate layer because I
don't have to undo this step. I can just switch to the eraser tool and just
paint this detail out. Now the eraser tool
also has a softness. I can even go over the
edges around here just to paint a little bit back and then continue with
the clone stamp tool, maybe paint over a little bit
around the edges more time. So that is also
quite convincing. I think it looks quite good. And the main thing I'm missing currently
from photoshop for iPad is the Content
Aware Fill option, which would be much faster
for removing these details. In Photoshop for desktop, we also have gone down ever move with which this
whole procedure of moving the lamp to the other side would
have been a single-step, actually two steps, making a selection and then
dragging it over. I am pretty sure that the
content of our features from the desktop version will be
introduced soon to iPad. But until then we have
the clone stamp and the spot healing
brush with which we can pretty much do anything, even if it takes a
little bit longer than doing it on the desktop
version of Photoshop.
40. Retouching - Landscape Photo Part 1: Now that we learned the
two retouching tools in Photoshop for iPad, it's time to use them for
something more creative. First in this lesson, we will create a nice landscape shot combining two photos. One that I took in
Yosemite National Park, and another one over here, which we will bring in soon. But first of all, I
would like to adjust the aspect ratio
of this panorama a bit because I feel like
it's a little bit too wide. So I'm going to use the
crop tool and we'll drag it in so we won't see the
road on the left side. But then I also feel like we
need to straighten it a bit. I think that looks
already better. And then I am going to also just crop a little bit
from the right side. Some of these trees I
will keep because they look nice and I
think that's good. So now we can just accept it. And then let's take
a closer look. Now here's another difference
between the desktop and iPad version of Photoshop on the desktop when
you're cropping, you can automatically
fill in the gaps that are created in the coordinators using the Content
Aware Fill feature. Here, we'll have to
do this manually. So maybe let's start with that. I'm going to open up the
layers in the compact view. I'm going to create a new layer. So this is the one that I'm
going to use for retouching. Then I will switch to the
Spot Healing Brush Tool, keep it soft edge, also sample or layers
and pressure is on. Let's see how big
is this brush size. Yeah, I think that's
going to work. So now we can just paint
over this gap here and let Photoshop fill it in
with neighboring details. That looks good. Let's paint this over. Maybe a little bit
more here as well. Yeah, that looks fine. And then a little bit
over here as well. Okay. That looks great. Now we can go to
the other corner, and I will just very quickly
paint over this with one long brushstroke and any details where we
can still see the edge. I'm just going to paint over again beat here as
well on the right. But now we have those gaps filled so we can check
before and after. And I think it works
really nicely. Now there's a couple of
details in the background, mainly these cars that
I would like to remove. So for this, I'm going to reduce the brush size and zoom
a little bit closer. Start painting over them. Now notice that if I
only paint over one car is going to actually sample another one and
replace it with that. And that's because the Spot
Healing Brush Tool samples automatically and it tries to adjust itself to the
neighboring details. So if we do this in one swoop, like so, it's going to
do a much better job. Now in some cases, you might be actually better off using the clone stamp tool to tidy up the automatic sampling
of the healing brush. So what I'm going
to do here as well is now that the cars are gone, I can tidy things up a bit by switching to the
clone stamp tool. And I'm going to zoom
a little bit closer. Use the touch shortcut. Select this point
here in the image. Yeah, I think that will work. And then start
painting over details. So I'm going to make sure
that we're not sampling that tree because that
would look repetitive. So it would be obvious
that it's been sampled. Yeah, that looks already better. And then these details are
actually looking okay here. But then once again, I would probably sample
from all the way here on the left and then align
it to these details. And then just go down and replace all of
these details here. So that looks
already much better. Let's see before and after. And see how the
combination again of the two retouching tools
gives you the best results. So once again, don't
just rely on one. Always try to find
a good combination. I think we can just use the clone stamp
tool here as well, or we can switch back again
to the Spot Healing Brush. Just quickly get rid
of these details. And then once the
scene is ready, we can switch back to the clone stamp tool
to refine things. I think it actually
worked quite well, but we can still fix
it a little bit. Most important thing
is that you should avoid having hazy details. There's always makes it obvious that there was some
retouching done. So I rather fill up these
details here and have some more trees or so
here at the bottom. I think I'm going to sample
again from this left side, maybe all the way from here. And then go back and just add some darker details just to create a little bit more
sharper edge there, just where the forest
and the grass meets. Okay, so that looks much better. Let's see once again before
and after. Much nicer. And then maybe
there's just a little bit more here on the right side. I'm going to paint over that car and then just check
if there's anything else. Maybe these two people,
you can remove them. And I think that's all good now.
41. Retouching - Landscape Photo Part 2: Now that we're done
with the retouching, it's time to add
our adjustments. But just like last time, I'm going to put these two
layers into a group first. And then I can add the clip
Adjustments because they will affect both the
retouching layer and the original image
inside the group. So let's start with levels. Just like in the
previous examples, I would like to increase
the contrast a bit. I'm trying to be careful not to make this bottom part too dark. But what we will
be able to do is to create a little bit of
a selective adjustment. So now that I've set
this up, Let's see, without and with, yeah, I think it definitely
looks better. We can use the Brush tool and increase the brush size a
bit, something like that. And the black color selected, I can paint over this shadow detail here
in the foreground. That way we don't increase
the contrast here. We only increased it
in the background. That looks much
better or so maybe on the trees we don't need it. So we can remove it from here. And now we can check how
it looks before and after. So we're only affecting
the background, not this dark foreground, but let's continue adding
another adjustment. I will again select the
group and then choose Add Clip the adjustment
and vibrance this time. Now with vibrance, we just increase the
intensity of colors, maybe a little bit of
saturation as well, and that makes
things really pop. So without wine brands and with this
adjustment added, now, I'm really happy with how
everything turned out, but we're missing
one important thing. There is not a real focus
point in this composition. Yeah, The tree here in the
foreground looks cool. This dead tree, but
it's still not as effective as having something more interesting like an animal. Now this is of course
something I wouldn't do as a nature photographer, especially if I wanted to
submit this to a contest. But for creative photo editing, we can do whatever we want. So why not spice
things up a bit? I'm going to use the
Add Image option and choose it from
the camera roll. So I have a really
nice shot here, and I made sure that this matches the direction
of light from my shot. So I'm just going to
make it a bit smaller. Yeah, something like
that will work. We'll see what size is
best for this shot. But I'm just going
to press Done. Zoom a little bit closer. And then now we can
select the deer. Just choose, Select Subject. And let's see how close
it's going to find it. I think again, it's
just astonishing how accurate this selection is. So I'm just going to
turn it into a mask. And like this, maybe what we can do is to make it look like
the deal is behind the tree. So I'm going to
use the Move tool and put the d or
somewhere around there. I think that will be a
nice placement for it. But of course we have to
match the perspective because now currently this would
be a gigantic the year. So we definitely need
to make it smaller. I'm just going to reduce the
size to something like that. That looks a little
bit more realistic. Yeah. Maybe put the deer just
directly behind the tree here. Yeah, that looks good. Or we could also have
it here in the grass. That looks quite nice. And if we zoom out and look at the whole composition together, it's also worth considering the placement in terms
of the whole image. And there is a very useful
compositional technique, the rule of thirds, which means that when you
are using the crop tool, you can see these vertical
lines and they are the division lines that divides the whole image
into equal thirds. And if you manage to get the full code point to one
of these vertical lines, or even better, close to these
intersection points here, then you will get a
really good composition. So it always works
and it's been used for centuries by painters, photographers, and
all kinds of artists. So what I'm going to do is to move the data a little
bit to the left, just so it aligns
with that third. And we have to do for that
is to use the Move tool and just drag the deer
back there where I originally thought
we can place it. I think this is a
good spot for it. Yeah, somewhere around there. Now because the selection that we created was
turned into a mosque, we can also go back and select the mask which currently
is already selected. And then I will just use the brush tool with a
smaller brush size, something like that, and
start painting around here just to make sure that
we get a right alignment. Holding down the touch shortcut, I can temporarily switch
to painting with black. So that's going to
hide these details. And I think that looks
quite convincing. Now I always like to hide
the mask and show it again, because that helps me to really spot any
mistakes that I made. But I think in this case, it looks already quite good. Yeah, I can't really see
any issues with this. And if we zoom out, I think the rule of
thirds really helped. So once again, the dealer is placed exactly in
one of those thirds. And I don't think we even
need any adjustments because it already
works quite nicely. That's all that I wanted
to do in this composition. And in the next lesson, we'll, we'll take a look at a
portrait retouching workflow.
42. Retouching - Portrait: It's time to use what we
already learned about the retouching
tools on a portray. And I'm going to zoom
a little bit closer. So we have this beautiful lady and we are just going to do some very minor adjustments
because I am not a big fan of the unrealistic
beauty retouching. I like to keep everything
look as natural as possible. So technically we are just doing the same
thing as before, creating an empty
new layer and then using first the Spot
Healing Brush Tool. Also having all the options
the same way as before. I'm just going to
zoom closer and make sure that we have a
smaller brush size. Normally I would
start retouching blemishes on the skin like
these little pores here, we can just go over and
remove a few of them. And I wouldn't remove every
detail like freckles, they are actually part of someone's personality and
that makes them unique. I would leave those alone. I would just concentrate on these small imperfections
around here. Just go over some of them. Has a few here. Just be careful not to
remove those lines, the lines that define the smile. I think it's getting
better already. Refine it a little bit
further down here as well. I would highly recommend not to use Gaussian blur on skin. Again, if you are losing
the texture of the skin, is going to look really unprofessional and
just not realistic. This is what you want to do. Very gently refine details. Now, of course, if you are using the desktop
version of Photoshop, you can do a lot more with frequency separation and more
professional techniques. Here, I'm just going to rely on the most basic but still
professional workflow. So I think that looks
already much better. Maybe on the chin we can also
refine these small areas. Okay, so let's take a look
at this before and after. That already looks much neater. And at the same time
on the same layer, I'm also going to just refine a little bit these
stray hair details, which has once again tidying up a little bit around here. Face. Also we have some hair detail
coming in on this side. I'm going to remove a
little bit more here. And these are a little bit
trickier to get rid of. So I need to go over them a couple of times until
they disappear. I could also use the
clone stamp tool, but I think that looks
already much better. So there's no need to switch. Maybe this part here I
will refine as well. Just tidy it up a bit. Okay, that looks much better. Now once again, let's
see before, after. These are subtle differences, so you might not even see it, but via zoom closer, it might help to see them. Okay, then the next
thing I would do is to soften the dark circles
under the eyes. Once again, less is more and you really have
to make sure that you don't overdo this because it can also look very unrealistic. So this I would actually do on a separate layer which
will allow me to be able to go back and forth
and adjust the opacity of the layer because I'm
going to use the same tool. And first is going to
look really overkill, but then I'm going to refine it. So let's see what
happens if I paint over this one here
on the right side, then refine it a bit. I pretty much can get
rid of it completely. But that's not what the final
result is going to be like. Okay? And then over, so go over
it here on the left side. Couple of times
until it disappears. Alright, That's not too bad. However, I don't
like details here. So I'm going to switch
to the clone stamp tool. And I'm going to
reduce the opacity of the Clone Stamp to
somewhere around 20, 30%. And then I will sample
using the touch shortcut from probably around
here on the skin. And then start painting over on this area maybe with a little
bit larger brush size. Okay, let's see. Yeah, that looks much better
already, more natural. But also notice that now
the size of the pores are too big for that area
that we are painting over. So I might pick another
sampling point, maybe from around here and just paint over it with
that section as well, just to mix it in. And I think that
looks already better. So if we turn off this
layer that was before, and this is after. But now comes the
important part to go to the preferences
on this layer, we can reduce the
opacity and then create a nice transition between the original details and
the retouch details. Something like that, I
think looks already enough. So 45 per cent that was
without it, and that's it. Maybe we can increase it
up to around 60 per cent. But I wouldn't go any
further than that because after that is going to just
look really unrealistic. Once again, without and
with the softening. So less is more
trying to be subtle and that will keep things
more natural and realistic. Now, there is another
really cool technique called contouring, which is very similar to
how you would do makeup, which helps to emphasize
the outline of the face. Or it's almost like
reshaping the face by adding some shading
on certain areas. And to be able to do this, we will again need
a separate layer. And on this new layer, I'm going to use the
paint bucket tool and choose a 50 per
cent gray color. Now, the best way or most accurate way of doing
this would be to use the HSB or hue saturation
brightness values where we can set the hue to 0, the saturation to 0, and the brightness to 50. That's the exact 50%
gray that we needed. And when this, we just
simply tap on the image and fill this layer
completely with 50% gray. Now you might think
that this didn't really help much with the portray. But if you then change the
blend mode to overlay, then this layer
seems to disappear. Because what happens with
overlay blend mode is that anything that's 50% gray
will be transparent, but anything darker than
that are brighter than that will start to be blended
into the layers underneath. So it's a very cool blend mode. And sometimes if
it's too intense, you can also use soft
light just to show you, again, you don't
see anything from that 50% gray layer with
either of these blend modes. Let's just stick to
overlay for now. And I'm going to
use the brush tool and increase the brush size
because I like to work with a fairly big brush for
this technique and making sure that it's
also said to soft edge. But then we also need to
make sure that we are using something darker
than 50% brightness. So we can just drag it down a little bit here
on the left side. Something like that. Twenty-five percent
brightness will work. And with this, we can start
painting over the image. Now will happen is that it's
still too intense because the opacity of the
brush is too high and it looks like we burnt skin. So that's definitely
not what I was after. I'm going to reduce
the opacity of the brush probably to
around ten or 20%. And then let's start painting. Maybe I'll brush size is a
little bit too big as well. Alright, so what I'm doing
is building up the effects. So painted over a couple
of times around there. I'm going to also paint here, but I need to reduce
the brush size and also the opacity
even further to be able to get even more accurate with the area
that I am targeting. So I'm contouring or adding shading on the
bridge of the nose. Then I'm going to add a little darker details just under here, under the eyebrows. And also I will add a bit
more on the right side. Okay. And also up here
around the forehead? On both sides? Yeah. I think that looks
already quite good. Let's just see,
without this layer. And we did once again
before and after. Now, I feel like
there's a couple of areas which got a
little bit too dark. So for this, what we can
do is to switch back to the 50% brightness
and just simply paint over those areas that
we would like to refine. So once again, this is a completely
nondestructive technique. So you don't have
to undo or redo, you just simply adjust the
brightness of your brush. And then with that
you can paint over. So as long as it's set to 50%, that's going to reset
that area on the layer. But we can use this same layer
not only to add shading, but also to add some highlights. So to brighten up some details. Now for this, we have to
increase the brightness. Go up a little bit. And I'm going to brighten up a little bit here
on the forehead, also on the nose, maybe here, on the chin and here, and here as well, slightly. And I will also
go over the eyes. I want to make the eyes
brighter just a bit. Doesn't have to be too much. Something like that. I think that looks
already better. We can maybe go over
the lips a little bit, make them more shiny, stand out from the face. So if I turn off the layer, this is before and
this is after. That's contouring
added to this photo. So just so we can see
what we achieved here, I'm going to select all
these three layers, put them into a group, and that way we can quickly
turn off everything. So I will hide all
the changes that we've done and then
show it again, once again before and after. So the most important
lesson here is to try to keep things as subtle as
you can and less visible. You can keep your retouching. The more professional and
better is going to look.
43. Creative Project 4 - Photo Restoration and Coloring: If you've never tried
restoring or photographs, you're really missing out
because they are a lot of fun, especially if you
use Photoshop on the iPad with an Apple pencil, because it's really
great fun to see how old photos come to
life on your screen. So just like before, I'm going to start with
an empty new layer and start with the Spot
Healing Brush Tool. And we will zoom a
little bit closer. I'm going to adjust my
brush size and then simply start painting over
all of these blemishes, stains, and details that
needs to be removed. Just have to make
sure that we don't accidentally start
copying any details. And that's part of the
face or the jacket. But you can see very quickly
it's already getting better. So all of these scratches
we want to remove. Sometimes if you see it being
copied, some scratches, that means that you need to make a bigger area selection with
the Spot Healing Brush Tool. And I'm going to just paint
over these very quickly as well as one stain that's gone. Now, we have another one
here that's gone as well. And the edge, we can make
sure it stays straight. But if for some reason
it gets messed up, we can always switch to the clone stamp tool
and then just use the sampling on the
edge, maybe around here. And then just paint
over these details that way we can get the edge back where it's supposed to be. Alright, now let's switch back to the spot
healing brush tool. And I'm just going to tie
some of these details. I'm not going to go through everything because it's quite
time-consuming to do this. And especially if you
want to do a good job, you need to be patient and use a small brush size and
really go over tiny details. So just to show you how
I would normally do it is I would literally spend time going through these
tiny as details very slowly and carefully to
make sure that I don't lose any
important details. So this is actually the
way you should work. Now with a massive brush, especially once you
are painting or retouching over the
important details like here on the main character in the short or the
subject of this photo. But you can see already that
we actually managed to cover quite a lot in a relatively
short amount of time. And all of these details we
managed to remove and refine. So let's just see
now that we done a fairly big area
how this looks. So this is what we achieved
and this is what was before. So already quite a
big improvement. I'm just going to focus a
little bit more here on the face because that's obviously the most
important part. And tidy up his beard and his hat and these
details around it. Okay. Detail there
needs to be fixed. Okay. Looks good. This one. And then we are
pretty much done. The face as well. So it didn't take long at all. Okay. Let's see how this looks now. So this was before, and this is after. Much better, a lot of
improvement there as well. Now, to make this
more interesting, instead of you watching me fiddling around with
these small details, I wanted to also
show you how you can colorize these old photographs. So this is also a fairly simple technique,
but it's time-consuming. So the way you set it up is by simply creating a new layer, which is going to
be useful coloring. But most importantly,
you need to set the blend mode for
this to color. So once that's set up, whatever color you paint
on this empty layer will be blended onto the
image underneath it. So let's see how this works. Once I select the brush tool, I can pick a color
for his jacket. Let's just say it's
going to be brown. So I'm going to pick
a nice brown color. Maybe something like that. A little bit less saturated, like this, I think will work. Then I will also make
sure that we have a full 100% opacity
soft edge brush. And then we can start
painting over these details. Maybe a little bit
smaller brush. There you go. We are now coloring
the photograph. And I think this
works quite well. This color. So we can paint over very
quickly these areas. By the way, at this point, you can also use the
selection, select subject, which should be able
to find the details as long as you have the
original image selected. I'm going to choose the Select, select that layer at the bottom. Go back again, choose
Select Subject, and then we get the
right selection. But now, don't forget
to switch back to the coloring layer and then you can continue painting
with the brush tool. But the good thing about having the selection is
it's going to keep the painting within
those boundaries so I don't accidentally
paint over the background. So with this, I can very
quickly go over these details. And by the way, if I wanted to add a color to the background, I could also very quickly invert the selection with this
option here at the bottom. So now everything
else is selected, but not the person in the image. And if I wanted to use
maybe a blue color, maybe a little bit
brighter than this, Something like that, I
think looks quite nice. The background,
just a little bit of color here on the
right side as well, just so we can see it. And I'm not going to
go any further because I would like to let you explore these techniques and create
a fully colored version of this photo or one of the other ones that you can
find in the exercise files. So I have found retouching
and I will see you in the next chapter
where we will learn about working with type.
44. Using the Type Tool: So far we only use photos
to create our compositions, but photoshop for iPad
also has the type tool, so it allows you to
work with texts. In this chapter, we will
first learn the basics, and then we will
start combining texts with images in creative ways. So first of all, it's the type tool that we
need from the toolbar. And with this, you can either
attacks by simply just tapping somewhere on the
canvas or click and drag, tap and drag to
create a text frame, the technical terms
that we normally use is point type and
paragraph time. So to create the first one, or we have to do is tap
somewhere on the canvas. And while we are editing this, there's a handy
shortcut here with which we can move
the text around. And then if you have
Bluetooth attached keyboard, you can type in something. And just like in
other applications, as long as you have
the text selected, you can make changes
to it by using all the values here
on the right side in the Layer Properties panel. So we will take a look at all of these character and paragraph
formatting options later. But for now, I'm just
going to press on, Done here on the top right. And that will go back
to normal editing mode. So we can still
use the move tool, of course, to move
this text around. And also you can use
the transform tool, increase the size of
the text if you want. This is not going to
mess up anything. So it's still going to
be editable either by using the Type Tool you
can select the text again, select individual words
and make changes. Or an even faster way
to get back to editing the text would be to double tap on the thumbnail in the layers. So if I double tap on this one, I can get back to it. Or if we are using the expanded
view of the layers panel, we can also double-tap
there on the thumbnail. Now of course you can have
multiple texts layers in the same composition, and that's what I'm
going to do. Now. I will just leave this one, move it up a bit, and I will actually
lock this layer. We don't accidentally move it
around or start editing it. And that's also a good practice, especially if you are putting texts layers close
to each other. So I'm going to lock it. And then using the
type tool again, I'm going to now click and
drag to create a text frame. Once this is created, it will automatically be filled with the
placeholder text, the Lorem Ipsum Copy. And if I reduce the font size, you will see that it's always going to fill in that space. And of course, we can
again type in text or even paste from
other applications. But what's more important
is that you can also have more texts within a text frame
that's currently visible. In these cases, what we call an overflow will be indicated by a little blue dots appearing on the bottom center point
of the text frame. So that control point, which is currently white, notice is going to turn blue
once we have more texts, what can actually
fit into the frame? So if I press done
all that excess text, which is currently in overflow
state is still there, we just can't see it. So if I double tap on
this layer thumbnail, I can go back and
reduce the font size. And once I've done that, the
little indicator is gone. And so it means that we
can see all the text. Now when you work
with texts frames, you can of course, reduce the width these frames, and you can also increase the height if you
need more space, you can again use
the little widget here on the top to
move it around. And you can also rotate text frames that's also
available for the point type. So it's not just for the
paragraph or line type. And when it comes to
work with paragraphs, don't forget that you can use
these formatting options. So left, center, right align. But then also you have
justified texts with the last line aligned
left, center, or right. Now, as a general rule, if you are using justification, you should have
your text frame via either to avoid those big gaps, which we also refer to
as reverse in your copy. So something like
this looks better. But now I am going to use the free transform tool and just reduce the size
of the text frame. And notice why that is a
useful technique to switch between using the paragraph everything and the
transform tool. Because with the transform tool, when I'm resizing
the text frame, I'm changing the text size, but I'm not changing the
formatting of the text, so it's not going to
flow back and forth. So I can ensure that visually the text is not going to change. And that is pretty much all
you need to know about how to add text into
photoshop for iPad.
45. Adobe Fonts Integration: When you have text selected
from the layer properties, one of the first option
that you will find is to change the
font and the text. We can find all these
other font options. And if you are looking
for something very specific and something maybe
that's not listed here. You actually have
the option to add Adobe fonts by using
the Creative Cloud app. Now we've seen this
app earlier on, but I'm going to show
you how to use it, or we have to do is to go
into the fonts option, which is here at
the bottom right. So once that's selected, we can already see a couple
of recommended fonts, but we can filter these fonts based on what classification
they belong to. So maybe if I'm looking for something more like
a script font, I can select that and immediately I get lots
of options for this. If I want to find something
even more decorative, maybe I can select
this last option. And once again, lots of unique,
interesting fonts here. And we can also check
here on the top, which are the installed
fonts currently on the iPad from Adobe fonts, which we can also remove
or uninstalled from here. But let's try a new font. I'm just going to go
back to OF fonts and maybe pick one of
these nice fonts here. Maybe Scarlett would,
it looks quite nice. So let's install this. And of course you just have to remember the name of the font to be able to easily find it
within photoshop for iPad. So after a little bit of weight, you will get a notification. And the app is asking you whether you want to
install the font. That's just accept that. And then soon we
will see it being installed here in
Creative Cloud. So now we can switch
back to Photoshop, go back to our document, double tap on the thumbnail
to select the text. And then from the font selector, or we have to do is to scroll down and find scarlet board. So that's how easy it
is to add new fonts and start working with them
in photoshop for iPad.
46. Formatting Text: So we've already seen in the previous video will
have to work with fonts. But I wanted to show you all the additional
options here in the layer properties when
at texts layer is selected. So if I pick another font, for example, Myriad Pro, which has multiple styles, these styles can
be selected from just directly below
the font selector. So we can switch
between these easily. And below this we
have the font size, which we also seen earlier. But then we have another very
useful attribute, tracking, which is going to increase or decrease the spacing
between the characters. Now, this can be
extremely useful, especially if you're working
with a certain type of font where there's a lot of
space between the characters. Or maybe you just want to
space out at title and create a little bit
more breathing space between your characters. So this is a useful
feature for that. Next feature is similar lending, but that is used for the
spacing between lines. So for this, I am just
going to double-tap on the paragraph copy
that we have here. So by using the lead in, I can increase or decrease the
spacing between the lines. And there is actually
a feature further down here called auto lending, with which we can automatically get a very good spacing setup, which will always be
based on the font size. So it will create a comfortable
reading experience. Now going back to the
other texts layer, I'm going to show you
the next feature by just having one of
these words selected, maybe title, by double
tapping on a word. By the way, you can select
that individual word or triple tapping can select
everything within a line. And if you have a
paragraph copy like here, you can tap four times in a row to select everything
within a paragraph. Sometimes it might
be just easier to highlight the amount of texts
that you need to work with. But it's good to know these
little shortcuts as well. So coming back here, I'm just going to double tap
and select this first word. By changing the baseline shift, we can increase or decrease the vertical placement
of that selected word. So essentially we are
pushing the text up and down with this attribute. Then we can apply
vertical scale and horizontal scale again
on the selected text. And these are things
that I would really suggest to avoid using because it never
looks professional when you start stretching text. So I'm going to even
cancel out of this just so we don't even
see a bad example. And then going back, we can of course change
the color of the text. And it can be again, a single character
or a single word. It doesn't have to be
the whole texts layer. So if I just change this
to a different color, we can see it's updating now. And then we also have further options for
changing the selected text to all capitals or set it back to the normal
sentence case. We can also use small caps were capital letter
characters are used but in the size of
lowercase characters. Or if we want to be more
technically accurate, these are uppercase characters
reduced to x-height. Besides this, we also have
options like superscript and subscript, underline,
and strikethrough. Now it's worth noting
that the opacity and blending is not available while
you are editing the text. But once you press
Done on the top right, then having the whole
texts layer selected, you will be able to get to these options here
at the bottom. Now I can easily reduce the
opacity and I can even apply blend modes or ADD adjustments
onto the text layer. Now that we've covered
everything that you need to know about
working with texts. In the next couple of lessons, we can start using them
for creative compositions.
47. Integrating Text into Photo: In this lesson,
we will learn how to integrate topography into a photo by using masking and a couple of
additional creative techniques. So first of all, I have already
the text layer prepared. And notice that I don't
have anything selected, just simply the
text layer itself. And already that
allows me to search for the right font that will
work with this composition. So this is a very
fast and easy way to quickly check which
font will work best. So I can really just tap and go through all of
these font options. But I think it's either
feature that will work here or maybe Dean condensed
might be even better. And I actually think that's the one that I'm
going to settle on. I will increase the
size of the text. And also notice that
the font size is already at the
maximum value here. So in these cases, don't forget to use the transform tool which won't mess up anything
and it will still allow you to make
changes to the tax so it stays editable even
after doing this. I'm just going to make
it around this size. I think that's going
to work quite nicely. And at this point I would
normally work on the kerning, which is similar to tracking, but this is when you
specifically target individual letters and
the spacing between them to create an optically pleasing and balance
look on the text. This is especially
important when you have all caps on big
titles like this. So the way you do this on
photoshop for iPad is by using the type tool and selecting the letter where you
want to make the change. I'm just going to
zoom a little bit closer just so you
can see it better. So notice that between RNA, there's a little
bit too less space. So they got squeezed to
each other a bit too much. So now having our selected, I can use the tracking
value here on the right to distance
them from each other. So I can set up roughly
like that much space. And then I'm going to reduce
the space between P and a so I can drag it
closer to that letter. Yeah, something like that works. Then between DNI, we can also
reduce the spacing a bit. And let's zoom out and think that's all
that we need it to do. So let's press Done and we
can see before and after. So I'm going to just
tap with two fingers, tap with three fingers
just to go back and forth, seeing before and after. So it's a very
subtle difference, but these are very
important to get used to when you
work with texts, especially as I said, on these large titles. Okay, so now it's time to make a selection of this building
here in the foreground. For now, I'm going to
hide the text layer and I will switch to the
photo in the background. And I actually feel like
it might work better if we flip this whole
image horizontally. So I will use the
transform option and use flip horizontally,
then press Done. And also I feel like the whole composition
would look better if we remove a couple of unwanted details of distracting
details from the image. Remember when we're retouching, it's always best to do
it on a separate layer. I'm just going to create that blank new layer and then switch to the spot
healing brush tool, making sure that it has
the sample all layers on. And then we can
start painting over details like this one
here in the foreground. Now, I will increase
my brush size just so I can very
quickly go over this whole section here and
refine it if we need to. Until it completely disappears. That looks great. And then let's come to this
section here as well. I will just paint
over this detail. Once again, I feel like it was a little bit of a distraction. And that looks better. Same thing for this one here. And once again, I'll just paint over a few times until
it's completely gone. And then this tower in the background as
well can be removed. Okay, So a much neater
composition already. Let's see, before
retouching and after. But now let's
select the photo at the bottom and I will
zoom closer and make a quick selection using the Quick Selection Tool on this area here
from the building, I need to make sure that I'm not selecting any details
from the sky. So I will switch to
the rectangle tool, set it to subtract, and just remove this
whole section up here, and maybe also this
section at the bottom. So I have a fairly good
amount of selection from the wooden pieces
of this structure. And now I can go into
the More Options. Select Similar to find all similar details
in the composition. And I think that
worked quite nicely. Maybe I can add a little bit more detail here at the bottom. Again, I'm just using
simply the Marquee Tool and make an additional
selection further down. I choose, select similar again, maybe add a little bit
more here as well. On the right side, choose, select similar,
and it's starting to find more and more
of these details. But if I want, I can even
just go over quickly these details and
add them manually. However, I don't think our texts will come
all the way down here, but still it's good
to have this ready. Okay, I think that
will be enough. And also notice that
the birds are selected, which will actually
come in handy for the technique
we're going to do. So now all we have to do is to create a duplicate
from this layer. So go into additional options,
choose Duplicate Layer. But then we will also turn
this selection into a mosque. So either by using
the icon here on the right or the other one at the bottom, we can create that. And if I double tap
on the layer mask, we can see exactly what's
included in this layer. Whatever it is,
white is going to be visible and whatever
is black is hidden. Now, I don't need this
whole frontal section to be included in this layer. So I will actually
use the brush tool, set the brush size really big, also set the
hardness to maximum. And by setting the
color to black, I can just very quickly
remove all of these details. I don't want these to show
up in my composition. So I will just very
quickly remove them. And I could do the same
with all the other details, but I think actually
they will be useful for the composition, so I will keep them all in. So I will just
double-tap again on the Layer Mask to go back
into normal editing mode. And I will now reveal
the text layer, position it a bit closer
to where I need it. Yeah, I think somewhere around
here will probably work. We might need to make
it a little bit bigger. Once again, I'm using
the transform tool and aligning the text to
something around there. And then comes the
interesting bit. We will now move that mask layer on top
of everything else. So I will grab this
and drop it on top of the whole layer stack. And that's the composition
that I was after. So to create this type of integration between the
text and the image, we selected those details that we want it to have
in front of the text. And then by placing
the texting between this mask layer and the original fully
visible background photo, we could create a
cool composition, but it doesn't need to stop
there because we can also add a layer mask on
the text layer itself. If I use the mosque icon, that will just
create a blank mask. But on this mask, as we've learned in
the previous chapters, we can use the Brush tool and very quickly paint over details. If we have black as
my foreground color, we can take a vein from
details like here. I can just hide a little
bit of these details. And then by either holding
down the touch shortcut or just wiping over the colors on the left
side in the toolbar, we can go over and
refine this edge. I will use a very
small brush size. Let's see how close I can get. Yeah, that looks quite good. Maybe holding down
the touch shortcut, I can reveal a bit more. And then once again hide them away until this
mask looks perfect. Yeah, I think that's great. Obviously, one very
important thing that you have to keep
in mind when you do these type of
compositions is to make sure that the text
is still legible. So that should be the
most important thing. And I think it's
still legible and it looks quite nice in
the center of the frame. But maybe one additional
thing that we could do is to reduce the visibility
of this layer. So if we go down
here at the bottom, we can reduce the opacity. Or another thing that
we could do is to change the blend mode
to maybe overlay, and then also change
the color from white to something sampled
from the background. Like this. Or let's again select
the eye dropper. We can even pick a
brighter color from above, something like these blue colors or the color of the mountains, maybe even colors from the sea. I think actually something like this color works really nicely. So once again, it's important to make sure that the
text is legible. So we can always just increase the brightness
a little bit more. But the blending again
helps to integrate the text into the
environment even more.
48. Creative Project 5 - Out of Bounds: In the previous lesson,
we've seen how to integrate text into a photo. This time we will
do the opposite and place an image
into a text layer. So to get started, we will use this image
and I'm going to actually get rid of all the
other layers from here. So I will select these
and delete them. I will keep the texts layer
and I'm just going to change the font because currently this font is not
available on my iPad, so I will switch to
something very similar. I think what you could
use is Futura and set it to all caps and then work
on the kerning if necessary. I think in this case is
actually looks quite good. I will tap Done, zoom out a bit and maybe
resize the whole thing until I get the right
placement of the letters. So I would like to have these
trees visible for that. I'm going to resize it
a little bit further, and I think that's going
to be a good placement. So I can now press done. And I will select both of these layers using
the touch shortcut. And with the move tool, I'll just move the
whole composition closer to the center
of the canvas. Now that we have the
two main assets ready, what we will need to do first is a duplicate layer
from the image. So I will set that up and I will move this duplicate layer
on top of everything else. Here we will have to make
a selection of the trees, especially these trees
in the foreground. So let's see whether
these subjects select option will be
able to select them. And unfortunately it's not
doing a great job this time. So instead, what I will do is to make a small selection by using the Lasso tool on an area where we only
see these green details. And then try the
select similar option. And that did a much
better job already. So maybe just these few details here in the
background we can remove by setting the lasso tool to subtract and then
paint over these. And I think that's all
that we needed to do. Yeah, I'm happy with this. So now we can apply
this selection as a mask on this new layer. So we already start to see a similar kind of
integration that we had in the
previous composition, where we can see almost
like a sandwich. So the text is in the
middle and then we have the two image layers
on top of each other. In these techniques, mainly what you need to pay
attention to is not to move one of the image layers without moving the other
one at the same time, because then you will end up having an alignment
issues there. But I think that's
all we needed here. And now what I will do is to
use the image layer and move it above the text and create a clipping
between the two of them. So use the icon
here on the right that's going to clip it
onto the text layer. And if I hide the image on top, this is how this looks. So the image is clipped inside this editable text layer
and the layer above it, I am going to apply an additional mask for
hiding the details that I don't want
to see similar to before when we use
two separate mosque, I would like to also keep
this original selection intact in case I need to reveal and hide details
back and forth. So we would need that
additional mask, which if you remember, we created by using a group. Now, because we only have
a single layer selected, we won't be able to group it. So in these cases here
on photoshop for iPad, what you can do is to just
create an empty new layer. And with the touch shortcut, select these two
layers together and then group them onto this group, add the layer mask. So now we have the group mosque and
the other mask inside. And at this point, if you want, you can even get rid
of that empty layer. So it's an unnecessary step, but it's required in order
to create the leaving group. So now I can go back
to that new mask, the second mass that we created. And I'm going to
use the brush tool with a little bit
bigger brush size and set the foreground
color to black so I can start hiding
these details. So here at the bottom, I will just go over very quickly paint over
all of these details. So everything's gone at the
bottom, something like that. And then once we get closer to these
details in the middle, we can decide what to
show and what to hide. Alright, so I think here
in the first letter, what we can do is with
a smaller brush size, I'm going to hold down
the touch shortcut and paint these details back. So we have those
trees coming out. Then this tree maybe
we can just paint out than come further here also, we can hide this tree. However, it's coming
out of the frame there. So maybe we might
want to keep it in. The only thing is
I want to avoid having the letters
blend to each other. So we might actually be better off removing this completely. I think that looks better than this one here can be
visible. It looks nice. Also, this one, I think
we can keep them. This one here on the right. I'm going to remove
just so once again, we have a better outline. More legible text than
that one can be visible. And this one I think we
can show once again, just hide the edge a little bit, cut into debt with a
smaller brush size. Yeah, it looks better. And then well, at this point
I think we can just separate the two letters and then have the tree coming out on
the left side of the S. And there's one more detail
here inside the counter of the D where we can paint
back these details. However, that might be
making a little bit hard to read that letter because there's now hardly any
counter inside it. What we can also do is to just make a little bit
more space here. Maybe we then even
smaller brush size just to go between the branches. That's just reduce it even
further, something like that. Yeah, just paint inside. And as long as we have enough
space, it should be fine. We can show a little
bit more detail and some parts like
here at the bottom. And let's see from a distance, I think that's already enough. And as a final step
to tidy things up, we can add an additional
blank layer at the bottom, which we can fill with a color. And this color can even be
selected from the background, maybe something like this
color from the image. Let's just fill in
that background layer and then make it
slightly brighter. Tap on it again with
the paint bucket tool. And I think we have
a composition ready. And the best thing
about this method wants more is that it's
completely non-destructive. So we kept even our masks separate and independent
from each other. So by using that group mosque, we can easily go back and forth, hiding and showing the trees by the other mask makes sure that it keeps the trees isolated or extracted from that
original background. So each mosque has
its own purpose, but they are independent
from each other. Maybe one last thing here
that we can do is to create a nice drop shadow by
selecting all of these layers, holding down the touch shortcut, I am going to duplicate
them altogether. And this Duplicate
Selected Layers, I'm going to merge by
using Merge Layers option. So this created a copy
with all of these details. And then I'm going to load
this layer as a selection and fill it in with a darker
color, something like this. But because there's all kinds
of different colors here, we can't just use the
paint bucket tool. We would actually need to
use the brush tool with a very large size and just very quickly paint over all of this. That's good. Then choose, de-select, move this all the
way at the bottom, just above the
background color layer. Place it where we
want to use it, and then use the blur option from filters and adjustments. Go assembler, reduce the blur a bit to something like that. And then also go into properties
and reduce the opacity. You can always use the move
tool to move it around. Decide whether we want to
have it above or below. I actually prefer it below,
somewhere around here. This is of course option
also we can always check without the shadow. With it. It's completely
up to you whether this is something that
you want to use or not. I just wanted to show you
this mainly to see how the Merge Layers option can
be used for in some cases. So generally I like
to keep my layers separate and I would very
rarely used merging. But when it comes to creating additional effects
like the drop shadow, it can be extremely handy.
49. Creative Project 6 - Joker Composition Part 1: I'm going to start with a new document and
I will set this up as an A4 portray size
with 300 ppi resolution. Settings are very
similar to how I would start the document
on the desktop. And I'm just going
to click on Create now that we have our
fresh new document, the first thing I'm
going to do is to bring in some of the images, all of these you can find on
the melanoma board and you can do composition yourself
while you follow along. So I'm going to choose
the camera roll. In this case, I'm going to
go to the images I prepared. First of all, the main
hero image is this one. I place it in and
then I can resize it simply just by using gestures,
something like that. For now we'll be fine. So I click Done. Now this is our first layer. We can see it already
here on the top. I can tap to turn it
off, turn it back on. Let's bring in the
other images as well. So we will need these
extra two poses. So there's this one
which I really like. I'm going to just place that in and then while more again
from the camera roll. And this is the other one
that I'm going to use. So now that we have all
these three images, I'm going to turn
them off temporarily and I will work on
the central image. First of all, let's get rid
of the original background. And for this, I'm going to
use a selection and a mask. So luckily we can create both clipping masks
and layer masks. Currently there's no
Vector Mask option, but this is already quite good. If I double tap on
the Selection tool, I can see this for
selection methods that currently we have
the free form lasso tool, the Quick Selection Tool, the two marquee tools. So if I use the Quick
Selection Tool, It's actually works
very similarly to how it will work
on the desktop. So I can just paint over
details and you can see it's going to find more
or less the outlines. Of course, we can also
remove from the selection. And that is by using this little touch shortcut
here on the left. If I press and hold
it with my left hand, I can start removing
because that's like holding down the
Alt key on the keyboard. So I can refine my
selection like this. And again, holding it down, I can't remove from it, so subtract from the selection, and so on and so forth. Now, I'm going to
de-select this, but instead of using the
Quick Selection Tool, I prefer to work
with the Lasso Tool. Now, in the desktop version, I would use the pen tool
and create a vector mask. But something very similar is what we can do here
with the Lasso tool. So I'm going to quickly make
a rough selection of Joker. And I am going to turn this
already into a mosque, so the majority of the
background will be gone. So we just have to click here on the Mask icon on the right. And that's already better. Now we can zoom closer and
still using the Lasso tool, I am going to make a very quick selection
here of this edge. Let's just go up and continue along the edge,
something like that. Then switch to the fill tool or the paint bucket tool and make sure you have black as
the foreground color. You can just swipe over them to switch between black and
white, which is quite nice. I like that quick
way of changing it. And then make sure that the
mask is already created, which you can see here
on the right side. So that little black and
white square is your mask, which I can just also hide and show with the icon
here on the right. So while the mask is selected
and we have the selection, I'm going to use the
Fill Bucket tool, tap twice on this selection
and then choose the Select. Now, the reason I use it twice or tap it twice
because it leaves a little bit of anti-alias
edge of the first time, but the second time it
completely fails everything. So let's just try this
again using the lasso tool. I'm going to actually paint over or draw over this
edge one more time. Okay, So just a quick
selection there. Then using the paint bucket tap twice to show you that
if I only tap once, That's the anti-aliasing it
over, you can see there. And then I can get rid of that. Now, there is no option to turn off anti-alias
at this point, only a feather, but the
feather is set to 0 pixels. So I don't really have
to worry about that. And I'm going to just
tap on the select and then I would literally
continue doing the same thing. So I'm going to draw maybe another section here
just so you can see it. I can start drawing over
this section and go up, make a selection, and use
the paint bucket tool, tap once, twice, deselect. So as you can see, this is a fairly
quick and easy way to create very nice refined
edges or mosques. And the mosque is
obviously non-destructive, which means that we
can always bring back details or hide more
of them if we need to. If you want to see your mask, you can double tap on it. So that's going to show you the black and white image
where white shows black hides. That's the same way how masks works in the desktop
version of Photoshop. Now I'm not going to
spend more time on showing you how to do
these clean edges, but I will show you
what I would do around the hair because that's soft edge compared to the
hard edges around the suit. So what I'm going to do is
to switch to the brush tool. And if you double tap
on the brush tool, you can also switch to
different brush tips. So the one that I
like to use for hair, I found this one
the natural edge to be quiet good. With this one. When I start painting still
on the mask with black color, it creates more like
like painterly edge, almost like has a little
bit of texture to it. I think this works
quite well we'd had. So if I start painting
around the edge here, I'm just going to paint over
it with a smaller size. So I'm going to reduce the
size here on the left. Just simply drag it down. And then you can see that it creates a little bit
more rough edge, which I think works
quite well for hair. So obviously these parts here
would be more difficult. But even these, I think, can be selected quickly
just by painting over it. So soft edges, I would
use the brush tool and I'm using an Apple
pencil on an iPad Pro, despite away is
the 2018 iPad Pro. I find drawing on the iPad
the best drawing experience. So that's amazing to be
able to use Photoshop on the iPad and have this drawing experience
that I'm used to. So once again, for
soft edges like hair, I would use the brush tool. And for hard edges I will use a combination of the Lasso tool and the paint bucket tool.
50. Creative Project 6 - Joker Composition Part 2: Okay, So we jumped
ahead a bit and we have the three mosques ready
for all the three poses. So if I select any of these, I can still show
how it looks with the background by using this
icon here on the right. Again, this one as well. We can see nothing is
lost at this point. So we have still everything, all the details on the layers. We just hit them with
the layer masks. There's one thing I really miss, the current version
of Photoshop for iPad and that is smart objects. So at this point, before resizing and
rotating these layers, what I would do is to turn
them into smart objects if I were on the
desktop version. But unfortunately here
we don't have them yet. I know it is coming or planned
to be introduced later on. So in a future update, hopefully soon we will get it. But at this moment, we will have to keep
on working like this. And the reason why I'm really
missing smart objects is because by resizing and
rotating these layers, I know I'm losing some quality, so I'm a bit more careful, but I already know the
composition what I need to do. So I can just simply
use the Move tool or select tool and I can
move these layers around. So I'm going to put this
one here on the left. I'm going to move this one here slightly down to
somewhere around here. I think that's roughly the
composition I used before. I'm just going to zoom
out a bit and see if we need to move a little
bit everything down. I think it's roughly
in the right position. I'm going to select
all three layers. When you drag right
on the layers, you can select them all. And then using the Move tool now we can move them together, but also we can resize them with the second tool.
So just go back. The second one from the top
is the free transform tool with which we can re-size
the whole thing a bit. I think something slightly even smaller will work
for this poster. Yeah, something like that. I'm going to click on Done. And then now we can start
adding some shapes. For this, I'm going to
create a new layer. So tap the little
plus sign here. And then on this layer again, I'm going to use the Lasso tool. And with the Lasso tool, we will draw the
shape that we need. So I'm just going
to try to draw it similarly to what
I've done before. Let's try this again. Yeah, something like that. I could be in shape and I am going to fill this with a color. Now for the color, I'm going to pick color
from the image for now. It doesn't really matter. We can change it later. That's going to be fine. I'm going to de-select this now, and I will move this
layer further down. I think I have it
somewhere around here. So just simply change the
stacking order and then we can move this slightly down
somewhere around there. Now the first thing
that I wanted to do here is to create depth. We already have an indication of that by having this character here behind the shape while the other two
characters are in front. To make this more interesting, the character on the right, so this one, I
would like to have that clipped into this shape. So all we have to do for that is to create a
selection of the shape. So we can do that from
going into the menu and choose Load Selection. So that creates a selection
based on the shape. This would be
Command or Control, click on the layer thumbnail
and the desktop version. But it's pretty much
the same thing here. And then after this, I go into the layer on the
right, select the mask. And I'm going to invert the
selection here at the bottom, we can tap on invert. So now everything is
selected about the shape. And now we can use
the Brush tool, maybe make it a
little bit bigger and just paint over
around the edge. Now I'm going to change
my brush back to the normal hard round brush. And then we can just
get rid of all of that. So we are masking
outdoors details. And this helps to
make it look like the character on the right is
standing within this shape. So we can now choose the Select. And I think we can move the
main character down a bit. Something like that, is more similar to the way
I've created before. Now, I would like to place
a scene into this shape. So for that I'm going to
bring in another image. So going into my album, this scene I think is a very recognizable
scene from the movie. I'm going to just
maybe get a bit smaller, Something like that. Tap Done. And then I'm going to place
it just above the shape. Let's just drag this down
just above the shape. And then this is the icon
here on the right to create a clipping mask so I can turn
it off, turn it back on. And what I want to do is to have Joker visible on the left, but I also want to see
the guy on the right. So they were quite important
in the whole story. So I want to make sure that
they are both visible. And it's a quite
nice way of having two interesting details
within the same shape. But then have the characters in the middle divide
the composition. But I don't want this
to be too strong, so I don't want it to be in its original colors and we'd like to use a gradient on it. So first of all,
what we can do is using these properties
here, the layer properties, having this layer selected, I can change already
the blend mode, maybe I can change
it to overlay. Now, this is going
to mix the colors of this layer with the
colors of the shape, which could work really well. And at this point, I can select the
layer itself and use a clipped adjustments
or to change the colors. Remember I said the
original colors doesn't really matter because I'm
going to change it anyway. So Ed, clipped
adjustment here in the Layer Properties and
then choose Hue Saturation. Now notice that there's
only a limited amount of adjustment layers here, not as many as what you
would get on the desktop, but most of them are here. One thing I'm really
missing is the curves, but hopefully that will
be added soon as well. For now, I'm just going to
click on hue saturation. And with this, I can
start to change the hue. You can see already we can experiment with
different colors. I think I'm going to go with something along
the lines of that. Now at this point O, so I'm going to change
the background color. I like to already set
that up in the beginning. I'm going to use the
paint bucket tool again. I'm going to tap on the
background and I will actually change this to something
a bit more purple, I think needs to be a little
bit more desaturated. Maybe brighter. Yeah, I think that's quite nice. So what we need to make sure is that this shape is darker. Just go back to the shape
and reduce the lightness. But also what I'm
going to do is to reduce the opacity of the image. So the image doesn't
have to be so strong and maybe even
set it to soft light, okay, something like that. Maybe reduce or increase
the opacity a bit. But then what we can also
do is to add another layer, just an empty layer. This can be on top of
the adjustment layer, can even be above the image. It doesn't really
matter at this point. Maybe I can just put it above. And I'm going to
use the brush tool and reducing the hardness. You can see we can create a very soft edge for this brush, make the brush size quite
big, something like that. Now we can start introducing
different colors. So what I have to do is to
switch to a different color, maybe orange, and
start painting over. Now it's too strong
at the moment. We can reduce the opacity
with this slider here. Just going to go down
and then paint over it. That's quite nice, something
like that on the top. Then we can make
the color darker, something like this that we
can paint around the edges. And that's already starts to
create a bit more contrast. We can also introduce maybe darker purples
around the edge. A bit bigger. Something like that.
51. Creative Project 6 - Joker Composition Part 3: So for now, I'm going
to just keep it at that and we can already
see how this is working. But I want to also change the colors on the
Joker characters. So I'm going to do the
one on the left first. I will select that layer. It's this one here on the left. So I'm going to
create a new layer on top of that and
I'm going to clip it. So I'm going to use
the clipping option. And whenever you see the
little arrow on the thumbnail, that's when it means
it's clicked onto it. So now that it is clipped, we can use instead of the fill
color or the paint bucket, we can switch to
the gradient tool. This is quite handy
that we have it here because with
this we can create gradients and it's going to create a gradient
between the two colors. So your foreground
and background color. You can just paint over it and it will recognize the direction. And you can very quickly set
it up to whatever you want. I'm going to use a
different color. Maybe use something like this. Okay, that's more interesting. And then just
reduce the opacity. Because I also want these
to be a bit more faded, so I don't want them to
be so high contrast. So something like this
actually works quite well. But then we can also
combine effects. So we can create a duplicate of this layer from
the extra options we can choose Duplicate layer. Notice that this is
automatically set up as a clipping layer again. And I'm going to choose multiply for this and maybe just
reduce the opacity a bit. So that is quite good. Now, what we can also do is to add the mask on
these gradients. So for example, if I want the face to be a
bit more visible, I can tap on the Mask icon and
then using the brush tool, we can paint over
the face maybe with a smaller brush size,
something like that. Actually, let's just make
the opacity size bigger. Yeah, so notice how we
can lift details and showed the face a
bit more because I think that's quite
important still. Yeah, something like that. It doesn't need to
stand out that much. Now once again, I would do the same thing on
all of the images. The one in the
middle, I would keep almost with its original colors. For that, maybe I would just
use an adjustment layer. I would go into add
clip adjustment, use most likely hue saturation. But another cool one
is color balance. I'm just going to show
you how it works. With color balance. You can start adjusting
these three sliders. And once again, this
is very similar to how you would do
this in Photoshop. So it works exactly
the same way. You can turn off the luminosity option
or turn it back on. That just helps to keep
the same tonal values. And I think this already
looks quite interesting. So if we turn off
this adjustment layer that was the original colors, and this is the new colors. So it's almost like adding a
bit of a tint to the layer. I would continue adding
effects like this. But another thing that I
would do at this point already start to
organize my layers. So I would have separate
groups for everything. And this is the
main composition. So for this, we can just
select all these layers. So I can hold down the
touch shortcut here on the left and just tap on
all of the layers here, apart from the background layer. And then I am going to click on the little Group icon
here on the right. So create a layer group
and we can call it jokers. Now another important
shave that we have to create that ring or a circle. For that, I'm going to
again create a new layer, just a simple empty layer. And then use the Elliptical
Marquee selection tool. Holding down the touch shortcut, I can click and drag to create the circle roughly
around that size will work. Now after you
created the circle, you can fill this
in with a color. Again, doesn't really
matter what colors. So I'm just going to use the paint bucket
tool, tap on it. And then what we will do is
to click on the More Options. And I really liked the
fact that they have this. There is the transform
selection option here. Then simply pinch somewhere in the center of the selection. And with this you
can create the ring. Yeah, something like that. Tap Done on the top right, and then hit erase. So that's how quick and easy
it was to create this ring. Can use the selection tool
and move this in place. So I think it needs to be
somewhere around here. Maybe we can use the
free transform tool, make it slightly smaller. And I think that's
going to work. Now I'm going to already add
to this adjustment layer, so add clip adjustment. And I'm going to
use hue saturation. Let's just increase
the brightness a bit. I'm going to change the color. I used a bright yellow,
something like that. For now, it's going
to work and I'm going to use the mask option. So add a layer mask on
this using the brush tool, I'm going to set my opacity up and also the hardness
all the way up. And then let's just test this brush out yet
that's going to work. Now when you are
using the brush, obviously you can
just paint over it. And then with this you
can make it look like certain details are in
front or behind the circle. But to make it even easier, because we already have these selections
saved as mosques, all we have to do
is to find them, like with the main Joker
character in the middle, I can select that
mask and then go into the extra options and
choose load as selection. Once we have that there, we can go back into
the mask of our ring. And then if I were
to paint over here, you see immediately
it just deletes exactly the details
from the arm. And this makes it look like the arm is in front of the ring. Also, we want the head
to be in front of it. So we can just very
quickly paint over that. And I will keep the other arm
behind the ring to create this nice interaction between
the ring and the character. But then I am going to
make another selection. Now, I would like to make sure that we have the other
Joe care selected. Now. I do the same technique,
so Load Selection. And I think that's it. Yeah, Oh, the selection. Now we go back up here and
also I want to make sure that we can see him properly. Then I would like
to make sure that the ring goes behind
this other shape. So I could also move the whole
thing behind everything, but then I won't be able to
create these interactions. So that's why I prefer
to do this on top. Anything that I create as
an interlocking shape, I like to keep on top and
instead just use these mosques. So what I'm going to do is similarly to what I've done
with the Joker characters, I select that shape,
the bean shape, and I'm going to load
that as a selection. Then go back to the mosque and just quickly paint
over this thing here. So now what we need
to do is to select the other gioco
character on the left. So load that as a selection. Go up, paint over him. So he's also in front. And then I want this also to be behind the central character. Once again, I just load
that as a selection and make sure I'm on the
right layer style painting.
52. Creative Project 6 - Joker Composition Part 4: So we have the interlocking
shape created. We started adding
some adjustments. Now, notice that there is one issue with this
selection in the middle, that the shoes are
obviously not completely visible and that is because
he was standing on stairs. Now the quickest way to
fix this would be to actually paint in those details. So I'm going to
create a new layer quickly and I'm going
to use the Brush tool. If you use the touch shortcut
and then drag to the side, it will become the
eyedropper tool. So we can very quickly pick a color and then start painting. So I'm just going
to go a little bit closer and make the brush
size smaller as well. And in the settings I will
make sure we have the pressure set and maybe also
a bit of smoothing. So when I'm painting,
it looks like this. One thing for drawing
that I'm really missing is the ability to rotate the
screen, rotate the view. That's also something that
they plan to add later. So I'm really looking
forward to that. I'm just going to put
this actually on top. And then that way we can paint over it and blend
it a little bit better. Okay, So this is
just going to be a very rough drawing
just so I can show you how I imagine having
this quick fix. You already see that that
looks quite good already. And then the other one, we have to do a little
bit more work here. So I'm just using the brush. Then again, touch shortcut, pick this color, and then paint. Something like that. Now you could also use the
clone stamp tool for this, but I just feel like I'm faster working with the brush tool. Try to imagine how
this would look like. Probably a bit further out here. And then that needs to come
out as well a bit more. Okay. So I'm not going to waste too much time
on this for now. I'm going to be just wrapping it up around
somewhere around that. Also, if you hold down the touch shortcut
while you are painting, that temporarily turn
us into the eraser, which is really handy. So you can paint and then
erase with the same tool. Okay, so let's see, without, and with this layer, I think it looks quite good. And I want to make
Joker look like he's floating in space almost
like he jumped up. So I'm going to create
another layer at the bottom. And I will use the lasso tool and just draw very quickly,
something like that. Feel that in actually
going to separate layer, I forgot to do that
on a separate layer. Fill that in with a
color, then de-select, and then we are going to use this additional options here. At the moment, we only
have two filters here. Gaussian blur and Invert. Invert will just
invert the color. But that's not what I wanted. I wanted Gaussian blur. So I'm going to create this
very soft shadow because he's up in the air
so it shouldn't be too harshly edges
of the shadow. And I'm going to wrap
around there is fine. I can adjust the blur obviously. Just going to keep it around 70. Hit done. And I use the
free transform tool and just squeeze
this together a bit, make it a bit more
flat, drag it down, and then reduce the opacity
in the blending options. So there you go, that
looks quite good already. Maybe one additional thing
is to set this to multiply. I think it will blend with
the background a bit better, doesn't make much
difference, but it's still, I think, looks slightly better. Now of course, I can
always treat this further, but for now, I think
this will work. Now of course, we
can always check how the whole thing looks on
different backgrounds. So we can create a
new duplicate of the background layer and we can fill it in maybe
with a darker color. It looks quite nice
with dark as well, but I like to have several backgrounds and then I'd like to experiment with that while
I'm working on the design. Now, going back to the ring, there's an additional thing I
wanted to do there as well. I'm going to select the ring, create a new layer, and this is already
clipped onto the ring. I'm going to use the brush tool. And with the brush tool we
will pick the original color, but then I'm going to
change that color, make it darker, make
the edges soft, make the size slightly bigger. And the opacity was, I'm going to keep low. Okay, I really liked this little selector here on
the left with my left hand, I can very quickly adjusted. And of course, if
you are left-handed and you draw with the left hand, then you can move that
little selector to the right side so you can
customize the location of it. But what I'm going to do here is to simply paint over this. Having the layer on top of the adjustment will work better. Let's make the size
of the brush bigger. So what I'm doing here, you will see I'm just
adding a little bit of shading with multiply
adjustment layer. I think it works better. So I can create a bit of
shading around these parts. So make it look
like there is some shadow cast shadow
around the ring. Okay. It's just very quickly. I'm not going to waste too
much time here as well there. Okay. So without and with just a subtle little
addition that now of course, if you feel like
it's a bit too much, you can always reduce the
opacity because once again, this is completely
non-destructive. It's on a separate layer. One thing that I find not
that good at this point is that we have here a very strange thing
I'm going to show you. I would call this a tangent. So this point here, the problem with this is that
we have our ring coming, and then we have
this shape coming, and then we have the jokers. Trials are also in
the same place. So this point here is an
intersection which is not good. It would be better
to have this ring slightly visible there,
something like that, or maybe have the ring
further going up so it's not feeling uncomfortable that it feels like almost
like a mistake now. So it's good to avoid these. And even this here
is a little bit too small, that negative space. So I will make sure if
I have a bit more time, I would refine these
negative spaces as well to make sure
that they read well, like here we have a nice
negative space there as well. That these are, these
are working really well. So I don't feel like there's
a crushing between them.
53. Creative Project 6 - Joker Composition Part 5: All in all I think with the
image and the composition, we are already doing quite well. And I'm going to just
very quickly show you how I would add the
typography for that. We can use the type tool. And with the type tool we just click somewhere on the image. And then I'm going to
just type in a capital S. Actually need to have the
text selected, make it white. And then let's
increase the font size to something like that. Okay, so we have the
first letter there. Now I actually had
another shape here, which I'm going to very quickly
create in the background. So new layer lasso tool, I'm just repeating the same
things that I've done before. So I'm going a
little bit faster. I'm going to create this shape. And then we can feel this on
this new layer with a color, maybe using an orange. The topography, if we go
back to our text layer, now has a place
where we can put it. So I'm just going to place
it somewhere around here. I'll just make it
slightly bigger. And for this, we can also
use the free transform tool. Just have to make sure you
drag one of the corner points. Otherwise it's going
to stretch it. And by the way, whenever
I'm going back and forth, so I'm redoing undoing things. I just tap with two
fingers, so that's undo. And with three fingers
you can go ahead. So that's redo. Now I'm going to
duplicate this layer and there's also another
handy shortcut for that. With the touch shortcut, you just press and then
drag to the side of it, and then drag the shape or the layer that
you have selected. So that's a quick way of
duplicating something. Let me show this again. So if you just hold down the center of the
touch shortcut, with that, you can
constrain the movement. So that's like holding
down the Shift key. But if you then
drag to the side, that becomes the
Alt or Option key, which is to duplicate. So what I'm going
to do now is to double-click on the second one, and this is going
to be a capital M. Then double-click on the
thumbnail of the third one. That's going to be n i. And then I'm just
going to very quickly duplicate this two
more times as well. Another one. And then this
one is going to be the L and the other one is going to be the top one is going to be E. So the reason why I created
them all in separate layers, because I wanted to create this more dynamic
composition on the text. So we can place the
L somewhere around here, somewhere around there. And then the M can go
somewhere around here. Now, what I want to make sure is that it will definitely
read in the right order. So I don't want it to be
too complicated to read. Now I would like to just create a little bit of
interaction on the text. So they are not just sitting
on top of these images. So first of all, maybe the M, I can move further down
in the composition. And I think it would work quite
nicely behind that shape. So here you can see
that it's quiet, nice. Make sure it's still legible
so don't hide it too much. Just going to keep one of the
details behind that shape. And then what I'm
going to do with the letter I is to
add a mask on it. So layer mask, use
the brush tool, set the brush up, make sure it's a hard
edge brush, smaller size. And then all I am going to
do here is to paint over it and make it look like it's
hidden under the jacket. And it gets smaller as well? Yeah, something like that. And then an additional layer
on top of this, clip it. And then just simply
on the separate layer, we can paint over the top
and keep adding on it a bit. Just to create
that depth effect. Yeah. Something like that. So you can see it feels like
the eye is under the jacket. So little bits of
tricks like these, you can create a more unique,
interesting composition. And all I would do
after this is to refine things and obviously
add the additional tax, the put on a happy face
on the bottom right. But essentially these were the techniques I
wanted to show you. And you can see that we could
create a composition on photoshop for iPad quite
quickly and efficiently.
54. Brush Tool Basics: Photoshop for iPad,
amongst many other things, is also great for digital art or illustration and even mixed media where you combine
photos with drawings. And that's mainly
thanks to the fact that you can use
the Apple pencil. And this gives you
pressure sensitivity, and they're very quick
and intuitive way of drawing on screen. So in this first
lesson of the chapter, I'm going to walk you through all the settings
for the brush tool. And then in the other
lessons we will start using it for various
digital artwork. So to start with, once you
select the brush tool, you'll get a couple of
options here on the left. First of all, you
can decide what is your foreground and
background colors. When you tap on these colors, you can set them up
to whatever you need. And don't forget
that you can also use the HSB values
here at the bottom, or even the other color modes, RGB, lab, and CMYK. At any point, you can switch
between your foreground and background colors by
simply swiping over them. You can do that both there in the tool options are here at
the bottom of the toolbar. And if you want to
sample a color, you don't even have to switch
to the eyedropper tool. You can just hold down the touch shortcut and drag
it into its secondary state. Then drag over the image and find the color that
you are looking for, as just say this one here. And you can let go the touch shortcut and
it will be selected. The next setting is the
size of your brush, which you can
increase, decrease, and you will always get a
preview on the Canvas just so you can see what's the size that you will be working with. Below this, you get the
opacity of your brush, which you can
reduce or increase. And finally, you have the
hardness of the brush, which is set to the top
will be the 100% hardness. And all the way at the
bottom is going to be the most soft or 0% hardness. Now, this option might not be available for all the brushes, but whenever you see it, you can adjust it easily. Now let's just do a few lines. And the first thing I notice is that the pressure
sensitivity is not active. This is something
you need to enable, but you can decide
whether you use it for the size or the opacity or both. So if I set it to size
and I start painting, you can see now I
can vary the size. So I will just draw
another line here. Once again, I can press
harder and then feed it out. This is when the
size is affected by the pressure of the pencil. And then if I turn on, use pressure for opacity only, then this is what we get. So the size of the brush is not changing, only its opacity. And then if I have
both of them on, then we can create a line
where both the size and the opacity can be varied
by changing the pressure. Now let's just try to
draw something with the settings With zoom
closer to this part here. And notice that I'm working
on a separate layer so I can keep all my drawings
separate from the photo. And that's the non-destructive
way of working usually. So if I start drawing here, we can create lines like these. And why I want to
achieve is to have this world going around her leg. But before I go any further, I notice that my lines
are a little bit wobbly. There are not that
nicely defined. So this is because
I don't have any smoothing on the settings. So if I increase the
smoothing and I'll do something similar
with 50% smoothing. For now, you will see how
much nicer my lines can get. Now, the brush gets a little bit slower when you have a
higher smoothing level, especially if you use a 100%. But that's going to help you
to create even nice curves. But it might be a little
bit tricky to handle it. And you can see I wasn't able to get the curves that I needed. So I normally would keep it
around 50% or 60 per cent. That's a good amount. So once again, let's try
to draw these lines. I think that looks quite nice. And then there is a
very handy shortcut. If you hold down the touch
shortcut in its primary state, you can access the eraser
tool very quickly. So with that, you can erase
back from your lines. And I can create the illusion
of these lines going behind her leg and basically
creating a bit of depth. Maybe this one here, the bottom. Paint over it quickly
and zoom out. And already there is
some interactions between my lines and the photo. Now of course we
could take this even further if I duplicate this layer and then use
Gaussian blur on that, we can create something
like a glowing effect here, which can work even
better if we change the layers blend mode to
something like color dodge. This was without the glow
and together with the glow. So you can see already
with a single brushstroke with the right settings and with a little
bit of creativity, you can already create
something fun and exciting.
55. Brush Presets: Besides the basic
brush settings, we also get to work with
the various Brush Preset. And some of them can
really nicely simulate even natural media brushes
like watercolor wash. The way you can
get to this is by double tapping on
the brush icon. And then there's a list of
really fun brushes here. But let me show you first this one called
sixties background. And I will actually use it as a background and paint behind this dancing Mommy that I painted here inside
photoshop for iPad. So once I start
painting with this, you will see
immediately that it has a much more complex effect
than the default brush. Zoom closer, you can see
that it has a texture in it. Also, the color very
as I'm painting, and usually it gets more intense the harder
I press the brush. But this is not all
because of course you can also customize
these brushes. So if I go into the settings, I could even use blend modes via drawing so I can select
something like color burn. And wherever I'm painting, it's the same color, but it gets more intense
the more I paint over these details because of that
blend mode that I applied. So don't get confused. This is not a blend
mode on the layer, so we can check here, the layer is actually
set to normal. This is the blend mode used, the brush and just like experimenting with
blend modes on layers, I highly recommend
to do the same with brushes because each of them will have a
different effect. For example, Color Dodge will
have the opposite effect. And it's going to
brighten up details. So you can see already that
we could create almost like a flame effect just by using a single color and
a single brush. But there are plenty
of other cool brushes here, like spatter inside. I'm just going to
paint on the side or we have the mixed pattern, each of them having a
completely different effect. And of course we can switch
to a different color as well and paint with the same brush
over the previous ones. So really, once again,
it's completely up to your creativity,
how you use these. But there is an
important limitation currently on photoshop for iPad, it doesn't support saving or
importing custom brushes. This is something I know that the developers are
working on and I'm sure it's going to be
introduced in an update soon, but until then we just
have to make do with the existing brush presets.
56. Drawing from Reference: One of the reasons I
love to use the iPad for digital art because
it's so easy to set up a split screen where you
have photoshop for iPad on one side and your reference
image on the other side. So normally what I would
do is to save a couple of references in my photos. Here, I'm going to show you
for this digital painting. I had these references. And the one that I picked
to use for my artwork was actually this shot from the amazing BBC series
called peaky blinders. So this character
is Tommy Shelby. And let me show you how I set
up the screen for drawing. So to be able to get Photoshop, I would just drag
it out and drop it here onto the
left or right side. I normally prefer to keep my reference on the left side
because I'm right-handed, so I will just drop it there. And then also I can decide how much of the screen
I14 the reference. Most of the time I would
just have this small size. And then still I can zoom closer and move the reference
around within photos. And also I can do the same thing here on the right side
within Photoshop. Now of course, you can
also place your reference into Photoshop and
then trace over it. But with that, your
drawing skills wouldn't improve as much. And also, you wouldn't
be able to create your own artistic
representations of images because you will end up copying instead of trying to
recreate something. So if you want to improve your drawing and
painting skills, you should try this
split screen setup. And I guarantee after
a few paintings, you will notice the difference.
57. Coloring Drawings: Another common technique
that digital artists would use is to bring
that line art into Photoshop and do a
digital coloring by using a separate layer, which I already
have here on top of the line art and set the
blend mode to multiply. This way, whatever
I'm painting on this layer will still show
the line art underneath. Now of course, you can
make selections from the line art layer to
contain the painting. So for example, if I select my line art layer and use
the Quick Selection Tool, I can make a selection
of this heel. Then I will go back
to the layer on top, use the brush tool and just
start painting quickly here. Maybe I will use this as
the base color and then I can make it slightly
brighter on the top. Just to paint over again, make it slightly darker
and also maybe a bit more different in
hue here at the bottom. And I can very quickly
build up a cool effect, especially by using the brush presets that we've seen
in an earlier video. Let's just make it a
little bit more vibrant, some more interests
on this detail. So once I'm done, I can
just choose the Select, can zoom back and already
you can tell how quickly and easily we can start
building up this illustration. Besides using a
selection, of course, you can also use other
methods to fill out areas. So I'm just going to show
you here on the cactus. Another way of doing this
a little bit differently. So I'm going to just go
into the brush settings. And first of all, I choose
the hard round preset. Then from the
additional settings, I will make sure that
no pressure is used, but I will set the smoothing to really high, maybe a 100%. Then I will reduce the
size of the brush. Do something like that, and then start painting
around the edge. I feel like the smoothing
is a little bit too high, so let me just reduce
it down to around 50%. I think that will be enough. Now we can see it a little
bit faster what we're doing. So I'm just going to go
around this section here. Up, close it down
around that edge. So this feels a little bit more natural because I went
over the edges and sometimes not being a 100%
accurate actually pays off at the end because the illustration will look more realistic. So once I have the
outline for this section, I can switch to the
paint bucket tool and tap once and twice
into that section. The first time it doesn't
fill it in because there is a little bit of anti-alias
around the edge of the brush. But once we do it twice, it completely fills in
all of those details. Now at this point, if I
wanted to paint over it, maybe add some shading
on this detail. I could now go into the additional options and
choose Load Selection. And then within the selection, go back to the brush tool, maybe reduce the
hardness of the brush, increase the size a bit, and also change the color for
something slightly darker. So now I can start painting over the left side and
the bottom area. Something like that. And then let's make the brush brighter and
paint over the top area. And then the right side where I imagined the
light source to be. So you can see very quickly, we could create a little bit of almost like a
three-dimensional effect, but it can look even more interesting once I
remove the line art, which I used just as a guide, but that doesn't
necessarily have to stay. So once you have your coloring, you can decide whether
you want to show or hide the line art or of course, you can also make
various changes to it. You can put it on top, set it to multiply and maybe
just reduce its opacity. That's also a way of combining the original line
art video coloring. As long as you keep
your layers separate, you will always have as smooth,
non-destructive workflow.
58. 2021 New Features: First to demonstrate how the
Refine Edge has improved, I'm going to use this image
and remove the background. And I will use my iPad
Pro and the Apple pencil. So without any further delay, let's zoom a little
bit closer and take a look at a couple
of details here. Obviously we have soft edges
around the hair details, but we also have this for and quite complicated
background with all kinds of different
colors going on. So we have more contrast
around this area here, but further down where we
have the yellow background, it doesn't really stand out
as much to add the details. And then also we
have a couple of additional details
like the hard edges here on the right side, which obviously has to be
handled completely differently. So let's see how Refine
Edge can tackle this. First, I am going to go to the selection tools
here on the left side, and I will choose,
Select Subject. So that's going to help us to identify details that
we want to work with. And I think it did a good job apart from maybe
this section here. Now we can very
quickly refine this by switching first two with
the Quick Selection Tool, which has a brush size
that we can adjust. We can probably make it a
little bit larger and make sure it's set to subtract that
as the second option there. So we then I can just
quickly paint over it. And if it doesn't find
the edges properly, we can also try the object
selection tool again, set to subtract mode, and let's make a selection here. This actually created a
much better result already. Now maybe we can switch
back 1 second to Quick Selection Tool
and just tidy up these little outstanding
details here. And now it's time to
do the Refine Edge, which is going to help us to get a much better edge quality. Because if we were to
use a mosque on this, at this moment, it's
not going to look good. So we go two more here at the bottom and
choose Refine Edge. This gives us, first of all, the preview of our
current selection. And as I said, both the hair and
looks really bad. We are in black and white view, but we can always
switch back to overlay or on black, on white. I am just going to stay with
black and white because I think that's the best way
of seeing the details. And I am going to turn on first this smart radius
option and increase the edge detection
radius immediately, the details here look better. So I can switch back and
forth very quickly just by tapping on it and then showing
you after when I let go, I am going to
increase the amount, maybe somewhere
around a 100 pixels. And that's going to
reveal more details, especially around the hair.
Let me show you this. If I come down to
a lower amount, there are some gaps on the hair. But if I increase
this back up again, we get a lot of more
details on the hair, so this looks much nicer. However, this also introduced a couple of additional
details like here. Once again, with a lower radius, it's doing a little bit
better job at finding the edges with a higher
radius is going to introduce a little
bit more artifacts are mistakes that
are on this side, but we can all fix this later. We have the Refine Edge
brush as well here where we can switch to
minus on the top left. And I can paint over
some details just to tell Photoshop that we
don't need to include those. But to be honest, I
prefer to do this once we have our mask ready. So I am going to actually
accept this and save it. So here it's important
in the output as option, I choose Layer Mask
instead of selection. Once that's selected,
we can hit done. And I already prepared this
orange background just so we can have a closer look at
the result that we created. So I feel like the Furby tails
are looking really good. As a lot of nice details, obviously some mistakes here. Once again, as long as the mask is selected here
on the right side. So dragging over that thumbnail, you can switch between the
mosque view and the ImageView. So as long as the
mask is selected, we can use the Brush tool
and quickly paint out these details and just
improve our selection. We can swap the
colors from black and white very easily
here at the bottom. So in case we want to show
some details that are lost, we can use the white color whenever we want
to hide details, we just use a black. And let's just look at the
hand here on the right side. This definitely needs refining and this is where the
rotate canvas is going to be extremely useful because I find this angle much
easier to work with. Drawing from left to right
with a little bit of upwards angle is much easier than to draw
the other way around. And all I have to do is to
just simply rotate it around. This feature wasn't
available before, so I'm so happy for it
to be introduced now in this new version of
Photoshop on the iPad. And like before, we can just
paint out these details. Now the good thing
is that just like on the desktop
version of Photoshop, we can increase the smoothing
value with which we can get a much nicer and smoother result whenever we are painting. So we don't get a scribbly line. Instead we can have a very nice smooth line
around the edge, like so. And we can do the
same thing here. Maybe again, I rotate
it around the bit, swap two white color
on the left and reduce the size a bit,
something like that. And then now with white, I'm revealing details that got lost in the masking process. You go. Now if you want to get
out of the rotated view, all you have to do
is a quick pinch, which was zoomed out and
also reset the rotation. Another really
useful new feature that now we have on Photoshop on the iPad is the imagery
size or Image Size option, which we can find
in the settings on the top right here we can see the current pixel dimensions and resolution and
even the color mode. But once we click on Image Size, we get very similar options
to the desktop version. So first of all, we can decide on the
interpolation method. And most of the
time you would want to keep this on automatic and directly under this there's a really cool feature
called Fit to which you can resize it to a
specific device size. So the resolution of these
devices like iPhone, iPad Pro, or a print size, and even standard
photography aspect ratios and resolutions. Or of course, you can also type in the values
here at the bottom, either in inches pixels, or by changing the
resolution at the bottom. Now if you only want to change the resolution without
affecting the pixel dimensions, you can turn off Resample. And then if I just type in, let's say 300 and hit Done, I won't see any changes. But once this image is
printed out is going to be more condensed and it will
become a higher quality print, but on a smaller size. If you're a big fan
of brushes and you hoarded many of them for the desktop
version of Photoshop. Now the good news is
that you can easily sync them and start using
them on the iPad. All you have to do is once
you selected the brush tool, just to tap on it again, there you will see the
currently available brushes. But then if you click on
the additional options, you can turn on brush sinking. And there is also
an option to manage reach brush categories or groups you want to
sync onto your iPad. By tapping on Manage brushes, you will see all the groups of brushes that I created
on the desktop. So I can then go into each
of these individually, disable or enable them. Or I can also turn off the whole category or
turn it back on again. Once the thinking is complete, we can go into any of these, maybe select Kyle
Webster's special effects brushes and choose the spatter brush
with which I can very quickly start
painting already, even though you only have a limited set of options
for brushes on the iPad, whatever you set up on
the desktop and sink here will inherit all those
settings and preferences, which allows you to use really sophisticated
and advanced brushes right here on the iPad. For those who like
to share their work, there's a long-awaited
feature that we can find here in the share settings
called live stream. And this is exactly
what you would expect. So using your Behance account, you will be able to stream
your work directly from the iPad and communicate and
interact with your fans. And last but not least, since we talked about Behance, there is also a discover
on Behance option here in the main menu where you can find other artists
streaming currently. Or we can also see projects recently created with
Photoshop on the iPad.
59. 2022 New Features: The feature I'm most
excited about in Photoshop on the iPad
is the fact that we can finally now use and
also create smart objects. These are the special
layers that can retain their original resolution from the moment that
they are created. And for Photoshop Cloud
documents that are created on the desktop already
using smart objects, they will now show up here on the iPad as well
as smart objects. And you can see the little
icon next to the thumbnails, both in this view and also in the more detailed
view of the layers. By selecting this balloon layer, which is also a smart object, I can use the transform
tool and easily resize it, move it around, and I don't have to worry
about losing the resolution, even if I make it much smaller except these
changes and then go back again and resize it because it will retain the
original resolution. If I wanted to turn
any layer like this cloud here into
a smart object, all I have to do is to bring up the layer properties and choose
Convert to Smart Object. Or if you are using
the other layer view, you can also just tap on
the thumbnail icon and from the additional
settings you will find Convert to Smart Object. Remember that you won't be
able to directly edit or draw on to these
smart object layers. So if you ever wish to rasterize it back or convert
it to a normal layer, what you will need to do
is to tap on it again and choose Convert to layers
or flattened layer. Now even though it
is great that we finally have this smart
objects currently, they are still limited
compared to what we can do with them on the
desktop version of Photoshop. And probably the biggest
difference is that you can't actually access the source of
smart objects on the iPad. So what you would normally do on the desktop is to double-click
on the thumbnail. And that way the source of the smart object opens up
as a separate document. Here nothing happens
when you try to do that. In fact, it will just tell you that you will have to convert this to a layer if you want
to make any changes to it. Another aspect of working
with smart object that's currently missing
is smart filters. But again, hopefully these will be added in later updates. Dodge and Burn tools have
been added on the iPad. So we can find these on
the adjustment tools here. And whenever you select
either of these, you will also get additional
options like on the desktop, you can decide the range in
which you want to use them. You also have the
pressure option for using the Apple pencil, and you also have the additional
option to protect tones. So for instance, here
I'm going to select the forest layer and
using the dodge tool, I will be able to brighten up some of these details
on the trees. And then switching
to the Burn tool, I will be able to darken some of these other trees
in the background. Remember that these changes are directly applied on
to the image layer, so they are in a
way destructive. However, you can also use the same nondestructive
method with these tools, which we are used
to on the desktop. And all you have to
do for that is to create an additional new layer, then use the paint bucket tool. Make sure you have a 50%
gray color selected. And with that tap
anywhere on the screen, you can also put this layer
on top of everything else. And then from the
layer properties, you can either use
Overlay or Soft Light. Both of these will work. And now if I use either
the burn or dodge tools, we will be able to make these changes on
a separate layer. So if I make these trees
darker on this side, you can see that all this happened on that separate layer, which I can easily
turn on and off. And this keeps these changes
completely non-destructive. Now you can also import Camera Raw files into
Photoshop on the iPad. So I'm just going
to go to my photos and from the albums I have a raw image which
I exported from Lightroom together
with all the changes that I've done that already. And you can see that we get a very familiar Adobe Camera Raw interface here on the iPad. We have all the options on
the right to make changes. I can even reset the photo
to the original capture and then go back
into the settings and maybe increase the shadows, decrease highlights, maybe add a little
bit more contrast. And then we can go
even into things like effects, increase, dehaze, clarity, and then
even go into color, increase vibrance, and
so on and so forth. But most importantly,
remember that thanks to the fact that we
are working with a raw image, we have a much wider
tonal range to work with. So we will be able to
recover a lot of details in the brightest and darkest
parts of our images. It's important to
mention that at the end, once you are ready with
the changes in Camera Raw, you will be able
to choose whether you want to import the image as a simple layer or
as a smart object. Let's see what happens if
we choose Smart Object. This at the moment only gives
us the advantage of not losing any quality when
we're resizing this layer. However, if the same
Photoshop Cloud document is opened on the desktop, you will also be able to access the original image in the
source of this smart object. An all-time favorite
tool has been all sweaty to Photoshop on the iPad. And this is the magic wand, which you will find on
the selection tools. So here we can
choose magic wand. And it's going to work very similarly to what we're
used to on the desktop. So by clicking
anywhere on the image, it will find similar colors. And we can see that it will find a range of colors nearby. However, we can change
the behavior and instead of being limited to contiguous or
neighboring colors, once we take that off and maybe click on the sleeves here, you will see that
it will be able to pick up similar colors on the other side without the
two sides being connected. It's worth mentioning
that by default, this tool is using
a point sample, but you can increase
the sample size. I actually prefer the
five-by-five average with which if I
click anywhere here, it will be able to
pick up more details. And of course, if I hold
down the touch shortcut, I can click on additional
areas to add to the selection. Or you can also choose from
these icons here on the left. And the second one is
the one that we'll be able to keep on adding
to your selection. And another useful option is
the tolerance with which you can increase the amount
of colors included. So if I deselect this
and I click on the ones, you can see pretty much
managed to select everything. However, it also started to include details
from the face, the hands, and the lips. So be careful with the
tolerance is usually best kept lower if you
want to be precise. But to be honest, I very rarely result using the magic
one tool anymore because there's just
so many amazing AI assisted selection methods
like remove background, select subject, object
selection tool, which omegas creating
selections so much easier even when you have isolated
subjects like this one. Don't forget that
with this icon here, you can share your Photoshop
Cloud documents and invite collaborators or
reviewers to give feedback. And all of this feedback is
going to show up here on the comments section
where you will be able to respond to these and also marked some of them as being resolved.
60. Generative Ai : Generative AI features
powered by dB Firefly are now available to use on Photoshop on the iPad. So here we have an image, and I'm just going to
make a selection here at the bottom with the
rectangular Marquee tool. And in the contextual
menu below my selection, the first option is
the generative fiel, which I'm going to use. Here we can just
type in our prompt. I would like to
create a tiger here. Maybe if you want to
be more specific, we can type in that
it's a photo of a tiger and then he generate. In the layer properties panel, which you can access
from the right side, you will be able to
see the variations. We have the first one,
second one, and third one. Now I probably prefer
the first one the most, so I'm going to stay with that. But in case you want it to
create additional versions, you can always hit generate
again here in the menu. If you click on
that, it's going to create three additional
variations for you. Worth mentioning
that each time you are using generative
AI features, whether it's on the
iPad or on the desktop, you are consuming
generative credits. You get 1,000 of these each month with a
creative cloud subscription. So you probably won't
run out of them, but it's still worth
mentioning that it is not a completely free and
unlimited feature. Here's another
generative AI feature. This can be accessed by
selecting the crop tool. Straightaway, you can
see on the left side, once we start increasing
our Canvas size, we have the generative
expand icon showing up and simply
just tapping on this, we can again use a prompt, if you want to
define what we would like to see in that new area, But if you just choose Generate, Photoshop on the
iPad is going to analyze what's in
the image currently, and it will just try to predict what would look
best in that part. So I'm going to just hit
generate without any prompts. And then you have again, three variations
as the first one, second one, and the third one. I feel like again, the first
one is probably the best. Let's just zoom a
little bit closer. And if we open up our layers, we can also toggle this before and after. It's a very nice
seamless addition, so it blends really well with
the rest of the details. It's also worth mentioning that generative layers are indicated with these little
stars next to them. So both here in
the thumb ne view, we can see the little stars
next to both of these layers, but we can also see them
in the layers panel, even though it's smaller, but it's still visible that
these are special layers.
61. Remove Tool: There is a welcome
addition in the toolbar. We have now the remove tool also available on the iPad
version of Photoshop. It's a similar retouching tool to the spot healing brush tool, but still it's more advanced and can create better
results most of the time. Whenever you select this tool, you will also get the
additional options here below the brush size. So first of all, I
like to make sure that the sample all
layers is turned on. I also like to enable
pressure for the size. That way whenever I'm
using the stylus, it's going to pick up on the
strength that I'm using. And I also like to keep on
the remove after each stroke. However, first, I'm going to demonstrate what happens
if this one is turned off. So I am going to create a
new empty layer as well. That way, I can work
non destructively. And I'm going to zoom a
little bit closer and maybe just reduce my
brush size a little bit. Now, if I paint over
this area here, when I let go, notice
that nothing happens yet. That is because we turned off the remove after
each stroke feature. So in this case, what I need to do is to click on the little tick icon here at the bottom
so that blue icon, I can accept this change, and then it's going to update. So the advantage of this
is that I can paint over additional areas
before committing to the changes and
then accept it, and it will do it all
at the same time. However, if you
don't want to waste time always accepting
these changes, just turn on this remove
after the stroke setting. And this way, you
can just paint, and immediately, it's
going to take effect. So we can just paint over
this section here as well. And you can see we've done all of this on a separate layer, so I can easily turn them
back on by hiding this layer. Or again see the results of what we achieved
with the remove tool. Now, let's see what happens
if we try to remove a bigger detail like
this second astronaut. So I am going to paint over it. I'm using a big brush size and just paint over
this whole area here. Fortunately, there is no way to make a selection
around the detail. You have to just
completely paint over it, and then we can see the result once again
before and after. Maybe we can just paint over a couple of additional
details here. Also, something that we
can change on the desktop, but currently it's
not available on the iPad is to change the
color of the overlay. It's not the most fortunate
color when you are painting over purple
or pink details, having a pink overlay, but it probably will
show better around here. If I want to remove this planet, you can see now my
highlight color. Is very similar to the
colors in the background. But the effect of
this tool is great, so we managed to do a lot
of changes very quickly, and once again, everything is
completely non destructive.
62. Camera Raw Filter: I'm very excited that one
of my favorite filters is now available on the iPad
version of Photoshop. You can find this in the
filters and adjustments, and it's the one at the
bottom camera filter. However, it's grade out
whenever you try to use it on smart object layers or
on generative layers. In this case, this is
a generative layer. I extended this photo to the left and the right using
the generative expand, and it did an amazing job. So it added a lot of detail, and it looks very
accurate as well. Hard to tell that
it was generated. But the problem is, if I want to use the
filter on this image, I would have to create a new layer or have to
rosterize this current one. So if I go to the
additional options, I can choose merge
visible here at the bottom or flatten
image would work as well. And now we can go into the filters again and
choose camera raw filter. Here, you will be able to find most of the categories that you have on the desktop version
of Adobe camera role. So first of all, we have light, and we have the auto
setting as well, which does a really good job, so that was before and after. You can also tap and hold on the image to see before
and after views. You can, of course, then
manually adjust anything. Let's just say I can
increase the contrast. And if I don't like it, I can just double tap on the value. It will go back to
its default value. A little bit of contrast, I feel like is good in this
case again before and after. Then we can go into
color settings. Once again, we can do
this manually or we can use the eye dropper
to set the white balance. In this case, as we
drag this around, we get a live indication
of the color adjustments. So if we find a spot that we feel like is supposed
to be white, then we can just let go and it's going to update
based on that. Once again, that was
before and after. I feel like it helped to
get a better color balance. And then maybe we
can also increase the vibrance just to have a little bit more
color intensity. Moving on, we have effects, and these I love, we can increase the texture in the image and the
clarity as well, which makes it a
bit more detailed and just adds a bit
more contrast as well. Once again, before and after. We can also reduce
the vignette just to make the corners a bit
darker in the image. Then further down, we can go into detail, increase
the sharpening. This is something you can see better when you
zoom into an image, once again, before
and after before. After that certainly helped. And when we look
at the background, we can see a bit of noise. So we can increase the
noise reduction as well, which is another brilliant
feature in Adobe camera role, and we can also use the
color noise reduction. Now, it's also worth
mentioning that you can use camera roll filter and utilize it on non camera
row files as well, so you don't have to work with a camera row file for these
features to work well. However, if you work
with a row format image, it's going to give you
a lot more detail and total range compared to a
compress five format like a JP. But once again, that was before. This is after, let me zoom
out before and after. And if we like what we see, we can just press on done
on the top right corner. And it's going to
apply the filter. Now, even though you can't use this filter non
destructively at the moment, because we can't apply it on a smart object as
a smart filter. What you can do in
the meantime is to duplicate your layer before
you apply the filter. And that way you will
have an original version and the updated version
on top of each other. It's not the ideal way of
working on destructively, but it still gives
you that option to go back to the previous version
in case you want to.
63. Color Picker: Sampling colors go so much easier now with
Photoshop on the iPad. The eye dropper tool, which we have here in
the toolbar on the left, will give us the way
to sample colors. We just have to drag over an image and we can see the
currently selected color on the top half of this ring and the previously selected
color underneath it. And when we let go, that
color is now selected. We can see it here as well, and we can also
check its values, whether we want to use
the hue saturation brightness sliders or maybe the RGB values or any of these other options
that we have here. And we can also
save this color by tapping on the plus sign
in the Swatches category. Now, when I go back
to the hydroper tool, It's also worth
mentioning that there's options for the sampling area. By default, I believe
it's set to three, but you can increase
this value up to five, 11, 31, 51, or 101. This is going to have
a much larger area, so 100 pixel sampling area. Will result in an average
of colors from that area. So when I'm dragging my
stylus over the image, what you will notice is
that the top half of the circle is
changing more slowly. There is a smoother transition between the colors
when I'm hovering over them compared to previously when I had the
sampling set to three, When I'm hovering over details, it's just flicking very fast because it has a
smaller sampling area. Additionally, we also have options with the
hydroper tool to sample from all visible layers or all layers without
the adjustments. And then also we have the
additional options below. But to be honest,
most of the time, you probably want to
use the all layers. So that's a good one
to keep selected.
64. Liquify: Another welcome addition in Photoshop on the iPad
is the liquefy filter, which again, we can find
here in this section. It's again worth mentioning
that unfortunately, it cannot be used on smart
objects at the moment. This might change in the future. But for now, we just
have to work on raster layers whenever we
want to use this feature. Going to select it,
and it opens up its own editor where we can access all the
tools on the left, and we have the
size of our brush here and also some
additional settings. Like the density, which
is an important one, if you set that to zero, it's going to make changes
in a more subtle way. So as you can see, when
I paint over this image, let me just do another
line here in the middle. This is how it looks
with zero density. I increase it to 100%, then it's going to be much more stronger and creates more distortion
when we are using it. I like to keep this
somewhere in the middle, and I also like to
turn on the pin edges, which is going to make
sure that when we are using the tool around
the edges of the document, it is not going to stretch the pixels closest to the edges. So without it, this can happen. You can start to see
what's under the carpet. I'm just going to
keep that turned on, and this is the way
I prefer to use it. Now, the default tool that
is selected is called warp. And with this one, we can just drag and move
things around, so I can make this mountain look much bigger in the
background if I wanted to. I can drag it down
as well a bit, and already we created a
quite good result here. And if we use this icon
here on the top right, we can show before and after. Four and after. If we make our brush
smaller, we can, of course, be a bit more precise and maybe even make some
trees look taller. One thing about liquefy
is that, of course, you will also distort details in the background, so
that's inevitable. However, you have the
reconstruct tool to fix things. I'm going to again reduce
the size of my brush, make it very small, and I can paint over these details
in the background. Can't completely
get rid of them, but you can probably
improve it a bit, or you can also try to use the
smooth tool with which you can recover partially details
that were there before. When you are ready, just press done on the top right corner, and that's going to
apply the changes. Once again, we can
see before and after.
65. Lightroom Photos: It became so much
easier to work with light room photos in
Photoshop on the iPad. You can either access this from the import and open
in the home screen. So if you tap on this, you can find light room photos. And when this dialug
box comes up, you can switch between seeing all your photos or collections. I'm just going to pick
one of these images, maybe this one here, and then choose open. And then if I wanted to access
another light room photo, I can also do that from
the plus icon, once again, choose light room photos, select the same category
or collection this time, and then pick maybe this image, and once again, choose open. This way, this
second image will be placed in as a new layer on
top of the previous one.
66. Auto Select: The Move tool now has the
auto select layers feature, which by default is enabled. Of course, you can
still turn this off. But as long as it's
enabled, by default, is going to select either
individual layers or groups. For now, since I don't have
groups in this composition, I'm just going to use the
individual layer option. You can see I have this layer selected here on the right side. To be able to change
to another element, I just have to tap on it
once and then tap again. Now I have that one selected. Whether you use your
fingers or an Apple pencil, you should be able
to do the same. Tap once and then
tap again to select. If you do double
tap too quickly, it's going to zoom
in to 100% view, and then double tap
again would zoom out to fit the composition
to your screen. You have to make sure you
don't double tap too quickly, you have to do one and 21 and two. So that's a way
to select them quickly. It's still not as quick and fluid compared to the desktop
version of Photoshop, where you literally can just click on anything
and start moving them straight away with the
same auto select feature. But I still find this
a welcome edition, and it definitely makes working with complex documents
much easier. Now, I just wanted to show what happens if I have
two layers selected. I'm going to have the one
in the middle selected, and then with the
touch shortcut, I add the image on the
right to my selection. And then I go to turn this into a group with the
icon on the right side. So now we have a layer group, and I can move this together. But remember that
from the settings, we have the individual
layer options selected. So even if I have a group, if I do the same technique, I can still select the layers inside the group with
the auto select feature. However, if you want to
automatically select groups, whenever you have them
created in your documents, just use the other option. So now that I have
the group selected, I can have this
layer selected here, and then with the auto select, now it's going to have both
of those layers selected, which were put into a group.
67. Auto Adjustments: We have three new auto
adjustment features in Photoshop on the iPad. We can find them in the
filters and adjustments area. So here's first auto tone, which creates a more
balanced result in terms of the tonal values. So this was before.
This is after. So it's mainly affects the
exposure of the image. Then if we choose auto contrast, that's going to improve the contrast in the image
again before and after. And then once again, auto
color is the third option, which will just simply
affect the colors, so it will change the hue and saturation of all the colors. That was before,
and that's after. Now, of course, you can
combine these as well. After you use auto color, you can still add auto
contrast and auto tone. This is the three used together. Fortunately, we still don't have control over smart filters, so you won't be able to use
this non destructively. But if you want to test how the three filters look together compared to
the original image, what I recommend to do is to
create a duplicate layer. So just select your current
layer, create the duplicate. And then apply the auto
adjustments on that. So like before I'm going to
start with auto contrast, then I will use auto color, and finally, auto tone. So this is how the three
adjustments looked together, and this was before. Once again, after
before, and after. And I just wanted to
mention that it actually depends in what order you
apply these adjustments. So if you are planning to
use all three of them, this is the right order
that I showed you. I'm just going to
demonstrate what happens if you use
a different order. So I'm going to create
another duplicate layer of the original image, and I'm going to turn
off the visibility of this one that
we just created, combining the three adjustments
in the right order. So first, I'm going to apply auto contrast, then auto Tone. And finally, auto color. You can see if I use the
auto color at the end, it actually ruins the colors, so it gets too cold. This is with the right order of doing things and not leaving
the auto color at the end. And that's the one with
auto color at the end, and once again, this
is the original image. So definitely the order of
these adjustments matter. In some cases, you might need
to use a different order, but I found that leaving auto color at the end
usually is not a good idea. I like to start
with auto contrast, then auto color and then
auto Tone at the end.
68. Layer Effects: Layer effects are finally available in Photoshop
on the iPad. The easiest way to
find them is to go into the layer
properties area. So click on the
third icon here on the right side and have
your layer selected. The good news is that
you can apply these to smart objects as well or
normal roster layers. So as you can see, I have this layer selected
with the Girl, and I'm going to go
to the effects area. I'm going to close
the blending options just so it doesn't
get in the way. So in the effects, we can
choose ad layer effect. And then the two options
that we currently have available here are
stroke and drop shadow. So it's still very
limited compared to the desktop
version of Photoshop, but these are probably the most commonly used effects anyway. So let's start with stroke. I'm going to increase the size of this so
we can see it better. I'm going to change the
position to outside. I will also change
the color to white. But you can see we could
apply any color easily, and once the white is selected, I can further adjust the size, and we get a very nice quick life feedback
on what we are doing. We can also change the
blend mode of the effect. For instance, we
can use dissolve. If I increase the
size a bit even more and reduce the opacity, we can have that nice grainy
effect on the stroke. But for now, I'm just going
to keep it on normal and just reduce the size a little
bit. Something like that. And then if we want to go
back and add more effects, we just have to tap on this little arrow
here on the top left and then press the plus
sign to add drop shadow. Once we select that, we can start increasing the size of it. Also the spread can be
increased and the distance, and it starts to show
up in the composition. Maybe if we increase
the opacity, it will be more noticeable, and also maybe the distance
can be increased a bit more. We have a use
global light option similarly to the
desktop version, which once we turn off, we can also adjust the
angle of the shadow. So we can decide which
direction we wanted to go to. Going to keep it going
towards the bottom, and we can also apply noise to the shadow
if we wanted to. But for now, I'm just
going to keep it as is. And of course, don't
forget you can also change the
color of the shadow. I prefer to keep usually my shadows colored instead
of being completely black. So in this case, I will
use a dark purple or blue. And once we go back again
to see all of our effects, now we can see
them individually, so I can turn off stroke, turn it back on, or turn off the drop shadow, and
turn it back on. We can also go back and make changes to them by clicking
on these little arrows, or we can also click on the additional options
and reset each of these effects to
their default values or delete them if we
don't need them anymore. Even though there's only these two effects currently available, you can still add
multiple instances of the same effects if you want. So for example, I could add another stroke on
top of everything, and this time I'm
going to set it inside just so we can
see the difference, and I will change the
color to purple, pink. We'll reduce the size of it. So now we can see that
we have two colors. Maybe instead of inside, we can also set this to center, and then it's going to
overlap both the image and the other stroke effect that we have underneath
it, the white one. When we go back to
all of our effects, now I can turn on and off individually each of
these stroke effects. And when you have lots of
effects applied to a layer, you might also want
to use this feature, hide all, with which you can very quickly turn
all of them off, and then again, show
all at the same time.
69. Sponge Smudge: Besides Dodge and Burn now, we also have the smudge
and sponge tools available in the
adjustment tool category. First, let me show
you the smudge tool. Whenever you use this tool, I recommend to create a
separate empty layer. Because this tool has the
sample all layers option, it means it can be used
non destructively. I also like to use the pressure
sensitivity for the size, so I have a bit more control when I'm using the Apple pencil. So this is how it
works by default. If I start dragging
over details, they will get smudged,
as you would expect. It can be useful to add some
motion to some details. Like, for instance, here, I can use it on the hearts, make it feel like they are
coming from the whale, and I can adjust
their angle easily, set a direction for the blur. In a way, it can be used almost like as a motion blur effect. Because everything is
happening on a separate layer, it's going to work
non destructively. There's also an
additional feature called finger painting. If you turn that on, you can also blend your currently selected
foreground color, which right now I have set to yellow into the smudged details. So as you can see, when
I do the smudging now, is going to introduce that
yellow color as well. Can, of course, control
the size of your brush, the strength, and the
hardness as well. Now, similarly to
the Smudge tool, for the sponge tool, we have
also the same features. However, this tool cannot be
used on a separate layer. You can see that there's no
sample all layers option. We have to make
sure that we have the image layer selected. If I start painting with this, I can start
desaturating the image, and the default
setting is that it's applying vibrance adjustment
instead of saturation. In case you don't
know vibrance means that you're trying to equalize the color intensity while desaturating the area
that you are affecting. I turn this off, it usually just results in a more
drastic change. So it's going to have all the colors de saturated
with the same amount. Of course, tool can be set to saturate instead of
removing colors. For this, I'm going
to turn on both vibrant and the
pressure sensitivity, and then I will
start painting over existing colors just so we
can see how this looks.
70. Fonts: Now in Photoshop on the iPad, you can access thousands of DOB funds or even upload
custom funds yourself. Simply select the text layer and go to the properties panel, where you will be able to
find the fund properties. And if you click on
the Typeface option, here, you will be able to find
your recently used funds. But if you tap on more
funds at the bottom, you will be able to find
all the categories here. And for instance,
if I choose school, I can find some nice fonts that would work well
with this composition, like even this first
one, Mon blossom. If I zoom out a bit, we can see it better
how it looks, and this font will be now available in other
compositions as well. Add your custom fund, or you have to do is to
tap on the plus sign, choose Add more, and of course, you have to have a fund file
first added on your iPad. I have one example right here. I'm going to select this. After I taped on OPN, it tells me that it is now ready to be added to the Cloud. You just have to also take this option and
agree that you have the license to use this
fund on Creative Cloud. I'm just going to
do that. Now if I just tap on the
plus sign again, I can choose view dit funds. And there is the Havits
regular that I just uploaded, ready to be worked with
and, of course, edited. So if I just use the Type
tool and click on this, I will be able to separate
it into two lines, for instance, and make additional adjustments
if I wanted to.
71. Remove Background: A smart feature called
Remove Background is now also available on
Photoshop on the iPad. You can find this amongst
the selection tools. When you tap on this icon here, you will see it
under the actions. So let's just choose
remove background. And I intentionally chose an image which has
blue background, and also the subject. This girl is wearing
a denim jacket, but he still did a really
good job. So that was before. And after. And if you double tap on the layer mask
here in the layers panel, we can see the mask
that was created. So let's see again, the image. So essentially, this feature is exactly like the
select subject, but it goes one step
further because it turns that selection
already into a layer mask.
72. Content Aware Fill: Whenever you create a selection in Photoshop on the iPad now, you will be able to use the
content a feel feature, which shows up here
at the bottom. So I'm just going
to tap on this. It will take a while, but it's going to create a fairly
good result here. So let's just see
before and after. That was before,
and this is after. Now one thing that you have to know about this is that it's only going to sample details
from your current image. It's not as smart as
like the remove tool, which is one of our new
clone tools available in Photoshop on the iPad that relies not only on
your current image, but also utilizes AB fire
fight generative AI. However, in certain cases, the content of fiel might
still be useful for you. One big downside of it is that it cannot be used
non destructively, so you won't be able to use
it on a separate layer. So in case I create a
new layer, and again, I make a selection of a small
detail like this one here. If I tap on content aware fill, it's going to tell
me that there is just no pixels to work with. So if you want to work
non destructively, just use the remove tool. Again, I'm just going to select this and paint over the detail. And it's already gone. So this is on a separate layer, which I can easily
hide or show again.
73. Conclusion: Congratulations on
completing this course. I hope you found it useful, inspiring, and enjoyed the
whole learning experience. Although this is the
end of this course, it is only the beginning
of your creative journey. Now it is your time to create amazing compositions using
Photoshop on the iPad. And I would love to
see your work when sharing your artwork
on any social network, please tag us with the hashtag. Yes, I'm a designer. We can check it out and maybe even feature it on our channels. For inspiration, tutorials
and useful resources. Follow us on YouTube, Facebook, instagram,
Pinterest, and Twitter. Also don't forget to check back as we are continuously adding new lessons to discourse whenever new features
are introduced. Thanks again for joining
me on this course and I hope to see you soon on
another one. Goodbye.
 Martin Perhiniak, Graphic Designer, Illustrator & Educator