Transcripts
1. Adobe Spark Post: Intro: [MUSIC]. Hi, I'm Priscilla
Cadwell and welcome to my Skillshare class on
the Adobe Spark Post app. As an illustrator and
surface pattern designer, I constantly use the
Adobe Spark app to create engaging
social media posts for my business,
Cardwell and Ink. In this class, I'll
be teaching you how to use this tool to take your marketing and your
content creation to the next level and how
to do it in minutes. Adobe Spark allows
you to create content quickly from anywhere as photos, videos, or animations for your
social media and websites. I'll be showing you how to
navigate the user interface of pre-made templates,
color palettes, fonts, and icons to coordinate and improve your overall
branding for your business, and you can do it all from your smartphone or your tablet. This class is great
for beginners and creatives of any
level wanting to easily incorporate more
graphic design skills into your content for a more
professional presentation. Your class project is to create one social media post
for your business, and all you will need
to take this class are 3-4 to along the same theme, The Adobe Spark Post app on
a phone, iPad, or tablet. So enough talking,
let's get started.
2. Adobe Spark Post: Overview of the App: [MUSIC] I'm going to
start by giving you an overview of the
Adobe Spark Post app. Now, if you take a
look at my screen, the app should highlight. Adobe Spark Post is free software that can
be downloaded from the App Store on an iPad
or an iPhone, or a tablet. There is a web version, but this class will
mainly deal with the iPad and mobile interface. First of all, you need to download the app
from the App Store. The icon looks like this. They have recently
changed the icon from a yellow icon to a
red symbol in 2020. If you have used the app before, just be aware that it
is slightly different. When you open up the app, the homepage shows a range
of pretty many templates. Some are premium with a yellow tag that
requires a subscription, but the ones without the
yellow tag are free. Now, I do want to preface this by saying that for this class we are only going to be using the
free functions of the app. You don't need to have
an Adobe subscription. I believe it is
free to sign up to create an account
so that you can access the features
and store any of your posts on your
phone or iPad. At the bottom of the page, you'll see three things. The first is a templates icon. Then we have a plus icon with a green secular background, and then on the right-hand
side at the bottom, you have the my posts. I'm going to take you through
this initial interface starting with the my post. Every time you create a
post, I'll just click. It does get stored in
the app so that you can always go back and review
or edit your purse. Clicking on the My Post
tab shows your library of safe posts and you can
scroll through them. At any point in time, you can also modify
and edit them. This is great if you have a
template you have made in a particular layout
that you want to reuse without having
to reinvent the wheel. You just can swap in and
out different images. This can help you have
a more cohesive feel to your social media posts
and your website posts. It also means that you can keep the same color
palette throughout. As a creative, I generally have content in the form
of images and videos. I do find it great
to look through the my template section
as inspiration, which is where we will go next. At the bottom left-hand
side of the screen, when you click on my templates, this is generally
the landing page for the Adobe Spark Post app. It showcases, arrange, a free, and pre-made
subscription templates. The templates with
the yellow tab require a paid subscription. The ones without it are free. We are limiting our use in
this class to the free ones. I generally use this as a library for inspiration
for different types of posts that I can create
using my content or using the free photos that are embedded
within the app. At the top of the landing page, you'll see a range of different categories
like featured, premium, animation, collage, seasonal, lifestyle, business
school, travel, etc. There are a whole range that
you can scroll through. For example with the
animated templates, I do love the little fish. You can actually click on any of the posts and just
have a look and see up close if that's something that you
would like to use. Please note at the
top left-hand side there is also an x
which will take you back to the original homepage that you were on to begin with. Also on the top right-hand side, you will notice a
little search bar. You can also type in. I think I've already
put textile in. You can type in and search for a particular term that fits in with a theme that
you are working on. For example this is
the textile one. Being a textile designer. That's always an
interest factor for me. You can scroll through. It can just be great
to get some ideas for things that you may want to
showcase your work with. I'm taking a look and I
really do love the look of this template in terms of the color scheme
and the rest of it. Looking at it, any template that is a
pre-made free template, you can still modify. There's a little tab
at the bottom that said re-mix the template, which means that
you want to adjust the template and
make it your own. When you click on it, this is what you get. You get the post, you get a new contextual menus specific to that
post, at the bottom. Anything in this
post can be altered. You can click on the photo
and then swap in or replace. You'll notice another
contextual menu shows up at the bottom
and replace it with one of the photos from your own photo library
or from your own files. You can also adjust the text. There'll be a range of
color palettes that are embedded in the
app that will come up that you can then use to adjust the text to whatever you
would like it to be. Then I will go into a bit
more detail in that later. Now, when you open the app, you can log in with your Adobe account or
create a free account. One benefit of logging in with a subscription is
that you can remove this watermark at the
bottom right-hand side of any of the Adobe Spark parse. If I click on it because
I do have a subscription, I can immediately remove the
watermark on this project, and then none of the parse
will have that watermark when I save the image or when
I save my animated post. It's not very obtrusive, so it's not a problem if you have it on your posts that if you have a subscription
to The Creative Suite, you can login with
your subscription and have that removed. I'm going to show you
how to get images, use and manipulate
images to make your own social media posts in the next class. See you there.
3. Adobe Spark Post: Choosing Your Images: [MUSIC] We are going
to move along to choosing our images for
our social media post. Now as a creative, I
generally will have my own content created
but I do know that there are a lot
of people who are small business owners
who are not necessarily artistic but just want photos
along a particular theme. At the bottom, I'm
going to click on the plus icon because Adobe Spark Post has a
solution for this as well. You're taken to a whole range of options that you
can incorporate. You can go to your
photo library and pick any images that you
have created yourself. But if you don't have
content readily available, there is the option here
for searching free photos. If I tap on "Search free photos" you'll see a whole
range of photos come up. Now, these photos are sourced
from Unsplash and Pixabay, which are sites that have royalty-free photos
for people to use. Whether you are using that for your website or
whether you are using that for your social media
posts they are royalty-free. It's really awesome
to see an app incorporate these photo sources, or these stock photos
into their app for their users to
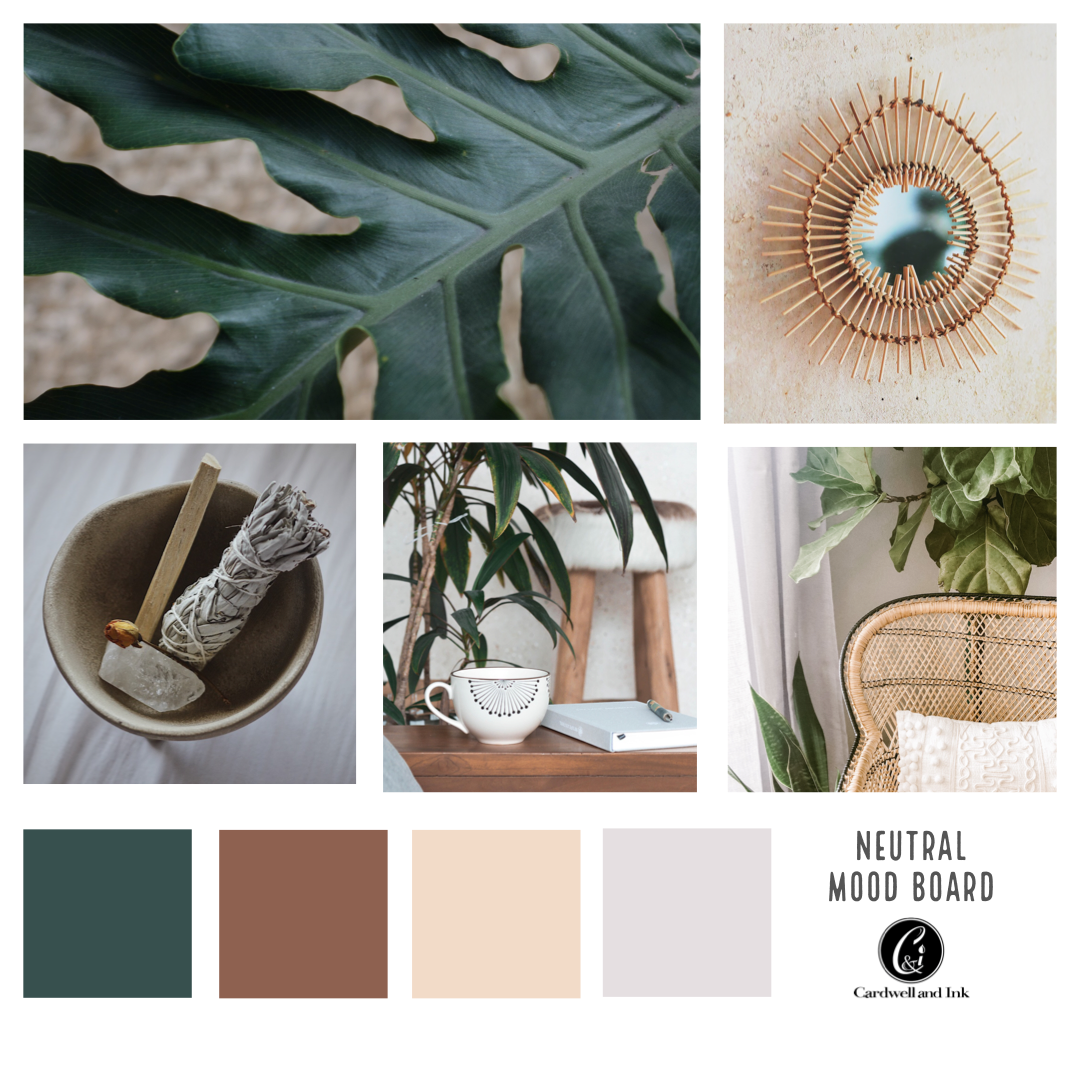
have access to. If you wanted to
create a mood board, for example I think
we've gotten into a haze is the term that
they've used here. A whole bunch of
different photos come up, but just the same way
as you can search the templates there is
a search bar at the top where you can search for images that you want
to use for your posts. I'm just going to bring my keyboard and I'm going
to type in Bohemian because I'm going to walk
you through creating a post that has a neutral,
natural vibe. I think that's a great term. You can pick any search term to help you streamline
or narrow your choices. When you click an image
and already I can see images that I want to use. We'll go with a bit of
a leafy one for this. I love that. Just select the photos that seem to resonate
with your theme. Once you have
selected your images, you do have to go to the
top right-hand side and click to add those
images to your post. There you have it. Now, straightaway, the
first thing that shows up, which I think is an
awesome feature, is the size of your post. You can have a post
for Instagram. You can have Facebook,
Pinterest, LinkedIn, Snapchat. A whole range of
different templates are available to you
to be able to use. It takes the guesswork
out of thinking, well, will I be able
to use it for this? Will I be able to
use it for that? I'll just click
on a few for you. If it was a profile cover, it automatically will resize to that particular size for you. If you're wanting it for
print, a five-poster size, letter size,
Snapchat, Pinterest. This is a really awesome feature that we can use in order
to streamline your posts. You may be wanting to make
a post for your Instagram, and then you want to convert
it to a Pinterest post. Adobe Spark Post will
automatically do that for you. You don't have to, again, reinvent the wheel. I'm going to go with Instagram because I
want to square post. I'm going to click "Done." It will take us to a
new contextual menu where we can start to modify. Now I do want to show you
this great little feature. If you notice the text, the text really fits into the whole field and
the color palette, of the photos that
you've selected. That's another great
feature of Adobe Spark. It will actually automatically draw out any colors that are in your images and create a cohesive color
palette for your fonts. In the next video, I will show you how to play with these images to create
a social media post. I will show you how to
use the different fonts, how to use different
color palettes, how to use the different icons to then make the posterior. See you in the next video.
4. Adobe Spark Post: Setting up your Post: [MUSIC] Now we are going to continue customizing our post. You'll notice that
I have four images. Once again, at the
bottom right-hand side, if you have a subscription, you can tap on that to move
the Adobe Spark watermark. Now looking at my post, it looks great. Instagram ready. However, I feel like I want to add another photo and use this to show you if you've already picked photos
and you decide, well, I think I would like to add a few more into the mix, how you go about doing that. In this case, the first
thing I want to show you is that for any
image that you have, you can click on the image
and you can move it around. I think I'd like the
cap at the bottom. I think I'm going to
swap it over there. You can always hold an image down and swap it around into any of the other
cells that you want to. They're not necessarily
fixed in place. The next thing is, if you want to add an additional photo, when you tap on the photo, you'll notice that
at the bottom of the screen a new
contextual menu comes up. You can replace it or
you can add a new photo. I'm going to go to Add
and say Add Image. I'm still going to go
into the free photos and continue with my bohemian theme. I'm just going to add one
more image that is along the same color palette
as the others. I'm just scrolling
through until I see what I'm looking for. That looks pretty good. You want to keep your images cohesive in a particular
color palette or along a particular theme, as always, at the
top right-hand side. You then type it in at one. Once you have popped that in, it will ask you, do you want to add it to the collage or do you want
to allow it to move freely? If you add it to the collage, it will add a new cell into your post that will
put the image in, if you want to move it freely, it'll float on top of everything else like
the image implies. I'm going to go add to collage. Now the way that this
image has gone in, I would prefer to have three images at the
bottom and two at the top. In this case, what do you do? I'm going to first tap
Done so the image is in. But I want to rearrange
the layout a bit. I don't want to resize it to a different
social media post, I want to keep it in
this social media post, but I just want to
change the layout. You'll notice at
the bottom there is an option for layout. I'm just going to click on that. You will see that it brings up all these different grid
options for you at the bottom. Now, I can already see the
grid option that I want. I would prefer to have
three at the bottom and two large images at the top. I'm going to click on that one, see how my image has
been swapped around, and then I'm going
to click Done at the bottom right-hand side
to keep those changes. I think I'm pretty
happy with that. Now that we have our images, you can also rearrange
your images. I would like this leaf at
the top left-hand side. I'm going to click on it
and I'm literally just going to swap it through
and see how it feels. Yeah, I'm happy with that. I think I want this all
the way in the corner. I would like my tea
cup in the middle. There you have it. I'm
also going to move these around to have the
view that I want. Pretty happy with that. I think this image
can go a bit smaller, maybe want the leaf a bit larger so I might
move that over to the side. I feel I'm pretty happy
with that layout. Now you'll notice that the
text can be moved as well. Anything in this can
be moved so as not to obscure the
pictures beneath them. I'm just going to resize
this image again, as well centered a bit more so you can see more of them
all. Fairly happy with that. That was the layout. The layout is probably the first thing that
you want to play with. You'll notice when I did click the Layout and it
gave me the grid. You can also adjust the borders. You'll see as I
move the borders, it moves the cells as well. You notice there's a
little lock there. If you undo the lock, you can adjust the border
independent to the cells. You might want this a
little bit smaller, but you might want the border
a bit larger around it. That's another thing that you
can adjust fairly easily. I'm going to lock
the two together. Color as well is there. You may see the color
palette and go, I love the white but
maybe I would like to try a sandy color or a teal. The thing I love about
Adobe Spark as well is that your color palettes are
drawn from the images. It creates a suggested
palette for you using colors from the images that you've already drawn in, and you can pick and choose, or you can choose any of the colors that are
available to you. If you have a specific color
palette in mind as well, you can actually
click a color and you'll notice the little
lines that show up on it. You can choose a custom
color that you want it to be, for example, a brown, or you can actually
use the eyedropper tool and select a color from your image that you may
want to use as a border. That's another really
great feature. You may want to save those
changes, you click Done. If you are not happy
with those changes, you click Cancel and
it will take you back. Now, I really do like the white, so I'm going to
click Cancel again, and it should take me back
to the original piece. We're still in the layout. The last thing in the
layout menu is the design. There are a whole host of pre-made template designs that are embedded in Adobe
Spark, which I love. As I click through
it, you will see what it does to my post. It adjusted to that
particular layout. It still maintains your
images but it allows you to look at different layouts that you
may prefer to have it in, and then you can save
those changes for your layout and continue to
customize it from there. This is another wonderful
and quick feature. As I'm going through,
I'm thinking, yes, I do want to choose
one of their designs. I'm going to pick
this one because I want to make it
into a mood board. I want to use the whites pace at the bottom in order to add a few icons to show you how
to use icons in your posts. That's done. It means my text is not obscuring any of my images, people can appreciate the images without the text over them, and I'm going to click Done. In the next video, I will show you how
to insert icons and adjust your text to
enhance your post. See you in the next one.
5. Adobe Spark Post: Customizing Your Text: [MUSIC] The next thing
that we are going to be looking at is the text. There is text at the bottom in this post that is customizable. As soon as I click
once on the text, the first thing
you will notice is that another color palette comes up and another contextual
menu comes up at the bottom. With this, you can
adjust your text color. Once again, you have the suggested menu on
your left-hand side, which is drawn up
from the image, or you can select any
of the images that are available to you at the
bottom of the screen. I'm going to keep it
in black for now, so you can edit the color. For the text, you can either double-tap
to edit the text or on the left-hand side
of the contextual menu, it does have an Edit button. With editing text, I'm just going to write neutral mood palette or neutral mood board, maybe. Done. It adjusts your text that way. You can increase the
size of your text. You'll notice as well as
I move the text around the post that you have
your guides show up, which allows you to
center your text in the middle of the post or center your texts to
the images above. That's another wonderful
feature with your text. You can delete your text if you want in the editing
capabilities, you can duplicate your
text if you want. You notice when I
click "Duplicate", it brought that up again. I'm going to cancel, and I'm going to undo because
I don't want two of those. Unfortunately, it has
taken off my text, so I'll just do
that one more time. Neutral mood board. The next thing is the font. Adobe Spark has a whole range of fonts available
to you to use. I'm using the local brewe. However, once again, there are suggested
ones that fit the vibe of your post that
is predetermined by the app. Or you can pick any of the
other fonts that are available to you which are extensive. [LAUGHTER] Feel free to
have a play with that. I'm going to keep it
on the local brewe. The color we have looked at. The shape, now, this is a fun one. At the moment, it's basic. It has no shape around it, but you can actually
have a shape which you can adjust as
well in terms of the color, etc, as you move forward. A banner, you can
have it be a cutout. You have a whole host of background shapes
that you can apply. Once again, you have a very
extensive menu to choose from in terms of the
shapes behind your text. I'm going to close that
and move to the effect. Once again, text effects. You can have a shadow, an outline, a cutout. Shadow and outline, cutout and outline, cutout and shadow. You can adjust, so you can nudge your text up and down and sideways
and all the rest of it. You can rotate your text so you can move it to the
left or to the right. I love that it gives you the exact degrees that
your text is aligned with. That's another great feature. You can scale your text. You may just want to instead of just using the corners to put
to different sizes, you may want to scale
it to 100, 200, etc, percentage points. I'm going to leave that there. Size. Once again, that's
another way of adjusting the size of the text. Alignment options. You can align your
text to the left, you can align it to the center, you can align it to the right, you can a magic line. These two new features, you can curve it. I'm just going to make
this a bit larger so that you can see what
that looks like. That's a bit like a little
step around a circular point, which is very cool. Or you can grid it, which is another great
feature of the text that is a new addition to Adobe Spark. Loving those two new additions. Next you have, I'll go to spacing. You may want to adjust
your letter spacing, so space it right out. Or you may want to
separate the lines, so I'm just going to go from 50. Notice the lines
separate out a bit more. The next thing is your opacity. I'm just going to realign
this in the center. Your opacity, to allow you
to see what that does, I'm going to turn it
all the way down, so you can adjust that
as you go all the way up to full opacity. I think it was about 60. Lastly, the style. Just like you have the designs in Adobe Spark,
you also have a style. You may not necessarily
have graphic design skills, but you want a few ideas as to how you can arrange the text. If you click on
"Style" on the end, you'll notice this great
little circular feature. I'm just going to
move this around, and you'll see what
it does to the text. It gives you a whole range
of different options. As you move it around, if you see something
that you like, you might go, I
think I like that. Let's go with that. Once again, it's still is
drawing from your images to give you an idea of the different options
that you have. Once again, if you click "Done", it will implement those changes. If you click "Cancel", it will go back to
your original text. That is the text menu. I'm going to
[LAUGHTER] double-tap and put back my
neutral mood board, and I will see you
in the next video.
6. Adobe Spark Post: Icons and Branding: [MUSIC] In this section, we will be using icons to create a mood board from
our existing images. Mood boards are great
for logos and branding, or as color palette inspiration for design and
illustration work. To find icons, you move to the plus button at the bottom left and you click "Add icon". Again, a range of icons in the library will come up
for you to choose from. But I am going to keep it fairly simple and choose a square icon. Again in the search bar. I'm just going to
type in square. I'm looking for a
simple block shape with sharp edges to match my images. This one seems to suit. As always, you can
select more than one, but I will just add one here. At the top right-hand side, you can click'' Add one'', and it will insert an
icon into your images. As you can see, this is a really large icon, and I would like it
to be a little bit smaller so that it suits the area of the whitespace
that I have at the bottom. In order to do this, I'm going to go to Adjust and
I'm going to select Scale. Now the reason why I'm using scale is because I
want to adjust it specifically so that it doesn't
distort into a rectangle. If I were to pick it
up with the sides, it could distort it into a rectangular shape and I
want to keep the proportions. I'm just going to use
the adjust as is. I've used the guides as
well to keep it in line with the left-hand
side of my images. Looking at the square, Adobe Spark has intuitively
made the square green due to the
color in my images. But I want to be able to select specific colors from
my images to use. With the shape highlighted, I tap on the color
tab at the bottom, and then I tap on
the icon settings. This opens up the color
tab where I can use an eyedropper to select the exact color from
my image that I want. I'm going to go up
into the green and select bluey green shade there. Perfect. Okay. Once
I've done that, I can click "Done"
and it takes me back to the original color tab. Now, I would like to create four squares of different
colors for my mood board. I'm just going to move this
down a bit to center it. Instead of having to go
through that whole process of inserting a new icon
and changing the color. In this case, I'm
simply going to click, "Edit and duplicate". A new color is made, a new color block. I'm going to move that
across and then just go through the process of
adjusting its color. In this case, I
would like a brown. I'm going to select a brown
perhaps from the stool. Not quite happy with that. Yes. I think that would
be a better color. I'm just going to go
through click "Done", and carry out that same process
for the next two blocks. I duplicate that one, send it across,
adjust the color. I think I will go that teal. Then one more time,
duplicate across. Now you'll see what has happened here is that the
block is too large. Now, the issue with this is that I should have made my
blocks slightly smaller, but I wanted to
leave them large. I could show you
another feature in Adobe Spark that is
really fantastic. I've got four blocks there, but I really want to see my
text on the right-hand side. I'm going to highlight
one of the blocks. I'm going to go to Edit, and then we're going to use this feature called
select multiple. I'm going to add another one and click "Next". Then I'm going to go to My
adjustments and I'm going to scale the boxes so that they are all still sized accurately. But then adjusting the
scale, clicking "Done". Then I can continue to move that whole block to
the left-hand side. Click "Done" and there
you have your mood board. The last thing in this section, in terms of inserting icons, you may want to
insert your brand, which I do often into your post. For this, I'm going to move this little neutral
mood board text up and I want to insert my brand
at the bottom space there. Now I did speak to you about Adobe Spark having
a branding feature, which is a paid feature. But there's a great little
work around for that. If you have your
own logo and you have it in a PNG format. For that, I'm just going
to click 'off the text'', and I'm going to click "Done". I'm going to go to Add and
go add image. In this case. Now, if you already have a logo, go to My photo library, go to Adobe Spark Post. I'm going to find my logo, which is saved in a PNG format. Now PNG means that it has
a transparent background. The logo is set against
the background and so it can be used as an overlay
for pretty much anything. If you do not know how to get
a transparent background, but you have an image of your logo with a
white background. If you take a look
at my Skillshare class on linocut cut motifs for surface pattern design. I go through how to
use a little app, a free app called magic eraser, to then take an image with a white background and
remove it so that you end up with a PNG with a
transparent background. I'm just going to
align this with the text and we are done. There is your mood board with your color palette and
your logo inserted. See you in the next
video and we'll talk through how to insert a video into a post
that you have created.
7. Adobe Spark Post: Photo and Video Animations: [MUSIC] Animations and
videos are a great way to add a bit of visual interest to your
social media posts. Statistics show that animated
and video posts rate higher in engagement on
social media platforms. In this section, I
will show you how to easily incorporate animation and video into your
posts to make them more eye-catching and engaging. In the Menu Bar [LAUGHTER] of the
homepage of Adobe Spark, there is an icon for Animations. This can be used to
animate your text or the images in your purse. I have touched on
animating text already. I just want to show you, if you scroll to the
right hand side, there are a range of video animations that you
can apply to your photos. You can zoom in. You can pan, you can gray-scale
into color. You can blur. You can fade to a color that has been
pulled out of your palette. Or you can fade. Once you have chosen
the one that you want. You can go back to the beginning and click
"Done" if you want to keep that animation or "Cancel" if you want to go back
to your plain post. The next thing is, you have an option
now to insert a video into one of the cells of your posts.This has become
available as of 2020, and it allows you to insert a 15 second clip into your post. I will often place progress shots of my pattern
design using this feature. But you can insert
any photo from your camera roll or a time-lapse video that
many apps now have. The possibilities
really are endless. The first thing I'm going
to do is swap the leaves in this peak with the
bowl underneath. I might go the rest order of the bowl with leaves because I would like to replace
this bowl with a video. For this option. I'm going to click "Done". I'm going to click
this cell first , "Edit" and "Replace". Now I'm going to replace
that cell with a video. I'm going to old videos and select the video
that I would like. This will then insert a little video strip
into your cell. I'm going to click
"Play" and you'll see that video begin
to animate itself. If you had a video that was
larger than the 15 seconds, it would give you an
option to then edit the video down to the
size that you would like. Adjusting that length. Another great feature is
you can adjust the scale, which I really do love to use. You might think, for example, your video is a bit
small if it's a pattern, or you may want to center your image a bit more
if it's a time-lapse. You can increase the scale here. You can play to preview. As you can see, the pattern is now a
little bit clearer to see. I might even increase
that scale one more time, test again. I'm really happy
with how that looks. I will click "Done", and it will save the
video into that purse. Now, there are other features, you can rotate, you
can flip horizontally, you can flip vertically. You can nudge your video to
the left or to the right. Lots of great functionalities
in this Adobe Spark Post. I'm going to click "Done". Then to export, whether
a post or a video, you click the "Share" icon
at the top right hand side. In this case, it is
creating a video. As it creates the video, it will then give you
options to export it. You can potentially
export it to Instagram. You can send it as a message. You can email it to a friend. [NOISE] You can store
it in your camera roll, which is the option
that I'm going to be using in this case. You have a lot of versatility
with what you want to do with that video once you
are finished with it. Those are your options. I'm going to say video. Then the last thing that
I will show you before your class project is this little back arrow
at the top left. Now this is different
to the Undo arrow. You can undo or redo as you go through this whole
process from beginning to end. But the Back button
then allows you to store your Adobe post. Now, if you have a subscription, especially to the
Creative Cloud, it will sync to all your devices that have Adobe Spark in them. That is a really
wonderful feature. It also means that if
you would like to use that same template to then create a new color
palette down the track. You can always go
back to your Library. Click on it and you'll
notice it has the delete, edit or duplicate or more. You can then duplicate
that design and then change out all the
colors without having to start
from scratch again. You have a template for a mood board or a template
for an Instagram post that can then be cohesive with your images changed or
with your colors change, but that can be recycled. Next year class project.
8. Adobe Spark Post: Class Project: [MUSIC] Thanks so much
for taking this class. Your class project is
to create a post for your social media using
the Adobe Spark Post App. In the browser version of
Skillshare you can upload your class project in a
tab just below the video. I would love to check out all the creative variations that I know that you
will come up with. If you are on
Instagram or Facebook, feel free to tag
me @Capellan Ink, Ink with a K and feel free
to check out how I use the Adobe Spark Post app to showcase my textile
designs and artwork. Have a great day guys. Hope to see you in our future
Skillshare class. Bye.
 CardwellandInk Design, B.Sc, B.A, M.Teach