Transcripts
1. Class Introduction: Hi, everyone. So,
this class is about painting and different ways
of applying acrylic paint. I will be showing you how
to find and manipulate a reference photos online for when you are
planning a painting. I'm just sure, the creator
and CEO of its reigning art. Where I get to paint basically all day everything
I can imagine. And I also get to teach
it as an art educator. So I love to juxtapose together different images with different techniques
and different styles. And I get to teach all of this to you lovely
Lot, basically. I've recently been
diagnosed with ADHD, which was a surprise to
nobody except myself. So it explains how my brain
is incredibly creative. Over the years, I
have realized that most people will either not know where to
begin with painting, so not know what's safe
to start painting. They think that there's
all these other things that they have to do first, which causes them to
get really stuck. It takes the enjoyment
out of painting. There are also
people who do paint. I've taught people who do paint and one of the
resounding comments that I used to get or still get is basically I
love your brain. I love the creativity
of your brain. I don't know how you
can never run out of ideas. Now we know. But yeah, basically,
people get stuck, and that's where I come in. So let me be like the whale in this little cartoon that I have made for you, so you are the snail,
and I am the whale. Just watch that for a second. A. So I hope you enjoyed that little cartoon and
got the idea of it. Basically, let me
give you my brain, my creative brain on
loan for this lesson. And let me show you
what you can achieve. I love experimenting with
fun diverse techniques. These are just a few of
the lessons that I have created over the years
for my students. I live on the South
Coast of England with my husband and my little
dog, you can see here, who I walk every single day, so I'm lucky enough to get my inspiration from this
beautiful environment. In this lesson, we'll be exploring different
ways to apply paint and explore the
textural qualities that Gesso can provide for us, and also how the colors
can work together, how we can mix them, using different implements,
some of which you may find quite surprising as
they're quite unusual. Here are our class aims. I will also be showing
you how to preserve your precious paints
and make them last for weeks with a cheap, easy, stay wet palette. So if this looks like a lesson for you and
something you can enjoy, yes, that's me stood in the sea, and something you
could feel really as smug as my dog
looks here about, then have a cup of
tea, get ready, put the kettle on,
get your paints out, and wait for your pets
to admire you painting. Then you can upload your fabulous masterpiece here at Skillshare for
us all to admire.
2. Making a cheap substrate: Right, so I want to show you how you can make an
alternative substrate. So a substrate is just
something that you paint on, whether it be paper,
whether it be wood, whether it be whatever
it is that you're using. So this is how to make an alternative to
the amounts board, because I'm well aware
that sometimes, you know, things, it's really annoying when you can't get
things, you know, I was that kid that
watched Blue Peter and couldn't get the washing
up bottle and all of that. So I like to have alternatives. I like to have variables, and this is something that
I'm just going to show you, which I quite often show students how to do because
it's cheap, it's cheerful. And it works. So for this, You are going to need so Musa. You are going to need
either a cereal box. Normally, with the insides
a little bit brown, a piece of, you know, or a bit of cardboard, amazin packaging,
whatever you've got. I'm going to use
that choco rice one, you know, cereal boxes. And you can create
absolutely a load. That's me dumping
them over there. You can create loads of
substrate, which is free. All it is is that I normally
use the mixed media paper. But because we need this
a little bit tough, the application is quite
thick with this one. So basically, we're going
to get our box, flatten it. Okay, get them nice and flat, get yourself some scissors. Just some biggish scissors. You can obviously, you can
be a lot more careful. I'm not being very careful with the sizing of the edges
or anything like that. You can see that gives
you all of that to paint. I've done a lot of lessons on
the back of cereal packets, pizza packets, Amazon
boxes, all of that. Like I say, you can either keep these bets or you can cut them off. I'm going
to cut them off. And also, I should mention that with this lesson
that we're doing, the C scope lesson, you basically can alter the
size to whatever you wish. Okay, so just think about it in the size of
brushes, though, and either change, you know, ult brushes or just swoop a little bit further. It
doesn't really matter. So as you can see, I've got
lots of bits to play with. I can move to one side
there with the scissors. Now, I use drawing
boards all the time. They come in small
sizes, to large sizes. You get them all over the place, you know, whatever
art shop you go into. You will find a drawing board. I can almost guarantee it. So I use these because they're
brilliant to mask down. I still mask down
even mount board, I mask down because cockling, which means when it wobbles and bends, is really annoying. I use masking tape. I prefer the sicker one, but the sinner ones okay. So this is about 5 centimeters wide this one, which
I think is great. So tell it to size. And you can always
re use as well, masking tape if you're careful. Give it, just go over, say a centimeter in. Plan that down. And what this also does is gives
you a nice edge. You will notice
actually on the video that the mount board I
used from a framing shop. Did have a little bit
of writing on the top, which when I remove
the masking tape, I could happily then just
paint over that white. Here we go. There's that. We'll just go for
what's this one? A three quarter flat. Flats obviously are
your desired one. I like the PBO gesso in white.
You can get other ones. Obviously, it's just
cheap and cheerful. It's quite it straight on. All right. Always
wet your brush. It's really important with
acrylic, Always wet it. And then just pull off. So, let's get a bit of cloth. Oh, drop something. Right. Just pull off the
ends, so that it's damp. And that's just so that you
dampen this area here so that you don't end up
with a broken brush unless you want a broken brush. And you can see you
can just pop this on. Some of it, if there's
a little bit too much, you can just keep on your
brush for the second coat. You can do two,
three, four coats. It is up to you
depends on what color the underneath is and what
this is brown, obviously. You might get a
little bits on there. If you want it really flat, you just pull those little bits off, put them to the side. Go over quite quickly. It's summer at the moment here. There we go. All right. So once that's dry, you can put on a second coat. You can see I did mock that
up a little bit there. I'm sure yours will be perfect. This one doesn't really matter because I'm going to
be putting texture on. So pop on another little dollop. You can let it cool
in between just so that the paints a
little bit more sturdy, but you can see I'm getting rid of that brown there anyway. Let's just pop that
on for a second coat. All right. I hope that has benefited you in the fact that
you can now make a substrate out of a cereal packet or piece
of cardboard, et cetera. Basically, the acrylic gesso
will cause a plastic ground, but it still has a
lot of tooth on that because it is with the gesso, not with the acrylic paint. Don't use white acrylic paint. Always use the white gesso, and you've got a great
ground to go now. Like I say, leave it
masked on if you're about to paint on it and then
heat it up and remove it, but do it really,
really carefully, warm the glue up on the
masking tape. Right then
3. Reference piccies and how to get them: Yeah. Hi, everyone. So the question, where do I get well, Where do I like to get my
reference photos for Rm. If I haven't taken
them myself or, you know, got them off
a friend or whatever. I like a site called Pexels. So C Google Pexels, PEX ES. And this site has over
1 million photographs uploaded by gorgeous people that let you use them for free. Okay, so they are royalty free
and they are free to you. So I can teach you
from these images, knowing that I'm not in
copyright infringement? I'm not using anybody property. It's all good. I always
like to give a shout out to the people's
photographs who I, so I always like little link ser neath that
you can click on. Even when I've sort
of mashed two up, I'll put both links on, you can click on them
and you can go to them. You can even donate
these lovely people, which is a really nice
thing to do as well. So this is a great site, so I'm just going to show
you that now. All right. So popping pexels into my Google Search bar brings up pexels with the green
little P in the circle. Then you've got a
search bar in Pexels. I'm going to put
what shall we put? Let's put sunsets or sunset. All right. Press Enter. All these glorious
sunset pictures come up. There are a few from things
like stock and Shutter stock. Those ones you have to pay for, but they're well sign posted that that is
what that image is. The rest of them
beautifully are all free. So this one I like
by Bella White, and you can see underneath, you get a variety of photos that they think you might
like that are the same. It's very nice of
them. Okay. And I can add this to my collections
by pressing collect. Goes saved collections.
So to do that, you need to log in, first of all, which
is really easy. You can figure that a bit out
yourself. That's not hard. Right. So going back
to the search bar, I'm going to put in C SEA and see what comes
up. No pun intended. And scenic see pictures came up. So I'm going to just go through those and have a little look, see if there's one I like. And this is just for playing and just for
showing you how I do this. This is not the one
we're going to be using. So this is just to have a
play or I like that one. The one with the
hand in is nice. So again, I'm saving this one to my collections,
and there we go. Right. So once you've
got your images. Now, if they're not
exactly how you want them, which often is my case, I love to cut and paste
things together and put things in odd ways together. So, actually, for this lesson, you will have you will be
using two images from Pexels, which I have put together
in exactly this way. So I'm going to show
you on my iPad Pro, how I do that with an app
called Pro Create, okay? And I also use an apple pencil. Now this is part of my work. I work with this
every day all day. If you don't have
that, then don't rush out and buy one
whereever you do. Just print off those
images and cut them up and stick them together with a bit of
seller tape on the back. That is not a problem. I also say to my students, you know, I if you've got two images there
and you can imagine them. I mean, this is a really
abstracted piece of work. If you can imagine them
slightly different, put notes on it,
put color swatches. Change it around. It's only
for the reference after all. But this is just going to
show you how I go about it, and I do this with a lot
of my reference photos. So here we go. Right. So
first choose Procreate. This will take you to
the Procreate screen, which is this one. You can alter the size of your screen that you want
to use over here, like so. But I just want to use one of the pre prepared ones
that I've done here, so I'm going to
click on this one. Then I'm going to
press on my layers. I'm checking that I've
got a layer there, going to my wrench tool, which means I can add my screenshots that I
took of my Pexels image. Pop that in, and then I'm going to just
readjust it slightly. Go over to my Lasso tool, which is just one
in. Press on that. And then I can use
my Apple pencil, as long as I'm on free
hand to basically draw around my C. And when
I press copy and paste. Oh, sorry, my sky, not the C, what am I saying. And when I press copy
and paste at the bottom, that will basically
cut that out for me, and I can go to layers. It will be in a different
layer. Here we go. And I can click on the layer I don't want underneath.
So there you are. And I can just leave the sky. I'm going to take the
sky away at this moment, press on another layer, and I'm just going to
do exactly the same now with the other
screenshot image, which I've taken off of pexels. Okay, so I just want the C
and the hands for this one. So again, I'm using
my Lasso tool, which looks like
a little ribbon. I'm going free hands
at the bottom, and I'm drawing
around the C with my dotted line There you
are on my apple pencil. Then I'm doing exactly
the same thing. I'm going over to my layers. Oh, so, copy and paste
onto the layers, take away the layer
I don't want. Then I'm just squeezing
that in and rearranging. This is with my fingers and
with the resizing tool, which looks like an arrow at the top that's illuminated
at this moment. So that's in the blue.
On the left hand side. So I'm just going
to pop that there. Then I'm going to bring up
just by pressing on my sunset. I've tapped on the tick,
and I'm pulling it up. Again, I'm pressing on that. I've pressed on the
wrong one. Who sorry. Let's just put that back. So it's still on the arrow, which is the resizing
tool at the top. Yes, clicking on
that on my menu. And now I can resize
with my fingers. My sunset, there we go. It's as easy as that people. Then basically, once you've
put it to the size you want, you just press on, there we go. I'm just making it a bigger. You can make it bigger, smaller. Then you can just go pop
it back into gallery, and then you can select
it from your gallery and take it to wherever you want as a J peg by sharing it. Walla. There you are, and you can press just on
there on the top share. I'm going to check the J peg, but you see you've got
lots of different bits, and that's it. I.
4. How to make a stay wet palette: Hi, everyone. So this is just to show you how I make
a stay wet palette. I'll put this on because this is the first skill share lesson. And then obviously,
I'll refer back to it in case anybody
doesn't know how to do it. It's a really cheap easy way
that I've been using since I was 14-years-old, so 32 years. Honestly, it's really
good, and it works. I don't use to aware boxes with the lids or
anything like that because I tend to I don't
know if it's just me, but I tend to find that it
water logs around the side. So all I do is I
put a little bit of cling film over a lip dish. So. Here we go. So what you all need. As long as you have
a lipped dish, so like so, a lip
dish like here. Okay, this is the top of
a ferro he collection. Doesn't matter if it's
a bit messy inside. You can see I've used
that and it's just dried, so that's absolutely not a
problem. This is a bigger one. You can use metal, you know, lipped dishes, anything
that's lipped, basically, lipped, I mean, just a little scoop there, not like a really
deep sort of wall of, you know, wall around it, because that doesn't
seem to work for me. Works for some people, doesn't work for me, but you get this. You get a piece of parchment, or parchment paper, which
is a shade the one I use. I got this one of Amazon, and it's lasted me
forever and a day. So basically, it's like the grease proof paper
that you use for cooking. But it's always the white
one, and never the brown one. So I've got a little piece
that I've already used here, so I just basically slice off the pieces that I
need as I need them. You will need kitchen roll, and it needs to be two pieces of kitchen roll
thick on the base. Okay? So just two,
three, not one. Three, it goes wily cloggy. One is just not enough, so I've always found
two to be perfect. So put those together,
first of all, get some scissors and
get a little wax pencil. Put that down. Pop that over. It doesn't need to be too
precise to be perfectly honest. All right. There's a
little bit of extra that, which I'm just going to cut off. Actually, I am
normally quite lazy. I normally just fold
it in to be fair. Like I said, it does
get a little bit cloggy and a bit weird
when you do that. Alright, put that to one side. Just check that that fits. Lovely. There. A, get your parchment paper and
kind of do the same. I know that this
will just about fit. Yeah. Turn over.
Get it to the end. And again, I'm just using. And the reason I'm using
a wax crayon pencil, wax, pencil or crayon,
whatever you want, is to say that when it gets wet, it doesn't move basically. Okay. Let's get that back over. Outs. Put to one side. And here we have our elements. All right. So once you've
got these articles together, I use a pipette. Obviously, you can get all
different types of pipettes. But if you haven't
got a pipette, then a little jug of water
will do absolutely fine. Whatever you want to do. Put your two sheets of kitchen mole in the base
and get some clean water. And just really wet that. Okay. So wet it
really thoroughly. And you can pour off any
excess that you might get. Just get your water container. Pour off any excess. There's just a couple
of little drips there. Not a lot in fairness. I was a little tinuin ledge, you could rip off
if you want to. I'll just fold that over. Pop
on your groove poof paper, and you are good to go. Now, as long as you keep that basically the two
plies of kitchen roll wet, as long as you keep those wet, your paint will stay wet on top. Okay? So overnight, I'll show you one that
I've got here that's still working order.
After a month. This is a month months worth
of stay wet palette here. Okay. So I just put loosely over the top a piece of clinging
when I walk away from it. And I keep that for many,
many, many palettes. Okay. So I'm trying to
be as green as possible. All right. So as you can see, this one is
absolutely still wet. And if it needs a
little too hot, it has been really
hot just lately. Find a corner that's
a little bit bare, and just pick it with your
finger. Pull that back. And this one's quite
wet, but you just need to square a little
bit more water in. And then just tilt it so
that the water runs down. If there is too much
excess, then obviously, you can just tip
that into a bowl, your water, or tip it away. That's pretty much
it. That keeps. Now, after you've finished with your palette and you
don't want it anymore, let it dry and you
get a piece of paper that's covered in all
the paint mixes that you, you know, that you've
been using that you can use to collage or wrap, or whatever you want to.
5. Project Part One: Hello, everybody. So this
is a piece of mount board, 35 centimeter squared,
which it's variable. If you've got one, if you
find a piece of Muntboard, that's a different size,
as long as you're happy, it's an abstract painting. It's absolutely not a problem. If you are doing 35
centimeter squared, I'm coming at 15 centimeters
from the bottom with two little marks on either
side on my masking, and take masking tape. Yes, I have got some fabulous. That was quite organized for me. I'm going to do is, I'm going to put a piece across, and it's going to be
covering from down so that I'm working on the
upper half at the minute, so I don't want to block
off the upper half. I want to block it down.
Now, with your masking tape, you must de stick it
slightly by putting it onto your trousers or into
your piny and pulling it off. That's literally
what I'm doing here. You get some of those fibers from whatever it
is you're wearing, and that just helps it
not to cling on quite so fiercely to our
board. There we go. That's that one done. Now, because this is
an abstract painting, I want to put down some
texture to begin with. This is the white PBO gesso. Really cheap and cheerful, but it does the job wonderfully. I'm going to actually squat that straight onto
the upper area, and then I'm going to
be using my fingers plus a cheeky
little glue spoder. Let's get on with this.
Oops. There we go. It's fabulous, isn't it? Let's do it bit by bit. So put that's one side there. Now, what I want to create
is enough texture for this. So I'm going to scrape into it. Root it over happily.
There you go. If you've got other
implements that you want to use, please feel free. Now, it's going to be a
sum of a roundabout there. And then that's going
to have some sort of texture coming
in off of this. It looks quite messy
at the moment. But you can see I'm just
pushing that straight in and pulling off coming round. I have some lines in it, where I'm just scraping that. It gives me a lovely
texture to work on. I don't need it too thick. So these blobs, I'm
just moving over there, in fact, I think that's enough, guess for the whole
of the upper area. You are going to so sin. L I say, you can use your
fingers as well around here. If you push down a blue spatula, and then pill it off, you get like vein marks. Push into it a little
bit, have some scrapes. It looks like you've
scraped the paint and. It's also complicated
and fabulous. Give it a few little
wiggles into it like that. You'll get some marks as well. Spend a little bit
of time on this bit. Can see I'm just pushing in. It's all lovely. Get my finger, and just smooth a
little bit there. But also, I can pull off with
my finger as well to create more that lovely veiny
texture that goes in there. Like I say, don't
want it too thick. And moving it with
my finger now, squiging that up, squidging
up with the glue spreader. Just getting a nice textured
ground. Bits over here. Smooch that up a little bit with that glue
spreader as well there. Fabulous. So I think. Probably about right. Now, you do have to get
on it with the hair dryer with this one, especially. I mean, if you are using
mixed media paper, then you will already be aware. It will already be
cockling quite badly. You do get a bit more time
if you're not using that. All right, so I'm
going to pause you, and I'm going to dry that and
just clean off my fingers. So 2 minutes. All right. So after you've dried that and let it cool a bit. I might be a little bit. Just press it into
the tape again. After that, you can see I
have now put on my palette. I've got a crimson red, I've got the cadmium red, I've got the cerulu blue, the ultramarine blue,
the cadmium yellow, lemon yellow, and a big blob of titanium white on
quite big palette. I've also got a piece of cloth, which is just an old tel. For rubbing paint in with, because the colors
will start to build up on my fingers
otherwise and come off, so I've got a little
bit more space on that. I have also got a broken brush. This is an old fill
bit around about a size eight old fill
bit that you can see. It's more like a mop brush now, but a little bit
sturdier because of all the paint that's
in the feral there. And I've got an old angle brush, which is also broken. If you haven't got
any broken brushes, then just use some
bristle brushes that will be absolutely fine. It's just something to
sort of brush your color. On with. It's not a problem. These are all system
three paints, by the way, because I know some people
do like to know they're the heavy body acrylic
ones that you get, I'll show you one of
them that you are. They're all of the
same. I do find those incredibly good
for this purpose. For painting in general,
Ashley, they're great paints. I know they say student quality, but they're great acrylic,
you can get away with it. I've also got the glue
spreader back from before. So what we're trying to
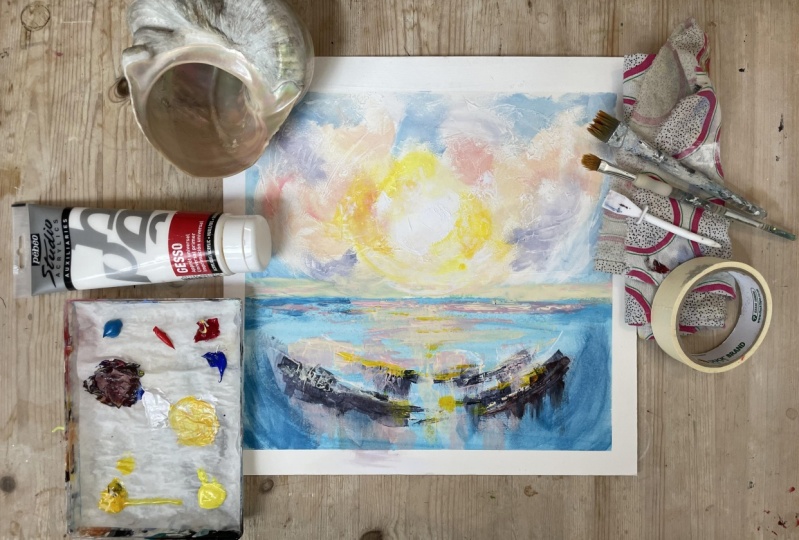
do is we're trying to create an abstract sky here. So what I want to do is
to look at the colors on the I've put your notice. I've put two photos together. I'll give you both photos plus the one with
them put together. I mean, you can do
one or the other, if you want, but this
is how I wanted it. So that's up to you. And what we want to
do is to pick out and accentuate colors
and place them. So instead of how the
photograph shows us what to do, It's showing us the colors, it's showing us the basics, but I really want
to Paul pull out. Abstraction is sort of how I understand it is p can
be, it can be different. But pulling out some of the areas of interest
and placing them how you want them put on the paper or whatever substrate
you're using Mulboard. With this, I'm going to mix up a few really lovely peaches, ok? That's the sort colors
I'm looking at and pinks. So Let's do that. I can do that with my
broken brush and get those on here and I can add
them at the same time. Now, for a peach or a pink, you want white, red, for the peach, add a
little bit of yellow. I'm going to go with
the pinks first of all, so I'm just going to get
the white to begin with. It's always important to start with the white
to begin with. I'm going to get a little bit of the the cadmium in this one. Just mix that in and see
what color that gives me. That's quite lovely,
but I would say it's more on the peachy
sides, these ones. I don't know how about
you. Is glorious, though. I'm going to add a little bit of that cadmium yellow as well. Just a little tiny drop to make it more of
strawberrish color. Looks more like a
strawberry milk shake now. All right. And so
what I want to do is I've got that on one
of my broken brushes, and I've also got this
lovely cloth here. And I'm just going to touch
on some of these colors. Okay. So some of
the color there, and then I'm going to rub
it over with a cloth. Now, what this does is picks up on all the texture
that we've got. It Obviously makes
the color less vivid, but you've also got these
fabulous creases everywhere, and it blends it outwards. So this is a great
way of doing this. I'm going to put out a
few more around here. So just a bit of the color. You've got to be
on it and actually do this with one hand
and the other hand, so whether you're
right or left handed. Couple of bits over here. Because you can't leave
acrylic paint for too long, and I don't want slow drying
medium with this because it would reactivate
the gesso underneath. So it's quite, quite
technical for you. Put some of those colors on, and I'm going to tap
it with the cloth, so I'm quite happy with those. Now I want to add perhaps a little bit more
white to the mix. I can pull that off on the
side because I will also need these colors for some
little reflections in the s area underneath. So I want to keep them. I'm pulling off some
colors on the side, getting a little bit
more of that yellow. A little bit more of that white. And just making a
slightly different mix. Now I can come in
again. Same process. It's a little bit too similar, actually, I might do an O. It's quite good when
actually there you are. It's good when it's
brushed around, fabulous. I'm going to pit
some more over here. You see, I'm just pulling
out the colors that I want. Quit glorious. I'm
leaving colors. If there's colors you
don't want the clouds, I might put a touch
a nod to them, but this is abstracting a sky. Actually, I've got different
mixes in my brush. So that's quite
handy. So you can see how that is coming together. So again, I'm going to grab a big block of white,
put that there. I'm going to get a little bit
of that lemon yellow now. Just put that into that. Just so I've got
this gorgeous color. I'm not washing my brush
off because really it can have a little bit
of that peach in there. This one. Again, getting the cloth, just a different part of it, it'll dry as you
do it around it, so you'll be able to use it
on the other parts after. Bringing that in. It's a really lovely
process, actually. Round. A little bit round here. And how glorious does
that look already? I hope yours is
looking glorious. But you will notice all the lovely marks
that you've just done with the guess I
just showing through. I'm scrape a bit more of that on there. Put some around here. I'm also going to get to
put pure white and just pop that over that
and then rub that in. It's given me a
real pastel color there just by popping in a bit of that
white over the top. I want to bring
this into the sun. I'm putting my sun here, moving again on
this bit of cloth. That's working really nicely. Now I want to maybe come in with some stronger colors
and rub them in. I'm going to grab, actually
I'm going to wash my brush. Okay. I'm going to come in with some of the
let's have a look. It's got some purples.
Ant in there. For the purple, I'm going to actually use ceran,
which is an unusual one. This is more for a gray purple and a bit of the cadmium
red. There we go. That gives me a nice
and dullish purple, which I think it is
more akin to that. I'm just going to
squeeze that off. Grab a bit of white,
do that by the side. There we go. That fabulous. Now I'm going to just bring
in some little bits of that. Again, rub it up and in.
Rub in this up and in. Rubbing it. You can
also, I should say, especially if it's a hot day, grab your cloth, get a
little bit of water. A went to the wrong one.
Bit of water on the ends. So adds a little bit more to it. If I put a bit here.
You'll be able to see. It'll just really wisp it out. You can really stretch
those colors coming in. It's bringing that in. I still going over this
gorgeous texture. Have to say. Look at that. Gorgeous. It's like sco work. I'm going to add a little
bit more blue to that. Again, I'm still keeping the last two mixes and
bringing that down. A little bit more blue,
a little bit more white. Let me go. Bit more
white to that. And now I'm going to start
to bring that in again with the wet cloths. Okay. This makes it really abstract and really quite
special, I think. Sort of like the old masters. Say going around. And you're
rubbing in these colors. You're coming down. With a fit. Right up to the masking. Okay. A bit too
much water there. And down Oh. All right. Move the cloth up again.
The stuff on there. And then I think I quite like at more of a color just
down here as well, which would be that real yellow. I think I'm going
to go with some of the lemon yellow here. Just to really
brighten that area. This isn't a damp cloth. This is dry. Move my
cloth up a little bit, and I'm going to get a bit of
that cadmium there as well. A couple of little bits. If you don't like it too bright, then you can always
add a bit of white. That's not a problem.
How lovely is that? I really like it, obviously. All right, so that's my kind of gorgeous and glorious
sky nearly complete. What I'm going to do is I'm
going to hair dry that, and I'm going to move
while I've hair dried it. I'm going to move
this piece of tape, so make it nice
and warm and move it up for after the breaks, we're going to be doing
the lower area. So see.
6. Project Part Two: Welcome back. As you can see, I've I've heated up
the masking tape and I have moved this so that it
just goes over that line. Now, when I come
to take this off, I will heat it again and carefully remove it so that
it doesn't rip your work. Very, very important. What I want to do now is I
want to cover the bottom. I'm using this lovely district.
It doesn't really matter. You can use a flat like a half inch flat or
whatever you want. I just want to cover
the bottom area with a very pale
cerulu blue now. So let's just get that.
When nice and watered down, just going to grab a
bit of cerum blue. In a little bit more water. All right. Let's just
slap that on. Lovely. It's just one to the other just paint over this area here, and then we're going to dry it. Do it left to right or right to left because if you don't, you will get some
little lines in there and you don't want to be lines where you've tried to
do some vertical strokes. Horizontal strokes,
please people. There we go. Gragulus. Well, I'm just
going to dry that. I'm going to pause you
for 2 seconds. All right. So once that's dry, this is the difference between
the top and the bottom, we're going to get some gesso, and we're going to
scrape on a few rocks. Looking at the picture,
we swat a little bit of basically texture so we square a bit on that
and move that over. This is with the
glue spreader again. So it's quite blobby, isn't it? Right. De some bits here. I think I have some over
here because don't forget we want this to look
sort of frame esc. There we are. There's
quite a bit there. I might have to move
some of that off. I'm going to scrape
it slightly down. This probably got a bit
too much on as well. Probably less than a square
to be honest with you, and I'm going to tap
on and just pull down. Tap on, pull down.
Pull up as well. I you're giving that
kind of idea that this is a rocky landscape. In this foreground. But I want it also to be pleasant and framed
compositionally. I'm getting these rocks to come in rather than doing
them as they are. You can do them as
they are if you want to with the same technique. I'm going for a more
stylized abstraction here. You can see I'm
pressing this batula down and just moving
these lines as well. And a bit coming here. There we go. I'm going to
dry that now, so two secs. Now what we want to do
is to get a darker mix. Well, the darkest mix we can, and that's for the shadows
underneath the rocks. It's important to do it this way around because we'll
be putting some of the colors over the
top when that is dry. When we look at our palette, we have here the obvious, which is the ultramarine
blue, lovely and dark. We have some crimson red, which is also quite dark. Mix those two together, you're going to
get a deep purple. Now, we want to add a
little bit of ether yellow, we'll throw this back for me, but I'm going to actually
opt for the lemon. Just throws it
into a gray color. Here you go from the purple to the lever get
quite a sludgy green. If it's too green, add a little bit more mines
a little bit too green. Add a little bit more of
the crimson. Here we go. Just think about
what colors it's representing to which one
it's lacking, if you like. I've got quite a, I'm going to add a little bit
more of that blue as well because I do
want it quite bluesque. Gorgeous. Right. And now what I'm going to do
is the same as before. I'm going to grab not my glue. I grab my broken brush, and I'm going to grab my cloth. Okay I'm looking for
bits of the cloth I haven't used yet or
bits that are dry. And what I want to do is to sort of look at the
picture or the photograph, even though we're
just using that as a very, very rough reference. Chuck on a little
bits and then rub them over that gorgeous
We're going to build up, so we're rubbing them over
that gorgeous gesso texture, which is like magic. You rub it on and you can
see all these little bits of texture that you couldn't
see with the naked eye. But with the just going
over it and rubbing it on, it shows itself, which
is rather lovely. So a little bit darker there. I'm going to pull some of it down with this cloth as well. Just pulling that up, smudging it a little bit and
pulling it down. So again over here. Across and then
down, you can see, I'm just bringing that
down with my finger there. That's creating a
wonderful effect. I'm also going to
just do the water, so I'm going to add a little
bit of water to it now. So maybe coming over this bed. A little bit with
that water as well. It's not quite as I don't
like that as much, actually. No, I think I won't
bother with that bit. I will take that off
of your instructions. I always get a bit carried away, but you can see what you like
and what you don't like. I do experiment a lot. I can't help it. There we go. It's just part of
the fun, isn't it? Come up with a plan, pre doo it, and then change it midway. There we go. Maybe
not the water. Right. It should dry quite quickly
as you're doing this. I'm just going to get a bit I'm going to use
the glue spreader now. Put that spare in the, get a little bit of
that glue spreader, and I am just going to just
on the bits towards the sun. I'm just going to put
a really thick scrape on some thicker
blobs of this now, which I think whites
quite nicely too, so it's texture upon texture. Pretty cool. That's just that mix
on the glue spreader, bring it round and I'm just fanning it down a little
bit. There we go. You can see. Let me get
some darker areas there. There we go. All right.
I'm just going to dry that off now. So two sex lovely people. Right. So after
you've dried that, and let it cool a
little bit as well. Now going to be using
a glue spreader. We will use the cloth as well. I dried the cloth whilst I was drying the paint
actually so that the dark bits won't
come off when I smudge the pastel bits. So what I want to do
now is I want to add some reflection coming
down from my son, actually, I probably
should have removed this at the same time it's going
to let me or it will. This is very naughty. I should have done that with
the hair dryer. Very good. I got a couple of little bits that have leaked,
but it is an abstract. I'm okay with that. I'm going
to grab my glue spreader, as I say, and this is where all the pre mixed areas come in. I've got some pinks, I've got some whites, I've
got some peaches. What I want to do is to just
scrape them as if they're reflecting in the water here, so I can just pop some
on, scrape them over. And this is smooth, but
it actually does still give you a texture.
It's so cool. You can do it on the side
if you want some sort of more opaque areas with
thicker paint as well. And I can bring in some
of that lovely yellow, you know, really
sort of get them glistening on this water. You might have to mix
up a little bit more. That is a possibility. You can see just popping
these we do color by color, I think, might be easier. So on this bit, I'm
just going to put some of this coming
up to these areas, which are representing
the tops of the rock, which is obviously, like I say, this is very abstract. I'm pulling down again. Pulling down some
of those lovely, g listening twinkling areas on the water between the rocks. I go. So coming in
the middle of there. This is the difference
where that's white, you're going in with those
colors over the top of white, you're coming in over the
top of the cerulan blue, which is what gives
it its real sort of lovely effect of water
here coming in right. I'm going to just hair dry that and come in
with the next color. So 2 seconds. All right. So once
that's completely dry and let it call a
little tenieni bit, I've mixed up a bit more of
the cadmium yellow and white, and now I'm going to apply
that with my spatula. Again, I'm just coming over and just twinkling
over the top of these. And just scraping these up. The color there. I'll kind of
do the job for you really. It gives you all this
lovely twinkly sparkliness. I can pull out. The thicker the paint is, the more opaque. Also, the more layers, the more opaque,
you will get it. Bringing some of this in. I want it a little bit more twinkly than rubbed
on at the moment, but you could rub it on if
you get if you need to, you know the effect that that
gives you from the clouds. All right scrape in a bit
also, actually perfect. I've put ale bit too
much paint on here. If I do get a bit
of water onto here, onto the cloth, I can
just scrape that. I can rub that off really
happily. And that works well. Do the twinky bits just putting
it on and pulling it off. Little bit. A little
bit over here. It's looking really sparkly. Tiny bits more here. I'm bringing that up. It's working really, I. It's kind of ice
cream colors this. All right. And I'm just going
to dry that now. S two sex. Now, for some of that brighter yellow, again, blue spreader. I think it was the
cabium, but you could use the cadmium
and the lemon. I'm just getting a bit
on the blue spreader. This is just going over,
not too much of it. I just want some of that
color coming down here. Just to really make it really
lovely and interesting. I get a bit of the yellow
on the lemon as well. You can see that's really thick. Couple of little bits
up here as well. Don't need to go overboard with the brighter color,
believe it or not. That's one of those
weird things that you just pop in a bit and it really dazzles Here we go. All right. I'm going to dry this again and then we're
going to just come in with the touch up
bits around the edges. So two secs. This is for the sort of
bringing it down a little bit. I like I say, this is abstract, so we're just grounding
it with what we know. I know that there's a little
bit of purple up here, so I'm going to make
a little bit more of that with some cerliu blue, little tiny bit of
the cadmium red. I've got that on the
larger broken brush, and I've got my cloth, and I'm just going to bring
in some little smudgy areas. Because I want it to
anchored at the edges, these are the areas that
I'm bringing it in. I need that wet. This
one needs to be wet. Hmm. Let go. Bring that in nicely there. So more suches will
be good again with the wet cloth, smudge them. They look a lot
more impressive if you smudge them with the wet. This is a bit of t tail, go a little bit there, and
then another bit around here. It's a process this one, but it's well worth
persevering always, and it is a lot of
fun, I think, anyway. Couple of little bits here. You're just tving these
bits into there, lovely. Then a little bit up here. I'm bringing that down
a little bit over. Not necessarily
smudging that bit. A little bit over here. This
is just bringing it into a makes a little bit of
sense around these areas. I'm going to wash that out. I'm just going to
get a bit of that watery cerulan blue
at this point, and I'm going to tidy
up these edges as well. Just around here. I know this isn't very in keeping with the photograph,
but like I say, I'm going for what I want in a painting and not what
the photograph dictates. I have got a couple
of little bits. I'm going to tidy up as well. So this is I'm just
tiding these bits up. And then what I'll do? I'm going to dry
it, so two secs. Now, just to finish
this off with the glues spreader
and my finger. I'm going to get a little bit of a peachy color or the
pale yellow with peach. I can do it with either. I'm going to tidy up
because my masking tape just went over the top. It just let a little bit
of the blue go through. I'm going to smudge that
over with my finger just at that bottom just
to really tidy up. You can put another
bit of masking tape on before you
do this if you want. If you're not
confident enough to go over and it will give
you a crisp edge. I think I'm quite enjoying
them What's the word? I'm enjoying the abstraction
of this. This is great. Again, just going
over the top with a really nice and
thick this paint. Like I said, if you
want the straight edge, then feel free to do that. We can tie it up after
it's in tivting. Just a couple of days, little
smudges coming down around just to give that
feel that it has got going on a little bit
of that white as well. I just smudging that out
with my finger this time. Then a big blob of
white as well in the middle and bringing that in. I really really looks like
it's supposed to be there. A couple of bits of white
just scraped on around it. There we go. I think I'm
pretty happy with that. In fact, I'm very happy I
could tivate with this rages. The one thing you will have
trouble with is stopping. I would say, look at that, isn't that glorious? Write them. It's a lot of techniques, lovelies, and I hope
you enjoyed it. I adored doing this
one. Take care.
7. Final thoughts: In this lesson,
just to summarize, we have learned how to
texturize a ground using Gesso. We have played with
paint applications and different paint applications and how they can work on
a texture ground. You have learned how to create a substrate from
a serial packet. Make a stay wet palette. Yes. And much, much more. Can't think what else
at this very moment. But if you want to carry
on the journey of, you know, exploring
acrylic paint with me, that would be really amazing. In the next lesson, we will
be creating Lawrence Shale, which is the whale you saw in the cartoon in the introduction. And I will be showing you
how as a little bonus, how I go about putting
them together. So I will be putting this class or with that class on top, but that's just how I do it
as a little bonus at the end, which should be great fun. And if you want to follow me
on Instagram or have a look, you know, have a
little nosey at it, then that would be
really lovely, too. So I hope to see you
in the next lesson. And I hope you've really
enjoyed yourself by flow.
 Jessica Shaw