Transcripts
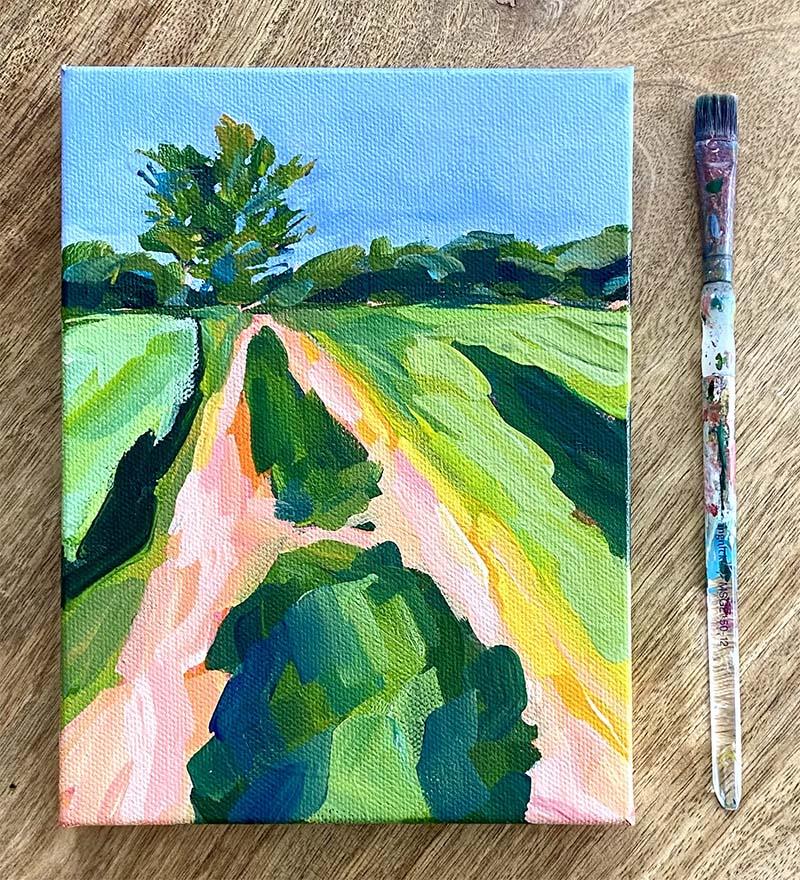
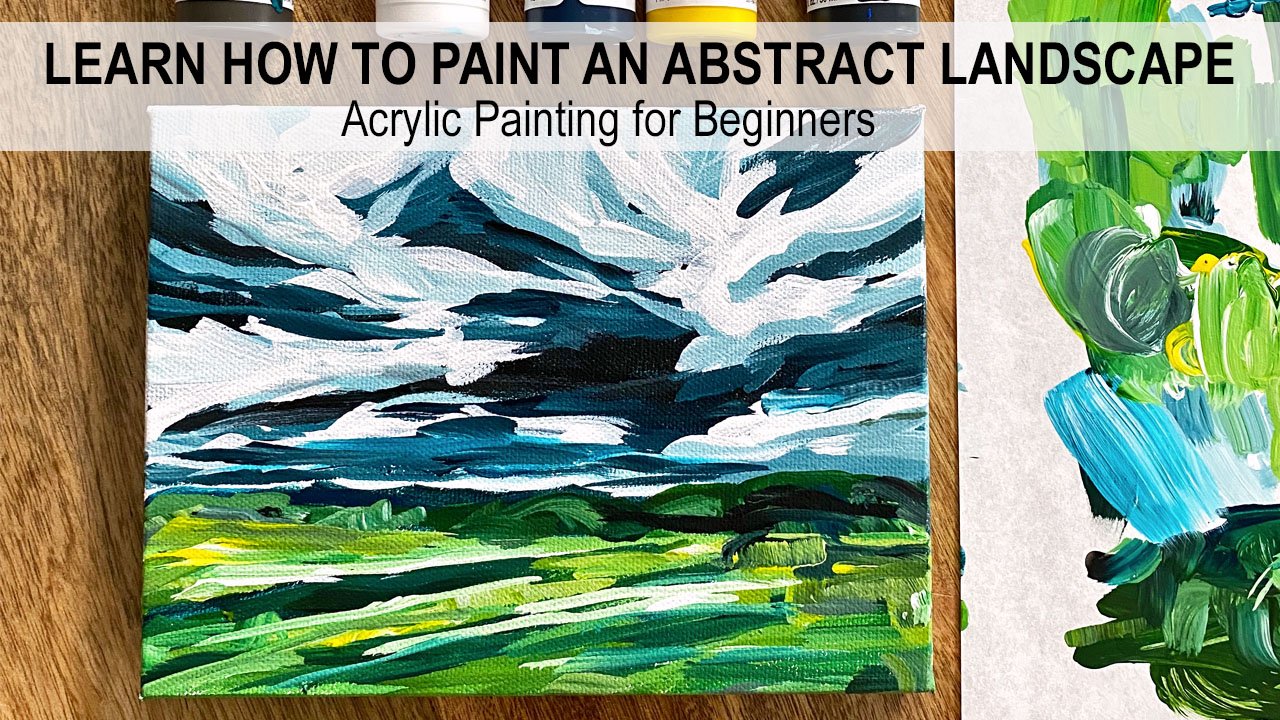
1. Introduction: Hi everyone. I'm L. Welcome to my landscape painting class. And this class I'm going to teach you how I painted this colorful abstract landscape with acrylic paint. I'm going to start off with a color mixing demo where I teach you how I mix the gray, brown, and green pink colors that I commonly use in my landscape paintings. I'm also going to give you some tips on composition, the rule of thirds and atmospheric perspective. Then how I block in the large shapes first and slowly start to add in more layers and details to build up my painting. Gradually. I used to six by eight inch canvas and flat paint brushes for this painting. For paints, I'm using golden fluid acrylics. I will list all of the pink colors and supplies that I use for this class. Under the video, I encourage you to use whatever paint and materials you have on hand. You don't need the exact same paint or brushes I'm using to achieve a similar result. I attached a copy of the reference photo as well as a photo of my completed painting below the video, feel free to use them as a reference for your own painting. Or if you're feeling a little adventurous, choose your own reference photo. You can easily use the techniques that I teach in this class and apply them to other landscape paintings. For your class project, I would love to see your interpretation of a colorful landscape painting. You can click on the Projects and Resources tab located below the video to upload a photo of your painting. If you would like me to share your painting on Instagram, use a hashtag, paint with L so I can easily find your work. And if you have any questions about this class or any of my other Skillshare classes? You can click on the Discussion tab below the video and post your question there. I right, I hope you're feeling excited to dive into this landscape painting. Let's get started.
2. Color Mixing : I am going to show you how I mix some colors that I commonly use in my landscape paintings. The first color is black and gray. Some artists will say, never use black right out of the tube. They think that you shouldn't mix your own because you can make it more dimensional. I say use whatever you're comfortable with, especially if you're, a beginner, might be a lot easier for you to just buy black. So the carbon black, which is this one here, is a cooler color. It leans blue and the bone black is a warmer color, leans red. So if I mix a little carbon black into my titanium white, I get a nice cool gray. I could be a good color for rocks or a paved rude. And then I'm going to mix some of this titanium white into my bone black. There's only a slight difference. But this one has a little bit more red in it, so it's a bit warmer. Not sure how much the camera shows the difference, but if you were to see it in person, I think you'd be able to tell. So carbon black, bone black. Another common way to mix your black is with ultramarine blue and burnt sienna. So burnt sienna is a brown color, and Brown has red and yellow in it. And by mixing all three primary colors, so yellow and red and blue. You can mix your own black like this. I'll put in some white here. And you can see shade of gray is just slightly different. So if you don't have black, but you have ultramarine blue and burnt sienna or burnt umber or another brown, you could try mixing those two together to make black or gray. And then the last way that I'm going to show you is to mix all three of your primary colors together. So I used primary magenta, hansa, yellow, and turquoise a lot. I always have these three colors on hand. It doesn't matter which three primaries you use. So if you don't have these three, just experiment with what you have. And when I take these colors one at a time and start to mix them together, I can achieve a black. So right now it's leaning green and I need to mix and more of greens compliment to D saturate it. And that is red. So I'm mixing and red here. And now I have more of a brown kind of like my burnt sienna. I'm going to mix in a little bit of blue. It's cleaning kind of green still. So this way might take a little bit longer to achieve the black because you kinda have to just play with the three colors. So that's leaning a bit, green's still. And then you can see that you can get lots of different shades of gray by mixing all three colors together. If you want a bluish-gray, then just mix in a little bit more blue. If you want, reddish gray, mix in a little bit more red. So mixing all three primary colors might take a little longer, but you can get more of a range of grays, which might be helpful to you. Maybe you're painting a beach scene that has a lot of rocks or your painting mountains, you can push the gray toward whatever color you need it to be. Another color that I mixed a lot is brown or tans page. So if I didn't have burnt sienna or some other kind of neutral, I am going to basically do the same process as when I was painting black or creating black. I'm going to mix an orange and just the tiniest bit of my blue, which is my turquoise. So start with orange mix in a tiny bit of blue and you can get brown if you want it to be warmer, mix in more of your red and orange. And if you want it to be cooler, mixin a little bit of blue. Start with very small amounts of blue because it can really overpower your orange very quickly, especially if you're using one of the phthalo blue's. And so you can make some nice beige colors which are great and landscapes, if you want it to be a little warmer, maybe you need like a pinkish beige, just mix in a little bit of red. If you need more of a blue beige. And you can see how I overpowered the two quickly with my blue. Right? But this would be a way to push your beige toward a cooler color. And so you can get a whole range of tans and beiges by mixing the same colors that you used for your black, just in different amounts. The last color I am going to show you how I mix is green. So green as a very common color in landscape paintings? And in order to mix a green that you want, you need to understand a little bit about color bias. So on my color wheel here, I would have primary yellow here in the middle, which is a truer yellow. And then I want to have a yellow that leans green, which would be considered a cooler yellow. And then I have yellow, orange here, which is a warmer yellow because it leans toward orange and red. So what I use for a cool, medium and warm, I have bends yellow light, which is cool. I have Hansa yellow medium, which is somewhere in the middle. And then for my warmest yellow, I have yellow ocher, which you can see leans orange. And then for my three blues. So I have my middle blue, which they low blue is somewhere in the middle. It's not a primary blue, but it is a more middle color. I have ultra marine blue, which is a warm blue. This has some red in it, which makes it a warmer color. And then I use turquoise as my cool blue, which means more blue, green. So why is it important to know which colors are warm and cool? I'm going to rearrange my paints here so that I have my cool colors, my medium colors, and my warm colors here. So if you think about when we mixed black, how we mixed all three primary colors together to achieve a black. That is going to help you understand how to mix a green. So my yellow ocher and my ultramarine blue have red in them. If I mix my blue and yellow that contain red, I'm technically mixing all three primary colors. And so I'm going to get a much less saturated green, which I'll show you right now. So that's ultramarine blue, yellow ocher. Great, because they contain red, small amounts of red. When I mix them together, I do not get a vibrant green. I get a very desaturated green, almost leaning gray. When I mix my bans yellow light. This has little to no red in it. Same with my turquoise and has little to no red. My cooler colors because they have no red and them are going to make a much more vibrant green. So it's a good idea to play around with all of the greens and blues, I'm sorry, all of the yellows and blues that you have. So that you can get a better idea of how to mix colors. You you don't always have to mix warm and cool colors. I can take my yellow ocher and turquoise. And I get something that's in-between these two colors here, right? So to get a more earthy, natural looking green, I would use little bits of warmer colors. And if you want something that's super vibrant, I would stick with cooler colors. If you only have cool colors, you don't have ultramarine, you don't have yellow ocher. You could mix in your own, read in very small amounts. So if I mix this very vibrant green and it's too vibrant for me, I can take a touch of red and I can desaturate that color pretty quickly with the red. So I encourage you to take all of the yellow and blue paints that you have and do a little bit of experimenting with your different colors. So that when you go to paint your landscape, you know, if you're looking for something less saturated or a color that is more intense. In my painting today, I am going to use just two yellows and two blues. So I'm going to stick with my Hansa yellow, which was one of my go-to colors. And we're also going to keep my yellow ocher handy. I am going to keep my turquoise and my ultra marine blue on my palette. I will use my primary magenta and also my titanium white. And I'm going to make my landscape painting with just these six colors. And I'm going to mix everything I need from these six. Don't worry if you don't have these colors, just find about five or six colors that you like that you've mixed and you know, they work well together and use those, you can achieve very similar colors to what I'm mixing by using what you have on hand. So don't feel like you need to run out and buy these colors.
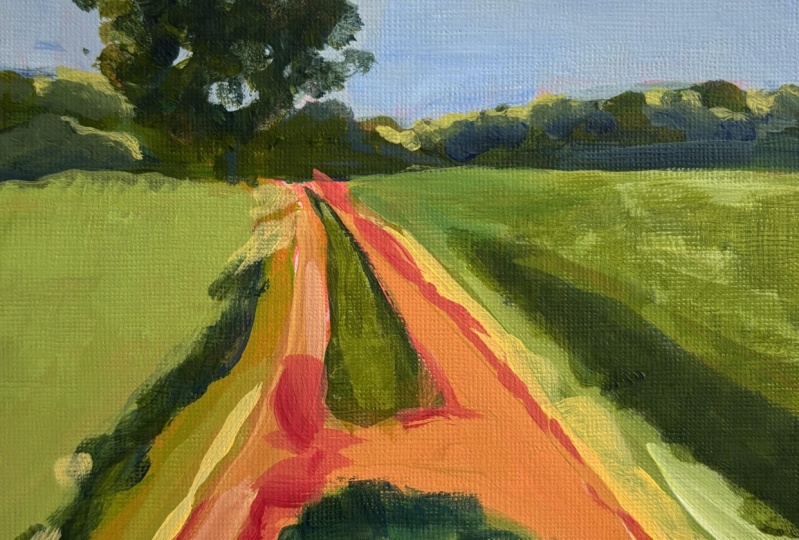
3. Composition: This is the reference photo that I'm going to use for today's painting. And I'm going to show you why I chose this photo in particular. If you're new to composition, it is a good idea to familiarize yourself with the rule of thirds. And I'm going to just draw some lines so that I can show you what I mean. These are not perfect lines, but I'm basically dividing my canvas into thirds, vertically and horizontally. So the rule of thirds says that an image pleasing when the focal point or the subject matter is placed along an intersection of imaginary lines that divides the image into thirds, both vertically and horizontally. So that's just a fancy way to say, divide your canvas into thirds and make sure that your focal point or your subject matter falls somewhere close to the intersection of some of these lines. So the tree here is a very good example. This is my focal point and it pretty much falls on the intersection of the lines right here. So when I paint, I'm going to keep my tree in this location. If I liked the photo, but the tree was here in the middle. I would take the tree and move it off to the side. You're the artist. So if you're looking at your reference photo and you don't think that it's going to be pleasing. You need to get comfortable with moving things around. Or to start off, you can just simply find some reference photos or take your own reference photos and make sure you're paying attention to the location of the focal point. The rule of thirds also applies to the horizon line. So it's going to be more pleasing if your horizon line is either in the top third or the bottom third. So if I were doing maybe a seascape, I would want to take my photo so that I either had two-thirds sky or two thirds land. It's not going to be a pleasing composition if you cut your painting right in the middle. So that is basically the rule of thirds. A quick note on perspective. It's objects in the distance gets smaller the further away they are. So in this photo, you can see the road gets much smaller as it goes off into the distance. And then this treeline in the background here, I know that these trees are behind this tree because they're smaller and they are less detail. If you have a photo that has mountains in the distance, very far off in the distance. You'll notice that they appear more blue and gray because yellows and reds will drop out the further away the object is. It doesn't really apply in this photo because the trees are not that far away. But if they were very far in the distance, I would push them a little more toward blue, and I would use a cooler blue because cooler colors tend to recede and warmer colors come forward. So in the foreground, it's a good idea to use warmer colors. And things way off in the distance should be cooler. And they should also be less saturated.
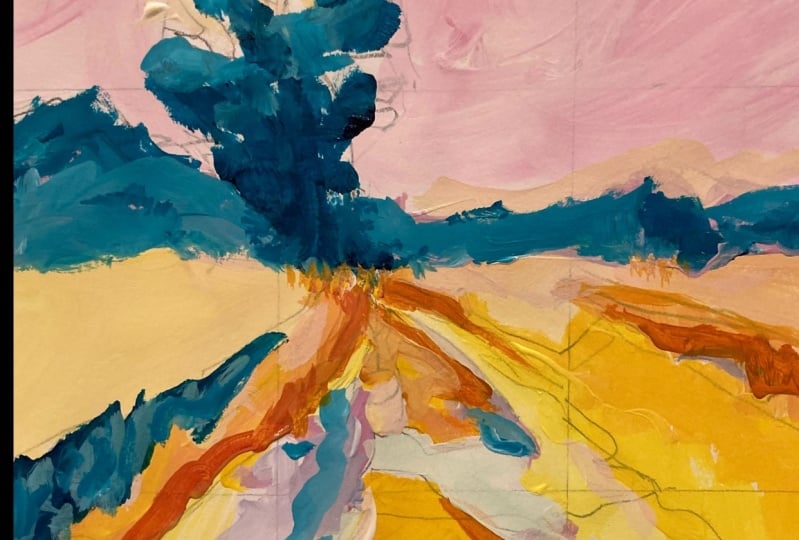
4. Start with a Colored Background: I like to start my paintings with a colored canvas. And I usually pick a middle value. By value, all I mean is how light or dark a color is on a scale of one to ten. So a value one would be black and value 10 would be white. And I like to start with something, maybe in the area of 456. It can be any color. But I am going to do a warmer pink because my landscape is going to have a lot of greens and blues. And I think the pink will complement the painting nicely. It's also nice to leave some of those pink pops showing through in the end. And it also helps me to judge colors and a little more effectively. It's easier for me to judge how light or dark another color is when I'm comparing it to a middle value rather than against the weight Canvas. So I have a very wet paintbrush. I have primary magenta, hansa yellow and a little bit of white. And where the paint is separating here and not quite getting all the way into the canvas. I'm going to go over those areas a couple of times. It's helpful to really push your brush down into the Canvas to get it all covered. And then I don't have to worry about any of those little spots coming through in the end. I'm also not worried about having the exact same color all over the canvas. It's okay if some areas are a little lighter and some areas are a little darker. All that's going to show through in the end is a few pops here and there. So if I wanted to know the value of this color, I can take my value finder, which I just got at a local art supply store. It's made of papers, so it's nothing fancy. You can probably find one online. I would see which which gray most closely matches this reddish pink color. I would say this is probably in the family of three or four. So for maybe five or a four, it doesn't really matter. I just wanted something. I didn't want a super dark color are super light color. And I think this is a good color to start with. Just really make sure everything is covered. And then I'm going to let this dry completely before mapping out my composition.
5. Sketch Your Composition: I start all of my paintings the same way, regardless of the subject matter that I'm painting. Unless it's something that needs to be proportionally accurate. Like if I was drawing a portrait or painting a portrait, I might start with a grid, but with my landscapes and my florals. I'm not worried about being exact. I'm not worried about making mistakes. You can easily work those mistakes right into your painting. And they end up like little mistake, sometimes end up being the cutest marks in the painting. So Don't worry, when you're painting loose and abstract about getting everything exactly in proportion, as long as it's close, it should be fine. Okay, so this is how I started my landscapes and my florals and still lifes. I squint my eyes at the reference photo, and I'm looking for big shapes of color, big blocks of color. And I'm going to just mark in, was any drawing tool. Sometimes I use a pencil. You can use chalk because the truck will just wash away. Or you can go right in with paint, some going in with a small brush. This is number 2. I'm going to spritz my palette with water so my paint doesn't dry up on me. And I'm sticking with the same color family to begin with, because again, I want this to be a colorful abstract landscape. And these reds and oranges are going to compliment the greens that I'm using, and that's why I'm choosing these colors. So I'm squinting my eyes and I'm looking at the reference photo. And the biggest things that stand out to me are the large tree and the tree line in the back, which is approximately a third of the way up the canvas. So I have a tree line. And remember the rule of thirds. And so I'm gonna have my tree here. Now remember I'm just blocking in where the shapes are going to be. I'm going to paint over all of this as we continue. I'm squinting again and I'm noticing the lines of the road. They are much thinner up toward the tree and they get a lot wider. And it kind of comes off the side here. So I'm going to try to just loosely mark these in. Don't worry about making mistakes. You don't like the way you draw your road or something else in your composition. You can let this dry and use another color and paint right over it. So basically these lines sort of coming together. And I have the line of the root here and coming off here. This might be a good way to mark your Canvas. Doesn't have to be perfect. You can make it wider or smaller as you go along in the painting. And here, there's a big block of green and then a smaller block of green and here. And then the only other two things that really stand out to me when I'm squinting my eyes because I have another dark shape. I have a line here of dark green that I see. And then I have over here a block of green. So I have this here as a block and then one more, the middle of it. This is its own block here and a different shade of green. And then I have my road here. And then this big patch of bringing in the front. And these are really the big shapes that stand out to me when I squint my eyes. When I'm not squinting my eyes, I see more of the yellow along the road here and I see some dirt and some puddles. But those shapes are too small for me to worry about right now. I'm trying to just simplify, put in the basic simple lines of the composition and then grab a brush that's a little bit bigger and just start to block in the big colors. I'm not going to use my number two brush here because it's really small and I would have tons of really small lines in the painting. I don't want that because it's going to make my painting, I'm really busy right from the beginning. So I like to start with a larger brush and really just cover the canvas blocking in the the average color that I see in each area. And I'll show you what I mean right now.
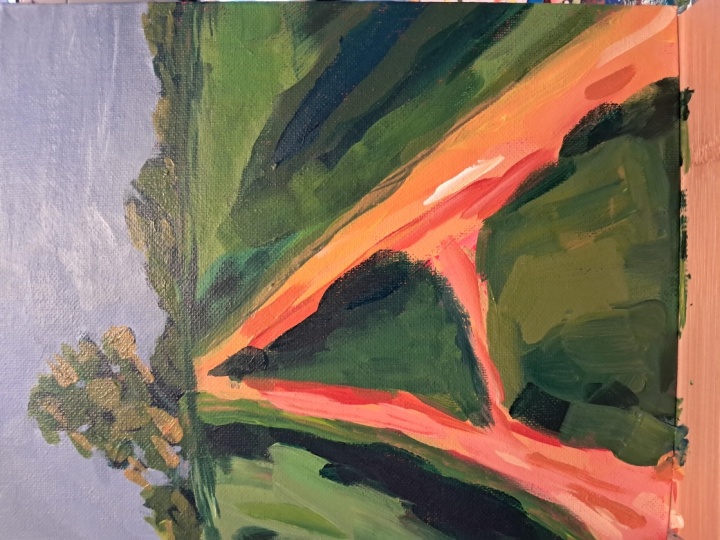
6. Block in Large Shapes: There are multiple ways to start your painting and there's no right or wrong way. You need to just do whatever you feel comfortable with. A lot of times I start with dark values and move to light values. But what I'm going to do today is start with the things that are furthest away in the distance just for this block in phase. So I'm going to start with the sky, and then I'm gonna do the trees in the distance. And then I'll put my cooler colors for shadows down in the tree. And then I'll work out my greens and beige colors as I move down on the canvas. So I have my turquoise and my ultramarine blue. I'm going to add a little bit more of my Hansa yellow, a little bit more red. And I'm going to bring it in my yellow ocher. So these are my five colors that I'm using today plus white. I'm keeping things very simple at this point in the painting. I'm not worried about details. I'm looking for the average color in each section. So I'm not worried about painting little bits of clouds or anything. I am just looking for an average light blue color for the background. I'm starting with ultramarine blue. If it's a little bit too bright. You could add and a little bit of yellow ocher. Or a little bit of orange, because orange is the compliment of blue. And everything feels pretty dry because it's warmer. So I am going to just keep splitting my palette with water so my paint doesn't dry up on me. If you're using fluid acrylics like IM, be careful with the water because if you overdo it, you're painting, get really running on your canvas, almost like watercolor. But if you're using heavy body acrylics, you can use a decent amount of water and it won't, it won't make your pain running. So this is just the initial block in stage. Okay. If some of my pink is showing through the Canvas, I don't mind. Just want to establish the colors and values that I'm going to be using. I'm just going to keep using the same brush and wipe it off on my paper towel. Next, I'm going to do what is next furthest in the background, which is this line of trees. I'm going to mix both of my blues. I'm gonna go a little bit of yellow ocher to get some green. It's a little bright for me, so I'm going to add in a little bit more red. And I'm just going to keep mixing until I got a color that kind of looks like the average of all the colors together. So I wanted like a desaturated green color. And I, because I want this to be more abstract. You can see I'm not painting in every single tree. I don't have a little brush trying to paint every little detail. I'm just trying to establish a tree line and the background, and I'll add some more darks and lights in here a little bit later in the painting to get the highlights and the shadows. Going to keep moving background. To foreground. And I'll do this section in here. When I glance at the photo, it looks more yellow on this side than it does on this side. So I am going to mix just a big block of big chunk of yellow hansa yellow into this green that I already mixed. I'm going to put a little bit more blue in it because it was really vibrant. So I'm going to use a little bit of ultramarine blue, which has the red in it. So it's desaturating my green here. And I wanna make sure it's different from the green that I used here. And this remember is just an average color. I know that in some spots, fright here example, it's a little darker over here, it's a little lighter, but that's too much of a detail for me to worry about right now. This is just color blocking. And I'm being intentionally very loose. I'm not covering every single pink spot on the canvas because I want to let a little bit of that show through in the end. Not too much, but I want a few pops of pink. If I have too much showing, I will cover it up later on. But for right now, I'm going to leave a little bit of that showing this spot in here is a little darker. So I'm going to put in a little bit of turquoise, a little ultramarine blue. I want it to be more of a blue-green and it's darker. It's not as dark as the trees, but it's darker than the graphs right here. I do need to darken up my trees a little bit later. And I think this is a fine color for right now. I'm just putting in that little triangle of darker grass. This color to me looks like a good color for that. Darker, shadowy grass that is over here on the left. Hey, so I'm still simplifying. I'm not painting individual blades of grass, I'm just blocking in the big shapes. I'm going to mix a color for right here, which is looks like it has some white in it. So I'm gonna pick up a little titanium white. I want it to be a little bit more yellow. And again, it's an, it's a completely different shade of green then when I've been using so far, I'm going to use even more yellow now because this strip of grass seems to me like it has a lot more yellow in it. That's really vibrant. Since I'm doing green, I'll do the middle pieces now. I would say in this back piece, it's leaning a little more blue and a little less saturated. Get some of that ultramarine blue in there to D saturate. And then I'm gonna do this. I'm gonna grab some of this later, green that I mixed. I'm going to mix a little of this in here. I think it needs to be a little more blue. I do a little bit more yellow ocher. Could probably push that a little more yellow. I'm not trying to mix colors exactly As you can see. I'm just trying to, you know, if it looks like it's leaning yellow, I'm trying to make my color lean yellow. And if it looks blue, I'm trying to make it lean more blue. And anytime I'm trying to desaturate the color green, I'm adding in something that has red, so my yellow ocher has a little bit of red. I can use my primary magenta to really desaturate the color. And I forgot to do my tree in the background. So I'm going to wait some of this green off my brush. I'm going to load up my palette again with the colors that are running low. I'm just going to put it in some darker blue for the tree for right now, some cool dark. Because that's the shadow area in the middle. And the cool dark colors are what is going to help create shadow. So I'm taking a turquoise, which is my cool blue, and I'm adding in, I need to add an orange too desaturated a bit. So I don't have orange on my palette. I'm using my red and my yellow. I'm getting a really dark blue, green here. Nice cool color. And I'm just putting in sort of in the middle. And we're just establishing some shadows. And I'll be layering over a lot of this, but leaving little bits of it showing. And now the last thing that I'm gonna do, I'm just wiping my brush a little bit on my paper towel. I'm going to block in the road. And I think I'm going to have my road which is really beige brown on this side and some brown on this side with that yellow strip coming down here. But instead of using brown and beige, I'm going to push it a little bit toward my beige, toward pink and orange. I'm going to play with the color on this. A little. Lot of times when I have a landscape painting and there's a lot of beige and brown. I I have the color lean a little bit too, pink or orange just to make it pop. So I'm using my dirty brush, which had a bunch of green and blue on it. And I'm kinda mix. I'm going to make some brown and then I put that into the white. That is really not the color that I want. So I'm going to mix in reds and yellows into that brown bij. It's a little darker than I want. It's a little better, but I want it to be more orange. And this color is not coming out and all the way that I want. So I'm putting that brush and my water and I'm going to start again. So instead of fighting with your paint colors, sometimes it's easier just to start at the beginning. Okay, So I have a little bit more of an orangey color. I think it's a little light for what I want. So I'm adding a little bit of white to my palette. And this is more what I was thinking for the road. So remember, for the perspective, the road is much smaller, closer to the tree. And the larger as you move down the canvas, I'm leaving a lot of that pink showing. I'm ignoring all the puddles and all that right now and just trying to get the road and here. And then I'll let it dry. And I'll start to worry about the details like the puddles if I want to add them in, you don't have to add in every detail you can leave things out. That's why it's good to just block in the big shapes first and then you can decide if you want to add those smaller details in later. So I have lots of pink still showing my tree is a little bit of mass. My treeline back here, I think needs to be a little bit darker. But overall, I think my block in stage looks pretty good. I'm going to let this dry for a couple of minutes and then I am going to start to add in some more color on top of this.
7. Layer the Sky and Trees: I rinsed out the brushes that I was using earlier. So I have my number 12. Clean again, and these are size eight. These are bright brushes. I'm also not usually this wasteful with my paint, but I'm only using a piece of pallet paper because I'm going to be mixing all my greens again. That piece really got messy and I don't think you'll be able to see the colors on mixing clearly. If I do it on top of that mess that was already there. So I'm going to start fresh. All my colors back to my palette. Hansa yellow, yellow ocher, primary, magenta, ultramarine, blue, and turquoise. And I'm just going to keep my white handy. What I'm going to do now is start to look for details and these areas that I already established. So I am going to start with, I'm going to start with the sky because I want to push this tree back a little bit. I don't know. I think I made it a little bit too big. And I think it'll be easy just to start from back to front again like I was doing. I'm gonna take my number eight brush. And I used a little ultramarine blue and a little yellow ochre, tiny bit of yellow ocher last time to mix the sky color. If you made your trees here too big, you can push them back with the sky. And the same thing with the tree. So if you made your tree too big, now that it's dry, you can paint right over it. So I want my tree to be a little bit jagged. So I'm going to push it back a little bit. And now I'm going to start to notice the medium detail. So I noticed that it's a little lighter on the top right of the canvas here. So I'm putting in a little bit more white. And then it's a little bluer. As I move down. Maybe a little too bright, but it's all right. I want a nice bright landscape painting. And I totally just went over all that weight that I put in. I'm not going to overly smooth out these brushstrokes because I like the way the different brushstrokes look. And I'm going to make my tree line a little bit more good by pushing that sky blue right down into the tree line. And you can even put these might get painted out later. I hope they don't, but because I like the way they look, but you can put some of the sky holes in here. You can even put them in later. But I figured why while the blue was already on my brush. And just kinda reshape this tree here. Right? I'm going to leave the sky alone right now. And I'm going to mix and just keep going with the background here. I'm going to do the tree line. This has so much white on it. It's gonna put it in my water and take the same size brush, bright Number eight. And I want to mix some darker and some lighter values in the tree so I see warm and cool. I see spots that are pretty dark. Dark green, almost a blue-green, so they look cool to me. So I'm going to use my turquoise because that's my cool blue. I'm going to use my Hansa yellow. And it's a little vibrant for what I want. So to D saturate, I'm putting in a little bit of my red. And now I have a nice dark color that is leaning blue, green. And I am chunking the colors together again, I'm blocking the colors. So I'm just putting some brushstrokes. I see some dark over here in the photo. I suggest keeping the reference photo handy, whether it's on a computer or whether you print it out or you have it on your phone so that you can see the colors. I'm talking about. If you just tried to paint what I'm painting, it'll work. But I think it'll be more helpful if you're actually looking at the colors as well. I'm going to put a little bit of this brighter green and the tree, it's still cool. And I'm just gonna wipe my brush. And I want to make a warmer green now. So I'm putting a, put a little more antsy yellow that I'm putting some yellow ocher in here. There's some of this really warmer, desaturated green and the tree line as well. So I'm going to put that around some of the dark spots that I created. And I do see a little pops of yellow. So I'm gonna put a couple of little pops of yellow. Not painting every tree individually, just blocking in those colors. We're going to mix a little bit more of this. I did turquoise, yellow ocher, and I'm going to put a new color in the tree. Want to try to make sure that I leave some of the darker spots showing and just layer on the new color. And then put in a little bit of yellow. Do the warmer yellow ocher. And I'm going to just leave that alone and I may or may not come back to the tree, but I'm going to try to work the whole canvas instead of finishing the tree and finishing this part, I'm going to try to just do a layer all the way down and then go back again with final details.
8. Layer the Grass and Road: I'm going to just keep using the same brush. If you're looking at the photo, you'll notice that I pushed the color a little bit warmer and the tree, I tend to make things brighter than what I actually see in the photo. I'm not going for photo realism. I like really bright colors, so feel free to experiment with different colors and see what works for you and what doesn't. I'm going to you now move over to this side here. And I grab some Hansa yellow. Just kinda mix it with the green that's already on my brush. I kind of like more weight than a green. Looks pretty bright to me. It has a lot of white in it. It's also not a perfectly straight line. You'll see that I'm not making perfect lines. A lot of my lines, they're kinda just curved and they're pretty jagged. So I'm going to leave that in there for that side for right now and I'll leave those little pops of pink for right now. I'm going to let that dry and move on to this side here, which is also very light, but to me it has a little bit more yellow in it. It's a little more vibrant. So I'm going to use my cool Hansa yellow to try to make it even more vibrant. I'm going to do the same thing here. Holding my brush pretty loosely. The trial leave some of the color. The first color that I put down showing. And because I'm trying to notice other details now I notice that right here, it is a little darker. So I'm going to grab a little bit of turquoise here and mix it in to just get us subtle shifts in color. If you paint everything all the same color and the same value you're painting is going to be pretty flat. So try to pay a little bit more attention to the subtle shifts and color that you see. A pretty jagged line again. I'm going to grab some of this hansa yellow and my brushes still dirty. I'm trying not to over mix it though. Mixing a little bit. I'm going to start to put in this detail here. This actually might need I might need a little red is kind of not really standing out for me as much as I thought. So I think I'm going to let that dry and I'm going to layer over that yellow stroke again with a yellow that has a little bit of red in it. So an orangey warm yellow. So I'm tempted to do these darker stripes, but since I have so much light yellow and light green on my brush, I'm gonna do this patch right here which has more yellow in it. So to me, the middle here looks more yellow and then the two sides look like they have a little bit more blue. I'm not going to just paint them as stripes. I'm going to be again, pretty jaggedy with my brush strokes. So I'm going to want to mix the different colors. So I grab some yellow ocher and I'm going to spritz my palette water so it doesn't dry up on me. I'm mixing a much warmer green for the foreground here. And I'm just trying to put in some different brush strokes. And I'm going to mix in a little bit of ultramarine blue, maybe a touch of turquoise to brighten it up. And notice in the photo, this isn't, it's not a straight line is it's sort of patchy grass. Alright, so I want to. Have those little patches. And I think that wasn't quite dark enough for what I want. I'm going to mix a bunch more blue into those and I'm going to layer over them again. I'm going to grab some more yellow ocher and maybe kinda lighten it up a little. It might be a little bit too gray. But just for some subtle shifts in color, I'm going to put it a little bit of that in. And I'm going to wipe this brush pretty good on my paper towel. Start over. So literally yellow ocher, I'm gonna do turquoise. Now, a little Hansa, yellow touch of white. Let's too saturated. I'm making a mess again. So what I'm trying to do is kinda mix this avocado, a color that I had earlier. So I'm going to wait my brush pretty good on my paper towel. Tiny bit of turquoise. I think I just went in too much with the turquoise the first time. It needs to be a little more green. I'm getting a little closer to what I want now. So color mixing, you just have to sometimes you have to start over. That's much better. And you can see it's not one flat color, it's a little bit streaky. And I'm going to leave it like that. And just kinda put some of these other colors that I mixed around it to get those patches. And I think I like this Much better now. Right? So when you're struggling, just remember watching other people paint. Sometimes. It looks easy if the person's experienced and they're painting fast, but painting really is not easy. It takes a lot of practice. In every painting I do, there's a lot of back and forth, changing colors, mixing and remixing colors. That's just part of the process. If you want to grow as an artist, you really need to push yourself. And when you push yourself, you're going to make mistakes. But as long as you learn from those mistakes, you're going to grow as an artist. So don't feel like other people are better than painting. Better a painting than you are. If somebody's really good at painting, it's probably because they practice a ton. So I'm going to move into this patch up here. I'm going to go more simple because there's less detail in it compared to this part down here in the reference photo. Keep tinkering with this area and I need to just leave it alone. That's how my end up overworking areas and I'm going to try not to overwork, even though you probably already did somewhat. So in the back here looks screen, but it looks like it leans a little more yellow and then on the rate it leans a little more blue. And I think I'm probably just going to leave it like that. What I'm noticing right now is a may have worked on this area a little bit too long. I like this right here. I think I'm going to push my tree back a little bit with the sky again and put in some of the sky holes and maybe do a little bit more coloring. I want to add another layer and this whole area here, I'm going to start with the darks because I didn't go over the darks a second time. And then I'll go back and do the road a little bit more. I'm going to just keep plugging away with the same brush, wiping out a bit on my paper towel. I want to make something dark. Putting in both my blue's, a little bit of my red. Scrape up this hansa yellow here. And a little more turquoise to cool it off. I like how the shape of this right here. So I don't want to really reshape it to March. I think it just needs another layer of paint. And I don't know if this is going to work, but I'm going to put in a little bit of wakes. I don't want the patch over here to be as dark as the patch over here. And I'm going to just leave that alone. I'll do a second layer on my road. And then my whole canvas will have a second layer on it and I'll let it dry. And then I'll go back and do a third and hopefully final layer. All right, I'm going to take my number 12 brush here just because it's clean. I'm going to try to find the flip my palette paper around and use the clean side over here. Going to grab a little bit of yellow ocher. I want to mix a similar color but not the exact same color. Where I have the like the darker patch of dirt on the side of the road. I'm not going to make that brown. I'm just going to put in a little bit of this darker orange to represent that. And I'll put a little bit of darker orange along the road on this side because I didn't put in that bright yellow yet, which I'll do next. So I want to try to get some subtle shifts in color in the road. Can I make this lean a little more pink by adding in some more of my red. I'm going to put in a little bit of white. I'm just going to play with this color till I get something that I like on a soft pink. And I'm going to start to put it in sin. And then it gets a little bit thicker. I just shifted the color a little bit. You don't want everything to be all the exact same color. That was an accident, but I kinda like the way that looks. So I'm going to leave it and put in a little bit more light because I think that's adding some nice contrast. I'm trying not to overdo it. I want to get, I'm going to wait my brush. I'm gonna get a little bit more warm yellow for this side of the road where it's a little bit brighter, starts off pretty thin. I think that as a nice bright pop of color and it helps with the overall contrast as well. I think I'm just going to stick to pink. So on this side and there was that little bit of dirt that kinda goes across the road. I've been ignoring the puddles, the thing I'm going to continue to ignore them and just have them just be kind of pink like the rest of the road. You don't have to add in every single little detail that you see in a painting. If if you're painting is working and you didn't add something, and yeah, you can always choose to leave it out. It's easier to add stuff in later. If you want to take something out, you can, but you just need to wait and let it dry and then paint over it. Okay. At this point, I feel like I'm happy with the road, I'm happy with this and this areas that need more detail I think are here and here. And I'm not exactly happy with the treeline And the trees. So I'm going to clean my brushes. I'm going to let my painting dry. And I'm going to address those areas that still need to be addressed.
9. Final Layer and Details: I rinsed and dried off my brushes again. And I found it helpful to step away from the canvas for a few minutes. So now I have fresh eyes. Messy palette. So this is my ultramarine blue and my white and I'm going to go no-go around that tree again. Tiny bit of yellow ocher just to desaturate that blue a little. I'm not trying to mix the exact same color, but I know that I used ultramarine blue and yellow ocher and white before, so I'll get something pretty close. And I'm just going to push this tree back again. I think I need to simplify the tree a little. So anything you don't like, as you can see, you just let it dry and paint over it and you're really just ends up building up some texture, which I like. So I paint over things all the time. Actually like some of these jagged edges that I accidentally created on the tree. So I'm going to leave those I think. And I'm going to put in more at the bottom just to give it a little bit better of a shape. And then couple of really faint, faint, faint little sky holes. And I already, just by doing that, I already like my tree a lot better. So I'm just using the tip of my brush, my number eight bright brush. And I'm just cutting into the tree. And then I'm just making sure that all those little marks are covered. Much happier. Maybe I'll put a little more color on that and maybe not. I guess. I'll just give it a minute and see. I'm going to put this brush in water because I want to mix a darker value now. Going to take turquoise and yellow ocher and a little bit of primary magenta and go in here and establish my shadows again. I think it ended up getting a little too light for me or it was all medium. And I wanted to put in a little bit more dark. But it takes some of that color now. And next it was a little bit more yellow ocher and just put a few warmer marks in the trees and try not to cover up the dark spots like I did last time. So I think I like that a little bit better too. And it put, I'm going to touch up the tree tiny bit with this former green. That's a little too much I think. All right, I'm going to stop fussing with that tree. I'm much happier with it now. And there are tiny little bits of pink barely showing through which I like and I can see some pink up here. I'm going to leave that. And I'm going to mix. And you go over the Lambda one more time. And pellets mostly dry so I can just plop some paint on here anywhere. The only thing is it makes it a little harder to judge the color because you're mixing and on top of something that's already there. And I think I just want to add a little bit more detail. And I didn't intentionally make that mark again mistake, but I like it, so I'm going to leave it. Before you paint over your mistakes, leave them, sit with them for a couple of minutes and see if you like them. A lot of times you will. And I'm just adding a little more color here, more layers, those layers and the different colors that are so subtle, but right next to each other and on top of each other. That's what's going to add dimension to your painting. So try to resist the urge to make everything all the exact same color and try to leave those subtle variations showing she was put my paints across the top. So that's my turquoise, my ultramarine blue. I have some yellow ocher right here. Hansa yellow. And just some subtle variations right there. Do you want to cover a little bit more of the pink? And wanted this side to have a little bit more of the white in it. So it's not flat. There's at least three or four different greens that I can see just in this little area, even though they're all very similar colors. Want to try to make this more of an avocado color now. Ultramarine blue, yellow ocher and Hansa yellow. And just put a couple of details on that patch and make the road a little more narrow at the top. And I'm also going to make this a little smaller right here. Just reshaped some route a tiny bit to try to stop myself from fussing with all the little details. Much happier with the painting now I feel like it's really coming together. This side should be a little bit more yellow. One thing that I'm noticing that I didn't notice before was I think this blue here, I should get a little bit smaller as it goes in the distance, it almost kind of fades into the distance. Right? So to get the perspective right, I want to just make it a little smaller. I think I can make it a little bit brighter in here. Now I'm a little nervous that I'm going to ruin the painting at this point. I do like it, so I don't want to overdo it. But I did want to just brighten up a couple of spots. This reshape this a little tiny bit. This little spot is sticking out for me too. I think the last thing I'm going to do is maybe just touch at the or put some highlights, maybe in the road. Probably pushing my luck, but we'll see how it goes. I need to grab a clean piece of paper. I usually put these aside and let them dry and then reuse them later. Once they're dry, you can mix right on top of them. But when I'm filming a class, I like It's easier I know for people to see on a clean piece of pallet paper. And I don't want to get any greens mixed in with these pinks. I attached the reference photo and a copy of my finished painting. So feel free to use those as a reference or use your own reference photo. Either way, It's great. I hope that you post a picture of your finished painting so that I can see it. If you're on a computer on Skillshare. Underneath the video, it should say, Projects and Resources. That's where you can find all the paint colors that are used and a copy of all the reference materials. If you post your painting to Instagram, you can use the hashtag paint with L. If you'd like me to share your finished painting. I like to share other people's paintings and my stories. Once a week or so. I would love to share your work. You can certainly tag me, but sometimes I miss tags. It's easier for me to find your painting if you use the hashtag paint with L. All right. I think I'm just fussing with details now, so I'm going to call this one finished. If you have any questions about anything in this video that I wasn't clear about, let me know. I'm happy to to clarify. You can send me a message on Instagram or you can send me an email. You can find my email on my Instagram profile. All right. I'm going to call this one finished before I go too far. I hope you enjoyed this video today. Thank you for watching.
 Elle Byers, Artist and Teacher