Transcripts
1. Introduction to the Course: Hello and welcome to acrylic painting for beginners. I'm so glad you've decided to join me on this course, and I'm going to do my best to make sure that you get everything that you need to become a confident acrylic painter. We're going to start off with the general introduction to a creek painting with the materials that you'll be using and a few tips there that I've learned along the way. Things like how to preserve those quick drying acrylic paints. Many other professional user experience tips as well are going to be toward in this course , so you're going to learn a lot of practical things. Then we're going to go into the basics off, making a good painting from observation, two sketches to composition and perspective, things that may sound difficult to begin with if you, especially if you've approached them in books in a more academic sense. But I'm gonna Hernan on the practical the stuff that works for me and helps me get paintings done quickly and effectively because our alarm that for my income as well so I'm not going to spend ages with theories and academics, but we're going to get straight into what is possible to use practically from the get go, I might get skimmers. Well, you're going to learn some good, solid stuff that you can take Ford in your painting. Maybe one day you want a painting oils. Maybe you're going to past ALS or different things. Even watercolor. What you're going to learn in this course, a lot of it you can use for those mediums as well. We're going to look at a few great painting subjects as well. How do you use light and dark effectively to paint a landscape? We're going to look at expressive landscapes as well, more modern techniques and the traditional techniques as well, but are going to make you an excellent painter. Don't forget as well that there is a workbook that you can download in the next forthcoming lectures to look out for that in the references, and you can work from that in your own time to consolidate what you've learned in the videos. I do encourage you to try out the lessons after you've done them. Don't just watch the whole thing in one. Go try out the painting subjects for yourself and consolidate and bold each listen as you go by doing it yourself. And that is, after all, the best way to learn. Great. So let's get going.
2. Download Your Workbook: together with this course comes a comprehensive workbook that follows a summary off the course and extra tips and advice in the workbook. So please go ahead and download your workbook now.
3. Materials for Your Acrylic Painting: as faras materials for this course or concerned, we can keep things very simple with acrylic painting As with oil painting, you can make this complicated or simple, as you want so much up there to purchase. But first things first. We need some brushes, so a large, flat brush like this is good for blocking and big colors. Onda soft bristles since synthetic bristles and then a larger full birds like this. This is a size six. Anything up to a size eight will be fine for most things. And then this is a short, flat brush, which can be used for acrylics. Oils on that is also very handy to have been a couple of round brushes like this, synthetic fiber says. I saw 12 and sauce six on their very handy for acrylic painting palette. Knife. Always handy. Mexica left in with the colors, has a wide range off colors available for acrylics. Good quality Student acrylics s at the very least, should do fine for this. Of course, I like the My Mary range off acrylics. For students, they're good quality, but the basic colors yellow or a permanent yellow lemon that will be fined one overs on Eliza in crimson is very important. Any sort off rid warm bread or red light flew off marine blue and cobalt. Cerulean blue will be useful then, of course, titanium. What is essential? You can have a few convenience colors as well, like burnt sienna and yellow polka. Even orange will be helpful to I use a rabbit rubber clothes for my hands as well. Not that there's danger from the acrylic paint to try and keep my hands clean. The acrylics do stick and dry very quickly. A notebook with pencil and felt markers in the which shape will be useful. Keep doing your sketches and No. 10 studies, which is very important. So on a five notebook like this will be ideal. Then, as a pellet, you can use the simple tear off pallets, which are very easy to transport and convenience. You can use them anywhere. Um, what I will be demonstrating is the stay with hell it, But I will show you how to make, and you can close to keep your paint from drying too quickly. Far as easels are concerned on a desktop easel like this to be very useful of any sort of easily will do. And that is really that you can supplement your brushes as well as we'll see during the course with Russell as well for texture effects when painting the fine Lord, keep your equipment a simple US possible.
4. The Stay Wet Palette: way, we'll know that one of the biggest benefits off acrylic painting and using a critics is that they dry quickly. But also one of the frustrations off critics is that they dry quickly, especially when you got a good bit of paint arts on your palate and you find the painted story into dry, and you need to keep that moist. So the easiest thing to do when you working, of course, is to just have a water bottle in a spritzer and just spritz a bit of mist water mist over the paints, so that usually takes care off. That irritating drive for me get over the piles of paint. But the biggest issue for me has always bean the paint lift. Artal, a parrot for any length of time or even overnight is impossible because the next morning it's unusable, and that's a lot of wasted paint, and you can always finish the painting in the same day, so you want to save your paint and pick up where you left off. So a solution to this is a handy tip that I got from another artist school. Tell Lily it, and he uses what it calls Ah, stay with a pellet and I'm going to show you how to make that stay with palette, and it will transform the way you can work with your krilic paint. You could put it away and you'll stay with parents for several hours during the day or even overnight and get back to your paint and it hasn't dried the next morning. So let's have a look at the stay wit parrot and how easy it is you can make when yourself okay. To make our stay with pellet, we need a plastic container like this that this will do fine, and it's a large enough surface year to have a manageable pallet. Size must have a lid that can close firmly and being a tight container. So the first thing we do is use paper towels, kitchen paper telling in the years about four pieces off that and I'm going toe. Line the bottom off the container, and you can roughly cut it to size. Definitely if you want, it's not too serious. Okay, so that will go on to the bottom, the container. So on, then with some water, make sure that is with thoroughly mustn't be water sloshing about in there, but just so that they have a town is with rocks through. Okay, then you need some flex paper, Andi, more or less to. Because we have to hold it over. You won t wax side on the top and on the bottom as barriers. Roughly How long? That as well. I guess I got two layers of wax paper shiny side up and lots of Funny cide. Don, put that on top off the wit kitchen towel on day, you've got the layer to put your acrylic paint on while you painting. You can obviously spread sons fine mist of water just to keep things moist on top here. But the main thing is that when you finished fainting for the day, you're coming. Put the little and that will keep the paint fresh overnight even longer. And then the next day, the paint is really to work on. And it hasn't got that annoying draw. Fulmer overturned. You've saved your print from spoiling. Well, that is your stay wit Hell, it And you can use that any time
5. Painting Supports: okay. As part of your painting materials, One of the most important items is the support that you paint on this video. I'm going to look at your typical painting surfaces and my favorites as well. A few pros and cons. But you should try them all and see what works for you specifically. But let's start with. The first thing you can use is paper and basic er. Watercolor paper is an excellent surface for critics. What do this is? Standard 300 gram watercolor paper? What I prefer to do is to tape it onto a board like this. Let's put some masking tape nice and firmly, and this holds the paper in place, and you can paint securely in this fashion. You can also stretch the paper if you want, just by waiting it with a clean brush and leading that drop for a few hours, or until it's Marcin flat and properly stretched, especially if you're going to be using acrylics more or less like water color with a very which paint. Then it might buckle if you don't stretch it. But if using acrylic straight out, the tube are so thick that's unlikely to give you any trouble, and you can just paint straight away like this. Another option is your basic painting panel, primed with acrylic primer, and that works very well for a usual painting. Andi. I use these a lot, but one disadvantage is if you're going to be using textract paste and things like that that we're going to explore late in the course the surface movie to smooth. This would be working with the painting, knife or some other device to put on the paste. Even think in fester you might. I prefer a surplus with some more group or more to thousands called in which Coz the canvas lined panel is ideal. I'll show you how you can make this for yourself just now. And this is just your basic India Hannelore canvas glued on and, uh, primed as well. So this has got all the tooth off canvas the firm surface off a panel, and that's quite lightweight and very durable, and you can easily spread on your text to paste or any other a multimedia material you want . That's very versatile surface. Then, of course, there's the traditional stretched canvas. This particular one is on polyester cloth which makes it an excellent surface for awarding based paint. I'm fairly traditional as well, so I quite like canvas, especially on the larger painting, because it's very lightweight getting all the advantages of canvas, but not heavy India of panel for using and large India Cannell. The weight increases quite rapidly. So a good canvas, excellent option and you can't go wrong with. Just make sure it's properly primed. Of course, now, because the critics are so versatile, you can paint on so many different soups is you could paint on newspaper various other items, even onto wood, and I'm not going to go into all of those. You can experiment as much as you like. If you are selling paintings in war lis, traditional way paintings to be framed or block block mounted canvases or shadow boxes, things like that, then you're more likely to go for one of these panel options or the traditional stretch canvas trialing experiments. See what works for you and enjoy painting on these excellent painting surfaces
6. Suggested Acrylics Medium: thing in this lesson, we're going to take a brief look at the subject of mediums. If there's one topic that seems to get a lot of attention for acrylic painters, it's that off mediums, you get mediums to slow down the drying process off acrylics. And they can be quite popular, especially if you painting outdoors, extremely hot conditions or perhaps windy conditions. And it may be an issue. Personally, I don't like to use mediums to slow down the drawing persons of acrylics because that generally is one of the reasons why I'm using the acrylics in the first place. That's and together with the stay with pellet and also the water spritzer that I use. I don't really have much trouble with the acrylic paint drying, and I prefer to work a bit quicker myself in general. So it's not too much of a hassle. If I really have something that I want to paint very slowly, then I'm probably going to use oil paint or maybe start the panning in acrylics and finish it with oils. So there's a lot these options. I'm you get acrylic paint that has a bolt in drying retired er in it already so you could buy the paint and something. Squeeze off the tube in and have that benefit if that's what you want. There is, however, a medium that I do quite like, and I do find quite useful, especially for in Pasto painting. And it is, in fact, and in pester gel for acrylic paint. The idea behind this is to mix it in with the critics on it extends the acrylic paint, but the great thing is that it drives still pretty quickly and doesn't lose too much of the vibrancy of the acrylic paint. So in theory, a small amount of acrylic paint can be extended double almost three times the volume in ah , thick gel, which convinced then be used liberally on your canvas. It almost sounds like it's magic, however, does A lot does depend on the quality off your critic paint, so high pigment, professional quality acrylic is going to handle much better. But a low quality acrylic paint was a little bit of pigment is not going to quite hold its intensity off color. A bit of common sense needs to apply as well, but in general, the acrylic Jill medium works great for thick in pester work, especially over a large canvas. I'm going to show you briefly, hardest. Joe Medium works, and you can try it for yourself, and I'm probably going to use it in my forthcoming impressed oh, demonstrations as well. Okay, so this is the in pester medium that I'm going to be using. There is the Joel medium on opaque looking substance that dries clear without influencing the paint too much. Get out. Some last brought Euller small. They passed a medium on will planned it all Together they can see moralists double the volume on. That's a nice, thick, creamy placed. Let's just look at the find straight off the tube. Compare it. That's pretty much a similar intensity. There is a bit of extra vibrancy, I would say straight out the tube, but overall, for what it can do. I think it works very well.
7. Essential Composition Tips: in every one of my painting courses. I tend to talk about composition, and I wouldn't be doing my duty if I didn't bring in composition into this course as well. It is that important, and composition is so fundamental that I have put together a list off essential composition tops and made it into this lesson. So if you've done any of my other courses and then my composition videos before, it will free to skip over this. But if you want to just reassure yourself on the essentials off composition and ball means watch this video and apply the composition tips to every subject that you paint when you're doing a thumbnail sketch. And you know, 10 studies and your preliminary drawings, putting the whole thing together onto your canvas as well. Keep composition in mind and make adjustments wherever necessary to make that composition strong, simple and powerful. So, without further ado, let's check out these essential composition tops. So, first of all, training yourself to see like an artist, what this means is having good observation off a seen. Very often you will notice a scene and it'll stand out, but you're not quite sure what it is that's attracting your as you practice composition, you will get to understand what is working in a CNN and why you naturally attracted to it. For instance, this some beach scene, the composition element that really stands out years, of course. The lines off the umbrellas and the lines off the beach receding into the distance, taking the viewer's eye nice and deep into the painting, creating that wonderful three dimensional quality that you may be looking for. These receding lines also make a strong structure that the painting can be based on at one of the fundamental rules. Off composition is the rule of thirds. In most cases, the rule of thirds should be followed. Photographers will also know a lot of battles. So, for instance, this balcony on the left is intersecting the line the vertical red line comprising the 1st 3rd off the picture plan, leaving the other 2/3 free. And this is just a natural phenomenon that is naturally pleasing to our I. If you play something in the middle, it tends to confuse the I and you're not quite sure what is the dominant part of the painting and the rule of thirds usually takes care off that the next important thing to remember is that picture plane, and we want to keep the viewer's eye in the picture and not distract them off to the ages off the painting and so on. What we put in the painting must help to take. The viewers are into the painting and around and back again and hopefully back into the painting. So one of the ways to do this we've already touched on is using direction. Lines keep the are moving into and around the picture. The line of the river on these rocks in the foreground recede nicely into the distance and intersecting with the tree line in the middle distance, takes the eye around to the right. Then the lines back to the right of the painting and naturally come back to the foreground . And these are just a natural elements that are always available. If you just look for them, you may have to change your viewpoint, or you may have to improvise in a scene to add natural. Everyone's like this, so there's natural elements again, keeping the are moving nice and deep into this painting, creating a wonderful three dimensional element. There's also an ask diagonal line coming from right to left and intersecting with the pathway, so that also draws the eye to that. And, of course, the overlapping trees, from tall in the foreground to shorter into the distance also creates a receding element that draws the eye into the painting. Variety of sizes is also important. As you can see in this painting, the largest yacht is squarely in the third section off the painting, so they are just following the rule of thirds the other yachts next to door smaller so they're not dominating. The focus point off the painting. A simple variety, off shapes and variety of sizes is more interesting than having everything the same size, and another natural quality that you can use is the overlapping shapes in any type of seems so instead of having them all next to each other or evenly supposed, which creates a very dull and boring energy in a painting at a cemetery. This is also following on the rule of foods. Avoid dividing your picture plane by placing something in the center on the next up is varying your viewpoint. We often paint a painting from a position where the viewer is looking at a scene from a standing position. But sometimes you may find something but more interesting. If you lower the perspective or height on the perspective and look down onto a scene, for instance, or in this case, the photographers go nice and learn. And it's got a more dramatic angle for what could otherwise have. Bean quite a boring kind of seen, maybe just could be a lot more interesting, distracting elements quite often found these days in any modern environment. You gonna find all sorts of things, and artist does not have to include every object in a scene, take out what is not necessary and what is not adding. For instance, in this case, maybe the Tripoli steaks need to be removed and the car as well, because they're not adding to the natural scene that you want a paint, this little stream and so on. Alternatively, this might be a painting about pollution, in which case you want to keep the smoke stakes. But maybe that car and the smaller building in the middle Grand would be a confusing elements. So you take them out, and if the scene is way too complicated with all sorts of things, perhaps that spiritist to look for another one. But look out for these things. I don't feel tempted to put in every obscure but and pieces that might be in the scene. Cropping is important, and as artist these days we work from photographs quite often, so it's natural that you want to paint what is in the four corners of photographs. But instead, maybe you should open it up in your computer system and crop the photo, tighten it up, go for the dramatic shapes and leave unnecessary dull areas off the painting out. You can do this also in painting a scene outdoors, just cropping a scene with overlapping but some card or using your fingers. Whatever started, may my maybe in history and just look through something to help you narrow down the scene. Balance is important to achieve harmony. For instance, this wouldn't pump on the left is a tool element, and it's breaking the horizontal that line off the landscape, and that creates a more interesting scene or so. The trees in the distance balance are the wind pump as well, because they are to the right and side, but also smaller. If all the trees were lined up with the wind pump of the same height, they would all pray to very static type of scene. Sir, balance doesn't mean everything. Being the same size but rather balance means eHarmony from large to small vertical to horizontal. But once again, keeping the I in the picture plane is important, and we want to avoid taking the into the corners or to the edges off the picture. So bright colors or very strong darks and other distracting elements like people, for instance, standing on the edge of the picture plane. All of that is very distracting. Sertic your painting as you proceed. Look at it as a whole. See what his mystery, what needs to be cropped art or removed out of painted over scraped back. You, as the artist must do these things as the painting progresses, test your composition with the no tends that you've learned off already, or your value sketches or help to refine the composition and then practice with lots of starts and layouts without worrying about completing the painting. Check your composition right from the start
8. Aerial Perspective: in this Listen, I'm going to cover a few topics, including perspective, painting, trees and color temperature. Now, when it comes to perspective, we've got really two main ideas in painting, and that is linear perspective and aerial perspective. I'm going to focus a lot on aerial perspective in this course. The fact is that I'm not too concerned about linear perspective because if you follow the simple principle off looking at shapes in relation to other shapes within your painting area, in this case the landscape area, you should pretty much have no trouble with linear perspective. Remember, we're not trying to print or draw like architects. We painting in a fairly loose style off painting in a critics, even if using oils the same concept of plus, but especially with the critics, I'm looking at nice, loose, juicy paintwork, brushwork rather and paint application. So what, I mean by getting to grips quickly with linear perspective. First thing you should really look at is the horizon line. So let's say we're standing in this field looking at this fantastic scenery. The Horizon line will be more or less. This line running across here scares that's not perfectly straight now Mets up the shapes in your scene according to that horizon line, in other words, relate everything to that line. So in your painting, when you're facing a blank canvas roughly painting that horizon line and then start relating things to it, yes, sir, there's the Roz Alon. The mountain lion will start there, go out about their on the writer inside, then the tree edge of the tree in relation to the line of the mountain. That is that distance away when you can bring that in its Citra and then figure out all the shapes in relation to the next. And you'll get a very accurate placement, certainly accurate enough for painting a scene like this. So that's linear perspective, very quickly dealt with now onto my favorite, which is aerial perspective for atmospheric perspective. In most landscapes, your sky is going to be the lightest light. That's where the sun is coming from, and it figures that that's gonna be the lightest so on your value scale. This is going to be the lighter slat, so let's look at the Manzo Value scale and you'll see that the sky will be possibly a nine or eight on the value scale. So that's basically taking care of their case, sir. Skylight, a slight next latte. This area is going to be a middle value will be in the grass region year and another mid middle value on the hills on. Then the darkest dogs are going to be in these trees on the shady areas of the treat, So more or less, you're four values. Maybe you can get an extra one in the mountain side over here, so 4 to 5 values. So what does this all have to do with Ariel? Atmospheric perspective. The important thing, as artists that were going to remember, is getting the venue and color temperature as accurate as possible. These are birth influence dramatically by aerial perspective. Let's look at the four Grand Yeo on. Look at these trees that really stand out practically a silhouettes on guard this one year . Very nice and dark, standing out quite crisply, as I said, Nice and dark, so the value is pretty strong. Probably a number two number one on the man's or scale said, complete opposite side of the spectrum compared to the sky. But look at the tree behind it and you'll see already. Big difference. Rika. The atmosphere has lightened that up on and cool down the color as well. Distant trees. Eras Well, all of these. Very much different in value, much lighter value than this, and much cooler in color. For example, these Sunday trees here much warmer, quite defined, etcetera. There in the distance, much cooler and color is cooler and de saturated. So there's mawr. What we would add something like white and blue into it to de saturate that green to get that soft and cool green. Let's go even further back into the middle distance. Here, Onda, uh, compare this grass to the grass in the foreground. So what color with this grass look like? If we're mixing it up, well, let's look at the green zero and just getting approximation. So be de saturated Andi Cooler green. Let's try this fairly close. Maybe even cooler stole. That's more accurate. So look at that. Quite subdued, de saturated and cool. Now let's put it on the sun that cross the bottom here. Wow, that is almost blew in comparison to what the gross really is. It's so the cross is more like that as the sun hits that, so compare those to a marked difference. You can see how much blues going. Let's compare the cross Sunday gross the foreground to that in the back there on a completely different. So that's the dramatic effect of aero perspective. Even more so upon the mountain, your not only is that cooler, but it's also looking a bit darker as well. So the degree of sunlight hitting this flat middle distance is different up in the mountain , where it's at an angle. It will be cooler and probably darker, stole in verse. So let's try this one. That's probably too warm. Let's try that. That's better, So that's fairly accurate now. That's compared to this cross. Yeah, and you can see a difference there as well. Darker and cooler in that middle distance cross. And this for interest. Let's bring it down into the shadow area in the foreground to light. Probably too cool. What would we do? The shudders in the foreground? Definitely. There's blue in there, so darker and blue that's not too bad. That's a darker green. There's more. We're closer to it, more light. So that's closer to us. There's Mawr saturation in that color. Let's compare that green to the middle distance green there, while massive difference so much more dark and value and saturation, it's girl come to the mountain or so major difference. Not as much is that because the sun hitting that mountain slope is less forceful than that's hitting the flat, flatter slopes in the middle distance. Okay, so there's a lot involved. But if you trust your ours and compare the colors so you could scoop up faint on your palate, squint a bit. Look at the distance. Put that paint down on your canvas. Hold up the brush at a sufficient angle to get light onto the brush and then compare it to that color and your start killer spotting. You can also use a piece of card with punch of pencil hole size in the card. Hold up their older that arm's length, squint through the hole in the card and just isolate that bit of color and see if you're getting it right on your palate. But of course, you know by now that relationships are all important. So by comparing this green to that green to the green in the foreground, all the relationships must make sense and read correctly. Warm, saturated color in the foreground, cooler in the middle distance, cooler store in the far distance and so on. And that's how you use relationships to compare value and color temperature accurately. So that's aerial perspective. Get those relationships true, and your painting is going to read correctly and have so much more impact already. And if you decide to paint in high key colors and really push it on etcetera, that's find too many bright greens. Super bright yellers brought blues. That sort of thing knows, and that's no problem. As long as the relationships between all those high key colors are correct. In the end, that's going to read correctly, and it'll look right. So the going for ultra realistic color off expressionist color, the relationship between warm in the foreground and cooler into the distance will still remain, and that will make your painting read correctly. Let's have a look at another thing I wanted to show you, and that is painting and trees and more, particularly when it consider shapes, and that's a good opportunity to deal with that way. Want to get a tree painted Okay, that's great. Let's ever look at this one year or the store of the show. Okay, now this tree or bush is made up off a number off shapes. There's the direct sunlight portion, which you can I slit like so like a piece of a puzzle. There's the indirect side portion, which is darker and cooler. And then there's the portion. It's incomplete shade forming this dark, but yeah, OK, so now we've got our tree. Shope produced it to three main mast shapes. Now we're going to try and get the colors correct. And as you know, by now we're looking for correct value and correct color temperature. So let's go into the greens and this bright green, warm yellow and green. Too much trial ASAT hand along. We're gonna paint that jigsaw piece, then darker and cooler, the indirect latte, roughly like sir on. Then the Tani said Caution, even. Be slightly darker, and you do this within the appellate by adding more blue, probably something like ultra Marine blue, maybe a touch of a lizard in crimson so they re have it, and then it's costing a shudder. Something like that. Anchor it to the ground. So that's more or less how you paint a tree. And now you can develop those shapes within those three ships. All right, so you make the shape smaller. You'll add smaller shapes within that main dark value of that middle value that light value . Keeping those relationships always correct without losing those relationships so you reduce the edges, smooths out a bit, so in the end, to have a pretty good likeness off your tree, that's how. Do you really approach these tough subject shapes than colors and values and temperature? If I hope this quick listen and sold a few perspective issues, as well as painting certain shapes in real life and simplifying it to a point where you can approach all of these things confidently on your palate and just keep practicing them, that's all.
9. The Nature of Color: I think in this. Listen, we want to look at the qualities off acrylic paint a little more detail so you can get the idea off. What are the differences between critics in the usage compared toa oils and watercolors? The great thing with acrylics, though, is that it combines elements off watercolor and oils, and this is what makes acrylics one of the most versatile painting mediums you can use. So we're going to look at the transparent qualities off acrylic paint and also the opaque qualities, and then move onto trying out different kinds of brushwork to also push the nature off the acrylic paint in practical ways that you can use as a beginner straight away. So let's take a look at the main colors we're going to be using and how they appear on a painting panel and the different consistencies from thin right through to thick acrylic paint. And I will encourage you to just play around with your paint and get the fuel off the paint and how it flows and how it works and how you can layer it without worrying about painting any specific kind of picture at this stage. But simply getting familiar with the paint itself. Okay, so you have got a panel primed with Jessa and a variety off brushes that we've seen already . My stay with hell it. Andi. I like to have some on paper as well to wipe off brush and torso devil for any excess moisture, so that's handy to have as well. So the first thing is, if you using quite a bit off water on your brush, you can thinned on the acrylic paint considerably, and it almost takes on feeling off water paint. You can see it's just about to just about to drop like that, so you may wanna just you're diesel to lie back or just catch that is very thin, and it's transparent as well. And you can try a different combinations with intuit, your ability or yellow parenting through that, and you can see the variety off color also transparent. I've you let that dry on paint over it With iler, you will get a different effect entirely. Yeah, for instance, I have some color blocks and we've got blue that has dried. So if I take something yellow lemon on paint over, you can see it goes green compared to the limit drill over there and similar with. It's a mix off water with the ultra marine blue, a painting of the yellow and we get a darkish green, and that's almost a glazing effect as well. You can use that water suggest shudder of across Andi. You can simply paint over the existing Giller, so we got a tremendous amount off transparency in acrylic paints or the potential for transparency. If we use a thicker paint, put a good juicy DeBow yellow on my brush, and I'm going to try and paint in a oil paint kind of star where I'm using more painterly approach. You can see a marked difference already, and we're getting a lovely, juicy stroke tapering off at the end. And ideally, if you're painting in that star, you're going to leave that stroke. And don't try and blend it away into a flat strike like yeah, it gives a different effect and quite appeasing effect. You have got some red on a similar situation with that dog, but what if I take a thumb mics off grid, add more water to the red and go over that blue? I'm getting more off the purple, feeding off purple coming through as opposed to that more reddish orange look over there. So I'm using thickness and getting different it fix each time. In most cases, I use very little water in my acrylic painting and preferred in its thicker form, and you can see the vibrancy compared to their. So we're necessary. Thin it after to get that effect and it's suggestive off. Perhaps what you're painting, maybe one transparent water effects. Then you're certainly will be using some paint for that. But if you're going for the thicker, painterly type of painting, applying six event with very little water, just use the water to Kenya brush. Now you can see that the Boon Sienna much more opaque, uh, killer. So you wouldn't use the Prince una straight up the tuneful glazing. Now, what about white paint? Everything changes with the additional white paint, but of what? Mixed with blue. And we get a good amount off opaque mixing what with the blue on. Suddenly we have on a pick color, and that's demonstrated on some Dr Color Watch on the blue on it completely blocks off the yellow, so we're not getting any green coming through. So be sure to use the pick nature off the paint fire, keeping white out on a summer idea of plans with oil paint as well. Where we want transparency, we keep war paint off Now. Basic color theory is always important, so you know that the red and the blue give the purple, the blue and the yellow. Give the green the rid. You've got rid already and you paint over with suddenly flew. You're going to give my dark color, which is good to know, because those dogs come in very handy for your shaded areas. Notice the difference between painting thin red over blue. You're getting a warmer purple, some blue over dry Reggie getting a darker purple. So let's overlook Another good combination is the burnt sienna on blue over that see how much darker that is, and no surprise that this is my favorite combination for dark shadows. When sienna and ultra marine blue use a combination a lot for your darks when blocking in to begin your paintings and, of course or color is relative. So light blue next to the white. Quite a peaceful and corn combination very far put orange next to it. Then suddenly the complementary nature of those two colors are working. And we have a very vibrant combination off color Informix green, green and warrant very nice. Peaceful combination, green and blue. Same sort of thing. But then, of course, green against Reid changed the whole relationship. So So always keep those things in mind. A violet will look much more vibrant next to yellow or violet next to yellow. The violet will be receding. More on the alert. Coming forward. All right. Different Russia. Fix of something like this doctor issue. No, it could years. An excellent paint effect, which require thick paint on your brush, Dragged across to get a broken color. More stumbling effect. Fresh parallel. Hold across getting broken color Ron showing through particularly effective on sunlit grass , for instance. This is with a short, flat brush so you're getting Taco Square. It can use in in this quarter. Variety off marks it can make with the short flat. Probably Mom was commonly used brush. Another important brush is the round, which can give you much more detailed paint effects, pressed harder or so drag and so on and for drawing a round brush, very effective in large, long flat. Also in Exxon brush to get big shapes, especially for blocking in. Or if you got too much fiddly shapes like that, we're gonna get the large brush in just two, get things back into broad strokes from which it can work. And then, of course, the rigger brush for fine lines dabs off highlights effects like cross lines of bringing for yachts, maybe, and, of course, to sign your name. I don't use the rigor that much, but towards the end of the painting, I use it more when I'm going for the smaller brush strike. And, of course, don't forget your it's nightfall painting knife that you can use to scoop up lots of paint and get fantastic scientifics, especially with acrylics. You can use the planet mouth extensively because the acrylic paint dries so quickly that this service the town. I don't worry about cracking pain toe anything like that. Just get paint on, scoop it on, dragging around the Kippers. Exciting marques. It can get so an excellent medium for the public as well
10. Understand and Use Color Temperature: in this lesson, we're going to look at color, but not in the strict sense of color theory. Although we're gonna touch on it. I'm looking more at the practical color that you need to be thinking about when you're painting. If you want to get into this in more detail and then a more thorough basis, my course learned to paint with impact covers the sin a lot more detail. I'm going to try and deal with us in one lesson, plus with a demonstration to follow. So you know that the color wheel quite well, I'm sure you've seen it on. Did you know that it's got all the primary colors, the secondary colors, maybe some 23 colors as well? What I'm going to focus on here is look at your color wheel as division between warm and cool color. It's how to see that woman cool color that is the most critical part of every painting. You can paint a painting in realistic color to look exactly like the scene, or you can make it more fanciful and and diverge from those colors and, for example, eternal the greens to reds and all the reeds to greens whatever you want. The most important thing, though, is that there's gonna be fluctuation in color, temperature and, yes, also in light and dark values as well. But if you can see the color temperature when you're panting, you're going to find be missing ingredient that a lot of beginners struggled with. Most people can figure out Latin Doc, if you even a black and white photograph is made up of light and dark failures, so that's relatively easy to latch onto. And that's also a very important thing. But to take that step up, you need to see the woman cool and to be able to adjust your color from warm to cool. So that brings me on to the next important word, and it's called relationships. We can assist a warm color are comparing it to the color next to it. What is the relationship between those two? A color is any warmer if it is next to a color that is cooler and so on. So by adjusting woman cool, your entire painting can have a wide variety cool colors, receding warm colors coming forward. How one color resonates or stands out from another. Are your focal area can also really stand out because it's in a certain relationship to another area. Well, let's look at some of the main colors that you find working from the color wheel, a swell, and then also explore the world off neutral colors or, as I prefer to call them, graze so much off. The natural colors in the landscape consists off graze, so how we work up as neutrals is also very important. Let's have a quick look at that, and then I want you Teoh. Practice these colors on your palate. Put out the color on your pill it and start mixing, creating secondary colors, creating tourist re colors and neutral colors as well and more importantly, how to very the temperature off those colors.
11. Values Overview: in this case, no one to talk a bit about values and the importance of light and dark. Sometimes you recruit to the subject as a tone or tone ality that top. I think I used the word values to describe the light and dark qualities off a painting. I go into the subject in a lot of detail in my foundation course called Learned to Paint with Impact. So I'm not gonna go into it in this top of detail. But this is a course on acrylic painting, and I don't want to leave this point out. I needed to be aware off the concept of values. If you really know the subject thoroughly, then by all means you the next. Listen, but if this is new to you, then keep it in mind as you progress through the course. When I talk about values, I'm talking about the degree of light and dark between colors. As a quick example. Have a look at the findings behind me. This painting is off clouds in the sky. The values or degree of light and dark are a lot mawr close together, although you can see the darker clouds they are really made to stand up are the extreme light value off these whites and yellows around the cloud without those extreme lights, the darker cloud, which not really stand up from all the other clubs and the skyline on sky colors behind it . So I've had to play around with lights and darks to try and make this painting happen. You have to look at every subject from the point of view, off values as well to see that's going to work out. If everything is too close to giver in value, it becomes difficult for it to stand out, and it can get quite easy lost. However, in this painting, I've used values much more extreme values, as you can quite easily see all these dogs and dark mass shapes. What makes this painting catch your arm? Because without these dogs, the lights off the sunny grass and on the trees would not have much impact. When assessing a painting. Always start from the point of view of what are the dark masses and even if they are dark masses to begin with when you're assessing a subject. But for large dark mass shapes again, switch the lights really work. So when you're preparing your subject and looking at a scene, look at it from a point of your, well, the dark masses. If they're over there, then that is the subject that you're going to crop art on work from. If they're over there, change your viewpoint and go for those dark masses so that lights can really stand up. You don't want to lose your subject where ALS the values are very close. Together we can measure values in something called a man's L value scale, and I'll have one available for you that you can download as a resource. And you can simply use that to assist because most landscapes have really four values, maybe, but more your on there, or or one less or so, depending on line conditions. But in general, four values Bryants and lots sky. Then the extreme docks in shadow areas like shadows of these trees and bushes and in the two middle values, which would be things reflecting light on the ground like the grass and uh, perhaps in the middle distance or hills or mountains. Those would be in the middle range, and that's it. If you can distinguish a distinct light, a distinct dark and two distinct middle values. You pretty much have a good value scheme in your subject already. Now you just have to paint them. The other big thing to remember is that or color has value. It's important to remember the distinguishing qualities off color. It is the name of the color, which we call the U, then the value, which is the light or darkness of the color and also the saturation. And as part of that saturation, I'm looking at color temperature. Also, talk about that in the course as well. Out of all of those what I take out our values and color temperatures my top two points. So I want a color in the light range to really stand off and in the dark range to be pretty dog and in the middle values to be quite distinct as well. So if you can see a color clearly and mix that color accurately, you're going to get the value correct as well or pretty close because earlier is bolt in color. So you're not just painting. Read your painting, read of a certain lightness or darkness. Then, of course, what is the temperature of it. Kelly. Is that a warm Raiders of the cool re? And we determine that fire relationships off color What is the one color next to the other ? So, for instance, in the dark area, year would say this green is a cool green because next to it is another green, which stands out a lot more. It is lighter in value, and it is warmer, so I have something to compare it against. So that's definitely cool green that's a warm green and the green. Catching the full light is warmer store, so there's distinct value changes, but also importantly, the strength temperature changes. So keeping on value and temperature when assessing your colors, and you are going to be mixing colors that are accurate and work extreme extremely well. But for the purpose of this, listen, I want you to consider values and look at any subject you want, be it art doors or in your photograph references and try and look for the light and dark potential images. Potential paintings based simply on strong lights and dark because it is that life dark relationship that really makes a painting powerful and stand up from the all the others. Another final took is spot the values a lot easier or simply closing your eyes a little and squinting at the scene, because that removes all sorts of irritating and unnecessary details. And the big shapes. Big dark shapes. The big light shapes stand out much clearer when you squint a bit, and it helps you determine your subject and your composition as well. Also, my lots of Skechers, lots of small from nail sketches and what we'll also look at coming up is basic No. 10 studies where you simply looking for the light or slight in the darkest, dark mass trips. In a small thumbnail format, this is more or less all. I'm going to be dealing on the subject of values. I'll be talking about it throughout the forthcoming lessons, any of the demonstrations, so you'll know what I'm talking about. But if this is new to do, encourage you to try out my course. Linda painted impact and get a firm grip on the foundations off values, and you will use that as the basis for your future painting
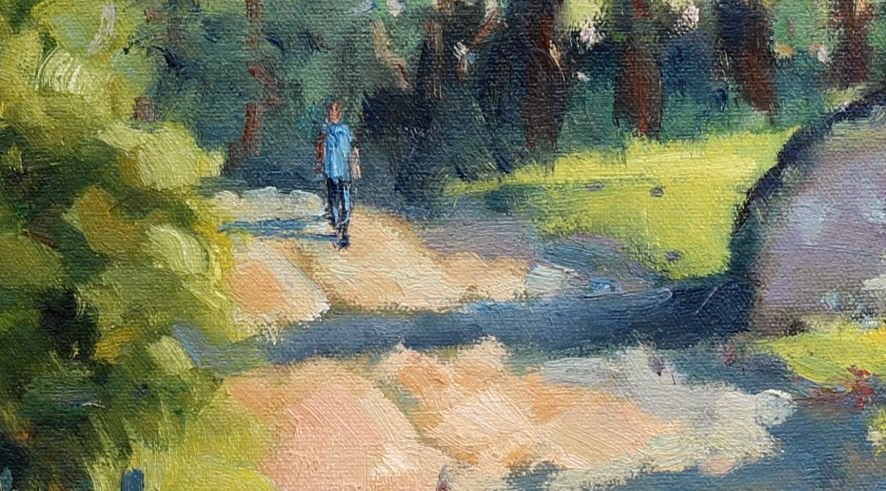
12. The Lane Painting Demonstration Part 1: way going to do a short demonstration painting that's going to focus on the strong lap dark composition off very particular landscape subject. We're going to start off with a no turn sketch in a little sketch book like this, using a wedge toe for mark up in, and that's going to illustrate, often establish and isolated composition. Using the Neritan sketch on the Good thing about no tennis that really gets you to see the dominant mess shape in your subject, the one that is going to anchor and give strength to your painting. Then I'm going to a tone a painting panel. I'm going Teoh. Use a rid tone for the panel because there's going to be some really son fold and bright greens in this particular study, and also to show you on how turning a panel is very simple. You can do the same for your canvases as well, and it gives a mass overall harmony to your painting and for better than painting straight onto a white surface, which often find a little cold and uninspiring. Even so, we're going to turn the panel. I'm using just a bit of watery, read a critic. Let that dry on and we're gonna get stuck into the big shapes off this painting, and we'll take it from there. Maybe proceed to finalize this painting. But the main emphasis is going to be starting this painting, getting in the big shapes, the structure, the composition and the working out off their shape so that we have an excellent start to this painting and especially to show you the fix off, working with dark and and cool shadow and in the expressive, strong light contrast and how powerful that can make a simple composition. This is the reference that I'm going to use for the demonstration. It shows a good light, strong contrast and should be perfect for this painting. Makassar. Yeah, it's the sketchbook that are commonly used to make entertain studies and studies would look something like that. Andare simply work through them, and it gives me he starting structure for a painting, saying this particular one relatively straightforward subjects. But I'll draw a small sum now landscape shape and then using the which top marker gets straight in and, uh, walk him those shapes on the large, strong dogs Ship shadows No. 10 study that I would do for the subject. Strong, dark shapes that look interesting, Dublin or mass lights on. And lots of sunny color potential as well. This is a basic to value No. 10. Very simple. And that will be Morris, the structure I'm gonna use on my painting. Penhall. Okay, so here's my panel that's being primed with acrylic primer, and now I'm going to turn it off my stay with hell. It still going strong and just gonna use some one red for warm road on an US with rush on. Just get that. They are very loosely put in. So if you want, you can use paper and first bitch as well. Also help you with your composition. I'll let that dry on will come back to it when that's dry and start the walking in. In the meantime, I met to cover your palate up again. So you covers stay nice and most
13. The Lane Painting Demonstration Part 2: Okay, now the pedal is dry enough and we can start with the painting. So getting back to my basic colors has already shown you on my stay, which have it. I'll start in with the main blocking in, and these dogs are going to be mainly ultra marine blue, burnt sienna and some lettering crimson as well. Just getting in that strong dark in the shadows, some more blue and listen crimson on a bit of white as well. Then I will be heading towards a von it color. So that's getting the ultra Marine. Texas is run in there and, uh, scruple Euller and my focal area is going to be was region in the Persik route of foods. And it's also an interesting shape on the grass heading off to the road down there as it can see these ships very abstract on so thing with representation Heart. The way we are doing it is it's a lot off abstract shapes that are simply arranged, you know, in a way that read like seen you painting. But I'm always thinking off shapes and color warms and cools. I'm not thinking or there's a tree almost now, copy that tree. So there we have already strong, strong, like dog shit already coming out. I must cross forming the verge. It's not going to be as dog get a block that in a lighter value straight away. Fear of the strongest dark shapes across good, well, the basic shape of the road of in it the horizon. Mine would be about there, just below middle, and I'm going to bring that ride on the swear leading into my focal area. Yes, that's mainly the prominent dog accepts in the strongest Lance using out 10 years. Want touch off Touch of Euler? I don't encourage following reference slavishly. If I feel that I want your extra light spots, I'll bring them in. So remember, it's your painting, and you must put it together as you feel. That should be some warm green, Uh, our goals from painting this finding to completion builder. The greens layer upon layer. Well, I'm happy, so it's not just one layer. There is going to be some scar showing through report for them. That's gonna be some scar holes, too. Could just be a little more blue in there, a little darker. Add in a few scar holes, even in the Lord's mash hopes as the ed a little bit of Latin air through and can relieve a scene as well. So those will work nicely now. There's some really interesting atmospheric perspective working in this painting as well. Some greens that will require but more blue, some yellow and I will come in the middle distance, give a nice sense off. Think on a little touch off this room appeared Brant's We'll break the middle distance shapes up their interest as we go along. All right, I did mention also the road in shadow on That's Going to lean. Was the pilot darker at the base of the shadow, getting slightly lighter and earlier I ain't greens and shut, uh, stay more blue in the mixed make a dark green. Yes, that is basically our first establishment off a block in between the lights darks on middle value colors. I would let that dry or could carry on painting, just trying to complete it alla prima or or I'm gonna do is and then let that dry, and then I'm gonna work over in layers. I'll bring more green cool greens into these dark masses. I don't want the first dark, too. To wit and muddy up the color I'm gonna put onto this so we'll leave that and then we'll work. Probably another two, maybe even three layers over this boulder. Really strong painting A a.
14. The Lane Painting Demonstration Conclusion: Let's try and finish this painting, and what I want to focus on is have a look at what can be done with a limited palate off colors and keep a close eye on the brushwork. Now you'll notice that as I'm working some detail into the sky and some variety off color variation in the sky using smaller brush strokes, we start off with laws, brushstrokes and adapt them smaller as we proceed. But the important thing is, I'm not trying to put on paint and then blend it away. I'm trying to ensure that the brushwork is visible, that the paint is relatively thick, where it needs to be, and that there is interest in the brushwork to keep a close eye on brushwork. When you are trying this painting for yourself, I will have the photo in. The resource is so you can use that now. The color area I'm now bringing in variations in the the shape off the bushes. I'm highlighted areas with hi key yellow touches and then cooler greens working towards dark and cool green shades. This adds to the three dimensionality off the subject. It also adds some believability or in other words. It reads correctly and working pretty quickly. As you can see, I'm not hanging around and and fussing over mixing the color. I have an idea of what I want and then putting that color down and not fiddling with it once it's down, just leaving it to learn, building it up as we go. Other. Some painting is not a difficult one. You can get stuck into this particular painting with some confidence, working into the middle distance to distant areas. As mentioned, you create that illusion by I'm saturating. Well, I should say, by de saturating the color and growing it down slightly. So you're mixing more white, and that would definitely helped, as well as complementary colors hope to gray down now on the ages, off the foreground trees and bushes, I've added a touch off purplish on violet, but more listening that makes him it is an optical illusion. When we look at trees and bushes like this in the distance, the edges sort of get a bluish or reddish violet tons. So I like to work that into the edges now, just defining the shapes between the shadows and sunlit areas, getting in a few thicker Debs for emphasis. I really enjoy working in the light areas, but not going into this mess. This large mass off shutter area. And although it's all in fairly dark shudder, it's not going to be flat either. Went interest. So there'll be a variety of shape and color, but all obviously much cooler and nothing too large. Nothing Teoh distract from the folk of area in the sunlit areas and more off adding weight and structure to the overall painting. This is what this large, dark mess why it's so important to look for these elements in your subjects on, uh, adding a bit off British burnt Sienna. Going to work over that, of course. But I don't want toe flat surface off just a dark green armento, a natural variety, so that will be all sorts of other little shapes in there. There's a variety of greens dark to light, but all in the cool as spectrum as it were so more surreal. Ian Blue as well makes a nice cool green some final touches with a small brush, some of the leaves that are suffering up the edges a bit, bringing in touches off like to define their shadows in the distance so important a few little touches and it just opens up that focal point mast thick son fold paints That's what of Euler Burn CNN What to get that warm sunny, uh, it fixed. Working so nicely against the violet bluish shadow areas in the road. Notice I'm leading a lot of the under painting. So through in the road surface. I think that does add interest. And it's not so bright that it looks completely unnatural. And now I'm really looking at shapes. I'm looking at flat shapes of shapes that look on interesting and putting it smaller touches in there. Well, so little directional lines in the road in the foreground, a bit off interest once again. Not too much so breaking up these edges on the pavement or the grass. Verge. No need to have them on two straight and perfect. Break them up a little dark X cents. A swell, a few little lines. You're in the to suggest branches, not too much done over. Do these touches soften up a few of the ages as well, and there we have it pretty much done. I think the effect is there all things to that nice big dark mass on a few little extra touches to break up a few flat areas as well? So there's the final painting. I'm pretty happy with it. I think the object of is there, and it's a simply enough subject have ago for yourself and just have fun on Let's the dark and light and woman cool work for you.
15. Conclusion of Part 1: well, you've reached the end of the acrylics for beginners. Course on. I hope you've enjoyed it and that it's inspired you to try a few new things with your acrylic prints. If you haven't really got into acrylic painting, then I encourage you to do that because you can learn so much from the spirits. It'll medium, and it's quite forgiving as well. Where do you go on to try? Other mediums as well are strongly encouraged that I think if you have a few mediums that you familiar with the world is your oyster painting wise off course, and you can try so many things. Each has the especial elements, but with a critics, they generally always available easy two years and give you so much scope. If you haven't done the exercises or tried similar paintings, go back and try some of the paintings to just familiarize yourself with the subjects and the lessons toward and then paint your own subjects and try and hold on. There it does take practice takes time and patience. But I think the moment you've practiced what I've been showing in this course, you will quickly level up your painting skills and developed a lot more confidence very quickly. With that, I want to have lost word and say that over time I do add more lessons as I tried new things or have a moment to make new video. You can also get some more videos as well and lessons on many different topics on my YouTube channel. Look out for that as well, Onda until next time Happy painting.
 Malcolm Dewey, Artist and Author