Transcripts
1. Intro: There's nothing like the
unconditional love of a pet. They show you a fiction, give you a sense of purpose, and greet you every day
when you come home. Animals have come to mean
so much in our lives. We live in a fragmented,
disconnected culture. Politics or ugly. Religion is struggling, technologies stressful, and
economy is unfortunate. What's one thing that
we have in our lives? That we can depend on a dog or a cat loving us unconditionally, everyday,
very faithfully. So this class is
specially designed for animal lovers, friends. My name is mohini Sinha and I'm from India and
this is my pet to do. He's also saying hi and really very excited
to be on the cameras. So just so many of you know me as more any Art Gallery
from my Instagram account. This time, I have
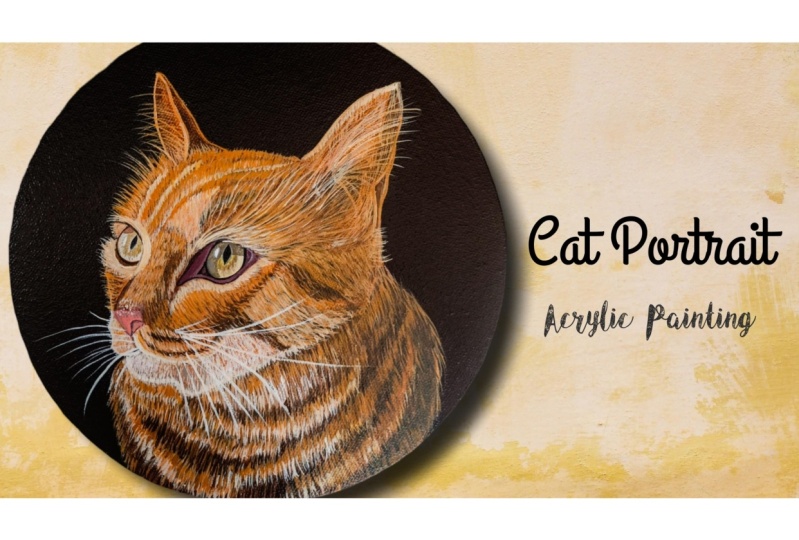
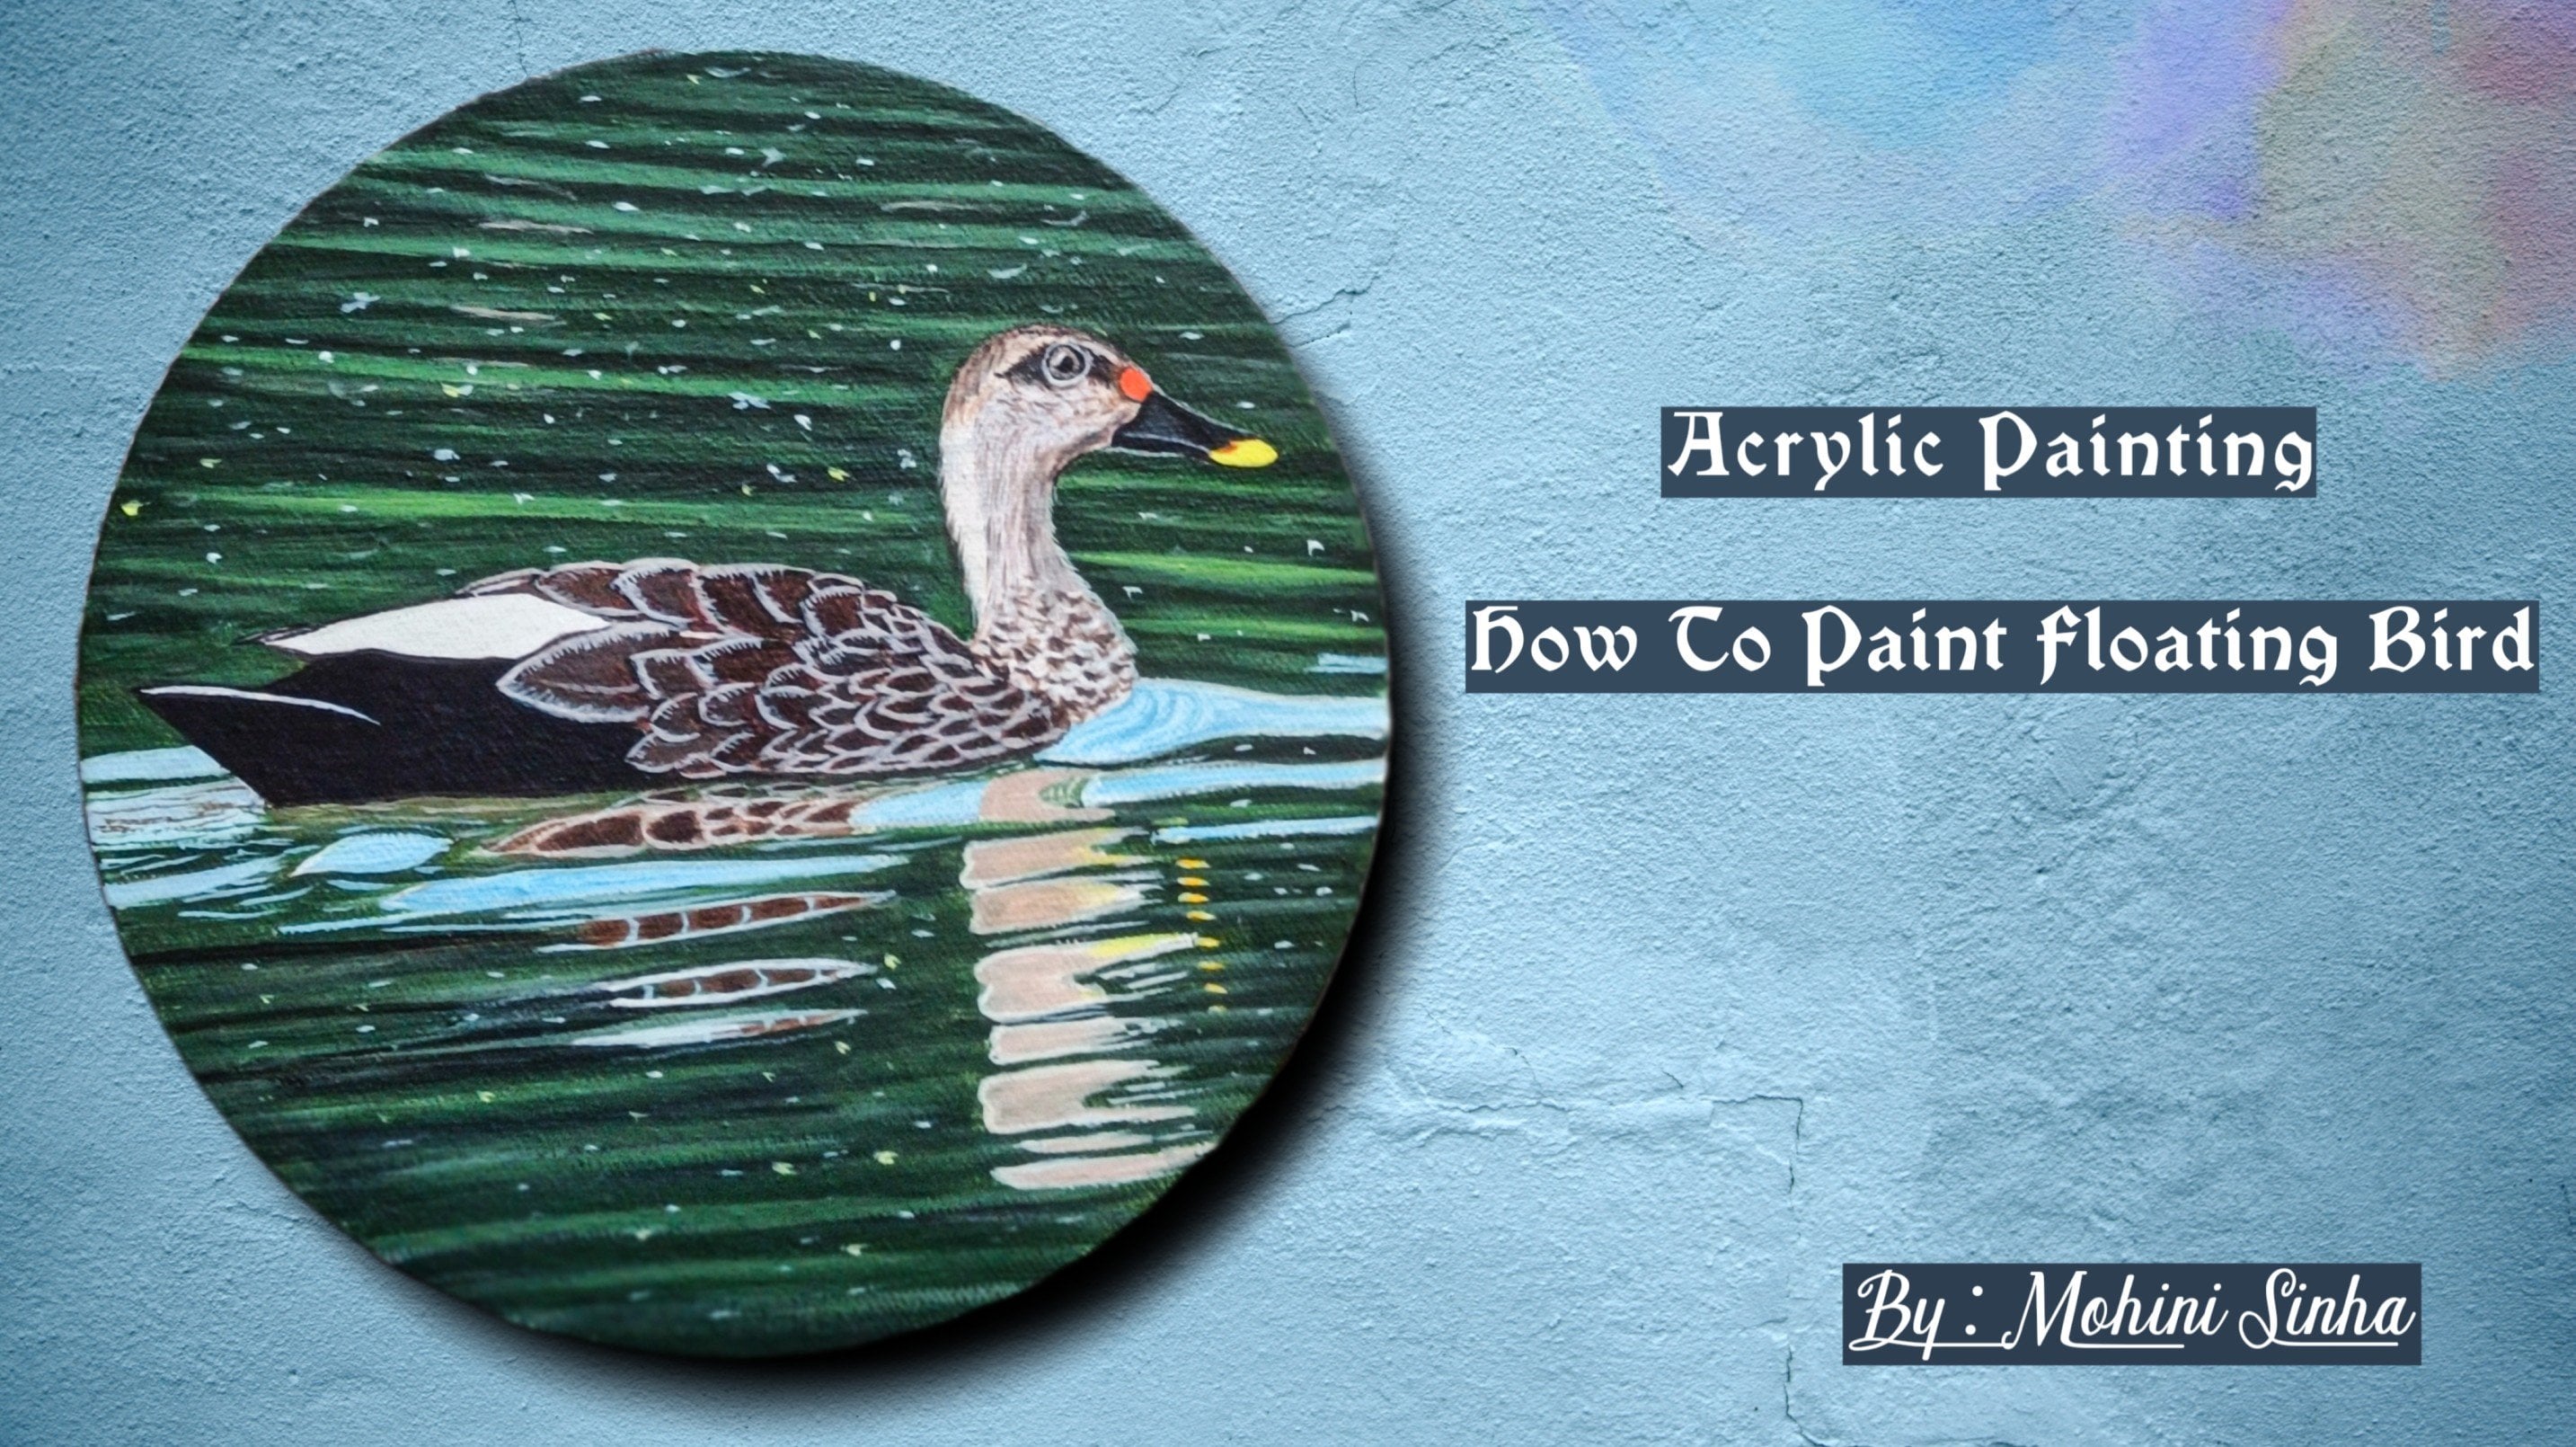
brought for you guys, especially the animal lovers, the gag painting, as most of you had seen
me on my Instagram, I have been already
uploading pictures of it. This time, especially
for the animal lovers. This painting is for you. This is the complete
painting which I will be teaching everything from
the background details, from the layering, the glazing, the I technique, everything I will from scratch real-time. And also how to protect your Painting by
doing varnishing, how to frame it. Everything will be
in the schools. So I hope you guys will enjoy doing this painting and do share your reviews and
project works if you are really animal lovers. And without wasting our time, Let's start with the painting
2. Materials Required: Let's discuss about
the materials. So the first thing which we'll
be needing is the canvas. This is the canvas, pre primed canvas
of medium green, which I have already just
wanted to three times. So, and this is, you
can see your hard board behind this canvas
I'll be using. And the colors which
will be needing is for the background,
black and red. And for the Cat Painting, we'll be needing
Alizarin crimson, raw sienna, bond on
board, Naples, yellow. Then this is the
permanent yellow, deep and white and
black and this is green gold apart from this will also be needing
cadmium yellow. This is the palate and the
jar for water Tissue Paper. And these are the brushes
which we'll be needing. Flat brush, round brush, and the rigger
brushes apart from this knife for
mixing the colors. So these are all the
brushes which I will be using for this painting is
a rigger brush to by 01. And another small size round brush to this is
all rigger brushes, round brush and the palate. So all these materials
I will be using, well, doing the painting. So let's start with the painting
3. Background Blocking: Hello friends, welcome back. So this is the sketch
which I have done. I will be sharing the
sketch with you guys also. You can just trace it or you
can do it with grid method. It's up to you how you want
to do the sketching part. So this is the canvas
which I have used, and this stays the two colors which I'll be using,
red and black. Whichever red you
have, you can use it. And the black color. So both the colors
I will be mixing because I don't want it
to be perfectly black. It will be a little,
you can say, or brownish touch to it
when we add red to it. So I'll just be mixing it
with the palette knife nicely and I will apply
on the background part. So try to use more of red and
little bit less of black, because if you use
more of plaque, then it will be
completely black. So try to use more of red in it. Now after mixing it
with my palette, I'll take my flat
brush and start applying the first coat
of the background. I've just just dip the brush
and water and I'm taking this color and I'm just applying it on the
background part. So try to apply it slowly. We will be needing at
least two coats of the background covering because in one code you don't
get the exact finish. When you apply two coats of it, you get a nice finished to the background of the painting. So do it very slowly. Take your own time and try not to take that color inside
drawing or sketch, but you have done
do it very slowly. And also you can use your round brush or liner
brush for doing the pods, which are near the
border of that sketch. I am doing directly
with this flat brush, but you can use your round brush also for first
outlining the sketch, and then you can
fill in the colors. Now this is just the initial
part which we are doing. We're just covering
the background. And this is around canvas, which is of size ten inch. And you can use
bigger size canvas, doesn't require that you have
to use round canvas only. You can use square, rectangle whatever
size you want. You can use it. And this
canvas or have primed, primed it at least 23 times, and then I'm using
it for a painting. So if you want a perfect
finish on the Canvas, at least try to prime it to three times before starting
with any painting. So you can see I'm doing
the areas which are near to the sketch
Part very slowly so that the color
does not go inside that sketch part because
this is a dark color. So try to do it very carefully. Avoid the colors for ongoing
inside that sketch part. And if you are facing issue with doing
with the flat brush, try to use your round
brush for doing this area. These corners, especially now one side I
have already done. Now we'll do the other side, but I'll try to use first
the smallest size brush. This is my rigger brush. So first I will
just outline it and then I will try to
fill in the colors. So first, what I'm
doing is I'm just outlining the sketch from the outer side line and then I will start
filling the colors. Same way you can
do the entire BAD just for us to
outline the sketch, the round brush or rigger brush, and then you can
fill in the colors. This is also a good option for filling out the background. To do it slowly take your own time and
cover the entire part. Don't use too much water in your paint because you can see I haven't used any
water in my paint. I'm just directly
using the paint. Water is just on my brush. So that much amount of water is enough for doing this
acrylic painting. So don't use too much water when you are doing Acrylic Painting. We're almost done
with the first code. And now after this first
quarters for lead dry, we'll do these second
coat of this background so that it perfectly
clean and nice. So we'll wait for it
to dry perfectly. And then we'll start
the second coat. So we'll just leave it aside and then now
it's completely dry. You can see just feel it. If it is not sticky
and it is fully dry, then you can always
do the second code. Now here also again, I'm doing first the outline
with the rigor brush, and then we'll start
filling the colors. Do it very carefully, and try to do it with
very neatly so that the colors does not get
inside the sketching part. And take your own
time, own speed, and do it carefully because
it's a simple painting, but background has to
be very neat and clean. Now here again, I'm using my flat brush and just
overdoing on that. Just one more code so that it looks perfectly fine finish. And then we are good to
go with the painting. So just enjoy the process
of blocking the background. Now once we're done
with the background, we'll start painting
this so dire. The first D background and then the background of the
cat and then the eyes. So there's a lot of
layering in this. So let's start with
the Cat Painting.
4. Blocking The Cat: Hello friends, welcome back. So now let's start with this
background painting of cat. So these are two colors that is burnt umber and raw sienna. So the lighter part will
be using raw sienna. And for the darker burnt
Dumbo. Let's start. I'm using my round
brush and I've just dip the brush in water and I'm
just taking raw sienna. First. And fourth, I will apply the colors on
the lighter part. So all these areas are lighter, so I'm just applying
raw sienna to this. You can use any brush
around brush or flat brush, but use smaller size brushes so that it'll be
easy for you to paint. I'm just covering
the lighter part. We will take very small amount of color and do the blocking. Don't take too much
color on your brush. And water is only on my brush. That's it. I haven't use
extra water in this. So just taking that little
amount of color and just blocking the areas
which are light. So these all wrinkles
are in light shade, which has darker
shade in the middle. Now this lower part is also
a little lighter and shades, so I'm just applying a bit of lighter color to this, also, taking little more of dark and light mix that has
raw sienna and burnt umber. These two colors are
very good for painting the background because
whenever we do any painting, the first layer is
the darker color. And then as we do
the fur painting, it becomes lighter and lighter. So that every time when we do the background painting of a portrait or
animal or anything. But first we use darker color
and for the background. And then 44 painting
we use lighter color. So that's why I'm trying to
be in a little darker shade. And I'm just doing the areas which are darker by
mixing both the colors. So it's more of burnt umber
and less of raw sienna. So do it slowly
take your own time. No need to do it in
a hurry since this is a little bit of
intermediate level Painting. So you need to take breaks
in between because this is almost two plus as painting so you don't
have to finish in one go. You can take breaks and
then start with it. So whenever you are doing
these types of paintings, so drawing is very important. So each and every layer
you have to draw, each and every wrinkles
and everything you have to draw to keep the
painting more realistic. The more you do
accurate drawing, the more it will be helpful
for you to paint properly. So I'm just adding the
darker colors slowly. And just trying to block
in this nose part. This is just the first layer of the background Painting
which we are doing. And there will be so
much less of first, which will add into
this painting to give it a realistic look. And in this, acrylic colors, don't use too much water. Water should be
only on your brush. Brush that does more
than enough, and all. You can use directly the colors. Don't make the colors ten. Now here I'm adding
little black because will be needing little
more darker color. So I'll be adding
black also to where it just blocking the nose area. The darker color. So now here I will be using smaller sized round
brush does of size two for painting
the details. So all these layers which
are there under the eyes, It's good that you use smaller sized round brush so that you can easily
paint it out. Now the darker part below, first is the lighter color
and the darker colors. So there are variations of
colors in the phase part. Now this is the darker parts. I'm just adding
little black to it. And this area is totally dark So I'll just apply the
darker color first. So this area is dark because
it has a shadow effect. This area is more
darker the side, that's why I've
added little black toward this area is
more towards the light. The light is coming
towards the other side. So and this part
is darker sides, so I have used the darker color. I've just added
little black to it. So all these things you
have to take care where the light is falling
on the face. So light is falling on the face and the other side is darker. In every painting,
whether you do landscape portraits
or board painting, all these things had
to be taken care. So slowly, slowly we are
doing the background, but I'm not doing it
in a fast forward manner so that you can
do it along with me. Do the black area. All these are the
darkest areas where I'm doing it with a darker color. It's to the upper part which
is little lighter in shade. So I'm just adding the lighter color and
this darker color mix, just applying on the top of
it and blocking it slowly. Yes, the blocking plays a very important role
in paintings equal, because when we're
doing the blocking VR, actually figuring out the colors where it should be dark and
where it should be light. So how the first
should be there, whether they should be
lighter or darker color for all these things
matter when we're doing these portrait paintings. On those ear part,
which is in the center, is dark color in color. So I'm just putting
little black to it, just covering it
with darker color. Again comes the lighter color, which is mixed color of both. So more of this raw sienna
and less of burnt umber. I'm just trying to
give a shape to it because when we were doing
the blocking the shape, some dark color gotten sided. This also you can do if you're this bird sketch has been disturbed by this
background painting. The, one of the advantage of
using acrylic is that you can always overdo the
colors if you want. But whenever you are
overdoing any colors, make sure that the base color
has dried off completely. Now this part is little
darker in color. And then the lighter version. So this three colors we are doing the complete
blocking off the upper phase. Do it very slowly. Take your time. No need to be in a hurry. Take your own time and
do it very slowly. Because all these
paintings take time. I have finished and two plus US, but it might be for you 5 h, so it depends upon your speed and how much you are
practicing the painting. So take your own time and
don't do it in a hurry. Outcomes, the darker part, which is the above
little black I'm adding to it and I'm just covering
it with darker color
5. Final Blocking Of Cat: So now let's continue
further with the blocking. So let's, I'm using same
round brush over you. So first, the mix
of both the colors and now the lighter color
first to the lower part. So just blocking this with the
smaller sized round brush. Just slowly filling the colors. You can use round brush
of size two or four, depending upon the size of
the image you are drawing. Now let's do the darker part. So these all are the first, which are the lower section. So first I'm just
outlining the area which is the body part. Then the lighter color to the lower part of
below the chin. So this is a chain part. So again, mixing
board the colors and trying to do the gen bad. So adding little water to wet because when you do all
these types of paintings, your brush gets sticky. So when you're Brushes
getting sticky, just wash off your brush
and then use the brush. Here, I'm adding
little white to it because there are little
lighter for CSE also. Now mixing white with this raw sienna and just
applying the force. So first the lower part
is that lighter in color and the upper part of
the four is darker in color. So this is how we need
to do the blocking. So just making it in
watercolor direction, vertical direction, and
unjust blocking it for us. The lines which I have drawn, I'm not filling the entire
color with this and die abortions because
the upper area is dark. So only the lighter
part I'm doing first and then we will
do the darker part. You just need to
move the brush in vertical direction to
give it a for loop. Now when we will be doing
the 40 dealing will get an idea that where there is a lighter shade and where
there is darker shades. So this is all we
are going to do, the four painting as well. So this is just the blocking. Now we're doing the darker part. So these upper area
is a darker part, so I'm just applying on
top of the lighter color. So similarly, you can do any Portrait Painting,
either does Dog, cow, or there, any
Painting which is, which is the one who
handles are having four. You can do paintings like this. So I'm just adding more
lighter color to this. So first dog and then light. Now again, the darker color the portions which
I have left blank. So I'm just filling
it with darker color. Slowly. You need to do it. Use smaller sized round
brush for doing this. I am doing a little bit fast, but you can take your own
time and do it slowly. No need to do it in a hurry. This video will be dead. You can always check, redo and reject the video
and do the painting. Again. Even there's option
to slow down the video. You can do that also. So you can see how
I'm just filling the gaps with the darker colors. And same vertical motion. Painting. I'm doing
just line, line, line I'm just blocking
the entire thing. So yes, every time
whenever we do any background
Blocking Of animal, so it takes time. The background painting is very important in any painting
and any portrait. So whenever you do any Portrait, always try to do the
darker color first. The background should
be in dark color. And as you do differ details, it should be lighter
and lighter. So the more layering
you will do, the more realistic
the fall will look. So all these things we'll see in this painting will
go step-by-step. So we're first only
doing the blocking, and then we'll go with the eyes, nose, and then the fur painting. You can see the below is done. Now we will do the
upper left part, which is left out. Now let's do the darker
bought mic's there. Now the lighter part is
there witches or below? I've just added white also do this because it
does not so light. But yes, it is light. Not just blocking that ear
part with darker color. And then the lighter color. And just mixing board
the colors together. Now comes this pathway that is most damage and everything
and the lines of the lips. So that will do with
darker color and rest. We'll do it lighter color. This part is also
light in color. Now the eye is Part
also more light in color. The underwrite. Now let's create the
lines with where the wrinkles are coming
with the darker color. And then we'll do the
blocking with lighter color. This lighter color Part. I've also added a bit
of white to it to give a contrast between the lower body part and
the upper face Part. Two just blocking the
spot which is left, that is the mouth part. We're almost done with the
blocking will now start with doing the iPod
and the four-part. So almost we're done
with the blocking. You can see it's already
looking very nice. Even we have done
just the first layer. Suggest outlining
with the darker color
6. First Eye Detailing: So now let's start
with the painting. So the colors which
will be needing here is this area is
left and the iPad. The colors here is the
white color, black color. Then burnt umber, green, gold, and Alizarin crimson. And this is the liner
brush which will be using. So let's start
with the painting. Now let's first do this part. So taking this Alizarin crimson
little bit of bond umber, mixing both the colors. So let's first take
more of bond Dumbo. And let's start doing
the outer portion, a little bit of black Also, we don't want very
reddish thing. So just adding little
black also do it and just outlining the outer
line of the eye. So whenever you are
doing such details, use a very fine line. Brush. Either two-by-two, zero, or three by zero size brush. Just outlining it
and also covering this part with the darker color. So take your diamond, do it very carefully. And also the spot which is inside area is also
another outline. Now this is the outer part of the eye and the inside
part is also there. Here I will be taking
Naples yellow because little bit of yellowish
shade is also there. So first I will cover
this darker part. Now, adding little bit of
Naples yellow to this to create some more muted color. And I will just fill
in this in side Part, adding little more white, little more yellow and
just covering the inside. But do it very slowly
and carefully because I is the main part of the Portrait Painting and
it should be perfect. Now once we're done
with the outer part, taking little black to red
to create more darker shade. I wouldn't want to
use directly black, so I'm just trying
to add red to it. And then outlining
the whole I bought. Lines should be as
fine as possible. Now does brush, which
I'm using here is the rigger brush of size
zero from Princeton. These are very good Brushes. So first I've done
the outer outlining. I'm adding more black and
Alizarin crimson to it. Again, I will do the
inside lines also. Now the inside round part, I'm just outlining it first. So I is the most important
part of the painting. So do it very carefully and take your own time when
you are doing it. So now let's do the bot, which is the inside
but not other. There's a shadow now I'm taking green gold and a little
bit black mix to it. Mixing little white Also. Now, little bit of burnt umber, and then just covering
the part which is on the spot and just giving lines to the area
which is in-between that oval circle part and
just covering that area? Similarly to the
other side Also, it's like a round shape to it. And now let's take this Naples yellow and
little bit wide mixing board the colors and adding this
color to the outer part. So the middle part, which is the eyeball
is little greenish and the outer part is
little more yellowish. So I've added more yellow
and white two-word. Do it very slowly and
adding more bond umbo to this mix and a bit
of green gold. And covering this area, which is the more darker part like a shadow part
you can say does. I'm just covering this part and leaving some portion which is exactly white reflection In see there's a white
reflection also there, which will be doing with white. So this whole part
is the darkest part. And Z we are slowly moving towards the Detailing
of the eyes. And the middle part
is the N black color, which is like oval in
shape but it is pointed. So now you can see how
this eyes looking like, bright and beautiful when you
add that black color to it. Now we'll add more
black and red color mix and we'll do more of outlining. Now, the inside
outlining we are doing. It's more towards
red than black. And just outlining and
covering the spot also. Now, slowly we are moving
towards more of the Detailing. So I'm again outlining
it with black to give it a more nice shape to it.
7. Second Eye Detailing: So now let's mix a
little bit of this. Bond. Dumbo, white and green, gold, little bit of
black. So it is all me. It's like a grayish, olive color, you can say. And applying on these areas, this is a round circular area which I'm just creating
lines, Fine lines. So whenever you are using
creating such details, please, you will find line
brush for this, at least two by zero
or three by zero, then only you will be
able to do such details. You can see I'm just
lining it vertically as the in the
direction of the oval. Also taking little
white and applying to that white area with
white spot over there. Just applying it with white. So very small, small
detail matters a lot, especially in the painting. And now I'm just outlining the outer part of
the black portion with white to take very tan
color and try to outline it. Do as fine as possible so that it would look more realistic
when you do it very fine. So I'm creating
light grayish shade also and also outlining
this white part. So small, small details actually matters a
lot in the painting. Now I'm adding red
and white mix. So very light, reddish
color I want and we'll just do the
outlining of this insight. But there's a black outline and there is a
white outline also. So there are two outlines, one as the black outline and
the other one is the white, not wide, it is pinkish
outline. You can see. This outline adds more
beauty to the painting. So do it very slowly. And whenever you are
doing these readers. So whenever you are
doing such details, tried to make it very fine
and for doing it Fine, make the color little bit fluid. So now the second Eye. So whenever you
are outlining it, make the color a little fluid, then only you will be
able to outline it. If you will use take color, you will not be
able to outline it. So try to use ten gala when you are doing the
outlining Part. Little fluid color. How you can make it fluid, just adding little more water
than we used to add water. So now let's do the other iPad. Now again, taking this bond
Dumbo and Naples yellow mix for us doing this lower part. So this is bit like not orange. You can see a bit of peach color and little darken to
make it more dark. So I've just added black and
just outlining it first. And then we'll fill the colors. And again, I'm saying that
whenever you outlining it, make the color little fluid so that you can do the
outlining very smoothly. Now again, taking
Naples, yellow, white, and there's
green gold mix. And then again trying to do
the same inside part first. So same color we're using
like we did in this one. But there is less reflection
than the other iPad. This is more brighter
and shade, actually. The small bright
color than this one, because light is
falling towards this, I'm more, so it has
more light in color. Now here you can use the color because we're not
doing any outline, but we're just
filling the colors. But when you are
doing the outlining, tried to use ten colors Now just making
the outer eyeball, which we did here, the more greenish texture. And then we'll create
this black eyeball. Taking more of white and just adding more light color goes very light in
color actually. So eyes should be very
beautiful then only the entire Portrait
will look beautiful. So now adding red to this bond, Dumbo, not read it
is alizarin crimson. So just outlining it. Now you, you can see
I haven't used much of black because it has a more light in color than
compared to the other eye. Now just outlining it. Now again, for outlining, make the color a little fluid. Covering this inside
part with black. Now you can see this black, but adds beauty to this
painting that's completely changes the whole painting
and hold Portrait Painting. Now again, adding little
black and bond amber to make the outer shades. Just the lines which we did
earlier in the first Eye. Take your own time and do it. It's not required
that you have to do both the rise in one, go. Take your time, take braids, take half-caf, we have
whatever you want. Then take breaks, listen to
music and then start doing, don't do this
painting in a hearty, otherwise you will
spoil this painting. There's a lot of
Detailing in this. So you need to take a break
and do this painting. So now again, taking
little white, a little bit of white
and making little tin and just making more
lines on the outside. First we did the
lines inside and now we are doing
the lines outside. And also you have to outline that eyeball with white color. Have not zoomed at much to this painting because
if I will zoom menu, not be able to see the
colors what I'm mixing it. So that's why I
haven't zoomed it. I haven't I have zoomed it to the maximum level so
that you can see it. Now just outlining
the lower eyeball. Small, small Detailing, which really makes this I beautiful. Now just covering
this area which is the eyelash
part, you can say. Just covering it very carefully so that it doesn't
go inside that iPad. Does Ada as little
light in color. So just outlining it
with light color. Once we're done with these
all outlining and iPad, we'll start with the more
with the four level. So giving more reddish texture
to this whole round part. Now taking white
and pinkish color, do pinkish shade and it'll
yellow. I'm adding two-word. Just covering this knows. This knows is very pinkish color and just added little bit
of yellow toward yellow, white and Alizarin
crimson, Naples yellow. And just blocking in this nose. You can see I'm using
the same brush, that liner brush, so
that the colors don't go inside the other area. That's why I'm using the
smallest size brush. So you also use the
smallest size brush when you are doing such
small, small failings. There's a darker part and
then again the lighter, but now we'll do that Blocking. And then the for details
8. Fur Detailing Part One: So now let's start with
the Fur Detailing. So same brush I'm using
here, as you can see. So the underwriters
with light colors. So first we'll make slight
color that is Naples, yellow and white mix. Make it little bit fluid because we need to create fine lines. So it should be little
fluid then only will be able to create differs. So just creating
small, small lines UK, as you can see under the
I do it very carefully. It should not go
inside this eye. But otherwise, again, you
have to redo the eye. Paintings would do
it very carefully. So there's under is
very light in color. So small, small hairs, we have to create small lines. And just outlining it also. Again, taking the same color. Just adding more lines. How we do the lines is the, in the direction of the image. The image is curved and
the lines also be curved and the images straight lines
or the should be straight. Now the iPad is, has to be the lines
as to be upward. So just I'm trying to
create little bigger lines, which are also the eyebrows and metaphors which are
coming from the area. So just mixing more
colors and applying it. So do it very
carefully and slowly. Now these are bigger
lines which I'm drawing. So I'm adding little more
white because I want little more white,
whitish color. Like creamish
color, you can say. Just adding these lines, which will be like
the eyelashes. Slowly, slowly will
move towards the area. So see, you can see there so many layers which I'm adding, I'm trying to create a
very thick fur details of below the eye exactly. So now taking more of water and on my brush and
just mixing it. And then again using
the same color. And first outlining the area and then trying to
create the lines. Very small, small lines
are there as well. There is far which is above. So first I'm trying to create a line which divides the nose, but this lighter color. And then we'll create, differ these parts which we
have done with lighter color. This, I'm just creating some diagonal lines
with the scholar. Slowly, slowly we are
proceeding towards it. So first I'm doing
the lighter colors and then some darker colors. And this part, I'm just
filling it with darker color. This is the bond umbo, which I'm just
applying it over here, which is left out in between. Now let's take again this lighter color and
start creating the for now these lines a little
bit in diagonal direction. So as the Gulf of the head is, so the lines also should
be like that only. So it depends entirely on how your body surfaces
if the disk corvee, the line should also be called, which should not be straight. So this is just the first layer
of T4 which we are doing. We have to do multiple
layers of it. So this is just a
starting and we have to complete the entire
painting philosophers. So take your diamond, do it very slowly and make sure that your color is bit
fluid, likely milky color. It should not be a
TIG Gallo otherwise, that effect, that line
effect will not come up. So try to use ten color. Now just outlining
this year Part first. Similarly, the other ear
Also I'm just outlining it. You can see already
the effect of the is coming up because we
have already done the iPod. Now the feather part is left, which we will be doing
slowly and gradually. And you're, there
is a white part which is more I'm
putting more white to it
9. Fur Detailing Part Two: So now you can see I've
just taken a fresh pallet. And these are the colors. So Naples, yellow,
white, burnt umber, and there's another color
which is deep yellow, or you can take orangey color, It's a bit of
orange shade color. So I'm just mixing white
with this Naples yellow. And first trying to create a more vibrant lines
on the below part. Just outlining,
lining the first. So the more Layer you
give to the first, the more realistic and furry
it looks actually just making little fluid
and trying to create more and more
lines on the top of it. Do it slowly and patiently. Take your time. And All these are being
done with just one brush. That is the rigger brush
of size two-by-two zero. Use smaller size brush for creating such
textures and details. Don't use bigger size brushes. So again, these Eye, which is there, I'm
just outlining it. I'm just creating
some nice dark shade. Not shade actually, it's
a dark value to it. There's more of white in it so that it becomes
more vibrant. And adding more
lines on the top of the eyes that are the eyelashes
which are coming out. So draw these lines
as close as possible. And these are all like S shaped curved lines which
I'm trying to create. Each and every four plays a
very important role in this. All these force
directions are different. Now the news here does the nose part where
I'm creating the fern. You can see this is little
bit in diagonal shape. And as we are going
towards this side, the shape is all diagonal. It's not straight,
it's diagonal. So you have to create
a little bit of diagonal lines to create
under that much damage area. So this is all the lines
which I'm trying to create. Taking more of this
color and trying to give more lines toward the lines
are, towards the end. These all are wrinkles which
are there on the head. Now taking this cadmium
yellow deep and burnt umber, mixing both the colors
and adding little water toward so that it
becomes a little fluid and we can easily
create the lines. Now I'll start from the top. Now the top part will be
a little straight lines. So I'll add more white to it so that the lines
are more visible. Now for create, if you don't
have cadmium yellow deep, you can use cadmium orange also, but whenever you are using cadmium orange to take
less of cadmium orange, cadmium yellow deep is
quite orange in color. So you can take cadmium orange Also when you are
doing this painting. So just applying on the top where the darker part is there, the lines just filling it slowly and also
overlapping little bit on this lighter but also create these lines very closely so that very small, small lines which are in breaks and we're very close
to each other. All these are Detailing. Take time and do it very slowly and make sure that
your color is a bit murky. Should not be very thick, otherwise these lines
will not be created well It should be a little tan color, then only you will be able
to create such lines. I've added it in Naples, yellow to red because I want
a little more lighter shade. So just adding on
below the slider bar. You can see the whole
portraits is full of four. So you have to, you can imagine
how many lines you have to create in this entire and also you have to do
the overlapping. But the final result
will be amazing. You will love to see this if you follow each and every step, which I am telling you, you can see these
are diagonal lines. But will towards the All
are not straight lines. I'm just staying really
black Also because we need black also to
give some textures. I'll mixing little more and creating little
more darker lines. Just adding these lines. There's some darker patch
above all sorts of I'm just trying to create a
little darker patch above. This has, which
are the eyebrows. You can say only one
eyebrow is visible. Now the nose, this
some decimal part, which is little darker in color. So I'm just adding
black to this bond on board and creating a
darker shade offered. You can see just straight lines. I'm just trying to do little
darker area over here. So take very little amount of color and start
creating the lines. Don't take too much
color on your brush. And again, I'm repeating is
the color should have to be fluid or Medicaid should
not have to be thick. Now this area is quite dark, so I'm just applying
the darker color. So there are lot soft
shades and values which are there inside this
for Painting there so many colors which
are added to this. So many color compositions. Color mixing is
done over here to create that unique color. Again, taking this
darker color and doing the eyebrow part. Now this the ear part
is also quite dark. So just adding the lines. You can see I'm mixing
very little, little color. I'm not mixing too
much color in one go, so try to mix a little
color and do little Part. Don't mix too much color
and then start doing it because there's so many
variations in colors. So you have to mix very
little color everywhere. Now let's same dark color. We will start using the, this just outlining
this jaw part, which is the below part, and creating some small lines. So whenever you are trying
to do such type of painting, just keep in your mind
that it will take time. Cannot finish in few minutes
or in few like in one day. So it takes times. So do it slowly and commonly. Be patient while doing it. If you feel if you don't
feel like doing it, stop it and take breaks
and do it another day. So no need to do it in one day. So this is just
an online session so you can watch it
anywhere, anytime. Now with the lighter color. Just adding lighter color on these other side of the nose part and also little bit inside
the darker part also suggest adding more textures, more lines to it. Adding more towards
this area also, it's difficult to draw the lines on the area which is
towards the light. So when we'll do that part will just tell it it
and then we'll do that. But again, taking the same light color mix and I'm just trying
to create more hairs, more lines, which this is also a diagonal line
which I'm creating. So many small, small lines which are
overlapping one another. As you can see. This is
little lighter area. So just so just trying to blend light and dark color
together with just the lines. Also creating some lines. Lighter lines on this area. Lines are coming outwards. So these are horizontal lines
10. Fur Detailing Part Three: So let's start for the with
the hair fur painting. So you can see I'm
just layering over the dark area of
the lighter colors. Also taking a little wide so
that the colors become more light and more visible because this side it is quite bright. Colors has been used. So when you add white and
little bit of Naples yellow, the brightness increases so that we have to take care in
mind that this area, one side it is bright
and one side it is dark. So gradually we are moving
towards the making of fur. We're first doing the nose. There's so many layers we
have to do it now again, I am doing the lighter
color on top of that color. So the more layers
you do on top of it, the more realistic
fur actually looks. So you have to do
a lot of layering when you are doing
any fur painting, any animal Portrait
Painting we're doing, we have to do lots and
lots of layering on that. Now you can see I'm padded the lightest color on the top of that
orangey shade color. So this side does, you can see this side
of disquiet light. The nodes. I'm not
covering the entire knows. But yes, the side which is more towards the light
I'm covering that. Now D has these wrinkles, I'm just adding
more light to it. And whenever you are creating
these types of Four, always use your
rigger brush that is to bind zero
or three by zero. It should be fine liner brushes otherwise that effect
will not come up. You can also use round brushes, but round brushes also
should be off smaller size. Again, I'm adding more
lighter shade to it. On top of the darker one. If you will follow
each and every step, which I have done
during this painting, the end result
will be beautiful. But for this you have to keep lots of patients and
lots of discipline. You cannot do it in a hurry. So try to do it very slowly. Now I'm making a
little dark color by mixing all three colors we can see and adding
the dark lines. Now this is a little more black
I'm adding to this color. So that becomes more dark. And now the most
part the ring goes, which are the most, judge. So I'm just adding
more layers to it. So this is the area
where the jaws, meat and the mustache comes out. The hairs. So just
making it more unique. Now slowly, slowly. We are moving towards
the darker part. Where there's dark part, you have to add darker colors and where there's light part, you have to add lighter
color two-word. Now again, I'm adding little
more orangey shade on the top of this blackish
that I Bro was there. I'm just trying to
cover that sharp line. I don't want sharp
lines anywhere. I want to cover those with hairs so that what we
have to do where there should not be any sharp lines or should be covered
with lines and hairs. There are long or here's where I'm just trying to create little longer hairs
on top of it. You can see I'm just
moving the brush upward from that
black area and just covering that part so that
black area is also visible but this area but the
hairs are also visible. So it's like that.
Tried to do it slowly. And now here the eyebrows part, the ears are different. It's like, Oh, angle, at an angle it is swinging. So like we do it
in the paintings, like in flower
painting and all that. You have to move your brush. Now, you can see I'm just mixing very little amount of color because there are
variations in colors. So don't mix too much
color on your palette. Mix it little by little
and try to do it. And whenever you're
creating such lines, make sure that your
color is milky. Color should not be taken. Otherwise these effects will
not come, should be milky. Now, these are long hairs which
are at, joining the ears. We can see slowly the
effect of the fur is coming up as we are moving towards the layering technique and
doing more and more first. And how does brush, which
I'm using is a rigger brush. You can see the difference between rigger brush
and liner brushes. That rigger brushes a
little taller in size, the brush size, and the liner
brush a little shorter. So when you use rigger brush, you can hold lots of
color on your brush. So it's good for doing
all these paintings. So now you can see
I've added more white, too wet to give little
brighter look on top of it. Just moving my brush in
the upward direction. And very light pressure. You don't have to
press your brush very hard, very light pressure. You have to put on your
brush to give this effect. Now, let's do the ear part. So this area is quite bright, so I'm just adding more lines, just going down diagonally. Adding more white to it because I wanted to
more brightness to it. And I'm just first outlining it and adding more layers on top of it. So now you can see I'm just
giving shape to the ears also because when I was doing the background painting,
it got to stop. So I'm just trying
to give a shape to it in taking these lighter
color and just adding to the part which is
below this year Part, just adding more hairs, more outlining this N part
11. Fur Detailing Part Four: So continuing further on that, I'm using the lighter
color and just adding some more lines
near the ear part. So these are small hairs. So the bigger hairs are at the iPad and rest are
almost small hairs only. So I'm just filling
the ear Part first. You can see just I'm
making it the lines, very small, small lines. And you have to also do the
same and make sure that the color is let milky fluid. It should not be
very thick color, otherwise you will not be
able to draw nice fine lines. Now I'm just taking
nipples, more yellow, more water and
little bit more of white to give little more
lighter color to it. And I'm just making
these bigger hairs, which are also coming
out of the ears. Adding more white to it. Making the hairs which are
coming out of the ear pods, especially the inner part. You can see how the
hairs are coming from inside ear and which are also just adding little more hairs on top of diesease so that they mix together and
overlap one another. So you can see the hairs are
in different directions. You have to take care
of each and every hair. This hair is going. And now this part, it's bit darker in color. I'm just blocking
it with dark color and little bit light
outline to it. Now taking this bond Dumbo and just filling it
with darker color. This part is done. Now again, taking
the lighter color, mixing little bit of
this yellow deep, and again adding some more
hairs on the cheek side. So this is the cheek side. You I'm just adding the hairs. If you feel that you're
Brushes becoming sticky and all the colors has
been staked on your brush. What do you have to do
is you just wash off your brush and then
use a fresh brush. So it happens that when we
create these lines are, most of the time the brush dries and the colors
ticks on the brush. So you have to take care of
that. Whenever there is. Your brush feels sticky, it's getting dried
and you have to wash off your brush completely
and then use fresh color. And to make sure that
your color is wet, just sprinkle some water on your colors so that
it becomes wet. I'm just adding the hairs
on this darker part. You can see slowly, slowly this effect of
hair and look off. The cat is coming up to
full of heads and 40 hairs. You can see in animals. So slowly, slowly we
are coming to it. Now I'm just mixing a
little darker color and also adding some
dark hairs below. Now my brush has
become stickies. I'll just wash it off. And then again, I will take
the color, the lighter part, and you will do
the lighter part, which is in-between
those darker part. So very carefully, I'm
just moving towards the area which is the
side of the cheek. You can see when you were
doing on dark color, the lighter color
is more visible. So that's why we use a
darker color first and then we move on doing the layering of lighter and
lighter and lighter colors. So like this, we do
the fur painting. Just have to make sure
that where the horse Here's our moving where
the fours are coming from, which directions we just, you have to take care
of that when you are doing some realistic painting. Otherwise, the hair
technique is same for all. Which color to use, which composition to use
that you need practice. The more you will practice
the color compositions, the more you will get
ideal which color to use. Now here this is the
lighter parts where I'm just adding the slider, which makes Naples
yellow and white to it. And I'm just adding
this has below that area which is the joy
area and the mustache area. So just adding small,
small hairs below. Also taking these hairs to the upper level and mixing
it with this darker part. Now here I'm doing the
layering technique to first Eye put the
background as dark, then again the lighter color
than more lighter color. So here we are doing
so much layering of the colors you can see you. So it will look that there
is a mixture of light, dark, and the lightest colors. So I'm just adding
more and more lines. Now you can see the lines are curved lines because
the phases COPD, so the lines are also
moving like that. So you have to make
sure that the lines have to be in the direction
where the hair is. Whenever you are taking
any Portrait Painting, make, take high-quality
pixel image. Then only you will be able
to see all the hair parts. Just adding more lighter hairs. And first little outlining
it with white color. So that becomes more bright. Adding more hairs
towards the nose part and this area as the brightest. Now again, adding little bit
more hairs towards the spot. Near the nose, the
hairs are quite bright. Now we will add the
heirs to the jaw line. First, I'm just outlining it. And then we'll create
all these is our below. Now these are in
one line actually. Just I'm trying
to create There's below first to the jaw line. Very small, small
hairs are these. Now does add beauty and
outline to this area. Adding more small, small
hairs to the upper part
12. Fur Detailing Part Five: So now let's continue
with adding more for details toward this down Part. I'm just filling it up. With this light color hair. We can see the
hairs are moving as the direction of
this joy is moving. So you have to also
create the lines as a Joy's little Islam's two lines will be also little slant. Now filling this entire
area with the lines. So now let's take a darker
color that is born Dumbo. And All my black has finished. I'll just take little
bit black and then we'll start with the darker
color painting. So just adding
little black to it. And we'll mix little black, very little amount of
black you have to mix. Don't have to mix too
much amount of black. And just adding some black
details on these lines, giving more highlight
to these lines. So some lines which I'm adding towards this darker part Also because this area is little dark as compared to the others. Also adding some more
darker details on top to give a shape to it. Like it is a curvy
shape of dark color. Now again, this lighter color, just mixing the lighter color and just adding some more
light details nodes, little more light actually. And just adding these
light color to this part. Well, you can see this disease, the third layering, which
I'm doing on top of it. In these cases, a layering plays a very important role because it adds thickness and
beauty to differ. Actually, the more you will
Layer your furthermore, it adds beauty to your Painting. Uh, take breaks if you're
getting tired doing the thing. You always should take
breaks when you are doing these types of painting because
sometimes what happens, we get bored doing the
same thing, same thing. So take breaks and do have tea, coffee, whatever you want, and then start with it. And see there are two
dark lines which I have promptly made
it too visible. So now, let's add more details. Now the upper part is left
though, Lear part the, which we will turn
it and then we will do it because it is
difficult to do that part. I will just done the painting towards my side and then
I will create the force. But first let's add more
fur to the, this area, this head area, giving more
depth to the force. Actually. You can see I'm layering the
textures one on the other, another, making little
more bigger lines. Also outlining this
year with bright color, adding little more white to it. And outlining the
outer part of the ear. So whenever we do these types of painting, it is required, just compulsory to take
breaks and please take breaks when you are doing such guide of
realistic painting. Don't make it a habit
to finish in one go because these paintings
cannot be finished in one go. Now this part, I'll just turn the painting towards
myself so that I can easily draw the
lines because it's really difficult to draw the
lines on the other sides. I hope you are enjoying
this painting. And I really enjoyed
doing this painting. I hope you guys are
also enjoying it. The lines, I'm just
trying to create it. The hairs which are coming out. Now. Again, taking
this color and just outlining this pod
which is above the eye. Gradually via proceeding
towards the painting, we are almost done with
the face painting. Just few little details are left off the ears
and the left part. Otherwise we're almost
done with the hair part. Now I'm adding this
lighter color. As you can see, the below part. Just making normal,
bigger lines. These are all hairs which
are below does neck part. You can see throughout, I'm using the same brush, just two or three Brushes
we have Used to this, to the, to do this entire
painting actually. So you don't have to worry
about the Brushes Also, we only need to do three Brushes to
complete this painting. Mostly fine liner brushes. Now first-time creating
the lighter colors. Then we'll do the darker color. So all these things will change. Now I'm adding little
darker variations of HER2 towards this. And I will also mix little
bit of deep yellow to it. And just making bigger hairs because this side is
the darker parts. So I'm adding the darker is. Now, as we move towards
the lighter part, We am adding little
more lighter colors with just white color. Have just taken take roll white and I'm just trying to add little hairs of white to it
to give variations to differ. So you can see there are lots of variations in hair color Also. There are dark colors, light colors and
super light colors. So all these layering helps to create different
varieties of colors. On the far, actually, I am darkening
this area which is the jaw line with white because I wanted
to be very prominent. Just adding more of
white towards this side. Again, adding more white towards the lower
part of the hair. Taking yellow and
adding more yellow now towards this side,
the darker side. Now, just taking the
darker color and adding darker lines below
the lighter one so that it gives a contrast
between the two fours. So they are layers
of force actually. So there will be dark, light, dark light fur is like this. So you can see I'm adding
the darker colors below. So first I'll do
all the darker part first and just adding more
darker towards the jaw line. So now we'll take again
this darker color and we'll start adding more hairs
towards the side, which is the darker part. Just adding few more
darker lines below the lighter lines and overlapping some of the lighter
lines with darker lines. Now let's take the lighter color and just add few more layers. 2d, some lines which are
bigger, some small lines. Now I'm adding the lines
below the darker ones. This is how we need to go
towards this layering of first. That's why does caching is very important when we're doing
this type of painting. Because in sketching is we draw where the floor should be, where the lines should be, where the darker
lines should be. So it's very important
to draw each and every details in the beginning. So adding more white can see how nice the farmers are looking when we adding the
contrast between the two
13. Final Fur Detailing: Now let's continue with
small for Detailing. So I'm just creating
darker shade and just trying to cover these
areas with darker values. Just creating lines along with the fur details where I put the darker color there only am just trying to
create the lines. So try to make sure that the lines are very
close to each other. Don't put too much gap
in-between the lines, otherwise it will not
look appropriate. So try to keep it
very close to one another and take colors, little color one at
a time and tried to do the lining very
close to one another. Don't press your brush, just use the upper tip of your brush and try to
create the details. So same thing we have to repeat on the entire Bellow area, which is the body part. We have to cover this entire
area with dissimilar hairs, which we have done
on the upper part. So do it slowly take your own time and make sure
that your color is Fluor, then only you will be able
to create fine lines. So when I started
doing paintings, I also used to get very
eager to finish the work. I also wanted to finish
the wagon just no time. So most of the time
what happened is that my paintings get ruined
and I was not happy. I was frustrated. Slowly, I realized
that you have to give time to your painting when you are doing such type of painting, tried to focus on each and every details
which you are doing, where to put the
brighter colors, where to put the darker colors. All these details
you have to take care when you are doing
such type of paintings. So try take your own time
and do it on your own pace. No need to be in a hurry, no need to be in your own speed. Don't you don't have to compare or you don't have
to be in a race. You just go with the
flow and just enjoy the process of
this entire thing. And so gradually
you will cope up with the patient's level also
and the discipline also. So actually it requires
lots of patients when we do these hearings because this is just a constant
work which we are doing that is the
lines, lines, lines. And sometimes we get
frustrated by doing so much lines and
you want to finish it like in just half an hour. So don't do that. Take breaks. Take enough breaks take or
if you don't want to paint, just leave it, do
it after some time, then start with that. So take your own time. That's what I'm saying. Now you can see I'm adding more lighter details over here. Del orangey shade towards. Now, let's do the hairs. Adding more layers to this. Some more orangey shade to that. Some gray mesh, some
orange, some white. So there's How far as the
mixture of different colors. Take little, little color and
start creating the lines. Just to enjoy the process. While doing this,
listen to music, listen to some
motivational quote and try to do this
along with it. And I'm sure you will enjoy doing the whole painting and
the results you are seeing. You can see the phase, it's already done and
just the body part is left and we're almost
done with the painting. So already it is
looking very gorgeous. And I really loved doing this painting because I have done first-time Cat Painting. I've never done kept
painting before. I have done portrait, animal Portrait Painting, but I've never done Cat Painting. I really enjoyed it. So I hope you guys will also
enjoy as much I did it. That's why I wanted to share this whole tutorial
with you guys because I really enjoyed
these paintings, especially the animal Portrait Painting
and bold painting. I really love to do that. So I wanted to share
this technique with you. So I hope you will enjoy it. Now you can see I'm
adding the lighter Values toward so
there is a dark, mid dark, and then
light and then light. So there are various values which are being added to
these fur painting you can see now to distinguish
between the four, you can see the darker
color is there, which distinguishes
between the force actually the layers of
first which are there. If you will not add
that darker part, it will not distinguish and
all will look when one shade. So that's why this dark color distinguishes the flower layers. Actually. Let's start
with the next layer. So same thing I'm doing. I'm just like taking
care that the part which is behind each little dark. So I'm keeping it a little
darker value not very light, because that area
is little dark. Create more darkness will
do the glazing part also. So I'm trying to
keep it not light, little light only not too
much light should be there. Whenever. You also
do these paintings. Do it with your own time, with your own pace. Take your own time and
do it very casually, very lightly, and
don't be in a hurry. Now you can see here, I have just put
the darker values because this area is quite dark. So I've just tried to put a little darker values there
by adding black mood to it. Well, you can see the fireplace a very important role and
the painting composition, which color composition
you have to use also plays a
very important role. Just enjoy the process
of this Detailing. If you have any doubts, any issues, any queries, you can always ask me in the comments section or
you can also ask me, you can DM me on my Instagram, that is mohini Art Gallery. There also you can
ask me any questions. Whatever you have, either
it does colors, Brushes, brand, anything,
whatever you want. You can ask. Now I'm adding the
lighter colors. See how the layers are
coming when we are doing the layering of colors of
darker, lighter values. There's so many layers, awful fire, which you can see. One on the Arnaldo
14. Second Layer Fur Detailing: So now you can see I've just
taken a fresh pallet and one color which I have added
is that all same colors, just one color that is cadmium
yellow, which I've added. So let's start with
it now, just mixing. So we'll do more of layering. Just taking this
cadmium yellow deep, then this is cadmium yellow. Now if you don't have
cadmium yellow deep, you can take cadmium orange. Now a little bit of burnt umber. Mixing both the colors and little bit of more of
cadmium yellow and white. Mixing all the colors together. You can mix these
colors with palatal. So if you want, I prefer
mixing it with this brush. So I'm just trying to mix
it with this brush only. You can mix it with
palette as well. So it is like
orangey shade color, orangey brownish
shade calorimeters. Now I'm just trying to do more layering offers on
the top of the head. This is like TO colors, so I'm adding more Live white to it to become more vibrant. Actually, just adding
a bit of more or less. Now you can see my
colors a little milky. So make sure that your
color colors milky then only you will be able
to create the lines. Now as I said earlier, that the more you do layering, the more it looks realistic. So that's why layering
is important. Now you can see I'm just adding more and more layers to it. This area will become
more bright and more. You can see more orangey shade. So I'm just repeating
the same thing, but just I'm adding more
orangey shade color to it because this era is very
bright and very orangey. It's like, Oh, I'm just adding more
and more layers to it. Just small, small
lines on top of it. Some diagonal lines. So the more lines
and layers you draw, the more value it
gets to the painting. Actually. Also taking these lines towards the nose Part. Now adding little more
lines to the corners. Just adding small, small
very close to each other. The lines are actually now taking yellow, more yellow, and that is Naples yellow. And mixing board the colors. And just taking this fluid color and adding to this lighter area. Just adding more lines
to these lighter part. Just be careful and draw
the lines very carefully. All this area which is close to the I is a
very light in color. So I'm just adding more of
white and creating lines Adding more light color
on top of the wrinkles. Also, I've extended the ring, goes towards the end. More Highlights to this area
which is light and color. So just I'm giving the
finished look to the painting. And after that will
not do the layering. So this is the last layering
which we are doing on the face and then we are
done with the layering. You can see the first we
did is the background, then we did the second Layer, third layer, and then
this is the fault Layer. So there are so many layers of colors are there on
top of each other, which gives a very fine and
fluffy look to the portrait. Actually. Know the node spot. The final Detailing as must. If you are doing this painting, you can leave it like that. The painting which we
have done earlier, it's finished. It's
finished only. But if you want to give it a little more
realistic thing to it, to have to add more
and more layers to it. So this cadmium
yellow deep plays a very important role for
doing this pair painting. That is, there are two yellows. One is permanent yellow deep
and one is cadmium yellow. So permanent yellow deep
is little orange shade. And if you're not having
that permanent yellow deep, you can use cadmium
orange for this. Now, I'm rotating the image and we'll do this side of the
painting because it is difficult to do the
painting from top of it because we want the
hairs to flow this side. So I want it to be reflow. So that's why I've just done the painting and
I'm just blocking, I'm just creating the
hairs which also coming outside the body and the air. So similarly I will do the ears also will do a little fur
Detailing is on the ears. I can see via adding little
lighter shade also do it. Now again, the lighter
values to the ears. Some hairs which are
coming out of the ear. Also do the background. The lines, the jar in
different directions. And also outlining
it very carefully, especially the tip of the ears. Now again, taking
that orangey shade and just outlining
the other part and adding more hairs do it. Now some lighter hairs which are coming below the eyes, but just making it more lines
with lighter color. Now you can see the
beauty of this. I would just solve
vibrant and so colorful. Now just keep it straight
and see how it looks
15. Second Layer Fur Detailing Part Two: So let's start with
for the Detailing. So you can see I've just
taken the lighter color, adding more white to
it, to Naples yellow. And just trying to
highlight the lighter area. Just adding more layers
to that lighter Part. Adding more lines to the same area which
is in lighter value. So as I said earlier, that more you do
layering and modulus, the colors, the more
realistic fur looks. So these things take time, but the end result is very good. So you can see I'm just
layering it again with the same light color layering
the part which is the iPad, which is close to
the hypothesis, quite bright and shiny. So I'm just trying to give
it a more nice, hairy look. Also, I will try to do the part which is
below the eyebrow, eyelashes, below the eyelashes. This is quite bright. I will just add more
bright values to it, first outlining and
then creating small, small hairs to it. So very small, fine line
here is I'm trying to draw. I'm just rotating it again. Straight. And now
again I will add more layers to this nose Part. Just adding the more heads to the snows Part
straight lines. Now taking this black
and Orangi shade, little darkest value and
covering that darker part. But just beside the eye. Now first Eye, which
we did on this part, is also quite dark, so I'm just adding
more darkness to it. Just take your time
and do it slowly. And just adding more
orangey shade the eyes, which is touching
the eye, actually. Just adding more hairs. See in most of the time we are repeating the same process, but only matters is how
much layering you do. The more you learn the colors, one on the another side, and especially which color to use where it's very important. And how much to layer two layer that is
also very important. And this will only come when
you will practice a lot, these types of paintings, you will gradually come
to know where to apply. Which color, which
color is good there, which color composition you
shouldn't mix with that. This color should
look similar to that. So all these comes with
experience and with practice. You cannot do it in one go. You cannot learn it in one day. So it takes time. So you have to have patients
and believe in you that yes. I'll do practice
it and I'll do it. Even if you have tried this painting that is
more than enough for you. Even if the result is not
same, it's perfectly fine. This video will be always there. You can watch it anytime, and you can practice it. Now you can see I'm just adding this white color to the
area where the most edges. So just adding
white layer to it. So now again taking the lighter color and
adding more white to it, and again adding more
layers to this part, which is beside the nose, as well as the there
are hairs below. Just adding more hairs to it. Just taking proper white and adding more white to
the area which is the cheek area and the MT area. Adding more longer lines, small hairs to the eyebrows, which is on the top,
the lighter values. And whenever you
are using these, creating these lines, make
sure that your color is fluid. Otherwise you will not be able
to create such fine lines. So it should be fluid, should not be too much fluid, but yes, it should be fluid so that you can easily
move the colors. If the color is take, you will not be able
to move the colors. Just adding more and more
lighter color. Here's do it. So gradually we are
proceeding towards the final painting and one or two videos are left
and we are done with it. Just creating fine lines, very fine lines you have to
create when you are doing the lighter color so
that it does visible. The hair should be visible. Especially the eyebrows,
which are closer to the eyes, are very important
how they are going. You can see how I'm doing it. I'm just carving it that
will move so that it does more Garvey like that. You have to do it. Especially the iPod is
very important when you are doing the painting. Now again, I'm using
this darker color, this orangey shade color. And again, little wide
I'm adding to it. And again, I'm trying
to create more lines. Now you can see the
variations from light to dark and dark. So this is how the
variation should go. Do it slowly and carefully where to put which
color composition. So towards the eyes, I'm just adding
more light colors. So now little more hairs
towards the ear pods. Some of the hairs are
coming out of the ear also, which is very thin lines. You have to create
very thin lines. Try to use to by zero or three
by zero size rigger brush, then only you will be able
to create such fine lines. If you don't have these
two sizes or brush, you can always use
a size zero brush. And little more
highlight I'm giving to this area little
more brightness. And just outlining it
led to more lines. Now again, if the color is
take annual Brushes ticky, just wash it off and then
use your fresh brush. Don't use it if it is sticky, otherwise those fine
lines will not come up. These are quite light colors
which are coming out. Also outlining the ears so
that it is properly visible. Now again, taking that orangey
shade color and adding more force towards this side, outlining the outer ear Part. Minute, minute details are left. And we can see we have done so many layers
of painting on this, their layers and layers of painting which
is done on this. Now let's take again this
orange shade color and little white mix and adding
more details on top. So let will more hairs
on the side, GQ, more lighter colors to give
a proper shape to the face. And it will more shape to
the sides and the nose spot. So just outlining
the spot which has to be a little bit visible so that this area is the
round shapes who I'm making it more light
by adding white to it. Just adding small, small lines
16. Second Layer Fur Detailing Part Three: So let's add little more
hairs towards this neck part. So just adding more of this lighter shade
of orangey shade, you can say not the darkest
one, the middle one. Here you can see we have
used three different shades. The lightest, then the
light and the dark is to these types of
shades we're using here for doing the
four paintings. So this is the mid-level, which is little orangey
brown Asian shade, which I'm just
blocking in some area. This is the final Fur
Detailing which we are doing and we'll be done
with the painting. So few that jobs are there, which I'm doing some areas, I'm making it a little light. Some area I'm adding
this orangey shared texture so that it
looks so, even. So whenever you are
doing this painting, just wait and said, if you how it does
looking and you can add the details and the
extra tough jobs where you want to be. So when you setbacks and sit back and see where it
should be more light, where it should be more,
has more brightness. Then you'll be able to see
the variations in colors. And you'll be able to add the color compositions
correctly. Just the final dot jobs I'm adding towards
this neck portion. Just enjoy the process and
flow off the painting. Now, this cat is already
looking so gorgeous and so vibrant that you feel like
UK, it's almost done. So yes, it's almost done, but just few highlights, I'm adding it and I will
not be overdoing it. Just view Highlights
where there are light colors are there. So just few Highlights and
we're done with the painting. More hairs towards
this beard portion. All whites here and they're more whites. The below are wrinkled region. You can see mostly the whites, which I'm adding is towards the one side only
not the other side, because that side is quite dark. So I'll keep avoiding to use little light color that especially with white
color that side. So the mostly the white
color is this side. Just adding fuel,
darker textures, also, adding little more hairs on top, little more lighter
hairs on the cheek side. So we are almost done
with the Herring bodies. Just a few more to go. See this for Detailing
is never ending process and you have
to stop somewhere. So the more you
watch the painting, the more you want
to do the layering. So you have to decide when to
stop and where to stop it. So I'm just adding few more of the hairs and where
it does Required. Just adding more
and more lighter his little outline to the heel pod and little
hairs to the ear Part, not a more hairs to the
neck bought neck region, though darker hairs to the batches with their
two patches there. The cheek region. So yes. Small, small
details which are left. So this is quite dark areas. I'm just making it a little dark
17. Final Detailing: So now let's do the final part of the
painting that is dynodes, which is very
important now after going Alizarin
crimson over here. And I'm adding little of cadmium
yellow and Alizarin mix, so making it little pink
and I'm just covering it, the nose part first. So just making and taking more of alizarin and
just outlining it. Now taking little black in it and outlining the one which is their outlining the inside part. Just making it little
more darker and shade. Also outlining the
other nodes Part. And then taking the white color and creating some texture, some dots on the top of it. So little dots and
hairs on top of it. Now taking this white and alizarin and little black and just making little more
dots on top of it. Taking white and creating
little more Highlights. Taking therein
crimson, black and just making little The
nosier a little more dark. Now taking little
white and yellow and highlighting the spot
more with light color. Highlighting the eyebrows
as well. Not Dunmore. Very small and minute
details are left. And little bit more of
this Alizarin cadmium. So yes, should just
adding little bit off the colors and just mixing it to make it little more pinkish shade and just
covering this nose Part. Very fine details
which are left. Just dots are taking white color and creating
the most, most damage. So very thin liquid color. And my rigger brush, I'll be creating the
lines, some curvy lines. So you're just wanting is
important that you have to take very thin liquid
colored as wise. Otherwise you'll not be able
to create such fine lines. The color has to
be in fluid form. Not so much tin, not so much tickets
should be in fluid form. To create a nice straight line. And scurvy line. Just use the tip of your
brush and just go in one, go. Some small, some big lines
which add curvy lines actually Again, see there in
different directions, one and top one, bottom one in-between. So different directions. And now the other side, I'm just rotating my canvas towards me and I'll
just draw fine lines. What's this site also? So by any chance of the
lines are not straight, you just need to cover it with the same background
color and redo it again. So this is how you
can overdo it. But whenever you are
doing it overdoing, it makes sure that the background color
has been dried up. Then only you do the
what we're doing part. You can adding nine days. Most data's really looking
very beautiful and bright. Now, adding little black color and just adding very
thin color actually, with my round brush, you
can see how much tinnitus, lots of water is there and that, and just glazing it over here, I'm using the glazing
technique to make it this part little more dark. I'm just adding this color, one layer of color. When you add this tin
colored, though below, lines are visible,
but this color makes it a little more faded. So this is how you can
do the darker part, just adding more glazing to
it to make it more dark. So I hope you guys
enjoyed this painting and do share your project works and do tag me on Instagram. If you are sharing
it on Instagram, that does mohini Art Gallery. I will love to see
your project works. Don't forget to give
reviews as well. Reviews play a very
important role. It keeps me motivated and
helps me to learn more. So I hope you guys enjoyed
this painting as much as I did teaching you guys so happy
learning and this is it. So this area as I have done, I've done the glazing, so it is little dark than the
one which is in the front. So Finally, this
painting is done. And
18. Varnish And Framing: Now, to protect this painting, we will be one hashing
this whole painting. So the varnish which
I'm using here is Liquitex varnish, it ounce. So this one shall be using. This is a ballot
in which I'll take out the varnish and the brush. Let's start with the varnish. So I'm just taking
little bit of varnish. You can see it is a little
milky form, but when you will, when it will dry, it will
be perfectly transparent, so no need to worry about that. So whenever you applying
one is don't repeat it. Just apply one go and it's fine. If you will repeat, it happens
that sometimes the varnish gets dried off and there
will be patches around, so don't redo it if it is wet. So this is the
synthetic brush which I mostly use for doing varnish. I don't use my Painting Brushes for varnishing because
sometimes what happens is varnish dries and your brush gets
stammered damage. So it's better to use
another brush for varnish. Now let's do the framing
now this is the MDF board cut out its little bigger size than the canvas
which I have used. It's around 11 " and this is canvas is off 10 " with
a little bigger in size. This I will be using
for framing it. So before framing it first, I will paint this
with white color. And using spawns, I will just
do the dabbing technique, and I will just paint
these borders first. Let's take out the
white paint and just put it around everywhere. You can see I've put lots
of paints on this border. And now with the sponge, I will just dab, dab, dab and completely
filled this border area. So just enjoy simple process
of painting that sponge. After this painting is
done, this border painting, I will also paint the sides and then I will leave
it for too dry. So it takes almost one out to dry because it
is quite thick paint, it will take quite an
odd to dry it out. Once this is dry, we will varnish this border
part and the sides of it. So now you can see it
has perfectly dried up. And now we will just varnish this whole border
area and the sides of the board using same brush and the varnish I'll just apply
to these All border part. Varnish also protects
the borders and give it gives a little shine
to this A-frame area. So it looks nice when
you do the varnishing. And now I will put
the fabric oil gum, whichever gum you have, whichever of the glue, whichever you have it,
just very powerful, you have to use that. And this is a fair we
call MR. which I'm using here and I will pour
it on this middle area, which is a circular path. And then I will place
the entire painting. You can see just pouring a thick amount of this
glue all around it. With my palette. I will just try to spread
these this thing evenly. And after that, I will place the paint painting on top of it. And I'll put some heavy things on top of it for few hours. And I will leave it for
fewer so that when it dries, it's completely sticks to it. You can see, I've
just spread it out. So now you can gently place your painting on top of
it and put some weight on it so that it completely
presses and it is fixed. Your painting is complete. Rewrite it with
framed as well as varnish and ready to gift
to someone you love. So thank you for watching
and have a good day.
 Mohini Sinha, Acrylic and Gouache Artist- Nature Lover