Transcripts
1. Hello!: Welcome to acrylic and mix media. Seven pumps finger abstract sketchbook practice. My name is Michelle and I'm an abstract artists living in Cologne, Germany a few years ago as part of a one 100 day challenge, I began painting abstracts in my sketchbooks and I haven't looked back since. Once I began the daily practice of creating abstract art, I felt an explosion of creativity. My daily practice brings me so much joy and I would like to share that with you in this Skillshare class and to work through seven simple prompts to boost your creativity. This class is designed with beginners in mind. I'll take you step-by-step through ways, I think will help you begin creating abstract art. First, we'll start out by simply creating lines. From there, we'll explore shapes, will trial collage, and I'll show you my favorite way to quickly paint blended page. At the end of this class, you'll be creating patients using all of these processes and adding texture as well. Together we will explore how the paint layers and how the paint moves. We will explore what colors make your heart sing. The goal of this class is not complete paintings ready to be hung in a gallery. The purpose of this class is for you to experiment and have fun, explore abstract art, and hopefully help you establish a daily art practice. But these seven simple prompts, you can focus on how painting makes me feel. Join me so we can paint together.
2. Class Project: In this Skillshare class, your project is to follow along with the seven prompts and paint them in your sketch book that I would like you to post your progress in the project section of the class. Join me in the next lesson and we will talk about the materials that you'll need.
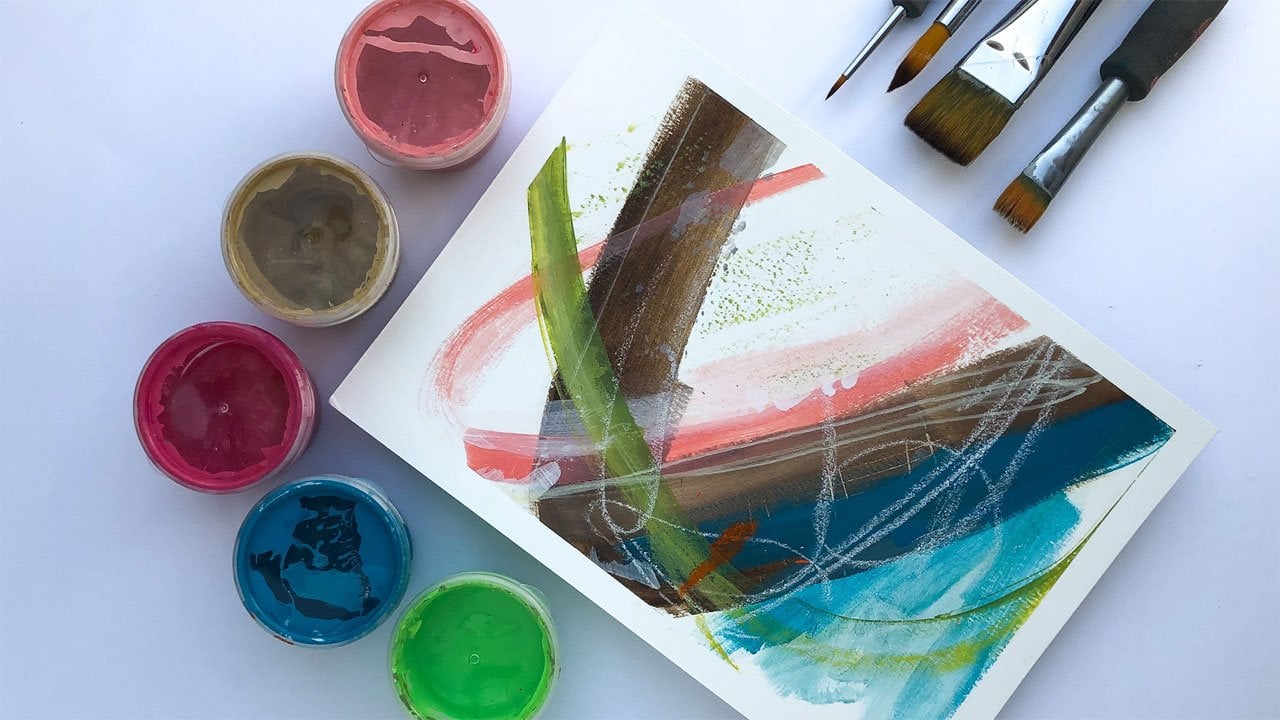
3. Materials: In this lesson, we will go over the materials needed for this class. I have broken down what materials I use for each lesson and added a PDF to the project and resources section. But let's go over quickly what we will need here. You will need a sketch book or an art journal of some sort. And I will address this in more detail in a separate video. I will go over exactly what type of sketchbook I'm using, what size I'm using. And I will also show you how you can use an old book as a sketchbook. You will need acrylic paint of any quality. Really use whatever you have on hand. Craft paint, student quality, artists quality, it really doesn't matter. Another good thing to have is some Gesso. If you're just starting out or new to painting, then go ahead and just by the primary colors, this is all you really need to get started. Then on top of the primary colors, I would also recommend that you have some Gesso. You could even add a black if you like. But this is really the basic you need to get started. For applying the paint. You will need an assortment of paint brushes. In one particular lesson, we will be painting with anything but a brush. So get creative here. You can use something like this, catalyst spatula. You could use a scraper like this that I've purchased in the hardware store. You could use an old credit card or an old hotel key. I have this catalyst wedge which is often fun to use. You can use a palette knife. Just get creative and see what kind of tool you'd like to use that could make some interesting marks. You will need some of your favorite mark making tools such as colored pencils or fine liner. You will also see me use these acrylic paint markers when we get to that lesson. If you don't have these, then by all means, go ahead and use paint and a paintbrush. Some other tools you will see me use our Posca markers, a gold fine liner. This one is from signal and my all-time favorite mark making tool, the China marker by Sharpie. I also have an assortment of these colored pencils by stubs below called woodys. They're really easy for me to find in any store here in Germany that sell school supplies. They're sort of in-between a crayon and a color pencil. I hope you're able to find them. They're really fun to use. Of course, to clean off your paint brushes, you will need some water, can wipe them off on a paper towel or a rag. And I usually like to have some painters tape handy. In one lesson we will be working on collage and you will see me create collage papers on tissue paper. But if you don't have tissue paper, then by all means you could use napkins or some old magazines. And another thing you, it's like to have is either matte medium or mod podge. And finally, you will need somewhere to mix your paint. I will mostly be using this palette paper pad, but you can use a paper plate or a mixing palette or porcelain plate, whatever suits you best. Well, there we have it for the materials section of this class for a more detailed list, please be sure to check out the project and resources section for a PDF you can download. In the next lesson, I will discuss my personal choice of sketchbooks and show you how I set up my page. See you there.
4. Sketchbook: Let's take a moment and talk about our journals. These are a few of my favorites here. They are made by a company called Honolulu. New by no means need to use exactly the same art journal that I use. I've just find that I like the quality of their paper and they seem to be quite easily accessible for me to find in Germany. And they're in the price point that I'm willing to pay. This one is a landscape. You can also use it vertically if, if you would like to. I realized after purchasing two that were vertical that I was always working horizontal. And then I would have the problem that here in the middle, my pages would stick together and my my paint would come up. And so at some point I switched to working in these in the horizontal books, and that seemed to be much better for me. I started taping off my pages and getting a really clean, clean edge in here as I was working. And at some point I realized these books were too small for me. And so these are A5 size, as you see, a five is half the size of a four. And so I purchased a larger one. I would just like to take a moment to show you how I prepare my sketchbook or my art journal for paint. I like to reuse my tape as much as I can. So after I take it off each page, I hang it on the edge of my art table. And then I will try to use it until it just doesn't stick anymore. And I taped down only the width of the tape just to keep everything nice and clean. If need be. If it starts to get too thick, then I've just clip it down. And so for the majority of this class, you will see me working in, in this art journal here. I want to give you some alternatives. Maybe you have an old book lying around that you don't, you've read it, you don't need it anymore, but it is a pity to throw it away. You can use this old book. I'll show you how we do that. So I've cut some freezer paper about the size of my page. Just going to stick it behind my page. Try and get my page to lay relatively flat. To keep that down for a moment. This one here too. And I put these here with the hopes that the paint won't go onto the page is behind it. Rather than taping the pages like I do in a bigger sketchbook or art journal. And then we are going to cover these pages. But just to give us a nice base to work on and take any brush you have. This brush is pretty grimy that I use. And just cover your page. And just so being careful not to put in in the middle and don't go too close to the edge, then let it dry. And there we go. We're just about ready to get started. So join me in the next lesson where we'll start painting, finds.
5. Line: Line work has always been such an important part of my creative journey. I add line work in so much of my art work, whether it's just in my sketchbook or whether it's line work as a finishing touch on my painting. And sometimes it's just the base layer on this white page to get my hand warmed up and ready to create that it seemed to me this was a wonderful way to start out our first prompt. So I have a variety of materials here with me and I will do my best to explain them as I go along. So let's get started with lines. I've recently purchased these acrylic markers from the company Montana. And there is so much fun to work with. Now line doesn't necessarily mean that I have to go in and make a straight line and that's all I can do. Line is also a form. What it means to me, line is that I'm not coloring in a shape that I'm leaving it open. So the prompt here is line, and I don't have much of a plan. So you're watching me just go in and create line work without focusing on what the final outcome is, but just what feels right for me to do at the moment. So I think I'm going to let these dry for a second and move on over to this page. And this one I think I'll do a little differently. I have this sitting on my paint table. It's just beige paint. Take a brush and I'm just going to paint a background here. Give me something to paint over top instead of just the plain white paper. Linus. Great, this could be very minimalistic abstract painting right here on its own, but it would be just too boring. So let's add a little more to this. Here. I love these China markers, so let's just go in with these and make some marks. This is one of my favorite tools. This is platinum carbon pen. It's often very fussy. Doesn't always like to write, but I think that's the charm of this. Add some more color. In here. I have a blue sitting around. I'm creating lines and I'm not worrying at all about what it's going to look like at the end because I'm not expecting this is a painting that's going to be hung in a gallery somewhere. I'm really just enjoying the moment, enjoying the movement, enjoying how the paint is layering on my page and letting one lime lead me to the next. And I hope that this is the way you'll create as well. I have to hold this a little away from me while I open it because it likes to splash. Not really sure what I want to make. Just letting the shape of the marker sort of take the line that I'm going to draw here. Yeah, that's fun. I'm really liking the look of this black. Marker, how it left these spaces, these open spaces here, and you see the beige color paint through the marker. But I have this orange sitting next to me. So why not? I had a little something here. I'm really sorry. I think my hand is probably right in the way. But all I'm doing is dragging align with the width of my brush across the page and if there are dry spots in there. I don't mind. I kinda like that. Look about one more. Yeah. This is cool too. You see, you see that layering effect there? That that's nice. I still have some paint on my brush. So why not head over here and explore a little more line making. This page is dry and the orange paint is a little more, is the little translucent. So it's really making a fun layering effect. Now I'm just just playing. I think I'm going to keep this page as it is. Minimal line. I think I'd like to add a little detail to this side. So take my Carbon pen again here and just add some, some lines just to have an experiment and continue playing. I love the sound, this pen mix on the page. I'm not sure if you can hear at this sort of scratching sound. Something so pleasing a product for me. Scribbling is something that is in most of my paintings. Often at the very end. And I encourage you to try and scribble. Just make marks and realize that your hand will always make the same, the same mark. I can keep on. Adding more and more layers to this. Thick lines, thin lines, pen lines. Great way to experiment. I hope you'll give it a try and figure out what line is the line that works best for you and the best for your hand. That looks and feels the most comfortable to you. Now just when I've taken all the tape off and I think I'm done. I took another look at this page and decided just to add with my uni-ball signal pen a little bit of gold detail. I really hope you've enjoyed our first prompt as much as I have and join me in our next lesson, where we will create shapes and circles.
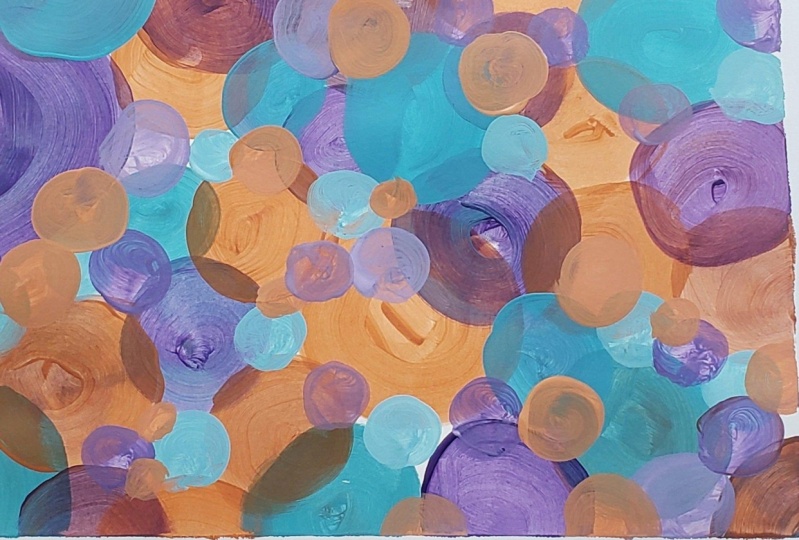
6. Circles and Shapes: In this lesson, we are focusing on color and layering. Let's make one page with circles and one page with shapes. This is a great opportunity to play and experiment with color. As you see, I have a variety of colors laid out and ready to go, but you don't really need this many. You can work with the primary colors along with black and white and mix as you go along. What I would like you to focus on is layering your paint, wet paint over dry paint. Acrylic paint dries very fast as you move along the page creating circles with thin layers. It should dry fast enough for you to then layer over top of it. Without rinsing off for cleaning my brush, I dip into another color and mix on the page to get different variations of color as I go along. Notice how I leave space between my circles and how they are different in size. This gives the first circles a good chance to dry before I start layering. Now with a clean brush, I add a layer of green over the red that is already dry. And you can see the green has a bit of transparency to it. So I get a great layering effect. This kind of layering can help create depth in your abstract art, which is why we're practicing it here in our sketchbooks with simple yet impactful exercises. And here I go again without rinsing off my brush. Continue to make circles, creating new colors as I go along. Some transparent, some opaque sweat makes up a lot of fun. Turn on some music or your favorite podcast. And just pain away. Let's see. So I'm winding down now I'm slowing down a little bit, running out of space, but I'm having so much fun. I have to be careful not to overwork it, even though it's just an experiment in my sketchbook, I want to be able to take something away from this experiment. What did I learn? What colors do I like layering over top of each other? Do I like more of an opaque paint layered over top or do I'd like the translucency? Do I like to see my layers popping through? It's always an experiment for me no matter how many times I do this and I enjoy it every time, just freeing my mind and painting. Now I've started the shapes page. While I let the circle patch dry, I'm going to follow the same format. I'm going to create my shapes with space in between, layering the paint. As I go along, letting the shapes dry before I add the paint over the top. I continue mixing the paint on my page. Just to see what kind of fun colors I can come up with and enjoy the variation of the color within the shape itself. So you can see here I still have this, the translucency of the shape over the shape underneath it. But maybe you don't like that. Maybe you want to create more of a puzzle piece with your shapes, keeping them all opaque. It's entirely up to you. I want you to have fun and explore how you're creating care. Okay? It's always hard for me to decide when to spell and I think that's a common question is how do you know when you're done? And at some point you just skip the feeling. I better stop here. And the most exciting part is as always, taking off the tape and seeing what it looks like underneath what these clean edges. Don't know. That just makes me so happy. I hope you've enjoyed this prompt and this last summer. I look forward to seeing what you create it in the project gallery and join me in the next lesson where we will make best school. See you there.
7. Squares: Welcome to our next lesson. Just squares. Well, aren't squares shapes and didn't we just do that? Shall we did. But this time, I want you to build on our last two lessons using squares as shapes and lines. I also thought this would be a great opportunity for the old book. Let's go ahead and let's use these craft paints just so that you can see it. You don't need to use fancy, expensive paints to have fun and create abstract art in a sketchbook. I always have my Just so here, I have these pencils which are from the companies still below. They're called Woody. He's an assortment of colored pencils in case I need to sharpen something. And then this is the special sharpener for the woody pencils. I'm not taping my pages. And I have some paint brushes here. And of course I have some water, as well as paper towel or a rag. Now in this lesson, what we will be doing is combining. What we've already learned will be combining line with shape to see what kind of layout and fun abstract we can create by using these now together. Now remember our prompted square, but that doesn't mean that we're limited to only a four equal sided square. Let's broaden that a little bit and include a rectangle. Just for some fun. I have only three colors that I'm working with here, so I have to get creative and I add some white to the purple to create different tones. As I'm working. I take a little more time than it looks like on the video. It's very sped up, but I'm layering the paint again, wet over dry, just like in the previous lessons. Here, I'm mixing the purple with the page to create different shades. Lightening it up, pull that off by adding white to it. You can get a lot from only three colors. There's great texture on this page that I'm short does not come across on camera using these old books as your, as your sketchbook or your art journal. I love texture. And so by scratching into the wet paint in the shape of a square with the end of my brush, I'm able to create a little bit of excitement and movement on the page. Now it's time to add a pop of color. It's time to add that hot pink. And I realized that the dark purple wasn't quite dry yet. But it doesn't matter. I'll keep working away. Makes a lot of white into the pink to create a different tone. And they all work so nicely together. So I've added most of my big shapes now and it's time to. Add just some small details. But these little purple squares, I'm really enjoying how this is looking and having fun working in this old book. Now the paint is dry and I think it's time to add some detail. I love making detail with black pen. So I've decided, although my hand isn't the way to just make some black lines to fill in the squares with some line work. Trying to make sure my hand is out of the way. And I'm obviously not succeeding. There's something so therapeutic about chest making this repetitive line over and over and over again. And the more imperfect the line is, the better it looks in a spread like this. This is my China marker. It's fun to use the white China marker on dark paint. Here we have it. Here's our spread and our old book. Now I have some leftover paint. So I pulled out my big art journal and I went ahead and did the same thing. I added squares using the same exact paint colors I used in the previous red. Now paint soft, dry. And I'm just going in and adding some detail. I'm only making squares. All squares, just squares, just squares. I've pulled out my uniform of gold pen. And I like to add little details here and there on a painting just to make it pop a little more when the light hits it just right. Again, I apologize for my hand being in the way. And my favorite part, taking the tape off. And here we have it, Our to spread side-by-side the old bulk and our art journal. I hope you've had fun. And I can't wait for him to join me in the next lesson. The blank page.
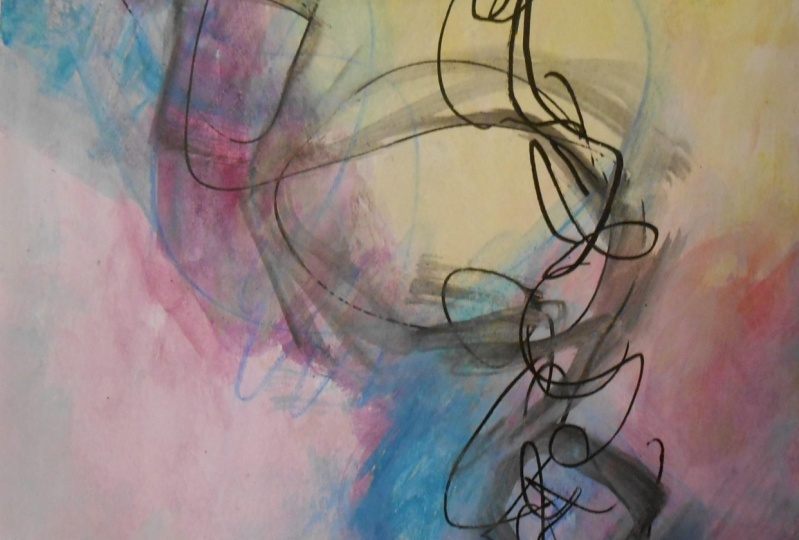
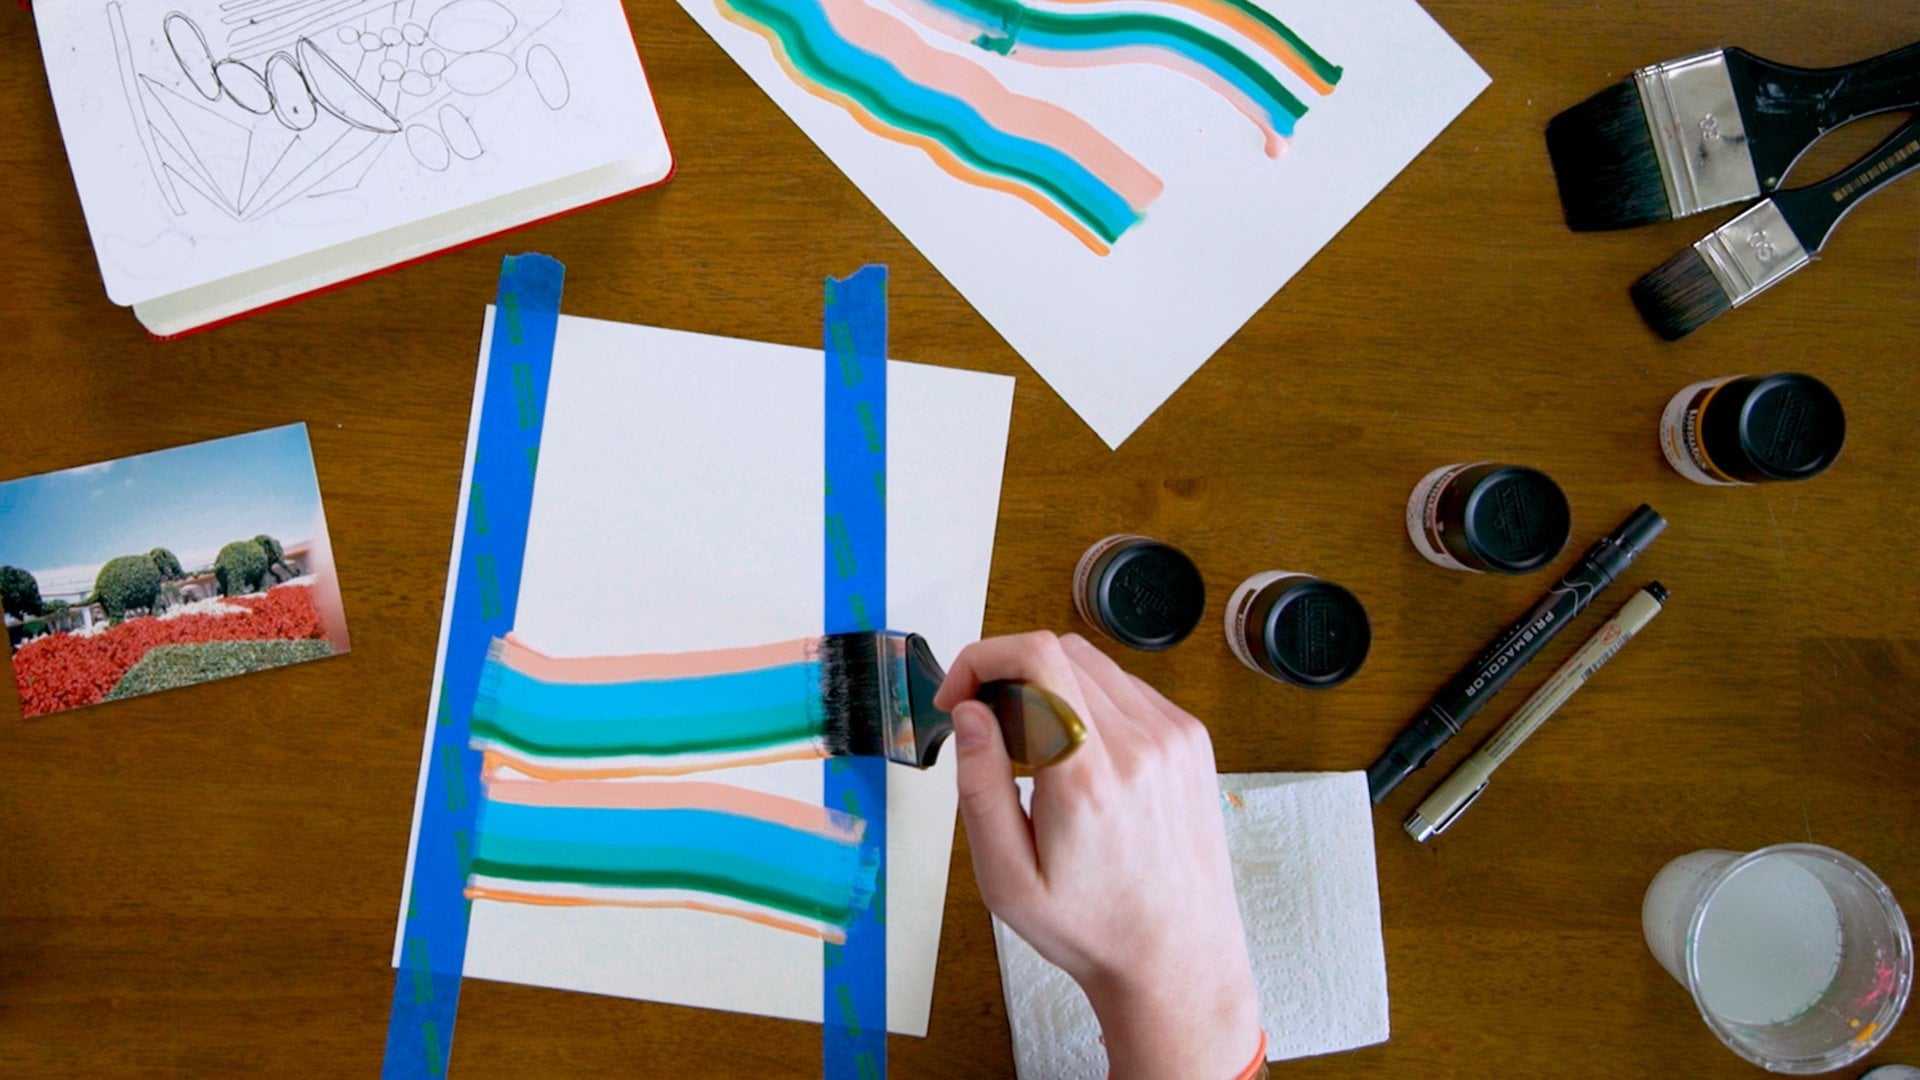
8. The Blended Page: In this lesson, I'll be showing you a tech I like to call the blended page. This is a technique you'll see in a lot of my work and in my sketchbook, I use the blended page as a background to jump off up. I use the blended page technique on top of my mark-making. I use my mark making on top of the blended page technique. This is my favorite way to create because such a simple technique can really create a lot of impact. So let's get started. So I have my usual materials here. I have some water, my precious rag, and an assortment of colors here, including a pink that I've mixed myself, NEP, so I'll read here. I have fern green, indigo blue. My just so and do you remember those lines that we did in our very first prompt? Well, let's go ahead and make some lines. On this page. There I go, writing my name, putting my initial anything just to get some mark and line on the page. There we go. There's no going back now. That was easy, wasn't it? For all done? Just kidding. Let's keep going. So here I have about a one-inch brush and I just load a little bit of red on to the brush. I tend to work from right to left because I'm left-handed. I feel this corner with a little bit of the red. Not so hard so far. My brushes dry because I like these dry brush strokes. So now without rinsing off my brush, I take a bit of the fern green and because there's quite a bit of yellow in this green, I get a nice orange. And I want these blended colors. I've taken a little beige, a little white. And I'm makes those colors that I've previously put on the page together with each other. There we are, the blend. Now I've decided I need some yellow, so I'm going to add this one on to my palette. Without rinsing my brush. I've added yellow onto my brush and I'm just blending it in with the color that's already there just to create a little more variation and a little bit of excitement. Now with a little up the beige and a little of the white, I just continue working at all over the page. For me, the goal is a quick application. I have not sped up this video. This is actual time of me working so you can see how quickly I move along. And the reason I like to do this isn't makes it more spontaneous. I don't have time or don't give myself that time to be nitpicky and think about where should I put this and what's coming next? I just want to get the page covered with paint. When it's your turn and you're sitting there in your sketchbook painting the blended page. Try out all the possible different color combinations. This is so much fun in such a great way to experiment with color. You'll discover your favorite palettes quite quickly. And I bet you'll be just like me and we'll be able to stop at just one page. You'll make this over and over again because it's so much fun to just paint so freely. Little more white. I love using white. Now it's time to go in with a little bit of the fern green and I put it in the lower corner and then the upper corner, just for a little bit of cohesiveness. Switching my brush now. And the reason I switched just because the brush was so filled with color that I lose that dry brush feeling that I, I like so much. Continuing to work fast. Now I'm starting to think it might be time to add a little bit of an accent color. So I've grabbed the blue and I'm still blending this in. I've not rinsed out my brush. This spot here. My first inclination is to blend it, but I think I'm going to leave it. I'm holding the brush a little bit sideways to get more lineal marks and just continue getting some variation on the page. There. You can see this is my, my scribble motion that I've done with the pen now I do it with the paintbrush. I hope you'll give the blended page technique a try. It's really so much fun. And what I have discovered is often times when my page is wet and the tape is still on, I think. Well, what a mess. Then I let it dry. I take the tape off and it's almost like I'm looking at a completely different painting than it was when it was wet. Every time. It's a new adventure and it's so much fun. It might take you a little while to figure out the blend. Byte is your friend working the colors together and within each other. Try and vary your brush stroke. Add some line with your brush, add some scribbles with your brush. Experiment. Play. What you see me doing here is adding texture into my wet paint with the end of my paint brush. I love to do this. I can tell I'm winding down now. I'm adding just a few more accent colors, few more scribble shapes. You can see the way that my hand is working. I think it's time to let this dry. Okay, here we are at. The painting is dry and I've decided to take my signal metallic gold pen and mimic the square shapes that I scratched into the wet paint. And I think I don't need to add too much market-making. There's a lot of mark making that happened with the brush as I went along with this woody pen, a pencil, I can add some interests in a similar tone that I already have in the painting. So this is the blended page. I love painting this way. Every time I do it, it comes out different. I hope that you will give this a try and implement some of the exercises that we've done in the first two prompts at some line, at some shape. Happy blending. Let's meet in the next lesson and we will meet with British.
9. Anything But A Brush: Welcome to our next lesson. Now, much like in our first prompt line, I will be adding a background to my page by using the color page. I also have here this same color palette that I used for the blended page. I have extra paint leftover and I don't want to waste it, so I'm going to use it up here with anything but a brush. So what tools should I use when I'm using anything but a brush? If I want to quickly cover my page, then I can always use this catalyst wedge. The nice part about using this tool is you don't lose any paint inside of the brush. You see any extra paint I have stays on the wedge and I can use it and spread it around wherever I need to. Not to mention this Gibbs, an interesting texture to the page. Okay, I have quite a bit of paint left over and so I'm just going to rub it on to the neighboring page. So I'm thinking in this page, I would like to just do a strip color. So I have an old gift card. You can see I've used it quite a bit. And all I'm doing is dipping the edge of the card into my paint that you saw on my palette. And just dragging it very lightly down my page and across my page. Just to get the paint off of the card. But make an interesting mark as I'm going along. But I think you can follow along with me. I'm just continuing to add the paint to my page, upwards and downwards strokes. I started out thinking I would add just a small stripe of color. But once you start doing this, it's kinda hard to stop. So I'm really just enjoying this whole process. And I hope you can really get an idea of the texture that it creates on the page when you work like this. My intention in the beginning was just to wipe my card off this page on the right instead of using a rag or a paper towel. But I'm kind of liking what's happening over on the right page, completely unplanned as you see, I didn't tape down the edges as I normally do. But I think I'm going to just go with it. Going to let the page here on the left dry a little and start experimenting here on the right, adding some different colors in a more unorganized way. Then I was working on the left side. This is to me what a sketch book is all about. It's completely about experimenting and just seeing what happens. So here I have my palette knife and a little. Black paint. And now you see I've turned my page around to the left, which for me is the most comfortable sides. So that means I'm now committed to working on this page that I didn't expect to be working on, but it's just calling my name and asking me to to work on it. So I'm going for it. Okay, time to get back to the original page. Going to continue working with the palette knife now because it makes a different mark than the cart makes, and it's nice to get some variation in the page. I hope you've enjoyed this lesson as much as I have. Please get out all your tools and have fun creating in your sketch book. Please be sure to post your progress in the project and resources section. I'd love to see what you create. Join me in the next lesson and we won't work. Texture. See you there.
10. Collage Part 1: Welcome to our next lesson and our next prompt collage. This lesson will be broken down into two sections. In the first section we will create our collage papers, and in the second section we will adhere them into our sketch book. So Let's get started. What I have here is simply a sheet of tissue paper and to acrylic markers. You've already seen this Montana marker from our line lesson. And I'm basically following exactly what I did in that lesson. I'm just creating lines on the tissue paper. Any which way? Making fun little marks and lines across my paper. No rhyme or reason, just whatever I feel like. Little Xs. Like think it's time now to switch to the latex marker, which has a smaller, finer tip. It also is a little bit of a lighter black. So I get a nice contrast of the two different colors. Still both black, only one more intense, the Montana marker, the liquid techs marker, just a little more gray black because it's smaller, I can make finer marks. And all I'm trying to do is just to fill in the spaces on my paper. Now, here I have a small assortment of Posca paint pens. If you aren't familiar with them, these markers are real paint that dries permanent and there are really great to use this tissue paper. Okay, I think that's it for the mark-making. Now, it's time for the most fun part, which is tearing this paper apart. You might have noticed that I have a few solid pieces of paper here and a pure interested in learning how to create these types of collage paper, then I really recommend that you watch the class by Jennifer daily here on Skillshare. Because a great method for creating these painted papers. I'm going to continue tearing apart my tissue paper. And then we are going to meet in the second part of this prompt to add here our collage papers to our sketch. I hope you'll join me there. See you soon.
11. Collage Part 2: Welcome to part 2 of collage. I have a bit of matte medium here in a container as well as a small assortment of my collage papers. I'm working vertically this time, instead of horizontally, I will simply take paintbrush and start a hearing my papers to the page. Before I sat down. I thought I might want to work vertically just for a change. While typically, I don't have much of a plan when I sit down to work in my sketchbook this time in particular, I decided ahead of time then I wanted to work in a little bit more of a square format because a lot of my papers have circles and rounded shapes in them. I thought it might be fun to create the layout a little more square. So let's see how, how I do with that. Or if maybe I deviate from my plan as I go along. So to adhere the papers, the collage papers to my page, I first need to apply the matte medium. And then the paper, and then the matte medium again over the top. Now, if you don't have matte medium, you can use mod podge. I didn't pre-select my papers. I'm just taking them out of my container, appear and adding them onto the page. As I said, the only thing that I thought about from the advance was trying to work vertically and trying to come up with sort of a more square layout. Other than that, I'm just free styling it. So to say. Now with the same brush that I've been using all along, I've just add a little bit of paint in a few spots. I use the back end of the brush to create a little bit of texture in the paint. And I like the look so much that I decided to. So duplicate data at the top painting stripes. So I thought I was done. But I decide I want to go in and add a little more extra detail. It's one day later and everything is really dry. So I have my, my carbon pen in my hand. And I'm just going to add some line work. Because if you haven't noticed yet, I really loved making lines with this pen. Now here I'm contemplating continuing that square theme by adding some almost like a border with the with the China marker. And as soon as I'm done. I don't like it was too late. I already did it. So I just have to work with it. And what can I do to improve it or change it, or make myself like in a little more. And these kind of things happen when worth experimenting when we are creating and trying things. Sometimes we like it, sometimes we don't. And so I'm looking for little spots here where I can just make some more marks. I looked at this, at these collage papers and I had this blue posca pen. I had made marks on the collage papers, if you remember, with the blue posca pen. So I decided to grab the pen and continue these polka dots that were in the collage paper to drag it out a little towards the edge to make this frame look less like it's just hanging there anymore. Like it's meant to be there. Do you see what I did there? I put my hand right into the wet paint. Quite honestly, the smudge doesn't bother me because it almost looks like it's supposed to be there. It reminds me of the marks from the Montana marker, so I don't mind it. Now I took this same yellow paint that I had in there before that I used when the collage was wet. And now I feel like I'm pulling it all together. The frame feels less like it's just floating there and now it feels a little more cohesive plan I can tell I'm still not done. I need to add a little something more. So the golden silver paint, it is circles, I have squares, I have lines, I have everything we've done so far. Be sure to join me in our next lesson. This is our final prompt here, almost to the end. And in the next lesson we'll be working on texture. See you there.
12. Texture: Welcome to the next lesson and our next texture. I love adding texture to my paintings. Today you're going to see me use this transparent watercolor ground because it won't make my sketchbook heavy like some of the traditional texture pace meant for acrylic paint. It has low older and as you see it has the consistency of yogurt. It goes home so smooth and dry, smooth. If you're a mixed media artist, meaning you like to use watercolor as well as acrylic together on one page, then you will love using this ground. When you apply texture to your sketchbook, please pay attention that you don't get it onto your tape. Otherwise you'll have a hard time removing your tape. So I don't want to cover my entire page with the texture. I just want to add a little bit of something underneath my paint to give it a little excitement. So I'll add a little more and just try and thicken it up in a few spots. So now you see I have an empty pink pot. I just would like something round so I can make a circular mark into the texture paste. So later when the paint goes on top, I have a little more interesting structure on the page. Next, I'm going to use this scraper here. This you can purchase in the hardware store. I found mine near where the supplies are for hearing tile. It's a great tool, a great inexpensive tool for Making texture. You can use it over texture paste like this, or directly over your paint. All I wanted to do is create just a little more interest and some grooves that the paint can sit in. That's it. I'm going to let this dry overnight and me to hear tomorrow and we will add some paint. Here we are. It's the next morning. Everything is dry. I think you can see all the great texture that I have on this page. I made a swatch sheet for you to show you the colors that I used. I used the primary colors, they use PowerShell bread. I use indigo, blue, hansa yellow, and mixed each one of those with an bleached titanium you will see me use on bleached titanium pure. I used raw sienna mixed with bleached titanium and my favorite brown Van Dyke brown mixed with unbelief titanium and I added a little bit up the red to it. You will also see me use gesso. Now in this lesson, not only to where I want you to experiment using texture, I would also like you to explore intuitive painting. As you add paint in your sketch book over the texture. I want you to feel free and I want to play. I want you to have fun and don't judge the process. There are no rules here. At this point in the painting. All I'm thinking about is covering the page with paint. I'm not thinking about any composition. I'm not thinking about the rules of thirds. I'm not thinking about anything. I'm just adding paint onto the page. I'm exploring how the paint sits in the texture and the texture. I'm blending as I go. Adding a shape here and there. Like we've done in our previous lessons. Seeing how the paint mixes and trying to decide do I lie. Do I not like that? Do I want to continue with that part too? I want to change it. This is what is so glorious about painting with acrylic paint. You can add layers and layers of paint until you get to the point that you feel you are done. I'm in the middle of the process, but I think I'd like to add some lines. So I pull out my posca pen and add some line. I like to make EMS. I like to make shapes that feel comfortable to my hand. Now at this point, I could have stopped the painting, could have taken off the tape and called it done. Could have turned off the camera. But just didn't feel done to me. I felt like I needed to add more color to the page. This is what's really great about working in your sketchbook. If you only have time one day to add the texture, then go and add the texture. The next day you can come back and add the paint. And if you only have time to add a base layer of paint or you only have time to add a few shapes of paint on your page. Then do that and come back to it another time. Your sketchbook will always be waiting for you to add paint in. Continuing adding color layer by layer. Seeing what the page is calling for me to do. Now you might be wondering why I'm adding so many layers of paint. But what you can't really see on the camera is that each layer just adds another bit of interest to the page. You're able to see a little bit of each layer through the layer that goes on top of it. Squares so the shape that feel the most comfortable to me. So you see I've added them. Now I go ahead here in this spot and I'm at some polka dot tea towel. Chances are I will cover these up with paint. But they'll most likely peek through and you'll see a little bit up them. I'm loving all the texture. Take my favorite pen. The end of it is just as good as using the end of a paintbrush to scratch into, add more texture. On top of the texture that's there. I've switched to a smaller brush. Now. I'm just adding a few more details than the shapes, squares. Now I've taken my fine brush and indigo blue mixed with bleached titanium. Just to add a little accent color. I'm adding the paint and blending it together. On the page. You've done this already in the blended page prompt. So you know exactly what I'm doing and how I'm landing at. See how nice sleeping yellow blends in with the red at the top. Now I add a big contrast color with the brown. Landed him a little more squares. Okay, I'll let this dry. Now I have my white just so and I just add a few little boxes of color here. I can still see the paint behind it. But just to add on little bit of interest, I have my gold unit ball pen. And what I'm doing here is tracing over the circles that were made in the texture layer. And for just a little fun, I had a few circles here on the other side of the page. So here you see I've combined everything that we've learned so far. I've added shapes, I've added line. I've used the blending technique. I've used a texture that is light in my sketchbook. I hope you'll give this a try. This transparent watercolor ground, It's great in a sketchbook. Let's take off the tape and see what we have. I really hope you've enjoyed our last prompt texture and that you're feeling inspired to start a daily art practice. Please be sure to share your progress with us and I'll see you in the next lesson.
13. Thank You! : Thank you so much for spending time painting with me. I hope painting brought you joy and you felt mindful while working on your daily art practice. I know I sure did. I hope you'll feel comfortable sharing your progress and that you post pictures in the project section of this class, we would all love to follow your creative journey. If you'd like to be notified when I release a new class here on Skillshare, be sure to follow me. You'd like to keep up with me and see what I'm doing on a regular basis that be sure to follow me on Instagram. Thank you again and happy creating.
 Michelle Grams, Creative Explorer and Abstract Artist