Transcripts
1. Intro to Abstract Watercolor Painting 3- Making Marks: Hi, it's crispy here in the studio and I'm so glad you decided to stop by. I've been working away on more abstract watercolor painting projects for you. And in this class, we'll be focusing on making marks. Will talk about your project. Go over tools and materials I'll be using, do some practice marks to warm up, then dive into three distinctly different painting projects. So you can begin to see really using marks Can your work. This class is ideal for beginners to intermediate and even experienced artists who want to get a new take on things. I hope that you'll work alongside me as I do all three project examples. You can do the projects as I have painted them, or you can infuse your favorite colours, paint brushes, and shapes to make them your own. Either way, after this class, you'll have a much better understanding of how making marks can bring character and interest to your work. You can use your paintings for greeting card designs, uploaded POD sites, for social posts, or just to have a bit of fun. If you have kids, bring them along for the ride as well. They are so fearless and make the most intuitive art. I have found a deep personal connection with abstract watercolor painting that helps me manage my stress. And I hope that you'll fall in love with it too. So get out your art supplies, turned on the videos and let's do this. Abstract watercolor painting making marks. See you in the next video to get started.
2. My Project: Learning by doing is so effective. That's why I encourage you to create a project, whether you share it or not. In this class, your project will be simple. Create a project using watercolors and add marks to them, either with watercolors or another tool. There are lots of ways to do this. We'll just see in the class videos, but you can even add your own spin. You can do one or several projects. The more practice, the better. You're not required to share your project. But I hope that you do. I grew so much more in my skill level when I started sharing and getting feedback from my fellow artists. You might even be better than you think you are. It's a bit scary at first, but when you get comfortable with it, it's much easier to call yourself an artist. You can upload your work by going to the projects and resources tab under the class videos and clicking the green create project button. You can make your project public or private by clicking the box at the top. From there you can upload a cover image by clicking the Upload Image button. Then select an image from your browser. Below that is a slider that can make your image larger or smaller. Just slide it back and forth until you're happy with the way your image looks. And click Submit. Then you a title for your project. It can be something descriptive or clever. Below. In the larger field, you can start writing about your project. You can write about your experiences, your process, how you enjoyed the class, et cetera. At the very bottom you'll see buttons to add additional images. You can add as many as you like. A video button to add a link to a video, for example, on YouTube or Vimeo. Just paste your link into the field just above the button. The other button will allow you to post a link to another webpage like your social media accounts, for example. When you're all finished, don't forget to click the green Publish button, which will complete your upload. And that's it. Congrats. Now you've shared your work with the class and can begin to get feedback. I've made lots of skill share friends and connections this way. So there are lots of benefits to sharing. You may even inspire someone else you didn't expect to from your project, making them a better artist in the process. Either way, I cannot wait to see what you create.
3. Tools & Materials: So I'd like to go over what I'm using in this class regarding supplies. I have a detail round brush, a number six round brush, a little bit larger flat brush, and then a much larger flat brush just to cover different types of strokes, which will be going over in the class. My watercolor set is a Windsor and Newton cotton in 12 piece tube set, which works great for me. I can leave the paint thick. I can leave the paint thin if I want to thin it out either way, uh, but I love the colors, but you can use a pan set or anything you like. And then for making marks, I am using a micron pen number eight size, a fine point Sharpie, and some Artesia brush pens that are water-based. Paper is Canson watercolor, OK, morale and this little Strathmore Sketchpad, which I'll explain in a minute. The Canson papers, a 140 pound cold press. That means it's going to hold a lot of water and you can see kinda the bumps in the paper that are meant to absorb and hold that water and it's perforated so I can tear these often frame them. Whether the scratch paper, on the other hand, is that it's flat paper. It doesn't absorb anything. It's literally my messy paper that helps me not stress out about ruining my painting. So it's kind of a practice run. I also have this acrylic paper that are used from time to time. Just to show you you don't have to use watercolor paper. It just needs to be heavy. And this one's like a cardboard, a textured cardboard style paper that can hold acrylic paint so it could def, you know, can definitely hold water. And water colors will work on it. As this, as long as it's textured and it's it's made for paints. I also have a cover, my recycling bin or a ceramic cup to hold water to rinse out my brushes and some paper towels to clean up messes and also to clean my brushes. So I'll see you in the next video to set up our workspace.
4. Setting Up Your Workspace: I just wanted to show you quickly how I set up my workspace. It's super simple. I keep my brushes off to the side so I can grab a different brush easily. Keep extra paper towels, a handy, and I keep on my hand too for quick masses. On the right I have my water cup up above so I can switch easily and my paints on the right since I'm right-handed. But if you're left-handed, you can move them on to the, over to the other side. Of course, my paper or canvas in the center. And I keep paper tells underneath so I'm not freaked out about ruining my table surface. I'd love to see how you set up your workspace if it's different and how it works for you. And I'd love to see that in the comments or in the Facebook group. See you in the next video.
5. Practice Marks: I want to start off our practice marks with a number eight micron pen. That's going what I'm going to be using throughout this class. And I'm just going to start off with some basic lines. So marks can be as simple or as complicated as you like. But I'm just gonna do a series of different style of lines here so you can see how you can work them. And There's a criss cross pattern. I mean, rat marks are pretty random and they are about as random as your own signature. I mean, they will really, this is another thing that will help you find your own unique style is what kind of marks come out of your practice page. So I would encourage you to pull out a sheet of paper and do this along with me. If you'd like to do some different types of marks, I totally encourage that you could do the same as me as well. And then do a whole nother page of different ones or one or the other, either way. But I really think, you know, getting a sheet of practice marks down will really help you coming projects. And you'll see that as we go along. It's not just painting some little tiny circles. Some, the first batch was random in this batch is kind of in rows. Dots are always great marks to put down. Kind of mimic grains of sand sometimes. Here's some shapes like try and concentric triangles. Here's triangles sort of going in a pattern like you might have in a pattern design. I mean, it's, so all over the place. It's crazy. Here are some very odd triangle shapes kind of fitting in together. Yeah, what else can I do? Let's see. How about arrow shapes. I'm just randomly thinking at pulling stuff out of my head. Oh, here's combinations, combination of lines and circles so they can start sort of combined. So here's squiggles with a circle like a sun with a kind of solar rays extending out of it. Stars, I mean, it's, like I said, it's so, so random. So I just want you to get your sheet out and do a bunch of these. Fill a whole page, filled two pages if you can. But one page will give you a good amount to work with. Two pages will be even better and you'll practice your mark making. So this is a scroll shave. Here's a squiggle squiggle stack. I'm going to call it that. Here's a bigger squiggle. Oh, here's like a, a data sheet, kind of a graph sheet, sort of almost like heart monitor kinda style line edge. Now I want to show you another set of of marks now with my small paintbrushes is my detail brush. And I'm gonna do exactly what I did on the top row. So you can see how different these look and how similar they look as well. But the brush strokes will be very uneven. There'll be very painterly. There'll be thick and thin. They'll be kind of all over the place. It adds a whole nother effect that will bring character to your art. So you can combine micron and paintbrush. You can combine Mark, ron, and Sharpie, which we'll be doing in a little bit. This is my number six brush. So my my well-loved most used brushes you can tell from the and I'm just going to speed this up a little bit more and mimic the following line. Now with a Sharpie. And I don't want to bore you to tears, but this, I want you to see all these different tools and how different they look with the same exact marks. This next tool, I, our brush pens with water soluble ink. So they act like watercolor brushes, but they have color already inside of them. So this is cool because the lighter that touch on this one, the thinner the lines, and then the thick, the harder you press, the thicker the lines. You can see how so you can kind of do a lot of really cool stuff with this. And the, another cool thing about this is because it's water-soluble. I could make wine edge like this and then take a paintbrush and wet part of it. So you can make some really interesting lines with a tool like this. Next, I want to do my flat brush. And very quickly show you how, just how different that looks and how interesting the lines can be with all these different shaped tools and all these different intense color intense tools. And I'll see you in the next video.
6. Simple Marks: In this lesson, I want to show you how practice marks can become an art form all of their own. For this one, I'm going to pick just one color and blue is one of my favorites for this, for some reason. Blue. And it doesn't really matter, this is just my own personal preference. Black even block is great, but I'm picking a color blue. This one happens to be some alien. And I'm going to load up my, my favorite brush and just pick a mark to. Okay. This is one of the first marks I made on the Practice page. And I'm just going to stack some lines back and forth and alternating directions to create sort of a pattern. And I'm just going to go all the way across the page with this. And I'm being careful but not too careful. Just wanna load just a little bit more pain in this little spot here. And on the next row I think I'll start something different. Ok. And I'm just going to keep going in a row like I did in the first one, but going in the opposite directions. And as I'm making these marks, I'm also trying to put a new spin on them. A cat kinda, I can't help myself at this point. I keep wanting to add creativity to these marks there, the same marks when I'm adding new spins and you patterns to them. So we'll break it up, break up the circular with some with some triangle arrow shapes. And that's a shape we don't see on the top either. So it's a nice, a nice compliment. And kind of enjoying these rows of things. I think it's fun. Very basic and yet it works. See here. Okay, great. So again, I am taking my little circles and I'm gonna do every other one filled in. So that changes it up again. This is not something you have to do, but if you'd like to do, it's a fun exercise. It's a fun challenge to yourself to see what you can add or change about these marks and just keep adding creativity to them. That's the really the whole point of marks is bringing your unique style out through them. And let's see what I'm gonna do next. I'm, I'm enjoying this sort of linear than circular than linear than circular sort of thing going on and adds a nice ballads. Oh, so there's another twist. This always makes me think of water. And it looks very prehistoric to me. Especially in the blue color really looks like water. Just adding a little more paint. And while your pain is wet, it's an excellent time to drop more paint in if you feel like it needs it. It'll just blend right in with the rest of it. And I might add just a little bit of detail at the bottom. And I've gotta, gotta get more pain my palette. But in the meantime, I will see you in the next video for the next project. See you there.
7. Minimal Marks 1: So I'm going to start this next project that I'm calling the minimalist project is going to be a minimal list. Abstract painting, as you might have guessed. And I wanted to keep it some really neutral tones. So I'm gonna start with a very light brown, kind of a tan color. With this larger brush, I wanted to make some shapes and I don't even know if I know what shape I'm making here. Just I don't really want it round and I don't really want it square. But suppose something in the middle of that. And I want to make another shape similar to that down here, but of course not exact. Wanna keep it fairly light because this is going to be our background. Obviously got a little more paint on there than I expected. But that's okay. Pbl just spread that out a little bit more and you get a bigger. And then I'll transfer some of that Pete to this other shape. Yeah, maybe they'll connect. Kinda adding little character to this one. You can see I've gone a little bit closer to the left side of the page to the right. So I want to I spread that right, went out just a little bit out further. And this is a good time to stand back and look at how your your background, whatever shape you decide to use, how it's framed and how it's how it's looking on the page. And I'm going to adapt my brush. When you dab your brush, you kinda release the paint. I just want to add a little darker where they meet to kind of show a connection there. And I'm just going to clean out my brush. And I will see you in the next video to continue.
8. Minimal Marks 2: So in keeping with moving on with this minimal project, I have chosen this flat brush to add marks with. So I'd like to load it up and I'm gonna keep, like I said, I'm keeping this one neutral. I want to do black on top of this brown or at least a deep gray. I don't want to I don't want this to dark. So I'm just adding taste of water. It's not bad. I don't care that this isn't a perfect circle. That's not what this is about. I just want a shape that looks like a circle. And honestly, the more imperfect it is, the color it looks. So that's fine by me. I'm happy with those pv1 more little one right here. So my adding three different sized circles at different parts of this page, I've got the large one at the top and then two small ones at the bottom. I'm adding some balance. So I kind of went in a, an angle. You can see the two larger circles are kind of going in an opposite angle as the background shapes. So it kinda keeps your eye moving around the canvas. And I'm going to start adding some texture and more paint to these, to these circles. I'm sort of just discovering my way through it. And again, you're more than welcome to grab your watercolor paper and your supplies and follow along with me on this project. Or you can do when very similar and your own colors with your own shapes. There's so much you can do with this project all by, it's just all on its own. You can do so many shapes, so many colors, so many background shapes and so forth, you can completely cover the background with paint. I just wanted this to be very flowy and keep the eye moving. So I didn't want to do it in a full background. I wanted to see what I could do too. Bring some contrast. And the white behind there is kinda fun. So the thicker I make these circles and more like him, but I think I'll I'll stop right there. And with my Micron and number eight micron, I'm going to start adding some marks. And this, my little practice pad that we talked about is the perfect little tool for me to practice on what kind of marks I want to add with this micron that's going to complement what I have on the paper already. So I'm playing around. I don't love the hash marks. I don't love the circular stuff. I think I have enough circular stuff. So I do like this crazy random rectangle thing. I made the center though, kind of like that a lot in fact. And I like this stuff I'm doing in the middle. I think I'll ditch the circular and the hashtag and go with all those crazy squiggles that go all over the page. So with my little pad next to me, obviously it's not going to come out exact what I'm gonna do, a version of it, keeping my eye, looking at my pad, so it gives me a guide. I'm going to mimic something very similar to it. Yeah, I think I like the way that's looking. Because these lines are a thin black. They're not going to take over the painting. But this movement with the micron really keeps the eye twirling around the page and it's creating a lot of interests as long as I keep those scribbles kind of random, it gives the ice and look at all over the place. Had a little bit of interest over there. You can see I can fill into just by adding some extra squiggles. Just because it's not one continuous line doesn't doesn't make it look any worse. Oh, I didn't know I was gonna do that, but that looks really cool. I don't mind that at all. I didn't think I was gonna do circular. But it really brings out the black underneath, kind of an accent all around it. And I am really happy with the way that turned out. The minimalist project is now complete and I'll see you in the next video.
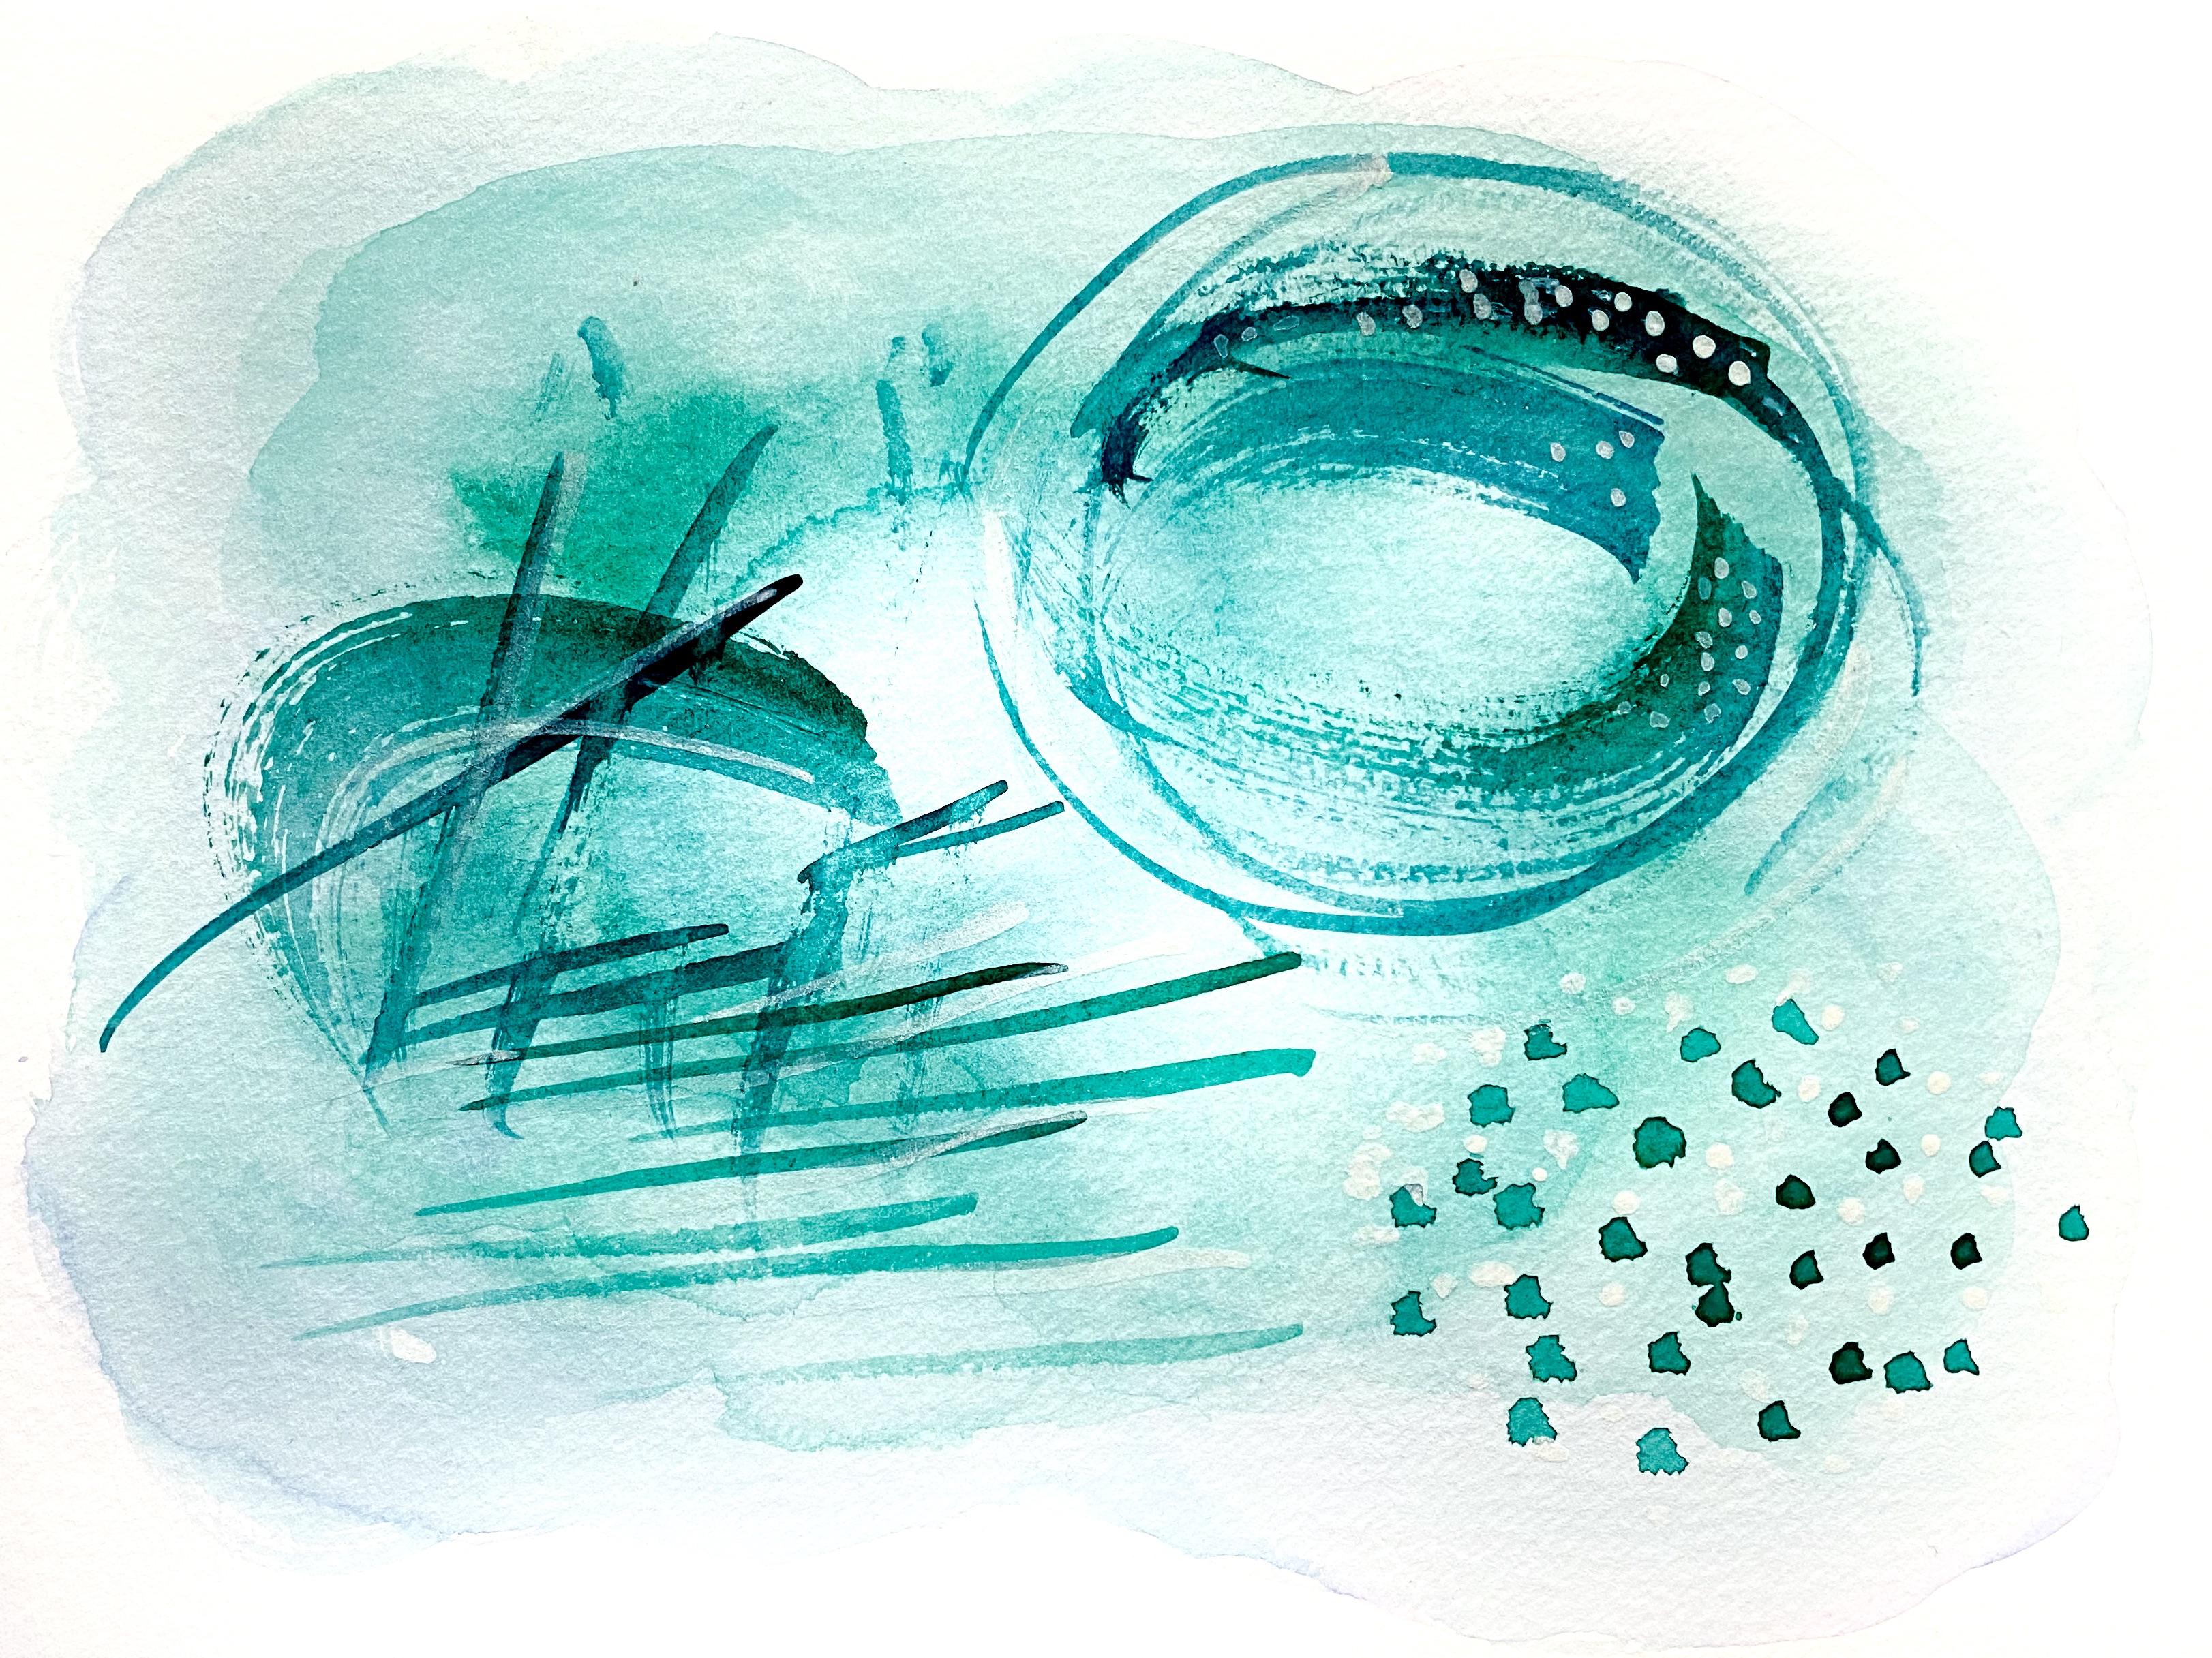
9. Marks Bonus Video: So it wasn't intended to share this one, but this is a project I did from a background I created in abstract watercolor, painting backgrounds, the first class in the series. So if you watch that class, you'll recognize this painting. And I wanted to add some marks to it to spice it up. And I've decided I want to keep it pretty monochromatic. So I've got my little sketch pad next to me. And it's going to be an example of using this sketch pad with paints this time. So I'm gonna just dip my paintbrush in and just pick a color. So I'm going to go with a green and just start making marks on the page. And this is the practice, Paige, I mean, that's what it's for is to make marks that can start over if I don't like it. And I liked that movement, but that's way too light of a movement. I mean, I'm sorry, way too light of a color. So I'm going with a much, much darker teal. And that's way better. I think that'll look really nice on this background. Hum, dots and lines kind of like that. Now I'm going to show you the finished painting and you can see how similar the painting came out to the practice run. It's not exact, but you can see that it really helped me be confident and lay down my marks on my on my finished background that I didn't want to mess up. So I hope that helps you. In the end, I decided to add some very saturated white marks to this painting just to add a little bit more flavor to it. So I added them some dots to the darkest parts of the painting. And then I went through and I added some white throughout, which is going to look more gray since I didn't saturate it as much. But it was just enough to have the I again trailing around the painting and being interesting. So I hope that this was an additional project example for you to add marks to your own paintings. And here's what it looked like in the end on bass, a close-up. So you can see all the marks that I've added here with the white paint in addition to the green and T L. I will see you in the next video to start the next project.
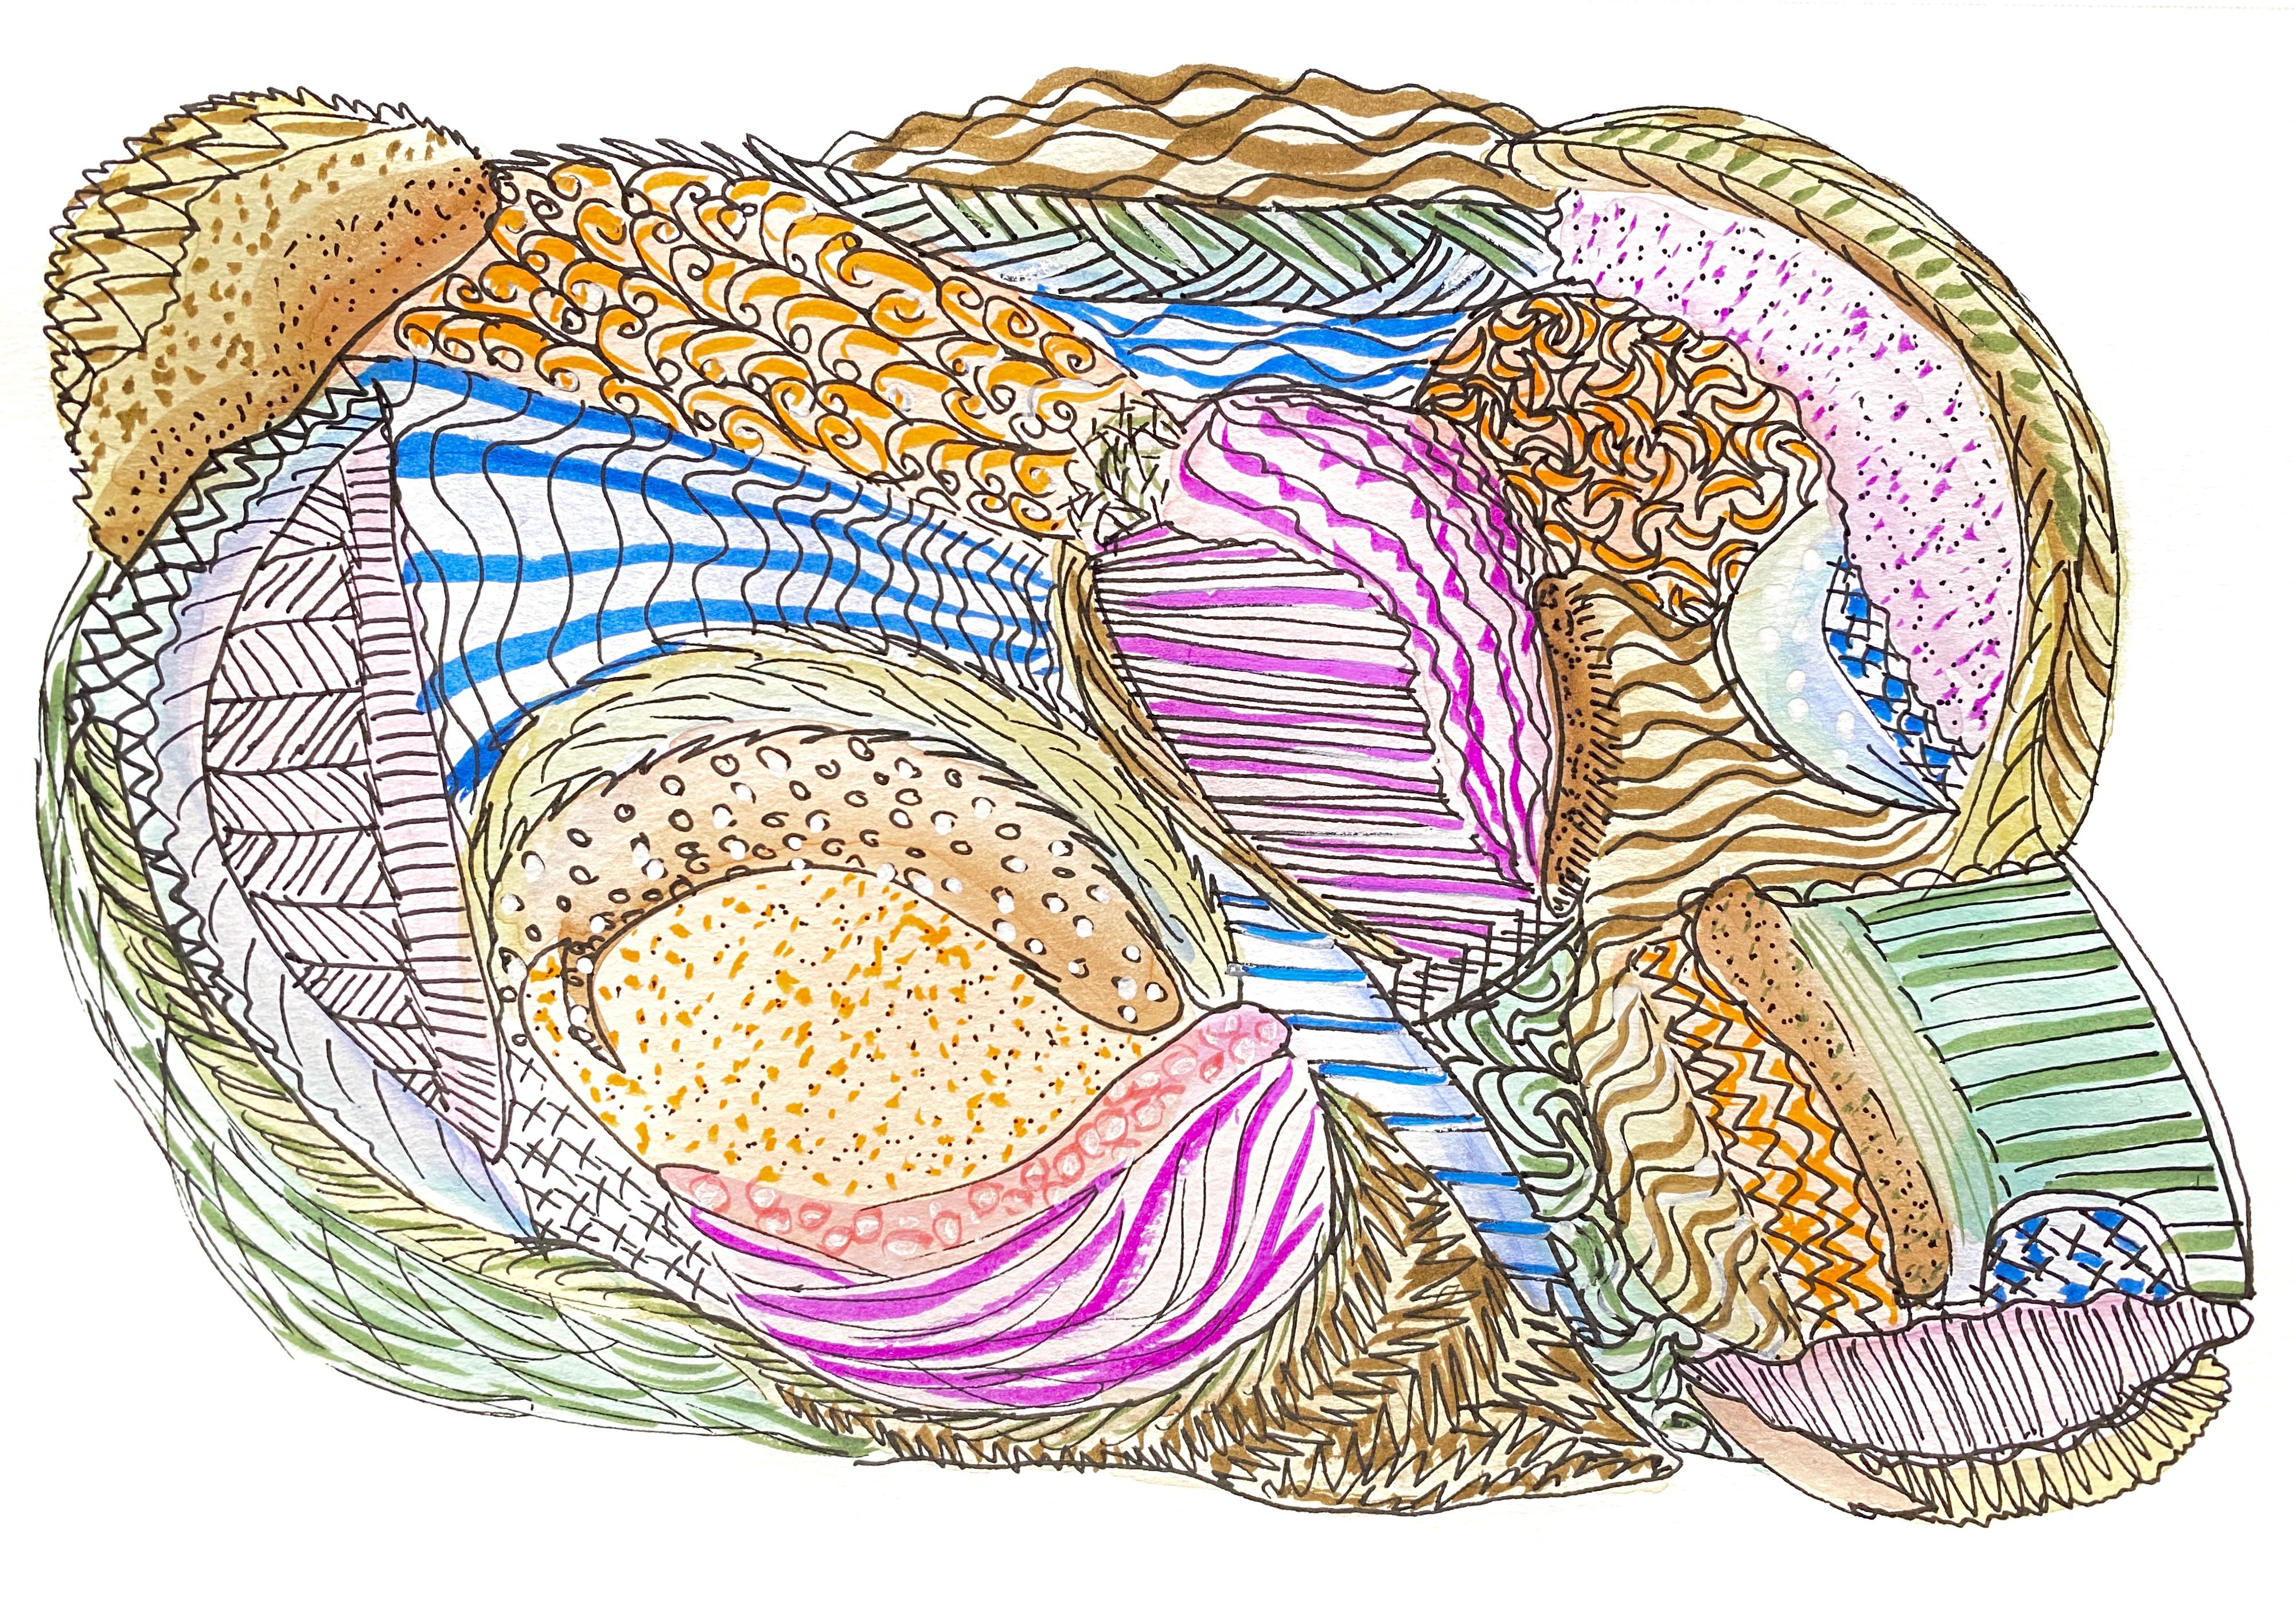
10. Random Marks 1: So this is another project, that, one that I call the random marks Project. And the background on this one is going to be more intricate and this is going to be by far the longest project in this class. So buckle up and let's see what we can do if you would like to follow along with me, I'm going to be painting some random shapes and I'm going to start with this peachy orange color. And I am not making any plan here. I'm just throwing paint on the page. And this is a project that I did. I used to break any creative block that I might have. So I'm just throwing and just sort of creating a balanced composition on the page already. I'm going to start adding color all around these shapes. So I might go with a pink, but now I think what I'll do is go with the purple and add allude to this red to create more of a lavender color. That's great. And I don't mind dipping into the next color. But for the most part I'm going to be dancing around each color with a different one. And I'm going to try to keep all of these colors evenly spaced around the page to create some visual balance. So some Lavett around the top, some lavender on the side left or on the bottom a little just not perfectly placed, but enough that it definitely balances out the composition. Again, that's not something you have to do. I mean, you could equally split a page with different colors or I don't know. It's just so random and this is something I don't want you to think too much about. I don't want you to overthink this project at all. It's just a random Creativity project. So now we're going to start filling in this negative space with some blue. And I'm kind of digging this pastel vibe. It's not something I normally normally do with all these different colors, but I'm enjoying it. So against and blue at the bottom, some blue at the top. Some glue on the side to balance out the colors. Maybe a little at the bottom and fun. And then with some yellow ochre. And I'm going to add some yellow to this project. And it's a nice compliment. Oops, looks like you've got some unmixed paint in there that created a line. And I might leave like that. We'll see, we'll see how I feel about it later on when it's drying. That's kinda cool. And I'm going to just going to mix a little bit more of this brown. This is like a raw Sienna with the yellow ochre, but I think I want to create more of an olive color. So I'm going to add a little bit of green to that. And that makes it look a little more gold, which is interesting. So it adds a new yellow into this composition. You can see I've sped up this video because honestly a project like this can take me up to two hours. I just get lost in it is so much fun. This is only the first stage of it, but you'll see it's a super interesting and involved project. See where else I wanna put that. So now I'm just kinda creating strokes since my pages getting really filled up. That will give me something to play with a little later, which you will be seeing. So in keeping with this pastel vibe, I'm adding some white to green, enlightening that up. White mix colors look very creamy too, which is indicative of pastels, tend to look creamy. And just balancing my green here and they're all over the, all over the page. Yeah, this is looking all empty down here. I'm almost done. I'm going to let this dry. And then I will see you in the next video to get to the next step.
11. Random Marks 2: So now that this project is all dry, I'm gonna take my number eight micron and number eight is nice and thick for a micron. So the lines will really show up nicely. And I'm going to start outlining my shapes with it. So I'm kind of drawing outline around the color that I've just painted here, this pastel green. And I'm adding some lines to it. Now at this stage, I don't add a lot of marks. I just do a lot of outlining, but hearing there, I might I might do some here and there. Just to get a feel for different sections of this project, which will be it'll look different at every point. So what I'd like to do is start getting a feel for what kind of marks I want to put where. And we'll kind of lines I want to use to separate, like these are kind of squiggly lines, but they're separating that purple from the yellow on the side. And then I think about where I want to go next and just throw a mark on the page. Now this sweeping stroke looks great with these feathery looking CORS. Yeah, that's working. I think I'll leave it unconnected. Maybe. See what happens. So this is very, very intuitive and that's what makes it so relaxing. I have absolutely no pressure here. I am just taking one shape at a time, thinking about it and then diving in. Just enough to collect my thought, my thought process enough to come up with a mark. And I try to keep the marks different. How can I put this? I can use the same marks within the same project, but they might be somewhere else on the page so they don't look like all the same marks on the same section of the project. And there's nothing wrong with having the same kind of marks on the same section of the project. I just liked the variety of heavy Every mark look different. I think it's really interesting to the eye that way. Again, as I said, I'm not saying this a lot. It gives you I something to look at. It. It's just trying to, the eye's going to try to figure out what is going on with this project. And there's going to be so much going on by the time we're done that I will want to travel around and around for a long time. And that's one key I've found to getting my projects noticed. So I just want to make sure I pass that on to you guys. And let's see. Another squiggly line, maybe a little larger squiggle and a sweeping. And I try to see shapes in these two. Just make some project more fun. Like the yellow and green I just did looks like a leaf shape, almost. See and make some really small squiggles on this side. Really jaggedy ones. No, I didn't even know is going to make two different sections out of that, but I like it. So you'll see I'm mostly outlining, but here in there I'm going to just add a marker to to get a feel for the project. Multiples like a caterpillar. And I am just working my way across and down. This project. Here's some crazy random hash marks, but not really more like confetti, confetti being thrown. And I'm going to speed this up for you because this is going to take me quite a while. And you'll see it every part, every section gets outlined in some way. You are welcome to slow down this video. If you'd like to see any particular area of this project in more detail. But the key is to just keep traveling from one section of the project to another and just keep filling in until you've got it all done. And again, refer to your practice sheet because it will help you a lot. It will help you think of new ideas that will help you think of new types of Marx, as well as the old ones. It might even want to turn on some soft music and chill. I hope you enjoyed this stage of the project and we'll see you in the next video to continue.
12. Random Marks 3: So to finish up the final portion of this project, I'm bringing in my art teaser, water brush pens. And they are a brush tip that looks like, kind of like a paintbrush and has water-soluble Incan it. I've done some practice marks of the colors I'd like to use for this project. And this will be accenting the painting that I've already done. And I've decided to stay with the same colors over the same colors. So that's a light lavender and I'm just covering it up with a little darker purple just to accent what's going on there. And this is, you know, you can add so many things to your projects. There's so many little creative, just accent type of things that you can do to bring your project to life. So I always look at my project and if it seems a little bit flat or dull, I think of something I can bring in like this. And these brush pens are nice because if I do light pressure, then the line is this thin and if I do harder pressure, the, the stroke is much thicker. So that's quite a lot you could do with this tool. And I got the 48 piece brush set, which is a bit much even for me. But it does give me a whole lot of options with color and so forth. Even the smaller set would be a fantastic, a fantastic addition to your supply closet. So I highly recommend these. They stay really nice and dark for a long period of time to sew. Alright, and switching over to my next color. And just very patiently, I'm just gonna go through each section of marks and just figure out how I want to accept them. I just want to do a little scrolling here and there. I'm not gonna do every single scroll in the whole section, but just enough to make it pop with some color. Again, this is super relaxing to so just turn on some music and get lost in the process. So I've sped this part up since you don't have to. I mean, you get the general ideas to want to torture you through the entire process because it's quite lengthy. Switching to my next color. I'm varying ways, stroke thicknesses from section to section as well. So I'm keeping these dots super light, but I kept the lines before a little thicker. So this also adds variation to the project. Adding some blue now. And you can see I'm going quite fast now, but it's all pretty much the same sort of stuff. And if you want to see some of these sections more slowly, you are welcome to slow down the camera speed under the videos. There's a an option to do that so that you can I see this more slowly. And we're just about done with this one. I hope you enjoyed this. This is one of my favorite projects with making marks. I can't wait to see what you do with it. And I'll see you in the next video.
13. Closing Thoughts: I just wanna take a moment to thank you so much for spending some time with me in the studio. Pat yourself on the back because you've got through the entire class. I really hope you enjoyed abstract watercolor painting. Focusing on Marx is a truly valuable skill to learn and use in your work, whether you're a beginner, intermediate artist, or experienced. I can't wait to see what you create. Gallery. Whether you're creating an opt-in for your email list, a promotion, a social media post, or something just for fun. I know you'll end up with a project that you'll be glad you created and that you want to do over and over again. I can't wait to see what you create. Honestly, my favorite kind of producing classes is senior work and the project gallery. And engaging with you in the comments. It absolutely makes my day. So now it's your turn. If you haven't already get out your art supplies, setup your workspace, practice marks down. Then the one of the projects I've shown in the videos, do all three. The more you practice, the better you'll get at the process. And remember, you got this abstract watercolor painting marks. I for now.
 Chris V, Artist, Designer, Maker