Transcripts
1. Welcome: [MUSIC] Hey, I'm Denise Love and I want to welcome
you to class, so let me show you
what we'll be doing. In this class, we're going to
have a ton of fun. I'm showing you several
different projects that you can sit down and get creative with anytime you're wanting to
come to your art room. This class is all
about art prompts. What I like about using
prompts in my art, is it helps me get outside
of my own comfort zone. It helps me use
different materials, different mark-making,
different substrates, it really makes me think
outside of what I normally do, to get out of a rut, to give myself new ideas, make myself just experiment
a whole lot more than I might normally do
if I come up here and I sit and I do the
same thing every day. We start off, I have come up with 30 or so different prompts, things like paint
using a palette knife, do some stitching, turn your page upside
down and keep working. Add some paint splatter. What the goal is, is to have yourself a
nice deck of cards, whether they be some like
this where I've written onto some blank business
cards or they be something like this
where we create our own art decks in class
and I give you tons of different options
and ways that I've thought of that I could
make an art deck in class and then share
those with you so that then you can be making some of your own depending
on which you like. This is one of my favorite, piece of art on the front, art prompt on the back, so every card is a
yummy piece of art. This was my personal favorite in all of the ideas
that I came up with for making up a set of prompt cards that are actually
made out of your art. This was easy because this is something I've been
using for a long time, writing them on business cards. But as I was doing art
prompts for this class, thinking what else could I have done besides just wrote these
on a little pretty card, that's when I thought, I
should have done these on little pieces of art and
made a whole deck of these. Then what I really
liked about this, if you have enough
that you love, you could make your own
set of artist cards, scan them into your
computer and you could maybe offer
those for sale, because I'm one of those people, I get inspired by artist cards, by others and this is an
inspiration deck with piece of art and a
inspirational word. But you could do
something like that in your art with
beautiful piece of art and a phrase or
prompt to go with it. If you had 30 different
pieces of art as your art cards printed
somewhere like moo, M-O-O, they would be
really beautiful, so just a fun idea that I'm just brainstorming here is
I'm doing a welcome video. [LAUGHTER] This is real fun, so we're going to
use the art prompts. You could go do the art
prompt video first, even though that's the third
lesson in here and create your beautiful prompt
cards before you come back and do the Lessons 1 and 2. But we're going to use
the prompts to then create some fun art, I chose to do little sets of abstracts
which, let me tell you, this art prompt was, use a surface that you
don't normally use, so I used really rough
watercolor paper. It almost just like smooth watercolor
paper that we sanded, I've never used
the rough before, but I bought a pad of it a
while back and I thought, perfect for this project. These look completely different than the other
abstracts that I do, because of the way that paper grabs my paints and pigments, so I loved that I
picked that prompt. Then I did some larger
ones just to play around and experiment on
regular watercolor paper. Then I made the art cards,
but let me tell you, this might be the most
fun project in here, is creating the cards
themselves and then using them to create some
yummy pieces of art. If abstracts' not your thing, you don't have to do abstracts, you can do whatever your
particular art happens to be. But I love this set of three so much that I
think I'm going to have it framed and hang
it somewhere [LAUGHTER], because every time I do these, these are like my
little children, I just I love them so much I want to hang them up and look at them and use
them as inspiration for myself for later, so I really loved those. I loved the art cards. Definitely, I think
you're going to have a lot of fun in this class, coming up with prompts and
then using those prompts to push yourself
further in your art, so I hope you enjoy this class, I'm pretty excited to
see what you create, so definitely come back
and share some stuff with us and I will see you
in class. [MUSIC]
2. Art prompts: [MUSIC] Today I'm going
to show you something really fun that I like to do. Just to push myself a little further and get out of
a little slump or get out of a rut and push
myself into new directions. What we're going to work
with today is art prompts. What I love about these is I've got a whole bunch
that written down on these fun little business
card-sized pages. This is a little
pack of cards that's real fun that came from
efrancespaper.com, E-F-R-A-N-C-E-S,
paper, P-A-P-E-R.com. I like it because it
looks like something that would be in an art studio. It's already pretty, and I can write anything in
this blank space that I need. That's perfect for
writing art prompts. That's exactly how I've ended up using this fun little
deck of cards. What I've done is, thought up lots of different prompts that I could then pull a card while I'm working in my studio on different
little abstracts. I could pull out a card and incorporate whatever that
card says on that abstract. I like it because it'll push you in a
different direction. It'll spur an idea maybe
that you didn't have. Some of these are cards that I might
pull before I even get started or I might pull five cards before I
get started and say, okay, I'm going
to do all five of these things in my work today. The ones that are
counted for when you get started is like
work in a series. So if you are planning
on doing just a plain, a little abstract, maybe you could do a
set of three abstracts. Really fun prompts to push
you in different directions. Try a different substrate
you don't normally use. That's one of my
favorite because in most of my things that I do, especially for a little
workshop with abstracts, I might be using cold
press watercolor paper, but who's to say that rough press watercolor paper or hot press watercolor paper, or mixed media paper, or vintage book pages or canvas or something else
wouldn't be just as fun to work with
that day and teach me something or push me
in a different direction than I might have gone
if I didn't have that prompt because we're
creatures of habit, we're going to pull out
what we're comfortable with and what we
always work with. That's what we're going to do. If you'll pull an art prompt to push you in a
different direction, I think you'll push
your creativity and stretch yourself
as an artist. Use an art product or color
you've never used before. That's super fun if I'm doing
a lot of things that I do. Purple is the color that I never use because I'm just not
really a purply person. So that might be a color that I try to incorporate
into something or maybe I'm using a different product and
say like liquid pencil. Maybe I use a blue
or a yellow and a liquid pencil that I would
never have thought to use. There's lots of ways we can
interpret these prompts. By pulling that out, I'm going to push
myself that day to do something I
haven't done before. Use a color you don't like. How fun is that? That's going to be something that's going to be
a little harder. Make you think a little bit
outside the box and think, what can I do here so that I like my piece of
art when I'm done maybe, but using something I don't like or something I'd never use. Perfect for that. Add some
scribble with some pencil. I love adding
scribble with pencil. [LAUGHTER] Some of
these art prompts may be some things that I've
thought of that I like to do. But maybe you didn't
think to do this. If you have this on a little prompt card and you
pull it out and you think add some scribble with some
pencil, okay, that's fine. Let me try that out. Limit yourself to only
five art supplies. Now, this is a hard one
because even when I limit my color palette to
two or three colors, I'm still going to have
several different types of supplies perhaps in those colors that I'm going to be using. This is one that I might
want to pull ahead of time. Maybe I want to use a
different substrate than a normal use. I'm going to limit myself
to five art supplies. And so I'd put those
supplies out on my table. That's what I would work with that day and see
what I could create. I love that one set of dots. That's where I'm going to
create a set of dots somewhere on my piece. Tight circles. Some of these are just
prompts for shapes or color or just little tidbits that you can add into your art. I might put tight circles, you might put tight squares, tight triangles, stars, whatever shape
it is that you want. You can take these
prompts and go way further than I
have gone with my, say, 30 or so cards
that are here. You could create an
unlimited number of cards using this same idea, but maybe picking different
shapes and writing each one down so that when you pull a shape today you
get a triangle, and when you pull a
shape, next week, you get a square [LAUGHTER]. Whatever. Don't limit yourself to the things that
I'm telling you. See how else you can think
outside the box and how you can push these prompts
even further for yourself. Add some white, add some
black, add some collage. I do like this one
because I don't work with collage nearly
as much as I want to. This would push me on a day that maybe I
wasn't going to pull out my box of old papers and books and stuff and
I'm going to tear up. Maybe this will push
me that day to add some collage elements that I might normally
have just skipped. Do a set of lines,
overlapping circles. Yeah, you can make these
as detailed as you want. I've got words here that
prompt something for me. But if you want to write, create overlapping circles
in the lower-left, you could be more
specific than I'm being. I'm giving myself
just a little bit of leeway with these prompts. These overlapping circles
could be overlapping squares, overlapping shapes,
overlapping triangles. You can expand upon those and get many different cards
out of some of these. Add some paint splatter. I do love a little
bit of splatter. Add some bold marks. If you normally add real tight little tiny marks and
scribble and stuff like that with maybe a sharp pencil, maybe it's time to get out a fat marker or a paint stick
or something that's got a bigger tip on it
that's going to make a much bolder statement or bigger paintbrush or whatever it is that you're working with, make it bigger and
make it bolder. I like that because that's something that I
don't do very often. I should definitely take
that to heart and pull that card and add some bold
marks in, add some writing. This one to me doesn't mean it has to be readable
writing either. You can add some scribbles and lines that
look like writing. You can be creative there and the writing could be
on your underpainting. It could be your
wish or dream or desires for that painting or your life or the
world or whatever. Then you can end up
painting on top of it. That writing just be a wish
underneath everything. You could be pretty creative
with add some writing. This one is do some stitching. This is fun because it's a 3D element that's different than the
paint on the canvas. It's going to add some
different elements into your work that maybe
you don't normally do. Usually, you would do this with a colored embroidery thread and a needle with a
bigger eye in it. Maybe just puncture
some holes and make it where you could stitch a
little bit on your painting. That's fun. I don't
do that very often. I wrote that prompt down
to maybe spur myself into doing that occasionally
when I pull that card. Turn your page upside down
and keep working. That's fun. How often do we rotate our piece the other
direction and then keep on creating on it from
a different viewpoint there? I like that because
I never do that as just in my regular workflow. I know that's going to be a
fun prompt when I'm working. Make marks with a paint pen. That's one of my favorite
things to do with that white posca pen or
this gold posca pen. I do like making marks
with paint pins. That's one that I put because I like doing it and that'd
be fun to pull out. Add some marks with a stencil. That's really fun too. My favorite stencil
is the punchella, which is the piece that
they cut sequence out of. This is the leftover piece of what they were making
the stencils out of. It's called punchella. I love using that
more than anything. But I also recently got some different stencils
at the dollar store. Then I've got other
regular bigger stencils that I might use for things. I've just got different
stencils about. I don't normally use them as
much in my art as I should. I just got these. Look how fun these swirls are, and I love this with
the lines of dots here. I think that's going
to be really fun. I found those at the
Michel's the other day. Just go looking around at
the Michel's Hobby Lobby, your art store wherever, and see if you can find some stencils that have
some marks that you like, that maybe you'd
want to incorporate into some art when you came
up with this art prompt. Add some paint with your
fingers. I love that. I do like having different marks and things
with paint brushes, but I do like having
some more organic and less defined using my fingers and that doesn't
mean you have to use your fingers without
gloves on and it can be a gloved finger too, so keep that in mind but don't be afraid to get your fingers in your art, and like that reminder. Add a floral doodle
with your paint pens. That's what I was meaning about, if you want to be more
specific with your art prompt then you want to give yourself some
definite direction, then put more words
on the page and be a little more specific
with how you want that prompt to be done, and this one is add a doodle
with your paint pens. That's fun, I like that prompt, I like flowers and
I don't doodle as much as other artists, that's a good prompt to push
me out of my comfort zone. Add some squares, add an
accent color, loose circles. See this can be loose circles, loose squares, loose
triangles, loose stars, whatever shape it is that
you want to focus on, that could be just
wide-open there. Do a line of dots. This will be real fun
with that stencil because these make
lines of dots and I think that would fit
in really nice and I could hit two of my
prompts at the same time, line of dots and use a stencil. Or I could just use this as my guide if I want them
to be real defined and I can take my pink
pen and just follow the stencil dots if I want
them to be real orderly there. Use your non-dominant
hand to draw lines. I love that one because
how often do you switch with the hand that you
don't normally write with. That's definitely going to push you into a little more organic, less defined, less on purpose. I like things that
don't look like they're on purpose and look to pretty, too straight or too curved, I want it to be a
little more broken up, maybe like it was drawn by
a three-year-old sometimes, and if you use your
non-dominant hand, you're likely to get marks that you never
would have got before, so I love that. Paint using a palette knife. This could be all stuff, paint using an unusual item, paint using a scraper, paint using a credit card, paint using anything it
is that you can spread paint on with some hard surface, business card, you can use
all things to spread paint. With your prompts, you
could put paint using a palette knife or a
credit card or whatever it is that you want to use for
that prompt to make yourself get different paint marks and streaks that you wouldn't
normally be able to get. Make a mark you've
never made before. That's fun and you're
going to have to think for a moment about what
marks normally make, and then make a series of marks that you wouldn't
normally make. Maybe you normally do lines and dots and today maybe we want
to do something different, and in my little art room
up here above my art table, I have just ideas that I've
written down to give myself some mark-making ideas when I'm doodling and stuff
on a little abstract, I can look up and
get some ideas. If you do something like
this, just something small, look at shapes as you're looking on Instagram
or something, and if you see something
that looks appealing, add that to your
idea card for marks. Then use one of these that you don't normally use
in a piece of art. Something like that's real
handy to have up hanging up on your wall in front of you because you can just
glance up at it and be like, yeah I could do that. Focus on a limited
color palette. I like to remind myself of that because I have a lot
of art supplies, and when I'm in my art room looking at all of the supplies, it gets a little overwhelming, and I find it much
easier if I decide right up front maybe I'm going to work with just a
few colors today, and maybe I'm going to only
work with maybe acrylics, maybe acrylic ink, maybe I'm going to
pull a color palette and a few drawing utensils
and a mark making tool, and then say that's
what I'm going to work with today because then I get past supply paralysis or white page paralysis with my piece of art that I'm
going to be working on, and I just have a blank
page staring at me. There's a lot of
things that are going to get in your way. Freeing your mind of some of these obstacles and getting yourself to creating that day, and focusing on a
limited color palette and limiting your supplies, pull those out up front
before you start creating, is going to help you get out of your way and getting
to creating that day. I guarantee you, if
you're like me and you have every color of every
supply that's available, that is going to be a
hindrance, not a help. Because for years I was like,
I want to do watercolor. I want all the watercolors
because I need them all, and then I would sit
there and I would look at the blank page and I'd want
to create a masterpiece, and I'd get frustrated because I couldn't
even get started, I was just paralyzed. If I had limited myself to maybe a few colors
or one brand or one type of watercolor
or maybe pulled out five little watercolors I was going to work with that day, I would have not had so
many frustrating days sitting at my art table with all the supplies that
I felt I needed. I love this. Focus on a
limited color palette, you could change this up in
a lot of different ways, limited supplies,
limited papers, limited whatever it is that you feel is getting in
your way mentally, that's what could
be your art prompt, I'm focusing on limited
colors for that prompt. I've got probably 29
or 30 prompts there. What I'm going to
do in this class, and what I normally
do for myself, is I will flip these over, and I will pick out
random cards so that I'm not picking out anything
that I know what it is, I don't want to know
what I'm picking and maybe we'll pick five cards, and then that's going to be
my project for that day. My first five cards would be add some paint
with your fingers. I was hoping to get this one, try a different substrate
you don't normally use, and I was hoping to
get this one because I remembered in my art
closet that I have a whole bunch of different
watercolor papers that I had gotten at some point that I thought I need them all, so let me try them all, and it's the Arches
rough watercolor paper and cold press and hot press. Because I had gotten a bunch of oil painting paper from
them, and I thought, Well, I wonder how their
papers are different, and this rough
press, I don't use. I've never used it, I might
have pulled it out and did one thing with
it and thought, that's weird and then
never looked at it again, and as I sat down at this table, I thought I need to
pull those papers out, and if I get this prompt, I could try this paper. I got pretty excited about that, so that's crazy that I actually pulled a prompt that
I was hoping for. [LAUGHTER] Line of
dots, I like that. Overlapping circles, and use your non-dominant
hand to draw lines. That's a lot of fun prompts. That's the first five
that I came up with, and you can pull a
prompt as you're working or you can pull
the prompts beforehand. If you're working
and you get stuck, then you might pull
your cards out and say, I want to pull a card
to keep me going. Add some scribble
with some pencils, that's what I'm
going to do next, so you could do it that way, or you could pull, say five prompts at the
beginning like I just did, because some of these
are beginning prompts and you can separate
those out if you want to separate and have a stack of beginning prompts and a stack of while you're working prompts. That would be great
because then you could pull a beginning
prompt and say, I'm using with a
different substrate, and then you can
pull these prompts while you're in
process or beforehand, and then these we're going to use in our piece
of art somewhere. That's my first five cards, that's my first project
that I'm going to do. I hope you enjoy working
with art prompts as a way to move yourself on
to the next level. These are super fun. Definitely gets me
out of my swamp or my creative rut that I get into and into using things
that I might not normally use. These
are super fun. I hope you're going to enjoy doing a couple of projects with me during this class
using art prompts. Write out the ones that I have, add some of your own, come up with all of
your own if you want. If you want to have
different ones than I have, I'm just trying to give you some ideas on things
you could work with to be a little different and get outside your box and
just try things out. I'm pretty excited to see what projects we can
do in this class. Pull in different
art project prompts. I'll see you back in class. [MUSIC]
3. Supplies: Let's talk about
supplies for this. I have supplies
sitting out here, but it's really a
little bit to fool you because this class is all about making some
art prompts that you can then use to
create your art. To make some art cards, I'm using just a large piece of cold press watercolor
paper and cutting that into smaller pieces to make a set of cards like this. But you can create pieces
of art and cut it into a card any way that
you'd like to do that using whatever supplies you
happen to be interested in. I'm showing you in this first project different supplies and techniques
that I like to do. I could have then cut this down and made that into a card. That could be one way to do it. This could have been
three little cards that I created and then cut
down and made into maybe a smaller card or maybe this could
have been two cards that I cut in half and
cut a pretty edge on. If you want to jump
to the first project, create a bunch of
little abstracts, and then cut these
up into little cards that you then use
for your art cards. That would be a great idea. If you want to go and use the
big sheet of paper that we paint on and then cut
into little pieces. That's another really great idea because you could have pretty
piece of art on the front, fun art prompt on the back, maybe with some mark making, there's lots of choices here. What I like about doing
like a whole set, like with that we use in pain is now I have different cards that
I can then look at. Pull a prompt off of, I've written these on little business card so you could find blank cards at the art
store, maybe the bookstore. I think I found these
at a bookstore. They're pretty on the
front and the back and I can just write a phrase on it. That's another option. I'm using acrylic
paints and I'm using the Arteza inexpensive
paints to create my large abstract that I
cut into smaller pieces. Do a little stencil work. I'm using some punchella, which is the stuff
that you get when you punch sequence out of this,
it's called punchella. [LAUGHTER] I love that, but you could use some sequence. You could get as
creative as you want. Got some paint pens, a pencil. But really, what this
all comes down to is create some random
abstract pieces of art. Then we're going to
cut those into say, a card to make some art cards or after you have
your art cards, we're going to use these art
cards to create pieces of art to then push us outside of our comfort
zone when we're creating. I really love having
some guidelines or some boundaries or some
limitations sometimes to art. Like I like to limit
my color palette. Because if you have all the options and
all the supplies, and all the colors,
it's paralyzing. If you will sit down and say, today I'm going to
pick five cards. Let's pick these five. Here's what I'm
going to do today. I'm going to add some black, work in a series. I love that because then I
could do a set of three. Maybe I don't normally do that. Make marks with a paint pen, add some writing and add
some paint splatter. That's a good one
because I do love a little bit of
splatter on stuff. Now I'm going to put
my paper out and I'm going to use these to
guide me when I get stuck. I might have some colors that I want to use and I might get going and I might think, what else do I want to do? Well, then I might be like, let's add some paint splatter. Let's add a little
bit of writing. Now I have some
guidelines to push me into the next level or to make me do something that
I wouldn't normally do, that's maybe a little bit
less comfortable for me. That discomfort is how we learn and grow and push
ourselves as artists. I love having prompts and limitations sometimes
because that really makes you think outside
the box and you think, what can I create with this? This is all I have
today that I can use. What can I make? You'll be surprised
to how you'll grow as an artist in
the things that you'll create by having some
things that pull you into a certain direction that maybe you wouldn't
have otherwise have chose. Even though this
is a supply video, you can get the hint
here that we're working with some
watercolor paper. I like the 140 pound to make a card because that's
a nice thickness. We're going to be creating
some art prompts and a few projects based on those
prompts that we create. The supplies are
open to what would you like to use
in your projects? It's not specific. You don't have to use the
same things I've used. I like using paint pens, a little bit of acrylic paint, maybe a Stabilo pencil
to do some marking. I like to have a
mechanical pencil to do some drawing and marking. I like this little clay tool that's got the pointy edge on it to do a little bit of marking. That's what I'm going
to use to create. I'm going to keep it simple. I think in these
projects here I've actually used some gesso, so I have white gesso
and clear gesso. You might want to
glue stick or R2 to glue prompts onto your cards. If you're going to do
paper that you glue down. These are acid free. Craft sticks you can
use, yes, paste. That would be great also
so or matte medium, your choice of glue there. I'm also using some pastels personally because I like them. But if you're making cards like this where you're going to be
touching them, be careful, whatever it is that you're
going to use on there that maybe the pastels
not the best choice because you don't want to
smear it and end up with pastel on your hand every
time you use your card. [LAUGHTER] You do want to be careful because on some of these where I've used cards that
were already created, you can see I get pastel
on my fingers every time. I don't think I fixed this with a final fixative before I cut these up to use it because
these were scrap pieces. But even if you're using
final fixative a nothing truly permanently
fixes a powder, and that's basically what
a pastel is as a powder. For these projects,
pastels, great, because I'm just
going to frame them and then nothing is going to be touching
them and smearing them. But for my art cards probably
better not to use a pastel. [LAUGHTER] That's basically
the supplies I'm doing. These are some of the
projects we're doing. I really love if you made yourself the set of
art cards rather you write them on a pretty
card or you make the pretty art card like this, and then jump into your
projects using those cards. One other little thing
I forgot to mention, and I just happened
to notice it. I like having a corner cutter and you can have
any corner cutter. There's lots of variety out
there at the craft stores, the Michaels and
the Hobby Lobby. This is a very old one
from scrapbooking days, so they're not going to quite
look exactly like this one. But I like having the little
corners cut because it makes your card look like a truly professionally
finished card, rather than just something
with a square edge. To me doesn't look like
as finished as it could. You might look at corner
cutters and I thought I had one that just had rounded corners but I couldn't find it. So I got this one with
a decorative corner. The decorative corner is just
as pretty and really fun. Pick out a corner that you
like and then you can cut pretty corners on your
cards if you'd like. I forgot to mention that I
used one of this and just to be looking around for
one that you might like. I'll see you in class. [MUSIC]
4. Using Art Prompts on small pieces: [MUSIC] Let's see
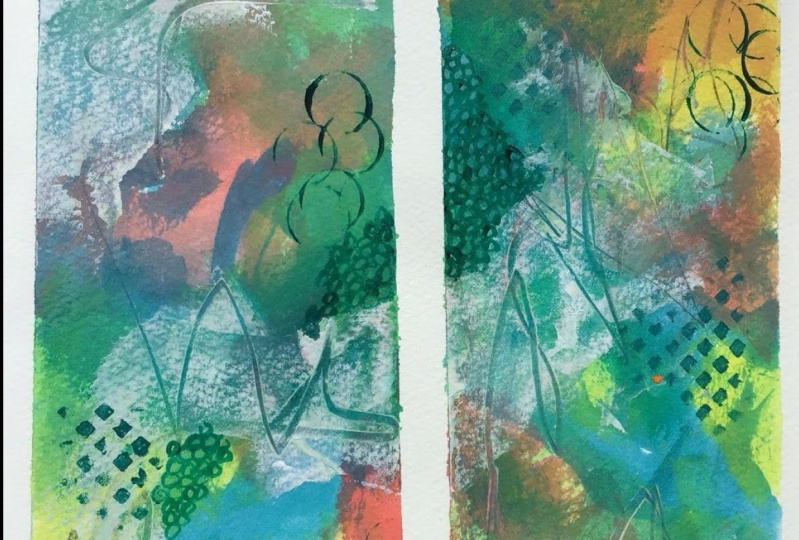
what we can create. What I have is our five original art prompts
from our art prompts video. Try a different substrate
you wouldn't normally use. I was super excited
to have picked that because I wanted a reason today to use this rough
watercolor paper. This is 140 pound paper, which is the same weight as the cold press watercolor paper, but it almost fills stiffer to me than the cold press
for some reason. This has two sides, but one side actually feels a little rougher
than the other one. The top side is a
little rougher. I'm excited to see what this
paper's going to do for an abstract project that I do quite frequently because
I enjoy doing this. But I've never done it
on this kind of paper, which is going to be
exciting to test that out because I don't know if
I'm going to like the paper. We might get done and
think worst paper ever. But how are we going to
know that if we never experimented with the
paper and found out? That's why I really love
doing stuff like this, because it makes us use
and experiment with things that maybe
we weren't going to use and experiment
with any other way. Now you don't have to do rough watercolor paper
with this prompt. You could do hot press paper, you could do mixed media paper. You could do some
vintage book pages. You can work on a cradle board. You can work on a canvas. You can see here there's
just any direction that you want to go, you can go. But for me, I immediately
thought of the stash of paper that's been sitting in my little art closet in the
hallway for quite a while. I thought, perfect. We're going to do
some, add some paint with your fingers, we're going to add a line
of dots in here some time, we're going to do some
overlapping circles somewhere, and we're going to
use our non-dominant hand to draw lines. I'm going to pull
from these cards for my inspiration in
painting today. For the cards that you would need to pull
before you got started, you could have one little deck of those and you could have one little deck of
these extra prompts. Pull this first to
get you started. That could have been
different substrate, it could have been
limited color palette, it could have been any of those that you need to know upfront. Pull that first. Then you can pull these
as you're working. If you get to go
in and you think, I'm stuck, what do
I want to do now? Get your deck out
and pull a prompt. Maybe that prompt is
do a line of dots. Now you're like, let's
add some dots in here. Then that will hopefully
get you over your hump of, where do I go now? What do I do now? I feel stuck or whatever. Let's get started. These are my prompts
that I'm going to use. I pulled them ahead
of time for this one. What I've got over here that
I think I'm going to play in and use any paint you want. These just happened
to be some of the fun ones that I like
that I want to play in. I've got whole being sepia, that might be my dark. I'm going to have white gesso, so that'll be my white. I'm not going to
use a white paint. I'll use the white gesso. I use the gesso product with
my acrylics so that I can then draw on top of the paint
with things like pastels. I've pulled out
Charvin, olive green, green-gold, raw sienna,
and Caribbean pink. I don't know if I'm
going to use all those, but I do have them. Then I thought maybe a
Payne's gray acrylic ink. Let's just play with that too. I'm going to put some
of these and I've got just a couple of cheap
paint brushes here, and I've got some
mark-making tools and I've got some palette knives
over here on my desk. I do have a lot of things
that I could be working in. If you're working with paints or you've got paint sensitivities, then I've got gloves
over here too. Keep safety in mind as
you're working with your paints and have gloves
handy that you can put on. I'm just putting a
little of each of these on my paint palette. You can tell this green gold by Charvin is my favorite
one to pull out and use. It's almost empty. I think I do have another
one that I ordered. I don't know if it's going to be exactly the same or not, that one container
is my favorite. This Caribbean pink, I do like that little
dash of pink there. I think what I'm going
to start off doing is maybe just putting
some water here on my paper and dropping some of this
ink on it and it looks like there's some
color in my brush. I don't know if it's
the brush or the water, but we're not going to
see it in a minute. It doesn't matter. I want the ink to do what it's
going to do to begin with. Look at that. This is
something I've never done. When I sit to do this,
I start thinking, what can I do that I
have not done before? I want to practice techniques. I want to play with
different colors, I want to experiment. This is very interesting. It's not spreading
nearly as easy as I think it would with
a smoother paper. Now I wish I had
left it like that. Let's not spread that one out. This paper is almost like smooth paper that we sanded
with some sandpaper. [LAUGHTER] I'm going to put
some of this gesso out. This is a white gesso
and this is clear gesso. I want to do some of this and not really change the color up. I've got some towels over here. I can get one of those
and then let's go ahead and I'm just mixing
paint and gesso when I can do paint and white gesso or I could do it with
the clear gesso. Because I'm doing this
wet a little bit, this is still wet, you're going to see some
color blending a little bit. This paper definitely feels way different than the smooth paper, it picks up that paint
and then just grabs it. Very interesting. Now because I'm working on a series here. I'm just going to
paint on all three of these at the same time. This is just a clay tool that's got the sharp
end on it here, then I could just see
if we can drag some of this ink out and
do some mark-making. I'm liking this one over here. This is the time to
really experiment with your supplies
and your techniques. This is where you're
going to discover things that you never
thought before. One of our things is add
some paint with our fingers. Let's go ahead and do that, and I might mix in some sepia with this to get
a different color there. This paper grabs the paint
too when I'm working with my fingers too it really grabs that paint and holds
it in one place. Its fascinating. It's not as intuitive as the smoother paper for
moving and blending. Which that could have
its place in your art. I'm not really sure what
I would do with that. I'm going to have to
definitely think on this. How I would use this
in my regular art. What did they make
that rough paper for? Who came up with that? What was their intention? [LAUGHTER] Thanks
to contemplate, is you're experimenting with
some of these supplies. Where did this come from
and why did they make it? I'm confused on
this rough paper. Why did they create that? Let's go back to our paintbrush. We played with our fingers. We're going to do that some
more in a bit probably. But maybe I'm going to come through and add
some of the sepia. I don't know that
sepia mixed with that paint gray is pretty, I might spread that
around a little bit. Look at that. I'm really
liking this third one over here at the moment. Adding in the gesso does make
the spread a bit easier, and I like doing that
rather than water because then I can
put stuff on top. Water thins down paint and this gesso doesn't thin
down paint per say, I mean it might thin
it a little bit, but it's not diluting the paint to the point where
it's diluting pigment, it's still got full
pigment in there. Let's try out this raw sienna. Is that raw sienna? Yeah, is raw sienna. I'm not sure I care for that raw sienna
in this color palette. But now that I used it,
I'm going to use it a little bit on
every one of these. Before I forget to, what other prompts do
I have over here that I need to work in? I really like the prompts for getting you past roadblocks, basically like
what's stopping you? Let's go ahead and
blend some of these in. What's stopping you? What is creating a
roadblock in your mind? I am probably going to do
some of the prompts on top. Because the putting the
paint on the paper here, I already know I
like doing that. That's my favorite. I can do it pretty good. I want nice Blanche
color in there. I want to get that
going pretty good. That acrylic ink isn't really drawing very fast,
that's very interesting. That ink is staying wet longer even than the main paint here. We also have line of dots, overlapping circle, we will use our non-dominant
hand to draw lines. Before this paint dries, I'm going to go ahead and do some
mark-making with my non-dominant hand. What I like about that is, I'm not used to using it, so these lines are
going to be stiffer. They're going to
be less uniform. They're not going to be drawn by hand that's used
to doing any drawing, or pencil holding, so they're not going
to be as uniform. I've got some circles here, so we'll call this our
overlapping circles, which we might do some more of that once our paint gets dry, but it definitely
got that in there. I think I want to
add some more paint. I'm liking this one over here. What really makes these fantastic is when
you pull the tape, you might be thinking
the whole way. You might be thinking, I
don't know if I love this. But let me tell you every time, I'm doing this and I pull
the tape off, it's magical. This paper is weird
though. This paper is grabbing my paint and not smoothly letting me
move it around like the the cold press
and hot press does. That's very interesting. I don't know that I like that, but how would I know
if I never tried this? Just going to add a bit more
color in here and there, and then I might have
to let this dry for a moment and come back and
add some details on the top. I have a love-hate relationship
with this green gold. I think I want to love
it because of the name, and sometimes I use a
brand of green-gold. Sometimes I use it like this, Charlene green gold for some reason I'm
really drawn to that. I love that. Let me let
this dry for a tiny bit, and I might do this
with my heat gun and I'll be right back. [MUSIC]
5. Finishing up our small pieces piece: I would not say these
are 100 percent dry, but I would say they
are dry enough. Now to maybe add a little bit of
some mark-making on the top. I think I'm going to move my
paint palette for a moment, and this is my orange and green mixture of
pastels that I've thrown into a fun
little box that I can keep everything organized. I'm going to stick within the
same color palette mostly, but add some extra details, and I have discovered that the drawback to putting
all these colors in here together is then you
have pastels that stick to the side
of the pastel that then shows up in your art If I had a choice
to do it again, I don't know if I would
quite do what I've done, but it is what it is now. I think I'm going to
come in here and just add some details and see
how working on this paper. See? even the pastels don't spread around as easy on
this thick rough paper. That's very interesting. I'm going to go ahead
and just go through. I had some extra paint
in details and see, this is not quite
the color I thought it was when I got started here. It spreads around, but it really picks up in a different way than
the smoother paper. I really want a little
burst of this red. Let's see if we can get
that in there a little bit. It's not really a red, but it's a burgundy-ish, maroon-ish, pop of color
is what I'm hoping for. I could do some
yummy little lines with the pastel, look at that. I pick that bit. I do like those. That little pop of a
color there with that line. This paper does really
pick it up when you try to draw a line here that's
really picking up that color. That's an odd color. That's different the way this
is reacting in the paper. Maybe I want this lighter pink. Let's see, is this it? No, maybe this one. Now here we go. Maybe we want to look at our
prompts and say, what do we want to do now? I've got the
different substrate. I played with my fingers. I did overlapping circles
with the drawing, the line, I did the
non-dominant hand. I have a line of dots. Well, I might do that
with a paint pen. I might try with a stencil too, I don't know if this
is going to work with a pastel and a stencil. No, that's really not going
to work with a stencil. I'd probably do that
with a paint pen. Let's just do some
more coloring here. Let's just see, so the
prompts are there. Not to really stop you
from what you want to do, but to give you more ideas to continue on as you are working. I really liked the way the acrylic ink
looks on the paper. That's the coolest
part. I love that. We're going to go
through and do some mark-making now, I think. We'll look at that. I like that. Maybe I should've done that
one on that first one. We could call this
line of dots too because these are in a line. They are in a line, it's just
lots of lines. That's fine. I liked that pink dot
on that dark color. That's pretty on
that dark color too, so that's fun. I do want to play
with the paint pen. I might go in with
my paint pen here. That's super fun and
there's nothing to say, and either after we pull our
tape off from something like this and we can continue to add to it if
we look at it and think, oh, it needs something else. I also have my pencil here. This is my mechanical pencil. I've hit all the dots. Let's
just look one last time. Is there anything else
that I want to try to do? Maybe some extra
scribbling here just for some extra detail. This rough paper really
picks that pencil too. I can definitely tell the
difference in the paper here. Let's do this with
our non-dominant hand and just see how we like that. I like that. This is definitely way
different than I've done color-wise
and pattern-wise. Let's just see what
these look like. Pulling the tape off, which I think is part
of the magic of doing little pieces like this. But I do have pastel
all over my fingers, so let me wash my
hands real quick, and then we'll
peel the tape off. Got the pastel off my fingers. Let's peel some tape because this is the magic part. It is my favorite part. The reveal, if you
want to call it that because pulling
the tape off is what magically makes these
finished little pieces of art rather than big messes, and I can see already
now that I've peeled off three
sides of this one. I'm loving where it
went even though it's got a question in it beforehand. Look what we got when we peel
the tape off. Look at that. I am loving that one. I would like to say using that rough watercolor paper was definitely a
different experience, and I'm glad I did it. I wonder what they make it for. I'd love to know an artist that uses that on a regular basis, and why they use it. What makes it different for
them than other pieces? Look at that one, love it. This would have been a
good one where if we had, turned it upside down and
see if you like that too. Some of these when
you get them undone, turn around and see, do you like it the other way or do you like it
the way you painted it? Because I like this
one this way too. Maybe that's the way it
goes. What do you think? I wish you could give me a
little vote in real-time But I'd like to ask an artist. Why do you use that? What does it add to your art
that smooth paper didn't do? I'd love to know
what their reason is for picking the rough paper
and what it does for them. See? Even that one turned
out better than I thought. I love that one too, and if we flip it
the other way, nice. Which way do we like it better? We like it with that dark
on the bottom maybe. There we go. Ended up completely
different than I expected. I used some colors together in a way that I
don't normally use it. The acrylic ink was definitely an interesting
different technique that I don't normally play in because the ink part of this is some of my favorite
part of that, so that was fun. I love that the paper was really rough and grabbed
the paint in different ways than I expected and that I normally would use the
paint and the blending. It didn't blend in the same way that the
smooth paper blends, so that was very interesting. Learning the differences
of that material and how it worked with my supplies that I feel fairly
comfortable with. I use them in lots of
other little abstracts. But that paper completely changed the way that
they worked for me. Love that, so this was fun. I hope you have fun
with your first project picking
out some of these. I'm going to do a
few more projects picking out different cards and having different things
to push us in different ways. But for this very
first art project, I am thrilled and I hope you get just as thrilled
working with these as I do because it really pushes me in new directions
to try things that I wouldn't
normally try and to figure out supplies
and how they work with each other on different
papers and things that I just normally might
not sit down and do, If I'm in here playing in my art room without
a prompt to say, hey, try this instead, or hey add this in there, or try a different colorway
or flip it upside down, or do some fun
things that you just normally wouldn't think to do, and I just love how
all of these came out. I'll see you back in class and we'll do another one.
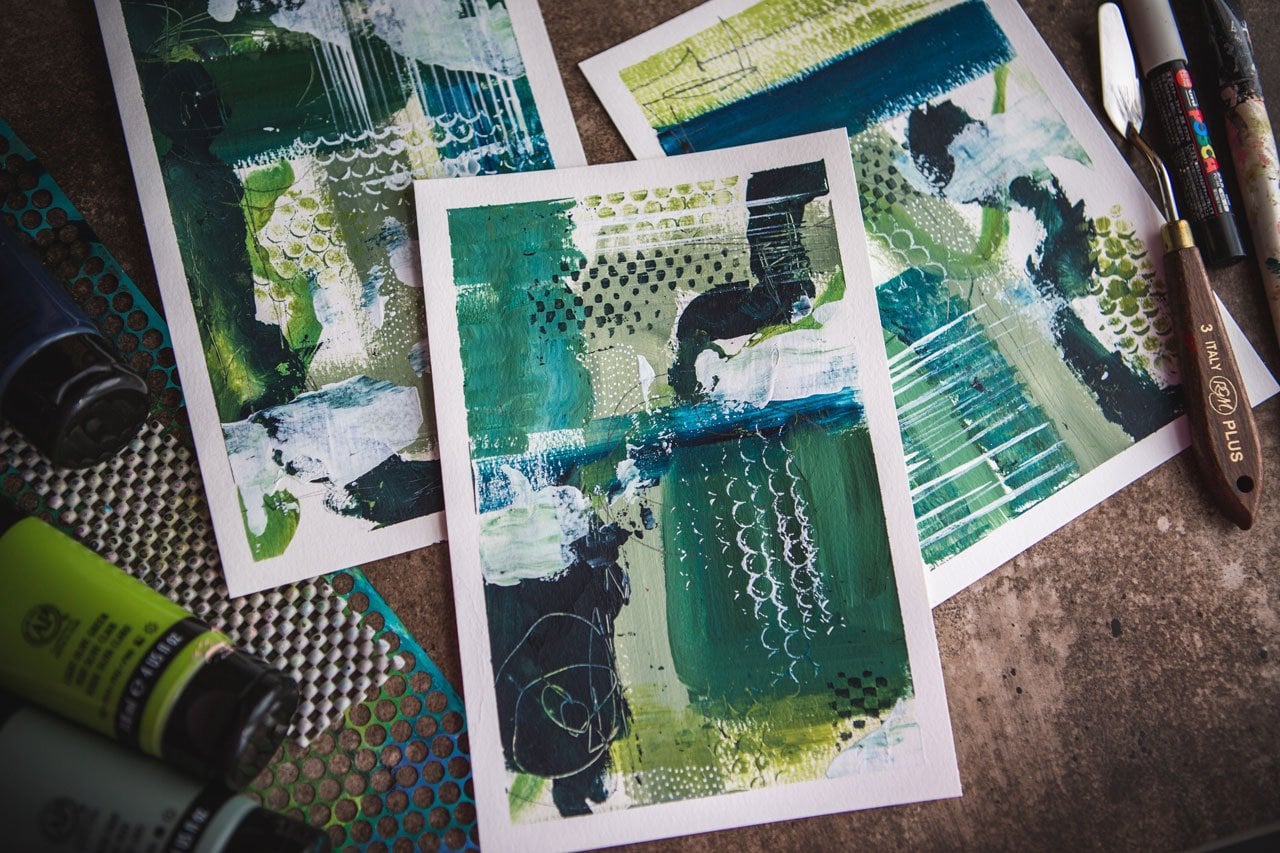
6. Using art prompts on larger pieces: [MUSIC] Let's start our
next little project. I'm just going to shuffle my little cards here
like a deck of cards. I'm going to pull five
and see what we get. Add some writing, super fun. Paint using a palette knife. Love it. Do some stitching. That one I'm going to have
to think outside the box on. I wasn't expecting
to pull that card. [LAUGHTER] Turn your page
upside down and keep working. Make marks with a paint pen. I already do that a
lot. I like that one. Let's pull another
card just to see. Add some paint splatter. There we go. We've
got some cards. I'm not limiting myself on substrates for this collection. The thing I got that
I wasn't really expecting was, do
some stitching. Very interesting. We're going to have
to think on that. What I might do, I'm going to take all my little
prompts here and think for a moment because it's interesting too if you pull
your prompts all up front, then you can put a little bit of thought
into where you want to go whereas if you're painting and going and
pulling them as you go, you're getting past a block
on what you can do next. This way, you can plan what you might do with these fun prompts. The other way is a little
more organic and you're creating thinking, what's next? Very interesting. Let me get my paper
and my thoughts together and some paint colors and we'll see what
we can come up with. In this project,
I've been sitting with our cards for a little bit, do some stitching, writing, splatter, marks
with a paint pen, palette knife, turn it upside
down and keep working. I thought what I would do
is pull some paint colors. I've got this alizarin crimson, Caribbean pink, olive green. I've already pulled
these out and decided, I think I'm going to use these. Let's just go ahead and put these colors out
and commit to it. This is my older Caribbean pink, which is just as used up
as that yummy olive green. Those are two of my
favorite colors to use. [LAUGHTER] I like
this olive green. Then I want a bluish-gray, but I don't think I have
the right shade of blue. I've got these alizarin
colors that are fun and they're
inexpensive to work with. I think I'm going to
use the cool gray. I've got a little
palette knife here. I'm going to take a little tiny bit of blue and
start mixing that blue and gray and see if I get a
color that I like better than the color this is. Also, I don't want it bright, I want it to be a darker
shade of this color. I'm going to add in a
little bit of black to give me a darker tone. That might be way
too much black. Let me just pull a little
bit of that. Maybe not. [LAUGHTER] I want
a grayish blue. I may just need to
pick a different blue altogether. I don't know. Maybe I need it brighter. That's more gray blue. I do like that a lot. You know what? Let's go with
that. I'm happy with that. I do like mixing colors to experiment with how can I make the colors I
have go even further. That's fun mixing colors. I think what I want to do, because I discovered in our last project
how much I liked that Payne's gray ink
on that rough paper, this time I'm using
smooth paper. I've actually pulled out my cheap watercolor pad
140-pound artist's loft. This is just a cold press
paper and this is six by nine. I just taped it down. I thought let's just
do two bigger ones, and because we're working
on that cold press, I really would like to know
how that ink put down in the same way that I put it
down on that rough press. How does that work
different for us? I think I want to start
off with some of this ink. The only thread that
I have currently is some bookmaking
thread from when I was experimenting with
making some of my own little books
and some big needles. I'm going to use a little bit
of that bookmaking thread. Most people use
embroidery thread. This is real thick and stiff, but we're just going
to give it a try out. I've pulled out a
couple of little old paper piece of burlap old pieces of a book
because I may do a little collage element with
some stitching possibly. I've pulled it out to come
over to this one that says, do some stitching which
I'm not as comfortable with. [LAUGHTER] I like that. I've got something that we're
going to be working with that is definitely outside
my normal comfort zone. I'm going to add some
water to our page here so that I can drip this ink on and see how is
this going to work different than what we
did on the other one. I may need to add
some more water to get that to really
spread around. That's definitely
grabbing the paper different than what we
just did. I like that. That's fun. See that
rough paper really grabbed that ink and kept it in one spot where this is
very easy to move around. I can blend it with stuff,
probably pretty easy. Let's start with that. Then I'm going to go ahead
and put some gesso on my palette over here
and we'll start adding. That's white gesso and I got some clear gesso and we'll
start adding some paint. I got a couple of
cheap paintbrushes that we can dip in
our water there. Then let's just start off with our bluish-gray
here. [NOISE] I'm ready to work on say larger color
blocking because I've got a bigger piece of
paper go in here and I tend to get in with
tiny clumps of color. [NOISE] This would be a
good time to experiment a little bit with color and making bigger areas
of color perhaps. [NOISE] Don't get
stuck on being so tied in with tiny bits of
color because a lot of times when you're working
on smaller papers, you tend to work small and
as we get bigger with paper, we want maybe use
bigger brushes, bigger bold spots of color just be a little more
large in what we're thinking. I like how some of this
mixes with that ink there, I like that a lot. Let's see what we want to do? [NOISE] I think I
want to come in here maybe with my finger. A little bit of some
white going in here. [NOISE] I come in here, [NOISE] trying to get that green off my
little paintbrush here. [NOISE] Splash paper everywhere. Let's come in here with some of this yummy burgundy [NOISE]
just mix with white. I think I would've
rather that be the stronger color, there we go. [NOISE] I just dipped my finger
there in that clear gesso to give me a little
bit more movement with that paint rather than
just looking like my finger. [NOISE] Because it's helping me spread that
paint around some. Out of these two, I'm liking
this one a little better. [LAUGHTER] That's why
I like doing more than one because then
composition wise, if I like one better than the
other and I only did one, then I wouldn't have known
that and I wouldn't have gotten maybe the one
that I liked the best. [NOISE] But then it might
be like photography and when I finally go
and peel the tape, I'll end up liking the
one I thought I was going to like less even better because when I'm
taking pictures of whatever picture I
get in the camera, that's always whatever is my favorite one when I
get it on the computer, I'm always a slightly bit disappointed because
it didn't quite turn out the way I thought in my mind by the time I get to
the computer to look at it. My photography is funny
that way and then my least favorite tends to be the
one I loved the most. [LAUGHTER] I love
how that works. I try not to judge on
the back of the camera now or when I'm painting judge here with my initial
feelings here with the pieces that
I'm creating because I know how I tend to
operate and whatever I'm thinking I'm not going to love
ends up being my favorite. Before this dries completely, I'm going to go in here
with my pencil. Let's see. I've got a lot on there
that none of these really is what I
want to do so let me do this first [NOISE] and
get some marks in my paint. [NOISE] Get some interesting marks going before that dries on me. [NOISE] Now a little
bit of mark-making. Now let's see, I
add some writing, I add some paint splatter, mark with a paint pen, paint using a palette knife, turn it upside down. Let's go with a
palette knife first. [NOISE] I might go ahead
with the white and see what interesting
marks I can get in here. Maybe I like this paint too. [MUSIC] This looks like a little garden over here to me, I like that. The green and this touch of red and this touch of
little lighter pink. I feel like I'm in a
little garden right there so I love
that. [MUSIC] I've got these fun jelly plate
mark-making things. It might be fun to come
through and just see on some of that that
I just put on there. I can pull some little lines. [NOISE] It's dry
actually though, but I like keeping a little
tools around playing. Now we have added
some paint splatter, some of this I might
have to add after. Let's put the palette knife
one there. You know what? Let's go ahead and
turn it upside down [NOISE] and keep working. Let's do that first. Let's turn it upside down. [NOISE] I had to keep from covering all this up with
a whole bunch of paint [LAUGHTER] supplies so
that I could do that during this one so let's
get this one resettled. There we go upside down. Another perspective is
basically what this is doing. We've turned it upside down. Now we've still got I
had some paint splatter, which I'm going to be careful because I'm sure I'm
going to splatter my inspiration pieces here. I'm going to move
these, I don't want them all paint splattered. Maybe I do. Maybe you want
them all with paint on it. I'm sure some point these will
have paint all over them, but those are freshly
written out for this class since the ones I had were definitely
all covered with paint. What color splatter? I think
I want white splatter. I'm going to mix this in. It's just mixed with some water and some gesso is what
I've got going on here. [NOISE] Because these
pieces are a little darker, white is what inspired me some but that doesn't mean
I can only do white. I could do the
white and then with a really wet brush maybe a
little tiny bit of this green. A little bit of that
green is pretty. I like that. [NOISE] Before I can do some of these others. We added paint splatter so
that's three that we've done. Marks with a paint pen
and add some writing. I need to get this dry before
I can draw on top of this. I'm going to dry this with my heat gun and
I'll be right back. [MUSIC]
7. Finishing up our pair: [MUSIC] We're about
90 percent dry now there's one or two little
spots that aren't perfect, but that's okay.
We'll keep going. So we're going to
make marks with the paint pen and
add some writing. So I might combine marks with a paint pen
and add some writing. Or we could do the writing
in a different color. I think I want white though. There's nothing saying that you have to be able to
read the writing. Or if you are really
good at lettering or you want to make a statement
or have a point in there, or some words of inspiration. You could do that. I'm
going to do it more like a scribble so that you think
there's something there, you're not quite sure, can't quite read it. You're wondering, what
does that really say? So it's more of an
implied stuff here, but you're not really
sure what that says. You're like, what is that?
I like that mystery. It's what would it
say in your mind? What do you think in that
says. So I like that. That fits in with add some
writings and some marks. So we're going to
maybe call that a little bit combined because
I'm going to come in here. Maybe add my little
dots that I like. I like little areas of
white dots in addition to what we've already done
with our paint splatter, these are more uniform, more defined, a little different than
the random paint splatter. That's a little bit of whimsy. Then don't feel like if you pull a prompt and you get going
and you're in all inspiring, you feel like okay, I'm there. I think I'm done. Don't feel like you have to
use every prompt you pulled. The prompts are there
to get you going, get you out of
your comfort zone. Just pull you in different directions than
you would normally go. If you pull something and you get to the end
and you think, wow, I think I'm done. You don't want to do say one
last prompt that's on there. I'm going to reserve that
right for the stitching. [LAUGHTER] If you
get done and you think that's just not
right for this piece, don't feel like
you got to do it. You don't have to keep going. I've feel like I want
some punchella in this, which is my sequence paper. I'm going to use a dry brush and do a little bit of stenciling cause all of a
sudden I'm filling that. I'm filling that in this green. So I'm going to keep the paint dry on the paintbrush and just scrub that through so that I get some yummy dots in here
in this green color. Yeah, see I love that. Now that got me excited. That's the purpose
of say, art prompts, they're there just to get you going in a
different direction. Think of things you
might not think of. Get excited about
pieces in your art or things that come to you as
you're going. I love that. Then I even want to
maybe try this one out. Let's try this one out. Let me put that
paintbrush in water and get another dry paintbrush. I have lots of cheap
paint brushes here, little packs of three
or four from the Michel's for like
five bucks because I know that I want
to use lots of little things like this. So I like this pencil with these random lines of dots here. That's fun. These are more like octagons rather
than dots, but that's okay. I just want that. It might work better
with light regular paint rather than the gesso. But the gesso is what I have out and that's what
I'm going to go for. That's fine. I
don't love that as much as the punchella,
but I do like it. So we're going to put
that to the side. Then I think what we'll do, do some little mark-making. I've got my pencil here. [NOISE] I might just
come through with marks. Some of this you're only
going to see as you get up close and that's okay. This time too, I
could add pastels, but I think I'm done
with the paint and I still want some other details. I could come back with pastels, which I always have handy over here because I
do like playing with these. I'm going to be in
my pink green box because I'm in my pink
green little mode here and just see what
do we want to add. I like this green here. These are going to
be way easier to smear on the softer paper. These were really hard to
smear into anything on that rough paper
that we were trying. Because that rough
paper just grabbed it, it didn't even matter how
much paint was on my paper. It just grabbed it and did not let me smooth
anything around. I wonder what it would look
like if we added a touch of this really bright, crazy, almost neon color here. Because almost like sometimes a little extra-like surprise and this color pink is a surprise and I don't think
I've ever used it before. It's fun. I'm just doing
a dab here and there, not overwhelming it, but I
thought that might be fun. I also have a green gold
here in the pastel, but I don't think I
want that on this, but I do have a pastel
on that yummy color. [LAUGHTER] Have
some purpley shades here that I don't normally use. This almost turns
purple down here. I don't want it too
much though I see. There is a pretty Burgundy
over here that maybe I want to add little tiny touch. Here we go. Can't
really see the color. But look at that. That's pretty. Might give us a nice
little extra pizzazz here. [MUSIC] At this point in my art, it tends to be that I'm not
a minimalist with my art. [LAUGHTER] I sometimes overdo it and I need to make that
maybe a focus of mine that I'm going to do less in some pieces because I keep adding and
adding and adding, even though I want to focus
on larger color blocking. By the time I'm done,
let's put these away, I might have started off
with larger color areas, but that's not what
I end up with. [LAUGHTER] So let me
wash the pastel off my hand and I'm going to pull the tape off of this and see if there's anything
else we want to do, so I'll be right back. I haven't ruled leaving
out the stitching, even though in my mind, I am greatly resisting
the stitching. We've done everything on here. Make marks with a paint pen, add some writing, add some paint splatter, turn it upside down, and paint with a palette knife. So we've done everything
but the stitching, haven't ruled it out, but I am greatly resisting it. Let's pull our tape off
because I'd have to have them up anyway and see if adding anything on top
of this is going to make it any better or just
make it more chaotic. Look at that. That's pretty. I love the peeling of the
tape, the great reveal, because really that's
what finishes it, makes it a piece of art to me, is when you pull that tape off and you see that clean edge. That's why I don't
work all the way to the edge of the paper too, I like to be able to
secure the paper down. Then I like to be able
to peel the tape off. So look at that. So we turned this upside
down at some point. So which way do we
really like it? Do we really like it that way? Or you know what, now that I did that
I like it this way. We're going to do
that one that way. Which way do we
really like this one? I'm maybe feeling that way, so back upside down
the other way. So before I completely
give up on the stitching, let's just look and see, is that going to really add
anything to either one of these pieces and we don't have
to add it to both pieces. I think I got this paper wet. This might be a
good point to add some finishing spray
to our piece because we did use pastels on here. But for the moment, I'm just going to think
about this for a second. See what do we have here? Got some burlap. So let's just cut this or
I mean, I can untie it, but it's in a knot there.
Let's just cut it. So I have a bow left. That's an ugly bow, but [LAUGHTER] I do
like this burlap. Would that add anything if I did a little collage bit on here? Not really. Now here at the end where I'm actually
to where I want it. I don t think that this is
going to add to this at all. If I were going to do
stitching on here, I almost want that stitching
to be green or burgundy. I think on mine, I'm going to take this
and not do the stitching. So I did five cards, the stitching was a sixth card. Then I do reserve
the right to not add that particular prompt to my art piece if I don't love it. So you do have permission, give yourself
permission to not use a prompt that
doesn't fit in with the piece by the
time you get here. So look at what we have
leftover though. Look at that. These are so yummy and
I like that they're larger pieces than
I normally do. These are six-by-nine. Look at those, so pretty. Another thing that I always
give myself permission to do is if I do the bigger piece, maybe there's a five-by-five
in there that I love better. I do come back and
take a look to see, do I love it as the full piece
or do I want to cut that down to a piece that's got a section in it
that I love better. Keep that in mind too. I'm not going to
cut these because I actually love these
the way they are. Look how pretty those came out. Again, next project where
we did some prompts. So I'm going to do
another one where I do the whole big piece
and we do some prompts, so I can't wait to do
that project with you. Now, we'll get started and I'll see you back
in class. [MUSIC]
8. Making Your Own Art Cards: [MUSIC]. I was
thinking yesterday of another fun project
for us to do, and I thought, wouldn't
it be fun if we made our own deck of art cards? I know I've made my own
deck out of pre-made little business card shapes here and
I really like using those, but wouldn't it
be fun if we made them out of some of our art? I was really inspired
by this wisdom of the forest card deck that I had gotten from an artist on
Instagram, Jess Purser. She takes her beautiful
art and has it on a card with an inspiration
word just under there. You could use something like
this as an inspiration deck, art prompt deck,
and oracle deck. You could create all
fun stuff like this. I like that you can then
pull a card and use that as your inspiration or your intuitive word of the
day or your art prompt. So I really love
things like this. If I see an artist
that's created something wonderful like that, I might end up buying it because sometimes I like to look at
it and find inspiration. So I'm still going
to be inspired by the art prompts that I talked about in the art prompt video, and certainly use
all of the ones that I've thought of and
then add some of your own. But I've done several
fun little cards here out of actual pieces
of art that I created. If you do these, and we'll do a big one
just to give it a try out. But in my abstract
venture videos that I've done in other
little workshops, we paint a whole big piece of paper with random
marks and colors. Then when we're all
done, we can cut that into little pieces of art. In this case, I have a whole
bunch of leftovers. Usually I say, these are
perfect for collage and they're perfect for doing little cards and fun little things out of it. For my little samples
that I was playing with, these are the
pieces that I used, the leftover pieces
from prior paintings. But today what we
could do is we could paint a whole whole
and cut these into card sized pieces
as we're going, and then write our
prompts on it. I thought of several
different ways that we could do that. Feel free to do any of
these that look inspiring. One way is to cut your cards. These are three by four, which is an approximate
size of a card. You can do them square, you can do larger, you can do them smaller
like a business card. This is more like
one-and-a-half by three, maybe three and a quarter. Pick a size that
you like and that's the size to make
your whole deck. What I've done on this
first one is I've wrote my prompt down below. Then I've cut a smaller piece and glued it down with
a glue stick and I just used an acid free craft
glue stick to do that. I have cut the edges so that
it's nice and finished. I cut the edges of my little art piece so
that it was finished. I have a very old corner cutter. I thought I had one
that was just rounded, which I know you can find
anywhere that sells crafts. You want a rounded
corner cutter, but this is a very old one from scrapbook and days from
creative memories who is out of business so you're not
going to be able to find this exact cutter that I have. But I know you can find interesting shaped
cutters over in the craft section of the
Micheal's and the Hobby Lobby and anywhere that they sell all those ranger type products. Just get yourself
a corner cutter to then be able to nicely finish
the corners of your pieces. Because look how nice and
finish that looks as a card rather than just a
straight edge that looks like I didn't take the
time to finish it. So I love this because
you can do your prompt or your word or your
inspiration below it. Little piece of art above it, and you can have a whole little
deck of cards like that. That's fun. This is
really great for all those leftover pieces that we make doing some
of those abstracts. This is another way
that you could do that. You can take one of
those pieces of art, cut it into three inches by four inches, cut your corners. You could take a little
white piece of paper and just write on it and glue
that on with that glue stick. That's another way to do it. This is another way to do it. This is a same size, another piece of art, but we haven't done anything
with art on the one side, but on the other side, we wrote our paint using a palette knife prompt or whatever prompt you
want to put there. Then too, what I was
really inspired by with these little cards was
when you turned it over, there's fun little stars and
things on the back of that. So there's nothing saying, on something like
this that we don't continue to decorate
it even further, so that when we flip it over, we have some really nice design. Mark-making, whatever
it is that you want to do on the back side along with your writing so
that both sides are decorated. I really like this
personally because then we have a whole little
piece of art on one side. We can have a whole stack of these with different
patterns on, and depending on where it
got cut out of our sheet. Then on the back side we can
see our prompt and some fun little marks that we can refer
to later as inspiration. I like this personally. That might be what I do. Here's another one where I've
taken a piece, cut it out, and wrote with a
sharpie right on top of it what my prompt was. So that's another idea. Here's one where
I've cut it out, and I've wrote on here
with my white posca pen. Then just to show you how easy it is to cut these corners, you just slip the corner
in and you cut it and look how pretty that instantly
finished that piece for us. I really like this piece of art, but I don't like the paint
pen on top of it and I didn't personally love the
sharpie on top of it. That was just my own thoughts. This one was the piece of
art that I cut same size. Then I actually took some white gesso which I
had sitting over here. I painted a space for me to write on and then
just took my pencil and draw around it and
wrote on it with a sharpie or I could have used a paint pen or whatever
it was that inspired me. That's another idea. So I'm just trying to give you some good ideas for how
you could do these. I really personally like this one where I wrote
on the other side. Another thing you
could do too is you could have taken
strips of white paper, wrote your prompt on it, and glued those down like
we glued this one down. So all good ideas that were
just brainstorm in there. So If you like any of these
ideas for an art deck, feel free to use any of
those that I've thought up. Then what I'm going to do is create a piece to
do as my art deck. So I'm going to take
a piece of paper. This is just cold press
watercolor paper. I'm going to just
tape that down to a board and create one
of my abstract pieces, and then we can cut this up into cards and create an
art deck out of these. If you're doing 30
or 40 prompts you might need to do several
different pieces, but I really love doing stuff like this where we're
doing a big piece and cutting things out of
it because then we can create without putting a
lot of thought into it, without getting paralyzed
in the creation process. This is my favorite way to
make stuff and I know you'll hear me say that every single time I go to create something, but it really is my very
favorite way to create. I've just got a bunch of
acrylic paints up here. I haven't even decided what colors I want
to use or anything, I just wanted to be really
intuitive about this. This is just a pencil, so I might go ahead
and just start marking here on that paper. [NOISE] Another fun thing you could do if you really make a set that you're
so in love with, that you can't wait
to share with others. I picked neon pink. That wasn't quite
what I had in mind. [LAUGHTER] That was
exciting a little surprise. Let's do orange, yellow. I was going to do
a pink and orange, but the neon pink wasn't exactly what I had
planned on pulling out. Let's use this
color called pink. I might still use that neon, but that was a surprise. Let's see. Let's just do
pink and orange for now. We can pull more
out in a minute. I've got some gesso over here. I'm going to pull
out some gesso. That's clear gesso, this is white gesso. I like to mix those in my paint. Now, a lot of the previous scrap pieces
of paper that I did have pastel on it
and I did not put a finishing spray
on top of these. So every time I touch them
I get pastel on my fingers. For something like
this where we're going to be using it as a card deck, we're going to be touching it. We're going to be using this maybe every time we get
out our art supplies. I feel like I might not
want to use something on the top that is going
to smear like a pastel. If I do, I'm going to take this whole paper out and
spray it with finishing spray several times
before I cut it up just because
we're going to make a big mess every time we use
these cards if we don't. I've got just a one-inch
cheap paintbrush here and I'm going to just start
laying some color on here. My goal is going to
be color and marks and anything interesting that I feel will add to my piece and then we will
cut these into a card deck. Like I said, if
you're doing 30 or 40 to make a whole nice
rounded number, nice quantity to
work with later, you might need to do
three or four of these. Each one could be the same color range if
you wanted them to match. It could be completely
different colors if you want to just have different
shades of whatever. You can get creative with this. Do it however it inspires you. Let's just lay some paint down. I'm already loving these colors, and we'll have that neon
pink as a surprise maybe. I love pink and orange
for some reason. Who knew because there's no
pink and orange in my house. I don't decorate with
pink and orange. I don't think there's
anything pink and orange that I do, but when I get to
painting I have noticed this color
really appeals to me. There's probably pink and
orange in my wardrobe, but I don't even know
how much of that's in my wardrobe since I hadn't
gone shopping in awhile. [LAUGHTER] I think I've always been drawn to
pinks and orange. When I was younger I
worked at Home Depot, and we wore orange aprons. I didn't get any more
orange than that. [LAUGHTER] I can't say that
was my favorite color, orange, but that's
funny that I wore an orange apron for years and years and I don't
hate the color. [NOISE] Now we got
some color laid down. We'll come back in
here with some white. I also want to go ahead and
get my mark making tools and this will be a good
time to go ahead and create some marks. [NOISE] You know what I was just thinking
I want to do too? I want to get my stencils out and maybe do
some stenciling. So I might. What if we do stenciling
with this neon? Let's try this neon and see. Wow, look at that. Oh my goodness, that's a color. Not quite what I had [LAUGHTER] thought when I initially started
picking up paint, but we're doing this
wet-on-wet so it's not as neon as it
started out but fun. This is the time
to experiment with stencils and painting and
mark-making and just creating. Let's see what else
we got going on here. Maybe I want some more
white and I might start pushing back
some of these marks. I just love it too
when the pink and orange starts to combine. It's so pretty. Another color I really love, and I could have pulled that
out too is yellow ocher. That would have been
pretty in this collection. [NOISE] Hang up all of these. Now just imagine when we cut
this into smaller pieces, how fun is this going to be? [NOISE] This is the
time to go ahead, experiment with
your paint colors, experiment with your
mark making tools. I'm going to let this dry for just a moment and then
I'll be right back. [MUSIC]
9. Finishing our cards: This is mostly dry. So what I'm going to do, let's go ahead and
peel the tape. Then I might go ahead
and cut this up. Then I could continue to
decorate on my little cards because of all the pieces that I already had in my little
scrap pile to cut up, they had a lot more marks
and things on them. You can leave it planer. You can continue decorating it. I like to add a little
paint pen stuffed to mine, a lot of times. I'm going to use a bigger
cutting mat on this so that I can use this handy-dandy clear
ruler that I have. This is a three-inch ruler. I like that because now
I can just put it down, align it up with the edge, and use the other edge as my cutting surface
for three inches. Then for the four inches, we can cut that out
in a moment too. But I'm going to go ahead and I'm going to cut
these into strips. They may still be
a tiny bit wet. I might be painting on my
ruler, but that's okay. We'll cut this piece
off here also. Then you just got to decide, which one of those ways
that I showed you, those ideas that I had, which way do you want to create? I'm creating this for myself. I like being able
to flip it over, seeing some marks and an inspiration phrase
above me on my art table, I have this just piece
of watercolor paper. I've done ideas for mark-making that I keep hanging up here
on the board above me. I might use some
of these as ideas for things to mark around
a phrase that I put. Then I have mark-making ideas and an inspirational phrase. But I keep that hanging on
the board up behind me. Do you want to do that
or do you want to have pretty white cards with a piece
of art inspiration on it? You could draw and paint on
a little card like this too. If you wanted to do something
of your artwork in a square that maybe you have a
pencil drawing around or something right
on that white card you don't have to glue
another piece on top. I was just brainstorming and seeing how
creative could I get with these little cards
that I'm making myself. I had a thought. I don't know if I ever
finish that thought, but what if you created a
deck that you so loved? You could scan it
into your computer. That one's a little bit smaller, so I might not use
that for this. Let's make the square. This set will be three
by three squares. How about that? Or at least from mine. But then I can just mark these
with my ruler really easy. What if you scan these
into your computer and then you can have them
printed like mood cards? I like mood because they're
such beautiful cards. Then these little
pieces that you end up with leftover can just put those in your pile of collage scraps or scraps to do something
else with like I did. Because then you can pull it out when you're inspired to
do something like this and you have little scraps
already ready to go. Then once we get cut out, you can leave them
like you got them. You can keep working
on your art. You could keep adding marks
and fun things to these. I could keep working
on this more. I don't have to stop just
because I'm cutting them up. You can make these as artsy
and decorative as you want. But I would keep in mind if
it's something you're going to be using to touch
like I was mentioning, then be careful
whatever it is that you put on that top layer. Because if you use pastels, you'll be scrubbing those
everywhere forever. So now we've got some
of our cards cut out. What we could do if you've
used a light enough color and you've kept it where you
could right on top of it, we could take our white paint
pen and be inspired by that and do mark-making
and write our things. Let's say my original thing was paint using a palette knife, if I'm taking my
white paint pen, I might look at this and think where would
I want that to be? What other mark-making
could I do on this? Let's say that's what
I've got going on. Now, I want to do maybe some marks and
some dots perhaps. Maybe I'll come back on here with some different
things that I draw. Maybe I want to go ahead
and add some dots. You could do these. You could do collage with these. You could all kinds of stuff. I did keep it simple
with my paints and my marks to begin with because I knew I'd
be cutting these up. But on some of these, and if you go back to some of my abstract adventure classes, especially number 1, I really go to town with lots of paints and
marks and supplies and different things
that are real fun that you might spend some
time really creating and thinking and playing
with your supplies. But look how funny fun that is. That is real fun. I do want to cut
the edges because I'd want it to look like
a finished maybe card. So if we cut our edges, I don't know, that I liked the Posca
Pen as the writings, so you might experiment with your different
pins and stuff, but look how pretty that
is as a cut off card. Now, I like that a lot. Now if we want to
do this other way, which I think I'd rather do, and we'll cut these edges. Then you can pick a color. You can pick gold. I think I'm going to do gold. Maybe on the back side, I write down my prompt. I don't have the
best handwriting. So you don't have to have
the best handwriting. Don't let that be a deterrent. Maybe I want to use this to make marks all around
whatever I wrote. This will be my
mark inspiration on top of my words, my prompts. Then when I look at both
sides of this paper, it'd be pretty. There we go, I like that. Now if I use either side,
they're both pretty. I like that a lot. That's my choice. I want you to consider
what kind of card you'd like to make for yourself, whether it's the
little business cards that I started with
that I showed you that I've been using
for quite a while, or if you want to do your own little set of art
cards out of some of your art, which I particularly love. Those are some fun ideas too. I hope you have fun
with this project. I want you to definitely
make a deck of at least 30. See, I love these. Look how pretty those are. These are my favorite. That's my personal. You see, I've got
so much more going on on the original
cards that I've got. I've kept these little simpler on the thing
that I painted. But you can be as
simple or as busy and filled as you want. What you could do too
is paint the abstract cut out pieces like I do in
the abstract adventures. Then whatever pieces
that you have leftover from making your art, that's what you could use
to make your deck of cards. Then you're making some
yummy pieces of art and you're ending up with some
really beautiful leftovers that you can then use
as your art cards. I love making the abstracts and using the pieces like that. Look at all these
yummy different pieces that I've got that would be great for a section on a
card or a whole card itself. Look at all that. Super fun. I hope you get inspired
with this project to create a set out
of your own art. This is one of my favorites. I love this card here. It's very simple with my prompt. One last thought to
that I forgot to mention that I
happen to think of, before I let you go is, if you think that your
handwriting is just so terrible that you'd rather it look prettier than
your handwriting, you can print out words
or phrases in a font that you like on your computer. You can print that out on a white paper and
glue those down. Then maybe draw a little frame around each one as
you're doing that. That's another thought. You don't have to use
your own handwriting. Just pick out some fonts and some phrases
and some prompts that you want to print out
on printer paper, cut it out and glue those onto your
finished little piece of art, draw a little frame
around it if you want, and let that be your art card. If you don't like
your own handwriting and you want it to be something
that's a little neater, more uniform, more readable, then print out some
phrases and such and then you can glue
those onto your cards too. Just an extra thought
that I forgot to mention as we were going through. I will see you back in class.
10. Using Art Prompts For Large Cut Out Piece: [MUSIC] Today I thought
I'd do a bonus lesson because sometimes when I'm working on a particular subject or doing a workshop like this, I get so excited about
the subject that I just want to keep
going for another day. What I thought I would do today is take some inspiration from the art deck and use a
paper I don't normally use. I've pulled out a hot
press watercolor paper which is different
than the cold press. It's very smooth, whereas the cold press
has a texture to it. The rough press is so rough, it's almost like we send
paper at our paper. I have a pad of the arches hot press and
you don't have to use arches for whatever you're doing but that's the
pad I happened to have. I'm going to use
a hot press pad. It's 140-pound weight. Because it's not as big as my coke press one that has
a great big piece of paper, I've taped down two sheets of hot press paper side-by-side, and I've just put a
piece of white artists tape here in the middle
tape in that middle down. I'm going to do one of
my search-out abstracts and what I've
considered is if I find something I loved that
sitting in between a seam, then we could sew that together and that would have a
sewing thing on top of it. I'm not necessarily looking
to do that on purpose, but I did think if there's something
sitting on the seam, that's a way that we
could handle that. I've got these infusions
colored stains powders which are colored bits of pigment mixed in with
walnut stain pigment. They give you just interesting
color when you use them. What I'm going to do is maybe spread some water
out and put this on there like we did with
our Payne's gray ink. Because the ink was one
of my favorite aspects of those smaller
abstracts that we did, I thought you might
just try that on some of these infusions, pigment colors that
I've just never used. I thought it would be fun. I have at the time that I bought these a
couple of years ago, I think they came from
maybe England or somewhere. They weren't local
and I ordered them and you may not be able to
get these now, I don't know. I haven't looked to see if
it's a current product that's available out there but they are fun and I've
never used them. They're just hanging out in my art room and it's got
lots of different colors. I thought I'd use a product on this that I've never
used before I thought. Let's just experiment with
what we have in our art room. I'm also going to put
out some acrylic colors. I'm going to put out
that fun Caribbean pink, which is a Jarvan color, and you can use
any paint that you want and whatever
colors grabs you. Because I'm using a terracotta, I thought I would put out maybe this maroon and maybe a yellow ocher and will be
in that yellow, pink, orange color
family that I like. Maybe totally different
than what I'm thinking when we're done, but we'll give it a try. I'm going to put out
some white gesso and some clear gesso. I've also got out a couple of neo-color crayons
and then I've got my punchella
that I like and I've got some different
paint markers, my marking tool, my clay tool. I've got my posca
pen and I've got my mechanical
pencil, my Stabilo. I've got a sharpie here. I've just got these sitting
to the side because I'm also trying to limit my
supplies for this. Then as we go, I've got
my card sitting up here. This is in general the way that I might
normally use these. I would go ahead and decide. Here's what I'm going to use. Let's go ahead and paint and look around and see
what we've got going. If we get to a point that we're like what else can we do, then I'm going to pull a card. If I pull a card, that's something
that we should have pulled right up front, like a paper variation
or something. I'll put that back and
pull a different card. That's what I'm starting with. I've got some water
over here and a big paintbrush with the
water and I think of going to start off with
some water and I'll be working on both
pieces of paper and then I'm going to
take these infusions terracotta and work
that around the paper. It may end up looking grainy. It may look like pigment with
coffee because this has got walnut stain pigment pieces in here in addition
to the orange. What I thought I could do
with these two after I had pulled these out is
it's basically pigment. I could make some of
my own paints out of these pigment pieces
and use them instead of just letting them sit in
the cabinet because I have suppliers now to create some
of my own natural paints. I may do that too. I may use that. I may use these as pigment
for some paints or something. I've got that going in
there and I'm going to start maybe adding
in some paint here. It's a really pretty color
though I like this color. Maybe work on big blocks
of paint maybe this time. I always get a real
tight with the paint and sometimes I wish I would get a little bit wider and
bigger with my bolder, with my color blocks so I might work on
that a little bit. I'm going to grab
another paintbrush here. Maybe we'll grab this one. I have found if
you're looking to make bigger color areas, use bigger paint brushes. I know that sounds
like common sense, but you'd be surprised
that it isn't to me. I would use little bitty
paint brushes and be like, why can't I get real
pretty big areas of color? Then it dawned on me one day. Maybe the bigger
areas need to be a bigger tool. I do like this. Let me grab a third paintbrush and maybe come in
here with some ocher. I like mixing my acrylic
paint with the gesso so that I can later keep drawing
on top of the paint. Acrylic is real, plasticky, and shiny and it's just not
going to let me draw on top of it without some
type of additive, either in the paint or
on top of the paint. If you don't want to
mix your paint with gesso you certainly
don't have to. You could paint a clear layer
of gesso on the top when you're done either way. I need to before this
completely drys everywhere, maybe come in here with
one of my tools or my pencil and start making
some marks in the paint. We could do this with
our non-dominant hand. Maybe on one side, do your dominant hand
on the other side, do your non-dominant hand. I'm going to come back on
here with some paint now. I'm just going to continue
to build up the layers and the color until I get
to a point where I'm like is there something
else I need to do and then we'll
pull an art card. Let me just continue adding
a little bit of paint here. Let me set that to the side. Let's see what else
we want to do. I've got the neo-colors here, so I might go ahead and do some marks with
the neo-color crayons. These are water-soluble,
so I could come back on here with some
water if I wanted to. I like the black
because it gives us a nice little darker
shade in here. That's fun. Now if I do something
on one side, I'm probably going
to do a little bit of it on the other side just to have some
consistency there. We could do shapes, we don't
have to do all scribble like I could do.
Oh, look at that. I like this color. This is crimson alizarin. It's that pretty crimson color and this draws on top of
that stain really nicely. Be careful where you're
setting your hand down because we are working
still with wet paints here. I might need to prompt my one hand on something
other than the painting. Let's take a moment and
let this dry a little bit and pull a card and see
what our card says. Oh, make a mark you've
never made before. Let me let this dry for a moment and I'll be
right back. [MUSIC]
11. Adding details: [MUSIC] We've got to a mark
you've never made before. I have my little sampler
set of little marks that I drew out as inspiration at one point and
sometimes I add to this. I really like some of those. I would almost like some big something that I've
not done on a lot of these. Maybe I could use something
like this as my inspiration. You might take a look at that and see if there's
anything there that appeals to you that
you might want to try. I might also use a plasticky tool or
it's a plasticky tool. I don't have my plasticky tool, but I've got these catalysts. I could use a catalyst
and make a mark. Also have some
catalyst paint brushes that are throwing paint
brushes around my room. Here we go. That'll give
me a different mark. What if we take
maybe something and swipe across here like
we've never done before. That might be something. Could do that with
some ink also. Let's get some marks on here that we may
or may not like. But the name of this game is to experiment sometimes with
things you've never done. That's how we discover new, yummy things that
we're going to do in our art after that. Look at those. Those are fun. While I have this catalyst out, I really like using this
tool for mark-making. We might as well go ahead and make some lines
because I like lines. [NOISE] Maybe this is a mark
you've never done before. I love using the
catalyst to make lines, so you might give
some of that a try. Then if we've got extra
paint on the catalyst, we can go ahead and
smear that into our painting. I like that. Fun. What else do we got? Let's try another one. Add
some paint with your fingers. You know what I might
want to do is use this pink and add some dots with the pink
in this darker color. If you're using a paint or
you're sensitive to paint, put some gloves on and
you can do this just as easily with the gloves. I like that. Let's
see what else. I usually like to
paint with my fingers. That's something fun to add some just interesting
color areas in here that I just like to get in here
with my fingers really. I really just like
to finger paint. [LAUGHTER] At this point, I'm not even thinking about
where I'm doing stuff, I'm really getting in here fast and with
as little thought as possible so that we're not worried about
composition and where the colors are working
together or not at the moment. That's how at the end, I go through and search
for things that I love. That's what I love about
this technique because with photography I'm
always searching out things and then
I'm framing out that scene at that time
and I don't really have control over that scene usually unless it's a
setup I'm doing here in my studio and I'm framing
that out in camera. I'm using this as
that same type thing. I'm doing interesting
things all over, but it's not the final
composition and then I'm framing it out just like I'm framing things out in camera. I think that's why I
love this so much, because it just pulls back
from my photography roots. The way that for a
very long time I have composed and
moved things around. With the painting, I get
such joy out of that, searching out yummy
compositions after I sit here and have such
fun playing in the paint. Because if I'm
sitting down to be seriously painting
something and I've got a size of paper that I'm limited to and I'm
trying to create some masterpiece I always get so mad because things
just don't work out right for me and then I'll leave my table upset and I don't
come back for awhile. Let's use some of
our punchinella. We might do some white dots. I'm going to get a dry
paintbrush because I like the way this
looks dry brushing color on and we
don't have to do. We could do a color though. Do we want some bright color talking to us here?
What might we like? Do we want maybe
some bright pink? I don't think I like that. Maybe we'll go into
use some color you've never used
before territory here. I like this color.
This is vermilion red. From the Arteza colors, it is brighter [LAUGHTER]
out here than I was thinking it was going
to be. What the heck? Let's just go for it. I like playing with these experimental color
palettes like this. I'm just going a little
bit here real dry. Because then I discover things that is pretty that I wouldn't
have thought otherwise. I like that about it. I like discovering things. I like doing stuff that I
wouldn't have normally done, using colors that I might
never have pulled out. Like I might have not
ever pulled out this red. That is very interesting. This is not a color palette
that I would say is my signature color
palette by any means. That's why I like every single
time I do one of these. I like to play with my supplies, play with my colors. I like that. Try out things that I
wouldn't have normally done. Then when I get to painting
something serious later or something that
I really want to create in a certain color way, I have different things
to come back to. Let's see here. Let's try a different substrate than
we normally would use. I did actually do
that to begin with. Use your non-dominant hand to draw some lines. I like that. I might take my white
paint pen and play here with some lines with my left hand since I'm not left-handed,
Whatever you're not. I like that. Look at there. Some of this paint is still wet, so I'm picking up
that wet paint. Now what are two I might do. I could go ahead
and add some dots. I like dots. [MUSIC] I think I will save some
more dots for after we find some compositions
that we like. Let's just see,
is there anything that's starting to grab me? I like this right up in here, like that right there
is grabbing me, I do like that. After I get these cut out, I get so excited because even as I'm painting,
I start to doubt. I like this right in here. I start to doubt,
do I like anything? Is anything starting
to work out? I might take some paint, add some more paint. We could always add paint, I like this one actually though. Don't know that I like this. Whatever I was creating. Totally missed whatever I
was saying there sorry. [LAUGHTER] I always
start to doubt, I'm I going to like anything but then I cut stuff
out and then I'm like, whoa, my favorite piece ever. [LAUGHTER] This is fun right in here I do like
this, I do like that. One of our prompts is add overlapping circles or squares
or triangles or whatever. I do like having this strange circly
thing going in there. I like doing that. I'm not sure I'm ready to call it done yet so let's
pick one more card. Add some black. Black, that's very interesting, I haven't added any black. I've got Mars black
here from the oh, I didn't quite
intend to do that. I've got the Mars black here. Not mean to dump that on there. [LAUGHTER] Guess we're
adding black no matter what. I'm going to get a
little palette knife and I probably will keep
some of that black, but we'll pull the rest of
it back off there we go. What do we want to
add black with? Here we go, this is
what I was looking for, this tool here. That's fun, this black
is more transparent, it's not really solid. I might just do some marks, hope I didn't go in between
something that I loved there. [LAUGHTER] You know
what else we could do? I was thinking a moment ago. Just wipe that off. I could take my jar, it's holding some paint stuff, but I could put
black on this and then have some big
black circles. That's fun because this is a jar that I use for
paint stuff anyway, I'm not really concerned
about the lip of it having color on it. I'll just put my pink
brushes back in there. Maybe wipe off the
edge and there we go, still my paint holder. [LAUGHTER] I like that fun. Also, have a black paint
pen I could always come back in here with
some black marks. I do like this and
then what we could do also is at the end, we could do some extra
marking after we get everything cut up
to how we like it. I'm almost thinking, this right here is pretty
and you see how it's got that line right there so we might end up doing
some stitching. Because I opted out of
that on another piece in this workshop because
I wasn't feeling it. I think this work, this piece I'm feeling it, so we move the paint
out of the way. Let me go ahead and
peel this up and then we will search out and
cut out some pieces. Of course, I would
have a line here. I shouldn't have put that line there if I was going to do that. Let's pull that paint back. Let's do something with that
line before I cut these up. I didn't think that
out very good, did I? I don't know what I was
thinking there I guess I was just in my mind thinking
that would have pink there. Well now you know, if
you're doing this, [LAUGHTER] don't put
tape down the middle. I need some more of
these little paints out let's pull
some of these out. Still I might not end up
using anything up this line, but I hate to not have that choice since I've
thought was feeling it. Wouldn't get anything
out of that center part. Darn it. Let me get
a paintbrush here. Now I'm sad, I had convinced my mind that I was ready
to stitch on this. [MUSIC] I don't think I like
it as much now, but maybe with the
stitching I would. Maybe I like that up there. We're going to consider
it now because maybe I like this up here and
I could do stitching. The only stuff I
have still is the book binders thread but
if I stitch in black, you'll definitely see it and I have black out
on my big needle. I have a great, big
needle on that. That might look good anyway. I do like this up here. I think I'm really determined
to stitch on this one, especially since I went
down to the last one. [LAUGHTER] Let me peel the tape and get my cutting board
out and I'll be right back. [MUSIC]
12. Finishing up and cutting out art: [MUSIC] Ready to
cut our piece out, and I've got a couple of
different sizes here. I've got five by five, five by seven, and I got six by six, which I think my six
by six is a little bit crooked. But that's okay. So I could cut out several
different sizes here, depending on what it
is I think I like. I really like this five by
five size. A lot of times. I like it for this piece right here which I know
I want to stitch. So I like that. But do I like that? Do I like it bigger? I don't think I
like it that size. I don't like it this size. See, the five by five
almost cuts that piece of Burgundy right where I want it rather than it being so big. So I know I
definitely like that. I also like this one down here. Another thing that
we could do is we could turn this around. We don't have to keep it all
going the same direction. And see if we like anything better going
the other direction. I have taken a little piece
of tape on the back of this, and just taped it right at the top and the bottom
to kind of keep it together as I'm deciding
on what I want to cut out, in case you're wondering
how I just did that. See now I still like this
here, even this way. Kind of like that right there. Yeah, I'm liking that
right there a lot. I think that's far
enough over that I can definitely
get. I love those. All right, so let's go ahead. Commit to this. You can draw this with a pencil, and cut it out with scissors. You can mark the edges and take a big ruler and
then cut that out. I've got a board
that I use to do this that's the same size
as the center of this that I'm going to use as
my cutout thing here. I've got my x-acto knife,
and it may be dull, so eventually, I'll just
have to change this out. But I just try to
follow the edge of my piece preferably
without cutting the wood, which I do sometimes
just like that. [LAUGHTER] But I do just find it faster to just use
this as my guide to cut. So this is a two-piecer, and what I might do
before I pick it up is take a little piece of tape and get it under this piece before I
completely pick it up. Because we're going to stitch
that and I just want it to stay in place until we do it, because I'm determined
to stitch on this. Look how pretty that is. Now when we add a little row
of stitching down there, how pretty you think
that's going to be? I am thrilled with that. Definitely a fun
colorway that I've not played with before. I like this one over here. We can stitch on ones
that we didn't cut. But I just thought
that cutting on that one made the
stitching perfect. I think I like that
one right there maybe. Yeah, I think right there. All right, so let's
get that right there. We'll cut that out. Now, that one I love. I love that one. Next to this one
that we have with the stitching. I love that one. [LAUGHTER] I like getting
excited about art. Now see, I don't want this
with a full circle in it. That one's not really
talking to me. I almost wish I didn't
have these in there, and I think that would
have been beautiful, but we do have them in there. Let's turn this back
around and see. I like this corner a lot, so let's go with that corner. I think I like it. I think I like it right there. I like that. Let's see if we turn it around. I like that too. I am feeling that right there. [LAUGHTER] I like this
a lot. I like that. Let's see what we got left. I'm kind of liking
this right here. It's a little bit muddy, but maybe with some stitching, it would be less muddy. I don't like this
mark that I did. I don't like that there, so let's just cut that out. We could stitch it if we want to have two pieces
that we stitched. I think before I pull that off, I'm going to go ahead and
just tape the back of that. This is just artist
tape that I'm using. So I like it that way. Yeah, I like that a lot. [LAUGHTER] All right, so these other little pieces, I'm going to use those for collage paper or some
other project later, maybe little mini pieces of art. I like saving the leftover
stuff for stuff like that because I do stuff
like that. I enjoy it. Look how pretty that
little piece is. I can cut these out with
my scissors and keep revisiting these pieces later. This is a great big
piece that would be pretty in a collage, especially this right here. Like these right here, these could be like little
micro pieces of art. I like this piece right here. I really love this strip. Look at that strip. I love that. So these are going
to be leftover, yummy art things that we do. Let me get my needle
and thread out, and we will stitch on our
piece, so I'll be right back. I've cut my piece
out ready to stitch, and I have two pieces
that we can stitch. I think to make this
really easy on myself, I have this off and it's just this thing with a
sharp edge and you know what I could've used too this clay tool that I
used for mark making. It's got a sharp edge. I like the hand grip on this, but either tool, you could
use something like this. I think I'm going to
go ahead and just mark my holes right now. That way when I
get to stitching, it's already got a hole
there for the needle. It's like it's already a
guide for that needle. I don't know how
straight those are, but you can see it makes little
needle marks on the back. I'm going to leave
that tape on the back, I'm not going to remove that. I'm going to use that
as my needle guides. I'm doing this on my cutting mat but it's one of those
self-healing mats. So it doesn't matter. It's going to self heal itself, it's the perfect mat to
do this kind of thing on. I'm not pushing so
hard that we're going all the way
through the mat. I'm just getting
through the paper. If you wanted these to be
perfect and same spacing apart, you can line these
up with a ruler. I didn't do that,
they may not be perfect from top to bottom. Just depends on how specific you'd like to be
when you're stitching. In this thread is extra thick, so I put a knot
at the end of it. Should I do straight or cross
hatches filling little x's? I didn't measure out the thread, I'm just hoping it's long
enough or we'll have to start. Oh, yeah, I like that
x. Look at that. I'm just hoping is long enough because it was
already threaded on my needle [LAUGHTER]
If you do little x's, it might be less
obvious if they're not perfectly straight too, just as a side thought there. Look at that. These are so fun. Now, I'm glad that
I did that with that cut in there and we
didn't have to have that cut. We can do stitching on anything. We can do stitching
with any of these, but I'm glad that
cut was there to make me come up with
a creative solution. Just enough thread. Look how beautiful that
is, oh my goodness. Because I've got this
thread leftover, I'm just going to make a
little knot on the back. Now, if you're going to do
this where you're trying to mount this to a wooden board, having something like this on the back is going
to make a lump. So you got to really figure ahead of time how are you
going to mount these. If you're going to
mount them, you need to use thinner thread because these are going
to make a lumpy box. If you do something like that, it's not going to lay as flat as if I'm framing
it in a frame. How cool that is though. Really, if you want
to do something like that but you don't want to have the real
thick back on it, then you might take
some black paint and do little x marks
all the way down it, or use a thinner thread, like an embroidery thread or a sewing thread
that's real thin. So keep that in mind
when you're deciding on sewing on something. How are you mounting it
and is your thread too thick to make that
a flat mount thing? But I do love how it turned out. If you just have a cut on it, we could just take our, we call that paint back. We could just make it look like stitching by using our
catalyst tool here. I'm not being as
careful as I could be, but it definitely
gives you the idea. We have the same look now
without any of the bulk, so that's fun too. Let me not get paint
all over everything, either way would be super fun. I love how both of those came
out, I'm super thrilled. Let me move this
paint out of the way. Then we can just take a
look and see if there's any last little marks that we're wanting to
make on our pieces. This is the time that
I would do that. I would just take one
last little glance. I want any little
marks or dots or any last little somethings
like on this one. Where's my paint pen? You don't have to
do them in white, I like white so I
do them in white. [NOISE] Let me just get this piece of paper and
start my paint pen here. There we go. So this one I might like something over here. Like maybe something that
looks like scribble. Some writing, some
lines of poetry. I want something right in
that little spot there perhaps and I want to
finish off the dots, I didn't really finish
off earlier [MUSIC] Yeah. So we could keep going, and going, and going on these, but I think for me I'm
going to call this done. Super happy with my
four little pieces. I hope you saw how much
fun that was to be working on a piece and then
come back later and say, okay, what else could I do now? I could make a mark
I've never made, I could add some paint
with my fingers. I could try a
different substrate, which we did upfront
because I was already inspired by that card
before I even got started. Use my non-dominant
hand drawing lines. I love doing that
and add some black. When you're making these cards, pick out things
that you like to do and then pick out things
that you never do and pick out things
that you just wouldn't even think that would have occurred to you to do, 30, 40, 50, a little cards. Then as you're working,
pull a card and say, well, what else can I do? What direction can I go? Where can this lead me and just see what it is
that you can come up with. Because look how
fun this set is. I'm just thrilled every time. I don't have anything set
in my mind when I do these, I just go with the flow and just let it lead me where
it's going to lead me. Then I end up with pretty
little pieces like that and this that I would not have
otherwise ended up with. I love the way this
ended up and I love this big squishy bit of see-through paint as a
mark or something that I've never done before that I wouldn't have thought to do. Love these. So hope you enjoy
this bonus project here. I've just started with these
little cards creating. This week I was just in
the mood and I was like, well I don't want to
put this away yet. So I decided to do a little bonus
project in here and I hope you really
enjoy doing these. Definitely come back and share a picture with us
and the projects. I will see you next time [MUSIC]
 DENISE LOVE, Artist & Creative Educator