Transcripts
1. Introduction: Get your free copy of
Ableton Live Lite. You struggling to install it or find it to
overwhelming to learn. Don't worry, I can help. I'm pleased to introduce you to my Ableton Live Lite
Beginners Course. Unlike other courses that overwhelming you with
so much information, I understand starting out
should be an exciting journey, not an overwhelming what
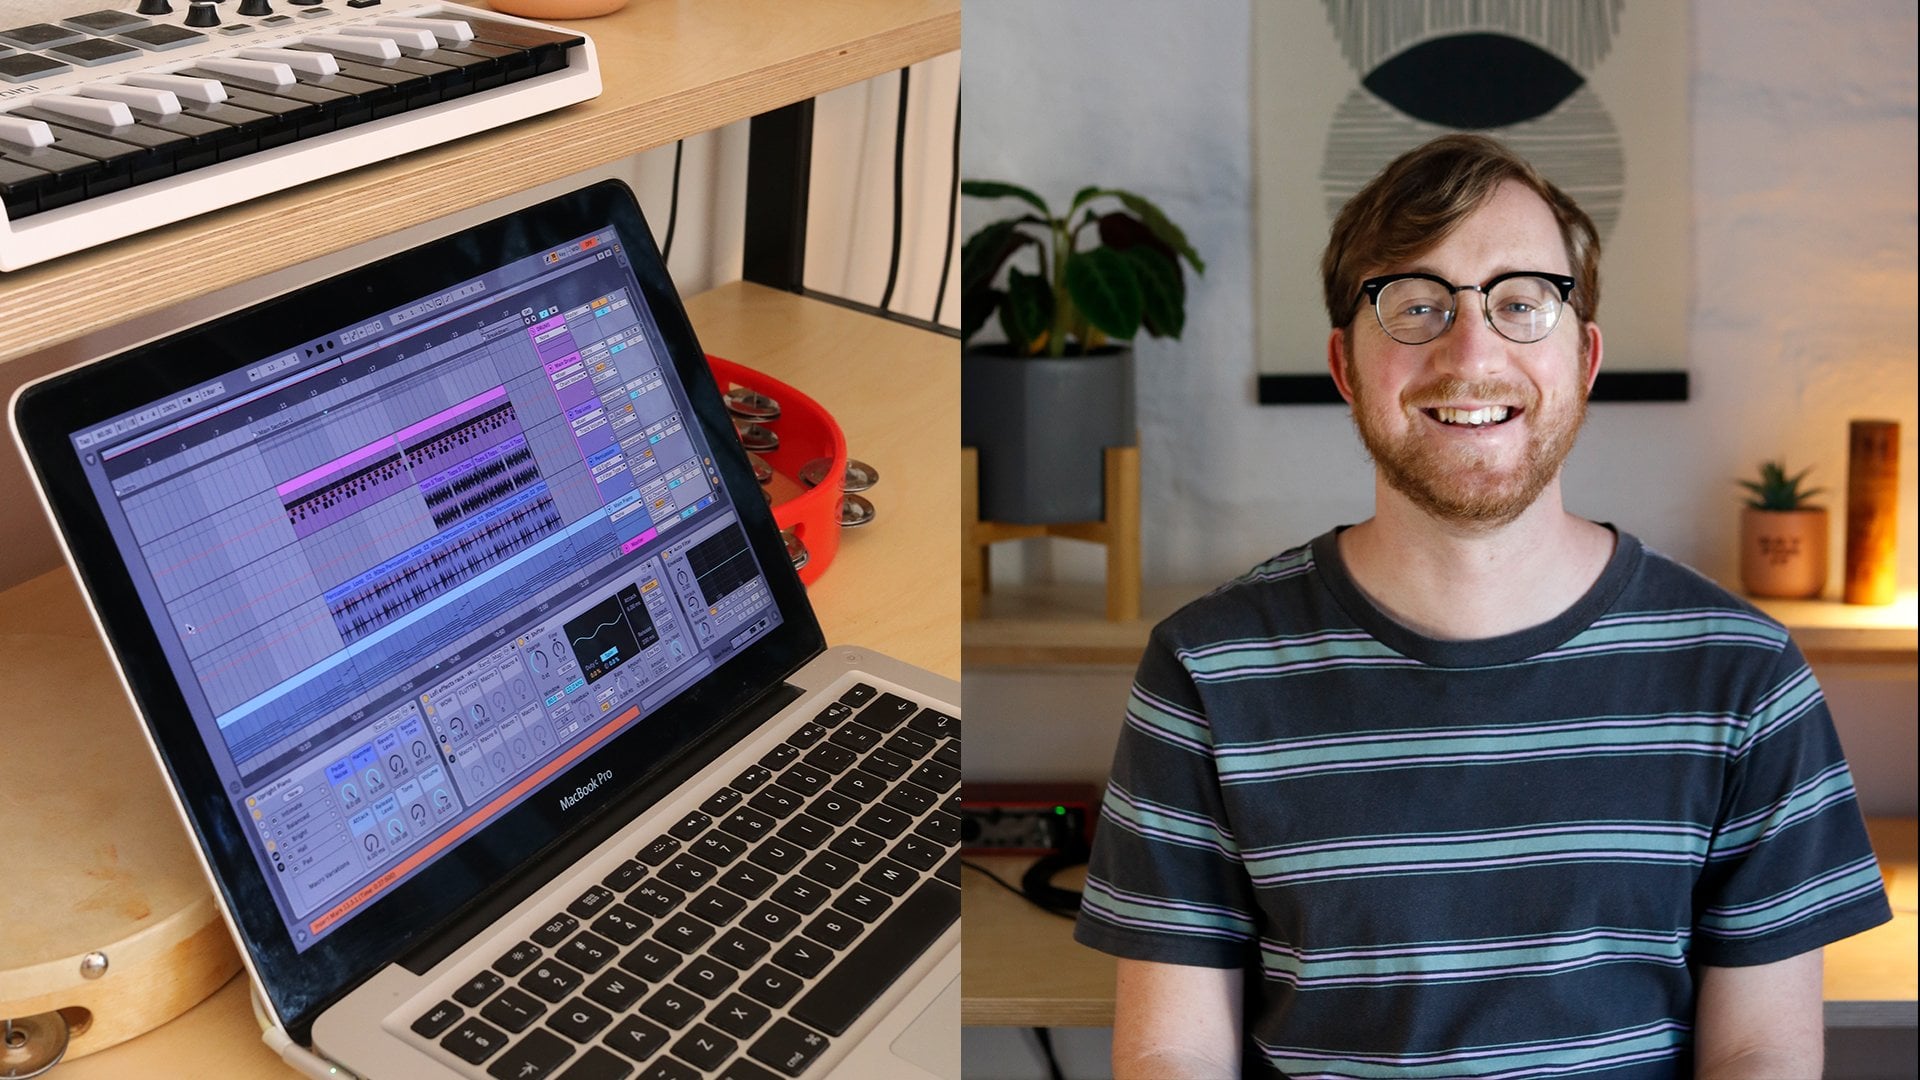
my name is Craig glow. I've been teaching
music technology for the past ten years, or something, UK's most
popular music universities. But this experience, I've
created the perfect balance of all the essential basics you need to get up and running
without confusing, you get ready to start
making music in next. No time. See you in class soon.
2. Module 1 - Overview of Ableton Live Lite and its features: Let's first discuss the
features of Ableton Live Lite. So if we scroll down here, key features remain
predominately the same as the, all the versions
of Ableton Live. And also it stacks up against any other professional
DAW in terms of the, it can do multi-track
recording up to 32-bit 192 khz sample rate, which basically means
it can record audio, playback audio to a
very high standard. You have all the
features that you would find an associate
with Ableton Live. You can include your
third party plug-in, so it's any extra audio effects or instruments you download. Now whether limitation
is we can only have to send return tracks, 16 scenes, eight mono
inputs and outputs, eight audio and midi tracks. So that's where
we're going to find the limitations and we'll
have a look trying to get to these limitations and see if it's a problem
for us. Okay. The other limitations
is the amount of included software
instruments. We only have 1234 audio effects. On the other hand,
we have quite a few. We scroll down here, you see there's quite a
few going on here, which we will go
into what they will do later in this course. And we have midi
effects as well. Again, we have quite a few. Then this here also shows all the amount of
extras you get. So how many racks? While racks are
basically like Presets, then how many midi clips? So you get some
preset midi clips. Also you get some
presets as well if the individual instruments
and Audio Effects templates. And then you get some
samples included as well. So that's all the features
of Ableton Live Lite
3. Module 1 - Installation and set up process: So let's get able to
Live Lite installed. So if we go here to
get Ableton Live Lite, first thing you need to do
is scroll down and find out that it will actually
work on your computer. So you need to see
if these specs match up with what you
have your computer. So what's really cool about Ableton Live is Mac
and PC compatible? Just check you have all the
specs on your Mac or PC K, If that's all good,
Let's download it. So that installation process for Ableton Live Lite is
slightly different. Able to Live intro Interests, pretty
much straightforward. You go to the shop here
and you go by now. And you would download intro. It would ask you to
create an account. You will then download it, press a button
enabled and allow. It says authorized
and it's authorized. Be harder with Lite and let me go through
the process and I'll refer back to how easy it
is with intro in a second. So we go Get Started. We click Download.
Once it's download, run through the
installation process, then go to your applications. And we're just going
to double-click open up able to Live. We're gonna go authorized
with ableton.com. Now, if you would
installing intro, this is all you will need to
do. You would click there. It would open up your account. You got open sweet. And it will go is installed
as long as you are still signed in on your
browser to your account where you purchased intro. Now if you see here it says
licenses do not match. So remember, Ableton Live Lite has to be purchased
with a controller. So it's not completely free, although it looks
like it's free there. You have to have a license. So I've brought a
launchpad by novation. I've signed into my
account on their website, and then I go to my
software and it shows all the software that
comes with my products. So you need to just
double-check before you purchase a product that comes
with Ableton Live Lite. I go view details and
here's my cereal. So I'm going to go copy that. Now I'm gonna go back to
Ableton Live website. You need to create
an account with Ableton, but it is free. Then once you've done
that, if you see up here I have my licenses. Click down. It says register a new product. And I'm gonna do is paste the code for Ableton
Live Lite, press Submit. Then we're going to do
the same thing with you for authorized with Ableton. Is Ableton Live Lite authorized. Click Authorize Pope
and Ableton Live. Sweet success. We've been authorized. Now if you don't
do that process, it will come up with an
orange bar down here saying you cannot
save and export. So it's really important
that you do this. Now, depending on
when you downloaded, you might need to do an update. And I'm just going
to update that now and then we'll get started. See you in the next video.
4. Module 1 - Interface orientation and navigation: This is the main window
of Ableton Live Lite. So let's go through and figure
out what all of this does. So it can be broken down
into 1234 main sections. So we have our transport
controls, our browser, a detailed view on our
main music creation area. So let's start with the
transport controls. So not gonna go
over all of them. I'll just go over the ones you need to get up and running. It's the first one is
the tempo up here. So this sets the speed at which you listen and
record your music. You can adjust it by
simply clicking up and scrolling up or scrolling down. You can double-click and type in value to be able to hear
the pulse of the song, you can use this thing here,
which is the metronome. So if I press space bar now
to engage the playback, you can hear the
metronome sound. I can slow it down, beat up, Double-click to get
back to the preset 120. Now if you click on this
little drop-down arrow here, we have options so we
can have accounting. So that gives you cinematic bars before it starts recording. That's always quite
good. And then you have some rhythm options here. And enable whilst only
Recording Standard off for now, next thing on the main
transport controls. So we have play,
which plays back any audio or midi information we would have engaged
or in arrange view. We have stopped, which stops, and if you double-click it
takes it back to the Start. Here we can see where we are. Bars, beats, and
then 16th notes. So if I press play here, 1234, you can see
it's going through. This enables us to record. Now we'll come onto
this in minute because this record works slightly different
to a traditional record and unnormal DAW. And this one here also
records, we have to record. This record basically deals with the other view
which has arrange view. This record deals with this view which is
called Session View. So this is called
a transport Record and this is called
our session record. We go over here, there's
a couple more features over here that we
should be aware of. Which is this little
feature here, which is our pencil tool, which we can press B to
engage that on and off. And that enables us to
draw in midi notes, which we will do
later in this course. Next is the keyboard here, which enables our query keyboard to turn into a midi controller. So be careful to
turn this on when, only when you need it, because some shortcuts become redundant. If you have disengaged, if you have a presser
shortcut that I say and it doesn't work, check that this little dude
up here isn't engaged. Then key mapping will
come on to that later. But this is where we
can essentially map, I think, to our query keyboard. So if I wanted to stop
button here to number one, I would just press
number one, press that. And then if I press one,
you see it flushes. Next is midi, which
is exactly same, but for an external
midi controller, it keeps you updated on your
performance of Ableton Live. So it shows you the percentage
of CPU you're using. I'm on two. So you can have a worn
when current CPU overload. And then also it tells you when you're audio engine is on, which we will come on to how to set you audio engine
up in a minute. So that's sort of
features you need to know about for now. Next one is the browser. So if this isn't already open, It's this little drop-down tab. So you have a categories with all the different
things you need. Use within Ableton Live Lite. Then we have places, which is just a
link to places of files and samples are
stored on your hard drive. So we come down here, we have another little
menu which is tucked away. And this is something
called the groove pool, where we can add
swing and grooves to our already
existing midi clips. Don't worry if any
is terminology doesn't make sense just yet. You're in the right
place because as we go for this course, it will all make sense. You have another little
hidden drop-down menu here, which is our help or Info view. So if I keep that open, if I hold my mouse
over anything, it tells me what it does. So this is quite
good to have open whilst you're learning
Ableton Live Lite. Next is our detail view. So this will either show our instruments we have
on our midi tracks. So if I click the
top of midi track here, it will show
an instrument. If I click the top
of audio track, it would show audio tracks. If I clicked on either midi
clip or an audio clip, would show me what is inside. Then you can hide that here with this little drop-down menu here. And that brings us onto the
main elephant in the room, which is this view which most people open up
Ableton Live and go, ****, no, this is just doesn't
look like any other DAW. What is this all about? So this is something called
session view. So let me dissect it into
three manageable chunks. Which is, first we have to understand
what the tracks are, the clips are, the scenes are, and then we'll get playing with it and see how it all works. So first off is we have tracks, the tracks of vertical
columns that contain clips. And the clips can
either be a region of midi or a region audio clip. So the burden block of life, there are pieces of
musical information or midi information that
when played or launched, will loop continuously
until we tell them to either stop or
play another clip. Now we can stop
them by pressing, as said before, the stop button. If I put a clip underneath, it will cancel the clip out. If I put a clip next to it, it will play on top. I will demonstrate
this in a second. Last thing we need to get used to is this thing here
called the scene. So scenes are used to launch every clip in a row
simultaneously. So we click on the associated
seen Launch button, which is this Play button here. And that would play all
the clips in that line. This is very good for
organizing our clips into different
sections of a song. In the tracks we have a
few more controls here. We can control where we
receive audio from external. N means audio from outside the computer which we will come onto in the Recording audio. Monitor is then how you hear that audio coming
in and real-time. Do you hear it directly from the sound card or do you hear it being processed
through able to live? Then we have sense, which
is where we can route the audio to one of these
send and return tracks. We have a volume
which we can adjust the amplitude of
the audio or midi, get it back to zero,
just double-click. We have a pan which adjusts the audio or midi within
the stereo image, we have a meat which
silences the track. Then we have a solo
which will just play that one track
that is solid. The rest. We also then have
a record engaged, which ones that's turned
on that enables us to record loops within our track
5. Module 1 - Basic preferences and settings: Check our audio preferences
to make sure that we can hear audio coming
out of able to Live. We do this by pressing
Command comma on a Mac or Control
comma on Windows. You can also go up to
the shortcut here. It says settings. I
believe on Windows, it's in Options somewhere. Then we're going to choose
the Audio tab down here. And we're going to look
at this area here, the audio input, output device. This essentially deals with
how we hear audio going in. So when we come to
record how we will get the audio into Ableton
Live for it to capture it, and how we hear it out. And that's the main thing
we want to do today. So depending on how you've
got your computer setup, you listening just on
your laptop speakers. Do you have your headphones
plugged in or do you have an audio interface? If you don't know,
audio interface is simply a box that you plug
into your computer that allows you to convert audio into Ableton Live to be
recorded and captured. Once you've plugged that in, you will then need to
plug your headphones into the audio interface. Not the computer will
come onto more about that in the Recording
audio section. But just if you've got that
in, remember that's how you, you plug your headphones
in or plug your speakers in the moment I'm using
some streaming software. So that's where I'm
hearing the audio. So this drop-down menu here basically dictates where the audio is going
to come out from. If you are listening on
your audio interface, you choose your audio interface. If you're listening
on your speakers, you choose your speakers. Or if you've got
Bluetooth headphones, we choose your
Bluetooth headphones. We don't need to
worry about the rest of the settings just yet. We will come on to that
into the audio recording. So now we should be
able to hear something. So if I click on one of
these, we can hear it
6. Module 1 How to install plugins: You could do this by
pressing Command Comma, which opens up the preferences or on Windows is
controlled comma. You can also find it up
here in the Live tab. You go to settings or in
Windows, it's an options. And down here somewhere,
once you're in the settings, go down to the plugins tab. Make sure you use Audio Units. Version two is turned on, Audio Units turned on, and then use VST system
plugins folders. So when you install your
VSTS from developers, they will automatically install
into the system folders. If you've had to manually install things on your computer, you might have custom folders. So you can choose your
destination here by going browse and finding where
you're plugins are stored. And you can turn
that on his wife. He wouldn't have any VSD
twos in any custom Florida. So I'm just going to keep it in my system photos then same for, same options for VSD three. So to choose the system photos and set the same
thing down here. You can choose the
destination if you have any custom folders. Then here the plug-in windows, this is like an
additional option I would highly suggest to having
multiple plug-in windows on. Then you've got auto
hide plugins in Windows, turn that off, an Auto open plug-in
windows turn that off. So basically what happens then
is if I select the track, it will automatically
open all the plugins. And then he got Auto open plugins says basically means
if I'm not on the track, it will hide the plugins. And if I'm on the track, it will automatically open
up all the plugins, not big finance, so
I'll just turn it off. It's just good to
be aware of it. So close that down. We've done everything we can
enable to life. Now, what we need
to do is go over here and go to our plugins tab. And that will show bull the plugins you have
available on your computer.
7. Module 2 - Understanding audio tracks and clips: As discussed before,
and the overview clips are the building blocks
of Ableton Live. There are regions of music
or midi information. So let's look at the
differences between midi. If I double-click, I can
create an empty midi clip, which brings up the midi clip
editor in the detail view, this is where I
can control sounds already living
within Ableton Live. This is where we would use
our instruments tab here, which we will come onto in a bit more detail on the
midi section of this course. And I would use this window
to draw in or record in some information here
or language that over a period of time would
control a sound. Now, audio, on the other hand, is Recording real instruments with an audio interface
or microphone. Or it's using samples of
pre-recorded material. Now, Ableton Live Lite comes
with a bunch of samples. We can simply click and
drag a clip like this. And you will see this
is now an audio region. So if I press Play, we will
hear a short spurt of audio
8. Module 2 - Importing audio files: Let's now look at Importing
some audio samples and playing with all
these features we've learned in Ableton
Live Lite so far, we'll come onto the
midi stuff a little bit later as this a little bit
more complex, its first off, we're gonna use this
Add Folder tab here in the browser window to find a folder that you can download for free on our Gunn wrote page, Lincoln description
below, which is a free sample pack
of audio files. Now this simply creates a link to a destination on
your hard drive. And then you can preview all these files within
Ableton Live Lite. They will perfectly match
the timing of your songs. You see here minds at 123. So if I want to three, now if I play these back there
all magically be in time, which is great for getting
those creative juices flowing. How we import these
files is quite simply, once we got it here, we can simply click
and drag it in. Now that has imported this clip. So if I go into my
arrangement of here, I'm going to launch
my first clip by pressing this little
Play button here. Now the detail view comes up and you can see what's going on. So at this clips, you
can see the audio here. So that's the volume of bits. So remember we can turn it
down or turn it up here. Double-click to
get back to zero. We can use the
sense to extend it to some effects tracks
which are here. We have another one
which is a delay. To add more layers to that, we simply will choose
another instruments to the kick drum and drag it either into this area which says drop files
and devices here, which it will create a new track for us ready to play our audio. Or we can drag it onto
an existing audio track here and press play. When we're cooking already. Great
9. Module 2 - Launch Quantisation : Did you notice I press them all at different times but
they all came in on time. So this is something called
Launch Quantisation. What does Launch
Quantisation mean, Craig, It's this dial here. It's basically the
Quantisation of pressing play on these loops. So Quantisation means keeping it in time essentially,
as a default, Ableton Live January
across the board is on a one-bar Quantisation value. So basically means
wherever I press Play, it will wait to
the first beat of the next bar, and
then we'll play it. Let me demonstrate this view. So if I have this
kick drum going, I want to bring in
this percussion. Look at the top of here, 1234. Now if I press it
on beat 21234 DC, it flashed for a little bit
before it went and played it. So essentially that keeps
everything in time. Now, with this sample pack, I've made it pretty simple in terms of either
have to take in consideration chord sequences.
That's the only bad thing. So if you had a base track that has an arrangement
of four Bahamas, you want to make sure you launch all the harmonic information in time with the sequence of
chords and paste and all that. But for this we can get going. We can just bring a
load of stuff in. So you see there plus bonus
10. Module 2 - Launching clips: Once the wants to
clips are engaged, the play buttons will eliminate. Now when I press
the transport play, which is this play up here, all these clips with the green play buttons to
engage will play. Press, play again. We'll play. How do you turn them off? I hear you say, this is where the stop buttons
in the track work. We can press the Stop
button in the track. We can press the
Stop button here, or we can press the
Stop button here, which stops all clips. So it's a few options there. So here we got clips playing on top of
each other to cancel, to get the clips to
cancel each other out. Say for example, here if I
choose another kick drum, if I put it next to it
is going to play on top, which we don't
really want to kick drums playing at the same time, same rhythm. It's
just not necessarily. But then maybe in
another section I said I want this kick
drum to come on. He put it in the list. So you watch here. Same thing happens with
the Launch Quantisation. I compare 12341234, turns this clip off and
engages this clip. 1234. We got to think about
when we're using Ableton Live as sounds that
go on top of each other, go next to each other. And the arrangement, we work almost down in a list fashion. And that's add a few
more layers to this. So we have our percussion, maybe a simple layer. Maybe like another percussion, like a shaker or something. That's bringing a
baseline in this one. And I go around and adjust
the volume of things. You'll see here is start
going into red quite quickly. So remember, you can adjust
the volume by turning things down quite turn the
volume down like this. Generally want to
stay away from red. Come on to that in a
bit more detail in the mixing section
at this course.
11. Module 2 - Understanding scenes : What we wanna do
is create a short arrangement using the scenes. Remember this is like the list or the organization
and sections. So cool, shortcut, Control D or Command D and Apple,
and this duplicates. So I just did it a
couple of times here. And what I'm gonna
do is I'm just going to work backwards. Maybe take the base
away from that one. Percussion. Let's
do all the same. So that just comes
in on the chorus. They're kicks going to
steal away Drum top. Maybe that could come in here. Then we delete all that
Drum top command there. Let's do that. Okay,
So I've deleted, I've still got the same
thing, but now I'm kinda building
like crescendoing. So if I press Play here. So if I stop Eclipse to start
again and press play here, bringing the next
section concerning clips off and maybe I won't, that won't go and actually
bring that back in. We want the base going
on that one as well, just starting in next section. This next section, the
kickoff and bring it all in
12. Module 2 - Introduction to arrange view : You can see it's quite
good for sketching ideas. Notepad. And we've
gotten arrangement here going on that we
have to manually control. So this translates quite well
to Live performance area, unlike a jamming of by, but in terms of like
showing somebody that you might not want to perform it to them or you
might want to send it to them. That's where we can record
a short arrangement. We want to turn off
all the clips here, double-click on this top button. Then what we could do is
we're going to record the arrangement, the
clips being played. So whatever I play in
here with this record, it record into this view here, which is arrange view, which
we'll come onto in a second. If I press record, it
gives a two-bar count in a setup. Press play on this. Now recording what's being played in the other
view, into this view. Let's go down here. In, at that point that I just
press play. Next one. Okay, so you get the point. Then I gauge this view by
pressing this button up here. So what it does is
ultimately mutes it. So when I press Play now, hearing this and the other
view at the same time. So now the other view, session view is muted
and this V is engaged. So if I press Space-bar, now you're hearing it's arrangement and I can
move the play head around and I can move
all these things around and just
generally arrange it, which we'll come onto
later in this course. But essentially arrange view is same as what
we've just heard, but it's just a
different way of viewing the audio and midi information. It works kinda like your
traditional DAW setup. It works on a
predetermined timeline. So we have bars top here and
we have timed on the bottom. The tracks are now viewed horizontally rather
than vertical columns. You have all the same
track dials here you have the IO, the Monitoring, the on-off solo record, volume, Panning, and then the sense also
have the output here. Also you have the same
colors in the same names
13. Module 2 - How to save: Let's now look at
how we would save all our work within
Ableton Live. So if you're on Mac,
it's Command S. If you're on Windows,
it's Control S. And we get the
option to save. I'm gonna go and save
it on the desktop. I'm going to save this, has able to turn
Live Lite course, press Save, easy,
less than over. Not quite. So Ableton Live
does a weird thing. So if I minimize this, come down to where we saved it. So this is our file here. It saves it as a folder. If I open, we have Ableton Live Project
Info, and that's it. Now, the thing that's confusing is we've got audio
samples in here, but they are not
saved within here. We're Ableton Live does
is it simply creates a shortcut to where the audio file is saved
on your hard drive. Imagine it like a fishing line. It just goes and holds
deficient line out. Now, when you save it, it doesn't automatically
real in those samples. So if I was to then
give you this file, if I emailed you this file, like a lot of my students do, I would open it up and it
would say samples offline. Why? Because we need to do another
option and Ableton Live. So we've press
Command S to save it. Now once we save it,
if we go up to File and go down to
collect all and safe. Well, that does is
it simply reels in all those samples and
stores it within that folder. So I press Okay.
It will ask you, Would you like files
from elsewhere? Other projects use a library, files from Factory Packs. Just select them all and go, Okay, you see they
flashed a little bit. Now if I go back to
that folder now, can you see I now have backups and I have
a samples folder. There is all the samples
that were imported. That option is good if you have samples on an
external hard drive, you don't want to keep
plugging in the hard drive. Or if you want to share
the project with someone, I would say you have to
send the whole folder, not just this file. So it needs to contain
everything here. So you would need to send
this whole thing here. And you can do that
by right-clicking and pressing compress, and then you can
send this zip file. Now there's a few other options. So you have save lives set
as this is really good for saving your set as
an alternative file. So if I go in here and go save as save in the same project, and I could call this course V2. So what that does is it
will create a new version. It will leave the previous
version untouched. This is good for mixing. If you're mixing different
versions and you want to keep the original,
you could do this. There is another option
could save copy, and that essentially does
the same thing. We've done. Collect all and safe, which is what just demonstrated
then we have save lives as a template or
save lives set as default. Things do exactly what
they see on the scene. You can save this as a template. So you could have
all your effects plugins and everything on. Save it as a template. When you open up able to live, you go down to templates and
open up a template here. For example, there
are some, this one's already made here. For example, the podcast
template for open that up. We have everything ready
to rock and roll in there. We can also save as
default Live set. So basically that means every time you open up Ableton Live, it will have all your settings pre-made. This is quite good. If you have a studio with
lots of ins and outputs, you can always open
up your template. You don't have to
do all the routing, put plugins on and all that. Yeah, that's saving
within Ableton Live
14. Module 3 - Introduction to MIDI: Before we get started,
let's figure out what midi actually is. Midi is essentially a
set of instructions that we give the computer
to make a sound. We tell the computer
where to play, what to play and
how long to play. And then we can customize the sound that we
wanted to play as well. So midi controls the
virtual instruments that Live with
inside the computer. We can do this by
either Drawing in midi information or playing
in Live like an instrument, just like with this
midi controller here, we can use it to play
something akin to what we're gonna do is we're
going to start by drawing the midi notes in. This allows us to create
drum beats, Chord baselines. I think Else without the
ability to be able to actually physically
play them in. So if we're not the best drum
or best keyboard player, we can actually just draw what we would like the computer
to play it back to us. Also within Ableton Live, There's a few handy tools to help us conquer music
theory as well. So if you're also thinking, well, I can't play
an instrument. And also don't
know music theory. Ableton Live's got our backs,
so don't worry about that. When you create a default
set in Ableton Live, you will have to midi tracks
and two audio tracks. So the midi tracks,
we'll deal with the midi
15. Module 3 - Drawing in and editing MIDI notes: We create an empty midi
clip is we simply find an empty clip slot and we
double-click. There we go. Now by default will
able to knife will do is it'll create a one-bar loop. Loop is turned on here,
you can turn it off. So that means it would just
play through the one-bar. But as a default, turns on to help us see that
this is 1 bar. Ableton Live has grayed
out this section, which is beat one, and then greater this
section on beat 234. Maybe we see there's
another four segments within each one of these areas. That is our 16th
notes within music. So what that basically means
if we imagine each beat as like an orange, we have 1234. So orange, we can then
cut those beats up into segments of the orange. Usual one is we
cut them in half. We get 1.2 and 3.4 and the
subdivision will go in. Here are the segment
of the oranges. We're cutting it into four. We have one E to E and a
3.4 under that's one E. And that's quite confusing stuff with so I'm going to reference that is I'm just going
to call this beat one. And then I'm going to reference what space I would
like to put it in. So beat one space to be here. Beat three space, one, beat for space one. It makes sense. So now we've got the duration and we can see
this across the top as well, beat 1234, and then halfway point is
measured there as well. Now done the left-hand side here we have the
musical keyboard. Now this goes up in
octaves. We scroll up. You get the highest
picture is to see, if you scroll down, you
get the lowest pitch, which is C minus two. And essentially if you imagine
it like a spreadsheet, we plot a note on a horizontal line which
represents the pitch. If I double-click to create my first midi note
will be G. Then along the top it tells
me at what point in time would I like
that Note to happen? At the moment that's going
to happen on beat one. So if I double-click on the
first base of each beat, you would have a note play on the first base of each beat. So let's jump in and
choose an instrument. So I'm going to go to instruments
here. Instrument Rack. I'm going to go down
to piano and keys. There's some nice E pianos here. So I'm gonna go to the
piano, the piano score, and drag that to the top of the channel, and
that will load. And I see the midi
channel has changed. This is what it was previously. It would just show us that
it was sending midi data out and we'd have a
midi output here. Now if you look, it's been
loaded with a sound source. So now it's sending out audio
and we have a meter here. So now if I press play, sounds like a heartbeat machine. Okay? So what we can do is we can highlight the notes and
we can shift them up and down by pressing command shift down says you can hear
what's happening there. And then if I
double-click on here, you're going to have a
different rhythm of that Note. Okay, fantastic. This is all well and good.
Hopefully that's making sense. We can also adjust the length of the Note
here by dragging out. And also down here we have
to Velocity is like how hard the node is
going to hit when we program in the all come
at the same velocity, which can sound a bit robotics. So we can go in and we
could just drag it down. That's gonna be less hard.
And we could drag one out, that's gonna be harder case. It just the Tom burnt
humanizes the rhythm. We can also click in here, press Command a and
select randomize. So that will randomize the
velocity from the point that is at within 127 degrees. And then you have, well, how much is it going
to randomize it by? Is it going to randomize it with a whole 127 Velocity range? Or could you just do a little bit? Let's
just do a little bit. Chuck them out a little bit. You can go in and decide doesn't naturally mean
it's gonna be better, can be a bit too random. Okay, great, So that's, that's hopefully making sense. And now let's make
some music with this. So let's program in some courts, this feels like a good octave. If you're unsure of
what notes to play, what you can do is turn on
this little headphone dial here and go through and select. Now, this is where this
little built-in lifesaver, it's been put in,
it's good Scale. Now what we can do
is we can turn it on and then it gives
us what highlights, just the notes that
live within a Scale. So we've chosen, see, if we go what we started on G. Let's choose a G, G major. And then it only
shows us the notes that live within G-Major. Now the ones that are
grayed out, I mean, they are not within the key, so if we played them at
technically would sound wrong. Now what we can do
is we can press Scale and that will
fold those notes away. So now we only have notes
that live within G major. So this makes it super easy for making chords, which is great. We can do is we can go and we can create
a chord sequence. Its first thing
we're going to, we want to extend the length of this loop because we
think about chord sequences. They don't naturally
lasts for 1 bar. Usually have four chords and
their last row bar each. So we could do that by
going up to length here. And we can select for, now I'm just going to
delete these midi notes here to start again. Now if you notice,
I've still got all these subdivisions going on. And what I want, what I want
to do is I want to have my chords ring out
nice and long. So it's a quick way
we can do this. We can right-click and we
can choose the fixed grids. The fixed grid is
how many segments? So we seeing, I'm going to just put it down to 1 bar here. Now it gets rid of all
those subdivisions. And when I put a note in, if I choose this G and now
lasts for a whole bar. Now this is really cool because now we can't plenty wrong notes. What we can do is we can simply
just put a Note Anywhere. I recommend doing it
within the octave. So if we went like
that, there may be. We go through. Now how Make chords with
that as we just simply count up three notes
from this note. Here's 123123, same here. Now we should have a
diatonic chord sequence. Basic means it's in key and it should sound, should sound. Alright, nice. Now, this is a
little cool trick. If we, we click on
this first Note here and we press Shift, go through it and select
all these notes here. Hold down option. Now just drag them
down an octave. So now we have like
a bass note here. This is where we
can go in now and randomized some of
these Velocity. So I'm going to just select
them all and go sit, Let's go up to ten
here and go randomize. Know it's kinda moved them
all around a little bit. Now say if you wanted
to go in and put another chord on the end
here, what we can do it, we can go right-click, go back to a fixed grids. So let's say eighth notes
this time, I like the notes. This is where we can
edit the rhythm. There we go. And then I
can double-click and maybe put in Chord just
before I maybe do. Let's try this code. Let's go like that. And I'm just going
to click like this. I can do here. I can either extend them out like this or I can just press the go-to
up here and extend them. There we go. So that's,
that's Programming chords. And now try experimenting
with different chords in different keys by
goat here and select different route notes and
stick maybe a minor key. If you want to get
a bit Work Strava, you can choose all
these different kind of crazy scales here. Then press the Scale button
up here and it folds it
16. Module 3 - Recording MIDI overview: Now let's look how we
would record midi. So there's two
ways we can do it. First way is we can Record a new clip completely
from scratch. So I'm gonna do that
with my midi controller here. To just put an insulator. You don't actually need an external midi controller
to play these midi notes. If you've got this little
dial up here, tennis on, you can play your query keyboard just like a musical keyboard. So a becomes that
the musical see, the track comes to see. Now we can change
to the octopus by pressing Z, which goes down. X to go up the audio is
now we can play chords. So this is a C major scale. Then we have two black
notes in between, which is E. You can also turn this
off by just simply pressing M on the keypad here.
17. Module 3 - MIDI preferences : Before we get going
with midi controller, we just need to check that our preferences are
set up properly. Now, most midi controllers these days are something
called class compliant. This basically means
you plug it in and ableton Live will recognize
it straight away. You don't need to download
any additional software. But if you do plug your midi controller in
and nothing happens, you will need to go to the
manufacturer's website, go to the download section, and then see if there's any software you need to download. Once you've got your midi
controller plugged-in, press Command comma, open up, able to knives preferences and go to the link tempo, midi tab. All we're going to worry about
is this section down here, which shows us the external
midi controllers plugged in. Say what we've got is
we've got in a midi out. So that's how Ableton Live is receiving midi
information in from an external controller and
how it's sending it out via the USB lead
receiving midi in. If we look down here, we have a few options. We have tracks sink remote MPE. So track is dealing with
receiving musical notes in sync is dealing with tempo
and post information. And remote is dealing
with any kind of CSI messages or any
remote controls. Now on the output,
we can do the same. So we can send midi notes out of Ableton Live to
the controller. We can send Tempo Information
and we can send remote. Now the reason why I've
got it set up like this, I've track because I want to be able to play midi
notes in like this. If I turn that off,
I can't do it. Remote enables me to control parameters within
able to live as well. Now we don't really want
to send midi notes out because there are no
sounds on this keyboard. But we might have Arpeggiator
are sequences built in Arpeggiator areas where
we press the fingers down and it will over rhythmic
duration playback notes. So if we turn this on, this we'll send out Ableton
Live posts or its tempo. That's like what this is. Then it will sink
to the controller. Now you'd have to go to the midi controllers
preferences and go to sink and select external us in different places for
different controllers. So just look at your
manual and look at tempo sinking with a door. And that'll be it. Remote. Also, we don't really need for a midi controller
that is sending out CC information
or automation. So we can control different parameters on our
midi controller, which we don't
really need to do.
18. Module 3 - Recording and editing MIDI notes: So I do this by turning on
session record up here. Now what we can do
is we can go up here and we can right-click and then turn start playback with
record of CCS tectonics. So I press down it
started straight away. I might world not ready yet. So I can turn that off
and then I can just essentially arm
it so it's ready. Now I can go on my track. That's the record on there. Now can you see my stop buttons which would like this before
of now turn to record. So as soon as I press that, it's going to give me
a two-bar count in. And you can change that by going up to the metronome here. And I need to engage
the metronome so I can stay in time. Okay. Here we go. Now
it's playing back to us what we just recorded, okay, and I can double-click and go into the midi notes here. Now, if you played
some wrong notes or you're in a different key, I can now I'm playing
in a minor key in guaranteeing the Scale
feature off here, then we can see our notes. Now notice, classic
thing is if I zoom in here and I can do this by going up here and dragging down. See that turned to my pointer
head to a magnifying glass. I am late with the timing. So I could go in and
move these all round. No one's got time
for that. We could do is we can use quantize. This is another beautiful
thing with midi. What we can do is we
can go Command a, and if we right-click, we can
see here quantize settings. So we can go say
to current grid or nearest 16th note or
nearest eighth note. I like nearest 16th note
and 100 per cent apply. Co, it's got it. Now, can
you see one of the problems? And it's got this one. It's
got this one, this one. I was closer to the second
16th note within the past, so it's coming a
little bit late. So what I can do is
I can go in again, right-click and go
Quantize Settings and maybe set it to
one-eighth note. Go play. It's called it Rankin. So what we can do is go
Quantize Settings and we go and we can change
it to one-fourth. Now, apply masking to
snap it to the beat. Will say notes that I
got a little bit too excited and I hit the
notes a bit too hard. So I could go in and I can
highlight the notes here. And then I can pull velocities down to match the other ones. You see there with midi, we have a lot of options
to correct our mistakes. Also another thing
if you record at save this speed and you
want to speed it up, it's not going to
affect the sound. You're just simply Recording in like data points
along the timeline. So if I do this, so it's an out. What it means is if
you're not the best keys, but you could record
this very slowly, then speed up a later date.
So that's pretty cool. Last thing is with
this session record, we can add on top of things
we've already recorded. So for example, here, if I look at this
recording, I did. And I was like maybe
I want to add in like little melody like
tennis session recording and then press play on the clip. And it will act as
I can midi overdub. See I've got the speed
down so I can play. I can maybe go up
an octave and go, go CC that my timing
is not great. So what I can do is I can go up and I can actually turn on something here in edit
code Record quantized, and that will automatically
record whatever I play in. So I can go here
and then go down to 16th note Quantisation. So it's going to knock it
to the nearest 16th notes. So I'm going to undo all
that I just recorded. It's done the audio
and S-curve again, same thing, play there, session record on that. Nacht in time. See this one, it got a little bit confused, upload
a little bit late. So what I can do, I can do select it individually
and replace it. And I can also go in and
adjust the velocities. If I wanted to go in here, maybe I could go randomize. So that's Drawing
and Recording midi
19. Module 3 - Software instruments: This part of the course,
we're going to look all these software
instruments available to us in Ableton Live Lite. Now there's always only been four available,
but since Ableton, new update 11.3,
they've included an awesome new virtual subtractive synthesizer
called Drift. Let's jump into, have a look at the old for them will have a look at the newly
added Drift synth. So you're probably thinking, this looks different to mine. You don't only have five. Why have you got more than me? Because I got sweetened
still on this computer. So some of those instruments
open up within Lite. So just look at the five that are
available in Lite anyway, just ignore the other ones.
20. Module 3 - Drum rack: Start with Drum rack. Drum rack doesn't
actually generate sound itself is just
plays back samples. So it's an instrument
for layering samples, for layering symptoms
and also effects. And it does this in a
classic 16 pad grid. So let's drag that in. Cc. If I click,
there's no sounds. And if I press play
on my midi clip, nothing happens, but you can see the play buttons illuminate. Basically it's
sequencing those pads, but I need to load them with
a pre-recorded audio file. So if I go to my samples here, I can go and search for a kick. It's quite a good
place. Bring that down, put that on that pad,
then search for snare. Quite cool, but that one there, then hi-hat. It's
quite cool as well. Now for press play, we
should hear a drum beat. Now this, this has been
sequenced by this midi clip. I programmed cilia
as they're playing. What we can do is we
can also swap out the sounds with this little
hot swap button here. Clicks and shows us
where the sample that we generated lives within
our sample library. Then I can simply
double-click on another one. It will load it snaps. We can also layer
the sounds as well. So say this snare here, I would like to
live with a clap. Search for clap. Drag it down before I let go, if I hold down command, it puts it into an
Instrument Rack, and then I have the chance
to blend them together. So now I can help have
two sounds plan together. We'll look at Instrument Rack
in a minute as it's one of the instruments that is
included within Lite. So that's how you would load
and make your own drum kits. Now if you look here
within our categories, Live Lite has its own
category for drums, and this is where it has some pre-made Drum racks with samples already loaded custom macros and all sorts of crazy stuff
for us to play around with. Now, the ones that are really
FUN are the core kits. So I track that on there. It eight to eight
core kit and it has some snapshots available for us, a macros, which we're
not gonna get into how to generate these
ourself in this course. But like I say, if you want
to dive deep into that, do have a full course
on Skillshare Udemy where we dive in and
look at how you can make all these custom racks yourself. So check the links in
description below. Let's see what that sounds like. I can play around with some of these snapshots here which
changed the sound of the bleed drum kits and the
effects on it. To clean. Boomy, low phi. We can go and adjust some
of these styles here. We can drive it a
bit more to me, a bit more distorted, bit more lower-end, more vintage, and compress
it a bit more. Cool. So that's Drum rack
21. Module 3 - Impulse: We're gonna look at
Impulse, which is also a sample playback device. But this has a lot more complex
modulation capabilities. And we can get some really
cool crazy sounds out of it. Let's have a look at
that. So it's going to Instrument and we're going to scroll down to Impulse and load that onto our track. This is the empty patch. You can do the same
here with the pads as previously discussed
with the Drum rack. Drop a sample here
is hot, swap it out. What we're gonna do this times we're gonna look at preset. You do this by clicking this
little arrow down here. I'm gonna go to
Impulse, a two-way, just double-click
and that's loaded the samples. Spell misspeak. Right. Now what we've got for each
one of these pads here, we have a Modulation section
here and some effects. We look here with
this, this kick here. I have tramp position
and stretch, which this will
stretch the sample out and this will transpose it. Now I can have the velocity of the drum coming
in, modulate this. So if I go up to my here, you see I've got a Beat, got the velocities here. And I've changed this one
here to be really loud. This kick here to be
a little bit quieter. And that's going to change
and play around with the, the Modulation in here. So if I transpose 100%, can you hear it's affecting
the Pitch folks and off again. Now if I do the stretches, I can say it's a random into, I have Random capabilities coming up with the hi-hat so you can do it individually,
drive them a little bit. Then we can also do this
with the filter as well. So if I do this with
the snare here, and I'm gonna turn the filter, the filter on here, but the frequency
down into the will see that there we go. I've got some Panning
Velocity here. Or maybe let's do that one
to do that one to Random. I think that want
to work better on the hi-hat such leases
do that two random. There we go. We overruled time here so we can stretch
all the samples out. Nice. And then we can
transpose as well so we can get some glitchy
sounds will write down fantastic drum machine this. So play around with Impulse and all the different modulation
capabilities there
22. Module 3 - Instrument Rack: When we looked at
was Instrument Rack. So Instrument Rack is a way of grouping or combining multiple
instruments and effects into a single device and
allowing for splits and lead keyboard sounds and
customized macro controls. Fantastic. What
we're going to look at today is just the precess. The presets are amazing
because they've got quite a lot of real
sounding instrument. So it's really good for pianos. If we scroll down here, we have some amazing
piano samples. Select the E, E Piano here. So if I drag that in on the
other midi channel here, that one and plus M. Okay, let's try a grand piano sound. Nice. Okay, so yeah, I would suggest
that Get started. Just look through
the presets here. Once you get a bit
more comfortable within Ableton Live Lite, then you can start
looking at making your own custom
Instrument Racks.
23. Module 3 - Simpler: Next one is Simpler. So Simpler is another
sample playback device. Drag this on here. We can use this as like a drum playback or we can
build our own synthesisers. Okay, so let's just
look at pure its form. So if we go up and
find the sample, Let's go like kick. Here we go and we just
dragged in there. That's Pitch to cross the
keyboards. In classic mode. One-shot. Same thing again here. Slice will come
onto in a minute, will bring you in a
more percussive thing and we'll see what that does. But essentially when
you change the, you have a few more
different options. We'll look at the classic
mode in a second one, we build our own synth. But one shot here that we've
got fade in, fade out. We have transposition. And
then we have Velocity. So basically we get
rid of the velocity and we have a filter here. So let's look at the
classic mode now on how we would build our own synth. Go here. I'm going to bring in like, yeah, like a long note here. This could be anything,
this could be used singing into the computer. Play it now. Cool, hey. So what we can do now
is we can customize that a little bit with
the controls here. So I can, I can choose
this thing here. I put loop, and I can
choose the length of the loop here so I can
drag a little bit in there, or it can offset the star
C. So it will start here. And then I can fade that. Go, Hey, also we need
to check the tuning. And we can do this when an audio effect when goats
utilities and go tuna. The edge, put this in the a, now I'm pressing B. So we can do is go over to
these controls here we have a further Modulation area here. And I'm gonna go to transpose. I'm going to put it
up semitone here. So it might be already on zero. So you can transpose it
down to the sea is doing C. And then you could do
sense here. Fine-tuning. Start with fit with
other instruments. Now, this is where
we can now use our attack decay release. So if I put the release
up a little bit, go Hey, puts it yet, but some reverb and
delay through it. Co hey, then also if we go into controls here
we have some Modulation. So for example,
here we have pan. I can put that up here, and then I can use
this LFO. 16th notes. Here we go. Can have this spread as well. Spread it out wider. Bring the filter
down a little bit. The other photo, the
filter Pitch a little bit. And we are ambient
artists. There we go. So now let's look
at another one, which is the slice mode, which if I go a, a drum kit here, bring it in with lots of
translating information. It's now spliced
it, cross the keys. Now it's done it by transient. I can go in and I
can choose by Beat. Who have got the effects still,
I want to turn that off. Go through the octaves to find a Superfund as well with vocals. So if you go vocal
is drag that in
24. Module 3 - Drift: Next is the amazing new
synth, which is Drift. So Drift is a, is modeled on an analog
subtractive style. Symphysis is ripping off symptoms such as the
move the monologue, the grandmother cog MS. 20, all those really rich, warm selling analog Sims. And it does this with a super
user-friendly interface. You have your oscillator
section here. Your filters, envelopes
section, mod section. And then this is the
heartbeat of Drift, which we have this section here, which is the actual whites where it gets its
name from Drift. Basically it puts the
two oscillators and the filter frequency out of phase and sync
with each other. So you get this movement that and combined
with the stereo mode pants those voices
around the stereo image, let's say the synth with
just Polly and no Drift on. There. We go. Drift
25. Module 4 - Drum racks and sample-based beat production: Now we, in previous module, we got introduced to midi and we looked at all the different
midi instruments. We made some noise and then
got this music in the end. Now we're going to look
at programs and beats. So we're going to
use the Drum rack. And we're also going to look
at Impulse for this as well. Drum rack, you can go
to the Drum preset here and use any of
these core kit preset. So I'm going to use AOA Kauket loaded onto the
track by dragging. Now I'm going to
double-click to create an empty one-bar midi clip. So what's difference between a melodic or virtual
synthesizer, midi instrument to a
sample-based playback, such as the Drum rack is not all the midi notes are occupied
by sounds in Drum rack, what happens is it
will only give you the keys that have
samples loaded onto them. So we go in here, you see
only have the samples here. If I click on this
little arrow up here, shows you all the other
midi notes which don't have samples loaded onto them. So if I was to go in
and press on play this midi note here, no sound. If I was to load a sample
into this Drum rack. And you do that by going like samples and say like if
I just choose that one, weird sound, then put it
on E2. See that's loaded. If I go into my midi clip of
that now available there, can you create your
own Drum racks by just going to the Instrument
and dragging on Drum rack. And it'll be empty like
that and you can drag in. So if you use a
website social splice can drag them in there. I'm just gonna go back to my
eight-week delete that one. There we go.
26. Module 4 - Programming drum patterns with MIDI: Let's go and create drumbeat. So we have all the sounds
here from top to bottom, doesn't work in
octaves this time it's just different sounds
on different lines. Right-click on this bass drum, you see it highlights across the page where that
sound will Live. Then along the top
here is the rhythm. So we have B1, B2, B3, B4. Then we have the
subdivisions 1234. Remember refer to them as
spaces within the beat. I'm going to lay out the beat by pressing the kick
drum like this. Now if I press
play snare on top, and do this by double-clicking. Now if I press B, that
engages our pencil tool, which we learned about
earlier, so I can turn the pencil tool
off and on like this. Now, I can do is I
can click and drag. Now I don't have to double-click,
drag across the page. Minimum stake there,
I can correct them. And now I have to turn off sounding
pretty vanilla. So far. We'll thing,
I'll do this. I'm going to change the tempo. I'm going to take
it down to like 91. So you're going to funk
of Phi, this drumbeat pi, just moving the kick drum
one space to the left, this 11 to the left, then this 11 to the right. And I say, Well that sounds
like turn the click off. Now because we started
with the kick, snare and the high hats, pretty solid beat and then we
moved it around afterwards. It's really good way of thinking about Drum Programming
is thinking invoices. So start with a kit stuck with it on the first
base of each beat. Snare on the first base to 2.4, then a constant
16th note hi-hat. Now I can add some random notes on top by pressing just be, Get rid of some of these and
maybe not as It's an hour
27. Module 4 - Applying groove and swing to add a natural feel: Next thing is if
we've programmed, majority of it might
sound a bit stale. What we can do is we can
apply a groove to it. And how we did is we can go
to our groove pool here, which we can put in some groove, so Ableton, so if we go to this little groove
section here as well, I'm press hotspot that will
bring in all our groups. I'm going to just choose
two-step for now. I can drag it in here and I
could do two-step sixteenths. This is almost just
like a favorites list. Now to put this
onto our channel, what I can do is I can go boom. And now it's applied. Now I can go up here and adjust
how much I've got here, like the timing, 100%. So I could bring it. Just kind of just 12%. Still add something.
When you happy, just press the little
arrow and it commits it. It moves all the velocity
in the notes around before. It's just almost like a preview. There. You've got those there. I can close that away and I can apply that then to my chord. So to keep the groove
nice and tight. So if I go to my
E codes for them, nice, there we go.
28. Module 5 - Recording audio preferences set up: This section of the course
we're going to look at now how we can get audio from external world
into Ableton Live, be captured, augmented,
and enhanced. How we do that is
with this thing here, which is an audio interface. And we can do this with
the built-in microphone and headphones on our laptop. But it's not really going
to sound that great. So I recommend getting your
hands on audio interface. Now this one here is fantastic. It's by audience called it 14. Around about the hundred pounds. Mark up a link in
the description so you can have a look at
getting your hands on this. The other one is a focus, right? Scarlet, that's also quite
a good entry, 0.1 as well. They do so you convert audio or my microphone into binary code, which is computer language for Ableton to
capture it, store it, it then processes it, sends it back out to my
headphones or speakers. So how this works is you plug your microphone into
your input here. You turn up your microphone. How much volume do you
want to send into Ableton? Now if you're using something
called a condenser mic, you will need to add
some power to it. I'm using a dynamic mic which
doesn't need any power. Once you've done that,
you then need to connect it to the
computer via USB. You then need to plug-in
your headphones here. Remember, this is a very important thing
with audio interfaces. I see a lot of students
struggle with, is they will have
either a separate dial, especially on the focus, right, for this here, which
is the speaker output. And there'll be adjusting
the dial for the speakers. Putting the headphones on
saying I can't hear anything. There's a little separate dowel separate for the headphones. So this will adjust
your speakers. So if you're using
active monitors, you can plug in the back here, which then you can
plot your speakers in and adjust hearing
for the speakers. We can plug in headphones and adjust them using
your headphones. Once that's all set up, we need to go into Ableton Live and ensure our
preferences are set up. We can do this by pressing Command or Control comma
and go into the Audio tab. And we use this earlier
to get audio out. Now we're going to look
at forgetting audio in most audio interface
is a class compliant. So what that basically
means is you don't need to install any additional
software drivers. Some do though. You will know this by
plugging in your interface. If it doesn't show up here, it will need to drive a go to
the manufacturer's website, download any
additional software, you need, an extra show up
here. It's still don't see it. You need to contact
the manufacturer of your audio interface. So I'm going to select
audience ID 14. Then the next thing is, what's the quality
of the recording? It's the sample rate. So usually the industry
standards for 4.1 or 48. 48 is going to sound
a little bit cleaner. I just like it, but 44
is more than enough. So that's the quality
of the audio. So like how high-definition
you're going to have it. 40 is just me being a
bit posh before it. 4.1 is fine. Also, all depends on how
good spec you'll compute is. The higher the, the
definition of the audio, the more information is kind
of the process in real time, which could cause your computer's
slow down a little bit. Buffer size. That's how quickly your
computer's going to deal with process and all
this audio in real time. Now, the lower the buffer size you've got, the less latency. So what latency is the round trip from
audio being converted from analog to digital
than digital to analog. So your microphone going
into your interface, it Ableton, Ableton back to the interface,
the Your headphones. There's inherently
a slight delay with all interfaces and computer
setups depending on spec your computer is
will all depend on how quickly it deals
with processing that 120k is usually
a good sort of area. Myelitis is quite high at
the moment because I'm using my audio interface to go in and some streaming
software to go out. So it just incurs
a bit of latency. You'll know when you've got
latency because it does sound like there's an
echo to microphone. So we'll look a way of
combating that as well. So once that's up,
we're ready to record. So now you need to use one of your audio tracks and you need to make sure you're plugged into either the first input
or the second input. See here I'm plugged
into the second input. Audio two is already set up. A little green dial there. Now if I press the record, it's now grayed out still, but you can see there's
audio coming in. The reason why it's grayed out is because of this section here, which is the Monitoring
29. Module 5 - Monitoring : Monitoring deals with how you hear the audio in real time. Off, essentially means
you're not hearing it, goes through, able to live and come back out. How
do you hear it? And you probably
ask him directly monitor it from your
audio interface. That Basic means you
are hearing audio, hit your audio interface before it goes to Ableton
Live and comes back up. That's how I do all my
recordings as how I'm listening to myself now on
the focus right interfaces, there's a little button that
says direct Monitoring. Press that you need
to make sure you're not monitoring in here
and you'll be able to see yourself without
any latency. The latency is in the trip going from here into Ableton, Live. Back out again. If it's just from here, you don't
get any latency. If you don't have a
button on the front, but this audience, you need to go into your control software. Let me see here
I've got the volume turned up on the
direct Monitoring. If I was to mute that, I wouldn't be able
to hear myself. And then I'd have to go to
the monitoring options here. Now, Auto basically means automatically
switches on and off. Well, that means is
when I'm recording, it will let me hear myself back. Soon as I've recorded something, it would mute my mic
that so I don't sink or talk over what I've
already recorded in. Basically lets me record in, but mutes the
pre-recorded material and continues me to keep singing on top, so
always Monitoring. So let's look at these
different types. So obviously we've
done the off here. So now I'm going to
record some thinking by pressing the little clip, just like in the midi view. To by counting again. According the Recording,
the clip according the Recording the clip according the clip
Recording the clip. Fantastic. And then I can
double-click and I can see my audio in here. And plastic nasty the Auto. So you might hear two of me now. I might Auto so I'm
automatically Monitoring out. Says Record again. Chord again, Record again, Record again, Record again. Chord again, record. So TDC, when I press
Playback there, it muted my mic. You might, you might
not have heard it, but it muted my mic is synthesis
clips playing back so I can only monitor or I can only hear my voice in real time. Once that Recording I've made
is not playing back then in recording a clip, Recording. Recording a clip,
Recording a clip. Essentially this time it doesn't play it back, so it records it. So this is if you want to
sketch loads of ideas down and you don't want it to be interrupted, dominant
to play back. You just get the idea down, keep going, Get it
down, keep going. Then you can go back
and listen to it. Downside direct Monitoring. You're probably
thinking why you show me that iterating
monitors, amazing. You can't use all the
processing in real time. So what that basically means
is any EQs compressors, which we'll look
at in a minute, or delay and reverb you can't use. So that's something
to think about when Monitoring and Recording
in Ableton Live
30. Module 5 - Recording in session and arrange view: Two ways we can record
audio in Ableton Live. We can record it in session view in a clip
or loop-based format, or we can record it in arrange view in a
more traditional way, just like a tape machine
on a linear timeline, the benefit Recording in
session view is we can almost get a sketchpad
view of the audio. We can hear things playback
really quickly and loop brown we can let
harmony downside is, say if there's a
bit in the middle, we can't cut it out. That's where we can put it into arrange view and we can do some editing and moving
around a manipulating it, enhancing it, and getting
rid of all the bad bits. Let's look at the
difference between the two. So I've already recorded a little bit in here,
but I'll show it again. You need to have the
arm, the track armed. You're monitoring setup, setup, then you just record on a clip. Make sure your metronome is engaged and you select how
much of accounting you want. So Recording audio
is very important. You have a counting because otherwise you'll
be late to start. So I always do 2 bar, gives you a little bit
time to get going. Then we press record according a bar Recording a bar according
a bar Recording a bar, coding a bar Recording a bar. You saw that as soon as I press Play it played it
back, which is great. If I, if I had that
playing there, and I basically duplicate
this trapped by pressing Command D. Delete
these clips here. And then an alkyne record
into this one as well. So putting a bar,
Recording a bar, still recording a bar, still recording a bar, putting a bar. Recording. Record and arrange
view is the same as the tracks up
in session view, you need to have
your record enabled, but you need to have
your Monitoring set up on the right input setup. Once that's all sorted, you just need to select where
in the timeline you would like to start recording from with the playhead by
just simply click, click, click right, start. We will start. This time we use the
transport record, just like a traditional DAW. Sure. Your metronome is turned on and that you have
a accountants setup. Now let's press Record, Recording, Recording,
Recording, Recording. Now notice you don't get that instant feedback
as session view. When we press play on the
clip which stops the Record, it plays it back to
us now because we're working in a more
traditional way, are not linear timeline. It plays it well, we record it. Then when we press space-bar
to stop the record, it just stops when we have
to go back and back to it. It's it's up to you which one works for you the best in
terms of real-time Recording. Personally, I like using
session view to capture the recording and then move it into arrange view to editing
31. Module 5 - Warping: Let's look at now a thing
that Ableton Live is famous for and that is its
ability to warp audio. Warping is where you input some audio and ableton Live will automatically work out
what speed the audio is. Then it will stretch
it or shrink it to fit your songs tempo. So all the audio you import
will nicely fit in time. This works exceptionally well. If you have a loop that has
a clear start and end point, if you input a
piece of audio that doesn't have a clear
start and end point. The Warping algorithm isn't
going to get it as exact. You might have to
go in and adjust it yourself manually,
which we will look at. This is also great
for correcting any mistakes you might make
in the recording process. Say for example, you play
a guitar line in and you do a Section,
little bit of time. You can go in and warp that one section back
in time on the grid. So let's jump in and see how
we can do this is important. One of my loops from my
sample pack we used earlier, drag onto an audio track, open a detail view. Now we can see this
Warping thing in action. So it's enabled by this
little button here. If it's not on, it
will look like this. And what have any Warping? Marcus also, you won't
have the ability to loop. It would only play
through this once. Then it would stop. Okay? So in turn, warp on. Now we have different
types of warp. The default is beats. I have it set to Complex
and Complex Pro, just because they
are the cleanest sounding warping algorithms. So they do change the sound
of the audio slightly. Now this you can dive in
deeper with my full course. I've mentioned it a
few times in this, have a full deep dive
able to live course, which I'll go into
all the nuts and bolts of this in that course. But for now, we're just
going to look at beats. This works great for drum beats. Okay, so now let's put this on. Now the Warping
algorithms engaged. What I can do is I can go to my metronome here and I can
gradually bring that down. It's going to walk the audio
and you can hear it's kind of stretching it and go
right down real slow. Some really cool
sounds like that. Let's double-click
and take it back. This here shows you the
original speed of the audio. So you see it's 123. Now, what I can do
is I can adjust this by pressing divide
by two or plus two. Press divide by two. It does double time, times
two, stretches it out. So that's quite cool
if you are looking to get some cool
variations on the loop. Now, this is all done via
these warp markers up here, so we have one there. Now if I zoom in here, can you see this little
arrow is pointing down? These are unengaged warp markers were able to nice
algorithm has done, is it seen where there's a big spike in transient
information and gone, That's probably a beat. And it's giving
you the ability if I drag up here to engage it, so it's gone gray. If I double-click, that
now activates that Warping market and then go through and I can do a few here. So think of these warp markers
is like anchor points. So now that point there
is anchored to that grid. Now I can go in here and I can move this bit of audio around, but it doesn't affect
these audio here. Whereas if I double-click
to unengaged, it can see effects
all the audio. So this is great for messing
around with the beats, so you can change the
beat a little bit. So if we did
something like that, crazy stuff, okay,
This is great. If you play something in and you accidentally mess
up a guitar line, or you sing in a
bit out of time, you can see where it is
in double-click and you can stretch it and move it back in C2 that by just hovering over the
unengaged warp marker, double-clicking and
then stretch it. Now let's import a
piece of audio that doesn't have a clear
start and end point. And the algorithm just
doesn't understand it. How can we fix it manually? Okay, I'm going to downloads
or have a drum loop here. If I play, it sounds great. Now if I bring the temperature, it's all the time we now want you to do
is I'm gonna drag, I'm gonna go in here, and I'm going to look for
the first beat of each bar. So you see here has got
the first beat right. Turn the metronome off first. Drug that two,
second. There we go. And I'm gonna do the
same for this next bar here. Track that. Is that one there. Click and I'm going to drag it, see how I can manually fix this. There we go. We got it. So there we've got
the bars sorted out. Now you can see here as well, There's a couple of fields
that were a bit fast, so you could go in and you could manually pull the beats
back and forth like that. But as a, just a rough guide, that is pretty much there. Okay, now we can quantize
the audio as well. So we press Command
a, select everything. We could go Command U. You can see here
it's looking for the nearest quarter note beats and anything that you
can slot in time. So it's in the metronome. That works fantastically well. If you're recording
something Qin, so if I just record
my voice in here, so if I on this track, put the input two, I'm just going to
record 123,412.4. Now, there's some latency
with the streaming software, so that's a perfect demonstrate, perfectly demonstrates this. Go in command, a command you should have
sorted out 24124. Fantastic. So that's Warping in Ableton Live experiment
when Importing samples in, changing the speed and use it to help you fix any timing mistakes you might have within your audio
32. Module 5 - Auto warp: So how you turn it on
because you got to live settings and then you want
to go down to record warp, Launch menu, turn on Auto warp long samples. If
you haven't already. Once you've done that, boot, Ableton Live and open up again
and that will activate it, a case of dragging your
sample you wish to warp. Now what it's done
is this automatic, The looked for the bars in the sample and walked
it to the grid. So now if I go and
choose the temperature at which here to my metronome
on solo this track. And let's see if it's in time. Great. Now let's see if I
fluctuate the tempo. Yes, got it and find great. Now that's amazing for if you want to use the
pitching staff as well. And then bring it in. Awesome. Check that out.
33. Module 6 - Understanding the arrange view: Let's explore, arrange view and a bit more
detail and look at some editing skills for arranging our songs and
moving everything around. This was from our previous, previous lesson
where we looked at using clips to create
a short arrangement, then record it into this view. Now once we've got it in there, what we can do is we can
press Play and we can have things drop in and
out along a timeline. So this is the time
on the bottom. This is the bias among the top. We can zoom in by
using plus a minus. You can also, if you're on a Mac user track pad, shortcut, I quite like is if you select
a section hand presses, you need to make sure you're
QWERTY keyboards turned off, press set, zooms in. This is quite cool.
34. Module 6 - Basic editing and arrangement tools: So now what we can do is we can go and take chunks
of the audio out. So say for example here, I didn't want this section here. I can simply highlight it, press Delete, it,
gets rid of it. And I feel like, Oh God,
I didn't mean to do that. You can simply click and
drag it, brings it back. Here's doesn't really delete it. It just takes that chunk out, tucks it away, it rolls it
under the carpet. Like carpet. You roll it away. And then
you can unroll it again. Now so that you just
wanted this section. He can press Command E
or Control E on Windows. It takes such that section out. Same thing again, you
can unroll it like that. Now say if we wanted to move
all this and duplicate it, we can highlight
everything and then just press Command D or
Control D duplicates it. You see how we could
make an arrangement quite quickly by taking command E and delete and
Control or Command D. Next thing is Time-based
shortcuts, which is really good. Like I wanted to delete
just this section. I can press Command Shift or Control Shift
Delete on Windows. It takes out that and it
moves everything back. Command Z to undo. Now say if I want this section, but I want to overhear a compress command C and
then click at the top track, press Command Shift
V, which pastes time. So when I say paste
or copy time, that means basically you're
shifting everything along. You're not copying over
something that's already there. Whereas if I did that same
thing I did there without the shift Command V C,
just paste over that. Did not shift along. This super useful
tools for arranging
35. Module 6 - Introduction to automation: Next thing we can look
at is automation, which automation is
the way to automate things over a Time-based period. So that can be the most
obvious one, which is volume. So something can get louder and quieter
certain point in the song without me having to manually turn the volume up and
down. So how do we do this? So first thing we need to make sure this little
dial is turned off because the shortcut to get automation is a if
that's turned on. Now, nothing is
happening. Turned off. Now we're talking this height, this shows and hides
or automation. So for example, here let's
look at this last section here and let's do a
classic fade out. So what I'm gonna
do is by default, it's set to track volume. And I'm just going to
and I'm going to select this one of the trucks here
that's already turned down. Now this one here, see it's
got Mix, it has got delay. So I'm gonna go to mixer,
track volume met one tau. Now if I click from here,
click on the playhead. Whatever happened to
the classic Theta, I think there's a very
nine-hundredths singles in it, but that's how you would do it. Here's all the different
sections you can automate. So if you had audio effects, they will come up here to mix. It basically means the track, then these are all
the things you can automate on the track. So you could have
like the reverb here. We could get it really reverb macro, so you get the delay as well. Same point, going crazy, crazy. Okay, so experiment with
36. Module 6 - Introduction to MPE: The next thing that's amazing
is the MPE capabilities. Now this is something that's not new again to Ableton Live, but they've made it a
lot more accessible within Lite and intro. How they've done that is
bringing the Drift since again. So here we go. Let's
drag Drift into here. Now if you look there as various Modulation
points on the same, so here, one here, and we've also got
a mod page here. Now, if you look within this one here you can
see someone says Slide, pressure, Velocity,
all this other stuff. So slide and pressure are
two of the MPE parameters. So what I'm gonna do
is I'm going to go to the Note expression page. Then I have my slide and
pressure automation lanes here. And also directly on the notes. I have the Note slides so I can get my notes to
manually slide down. Now the difference between
automation and MPE is it's like basically
polyphonic automation. You've got it for each
single note of the chord. So for example here, if I do this pitch, that's only going to happen
on that one note. I want it to happen on this
note would have to go in individually and
do it like that. Whereas automation, if I did, maybe this like that, now I have an automation
there just for that OneNote. And then I can click here, maybe I have a different
slide, go like that. Now if I go back
into the synth here, slide which is on
the shape here, I can put up to
Understanding crazy stuff. So you see that I can go in
and change it straight away. Now this works fantastically, obviously with MPE capable
controllers as well, such as Ableton new push three, which features all these
parameters on the new pads
37. Module 7 - Audio and MIDI effects: Have a look, kids now Applying audio effects and processing
to what we've recorded so, so far we've been working
with the raw files such as midi and recorded
audio as samples. Now we can manipulate,
we can correct, we can enhance, we can change
this audio with effects. So let's go through, and let's go through
in order of importance
38. Module 7 - Equalisation (EQ) for frequency shaping: Equalisation is the
most important, and that's the way we can shape the frequency
of the sounds. We can anything that we
don't want and we can enhance stuff that is a little bit dull or
need to enhancing. So it's got to EQ. We have
three EQ's available. We have filter Channel
EQ and EQ three. Now, EQ is a really good feature in the other versions
of Ableton Live, but there's a way around it, because we're quite limited
in terms of parametric EQ. That means the
ability to augment the EQ frequency spectrum with
lots of different points. Essentially, we can do
this on the master. And we're going to do is
we're gonna use the filter to cut out low-frequency. So we can do that by simply
selecting the low cut filter. And then we can choose to
frequency here and we can put it down to 30 hz. So that essentially takes
the base of the music. So if I press play here. So this is usually
a performance tool, but we can use it as a utility. Then what we can do
is we can then use the channel EQ to
boost anything. So I can now boost the
lower frequencies. But because I've cut out
the problematic areas here, it's only going to
boost the nice ones. I can do that by two dB and I can do the highest
by two dB here. All the way up. It makes it brighter,
the lowest, make it more fuller. Achi, three similar sort of
thing as the channel EQ. But what you do is you have
a selectable frequency, so you have to select both
high and low frequency. The mid-frequency is
everything in between. So this, you can basically do the same thing as these two, but the interfaces are
not as, not as good. You don't have this
visual representation of frequency spectrum
which are like, but you can use all
three so you can boost the mid here
with this one, or cut the mid or cut the lows. And with combination
those three, you can really org meant the
sound and Ableton Live Lite
39. Module 7 - Dynamic processing (compression, Limiting, etc.): Next up is Dynamic processing, which is basically dealing with the loud points and the
quiet points of music. We can use something
called compressors and limiters to turn down
the highest parts of music and turn up
the lowest part so we have more consistent
and concise sounds. Now we can overdo this. We can make music sound very one Dynamic where
we want a bit of depth. I'm trying to get
that balance is the ART form of using
Dynamic processing. So let's try a compressor first. So what we're gonna do
here is we're going to turn the threshold
down until we, here, we see the
compressor start working. The compressor starts working
by this little line here. Must basically, soon as
one of those spikes in the transient is going
through the threshold, the compression is engaged. Now compression based, it
means it's going to turn down anything that goes above
that threshold lines. And the more I turned
down the threshold line, the more compression happens. See that that's basically turning points. I
wanted that much. Now if I flip this
over into here, this view, I can see how much
gain reduction is going on. So the moment, not much, so I can pull it
down a bit more. One, 2-5 dB, then the ratio is how much
you're going to turn it down by 4-to-1 is a standard
compression setting to one, which we can go here, go to, and that's gonna be a more
transparent settings attack and releases how quickly that compressor is going
to pull that down. So usually we have
a slower attack and a quicker release
is that basically means as soon as the
peak goes through, it's going to let a
little bit through, which is going to make
it sound a bit more transparent, then pull it down. The release is how quickly
once it's compressed, which is like elastic band, how quickly you're going to
let go that elastic band, quick release means that pings
straight backup so you get more of a punchier sound slower. It's going to sound
more smoother. You're going to hear
more of the tone of the compressor and be careful if you have to release too long. For 1 s, the compressor is not going to be able to get back to an uncompressed state. So it's going to
sound, just going to sound like you've
turned the music down. So go for a slower attack
and a quick releases. Then once you've done that, you need to boost up
the overall game. You can check this
by turning this off and you basically don't want a different volume
or boosting volume. So you can compensate for the amount you've turned
it or compressed it by, by turning up here, which
is called makeup gain. So you turn it, you turn
it up to compensate for the amount compressed
it or turn it down by, but you don't want it to
be boosting it too much. That's not the point
of compression. The other thing is knee. The knee is how smooth
is it going to go? So once it's gone
through that threshold, it engages the ratio is how quickly that transition
is gonna be if it's quick, compression is going to
be a lot more visible. If you put a bigger knee, which we can view
it in this view. If I put a knee like this, you see as more of a point, we're going to have more
of the compression. That's quite good for say, rhythmic or stuff like drums, one vocal staff or Master chain. We wanted to be a bit
more of a slower knee, so we have a bit more of an invisible transitions too much. It's an next one is Limiting. Limiting is essentially
the same as compression. But we don't have an
attacker release or ratio is basically there's no ratio. Anything that tries to go above the threshold
is just cut off. So this is something
you would put on your final output and
it's usually good to put ceiling of minus one. And then we can push
the volume into the. Now see its limits. What you're seeing here,
there is it's Limiting now. That stops it from
clipping on the output. So nothing's going to
go above minus one
40. Module 7 - Time-based effects (reverb, delay, etc.): Next, the Time-based effects
we've already been using, so we've been using
the reverb and delay. So reverb essentially
creates a sense of space. You can adjust how big the space is or how
small the spaces. If I play, you hear
just this Drum top. By using the solo. Then I thought in the
amount of reverb decay, see how much it changes
the sound. Okay? So that's the reverb and that's found in the reverb
and resonance. So remember I have a couple
more because I've got previous version of Ableton
install which Max for Live, so it's copied over
then corpus as well. So let's put this on. So this acts like a
resonant chamber. So it's like imagine playing
your music into a pipe. Resonates on a
certain frequency, but it's 100% when you tune it. So it's essentially
like a resonator, makes a resonant sound on top of the sound
you've already made. So it's another
one called delay. Let's put this back to reverb. Delay just simply repeats. So we can choose this time
division here so we can have a one slightly different
in each year. We can't slower.
So these are done. How many 16th notes are going to be in the
distance from the delay? So if it's one-sixteenth
note, this super-quick, if we have 16, 60 notes, it's gonna be
really long on this. Other thing keeps going. So we've got feedback. It's like, how many
are those delays hot? How long did it go on for? Can we have like read
Pitch, fade and jump, and that all deals with what happens with the repeat of it. Then we have Beat
Repeat was a beat repeats like a weird Looper. So there's quite cool like
Brain Dance preset here. So that's a very
complex audio effect to fully understand what
all those are doing. And that's another
story for another day. But essentially, that
introduces us to presets, which all the audio
effects have presets here with this little
drop-down menu here. So all the previous
audio effects are shown. You can use some presets,
so check that out
41. Module 7 - Distortion and saturation techniques: One is Distortion
and saturation, which is found in driving color. Now we have a guitar AMP, which then goes into
cabinet. So this is great. If you're recording guitar
in, you have erosion, which is like a dirty mixing
sound a bit noisy and dirty and redex basically works is like
downsampling, so on. So you get digital
artifacts that come in. So like digital Distortion, made popular by like Daft
Punk and people like that. So real bitty Distortion. But what I want to go over
saturate as a really good one. I put this on the drum top we've just been working on here. What we can do is we can derive, make it more distorted. Dc mixing. Cleaner
base is how much of the base frequency
you're going to send through the saturated. So the more you take out
the cleaner saturation. Then also we have another
filter point here which we can boost through the saturated and petal
width and depth, how much that factor. Then we have the
match the output C because it brings the
volume up quite a bit. So that's the saturated
master driving color
42. Module 7 - Modulation effects: We also have some other Modulation based
effects like chorus. And phase course is really good on say like base
so of instruments. So if I put this on the base here just creates
a bit of width. We can use the dry
wet lot Sal here. There's a lot more
in the center, makes it a bit more wider. Color. The dry wet down. I can drag audio effects onto the
channel as well as pneumonia. Send them return so you can
replace the ones on send and return can't add anymore
set and returns. In Ableton Live Lite, maybe you only get to
sausages about say, adds more sense but you can't. So there's another
limitation would getting the limitations with
flushing amount guys
43. Module 7 - Utilising audio effects racks and utility effects: That's nearly it. So utility, so one of my favorite, so we've done, we've
done Instrument Racks. You can also do
audio effects racks. So for example, here, if I bring this down, I can drag these two
instruments into Iraq so they can be
one after each other. Or if I bring this
here, I can drag one, put it here so you can have
them on top of each other. So I can have like reverb and corpus happening at the same
time, which is pretty cool. You'd have to play
around with that sound. Good. The next one is tonight and utility tuna just works
like a guitar tuner. Utility is one of my favorite
effects in Ableton Live. So I'm gonna put this on
the master, put it right. She have a couple of here yep. Phase and you have a width
dial so you can make it wider. So you have a mono tau, so
you can make some monarch. You have a bass mono,
which is wicked. So you can check here
with this headphone. Just makes that space
based on the middle. You have a balanced pan
and you haven't gained
44. Module 7 - MIDI effects: Next is midi effects. So this is going to look
slightly different for you again because I have some Max for Live
stuff downloaded. But essentially we've
got Arpeggiator, Chord, midi effects, rack, don't length, Pitch,
Random, Scale, Velocity. I say there's just an
overview of what they do. I will go over some of
them in a bit more detail.
45. Module 7 - Arpeggiator : Let's jump straight into the
first one is FPGA to us. If I drag that onto this here, notice the difference between
this and audio effects. Midi effects come
before the instruments, so they affects the musical
information language controlling the sound. This is basically going to
look at the code that I played in Northern play the
three notes at the same time, it's going to stack
them one after each other, a certain rhythmic, rhythmical value or value here. She's the style. So
if it goes down, up and down, and then we
can choose how many steps. That's basically
how many objects. If we tend to delay on. I'm getting carried away. Man is supposed to be
teaching the lesson here. So you see that's
pretty cool, right?
46. Module 7 - Chord : So next one is chord. So if I get an empty midi channel here
and bring it over next here. So I'm just going to turn these oxytocin Chairman away again. So here we go. So it's
just ten chord on here. And then I'm going to put
the same instruments, can copy instruments
across, paste here. So essentially what this
is going to do is it's going to harmonize
midi notes coming in. So if I, if I press this
note here, one Note, whereas if I get this now, press this up four semitones, same notes pressing is
now harmonizing it. So it's playing
that one that I'm playing and doubling up. Note four semitones up. So if I go seven
semitones, wicked, Hey?
47. Module 7 - Scale: Onto the next one, which I'm jumping
ahead is Scale. Scale here we'll quantize the notes coming into
it to a chosen Scale. Amendments to the
chromatic scale. That's a bit of a
confusing interface. Don't get me wrong. So it deletes it and I'm going
to use one of the presets. I'm gonna go Major. Put it here, I'm playing
a major chord and quantize to a major scale. So what happened now is
if I go through the keys, I press C. It will lock the notes to the diatonic harmony of that Scale was if
I had that chose, if I have that Scale off. Playing a major chord on
each degree, turn it on, locks it in, which is quite cool to look at them in
conjunction with each other.
48. Module 7 - MIDI effects rack: The other one is midi effects rack so I can drag their own or I can do the same
where I can highlight everything this and
press Command G, and that puts it into a rack. Now what happens stated
before, it's quite cool. Rack as you can
then save these as a preset so I can come on, I'll rename as like
Chord jet and then save, that was saving my
Instrument Rack as all these settings and
everything saved here. So not only can we layer things, we can save a chain of effects as one preset, which
is super cool. So that's the same
with all the effects rack and Instrument
effects rack as well.
49. Module 7 - Note length : We've got note lengths,
so that just deals with the length of the note. So if I put this start
here, I can just choose. That makes you think what's the point in that is if you
don't have a sustained pedal, so you could put in
that length here. So hands-off acts as
like a sustained, but over time such
that your fingers or your foot's on the
sustain pedal all the time. So that's quite good. Feature
50. Module 7 - Pitch: Pitch so that we can
put the start as well. Just changed the key. So I can change it down
two semitones. That's going to affect the scale thing here,
but that's okay.
51. Module 7 - Random : Next one, Random, soon as you can choose
random midi notes. So I'm pressing the same midi
note here. I put chance. I'm just pressing one note here, is being quantized
by the scale thing here, but that's quite cool. Downscale them Velocity is basically quantizing
the velocity. So the moment, the velocity has been dictated
by my controllers. So I can hit it slightly louder. I can do is I can put the
lowest point of being 127, the highest point in 127. I've got rid of
Velocity essentially. So that's quite cool. That's
what I use that one for. But that's essentially
all the midi effects that are in Ableton Live Lite
52. Module 7 - Velocity : Velocity is basically
quantizing the velocity. So the moment, the velocity has been dictated
by my controller. So I can hit it slightly louder. I can do is I can put the lowest point of being
127, the highest 0.127. I've got rid of
velocity essentially. So that's quite cool. That's
what I use that one for. But that's essentially
all the media effects that are in Ableton Live light
53. Module 8 - Mixing techniques overview : Module, we're gonna get
an understanding of all the Mixing concepts
and principles, balanced level and Panning, Grouping tracks, bet
and organization, and then understanding and applying effects to
enhance the mixing
54. Module 8 - Gain staging: The first thing we'd like to do if we're starting to mix is make sure that the sum of all
the tracks isn't too loud. So each one of these
volumes here is going to be contributing
or adding together, summing together to make
this final output here, which you're hearing
your outputs. Now if we make each
one of these loud, loud, loud, it's gonna
get too loud here. It's not going to make our
plugins on our master chain. Some very good. If we don't have any
plugins on, our mass, is going to distort, is going to clip and it's going
to sound broken. So first thing I'll do is
I'm just going to mute all the audio effects
master chain here. And what we're
gonna be trying to do is we're trying
to get this down to about minus six to
minus three dB. That's generally like an
industry standard practices, not the rule, but it's just
a good place to start. And that will that will ensure
that all your audio coming to your master chain is gonna
be a nice, healthy level. And it's not gonna be
driving the plugins and the audio effects too hard. So it's already. You can see here this
is the peak for him. So he's come in at -6.4,
so that's all good. If it was too loud,
what we would have to do is go
over here and turn down the individual
channels here. Feels good. And I can
just bring this one in. Gray
55. Module 8 - Panning: I can do, I can
move things around the stereo image now
with this Panning tall. So that's basically
the balance of how loud it is in this beacon, how loud it is in that speaker. So for example here, this percussion, I can maybe move that
over into that speaker. Can hit that. Then
maybe this percussion here. We've ever in there. Then when I bring
the drums and that leaves a bit space
in the middle, that's missing. So Panning is just essentially
moving things around as their image to give them
their own little space.
56. Module 8 - Grouping and sub mixing : Now we can group tracks
together as well. So I've got quite
a lot drums here. So at this, this is what I can do is I
can group them together. So I made this
percussion over here, highlight the two tracks would like to group together or more, press Command G. So that does is now if you
look at the output, it says audio to group. Now what I can do is I can just write PRC and I
can tuck it away. You get like kinda
stripy clips here. So that visually is a good
organization proposed routes that audio through this so
I can do group processing. So if I wanted to get one of my audio effects like the EQ, maybe put a filter on it. So just take out some of those lows and put
that down to like 30. And then maybe the channel
EQ just to boost up, boost the highs up a little bit, and maybe a little
bit compression. So I'm gonna go two-to-one, quick release, slow attack. Now process them as a group. And I could do that on
this drums here as well. Command G, rename Drums,
do the same thing. So we get almost like mixing
it a sub group level. And what that does
is you attenuate the peaks here, the group stage. So then when you get
to the master stage, this compressor
and the limiter is not having to pull
down as many peaks. Sounds already colored smooth. Then when you get to the master, that's like the final polish or like it's already
quite smooth. It's not a rough surface. Just gone over with
a fine sandpaper, just bring out the smoothness. So that's where we now
57. Module 8 - Master chain: Apply like what you call
Master chain stores, like the finisher effects to
enhance the overall volume. So I put utility on here just so I can check
the mids and site, water-filter the Cutler lows out Channel EQ to boost the lows and highs didn't need the Q3. Then we got the compressor
just to attack the peaks. I like this on the
master to afford a one. And then limiter. Don't want it really
working too hard. And that's minus one. So it's going to
ensure nothing clips or goes above minus one dB is just a good practice to get into when you start converting it into a lower file
formats such as an MP3, you're not gonna get any
digital artifacts come in, which is what we get onto next.
58. Module 9 - Exporting : This is the final module. Congratulations if you
made it still here. Well done. So now we're looking
at how we can export music from Ableton Live, Share with all our
friends and family. I find works well to get everything from session
view into arrange view. So if you've been
working in this view, jamming out some loops, record the arrangement
as previously discussed in previous lessons in
this course is ten, a lot easier to bounce
out and arrangement, it's not impossible in here,
but it's a bit harder. Flipped over into arrange view. We're going to use the
loop function up here, the range to highlight the
area we want to export. Now we're going to
press Command Shift R, which is the shortcut. You can do this going up
to File Export Audio, and on Windows it's
Control Shift R. So the render is basically
what do you want to export? You can export the master, which is the sum
of all the tracks, which is what we want to do. But you can go in, do the individual tracks or certain tracks just from this drop-down, the render start and length is the duration of the render. And that is dictated by what we did just a second ago
with the loop window. Just double-check,
see it goes up to 30, then all these
rendering options here, you want to turn
off sample rate. Usually 44.1 is good
or 48 is what we're Monitoring and we can do that just depends on
where you transfer it to. It's good practice
just to keep it 4.1. Now PCM is basically how, what file format
you want to use. We want to use WAV,
24-bit industry standard. That's our High Res output. So this is good for if
you want to send it to a mastering engineer or if
you want to release it on, say Spotify, SoundCloud,
YouTube, all that. Now, Mp3, if we turn that on, Mp3 is a smaller file
size and lower risk, why would we export that? What's the benefit of it? It's really easy to share. So this is quite good if you're collaborating with people on the Internet or if you just
want to send it to South. If you export is just the WAF, you probably have
to use something like WeTransfer because it's such a big file format that
it's not that easy to share. So Mp3 is just a great
way of sharing music. Hence why you download
will use to download MP3s. Lot smaller file size, lot quicker to download. More economical to share. But the compensation that is, you degrade the audio slightly. Think of it like Instagram, you upload a really high-res image. Instagram compresses it. If he were to take
a screenshot of Instagram and put
up on a billboard. Even though it was
a high-res image that star, if you blow up, it'd be like you'd have all
digital artifacts it look to, it will look blurry anyway. So we go export, asks us where to send it on, will do it to desktop, Save. And it does it offline. This is a rendering it, and it's done. We go. So now if we come
out of Ableton Live, go to, go to the desktop. We have two files here. So this is the most
important thing. This is the thing
I always say to all my students when I'm
teaching in university, if you an exam you're
handling stuff in, we're just check it anyway. So just thick on here. Make sure it's
exported properly. That's it. You made it
59. Outro: Congratulations, so happy
you've completed this course. I hope you've enjoyed it
and you've learned, lots. Don't forget if
you'd like to dive deeper into any of these topics. I have a full Ableton Live
course for you to check out, but only take that
up when you feel you've really mastered
all the basics. Anyway, thanks again. Hopefully, see you in a class again sometimes
soon. Bye for now
 Push Patterns, Music Production School