Transcripts
1. About this class: My name's Julie. In my
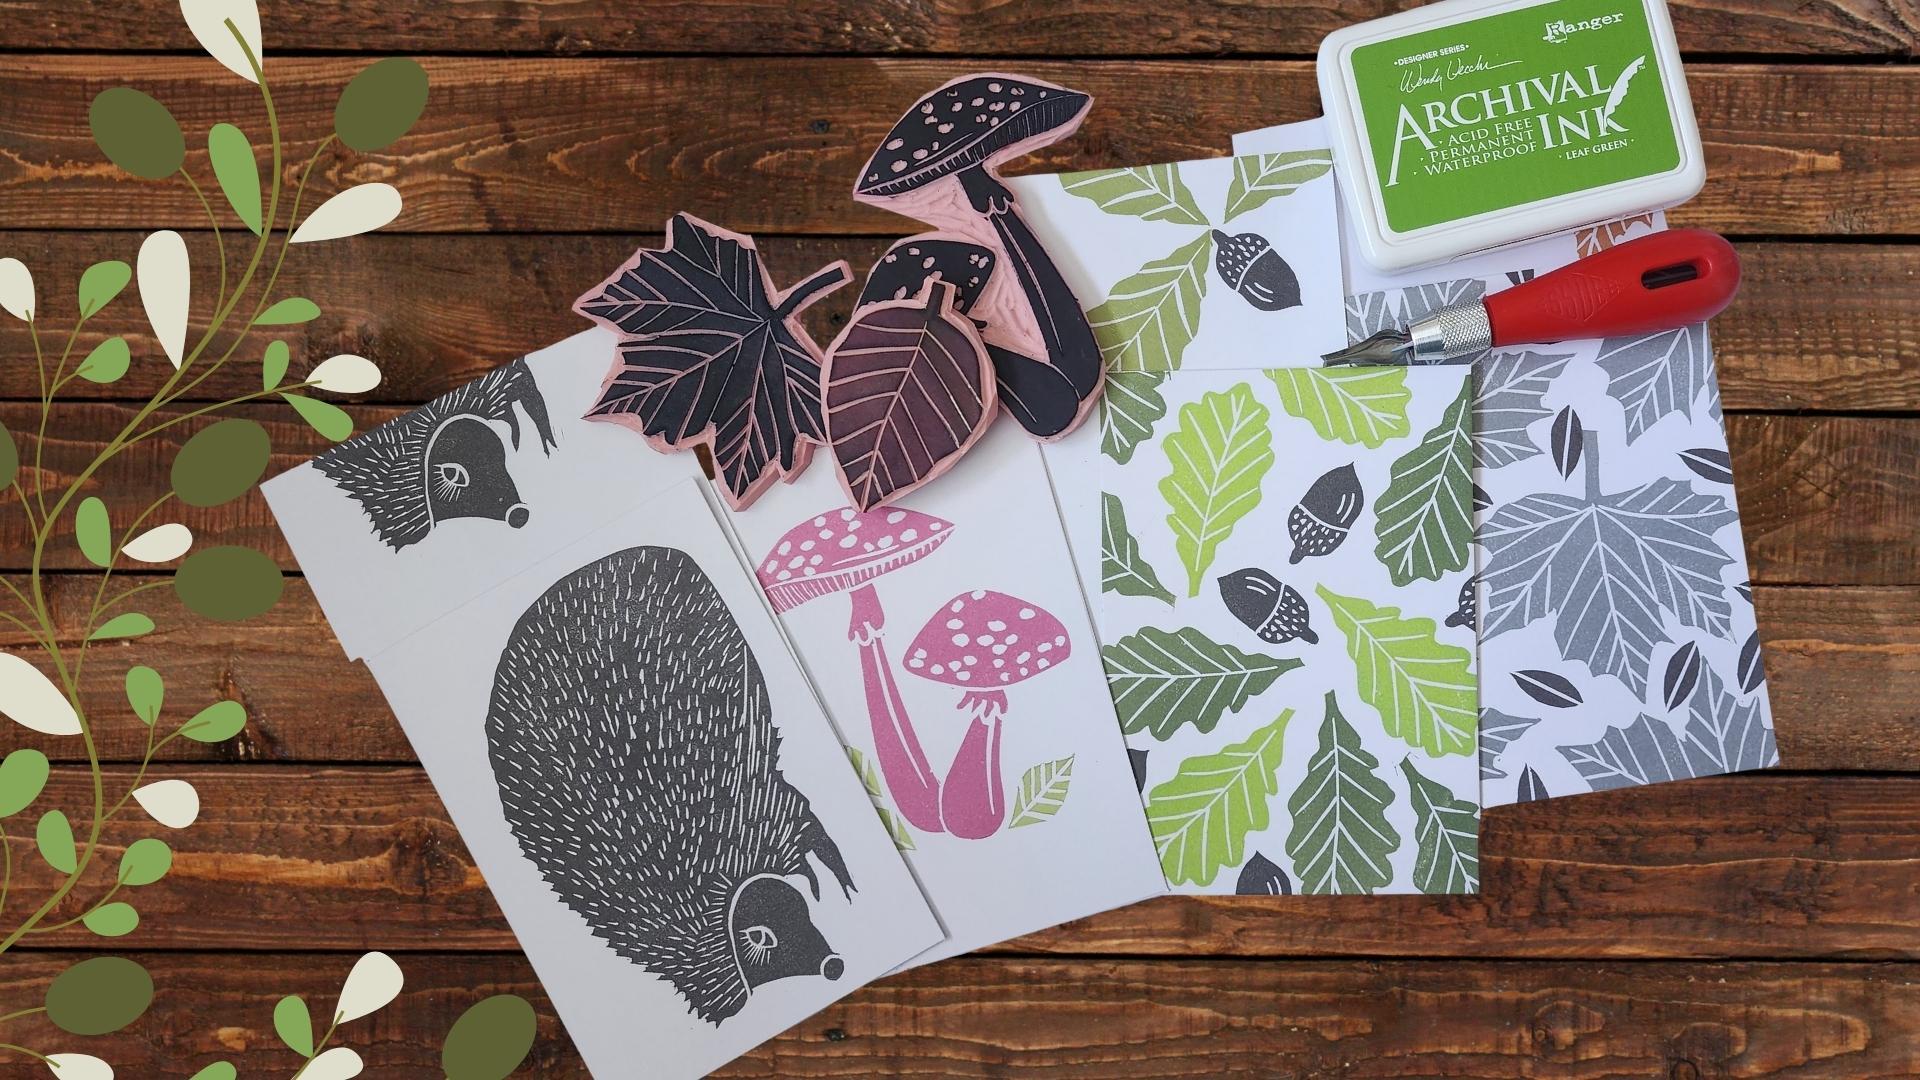
first skill share class, I'd like to share with you how I carve my own handmade stance, will use these stamps to create a beautiful set of autumn
inspired greeting cards. When I first started
block printing, it was really difficult to
find all of the information I needed to learn about
block printmaking. So I've designed this class. With that in mind, we'll talk about the supplies
that you need. We'll take a look
at carving tools, the types of rubber blocks
that are available. We'll also at Ks, for this class we will
be using ink pads. We'll create a playbook. I'll teach you how to
transfer your design and how we can make it
easier to see the lines. At the end of it, we will
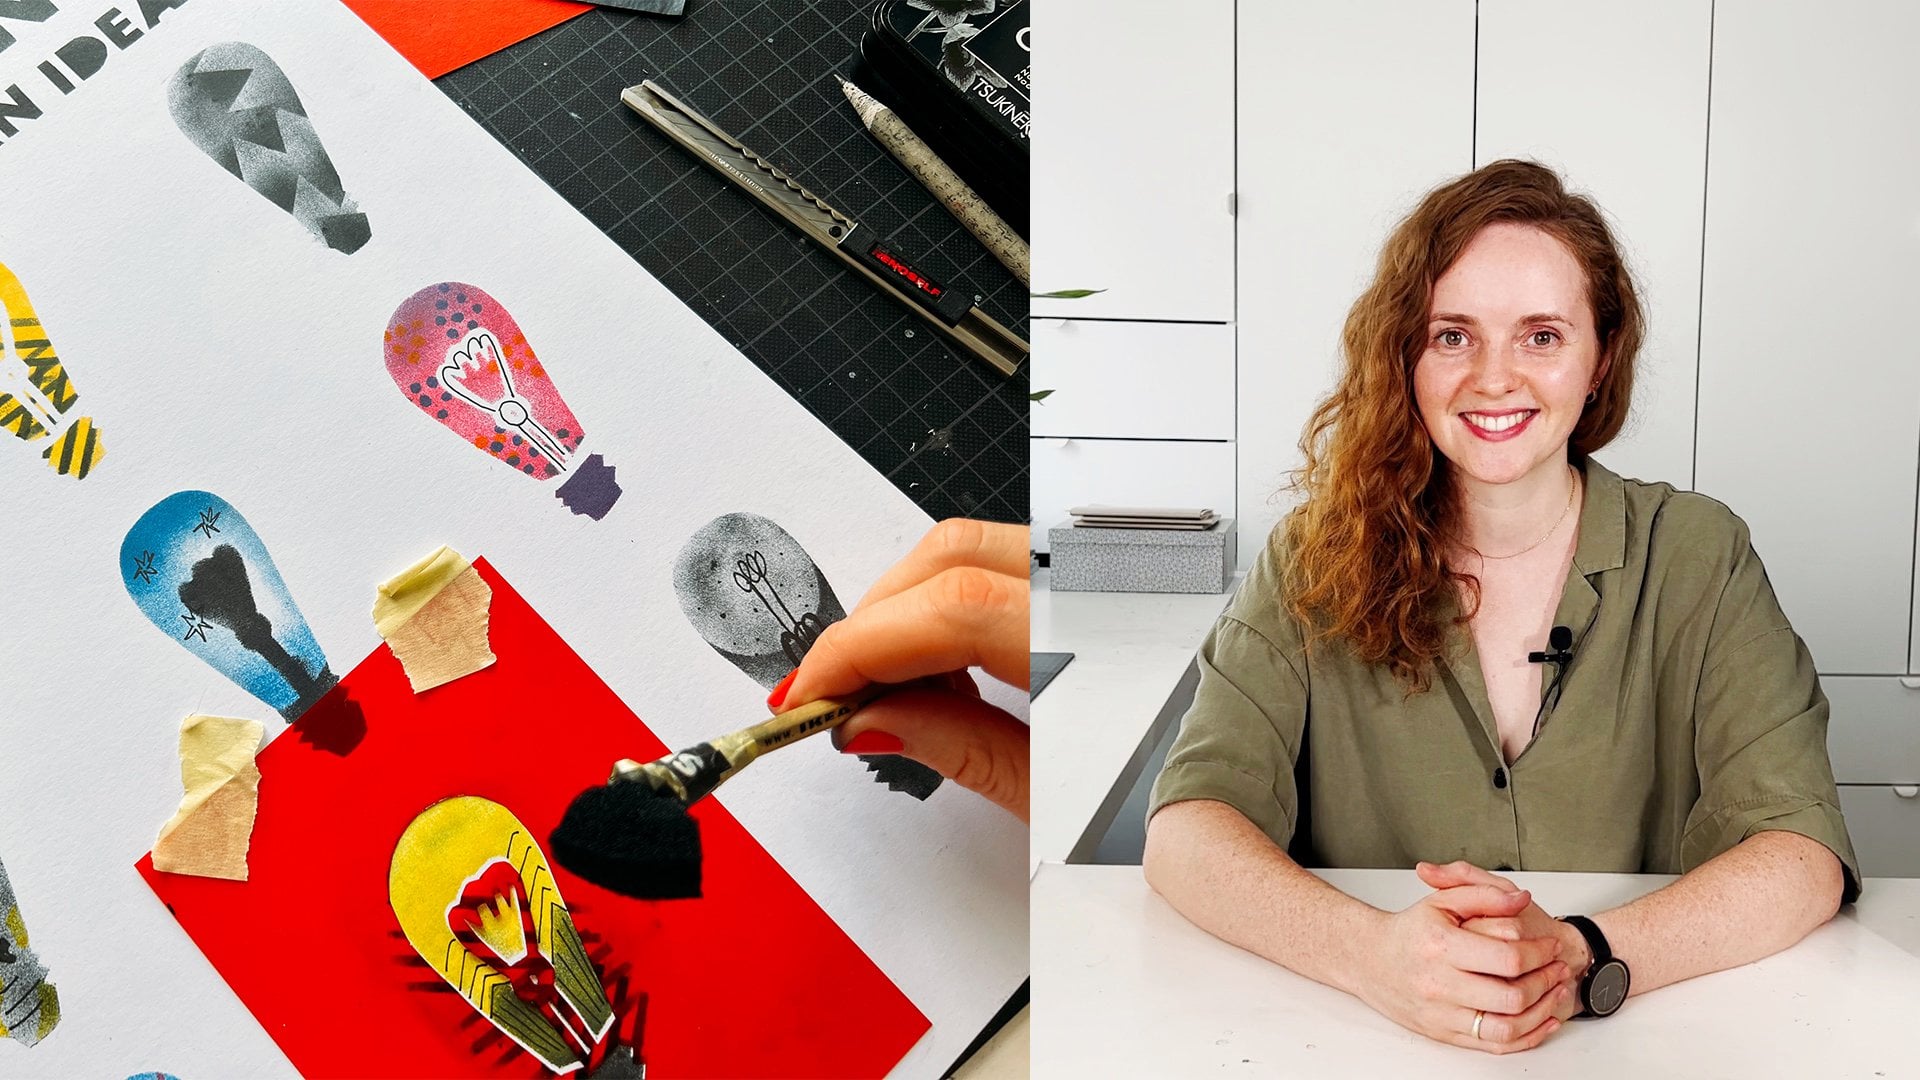
create some beautiful images. I'm Julie Saunders
and I'm an artist, a printmaker and surface
pattern designer based in New Zealand. I've been printmaking and creating art for as
long as I can remember. My favorite medium is
carving lino or rubber. I love the result you get. My favorite to be and to be
inspired is out in nature. I love going for a walk, getting into the forest. I love gardening and flowers. I'm also passionate about
printing on fabric, and my work sells here
in local galleries. I really hope that you
enjoy taking this class, and you can use these stamps long after this
class is finished to create something
else. I'll see you soon.
2. Class Project: Your project for this class is to hand carve your
own rubber stamps. You'll then take these
stamps and handprint a series of greeting
cards using ink pads. The template is available
under the class resources. Please feel free to print this out and use that for this class. Or you may have your own motifs that you might like to car, which would be amazing. I can't wait to see
what you're going to create. Let's get started.
3. Supplies needed: Let's take a look at some of the supplies you'll
need for this class. You'll need your rubber
calving material. Today I'm going to be using the Speedy Carve by Speedball. I'm going to use
three pieces of this because I want to create
all of my motives. Pieces here are
approximately 10 centimeters by 15 centimeters. You can buy them in a larger size piece too
if you can access those. We will take a closer look
at the different types of carving blocks in
an upcoming lesson. A craft knife, you'll need
your lino cutting tools again. We'll talk about
the different kinds that I've tried and used. In an upcoming lesson, you'll need a Sharpie, some scissors, cutting mat, your template, and
some scrap paper. Lots and lots of scrap paper. We'll use this to rub off
any ink that we don't want on our stamps and
to test our stamps, you'll need some ink pads, any kind will do
for this process. I do get really
good results with the archival inks and
the versifying clear. If you wanted to
grab some of those, that would be amazing, but really not necessary. If you do have some
ink pads at home, grab them out and
give them a go. You'll need some
wet white so that we don't accidentally transfer any fingerprints and things to our already printed
images and cards. Sometimes it's a
little bit hard. You'll need your greeting cards. These are just a heavier
weight paper stock. Nothing fancy about
them when you buy them, just make sure they can cover your head Chog
or fit your head Chog. You will also need
a basic pencil.
4. Carving tools: One of the questions I get
asked about the most often is around the types of carving tools that
somebody should get. I'm just going to
share with you some of the ones that I've
tried and used and then you can make your own choice from
there about what's right. For my first set was
one of this style here. These are available from
any art and craft store. They come with all of the tip. To change your tips, you just unscrew this here
and pop your new tip in. These are a really great first set because they give you the flexibility of having the different types
of tips available. They cut a beautiful line. You'll also see some little wooden box set
tools that are around. These, again, are a
great beginner's set I used and used, and used again. They cut a really
beautiful line for me. They come in all of
the tips as well. We'll talk about those shortly. You can also buy
individual pieces. This was an individual
knife that I bought and it does come in all of the
other tips as well. This knife has got
quite a long handle. I don't use it a
lot for carving, but I will use the
edge of the knife for getting into
really small spaces. That is also a
beautiful carving tool. My absolute favorite tools
are these ones here. These are a Swiss made tool
and they're well worth the investment if you're going to continue
your carving journey. These are what you
call a palm chisel. They're a Swiss made tool, they're really wrong
and well made. The palm chisels
are really great for me because that
fits in there. My finger goes there, I'm holding it like that, that is really
comfortable in there, and then I'm carving. It gives me more
control essentially. They are an amazing tool. They come in many
different styles. You can buy them in sets or you can buy
them individually. That some of them there. I mentioned before about
tips for this class. You'll need two tools. One is this V shaped tool. It's in a shape at the end of a. We'll use this one to
carve all of our lines. We'll follow the line around our stamp and use this
one to create the line. The other tool we'll be using will be something
that looks like this, like a crescent moon shape. That one we'll use to carve off all of the excess
around the stamp. We don't want, they come in different
sizes, as does the V. If you can get
yourself a smaller one of the half of
the crescent shape, a bigger one for bigger areas, and a really good V. That's what you need
for this class. Just the three better yet, if you want all of the tips, pick yourself up one of
these sets to start with. In that way you get
everything you'll need.
5. Carving blocks: The other question
I get past a lot is what type of carving
material shall I buy? I'm going to share with you just some of the ones
that I've tried. And we'll start with the
Speedball Pink Speedy Carve. It's one of my favorites. And the reason it's one of my favorites is that
it's super flexible, it's super spongy that when I'm pressing my stamp down
on a piece of paper, I can get some really
good pressure and it leaves me a really
good impression. It's one of my gotos. That is why I choose
to carve with this. I do have some others
that I enjoy using. One of them is this
cheaper brand. It's a Renoir brand. It's not as flexible
as your Speedy carve. It's a lot thicker though. I will often use this one
for my smaller stamps because when I'm stamping I've got more room for
my fingers to hold. I'm not going to mess
the ink up, essentially. I'll be pressing, I can
hold it and lift it up without interfering
with the image. That's also a really good
option for you if you want to create a whole
lot of small stamps. I'm sure there are other
similar brands out there. You're looking for
just a thicker block. This brand is another
one that I enjoy using. It is called Master Cut. It comes in a two pack, a really economical purchase. It's a lot thinner than
any of the others. You can see that there, it carves a beautiful line. You can see from my mushroom. But the trick is
going to be when it comes time to
creating your image, you've got him all linked up. Then you're going to have
to hold him and get him on the paper and not move
him or get your fingers. Then you're going to have to
try and lift him up again. We've got more room to move
with this pink speedy car, but a really good option, all you can get your
hands on, there are some blocks, it out there. This one feels a
lot more plasticy, so it doesn't even
feel like rubber. I've used this in the past and got some pretty
good results. There's lots of this type
of material around as well. It feels very much like
plastic I've carved with it. You can see here on my rabbit, it holds a pretty good line. If I wanted to use this stamp
over and over again though, I would mount it, which
is what I've done here, onto a piece of perspect. Just glue it. And that way when I am stamping because I'm not going
to get much pressure, because it's so thin, I can pop it on there and get
some really good pressure or I could brayer it to
get a more even print. I thought I'd quickly
talk about Lino as well. Some of you may have some line. It's the go too. For most printmakers,
it's amazing. It just holds so much detail. For this purpose, line probably wouldn't work because
we're not going to get any pressure on there. Normally, placing a piece of
paper on top of the lino, rubbing out this way to
get your impression. We're printing in reverse. We are creating a
stamp and we're turning the stamp itself
and the papers on the bot, then we're pressing this
way for this class. Choose yourself a rubber
carving material if you can. I hope that's helped.
6. Ink pads: Welcome back. I thought I'd just share with you some of the inks
that I've tried and used when I
create my own print. I have some that I go
to more than others. One of those is the
versifye clear. That's this one here and
they come in many colors. It's got a really nice
raised in bed for me, the verify, the ink that acts like a print making
ink that you would bray up. It's really, really sticky. It's great for covering
a larger stem. It's one of my gotos,
versifie clear. It's a pigment ink. It is
for me and for this process. One of my gotos. The other inks that
I love to use for this process are
the archival inks. The color range in these
is just phenomenal. You get stuck actually
on which colors to buy. These are amazing work really well for this
process as well. The ink bed itself is not as raised as
the versifye clear, but they do give a
really good coverage. One of the most versatile, I guess that's the
archival inks. And you will fall in
love with many of the colors I've used, the versifye, which is
really great for detail. You can buy other brands
such as Versa Magic, which is like a chalky finish. You've got other inks that
are suitable for fabric. Once you've created your stamp, you may want to start printing
on some fabric as well. There are ink pads
available for that. You can buy them in an umbra, which is something like that. That makes an interesting effect depending on the
piece that you're creating could be
really interesting. They come in metallics.
Look at that. The metallic inks are amazing
for really small details. You might have some
berries that you want to accent in gold,
that's really cool. Or make a print
on black paper or dark paper, really useful. You've also got inks
that come in minis. There's lots of
different brands around. They are really good for
your smaller stamps. A little bit more challenging
to use if you're creating a bigger piece because it
would take you a long time, number one, to ink up. Also because it is
a smaller area, sometimes you'll get lines from the ink pad showing
up on your stamp. I'll show you an example
of that coming up. Grab out any of your inks that you may have
lying around at home and start playing
and see what you get. Because I'm a bit
of an ink holder, I like to keep all of
my inks in a book. That way I can see at
a glance what colors I have when I'm creating a piece. For example, green is not green. I can take a look at
this and decide at a glance which green might be the right
green for a piece. I encourage you to do that, I'll just show you
those metalics look at that, isn't
that beautiful.
7. Create a play book: I get lots of inspiration from keeping any
work that I create, even if it's just the play work and I keep it all in the book. This was some stamps
that I carved, and I overlaid them
over a cut out circle, so that I got this
beautiful circle form. These are the same stamps, but in a different color. This was absolutely stunning. I really, really loved all
of the colors in this pace. The orange stamp is one stamp. Then I created the stems, individual pieces,
so that I could go up the page if I wanted to. I've played with some
pebble shapes here and over them to see what
that might look like. These blue ones are
just one stamp as well, and again, I've overlaid them just to see what
that might look like. This stamp here,
very simple shape. I thought, oh,
that's a bit retro. Let's have a play with that. And then I played
with some retroclors. This piece, I had a big play with him and a lot of it didn't
quite work out. I really didn't like the black, I didn't like the mushrooms
where they were placed. I wrote some notes when
I come to create them. Again, I've got the notes and
I know what I need to do. I'll change that up. Playing again, this was
one of my favorites. You can really do
a lot with stamps. You can create your own paper, you can cover a journal. These leaf shapes
here are one leaf and I've just overlaid them that
I can get a flower look. Some paisley paper. Again, I'm playing for a new, exploring what might work. This piece here, I absolutely loved until I did the black, not sure why I put black on it, because it actually never
quite works out for me. But it's about playing
and exploring. This was one of my all
time favorite pieces. I absolutely loved all
of the colors on here. This would look
amazing is fabric. Really liked those colors. You can really get to
play once you've got a whole collection of
stamps you can just create. The book is where I also
just play with new stamps. The green squares there are
from when I was talking in the ink video how I
said it leaves lines, that's an example of that. Here I've tried to create a B. You'll always refer back to this book even if you don't like some of
the images you create. When you go back through it, you think there are things
that you will like, things that you might
want to explore more. Even if you don't
like the images, you'll get ideas through it. There's lots in there. I just
really wanted to share with you my book and my inspiration. I encourage you to buy a
journal or buy a book, or even keep a tray of paper, all of your play pieces in that, and then you've got
something to refer back to that might inspire you to
win your next carving. I hope this has been helpful.
8. Transferring your designs to the block: It's time to transfer our
template to our blocks. So the first thing we're
going to do is cut out all of our motifs
from the paper just around the shape. You're not trying
to be accurate at this stage. There we go. The next step of the process is to trace around
each of our shapes. I've done a couple of the
leaves here and I'll show you my transfer process using just an ordinary
everyday pencil, we'll take our shape. All you're doing is drawing around the outside of your
shape with your pencil. It's not a special pencil, it's just a standard
HB round your shapes, draw around your steam. The next step is we're going to draw in all of the white space, because that is
where we're going to carve drawing into that. These are our carving lines. Doesn't have to be perfect. I'm not taking a
lot of care here, I'm just getting a mark for
where I want the line to be. This maple leaf is a great shape to practice
your carving skills. Here we go, drawn into all of my white lines
and around the edge, and you'll do that for
all of your shapes. You then take your block, take your leaf holding
the paper down, you can tape it
if that's easier. And just using the same pencil rubbing onto the
back of your image and we should have a shape. So I'll carry on and
do that for all of my shapes and I will
see you shortly.
9. Making your lines easier to see: Now it's time to
outline our shapes. And I've just grabbed my Sharpie and I'm going to
go around each of the shapes all over the pencil lines that
we just created. It's going to make it
so much easier to see. When it comes time to carving, I do all my motives. This leaf shape is one of the best leaves that you can practice when you
first start carving. It's got some rounded edges, it's got some straight edges. And it really is a good place to start when you're
just beginning, just go around
each of the edges, draw around your stem. When I first started
printmaking, I would cut all of my stems of. Now, if you wanted to make your mushroom into two
separate mushrooms, you could draw your first one in and then move
this one over a bit. In that way you can have
two separate mushrooms. I've joined mine together. You don't have to you, do you? Now, for the star of the show, you could get yourself a Sharpie that's a little bit smaller
than the one I have. I'm going to pay particular
attention to the length and direction of his spine because they are all of
the things that make him, I want to make sure that I get in properly because that's
the look I'm going for. You may be going for
a different look. And you can change it up, you can make a little one. You don't have to have him
looking the same as mine. And I want to pay particular
attention to these ones down here because that told us that that was
underneath of his body and there we have him. You can tweak him later
on. You can add more. It's just to give me an
idea of where I'm going to carve in the direction
of his spines.
10. Cutting apart your stamps: Welcome back. Time to
grab out your craft knife and we are going to
separate all of our stamps. I've just got a
basic craft knife. If you've got a bigger one, use that you're cutting
in between each of your stamps and making sure that you leave room
in between each one. It's pretty easy to carve The corners
can get a bit trick. The main thing is you're
remembering to leave yourself some room
between each stamp, in between each one. Making sure you don't
accidentally cut the one next to it is sometimes
it can be a bit tricky. We've got a beautiful,
big piece here, we'll save this piece, and we will practice
our lines on this piece so that we can get
to know our carving tools. Try and save as much of
the material as you can. If you can cut close
like this to the stamp, do that because then you've got another piece
to use for something else. Some little leaves or a
flower, some berries stem. You really are just trying
to remove any excess. It's just going to
make it much easier. I'll carry on and I will
do the rest of my cutting, and I'll see you
in the next video.
11. Tip - staining your stamps: Before we go ahead and carve, I want you to grab if you
have an archival ink pad. This is going to make
your life so much easier. When we are carving our steps, we're going to take our leaf. We're just going to apply
a little bit of ink on it. Nothing fancy, doesn't
have to be perfect, and it also doesn't
have to be even. And then we're going
to wipe it off, and you can see
some of that black mark coming off already. The reason we are doing this is because now when
it comes time to carving, we can see a bit more clearly. I'm just going to
go ahead and do all of these with my stamp. Again, it doesn't
have to be even. I'm just changing the color. Putting a stain on the back of, on the front of the stands
so it's easier to see. When you carve the black line, you're going to get the
paint coming through, which is going to
contrast against the blue stain that
we're putting on. And see how that
Sharpe stays on. It really is good for
this particular purpose. You can also see how inky get.
12. Get to know your carving tools: Welcome back. Now that
we've stained all of our stamps and cut
off any excess, let's get to know
our carving tools. It's really important that
you practice with your tools before you start
carving your stamps. It's really important to
look at your stamps and see what line you have to carve. We've got our leftover
pieces from our blocks. I've got my Sharpie. I'm going to take a look at my blocks and decide what
I need to practice on. It's a good way of getting to know your tools and
how they behave, how you need to hold
them like anything new. If the more you practice, the better you become, the more confident you
become with your tools. Looking at our stamps, we've got our leaf. I'm just going to draw on my practice bits
which are stained, that's got some wavy lines. I want to practice those. I know that I want to practice those because they're always more challenging then
a straight line. I'll draw some straight
lines because we've got straight lines in our
hedgehog, underneath the body. We've also got the spine. I want to practice
those as well. The other thing I
think I'd like to practice is these little
circles for our mushroom caps. I'm going to draw some
of those as well. How am I going to do them? Which tool is right
and which size tool? If you've bought that cat
with all of the tips, now's your opportunity to
grab those out and play. I know I want to practice. I also probably want to practice doing some
long straight lines. I might want to practice
maybe the acorn cap, it's got some little tiny dots. How are we going to do that? Which is the right
tool to do that. I don't need that one.
I'll get rid of that. They are the lines that
I want to practice now. I've drawn them up and I
encourage you to do the same. Okay. I've got some of
the tools beside me. I've got my scrap piece here
and I've drawn my line. I'm going to practice and see
what I get to start with. I'll use this tool here, which is the one we
talked about earlier. This is my V shaped tool. Let's give it a go. I'll start with my line. I've got my tool finger
on there for my control. And that's sitting in there. I'm going to press down. I'm coming up slightly. I'm coming up to like
a 45 if you like. I'm just pressing
then I'm slightly lifting up to finish at
the end, up a little bit. Engage the tool, keep
pressing forward, lift up at the end. That staining the
block makes it so much easier. Up a little bit. With the small ones, we're going to have to just
take our time with it. You're pressing and
flicking up if you like, engaging the tool,
going down a little bit and then pressing
up at the end, pushing up at the end. A smaller one. We need to
practice these lines for our. There you go. My favorites, which is
the Swiss made tool. Again, I'm holding
it in my hand like that and I'm using
my finger to control it down a little bit. Pressing up, practice our small ones. Then we're going to
do these curly lines. Wavy lines, I'm starting now, I'm going to turn
the block around. You're turning the block
slightly on your corners. It won't always be possible
to turn your block. If it's a tight corner, it makes it so much harder
and you have to stop. Just start in the same line
that you were carving. Let's try that again. I'm not going to
be able to turn, so I'm just going to lift off. I'm going to put the point of my tool into the piece
that I've already carved. And you can feel it turning and you're carving
away from yourself. Again, I couldn't make it. So I'm going to redo that. Just take your time. Let
your hand get used to the tools and lifting
up to finish. Let's try these lines here. Change tools again
so that you can see one of those wooden ones. This one here, this one
here is still a V shape, but it's a little bit wider. Let's see what it does, lift up. If it's a wider V, it's going to give
you a wider line. You choose whatever
your style might be. You might want a thinner one, which means you're looking for something a little bit thinner. This one's wider, it's going
to give you a wider line, which might be nice
for your leaf. And flicking out we've got some of these little
circles for our mushroom, I thought I might try and use our half moon or crescent
shaped tool for this. Let's see what we get. I'm going to go
down a little bit, then I'm going to
try and lift off. Look at that. That's perfect
for our mushroom cap, the crescent shape and just off, starting up a
little bit high and off, made a mess of that one. But that's okay because
that's what the mushrooms, the spots on the
mushrooms look like. Let's try again. That's why
it's important to practice. Now let's go back to, these are our acorn, I might like to use that wider tool you use
whatever tools you've got, just give them a go
and see what you get. Just keep practicing until you get the result that you want, and then you know what you need to do when you come
to carve your stance. I'm happy with that. Go ahead, grab a scrap piece
out and practice. Practice. Practice until you feel comfortable
using your tools. Learn how to dig in slightly. Learn how to lift off so that
you can finish your line. What I will say is if
you do get your V, it's about the angle. If you get it too high, you go up too high and then you try to carve, It won't move. So just be careful of that. It will not move and you're
going to have to take it out and you're going to have a
big hole in your rubber. And you can see there,
it's just a mess. If you go too lightly, it's going to slip and
you're not going to have any control practice
those things get the depth right and
it is a matter of just practicing and you'll feel
it and you'll know that that's right. Give that a go.
13. Carving your stamps: It's time to carve, grab your stamps, grab your gauge and let's
start with our line work. I recommend you start with either your maple leaf
or your plain leaf, so that you get used
to the lines first, and then do all of
your other ones. After you've
practiced these ones, I will grab my and
we'll get started. The first thing I'm
going to do is go round the edge of my stamp and you can go over the edge of these ones on the outside edge, because we're going to
carve that away anyway. Turning the stamp to help you turning, coming back up always, wherever possible, carve
away from yourself. So we're not going to
make that one there. So I've just lifted it up and do not chop off your stem. When I first started, I had a habit of going across
the bottom of the leaf and somehow always managed
to chop off my stem. I'm using my arm and controlling the blade
with my finger, and I'm also turning the step. You can have a leaf without
any lines if you want, or you might decide to do
a different pattern on your leaf or have none at all. Do you and embrace
your creativity. Now I'm going to do the main veins and you
can go over the edge, because we're going
to carve that off. Anyway, when I'm starting on this in vein, I will get the bottom
of that point of my tool and pop it into that
line we've already carved. And it just sits there
and you can feel it have a practice at that. And then you can push
off from there and see how creates quite a nice
line pushing off from there. Again, bottom of that tip into the line you've
already carved. And if you went the other way and did a line and
then tried to stop, you may not meet it. Or you might go
over the line and create a mark here
which you don't want. Push off from that bit there. I'm leave, little leaves are really great
fillers for compositions. If you have some of
your rubber leftover, I encourage you to create a
whole lot of little leave, little fills, super useful
in the style of art making. Often they will help you fix if something's not quite right in a piece or it's missing a little
bit of something. If you've got some
little tiny stamps or smaller stamps that
can often fill in that weed space or
whatever that might be. When you create your
prints, your cards. Little flowers,
little berries even. They're just little circles. It can really help
just lift a pace. I really don't want
to get my finger in the way it's going to go.
14. Trimming your stamps: It's time to trim up our stamps and make
them look like stamps. For this, you'll need your crescent shaped tool
that we spoke about earlier. All you're going to do is try and get this
edge of the tool, this edge here, into the line that you've already
carved on the outside. If I start here, you can see my tool
is inside that line. I can see it because I can see the silver bit,
the metal bit. All you're doing is following that line into the line
and you can see it, you'll know that it's right. Because you can see it. It feels smooth. You're not fighting the
material you can see. I've got a beautiful space
around the edge of my stem. And I normally like to
go around one more time, a bit further away from the
line with the same toll. I'm just taking off any bits. Once you're at that stage, you take your knife, your craft knife, and then
you can trim your stamp. You're cutting
into the pink bit. Remember, don't cut
too close because you want somewhere to
hold onto your stamp. And if you follow the
shape a bit more, it'll make it a little
bit more accurate. When you come time to stand as well, that's it. You've got your first stamp, you'll notice that I left the pointy bits on the end because when we turn
it over to stamp, I can see that that's a stem
bit because I've given it a square edge and that's
the other end of the leaf. When I'm printing like this, it's easier for me to see. I'll do that for the
rest of my stamps. Just wanted to share with
you about the mushroom in this middle bit because
I've left me together, you actually need to
with the U gauge, dig it out somewhat. You're trying to
get that bit down away from this bit which is
going to be a printing bit, just ensuring that it is lower than your printing bat. You could cut it
out if you want to. This will be a stronger
stamp if you leave it there. I just wanted to
share that with you. The rest of the process
is just as before.
15. Testing and checking your stamps: We've trimmed off any excess around the edges of our stamps. Now's the time to check
to see if they're right. I've tested these ones earlier, and I've used my
archival ink pad. And I'm just going to test
my maple leaf just to make sure that everything
is how I want it. Now's your chance
to tidy them up. I'm just pressing the con I'm not too worried that
it's not even at this stage. I just want to make sure
those edges are done. Just so that I can see if there's any mark unwanted
marks that I don't want pre getting
a good coverage. But again, doesn't
have to be even. I can already see that
there are some marks. Let's turn it over.
Pressing, make sure you press
well around edges. Normally, there
are unwanted marks there where you haven't quite carved away
enough of the block. There we go. I do have some marks that
I'd like to clear off. There's a few little ones
around the edges of this stem. I want to tidy up that stem as well to my crescent shaped tool. You're just going
around the edges, taking off any pieces
that you don't want. And you can see it
from your picture, the image that you've
already stemmed. They will go round going to tidy at my stem another bit, not and come done. Let's test it again. The same process, pre sing, pre sing, Making sure you
get those edges again, if that's the area that
you wanted to tidy up. There you go. A lot of
it has been removed. You'll do that for all
of your stamps and I will see you in
the next lesson.
16. Tip - Play on paper first: It's time really just to have
fun and play with color. And that's what I'm going
to do, my ink pads, I've got my scrap bit of paper
cut out to my card size, and I've got lots of different
inks surrounding me. I'll just place it on my paper and see where I might like it. I'm not sure if I want
to leaf beside it. I could do some
leaves coming down in the corner perhaps just
to add a little bit of, there may be some down there. That's what I'm going to try. I'll normally just
place my stamps on a piece of paper
and see what I get. Play with my mushroom. And I put my maple leaf in the corner just because
I wanted to see, is that a composition
that I like? No, it wasn't really. Then I had to play
with my smaller leaves and you can see I was
going for a tree, didn't quite work out. Purpose of me
showing you this is often you see these amazing
images and you think, wow, that person's really
clever or whatever that is. And then your self
doubt kicks in. What I can say is, for me, the learning in the
growth comes from the play. Then you discover what
works, what doesn't work. You keep going until you get an image that
you are happy with. This one, I didn't
mind. That's my acorn. It's I played with the colors when I'm testing them
on this basic paper. I'm not too fast about
how I ink them up. It's just really
whacking the color on so that you can get an indication of
what it might look like. And then we'll take
a bit more time when we actually do our cards. I didn't mind that composition. I thought that was quite cool. I think I might like a pot
more color in it though. May not go for the brown. I might go for a darker green. Where that brown is through the play, you can have a look, you can even write notes on your scrap paper and so that you can tell yourself what you liked, what
you didn't like. That first mushroom I did, color was all wrong, so
I thought I'd lighten it up and I went
for this rosy pink. That was that one.
And then I thought, oh, there's still something missing from that composition. I ended up with this one here. It just needed remember, I spoke about this earlier. If you make some little stamps, they can really help
your composition. They're only little, but they
just add something to it. I got my mushroom stamp and
then I've just placed three of those smaller leaves that we created into the composition. I'm really happy with that. I'm actually going
to go with that. I think that's really cool. That is one that I'm going to keep and I'm going to
recreate on my card. These are some more
that I played with. I did have a little round
stamp that I had carved, that added to this. I've done my leaves that were created and then I've
put in the smaller leaf, it was missing something. Then I thought, I
wonder if I should pop some little dots on
to represent berries. Then I had to play
with our bigger leaf. I tried to overlap some colors just to see
what that might look like. Play the mushrooms and gold. While I really
love the gold ink, I think for the mushrooms, the composition would
have been better had I left it like that. But still, it's an
option you could do, even the nose of the hedge over here peeking in with the
mushrooms down there. In that action, I
might still try that. Then I did the acorn. I actually quite like that one.
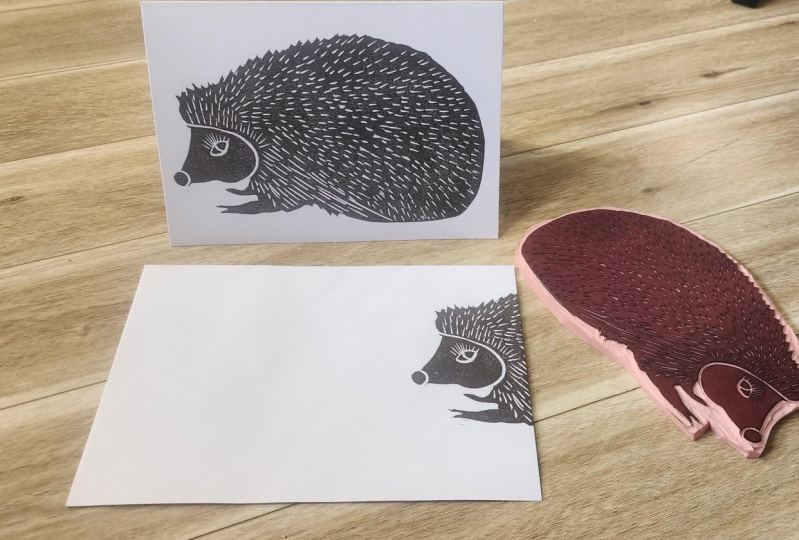
17. Hedgehog card: I have my cards, I have my envelopes. I have some paper underneath. When I print, sometimes I will go off the edge of my card. If I've got paper underneath, I'm not going to get
ink on my table. I'm going to use
one of my gotos, which is the
diversifying because I really want you to hear
and see how this in behaves. I'm just give myself
a bit more room. Move it out the way. Nice raised ink bed. Here we go. You can see
how good this inch is. By just that first initial
lay down, it's sticky. And if you listen closely, you can actually hear the noise the stamp is even
sticking to in up. I just with my stamp
pad all over the head. Really sticky inch, great. And if you touch them
and you touch the ink, you'll need to wipe your
fingers. You can hear that. You can also see it if you hold your stamp up to the
light or up close, you can actually see which
areas might need more ink. This is my process for there. For a larger stamp, I'm just pressing, letting
the stamp do the work. You don't need to
press too hard, making sure I've got a
really good even coverage. I'm not sure if you can see
the light on that stem. And you'll be able to
tell if it's not inked up properly because
you'll see spots that are lighter than others. We'll get down scrap paper. The process will be exactly the same for when
you do your card. I mean to line him
up, press them down. Now, once you've put them
down, you can't move him. If you move him, you're
going to get a smudge. And like a second image, dancing fingertips
with this process. You are pressing hard because this speed
ball is really spongy. I can get my fingers and I
call it the finger walk. I'm making sure that I
go all over the step. Better to take your time
with this than to rush it, otherwise, wasting your ink. Make sure his nose is done
around the edges you press. If you're struggling
with your fingers, you can use a Brayer or something like a
heavy paper weight. You can even do this and that is like a gentle pressing, but with pressure stand up. If you Nato and use
your upper body weight, and then you're lifting
off really gently. Now the key is not to drop
it, and there you have it. He's amazing. I love him. I've pinked my card up, doing exactly what
I did just before. So that's my paper
and that's my card. I'm thinking I might like to print a matching
envelope for him, because I think he's
really cute and I might just use part of his face. I'm going to take my envelope. I'm going to just ink up maybe this much of
him, the beginning bit. You don't need to ink them
all up because we're only going to do just as head. So go a bit further than
you think you need to. That is so cute. I would love to get
that in the mail.
18. Mushroom card: I'm going to recreate my
mushroom because I really, really like how simple that
was, this think I'm using. Again, I'm going to go for my favorite, the versifye clear, because it is a larger stamp, and for me it's stickier. But again, when we
come to the leaves, I'll show you some other rinks, you can't decide what's
right for you there. But I really, really
liked this color, which is why stick with it. You'll notice that I'm holding right on the edge of the rubber, not on the stamp itself. So that's why it's
important to leave yourself some room for your fingers to actually pick it up. I'm looking at my
test piece here, pressing, making sure
you don't move it. It's a good workout
for your fingertips. Making sure you do the edges lifting off. Whoa,
nearly lost it. It's interesting
because this color ink has acted differently
depending on the paper. That's another thing
to keep in mind. Depending on the paper and
the content of the paper, your colors may vary
from paper to paper. This is our photocopy paper
and this is our card stock. But I still really,
really love that color. I think it's just a bit more
muted than a bright red. Happy with that, I'm
going to carry on. I'm just going to
wipe that stamp. I'm not going to
be using it again. I don't need to give it a
pat with a dry paper tail. I'll just leave that there. Or a dry rag is actually better. What's this little guy here? Cover your ink pads. Otherwise they're
going to dry out. Let's go. And when I was playing, I actually wrote down the name of the Yank, which
is really helpful. That is the ranger sea grass. These ones you
might hear a stick, they feel a bit harder when you, I'm just pressing,
I'm going to do this three or four times with this little guy and
I'm holding him. I'm looking where that
point is because we created that point so that we could see where to place it. And that one is just to press. He's only little, so you don't need to spend too much time on him And press up pretty good. Do that again. And
even he looks a bit brighter on this
card stock as well. A card to make him all help. Oh, looking for my point. And it was what more?
19. Acorn Card: For my acorn card, I'm going to refer
back to my playpiece. I really liked that composition going to change it somewhat. Change the color
of the leaves from brown to another shade of green, which contrasts nicely
with the lighter green. I'll do very little
talking in this video. Just sit back, relax,
enjoy the music, and enjoy my process for
making this acorn card. I really look forward to
seeing your acorn cards and seeing how creative you get in the compositions that
you can come up with.
20. Maple Leaf and Large leaf Card : I thought for my leaf card I would use a couple
of different greens. And my smaller stamp there, I'm going to ink up my stamp. You're not going to see
this on camera very much, it just goes a slightly
different color. I'm just pressing quite firmly. Pretty good. And I didn't press
hard enough There you can see there's
quite a faint mark. I missed it. That's okay. Will get better. It might take you a couple
of goes to before you feel confident with the
pressure and the inching. But for this look, it doesn't really matter
because they're hand printed and it's block printing. Remember to have your
wet wipes with you. You will get in, as you can say, stained. Very difficult to get out from
under your nails as well. That's a better one. I'm starting to get a bit
better as I go around the page. I think that's enough
for the big one. It's going to wipe that extra
ink off with my wet wipe. I'm going to fill in
a little bit with my smaller one for
your little stamp. Sometimes it's easier just to, if you can, if you've
got the thicker rubber. Do this just the opposite way. I might like to
just fill in pre, just some filler leaves. I'm happy with that. I might have one more turnatve though. Maybe I might need to look
at changing my colors. But that is still
a beautiful card. If you were to give
that to someone, let's have a turn at this distress and see
what that acts like. And we should get
a vintage Ripe. The Distress Inc,
because of its formula, is designed to give you a
very distressed looking step. It's cool, you could even print up a whole lot
of these maple leaves onto heavier weight card stock and cut them out
and make a garland, if that's what it's called, something like that, bunting. Even though I'm
pressing really firmly, the look it's going to give
me is that vintage vibe. Pretty cool, though.
I'm going to carry on and I'm going to create my final maple leaf card and
my final green leaf card.
21. Thank you: Thank you so much for
taking this class. I really hope that
you learned a lot and were inspired to create your own set of beautiful greeting cards using the stamps that you created. I'm always inspired by other
people's creations and I would love to see one of the
cards that you've created. Please upload that into
the project section. That would be amazing. I hope that you've played, that you've explored
color and you've started a playbook
in the meantime. Take care and happy printing.
 Julie Saunders, Artist