Transcripts
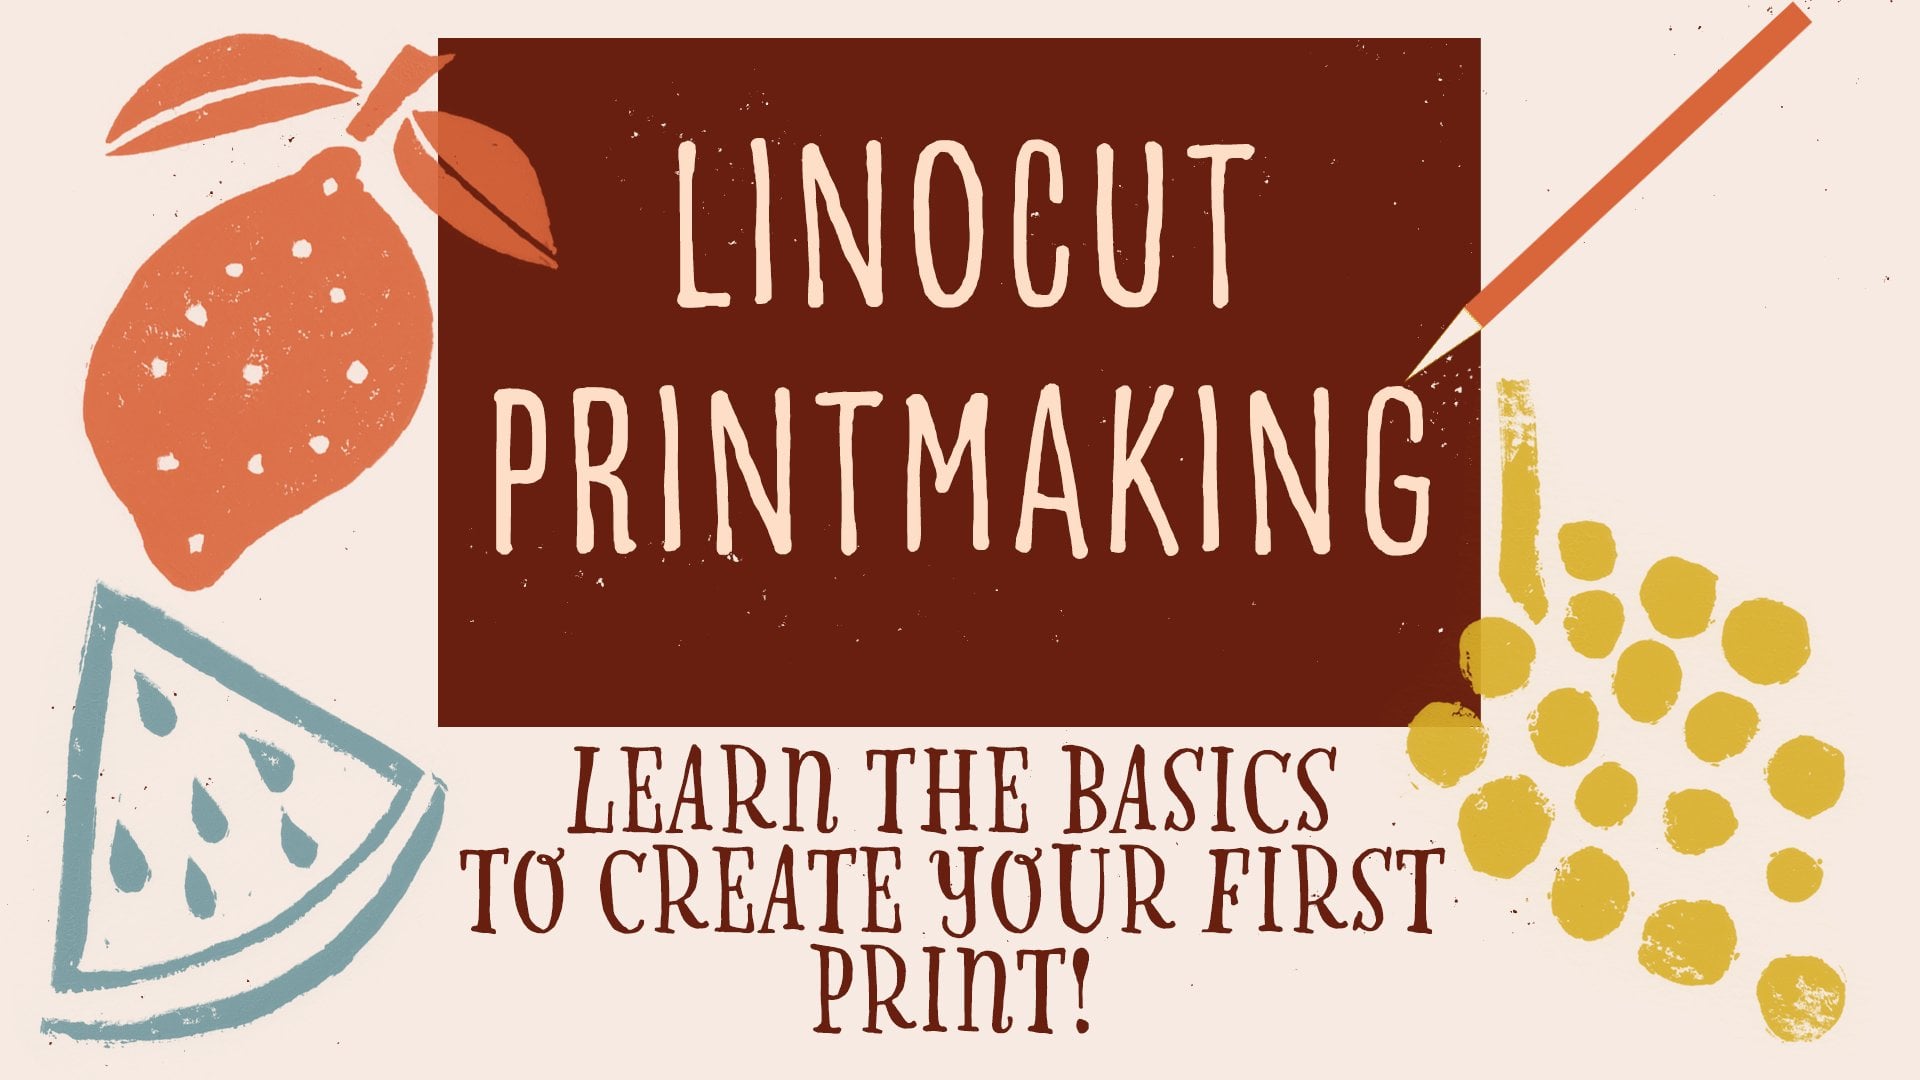
1. About this class: My name is Julie, and in
this skillshare class, I'd like to share with you
how I carve my own stamps. We will then use these
stamps to block print our own beautiful
handmade gifts. I'll share with you how
to carve your stamps. Tips for making our
lines easier to see, and my process for
printing on fabric. And at the end of it, we will create some beautiful
festive gifts, like a tote bag, some fabric
for wrapping our gifts, gift tags and greeting card. I'm Julie Saunders.
I'm an artist, a printmaker, and a surface patent designer
from New Zealand. I've been printmaking and creating art for as
long as I can remember. My favorite medium
is printmaking. I love the results you get. My favorite place to be and to be inspired is out in nature. I love going for a walk, getting into the forest,
gardening and flowers. I'm also passionate about
printing on fabric, and my work sells here
in local galleries. I really hope that
you enjoy taking this class and that
you are inspired to create some beautiful
handmade festive gifts for family and friends, and of course, for yourself.
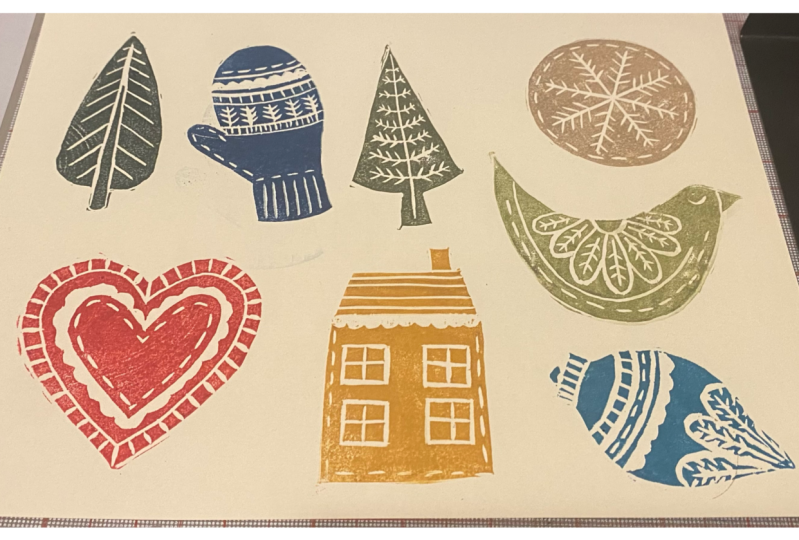
2. Class project: Your project for this
class is to create your own set of
festive themed stamps. We'll carve those stamps
and then we'll use them to print a range
of festive gifts, such as a greeting card, gift tags, a tote bag,
some wrapping paper. The possibilities are
endless for your project, you need to print just one. I can't wait to see what
you're going to create. Let's get to printing.
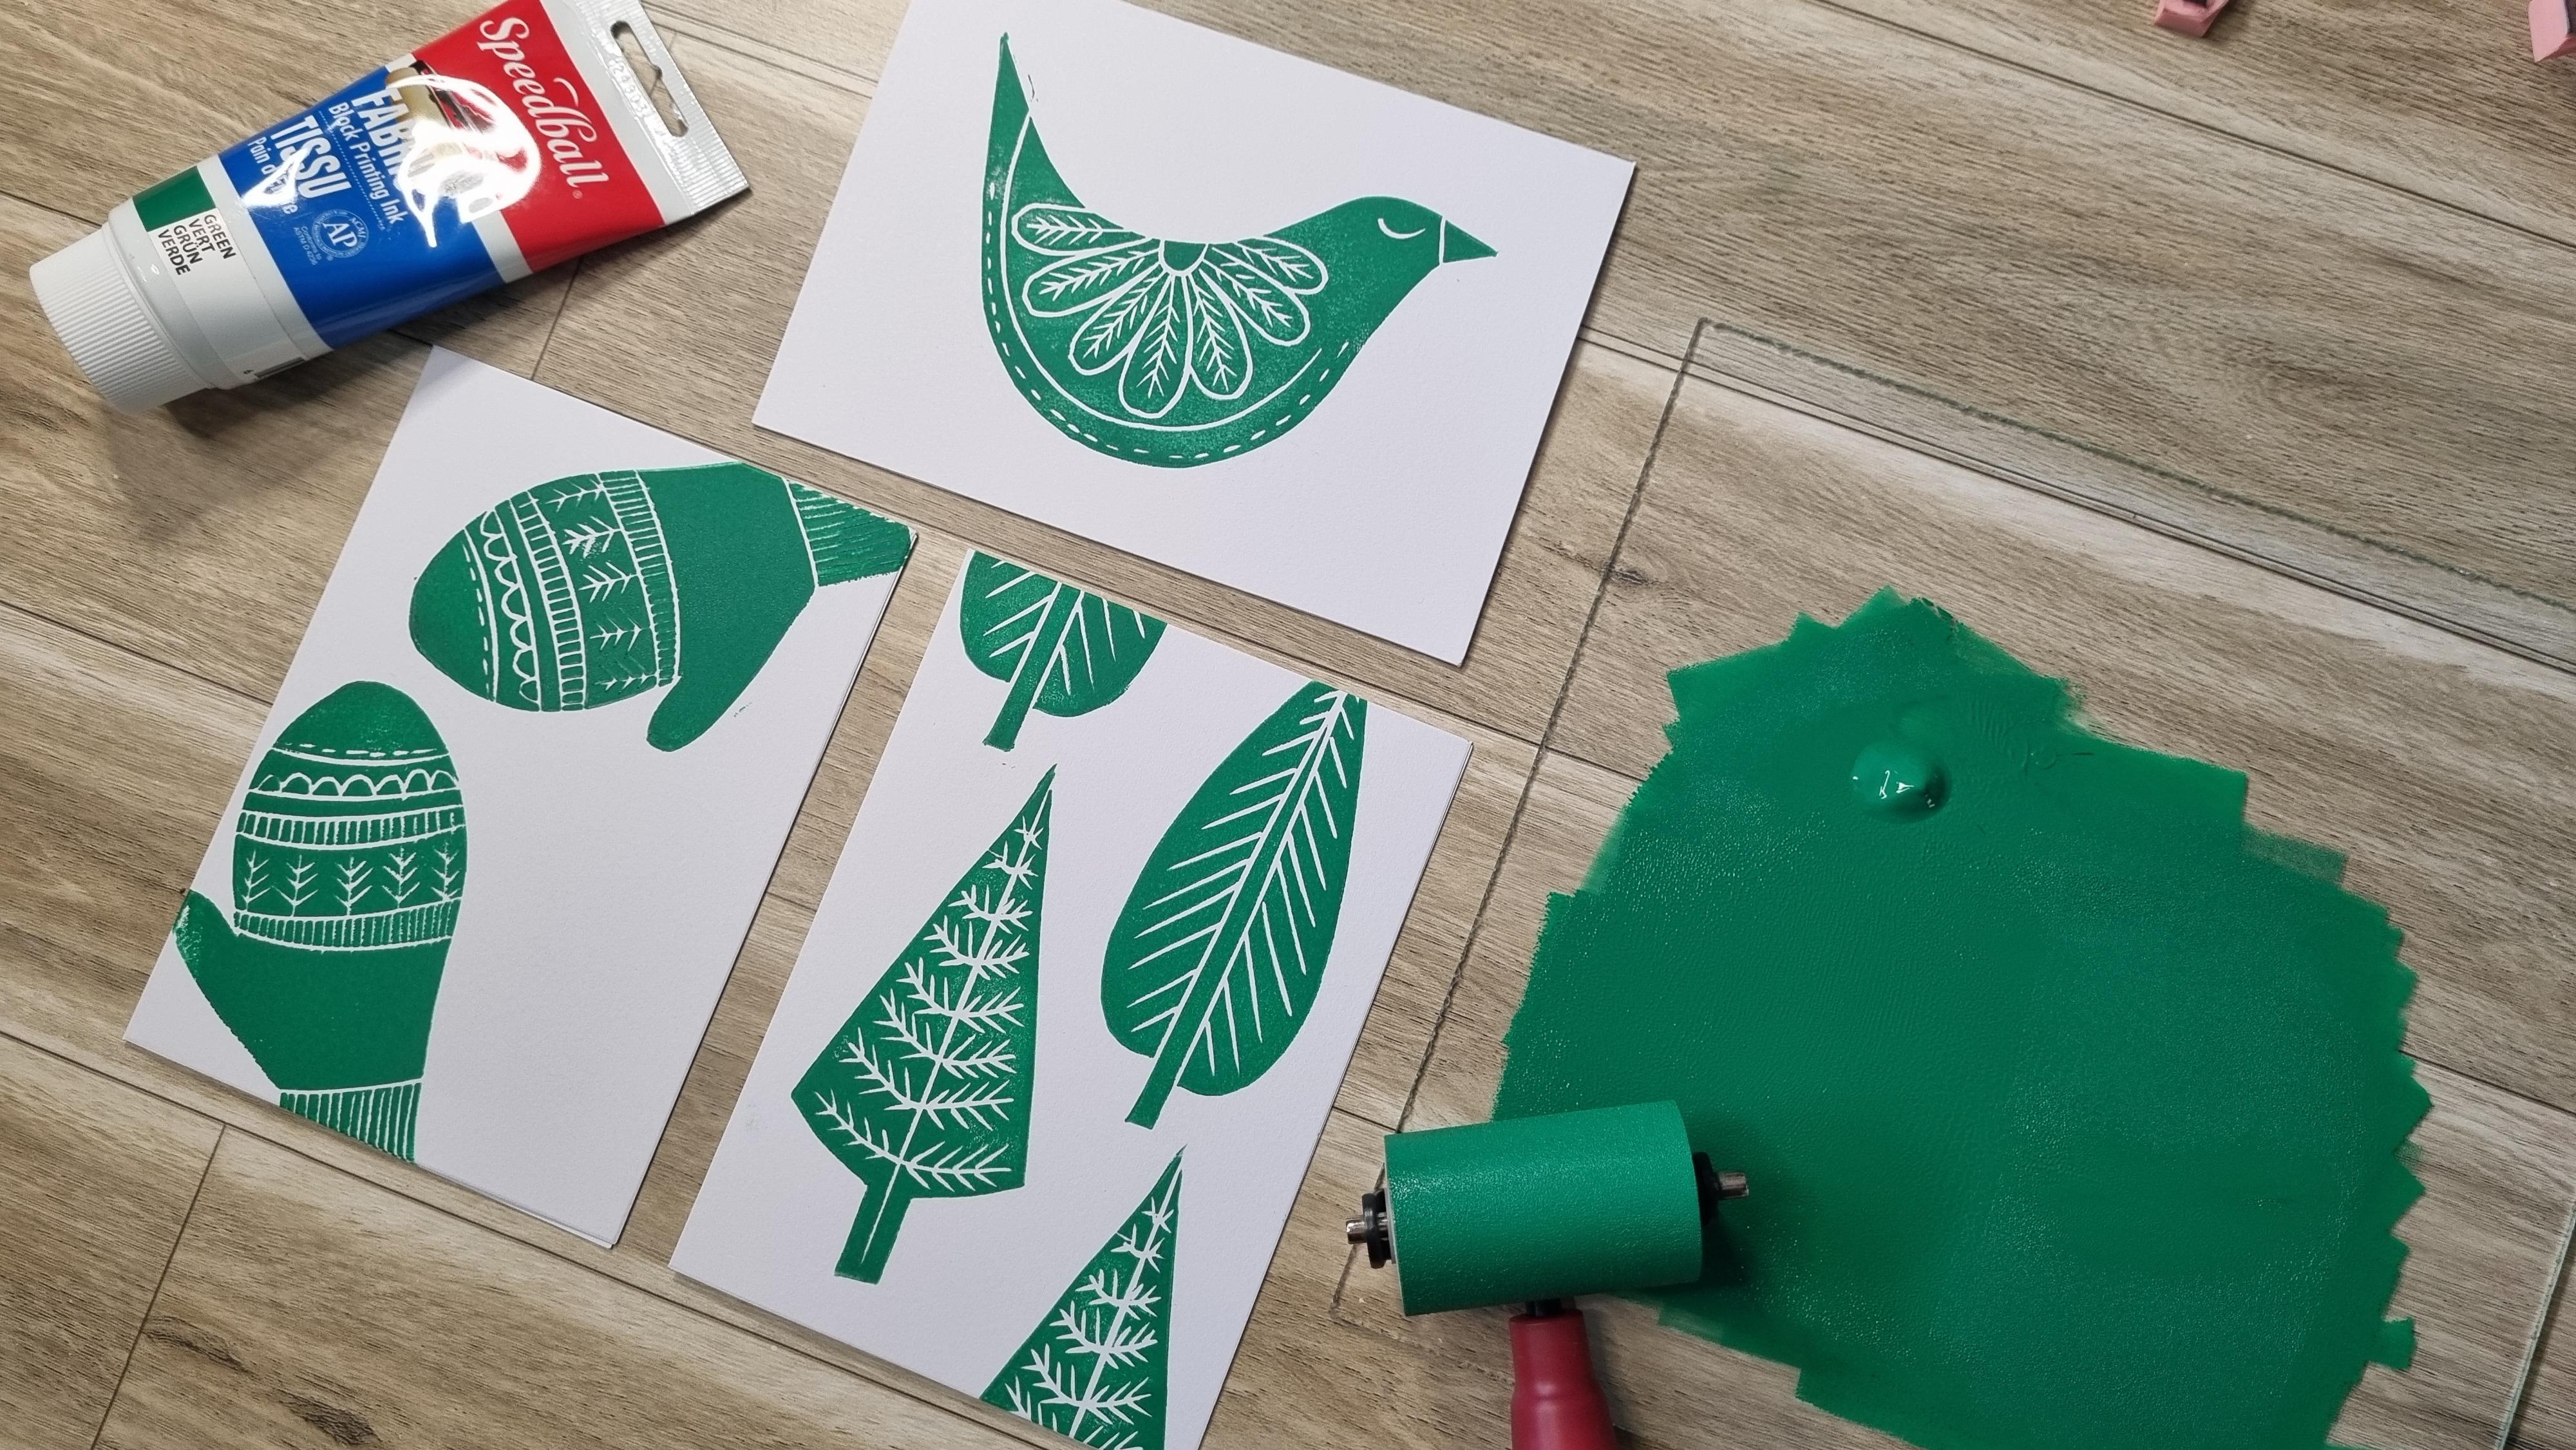
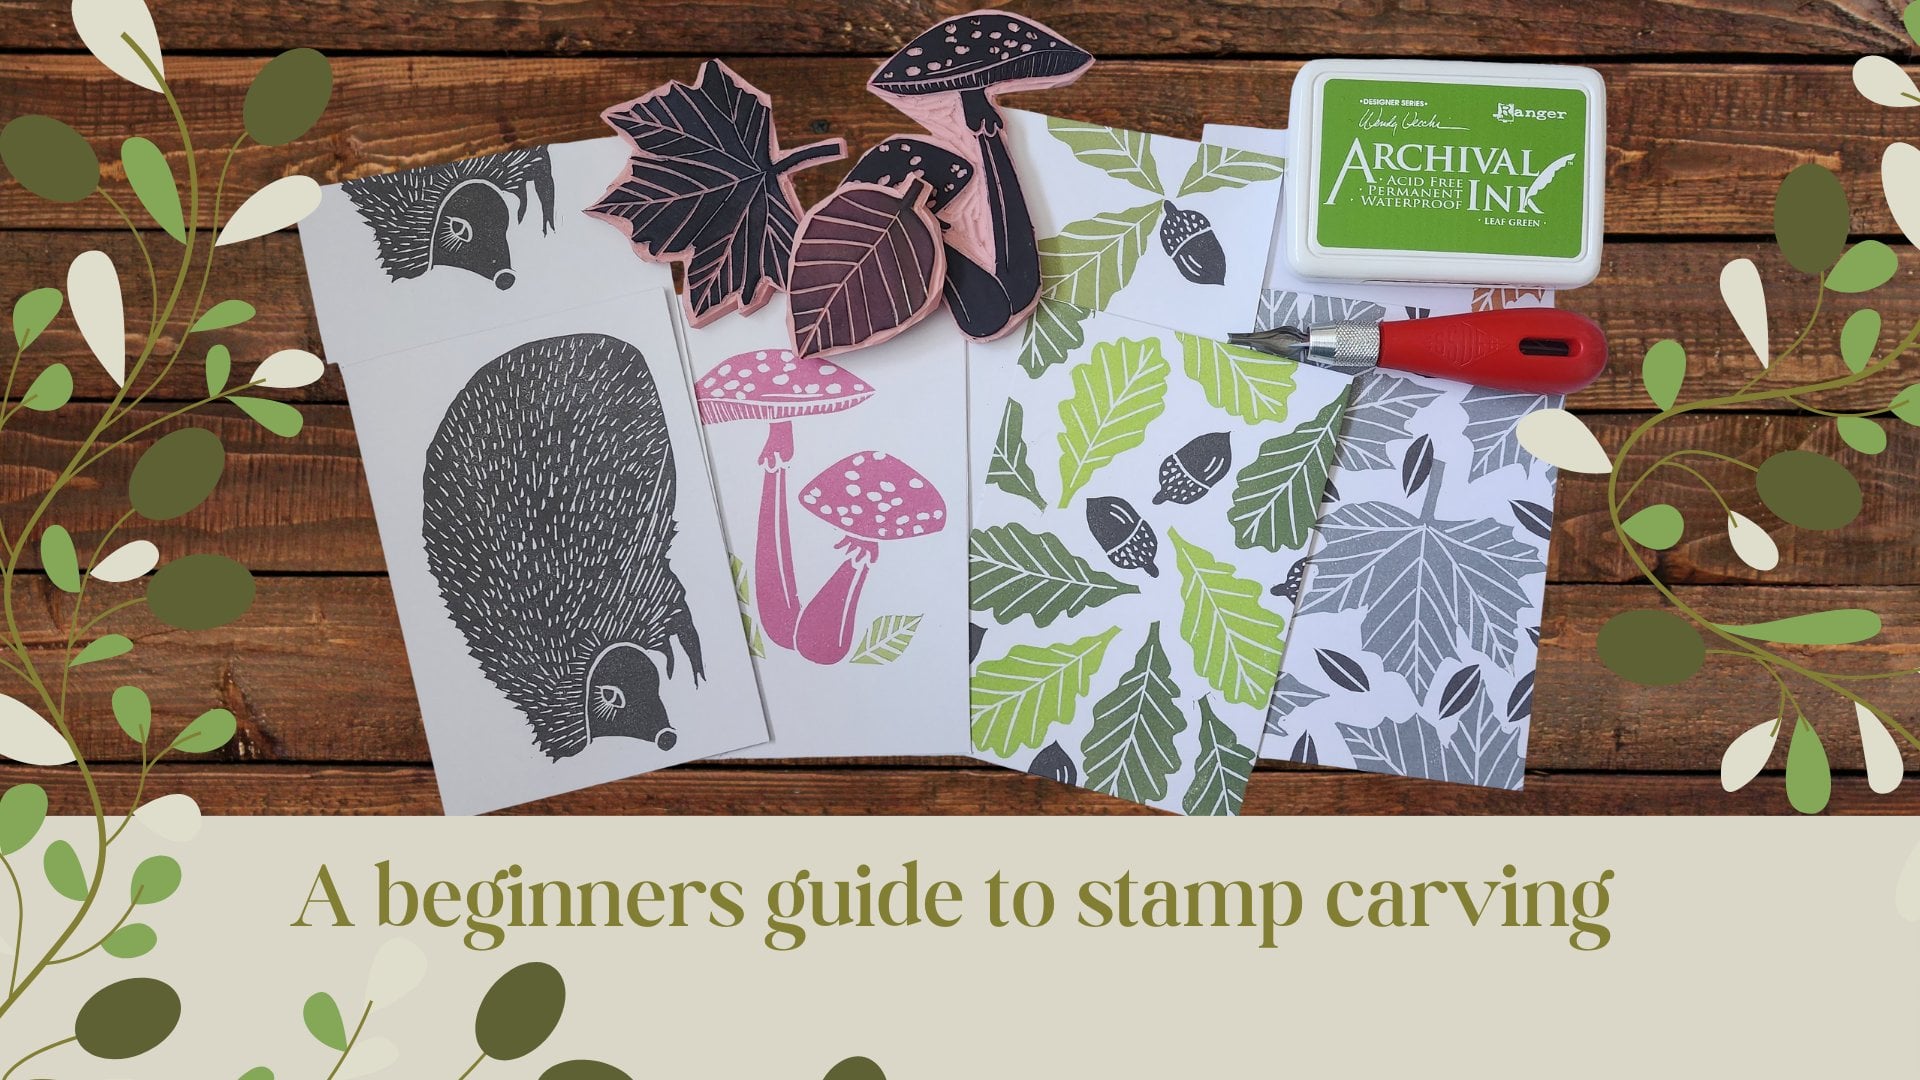
3. Class supplies: Let's take a look at what you'll need to create your own gifts. Today, I'm going to be using
the speedball fabric ink, and you can also
use this on paper. It's perfect for this class. Everything washes up in water. In terms of cleaning up, it makes it a lot
easier as well fabric, this doesn't need
to be heat set. You can print your fabric or whatever that might
be for you today. It'll dry in around
ten to 12 days. For my paper images or my cards that I'm
going to print up, I'm going to use just a
basic student grade red ink. You'll need a pencil, a Sharpie, some scissors, a
print making roller, or a Brayer, they call it. You'll need your carving tools. You'll need a U shaped tool. You'll need a V shaped tool. If you pick up one of these sets that you see in art
and craft stores, they come with all of the tips you should get both of those. That set, you'll
need some wet wipes. It gets very messy, and you don't want
to be transferring ink onto your already
printed images. I'm going to use an
archival ink pad today. Any color that's darker
than your printing block, you'll need some paper towels. You'll need your template, which is available in the
class resource section. Feel free to download
that, use these images, or you may decide
that you want to draw and create your own
stamps using your own images. That would be amazing. You'll need your
carving material today. I'm going to be using the
Speedy Carve by Speedball. I find that it prints really, really well on fabric and on paper and I can get some
really good results with it. You'll need some greeting cards. If you're going to
create greeting cards, I'm going to be making
Christmas tags. I've got some craft type paper. I've got some heavier weight
card stock here which I'll use to create my art
prints and frame them up later. You'll need a cutting mat, a craft knife to cut
apart your steps. You'll also need
some scrap paper. Lots of scrap paper. We'll use this a lot to
test our stamps and to put behind something so that we don't get
ink on the table. You'll also need
whatever it is that you want to print out today. I'm going to print a bag. I've just picked up a
checked little type bag from my craft store. Then I'm going to print
my paper products. I just thought I'd
mention about this barn, you don't have to have this particularly for the
fabric, you don't need it. You could use a clean roller and you would get
the same effect. Or often I will just use my fingers if I'm using
the speedy curve, it's so spongy and so flexible, you can get quite good pressure
with just your fingers. Barns come, they can look like this or they
can look like that. Or you could even use
a smooth paper weight. If you've got one of
those glass paper weights you could press down using that. They're optional. You don't
need them for this class.
4. Transferring your images to the block: I've cut out each of my shapes and to transfer
them to my blocks, all I'm going to do
is to grab my pencil. It's just an ordinary HB pencil. I'm going to draw the edge of my shape and then over all of the other black lines
you're pressing firmly. But I'm not taking too
much care with it. I just want an indication of where my where
I want to carve. And you can decorate these
shapes anyway you like. You don't have to use these
lines, which I've drawn. You might like to
have one window or two windows or a door, which is clearly
missing from my house. I've got a side door just around all of your lines. I'm not going to worry
about these smaller lines, but I'll use those as reference when I come
time to carving. All you're doing now is
grabbing one of your blocks, turning your motif over, making sure it fits
onto your block. And you need a bit of room
around your block as well. It's a matter of you fitting. You might have a different
size block to me, you can buy them bigger. I struggle to find
them in New Zealand. All I'm doing is rubbing the back of my pitcher
with the same pencil. I'm not pressing too firmly. You can use a piece
of tape to hold it down if that's easier. And I should have
I transferred him. I'll carry on doing the rest of my motives and I'll see you
back here when we're done.
5. Making your lines easier to see: The next step is to go over
our pencil lines once more. I'm just going to use a Sharpie.
6. Cutting apart your stamps: It's time to separate our
stamps ready for caving. Sometimes when you're trying to fit all of your pieces
onto the block, it can be a little bit tricky. Try and leave a bit more
space than I have here. You don't want to be cutting
into any of your designs. Take your time and go slow.
7. Tip - staining your stamps: When it comes time to carving, I find this is my little trick that I
picked up somewhere, is if you stay in your block with one of your archival ink pads before you carve, it actually makes
it easier to see. Come time to carve, you can see the contrast
of where you've carved. It allows me to see my lines a little bit better
when I'm carving. I'm going to do that now. You don't have to do that. This is just something
that is optional for me. The screen that I've already got here makes it easier to see. That's what it would look
like if you didn't do that. I'm going to do that now.
For all of my stamps, you are just taking
your ink pad. You can either rub it or pat it is actually better
for the ink pad. It doesn't have to be perfect, it doesn't have to be even. We're just changing the color and then we're rubbing
it on our paper. You'll see that some of
the Sharpie is coming off. That's a good thing as well. The Sharpie will show up
on your images or about maybe 234 times before
it no longer shows up, which is good and then you
don't have to worry about it. That's that's all we're going to do for the
rest of my stamps. It helps me to see my
eyes aren't that great. This is really useful for me, but again, you don't have
to do it totally optional. It's just a little tip. I'll do all of mine now and
I'll see you once I'm done.
8. Get to know your carving tools : Now that we've
stained our stamps, I want to practice
using my tools. We've got some shapes
here for these designs. There's some very
distinct patterns on it. They are replicated through
many of the motifs. I really want to
practice those so that I know how to use my tool. I've got my Sharpie and
I've got my scrap piece. I'm just going to practice a line then this
little crescent shape here. I know that I want
to practice that. I'm just going to draw
that onto my block. Really important that we get to know how we
need to tune it. We've also got some
of these ones. Practice, we've snowflake type line,
that's a line. Then we've got some of these. I really want to
practice those as well. And I want to practice some smaller ones because we've got some
smaller ones here, we've got a few corner shapes. I'm going to start
with this one. I'm holding the tool like this finger on the end and it works with
any of those tools. You're holding it like that and your finger is controlling that. Point to the end of my line. I'm going up a little
bit to engage it and you'll feel that it's right and it should
be nice and smooth. You can see how having that black Sharpie line
really, really helps. I'm going to do these
ones along here as well. Pushing then lifting
up slightly. When you get to the
end of the line, lifting up slightly, I'm going to practice
these curly bits. I've got the
straight line there. What I'm aiming for is
to get that point there. The bottom point of that, into the line that
I've already carved. And you can feel it feels
like it's stuck in there. Then for these ones,
you're turning the block and then lifting up. When you get to that line, try that again into the line
that you've already carved. Turning the block, do
it slowly, lifting up. Do as many of these as you want to so that you get used
to how your tool behaves. So your tool is doing
the cutting work and your tuning is helping it. And you're always cutting away from your self.
And that's our lines. Same for these smaller lines here that we're going to use
for the cuff of our mitten. You're aiming for that into the line that you've
already carved. And you really should practice
these ones just to see how you go so small. If you are having trouble, maybe you could do a different
design for your mitten. You could just have plain lines. You don't need these, but if you wanted to add
them, practice them. As you get down the line, you'll find that you
get better and better. It's weird, your body goes, okay, I can do this
and it does it. Let's try this one. It's just a line lifting
up to finish again. We're going to start at that point into the
line that you've already carved and pushing
out and lifting up. When you get to the end of it, it's a reminder. Put that little point
into that first line. These ones you're going
to go engage the tool, it push a little bit and then flick up straight
away as well. And I'm going to use my other
hand for tuning the block.
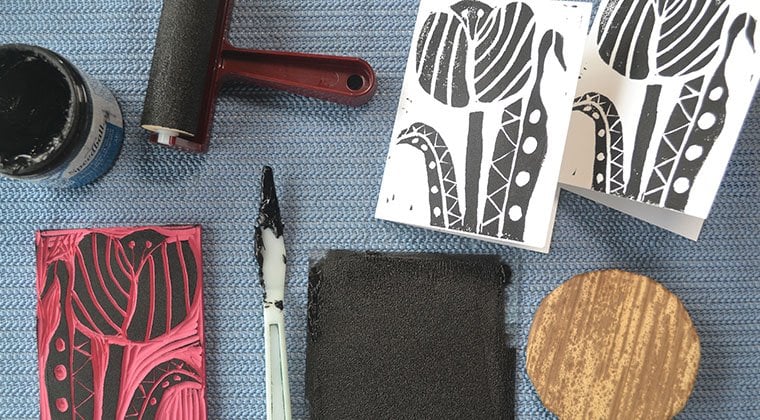
9. Carving your stamps: Now it's time to carve for
this initial carving stage. We are only going to use the
V shaped till grab that out, make sure you've got
your cutting mat. I always go for my
easiest motif first. That way, by the time I get
to the more difficult ones, I'm feeling a lot
more confident. I'm going to start with my house and it's okay to carve over
the outside of your motif, because we're going
to carve that off later anyway, like that. And here I can go right across and then put the
chimney on later. That pushing off from that line, getting the point of that tool into the line that
you've carved. And I think I might do this one and now we've practiced these. So we'll get those ago
member tuning the block. They look hard but
they're actually not the windows. When you get to the end of your
line lifting off in a pop, you can see how
that sharpe makes it so much easier to see
where you're carving that. And the staining, it can get
pretty tricky on your eyes. After a while from my windows, I'm wanting to get that point right into the very end of
that line that we first, and I want to meet up
with the other side. There we go.
10. Trimming and carving around your stamps: We've carved all
of our stamps out. The next step is to carve
off any of this excess. To do that, you'll need your crescent shaped tool
that we spoke about earlier. All you're going to do
is get this point here into the line that
you've already carved with slight pressure, your carving and you'll know
it's right because you can see the edge of your tool popping up through that line
that you've already carved. And we're going to
stop just like that. I'll go round, I'll do this
house shape, you'll feel it. It's so smooth and easy to do and you can see
that it's right. It is pres into that line that you've
already carved. This is where staining the stamp comes in
useful because you can really see the pink against the color
that you stained it. I normally just go around again, taking off a little bit more. All of this is going to
be trimmed off anyway, but I just want to give myself a bit more space so that I don't accidentally cut
through my stamp. So you're trimming it down. Getting rid, giving
yourself a bit of room to grab your carving knife, your craft knife starting
to look like a stamp. Now, once you're at that stage, you will then take your
craft knife that we used earlier and you're just
going to trim your stamp. Don't trim it too
close to your stamp. You want somewhere
to be able to hold it so that you don't
get ink on your finger. A little bit close there. My knife is blunt. If you try and keep the
shape of your stamp as well, that's always useful because
when you turn it over, you can get an idea of where it's going to
be on your paper. I'll carry on and do all of my stamps and I'll see
you back here after that.
11. Testing and checking your stamps: Welcome back. Before
we start printing, it's always a good idea to test out the stamps that
we've just carved. I've got my archival
ink pad here, and I've got all of my
stamps that we've carved. And I just want to check to make sure that there's
no lines or anything on them that I don't
want to do that. The quickest way for me is
to get my archival ink pad, and I've got my
scrap paper here. I'm just pressing my
ink pad onto my step. I'm not too worried
if it's not that even I'm just wanting
to see if I've got any unwanted lines on
my stamp so that I can remove them before I start
printing on my products. Let's have it go. I'm just using my fingers, making sure I'm pressing
around the edges. Normally, the unwanted marks
show up around the edges. You can see from there, I do have some down here you
may choose to keep them, call it noise or chatter. Some people like that, some people like
a cleaner stamp. My personal preference for myself is that I
want that removed. I'm going to do that now. All you need to do have
you cutting that near you. Take your gauge that we spoke about earlier because
we've used the ink pad, you can actually see
where those marks are. I'm just going to go round
the same as what you did before and remove that. They will show up on feed brick a lot more
than they will on paper. Let's try that again. You can also see that I've still got some
Sharpie coming off after three or four uses using this stem that will disappear. It's not permanent,
it's a bit better. I've still got to mark there, and that's coming from there. When you're looking at it,
you're looking in reverse. If it's on this side,
it's on that side on your stem. Let's do that. Again, pressing quite firmly, it's much better. Nice, neat and tidy. I'll go through and do
all of my stamps and test them just to make sure that
there's no unwanted lines. And I'll see you
in the next video. I've tested all of my stands and I'm
really happy with them. Now it's time to start printing.
12. Printing your gift tags: Welcome back. I'm going to start printing my
gift tags first. This is a great place to start if you're new to
block print making, because when we stamp, it doesn't matter if
they're not quite perfect, because we're going to cut them out and make them
into gift tags. It's cool. I have my stamps, I have my craft. I have my I have
got a barn here. I may or may not use it. I've got my piece of purse, my basic paper ink. I a whole lot of wet wipes because we're
about to get really messy. Apply a little bit of ink. You're taking your roller just starting and
you're working it. You can hear a stick leave that beginning
bit there and work on what you've got on here. I just want you
to watch how it's behaving and you'll hear that
the hassle stick changes. That's what we started with. This is the stage
that we want it. Just check your roller,
make sure your roller has got a beautiful coverage
and I think that's ready. You must work your ink before
you and cup your steps. I'm going to grab one of my scrap pieces of paper
that we used earlier, and I'll just put
that under there. You are looking for a nice, smooth consistency
on your stamp. Have a play with
it. And it might take you a few goes until you
get the consistency right, and the inking right, and also the pressing right. But that's the fun of
making these gift cards. I love that they are a
little bit imperfect. It adds to the handmade
charm of them. Always remember to give these a wipe if you've
finished using them, so that you might want
to change colors. Normally, at the end of
a big printing session, I will fill up my
laundry tub with some water and give
them all a wash. Just remember, once you put
it down, you cannot move it. You can't move it.
If you move it, you'll get a double line. I've got a bit of ink
there on the edge. Sometimes you can get rid of
it by taking your wet wipe. You can see how inch you get it, but it's fun and just
wiping off that. I had too much ink on my roller or I wasn't
paying attention. You get inky and messy. Make sure when it comes time
to printing that you've got some old clothes on as well and you can't
answer your phone. There you go. Prime
example of inky fingers, nice even coverage. All these little
mistakes that you make are really forgiving
on the gift tags, so they actually add quite a bit of charm
and character to it. So that's why I've started
with the gift tags. I'm gonna have so much
fun cutting those out and creating some gift cards
to adorn my presents. Or I might even make a
garland with some of the
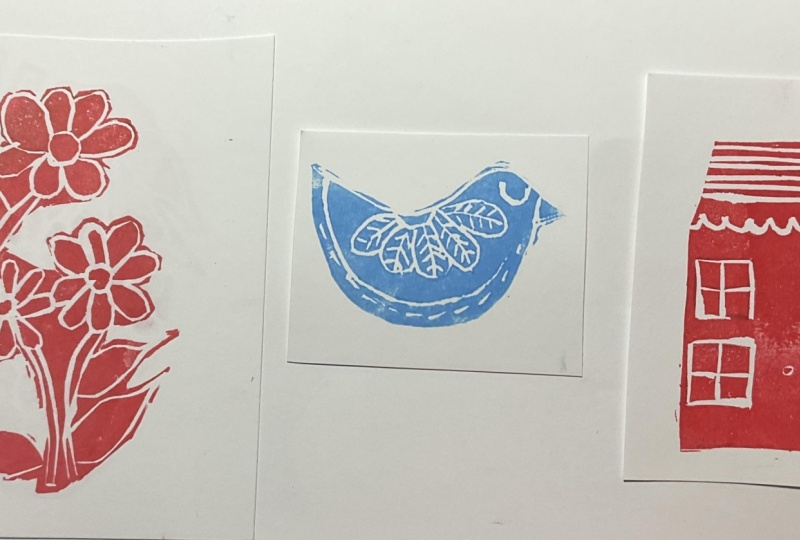
13. Greeting cards: For this one, let's try the speedball fabric
and paper rink and just see how they
react to the paper. I have cleaned my
Brayer from last time. I have my purse specs and
I have some script paper. The script paper
I'm just going to spread onto my work surface so that I don't get all K got
my greeting cards here. These are just from
my craft store. Nothing special about them. Just a heavier card
stock for my cards. I want to keep them
pretty simple. I think that bird would
look quite cute on its own. I'm just going to do that, just taking a little
bit on our roller and bringing it down
and inking that bit. You're waiting for that stick? I'll just do a little bit more. I think we're waiting for that, that beautiful hissing noise. And you'll be able to
hear the change and see it starting to sound hissy. This particular
ink smells has got a stronger chemically
smell to it. Make sure you open some windows. I think that's perfect. If you look at that, Brayer, maybe you're not pressing hard. When you're inching up, you're just getting even coverage. Let's try it. I got my card. Make sure it's opening
the right way. And I might go off
the page for the No, wait, I will pressing. Oh, that's really nice. Inc. I love that ink. Get your Brayer if you need to. And I got a inky green
finger on there. Never mind. This is all
about the handmade look.
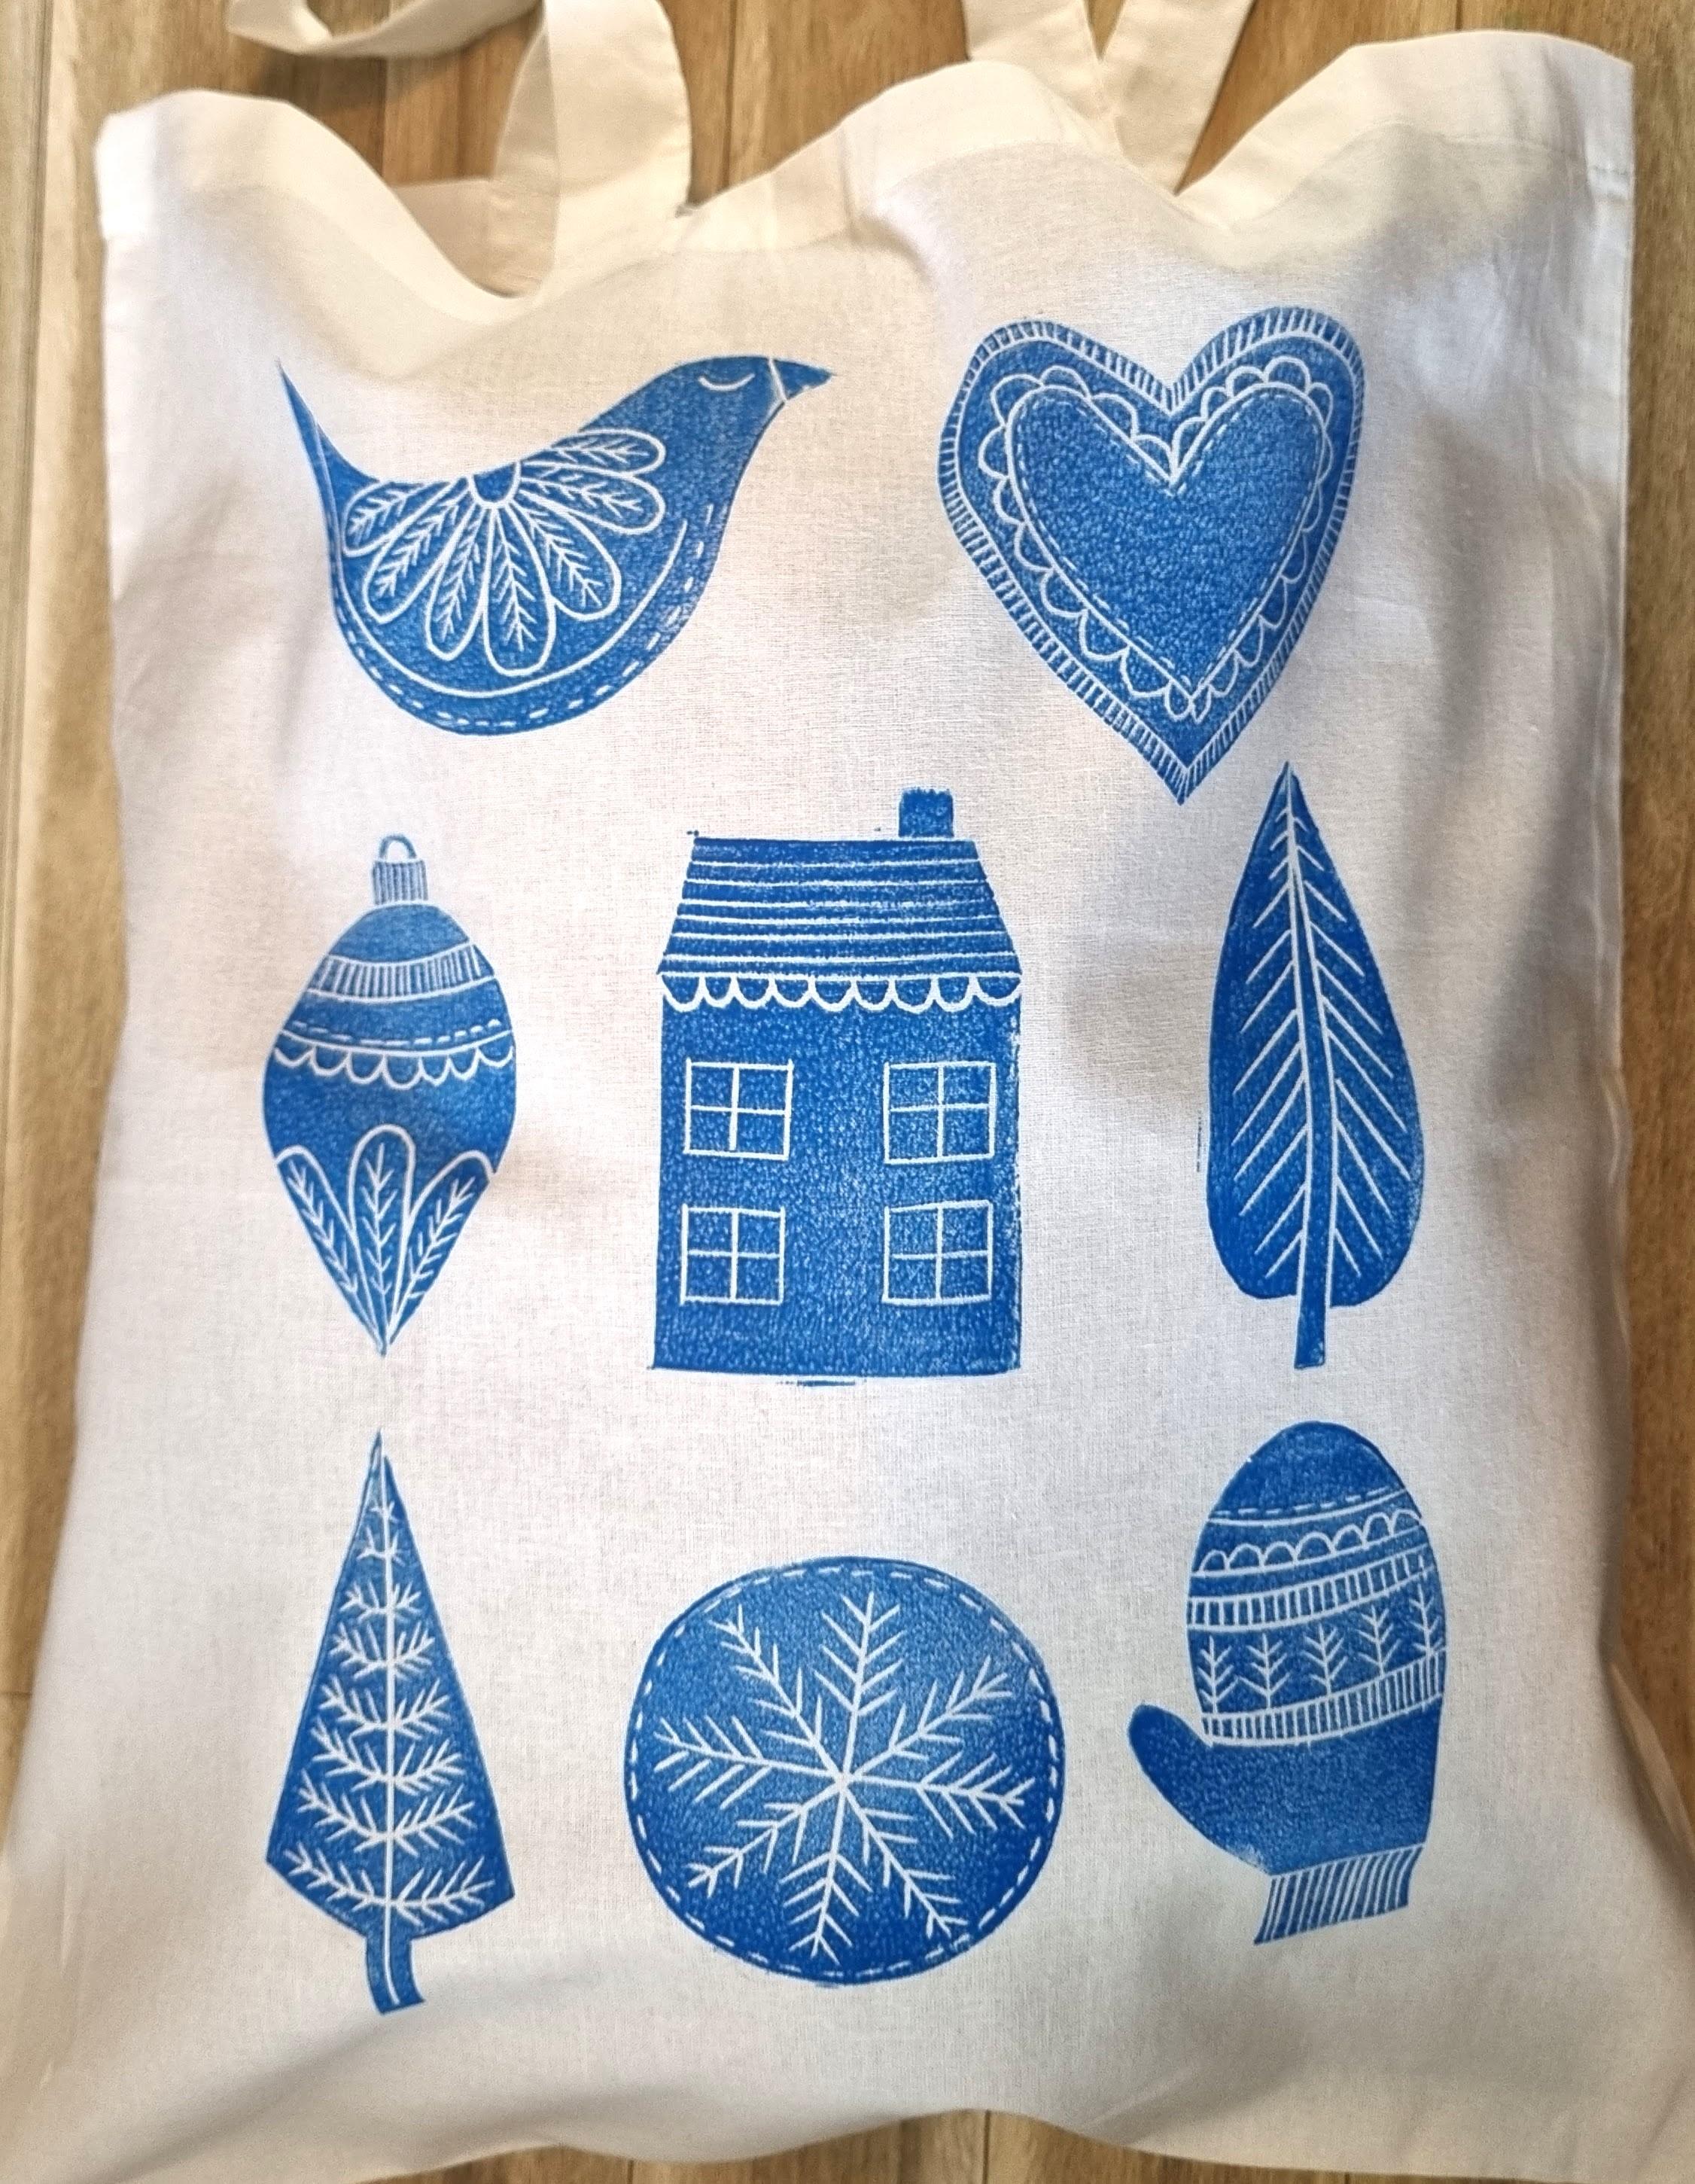
14. Printing your tote: Top bags are super useful and they're relatively inexpensive
to buy the blanks. I think this one was
about $3 or thereabout. My process for printing
on fabric is to make sure that you have a blanket or something
soft underneath it. If it was hard, it just makes
it a lot more difficult. I've also grabbed some
masking tape for my toe bag. I actually want to just print
my motifs inside a border. So I'm going to masking
tape around my toked bag. So I'm happy with that layout. I think that looks
quite nice for me. So I want to make sure that I keep them all in that center. So I think I might like
my tight bag blue. So I'm going to pour out
some of the fabric ink. And then I might do
my complimentary or my maybe with the green
that we used earlier. I'm going to use my bigger
Brayer for this because I've changed color again. You remember you're just
taking a little bit and you're working it until
you hear that beautiful hiss. I'm going to take my stamp, pop it onto my piece of
paper and prayer on the ink, making sure I get a
good even coverage. Then you can hear that hiss. I have my stamp, it looks
like good coverage. I'm checking it to
make sure I've got all the edges and checking
that my fingers are clean and checking my placement, once you've popped it on there, you cannot move it. Otherwise the impression
might be good because you've got your blanket underneath. This will feel completely
different to you using your fingers
than it did on the paper is really
spongy and you can get a really great impression
just using your fingers. It's so much easier. Make sure you still get
all of the edges though. And the trick is
going to be not to drop the stamp onto your fabric when
you're lifting it off. There we have it. Let's lift him up. Hey, he looks cool. I've removed all of
the masking tape, and honestly, I just
think this is gorgeous. I can't wait to give this to some of my
family and friends. I'm going to make lots
more. So $103 type bag and some investment into your
time and your creativity.
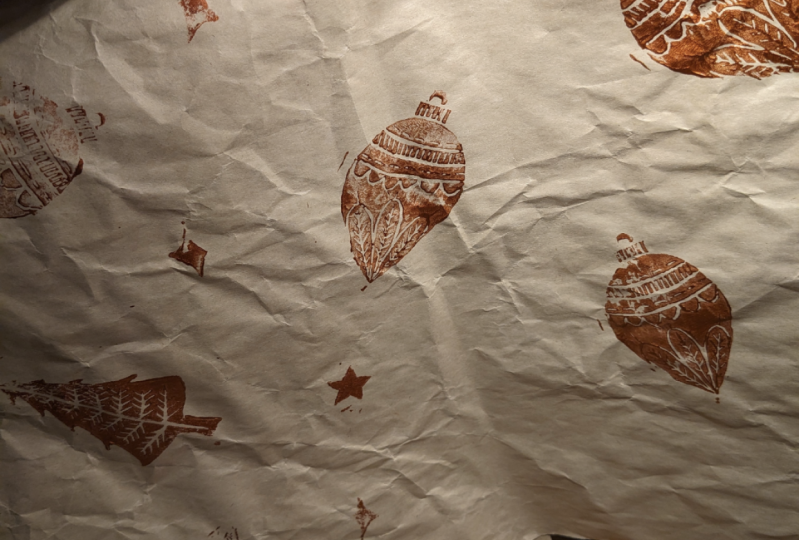
15. Printing a pattern on fabric: Welcome back for my next gift. I'm going to print
out a piece of fabric and use this
to create some, either wrapping paper
or some other gifts. I might like to create a P type with it or a kitchen towel
or something like that. It's just a quilting
weight piece of fabric. And cotton is best
for this process. I'll take my stamps and put them all over
the piece of fabric. I'll turn them and rotate them so that it adds a little bit of interest to the final piece. I always place a piece of paper towel around the
edges of my fabric. I like to go off the
edge of my fabric, it always works
out better for me. I'll re use that same
piece around the edges. This particular ink, the speed ball fabric ink is
amazing on anything printed. The fabric still
remains soft and again, you don't need to heat set it, you just need to
give it time to dry. It does have a smell, as I said in the tote bag video. So make sure you open your windows and
give it time to dry, and then that smell that's associated with the
ink will disappear. You're just following
the same process that you did for your tote bags. I love it. It's awesome. I can't wait to see what
you're going to create.
16. Thank you: Thank you so much for
taking my skillshare class. I hope that you've enjoyed
creating your own hand carved festive stamps and
that you've used these stamps to create
some beautiful gifts. I can't wait to see
what you've created. Please upload your project into the project section so that I can be inspired by
your creativity. You'll have these
stamps to create, anything that you can
imagine like this art print. In the meantime, take
care and happy printing.
 Julie Saunders, Artist