Transcripts
1. What We'll Learn: You can draw cute people or characters easily using only simple shapes and lines. All you need is a pencil, eraser, a ballpoint pen or brush pen and your brain and imagination. This class will show you super simple techniques that will give you the ability to draw your characters in any pose you can imagine, and make them super cute. We'll learn about things like the rules for cuteness, how to draw things like faces, hair and clothes and how to find your style. You will also pick up tons of other useful tips and tricks along the way. I'll also show you three complete illustration examples from start to finish that will utilize all the techniques that are taught in the class, and you can even follow along with me. By the end of the class, you'll have the skills to draw any character you can think of, super cute. What are you waiting for? Let's draw some cuties.
2. What makes things cute?: Let's start the class off with a simple explanation of what makes things cute. We, as humans are programmed to think that babies are super cute, and their characteristics are what we mimic in our cute illustrations. But as artists, we can take it to an extreme by exaggerating those cute characteristics. I'm going to show you a couple of rules for drawing cutie people, but these are not written in stone. Be sure to do with the way you want to do it and in your own style. You'll find that sometimes using one characteristic is enough to make something cuter, so be creative and break the rules. If you've taken my cute animals class, you'll remember that the bigger the head in proportion to the body, the cuter it will be. Well, the same rules apply to cute people or any cutie that you draw. Another thing to notice, is that the smaller the head, the older the character appears, and the bigger the head, the younger they seem. But this doesn't mean you can't draw old people with big heads. It just something to keep in mind. I encourage you to play with the head to body ratio to your liking. Another rule that I've shared in my other cutie classes, is that rounded edges are cuter than sharper edges. If you look at a baby, their features are more rounded, and soft, than in adults. Also, sharper edges make us think of sharp things like spikes or knives, so they feel more dangerous. But it's really about keeping a balance in your work. As you can see, the one on the right isn't that much cuter than the one on the left, it just feels less threatening and that way more cuddly. It's really a personal preference. I won't tell you to avoid sharp edges, just pay attention to them and maybe smooth them out with a slight curve instead of an angle. But it's up to you. One cutie rule that's very important is not to over-complicate your characters. As you can see, I added way too much detail to the first character, and it's not only too much visual noise, but it really distracts from the cuteness. The simpler you draw your character, the cuter it will be. Think about it. Babies don't have wrinkles or even hair, and they're simplified versions of adults. The result on the right is much cuter than the one on the left, and it's easier to draw. Also, notice I didn't include a nose. I usually don't because you don't need one. But you can if you want to, just keep it simple. If your character feels over done, just get rid of some detail and this will usually fix it and make a huge improvement. Just remember to always keep it simple. If you want to find more inspiration in drawing cute people, I suggest you do a quick search on chubby characters. It's a manga art style that draws everyone with a big head and simplified characteristics. It also has a distinct style because the eyes are usually drawn very large and in particular way. Big eyes can look super-duper cute since babies have big eyes as well. Just because it's not the way that I like to draw my cutie, doesn't mean that you can't draw your cuties this way. Maybe you like the big eyes look, and it really can add a lot of cuteness to your characters. I also made a Pinterest board filled with cute characters. I encourage you to look around here for inspiration and think about why these characters are cute. Which rules do they follow and which do they break? Noticing subtle things like this will make you natural at coming up with your own cutie characters. If you want to speed up your learning process, you can copy the ones you like the most. It really helps you to study it and notice the detail, but don't share it anywhere reclaiming, it's yours. It's okay to copy for learning purposes as long as it stays secret in your sketch book or you ask the artist's permission and credit them. But on that note, feel free to copy my style of drawing in this class or you can draw along with me. You have my permission to share it as well. Now, let's cover the basics of drawing the body of a cutie using a simple oval or circle and a bean. Easy, right?
3. The Oval & Bean: Anatomy can be scary, especially for beginner artists. So I invented a technique to simplify the drawing of the body of your cutie. You just need to draw a circle or oval and a bean like shape, which is really just a continuous squiggly line that's curved at one end. You can draw any character in any pose by just starting with the simple circular oval for the head and a bean shaped for the body, and I'll show you how in a second. But the reason I chose a bean is because of the slight curves. The curves are very important and here's why. As you can see, if I make my character perfectly symmetrical, it looks cute but flat. Now if I simply use a curve being shaped with a body until the angle of the head a little it looks so much more alive and interesting.The second character is lifelike because it feels like it's moving and the body feels dimensional in 3D, even if I choose to color it flat without shading. Another awesome thing about the bean body, as you can make it have any pose you want with the same exact shape. So here all the bodies are identical ovals and beans. Now, I made the first one look like he's standing and looking up at the rain, the second one is texting in a chair, and the third one is posing. You could do any pose you can imagine with a simple bean and you'll see more of them in this class. But also notice how the arms and legs are done super simply as well. They're just too straight or curved lines, and if this is difficult, you could even make joints by connecting tooth and ovals. You can also draw an fingers if that's your style, or simple glove shape, which is super simple to do or even a peace sign that thumbs up with simple details like this. You just notice how simple I keep it. It's not only easier for you to draw, but it's also cuter. It's up to you if you want to get detailed or not, but usually less is more. Now let's quickly go over how to draw the head Start with your oval or circle and pick where your characters looking. The dot represents that here. Now I just crossed the face twice and the lines are curved mimicking the shape of the face and the horizontal line represents if it's looking up or down, and the vertical line represents if it's looking left or right. Once you have the cross, you can add the eyes and mouth easily by just placing the eyes on the horizontal line and the mouth on the vertical line close to where they cross. Always start by drawing an oval or a basic shape and the lines and then you can add all the other details easily. You can also draw in a chin, just make it end at the end of the vertical line, and you can put the ear at the end of the horizontal line. Just pay attention to the angle of the face. Since this one is tilted the other side doesn't show the ear. If you want to do the face and profile, you can draw the ear either one-thirds into the face or at the end of the face. It's a personal preference, but the first way is more realistic. You also have the choice of making a cheek come out of the face. This actually makes it cuter sometimes, especially if you put pink cheeks inside. Just be sure to draw it on the side opposite of the ear if the character's faces turned sideways like it is here. Now that you understand the basics of drawing the face and the body, let's see it in action.The best way to practice this is defined references of random poses and then draw the pose using simple techniques. So we're starting off with a runner. A simple kidney bean, I circle, and simple arms and legs mimicking the position and angles of the reference image and we're done. Same thing with this guy. Notice how the bean is less curved because I'm paying attention to how the body looks and simplifying it into a bean. But everything is just as simple. You can always curve you're being more or less, or put in any direction you want. Even this ballerina is super simple to draw. A complicated pose like this is also really easy to interpret. It's the same exact steps. Notice how the bean is marked curve this time because of the extreme angle of the body. But nonetheless, it's still very simple to draw. Pause the class and try this out yourself before moving on to other lessons. There are a ton of websites that are made just for artists to practice drawing poses. So check these out if you wanted to take him more seriously. If you do only a couple of poses, you'll get the hang of it quickly. If you find it hard, you might be overthinking it and probably just take more practice. So just keep trying until it clicks and use your power of observation interpretation. Again too, you can do this easily with practice. But if you feel like you can't, you always have the option of making your characters in neutral front pose, which is the easiest, and you can even play with the shapes of the head and the body even more without worrying about getting the perspective right, is everything is symmetrical. Now let's bring our character to live with hair, clothes, and face expressions.
4. Hair, Clothes, & Faces: Let us start with hair, there are numerous ways to draw hair and a full-proof way to get inspired. It is with a quick image search of hairstyles. You can simplify any hair cell you see and add your own twist to it. My method for drawing hair is very simple, I first decide on the shape of the hair with a sketch. Notice, why I don't stay within the circle of the head. That is because hair is proofing expands out from the head. You can use any kinds of lines to show any kinds of hair and makeup young shapes even to make it more fun. For once I am happy with this shape, I can ink it in with detail. I love leaving two a little leaf shapes on top of the head to give more character where the hair parts and you can draw little lines, add texture or detail. In the second one, notice how the hair has little spikes or three effects and added some [inaudible] with little shapes. You can even make the hair look curlier by adding little swirls and just straight lines for phrase, I like the frizzy and messy look, but that is up to you. Really, just do it your way like anything else. Now for the close, the easiest way to get ideas is to also do a quick image search. Well you can see I did that a lot because even though you are drawing cartoons, it really helps us see something real in front of you first and then interpret it into simple shapes. This will make your work feel more real even though it is a cartoon over time, you won't need the references, but for now, use them for everything. You are really just developed in your visual vocabulary and that takes time and practice. Before I show an example of how I draw close from a reference, I want to show you one important thing in the first example, the character is perfectly symmetrical because it is a front view of him. In the second one, we use the bean body so it is more dimensional and it is more of a three-quarters view. Notice how I put a dotted line in the middle of the body to show which direction its body is facing this is the same thing as we do for the face. I usually don't sketch a sly now, but you should if you feel like you forget that things should be at a slight angle or a different perspective. This is what I mean by that notice how in this symmetrical one, the clothes are exactly the same on both sides. But since our second figure is turned sideways and the line represents the center of the body. We have to draw things a little skewed to make it realistic, we have to move things away and make the things on the left side smaller and shorter. I even do that with I sometimes, but I don't want you to think about the axial over complicated. If you forget this important detail, your characters will look a little off. If this seems too complicated, hard for you. Always use a reference for poses and close until you get the hang of drawing close properly, naturally, you do not have to copy exactly. In fact, we have to leave most of the detail out to make it simple enough. But just observe the angles of the details in which direction the bodies facing and tried to copy that with simple lines. Let us take this fun costume is an example of how you get inspired from clothing. I will show you what the mistake looks like. If I were to make a character inspired by this, I start like always by doing the being an oval or circle. The cross and the face had simple legs and arms and I can add the hair shape, which also inspired from the image. Now I am ready to draw the [inaudible] and silly me did not think about the body line and did not bother sketching it in. I ink in the center of her dress too far to the left, and because of this, she now looks awkward or your brain thinks addressed a funky style to it. As you can see, it is not a big deal and does not ruin the piece, but it is a mistake and I want you to avoid it by keeping this in mind and sketching out the body line before drying in the alphabet, especially if you have no experience in drawing the three-quarter view. The dress itself turned out super cute and notice how it is not a copy of the original. In fact, there is very little detail you have to be selective with what you put out because as we learned earlier, the simpler your character is the cuter it will look. Using this method clothes are really easy to draw just look for simple shapes and lines and simplify them as much as it can. Also, don't be afraid to make up your own alphabets. Just pay attention to where the body is facing. At first, you will use references a lot and they are super easy to find out Pinterest or Google Images. But over time, you will not need them because you will memorize the look of many different alphabets and body angles is just practice like anything else in life, face expressions are also super easy. The biggest shortcut is playing with the eyebrows and mouth shapes. Notice how all of these feel different just by slightly warping my lines. You can also play with the way you dry your faces by making it slightly more detailed or stylized. There is really all kinds of ways to draw faces, and these are all just tiny examples that I came up with on the fly. I really encourage you to play with it and find your own style. Just remember that the simpler, the cuter and you can make really big eyes are really tiny eyes. I have noticed that those two are the best QD combinations, but really break the rules and do it your way. Also if you want to portray a certain motion, what do you do the same as anything else? Find a reference photo of a person showing that particular emotion and study the eyebrows, eyes, and mouth, and portray these [inaudible] changes in your faces. You can exaggerate as well as you can see, I use references a lot in my drawings, even if I draw out really, really stylized. Don't Be afraid of using them that is the best way to learn to draw properly. Now let us have a quick chat on style.
5. Finding Your Style: Everyone has a unique way of drawing things. This is called your personal style. Over time, your style will evolve naturally. So don't feel like you're stuck in the salutary drawing. If you feel like you don't have one, don't worry, it will come with time. My style is very colorful, simple and I really like the dots for the eyes and no-nose look. These are tiny details, but this is the way I like to illustrate. If you look at all the QDs I draw, you'll see how they all feel cohesive because they're drawn in the same style. Now let's look at an example of what I mean by different styles. Let's draw the same character of a little boy in a cap pajama in a couple of different ways. In fact, I challenge you to give it your own twist as well. The first one has slightly more detail in its eyes and outfit and just the way I drew the eyes is already very unique and stylized. The second one is extremely simple and this is style all on its own. The third one is more my style, but I made this outfit more detailed than I usually do. The fourth one almost looks like an old-fashioned video game character. Notice how all of them have completely unique outfits, faces, and are made up of different shapes, even though they all portray the same character idea. There's more than one way to draw any character and I just scratched the surface. You can see a huge variety of styles if you look back on the Pinterest board I showed earlier. Notice how each artists really sends out because they illustrate in a very distinct way. You have your own way as well. It just takes time to find your unique voice. But a good hint is what kind of styles you are drawing to the most. Do you have a favorite character or a favorite artist? What is it that you like most about the way they illustrate? These are the questions to ask yourself when you're looking for your own unique style, but don't force it. Just practice every day and keep creating more characters, your style will come naturally with time. If you like how I draw, you can draw just like me, but over time you'll find things to perform more than others and your artistic ways will shine. So don't stress about it and don't force it. Just stay experimental, and most importantly, have fun, that's what drawing is all about. Don't be afraid to take risks. Most of them will be failures, but some of them will be huge successes, and you'll have a big clue on what you like to draw. Now that we've got a good idea of how to illustrate QD people, let's see some examples down step-by-step that will help you memorize the techniques and concepts.
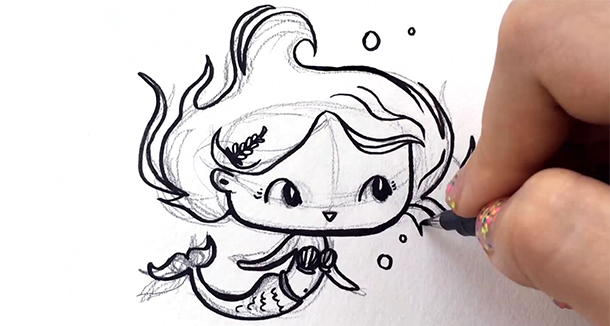
6. 3 Fairytale Cuties: Now I'm going to show you a couple of examples of how to make characters with the techniques we learned. Feel free to grab your sketch book and follow along with me. This will help you to learn faster. If you're not too shy to share your cuties, post them in the project gallery or tag me on Instagram. In this first example, we'll make a cutie ferry. To start off, I'm making oval for the head and then I cross it to show where she's looking and draw in a cheek. Next, I sketch in the bean shape and legs. I wanted her to be playful. One of them is pointing up, one arm goes out and the other will be holding a wand so I bend it. But notice that it doesn't look right. I made the second arm a little too long. This can be tricky, so always pay attention to how long your arms and legs are, especially if one is bent in and the other isn't. But it's a good thing that we're still at sketching phase and I can easily fix it. Next case, sketch in the wand, the face and the hair. She has a loose bun. I also added in her dress, ears, and wings. Since she's facing sideways, the right side of the wings shows more than the left because it's blocked by her body. Now I'm ready to ink. I slowly and carefully ink in my sketch and add detail in places like the hair and the wand. If you are a digital artist, you can just scan in your sketch and then trace over an Illustrator Photoshop. Next, I use watercolors and a white gel pen to finish her off. You can use whatever media you like or have. Be sure to keep your colors light and get creative with color combinations. Also, if you want to learn to water color, I have a class that teaches you everything you need to get started. Our fairy turned out super adorable, but there is a lesson hidden in here. I did notice in the sketching phase that the wand overlap with the wing a little, and I didn't choose to fix it. That area feels a little too detailed and if I were to redo this, I'd change the angle of the wand and make it simpler. My point is, we're all constantly learning, so don't be upset if you make a mistake. It's only a lesson disguised for next time. Now, let's do a cutie mermaid. This time I made the head more rectangular to mix it up a little, and I draw in the bean like always. The mermaids do not have feet, so I sketch in a simple fin by using simple lines. The mermaid can be facing in either direction at this point, and it all depends on how I position the face and arms. I decide to space in the right side. I sketch in the simple arms and the lines for the face. This time I do the eyes a little differently and sketch in loose hair. Now I'm ready to ink and add detail. I give her a seashell bra and add scales to her fin. I add simple lines to her hair to show movement and looseness. Since she's underwater and add bubbles all around by using simple circles. Smaller details like this could make the scene more believable, just don't overdo them. I paint her in using watercolors and add highlights with my white gel pen, and I'm all done. She turned out super cute. Notice how just by making the shape of the head a little different and using different eyes, the style feels slightly changed from how I normally illustrate cuties. Now, let's draw a princess. This time I'm going to make subtle changes and I want you to see how big of an impact they have. I draw in a chin right under the vertical line and instead of a bean, I do a more rectangular body shape. I also make her legs longer. This would make her seem a little older and taller. I loosely sketch in her outfit and hair and now I can ink. I add in detail and refine the shape while inking but notice how she feels unique just by making subtle changes, and notice I gave her a neck this time. Also, the long hair and body definitely make her feel like she's older and the angle of her legs and arms make her feel dainty and charming. I also add in little eyelashes and a nose. Notice how big of a difference in style the nose made. Also, because your earrings are leaning to one side, it looks like she's moving. I add some lines around the hair and paint her in with watercolors and highlight with a white gel pen like always. The blue hair and pink dress give her a lot of character. Notice that most of my characters have trademark pink cheeks. This usually does up the cuteness just a little, but it's a personal preference. I hope this princess example showed you that making little changes in your process will give you different results. Get creative and try this out yourself. Whether you make up your own characters or copy me exactly, share them in the project gallery. If you don't know what kind of character to make and need some inspiration, get your creative juices flowing, and watch the next lesson for some fun challenges and examples. I cannot wait to see what you guys make.
7. Finding Inspiration & The End: Inspiration can be hard to come by. A lot of the times I do feel stuck in creating a character. But you should know that you can find inspiration literally anywhere. In my previous "You can draw anything" class, I showed you how to study a reference and draw it with your own twist, doesn't resemble the image you are inspired from, this is a great thing to do. But let's take it up a notch. A fun challenge, get inspired from and to grow your skills faster is to pick an animal, a character, or an object, pick them randomly. Then illustrate your character in your own way, inspired from the image or combination of the images. Let me show you what I mean. Let's take a hedgehog. I started out with a normal circle in being, and start adding more detail. I make his hair super spiky, put him in a sweater that I can add a free texture to, give him big beady eyes and eyebrows and pointy nose. I also put him outside in grass and flowers. All of these features were inspired by the hedgehog picture and I continue to add detail inspired by it, simple, and the cutie is very unique, you can do the same thing with any character from any image, just don't copy it exactly. Instead, it's about taking out the characteristics that work and drying them in your own unique way. Let's take Mario. We start like always, and I give her hat and make her hair curly like Mario's mustache. I also gave her a round nose, a similar ear shape, and eyes, and boots. I decide to change where she's looking to make her look like she's playing a game on her phone for an inside joke. But notice how even though she's inspired from Mario, she looks nothing like him. You can even mimic the color combos you liked from characters or any harmonious images or artwork. Here, I use the same colors but a different way for unique result, and notice how our dress's inspired by his overalls, it's really the same colored overalls with yellow buttons everywhere or polka dots, I think she turned out adorable. Now, for objects, they can be a huge source of inspiration for characters. All you have to do is incorporate a couple of the features and you'll make your character super unique. Here I paid attention to the shapes on the binoculars and incorporate them in things like the hair, and notice how I gave him a cool eye piece. I don't love how this one turned out, but it was fun to make and worth a try and I feel like I learn from the experience. This in itself is a great creative exercise, so be sure to try it, and If you want an extra challenge, try combining an animal with an object or an object with other subject and so forth. It's super fun to do these drawing challenges and it really works out your imagination muscles. This concludes our class. I hope you had fun and I cannot wait to see what cutie characters you'll make. If you have any questions, leave them in the community section, I'll answer you soon as I can. If you want to be notified every time I publish a new class, be sure that you're following me here on Skillshare, and if you're hungry for more learning, check on my numerous other classes on tons of different topics relating to drawing, and painting, and more. You can also see what I'm up to on Instagram and find SPI paintings and many tutorials on YouTube. As always, it is such a great pleasure to share my knowledge with you guys, and remember to never stop drawing and learning and believing yourself and your abilities. I'll see you guys in the next class. Stay cutie my friends.
 Yasmina Creates, Artist & Creativity Cheerleader