Transcripts
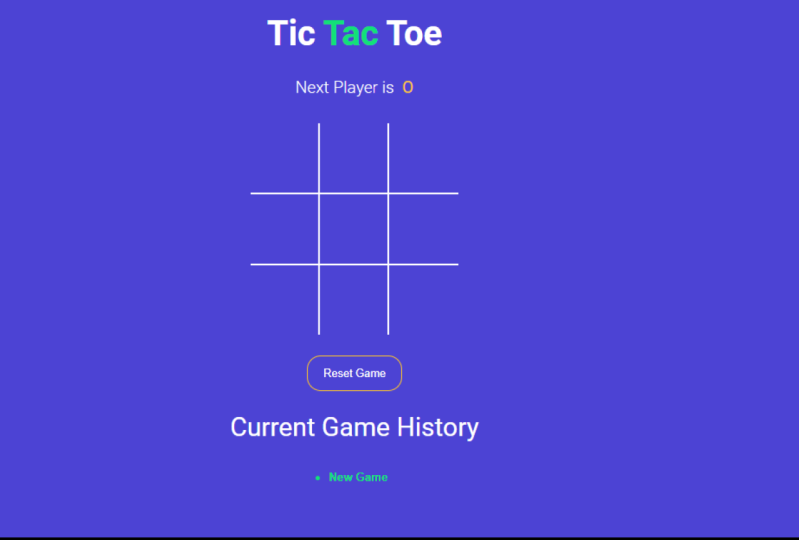
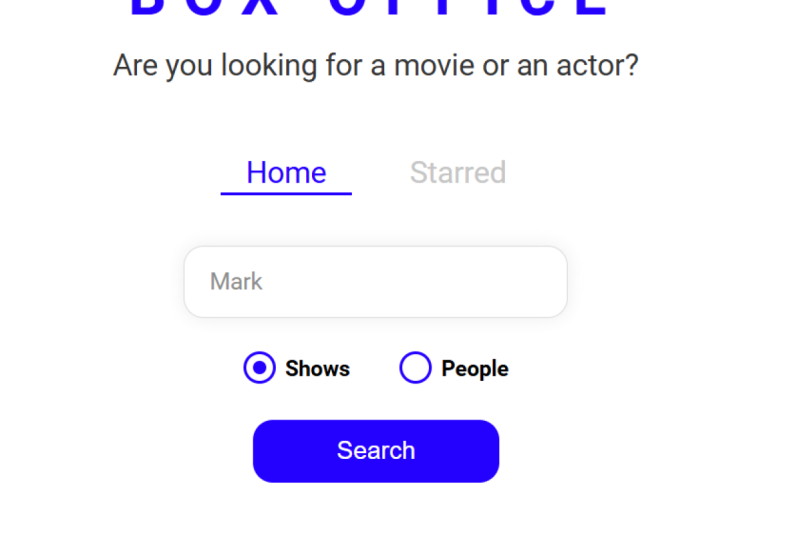
1. Introduction: Welcome to the complete react bootcamp. Hi, my name is Andrew and I'm React developer. Hi, my name is our Ash and I may UI UX designer. Have you ever wanted to create an app similar to Twitter or Facebook? Do you prefer practice over theory? If so, you're in the right place together, we are going to build three separate projects of different complexity from scratch, a tic-tac-toe game and movie Search app, and finally, a chatter. These course is aimed at people who are eager to develop web apps. We technologies that become more and more popular nowadays. First, we'll discuss all the basics you need to know before jumping into react. Here we will talk about no GS, good client-side and server-side rendering APIs and essential tools to make you feel comfortable at any stage of the development approaches. Right after that, we have a dedicated JavaScript section, but we discovered the latest and up-to-date features of the language. Then we slightly move to react with the small portion of theory. At this point, you will get to know once Riak is made of and how it works. From here, we will start with our first project, that tic-tac-toe game. It has a modern UI with cool animations and seamless functionality in this project, get to know first react. You will learn how to create components, dynamic styles in user interfaces. But we'll talk about state management and component lifecycle events using Hooke's. By the end of this project, you will be able to create a simple web app that shows off your strong react basic, and you will experience the development flow in general. The second project is called box-office. It acts as a search engine for TV movies and shows. You can get information about any movie or AG. And on top of that, you can add them to favorites to review them in the future, we these project, you move towards a more complex React app or you're working with external APIs and managing non-primitive scenarios using costume 3i hooks. Moreover, you will learn about CSS and JS as an alternative for styling and application, we're going to explore the concept of dynamic routes and remote data fetching. You will also understand how to optimize and analyze React components using built-in react tools. At the end of these projects, we will even turn our app into a progressive web app that works offline. After the completion of the box office, you will be able to create a typical React application that requires more comprehensive and advanced react knowledge. Our final project is going to be a chat up with the most popular features required by any chat application. These include social media logins, account management, role-based permissions, real-time data, and lots of other cool features in this project, you will get to know Firebase in the first place. Here you will master user authentication and global state management. At this stage, react hooks is going to be your main weapon to develop a production ready React app managing styles yourself isn't always desirable. That's why here we will use a UI components library to utilize a pre-built design system. Finally, we will develop our own backend using Cloud Functions, and we will add the real-time notifications feature to our chat application. Wait, you're not done. You're ready to help you out at any stage of the course and answer your questions as quickly as possible. Are you ready to explore, react together. See you in class.
2. Requirements: Hi, My name is Andrew. I'll be your instructor. Throw Dick Koers. Let me tell you about the requirements for this court to start working with react. First off, all knowledge off HTML and CSS is essential. I'll not be any extra attention explaining what dif tag is. The same goes for CSS. I expect you to know about classes and selectors but will not make any stops on explaining HTML and CSS basics. But you can always ask questions in the Commons. There are definitely a few key moments off HTML and CSS, and that will be explained. But most of the time we will work with JavaScript. I don't expect you to be good a JavaScript or have some decent experience. I wanted to know about programming in general, you must understand basic things like what is available or a war is a four look. You'll get, you know up today. JavaScript syntax. During the course, it is quite user friendly heart to understand. Parts will be explained, so don't worry about that. There is also a special section dedicated Onley to JavaScript. It covers most important aspects off the language to ensure you know enough to start with react rush, and I try to make everything as smooth as possible. But nevertheless, I wanted to ask as many questions as you can. And don't be shy asking silly questions were always there to help you. Let's quickly summarize. You must be aware off html CSS and some general programming knowledge. That's it. See you in the next video.
3. Updates & Issues: Hey, in this video, I would like to reference a file that will tell you about the updates and changes that humans do during the course. In the web, everything constantly changes. And to keep up with up-to-date content, we created that file. Please find updates and issues dot pdf file in the projects and resources section inside you will see two major chapters, important updates and common issues. Important updates affects everybody who takes the course. Please read that chapter to avoid having any inconsistencies during the videos. Common Issues refers to potential errors that you might experience and their solutions along. Please reference this file in the first place when you have any problem. In worst case, please read chapter three. We always want to keep you with up-to-date content. Only. Good luck with the projects.
4. Introduction to the First Section: Hey, welcome to the course in the section Mobile cover All things we need to know before we get started With react development. This includes tools, a little bit of theory and a few other things. Hope you enjoy them. We'll see you there.
5. Installing Git + Git Bash (Windows): Hey, in this video we will install and get what is good and why do we need it? We're going to cover all of that in the upcoming video. This video is all about installation. Let's go. As always, we first open Google and then we'll look for and get this will bring us to the official website. In a new tab I'm going to open don't loads. And in the current tab, I'm going to look for Git installed at location. This will bring us to at least one.com. So why do we need it? If you if you will see discrepancies in Git installation or if you are lost about Git installation. This is latest, up-to-date get insolation tutorial. I recommend that one. So if you are on MacOS, linux, Windows, it doesn't matter. Just navigate here and it's very easy and straightforward. All right, Now let's get back to downloads. This video is targeted at Windows users, but if you are from Linux or macOS, it's totally fine too. So if you're on Linux, just click here, and depending on your distribution, just select the command. It is very easy to do, okay? If you come from macOS world, you have a few options. You can install good-bye using a package manager like Homebrew, or you can use an installer directly. That tutorial here, it recommends to use an installer, which is the easiest way on MacOS, okay? Since we are on Windows, we're going to click on Windows and we will get the installer. Again if you are coming from a different OS, I still recommend you to quickly go through this video because we're going to cover a few important questions. All right, so we opened the installer and we hit Next. What do we need here? Additional icons. This is up to you, Windows Explorer integration. So this is Windows only option. And we wanted to select Git Bash over here, and we wanted to uncheck good GUI. Nobody uses good to go. This is a visual tool to represent a good, Okay? And Git Bash is a short version of Unix terminal called Bash. So this short version is just available on Windows under Git Bash day. And I think this is very useful and convenient. So on Windows we have cmd and PowerShell, and we're going to install Git Bash and use it instead of CMD and PowerShell. Okay, Then we wanted to select good L of c. So this is just in case if we have really large files and our good project, this option will allow us to put those files. So in a good project basically, then we wanted to keep associations. I don't need daily updates and Git Bash profile to Windows Terminal. So I'm not sure about this one, but I guess this is related to the new Windows Terminal that was recently published. Okay, so I don't want it either. So next, this step, let's choose an editor that you feel comfortable about. So I know that you don't know about yet, but in good, there there is a possibility there that there will be a conflict between multiple files. And to resolve that conflict, you will have to manually go through those files and edit them. So when this conflict occurs, get will open an editor that you select over here by default. Okay, so choose something that you know how to use, for example, Visual Studio Code. All right, next here. What do we have here, justing, the name of the initial branch in your repository as well. This is a tricky one. We're going to select, we're going to select, let, get to decide. But what this is all about. Well, I get, I know that you don't know about yet, but there is this concept of branches in good. So about a year ago, good community and GitHub community decided to change the default branch name two, main right before it was called master. Now it is officially called main, but still there are lots of projects that keep using master. So what I recommend to do is just choose, Select, let, get, decide. Then let's hit Next. And here we have adjusting your path environment so we want to select Recommended second option. It will allow us to use Git from any terminal shell, whether it's CMD, PowerShell or Bash, or from any other software and shells that we're going to install and use. So this is why second option is what we want. At this step. We don't want to change anything, just keep a default use bundled OpenSSH will get four. It's connections might use SSH tunnels. Okay. That's why it comes bundled up with SSH executable, which comes from OpenSSH. Okay, Next, here, https transport back-end. Keep using OpenSSL. We don't want to change it as well. Next here about line endings. Well, good is a cross-platform tool. However, there are some specific things that must be somehow, somehow managed or controlled to achieve that cross-platform availability. And one of those things is line endings. Thing is that on Windows and on Unix-like systems, line endings have different codings, okay? And it might create big problems to get projects. So this will give us ability to keep our project cross-platform without any problems. This is a very minor thing, but it is very important because if you select third option and if you're gonna do some changes to get project on Windows and then you open that project on a different OS, you will experience a lot of problems. Why we don't want it. So for Windows, we select this option. Next, configured the Terminal Emulator to use with Git Bash. Okay, so Git Bash is going to be again our new shell that we will use as an alternative to CMD and PowerShell. So minty is that terminal window, okay, so if I open CMD, I have this default windows window, basically the right, just like it says, the second option here, default console window. So mentee is that that software, basically that runs the trans terminal shell, shells inside of it. So it will be that window that we will be able to configure, change its color and coding and other things may be key bindings, all of that. So this is just that, you know, windowed that runs terminal shells. Okay? So we want to use mentee, then choose the default behavior of good poll. You don't know about it yet, but let's choose default. This is the preferred option, almost always. And I would say always. Next, choose a credential helper. Here we want to select Git Credential Manager core. This is specific to Windows here, but still use that option. What it does, there will be times, I mean, always like that. We wanted to host our good project somewhere. We hosted on GitHub. And to authorize ourselves to GitHub, we will have to enter our credentials for a GitHub, our username and password. So to not answer them every time those credentials must be safely stored somewhere in a cache storage. On Windows, this cache storage is named Git Credential Manager core. So this is why we needed to not enter our credentials every time. We would like to push our changes to GitHub. Okay, Next, at this step we wanted to enable system caching, symbolic cleanings. Keep it as it is. We hit next and we don't need any experimental features at all. So just hit Install. Removing previous version. Yeah, I mean, for me because I already had it installed. Let's wait for a second until it's installed and let's see what we have. Okay, good. Completing the good setup wizard. I don't want release notes finish. Now, good is installed. How we can verify that? Let's go to CMD. And in cmd, we want to just type git space dash, dash version. And if you see the version installed, congrats, get is now installed. Now, this is only related to Windows users who installed, who selected Git Bash during installation. How we can verify keep Bash? Well, we can run git Bash directly from another shell, from seeing Cmd for example. So if I type Git Bash with dash inside, I will see Git Bash is not recognized. Well, this is to be honest, expected. And to fix that, we have to do again, a small change in our path variable. So what do we need to do is to go to start Panel and in search with Type III and V. Then we go to edit the system environment variables and vitamin vegetables. And under System bubbles will look for path. Double-click on that. And here at the end of the list you will see C Program Files, good, CMD or whatever installation path you chose during installation. Okay, so if we open this path, Let's go to folders. And let's go here. Executables that we have here are good, good GUI, everything but except Git Bash. However, if we go to get folder here we have Git Bash executable. Alright? So in order to use that executable from the terminal, we have to add folder path to the path variable. Okay? So we go back here to that list. We click on New and we add C Program Files. Good. So we hit OK, OK, OK. Now I'm going to restart the terminal again. And now if I type Git Bash, boom, I'm inside Git Bash shell and it uses minty. So if I click on options here, you will see that logo of minty. So it might look very similar, but it actually uses like Windows default console. But this runs inside minty Terminal Emulator. All right, if you want to, you can configure different options here, Key selection, Windows Terminal. So these are all the options and just in case, and this is Git Bash. Now if we want to type very basic Linux commands here, we're able to do that, for example, ls, to list all files in this folder. Okay, Great, And this is our C Users entropy. This is mine. It will be your username over here. If we wanted to go to different disk, we're going to type cd to change directory and then the name of disk. Great, so this is about Git Bash. You can also run it from the run window in start Panel or by pressing Windows plus r and typing Git Bash. And you are inside. That's basically, it's, this is everything we need to configure Git, okay, Maybe one more option is that Git config command, right? So if we go to that at lesion to total, it doesn't matter when for Windows, for Linux doesn't matter. So here we need to configure, get to use our name and email, right? So just copy this command here and paste it in terminal. And here enter your name. It can be your real name on it, or it can be your nickname, whatever you do. So press Enter for your username, and then the same for email. So what are those? Those will be visible in the commit messages. In the good history, we will cover all of that, but this is something that other users and you will see in your project history, pick something real, that's basically it gets installed for Windows user, you get bashes installed. In the upcoming video, we will talk about it in details and how it will make our lives easier. See you there.
6. Change Git Bash Appearance (Windows only): Hey, first of all, I want to mention that this video is only for Windows users. In this video, I would like to address Git Bash appearance. Let me show you what I mean. If I launch Git Bash. I don't like the way it looks. I want to remove that mean W 64, I want to remove that entry B at, in my machine name. I don't need all of that. This is totally optional, but it will make your developer experience a little bit more pleasant. So let's change that. What we have to do, we have to navigate to get installation folder at first. So for me it is going to be C, Program Files, good. Inside this folder we want ETC. And profile D here will look for a good prompt dot SH, and we open it with any text editor. I'm going to open it with Sublime Text. And you will see this. I know what is going to be completely confusing and we don't know what is going on here, but don't panic. We only want to remove them or maybe replace them with something else. So first of all, to remove that title Ming W6 for we'll look for something with title, apparently. So this dollar sign title prefix is exactly for Ming W 64. So we just remove it from here. And we also remove the colon, but don't remove that semicolon from here because this is part of that color represented as this basically. So here, let me put my nickname with an arrow and let me save the file. Now, let me restart Git Bash. So again I go to Run window Git Bash. And now boom, I see my nickname and, and I DO pretty cool right Now I want to remove all of that that I highlighted. So I look for EMS system. I just remove that line completely. Then I remove user at host name. And also what I would like to do, I would like to highlight current path, which is displayed over here. So if I navigate to see, I have it like this, but I wanted to put it in brackets. So backslash w is current working directory. So I want to put it inside box brackets like that. Alright, and a class, what I wanted to do, I wanted to change the prompt from the dollar sign to an arrow maybe. So here I look for this line. Alright, prompt is going to be always an arrow. I change it, I saved the file, and now let's see the result. So again, I restart Git Bash. And now this is our final appearance. If we navigate to disk D, we have it like that. Pretty cool. So again, this is totally optional and this is my personal preference because I like simplicity and I like the way it looks. And for me from my point of view, it looks much, much better than it was before. It's totally up to you whether you needed or not. But that's it. This is what I wanted to address. See you in the next one.
7. Install Git (macOS): Hey, in this video, I'm going to show you how to install Git on Mac OS. First, navigates to Google and type git. Go to the first URL. This is the official website. Click on downloads, then select macOS. You will see a few ways how to install Git. We're going to choose the one with Homebrew. Homebrew is a package manager. It allows us to download distributed software with a single terminal command. Install Homebrew, copy the installation command from the website, then go to Launchpad and run the terminal, paste the command, and wait for it to install. It might also prompt you for your password. Now that we have Homebrew, we can easily install Git, navigate back to get website and copy homebrew installed Git, open the terminal and paste the command. It will take a few seconds until homebrew will install get into your system. If it says that get is already installed, then you are just fine. It is probably because of Xcode. And that's it. Bye bye.
8. Installing VSCode (Windows): Hi, In this video, we will install VS Code and editor that we will use throughout the course. First of all, why VS Code or Visual Studio code? I think I personally think that this is one of the best editors and IDE available for JavaScript projects. If you're comfortable with any other editor, for example, atom for development, if you have any prior experience, feel free to use it. But into training, I advise to his missiles pseudocode due to its plug-in system and is just comfortable. Okay, So let's install it. What we have to do is to go to Google as always, and type VS Code. And it brings us to the official website. So I suggest to open docs page and don't look page. So on the download page we have installers for three different OS, Windows, Linux, and macOS. So for Windows it is pretty straight forward, right? You click on the installer and it starts the download, okay, for Linux and macOS, I advise to go to the docs page and then depending on your OS, go to appropriate section. So for Linux, it is also pretty straightforward. Depending on your Linux distribution, there are dogs that you can read and see how you have to install NodeJS. I mean, how exactly you're going to do that because the commands will be different based on your distribution. Okay, so just treat the Dogs. Trust me, this is pretty simple and basically the same for Mac OS. That is one easy way. You get the installer and you just drag it into your launchpad. That's it. And VS Code is considered to be installed. Okay, so for Windows we got the installer. We'll launch it. This user meant to run to ground us and said, Oh pay. So in So yes, I want to continue running. Okay. I close it. You will not see that. Okay. So I'm here. I went to accept. You can change the path if you want to this as default installation. This is also written into dogs. You can read about it here. So where is it? Okay, it's here. Now we click Next. Next. Now here we need to select at two path that is selected by default, but make sure it is there. Register code as an additive for supportive file types. Yes, this is advised to be selected. This is optional and if you need to create desktop item, okay, then hit install. After that, it will take some time and boom, you will see VS code on your desktop. After that, you launch it and you end up in a window like that, the theme will be different, but it doesn't matter. Vscode is now installed. How to configure with SQL code and how to install plugins. Everything will be covered in the next video. See you there.
9. Install VS Code (macOS): Hi, In this video, I will show you how to install VS code on MacOS, go to Google search and type fiasco, then click on the Download button and it will bring you to the download page. Click on MacOS installer. It will automatically started download for you, wait until it's done. And that opened the file inside you will see the VS code. I can shortcut, just drag and drop the icon on applications right after that, VS Code is considered to be installed and you can access it by going into lunch, but then search for VS Code, open and verify that everything is okay. And that's all. See in the next one.
10. VSCode Configuration & Extensions: Hey, in this video I would like to talk about VS code, how we configure VS Code, and what we need to do to feel comfortable during development. Let's go. The first thing I would like to introduce is VS Code Search bar, because it is amazing to open search bar. I press Control P. And it brings me here. I can type anything I want here, but it will give no matching results because it tries to look up defiles in current project. But since we don't have any project at the moment I opened, it gives no matching results. What I want to type instead is right arrow. By typing right arrow at the very beginning. It signifies that I want to use VS Code built-in commands or VS code options maybe to navigate somber. For example, if I type arrow and then settings JSON, it gives me preferences open settings chasten. Let me click on that one and it brings me to settings JSON file. So settings JSON file is basically be as code user configuration file. Here we just need to type different commands to configure extensions, to configure some tools or whatever. First thing I wanted to put here, let me open browser. And here I have that file, this code configuration. You will have that URL and maybe already how it's shared. So just open it. And from here, first thing I will take IS security trust window. And I'm just going to place it here like that. And what it does, it disables security Window, but don't panic. What is security window? Well, VS code will ask you a lot of times, do you trust this environment or do you trust this folder? And trust me, this is very annoying to disable this window. Just copy paste this option and you will never see that window. Again. If you're curious, you can always comment out this line of code and see it yourself. But I'm going to keep it as it is. Now for a second. I'm going to leave the second option and I will just take the very last option from here, which is about preacher. What is preacher? Pre-clear is a tool that we will cover in details in the upcoming video. Preacher will form it our code when we save files, that line ensures that when we hit save, our code is going to be formatted. At this step VS Code is basically already configured and you can start development tries straight away. But one thing I want to mention is VSCode integrated terminal. So if I hit terminal and click on new terminal, it opens PowerShell for me because I'm on Windows. If you're on Linux or macOS, you will see Bash for Linux and macOS users, this is fine. But for Windows users, since we installed Git Bash, let's use Git Bash and not PowerShell or Cmd because by default VS Code and Windows uses PowerShell. So what do we need to do? We need to go back to that file and copy this configuration and let me place it here at the end. So what it will do, it will instruct VSCode to use Git Bash as integrated terminal. It's not different as if you would open it outside of VSCode. It does just convenient to use everything in one place, especially tool like terminal. I copied all of these options if path is different for you, just replace it following the same pattern. And let's close it and then let's open it again. And let's verify that now we are using Git Bash. That said, Windows users congrats, we're using Git Bash. Now, last thing I want to talk about at this video, and I would say the most important one is VS Code extensions. Alright? So what is VS Code extensions? These are all optional tools that extent VS Code with really great functionality. To go to Extensions, we hit on this icon on the left panel. And here I already have 33 extensions installed. That's a lot I know, but don't panic. We dont have to install all of them. What I will do right now, I will quickly go through the extensions that I think are required for our course. And it will be up to you whether you want to install them or not. To sell and extension in the search bar you just type extension name. For example, better C Plus Plus syntax. You click on extension, for example, that one and hit Install. After that it will be installed. And it might ask you to reboot VS code, but it's very rare. And by the way, I don't need that extension, so I'm just going to uninstall it. So I go back to Installed Extensions and let's quickly look for them. First extension that I want to mention is out to the name tag. What it will do. It will just out to rename HTML, opening and closing tag as we type HTML. This is very useful. I recommend this one, bracket pear color riser. I think this is one of the extensions that it should install because it simply highlights opening and closing bracket and decode. This is useful because it makes our code more readable and distinguishable. I highly recommend this extension. Next we have ES 7 React redux GraphQL React Native snippets. This is an important extension. We're going to utilize it a lot when we're going to write React code. So install it. I'm going to mention that extension in the future one more time. Then we have ES lint. We're going to cover ES lint in more details in the upcoming video. But make sure you have this extension installed upfront. Next we have highlight matching tag. Just like it says, it will highlight matching HTML tag, just like you see on that. Preview. Pretty cool. I think it's, it's, it's useful. Now we have IntelliSense for CSS class names. Well, yeah, it is useful. So what it will do, it will add auto-completion for CSS class names defined in our project, totally up to you. Next we have Material Icon Theme. It will just add this set of icons to the files that we will see in File Explorer here on the left panel. I use it and I recommend it to everybody. Npm intelligence. This one is important. What it will do, it will add outer completion for packages and libraries that we're going to import into code, highly recommended. Next we have path intelligence. Basically the same thing, but for local files. So auto-completion for local files import. Then we have preacher, preachers, a tool that will format our files. So again, we're going to cover that in detail, so just make sure it is installed. And last extension is going to be toggled quotes. Toggle quote is very simple. It basically just toggle quotes. For example, if read here, we need to press this depending on your OS to toggle quotes from single to double, from double to backticks. Let me demonstrate it to you. If you just going to press these buttons anywhere, you will have This message that running contributed Command failed. The thing is that you have to use this command only inside quotes. I have to put my cursor over here inside a text with quotes and then use the combination to triple quotes. I use it a lot personally and I highly recommend to everybody. I think that's it. I covered everything that I wanted. I mentioned all the extensions that I think are important. I gave you everything about settings, JSON, you know, about integrated terminal. I personally open it with control plus J key binding, not from here. And yeah, that's it. Maybe one more thing to mention is VSCode theme. If you want VS Code to look cool, look for an extension theme, okay, and pick something that you like. I personally like Firefox theme. And I already have it installed. So I'm just going to click on Set Color Theme, Firefox, dark, and boom. Now I have different colors in my VS code. Pretty nice. It also have light theme if you're interested. Okay, I think that's all. See you in the next one.
11. Working with Git - Part 1: Hey, in this video, we're going to talk about, good, Let's go. First of all, what is Git? Git is a project management tool that will allow us to keep track of all of our project files. For example, we're going to do a lot of changes to our source code when we're going to develop our projects. Maybe it will take one year. Maybe it will take two years to develop that project. After one year, I will probably not remember what I did in the past, how fear ago. And in order to have this project history Good exists. It will allow us to view what changes we made, what exactly went wrong at this particular step. Maybe we would like to change something. Maybe we would like to contribute with other people and in order to manage all of that, good exists. Now, let's see all of that in practice. First, I will create a new project folder. I already open VS Code. Now we need to open a project folder. I'm going to click File Open Folder. Then I'm going to navigate to a folder where I want to create another folder. This is going to be my test project, and I will open it in VS Code. Great. Now let's open integrated terminal. I'm going to press Control plus j. And it will open Git Bash for me. And as you can see, it is already in project folder. Great. Now, we need to initialize good in this project folder first. To do that, we need to type git in it. And you will see this message initialized empty git repository at this folder. And important point here that it will create a hidden folder dot get an order to view that hidden folder, we need to type ls minus a. It will show all files and folders in the current folder plus hidden folders. So good. And we can actually navigate to that folder by using cd to change directory. And then we can type ls again to view all files and folders. And you can see a bunch of things here, but we are not interested in them. Important point here that if we're going to delete this folder, all of our good project details gonna be deleted. So if I navigate back to the main folder, I will use CD and two dots, and now I will delete it. So I'm going to type a RAM than our F and folder name to delete all files and folders inside good, and get folder itself. Now you can see this master, master title disappeared here. It means that now get is fully deleted from this folder. Now let me type git in it again. And boom, good, is now initialized one more time. Great. Now, what about this master title over here? What is that? This is our current branch. We're going to talk about branches later. Right now. Do not focus on this. We're interested in get itself what it does. So what, what are the benefits? First, let's create a file over here. We're going to call it some file dot TXT. Here we're going to type hello. Maybe this is going to be our main project file, pretty dump, but it will do the trick. Now in order to use good, we can type git status in the first place to understand what is going on at this particular moment in a good project. So you can see no commits yet. We are currently on branch master and we have a bunch of untracked files to be more specific. For one file, some file.txt, nothing added to commit but untracked files present in a good project files can be in three different states. First state is untracked state, second state is stage state. Third state is when files are committed. So right now we are in untracked state. What does it mean? It means that get detected that we have some new files in our project, but they are not part of this good project yet. In order to add these files, to get to let them know that we want to track these files to include them as part of our good project, we need to add them to the stage state. To do that, we need to type just like it says here, git add file. So we can type git, add some file.txt. I pressed tab for auto-completion. So I just type some file, some F, then press Tab and it will allow to complete filename for me. But I can also do git add dot to add all files in this folder to the stage state. So the dot represents all files in the current directory. I'm going to use that command because it's shorter. Git add dot. Now you can see the color changed to blue over here. And what is happening. Let's type git status again to see what do we have no commits yet, changes to be committed. Now you can see we have new file, some file.txt. Great. It means that our file is in the stage state. And since we are using VS Code, VS Code has built in Git integration and disintegration is a really powerful tool. That's why here on the left panel we have this icon with one number inside it. Let's click on that. So these tab represents get integration. So you can see we have two dropdowns here, staged changes and changes. You can see that now our sum file.txt inside staged changes. So you can see on the left what was before, and on the right with green, what was added, since it is a new file, we see nothing and red on the left. Now, if you are struggling with all this good commands or I don't know For some reason, it's hard for you to remember all of them. You could always use Git integration here. So if I click minus here, it will delete this file from the stage state and it will revert it back to untracked state. Now, if I type git status, the terminal again, you can see untracked files, some file.txt. Now if I want to add this file to the stage state, I just click the plus sign. Boom, it, it is, it is in staged again. Great. Now, what is the stage state? Well, this stage state is basically that pre-operational stage at which files can be committed. So what is a commit? A commit is just a record in Git history and it represents changes made to the project. Now let's commit that file to our good history. So what we can do, we can type git commit and then we need to type minus M for commit message. And we will type added some file.txt. I'm going to execute that command. And you will see treated mode, one file changed, one insertion, great. And all changes on the left have disappear. That is fine. Now, if we're going to type git status again, you will see nothing to commit. This is because commit is gun. It's in the past already. Good keeps track of all of our commits that we've made in the past. In order to view Git history and the terminal, we have to type git log. We have one commit which we named edit some file.txt. Date is this and the author, my nickname and my e-mail and commit hash on master branch. Let's say I want to add new changes to that file. I'm just going to go ahead and modify this file. I'm going to type something dumped and save the file. On the left, you will see that we have again new changes to the file. And this is what we've added, this is what we had before. Now, the same steps. We need to first add these changes or that file that was changed to the stage state, right? And after that, we will be able to commit that file. Because now if I'm gonna do git commit and type something, you will see an error message. Well, it's not an error message, but it will not commit anything because good can only commit staged files. For example, if I'm going to create a new file, test.js and I'm going to type, I don't know, very basic thing in JavaScript, console log. Hello. I am going to go back to that tab. I'm going to type git status. You will see one file is modified, one file is untracked. Now I want to stage all of those files. I'm going to do git add dot. And you will see all of them are now staged. And if I'm going to type git commit, those staged files will be added to the new commit. All right? However, what if I don't want all of these files to be committed? Maybe I created that file, but I'm not ready to commit it yet. I just want to commit those changes to the history. So what I will do, I will remove test.js from this stage state, and I will leave only some file in this stage. So as I said before, git commits only staged files. So if I'm going to type git commit and I will type edited some file.txt. I will execute it. You will see test just stays because it is still untracked, uncommitted. And if I type git log, I will see now I have to commit grade. Now if I want to add test.js, I will type again git add dot, then git commit. And I will type edit, test. Yes, cool. Again, good luck. And I have my Git history over there. This is what good does. It allows us to create that project history through commit messages. But, okay, this seem useful, but I don't see the main point here to see all the files, all the changes that you've made to get project or different commands, like good show for example. So we can type git show and then commit hash in order to view the changes made on this particular commit. So I will just copy that and put good show cash message. We have that commit. This is the difference. In file. Some file.txt, we have one line edited and the second line edited. This is it. So now I agreed that this is not convenient to view everything through the terminal. That's why there are lots of VS Code extensions that we can install in order to visualize this process. So if I type git in extension search, you will see a lot of different extensions like good history, get lands, good graph. And all of them will help you to work with the good. They will allow you to visualize, reuse, and make your kit development as comfortable as possible. I personally do not use any of those because I think that this integration is more than enough and the rest will go on GitHub. In the second part, we're going to talk about the GitHub. Github is related to get what is GitHub. You will know all of that in the next video. See you there.
12. Working with Git - Part 2: Hi, Welcome to the second part of good series. In this video we're going to talk about GitHub. What is GitHub and why do we need it? Let's go as remember, I have the small good project from the first part where I have two files and a few Commits in the terminal, if I will get log, I will be able to view Git history of that project. Now, the question is, what will happen if I'm going to delete this test project folder from my PC, is my project going to be gone completely? And the answer to that question actually will be GitHub. It will come to our rescue. Github is a hosting service for good projects, just like we have hosting for websites, GitHub is a hosting service or platform for good projects. If I go to Google and look for a GitHub, it will bring me to the official website. If you don't have a GitHub account yet, I suggest to create one already right now, at this moment, I already logged in. I want to mention that there are some other popular hosting services for good projects, such as Git lab or maybe Bitbucket. The difference between them will be in features and integrations that they give to you. Github is the most common one. All right, now, we have our GitHub account over here, and we would like to host our good project that we have locally on our PC, on GitHub. How we can do that. So first we need to create a remote repository on GitHub. If I click on the plus sign and the top corner and click on new repository, it will prompt me for my new repository details. A repository is basically a project okay, that you Put on GitHub. So Repository means project, but on GitHub, so my repository name is going to be my project. I will leave description empty repository visibility that it might be public and private repository. If you choose public, your repository will be visible to everybody, but only authorized people will be able to contribute to that repository if it's going to be private, no one will ever know and see that repository. So let's choose private, then let's click on Create Repository. So at this step, we've created a new project on GitHub. Now, we need to associate hour Local good project that we have on our PC with a remote repository on GitHub. We can do it in two ways, either through HTTPS or through SSH tunnel. Ssh is an available option, but GitHub recommends HTTPS because it is more simpler and easier to set up, let's use HTTPS. You can already noticed that GitHub suggests a few steps how we can associate our local code or local project with remote repository. We're going to follow the second step to push an existing repository because our local good project can be called local Git repository. So let's just copy the first command from here and put it in the terminal. So what does git remote add origin? Let's first execute this command and let's see what is going to happen. Nothing gets printed and this is totally fine. But now our local good project knows about this remote repository. We can verify that by typing git remote dash v, you will see origin and you will see repository URL that we've copied from here. It is also available over here. Now, let's look one more time at this command. So we have git remote add. This is the command to associate our repositories. Origin is the name of an alias that we assign to this URL because it is easier to always refer to nickname or to an alias instead of URL all the time, which was origin. This is the most common name. Okay. Now, what do we need to do in order to applaud our local files to the hosting, we need to do git push than the alias that we associated with our repository URL, which is going to be origin and the name of branch that we want to deploy. So git push origin master. If we open again and Git Hub, we will see that it suggests good branch main and then git push origin main as remember I already mentioned that fuss about a year ago that community wants to shift default branch name from master to main, but we're going to keep using master right now. So we're going to use git push origin master instead of git push origin main. I'm going to execute it. And you will see that new branch was created on that URL rate. Let's get back to GitHub, refresh the page and boom, we can see everything is visible over here. So what we can do on GitHub. Github, we can view our complete good history. We can see all the files and we can see at the time when this command for that file was created, okay, So three hours ago was the latest commit for that file and for that file as well for tests, yes, we can click on Files to view the content. We can actually click on commits to see what changes were made on that commit. So for edited some file to recommit, we modified or remove that line and we added these two lines. Green is what was added. Red means something that was removed. Let's get back to repository here. We can also view full good history by clicking on that button. And we can see we have three commits. We can browse the repository at this point, at the history. If we click, we can see at this point there was only one file. Let's get back to main repository again answering the main question, why do we need GitHub? We need GitHub to collaborate with other people or to make our project portable. What I mean is that suppose that we accidentally lose this test project folder on our local PC. For some reason, it just does not exist. However, our project exists on GitHub. So what we can do, we can actually don't load our project from GitHub and put it in our local PC by clicking on this green button, we have a few options here. We can download zip or we can clone. So if we click on Download Zip, and if we're going to open that zip, you will see all of the files inside. So this is one way. The second way is to clone that repository using the CLI. So we're going to choose HTTPS connection. We're going to copy that URL. And now suppose that my test project here does not exist on PC. I lost it. So if I wanted to recover it or retrieve it back, I will do git clone and then the URL that I copied. So it will copy, it will create a new folder called my project, and it will put all the files inside. If I'm going to inspect my project folder, you will see some file.txt and test, yes. But also if I'm going to go to my Project folder and if I do alas F, to view hidden files, there will be another Git folder over here. So this is because when you clone a repository, it will come with good folder with Git setup already. Imagine that test project never existed on that PC. I clone the repository using HTTPS and git clone. And now my Git setup is already complete. I can just navigate to that my Project folder and everything is already there. Setup for me. I can now continue to do new commits, to do some changes, and then upload to GitHub again, let me delete my project folder. I don't actually need it. I will navigate back. Now. How can I actually continued to develop once I have my project on GitHub? That's a good question. Well, just like before, if I need to introduce new changes to the project, I will just keep doing my changes. Maybe I add another line with hello two over here and save it. Now as you remember, I have untracked changes. If I type git status, you will see that file is modified. So again, I need to add that file to the stage state. I'm going to put git add dot. You will see here it, it appears now in staged changes and now I'm able to commit. So git commit added hello two. Now if I type git log, I will be able to see new commit at the top. Now I have four commits, but if I go back to GitHub, I don't see it here because GitHub and Git, they are not magically synchronized with each other. Whenever you do new changes on your PC, they are local. They are available only on your PC. And if you want to see them at hosting, you have to upload them to hosting. And in order to do that, we again use command git, push, Good Push, and the name of LES and our alias. We can verify that with git remote dash v, our Ls is origin, which leads to this repository, which is correct. So I'm going to do git push origin and then master the name of branch. Now I see my changes are uploaded. I refresh the page. And other committee was added here one minute ago, which is correct. If I click on that commit message, you will see that these two lines for edit exactly what I just did. And one more time answering the main question, what GitHub does? Why do we need it? Github is needed for collaboration between people and to make our project as portable as possible. In the next video, we're going to talk about branches and how people are collaborating using GitHub. See you there.
13. Working with Git - Part 3: Hi, welcome to the third part of good series. In the last part, we've successfully deployed our local good project to GitHub. And we know what GitHub is. It is a hosting platform for collaboration and we use GitHub to make upper project as portable as possible. In this part, we're going to discover these main concepts of good cold branches. And we're going to talk how we're able to collaborate on GitHub. Let's go. First of all, let's talk about branches. This mysterious master branch was here from the very beginning. But what does it mean? If we're going to type git branch in the terminal, we will see you will have only master, but we're able to create as many branches as we want. So branch is just that another copy of our project. Let's look at that through an example. So let's create a new branch. To create a new branch, we have to type in git checkout than minus b and then the name of branch that we want to create, let's call it my dash feature. You can see switch to a new branch. My feature, again, I type git branch. I have master and I have my feature and a set of master. I see my feature now, this is because this is my active branch at this moment. So what you see here is your currently active branch. Now, what is the difference right now, these two branches are equal, but suppose that I want to develop a new feature into my app, but I don't want to touch my main code. My main code stays unchanged, but I wanted to develop a new feature. This is where branches come in. So my master branch contains my latest app to the code that is deployed to production. It works right now. And at the same time I wanted to develop a new feature. So I create a new branch called my feature, and now I start to develop on that new branch. Suppose that I'm on my feature branch, I create a new commit. My new feature is going to be a new console log, which is going to be hello three. Alright? Now I commit these changes. First I push to the stage state and then I do a new commit. I call it developed my new feature. Great. If I do git log to view the history, I can see my previous history and then my new commit, develop my new feature. Awesome, but how is it useful? Now, if i need for some reason to switch back to my main code and to see what was there. I'm now able to switch between branches. So I put git branch to see what branches do a half and then I can do git checkout master to switch between branches, but this time without minus B flag. Now I'm switched to branch master. And you can see how this change dr made on my feature branch has disappeared. This is because that change is part of my feature branch. It has no relation to master because if I put a git log, you will see I don't have this commit that I've freed it on my feature branch, on master branch, it's completely different. So as you can see, Master and my feature are some sort of a copies of my project that exist at the same time, I can manipulate those branches to develop different features. Now, how can I actually utilize this branch concept to make it useful for me or for people who I collaborate with. So suppose that there are 10 people that work on the same project and to invite people to a repository and have to go to settings, manage access. And here you will usually invite collaborators. So people who have access to that private repository will be able to do changes to that repository. But if the, all, if all people working on a project going to push to the same master branch or main branch. This is going to be slightly a mess. We want to make it as structured, arised as possible to keep our good history clean, readable, and maintainable. And to do that, we will utilize branches. Suppose that our main code is on master branch, which has latest commit added hello to I am another person sitting somewhere out there. I'm a collaborator and I create a new branch, my feature that I already created, and I did some change. I want to push those changes to GitHub, and I want to merge those changes into the main code, which is located again on the master branch. So what I need to do, I need to first push that branch. To GitHub. To do that, I will do git push origin because this is our aliens for the repository. We remember that git push origin, my feature. Let's wait a second. And now it's pushed and it even suggests us create a pull request for my feature on GitHub by visiting. We're going to talk about that in a second. But if we go back to GitHub, we already see that my feature had recent pushes less than a minute ago. Compare and pull request. If I refresh the page, now here I'll see two branches. If I click here, I have default branch master and I have your branches, my feature update it for minutes ago by me and main branch of the CEU hours ago by me. And here I can see if I hover, I will see one commit ahead of master. Now, in order to push those changes that I have on my feature branch into master, I need to create a pull request directly on GitHub. A pull request is that developer request when you ask project maintainers to merge your branch into the main branch. So basically you want to contribute and you would like to push those changes to the main code. We're going to click on new pull request. We will name it developed. My new feature will leave a comment that, hey, I just did that great change. And here we select that. We want to push, we want to merge my feature branch into master. These are all the commits that I've made on that branch. I can create as many commits as possible. For example, if I add another commit, maybe console.log, hello for, again, I stage those changes, I commit them again, new change. Again, I push, Good Push origin, my feature. The branch will be updated. Even if I created a pull request already, I haven't created it yet. But anyways, so I'm going to click on create, pull, request. And let's see what do we have here. So first we see Checking ability to merge because there might be conflicts in those changes. But since we don't have any conflicts, it's fine. So we will see our pull requests over here. So now what is going to happen? I'm that person that sitting over there creating that pull request, then project leader or project maintainer comes in and that person responsible for pull request goes here and it sees that, hey, that person wanted to merge those changes. So he clicks on that pull request. Okay, great, That guy did that great change. Oh my god. I want to merge those changes. So that person merges that pull request. So he selects one of the options here. Let me click on merge pull request and let's see what is going to happen. So merge pull requests from that person, that branch developed my new feature, confirm merge, merging, poll request, successful emerged and closed delete branch. We're going to click on that branch was deleted, pull requests, merge. If I go back to my project here, I can see merge pull requests from Sherlock 16, my feature, and it is now part of good history. If I click on commits, I will see that first I have these two commits that I had on my feature branch. And on top of that I have another commit merge pull request. Now all these changes that were on my feature branch were merged into the main code and they're available here. This is how people usually contribute through pull request one, all of these changes are on GitHub. We will have discrepancies because we have seven commits on master branch, on remote repository, on GitHub in our local project, we're still having my feature branch. And if we go to master by using git checkout master. And if we do git log, we see the latest commit here is added hello two, while here it is, merge pull requests to one. To fix that, we have to download the latest changes from GitHub into our local code to synchronize the history. In order to do that, the command is very similar to git push, but instead of git push, we will use git pull. So again, we get pull than the repository areas and then the name of branch to pull. So we want to pull master from origin. I'm going to execute it. And you will see that great, something happened. And as you can see, now, all my changes are here. The latest commit introduced, hello four and I, and now I have hello for in my code. Pretty cool to verify that I do git log again. And you see that I have multiple requests bomb from Sherlock 16, by the way, to exit this state when, when good history overflows, you can just type q and it will bring you to the terminal. All right, I would say that this is probably it, this is how people use GitHub to collaborate. The model would be a little bit different if it is a public repository and you want to contribute to an open source project. But we not going to cover that in this series. This is more than enough for us to understand how Git works and how people do collaborate with each other. So again, I'm going to repeat the flow one more time usually. And if you wanted to create a new change and you're working on a project. First, you create a new branch by using git checkout minus b and the name of branch, it can be anything. Alright, so these copy, this new branch will be created from the branch that was active at the moment when you run that command. So these branch now will contain all the commits that you've had when you run this command, okay, you keep developing conduct branch, do as many commits as you need to complete the feature. Then you push that branch to GitHub by using good Push. Then it appears on the repository. Then you go to your pull requests and you create a new pull request to merge that branch that you've just published on GitHub into the main code, into the main branch. And then a responsible person will come and see that, Hey, that guy wants to merge that branch into the main code. And once this pull request is merged or accepted, your changes will be merged into the main code. After that, everybody who's working on a project, they will be required to pull the latest changes from the main branch by using git pull command. And that's it. This is the basic flow of Git and GitHub collaboration congrats. I think this is our finished for good series, and I'm gonna see you in the next one.
14. Installing Node.js (Windows): Hi, In this video we're about to install Node.js on Windows. What is NodeJS and why do we need it is explained in the next video. What we need to do is to open any browser and go to Google. And Google will look for no GS. The first link is going to be the official website. Here we have two versions to be downloaded, LTS and current version. Current version is the very latest version available for download, and LTS is the latest stable version. We don't need to over-complicate. That's why we get LTS. Click on that one, and then open the installer. Wait a bit and hit Next. Yes, I accept Next, change the path if you need to. Next, at this step we need no GS, NPM and attitude path. Next, at this step we have tools for native modules and we want to select this option. What is that and why do we need it? Just like it says, some npm modules need to be compiled from CC plus plus when installing. What does it mean? It means that there are some libraries, modules, or packages that we will install during our development that requires some native binaries specific to the OS, in our case, windows. So the tools that will compile those smooth muscles are Python and Visual Studio build tools. So this option will just install them if they are missing now, right? Hit Next and hit Install. I'm not going to click Install because I already have no GS installed. But for you, this is what is going to happen. When you click on that button, you will see a new CMD window will pop up. And it will see something like we're going to do and install this order that we will require this number of space. Just close that window and after that, you will see another window will be opened, which is PowerShell window. And there will be all installation log. So just wait some time until it's done and then you're good. No JS is considered to be installed. Now let's verify that. How to do that. Click on Start panel and look for cmd. Then we open that. And in CMT we type node space, dash, dash version. Hit Enter and you should see the version that you've just installed. It might be possible that when you type node dash, dash version, you will see something like node is not recognized as an internal or external command. So we have to find another way to verify our installation. To do that, we need to again go to start Panel than to control panel. And then we'll look for programs and features, okay? Here we need to verify that we have no GS in the list. So if you have no GS in the list by here, it gives you notice not recognized as an internal extra command. Then you need to do a small tweak in system configuration. So what you need to do is again click on Start panel in the search type ENV and select edit the system environment variables. Then click on the environment variables. And here, under system variables, you must find the path variable. Double-click on that one. And in the list you will not see C Program Files. No JS, which is my installation path for no jazz. So because you don't have it here in the list, you see node is not recognized, okay? So what you need to do, you need to click on New and add your installation path for no GS. So if you didn't modify the option in the installation, it would be C Program Files, NodeJS as well. So hit New, paste the path over here, okay? Okay, okay, then just restart the terminal. Then try node dash, dash version. Again. After that, you should see the version. And that's basically it. Congrats, You've just install NodeJS on Windows. See you in the next one.
15. Installing Node.js (macOS): Hi, In this video, I will show you how to install NodeJS on macOS. Let's go. As always, you go to Google first and type NodeJS, go to the first URL, which is the official website, then navigate to the downloads page and click on MacOS installer. The download will start automatically. Open the downloaded file. You will see the installation wizard click on Continue, then accept the terms, then verify the installation path and click Install. It will prompt you for your password and that's fine. Wait for no GS to install right after the installation process, you will have no GS and NPM in your system to verify the installation. Let's go to the terminal, go to lunch bad. Then search for terminal to verify NodeJS type node dash V, which stands for version. It should print the version you've installed. And in the same manner, we also need to verify NPM. So type npm dash v, and that's it. See you in the next one.
16. Node.js & NPM - Part 1: Hi, Welcome to know GS introduction video. Right now we're going to talk about what is no GS. Why do we need it, and how we are able to use it? Let's go first things first, what is no GS know GS is JavaScript runtime environment. It means that it is something that allows us to run JavaScript. And you will probably thinking, why do we need no GS? Because we have JavaScript running in the browser and that's the point. Nowadays, we are able to run JavaScript outside of the browser with the help of NodeJS, we can use JavaScript to write mobile applications. We can use JavaScript to write desktop applications. We can basically do anything with JavaScript right now. Thanks to note, yes, because it allows us to run JavaScript outside of the browser. So for example, if I open browser here, I click Inspect, then I go to console. So this is browser environment. I'm able to write any JavaScript I want here. For example, if I want to type console.log 5 plus 2, it will print six for me. That's great, but this is inside the browser. If I wanted to execute it somewhere else, I wouldn't be allowed to do so. But with the help of nodes, yes, I will be able to do that. Let's go to VS code and let me create a new project folder. I will go to My Projects folder, and here I'm going to put test GS. I will select that folder. And now let's create a new file here we will call it test.js. Before we will write anything, Let's first ensure that we have no JS installed in. We're able to access it. For that, I will open my integrated terminal. And in order to access NodeJS, I just need to type node. Once they execute node command, I will enter the Node.JS environment. So here, I will be able to execute JavaScript. For example, the same thing what I did in the browser console log 2 plus 4. Pretty awesome. This is the proof that JavaScript was run outside of the browser. But this is not very convenient for us to always write JavaScript inside terminal. So to exit that mode, which is going to press Control plus C multiple times. Great. And now instead, let's write a few JavaScript files that we will later than execute with no JS before we're going to jump into files, I just want to mention that every file, every JavaScript file that is run inside Node.JS environment is going to be a module. A module is a JavaScript file that is self-contained. It means that it is not know about outside world only what is written inside. Let's first create maybe Am I audible? Const five equals five. And now let's console dot log 5 and hit Save. That's it. We've just created our first script. Now let's run it to execute a file, we have to type node and then the name of the script that we would like to execute. So this is going to be test GS. I run that command and you can see five in the console because I just console log 5. If I'm going to remove that line, I will comment it out. And I will try to run the script again. Nothing will be printed. And this is obvious because we don't do anything inside. Now, let's make our task a little bit harder. What if we have two files to modules? Let you create second dot here, and let's put a string here. Maybe my name, I will print Andrew. And what I want to do, I want to somehow share information between these two modules. So I wanted to pass my name from second gs into test. Yes. And I'm able to do that through import and export. So to export something from a module, we use module. So our experts than we export an object. And in this object, I will put my name variable like that. So I can do it actually like this. My name, then call on my name. But in JavaScript we can use a shorthand. We can just put it like that and it will work great. Now my name is exported from second gs. Let's try and import that. If I go back to Ts, gs, let me remove all of that. I will put a const that I will name my export something like. Imported my name, whatever. And in order to import what I exported from here, I need to type required. And inside require, I put path to that module, which is going to be just second GS. I don't need to specify the extension. So I put dot and slash over here to specify that this file is located at this folder. Now, what I will do, I will simply console log imported my name. I save the file, go back to the terminal, and then again, node, test, GS. Boom, what I see, I have an object. And this object contains my name key. Exactly what I exported from second, yes, actually we can rename that to imported second module. And then I can reference imported second module dot my name because this is an object and it has key my name. I save it, I execute the script again, and I have entered printed in the console. This is how NodeJS works by simply creating different modules that shared data between each other. That system with a require and with module exports is called common GS, which is written like that. Comma gs. This is native import export system in Node.JS. However, at this moment, NodeJS community is actively working on and use system which is called ECMO Script modules. So these modules are part of browser environment and at the moment they are experimental in a Node.JS environment. So they are slightly different from require and module exports, but they are more easier and intuitive to use. Let's try out them. What do you think in order to use ACML Script molecules in Node.JS environment, we have to add another extension to our modules. So instead of js, we need to use MGS, which is going to be module GS, MGS and rename that file as well, going to be mgs. So instead of required, I'm going to comment this line out by pressing Control Slash. And instead I will use Import. Then since we export an object, I will again put curly brackets. And I'm going to specify that I need to import my name. It is important to specify the same name because if I'm going to specify something different, it does not exist on the exported object, right? So I will put my name from second module. Great. And now I will console log my name. And in second MGS, instead of module exports, I simply type export my name. That's it. And it looks much, much cleaner than CommonJS. Now let's try an executed node test. Yes, and we will have, cannot find module aha IC. This is because I probably have to specify the extension. Let me try it out. Yeah, exactly. So there is one more drawback with the using ECMO scripts module at the current state of NodeJS, I have to always specify the extension with CommonJS, I can admit specifying the extension when a Import different modules like that, but with ECMO scripts module, I have to do that. The result is the same. I'm going to run the script. I have Andrew, but you can see now it uses ECMO scripts module in our project. When we gonna do all that development stuff, we're going to use Node.JS environment and we're going to utilize Achmat Script modules. You can see that this is a very simple example. It uses single scripts here, nothing complicated. However, we are obviously need something more complex and this is our topic for the next video. See you there.
17. Node.js & NPM - Part 2: Hey, welcome to the second part of NodeJS introduction and the last part we discussed what is don't yes, and how we're able to run single scripts. In this video, we're going to talk about NPM and how we can use npm to manage project and project dependencies. Let's go. First of all, what is npm? Npm stands for Node Package Manager and it comes already bundled with NodeJS. So if you have no JSON installed, you already have NPM to verify that inside the terminal, just type npm. There's dash version and it will print currently installed NPM version. Now how we can use npm or what it does for us? Well, the thing is that in real JavaScript projects, there are dependencies or project packages. So these are those libraries, different modules from the Internet or different tools that we install into our project. And npm is the tool that will allow us to do that. So in order to install those packages, but first, how to initialize npm inside our project folder. In order to do that, we have to use npm init command. And once you execute this command, it will prompt you for a few things such as package name, version and some other things. Just skip that by pressing enter all the time. Once the command is finished. In the project route, you will see package.json file package Jason is that manifest file which describes our project inside we can see project name, maybe project version description. If we're going to put that author lights and see if we have any scripts and a few other sections that we're going to talk about in a second. The question is, what package JSON does for us? How it can be useful? Well, let's go to the browser. Let's look for NPM in Google and we will end up on the official npm website. Npm has the NPM registry. So Node Package Manager is a tool that allows us to manage packages inside our project. But where do those packages come from? They come from the NPM registry. The NPM registry is that ocean of different packages, tools, and libraries that we can install into our project using npm. So on this website you can search for different packages. There are millions, billions of different libraries that we can use. But for now, let's just look for the one that I prepared, which is cowsay. Let's click on that one. And now we can see the official webpage for these packaged on that page, we can find its documentation, how we can install that package, what it does, how we can use it, and all other things. We can see that it has for dependencies. The thing is that packages published to the NPM registry have dependencies, and those dependencies are also published packages. And those packages might also have Dependencies. Dependencies, dependencies, and dependencies of dependencies are called peer dependencies. On that page, we can also find some matter information like version, how many weekly downloads it has the author last published, and some other things. Let's read the documentation. What do we see here? First of all, what this package does? Well, this package is basically very simple. Its sole purpose is to just print that cow into the terminal. So let's see the installation part, npm install minus g cowsay. Let's copy that command and let's put it into our terminal. Let's see what is going to happen. So we can see something is happening. Can we can see that installation was successful already. We can see Edit 41 packages and the version that we've installed, which is 1.5. Why 41 package? Just like I mentioned earlier, packages have their own dependencies, and those dependencies have their own dependencies. And eventually we have this dependency tree. That's why at the end we have 41 packages in total. We have npm installed cowsay. What did it do? Well, it just installed cowsay into our system as a global package. As a global package because we minus g flag to verify that we can type npm list minus g, then dash, dash depth equals 0. Let's execute that command and let's see what gets printed. I already have a few packages installed here globally, but in your list you will see cowsay. So what does it mean? What it gives us? It means that now we can use the package as a CLI globally in our system. Let's see the usage park, cowsay JavaScript. Let's copy it. And let's try and execute it in the terminal. I have this small pretty cow here saying JavaScript. So this is exactly what this package does, and we can use it as a CLA in our terminal. And it doesn't matter from where it is available globally. If I open another Git Bash instance over here, I will still be able to use cowsay. Because again, we installed cowsay as a global package. It means that we can use it anywhere. There are two types of packages, or I would say two ways how we can install a package. First, we can install it globally, just like you see here. So when a package is installed globally, it is not bounded to any project, is just installed globally in your system. The second way is to install a package as a project dependency. When a packages installed as a project dependency, first of all, it is not available globally. It becomes available only in that project where it was installed into, Let's first uninstalled cowsay as a global package, and let's instead install it as a project dependency. So first we're going to type npm install minus g cow sake. You will see at the end removed 41 package grade. Now to install cowsay as a project dependency, we have to do npm installed cowsay, but this time without minus g flag, let's execute that command and let's see what is going to happen. What is new in side File Explorer. So first, if we open package Jason, we will see new dependency section. So because package Jason is our manifest file, it will contain, it will list all the dependencies that we've installed. So we've installed only one dependency cowsay of that version. Now we also see package.json. And package.json appears whenever you install any dependency package.json purpose is to look versions of the installed dependencies and dependencies of dependencies. This way we can avoid different problems with version resolutions. And we also have node modules folder. Node modules folder is that folder where all packages were installed into. If we open that folder, we will see a bunch of different packages here along with cowsay. These are those 41 packages that we saw were installed. They are here under Node modules. If we're going to delete this folder, they will be deleted. Now, let's go back to cowsay and let's see how we can actually use that package. So if we scroll down, we can see usage as a module. Remember that I told ones that all files in Node.JS, our modules the same with packages. Because packages in the NPM registry are also JavaScript files, it means that there are modules. So let's see how we can use it as a module. And looking at this code snippet, I can say that this example uses require, which means it uses CommonJS import system. But now we know that there is CommonJS and there's also ECMO Script modules. So instead we're going to use atmospheric modules. So let's copy this example. And let's put it inside our test mgs. But instead of require, I use at my script import. So we will type import cowsay from cowsay. And here I have to specify package name, where dependency name from package JSON. I don't need to specify the path where I don't need to reference node modules. I just need to type dependency name, which is going to be cowsay. Now, let's delete this and let's delete this, and let's save it. And let's try and execute that script. I'm going to type node test.js. And let's see, again we have that cow saying I'm a Moodle, but now cowsay is part of our project. When we installed it globally, it was independent. It was just a tool in our system that we can use through the terminal. But since now cowsay is part of our project, we are bounded to cowsay in this specific project. If I am going to remove node modules folder, let's go forward and deleted completely. And if I'm going to try and execute that file again, you will see cannot find package cowsay because we just deleted all required files needed to execute cowsay. So in order to re-install packages listed in package Jason listed in our project, we have to just type npm installed whenever we don't have node modules folder, but we need to install the packages. We just type npm install. So what it will do, it will look inside package Jason. It will look for the dependency section and it will install missing packages. That's it. Now you can see again at it 41 package, if I execute the script again, the cow was there. Awesome. Let's inspect package JSON, and let's find the scripts section over here. I want to talk about this section now, the thing is that in the projects, there are a few projects specific scripts. So this section is called NPM scripts. So usually project-specific scripts are defined through NPM scripts. We already have test script defined here, but let's remove it and let's define our own script. It can be anything, we can name it whatever we want. For example, my test script. And here we need to type what the script will do. For example, if in the terminal to print something into the output, I would use the echo command, echo, hello, and hello gets printed. So well, here we can define the same thing. For example, my test script will execute echo hello, for example, at code hello. Now in order to run that NPM script, I have to type npm run and the name of script, which is going to be my test script. Once they execute that command, that command will look for package JSON in this folder, and it will look inside this script section, and it will find my test script, and then it will just run whatever is written here. Let's try it out. You can see I have Hello, basically the same result. That's it, why it might be useful. Well, there are some situations when we might have a really, really long script over here. Imagine it goes like that. And now, instead of writing all of that, all the time, we can just run npm, run my test script, and it will do the thing. That's it. We're going to talk about NPM scripts more in details once we going to scaffold a real React project for now, let's just leave it empty. One more thing that I want to mention here is that project dependencies can be of two types. Actually, there are regular dependencies that we use in our source code, and there might be dev dependencies. So dev dependencies are also part of the project, but they are not referenced inside the source code. They are used only for development. So these packages that we're going to install for development are going to be preacher and ES lint. And we're going to install them as deaf dependencies. We will talk about them in the upcoming videos. They will be used to facilitate our development, but they are optional. If we're going to remove dev dependencies, the project will still be able to run. However, if we remove that dependency from here, if we're going to remove node modules, the project will not be able to run because it depends on cowsay. So if we remove dev dependencies, the project will still be able to run. But if we remove the main dependency, the project will not run because now the dependency is missing because our project depends on it. But dev dependencies are only dependencies for our development environment. It does not have direct influence on the source code. We're going to talk about that one more time Once we're going to talk about preacher in the gasoline. But for now, I think it's enough. All JavaScript projects are managed just like that using npm, the NPM registry packages, you're going to have packaged JSON in your root folder. You will have dependencies installed from the NPM registry. Then you're going to reference those dependencies in your source code. At the end of the day, when you have to either develop the project or you have to build the project, you will have NPM scripts defined here in package Jason. And that's it. This is how all JavaScript projects look like. That's it for NodeJS. And I will see you in ES lint and preacher video.
18. What are Prettier and ESLint?: Hey, in this video I would like to talk about preacher in ES lint. What are those tools? Why do we care and how they're going to help us? Let's find it out together. So first thing I want to mention that in this video, I'm going to reuse the same project that I created in the Node.JS introduction video. As you remember, it contains only one dependency, which is cowsay, and we use it inside just MGS. Let's start it off. Preachers a tool that is going to format all of our files. It has only one purpose to Format files. It gains the predefined conflict. So let's find out how we can use preacher. If we go to Google and we'll look for a preacher, you will end up on the official website. Let's go to the official installation documentation and let's just follow it. First installed preacher locally. Let's copy that command and let's put it inside the terminal. So save-dev flag inside the command means that that package preacher will be installed as a development dependency. If we're going to open package.json, we will see new section over here, dev dependencies, which is developer dependencies. And we will see preacher over here. Now. Let's continue on the dogs. And here we have created an empty conflict file. Again, I'm just going to copy the command. Put it in the terminal, and it will create an empty preacher RT JSON for me, each tool preacher and Eastland, requires a config file to understand what we want from that tool. And we can see all of this conflict options for preacher inside the documentation under Options link. If we're going to go here, we will see different options here that we can use inside picture RC Jason, for example, tab with. So I'm just going to go and use Tab width from here. I'm just going to copy it, put it inside the config. And we can see the default is two. So let me maybe put 10 over here and let's see what is going to happen. I saved the file. I go back to test MGS. I press Control S to save the file. And boom, you see the indentation has changed. Now. It uses tap width of 10 empty lines. You're probably thinking how it is automatically like formatting that file. The thing is that what we've just installed inside our project under dev dependencies, we've installed preacher as a tool, but out of formatting, as we see, feature is available through the VS Code extension that you should have already installed by now. If you didn't do that, go to the Extensions tab. Look for preach here. This is the extension and install it and make sure it is already configured. If you didn't do that, to watch VS Code Configuration video from project to project, you want to reuse preacher. You don't want to always specify different options here. Trust me, there will be only a few. So for that reason, I'm going to share with you this gift and you will be able to just copy and paste that preacher conflict that I use everywhere. So let me put it here and let me save the file. As you can see, I use five commands and this is enough for a preacher to work. You can see if I'm going to save it. It uses that conflict now. Awesome. So answering the question, why do we need preacher? First of all, you need to understand that preacher is an optional tool, but it is highly recommended you to have preacher inside your JavaScript project. The reason for that is because we wanted to make our code as readable and maintainable as possible. And preacher will help us with that. Which one do you prefer? This weird formatting? Because for some reason you didn't end manual indentation or do you prefer very clean code achieved with preacher? I guess it is going to be the second option. At last, consider a situation when you have a lot of files inside the project and they are not formatted. Preacher. So what to do in this case? Well, the first option is of course, to go to every file, hit Control S to save each file manually, and then preacher will form at them. But this is not very convenient. It would be better to create a script that will format all of our files at once. And that script we'll use preacher, and this is where NPM scripts come in. Let's create an NPM script that will use preacher to format all of our files inside the project using preacher RC JSON. So if we go back to preacher documentation, let's go to the installation page. Let's scroll down and here we can see now format all files with preacher and we have that command and px preacher dash, dash right dot. Let me copy it. And let's navigate back to the NPM scripts. So here let's define and you NPM script that we will name format. Inside that script, I'm going to put n px, preacher dash, dash, right dot. However, we don't really need and Px here, you can read what is n px in this yellow alert. Are we sure? So n px is basically a tool that is shipped with no JS that allows to run packages directly from the NPM registry without installation. If I haven't installed preacher and then I would use n px preacher dash, dash Reidar. It would work because NP x will use preacher without installation directly from the NPM registry, but we don't need it at all. We have preacher installed. And when we write preacher here inside the NPM script, it will use preacher installed inside node modules. Let's try out that command that we've just defined. I'm going to go back to my terminal and I will execute npm run format. You will see something is happening. And now some files are affected, basically all of them. Let's shake them out. So we have that file formatted, that file formatted, that file formatted. So basically everything is now formatted using a preacher. Let's go back to preacher RC Jason, and let's maybe change it to 10 tablet. And let's rerun the command npm run format. And you will see that all files are now formatted against preacher conflict that we've just defined. That's it. Now you know what preacher does and why do we need it? Let's quickly summarize. Preacher is a tool that will format files inside our current project, prettier has a configuration file which is dot preacher RC JSON. We can use preacher through the NPM scripts or we can use preacher through the VS Code extension that we've installed. So that extension, the only thing it does, it just allows us to format files. When we hit the save button, If we're going to disable that extension or if we don't have it, preacher will not form at our files when we hit Save, the only opportunity for us to format the files will be through our custom NPM script, which we named format. But with extension, it is much, much more convenient. Now, let's move on to ES lint before we're going to jump to Eastland, let me just quickly fall back to our previous setting here and rerun the format command. Awesome. Now, what is Eastland? Eastland is also an optional tool that will allow us to check JavaScript against some common problems, against some predefined code guidelines. We will need ES lint to verify that we do not have very simple mistakes in our code, such as undefined variables, unused variables, or maybe we have some piece of code that is used in a wrong way and ES lint will let us know about that. So again, just like with pressure, Let's go to Google and let's look for ES lint. Let's click here. You can see that ES lint is a linear. So linear is a tool that actually checks the code against errors. Let's click on Get Started, and let's again simply follow the documentation. So npm install ES lint save-dev, copy. Let's put it into the terminal again. Dash, dash save dev flag will ensure that ES lint will be installed as a developer dependency in package Jason, again, water dev dependencies, dev dependencies are those tools that we use in the development environment. They are not part of the source code. So if I'm going to remove the Iceland and preacher, my project will still be able to run. Great. We have ES lint installed. Now let's follow the documentation. So it suggests us to use the init command to initialize the config file. So instead, let's create it manually. So I'm going to create a new file here, and I will name it dot ES lint RC. So this is going to be my ES lint config file. In order to configure ES lint, we have to follow exactly the same pattern as with preacher. You have to create a config file and we have to put a few commands to let Yes Lint understand what we want from it. Let's get back to the website and here we have configuration. So let's just maybe copy it. But we're going to change a few options here. I will put it here. I'm going to remove this and We end up with the rules section. Inside the rules section in Iceland, RC, we define ES lint rules that we would like to use inside our project against which our code will be checked. For example, I can type a rule called no unused virus, and we need to supply some options here. And you can see it even gives me auto-completion editor off and worn. So what are those? So if I'm going to put off, that rule will be disabled and my code will not be checked against that rule. If I'm going to put toward as an option for some ES lint rule. It means that when I go against that rule, ES lint will give me a warning. And I have a third option, which is error. It means that whenever I go against that role, Yes, Lint will produce an error. So there are some, let's say, crucial rules which I want to be reported for me as another. And there are some maybe minor rules that I want to be reported to me as warnings. We can find all these rules inside the documentation. I always suggest you to look inside the documentation. You can find everything there so you can even see off warn error options here, exactly what is said to you. Now, we can go to User Guide and we can go to rules. This is rules reference. You can always find all rules here. For example, if I'm going to look for no unused bars, you can see it here. Let's look for it. Yeah, disallow unused variables. So this is what the rule does, is this allows the usage of unused variables. So let's try it out. I'm going to get back to my code. And here what I have parsing error, the key input is reserved. Well, yeah, we first need to let ES lint understand that we are using the latest JavaScript syntax. In order to do that, we go to ES lint. In here, we add another option which is going to be parser options. So inside parser options we have to supply AVMA version. And let's put 2020 here when I save the file and go back to test MGS, and I see another error saying import and export may appear only in source type module coming from ES lint again. So I go back to yes Lind and I can supply another option here is going to be source type, module grade. Now we don't have any errors or warnings, so we have no unused virus rule defined which will produce an error whenever we go against that, true, Let's go to test mgs. And here let's create an end-use variable. Maybe I will name it Hello. And what do we see here? We see that it is highlighted with red line. If I hover, you see how low is assigned a value but never used. And it comes, as you can see from ES lint, no unused variables. If I'm going to go back to ES lint RC, and if I'm going to disable that rule, to disable the checking against that rule. You will see now, I don't have any warning or an adder. So let's get back here and let's put it as a warning. And we can see it is yellow because it is a warning now. And if I put it back to utter, it will be turned red. Awesome. Let's maybe keep it a warning and let's get back to the documentation. So let's get back to the installation page. And here we can see at the very bottom that we can also put the extents option inside ES lint. The thing is that ES lint has a lot of different rules and writing all of those rules manually over here all the time. This is not very convenient because our ES lint ours is going to be pretty, pretty long. This is not convenient. So to solve that problem, ES lint has config files or let's say predefined conflicts that we can extend from ES lint comes built in ES lint recommended conflict. So let's just copy it and put it at the top. Now, we use the recommended convict. If we go back to test MGS, we see that we have console is not defined now. Well, this is because ES lint things that we are running inside the browser environment. And for that, we have to again specify that we are running inside no jazz. So for that, we have to put the ENV options here and we specify that we are inside. Note. And we will put true, we can actually put a lot of different options like ES6 to specify again that we're using the latest JavaScript syntax. And there are lots of different options. And trust me, you don't need to know all of them. Because you always have first documentation that you can use whenever you have problems with Eastland understanding or you can just copy and paste yes. Link conflict from somewhere and adjusted for your needs. This is a very basic one. Let's keep it as it is. One important note that I wanted to emphasize is that you can only see that yellow hovering or maybe you can see that red hovering over here. I mean, direct reporting inside VS Code, thanks to the extension. So I have ES lint extension installed. That one which integrates ES lint into VS code. That is why here I see this red line. If this extension was disabled than ES lint wouldn't actually reported to me, just like I see it right now. It wouldn't be turned red. The only way I would know about that error would be to running ES lint command, just like we did before with preacher. So maybe let's create another NPM script and let's define the command for Eastland. Let's get back to package.json. Here I'm going to put may be lint command and I will call ES lint asterix dot JS or since we have MGS extension I will put and gs over here, we're going to run to ES lint against all files with the MGS extension. Let's go into the integrated terminal and let's execute the script that we've defined, npm run lint, and you will see ES lint reports one problem. Hello is assigned a value but never used. So this is very convenient because in the production code, we apparently do not want to have and use variables. And there are lots of different errors and warnings that we might receive. But trust me, this is for our own good. Es lint will help us to maintain our codebase with fewer errors as possible. We're going to utilize ES lint combined with preacher a lot. However, there is one problem with ES lint and Preacher. The thing is that some preacher rules overlap with ES lint rules. And to fix that error, we need to navigate to ES lint. If we go to ES lint in we scroll to the summary here we can see use ES lint convict preacher to make preacher and ES link play nice together. Let's navigate to ES lean conflict preacher. And let's go to the installation part. We're going to copy it. We're going to put it here. And again, dash, dash, save dev flag for installing that package as a dev dependency. If you're going to look inside dev dependencies, you will see Eastern conflict preacher now. And let's see what we have to do at preacher to the extensive array in your Eastland RC file. So extends some other configures and pressure. All right, so let's put, let's copy preacher. Let's get back to ES lint extends. And you can see from the example it uses an array. So ES lint supports both. Let's turn it into an array. And let's put preacher here. Nice. Without that package, without that ESPN convict preacher, you will end up in a situation when you will have Eastland errors and you will not understand why are you having them. This package ensures that you do not have any conflicts. And I will see this is it. This is all I wanted to tell about ES lint and preacher to quickly summarize, what is Eastland? Eastland is a tool that will allow us to check our code, our JavaScript code, against some predefined common guidelines. It will eventually make our code less error prone, and it will ensure that our codebase, as clean as possible. Preacher will format our codebase so it becomes as readable as possible. Just one more time, I'm going to say that these tools are optional, but you will see preacher and ES lint in almost every JavaScript project because people want their projects to be readable and to be less error prone. That's it. See you in the next one.
19. What are Server, JSON, REST API and GraphQL?: Hey, in this video, I would like to talk about servers. What is a server? What is an API? What is a rest API? What is GraphQL? Let's find out it together. First, let's start off with server. What is a server? A server, it is just a computers somewhere out there on the Internet. It runs some software. And that software on that computer lessons for our incoming requests. So for example, when I navigate to any website, when I click on that link, my browser sends a request to that server. So on the left, this is my browser, and it sends that request to that server. This server handles the incoming request and sends back HTML, CSS, and JavaScript files. So again, a server, it is just a computer which runs some software that somehow handles our incoming requests and sends a response back. Now, what if I don't want to always receive HTML, CSS, and JavaScript files, maybe I just want to run some query on the website, like on the search bar. Do I need to return HTML again? No, you don't. You just need to get the data, the result of that query in the search bar. So in this case, data must be transferred in some other format. So some other format is usually JSON format or XML format. But XML is already obsolete, I would say on the web right now, everybody uses JSON. So let's look for JSON or maybe even for JSON placeholder free fake rest API. Alright, so first we need to find out what is JSON. I'm just going to click on Run script over here. And I receive this JSON is just format in which data is transferred over the web. It can be used not only on the web, but in any other scenario. It is just very easy to transfer information in this format. It looks very similar to a JavaScript object. Now, let's get back to our canvas. So how does it fit this scenario? So imagine I'm here on the website and I type something in the search bar, which is inside the website. And I want to get my search results back in JSON format, I would send another request to that server, and that server will handle my request, my query. It will look up for the database. It will retrieve the results, and it will send this data back to me in JSON format, which looks exactly like that. So no need for HTML, CSS or JavaScript. So these kind of server that hosts HTML, CSS and JavaScript files, usually called the hosting services. So they are used to host basic HTML pages. They just put your files, HTML and CSS on their machine, and they just serve these files on their computer. That's it. What about API servers? So what is an API in the first place, API stands for application programming interface, and it usually fits API servers only because most often API servers serve this purpose of a middleman between you and underlying database. But this is not only the case. Well, they are usually called API servers because they are interfaces for everything that is behind that server. That it is why they're called APIs or interfaces or whatever he called them. Let's take a look at this JSON placeholder one more time. So I send a request to this URL. I'm just going to copy it and put it here. If I access it, you will probably see this in raw format like that. This server acts as a rest API because it follows the rest format. So it is an API because it is a custom server implementation. So it is that custom software installed on the server which handles my request to it and sends back Jason, this is the API part. Now, what is rest? Rest means that it follows the rest design pattern on rest implementation. It means that the server JSON placeholder type code that calm exposes multiple endpoints that we're able to access in order to retrieve data. For example. Go to slash to do's slash one. This is todo id. We get data for to do with ID number 1. If I type seven here, you will see I have now user id one, id seven and different data. If it's going to be four, it will be different data. If it's going to be something like that, you will see nothing because it does not exist their API server, this one that we're accessing right now is actually an API for the underlying database that it uses on under the hood. Okay, and it follows the rest pattern. You can navigate to the main website over here. And you can look for other end points available on that resource. For example, you can see resources here. We can go to posts, we can go to users, we can go to albums. And you can see they all have different endpoints. Again, this is because it follows rest implementation. Imagine a big house with a lot of doors. So a big house is the server, the API server. And those doors are and points that you are accessing in order to get data. And that data is transferred in JSON format. Because it is very simple to understand that format. It is very lightweight and easy to read or write, but rest is not the only server implementation that might exist out there in the wild. There is another one really popular right now, which is called GraphQL. And there are obviously the others. So, but right now at the present, primarily two types, rest API and GraphQL API. Graphql is at the same time a language and at the same time the server implementation, the architecture. So let's look for GraphQL in Google or maybe GraphQL Explorer. It will bring us to this GitHub docs page GraphQL API. And it will, we will end up on that page. It will require me to sign in in order to use it. So I'm going to sign in with my account. If you don't have GitHub account for now, it's fine. Just look through the video. So this is GraphQL language. This is how it looks like. In order to request data from GraphQL server, we have to send a co-vary like Dad in that format following graph QL language. So if I'm going to send it, you will see I get data in this format and it is JSON format, as you can see. So what is the difference between graphical and rest? Well, first of all, just like I mentioned before, rest API has multiple endpoints. For example, slash todos. Where is it? Slash comments, albums, photos, and to-dos. To access data, your URL must be different to access different resources. But GraphQL, it is slightly different. If I click on Inspect and go to Network tab here, when I hit this play button, you can see the URL that is being accessed, which is slash GraphQL slash proxy. And if I execute another request, the URL does not change. Well, GraphQL server implementation has only one end point through which all requests go through to understand what the user declined, what we want from the server. We send that co-vary to the server. If, for example, we navigate to references and queries in a new tab. So let's look for user and it expects one argument. Let's try this query. So I'm going to remove all of that. I'm going to type user, just like it says here. And we need to supply an argument. You supply an argument. We have to open parenthesis and we put this argument over here. Login is the argument of type string. We're going to put my nickname over here. Now in curly brackets have to specify what kind of data we have to receive. So it is going to be login. If I put it like that. Well, I basically have the same information, but the query is different and at that point is the same. Now, have you spot the difference yet? Well, the difference, the main difference about GraphQL and rest API is that GraphQL only sends data that you ask for, right? So here I ask only for login in my query. So this query is actually called a schema, schema that you request from the server. All right, So I request this schema of only login and I get only login back to rest API. If we go to posts, I asked for posts. I don't specify what fields I want to retrieve from pose. This is up to the server to decide so that server centers title and body, and we cannot change that. All right, if I access posts with that ID, it gives me title and body. But with GraphQL, I'm able to specify what fields I want to retrieve from the server if we navigate to the dogs. So login, actually this query returns us type user. If we open it, user has a lot of fields and we can actually use intelligence from GraphQL. So I'm just going to press control space. And here I have bio control space here I have maybe name here I have login. So you can see I'm using the query language to specify what field I want to retrieve. And when I hit Play to send the query, you can see now I have my custom data shape that is specified in the query. Pretty cool. So this is the main difference. And you will probably think that GraphQL is, Oh my God, It is amazing. Why do we even need rest APIs? The problem is all about implementation and its complexity. Graphql was created by Facebook a few years ago and it became really popular. However, rest API is more mature and battle tested solution. Graphql is hard. It's not that easy. It is easy to consume Graph kill, but to implement GraphQL, it requires good knowledge. Rest API is simpler, easier to implement, and it is more intuitive compared to GraphQL congrats. Now you know what is an API. See you in the next one.
20. Client Side Rendering (SPA) VS. Server Side Rendering (dynamic and static): Hey, in this video, I would like to talk about client-side and server-side apps. Why do we care and why it is important to understand the difference? Let's go First. Let me open my small canvas that I prepared. At the top here we have three main types of rendering on the web. First one is server-side rendering, which is a server-side routing. Then we have client-side rendering, which uses client-side routing. And then we have hybrid approach, which combines both of those. The best way to understand the difference between those three is looking at the examples. And this is exactly what we gonna do. If I go to browser here I prepared two websites, steam website and Netlify. Both of them are server-side rendering apps. And how do we know about that? If we right-click on the page and go to view page source, here, we can see the markup. So if we see the markup in page source, it means that the page is server-side rendering. So this is what you see here, was returned from the server when I access that URL. Also, each page contains unique met attacks. It means if I go to a different page and if I inspect page source of that page, the Meta tags will be different and the markup will be unique for each page on the website. Now, we have a second example, Netlify. It also uses server-side rendering. If I inspect the page, I have exactly the same picture. I have unique meta tags and I have the markup. Alright? But Netlify is different. The thing is that Netlify uses static pages or static server-side rendering, while steam uses dynamic server-side rendering, what is the difference? The difference is that in case of Netlify, all these pages are just static, they do not change. It also means that every page on Netlify website has its own HTML file. If I go to pricing page, pricing page has its own HTML file, just like homepage or any other page. Now, what about steam? Steam, slightly different. It uses dynamic server-side rendering. It means that this page, for example, game page, this is just a skeleton page. It has the template that it uses to render games. So if I go to any other page, you can see that it looks exactly the same. The only thing that was changed is the information on the page, but the layout is the same. And this layout is the skeleton used to dynamically insert data into that skeleton. And this is exactly what steam doing. So for all these pages of games, they have only one skeleton. And this skeleton is reused to dynamically insert the data. It is called dynamic because every time I send a request to access that page, the server dynamically creates HTML markup and then it sends back to me to decline. That is why each page each page is different. It has unique markup because it was dynamically created or assembled on the server. Unlike with static pages, HTML markup is not assembled at the request time when I access this page. Markup was assembled when the application was built. So it was created once and now every time I access this pricing page, it just sends the static markup because it does not tend to change. All right, The drawback with static pages is that if we need to change something in our static content, we have to rebuild the app, regenerate HTML pages and then upload them to hosting again. So now they are considered to be updated. With server-side rendering, this is not the case. You have the skeleton and the data is dynamically inserted. This means that data retrieved from the database and then based on that data, HTML is returned. You don't need to change anything. You don't need to regenerate pages or do anything. Only if you need to change the layout or the skeleton. Only in this case, it must be redeployed to reflect all the changes to that skeleton. Let's go to second type, which is client side rendering, or more often called single page apps as PA. Now, what are those websites? Here I prepared also two examples. Telegram, web version. And this snapshot website which was built with React by the way. So if I inspect telegram, View Page Source, I can see that I don't have anything here at all. If I go to the body tag, it's totally empty. However, if I inspect elements of the page, the markup is there. So what is happening here? From the server? I get this bear HTML file only with JavaScript bundles. And JavaScript is the one who will render my page, who will create the markup? Who will create the HTML inside the browser. This is why it is called client-side rendering, because JavaScript is the one who will render the page inside the browser once we have that HTML from the server, this is the difference. So in server-side rendering, we have markup already assembled and returned from the server upfront. But with single-page apps or with client-side rendering, we don't have that. We have very bare minimum of HTML and the rest is assembled inside the browser by JavaScript. That's it. But there is one very crucial drawback about single-page apps or client-side rendering. It is bad for SEO, which stands for search engine optimization. The thing is that if you want this page to be ranked and crawled by Google or by Facebook, it is always better to server-side rendering. Because crawlers, what the sea, they see exactly this, this page source. They see the markup, they see Matt attacks. And based on that markup and Meta tags, they can run and understand what is this page all about. However, but single-page apps, crawlers, they do not see any of those. They do not wait for JavaScript in the browser to assemble and render the page. They just see this empty body tag and those basic math attacks. So if you need good SEO, use server-side rendering. All right, now we have this concept of server-side routing and client-side routing. What are those? And single-page app. You can see that if I navigate through pages, the URL changes, but my page, it does not refresh. This is called client-side routing because it has handled on the client by JavaScript. It means that the JavaScript is the one who changes the URL. Javascript is the one who renders the page. Okay? It does not send any additional requests to the server. It is all done inside the browser. Unlike with server-side the routing, if I go to any other page, you can see it is being refreshed because what I do basically, I ask the server to provide me with this page. And this is the difference. So server-side routing is when you send another request to the server and you ask for this page with single-page apps with client-side routing. This is all done inside the browser without additional requests. Okay, great. Now, third way of rendering is called hybrid approach. Hybrid approach is best of two worlds are combined. We have server-side rendering, and we have client side navigation, client-side routing. Now, an example would be documentation of Netlify. So if I inspect page source, I can see the markup and I can see unique met attacks. Pretty cool. But if I try to navigate to any other page, you can see the URL changes. However, the page does not refresh. So on the first request, when you access this website at first like that, it will send already assembled markup from the server to you, which means it is server-side rendering. However, after that, once page is loaded, then JavaScript takes over and you have this in-app like feeling when you browse the web page. Pretty cool, right? So at the moment in the present, hybrid approach is very, very popular because again, it combines the best of two worlds. You can have good SEO optimization due to server-side rendering, and you can have an app like feeling with client-side routing. Pretty cool. Now, what are the cons and pros of each approach? So I already mentioned that, but I'm gonna do that again. The first one is C0, which stands for search engine optimization with server-side rendering, COO is the best outcome because you already have meant attacks assembled. You already have the markup assembled page content. And based on that information, crawlers, like Google crawler, Facebook, Twitter trawlers, and any other trollers. They can analyze your page based on that information and rank your page appropriately with single-page apps. This is not the case. If I inspect the page, I can only see very bare minimum. However, there is a modern solution to solve this single-page apps problem. And the solution is to pre-render single-page app. It means, it means that each page in single-page app in client-side app will be pre-rendered into a static HTML file. So each page will have its own HTML. And when you access this page, it will bring you, it will give you the static HTML that was generated. This is what Netlify does. Netlify is a hosting service and they do pre-render single-page apps to make them more SEO optimized. This is a really great solution. So next we have an app like feel. So server-side rendering apps, or more specifically, server side routing, does not have this feature because you can see whenever you navigate, the page is refreshed and you instantly understand that this is a website. However, with client-side routing, you receive an app like feeling because the page is not refreshed, just like we are browsing mobile application. And the last point is, requires JS, server-side rendered app or more specifically static pages. They might not mean JavaScript at all. It might be a static content with HTML and CSS only, which does not need JavaScript. But single-page apps or client-side apps always need JavaScript because everything is done by JavaScript. It's like the core of client-side apps. And if you disable JavaScript or if it is an unavailable for some reason than the apple simply not work in the training. We're going to target ourselves at building single page apps with React. I hope it was clear and I'll see you in the next one.
21. VS Code Shortcuts: Hi. In this video I will show you mine shortcuts that I use in V s code. This will be useful for everybody. Do not concentrate on the cold Right now. This video is about shortcuts. We start off by opening a project folder for that hold control than press K plus o then select the folder to open. And we are insight. Now we need to terminal for that. You can press control, plus tilled or control plus J T open into greatly terminal chuckle between hide and show State press control plus Jay, There are lots of situations where we need to move lines of code around for that just hold out and press chopped and bottom arrows she moved lines Cordis pointing Be then we need to manage multiple tabs open to open file in a new tab. Just open that file from the Explorer or press control plus B for Riesco Charge bar, Then look for the file and press enter to switch between tabs. Hold out and press numbers from 1 to 9. She opened the relevant ordered tap Most of the time. We need to add it. Something in multiple lines. Multi line selection and help us move the course or to the right place. Hold control, plus out and down top and bottom arrows to extend the selection with lions. Release control plus out and now we are able to edit code in multi line mode, hold, shift and press meadows for single character selection were hold control and press arrows to move cars or to the next or previous words. You can combine shift and cultural to select the whole ward. We can also select specific match for multi line editing, move your course or to the ward or select some characters, hold control and press D. One time it will select the current court, then keep holding control and President de It will add occurrences to the selection that match the pattern. We can also create multiple tabs for convenience press control, plus backslash to split this Korean into multiple taps. Actually, the same can be applied to the terminal inside the terminal press control plus backslash to open multiple instances. This which between instances hold out and press top or bottom arrow and that's it. These are the main shortcuts that will facilitate the development protest. You can always customize stamp Invesco settings were down here. See you in the next one
22. Introduction to JavaScript: Hi, Welcome to JavaScript section. In this section we're gonna talk about most common JavaScript syntax features. We will not cover the very, very basics because we will understand all of that during the process, we're going to attach more advanced and more common patterns. We need to understand all of that to feel comfortable during create development. Hope you're going to like it. See you in the next one.
23. Var VS. Let VS. Const: Hi, In this video, we will talk about different types of variables that exist in JavaScript. These are var, let, and const. In this video, we will understand the difference between them and which type we have to use in this situation. Let's go. So how all of that is going to be organized? I'm going to create a single script that I will name file gs. And then I'm going to execute that script with examples through the integrated terminal using node file.js command. So bar, let and const. What is the difference? Let's maybe create a variable of type var and call it my name. Then I will just console.log that variable. And then let's execute the script. You will see Andrew gets printed, everything works. So what's the deal with that variable? They deal with var is that these type of variable is enclosed to the closest function scope. To understand that we have to create that variable inside of a function. So let's create a function. Print my name. And inside that function, I'm going to put var. And then I will console log my name inside. Now if I'm going to run the script, I will see you nothing because well, it is a function and I have to call it, print my name. Great. Now execute the script again. You will see Andrew, the result is the same. If I'm going to put console log outside of the function scope, I will get a reference error. Because my name is defined inside function scope. It is not visible outside of it. That's why we have reference error. Great, We understand that. Again, what's the deal with var? As a sad, it is enclosed to the closest function scope. It means that it doesn't matter how many scopes I have inside that function, it will be visible everywhere. What I mean is that if I'm going to put a lot of, let's say, if blocks here, if five is greater than one, then I'm going to create another in their blog just to create scopes, okay? If 10 is less than 20, if five is greater than three, it doesn't matter what I do here. I just want to create as many inner scopes as possible. And now what I will do, I will put var, my name inside the most in their scope, and then I will try and access my name inside that function. What do you think is this code go into work as expected and we will see entry in the terminal. Let's try it out. I'm going to rerun the script node file.js. And we see Andrew, well, this is unpredictable. We want this variable to behave to actually not be visible outside of the scope where it was defined. So the scope where that variable was defined is this most inner if block, if it was defined, let's say in this block, in this if over here, then it would be visible everywhere inside but not outside of it. Var is again, is enclosed to the closest function scope. It does not matter where or in what, in their most scope, I defined variable of type var inside a function, its visibility is always going to be function scope. And this is bad because it is unpredictable. We want to always ensure that our variable is always visible only within that scope where it was defined over here. So to fix that problem, we have variables of type, let and const. So if I'm going to put LED over here, and then I will try and execute the script. You will see reference error. Because now let is scoped to the closest scope, actually to the scope where it was defined. And the same with const. If I'm going to put const over here and run this script, you will see again the same thing. My name is not defined reference error. So to fix that, to fixed reference error, we have to reference my name in this scope where it is available, which is going to be this. Let's move console log to that scope. And let's try it again. You will see entry gets printed. And now this is predictable because we know that this variable is defined inside this scope and its visibility ends whenever we go outside, if I will put console log in this scope, you will see again the reference error. Oh, let me save the file. You will see reference error because this goes outside of the scope. Where my name is defined, right? This is the difference between lead const and var let and const type of fiber bowls. Visibility ends with the enclosing scope, while var ends with the closest function scope. So if I have another function inside of a function, Let's say function hello. And then I'm going to define the same thing. All of that inside Hello than var will be visible only inside hello function. It will not be visible to print my name but to Hello. All right, I guess it's clear. Now, what is the difference then between let and const? Let is this type of variable which tends to be reassigned. Let's say I created viable my name and then in the future I want to reassign it. Maybe I want to now how value not Andrew, but something else. So what I would do, I would reassign that valuable. So by name now becomes john. And if I'm going to console log John, you will see actually John not entry because now it has different value. Let's type that can be reassigned. However, with const, it's not. Let me save it and run the script. You will see assignment to constant variable because const means constant, something that does not change if I create it by double my name and put it as entry, it means that it won't change. It will always be Andrew. Again. Let can be reassigned. If you created a variable, my name, and then in the future, if you are sure that you are going to rename it, then use lead because lead can be reassigned if you don't want that variable to change, You sure that whatever value you assign to that variable will stay like that. Use const. In practice, most of the variables will have const type. And those variables that we know that we will reassign them. We're going to use lat, but otherwise const, and we never use var. So to quickly summarize, wire is datatype of itable, which was ability is the closest function scope. It does not matter how in there most would define that variable. It will be still visible in the function scope. And like let and const, let and const are scoped to the closest scope where they are defined. Let is this type of variable that can be reassigned and const is constant. If you're going to create a constant variable, it will not be changed later. However, there is one more small trick with const, and this trick is objects. So if My name is going to be an object, that object can be modified, but you cannot switch the type from object to something else. What I mean is that if my name, I define it as an object and later I want to change it to John. I will have assignment to constant battle. But if I want to let say, modify the object itself, for example, give it a new key. For example, my name dot something is going to be hello. And then I'm going to console log my name. You will see the object which has one key, something with value Hello. You have to remember that. So in this case you do not directly modified by double type, but rather you modify the object itself. Now you know the difference between different types of variables. I'm going to say it one more time. In practice, most of our variables are going to be of type const. And for those variables which tend to change, we're going to use the LED type. We will never use VAR. See you in the next one.
24. What is Array.map used for?: Hi, In this video, let's talk about array dot map. The array dot map method is available on all JavaScript arrays. It is used to iterate over array of elements, and it is used to transform each array element to something else. That is why the name array dot map. Let's see it on an example. In file.js. I'm going to create a new array, which I will name hello and let it be 4326. Now, let's say I want to iterate over that array. I want you to simply console log each array element. Generally speaking, I can achieve that with the traditional way of doing that using the for loop, but we can now use a radar map. So I'm going to put hello dot map. And once I open parenthesis VS code will give me the description. You can see that the dot map method receives callback function. And the second argument is this arc. This arc is about the, this keyword in JavaScript. We're not going to touch that. We're interested in. The callback function. Callback is that function that is being passed as an argument to some other function. So since we're going to pass a function to map function, that is why we call it, call back. All right, I think it's clear we're going to use word callback a lot. So that callback receives three arguments. The first argument is value, then we have index and array. And let's type it function. And if I'm going to open parenthesis again, I will see value, index and array. So value is the value of the current element. The thing is the dot map method iterates over an array. So that callback that we pass to the dot map method will run for each array element. So if we have four elements in total in that array, it means that these callback function will run four times for each array element and value. The first argument in the callback is going to be current value that we are iterating over. So for the first time that callback will run, value will be, for the second time it will run value will be three, and so on up until the very last element. The second argument here is the index, and it is going to be the index of current array element. So for the first element, it is going to be 0 because arrays in programming start with 0 index. So it is going to be 0, 1, 2, and 3. Let's call it idx. And the third argument is going to be the array. And it is going to be the same array for which we applied these dot map method. So let's put it are, and I'll inside that callback inside that function. Let's actually console.log, value, index and array. And now let's try and execute the script node file HGS. And what we see, so first goes the value. As you can see for three to six, we see all our array elements, which is correct because again, that callback runs for all array elements. The second column we see is the index of that element. So for has 0 index, this is what you see in the terminal. And the last element will have index three, because, well, this is the last element and we know that arrays start with 0 index, which is correct. And the third value is going to be the array itself on which this dot map method was applied on. But this is not the true power of the dot-plot method. It is used to transform each array element into something else. And they took map method produces a new value. It produces a new array. It means that I can write it into a variable. So I'm going to put const result equals hello.mat. And then I can actually console.log result to see what I have. If I'm going to run this script, I will have an array of four elements where every element is undefined. Why it is undefined? Well, the thing is that the map method expects us to return some value from that function, from that callback. And that value that we return will be set as a new value for the current element. By default, when we did not return anything from a function, that function returns undefined. This is why we have undefined everywhere. Let's try and put return for from the callback. Can you guess what is going to be the value? I'm going to run this script and now it is going to be 4, 4, 4, 4. Well, again, that callback function runs for each array element. And for each array element, we return for, if I'm going to put value multiplied by two, can you guess the result now? Let's see. Now we have 864 and 12. Basically what we did, we just multiplied each array element by two. Because one more time that callback runs for each array element. For the first time. It will run for the first element which is four, value is going to be for, value's going to be multiplied by two, we return eight, which means that in the returning value for the map method for the first element, we have value 8. This is what we see. The same goes for the second element. That callback runs. Value's going to be 3. 3 multiplied by 2 is 6 for the second element. Now we have six, and so on up until the very last element. And That's it. This is word array dot map is used for, we're going to utilize it a lot, especially in React, but we'll have to map some array to react markup. That's why it is very important to understand the map method. That's it. And I'm gonna see you in the next one.
25. What is Array.reduce used for?: Hey, in this video we're going to talk about a redox reduce, just like a radar map array dot reduce iterates over elements of an array. However, it does fundamentally a different thing if array dot map is used to map each array element to some other value, array dot reduce is used to compress or reduce all array elements into a single value. Let's see it on an example. If we're going to go back to File GS, we're going to create a new array here, hello, which will be seven. 6945, maybe. Great. Now we can use the dot reduce method in the same way as we use the map method, which means we can type hello dot reduce. And just like with dot map, we have to supply a callback function. But this time, the callback function will receive different arguments. So we have previous value, current value, current index and array. So let's try and see what they are. So we supply the callback and we open parenthesis again for the IntelliSense. And we have first previous value, current value, current index and array. Just like with dot map, dot reduce will run that callback for each array element. It means that this callback will run five times for every element. That is why we know what are going to be current index and array. So just like in dark map, array is going to be the same array that we use for this.radius method. And current index is going to be the index of currently iterating element, which is going to be 01234. We don't need them. The only thing we need is previous value and current value. But most of the time, previous value is not cold previous value. It is called accumulator. What is accumulator? We're going to talk in a second. I just want to mention that the dots reduce method also expects a second argument next to the callback. The second argument is the initial value and it is optional. So let's put 0. Great. Now what is accumulator or what is that previous value? The thing is that dot reduce method works by compressing or actually accumulating each array element towards the final result. It means that we start with some initial value with 0. Okay? Then when all of these callbacks run for each array elements, it somehow modifies our initial value. Alright? And at the end, at the very last callback run, we have the result. It means that the dots reduce method also produces a value, but instead of a new array, it produces a single output. So maybe it's going to be 15, We don't know. So since it is produce a value, Let's place it, let's put it in a variable. So const result is going to be hello dot reduce, and at the end we're going to just console.log result. Great. Now if we're going to try and cancel log accumulator and next to it we're going to console log current value. And we're going to run this script. What we're going to see, the output is not pretty obvious. What do we have? We have first 0 and then Undefined, Undefined, Undefined amplifying. To not confuse ourselves, we actually have five console logs coming from the callbacks and the last one for the result. Let me put it like that. And we run it. Yeah, perfect. So why do we have a lot of undefined values? Well, on the first run, when this callback runs for the first element 47 accumulator is going to be our initial value that we supplied over here. That's why we see 0 current value is going to be current element, which is seven. That's why we see 07. Whatever we return from that callback will be sad as the accumulator value for the next call back run. Because we did not return anything from that function. By default, return value is undefined. That's why on the next run of that callback for the second element, which is six, accumulator undefined. If we're going to return one for every subsequent R1 accumulator will be always one, and the final value will be also one. If I execute the script, you can see it yourself. We always have accumulator set to one, but this is very dumped. We want to actually do something with that. How we can use dot reduced to do something real, we can actually use dots reduce method to find the sum of all our elements. We can actually type accumulator plus current value. And that's it. That will do the trick. Let's actually save it and let's see what gets printed. We see result is 31. But how we ended up with that, Let's break it down. For the first run. These callback has accumulator set to 0 because our initial value is 0, current value is going to be seven. So we have 0 plus 7. This is what we see over here. So from that callback will return seven. We're going to type first run is going to be a return seven. It means that on the second run of that callback for element six, accumulator is going to be this return value from the previous run. So we have accumulator equals 27 on the second run for the second element, and we have seven plus current value. So we have 7 plus 6, we have 13, which means from the second run, we return 13. On the third run of that callback for elements nine, accumulator is going to be 13 because this is what we are returned from the callback for the previous run. Four elements, 613, That's why now it is 13. So 13 plus current value is going to be 13 plus 9 is going to be 22. We returned 22. For the fourth element accumulator is 2222 plus four is going to be 26. Return 26. And for the last element we have accumulator 26. 26 plus five is going to be 31. And this is going to be our final value. So our final value that we have in the result variable is going to be the value that would return from the very last call back of the dots reduce method that is wide. This first argument is called accumulator because just like you observed right now, this value is accumulated across all callbacks that we have in the dot reduce method. It is a very flexible tool and at first it's really hard to understand how dots reduce works, but trust me, it is very flexible. Another example would be when we have to produce a new object from that array. For example, we wanted to have that object where key is going to be the index of the element and the value is going to be devalued. So for example, element 0 is going to be seven, element one is going to be 6, second element is going to be 934 and forth five, right? So suppose that we need to transform that array into that object. So this is our desired result. We can actually use dot reduced to achieve that. Let me remove those Commons and let's see how we can approach that. So we know that we need to receive an object at the end. So before when we calculated the sum, we know that our final value is going to be a number. That's why we put 0 over here. But now, since it is going to be an object, we're going to put an empty object here. This is going to be our starting point. Accumulator for the first run is going to be an empty object. Current value still stays the value that we have inside our array. So now, in order to achieve this result, we have to actually merge values inside this object. Since we need to work with objects, we need to return an object from that callback because this is our accumulator. Our final result again is an object. That's why our accumulator is an object. So we're going to return and we have to return an object. So in order to merge objects, we have to type object dot assign. So the first is the target. And here we're going to supply some value that will be merged into that object. But before we can merge it, we have to actually create the object, right? So we're gonna put const, let's say mapped current element. And let's put it as an empty object first. And then we have to create that single piece of value that will represent our current element inside final result. So we want this map current element to be that object. So for the first element it is going to be 0, 7. We want mapped current element to be of this shape, and we will merge this object into our accumulator. So we need to somehow achieved that we can actually type mapped current element. Then the index of our element, we have to use it. So now we can actually put our argument here and call it current index. Put it like that. So that way we can reference that mapped current element dot current index equals current value. And this line will bring us this result grid. Now we merged that result into our accumulator mapped current element, and now we will have our desired result. Let's check it out. Node file gs. And today we have 0 element value 7, first element value six seconds, 9, third, fourth, 45, grade. Everything just like I wanted. What actually happened here? Let's try and console.log accumulator. Well, and as you can see actually this is a really great example from this output. You can see how accumulator is actually being accumulated over all of these callback runs. So first, for the first run of that callback, we held our empty object, right? That's why we see empty object here. Then we created that element here, which is this, and then we merged it into an empty object. So this is what we return from the first run. On the second run, we merged this into the first object, which resulted in this object with 76, and so on until the very last element. So at the end, we have our desired result. Pretty awesome. Dot reduce is really powerful and really flexible. It is crucial to understand that because Dr. US is pretty common, not that common as the dot map method, but still it is used very frequently. I know it is hard to understand. Dots reduce entirely when you first see it, but trust me, just take some time, experiment with it, play with the different values. Try it yourself, maybe try console logging values. Tried putting different values into a ray, tried to return different values from here. And you will see that after some time you will understand, you will have that aha moment. I'm pretty sure. I think this is all four dots reduce method. I hope it was clear. I tried to break it down as much as I could and the rest is on you. I'm gonna see you in the next one.
26. Function Declaration VS. Expression: Hey, let's talk about function expression and function declaration. Why do we need to know the difference and what are those? This is going to be more of a theoretical video rather than the practical one. But I think this is important to understand the difference, even though B might not needed. Regardless, at the end of the day, it will make you a better developer. Let's go. So if I'm going to go back to File G, S here, I'm going to declare a function. I will call it Hello, and inside I will cancel log. My name is Andrew. And below I'm going to create a valuable hello to and to that variable. I'm going to assign a function. And inside I'm going to print. And you too. Now, as you can see, the both do the same thing. Let's call them. So first we're going to call hello, and then we're going to call hello to the terminal. I'm going to run the script and the output. Well, it's basically the same, right? So what is the difference? The difference is that the first example is a function declaration, and the second example is a function expression. The second example is actually a variable expression. So if I'm going to put any variable and give it a value, it will be an expression. So the same we can observe over here. We basically assign a function to a variable. Unlike over here. Here we do function declaration. The most important difference between these two is that with function declaration, it does not matter where we define the function weather. It is at the top or at the very bottom, but with function expression and actually matters. Let's put both of them at the end. And let's call them again. I'm going to run this script. And what I see, the first function, which is function declaration, went through and I can see the output. But the second example, failed reference error cannot access hello tube before initialization. The thing is that hello two is a function expression and JavaScript will only create that function when actually JavaScript goes to that line, function declaration will be created or it will be hoisted to the chop. In JavaScript, there is this concept of hoisting when function declarations are actually like moved to the top before the code runs. That is why it does not matter where we define them. The code will always, the language will always see this code as if function declaration was at the top, just like that. But function expression stays where it was defined. Just like with variables, we can actually reference variable. Let's say hi, before it was created. So if I'm going to create high below, and if I will try and execute this piece of code, I will give the same adder. Reference error cannot access high before initialization. So because this is an expression and the same we see with hello to, this is an expression and we cannot access that expression before it was created here at the top. So the only fix for that is, well, to actually access hello to after we created that variable. So now if I'm going to run it, I will not see any error in real-world in molar JavaScript projects. This is actually not a thing. You will not observe such behavior in the code. Well, because this mostly related to plain JavaScript and it is always good to know and understand the difference, right? But in modern projects, since we have tools that process our code, this thing will not take place, but as I said, it is good and I personally think important to understand the difference. So to quickly summarize, function expression is when you assign a function to a variable, it is easier to remember if you can think of it, is that function declaration always starts with function as the first word. And function expression does not have function as a first word because first word we have const over here, we assign it to a variable and function declarations are moved to the top regardless where they are defined just before the code runs. And that's it. I'm gonna see you in the next one.
27. Arrow Functions and Default Function Arguments: Hey, in this video, let's talk about arrow functions and default arguments. Let's go. If I'm going to navigate to file.js, let's create a simple function declaration that we will call my name. And it will print Andrea, which is my name. And let's create a second example which uses an arrow function. And arrow function is a function expression in the first place, which means it will be assigned to a variable. So I'm going to put const, my name, 2 equals parentheses, then the arrow function, or sometimes it's called a fat function. And after that function body, I'm going to put console.log and drew two. Now, if I'm going to call my name, we know what is going to be the result. But if I'm going to call my name to, will it be the same? Let's check it out. Node file.js. And we see that the output is predicted because, well, it is just a function, but it is now an arrow function. So what is the difference? The first difference is that arrow functions have more lightweight syntax compared to function declarations. Well, the thing is that we're going to use arrow functions a lot, especially in modern JavaScript. They are even more preferred than function declarations that start with the function keyword. There isn't because the syntax is more lightweight, especially when we are going to supply callbacks, two different methods. It is more easier to supply an arrow function. So if I'm going to, for example, going to use array dot map, it is easier for me to supply an arrow function. It is more lightweight to write an arrow function instead of using function, then parentheses. And then now it looks like dad, it even might confuse some people. So eventually, it really does not matter which one, whether it is function expression or function declaration. It does not matter because at the end of the day, our code will be processed by the build tools that will take care about all of that under the hood. The second difference has something to do with these keyword in JavaScript. We're not going to cover this use case with the this keyword. But I would say that you should really go to Google and check it out yourself. Just look for arrow functions, these keyword. And the third difference is that arrow functions allow us to use even more shorter syntax than this. When we need to return a single value from an arrow function, we can omit using the curly brackets to specify function body. So for example, if my name to returns a string, Andrew, we can actually write it like that, the same we will have in my name. So let me write it. Return Andrew, and there will be no difference, right? But with arrow functions, we can even make it shorter. So I'm going to just copy string Andrew. I'm gonna remove curly brackets. And I'm just going to put a string, and now nothing will be changed, but the syntax is much, much shorter. Let's verify that my name to actually returns a string, Andrew, since it returns a value, I'm going to write it to another variable. Let's call it m and then console.log M. Great. Then I'm going to run the script again and you will see angio, correct. This is what gets returned from my name to it is very important to understand that if you're going to write it like that, the function will return nothing, which means it will return undefined. Let me run this script and you will see undefined. Well, because this is not a short syntax, this is the same as writing this, but without the return keyword. So it is important to understand that if you need or if you want to use shorter syntax, always remember to delete curly brackets. And also it is important to understand that shorter syntax only returns a single value. If you need to do some action within a function, you will not be able to use the short syntax because in this case you have nowhere to actually write your code. So in this case you are required to do some operation here, right? Right, your custom code, and then the end, you would return a value just like that. So there is no difference whether you do it like with the return keyword or you do it with the shorter syntax is the same. This is just your way how you write the code whenever possible, try to use shorter syntax because well. It is shorter. There is one thing that I want to mention about this short syntax is when you need to return an object. So when we have a situation, when we need to return an object, for example, name, entry. So this object I want to return from this arrow function. Well, with the return keyword, it looks like that. But how it is going to look like without the return keyword, will objects also have curly brackets and function body also have curly brackets. If we're going to put it like that. You will see syntax error because well, this is wrong JavaScript things that this is function, but it is not an object. To actually fix that problem, you have to wrap the returning object in parenthesis just like that. So this way it will understand that you want to return a single value that you want to use shorter syntax and you're returning an object to verify that lets you run the script. And we see that now we have our object returned. Great, so well, that sit about arrow functions. We're going to utilize them a lot. Let's talk about default function arguments. Well, that one is actually easy. There are lots of situations when we need to pass arguments to our functions. For example, my name to the only thing that function will do. It is going to console log the first argument that we are going to supply. And let's call that argument my name. So on the receiving side we have my name and then we print my name is my name. Great. Now if I'm going to call my name to, let me remove unneeded code. If I'm going to run my name to without supplying the parameter for that argument. Well, in this case, My name is going to be undefined because, well, we did not supply it, right? We did not provide any value for my name. To verify that we can see my name is undefined. And there are lots of situations when we have different circumstances in our code and variables. They do not produce expected values. They do not produce expected outcome, right? So in this case, we want to ensure that we always have some fallback value to supply the default value for that function argument. We need to just put equals and then provide a default value. I don't know, John. All right, now, whenever I do not pass any value for that, my name argument, John, will take place and will be used as a fallback. Now let's try and execute the script and you will see my name is John, right? Because I pass nothing. This was picked up and now it uses John and John gets printed. If I'm going to supply angio, John will not be used instead of Andrew because Andrew is not undefined. It is a value that we pass for that argument, right? Either run the script. Now I see my name is Andrew. Everything works great. So if I'm going to pass undefined, what will get printed? Correct? John? To verify we're under script again, my name is John. Perfect. Imagine the situations when we have multiple arguments in a function. Let's say my name and my age, and I'm going to print my name is and my age is going to be my h. If I do not supply any arguments, My name is going to be undefined. My h is going to be undefined. To verify undefined, undefined, perfect. Now, I can actually supply a default value for either all of them or only for one argument. So let it be my age and by default it will be equal to 10. So now if I rerun, you will see that my name stays undefined because we don't have any fallback value. And my age is 10. Maybe. Let's put it to john. Let's pour Andrew here. And let's put undefined to finalize our thoughts to, let's say straight and our knowledge. So for my name and you will be picked up, and for my age, 10 will be picked up because we supply undefined. This is the same as not supplying a value at all, right? If I'm going to write it, my name is Andrew and my age is Stan. Perfect. Well, that's it. Now you know how we're going to utilize arrow functions. What are those? And now you know about default function arguments. See you in the next one.
28. String Interpolation: Hi, In this video we're going to talk about string templates, or actually they are called template strings and string interpolation. Let's go in file.js. Suppose that I wanted to print out my name in a sentence. I want to say my name is Andrew, my h is 10. For that, I'm going to create three variables. The first variable is going to be name, which is going to be Andrew. The second one is going to be h, is going to be 10. And the third one will be the result that I will print to the console. So in order to make a sentence, I will have to concatenate strings because I'm going to use dynamic values, which are name and age. In programming. In other programming languages, this is usually done by using the plus operator. So this is going to look like my name is plus name. This will yield entry. Then again, plus. And now the string dot that I have to type my age is again then plus h. And we also have to take care of the spaces. Here. I have to add a space and here as well. Great. Now let's try and print it out and run this script, node file gs. My name is Andrew may, h is 10 grade. This is our desired result. But as you can see, this is not very practical because, well, this syntax, it is actually not convenient. What if we have a lot of variables and we have a really long string, then it will become unreadable. What if there is a better way of doing that? Well, through actually is, this is string templates, or usually called template strings. Let's try and rerun this line of code using string template. So we're gonna create another variable results to. And we're going to use string template. In order to use string template, we have to use backticks. So for regular strings, we use regular quotes, right? Either a single reclose or double-quotes. For string templates, we use backticks. So I'm going to toggle quotes using the toggle quotes extension that I have installed in VS Code. You can find it in VS Code marketplace. This extension toggle quotes, that one. Then I'm pressing the key binding to switch quotes and I stop on backticks. Backticks, the string is evaluated as it is, as it appears in the code. So I'm going to type, my name is space. And here I wanted to dynamically, let's say inject a value. In order to do that, we have to interpellate that value into a string. String templates allow us to do so by using the dollar sign and curly brackets syntax. So when we put the dollar sign followed by curly brackets, inside curly brackets, we can put any JavaScript expression which produces a value. This value will be interpolated into that string, into that place in that string. So we wanted to put names here. My name is name. I put Dodd. My age is again, the dollar sign followed by curly brackets h. I'm going to save it. I'm going to console log it next to our first result. And let's compare those two. As you can see, they are the same. But the difference is in the syntax result to uses string templates and the first one uses just the plus operator and concatenate strings have ever result to. This is much nicer and more comprehensive syntax, and this syntax is preferred in modern JavaScript. Nobody actually uses concatenation to concatenate strings, maybe very rarely, most of the time, you will see string interpolation using string templates with backticks. As I mentioned earlier, the string that appears within backticks is evaluated as it is. It means that if I'm going to put a lot of empty spaces here, and maybe over here, they all will be included into the final string. So if I put blank spaces here, blank strings, they will be blank strings in the output. Let's see it. You can see the spacing is all retained. I put three empty lines here, they appear in the output. We cannot do that with the plus operator. If I'm going to put blank spaces here, I will have syntax error. And if I will try and execute the script, I will have syntax error, invalid or unexpected token if we want to use empty lines in our string and we wanted to retain them, we are required to use string templates. So these will lead to invalid syntax. Let's put it back as it was before. All right, Now we understand string templates, as I mentioned earlier, inside curly brackets, we are able to put any JavaScript expression. And as we remember, expression is an entity which produces a value. So we have name which is available expression, it yields Andrew a string. What I want to say is that we are not limited to only putting variables here. We can put any JavaScript expression inside. For example, we're going to use the ternary operator. If 10 is greater than five, then we're going to put name variable. Otherwise we will use age because 10 is always greater than five, we will always have name. So let's try and see. And we have My name is Andrew, my age is 10. Great works. Let's change the operator. And now we will have, my name is 10 because well, we have false here, and that's why we receive H at the end. So we can actually put a function of each year. Let's create const and get my name. And it will return John over here, right? And inside curly brackets using string interpolation, I'm going to call that function. At that function will return me the string. Let's try it out. We're going to see my name is John. My age is 10, and that's it. That's all we need to know about string templates or a string literals and string interpolation. At the end, you have to remember three things about string templates. So the first one is that they use backticks. They do not use regular quotes. If you're going to put regular quotes over here, this will not work. String interpolation will not work. If I check it out, you will see I will have the dollar sign and curly brackets gets printed. I have to change my quotes to backticks, so string interpolation will work. The second thing to remember is that inside string interpolation, we can put any JavaScript expression. We are not limited. And the third thing to remember is that the string within backticks is evaluated as it is. It means that if we put empty spaces here, they will be included to the string. They will not be omitted. That's it. See you in the next one.
29. Object and Array Destructuring: Hey, in this video we're going to talk about object and array does structuring. These two features are used a lot. Let's check them out in file.js. Let's say I wanted to create an object, let it be car. And it will have the following keys. Color, which is going to be red, Let's say Gears 5 and maybe engine type. Let's put diesel. Now let's say I want to access keys of that object. So usually I would do it like car, then putting DOD and then key name that I want to access. And if I wanted to put it in a variable, I would usually do it like that. So I'm going to declare a new variable called engine. And then I would put car and attention. And if I wanted to pull all of these objects, I would create a separate variable for each. For example, const gears is going to be car gears and the same we will do for color, right? We can see this as three separate lines of code. Well, this is not very convenient in modern GPS, we can do something more simpler, object destruction. So instead of doing that, let me comment it out. We can replace it with one line. So we're gonna put const, then we're going to put curly brackets to specify that this is going to be object does structuring. Then we're going to put equals and the object that we would like to destructure, which is going to be car from that car object, we wanted to pull engine and gears. Let's say we don't need color. So in curly brackets, I specify what keys I want to pull from that object. So it's going to be color. And then I'm going to pull gears. Will that single line of code just replaced These two for color and gears? If we wanted to pull engine as well, we would just type engine here. And of course, it is very important to specify key name very strictly. Let's say if we have gears over here for some reason and they're capitalized, we don't know about that, right? And we destructure gears, it is going to be undefined because well, it does not exist on that object. Let's maybe try and console log, color. Like that. Let me quickly do it gears and also ancient. Okay. Let me poor Node file GS and you see Colorado and gears undefined engine diesel, since we have gears, objects starting from a capital letter, and we destructure gears which does not exist on that object. We have undefined, but other values are. All right. So let's put it back and let's verify that it works. Awesome. Now we have Gears 5, that object is structuring, think, is a really powerful tool. This is basically all it does. It just pulls keys from an object. That's it. This is basically the same as doing this with those three separate lines. I would say this is just a shorthand. It does not bring something new. It is just a shorthand. There is one more thing to that object just structuring is that, let's say with the first approach with those three lines, we can easily rename variables. If I wanted to specify car engine, I would just rename the variable from engine to car engine, just like that. Pretty easy, right? But when the object is structuring, remember that we have to always specify strict key that we would like to destructure as otherwise debatable will not exist. The key will not exist on that object. So how can we renamed them? Well, in order to do that, Let's say instead of engine, we want to use car engine. I have to put colon and then the new name for that variable. So now from the car object, I pull engine and I renamed engine to car engine. Engine will not exist as a variable. It will appear as car engine. If I'm going to console log only engine, let's see what we will have. We will have reference error. Engine is not defined because this variable does not exist. We pulled the engine key, but the variable name is now car engine. So if we're going to reference car engine, it will not give us any error. I think it's clear. So the same with other keys, if you would like to rename color, we will put column and then car color. And that's it. Pretty easy, right? As a sad object destruction because it really powerful tool. We're going to use it a lot, especially in React. Let's take a look on a real example that we're going to use in React actually. So I'm going to create a function, let's say some function. And this sum function will receive an argument, let's call it arc car. We're going to expect that our car is going to be an object. And we can call some function. And we will supply our car object for our car, right? Let's quickly comment it out and let's try and console.log, arg, car like that. And we will see our object pretty simple. Now, let's say we wanted to actually cancel log separate keys from that object. So again, the same picture as we just did. So we either reference those keys by using arc car door key name syntax. For example, arc car dot color. Right? We have read, if I'm going to use engine, it is going to be disloyal if I supply a non-existing key, for example, square wheels, right? I'm going to get undefined because well, this key does not exist on that object. Instead of doing that, I can use objects restructuring and I can use it actually directly inside parenthesis. So the first way we can use actually this line of code, just like that. And it is going to work, right? Just like we discussed earlier. But instead, I can actually move that object is structuring directly inside parenthesis. So I'm just going to copy that and put it over here. And now we just removed even more line of code. Now I can directly access color and gears critical. Let's verify that we have read and five, which is correct. Nice. Let's extend this example a little bit more. What if I supply a second object to some function? So here, suppose that I supply a second object. Maybe it won't be car, but I'm just going to put it as a car. All right? And here I expect some object to, and I expect that this sum object two will have two keys, name and age. So I can reference them by doing some objects to dot name or age. But instead, I can again use object destruction directly over here. So I would put name and age. We use object destruction for both of our arguments. So arguments are separated with the comma, right? And the keys that we destructure is specified in curly brackets pretty easily that some function is a really good example because we will have a very similar piece of code in React. Let's combine object does structuring with default arguments. So what if I do not supply any arguments to some function? Let me remove second object from here. And let's say I destructure color and gears. Let's try it out. What will I get? I will get cannot destructure property color of undefined. What happened? Well, the thing is, as you remember, when we do not supply any arguments for some functions, that argument that we expect to a peer in that function is going to be undefined. So what we're basically doing here, we are trying to pull those keys from an empty value, which basically does not exist under the hood, it looks like that. So we pull color and gears from undefined. But as you can see, this syntax leads to type error. This is incorrect. So in this case, to actually fix that error, we can supply it a fallback value. So I'm going to put an empty object, and now let's see what we're going to have. We're going to have undefined, undefined. Well, this is expected because we did not supply any value for that object. Undefined value fall backs to an empty object. And from that empty object, disruptor non-existing keys, color and gears. Well, because they are not defined on an empty object. If I'm going to put color green and tried to console log it, you will see that the value will be green and gears is going to be undefined, right? Because again, our undefined value fall backs to that object. And from that object, we destructure color in gears. There is one more drawback actually with this approach. What if I supply an empty object here? As we might know, an empty object is already a defined value, right? I'm going to put an empty object. Can you guess what is going to be color and gears? Correct? It is going to be undefined. Undefined because now color and gears, they do not exist on that object. That's why we have undefined. Undefined. What if we want to somehow specify default values for separate object keys? The approach is the same by using the equal sign. So we can put color by default will be green. Let's put an empty object to verify that in a second. And gears by default will be six, right? Now if I'm going to run it, you will see green and six. Pretty awesome. So again, to extend that example, what if I remove the default value for the object itself, but I keep default values for separate keys and I'm going to remove an empty object here. Let's try and execute it. Again. We have cannot read property color of undefined because again, we have the same situation. These two keys are tried to be destructured from undefined, which leads to type error. So to fix that, we have to provide the fallback. This is important. We provide the fallback for the object itself, and here we provide default values for separate destructured keys. But I can agree that this syntax is a little bit of confusing. We can actually refactor it to make it look more nicer. Eventually we will end up with a more line of code, but it's fine. In parentheses, I'm going to keep only the default value for the object itself. And instead of using the structuring, I'm going to put the name for the argument. So let it be car object. And on a new line, I will actually put the restructuring for the object, const color gears equals Car object. Now you can see we actually separated the concerns in the parenthesis. We only specified default value for the object itself and on a new line, when we use this structuring, we specify default values for separate keys, as simple as that, I personally think this is one of the coolest features available in modern GIS. I really like it, but we also have a radius structuring next to object. The structuring, it is actually very, very similar. So let's say I have an array or maybe let me actually remove all of that. I'm going to keep some function, but I'm going to comment it out. And below, I'm going to create some array. And I'm going to put some values like 5, 4, 3, 2, and 8. And the same manner as I apply objects restructuring to an object, I can use a radius structuring to signify that we use object destruction. We use curly brackets, but for arrays, we're going to use box brackets. So in the same manner, we're going to specify box brackets equal sum array. But this time we do not need to strictly follow the name of the keys. Will it object? We have key names, but in array we don't have it. In array, we have ordering. So when we apply object destruction, it does not matter in which order you destructure the keys. But in a rage is structuring. It is important. But you can give whatever names that you want for your future variables. For example, I'd like to disrupt your, the second element of that array. So in order to do that, I am required to first destructured the first element, the order that you specify in a radius structuring will be the same as the elements go in the original array to destructor the first element, I supply first element. And now I destructured The second element, second element, which is going to be 4. So first element will be 5, second element is going to be four. As you can see, the order is retained. First element five seconds 4. If I'm going to put third element here, can you guess the value? Well, yeah, it is going to be three. Let's check it out. Console log, first element, second element, and third element. Note file GS, what we see 5, 4, 3, exactly the same values. If I, for some reason wanted to emit this element, Let's say I use it like that, right? Const, second element. Well, this is not going to work. Second element now is going to be the first element, which is five. If I console log it, you will see it, it'll be five. Because again, the order is important when you apply a restructuring because elements, they are ordered, they do not have key names. You can give any name to that variable, but you have to retain the order. I think it's pretty clear at last, I would say that a radius structuring is used in the same manner as object restructuring. If you want to do something similar with a radius structuring in parenthesis when are using function, it will work. The difference is only that with object destruction, q are required to use curly brackets with the radius structuring, you're going to use box brackets and also the ordering. Remember that in an array, elements are ordered and that's why you are required to destructure all previous elements. If you wanted to destructor the element number. And if I want to destructure fourth element, I am required to disrupt your first three. This is inevitable while in objects keys, they are not ordered. That's why you can use any ordering. When destruction the keys, That's it about object and a radius structuring. We're going to use it a lot and I hope it was clear for you. See you in the next one.
30. Spread and Rest Operators: Hi, This time we're going to talk about the rest and spread operators. These two are tightly coupled to object in race and are used a lot in modern js. Let's find out what they do. If I go back to File GAS, let me maybe create a function and the top that I will name some function. It is going to receive argument number one, argument number 2 and 4. Now religious console log arg1, arg2, perfect. Below, let me call that function and let me supply hello as the first argument. Second argument is going to be n to the third is going to be 15 forth, maybe just an empty arrow function, and then let it be just number 5. Great. If I'm going to run this script, I will see that I have Hello Andrea, first two arguments. Now, how can we actually achieve the rest of the arguments and how we can accumulate them into a single unit, into S and Google bearable, this is why the rest operator exist. It accumulates the rest, the arguments over the rest of something into a single barrel. So at the top, I'm just going to put a quick reference for us. So rest operator accumulates or let's say false values into a single variable. Faults. Great. So to use the rest operator, we have to put the three dots and the name of variable in which the rest will be written into. So let it be erast of arcs. It can be any name. Now let me try and console log rest of arcs. And now we have 15 anonymous function and 5, we'll basically the rest of the arguments that we did not define. So we can see our first two arguments are hello and NGO, and the rest is 15, the function and five, great, if I'm going to remove R2 over here, can you guess how rest of RX will change? Let's try it out, right? So we have now Andrew at the beginning than 15 function and five. And this is how the rest operator works. It just takes the rest of the values and folds them all into a single variable, just like that. Now, let's see how we can use the rest operator inside objects and arrays. Let me comment that out. And I'm going to create an object, would say it is going to be person and name is going to be Andrew. Maybe age is going to be 10. And suppose that I have object is structuring over here. And I'd like to grab maybe name from that person object that I'm going to cancel luggage. We can receive angio grade. Maybe let's add more keys there. Let's say hobby games, perfect. Now, what if I want to somehow retrieve only the name key and the rest of the keys, I would like to fold into a new, completely new object. We'll in this case, again, I can use the rest operator. So just like in function, I'm just going to use three dots inside object does structuring and the name of the object in which the rest will be written into. So let it be the rest of person. Now let me try and console log the rest of person. And what I will get, I will get a new object with the rest of the keys that I did not destructure. So I destructured only name. And the rest is h and hobby. That's why in the new object, which is the rest of person, I'm going to see H and hobby if I'm going to add H over here. Now, the rest of person will contain only hobby because this is the rest. What is left? Let's verify that. Perfect hobby games. If I'm going to destructure hobby as well, can you guess the value now? Right? It is going to be an empty object. If I'm going to remove all of the keys, can you guess the value now? Correct. It is going to be exactly the same object because the rest, well, is all the keys that we haven't destructured since we haven't heard anything. The rest is basically everything here. The same rule applies to erase. Let me comment that out. And at the bottom, I'm going to create some array. And I'm going to put 5, 4, 3, 10, and 8, right? And I'm going to apply a raid restructuring. So const bogs brackets from some array, from some re, I'd like to grab first element and the rest. I would like to write into a completely new variable. So again, I'm going to put three dots and the name of variable, which is going to be the rest of some array. Let's verify that I'm going to console log the rest of some ray. And I'm going to get 4, 3, 10, and 8, which is the rest of the array that I did not destructure. If I'm going to destruct your second element. Now, the rest is going to be 3, 10, and eight because well, I have first two elements and the rest is 310 and 8. If I verify that correct, everything works perfect. Now, we haven't talked about the spread operator, but we can see it also has the three dots. Well, the thing is that the rest and spread operators, they have the same syntax, but they are used in different contexts and it is very easy to miss confused them. As we know, the rest operator accumulates or false the rest of something into a single variable. They spread operator does exactly the opposite. It unfolds some value. So let me demonstrate it to you. So suppose that we have an object. All right, where is it? Let's, let's reuse this person object. And let's say I have another object which is called some other object. And it has some fields such as AI genome are their name is going to be Alex, and maybe car is going to be BMW. Great. Now what if I want to merge these two objects? We can use the spread operator to achieve that. So below we're going to create a completely new object, which we'll call merged object. It is going to be an empty object. And in that empty object, we're going to first spread the person object and then we're going to spread some other object. So we first spread person and then we spread some other object. Can you guess what is going to be the valley of Merced object. Let's verify marched object. And we see that the new object has all the keys that we have in person and in some other object combined. Well, just like I told you before, the spread operator unfolds values. So in this case, it unfolded first the person object, and then it unfolded some other object. On top of that, as you might already notice, it has exactly the same syntax, three dots as the rest operator, but they have both the underlying difference that again, the spread operator unfolds values while the rest operator folds them. Let's take a look at another example with objects. What if, instead of that, I'm just going to directly merge some other object inside person. I can easily do it like that. Some other object. And of course I have to put it at the top. And now I don't need merged object. And now our new person object will contain all the keys from bowl itself and from some other object. This is very flexible because now you can use the spread operator to manage objects as you want. You can merge objects together. You can merge one object into another. And there are a few some other use cases that allow you to somehow use this spread to unfold the keys of an object into some other place. In our case, what we just did, we unfolded all the keys of that object into the Person object. If I'm going to remove the spread operator, Let's see what is going to be devalued. We will have some other object as a key insight person. And that key will hold the value of object with keys, other name, and car. Why do we have it like that? Well, that syntax that you see here is basically the shorthand of some other object, colon, some other object. This is the key, this is the value. But when we have a situation, when key is going to have the same name as the variable that holds devalue, which is some other object. We can use the shorthand and it will work. Perfect. Now let's see the spread operator on the erase. I'm going to comment that out. And I'm gonna uncommon to our sum array. So here we have the rest of some array. Let's actually remove that. And let's use this example. Y is, let's create a new variable and neither array, and let it be 123. Good. Now, in the same way as we just merged objects and exactly the same manner we are able to merge erase, right? So here I'm going to create a completely new array. I'm going to call it result. And in that new array, I'm going to first unfold summary, and then I'm going to unfold another array. So at the end, we're just going to concatenate both of these arrays. Summary and don't forget three dots. And then another array with three dots. Now we're just console log results and eventually will receive two arrays combined. Awesome. This is a spatially flexible with arrays because we are able to unfold some array into another array in any place. It means that if I'm going to just replace them, I'm just going to swap them, right? I will have completely different ordering because now another array goes first. That's why I see 123 and the resulting array. If I'm going to remove the spread operator from both. Now, our array has only two elements where every element is an array itself. Right? So we have an array of two elements. First element is an array, second is an array, but this is not exactly what we want. We normally do not want these nested arrays. We wanted to work with flatter race because this is convenient and well, this is just normal to see. There will be lots of situations when we will have to use the spread operator in arrays. And we would like to strictly follow some ordering with the spread operator, we are able to place any values anywhere we want. Just like I'm doing right now, right? So can you guess the value, the resulting value, if I put this line of code, Let me see. So first, I will have another array. After all the values of another array which is 1, 2, 3, I'm going to have 15, 16, and 12. After that, I will have all the values of summary. And at the end I'm going to have 16, 1, and 0. Pretty cool. I guess this is all about the spread and rest operators. We're going to use them a lot. They are very, very useful. So I advise you to get comfortable with these and practice a little bit. They might be confusing, but they are eventually very easy. So trust me, just take some time, get used to it and I'm gonna see you in the next one.
31. Async Code, Callstack, and Event Loop: Hi, we finally reached our final JavaScript topic, a sink and sink code promises and async await. This is the most important topic in modern GS, knowledge of that topic is essential. Without that knowledge, JavaScript development will never feel complete for you. That is why I suggest to get as much comfortable with this topic as possible. To understand a sink and sink code and promises, you must understand more deeper topics, how GPS works under the hood, what is event loop and call stack? In this video, I will try to explain in simple terms how JavaScript works in order to then understand the concept of promises, let go. What you see on the screen right now is a high level overview of how JavaScript executes the code. This image describes how GS runs inside the browser. For NodeJS, it will be slightly different, but it's fine to use it for our use case. So in yellow frame, you can see parts of JavaScript engine which are called heap and call stack. Heap is in memory allocated space where all defined variables live during code execution. Call stack is that throughput place where JavaScript decides what to execute. Next, we will talk about call stack and a moment. Outside of the GS frame, you can see web APIs, callback, queue, and event loop. These all are not part of the JavaScript engine. It means that they are defined by the environment where JavaScript runs. We know two primary JavaScript execution environments, browser and NodeJS. For example, web APIs include things such as DOM API or Fetch API, which are part of the browser environment. Only, web APIs are not implemented in Node.JS. We don't have HTML manipulation features like document get element by ID and NodeJS. These are features implemented in the browser environment only know gs, however, implements a few things from web APIs. For instance, set a timeout. They look exactly the same in both environments, but under the hood, the implementation is different. You might have already heard that JavaScript is single threaded language. But what does this mean? It means that JavaScript has a single call stack. As single call stack means that the language can process only one operation at a time. Imagine a simple doorway. Few people around trying to go through the doorway can fit only one person at a time. It cannot fit to people at the same time when first-person goes into the doorway. And if that person gets taller than other people trying to get through the doorway will have to wait because they are unable to enter only after the stock person leaves the doorway, other people will be able to continue and go through the same with JavaScript engine if there are two lines of code going one after another, for instance, two console logs, we know that first line of code will always run first and only after first-line finishes, second line will be executed. It means that if first line of code will take five years to be executed, the second line of code will wait all those five years for the first operation to finish, and only after that it will be executed. So again, JavaScript is a single threaded language with the single call stack. Because of a single call stack, GS engine can process only one operation at a time. Call stack is a temporary storage for all pending functions to be executed. And it is organized as a stack, a structure which follows last first out method. Last in, first out means that last element added to the storage will always be removed first, a pile of plates is a perfect example of last in, first out, imagine a pile of plates. You stack plates on top of each other. Once you have templates on top of each other, Let's say you need to remove the very first plate from the bottom. You can't just take it from the bottom right? If you would do that, the pile will fall and plates will scatter. The only way for you to take that played off is to remove all the plates from the top, one by one until you reach the desired plate at the bottom, these type of organization is called stack. The last plate added to the pile will get off that pile first. Thus, the name last in first out. Java's could call stack follows exactly the same organization. Now imagine a container. That container is going to be the call stack. On the left, there is a simple piece of code. Let's see how JavaScript would protest that snippet. Javascript splits the code into functions. When JavaScript must execute a function, the function is added to the top of the call stack. Every time the function exits or returns, it is removed from the call stack. So first, JavaScript sees console.log. Are you ready? It is added to the call stack than executed and immediately removed. After that gs, Cs, print my bio, it gets added to the call stack inside print my bio, GS first sees, get first my name, which means it has been added to the top of the call stack. Gs looks inside, Get FirstName and sees that this function returns a value. Once the function returns, GS, removes it from the call stack. The execution of print my bio continues. Now gs, Cs function getAge, the same situation. Gs looks inside getAge, the function returns and gets removed from the call stack. Then there is final console.log. My name is Andrew, my age is 10, added and instantly removed. Print my bio exits and call stack is empty. Now the execution of main code or mainframe is finished. The notorious maximum call stack exceeded or stack overflow errors occur when call stack size is inflated and the number became ridiculously huge that the engine cannot process that number of operations inside the call stack. Because JavaScript has a single call stack which is organized in a way that you just saw. It is called blocking. Remember, one operation at a time, next function will not be executed until previous finishes. This leads us to the term synchronous, which basically means execution goes one by one as we see it in the code. The blocking behavior can be easily absorbed inside the browser environment. On any page, right-click, select, Inspect, and then open the console tab. Inside the console tab we're able to execute any valid JavaScript inside the browser. For example, console.log. Wow will produce wow printed in the console. Perfect. But what about the blocking behavior inside the browser environment, we have the alert function and it is a good example to demonstrate the blocking behavior. So I'm going to type Alert high. And once I press Enter, what happens is that first I see the pop-up which says high, but what happens under the hood? Under the hood, the alert function was added to the call stack and it haven't been removed yet because alert did not exit and alert did not return any value, which means that alert is still inside the call stack and it blocks the execution of all subsequent function calls. I'm going to console log anything. When I press Enter. Nothing happens because currently at this moment, alert is inside the call stack and it blocks the execution, and it will continue to block the execution until the alert function returns or exit. And that's going to happen what I'm going to press, Okay, so I'm going to press console.log. I'm going to execute console log two more times and then I'm going to press okay, Let's see what is going to happen. Now. You see how everything just unfrozen under the hood. The alert function was removed from the call stack and the execution continued. That's why I can see all my S3 console logs for which I pressed Enter earlier. Great. Now we understand the sync code. As you can see, it is not very convenient to always wait for one operation to finish. This is where a sync code comes to the rescue. When JavaScript reads a sink piece of code, it is processed, not executed, processed in the background, and once processed, it is then placed in a separate to waiting queue, which waits for the call stack to become empty when all sync code is executed and call stack becomes empty, async code, which was placed in the waiting queue, is pushed into the call stack and is now being executed. There are special language features which allow us to write async code. These are promises and callbacks, implementations of which are exposed to us by the environment. Browsers, web APIs process the code in the background and delay its execution event loop in this system is some sort of a watcher for the call stack and the awaiting Async queue, once called stack is empty. Event loop pulls items from the waiting queue and places them into the call stack. These concept introduces a non-blocking code execution model. It does not change the fact that call stack can process only one operation at a time, but it allows to run the code in a non-blocking manner. Let's consider a case with two operations. Send a request to a server and print hello to the console. The request would take 500 milliseconds to finish while printing Hello would take only ten milliseconds if going with sync modal console log would have to wait 500 milliseconds for the request you finish and only then hello gets printed. With the non-blocking model, the request would be processed asynchronously in the background. Well, sync code continues its execution. We would see Hello gets printed right straight away after ten milliseconds and the request in the background, we'll finish its execution sometime in the future after 500 milliseconds under the hood, there are actually multiple waiting queues. One for timers, one for cold bags, 14 promises, etc. They have different priorities and certain order. For instance, promises have priority over callbacks to not over-complicate on this, let's imagine there is one single queue for all async code. One of the examples of async code is callbacks. Callback is a function that is passed as an argument to another function. Callbacks are not Async by default, but those exposed by the web APIs actually are. For example, let's take a look at setTimeout. It is available in both know gs and browser environments. We're going to take a look at two examples. One inside no GS and one inside the browser. It actually doesn't matter where we're going to use setTimeout. But the more the better, isn't it? The first example is going to be inside no GS. And I already have prepared this simple piece of code with two console logs and setTimeout. So setTimeout expects us to supply two arguments, where the first argument is the callback that will be executed after the number of milliseconds that we supply. As a second argument, in this case, I supply at 0 milliseconds, it means that the execution will not be delayed. But let's see how the code will be executed. Can you guess the outcome? What will come first? Let's see. I'm going to run the script and we see 1, 2, and only then timeout fires. The thing is that setTimeout is asynchronous. It means that the timeout, the callback was added to the callback queue in the background. I'm going to supply 2504.52 seconds. Let's see how the picture will be different. I execute the script, I see 12. Then I see the delay of 2.5 seconds. And only then IC timeout fires under the hood. Settimeout was processed by the code. Settimeout was added to the call stack, but the callback and the timer execution were delegated to the Node.js APIs to be processed in the background, setTimeout was removed from the call stack. It means that the execution continues. Then we see console log one to the call stack and instantly removed. And the same with second console log added to the call stack and instantly removed. And once in the background, the timer is done processing after 2.5 seconds in the future. These callback will be added from the background callback queue into the call stack and then execute it. And it doesn't really matter how many milliseconds I'm going to supply for the second argument. It will be always protest in a non-blocking manner, and it will be pushed towards the callback queue. And only after the call stack will become empty, the event loop will pull that callback from the background callback queue and push it into the call stack. It doesn't matter how many milliseconds I supply or where I put this code, it will be always protest asynchronously. If I put it in between and I supply 0 milliseconds, the picture is the same. Let's take a look at second example. You can see a very basic index HTML, which has a single button element with id, btn. Then inside the script, I just pulled that button using the DOM API, documented credits selector, hashtag, my btn. Then to that button element, I attach a listener for the onClick event and for the onClick event on BET and click function will fire. Right now it is empty, but let's add something inside console log hello. And let me actually open that index.HTML inside the browser. Right-click reveal in File Explorer. Double-click on it and boom, here we go. Right-click Inspect. And I open the console tab, I press click me and I see hello gets printed just like we defined inside the handler for the onClick event. Perfect, let's actually copy and paste the code that we had in no GS to the handler. Now, is the behavior going to be the same as inside no, GS. Let's verify that. I go back to the browser, refresh the page. I press the button and as I can see, first goes 1, 2, and only then timeout fires, even though it is placed in between console logs. If I put it at the job and if I'm going to put let's say two seconds. I refresh the page. I click the bottom, one to two seconds passed in IC timeout fires. Well, the picture is the same. So what happens is that once JavaScript reads setTimeout, setTimeout is being added to the call stack again, but the callback and the timer where delegated this time to the web APIs inside the browser. It means that they are being processed in the background. The execution continues. Settimeout gets removed from the call stack. Console log added to the call stack, executed and remove. And the same with the second console log. Once the code finishes, the mainframe or the main code finishes, event loop will constantly check for the callback queue. So di callback is added to the callback queue. And then event loop sees that and pushes that callback into the call stack. And after that, the call backfires grade. But let's actually see it with the blocking example. What if I'm going to put alert instead of console log, I will just type alert high. And I'm going to remove the second console log. And now the question is, will set timeout be processed in the background once alert will start blocking the event loop, Let's see. I refresh the page. I press the button, alert fires, and now it blocks the event loop. But I see nothing inside the console. And if I'm going to press the OK button, only after that, the code will start processing the callback. Because setTimeout appears after the alert line. If we're going to put setTimeout before the alert line, then the picture will be different. For refresh the page. Click Me button again. Alert starts to block the event loop, but now setTimeout already delegated the processing of that callback to web APIs. It means that while alert blocks the event loop, callback is being processed by web APIs in the background. And now this callback is inside the callback queue waiting to be pushed towards the call stack. If I'm going to press Okay, I will instantly see timeout fires. Right? But if I'm going to press Okay, within those two seconds over here, the picture will change, refresh the page, click me, instantly hit Okay. And you can see it was even less than two seconds because once I click the button, this is instantly delegated to the web APIs. And it doesn't matter for how long the alert line will block the execution. This is already processed in the background. Great. So in simple terms, we can say that async code is that type of code which is always executed after all synchronous code. To easily remember that concept, imagine two columns, one for sync and 14 async code, let's say gs starts to read the code and then it sorts out the code into zinc and the zinc columns. And once it's time to execute the code, just place the async column below the sink column. And here you go. This is the order in which the code will be executed. Of course, this is oversimplified, but it gives the basic idea. In modern GAS, you will see promises everywhere. The basis for promises is async code. That is why it is so important to leverage these concept. Server requests, database operations, file read operations. For all of that, we would use promises and async code. I hope it was clear and now you have better understanding how GS interprets the code. Next time, we're going to talk about promises and async await. See other.
32. Async and Sync Code - Promises and Async Await: Hi, In this video we're finally going to talk about promises and async await. Let's go. We know that the basis for promises is async code. But then what is a promise? A promise is an object and that will produce some value sometime in the future. In a non-blocking way asynchronously, a promise can be one of the three states pending state, results state and rejected state. While a promise is in the pending state, it means that the promise hasn't resolved or hasn't produced any value yet, one promise is resolved. It means that the promise already produced a value. And when promises rejected, it means that this promise has thrown and adder and it hasn't produced any value. All right, let's see how a very basic promise looks like, and let's see how we can start working with them. So let me create a variable. I'm going to call it do some. And inside that variable I'm just going to call promised constructor. To do that, I have to do new promise. And the promise constructor, I have to supply the executor or the callback that will initialize the promise. So I'm going to pass an empty callback. And that callback that I pass to the constructor always receives two arguments. The first argument is something called resolve. Second is reject. So the first argument is the function that we must call inside the callback in order to produce a value from that promise. And when we call reject, obviously we throw an error from that promise. We reject this promise. So for example, I'm just going to call resolve. And as you can see from the intelligence, I have value that I have to pass. We resolve a promise with some value because promise produces a value. So for example, hello. Now, let's try and just somehow use that promise. So remember that a promise, it is not a function. So it would be wrong to call it with parenthesis as if that do some valuable was a function. It is just enough to reference the promise in order to make it work. If I save the file and then I execute the script, you will see nothing is going to happen because well, we print nothing to the output. But if I'm going to console log do some, in this case, I will see the promise object will be printed. It is important to note that what you see here is the promise object. So it is the promise itself. It is not the value that the promise resolves. That callback that we pass to promise constructor is initialized synchronously. It means that whenever we reference to some, this callback will run in a blocking way. However, it, the value which will be resolved from that promise is resolved in a non-blocking way. And to resolve a value from that promise to get the actual string hello, I have to use this special promise syntax called then or just venerable syntax. It's called sometimes like that. So do some DOD. And from the intelligence you can see I have three options catch finally, and then, so to resolve a value from that promise, I have to call the dot then method on the promise object and 2D dot-dot-dot method, I have to pass a callback. And that callback as the first argument, will receive the result value from that promise, for example, resolved value. And if I try and console log result value, you will see that it will be our string Hello. If I run the script, you see Hello gets printed to the output, which is correct. Now, what about the reject function that we receive as the second argument in the initializer. So let's try and instead of Resolve, use reject, and once they call it, you can see an optional argument reason. So whenever we reject a promise, we rejected with some reason, most of the time, you're going to reject a promise with an error and other promises that you're going to let say encounter in the wild, they all will reject with an adder object. That's why instead of just passing reject with this promise failed. But the message like that, instead, we pass a new editor and message is going to be promise, failed grade. Now if I'm going to run this script, you will see error, promise failed and handled promise rejection warning and important note here that this then call back never fired because the promise rejected and we don't see any results value. It means that the promise throws an error and we don't do anything to handle that. Always try to catch errors from Promises. This is really important because otherwise you will see messages like that unhandled promise rejection, which can potentially crash the application. So in order to catch that rejection inside the promise, we have to use the catch block that we saw earlier. So I'm just gonna put DOD and then I'm just going to call catch method. And inside I have to also pass a callback as the first argument that call back to the catch method will receive whatever we reject that promise with. So since we rejected this promise with another object, new promise failed. Here. First argument, I'm going to receive the object. So I'm just going to console log. And I will say adder occurred. And then I'm just going to print out error message. Great, Let's try and execute the file. You will see we don't have any unhandled promise rejection warning. And this time we see our console log. So whenever we reject the promise, all dance that we defined to resolve from that promise will never be executed because promise throws an error and that error or rejection is handled by the catch block. Another great tip about promises is that dot dance. They can be chained as many times as we want, the same with catch blocks. So for example, if here I'm going to put another dot again, you will see the intelligent sketch finally. And then again I call the then method, I pass the call back. This time I received value, let's say, and I try and console log value in second them. And can you guess what is going to be that value? Let's try. And we see a promise failed. Aha, okay, So instead of reject, let's again use resolve to actually let say give the control to dot dance. We don't need to throw adder from this promise this time. So note file GS, you can see Hello first gets printed because this is what we do in the first call back and then we see value in second Dan is undefined. The thing is that when you chain multiples then arguments, the first argument in the subsequent Dan will be the returning value from the previous then, because from this first, then callback will ensure nothing. Second dot then first argument is going to be undefined. If I'm going to return five here, value here now will be five. Let's try. And you will see value in seconds then is five grade. So if I'm going to use another third Duck Dan, and this time let's say val three In third then is going to be three, right? It is going to be undefined, right? Because literature nothing from the previous. Then if I'm going to return 10, val three is going to be 10. I hope it's clear. And you might have a question, why do we need to chain multiple dance over here? The thing is that in the real world we're going to work with multiple promises at the same time. And inside one promise, we're going to call another promise something like do some dot then, then inside we will have something like return another promise and again then, and so on. That is why it is easier to pass the result of some logic to another then in order to simplify the code so it will make it more readable. I know it might be confusing because there is no like real example right now over here. But trust me, it's totally fine. You will see that in the future. Let's actually try and create a more real-world example using promises. So I'm just going to remove all of that. And instead, let's create a completely new promise that we'll wrap the setTimeout function that we already know. We would like convert setTimeout to, let's say promise based syntax. For example, I want to create a function, let's call it weight, sum. That function I would pass, let's say number of milliseconds, let's say 40000 for 40 seconds. And this is going to be a function that will return a promise. And after that function, once it resolves, once the promise resolves, this callback will be run. For example, console log, four seconds passed. It is some sort of a replacement for setTimeout, but using promised be syntax. So how we are able to implement that. So this is our mockup. Let's just actually commented out, and now let's start writing the promise. So weight sum is a function that receives one argument, which is number of milliseconds. So I'm just going to create weight sum. As an arrow function. That function receives one argument timeout in a mess like that. And that function returns a promise, that churn new promise to the promise constructor, I pass the callback. And that callback receives two arguments, result and reject. But since we don't meet reject here, I'm just going to use the resolve argument. So now we have to somehow delayed code execution will inside that promise, we can use setTimeout. So I'm just going to call setTimeout. First argument again is the callback that will fire after supplied number of milliseconds as a second argument. And for the second argument, I'm just going to pass the argument for weight some function itself, timeout in the mass. And once these cold backfires, I'm just going to call resolve to resolve from that promise. And that's it. This is our implementation. Let's comment out our usage of that promise, and let's just see how it works. Note file GS. I can see four seconds have passed, and I see my output four seconds past. Just to demonstrate to you how this is going to be non-blocking, we can actually use the same example from our previous videos, console log console log 2. It does not matter where I put some promise dot Dan, it will always be resolved using the dot syntax in a non-blocking way. It means that it will always appear after all synchronous code. To verify that, again, maybe let's make it a little bit shorter. A 100 grade. You see 12 and only then four seconds passed. And it doesn't matter if I put setTimeout or not over here. For example, I'm just going to resolve it without any logic. It will always be at the end because a promise is always resolve in a non-blocking way. I hope it's clear. Now, let's take a look at another real-world example using the Fetch API that we have available inside the browser. If when Google, I'm just going to type JSON placeholder, I end up on JSON placeholder dot type code.com. When I scroll down a little bit, you can find this section with an example. So I'm just going to copy that and paste it inside my NodeJS script. If I will try and execute the file, you will see Fetch is not defined because again, Fetch is available only inside the browser environment. It is part of browsers web APIs. It is not implemented natively in Node.JS. That's why this piece of code will only work inside the browser. So I copied again, I go to browser console, right? And here I execute the code. So let's break it down. What's happening here? So first of all, what fetched does, we supply a URL to that function, and that function sends a request to that URL and gives us the response back. This dot fetch is a function that returns a promise. That's why we have to use the dot Dense syntax in order to resolve that promise. So fetch sends a request to the URL in a non-blocking way in the background. And once the response for that request is ready and browser is ready to handle it, this promise resolves, that call backfires and we get access to the response object. And as you can see, this is our payload sense to us back from the server. And this is the promise which was pending Once it was cold and once it was resolved with first dot, then you see promised state is now fulfilled. As I mentioned earlier, that request will be processed in a non-blocking way. It means that if that request will take up to 10 seconds, then that callback inside the first dot, Dan will fire after 10 seconds in a non-blocking way. But what is this response over here? Let's try and rewrite that example a little bit. And instead of calling response JSON, we're just going to console.log response object that we have here. And as you can see, the response object has something buddy, buddy used headers. Well, that response object represents the response from the server. And on that object we have the dot JSON method that we must call on that object in order to get the payload in JSON format. So if we're just going to access that URL in a separate tab, right? This is all happening like manually. We do it manually using the browser search box, but to do it programmatically, we would use fetch and then we would call the dot JSON method available on the response object. This but JSON method also the Cerence us a promise. But since it is a single action within that call back, the value from that promise will be resolved automatically, and it will be the return value from that call back. What is happening here is that inside first dot then response.data isn't method is called, that promise is resolved and it is returned. From the first dot then callback because this is the shorthand for arrow functions, we already know that the returning value of the Dodge JSON method will be available as a first argument in the subsequent then that's why here we have argument called JSON. You can name it whatever you want, and then we just console it block. That's why if we're going to run that example, we will see our payload. But this time we did it programmatically instead of going to the browser and just accessing the Euro. Now this all happens programmatically using the Fetch API available in the browser. Great. I would say this is all about promises, but there is one more thing. We also have something called async await. And async await is just an alternative syntax to the dot then syntax, since we are going to work with multiple promises at the same time, dot dot syntax becomes really messy at some point. That's why an alternative to that syntax is async await. Let's see how it looks like, and let's actually try and rewrite this example with fetch using async await. So first of all, async await syntax is available only inside a function. It means that in order to use it, we have to create a function. So I'm just going to create a new function. Let's call it send request. And to make async await syntax available inside that function, we have to mark that function as a sink. So async function send request, if it was an arrow function, Const, let's say send request. It would be like that. Right before the arrow function, we would put the async keyword, but let's keep the regular function syntax so we know that. To resolve that promise, right, we have to call the dot Dan and supply a callback inside the async await syntax. We don't use dot, then we use the keyword await. Await. That's why the syntax name is called async await because well, it is just two keywords, async to mark function to be used with async, await syntax and a weight to resolve the promise. I'm just going to call fetch. Let me copy it. Fetch. And to wait for that promise to be resolved, I have to just put a weight in front and this will replace the dot then with it's called Back in front of a wait, I have to sign the result value from that promise to about Apple, for example, this is going to be response equals await, fetch. And the same we will do with the JSON method. So now we have access to the response object. And then we're going to create the new variable JSON. And it is going to be await response dot JSON, which is available on the response object. If you're not going to use the await keyword, the JSON variable will be the promise object, just like you saw at the beginning of the video. This is not what we want. We only want the result value from that promise if I'm going to remove the await keyword, right? And if I hover on the variable, I will see promise because this is the promise object. But if I keep await, I will have any, which means that this variable will hold any value, but it's definitely not a promise object. Now, we're going to try and console log JSON. And this piece of code will just completely replace these three lines. Yes, it a little bit more of lines, but this syntax is more easier to read. The async await syntax is built on top of promises, and its intention is to make promises to look more like regular synchronous code. Because you can see we can read this piece of code line by line, unlike with dot then one node to point here is that second line of code, right? Line number seven will not be executed before line number 6 results since we use the await keyword, it means that if this line of code, it, that promise takes 10 seconds to be executed, the code will not go further. It will wait all ten seconds until the promise resolves, because we use the await keyword, it awaits for the promise. The promise resolves and only then the execution continues. I hope it's clear to verify that let's call the function and let's execute this piece of code inside the browser. And you will see we will have exactly the same result. We're going to see our payload that we receive from the server. Alright, I guess that's all for this video. And I know that it was really hard to understand that amount of information. It was very confusing, but trust me, it does not that complicated as it might seem. We're going to attach the topic one more time in our React projects. And this is where I'm gonna see you next time. Bye-bye.
33. ECMAScript Modules: Hey, in this video I would like to talk about atmospheric modules in Node.JS environment, we already know that there is a native module system which is called common GS. It uses require and module exports syntax to import and export something from a module in the browser environment, we have also a native browser module system which is called script. Modules and atmospheric modules use import and export syntax. Nodejs community pushes Ackman Script modules to be implemented in Node.JS in order to replace CommonJS because Ekman Script modules are more convenient and more comprehensive. And eventually we have built tools that allow us to use ACML Script modules in Node.JS environment without direct support for atmospheric modules in Node.JS environment will anyways, and modern JavaScript, you will see ECMO Script modules. And rarely, I would say you would see CommonJS. Now in this video, I would like to talk about import and export of atmospheric modules because there are a few important aspects that we need to understand about them. First, let's create two files. So I'm going to rename file.js to file.js MGS in order to use ACML Script modules natively in Node.JS environment. Then I'm going to create a second file called second MGS. And from second MGS, I'm going to export a few things. So first I'm going to create a variable called Five, and I'm going to export five right next to it. I'm going to export const 10. And I'm going to specify it like that. You see the difference? So first I created a variable, then I exported it. And here is just a one-liner, basically the same thing as at the top. Maybe let's export something else. Export const. My name is going to be Andrew. And at the very end, I'm going to put export default and this time, let it be shop just like that. So as you can see, we have two types of experts. We have named exports and we have one default export. So an aqua Script modules, there are two types of experts named and default. There can be only one default export in a module and as many as you want named exports. Now, how we can actually import all of those. If I go to File MGS here, I need to type import something from second MGS. Great. So what should I supply over here in order to import 5? Well, the thing is that any module has its own export object, the expert object for second MGS is going to look like that. So first we explore it five, right? Which is going to be our named expert because well, we have Bible named five and we export variable named five. So five is going to be five, then this same width, 10, and the same with my name. These are all of our named exports. Then at the end we have export default shot, default experts. They do not have any name. That's because they are default. You export just a value. You can see that I didn't create any explicit name for a string sharp, right? It is not assigned to any variable, it is just exported by default, atmospheric modules will actually append that default export to the export object under default key, just like that. So eventually we end up with an object like that. This is what we export from second mgs. Now, if I want to import 5, I can use object is structuring. Why? Because well, we export an object. So again, every module has an expert object, and since it is an object, we can use object destruction. That's why. Here next to import, I'm going to put curly brackets for this structuring. And I will import 5, right, specified the key that I wanted to import 5. Also, I'd like to grab maybe my name, five and my name. Let's console.log five and my name. And let's execute the script to verify that. And we see five and Andrew. Which is correct. However, what about our default export over here? Let's try and import default. Actually less destruction default. If I will do that, I will instantly have syntax error. The thing is that we cannot just use that reserved default keyword. This is not allowed in order to import default export, we don't need to use the structuring. Instead. We just have to give it our own name for the exported value. So let it be my default import comma and then all named exports. So if we don't need actually all those named exports, we can only import default export, which is going to be sharp. So I'm going to remove this structuring part and I will keep only my default import. Now, let me try and console log my default import. You will see sharp and it doesn't matter what name I supply for my default import. It does not matter because we'll initially, it does not have any variable name. Unlike with our named experts, they all have a meaningful name. We export it variable named five. That's why when we're going to import that variable, we can just rename it, right? We can just put 55 capitalized does not exist on the exported object. We have five, which is lowercase. That's why we have to strictly follow the same rules as with object destruction. We have to use the same names that we export. Another use case would be when we have to import all of that as a one single object. Just like you see over here, we do not want to separate like named exports and default export, just like that. We don't want to separate them like that. So instead we wanted to receive the one whole object. So in this case, we can do import asterix as and then the name of the object. So let it be second module. And now if I'm going to cancel log second module, you will see that I have, will basically my export object. I have 5, 10, my name and default. And now in order to access default expert, I need to now actually reference the default key, right? You will see sharp. If I need to access 10, I will have to use 10. So what we just did, we imported the whole module into that single second module, batter bowl, I would say in practice, this is less common in practice in real world. Most of the time, we're going to see either a default export or named export. They are used a lot in real-world. We actually going to see either like that 510 or if a module has only default export, we would use only this default import. And we would use it just like that. Well, that's where basically you're going to see it. It's not that hard to understand that part. You just need to always remember that there are two types of export. A default export and named export, there is only one default export for a single module you cannot use to export default over here. If I will try and do that, you will see that I will have syntax error identifier default has already been declared. I recommend you to always remember that every module has an object which is being exported and all named exports are merged into that object. Way it is easier to remember that you have to import that object. Using object is structuring. I think ECMO Script modules are fun and I really do like them. And I hope U2 going to see you in the next one.
34. ECMAScript or JavaScript: Hey, this is going to be a short one. I just want to clarify the difference between a script and JavaScript. You probably saw a lot of terms such as ES6 is five, ES 2015. After that video, you will know the difference. To look for the answer, I'll use Google and I'm just going to type ECMO script or GS. And Google will tell me the difference. So as we can see from the first pop-up, the ECMO script specification is a blueprint for creating a scripting language. And JavaScript is an implementation of that blueprint. And you can see different variations of this statement across all of those link. To quickly summarize that statement, I can say that ECMO script is a set of specific cations that JavaScript implements. It means that AGMA script is some sort of a script for a movie where movie is JavaScript, as easy as that. For more information, you can navigate to Wikipedia page for ECMO script. So let me open that page and from here we can see different versions of acme scrape. The most common version of ACML script is probably yes, 2015, which is called ES6 because it was the sixth edition of ECMO script. If you scroll down, you can read what exactly was made on that specific version. And also there is a term called ES. Next, as you can see, this is a dynamic name that refers to whatever the next version will include at the time of writing. Now we know that whoever refers to JavaScript as ECMO script is a right person. Because now we know that these two are basically the same thing. I think that's it. For more information, please refer to Wikipedia or a Google. See you in the next one.
35. What is React?: Hey, finally we start talking about react. These short upcoming videos going to touch on the React theory and concepts. Feel free to reference these series anytime in the future. Let's go React is a library for building user interfaces. It can be used to build websites, mobile apps, and even desktop apps. The easiest way to learn react is probably to start from react on the web to build websites. In this video, I'm going to speak from the web point of view, reacts goal is to create user interfaces with something called components. For websites, it is just react or React for the web. For mobile apps, it is React Native for desktop apps it is called electron. React operates only on the view layer. It means that react does not force on how you should build your app. React just forces its own logic and dictates how you should manipulate the underlying HTML elements. The rest is on you in the past. In here, around 20 and 10, JQuery was used a lot to manipulate HTML through JavaScript. But there is no need to use jQuery nowadays. Since react is just to library, it can be integrated into any existing app to build a user interface. Examples of React websites are Facebook and Netflix. Discord uses React for everything to build their website, mobile app, and even their desktop app is built with React. Pretty impressive, isn't it? React is not a framework that is by other parts of the application, must be built with other tools and libraries. And you will see that once we get into coding, at first, react was used to build single page apps, only, websites that are fully managed by JavaScript and intended to fill a more like mobile apps. But as for now, React community, it has created a lot of tools and frameworks around react. Therefore, nowadays we are able to create any type of a website with React. But there it is, server-side rendering, single-page app, static web pages, or maybe a hybrid application. And you probably saw other solutions out there like Vue, JS, svelte, or maybe even Angler. They all are based around components and eventually achieve the same result. It is really hard to tell which one to choose. Something is more easier. Something is more harder. If you still struggled with the choice, I would recommend to pick the one with more appealing name or logo, as simple as that. But in our projects, we will get to know React. Stay tuned because only a few more theory videos left before we get into the coding part until the next one.
36. Component-based Approach: Hey, there In previous video, I mentioned components and component-based approach. But what is the component? A component is just a block of HTML that can't be reduced in the future. Component-based approach is when an application is being built with components, better to think of a component as of a custom user created HTML tag. But on top of that, components can also include logic and state. For example, a component can be a button that changes color. Once clicked, the button changes its background color. We can name this component as color button. And later on in any part of HTML code, Use Color button as many times as we want. This is basically what we do with HTML tags. Components are no different. It has makes sense to think of them as building blocks for the app. Component-based approach forms a tree of components. On top of that tree, there is a root component which nests other components in React root component is almost always called app, or other components are nested within the app component. Components that lay on top are called top-level components. These are usually pages. Components that appear higher in the tree are called parents. Once that lay below are called children. Let's take a look at official Facebook page. Facebook is the creator of React, and that's why it is the best possible example to observe. I will try and split the space into components to give you a basic idea, Let's go. The entire website itself is the App component. At the top, we would have Navbar component and Navbar in the center, there is navigation component and every button inside is another component as well. On the right, it can be profiled navigation component, where every similar button is the same component but reused multiple times. Try it yourself and split the drop down below into components below now bar, it can be a homepage component. Homepage includes three components. Sidebar on the left, sidebar on the right, and feed in the center sidebar component includes menu. Feed component includes list of posts and sidebar on the right includes something else. It is totally up to the developers how to structure and create components. It is certainly possible to keep all the markup and all the logic in a single component without creating other components. But then the idea of component-based approach would be totally compromised. And it will be the same as not using components at all. At the end of the day, we end up with tree of components. And that tree has always one direction from top to bottom. If there are some changes in a parent component, all children of that component will also be affected simply because they are part of it. Let's conclude. Development with React is based around component-based approach. React app can be visualized as a tree of components. Components are reusable pieces of the app. Advantages of components are reusability and consistency across the application. Whether usability user post component can be inserted into any place in the app was just a single line of code. With consistency, user post component will always behave exactly the same regardless of the page or the place where it is used. Well, that's it. That's how all modern apps are built nowadays with components. I hope it makes sense. Cia.
37. Functions vs. Classes: Hi, In React. There are two types of components available for us, class-based and function waste. They differ in syntax and the way we manipulate data inside them. Before React Hooks, we had no other option but to create competence using classes in the present, the situation is slightly different. With React Hooks, we use functions to create components. React hooks are available only in function based components, and this is the reason why functions simplify components. The syntax is more lightweight and easier to comprehend. In our projects, we will use React Hooks, which means we're going to work with function based components. Only. Class-based components become more and more seldom used. It is however possible that sometimes out there you will see class-based components, but that's totally fine. The React team have their stakes on React Hooks and they do believe that hooks are the future. After finishing the last project, you will be able to read class-based components and you will not have any troubles in transitioning between functions and classes. I hope it makes sense. See you in the next one.
38. React Under the Hood: Hello again. Let's see how React works under the hood. On the example of a single-page application, the best way to think of a React app as if a tree of components in React, there is a thing called the mounting point in which React application is being inserted, or better to say, mounted by default, it is a div tag with ID rude. At the top of the tree, there is the app component, which is the wrapper for all components in the app. Inside the app component lay top-level components. Inside them, lay nested components, and so on until the very nested component. If we would think of that for a moment, it is pretty much the same as the HTML DOM structure, isn't it? The Document Object Model or DOM is the representation of HTML page in form of a tag tree. Dom is how browsers see and interpret HTML markup. When we do basic things in JavaScript such as document.getElementByID id. That document object is part of the DOM API which is exposed by the browser. React creates in memory representation of component tree called virtual DOM. It is the same as browser's DOM, but it is used only internally by react. When React app being rendered on the page component tree is being translated from virtual dominant presentation into HTML markup. That HTML markup is then being inserted into the mounting element on the web page. Remember that all of that is done through JavaScript. When data are components need to be updated, react always operates with the virtual DOM in the first place. It takes previously captured state of the virtual DOM, compares it to the newly created one with updates and calculates the difference. If there is any difference, react computes what data and components must be updated. And those changes are called 3D renders. Every render basically represents virtual DOM state at a moment, the process of calculating the difference between renders is called reconciliation. And the algorithm name for that process is React Fiber. In simple terms, React Fiber detects what must be updated in between re-renders. You might have a question, why use virtual DOM? Isn't it adding an extra step and more complexity? Well, it depends. Virtual DOM changes or more lightweight because they are all in memory, unlike changes in a real DOM, when HTML markup is changed, browsers usually recalculate the layout and repaint the webpage. It is better to have 100 updates in virtual DOM, which eventually will result in a single real dom update and patch repaint greater than applying all 100 updates directly on real DOM. When we navigate through a website under the hood, HTML is constantly being updated. React ensures that these updates are done in the most efficient way possible. The idea behind virtual dome is to reduce the number of real DOM updates. I know it might be hard to perceive that amount of information, but it's totally fine. You are not required to know all the details. Now, we know how React works internally. That is one where a missing piece about its architecture, these peas is one way data flow, which is called flux. Flux is the name of a reacts internal architecture. Flux implies that data in the app always flows in one direction from top to bottom. For example, when data inside a component is updated, the component and all its children are rendered as well. Should children be updated or not, is the work for the previously mentioned React Fiber, the algorithm which computes what exactly needs to be updated. But the fact is that updates move from parent components to children. It is impossible to have data flow going from bottom to top. I think you will be able to sense that when we going to write React code. All right, let's sum up under the hood, react uses its own HTML DOM representation called virtual DOM. Virtual DOM goal is to reduce the number of real DOM updates. React core algorithm is called React Fiber and its main task is to calculate what exactly must be updated in between the re-renders react architecture design is called flux, which implies the data flows only in one direction from parent components to children. Well, this is the all information about React. Don't worry if that was confusing. Just rewatch the video or seek for more information if needed. See you next.
39. Boilerplates and Project Bundlers: Hey, this time I'd like to talk about how we can start development of a new React Web App. In this video, I will not consider a different online platforms, such as CodePen for developing directly inside the browser. Because these platforms are used only as playgrounds, or usually just to quickly share the code with basic setup. To understand how modern JavaScript apps are being built, we must understand what our project Butler's a project Bundler is a tool which takes all of the source code, scripts, styles, images, processes, all of that, and create a project built. Project built is a bundled minified version of the source code optimized for maximum efficiency. That are tons of project Bundler sound are the most common ones are Webpack, roll up and parcel. All modern JavaScript projects are covered by these tools. Great, Let's get back to our main question, ways to start developing a new React app. It eventually boils down to three pass. The first way to create a React app is to set up and configure all the build tools, such as web pack for React from scratch. Second way is to use a project template. We're built tools already configured for React development. And the third way is to use a React framework such as next GS, or Gatsby. There is no correct answer on which one to choose. It all depends on what configuration you are looking for, personal preferences, special features, and so on. Setting up everything manually and configuring project Butler's such as Webpack from scratch, is rarely seen nowadays. Almost every time You would either go with a template or a framework. Templates, by the way, are often called boilerplates, meaning whenever you see where the boilerplate do not freak out, it is just another way of saying word template. There are lots of different community created React project boilerplates, which is copy a template and start developing nothing more needed. The most widely known React boilerplate is probably Create React app, which is maintained by the React team under the hood, it uses predefined web back configuration. You might be tempted to use only Create React app. But it is important to remember that Create React app is not the only way to develop React apps in the present, there are lots of great alternatives. Currently, pretty popular built tools for front-end are VDD and snowpack. Another way to deal with React is to use a React framework. Frameworks are super popular right now, especially next, yes, but I would say that it is better to start learning react without a framework. Because frameworks for CHEs framework specific features and roles in our projects, we going to use already configured templates and built hills. Which ones? Seat yourself once you get into the projects, see other
40. TicTacToe project overview: Hey y'all. Welcome to
the Tic Tac Toe section. This is going to be a quick introduction video where you can
preview the project. The project is going to
be the Tic Tac Toe game, which you can see at
your screen right now. We can click on squares. We can play the game. Whenever we have a winner, the winning combination
will be highlighted. We will have a different
active effects. Also at the bottom, that will be game history, which we can traverse, and see what moves with did, as well as if we
click on squares, we will be able to
overwrite the history in case we needed
start game button, and I would say, this
is pretty much it. Although it might look simple. It has a lot of basic
concepts that will create good foundation
for your react knowledge. So let's get started.
41. Creating and configuring new project with Vite: Hello there. We're finally
going to start building the first project which is
going to be Tic Tac Toe. The tool that we're
going to use to build Tic Tac Toe is going to be Vite. This is official Vite website
that you can see right now. You can find it on Google. I'm going to click
on "Get Started", and let's see what
exactly Vite does. Basically, Vite is a front-end tool that
builds the project. It can be anything. It can be react, it can be raw JavaScript, or it can be any other
supported framework. Under the hood,
Vite uses Rollup. Rollup is a module bundler. Rollup is basically
the tool that builds the project and Vite is the
configuration around Rollup. Vite is pretty fast and actually very
popular at the moment. Let's go ahead through the documentation and let's scroll to scaffolding
your first week project. It requires us to have
Node version 14 and plus, but I'm pretty sure you have latest stable version
which is 18 at the moment. We can see that we can
create new project with npm by just simply
running that command. I'm going to copy that command, and I'm going to go to CMD. Throughout the projects
I'm going to use Git Bash, and inside VS Code I'm
going to use Git Bash. However, for this one
I'm going to use CMD. You can use any other shell. I choose CMD specifically because Vite going
to prompt us with a few questions and when Git Bash runs as a
separate instance, it has problems with
interactivity unlike CMD. Once I'm going to
run this command, Vite is going to ask me a few questions and
then I'm going to create a new project folder. However, I'm going to
create new project folder inside our current
terminal navigation. Right now inside CMD, I'm navigated to
see my username. This is user folder, and once I'm going to
run the Vite command, it's going to create
project folder here inside this directory. I don't want to do that. I want to set my own
project folder path. For that, I first
need to decide where I would like to
put my project in. For me, it is going to
be here inside D_web. This is the place where I would
like to place my project. First, I need to navigate inside the terminal
to this folder. Inside CMD, I'm going
to type disk name to change navigation to disk D.
If you are inside Git Bash, then you have to
type cd d and colon, if you're inside
any other shell, then I'm pretty sure
like Linux shell, like Bash, or maybe on Mac, I'm pretty sure you
don't even need that. Anyways, I'm inside the D disk, then I'm going to type cd, cd stands for change directory, and I'm just going
to type cd_web. I know it is _web
because if I type ls, ls is a Unix shell command to list all folders inside
current navigation. However, since CMD is
Windows-based terminal, I need to use dir, so dir is the command
alternative to a less inside Windows
Power Terminal. Inside D, I have _web. This is exactly what I navigate, so I'm going to type cd_web, and boom, now I'm inside that folder and I'm safe
to run the Vite command. I'm going to run
the copied command. It asked me for a project name, we're going to name
it tictactoe-vite. I press "Enter". Now I need
to select a framework. We're going to choose react and variant is going
to be JavaScript. Great. Now, the command
was successful. It says that scaffolding project in _web tictactoe-vite, done. Now run cd, npm install, npm run dev. We're going to do
that in department. We're going to exit that. Now, what I'm going to do, I'm going to open VS Code file, open folder, and now
I'm going to go to D web and select tictactoe-vite as the project
folder inside VS Code. Once we're inside we
have a few files here. The very first thing
that we're going to do, we're going to
install dependencies. We have the files created. We have package json with a few dependencies
listed already, but we do not have any
of them installed. For that, I'm going to open integrated terminal
inside VS Code, and here what I'm going to do, I'm going to install dependencies
by running npm install. Npm installed without
any arguments it scans package json inside
current navigation. My current navigation is
tictactoe-vite folder. It looks for package json. It looks for dependencies, and dev dependencies
listed inside, and if they are missing, if they are uninstalled, npm will install them. I'm going to write that command, and I'm going to wait. While it does its thing, let's see what kind of
dependencies do we have here. By default, we have react and react-dom
dependencies installed. These are core
packages of react, so react is the core
package and react-dom is the core package specifically
for the web because, well, web uses the dom model. Inside dev dependencies
we have types react, we actually don't need
them in types react-dom. This is something
for TypeScript. I'm not sure why they come in. Then we have vitejs plugin-react and Vite
itself as the tool. Also we see viteconfig.js here. Since Vite can be used to
build any front-end project, it must to detect. First of all, Vite comes with
almost zero configuration. We need to specify, we need to configure with, okay, take my react files and
please do the magic, and Vite will do. For that, we need to
install the plugin, well, which is
already installed, and then inside
viteconfig we have to list that Vite plugin here. You see everything is
already configured for us. We don't really need
to do anything. If you want to read more
about Vite configuration, follow that link over here. It is pretty straightforward. As of now, if I open
my terminal again you can see added packages,
everything's great. Two more things appear here, package-lockjson
and node modules. So package-lockjson
represents the version that we've just installed. It catches the specific version of the package
that we installed. Then we have node modules. Node modules is the
place where all of our dependencies
were installed. Since we have that folder, now we can easily run our
scripts and they will work. Before we're going to do that, let's configure a few
more things here. We're going to add eslint
and prettier to our project. In order to do that we need
to install them first. I'm going to run npm
install dash dash save-dev. Save-dev will instruct
npm install to install the packages as
developer dependencies, so npm install
eslint and prettier. Then we need to create
config files for these two. You can see that once
the command finished, I have both prettier and eslint appear as developer
dependencies in package json. I'm going to create new file.prettierrc
and the other one is going to be.eslintrc. Now, how are we going
to configure these two? We have something called Gist. This link will be
shared with you. Inside that Gist, you can find.eslintrc
and.prettierrc files. These are the configs
that we're going to use. We're just going to copy it from here and paste it
just like that. You can choose any
prettier config you want. This is just my personal
preference that I picked specifically
for this project. You can change any
values for your needs. Then eslint config, I also copied from there. However, it is more
interesting than prettier. Here we do a few things. We extend eslint recommended, which is the config
built into eslint. We don't need to install it. Then we extend plug-in, react, recommended and plug-in react JSX runtime as well as prettier. These are actually coming
from the packages, so these packages
to be installed. If we go back to that Gist here, we can find developer
dependencies, MD, eslint-config-prettier,
and eslint-plugin-react. If we go here, we need to install them first. These are the plug-ins
that we extend and they do not appear
out of thin air. They have to be installed. I'm just going to copy the
installation command for eslint-plugin-react
and install it. Exactly the same I will do
for eslint-config-prettier. What these two are doing? The eslint-config-prettier
will ensure that our eslint configuration and prettier configuration do
not collide with each other. This package just ensures
that we did not run into any misunderstanding
between these two tools. Eslint-plugin-react is a
pretty popular package. Well, basically a list of rules for linting
react projects. The configuration that
we have here below, I basically took it from the eslint-plugin-react
page documentation. You can find it here. We extend two things
from that plug-in, recommended set of rules
as well as JSX runtime. JSX runtime, we're going
to get back to that, what that is exactly. Insights rules, I disabled
react prop types rule, which comes from
plugin-react package. The reason for that prop types is something that we're
not going to cover. However, it is included here, so we don't really need it. It will only disturb our
development process, so we just disabled that rule
completely, we shut it off. The rest is just
like I told you, it was taken from here. Great. Let's finally maybe
try and run the project. Inside the scripts, we have three scripts
defined by default, dev, build and preview. Dev is going to run local
development server, build we're going to
build the project, and preview I'm pretty
sure it is going to preview the final
production build to us. It will serve the
production build files. Let's go ahead and run the
dev script, npm run dev. After a second, you
will see that message. Now, we can actually
access that URL that it gives us an open
it inside the browser. If I'm going to go here, you will see this. Well, this is our React
application at the moment. What it did in this case, it created a local server for us and exposed us the link that we can use to access
the development server. This is the place
where we can see the project locally
and develop it. Let's stop the
command by pressing Control C multiple times. Let's try out and see
the other command build. If I'm going to npm run build, you will see a couple
of things here. Vite creates the dist folder, and inside the dist folder, it creates SVG, HTML, and inside assets, it
creates JS and CSS files. What this command does, it takes all files inside source folder and
builds them into HTML, CSS, JavaScript, and
secondary files. This build command produces final production build
of our application. Later on, we can take the dist folder and
deploy it to hosting. This is exactly
what we're going to do later in this project. We don't really need to
inspect anything inside dist. It is optimized, it is minified, and you can see it looks ugly. This is totally
fine because it is supposed to be
optimized in this way. Again, under the hood,
vite uses roll-up. The roll-up is the
tool that does all of that minification, transpilation, and the rest. Now, let's take a look, what do we have here
among other files? The source folder is the
folder where we're going to create our source files. All react components, all
the code goes inside source. The rest of
configuration, eslint, prettier which are not
part of the source code, but they are part of the
project configuration, they are located in the root folder here
next to package Jason. Also, we have index HTML here. Index HTML here, this is
going to be our entry point. This is where our
project starts itself. We will get back to that later. What we're going to do now, we do not going to
touch anything. We're going to cover
that in the next video. For now, let's just
overview the rest. We have public folder and
we have the source folder. The public folder
is the place for static assets of our project. They are always served under the root path
of our application. What I mean is that let's
run the dev command again. If we're going to access, let's see what we
have in public. We have vite SVG so if we're
going to access slash, which is root vite SVG, we see that file is being
served here under vite SVG, so the path that you
have for the file inside public folder is
mapped to URL segment. If I'm going to create a
folder, let's call it. I don't know, lol and we can
move vite inside lol then vite SVG is going to be
served under lolvite.svg. This is the place for
files that are not supposed to be transpired, or somehow minified, or affected by the build tool. They will stay as they
are here inside public, and we can reference them
inside our application. The public folder
is pretty common inside every front-end project. Great. Now that we know what
are all of these files, there is only one thing we
want to do before we can start the development and
digging inside these files. We want to introduce, Git to our project. What do we need to do, we first need to
initialize, Git here. Inside the terminal,
we're going to type git init and here you can see that Git is now
present so what we can do, we're going to add all of that to the stage and then
commit everything. Just one note here. There is a new file
here called Gitignore. Gitignore is the file
recognized by Git system and everything that is listed inside Gitignore will be
ignored by Git. Inside that folder,
we have a lot of secondary files that we
don't really care about. However, we also have here
node modules and dist. These two will be ignored by Git and if you
see inside VS code, they are not even highlight.
What does it mean? It means that when
we commit files, all the files that are affected, they will be added as
part of the Git project, but those files that
are listed here will not be recognized by Git. They will be simply ignored and this node modules
are ignored because, well, we don't really need them. These are dynamically
generated files. If we want to, let's say, share our project
to somebody else, that person ones downloads all of the project files
will not have this and node modules because
the weight a lot and they don't really need it because they can be
created dynamically. I'm just going to
type npm install, Node modules will be recreated. I'm going to type npm run build and dist folder
will be recreated. We don't really need
them the weight a lot, and they can be
created dynamically. That is why they are
listed inside Gitignore. Let's go ahead and
add everything to the stage state with
the git add dot, so we can see a bunch
of warnings here. Sometimes it's totally fine. Git ensures that our project
is cross-platform between different systems which have different encodings so we don't really need to
worry about that. After that, we do commit
all of these staged files with first commit message
and if we type git log, we see that we have
first commit here. Awesome. Now, we need to upload that Git
project to GitHub. What we're going to do, we're going to go
here to GitHub. We're going to click on
New repository here. Repository name, we're going to stick with TicTacToe-game. I'm going to choose this
repository to be public. I'm going to make it public
later on once we finish that, we don't need any ReadMe
file initialized with the new repository because we're going to create
that ourselves later on, or maybe we can do it right
now so I'm going to create a new file called README.md, and inside, I'm going
to use Markdown syntax. This is documents syntax, so I'm just going to
add hashtags here. Don't think about that too much. Let's call it Tic Tac Toe game. I save it and since
it is a new file, we again need to
add another commit. Added, ReadMe.md. Perfect. Now we
have two commits. Great. We don't need ReadMe, we don't need Gitignore
because we already have Gitignore auto
add it by vite. We don't need any license. I click Create Repository. Great. Here inside the setup now I can configure and
I can actually associate my newly created
repository on GitHub with my local repository
on my computer. We can follow the prompt here. If we are creating
completely new repository, if we don't have any files, but that's not the case. We need to choose push an existing repository
front common line. I'm going to just copy
line by line here. Git remote at origin. Once I do that, after that, I can type git remote-v and I'm going to see
that under alias origin, I have this repository and if I copy that link and if
I open in a new tab, it will lead me here, which means well the
link is correct. Then it suggests us to
type git branch-M main. I don't think we're
going to do that. The problem with GitHub and Git Community is that
they can't decide what is the better name for the for the default main branch well
usually it is called master. We are currently on
the master branch, but people want to make it
pretty straightforward. Instead of master, some
people wants to see main. We're going to
stick with Master. This is not a big
deal after all. What we're going to
do since we're now associated the project with
the remote repository, which is going to upload
it to GitHub by typing git push origin master. Origin is the alias
which points to the repository and
master is the name of target branch on the repository where are we going to push our current code. I do that command. You can see something happened and if I'm going to
refresh the page here, I will see all the projects here and ReadMe file
that we've created. Something like that. Congrats to everybody. We created and configured
the Tic Tac Toe projects. See you in the next video. We're going to start
creating the app finally, and we can see what are
the components. Bye bye.
42. Eslint and Prettier extensions: Hey you, here's just a quick reminder
about ESLint and Prettier. Since we want to make sure
that these tool are integrated into our VS Code and we see
everything in real time, we see the highlights and we form a defiles
when we save them, we need to make sure that the
extensions are installed. Go to the Extension stop here, and make sure that you have Prettier code
formatter extension installed here as well
as ESLint extension. ESLint extension will make sure to highlight
any ESLint problems, so warnings, or errors
that we have in the code, the extension will
take care of that. Prettier extension will
make sure that files are formatted against the
conflict when they are safe. However, for Prettier
configuration, we need a bit more
of configuration, for that, you have to go to
settings JSON in VS Code. Open user settings JSON, and here inside we
want to make sure that we have editor
format on save true, as well as editor
default formatter and JavaScript, editor
default formatter. All of that is described
inside the Extensions page. Just open that page directly in VS code, just scroll through, copy that as well as
copy editor format and save and put it inside your settings JSON,
just like that. After that, once you're
going to save files, they will be auto formative. For ESLint extension, we
don't need any configuration, it will just work. See you.
43. What are React components and props: Hey all, let's finally find out what do we have
inside the source folder. Let's first see how Vite resolves everything
to the source folder. If I'm going to run npm run dev, then Vite serves the dev
server and we have this. All of that is created and
defined inside the source. But how Vite actually
resolves to this? If we look inside package.json and we'll look inside
the dev script, the dev script, what
it actually does, it just calls the Vite command. However, an optional argument to Vite command is
path to index.html, which serves as the entry
for Vite to understand that, hey, this is our entry point. Index.html that we have here is the entry,
and by default, when Vite is called
without any arguments, it looks for index.html
inside current folder, which is correct in our case. Inside index.html, we
have simple markup, so Vite results to that index.html as soon as
the command starts, and it sees that, okay, inside the index.html, we have script which
points to source main.jsx. Source main.jsx is the entry
point for React application, while index.html is the point
to the application itself. Well, in one application you can actually have
multiple React apps, but that is rarely seen. We have script which
points to main.jsx. We have dev with ID set to root, and we have pretty
default met attacks here. We can actually change it
and call it Tic Tac Toe. Once I save it, you can see in the terminal it was
changed to page for load. If I go back, it was automatically
loaded for me. I didn't press anything
and the title was changed. Pretty awesome, isn't it? If we look inside,
source main.jsx. Here, we finally
get to know React. We have a few things
imported from React, and react-dom/client. This import React from React, before React 17 was required in every file where
you write React code. However, starting from React
18, this is unnecessary. You can omit import in React. But in our case, since we use React namespace
to use strict mode, we still need to
import it only here, but in all other files, we don't need to type
import React from React. This was necessary again
only before React 17. Inside eslintrc, we have plugin jsx-runtime to configure eslint to understand that
we are using React 18, please do not tell us that we need to import React from React. Eslint knows about that. We import ReactDOM and on ReactDOM object, we
call createRoot. To createRoot method, we pass document get element by ID root. We grab element from index.html, which is just an empty element, and this empty element is
called the mounting point. This is the just empty element. It can be any valid HTML element that must be present
inside HTML. It will serve as the vessel
for the React application. For the component tree. We create root from
that HTML element. We get it again from index.html, IDs must match if
I'm going to type something different
that does not match root define an index.html. Nothing will be
created on the page. Well, this is obvious. Great. We get it back to root
and sure everything works. Once we have the root object, on the root object, we
call the render method. To the render method, we have to pass
the component tree that we want to be
present on the page. Well to render method, we basically pass our
React application, our React components. The App component is almost always represents the main
components inside React app. It's almost always, I'm pretty
certain, called just App. React StrictMode,
it is something that was recently
introduced to React. It comes also as a
component, but what it does, it just does a few things that will warn us about
potential problems, or errors that we might
have in React app. We just keep it like that. We do not change anything here. What you see here is our
component tree, just like that. All components always start
with a capital letter. You will not see a
single component that starts with lower case letter. This is impossible. The first golden rule is that components are
always capitalized. Always, no matter what. We have the React StrictMode
mode and App component, and this is our component tree. Now, let's finally take a look
inside the App component. Inside App component, oh my God, we already
have something. If we hover we can see any eslint error which comes from react/jsx-no
target blank rule. Well, that is fine we're not going to do
anything about that we're just going to remove
that markup anyways so we don't really
care. That is good. That eslint tells us
that this is unsafe to keep Anchor tags without
specific attributes. Perfect. We just
don't touch it then. This is a component. App function that you see here is a component
it is called App, so it is an App component and we have a few things already created here but let's just remove them we
don't need them. I'm going to remove that, I'm going to remove
that something you said that we don't know anything about,
React logo, App.css. Maybe we can keep App.css. We can then remove the rest. Instead, we can just type hello, remove class name at all. We have a single div, hello and close div, we save it. Then we're going to
remove assets folder. We don't need it. We're
going to remove index.css. We don't need it
inside main.jsx. We're going to remove
the reference to index.css since we just
removed that file. We only have main.jsx, which imports App component, and inside App component
we have App.css. Great. A component is just a function that
returns JSX markup. What you see here is HTML, but in reality,
under the hood it is translated to JavaScript. Everything that you write
here is JavaScript. This HTML markup
here is called JSX. If I'm not wrong and if
I remember it correctly, it the combination of
JavaScript and XML, I'm not sure about
that, but anyways, this markup is called JSX. If you can see, we also
have the extension.jsx. We could have used extension just.js instead of
jsx, but the thing is, since Vite is a front end tool and it also somehow
needs to detect where exactly do we have
React markup and where exactly do we have
regular JavaScript. It requires us to name
all of our components, or all of our files
where we have jsx markup wit.jsx extension. That is why you see main.jsx because we have JSX
markup inside an App.jsx because well this is a component and it definitely going to have JSX markup inside. Again, a component is just a simple function
that returns JSX markup, which looks like HTML and under the hood it is translated
to JavaScript. We can type any valid HTML here. If I'm going to type span tag, or h1 tag and call it a
title then I save it, then I go back, you can see
it is been reflected here. Great. If I'm going to inspect
markup inside the browser, I see div id root, which is again our
mounting point for the application
defined inside index.html, and then our React
application is mounted inside the div, just like you see here. The markup that we defined inside App component,
div and title. As simple as that. Now, we also have App.css here. As you already noticed, to create some styles, or to style a React application, it does just enough
to create a CSS file. Write regular CSS here, then import it inside
the component. Just like that. Nothing special. To assign classes to
elements that we have inside the markup we need to pass className attribute to elements, not class but className, because remember that
although this is HTML markup, it is translated to
JavaScript under the hood. It means that it is
processed by React. In React, instead of
passing just class, we pass className attribute. Inside className
attribute we specify what class names this
element should have. Let's pass something random. Let's pass the card class
that is defined inside CSS. We're just going to do
card, and then save it. If we inspect, you can
see now this div has card class with the CSS
that is defined here. It works just like that. Nothing special about that. Then let's go ahead and
create our own components. Inside source, we're
going to create a new folder called Components. Inside that components folder, we're going to create new file, which we're going
to name square.JSX. Here, we're going to create a new function called square, and for now, it is going to
return a simple div, hello. From that file we're
going to export default square, just like that. Now, we just created
as square component and we want to use it
inside another component. In the react, you use components inside
other components. Everything is a
component in react. We go back to app JSX, and here we're going to import square from components squared, and then inside here, we're just going to type
square and self-closing. You can see when you
want to use components, you use them like HTML elements. However, again, the first rule, they
are always capitalized. Basically components,
they are very similar to reusable HTML tags, but they are components with their own logic defined inside. If we go to the app again, you can see hello is
being added here. This is our component
and the mark up is inside square
is about hello. If I change it to
something else, it will be reflected here. As simple as that. Now, you know that any HTML attribute can receive some arguments to pass
some information, to pass some data
to that element. For example, we have image tag. Image tag expects
two attributes, source and alt, in case image does not load. Let's go ahead and
try and specify that vite.svg as the source
for that image tag. Since vite.svg is
served under root, because remember
that public folder mapped to URL segments, I'm just going to
specify vite.svg, save it, and you see it works. It points us to vite.svg,
which is correct. Components also have attributes, but all these
attributes are fully defined by us inside the
component definition. These attributes
are called props. Just like HTML elements
have attributes, components have propts to pass some data inside that component. We have square component. If we open square component, this is just static data here, it just shows hello. What if I wanted to display
the square component and change what is going
to be displayed inside? Let's say we can duplicate
square components, just like that, and we will have multiple square components, for instance hello,
hello, hello, hello. But what if they need some
dynamic information in size, some dynamic data like hello 1, hello 2, 3, 4, etc? To do that, we need
to pass props. Props is just the object that the component receives
as the first argument. Just like that. If we're
going to cancel log props, and if we open console, and if I'm going to
refresh the page, you will see multiple
console logs here. Why do we have multiple? Because we run the square
component multiple times. For each component,
console log gets printed. Right now it is an empty object. It is not undefined, it is an empty object. Whatever we pass to the
component as a prop, will appear under the
props object here. Just like we pass
attributes to elements, we pass props to components. Let's say to this latest
square component, we're going to pass prop. Again, it is going
to be fully custom. Let's call it value. We're going to pass String 5. We go back here, I refresh the page, inside browser console,
we can see value 5. It has been cancel
locked two times. Well, that's wrong, that it has been
canceled two times. I think the reason might
be the strict mode here. Let me try very
quickly and remove it. If I refresh, now I have only one console
log. That's weird. The thing is when the
component updates, it has been updated inside. When the component updates, JavaScript reruns and the logic inside component runs again. For some reason, the strict bone component
forces component to re-render JavaScript
inside component to rerun and we see a console log for the same component
multiple times. Let's keep it like that. We have value 5. For the rest of components
that we have here, it is still an empty
object because well, we do not pass
anything inside it, but for the last component, we pass value 5, we pass the prop. Great. I think it's clear that since we do not
pass anything here, for these components,
it is an empty object, but here we pass value 5. Now, inside the props object, we have key value
with value string 5. Inside square
component definition, we can now use that value here. Since it is an object, it is available
under props.value. Let's explicitly console log props.value and
refresh the page, we see undefined and
five, because again, for all these components
that do not pass value prop, value will be undefined, but for the last component
value will be string 5. Great. Now, inside JSX markup, we can display
JavaScript expressions. Right now if I type anything or if I wanted to, let's see, display that props value as a text inside my component
instead of hello, so it feels dynamic. I would probably
type props.value. But will it work?
Let's try and see. If I open my page, I see props.value as a text
because it does not work. It is just a string. But if we want to evaluate props.value as a JavaScript
inside our JSX markup, we have to use curly brackets. Just like that. Inside
curly brackets we can enter any valid JavaScript and it will be evaluated and eventually interpolated into the
markup that we write. If we go back here, we see only five. But where are the rest
of the components? If we inspect the markup, they are just empty. Because they are empty, they do not take any
space on the page. But the last component, which has been rendered,
has five displayed inside. Exactly what do we
pass here as a prop? If we go ahead and pass another
strings here like hello, value is going to be my name. Value is going to be something. Let's remove this one and
we save it and we go back. You can see everything is being displayed
just like we pass. In this manner, using props, we can pass the information
into the component. Here's a quick tip, since
we always know that the first argument to the component function
will be the props object. We can use destructuring
instead of writing props.something all the time. What I'm going to do,
I'm just going to apply destructuring directly
inside function arguments. Since we destructured the value of key from the props object, I'm just going to
grab it like that. Now it looks much cleaner and we don't need to
write props.something. In this manner we can pass as many props as we
want inside component. Also apart from that [NOISE], we can pass another
special predefined prop called children. Children is something
that you pass inside the component
as its own markup. What I mean by that is that if you look inside square
component right now. It is self-closed. It is and inside we
pass different props. However, we can also
write it like this. Square then close it
on a separate line. Then inside we can pass
something like div, hello there. Maybe another title
says, this is title. In this case, this component is now not self-closed anymore. These stay self-closed
but this is just like a regular not
self-closed component and inside we pass markup. Everything that we pass inside the component
in this manner. This markup here, hello
there, this is title. It will be available inside
the component definition. As the children prop, it is a reserved key name
specifically for that. If I'm going to go ahead here
and console log children. If we open console again, you can see that for the
rest of the components where we do not pass
children, it is undefined. But for the first component, if you open it, there is
some weird stuff here. This is the JavaScript
that is being actually used under the
hood behind the JSX markup. We can take the
children and render it. We can use it as a slot. In other libraries,
it is called slots. In the reactor, it's
called children. You pass some markup inside the component and
then the component inside using it as a children can decide where
exactly it will be rendered. Inside this markup, I'm going to type, children
will be rendered below. Inside the div, I'm
going to interpolate children because again, if I'm just going to
pass children like that, it will be considered
as a string children. But since children is a
variable inside this function, we need to interpolate
it into the JSX markup. Just like that. Now, if we look inside our HTML, we have different things here. For the first component, we have something then we have children will
be rendered below. Then we have div, which is children that we passed to the
component inside it. We pass hello there
and this is title. This is exactly
what we see here. This HTTP of HTML is interpolated inside
square component. It is available as a children. It has exposed as
a children prop. Again, you cannot change. It always stays like that. It's reserved prop
name children. It never changes and it will always stay like
that no matter what. For the rest of our components, nothing will be rendered. You will see it will
be an empty div. Whenever you try and display, or let's say whatever you try and interpolate undefined null. Inside JSX markup, it will not be rendered
because well it is considered as an empty value, it will not be displayed. If I'm going to go ahead and just try and display
null inside, nothing will be there. It will be just an empty div. The same goes with
undefined and with false. All falsy values will not be
evaluated into something. They will be just omitted. Just like that, we can
create components. Cool, isn't it? In the next video, we're going to create
board component. We're going to create
square root component and we're going
to try and tackle some functionality into
the app. See you there.
44. How to apply CSS styles. Configuring SASS: Hello there. Let's
continue building the app. Last time we discussed
the components, how we can create components, how we can pass children, what are the components, how we can display them, etc. Now, let's start and
bring life to our app. What we're going to do now, we're going to create the markup that will
be used in our game. We go back to app JSX. We're going to remove
everything from here. We're going to remove
that class name for now, we're going to remove
import of square, and we're going to
go ahead and create a new component inside
the components folder, which we're going
to name board JSX. It will represent our
board and we will put all relevant logic
inside that component. Again, I'm going to
create word function. Inside for now, we're going
to display div as hello, and from that file, we're going to explore
that board component. Then inside app JSX, we're going to import board
from components board. Then we're going to run for it here as a self-closing
component. Now we go back to the browser, we see hello, which comes
from board component. Now, inside board, we're going to define
the initial marker. We're going to give it
a class name board. It's not treated anywhere yet, not in CSS file, not anywhere. We're going to just tag it
with the class name board. Inside, we're going to create rows because
if you remember how our game is going
to be tic-tac-toe and it has to be that, let's say row-like
structure inside HTML. We're going to
create three rows. We're going to have three divs. Each div will have
class name board, row, and inside each row we
will have three squares. It will be basically just
a grid, three-by-three. Inside each row, we're going
to use the square component. We're going to import
square from square. By the way, this./ represents current folder where
this file board JSX in this case located it. If I type./, it represents this
components folder. It means whatever I type further on will be resolved
from that folder. I import default,
export, this one, a name, its square inside board, and all of that is imported
from this square file here. Inside each row,
I'm going to run the square three
times, just like that. Eventually, it looks
something like this. If I refresh, we still have
markup from the last video, but let's actually remove it, and let's use only
the value prop. But we still have to pass it inside each instance of
square root that we run. I'm going to pass
the value zero here. Value is going to be one. By the way, in the last video, I pass the value as a string. Just like that. A string can be passed without any
curly brackets but if you try and pass five and you want it to be a number
instead of a string, you will have to
use curly brackets. Again, curly brackets
anywhere in JSX markup allow you to use any valid
JavaScript expressions inside. Zero as a number is a
JavaScript expression, and we can pass it
as a value prop, and it will be just
number 0 or number one. If you want it to be a string, you can just type it like
this and it will be a string. An expression which
evaluates into string. But if it's a string, you can pass it like that. If we pass numbers, we have to use curly brackets. Value 0, value like that. Let me quickly copy
it all over and make it like this up until eight. You might have a question
why it starts from zero. Well, I didn't tell you, but we're going to touch it very shortly how we're going
to represent board, how are we going to manage that, and we need to represent
squares somehow. We can represent
them by indexes. A raise in programming
start from zero. Since we're going to use a
raise to manage a board game, indexes will start from zero. That is why for now we give our squares indexes and they start from zero
because these are going to be array elements. We go back here and we see this. Well, if we inspect HTML, this is exactly what we wrote. Now, let's make it a
little bit more stylish. We go back to square JSX and our squares
will be clickable. Instead of div, we can render
a button with type button, and we're going to give it
a class name of square, which we're going to
define in a moment. Now, it looks like that, well, and it's not
too bad, isn't it? But we're going to apply
our own styles here. If we go back to guest here, exactly this page where you can have all the provided
information for you if you scroll here we have
styles.scss here. Well, SCSS is for Sass files. Sass is a CSS preprocessor
that we're going to use. What is a CSS preprocessor? It is basically just a
language built on top of CSS and it has its
own set of features. Eventually, when
we're going to write this something dot SCSS, it will be compiled
to something dot CSS, and it will work just
as a regular CSS. But it has disadvantage
of its own features, for example, like nesting. In regular CSS, we're not
allowed to nest selectors. We have to write them in line, like dot history rapper then
space then dot history. In SASS, everything
can be nested. We can have variables
and different things. You can look in Google for SASS, Syntactically Awesome
Style Sheets. You can open it,
click "Learn SASS", and go through this
page very quickly. It is not too long, it's pretty short,
and it covers, and shows you all
SASS capabilities, for example, variables. By using the dollar sign, you can have variables in CSS. Pretty cool, and you
can have nesting. You can see if you
write this SASS markup, it translates into that CSS, so we're going to use SASS. In order to do that, we need to instruct Vite. We need to tell Vite that
instead of regular CSS, we also would like to use SASS, and Vite has support for SASS. If we go back to Vite documentation and if we
click on "Search" and look for SASS here and we
open the first link, we have the CSS
pre-processor section, and Vite does provide built-in
support for SCSS files. Then in order to do that, enable the support we need
to install SASS compiler. SASS compiler is available
as npm package called SASS. You can see this command here. If I type npm SASS, and I'll put the first link. This is the package
that gives us the ability to compile
SASS into CSS files. So we just need to install it
and Vite will take care of the transpilation
process actually. I'm just going to copy that
command, open terminal, stop the command by
pressing Control C, so our diff server breaks, then I'm going to install SASS. Dash D is basically
the same as dash, dash save-dev. Just a shortcut. It will install SASS as
a developer dependency, and if you look
inside package JSON now you will see SASS
under dev dependencies. Great. Now we need to
first run npm run dev to start the server
again and we can go ahead and actually
create SASS files. Inside source folder,
I'm going to create styles.SCSS, and what
I'm going to do? I'm just going to go ahead to the guest and I'm just
going to copy everything from here and put it
inside style CSS. You don't need to go too
much into details here. This is the final markup
that we're going to have in our application because these
videos are not about CSS. If you need to change something or if you want to
bring something new here, you are free to do that. Please go ahead, change it, play with it, we're going
to use this markup. Inside these styles, we
have board clause defined. Then inside board, we
nest board row class, and then inside board row class, we nest square class. Under the hood, if
you open SASS again, nesting compiles into
these selectors here, so basically board, and inside the board row will be compiled to something like that, and square will be compiled
to something like that. This is very
convenient, I think. We have board and board row
and square root classes, so what we're going to do, we're going to import dot
SASS file into our app. We're not going to need
app dot CSS anymore, so we just delete it. Then we go to app component, and instead of
importing app CSS, we're going to import
styles dot CSS, and it will work. Now we have board, board row, and
square classes here. We go to square, we assign square class, which is going to
resolve to that CSS. Inside board, we have board, and board row, which is going to resolve
to these classes. Now, we go back to the app, and boom, you can see, it looks just like that. However, you can see something is wrong or something is wrong, is actually our markup so we need to change
it a little bit. If we go to app here, we're going to give the component that wraps
our entire markup. We're going to give
it the app class here that we defined
just like that. So we can give it a
class name of App. What it will do, it will give us the basic flex-box
with the column setup. If we go back here, you can see now we
have our final grid, which looks like
that. Pretty cool. That's it about styling. Now you know one more trick, how you can style
your app using SASS. If you already know any other
pre-processor like Less, you can also go ahead, and read in Vite documentation how you can plug
it in or stylus. SASS is pretty popular in every common solution
in applications. I think it's pretty cool
and very convenient. Now we actually started off with interactivity but
ended up with styles. I think for now, we're going to end
up with styles, and actually in the next video, we're going to talk
about interactivity. I think you don't mind. Since we've already done
a lot of work here, we introduced SASS, and we created board
and square components and we have our
pretty markup here, let's actually
commit everything. What do we have here?
We removed app CSS, we modified package JSON, we deleted a couple of files. So we're just going to go ahead and add everything
to the stage state. I'm going to type "Git
add dot" that everything appears under staged changes and we're just going
to commit everything, and we're going to name the
commit as installed SASS, and created board and
square components, bare-bones, something like that. Very weird commit message, but I think it will do. We commit everything. In order for everything
to appear on GitHub, we need to deploy
it because again, here we need to remember
that if you commit changes, they stay locally on your PC. If you go back to
GitHub right now, nothing will be changed because all your
changes live locally, so you need to deploy to GitHub hosting every time you
introduce new changes locally, so git push origin master. I do that, and I refresh, and now we have everything good. Awesome. As I promised, next video is going to
be about interactivity, so see you there.
45. React State with useState hook, React events: Hello again. In this video as promised, we're going to talk
about interactivity. What I mean by interactivity. Interactivity is something
that happens when user interacts
with the web page. When I click on the button,
something must happen. An event occurs and something
gets updated on the screen. This is called interactivity. Now we would get to see how
we can manage that in React. In raw JavaScript, in plain JavaScript
without any React, you have a JavaScript file. You usually grab
elements with DOM API, something like document
get element by ID. You grab some button, then you write button.add
event listener, and that listener, you attach some function that will run when you
click on the button. But in react, it is pretty much the same. It looks different, but it's almost the same so
let's open up JSX in here. Just for an example, let's create a button and
we're going to play with it. I removed the board for now. Where did component for
now? We don't need it. We have eslint editor
here, no unused variables. It produces an error
instead of awarding, let's actually make it into running so it
is less variables. In eslint, I'm just going to no unused vars and I wanted to produce a warning so now it will be orange instead of red and it will not
disturb us a lot. So I'm going to go
ahead and create a button element and
I'm going to call it, clique me, please. Now, what I want to
do on that button, maybe I want to
update something or I want to cancel log something, and see some value
inside browser console. How we can do that? To every element, to every HTML tag that's
used inside JSX markup, you can pass an event
handler so we have events, click event, mouse event, different types of events and whenever I say event handler, I refer to the
function that will run when this event occurs. For example, let's take
this button element. If I'm going to try and pass attribute that starts with
on from the intelligence, I can see a pretty long list of different events available
for that element. Onsubmit, onResize, onMouse, over onKeyup, etc. Right now we are interested
in the onClick event so I'm just going to do onClick and for that attribute
on button element, I need to pass an event handler, a function that will
run when the click occurs so I'm just going to pass an empty function here and inside that function, I'm going to do console.log, "Hello" so if I save it, I go back to the app. Now whenever I click
on the button, you will see hello
gets printed every time I click on it so
it actually works. In plain JavaScript, all event handlers always
receive event object as the first argument so
this function here in plain JavaScript always receives an event object which
represents the event. Let's try and cancel
log this object here. Let's see if there
is any difference. So if I click onbutton here, I can see hello and then
I see the event object so this event
object is a wrapper around native event
object that you would usually get with plain
JavaScript but in react, this is something called syntactic event so
it is basically just a wrapper around native event with the
few react properties. If you inspect it, you have a pile of different
properties here, as well as you have native
event that you can access with just event.native event. In this manner, if you need it, you can get native
JavaScript event object. But most of the time
it has just enough to refer to synthetic event. Most of the time it contains the information that you
are looking for in case you need to use it
so in this case we don't need an event
object at all. We are interested in
providing some interactivity to the app so now let's try it and
see how we can do that. Let's say we have a counter. Let me go ahead and
create a variable. Let's call it "Let counter, which starts from one." Now what I want to
do, I just wanted to display that counter here and
whenever I click on button, I would like to
increase the value one, 2, 3, etc. Inside the onClick event
handler, actually, let's try and move this function here to the app so
it looks more nicer. It looks just more
appealing and easier to read so we just can create that function here
and we can call it onBtnClick and I'm just
going to copy it from here, paste it here and for
the onClick attribute, I'm going to pass on BtnClick. Just like that so let's say
inside that event handler, I would like to increase counter here so instead of console log, maybe let's keep it. Let's go ahead and say counter
equals counter plus one. Nothing special. Now, we can see that it's
actually been increased? Let's go head and below. Let's display the counter value so I'm going to
use curly brackets to again interpellate
value into just six because it has
a variable counter. I save it. I go back
here, I see one. Just we have it
initially, great. If I try and click
it, nothing happens. But why is that? The problem with this
approach that React does not follow exactly the same
rules as plain JavaScript. So if you were using
plain JavaScript and tried to write very
similar logic, it would have worked,
but not with React. In React, whenever you need a value that changes over
some period of time, after let's say
over the period of interactivity just
devalued the changes, you need to make it as a state. So in React, a value that
changes must be a state. Just in a second, we can now create
our first state. But before we going to do that, let me quickly explain to
you why this does not work. I'm going to open
paint and just quickly write you how React
handles that. In React, there is the
concept of re-renders. A re-render is basically when the component is being
repainted on the web page. When we use state, state always triggers a
component to re-render, and the state on next
re-render will be updated. But, if we just create variables like that and
try to update them, it will not do anything. The reason for that is
because when we just try to mutate the
variable just like that, it will not trigger
component to re-render. A component life-cycle is
actually based on re-renders. When we refresh the page, the component is being
mounted on the page. It means that it is being
rendered for the first time. So let's say this square here represents one single render. The component is
mounted on the page, it has been rendered,
it has been displayed. Now, by React rules, if I want to update
something on the screen, if I wanted to update something
within that component, I need to trigger a
re-render for that. Approximately on this picture
it will look like that. This re-render will translate
into a different re-render. These are frames and
React switches over them. So this is our first render. Let's say we update state. Again state will be the value that changes over
some period of time. State has been updated, state update triggers
a re-render, and now we have a component
that was re-rendered. Again, with variables, if we're going to use
them just like that, it will not work. The reason for that
variable update, this line number 9 it does not trigger a re-render
and this is a problem. We stay at this first frame and try to update this
counter plus one here, and this it does not nothing, it does not trigger a re-render, which means we need to use state for all
values that we know will be changed
over some period of time after some interactivity. Each re-render here, so this is first re-render,
second re-render, they are oscillated
of each other, they do not know anything
about each other. The first re-render does not know that there will
be a second re-render, and as well as second
re-render does not know whether there was
a first re-render or a previous re-render, they are oscillated
with each other. All of that is managed
internally by the React, but the main point
here is that we need to know that in order
to update something, we need to trigger a
component to re-render. Whenever a state updates, it triggers a component
to re-render. Now, if we wanted to have this counter updated
and work as expected, from React we would need to explore something
called useState. On the top, I'm just going
to import useState and here I'm using named
import from React. What is useState? In the React, there is a concept
of React Hooks. What is a hook? Hook is basically just
a function that allows us to manipulate
component life-cycle. What is component life cycle? A component's life cycle
is just a period of time in which something is happening inside
the component. It is being mounted, it has been updated, it is being unmounted, so this is component life cycle. We can use React
Hooks to somehow manipulate that
component life cycle. So useState allows us to create a value that will be changed
over a component life cycle. How we can use it.
Inside our component, we just need to call
useState as a function. Again, all React
Hooks are functions. By the way, all React Hooks
always start with use prefix. So this is the
convention in React. Whenever you see use something, it is definitely a React Hook. We call it as a function, and as the first argument, we need to pass
the initial state. What will be the default
value for that state? In our case, we wanted to give it an
initial value of one, so we're just going to pass one. Now, this useState function
returns an array always. UseState always returns an
array of exactly two elements. Let's go ahead and let's name
it return value for now, and let's try and
console log it, write directly inside
the component. Let's see what do we have here? So I refresh the page and here I have just
like I told you, an array of exactly
two elements. The first element will be state value at this moment
at current re-render, and second value inside
that array will be the update function
that we need to call to update this state. Let me show you what I mean. Most of the time you will see we're going to use
a re-destructuring because we know that useState always returns an array
of exactly two elements, so we can safely apply
a re-destructuring. The first element is going
to be our state and second, a function that we need to
call to update the state. These are referred to as state and the state
update function, and we can name it
whatever we want. Our state is going to
be called counter, and the update function to set the state we're going
to call it setCounter. Now I will remove this
let counter equals 1 one I'll remove this line
counter counter plus 1, we don't really need it. Let's try and
console our counter. We actually didn't
need to cancel log it, we have it already here. If I save it, I
refresh the page, we still have one here. This is our initial state. Now, if we want to
update the state, we need to call the state
update function, setCounter. Inside on between click
and click happens, we want to increase the value. So what we can do. We can call setCounter, and inside we just need to pass a new value for this state. For now, let's just put some
static value. Let's say 10. I save it, I go back
to the browser, now I click on the button, and you see the value
was changed to 10. Inside the console matters
that you see hello here. What happened is that when
you click on the button, setCounter was called, it updated the state
from one to 10. Then you re-render took place. If we get back to that
little small diagram here, what happened is that component
was rendered on the page. We click on the button, we updated the state, and that state update
triggered the re-render. The second frame here represents our current re-render
where now state is 10. Why we see console log here? Actually, we see console
log here because we have it inside onBtnClick. But what if we put console log here outside of onBtnClick. Let's try again. I
refresh the page. We first see two
console logs, but well, this is expected because
as you remember, I told you in the previous
video about React StrictMode, it was intentional that it renders the component two
times to catch errors, but that's not the point, or maybe that will be the point. Let me just remove
React StrictMode for a second. I refresh the page. We see one console log hello because the
component gets mounted, the logic inside component runs, we see the console log. Great. But now, if I click on the button, we see value gets updated, the component gets rendered
and we see hello second time. We see that because again, on every new re-render, the logic inside the
component is being run again. Javascript runs again when the component gets re-rendered, so the state is
persisted because the useState is React
internal feature. Well, it is fully
managed on React so the value that changes over the period of time
is managed by React. It is persisted. Everything's cool. But we see console log
here because, well, this is something
that we bring into the component and the
logic runs again, so that's why we see
it a second time. If we are about to update
the state again when the next time component
going to re-render, you will see another hello, etc. You will see hello every time the component
gets re-rendered. But what happens if I
click on the button again? You see, I click
it one more time and we do not see
any hello anymore. React is smart enough to detect that the state stays the same, so the value stays the same. React is smart enough to not update component all
the time again, again. It does not run
re-computation all the time if the state
value is the same. Let's go ahead and let's try and just increase
the counter. We can do counter plus
1, just like that. Now, if I refresh the page, I click on the button, I see 2, I see hello, because again component
gets re-rendered. I click on the button again, and now the hello, we see 3 and so on and so on. However, this approach with
updating state like that, when we need to set new value
for this state and we want to calculate new state value from the current state value, we need to use slightly
another approach. Instead of doing
a counter plus 1, we can actually pass alternative callback to
the state update function. State update function can
receive one of two arguments. Either a new state value, just like you saw, so 5, 10, new value that will
set the stage, or we can pass callback to
this state update function, and inside that callback, first argument will be value, which represents current state. Let's say current counter. Whatever we return from that callback will be
set as the new value. From that callback,
we can now return current counter plus 1. It will be the same and
from user point of view, nothing will be changed,
but internally, this is correct approach
when you need to calculate new state value from current or
previous state value. Since this is the counter and we would like
to increase it, we need to know
current counter state. Whenever you have
that situation, always use the
callback approach. If we just wanted to set
it to just random number, we don't really need it
because we don't need current state to
calculate new state. We go back to the
app. I refresh. Again, just like I told you, from user perspective,
nothing changed. With something like that, you are able to manipulate
elements on the page. Based on that simple, basic foundation knowledge, all React apps are being
built just like that. You have multiple states. You can create as many
states as you want. You can manipulate
them as you want with different events
on click event, on hover, when
something gets opened, something gets
closed, everything is managed with
states like that. I think for this video, this will be enough. Now you know about React events that you can pass on something. For that attribute, you
can pass any event handler to run some function
when some event occurs. That event handler
always receives an event object as the first argument
in case you need it. If you don't, well,
just don't use it. If you need to update
some value on the page, the color counter, text, whatever, we have
state for that. Variables will not work because React does
not work this way. React is based on the
concept of re-renders, and in order to persist
value across re-renders, we need to use state. We can do that by using
the use state hook. Hooks in React are just
functions that you call during component life cycle to manipulate data
inside the component. Something like that.
In the next video, we will see how we can use that knowledge and how we
can apply it in our game. We going to create
game state and we going to manipulate squares
so when we click on them, it will somehow update
the state. See you there.
46. Creating game board state: Hey. In the last video we
talked about interactivity, about state, what is state, how it can help us. In this video, we can
continue with state, but this time we will
apply it in our game. From the previous video, I've got a few
things changed here. I'm just going to refer
these changes very quickly, and I have eslintrc
config outdated. I put no unused vars
role as a warning. Actually, let's add
another commit for that. Bars awarding reduce warming. Okay, this will do great. Now, let's continue
with interactivity. So, if we go ahead
to board, here, we're going to create
our board state, which will basically
represent our game board. But the question is, how are we going to do that? If you remember, I once mentioned that it is
going to be an array. That is why we have nine elements here and
they all start with zero. They just start with
zero not all of them. So, I'm going to
open paint in here. I'll tell you how
exactly we can represent the game state with an array. It will be an array
of nine elements. So by default, it will be an empty array with
nine elements. And by default, each
element will be null, okay. So by default, initially we will have an array
of nine element, each element is
going to be null. Then when we going to
click on a square. So our squares will
be represented by indexes inside that array. First square will
have index zero, second square will
have index one, two and so on. When we're going to
click on a square, let's say we're going to click
on square with index one, it will change its value
from null to either x or zero based on who
clicked on that square. And just like that, we're
going to manage the state. So, eventually, we will have array
of nine elements, each element can be either a null if the square
is not clicked, or x, or zero if the
square was clicked. Let's go ahead and inside
board we're going to first import useState from react. Inside board, we're going
to create new state, which we can name squares. Set squares, it is
going to be useState. Now, initially, we need
to create an array of nine elements and each element
by default will be null. For that, we can use just
simple JavaScript here, so we cannot call
array constructor with nine as array length. Then we're going to
call dot fill method, And we're going to
fill array with nulls. Eventually, it will
produce an array of nine elements where
every element is null. Now, how we can
actually associate each square with each component
that represents a square? Right now we pass 0,1,2,3 and 4. So instead, we're going
to pass squares zero. So since it squares
is our state, it will be always an array which has grabbed
first element from that array. So for second square, we can grab second
element and so on. We need to do that
for each square. Let's go ahead and do
that for each square. So we save it. We go back to the app. This site can't be reached. That is because I did not
around the development server. So, npm run dev. I go back here and now we can
see our squares are empty. Well, this is expected
because we have null value. We pass nulls. And if you remember, if we try and display null, it will not be evaluated. It will result in
nothing and HTML. Now, what can we actually do? You can see we need to
update state somehow, to update squares, to update the state when we
click on a square, how we can do that? So we have stayed inside board, but we have all the logic about square component inside
square component. What we can do,
we can use props. So we can define
some function here inside board that will
manage the logic, and we can pass that function as a prop to square component. So again, we just props
to pass some data, some information to components. So here, what are
we going to do? We're going to create
a new function called handle square click. That function will
receive one argument. We're going to
call that function with an argument position. It will be the
0,1,2,3,4,5,6,7and 8 will be the index of square. And inside that function,
we will do something. For now, we're just
going to keep it empty. So as I told you, we're going to use prompts
to pass data to square. What we want to do when
we click on this square, this handle square
click will be cold. So what do we can do, we can pass onClick or on Squared Click whatever
you named that prop. Let's just name it onClick. And for that onClick prop, we're going to pass and
build square click. But the problem is that, since we pass that handle
squared click here, and if we pass it
in this manner, then we're going to
grab that onClick here inside square, and we will need to call this function inside
square and pass the position as the
argument because handles squares click
receives position argument. So when we call that function, we need to pass that position. But the problem is that square doesn't really need to
know anything about that. What do we want to do ideally, we just want to grab that
onClick function here, and for the onClick attribute, we want to pass that
function like that. And square will not do
any logic about this. Everything will be
managed here in board. So in order to do that, what we can do for the
onClick prop here, we can pass a function, and that function will call handleSquareClick with the
position that we need. So eventually it looks
something like that. We can even simplify that
and remove function body. Now it looks more concise
and it looks like this. Why do we need to pass a function that calls
another function? Why can we call it that? Well, the problem is
that as you remember, when the components
mounts on the page, JavaScript inside
the component runs, and with this syntax, some JavaScript we'll
go line by line, and as soon as
JavaScript uses light, it will see we just call this
function here on that line. So what it will do, it will call this function write
straightaway. And whatever dysfunction
returns we'll be set will be passed the value
for onClick prop here, since our function
returns nothing, it will be undefined, and eventually onClick here inside square will be undefined. Nothing will happen. We will have this
function called write straightaway and
undefined at the end. This is not exactly
what we want. First of all, event handler is function in the first place. That is why we pass a
function, not something else. So we pass a function
that calls handles quickly with the
arguments that we need. Well, as you can see, we need to do that for
every square here, just like that and pass different position but
you can notice that there is a small
repetition here. We have a lot of things
that we can simplify here. So instead of framing values, squares, then array index, then onClick, and repeat
handles click all the time, we can simplify that function. We can simplify that syntax
by using another function. So, what do we can do here to avoid that repetition,
here inside board, we can create another
function which we can call something like
a render square. This renderSquare again receives position which is going to be square index and
inside that function, we can then return JSX markup. We're going to just copy here. From renderSquare, we
can now return square, so instead of squares zero, we're going to pass squares position and handleSquareClick. Instead of zero, we're
going to pass position. Eventually, something like that. Now inside JSX, we use curly brackets to interpolate
JavaScript into it. Since we can interpolate
variables here, which are JavaScript expression in exactly the
same manner we can call functions here
because functions are also part of JavaScript
expressions. Instead of writing squares all of them just like
that, what can do, we can just open curly
brackets and call renderSquare and pass
zero index inside. As soon as the component bounce, this function will
be called with zero as an argument which is going to be the
position inside of it. It returns JSX markup and
this JSX markup will be interpolated on the place where this function was called
well, basically here. Exactly the same
we're going to do for the rest of our squares. I'm just going to
copy it two times. I remove this because we
didn't need it anymore and I will do exactly the same
for the rest of our squares, so 3, 4, 5, 6, 7, 8. Now again, we call function
when the component mounts, this function
returns JSX markup, and this JSX markup will be inserted on that place where
this function is called. If you just referenced
this function like that, nothing will happen. If I go back, let's
see what happens. Well, we see some weird stuff here and if we try and see, we have only two squares here. What we're doing right now, basically we are trying to
display the function itself. Not what the function returns but the function
signature well and react it doesn't work
this way if you try to display objects as they are, you will not be able to do that. You first need to convert
them into strings but this is not what we're
going to do right now. This is a bit of advanced thing and we will get back to that in the future. We call that function, we pass it an argument and we check that
everything works. We basically just
slightly refactored our component but it
does exactly the same. It renders value at the
index that we specify here, value from our squares array, which is the state. Inside handleSquareClick we
need to do some logic here, so some logic to somehow
display squares. To update square state, we need to call the
state update function in our case when
index its squares. This is exactly what
we're going to do. Since our state is an array that will be changed
over the period of time and our new array state
that we will have calculated needs to be calculated from
the current state, we're going to use the
callback version of set state. I'm going to pass callback
here and first argument is going to be square state
at this moment in time. I'm going to name
it currentSquares and we need to
somehow manipulate currentSquares
state and get new, and get new squares state
with updated values. One point here that I didn't mention in the previous
video is that we cannot mutate state variable.
What do I mean by that? If we use useState and
we try to take that squares and we try to
do something like this, squares at some position
equals something. What we do here, we
directly manipulate this state instead of using
this state update function, this will not work. This is prohibited in this way, state will not be updated. In React, it does
not work this way. We need to call the
state update function all the time in
order to do that, so again, this will not work. We call setSquares and
inside Setsquares, we also have
currentSquares which represents state at a time. If we try and again mutate
the state directly here, this will not work. This will simply not work. This is not how React works. We need to call the function and we need to
return a new value. React is not about
mutating values directly. React is about returning new values if that
makes sense for you. From the setSquares, we need to return a new value. What we can do to loop over all of our squares and
somehow update them, we can use the Array.map method and Array.map method
does not mutate the state, rather, it returns
a new array value. That is why it is
safe to do that. A return currentSquares.map, so we're going to loop
over our square state. Our first argument will be the value that we
loop over at the moment, so it is going to
be our squareValue. Then we have index
of the square. Let's call it just pos. Since we already have position
in this function scope, if we try and name it position, we have collision of variables. We just stay made pos. Whenever I returned from the.map
for the current element, it will associate new
value for that element. Here the logic will
be pretty simple. The position that we
pass to that function is the position that we
basically click on. To not confuse ourselves, let's actually rename it to
clicked position and here, index inside Array.map, we're going to call position. We're going to tell if clicked position equals position of the square that we look over, in this case, we're going to return X for now from the.map. Otherwise, if the
square that will loop over at the moment is not
the square that we clicked, we simply return the
same square value. Now let's save it, it looks like that
when it's formatted might be a bit confusing
because we have function which calls function and inside function
we have callback, just get used to that, so
we get back to the app. Now let's try and
click on a square. I click in the middle and boom, nothing happens. Why is that? Let's try in console log
the square state here. Let's see what we have. We have array of
nulls rate and if I click, nothing actually happens. Let's see what might
be wrong here. The wrong part here
is that you can see the square component
was not saved. This is because, well,
whatever I just wrote here, it was not saved so the changes basically they were
not committed. I save it and now
it should work. I click on square
and you see now I have X here and if you see here, the state was updated. Now, since I clicked on
square with index 4, 0, 1, 2, 3, 4, we clicked on that square and inside that array we
updated element at index 5, and we set its value to be X which has great
exactly what we need. If we go ahead and click
all these squares, you will see all the squares
will be filled with access, which is exactly
what we wanted and we see all these console
logs again all the time. Because since we
update this state, component re-renders
logic inside runs again and we see console log every
time the logic re-runs. Great. Something like that, we are able to manage our state. For now, I think
this will be enough. In the next video, we're going to
introduce our players. We will actually have
the current player, so we will be able to differentiate who's going
to click this square next. It will be either X or zero, so right now you can
see we have only X's, which is not exactly
what I'm looking for. In the next video, we're
going to tackle that. When we click on this square, it will be either X or
zero. See you there.
47. Add players X and O: Hello. In the previous video we talked about these
squares of state, and we actually managed to set X inside the square
when we click on it. In this video, we're going
to add more functionality, so when we click on the square we can actually
display either x or zero. In other terms, we
will have a player. Before we get to
introduce new changes, we have a lot of changes made so far from
the previous video. We added that functionality
when we click on the square, we display X inside them. Well, let's go ahead and
commit those changes. I'm just going to type git add. and I'm going to name that
commit-message called, let's say display X when
clicking on a square. Let's start the server again. Awesome. Now, let's go ahead and add a player
functionality basically. Player is something that will change over
component cycle. It means, it is
going to be a state. What we'll introduce
a new state, and the state will
be the player. However, we will not make any
complications about that. It will be just a
simple Boolean value, which is going to tell us who is going to be
the next player. We're going to name it
something like, isXNext. If it's true, we
set the state to x, otherwise it is going to be
zero, as simple as that. Inside board, we can
go ahead and we create new state and rename it isXNext, and update functions
set isXNext, and by default,
it will be false. Since we already have pretty much everything
that we need, we're just is going to
modify this line 12. Here, we return x. It is hard-coded here. But instead, we're just
going to introduce another simple if else condition.
We're going to ask. If is XNext, then the value that
we will associate to the clicked square
is going to be X, otherwise, it is
going to be zero. Right after we update
setSquare state, we're going to also
update setIsXNext, we're going to toggle it
since it is a Boolean. I'm going to call setIsXNext, and since we need to toggle it, and it'll order to toggle it, we need to know current
Boolean toggle, which at this moment it is
either a true or false, and we will just simply flip it. We're again, going to use the callback version
of set state updater. We're going to press callback. currentIsXNext or
let's make it simpler. Let's just name it like
P or prev for previous, or let's go without
any complications, whatever currentIsXNext. To toggle that Boolean, we just need to apply
negation infront, just like that, and that's it. What it will do, it will
take current Boolean stage. It will be either true or false, if it's false, we apply
negation to false, it will turn into true, and if this is true, we apply negation, it
will turn into false. Basically, flip the Boolean and we do it after we update
set squares state. We do that, we go
back to our app. We click, and now
we have zero first. Now we click further, we have X and we go had, and you can see it is
toggled and flipped, and everything
works as we expect. However, if I click
on square again, you can see something
thrown here. The problem is, when we
click on the square, the logic runs again and
it updates square at the index at the position
that we clicked. What do we want to add
here, another condition. If the square already has value, if it's not null, then we simply do
not run that logic. Here are the top inside
handles square click, we can ask if squares yet, clickedPosition,
value is truthy. Truthy value means not null. Our square value can be
either null, X or zero. If this value is truthy, it means that it's not null. In this case we simply
return from that function. The return keyword
exits the function and does not go
further. We save it. Let's see, our is
going to look like. I click squares and
I try and click on the square again and
nothing happens because again, it checks the condition
and exits the function. Pretty cool.
Something like that, we added player into our game. Our next step is going to be to display the
message at the top, who is going to be
the next player. However, we're going to do
that in the next video. For now, we're going to
commit our current changes. I'm going to name that commit. What we did, let's review. We basically introduced
a player here. Introduced a player to the game. When clicking on a square, show either x or zero. We commit that, we deploy. I misspelled it. Push origin master. I have only because I did something behind the scenes
when I turned off the video. Excuse me, you should
not have that. I'm just going to use the
first flag just like that, and now everything is on gitHub. Please do not mind this part, you will not have it. Great. See you in
the next video.
48. Show next player and winner messages: Hey. In the previous video, we managed to add player
functionality to our game. In this video, we will
proceed and we will display the message here
on top of the grid, which says, next player is
and if we have a winner, we're going to display winner. In this video, we
will cover all of that plus winner calculation. First of all, what
we want to do? We need to decide
what exactly we want to put a markup
of the message. Next player is x or zero. Well, we want to do
it inside App jsx. Here, just a simple H2 tag which says next player is
for now somebody. If I go back, it looks
like this for now. However, we already
have a problem. What we need to use here in order to display who is
going to be the next player. As you can see, all logic and state lives inside
board component. It means it is not available
to the outside world. The only component
that knows about squares and all of the
state and all that logic is the board component itself and you can pass
whatever data you need from that component to
its children components. For example, like
we do with square. If we want to get
access to that state or data outside of board,
this is impossible. We have two options here. The first option is
to actually move that next player is somebody message inside
board component. Maybe put it here. We have all the data that
we need in the scope of this message so we can
actually get something from it and eventually
display that. We have next player this
or second option is to move part of this logic
to parent component. For example to app component, and then pass the
required information to board component through props and then pause another information
needed for message here. If we try to visualize it, if we open paint, we
have picture like that. We have app component
which renders board component and also
inside app, we render message. It does not component for now, but still part of app
not part of board. State is managed here
inside board component. Since message is
not part of board, it has no relation to it. It lives as a separate leaf, then it means it
is impossible to get access to what's
happening inside board. The first option that I
mentioned is to make message part of board component here. If we go to board and
put message here, we can access to data, so we can manage it here. That's the first option, but we're not going to do that, we want message to be
part of app component. Second option is to
lift up the logic, lift up the state to parent
component, which is app, and then pass required data to the corresponding
components using props. Logic will live inside
App and then we pass data to board through props and then we pass another
data to message, again using props in the future. For now it's not a component, but the idea is the same. We share data in
patent component. We open board and from
board we're going to take the state and move
it to app component. The same we're going
to do with import. We will put it inside app and handle square click as well. From now on, it will live and will be managed
inside app component. I copy it here. I've put it inside
app. Just like that. We save board but you can
see that inside board, we do not have handle
square click anymore. If we hover handle
square root is not defined because it was never
created anywhere here, the same with squares. Board component now has
these undefined values. Well, it means that we need to get access to it somehow and
we will do it through props. Since we have now squares and handle square click
here inside app, we can pass it down to
board component with props. I'm just going to pass
squares here like that and handle square click in
exactly the same manner. Now inside board, I can
apply destruct link and grab squares and
handle square click. Now, if I save both files, I open my app again. Everything works as before, but now the state
lives inside app, and all required data is passed to board
components through props. Great. It means that now
the message that we display in app component has
access to state. We can display the message. Our logic will be pretty simple. I'm going to create
a new variable here, and I'm going to tell you why. We call it a message or
let's say status message. Here we're going to do IsXNext, we return x string, otherwise, return zero string and status message since
it is available, we will interpolate
it into JavaScript. We're going to say next
player is {Status message}, or let's say instead
of status message, let's call it next player. Next player is next player. We save it and we have next player is zero.
Awesome. We click. Indeed it was zero, and you see it
changed and it goes on and everything
works as expected. However, you might
have a question, why do we displayed
as a variable here? Why don't we create eight
state for that maybe? The thing is, this next
player is something called derived or
computed state, and why don't we create another state for
that using use state? Derived or computed
state is value that is derived from latest state. Since we have
IsXNext as a state, and we know that every
time the component runs, the logic inside runs, which means this
line of code will be rerun on each
component re-render. The thing is when the
component re-renders, the state gets updated. It means that for the
current re-render, the state that we have
here will be up-to-date. It is the latest
state that we have. Since this logic re-runs, it will always use the
latest state here IsXNext. That is why we do not really need to create another
state for that. We just create a value that is derived from the
latest state value. Well, it might sound
a bit complicated, but if you think about that, there is nothing
sophisticated about that. We already have some
value that changes and we actually derive something
from that value. Nothing more than that. That is why we do not need
to create another use state, it doesn't make any
sense to do that. Now we have the message which says who is going
to be the next player, but let's go further
and display the winner. Whenever we have a winner, we would like to display. The winner is this
guy, next player X. If we go back to the guest that was shared with
you in the beginning, and if inside you look
for calculatewinner.js, you have a function
here, calculate winner. Let's copy that function. Let's get back to our
app and inside source, let's create new file
and call it winner.js. If you noticed, we did
not name that file with dot.js6 extension because this file does not
have any js6 markup. It is just a regular JavaScript. From here, from the js file, we're going to export
function calculatewinner. What it does, it takes
our squares array, which again, if you remember, is an array where we store
our square values; null, X, or zeros, and from that
array, it calculates winner. If there is no winner for cotton squares, it returns null. If there is a winner, it returns X or zero, which takes place on line 15. How does it work? How does function work? Here we have lines
array defined, which basically represents all possible winning combinations
in tic-tac-toe game. For example, 0, one, and 2 is the combination 0, 1, and 2, so if you
have X's in one row. You can check every possible combination that you see here. Again, it's just a set of all possible winning
combination. Then what do we do here
we use simple for-loop. And we loop over these. We go over each
winning combination. I'm saying very simple. We check our current squares array against
winning combination. If we have that
winning combination in our squares state and
our squares array, then we just return the winner. Here we use array
destructuring on line 13. Lines at eye position
represents this array. From that array, we
wrap first, second, and third element
and name them a, b c. For example,
for this array, a is going to be zero, b is going to be one, two is going to be c.
Then using that if logic, we see if there is any winner. If you're really interested
in how does it work, just try and actually put
the values into that, let's say, formula yourself. A bit of logic here. We go back to app
and we can do it by simply just running that function inside
app component. Since we need to pass
square state and calculatewinner will
produce as the winner. We don't need to
create another state. This winner variable that
we have is going to be, again, the derived state
from the square state. I'm going to go ahead in here, maybe on top, I'm going to
create winner variable. What I will do, I will
import calculatewinner. This is named export, so I import it with curly
brackets from winner. I call that function here and inside I pass
our square state. I will have a winner here. Let's try and cause log it
and see what do we have. I open console. Inside console, I have null because, well, we do not have any winner. When I play the
game, null, null. Let's create a winner. If I click here now, I will have the
winning combination, and you see it produces zero
here because now, well, we have a winner, which is zero. In this case, we need to
display. Let's go ahead. We already have the next
player is next player, but we're going to slightly
modify that message. Or maybe we will not touch it. Here we're going to
create another variable which we will call status
message at this time. Here, we're going to
ask if we have winner, then we're going to say, winner is winner, the variable that we have. However, we need to use string template here to
apply string interpolation. I'm going to turn this
string into string template by replacing regular singular
quotes to back ticks. It will allow me to
use interpolation by using the dollar sign
and curly brackets, so winner is winner. Otherwise, if we do
not have any winner, we're going to use next player message that
we have already here. Instead of showing next
player is next player, this time we're
just going to show status message. I misspelled it. It is going to be
status message. Now, let's see what
do we have here? So we have just next player
is next player. I see. Instead, we need to tell
next player is next player. We go back, we have
next player is zero. Let's play the game. Let's create a winner. Now we see the
message, winner is X. Great because we have a winner. Cool. However,
here's one problem. If you try and play the
game, if you go on, we can still click squares, but this can be easily fixed. We already have the logic
to exit the function if we click on the same square twice or thrice just
multiple times. Here we're going to just extend that condition and
we're going to tell. If we click on the same square twice or if we have winner, we just going to
exit the function. Just as simple as that. Let's try. I played the game. We have winner now. If I click on any of squares, I will not have any logic
run because we exit here because this produces
maybe false maybe true, it doesn't matter, but here
it does definitely true. We have the exit condition. Just like that, we're almost
finished with our game. The only functionality
that we will add here is going to
be game history. We will be able to navigate
through game history. We're going to track
our moves that we did and we will be able
to travel between them, but we're going to manage
that in the upcoming video. For now, these
changes are enough. Let's actually
commit them to Git because we will introduce a
lot of different things here. I'm going to open terminal, I'm going to add
everything to stage, and I'm going to name
all these changes as, let's see, let's overview. First, we lifted up
the state from board. It appeared inside app component and then we displayed
the winner. Well, that's a lot. We're going to tell,
lifted up the state to app component and show
status message to the user. No status message to the
user, calculate the winner. Let's not complicate
with the messages. I think this will be sufficient. Eventually, lead deploy
everything to GitHub. On that deep note, let's add this video. I will see you in the next one.
49. Showing game draw: Hello. In this video, we will continue to
talk about, actually, messages that we display
to the user here. The one point that we missed from the
previous video where we displayed status
message is game draw. What if we end the game but we do not have
any winner eventually? In this case, we would like to show another message
to the user that, let's say, x and zero tied, so there is a draw. In order to do that, we need to apply
more logic here. But we're going
to do that inside a component that
we're going to create specifically for status message. Inside components, I'm
going to create a new file, which I'm going to
call status message. This is going to be
the new component. From here, I'm going to create an export status
message component. Status message. Just like that for now, it will be a div,
which says hello. Also, I need to
export it from here. Then inside App JSX, I'm going to import square
from components squared. Oops, excuse me, not square, status message. Then here instead of
H2 status message, we're going to display status message component
just like that. So we remove this. Now, the status
message is supposed to be somewhere inside
status message component. However, we do not
have any data here, that is why we again
going to use props to pass all the required data
to status message component. We have next layer and
status message here, which is going to move it to status message
component directly. We do not have isXNext, and we do not have
any winner here. So that is why we
expect winner to be passed as well as
isXNext to be passed. The winner calculation
is done here. However, the thing
is that we also need to detect when do we have no empty squares and
we do not have a winner? We need to write that logic. In order to display draw, we need to know
whether all squares are busy with something and we still do
not have a winner, to get that value, that Boolean which indicates
that we need to get access to our
squares state again. We will need it inside
status message as well. We're going to pass it here too. We're going to have winner, isXNext and squares stay here. Pass everything as props. So here when I render a
status message component, I'm going to pass winner, I'm going to pass isXNext, and I'm going to pass squares. Great. Now, here we're going to use something called conditional rendering. Well, actually you
don't know about that, but we already applied conditional rendering
here on line 3-5. Conditional rendering is simply displaying something
based on the condition. For example here, if I open curly brackets inside JSX and I
write, let's say, simple condition,
five is less than 10. In this case,
please display div, which says five less than 10. Otherwise, display another div which says something else. What you see here is called
conditional rendering. Is basically, this is
exactly what we do here. Instead of just simply
using strings here, we can write JSX markup, just like that, and everything eventually
looks like this. But we don't need JSX markup, we need simple strings, so we keep it as this. Now, what about draw? What is the logic
for displaying draw? We need to know that we have all squares busy on the grid
and we don't have winner. In order to get the Boolean which indicates
whether we do not have any free squares
on the board, we're going to create
another variable because, again, it is going to
be a derived state. We're going to call
it no moves left. It is going to be squares.every..every
method is the method that can be called an erase. It will return either
true or false. We pass callback to every. That callback is run for each element inside
squares array. If each callback, if for each element the
callback returns true, then eventually the final
value will be true. If at least one
callback returns false, then the final value
will be false. That's basically the name every. The callback has exactly
the same arguments as the map method. First we have the element
which is going to be square value in our case. This is enough, we don't need index and we don't
need array itself. We simply check if square
value does not equal null. We check that. If every
value does not equal null, the whole condition
will return true. If at least one
square root not null, then the entire structure, entire condition returns false. This is exactly what
we're looking for. Now, we simply go
and have the div, and we can apply multiple
conditions here. If we have a winner, then we can display something. Here's the trick, how we can also apply conditional
rendering. If we have winner, we can use a logical
end and then we can display any
JSX that we want. This is also conditional
rendering and this is alternative to writing this. If we have a winner, display this, otherwise
please display null. If you remember, null will be evaluated to nothing and eventually nothing
will be displayed, but this might be tedious
to write every time, that's why people usually choose this way to write things. But you need to be careful. This thing here, when you
check for the condition, it must be a Boolean value. If it's not going to
be a Boolean value but it will be something
that is truthy, for example like zero, it will display zero. Zero is considered
to be a falsy value, but this is not a Boolean. So the way the and
operator works, only when this condition
returns exactly false. We need to make sure that this value is
Boolean if you want to use this approach
with logical end. In our case, winner
is already a Boolean, so we don't need to do that. In the future you will definitely stumble
upon that situation, when you will
remember about that, especially when you're
going to deal with a race and data
coming from APIs. Our logic is to
be the following. If we have winner, we want to display
winner as winner. I'm just going to copy
it and put it here. Then we can apply another conditional
rendering here and say, if we don't have winner and
we don't have any moves, then we can display
something else. If I save it, it will
be auto formated. We will end up with a
structure like that. Then we will have another
condition when we do not have a winner and we do
not have any nodes move left. But this thing looks not ugly, but it might be very impractical and sometimes
very hard to read. Instead of doing that, we can write it in a
more readable way. So if you remember what we
did back in board component, so we created that
renderer square function from which we return JSX markup. Here, we can apply exactly
the same approach, and we can write the conditions for conditional rendering
inside that function. Here we're going to tell. Something like renders
status message, okay? This function will not accept anything as
arguments because, well, we don't deal with
any arguments here. We get access to all of data that we have
in the upper scope. Here we're just going to ask. If we have winner
from that function, we're going to return
winner is winner. Then we're going to
ask if we don't have winner and we have
no moves left, it means that we have
a draw, in this case, we display zero and x height. Otherwise, technically we can add another condition like if we don't have a winner and
we don't have no moves left, in this case, games
go on and we display, next player is next
player, like that. However, we can make it like a default return statement from that function because it doesn't make any sense
to apply this if, because this is the last one and then it will definitely be fired only when these two fail, so we don't really need to check it here or we can do it, let's keep it like that, let's check for that
condition and at the end if we do not have any if condition that satisfies
us in this case we return nothing just in case something goes wrong for us. However, this will never happen. Let's wrap it in div. Next player is going
to be next player, we don't need any dollar sign, we actually do not need
any of this anymore, we only have render
status message and instead of all this
weird construction, we can simply call render
status message function. Now, it looks much more
readable, isn't it? We go back to our game and
we see next player is, which is correct, let's go ahead and create a winner and everything works as expected but let's
go further and let's actually not have any winner
here, well, that's hard. That's not hard, so as you can see now, all squares are busy
with something, but you do not have any winner and eventually we
have zero and x tied, exactly what we were
doing which is great. Now, let's go ahead and style
that because you can see we have these styles file
here from the very beginning, but we didn't do much about that because we were busy with
all that functionality, so let's go ahead and style that status message because we already have our styles here. If we look closely
inside history, we will deal with
that in the future, we have status message
class define here, awesome, so we go to status message here and to
that wrapping element to div. Let's add a class
name status message, if we save, we already
have like this, we have margin maybe let's
turn it into H2 element, like it was previously but actually nothing really going to change because we
have font size, which is set here, great. Now let's go and add something here because
as you can see, the span elements that go since a status message also
has font-weight normal, there is probably I intended
it to be this H2 tag. Also we have classes here, text green and texts orange, which we can apply to
our x and zero players, so what I'm going to do, I'm going to do it like that, so for this zero and
x that we have here, we can wrap them in span
elements like that, and to that span element, we can actually add pluses. X is going to be green and
zero is going to be orange, so we add the tags green for x, for zero we're going to add
plus name of text orange, now it looks like
that, pretty cool. Then the next,
what do we need to do is to somehow conditionally, when we have next player, is somehow conditionally
apply styles, well, this is something new that
we haven't talked about, so we need to somehow
conditionally apply classes. Again, we're going to
wrap next player in span and we're going to
display next player here, but now we need to also dynamically apply classes
based on the player, so to span, we're going to pass class name and instead of just
passing string, we're going to pass
JavaScript expression, so for that again going to use curly brackets and here
we're going to ask. If is Xnext, in this case, we going to apply texts green class otherwise we're going
to apply text orange class, so since it is a JavaScript, you can use any
available method to somehow transform
apply, combine, concatenate the string,
and eventually it will be evaluated as the class name
string here, so let's see. We have next layer
is zero and it is actually orange and
as we play the game, you can see the color
changes and the colors work, which works amazingly find. So at the end, we also have winner as winner
so the same logic as here, we're going to apply to winner. Winner is winner, but here this time we're
going to ask if winner equals x only then
we use tags green, otherwise text, orange, let's quickly check, great, winner is x. Maybe one thing that
we can add here and that might be
useful for the future and for us now is that
you can see now whenever we want to display something, it is always wrapped
in an element, in this case in H2 tag, in div but what if
I want to not drop, not display any div here at all? What if I just want
to display winner is, as it is with the
span tag without wrapping that in a div
because if you open markup, it's wrapped in the div, what if I don't want to do that? I just want to display winner is and span without any div, like directly inside H2. In this case, we
can use something called React fragments, so React fragment is basically
just an empty element, so if I remove the div and
if I type React.fragment, so import React from
react because now we use React namespace is
basically a component, but it is like an empty
component, just a placeholder. If I'm going to use React
fragment everywhere here, I refresh the page, I play the game, I open markup, here you see nothing gets rendered except
winner is, excuse me, except next player is in span, I did not have any
wrapping element. Again, React fragment
basically represents an empty element
but React fragment is very broad syntax and it is good to know that
you always can use it, however, React fragment has
more lightweight syntax. If you remove it and keep
your brackets empty, just like that, this is short
version of React fragment. We can remove React
namespace from here and remove React
fragments everywhere, and just keep empty brackets
like that and it will work, so this is also react fragment, but this is short syntax of it without explicitly
saying React.fragment, feel free to use any, I prefer using this syntax, less code, the better. Right we are finished now with
status messages for good, so let's go ahead and commit
our messages, excuse me, commit our changes because well, we did a lot, we talked about
conditional rendering, we talked about conditional
styles, dynamic styles, dynamic class names and we also displayed the
draw message, great. Now, I already added everything
to the stitch state, this time let's use
VSCode user-interface, so I click on "plus" sign
here to stage all changes, now they're all in stage and we can type a message
here and press commit, but I prefer to manually
select everything, but I want it to be staged and then manually type git
commit and determine. Commit message is going
to be this play or yeah, display draw message, apply styles or status
message component , and that's it. In the next video,
we're going to start with game history, we're going to talk how
we can actually introduce this game history feature
which we can traverse, this is going to be
fun. See you there.
50. Implementing game history: Hello. In this video, we're going to talk
about gaming history. In the last video, we
talked about game draw will display the messages
that appear here on top. Next player is,
we have a winner, we have draw, which is amazing, but this time we're
going to talk about gaming history so that
we will be able to click on any move that we made and then travel the history. To achieve that, we need to
actually transform our state. The way we currently
manage a gaming state, we do that by using squares
and isXNext states. That is fine and we will
keep to manage it this way. However, we will slightly
change its shape. Since history is something that we need to remember about because we will be
able to traverse that, we need to turn it
somehow into an array. Let me open Paint and show you how exactly we're going to
represent gaming state. Because it is a history, it will be an array of elements. It will be an array
and inside that array, each element is going
to be an object. It will be basically an array of objects and each object in that array will have two
keys, squares and isXNext. Each object in that
array will represent gaming board state at
the time of our move. To keep track of moves
that we do in the game, our currentMove,
we need a counter. We need to somehow track what is our currentMove so that we will be able to travel
in that history. If we click on a history item, let's say go to Move Number 1, we will actually go
to Move Number 1 and our currentMove
will be changed. For that, we need another
state to track that. Let's go ahead and see how this is going to
look like in reality. Here at the top inside App, I'm going to create a new state, which we're going to call
history and setHistory, and this needs to be an array. By default, we already have
gaming state which is empty, just like we do have
here on Line 11 and 12. We're going to create
an empty array with one object inside, and by default, it
will be squares, which is going to be an array of nine elements filled with nulls, and then isXNext is
going to be false, just like we do have here. We can safely remove that. Then we're going to
create another state which is going to represent our currentMove. We go ahead. We create currentMove
and setCurrentMove. By default, our
currentMove will be zero. Our counter will be zero-based. Great. Now we can see since
we changed everything, we have a lot of errors here. Let's change that.
How we can get latest gaming board
state that we have here? We can create another
variable which is going to be our derived value from history
and currentMove states. We can call it, let's
say, gamingBoard. This is going to be history
and our currentMove. Actually, it will
give us this object for our currentMove. Now, instead of parsing
just squares here, we're going to pass
gamingBoard.squares. You can see I even have
the IntelliSense for that. Awesome. Now, handleSquareClick, we're going to touch
that in a second. Let's go to status message here. Right now we parse two
props, isXNext and squares. Now it is all combined
under one object. We can simply pass the
object to status message. What I'm going to do,
I'm just going to parse gamingBoard directly
to status message. I'm going to remove
these two props. I'm going to open
status message here. Now since I parse gamingBoard, instead of destructuring
isXNext and squares, I will do gamingBoard. I'm going to destructure
gamingBoard here. Now, I need to type
gamingBoard.squares, gamingBoard.isXNext, and here as well,
gamingBoard.isXNext. But instead, what
I will do since gamingBoard is just an
object with two keys, squares, and isXNext, I'm going to apply another
destructuring here. What I will do from
gamingBoard object, I'm going to destructure squares and isXNext. A quick reminder. This is the same. This single line
replaces us writing gamingBoard.squares like that and gamingBoard.isXNext
every time. Awesome. We dealt
with status message. Let's dealt with
everything else. To board, we parse squares. Now we have gamingBoard.squares, and now we somehow need to
deal with handleSquareClick. Well, the logic is that we have history and whenever
we create new move, whenever we play the game, we need to extend our array. We need to add new
values to that array. Inside handleSquareClick,
let's go ahead and do that. First, now we have
gamingBoard.squares here. Then instead of set squares, we're going to do setHistory, and we will get back to
that logic in a second. Instead of setIsXNext, what are we going to do? We're just going to
increment our currentMove. Whenever we click on a square, the move, the counter
will be incremented. For that, if you remember our example from previous
videos about counter, this is exactly the case. CurrentMove, and we can name
it as currentMove inside. However, we already have
that name here as our state, so let's just simply
name it move. Move is going to be move plus 1. We're just going to
increment it again. Move is going to represent our current state
for currentMove. Inside setHistory, instead
of currentSquares, we're going to name
it currentHistory, and now we need to somehow
extend the history. First of all, we need to know
our latest gaming state. In order to do that,
we need to grab the latest element
from history array. We can do that by typing. Let's maybe name that variable lastGamingState is going to be history, and we're going to grab
the last element by doing history.length minus 1. In this manner, we can grab latest element from
history array, which is again going to be
an object of this shape. Now, what we can do, we can actually calculate a new state that we're going
to add to the history array. We already have the logic here. Instead of return, we're
going to put it in a new variable called
nextGamingState. Instead of currentSquares, we're going to use
lastGamingState.squares, and instead of isXNext, we're going to do
lastGamingState.isXNext. Now, in order to set the new
value for history state, we need to return
from that callback. From that callback,
what we're going to do, we're going to concatenate
what we just created here, nextGamingState, to our
current history state. We can use the array.concat
method for that. CurrentHistory.concat
and we're going to introduce a new object here. We need to parse an
object of this shape. Squares is going to
be nextGamingState. We named it nextGamingState, let's call it nextSquaresState. We're going to
parse it like this. IsXNext is going to be, again, the flip of a
Boolean like we did before, but this time we're
going to refer to our latestGamingState that we have here, so
latestGamingState.isXNext. We're going to apply
negation to flip the Boolean and everything
will now magically work. Let's get back
here and let's try and console log history
and currentMove, both of them, to see what
is actually going on. We're going to console log
history and currentMove. By the way, I'm console logging both of them inside the object. I'm just doing that for
my personal preference. This way, it is easier
to view them in console. There is no special
reason behind it. You can console
log them just like that, one after another. But if you console log
them as an object, it's easier to view. We go back to the
game, we inspect, we see the console, we open that object. We have currentMove, zero, we have history,
which is an array. First element is this object
with squares of nulls. Now, let's go ahead
and play the game and see how this changes. I click somewhere multiple
times and if I open these, you can see that our next
move currentMove index was increased and on every next move,
index is increased. Grows. Initially, it was just an array of nulls
inside first element, then we played the game, we added that to history array, then we played again, we added more
elements to history, so in this way we're
able to track it. Now, the question is, how
we can actually display it? Since we have an array, it is very easy to do. If we go back to
the app component, here we need to
display it somehow. What I suggest is to create another component inside
component's folder, which we're going
to name history. This is going to be
Yan history component. We're going to export it by
default from history JSX. For now, it will be
just an empty function. Inside app, I'm going to import history from components history. I will scroll down
and I will render that history component
below board. I save it, and now
inside history, we want to somehow display all
the steps that we've made. In the reality, it
looks like this. When you have an
array of elements, you usually want each element represent something
in the markup. For example, if we have a list of fruits represented
as an array, let's say apple, kiwi, and something
else in react, it usually looks like that. You take array of
elements and you map each array element
to JSX markup. This apple string
transforms into div, which displays
this apple string, and the same for the
rest of the elements. To history component, we're going to pass our
history array as history prop. Inside history, we can prop it by using distracting
from the props object. From the component,
we're going to return to JSX markup, the wrapping elements
will be div, and we're going to use an
ordered list element for that. Here we need to map each array element in our
history to JSX markup. I'm going to open
curly brackets to interpolate JavaScript into JSX. I will do history.map. Now, without any
extra logic for now, which is going to display div, so from d.mapcallback, I'm returning also JSX markup
and I'm saying hello here. Don't mind the red message now, we can attach that in a second. Let's just save it and
see what do we have. We have hello. We played the game, and you can see that each our array
element is actually mapped to corresponding
div inside HTML. Since we have six elements, each element was mapped
to the div here. By the way, I just noticed we also have something
wrong because we display only those
here. Let's see. I somehow changed the logic. Let's quickly check
that it works. Great. I was talking that each array element is mapped
to corresponding div. We did that using
the.map method. However, you already noticed there's warning
inside the console, and also if I hover here,
it will be the same, missing key prop for the
element in iterator. The thing is when
you use.map inside JSX markup to map
array element to JSX, you need to always pass the key prop for the JSX
elements that is being mapped. The reason for that
is because react needs to internally
keep track of each element that you mapped to JSX markup in case it will
be changed in the future. The reason behind that is
because this array is dynamic, each mapped JSX element inside that array must be
uniquely represented. To help react
uniquely represented, uniquely identify
each array element, we need to pass the key
prop and the key prop must be unique for each element. In our case, each array
element is an object, squares, and isNext keys, so we don't have
anything special here. What we can do in simple cases, we can just pass an
array element index as the key because it will
be unique for each element, because for first
element it will be zero, for second, one, and so on. It will uniquely identify the
element inside that array. It will be sufficient
for our case. We're going to grab
that index here. First, we have the object, with the squares and isNext. We don't need it, but still, we need to define it
because otherwise, we will not be able
to grab index, which goes as the
second argument. Since we're not
going to use object, which is going to
name it underscore, and we're going to grab index. For the key, we're going to pass
index just like that. If I save it, if I refresh, you can see now everything
stayed the same, but we do not have any
problems with key anymore, because now each element inside the array is
uniquely identified. Now we have index here, and we can actually also
interpellate that inside the div and we can
display that index. What we can tell
here move is index. Let's see, what do we have? We have move is one, move is 2, 3, and 4. Great. It looks
pretty good so far, but first of all, we don't want to
display move is zero. We want to display something like new game or
start up the game. We're going to apply
conditional rendering here. Instead of doing that,
we're going to ask, if index equals 0, then we're going to display
text new game like this. Otherwise, we're going to open backticks, and
we're going to say, go to move hashtag. Here we will display index. Let's see how this looks like. If I refresh the page, we have new game by default. If I play the game, you can see now we have
much more cleaner output. However, instead of new game, maybe let's call it, go to game start. Actually, you can see they
are not clickable at all. Let's convert that div to button element of type a button, I save it and now
you see it broke. However, if you remember, we have our styles
in styles.css. For this history, we can actually apply this set of classes that are
already written here. First, we have history-wrapper, which we can assign to
div history-wrapper. Then we have history itself. This will be our
unordered list history. Then inside history, each
li element will be styled. Well, actually, right, because we forgot that
it has to be li element. Instead of button,
we're going to type li here and we will
move that button inside. We still have that
message for the key, because I told you the
key must be assigned, must be passed only to
the wrapping element. Button is inside that element. The element itself is a li. I need to pass it the key to the li
element. Now I save it. We also have class
btn-move here. We can give to that button
className btn-move. Let's see, the result. Looks pretty good so far. You can see it looks
much, much nicer. But the thing is that we're
not able to do anything now. We need to somehow add
the traversing feature. The logic, where we are
we going to do that is going to be placed
inside App jsx. We already have the
currentMove state, which represents at which
step we are currently at. Inside here, we can create a function that will
change our currentMove. We're going to call
that function moveTo. That moveTo will
expect one argument. Let's call it move.
What will it do? It will just update the state to the move
that is being passed. Whenever we call
them moveTo, we, let's say five, it
will set moveTo five. Now we're just going to
pass that moveTo function, to history as a prop like that. Inside history, we're
going to grab moveTo. Here we can attach that
moveTo to the onclick event. For that button element, we're going to specify
onclick event handler. We're going to pass
a function that will call moveTo with the
index of that move. Something like this. I save it. I refresh the page. Let's play the game. We
have multiple moves here. Whenever I click here, I have moveTo is not
a function that's because I again did
not save App jsx. Let's try again. I play it, I click on "Moves"
and you can see the gaming state
actually changes. It works as expected. But to make it more
user-friendly, let's highlight our current move at which we are currently at. We go back to the code
and here inside history, we can apply dynamic
classes again. If we look inside styles, we have active class here that
can be given to btn-move. We already have btn-move class, but it is static
for all elements. Now, we're going to
open curly brackets. We're going to pass
btn-move here. We're going to turn
that string into string template so we can
apply string interpolation, which will give us the ability to use JavaScript
inside that string. Here, we're going to
do very simple logic. If index or let's say if
currentMove equals index, then this element is going to be active and these
tiles will be applied. We're going to give an
active class otherwise, we're going to give
it an empty class. But we do not have currentMove here so we will have to receive it as a proper again
and inside App jsx. I'm going to pass our
currentMove right up here. CurrentMove is
equals currentMove. Something like that.
Let's save and let's see. Well, now, it is actually
being turned into green. Let's inspect HTML markup. We have btn-move, and we have active class. Exactly what we wrote
because index of first element is zero and
currentMove is zero by default, this is our initial state. We play the game and you can see how the className changes and latest element always
have active class by default. But when we're going to click
on "History" to travel it, you can see how className
changes. Pretty cool. Something like that. However, let's try and play the game. Go to some move and then
continued to play the game. You can see some weird
stuff is going on here. The problem is that our
gaming state is not in sync with the move that
we traveled back to. That is problematic. What we want to do
whenever we are traveling through the history and if
we click on the square, we want to overwrite
the history. Now, we need to add another piece of logic
here to achieve that. We need to detect whether
we are traversing the history and if
we're traversing, we want to overwrite. Otherwise, we want to keep
it as it is right now. Let's get back to App jsx
and insights set history. Let's first detect whether
we are traversing. We can do that by introducing
new variable isTraversing. The logic will be the next. If our currentMove plus 1 does not equal
currentHistory.length. Then we can try and console
log it and see if this is true and why we are doing
current move plus 1. Again, let's console a currentMove and let's
console log history.length. Let's name it his
history length. Let's see why do we need
to add plus 1 here? If I open "Console"
and play the game, you can see our history
length is always plus 1. Then the currentMove
that we have. This is because history
length minimum is one which is set by our
default state here, while our currentMove,
zero index-based. To normalize that, we need to add plus 1 to current move so they match with each
other. We simply check. If "currentMove" equals
whatever length we have, then we know that we're on the latest move and we're
not traversing history. But if we're not on
our latest move, then we are traversing,
something like that. Now, we need to somehow
also change our "lastGamingState"
Because whenever we're on our latest move we
always concatenate, we add to current gaming history
to the end of the array. However, if we
want to overwrite, we want to add to the history, which is at the
point of this move. We do not care about move Number three and
whatever goes below it. We only care about
history at this moment. We need to write the following logic here.
We need to modify it. We can ask, if we
are traversing, in this case please take current
history at current move. Otherwise take the latest
element from that history. The logic with
"nextSquareState" does not change, and now here, instead of current
history concat, we need to also consider a different base array
to which we're going to concat new gaming board state. We're going to create
a new variable and name it something
like base maybe. Here we're going to again ask, if we are traversing
in this case please, from current history, slice only these elements here. "Go to Game Start," "go to
move 1," "go to move 2". We slice from zero index to current history index
of last plus 1. Otherwise please keep current
history as the base array. Instead of last we want
to use last gaming state, and instead of current
history I want to use base. We will get back to
that logic in a second. It looks terrifying I know, especially with
all these nesting. But let's see how our
game looks right now. We travel through the
history, everything's good. We are on move Number 3, and if I would like to
overwrite the history, now I'm able to do that. You can see that
we basically strip the rest of history
and we override it with our new move
here. Just like that. It seamlessly works. Now what about the logic here? Again, slice is used to slice some elements
from that array, from current history array. We sliced from first element to current history
index of plus 1. We just take index of less gaming state that we have and we add
one to it because, again, we have zero-based
"currentMove." Might be confusing,
but just go over it a couple of times
and it will make sense. It's not that straightforward
at first sight, but there is nothing
too complex about it, and you don't really need
to overthink about it. Now we have gaming history
and it works amazingly fine. We are able to travel, we are able to override the
history without any problems. Perfect. Now, it seems like we did a lot and we
actually did a lot. Let's remove that
unnecessary console log and let's see if we need
to add anything here. Maybe we can add a message here, something like
current game history. Let's see how it looks like. It looks like this, which is fine, and I think this will be
sufficient for this video. Let's try and commit
everything that we did here. That's a lot. I'm going to stop the app, I'm going to add
everything to stage, and I'm going to commit
everything and I'm going to call it edit game history. Basically this is
exactly what we did. We transformed this
state into an array. We modified our logic and
we adjusted everything to the new state shape that we
introduced with the history. GIT commit added game
history.Awesome. Maybe let's actually add
one more extra thing here. It is completely
unnecessary but it will help us for the future video, and I'm going to give you a small exercise
till the next video. I'm going to start the server
again, and what I will do, I will move that array as initial state outside
of the component. I'm going to create it here and I'm going to
call it new game. I uppercased everything
because this is the constant global
value definition that we will not change, and I will give it
this array, like that. For initial state, I'm
going to pass new game. I can actually move it
inside the component, but it is better to
keep it outside. The reason for that is
because if you remember, whenever we have
a new row render, JavaScript inside runs, and
whenever JavaScript runs, it creates all new
variables again, and since new game is
something static that we don't need to
recreate on each row render we can just
move it outside. This is just a very
small optimization, but it will serve
us only for GIT. Why did they do that? In the next video what
we're going to do, we're going to add a button on which we click and
which resets the game. Here's a small exercise for
you till the next video. Try and do it yourself. Create a button, display it somewhere over here, and when you click on it, it actually refreshes gaming
state to the initial state. Again, you play the game, you click on the button, it refreshes the state. Try and implement that using that new game variable that we created outside
of the component. I'm going to commit that, and say moved to new game state outside
of app component, and I'm going to
push everything to master and the next video it will help us to
implement game reset. Try and exercise. See you in the next one.
51. Adding game reset button: Hey, how was your exercise
from the last video? Did you manage to
do that? Let's see. In this video, we will
add a button that will reset our gaming
state. Let's go. So right up here in the markup, right on top of
current game history, we're going to add
a button element of type button and we're going to tell that it
will start new game. So when we click on it, it is supposed to do something. We're going to put the
onClick handler here, and for this onClick event, we're going to specify
onNewGameStart, and that onNewGameStart
is going to be a function that we will create
here and that function, the only thing it will do, it will just update the state. In the previous video,
at the very end, we moved new game to the outside of the component
and this will help us now. Now we can actually call, set history and we
can pass new game, which is our initial state. As well as history, we need to also reset the
counter for our current move. We're going to go
ahead and call set current move and set it
back to zero. Let's see. If I save it, I play the game, I click "Start New Game". Everything has been
refreshed now. However, it is unstyled and
if we look inside style CSS, we have here,.btn-reset class. Let's go ahead and use it. So for that button, I'm going to pass class name and I'm going to pass btn-reset. But if you see, it also has the
active class here. What I wanted to do
when I introduced that active class is that
whenever we have a winner, this button becomes active. So we're going to apply the
logic inside class name here. Because we're going to
apply JavaScript, again, we use curly brackets
and first of all, this is going to be string
template with backticks. We're going to give it static, btn-reset class and then
we're going to open the string interpolation quotes and inside these curly brackets
for string interpolation, we're going to ask. So if we have a winner, please give it active class
otherwise, keep it empty. Something like this
and now let's see. So we have this pretty button here and if we play the game, and let's go and have a winner, and whenever we have a winner, this button becomes active. If we traverse the history, everything works as
expected again. Looks good. That's it for button reset. As you can see, nothing complicated so let's go
ahead and commit it. I'm going to add
these changes to the stage state and then
I'm going to commit. Commit message is
going to be added game reset or start
a new game button. Awesome. I push everything to GitHub and I will see
you in the next video.
52. Highlighting game winner (winning combination): Hey all. In this video, what are we going to do? We can display the
winning combination in case we have a winner, and also, but we'll
change the color of the squares because
now they are black. Right now, maybe let's
start with colors first. If we go to components square, the logic here will
be pretty much the same as we have it
inside status message. If you remember, we applied
dynamic ClassName here. If winner is X it is text green otherwise it
is text orange. The classes that we have
defined here inside styles, it basically just gives the color to the element
defined by SAS variable here. Here inside square,
we're going to simply convert it to
JavaScript expression. We're going to
change quotes from double quotes to backticks. I'm going to go ahead
and I'm going to ask if our value is X, then we're going to
display text green, otherwise, we're going
to display text orange. Just like that,
nothing complicated. You can see now
everything turned into beautiful colors system. If we click, if we play, it works. Great. Now, let's go ahead and think how we can actually
highlight winning squares. In order to highlight
winning squares, we need to know the squares. We need to know their indices. We need to know that if we have winner X for that
winning combination, we have winning
squares and Index 2. Then we have 0, 1, 2, 3, Index 4, and Index 6. This are our winnings squares. We calculate winner inside
calculate winner function, and we return only the winning
square, only its value. However, from this function, we can actually return
winning squares as well. Because here we check against every possible
winning combination. We already have this a, b, and c variables,
they're structured here, which represent winning indices,
the winning combination. From that calculate
winner function, we can return an
object instead of just either null or the winner. We can return an object with the winner and
the winning squares. In case if we do not
have any winner, we right now return null. But let's change
it to an object. We'll return winner or null, and winning squares is
going to be an empty array. But in case we do have a winner we're going
to return an object, winner is going to be squares c or squares a or squares b, it does not matter. But for winning squares, we're going to return lines i or we can actually
return it like that. We can create a new
array and then we can explicitly specify that
we're returning a, b, and c, or we can specify
a line a lines i. Now we go back to J6. Now this winner is an object. If I highlight it also
shows me an object. I can use this
structure in here. From the returning
object ID structure, winner key and winning squares. Winner and a winning squares. Now we can pass these
winning squares down to board component as a prop
and handle that logic there. I will pass winning
squares to board, and inside board, I will grab winning squares and to that square component
that would enter here. I can pass a prop
which tells whether this square is a
winning square or not, and then apply some logic
inside the square component. In render square I'm going to check if the square
is a winning square. I'm going to create
just a variable inside render square and call
it is winning square. Winning squares is an
array of winning indexes. Like 0, 1, and 2. For example, let's
take that combination. We need to check if
the position of that square is inside the
winning squares array. If that's the truth, then we know that the square is part of the
winning combination. We can simply check
winningSquares.includes this is array includes
global method position. That's it. Then we can pass this winning square as I drop
down to square component. If we open square component, let's move it here. Inside square since we
pass is winning square. We grab this winning square
from the props object. Here we can apply another dynamic ClassName based on this winning square Boolean. The dot includes method returns as a Boolean which indicates whether this array
includes this element. We already applied dynamic
last name here based on value. We can do exactly the same
for is winning square. I'm just going to extend that string with
another interpolation and I'm going to ask if
this is winning square, please apply some ClassName and some ClassName
is going to be, if we open styles, CSS, inside we have that
winning class. That winning class attaches the scale text
animation defined here, which increases the font
size in an infinite manner. Let's get back to square. If it is a winning square, we attach winning class. Otherwise, we attach
an empty class. Let's see if it works and after that we're
going to do something about this slide because you see that it looks a
bit messy right now. Let's have a winner. Boom. Indeed it works. Just look at that. We have
everything in place here. Pretty cool, isn't it? Whenever we traverse history, and if we get back to latest moves still the
animation will be there. If we inspect the markup, we have the winning
class attached to each square that is part
of the winning combination. Pretty cool. Now let's do something about
that string because, well, it looks a bit messy. We cannot do much
about it actually. We can split it into
multiple variables and then combine
it all together, maybe something like
colorClassName. Then we can just cut
that logic from here, put it like this, then we can maybe say something
like winningClassName, and then we exactly do the same. We just cut that
logic, put it here. Instead of using
this logic in line, like we did right now, which is going to
pass the variable. This is going to
be colorClassName. We interpolate this
variable value inside that string and we do the
same here, winningClassName. Now, it looks much cleaner. We basically separated
logic into multiple lines. Whatever you prefer. If you want to make it a bit more cleaner
this way is fine. If you liked it the messy
way, feel free to do that. Something like that we have
the winning combination, it has been highlighted
with the game history. Great. I think in
the next video, we're going to do the
final preparations and we're going to give
it a few things more, maybe just additional
text, more styles. We will finally have
the app prepared to be deployed to a hosting. Awesome. Now, before
we end that video, let's remove comments,
console logs, and let's commit everything. Let's overview what we did
so we modified calculate when the return returned that value into an
object with two keys, winner and winning squares, then we pass those
winning squares to your board component. Inside board, we detect whether the square that we went
through is a winning square, and based on that inside
square component, we dynamically apply class
names to toggle the animation. Something like that. Let's
go and commit everything. Git add that. Message is going to be
highlighted winning combination. Awesome. Let's push everything. Till the next one,
see you there.
53. Final Touch. Correcting styles, adding font, inline styling: Hello. In this video, we will give our application a final touch before deployment. Well, if we go to our
styles, actually here, to body element, we apply this Roboto font, but we don't really
have it on our PC. We don't have it anywhere. Where did it come from? The thing is that
it was not really applied. Let's fix that. In the guest that we
have shared with us, we have index HTML here
with a few properties. If we look inside
our index HTML, we do not have that link to the style sheet
that we have here. The style sheet,
what it will do, it will download the Roboto
font from Google APIs. We're just going to include
that and with that line, if we refresh the app, nothing changes because we
did not run the dev server. I run the server, I
go back to the app. Now we actually have the
Roboto font applied. If I remove this line, you see the font family changes. But as soon as we don't
load the font that we specified in the style
sheet, everything works. Great. Now let's add the
title to our app at the top. Here inside app, right on top of status
message component, we're going to display
simple h1 title tag and we're going to
tell TIC TAC TOE. To make it more appealing, we can change the color of TAC. Let's wrap it in a span
element and give it a class name of text
green. Let's save it. Now it looks much better, and I think we
should really remove the font-weight bold property from current game history title. We can do that by
applying inline styles. Well, which is great. We did not hear it, or we did not see it before. The only way we applied
styles so far in the app was using
class name property. Class names are defined
here inside SaaS file. However, what if we do not have any CSS files or SaaS files? How are we able to apply styles? Well, without React
in just HTML file, we can have two types of styles. We can give elements class name, or we can pass inline styles. The same we can
do here in React. To this game history, we can pass the
style property and the style property
must be an object. We must specify styles
using JavaScript, not with CSS, but
with JavaScript. We're going to write CSS
with the help of JavaScript, and this is called
inline styling. We want to remove
font-weight bold from the title element
that we have here. Element style is going to
be font-weight normal. Here we need to pass font
weight normal just like that. Let's see if it worked. If we inspect the element, I can see style,
font-weight normal. These are inline styles. The JavaScript object
that we pass here was converted to that
inline style string. You can see that I did
not specify the dash in-between font and weight words because when you
specify inline styles, you have to use
camel case syntax. If your property has
dash in between words, or it have spaces, whatever, you always replace
it with camel case. For example, font family. You would have font family
in camel case manner. Something like that. Let's go and apply inline
styles somewhere else. If we go to components history, we have this button here which represents this
item in the list. Let's make it bold
whenever it is active. If we open class names, let's see if it's bold there. Actually it is bold. What we could have done if
we did not use any styles, we could have done the
following if we go to history. Here I would have passed
style and I specify, you can see double
brackets here. First brackets is to
specify that we will use JavaScript inside and second in their brackets
signify that this is going to be an object that
we pass an object inside. That is why we have
double brackets here. Font-weight property,
we could have asked, if current move equals index, it will be bold,
otherwise normal. If we didn't have these classes, let's remove it and
see if it worked. If I zoom in, I play the game, you can see that the element for which this condition
is true becomes bold. Basically, our current
move becomes bold. Otherwise, it has
font-weight normal. We don't need it for
this specific element because this has managed
inside CSS already. You can see it has font-weight
bold when it is active, so we don't really need
inline styles here. I think this is it. I would say we are finished
with our application. We have all the functionality, we have all these styles. Everything works seamlessly
and looks amazing. Feel free to modify anything, feel free to apply
your own styles, feel free to play with it, extend it, or maybe
change something. There are no strict
requirements that this has to be done
specifically this way. You are the developer here, and you're the one who decides. If you need to change
the title here, feel free to change the title. If you want to include extra
meta tags inside head, feel free to do that. We are finished here. This is the final
state of our app. In the next video, we're going to talk
about deployment. But before we finish this video, let's wrap it up and
let's commit everything. I'm going to open terminal; I'm going to commit everything. I'm going to specify the
changes that we did, so we added the font
and we add the title. Added the TIC TAC game title and included Roboto font. I push everything
again to GitHub. As always, see you
in the next one.
54. Deployment to surge: Hi there. At this step, we have our precious
app finished. It looks beautiful. It has all functionality. Now, it is the time for us to share this application
to the outer world. We want to publish it on the Internet so we can
have the real link, the real URL that we can
give it to our friends. How we can do that. There are different and
tons of different services that can host our static files
for free or not for free. We're going to use
free services. But the question is, how exactly does this happen? When are we going to run the build script defined
in package Json, vite will build our application
and produce static files, HTML, CSS, JavaScript, and
images if we have any. Then we can take this folder and give it to a
hosting provider. That hosting provider will
serve these files somewhere on their servers and expose it publicly through
auto-generated URL. One of the services
that we can use to host our application for free, to host our HTML, CSS, JavaScript for free, it will always be free
and it is very simple. The service is called Surge. You can access it by
going to surge.sh. The cool thing about
Surge in its simplicity, you don't need any extra setup. What you need to do, you need to only install surge global package and then by
using the Surge command, you can deploy the
app just like that. Let's go ahead and do that. NPM install global surge. I'm going to paste
it into my terminal. It will install
global surge package. It says, one critical
severity vulnerability. Well, you don't need
to worry about that. Whenever you see
vulnerabilities, it might be pretty common, especially with global packages. Well, this is the
problem of the package. What we can do about that and what are the
vulnerabilities? Vulnerabilities in the code that we download
from that package and it might be malicious. But you don't need to
take it seriously. Most of the time
in the NPM world, package gets updated
maybe once a day, maybe twice a day. But you can't always keep up with the changes,
with the updates. You at least will see
critical vulnerability once. Your options are, first, not to do anything and
update to the latest version and hope that the package
author fixed the vulnerability. Second option is to
not use that package. In our case, we can't do really much anything
that's why we go along. Now, we have global
search package installed and it says that we need to run
the search command. If I do that, it will ask me to either login
or create an account. I'm just going to
enter my email address and then enter my password. I already have an account, so it will sign me in. But in your case, it will
create you a new account. Now, it prompts me
for the project, but I don't really need
anything right now. So I'm just going
to do Control C to stop the
publication of my app. First, we need to build it. I'm going to run npm
run build script and vite will produce the
latest build of our app. Great. Now it's there. It looks minified, aglified, and everything like that. Now we want to take
the Dist folder and deploy it to search. So we use the search
command and then we specify path to the folder
that we want to deploy relatively to
our current navigation. Since our current
navigation tictactoe-vite, and our folder is located in that folder in the
same directory. We don't need to
go crazy about it. We just only need to
specify folder name that we want to deploy. In our case, this is
folder called Dist. If I do that, I just
run Search Dist. It asks me for domain. So whenever you deploy to Surge, it will always deployed
to a sub domain. It will always be something
dot surge dot sh. You cannot change surge.sh part, but you can pick a unique not
taken as of now sub-domain. By default, surge
will auto-generate you a sub-domain
that is available, but you can change it. Let's maybe go and name
it tictacgame.surge.sh. I pick that name. But in your case, you
will have to come up with your own sub-domain
because if you're going to try and deploy
into a sub domain that is already taken by
another Surge user, you will get permission
denied or something. It will bring you that your
request will be aborted. So make sure you pick something unique and stick with that. I choose tictacgame.surge.sh. I deploy, and now it is published
to tictacgame.surge.sh. So now I can take that
link and I can go there. As you can see now, my app is live. It has HTTPS link. It means that the SSL
certificate is present. It is managed by Surge. We don't need to worry about
that. Everything works. You can now take that link
and share to your friends. Just look at that.
How cool is this? Great. Now, for
future reference, we might want to simplify
the deployment process. What if I want to
change something and then redeploy again to
exactly the same domain? So in this case,
what I need to do, I will do my new changes, introduce new
changes to the app. Then I'm going to run
npm run build again to produce new updated dist
folder and then again, I'll have to run surge dist
and enter the same domain. However, I want to make
it as simple as possible. So why don't we
create another script inside package Json,
and call it deploy. Let's go ahead and create
new deploy script. That will do two things. The first thing, it will
run the build command, npm run build, and right after that, by using
the logical and operator, we can chain the command that will run after npm run build. So we want to run surge dist and the domain
that we have so far. Surge, the name of folder
that we want to deploy, dist, and then the domain. Yeah, I can pass it to the surge command as the
argument and it will work. Surge will understand
that we want to deploy to this domain name. So we can strip HTTPS and just only keep
domain name like that. Now, if I try and
change something, maybe inside app, let's quickly check if it works. So let's change tic
to something else, and now I run npm run deploy. You will see it picks
up the build command, and right after that, it
picks up the surge command. It has been deployed, it says published to
titacgame.surge.sh. If I refresh. Now, you see new changes. Cool, right? All right. Let's revert everything back
here and redeploy again. Again, it produced a new build. Again, it was deployed and published again
to that sub-domain. Awesome. That's it. Now you have our app online. You can go ahead and
share it with the world. Let's commit our deploy
script that we introduced, git commit added deploy script. So congrats, we build
that pretty cool game here with not so
much of an effort. We published it
to Surge service. So now it is available to the Internet and it
will always be free. It will be hosted for free forever and now we
can boast about it. In the next and final
video about Tic-Tac-Toe, we're going to summarize
what exactly we learned during these videos, what concepts we grasp, what we are able to do
now with our knowledge. See you there. Congrats
on the deployment.
55. Summary: Hello again. In this video, we're going to quickly summarize what exactly we've learned so far throughout the
tic-tac-toe game. Let's go. If we look at our structure, we can already tell that
we know how to use Vid. We know about front end tools
that can build our project. If we look inside package JSON, we can see that we
also learned about hosting and how we can host
the application for free. You can choose in Google for any hosting services that allow
you to host static files, HTML, CSS, and JavaScript, and see how you can apply them in case you need an
alternative to search. We know about hosting
services now. If we look inside the
source folder and if we look inside main JSX, we can tell that
we used React 18. This is the API of React 18 headers and it is
different from React 70. We learned how to use the
latest React version here. If we look inside App JSX, we can see different logic here. We already know what is state, how we are able to manage state, how we can update state, and why it is needed. We also know what is derived
value from this state and why we don't really
need to create another state to manage
these computations, like winner or maybe
like gaming board. We also know about
state update or function that it can be
called in multiple ways, either with the
callback whenever we need to set new state from the current state
value or just a regular call without
callback, just the value. We know about JSX markup now. We know how to
apply class names. We know about inline styles with just the style object so we can write CSS using JavaScript. We know how we can
apply dynamic styles by simply using string templates
and a bit of JavaScript. We know how to pass props. The prompts are basically the attributes of
components that you can use to pass data
into the component. We learned about
conditional rendering. We know that we can render JSX markup based
on some condition, and we can achieve
that in multiple ways. We can do it in line by using the AND operator
directly inside JSX, or maybe we can create a helper function and
write the logic inside. Let's see what else
do we have here. If we look inside square, we already talked it through. If we look inside history, we haven't talked it through. We also know now
that we can take an array and we can map each
array element to JSX markup. In case we need
to display lists, we use the dot map method. The dot map method maps
each array element to JSX markup if we
use it inside JSX. Whenever we do that, we remember that we always
need to pass the key prop to the wrapping element
because React needs to identify each mapped
element inside JSX. I think that's it. We already learned so many
concepts about React. Trust me, all of these concepts
that you've experienced, they form the foundation that you need to build
anything with React. Everything that you see here is present in any other
React application. If you feel flexible
with it and you can leverage that, that is awesome. It means that in the
future you will not have any problems to build
any type of application. Congrats. On that good note, we're going to end the
tic-tac-toe project. See you next time.
56. Extra. Adding CSS background circles.: Hey y'all. Actually, I forgot about one
small subtle detail to add into our app. This is about styles. This is about this circles
that we see in the background. We don't see them
now because well, we did not add them, but I forgot to do that. Inside Style CSS, you have the BG balls class, which takes care of the
background circles. We just need to create
an empty element somewhere inside App markup. Let's say empty div. We give it a class
name of BG balls. If we refresh the page, we see the circles appeared
in the background, they are responsive
and look pretty nice. Sorry for that one. Don't forget to redeploy the
app and omit that change. I'm just going to go ahead
and I'm going to add , added background circles. Then NPM run deploy. The deploy scripts that we
define inside [inaudible]. Alright, see you.
57. Box Office app overview: Hey there, welcome
to Box Office. In this video, I would like to quickly introduce
you to the project, what this is going to be. Right now, you are
looking at Box Office. This will be movies
and actors search app. You will be able to search
for movies or actors, and the data that you look for will be grabbed from the API. For example, in the input, I'm going to type
something like girls, and when I press "Enter" or
press on the search button, I will see the results. All these results
will be grabbed from the external API server, which is publicly available. We will be able to star shows. When we click on a show, we will see that cool animation. To let a user understand that
this show is now starred, we can click on the Read more, and in this case, a new page
will be opened in a new tab. Here we will be able to see all the information that
we retrieved from the API; details, seasons, cast, everything about the show. Here we go back to your home Here button in case
we need to go back. Let's close this tab. Now, since we
starred shows here, they will be available
somewhere else. They will be available
under the Start tab. When we navigate here, all the shows that we selected previously now appear
here on that page. Even if I close the browser, or if I close the tab, or refresh the page, our shows will still be there. They are not stored
inside a database, but they are saved in
browser's storage, in local storage specifically. Let's get back to Home, and you can see the
input is still there. The same happens to input, just like the shows that we starred are saved somewhere
inside the browser, the same we do with
the input here. If I refresh the page, the input is still there. Also, we have this radio
box here, radio buttons, if we switch to actors and
then look for some name, for example, like James. Instead of shows, now we will see the actors. Again, the same API,
but unlike shows, actors do not have their
own page because we do not receive too much
information from the API. This is sufficient, just
cards for people, for actors, and this application also
is a progressive web app. It means that our
application is now installable as if it was
a native application, whether we are on a
desktop or mobile device. For example, here on
the right top corner, I have this installation button, and if I click on that, it will prompt me to install this website as if it
was an application. If I click Install, right after that, I
will be, let's say, redirected or opened in a new window which runs on its own and this will
be my application. Right after that, if I go
back to my desktop here, I see this, I can now. This is my shortcut
for the application. If I close it and
if I open it again, this will be opened in a separate tab and will act
in exactly the same way. Pretty cool. I would
say this is it, this is our application, this will be a lot of fun. We'll see you there.
58. Creating the project with Create React App: Hey, there. How do you
feel after tic-tac-toe? Ready to proceed? This time we're going
to work on Box Office, a web app where we are
able to search for different movies and
actors. Let's go. For Box Office, we're going
to use Create React App. It is a very popular
React boilerplate, which allows us to
create project files. In tic-tac-toe, we used
a tool called Vite. This time we're going to
use Create React App. Create React App is
like a holy grail of all templates for
React applications. The reason behind
that is because Create React App is
maintained by the React team. It is what we can call an
official React template. You you have a question,
why do we choose Create React App when we
used Vite in tic-tac-toe? The answer for that
is very simple. Just because there is no actual reason
behind that decision. Whatever you choose,
you will be just fine. But for the sake of our trading, we want to explore as many
options as possible and see what we can do and what we can achieve by using
different templates. They all will be
pretty much the same. They might be
different depending on how much you can go
with customization. But overall, they're
pretty much very similar. Right now I'm currently at official Create React
App template website. What we can do we
go to Get Started. From here we already have the Quick Start section where we can just copy that command. But our Box Office app is going to be something called
a progressive web app. We're going to talk about
progressive web app. What is that? Why it is cool and why do we need it
or maybe we don't need it? We're going to touch all of
that later in Box Office, but we have to take
a specific action before we scaffold
the application. Later on, we can use it. If we scroll down
and go to Templates, we can see that we can run the Create React App command
with the template flag. If we go to Advanced Usage
or if we go to development, let me see where is that, building your app, making
a progressive web app. If we go to that section here, it gives us this
command that we can run with the template
as specified, that this is going to be
a progressive web app. This is exactly
what we're going to copy and we're going to use
to create new project files. So what I'm going to do, I'm going to go to the folder where I would like
to see my project. This is going to be
wrap folder that I had back in the previous video. The approach is the same. You need to run this command in the
folder where you would like to see your project folder. I'm going to open Git Bash, you open your terminal. It can be anything. We will not have any
interactivity problems if we are on Windows
with Git Bash. I'm going to go to disk d, then to app folder. Here I will paste this command
instead of my app here. I'm going to choose
Box Office template, Create React App template PWA. When I press enter, the command will launch. It will take a couple of minutes to create
all necessary files. It will not only create files, it will install all the
dependencies from package Jason, so this command
might take a while. While it is through the
installation process, let's talk about the difference between Vite and
Create React App. In tic-tac-toe, we used Vite. Vite is basically a
configuration on top of module bundler roll-up
with Create React App. It is almost the same. Create React App
is a configuration on top of module
bundler called Webpack. While Vite can be used for
any front-end library, for any front-end project, Create React App
targets only React. Vite uses roll-up. Create React App uses Webpack, and they both are configurations on top of
these module budlers. There is no so much of a
difference what to choose. The answer is that it is very
subjective what to pick. I personally prefer Vite, but Create React App has
its own set of benefits, for example they have this progressive web app
support out of the box, which is great and
which perfectly fits for our project needs. Let me get back here
to the terminal. I can see that everything
was installed. I can see the success
message and welcome message. If I open my folder here, I have Box Office, and
inside my project files. Now, I'm going to open VS
Code and inside VS Code, I'm going to open
that folder lab. This is going to be Box Office. Here we have a couple of
things which are slightly different from what we had
before in tic-tac-toe. We're going to talk about
that just in a second. Before we proceed, let's open the guest that
you have shared with you. From here, we're going to
configure Prettier and ESLint. The setup will be
pretty much the same as in tic-tac-toe, but
slightly different. First, let's copy
the ESLint config. I'm going to create eslintrc. Copy everything here, the same I will do for Prettier. In ESLint, what we have here? Exactly the same setup
as in tic-tac-toe, but we also have
the plugin here, React Hooks, and just a
couple of rules defined here. Then we need to
install dependencies. Just like before, we need to install ESLint config Prettier. The Prettier plugin
that we extend, that we have to install ESLint plug-in React and as
well as React Hooks plugin. I'm just going to copy
this plug-ins here. The installation
command is going to be eslint-config-prettier, eslint-plugin-react, and
eslint-plugin-react-hooks. As well as I need to install
the tools themselves. I need to install
Prettier and ESLint. Great. Now, let's wait
for the installation. I already have six high
severity of vulnerabilities. Well, so what I'm
going to do next. Next, we're going to inspect what exactly do
we have in package Jason. Let's start with scripts. Just like I told you, Create React App is
a configuration on top of Webpack underlying
module bundler. This hidden configuration is exposed to us through the
React scripts package, which is distributed
through NPM. Just like we have beat
distributed through NPM, we have React scripts. That is why in our scripts, we have React scripts start, build, test, and eject. What are these scripts? In Tic-tac-toe we
have the dev script, which runs local
development server for us. Here, it is called start. Well, usually it
is called start, but it does exactly the same. It launches local
development server. Then we have the
build script, again, to create a production build, test script which runs tests. We're going to touch that
in a second and eject. Eject allows us to opt-out from React
scripts configuration, and customize the config ourselves to whatever
extent we need. Then we have a lot of
dependencies related to workbox. What is that? This is all related to making
a progressive web app. We're going to talk
about that later, we do not touch any of that. Web vitals, we're going to
touch that in a second. React scripts is the package
with the configuration. React dependency,
and testing library, we're going to touch that
in a second as well, and our dev dependencies
that we've just installed. Awesome, now, if we look inside public folder, the purpose of this
folder is exactly the same as in feed. Whatever files we place here are mapped to URL segment
in our application. Here we have index HTML
inside public folder. If in feed we had it
in the root folder, here we have it in public. This is the first, let's say, major difference between
feed and Create React app. In here we have a few
things which are different. First we have this public
URL, global variable, this public URL will
be sent by webpack. When our app will be compiled, webpack will process index HTML, and it will replace
this public URL with the root path of our app. In our case, it will be translated to
something like this. Just favicon, and that's it. Now we also have the root element in which the application
will be mounted. Pretty much what we
had in tic-tac-toe. Then we have the manifest file. The manifest file edits against something related to making
the Progressive Web App. It will basically control the shortcut which will be
used to open our application. We're going to cover
that once we get back to Progressive Web App, we don't think about
this right now. Now, what do we have
in source folder? In source folder, we
have very basic setup. Actually, let's run
the Start script to launch the
development server. Let's see, what do we have here. If I go back here, it takes some time
to open the app. While it is still opening, let's see what do we have
inside index it opened. Let's see how the app looks like and we get
back to the files. You can see it takes a couple of minutes and we already
have instant problem here. React is defined but
never used inside App.js, because just like I told you, in React 17 and earlier, you had to always
import React from react whenever you use
JSX inside files. Starting from React 18
this is not required. We use specific plug-in
option here jsx-runtime, which will tell us
we don't need it. That is why we remove it. In React 18, this
is not required. Now, this is our application, this is how it looks like right now nothing too special,
pretty basic setup. Let's explore the files. Let's start with Index.js
our entry point, and here we have a few things that we've never seen before. First of all, we have
ReactDOM.createRoute, document. Get element by ID root,, which is the element that
we grabbed from index HTML. The ids must match. This is where the
application will be mounted. Again, we have strict mode rendering our app
pretty basic setup, but also we have Service
Worker registration and we have reported web vitals. What are those? Service Worker registration
and Service Worker GS. These are the files
that will make our web app a
progressive web app. We don't want to really
think about them right now. This is something that
we will use later. We just keep them and for now, we just ignore what we have here about Service
Worker registration. Again, we're going to
talk about that later. But we also have report
web vitals here. If we look inside, web vitals, this
is what we import. Here, it is just a
simple function which imports something called
web vitals and after that, it calls a set of
functions here. What is a web vitals that
is being imported here? This is the package that
we have here web vitals. If we go back to NPM registry, inside NPM registry, we can search for
this package where vitals and see what
exactly it does. In short, web vitals
is a package it's just basically a set
of functions that you see inside
report web vitals. These functions that allow us to measure performance
of our application. What type of performance? Performance is based on different metrics that we can collect when our page loads. You can read about
them in details here on the official NPM
page of the package. It is very useful when
you want to achieve maximum optimization and
maximum speed in your app. How it works, is that
inside index, yes, we call this report web vitals
and here as a callback, which is defined again here
on performance entry here. The callback that
we pass here will be called on each metric. If we pass, just
cancel out here. It means all of our
performance metrics will be canceled out. Let me actually save it and let's see what
exactly do I need. If I go back to the app, I go to Inspect. If I look inside console, I can see different
metrics here. Console logged as objects
with the different values. This is exactly what web
vitals package does. It measures the performance and gives you metrics.
Nothing more than that. We don't really need it. Maybe, but we'll use
it later, but not now. So we can keep it as a
simple function here. Let's see inside App.js. Actually, a good
question here would be, why do we have all files with.js extension
instead of JSX? Because in Tic-Tac-Toe,
everywhere we use.jsx. Well, Vite required us to use
the.jsx extension and Vite works in a way that it
picks up all files with JSX extension and understands
that this is React. Here since Create React App is targeted only on React apps, this is not a
requirement because it understands that
everything will be React. But in Vite, it was
different since Vite can be used for
other libraries too. We're going to also name our
files with.js extension. We're going to rename them
in the upcoming video. Right now we will not
delete anything from here. Inside App.js, we have
logo file imported here. I just want to make a
quick note here because we can have our static
assets like images, fonts, something
that's static and does not require any processing, is placed in public and then referenced from the source code. But here it is imported. Svg file is an image. It has been imported as if it was some script or some module. Then whatever is important
here is passed as source. If we look into HTML, sorry, here we have image
which points to the URL. You can see it is like
auto-generated or something was done to that URL. Exactly. Under the
hood what Webpack did, so that package React
scripts the configuration, it understood that we
want to import image. Then it processed that image and automatically generated
the URL for that. So basically it was
processed by the Bundler. You might have a question why. Why we need to keep it separate? Why some files, some images we import like that from source and others
we keep in public? Actually, there is
no special reason behind it, I suppose. The difference is
that these files are processed by the Bundler. These that are
inside public folder are not processed
by the Bundler. We could have moved that
logo.svg inside Public. Then inside App.js, we would just reference
logo.svg, right? If I save it, I refresh, everything stays the
same and you can see logo.svg is served on application route
because we have it inside public folder and the URL segments are
mapped, as you remember. It is placed inside source, then it is being
imported just like that, and then specified source. In this manner, you
can load images. It says that cannot resolve. This is probably because
I need to restart my app so it can actually
pick that up again. Let's do that just
in case to ensure. But I think this is all
what we needed to do. What we can do here
to wrap that up, what we've just created so far, we need to also in Git we need to upload this project
that we've just created to GitHub and add another commit because we
installed new dependencies. I'm going to start the
app. You can see it was working fine and the
URL was successful. Anyways, you can see that Git is actually
already in it here. When I created the template, when I run npx Create React App, it automatically initialized
Git inside that folder. If I type git log, I already have an
initial commit here. The command took care of it. However, since we
introduced our own changes, we're going to commit them. Let's see what do we have here? We have App.js, index.js. I'm just going to remove all
the changes that we made here because we really
don't need them. We're going to do everything
in the next video. We are interested only
in our ESLint config that we added and
Prettier config that we added package lock and package.json because we
installed the dev dependencies. Great. Everything
is inside stage. I'm just going to
commit everything and call it installed and configured Prettier and ESLint. Awesome. Now it is
a time for us to upload that project
to GitHub. Let's go. On my GitHub account, I'm going to create
new repository at the top-right corner. My repository name is going
to be Box Office App. I will make it private. I don't want to add any Read Me. I already have gitignore. If we look inside gitignore,
just like before, we have node modules
as well as we have the Build folder ignored. If in Tic-Tac-Toe, we had build generated inside
the disk folder, Create React App generates
build inside the Build folder. Actually, let's create the repository and then
run the build command. Then we will upload everything. I click on Create Repository. Then again, follow exactly
the same procedure. I copy git remote add origin
in my repository URL. I place it inside my terminal, I run that command. Then I do git remote
minus v to check that alias origin points to
my GitHub repository. Awesome. So I will do
git push origin master. And now if I refresh my GitHub
repository, it is there. Awesome. Let's try and run the build script at the end just to see that
it actually works. Npm run build as defined
inside package.json. Where is our scripts? Here, and let's see it says creating an optimize
production build. Well, we have React is
defined but never used. This is exactly what
we had actually. This is pretty annoying that no unused vars
produces an error. Because you can see
it breaks the build because ESLint produces an
error for no unused vars. Let's go ahead and specifically for that rule, if I'm not wrong, we did exactly the same thing in Tic-Tac-Toe for no unused vars. We're going to tell, please give us a warning instead
of an a error. A warning, it's just a warning. It's just a message to warn you. It does not break the
build or anything. You can see now it turned yellow and my build successfully
went through. I'm just going to
keep it as it is, I'm not going to modify App.js. Let me remove the
changes that I've made. Here you can see now the Build folder appeared and if we look into the terminal, we have the output that
the project was built, assuming it is hosted at the route then different
set of commands, and if we look
inside build we can see this is our
production build. We have just static files. We have HTML, CSS, JavaScript, images, and Json
files, and even TXT. We have license for
a service worker. Now we will take
the Build folder and upload it to host it. Again, this is what we're
going to do at the very end. You can see it work. It
looks perfect, isn't it? Now, let's add this
ESLint change to Git. So I'm going to
commit and name it, turned no unused vars into warning and then upload
everything to GitHub. Great. In the next video, we're going to clean up all
these files inside source. After that, we're going to start with the development.
See you there.
59. Cleaning up redundant files: Hello there. In the last video, we created a new project using
Create React app template. In this video, we're just
going to do a small cleanup, which is going to remove these unnecessary files that we're not going to
use from source. Right right that, we will start the development. Let's go. First of all, in the last video, I haven't really
covered anything about setup tests and the testing library
packages that we have here. So we can actually test
React applications. We can write programmatic tests using something called
React testing library. We're not going to do
that here in Box office. That is why we simply remove it because it will be unused. First thing I will do, I will remove "App.test.js". I'm going to remove
"setup.Tests.js" from "package.json" I'm
going to remove all these dependencies
just like that. Let's see, and that's it. Now we removed
testing library from the project because we're
not going to cover it here. Next, we have "logo.svg." We don't really need it. We have "index.css", we can actually keep it. We have "App.css, " we don't really need
it because "index.css" contains global styles for body, let's just keep it
there and not touch it. Then we have
"reportWebvitals.js." We might need it to measure performance if we're
really interested, so we can just keep
it, just in case. "Service-worker.js" is
something that we can attach later on when we're going to deal with progressive web app. And by the way, if you look
inside service-worker, we can already see that we have something here which
is highlighted with red. Again, it is our
lovely ESLint rules. What we can do about that, we can just disable ESLint
only in these two files, inside "service-worker.js" and inside
"serviceWorkerRegistration.js." Again, we're going to talk
about these files later on. We just want to make sure
that these files do not produce any errors or
warnings by ESLint. We're just going to use eslint-disable just like that
with a slash in asterix, to disable ESLint
only for that file. I'm going to copy that
line and paste it inside "serviceWorkerRegistration.js"
at very top. Now we do not have any ESLint
warnings or errors here. Awesome. The next
thing we will do, we're going to rename
"index.js" and "App.js" to have the.jsx extension just to
differentiate files with jsx markup and files
without jsx markup, just regular js files. This is specifically important for "service-worker.js" and "erviceWorkerRegistration.js". Because these files are
not about React at all. These are files about
just front end. They can be used not
specifically in React. We re-name "index.js"
to have the.jsx markup. Exactly the same, we're going to do for "App.js ". Inside App.jsx,
we do not need to import React from
React because again, we use React 18. And React 18 does
not require you to import React into
the scope of jsx. We removed "logo.svg", so we remove reference
to non-existing file. We removed "app.css", we again remove reference
to an existing file. Inside App component,
we can simply keep hello for now without
any class name here. Pretty much simple. Pretty much simple here as well. "Index.css" is kept, that's why we imported. Let's see what
else here as well. Whatever we have in
public at the end, we're going to replace
it with our own icons, with our own images. We don't delete them for now, and I think this
is pretty much it. The only thing we need to do, we need to run npm install to reflect the changes that
we've made to "package.json". Since we removed this testing
library dependencies here, they are removed
from "package.json", but they are not uninstalled
from "node_modules." If I run npm install, it will just remove the unexisting dependencies and "package.json" from
"node_modules" folder. You can see, "Removed
71 packages."Again, I have six high vulnerabilities. Please do not scare
me with those. For now, let's commit, git add. It's already in stage and
"git commit" is going to be removed or cleaned up source folder from the
initial Create React app. setup. Awesome. We push
everything to master, and on that good note, we see each other
in the next video.
60. React Router v6 introduction. Creating pages: Hey, in this video, we will finally proceed
with the coding, and we will finally, start building
something. Let's go. If you remember in Tic-Tac-Toe, we had only one page
on our application. We did not have any
navigation between pages, and the thing is that in React, there is no navigation that
is built-in into the library. It means that if
we would like to achieve some navigation
between pages, we need to do it ourselves. Well, there is a
package for that, that manage the
navigation for us. In reality, there are
multiple packages that can provide routing inside the App. That navigation between pages is called routing between pages. There are different
packages that can do that, they more or less have
the same interface. The one that we're going
to use is React Router. If I open the official
documentation here, I can choose that I'm new. However, I can agree that their latest documentation
is not very clear. I did not see anything that I need to run in order to install React Router and
also that tutorial is very long and it
covers everything, but what if I want to
do just a quick start? To start with the React Router, first need to install that
package and to do that, we need to run npm
install react-router-dom. We do that, after that, it will appear
inside package json. Now, I'm going to run the
development server again, and let's look inside
the documentation. Here, if we go
through the setup, it actually prompts us to bootstrap a new
React App with Vite. We're going to skip this step. Then after that,
we see "Adding a Router" and here we need to
create something like that. But I personally find it a bit confusing following
this documentation, because I've known React
Router from the past versions, so currently it is at Version
6 and every major version, like 5, 4, 3, it always changes its
API, its interface, because now it is completely different from what
it was previously. To make it simple, we go to main Concepts on
the left and here we go to that section called
Rendering, if I'm not wrong. Here, you can find a
very good example from which it is clear what exactly React Router does,
and what we're going to do? Instead of following all
that long documentation, we will take only what we need. We're going to take that
example and we're going to understand what exactly
React Router can give us. We can see a pretty
basic create root call which we already have inside index.jsx and we see that we
need to have this sort tree. First of all, we need
to have browser router. We're going to import
that and we're going to do all of that
probably inside App. We can actually import browser router and use
it inside index.jsx, however, let's do it inside App. We first need to get it from somewhere all
these components, they all are imported
from react-router-dom, and there are somewhere inside
that long documentation. You can actually
find them there. We need browser router and we need routes,
and we need route. So, we're going to import something from react-router-dom, so we need to grab
browser router and we need to grab routes, not router, and we
need to grab route. These three components. Now, what I'm going to do, I'm just going to
copy that markup and put it inside App,
just like that. But here, now we do not have all these components that are defined
here, that is fine. Actually, what is going on here? By using this
tree-like structure, we can define routes in
our React application. Think of routes as of pages, so each route
represented by a page. Route is basically
just URL segment. If you have, let's
say for path teams, whenever the URL is, let's say slash teams, we can display that teams
component by using the syntax. But we're not going to do that. For now, we just need to
display at least something. Let's comment this out, these routes components, and by looking at them let's see what we can bring ourselves. We're just going to
go ahead and create route at path; route and index. An element is going
to be something. What we need to display here? Here we need to render the component that will
represent our page. What I suggest is
that inside Source, would then create new
folder and call it Pages, and here we're going to create components that
represent our pages. I'm going to create
a new file here, let's call it Home.jsx. From here, I'm going to create home component
like that and then I will export it by
default like this. From now, it will be a simple
div which says Home page. So, for path index
for just route, we're going to render home
component and by the way, you can see as soon as I type home and when my cursor
is placed at the end, I have this intelliSense
here from the drop-down. If I press "Tab", it will be alto imported for me, pretty cool, isn't it? Now, I keep it like that
and if I go back to my App, look at what I have. I have home page here and
if I go to any other URL, I have an empty page. If I inspect mark-up, I open body, I have route. But inside route, I
don't have anything. That's because here, I did not define any
route, any page. React Router works in the way that it matches
URL segment here, path name against path that you specify here at renders,
corresponding element. Now, let's try and
create another page. Let's call it Contact and
here let's just render. Just to make an example, I'm going to create
div and say contact. Now if I go to contact, I see the markup,
what I've passed as the element here,
just like that. Now we know how
React Router works. The rest that you see
here in the example, we're going to cover that in the next videos because this
is something about layout, so we can have layout that can be shared between
multiple pages. That's when this route without any path or without
any index comes in. As well as we will
cover this column here, which is going to be the representation
of a dynamic page, but again, we're going
to cover it later. This is not the time. What we will do for now, we just going to create
our initial pages maybe. What I can tell you
here is that in Box Office we're going
to have the homepage, and then we're going
to have starred page. For the future reference, since we already
created two pages, let's add another
page component, which we're going to
call start basics, and I'm just going to copy
everything that I have inside. I'm going to rename
it to starred. Then inside app component, again, I'm going to
import starred component, which represents our page. Instead of contact, I'm going to display starred
and instead of contact, starred path just to verify, if I go to starred, I have my starred page. Great. What about
these empty pages then if we go to
undefined route? It is not 404 but it is
page that was not found. React Router has an explanation for that how to handle that. If we go to FAQ section here, we can see how do I add a no-match 404 route
in React Router 6. You can just use this. We're going to place it maybe
at the end or at the top, If I'm not wrong, it
can be placed anywhere. Instead of no match important for now or maybe we will not change it we're going
to just display not found. Let's try. We go to the app and
whenever we go to any route that we
did not define, we receive not found. But if we go to homepage, we have homepage, if we go to starred,
we have starred. Awesome. Now, how
we can navigate between these pages because
we have anchor tags, but we cannot really
use anchor tags when we use client-side routing
library like React Router. We need to use a specific
component for that. Let's go to home and now here we need something
called the link component, which we again import from React Router dom link component. I'm just going to display
link component like that, it is basically just a wrapper
around the anchor tag, but it is specific
to React Router so React Router can
understand that you wanted to transition
from one route to other route and then we're going to call it
go to starred page. To that link component,
we need to pass prop called to then specify the route
which we would like to go to when we
click on that link. Since our starred component is defined under path starred, when we click on Go
to starred page, we go to starred route. Now we go back to home, if we look into the markup, you can see under the
hood it is actually an anchor tag which
leads to starred route. If we click on it, we're
now on the starred page. Cool, isn't it? That's it. Well, these are actually
the basics of React Router. As you can see, its
purpose is to give you that navigation experience
into React app. Because again, React does not have any built-in
solution for that, that is why we need to
use our own solution or install a library that provides routing
capabilities for us. I think this is it for the introduction
about React Router. In the next video,
we're going to start building layouts and we're
going to proceed with our app. At the end, I just wanted to add one note
about React Router, and why actually we
call them routes, why don't we call them pages? The thing is we are
building something called a single-page
application. A single-page
application is basically just a single index
HTML file here, that is why it is
called single-page app. Whenever we navigate between routes or we call them pages, what actually happens is
that React Router uses JavaScript to
replace HTML markup and then display
corresponding components, we call it navigation but
basically what it does, it just takes existing
HTML, removes it, and inserts new HTML, and then it replaces the URL with whatever
we specify as route. Everything here is
managed by JavaScript. We still have the same page, it does not change that
HTML does not change here, the skeleton, the template, that indexation does not change, but JavaScript actually imitates that navigation experience
so to the end user who consumes the application it looks like we're
navigating pages. Well, we can say in fact we are. Technically speaking, this
is just removing HTML and inserting new HTML on the page and changing the URL
segment, that's it. In traditional apps, when
you click on different page, the page is refreshed, and this is when
you have like real, let's say page-to-page
navigation. Here at the somewhat what we call client-side navigation, client-side navigation
means that we actually navigate through pages
using JavaScript. Now, let's commit the
changes that we've made. Inside app, I'm just
going to maybe keep it. Let's keep it for the
future reference. We're going to add up jsx, we're going to add home, we're going to add
everything to stage, we installed React Router, and eventually we're
going to commit everything and say Edit, React Router dom to
the app or maybe installed React Router dom. Perfect. See you
in the next one.
61. Layouts and Navigation between pages: Hello again. In this video, we're going to talk
about layouts, how we can manage them, and what are the layouts
in the first place. In the last video,
we installed and let's say configured
react router. This is the routing solution that we're going to
use for our app. Now, we're going to see
how we can actually apply layouts because we have starred page and we
have index page, and let's say they
share common layout. On both pages, we want
to see navigation. What we can actually do, we can go to a home component
and put the link here. Then we go to starred component
and put the link here, but this is a lot of repetition. We just want to have
some common markup that we put in one place and
it is displayed everywhere. Looking at this example, if we go back to
the documentation, if we go to Main
Concepts, Rendering, this is the place where we took that markup from the last video. We can see something
called Layout Routes. If you read it here, it says basically that this
route element here that wraps other routes is just a component that can provide some layout
to underlying routes. It does not represent
page itself. Pagers are only
represented by routes that define the path prop here. To achieve layout, we can
follow this approach. If we need to share layout between homepage
and starred page, we can wrap them in
route just like here. So let's go ahead. We're going to create
route component. We're going to wrap homepage and starred page in that route. We can specify element a single prop without
any path prop. Here, will be our
layout that we would like to see for these pages. How are we going to manage that? Inside sorts, we would create new folder and name
it components. Here, we're going to
place new component, which we will call MainPageLayout or let's
call it MainLayout. Here, I'm going to
create main layout. Then export it from here,
export default, MainLayout. Awesome. Now, we're
going to import that layout from
components, MainLayout. Then instead of page layout, we're going to use
main page layout. However, how exactly it works? Because if I open
my main layout, it is completely empty. There is nothing in there. So what is going to be rendered? Let's try and see. If we go back to app, now, our app is empty. Well, what happens? The thing is, if you remember, in React, we have something
called children prop. If we define a component and let's say
something like that, MainLayout and inside
we pass something, whatever we pass inside that component in between
opening and closing bracket, it will become available
as the children prop that we can use inside JSX
markup inside that component. However, with React router, it doesn't look like this. We do not pass any
children because we pass it as a
self-closing component. So how does it work? If we'll look here
inside PageLayout, we need to for something
called outlet. Here on the right, there is
the section called outlet. Outlet is used inside this components that
represent layouts. They basically
represent the children, at least, the concept is
very similar to children. I pass for this set of routes. This element has
the main layout. But since we do not have
access to children here, we need to still somehow let
this MainLayout component know that we want to render
whatever goes inside. For that, React router has
this component called outlet. Outlet is basically
like children but for all the routes that are passed inside that route component. Well, it's confusing. Let me actually just show you. We import something from reaction for dom and that something is going to be outlet. Instead of writing children, outlet is the replacement. We don't use children, we use just outlet. Just like that. Here on top of our outlet, we're going to tell
this is shared markup. I save it. I go back and you
can see that what is being rendered here is this
is shared markup and then this is starred page. Basically, outlet here
represents whatever we pass inside that layout as defined by the
route components. Now, if we go to home, we will see exactly
the same picture. We have this is shared markup. Now, we're going to
go ahead and add a navigation that will
be shared across pages. Inside components, I'm going
to create new component, which I'm going to call Navs. For now again, as
always, it will be div, which says something and
then export by default Navs. Great. Then inside main instead of this
is shared markup, we're going to display
Navs component. Again, you can see I started typing my cursor is at the end. I have the drop-down with the intelligence and
if I press "Tab", now, boom, it is auto imported. However, be careful with that. This is very important feature, I would say in a way
that it can easily import the other files, not exactly what you expect. Be careful with that and
always check your inputs. We're under Navs here. Inside Navs, we would like
to display navigation. We're going to grab
that piece of code that we already
have in homepage. The link component, you remember that we use to navigate between pages when we use client-side library
react-router-dom. I'm going to copy import
link from react-router-dom. I'm going to place
it inside Navs. Here, we need to display navigation. How are
we going to do that? First of all, we need to define our buttons on which we're going to click and
transition between pages. Let's go ahead and define
our array of buttons, array of elements, which
are going to be our links. Then we will map those links to JSX markup exactly the same like we did with
history back in tic-tac-toe. Here outside of Navs, I'm going to create component because we know a component
just a variable called links. It is going to be an array of objects and each object will
have the following shape. It will have text, and it will have to. To is going to be something
that we will pass to the link component and
text is the displayed text. Text is going to be home. It will go to the
route, to the homepage. Then we're going to add
another object here. We're going to call it Starred. It will lead us to
the starred route. Now, we need to take that array and mark
it to JSX markup. So here, inside Navs, instead of div, we can
display a UL elements, or maybe inside div, we're going to display UL, let's keep it like that. Now inside that UL, we're going to map our links. So I'm going to open
curly brackets here. I'm going to tell LINKS.map. Now we take the item. Let's name that object
that we map as item. We're going to map
it to li element. Inside that li element, we're going to tell, please display
item.text and as a key, because you remember
when we map elements always to JSX markup to
the wrapping element, we have to pass some unique
key that will identify that element inside the JSX
markup that is being mapped. So in our case, the URL segment that we use here is
unique for each item, or it can be text. But let's pass to as the key. Item to is going to
identify our element. We need to also turn
it into a link. We use the link
component for that, that we import from
react-router-dom. So instead of item text, we're going to do
link item text. For the queue prop
inside link opponent, we're going to pass item.to. It is going to look like this. Now, we go back to the app and what we see,
we see navigation. If we click on Starred, we go to Starred page. If we click on Home, we go to Home. Cool, isn't it? Congrats, now we have
navigation component, which works pretty cool, as well as we used
layouts to manage that. Now, let's clean up
homepage and get rid of link here and just say Home. Now, it looks like that. Awesome, isn't it? Maybe, let's go ahead
here and add a title. Let's create a new
component here and call it Title or,
let's say AppTitle. So from here, let's take another approach
because we always were creating a function and then exporting
that by default. So instead, we can just say export default and then the
function and what it says, let see component definition is missing display name, of course. So what it want us to do, it want us to do
something like that. Function AppTitle. Because it want us to export a function that
actually has name, not just an anonymous function like that,
but with the name. That is fine. That will make the code a bit of
more declarative. Sometimes it helps to track down errors that might come
from different functions. In our case, this
will not be the case. But still, let's just explore more of
JavaScript Syntax. Let's call it this way. So here instead of
Navs and outlet, we can display h1 title. So title is going to be the prop that we're
going to receive. Again, since we
started to explore more of JavaScript Syntax, instead of destructuring, let's apply destructuring
in another place. So we receive the props object. Here, on the next line, we're going to apply
destructuring, instead of directly inlining
that inside the arguments. So we're going to
grab title as well as we're going to grab subtitle. Subtitle is going to be inside
the paragraph, subtitle, and let's use that
AppTitlecomponent inside main layout, right below navs. AppTitle, again,
IntelliSense and tab, and boom, it is imported. Let's see how it looks like. I don't see anything or
did I miss something? Let me see. No, I did not. Actually, I did. If I inspect the markup, I can see I have my markup but it is empty.
Well, what happens there? Because, well, you
might have noticed, but I ran the AppTitle without
any props being passed. However, AppTitle renders
title and subtitle. Because we did not pass them, they are being empty. It means that they're undefined. Title is undefined, subtitle is undefined because again,
we did not pass them. In this case, we need
to either pass them, hello, and something else. Boom, now it this here, it has been displayed,
everything works. But here's an alternative. Let's say we have situations where we do not
pass props at all, just for some reason. Maybe we have this
component that has been reused in multiple places, a lot of times, whatever, and not all the
time we pass props. For that reason, since
components are just functions, and we know that we can apply default arguments to functions, we can do exactly the same
here inside Components. So from the props object, props object is always defined, it is at least empty. From that object, we distract your title, subtitle that are not defined on that object because
we did not pass props. But we can apply default
values for them. If we do not pass any
title by default, it will be Box
Office and Subtitle, search movie app, or
maybe let's call it, are you looking for
a movie or an actor? Just a question,
something like this. Our final structure is
going to look like that. If we look inside, you can see, well, they are being applied. If I go back to
main layout, well, you can see I do
not pass anything, but still I have
my default values. If I want to change
it or overwrite them, I would just pass them straight
away and they'll work. However, since we define them here inside
AppTitle by default, we're not going to pass
anything here to props. Let's actually put
it on top of Navs. So it looks like that. Awesome. So I think
that's it for that video. We actually did a lot and we've covered a lot of new concepts. We've covered layouts,
how we can manage layouts that can be shared
across multiple pages. If we look inside, we use that outlet component, which is the replacement
for children, but for route definition
that we have here. Then we also covered how
we can create navigation by using the link component and display it inside
shared markup, as well as title and
default arguments, well, default values for the
arguments or for the props. It looks good so far. Let's commit everything, and let's end this video
on a good note. So I'm going to stop the app. I'm going to commit
everything with a message. I'm going to name it, "added navigation and shared layout for home
and start pages". Amazing. See you
in the next one.
62. Inputs. One-way and two-way data binding: Hello again. In the last video, we managed layouts and navigation
inside our application. It looks pretty cool. Now we are able to navigate
between different pages. We know how to create routes. Our next step here
is going to be the tags box that we have on the homepage in which
we enter something, then we click on the button. Then we take the text from the textbox and send
it to some backend, which gives us data back. However, before we can
implement all of that, we need to understand how we
can manage inputs in React. In this video, we're
going to do exactly that. So let's navigate to
home component and here, let's create a simple
input of type text. Nothing fancy. If we go to Home, now we have this empty
element here, empty textbox. We cannot do much about that. What if I want to grab
some value from it? How can I do that? Because, well, in the
future we're going to add a button here and when
we click on that button, we need to somehow wrap
the value of that input. From Tic-Tac-Toe, you know
that we need to use state whenever we have
value that changes over the period of
component life cycle. Whenever we type
something in the input, this is value that changes. That is why for this
reason we're going to use React, use state hook. So let's go ahead. From React, just like before,
we're going to return new. So we call usestate hook and inside we need to
pass default value that will be the value for our state initially when
the component mounts. Since it is going to
be input element and input element is always a string and if we don't have
anything inside, input just empty textbooks, it is still a string but empty. That's why we're going to
pass an empty string here. The reason for that
is because if we do not specify
anything for usestate, we just call it like
that, by default, initial state value
will be undefined. So as you remember,
usestate returns an array of exactly
two elements, where first element
is the state itself. So we're going to call
that state input value. The state update function is
going to be set input value. Now, how we can actually listen for these updates that we type something
inside textbox? If you remember, we have events available on
every HTML element. So they start with
the on prefix. So if we deal with inputs, we need to use the
onChange event. So for that onChange event, I'm going to pass
an event handler, and let's see what do we have
and when this event fires. I'm going to create
a function here , call it onInputChange. If you remember,
all event handlers always receive event object
as the first argument. I'm just going to console log the event object and
then I'm going to pass onInputChange as the
onChange event handler. Now, whenever I type
inside the input, I can see something
being console logged each time and if I
expand that object, I have the target property here that we are
interested about. So event target represents
the target of that event. In our case, this is going to be the input element itself. If I expand it here, I have value property, which represents value that
input element has at a time. That is why we can go on and
console log event target. Let's first consider
event target just to see it one more time that
whenever we type, event target represents
our input HTML element. On that input HTML element, we have this value property, which represents input
value at a time. Whenever I type,
you see now we can get access to the value that we have inside the
textbox. Pretty cool. Now we can use set input value, state of data into that state of data we can pass event target
value to set the state. Now, whenever we type, we update the state with
event target value. Great. Now, how we
can actually see that input value is being whatever we write
inside textbooks. As you remember, we can just simply put it here, console log and verify
because state update will trigger component to re-enter and when components are renters, JavaScript inside runs
again and on each re-enter we're going to
see that console log. Let's try. Whenever I type, now, I can see that indeed
home.jsx6 at line 6. Yes, I have this console log, which means component re-enters, our state gets updated
corresponding to the input. With this approach,
we have a problem. What you see here is called
one-way data binding. So in libraries frameworks, you will always have
this concept of one-way data binding or
two-way data binding. What does this mean? So with this approach, we introduced one-way
data binding, will listen for changes inside textbox and
we update state. However, if we update state, we do not update value of input. Let's try and see
what do I mean. So if we wanted to show that input value
somewhere on the page, we can just use interpolation. Just like that. We
already know what to do. We have input value here. Let's just see that it works. Whenever I type, is being interpolated into
J6 and being displayed. Pretty cool. How we can verify that it is
one-way data binding? I'm going to create
a button here with "Type" button, update to random. For unclick, I'm going to say, please set input value to
something like my name. Let's see what do we have. So whenever I type, I have my state being updated, but if I click ''Update
to random" state updates, however, the text inside
input wasn't updated. So what happens here exactly? The thing is just until we
have one-way data binding, we bind it changes that we make inside
textbooks to state, but we did not bind state to
the textbox, to the input. To fix that, we need to
pass a value attribute to input element so that whatever value inside
state we have, it will be mapped, it will be binded to the value of textbox. So for value attribute, I'm going to pass input value. Let's see if I type something in here and then I click
''Update to random'', now the text was
updated not only here, but it was also updated
inside the input element. Because now we have
two-way data binding. If we update state, it updates textbox, and if we update textbox,
it updates state. It is two-way, works in two directions, unlike we had previously. If we move on change and we keep only value here, it
will be the same. It will be one-way data binding. We have this error
here which says you provided a value prop
without an onChange handler. Even React tells you
something's not right here. So as you can see, one-way data binding
can be very tricky. So you have to always remember
which suits you best. I would say that
in most cases you might not even notice that one-way data binding can
potentially bring your problems, and in most cases, it won't. However, two-way data binding is important and you need to understand the
difference between it and know how to leverage that. So far in this video, we learned how to manage
state with inputs. How we can use them for changes inside input
element and update state. We also learned what is
one-way data binding, what is two-way data binding, and what is the
difference between them, and why one-way data
binding can be tricky. It's always better to use two-way data binding
if you are not sure. I think this is it. Now you know everything that
we need in the next video. We're going to create
a button here. We're going to grab
whatever we write inside the textbox and send it to API. Let's see how it plays
out. See you there.
63. Form submission. Getting shows data from TV Maze API: Hey, there. As you remember,
in the last video, we talked about inputs, how we can manage inputs, how we can bind input
value to state, and the difference between two-way and one-way
data binding. In this video,
we're going to send data that we write inside
a textbox to an API, and we get results
from API back to us so that we can display something in our application to the user. In the last video, we did all of that
inside Home.jsx. Actually, we can keep it, we're just going to
place this button here, right below input, so we can type text. We already have inputValue, and we have onInputChange. Maybe we can name it
something like searchString, because it will be basically our search string
for search results. We can rename the state to be searchString, searchS-T-R, and set searchS-T-R. We
don't need to output it, value is going to
be searchString, and onChange is going
to be onSearchString, or onSearchInputChange, and we're going to
update searchString. Then for that onClick button, we're going to remove
it completely. We're going to wrap
these two in form, and then we're going to leverage
form onSubmit attribute. Actually forms in react, they work slightly different. In single-page apps,
you work with forms slightly different than
in traditional apps. In traditional apps,
when you click on "Submit" and you have form, you need to define
an action here which will bring you
to some other page. When you click ''Submit'', it redirects user and submits
data to some other page. In single-page apps
and modern web apps, it is not managed like that. How is it managed then? On the form, we put
the onSubmit method, and that onSubmit method
will be the function that we will call onSearch. Again, since it is an event handler for
the submit event, we have the event object. Let's try and for now, do nothing, which is going to
pass for onSubmit onSearch. Again, since it is form, instead of type button, in order for us to
submit the form, we need to specify that this button is going
to be of type submit. When we click on it, it actually submits the form, and instead of update to random, it is going to be search.
Something like that. Let's try and see so
if I type something here and if I press ''Enter''
or if I click ''Search'', let me press ''Enter''. Do you see the app
was refreshed? You can see the
page was refreshed. Now I have this question
mark at the top. This is because we did not
handle the form properly, because it thinks that the form, the action, needs to be
handled by some other page. It tries to redirect to some
other page to submit data. However, just like a tool
do in modern web apps, this is not how form is handled. For the onSubmit to
prevent page refresh, we need to prevent the action
that the submit event does. For that, we call
event-prevent default. By calling that method, we prevent default
behavior of this event. If I refresh the page, let me remove the
question mark at the top. Now, I type something,
I click ''Enter''. You see nothing happens. In our case, instead
of nothing happens, we need to actually
send data to the API. What is going to be the API? How are we going to manage that? Where are we going to start?
If we go to guess here, if we scroll to resources, you can find TVmaze API here. Let's open that link. The TVmaze API is
a public API that can give us information about different
movies and actors. It is completely free and it has unlimited quota,
and it is public. You can just open that URL
and follow the documentation. It is pretty
well-documented with good examples and
good explanations for endpoints that it has. What we are interested in is actually that very
first paragraph here, which says "show search." It has this URL, and here's an example. Let's try and open
that in a new tab. As you can see, we have data here. We just access it and
we get data back. If you take a look at the URL, here we supply the q, query string parameter, and if I change it
to something else, it will give me different results based
on the search string. This q parameter is
basically the search string. You can read about it inside the description of
what this endpoint does. We're going to use that
endpoint inside our app. Let's go back and
let's put it here. I'm going to just
comment it out. Now, you might have a question. How do we send a
request to that API? Well, we can access
it in the browser, but how we can do
that inside the app? Well, inside the browser, we have a web API called Fetch. Fetch function is globally available inside
browser environment, so we can use it
inside JavaScript. What Fetch does, it sends a
request to the supplied URL. We can take that URL, we can call Fetch. Again, it is a function
that sends requests and it is globally available
inside browser JavaScript. We call that Fetch
function here and we pass the URL inside. I click ''Enter''
and as you can see, it returns us a promise,
a promise object. It means we started to work
with asynchronous JavaScript. This is where things
start to get interesting. In order to get value
from the promise, we have to await that
promise or resolve it. For now, we're going to
use the.then syntax here. That Fetch function resolves
to the response object. The promise that has been
returned from Fetch results to the response object, which represents the response of that request. Let's
call it this way. I'm going to call it response, and let's try and
console.log response. This is the response
object that we have. It represents the
status of the response, the URL that was used, headers, and a few
different things here. However, also this
response object has the.JSON method available
on it response to JSON. It is also a method
that returns a promise. The promise resolves
to the response body. What you see here inside
browser is response body. It is basically what is being
returned from the server, the response, so we
get it in JSON format. That is why we call
the.JSON method. Again, it returns a promise, which resolves to the body.
What are we going to do? We're going to chain
multiple dense here from first.then we're going to call the.JSON method on
the response object. Then we return that promise
from.then callback, which means on the next.then
it will be resolved. Inside next.then we're going to have our payload
or response body. Let's call it body
and console.log body. Now, that string gave us
that array of 10 elements. If we expand it, you can see this
is the data that we have here inside
the browser window. Cool. But now we manage that programmatically
using the Fetch API. Exactly the same, we
can do not only here, but inside our code, because what we
write here is going to be client-side browser JavaScript and we
just played with it here directly inside the browser but still it doesn't matter. This was just to give you an overview how this
is going to be. But we're going to do it
here inside our code. Inside onSearch,
we're going to call that Fetch API
tvmaze.com/search/shows. Now, instead of using
the.then syntax, we can use async-await to
make it more readable. In order to use await, if you see I hover
on it, it says, await expressions are only
allowed within sync functions so which means we need to
mark that function as a sync, and now the message disappear. We await Fetch, then we get response. Then we have body by
await response.JSON. In here, when I type
response and press ''Dot'', you can see now I have
the IntelliSense, which gives me the.JSON method. If I call it, you can
see the window pops up, which means it returns promise. Now we have body. If we try and cancel
log body here, and we go back to our
application, where is it? Here. Actually, it
doesn't matter. If I type something here, I can see data here which
comes from Home.JSX line 16, from our console log here, which means we just did the
search programmatically. We send request. If we open network tab here and if I click
on ''Search'', you can see we send a request to that URL that
we specified in Fetch, and if we preview,
we get the data. Awesome. Now, let's make this request dynamic because we have the search string here, but we send voice all the time. We have stated
here searchString, so we can pass it to the Fetch by replacing static
string with backticks. Instead of boys, here, we can interpolate
our searchString. Now, let's try and
console log body. Again, I refresh. I type girls. I
click ''Search''. If I look inside network tab, I can see that I send
search shows query girls. If I type something else, you can see it will
be something else. If I type some gibberish,
it will be gibberish. Our request is dynamic. How cool is that? Now you know how we will
be able to fetch data. You can see everything
is connected now into one single piece of
these few lines. Great. We use TVmaze API. You can read it through. It is very simple
with good examples, just quickly just
skim through the box. In the next video, we're going to make this function reusable
and we will try and display results that we
receive here from the API. This body, we're
going to try and display it inside
our JSX markup. Let me commit the
changes that we've made. I'm going to click
on the plus sign. I'm going to stop the app
and I'm going to say, let me see what
changes did I do? Let's say search for movies or search for
shows on button click. Let's say added
textbox or searching. Search for shows on button
click. Something like that. Then upload to GitHub and till the next
one. See you there.
64. Rendering show data from TV Maze API: Hello again. In this video, we will finally display the results that we
get from the API. In the last video, we got
to know how we can query data based on what we type
inside the input element. This time, we're
going to try and display the data that we receive from the TVmaze API that we
use to query data. Let's go. If we get back to our code, we have the following
logic to fetch data. However, we also going to use the same logic in
other pages as well. Why don't we make a
very simple wrapper around this functions so it will be easier to
reuse in other files? What I will do inside source, I'm going to create
a new folder, which I'm going to call
something like API or maybe like utils or you can
call it whatever you want. It is just to separate
it from the rest of the logic from the rest of the file and it will
be easier to find it. Here, I'm going to go and create a file called tvmaze.js, and inside that file,
what I will do? I'm going to create a
reusable function that we will call apiGet. That apiGet will receive only
the path name of the URL, so just like you see
in the documentation. We will only pass that segment
of URL to the function, and the function
will do the rest. Instead of doing this, we will call just apiGet, and then we're going to pass search shows and query
string, something like this. However, we can go even further and create
another wrapper for that. Instead of using this
function like that, we can just call search
for shows function, and then we just pass
the search string, and that's it and the rest, all that logic here, will be managed inside. Pretty cool. Let's go
ahead and implement that. First of all, we need to create this apiGet so that we will
be able to use it like this. This apiGet will be a function that will
return as a promise, which will be the response
body, just like here. Eventually, it's going
to look like that. Let's go ahead and do that. We pass the queryString here. The first argument that this function will receive
is going to be queryString. This function is going to
use fetch these two lines. I'm going to copy
them from here. Since we use the
await keyword here, we intend to use async-await, so I mark this
function as async, and from this
function return body. However, we get this
URL hardcoded here. We can move it outside
just to somehow declare it somewhere
at the top so we know what is the BASE_URL here. Here at the top, I'm
just going to create variable called BASE_URL and it will be this
https://api.tvmaze.com without leading slash. Then I'm just going
to interpret it into the fetch call BASE_URL. Instead of using
slash search shows and then search string, I'm just going to apply that queryString that we
pass as the argument, which is going to be this
string with the leading slash. Instead of all of that, I'm just going to
use queryString. Eventually, our URL
will look like this. It will take
BASE_URL and it will take the queryString that
we pass from the arguments. Eventually, this type
of URL will be formed. Now, we go ahead. We agreed on that we
got further than apiGet and we create
another function on top of apiGet that we
call searchForShows, so we don't pass slash
search slash shows. If you want to manage that, it will be managed
in a single place, in single file here
inside tvmaze.js. From here, I'm going to export because we're
going to use it later on inside home function called
export const searchForShows. Again, this function will
receive just the queryString, just whatever we type
inside the input. It will be query. Let's just name it query. That function we'll call apiGet
and it will pass search, shows, and query is going
to be query that we pass. This we'll call apiGet and whatever apiGet returns will be returned from searchForShows. I'm using here arrow
functions short syntax. This syntax without
explicitly using function body with
curly brackets returns whatever apiGet returns. This is the same as
writing return apiGet. To make it shortened, we use it like this. I save it, and now I can use that searchForShows
inside my home.jsx. I'm going to import from, we go back one for
the level above. We grab api/tvmaze, and we grab searchForShows. Now, we can remove all of that and we can call searchForShows
with the queryString, which is going to be
our searchString. Like that. If we
see the results, let's call it apiData
and log apiData, and we get back to the app. Whatever we type here, let's inspect the Network tab. We type girls, we press "Enter". You can see the request is
being formed correctly, request URL is correct. Everything worked perfectly. If we look inside console, we can see that on
home.jsx line 15, exactly where we have
our console log, this is what we receive. This is our apiData. Now, what we can do? We can create another state and whatever data
we receive here, we can place it inside
the state because again, this apiData that we receive
is data that changes over the component life cycle because this is data
that we search for. It can be empty, it can be not loaded, something might trunk with it. I'm going to go ahead and
here I will create new state, which we're going to call
showsResult or let's just name it apiData
and setApiData, and it will be used state here. By default, it will
be an empty array, or maybe it will be
null by default. Here what I will do, this variable length 15, I will call it as
result or response. Yeah, let's just call it result and I'm going to
call setApiData, and setApiData is going
to be the result. Whatever array we receive here, we will place it inside
our apiData state. Then we already know what to do with the arrays You
you remember that. We can map each element to some JSX Barker
and then display. What we will do
right below form. Let's create a div here. What we'll do, we will
create a function here. Instead of inlining
the dot map method or let's first inline
these dot map method. There's one thing to keep
in mind when mapping. We're going to call apiData map. We have data here and for now, we're going to map
it to a simple div. Let's inspect what type
of data do we have here. What is the shape of data? We have array of objects. If we inspect this data object which represents this
object that I highlighted, it has score key and
then it has show key. Inside show, we have name, we have ID URL. For now, let's
display just name. We need to access data.show. I I interpolate data.show.name. You always have to remember that you need to
pass the key prop. Key needs to be something unique since we
deal with API data, API data when it comes from
beckoned usually has ID, and ID uniquely
represents the item. ID is the perfect case
for the key prop. Data show ID to uniquely
identify the mapped element. Let's try. We go to the app
and what do we have here? We already have the
error which says, can not read properties
of null, reading map. If I refresh the page, I will always see this error. What happens? The thing is, our initial
state here is null. It means when the
component renders, the state API data
is going to be null. Because we didn't
click on any button, we didn't get any results.
The state is null. If we try and map null, we get this error
because basically, our code looks like
this, null.map. Well, this is wrong. This is why we see this error. It says, can not read properties
of null, reading map. Which means it tries
to do null.map. How we can overcome this? We can make it in multiple ways. The easiest way to deal
with that is to change initial state from null
to an empty array. Let me get it back to API data. If we change it to
an empty array, whenever we do not
have any data, since array is empty, we will not see anything. Because well, nothing will
be mapped ultimately. When we search for
something like for boys, and when we get our
results from the API, each API element is mapped to corresponding div with
the name of the show. However, what I want to
alternatively show you, instead of using an empty
array as the default state, we can still use null, but we can handle our
logic slightly different. Let's go further
and let's create a helper function which we
will call renderApiData. Instead of inlining the.map
method here directly, which is going to call as you remember we
already did that, renderApiData and we will manage a rendering logic conditionally
inside that function. Here I'm going to
create renderApiData. Instead of using this, I will say our initial
state is null, remember. When we try to display null, we will get an
error because well, we cannot map nulls. We can simply check if API data is null or if our API data
is false, we return null. Otherwise, we know it will definitely be an
array once it's set. Or maybe we can invert
the logic so it will be more readable and it will
be better. We can tell. If we have API data, if data is truthy,
it's not null. It is something for
example like an array. In this case, we
did call the.map method to return apiData, map, data, and then the logic that we have. Otherwise, by default, if this condition fails
and our API data is false, it will fall through here, fall through this condition. Then by default,
we return nothing. Remember, null results into nothing will be rendered
inside JSX markup. If we go back to app, you can see nothing gets displayed. That's because our API data
initially is set to null. That is why we render null. But as soon as I
search for the API, I have my data here. Awesome. Whenever I change
query, it will be updated. Just look at that, how does it look like? One more thing that I want to add here is actually
data handling. I know we've already covered
a lot and it is a lot. But what about errors? Would, if our request
that we sent here, if we look inside network, if the request that we sent
here fails for some reason, it throws an error. What happens in this case? We can actually emulate this error inside search for
shows or inside API data. So instead of just
doing API search, we can just throw error until
something bad happened. This is exactly what will happen if this request fails for some reason,
something bad happened. Let's try and see. We have unreachable code, which again comes from eslint. Eslint you saved me a lot. For now, we're just going
to comment this out. I'm going to look for anything,
something like hello. If I click, nothing happens. But you can see here
inside console, we have uncaught in promise error,
something bad happened. In this case, we need
to always remember when we deal with
asynchronous JavaScript, when we deal with APIs, we always need to catch and
handle errors no matter what, even if you are sure
about this API, how great it is and you
can think of any error. Well, you need to
change your mindset. Something will eventually
bring an error, so you need to be
sure to handle it. In this case, inside this
await search for shows, we can wrap it and try catch
block to catch any errors. I'm going to move these
two lines inside try. If something inside
the try block fails, it will spit out the error
inside the catch block. We can create another state, and whatever error
we receive here, we can place it
inside the state. Here at the top,
I'm going to create apiDataError state and
setApiDataError state. By default, it will
be null as well. I'm going to go ahead
and inside catch block, I'm just going to
call setApiDataError to whatever error
that we have here. Now, if we try and
cancel log error, the state, by
default, it is null. But whenever we have an error, we can see we have the other
object inside our state. We can use it inside
renderApiData and display any error message
in case there is an error. We can tell if we
have apiDataError. In this case,
please display div, which says, error occurred, and we can interpolate apiDataError.message
since our apiDataError is going to be the error object. Let's try. If you remember inside API Gateway throw
something bad happened. We say it doesn't matter. We click on Search and we now see error occurred,
something bad happened. Cool. However, we need
to also remember that we need to update this state in case we
click once Search, then we see this error occurred. Then we click next
time on Search, and then next request
goes through. However, our API data at
our state is dangling. It still has its previous state, so it will be displayed. We need to make
sure we clean it up before every request
that we send. We call setApiDataError to
know the initial state. Just like that, we manage the
full flow of our request. Now we can remove throw new
error and common the logic. Let's see everything
once again in action. I look for girls, I have girls, I have boys, and I have
whatever I type here. Everything works as expected. In case we have an error
thrown by the API, it will be handled here. How we can test that? We can actually just type
some gibberish in the Euro and see what the
API gives us. I typed girls. I click on Search. You can see inside Network
tab now it is red. It says 404, which means we did
something wrong. This endpoint does
not exist obviously. Our API to VMAs API
returned some error. In our case, it
returned an error. It just returned a
404 status message. Fetch understood that
it was an error, but it didn't have
any error message. It says failed to
fetch by default. Now, if we try and
change it back again. If we'll look for boys. Now, everything has
been displayed. How cool is that? I think it looks amazing. We handled all possible
situations that might go wrong. Now we have a pretty
robust logic, not only to create data but
also to handle any errors, as well as we display
the data that comes from API,
something like that. I think we actually
covered a lot here. We talked about
different states, we talked about data fetching, we talked about error catching, we talked about displaying data. That's a lot. Let's wrap it up. Git add, git commit. Let's name it fetch and display data from tvmaze api. Create reusable
function to fetch data. To reusable function, I refer to the search for shows. Awesome. Let's commit and let's push everything to master. I'm going to see you
in the next one.
65. Fix Prettier not working: Hi there. This video is going
to be quickie because I just noticed one small
problem in the project setup. The problem is this
prettierc file. So I misspelled file name
and because of that, the conflict that we
specified here did not work. However, you might have noticed
when I was saving files, they were out of formative. This is because we have the Prettier extension
installed and by default when this extension cannot find the configuration
placed into your project, it will fall back to
the configuration defined somewhere internally
inside that extension. That is why it still worked. However, it did not
use this conflict. To fix that, let me rename
that file to prettierrc. So now it can actually
be picked up. If I go to, let's say app
component and I save it, now you see I actually have single quotes as defined
in prettier conflict. However, to fix
the small problem, I need to go over each
file inside source. It might be tedious and we don't have actually
a lot of files, so we can do it manually, but here's a tip. We can use prettier common
line interface and write a small script which will form an old file's inside source. If I go to Prettier
Documentation, I click on Docs and I, under Usage section, can look for CLI, I can find that snippet here. In practice, this may
look something like this. I can just copy this one. Go to package JSON, define new script here, which I will call format, where I will write prettier
dash dash write dot. Dot will format all files
in current directory, but I don't want to do that. That's why I'm going
to change it to source dot blast streaks, asterix, dot, then
curly brackets, JS,JSX. Do not panic, this
is something called glob pattern or a glob syntax. It is used to match
files and Prettier can accept this pattern
or syntax as an argument. So it will look for
all files inside source and in old sub
folders and will look only for files with dot JS and dot JS6 extension.
I'm going to save it. I'm going to do NPM run format. Let's see what do we have. Now, we can see the output. So these are all the
files that were formated by the format script by feature. This prettier here
that I refer to, it will be picked up
from Node modules because we have it installed
as a dev dependency. So we write prettier here
inside NPM scripts and it will resolve to the installed prettier from Node modules,
as simple as that. Now that we have
everything fixed, let's commit everything and say fixed prettier
config misspell, add format script
to package JSON. Awesome. See you
in the next one.
66. Radio buttons. Add search for actors: Hi there. In this video we will proceed with our development
of the homepage, and this time, we're going to add radio buttons inside our form that we use
to search for the results, and we will be able
to select whether we want to look for shows or we
want to look for an actors. Let's go. I'm going to
back to home component, inside home component, right
under input of type text, I'm going to create
another input here, since it is going to
be a radio button, I will place it
inside label element, so it will be input of type. Radio label will be shows, name is going to
be searchOption, the value of that radio
button will be shows. Then I'm going to
create another input, another radio button,
this time for actors. Actors, type radio, name stays the same because these two radio buttons
share the same state, value will be actors. I go back to my markup and I can see that checkboxes are there, excuse me, radio buttons. Now, in order for us to
somehow include the value, the selection of our checkboxes
into the API request, we need to have another state
for these radio buttons. At the top, I'm going to
create another state, which I will call searchOption, something like this, set searchOption by default, it will be shows. Our searchOption state can
be either shows or actors, either shows string
or actor string. Based on that, we will send relevant request to TVmaze API. Now, we need to associate that state
that we've just created with the radio buttons
that we wrote previously. It is pretty much the same
as with input of type text, we're going to do
two-way data binding, we already have value, now we need to listen for the change event
on these inputs. Logic is exactly the same, I'm going to introduce the on
change event handler here, which I will name
on radio change, and it will be the same for both elements here at the
top right next to it. OnSearchInputChange, I will
write on radio change, it also receives the
event object, and now, in order to set the
searchOption state, I can refer to the
value attribute that we passed to each
corresponding radio button. Radio buttons are
represented by values so we can actually
access event.target, which will resolve to
the input HTML element. They have value attribute
and it will give us the corresponding value that we associated with
each of the radios. SetSearchOption will
be event.target.value, basically the same as we did
with onSearchInputChange. Now, this is one-way data
binding, as you remember, but listen for changes inside
the radio but we did not associate searchInput state
back with the input element, so we already have
value attribute here, but radio button state is represented not by
the value attribute, but by the checked attribute, and our shows radio button checked when our
searchOption equals shows, so we can write it
just like that. Search for shows equals shows. This expression will be
true when search for shows will be string shows. Exactly the same
logic we're going to apply for actors input. It is going to be
checked only when search for shows equals actors. Great. Now let's take a look. Let's console log
searchOption, and excuse me, it's still says I used search
for shows here, sorry, I meant to use searchOption, if state equals shows then
this input will be checked. The same goes for actors. Great. Now let's try and
console log searchOption just to make sure that
we did everything right. By default, it is shows
this is the initial state. If I select actors, now, it's actors, if I select shows back again, it's still shows, which means everything
works perfectly fine. Now, we need to somehow plug in this searchOption state into our request and place the corresponding
logic somewhere inside the on search handler. Right now, we're going
to put it very simply, but in the next video, we're going to slightly refactor that component and we will make it look much, much better. But what will be the
logic in the first place? If we go back to TVmaze
API documentation, we used this end point here
to look for the shows. If we look inside
table of contents, there is another link which leads us to people
search section here, and it is almost the
same as with shows. You can see that, well, the template basically
is pretty much the same, but this time we look for
people instead of shows, so how we can achieve
that in our code. If we go back to TVmaze.js, here we already have this reusable function
called search for shows. We can copy that function and
rename it searchForPeople, and instead of passing
/search/shows to API get, we're going to pass
/search/people, and all the arguments stay the same because we also
have query string here. Awesome. We go back to homejsx, this time we import
searchForPeople. The logic inside on search
handler will be very simple. If searchOption equals shows, please run this logic
that we already have, otherwise, please run the same logic, but
call searchForPeople. You can see we have a
small repetition here, but we will adjust that
in the next video. For now, don't think
too much about that. Let's see how it looks like. We go back to our app, shows selected by default, we search for something, and you can see everything
works as expected. If we select actors and
then we click on "Search", we have a blank
screen, what happened? If we look inside network tab, we can still see that the
request went through with the correct endpoint
/search/people, but if we look inside console, we have that header, which says can not
read properties of undefined reading name. What happened? If we look at the response body that we
received from the API, this is the object that we have, but inside the code, we actually write, if
we have API data state, we're going to render
data.show.Id or data.show.name but in
our actors result, we do not have that. We do not have data.show,
we have data.person. We are basically
accessing the wrong data. Console here, tells
us about that. Cannot read properties of
undefined reading name, because data.show is undefined inside that response object, and then we try to
access undefined.name, and this is what we see, cannot read properties of
undefined reading name. This is our problem. The solution for
that will be that somewhere here we'll
need to write, when we search for
actors or when we have, let's say actors results, please display actors, but when we have shows results, please display shows, and we cannot do the
same logic as here. We cannot rely on our state, we need to rely on data
shape that we have. Here inside the logic, we can just do if, where is it? We have an array,
we're going to ask, if API data first element
has show property, in this case we can tell that we are working with the shows, we have shows data from the API. Otherwise, if we
do not have shows, if our first element inside that array does not
have the show property, we can tell that we are
working with the people here, with that person object. We're going to tell otherwise, please run apiData.map and data this time will be
not show but data.person. Data person, let's see, id as well and data person, let's say name, pretty much
the same as with shows. Now let's try. It
looks a bit messy, no worries, we're going to fix all of that just a bit later. Let's see that everything works. I look for shows, I get results from the API, they get rendered, perfect. I switch to actors, and I look for something like Andrew and you can see now
we don't have any adder, console is clear, we get response in the network tab and we
have data rendered, so we can tell that it worked. Awesome, isn't it? Great. I can tell that we've achieved
what we wanted for now, let's commit our changes
and in the next video, we're going to slightly refactor that component and encapsulate that logic that we have with the form element here in
a separate component. But for now, let's just
commit everything, and name that commit
as let me see, added search for actors. Great. Let's push to GitHub and we'll see
you in the next one.
67. Moving search form logic to its own component: Hello again. In this video, we will continue to work
with our logic that we've introduced in
the previous video. We added an option to select either shows or actors and then based
on that selection, we send corresponding
request to TV maze API. You can see that once
we added that logic, our home component became a bit bloated with lots
of different logic. We can actually simplify it and this is exactly what
we're going to do now. Why don't we move all that
logic related to form element, all these states, why don't we move it to a separate component and
put the logic there, and then we're going to expose only what we
need through probes. Let's try and do that.
Inside components folder, I'm going to create a new component, something
like searchformjsx. From here, I'm going to
export search form component. But now it will be
just an empty div with something export
default search form. Then, now let's try an
important and let's see how approximately we want
this component to behave so that we can write
the logic correspondingly. I'm going to import search form from
components search form. Instead of all of that, which is going to write
search form. What do we need? We want to perform the
search somewhere here in that component because this is the component where we
actually render data. If we wanted to manage
everything inside search form, then we wouldn't be able to access that logic
from the outside. We're going to manage
the state logic with inputs inside the component but search will be
actually happening here. The search logic will be
written inside home JSX. We need to somehow find a way to expose a probe which would allow us to search for shows
here inside home JSX. We can just actually
pass this on search function to the
search form and insight search form when we click
on submit which is going to call the function which is
defined here inside home. We're going to call
it something like on search and we're going to pass our concert function
that we already have but we will slightly
modify the logic. Instead of writing
all of that we will just have one single line. Now, let's copy that markup with form element that we have, and let's put it inside
search form like this. Now, we need to move the logic
that we have in home JSX to its state like on search input change and
on the radio change. We're going to move all
of that to search form. Here, also these states, search option, and
search string. Let's copy these two. Let's put them here on top. We need to import
the use state now. I will copy this as well. Now, the only thing
that we missed from here is the on-search handler. Let's go ahead and
define it here. Instead of calling
that on search, we will call it on submit, the reason will
be the following. We can pass that
on search handler here directly as
a probe and then specify directly as
on submit handler but we will expose
the event object, which means we
will have to write the logic to prevent
the submit event. However, the outside
component which home.JSX is does not really
need to know about that. Why do I really need to prevent some default logic,
some default behavior? We can move part of
this logic from on search directly inside
search form component. Here, I'm going to create on submit function and I will pass it as on
submit attribute. Again, we have the event
object inside that function. We prevent the default
submit action by calling event prevent default
and right after that, we need to run this logic. But this logic will
be defined here. We can expect the on-search
prop which is going to be a function and we simply going to call it
here, just like that. Let's try. Here, instead of writing
event prevent default, we don't need it because
it's already done inside the search form
component, I will remove it. Right now we call own search
without any arguments, which means I do not
receive anything here. Just a function
without any arguments. However, we lost the access to search option and we lost
the access to search string. To fix that, whenever we call the on-search function that
we defined inside home, we can pass arguments
here because we do have him here
inside search form. Why don't we call on
search web search string and search option? But to make it more
user-friendly, the API that we expose from the search form component to
make it user friendly here, we can pass may be an object,
something like options. Query, let it be just Q will be the search string
and the search option, let's keep it as it is. Eventually, we will
have an object called options with Q property and
search option property. We're going to pass that object to the on search function. Here we receive
the options object and we can do destructure
directly here. We're going to destructure Q property and search
option property. We grab Q, we grab search option
instead of search string. Now we're going to use Q. Let's try and see. If I refresh the
page nothing happens because I did not run
the development server. Let me do that very quickly. Let's wait a second. It's here. Let me
refresh. Let's see. Our functionality
should not really be changed because we just
doing a smaller factor here. We expect everything to behave exactly the same
as it was before. Girls, we have girls, works perfectly, actors. Let's say, Garry, we have Garry. You can see functionality stay
the same but now our logic inside a home JSX was
drastically simplified. We have basically almost nothing here except the logic related
to the search itself. The logic which takes
care of the form of all inputs was encapsulated
inside search form. Now, we separated the concerns. Makes sense. I think it does. That's it for now. Actually, wait, that's not it. We still need to do something
about that because you can see we still have the
small repetition here. We can actually
keep it like that and do not really think
too much about that. Nothing wrong with this but
we can make it simpler. We can let's say first create
a variable called result. Like this then we're going
to move set API data here and we're just going
to do something like this. Or maybe we can even
make it simpler by inlining the logic
with ternary operators, search option shows, please await search for shows
otherwise await for people. But I think this
statement will do. Awesome. Now that's totally it. Let's commit everything
that we've just made. How we can name that? We can name that very simply. We just call it
factored or let's say oscillated search form logic
and search form component. Perfect. I will see
you in the next one.
68. Displaying cards for both shows and actors: Hi. In this video, we will continue with
the development, and we will proceed
with displaying data from the TV maze API. At this moment, our logic to
display data is very basic. We simply map over
API data state and then display either
acronym or show name. Let's make it real this time. So instead of writing that, we can, again, oscillate all of that logic
in a separate component, specifically for actors, and in other components,
specifically for shows. Let's do that. Inside
components folder, I'm going to create
two more folders here, one for actors, and another one for shows. In these folders, we will put specific components only related to shows or related to actors. Inside shows folder I'm going
to create new component, which I'm going to
name ShowGridjsx. This is going to be
y now as simple, div export default ShowGrid, and for the future reference, I'm going to copy
this logic and put it inside actorsGrid as well. But I'm going to rename it
to ActorsGrid this time. Now let's get back to home. Now, instead of doing this, instead of mapping
elements here directly, we can display either
ShowGrid or ActorGrid. When we have shows, we're going to display ShowGrid. You can see the intellisense
again, from the drop-down, I press "Tab" and I verified that it was
imported correctly. Well, it was, so I can continue. The same I will do for actors, instead of mapping
elements here, I'm going to display ActorsGrid. The intellisense,
boom, imported. I've verified the input. Looks great. Much
simpler now, isn't it? In order for us to display
data inside these components, we need to pass
data so that they can somehow manipulate
it from inside. For ShowGrid, we're going
to pass shows prop, and it is going to be API data. For actors grid,
it is going to be actors, again, API data. For now, we're finished
with home component. All the logic will be placed in the corresponding
grid component. Let's start with shows first. We go to ShowGrid, here, we receive the show's prop that we pass here from homejsx. Great. Now, inside Show grid, we're going to map data now. We're going to write
showsgrid.map. Here we have our data object. For now, let's just quickly remind ourselves,
what do we have? We have data show.name
if I'm not wrong, and for the key, I'm going to pass data, show ID. Let's just quickly verify that. Let's get back to the app. I type something and
I've got an error, which says cannot treat
properties of undefined. I think I see now. The problem is that we handled the case when we
have stage equals null. But we didn't really
handle the case when the stage is
an empty array. Because you saw I
entered gibberish now, but if I type something
sensible and we actually have results from the
API, we have an array. But if I type
something gibberish, it will be an empty array. If we look inside
the network tab, you can see from the
API on your preview, we have an empty array and
we do not handle this here. But in the logic we write, please check against the first
element inside the array. But since the first
element does not exist, it is undefined, we have undefined.show, basically. We need to fix that. We need to consider the case
when we have an empty array. Here, we're going to add
another if condition, if APIdata.length equals zero. You can see what I did here, I actually added that
question mark here. This is called optional chaining because if
API data is null, and if I'm going to
type null.length, I will get an error. To prevent this
error and to make sure JavaScript access length only when API data is truthy, we can add this
question mark here. If API data is falsy, it's null, it will not throw an
error saying that cannot read property
length of null. But when it's truthy, it will proceed and it will
use the length property. If APIdata.length equals zero, if our array is empty, we're going to
display no results. Let's try and see that
if I type gibberish, we get empty array from the API, and this time we have
no results texts. It looks good to me. Let's type something
that makes sense. We have girls, the
logic that shows all the oldest shows is
written inside ShowGrid. Looks perfectly fine. Now, let's go ahead and create the card component for the show. The card component will
be our style show-card, where we see all the data about the show instead of just
showing in simple div. Inside shows folder, I'm
going to create ShowCardjsx. This is going to be show card. Again, simple div, and by default we
export ShowCard. Now we're going to use that show-card here
inside ShowGrid. Instead of mapping each element, each show object to
that simple div, we're going to map each element to the show card component. Instead of doing that, I will map each
element to ShowCard. Again, Alto input, and I will need to pass
props to ShowCard component. However, it is all
red because again, I need to pass the key prop. It does not matter
whether the element is your own custom component or
it is just an HTML element, you always need to pass the key. Key is going to be data show ID. Now, what data we want to
display inside ShowCard? Let's start with
something simple. So first we're going
to receive name prop, and probably we're
going to receive image or let's start
with the name first. Inside the div, we're
going to display that inside h1 tag. We're going to interpolate name. Now we need to pass
that name prop here. When I'm mapping the
show card component, I'm going to pass name, equals data, show.name,
something like this. Let's try and see. Indeed, you can see now
is all large and bold. This is our h1 tag. Then we're going to pass image if we inspect
our API data. Let's try and see. We have show image. An image is an object with
medium and original keys. Let's try and see if this
data somehow changes. Image, still we have some but I can tell
you that image here might be null
because not all the shows that we receive from
that API have images. They might not have any data. In this case, image
will be null. How we will be able
to display something? For these situations,
what I suggest to do. In case we do not receive
any image from the API, we would show the placeholder
image to the user, something like image not found. For that, we can go back to the guest that you
have shared with you. Here you can find that
placeholder for shows, actors without cover image. You can click on that image, then right-click on it, save image as and let's
place it into our project. I'm going to place it inside public folder and
I'm going to call that as not found image.png. Great. If I look inside public, now it appeared here and
we can actually refer to that PNG image inside
our source code. Let's just quickly see
how it looks like. Image source is going
to be not bound image because our
file is placed inside public and it is served
over the app route. We save it, we go back to the app and whenever
we search for shows, we have this, perfect. This is the image that we have. Now inside show grid, we're going to pass image prop, but we're going to specify if data.show.image is
truthy in this case, take this image.medium, data.show.medium, otherwise
please show not found. How did we name it? Not found image.png. Great. Now inside show card, we can grab that image prop and we can displayed
somewhere up here on top. We're going to wrap
image in a div. Then source is going
to be image that we pass and out will be
the name of the show. Let's quickly see
what do we have. We have something wrong here. Let's see, we do not
have any source. Why is that? It has to be
data.show.image.medium. Now you can see
worked pretty good. Let's try and look for actors, and you can see now we have
all these cover images. Nice. Let's go ahead and
fill in the app data. What else do we need to show? We would like to show maybe just a summary and
inside each card, but we'll also have a button for the future to start that show. When we click on that
button, it will start, as well as when we
click on the card, it will bring us
to the show page. That we will create
in the future. Inside show card,
we will need ID. We will also need summary. Let's see how we can
display everything here. We're going to
create a div here. A div will be just
probably a link for now that we import
from the [inaudible]. Inside the link we
going to say read more. The link will bring
us for now to route. We're not going to do
anything about that for now. Then we have a button
here of type button, which will be star me for now in the future will replace
it with the icon. About summary. Summary
we're going to display somewhere over here and we will not display
summary as that just will not display the
prop that we receive, we going to somehow
transform it. The reason behind that, if we look into
the API response, we have the summary string. But as you can see,
it is HTML string. It means that we can just
take that HTML and use. The problem is that
it is pretty long. We want to make it short. We don't want to display
hundreds of words here. I suggest to transform that summary string into
something very short. We're going to strip all
HTML tags from here, and we're going to grab only, let's say first 10 words, probably. How we can do that? Suppose that we receive
this string here. Let's write the logic inside
Browser Console here. We have this string here. On that string, we're
first going to transform it into an array by calling.split method
and we're going to split it by empty spaces. Now we have something like that. Then we're going to take
only first 10 elements from that array,.split after that, we're going to slice from
index zero to index 10. We end up with an
array of 10 elements. Then we're going to transform that array back into string. We're going to join all elements with an empty string in-between. It looks like that. But we still have
HTML tags here, so we need to replace them. I'm going to change the.replace method available on all strings. Here, I will pass something
called a regular expression. I will match all
unnecessary characters and then replace them
with an empty string. Basically it will
just strip them away. Do not think about
that to match. The regular expression that I'm going to write
will just replace all the HTML tags inside
our current string. It will look like this. Just don't pay a lot of
attention into that. Our final result
will look like this. We took that HTML string, we shortened it, and we
stripped all HTML tags. I can just copy this logic. They just wrote here, and I will do something
like summary stripped. If I'm not wrong,
in the show summary might also be not present, that's why we're going to check against falsy values here. If we have summary, then we're going to call the split method
and all that logic to transform our HTML
into simple string, otherwise we're going
to tell no description. Then we're going to
display summary stripped. ID for now is unused, but we're going to
keep it like that. We save the file, go to show grid again
and we pass ID, which is going to be
data.show.id and for name, we already have it. At the end, we going
to pass summary. It will be pretty simple,
just data.show.summary. I know that it sounds like
a lot but trust me this is just a regular way when you
work with data from the API. You need to somehow think how you want it to display data. This is just a
normal thing here. I save it, I go back here, and if I look for
boys this time, where are my boys? They are here. Now I have the summary string
that we transformed with Read link as well as
the Star Me button. Well, looks great, isn't it? Now, we actually spend a
lot of time on shows here. Let's quickly wrap up
the actors that we have. Inside actor grid, we can just copy this
logic from here. We don't need console log. I'm just going to copy
logic from show grid, put it inside actors grid. I will quickly receive the
actors prop that I pass here. Actors.pop data. I do that inside show grid. I need to do that
inside actors grid. I receive actors here. I map actors and I map
them to actors card. Actorcard.jsx. I will copy that logic very
quickly from show card, place it inside actors card. I will rename show
card to actor card, and this time, what
data will I receive? First of all, actors
also have names. They also have images, and they also have IDs,
or maybe they not. We don't need ID because we will have a separate
page for each show, but we will not have a
separate page for each actor. We will need a name, we will need image, we will need probably
something like gender, their country, maybe
birthday and death day. Then here inside actors grid, I'm going to use that
actor card here. It was auto imported instead
of passing all these props. Let me remove it. For key, I'm going
to pass data dot, let me actually see. What do we have here?
Show card is not defined. Summary is not defined. Come on. Let me look for actors. Let me see the network request. Here I have person. This is person, so data, person. Inside person, I have birthday, null country, null death
day, null gender, females. You can see we already
you have a lot of nulls. Well, that's not bad. We're going to pass name. It just going to be
data person.name. Then it is going to be country. If I'm not drunk, country
can be actually an object. It is an object with name here. I will just pass data,
person, country.name. However, country can be null, so we need to check
against that. If data, person, country is truthy,
then please take name. Otherwise please give it null. Then we have birthday. As you saw birthday
can't be null, but we will handle that
inside actor card. We're going to pass
data, person, birthday. Then we have death day as well, which is pretty much
the same as birthday. Then we also have gender. Gender is going to be
data, person, gender. Also, I think we forgot image. Image, I think it will be pretty much the
same as with shows. I will just copy it. I will ask if data, person, image exists. Please state data, person, Image, medium, otherwise not found image PNG. Great. Now, what will be the
markup for the actor grid? Let me see. The image will
stay the same without name. Inside H1, we're going
to still display name, but next to name we
will also display gender in parentheses
if there is any. We can inline our logic here. You remember that we can
inline conditional rendering directly inside JSX
if gender is there, please display the string, which is going to be parentheses
and inside parenthesis, we going to interpolate gender, and this gender can be null. When we use the and operator to conditionally
render this logic, we want to always
make sure that gender is a Booleanish value. That is why we're going to either transform it into a
Boolean like that to check it, or we can apply double negation, which will also turn it
into a Booleanish value. Next to name, we're
going to display country inside the paragraph
tag, I think. We're going to ask
if country is known, then we're going to
display a string which says comes from country. Otherwise we're going to
tell no country, no one. Then we have birthday
and death day. We're going to do
the same logic here. If we have birthday,
a Booleanish value. Please display the p tag
with born on birthday. Probably the same
for death day or for a death day instead of not showing nothing
when it does now, we can still say that
this person is alive. That is why we're going
to create the p tag here and we're
going to ask if we have death day, please. Display died at this death day. Otherwise, please display alive. We don't really need
that div at the bottom. Our final markup
looks like that. We don't need the link
component on top. Well, that was a lot and
I'm already tired now writing all that pretty boring
logic of displaying data. But still we have
to go through this. Let's look for shows. We have everything
being displayed. Now, we've switched to actors. We'll look for Harry this time, not Gary but Harry. Here we have image. You can see if image
does not exist, it shows image not found. Then we have the name, the gender in the parenthesis. Then we have no country, no one alive or not alive, when the person was born. All the data that we have from the API will display
in this manner. I think this is it. Let's commit everything
and let's move on. I'm going to commit everything. I know that you saw this one warning that we have
because of that ID. That is fine. Let's just
keep it there for now. We're going to deal
with that later. We're going to commit everything
and we're going to say displayed shows and actors data. Let's push everything to
master and let's take a break. I'm going to see you
in the next one.
69. Pages with dynamic content. Creating Show page: Hey there. In the last
video we've created cards for shows and actors. This time, we're going to
talk about dynamic pages. As you remember in
cards for shows, we have that read more link. If we go back to markup, this is the link component that we used from
React Router dom. For now it resolves to
the homepage to the root. Basically it does nothing
if we click on it. Now, what we want to do instead, when we click on
the "Read More", we should be navigated to
the specific show page. First of all, we
need to decide how exactly our show page
will be represented. In this case, and
most of the time, pages are represented
by Ids. We have showId. It can be our unique
identifier for the page, so whenever we click
on a page in the URL, we will somehow see showId. We can consider
two options here. First option, our URL will look something
like slash show, and then Id of the show will be supplied as part of
the query string. Something like this. Second option that
we can consider, instead of supplying Id as
part of the query string, we can actually turn
showId into URL segment. Eventually, show
page will have URL, something like slash show, slash showId, and
that Id will be changed based on the
show that we click. The question here is how this can be achieved
with React Router. If we go back to
app component here, as you remember I commented out that markup that I took from the documentation for
the future reference. Here we have these
route teams and inside it we have
something with colon, we have colon team Id. Whatever you see here
is something called dynamic URL parameter
or dynamic URL segment, because it is something
that changes. All of our data
that we have inside our application is dynamic, because whatever we
type in the input, it will be dynamic. We can't really predict what data we should
expect from the API. We need to somehow
think how we can write the skeleton for
the dynamic data. What I suggest to do
is that we consider the second option
that I just show you, and our URL will look like
slash show, slash showId. That dynamic showId
URL parameter is what you see here in
this example with colon. We give it some name,
let's say teamId. We specify that this
named parameter will be something dynamic that we
can take from the URL. In our case, what
we can do here, we can create another route
and we will create it outside of the main layout
because for the show page, we will not use mainly route
that we've created earlier. That route will have path slash show,
slash, colon showId. That dynamic URL segment here, I gave it name, showId. I will have URL parameter, which will be dynamic, and it will have name, showId. For that route, I would
like to display show page. Let's go ahead and create one. Under pages, I'm going to create another component called show, another file called show, and the markup for now will be very simple show
page inside app. I'm going to import that show page component,
and let's try. If I navigate to slash show, slash something, you will
see I have show page. It actually works. React Router was able to match this path and render
me the show component. If I go to just show, I have, not found, because just show without dynamic URL segment will not
match that route definition. That's why it falls
back to, not found. But as soon as I go to
show slash something, I will have show page. Great. Now the question is, how we can somehow
retrieve that showId from the URL here and use it
inside our show component. Our strategy will
be the following. Whenever we navigate to
show page and we have showId in the URL segment
inside our component, we can take that URL segment, we can take that showId
and then use it inside the component to query TVmaze
API and get show data. This is very common
approach when you deal with dynamic pages. You will have dynamic
part inside the URL, and whenever you
navigate to that page, you take that dynamic
part from the URL and use it inside the component
to query for data. In our case, this is
going to be showId. Now, how we can take that
showId from the URL? If we go back to React
Router documentation, on the left we have menu. We can scroll down to
the hooks section and here we are going to be interested in the
use params hook. You can read that
quick description here so use params hook
returns an object, key value pairs of the dynamic params from the current URL that were
matched by the route path. Let's try that.
You can see it has been imported from
React Router dom. I will do exactly the same. I'll just copy
that very quickly. I don't need route,
so I only need to use params and inside Show, I'm just going to
call use params. I will create a new
variable called params. For now, I will just cancel log params and see
what do I have. I go to browser cancel here, and here you can see I
have an object where showId equals whatever
I supply in the URL. That key here will match the parameter name that we gave to that URL segment
inside route definition. If we put here something
like, I don't know, very random, I refresh the page you can see
now the key changes. I specifically gave it something
meaningful like showId, so that later on we can access that dynamic showId by
using the use params hook. Since it is going
to be an object, we can use this structuring. From that params object, I'm going to grab showId. Let's try an interpolate
that inside our JSX here. Show page for showId. Let's try and I noticed
that my app is not saved, let me save it. You can see show page for show
whatever I put in the URL. If it was show with Id1, I have for, Show 1. Just like that, we
now have created a dynamic page that will
represent our show. There is one more thing to that. We are not going to
change the URL inside the browser search box
manually all the time, are we? We need to modify the link
that we have inside show card. It actually brings us
to that dynamic page. Let's try and do that. Inside show, we know
that for attributes, for props, we can supply dynamic
values using JavaScript. Instead of just passing
a static string root, we can open curly brackets. We can say, please go to slash, show slash Id and this is it. Let's try and see that. If we look for hello, and whenever I hover on the link in the
left bottom corner, you can see the URL slash
show, slash five something. It will always be
different for each show. If I click on it and
navigate it to the page, let me go back and click on something else You will see
now it's different. Just like that we're
able to create dynamic pages inside our
app with React Router dom, and we're able to grab dynamic parameters from the URL using the use params hook, and then you use them inside
the component to fetch data. We're going to do that
in the next video. For now, let's just commit
everything that we did here. Let's overview. Insight app, we created
new dynamic crowd, which is based on the
showId parameter. We named that
parameter as showId. Inside Show component that we've created and that
component represents our page, we grabbed that
showId parameter, using the use params hook. Inside short card,
we modified link to actually redirect
us to the show page. Awesome. I'm going
to name everything as created dynamic show page, and I think this
will be just fine, push everything to GitHub and going to see you
in the next one.
70. Introduction to useEffect hook: Hey there. In the last video we created dynamic show page. Now it is the time for us to fetch some dynamic
data on that page. In this video, we're going
to talk about the ways, how this can be achieved. In order for us to
understand the way it works, we need to get to know another React hook
called useEffect. Previously, you
remember I talked to one's about
component lifecycle. Component lifecycle is that
period of time from when the component mounts until it gets unmounted from the page. Let's take a look more closely
at component lifecycle. We can differentiate
three different points of time when component mounts. Second is when component
is already mounted, and it gets re-rendered every time when state inside changes. Re-render and third
point in time will be unmounted or just when
the component unmounts. These three points in time represent the
component lifecycle. For our data fetching strategy, we are interested
only in that point of time when the
component mounts. Because our logic will
be the following. As soon as we open the
dynamic page for show, we grab show ID from the URL, and then we use that
show ID to fetch data only once when
the component mounts. We do not want to
rerun that data fetching logic every time when component gets re-rendered. This is important to understand that we need to run
logic only once. Now let's try and see how the useEffect Hook can
help us to achieve that. Let me navigate probably
to search form. In this component,
we're going to play with this useEffect Hook and understand how it works
and how it can help us. I'm going to put
these three points about component life cycle here. Then at the top from React, I'm going to import useEffect. Now, let's try and
use that hook. Inside the component, I'm going to call that hook, and that hook receives
two arguments. The first argument
is the function, the callback that will run the logic that we
want and second, argument, is something called
an array of dependencies. We're going to talk
about array of dependencies just a bit later. For now, let's just
pass an empty array. Now, our first use case will
be when component mounts. We want to run the logic only once when the component mounts. By the way, this
callback is called the effect of the useEffect. Let's refer to that
callback as the effect. My effect will be that
I'm just going to run console log and say
component mounts. Nothing complicated. Now let's get back to our app, open console and inside console
we see component mounts, gets printed two times. It gets printed
two times because we have React strict mode. If you remember in development, intentionally it
amounts to component twice in order to catch
any potential errors. We do not want this behavior
when we work with useEffect. For now, I'm just going to
remove React strict mode. Let's get back to our app. When I refresh the page
and the component mounts, the search form
component mounts, I see my console log here. If I try to update
one of these states, if I type something into input, component will be re-rendered. But you will see that
component mounts will never be run again. Let me try. I type
something in the input, that component gets re-rendered. However, component mounts
will never run again. To make it more friendly
for us to observe, here, I'm going to add console log
and say component re-render. What do we have here?
Component mounts. We see component re-render. This is fine because this is the first time when
the component mounts. Then we actually see the message that we
use inside useEffect. Now, if I update this state, you only see component
re-rendered. We never see component mounts. Just like that, we're
able to run the logic only once when the
component mounts. Now, let's observe the
third use case here. When the component unmounts. In useEffect inside that effect, inside the callback,
you can pass something called the
cleanup function. It is basically
the function that gets returned from the callback. Return function. This function here, it will run when the component unmounts. Let's try and see. Inside the cleanup function, I'm going to write component
unmounts. Let's see. First we have exactly the
same behavior as previously. But as soon as they change
the page, the navigation, if I go to the start page, this component search form will be unmounted from the page. Let's see what happens. I go to start and you
see component unmounts. The logic defined inside the
cleanup function will be run just before the component gets unmounted from the page. In this way, we're able to hook into the unmounted
point in time. So far, we hooked in
two points of time when the component mounts and when the component unmounts. With the second use case, when the component
gets re-rendered, it becomes a bit
tricky with useEffect. Let's say I would like
to run some logic, whenever search option changes. UseEffect is able to run some logic when
something changes. That second argument, the dependency array serves
exactly that purpose. It defines, it instructs the useEffect to run that logic from callback
when something changes. Inside the dependency array, we list values for which
we would like to listen, and when this value changes, we instruct useEffect, please rerun the logic. Let's try it and see. I'm going to comment out
the cleanup function, instead of component mounts, I will tell something like
search option changes. As the dependency array, as one of the values inside
the dependency array, I will pass search
option. Let's see. I refresh the page, nothing gets printed because I'm currently on the start page. As soon as I go to Homepage, we see component re-render
and search option changes. Why do we see search
option changes when we specify something inside
the dependency rate? The thing is that
useEffect always runs at least once,
no matter what. UseEffect runs at least
once, no matter what. Now, if I try and type
something inside the input, we only see component re-render, we never see search
option changes. But as soon as I update the search options state by
calling set search option, the useEffect will rerun. Let's see. We see
search option changes. We change it again, and
every time the value is changed, the effect reruns. As simple as that. Here, you can list as many dependencies
as you want. If one of them changes, the effect will be
rerun every time. Basically, we listen for
value changes and if that value change take place,
the effect reruns. By using this method, we are able to hook into
the re-render logic of the component and run our
own logic here by using, again, the useEffect hook. However, let's call
it 2.5 use case, when we want to run logic
before the next re-render. It might sound sophisticated, and at some degree it is, but let's see how it works. Our 2.5 will be logic before
next three re-render. The clean-up function here, previously I told you
if you want to run some logic before the
component amounts, you can return
that function from the effect and whatever you put inside will be run before the
component gets unmounted. However, this only works when the dependency array is empty. If we have dependencies
inside the dependency array, the clean-up function
will run for each effect. When current effect finishes, the logic will be run for it that effect before
the next effect runs. Instead of component amounts, let's say search option changes, and here inside the
same console log, we also going to
put search option. We will be able to see
the value of the state. Let's try. I refresh the page. I see search option changes. It does currently shows. As soon as they
change the option, let's see what happens. We see component
re-render as usual, we see search option changes. Let's say search option, let's say before next
search option changes, or let's say before
next useEffect run. Let's try again. We see
search option changes, shows. Now we change the option, and what I see before next, useEffect run we see shows. That cleanup function
runs for each effect run. Our current run here of that effect it is
for state actors. Because our current
state is actors, this is when the
last effect run. Next time the effect will run, the clean-up function
will run for our current effect for actors. If I change it to shows again, we will see before next
useEffect run with actors and then we will see search option
changes with shows. Let's try. We see before
next useEffect run, actually as of now for our previous useEffect run
and our new run of useEffect. Well, it sounds complicated. Actually, at first sight it is. However, it actually
makes sense. There are lots of use
cases when you want to use each of these options. By using useEffect, we're able to run
some logic during competent life cycle under different conditions
and circumstances. We can use the dependency
array to instruct useEffect when we want
to run that logic. Right now, we looked
at useEffect, and we console
logged the value of search options state whenever
a search option changes. You might have a question, why do we use useEffect
here if we can just put console log directly
here without useEffect, just like we did with
components re-render. Well, the thing is, with useEffect again, you
have the dependency array. This console log
component re-render will run on every competent
re-render, no matter what. Component gets rendered, you will always see
that console log. However, with the useEffect, you listen only for
values that change, and these values are specified inside the dependency array. If you specify an empty
dependency array, then these useEffect will run only once when the
component mounts. This logic, the
clean-up function here will run when the
component unmounts. Even if you have the dependency, when the component
gets unmounted, you will see that the cleanup
function will run as well. Let's observe that.
We change actors and we have our before
next useEffect run. When the component
gets unmounted, you will see before
next useEffect run. Basically, the
clean-up function, just like I told you, it cleans up the
current useEffect run. By using this approach, we're able to fetch data only once when the
component mounts. We will specify an
empty dependency array to instruct useEffect to run only once when the
component mounts. Inside the effect, we're going to fetch
logic from the API. As simple as that. Now that we know about competent
life cycle a bit more, now we know that we
can use useEffect to manipulate competent logic
during component lifecycle, we're able to fetch data and
finally display something. In the next video, we
will do exactly that. For now, let's get react strict mode back and we're going to talk
about that once more. For now, that's it. I'm going
to see you in the next one.
71. Fetching TV Maze API data with useEffect: Hello again. In the last video, we talked about the
useEffect Hook, how it can help us to manipulate the logic inside the component during component life cycle. Let's try and apply useEffect in our dynamic show page to
fetch some data. Let's go. I'm going to go to
pages, Show.jsx. Here, as you remember, we grab the showId from the URL. Let's look for shows. Let's say, Boys. We go to read More. We have this URL. Whatever we have in the URL, our dynamic parameter, we grab it using
the useParams Hook. Now, let's go and import
useEffect from React package, and now inside, which is
going to do useEffect. Since we want to
fetchData only once, we want to run logic only once
when the component mounts. For this reason, we specify an empty array of dependencies. Inside that useEffect,
we will fetchData. Let's see how the
endpoint will look like. That will give us
show information. If we go to TVMaze API and look for the shows section here, we have this endpoint/shows/id, and you can see this example. Let's open it and see. By providing the ID of the show, we will be able to grab
all the required data. Let's go and create
another reusable function inside the tvmaze.js where
we query this endpoint. Let's explore another
function from here that we will
call getShowById. As the argument, we're
going to specify showId, and inside we're
going to call apiGet, and we will call this
URL, this end point. Since ID is something dynamic that we supply
through the argument, we're going to use
backticks so that we will be able to apply
string interpolation. Our function will
look like this. Now, inside show jsx, we can import getShowById
from API TVmaze. Then inside useEffect, we will be able to call getShowId
and pass showId inside. We would like to
use a sync await syntax because it is
more user-friendly, but you cannot make the
callback of useEffect async. If I do that, you will
see this warning here, which comes from this
ESLint rules of hooks rule. It tells, effect callbacks are synchronous to prevent
race conditions, put the async function and site. You can see this example here. Well, we're going
to do exactly that. We're going to create
an async function inside useEffect and then
call that function inside. Let's try that. In our case, it will look like fetchData. We do not mark the
callback as async, which is called fetchData. Inside fetchData, we're going to call a weight get show by ID, and we're going to supply showId that we grabbed from the URL. Now, as soon as I use
showId inside useEffect, you'll notice that now I have this warning
here which says, React hook useEffect has a
missing dependency, showId. If you have something defined
inside the component, and you use that something, that value inside
useEffect, ideally, it has to be specified as the dependency
of that useEffect. The reason for that
is because let's say our showId here might
be also dynamic, for example it
might be our state, and we want to run
that useEffect whenever that value changes. If we do not supply
any dependency here, keep our array of
dependencies empty, the logic will run only once
when the component mounts. But what if this showId changes, let's say from 1-2? In this case, it makes sense
for us to refetch data, to grab the latest show
with ID equals two. But if we keep array
of dependencies empty, the effect will
never be run again. In order for us to fix that, whatever we use
inside useEffect, all the values here which might be potentially
dynamic or change, we need to specify that. This is our dependency of
this useEffect callback. That is why I will list
showId as part of useEffect. Now, we get our data here. Let's try and console log data. We get back here. Now what we see, we see two console logs. Again, the reason for that is the StrictMode that we have. StrictMode is problematic, and it was introduced
in React Version 18, but you can see now we have
this problem in development that component gets
re-rendered two times. Since we fetchData
inside useEffect, it means that we
fetched data two times. This is not really what we want. In this case, the React team recommends that
starting from React 18, if you want to fetchData, you should be using something
else rather than useEffect. We're going to talk about
that just a bit later, however, this is
very controversial. Previously before React,18
in Version 17 and earlier, the very basic and
default way to fetchData was exactly
that, by using useEffect. Well, with React 18, nothing much changes, except now we have
React StrictMode. For now, I suggest us to
remove React StrictMode, and we will turn it on later
when we're going to see an alternative to using the
useEffect Hook to fetchData. For now, inside index jsx, I'm just going to remove
React StrictMode. Our useEffect will not be run twice in the development.
Now, we save it. I refreshed the
page and you see, I have data here. If I open Network tab, I refresh the page. Here, I can find that call to TVMaze API with showId that
we receive from the URL. If I preview, this is
the data that we have. Now, let's create a state and put this
data inside state. Let's just call it showData, and set show data. This will be the useState call. By default, data will be null. Then let's create
another state to catch any error in case
the request fails. I will create showError,
setShowError. By default, call are null. I will wrap a way to getShowId, getShowById in try catch block. Inside catch block, I will
call set showError to null. Then, when I get data, I call setShowData, and set this data as
part of the state. Now, here we can use conditional rendering to display whatever data
that we grabbed, and we will be able to
use showData state. We can write the
conditional rendering logic directly inside the component, not only inside JSX markup, not only by using, let's say, a helper function in
which we define logic, we can also write it directly
inside the component. Here, I'm just going to ask, if we have showError from that function,
from our component, please return div, which
says we have an error, which will be showError.message, because showError will
be the error object. Here I set it to null, sorry, it has to be the other
object that we catch here. Now, in case we have an error, we return JSX markup with error. If we have showData, in this case, got show data. For now, let's just cancel out. Let's see. What do we have? We have name, so let
it be showData name. By default, if none of these
two condition is held, we can say data is loading. I can see that I did not
use search showError. Here, I did not use
it indeed. Let's see. Got show data boys. When I refresh, you can
see that blinking here, and this blinking is
this data is loading. The data loads so
fast that we can't even notice that data
is loading message. But if this API call took, let's say, 10 seconds, we would see data is loading. By using this approach, you are able to fetchData
when the component mounts. In the next video, we will introduce
a new term to us, which is called
custom React Hooks. For example, here, we used to useState, and we used useEffect
as well as useParams. Whatever you import
from React directly, these hooks are called
built-in React Hooks. But you can see from
react-route-dom, we import something
called useParams. It is also a React Hook, but it is not a part
of React library. It is something custom that was created by react-router-dom. In the next video, we're going to talk about that, and we're going to create
our own custom hook. But before we finish this video, let's commit everything
that we did. First of all, we
disabled the StrictMode, so in the development, our useEffect will
not run twice. Then we create a
getShowById function that fetches data and inside show component by using the useEffect
Hook, the fetchData. Git add dot commit everything. We're going to tell fetchData inside show component or fetch show data inside show
component, just like that. Next video, custom
hooks. See you there.
72. Custom react hooks. Extracting and reusing hook logic: Hey, there. In the last video, we fetch data inside
show component with the help of useEffect. Last time I mentioned that in this video we're
going to talk about the difference between
built-in react hooks and custom hooks that we can
import from other libraries. The thing is that these
custom hooks are actually just more logic on top of built in react hooks
that you already saw, like useEffect or useState. What is the difference then? These hooks useParams
for example, are just hooks with
extra logic so we don't need to write that
logic inside the component. The question is here, why do we need custom hooks? You can see that
in the last video, we actually used three
different hooks, actually two hooks,
but we use them three times inside
our component, useState, UseState and
then useEffect here. Now, let's say I want to reuse that logic inside
other components. What is my option then? A very naive approach is
just copy this piece of code and use it somewhere
inside other components. But you can see it is
a lot of repetition. If we not talk about
react specifically, if we can look at the
example of programming in order for us to
somehow reuse logic, we use functions or if we want to just extract something
from the place, we would also use
a function to not color the space where
this logic is present. Exactly the same
applies to hooks. If you want to
re-use hooks logic, or if you want to just extract the logic
from the component, you can place it inside
a custom reactor. This is the reason
why we use them. They are used to re-use
the hooks logic and second option is when
you want to extract logic from the component
so it does not take a lot of space
inside of that component. In our case, this logic will not be re-used anywhere
in the app because we have only one
place where we fetch specific show inside
the show component. But let's imagine we had other place where we wanted
to fetch that show data. Instead of copy
pasting the logic, we could have put it
into a custom hook inside all the components where we need to
fetch that show. Let me show you what I mean. On top of the file, I'm going to create a function custom hook that I'm going to call something like useShowById. You can give it
any name you want. But all react hooks have that convention that they must
start with the use prefix. If you want to name
your custom hook, make sure it starts
with use, useShowById, It is going to be just
a simple function and I'm going to just copy my logic to fetchData from the component into
the useShowById hook. You can see a couple
of things here. First of all, inside the hook, we do not have access
to the showId variable. But since it is a function, we can receive it as an
argument. Let's do that. You can see that inside
show component, now, we do not have any access
to showError or showData. Exactly the same approach. If our useShowById
is just a function, we are able to return
some value from it. We're going to say
return an object with two keys, showData
and showError. Now we're able to use that useShowById hook inside
the show component. We simply call that hook
inside we pass showId and this hook returns
us an object with two keys, showData
and showError. Let's destructure them. Now, look at our final result. We have only one single line and the logic is
written somewhere else. If I hide it, you can see now our component is much
cleaner than it was before, and our logic to fetch data to fetch show lives
somewhere else. Now, if I wanted to reuse that
logic in other components, I would just simply
call useShowById, pass, showId as the argument, and then receive my
showData and my showError, for example let's
copy this line. If I wanted to fetch show
inside the app component, I would just use that hook
in past whatever show I want as the argument and I will have access to showData
and showError. The logic with custom hooks, the idea with
custom hooks is the same as with functions
in programming, but with custom hooks, you write logic on top of
built-in or other react hooks. As simple as that.
Now that's it. But you remember that in the last video when we
introduced that useEffect hook, we had this problem with react strict mode
in the development, react strict mode renders
the component twice. That is why our useEffect
always run at least twice. That was problematic. The solution that the
reacting recommends is to use something else
instead of useEffect. In the next video, we're going to talk about that. We're going to talk
about the alternative to useEffect to fetch data. We will finally be able to get back our React strict mode, and we will not have any
problems with fetching data only once when
the component mounts. For now, let's commit
everything and let's end this video on
a good note as always. My commit message is
going to be very simple, extract data batching logic into a custom hook useShowById. Awesome. See you
in the next one.
73. Data fetching with libraries. React Query: Hello again. In the last video, we talked about the
difference between built-in React hooks
and custom React hooks. Basically, custom React
hooks are the hooks that we write with our own logic on
top of built-in React hooks. The reason behind
that is that we want to extract some logic, or if we want to make
hooks logic reusable. In this case, we
use custom hooks. We also fetch data from the TVmaze API only once
when the component mounts. We do that with the help
of the useEffect hook. But if you remember, we disabled React
StrictMode because it forces the component to re-render twice in
the development, which means useEffect
will always run at least twice
instead of only once. This is problematic for our specific situation
and to avoid that, the React team recommends to fetch data with something else. They do not recommend
using useEffect hook to fetch data when you have
React StrictMode enabled. They talk about something else. What is this? Well, in front-end, there is the concept
of something called data fetching libraries. Two examples here
can be React Query, and use SWR; both are very popular and both are very
similar to each other. But what they actually do, for example on the use SWR page, we can see that very
simple example we call the use SWR hook with, let's say the path
that we want to fetch, and then the function
that fetches data. Then, the hook gives us data error which we can use
inside our application. Now, if we compare that
to what we wrote here, you can find very
similar note, however, our hook here is
aimed specifically on fetching shows from TVmaze
API and fetch them by ID. So this is the specific logic
which is tightly coupled to TVmaze API to fetching
show specifically by ID. If we had, let's say, a lot of different
fetching logic inside our application across, let's say, hundreds of
components, in this case, we would have to come
up with something more abstract to make our fetching logic more
reusable and not tightly coupled to
specific implementation. Data fetching libraries,
they do exactly that; they give us the abstract hook that we can use to fetch
data inside the component. So it is easier for us to reuse that logic across
the application that we write, that we built. For example, in React Query
let's find Quick Start. You can see the logic
is pretty much similar; we have something called
query key and query function, we're going to talk
about that in a second, but the logic is the following. We have some abstract
hook to fetch data, to that abstract hook, we supply our logic
to fetch data, and that custom hook
gives us data error and it's loading
variables that we can use inside the component. They exist to make data
fetching more optimized, more reusable and easier
for developers to use. Let's try and install
one of these libraries. In our case, we're going
to useReact query, that's just because
I decided like that. If you want you can try useSWR, the syntax is pretty
much similar. Inside the
documentation, I'm going to go to the installation page. From here, I'll just copy NPM installed
tanstack/react-query. I'm going to add this
dependency to my project. It will appear inside
package Jason here on top. Great. Now I will go to Quick Start and
follow the example. First, we need to
create a client, then we need to use
something called credit client provider and
pass that client there. Then inside components, we're able to use useQuery hook. Let's see how it can help us. I'm just going to copy
these inputs from here, I will go to app component here, at the very top, I'm going to import only query client and
critic client provider , just like that, then I will create new credit client outside
of the component, then I will use credit
client provider, let's say somewhere here
and close it at the end. Eventually, my app
now looks like that. Great. Now I can go to the show page and instead of using the use show by ID hook, we will use the
useQuery hook here. Let's comment out
what we have here, let's call useQuery, which can be imported also
from tanstack/react-query. Let's do that. We will only need useQuery and inside
the component, we're going to call
useQuery like this. Now we need to
pass options here. Options is just an object with different keys
that we supply. Query key and query function are required options that
we need to pass. Query key will uniquely
identify our query logic, our factor like getsTodos
across the entire application. Query function is the
logic to fetch data. Let's see how we can use that. First we need to pass query key, and you can see right
now it is an array. In our case we can name it
something like show maybe and then our show is identified
by ID as you remember. We're going to pass
show and showId. Then we need to pass fetcher. However, you can see that right now in the example it is
passed just query function is getsTodos. But in our case, we
need to somehow get access to showId
inside our fetcher. Our fetcher is this
function that we created earlier
called getShowByID. If we look inside documentation, it is hidden somewhere inside, I'm going to tell you where. It is here under
Query Keys section. If we go here and
if we scroll down to the very bottom and we can see this
whole section here, if your query
function depends on the variable included
in your query key. We're just going to follow
these example here. I'm just going to copy
it and put it like this. Query key will be show
instead of todoId, we're going to place showId
instead of fetchTodoById, we're going to call getShowById. We will pass showId. UseQuery returns us result. If we try and use IntelliSense
from this result object, you can see we have a
lot of things here, but we're interested specifically
in data and in adder. Let's try and do that. From the result object, I will grab data and
I will grab error. I'm going to rename them. We can use data
instead of showData, but let's rename them, I'm going to put colon next to destructured key and I
will name it showData. This way. Data key that I destructured will be
renamed to showData. From the result object, I still destructured data, but I just wanted to have
another name, showData. The same goes with error, it will be showError. Now, I can actually go back to my application
and see how it works. But I need to start
the app again, npm run start, I get back here. Let's go and refresh. You can see, well,
nothing changed, however, right now, we used
the useQuery hook. It is a custom hook logic
of which is written somewhere inside
tanstack/react-query library. We just use it to fetch data. You can see this hook gives us that abstract interface
so we can wrap that function in a hook like useQuery and fetch data only
once inside the component. This query key here is somewhat resembles that dependency
array inside useEffect. If something inside
query key changes, data here will be fetched just like with
useEffect, very similar. React team actually advise us to use something like
that to fetch data. This is actually a very
good recommendation. You didn't want to deal with all that repetitive logic every
time in your application. These libraries have
a lot of options, these libraries are
optimized for fetching, they have these cache keys
and they can do much more than just simple data fetching
pointy component mounts. In modern React applications, data fetching library is
a very good way to go. We're going to use useQuery
for our specific example. Now we can remove the logic that we wrote
earlier and actually now we can include
React.StrictMode back again, because now our query
logic will not run twice. Let's see that. If
I refresh the page, here, I have only
one call to the API, which means our
logic that we write here will not be fetched twice and still we have
access to React StrictMode. With this approach, we killed
two birds with one stone. I hope it wasn't
too complicated or sophisticated to
understand how the data fetching works in React. We started with bare
minimum with useEffect, because useEffect can
be used to manipulate data and manipulate logic
to a component lifecycle, we used useEffect to fetch data only once when
the component mounts, but we had to disable React StrictMode as
otherwise we need to write some logic to
somehow overcome double re-render inside
the development mode. To overcome that, we used
a data fetching library. In our example, we
installed React Query. React Query gives us that abstract hook useQuery that we can use to fetch data
inside the component. Hopefully, it does make sense. These fetching
libraries is a way to go when you work with
modern React apps. Let's commit the changes
that we've made. What we did, we basically
just installed React Query, then we replaced
our custom hook to fetchShowById with
the useQuery hook. We also returned
React StrictMode to the application because we did not have any problems with data fetching inside
useEffect anymore. Now, let's add
everything to stage, let's commit and let's say
installed react query, replaced, useShowById
with useQuery hook. Awesome. Till the next one.
74. Assignment. React Query on Home page: Hi there. In the last video we talked about data
fetching libraries. We talked about
React query and we integrated React
query into our app. We used the use
query hook inside the show component to
fetch data by show ID. However, if we go
back to Home jsx, your home component, you can see we also do fetch data here. It is slightly different
than just doing a simple GET request when
the component mounts. Because we have
basically filters, we type something inside the search box
then we can choose different radio buttons
and then we click on the Search button only after that the request is being sent. However, React query
and data fetching libraries can handle
these scenarios as well. I have an assignment for you. Can you integrate the
Use query hook into the homepage so we can
replace these use states here with a single
Use query hook. Go ahead, try and integrate the Use query hook inside
the home component. Here is an advice
that I can give you. You can go to React Query
documentation specifically to under guys and concepts
you can look for. Let me see disabling, slash pausing queries, and at the bottom, they have this example with lazy queries. You can use this example
here to integrate, Use query inside home component. The logic will be very much
similar to that example, but you have to adjust that
logic to our use case. Go ahead, try to do that, and then we will
compare the result in the next video.
See you there.
75. Using React Query to search data on Home page: Hello. How was your assignment? Were you able to
achieve what we wanted? Were you able to integrate the useQuery hook
inside home components? Let's try and see. Just like I told you, you can refer to that example to implement the logic
with the useQuery hook. What I'm going to
do, I'm going to just copy these two here, and place them on top. We also need to import,
useQuery from react-query. Let's put the input on top. Then we don't need to use
React.useState because we import useState
directly from the library, and now we need to adjust
that to our use case. First of all, what is
this enabled key here? The thing is that there
are situations when we want to fetch data
conditionally, because this logic by default, it runs when the
component mounts. Data is fetched when
the component mounts. However, this is
not always true. What if we have some a toggle, and when this toggle is true, or when we apply the filter only then we
want to fetch the logic. In this case, we can use the
enabled option here to let react-query understand
that we want to either run or not
run that logic. In our case, we have filters. Our filters are
the query string, whatever we type
inside the search box. Then we also have
the search option, which is the value for read
your button that we select, either shows or actors. These are filters that we have. Since we manage all
the logic related to entering this filters to select and read your buttons, we manage all of that
inside SearchForm. Then we pass the data back to home by using the
onSearch function here. We need to somehow
think how we can pass that filter information
to the useQuery hook. We can use, let's say, helpers state for filters, and then we can pass that
filter as part of the queryKey. If the filter is
null or it's empty, we did not select anything, we simply disable the query, because when we
entered the page, we don't want to fetch
data because well, we do not have any filters. We did not enter anything. In our case, filter by default, instead of an empty string, it will be null and we pass
it to the enabled option. If filter truthy only then
we can query the data. In this case, the
hook will be enabled. Then we also pass filter
as part of the queryKey. It means that if filter changes, if this value changes somehow, in our case it
will be an object. If this object will be changed, reactQuery will understand that and the queryKey will change, and they useQuery hook
will revalidate the query. It will rerun the query
with the new queryKey. Basically, queryFunction that we supply here will be run. Again, it will refresh data and repopulate the data
variable that we have here. Enough of talking, let's finally do something. First of all, we need to
set that filter here. We will do that inside the Onsearch function
that we have here. We don't need all of
this try-catch blocks. I'm just going to
comment that out. Inside Onsearch I'm going
to just call setFilter, and I'm going to
set setFilter to whatever query string that we have and whatever
searchOption do we have. Then, just like I told you, we pass filter as part of the
queryKey instead of todos. Let's name it
something like search, it really does not matter. Inside queryFunction we
need to somehow place that logic that we have here
based on the searchOption. Inside that queryFunction, we're going to ask if
filter.searchOption, this is what we set, and by the time I
write the logic inside that queryFunction
filter will be defined, it will not be null. Because as you remember, the query will be
disabled when filter is null in our case. It means that it is
safe to write here filter.searchOption without
worrying that filter might be potentially null, and it will throw us an error. Something like can not read properties searchOption of null. If filter searchOption
= shows, in this case, please searchForShowsfilter.q
otherwise, searchForPeoplefilter.q. That's it. Now we
can remove the logic that we had previously
inside on search. We can remove these two
useState hooks here, data that we destructure
from the useQuery hook, we're going to name
it as apiData, an error that we
destructure we're going to name it as apiDataError. That's it. I remove this unwanted comment and
let's see what do we have. Let's inspect the console. Let's inspect the Network tab. I'm going to type
something like hello. Click on "Search," and
you can see it worked. Well, the same behavior
that we had previously. If I change to actors
and type boys. For example, here we
have the request, if I change it back to
shows and then I do again, something else like girls, you will see data is fetched. Because again, filter changes whenever we press
the Search button. Whenever we click on
the Search button, we update the filter state. Filters state gets updated, queryKey gets, let's say
invalidated, it changes. It means that reactQuery will re-fetch data with
the latest filter, with the latest queryKey that
we pass. Just like that. You already probably noticed
that strange behavior, when you can see multiple
requests going through. The thing is reactQuery
has something called re-fetching
data on re-focus. This is one of the features of these data fetching libraries. Whenever you try to
refocus the window, it will refresh data. You can see if I click
inside network job, then I click somewhere
inside on the page again, it always sends the request. This behavior, most of
the time might be wanted, but in our case, this behavior is
definitely unwanted. We can disable that. Inside options, I'm going to
pass refetchOnWindowFocus, and if you hover you can read the description what
exactly this option does, which is going to
keep it as false. Let's see. Let's
look for something. If I try to refocus the window again, nothing will happen. Something like that. Now, we have useQuery also inside
home component, congrats. I really hope that you
nailed that assignment. It might be pretty challenging, and it definitely was because it is something new
library, new logic. But you can see once
you get used to it, it's nothing really
complex at the end. Let's commit the changes
that we've made. It's going to be pretty simple. We're just going to
say that edit or used, useQuery on Home page
to fetch search data. Awesome. Pushing
everything to GitHub, and until the next one.
76. Displaying information on Show page: Hello again in the last video we added the use query hook to the homepage and now we have the complete cycle of data fetching inside
our components. But since we created show page, we need to display show
data on that page. This is exactly what we're
going to do in this video, we're going to populate data on the show page inside the
show component, let's go. What data do we need to display? If we take a look at the API response this is
what we receive in our data. We need to decide what exactly we want to
display on the show page so we're going to
create a few components and I already have an
idea so let's go ahead. First of all under show's
folder I'm going to create a new file called
ShowMainData.Jsx. This is going to be a component. But now it will return a simple div export default
show main data. Then I will also create, let me see another component
which I will name details, jsx details then probably we're going to add
something else. For now this is sufficient
we go back to show page. Here we have this got
show data, showData.name. Instead of that we're
going to use show main data component that
we import from components, shows ShowMainData where
now we keep it like that. After that we're going
to display details. Here we can tell details
under h2 tag and then display details and we need to import it as
well from shows details. All right let me
save it let me get back to the show page
and here I have hello, hello, exactly what we have inside our
components for now. What are we going to display
inside ShowMainData? I think we will need show name, something like grating,
summary and tax, let me see. We have name here, we have genres, we have average or not average, rating average so we're
going to display all of that inside ShowMainData
let's pass it there. First of all we also need an
image and if you remember we have that image medium original as well
as it can be null. We're going to handle
null cases inside the component this time
so let's just pass showData.image then we will pass name which is going to be showData.name then we're
going to pass rating. Rating is going to be
just let me find it, just rating average
we're going to pass the object and handle.average
inside the component, showData rating then we will need summary as
we remember we display very short version of
summary inside inside show card this time
we're going to display full summary
on the show page. We're going to pass summary
which is located here. This is the HTML
string as you remember showData summary and then
we will pass genres. Let me find genres here. This is just an
array of genres of this show, showData genres. Awesome. Now let's go inside ShowMainData and let's
grab all of these prompts. We're going to grab image, we're going to grab name, rating, summary and genres. Now what we're going to
write inside that div, first of all we will need
to display the image. Source is going to be
Image.medium as you remember but this time we're going to display the original image instead of the preview the medium size. However, we need to handle the null use cases
as you remember so we're going to ask if image is truthy,
is images defined? Then please use image original otherwise please
use image not found. If I go back to the show card or to show grid I have pretty
similar logic over here, I will just reuse that not found image png and put it here and if you remember it is placed inside
the public folder, it is served under the root. Next to the image
maybe let's also add alt here which will be shown name then we're going to display the information so let's separate that
block with a div. Here we're going to
put something like name as a title
then we're going to display here rating
so we can have put rating as average, this object but
rating as well can be null or if I'm not
wrong rating average can be null or not defined or
it can be zero I'm not sure about that but the
rating average this structure will
always be the same. In this case we can do
something if rating average is something truthy or let's
say it is not zero, we can use the or operator. What I mean is that suppose that we have rating average zero. Let's create that average here, it is zero so we're
going to display either average or hello and you can see hello gets printed which means average did not go through because it is falsely
and zero is considered as a falsely value in these
case please display hello. We're going to apply
exactly the same logic here so if average
is zero or if it's falsely in this case please
display N/A, makes sense? Then we're going to display the summary but
here's the thing. Let's try and just do that, let's see what we will have. Let's get back to our app and we have a pretty
large image here. That's fine let's just
increase and scroll down. Here you can see we get
HTML string as it is. The HTML string
actually consider it as a string not as HTML. If we look inside data
it is just a string and React does not know
that this is HTML. In order for us to treat
HTML as if it was HTML, we need to use the following. First of all we're going
to turn that div into a self-closing component
and to that div we can pass something called
dangerouslySet InnerHTML. This is a special React prop, this must be an object
and that object has HTML property and
we pass summary inside. With this construction, React understands
that we want to treat HTML actually as HTML. Let's try and see. Now you can see we do not have any HTML tags here
and if we inspect the markup whatever HTML we received is actually
treated as HTML. Why is this set as
dangerouslySetInnerHTML? The thing is when you want to, let's say display HTML or
inject HTML onto the page, it can contain malicious
JavaScript so to prevent that, React warns you that if you want to make sure that
you want to insert HTML on the page this is fully your decision and the
precaution is that you need to use
dangerouslySetInnerHTML because it is dangerous. Next to summary we're
going to display genres. We can tell genres and why I
have a question mark here. Genres are going to be, let me see so we have it is an array which means we can map each element to jsx markup. We're going to use
the.map method let's go. We're going to create
another div here and genres are going to be genres. map. Here we will have genre and we're going to
display maybe a span tag and inside we can display
genre and when we use the.map to map jsx
markup we need to pass the unique key to
the map element. Let me see genres are
pretty unique I would say, so we can pass the genre
itself as the unique key. Let's try and see. I zoom in we have
genres, comedy family. I think this show
has only one genre. It has comedy and family. Because we do not have space, it looks this is one single
string however it's not. Do not pay attention please that this is for now unstyled. For now we deal only with
logic inside our application. We will deal with
styling at the end. Now let me see, so we used every
prob that we wanted. For now I think that's it. Let's go further and
deal with the details. What inside details are
we going to display? Let me see what kind of
data do we have here? Probably we're going to display something like
status of the show, whether it is still running, ended or maybe it was
just released and when exactly this show was premiered, and maybe network, where exactly the
show was published. In which region, on which TV channel,
something like this. To details component, I'm going to pass first
of all status and this is going to be just
showData.status, then probably when
the show premiered, so it will be just
showData.premiered then network. Network is just an
object, showData.network. Cool. I save it. This time I go to the
Details component here, I pass status premiered network and I'm
going to grab status premiered network or maybe let's just take
another syntax this time just to again make, let's say casual
use of JavaScript. Instead of desructuring props directly inside
function arguments, we will do it on a separate line just because we want
it to be this way, nothing special about that. Here instead of "hello"
I'm just going to say, maybe add a paragraph tag
and say "status is status". Then inside other
paragraph I will say "premiered on this date" and then we will
display the network. However, this network, it can be also null
because not all shows contain this information, so we need to handle this case. We need to assume
that actually that's a good practice when you
work with something unknown, it is very good to assume
that something can be null or undefined or might
not be even past. We're going to ask network, if it is trusty, if it exist? In this case, we're going
to display a string, something like premiered on this date on specific
channel or country. Let's probably choose just name, premiered on this
date on network.name. I used backticks
to specify that we want to use string
interpolation inside the string and then I
interpolate network name inside the on
network name string. Otherwise please display null, don't display anything
or we can make sure that we use the
Boolean value here. We can turn network into a Booleanish value and instead of using the
ternary operator, we can use logical end. In this case, on
network name will be displayed only when
network is truthy. Now, let's see what
do we have and we have status ended and
premiered on this date on CBC. Awesome. Now, it looks we displayed almost
everything what we wanted. However, we can take one more step further
and display more data, like information about seasons and information about cast. What do we need in this case? If we look inside API
data that we received, we do not have any information
about casts or shows. But if we go back
to TV Maze API, here we have this section, let me see, about embedding. Embedding allows us to load
more data about the show, and here is an example.
Let me open it. The URL looks like that. We have embed episodes, embed cast and if
we scroll down, we will see this
underscore embedded section with episodes and cast. This is exactly what
we're going to do, but we need to modify our
function to search show. Let's copy this
embedded part then we use that getShowById
function to get data. Here to the URL, we can add embed, episodes, and cast. But instead of episodes, we're going to embed seasons. We can also grab
seasons information. Instead of episodes, we're going to specify seasons. We save it, we go
back to the show, and now it has been revalidated
because you remember when you switch focus between
window and something else, data will be refreshed because
we use the useQuery hook, and we can prevent it behavior by using
refetchOnWindowFocus. If you don't want this behavior, actually we probably
don't need that behavior, I'm going to disable it just like we did inside the homepage. Let's see what do we
have in this case. You can see now we have this underscore
embedded section, here we have cast and
seasons information. Let's actually copy that URL, open it here and inspect the data shape
of seasons and cast. First of all, we need to create corresponding components
for seasons and cast. Under Shows folder I'm going to create cast.jsx and I'm
going to create seasons.jsx. I will quickly copy the markup, so for now it will be div, props we're going
destructure them in line and I will name it Cast. The same I will do for Seasons. Now we're going to use these
components inside show here. So in the next div, we will have something like div again another title tag
which will say Seasons. Here we're going to
display Seasons component. It was auto imported. If I look at the top, it was imported from
components show seasons. I will copy that. Instead of seasons,
now I'm going to display cast and then I will import cast
again. How to import? I press "Tab", boom, imported on the top. Great. What data I will pass? For Seasons component, I'm going to pass Seasons prop, and Seasons will be
underscore embedded seasons. This is what we
receive from the API, so I'm going to pass show
data underscore embedded. Make sure you do not
misspell it,.seasons, and exactly the same I will
do for cast but instead of passing seasons I will pass the cast prop, showData
embedded.cast. Now, inside Seasons, I will destructure that
seasons prop that we passed. Let's see what I
will display here. First of all, we want to know how many seasons do
we have in total. If I go back to the app, I have this problem unexpected
empty object pattern. Let's quickly fix that
If we go to Cast, I will just remove that. So inside Seasons
what I will display. First of all inside the p tag, I'm going to display
Seasons in total. Let's verify that we have
this, Seasons in total. Here we're going to
add seasons.length. If we look at our data, seasons is just an array. So each season is
an array item which means the number of elements equals the
number of seasons. Well, it seems like
it is logical, so we're going to
use seasons.length. Next to seasons in
total we're going to display episodes in total and we're going
to say, let me see. Since we have seasons as an array and inside
each element we have episode order, and basically how many episodes do we have inside
a single season? We need to somehow
calculate the total number of episodes throughout
the whole seasons list. We can use something
array.reduce to calculate that. So we're going to
tell seasons.reduce. Seasons reduce is going
to be by default now so we're going to reduce
all our seasons array into a number. We will compress that
seasons array into a number. We will just basically loop over each array element and
sum up episode order. Here this will be our sum and second element here is going to be current array element
that will loop over. This is going to be season. So we're going to
tell please return us some plus season.episode order. Let's try and see if we
do not have any order. We have seasons in total one, episodes in total 13. Great, it worked. Now next to the
paragraph we're going to display each season
data so basically, this information, which
means we need to map each season element
to jsx markup. We're going to use
the dot map method. We're going to tell
seasons.map, season. We're going to map
it to a div or now let it be hello or key, we're going to pass season., let me see the data. Season has id which is uniquely represented so we can use
it safely as the key. We're going to tell
please display season, season.number, so the
number of season. Great. Then we're going
to display the p tag. We're going to tell episodes how many episodes
this season has. Probably season episode order
we can use it, why not? Then we're going to display
when this season was aired, and we can use premier
date and end date. Great. So let me
separate it into separate div then
I will tell aired. What I will do I will say season.premiereDate,
seasonendDate. Probably this, yes. Let's try and see. We have seasons in total, episodes in total then we
have season one which has 13 episodes and it was aired from this date
till this date. Looks good to me. If we need to add something else we
will do that later, for now this will do. Let's work on the cast
component this time. To the cast component
we pass the cast prop. So here inside cast component I'm going to grab the cast prop, and let's think what data
we're going to display here. Let's inspect the API. Cast is just an array as well and each array
has this person, character, self and voice Keith. Let's see what
we're going to do. We're probably just going to map each array element to some information and
display it here. Let's do that. So we're
simply going to do cast.map. Let's name it item and we
will map it to a div for now. Key is going to be, let me see, item person.id, probably this. I think this will
be pretty unique. Inside the div, first of all, we're
going to display, let me see, probably actual image. Let's
try and do that. Let's wrap that image
in a div for now. Image is going to be
item.person.image, but you remember
that image can be null so we need to handle this. If item.person.image exists, in this case use
item.person.image.medium. Otherwise use again, let's grab it, let's use
not found image png. Great, let's save it. Then next to that
image we're going to display, let me see, we have item.person.name then we're going to display the character inside
that show in that show. Character is going to
be character name, so that person played
item.character.name. And you know what? It
is pretty repetitive to type item dot
something every time, so from that item we're going to destructure
person and character. Instead of writing
item dot every time we're just is going
to write person.character. So character.name. Let me see how we can
use something else. We have this self
and voice here. Voice probably refers
to whether this was just the voice over and the role was not played
in the show directly. It was just a voice over by that person so we
can use that maybe. We can destructure
voice from here as well because it is the key of our item and we're going to ask if this person takes
care of the voice over. We're just going to
display something like another pipe because
this is what we used here and we're
going to say voice over otherwise an
empty string or we can again use the and operator and we want to make sure that this is
going to be a Boolean, but I think this
value here will be always a Boolean so we do not
need to turn that variable, that value into a Boolean value by applying double negation or using Boolean constructor. This will be sufficient I think. Now let's try and see
our final result. We have the following show page. Let me make it smaller. Right now I know it is unstyled but we'll take
care of that, no worries. We have everything that
we want about the show. We embed summary, we display
show average rating, we display genres, we display details
when it was aired, maybe when it was ended, we display information
about seasons, and we display
information about cast. What was the person who played that role and was
that person a voice over character or it was just whatever character
inside the show. I think this is it. It actually was a lot. We worked with API data, we created corresponding
components to display data. Where now let's
commit everything. Let's quickly overview
what we have here. We modified the get show by id function to fetch data,
we embed seasons, we embed cast then we use
the information that we get from the API and display that information
on the show page. We created corresponding
components, we passed corresponding props and then we handled everything inside each corresponding
component, something like that. I'm going to add
everything to stage and my commit message
is going to be displayed detailed show
data on the show page. Cool. One more thing that I would to point out here is that, as you remember we disabled this refetchOnWindowFocus
behavior of the use query who. Now when we re-validate, excuse me, let me
start the app again. Where is our show page? Oops I accidentally closed it. What I mean is that when we refocus window now the
data is not refetched all the time but what happens if
our show id is non-existing? Let's try and see. Let's
try something gibberish. Let's see what do we have? We see data is loading and we can see this retry behavior. You can see the request was
sent three times actually, and if by the time when third request hits we
still have an error from our request only then use
query will display error. You can see data fetching
library is just something more than simple please fetch my data when
the component mounts. This data fetching assumes that the requests can
potentially fail and if it fails it out automatically
retries it a few times with something
called exponential backoff. For example, if our
request failed for the first time then the request will be
retried after one second, then if it fails then the
next retrial will take place after two seconds and next retry will take place
after three seconds. Use query takes care of that. Pretty cool. That's it. See you in the next one.
77. Adding Go Back button on Show page: Hello again. In the last video, we created components
where we display data about specific show
on the show page. It was a pretty long one. Now we need to think a bit
more about user experience. What do I mean by that? Assume that we are
on the homepage, will look for specific show, then we click on Read More. We end up on the show page. Now, we do not have any extra buttons
for navigation here, which means user
needs to click on, Go back to previous page, and if we go back to that page, we see that all of
our data is gone, we need to start the
search all over again. What we can do in
this situation. First of all, we need
to add on the show page a button that will bring the
user back to the homepage. This will be just a little bit more convenient for the user. But still, it does not solve
the problem that the data is gone when the user returns to that page and box office, we do not handle
that, but ideally, we need to somehow
remember the latest search that we did so when the user
goes back to that page, it is still there. We're not going to cover
that in Box Office, we're going to introduce
an alternative. What if we'll look for the show and when we
click on Read more, it brings user to the new tab? It opens this show
page on the new tab. Let's go ahead and do that. If we go back to the show
card component that we have, we use that link component here. We use link component
because we use client-side routing
library react-router, and in order for us to handle the navigation properly
through links, we use this special
link component imported from React router dom. But if we want to open
something in a new tab, this is somewhat not related
to client-site routing. In this case, we can use a simple anchor tag instead of using the link component
from React router dom. So we can simply remove it, and instead of using clink, we're going to display
the anchor tag. Anchor tag has a
trough property. Now we can supply another
attribute of anchor tag called target and we specify
underscore blank. As soon as I specify
blank as the target, I get this error from ES link coming from
React JS x target blank that please use
relationship no referred. I'm just going to
copy unspecified. This is just a very
small security measure. I save it. Now, let's try. If I click on Read more, it opens my show page in
a new tab. Pretty cool. However, again, as we agreed to make user experience
a bit more convenient, we're going to add, go back to Home button somewhere
at the top. We're going to the show page component. Here on top, right on
top of show main data. We can add two things here. We can either add a link component that
brings us back to home, something like this,
go back to home, and this is totally
fine solution. We're actually going
to use this one. But I just want you to see
the alternative to this. Because React router
is a routing library. It has something to offer. We're going to take
a look at that. But still, we can use
the link component. Instead of using clink for now, we're going to add button, and we're going to tell,
"Go back to home". On that button of type button, we're going to put the
on click handler on, Go back and that on go back, will do something for us. If we go back to
react-router documentation, it has something
called use navigate. Use navigate hook, looking at this example, allows us to programmatically
navigate between the pages, still using React router dom. Instead of using
the link component, let's say more declaratively, we use function which will do the navigation basically programmatically and
more imperatively. By looking at that example, I can grab, use navigate
from React router dom. Actually, I already imported, so I will just do it like that. Excuse me, not use
params, use navigate. Then I will call
use navigate here. That use navigate returns
us a function that we need to call to navigate
to specific page. Navigate to, I will
call it this way. When we click on, go back to home, we're going to call navigate
to and then we specify, we go back to the homepage. Let's get back to the app. On top, we have
this button here. Again, this button, it does not link component, it is a button. If we click, we
get back to home. In case you need to
programmatically navigate or redirect
user to a page, you can use the
use navigate hook. But in our case, we don't really need to turn button into a
link programmatically. We can directly use
the link component because it actually
makes more sense. That is why we're
not going to use, use navigate, which is going to stick with
the link component. As simple as that. Now, let's try and see. If we look inside markup. Now it is actually
the anchor tag. Cool. If we click on it, we're still go back to home. But it requires us
to use less code. It is actually better because
it does now proper markup, proper HTML markup to navigate between pages
since it is an anchor tag. Cool. Now we increased user
experience just slightly. Now it looks much, much better. That's it for now. Let's
commit the changes. We added go back to home and we open show
page in a new tab. I'm going to tell inside
my commit message Open or Read More button
brings user to new tab now, added Go back to home
link on the show page. That's it. Push
everything to get up. I'm going to see you
in the next one.
78. Introduction to useReducer as alternative to useState: Hey, there, in the last video we talked about user
experience just a bit. Now when we click on Read More, it opens show page
inside new tab, as well as we added
"Go Back to Home" button. This is all great. However, we lack functionality
for the "Star Me" button. Whenever we click
on that button, we want to star that show. Later on, when we navigate
to the starred page, we can see our
starred list here. How we can achieve that. Before we can do that, we need to look at the
alternative to use state. Let's get back to our component. Let's say to homepage probably. Here we're going to
play with the new hook. As you already know, if we want to have some value that changes over
component lifecycle, we need to use the
useState hook. Basically it is just
a value that changes. It gives us the
state variable and the function which we can
use to update this state. This is our way to manage
local state of a component. There is an alternative to
use state called useReducer. It is an alternative, it means that it does
not replace useState, just like useState does
not replace useReducer. You can use whatever
you want and whatever you think
is more appropriate. If we have useState and we have, let's say set filter
function that we can call to lead the state
with useReducer, we have something
called actions. We actually initiate
an action and then that action is handled
by a function, and that function decides how to update the state
based on an action. We're going to take a look
at the example of a counter. The hook I was talking
about is useReducer. We're going to define what
is a reducer in a second. Here on top, I'm going
to call useReducer. This useReducer as
the first argument receives something
called reducer. On top, I'm going to
create reducer function. Now it will be an empty function and I will pass
it to useReducer. As the second argument, I need to pass initial state. Just like in case of useState, our state by default is going to be zero because we're going
to implement counter. When we click on a button, we want to either
increment or decrement. UseReducer, just like useState, returns us an array of
exactly two elements. We're going to destructure
these two elements. The first element, again
is going to be the state, just like with the useState. Let's say counter. Second element is going to be
something called dispatch. Now, what do I need to do in order to somehow
update the state? The reducer concept, so this useReducer hook is based around the
concept of reducers. Let me open paint and
explain you something. Just visualize the
useReducer idea. With useReducer, we take
approach of actions which are handled by a single function
called the reducer. We have multiple actions
happening to our state. For example, in case of
counter, we have increment. Let me make it a bit larger
and then we have decrement. Let's say we have another
action called something like reset counter, reset. Then all of these actions are dispatched by this
dispatch function to the React internal logic. Then we have a single
function called the reducer, which handles all of
these incoming actions. Whenever action is
being dispatched, it is being handled by the
reducer function and whatever the reducer function returns
will be the new state. This whole flow replaces the useState hook and it is based around
the reducer concept. Now, what is the reducer? Just like I mentioned
previously, reducer is just a function that somehow handles
these actions. But what are these
actions? That's the point. We need to define
actions ourselves. An action, in this case is just an object which
conveys some data. For example, we can define
an action to increment data. Usually when we talk
about reducers, when we talk about this whole concept an action
will always be an object. With the type, let's say increment and some
additional payload. It can be anything. It can be new value, whatever. This object can take any shape. But usually it has
this type,key, and payload just to make
it more consistent. We need to define these
actions ourselves. Then they're handled
inside the reducer. I'm going to go here. Inside JSX markup, I'm
going to say counter is going to be counter,
interpellate the state. Then I will add
two buttons here. One will be increment, second will be decrement, and third will be reset. Each function will have this onClick and let's name these handlers
as onIncrement, then onDecrement, and onReset. Now we need to create
these functions. Let's make it here on top. We have onIncrement, then we have onDecrement, and we have onReset. Something needs to happen. We need to dispatch actions in order to
somehow updates state. We can call dispatch. Here we need to pass an action. For example, when
increments happens, we dispatch an action. Again, an action
is just an object. Let's take this one actually. We do not need any
payload here for now. We're just going to
dispatch an action and it will be an object
which has type INCREMENT. When we decrement, we want to dispatch an
action DECREMENT. If we have on reset, we can dispatch an
action of type RESET. Again, these are the objects that we define ourselves for us. It will be easier for
us to understand them. Whenever this dispatch
is being called this action will be handled
by the reducer function. This reducer function
must return a new state. For now, let's return zero. This reducer function
receives two arguments. First of all, it
receives currentState. Just like in case of state update function with useState when
we pass callback. We have access to currentState
as the first argument. The same idea is here
inside the reducer. We have currentState, let's
call it currentCounter. Second argument is the
action that we dispatched. I'm going to log
currentCunter and action. Let's get back here. We have something like this. Let's inspect Console. Whenever I click on Increment, I see two things being Consoled. I see currentCounter
equals zero. This is our current
state. We have action. Action is just whatever we pass when we called
dispatch function, this will be this action here. Based on what we pass, based on what we dispatch, we can write our logic
inside a single function. Usually when you
work with reducers, you work with switch case. We're going to
switch action.type. In case we have type INCREMENT. In this case, from the reducer, we return currentCounter plus 1. We increment the counter. Again, whatever is
being returned from the reducer will be
set as the new state. In case we have decrement, we say currentCounter minus 1. In case we call RESET,
please return 0. In case if none of these
matches by default, we're going to return 0. Let's save it and let's see. If I click Increment,
counter gets incremented. If I click Reset, it has been reset to zero. If I decrement, it is
being decremented. As you can see, by using this reducer function
and by using the actions that we defined ourselves and then handled them inside
the register function. We can achieve this logic to manage state
based on actions. And again, this is an alternative to using
the useState hook. Use the reducer just like
you state handles state, but with the concept of reducers
and dispatching actions, which one to use. It depends on the use case and actually whatever
you prefer more. Most common is to use useState, but let's say if your
logic to update state includes a lot of let's say different actions for
example Increment, Decrement Reset, sets to specific value let's
say Increment by 10, so you can have your logic
to update state based around specific actions you
can use the useReducer hook. Why I am telling you all
of that is because for our logic to implement,
Start Shows, we going to use the user
reducer hook because we will have a few actions like
Start Show and onStart Show. Previously I mentioned that to that action you can
pass any data here. Let's see what I mean by that. Just like I told you, we have single place where we handle logic and whatever is returned from the
reducer function will be set as the new state. Why didn't we define
another action here called SET_VALUE,
something like this. Then I will just create another button here and
tell Set to let's say 500. Then onClick onSetToValue. I will create that
function here and I will dispatch type SET_VALUE so it can be handled
by the reducer. I will pass value, or let's say
newCounterValue 500. Now, since we have access to the action object
inside the reducer, and we know that the
action object is just whatever we dispatch we can tell return
action.newCounterValue. Whatever we pass as
newCounterValue will be returned from the reducer function, and it will be the new state. Let's try and see
Increment, Decrement, Set to 500, it is 500,
something like that. Whatever data you pass here is available inside the
reducer function. That's it basically. Nothing more to
add about reducers maybe is that if you
probably heard about redux, a library to manage global
state in React apps. Redux is based around
the reducer concept. In a redux, you
dispatch actions like that and then handle all
of them inside reducers. Cool. Let's get rid
of all of that. Hopefully, it was clear why useReducer might be useful as an alternative
to useState. Actually, maybe I
would add that all of these actions on increment, on decrement, they can be easily replaced
by useState hook. Instead of handling all the
logic inside the reducer, you can just do something
like setCounter, let's say currentCounter plus 1. The same you can do
inside on decrement. Excuse me, it will be like
this, currentCounter minus 1. You would basically write the same logic as you
do inside the reducer. When you use, useState
hook and if on reset, it would be just
setCounter to know and it might be
easier. It depends. This is why it is
called an alternative. It is up to you whatever
suits your needs. Now that we know
about useReducer, we can actually use
it to implement our logic to start shows. Cool. See you in the next one.
79. Starred shows p1. Creating state with useReducer: Hey, there. In the last
video we talked about useReducer as an alternative
to the useState hook. It can be used to manage state when we have multiple actions defined and we would
like to update state based on some actions. We're going to use
useReducer to implement our logic for studying
shows. Let's go. First of all, how are
we going to manage the logic behind
the starred shows? Whenever we're
going to click on, 'Start Me button", we're going to add
show ID to the array, which is going to be our state. The state of start shows will be just an array of show IDs. If we click on a show, ID will be added to the array. If we click on that twice, it will be removed
from that array. Then whenever we go
to the start page, we take that starred
shows array and then use it to query data
from TV maze API. Pretty simple. The question is, where are we going
to write that logic? We have home component. However, in whole component, which is displayed
either show grid or actual grid based on
data that we have. We're going to write the logic
inside show grid for now, and later on, we're
going to extract that logic to a different file. It will be easier to access
that inside other components, for example, start
component because our logic will be shared between multiple
files eventually. We're going to start simple. Inside show grid, I'm going to import
useReducer from react. Then I'm going to call
you with, for now, let's say starred shows reducer that we're going
to create in a second. Our initial state is going
to be an empty array. UseReducer returns as an
array of two elements where first element is going
to be the state itself, so starred shows, and then the dispatch function, let's say dispatch start. Now we need to create
starred shows reducer, a function which will
handle the logic to update the state as well as
we need to define actions. We basically will have
only two actions here. To star show and to unstar
show. Let's define them. Whenever we click on star me, we're going to
dispatch an action of type star me or just
let's say star, and the data that will
pass will be show ID. The second action
will be unstar. Again, we're going to pass
show ID to the reducer. Inside the reducer, the first argument is
our current state. Let's name it as current start. Second argument is
going to be an object, the action that is
being dispatched. Then here by using
again the switch case, we will write the
logic to handle actions that are
being dispatched. We write logic based
on the action type. We switch action type. In case we have
star, in this case, please return currentStarred.concat
action showID. Whatever show ID we do
pass through the action, please add this value to
our current starred array. Second action is going to be on star that we're
going to handle. In this case, we need to remove that show ID from our
current state array. We can take use of the
dot filter method, which is available on the array. For elements, so first of all, the filter method expects a
callback in which we write the logic to filter
elements inside the array. This dot filter method, just like the dark map, receives exactly
the same arguments. First element is value, the current element
that we loop over than the index of that element and the reference to
the array itself, we only need the value which
is going to be show ID. Whatever this dot
filter returns, it can be either true or false. If this callback returns
true for that element, then this element will
stay inside that array, if the callback returns false for the element
that we loop over, it will not be included
into the final array. We're just going to
tell if show ID does not equal action show ID. With this logic,
we can filter out all elements that do not
fulfill this condition. By default, if we pass
something unknown in this case, please return the same
pattern starred state. Let's go here and create a function that will handle the logic when we click
on, "Star Me button". We're going to tell
const on star, me click. Inside that function, we're
going to write the logic. First of all, on starring me click is going to be a function that will receive show
ID as the argument. This will be show ID, the corresponding show ID
with the, Star Me button. It will refer to show ID
that we basically click on. Then inside here,
we're going to need to determine whether the
show is already starred. If show is unstarred, then we're going to dispatch
the start action otherwise, we're going to dispatch
the unStar action. We can create a variable called starred and we're
simply going to ask if starred shows array includes
show ID that we clicked. If this show is starred, we going to dispatch starred. Action is going to
be of type onStar, and show ID, we need to
pass the show ID here, will be whatever we call
onStar me click width. Otherwise we're going to call dispatch starred of type star Now we need to somehow
use that onStarMeClick. Well, we can use that
function inside ShowCard. We can, let's say, pass an argument, pass a
prop called onStarClick, and we can pass the directory
onStarMeClick here, like this, or let's say onStartMeClick
will be onStarMeClick. Inside ShowCard, we're going to grab that onStarMeClick
probe that we pass now. You you can see that this onStarMeClick is being
called with showId argument, which means whenever
we call onStarMeClick, we need to pass showId. On this button here, onStarMe, we're going
to tell onClick, please call onStartMeClick, and pass the ID of the show. Cool. Now, we have the
complete flow by now, let's try and cancel log starredShows to see what exactly do we
have inside our state. By now, initially it is an empty array, this
is what we set. If I click onStarMe, I now see this showId was added to this
state. Pretty cool. Let's try and add another. We can see now we
have three elements. If I click on the
same show twice, it is being removed
from the state rate. Our core logic to star an
unstar shows works just fine. However, since this hook lives inside the
ShowGrid component, whenever we navigate to Start, and then let's say back to Home, our state will be back
to initial again, reason because is that this state is local
to that component, when the component unmounts, the state is gone. We need to think how we can
actually persist that data. We can do that by, let's say, saving starredShows
inside browser storage so later on we can retrieve it. This is going to be
somewhat advanced because the first thing that
comes to my mind when we need to share state
between multiple pages, between multiple components,
we can lift up that state, let's say somewhere
to maybe app. If we have our
state managed here, this state then can be
passed as a prop to, let's say children components
to starred and to home. But in this case, we lift
up everything to the top, so everybody, our root component knows
something about this state. This is not bad, and this
is pretty default way of managing share state between
components in React. But we're going to introduce
an alternative to that. Why we're going to
do that this way and not lifting up the
state to app component? Because even if we share state
between pages inside app, when we're going to
refresh the page, this state will be gone. But we don't want to do that. Instead, we want to
somehow persist the state, so whenever we refresh the page, our starredShows is still there. Even if we close the browser
or maybe close this tab, our starredShows
will not be gone. What we're going to
do in this case, we can use something
called browsers storage. We can use specifically local
storage or session storage. This is just like
a small database that lives inside the browser, and you can use it to store temporary data
inside the browser. It is a database
of type key value, which means under specific key, you can save specific value, and when you refresh the page, or let's say close the browser and get
back to that page, for that specific URL, for that specific website, this storage is persistent. The values are still there, unless they are cleaned
by the application itself or manually
by you, by the user. We're going to store our start
page inside local storage. Let's go ahead and think
how we can do that. We need to think
how we are able to write the state that we have inside our app
to local storage. We need to synchronize it, because whenever we
change this state, we want to also save it
inside the local storage, save it to database, and then when we're going
to refresh the page, we would like to
retrieve the data from this storage and then
use it inside our app. With that, we can
write, let's say, additional logic on
top of useReducer. For that, we can create
a custom hook on top of useReducer with
extra logic which persist state inside
local storage. This is somewhat advanced, but there is nothing, let's say, confusing about that. Let's go ahead and
try to do that. We already have the
useReducer hook, and we want to write
the logic that does everything exactly the
same as useReducer, but also synchronizes the
state with local storage. We can create a custom
hook called something like usePersistedReducer, maybe. Let's go ahead and make
that custom hook on top, we're going to call it
usePersistedReducer. We want to retain the API
of the built-in hook, which means we want to use
exactly the same arguments, we want to return exactly
the same elements, so everything will be
pretty much the same. Let's go ahead and
try and do that. Inside usePersistedReducer, we're going to use useReducer. Since this hook is going to be, let's say, reusable, we don't want to, let say, tightly couple the logic to specifically starredShows here, it will be something, let's say, abstract and reusable to
handle multiple use cases. We're going to just name
this patch as dispatch, and instead of starredShows, we're just going
to call it state. Then inside that useReducer, we need to pass the
reducer since we're going to retain the API of
usePersistedReducer. We actually going to
use it like useReducer, usePersistedReducer,
we're going to pass, let's say, a reducer, then we want to pass
the initial key, and then we also want to pass the local storage key under which the values
will be saved here. Now since we need to pass
three arguments we need to receive them inside
UsePersistedReducer, so we receive reducer, will receive initialState, and we receive localStorageKey. We pass to useReducer. The reducer we pass initialState and we pass
something called initializer. What is this? When we refresh the page, we wanted to retrieve
data from local storage and use it as our initial state. We want to execute that logic only once when
the component mounts, so that we can use the
initializer function. It is the third argument
which runs only once to initialize initialState. This initializer receives
one argument, initialState. Basically whatever
we pass here will be available as the argument
inside the initializer. This is made in this
case if initializer is created as a separate
function some where outside. In this case we're
not going to do that, we're going to just inline
the initializer directly here which is going
to call it initial. This initial argument
will be basically just that initial state
that we pass here. Now the logic will
be the following. First we need to
check if we already have data inside local storage. Local storage is available
on the window object, it is let's say a
global variable which means we can just start local storage and then
boom it just works. Here we're going to
ask persistedValue. If local storage getItem
under specific key, we need to first
understand whether this value exists inside
layer base or not. Let's maybe play
with localStorage a bit so you can get the idea. LocalStorage we can setItem
under specific key insight. Let's say under key low
I can say value high. I run that logic I go
back to localStorage. Here just in case I refresh it, you can see that under key
low now I have value high. I can store as many values here, I can rewrite them. Now since this value is stored
inside browsers storage, I can just call getItem
and then specify the key under which I
wanted to get my value. I specify getItem low, I received my value high. The thing with
localStorage that it can work only with strings. In our case the
state that we work with is going to be
an array which means when we going to write to localStorage we're going
to convert our array into a string and when we to retrieve that every
from local storage we need to convert it from
string into an array again. How we can do that. First of all from localStorage we getItem under
localStorageKey. Our persistent value
is going to be either null or a string. Null in case if
this value does not exist inside local storage, otherwise it will be a
string always because localStorage again works
only with strings. Here, whatever we return
from the initializer will be set as the final
initial state. Whatever we specify here comes as the argument to
initializer and then the initializer decides what will be the
final initialState. If we didn't have
that initializer, we can simply pass
initialState and it will work. But if we worked with
initializer and we work with initializer because we've
worked with localStorage, we add all of that
logic on top of it. Here we're going to ask if
persistent value is truthy, in this case please
apply JSON.parse method. What is JSON.parse? We have an array of
let's say elements 1, 2. We convert it to
a string by using the method called
JSON.stringify. Now our array turned into a string and when we
retrieve from localStorage, this persisted value
will be that string. Now we need to
convert that string back to object, back to array. We can use JSON.parse as
opposed to JSON.stringify to deserialize our value from localStorage and we can see that we have
unexpected not white. Because this is already an
object it has to be a string, so let's say we pass
a string which is this array and we still
have this problem; it's not a valid JSON. What is going on? Probably it wants me to
use this. Let's see. Now, I pass the valid
string and you can see it parsed the string
back to the array. Now this data structure has the type of array
not just a string. Hopefully it makes sense. Here we parse persistedValue, otherwise if
persistedValue is null, if value does not exist
please use the initial value, which is going to be
the initialState. Now we're finally done with
logic to initialize state when the page is being refreshed or we get
back to the page. Cool. Now we need
to somehow also synchronize state updates inside the usePersistedReducer
hook that we worked on. We can use userEffect
because you remember, userEffect allows
us to hook into component life cycle and run logic when
something changes. I'm going to import userEffect, and from here I will call userEffect and I'm going to pass the dependency array in
which I'm going to specify. If our state changes
as well as if our key; localStorageKey changes, in this case please
run that callback. Again, if states changes or
if localStorageKey changes, we call that function. That function will synchronize the state with localStorage, so we're going to tell
localStorage.set. Item key will be localStorageKey
and value will be state. However, we need to turn it into a string before we can
write to localStorage. We're going to call
JSON.stringify state. At the end from that hook, we want it to return an array of exactly two elements so our hook UsePersisted reducer resembles the original
UseReducer hook. We're going to tell [inaudible]. State and return these
packet and that's it. This is going to
be our final hook. It is basically just an
extra logic on top of built-in useReducer
which synchronizes the state with localStorage. Just like I told you it
is a bit of advanced, however, if you take a look it's actually nothing
complicated here. Now instead of using useReducer, here inside showGrid
we're going to call usePersistedReducer
and as the key as the third argument we're
going to say starredShows. Now let's try and see. If we go back to the app let's open application local storage. Let's clean it up for now, let's look for shows. You can see as soon as the
component mounts on the page, this usePersistedReducer
hook runs the state is initialized since
our state changes and useEffect runs
at least once. It already started
to synchronize the state with
localStorage here. Under key start shows, we place our empty
array, our initialState. If I try and start
something boom, show is edit here. It is synchronized. If I click on "Star me" to
something else it has always been synchronized with localStorage which
means it worked. Awesome. For now I think this
will be good because well, I think that's enough for now. In the next video we're
going to talk how we can proceed with that logic, so we actually can somehow display whether this
show is starred or not. Somehow visually tell the user that this show is
already started and then we're going
to probably fetch all that data inside
the starred page. For now let's commit that; what we already have, so we do not lose the changes. Here I'm going to say, added initial logic to star
shows with useReducer. Created usePersistedReducer to sync state with localStorage. In the next video
we're going to proceed with that. See you there.
80. Starred shows p2. Extract starred shows logic in a custom hook: Hey there. In the last video we started to work on starred functionality. We created custom hook
use persisted reducer, which synchronized our
starredShows state with local storage so that
whenever we refresh it, we are able to reinitialize
state from local storage. I did not show it in
the previous video, but if we try and cancel log starredShows if
I refresh the page, let me go back to home. If I refresh the page and
when the component mounts, our initial state is
retrieved from local storage, whatever we have here. If we clean it up, if we remove everything
from local storage, refresh the page
and look for shows, our default state
is an empty array. Cool. Now we need to think how we can
actually, let's say, reuse that hook across
multiple pages, across home and start. But first, we're going to tell the user whether this
show is started or not. We're going to get
back to ShowGrid here and to the ShowCard, we can pass another
prop called isStarred. This isStarred will be
pretty simple we're just going to ask
whether starredShows. State that we have includes
this data show ID. So this isStarred will be a
Boolean which will indicate whether this show is already present inside the
starredShows array. Then inside ShowCard
we're just going to grab isStarred as a prop. Here for now, we're
just going to ask if this show is
already starred, please display on
Star me please, or just Unstar me or Star me. Let's try and see. Whenever I click here it
turns into Unstar me. If we click "Hello tomorrow"
it's still Unstar me. Now, if I refresh the page, I search for hello again, if I scroll you can see the
values are being persisted. Even if I close my browser, close this tab and get back to that page again to
the specific shows, they still will show
Unstar me because we again synchronized the
state with local storage. Cool. Now let's
proceed and extract that logic that we wrote here from ShowGrid into
a separate file, so later on we can reuse the same logic inside
the start page. Let's go. Probably
inside source or maybe let's create new folder called library, lib for short. Here we're going to create a
file called useStarredShows. Inside that file, I'm going
to put all that logic related to hooks that
we wrote previously. This will be
usePersistedReducer, this will be
starredShowsReducer, this will be this
usePersistedReducer call and the import of
useReducer and useEffect. So if we wanted to, let's say, use exactly the same hook
inside other component, let's say inside pages starred, we would just copy it like that. We need to call
usePersistedReducer again, we need to pass
starredShowsReducer again, specify the same key, but we can go one step further, we can create another
custom hook on top of this, and let's say hide
the logic there. Inside useStarredShows
we're going to create new hook called useStarredShows and
this hook we'll call usePersistedReducer
and instead of just destruction values here, we're going to return whatever value
usePersistedReducer here returns. Here we probably not going to pass anything
because we want to, let's say, conceal the logic
just behind that hook, so inside our component, we can just simply call useStarredShows and
let's actually save it, then export it from
useStarredShows, and then import it from library, useStarredShows and the hook is going to be useStarredShows. We call it and we simply get starredShows and we simply
get dispatchStarred. You can see now it looks much, much cleaner than before. Now it is also reusable, which means inside
starred component we can do exactly the same, we can just call useStarredShows
and drop the same data. Let's do that. Inside
starred I'm going to import useStarredShows and here we probably will not
need dispatchStarred, we will not need the
dispatch function, so we will not
destructure it we're going to grab only the first
element, the starredShows. Now, here we can write the
logic to credit the data, we're going to do that
in the next video. For now, we're just going to probably starred page, starred, starredShows.length,
which is going to display the number of shows that
we have starred so far. Let's try and see
whether it worked. If we go to the start page, we can see we have
two shows starred, this is what we see
inside our state that is persisted inside
local storage. If we try and clean
local storage, and if we refresh the page, starred is going to be zero because we
removed everything, the state was reinitialized,
something like that. For now, let's just commit
everything that we did here. We extracted hook logic into a separate file that we
created another custom hook on top of our
usePersistedReducer for starredShows specifically and
called it useStarredShows. Then we use that
custom hook inside, starred component to display for now the total number
of shows that we've added and we use that
hook inside showGrid, useStarredShows as well as
the visually notified user by displaying Star me or Unstar
me texts based on show ID, whether it is inside
the state array or not. Actually, it seemed like a lot. However, it wasn't
that much, was it? So I add everything
to stage and I tell created useStarredShows, custom hook placed
all hook logic placed all or let's say placed useStarredShows hook
logic in a separate file. Tell the user whether
show is stared or not. Tell user whether show is
stared or not. That's it. Let's push to GitHub and we'll
see you in the next one. In the next video, we're going
to fetch all these shows that we have access to
inside the start component. Now, we're going to
fetch them from TV makes API and display them
finally. See you.
81. Starred shows p3. Fetch shows from the API on Starred page: Hey there. In this video, we're going to finally finish
the starred show page. In the previous video, we've created custom
hook called user starred shows which
is a hook on top of use persisted reducer which is also a custom hook on
top of use reducer but with extra logic which synchronizes the state
with local storage. In this video, we take that
starred shows that we have inside starred
component and then fetch them from the TVMaze API. First of all, we have
an array of show IDs. If we look inside TVMaze documentation we
do not have any endpoint. Try and look for it where we can grab multiple shows at once. So in our case, we're going to send multiple
requests to the API. Let's go to starred component. Here by default, we would use use effect to grab data from the API only when the
component mounts, but now since we use
data fetching library, use query, we can
use it to grab data. Let me copy that
from home component, I go here, inside starred I import use query
from React query library. Now, our query key is
going to be starred and we're going to pass the array of starred shows that we
have as the query key. Then inside query function, we need to get all of our shows. How we can do that? The first and naive
approach is that we can actually use the
simple for-loop, then we loop over each
show that we have inside the starred shows array, we take each show ID, and then we send the request. However, you can see that all of these requests that we can send, let's say we have two show IDs inside the state and we're
going to send two request. When we can loop
over each element it will send the first request, then only when it's finished then it's going to send
the second request. This is not efficient because the requests that we're
going to send for shows, they are not dependent
on each other. We want to make that happen
as fast as possible. That is why we need to send multiple requests
at the same time. To achieve that behavior, we're going to use promise.all. Let me show you what I mean. Inside query function, we're going to write
the following logic. Before I do that, let's remove enabled and we're going to
keep refetch on Window Focus. Here the logic will
be the following. Let it be just a function
and a sync function. Here we first going to
map our, where is it? API TVMaze. This Get Show by ID function. We're going to map
that function that returns promise into an array. Sounds already complicated but let me show you what I mean. What we will do here. We will say, let's say
API request promises. We will do starredshows.map. We're going to map
show ID to API to get show by ID like that. We're going to
specify show ID here. With this approach,
we're going to end up with an array of promises. Because we map each show ID to get show by ID which
returns a promise. Eventually, we end up
with array of promises. To handle array of
promises and to make sure that these requests
will be handled, let's say in parallel
at the same time, we can use the
promise.all method. We're going to tell
await promise.all. We can actually, you know what, move all of that logic from here to a reusable function
inside TVMaze.GS. We're just going to
tell get shows by IDs this time and we will
receive show IDs here. Instead of just
doing API Get Here, we're going to turn
this function into a sync function and we will put the logic that we wrote
here inside get show by IDs. We're going to map each
show ID to a promise, then inside promise.all, and we already see
that promise is not defined coming from
ES lint actually. Well, that's interesting. I suppose this is because
inside ES lint RC we need to instruct ES lint to
understand that we use the latest
JavaScript syntax, the modern one, so
we're going to tell ES6 is going to be true. ES6 means EcmaScript
Version 6 and higher. Now, I think we don't have
any errors, that's true. To promise.all
we're going to pass API request promises or let's just call it promises
to make it simpler. What promise.all does, it resolves an array of
promises in parallel, and they are resolved all at once and handled in parallel. Under the hood, it
looks like promise 1, promise 2, promise 3
to promise.all again, an array of promises. Promise.all resolves
all of them at once. Then promise.all results to
an array of resolved values. If we have an array of
promises let's say promise 1, promise 2, promise.all
resolves them all at once. Promise.all returns an
array of resolved values. If promise 1 resolves
to let's say value 1, we would receive an array with let's say resolved value 1. They've promised to
resolve to something else, we would receive resolve,
resolved value 2. If the promise does not resolve to anything,
maybe to null, to undefined value would
be undefined or null. But the order is retained. Whatever order is
present here in the same order promises are resolved when using promise.all. One point here, promise.all
also returns a promise, so we need to evade it. This is important. Now, we can call it as result. Here we pass promises
and we return result. Because in our case, each promise will
resolve to show data, eventually we will
receive array of resolved promises
which means we are going to receive array of shows. We're going to console log it just to see what
exactly we work with. Inside start J6 we're going
to call this get show by IDs. Maybe, you know what? Inside get show by
ID we embed data. But inside start page,
we don't need it. Instead of calling get show by ID here
we're just going to call ApiGet without
the embed part. Something like this. Now, inside the starred page, we're going to specify, please call get shows by IDs. Inside query function and inside pass starred shows,
that we have. Now we will have starred
and starred error. Do not confuse
ourselves with naming. Let's probably call it starred
show, starred shows IDs. Here it will be
just starredShows and starredShows error-proof. Now we're going to apply simple conditional
rendering here, just like previously
we did inside show page with if
and if you turn. We're going to ask if
starredShows actually is truthy. In this case please return ShowGrid because we use show grid to display all
the shows that we have, so which is going to use ShowGrid but first we
need to import it. Import ShowGrid. It already auto-completes for me from components
shows ShowGrid. If we have started shows we
are going to return ShowGrid and ShowGrid expects
us to pass shows here. Let's try and do that, shows equals starredShows
chose and by default, weekend and display hello. Let's first try and
see what we have. Our app is not running because we did not start the div server okay now we have our shows let's try and add
something star me. Now we go to start
page and boom, we have a blank screen and
if we look inside console, we see cannot read properties
of undefined reading ID. What happens if we look
inside ShowGrid? Where is it? We receive shows,
which is supposed to be an array and
inside that array, each element has.show
property.show key but if will look into
our result and this is what we console log inside
gets shows by IDs here. You can see we have array of elements and each array
element does not have the. show property. We need
to somehow fix it. We need to adjust that data shape to
the data shape that is expected to be used
inside the component. The question is, where
exactly we need to do that? That's a good question. Well, if we want to make
this function, let's say, as reusable as
possible in our case, in our app, this is
not true, but still, a good practice to make the needed changes
only where they are needed and if we want
to make it reusable, we don't want to let say, somehow modify the
data shape here. We going to do that logic
inside query function. Here inside getShowsByIds, I don't need to
console log the result anymore or actually
let's keep it for now, and later on, we will
get rid of that. But inside query function here, we're going to do the following. When getShowsByIds
the promise resolves, we're going to use the
dot that syntax now because it will be
a better fit with, let's see this syntax
that we have here. Instead of using async await, we can remove async from here so when this getShowsByIds
request finishes when the promise resolves with that result then
what we will do, we will map over each array
element and we will nest whatever data we have
here under the show key, under the show property, so that we will match the structure that is
expected to be used by the ShowGrid because we
need an array of elements where each element has
the show property inside. What we will do, we're
going to tell result. map we will get show data
here and from that callback, which is going to return
showData to make it simpler, instead of using the longer
syntax with return we going to tell return showData
with curly brackets. Now, if we try and cancel
log starredShows here, we still have this problem. Let me see. We have showData. This is because we
mapped you can see each array element to
have the showData key, but we expect it
to be just shown. Here instead of show data, we can use show and show. Now let's try and see
we refresh and boom, everything magically works now. If we look into result, we have this data
that we receive from the getShowsByIds and
then we mapped the data. We actually nest that
data under the show key inside each array element,
something like that. Now we can finally remove
that result from here and simply return
promise.allpromises. Here we don't need to change anything this
is our logic here. Now we need to handle
the case when we do not have any starred shows. Let's say I clean
up local storage, I refresh the page, nothing gets displayed
but ideally, we want to tell the user that, hey, we do not have
any starredShows. We already write
this if condition, which will work for both if we have shows and if we
do not have shows, because an empty array is also a truthy value so
we can just tell if starredShows.length is
greater than zero if we have at least one show and we use the optional
chaining here because our initial state is going to
be undefined by use query. Well, the request does
not happen immediately so this starredShows can be undefined and do not
throw any error, for example, let me remove that, I refresh it, I go to console and I see cannot read
properties of undefined, because initially, this
state is undefined again, the request does not
happen immediately. We can either use optional
chaining here or we can ask if starredShows is truthy then by using
the add operator, this starredShows, by that time will be
defined we can safely type starredShows.length
but to simplify that, we use optional chaining. If starredShows length
is greater than zero, we display ShowGrid then we
add another condition on top if starredShows length
equals zero in this case, we display div something
like no shows were starred. Then we're going to
add another condition in case we have any error. If we have started shows adder, we going to tell error occurred and we're going to say starredShowserror.message. By default, if none of these conditions are
held in this case, we are telling shows are still
or just shows are loading. This is our final market, for now, let's try and see. If I quickly refresh, you can see a quick
blink because initially, this state is undefined it means just for a short period of time, these conditions will not match and we're going to see shows loading if the request takes
longer time than expected, we will see shows are loading then we see no
shows were starred. If we go home, we look for shows we starred
some shows here this one, then we look for something else, like, hey dude, hey, we go back to starred you can see now we
have this shows here. Even if we refresh the page, the shows are still
there. Pretty cool. Now we have the complete, full cycle of this
starred functionality. Congrats. For now, that's it, we're going to add all
the changes to the stage. We first instructed
ES link that we are using modern JavaScript so it will not give us any
error when we write promise constructor like this. We added another
function here to fetch for all shows, knowing show IDs. We use the
promise.allmethod to handle all the requests at the same time because these requests are not
dependent on each other, they need to be
handled in parallel, and then resolved all at once this is exactly what
promise.all does. Then inside starred component, we used the use query hook to fetch data we
already know what it does and why we use it then we apply conditional
rendering to display data. That's it. Great. Let's commit everything and
let's say fetched, starred shows data and display. ShowGrid for them. Cool. I push everything to
GitHub and on that good note, I will see you in the next one.
82. Assignment. Custom hook usePersistedState on top of useState: Hello again, I have another small assignment
for you to remember that in order to implement
Start shows to persist data inside browser. When we refresh the page, our state is still there. We used local storage, storage inside the browser
that can persist data. Wouldn't it be nice
if we can also persist whatever we type
inside the search box, inside the home component. So if I refresh the page, whatever is inside
textbox is still there. The idea here is
very much the same. So if for start shows, we created our own hook that synchronizes the state called
fuse persisted reducer. We can create a very similar
hoop which is called Hughes persisted state on
top of US state this time, and then use that state to implement this date
for the search box. This is the assignment for you. Go ahead and try that. And this time instead
of local storage, you can maybe use
session storage. The difference between
local storage and session storage is that
local storage persist data, even if you close the tab
and close the browser, session storage only persist data until you close the tap, close the tab, and then
get back to the page. Again, session storage
will be empty, which is, might be a better fit for textbox because
it is not something that we would like
to save when we close the tab or
close the browser. So the API isn't the same, which means just instead
of local storage, you're going to write
session storage and the rest stays the same, get item and site item. So go ahead and try to create
that use persistent state and then implemented to persist the state
of the search box. Good luck with that one. See you in the next one.
83. Implementing custom hook usePersistedState: Hello again, how was
your assignment? Were you able to
achieve what we wanted? Were you able to persist data inside session
storage? Let's see. If we go back to search form, here we have that use state call to have the search string state. Now, if we want to persist it inside local storage
or session storage, we need to write an extra logic. We can extract all of that logic somewhere inside other file, and then here
inside search form, we were simply going to call use persisted or maybe
use search string, which returns us again an
array of two elements, string and search
string so we do not change the API of
the use state hook. It will be pretty much the same. Let's go ahead and
implement all of that. Under library folder that I have here where use start
chose is located, I'm going to create a
new file called use search, STR, search string. Here I'm going to export
const, use search string. Our hook will not
take any arguments, we're going to handle
everything inside, so initial state will be
defined by the hook inside. We don't want to care about that whenever
we use that hook. Then I save it for now. Then from here I'm
going to import from library use search string. The final look will be this. Pretty much the same as we had previously but all the
logic now we'll go inside. In case of use start
shows weekly aided that custom hook called
use persisted reducer. We can do exactly the same with use state but instead
of use-reducer, we're going to use use state. I will comment that
out for the reference. Use a factorable again, needed to synchronize this
state with session storage. I will need you state
and here I will create use persisted state. Use persistent
state will receive initial state as the argument. Here, I'm going to call use state and pass
initial state here. But unlike with use reducer, use state can receive either the initial state
as the argument or the initializer function, which will run only once
to initialize the state. In case of use reducer, it was third argument, in case a few state, it is just still
the same argument, but you just pass
the callback there. Here inside the logic will be pretty much the same as we
did with local storage. First of all, we refer
to session storage, get item local storage key. We need to get that
local storage key here. In our case, it will be
session storage key. We're going to grab it from use persisted state arguments. Next to initial state, we can pass session storage key. Then again we have persisted
value, if value exists, we desoralize it
from the string, otherwise we use the initial
value that we passed, which is going to be
initial state argument. Awesome. Here we receive state
and state update function. Then exactly the same
logic with use effect. We'll just take it
from here and we say, whenever state changes or whenever session
storage key changes, please call session
storage dot set item, session storage key
JSON, stringify, state. Then from use persisted stage, again to keep exactly the same
API as for use state hook, we're going to
return an array of two elements where first
element is the state, and second is the
state update function. Now, we can remove these comments here and
inside use search string. We can call use
persistent state, inside we pass initial state, it will be an empty string
and session storage key is going to be search string. Awesome. Now, whatever this
use persisted state returns and it returns an array of two elements where first
element is the state, second is state update function, exactly the same API as
for the use state hook. Instead of writing this and then writing return state
and set state, we can simply return whatever the use persisted state
function returns. Return, use persistent state. Now, this is it. Now we can use that
hook that we've created inside the search form and
it will magically work. Let's try and see. If I refresh the page, you can see that inside
session storage, I have key search string, whatever we specify here as the session storage
key so the state is initialized with the value that we pass here by
default an empty string. Now, whatever we type
inside the search box, it will be deflected
as value inside the session storage key under search string because
we use effect for that to
synchronize the state. If I refresh, you can
see whatever we have inside session storage
is now being displayed as initial state inside
textbox if I refresh. This is very convenient
for example, if let's say I accidentally
refresh the page, hopefully it does make sense. Not too complex as you can see, and I genuinely hope that you implemented pretty
much the same logic. For now, we're going to
commit everything and say that this was the use
of search string hook, commit message is going to
be persisted third form, text box value in
session storage. All the logic in use,
search, string, hook. I push everything to GitHub. See you in the next one.
84. Introduction to Styled Components. CSS-IN-JS as alternative for styling: Hi there. In the last video, I would say we finished all
of our logic within the app. Now it is the time for
us to talk about styles. How we are going to
style the application. In this video, we're going to talk about the approach
that we're going to take and here's a
spoiler for you, the approach will be
styled components. In this video, we will see
how styled components work. Why exactly do we pick
them and at the end, we will compare
styled components to the traditional way of selling apps with just
regular CSS styles. Let's go. What is
styled components? That is just a library
to style or react applications with an
approach called CSS-IN-JS. CSS in JavaScript is an
approach which allows us to write CSS markup with
the help of JavaScript. Right now I'm at the official website of style components,
official documentation. What we will do right
now in this video, we will go through the
basics to understand how exactly we will be
able to use that library. If I scroll down a little bit, I will go through the simple
installation process. I will get back to
my application. I will open a new
terminal instance here and I will run npm install
styled components. Once it will be installed, I will just close the instance. I did that only because not to stop the application itself. Now we have styled components appeared under package Jason. Dependencies inside the
documentation we can see your first styled component. We need to import styled
from styled-components and then use
something like this. Let's go to the home component
and we can apply with styled components
here on the homepage. At the top, I will import
styled from styled-components. Then I will do styled.button and at the end I will leave empty
back-ticks for it. Now, what is this? By calling style, style.HTML element
that you have in that very long list you
are able to create, let's say, the
underlying element that you want to style, for example styled button. From that element,
styled-components will create a component and that
component will have styles. If we go back to the documentation
and scroll down a bit, here we will find
this basic example, style.button back-ticks and then CSS markup As you can see, CSS markup is written
inside back-ticks. By the way, the syntax
highlight that you can see here is coming from
VS Code extension, which is called VS Code
styled components. If you want your syntax
to be highlighted and auto-completed, installed
this extension. We are able to write CSS
here inside back-ticks. Styled-component will
use button element and it will basically
just to take that native HTML button
element and will apply this styles that we write here on top of
it and at the end, it will produce the
button component that we can use
inside our markup. Let's go ahead and try. Inside markup, I'm going to use that button style component that was created
and say hello here. I save it. I go back to my
app and what do we have here? If we look inside markup, we have this styled
pretty button here with this
unique class-name. All styles were merged and let's break down what do we have here. First of all, this
button component renders HTML button element
exactly what we specified here as the base
element to apply styles for, which means this
button component here basically renders
native HTML button element, which means all the props that
this styled.something has, we can pass directly
to that component. If button element has an
attribute called type, we can pass type here. If I save it, you will
see it will be reflected. I have type button now, exactly the same you will
do with any regular, let's say native HTML attributes on the
button element if you want it to pass
something like on click, or if you wanted to pass
something like data attributes, some custom attribute, you would do that,
then it will work. Cool. Now, we have that
unique class name here. What is this and why it looks
like that very strange? The thing is these tiles that you write here
specifically for that element are scoped
to this element only, which means these
styles are unique. That class name is
unique and it was automatically generated
by styled-components. Styled components
guarantees the uniqueness of classes that you
write for that element. If I create another
styled-component, which looks exactly the same, but it has a different
name, it doesn't matter. It can be, lets say, anything, and then I use that
anything component next to that button component, they have exactly
the same styles. They visually look the same. But if you compare their class
names, they are different. What styled components did, it generated a unique class
name based on these styles. Again, styled-components
creates locally scoped, unique styles, specifically
for the element. Makes sense? I think it does. We also have here dynamic
styling available for us. If we go back to
the documentation, if we scroll down, here, we can find another example, extended example with
string interpolation here. Let's copy that
string interpolation. Let's get back to our button, and here, I'm just going to use that
string interpolation. I also need to import CSS named export from
styled components. Now, if we get back to the app, nothing will be changed. But what exactly this
string interpolation does? First of all, we are able to use string interpolation here because we write CSS
here inside backticks. Inside backticks, we
are able to interpolate JavaScript by using the
$ and curly brackets. Here we pass a function
that returns this CSS, let's say, another
CSS markup here. What is going on? Here we use something
called props argument. That argument is going to
be an object which has the primary key property,
but nothing changes. These props here refers
to the props that we actually pass
to the component. If I pass primary here, it will be a custom prop to that button component
which means it will be available here
under that props object. If I get back to the app, you will see now
these styles changed. If I look into the markup, these are the styles that were applied when we pass
the primary prop. They overwrite our base styles. To make it more clear, we're going to create another
button called also hello, but without passing
the primary attribute, without passing primary prop. You can see now
these are different. They have the same
base class here, uniquely generated, but the
second class is unique. This way we are able to apply dynamic styles using
styled components. You can basically
pass any prop here. It can be anything not primary. Let's say it can be like font size and you can specify how many
pixels you wanted, for example, 20. Then inside string
interpolation, by using that function, you are able to return CSS based on the props that you
pass to the component. For example, let's
say we wanted to specify font size
dynamically for each button, we would again call another string
interpolation inside this style component, and here we would just pass. On size, if we do
pass font size, please include CSS, which has font size property
with against shrink interpolation props.fontsize
pixels that we pass. We basically interpolate
JavaScript into CSS markup. Now, if we get back here and
if we inspect the element, we have font size
here, 20 pixels. I just noticed that we also have this font size attribute being attached to
the button element. This might not be needed and that might not
be wanted at all. I think when we pass
something random to start components and we want to make it available only as an argument as part of
this props object here, we want to prefix it with the $ to let styled components
understand that, please do not let
say, interpolate. Do not pass that font size as the actual attribute of
the underlying element. Make it available only within this string interpolation
when we apply styles. Now we would refer to
props font size in here, props font size with the $
prefix if I'm not wrong. Yes, right now you
can see we still have the styles and still it works. By this way, we can
apply dynamic styles. If we go back to the
documentation here, we can find another example
of styled components. We create another styled
component called container. Let's go ahead and
do that at the top. I'm going to create
this time style, the div, the component at the end that we will
have will be container. Now we can wrap our buttons
in the container component. If we inspect, again, you will see a unique class
name that specifically identifies this component which has the corresponding styles. I would say this is a good
intro for style components. You can see that it
is very easy to style the application by
using this approach because everything
here is a component. It might be, let's say, confusing to differentiate
between regular components, installed components but
these are the drawbacks. You need to find the
golden mean where you want to have your styles or where you want to have
your regular components. But style components is a very popular
solution. I would say. Also, one thing that it
also provides is something called global theme or
global configuration. If we go back to styled
components docs, and if we at the top right
corner search for theme, we can find that theme
provider reference, and theme provider reference is something that we're
going to try right now. Let's import theme provider from styled components
here at the top. Then by following that example, we're going to pass theme prop to the theme provider component. The theme that we need to
pass here must be an object. Let's define it
somewhere on top. We're going to call it theme. It will be just an
object and this object, whatever you specify here, will become available inside string interpolation inside
every styled component. Which means here, you can define any global configuration
that you would like to be used within
styled components. It can be colors, it can be, let's say font sizes, it can be font-family,
in box office. When we're going
to style the app, we're going to use
colors and font family, for example, here we
can specify colors. Let's say main will be just red. Then we pass the theme object through the theme provider here. Now, inside the interpolation, wherever you want to use that global theme conflict
that you have here, you just write color will be
again reopen interpolation. We pass a function that must
return a string CSS markup. It will be, let's say, props. Props.theme and the props.theme will refer to that object here. Props.theme.colors.main. Now, if we go back
to the app and see, color will be red. Now instead of writing red everywhere in every
styled component, you would just refer to
props.theme.colors.main. Then instead of changing this
color in all the places, you will have one single place where this color is defined. For example, now I decided to change my main color
from red to blue. I would just type blue here
and it will be reflected in all components
where prompts.theme colors main is referred to. We're going to take this
approach to create, let's say, some global config
in box office. Now, this was an introduction
to styled components. Now let's compare what
exactly it gives us and what exactly are the drawbacks and what is the
difference between, let's say, using
cell components and a traditional way to use CSS. I'm going to open Paint. On the left, we will have
something called static CSS and on the right corner, we will have something
called runtime CSS. Styled components is
part of run-time CSS, but we're going to start
with first static. What is static CSS? In the traditional way, when we write CSS we write
them inside CSS files, and then the CSS files are
being imported into the app. For example, if we
take a look at GitHub, they use static CSS to
style their website. What I mean by that,
if we look inside their markup,
inside the hashtag, they load CSS files, and if we open one
of these styles, one of the CSS, maybe
let's open another one. There's global one. It has these class names
like color border inverse, maybe like BG gray something. They import static CSS files that were defined
at the built time, and then they use the
class names that come from these CSS files
inside the markup. Let's open body tag. Here you see regular, understandable,
comprehensive class names. But if we look inside
styled-components, it is slightly different. Static class names, no matter what are defined
at the build time. If we wanted to apply dynamic class names or if we
want to apply dynamic styles with static CSS class names
approach with static CSS. Let's say we have a button
here which can be primary, we would create, let's say, with regular CSS
dot button class, then we would create
dot primary class, and then when we going
to style that button, we're just going to
toggle class names. By default, let's say it was a button element you
would have here like dot, let's say button class here, and then when you
click on something, this button has additional
class name called primary. This way you can use
static class names, static CSS styles to create dynamic class names
specifically for elements. With styled-components or with run-time CSS it is different. CSS is let's say
built in on defly. What I mean by that. If we
look inside our app here, in the hashtag we do not have
any CSS files connected. The question is where exactly these styles
are coming from? They are coming from. Let me see. If we open hat. Here we have the style tag. The thing is runtime
CSS, what it does, the library-styled
components inject styles dynamically onto the page
by using the style tag. If we open styled-components , markup, official
documentation, they have these, let me see hat, they have exactly
the same style tag here where these
styles are injected. This is empty, I'm not sure why. Let's see this one, this is some global conflate. These are not dynamic styles. All these styles that
you see here they are injected onto the style tag. It is empty here. Let me try with page source. Here it's not empty. All these styles here are injected here inside
the style tech. The thing is that these
files are injected on defly. They were not defined
at the build time. Which means when I
access this page, first, the style tag was empty. But when I actually
go to that page, styled-components, the parts, whatever JavaScript were
right here inside backticks. Then it takes some
time to process that, to parse whatever we write here, then it creates that
CSS markup and then it injects that CSS markup
here inside the style tag. This way, styles are injected at runtime, during
user interactions. The thing with this approach is that when you
switch between pages, it only injects the
styles that are needed to display the content
on this specific page. It means it loads styles only needed for the current content. It will never inject
styles that are not required by
that specific page. Unlike with
traditional apps here, you import that large, large CSS file, it has a lot of
different class names, but they might not
be used on the page. Styled components, first of all, injects styles
dynamically at runtime and if let's say something
is dynamic, for example, we changed the probe here, these styles will be also
dynamically injected, added to the style tags so they become available
on the page. With traditional apps,
this is not right. Everything needs to be predefined upfront and
loaded through CSS files. The problem with this
CSS NGS solution, specifically with
runtime JavaScript, is that it takes time. It takes time to parse that JavaScript to
translate it into CSS, and inject it onto the page. It is computing, it takes time. It means that if you
have a very large, let's say element tree on the page which is a
styled component, it might become a bottleneck at some point because
the JavaScript, it takes time to process it. If you have millions of hundreds of components
on the page, it might take a second, a couple of seconds, while the styles will be
injected onto the page. But in most apps, this is not the case. But you should really have to
consider that option if you work on larger apps and you're the one who
makes decisions. But again, most of the time, I'm not here to scare you. Most of the time this
is totally fine and end-users will not even
see the difference. For box office we're going
to use styled components. We're going to try
out that option. The advantages of
styled components is that they are easily allow us to first define global
configuration with JavaScript. We create the theme object and it provides everything through the interpolation within
the styled-components. Second advantage is
that we can easily apply dynamic class
names by using, again the same string
interpolation, and third, everything
is JavaScript. You don't need to create
CSS files at all. Everything is written
here directly. Drawbacks is that first of all because this is JavaScript, it takes computing time. Again, in very large apps, it might be a bottleneck. In smaller apps, this will
not be even visible at all. Second drawback, it might be confusing because
now everything is a component and it
is easily to get confused between
regular components and styled-components. I think this is it. For now, we're just
going to remove all the changes that we
did inside home GS6. I'm going to keep
the installation of styled components and
then in the next video, we're going to finally style entire application by
using styled-components. See you there.
85. Styling the app p1. Global styles, theme, React router active link: Hi there. In this video we will continue to talk about styles. In this video, we're going
to style our application, not entirely, but we're going to do the major apart. Let's go. In the previous video, I already installed
styled-components, I just run npm install
styled-components, I can run this
command again just in case to ensure that the package
is definitely installed. Right after that, I'm going to start the local
development server and let's see where
exactly we're going to start styling
our application. The styles that I'm going to
use in this video will be shared with you through the guest that you
already have access to. Let's start from here. First of all, we're going
to connect Google font, specifically Roboto
to our application and maybe change the title. Because right now it
is just React app. I'm just going to go here, stylingPart1.MD and going to copy that index HTML
that I have here. Then I'm going to
navigate to index.HTML. Here instead of title, I will connect this font, I will load this
style sheet and as well as change the
title to Box Office. Now, it will appear
under Box Office. My app appears on the
Box Office and I have this font Roboto connected here. Awesome. Now, from
the previous video, you remember that I talked about styled components theme, we used theme provider. Let's go ahead and
create that theme. If I navigate back to guest, I have this object here. This object here is going to be our global theme configuration. Just a couple of colors plus the global font that
we're going to use, the Roboto that we've just
connected inside index HTML. I'm going to take
that theme object, I'm going to go to, let me see, app JS6. Here, I'm going to add
this theme object, and now I need to use
theme provider and pass that theme object to
underlying components. First of all, let's get
rid of that markup here, we don't need it anymore, it was commented out. Then from styled components, I'm going to import
theme provider. Here below query
client provider, or on top of it. It doesn't really matter, I'm going to call
theme provider, I'm going to wrap
my browser router in theme provider and
as the theme object, I'm going to pass that
theme object that we have here that we've
copied it from the guest. Now, you can see that actually
was this new edition, let's say with this
new theme object, our app j6 became
a bit polluted. What we can do in this case, we can maybe partially
oscillate or extract logic that we've written so
far here in a separate file. For example we can
somehow extract that theme provider and
the theme object into a separate file and manage
everything from there. What I mean by that is
that inside source folder, we can create new file
called theme.jsx. Now here we can move
the theme object, and here we can create
our own component, which will be called something
like global theme, maybe. Let's try and create
that, const, GlobalTheme. This GlobalTheme
we're going to use inside appjsx instead
of theme provider. We will not need to import theme provider
from styled components, manage the theme
object here inside, then use theme provider
pass the team object, we can extract all that
logic inside theme jsx, manage everything from here. For that, we can create just a component
called global theme, and we cannot wrap
browser router in global theme component,
just like that. That we're going to import from deemed jsx. Let me do that. I'm just going to import
from the global theme. This GlobalTheme needs
to be exported to, I'm going to call export
const, GlobalTheme. Now it looks much cleaner. This GlobalTheme must surrender all its children that
are passed inside. It means that inside
GlobalTheme component, I'm going destructure
the children prop, and from that component, I'm just going to
return theme provider, which is imported from
styled components, and old children will go inside. For the theme prop, I will pass the
theme object here. Now, we've created theme, we managed the logic
in theme jsx however, we also need to apply
some global styles. Right now, we have a few
of global styles defined here inside index CSS but
for our style solution, we use styled components. We can actually use styled components to
create global theme, which is not, let's say somehow scope to some
specific component. So some styles defined by styled components that
are available globally. Instead of using index CSS, we can actually
delete that file. Inside index jsx
we can now remove reference to an
existing index CSS. Now, we need to somehow
create global styles. In styled component, we have one thing called
create global style. We can look for that in
documentation. Let me see. Create global style,
APA reference, create global style, web only. It is just a function
that you call. Again backticks, you
write global styles, global CSS, and then you
just use it as a component. Basically the same as regular
style component usage, but this time it will not be scoped to
specific components. Styles will be globally applied. We're going to call create
global styles here but we have that call inside
guest that is shared with us. So we can just
take it from here, let's copy paste it. I just call create global
style that was imported from styled components and then
specify some global styles, specifically here
for budget deck. Here what I do, I use string
interpolation to interpolate that theme object and grab font-family that
is defined here. You remember because
we use backtest here, we are allowed to use
string interpolation, we must pass a
function which returns some CSS that will be
directly interpolated here. In the previous
video, I used props, right then I did props.theme. But since the first argument is an object which
contains the theme key, we can destructure the theme key directly
inside arguments. This is totally optional. This is just to, let's say, simplify and shorten
this syntax. I'm just going to
destructure theme from here and use theme font family. Again, the theme
object refers to that, the object that we defined here and then we pass it
to the theme provider. This is why it is available inside our styled
components definition. Then we just use
this global styles inside our markup, like
irregular component. Now, this all magically
becomes available. If we go to our app again, and if we'll look for body tag, let me find it, you can see the
styles were applied. We have font-family,
Roboto sans-serif, just like we defined
in the theme and the rest of CSS that
we placed here. Great. Now, what will
be our next move? I think we're going to
start with navigation first because we have one small
thing that we need to discuss. What I mean by that small thing, when we navigate between pages, we want to indicate what
page is currently active. For example if I'm
at the homepage, I would like to show
to the user that this link is being active. If I navigate to start
I want to indicate the start link is
active right now. How can I do that? If we go back to components, Nav.sjsx here we have
this simple markup, we just map our links
array to LI element with link component which is imported from
react-router-dom. How we can somehow check that this link that we render
here is being active. But that React router has specific component
and if we go to the documentation
and if you look under components for NavLink, we can read from the
description that a NavLink is a special kind of link that knows whether or
not it is active. If we read further, it says that by default an
active class is added to a NavLink component when
it is active, so in short, instead of using link, we can use component called NavLink and when
it is being active then the active class will be attached to
that link by default. Let's try and see. I replaced link with navlink
from React-router-dom, I go back to my app,
I inspect markup. I look at [inaudible] tag here, and you can see that right
now I am at the start page, and I see that plus active
was added to that link. If I navigate to home, now plus active is
being attached to home. Just like that,
React router gave us that ability to style our active link with just
replacing link by navlink. As simple as that. You can read more how
customizable this NavLink can be, maybe based on some
conditions but in our case, it wants to be somehow changed, the interface, for example if we look
at the documentation, we can use this style tag, which can be a
function that receives this is active key from
the first argument. We will not go any
further with that, we'll just go back
to our guest here and I already prepared
the styles for us. Let me explain
what we have here. First of all, we're
going to copy that Nav list styled component, and we're going to place it
somewhere at the bottom. First of all, we need
to import style. At the top, we're going to call import style from
styled components. Here we create a
simple UL element, this one with styles. Now we're just going to
replace UL, with novelist, and everything inside markup
inside will be styled. Again, we create styles dot an ordered list element
with styles and then we also specify that every LI element inside will
have margin with 10 pixels. Let's try it and see. We go back to the app, you can see the
layout was changed. If we look at the L
class, just like before, we have uniquely generated class specifically for that
Nav list element, specifically for
that UL element, we can see the styles. If we inspect LI element, it also has styles. Great, it worked. But now what about the links? Because we did not touch
any NavLink component. If we go back here to the guest, we also have link styled here. Let me copy it and I will
explain what do we have. Styled components is,
let's say versatile enough that it allows
us to not style basic, let's say native HTML elements. It allows us to style
other components as well. Here I'm calling styled
as a function and I pass the NavLink component
inside as the argument. This way, we extend NavLink component with these
styles that we have here. This way, at the end, this link style will be
just NavLink component, but with this CSS style sheet, as simple as that. Now instead of
using NavLink here, I can safely use Link styled or maybe we can even call it NavLink
style if you want, let's keep it link style. What we do inside, we just specify again color from the theme object and then
here we have the ampersand, and then we have.active which
means when this element, so this ampersand
refers to itself, which means that
ampersand here refers to the NavLink component itself, and then when this component,
when this element, when this NavLink has
the active class, we specified that it will have
colored this and then the other markup to achieve
the effect that we want. Let's try and see.
What do we have? We go back here and you see now we have this
pretty navigation. When we navigate, now it is indicated the page that is
currently being active. Great, let's move on. If we go back to the guest here, we have one more moment
here called Custom radio. For these radio buttons
that we have here, let's say we're going to
create custom radio buttons. When it comes to styling inputs like checkboxes
or custom radios, it is a bit of a fuss, but nothing really complicated. If we go to the search form
component that we have here, we see we have two labels. Inside each label, we
have input of type radio. If we need to create a Custom radio element that
we want to be fully styled, we need to take slightly another approach than that to make it, let's say reusable. What I mean by that is
that I suggest us to create a component that we
will call Custom radio. Under components,
I'm going to create a new file called
Custom radio.jsx, so here I will
create custom radio. Here, for now, it will be just a label. I'm going to put it to the side and let's see what do we have. We have label, and
inside we have text, and then we have input. So we can just copy that markup here and put it in custom radio. Now, what we want to do, and what interface we want to give to that custom
radio element? Let's just assess how exactly
we would like to use it. So right now we create label, we pass input inside instead. Since now it is going to be a component called custom radio. We're going to
call custom radio, and to that custom
radio, ideally, we would like to
pass all the props, all the attributes
that we pass to the input element of type radio. So I'm just going to
copy all of that, maybe without type radio because this component is
already about radio. We're going to pass name,
value check unchanged. But what about label? What are our options? First option is that we can maybe pass this
label as children, for example like this. This might be an option, but instead, I personally prefer to pass it
as an attribute. So we're going to say
define one more attribute, one more prop, which
we're going to call label and we're going
to pass shows here. Instead of using children, it will be a self-closing
component with one more additional
prop called label. Now, how we can handle all
of that inside custom radio? First of all, we're
going to specify props here and from the props, we going to destructure. First of all, we're going to
take that label attribute, that labeled props that
we're going to pass label, then inside the markup, we're going to
interpolate that label, and now our goal is to
take all these props, the rest of props that we pass, no matter what are these props, we know that all of them will be somehow redirected to
the input element here. So the question is,
how we can do that? We are not going to destructure all of the props one by one, are we? We don't
want to do that. We know that we take label and the rest will definitely
go to the input element. In React, since the props object is still
just a JavaScript object, the same rules apply. We can use this structuring, we can use the spread operator, we can use the rest operator. So all these rules apply. What I suggest is that we can actually use the
spread operator. We can call three dots here
and specify input props. By using this syntax here, maybe I can directly
inline it here. So we grab only the
label prop here, and then whatever we pass, the rest of props
will be available under input props object. Now we can take that input props object and spread all
of these props that we pass by using the spread
operator just like that. First of all, we use the
rest operator to let say, accumulate all the props that
we pass to custom radio, all of them will become available under
input props, object, and then we spread all props, all keys inside input props, as props, as attributes
to the input element. Now, from custom radio, we're going to export by
default custom radio, and now we need to somehow
style all of that. So if we go back
to the guest here, we have styled radio. Let's copy all of that and
then place it at the bottom. Now, we first need to import styled from
styled components. Here we create styled dot label, and I call the returning
component as styled radio. Instead of label, we can
just use styled radio, and now everything
will magically work. So all that CSS
markup is just to create a custom radio button completely styled
with the theme that we have and the colors that
we define inside that theme. Now, let's save it. Also, we need to add an
additional markup here, just an empty span
element. Just like that. It will be used inside the
markup, it will be styled. Now, let's go back and
inside search form, let's use that custom radio. So now instead of using a
label and just like that, we're going to import
a custom radio first. Import custom radio
ROM components from custom radio,
just like that, and custom radio is
exported by default, so I do not need to use
named export, name import. This is wrong. Now, I'm just going to use
custom radio I will pass the labeled prop and the rest of props will be redirected, let's say to underlying
input element. So the same thing I
will do to actors. I don't need that
label here anymore. I'm just going to copy that
custom radio label will be actors and the props
will be the rest. One more thing that
I noticed here, we specified that this input
will be of type radio. However, we do not
specify it anywhere that our underlying input
also has type radio. First, let's say, all these props that we pass to custom radio redirect to
underlying input element, but whatever we pass, we can overwrite it with the props that we
define here by, let's say, including them
after we do the spread. So our input will
be of type radio. When we specify props
after we do this spread, whatever we specify will
be overwritten by that. For example if here
to custom radio, I'm going to pass type, let's say text, this will be overwritten by whatever I specify
after this spread. But if I specify here
inside custom radio, type radio before the spread, the spread will override, let's say default props
that I pass here. But if it is defined afterwards, it will be overwritten. Exactly the same rules
as you would apply spread inside a simple object. So you spread something here, let's say input props, and then you specify that. Type is going to be radio. Basically, whatever we have on line 12 is
roughly translated. What you see inside these lines three till six,
roughly the same. We specify type radio, we do not need to
specify type text here. Now we can just save everything. We can get back to our app, and we see that now we
have styled elements, but we forgot to delete the label here and now
you can see it works. If I specify, look for boys, now, it actually
looks for actors. Then I switched to
shows and it works. So everything is good here, and I think this will be it
specifically for this video. We've covered, let's say the essential
things for styling. I think we managed to do a lot. For now, let's limit ourselves with that
and commit everything. Let's quickly
overview what we did. First of all, inside index.HTML, we added that link
to Roberta font, we set the title to Box
office, inside app.jsx, we use the global
theme component that we've created
inside the jsx. So we created that global
thing component that is just a wrapper on top of theme provider and global
styles from styled components. The logic is managed
inside theme jsx. We created that global
theme object that we use inside our styled
components across the app. Then inside navs.jsx, we've used the nav link
component because this isn't a component that provides
us the active link. So the active link
receives the active class, and then we use that
active class inside our CSS markup to
style the active link. Then we created and used
custom radio component, which is a custom radio button
that we've created again, with the help of
style components. We also got to know this new small trick here when we need to redirect, let's say, or pass the props to underlying element using the
rest and spread operators. So we can actually
spread an object into an element and whatever
key values that it have, they will all be
considered as props, as attributes to the element. That sounded like a lot. Let's commit
everything and let's say installed styled components, then we're going to say that
created global beam with SC. Let's simplify with
styled components. Created custom radio. Used nav link from React
router to style active link. Sounds awesome. Let's push everything to
GitHub and in the next video, we're going to continue
with styles. See you there.
86. Styling the app p2. Styled Components dynamic styles based on props: Hello again. In the last video, we started to style the application using
styled components. In this video, we will continue. If we go back to the
guest shared with you, you can find stylingpart2.empty. This is the file that
we can refer to. We have a lot of CSS markup, and writing all of
that is going to be very long and boring. To avoid that,
we're just going to use the existing style sheet, so you and me will not need to write all
that down ourselves. Let's go one by one. What we have inside
stylingpart2.MD. First we have
AppTittle.jsx and we have Titlewrapper styled
component here. Let's copy it over. Let's get back to our app. Let's go to where is it? What was the file? AppTittle.jsx? Let's go to AppTittle.jsx, and here at the bottom, we're going to use that
titlewrapper and we're going to import styled from
styled components. Now instead of the
div over here, we're going to use Titlewrapper, and all this h1 and p
text inside will be styled as according to our
styles inside styled div here. Let's save it. Let's get
back to the app and see. Now, boom, we have this
pretty centered title. Awesome. Let's continue. Next, we have search
form on the list. Let's copy all of that, and let's navigate
to search for. In the last video here, we already created that
customRadio component. Now we're going to add
additional styles, so our entire form looks good. All this styled components
I'm going to put inside at the very bottom. However, just to mention, you can put this styled
components anywhere. You can create
searchform.style.jsx, and place all styled components there and then import
them inside search form. This is in case
you do not want to pollute search form file itself. Because styled components, CSS, it takes a lot of space. Just in case you don't want
to write all of that here, you can write it in a separate file and then
import it here in site. In our case, we will write
everything at the bottom. First we need to import styled, I press the intellisence to
open the drop-down menu. Here I import styled from
styled components as always. Now, let's use these components. First we have styled
input element. We have that input of type text, so just instead of using input, we're going to use
search input component, styled component
that we've created. Next, we have this
RadiosWrapper styled div. This will be an
additional div here, styled or what did I call it? It was RadiosWrapper. It will be just a div
that will wrap both of our custom radios
just like that. At the end, we also have
search button wrapper, which will be another
additional wrapper div for that button element. We can use search
button wrapper, and we're going to place
button of type submit inside. This is what we write inside
styles. Let's save it. Let's get back to the form
and now just look at that. It looks so good so far. Let's try and look for boys. You can see our card
are not styled yet. We're going to fix
that in the moment. But the form looks great. By the way, we do not have any placeholder here
inside this search box. Let's maybe add it. I'm going to pass placeholder prompt to
search input component, which is actually not
like a component. It is still the input element. Placeholder will be
search for something. Let's try and see. Now, looks better. Great. Let's go further. Further, we have a set of files which are
prefixed with common. These are styled
components that will be shared across multiple
files inside our app. They will be imported into
multiple other components. That is why they are
prefixed with common. It means that inside components, we probably going to create
a folder called common, and we're going to place these
styled components there. First we have flexgrid.jsx. Let's copy that. Let's create a new file
here called flex grid. Inside that file we just
export flexgrid component. Nothing special. Then we have search card. This will be a set of components that we're going
to use to style search card. Both for shows and actors, we copy that mark up. We'll put it here. From
here we export two things, search image wrapper and
then search card components. We will use these two
to style search cards. Now let's go further. Here we have starIcon jsx. Let's create this
one, StarIcon,jsx. This will be interesting. This is just a styled div. However, here we're going to
use a prop called active. We're going to pass
active prop to change the color of this starIcon. We're going to touch
that in a moment when we get back
to that component, when we're going to use it. Now we have one more thing
here called text center. Nothing special here. Just a div that will
center text inside. Next thing we have is
called Pages Show.jsx. Let's copy all of that. Let's go to Pages Show.jsx. Just like before, we're going to use all of
our style components. At the bottom, we're going to import styled from
styled components. Let's see how we can
use these components. Back home wrapper. It is styled div, and inside it styles
the anchor tag. Here we have that link
which leads us to homepage. We're going to wrap that in
back home wrapper component. Eventually it looks
something like that. Then we have show page wrapper, which will be the wrapper
for the entire markup here. I'm just going to
use it like this. Booms. Show page wrapper and the closing tag
show page wrapper. Then we also have infoBlock, infoBlock is this reusable div for our additional
information for the show. Here it will be
infoBlock details, infoBlock seasons,
and infoBlock cast. Here we also have this. We have an error,
data is loading. Instead of just using div, we can reuse that text center styled component that we created inside the
current folder. I'm going to import
from components, common text center, and I will import text center, and instead of using
these divs here, I will apply text center. Awesome. Now let's try and see if I click on any of
the shows on read more. This is how our page
looks like right now. However, we still have
unstyled show main data, we still have unstyled
details, seasons and cast. If we go back to guest here, we have shows cast, shows detail,
seasons, show card. We're going to style
all of that right now. Let's start with cast. I'm going to copy
all of that and put it inside shows cast. At the. Bottom, styled will be imported from
styled components and cast list will be the
wrapper for the cast. Inside we have things that will be styled a
list of class names. We can actually use these class names inside
our markup and they will be styled because this is what we specify for the div, the styles. Cast list inside
we have this div, which is going to be of
class name cast item. Then we have pic wrapper, which will be our image
wrapper actually, I call it like this, and then we have actor, which will be this
class name actor. Awesome. Now, if
we get back here, we don't have any cast
for this show available. Let's try something else. We have a very large
image. Know what is here. We're going to deal
with that in a moment, but you can see that now, our cast is styled. Looks pretty cool. Now, let's go further. Let's go to the details
component here. Shows details will be
this DetailsWrapper. Nothing really special here
inside of details component, instead of div, we can
just apply DetailsWrapper. Let's get back and see details. Nothing really special, just
additional margin here. Let's get back to divs. Now, we have seasons here. Let's copy all of that. Let's go to seasons. At the bottom, I'm
going to import, again style from
styled components. We have SeasonsWrapper. This is styled div,
SeasonsWrapper. Let's use it like that. Then inside, what do we have? Why it was not used? Because I forgot the S. We
also have SeasonList here. Let's use that for that div
when we map the markup. Here inside, we also
style season-item. Then we pass left class, then we pass right class. Our season-item will be
this div that we map. Last name will be season-item as defined inside the
file component. Season item. Then we have left
class and write class. But here, we have the
following markup, which means we want to
display seasons and episodes. Let's see on the left side and the rest on the right side. We can wrap seasons
and episodes in div. Right into the div, we can give class name of left. Then to the div, we will give class
name of right. This season's premiere
date and season end date, we can maybe put them inside the strong tag to make it bold. Let's try and see what
we have at the end. Now, we have this, let's see. Left side and right side are
just like we defined here. We do not see any bold here, but now, we do see
because we have it. Let's inspect the markup. Great. Our dates are now bold because they are
inside the strong tag. Perfect. Now, let's
move forward. We also have ShowCard here. This is going to be
interesting finally. Inside ShowCard at the bottom, I'm going to place
this action section and StarBtn section. Let me import style from
styled components as usual. The first thing I would like
to do here is the following. If we go back to our app, and if we look at the
summary that we strip here, as you remember, we
receive raw HTML. We replace all the HTML
tags, HTML characters. But it looks like it's just
being cut out of no reason. At the end, we just
can add three dots to make it more, let's
say user-friendly. We can either apply string template like
this and at the end, we can add three dots. But to make it, let's
say less verbose, we can just concatenate
it by using the plus operator and it will give us exactly
the same result, but it looks much
better, I think. It is a better fit in this case. If we look, now, we see three dots at the
end, which is awesome. Now, let's use the styled
components that we have here. First of all, we
do not have any, let's say styled component that will wrap our marker,
that will provide, let's say styles for the card, only for something specific like action section and StarBtn. But we created that common styled component file called
SearchCard.jsx and inside, we have search card and
search image wrapper. Let's use these two
inside ShowCard and we will use these two inside
actor card later on. I'm going to import from
common SearchCard inside. I will specify that I import SearchCard and I import
SearchImageWrapper. Now, SearchCard will
be the wrapping div. Then the div that wraps image will be actually
SearchImageWrapper. This ActionSection here will be the div that defines
our actions section, Read more in StartMe buttons. Then we also have StarBtn here, which is styled button
element, which is this. Now, let's try and use it. Let's see how our
cards look right now. You can see they look not bad. Everything seems to be valid, but we do not have, let's say, any icon here. The icon that we've created
earlier is this StarIcon. This is just a styled
div with this specific, let's say clip-path
CSS attribute. Let's try and use it and let's see how it's going to look like. Instead of using isStarred
unStar me and Star me texts. I'm going to comment that out. Inside, I will pass
StarIcon component, but I also need to import
it from common StarIcon. Great. Now, let's see. Now, we have the star here, which is achieved with the
clip path CSS property. But you can see
if I click on it, if I try to start the
show, nothing happens. We need to make it
somehow active. We need to let users know
that this show is start. Previously, we used
conditional rendering, Star me and Unstar me. But now, since we have
styled components, we can apply dynamic styles very easily by using string interpolation
inside styled components. I just pass this
function and I specify. If we have props.active passed to the star
icon component, please, apply this yellow color. Otherwise, please, apply that gray white color. What we need to do
here is we simply pass the active prop here to
star icon component, which is going to be isStarred. When isStarred to true, active prop will be true, which means it will
be used inside the style component to
choose the yellow color. When it is false, it will
be the gray color here. Let's try it and see. I save everything. Now, you can see it is actually yellow because this
show is now starred. If I click it, the
styles will be changed. I click it again, boom, the show is starred. Pretty awesome. Cool. We've
finished with ShowCard here. Now, let's move on to our guest. Here, we also have
our last component here inside guests ShowMainData. Let's actually copy
everything from here. Where is it? It just flew away. Let's get back to ShowMainData. At the bottom, we have a lot
of components here actually. Let's move on to the
top and let's see. First we have MainDataWrapper. This will be the div
that wraps everything, so opening bracket,
closing bracket. Boom, we have it. Then we have image-wrap
and then inside we have image text style which means we need to a bit modify
the markup here. We're going to add
additional div wrapper for the image tag and className for the div will be image-wrap. Cool. Now, this div here
that wraps the rest of the markup will be this data
section that we have here. Let's use it. Great. Now, we also have headline and we
also have summary and genres. Our headline will be the wrapper
for the h1 div and span. It's a bit too abstract, but headline will be
just h1 tag here, that div and maybe start icon that we haven't
used here previously. Let me wrap h1 and div here. We have Headline which has now the title which have
the div with rating, but inside the div we can
also add let's say StarIcon. Let me actually use rating.average
here and according to our styles we have the
span element inside dive, so we can actually
wrap it in a span. Then here we can use the
StarIcon which we're going to import from common StarIcon. We going to just call StarIcon component and we pass that it will be active always. We will always have
the yellow color. Eventually the markup
will look like that. Let's try it and see the result. At the end we have this
yellow star over here which will be always
yellow next to rating. Cool. It looks not bad. Here we also have
summary and genres. Summary is going to be just that styled div and genres
also styled div; let's use it, or that
wrapping div or maybe not. Genres will be just the div
that drops the.map method. Let's try and see, and now just look at our
page how beautiful it is. It is fully responsive. You can try and
resize the window, access it on your mobile phone. It will look great
on all devices. Go back to Home, we have this page styled. We have almost
everything styled, but we miss a few things. For example, you can
see this list of cards is let's say
not styled at all. We want to have a grid. Let's see what things
we did not style here. We did not style show grid, so we go back to ShowGrid. Here for that div, we're going to use
that reusable styled component that we've
created called FlexGrid. I'm just going to use
that FlexGrid inside ShowGrid and let me close all of these components because we
have a lot of files opened. I go back to ShowGrid. Here I use FlexGrid and I import it from /common/FlexGrid. Awesome. I get back
to the page and you see everything
looks just fine. It is fully responsive
and looks good. Now what about actors? Let me look for actors. You can see actors are unstyled because we
completely forgot about them. Let's fix that. We
go to actors here. For ActorCard, we're going to import this common
SearchCard component from common SearchCard
will be SearchCard and bubble wrap everything
in a SearchCard if we'll look inside
SearchCard file. We also have
SearchImageWrapper here, so for the div that wraps the
image tag we going to use SearchImageWrapper which is also imported from common SearchCard. Let's see, maybe we do need to change anything from
here according to the styles but I don't think
we don't need to do that. We also need to use the FlexGrid actually to make a
grid out of our cards. We go to ActorsGrid, and just like before we're
just going to use FlexGrid which has been imported
from common FlexGrid. Now, just look at that. It looks amazing. Actors are styled, shows are styled, everything
looks awesome. We have this StarIcon, but if we go to the
Starred page we also see that everything looks fine because inside Starred
component inside Starred page, we use reusable
ShowGrid component. Let's see the rest. What do we have here? Inside other pages, we used
also just a few of things. For example, inside Starred, we use those empty divs
without any styles. We can replace them with text sensory component which is located inside common folder. This is on Starred page. Instead of just showing
div no shows were starred. We're going to use
TextCenter and this TextCenter needs to be imported from
components/common/TextCenter'. Just like that. Instead of that div we're
going to use TextCenter, it shows our loading TextCenter. Everywhere is TextCenter. The same we probably we're
going to do. Let me see. Inside home JSX instead of showing this div
and div no results, we're just going to show TextCenter IntelliSense imported
from common TextCenter, no results TextCenter, and I think this is it. Let me see. If I go to home and I type something
completely gibberish, so we definitely
have no results. We will have this message
here, no results. If we go to Starred
and if we're going to clear the storage here
and we refresh the page, we will see that message
No shows were starred. Finally, our application is
now entirely fully styled. We have everything and we took care of every page
inside the app. Great. Now let's commit
everything here. Would it allow? It was a
long journey in this video. The commit message is
going to be styled, the entire application
using styled components. Awesome. In the next video, we will add just a
bit of let's say smaller style things to the app. To make it even
more interactive, this is going to be
interesting. See you there.
87. Styling the app p3. FlexGrid animation and useRef hook: Hey there, congrats on
styling the entire app. Now we have everything in place. However, we can
improve a few parts, so it will look a bit
better, in my opinion. First of all, the first thing I would like to mention is that, whenever we search for cards, they just pop up on us. Wouldn't it be nice to provide some animation when
these items appear, for example, fade-in animation. On the NPM registry, you can find that package
called react fade in, which is just a component
that you import. You specify it just like
we use styled-components. Very much similar
to that and then it provides animation for
its children elements. They fade in and they
fade in with the delay. This package is
very simple to use, however, it is still a package. I mean that for such
simple use case, we actually might not
need a package at all. You can just install
it and you don't think about writing any CSS, but fewer packages you have, the better because it has less
dependencies in your app. First I wanted to
use that package, but then I decided we
can actually write just a very small CSS markup that will achieve
very similar effect. If we get back to the gist here, styling part three dot MD file, here you can find that, let's say enhanced flags grid
that we already have inside common flex grid jsx with this
animation and key frames. Let me copy all of that
and just replace it. Now whenever flex grid
component mounts, it will have this
fade in animation, as defined by these key frames. It will just bring the
capacity from zero to one and we'll achieve
very similar effect what react fading does, but without the delay. Let's try and see. Now whenever I look
for actors or shows, just like whenever I have the flex grid component
used inside somewhere, you will see that fade in
animation being at play, whether it is for shows, whether it is for actors, whether it is on the start page. Very similar effect, but
without any dependency. You should also consider
that in your future, when you're going to
install something from npm, first, ask yourself a question. Do you really need that dependency or you
can make it yourself? This is very important
when you're going to work on real projects. Great. Now, the next thing I
would like to add is that, whenever we start
a show, right now, our star that we have
here just becomes yellow. This is not bad, but we can make it more user-friendly and we
can provide, let's say, an animation when
we start at button, when we start that show, the star actually, let's say
somehow is being animated. If we get back to this here, we also can find this
under styling part three MD that show card JSX with enhanced StarBtn
styled component. Let's go to shows, show card. Here we have that StarBtn,
if we compare it. Here we define another class called Animate and we
have something new here. Let's copy it over and let's
inspect what do we have. First of all, we define
that animate class, which also has
animation as defined by those keyframes but also we have here that
interpolation and we have star icon
here, what it does. You know that inside
the CSS markup, inside styled component, we
can specify similar to SAS, the nesting of elements. Here, I interpolated Start icon and it
means that whatever I interpolated here will
actually resolve to existing styled components
as reference gear. Inside that animate class, whenever this elements
StarBtn has animate class, inside that element StarBtn, we displaced our icon. Whenever there is StarBtn, will have active class, will have animate class, please style star
icon component, which is used inside of it. This way we can resolve to
start icon style specifically. That element, whenever
StarBtn has some class. Let's try and see. We would like to give that
StarBtn component class name animate whenever the
show is being started. Which just going to specify
please when show is start, please append the animate class. Let's try and see. Let's get back to
our application and you just saw that animation. Whenever I click on the show, now it is being increased and decreased in size. It works. Looks good so far, but if we go to start page
and if I refresh the page you will still see the same animation and
I did not do anything. This is because when
the component mounts, this animate class is
being added because our show is already start
and we see the animation. This is not bad, but this is not exactly the behavior
that we want to achieve. We only want to run
the animation when the component is
actually been start, not when the component
being mounted. To achieve the result we want, we're going to
introduce a new hook called use ref. What is that? First of all, let's
import it from React. This is one of the
built-in hooks that you will need during your
future developer career. What this hook is? Use ref is just a hook
that you call like that and this hook gives
you back a reference. A reference that
you then specify, or let's say associate
that reference with some element. Let's try and see. For example, we want to give
that StarBtn a reference. Let's call this reference as
StarBtn ref, just like that. Now, in order for us to
associate this reference, so we just called the hook, we got our StarBtn ref variable, but it is not yet associated
with any of this elements. In order to do that,
we need to pass to StarBtn, a prop, actually an attribute
called ref and to that ref, we specify, StarBtn ref. You can simply pass ref to your custom
components, let's say. If I have this, let me see for example, app title which I use
inside main layout, I cannot just pass ref and
then specify something else. Ref is being passed only to underlying native HTML elements. If you wanted to pass ref
to your custom components, it must be handled properly, and we're going to talk
about that in the future. But for now, we're
going to limit ourselves with native elements, since starBtn is basically
just a native HTML element, because under the hook, it is still just a button. It is a component created by styled components library and it handles references properly. Basically, whatever
we pass here, we'll be redirected to underlying button
HTML native element. We pass ref as starBtnRef. Now, what we can do with that? Why would we do that? Let's try and refactor that onClick handler here
that we pass to starBtn. Instead of passing a function
that calls onStarMeClick, let's create a function called handleStarClick that we're
going to create here. HandleStarClick inside, which is going to call OnStarMeClick
and pass ID inside. But also, let's console log starBtnRef and let's
see what do we have. If we open a console, whenever I click here, we will see the object with only one property
called current. Whenever you create a
reference like that, you always have an
object no matter what, with the current key. You can see that
current property points to button element, to HTML element called button, not called button 2, just the
underlying button element. This is actually equivalent to writing document.getElementById,
for example. When you grab some
element by ID, this is the equivalent. In React, whenever
you need to access the underlying element
directly with the DOM API, instead of using
document.getElementById, document.getElementByClassName,
by something else, you would use references, and then you would use starBtnRef.current and
then get your element. I save it, starBtnRef.current. Again, I click on the button, you will see now I
have this element, which means I can
just use whatever I want here and play with
it using the DOM API. But it is important to associate elements
and pass the ref. Because if I don't do that, my reference will be empty. Let me try and see. I refresh the page. I click, now my starBtnRef.current
gives me undefined because now my
reference is empty. It was not associated
with anything. Whenever you use ref, do not forget to pass
the ref attribute. Since now we have
starBtnRef.current pointing to underlying
DOM element, we can use DOM API to
manipulate our class name list. Here I'm just going to
create a variable called, let's say starBtnElement. It will be starBtnRef.current. First of all, our
current, as you just saw, can be undefined, so we're just going to
do a safe check here. If starBtnRef.Element is falsy, just please exit that function. Otherwise, we
continue and we say, if show is starred, in this case, please
do the following. I just noticed it is called
start instead of star. Let me rename it
to starBtnElement. StarBtnElement.classList.remove(animate).
Otherwise, we call
star.BtnElement.classList.add(animate). First of all, the logic
does not add up here. First of all, let's
see whether this works and then we're
going to discuss that. Whenever I click, you
can see my show is being starred and I
see the animation only when I click here. But if I go back to starred, I still have that animation. This is because I use
this className here. Let me remove it. Now let's try and see. No animation runs right now. Let me get back to homepage. But when I'm trying
to star the show, you can see the
animation is there. Why do we use this logic here? By the time this function runs, isStarred will be still
the previous state. Just read it as the
code is written here. Our show is currently starred. When we click on it, we don't want to
run any animation. When our show is currently
starred and when we unStar it, we remove the animate class. We didn't want to run
any animation here. But if our show is
currently unStarred, this else condition fires. In this case, we add the animate class to
provide the animation. This way, by using the DOM API, by using the useRef hoop, we can manipulate
class names directly, let's say imperatively using
the DOM API instead of using className interface
that React provides us. Just like that, we're able
to add animation and we got to know the new
hook called useRef. Again, to quickly summarize, useRef can be used
as a reference for underlying native HTML
elements in case you want to get access to the DOM interface of that
element, something like that. Let's add everything to
stage, and let's commit. First, we actually did not
use React Fade-In package. We use our simple CSS to achieve very similar
fade-in effect. Then instead of using just className to provide animation for the star element, we use the useRef hook to get access to the
underlying DOM element. Then we use that DOM API, DOM element classList
property to add and remove the animate class imperatively to add or remove animation, which is defined inside
our styled component. Now, we can commit that and say, added animation to FlexGrid. Let's say added fade-in
animation to FlexGrid. Added StarBtn animation, or let's say added scale
animation to StarBtn. Awesome. That's it for now. I'm going to see you
in the next one.
88. Deployment to Github Pages: Hi there. In this video we will finally deploy Box Office, so at the end we will have publicly available URL that we can share with our friends. In the previous project, in Tic Tac Toe, we used a service
called Search.SH, this time we're going
to try something new. The hosting that
we're going to use is going to be GitHub Pages. Why GitHub Pages and not Search? First of all, they
are very similar, they both are used to
host static files, but we want to explore, we want to try out new things, we want to see alternatives. At the end you will be able to compare what you like more, GitHub Pages, or Search, or maybe even something
else. Let's go. First of all we're
going to navigate to Create React App documentation. If we click on "Get Started", on the left we can look for
the deployments section. Inside the deployment section we can look for GitHub Pages. What we're going to do
we will just follow that simple
step-by-step tutorial. The first thing that it asks us to do is to open package.json, and add homepage field for
your project. Let's do that. I will just copy homepage, open package.json, anywhere in package.json we're
going to add homepage. But here we need to
change a few things. First of all, my
username.github.io. My username must be replaced with your username on GitHub. I'm going to take mine. My app needs to be replaced with your repository
name on GitHub. In my case, it will
be box-office-app. Eventually the URL for
me will look like that. Very similar, must
be for you as well. I save package.json, I get back to the tutorial. Let's see step number 2. Then we need to install a
package called gh-pages, and then add a deploy
script to package.json. Let's first install
the dependency. I will just copy the command. I'm going to stop my app and then run the
installation command. While it is installing let's see what we need to package.json. We need to add two more scripts, deploy and pre deploy. Let's copy them. Let's get back to package.json. By now we already have
the dependency installed. Let's navigate to scripts, and at the end let's add
predeploy and deploy. We don't need any pluses
that were copied, we save and here what we see. We have the deploy script defined and then
we have predeploy. Npm let's say is smart
enough to understand that predeploy must be run
before the deploy script. So whenever we going to run the deploy script,
predeploy will run. Predeploy will build the app, application build will be produced under the build folder, and then we specify that please deploy the
build folder here, so that build that
you see on line 35 refers to that build folder
inside our project root. Then if we go further
in the tutorial, if you are deploying to a
GitHub user page instead, note this is not our case. Third step is just
run npm run deploy. Let's try and do that. Now we can do npm run deploy. Let's see the output. First we see npm run build, this coming from the
predeploy script, then we have the gh-pages
minus the build command, and now it says published, but we do not have any URL, where we need to go? The homepage that we
specified in package.json is actually the URL that we need
to visit to access our app. Let's copy that URL. Let's open it in a new tab. But as soon as we navigate here, we will see that
it is not found, it is 404. So what happens? Let's investigate. If we get back to
our repository, here is one thing that I
didn't mention previously, is that GitHub Pages
is available for free only for public
repositories. In my case, the
repository is private. It is marked here on
top-left corner, Private, so in order to use
GitHub Pages for free, I need to make sure that
this repository is public. Let's go to Settings, and on the Settings
we're going to change our repository visibility
from private to public. We go to the Settings page, we scroll down to the bottom, and here under Danger Zone, we change repository visibility, we change it to public. Yes, I want to make it public. Yes, I'm sure. It might also prompt you for your password, that's is fine. Now my repository became public. However, if we try and
access the URL again, it will still be the
same, not found. We need to instruct hosting, we need to instruct GitHub Pages that we want
to publish our app now. First of all, how does it work? If we go to main
repository page here, we will see two
branches now available. Previously it was only one. Right now if we click on
those two branches we will see gh-pages branch here. If we click on that branch, you will see all files that we have inside
the build folder. Basically the deploy
command here, what it did, it used
that build folder, it created new branch
on our repository, and it uploaded all files from the build folder to the
gh-pages' branch on GitHub. The way GitHub
Pages hosting works is that it takes one
of your branches on your repository and all
files that are located here are hosted on
the GitHub servers. This way we are able
to host files that are located inside
our repository. To properly configure
GitHub Pages to point hosting to that specific
gh-pages branch to these files, we again need to go to the Settings page
of our repository. On the left we look for
Pages section, Pages page, and here we specify, that, okay, source for our deployment will
be deployed from a branch. This is by default, this is what you
should have for now, and for the branch you
specify that please host our files from
the gh-pages branch. We click "Save", and right after that
deployment is triggered. Now it will take a
couple of minutes, a minute or two to deploy
all of your files from the gh-branch on your
repository to the hosting. If we go to Actions here, that Actions tab on
your repository, here you will see now
this one workflow run. If you click on that, you will see the progress
of your deployment. Once it's finished you will
see a green mark here, it means that your app will be published here, under that URL. Let's wait until it's done and then I will get back to you. Now it seems that our
app was deployed. You can see everything is green. Now I also have that
URL appeared here. If I click on that
this is what I see. First of all, my
application just like it was previously
is available under the same URL that
you specify in homepage, under homepage key
inside package.json. But if we access it, we see Not Found. Why is that? The thing is that it actually was deployed but for some
reason it says not found, and it is definitely coming
from our application, because if we inspect markup, this resembles our application, what we have inside
index.html, our skeleton. Inside public, we
have that skeleton. It is ours. We have
the same head, we have the same everything. But what happened? The thing is, if we go back to the tutorial inside Create
React App documentation, it has this note called Notes,
on client-side routing. The problem is that
the GitHub hosting is not really configured to handle
client-side applications, to not handle single-page apps which use client-side routing. You can read actually
more information here inside official
documentation. We're going to use
something called HashRouter, from React Router. This is one of the
solutions provided here. Let's do that. We go back to the app, we open source, App.jsx. Here we use BrowserRouter, which is imported from
React Router dom. Instead of that we can
use something called HashRouter, and that's it. The rest will be on
React Router dom. We will not need
extra steps for that. To understand what it
does let's first run the local development server
again, npm run start. This is what we have now. First of all, our app is now, although being locally served, is available under
/box-office-app prefix, whatever prefix
we specify inside the home page in package JASON. Create React app is smart enough to understand that we can deploy under box
office app prefix. This is why it is kept here. But when you serve
apps under prefix, you need to consider
that as your base URL. What I mean by that, if we look for, shows for example, here if we hover on read more, we go to that page
/show/show ID. When we can be on
GitHub hosting, our URL will look like this,
/box-office-app/show/show ID. But we will not
have that prefix, just like we have
here on local host. It will be problematic
because otherwise our page will be not found. What I mean by
that is that let's first deploy the app and
you will see it yourself, and then we're going
to fix that with a very small addition
to our existing code. I just run the
deploy script again. It again builds my app and then publishes to
GitHub Pages again. If we go back to repository
under Actions tab, we will again see
another workflow run. We just wait until it's deployed and then we're
going to check out. It's deployed now. Let's get back to the app. If we go back to our app, we'll still see not found. But if I refresh, now we have the application. It looks perfectly fine. However, if you look at the URL, now we have that hash here. It will be used to
properly handle client-side routing when
we deploy to GitHub Pages. But still we have one
more problem that I just mentioned previously
about the link, about this Read More button. If I click on that button, you see that we navigate
to /show/show ID. We do not have the box
office app prefix, and because of
that, we have 404. To solve the problem, we need to first
understand why it happens. Let's go to read
more and markup. This will be components,
shows, show card. Here we use a simple
anchor tag which points to /show/show ID. That is fine, and it will work. It'll worked if
our app was served under the route not
under the prefix. We need to somehow fix that. One naive fix is just to manually enter whatever
prefix you have here. It will work, but this
is not a good solution. We need to somehow automatically resolve to
whatever prefix we have here. React Router takes care of that. In the past, we replaced link
component that we used from React Router with
that anchor check because we didn't really
need that link component. However, now we will
get it back again. I'm going to import link
from React Router dom. Then instead of anchor tag, I'm going to use a link
again, one more time. Instead of href, I will specify to, and I'm going to keep target blank and relationship
attributes. This way we will still have the same link
just like before, but this time the
link component from React Router dom will
take care of the prefix. It will automatically
resolve to the correct URL. Now, let's try and run
the deploy script again, redeploy the app, and see the final result. I will see you once
it's deployed. I awaited another minute. Here is my third deployment that was just published
one minute ago. I will get back to my app. I'm going to refresh. I look for shows and now
if I click on Read More, now my URL was
resolved correctly because now it was handled
by the React Router library. Just like that, we were
able to deploy our app. Congrats. Now, let's get back to our code and let's
commit everything. First of all, we installed gh pages library in order
to deploy to GitHub Pages, the homepage field
in package JSON specifies where exactly the
application will be deployed. Again, we deploy the
build folder that is produced by the npm
run build command. Now, we also replace
browser router with hash router because GitHub Pages does not handle client-side
routing properly. One way to fix that problem
is to use hash router as suggested inside Create
React app documentation. Then we also changed a simple anchor tag back
to the link component from React Router dom because
we need to resolve to the prefix once our app is
deployed on GitHub Pages. Let's add everything to stage and let's commit
and say deploy, deployed the app
to GitHub Pages, use HashRouter, use link instead of native anchor tag. Cool. I push
everything to master, I go back to my
repository just in case to ensure
everything is deployed. My latest change,
10 seconds ago. I have second branch
called gh pages. Whenever you run npm run deploy, it will update GitHub Pages and it will update files hosted on your URL that you can use
to share with your friends. One more simple thing
I would add here is that we can actually take that URL where our
application lives. Let's just visit
it one more time. Yes, it is indeed here. We can add that URL to our About section on the
repository page. I click on the
Settings sign here. Under website, I add the link, I click Save Changes. Now boom, it appears here. This is just for you to easily access your application
in the future. That's it for now, see
you in the next one.
89. PWA (Progressive Web App). Service worker: Hello again. In the last video, we finally deployed box
office to live environment. This time, we're going to
talk about service workers. As you remember in the very first video when
we created that project, we have the service worker, service worker registration, as well as we had the service
worker registration dot on the register and I told you that we're going
to talk about that later. Now, this is the time. That service worker is needed
to make our application, to make box office at
progressive web app. What is a progressive web app? A progressive web application is just any other
web application, any other website which
follows a list of specific things and
when the website DevUp application fulfills
that list of options then this website
becomes a progressive web app. It means that the application
becomes available offline. The application can
be installed as the real mobile-like
application, whether you are on desktop
or on mobile device. The question here,
what are these options that make a website a
progressive web app? In Chrome browser, if you go to Chrome
developer tools, if you expand this
section on the right, you can go to
lighthouse section. Lighthouse is a built-in
tool in Chrome browser. It allows us to evaluate website performance by
measuring its speed, lot time, and a few
different metrics. Here under categories, we have this progressive web app check. Let's make it there and then
click on Analyze Page Load, and let's see what
is going to happen. It will take just a couple
of seconds until it audits the website and now we have that we have almost
everything perfect green, but we're not really
interested in any of those. If you are, you can easily
just go one by one, expand different sections and read what can be improved,
what can be changed. Maybe you don't need to change anything but at the very bottom, you will have PWA section,
progressive web app. A list of things that you
see here is basically what the website needs to
follow in order to become a progressive
web application. First of all, we do not
have a few things here. Our application is
not installable, so to make our
application installable, we need to introduce
a service worker. What is service worker? Service worker actually it is easier when I'm
going to visualize it. We have the website here. Our website here on the left. Then on the right, we
have outcoming requests. Just like that. Let's maybe inspect
that ourselves so we go to the network tab and
when we refresh the page, we see a list of requests so
this is our browser makes a request to GitHub pages
server to get index HTML, to get JavaScript CSS files
from the hosting server. A service worker
is just a script. It lives inside the browser, somewhere inside the browser, outside of our application service worker and what it does, it just intercepts
all these requests, outgoing requests and
does something with it. In our case, service
worker will be just a proxy that will intercept all these outgoing requests
and put them inside cache storage inside
the browser so next time when these
files will be accessed, instead of letting
them going through, service worker will
use cached storage, will retrieve all
these requests, all the files that
were retrieved previously from
the cache storage, and serve them to our webpage. With this manner,
our application can become available offline, which means whatever request
will be sent through, service worker will
intercept them. It will check the cache and if these requests are
present in the cache, they will be served from the
cache by service worker. To quickly summarize,
a service worker is just a script sitting
somewhere inside the browser. It is just a proxy
that intercepts outgoing requests from the
browser. Something like that. If we get back to
our application, we see that we have service
worker JS file here. This is the script itself, the service worker itself, that will be run
inside the browser, outside of our application. This file that you see here will sit somewhere
inside the browser. But the question is, how we can handle it? How we can actually do
something with that. Before we can answer
that question, we have work box here. What are these and if we
look inside package Json, we have a lot of work
box dependencies. These are basically
just libraries that allows us to somehow, easily write some logic
inside service worker script. You can see this script
was auto-generated by create React app and the
logic that is written here, it simply intercepts
all the requests and put them inside
cache storage. We don't really need to
think about that a lot. We will not going to write our own logic for
service worker here, we're going to use
existing logic, and it will be
sufficient to cache everything and the word box is just a set of functions that we import and use in
order to achieve that. Since that file was outed
generated by create React app, we're not going to modify it, we're not interested in it. This again will be sufficient. Now we also have service
worker registration. To let browser understand that we want to somehow use
that service worker JS, we need to register it inside the browser because if
we're just going to put it as part of
our application, nothing will happen so we need to somehow register
that service worker inside our application and that service worker registration
has two functions here. The first function
is called register, which has been
exported from here and second function is
called unregister. Again, all of this logic is auto-generated by
create React app, and it will be again
sufficient for our use case. The register function will register service worker
JS when our application runs and the unregister
function will unregister existing
service worker inside our application. If we look inside index jsx, here we have input everything as service worker registration from service worker
registration. It means that under service worker registration
import object, we have two functions, register and unregister
and all the time it was actually unregister for us because we were not
interested in service worker. In order to register
a service worker, we need to call the
register function. However, if you're
going to use register, it will work in both environments when you're
going to develop locally and when it will
be deployed live to let's say GitHub
pages hosting. But since it will use caching and the caching strategy
here is aggressive, it means that it will cache everything so what
I suggest us to do is to first check if we are currently inside
local development, we don't want to call that
dot and register function. But if we are inside
live environment, then please yes, called
the register function. How we can check
that and how we can finally see how this works? Inside the application, we have access to something
called process.env. This is just a set of environment variables
that we have access to. Environment variables are
variables that are set globally by the environment
where our code runs. Let's try and console
log process.env, and if I type dot I
have intellisense here, I have node ENV. If I hover, you can
actually see that it has three potentially
different values, development,
production, and test. But in our case, we still
going to cancel log js to see. Let's say current ENV, and for now we will
still unregister it. I'm going to run local
development server, and I'm going to also
fix that process is not defined
problem coming from ESLint because
protest is something that runs on the node JS side, not from JavaScript that runs inside the browser
so we need to let the ESLint to understand that we also run inside
node.JS environment, not only inside the browser. Node true, this node
true we'll let ESLint understand that we are inside node JS
environment right now. This will not do anything except it will just
remove that error. That's it. I run my app locally. If I go to console, I see current ENV
equals development. What I'm going to run the build command here to
create production build this variable node
ENV will be set at the build time so when we use
local development server, this is development build. The app is built but just under the hood, we
don't see that. That is why we see node ENV set to development because this is our development built and again, this variable is set
during the build time. When we're going to
run the build command, our app will have
node ENV set to production and we can
actually use that variable to register or unregister
the service worker. Let's try and do
that. We're going to add a simple condition here. If process.env.node
ENV equals production, in this case, please call service worker
registration, register. Cool. Now, let's try and
redeploy the application. Once it is deployed, we will see how
everything changed. See you there in a
second. Hello again. Now our application is deployed. My first deployment
workflow here. Now we go back to
our application, and if we refresh it, now something was changed. First of all, we have this Install icon here
at the search bar, but we're going to
touch it in a second. We are interested in the
Application tab here. If we go to the Service
Worker section here, now we have service-worker.js. This service-worker.js
was again registered by that register function which is imported from
serviceWorkerRegistration file. That's register function, hit to that
"service-worker.js," which is available on the
box-office-apps/service-worker.js. It's register, that
service worker inside the browser when our
application was accessed, and now that service
worker is being running, which means now that service
worker is active and it intercepts all the
requests going out and caches them
inside the browser. You can see that if
I refresh it again, my files, for example, that index HTML, is being served
from ServiceWorker, just like the rest
of files here. Let me "Empty Cache And
Hard Reload." Do it again. Actually nothing changed,
but still the app is being served
from ServiceWorker. If I'm not wrong, it is somewhere inside
cache storage here. You can see it under the cache section under
the Application tab. Under cache storage, you now
see where the box precache, files that are being
stored inside the cache. Just like that, we can
run the Lighthouse. Command again and see
what do we have as of now for progressive web
app checklist. Let's go. We have auditing my app. Just a couple of seconds, we go to the very bottom, and now we see that
progressive web app is now installable and
not really optimized. Well, it is actually optimized, but we just have one point here. Manifest does not
have a maskable icon, but we're going to fix that
in the next video when we're going to
customize the icon, the name of our app, and the rest of a
couple of things. For now, we can see that our
application is installable. That icon that we see here at the top corner inside
the search bar, we can click on that
and we can install our application as if
it was some native app. If you were on mobile device, you would also have the pop up once you access your app
for a mobile device. You will have the
pop up that, Hey, you can actually install this
website as an application. If you click to
"Install," it would add the website to your home screen as if it was a
native application. Now, if I go back to my desktop, here, I have this app called
Create React App Sample. Right now it has this weird name because this is
what is specified under manifest file that we're going to customize
in the next video. But the thing is that now this is an application,
it is installable. If I click on it, you can see that now it does
not open inside a browser. It opens inside it's own window as if it was some native
real application. It will work just fine like it was working
previously. Pretty cool. You can see it actually opened that new tab inside the browser. This is the thing with
progressive web apps. Ideally, you should not open
anything inside new tabs, but you should use
current tab and use only, let's say one page for navigation
without using new tabs. But still, now we have the application which
runs as a native app. This all was achieved
by using ServiceWorker, which gave us the
green checklist for progressive web app. To summarize, a
progressive web app is just a web application, which follows a specific
list of things. For example, it must
have service worker, the application must
use some caching, so it can be available offline. Then it must also be
served from HTTPS and a few other things that you
can find inside Lighthouse. Let's try and see again. What else do we have here? Multiple tabs are being opened. Let me refresh it.
What do you want? Analyze page load. Let's just quickly
see the list again. Inside the list we have, let me see, theme color, configured custom splash
screen, touch icon, that specific
viewport tag and that manifest that we're
going to take care of very soon, service worker. All those things
just make a website, progressive web app,
as simple as that. One more time,
service worker that was registered as a proxy inside the browser to
intercept the request is the heart of that all. Only because a service worker, we were able to achieve that
installable section here. Our application now became installable as well as it has
become available offline. I think it was pretty much clear what exactly
progressive web app is, what is service worker, and how everything
approximately works. At last, let's go back to our application and commit
the changes that we've made. First, we edited Eslintrc, so that we can use
the process.env without any warnings or
errors, and we check. If we are at the build stage, please use
serviceWorkerRegistration.register. That will register that service-worker.js file
inside browser context. Cool. Let's commit
these changes. Enable service worker
in production env. I update my GitHub repository, and that's it for now. In the next video, we're going to handle that problem that we
saw in Lighthouse, so it will be 100 percent
green. See you there.
90. Fixing base URL to correctly resolve images on Github Pages: Hey there. In the last video, we've created that cool
progressive web app called Box Office. But here's one problem that
I actually missed and it is again about the base
URL inside our app. If you noticed when you look for specific shows and when
they do not have an image, we try and display that
not found image PNG. However, all of our
files are served under the Box Office app prefix
on GitHub Pages hosting. But this image fails to be loaded because
you can see it is always 404 because it does not exist on the path that
we tried to load. We did not specify the prefix. How we can actually fix that? If we go back to our app and if we'll look for not found image, we specify just like that. Just static specific path. But since we have the prefix, we need to somehow
understand it. One way we can fix
that is instead of using the image inside
the public folder, we can actually place it inside the source folder and
then use it as if it was, let's say a module. Then it will be processed by underlying Webpack
configuration and the base path will be
automatically resolved. The same thing just
like we did with anchor tag and the
link component. Well, at least the
idea is the same. I'm just going to move not
found image somewhere to, let's say library folder, not found image PNG. Now instead of referencing not found image PNG everywhere, I'm just going to import not
found image from library, not found image PNG. Maybe I will name it not
found image source and I'm just going to specify
it like that. Then I will copy that import and make the same import everywhere. Here, this is what I just
did inside cast as well. Here let me see
the correct path. We go back one folder, second folder, library, not found image PNG. We specify not
found image source, the same we will do
inside show grid. Import not found
image source from. We go back again, back library, not found image PNG, not found source, and the same. At last, we will do that
inside ShowMainData. Not found image
source from library, not found image PNG. Now, let's try and
redeploy the app and let's see how exactly this will be reflected
in our final code. I will see you in a minute
once this code is deployed. Now the application was
successfully deployed. Let's get back to our app. Now, let's refresh the page. Our last search was ''Hello''. We search for it again. This time we also see
not found. Why is that? The problem is that
our image right now, our previous image, is served from Service Worker. It was not updated. It is served from the cache, which means we need to clear the cache to see the updates. I'm going to right-click
on the Refresh button on the top left corner and click ''Empty Cache'' and
''Hard Reload''. Alternatively, I can go
to the Application tab, go to Storage, and click on ''Clear
Site Data''. It will clear all
the cache inside the browser specifically
for this website. Let me click on
''Clear Site Data''. Then I just refresh. Then I search for ''Hello''. This time our application
was successfully resolved. You can see that instead
of the actual URL, we see this base 64 data
image. What is that? Again, because our image was brought to us by
Create React app, the underlying Webpack
configuration took care of it. Inside the Create React
app documentation, it was somewhere mentioned
that if the image has smaller size than
specific threshold, instead of let's say, processing the file and serving the file inside
the public folder. The image is converted to base 64 format and then
let's say inlined this, let's say, long string
represents our image, not as a file, but as a string. Pretty cool. Now everything
looks good so far. In the next video, as promised, we're going to give the
application a final touch. We're going to use custom
icons, custom names, so our application will be
perfect. See you there.
91. Final touch. Creating favicons: Hey there. In this video, we will finally give
our app a final touch. We're going to create icons, we're going to change titles so the application will be
finally perfect. Let's go. But before we do that, let's actually
commit changes that we did in the previous video. In the previous video,
as you remember, we fixed our problem with image. Let's quickly add everything to stage and then commit
everything by saying moved not found image
from public or just move not found image to
source and then import it instead of serving
from public folder. Pretty long, but it's worthy. Then I push
everything to master, and let's finally get
back to our icons. First of all, we need
to decide on an icon that we're going to use
inside the tab here. If we go back to the guest
that we have for Box Office, here we have this money icon
that I prepared for us. We can just download
that icon here. I'm going to place it
in Downloads folder. Then we need to generate
a set of icons that we're going to place in
the public folder. Right now, we have these basic react icons
that we can now replace, but first we need to
generate this set of icons. Usually, what you would do you first decide on an icon
that you want to use. It can be yours, for example. It's not compulsory to
use this specific one. If you have yours,
feel free to use it. We go to Resources.MD. Here at the bottom, we can find this favicon generator
that I left for us. We go to that page. We click here, we upload
the image that we want to be used for
icon set. We download. Inside the Downloads folder, now we have this favicon_io. It is in archive. Right now I'm going to
extract it all to a folder. This is the set of icons
that I eventually have. We're not going to
use all of that. We're going to reuse
those that are already present inside
the public folder. I'm just going to open
that public folder here. Instead of logo192 by React, I'm just going to use the
one that I have here. I copy it. I change the name. I delete the previous one. I rename this one. Then same I will
do with this logo. I delete it. I move that
one here of the same size. I give it the same name. Favicon will be
completely replaced. That's it. Everything is ready by now. If we go to manifest.json, here we reference
all these icons. These icons will be used when your application is being
installed on the home screen. Whatever you specify here, that manifest file will instruct Progressive Web App to
use that information. For example, if here we specify React app
as a short name, this is what the users
will see when the add your application on
the home screen. We do not have any
long name for our app. We're just going to
use Box Office for short name and Box
Office for regular name. Icons stay here, but if we go back to our application
and if we remember our previous run for Lighthouse, we had that problem
with maskable icon. Let's see one more time
what exactly we had there. Again, I run Lighthouse outdate. It takes a couple
of seconds here. We go to the very bottom and we see that our application
is installable. Everything's good,
but we do not have a maskable icon. We go here. You read about
maskable icons here. This is a new format. Basically, we just need to add another icon to
manifest.json and specify that it will have this
purpose of maskable icon. We can use that Maskable.app Editor to convert an existing
icon to a maskable icon. Maybe let's quickly do that. At the right corner, I click on the Upload button, I specify our icon. Now, it looks like that, but I wanted to have, let's say, a white background, so our maskable icon
will look like that. Cool. This will be
our maskable icon. That will settle our problem with this checklist
in Lighthouse. We click on Export. Let's say it will be max size. We download. Show in folder. This will be maskable
icon that we're going to put into the public folder. I move it here, and now we need to specify
that maskable icon. This one inside my manifest.json and say
that maskable_icon.png, the names must match, will be of type, let me see. Where is it? Where is this information
about maskable icons? Here. It will have
purpose maskable. We get back here, we specify purpose maskable. We save. This is it. Now our application will look
amazingly good everywhere, with our own titles, with our own icons. Let's deploy everything again. Wait, excuse me. I went
on the wrong path. I wanted to deploy
everything at first. Npm run deploy. Now let's just wait
a couple of minutes, and I will see you once the
application is deployed. The application was
successfully deployed. Let's get back to the app
and see the final result. Before we do that, before we're going
to refresh the page, we're just going to
clear the storage again to clear all the caches, whatever we have saved
inside the browser, Empty Cache and refresh. Now, you can see we have our custom icon
here, custom titles. Everything is now used as we specified inside manifest file. You can actually click under
the application tab here on Manifest and see different information
about your application. Now, let's see how it is
going to look like when it is being added
to the home screen. In one of the previous videos, when we added one of
the service workers, when we registered it, we added our app to
the home screen. However, you can see it
is not been updated here. Let's actually run it and first, let's uninstall it
and install it again. What I will do, I'm just going to click on
three dots here. Click Uninstall Create
React App Sample. Check the mark. Also
clear data from Chrome. Now it's gone. I will go back to my application
inside the browser, and I will install
it one more time. Install Box Office. Install. Now, boom. I go back to my
home screen again, in my case it is desktop. Now I have my Box
Office application, which looks like any
other app on my computer. If I click on it, we still
have everything the same. I would say this is it. Now you guys build this amazing application
which works offline, which is installable,
which works with the different
dynamic data from APIs. You learned a lot of concepts. I would say you significantly boosted your React
knowledge with this one, but now this is it. But before we end this one, let's actually commit all of
our icons that we've added. I'm going to add
everything to stage. I'm going to commit everything. Let's say added custom icons
and updated manifest.json. Let's push everything to the master branch so
the changes will be reflected on GitHub
repository. This is it. Congratulations on that one. In the next video,
we will wrap up what exactly we've learned with the
Box Office. See you there.
92. Summary. Gained knowledge: Hey, yeah. In this video, we're going to wrap up
everything that we've learned so far in Box Office. Now we have that amazing
progressive web app, which works offline, which is installable,
which works with API, and it looks just
cool, isn't it? Let's go maybe to
our commit history and quickly go through that. First of all, as a tool, let's say as a boilerplate
to create box office, we use Create React App, which uses underlying
web pack configuration, which we consume by using
the react-scripts package. Now you know what
is react-scripts. Now you know what is
Create React App, which means you know how to work with Create React Boilerplate. We also used
Prettier and ESLint, but this is not something new. You already know these
tools. Let's see. We learned about React
Router because as you know, by default and react, we do not have any
built-in solution for routing inside
our application. React is all about rendering, but it is not about
navigation as simple as that. That is why we used a library called React Router to achieve navigation inside our
application. Let's see. Then after React Router, we added different functions
to work with dynamic data, to work with API. We used built-in browser API called "Fetch" To fetch
data from the API, we created a lot of reusable functions which we
use across our application, and they look very simple. We handle all potential adders inside components in case
something goes wrong, we handle errors
properly by using try-catch blocks
inside our components. We also got to know that if we want to fetch data when
the component mounts, when we do some
interactions on the page, instead of using
"useEffect" we can use a data fetching library. In our case, we got to
know React Query library, which helps us to query
data when the component mounts or we perform
search on the page. Now you know about data
fetching libraries. Data fetching
libraries is a way to go in modern React applications. There are recommended
way to work with data because as your
application grows, you will have more and more
and more requirements. Data fetching
libraries will help us to manage all of that with ease. Now that I also
mentioned "useEffect", you now know what
"useEffect" does, "useEffect" allows us to run some side effect function When something inside
component changes, we have array of dependencies
inside useEffect. Let me find it here in the code. We have a ray of
dependencies here, and when something
inside the rate changes, if value changes, we run
that side effect function. Not to mention that
we also created our own custom hooks on
top of "useState", and "useReducer",
and "useEffect." These custom hooks are just, like any other hooks, but with extra logic. Now you know that
in case you need to create a reusable logic
for built-in Hooks, you just create a
custom Hook and put all the logic inside. Eventually, it becomes reusable. We worked with browsers
storage as well, we worked with session storage, we will work with local storage. You know that now
you can persist data inside the browser. Of course, this is not a
replacement for a database. But if you need
to somehow retain information like the search
input or user preferences, you can use that
storage just fine. Let's see what else
do we have here? Let's get back to
the commit history. Here we also created
this dynamic pages. This is also part of
React Router but now you know the concept
of dynamic pages. You create a template
or a skeleton, and then you grab dynamic
parameter from the URL, in our case, it was show ID, so if I look for any show, I go to show page
inside the URL, we have show ID
that we grab inside the component and then we use
that show ID to fetch data. This way we can
achieve dynamic pages. Now you know about this concept. Let's see what also
do we have here? Again, "useQuery"
about Query data, Different initial logic
with custom Hooks, this is what we've discussed, we also installed
styled components. A CSS and JS runtime solution
for styling components. Now you can decide what
is better for you. Either use styled components
or something very similar or use traditional
way with CSS files. Because now you
know the drawbacks, now you know what are the
advantages and you are the one who will decide
what you're going to use. I personally prefer
traditional way of styling apps and I'm not really
a big fan of CSS and JS. Also, we add this
fading animation as a replacement for the package that I mentioned, React-fade-in. I mentioned it only once, but I did not put a lot
of stress on to that. We need fewer dependencies
in our applications. Less dependencies the better, because you need to
manage fewer things. I think it does make sense, and you will stick
to that rule in the future because it will
be for your own good. We also got to know
progressive web apps. What is the Progressive Web App? It is just a web
application that follows specific list of
things for example you need to have the
application needs to have a service worker file it needs
to be served over HTTPS, it needs to have
that manifest file, and when the application, the website meets all
of these requirements, it becomes a
Progressive Web App. It's like a titled website and the title is
Progressive Web App. The application become available offline because of
service worker. Now you know that
service worker is a script that runs somewhere
inside the browser, outside of our
application contexts, and it proxies all the requests, all the outgoing requests, and does something with them. In our case, we use
service worker to cache all the outgoing request. Application will
work offline once it is installed somewhere
on the home screen. At the very end, we added our own custom
icons by using the [inaudible] I generate
that I shared with you but it
doesn't really matter, you can use any
generator but the thing is now you can see
the full flow, how the application being built from scratch
to deployment, to styling and doing some
modifications in the future. Something like that. Congrats, you, did a very good job. For now, that's it. I will see you in the next one.
93. What is Firebase?: Hey, welcome to the new section here. We're gonna talk about back in solution for our final project. Whenever we built a single page app in order to communicate with the database, we would normally create our own AP I server or use an existing one. Modern, small or middle sized applications do not necessarily right back and from bare bones on their own most of the time they do, but it depends on type of the application. Wouldn't it be nice if we had some sort off an obstruction layer around back? And so we don't need to set it up ourselves and focus more on the application? Well, firebase can help us to achieve that. It is beckoned as service solution that gives us the abstraction layer around back and and it does. Even more Firebase is Emma Bile and Web Platform, which is built on top of Google Cloud Platform. It means that it can be used along with any Google cloud service. From now on, we don't need to worry about creating our own AP I database maintenance file hosting everything is already there and waiting for us. So in our code, instead of sending a request to an A P I to retrieve data. We would just use a library that has functions already pretty fine for us. Like get this document by I t. And this function will interact with the database. It has really time sing support and faster queries. And it is also well documented, which is really important to understand. Bachir. What Fire base is in the next video but will go through fire base services and we will try and evaluate them. See you there.
94. Overview of Firebase Services: Hey, let's quickly explore Fire Base and its services. For this video, I opened fire based Dashboard off our final project Here. We can monitor and manage every service that we use inside a firebase project. We could manage multiple APS. There can be multiple lap APs, and that will share the same database. Or if we had Android, IOS and Web applications, we could manage all of them from single dashboard on the left. Inside sidebar. Under develop, you can see a list off Main Firebase services. Let's go one by one. A syndication. With the service, we are able to log in and authenticate users across our applications. This is really cool because, let's say if we look in with Google on website and later on, we look into the android application with the same account, data will be the same. There are lots of different sign and methods available for us, and the thing is that all of them are configurable. It was just a few clicks. This service is complete. It has built in a mail system that handles all email verifications and recess. We need you only customize the template off the email. Also, it supports SMS verification, which is also really cool. Then goes database. Firebase has to data basis asked for now Fire store and riel time database. They both are Jason based no sequel databases with support for real time updates. What's the difference and which one to use? It depends on many factors, but here are there three key differences. First, pricing model Fire store is charged per operation. Read, write, delete or update. This is no good for high frequency data writes Real time Database has more suited for this as it is charged for storage and bandwidth, which is the perfect use case for something like a child application. Second Queries. Fire Story gives us more advanced and compound queries compared to real time database So real time data base has really poor query builder, but it is good enough to manage not to complicated database structures. Third structure they both are Jason based Fire Store has documents, collections and sub collections, which make database more robust. Real time data base is just one large Jason object. That's why it has quirk very support and most of the time we need to de normalize a k a duplicate data for our project. We will use real time database because we will have a lot of Faried and write operations. And we did not require complex queries. If it wasn't a chat application, I would have peaked Fire store as it has more sophisticated queries and data base structure . Also, we are not limited to use on Lee one database. We can combine both fire store and real time data base in one single application. Then we have storage. Nothing too special. Over here. Here bubble Porter, user images and audio files Firebase hosting here. We're going to deploy our website. It only supports static files. So if we have a server side rendering application, this hosting will not work. Cloud functions in our application were also able to write custom back and inform off server last cloud functions that can be called from inside the coat. We're going to deploy only one that will send notifications to users. We will talk more about server last when we will get into the topic machine. Lauren, get amazing tool that provides machine learning utilities such as image recognition and the others. But unfortunately it is only available for IOS and Android APS at the bottom. We have other services. They all are supplementary and used for monitoring and analyzing deployed applications. We can manage performance off our website, how fast it lows and some other metrics. We can even integrate Firebase Analytics, which is basically Google Analytics but wrapped as a firebase service and the very bottom we confined services to engage users for our project. We will use only firebase cloud messaging that will allow us to send real time notifications to users if browser has support for it. And that's basically it. This was high level overview off fireplace. But what about security? Is it secure enough? We will find out that in the next media see you there.
95. Firebase Security: Hey, let's see how secure Firebase iss. Since we don't have any server side code, we're gonna access database from client side. How we're gonna expose any sensitive data? Yes and no. In fireplace databases are accessed via Public euro. This is a part of the conflict. Let's say we have some data inside database. We have public your el No. One as well. And if Random Person tries to access the Ural and we didn't protect the database, this person can get all the data, whether it meant to be public or not, to prevent unauthorized access, their security rules. These rules define how data can be accessed and by who. It means that the level of security depends on how good security rules are written. It is a good practice to look down the database by default and then it just rules. As we write code security rules apply on Lee to you clients. I If we write custom backend with cloud functions, this rules will not apply when application grows. Some people find it hard to write seek rituals. For this reason, they use cloud functions and perform servers at validation themselves. The same applies to cloud storage. We have public who are ill and rules by default. Storage can be accessed only by signed in users. For most cases, it works well. But it doesn't mean that if we upload an image that we want to share, this image will be locked down. Every uploaded file can have public Europe. All right, that's it for security. I hope it was comprehensive and concise. Now, what about pricing? Is firebase free? I'm gonna find out that in the next video. See you there.
96. Firebase Pricing: Hey, let's see if we need to pay something to use fire base. As for out, there are two plants available. Spark and blaze sparked plan is completely free and it comes with a few limitations. Police plan is pay as you go model. Both of them have very generals freakier And even if you're subscribed to blaze plan unless your APP has a lot of active users, you will not pay anything for us to make sure that we will not get charged Spark plan is okay. However, with the recent updates to your fire base and Google Cloud in order to use cloud functions , we need to have blaze plan enabled for our project. But don't worry, but we'll get into that when we start with cloud functions. Until then, sparked plan is our choice For more details, please navigate to the pricing page to Avala everything yourself. All right, I guess that's all what I wanted to cover for firebase in production. In the next video, we'll finalist started building our project. See you there
97. Project Overview: Hey, welcome to the new section. Did you take a break? Because right now I'm gonna show you how our final project will look like when we first now engaged to the website. But we'll see the sign in page. From here. We can continue either with Facebook or Google. Let's choose Google. Then I'm going to choose by second account and then I am inside the app. So on the left, I can see that board create new chatroom bottoms and list off chat rooms available on the right. If I click on either off chat rooms, I will see its messages and a few other things that we will cover just in a second. Let's first start with dashboard, so if I click on it from here, I can manage my account. So at the top, I can see that right now I'm connected to Google, and I can also associate my account with Facebook. So if I click on a link to Facebook, it will prompt me for my phrasebook credentials if necessary. And right now I'm connected to phrasebook. It means that next time when I will look in with Facebook to buy app, I will be linked to this account. I will end up with the same account, then I have a nickname and I can edited from here. So if I click on edit button, I will be able to change it. So let's change it a little bit, and if I click safe, it will be updated. Also, I can edit my ometer if I click on Select New Avatar, and if I choose this image, I will be able to added it a little bit on develop state. And then I will click un uploaded and my Al Atar will be updated. And from here, I can also sign out. Next, we have create new chatroom button. So let's specify in Europe name, let's say whoa and description is going to be Whoa! If I click on it, it will appear over here, and the chatroom will be completely empty for now. So let's select the first chat room because it is already populated with some messages. So what do we have here? So, on every message, if we have her on it, we can see this like button. It will show you how many likes this particular message half. So if I click on it, I will remove toe like if I click in again like will be added to this message. And also we can see if this user is online or offline. So if we have her on this circle, we can see that this user was offline on this particular day at this particular time. And this is my account. That's why I'm currently online. Also, would you have here if we click on user nickname Global Sea Motile window with its of a car . It's full name Member since this date. So when this user joined the application and also we can control admin permission off this user if we are currently an admin off this group, we will take a look at admin permission just in a moment. So what else do we have? So all messages are split into dates. They are grouped by dates. So you can see today I send this message is yesterday there were these messages and so one also we have pagination off. Message is it means that we do not lower all off our messages from the database. When we see the chat a load only, let's say 15 messages. And then when we click on load more, we will see more messages being loaded to our application. All right, so we are able to send normal text messages to our Chad. Then we also are able to send files. So if I click on attachment button, I will see this mortal. Then I click on upload. I can select normal files as well. Assim itches. So I'm gonna select this file, this image, that I'm gonna open it. It will appear over here that I'm gonna click, send to chat. And as you can see, if I send a normal file, I condone Load it by just clicking on this your out. If it is an image, it will be displayed over here. And if I click on it, I will see the preview. And also, I will have this view original bottom. And if I click on it, the original will be opened in the new tap. Also, we are able to send audio files. So if I click on this button over here, the record ing will be started and I can see this I can. Over here, it means that currently it is record in my mic. So if I click on this button one more time, it will save my odio message. That was record it just right now. And I will be able to play it if it is supported by the browser. All right, What do we have else? So on the top, we can see room name, we can see broadcast message. And this blue button over here, they are related, but we'll take a look just in a moment. On that, we can click on room information to see description off this chat room. And also, if we are an admin off this group, we are able to see this Aiken. So if we click on it, we can add it. Room information such as name and description. So if I click on edit button again, I can for any name I want. And then I'm able to save it, and it will be successfully updated. All right, So now, about broadcast messages. What are those? Let me first show you how admit permission can be controlled. So let me actually look into these app from my phone, and I will remove admin permission. So right now I'm inside in the app, and you can see that the status has been changed. And right now I can see the green dark. All right, so I'm going to remove admin permission for this account that you can see right now. So what I will do? I will click on my profile and I will click room of Admit permission, but from my phone. So right now, I removed admin permission. And now I can only have this notification button and room information. All right, Now, I'm gonna give augment permission to myself, and you can see now it is updated and everything is in the real time. So what is happening here? So first of all this notification button, So it means that I want to subscribe or unsubscribe from notifications that I will receive from admits off this chat room. So right now, I am subscribed. And if I change my mind, I will be on subscribe, and I will receive no messages at all. So what are those notifications? These are real time notifications that are being displayed by browser on the device. So it is this permissions or notifications that if I click on this bottom, I can see notifications over here and right now they are allowed. So what is going to happen? Let me send a notification from my phone to all users inside this chat room. So right now, from my phone, I'm going to click on broadcast message here. I will specify title and message, and then I'm gonna publish message. So let's see what is going to happen. So I Steidl, I'm gonna select, Let's say web deaf and for message, I'm gonna type hello from phone and then publish message. And as you can see right now, I have this web half from this room. I help hello from my phone. And also I have this notification inside windows. So what? It means that if I am currently on the website, I will receive this kind of notification that I can close if I let's say outside of the browser or I just close the browser entirely. And if I receive a notification, let me send another one and yeah, I can see that I will still have notification inside windows or inside your operating system if it is supported. So this is what our riel time messages in this way you can not if I your users to engage them. So this is pretty much it about our application, a lot of things to cover and I will make it as comprehensive as possible. I think you will enjoy it. And I'm going to see you in the next video. We will get started. See you there.
98. Chat app Updates are Coming up!!: Hey guys. In this video, I would like to reference upcoming updates for
chat application. Both projects, Tic-tac-toe, and Box Office, were updated, but updates for a chat
applications are yet to come up. To make the transition
from Box Office updates to older version of
chat application as smooth as possible
this video exists. What we're going to
do, we're going to use the template that I
have prepared for us. We have that repository
chat app starter. The link will be shared
with you in the resources, so you will get access to it. You end up on this page, you go to this page, then what you need to do, you need to click on
the green code button, Then you click on
"Download Zip". Then you go to the
place where you downloaded that zip
file, you unpack it. I just grab that folder. I put it into downloads, and here I have the project. Then I go to VS Code. I open that folder as
the project in VS Code. Here, this one and I see this. Here you can find
the starter project. You have all needed dependencies installed
such as Sass compiler, rsuite library,
diversions are important. Then we have react router, and Firebase library installed. ESLint, and Prettier are
both configured here. You don't need to
worry about that. Inside source, you
have styles here. Basic app with React Router of older version that is used
in chat application videos. You've got everything
configured, styles imported,
you are all set. The only thing that you
need to do is first, you need to initialize Git here. You type git init, then you add
everything to stage, then you commit that. Right after that, you
need to associate this new Git project with
your GitHub repository. You go to GitHub repository,
create new repository, then you get repository URL, and then you do git remote, add origin, and repository
URL that you will copy when you're going to create a new repository here on GitHub. Right after that you need
to install dependencies. As you can see, there is
no node modules folder. The only thing you need to do, is just type npm install, and it will install
all dependencies listed in package Jason. After that, you're all set. You will need to use the start script by
running npm run start, and proceed with
the development. The rest stays the same. Just continue to watch Chat app, and everything will be fine. That's it. See you there.
99. Scaffolding the Project: Hey, welcome. Right now we're going to use scuffled our protect as before, we're going to use create reactor app and to create in your project, we need to open folder of everyone to to put our project in in the terminal. So from my terminal, I'm gonna execute and p x create react up, and then the name of folder, which is going to be Chad app. And then I'm gonna put use NPM because I have yarn installed on my system. And now the EU project will be created for us. Let's just wait until everything is done. All right? Seems like we are done. Now let's open V s code. And from here, let's open our new folder. So what do we have inside as before? Under source, we have our initial files for package Jason. We have our scripts and so on. So let's perform our initial clean up so we don't need ap CSS. Then we also don't need all of this inside our app component. So let's clean it up like this leads to delete this class name, we will put just Hello. We will Tillett logo and import for us. Yes. Has filed then we don't need AP Test GS than four index CSS. Well, we actually don't need it as well, then for index? Yes, let's remove street mode because we will receive errors when we will use other libraries. It is totally normal. Then let's remove Index CSS and let's comment Service worker for now, just like this, then we don't need logo SVG. We don't need set up tests and we are done here. Now what do we do? We will install other dependencies, and we will get them from the Assets folder. So let's open this folder and let's open scaffolding. Doug Jason. So from here we are going to copy comments to install dependencies. So let's copy the first line and let's put it inside our integrated terminal just like that . Now, while it is installing, let's create preacher and excellent configuration files. So for excellent, it is going to be, yes, land RC. And for preacher, it is going to be prettier, RC, and also let's copied them from our scaffolding to Jason file. So for yes, leaned we have that one. Let's put it here and save it. And for per year we have that one All right. So, yes, lint and preacher are Don, let's adjust our NPM script. So let's copy all of that and put it inside. Package Jason, inside this script section at the bottom, just like that. And also we have the clear script to clear the bill folder. So right before we produce our built let's run and PM, Ron Clear like a died. All right, so we are done with scripts. What else do we have inside disc unfolding file? We have other line for installation dependencies, which is notes. Ass are suit react router and reactor for dumb. Let's copy it. And let me explain what is going to happen. So for our style system, we will use SAS with you. I library named are here, and we can take a look at our suit if we not gauge to its official documentation. So what is a Y library? It is a library that gives us already pretty find components that we can use. And that's basically it. We will see that when we will start using it is pretty simple, and it boosts our development speed. You will see that. All right. And whenever we see that our suit is not enough for our cases we will use says Okay. Also, we install, react router and react Rotterdam All right, so that's basically it. But one thing to do is also to copy this styles folder for our project. So what is this Styles folder? So it comes with Assad off pre defined classes. So let's actually copy this folder. So I'm going to copy this folder. Then I will open that file in ah, reveal in File Explorer, then inside sores. I'm gonna paste this styles folder and let's take a look. What do we have inside? So we have our main file, which is basically our index CSS or just our main file for styles here would define, Let's say, really a few off classes that we will use. It will take you look and them They're really simple. Nothing too complicated. Then we have utility and you facility colors that we import into Maine CSS. So now we can manage our files. So, for utility here we have classes that are kind of similar to bootstrap utility classes, so we will use them a lot in our code. So please take a look at them. They're not that hard to manage. I don't have utility colors. These are basically classes for colors. Nothing too special over here. And then we have override as he SS. So this year I library are sure it is intended for desktop applications. So some off their components are not really good to displayed on mobile devices and to adjust them for mobile screens. I a little bit modified their CSS I override their classes a little bit. So now they look good on mobile devices as well. This is just to make everything good. Police take a look on all of that. It is very simple. Just make sure that you know what is happening. So inside Abdel Gs, what we need to do, we need to import it. So let's import. Ah, we're styles main CSS just like that. And also we need to configure our suit and advance. So if we navigate to their official website and if we go to getting started and if we click on use in Crete, react app from here, we can see that we need to also import their default CSS solutions copy this line of code and put it before we import our main styles just like that. So now we are ready to go with our conflict for you. I One thing to do here is to actually connect our project to get help. So let's open integrated terminal and commit all off our files. So first, we're gonna add everything to the stage state, and then we're gonna get commit. Let's say scaffold the up something like that. Right now we are going Teoh open. We're get him account. Then we're going to create a repository. Then we will name its chat app. Let's make it private, and we will create a new repository Right after that, we can copy this command at the bottom. Get remote at origin. Let's copy that one and pacer in our terminal. Now our local files will be associate it with this remote repository and we need to push our local changes online to get her. Let's use get push origin mustard. And now let's take look so everything is deployed. If we refresh the page, our project will be online. So we have everything. Chraidi. And in the next video we will start building. See you there
100. Create and Configure the Firebase Project: Hey, in this video, we're going to create a new firebase project and edit to our application. Let's go. So let's open Google. And here let's type fire base. Then let's open first your L and we will end up on fire base. Official webpage. Since Fire Base is part off Google Cloud platform, Google manages everything. It means that we don't need to create a new account or something. If we have a Google account, which I guess everybody does, then we will associate our Google account with Firebase Project. So let's click on Get Started and here we click on Add New Project. Then we're gonna specify new project name, which is going to be chat Web app. Let's say then let's click on Continue. Then let's disable Google Analytics. We don't actually need it. And let's wait a few minutes until our project is created. Okay, good. Seems like project is ready. Let's continue. Then we end up on fire base dashboard. So from here we will manage everything. And as you can see, we are currently on the spark plan, so it means we will not get charged for anything. All right, now we need to add our Web application to our firebase project. So let's click on this settings button and then choose project settings. Then, here at the bottom, we will see our APS from here. Let's click on this lab application, and then let's enter the name for our app, which is going to be, Let's say, just chat and let's not set up firebase hosting. Let's click on Register. It will also take a few seconds, and right now our application is ready. Let's click on, Continue to counsel. Now we need to set up services that we will use inside our application. So first, let's set up database. So let's click on it. And on this page we are able to set up either cloud fire Store or real time data base, so make sure you don't use cloud Fire Store. You use a real time database here at the bottom, so let's click, create database and let's select start in locked mode so all of our rules will be looked down. OK, so let's enable it, and it will take a few seconds just to create a new database for us. All right, it is done. Now we need to also set up storage for our app. So let's click on it and then get started. It will ask us for rules. Let's click next. Then we need to select location for our storage. It is very important and it really influences this speed, so just select the nearest one to you. For me, it is something, I guess, with Europe. So I select Europe West three. Then I click Dung and it will take a few seconds to create a new story for us. Let's wait. Okay, Perfect. Seems like storage is ready. Our final thing is to set up authentication for our application. So let's click authentication here. We don't have any signed up users. For now, let's click on Sign and Method, and from here we can see all signing providers that we can use. We will not use email, and password will use only Google and Facebook. So first, let's click on it. And then let's just click enable just like that. So let's select support and email and then project public facing name. Let's maybe said something like chat, app and let's click safe, and after that it will configure everything automatically. We don't need to worry about anything. Google Sinan is already enabled. Now what about Facebook? Log in So let's click on it. And from here we will not have any automatic configuration. We need to do it manually. So let's click on enable here. We need to fill in APP, idea app secret. And we need to use this. Redirect your l So what do we need to do inside Google? We need to type Facebook developer. Then we're gonna go to Facebook for developers. And here on this page at the top, we will click on my APS and from here we're going to click on Create APP, lets selected. And this play name is going to be something like charts just shot wept. All right then let's click on Create app I d. Then let's perform security check submitted and ah were Facebook application will be created. So from here what we need to do we need to go to settings, then go to basic And here we will find our app I d and up secret. Let's call p app I d and then pace it over here. Then we need to also get our app secret. Let's click on show and let's call it as well and paste it here inside fire base. And also we need to add this. Redirect your l here, let's copy it. Then let's save our changes. And here under Prokes, let's click on plus Sign. So when we click on it, we need to to select Facebook. Look and let's click on Set up. And then we need to select that we will able to log in on Web, then site your l. I don't know. Just put something that really doesn't matter. Actually, no, we don't need this. Let's click on settings because we already have Facebook. Logan at it It was just quick start from Facebook team. So here for these valid Redirect your else we need to add this your l that we have on fire base. So just make sure that it is here. So now it is edit. Let's click on save changes. And now our Facebook application is ready. So let's save it. And now our Facebook in configure it and we configure it everything inside firebase website . Now we can actually add it to our code. So let's get back to V s code and from here. Let's open our terminal first. Think we need to do we need to install Global Seelye from fire base. So for this, let's type NPM install Dash G firebase tools and install it. I already have it on my machine, so I'm not gonna install it twice after that. When we have this firebase tools, we need to type fire base in it and that's all. After that, it will prompt you. Authorize yourself, please complete the instructions. And after that, when I run this command, I will see this see light in work. So I'm ready to proceed. Yes. Then I need to select services that I want to initialize. So I need only database. So I navigate with arrows and I select with space and also I need hosting Onley. Those two don't select storage. So then I hit Enter Then I will choose use an existing project and then I'm going to select chat Web app that I just created. I selected what file should be used for later waste rolls. Let's hit just enter than what public directory I want to use instead of public. Let's type built and then I want to configure my app as a single page application. That's true. So let's click. Yes, and built index HTML already exists over, right? Yes. I want you override. All right now. Fire base is associative. Let's say our remote project that we just created that one associated with our local project we can see Firebase Jason Fire Besar See which contains our project I d than inside database rules. We have our database rules and inside firebase Jason, we have our let's say project description. So for database rules are deployed from that file for hosting, we have public folder, which is built. Then we have ignore files that we will not deploy to firebase hosting and also rewrites. So do you remember when we tried to upload our project on hip hop? So when we refresh the page, we got not found. So this is because we have single page application and Firebase solves this problem by just writing all the routes and configure it for single page rap. So we will not have any issues with that. All right, so that's it. Now we can actually install library into our project. So for that, let's just type in PM install firebase. And let's wait until it is done. All right, we have firebase installed as a library. Now what we need to do under source folder let's create in your folder that we will name MISC and here we're going to create a new file firebase dot gs. Here we will configure our fire base inside our app. So first think we need to do we need to go back to the website, then again go back to project settings. And if we scroll down from here, we can find this firebase conflict. So let's copy that. And here we're going to create a new valuable let's say, just constant conflict and let's paste it just like that now capable. Also import firebase libraries. So we're gonna type import fire base from firebase app. It is important not to import from firebase because it will import the the whole library and the whole library is really, really big, and it will add all files from it. So we make sure that we only imported firebase app that what we need to do we need to call fire base dar initialize app and inside We need to vote our conflict file So let's put come thick. And now this for initialize app returns as an instance off fire based application. So let's put it in a valuable let's assign it to, let's say, just app just like that. And we are ready to go now. Using this app valuable, we are ready to access firebase services like up off ab native bees, Fire store function, messaging all of that. So but this is what we will do in the next video for how we are done. The one thing I want to do before we end this video, I want to commit our changes to get help. So let's forget at dot Then we're gonna put, get commit and we will say that initialized firebase project Something like that. All right, Perfect. See you in the next one.
101. Creating Pages - Private and Public Routes: Hey, now we have firebase initialized inside our project. Let's start building the project itself. The first thing I'm gonna do I'm gonna open my terminal and I will execute and PM Run start to start developing server. But right before I execute this comment, I'm gonna create new file, which is dot e n v dot local and I will put it in the root directory and here rivals pacify browser to none. This is to prevent and PM Ron start from starting the application instantly inside my browser. So I really hate this behavior. If you do like it, don't do this browser. None thing. So now I'm gonna run this command and I need to manually go to browser and access local host 3000. So here I will see the hello message that I specified inside Abdel Gs when risk unfolded the project. Now what we need to do we need to define our pages at first. But we didn't initialize react rotor when risk unfolded the app so lets navigate to index togs and here to initialize reactor will import browser rotor from react router dumb and then we need to wrap our app component around browser, rotary component. And now we are able to use it. Okay, good. Let's go. Teoh Abdel Gs and hear what routes we will define. Let's first use switch instead. Off this, def. So I'm gonna put switch from react ruder than inside the switch. People define route. And what routes should we put here? Well, we will have a few routes to find, and one of them is signing page and the home page. And the thing is that we will not be able to access the home page until we are signed in to the APP. So we need to define some sort of a private trout that can be only access if we are signed in. So what we're going to do the first thing people do it will create new folder on the resource reachable name pages. Here we will create two new components and that will represent our pages. First is going to be a sign in page sign and she s here. I will scaffold and you component with the snipper extension. And let's just for sign in just like that. Then I will create another component, Holmdel Gs and I will do exactly the same thing. And I will name a just home now How can we define these rows over here? We can put route and then we can put first sign in so this route is defined. But what about home? How can we make it private for this will create another component. We will name it private route and it will imitate this route component that comes from react Router. But it will be enhanced and it will check against some condition. So under sores, let's create new folder components Here we will put new file private route just like that. So it will imitate this route component. So how is pacify this route component? What problems do we path? What Children do a path. So we need to specify path. So for signing it is going to be just signing. So now about private Rauer. So let's define how we're going to use it. So it is going to be private route inside. We need to pour a component or just Children that we want to render. It is going to be our home page just like that and for props. We need to also specified that we will render this component at just slash. Okay, now inside private route. We know that whatever we pass to this private traveled component as a props will be actually kind of redirected to this route component. So here we're gonna d structure everything and put it inside. Let's say route props. The only proper that we need to get from it is the actual Children that we want to render. So let's d structure Children and everything else will be available under route props. And we need to pour a simple condition over here. Let's say so for now. Since we don't have any profile, let's just create the bull invaluable Let's say profile and set it to false. And now what we're going to do we're gonna ask if our profile is set to fools. If we don't have any profile, then we're going to return and you component that we haven't used before it is going to be redirect, which also comes from react rotor package. And this redirect will basically redirected to specify pass. So it receives only one prop, which is to and for this to will specify. So if we don't have any sign and data. If we don't have profile, we will redirect to signing. All right. Pretty simple. Now, if this condition takes no place, then we would normally use our component that we pass as Children. So instead of returning this def, we will simply return route from react rotor than four props. We're going to specify all props that we gather it from here. So we're gonna spread them over this route component with just this syntax and inside verbal past Children just like that. And if we save it, let's check it out. If it actually worked now, if I will try and access slash a slash home page, I will be instantly redirected because we always have false condition. So it means that we always be redirected to the sign in page. So if I said it's too true now if I will try and access home page, I will be there. So this is it. This is how we can do the private route. And also, when we are signed in, we don't want to see the sign in page. We want to be redirected also to, let's say, to our dashboard or to home page. So what we can do, we're gonna create another component which we will name public crowd. So let's create public route. Don't Yes, and let's actually copy everything from private route. And here, let's rename private route to public route. And here the thing will be the next. So if we have profile, then we're going to be redirected to home page. In this way, if we are signed in, we will not be able to see the sign in page where will be instantly redirected to home. So the logic is kind of the same. But it is reversed now how we can actually is disposable crowd actually in the same manner as we used our private I'll. So here, instead of just route will poor public Rauer that we import from Components folder. Now we don't need this import from react router. Let's save it. And actually nothing will be changed because we don't have any data for profile. So that's basically it. That's how we are able to manage our private and public crowds in react router. Now let's commit our changes and finish this video, so we're gonna put get at everything, then we're gonna commit our message created public and private routes for right. In the next video, we will start building the sign in page. See you there.
102. Sign-in Page - Interaction with Firebase: Hey, welcome in this video, we will start building designing page. Let's go. Before we begin. I just want to mention that we're going to use the react suit. You. Why library that we've installed? We're going to utilize it a lot. So please open this documentation on your next step, so you always have access to it. So go to home page, then click on components. And here on this page you can find all components that this library provides us west. It is very simple to use, and they all are mostly intuitive. So let's say if we go to button component from here on every company page, you can find a lot of different examples and use cases. And also, if you click on showed the source, you confide how this component can be used in your coat. You can always copy and paste it. And also, if you only need to know what component receives as props, you can scroll down to the very bottom and you confide all possible props that can be passed down to this particular component. All right, so inside our code, when I will write this stuff, I will not reference It may be a few times, but most of the time, because it is better intuitive. I'm not gonna explain it. So if you still don't know what is going to happen, please navigated to this documentation. All right, so let's get started. So lets navigate to our code and let's open sign in page. And here we're going to start first, we will remove this def, and we will put container component from our suit. You might think that it is very similar to contend from bootstrap because it is container have ever in this library. It is not. It just gives us the display off Flex. Then we're going to use grit. And in this library, great is pretty much the same as in Bootstrap. But unlike in Bootstrap, it has 24 column system. Unlike with boots, drop with 12 combs. All right, so inside grid, we have grow and inside row, we have column just like that. So our colon is going to be health off its max with on medium devices. So on very small devices, we're going to poor old 24 columns on medium and above. We're going to put 12 now, inside this column we're going to put panel component, and it basically will give us a few off patting. OK, so inside we're gonna put def. And inside this difficult define age to tag that will say, Welcome to chat Underneath we will put Pitak that will say, progressive chat platform four meal fights, something like that. All right, let's check it out. If I refresh the page, I can see this strange, weird background. That's because I imported column from our suit Leap Carousel. I didn't want this. This is a little bit off tricky when you use outer intel Essence make sure imported from just our suit. If I save it now, I can see that it actually worked. However, our text is not centered. We want to make it center so we can use one of our utility classes that we poor inside utility, as here says, and they're almost like bootstrap, so we can define class name, text center and it will work. However, we can see that if we inspected, our component is not completely centered on large devices. However, on mobile, it's OK. That's because when we apply this 12 column system, our element is not, Let's say tender it. We need to apply. Offset. It is again very similar, like in Bootstrap. So for 12 columns we need to apply Offset off six columns before it. So we're gonna put empty offset off six columns. And right now our great element will be centered, As you can see from this padding over here. All right. It looks good now under a Disney, if we're gonna put another def. And here we will define our buttons, signing with Google and sign in with Facebook. So first I'm gonna put button. Then, as props, I will pass. It is going to be a block button. It will take all with off its parent. Then I will put color, and I will set it to blue. And that's it for now. So inside this bottom, I'm gonna pour Aiken component from our suit, and as I can, I'm going to specify I can prop four Facebook just like that. And then I will put a simple text, continue with Facebook, but capitalized and the same I will do for signing with Google. I will specify a color green. And instead of phrasebook, I can I'm gonna specify Google Aiken and then continue with Google just like that. Now what's take a look? Okay, it seems fine, but we want to add some margin. So for Disney, if let's put class name and margin top three, something like that. OK, Looks good. Now we need to make it that centered vertically. Or maybe at some margin to the top elements. So it looks more nicer. So for this great component, we're going to define class name, and we're gonna put margin top page. So this is class that I defined in one off the utility files, so it just gives a lot off margin to to the elements. So if we inspect it as you can see, margin top gives us 150 peaks else. All right, so it looks good. Now, what about functionality? How we can actually manage our signing and finally start adding this Facebook and Google science. So what do we need to do inside Firebase gs where we initialized our application? We need to import off library from fire base. So here we're gonna import firebase off just like that. Then here under app, we're gonna export const in available, which will name just off and we will call app dot off and it will give us the object that we can use to interact with fire base. So let's save it inside signing. We're gonna define our handlers for on click event for buttons. So we're gonna put first on, let's say Facebook sign in, and then I will do the same for Google on Google signing and their functionality is almost the same. So I'm gonna create 1/3 function that I will call inside on Facebook signing and inside on Google signing. So we will name it something like sign in with provider and provider as either Facebook or Google. All right, so as an argument it will receive this provider and then we will do some think insight. So inside on Facebook, log in. We're going to call, sign in with provider and Rubble pass a provider will talk a bout provider in a moment and here also signing with provider now how we can actually signing so inside signing with provider, we can just type off and imported from our misc firebase file this off object that we got from here If we just put dot from intelligence. We can see a lot off things happening over here. We can access current user. We can confirm reset password and different. If we just type signing, we can have different things here. We consign in with email and password with phone number with pope up with redirect. So a lot of things happening here we're interested in signing with pop up and if we call this mounted inside, we need to pass the provider and it is going to be provided that we will receive as an argument. So we will put it here. So what is this provider? So this provider object we need to import from, Let's say, firebase library and it is static. So what we need to do here, we need to import fire base from firebase slash AP again, it is important to import from firebase slash ap So here, as a provider, we're going to pass new firebase dot auth dot facebook off provider and we need to call it it will return us and you provider object that we will pass as undocumented to dysfunction and the same rebel do for Google signing. We're gonna put new firebase off, but this time Google off provider just like that. Now what's actually associate this? Handlers with buttons. So for on click event for Facebook pattern we're gonna put on Facebook signing and for Google, we're gonna put on click on Google, Sign in just like that. All right, Looks good. Now this signing with pop up if we however, it is a promise. So we need to await it. Lets convert our signing with provider to in a sink function and await this signing with Pope up. And then let's put the results into result viable. And let's consul look and see. What do we receive, though, if I refresh the page I opened council, then I can see that responded with 400 Arkwright. That's fine. Let's click on Continue with Google, for example. All right, you can see that it actually doing something, and right now I can select one of my Google accounts. All right, let's select mind of my accounts. And now you can see that I have result over here. So it is an object that has three different objects additional user info so we can see that this is our new user. We can get email given name, different ideas. We can get picture if our email is verified. So this data comes from Google and you can see provider. I deace that to Google. Then we have credential, different access tokens and then we have user object. So this user object represents currently signed in user. It is general. And from here we can understand whether our user logged in. We're not. We will talk about this user object in details in upcoming videos. So now what we can do We can actually go back to Firebase Weaken, Go to authentication. Here we can reload our authentication. Let's say sign in database. And here we confine our email with provider when it was created and created User I d. So, first of all, this is not a database. This is just like small database inside this authentication library. We still need to store our users inside database. This is just to track. How many users do we have signed in on inside our app or something? All right, so now let's actually modify our code slightly and let's store our user inside database. So first of all, let me put, try, catch, look over here because we work with promises and we want to make sure that we always handle any others. And by the way, just to notify user that we currently signed in or if we have any errors, we can use the alert component that again comes from our suit. So if we have any error, we gonna call alert, and then if we put dot we can see we can have access to atter info and success and warning messages. So let's put in for message. So as a first argument, we will put error that message, and then we need to put the duration off this message off this alert message. So let's poor for seconds in specified in milliseconds. And if we are signed in, we're gonna put alert. Let's say success. And then we're gonna put signed in with again time out off four seconds. All right. Seems good. Now what we can do with that result. As you remember, we received an object. We received additional user info and also received user object. Now, by checking if additional user info is your user, so if our user is that is currently being signed, it is a new user will store it inside the database. So how we can do that? Let's navigate back to Firebase Thaci s here. We're gonna import another library, which is going to be firebase slash database to interact with the database and similar to off. We're going to export const database ap dot database just like that. So under this database, valuable we can interact with database. Let's savor so from inside signing, we gonna reference database, which we import from misc firebase. Then we're gonna put dot here. We need to specify reference, which is basically path in our database on the ritual store our data. So we're gonna store our user information under slash profiles slash user i d. So let's open string interpolation. And as user I d. We gonna reference user dot We can have email display, name delayed and a lot of other things related to this user. But we're interested in user I d. So this user I d is going to be the same as this user. I d inside authentication library. So it is going to be like we create a new user. It has been added to authentication the user I d is automatically generated, and then we will use this user I d to store the user inside the database. All right, so now when we have the reference, we can put another dot And from here, we need to call SAT method. And as you can see from description, it writes data to this database location. So if I call it here, we will store an object because we have adjacent based data ways. So our object is going to look like this. We will have name and name is going to be user dot display name. Then we will also have created at which will say, when the account has been created. So to put let's a proper time stamp to our database again needs to use some static. Let's see property that comes from Firebase Library. So we get a report firebase dot database dot server value dot time stamp, and it will put sanitized time stamp to our database. All right, so this dot said also returns that promise. So whenever we do anything with database or whatever, we interact with anything. Most likely, we're going to interact with promises. So that's why we need to await it and everything will be catched by this catch Block and user will be notified. All right, let's save all of that because it seems like, really a lot. Now let's click on, Continue with Google. Let's select my email and now I'm signed in. But it is actually a really strange. That's probably because I have this account already added Here, maybe you let me deal it this account. And now let's try one more time because we need to receive a matter. All right, so we click on, continue with Google, then we're going to select our account again. And now we have permission denied permission tonight. And we have this not in for Let's put dot at her message. But the thing is that we have permission denied and this is because if we open our database , all right, let's go and click, create database. Then we go to rules. And here we created the locked database by default. So whatever we tried to do with the database, we will have this permission tonight because, as you can see, we have read and rights permission set to falls for all off our database. So to avoid that what we can do here right before we said this rules, we're gonna say that for profiles, and we need to defy let's say, esque EBA for our security rules. And it's not that standard way to define something with security, but it just takes time to get accustomed to. Trust me, it is very easy to work with. So we have our profiles path. We just need to follow the past. So we store our data under profiles slash user i d. So we're gonna put it as an object. So we have profiles, then we're gonna need to put a key. And because it is going to be something dynamic that will change, we're gonna put a dollar sign, and then we can put something like user, i d. This is just to reference it inside nested object. Let me explain what I mean. So under this past, we're gonna open again another object, and inside, we're gonna put another key which is going to be dot treat and dot Right? Exactly the same as we have over here. So for dot Read what we are going to do. We're gonna reference if this user i d. That we received from here. Now it goes as available. We can reference it inside this scope. Let's say that I just highlighted. So if user I d which is that one equals off and off over here in this let's say context off rules is a global valuable that we can access so we can read data from profiles slash user i d. Only one user i d. That we could try to access equals us dot user i d. So it means, actually, only the owner off this document. Only the actual user can read its own data. Any other person, any other user will get access denied. All right, that's how we define the rules for don't treat. So let's copy it and we will apply the same for dot Right? So what is going to happen here? How it will understand the two year signed in Well, let's get back to the code when we call this sign in with pop Pop. Now our user is signed in internally to firebase services. So when we try to access database afterwards, firebase will pick it up and this user I d will be known to the database and it is going to be this auth dot user i d. And then we will check it against the path that we write to. Now let's click on Publish. Okay, Rules published. Now let's get back to the database and actually, let's copy, Visit ALS and let's paste them, too. Database rules to Jason. So they're always there. Right? Then go back to authentication. Let's delete this user and let's start over. So I'm going to click on, Continue with Google. I'm gonna select my account, and now I don't have any error. Now, I'm signed in. So now if I navigate back to database, I can see that I have data. I have profiles and that I have user I d exactly the same as we have here. So this is how it works with fire base. All right, so if we expand it, we can see we have our name, which is chilled 16 which is my name on Google account. And then we have created at which is milliseconds stored internally by fire base. All right, so now we created the user and we managed our signing page. Congrats. I guess it wasn't too complicated for you. because there are lots of things to cover here. Sign inflow than this database than security rules. And everything goes at once. I know that's hard, but trust me, just let it go after one hour or maybe one day when you will take a look on all of that one more time. It will not be that complicated. All right, so let's commit our changes and finish this video, so we're gonna pull, get at everything, and then we're gonna commit something like edit sign in page and sign and with facebook slash Go girl. All right. Perfect. In the next video, we'll continue our talk with authentication, and we will start our user management. See you that.
103. Creating Profile Context - Context API and Global State Management: Hey, in this video, I would like to talk about context, a p I and global state management. When it comes to manage user profile how we can approach this, we know that it must be accessible globally most of the time inside every component. Imagine a very less component in the APP. This component needs to display user name that is currently signed in question is where we manage this user exactly. Let's suppose in the APP component. So to get user name, we must pass it through the props to every next component all the way down the tree. But this is not cool. We have, like, 10 components above, and every component is playing a role in that this is called prop drilling. When some value is being passed down, the props on a lot off levels deep, this is no good and should be avoided to avoid problems kneeling. There is context, a P I in react. It introduces the concept off provider and consumer provider is a component that provides all its Children with some value or context. Consumer is a component that consumes the context and gets the value using context. AP I. We can easily manage our user in provider component and then consumers. In any component. We want to avoid probe drilling and intermediary components. We would create user context and put user name as its value. Then we would wrap up component around user provider. So basically all components get access to the user context to consume it inside the component where we need to get the context value we would call use context hook. In that way, we are able to get user name from any place inside our app. There are no limitations off context usage. We are able to put it anywhere in the APP component around home page around multi page form and so on. All right, let's actually see how context AP I works on the example off our chat application. Let's go. So on the resource folder, let's create another folder that we will call context. And here we're gonna put all of our created context. Let's create new file and mobile name it not maybe user context, but profile context. I think it is more suitable in our case, So let's put profile dot context doggy s. So what is our strategy? We're going to create this context and we will put it inside our APP component, so any other component inside our application can get access to it. So what do we need to dio to create a context? We simply need to call create context that comes from react package. So let's put it in available. And let's say it is going to be profile context just like that. Now we need to create a provider, a component, and that will provide all its Children with this profile context. So let's poor export CONST. Profile provider. And it is going to be a component. So this is going to be a function just like that. All right, now what's do we need to board here? What is going to return? It is going to return profile context dot provider And then inside this provider, we need support all off our components, whatever we pass inside. So it is going to be our Children. This profile provider is just a rapper, So let's destructor it as a prop over here and put it inside provider component just like that. All right, now, if we have or we can see react must be in scope. All right, let me import react. And some people get rid of this warning now how we're able to actually do anything. So because this is a component, we can do our state management directly over here. Let's navigate Teoh our private route, and here we know that we put this for now. We put this bull in value. This just falls by default. So let's get treat of that and he will consume our context. So let's put this. Let's say, bullion. Inside this context, we're gonna create, Let's see profile and said Profile as used state, which is going to be, let's say, Abul in value for now, just to demonstrate how context works in order to pass at value to these context, we need to put it as a prop to provide their component over here. And we need to pass our profile just like that and let's go meet set profile. Let's just not destructor it just like that. All right, we're ready to go. This is it. This is how we can manage our context now to actually use it inside our app inside our component. We need to put it here in app component just around switch. So let's type what we named it raw file provider. And that's it. And they will think about context that it can be very customizable because this is just a component. Let's say if we need to get user with specific I d. We can simply pass this user i D as a prop, and then we can grab it from props over here and then put our A P I call or any other state management related to this particular user i d. This is really, really cool, All right, now that we provided all of our components with profile provider without can consume it. So how we're able to do that? As you remember I mentioned use context hook. So inside our private route, Instead of doing this, we can simply do constant profile equals use context that comes from react package and then inside the records inside parent is is we need to specify context that we created. It is going to be this profile context, and it is really tedious to reference profile context every time we call it with use context. So to avoid that, we can create another hook, a rapper for profile context to make it more accessible. So from profile contacts Yes, file, we could export Const. Let's say Use profile Hook, which is going to be used context, profile context just like that. And now it says that cannot be called. Oh, excuse me. It is going to be a function that returns whatever this use context returns. And this use context returns us a value. So from our code, we can simply call use profile and let's remove use context from here. And right now, this profile is going to be this value that we passed over here. So now we can check if no profile, then we're going to redirect so and let's do exactly the same thing for public profile. So from here, instead of false, we gonna put use profile, and that's basically it. Now I already launched the app, So if I had a fresh, nothing has changed. As you can see, if I try and access the home page, I'm being redirected to sign in so nothing has been changed. However, now we manage our profile as let's a global state that we can access from any component not only from public crowd. So every component that is inside profile provider can access its context. All right, with use context, Hook and we created a wrapper around use context with profile context, which is used profile. So now it as even more user friendly for us to access. Also, it is very important to mention that let's say we created this profile context. Or maybe let's imagine we paraded something like counter context. Let's say 12345 all right, and inside our app. Instead of using it like this, we use it multiple times. So let's say for sign in page we have, let's say counter context counter provider like this all right, and the same goes for home. So we have it like this. We now have two different contacts. Their definition is the same, but they are different. So if inside sign in page, we let's say try and access context off counter, then we will get to one. Well, you, if we try and access the same context with use context, hook inside home page but will get another value because they too, have different states. All right, so it's like managing to separate states but with one definition does just to point out that it is different. So that's basically it in the next video, what we're going to do, we will continue working with our profile provider and people finally managed our signed in firebase user. See you there.
104. Global Profile State Management With Context: Hey, welcome in this video. We're going to manage our signed in firebase user with context. AP I Let's go In the previous video when we got to know context AP I we created profile provider. So now let's use the actual state instead of just a bull in value. So let's replace false with null. And let's also call, Let's define the set profile update function. All right, then we're going to use Yousef act to get user from fire base when the component mounts. So let's use your the fact and hear what we will do. We're gonna call on off State changed. So from firebase gs, we're going to use our object. And if we put dot if we type on, we see that we can use on both state changed. So this on US state changed. Allow us to subscribe to currently signed in user inside fire base. And inside this subscription, we're able to access off object. So let's put it like this and for analysis. Consul, log off the object. Now, if we navigate back to the app if we open our council, we will see this off object. And if we expanded it is exactly the same object when we signed in with the either Facebook or Google. So this is how easy it can be managed. If we were signed off to the app, we wouldn't see this object. It would be now. So the thing is why we're seeing it currently? Because firebase managers sessions for us, we don't need to implement everything. Once we are signed in, author, object will be automatically populated for us and managed for us. We don't need to do everything we need to only sign in or sign out, and then user object will be here. All right, so using this information, what we can do so instead of just Consul, look, we're gonna ask if both object exists. If it is populated with some value, then we are going to do something. Otherwise, if this Earth object is not the object, if it is still then the user is not signed in. So this on off state changed, called at least once when the component mounts and if we are not signed in, then it is going to be set to know also if we sign out from the application because this is the subscription. It will be picked up by this call. Back and off object will be such to know. So inside this else we're going to set profile to now and here when we have the object we can call, set profile and put some profile data that we will define over here. So our profile data is going to be the next it is going to be first user I d. That we will get from both object dot your i d Which we can see over here. And it will reflect our user I d inthe e off many library that we saw on fire base. And also I were user I d inside real time database. Then we also want maybe email. So we gonna pass off object dot email, and also, we need our data from real time database, so we need to actually get it here. So what we will do as we can see, profile is already declared. All right, maybe less. Just name it data and said profile data. Okay, so here to get actual data from the database for this user, we need to call again database from MISC Firebase. Then we're gonna put reference again, we're gonna profiles. Then we gonna pour off object dot your i d Then we switch quotes for string contar population and then we want to pour aerial time subscription for our user leader. So if something changed, then we want to be notified about it. We don't want to manually manage everything. So with real time data base and with actually any database and fire base, it is very easy. So to get data only once we call dot once method to put a real time subscription on this data we need to put on, then we need to call it as a function and first argument. We need to specify the target, the event. Let's say so on value. We want to execute this Colback. So whenever our data at these path inside database changes like anything, these Colback will be fired like every time and we will receive a snapshot. So let's Consul Luck snapshot just like that. So now we are inside home because we actually get some profile data. And as you remember, inside private route, we check against profile so we don't see the sign in page. Okay, that's good. So Our data snapshot has key node reference and a few other things and meta data related to this snapshot at these path inside data base. Well, inside the snapshot we have this method. It is called snapshot dot value snap shirt, dark value. And it will give us the data from the database, Inform off JavaScript object. So let's put let's say profile data equals snapshot, not value. And now let's come Salak profile data like this. Let's check it out. Now. If I refresh the page, I can see have an object with created ad and name, which is she looks 16. Exactly the same data that we have inside database. Now what do we need to do? We can actually destructor this profile. Data weaken D structure, name and created that like this. And here we can move this data object to this subscription like this, and then what we can do. We can also move this at profile data over here. And for this data we can put name and created at just like that. So our profile at the end we'll have named created at your i D email. Right? So this is it. And now we passed this data profile state down the context. So inside our private out, we also need to somehow keep track if we're currently being signed in. So we need to put the loading state in order to put a spinner or something else. So let's put another state which we will name is loading and set is loading by default. It is going to be set to true. And right after we said the profile we're gonna call set is loading and put it to false. Or if we don't have any profile, we're gonna call Set is loading and put falls as well. All right, Now this is loading. We gonna pass along with our context. So instead of just passing profile inside, we gonna pass an object with is loading state and also profile. So now, inside our private route, when we use use profile, we receive an object with his profile and profile objects inside. So we're gonna d structure our profile from it and the same mobile do four use profile. So now what we can do here, inside private out we can actually use This is lowering. So let's d structure is loading and what we're gonna ask. So we're gonna put another if over here, and we will ask if our data is loading and we still don't have any profile data. Then we're gonna return container from our suit and inside, we're gonna put Law Order. It is going to be a spinner, also a component from our suit, and it is going to be centered. It is going to be centered Vertical e wolf size whoops. Off size equals M d. Then content is going to be loading, and speed is going to be slow. And let's move it to avoid es lent her. Let's move it just to the top like that. All right, so this is our first condition, and then we need to also modify that one. We're gonna ask if we have no profile, and if we have no is loading state only, then we're going to redirect. All right, so let's check it out. Now. When we refresh the page, we can see the spinner Pretty cool, right? And only when we get the data, we actually see the homepage. All right, let's do exactly the same thing for public crowd. So let's copy this logic and let's put it over here. Let's Destructor is loading and we gonna ask if we have is loading and we have no profile then we're gonna put again loading state like this if we have profile and, well, it might be a little bit tricky. So if we have profile and is loading is set to false, then we're gonna redirect. All right, this is basically it. I only want Teoh do one more important step here because we are working with subscriptions in react. Whenever we work with real time listeners to the data, we use a subscription. So whenever we have a subscription, we need to unsubscribe from it when we don't need it. So this on US stage changed. If you can see it returns fire base unsubscribed. So it returns us a function that we need to call to unsubscribe from this subscription on off state changed. So let's put it, let's say off on sub and we will call this off on sub and our cleanup function off Yousef act. So we're gonna return a function and here we're gonna call off on. So just like that and the same actually applies for our database reference over here. So at these past, we put a real time listener which is on value, and it is our Colback. So we want to make sure that we unsubscribed from that one as well. So here, let's say, inside this use of fact, we're gonna pour, lets a user reference. Then we're gonna assign Use a reference to database reference at this path like this and then user rough on value. We will execute this callback whenever we don't have any data. If our user is not signed in, If we don't have any other object, we're going to ask if user ref is defined. Then we gonna call, use rough dot off because if I put dot over here, I can put on I could put once and also I can put off and this off as you can see detaches A callback previously attached with on so we can. In this way, we can unsubscribe from these call back from these path inside the database. Actually, the same we will do inside our cleanup for use effect. So this one whenever we signed off and this one whenever we amount the component, So here we're gonna ask if user Raph, then we're gonna use a ref dot off unsubscribe from this user reference. All right, so this is basically it. I hope it wasn't too confusing cause for me. When? For the first time. When I saw it, it was, but at the end, it does make sense. All right, let's commit our changes and finish this video. We're gonna put get at everything. Then we're gonna commit everything with the message. Something like man age user with profile context Put riel time subs something like this. All right, see you in the next video.
105. Start Building the Sidebar and Dashboard: Hey, welcome. Now that we have full signing flow, let's finally start building our homepage. We will start from the left site. So first we're going to build our buttons than chatroom list and then we will go to Maine. Shatt Window. Let's go So inside pages instead of this def. Let's define our grit. So it is going to be great component, which is going to be fluid and class Name is going to be a Chuan 100. We will make it full height. Then inside we're going to control element and then we're going to pour column element from our suit. So for small devices, it will take all columns, which are 24 columns and starting from middle devices. We're going to put it something like eight. Not health, but eight. And inside this column we're going to use sidebar component, but not the one that comes from our suit. The one that we will create ourselves. Let's save it. And under components, let's create new file, which we will name Sidebar doggy s. Let's open it and let's ask a folder for a rapping. Dave, I'm gonna put class name off full height and then a little bit off patting at the top. So inside we're gonna split it into two elements. So we will have the top part with our buttons and at the bottom we will have a chat room list. So let's first create def for our top part and at the bottom because we don't have any chatter on the list yet. Let's just would bottom text like this. So inside this different will pour dashboard juggle that will create in a moment and save it. So other components. Let's create new folder, which we will name the report here. Bubble defined two files. First is going to be indexed togs, which is going to be our dashboard component, but we will manage everything, but for now we will keep it empty. So let's name it, Dad report and just put hello insight and second element is going to be dashboard juggle. So here we will define our button and the drover itself. So first we want to get rid off the wrapping Div. Then I will define a button over here, which is going to be our Tobler. Let's say it is going to be a block element. It will have blue collar and inside were going to put Aiken that we import from our suit. Aiken is going to be that word. And then text is going to be dashboard like this. Now let's actually say with and let's see, what do we have? So if we refresh the page inside sidebar, we don't have dashboard till go, Let's imported. And also inside home We don't have sidebar. Let's imported as well. All right, let's check it out. Right. So we have button. But when we click, nothing happens. So let's define our Drover component on or Drover, element here next to Button. I'm gonna put Drover that comes from our suit package and it is not so closing element inside. We actually need to pour drover elements, but we are going to define them inside this index adult NGS file. So for this struggle, we only need to define this show property and it is going to be It must be a bowline value that will indicate when this drover is opened. Then we need to define on height event and then we also need to define placement. In our case, it is going to be on the left or right now we need to actually define our handlers or state for our drover. We need to keep track over its state on our own. And since we're going to have a lot off motels or drovers in our application, and we're going to re use a lot of the same logic, I proposed to create a custom hope that we will name use model state and it will expose only three elements is open on height and on show. So under MISC, let's create new file custom hooks GS. Here we're gonna define a new function, which is going to be our hook, which we will name use model state. It will receive default value. Let's say default value, which will be set to false if it is undefined. Inside, we're going to define state, and by default this state will be our default value that we pass as an argument and also here we will define a few helper functions. Let's say so. First function is going to be open and it will be a wrapped around use cold back in advance to make it optimize, and he will call, said ST, and we will set it to true and the same we will apply to close. But instead of true, we will pour false over here and from this hook, we're going to return our state. Maybe let's rename it too is open, and the here set is open. So from this hook, we're going to return is open, open and close helper functions. And don't forget to export this year's model state from custom hooks. All right, so inside Arab or toggle, we're going to use this use model state which returns us is open. Then it returns us close and open. So now we can use it. So on height, we're going to specify with our own clothes function that we define in the hook show. It is a bull in value, so little specify is open and also for our button. When we click on it, we want to show the Drover. So for this button for on click event, we will specify Just open. All right. And now we actually need to put something inside Rover. It is going to be this element. So let's define dashboard and you will see that it will be imported from dot It means that it will be imported from our current folder. So why we put Index Gs like this? So if we use it in any other component, let's say inside pages and the way we import it, it is going to be like that. We're going to import from components. That report will not specify Dashboard Index GS because it is named as index. Yes, we can specify only the folder name where this index dot gs re sites and it will work. All right, so now let's save everything and let's take a look. Now if I click on dashboard, it worked perfectly. So I guess that's it for this video. In the next video, we will continue and make our mortal a little bit more responsive. Because if I'm gonna just click on it, if I'm gonna, you know, just resize the window, you can see that it stays static. This is not user friendly behavior, so we will fix it later. But for now, let's commit our changes, and we will say, starting or started building the sidebar component. All right. Perfect. See you in the next one.
106. Responsive Sidebar Using Media Query: Hey, welcome in this. We're we're going to make our job, er, that we created in the previous video responsive. What I mean is that now, if we try and inspect our element and if we open Drover, if we resize the window, it stays static. Well, it is not responsive at all what we can do to fix this for Drover. There is this probe available, which is full, which means that Drover will be available for full screen. Let's check this full property and let's see, what do we have? So right now when we open it when we are on desktop devices, we can see it is full screen. However, if we are on mobile devices, it looks good. So what? Weaken Dio? We would ideally want to enable this full screen property only when we are on mobile devices. So we need to some have determine it programmatically well, we can actually use media queries, but they're only available and CSS But with hooks, we can achieve the same result programmatically. So let's open the assets file the assets folder and here confined use media query gs. Let's open it and let's copy this hook now Let's pace this hook to our custom hogs dgs and let's import use a fact from react. So now what this hook does it hooks into window much media a p I, and it allows us to manipulate media queries. Programmatically I will not dive into details here. Let's just see how it works. So I'm going to save the file. Then let's come back to Dashboard Tuggle. And here we gonna call this use media query hook and inside we need to pass a media break point. So let's say we will open our parent eases and we're gonna pass Max with 1992 pixels. And now this hook returns at Bullen that will indicate whether it is true or false. So, using this, we can check if we're currently on device with 992 pixels. So let's poor is mobile And this Bullen we're going to pass toothy, full prop. So when we are on mobile devices, we will have full property enabled. When we are on desktop devices, this will be set to falls and we will don't have this full property if we save it. Let's get back to the app now if we are on mobile devices. If our screen size it's less than 992 pixels, we have our full Drover and it works perfectly. And if we are on desktop devices, we have this static Drover that is not changed. Well, this is exactly the behavior we wanted. So here we're done with our responsiveness. Let's finish this video and commit our changes. Let's put everything to the get and we will name our commit as edit use media query hook and made Drover responsive. Okay, Perfect. See you in the next one.
107. Creating Dashboard - Part 1: Hey, welcome in this redeemable. Continue building our sidebar and we will start building exactly Dashboard. Let's go. So first, let's open index togs And here instead of visit if we're going to use Drover elements. So since we don't have any rapper because we defined it it inside the airport toggle these Drover, we will use react fragment insight like this. So our job, er elements will be drover dot Not titled over dot Heather Inside header. We will get drover dot title and because off V s code bark with react fragment Now I have this data duplication, but that's fine. So next you had er we will have drover dot body And then we will have drover dot footer just like that. So inside body were going to display user data. So here we're gonna port. Let's say h three element and then we will say, Hey, user or we have profile. We have profiled dot name. So this profile will be our profile that we get from use profile hook. That is our context. So we're gonna call use profile and I don't have intelligence. So let's open profile context. And now, if I put intelligence it will be important for me. All right. Good. So inside body, we have text displayed inside title. We gonna pull just dashboard and inside footer, we will add Sign out button. So let's add button element. It is going to be a bloke element. It will have red color and for unclipped we will specify on Sign out and we will poured Sign out as text. All right, so maybe let's just remove one click for now and let's delete this H three tack at the bottom. Let's check it out. What do we have as a result? We're right. Perfect. So now we have hate. She looks 16 which is our user name. And then we have signed out button, but it doesn't have any functionality yet, so let's add it. Well, when we sign out from the application, we want you also close this model window. But this close function recites inside Data Board Togo. So I proposed to define one sign out, function inside dashboard togo, and then pass it down to dashboard component. So here we gonna put const on sign out. And because we have this is open state over here, every time we open and close it every time. We will have a new copy off this on sign out function. So we want to keep this copy. We want to you memorize it. So we're gonna use use call back in advance and inside were going to put the next logic. We need to call on Sign out, which is available on the oath. Object? Oh, not sign out. Just sign out. And that's it. That will completely sign out. Our current user. Everything is managed by fire base. Then we need to put alert, which is going to be an in for alert. We will say, signed out. It will last four seconds and then we will close the Drover as well. So because it comes from our custom hook, we needed to pass it as a dependency. But that's fine. Clothes function is memorized inside use model state because we put it inside. Use CLO back as you remember. No, Let's pass on. Sign out to dashboard and inside dashboard. Let's consume it on. Sign out. Is it capitalized? Yes, it is. So four on. Sign out. Click. We're gonna put on sign out function. All right? It seems fine. Now let's check it out. If we open our their board, if we click on sign out right now, we are signed out. And the potential question could be why we are redirected to sign in page. That's because inside our context, we have this on off state changed. So when we sign out because it is a real time subscription, firebase will pick it up. It will sign out the user, and this Colback will be fired. So when we don't have off object, we call set profile to know. And when we have set profile now or undefined, if we look inside private route, we redirect user to sign in. So this is exactly what happening. So now we have the complete signing and sign out system, which works seamlessly. All right, so to check that everything works. Fine. Let's sign in one more time and I'm gonna again select exactly the same account. Now I'm redirected. I am signed in and again, I have hate. She looks 16. So perfect. It works as it must work. Now let's commit our changes and finish this video. We gonna port, get at everything, then get commit. Started building a dashboard and it sign out button and display user name. All right, See you in the next one.
108. Creating Dashboard - Reusable and Editable Components (Part 2): Hey, welcome in this leader were continue to build that pork and verbal create a component that we will reuse multiple times across our application in a few places. So it is going to be an input with the two buttons that while I was too edited. So when we save it, we actually update data inside the database. Let's go. So first, what I propose is to create the actual component. So under components, let's create new file creditable in port for now. Let it be empty. Let's just put hello over here. Let's first define how we're going to use it. Let's open that word file here under Hey, profile name. Let's put divider from our suit. And then let's define Edita ble import. So what? Props should re pass insight. So first of all, we're going to pass initial value, which will be sad to the input. So let's put initial value, which is going to be profile dark name. All right, then we also need to define on safe function and that will be fired when we will save the input. So let's put on safe and let's define it over here. So we're gonna put on safe and this callback function, it will receive the same value as an argument. So let's put new data and for our let's leave this function empty. Also, we wanted to report maybe some label in front of the input, so we will have an option to pass a reactive component as a prop to the edible ample component. So let's define something like age six. Maybe, let's put it is going to be Nick name and class name is going to be margin bottom to because we want to add some space between our label and between the actual input. And also we can pass other props that will be redirected Judy Input element. So maybe we can also pass something like name, which is going to be, in our case, nickname. So what is going to be input with our nickname that we will be able to add it? All right, Cool. So let's open our component and let's start building. So first we have initial value. I worked one of the main props. Then we will destructor on safe venerable also have label, which is going to be this age six, and there is a chance and that this label will not be passed. So let's put now VT fold and then also some other things, like placeholder. Maybe so. Let's poor placeholder. And by default, it will be said, Choose something like right, Your value. All right. And then also, what I propose is to poured a prop that will represent our empty message when someone tries to save our input and it is empty so we can put like a global value that will say that input is empty. But what if we want to customize it? So let's also pass it as a prop empty message. And by default, if it is not specified in props, we will say that it is going to be in court, his empty all right, and any other prop is going to be our input props. All right, so for this live what we're going to do So here, right before the actual import element, we will port label. All right, then we will pour input that comes from our suit. So for this input, at the very first prop, we will pass our input crops, and we gonna overwrite a few off them. So we're gonna overwrite placeholder, which is going to be this place holder from props. Then we will also have other things that we will manage inside this component, such as its internal state. So when we're going to edit it, we will manage everything from here. So let's put it here in advance. So we're gonna define new state, which is going to be, let's say, just input and then set in port by default initial value. It is going to be our initial value that we pass over here. So let's put initial value. All right, so then we have own change handler that we need to specify. So let's pour on input change. So normally, as you remember, it receives an event object. But on our suit, it is slightly different as the first argument for on change event. So if I put unchanged over here, if I hover on it, you can see that first argument goes value. So it is just made for us to be more user friendly, so we will have value instead, off referencing even target dot value. So here, we're gonna put also use call back because we will not have any dependency and we want to optimize it in advance from here. Bubble call only set input to her value like this. And for these on change, we're going to pour on import change, all right. And also, don't forget to associate the actual value with our input, and we're almost done here. Now, we also want to make our input edit herbal. So it is going to be just a bullion value that will indicate So we're gonna create his creditable state is a desirable and by default, it will be set to false. All right, so this input will be disabled when we have is creditable, set to false. So when is edible such the true? We will be able to manage our inquiry. So let's create actual button that will indicate that So let's poor input group will not put just button because we will have the two buttons inside our import either close or edit . So we're gonna put input group to make it look groped, you know? So input group in button and inside this button, we're going to put I can and this I come will be the next. So if our input is going to be edible, venerable display close button. So otherwise, when we see the actual input and we don't intend to edit it, we will receive added to So this is just an icon with, like, pencils, so So we can see that we can added it. All right, so for this on click button, we're going to pour on edit click and this unedited click we will define over here. So on edit Click also will quote it around, use call back in advance because we will have no dependencies or actually with you. But it doesn't matter, Corneau. So we're gonna put Set is creditable to reverse value off our current state. So we will call this function which will reverse the bowling value. And then also, we want to make sure that if we click on cancel, we get back to the initial state. So we want to also call set input and just in case, set it back to initial value. So now it appears as a dependency. So let's put it here. And let's actually say with and see what is going on here. All right, Cool. So now we have it like this, and it looks almost cool, but it seems like I'm a something. Oh, yeah, actually, because we use input group, we need to wrap it around Input group. That's my bad. So important group. And I'm gonna put this at the end like that. Now, let's take a look. All right, So now it looks good. I can't add it input right now, because is edible such to fall. So when I click on this button now, I will be able to add it. This button. And as you can see, when I click on this button, the on edit click function will be fired. So if we don't have this set input initial value when I click on this button, it will not be re set to the default value. So we want to make sure that it is always initial if we cancel it. All right. So what else do we need to do? We need to define another bottle which will be displayed when we actually click on edit. So we are able to savor here. What? We're going to pour. We're going to pour. If our import is creditable, then we're going to render another input group bottom. Let's just copy it and put over here. So for on click, we're going to put on safe click. It's not going to be the same on Save that. We pass as a prop. We're gonna define another on safe click over here. For now. Let it be like that. So, for this button, what we're going to his passive fireable change. I can I can is going to be a static Aiken. And this I can is if I remember it is check. Let's take a look. All right, Go. Yes, it is. Check. So it seems like we have the markup. Let's actually define the functionality for on safe click. So what we're going to do here? First, we're gonna do a very primitive validation. First, we're going to get the trimmed value to avoid unnecessary spaces around our text. So let's put trimmed value and it is going to be input dot trim. OK, then we're gonna check if our trimmed value is going to be just an empty space. Then we're going to alert was pacified. Empty message as a prop. We can put this empty message over here and let's put time out off four seconds. All right. Then at the end, we're going to put Set is creditable to falls because when we click on safe, we want to make it not creditable like it was before. And now here, we're gonna check against one more. Think it is going to be if trimmed is not going to be our initial value. So we're going to check if we actually edit something and our value is different Onley, then we're gonna call our own safe call back that we specify here inside dashboard. So it is going to be in a sink function. So let's pacify it, since it is going to be facing it is going to be a promise, so we need to await it. So let's pour a sink and let's pour a weight on safe that we pass here. And as you remember, this callback will receive new data as an argument. So here we need to pass our actual input. So let's poor not input or maybe trimmed to value, because we don't want to put it with the just unnecessary spaces around it. All right, so now let's check it out. And here, let's come sold out. Look, New data to see if it actually worked. Now it seems pretty finished. Maybe in the future we will adjust it a little bit to fit our requirements. But for now, it looks good. Let's open our dashboard. Let's open, Consul, and let's take a look. So now if I edit it, if I cancel, everything is good. So if I again click on safe, nothing changes. And we don't have this call back on safe fired. So if I change it and if I save it now, I have the new value that is being consul locked from this on safe handler. So actually it worked. And I guess we are done here in the next video. We will actually apply some functionality to this component, or maybe around this component. So we update our riel nickname. But for now, let's end this video and let's commit our changes. So I'm gonna put created reusable, creditable input. All right, Perfect. See you in the next one.
109. Creating Dashboard - Update User Nickname (Part 3): Hey, welcome in this video. We're going to continue built our dashboard edible update our real nickname inside riel Time database. Let's go. In the last video, we created creditable input. And we define this on safe function that we passed down to edit herbal input. So this callback function is going to receive our final input when we click on save button . So let's now use this data and update our database. So, as before, we're gonna use our database, object to access database. Then we need to choose pacify reference to the database. So we're gonna put profiles slash We're gonna use string of their police in here. We will put profile. Don't user, I d. Now we need to update only nickname. We don't want to have created that. So we need to be more precise when it comes to referencing something inside real time database. So we need to reference this name over here. What we can do, we can actually reference it in two ways. We can put your slash over here and put the name or I prefer another way just to make it, you know, more user friendly. I would put child over here and here. I also need to specify path, but this path will be a relative to the path that we specified inside first reference. So let's push this name. So we gonna specified child off this path inside database, all right. Or actually, let's put it in a valuable let's put it, let's say, user Nick name, ref. Then we're gonna define a try catch block because we're going to work with asynchronous data and promises. So here we're gonna pour, await, and then we simply call user name nickname ralf dot sat, which will write data to the database. And here we're gonna put new data that we receive as an argument. After that, we will not If I user with success message and we will say nickname has Bean updated and again for seconds and for any other we're gonna put at her message where we will put our message as its text and also four seconds. All right, Seems nice. Let's check it out. Let's navigate back to the app when I click on edit let me change my nickname to enter Be than I click safe and nickname has been updated And if we go back to later base. You can see that the actual data is changed. Let's try one more time. Let's put just I do know nd I click safe. Nickname has been updated. Database is updated. Everything seemed nice away. If you still have a question. Why exactly this? Hey, Andy being updated when we update the actual data inside the database. Okay, One more time for explanation. Inside our provider context, we used subscriptions, real time listeners for our data. So for use a reference, which is our database path under profiles, user I d. We put real time listener these call back. So this cold back fired every time something changes under these path inside database. So if let's say name changes under user I d than these call back will be fired and we will update profile state with this data object, which will be new at the time when these Colback is fired. So the same applies for created at or for any other filled. So if we had something like age over here, and if age has been changed than these Colback will be fired and so one all right, I guess that's fine. And you get it. Now let's commit our changes and finish the video. So let's good get at everything. Then let's put Pete commit, Let's say updated nickname inside the database. All right. Looks good. See you in the next one.
110. Creating Dashboard - Link Social Media Providers (Part 4): Hey, in this video, we're going to continue built the airport component and we will associate user account with multiple signing providers or multiple Sinan methods. So, for example, if I connect or if I look in with Facebook and then if I look out and look in with Google, I end up on the same account. I will not have two different separate accounts. All right, so let's do this. First, let's navigate back to our code. And here under dashboard, let's create your file, which we will name Provider Block for now. Let it be an empty component and let's edit to our dashboard inside Index GS right after Hey Profile Name provider Block. Perfect. Now to continue, we need to know how we can actually access our current user data where user object data to be more specific. So instead of using our use profile hook to get the data, we can actually use off object, and then we can access current user. So let's come slug it and see what do you receive? So if I now go to that board, if I look inside Consul now, I have the user object off currently signed in user, so it is managed by fire base. Here we confine different access tokens, refresh tokens, display name, email and other data. But we are interested right now in provider data that we have over here. So it is basically an array off providers or array off Simon methods that we are using right now. So, as you can see, right now, we have only one element, which is google dot com. So we will use that information to display that we're currently connected were not to this specific provider. And the thing is that if you remember, we put real time listeners for our profile data. So whenever we update something, it updates in all places with the providers. It doesn't work in real time, so we need to manage it using react state. So all right, let's get back to provider block. And here we're going to define a new state, which we will name is connected, and it is not going to be a bowling value. It is going to be an object that will indicate whether we are connected to Facebook or Google. So we will have an object with two keys, google dot com and facebook dot com, which is Provider i d can be found that inside this array, so as you can see for Google, it is google dot com. All right, so for google dot com, we're going to check if we are connected. So we're gonna access us current user dot provider data. So it is an array, and on the rain, we can apply some to check if some element is actually justifies the condition. So we're gonna have here our data, and we're going to check if some off our where array elements has provider I D or google dot com. If data provider I d equals google dot com and the same we will do for Facebook. So let's copy it. And let's replace google dot com with facebook dot com. All right, good. In this way, now we will have available is connected. That will indicate what we're connected to Google or Facebook. Now let's actually define our marker. So inside this def, we are going to pour our buttons or attacks that will indicate it. And here we will have a load off conditional rendering. But for now, listen. Defiance, aesthetic markup. So first is going to be tacked element. So the stack element will be close, herbal, and it will have color green because it is going to be four Google inside, we will have Aiken. And this I can will have I can off Google and it will say connected. All right. And also now we have this morning. Let's put it here at the top the same. We will apply for Facebook. So let's copy it. And let's replace color with the blue and I can with Facebook. All right. Seems good. Now let's check it out. If we go to dashboard now, we are connected. So this will be displayed when we are actually connected to our providers. All right, then we're gonna define other things which will be our buttons to actually connect to these or that provider. So let's put a little bit off, merge into this block, and then we're gonna define our bottoms. So first button is going to be for Google. So it is going to be a block element. It will have color green and inside again. We will see and I come and I can will be, Let's say, also Google and we will name X linked to Google. The same will be for Facebook. Let's copy it. And let's replace color with the blue Lynn to Facebook. And I can is going to be Facebook. All right, let's check it out. All right. Looks good. So we will have this to bottom buttons to actually connect to provider. And these two at the tell people have when we are connected. All right. So let's first pour our conditional rendering for the case when we are already connected. So for these tags, we're gonna put if is connected, then because it is an object we can access its properties. So if I am connected to google dot com on Lee, then I'm gonna render this tag element and the same actually, we will do for Facebook. So now we will have a displayed on Lee when we are connected. All right. Looks good. And for this buttons, we'll applied the next. So if we are not connected to Google that come, then we gonna display this button and the same will do four facebook. So if we are not connected to your Facebook, then we will display this type of button. All right, let's check it out. If I open my dashboard, I'm connected to Google and I'm not connected to Facebook. All right, so now the thing is actually to do some functionality to apply everything with a state. All right, so first we need to define were handlers. So we will have in total for handlers, to handlers to UNL Inc from Google and Facebook, and two handlers to a link to Facebook and Google. So let's define them first is going to be on a link on link Facebook like this. Then we will have unlinked Google. Then we will have linked Facebook and LinkedIn Google and link Google like this. All right, First, let's maybe do unlinked functionality, so it will be kind of the same, and it is very actually easy to do. So we're gonna create another, like, a common function that we will call inside on link Facebook and allowing Google that we will call, you know, just on link, and then we're gonna receive here provider I d provider. I d like this. All right, so we gonna call this unlinked from unlinked Facebook like this, and then we're gonna put facebook dot com and the same we will do for Gogol. We're gonna put on link google dot com like this. All right, so do you unlinked the actual provider. We're gonna do the next thing we're gonna put first try, catch block, and we're gonna ask in the first place if only one sign in method is left for the user. So it is possible that we unlinked from Google, and then we end up with no sign in providers at all in this way, account will be abandoned and it will not have any sign in method, so it means it will be kind of that. So we want to avoid that. And we're going to check if off dot current user dot provider data dot length is equal to one. And we wanted to and link it. So we have only one sign in method and we click on unlinked. We will receive a warning. We will throw new editor, and we're gonna say you can not disconnect for, um provider I d. That we receive as an argument over here. And now we will catch this matter that we throw over here, and we're gonna put it alert and art editor, we will say better message for four seconds. All right, So if everything is cool here And if we have let's say to providers connected and we want to disconnect from one of them, it is safe. So we're gonna call off dot current user dot unlinked this method, if I call it, you can see on links a provider from user account and I need to pass provider I D, which is going to be provider I d from our arguments. So it is a promise what we gonna do, we gonna awaited. And because it is a think awaits index, we need to put a sing in front of the function. So after we awaited, we need to update our set is connected. We need to update our local state. So what we can do? We can actually create another function just to update our state so we can call it something like this update is connected, and inside we can pass provider I d and then just value whether it is true or falls. So here, report provider i d. And when we unlinked, we want to set it to force. So let's create this update is connected we're gonna receive provider I d. As an argument. And then we will receive actually, the value, something like this. So inside this function we're going to call set is connected here, we're gonna receive previous value inside the callback. And here we need to return and you value because it is an object. We want to make sure that we maintain the structure. So we're gonna return. All right, let's maybe put it more explicitly from this callback week in return And Alba jet here, we're gonna merge the previous state like this and then to update the actual provider i d. We need to open this type of brackets. Then we need to quote provider I d as a key and then reveals pacify the value. All right, so in this way, it will update the object with the specified from either i d and value. All right. Good. It looks just fine. Let's maybe also, and another alert over here with alert, maybe just info, and we will say, disconnected from provider disconnected from provider I d like this unless put four seconds over here. All right. Now, let's actually link this handlers to our buttons, so we need to unlinked Facebook. We need to put it to here to the sack element. So here we can have this on close event. So for this unclos event, chewable specify on link Google, actually, and the same for Facebook. So here we're gonna put on clothes and we're gonna put on link Facebook this time. All right. Now it has sufficient functionality to test it out. So let's open dashboard. Let's click on this close element. So when we click on it, you cannot disconnect from google dot com that because we only have Google signing method only one of it. So if we disconnect from it, we will make our account that all right to go now it's actually and our link functionality . So again, it will be the same almost the same. So we're going to create a common function as UNL Inc. So let's put it, maybe over here and we will name it. Let's link. All right, So it is going to receive not a provider i d. But the provider object the same as we used inside. Sign in page. Let's see this new firebase Auth firebase provider. All right, so I copied it. So let me comment it. And here we're gonna call this link and then signed. We need to pass provider object that we will receive as an argument. So for Facebook, we gonna call new firebase off Facebook off provider. Let's first import fire base from firebase up. All right, look, the coach and the same will do for Link Google. So let's copy it. And here we gonna call Google Auth provider. All right, Looks good. Now let's associate this handlers in advance with our buttons. So on click, we gonna link Google And for this button on click click on a link Facebook. All right. Looks good. So now what will be our strategy? So it is actually very, very simple with fire base again, we need to use our auth object. And here we're gonna call our current user and then link with pop up link with pop up. We need to specify just the provider object that we receive as an argument which is going to be one of those, all right. So, again, it is a promise we need to awaited. And after it is successfully is updated, what's converted to you racing function after it is successfully updated, we will notify users with alert in four. Let's say connected or maybe linked two. Provider. Let's use Rincon preparation. And because it is at provider object. This time this provider object has provider I d as its key. And again we will specify four seconds in case of any other. We're gonna put alert at her message and we will put our message here like this. And at the end of the day, we need to also update our local state. So we're gonna call the same as before update is connected. And this time we will pull provider dot provider I D. And then we're gonna put true because we link our account. All right now it seems fine. Let's check it out. It seems like we have all functionality. Let me double check. Okay, look good. Now let's go to dashboard. If I click on link to Facebook, let's see what is going to happen now. I will be asked to look into my Facebook bust because I already signed in. Now I have linked to Facebook. If I go to authentication and if I had a fresh, I can see that I have to sign in providers associated with this user. So it actually worked. Now, if I Let's a click on Disconnect from Facebook Now, I have disconnected from facebook dot com. If I click on Google, you cannot disconnect from Google because it is the only one left. And if I refresh again, you can see Facebook disappear. So actually, everything work. All right, so it was a lot, actually, I guess that's the good time to finish this video. So we're gonna add everything to the stage state, and then we're gonna get commit linked Facebook and Google to one account created provider Block Who? All right, see you in the next one.
111. Creating Dashboard - Creating Avatar (Part 5): Hey, in this video, we will continue to build dashboard, and we're going to start off our management with user profile avatars. So in this video we will create a button and we will be able to select an image from our PC that then we will upload to fire base and use as our avatar image. Let's go. So first, let's create a new file on their dashboard. That trouble name of a car applaud Bt in. Then let's create an empty component. For now, let's put hello inside than in Index GS, which is our dashboard right after edible input. Let's reference avatar upload Bt in like this. Okay, good. Now let's start building our component. So our upper element is going to be a development for class name. We will give it a little bit off margin at the chop, which is going to be empty three. And then we want to keep everything centered. That's why we put Tax center. All right, then we're needs to specify input off file type, but we don't want to use the native one because it looks not the best way. So for now, let's just keep it as text And maybe if you want to, you can change it. To do so. We need to put a dif over here. Then let's specify label insight. And inside this label, we're gonna put select new Avatar and also next to this text inside label. We're gonna put in put off type file, but we're going to give it display off none. So we actually click on this text. However, at the same time, we click on this input. So let's pour in port off type file like that. And also, let's give it class name off, display none. And we have this warning on label saying that it must be associated with the control. So for this input, let's define an idea something like Al Atar upload. And let's give this idea to html four for dis label. So HTM of four is going to be avatar. Applaud. All right. Also for this label, we're gonna give class name off this play block. Also, it is going to be coarser pointer, and it is going to be a little bit padded like this. All right, let's check it out. Now. If I go to dashboard, it looks nice. Now we have this button. So when we click on it, we can actually select files. Let's make it this way that we can select only images over here. So for this input, we're gonna put another prop, which is, except and it is going to be a string off accepted file types. But let's specify this file types outside of the component. So in the future, it is easier to navigate inside this component. Let's tie file import types, and it is going to be as drink off file types referenced by comma. So first we gonna accept PNG files than J PAC files and also J pack off this extension. All right, so for this except prop, we're going to pass file import types and we are ready to go Now let's check it out. If we click on it here, we can see P and G and J back files. All right. Looks good. Now, what will be our next step? So when we select an image, we want a new model to be opened, and inside this mortal, we're going to see the preview. So we need to define the motor of Indo. So here, next to label we're gonna use model element from our suit. And inside this model, we're going to put model dot Heather than next to it. We will have body and also footer like this. So for model, we need to specify show property. It is a bullet that indicates whether it is open or not than on height handler when this model is closed. So we need to use our own custom. Hope that we created earlier use mortal state to actually get those values. So let's import it. And let's D structure is open, open and close. So for on height event, we are going to call Close Handler and for show we will specify is open. So inside Moto Heather, we're going to port model dot title So this title is going to be a just and applaud Maybe like this, applaud new avatar and let's remove this title at the bottom over here. Then inside body. We're going to specify something else. And inside footer, we're gonna put a bottom that will actually upload our avatar. So let's type applaud New Avatar and for these buttons will specify appearance. Let's say ghost, and also we will give it with off 100 by specifying that it is going to be a block element . All right, so now, as you can see, we don't have any trigger to actually open our moto. We need to somehow determined when we select the file. So for this, we're going to use on change event available on import off type file. So let's pacify own change. And for this one change, we're going to create a function which we will name on file input change. All right, now, let's created here at the top and this function because it is a handler for an event. This function receives an event object. All right, so this event object will have target and under target. We will be able to access actual files that we select, and it always comes as an array off files. So let's put current files under even target files. So since it is going to be always an array, we need to check that we select only one file. So let's check. If current files that length is equal to one, then we're going to apply our logic. So let's first grab our first element from the array. So let's put file, and we're gonna put current files and reference the first element. Then we need to actually check if the file that we select is the valid file, because it doesn't matter what we specify. Over here. I can look for any file and change it to all files, and then I can buy May steak upload, Let's say adjacent. So we want to check if this file is actually an image. So here at the top, let's specify mean types that are accessible by us. For that, let's specify any available, Let's say, accepted file types. So here we were going to specify an array off strings. So first, our beam type is going to be image slash p and G. Then we will have image slash j pack. So if I'm not wrong, it is the correct one. And also we are going to have image slash p j pack. All right, Good. Now we need to create a helper function that will check if this file satisfies array off mean types. So if our file type is one of them, so we're going to create a new helper function which will name is valid file and it will receive file as an argument, and it is going to check file type against those values. So we simply going to check accepted file types Includes file daughter type. All right, so it will return a Boolean value. All right, so now here, inside. Ah, were handler. We can actually ask if we're gonna ask if is valid, file our file, then we gonna do something. Otherwise we're gonna show an error to user that. Oh, boy, you selected the wrong file time. So let's put alert. Then we're gonna put warning, not an error, and we're gonna specify, maybe wrong file type, and then let's poor file daughter type like this, and let's specify four seconds. All right, so what we're going to do when we have the valid file? First of all, we actually gonna open our motile window. But right before we open it, we need to somehow set our image that we applaud. So for this, we will create a new state. So let's create a new state with use state, which we will name. Let's say just image and set image by default. It will be set to now. But when we have developed image selected. We're gonna call set image, and we're gonna put file as our state like this. All right, Now, let's check it out. So if I go to dashboard, if I select new avatar, if I upload an image, all right, Motile opens. Now, let's do the same thing. But let's select Jason file. If I click open, I have wrong file type application, Jason. So it actually worked. All right? Now, what will be our next step? Our next step is to show the preview and adjust the image. So how we're able to do that, we will use react avatar editor package that comes from an PM I really like this mini package. It gives us an opportunity to customize the uploaded image. We are not going to dive into too much details, but we will just able to scale our image to need it size. So first, let's install it. So I'm gonna open my terminal and from here, which I have another All right, that's fine. I'm gonna npm install react avatar, editor And let's wait until it is actually installed or right. Seems like our package has been installed. Let's rerun the AP and P. M Run, start and let's see how we can actually use this package. So let me copy the import command. Let me put it here at the top. And as you can see, I need to use this component like that. So let's copy this. Let's copy this component than inside our code for model body. We're going to specify this component, but first, we're gonna check if we have our image defined inside the state. So let's poor image. If we have image, we're gonna display this about our editor component and for image. We're going to specify our file that we have US state for With and Height Mobile limited to 200. Then for border, we will put let's say, only 10. And this is that border by edges than we don't need color. We don't need scale, but we need border radius. We want to make it circled. So we're going to specify border radios 100. All right, now, let's check it out. If I refresh the page than I click on model Select new Avatar. If I click on this car and hit open now, I can see that I have this Converse element, which is this package. And now I'm able to add it my image a little bit. All right, so it looks good, but it does not center. It means that we need to add additional market for this image for this avatar editor. Let's put another def around it like this. And for this def. Let's specify display flex. So we're gonna put the display flex. Justify, let's say, center, align items center and let's put it full height like this. Now, if I had a fresh, let's check it out. Let me select an image again. But still, it doesn't look good because it's not justified. Center. It's justified Content center. Now, let me try. Select New Avatar. All right, now looks good. It is centered. Okay, so I guess this is it for this video, and our next step will be to actually upload the image. But it is going to be the topic for our next video on this step. Let's commit our changes and finish this video. So we're gonna add everything to this stage state that we're gonna get commit, and we're going to put let's say, started to work with user avatar. Applaud. All right. Looks good. See you in the next one.
112. Creating Dashboard - Uploading the Avatar to Firebase (Part 6): Hey, in this video, we will continue to work on avatar upload between component, and we will finish off uploading que sera waters. Let's go. The first thing quibbled you were going to define a handler for one click event for applaud your avatar button. So let's pacify on click event and let's create a new function that we will name on upload . Click. Then we're going to put this handler right after on file import change, and now we need to somehow get access to the actual image. This time this image is edited. So we need to get access to this converse element. So if we inspect it, it is a converse inside Dom because it is about our editor component that we use from the package. All right, So in order to understand what is actually happening, how we can get the image we need to navigate to their documentation than if we scroll down , we confined an example off accessing the resulting image. Here we confined this method get image scaled to converse. But as we can see from this example, it uses class based component, and also it uses something called references. So references in react is the way to access Dom elements directly or react elements directly where more appropriately would be to say programmatically. So let's find out how we can actually put a reference on our avatar editor component inside a function based component. So first, we need to import a hook that we haven't seen before from react, which is used ref, which stands for use reference. Now we need to create a new reference, and we will name this reference avatar editor graph, and we will call this hook like this. Now, we need to pass this reference to this component. So we're going to specify Raph, and then we will pour avatar editor rough. So now we're able to access this, Let's say, avatar, editor component using this reference, which is our water I did too rough. So on upload click. We gonna put Let's take a look. We need to access this editor. Get image skill to canvass to access the actual value off this reference. We need to put the next so let's put converse, and we're gonna say we will access avatar edita ralf dot current. So it is current element off this reference because it also can be undefined. So we make sure that we access the current element. So next we can access the actual method, which is going to be get image scaled, two cameras. So let's call it. And now we can actually have our converse element. But the thing is that we can't work with the converse. We can't upload it. We can't actually do anything with that. So first we need to convert it to some former that we can applaud to fire base so we can actually convert Converse to a blob file. And a bloke file is just a piece off file represented in binary format. So using this format, we can applaud. So, on every converse element, we have this method which is called to block, and the thing with this to block method that it only accept callbacks. We can't actually use any promises. So for this I want to convert this Colback based method to a promise. So to do that, we will do the next here at the top. We're going to define a new function that we will name get block, and this function will receive a converse like this and this function is going to return and you promise object. So let's put return new, I promise. So we haven't seen it before. So to create an actual promise, we need to put a callback insight that receives two arguments, result and reject. So we will call this method to actually resolve or reject the promise. So here, inside, what we gonna do? We're gonna call Converse to Bluff. Then we're going to specify this call back with the with the result which will be the actual bluff. And inside this cold back, we're going to check. If our blood exists and everything is fine, then we're gonna result from this promise we're gonna resolve it. So result and value is going to be the actual blow up advice. If we don't have any block elements were going to reject with new error and for error message, we're gonna say of something like file protests ever. All right, so using this way now, we converted a cold, back based method to a promise. So now we can use this get blow up and what we can do, we're gonna put to try catch block over here and now what we will do we will call this get blow up like this. Then we're gonna put canvas inside. And because it is a promise, now we need to awaited. And in case if we have any error, it will be catched by these block over here. So because we use awaits, Index, we need to convert this function to anything function. All right, So result is going to be our blow up that we can applaud to file storage now about storage . How we can do this. We haven't uploaded anything yet. Well, let's navigate back to Firebase Doggy s. And here, let's import another library from Firebase. This time it is going to be firebase slash storage now to actually access storage in exactly the same manner we're going to export, const storage app dot storage all right. And the storage A pie is very similar to database storage. We need to specify the reference which is actually the path to file, and then we need to applaud it. So now here. First, we are going to specify the path under which we will store our image. It is going to be, let's say, avatar file reference like this so that we were gonna access our storage object from misc firebase. Then we're gonna put dot and then we're gonna call reference. So we're gonna store our files on their past, which s slash profile slash user i d. So we need to get you there. I d So let's use use profile hook, So const profile, we will get from use profile. Then we're gonna specify profile dot your i d and let's convert it to string interpolation . And then, actually, let's access child and child is going to be avatar. All right, so what we're doing here, we actually specify these path inside our storage, so it will represent our folder and this child it is going to be a file named Avatar. We will not put any extension because it will be automatically picked up by the fire base. All right, now, next thing quibbled, you will actually upload the file. So let's put const upload avatar result. Then we're gonna put a weight avatar file Arraf dot put. And then if we call it, we can see that we can actually put either blob or array buffer array. So let's actually put our blub over here, and then Let's also second argument. We can specify meta data. So for matter data, let's specify cash control header. So we can actually cash our images inside the browser. So let's put a cash control. And for cash control, we're going to specify public than Marx Age. We're going to port 3600 which represents one hour in seconds. Then we're gonna multiplied by 24 to get the actual one day value, and then we will multiplied by three. So now we have marks age off. Three days specified in seconds. All right, so now that we have ah, Petar, upload result let me remove this Sammy column from here. Now that we have a Plourde avatar result, we need to get the Don't load your l off our file so we can save it to our database. So here we're gonna put constant download, Ural. So we're gonna call upload our water result dot reference. Do not fool yourself, and do not directly call download your l Because, as you can see, it is deprecate ID to use reference that get don't load euro. So we're gonna call Ralf, and then only then we're gonna call. Get don't load euro. It returns a promise. So let's await it. And now we can actually store it inside. Our database lets poor user avatar Raff which will represent our reference inside real time database. So which is going to be database Daut Ralf than it is going to be? Profiles slash profile dot your i d And then we're gonna put child of a car. And now we're gonna call user Avatar Raff, set, don't load euro. And right after that, we're gonna call alert dot info of a car has bean applauded. And let's put four seconds. And in case off any editor, we're going to alert whatever and we will say our message with four seconds as well. And also right before we save this file, let's actually specify the loading state as well. So here we're gonna simply create is loading and set is loading which by default, will be set your false. So when we perform all operations right before that, we call set is loading to true. And then when we are finished, we call set is loading to false And in case if we failed, we also call Set is loading to false now when we actually use it, we actually use it for this button to make it disabled. So disabled is going to be only when we have his loading state enabled. All right, so it was a lot. Now, let's actually test it. So let me refresh the page. Let me open, dashboard. Let me select New Avatar. Now I'm gonna click on this car. I'm going to click on Applaud new Avatar, and I can see Avatar has been applauded. All right, now let's first check inside our database. So it seems like now we have avatar here. As you can see now, we have this public who are ill, which leads to firebase storage. Let's check it out. Our storage. And here we can see a folder. Let's click on it. Then we have user I d. And inside we have avatar file. So when we click on it, you can see we have this your l that we can click, and it will open us the image in in you tap. But the thing is that now we successfully uploaded file to fire base storage. All right, so now how can we actually display this image? Well, I guess this is topic for our next video, because right now it is getting too long. All right, so let's save everything to get system. Let's come it our changes and let's say uploaded User Avatar. All right, see you in the next one.
113. Creating Dashboard - Displaying User Avatar and Names Initials (Part 7): Hey, in this video, we're going to display the uploaded avatar image inside our dashboard. Let's go. First, I want to show the component from our suit, which is Allah tar. So I navigated to its documentation, and I opened Alit are under data display. So here the cool thing about this component that it can actually show name initials if we don't have any image. So let's open an example. And let's see how we can actually put name initials if we don't have any source file. So we need to simply pass this initials to Avatar Component. So what I proposed to do, I proposed to create a wrapper around this component. So whenever we don't have an image rebel display name initials. So under components, let's create new file, which we will name profile Avatar. So let it be a component that returns this Ah, what are component that comes from our suit like this? So what props should we specify for these Avatar? So we're gonna need the name off user, so we're gonna pass it as props. So let's destructor name and whatever goes to these component, it will be redirected to the avatar component from our series. So let's put it, Teoh Avatar props. And then let's spread it all over the element. All right, Good. Now, inside this avatar, we need to port name initials. But let's say our name is something like Andrew, and something goes afterwards. So how we can get the actual name initials we will create a helper function. So let's delete this. And under MISC, let's create new file that we will call helpers doggy s and hittable define all our reasonable functions that will help us during the code. So we're going to create a new function that we will name, Let's say, get name initials. It will receive user name as an argument, and our logic will be the next. First, we're gonna split it into array off awards, and then we're going to check if we have two or more words in our nickname, Then we will get first letters off first to wards. So let's first get the actual area. We're gonna name it, Let's say split name. Then we're gonna do name dot to opera. Case will converted to uppercase in advance, and then we're gonna split it by empty spaces. So in this way, we will end up with an array off words. And then we're gonna check if split name array doc length is greater than one. So if we have two awards, at least then we gonna return Split name, First word. And then from first word, we need to get the first letter. So we're gonna open second brackets, and we're gonna put first element. Then we're gonna put plus sign to come cut in a district. Then we're gonna put against Bleidt name this time Hubble reference. The second element. The second word. So we're gonna put one and again, we're gonna reference the first letter. We put zero. All right, In case if we have only one word by default, we gonna return. Just split name zero, which is First Word. And then first element first letter. All right. And let's also explored this function from here. Now, inside our profile avatar here inside curly brackets, we can actually call, get name and it shows, and we can pass name that we receive from props. All right, now, let's go to Avatar. Applaud Bt and component. And here, let's use this component. So we're gonna put profile Allah car as source. We're going to specify profile dot avatar and then for name. We're going to specify profile dot name. So in this way, when we have a source file, then the source file will be displayed. If we don't have it, our name initials will be there. All right, let's save it and let's take a look. What's do we have? Let's navigate back to our dashboard And right now I can see that I don't have any avatar image. All right, maybe a Let's upload one. Let's open it. Let's upload New Avatar Avatar has been uploaded, and still I can see any data. All right, so that's because actually, we didn't modify our contacts. Our profile contacts. Let's go to profile context and data that we pass over here doesn't have any Ah, what are but inside Al Atar Applaud BT in US source. I specified profile Avatar. This profile comes from use profile context. So what do we need to do now that we re data from database? We can actually just destructor it from here from our snapshot, right? As simple as that. So then we also will pass it to our contacts All right, let's save it. And now let's take a look. If I go to my dashboard now I have this image. But first of all, it looks really weird, So let's modify it a little bit. Let's go to profile Avatar and by default, right before we spread all off the props. Let's put circle so it will be circled by default. Let's check it out. Now it is circled, but the size is really, really small. So what, we can dio inside avatar upload button? We can apply class names and that will fix it. We know that our image, our converse that we specified for our tar editor is 200 by 200. So we're gonna apply with 200 height 200 pixels, those classes that you confined inside utility classes. So let's save it. And if we go to dashboard now, we have the correct size for M A dropper. But the image itself is really small, so we need to recites the actual image. For this. I created this plus name that you can also find inside utilities, which is image full size, and it will give with an height 100% to the image. So now it looks good. However, there is one small little problem. If I delayed this image, let's deliver it from here now. As you can see, if we don't have any image, I get name initials, but they're too small as well, so we need to also adjust phone size. So for this, let's put front huge size and everything will be fine. Let's check it out. Now. I have the correct size for my text as well. So now maybe let's change the nickname and put two words. Let's put and to be. And let's check if we have two letters as our initials and in Did we have a displayed here ? Nice. Let's try and applaud New Allah car. Let's select it. And Avatar has been uploaded, looks nice and works seamlessly. Okay, good. I guess that's the good time to finish this video. So let's commit our changes with message. Something like displayed have a tar user avatar. Okay, Perfect. See you in the next one.
114. Add Create-Room Button and Functionality: Hey, welcome in this video. We're going to add new bottom billow dashboard that will love us to create a new chat room . Let's go. Let's navigate back to code and other components. We're going to create new file that we will name Create room bt n motile Don't. Yes, Let's go full This component for now. Let it be just hello and let's actually use it inside. Inside our sidebar Let's open sidebar. And here below dashboard Tuggle, we're gonna put create room Bt and Moto. All right, now let's not engage to disk opponent. And here we're gonna define a button that will open a model window with form inside that we will fill to actually create a chat room. So it is going to be all right, maybe a diff component. So inside we're gonna put button which will be our tuggle to open the bottle window. So we're gonna put I can in sight. So this I can will have icon off may be creative, and the text is going to be creating new chat room. All right, so this button is going to be a block elements it will have color green and on click we're going, Teoh, open our moto. So let's actually use our custom hook to manage mortal state. So this hook is used Model state from here begun, infrastructure is open, open and then close. And for button click, We're going to pour open. All right, now, let's define our motile window. So let's put model element from our suit. We will have, as always, mortal Heather. Then we're gonna have body and falter. All right, good. So inside Heather, we're gonna put title more. They'll dot title and inside. We're gonna put something like new chat room and let's remove this idol from here. All right, Inside body, we are going to define the form and inside foot, or we're gonna put button to submit the form. So let's first create the button. So it is going to be a button element. It is going to be blocked. Component and appearance is going to be primary. Okay, I guess. Appearance set to primary by default. But let's just keep it as it is. All right? Create new chat room. Now let's save it and let's see, What do we have? So now we have this create new chat room, have ever. We don't have the margin, so let's at some. So for this stiff, let's put class name and let's add margin top two. All right. Looks good now inside this body were going to define our form. So let's poor form element from our suit. And inside this born, we're going to define our input elements, and they are grouped under formed group components. So let's poor form group and inside this form. But open will have first Control label. And then we're going to put form control, which is going to be the actual import itself. Let's perform like this. So inside Control label, we are going to port room name at first and form control is going to be name, name, and placeholder is going to be a placeholder is going to be something like enter chat room name and three ducks, and it is going to be a self close component because it is an input. All right, so if I hover in this form group, it say's it does not define, so let's import it from our suit. All right, then let's define our second input. Let's say would actually and see, what do we have. So if we're gonna click on create new chatroom, nothing is going to happen because we didn't specify show prop for motile window. So let's put is open and on height, we're going to put clothes handler. All right, looks good. Now let's check it out and I see that we added a lot off space over here. So let's poor margin top one all right now it is. Okay, let's open it. And here we can see that we have our input, but it is a little bit off, not full with. So let's quickly fix it. And four days form elements. We will make it so it it will make it take all with off the wrapper element. All right, looks good. Now let's move on and let's create second Foreign Group, which is going to be room description. So for this reform group, also, we're going to copy control label on form control like this For this control label, we will specify description, and for this form control, we're going to pour a text area component. So let's poor component class property. It is going to be text area than her Rose. By default will be equal to five. Name is going to be description. And placeholder is going to be Let's say enter Rome. Description. All right. Looks good. Now, let's take a look if I click on it. All right. I have description. I have real name. Okay, now, maybe let's define our state for the actual data. So here what? We're gonna Ford, we're gonna define your state that we will name, form, value and set foreign value as the update function. So your state is going to be the next it is going to be an object, and I what I suggest I suggested to put it outside of the component because we're going to recite it to initial value when we will submit it. But we will submit the form. So let's put in the show form. And it is going to be an object with name and description insight. All right. The same as we have name prop for our input. All right, so you stayed by. Default is going to be initial form. All right? Also, people need the loading state. Let's define it in advance. We will use it when we will submit the form. So your state is going to be false. All right, now, first we need to handle when we have to take the data. So when we use own change event So let's four const on form change And the thing with our suit, when we use on change event, it automatically gives us the value as its first argument, not the event object. So we will have value here. So we're gonna pour CET form value as value. And actually it is slightly different with our suit forms. When we have a form component in our sure, it automatically gives you not the value off the actual input that you add it. But it gives you the value off the entire form, so it is really convenient to use it with use state. All right, so on this on form change, we're going to port for our form component. So on change handler is going to be on form change. Now. We also need to somehow validate our data and first, we're going to associate the actual state with the form. So it has this property called form value. So it must be an object that interacts with the with the form just our state. All right, so we're gonna poor form value. And this on change event will give us the the new form value when we update any element off this form. So which is going to be our object at the end? All right. So, as I said before, now we need to somehow validate the data, the form when we submitted. Well, our suit provides us whether with helper methods to achieve that, we can define a schema that we can submit to our seared, and then our suit will check against this schema. So let's define our scheme. I here at the top for our form, Let's define it model. And here we're gonna use schema that we import from our suit than we gonna put model. And inside this model, we need to put an object that will represent our state. So we will have name. It must have the shape the same as our state. So name is going to be string type, which comes actually from schema types. So let's do structure it string or maybe schema dot types from this object, we're going to d structure string type. Then we will use the string type to define that name is going to be a shrink. So string type, then we're gonna put is required to perform the validation and other message is going to be shot. Name is required all right, and the same will do. Four description. Let's copy it. Let's rename to description and let's say description is required the cool Think about this moral schema validation that it will be validated in the real time. Now we need to submit this scheme on to our form. So let's find this form component. And here as motile, we're gonna specify our Moto schema, our model object here. All right, now we need to actually create the submit function. So first of all, let's actually on form change. It is not optimized here because we have a lot off states that constantly change, for example, is open and foreign value. So every time we will have on form change being created and you copy off this function. So let's memorize it in advance to make it more optimized. All right, And now let's actually create our on submit function. So we're gonna call it let's say on submit and it is going to be an a sink function in advance and here the first step will be to actually validate data. So how we can do this? How it can validate our data against the schema that we define here. We need to actually use a reference to reference our form component and then using this reference, we can call its internal methods to validate it. So what we can do now? We know that we can use use ref from react. So let's put it here. Let's name it form, ref, and then we're going to call use ref from react. Then we're going to pass this form ref to this form component. So rough is going to be form, breath and hear. The first step is going to be if form ref dot current dot check. So this check method is available on this form component that we access directly over here , So this check will validate this data will validate our form value, which is our state against the schema that we define here. So if everything is alright, it will return at true Bullen value. If it's not, it will be false. So we're going to check if our form value check not passed. So if we have a false value, then we're gonna simply return from this function as advice. We're going to update our database with the with the new room. So let's pour CET is loading to true before any asynchronous task. And here we're going to create a new object that we will save to the database. So let's say new room data. It is actually going to be, ah, where our state form value. But also we will upend another property which is going to be created at so here we're gonna spread all form value that we have, and then we're gonna put created at and then we're gonna import fire base from firebase up and then here has created at we're going to pour firebase dot database dot server value dot timestamp. So now we have the complex neuron data that we need to save to the database. So let's put try catch blawg before any asynchronous task. And in case off better, we're gonna pour. CET is loading to false, and we gonna kill alert dot Better error message with four seconds. All right. Looks good. Now we're gonna call await database for Project from Firebase. Then we're gonna put Dr Ralf for this ref. We're going to specify just rooms so we will keep our rooms under rooms, path inside database and to push. And you, let's say value two database so the key is automatically generated. We're gonna call push method, so and inside the schools were gonna pass new room data. So after we have data inside our database, let's set is loading two falls and let's reset our initial state. So let's call sat form value. It is going to be initial form, and after that we must ensure that we also close to the motel window. So let's also call clothes. And then let's put another alert with info and we're gonna say foreign value. Let me open quotes here. We're gonna say foreign value dot name Or actually, let me call it before it like this. So form value is going to be we will say has been created. And then again, four seconds as always. All right, so it looks good. Now we actually need to use is loading and on form submit. We're gonna put it for this button we're gonna put on click over here and we will pass on submit like this. And now to use this is loading state. We will use it for this button. We will make it disabled when we have is loading set to true. All right, It was a lot. Now let's actually test it out. So now let me refresh just to make sure. Let me enter. Hello, then I'm gonna put something else. And here, if I leave it empty, you can see that description is required. The form is actually being validated in real time. That's because we defined the schema. All right, let's poor Hello. And let's put description off this room. Let's click on Create new chat room and we can see that alert is not a function. All right, maybe let's move it like this Alert. All right. Alert dot Error was the actual issue. I called just e r R, but it is error. So that's my bet. All right, now, let's try it one more time. Create new chat room. Let's put hello description. Hey, three new chatroom permission tonight. That's fine, because we also need to define security rules for our database. So let's open rules and here we're going to define our next schema. So next two profiles, let's copy this. We gonna port also rooms and for rooms we're gonna specify. So for read and write for everything inside over here, we are going to allow it only when user is authenticated. So instead, off using this verification, we're gonna say that read and write permission is only allowed when off, not equals now and the same we will do for basically everything here, we're gonna put it here instead of future idea, we will have, Let's say, room I d. And then also for read. We're going to pacify author, not equal snow and off, not equals now. All right. Looks good. Let's copy it. And let's also synchronize it with our local file, which is database rules. Jason. Let's save it. And let's take a look. So now our rules are published. If I click on create new chat room now, hello has been created. And if you look inside database now under rooms, we have a new key that was automatically generated by database. And then we have our data created at description and name. All right. Looks perfect. I guess That's the good time to finish this video. Let me commit everything. And then we're going to specify create button to create new chat room. Or maybe at new button at bottom to create new chat room. All right, see you in the next one.
115. Creating Chat Rooms Lists - Part 1: Hey, In this video, we will start creating Chatham List Inside sidebar Here at the bottom. Let's go. Let's hope inside Bardo GS in the first place. And here, right after a creature on Bt and Moto, we're gonna put divider component from our suit and inside bubble past. Join conversation text. And also, let's move this import to the top to avoid excellent warning. Let's check it out. It looks good. Now we need to actually define components. So under Components folder, let's create new folder that people name rooms here. We're gonna put two new files chat room list dot GS and room item. Don't Yes, so room item is going to be empty by now. And actually the same applies for chatroom list inside side Bardo Gs Here at the bottom. Instead of this text that we used as a placeholder, let's use chat room list. All right, let's save it. Let's take a look. We can actually see the Hello text so it worked. Perfect. Now let's define the market. Let's hope in Chatham List and here we're gonna put enough component from our suit for the props will pass appearance Satel. Then it is going to be vertical and reversed. And for class name, we will pass the next. So we need to make this component this elements crawl a ble. So we're gonna pass overflow on Why? Access scroll. So we will see the scroll bar always. And also we're gonna pass customs Crow to make it styled. All right, And then inside bubble past enough dot itim and then room item like that. All right, let's take a look. Okay. Looks perfect. We can seize crowbar, and we can see that it is styled a little bit. Okay, good. Now let's define our markup for room item. So we will split it into two. Dave's inside top, part and bottom, part inside. Bottom part, we're going to define our text. So we're gonna put spun element, and we're gonna put no messages yet for now and for the class name. We're going to specify that it is going to be display flex align items center, and we will apply text black off 70% capacity. Okay. For the top part, we're gonna put here room name and how much time ago? The last message has been published. So let's define class. Name off display flex, then justify content between two ad space between our elements and then align items center . All right, so our first element is going to be aged three title with the room name inside. So first we're gonna define static text, and when we will have the actual dynamic values, we will swab them. So for H three, we're gonna specify text disappear to prevent overflow. And second Element is actually going to be a new component that people install. So for now, let's put span and let's take a look at the browser first. Let's check it out. How it looks like Okay, it looks good. But instead of this x X, we're gonna use time ago React to show a relative time like this has been published five minutes ago. Two hours ago. One day go. So let's install it. I'm gonna open dogs and just copy this Commend. Then I'm gonna stop my app and installed this package. Let's wait and then we will continue. Okay, Package has been installed. Let's start the up again and let's use these package. So from documentation, I'm going to copy this import. Then I'm gonna imported to room item and let's copy d company itself. And let's place it instead of this span so we don't need to localize it. Then we gonna use new date for now. Instead, off this dates drink to just show the current time. All right, so let's refresh the app and let's take a look. Okay, so now we have just now perfect. And they will think about this library that it will update this timer, Let's say in real time, but I don't like the appearance off this text. So I'm gonna change class name off time ago, component a little bit. So it is going to be formed normal. And also text black. Let's say 45 opacity. Let's take a look right now. All right. Looks much better. Okay, let's move on. And our final think here will be to actually make this component make this chatroom list full height. So for this, we need to calculate it because our chat is full page. So how can we do this? How can we approach this? We know that our full page is 100%. We can get the height off top part off sidebar, and then we can subtract this top part from 100 then we will get to know the rest height, which is our chat room list. Let's go. So let's not big age to slide Bardoczky s And our top part is this Def element. To get the actual height off this, def, we need to use references. So let's create new reference, which we will name topside, Bar Arraf and we're gonna use use ref hook. Then we're gonna pass this topside bereft to this def breath is going to be topside by ref , and we're gonna put height to state so we will keep track of it. So let's define you stage, which will name height and sat tight for now, by default, it will be such to now or 20 it actually doesn't matter inside use effect. We're going to get the actual height off this def and then said it to state. So let's put use effect. And inside this use effect, let's ask the next. So if we have topside by ref dot current because it can be undefined at some moments, So we're gonna check if it actually defined, then we're gonna set height to topside by Ralf, not current dot scroll height. So when we try to access topside bereft of current, it's like we try to access element when we get it with document. Get element by i t. So it is very useful in some cases like this. We also want to run this effect callback function whenever our were topside. Bar F changes. All right, Now let's pass this state this height to Chatham list so we can calculate the actual height . So let's pass above element height as height and inside jet room list will d structure above element height and then what we will do. We're gonna apply style in Lyons style, which is going to be height, incurable, use CSS calculate function. So let's pork alc. Then we're gonna use 100% age minus above element above element height and at the end, we're gonna put pixels because this height calms in pixels. Now let's take a look. If the app refreshes, nothing actually happens. That's because we didn't cascade were full page height. So what is happening that inside home dodgy s here? Who said h 100 on Lee to the great component, but to make it work for a nested components as well. We need to set height off 104 all Children for all nested components. So for row, we're going to specify age 100 and for column will do the same Now. Inside side wire, we already apply H 100 to their upbringing element, so it will work. Now let's take a look and let's inspect the component. As you can see, we already have full height and it is automatically calculated and we will not have any overflow. It will always fit full page height. So if we inspect this element, we can see that height is automatically calculated for us. So we have 138 pixels, which is height off the top part. Off sidebar. All right, so it looks nice. And I guess this is it for this video and the next one we will continue. So let's add everything to the stage state and let's commit started to work with chat room list. See you in the next one
116. Creating Chat Rooms List - Rooms' context (Part 2): Hey there. In this video, we will continue working on Chatham List. Last time we defined Mark up. This time we're going to create and manage the state. Let's go before we get into code. I want to define how we're going to access this state. So chat rooms. It is something debt we will access globally inside home page. So we're going to use context a p I to be able to access it from inside sidebar component, but also from inside chat window that we haven't created yet. Let's navigate to Contacts Folder and here let's create you file rooms context. The G s. Here we will create new context undateable dame rooms context with create context function that comes from react. Then we need to define a component, a provider that will provide all its Children with the context. So let's export const rooms provider as an argument. It will receive Children and it is going to return rooms context dot provider, and we will put Children inside as a value. For now, let's just put a string. And if we have her on this component, it says, react must be in scope. So let's import react from react. All right. Good. Now let's define the state. So it is going to be simple. That's why we can use use state. So let's define rooms and sat rooms by default. It will be set to mount, and we will get our data inside use effect when component mounts. So let's for use effect and inside first, we will store our reference to the data ways. So if we open database, we remember that we store our data under rooms, slash room I d. And then goes data. So what we will do, we will put a real time listener on rooms so we can get real time updates. Let's create you valuable that we will name room list rough and it is going to be database dot ref rooms. So now we have the reference. Then we're gonna put a real time listener using dot on method. So let's call room list. Ralf thought on value and then for the callback. As for now, it receives snap shirt. As for now, we're gonna Consul look, snapshot dot value right. And because it is a real time listener, we need to unsubscribe from it because this is a subscription. So we will do this inside the cleanup function. Off use effect here. We're gonna put room list rough dot Off it will detach all real time listeners from this reference inside database. All right, let's save it. And let's actually use this context. Let's navigate to home page. And here we will wrap everything around rooms provider. Okay, let's say with and let's take a look. If I go to console, I can see I have snapshot value, which is an object where every key is room idea and then goes data. So we have this foreman because we have Jason based database. But this is not exactly the four months that we wanted to work with. We need an airway. So let's create a helper function that will transform this type of object to an array. So we're gonna define a new function inside helpers togs that we will name. Let's a transform two array with I d. It will receive snapshot value as an argument and it will return. The next thing first is going to check if snapshot value exists. If our data is not now, if we have any data. So if this is the case, then we're gonna put the logic. Otherwise we will return and empty. Right. So what will be our strategy? We're gonna call object the kiss method to pour all room ideas into an array. And then we will map every value, every room I d to this data. Let's go. So let's put object dot keys off snapshot value to get all kids as an array. Then we're gonna map every value off this area where every element is room I d to an object that will be all data from our room. We can access it with snapshot value off room I D. And then we're gonna attach i d another property, which is going to be room I d. All right, let's navigate two rooms context and here instead, off using snapshot dot value, let's actually transform it less great new valuable data here. We're gonna put transform to array with i d. And we will pass snapshot dot value insight. All right. And let's consular CTA's later to see what we actually receive. Now, As I can see, I have an array off rooms and I have data and also I have I d as a property. All right, so this is what I want it. Now, let's actually update the state. Let's call set rooms and put data inside. And then let's pass this state to context as our value of which is rooms. All right, this is it for now. I guess in the next video, we will finish this up and we will display our rooms from the database. But for now, let's finish this video by committing our changes. Get commits dash M and for message report created rooms context. Okay, See you in the next one.
117. Creating Chat Rooms List - Show rooms and use them as links (Part 3): Hey there. In this video, we will display chat rooms that we store inside the database, using the markup and context that we created in the previous videos. Let's go, Let's open our code. And here let's open chat room list component. Here people consume our context. And again as before, instead of using cues context and then specifying the context by importing the file, we're going to create a helper hook inside rooms, contacts. Let's export. Const. Will name it. Use rooms, and it is going to be a function that returns us the contacts value. So let's put to use context and pacify rooms context. In this way, we will avoid calling cues context with rooms, context every time but use rooms. All right, so inside shattering list components. Let's call this use rooms hook and now we get the context value. Now the thing is that this rooms might be null by the time when we try to access it, because our initial state is dull and only when component mounts we get the actual data. So we need to put conditional run, drink and check against it here inside. Enough. Let's put if we have no rooms. Then we're gonna display Lauder component that comes from our suit. It will be centered, and it will be centered. Vertical E. Also, it will have content, which will say loading and it will have low speed. All right. And also, let's specify size to medium size. All right, quote. Now, let's display second conditional rendering to actually show data we're gonna map every array element, which is rooms that we transform with transform to arrive with I d to a j six element. So let's ask if we have rooms and rooms dot land is greater than zero Onley. Then we're gonna call room, start map inside we will have little my Tim and we got a map. This room I tempt to love item component like that. And don't forget, when we used this dot map, we need to specify the key prop. So let's put room dark. I d. And then we're gonna pass the whole room object as a room, property to room item like this. All right. Looks good. Now let's open room item the next here, we gonna destruct chur or own property, and inside the component, we're going to get our balance again by de structuring the room object this time. So we will have created at and also we will have room name. So instead of this static taxed, we're gonna display room name that we D structure and also four time ago component. If we don't have any messages, we're gonna display time when this room has been created. So let's just pass New date created at all right, Let's save and let's take a look. Perfect. Now we can see that room has been created one day ago and room name is Hello, Maybe let's try and create one more room. So let's click on our Moto. Let's pass if I knew Roll name and whatever report for description. If you click on this, we can see that the data is being updated in real time, so everything works perfectly. However, I want to also turn this component into a link. So when we click on it, we actually go to chat page. All right, so lets navigate back to code and let's go to chat room list here for this snuff item. First. Think I want to do, I want to specify component class so it will render this enough item using this provided element for a competent class. It is going to be linked component that comes from reactor router dumb for this link component, we're gonna pacify its property, which is too. So let's put two. And let's use string interpolation to specify what path there will be if we click on it. So it is going to be chats slash room I d. So let's open string contar population and let's put room idea. All right, cool. Let's check it out. Now. If I click on it, you can see that the Ural changes and we actually have the functionality. But I also want to make this item active whenever we have the correct path corresponding to the link. So what we need to do as before with box office, we need to get our current location. So let's use use location hook that comes from react Router down package. Now for this snuff, we're going to pass one more property, which is going to be active key, so active key is going to be location, not path name. Then we need to pacify or, let's say, associate every love item with its current. Let's a key. So for this, we need to pass one more property, which is going to be event key. And it must correspond to the active key, which is location dot path name. So it will be slash chats, slash room I d. So for event key, we're gonna specify exactly the same as for to property. And now it will work. Let's check it out. And right now, when our location matches, we have the cool animation and we have the active key. So it works perfectly. But I want to modify one. Think instead of chats, I want to use just chat like this. All right, let's check it out one more time. If I switch to chat page, I have this element active. All right. Good. So this is it. Let's finish our video. Let's put everything to the stage state, and then let's call, get commit with the displayed chat rooms. All right, cool. This is it for this video. Next time we're going to build our right part off the website and we're going to start building chat window. See you there
118. Creating Nested Layout for Homepage: Hey, In this video, we will create Lee our for the home page. So for now, we already built the left part, which a sidebar? Right now we're gonna define our right part, and we're going to see how they gonna play a responsive let's go. So let's open home togs file. And here we will have a nest, a drought. So when we click on a chat room, we can see that we go to chat slash room i d. For that, we need to create an acidly out because we're gonna show it on the home page. So what I proposed to dio here instead of just using one file directly, let's create to not the folder home. And here we're gonna put all Nestor droughts and home DGS is going to be inside index togs . So let's create new folder home inside we're gonna put home than we're gonna rename it to index dot gs. And here our nest the drought is going to be chat page. So let's create new file that we're gonna name Chat Doggy s. And for now, it is going to be empty. Solicitous port. Hello? All right, so inside this index If we save it, let's refresh Cannot open directory. All right, maybe let's restart the app and it will work. Let me refresh. All right, now it seems fine. Good. Let's continue. So our first step is going to be defined. Ah, where? Nestor Drought. So here, next to this column, let's define switch statement and here we're gonna pour the chat route and the sidebar It will be persisted because it is our layout. So inside this, which let's pour out and because our home page is already private, we don't need to pour nest droughts. Also private routes. We can use them as public because our parents is private. It means that those are already protected. So it is going to be exact route and path is going to be slash chad slash chat I d to follow the grid. We need to also put a column over here. So let's put column and inside we're gonna pour chat and let's also imported from this folder. So let me specify chat and we're gonna use chat. All right, now it looks good. Let's define how Maney columns the chat page will take. So on small devices, it will take all 24 columns and on medium devices. We're gonna take the rest off this so it is going to be 16 and then class Name is also going to be a church 100. Now let's take a look and let's see. All right, do we have Hello, Let's inspect and let's try and rece ice. All right, so we see that when we are on small devices, we have this, let's say, from top to bottom, Lee out. That's not what we want. We want to hide this hello on small devices and because we need to not only hide this, we also want to make sure that whenever we go to chat room, we don't see the navigation bar. The sidebar. So that's why we need to put some sort of ah, let's say complicated condition. So first of all, we need to define our break point when we are on desktop, and this is when we have 992 pixels. So first let's define is desktop, and it is going to be the result off use media query hook that we defined earlier. And here we're gonna ask if men with IHS 992 pixels, right? So in this case, we will have desktop. Also, we need to take our second condition when we are exactly on the home page so we can show sidebar on small devices, not the chat page, so it will become hidden. So let's define is exact like this. Let's destructor it from use, not use. Media Query used route much. It is another hook that comes from react router, the same as use location. But this cook gives us, let's say, thinks related to our current route and drought match. So one of these props is is exact and it will tell if we are currently on this defined route, which is home page. So whenever when we will be on just slash it will give us is exactly equal to truth. All right, so now let's define our condition. So let's poor can render sidebar and we gonna ask if it is desktop for if it is exact passed on Lee, then we will be able to render sidebar. So now here, let's pour the next logic. So if we can render sidebar, then we're gonna put this column and now here we need to also define, Let's say, a four a four hour or if someone opens a broken chat page, we can live it empty and it will be fine. But let's make it fancy and let's pull out over here and here. We're gonna ask if is desktop only. Then we want to show column, and it will have, I guess, the same lee out as here. So let's just copy it. And inside, we're gonna pull it. Let's say just text that will say Please select chat and class name is going to be taxed center and margin top Fage rights. Now let's take a look. So whenever now we are on slash chats less room I d. We can see only chatter on page. If I remove this and navigate to home page, I can see only sidebar, so it looks good. If I resize it, I can see both of them so I can see my chat room, but instead off the actual chat. Whenever it's not selected, I can see police select shot at full back for out, so it works like 404 and if I select one of the chats, I can see the actual chat window. I guess this is it for this video. Next time we will continue. But for now, let's just commit our changes. Let's put, Get at everything. Get commit and let's say created we our for home page and created Shat page for right. Awesome. See you in the next one.
119. Creating Chat Page Layout/Component: Hey there, in this video, we're gonna create Lee out for chattering page that we can see on the right instead of this . Hello? Let's go. Let's navigate back to decode. And here under Components folder, let's greet and your folder and that we will name Shatt Window inside. We're going to create three new more folders and each one will represent every part off this page. So we're gonna have first Folder is going to be messages. Then we gonna pour top and bottom like that, an inside a bubble place, all corresponding components. So inside bottom, let's put index togs and it will be empty for now than the same we will do for the rest. So here we're gonna put index togs, but a name it messages that we're gonna put messages inside, Let's save it and close. And our latest component is going to be this talk. So let's create another index togs. And let's put the top with the top text insight. All right, let's save it and let's navigate to chat page. So here, inside this def, let's pour another def. That will be a rapper for Chat Top, and we will import it just in a second. Then we're gonna pour another Dave. And inside we will put messages and the same. We will apply for Chad bottom, all rights and for each of these Daves. If we open main daughter a CSS. Here we have classes chart top, Chad bottom and shot middle. So let's use them for top level Porter chat Top four messages. We will put a chap middle and for But, um, we're gonna put class name Chad bottom. All right, now, let's import these components. So first, let's import chat. Tell up from Let's navigate two components, chat window and top. Then I'm gonna copy three times. Then I'm going to use bottom and messages, and then I will replace them with the chat bottom and messages. All right, Looks good. Let's take a look. So now if with a fresh we can see, we have top messages and bottom and let's remove this wrapping, def. And let's take a look one more time. Now we have top messages and bottom at the very bottom. All right, good. Now let's define our initial logic for chatroom page. So first of all, let's grab this Chad I D. From our perimeters as you remember inside home page with pacified it as just chat I d. So let's grab from use programs hook that we can use using react rotor package. And then we can grab all off our rooms that we have inside the context as you remember. So let's use use rooms hook that we created earlier. And now let's actually get our current room data. So what do we need to do? First of all, we need to check against this room's because it can be no by default, as you remember. So let's ask if rooms do not exist or if this value is now, then we're gonna pour law order component that comes from our suit. And again it will be centered vertically as before. It will have medium size. It will have content loading and speed is going to be slow. All right. Our next step is going to get our current room from this room's a rate. So let's port const Current room is going to be rooms dot find we will get room item. Then we're gonna ask from i d equals chat. I d. All right. And then at the end, if we don't have current room. So if we put a random your l that does not exist inside this room's array, then we're going to return H six element with the class name, text center and margin top page. That will say, Chad, I d not found. All right. Looks good. Let's remove this, Lauder. Let's move this import to the top. Let's save. Let's take a look. So charred, This one not found. All right, I'm run here. Let me put negation in front of it. So now it will work. All right, So we have talked messages bottom. And if we put a random shrink over here, but we'll get shot not found. Okay, Perfect. So this is it for this video in the next video, I would like to talk about context problems and why it is a bad idea to directly use use rooms, hook. Let's commit our changes and finish that one. So let's at everything you get system that we're gonna commit our message and we will say created Klay, our four charred page. All right, good. See you in the next one.
120. Context API Problem and a Potential Solution: hi context. AP is amazing, isn't it? But always with any good tool, there is also a negative side. The problem with context is that we can select a part of its value. We can't define a selector for that reason. Whenever context is consumed with the use contacts hook, even if the value is not used and it changes, the component will be rendered. Imagine the context that passes down and object with the next structure. In a component where Title is displayed, we would like to get only title tax, right so we can destruct your title text from context value and it seems okay. However, for context, it doesn't matter whether it is destructor or you trying to partially select elements. It always gives you the whole context value from now on, since title component gets the value whenever anything inside our object changes. For example, searching put, the title component will be to render, and that's bad. To solve this, we can actually split the context into two separate context providers one per object key. In that way, we split responsibilities and render will not be triggered because we will consume only what we need inside a provider component were not limited to you. Only one context can combine multiple contexts under one provider. It is very useful when we pass through the contacts, for example, the result of use state, state and its update function for them. That will be two separate contexts grouped under one provider. So now, if inside a component we consume context that provides the update function component will not be rendered. When this state changes, it will only render if the actual value off consumed context will be changed, which is the update function. In this case, this will work for most cases. However, there are situations when we would like to pass a large object through the context, and creating a new context for every key will be an overkill. For these situations. There is a package use context selector that provides us functionality to partially select value from context. It comes with the few limitations, but when used wisely, renders can be avoided at all. Just to point out, all of that is considerate when using creed ducks instead of context a P I. For state management, however, Redox has a learning curve and brings more complexity, depending on the app. You probably don't need it. That's why we use context. A p i in the next video we're going to install use context selector and we will see how it can help us see you that
121. Context API Problem in Practice - Creating Current Room Context: hi in this media will create context for currently opened chatroom using cues Context Lecter package. Before we begin, let's explore how everything is going to be handled. Right now there is rooms context that robs the entire home page. Context data is chatroom list with real time subscription. It means that if anything changes in any off room context, value will be updated inside shadow GS rooms. Context is being consumed. So any update to any room will cause a surrender. Two currently open chat page, even though the AB date hasn't been related to it. Therefore, inside Chad Ogea s, we will provide a new context that we will name current room context and we're gonna pass currently opens room data for these contexts. We gonna use use context selector. Imagine a situation when currently opened room name is updated. It will create a surrender for currently open room and values that we will pass to current room context will also be obviated. There is a component that consumes current room context and it displays only description, not name, because off use context selector, that component will not be rendered. Changes will affect on Lee the component that displays name. Okay, let's put everything into practice. I already opened official get happy webpage for use context Selector package And if I scroll down from installation part, I can see that I need to copy this command. So let's do it. Let's navigate back to code and inside Integrated Terminal I'm gonna execute it and let's wait until it is installed. Perfect the packages there. Now let's run the app and let's not get back to the documentation. So from the usage part, we can see that it is actually no different from how we use normal create context. So lets navigate back to code. And here on their context, folder less great new file that we will name current room context. Dodgy. Yes, Here. We're gonna create current room context and we're gonna use create context, the one that comes from not from react. Let's converted Teoh a six mo jewel and from use context selector. All right, so next part is going to be to create the provider component. So let's put export const current room provider so it will receive Children and then also it will receive data so it will carry some data that we will pass to this provider. So here we're gonna return current from Context Dar provider. And we're gonna poor Children there and for value. We gonna pause data, so provider component is going to be like a middle man. All right, So if we have our react, must begin scope. So let's import react from react or I d go. Now let's actually see how can we select some data from here? So we need to use use context, selector. Then we need to provide context that we want to consume. And then we provide the Colback that will pique our value where argument is our current state. So let's navigate a little bit down from here. We can see that we can actually use it like this. So let's copy this and let's put it here in current room context. So what we will do, we will turn it into our own custom hook. Let's import use context selector from the package itself, and then we're gonna turn it into a hook. So let's convert it to function. And instead of first name, we're gonna use use current room and let's also export it. And for this use current room, we will only pass selector. So let's pass selector here. And instead of person context, we gonna pour current room context and for selector, we're gonna provide selector. We already here. Now, let's not get back to our chat page. And here, instead of this empty brackets instead of react fragment, let's use this provider. So we're gonna put current room provider, and we need to pass data that we will put to this context. So let's put data And for data, we will create an object that we will name, Let's say current room data. So here we're gonna create this object, and here we're gonna pass next values. So from our current room, we're gonna peak name and description by destructing the values. And then we're gonna pass name and description to current from data that will will pass to D context. All right, So if we save it and if we save everything here now, if we go back to our app, nothing actually will be changed. However, if let's say we go to chat top here, we're gonna use use current room hook that we created. Then let's maybe select a name and for selector we're gonna pass State and from state, we're gonna pick name or maybe not, state. Let's just put envy for value like this. And now instead of top, let's display this name from the context. All right, So if I say that, if I refresh, I can see Hello the room name that we passed to the contacts And if I switch, it will be changed. So this is it. This is how we can actually peak values from context. And it is also very important to note that these values that we pick from the state that we pick from the context it is important to understand that we can select objects because objects are compared by references. And if we opened the documentation for this package, if we scroll down to limitations, we can see that provider trigger renders Onley if the context value is preferentially changed, so objects are preferentially changed. So we must be careful with that. We need to select only primitive types which object is not. And also, if we'll look inside limitations, we need to wrap our component around react, Mama. So let's also import mammal from react and let's wrap it around it like this. So now our value is memorized. And if something changes for this current from data, let's a description. And inside this top component, we only consume name. This component will not be updated when description will be changed. So this is it. One thing to point here is that, as I mentioned earlier, if we consume rooms context inside this component, and if something changes, the whole component will be rendered. So including this chat top messages and chat bottom. But because we use mammal here, Teoh, memorize our components. We significantly reduced the update tree so only this wrapping dips will be updated on every change. Underlying components chat up messages in chat bottom will not be render. So this is it. This is the cave. It's off context. AP I Let's finish this video. So let's commit everything and let's put the next message created current room context with use context selector. All right, see you in the next one
122. Creating Initial Chat - Top Part: Hello. In this video we will start a building chattel page. Let's go, Let's navigate back to the code and let's open index togs that represents in the top part here. Instead of this name, we will pour another def. That will be another upper. So for this difficult quit class name on display flex, justify content between the line items center inside we're gonna pull the age four tack and inside rebel display Ah, were chat name. So here of a vocal name and class name for this pan will be text disappear and also we're going to put and I can over here in front of this text when we are on mobile devices so we can not to get back to the home page. So here, let's board and I can and competent class is going to be a link that comes from react Router dumb than the Eiken itself is going to be Arrow circle. Left size is going to be double X And because it is a link component, we also need to provide to property which will lead to homepage, right? And also we will pour conditional class name for this Aiken. So we're gonna ask if we are on mobile devices. Then we're gonna put one class names. And if we are on desktop, we're gonna put other class names for that. We're gonna use use media Query hook that we use earlier, and we're gonna create the Bullen, which is mobile. And then we're gonna use Media Query from custom hooks and inside a bubble port marks with off 992 pixels. All right, so when we are on mobile devices, we gonna pull the display in line block than batting is going to be zero margin right to text Blue and Lincoln styled to make our link element fully on styled. And if we are on desktop devices, then we just not displaying this Aiken. So let's save and let's inspect. What do we have? So now we have room name. If I inspect and resize the window, I can see this button over here. When I click on it, I go back to the home page to see Chatham's. Alright, Looks good. Let's continue. So here, next to this h four, let's put button toolbar that comes from our suit, and this was going to be our to do So also, let's put class name off Ws No rap. All right, unified a fresh. All right, So this is to do next to this day if we're gonna put another def and it is going to be our bottom part. So for this bottom part, we're gonna put, display, flex, justify content between and align items center inside. We're gonna pour as fun element That also will be our to do. And also, we're gonna put a button over here, so when we click on it, a model window opens and we can see room description. So it is going to be another component that we will create and we're gonna name it Groom Info, BT and Moto Dar g s all right. For now it is going to be empty. Let's use it inside. Index togs here. We gonna poured from info bt and Moto, Right? Let's say with and now let's define our component. First of all, here we're gonna display our room description and room name as well. So for this we gonna use use context, Elector. So first of all, we will poor description over here, and it is going to be used car and thrown hook. So we get our value and from value we grow up description. And do you remember that I told you that it is important not to select objects because they are compared referential e So it means if we need to select multiple values from an object , we need to select them separately. So they become a primitive value because description is a string. Hence it is a primitive type. So we also need to display name. So we're gonna do exactly the same thing. Use current room, and we're gonna peak room dot name. All right, Now, inside our markup, we gonna pour a button element from our suit inside. We're gonna pour room information and appearance is going to be blink and class Name is going to be patting on X access is zero now, because we have a motile we will use again our own custom hook, which is used mortal state. So let me import it. And from this hook we gonna grab is open, close and open. Now, next to this button elements we can afford a moral component than for show property we're gonna set is open for on height. We're gonna put clothes. And inside this mortal, as always, we will have mortal dot Heather. Then we're gonna have body and footer. So let's replace those values, Littlefoot her. Okay, so for Model Heather, we're gonna pour model dot title and for title, we will pour about than about this room name than for footer. We gonna pour another button that will just close the moto. So let's put clothes then we're going to specify on Click is going to be clothes And also it is going to be a block element, all right? And we're body, which is gonna specify something simple, which is going to be a six tack. And we're gonna put description and class name is going to be margin bottom one on then will go the description itself. So let's put description. And now let's save And let's remove this dropping def and replace it with the react context . Let's also move import to the top. And also we didn't use this open handler. Let's put it for days. Button on click is going to be open. All right, let's save it and let's take a look. Now we have room information button that looks like a link. And when we click on it, we have a moral window that says about Hello. Description description. Hey, close. Let's test it for in your own name again. We have this strange description and everything works fine. So this is it for this video. Let's commit our changes. Let people get at everything can then get commit. Let's say, started to build Chat Top Created a room description. Modoff. All right, Perfect. See you in the next one.
123. Denormalizing Data - Creating Chat Bottom: hello. In this video, we will start creating charred bottom. Let's go before we begin. I want to mention that in the previous video, when we started to create chat Top, I forgot to mention a few details. First of all, we need to add a few more class names and it is going to be this age for Element. So let's put class name and we're gonna put text disappear to prevent tax from overflow if it is too long. And then we're gonna add the display flags and align Items Center to make sure that when we are on mobile devices, this Aiken and text are centered vertically, right and also one more detail. If we open the room in for Betty Inamoto, we used use context selector, So to make it work, we also need to rub the element around mammal. That's what we forgot to dio. So let's put memo here at the bottom and also let's imported from react Now use context. Selector will work as expected. All right, let's move on and let's start with Chad Bottom. Let's navigate Teoh Index Dodgy s inside the bottom folder. And here let's define our market so First of all, we're gonna pour in for group and inside this input group, we're gonna put the actual input with placeholder, right? And you message here and three dots at the end. Next to this import, we gonna pour a button element. So let's define import Group Dar button. And this button will have color blue and appearance Primary inside this barn group, we're gonna pour. I come and I can is going to be sent. All right, let's say wait and let's see, what do we have? So now we have this import and we have the bottom. So when we click on this button, the message will be sent. All right, now, let's define our functionality. So first of all, we need state. So let's create import and said in poor, and by default it will be set to an empty shrink. Then we need to specify on change handler for on change event for our import. And also we need to associate our input with the actual state. So let's define value. It is going to be importer. And for a change event, we're going to specify on import change. Heller. Let's define this on import change and we can optimize it in advance where they use callback because we have input state that changes frequently and on import change will not have any dependency. So this unchanged event gives us value as the first argument and event. So we need to get the actual value from here, and then we will call said, import with value. And just to mention that because we use this input that comes from our suit as a component , that's why we receive value as the first argument. In any other case, we will receive only the event object. Now we need to add functionality to our button to actually send the message. So that's why we're gonna specify a new function that we will name on Send Click. It is going to be our handler for on click Event on this button. So let's pacify. So foran click, we will pour on send click And first of all, here we will do a simple check If I were in port. If our message is not empty so we're gonna specify import dot trim equals empty message. If it is the case, then it will simply exit dysfunction. Next we need to assemble the message. And in the future we will also have filed messages. So for this, we gonna create a common function that will be called to assemble the message so it will attach common properties to our message. So here at the top, we're gonna create new function that we will name, assemble, message, and as an argument it will receive user profile. And let's say Chad, I d ok, and then it will give us an object with the room i d which is going to be checked, I d. Then we will have author object and here we will de normalized data before we continue. Let me explain the structure that we will have. So if we open our database right now, we have rooms and profiles and our data now is flat and really easy to manage. However, now we have rooms and we need to create messages. How can we approach this? We can obviously put messages inside this object, However, with real time data based because we are limited enquiries, we need to wisely decide on our structure. So with real time data base, it is really important to keep the structure as flat as possible. It means that ideally, we don't want to create nested object. So that's why we're gonna create another Let's see, route object that we will name messages and insight. We gonna put our message data and then to reference that this message belongs to this particular room. We're going to specify room I d inside this message. And also we will de Normalized Data de Normalizing means that we will copy and duplicate our data. This is to prevent performing multiple queries on our database when we need to display something. For example, chat message with chat message. We also want to display user profile name, Avatar and other things. So when we display message, if we don't duplicate data, we need to send a second request to our database and get the actual profile ometer. So to prevent performing multiple requests, we will duplicate it. So this is normal in no SQL databases. Let's go. So for assemble message for author, we gonna pour name which is going to be profiled the name then we gonna pour also your i d , which is going to be profile your i d then created at is going to be profile created at, and also we need to pour conditional avatar. So if you there don't have any arbiter, we do not put it inside this object for that. We're gonna pour three dots. Then we're gonna poor profile on Avatar, and we're gonna ask if gift exists. Then we're gonna pour avatar key with profile door avatar. So otherwise, we will pour an empty object. So when profile avatar exists, we're going to specify this object. And because off three dots, we cannot spread this object to this global object. So in this way, it will attach this property to this object. Otherwise, we will spread the empty object, which will add nothing. Okay, So next your author, we're gonna add, created at and here we're going to specify firebase. But let's imported in the first place. Let me put import fire base from firebase app, and it is going to be firebase database server value. Timestamp. All right, now, let's use this assemble message and let's put it over here. So we're going to create a new available that will name message data. Then we're gonna call, assemble message with profile and Chad I d. So we're gonna get profile from our context. So let's poor profile from use profile Hook that we have from profile context, use profile. And also, we need to get chat idee. And we can get it with the help off use Paramus that comes from react Router youth programs . All right, good. Now to this message data, we need to attach the actual message text. So here, let's pacify message. Data text is going to be our input. All right. And now the thing is that we need to perform an atomic operation to update data in multiple places inside database with real time data base. It is really easy to do, and I really love that. Wait. So what we will do? We will create a new message inside messages path. And also, we will update rooms. And here we're gonna put another prop, vegetable name, last message. This is to display last message here inside this chat room list. All right, so what we're going to do, we're going to create a new object. It will be an empty object by default, which is going to be updates. And the logic will be the next inside this object we model our update data inside database related Lee to the route off the database. So we will have the update pass as a key. And for this key, we will have the actual updated data, and then we will call this updates to the route off the database, and it will perform it as an atomic operation. I really like that way. So what I mean is that first we need to define a new message I d in advance. So for that, let's create new variable message I d. Here. We're gonna put database. This time it will be database that comes from Let me again, how to import it, right? It doesn't work. Let's do it manually. So we're gonna import database from MISC. All right, let's go back to folders. Okay, One more level. Misc firebase. All right, Perfect. So, database, then we're gonna need to specify reference to our messages. Then we're gonna floor push, and then we will get keep this way we can get and unique key from riel time database without creating the actual document. Okay, Now we need to update this updates object. So let's put updates and our first property is going to be messages. Then we're going to specify message I d over here. And for this message, I d. We're gonna pacify message data than second object is going to be rooms, slash chat I D and slash last message and for last message, we're gonna pacify all off our message data and also on top of it, we're gonna attach message i d. So message I d is going to be message I d like this. Now we need to update the actual database. So here, we're gonna put to try, catch block, and here we're going to call a wait and let's convert dysfunction Teoh a sink function. We're gonna call our database with Treff. So we get reference to the road off our database without specifying the path, Then which is gonna call update and we're gonna pass our updates object, and it will peak All update passed from Keys, and it will update these past inside the database right after our data is updated. We gonna call set input to an empty string again, and also we're gonna put alert door error and we're gonna specify ever dock message, okay? And also maybe Let's define loading state. So next to this import, let's create is loading and sad is loaning, which will be set to false by default. Then we're gonna call said is loading right before we do any asynchronous task. In case if we failed, we're gonna call it as Satya Falls. And when we are finished, also, we're gonna call False. Now let's use dis loading state for this button. So let's put disabled Onley when our data is loading right now, maybe let's save and let's take a look. What do you have? So if I send any message to the database, I have permission tonight and that's because we didn't specify any security rules. Let's navigate to rules. And then let's just copy all of that. Let's paste it here at the bottom. Let's rename it to your messages and let's specify message I d Let's save it and let's synchronize it with our local rules. And now let's try and send a new message. So if I click now, let's open our database and here I can see a new path, which is messages I have newly generated key, which is actually this message I d that we created with this line of code. If we open it here, we have created at belonging stewed This room I, d text author, is the next person and inside rooms. If we open now, we also have lost a message, which is this message that we sent. So it looks just fine. The only thing I want to do here is actually I want to maybe at a new handler for on key down event. So when we also click on Enter Button, the message is being sent. So for this import, let's also put on key down event and we're going to specify on key down handler, Let's put it next, Teoh on input change. And this on Qi down is going to be Or maybe let's put it here at the bottom, next to on sent click inside on key down. We will receive an event object this time, and we're gonna ask if event Kiko or equals 13. If our button that we press is enter, then we first gonna call event prevent default to prevent any default functionality defined for this button. Then we're going to call on sent click. All right, now, let's try one more time if I say hello again. If I click enter right message has been sent and the database has been updated. So I guess that's it. Let's finish this video. Let's commit all off our changes by calling good at everything. Then get commit and, let's specify created charred bottom Sent messages to de chat. Splendid. See you in the next one.
124. Display Last Message in Room List: Hello. Now that we have messages inside our database and we have lust message property available on chat room data, we can display this last message inside chatroom list Inside room element. Let's do it. Let's navigate back to code and let's open room item component here at the top, where we d structure around properties. Let's also d structure last message than first here inside time ago instead of displaying you date created at Let's ask, if we have lost message data, then we're gonna display new date off last message created at so when this message was created. Otherwise we will keep it as it was before we gonna display when the room was created, then here below, where we display no messages. Yet instead of that, let's poor conditional rendering. So if we have last message, then we're gonna display last message markup. Otherwise, it will be as before. We're going to display span. No messages yet. So inside this react fragment, we're gonna put First user Avatar and then the actual message. So this def is going to be rapper for profile avatar component that we created earlier as you remember. So let's import it and for props. Let's specify source is going to be last message. Let's take a look. Last message Daughter author Nora al atar dot author Lord Avatar Name in case if Avatar is not defined is going to be last message Author dot name and size is going to be smoke. And for this deaf let's pour to display Flex and a line item center. You make sure that avatar element is 10 to read vertically. Then next you decide if let's get rid off this bark for react fragment next to this profile avatar. Let's display another deaf with class name tags disappear to prevent attacks from overflow and margin left. Let's put you inside. We're gonna put def. That will say last message dot author dot name. And next year after name, we're gonna poor span. Last message, dog text and toward this author name, we gonna display text italic just to distinguish between author name and last message. All right, let's save everything. Let's not get back to our application. I can see that unexpected. All right, so again, this react fragment buck. Now, if I say what I can see that I have the actual message. I can see author name. I can see my message and I can see my Ah litter. Now maybe. Let's try a new message. So let me say hello from future. If I send this message, I can see that message has been sent. Just now again, my avatar, my name and hello from future. All right, so this is it. It was pretty easy, right? Let's commit our changes. Let's put everything to get system and let's commit by saying display last message inside room item, for fact. See you in the next one.
125. Working With Denormalized Data: Hey, now we have lust message inside shattering list. But here is the problem because we duplicate data now. If let's say I go to my dashboard and I update my nickname to something else, let's save to show look 16. Then they also update my avatar. If I upload it, it is being uploaded. But last message is not being updated because these data is duplicated inside database. So we need to take care of that when we update the actual data. If we do some changes, we'll make sure that we also update all references that we duplicated. Let's not get back to code and let's navigate to dashboard, Let's go to Dashboard Togo and then go to dashboard. And here, instead of this user nickname rough set new data. We need to find a way to update all references. So what I proposed to do, I want to propose to create a helper function that will get all the references inside our database, and then we can update our database with old that reference. Actually, it will be the same as we did inside Chad bottom when we created this updates object and we specified multiple passed to perform an atomic operation, so it will be basically the same. So we can call this function like this. Let's define how we will do it. So instead of a weight user nickname Raff set, we're gonna call, Let's say we will receive updates and because we will access our database, it will be in a sentence operation. We will name it. Let's say get user updates inside. We will pass User I d which is going to be profile adore your i d. Then we will pass the key that we need to update. So in our case, it will be name and then we will pass the actual value, which is going to be new data like this. So now we need to create dysfunction. Let's navigate two helpers, she s and here at the bottom, let's export function de trouble name get user updates. So it is going to be anything function and it will receive user i d. Then it will receive key to update and also it will receive value. And maybe let's also pass the database object along with our function. So here we're gonna pass also this database object that we have inside misc fireplace just for convenience like this. So now inside of helpers, we can also have database over here. Now we're going to create an empty object. Indefinable coal updates than our first update will be the actual value that we're trying to update so updates. Then will go profiles slash user i d than slash key to update, and it will be set to value. Now we need to get the actual references. So our references are Let's take a look messages message I D. Than author than avatar created at in Also rooms. Last message. So what we will do? We will define a few promises because there are multiple promises. We don't want to make them one by one. We want to execute them at once. That's why we will define our promises. And then we will await all of them with promise dot All our first promise is going to be get messages and it is going to be db dot Ralf dar messages, then to get messages where Let's say this author, I d equals you our user, I d. We need to first full order by child. Then we need to specify what child. We went to reference. So in our case reference messages So we have the message object. Then we have author slash user i D. So let's put order by author slash user i d. And then this key will be equal to user i d. That we receive as an argument and then we're gonna put one's value to get the actual value . Then our second promise is going to be get user rooms, which is going to be DB reference slash rooms. Then again, we need to put order by child. And this time, if we open the rooms, we have less message slash author slash user i d. So let's boy last message Author, user I d. And then equal to user i d. And again once value. Now that we have these two promises in unresolved state, we need to resolve them. For this reason, we're gonna create a weight promise that all inside we need to pass an array of promises which is going to be get messages and get rooms like this and get messages will return us snapshot off messages and get rooms will return us a snapshot off rooms. So here we're gonna d structure them. First element is get messages. So we're gonna first receive message, snapshot or messages. Snap shirt. A second is going to be rooms, snap shirt, which we will name corresponding Klay am snatcher and Air Snapshot. Then for every message that we have with user idea, we're gonna call for each so message snapshot for each message that we receive, we will get message snapshot, and here we're gonna call updates. Then we're gonna poor messages slash message snapshot dot key, which represents the message i d. So we will have an object with all of these messages, and key is going to be this idee off message. All right, so message key slash author slash key to update. So in that way, we reference messages author and the kid that we want to update, whether it is Allah car name your I d or created at. And then for this key to update, we're gonna put value and exactly the same we will do for our snapshot. So let's actually copy it. And instead of m snapshot, let's poor air snapshot, which is room, snap shirt and then for updates, we're gonna put rooms, then we will get room snapshot dot key, which will be the room i d. Then here we will have last message. Then we will have author and then key to update with value. All right. And right after that we're gonna return the updates object that we've created. Now let's say what Let's navigate to you dashboard lets and commented, and let's actually important this object from helpers, but it seems like it can be automatically imported. So let's import get user updates from Let's reference our helpers misc helpers and it seems like not found right, so get you there. Update. All right, get you there. Updates like that. Okay, Perfect. Now that we have updates, instead of calling this function over here and instead of referencing the actual data, we can actually call just database dot ref door update with updates. Then we will awaited and we will remove all of that and also all of that. Now let's save it and let's actually also open. Applaud Bt, in which uploads our avatar and let's find the logic. So here again, as so we did hear inside dashboard lets copy it and instead, off again the referencing the child element and then updating like this. Let's put updates would get your updates than for profile i d. We're gonna update avatar this time and Avatar is going to be Don't load euro like that. Now let's remove this reference. Let's remove this user avatar set. Let's caught be this logic. Let's put it here and now let's take a look. If it actually worked, let's navigate back to code. Let me the fresh just in case if I go to dashboard, if I click on change, my nickname Okay, maybe I'm going to say hello. New name. If I click safe nickname has been updated and I still have and to be over here. Okay, maybe you let me check Dashboard one. My time. I have name over here. Let's consul log updates and let's take a look. What's wrong over here? If I inspect, I go to console I update my nickname. I received this type of updates, messages, profiles, all right, but I don't update my last message. So that's weird. Let's navigate Teoh helpers. And here let's take a look. Author key to update. Okay, snap shirt lost. Author, your I D Let's check our database. Last message. Author, Your I D Which is user I d that we pass. Oh, excuse me. Here must be not last here. Must be less message. Let's save it. And now one more time. Let's change our nickname. Tiu. Let's say she looks 22. If I update my nickname, it is being updated over here. Perfect. Now let's check for Al Atar If I upload a new image again, Avatar has been obviated. Let's look inside. Last message. Yes. Ah, What are has been updated? Okay, just in case one more time. Applaud. Avatar has been updated. Perfect. Let's take a look. Yes, it has been updated, so it actually worked. All right. Perfect. Now let's remove this Consul luck that we put over here and let's commit our changes. This is it. Let's board everything to the stage state and let's commit. Update all user references if data is updated. Okay. Perfect. See you in the next one.
126. Displaying Chat Messages: Hey there. In this video, we will display chat messages here in the middle inside chat page. Let's go, Let's navigate back to code and let's find our folder chat window messages. And here we have index togs already less great, and you file that will name message item. For now, it will be empty. So let's put hello inside. And let's leave it like that inside messages here in the first place, we will define our state that we will manage with the use state. So we will name it messages and sat messages. And by default, it will be such to know. Then we also need to grab our chat I d that we currently opened. So for that we will use use Paramus Hook that comes from react rotor and we're going to get child, I d now inside use effect. We're gonna make a call to our database. First, we're gonna grab our reference to chat path inside database, which is messages. So let's poor messages rough. Then we're gonna call database, but not the one that comes from Firebase package one that comes from fire based RGs. So let's import that one. Then we're going to specify reference slash messages. Now we will put a real time listener on hold messages that are related to opened chattering . So we're gonna see pacify messages, Ralf, Door order by child. And here we're going to pacify room I D. And this is a property that we have on every message, which is room I. D. So this from idea will be equal to chat i d that we receive from Paramus. Now, it appeared as a dependency, So let's edit. And right after that, let's put a real time listener So we're gonna put on value and honorables pacify callback that will receive snapshot. Now, as you remember, this snapshot will be an object where every key is message I d. And then we get the actual data. So we need to to transform it. And we already did it with the transform to array with I d function. So we will call it one more time. So let's poor data and then we're gonna put transform to array with i d. Then we're gonna call snapshot dot value and pass it to this function. And then we will update the state with data like that and because it is a real time listener. It is a subscription we need to unsubscribe. So let's use Ah, we're cleanup function for use effect. And here we're gonna pour messages, raft and dog off, and we can specify value. So this way we gonna unsubscribe from all real time listeners on these path. All right, now, our next step is to actually display data. And first, we need to get actually a few bullying values that will help us to conditionally render our messages. So our first is going to be is shot empty and charred. Empty is going to be only when we have messages defined and then messages dot length equals 20 So we loaded all messages, but there are no messages at all. Right, then we can also have can show messages which will indicate whether we can render our message item that we created. So if we have messages and messages dot length is greater than zero. So we could actually put this condition directly here inside our markup, But just to be more neat, you know, we put them here. So inside this def, we're gonna put the next logic. First of all, it is not going to be a diff. It is going to be a u L. Then class name is going to be message list and also customs grow that inside we're gonna pour is charred empty. Then we're gonna display an ally element because we have you, l and we're gonna say no messages yet. And then if we can show messages, then we're gonna pour messages, Doc map and we will map every message to message item. Let's open it for intelligence message item. He is going to be message door i d. And then we will pass message with a message like that Now inside message we need to de structure this property. So let's put messages and here at the bottom level D structure from messages, but not from messages. Excuse me from message. Let's rename it to message. Let's save what's also changes to message. And from this message we will destructor author trouble D structure created at and we will destructor text. Now it is going to be an l i element and it will have class name off parted and margin bottom one. Then we will put Dave here. That will be the top part of our message. And then we will put another def. And inside this different will put span that will display our message itself detects and class name is going to be Ward break all to prevent text from overflow if it is too long. So for our top part, we're going to specify class name off display flags align items center font is going to be bolder and margin bottom one, then here we're gonna pour First profile Avatar, Let's open it. Profile all Matar. And now let's use intelligence to imported. So as a source, we're going cheaper. Author dot avatar for name. We're gonna pour us or doc Name four class name. It is going to be margin left. One size is going to be excess. And then next to this avatar, we're going to put Spawn Element whether we will display off name and class name is going to be margin left to and after that spine will display when this message has been created. So we're gonna put time ago. So let's open room item. Let's caught be this import off time ago. Let's put it at the chop. Let's call p the same time ago and put it here instead of this date. Time we will display. Just created at and for class name for normal and text black. We will keep it as it is, but we will also display margin left to who? It was a lot. Now let's take a look. As you can see, we have our messages. And now if I let's say, executing your message, let's say hi there. You can see it is appeared over here. And also it is appeared here inside last message. So now we actually have our messages being displayed. And it will work also for any other chat room. Let's say hello from here. Now we have message over here. Okay. Perfect. So this is a let's commit our changes. Let's forget at everything. Let's put, get commit. And people name displayed messages inside chat page. All right, see you in the next one.
127. Display User Profile Data: Hello. In this video, we will add a new model window. So when we click on someone's user name, we can observe user profile. Let's not get back to code. And here under Messages folder, let's greet your file. Vegetable name Profile Info. BT and Moto GS. Let's create a new component. And for now, let's keep it empty. Let's open message item. And here instead of the span element where we display author name, Let's display profile in for BT and Moto and for this component because we need to get user data, we need to display it inside. We will pass profile prop and we gonna pass. Just author and everything else will be managed from inside the component. So from here, we gonna destruct your profile for now and let's define the market. So first of all, we're going to put button and this button will say short name off our user. So let's create new viable here that we will name short name and it will just play on Lee the first ward off nickname. So if it is a full name like first name second name, we will display only first name. So let's put profile job name. Then we're gonna split it with empty spaces and then we will grab the first element. Now we will display only the first name because it is going to be model. We also needs to get mortal state. So let's use our hook, which is used model state. Here we will receive is open, close and open. All right, now next to this body and we will pour model. And inside this model, let's first define show property which is going to be is open and on hide is going to be clothes than inside this moto. We will have mortal daughter, Heather as always. Then we will have body and we will have footer like this. So inside Heather we will have mortal door title and inside moral title we're going to display short name profile, then inside body or maybe inside footer, bubble display bottom which is going to be a block element on click It will close our moto and it will be just about on just to close this this mortal than inside body. First we're going to put it class Name off text center So inside a bubble poor exactly the same avatar image as we do in Avatar. A blood Bt in which is yes, this profile avatar. So let's copy it and let's put it here. Now let's import profile Avatar. And next to it, we're gonna display H four where we will display the full name off this user. So let's first grab it. CONST. Name is going to be grabbed from profile. And maybe let's also grab Avatar and let's say created at So now we don't need Teoh the structure or we don't need to specify profile over here. So for this age, for we will pour margin talk to to add some margin at the top. And then we will display member since and then we're going to pour member since variable that we will create. So let's poor const member since and we're gonna put new date created at and then we will simply just call to local day string to former our date. No. So we didn't use open. So let's put it for this on click. Okay, Good. Now let's open message item. It looks fine. It looks fine. Now let's take a look. So, as you can see now, we have the button. When we click on it, we can see she looks 22. Profile our image, full name, member scenes and close Perfect. But I don't want to be displayed it like this. So we're gonna just a few things. So everything else that will be passed to this component as a prop will be redirected to button props. And also, let's get rid of this def as a rapping element. Let it be just a button at the end, so all of that props will be passed to this button. So let's spread Bt and props object over this component like that. So for this profile in four beat and model, we can pass appearance, which is going to be link. And also we can pass Class name. Let's add padding. Zito Dan. Let's add margin left one and also text black. Let's save it and let's take a look right now. It looks good. If I have or I can see that it is something that clickable. If I click on it, I can get user data. Okay, Perfect. So this is it. Now let's commit our changes. Get everything, get commits. Let's say displayed user data with maro window. All right, see you in the next one
128. Adding Real-time Presence - Part 1: hello. In this video, we will manage rial time presence in our application with fire Base. It is pretty easy to do. Let's find out how we can handle this. Let's go to Google and let's just type firebase riel time presence. Then we can go to the first link built presence and cloud fire store. And here we already have a solution using presence in real time database. So we need to just caught be this snippet of code and then use it in our application. So let's first copy is offline and online for database valuables and let's navigate to profile context. This is the place where we will handle everything, because here we can get access to authentication. Object with real time subscription. All right, so let's put despite a bles here at the top, and let's replace Var with Constant. Now let's take a look. What do we need to do next? So we need to guess Database raft to info connected. So this is like a general way in database path that we can access and we can get real time presence off currently signed in user. So let's just copy it. Or maybe let's copy all of that like this, and let's placed it here inside. If authentication object, Denver will perform our real time presence management. So here we need to get reference to interconnected instead of Firebase database. Let's use later base that we got inside misc. Firebase. So then we get reference to infer connected on value what's converted to a narrow function than we receive. Snap. Sure, if snapshot that value is false. Let's poor and three people equality than user status. Database ref. So let's take a look. This is that valuable that we can copy. And this is the place literal store our status inside our real time database. So what we need to do, because it is going to be a real time subscription, we need to also unsubscribe from it in the future. So let's put it here inside Yousef act as a new viable we're gonna name it user startles database rough. Let's remove database and let's just put user status, ref. Then we will assign user starters ref to database Ralf status and you idea, Let's put it here at the top, just like that, and instead off you idea. Let's use off your i d and let's replace it with the string interpolation. So we will get both object dot your i d like this then, because it is a subscription. When we are looked off. Let's check if we have user status. Ref, If we have it done, we're gonna unsubscribe from it. And the same we will do for our cleanup function over hero user studies. Rough off. Okay, perfect. Now let's manage this part. So let's remove all of the comments. Let's remove all of that. And here we're gonna pour user started strap on. Disconnect is offline for database, then function. Let's converted to an adult function. Then let's replace it with your status. Ref. Sad is online for database, so this is basically it. Now let's take a look. We have fire. Base is not defined. Let's take a look. Firebase database. All right. Less import fire base from firebase app so we can get access to server value. Times temp. Let's save it and let's take a look. Now, if we are inside, we get permission denied. That's interesting. That's probably something with security rules. So let's take a look where we write our data. Uh huh. exactly. So we write our data to slash status off you I d. So let's again right security rules for this past inside database. So we have status. So let's call it be this path. We will do it like this. So here we will have user I d. And then we will be able to write to these place on Lee. If we have off, I d equals to use their ideas so licious Copy this logic and paste it over here like this. Now let's save it and let's take a look if it actually worked. If I to fresh my app, I can see now I have no warnings. So let's call it P vessels and let's sing cries them with our local data like this. Now let's navigate back to data and let's check it out here. Inside our database, we have New Path, which is studies that I have my user, I d. And then I have less change and stayed online. Now let's take a look. If I sign out from the application, I have stayed online, so this is because when we sign out, we didn't put an geologic for our database, so Onley when we log in. Let me continue with Google and let me select my account. Okay? I'm signed in. You can see that last change has been changed. You saw that fleet shot, right? So what is happening? That it actually works when we sign in, but not when we sign out. And the thing is because we set our security rules in that way, we can write and read on Lee when we have off you I d. So when we log our from our application when we sign out, this author object will be set to now, so this will be fired. And if we put our logic over here when we sign out in this way, we will get permission tonight because at the time, when we will try to right to the database of object will be set to now. The solution here is just to go to dashboard. Let's go to Dashboard Tuggle here. We need to pour this logic. So right before we sign out Mobile right to database. So we still have access to our security rules. So we can still have access to the author object. And only then we are going to sign out our user. So what logic should be put here exactly the same as we pour here inside user starters. Refs, That is. Ah, flying for data ways. So what I proposed to you from here on, we're gonna export CONST. Is a flying for database. Then we're going to copy this logic. Then right before we sign out from our application, we're gonna paste this logic. Then we're gonna import is offline for database. Then we're gonna pour database Dodds Ralf, Then we're gonna put status than slash. Then let's change quotes and pique our current user. I d Then we're gonna pour set, and then we're gonna set is a flying for database something like this on Lee, then because it is a promise. So let's could done over here. Only then we will sign out our user. We're gonna alert our user, and we're gonna close our application. And in case off any error, we're also gonna notify our user, but better. And we're gonna say better dot message. All right, now, let's actually take a look. So let me refresh the app just in case. Let's take a look inside database. So now we have status online, and if I go to sign out, I'm signed out. And now I have stayed off line. So pretty cool right now if I signing again, I'm signed in and status has been changed. And now if I close my application, if I close my tab, I can see state is a flying, so it actually works. And this is it. So this is how it can be handled with fire raise. It was pretty easy, right? The only thing here I want to do is I want to actually unsubscribe also from referenced or info dot connect when we are signed off. So let's pour off when we are signed our And also we're gonna put the same for cleanup function just in case. So, in this way, we handle all real time subscriptions and everything works fine. Well, that's it for this video. So let's commit. Our change is gonna add everything to the stage state. And then I will commit everything with message. I'll say a riel time presence, listener for a user. Perfect. In the next video, we're going to display a real time presence for users inside chat window. See you there
129. Adding Real-time Presence - Part 2: Hey there. In this video, we will display real time presence for every user that we see in the chat. It will be displayed as a dar in front of user Avatar. Let's go before we get started with this. I want to point out that in the previous video, when we managed real time presence for every user here, we did this comparison. If snapshot value than triple equality equals false, so this is not completely right because this value might not be a bowling. So to prevent that, let's actually put double negation to convert it to a bowline. And now everything will be fine. All right, now let's start. So what do we need to go first? We're gonna create a custom hook that will give us the presence off particulary users. So lets navigate to custom hooks. And here at the bottom, let's export and you function, which is going to be use presence. And this hook will receive user I D. That we want to get presence off. So let's create our state for presence. We're gonna name it presence and said presence. It is going to be simple use state, which by default, will be said to know. Then inside you the fact we're going to pull our user data. So first we need to get reference. So let's great const user status graph was going to be database from firebase dot treff then began a poor status slash your I d that we get as an argument, then we need to pour an array of dependencies than we need to pass your i d inside. Then we're gonna poor user status Rough dar on value. Then we're gonna pour snap short, and right after that, we're going to check if snapshot exists. So if there is any record inside database for this path, then we're gonna pour const data equal snapshot dot value. And then we're gonna set presence to data, all right. And inside the cleanup function, we're going to unsubscribe from user status Raft, user start. It's rough off. And from this hook, we're going to return presence, right? Perfect. It looks good. Now, let's create a component that will be a dot where we will display the user presence. So let's go to components. And here less great. You file vegetable name presence dot the g s. So inside this component We're gonna call our custom cook, which is use presence. So let's poor const presence equals use presence. And we're gonna pass your I d. That would will receive as a prop to this component like this. Then inside the markup, we're gonna put the next let's open our suit documentation. Then let's look for tool tip. Let's open it. Let's find an example off triggering events hover. So we need exactly this functionality. Let's go to examples and let's copy that one. Then inside our court, we're gonna place it like this. Let's import whisper from our seer and instead of button, we will display a batch and tool tip is going to be not this tool tip. It is going to be this component. Let's copy it and let's based it like this. Now we need to also import tool tip and inside tool tip. We're gonna place nothing. For now, however, it says that empty component ourself closing and you are right inside. We're gonna put badge also from our suit and inside batch Well, actually put nothing. It will be just a dart off some color. So now we need to get what we will put inside tool tip. And what we will put inside batch what color will display? Well, we actually need to perform some logic, and the best place to handle that is actually to create a custom function that we will call from here. So for this badge, we're going to display class Name off car, sir. Point her and style background color is going to be get color that we will create in a moment and inside we're gonna pass presence like this and for tool tip for our text. We're gonna pass, get text. And also we gonna call it would presence like this. So now we need to create these two functions, So lets navigate here to the top. And first, we're gonna create get color. We will receive presence. And first, if presence is undefined or if it is now. So if it is not defined, then we're gonna return great color, right? Then we're gonna put switch statement and then we're going to switch between presence dar. Let's open our database presence dot state. Then if we have case online, then we're going to return green color. If we have case off lying, then we're gonna display rad color and by default, we gonna display also great like this. So for color, we already Now let's create this for text. So let's define get text with presence as well. And again we check against no value. So if we have no presence, then we're gonna display on no one state. Then we're gonna return presence the States. If it equals two online, then we're going to return online. Otherwise, we're going to return lust online than we're gonna open string interpolation than gonna put new date presence. Lust changed. Two local dates drink like this. Okay, Perfect. Now let's actually use this component. Let's navigate to message item. And right before we display profile Avatar, let's use presence not. And let's pass you idee as author dot your I d. Right now let's take a look. And actually, if fresh my app now in front off my profile, I can see green dot And if I hover, I can see online. So how can we now tested against multiple users? Well, let me sign out and let me look in with Facebook so it will create me and you user profile and we will see it So now you can see Dad. It is unknown state And this is because as you remember, in the previous video, we set security rules for status slash user I d. So we can read Onley our current user. I d equals two user I d that we are trying to access inside eight always. So now we have permission tonight. Well, to actually fix this for right, we're gonna keep it as it is. But for regionals, we're gonna adjusted And we will say, if off not equal snow on Lee, then we will be able to read user data. OK, now let's copy it and synchronize it with our local data. Let's say where and now let's take a look. If I refresh my app now, it looks all right. And if I hover I can see last online on this date so it actually works. And if I say hello, I can see that currently I'm online and other user is offline. So this is it and it works pretty awesome. Let's commit our changes. Let's pour, get at everything land, get commit And let's pour this play for real time presence for a fact. See you in the next one
130. Adding Edit Room Drawer: Hello. In this video, we will add Drover to chat to up where we will be able to add it room information such as room, name and description. Let's go. Let's not get back to code and let's find our top folder. And here inside index togs was Just open it next to that file. Let's create anyone that we will name Edit Room BTM Drover Inside we will put the next market. So first of all, we will use button element and inside we're gonna put just a letter that stands for admin. Then class name is going to be border radios circle than size is going to be small color red and on click. We're gonna put open handler that people grab from use model State Hook that we used a lot of times. As for now, So let's grub is open, open and close. Now we need to create the moral window. So let's greet from Drover. Let's imported from RC or so inside this rover, we're gonna pour show property which is going to be is open than on. Hyde is going to be clothes and placement is going to be right and the same as for models. Drover has Drover Header body and for so let's create those components. Inside footer we will pour another button that will be just to close the Drover so it will be a block elements and on click we're going to close our Drover inside Heather, we're going to pour, drove or title and for Drover title, we will pour the Edit Room All right now, actually, for Drover Body before we define it. Let's actually use this component inside top components. So let's open index cogs inside top folder and here inside. But in toolbar Let's use at it room VT and Drover, that's it. Now inside our body were going to define to import elements one for room name and 14 room description And we're going to use our edita ble input that we use earlier. So let's open this component and then let's important. So for Ed Izabal input, we need to pass the initial value. So we're gonna grab that one from our current room context. So here at the top Blacks board, name equals use current room and we gonna select value dot name and the same we will do for description. So let's grab it. And also, let's wrap this component around, mammal. So let me put memo over here and let me import it like this. All right? Now we need to actually set our components. So for edit Herbal import for the first input, which is going to be about name, we're gonna pass initial value name than we must provide on safe function and let it be on name safe. As for now, then we're gonna put label and label is going to be Ahh, six element with class. Name off margin, bottom two. Then it is going to be name. And also empty message is going to be named Can be empty. All right. Our second in poor is going to be a text area in port. So let's pacify competent class. It is going to be text area rose by default will be five. Then we're gonna pour also initial value as description than we're gonna put unsafe, which is going to be on description safe and also empty message is going to be description cannot be empty. All right, now, let's save it and let's define those functions. So first of all, we're gonna create on name safe, and then we will create own description safe. And because our functionality is very similar, we're gonna create a one common function that will be called inside each off these functions. So it is going to be, let's say, update data of day data, and it will receive key. Or let's say field what we need to update and also the value actual value that will be sad to this key. All right, now, inside own name Save. We're gonna call update data with the name as a key and also new name, which is going to be passed as an argument to this function because we passed this handler to creditable input. And as you remember, if we open it, it gives us the final value. All right, so the same we will do for on description safe here, we're gonna put description and new. Let's say desk is going to be new desk. So inside of the data, we're gonna call database object. Then we're going to specify reference to rooms slash room I D or chat i d. So we will grab that one from use Haram's. So let's grab share i d from use programs. Let's poor import to the top. And then for this reference, we're going to specify Child is going to be key set is going to be value. After that. When we are done with writing data to the database, we're gonna call alert, and we're going to specify success successfully updated and let's put it for four seconds. And in case if we have any error, we're gonna also said alert, but this time better. And we're gonna put our message like that. All right, looks good. Let's delete this empty space. Let's save and let's take a look. Now we have this A button at the top on the right. Let's click on it. We have Drover, and the first problem. I can see that we don't have any margin here, So if we inspected, we can see that if we open import group and we have to, Dave's over here and they basically don't have any margin. So let's open our creditable import. So we need to pour some space for this def, or it can be an option. So what I proposed to do, we can pass another argument to creditable input, which is going to be robber class name and by default it will be empty. So then we're gonna pass this rapper class name to that thief class name and what we will do It will say with damnable navigate, you are were creditable input. And for text area began a specify rapper close name is going to be margin top three to add some space on top of that, let's take a look. Now I can see that it looks good. Now let's actually edit some data. May be new Rome name. And if I say where I can see successful, updated and room name has been updated. Indeed. Okay, cold. But there is one problem us. Remember, with robbers, they are not exactly responsive. So what we need to do? We need to pass the full property to this robur when we are on mobile devices. So we're gonna use use Media Query hook here at the top. We gonna specify his mobile is going to be used. Media Query. And here we're going to specify marks with off 99 2 pixels. Then we're gonna pass. This is more bile to full property and it will be activated only when we are on mobile devices. So now if we open it and we precise the window, it still looks good. Okay, so this is it, I guess. Now let's commit our changes. Let people everything to the stage. State is always and then get committed. Added edit room. Drover. All right. In the next video, we will add more security to our room because, as you can see, for now, we are able to add it. This room, even though we are not admits because we don't have any user permissions. So this is our topic for the next video. See you there.
131. Role-based Access & Security Rules: Hey there. In this video, people manage our role based security on particular fills. When we try to add it. Room information, Let's go. So, first of all, how we're going to define our roles. If we open our structure inside rooms, we can see we have created at description, last message and name. So here we will also add another property, which is going to be admits. And with real time data base, we can poor a race or we can. But they are really poorly managed because off its poor query builder system, because off its poor queries on real time database, we're gonna put our Edmonds as an array off user ID's. So if user belongs to this array, it means that user is an admin and will not put it as an array. We're going to create an object inside our database, and every key is going to be user i d. And if this user is an admin, then it will be set to true advise. This user will not be inside the database. All right, So first of all, what we need to do, we need to add a user to our data. Let's go to, let's say new room name. Or maybe let's rename it to something more specific. Let's say cool, let's save it. And now let's navigate through this data base here. We're gonna add new field we're gonna create admits than we're going to click on plus sign over here. Then we need to put our user I d What we can do, we can go to profile context. And then when we get off object, let's Consul Accuser i d to get our user i d. So now I can caught me by user I d and put it inside database and then sat value to true and then edit to room data So it looks like this. Now, in order to restrict access, we need to define security rules, so lets navigate to rules. And here we will do the next thing for our rooms path. We're gonna remove right property so it will be picked up from here so no one can actually right two rooms path, but they are able to read rooms than for room I d. Instead, off write it like this. We cannot recreate the rule, but also for last message property, which is like this. We get us pacify, right? Rule said to off not equals No, Let me for mud it like this. This is due to if you remember, when we update data in multiple places, we also update last message inside our room. So basically, everyone who writes to chat can update last message inside the room but not other fields like room, name and description. Here we will define models for exactly those feels so for room idee, we are able to write data first when the data does not exist. When we try to create and you room, we're gonna specify if data. So this data is again a global object inside security rules and it represents the current data that we're trying to access. So if data exists so it is a bowline were able to write to these past when data does not exist. Alright, So when we're trying to create a new room with the specific room I d, or if we are an admin, only then we will be able to write and edit this information. So how can we do that? So we know that we store it under add men's then we have user I d and true. So with database with security rules, it works like that. I opened documentation for real time data, basically rituals. And here I confined this information. If I scroll down a little bit, I can find this information that I can access some filled by using this approach. So I'm gonna just use exactly the same pattern and what I will do. I'm gonna ask if data that we're currently trying to access has child admissions. Then inside this at Mons Child, we have another child which is going to be our user. I d. And we can get it from both object. So we're gonna ask if child off dot your i d dot value equals two. True. So if we have a record for our user inside Edmunds filled, then we will be able to write to that path. Now, let's save it and let's take a look. Now, if I am an admin off this cold group, I'm going to click on that. I will be able to edit it because we edit our user I d to the database. Let's say something random now successfully update it. OK, now let's navigate to other room When we are not an admin, Let me try and edit it. Hello world. Now if I will try and savor, I will get permission tonight So our security rules work and that's pretty cool. And because of that now we restricted access to our database. But also we need to manage it programmatically we need to add men's etcetera. So let's also do that. So let's navigate to create room, beach hand model. And here water will do. When we will create a new room, we will add ourselves to add men's. So here, when we define in your, um, data, we will also add a new object added beans. And we're going to specify us. Let's import off in the first place. Yeah, it has been imported off current user, your I d is set to true. Now, whenever we add in your room, we set ourselves as admin. Next, when we read room data, we need to know who exactly are Adnan's. So lets navigate to Chatel gs and here for a current room. We're gonna do the next thing because it is an object and we need to work with I raise Ideally, when we work inside our code, we need to transform this object to an array. So let's create here. New, valuable ad mons and inside helpers. We will define a new function that will transform our object to just an array. So we will name it in exactly the same way as we did with this function. But we're going to say, just transform to array here. We're going to receive snapshot value again and let me defined function keyboard, and this function will be pretty simple. So if Snapshot 12 exist, then we're going to return object keys off this snapshot value so we will get an array off user ID's. Otherwise, begin a return and empty Right Now let's say this helpers and let's use it inside. Chatterjee s here. We're gonna transform to array. Let's say current room door Adnan's And now we have the administrative. But also we want to know if we're currently signed in user is an admin. So what? We came to you. We can create a new valuable is admin and we're gonna just simply ask if admissions includes off that current user dot your i d and how we can pass it this data along with the context. So let's pass, admits and is admin. From now on, we will be able to display this drover Onley when we are admits. So now let's navigate Teoh our top part. Let's navigate to index togs inside top folder and hear from context. We're going to grab his admin use current room value. Value is admin like that. And now we're gonna ask if we are an admin Onley, then we will display at its room Bt and Drover. Now let's take a look inside this first room where we are the admin. We can see this Drover, and we are able to add it. Room information successfully updated. But in the room where we are not admits, we will not be able to see this Drover. And also we will not be able to update it because we said security rules. Let's actually copied the security rules. And let's synchronizing them with ah, war locals. Let's open data base rules and paste them here. All right. It seems good. Have that where there is one more thing to our security rules. If we inspect our council, we can see that we have this firebase warning your data will be doing lower and filter it on decline. Consider ending index on on the room idea at messages. So let's do that. That's to make our queries even more performance. So lets navigate to rules. And, let's see, consider adding index on room I d. At messages. Let's copy this. And that message is Let's add it over here like this. Now let's savor and let's take a look if we can still have this warning, okay? Right now, our council is clear. I don't see any warning. Let's again copy our rules and let's paste them. Teoh, our database rules, Jason like that. Okay, so this is it for this video. This is how we will manage our security. Now let's commit our changes. Let's at everything to the stage state. And then let's commit changes with the update security rules for role based permission. And that's all. All right, See you in the next one.
132. Role-based Access Management: Hey there. In this video, we will add button in order to be able to manage role based permission. So when we click on someone's user profile, if we are currently and had been off this group, we are able to create this user and had been to Let's not get back to code. And let's open, I guess. Message item. So here we will do a little modification to profile info, BT and model. So let's open it. And here we want to display this button here at the bottom. How we can do this? Well, it is actually easy. We can pass some Children to this component and they will be displayed over here. So here in side profile in four billion model, we're also gonna d structure Children and then those Children we will display in footer right before our close button. Now let's save it. Let's not engage to a message item. And here for profile in for Betty Anne Morrow, let's pass another bottom so this bottom will be a block element, and on click is going to be something that will define in a few of seconds. Also, it will have color blue and text is going to be the next. So, first of all we need to define when this button will be displayed. Maybe, let's commented. And here let's create a few bad apples and let's first move it to the talk like that. Okay, so first we need to define if we can grant admin permission. So for that, we need to get our contacted data. So let's get is admin from use current room. Let me open car into room context, then let me import the hook and from value Begin a peak is admin. And also we need other admits as well. So use current room value. Value admits like that. Then let's wrap our message item around memo because we use use context selector and here we will do the next. First we need to know if message author is an admin. So let's create his message author admin and we're gonna ask Edmunds Includes author, author door you I d. Then we need to know if we are the message author so we can create his author of Edible and we can ask us current. Let's import off off current user dot your I d equals author indoor you I d like this. And then we can create another edible which will name let's say can grant access or can grant admin. And we are able to grant admin permission if we are add Mons ourselves. And also, if we are not message authors so now we can use all of those valuables to display our button conditionally. So first, we're gonna poor. If we can grant admin only done, we will display this bottom and also for the message We're going to put his message, author admin. Then we're gonna say remove admin permission. As otherwise we're gonna say, give admin in this room something like that. Okay, now, actually, let's see what we did. Let me refresh. Just in case if I opened this profile, I can see give admin in this room. So when I click, nothing happens because we didn't define any functionality. So lets navigate here and all the functionality we're going to pour inside messages component, and then we're gonna pass this functionality to message item. Okay, so for message item here, we're gonna have let's say handle admin function that we will pass that we will get. And for this handle admin. We're gonna pass. Let's say, author dot your I d. All right, now we need to get this handle admin from props and let's navigate to messages. And here we're going to define constant handle admin, and let's optimize it in advance with use call back because we pass it down to child element. OK, so this handle admin will receive your i d. And then let's first define our Edmunds ref inside database so we can a call database object. Then reference is going to be rooms than it is going to be Chat I d. That we already have from use perms and then slash advance. All right, now we need to add chat ideas a dependency and hear what we need to do. We need to actually get our previous value in order to trigger it. So if we click on this button and we want to grant the permission, then it will be at it. Otherwise, if this user already have the permission, we want to revoke it. So actually to do it with real time data base, if we open its documentation, we can see this section under reading right data save data Estrin sections. So using this way, we're able to get access to the previous value and we can update it. And most importantly, it is transaction. It means that data will not be corrupted. So let's actually use exactly the same approach. So let me copy all of that and what I will dio I'm gonna call await what's convert this issue racing function. Let's call evade add men's Ralf Dar transaction. Then we receive our current or previous value, which is going to be admittance and hear what we're gonna put it. I'm gonna paste the same code that I cooperated and here I'm gonna ask if admissions exist . Only then I will perform my logic. So if admits exist, then I want to ask if admits, you I d exist. Then I want to revoke the access. So I'm gonna set admits your I d to know. And when we set value to know for real time database, it will be deleted from the database because you actually can store no values there. So now if we don't have the permission, then we're gonna grunted. So advance your i d will be set to True. Now let's remove the rest of the code. And in the end, we're gonna return admits, and it will do its thing. Right? Call. Now, we need to notify the user whether we revoked or granted the access. So we're gonna put alert door in for And what should report here? How can we specify whether we revoked or granted access for that? We can create available over here that we will resign. Let's say alert message. So when we have revoked access, we're gonna set alert. Message to admin. Permission removed. And for true, begin a specified Miller message. Admin permission granted, something like this. Then we're gonna pass this alert message to alert info, and I We need to pass this handle admin down to message item. So let's board handle admin. Handle admin. Now, let's actually take a look. Let's navigate back to our app. If I click on this user, give admin in this room. Admin Permission granted. Now I have remove admin permission. If I click on it, I can see admin permission removed. Let's navigate you our database. Let's find this room, which is room in for that room. Now. If I grant access, you can see a new value inside database. And if I remove access, I can see it has been removed from the database. All right, I guess that's all about security and role based management. Let's actually commit our changes and finish this video. But before we do that, let's move this import to the top, and then let's commit changes. So get at everything, then get commit and we're gonna say added button to grant or revoke admin access. All right, Perfect. See you in the next one.
133. Adding Programmatical Hover With Hooks: Hello. In this video, we will add pro grammatical hover to chart elements, and it will serve as a foundation for upcoming videos. Let's get started. Our pro grammatical, however, will be managed by a custom hook, and we confined this hook on the Internet. So let's opening Google and let's just type use hooks and then use hover. Then let's open the first link that lets get the code snippet and let's copy this hook. I'm going to copy all that function. Then I'm gonna get back to the code than inside custom hooks at the end. I'm gonna upend this function, and I'm going to export it from here. And also I need to use use draft for that one. So let me imported. And as I can see, I have this unnecessary dependency. But that's not exactly true. So let's add Yes, Lind, warning for this line. And also let's modify this hook a little bit instead off conditionally returning the cleanup function. Let's move this return here to the very end. All right, now we're ready with the hook. Let's navigate to message item and here we are going to use that hook. So at the top. We're going to create a new valuable, and we're gonna call use, however, Hook. So this use Howard Hook. It returns us an array off exactly two elements where first element is the reference that we need to assign to the element. So let's name itself reference and then actually the bullet valued that indicates whether this element is currently hovered or not. So let's call it the the self ref and let's pass it to this L I element. So reference is going to be self ref. Now we can actually use this bullion value and we can do something, but that so for now what I propose to do, I just want Teoh change the background color whenever we are hovered. So let's poor dynamic clustering for this ally element. So let's rob this shrink in brackets and let's use Rincon trip elation. And first I'm gonna add cars are a pointer to this ally element. So we know that whenever we hover, something is going to happen. And then I'm gonna ask if our ally is Howard, Let me change it to Harvard. Then I'm gonna display background black off 0.2% each. Otherwise, no class name at all. Now, if I navigate back to code, I can see that whenever I however, I can get my background. So this is it. And that's the end of this video. Let's commit our changes. Let's put everything to the stage stayed. Then let's commit with the edit pro grammatical hover. All right, see you in the next one.
134. Creating IconControl Component - Likes (Part 1): hello in these two videos we're going to handle likes in our application. In this video, we will create a component that is going to be a wrapper around control. I come that we will add to the message item. Let's go, Let's get back to the code and let's first define how we're going to use this component. So let's open message I, Tim, and we will place it right after a time ago. So here will have a component, something like I can VT and control. And then this component Well, except in next props. So first we're gonna define whether it is going to be visible or not. For now, let it be visible. Then we will put I can name and for now, let it be hard for our likes. Then also, we will have tool tip that will say something like like this message. Also, it will have a handler on click handler. So for now, let it be an empty function and also it will have a two conditional props. So first is going to be color and then it is going to be bench content. Eventually it will have to Aikens close Aiken and, like I confer like I can we want to display tilted with content. So that's why we're gonna put batch content as an additional problem. And for now, let's say that will have five likes something like this. All right. Now let's actually create this component and let's see how it will look like so here Under messages, Let's create Aiken, VT. And Control. And let's define how it will look like before we do any markup. Let's first grab the props so we have is visible. Then we also have I can name. We have tool tip we have on Click, and we have badge content way. Other props we will store under props. Object. Okay, so it is going to be a diff with class Name of margin left to let's say style is going to be the next. So we're gonna put visibility prop, and it is going to be visible on Lee when is visible, set to true. So if is visible, then visible, otherwise hidden. Okay, good inside this def. We need to pour. Let's say a conditional batch content a conditional component, and here's a little trick. How you can do that. It is not really a really primitive or obvious. Let's say approach. How to create a conditional render off component inside a component. So it is the trick. First we poured here, and you component, let's say conditional badge like this, it will receive one property, which is going to be, let's say, condition where a value that we wanted to display. Then here we're gonna pour conditional badge and as a prop, we're going to pass condition and this condition is going to be our badge content. And here we're gonna ask if we have a condition, then we're going to war batch with content off condition, which is going to be our actual value. And then we're gonna rapper in Children like that. Otherwise we will just return Children. So, yeah, this is the trick. And we need to grab Children from our props as well. So it will look something like this, but I can see that something is wrong. So what is happening here away? I forgot the bracket. All right, so this is it. Now, if we have much content, this conditional batch will be rendered otherwise, we have Children, which is all the content that we pass inside. OK, but inside we're gonna pass away. Spur and whisper is the component from our suit that they used for something like tool tip . So for a whisper, we're gonna pass. Let's a placement chop. Then we're gonna pass DeLay. It also has a delay of zero than dilly. Hide also is going to be Zito. DeLay show is going to be also zero trigger is going to be holler and speaker. We're gonna pass tool tip and for tool tip message. We're gonna pass guilty property like this inside this whisper or for a trigger, we're gonna display icon button normal component from our suit. And for it least Aiken, button, we gonna pour all the crops first that we received over here, And then we will have on click handler and we're gonna pass on click that we receive. Then we're gonna put it as a circle size is going to be very small. And also I can itself is going to be I can let's imported. And for ICANN, we're gonna put icon. I can name that we also receive as a property. Now it seems ready Inside message item. We can see that I convenient is not defined. Let's imported and let's actually see how it looks like. So now if we open our application now, we have likes. However, we don't have color. So what I proposed to do here, we're going to pour a conditional collar. So how wearable to do that? We already did that. So we can pour something like this. We can spread our object If our condition is true or we can spread an empty object. In this case, we will not pass any property. So we're gonna put something like if our condition is true, then we will pour the color off red. And otherwise, we're gonna put an empty object so it will work, and it will do its think. Now, if I had a fresh you can see I have red color when condition is true. Otherwise I have false. Okay, good. So it works. And by the way, if you're wondering where it will go, it will go here for these props. And these props will be passed to Aiken button. So basically, we said color for this Aiken button. Okay, So this is it for this video in the next video, we will display the likes and mobile at functionality. But as for now, let's finish this video by committing our changes. Leads at everything to the stage state and then get commit. Creator, I can VT in control component like this. Okay, Perfect. See you in the next one.
135. Likes Functionality (Part 2): Hey there in this video bubble, add functionality to the like button. Let's go. Let's first navigate to the database and let's see how we're going to handle our data structure. So inside every message element, we're going to create two new more properties. First Property is going to be like Count that will indicate the total number off likes on this particular message. And then we will have, Let's say, likes it will be an array off values with the user ID's that liked this message. But instead of storing and Ray were going to use an object the same way as we did with Rooms admits, let's navigate to the app. And here let's open first message item. Here we will receive handle like function and this handle like function. We will pass it to this own click handler here. We're going to call this handle like and for handle, like we're going to pass message dot i d. Okay, now let's navigate to bottom in textile gs And here when we create and you message, we're gonna attach a new property like count, and by default it will be set to zero. Okay, now let's navigate to messages to index dodgy s. And here, let's define Const handle like handler lets rapper in. He was called back in advance. And now let's define our logic. We're gonna pass it to message item on the like candlelight, so it will receive message I d. And the logic actually will be quite the same as with the handle admin because we're going to use a transaction. So let's actually caught be everything from here and let's put it inside handle like but instead of advance, ref, we're going to poor message, ref and message Ref is going to be database Ralf than messages. And then instead of chat idea, we're gonna use message I d. Okay, then we need to also convert this function to in a sink function for transaction instead of admits we will receive message. Then we're gonna ask if message exists then if message dot likes and message Dar likes you , I d off our current user. So let's grab it from other object. Let's use off current user and we will get you i d. So if we have, like by this particular user, then we're going to first delete this like and also we want to decrease our like Joan. So let's fix it to message Dog likes. Then we're going to decrease, like, count by one. So let's boy, my nose equals one. An alert message is going to be, like removed. Okay? Otherwise, when we want to pour and you like, we're gonna put a message like Conan Plus equals one and because we can have this likes object said, you know, it can be non existent inside databases community also handled that. And if we try to add something to non existen object, we will get an error. So first we gonna ask if no message likes. So if we don't have this object, then we will initialize it as an empty object. So message likes is going to be an empty object. And only then we will be able to set message. DOT likes your i d equals to truth. And then message is going to be like at it. Okay, Perfect. Now let's say wait and let's take a look. If we will try to click on this message, we will have transaction failed, and this is because it tries to update like, count, non existent property for existing messages. So what I proposed to do, I want to village all of this passage is just to clean up database a little bit. So now we're able to put a new message with the new properties. So let's put a new message. And now it has five like Count and we can actually fix this. But for now, if we click on it and we can see, like, edit if we go to database, if we open our message, we can see, like count one and likes contains our user i d. And if we click on it one more time, we can see likes is diluted and, like, count such to Zito. Okay, Perfect. Now let's actually fix our you I Let's not forget to message item here. We need to pass props, Teoh, I can be in control. So first of all, when we have color off red when our message is liked, right, So let's poor is light valuable that will create here at the top const his life and how we can define that. So first we need to see if this message has any likes. So let's grab, likes and like count from our message. And here we're gonna ask if our message has any likes. Then we're gonna put object keys off. These likes to get array off user ideas and then we can poor includes, Let's say off Dar current user, don't you? I d So in this way we can detect if our message is liked by this particular user. Okay, so then we're gonna pass. This is liked to weaken displayed here. We're gonna put it inside the condition, and then we're gonna put color red. Okay, then we have this is visible property. And this is for actual for responsiveness off our messages. So if we recites our window, we end up on mobile devices. So on mobile devices, we don't want to hide our icons. We want to display them always. So for this, we can use use media query to detect that. So first, let's put it here right below use hover we're gonna put is mobile. And then we're gonna use Media Query, and we're gonna ask if we have marks with off 992 pixels. So if we have is mobile, let's actually create new viable. That we will say can show Aiken's So if we have is mobile or if our current element is hovered so we will see them Only when we have her on the message Only then we can display Aikens so for is visible We're gonna pull can show I comes for on click We're gonna pour and the like And for bench content instead of five we're gonna put our current like count Okay, good. Now let's take a look If we have where we can see, we have icon If we resize the window And if we are on mobile devices were able to see the Eiken. Okay, Perfect. Now if I click on this like message, I can see like count and as well it is being displayed in color off red. This is it. And it looks pretty cool. Any fire size again? Back to my bile. I can see it always. This is it. And I guess let's commit our changes. Let me open my terminal lead Poor get at everything than could commit Handle message likes Okay, Perfect. See you in the next one
136. Handle Delete Operation: Hey there. In this video, we will handle delish in off chap messages for that rubble at another Aiken Bt in control to message item. Let's go. Let's navigate to message item Dodgy? Yes. And here next to like, I can begin control. Let another Aiken between control to delete the message and it will be visible on Lee to the message. Author. So Onley message author can do that. So let's copy this and let's conditionally render our next Aiken became control. So if we are author off the message, only then we will be able to see that. So we don't need color. Brad, we need is visible. I can name is going to be close. Tool tip is going to be delayed This message We don't need veg content. And for unclip we will add handle dill it that we will receive from props. Okay, I guess we are finished here. Now let's take a look If I, however I can see delivered this message, okay, Pretty cool. Now let's not engage two messages in text togs. And here let's define that function. Let's pull the const handle dill it and rapid in use call back in advance. Let's also don't forget about dependencies and let's pass it in advance to message item. Okay, good. So this handle delete receives a message idea as an argument. So let's grab it and I'll let's define our logic in the first place. We will ask if you sort of really intends to deliver this message. Maybe he just mis clicked it. So we're gonna ask if window confirm, deliver this message. So if user clicks on no, then we're gonna simply return from dysfunction. Then we need to perform a few operations over here when we update the database. Because as you remember, when we deliberate message over here, we need to also consider our last message property inside room item. So we also need to update it, and we need to perform an atomic operation. For that, we will create an update object, and then we will update our database from the root, as we did before. Okay, so let's create new updates, object, which is empty for now. And then we're gonna put first updates than people update messages. Then we will update message. I d Annable said it to know it will delete the original message that when our message is last, we want to update our room information. So first we need to detect when our message is lost. For that, we will create a new valuable over here, which we will name is last, Let's put it above updates. And it is going to be a comparison between our current state and message I D. So we're going to refer to messages. Then messages dot length minus one. We will grab the latest message from our state array that I d equals two message I d. So if this is true, then our messages lust Okay, so here we're gonna ask if our message is lust than for these updates. Object. We're gonna specify slash rooms, slash chat I D. And then last message equals the next. So it is going to be the previous object next to our current dilated object. So we need to grab messages dot length minus two, the previous object, right? So we're gonna spread it all over last message. So let's forward messages than messages dot length minus two. And also we need to specify message i d. As to remember for last message. So we're gonna also put messages, messages about length minus two dot i d. And because we are trying to access messages dot length minus two, this might be now or this object can not be existence. So we need to check against that. So we can do that by simply putting here. If our message is last and messages thought length is greater than one Onley, then we make sure that this object does exist. Okay, then our next case to consider when we have only one message left in the chat room. And when we delayed it, we want to delete the last message inside, um, information for that. We're gonna check if our message is lost and messages dot length equals to one on Lee. Then we will pull for last message Mel Value to deliver it. And in the end, we will update our database. So let's put try Kage. Look over here. Then we're gonna call, await database dot draft door update with objects and let's converted to anything function . And also let's specify array of dependencies. So we need to pasture idee and messages. And also to avoid this warning, Colette's suppressor like that. And also let's put alert here to notify user that we deleted the message. So message has bean dilated and not messages message. And for any error, we're gonna put alert door, enter error, but message. OK, looks good. Now let's take a look. Let me add a few new messages. Hello? They're high. Okay, So if I delete the very last message inside the database, I can see now room information is being updated. And now I have last message set to there, which is correct. Now if I do it not the last message, but one of those. Let's say hello. I can see that the last message inside room item has not been updated. This is correct. Now, if I delete the last message, I have new messages. And if I have only one message inside the database and if I delete that one, I have no messages yet in both places. OK, so this is good. And this is how we will handle that. All right, let's commit our changes and finish this video. Let's forget everything and then get commit. Handle dilated message cooperation. All right, See you in the next one.
137. Adding the Upload Component - Part 1: hallow. In this video, we will start at in functionality for file upload. Let's go, Let's navigate to Bottom folder and let's open index togs. Here we will add a new icon, bottom to our import. Here on the left, it will open model Window and from there we will upload our files. So let's create new file inside. This folder will name it Attachment BT and Moto Gs. Let's poor hello inside and let's use it here inside index togs right before the input elements were going to display Attachment Bt and Moto. Okay, now let's define our market. So here we need to pour in poor group Dar bottom because when we use import group inside, we need to pour in port group button in order to work and look good. So for this important group button, we're going to specify Aiken, which is going to be attachment now we need to you handle moral state. So let's use use Moto State hook and let's grow up his open close and open. So when we click on this bottom, we're gonna open our motile window. Okay, perfect. Next to this button, let's define the actual mortal window. So let's import model. And inside Moto, we're gonna specify Mortal Heather, body and footer. Okay, good for this model. We're gonna specify show property, which is open and also on height, is going to be close for Heather. Element inside, we will pour Moto title inside Mortal title we're gonna display are floored files. And let's remove this buck from here for a model footer. We're gonna pacify a bottom to applaud our files. So let's pour new button element and inside we're gonna pour a Plourde. Or maybe, let's say, sent to chat. So for now, it will only have one click property. And next to this bottom, we're gonna display small element and inside it will say Onley files less than five megabytes are allowed. And let's align this small element by the right site. And also, let's give it a little bit off margin top. Okay, let's save it. And for body, let's specify hello for now. And let's take a local one to be half. So now we can see we have this strange market because of this def. We don't need it. We need to react. Fragment. Okay, one more time. Now we have bottom When we click on it, we have this kind of moto send to Chad and where only files less than five megabytes are allowed. Our applaud element are uploaded. Component is going to be from reactive. So let's look for a plodder and let's go down to to manually. So this is type of the component that we will take from our suit. If we open code snippet, let's call P all of that and let's use it inside. Ah, wear body instead of hello. Let's import a porter. And here we're gonna pour out of floor equals two. False than action is going to be just an empty string because we're going to handle it manually for unchanged event. We're going to specify on change, Heller, that will create. We will not use any reference because we will handle everything to manually. Then we will be able to upload multiple files and also least type. We're gonna specify picture text. Okay, now we need to actually treat our state for uploaded files. So let's create a new state over here that we will name, file, list and set file list by default. It is going to be an empty rate and this file list. We need to pass it to this applaud er component. So let's pass file list as file list state. Now we need to define this on change, handler. So let's create that function over here and this one change event if we have gives us fire list, which is filed type. So we basically have array off files that we have to applaud. But from this ray, we need to a filter a few things. So first of all, we need to allow Onley files that are less than five megabytes of data. And also we want to restrict the maximum number off uploaded files. Let's say 25 So first we need to define our size in bytes to restrict it. So we need to get five megabytes in bites to do that. So here at the top, let's create Max file size valuable, and here we're gonna put So first we will grab 1000 which represents one bite. Then we're gonna multiplied by 1024 to get one megabyte in bites and then multiplied by five to get five megabytes in bites. All right, so inside this unchanged handler lets poor filter it, Let's say value or valuable. Then we're gonna call file array dot filter Here we will receive element. And for this element, we're gonna ask if this element blob file dot size it will give us the size off current file less than or equal to max file size Onley. Then it will be added to our filtered A rape. Also, from this filtered array, we want Onley to grab five elements. So let's put slice and from the slice we're gonna specify Onley 1st 5 elements like that. So right after that, we're gonna call set fire list and we will pour filtered insight like that. Okay, if we say we're now, we have this equal sign at the bottom. Let's save everything. Let's navigate back to the APP Let's click on this button and we can see that it is not full with. So let's fix this quickly for applauded her. We're going to specify class name off with 100. Now what saver? And let's take a look one more time. So when I click on this button, I go to upload, I can see that it is full with I can select multiple files. Let's say I'm going to select all of them. But only 1st 5 files will be selected. 12345 I can see that it actually works. Now I need to add functionality to send to chat button in order to upload all of them. I can also manage them from here. Okay, cool. So let's create And you, handler, which is going to be our handler for this on click sent to chat button. So let's create, let's say, on a Plourde it is going to be in a sink, function and insight. First, we will define, let's say, the loading state. Okay, so let's create is loading and set is loading by default. It will be false. And this is loading. We gonna pour for this bottom. So for disabled we're gonna put is loading for on click. We're gonna specify on a Plourde. And also let's make our applauded or disabled. If we can do that, they disabled. When is loading? Okay, Perfect. So for a Plourde, we will do the next thing. Let's pull, try catch block in the first place. So we know that we have file list as an array off file types. It means that we will applaud multiple files to our database. So in order to handle multiple promises, we will use promise dot All But first, we need to get an array of promises for that. Let's create any valuable applaud promises and we're gonna map our file list array to promise in order to receive array of promises. So file list dot map is going to be filed. Then we need to access our storage. So let's put a storage. Then we're gonna use storage object from MISC firebase. Then we're gonna pull reference, and we're gonna put it. Teoh, Let's hr slash chat. I d. Okay, like this. Now we need to grab chart I D. But it is very simple. We can get it using cues, Paramus Hook use programs. From here we will get chart I d React router. Let's move it to the top. And for this storage reference, then we will specify lets a child. Then we're gonna pour a file name and in order to come up with the random name we can put simply date now and then, let's say plaice file dark name to make it more or less randomized. Okay, then that your Plourde, we're gonna pour port and we can actually use this block file that we have from file objects. It will work. OK, so this is almost it. But for this file, I want to specify cash control. Heather, in order to cash it inside our browser for port, we're gonna specify second perimeter. It is going to be object off, made a data. So here we will specify cash control and we're gonna do the next So it is going to be public and then marks age. We need to specify here, Max, age in seconds. So let's specify three days in seconds. So let's put it to strengthen trip elation. And now let's do our logic. So first, we're going to get one hour in seconds, which is 3600. Then we're gonna multiplied by 24 to get one day in seconds and then multiplied by three to get three days in seconds. Ok, good. Right after that. Actually, don't forget to return from these callback function. Then we will get the next thing. Then we're gonna put a const a Plourde snapshots, a Plourde snapshots we're gonna call await promise dot All applaud promises. So one hour files are uploaded. We will receive an array off applaud snapshots. Then, as you remember to get your l four uploaded file to get public available, you know, it is also a promise we need to call Gedo and lower the aura. So it is a promise. So again we will end up with another area of promises. That's why again, we need to map a new array of promises. That's why Let's say it is going to be shape promises. And here we're gonna call applaud snapshots dot map And from here we're gonna receive pacing snap shirt, and this snap shirt will give us the next. So we're going to return an object which is going to be content type snap shore metadata content type. Then we will have name, which is going to be snapped. Shore meta data dot name. It is going to be file name uploaded, file name, and then your own is going to be a weight we can grab snap short dot reference door get Don't load Europe like this. So this is going to be our data that we will store inside database now to this street promises we're going to create new valuable, which we will name files. Then we're going to call a weight promise daughter all shaped promises, and I would have our files that we need to said to our database. So for that inside index surgery, yes, we're going to create a new function that we will manage in the next video for out. Let's just call it in advance. So from props here, we're gonna receive a function after a Plourde, and this after upload will manage uploaded files and said them to the database. So we're gonna call, await after a Plourde and for dysfunction, we will pass our files off this structure. Then after that call back, we're gonna set is loading to false. And also we're gonna close our motile window like that. And in case if we have any error we're gonna call said is loading. And then we're gonna alert door better with error dot message. All right, So this is it for this video. Unfortunately, we cannot test it yet. We can, but it will just upload files to this storage. So in the next video, we're going to continue to work in that. And we're gonna create this after upload function. But as for now, let's commit our changes and finish the video. So get at everything and then get commit. Created attachment, bottom with a floater component. All right, see you in the next one.
138. Store Uploaded Files in Database - Part 2: Hey there. In this video, we will define after upload function that we mentioned in the previous video Let's Navigate to Index Togs Inside Bottom Folder and here at the bottom right before we define markup. Let's create after a Plourde wrapped in use callback function. And also, let's specify it up dependencies as empty every So let's pass this after a Plourde in advance. Teoh Attachment Bt and mortal. And this after upload receives files that we need to pour inside a debates so as to remember this attachment beating Moto has its own loading state, and this is Onley inside model. But inside in exult. Yes, we also have loading state this time for the actual input. So right before we do any operation on the database, let's also call said, is applauding to true inside index togs. Okay, then, the same as for on sent click. We need to define an atomic operation, so we're gonna create updates as an empty object. And let's copy this logic for Let's say, four message data over here and this push key now because we have multiple files that we need to upload and this files is in the rate we're gonna call files for each to look over Every file inside this right will receive file. And for every file we get a poor message I d And also, we're gonna define message data. So let's caught be this logic from on send Click and put it for every file. So assemble message. And instead of text, we're going to specify file and for file we're going to specify file object that we created inside attachment BT model, which is this object. Okay, now we have message I d. We have updates with message data. It looks nice. Now we need to also surpass if I lust message as we do over here, so inside on some click it is pretty easy. However, now that we have, let's say this updates object populated with this data, how can we grab the very last message? While it is actually pretty easy, it just takes some time to understand the logic. So first we will grab last message idea, which is going to be object dot keys from updates and then from this array off, let's say messages idea. We're gonna pop the very last element which is going to be last message. I OK, then we're gonna put updates, rooms, chat I d. Last message. And instead of message data, we're gonna call updates last message idee. And for message I d. We're gonna specify last message. I d. All right, And then we're gonna copy this. Try catch block from here, and we're gonna put it right over here. And let's convert this function to anything. Function. So a database ref updates updates. Okay, Said is lowering We don't need in poor and it looks all right now, let's actually specify array of dependence is with chat I D and profile and now we are ready to test it. Now, let's not get back to the APP. Let me click on file upload. I'm going to select all of these files than open. Then I'm going to send them to Chad and I can see empty messages. However, if we look inside database, I can see four new messages and we have filed, like, count created at we have author. And if we open file, we can have content, type, name and euro reference to our storage. So this is it. And it actually worked. Congrats in the next video. We're going to display all of the files that we've uploaded. But for now, let's come in our changes. Let's forget everything. Get commit and, let's say store applauded files to D Data Maze. All right, see you in the next one.
139. Display and Download Uploaded Files - Part 3: Hey there, in this video, we're going to display all off our uploaded files. Let's go, Let's navigate back to the code and let's open message Bytom component the place where our elements are rendered. And here at the bottom instead of this pan with just text inside, we're gonna put conditional rendering. But first, let's grab not only text for message, but also, let's say file Now, inside this different, we are able to do conditional rendering. So if we have text inside our message on Lee, then we will display tax message. For if we have file inside our message, then we're gonna create a custom function to render files. So let's name it, render file message and inside, we're gonna pass our file, then here at the top out of this component, we're gonna define this function, render filed message so it will receive file, and this function, by default will return us just a link. And inside this link, we will pour download file dot name. If our file is not an image and for a treff, we're going to pour file door europe. Okay, Good. Now, if our file is an image, we store content type inside database so we can check against this property. So if file content type includes image, then we're going to return dif element Inside this def, we will pour an image as a button. So when we click on it, we open Moto window. And also we will have this bottom view original to get us to the other tap and view the full size. So for this day, if we're gonna specify class name off height to any 20 and then inside, we're gonna create image Bt in Moto And for this in major between model, we're gonna pass sores, which is going to be filed. Your l and also file name is going to be filed. Duck name. Now we actually need to create this image, beauty and Moto. So inside messages. Let's create new file image VT in Moto Don't Yes. And as always, we're gonna pour a model. But we're gonna wrap it around react fragment than inside. Instead of button, we will put in port off type image. It makes this import act as a button even though it is an image. So for alternative, begin a specify this file and for properties, we're gonna specify source and file name. So let's poor source and file name. And as I can see, I got the wrong file name. So let me replace it with Image Bt in mortal. And let me rename it with image Bt and Moto. Okay, so import off type image for source. We're gonna specify source for on click. We're gonna specify open debt will grab from use model state use mortal state so is open, open and close. And also we're gonna specify if you class names over here, which is Max with off 100 max, hide off 100. And with is going to be alpha. Okay, good is so for input. This is it. Now let's actually define motile. So let's poor mortal component than Mortal Door Heather, body and footer, body and footer. So inside Heather, we're gonna display mortal title model door title and we're gonna pour file name inside and let's also deal it deaths. And this now inside food er we're going to specify just a link to an external tap. So we're gonna put a and a treff is going to be source and we're going to specify tar, get blank for the new tab. And also we need to specify relationship. No opener, No rap Ferrer. Yes, like this, I guess. And this component is not self closing. We're gonna put view original inside and inside view Model body were going to display the actual image. So let's put an image tag Dan, for sores. We're going to specify sores. And for height, let's say, 104 with, Let's say, also 100 out is going to be lets it file. Okay, now let's use This is open for show property on height is going to be close and it looks OK now let's move this import to the top and inside message item. Let's import this component. All right, now let's take a look. If I refresh the app, I can see don't load file, name, download, file name and I can see images. So let's quickly fix said Instead of these brackets, let's both curly brackets. And now let's take a look so that we have doing load this file. Don't know this file. If we click on it, we will actually start to download, and I always see that we have images and when we click on it. We have this view original, and when we click on it, we get to the new tap. Okay, it looks pretty good. However, in lust messages, we have empty space, so let's quickly fix it. Let's navigate to you room item and here inside last message text. Let's put the next. So if we don't have last message text, then we're going to specify last message dot file dot name and that's it. Now let's take a look. We have file name, Okay, Pretty cool. And this is basically it. Now let's finish this video and commit our changes. Let's forget at everything. Get commit and let's say display uploaded files for fact. See you in the next one.
140. Record and Upload Audio Messages - Part 4: Hello. In this video, we will add an option to a Plourde user record ings directly from the browser, so we will be able to send audio messages to the chat. Let's go. So how they're going to handle that? Well, since we already have the code for file upload, it is going to be relatively easy. We need to only find a way how to record user's voice. For that. We're gonna use react, Mike Library. It is a library that offers to record user voice and then visualize it. But we're not going to use this visualization option. We only need the record ing. So let me install this library. I'm just gonna copy this commend than inside more terminal. I'm gonna execute it. And while it is executing under Bottom folder, let's create new file vegetable name. Let's say audio message Bt in doggy esque. For now it is going to be just an empty Deve. And let's use this inside index togs in bottom. So here, right after attachment, Beat and Moto Let's use rodeo my said you're TTN and also let's passed after upload because we're gonna upload audio messages. So inside this component, we will receive after upload. And now let's define our market well. It is going to be almost this same as for attachment beating Moto. So let's copy input group bottom from here and pasted as our market. So then let's import import group button for unclipped. We will have our own handler and let's also import icon. And for I can we gonna use my crow phone? Okay, good. Now how we're able to use this react my Kleiber Let's go to usage and example. So let's copy the import part and let's place it here at the top. Then let's actually use the component. And let's take a look what kind of props we need to pass. So first we have this record and if I hover on the property, said too true to begin record ing. So we need the state to control. When we want to start our record ing, let's create one. So it is going to be is record in. Bullen is recording by default, it will be set to false and we're gonna pass this state to record property that for class name, we're gonna put display none in order to display any react Mike Element, but to use their functionality. So for once, stop. This is going to be our handler when we have the record ing and we want to upload it. So for that, we're gonna create on a Plourde handler. So let's put on a Plourde and in advance, we will put it in use call back. So for now, let's leave it empty like that and on data, we don't need that one, because if we scroll to usage, we can see that when data it is optional, called when a channel cough order is available, we don't need that one. We don't need throw color and background color because we simply don't display this component that also we need to pass. I mean, type to that component to ensure that we receive MP three. Former. So let's pass mean type and then let's pacify audio MPA three. Okay, good now, ready to go. So first, let's define this on click. So let's put it here at the shop and let's optimize it with use cold back in advance again because we will simply call Said is loading and we're gonna reverse our Bullen value over here. Okay, good now for on upload, we're gonna poured the next logic. It is going to be correlative Lee the same as inside Attachment BT and Moto. So we will need to reference storage so we can copy this logic from here than we will put it inside. Try catch block here. We're gonna receive snap short and away this applaud promise. So we need to convert it to a sink function. So storage reference check, I d. Let's also grab chat I d. From use Paramus Hook than for storage. We need to import it from ISC firebase than for child for file name we gonna poured. Not this file name, but we're gonna pour. Let's say audio than underline. And then let's open string interpolation data now and then at the end, we're gonna put daughter MP three than for blob file. What do we need to specify for the actual file if we go to react? Mike on stop property gives us this record of data. So because we used javascript, we don't have any types. And we can't check what kind of data we receive here. But what we can do, we can actually put a function directly over here to get the intelligence. So we received this data over here. And if I put data dar, I can have blub over here. So this is developed type off object that we can upload to firebase storage. So let's put data dog blow cash control. We will leave it as it is now. We need to also specify the actual file that we will put inside database, not inside storage. So let's grab it from here from attachment, bt and model. I'm going to copy this object structure. Then I'm going to create a veritable file and then I will place it like that. So snapshot, media data. Hugh R L Okay, good. Now we need to actually Onley call after a Plourde with array of files that we want to applaud because we have only one. We can put just an empty array and then put our file inside. So now we have some sort of in a rate, right. So for any errors, we're gonna put alert Dar error error dot message then for area of dependencies. We're gonna pass after upload and share I d. All right, Good. Also, we need to define some sort off a loading state. So let's create new viable debt. Will say is uploading Let it be said is applauding. So by default it will be false And we will call that function right before a Plourde and set it to true. So after applaud or maybe right before it, we're gonna said, is applauding to false and also in case of any arable also called set is applauding to false. So now to input group Bt and we can pass disabled Onley when is uploading. And also we need to somehow notify our user when we do the record ing so he can understand that. OK, your voice is being record for that. We're gonna pull a conditional class name. So if we have is record ing, then we're going to specify any mate blink. And this is the class name with the CSS animation that I defined in one of the CSS classes . So now it looks okay and everything else looks fine. Now we can actually test the functionality. I haven't started it, so let me run the AB now we can see starting the development server. Okay, let's wait a few seconds until the APP is run. Okay, is loading. Now let's try and record that one. So if I hit this button, you can see that Now, here I have These tab is using your camera. We microphone this icon. And also, if I didn't have my permission to use microphone, it would have asked me for that. And now I am notified that okay, my voice is record it right now. So when I click on this button one more time, I can see that I have a new file upload over here. And if we go to firebase storage than to Chad than to our Chad, I d. We can have all of our files. And also audio message. Okay, so this is it. In the next video, we will talk about how we're able to display this audio message in the former that weaken directly. Listen to this older message inside the browser, But for now, let's commit our changes. Let me call, get at everything, then who did commit and let's specify, added option, an option to record and a poor audio files. All right, see you in the next one.
141. Display Audio and Delete File - Part 5: Hey there. In this video, we're going to display uploaded user audio records. And also, we're going to fix another problem that arise when we started to deal with file upload. Let's never get back to the code and let's open message item the place where we render our element. So here we check against content file time. So let's add another if statement over here and we're gonna check against audios. So we're gonna ask a file. Content type includes audio. So if this is the case, we're gonna return an audio element so for this order will be able to use controls. And also let's poor source element it is going to be a self closing element. Source is going to be filed, Lord, your L and type is going to be odio MPA three. And if this is not supported by the browser, then we're gonna display your browser does not support the audio element. Okay? And let's remove Odeon from here. And now we have this year slimmed warning media elements such as an audio must be must have a track for captions. That's fine, but we don't have any cop shins. That's why we need to disable this warning. Let's do that. Let's save it and let's move this suppressor. Now we can see that we have this track so we can play it. I can hear my voice so it is actually working and that's it for audio messages. It was pretty simple right now about other problems that arise when we started to deal with Philip O. When was ill ID the last message or one of the messages with files than we only do it message inside the database. But files from the storage is not being diluted. What I mean is that let me try and delete this older message. So if I delete that one that I go to storage, I refresh it. I can see it is steal their to fix that. We need to fix our coat. So lets navigate back to index togs. Inside message is the place where we deliver. Our message is so this is handled village function. So here we need to somehow also perform file delish in how wearable to do that. So inside message item when we call, let's find it. When we call handled, deleted, we pass message i D. However, we don't know whether this message has a file or it is just a text message. So let's also poor file to this handle delete function. So now we know that if there is any file so inside, how until the lid we will also receive file and right after we dill it message inside database. We can also put another try, catch block over here, and we can do the next thing. So if we have filed, then we will put this Try catch block here inside, and we're gonna first grab the reference to that file inside firebase story so we can call , Let's say, filed rough. We can call away storage than reference from your hell and does it return promise or not know, it seems like not so reference from your L. And then we're going to specify file door, you're out. Then we can simply call file ref door dill it So this is definitely going to be a promise. And in case of any other, we're going to specify alert ever alert error. And here's a very important moment to catch. Let's imagine we delivering the message and this fails. So if that one fails. This will try and delete the message. So to make sure that if this fails, the next code will also fail. We need to return from these catch block whenever we have an error. So now we have this a sink at a function expected no return value. We can actually suppress the again the yes, Lind warning for the entire file. And now it looks fine. So let's first manually delete this odor message that we record it. And if I try and dilated the latest message over here, if I dilated message has been deleted. And if you look inside of my database, I have two images. But if I refresh now, I have only one. So everything was successfully fixed. Okay, now let's commit our changes. Let's get everything, then get commits. Let's say displayed audio messages and fix file delish in when message when message is being delivered. All right. Perfect. See you in the next one.
142. Group Chat Feed by Dates: Hey there in this video mobile group chat messages by date, so we will be able to split chat fit into date related messages. All right, let's never get back to the code and let's see how we're going to approach that. So first of all, we need some sort of a function that will group our messages by dates. So let's create one. Let's open helpers togs. And here at the bottom, let's create new function that who will name group buy It will receive an array as the first argument, and then it is going to receive grouping key function. It is going to be a cold back and let me explain how we will use this girl by function. So we're gonna call it like this. The first argument we will pass messages, array and then grouping. Key function is a callback that will receive an item off this array. So in our case message item, then whatever we return from this callback is going to be our grouping key. So in our case, it is date. So we're going to turn message I term created at something like this. Then there's grew by, will return us an object where every key is going to be this grouping key that we return from this call back. So if we return date that it is going to group US messages by date. So let's say something like we have date like this and then we will have array off messages related to this date and so on, and so one. Okay, I guess that's clear. Now let's create that function. Let me uncommon, Dad, and we're gonna use array dot reduce so it don't reduce, receives a call back. And second argument is the initial state initial value. So it is going to be just an object. And for the co back first argument is accumulator we're gonna use Let's a result and then the current value current item just going to the item okay from every iteration we're gonna return result and then we will perform the next thing First, we're gonna pour grouping key valuable, and we will call grouping key function and we will pass item insight. So, in that way, we will be able to access message item inside this call back. Okay, Good. Now we're gonna check against the Null Valley or non existent valley. So if result grouping key property does not exist, then we will initialize it as otherwise. We will receive a warning or an error if we try to perform something on non existing object . So we're gonna put result grouping key and then we will quote it as an empty array. All right, then, if this does exist, then we're gonna put result grouping key dot push current item and this is it. Now we are able to use it. Let's open messages, index togs, and let's find the place where we render messages. So right now it is just this map function over here. Let's actually copy it and dilated. And instead of this map function, we're going to our own custom functional render messages. Death will create. So here lets were const grander messages and it is going to be a function, and inside of it will put this message map. But let's comment it for now. And here we will call group by So let's poor const groups. Then we will call group by. We will pass messages our state of the first argument and then group in key function so it will receive message item and trouble group by dates. So in to specify item created at but created ad as to remember, it is just a database time stamp. It is not a date object that we can use or display inside JavaScript. So let's convert it to late object, and then we conform at this date object with to date string. All right, so now we have groups and we need to create elements that we will push and display inside J six inside dog. So let's create object keys, then specify groups and for each method. So what is happening here that we're gonna loop over every date, every key inside groups object. So we're gonna have date over here and for every day. First, we're going to create items array. So let it be let items we will modify. And for this items, first, we're gonna push our first element. That is going to be a date. L I element. So let's create new l I inside rebel displayed date and class name is going to be text center margin wouldn't one and pad and also we need to specify key, which is going to be date, and it is unique within this. Groups arrange. All right. Now, we need to also push all messages related to this particular date so we can create new messages. Every and we're gonna use this map function over here. So we're gonna pour groups date to access all messages related to this particular date that we're currently iterating over. So group ST dot map and we're gonna map every message to message item from here. Let's copy it and let's delete it. We don't need it anymore, So we're gonna map it like that, And at the very end, we're gonna simply call items darkened cat and then messages, All right? And this is actually it. And at the end of this function, we're gonna return items, and they will be rendered to the dumb. So it says that items is never resigned. All right, so let's put const, Let's save it and let's take a look. Now, if we navigate, I don't see any message. Let me try slightly different syntax. Now, if we're fresh right, we can have Aikens. Okay, so let's use that one instead of can cat. So what we're doing here with spread all our every items into push. So they're treated as separate arguments to push. So instead of passing cower messages like that, we passed them like that. 12345 All right, so this is what this spread operator does in this case. Okay, so now we have, let's say, Thursday, June 18 if I put hello. Now I have June 19 so it actually works. And now we have this pretty little neat grouping. All right, so this is it. And I guess we're done here. Let's finish our video. Let's pour, get everything, then you get a bit. And let's specify grouped messages by dates for effect. See you in the next one.
143. Pagination and Control of Scrolled Position: Hello. In this video we will handle pagination inside the chat. Right now we load all messages from the database and this is not really good. So in this video, we will figures that and also we will fix this problem. When we refresh the page or switch between chats, we are not scroll to the bottom. Let's go. So the question is how you're able to handle pagination in firebase? Well, there are a few approaches and the most common one is just you re subscribe Teoh new chat messages Every time we load a new portion, This is the approach that we take. We can take another approach Teoh lower only old messages on the initial Lord and then subscribe to new updates. However, this approach will not work because if we load old messages on Lee once and we update one of the messages, it will not be updated in real time. So this is not our case. We want to update all messages and they all must be real time. That's why we're gonna use the first approach. So lets navigate to index dot gs inside messages and here at the top, we're first going to specify our size for the page. Let it be page size off 15. Now we need to create stayed inside our component that represents our current limit. So let's create limit and set limit. And by default, this state will be equal to page size. Okay, good. Now let's look inside. Use the fact where we fetch our messages. So we have this message, ref, that is not bounded to this use of fact or days component because it doesn't use any internal values, so we can safely move it here to the top. All right, Good. Now we will have to functions here to lure initial message and to Lord more messages when we click on the button at the top. So we're going to create a new function just to share the logic. So here, before use the fact we create a new function Lord messages and we will wrap it in use Call back in advance to optimize it. And let's put this logic over here inside Lord messages. And don't erase this subscription. It is really important to unsubscribe from user fact as well. So now we have this child RG over here as a dependency let's edit. And whenever reload you messages, we also make sure that we unsubscribed from old messages and subscribed to the new updates . So here, right before we get our new data, we gonna call message ref dot off to unsubscribe from the previous updates. All right, now, inside this user fact, we're gonna call Lord messages, and we will specify inside array of dependencies, and we're gonna remove chat I d. Because from now on, it's not Depart off this use effect. Okay, Good. Now what about limit? And what about Lord More functionality? Let's great new function next to Lord messages that we will call on lower more also lets rapper in use call back. And what should we put inside inside? We will simply call Lord messages with our limit that we have inside the state. So now we need to specify Lord messages and limit as dependencies and that's it. That's all for that function. Now, inside lord messages we receive limit that we want to increase when we click on Lord More. So here we will have a limit. And when we try to new messages for our query builder, we can specify this property called limit to last. So the number off notes to include in this query and we're going to specify limit or because we already have limited audible declared let's call it limit to lest and let's pass it over here. And in case if we have no value at all legis pacify page size Just a small fullback over here. And every time we lower a new portion off messages, we need to increase our current limit. Right? So when we click on this button, our next limit is going to be our current limit plus page size. So here we're gonna pour set limit, and then we're gonna reference previous, previous plus page size. Okay, now we need to define this bottom, and we need to put this unload more handler for this bottom. So here at the very bottom where we render our markup, we're gonna put the next logic. So we gotta ask if we have messages and messages Don't Length is greater or equal to our page size Onley. Then we will display an other l I element inside we will put button and inside bottom we're gonna pour lower more. Now let's add a few class names. So for this ally, we're gonna put a tax center margin top two and margin bottom to as well. And also for on click, we're gonna specify own lower more. And also we will put it with the green color, not red one. I don't like that one. All right, Good. Now let's take a look what we did. If we open our page right now, like me, refresh it one more time. We can see now we have Onley 15 messages and if I click on load more, you can see that more messages have been loaded. So this is it. This is what is happening. So right now when we load our page initially we have our initial subscription Onley four page size, which is currently 15. Then when we click on Lord More, this is being launched with our current limit that we increase and it is going to be increased to 30 and we will unsubscribe from these updates and we're gonna subscribe to new updates. So this is what is happening in the background. All right, now, what about our scroll? As you can see, it is pretty broken because when we lowered new messages. We beans crawled to the top every time. This is no good, so we need to somehow control it. Well, for that, we need to use reference to get the actual element so we can manipulate its scroll possession. For that, Let's create new reference over here. And it is going to be, let's say, self ref with used ref hook. Ok, then we're gonna pass that reference to our were you l element. So reference is going to be self reference. And now let's start to manipulate it. So first of all, for our initial use effect, when we load our page initially, we want to scroll to the very bottom, right? So here we're gonna specify note and we're gonna reference self ref dot current to get the actual reference to our element. And here, right after we load our messages, we can pour node scroll top equals no scroll height. And it'll Lloyd's thing. I have ever the problem with this approach is that because this Lord messages is an asynchronous operation and this is synchronous so this might be executed before this Lord messages has done with its think so it is important to put it as any think operation for that. We will wrap it around set time our and we're going to specify something like 200 milliseconds. So in this way, we ensure that this is being executed on Lee when Lord messages is done and when all elements that we're trying to display are displayed on the page. All right, so now let's take a look. If I refresh the page, I can see that I did not think, but I'm scroll to the bottom. Yes, I can see this. A little small delay off 200 milliseconds. But that's fine, right? There is nothing wrong with that. However, now I'm being scrolled to the bottom. Okay? Our next approach is to actually keep this crow position when we click on Lord More. So we're not scrawled to the top. Well, for that inside Lord, more in the first place. Let's again reference our current elements. So note is going to be self ref current. Then before we click on on Lord More, we need to know the previous height off our scroll element off our scroll position. So when we lowered new elements, we get the new height and then we can subtract those values. So here we're gonna pour old height valuable. And here we're gonna pour node scroll height. All right, then, after below our messages, we're gonna call said Time out again to make our operation asynchronous again. With time out off 200 milliseconds and then inside, we're going to specify new height, which is going to be no scroll height. And then we're going to specify node scroll top equals new height minus old height. All right, now, let's save it. Let's remove this pace and let's take a look. Now we're scroll to the bottom, and when I click on Lord More, you can see that this crow position is retained. Okay, so it looks pretty good. How are you? There is one more case to handle. Whenever I write something in the chat, let's say hello. You can see that I am not scroll to the bottom. So we need to fix that. And ideally, we want to make it something like this. So if we have scrawled more than 50% inside our chat and we type something, we want to be scroll to the bottom. However, let's say if we look for some old messages. And if we type something or someone else types, we don't want to be scroll to the bottom. Right For that, we need to also define our logic For this reason. Here at the top, we're going to create a new function that will name sure scroll to bottom, and it will receive this self ref current. So here we're gonna put note, and here we will put the next logic. And also we can specify second argument, which is going to be let's say threshold, which is going to be, let's say, 30% of by default. Okay, so here we're gonna calculate percentage off our scroll position, and then we're going to return the comparison. We're gonna turn the bull in value if our percentage that we define over here is greater than threshold that was pacified. Okay, so percentage is going to have the next logic. So first of all, we gonna multiply our value by 100%. Then we're gonna divide this value by no scroll height miners, no client height, and this logic will give us the percentage. And as a full back, we're gonna provide just zero. Okay? So now we can use dysfunction to detect if we really need to scroll to the bottom if we hate the threshold. Okay, so let me copy this and let's go to Lord messages and hear what we will do. Begin us pacify const again. Let's say node and then we're gonna reference self Ralf dark current and what it will do. We will put it right after we set messages. Then we're gonna ask if we should scroll to the bottom with our current node and let's keep threshold as 30% Onley. Then we're gonna pour no scroll talk and then no scroll height, okay? And actually, you know what? We can put this note to the top to reuse it. OK, like this. Now let's take a look. So let me load more messages. Let me scroll to the top. And right now, when I type a new message, I am not rolled to the bottom. However, if I scroll more than 30% and if I type hike, I can see that I'm being scroll to the bottom. So this is a guys. This is how we can handle pagination. And this is how we can control our scroll position. Okay, I guess it was not too confusing because for me, at the first glance, it waas All right, so let's commit our changes. Let's pull to get everything, get commit and let's say at it pagination and control scroll position. Perfect. See you in the next one.
144. Deployment to Firebase Hosting: Hey, As for now, our chat application has all core functionality implemented. The only thing that is missing is really time notifications. In order to implement it, a few things have to be done to fire Ways Project. We're gonna talk about it in the next section and to finish these section on a good note, let's deploy our current Chad using firebase hosting open Fire Base that Jason located in the road folder to the hosting object. Let's add pre deployed hook NPM run built bill Script is defined in package Jason. Now it is as easy as typing Firebase deploy from the terminal. This command will deploy all parts of the project that were detected in firebase the Jason . These include database rules and hosting. We could also deploy separate parts by running firebase deploy, Dash Dash only hosting after the Commander's finished, we can go to the host in section inside Firebase Dashboard. Here we can find a euro to access our Bab app. There will be two of them. Use the one you like more both will work. Firebase also keeps track off deployments and we can roll back to any deployment record in release history Let's open the app to see that it actually works. Nice. Looks good and pretty fast. However, Facebook Logan will fail if someone apart from us will try to sign in to fix it. Let's go to Google and Time. Facebook for deaths, Click on my abs than select chat application. Go to settings basic for privacy policy. Euro Copy website Curole and pasted here than scroll to the bottom. Click on and platform and make sure you've added your rhapsody. Click on save Changes than go to dashboard and turned this which on the top to make sure it displays life. And that's it. All right, this was the last video in this section. In the next section, we're gonna talk about custom fireplace backend with cloud functions. See you there.
145. Firebase Project Plan: Hello. This section is dedicated to real time notifications and cloud functions. Real time notifications are implemented with fire based cloud messaging that require custom back. And that's why we use cloud functions. In order for us to continue, we need to update our fire race project to the blaze plant with recent firebase pricing updates from now on, called functions require blaze plan as the use some of Google cloud services that are not available in free Platt Blaze plan is passed. You go moto and it doesn't mean that we must pay. All of these services are given with really generals. Preacher, trust me with the given quotas, you will never heat the paying border but it's totally up to you. Please read more about blaze Plan on fire base pricing page to operate to the blaze plan. Go to firebase dashboard, Click on upgrade at the bottom and select blaze plan. If you don't have payment source yet, Google will ask you for your car details and after that it will update the project to check what plan? Cutting project uses. Just look at the left bottom. Now we're all said in the next video, we're gonna talk about cloud functions and server less architectures. See you there
146. What are Serverless and Containers?: Hey, let's talk about server less. Sounds pretty cool, right? To understand better what it's serverless. Let's re wise how normal server works back in is deployed servers running and waiting for connections. Nothing's wrong here, but here is one small disadvantage. We have no users, while server continues to Ron and consumer resources. Not very beneficial is it would serve unless a server that is deployed runs on demand. Or it is better to say that code executes on demand on Lee when it's needed. If nobody's access in decode, it is not executed. Most of the time, Serverless approach is presented. Informal server Last functions. Each function is deployed separately and has its own execution context. When it function is deployed, it has its own Http, your l that is used to investigate the function. Your L is like a trigger to execute the code. There is no actual server at the end. There is just code that execute on demand. Under the hood, all the magic is powered by docker containers. A container is a small as elated package off Whatever is put inside with virtual machines, the entire operating system is as elated with containers on Lee. The content that is put inside it allows to run multiple containers on one operating system . Every deployed function, with all its code and dependencies is put inside its own container that trans on demand when the function is triggered. But containers also must be hosted and deployed. Samba right This is controlled and managed by cloud provider. We don't need to worry about that. And because everything is managed for us, we also don't need to worry about scaling and maintenance. Deployed campaigners will scale automatically based on number off invocations. Now we know that every server less function is separate piece of code that is run on Lee when actually used one function is not aware off another how we're able to share some code across multiple functions. For example, all of deployed functions must access some shared variable or another function. It depends and cloud provider with fire. Base Cloud functions code is shared in the global scope. What are the drawbacks that the main one is called start when code is not executed for a while, that functions container goes to sleep. When someone tries to access the code container spins up and it takes some time. This is so called cold start. It depends on multiple factors. For example, how large is decode for that function? Or how many dependencies attests after a code is executed, the container stays in warmed state for a while and waits for subsequent requests. It means that cold start will not take place. But after some time, when there is no requests at all, container will go to sleep, and next time we will see the cold. Start with server Less. Pricing is evaluated based on number off invocations and how long each execution lusted. Firebase cloud functions have free tear off to millions free invocations per month, and this is amazing. Now we know what is serving less and what are cloud functions. Hope you liked it. See you in the next one.
147. Cloud Messaging - How is Everything Connected?: Hello. Let's talk about Firebase cloud messaging. What's that exactly? Cloud messaging allows us to sand real time notifications to users. If we are on the website, we can get a notification pop up out of nowhere. If the website and browser are closed, we can get OS native notifications on mobile. It will be a notification as if it was a real mobile application under the hood, it uses browsers, Boucher, FBI and the main drawback that it has limited support and browsers and some operating systems. Okay, let me explain the full cycle off firebase cloud messaging. So each user has a unique token that represents users device. We get this token from user and store it inside the database. This token should not be publicly available later on. Fire Base will use that token to send a notification to users device to receive notification on the device. We're gonna set up a service worker. As you remember. It is a middleman script that sits inside the browser. Settlers workers are often used to pro to some background tasks. Notifications are a good example. It will intercept incoming message and using browsers. Bush ap I It will display the notification. For fact. Now you know how it works. In the next video, we will get to the goat. See you that
148. Storing Device Tokens in the Database: Hey there in this video, we're going to get users device token and store it in the database. But before we do that in the previous video, when we deployed our application, we get this hosting cash and also we modified fire based of Jesus. So first of all, let's open and get ignored. And let's add dot firebase fuller to get ignore to ensure that we do not track this folder . All right, Good. Now let's commit our changes and let's say, get commit, Deploy the app Perfect Now I already opened documentation for firebase cloud messaging, and from here we need to get Web credentials. And these are voluntary application server identification key. So this is the vapid key that we need to get to set up Firebase Cloud domestic in the first place. So let's go to dashboard than let's go to approach it settings and then to cloud messaging from here. Under Web configuration, we need to generate new key pair. So let's click on this bottom and this is our vapid key that we will use. It is public so we can share it. I mean, do not share it, but it is publicly available Now let's go to our application. Let's actually run it. And then let's Oakland Firebase Doggy s in the first place. So here we're gonna import firebase messaging, then here at the bottom. We're going to check if it is supported by the browser, so we can anti export const. Messaging. Then we're gonna ask if Firebase died. Messaging is supported. So if it is, then we're gonna call app dot messaging to get the instance. Otherwise, it will be said to not then at the bottom. We need to set it up to use this vapid key that we generated. So let's ask if we have messaging supported. So if we have the instance, then we're gonna call messaging, use public vapid key. You can find this in their documentation. All right, so let's copy this key and let's paste it here. Okay, good. And I we need to set up a handler for our messages. So let me explain. Messages or notifications are available in two types, foreground messages and background messages. Background messages are those messages that are handled when our tab or browser is closed and foreground messages are those that are visible when we are scrolling the website, so foreground messages must be handled inside the app. Background messages are handled by service worker. So here we're gonna call messaging on message and for knowledge is keep it as it is. Consulate data. So these subscription, let's say, will handle our foreground messages. Okay, let's say with and now let's get to decode to save user device to the database. So let's open profile context. So this isn't the place when we look in our user. So here, we need to manage it. And if I open again documentation, I can see that I can copy this piece of code to get current registration token. So, actually, you know what? Let me copy this and let's pasted somewhere over here at the bottom. But first, we need to ensure if messaging exists. So we're gonna check if messaging exists, which I imported from MISC firebase. So if this is the case, then I'm gonna pace this code, and maybe you let me convert it to a sink awaits index. So let me put a try catch block over here. Then I'm gonna pour messaging, get token. So it will be const Tokcan. Let's say current token equals await messaging. Get token and let's converted to facing function. Okay, Perfect. Then we're gonna check if current token exists. Let copy all of that. So if this current token exists, then we're gonna do some things. We don't even need it than in case off error we're gonna display inside the console and at our occurred. Okay, Good. Now let's do it. All of that. And here we go. Now we need to store this token inside the database. For that, we can call away data ways Dar graph and the place or the path that we will start our tokens equals two FC m tokens slash token I d and then slash user i d. So with these approach, we can easily query choke ins on the back. And okay, so it is going to be FC m tokens. Then we're gonna for current token, and as a child, we're gonna pour off object door user. I d I d. Off current user. Okay. Perfect. Now scrolling the documentation down, I can see the token can be also refreshed, so we also need to handle that for this. Let's copy this piece of code and put it next to this strike Hedge block like this and this own token refresh it is a subscription. So it means we need to unsubscribe from it in the future for that again. Here, Anti chop inside you the fact Let's poor Joe can refresh I'm sub, okay? And we're gonna pour on token or fresh to that terrible. And here at the bottom when we log off, we're going to check if joke and refresh on sub, Then we're gonna call this function two months up from it and the same mobile do in the cleanup function. Okay, good. Now what we need to do here, let's also converted to anything. Function. So here, we're gonna put a sing, and actually, the logic will be kind of the same, so we can easily copy it and place it over here like this. Okay, good. Now we are ready to go, but because we right to the database to the path that we didn't add to security rules, we need to slightly modify them. So let's go to database, then let's go to rules. And here, let's add a new entry. So let me copy disc status like this, then I'm going to replace status with FC M tokens. Then we will get a joke. And I D and mobile allow Read never. Because we don't want to allow anyone to access our tokens. And for right Onley the user, that is currently Sinan is able to store his own token. Right, So we're gonna check if new data dot value. So if the user i d that we write to this token, I t equals two off you. I d. Okay. Good. Now let's savor and it looks good. Now let's go to our application. Let's refresh. Okay, now perfect. Let's open council to see if we have no warnings. Okay, We get editor True. Been toking, were unable to register the default service worker. Okay, so this is good. And because we don't have any service worker yet, we get this enter. This is good, but this error says that it works. Now let's commit our changes. And in the next video, we will set up service worker. So let's pour, get at everything and let's check what kind of others to be received. Unexpected council statement. Okay, this is good. Let's get commit. And let's say edit firebase messaging and store choking user token in the db. Perfect. See you in the next one
149. Adding Service Worker: Hey there. In this video, we will continue setting up firebase cloud messaging and we're gonna set up a service worker. So I already navigated to firebase documentation and then I choose received messages. So in this section, I can read and you can read more about foreground and background messages, but we're interested in service worker file. So let's not forget to our code and the first thing we will do but will actually caught the rules that we created in the previous video with FC M tokens. So let's copy all of that, then go to database fools Jason and Paste all of them here now about service worker. So, as you can see, this is actually the service worker code. Let's call be it. And inside Public folder, let's create new file firebase messaging service Worker doggy s. So it must match this file name. It is very important because this is the name that will be recognized by fire base as decay . Now let's paste everything that we have here and we can actually do it. All of these comments like that, then we don't need the message. Incredible. And also, let's disable es lint for the entire file. Okay, good. Now for these conflict here, we need to initialize our conflict that we initialize inside our application. So let's open fire base Dodgy. Yes. And let's just copy this object and put it here so it will initialize firebase sdk inside service worker. And also we must ensure that the version that we import here must match our sdk version inside package Jason. So let's open it. And here we have 7.15 now let's hope in service worker, it has 7.15. That's OK Now let's save it. And I already run the ab. Now let's get back to the APP. Let me refresh it Now, As you can see inside the council, I have no warnings at all, So lets navigate to our database. And as you can see now I have FC m tokens here. If I open it, I have this pretty along user I d token and that I have my user i d and this is actually it before we commit our changes because we use a new service worker with firebase cloud messaging inside. We actually don't need service worker by create react app. So what I proposed to do in the future, we will need this. Is local host valuable? So let's copy it from here and put it inside helpers like this and let's exported from here . Now let's save it And let's delete service, worker file and inside after GS or inside index togs. Let's delete these comments. We don't need them anymore, and now we can commit our changes. So again, let's board get at everything and then get commit. And let's say at it, service worker on that said Perfect, See you in the next one.
150. Setup Cloud Functions and Node Version Manager (NVM): Hey there. In this video, we will set up cloud functions inside our firebase project. Let's go. Let's navigate back to V s code. Let's open terminal. And here we only need to type fire base. You need functions. Then it will prompt us with a few questions. Let's hit. Yes. Then let's choose Javascript. Then four years Lind, let's select. Yes, and let's install all the dependencies. Okay, good. If we look inside functions, a few files have been created for us. Yes, Lynn RC with already pre defined conflict. Let's not mortify it. Then we have get ignore Index Dodgy s and packaged Jason, So index dot gs in cloud functions is an entry point from index togs. File RealAge to export separate cloud functions that will be deployed separately. Okay, inside bike. It's Jason. Here we can find a few dependencies. So yes, Lind and also firebase admin and functions. These two packages allow us to access fire base from backend and also we can find a few scripts. Define over here serve to actually Ron functions emulator in local environment than we have something called Shell and it is firebase shell to actually test our functions and also then we have logs and other things such as deploy and start for start script. Since we're going to test our functions locally, I proposed to Ron serve instead off Shell. So let's put it serve and let's save our file. And also because we are going to access our database locally and by fire base. It is recognized as an untrusted environment. We need to provide some sort off authentication or credential in order to make it work. So for that we need to navigate back to our dashboard. Then we need to go to project settings and go to service accounts from here. We need to don't lower new private key. So let's create one. It will give us a Jason file. Let's open it and let's copied the content. Let's navigate back to the code. And here inside functions, let's create new file service account, does Jason and let's put everything that we've Koppett. Now, please make sure that you add this file to get ignore. This is very important. So here we add service account that Jason, so this file must not be publicly available. This is only for us, for local development. Okay, good. Now if we open again the service accounts here we can find a small snippet of code, so let's copy it and let's open index dot Js. So here we have functions at the top and firebase functions. Let's place it like this. And let's also caught the admin and replace VARS with constant Good. Now we need to specify a service account path which is this one and then put it inside, admin initialize at when we use cloud functions. Before we can do anything, we need to initialize firebase admin as decayed and for local development, we need to initialize it like that in order to access the real data in order to access riel database. This is basically it. However, there is one important thing to cloud functions. If we open package of the Jason here we confined engines. Node eight specify. The thing is that firebase cloud functions are supported in on Lee two no GS versions, either eight or 10 and recently they dropped support for node version eight completely. So now firebase cloud functions are basically available with no GIS version. Ted, this might be a little small problem right now. We use no Js version 12 and we need to somehow manage our cloud functions with note version 10. For that, we need to switch between different know Jess versions. For that, we need to don't lower additional software, which is called No Version manager. This is software that allows us to switch between different versions off. No GS in one command. All right, let's go to Google. And then let's just type and VM that Let's go to note version manager on the get hop. And this repository is on lee for Linux and Mac OS users. Please follow this tutorial and install and VM on your machine. If you come from windows down, scroll down to two windows part And here we confine envy M for windows and then click on download. Now you will end up on this page, then click on N V M. Set up zip file and then install envy M. Okay, After you have envy M installed on your machine, go to your terminal and then just call envy M version or envy em. Dash version. Okay. And VM version after that in order to install No, just version 10. Let me run my command and the M list. It will list all of my no GS versions installed locally. So for cloud functions, we need some off 10th version. So let's call envy M install and then 10.20 point one. After that note version, Manager will install and mainly everything for you. You don't need to worry about anything, then to switch between different versions off. No GS weaken, simply type and VM used. Let's say 8 16 to. And now I'm using this version off note. And if I type and VM use 10.20 point one now I'm using this version. This is it. This is how we can manage different versions off. No Gs, please make sure you have this one installed because otherwise, if you don't have no version 10 locally installed, we will not be able to run your functions locally. All right, now, to finish this video, let's commit our changes. So let's forget everything. Then get commit and let's say, set up cloud functions with envy. M perfect. See you in the next one
151. Notifications Flow in our app - Types of Cloud Functions: hello In this video, I want to quickly explain the flow for sending a notification. First of all, in the data, please. For every room there will be another field called FC M users. It will be in Rafe user ideas that will receive notifications on the back. And we will create a cloud function that will call from our chat application as an admin two definition, along with request we will send from mighty name and notification message. Then, using Crew my D, we will get user ID's that receive notifications using their ideas. We will query their device tokens and then send a notification using the's tokens before we start. I just want to point out that there are three different types of cloud functions. Gullible on request and triggers on request functions have its own euro send in a request. Using the euro is the only way to access the function. Call a bowel Functions also have their own neural, but in firebase client as decay, the one that we use in the browser, there is a special method to call this type of function by its name, not by euro and also callable functions automatically parse and validate user JWT tokens. Firebase uses JWT tokens to authorize users, and we don't deal with them directly. Trigger functions don't have their own neural, and they respond on Lee two different database document events such as own create on update and owned Illit. We could specify that every time a document is created on that path, this cloud function will run have ever. In our case, we only need one type of functions gullible, easy to access and user off his protest for us. Now, you have better idea what we're gonna do. See you in the next one.
152. Creating FCM Cloud Function: hallow. In this video, we will create our own plowed function to send notification messages. Let's go. First of all, let's open these code than let's go to functions, index togs and, let's uncommon, this de fold cloud function that already pretty find for us. Let's save this file. Then let's open terminal and navigate to Functions folder in packages and we have NPM run start script. So let's run it and let's take a look what is going to happen? So first of all, it will don't lower all needed emulators for different services off fireplace, such as AM a leader for functions. That's fine. After that, you will see this sort of message, and it will say that first http function is initialized and available on these Ural and also we have this local host for 1000 functions. So let's copy that one. Let's go to browser and let's open this rural to check what is going to happen. This is like a dashboard where we control what services we developed locally. So right now we have only functions. Am a leader and it is available on these port, and if we go to logs, we can see that. Now we have one http function initialized so we can copy this year. L And then we can access this function. And from response, we can see hello from fire base. This is what we have inside this function. Defiant. So this is it. This is what our cloud functions. But right now, let's stop the emulator. We don't need it. And let's also delete these kind of function because this is a two fold one and we don't need it. But before we do this, I just want to point out that every function that exported from indexed oci yes, is treated as a function. So what it will do inside functions. We're gonna create new folder called a ser C Inside. We're gonna pour new file FC M doggy s From here, we will export our function and then we will re export it from here. Okay, so let's keep it as it is. Maybe we will name this function in advance. Let's say send FC M. And for now, let's comment it. Okay. Good. Now inside FC M. Let's import functions and admin. And from here, we're gonna export our first function. Will name it. Exports exports sand fc M. So we need to call functions. Then we need to pour https, and then we need to put on call. So this function that comes by default was on request type of function they want, but we will create is going to be on call. Okay, so this on cold function receives two arguments. So if we however, we can see data and contacts, So data is this data that we pass along with request and we can access it inside context contains some context information such as user information and user JWT Token. Go. Now. Since we export this function from FC M Dodgy s file, we can imported inside index togs. So here we can type Const. Let me type f equals require than we're gonna reference source folder and then f c M g s. So from dysfunction, we exports and FC M Now we need to destructor it. And then from this index togs, we're gonna re export it like this. So exports sand FC M is going to be sent FC M function that we get from FC M file. All right. And we have this warning saying expected one empty line. Okay, let me put it like this. Now we need to write our function. Okay, So first of all, we need to check if our user is present. If the person that tries to access this function is actually authenticated, we already have user parsed and validated by this type of function, which is culpable. Now we need to only check if the user is actually parsed. So if the user is not parsed, it means that user is not present. Okay, for that we can create a helper function here that we will name check if off check. If authenticated inside this function, we're gonna pass context, and then we're gonna call it from our function like this. Check if off and then we're gonna pass context. And from this check if off, we will do the next. If context dot auth it has off object inside. So if I pour context and then dar here confined off. So if this context not off is undefined. So if we don't have any off object, then we're gonna throw new functions. Dar Https. Http error So this is Paschall. Let's say syntax that will give an error to decline our reason will be on authenticated and message is going to be. You have to be signed in. Okay, good. Here we are done. Our next step is to access data that we get from the request. It is available under this data object. Over here. It is already parsed for us. So from this object, we can destructor next values, we will sand Chad. I d then title off the room or lets the title of the message. And then also, we're gonna send message. Okay, Good. Now we need to get our room data using this chair. I d or room I d. Okay, so from here, we're gonna have room snapshot. And now we need to access. Our database database can be accessed from server environment using firebase admin as decayed. So here at the top, let's put new viable database, and then we're gonna call admin database. Using database from server environment is very similar to how we access it from declined. Okay, so now we can call database, then we put rough, and now we need to access from data. So we have passed rooms than slash room I D. Which is going to be chat, i d. In our case, it returns the promise. That's why we can put away over here. And also let's put a sink to make it valid. So after we have reference, we call once and then we poor value. Now we get room snapshot, Then we can do the simple check if room snap shore exists. So if it does not exist, then we're gonna return False. Okay. From this function, it will send just false request back to the client. When we will call this function, then we need to get room data to get a user ID's. So for that, let's courtroom data and then we're gonna record from snapshot door value. Now, we need to check if our current user is an admin. So we can actually send the message because this function can be called by some user inside Chad. But this user is not an admin, and therefore this user is not able to send the message. Okay for that, we need to check against user admits so first, As you remember, all of our a race in the labors are stored are objects, so we need to transform them to normal javascript arrays for that Inside helpers. We already have dysfunction transformed to array. Let's just copy it from here and put it here at the bottom. Now we can create a helper function to check if the user actually can send the message. We can create a new function at the bottom again, and we will name it. Check if allowed. And again it will receive context. And also it will receive chat admits. Okay. And here we will do almost the same check. So if no, let's say Chad, add Mons dog includes context off, and then you i d. So if user that is trying to access this cloud function is in list off Chad Adnan's. So if this is not the case, then again we're gonna send exactly the same message over here. And maybe we're gonna say restricted access. All right, Good. Now we can call this function over here. Check if allowed, we will pass context inside, along with transform to array room data admits. Okay, perfect. Our next step is to get actual user ideas that will receive notifications. For that. We're gonna put a new valuable FC M users. And again, we're gonna call transform to array, and we're gonna put room data FC M users. Okay, now we will get all user tokens. For that. I proposed to again create a helper function that we will call get user tokens. So let's scroll to the bottom. And here we're going to create a new function, get user tokens so it will receive user I D. And he will get all user tokens. So we're gonna call our data ways, and we will receive user tokens. Snapshot. Okay, so it is going to be innocent function and logic will be the next. So we're gonna call database ref. Then we're gonna reference FC M tokens. Then we're gonna order by value, and we're gonna put equal to user I d. And then to get old tokens, we will call once value. Okay, Perfect. And don't forget to put a wait at the beginning. Now we have user token snap shirt. So if we don't have user tokens, snap short has Children. So here we check if actually this particular user has any tokens. If this user doesn't have any Children, it means this user doesn't have any tokens. So we can simply return an empty, Eric. So if user has tokens, then we call object dot keys and then user token snapshot dot value. Because, as you remember, we store our A raise in the railways as objects. And by calling this object of keys, we get the actual user tokens. Okay, Good. Now we can call this get user tokens from our cloud function and for dad, because we need to get user tokens for multiple users we need to use Promise that all to make it as optimized as possible. Okay for that Here, we're going to create a new valuable user. Tokens, promises. And what we will do. We will map every FC M user. We will map it. So every user i d is going to be mapped to get user tokens promised. And inside of it will has this user I d. Okay, good. Now we will receive our result. Or let's say we're going to receive user tokens result and we're gonna call, await promise. Not all user tokens promises, but the thing is that promise that all returns us an array off results like that and our user tokens promises, so every get user tokens promise returns us an array off user tokens. So in this way, we will end up with nested array like that. So for the first user, we will have these tokens. So for second, we can get these and so one and so on. So to avoid that, we need to flatten our Eric. For that, we can call dot reduce method available on a race and flatten the area. Okay. For that, we're gonna call user tokens result then reduced, so it will receive a callback function. And the second argument is the initial value. So initial well is going to be an empty array. And this doctrine use first is the accumulator value, which is going to be, Let's say, accumulated, Filkins. And second is going to be current value, which is user tokens. So this function will be run for every user tokens for every every element. OK, and here we will simply merge. These two erase using the spread operator. So we're gonna call accumulator tokens, plus user tokens. So in this way we will end up with one flat and array where every token like is a normal value. Okay, go it Now. Let's move on, then we're going to check if tokens dot length is equal to zero that will return from this function because we don't have any tokens to send two. And how the question is that we have tokens, how we're able to send our messages for that we can navigate to fire by his documentation. So this the one I have from previous videos. But if I go to server environment on the left and then built sent requests here, you can find multiple ways. How can I send a message to specify device? However, we need only one which is sent messages to multiple devices because we have multiple tokens and we have one message to send. So let me just copy message, actually, and I'm gonna put it here, and I'm gonna call it F c M message. So I were data will not look like this because every message can also have different structure. It can have this type of object with data topic and tokens have ever This is Onley for custom notifications. We don't need anything custom. We need a normal notification for that. We need to slightly modify this object. So instead of data, we're gonna poor notification object inside. And this notification object has two keys, which is title and also body, which is the actual notification message. So for body, we're gonna see pacify message that we get from data object inside this cloud function. So let's put message. And for title, we can pour our custom title, which is going to be titled that we sent with requests and also room name. Okay, so let's poor room title. So let's put title and then from data door name. So in this way we will have title and from name next to it. But let's put maybe room name in parent eases so it looks more aesthetic. Okay, go it. Now let's take a look on how we're able to send this. We can use admin dot messaging done, said multicast, and then message. Okay, good. So we need to use admin dot messaging. Let's create available over here called Messaging on. Let's call admin messaging. Okay. Perfect. Now we can actually copy this code. Let me copy only the first line because we're not going to use the promises in Texas. We will use a think away. So let me call const admin messaging. I'm gonna replace it with messaging, Then send multi cast and we're gonna send FC M message, and we're gonna put it in a veritable, which called Batch responds, and then we will await this command. Okay, Good. Now the thing is that tokens can be invalid or tokens can expire because, as you remember, on decline token can be refreshed. So when the token is refreshed, the previous token is not valid anymore. So this is the case when we have failed tokens. So we can actually use this snippet of code to detect which tokens are failing, and then we can deliver them from the database. Let me copy this snippet of code, and I can call it like this, so we will have much responds and we check if much responds. Failure count is greater than zero than for every buttery scones responses. We look over responses and we check if our responds was unsuccessful. So this is the case. We have all failed tokens pushed to this failed tokens rate. However, we want to do something with them. Right? We want to clear our database as well. For that, let's pull this failed tokens here to the top, and we will do the next thing. So we will update our failed tokens. With this push inside, we will remove this consul lock. And now that we have all failed tokens, we can actually call our data ways until it all of these tokens here at the end, we're going to create a new array off promises that we will execute with promise dot all again because we can until it multiple tokens from the database. For that we can create remove promises valuable. And we're gonna map every failed token to promise so failed tokens dot map. Then we will have token, and we're gonna call database dot draft. Then we're gonna call FC M Jokinen's than Tokcan and then door removed. Okay, Perfect. So in this way, we will end up with a ray off, remove promises, and at the very end off our cloud function, we can call return promise thought all and we will pour him of promises and then in case off any error we can use actually dot catch Syntex over here instead of a think await. Because this is our last operation and it looks more readable in this case. So in case of any other, we're gonna return error dot Message. Okay, Perfect. So this is it. This is our function, and this is how we're going to manage it. I guess that's it for this video. And in the next video, we'll we will start updating our client. We will test this function and what I proposed to do. As you can see in files. Here, we have you I d. Bach. Let's add this file to get ignored. You I or maybe we will add all look files to get ignored. We don't need them. Okay, cool. And we have this warning saying that expected to return at value. Okay, maybe we can actually update our yes lint so we can put a consistent, consistent return was going to be zero. Okay. And it seems like we already have a somewhere here. Let's put it to zero. And let's deliver it here to avoid this kind of warning inside our file and also for Islam , Darcy, because we have multiple es ling files inside our project. One in the root folder and one here. We also want to make sure that we add option route equals two. True. So now it is recognised by decode. Okay, perfect. So for now we're finished. Let's commit our changes. So let's never get back to the root folder. Then let's call, get everything and then get commit and let's say edit cloud function to sent FC M messages . Perfect. See you in the next one.
153. Fix Cloud Function Errors: Hey there. In the previous video, when we created sent FC M Cloud function, I did a few spelling errors that I want to fix in this video. The first error underlies in room data. We want to get on data from room snapshot dot value, so let's fix it. Teoh room snapshot dot value, then second error is inside half cm users. We want to transform our data from DAR FC M users instead of FC M user. Then if we scroll down to FC a message object here. We used registration tokens, and this error comes from copy pacing from firebase documentation. So let's remove it and let's put tokens and the same mobile do inside fail tokens Don't push because we want to make sure that we get tokens from our tokens, a rape. Then if we scroll down the very last ever will be. You have to be signed in and that's it. Everything else looks good. Now. Let's save the file and commit our changes. Let's forget everything, then get commit and let's say fix spelling errors. Perfect CEO in the next one
154. Sending and Displaying Notifications Using Cloud Functions: Hey there. In this video, we're gonna work with clients and we will create a model window from which we're gonna send a request to our cloud function and then send a notification to Absi. Um, users. Let's go, Let's navigate back to B s code. And first, let's open fire Base Duchy s and let's import functions package. So at the top, I'm gonna pour import firebase slash functions. Now let's greet a new instance. So export const functions app dar functions. And when he opened, Parenti says you can see a region over here. The thing with cloud functions that they are available in multiple regions by default. They are available on the U. S East region. For Europe users, this is not great. That's why we need to change the region off our function. For that, let's navigate to FC M Dodgy s at the place where we create this function. And inside this definition, let's add another chain off a region and inside bubble specified that this function will run on Europe West three region. You can specify whatever region you like. OK, so Europe West three And now when we initialize this instance, we need to pass Europe West three in order for it to work. And also when we will use this functions instance inside our client, it will try and access the rial cloud function that is already deployed. But for local development, this is not good. That's why we need to here at the bottom check If we currently inside local development then we will use functions. Amma later that we run with MP Enron, start inside Functions folder. So here, if we're going to check if is local host and is local host previously in videos We exported it from here we extracted This is local host valuable from service worker file created by Creek React app and now we're gonna use it. Okay, so is local host. Let's import it. So if this is the case, then we're gonna say functions, use functions. EmLeader and we need to specify the Europe for that. Let's go to Functions folder inside our terminal. And here we're gonna jive and PM Ron start and let's see the output. All right. As you can see, our functions emulator is running on local host 5001. So we need to specify here http than local host and 5001. All right now, we are all set with our s decayed. Now let's create the actual Moto. So let's go to chat window Top. And inside this folder we're gonna create any file that we will name sent FC M Bt in Moto gs. And actually we're gonna copy and paste code from Let's navigate to create room Beat and Moto So we're gonna call be all of that and place it here. Now let's start replacing things. So first of all, we will rename it to send FC M Bt and model and let's actually use this component inside index togs inside top folder. So here, instead of this to do, we're gonna ask if our user is admin, then please show us. Send FC M Bt and Moto. All right, Good. Now let's start replacing component. First, we're gonna check our motile for our form, so we will not have name and description. We will have title and message that we will send to our cloud function so title and message and is required. We're gonna say title is required and message body is required. Okay, Good. Now let's delete this import than our initial form is going to be titled and message now let's import use motile State again. All right, so we have form. Value is loading for him. Rough on submit. Okay, we're gonna change it slightly. So, actually, let's delete this part and keep it like that. Now, here, inside Js six. We're gonna remove this, Steve completely. We're gonna remove this class name, and we will leave it as react fragment. So for button, we're gonna specify appearance off primary and size is going to be extra small than it's not going to be a block component and color. Let's keep it the default color. So for I can we're gonna specify I complied. Cast and we will say broadcast message instead of sent FC M. Let's be a little bit more creative. So for model, that's fine. Let's change title to send notification Teoh room users than for this form. It looks fine for form group. We're gonna change it. Teoh Title form control name is going to be title and placeholders going to be enter message title than four description. We're going to change it to message again. It is going to be a text area component of our name is going to be message. This name must match our state key, which is title and message. All right, so please, holder must be something like and the notification message. Okay, good. And for this button at the bottom. So appearance, primary on click on submit block. Okay, it looks good. Now, let's only change the text to publish message like that. Okay, Good. Now let's take a look at the top. We have unneeded alert and also a needed firebase import. Let's say with Let's navigate back to Chad. And now we have this moral window, so enter a title and message. All right, now let's define the functionality. So what is going to happen on Submit? We need to send a request to our cloud function. And as you remember, our cloud function is a callable function, and we use functions as decayed. That's why it is going to be so easy to do. So let's put try kitsch block over here. Let's put aside is loading to the top like this so inside trite kitsch block, we're gonna do the next thing First, we're going to create any valuable sent FC M and then we're gonna call functions as decayed that we import from Firebase Dodgy s. Then we're gonna call https gullible. And here we need to specify function name that we want to call, so this is very important. So inside index togs we export send FC M cloud function. This is its name. All right, so let's copy it. And here we're going to specify that we will call sent FC M Cloud function. This method https gullible, returns us and you function that we need to call in order to actually send a request to cloud function. All right, this is not the request itself. So right now we need to call or invoke ate sand FC M with data that we want to pass to cloud function. And then this data will be available here under this data available. So what we will do, we will call a weight than sent FC M. And inside we will past chat I d. As you remember, we need to receive Chad I d title and message. So, chet idea, we need to first get it. So let's put here and the top char i. D. Hughes programs. OK, Good. So we have checked I d and also we need to send title and message, which is our form value. So we can simply spread it like this inside this object, and now it will send the request. So at the end, we will have said is loading such trifles. Then we will call sat form value to initial value. So initial for and also we're gonna close this motor window. So in case off any alert or in case of any other, we're gonna call alert than at our and then ever dock message with the idea No. Seven seconds. And also in case of success, we're gonna specify alert info and we will say notification. Has bean sent good? Looks pretty awesome. Now let's take a look at, as I can see here, I must move it to the top. All right, let's navigate. Let's go to broadcast message. Let's specify something super and publish. Message and notification has been sent. Now let's take a look. If we open our terminal, we can see that inside our right terminal where we run cloud function, we can see that beginning execution finished execution, so it actually works. Now let's take a look inside our council. We don't see anything. And also maybe let's try to send it one more time to see what is going to happen. And let's open network tap. So I said the message. Then you can see that request is being sent to local Host Chat. Web up Europe was three Sand FC um, have ever I see that the result is false. And this is because as you remember, inside our cloud function, we check against room data FC M users. But right now, inside our database, if we open our rooms, we don't have any FC M users yet. We need to change it. So lets navigate to create room Bt and Moto and hear what we're gonna specify. So for admits, we will use also current user your i d. But also, we're gonna specify FC um users. The first admin. The creator off this room will also receive notification by default. So let's copy it like that. Let's say we're and now we need to modify the existing group, but that let's actually first copy our user i d. From here. Then let's click on this plus sign and let's say FC M users. Then again, plus sign. Let's add our own user. I d And then for value. Let's for truth. Then we add this value. Now, let's try and sand broadcast message one more time, so I will say something silly. Okay? Notification has been sent. If I opened my consul now I can see that I receive a new consul log, which comes from Firebase Dodgy s. And if I open this file, I can see that it comes from this messaging on message. So I have from notification, I have body and title. Now, the only thing that I need to do here is to actually display this notification in more user friendly. Wait. Well, this will be pretty easy to do with toast or notification component that comes from our suit. What we will do, we're gonna import notification as toast from our suit. Why? I'm using here. Notification has toast on not notification because notification also available as global valuable inside window object inside the browser. So it might be confusing and we might just do something on. So just to make sure that we use a custom component, we named it dosed. So here inside on message. We gonna pour something like, As you remember, we have notification. Object inside, so we can destructor it from here. Notification. And then we're gonna call We again will destruct chur this time from notification title and body. So now we have these two keys and we're gonna call toast door in four. Then we will pour title description and description is going to be body and old, so duration zero. So what it will do, it will court and you component a notification component from our seared with this title with this body, which is the description. Keep that we need to pass through this info and then duration is set to zero, so it will never close by itself. We need to manually go and close this notification. All right, so now let's savor and let's take a look. So if I put something like a low and then this is body and published new message Now I have this notification and this is it. However, there is one more cool thing to that. If I click on something like this published message and when I click on this button and then quickly switch between taps. Now I will receive this notification. Pretty cool, right? So this is it. And this is how it is going to work. And all users that are subscribed to this broadcast messages will receive them on their devices. Either it is PC or mobile device or whatever device to use. But this is what we're going to manage in the next video. For now, we're done here. Let's commit our changes. Let's open our terminal. Here is a good thing. It gives us firebase warning saying that using an unspecified index. So let's actually add, and you index to our database rules. So let's open it. And, as you can see, consider adding index on the value at FC M tokens. So let's go to FC M tokens. Then we're gonna add index on. So let's copy from somewhere and put it over here and Index on is going to be dot value. OK, so now let's publish these changes. Let's copy all of them. Let's navigate to database rules, Jason, and let's replace them like this. Okay, look, scored. Now let's commit our changes. Finally. So let me stop everything, then I'm gonna put get at everything and then get commit. And then I will say, manage FC M from plant called cloud Function and sent FC M Perfect. See you in the next one.
155. Managing FCM Users: hello. In this video, we will create a new model window. Ever will ask users whether they want to receive notifications or not. Let's go. Let's navigate back to the code and under Chat Window Top folder. Let's create new file. Ask FC M Bt and model. Let's go full this component. It will be covered with the act Frackman. And as a trigger, we're gonna pour Aiken button for Aiken. We're gonna specify I can component and for I can component will quote. I can name off podcast. This I can Button also will have blue collar size is going to be small and also it is going to be a circle. Let's save it. Let's navigate to Index Duchy Yes, inside top folder And let's use this component inside this button toolbar right before a Detroit beach and Robert. Let's poor ask FC M Beach in Moto. Let's say wait and let's take a look Now, As you can see, I have this broken mark up at the top, and this is because if we open edit room Beach intro Burr were upward in dif element. Let's remove it and let's keep react fragment. Now if we take a look. Everything is aligned nicely. Perfect. Now let's continue building our ask FC and beaten and Moto. So let's define a motel window over here. Inside, we will have mortal header than body and footer. Let me specify all of them. So inside Heather, we will have mortal dot title and people say not tea vacations. Permission. Okay, good. Now, in order to display something inside body, we need to know whether our current user is already receiving FC M messages. For that, we need to pour some other value inside our context. Let's navigate to Chad togs. So this is Page where we passed some context data about our current room. Here we can get our FC M users, So let's poor FC M users valuable. Then we will call transform to array than current room FC M users. Now we need to get our Bullen. So we will create is receiving FC M and we will ask if FC abusers array includes US current user. Your I d damnable past. This is receiving FC and Bullen to our current from context. Now let's save it and inside ask FC M Between Moto, we will get is receiving FC M from use current room hook. Okay, perfect. But for selector, let's specify value is receiving FC M Good. Now for model, we need use mortal state. So let's use this model state hook and you will get, as always, is open, close and open. So for mortal window, we're gonna specify show property which is going to be is open on hide. You're going to be close. And also we will specify another props that we haven't used before such as size. Let's specify extra small and also backdrop is going to be static. All right, now let's actually pour our conditional rendering inside by But before let me quickly fix this matter and here as well and we don't need that one. So inside footer to avoid this red line for a delicious put button with text high and inside body will put conditional rendering. So we're gonna ask if is receiving FC M. Then we're gonna put a diff element with class name off text center. And inside this Dave, we will put I come with class name off text green and margin bottom three, so I can name is going to be check circle and size is going to be five times large. And next to this, I can We will supply H six title with text. You are subscribed to broadcast messages sent by ad Mons off this room. All right, Good. Now, if we're not subscribe to messages, then we're gonna display another live again with class name off text center this time will display another icon with class. Name off text Blue and margin bottom three as well. So I can name is going to be questioned. Circle and size again five times large. Now next to this Aiken again, h six title. And do you want to subscribe to my messages sent by ad mons off this room? Okay, good. Next to this conditional rendering, we're gonna pour another text. So let's put p tag and class. Name is going to be margin top two, and we will say to receive notifications, make sure you allow not vacations in your browser. All right, Good. Let's savor and let's take a look. So before we can do that, let's pour on click handler for Aiken button. Let's put open and let's take a look. Okay, so if I click on this button now I have notifications. Permission? You are subscribed to receive notifications. Make sure you allow notifications in your browser. Also, it would be nice if we had some sort of a value that indicates whether we have the permission or not. Because if we open this side information here, we confined different permissions, such as for location, microphone and notifications. So if this is set to block, we will not be able to receive anything. That's why it is good to display here. But that the permission is granted were not for that. Let's put it next to this P tag permission indicator. So we will say permission. Then let's board colon and then put conditional rendering. So we gonna put notification and notification is the global object inside window inside browser. If I, however, you can see that this is notifications ap I So if notification dot permission equals two grunted, then I'm gonna display a spun element that will say grunting and let's put a class name off Text green. Otherwise, if we don't have the permission, we're gonna display span with text de night and class name is going to be text read. Perfect. But now I can save it because it seems like I have better somewhere. All right, Let's could this Pitak to the end like this. Okay, looks good. Now let's take a look. If I opened this window now, I have permission front. It looks going now we need to define our functionality. So insides footer. Let's first put a close button. So let me make a recapitalized and on click is going to be close. And right before this button, we will put our main buttons for functionality. So we're gonna ask if our user is receiving FC M. Then we're gonna put button with text. I changed my mind because as you remember, we have this question. Do you want to subscribe to messages for color? We will specify green and for unclipped we will create on cancel function just in a moment . Otherwise, if we are not receiving any notifications, we will quote another button. But text Yes, I do want to subscribe. All right. For unclip we will pour on except and for a color. We will work green as well. All right, let's save it. And now let's define our functions first. Let's poured on. Cancel on. Cancel and here we're gonna reference our database. So let's put database that we import from firebase file than reference. And people specify rooms, slash room I D or chat I D that we get from use Paramus Hook. So chat i d. He's received from use perms. Let's move this import to the top than we are going to reference FC M users and for child, which is off current user. Let's important off current user you I d Don't remove. We will simply remove this object from our database. Good. Now let's define second function, which is on except and different nationality is going to be pretty similar licious. Copy this, Nipper. And instead of removing this child, we're gonna set it to truth. All right? Perfect. Now let's actually tested. So let's open our motile And here we're gonna click on I changed my mind and now you can see that conditionality entering works. And if we look inside database, go to rooms Now we don't have any FC M users. If I click on yes, I do. Now we have FC M users with my user i d insight, But to make it a little bit more user friendly. Let's actually define another color for our Aiken button. So we will say appearance. If our user is receiving FC M, then we will pour default appearance. Otherwise we will put ghost and let's take a look what is going to happen. So if I say what now I have this color blue over here with the normal appearance. All right, so if I changed my mind now I have this ghost appearance without the color inside the bottom. Okay, good. So this is it. This is how we're able to manage our users, but they want to subscribe or not. So if they're not subscribe, it means that they will not receive any notification that are sent by this moral form. All right, so I guess that's it for this video. And this is the time for us to commit our changes. Let's open our terminal and then let's go get at Dar and then get commit. Let's a man age FC M users with the ask FC M vtm Moto perfect to finish off this journey. Let's Bush everything online to get up with. Get Bush origin muster after it's finished. Let's run, firebase deploy and enjoy our chat application online. I'm glad to say that we're completely finished with this project. We've implemented everything we wanted. The real time notifications, admin roles, user presence. We have everything in place. There will be a few more videos about react concept that we haven't covered your in thes three projects. But nevertheless, I hope it was a valuable experience for both of us. And I hope this course give you what you came for. Thank you for it. Time and patience. See you next time.
156. Key Features of React: Hey, in this most section, we're gonna cover react features that almost every production regular react application has . But we didn't have a chance to use them in our projects. Everything that will be covered here is going to be applied to our final project chat application to help us with the code double reference official react documentation. I highly recommend you to read it yourself to better understand how react works. See you in the next video.
157. React Portals: hallow. Our first video is going to be about react. Portals and portals is just a way Teoh. Render something with react outside off def with ideal fruit. What I mean, if we open our chat application and if we inspect our elements, we know that all off our elements, all of our components, our app goes under this dif with idea wrote right, However, let's take a look when we open a model window where it will be rendered. So if I opened this through eight new chat room, you can see that here at the bottom. I have this def role dialogue, and if I open it and if I inspect, you can see that actually, my model new Chatham is being rendered outside off this route. So this is what portals are used for. This is useful for something like model windows or tool tips or hovers. I don't know anything that must be renter it outside off main component treat. This is very useful when we deal with Z Index CSS property. So let's never get back to documentation and let's look through examples here you can read words that I just told you have ever by looking on this example, it might be too complicated to understand what is going on. So instead of copying, pacing, thes class motile from documentation, let's open our code. I already Iran the application and other components. Let's create new file model. Let's create a new component. And here, instead of returning this Dave from documentation, we can see that we're able to use react, don't create portal method. So instead of this def, let's return. Create portal and it will be automatically imported for us. And if I open parties, as I can see that here I have Children and then element All right, container. So for Children, we will put Children that will will pass to this mortal component. So here I will destruct your Children. And then I will pass it to create Porto than our container. Must be another div that trouble define inside index html. So here we already have this different with idea Satu Road. Now let's create another day if that will be a container for our model windows. All right, so here we will create Dave and I d will be model route. Let's save it and inside model togs. If we open documentation, we can get it using document. Get element by i. D. So let's copy that one. Let's put it here at the top and to create portal as a second argument, we will pass moral route. Okay, Perfect. Now let's save it. And it says that react is declared. Never used. All right, so maybe let's remove it. Now let's open. Maybe signing page. And here, let's render this welcome to chat. Let's run their visit if inside our model window. So here we're gonna put model imported from our file that we created, not from our suit. So let's remove this import, and I want to import it from our file. All right. Seems like it imports from our suit. Let's import it manually from components model. Perfect. So inside this model, we will put our def with text center. Now, if we never get back to our app If we sign out now, you can see that welcome. Chad is located and the bottom And if I go to elements and if I inspect my dumb tree here at the bottom, I can see mortal route. And inside this model route, we confined our welcome to chair under text center. So this is a This is used in your eye libraries like our CLR for model windows and for tool tips. For example, if we had to create, they react application without using tear I library and we had to implement motile window. Most likely we would use react portals because they're rendered outside off our main confident treat. You can find it more practical Onley when you get into it on a real world example. That's fine if you don't completely understand. But trust me, this is the key concept that you must at least know. Okay. Thank you. See you in the next one.
158. Error Boundaries: Hey there. In this video, we will talk about her bun trees. Let's navigate back to the court and let's open sign in page here. What is going to happen if we let's say, throw an error inside this component? Let's poor throw new error. Something bad happened. Now let's say what and let's take a look. If I refresh the paint, we can see that we have a never and something bad happened. And the thing is that these enter is on caught. It means that it is called by react, but not by us, and eventually react will amount the whole competent tree, which is really bad if we have a production ready by application to prevent that we have better bun trees that are boundaries are components that catch all of these kind of letters and the display at fullback You I, for example, a message that these paged crashed. Please refresh it. So if we open the documentation, we confined an official example how to create a simple answer bun tree component. And for most cases this is enough. Unless you have a really sophisticated error logging or I don't know anything what I proposed to do I want to go to a live demo? Then I want you open this example and from here I will copy this. Enter Bunge re class. So let me copy all of that. Then I'm gonna open decode and then inside components, I will create you file ever Bun gery. And inside I will put this class based component. And don't be scary about this component that it is class based. I will explain everything that takes place here. So let me import, react from react. And also we have a lot of yes length warnings. Let's disable all of them. I will just click on quick fix and disabled for the entire file. The same I will do here. Now let's save it. And what is going on here inside the constructor we define in you state, which is an object with ever and error info than using a competent deed Catch, lifecycle hook or lifecycle event. We catch any error that is happening inside this component, okay? Or to its Children. When we have any error, we update this state, then inside the render method. If we have any error inside our state, which is played the fullback ey. And otherwise, if everything is OK, we simply render all over its Children. Okay, Pretty simple. Now, in order to use this editor, we need to wrap our entire tree inside this letter. Bunbury. So let's open Abdel Gs. And here I'm gonna for ever bunch we component that we created. Let me save all of that. Then I will navigate back to my app. I'm gonna refresh the amp and now I still have this react warning. That's because we are in development boat. However, if I close it now, instead of signing page, I have this something one wrong message with the details inside. And if I open my other bun tree, I can see that in case off any error, this is exactly what I'm rendering and it can be customized bias. This is how we're able to catch any other inside the Y in every production ready application. This is a must. The cool thing about our boundaries that we can create multiple components. For example, right now we put the global Herman tree. If any error inside the competent tree will be produced than it will be captured by this letter boundary and instead off any component. It will display this message with something when drunk. Let's say we have a lot of components and knob or crushed, if not bar crashed. We don't want to remove everything right for these situations. We can put multiple other boundaries, for example, per component or per page. So for signing page, I can pull its own enter bun tree like that. Then I can create another component with another market forever. And then I can rub another page around another at her bun tree. So in this way, if error will be produced inside the home page, it will be catched by these other bun DRI and then the U Y. That is listed inside this letter bun tree will be displayed. The question is why? And went well. Evers can be produced by anything. It can be any error inside the code that we didn't control or we just simply avoid it. Or maybe it can be a network ever, for example, if something need to be access online. But out of nowhere, Internet went down and the component failed to render in this way it will be caged by enter bun tree and it is very important to understand that these kind of errors will not be catched by ever. Bun trees at her bun trees catch others Onley related Teoh rendering. Now I guess we needed this some sort of better Bunbury inside our chat application. So I guess this is a good time to commit our changes. So let's pour away this throne. You airline inside signing and let's put one global ever bun tree for our chat application and let's commit our changes. So I'm gonna pour. All right, let me restart the terminal. I'm gonna put, get at everything and then get commit and then added Better bun tree. Perfect. I hope it was comprehensive and not too complicated. See you in the next one.
159. Code Splitting: Hey there in this video bubble, talk about code splitting in react mode, splitting is tightly coupled with lazy loading in react, killed, splitting means to lazy load components, dependencies or maybe even CSS files. If we read through documentation, we can see this bundling section where it says that whenever we build an application, we have the final JavaScript file. And indeed, if we'll look inside our project and we go to the latest built static and jealous script here we confine a few jobs, great files. And as you can see, they are magnified and at the same time they are pretty large. So this is where our logic goes. But with laser loading, we are able to create more chunks off our application. And in this way we can lays a load our JavaScript chunks on Lee when they are needed. For example, if you look inside our application, we basically don't need sign in page right now. We need Onley when we are unauthorized, right? So it would make sense to lazy load sign and page component. So if we go to documentation and if we scroll down to the actual example with react, lazy react Lisi is a technique inside react to lazy load components. We can use this example to lazy load our sign in page. Let's copy this line of code than I'm going to navigate to Abla GS Place where we rendered the signing component here. I'm gonna pays this other component and I will replace it with Sinan. And then I will copy pass to sign in page. And then I will actually import lazy as well from react instead of using ink like that. And also I need to import suspects as we can see from documentation, because when we lazy, low, dim Ojul, it might take a few seconds or milliseconds to load this module. And while it is being loaded to avoid fleshing, we might use some fullback. You I something like loading. That's why we need to provide suspense always. So let me copy it, and my preacher is lacking. So let me cancel it and actually started the app. Maybe it will work. Okay, so I'm gonna pour suspects that I would sign in page and I'm gonna put it like that now I can lunch my application back again and let me save it and Now we must use sign in like that with suspects and let's remove the old import off sign in page. Now, if I save it, I also need to import suspense. Now if I say where and if I navigate back to the court if I refresh the app if I click on inspect and if I opened the network tap, let me sign out and pay attention. What file will be loaded? So if I click on this button, you saw this little flicker with loading def that we put as a full back over here while this fall back you. I was showing we actually loaded the chunk off our coat. And if we open it here, we confined our US or see pages signing. So this is what it means to code split our application. If you build a really large application, most probably when someone launches your website for the first time, most of your components are probably not needed. This technique is really important to understand. And a good example would be just to open Twitter rap side and to see that everywhere when you just load the website, you can see spinners they use lazy loading a lot so they lazy load all components to reduce the initial bundle size because it really matters. If I refresh the app, you can see that a lot of files have been loaded here, such as one chunk main chunk, and we want to keep main Chunk as small as possible because initial Lord off the website matters. All right, so this is it about laser loading? I hope it was comprehensive. Now let's actually commit our changes to the chat application. So let's pour, get at Dar and then get committed. Add lazy floating perfect CEO in the next one.
160. Conclusion: Hello. Now you know all modern stuff needed to create a large production ready react application. Give it a little more practice and you will definitely muster everything that we've covered . Here is a task for you. Go through react documentation and rely on topics that you haven't heard during the course . There are lots off subtle details that are unseen at the first glass. Make sure you understand why you're using this technique. As for now, we are finished with this section. See you in the next one.
161. Summary - Knowledge you Have Gained: Hello, You did very well. You build three separate react projects of different complexity. You can proudly say that you have react development experience. Now let's summarize what things you've learned on this course. I'll split everything into its own context. The courts started with more general things where you looked at different types of website rendering. Can AP eyes given the real world examples your gear, no GS and modern JavaScript crash courses and then prepared yourself to start working with react on our first project. Tick tack to you get to know first React components, probes, styles, ST Dynamic, you I and development of Flow. In general, you created a simple react project that demonstrates strong basics. With box office, you moved towards more complex react app by working with external a P I and managing known primitive scenarios. Using three AC cooks, you learn the concept of dynamic crowds and remote data fetching you so how to optimize and analyze react components, CIA says in GS or styled components are not foreigners for you from now on. By the end of this project, you have typical react application that requires more comprehensive re acknowledge In the last project chat app. You get to know firebase in the first place. You did a great job in managing Global state with context. AP I You experience confusing and non primitive situations that require advanced comprehension of react. Managing styles yourself not always desirable. That's why now you understand the meaning off you Y components, libraries, user, state and private pages are normal things for you right now. And react hooks is your main weapon. Several s backing off course. Pay less with minimum effort. At the end of the chat up, you build a production ready Web application with up to date technologies. There was also a small room off react concepts where we looked at them separately and apply to our final project. After all of that, you should be confident working with react and it's eco system. There will be always that feeling that your knowledge is not enough. And that's fine. Every developer has this sense. There is no limit to perfection. These were the things that you've learned in this course. See you next time
162. Your Future Moves: Hello. Let's talk about your next steps after discourse. There is no certain Web developer roadmap, but here are my suggestions and recommendations. First of all, learn typescript. It is a language built on top of JavaScript. It brings type system to the project, and at the end of the day, it will increase code reliability. Google four React typescript articles and start with these integrated into a simple react project to understand why it is amazing. Then take a look at re ducks. You already know the use. Reducer Hook Read Acts is a global state management library that uses the same approach as used reducer. It has a learning curve, but with react hooks and redox to kid, Redox has become more comprehensive. Lots of tutorials and forced ease Redox, but most of the time you don't need it. At the same time, it will be a really good practice to increase your value as a developer. Google for any article about modern reduction with three ducks toolkit. If you want to grow as a react developer, you must definitely start looking towards next GS and Gatsby. These two are frameworks built on top of react, and they both intended for server side rendering. Amazing eco system, good tutorials. They have everything to give you as comfortable as possible development and force yourself to build an A p I with no GS, no Jess knowledge is required everywhere, whether it is a JavaScript back end or just background script. Find any article on how to set up express GS and no GS. Do it yourself that increased that knowledge by doing more practice at the end of the day. Learn about testing when making you changes. To decode it is important not to break anything. That's why tests exist with modern tools. Testing is very simplified and enjoyable. Testing is important, but more importantly, is to test on Lee what actually needs to be tested. Google For any article related to jest or enzyme react testing. Read more about security off Web application, especially about Jason Webb tokens, cookies and local storage. Protecting backend is also a thing, but for that start lowering togs, no SQL databases such as Mongo, DB or firebase are easy, but they like powerful queries and structures when building. And no, she has back and wisely decide on the DB. Ask your databases are more preferable at large scale pose dress. Ask you L and Mongo db are quite popular nowadays. More attention is also given to graft ul. Once you feel comfortable with no chess and rest AP eyes start thinking about graft. You'll It is more flexible when there are lots of request with dynamic data shape Warren Cloud Computing and development off wraps using cloud services, it will not change the underlying development stack, for example, React and note GS, but it will give you services that allow you to deploy and manage the APP. Serverless deployment or cloud storage are examples of cloud services. Take a look at popular cloud providers and choose one. Make everything automated with continuous integration and continues delivery continues. Delivery allows it to automate the deployment process. For example, when you push a new change and get up, the APP will be deployed automatically continues. Integration goes before continues delivery. It basically defines the model off new code Push to the main code. This topic is not that easy to understand. So feel free to read any article and have a lot of questions. These are my recommendations. Feel free to choose your own direction. See you next time
 Arash Ahadzadeh, UI/UX Designer | University Lecturer