Transcripts
1. Introduction: What if you could transform your street photography
using science? Street photography is
candid photography of people in public places. It's super accessible
because all you need is a camera
and some way to go. But the accessibility of it shouldn't be confused with ease. But he is of course, really
easy to take boring photos. But you can change all of that, especially when you're starting
out by having a formula and by having some knowledge of how to speak the
brain's visual language. Hello and welcome. My
name is polyurethane, a diamond street photographer. I hope street photographers take better photos by
teaching them how to train their observation and develop their
intuitive composition. I run workshops and
create resources. So give talks about
street photography, judge street photography
competitions. And I've created and
published to Playbooks. What about street
photography and one about photo composition. I love science and I've spent hours deconstructing
photographs, figure out why some
work and some don't. I created this class
to introduce you to my formula for great photo before diving into some science, will begin with an intro
into why having ideas is key and how you can use a blueprint to help you
when you're out shooting. Then we'll dive into seven
Gestalt principles of visual perception
over five lessons. During those lessons, I will
also teach you the power of the frame and tell you all about a magnificent
filter in your brain. By the end of this class, you'll be taking better and
more interesting photos. This class is perfect for street photographers who
are just starting out. More experienced photographers
who might be a bit stuck. And anyone who is curious
about the science of thing, you can use any camera at
all to join this class. So if you're ready,
let's get started.
2. Ideas, a Blueprint, and Mindset: In this lesson, I'm going
to share what I believe is the secret formula of
what makes a great photo. You'll learn the importance
of having ideas. You'll get a blueprint
to add those ideas too. And I'm also going to talk about the glue that holds
everything together. Your mindset. The first part of the formula is to have ideas. Ideas of what to
take pictures off, and ideas of how to compose what you're
taking pictures of. And with practice
and repetition, the ideas of what photograph will eventually become triggers. Likewise, the ideas of how to compose will become tools
that are second nature. The ultimate goal is to train your observation and develop
your intuitive composition. Which means that you
can react quickly in any situation and compose
well in an instant. Now I have a number of
things that trigger me. And many of them started out as deliberate ideas of
things to shoot. Because it was only
when I started to give myself mini-projects of what to look for
and photograph that actually started to
take better photos. I might use some
interesting architecture. Play with mirrors,
head straight for any kids playing with
bubbles, shoot silhouettes. Find ways to make
someone anonymous, or simply tuned into shadows of things
and play with those. Now you may be thinking, I don't need ideas. I just react to what's
happening in front of me. But what if I told you that
you are reacting to ideas, you weren't even aware, you had more of that coming
up in less than four. Okay. So while I'm being
triggered by things that I'm brainwashed myself to say. I'm also figuring out how to
organize them in my frame. That's when I'm tapping into my bank of composition ideas. So any given moment, I'm figuring out in my
mind what would work best. It could be the classic
rule of thirds. There might be strong
leading lines I could use or sub-frames. Perhaps the good
old Dutch angle. Maybe I'll get some triangles, or even the Holy Grail with composition, the golden spiral. But don't worry though,
in less than five, I'm going to give you
the cheat code for both triangles and spirals. So stick around for that. But in the meantime, remember, the more you practice something, the more intuitive it becomes. So you'll not be going through a checklist of competition
options in your mind. You will simply get a
feel for what will work. Now for the blueprint. Once you have your
content triggers and your composition tools, you then need to consider why something deserves
to be photographed. Because let's face it, there are a lot of boring
photos out there. If you don't want
to listen to me and listen to Tony Ray Jones, who once said, Don't
take boring photos. You need to ask yourself, why should somebody
look at your picture? So this blueprint will
help you with the y. And even if you
don't consciously apply it when you're
out taking pictures, you can always apply it before
deciding whether to share it or whether to file
it in the trash. So the blueprint is this. Think of the street as theatre. What do I mean by that? Well, you don't go
to the theatre to watch somebody texting
at a bus stop. You need a show. And it doesn't have to
be musical theater. It can be a
meaningful monologue, but there needs to be
something of interest. And you are the
director of the show. You queue, right? The frame. Super-important to know that you actually have far more
control over the final image. Then you might think, even
though in street photography, everything is candid
and then staged, because you choose
what you photograph, where you position yourself, how you frame and
compose a shot. And finally, it's you who decides the moment
to hit the shutter. So how do you put on a show? You need light, whether
it's flat light, bright sunshine or
artificial light at night. You need to be aware of
the direction of it, the quality of it, and what you can do with it. You need a stage. This could be a
static stage, e.g. a good backdrop you found, or an ever-changing stage. Because you're either
walk in and shooting or there is a lot of activity in the background of the
location you are in. And finally, you need
the star of the show. The good news is
there are only really two types of star
in a street photo. So two types of street photo. The first one is the
aesthetic photograph. This is all about light,
shape, form, color. All of these elements
are the star of the show and the people that
you include a simply props, maybe their silhouette, a
fragment of reflection, but they could be anyone. The photo isn't about them. The second type of photo
is the story photograph. This is where it's all
about a specific person or people where there's
something happening. This could be a gesture,
emotion, movement, interaction. Or it's simply some
curious situation or an interesting
moment in time, something that ideally
generates questions. So now that you're aware of content triggers and
composition tools, and you have a blueprint of thinking about the
street is theatre. Let's quickly talk about the glue that holds
it all together. And then I'll set you
your first assignment. So let's talk about mindset. As Henry Ford said, whether you think you can or you think you can't, you're right. What you think and what you tell yourself are so important. There is never nothing
to photograph. You have to ignore the problem. Not enough people, too many
people, nothing happening. And find a solution. First, you have to become
aware of the things you're telling yourself
and then flip them. Go from nothing to something. I just haven't seen it yet. Street photography
is problem-solving. Think of it as a jigsaw puzzle where you don't know what the
final picture will be. Most pieces are moving, but all the pieces
have a place in the final image, UQ, right? What you include and
exclude from your frame. Remember, you are the
director of the show. I honestly believe
that photos are everywhere waiting to be seen. Of course, wherever you
are could be a dud. And the ultimate solution
might be to go somewhere else. But first, you have
to be sure that you really are in the wrong
place at the wrong time. And you need to
check your mindset. To summarize, collect ideas for both content and composition
so that with practice, you develop triggers and your composition
becomes intuitive. Think about the
street is Theatre. I remember you are the
director of the show. And keep checking
in on your mindset. Your first assignment is to take a fresh look at what you
think are your best. Three to five images. Ask yourself these questions. Is there any theatre? Did I work with the light? Was I'm mindful of the stage. Is there a star of the show? And is it the aesthetic, or is it the story
or a curious moment? In the following lessons, you'll have projects
to go out and shoot. But for this one, I want you to assess where you are right now so that you have something to compare to at the
end of the course. See you in lesson two, where I will introduce you
to three men in white coats. And you're very fast. Gestalt principle of
visual perception.
3. Introduction to Gestalt Theory: In this lesson, I'm going
to introduce you to the Gestalt theory of
visual perception. And we'll get started with the
easiest of the principles. Around 100 years ago, three psychologists
in Austria studied how the human brain processes
visual information. They concluded that
our brains massively simplify the vast amount of visual info that
we're exposed to. That instead of perceiving
all the individual pieces, we group similar things, look for patterns, line
things up, and create shapes. And because this
is how our brains organize and process
visual information, it means that if we
compose our images deliberately looking for and
including these elements, then we're actually speaking
the brain's language. The psychologists call this the Gestalt theory of
visual perception. And the word gestalt means hole. Essentially, we perceive
the whole picture instead of all the individual
elements separately. So on. Everything is well
organized in your frame. Then you have a
composition that works. Gestalt theory has a
number of principles. And throughout this course, I'm going to introduce
you to seven of them. Symmetry, separation,
proximity, similarity, repetition, closure,
and continuity. And in this lesson, we're starting with
the first one, which is the simplest
one that you're already probably
very familiar with. And that's symmetry. You could use a
reflective surface to create a classic
horizontal symmetry, or use a reflection in glass to create a
vertical symmetry, but perhaps play around with making distorted body shapes. You could find a
close-up detail of a person that's symmetrical. Or look for two people who are similar and mirror
one another in some way. Then you can play with
breaking symmetry as well by either placing
similar people in the center of an almost
symmetrical frame or split your frame
into a mirror, things that match but
don't actually match. So to summarize, by understanding how our brains organised visual information, we can speak the
brain's language. Symmetry can be photographed
in a number of ways. And you can get
really creative with it and play with
breaking symmetry. So your assignment
is to find and photograph a symmetrical scene. Start easy by using a
window or water reflection. Make it harder for
yourself by finding two similar looking people who
are mirroring one another. Or really go for it and
break some symmetry, but yet still give a bit of
an illusion of symmetry. So have fun shooting. And I'll see you
in lesson three, where we'll talk
about space invasion, which is when I introduce you to the principles of
separation and proximity. And also talk about the
power of the frame. I'll see you there.
4. Subject Separation and Proximity: In this lesson, I'm
going to cover one of the most important principles
you need to take on board. Separation. Or as the Gestalt
psychologists called it figure ground
relationship or FGF. But I'm going to
call it separation. Let's dive in. Separation is having
your subjects stand out in your image. That means stand out
from the background as well as from other
people in the shot. The lazy photographers way
is to use a shallow depth of field so the background blurs and you don't
have to worry about it. But in street photography, it's so much more interesting to shoot with a deeper depth of field and potentially
capture multiple stories. So you do have to work harder to achieve
a good separation. The key thing to take note of here is that you
don't have to fully separate all the bodies of
all the people in your frame. Bodies can overlap, but faces should be clearly
separated as much as possible unless
you're deliberately hiding phases to make
your subjects anonymous. Later in the course, you'll
see that the principle of continuity is deliberately
and d-separation. But for now, we'll stay focused on separating as
much as possible. Let's look at some examples. This image is all about the geometry of the
architecture and the light. And the human figure
which is in silhouette, is purely there to add
scale and a human element. But you can see he's
got an open stride. So we can tell that
that's a human person. In this shot, I've
deliberately excluded the wall that would explain the height of the little girl. I wanted to include
the man walking in the opposite direction in the background because
he adds depth. And also others
play on perspective because he looks so small
compared to the other people. And with inclusion of the chimney that adds
a fifth element. And you can see
that everybody is nicely separated
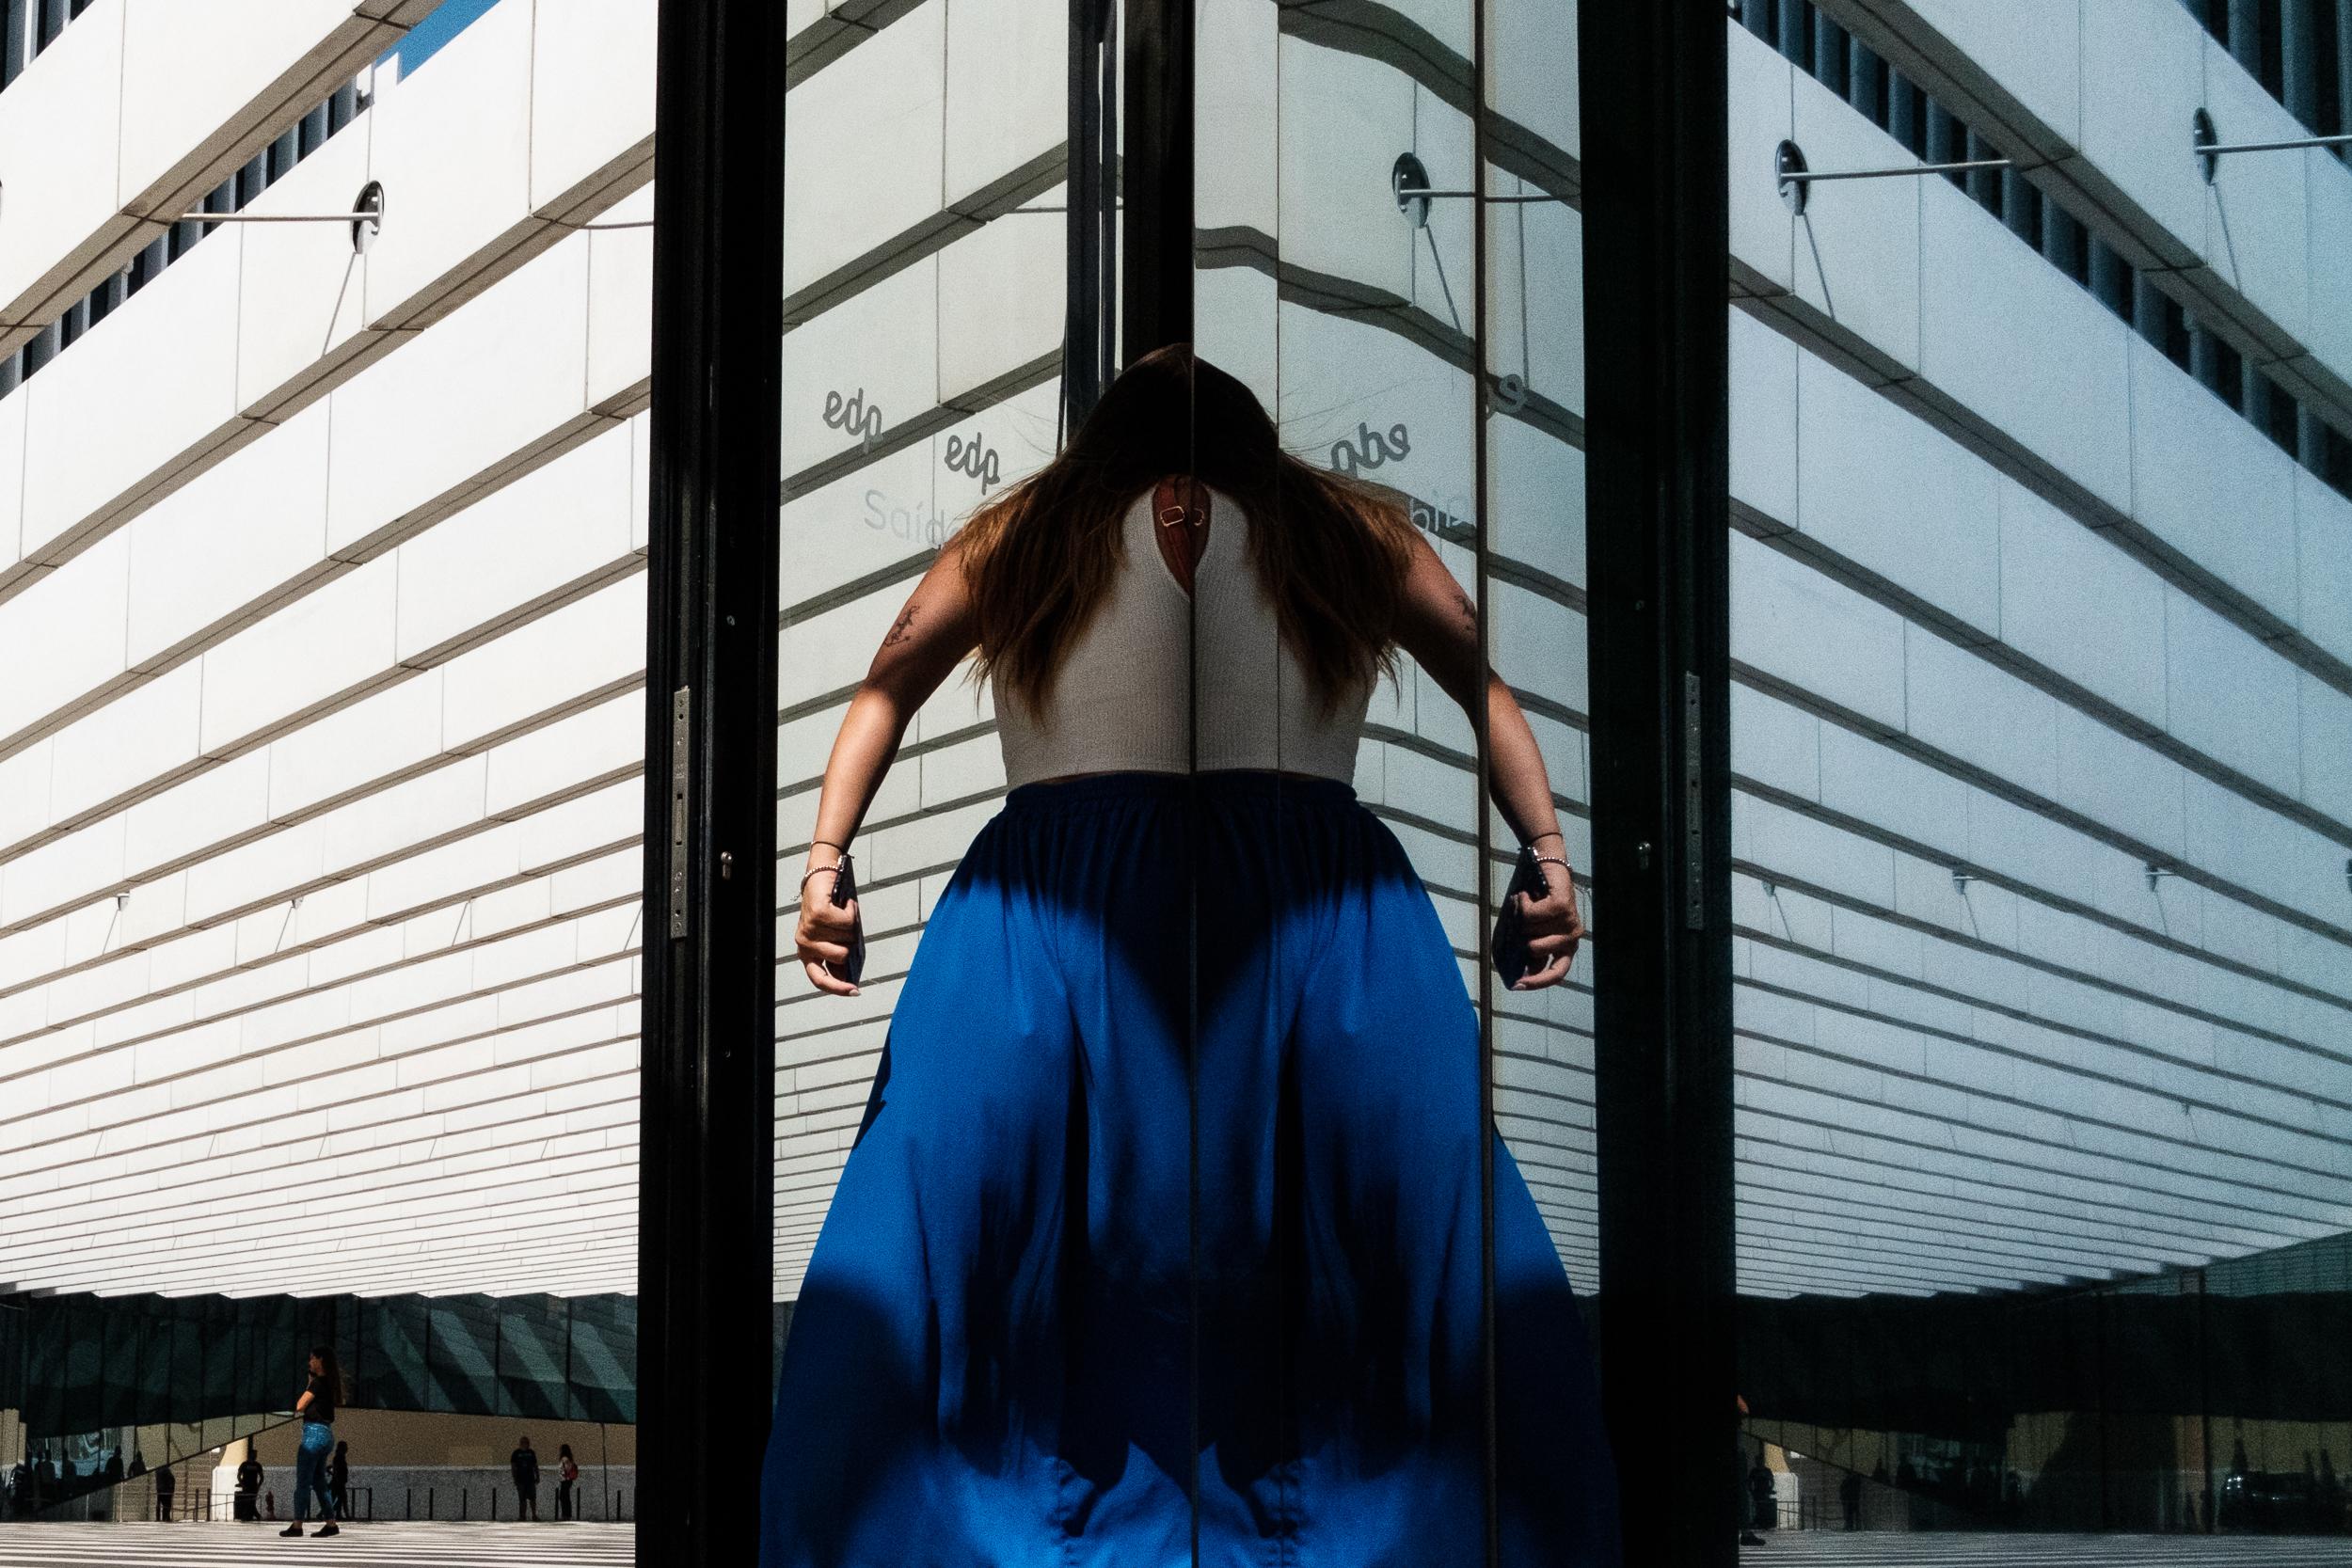
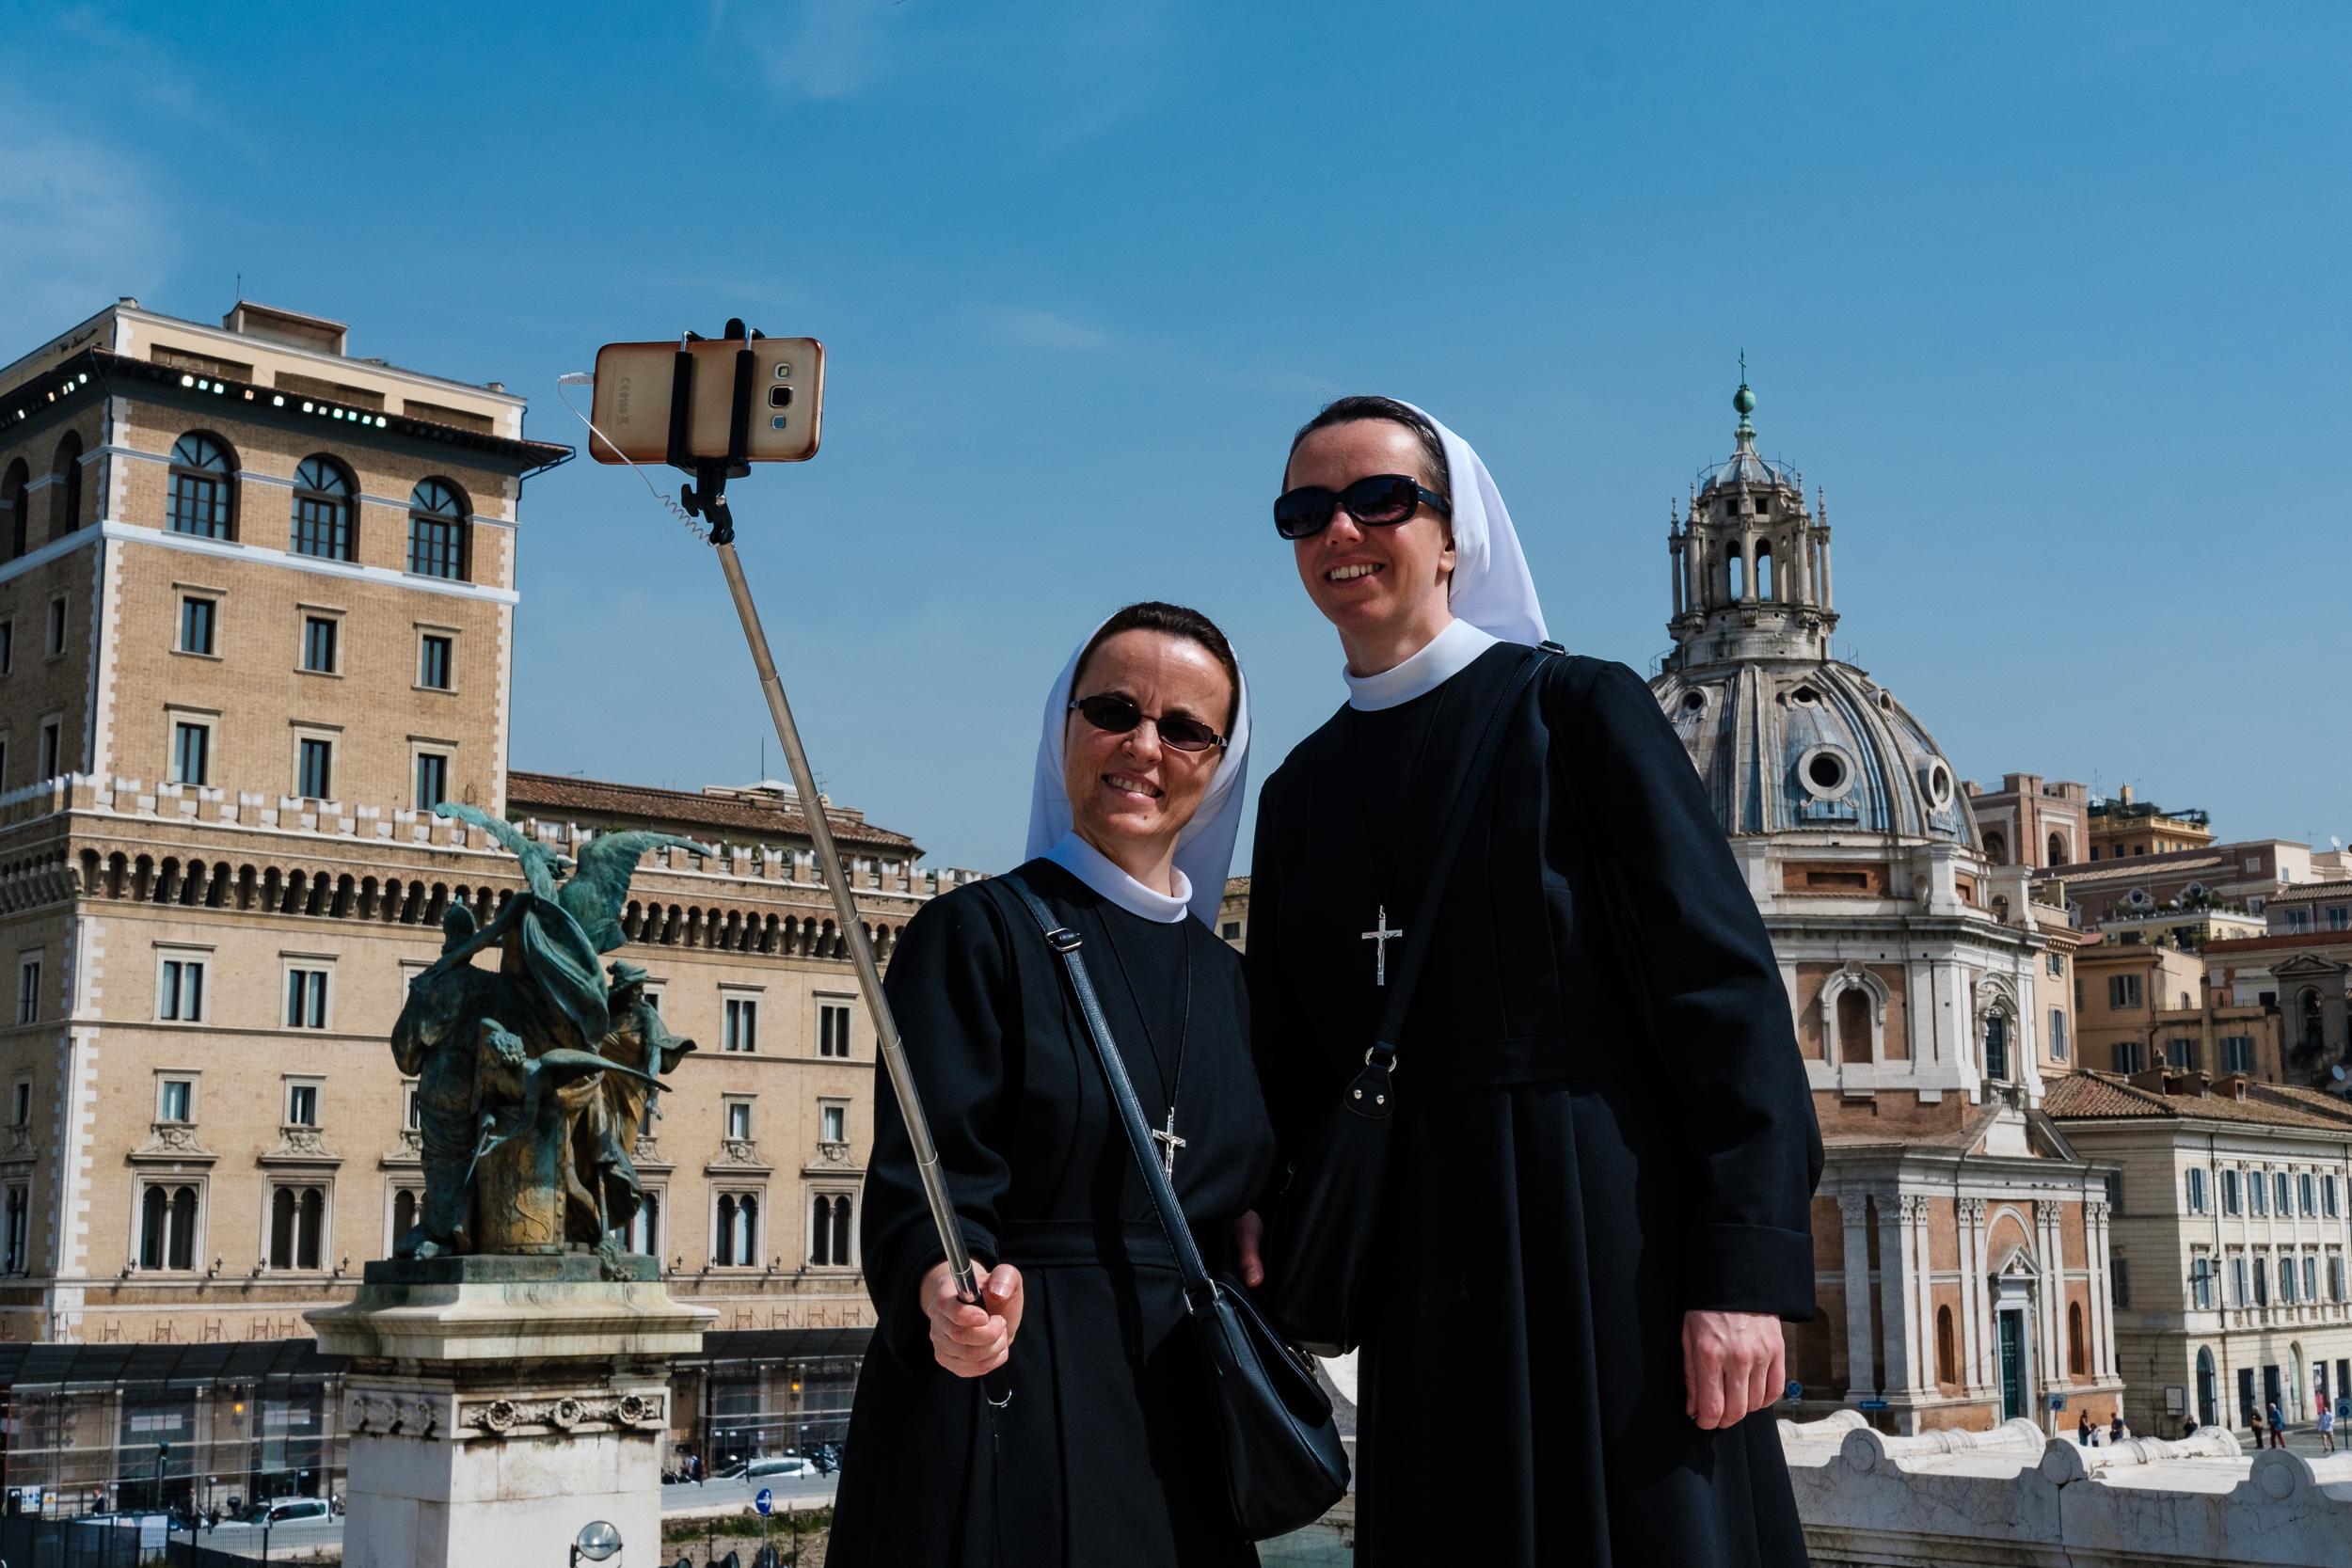
from one another. And these coolest of nuns didn't seem to care that I was
taking photos of them, taking photos of themselves. So I took four or five
shots here without rushing. My goal was to make sure the phone was separated
from the building. So I had to make just very small adjustments
to my positioning. Now I know that sounds like
it's such a trivial detail, but it does make a difference. Now, let's talk about
the power of the frame. Everything you include in your frame is your
responsibility. And that includes not
only the focal point of your photo star of the show, but also any of the extra
people in the frame. Everything around the edges, anything poking in
from the corners, whatever's in the background, the foreground, how
much space there is, how everything is arranged, the balance of
elements, everything. If you remember in lesson one, we talked about the
street as theatre, where you are the
director of the show. And then it's up to you what you include and what you exclude. Anyway, there's something
that happens when you place people and
things inside a frame. You basically force a
relationship onto them. This could be a relationship
between strangers, between the subject and the location or between the background and
the foreground. What you're actually
doing is using the Gestalt principle
of proximity, which is that things close together become related
to one another. Simplest interpretation of this is that we generally
assume people who are directly next to each
other to actually be together. But when you place people
in the same frame, you make them related. Even if you are separating them. Which means you have
to choose carefully who gets included
and who doesn't. Because to really
make all the people in the frame work
together as a whole. You need to also be thinking about other elements
that connect them, which we'll be looking at in much more detail in
the next lesson. An example of one of
those elements though, is color, as in this photograph, for everyone is wearing
something blue. Now imagine if there's
somebody wearing red, somebody else wearing purple, somebody in green, they
would ruin everything. You can actually have a lot of fun as you practice playing with timing as people walk
into and out of your frame. And you can tell
multiple stories in one picture that look as though they are meant
to be in one picture. Using lots of separation between people and groupings of people. Always keep an eye on
the background too, such as in this picture, where the door frames
don't cut into anyone. Again, it's all
about the details. But you can also use
the principle of proximity to play
with juxtaposition. So this means you can play
strangers close together in your frame in order to
create comparisons. Simple example is this one
with the older male silhouette placed next to the younger,
brightly dressed female. Or there's the contrast between the tourists
and centurion. One in a baseball hat, one and a helmet, but both
looking in the same direction. To summarize, it's key that the star of your
shows stands out. So you should always keep the principle of
separation in mind. Everything you place in
your frame is important because you are creating a relationship between
all the elements. You can use the
principle of proximity to create interesting
juxtapositions. Your assignment this
time is to find a photograph people looking
for separation between them. And it's okay to have pairings
because they become one. I remember. Don't worry if there's a bit of an overlap as long as
faces are separated. Start easy with
some architecture and wait for a human
to come along. Challenge yourself a bit more with having multiple
people in the frame. Or look for two people who you compare with
the juxtaposition. Or really go for
it and try and get as much separation between people and groups of
people as possible, whilst maintaining a sort of overall look where they all
belong in the same frame. Most importantly,
have fun shooting. And I'll see you in lesson four. We will talk about
algorithms and patterns, which is when I introduce you to your magnificent
brain filter and the principles of
similarity and repetition. See you there.
5. Using Similarity and Repetition: If you remember in
the previous lesson, I talked about the power of
the frame and how you need to also be thinking about
other elements that connect the people you've
chosen to include. I gave you the example of color. This brings us very nicely to the principles of similarity, also referred to as echoes
in street photography, and repetition, also
referred to as rhythm. And as visual rhythm. It's essentially opposite
to visual noise. They're similar. And I didn't
want to repeat myself. I'll teach you these two
principles together. But before we dive into examples
of these two principles, I want to introduce you
to your brain filter. Maybe grab a cup
of tea for this. Did you know we are
actually being bombarded by millions of bits of sensory
information every second. The reason I heads
don't explode is because our brains are
actually supercomputers. We have a filter called the reticular activating
system, or RAS. This filter is basically
a bunch of nerves that live at your brainstem. Your RAS is like a gatekeeping
superhero relentlessly battling with the crazy
volume of sights, smells, sounds, flavors, and sensations that we are
constantly being subjected to. Only letting a very
small percentage of information through
to our consciousness. The rest is either deleted
or processed subconsciously. So how does the Ras decide
what information to filter? What information should get through to our conscious minds. Well, think of it as
your personal assistant. Your *** is designed to please you to show you not only
what you believe to be true, but what you want to see. It will show you things that you've had your
attention drawn to. Such as e.g. your friend has
been talking about a particular movie or book, and then you start seeing
reference to it everywhere. That's your RAS. The beauty of this is you can
use it to your advantage. You can give it a task and ask it to find
something specific. It's your own personal
algorithm and you can train it. So you can do this when you're out doing street photography. Choose one idea. Remember how I talked about the importance of ideas
and less than one. And let your RAS lose. Your eyes will churn
and you will start to see that idea everywhere. Sometimes it takes
a few minutes, sometimes an hour,
sometimes the day. But it will happen. This is not witchcraft. It's neuroscience. The more you practice, the longer the effect will last, and it becomes part
of your programming. In other words, over time, when you are consciously
photographing one idea, it becomes subconscious
and becomes a trigger. You can test it out next
time you go out with your camera or
without your camera. Choose one idea around knee. It could be a color, it could be hats, it
could be gestures. And just stay very
focused on that. And you will start seeing
those things everywhere. Whatever you're photographing
is thanks to ideas, both from your
conscious attention and from subconscious
programming. So every experience you've
ever had is stored. And that also means every
photograph you have ever seen is stashed somewhere
deep in your mind. When you find yourself reacting
to what's in front view, you are actually tapping
into that pool of pictures without
even knowing it. Being inspired by images
you saw and forgot about. In short, your brain
mirrors back to you, evidence of what you feed it. Faded ideas. So let's go back to
the principles of similarity and repetition and how we can create connections
using these two principles. Let's take a look
at some examples. This one was handed
to me on a plate. Got identical shoes
and matching strides. There's always
worth looking down when you're out taking photos. Right here. The women have
matching hairstyles, earrings, hair accessories, and they're both looking
in the same direction. It actually doesn't
matter that we can't see the face of
the second woman. Because our brains
have probably already decided it will look similar to. So we don't even need to
show it. In this example. The similarity is
the yellow flowers. Even though they're
different flowers, they're yellow flowers. They're creating an
overall pattern. And so your brain is
actually connecting both the yellowness
and the flower nurse, but also, but it's also
connecting pattern, the pattern. Now here there are lots
of connecting elements. There's the connection
between yellow and yellow, red and red between vertical
lines, diagonal lines. Also, the shadow being on a diagonal matching the
diagonal of the mop. When we have more
than two elements that are similar to one another, we start to get
repetition creating a pattern like here with
the three matching shirts. Three matching has styles, three matching sunglasses
and three matching smiles. Here with the matching outfits. But while the outfits and matching the legs
themselves are not, they're all doing
something different. But that's cool.
And we can break similarity and repetition by
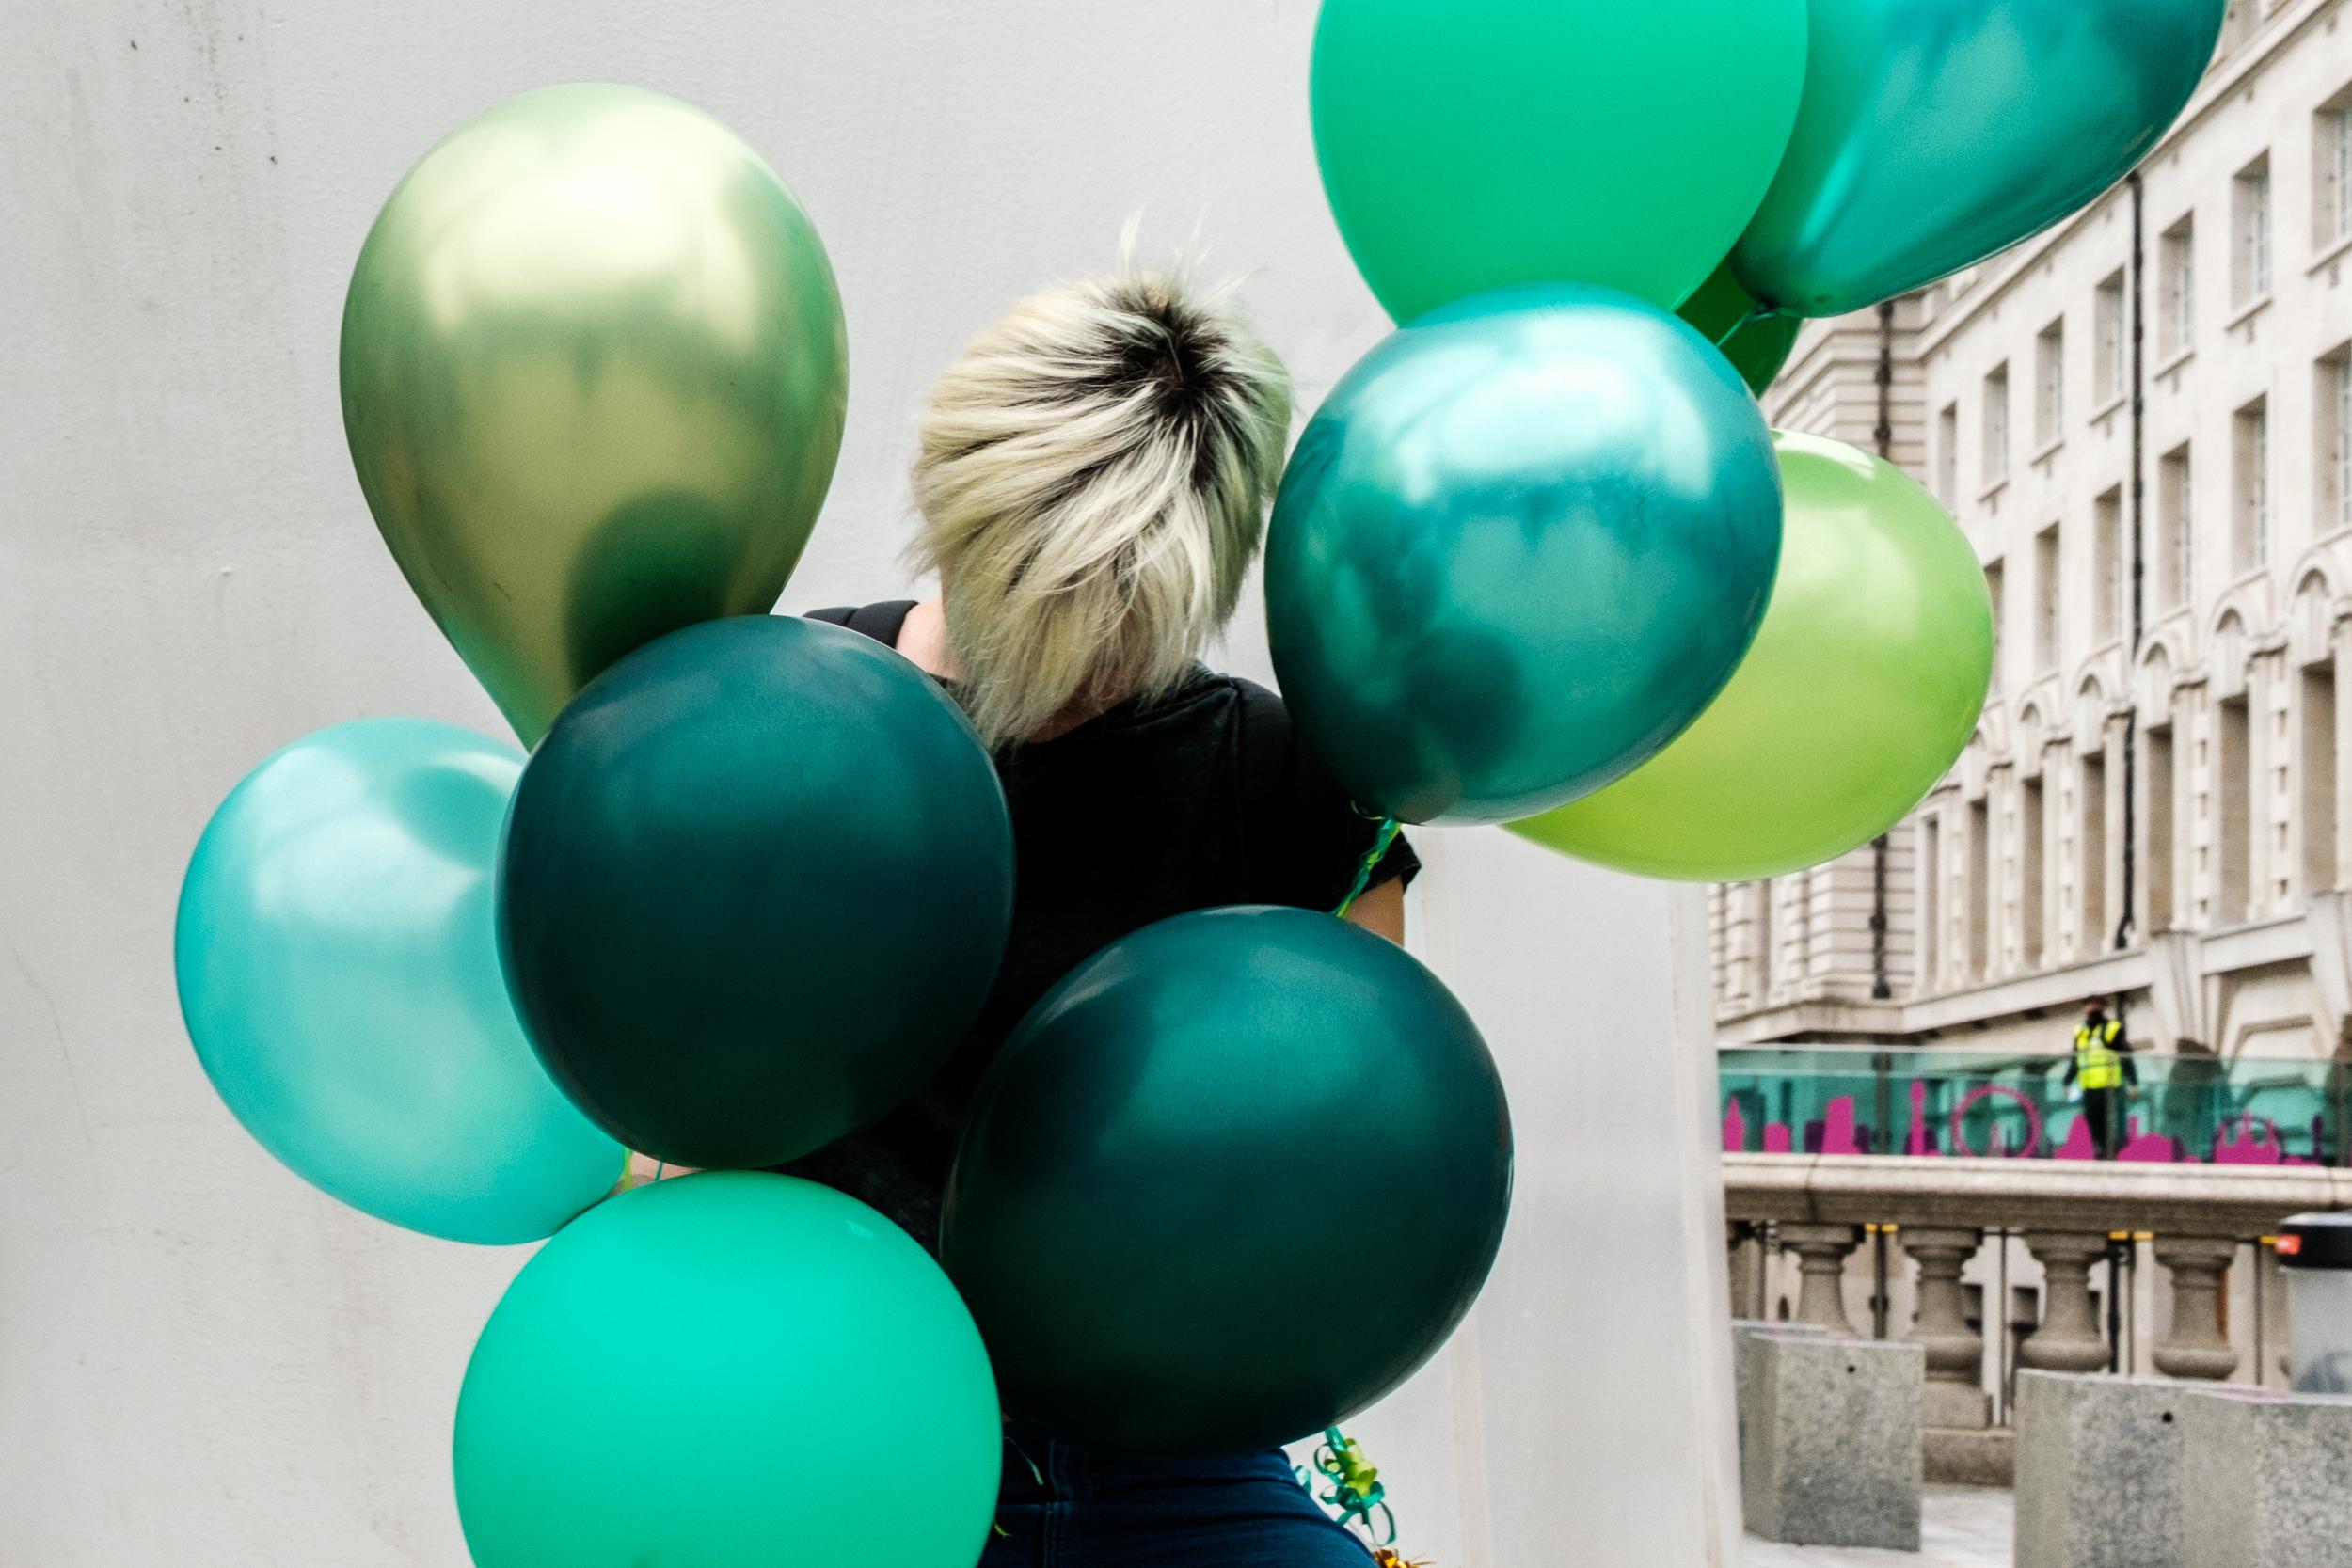
including an odd one out. Such as hair with these
gorgeous green balloons, where you can find this one Harry balloon
that's not green. And here we have the
repetition of stance, the similarity of color
and of shoe style. But we've got horse,
horse, woman, with the woman of course, being the odd one out. To summarize, you can train
your brain filter like an algorithm and use it consciously to find
things for you. By looking for
similar things and multiples of similar things,
creating repetition. You are creating very strong
connections in your frame. And you can play with
breaking repetition by adding an odd one out. In your fourth assignment. I want you to tune your eyes to start seeing similar things. Start easy by just
looking for colors that are similar or
motifs that are similar, such as the yellow flowers, or similar looking people can make it a little bit
harder for yourself. If you start looking
for multiple similar things or people, and then make it really difficult and try and
spot an odd one out. Remember to have fun shooting. And I'll see you in
the next lesson. The magic of the triangle, which is the
principle of closure.
6. The Principle of Closure: In the previous lesson, we've talked about creating connections using similarity and repetition of things such as
color, clothing or motifs. In this lesson, we're
going to take that to another level by
starting to think about where these similar
elements are positioned in order to keep the viewer's
eye in the frame. Take a look at this
picture first. Everyone is nicely
separated and we have the similarity and
repetition of the umbrellas. But everyone is align pretty much with their heads being level at the same height. This means the journey the
viewer's eye will take is in a straight line and
straight out of the frame. That's not to say
this is a bad photo. It just means you look
at each person in turn. And then you're done. In order to keep
the viewer's eye in the frame for as
long as possible. You can use shapes. And if you remember from lesson
two that one of the ways our brains organized
visual information is by using shapes, rail shapes such as
geometric shapes and frames, but also perceive shapes
such as the green notes in this picture that make a
triangle when you join them. This is called the
principle of closure. Because the position of
the green notes closes the shape and keeps the eyes circling around the
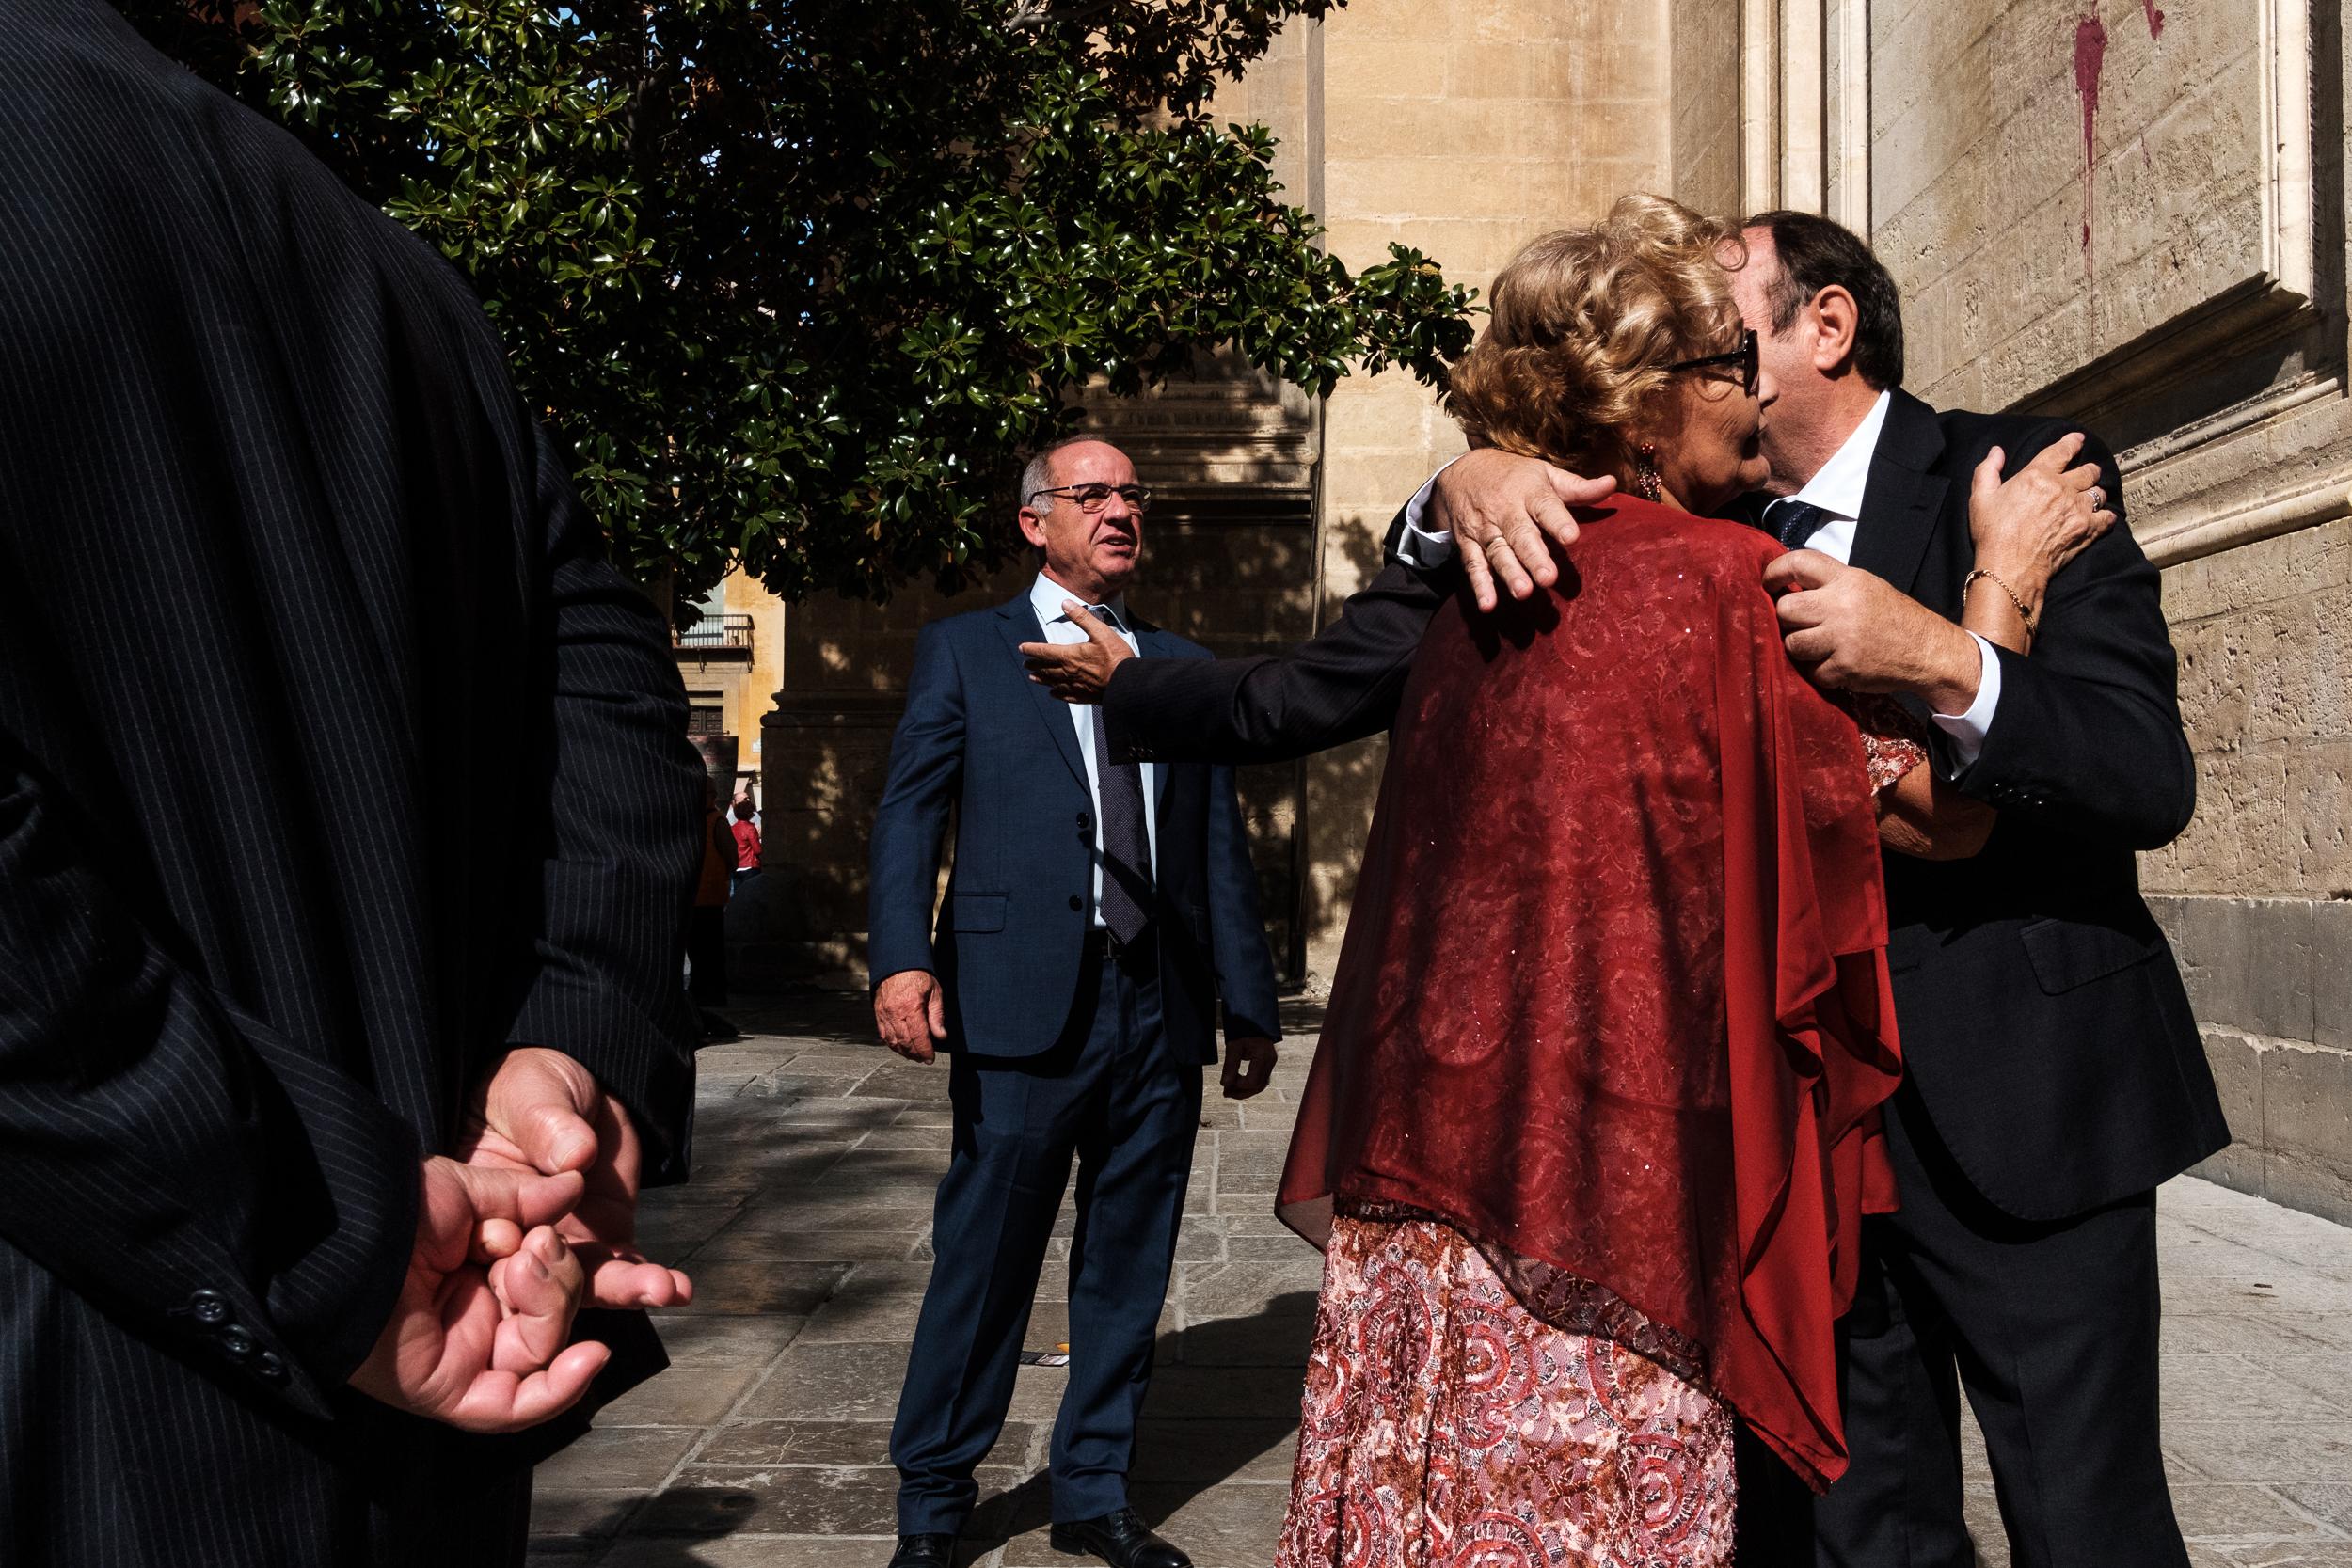
frame or triangulating. But that's not a word. Now in this image, we have four people. I'm first of all, I
should point out that they all have bits of
blue in their outfits. There are lots of patterns
that are different, but because they're
all patterned in the same color palette, they essentially
match one another. So there's lots
of similarity and repetition going on
in the image already. But let's look at the
arrangement of the four people. If you were to draw lines
between their heads, you start to create triangles. Similarly, in this image, if you draw lines between
the three people's heads, you create a triangle. But you can also
draw lines between the trees to get
another triangle. So you can think of this in
terms of the principles of repetition and similarity that we covered in the
previous lesson. You have three heads
and three trees. With the crowns, we have
even more triangles. Now I know what you're thinking. How do I say triangles when
I'm trying to think of the street as theatre,
apply Gestalt principles, especially making
sure everyone is separated and capture
fleeting moment. At the start of the course,
I promised you a cheat code. So here it is. Just avoid a straight
line between heads. That's all you need
to keep an eye on. Make sure all the heads
are in different levels. So our zigzagging between them, think of it like drawing
a mountain range. Will automatically be creating triangles without having to see each individual triangle and you will have
achieved closure. Let's now take a quick
look at the golden spiral, the most elusive of
composition tools. And to be honest, I think this is actually a
very intuitive way of composing based on an
understanding of composition. In general. It's usually afterwards
that you'd think, hey, I got the golden spiral. But really all it is is
a bunch of triangles. They do also make some kind of 3D geometric
shape their right. Essentially getting
a shot like this is not to even think about
the golden spiral. Instead, focus on everyone, on each different layer, the background, the mid
ground, and the foreground. And then reposition yourself whenever you need
two separate phases. Repositioning yourself
could literally be by leaning an
inch to the left. Also, you just need
to keep an eye on not having too much space
between clusters of people so that
you can keep them as one group due to
their proximity. Finally, let's look
at this photograph. And this time I'm not going
to draw a yellow lines on it. Just take a look for a few
seconds to see if you can see which Gestalt principles
have been used here. Pause the video for a moment
if you need to. Okay. So the main Gestalt principles
at play in this photograph include the principles of similarity and repetition
of hand gestures. The principle of closure. Because you can see hands
are forming triangles. The principle of similarity
of the color red. And you can see
that in the dress, the person in the
far background, and the paint on the wall. And the principle of closure of the color red because
it's forming a triangle. So how many did you get? Did I miss anything? To summarize? If you photograph people at the same height in
a straight line, the views I will
leave the frame. Creating perceived geometric
shapes such as the triangle, will keep the viewer's eyes
circling the photograph. You can easily start creating triangles by
thinking in terms of zigzags and mountain ranges
of heads or other elements. So your assignment
is to find and photograph at least
one triangle. Start easy with a
triangle of color. Up the challenge to photograph at least three people and connect them in
any way that you want. Then to make it
more challenging, head into a crowded place
and see if you can get more than three people
and create triangles. Just remember, mountain range. Remember to have fun shooting. And I'll see you in
the next lesson. I'm going to show
you how to create a dimensional illusions using the principle of continuity and some street photography
without people. See you then.
7. Two-Dimensional Seeing: In this final lesson
of the course, I'm going to introduce you to the most challenging of
the Gestalt principles. The principle of continuity, often referred to as coincidence
in street photography. So brace yourself. Principle of
continuity is that if one thing is placed in
line with another thing, than our brain will join
them up and make them one. So this principle is
actually a warning. However, in street photography, this principle is played with the idea is to line up
unconnected things. Does in fact anti separation, because you want things to
blend with one another. This is all about
seeing a 3D world. In 2D. You have to be
able to ignore 3D depth. Think of it as flattening. Think of it as background
and foreground. Being on the same ground. Probably best if I show
you some pictures. And I recommend practicing
this without people to begin with doing some simple
lining up such as hair. The metal structure
in the midground is lined up with the
forehead of the mural, the woman in the foreground. This is very
deliberate lining up. Here. I spent a little while at this window playing with
different reflection overlays. And after a little bit
of experimentation, I managed to create a
continuity of the hand of the poster on the ledge of
the reflected building. And likewise, the other hand of the poster leaning
against the building. So you can see it's creating
this kind of illusion. In this example, I
took my time lining up the building in the background with the structure
in the foreground, while simultaneously framing the dome
within the structure. So you can see I've been
flattening a 3D world into 2D. And the images have a subtly surreal quality to them because of the way our brains
are making sense of them. So once you've
practiced lining of buildings and murals
and reflections, you'll start to see this
way more naturally. But that can be an adjustment period for this longer than there is for
the other principles. Because it is really challenging the way
that we see the world. So just keep practicing and
then move on to people. Like here. Somehow the stripes lined up. I thought it was a
fluke when it happened. And you could argue
it is a fluke, but is anything really a fluke? Perhaps when things like this happens seemingly by accident, is because our RAS, remember your
magnificent brain filter has gone through the
filing system of sensory information
in your brain in less than a split
second and knows exactly when to nudge
you to hit the shutter. Just something to ponder on. This, however, was entirely deliberate because I've trained my brain to compress dimensions. I saw the opportunity when I noticed the umbrellas
could look like wings. Initially, I was drawn to her
because of her red dress. So to create the
illusion of wings, I had to work
pretty hard to keep lining things up as
I walked behind her. And this is another deliberate
play with continuity. And I must admit, I was
really surprised to see that this woman was dressed
exactly like the building. And I'm not sure
she even realized, I got the idea to try and line her up to create this image. I had to make a lot
of calculations in my mind to figure out where I need it to be relative to her and what height my
camera needed to be at. It was actually a very
tense few seconds. To summarize. You can create visually
intriguing images by deliberately
compressing dimensions. Practice first by
lining things up using inanimate objects,
structures, and buildings. Once you see the world in 2D, you can get creative by merging people with
their backgrounds. And so your final
assignment is to go out, find an photograph,
anything that lines up. Start easy with the building in the background and something
in the foreground. Make it a little bit harder by overlaying reflected
elements in glass. And then make it
extra challenging by lining people up with
background objects. And that's it. That's
the end of the course. Thank you so much for
getting this far. I hope you've enjoyed it
and learned something new that you can add to
your photography tool kit. There's a PDF with a summary of all the assignments
for you to download and links to some other resources
on there as well. Thanks again and happy shooting.
 Polly Rusyn, Street Photographer