Transcripts
1. Intro: Hey, everyone, Glad you could join. Welcome. Welcome to My very first class of lingerie making for beginners. I am Valeria I'm a textile designer based in Mexico City. I currently work as a surface pattern designer in a Mexican home decor brand and on the side, I'm a very passionate "do it yourself" maker, So I've being doing my own lingerie for about a year now, and it's been really fun and really rewarding, So I'm hoping I can show that to you. So you gain the trust and confidence to pursue lingerie to our first lesson Is the bikini brief, the pattern I am providing below in the class project section. So I'm gonna take you step by step in the understanding and making of this pattern. Also the cutting and the sewing while giving you some cool tricks and hacks for sewing your stretchy An elastic fabrics. And getting to know the world of lingerie for future projects, so grab your materials, grab your creativity. Let's get going on. We'll have fun
2. Class Project: our class project is going to be this bikini knicker sewn with a regular machine. No serger needed. And I also wanted to show you some other pieces I've made. Some are modifications from this same pattern, and some other are completely different patterns which we can see in future classes. And just to show you and remind you that all fabrics are different. So the more you use, the more iterations you make. You're going to make completely different garments, so don't be afraid to mix it up a little bit.
3. Supplies & Tools: now here are our supplies for our project. We're going to use the pattern which I'm gonna show how to print next Scissors, both for fabric and for paper, Tissue paper, rulers, maybe a pencil and an eraser, if you need it, measuring tape, thread, seam ripper and pins. I do recommend having all of these and your choice of fabric and elastic.
4. All About The Sewing Pattern: Okay, so first of all, we're going to print our pattern. So go to your project section right here in this class. Click on the bikini knicker pattern and you'll get an image like this. The preview of our pattern, you can download it or you can go straight to printing. Please make sure that this is in 100% And do not click the adjust to page. Because if you adjusted to the printing area, it's gonna change the scale of the pattern and it's gonna turn wrong size. So if you want to make sure that you printed it the right size, I put these little square, 1 cm Square here so you can download it and then make sure, in real life with an actual ruler that this is 1 cm - if it is, then you're good to go. So let's print it and let's start. So this is what Your printed pattern should look like. Now what I'm gonna do, is cut this side So these two lines match together, I'm gonna show you. - So here it is, our printed and pasted pattern. It is made out of 3 fundamental pieces. The front, the gusse,t and the back. What I really recommend, this is my tip for you. Is to always retrace your patterns, every single one of them. This way, it's gonna be easier to pin down to the fabric. The tissue paper, and the original bond printed one you're going to keep for future projects, to make other sizes for friends or family or modifications on your own size. So I like to trace my patterns with my free hand. But if you feel more comfortable doing it so with the rulers, it's also okay. Now lingerie has negative seam allowances. This means that the garment is smaller. So when you put it on, it stretches and fits just right. So just trace as it is, and it's gonna fit perfectly. I've already traced mine. So you're gonna end up with something like this. The front piece, the back and the gusset, another tip of mine. It's to always label your patterns. You can include the model, this size, and which piece you're working on, and these three little XXX that are so important, which means that your pattern must be folded right down that middle. As you can see, our pattern. It's half of the final product, these way. If you fold it right down the middle, you're gonna have a perfectly symmetrical piece. And you only do that one cut, which is really helpful for the time. So as long as you see those XXX, please remember to fold your fabric right down the middle.
5. What About Stretch?: Now, before cutting our pieces, we're gonna learn how to recognize. Stretch. So these one right here, it's a rigid fabric. Non stretchable. See how I'm trying to stretch it? And it won't? Now. This is a 2 way stretch fabric. See how it stretches a lot from the side? But from this side, not so much So, This is a one side stretch, 2 side stretch. And this is a four way stretch. This is what we're looking for, it has stretch from the side. And from this side. See?, this is a one way, 2 way. Three way, four way stretch. This is what we're looking for.
6. Cutting The Fabric: So, What we should know to place our pattern pieces before in the fabric. It's to take account on these little guy right here. These arrow means that the fabric should stretch the most in these directions. So make your tests, this one stretches, but these one really stretches, so I'm gonna cut my pattern this way. See? this is because this arrow, is in the direction of how the fabric is gonna hug your body because it's in the hip - It needs more movement, ergo more stretch. So I'm gonna place my pieces, but I'm gonna show you, This is a perfectly square, cut square. But I'm gonna use this sides, see? This would not be ideal for some projects, but it's ideal for lingerie. And that's what I love most about lingerie, that you can actually use certain scraps of fabric and you can make anything work. So I'm gonna place mine, and I'm gonna show you. I always like to start pinning down from the edges so it's easier for me to not stretch the fabric or make any wrinkles on it. This way. - I'm gonna cut the front piece. And if you've never cut a pattern before. Just cut it as close to the paper pattern as you can. It's okay. If you make mistakes, we can correct them. It's no big deal. And I'm gonna also cut the other one in a fast motion mode. - - Now, for the gusset I'm gonna actually use the two way stretch fabric that I showed you earlier. This is a great fabric, and it actually gives more stability to the whole piece. So if you find these kind, it's gonna work really good. But if you have a - 4 way stretch fabric that it's, - 100% cotton that's the best tip I can give you, is to always use cotton on the gusset What I also really like about lingerie it is that you can actually use the waste of other projects in the fabric, you know, thes kind of little pieces. And, It actually, because it's so tiny, can work in the most weird places. I can assure you, - by the way, I cut this piece with the stretch. You see the arrow, the stretch. So now we have all of our pieces, we have the cotton gusset, the front, and the back. So cut your pieces and up next we will be putting everything together
7. Putting It All Together: Now that we have our pieces cut, we have a front, a back and the gusset. How can you tell them apart? The front is longer and narrower, while the back part is wider and shorter. I like this example because, as you can see, my fabric has a nice outside view and an inside view. So place your fabric with the inside, meaning the piece you don't want to show on the outside, facing you now for the gusset As you can see, this is also wider. So it fits right here. Now, place your pieces like this, now for the gusset - We will just flip it, and front with front outside with outside Go together - And this right here is what you'll pin down, See? - Now, this seam is gonna be on the inside of our underwear so it won't bother us. See? So I'm gonna sew it and show it. So before sewing, I want to show you which stitches were going to use. The 1st one is the regular straight stitch. The 2nd one would be the zig zag stitch, which has this symbol And the 3rd one is an alternative I use for the serger, so it does a stitch around the piece - - And for me, is the number 20, its this symbol and it has to be stretchable. So make your test on your machine. Find out the one that you want to use, or if you need help, hit me up so I can help you. So let's start stitching.
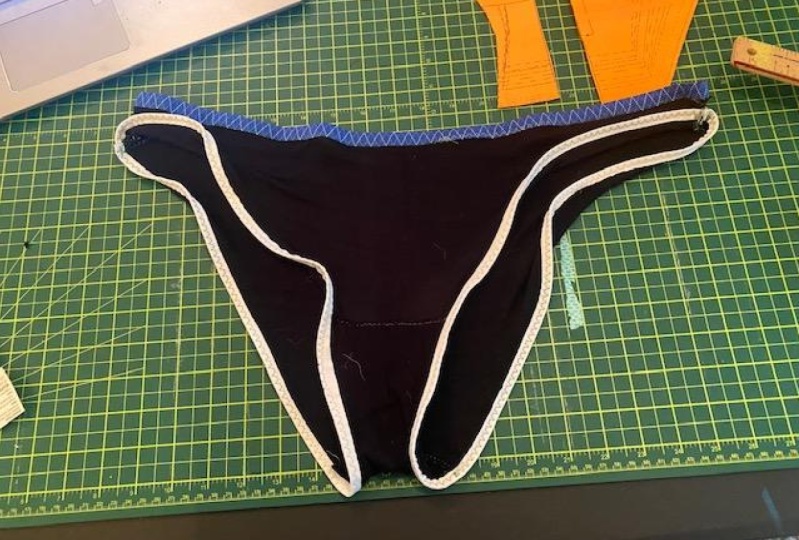
8. The Gusset: Okay, so now we're gonna sew our gusset to other parts of our bikini and with the straight sich first, both bottom and top white thread. Now, place it as closely as you can to the edge, as close as a needle as you can get. - I like to give it to manual stitches first, just a couple of them, just to get the thread right in the stitch. And then I pull. I really wanna emphasize how important it is to pull your threads to the back. If you do this, the stretchy fabric, it's going to be a lot easier to handle because sometimes because it's stretchy, it won't go through the foot as easily as some rigid fabric. So if you pull, your forcing it to do as you say, and to just continue the stitches, it's really gonna help. So keep your threads in the back a little bit longer for this. - Then I always do another stitch, so the needle pulls the fabric, remove the other pain and go. We're going to the same with this one, needle down, removed pin. - - I always like to remove all of the threads, Not just that the end. As you can see, we now have our sewn piece together, so you can see how the inside of the seam is right here - And as I opened the underwear, let me show you. Here is the open seam, so flip your gusset so it ends up inside. You need the bridge to be in the same side as the front piece, as in the original set up I showed you. Now I like to do an extra straight stitch on top of the seam, because I think it gives it a more detailed finish - - So this is optional. You don't have to do it, but I think it adds up to the final product. So the same. A couple of stitches manually. - I think it gives a more finished look, more polished one. So here's our first sewing session. We're going to do the finish of the top part of the gusset. - I'm going to the this with the number 20 stitch that I showed you earlier. The alternative to the serger. So just the gusset alone again, Hold your threads in the back, do a couple of stitches, and without stretching, be very careful because its gonna end up huge if you start stretching this part. So just lay it as flat as you can, and even push it up to the to the stitch a little if you can - - See? This is our finishing, let's move to the next lesson, to add the elastic.
9. Elastic In Legs: so, now that we have our 3 pieces together We're starting to see how are bikini comes to life, Now the next thing it's putting the elastic that goes next to our legs. See this black elastic right here? We're gonna sew it, right here, through all these 2 sides. So what I'm choosing for this beauty is this black elastic bias. - And as you can see, it has a different kind of weaving in the middle. So it's easier to fold down and use like a normal bias. So I'm gonna sew it all over here ,and also in the other side. So let's go to the sewing machine. So now for the elastic bias we're going to Sew these little fella, with the zig zag stitch so now we'll fold it in the middle and put it down our sewing machine foot presser And remember, do a couple of stitches first mannually, so you can see how wide it's the stitch. If it's too small, it's gonna be difficult to sew all the fabric and if it's too wide, it's gonna show on the fabric. So it has to be just the size of the bias. these way It will do exactly as I say and stay folded. I won't have to battle with it while I'm introducing the fabric. - - We're going to start with the back part. See here just with one of the sides. - Remember the top. Is going with another elastic. So this side right here, is for the leg - So we'll start putting these one down. Now, do a stitch manually. So your needle, is down and it helps you once you unpress the foot and put your fabric inside of the bias, just like this. And wrap it. Now for the first stitches for the first, like two centimeters. I don't like to stretch my bias because I like to just, - get hold of the things first and put my fabric correctly, and then I'll start stretching. I like to push it right to where the needle is. So the next stage is with the fabric inside of the bias. - Now, fold it, press down and We'll start stitching. - Always check that your fabric is inside of the bias. And now, after a couple of them, I like to stretch just a little. The more you stretch, the tighter you. It will get once it has no pressure. So please don't stretch that much because it's gonna show on your skin, like too tight, so just tight enough So it hugs firmly all of your body. See? this is how how I'm going to stretch just to make it lay flat. These depends on the material and how you like it with this stretch. But I really don't recommend it's too much of a stretch, because again, it's gonna show and it won't be comfortable, so just a little bit. So it lays perfectly flat and you start then sewn again - Pay close attention in this area, where the gusset it's gonna start taking part. And now you'll have 2 fabrics not just one. So pay special attention. So the bias covers both of them and continue. - We will continue doing this sewing both curves from corner to corner. So I already did mine. Let me show you. Now we have our elastic sewn This is our alternative for the serger. This is our double stitch, and it continues right through here. Now are beautiful bikini, starting to come to life!
10. Elastic In Hips: now that we have this We are only going to sew one side of it, just one. So I'm gonna choose this one, and be really careful to always create a straight line from these two sides because this is going straight to your body. And visually, it's nicer to have a completely straight line, than it is to have something like this, you know? So my tip for you Is to start sewing. Always remember, front with front. So the stitches are on the inside, the seam Start stitching with a straight stitch right here, the closest you can to the edge. And this way You can control your stitch better because this is, like, more rigid. And, so this is what we're going to do. And then we're gonna do the alternative to the serger, like again another stitch. So these will be very, very well sewn. Let's go. - The cool thing about lingerie is that you can stretch a little bit, so this will completely match the other side. - Now, get rid of all the extra material like that. And then, with the alternative to the serger, redo this stitch. - Now we have these alternative to the serger stitch. A complete straight line, and our first side sewn together. I hope you're excited, as I am to have our final product ready. - As you can see we've sewn this side, and now this is still open. So why is that? Because we're gonna sew up next, our top elastic, the one that is going around our waist. I chose this gorgeous elastic lace, - And the thing is that it's easier to sew along a line - - than it would be a closed circle. If this were closed, then it would be complicated to start sewing inside. See? So the line is easier Now, I'm gonna sew it and we will be almost ready. Now, As you can see, I have a black on top, which is gonna go like this into the machine so the top thread is gonna be black. But on the back, it would really need the white one. So attention to detail you guys. So I'm gonna change my bottom to white. - I'm going to start with a couple of manual stitches - As always, and please remember, these also depends on the kind of material this one it's really soft and has a lot of stretch. So I'm gonna pull it a little bit more and remember to never stretch the fabric, just the elastics. Another tip I want to share with you. Is to always check What are you sewing on - It doesn't matter if you do it slowly at first, but please unpress every once in a while the foot - - And check if you're sewing both the elastic and the fabric because it's really disappointing to end the sewing to only realize that there are some spots where you didn't sew the elastic to the fabric together. So just take your time. Enjoy your sewing and check, check, check! - - - - - Okay guys! Here it is, our almost final moment. Just one stitch left on this side and we'll have our bikini ready. We will do the exact same as we did with the previous side seam A row of straight stitches first - and then cover the seam allowance with the alternative to the Overlock stitch. - - So here it is guys! our final and completely done bikini bottom, as you can see, and I would like to show you. I sewed mine with a white thread in this piece and black thread through these piece. I do believe successes is in the details. So I really recommend you do this kind of thing because it adds up a lot of luxury and craftsmanship to your final product. So here it is. I hope you enjoyed this as much as I did. Can't wait to see your final product. So here up next, my final recap.
11. Final Recap: here I leave you with my final recap for you to read at your pace. Thank you very much for watching. I hope you had us much fun as I did filming and sewing this. all feedback is greatly appreciated. And I would love to see what you create in the project section below. So if you'd like to share your process and final undie, I will gladly receive it. Thank you again - Any question or comment, feel free to reach out in here or on my Instagram. Let's keep learning and upgrading our skills. See you soon.
 Valeria Carrandi, Textile designer & pattern maker