Transcripts
1. Introduction: Hey guys, Welcome along to this asana productivity course. My name is fewer goad, and over the last five
years I've been running my two core businesses
directly from home. During this five-year journey, I've learned how to create simple systems to not only
better manage my time, that actually how
to multiply my time by leveraging technology
like Asana and also productivity strategies
that I've picked up from influential individuals
like Stephen Covey, James Clear, Rory Vaden, Darren Hardy, and others. Within this practical
productivity course, I'm excited to share how you
can effectively use Asana, which is a free all in one task management platform to create more time
and to organize your life while also
feeling accomplished in your personal and professional
day-to-day activities. My goal for this
course is to help you achieve real productivity
with Asana by sharing how I use Asana and keep productivity strategies
to organize my life. Now, don't worry, I'm going to present this class
in a way that is actionable for everyone and
in a way that anyone can follow along and use based on your own personal situation. Okay, so with that
introduction out the way, let's go ahead and
get started with this asana productivity course. I hope you enjoyed the class.
2. Creating Your Asana Account: Okay, so first what we
need to do is create a fresh Asana account
to organize our life. Now before we do that,
the reason we want to leverage tools like
Asana is because these tools allow us
to create systems and solid habits by making the process fun,
easy, and enjoyable. Now, while I walk you through how to organize your
life with Asana, I'm excited to share
actionable strategies that you can use to
feel more satisfied, motivated and accomplished, and all your daily activities. Okay, so with that
out of the way, let's go ahead and dive into my computer and get
started with Asana. Okay, so to sign up
with a signer for free, simply hit over to your
browser and type in Asana.com. And that's going to take
you to this webpage. Then simply navigate
down to get started. Then navigate up here and
add your e-mail address. Then once you've
added your email, come down and click Sign Up. Here you have the option to continue with Google if you have a Google account or you can come down and if you don't want
to continue with Google, complete your sign-up through
the email we've seen to your e-mail address for the
purpose of this asana course, I'm going to hit over to my email inbox and locate
the verification e-mail. Once you've located the
verification e-mail and your email inbox, go ahead and click
Verify E-mail address. You just need to simply add your full name and
add a password. Then once you've added
your name and password, go ahead and click Continue. Here, asana is going to
ask what kind of work that we do and what do we
want to use Asana for? However, because we're
going to use Asana to organize every area of our life. What we want to do
is navigate up here, click on the type of work and
navigate all the way down to the bottom and select
general project management. Because essentially
what we're doing is becoming the project manager, the project architect
of our life, essentially, so we can better organize our day
to day activities. So go ahead and select
here, then click Continue. Then here asana is
going to ask what our main objective is
for using Asana for us, what we want to do is select a personal task management organized to-dos and
plan out my workday. So go ahead and select
personal task management. And shortly what
we're gonna do is navigate through
the structure and the design of a signer so that you can better
organize your life. It come down and click Continue. Now here we're given the
option to add our first tasks. Think about tasks as
important jobs, activities, and habits that
you do on a daily, weekly, or monthly basis. However, what we're
gonna do is skip this part because what
I'm going to do is show you how to add tasks once
we've arrived inside Asana. So go ahead and click Continue. Here we have the option
to choose how we want to view and organize our tasks. Again, I'm going to show you
how to do this inside Asana. So go ahead and click Continue. Now because Asana is a
project management software, you can also invite individuals
to collaborate with you. However, today, because
we're just using a salad to organize our life, we do not need other people
to join us on Asana. So go ahead and click Continue. And like I've mentioned, asana is a free software that you can use to
organize your life. You can also access a Santa across different devices on iOS, android, or on desktop. Now that you've
created an account, I recommend that you download the app onto your
phone so that you can seamlessly manage and organize all your day-to-day
activities across devices. Okay, so once you've
signed up to Asana and you've downloaded
the app onto your phone. Go ahead and click Skip for now. And congratulations,
Just like that you've completed sitting up
your Asana account. Now if we navigate up to
the top right-hand corner, you'll notice that you're
currently on a 30-day trial. However, after the 30 days, you'll be downgraded to a free plan and everything
that we're going to cover in this
online course to help you organize your
life with Asana, you can do with the free plan. Okay, so now that
we've completed this lesson for
signing up to Asana, we can now move into
the next lesson, which is all about understanding
your Asana account.
3. Understanding Asana for Productivity: Okay, So after completing
the initial sign-up, you will have arrived
inside your Asana account. Now one of the main reasons I love to use Asana to organize every aspect of my life is because of the concept
habit tracking. Did you know that the
most effective form of motivation is progress? And Asana makes
progress easy with habit tracking by making
activities obvious, a visual representation of what needs to be completed
also assign a makes habit tracking
attractive by allowing us to see
visual progress. And finally, Asana makes habit tracking satisfying
by allowing us to take off or cross off all our daily activities
or our to-do list. And let's becomes a form of
a repeated rewarded for us. And don't worry, I'll dive
deeper into examples of habit tracking as we
learned further into Asana. Okay, so here we are
inside our Asana account. We've completed the sign-up. Now it's important to understand
the structure of Asana. We can organize our life now as Santa is broken down
into workspace. And if we navigate over
to the left-hand side, you can find your
workspace over here. Then within your workspace we have projects, and
as you can see, we have a default project
over here that was created when we
signed up with Asana. And for the purpose and
simplicity of this online course, what we're gonna do
is name our project. The project we're
going to use in this online course
Is My Life project. We're gonna keep referencing
back to my life project. However you can call your
project anything that you like. And this project
is used to manage all your activities,
habits, tasks, everything that you
do on a day to day, week to week or month
to month basis. And we'll talk more
about that shortly. Then within your projects,
you have sections. As you can see, we have a
default section up here. We've got another
default section here and another one down here. And these sections are used
to categorize your tasks. Within this section up here, new tasks, you can see
that we have it to tasks. And like I mentioned, the task can be anything
from activities, habits, jobs, anything
that you need to complete. And then within tasks, you also have xs, two sub-tasks. And these are basically
tasks within tasks. So essentially what we're gonna do in this course
is show you how to create your own project and then manage your day to day, week to week or
month to month tasks so that you can better
organize your life. And again, we'll talk more about the structure of a
signer as I walk you through the process
of ECI creating and structuring Asana to
organize your life. Okay, so now that we understand the basic structure of Asana, what we're gonna do
is navigate over to our first project over here. Remember this is the
project that was created by default when we created
our Asana account. Okay, so what we want
to do is work from a completely fresh
account, a blank canvas. To do that, what we're
gonna do is navigate over through the three dots
next to this project. And click here and then navigate
down to delete projects. And then simply click Delete. Just like that, we've deleted our default projects and now
we can start from scratch. And that is it for this
lesson aimed at helping you understand the
structure of Asana, The next lesson is
about customizing your first project and using this project to
organize your life.
4. Create ‘My Life Project’ & Organise Sections: Okay, so now we're going
to organize your life by first creating a
project inside Asana. And remember, we're
going to call this project my life project. Now you can actually organize
all the different areas of your life by creating
multiple projects. However, I personally
find it easier to manage all your personal and professional
activities together in one project rather than jumping between
multiple projects. And by creating one project, you can simply structure all your different tasks
under specific sections. And this is exactly
what I'm gonna show you how to do right now. Here we are back inside
our Asana account. Now if I navigate over
to the left-hand side, you can see that I
have home selected. Now if I navigate down the
left-hand side and locate, create a project, this is where we can create
our first project. So go ahead and click
create a project. Then what we want to
do is go ahead and create a project from scratch. Go ahead and click
Blank project. Then go ahead and
name your project. Remember for the purpose
of this assignment course, we're going to name our
project, my life project. Because what we want to
do is organize our life by creating a project
within Asana. However, if you don't
like the name of this project for
managing your life, then you can always change this to anything that you like. Then simply navigate up to
privacy and click here. This is where we have the option to make our project public to our workspace or private
to project members only. Now if you're the
only one using Asana, it doesn't really
matter which of these options you select. However, if you have multiple projects that
you're managing within Asana and you've invited other people to
join you on Asana, then I recommend clicking
private to project members. And that way only you
can view this project. Then down here we
have options to how we want to view our project. We're gonna keep lists
selected for now, then come down and
click Continue. Then go ahead and
select goto project. Congratulations, Just
like that you've created your first project. Now think about this project, my life project as a
productive environment. Now your environment
is where you spend your attention, your time. It could be online or offline. For example, if you're
on holiday and you're spending time with
friends and family, Vin, you're probably not
gonna be productive because you're in a
relaxed environment. Or if you're at the gym
and you're working out, then you're in an
environment that influences you to work out. Or for example, if you're
at work in the office, this work environment will have a strong influence on you
for getting work done. So think about Asana, especially this project as an online productive
environment that has a strong influence
on your productivity. Basically, by using Asana
to organize our life, we're creating a
productive environment. And this is the foundation for
helping us stay motivated, getting tasks done,
feeling accomplished, and simply just
showing up every day. And this is a strategy I cannot emphasize enough to
maximize your productivity. Remember, the environment has a strong influence on
your productivity. Okay, so now what we
need to do is group or bulk similar activities
using sections. And what this is going to do
is reduce the time friction of jumping between
completely different tasks. So what we're gonna do is simply navigate up to Ed section. The first section that
I want to create within my life project is my workouts. This section here is
going to be used to group all our weekly workouts. Example going on walks, runs or hitting to the gym, or hitting to yoga or Pilates. This will vary between
everyone and this section here is all about creating healthy
habits for working out. Then think about other
activities that you do on a given day,
week, or month. For example, for me, that is replying to emails. I reply to emails every
morning and evening. So the next section for me is going to be called my e-mails. And I'm going to talk
about how to create customized and group tasks within each section
in the next lesson, okay, so now I've
added two sections. I'm going to navigate down
here and add another section. This section is going to
be called my social media. The purpose of this
section is to manage all my activities in
regards to social media. And this is part of my
professional activities. I run two businesses and
therefore I need to manage my social media activities
for both those businesses. And so I'm going to group all those social media activities
under my social media. Now it's important to take
the time and thinking about the different sections
that you can use to manage all the different
activities in your life. Okay, so what I'm going to do
is come down to Ed section. And this is going to
be called my videos. And this section is
going to be used to manage all the different
activities that I do on a weekly basis and regards to video
editing, video creation. So again, these are
professional activities that I want to manage
within my life project. Now what I'm going to do is come down to add six and again, and I'm going to
add my readings. This section here is
going to help me build good habits and
regards to reading. So this is a personal
activity that's going to help me build
the habit of reading non-fiction every single day for the purpose of this
asana online course, what I'm going to do is come down and add one more section. I'm going to call
this my projects. This section is going
to be used to manage all the daily tasks that
I do for my clients. Now remember, like I mentioned at the
beginning of this lesson, what you can do is you can split your projects into
multiple projects. This is an ideal
structure if you have many personal and
professional activities that you need to
complete every day, that way you can categorize and allocate the different
activities that you engage in every day into either a
professional or business project and a personal project. You can also create projects
specifically for clients. However, I'm going
to keep my life simple by managing
all my daily, weekly, and monthly activities
that I do in my personal and
professional life in one project, my life project. Okay, so now that we've created our project and our
project sections, we can now move into
the next lesson, which is all about
structuring, creating, customizing our
tasks so that we can organize our entire life
completely with Asana. Okay, so let's go ahead and
jump into the next lesson.
5. How to Manage Your Life with Tasks (Recurring Tasks & Habits & Prioritization): Okay, so now that we've
created the project, My Life Project and grouped
all the different areas in our life by creating
sections in our project. Now we need to
create, customize, and group all the different
tasks and our life. Remember tasks within
Asada, our activities, personal or
professional activities or jobs that you
need to complete in order to reach your goals and needs
can be one-off tasks, or they could be reoccurring
tasks that covered. Let's go ahead and
jump back into Asada and organize your
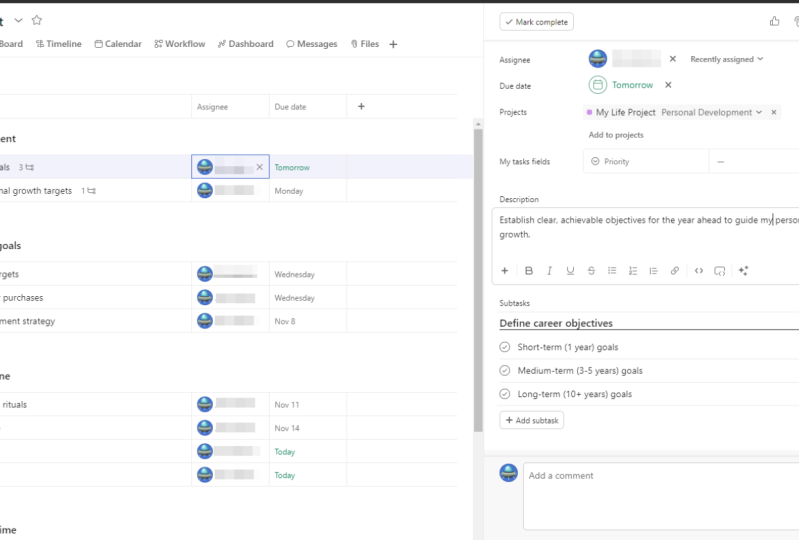
life with tasks. Okay, So BEC inside Asana, you can see that we're
inside our my life project. And you can see over here we've
created multiple sections that will be used to manage
the tasks in our life. And these sections within one project will be used
to manage and group all our personal and
professional activities that we engage in every day. Okay, so let's go ahead
and start adding tasks. What I'm gonna do is
navigate up to my workouts, which is a section up here. And then I'm gonna
go ahead and click Add tasks through the section. And this task is going
to be called Yoga. Now using Asana to organize your daily tasks and
habits that you want to create helps you
build systems and concrete habits by
automating the cube, which is a visual representation that needs to be complete. So for example,
this is the Q here, this is the task, the habit that needs
to be completed. Then what I'm gonna do is add another task and this is
going to be called Run. Then below this task
I'm going to add one more task within this
section, my workouts. And this is going
to be called, Jim. As you can see within
my first section that I created my workouts. I have three habits that I
want to perform every week. And remember, like I mentioned
in a previous lesson, we introduce you
the habit tracking. The first step to
habit trekking is making it obvious,
making it visual. And as you can see, we have a visual representation of the habit that we
want to complete. Now what we can do is go ahead and click on one of these tasks. I'm going to go ahead
and click on this task. And this is where I can
assign an individual. I'm gonna go ahead
and assign myself. Let's say for the purpose
of this habit, this task, what we want to do is set up a reoccurring event
for us each week. We go to yoga every Tuesday evening and every
Friday evening. So what we can do
is go ahead and set that up by clicking on due date. And I'm going to go ahead
and select this Friday. Then I can come down and
click sit to repeat. And as you can see,
I want to repeat this habit or task weekly. I can change that
to monthly, yearly, periodically or
custom if I liked. I'm going to keep weekly
selected in below weekly. What I can do is select the days that I want
to perform this habit. I'm gonna go ahead and select Tuesday and then
keep Friday selected says you can see every Tuesday I have yoga
in every Friday. I also have yoga. I can then also navigate
down to add time. And for me I have yoga every
Tuesday and Friday at 530. Think about your daily, weekly or monthly tasks habits. They one-off or are
they reoccurring? If it's a habit,
then you want to make that habit reoccurring, just like I've shown you here, then what I can do is exit
out of that and then I can come down and add a
description if I like. Now, depending on the nature
of that task activity habit, you might not even need
to add a description. However, for the
purpose of this task, That's habit, I'm gonna go ahead and simply add a description. And as you can see, this is
an example of a description. So I've added that I've got yoga with Benny every
Tuesday and Friday, and this is the location. So basically you can add any important
information and you also have formatting
options down here. And then if we navigate up to the top for this
particular task, we can also add attachments. For me. Maybe it's a confirmation
e-mail that I've booked in yoga every Tuesday and Friday
for the next five months. Some heavy with that task, what I'm gonna do is close
the details for that task. And as you can see, I've
simply gone head and customize that first task. Now you don't have to open up details for each task
if you don't want to, if you just want
to add the date, you can go ahead and
do that by simply navigating over to the due date. And for my weekly run, what I'm gonna do is come
down and click on the sixth, which is a Wednesday. And then I'm gonna come
down to sit to repeat, and I want to repeat my
run every Wednesday. This is a wind stay habit
that I want to form. I want to go on a run
every week on a Wednesday. And again, I can come down
and add a time if I liked, but I'm just going to
add that date in there, then I can navigate
up to assignee. And then I can simply go
ahead and add myself. Now you don't have to assign yourself if you don't want to, because it's only you
using your Asana account. However, I like to add
myself in here because it reinforces that this is an activity that you
need to complete. So what I'm going to do is
now come down to my videos and I'm gonna go ahead and
add a task to this section. And I'm going to add filming. Then below that I'm going
to add another task, and this is going to
be called editing. The envelope editing. I'm also going to add publish. The first task up here
is filming the video. The next task is
editing the video. And the third task I
have down here and my videos is publish the video. So what I would
first do is navigate over to assign this task, I'm going to add myself, and then I'm going
to navigate over to due date and click here, and I'm going to select
the 4th of April, and that is a Monday
that I'm going to come down to sit, repeat, and filming for me for my business videos
happens every Monday. I can also go ahead
and add a time, which is going to be first thing in the morning, nine o'clock. Now what I could also
do is if I wanted to add a start time as
well as an in time. So for example, if I knew how many hours it should
take me to film a video, what I could do is
click Stat time. And then what I
would do here is go ahead and select nine o'clock. Then over here, where I would change the time to the end time, which could be, let's
say one o'clock. So it takes me four
hours to film a video. And then if I click out of it, I can come down and
click on More details. And then you can see the
start and end date over here. Now if I exit out of more details and then
navigate down here, you can see that for this
particular task, filming, this state has already
passed and it's red because I haven't
completed this task. But let's say that I did
complete this task and what I would do is simply
navigate over to filming, then simply click here
to complete the task. Now, you'll notice that
the task will remain here. However, it's just not as
prominent as these other tasks. And because it's
a recurring task, you will see that
the new task for the following
Monday will appear. Now we don't want to see any
of these completed tasks. So a better way to do that is simply by navigating
up to all tasks. Click here, then come down and select and completed tasks. And as you can see if we
come down here that has removed the task that
we've already completed. And now if I complete a
task, so for example, if I go ahead and complete
this task for next Monday, you will see that the task is automatically removed and you get a visual representation
of that task being completed. And as you can see, it's
satisfying because you get to tick off all your
completed tasks. And because this is
a reoccurring task, the task will reappear, however, for the following Monday, which we haven't completed yet. Again, for example, if I have
completed this run today, what I would do is
click Mark as complete. And as you can see, we have
a visual representation. It's satisfying because we
get to mark that habit, that task off our list. And then you can see
that that task is generated again for
the following day, which is an alkane the following Wednesday because
we want to go for this run every Wednesday. That is how you can
simply add tasks to your sections
within your project. Now, what you want to
do is make sure that all your tasks within
your sections are simple. Make each task simple. What you want to do is create bite-sized activities
that at easy to complete, this is going to feel more rewarding and satisfying
for you if you can break down your activities
into smaller tasks, says you can see
under my videos, you can see that I've broken
up the activity of ECI creating and publishing videos
into three separate tasks, filming, editing,
and publishing. Okay, So what I'm quickly going to do is go
ahead and fill out all my sections and all my grouped tasks to
each of the sections, because I've showed you now
how to create each task. And then we're
going to dive into ways that you can further structure Asana to
organize your life. This is where you want to take the time to add all your tasks, either one-off tasks
or reoccurring tasks. So go ahead, pause this
lesson at the wrist of your tasks and then we'll
dive deeper into Asana. And as you can see
of quickly gone ahead and created
my life project. This is an example of this
structure of my daily, weekly, and monthly activities
that I need to complete in my personal
and professional life. Now, an important
productivity strategy that you can execute right away that will help you manage
yourself more effectively, is all about putting
first things first. This is a chapter within the Seven Habits of
Highly Effective People. Basically, what you're
doing is you're putting the most
important thing first, not the most urgent thing. This means being clear on your daily priorities and acting on those
priorities first. And this is what Highly
Effective People do. For example, if I navigate
down to projects and projects, I have client a, B, C, and D. These are jobs over the next month that
I need to complete. Now let's say that the
most important job is client C presentation. What I could do is drag
this task up to the top, and that is the most
important project that I need to complete. You can also manage
your sections. For example, this section
I can drag this up to, and let's say below emails. And now my project section
is below my e-mail section. You can simply drag and drop
your tasks and drag and drop your different sections
to structure your life. Now another strategy that I want to mention to
optimize your time is all about grouping or
bulking similar activities. This strategy allows
you to reduce the time friction of jumping
between different tasks. For example, under the
section my social media, you can come down here and
you can see that I have a task which is
reply to messages, and I also have another task
which has reply to comments. So basically one day every week, what I do is I reply
to messages on social media and
one day every week, I also reply to comments. And you'll notice that
by grouping activities, you're gonna save a
lot of time long-term. And this is a powerful and
simple productivity strategy. Now if we navigate
up to my workouts, this is a section that has
my health based habits, exercise based habits
that I want to solidify. James Clear talks about the misconception
about building habits, rather than focusing on how much time it takes to build a habit, you should be focusing
on how many repetitions does it take to form that habit? So by adding habits to your
project, my life project, you can ensure that you're completing habits
through repetition. Now you can also
navigate up to list, which is below overview. And you can click here to view your project with a
different layout. At the moment we have
a list selected. You can also click board, which allows you to
view your project in a visual board layout. However, it's a lot easier
to track your habits in a list structure to
organize your life. Now what we're gonna
do is navigate over to all tasks and come down through
and complete the tasks. Now you can also navigate
up to project actions, and you can come down and save the current layout as default. If we click here,
that's always going to show incomplete
tasks by default, which means every time
we complete a task, that task will be
removed from our list. So go ahead and select
Save Layout as draft. Now if you log out from a signer or you jump between
different views, you're always gonna have
incomplete tasks edit here. However, if you
want to be able to see your completed
tasks as well, then come down and
click All Tasks. And then you can go ahead
and save that as a layout. That is how you
can simply manage your personal and
professional day to day activities using tasks. Now in the next lesson, what we're gonna do is
further organize our life with Asana using subtasks. Then following this,
we're going to better organize
tasks that linked together as well as multiply your time by leveraging
dependencies. Okay, so let's move on
to the next lesson.
6. Creating & Managing Subtasks: Okay, So next I'm going to
briefly explain how you can use subtasks to further
organize your life with Asana. Okay, so here we are back inside out Asana account,
as you can see, we're inside the My Life Project and we currently
have tasks selected. And remember, this is the interface that we've
been working with. Okay, so let's dive
into this lesson, which is all about creating
and leveraging sub tasks. Now think about sub-tasks as micro tasks of your main tasks. As you can see under
each of these sections, my workouts, my social media, my emails and more down here, we have our main tasks, or you can call
them macro tasks. Now what we want
to do is leverage micro tasks or sub-tasks. And you can use subtasks to essentially better
manage your main tasks. And I'll show you
an example of this. If I navigate down
to this section, my social media and
I navigate down to publish content down here, this is a main task and this
section, my social media. Now if I click on Details, that's going to generate details for this particular task. Now to simply add sub
tasks or microtasks, just click Add sub-task
and your main task, okay, so the purpose of this
task is to publish content, as you can see here. Now, what I could do
under sub task is add the platforms that I
want to publish content to. For example, I could add YouTube, then
LinkedIn, Facebook. For the purpose of this example, one more which
will be Instagram. And as you can see, if
we navigate over to the far right-hand side
of these subtasks, we can go ahead
and add due dates, as well as assign
individuals that are responsible for
these sub-tasks, as well as add other information over here like
notes and comments, similar to what we can do with
our main tasks over here. For example, if I navigate
down to Instagram and then click on subtasks,
notes and comments. That's going to generate
all this information which is similar to the information that you
can edit when creating tasks. Okay, So we're going to
leave that blank for now and navigate up through escape. And then if we navigate
down to publish content, which is our main task, you can see that we have
four sub-tasks over here. If we click on here,
that's simply going to generate are four sub tasks. Or what we can do
is navigate over to this error icon over on the left-hand side
next to publish content. And click this. And that's going to
generate a drop-down of r sub tasks on our
main interface. Okay, So again, what we're
gonna do is exit out of these subtasks for the task published content by
navigating up too close. Okay, so it's as simple
as that to create subtasks for each of your tasks, what you want to do
is take the time to navigate through all your
different sections and tasks and identify if each of those tasks require sub tasks. And this is just a
more effective way to streamline your day to day activities by organizing
them through sub tasks. Now, like I've mentioned multiple times in
this online course, technology allows us to create systems and enhance
our productivity. So just quickly before we
finish up this lesson and if I navigate down
to publish content, which is our task, and then L sub a task down here, which are our four
social media channels that we want to post to. What we can do is automate
the posting process by leveraging tools like the
meter Business Suite, which allows us to
simultaneously share content on both Facebook and Instagram without jumping between
both these platforms. There's also another social
media management tool that we like to use
and talk about, which is called Zoho social. And this free social media
management tool allows you to connect each of these
social media platforms and simply schedule or
publish your post simultaneously and directly
onto each of these platforms. Rather than jumping between
each of these platforms, which can take time to construct the same post on each platform. This creates time
friction and can actually be a big waste of time. So leveraging social
media management tools like Zoho social, the meter Business
Suite, HootSuite, and others, allows you to streamline this posting process. Okay, So now that we've covered the subtask to better organize
our day to day activities. What we're gonna do is now
move on to the next lesson, which is all about dependencies.
7. Leveraging Dependencies: In this lesson, I want to share how you can further
streamline and better organize your life by leveraging dependencies
within Asana. This allows us to better prioritize our daily
activities by sitting up a dependency for
connected activities that must be completed in
a specific order. Let's dive back into a Santa and let me explain what I mean. Okay, so remember,
dependencies are connected activities
that must be completed in a specific order. And before I dive into an
example of how you can leverage dependencies to better organize your life and feel accomplished. It's important to
mention that to leverage the feature
dependencies, you do need to upgrade
to a paid plan. And the reason we
can use dependencies in this free plan is
because we're still on the free trial that allows
us to use premium features. However, this is the only
premium feature that we're going to mention
in this online course. Everything else that we've
covered you can use for free. Okay, so an example
of this is if we navigate down to my projects, these are our client projects
that we need to complete. Okay, so for the purpose
of this example, let's say that client C
needs to be completed first, I need to complete the
presentation before I can work on the client a logo. So basically this is the
specific order that I want to complete these
projects, these tasks. So to do that, all I
would do is navigate over to details for client. Then I would navigate
over to Ed dependencies. And it makes sure
you have blocked by and then select the task that is dependent
on you completing before you can work
on this In task. So the example I'm
using is client see, I want to complete this
presentation with my clients. See before I can work on the
logo designed for client a. Here we have clients
see presentation. I'm going to add that in here. And then I will close the
details for that task. Now as you can see, if I
navigate down below projects, we have this timer icon here. And as you can see, I cannot click this task to
complete the task. I cannot tick off this task. It's not going to let me unless I complete
this task first. For example, let's say that I completed the presentation
for this client. Now remember, this could be for any day to day activities that you do that you've
planned within Asana, you can sit up dependencies. So I'm gonna go ahead
and click this tech. And as you can see, I've marked client C presentation
as complete down here. Now as you can see, client a logo design now allows me to mark this
task is complete. Before there was
that timer icon. You can create as many
dependencies as you like. For example, if I
navigate over to Client B and I click on Details, and then I go ahead and
click on Add Dependencies. I can navigate over to, let's say, client logo design. And now this task is dependent on this task being
completed first. Now what I could also
do is navigate over to client D strategy session. And I can also add a dependency. And this time I'm going
to add client be launched Google Ads Campaign client be launched Google ads
campaign over here. This is the task. And then I can exit
out of details. And as you can see now, I have connected activities or tasks that must be completed
in a specific order. This is what a dependency is in order for me to
complete client D, this project, this
task over here, I first need to
complete client B, but in order for me to complete client be launched
Google Ads Campaign, this task, I first need to
complete this task here. So what I would do is mark
this task is complete. Let's say that I completed
this specific task today. The net task is now
labeled as complete. I can now go ahead and complete client be launched
Google ads campaign. So I can start
working on this task. And as you can see now I can start working on the third task, which is client D
strategy session. So remember, this
is just an example for how I organize my life. You do not need to
leverage dependencies. Remember this is a paid feature. However, it is an
effective way to structure your priorities and for you to manage and organize
your priorities, your tasks that both urgent and important
dependencies are a great way for you
to further structure and organize your
life inside Asana, we can also navigate
up to subtasks. Remember in the last lesson, what we did is we created four subtasks under
publish content. What we can do is
click on details for the subtask and we can go
ahead and add dependencies. However, there is a
brief understanding on how you can leverage dependencies if
you decide to use a pay plan inside a Santa. Okay, so now that you
understand the dependencies, what we have currently done in the previous lessons is
showed you how to organize your life and feel
accomplished by leveraging strategies that
you can use every day, as well as aligning those
strategies with technology. And the technology
that we've focused on in this online course is Asana. Now in the bonus lesson that we're going to cover
is how you can track your time for each of the different tasks that
you do on a day to day, week to week or monthly basis. This allows you to
allocate and understand the time it takes to
complete specific tasks. And we're gonna
leverage a free tool which is called toggled track. In the next lesson,
we're going to briefly explain how
you can leverage toggled track and align
with using Asana.
8. How to Track Time (Toggl Track): Now in this lesson
I want to quickly share a helpful browser
extension called toggled track that you can use to
track your daily tasks and identify how long it takes to complete your daily activities. This allows us to understand the time allocation for
completing specific jobs, habits, tasks, and
other activities. Okay, So let's dive
straight back into my computer and jump
into toggled track. Okay, So like I mentioned, what we want to do is
leverage toggled track, which is a time tracking software that you can
leverage for free. Now to arrive at the
toggled track website, simply hit over to toggle.com
forward slash track. And that's gonna take you to
the toggled track website. Now there's many different
platforms that you can use to track time
using toggled track, you can either download
the browser extension for toggled track on Firefox
or Google Chrome, depending on the
one that you use. Or you can also download the application
onto your desktop, either if you have a
Mac, Windows or Linux. And you also have the option to track your time across
different devices. For example, you can download the application for
free on your phone, on iOS or Android. And remember this is a completely free time
tracking software, although they do
offer paid plans, but we're just going to
talk about the free plan. So go ahead signup and
we'll meet you inside your toggled track
account and show you how you can simply
leverage this tool. Okay, so here we are. We've arrived inside our
free toggled track account. The first thing that we want
to do is navigate up to track and make sure that
you have timers selected. Then simply navigate up to
What are you working on and type in the specific
task that you're working on. For example, within
our Asana account, we have one task which is creating content
for social media. What I could do is track
the time that it takes for me to create content
for social media. Then all I would do is navigate
over to this start time at this Play button over here
to start the time entry. As you can see, the timer
will start over here. Now let's say that
I've completed creating content
for social media. I've completed this daily task. What I would do is go
ahead and click Stop, and that will generate
how long it took me to complete that
specific task. Now what I could do
is let's say that I was just pausing because maybe I wanted to eat lunch and
then I was going to continue this task after lunch. Then what I could
do is go ahead and click Continue time entry. That's going to continue
the time entry up here. Again, when I want to pause
or stop this time entry, what I would do is click stop. And then what I can do is
navigate over 22 over here, click down and you
can see I have two time entries for
this specific task. And then you have details
about the time you started and stopped
working on this task, as well as the total time. Now what you can
do is rather than jumping onto the whip version of this software or
the application on your phone or the
app on your desktop. What you can also do is
download the Chrome extension. And this is a simple way
to start a time entry. And for us we use the
Chrome extension. So what I would do is head
over to our browser and type in chrome.google.com,
afford slash webstore. And then all I would do
is locate, toggled track. And that's going to take me to toggled track productivity
and time trek it. I'm going to go ahead
and add this to Chrome. Add extinction. Once you've installed the
toggled track browser extension and you've logged
into the software, what you can do is
simply navigate up to your browser,
your extensions, and click on and locate
the toggled track, then you can come down and simply add what
you're working on. So for example, let's say
I wanted to find out on average how long it takes me to plan content for social media. What I could do is navigate up here and type in plan content. All I would do is simply
click Start time entry. Then I can exit out of that
and work on creating a plan. Once I've completed,
finishing that plan, all I would do is
navigate back over to this extinction and then
come down and click Stop. Okay, So there is a brief overview of how you
can leverage toggled track to understand how long it takes you to complete specific tasks. Then what you can do is navigate back over to your Asana account. And what you can do
is select on each of these tasks the details, then you can click on due date. You can add a stat
and in time based on The time that
you've realized, you need to allocate
towards this specific task. Or you can simply
add details about the time allocation for
that specific task. So you know that you're not
overspending time or you're not spending enough time
on that specific task. Okay, so what I'm gonna do
is exit out of this task. And just like that guys, you should now know
how to leverage Asana to organize your life
and feel accomplished. That is everything we wanted to show you inside of Asana to get started with leveraging Asana to better
organize your life.
9. Final Thoughts & Conclusion: Here we are. Congratulations,
you have made it to the end of this real
productivity course. Hopefully this has given you a complete understanding
of how to use Asana to organize your
life and feel accomplish. Now to remain excited with your daily activities
and long-term goals, it's important to be consistent, to consistently show up,
perform, and execute. Remember, make it easy breakdown your daily activities
into bite-size pieces. Also habit trekking, which is an important concept that
we've mentioned a lot in this online course is made
easy with tools like Asana, which helps you feel
more motivated and accomplished with your
day to day activities. And like I've mentioned multiple times in
this online course, the most effective
form of motivation is progress and assign a
helps us track our daily, weekly, monthly, and
yearly progress, as well as helping us
build unshakable habits. Now I hope I've achieved
my goal for this course, which is to help you achieve real productivity
with Asana and with key productivity strategies
that you can use each and every day to organize your
life and feel accomplished. Okay, So once again, thank you so much for giving me your valuable time and energy. Now if you want to
connect with me online, what I'll do is add
all my channels down below with that heavy note. Thank you. Take care and
I'll see you next time.
 Stewart Gauld, Helping Small Businesses Thrive Online