Transcripts
1. Course Introduction: Imagine the moment when
you'll be able to fill the empty space in
your photos with realistic and stunning details, all with just a
single mouse click. When you can correct, edit, and transform your photos in mere seconds in ways you've
never been able to before. When you can rejuvenate old
photos with a single click, you can erase, recolor, or add objects to your image. After this course,
your imagination will be the only
limit to editing your photos because
I'll provide you with all the knowledge and techniques you'll need and even more. Because I'm not just
a graphic designer, I'm also an AI expert. I've been working with
artificial intelligence and machine learning for years. This allows you to
understand Photoshop, A I from a perspective you've never had the
chance to before. It doesn't matter if you're an absolute beginner or have been using Photoshop
for many years. In this course, we'll
take it step by step so you can master
the generative fill. If you just want to edit your
family or community photos, then learning the
introductory section of the course will suffice. But if you're committed
and aim to become a Photoshop AI prompt
engineer in the future, you can also study the master
class section where you'll get to know the
artificial intelligence behind generative. Phil, join us and be a part
of this exciting journey. I look forward to seeing
you in the course.
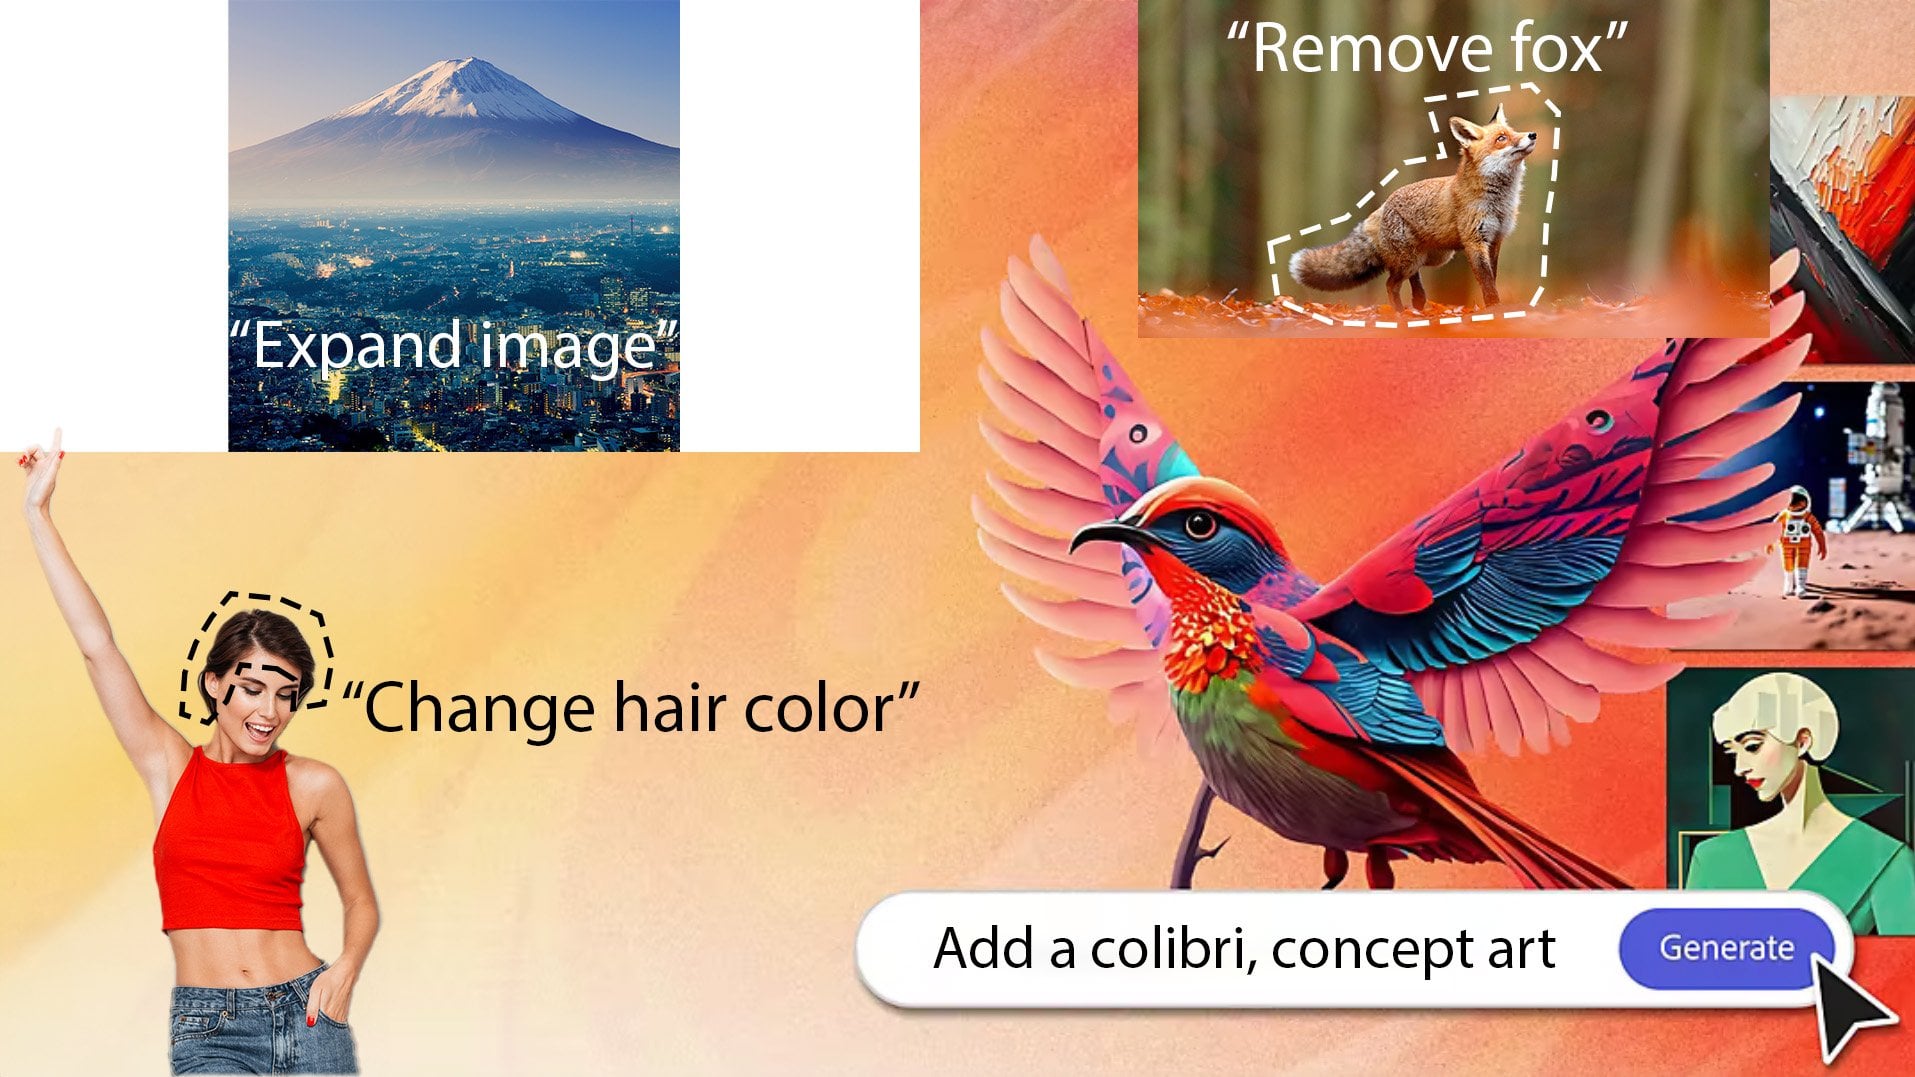
2. Starter Line – What is Generative Fill?: Welcome to the Photoshop
I Generative Fill course. I'm glad you've joined us. What is generative fill? Generative fill is a technology that allows you to
automatically fill in missing or unwanted
parts of your image with content that matches the style
and mood of the picture. Generative Phil can be used for various purposes such
as image repair. If there's something
on your image you'd like to remove
like a stain, a crack, Noise or
another object. Generative fill helps you restore the image to
its original state. Image editing, if you want to change something
in your image, like colors, lights,
shadows or effects. Generative Phil helps you
give your image a fresh look. Image creativity, if you want to create something
new on your image, like a new object, a new character, or a new scene. Generative Phil helps you
express your creativity. What makes generative Phil revolutionary is that it doesn't just simply copy and paste existing content
into the picture. Instead it intelligently
creates new content. Generative Phil utilizes
AI and Deep Learning to recognize the
features and style of the image producing
content that matches it. It also takes into account the lighting and
perspective of the image, ensuring that the new content appears natural and realistic. Additionally, it lets you
quickly and easily repair, edit, or create new images
without much time and effort. Generative Phil
takes digital art and photography to
a whole new level. Let's dive in, download
the images needed for the lessons and then
install the Photoshop beta.
3. How to Download Photoshop with Generative Fill: Hi there. In this video, we will install
the Photoshop beta which includes the
generative fill feature. The Photoshop generative
fill is a new text to image tool currently only available in the
Photoshop beta version. You can type a word
or sentence and the artificial intelligence will create a digital image
of what you've written. To download the Photoshop beta, we need to create
an Adobe account, visit Adobe.com and click on Sign In located
at the top right. Once the page loads, click on Create an Account Here. Apart from the traditional
e mail registration, you also have the option to sign in with a
Google account, Facebook account, or Apple
ID. Create an account. Once you've created your
account on Adobe.com navigate to the Creativity and Design tab in the top menu, and then click on What
is Creative Cloud. As you scroll down this page, you will see the Adobe programs. You can choose one or
subscribe to bundles. The main thing is that
your chosen package includes Photoshop. I'm going for the first one. A Photoshop subscription
is $20 per month, but if you're a
student or a teacher, you get additional discounts. The Photoshop subscription comes with a seven day free trial. If you just want to try
Photoshop for this course, you can do it for free. Just remember to
click on this icon. Once you've selected the
appropriate package, click Continue. Enter your e mail address
and credit card details. After purchasing the package, you can download and install Creative Cloud
from the main page. Once you've installed
the Creative Cloud software on your computer, sign in in the top menu. Select Apps in the
left side menu. Click on beta apps. Find Photoshop beta
and click Install. Wait until the Photoshop
beta installation is completed, then
launch Photoshop.
4. Learn the Photoshop AI Generative Fill Taskbar: Once you've installed
the Photoshop beta, we can start creating. But before we get started, let's familiarize ourselves with the new taskbar
and its settings. First, let's create
a new project. Click on the new file
button in the pop up menu. I'm now going to choose the
suggested custom document. In this lesson,
it doesn't matter what size and property
image we create. I'm going to make a slightly smaller image with a width of 964 pixels and a
height of 543 pixels. For the color mode, I
selected eight bit RGB color. But if you want, you can also make a black
and white image. Once we have set the parameters, click on the Create button. Once we have created
our document, we will see a white sheet
in the lower task bar. There's an import image
button with which we can insert a new image In
the adjacent menu, we can position the task bar. We can hide or
reset its position, or fix it with the pin
bar position option. If this task bar disappears, or we accidentally hide it by pressing the hide bar
button. Don't despair. In the drop down
window menu above, click on the contextual Taskbar, and it will reappear by clicking on the last
button of the Taskbar. It brings up the properties
of our document, which we can adjust at
any time as we wish. Click on the fourth
icon from the top in the left hand menu and select
the object selection tool. If you have a
different icon there, right click on that icon and select it from
the drop down menu. Now, using the
left mouse button, select the entire screen. Once we have selected it, the task bar changes and
will offer other options. Our first button will
be the generative fill with which we can generate new things with the help of AI. The second drop down menu
is the selection tool, where we can refine
the selection. We can increase contract
or even round its edges. The second is the
Invent Selection, where we can reverse
the selection. The third is the
Transform selection, where we can reshape the selection as we
like with the fourth. We can create a new mask
with the fifth icon, a new adjustments layer. With the sixth, we can fill the selected area with
color or gradient. The seventh option
we already know with this we position the task
bar and can hide it. Don't worry if you don't yet know the tools
I just listed. We will talk about
these in later videos. As the course progresses, you will gradually learn to
use them and become a master. Now click on generative fill. In the now changed task bar, we received an empty text box where we can type in what
we want to generate. The text entered here, we will call prompt. It's a command with which you
can detail and specify to the artificial
intelligence the AI what you want it to generate. Next to the text box
is a generate button with which the AI executes
the instruction given by you. We will not provide a now, so we will not write
anything in the text. We don't give anything, and the selected area is empty, Then the AI generates
an arbitrary image. Click on the Generate button. The process of generating
the image has started. The process can take some time. It can be a few seconds, even a few minutes. We have to wait a bit until the green stripe
reaches the end. Computer has finished
generating the images. It generated three
images by itself. Here on the side, in the Properties menu
under Variations, we see the images where we can choose whichever
one we like, whichever one we want to keep. If none of the three
are to your liking, you can regenerate them as
many times as you want. Let's generate three new ones. Click on the Generate
button again, the newer variations
will appear above the previous ones in
the Variations menu. If you like one, just select it. We will see the
selected image in the layers and we can
start working with it. Once the images are generated, three new buttons
appear on the taskbar. These buttons are used to send feedback to Photoshop
about the generated image. You can like dislike or
report the generated image. These buttons will probably disappear after Photoshop beta. That's the end of this lesson. I hope you enjoyed it. The next video will be
much more exciting. See you next time.
5. Create new Images: Hi there. In this lesson, we will learn to write prompts and create an
entirely new image. We won't go into the
topic deeply yet. We're only learning
the basics for now. Let's get started. Let's
create a new document. Click on new file. Unlike the previous lesson, I will specify the
width and height. I'll first change
the unit to pixels and then set the width to 12 80 pixels and the
height to 720 pixels. The resolution can
remain at 72 DPI, just like the last lesson. In our case, it doesn't matter
whether it's 72 or 300. However, the color mode
should be set to RGB, color and eight bits. Once everything is set, click the Create button. We now have our
white blank image. Select the object
selection tool from the left and use it
to select the screen. After that's done, click
on generative Fill. We'll start by generating something very simple type
house into the text box, then click the Generate button. We'll have to wait a bit for the computer to
create the image. We now have three images, which you can see under the Variations tab in
the Properties menu. All three images are
good depict houses. But this isn't quite
the house I wanted. I had in mind a White
House on a hill. Let's modify our prompt and write White
House on the Hill. After typing that, click the Generate button and wait a bit for the
images to be produced. The images are ready. But it generated something entirely different
from what I wanted. Artificial intelligence thought. I meant the presidential
residence in the United States known
as the White House. To get what we want from AI, we must be much more specific and accurate
with our prompt. If we don't want the AI to generate the
American White House, we need to expand
our prompt, right? Switzerland and little at
the beginning of our prompt. Then click on Generate. We have received our
three new images. This is exactly the picture
I wanted. They are perfect. All we did was add one attribute to our
prompt, Switzerland. With this new information, we completely ruled
out the White House in the United States and
got what we wanted. But what if I wanted
much smaller details. I envisioned a river
in front of the house, cows grazing in the field
and birds in the sky. Let's type that in and see
what image it will generate. I will extend the prompt
with cows in the pasture, birds in the sky River in
the middle of the picture. Cows in the pasture, birds in the sky River in
the middle of the picture. Then I'll click on Generate. We wait a bit again, the images are done, but sadly they turned
out to be terrible. The first image doesn't
have the house on a hill, the cows are distorted and there's not a single
bird in the sky. In the second image, the White House looks more
transparent than white. The third image
has deformed cows, strange houses, and
no birds in the sky. But the current Photoshop, A I text interpretation
is very weak. And it works best with prompts
shorter than eight words. If we want to enhance our
image with cows, a river, or birds, we'll need to use a completely
different technique. But I'll show that
in future lessons, this is just the surface
of prompt writing. In later lessons, we will delve into it and you
can understand how an A I like this
works and how to write prompts at an
engineering level. But first, let's
practice the basics. I hope you enjoyed the
lesson. See you next time.
6. Selecting Tools: Before we proceed in our journey to get to
know Photoshop AI, let's familiarize ourselves
with the selective tools. These tools will help us specify the area of the image
we want to work with, making their
understanding crucial. We won't be creating
a new image. Let's open the image number one which we downloaded at the
beginning of the course. Click on the Open and find the numbered one image
in the Res folder. Once the image is loaded, let's start getting to know the selecting tools by right clicking on the
second icon. From the top. We will find the
first selection tool, the rectangular marquee tool. This tool allows us to make
rectangular selections. Let's select a square in
the sky and then click on Generative Fill and type
in cloud for the prompt. After typing, click on
the Generate button. Now the A, I will
generate a cloud within the selected
square. It's done. The first version
turned out perfect. Let's now switch to the
elliptical marquee tool. This selection tool allows us to make circular or
elliptical selections. Let's select a
portion of the sky. Then click on Generative Fill and type in cloud
For the prompt, after typing, click on the
Generate button, it's done. I like the third
version the most. We go back to the second icon from the top and right click, we will see two more
selection options. Single row and single column. These only select a
single row of pixels. We won't be using
this selection tool, so I won't demonstrate them. Let's now go one icon down
and right click on it. Select the Lasso Tool. This tool allows us to freely select an area as
if we were drawing. Let's select a
portion of the sky. Then click on Generative Fill and type in cloud
for the prompt. After typing, click on
the Generate button. We will be using this selection
tool quite frequently, but don't be afraid of it. It's very easy to use. I finish the images, the first one turned out great. Let's go back to the icon and select the polygonal lasso tool. It works similarly
to the previous one, but here you can make
selections with straight lines. Let's try it out, Draw
a shape in the sky, then click on Generative
Fill and type in cloud. For the prompt, after typing, click on the Generate button. The images are ready. Choose the cloud
you like the most. Let's go back to the icon and select the magnetic lasso tool. With this tool, we can select
the edges of an object. Let's try it on a cloud
and attempt to select it. Once we have, click
on generative fill and type in dark cloud for the prompt after typing, click on the Generate button. This selection allows for much
more accurate selections. The three images are ready. The shape of the cloud didn't
change, but it got darker. Now let's select the fourth icon from the top on the left side. Within that, the
object selection tool, this will be another
selection tool that we will use quite often. With this tool,
Photoshop automatically recognizes and selects objects in the image on the right side, select layers at the bottom, then scroll down and left
click on the background layer. We need this because we created a new layer with each
generated cloud, and now we want to select
objects in the original image. Once selected, hover over the tree on the left
side of the image. When you move the mouse over it, the edges will glow in pink. Left click on it and Photoshop will select
the entire tree. Once we have click on generative Fill and
type in apple tree for the prompt after typing, click on the Generate button. Once it finishes generating, it replaces the entire
tree with an apple tree. It's not perfect,
but remember we can generate new images
as long as we want. Our next tool is the
Quick selection tool. This tool is similar to the magnetic selection tool
as it also finds edges. Let's select it before we
start working with it. Right click on the background in the layer section and merge the base image and all AI generated layers into
a single new image. Click on Merge Visible. Once done with that,
select one of the Clouds. If we accidentally
selected too much, choose the icon with the
minus sign in the menu above. And we can erase parts
of the selection. Once we have selected it, click on Generative fill and type in dark cloud
for the prompt. After typing, click on
the Generate button. It has transformed our cloud. Our last selection tool will
be the magic wand tool. With this tool, we can make
selections based on color. If we click on the blue sky, it will select the
entire blue sky for us. What's important
in this selection is setting the tolerance. With this, we set how tolerant the selected
color will be. Although it may not
seem obvious at first, there are multiple shades
of blue in the sky. If we set the color
tolerance to 80, it will select the entire sky. However, if we set
it to only two, it will select a very small
portion because the rest of the sky is either lighter or darker blue than the
color we clicked on. With this tool, we have
finished the selecting tools. We are also done with the
basics and the boring part. We will continue working with the original image
used in this lesson. If you save the image
we created now, please do it under
a different name. I hope you enjoyed the
lesson. See you next time.
7. Introducing the Beginner Class: Welcome to the Photoshop. A I beginner class. I'm thrilled that you've
joined us on this course. We will dive deep into the world of generative fill in Photoshop. If you're new to
Photoshop, don't worry. The beginner class material is specifically
designed for you. In this course, content, we'll learn how to
generate backgrounds, enhance and correct images, remove and replace objects, create realistic objects,
adjust the colors of items, produce panoramic
photos, and finally, craft a unique image by
merging multiple photos. By the end of the
beginner class, you'll be confidently creating and editing photos
with generative Phil. I promise it will be an
exciting journey exploring the possibilities within
Photoshop and generative. Phil, let's get started.
8. Generate new Background: From our previous lesson, we learned the basics. Now I'll show you
how to apply them. In this lesson, we'll create a new background for an image. Click on open and
open the image file numbered one located
in the Res folder. This is the same image we
worked with in the last lesson. We'll be transforming
the blue background of this image using
artificial intelligence. From the left side menu, select the Object
selection tool. Hover over the blue sky with your mouse and click on
it with the left button. Having selected the background, now click on Generative
Fill in the prompt box. Type, mountains in
the background, mountains in the background. Once you've typed it
in, click on Generate. We have to wait a bit. Here are the images I personally like the
third one the most. If we look closely
at the images, there are a few minor flaws. By turning off the
back ground layer, we can see that it didn't only
affect our selected area, but also altered the
house in the image. This caused certain parts
of the house to change. We can fix these parts, but in upcoming
Photoshop versions, the AI's object detection is likely to improve
eliminating such errors. If you're interested in
learning how to correct these, you can find a
lesson on this topic under the Practice menu
in the course content. Let's further enhance our
background with clouds. Click on the blue area above
the mountains and then click on Generative
Fill for the prompt, type in Clouds, and then
click Generate again. We'll have to wait for the
three images to be generated. The AI has finished
generating the images. The first picture was perfect, comparing our final
image to the original. The transformation
is truly astounding the style of the
generated background matches the base image. If we overlook the
minor issues for now, we've achieved a
perfect picture. That's how simply we can
change or modify a background. I hope you enjoyed the
lesson. See you next time.
9. Extend Images with Generative Expand: Hello there. In today's lesson, we'll learn how to expand images using the
generative expand feature. This is an incredibly
useful tool that you can frequently use even
for family photos. Let's get started
with the lesson. Click on Open, Open the image labeled as number two
in the Res folder. We'll be transforming
this image into a larger version with a
16 to nine aspect ratio. Select the fifth
icon from the top. If you have a different
icon in the fifth position, right click on it and
choose the crop tool. I'll zoom out a bit so we
can see the image better. The most crucial setting in the Croup tool is defining
the aspect ratio. Set it to 169. Here, drag the white edges of the frame as shown in the video to expand
our workspace. Also ensure that
in the film menu, generative expand is selected. Once you've set
everything up and enlarged the workspace
or the image size, click on the Generate button. We'll have to wait a bit for the AI to generate the images. They are done. Let's see
how they turned out. All three images are
astonishingly good. We didn't input any
prompts for these images. We left it to the AI to recognize and generate
the surroundings. Now let's try typing Forest
into the prompt field. After entering it, click
on the Generate button, wait for the AI to
generate the images. They are done and the
results are amazing. The A, I recognized the original
photo as a beach scene, but due to the prompt
we entered it, added forests in the background. There are a couple of minor
errors in the images, but they can easily
be corrected. However, by the time you
start learning this tutorial, the AI might not even make
those small mistakes. Now without saving, close
the image in the main menu. Click on Open again. This time open the image labeled as number three
in the Res folder. It contains a small
forest and a lake. We'll see how it can enhance a landscape image with
our previous image. The task was simpler
as the background was blurred and only the girl in
the foreground was sharp. But in this image, every
detail is crisp and clear. Select the fifth
icon from the top. The croup tool which we used
for the previous image. Similarly, pay attention
to our aspect ratio, which in this case is 169, and then expand the size of our image as shown in the video. Once done, type in
forest and lake. For the prompt, after entering, click on the Generate
button and wait. Ai has generated the
three new images. They are phenomenal, the
enhancement is sharp, and the style
remains consistent. The AI did an outstanding job. Consider that we're only
at the beginning stages of this technology and it can already made images
with such good quality. There are many more
exciting lessons ahead. I hope you enjoyed today's content and
I'll see you next time.
10. Remove Objects: Hi there. In this lesson, we'll learn how to remove
objects from photos. This can be particularly helpful when improving or
retouching photos meant for family albums or social platforms.
Let's get started. Click on Open and
within the Res folder, choose the image labeled six. We'll begin with this
beach side photo. First we're going to remove the tablet lying on the blanket. Click on the zooming tool
and magnify the image. Then using the lasso tool, draw around the tablet. Once done, click on
generative fill. Don't input anything
for the prompt, simply click on Generate. We'll have to wait a bit. As the AI generate the images the AI has
finished generating, the second image looks the best. Now I'll zoom out using the zooming tool to view the
photo in its original size. The edit turned out great. Let's remove the
sunglasses as well. From the left menu, select Lasso Tool and encircle
the sunglasses. Once done, click on
Generative Fill. You don't need to type
anything in the prompt field, just click on Generate and
wait for the AI to finish. First one looks perfect. Let's zoom out and watch
the whole picture. But what if we want to remove something bigger like
the girl in the photo? Let's see if the A, I
can handle it using the lasso tool draw around
the girl for accuracy. Try to zoom in on the image. It will make the task easier. Once you've outlined the girl, click on generative fill
and without any prompt, hit the Generate button. Let's check the
generated images. The first image
didn't work out well, the second one isn't
as expected either. However, the third
image is fantastic. The girl was removed
flawlessly from the photo. The AI is even
capable of removing objects or people from
more complex images. Close this file,
then click on open, open the five labeled
image in the Res folder. This is a sharp high quality
photo of two young girls. Let's remove the girl on
the left from the photo. Select the lasso tool and start outlining the dark
haired girl on the left. Try to be as precise
as possible. Again, zooming in will help. Once done with the outline, click on Generative fill, and without any prompt,
press Generate. We just need to wait for the
AI to generate the images. It'll have a tougher
chal***ge compared to the previous image the AI finished generating
the three images. The results are astonishing. It's almost impossible to tell. The photo was edited. The girl took up a
significant portion of the image and there was a
metal railing behind her. Nevertheless, she was
removed perfectly. If you want to remove something from an image, all
you have to do, draw around it and generate with generative fill
without any prompt. If the first three attempts
don't succeed, don't despair. You can generate as
many times as you wish. I hope you enjoyed this
lesson. See you next time.
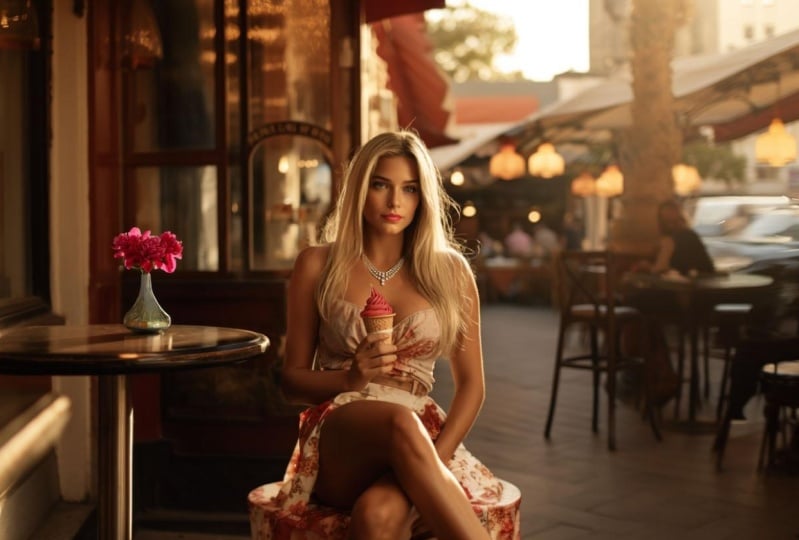
11. Replace Objects: Hi there. In this lesson, we will learn how to replace
objects within a photo. Let's get started. Click
on Open in the Res folder. Look for the image
labeled four where there is a brunette woman
holding an ice cream. We will be modifying
this image first, I'll replace the vase. Zoom in a bit to make
it easier to select. Next, choose the lasso tool
and start outlining the vase. Always visualize what you want to replace the object with. I want flowers on the table. When I outline, I leave more space at the top
to ensure a bouquet can fit is crucial because the AI will work with
the space you designate. If you allot too little space, an entire bouquet might not fit. Once you've finished outlining, click on generative fill in the prompt field
type flowers. After entering it, click
the Generate button. Let's see what images the
AI has generated for us. The second and third
ones are perfect. The AI did an excel***t job. However, I now want candies
instead of flowers. Delete the generative layer we just created by
right clicking. And select delete layer
After removing it. Re, select the vase on the
table using the lasso tool. But this time don't leave as
much space on top as before. Adhere more closely to
the vases contours. Otherwise, if you give
it too much room, the AI might generate enormous candies and
lollipops for us. After outlining,
click generative fill in the prompt
field type candies. Once entered, click Generate. Let's examine the
generated images. They're perfect, although they came out a bit larger
than expected. In such cases, it's
simpler first to erase the vase from the table and then generate candies onto it. Now let's replace the ice
cream with a microphone. Click back on the
background layer and start outlining the ice cream
using the lasso tool. Since a microphone is roughly the same size and shape
as the ice cream, try to stick closely to
the ice creams contours. Once outlined, click on Generative Fill in the Prompt
field type microphone. After typing, click Generate. Let's see how the
replacement turned out. The images are fantastic. Typically, the AI struggles
with hands and fingers, but all three images
worked out the first time. The first image does
have an extra ring, we can easily correct that. Now let's try something
more chal***ging. Close this image in the
menu, click on Open. Then in the Res folder, select the image labeled two. In this photo, we will replace the swimsuit with
a wedding dress. Select the lasso tool
and start outlining. While outlining,
visualize the girl wearing a wedding dress. Consider how it would
look on her and the space it would
occupy in the photo. Once you're done, click Generative Fill in the prompt
Field type wedding dress. After typing, click Generate. The AI has generated the images. All three are outstanding. There are some errors though. The AI struggled with
the girl's right hand, but we can easily
correct it later. Always remember when
replacing objects ensure the designated area can accommodate the new object. If the new object is smaller, it might be best first to
erase the original from the photo and only then
generate the new one. In the practice materials, you'll find several
videos where I completely transform an image utilizing
all of Photoshops functions. If you want to practice, check out the videos
under the practice tab. I hope you found this lesson
helpful. See you next time.
12. Generate Realistic Objects: Hi there. In this tutorial, we'll be enhancing our images by adding new realistic objects. Let's dive right
into the lesson. Click on Open in the Res folder. Select image number seven. We're going to enhance
this pub scene with some realistic objects. First, we'll generate
some food and drinks on the table from
the left side menu, choose the lasso tool, use it to circle a large
area above the table. Once done, click on Generative
Fill in the prompt box, type Soda and Breakfast. After typing, hit
the Generate button. Let's check out the images
the A I has created for us. They look good. I especially
like the third one, the wall looks a bit bare.
Let's add a painting. I'm imagining a
rectangular painting, so we won't use the
lasso tool this time. From the left side menu, select the rectangular
marquee tool and highlight a large
section on the wall. Once that's done,
click on Generative fill in the prompt
box type paint. After typing, press
the Generate button. Let's see the images
the AI produced. Only the second one
had a minor flaw, but the other two
turned out great. One of the strengths of Photoshop AI is its
ability to accurately gauge the light
sources in the image and generate objects that
don't look out of place. Let's give the AI a
more chal***ging task, adding a cat to the image. I'll stick with the
rectangular marquee tool and mark an area on the floor. After marking it, I click
on Generative Fill and type cat In the prompt,
once you've typed it, press the Generate button, the images are ready. Let's look at the cats.
They're not perfect. This is a tougher
chal***ge for the AI. Let's generate three more and
see if we have better luck. The next three are done. The first one turned
out pretty well. Generating living creatures is still a weak spot
for Photoshop AI. But as it's further developed, it will get better
month by month. Now let's try something
entirely different. Close this image in the menu. Click on Open in the Res folder. Select image number four. We'll generate a diamond
necklace for this girl holding an ice cream to make
the selection easier. Zoom in on the image
in the left side menu. Choose the lasso tool and
draw around the girl's neck. Imagining the shape
of a necklace. Feel free to get creative with
the shape, it's up to you. Once done, click on generative fill in the prompt
box type diamond necklace. After typing, hit
the Generate button, the images are ready. Let's take a look. All three
necklaces turned out great. Choose the one you like best. Then use the zoom
tool to see how it looks at its original
size on the image. I think it turned out really
well with Photoshop A I, you can add virtually any
object to your image. The AI takes into account the quality of the
picture, the lighting, and the colors, and can create entirely
realistic objects. It's only limited by
our imagination in terms of how we modify and
what we add to our images. I hope you enjoyed the tutorial. See you next time.
13. Change Colours: Hi there. In today's lesson, we will learn how to change the color of an
object in Photoshop. Let's get started
with the lesson. Click on Open in the Res folder. Select the image numbered four. This image features a girl with brown hair holding an ice cream. First, we'll change the color of the ice cream to make
the selection easier. Use the zoom tool to
zoom in on the image. Once zoomed in
sufficiently start outlining the ice cream
using the lasso tool. After you're done, click on the generative fill button in the prompt box type
red ice cream. Once you've typed that, click on the Generate button, Photoshops. Ai has advanced
object detection. Most times just typing red would suffice to generate
a red ice cream. However, more precise descriptions
yield better results. The AI has finished
generating the images. All three outcomes are great, but the third one is the best. We now have a lifelike
red ice cream. Now let's color the
girl's lips red. This will be a bit
harder to select. You are advised to
zoom in even more. Use the lasso tool to outline her lips in
the same manner. Once done, click on the generative fill button in the prompt box type red lips. After typing that, click
on the Generate button. When working with such details, the selection is crucial. If the selection is too small, the AI will generate
smaller lips. If too large than larger lips, the AI has finished its task. Again, the recoloring
looks great. Let's continue practicing. We'll give the eyes
a new color outline one eye with the lasso tool, hold down the left shift
key on your keyboard, and outline the other eye. After this, click on the generative fill button
in the prompt box type C, Blue eyes then click on
the Generate button. The outcome is once
again fantastic. The brown eyes have transformed into beautiful sea blue eyes. Let's zoom out to see
the whole picture. The results are
quite impressive. Now let's chal***ge
the AI a bit more. Zoom in slightly and start outlining the girl's hair
using the lasso tool, leaving some space between the selection and
the actual hair. When you are done
with the selection, click on the
generative fill button in the prompt box
type blonde hair. After typing, click on
the Generate button. The AI has finished
generating the images. These blond hairs look amazing. Personally, I prefer the
second one the most. Zoom out to view
the whole image. It's amazing to see
the transformation. Perhaps she would look
even better with red hair. In the prompt box, rewrite
blond hair to red hair. After making the change,
click on Generate. The images are now ready. Needless to say, the
outcome is outstanding. The red hair truly
suits the girl better. Selection plays a key role
when recoloring objects. I personally prefer using the lasso tool and allowing
some space for the objects. However, if you don't want to manually select using
the lasso tool, you can use the object
selection tool. Choose it from the left panel, move the mouse cursor to the top left corner
of the ice cream. Hold down the left
mouse button and drag the selection across
the entire ice cream. The AI will automatically detect and select the ice cream. This method works
for simpler objects, but not working for
complex ones like hair. I prefer to manually make the selections with the
lasso tool because it lets me control the maximum area The A I should consider
for each part. Proper use of the lasso tool can yield better results
during image generation. I hope you found
this lesson helpful and enjoyed it.
See you next time.
14. Make Panorama Picture: There In today's lesson, we will be creating a panoramic
image using generative. Phil, let's dive right
into the lesson. Click on Open in the Res folder. Select image number one. This image features
a large white house. Since the background is quite empty, let's generate mountains. Using AI, select the
Object Selection tool from the left hand menu. Click on the blue background. After it has selected
the blue backdrop, click on Generative Fill in the prompt field,
Type in Mountains. Once you've typed that
in, click on Generate. The mountains are generated. Pick the mountain that
appeals to you the most. This mountains makes our
background less barren. As we're creating
a panoramic image, we need to increase
our image width. In the top menu, click on
Image from the drop down. Select Canvas Size in
the pop up window. Increase the width. I'm
setting mine to 2,600 pixels. But if you're going for
a real panoramic shot, you can set it to 3,750 pixels. Note that this will take
much longer to generate images after entering
our desired width. Click on the okay. Our image is now much wider
to see the whole image. Use the zoom tool to zoom out. For easier layer management, it's best to merge them
in the layer's menu. Right click on background
from the pop up. Choose the merge visible option. Now we have just one layer. On the right side of
the background layer, you see a padlock. Click on it to edit the layer. If you do not click on it, you will not be able to edit this layer from the left menu, select the rectangular
marquee tool, then select the right
edge of the house. After selecting, as
shown in the video, click on the topmost icon in the left menu and
pick the moving tool. Drag your selected area
over to the left side of our image by holding down
the left mouse button. Once done, again, choose the rectangular marquee
tool from the left menu. Now select the remaining
part of the house. Once done from the left menu, choose the moving tool again with the left
mouse button held down. Drag the selected area to
the right side of our image. Be careful not to move the
selected area up or down. If you hold down shift while dragging with
the left mouse button, it will move the element
only along one axis. This can help in achieving
precise movement. After aligning the
edges precisely, again, select the rectangular
marquee tool from the left menu with it, select the empty space
between the two images. It's a good idea to overlap a
few pixels into the images. No space is left unfilled
after generation. Once selected, click on
generative fill this time, don't type anything
in the prompt, leave the AI's image
recognition ability to fill in the gap.
Click on Generate. The AI has generated the images. None of the generated images
are quite to my liking. The AI doesn't always do a great job at
generating houses. Let's try generating
a forest instead, in the prompt field type
in forest and mountains. Once done, click on Generate. The new images are a bit better. Of course, you can
keep generating images until you
get a perfect one. This isn't the simplest method for creating panoramic images, but it's essential for you
to learn how to move and re, position certain
parts of your photos. Now let's close this image. Click on Open in the Res folder, select the image number eight. The image depicts
a forested beach. We need to increase the width of the image in the top menu. Click on Image
from the dropdown, Select Canvas Size in the pop up window.
Increase the width. I set it to 3,750 pixels wide, but feel free to set it
to an even larger width. We won't be selecting and sliding the edges of
the image this time. Instead we'll opt for a
much simpler solution. Go to the filter
menu at the top. In the dropdown menu, click on Other and
then on offset, the pop up window,
you can easily slide the image both to
the right and the left. Slide the image horizontally
by roughly 1,000 pixels. Then click Okay. Next from the left menu, click on the rectangular
marquee tool. Use it to select the
white empty space, ensuring the selection slightly
overlaps into the image. Once selected, click on generative fill in
the prompt field. Don't write anything this time. And click on the
Generate button. The AI has generated the images. They look good,
but let's verify. First, merge the layers. Right click on the background
layer in the pop up menu. Click on Merge Visible. This allows us to move the
image as a single entity. If we don't do this,
the background and our AI generated layer will move separately under
the filter menu. Click on Other and then on
offset in the pop up window. No matter where we move the
image, it remains seamless. It's that simple to
create a panoramic image. You can even view our
panoramic image on Renders Stuff.com To do this, save our image in the File menu. Click on Save As and save
the image in Jpeg format. I saved mine as test. Once saved, open your
browser and go to Renders Stuff.com on the site. Click on on line 360,
Panorama Viewer. Upload our image by clicking on the upload image
from file button. That's how our image
looks in panorama view. To achieve a better resolution, it's recommended to create
an even larger image. I hope you enjoyed the lesson
and I'll see you next time.
15. Fixing Pictures: Hi there. In today's lesson, we'll be fixing and retouching images using generative fill. Let's dive into the lesson. Click on Open in the Res
folder, Select number ten. On this image, we see a very common mistake
on the left side. A small part of my finger
is visible in the photo. Such image flaws can
be corrected with the generative fill in a flash
from the left hand menu, choose the lasso tool
and encircle the finger. Once you've done that,
click on Generative Fill, leave the prompt field
blank and click Generate. The AI did a great
job fixing the flaw. You can't even tell
the image was edited. Let's now fix another
common mistake. Close this image in the menu. Click on the open button
in the Res folder, select image number 11. Blurred objects are also
common mistakes in photos. This too can be easily corrected
from the left hand menu. Choose the lasso tool and
encircle the wooden spoon. Once you've done that,
click on Generative Fill, leave the prompt field
blank and click Generate. The blurred spoon is gone. The A. I did an
impressive job again, but there's another
way to fix this image. Right click on the generative
layer in the pop up menu. Click on Delete layer
using the Lasso tool. Select the spoon again. Once selected, click on Generative Fill in the prompt
field type wooden spoon. After typing, click Generate the AI generated
Beautiful Spoons. For us, the image looks so much better than
with a blurred spoon. Close in the menu. Click on Open in the Res
folder, select number nine. It's almost a given
nowadays that people only post perfect
photos on social media. This would be a perfect photo, if not for that pesky finger. If we just want a
minor touch up, let's remove the white
discoloration from the nail. Select the lasso
tool and circle it. Once done, click on
Generative Fill, leave the prompt field
blank, and click Generate. At the end of the
image generation, we received an error. The generated images were removed because they
violate guidelines. Of course, we didn't
violate guidelines, We just wanted to remove the white discoloration
indicating vitamin deficiency
from our nail. This part of Photoshop
isn't quite reliable yet, but we can easily
outsmart the AI. Click on generative fill
again in the prompt field, type a dot and click Generate. This prompt worked without
triggering the error. Over time such
errors won't occur, but it's expected that
in the next update, writing a.in the prompt
field won't work. If you want, we can also replace the entire finger using the lasso tool.
Circle the finger. Click on generative fill
again in the prompt field, type a dot and click Generate with the
woman's finger prompt. I received an error. I use the dot prompt, but by the time you
learn this lesson, you might be able to type
woman's finger without error. Our generated images
are complete. The entire photo looks so much better with the
corrected finger. With generative fill, we can easily correct nearly
any flaw in a photo. For fixing these flaws, use the knowledge
you've gained so far and your creativity. I hope you enjoyed the lesson. See you next time.
16. Create a Unique Social Media Image by Merging Photos: I there. In today's lesson, we'll create a unique
image by b***ding two photos together.
Let's get started. Click on Open in the Res folder, Select the image numbered 16, and while holding down
the left control key, also click on image number 17. After selecting both
images, click open. This way we will open two
images simultaneously. We'll enhance this
photo and superimpose a bear in the background.
Let's start editing. Switch to image number 16. Comparing the two photos, we can see that the bear's
background is too dark, contrasting heavily
with our main image where a man is squatting. We need to adjust the
background of the bear image. First, from the left side menu, select the Object selection tool and click on the background. This should select most of the
image except for the bear. Click on Generative Fill
in the prompt Type forest, and then click Generate. We might have gotten
better results with autumn pine forest, but this could still turn out fine once the generation is done. Let's see the images
produced by the AI. They aren't perfect, but I think the second
image will do. Let's merge the layers. Right click on the
background layer, then use the merge
visible command. After this, we can copy the
bear to the other image. Choose the rectangular
marquee tool. Select the bear with
a larger selection. Then go to the top Edit menu and select Copy
from the dropdown. Now switch back to image number
17. Let's Paste the bear. Click on the edit menu at
the top and choose Paste. To fit the bear in the image, we need to expand its width. On the right, click on
the lock icon next to background layer To make
our primary layer editable. To view our main image better, temporarily hide the
bear's layer layer one. Once hidden, click on
image in the top menu. Then canvas size in
the pop up window. Set the width to 2,400
pixels or larger. And confirm with, okay, I'll place the bear
on the right side. So let's move the man
to the left side. Select the move tool and start dragging the
image to the left. That looks good,
enable visibility for the bare layer layer one
and click on it to edit. Before we start editing, re, arrange the layers so the
bear isn't in the foreground. It's good to get
used to ordering layers based on their
spatial arrangement. Drag layer one below
layer zero using the left mouse button
from the left menu. Click on the move tool and
adjust the bears position, ensuring layer one is
selected at the bottom, reduce the size of the bear. Click on Edit in the top menu. Then select Scale
under Transform. Adjust the bear's size by
clicking on the image corners. Begin removing overlapping
parts from the images. Select the eraser tool and
choose layer zero for editing. I'm increasing the
eraser tools size to 105 pixels and
starting to erase. Switch to layer one
and continue erasing, ensuring we don't erase
any part of the bear. The goal is to leave some
space between the two layers. Helping the A, I generate
a seamless transition. I'll slightly reduce
the bear's size again. Click on Edit in the top menu, then scale under Transform. Adjust as desired. Now that I've resized it, I see a small portion
left that needs erasing. Use the eraser tool to
correct any imperfections. When corrected,
all the errors in enough space exists
between the two images. Merge the layers, right? Click on layer on E. Then choose Merge Visible from
the top right. Click on the fourth icon and
choose the magic wand tool. Once selected, click
on the empty space. Before using generative
fill, expand the selection. Click on the icon next
to generative Phil, and choose Expand Selection
In the pop ups set, expand by to 80 pixels. This gives the AI more freedom to generate the transition, making the result
more realistic. Click okay, then
generative Phil, leave the prompt, field
blank and click on Generate. Let's look at the
finished pictures. I think the first
one is the best. It looks quite good, especially given we only
used AI generation once. Still, we can
improve it slightly. Let's merge the layers, right Click on layer one, then click on Merge, Visible in the top menu. Click on Image, then auto tone, auto contrast, and auto color. I'll also adjust the light
on the bears hindquarters, outline the bears as
with the lasso tool. Then generate it
without a prompt. It looks much better now. Wonderful. It's that
simple to create a realistic and
entirely unique photo using our own images. I hope you enjoyed the
lesson. See you next time.
17. End of the Beginner Class: Hi there, You did
an excel***t job. Congratulations, you've
successfully completed the beginner class
course content. In this material, we've explored Photoshop and its generative fill capabilities and controls. By now, you possess
the skills to transform any image into
whatever you desire. But this is just the beginning. If you feel like you'd like
to practice the basics more, I recommend checking out
the practice videos. If you feel confident
about your basic skills and want to dive deeper into
understanding Photoshop, I continue with the course
and start the advanced class. Happy Learning, and
see you next time.
18. Introducing the Advanced Class: Welcome to the Photoshop
AI Advanced Class. Having mastered the basics
in the beginner class, we'll now delve deeper into understanding
generative fill, and learn a plethora
of techniques. In this module, we'll explore the use of
the partial mask. We'll transform a
damaged painting into a photograph and then turn
our photo into a drawing. We'll learn to perfect
the blur effect, how to merge multiple
images into one, how to create rain or snowfall on our
image, and much more. By the end of the
advanced class, there will hardly be any
image you can't produce using the generative fill
happy learning and perseverance with
the advanced class.
19. Layer Mask editing - How to use multiple generated images for one picture.: Hi there. Today we'll be
creating a new image by merging two generated images and editing the layer mask of
the generated image. Start by opening
image number three in the res folder using
the open command. This image features
a forest and a lake. Once opened, select
the crop tool, Expand the image size
in all directions. For this image, I've used
a 16 to nine aspect ratio. Make sure to verify that generative expand
is selected under Phil. Once you've expanded
the image as shown in the video type forest and lake into the prompt after
entering click on Generate. Let's wait a bit for the AI to finish
generating the images. There we go, The
images are ready. I'll zoom in a bit
for a better view. All three images
turned out fantastic. Choose the one you like
the most from the three. My favorite is the third one. Now, right click on the
generative layer in the Layer menu and
select Duplicate Layer. This will copy the layer. I'll now switch back to the
previous generative layer. I change the second one to another image then and turn off the visibility
for the first one. I prefer the left side of image two over the left
side of image three. I'll erase the
left side of image three and replace it with
the left side of image two. To do this, we need to erase the undesired part
in the layer mask, restore visibility
to all the layers. Then click on the
layer mask thumbnail of the topmost layer to edit. Select the eraser tool and start erasing the parts from image
three that you didn't like. It's advisable to choose a smaller eraser size if you
want a more precise eraser. You can also adjust the
opacity of the topmost layer. This makes the top layer
slightly transparent, allowing you to see what the
underlying layer contains. Once you've finished erasing, you'll notice some areas where the difference between the
two layers is visible. We'll smooth these out
using the smudge tool. Choose the smudge tool
from the left menu. Set the appropriate
brush size and strength. Once you've set them, start smoothing out the edges
of the layer mask. We're almost done. Check
the difference and temporarily turn off the
top layer mask this way. If there are any
remaining errors, you can easily spot them. I think it turned out great. This is how you can combine two generated images
to create a new one. I hope you enjoyed this tutorial and I'll see you next time.
20. Restore a damaged old paint to make a photo: Hi there. In this video, we'll be restoring an
old damaged painting to photo quality.
Let's get started. Click on open and
open image number 13. We will be restoring this image
to make it photo quality. Let's use the generative fill to correct the white spots where
the paint is chipped off. Let's start correcting
them with the Lasso tool. If quality is a concern, it's advisable to correct
small sections one by one, rather than fixing all
the white parts at once. We will delve deeper into
the reasons behind this. In the master class sessions, use the lasso tool to outline all major flaws and repair
them without any prompts. I speed up these monton
parts a little in the video. Don't miss this large crack. Circle it, and without any
prompts, click on Generate. The tooth didn't
come out perfect, but let's deal with that now. If you want to select multiple
things simultaneously, hold down the left shift button continuously while drawing. We're done fixing
the major errors. Click on the back ground
layer from the pop up menu, select Merge Visible
to combine all layers. On the background layer, I unlocked the image editing
by clicking on the lock. But this isn't crucial for us. Now if you click on it, our layer named Background
will be renamed layer zero To further
enhance the image, we need to create
a partial mask. Click on Edit in
Quick Mask mode. From the left menu
in the top menu. Click on the Edit
tab and choose Fill. From the dropdown
in the window that appears under Contents,
choose Color. Adjust the blue channel to 30% The higher you
set this percentage, the more the generated image will differ from the original. Once done, click okay and
then click okay again. Now we can see on the image that the partial mask is ready. Now let's exit the
Quick mask mode by clicking on this icon
from the left menu. Even though the red
layer disappears, it's still there,
just invisible. Don't select anything, just
click on Generative Fill. Leave the prompt field
empty and click Generate. Because the image size is large, it will take some time
to generate the images. The AI has finished
generating the images. For me, the first
image turned out best. Select the image
that you find best. Then on the right side under the layer tab,
adjust the opacity. The image I generated
looks best at 80% But how much you
adjust is up to you. The painting already
looks much better. Merge the image into one
layer by right clicking on layer zero and
selecting Merge Visible. Now let's create
another partial mask. Follow the previous steps. Click on it and quick mask
mode from the left menu. Then in the top menu, click on the edit tab and
choose Fill From the drop down in the window that appears under Contents
choose Color. Adjust the blue channel
to 30% Once done, close the windows
with okay buttons and exit the quick mask mode. Now click on Generative Fill. You can leave the prompt
empty, or if you wish, experiment with prompts
like realistic. Then click Generate. Once the images are generated, select the best one and
adjust its opacity. When done, you can
merge the layers again. You can repeat this kind of image generation as
many times as you want. The more images we generate, the closer the quality of our image will be
to that of a photo. If you set the
partial mask not to 30% but to 20% or less, it will take longer to
reach photo quality, but the result will deviate
less from the original image. It's also worth correcting minor errors that might
arise during the process. Here, for instance, the eye
looked odd, which I fixed in the top image menu under
the adjustment section. Don't hesitate to make changes. Be daring and experiment. I achieved this image quality after five generated images. I was a little impatient, so her mouth became
a little different. But I believe the result
speaks for itself. I hope you enjoyed this tutorial and I'll
see you next time.
21. Unique Composite Images with Special Effect: Hi there. In this lesson, we'll learn how to transform
a mundane photo into a stunning image using generative fill.
Let's get started. First, click on Open and select the image numbered 15
in the Res folder. Once the image
loads in Photoshop, navigate to the top menu, click on File, and then click
on Open in the Res folder, open the image numbered 14. What we're aiming to do is
extract the ballet dancer from the photo and superimpose
her onto the phone image, giving her a holographic
style on the left toolbar. Click on the rectangular
marquee tool and select the
girl in the photo. Then navigate to the top menu. Click on it. From the
dropdown, select Copy. Now switch back to the image
number 15 in the top menu. Click on it, and from the
dropdown, select Paste. I imagine the image
as her dancing in holographic form
above the phone screen. The phone is at the
center of the image, but I want the girl to
be the focal point. Hence, we'll lower the phone
a bit. Let's get started. For now, let's hide the
new layer by turning off its visibility on
the back ground layer. Click on the lock icon
to make it editable. From the left tool bar, choose the move tool
and drag the image downward just a bit as a
result of moving it down, The top part of the
image is now empty. We can fill this using
the generative fill. Using the left toolbar. Select the rectangular
marquee tool and mark the empty
space at the top. Click on generative fill and generate the missing
part without a prompt. The first generated
image looks good. Let's merge the phone image with the newly generated right click
on Layer and see Visible. Now our background is ready and we can begin working
on the ballet dancer. Turn on the layers visibility and click on layer
one to edit it. First, let's remove
any unnecessary parts of the image from
the left toolbar. Choose the Object selection
tool and click on the girl invert the selection
by going to the top menu, choosing Select, and clicking on Inverse from the dropdown. We've now highlighted all the unwanted
parts of the layer, delete them using the Dell key, or navigate to the top menu. Choose Edit. And
from the dropdown, select Clear, Deselect
the selection by clicking outside the image, or go to the top Select
Menu and click Deselect. Move the girl to the
center of the image. Select the Move tool
from the left menu, drag the girl into position. I would like to slightly
reduce the size of the girl. Navigate to the top menu, select edit, then choose
transform from the dropdown. And within it, opt for scale. I've only slightly
reduced her height. Now we can begin transforming the girl from the left toolbar, select the object selection
tool and click on the girl. Once selected, click on generative fill and type in
the prompt green matrix. After entering the
text, click Generate. You can use a different prompt. I have tried a prompt that
makes glowing random outlines. The AI is done
generating the images. I like the first one
best reduce the opacity, reduce the transparency
of the image. Then right click on the generative layer and
choose duplicate layer. I set the new layers opacity to 100% generated a new layer using the same green
matrix prompt. Once the AI finishes generating, I opt for an image with
illuminated outlines. Among the b***ding modes, I select Color Dodge. Feel free to experiment
with the b***ding modes. Once the b***ding mode is
set, adjust the opacity. Click back on layer one and
reduce its opacity as well. The image is starting
to take shape. Let's correct some
minor imperfections. Click on the topmost generative
layer Mask thumbnail. And then use the zoom tool
to magnify the girl's head. I don't like the see
through effect on her head. Let's fix this on the left side, select the eraser tool and begin erasing this layers
section around her head. Once done, click on the layer mask thumbnail of the layer beneath and
begin erasing the part around her head there as well. And we're done. Within a few minutes,
we've managed to create such an
incredible image. I hope you enjoyed this
lesson. See you next time.
22. Covert your Image to a Paint: Hi there. In today's lesson, we'll be transforming
a photo into a painting using the
generative fill feature. Let's dive right
into the lesson. Click on Open within
the Res folder. Select image number six. This image features a blond
haired girl on the beach. If we wish to modify
an existing image, our approach will differ from what we've
done in the past. Merely selecting an area
and typing paint into the generative Phil
prompt will create an entirely new painting
unrelated to our original photo. Let's give it a try. Select
the rectangular marquee tool, highlight the entire image, then click on Generative Fill in the prompt box type
in watercolor painting. Once entered, hit
the Generate button. Ai generated the images. As you can see, it bears no resemblance to
the original photo. Right click in the
bottom right menu under the Layers tab on the
generative layer. Choose delete layer
to remove the layer. To ensure our actual
image is only modified, we need to create a partial mask first from the left menu. Choose Edit in Quick mask mode. Once selected,
you'll notice that the image under layers
has turned red. Next, click the top
Edit menu and choose the Fill option in the window that appears
for contents select color. Adjust the blue channel
to 30% one set. Click Okay and then okay again. We're done. And we can now see the completed partial
mask on our image. Exit the quick mask mode by clicking its icon
in the left menu. Although the red
layer disappears, it remains present
but invisible. Now click on
generative fill again and type watercolor painting
into the prompt box. After typing, hit
the Generate button. While the results
might not be perfect, it's evident our photo has
been repainted in water color. If we desire a better image, we can keep generating
images with the AI as many times as we wish. Pick the best looking image. We're now going to
frame this image. Click on Image in the top menu. Then from the dropdown,
select Canvas size. Increase the width and height of our workspace by
200 pixels each. The width will be 1,400
pixels height, 2000 pixels. After adjusting hit, okay, now the image has a white frame. While our image looks great
with this white frame, let's generate a
proper frame for it. Use the zoom tool to shrink
the image for a better view. Choose the magic wand tool and click on the white
area to select it. I'd like the selection
to be a bit larger by clicking on the icon to the right of the
generative fill. I'll expand Selection. This lets us increase the
selected area in the pop up. Specify how many
pixels to enlarge the selected area
by then click Okay, I expanded mine by ten pixels. Now turn off the visibility of the layers on
the bottom right. This is necessary because if they remain active, generative, Phil will consider
these layers when generating the image frame,
which we don't want. In the video, I
created a new layer, but this is only necessary when our image has just one layer. However, in our
current situation, besides the background layer, we already have a
generative layer. Hence creating a new
layer isn't essential. Click on generative fill, then in the prompt box
type old painting frame, once entered, hit
the Generate button. Now our frames are ready. The first one is
clearly the best. After choosing your
preferred frame, restore the visibility
of the other layers. There you have it, our
framed watercolor painting. With this lesson,
you've learned how to repaint images using
the partial mask. We can not only repaint
images but also use it for many other functions which will explore in
upcoming lessons. I hope you found this lesson
useful. See you next time.
23. Perfect Background Blur effect: Hi there. In today's
video we'll learn how to easily blur the background of an image and how the generative, Phil can assist us in this task. First, click on Open and load image number 14
from the Res folder. We'll be blurring the
background of this image. Our first step will be to
move the girl to a new layer. If you click on Select Subject, it should ideally
select the girl. However, the A I failed
to fully do so this time as it only partially
selected her left hand. If this happens, go to the left menu and choose
the object selection tool. Then click on the girl, especially on the
missed out parts. The selection was recalculated
and looks much better now, but there's still an error. It missed out on some of
her hair above her ear. We'll need to fix
this. Manually zoom into the girl's head
using the zoom tool. Right click on the
fourth icon from the top and select
Quick Selection tool. Choose a smaller brush size and start selecting
the missed areas. Zoom out on the image. It's better to click directly on Fit screen instead
of zooming manually, like I did in the top menu. Click on the Edit
tab and select Copy. Let's create a new layer
and paste the girl onto it. On the bottom right, click on the icon that
resembles a plus sign. Once the new layer is ready, go back to the edit tab in the
top menu and choose Paste. We've now created a new
layer with only the girl. Let's create another layer, this one just with the
background without the girl. First, turn off
the visibility of the new layer we just
created with the girl. Click on the background
layer from the left menu. Once again, select the object selection tool and
click on the Girl. Now we'll be erasing the girl
from the background layer. It's a good idea to slightly over select the subject
you want to remove. So the generative fill can
work more efficiently on the generative taskbar next
to the generative fill icon, expand selection and
expand the selected area by 40 pixels. That
looks about right. Click on generative fill
in the prompt field. Don't type anything,
just click on Generate. The AI will now produce a layer without the girl showing
only the background. Let's check the
images created by the AI Images 1.2 are perfect, select the best looking image and then merge the two layers. Click on the background layer and select the merge
visible command. Now we have two layers, one with only the background
and another with the girl. Turn the visibility of layer one back on so you can see
the girl in the image. It's time to blur
the background. Ensure the background
layer is selected and then click on the filter
tab in the top menu. There are various ways
to blur the background. The most commonly
used is ***s blur. Within the blur option, this will blur the entire image. However, this won't work for us, as it would blur the
ground beneath the girl, resulting in an odd look. We need a different
type of blur. Click on cancel again, choose Filter in the top menu. But this time go to Tilt
Shift under Blur Gallery. This effect creates
a horizontal band that blurs the image vertically. Click on the white dot and drag it down to the
bottom of the screen. That's much better. Once
you've adjusted it, click Okay, Our image already looks fantastic. But let's refine it a bit more. Turn off the visibility of the background layer and make some corrections
on the girl. The upper part of her
left hand isn't perfect. Zoom in and use the eraser tool to erase the gray areas
between her fingers. I didn't find any other
major errors on the girl. Select the zoom tool, click on Fit Screen and restore the visibility
of the background layer. The most noticeable
issue right now is a slightly pixilated
outline around the girl. We'll fix that next. The left menu. Select the object selection
tool and click on the girl. Once selected on the
generative taskbar next to the generative fill, choose select border
in the pop up window. Input two pixels for the width. And click okay. We've now selected the girl
and the area around her. Click on Generative Fill, and then without adding a
prompt, click on Generate. Let's check the results. Select the best one and play around a bit with the opacity. The result is flawless. It's that easy to
enhance our images. You can further work on
the image if you want. For instance, you could give the girl angel wings or add
extra effects to the image. The only limit is
your imagination. I hope you enjoyed this
tutorial. See you next time.
24. Make a hand drawing from your photos: Hi there. In this lesson, we'll transform a portrait into a hand drawn image
using generative fill. It's a quick and simple way to turn your photos into sketches, making them a perfect update for your social media profiles.
Let's get started. Start by clicking
on Open and select the image number 18
in the Res folder. We're going to create
a sketched version of this beautiful girl. First, let's zoom
in on the image. Click on the Zoom tool, then select Fit Screen. From the top options, I had a simple black and
white sketch in mind. We'll begin by turning our image graycale
from the top menu. Select Image in the dropdown. Within adjustments, choose the black and white
option in the pop up window. You can leave everything
on default settings, but if you wish, you can also
select different colors. Now our image is in gray scale. But before we can
use generative fill, we need to create
a partial mask. Let's do that next.
In the left menu, click on Edit in
Quick Mask mode. From the top menu, choose Edit. And then fill from
the dropdown in the window that appears
under contents choose color. Change the blue channel
to 30% in the pop up. Close the windows
by clicking Okay. If you see this red layer, you've successfully
created a partial mask. Now exit the quick mask mode. Editing from the left menu. Now click on Generative Fill in the prompt type charcoal
face illustration detailed pen and then click Generate the A I generated the images for me. The third one looks the best. Don't hesitate to generate a new one if none of the
options appeals to you. Once you've chosen
the best result, set the b***ding mode
of the generated image to overlay The image. Already looks great
at this point, but we can refine it further by creating another
partial mask. Click back on the
background layer, then enter the edit
in Quick mask mode. Again from the top
menu, select Edit, and then fill under Contents, Pick color again, change
the blue channel to 3% in the higher this
percentage there, the generated image will
differ from the original. For now, I'd like it to
deviate only slightly. Close the windows by clicking okay and exit the Quick
Mask Mode editing. Now click on Generative Fill. This time leave the prompt field blank and just click Generate. The AI is done with
creating the images, but this layer became
the second layer. We hardly see the result from the first layer to
see the result, turn off the visibility
of the first layer. As we can see, it barely
differs from the original. Choose the best image. Then turn the visibility of
the first layer back on. Use the left mouse
button to drag the recently generated
layer to the top. It's the uppermost layer. Set its layer opacity or transparency to 50%
There you have it. Our image is complete
and looks fantastic. Simple to create a
perfect sketch of yourself with this technique. You can also make oil
paintings or even transform your photos
into cartoon characters. Your imagination
is the only limit. I hope you enjoyed the lesson
and I'll see you next time.
25. Creative Advanced Selection: Hi there. In this lesson, we'll be b***ding two photos with very different
lighting conditions. It won't be an easy task, but AI will assist us. Let's dive into the lesson. Click on Open in the Res folder. Select image number five now, while continuously pressing
the left control key, Also click on image number 17. After selecting both
photos, click on Open. This way we'll open both
photos simultaneously. We'll be placing the two girls from another photo
onto this one. Begin by removing the
man from this photo. Choose the lasso
tool and outline the man after outlining him, click on Generative
Fill in the prompt. Don't enter anything, just
hit the Generate button. The AI has removed the
man from the photo. Choose the best image, then switch to image number
five with the two girls. We'll be copying these two
girls onto the other photo. First, let's select
the girls for copying. Click on Select Subject below the A. I
recognized the subjects, but the selection isn't perfect. It didn't capture the
left girl's shirt and the hair
selection is flawed. We can get a much
better result by choosing the cloud service
for the selection. Let's try it out
from the left menu. Pick the Quick Selection
tool in the upper toolbar. Next to Select Subject, you'll find a downward arrow. Click it and select
the Cloud option. Once chosen, click on the
adjacent Select subject. This gave us a much
better selection. It even detected the
area under the hand. We can refine the
selection further by choosing Select and Mask
next to generative fill. Here you can clearly see which parts of the
image are selected. There are many options
to refine the selection. It's worth trying out
all the settings. Once adjusted to your liking, click on the OK button. Now let's copy the selected
girls onto the other photo. From the top menu,
select the edit menu. Then from the dropdown, click on Copy, switch
back to image number 17. Then from the top menu, select the edit menu and
click on the Paste option. We've pasted the
girls onto the photo, but their size isn't right. We need to enlarge them to
fit the image at the top. Click on the Edit menu. Again, in the dropdown
under Transform. Choose the scale setting. Now we can freely
adjust their size, enlarge them, and drag them
to the appropriate position. This will do, it's evident that they don't
b***d well into the image. The two photos were taken under very different
lighting conditions. The light source
is different and even the sharpness
of the image varies. However, using AI and a few techniques in
just a few minutes, we can b***d the two photos
quite well, if not perfectly. But first, let's start by converting the background
into a single layer. Turn off the visibility
of layer where the girls are so we don't b***d them into the
background for now. Once done, right click on the background layer and select the merge
visible command. Let's try to bring the two
images closer together. Select layer one for editing. Once selected in the upper menu, click on the image option in the dropdown,
click on Adjustments. Here you can adjust almost
all aspects of the image. Don't be afraid to experiment and explore all the options. Consider visiting levels and curves to fine tune
brightness and contrast. Adjust the color balance to
match color temperatures. With hue and saturation, you can adjust the saturation. And with selective color, you can fine tune
specific colors. The match color and photo filter options are also very useful. But we won't use them for now. You'll see them in the
next How to fix video. For now, I'd like you to
manually adjust the colors of the image as this will
provide a deeper understanding. Once you've adjusted
the image settings, you can proceed
to the next step. Generate the legs of the
girls using generative Phil. Choose the rectangle
tool from the left menu. And select the empty
area below the girls, where we'll generate the legs. After selection, click
on generative Phil. Don't enter anything
in the prompt. Just click Generate. Generating Legs and arms
with AI is chal***ging, especially when subjects
are very close together. The AI has generated the images, None of them are
particularly satisfying. I'll generate them again
and hope for better luck. These turned out even worse. I see potential in
the sixth image, so I'll choose that one. But it certainly needs
tweaking to correct this. First merge the two layers, turn off the visibility
for the background layer. Then right click on layer one and choose the merge
visible option. After merging, restore
the visibility to the background layer. From the left hand menu, select the lasso tool and circle the flawed area
and the girl's arm. If you wish to adjust the
selection continuously, press the left shift
key to add to the area, or the left Alt
key to reduce it. Once selected, click on generative fill in
the prompt box. Don't type anything, just
click on the Generate button. Let's see how the
image is turned out. The second one is perfect, merge the layer again. Turn off the background layer. Then right click on layer one and choose the merge
visible option. What I don't like
is the green light on top of the
brunette girl's head. It completely stands out from the image. So
let's fix that. Circle it with the lasso tool, then click on generative fill. Again, don't type anything
in the prompt box. Just click on the
Generate button. Let's see the results. The AI did a great job making
it look much more natural. Let's merge the layers. I don't want to make any more
corrections to the girls, so we can also merge them with the background layer to make the image look
even more natural. I'll generate another layer to further balance the
lights and colors. For this, we'll create a partial mask in
the left hand menu. Click on Edit in Quick
Mask mode in the top menu. Click on the Edit tab
and select Fill from the drop down menu in
the pop up window. Under Contents choose Color. In the next window, adjust the blue channel
to 7% Click okay to close the windows and exit the Quick
mask Mode Editing. Now click on Generative Fill. Again, don't type anything
in the prompt box, just click on Generate. The AI will recreate the entire
image using its patterns, making the generated image look much more
natural than mine. However, I've set the partial
mask to just 7% It makes only a very slight change the AI has generated the images, We can see that the
heads appear distorted, but we don't need to
worry about that. Set the b***ding mode of the
newly generated layer to hard light and reduce its opacity to 15 to
20% With hard light, the images get a strong
contrast effect. And it'll be less noticeable that the two layers
were different, making it look
somewhat more natural. Of course, we can add more
partial masks if desired, but the image might
distort over time. Merge the layers using the
merge visible command. Now that we have one layer, we can start fine tuning the entire image using
the adjustments under the image menu. We're done. In just a few minutes, we managed to create such an amazing image from two completely
different pictures. It's almost impossible to notice that it was created
from two images, even though we didn't
use all available tools. Further refining of the images will be covered in
the how to fix on. Exceptionally save this image as we'll use it in
the next video. I hope you enjoyed the
lesson. See you next time.
26. How to Fix after Generative Fill: Hi there. We've
already learned how to fix minor flaws
in our photos. Now let's look at
how we can enhance our merged images made from multiple photos to make
them even more realistic. Click on Open in the Res folder, Select the image numbered 17, and then click open
if you've opened it, now open the image we created
in the previous video. If you haven't saved it,
you can find my version in the practice folder
in the top menu. Click on file, then open
inside the Res folder, Open the practice folder, and select the image named
Pan two. Then click open. We'll refine this image further. When you merge two images, the most noticeable
difference between them often lies in color
and shade variations. Photoshop allows us to transfer the color settings from one
image or layer to another. Let's try it out in the
top menu. Click on Image. In the dropdown, under
the Adjustments tab, choose Match Color in
the pop up window. For the source, select
the image numbered 17, and then you can
start customizing settings under Image Options, Feel free to deviate
from my settings. Once done, close with, okay, let's see the difference. It looks much more natural. It's worth starting with
this setting when b***ding to images even before
you begin editing them. There's another useful
setting that can greatly enhance the image to make
it look more natural. In the top menu, click on Image. In the dropdown, under the Adjustments tab,
choose Photo Filter. This option applies a
color filter to the image, altering its color,
temperature, and hue. The difference is
clearly visible. Choose the cooling filter, LB B, and adjust the density, 10-15% then close with. Okay, the improvement is clear. It looks almost like
an original photo. Apart from colors, there's a minor issue with sharpness
between the two images. The girls and the background
differ in sharpness. We can tweak it a bit
in the left menu. Click on the Quick
selection tool, the dropdown besides select Subject chose the Cloud option. Then click Select Subject. We've now selected the girls, but we need the background. Invert the selection in the
top menu, click Select, and then inverse
from the dropdown, now we've selected
the background. I reduce the selection by one pixel contract selection,
but it's not crucial. Now that we've selected
the background, let's slightly adjust its blur. In the top menu, choose Filter. And under Blur Gallery, select Tilt Shift,
Start Adjusting. I only want a subtle change, so I set the blur
to three pixels. One set. Click. Okay, let's
compare the final result. I think it's stunning
in just a few minutes, we've seamlessly b***ded
two very different photos. But not only blur
can be utilized. The sharpened tool can be equally useful for
sharpening parts. There's one more
image to practice on. Close these images and
return to the menu. Click open inside
the Res folder, open the practice folder, and select the image named
Pan one. Then click open. You can find the making of this image in the
practice video section. After opening the image, also open the original
in the top menu. Click file, then open
in the rez folder. Select image number 19 and click open switch back to the
image named Pan One. Start again with match
color in the top menu. Click Image in the dropdown, under the adjustments tab. Choose Match Color in the pop
up window for the source. Select image number 19 and begin customizing settings
under Image options. Once done, close with, okay, now set the photo filter as well in the top menu.
Click on Image. In the dropdown, under
the Adjustments tab, choose Photo Filter
for this image, the warming filter looks better. I'll use that upon closer
inspection of the image, there's an issue with sharpness. The bear's body and
its surroundings are too sharp compared
to the archer girl. Unlike the previous image, we can't use the
same blur filters. In such cases, it's
best to blur manually. The left menu select
the blur tool. Adjust the blur intensity to low visualize the bear and its surroundings in relation to the girl
and her surroundings. If you see the difference and can visualize the bear in space, start blurring the layers. First, I'll start with the
surroundings of the bear, which are too sharp. Then the bear's back side, which should appear more
blurred than its head. It looks much better.
Now, another tool I often use when editing images
is the Camera Raw filter. In the top menu, Click on Filter and choose Camera Raw
Filter from the drop down. Here you'll find nearly
all the adjustments you need to make the image even
more beautiful and realistic. It's worth going through and
trying out all the settings. Once you're done, click Okay. Let's check the
difference before and after the change is evident. It turned out incredibly well. I hope you enjoyed this
lesson. See you next time.
27. Reflection and Rain: Hi there. In this video
I'll be demonstrating how to create reflections
and rain using generative. Phil, let's get started. Click on Open and
select image number 16 in the Res folder
with generative Phil. It's a breeze to create a reflection or bring rainy
weather to our image. In this tutorial, we'll be
transforming this bear image. The bear will have
a lake in front of it and it'll be raining
in the picture. Once you've loaded the image, select the lasso tool from the left menu and outline an
area in front of the bear. Once you're done, click on Generative Fill in the Prompt
Field Type in Reflection, and then click Generate. For the prompt, you can also add lake or puddle next
to reflection. But for forest type
images like this, the AI will almost always generate a lake unless
you specify otherwise. For city images, it
might create a puddle. I generated six
images with the AI, and this one turned
out the best. Check out the bear's reflection. It's stunning
generative fill can create lifelike reflections
in just a few seconds. The reflection for metals
isn't perfect yet, but I'm sure Photoshop is already working
on improving that. But it's not just good at
generating reflections, it can also make realistic
rain and snowfall. Let's make this image rainy. To create rain, we
need a partial mask. First, merge the layers, right click on
background and choose the Merge visible option
in the left menu. Click on Edit in
Quick Mask mode. In the top menu, click on the Edit tab and
select Fill From the dropdown in the
window that appears under Contents choose
Color in the pop up. Adjust the blue
channel to 12% Click Okay to close the windows and exit Quick
Mask Mode Editing. Now you can click on Generative
Fill in the prompt Field, type in in, and then
click Generate. I generated nine images with
the last two being the best, which was what I had in mind. If you also managed to
generate a great result, set the b***ding mode of the layer you just
generated to lighten. There you have it. Our
image is complete. It turned out incredibly well. The picture is
entirely realistic. The AI even created the ripples from the
raindrops on the water. We can create stunning images in just a few minutes
with generative fill. I hope you enjoyed this
lesson. See you next time.
28. End of the AdvancedClass: You did an excel***t job. Congratulations, you've
successfully completed the advanced class material. In this course, we delve deeper into the generative
fill technique. You now possess
confident knowledge and can create or
modify any image. If you feel you'd
like more practice, I suggest you watch the
practice videos if you wish to explore Photoshop
AI even more deeply. I recommend the master class. In the master class, we explore the workings of AI and how such a
system is structured, wishing you continued,
enjoyable learning.
29. Introducing the MasterClass: Welcome to the master class. This course is designed
to help you better understand the system
behind generative. Fill the artificial intelligence itself and how it
functions compiling. This material was a
chal***ge for me as well. Although I've been working with AI and machine learning
for several years, every system is unique. Furthermore, Photoshops
AI is not open source. We have no direct insight
into its workings. In essence, we have very little information about Photoshops artificial
intelligence. Given this, much of the
content is based solely on my own experience and knowledge and does not
include external sources. There might be
some inaccuracies. However, I trust that you will still learn a lot
from it and gain a deeper understanding of the artificial
intelligence behind generative Phil Happy learning.
30. Database Structure: Generative fill leverages
artificial intelligence to alter content within
a selected area. This AI was trained on vast amounts of
image data and text. This enables it to discern the relationships
between text and images. Using this knowledge
to generate images. Let's delve into
how Photoshops AI operates upon entering a prompt, say hat, into the generative
fill and clicking on the AI first
analyzes our image. It identifies every crucial
element in the picture. It then tries to
comprehend the prompts, meaning and determines the type of image it should create. To do this, it taps into its
internal knowledge and data, such as vocabulary, grammar, semantics, and visual concepts. Using the information
it's formulated, it searches its database
for suitable images. Once located, it attempts to
seamlessly combine images, for instance, of
a hat and a bear. Adjusting their positioning,
orientation, lighting, and perspective to make them
appear as a coherent whole. Finally, it smooths, sharpens, and colors the image. From this, it's evident
that the task it performs is more intricate
than popular AI, like mid journey and stable
diffusion Photoshops. Ai likely employs a
reverse diffusion process, similar to stable diffusion
when generating images. This begins with pure noise, which is gradually removed
until a clear image emerges. Noise associated with the core is sampled from a
Gaussian distribution. At every step of the
diffusion process, it's added to the image. A neural network governs the
reverse diffusion process, predicting the amount of noise to be eliminated at each step. However, Photoshop, AI uses a new version
of the diffusion model, the generative fill in. Photoshop uses an
algorithm that breaks down an image's structure
into multiple elements. This means the algorithm can recognize different
elements in an image, such as objects, textures, colors, lights, and perspective. This allows for a more
accurate and lifelike fill compared to traditional
algorithms. This technique has
both pros and cons. The advantage is its
non destructive nature. The fill doesn't alter the
original image content. It takes into account the
image's structure and style and can more easily
generate complex images. However, a significant
drawback is that generating an image demands more time
and resources than other AI, like stable diffusion
or mid journey. Therefore, to avoid extended
image generation times, Photoshop trained its database
using smaller image sizes. With stable diffusion,
the size of the images used in
an average Laura or checkpoint model can
range 512-1024 pixels. While Photoshop can use
a fraction of that. I believe that during the
Photoshop beta phase, the A I database was
trained with images of perhaps 128 or a
maximum of 256 pixels. However, to better quality another AI up scales
these images, this meant faster AI training, lesser resource requirement
for image generation, and quicker overall process. But there's a downside. More complex things
such as faces become distorted when
upscaled to larger sizes. Let's illustrate
with an example. If I select a smaller area on an image and input
the prompt girl, the results are clear
faces with no distortion. If we select a larger
area and input girl, even without selecting a
significantly large section, the faces and bodies
are distorted. Larger images make the
distortion even more noticeable. However, if we isolate
the girl's face with a smaller selection and
generate using the girl prompt, we get a clear and
normal face because the AI didn't need to upscale the face
preventing distortion. The same can be
done with a hand. If I selected in a small box, input the prompt hand, A non distorted realistic hand with five fingers is produced. Photoshops AI is capable of
creating entirely realistic, flawless human figures and other intricate objects after
the Photoshop beta phase. They'll likely use a database
trained on larger images, resulting in better
quality images. But you can still
use this technique, just you can select twice
or even larger areas. I hope this gave you a deeper understanding
of Photoshops. I see you next time.
31. Max Sample Size: High there. From
our previous video, we already know that
the trained images in Photoshop Beta have a
very low resolution. However, we can still get a high quality generated
image thanks to upscaling and by generating multiple distinct elements
within a selected area. Think of it this way. When
we generate a forest, the AI pulls individual
images and patterns of trees from the database
and places them side by side. The resulting forest
might be 800 pixels wide, but it's made up of many
128 pixel wide trees standing next to each other. There's another limitation to
the generative fill though. The maximum generated
size cannot exceed 1024 pixels
in width or height. What does this mean in practice? If we generate an image on a selected area
larger than this, Photoshop will stretch it out. If we generate an image
that's 2048 by 512 pixels, the Photoshop I
will create a 1024 by 256 pixel image and simply
stretch it afterwards. This results in the image
becoming much blurrier. This limitation was necessary because the larger
the generated area, the more time and resources it takes to produce the image. Hence, they set such a limit. Let's see this in action. I'll increase the image
side by 1024 pixels. I've selected an
area that's 2,400 pixels high and
1039 pixels wide. Since the longest side is significantly more
than 1024 pixels, it's sure to be very blurred. Indeed, the generated
image confirms this. Let's try it with a
1024 pixel square. Generate a square that's 1024 pixels in both
width and height, and observe the difference. The image generated within the 1024 pixels square
is noticeably sharper, although it's still a bit blurry compared to the original. This is because the AI
has to upscale the size, but at least it didn't
need to stretch the image, resulting in a better
quality image. To avoid upscaling, I'm going to generate
an image inside a 128 pixels square and then compare it with the
previously generated layers. The image in the
128 pixel square came out as sharp
as the original. It's clear that the AI doesn't need to upscale
the model here. Of course, it would be quite
time consuming to generate an entire image from
128 pixel squares, but if we want the best quality,
we might have to do it. If we're okay with
lesser quality, we can use the 1024
pixels square. I expect that after
Photoshop beta, the trained images will
be of higher quality and at least 512 pixels in size. I believe the final generative
fill will allow for a generated pattern size
greater than 1024 pixels. The tests I've just demonstrated should be done
after every update. Because with each update, the model database
used by the AI and the maximum width of the
generated image might change. I hope you found this lesson
helpful. See you next time.
32. Prompt and Word Weight: Hi there. In this video, we will discuss prompts and
delve into their analysis. Let's begin with defining
what a prompt is. A prompt is an instruction
or description given to the AI based on which
it generates the image. How does AI interpret the instruction
written in the prompt? During A I training, we associate keywords
with every image. The accuracy of
these keywords is vital for the AI to
generate what we desire. Another cornerstone of
prompt interpretation is the I's capability
to understand. When we say the AI
interprets a prompt, it means it can grasp
the meaning and semantics of words and
sentences in text. To image, generating AI
to work efficiently, it must comprehend
human language. This capability is
achieved through deep learning models that learn from vast
amounts of text data. This understanding
allows the AI to grasp complex commands like draw a green dragon sitting
on top of a mountain. Merging these two cornerstones leads to innovative
applications. For instance, the AI could
create a full illustration or even a detailed landscape based solely on a
brief description. To better understand and
manage the generative fill, it's essential to recognize
these two aspects. If we aspire to become
prompt engineers, we need to understand how the AI analyzes and
interprets our texts. It requires numerous hours of
familiarizing and testing. Currently in Photoshops AI, we don't have as many
customization options for prompts as we
do in mid journey. However, this will
change in the future. Just consider this
simplified mid journey cheat sheet over time, many of these features will be integrated into Photoshop AI. But discussing them now is premature as we lack
specific details. Technically, the only thing
we currently need to focus on when providing a generative fill prompt
is text weights. We don't even have an option
to adjust this separately. It's embedded in the logic of
AI's prompt interpretation. What does text weights mean? The A I tries to understand your prompt by assigning a
value or weight to each word. The term with the most
substantial weight becomes the primary factor in image generation as
demonstrated in the video. If we write cat nine times
and dog once at the end, the AI will always
generate a cat. This is because the weight of the word cat is significantly
more than that of dog. With similar prompts, you can test how the AI determines what to generate and understand how Photoshops words
weights function. From my tests, it's clear that the weight of words
decreases linearly. The first word has a higher initial value
than the second. The second words value is greater than the
third, and so on. Therefore, it's always
advisable to start our prompt with the subject and mention the least essential
aspect at the end. What else should we
pay attention to? We get the best results if
our prompt is 3-8 words, thus always try to be
concise and accurate. It's also essential to consider the relationships between words. Although not the
best illustration, it helps depict the
interrelation of terms. If we input the
prompt as wings fly, the AI is very likely
to generate a bird. This is because both words
relate to the bird word. In more advanced
neural networks, relations also have values. In this case, the words wings and fly strongly
correlate with bird. If you wish to become
AI, prompt engineers, your main task is to experiment extensively and observe
how the AI behaves. You understand the basics now, All it takes is persistence and a lot of practice to
fully comprehend. Remember, an AI prompt engineer
must continuously learn, since an AI can change considerably in just
a matter of weeks, I hope this helps in deepening
your understanding of prompts and AI functionality.
See you next time.
33. Practice - Make a windows background (Beginners level): Hello, in this video, we're going to
create a wallpaper. In the practice folder, you'll find an image titled, I Generated Art
Mountains, open it. This image is much smaller than the resolution
of my computer. Go to Image Dropdown menu
and the canvas size option. I'm going to change
the image size to 1920 pixels wide and
1080 pixels height. These values match the
resolution of my monitor. Once we click okay, we get a large white
border around our image, which we're going to fill
with generative fill. First, we need to
select the area. We can manually select the area using the
rectangular marquee tool. After selecting an area, press the shift key, and this way we
can add new areas. However, a much simpler solution is to use the magic wand tool. If your fourth icon at the
top is different from mine, right click and select
the magic wand tool. Before clicking on the
empty white space, make sure that the tolerance
setting is very low. This way we can select the
entire area with one click. Then it's worth expanding the frame with expand
selection so that there won't be a faint
white border between the new generated
content and the image. And the generated content
will better match our image. I'm expanding the selection
by 20 pixels here. Once we're done with this,
click on the generative fill. Leave the prompt blank.
We'll have to wait a bit. Now Photoshop has finished
generating the images. Click here to watch them. All three. Turned
out really good, but I like the
first one the most. After selecting one,
I merge the layers. I write, click on the background and select the Merge
Visible option. Now I've merged all
layers into one layer. Then I'll do some touch
ups on the image. From the image drop down menu, I select Adjustments, then click on the Brightness
and Contrast option. In this setting, I'm
going to increase the brightness and
contrast values. After doing this, I select
Auto Tone from the down menu, which automatically
optimizes the colors, now looks much better. We can further improve the image by fixing
these minor errors. Select the lasso tool, draw around the error, and remove them using generative
fill without a prompt. After we finished
with the errors, we merge the layers again. Right click on the
background layer and merge the layers using the
Merge Visible button and it's ready to save. Choose either a
JPG PNG file type and it's ready to use
as your new wallpaper.
34. Practice - Expert Merge (Advanced Level): Hi there. In this video, we'll practice b***ding
multiple images together. Let's get started. Click
on Open in the Res folder. Select the image labeled 16, then while holding down
the left control key, click on images 19.20 as well. Once all three images are
selected, click on Open. This will open all
three images at once. We'll overlay the bear onto the image where
the archer girl. We'll also replace
the bear's head with a much fiercer and
bloodthirsty one. First, we'll work with image 16. Click on it. If you
look at image 19, where we intend to
place the bear, it becomes clear that the background is totally different. If we want a quality b***d, we shouldn't just cut out the bear but also the
surrounding area. However, this background is
too different from the other. We need to generate a new one. Click on Select
Subject at the bottom. This selects the bear. The selection looks great, but we don't need the bear, we need everything else. In the top menu,
click on Select. Then in the dropdown,
click on Inverse. This inverts our selection, selecting everything
except the bear. Now we can regenerate
the environment. Click on Generative Fill in the prompt field
type in forest. Once entered, click on
the Generate button. Let's see how the
image is turned out. The first one will do. Let's cut it out from the side menu. Choose the rectangle tool and make a large
selection around the bear in the top menu. Click on it. Then
from the dropdown, click on copy
switch to image 19. I don't want to place the
bear next to the girl. So we'll enlarge the image. Use the zoom tool to shrink
the image for a better view. From the top menu,
click on Image. Then from the dropdown, click on Canvas Size
in the pop up window, change the width
to 2,700 pixels. Since specify which direction to increase the image size in
the canvas size settings, it centered the archer
girl. Let's fix that. From the left menu, select the move tool and drag the
arching girl to the left. To be able to edit
the background layer, we need to unlock it. Click on the lock icon in
the bottom right corner. Now you can drag the
girl to the left side of the image that looks right. Now let's Paste the bear. Click on Edit at the top, then from the dropdown,
select Paste. The bear is too large, so we need to reduce its size. Click on Edit in the top menu. Then under Transform,
click on Scale by grabbing the corner of
the selection scale down the bear and drag it to the right corner of the image that looks good. The color of the bear's image differs
slightly from the archer girls. Let's make some adjustments. Instead of adjusting the
bear, I'll tweak the girl, make sure layer zero is selected in the top
menu. Click on Image. Then within the adjustments tab, fine tune the settings, adjust the brightness
and contrast. I'll also slightly modify the curves, vibrance
and saturation. Finally, adjust the levels
that looks much better. Now let's add the
aggressive bear head to the bear switch to image
20 in the left menu, select the lasso tool and use it to draw around
the bear's head. Then in the top
menu, click on Edit. And from the dropdown,
click on Copy, switch back to image 19, and paste in the bear's head. It's too large, so we
need to scale it down. Before doing that, we should
rearrange the layer order. As you can see, the bear's
head is behind its body. Grab layer two, and while holding down the
left mouse button, drag it above layer one. Now in the top
menu, click on it. Then in the drop down under
transform, click on scale. Scale down the head to
fit the bear's body. It's ready, but the
hardest part is yet to come zoom in on the bear's head. Using the zoom tool, I've reduced the
opacity slightly to ensure that the head aligns
perfectly with the body. It looks good. Now we can remove the original
head of the bear. Turn off the visibility
for layer two. Then on the left hand menu, click on the Eras tool. Remember to select layer one as that's the one
we'll be working on. Now let's begin erasing. Once you're done, turn
on the visibility for layer two and turn off the
visibility for layer zero. And right click on layer one. Merge the layers using the
merge visible command. The next step is to b***d the new bear's head
with the bear's body. Using the generative fill, make a selection around the bear's head using
the lasso tool. Once done, click
on the icon next to Generative fill and
choose border Selection. If you've selected, like I did, a pop up will
prompt you to enter a value type in 34 pixels. The aim is to cover the gap
between the two bear parts. It's okay if it's not perfect. I have some missing areas too. For those, use the lasso
tool to add areas to the selection draw around them while holding down
the left shift key. Holding the left Alt key will let you remove areas
from the selection. Make sure not to select the
center of the bear's head. Once done with the selection, click on Generative Fill, leave the prompt field blank, and just hit the
Generate button. Our images are ready. They look decent, but
there's a small issue. The bear has lost its ears. It looks odd, even
from a distance. We definitely need to fix it. Merge the layers, but ensure
layer zero isn't selected. Once merged, draw two ears for the bear using the lasso
tool for the second ear. Don't forget to
hold the shift key. Click on generative fill type brown bear ears in the prompt field and
then hit Generate. I had to generate a number
of ears to get a decent one, but I'm still not satisfied
with the bear's left ear. Let's merge the layers then, using the lasso tool outline
the bear's left ear. Click on generative fill. This time I generated the ear without a prompt and got
a pretty good result. Now that looks good, let's merge all the layers using the
merge visible command. Don't forget, restore
the visibility of layer zero like me, choose the lasso tool and
start outlining the image. Make sure no part of
the bear is selected. After outlining, click
on generative Fill and hit Generate without
entering anything in the prompt. The images are now ready. The second image
turned out perfect. We can now merge all the layers. The image already looks great, but there are a couple
more techniques we can apply to enhance it. Let's create a partial mask
in the left hand menu. Click on Edited in Quick
Mask mode. In the top menu. Click on the Edit
tab and select Fill from the dropdown
in the window that appears choose color for
the contents in the pop up. Adjust the blue channel to
7% Confirm by clicking okay, and exit the Quick mask mode. Click on Generative Fill. Click on Generate.
Without a prompt, the AI will recreate the entire
image using its patterns, making the generated image more natural looking than mine. But I've set the partial mask to only 7% It only
tweaks it slightly. Both the bear and the
archer girl are distorted. But doesn't matter. We just need the lighting and
colors from this image. Set the b***ding mode for
the generated layer to hard light and reduce its opacity to somewhere
20-30% With hard light, the images gain a
strong contrast and the difference between
the two layers becomes less noticeable, making it look
slightly more natural. We can add more partial
masks if we like, but overdoing it might
distort the image. Our image looks fantastic, but it's still not perfect. To learn more about
refining this image, check out the how to fix
lesson in the advanced class. I hope you enjoyed this
lesson. See you next time.
35. New Feature - Reference Image: Recently, Photoshop
has introduced a new feature called the
reference image option. With this new feature, we can provide a
reference image to guide the AI in generating
the desired image. Let's try it out in practice. We will generate
this women's top onto the model we saw earlier. It's important to select exactly as much of the original
image as needed. For this image, we need to pay attention to the shoulder
part of the women's top. Let's start by
selecting the area in the original image where we
will generate the new top. After clicking on the
generative fill button, an icon will appear next
to the prompt field. Clicking on it will bring up
the reference image option. Allowing us to choose
a reference image. I will select the women's
top we viewed earlier. Even with the reference
image provided, it's useful to add a
prompt for more precision. I'll just type Top and
click the generate button. I chose a fairly complex
and detailed pattern for the reference image, to see how well this
option performs. Three images have
been generated. They are not bad at all. Although we can see
that they differ from the original image and
are not exact replicas. Currently, this
feature is not yet capable of precisely copying
more complex objects. For such detailed
and intricate items, it can only replicate the style. Let's generate more images. These are also quite similar. The style is captured, but it's not identical
to the original. It's worth noting that the entire reference image
is used as a pattern. This is why a necklace appears
on the generated images. Better results can
be achieved if we remove everything else
from the reference image. So in our case, only the clothing should
be in the picture. Now, let's try something much simpler to see how
the AI handles it. We will use these
glasses as a reference. The image contains
only the glasses which have a unique
but simple shape. I mark the location
for the sun glasses on the original image and provide the previously shown
glasses as the reference. The result is much better
than with the top. The third image is almost identical to the
reference image. However, compared to
the previous example, it looks less realistic
in the photo. The prompt processing
is still not perfect while you can
experiment with prompts. My experience is that more complex prompts result in a greater deviation from
the reference image. Therefore, it's better
to refine the image afterward through
post processing to make it more realistic. I hope you found
this video useful. Enjoy your photoshop experience.
36. New Feature - Remove Background: A new remove background feature has been added to photoshop. With just one click, Photoshop can detect the
subject and background of an image and remove the ladder instantly. Let's try it out. Click on the new remove
background button. The background has disappeared. Let's check the result. I'll zoom in a bit.
Due to the stray hair, this was a challenging
task for photoshop. In a few places, the
cutout isn't perfect. But overall, I'm satisfied
with the result. After removing the background, we can generate a new
one with another click. Click on Generate background. In the prompt field, type a simple prompt. I'll just type
mountains and a river. When generating the background, photoshop considers the
lighting and direction on the subject and its colors to create a background
that fits well. Since this is an urban image, it's not an easy task. The results aren't perfect, but maybe the second
image is the best. I tried several simple prompts, but the results
weren't convincing. This might change over time. To get the best background
for your image, it's recommended to provide a prompt similar to the
original background. This graffiti brick wall image turned out particularly well. I hope you found this lesson
useful. See you next time.
37. New Feature - Generate Similar: In this video, I will introduce a new photoshop feature
called Generate similar. Let's see what this
new option can do. First, select an area where you want to use the
generative fill feature. Then click on Generative fill. I will give a simple
prompt Gentleman's hat, and then click Generate. Three generated
images are now ready. The second image
looks very good, but let's work with
the white one. I select the image
with the white hat and click on the three
dots next to generate. In the drop down menu, you'll find the generate
similar option. Click on it. You can see that
all three hats are now white and very
similar to the original. Let's try the same
with a black hat. Now, all three hats are black. However, there is currently
no feature to specify how similar the generated images should be to the original. Additionally, there
are other limitations. Let's change the prompt to party hat and click on
the generate button. Select the second image and click Generate
similar a few times. You will notice
that our party hat starts to look
more like a crown. This shows that generate similar
does not use our prompt. It only samples from the generated image and
begins to alter it. I hope this video was
helpful. See you next time.
 Skillshare Member Thomas