Transcripts
1. Trailer: Welcome to this class
on perspective drawing. This is a subject matter
which is often a little bit intimidating for
people to get into. So this class has been designed in a way to ease you
into the subject matter, starting with the basics
of one-point perspective. Throughout this lesson,
we're going to do a series of lectures
and exercises. And along the way,
we're going to figure out how all this stuff works. At the end of it,
there's going to be an assignment for you
to complete where you'll be asked to design your own room in
one-point perspective. If you've ever had
reservations about this topic, then this is definitely
the class for you. So let's get drawing.
2. How To Use Perspective: Let's make sure we're a 100% on the same page before
we start anything. Perspective is more
like mathematics than it is on that bank said alcohols to use the
information perspective gives us to work
alongside our art. At no stage do we want to be beholden to mathematics
in our compositions. That is simply going to
suck all the font and enjoyment activate
illustrations and paintings. Instead, we want to use
perspective as a tool to help bring about the
best in our compositions. We always want our initial
compositional ideas, whether it's a still-life, busy city street or
cool sci-fi vehicle to always come first and to think
about perspective second, this is an important
thing to emphasize because if we rely
entirely on perspective, everything we draw is going to come across very mechanical, which is subsequently
going to make the drawing process
more tedious. Perspective by its nature
is very mechanical, but we want to make
it work for us, not the other way around. Always remember our
compositional ideas have to come first. Now, there's an awful lot to cover about perspective drawing. At first it may seem
like a lot to take in, but the good news is, is that it's not as daunting
a topic as it seems. There's a lot of
initial complexities, but you'll soon start
to see it's not as hard to grasp as you think once we start to understand how
we see the world in 3D and how we translate that vision
onto a flat 2D surface, then perspective drawing
becomes a lot easier to manage, whether it's 123 or
even 4 perspective. Again, we want these perspective
concepts to work for us, not the other way around whether we're doing
landscape painting, concept art, coming in
whatever field it is. These ideas are going to
ring true with that we are working on pipa or
working digitally. Now I know all of us digital artists and
they haven't arrived. Tools that helped to create shortcuts for
perspective drawing. That's all well and good, but it's still important
to know exactly what's happening at
a fundamental level. Avoid taking these
shortcuts at first. Once you have an
understanding of what lies underneath here for
all these mechanics, then feel free to use whatever tools are
available to you. All right, let's get going.
3. The Picture Plane: Let's first cover some basics. This is a flat
two-dimensional plane, and this is a
three-dimensional object. Perspective is used to not only help bring form to an object, but also allows an object to
sit within an environment. That environment itself resides within something called
a picture plane. What is a picture plane? Let us first imagine we're
standing right at in front of a piece of gloss or some
type of transparent plane. We can look through this
transparent playing off into an infinite distance, whilst the plane itself also
moves along to infinity, both horizontally
and vertically. That imaginary picture
plying follows us no matter which way
we turn our head. Now, every object that we build
within this picture plane will always converge to something called
the horizon line. What is the horizon line? While it might seem
pretty obvious, but we'll cover it
just to be sure. Let us imagine a flat
grassy field all around us. There's going to be
two distinct features that we see heap, the grassy field itself, of course, and the
sky that makes it. The connection between
these two areas is our horizon line. No matter what else is
in the environment, trees, buildings,
mountains, people, etc, no matter what
else is obstructing L view that horizon line is
always going to be present. All of this seems pretty
straightforward so far, but we need to develop
it a little more. We need to create
somebody's point of view to see how this
environment looks. This is where our
eye level comes in. Eye level as obvious
as it sounds, refers to the actual
position of our eyes. For instance, if someone is
a five foot six tall person, the eye level is going to be
equal to that height also. In reality, it would be a
little bit lower than this. But for the purpose
of simplicity, we'll say that someone
who is five foot, six inches tall is going to have an eye level that's
five foot, six inches. Another way to look at
this is that we're looking through the heart of our
hypothetical camera, taking a shot of
the environment. We can consider this as either looking through the
eyes of someone standing at a particular height in first-person viewpoint, or the height of our
hypothetical camera. The simplest definition
that we can use for this is to refer to this
as simply the viewer. Now, you may have
already noticed that the horizon line and the eye level look
like one and the same. Why do we give two names to
the same horizontal line? Well, there's actually two
lines at work here that are overlapping each other
in both 12 perspective, they work together as a team and provide the same function. It's when we shift to
three-point perspective that they begin to serve
different purposes. That's something we'll talk
about in a future lesson. But for now, all we
need to know is that the eye level and the horizon line are
equal to each other. In this instance,
our environment is going to react to where our eye level is
positioned vertically. What this means then
is that if we stand on our tip toes or crouched
down a bit low up, we're going to see
the horizon in our field of grass move
up and down accordingly. It has to be stated
that this isn't the same as tilting our
head up and down. This is merely a bat standing in an upright
position without eyes looking directly out in front
at an angle of 90 degrees. A good example is to imagine a difference in level
between a mouse, a man, and a giraffe, if at all looking at
it the same direction, there are levels of
o going to be in slightly different
places vertically, which subsequently means
they all going to see the horizon in a slightly
different position. Our eye level reacts vertically, but what about horizontally? Well, we have another line
here that covers that cold, the center of vision line. This line intersects
without I leveled slash horizon line and follows this old way down in
the middle of our body, are sent to a vision line
is going to play more of an important role when we talk about two-point perspective. For now, all we need
to know is that wherever we look around
now grassy field, this imaginary cross-section
formed by these two lines is always going to be following us no matter which
way we turn our head. This is a permanent
cross-section that we carry from the day we are born and forms the basis for the next part
of adolescence lesson. So let's look at that now.
4. Vanishing Point: We've got to have us standing
in our grassy field. Let's now add something
else to the environment. Let's see what
happens when we put a road right down in the
middle of the view here. What's going to happen is the
edges of the road are going to move back into the distance
of our grassy field way, they will converge and meet
up with the horizon line. This is called the vanishing point because as you can see, the road literally
vanishes at this point. In one-point perspective, this vanishing point
is one and assign with the cross x is formed from our eye level and our
center of vision line. Wherever this cross axis moves, so does our one-point
vanishing point. But why exactly does
this convergence happen? Why don't we simply
see the edges of our road running parallel
with each other like this. Let's change our road to a railway track to
help work that out. We've got our train tracks here and alveoli is standing
right in the middle. We're going to have a look at
not just the top-down view, but also the profile view to get a better understanding
of what she's saying. If alveoli it looks down
at the Trex below her, her eyes have to take
in a wide field of view to see the entire
width of the railway track. As our figure rises a head
more and more Horizon don't need as wide an area to take in the sign
width of trek. The most she raises her head, the more of the tracks width
gets narrower and narrower. The moment Hood island meets
up with the horizon line is the moment that trek converges and
disappears entirely, hence the vanishing point. This idea remains true not just for horizontal structures, but vertical structures to if we add in a row of
electrical pulse, we're going to see the same
diminishment happening. Now what you might
notice is the width of that track heat is running
parallel with the horizon. What this means then is that
in one-point perspective, anything that runs
parallel across with the horizon line is itself
going to be a true horizontal. And anything that runs up
and down perpendicular to the horizon line is itself
going to be a true vertical. In order to create depth, we need to indicate
three-dimensions. We've got a true horizontal, I true vertical indicating
two of those dimensions. And the sides of
our attracts whi, which are diminishing often to the picture plane to
create the third, Simply put in
one-point perspective, one of ads dimensions
is always going to be converging to the vanishing
point to create depth. The other two will remain both horizontal and
vertical respectively, to create height and width.
5. Exercise 1 - Informal Boxes: Keep things nice
and simple at first and just draw in some boxes. I'm not going to worry too
much about being perfect here. So just getting the
foundations in place with a square for the front
face of our books. I'm going to worry
too much about size or depth or
anything like that. Just keeping things
nice and loose. If you don't have
a ruler on hand, you don't even have
to really worry about it at this stage. Just creating some
diminishment lawns. He strike back to
the vanishing point, ensuring we've got the front of that box having true vertical
and true horizontal lines. And just connecting each of these corners all the way
back to that vanishing point. We want to treat
all of this like it's a transparent
object as well. That's just honestly
going to make the learning process
a little bit easier. So always draw your
objects when you start doing perspective drawing as
if they are, might've gloss. Going to have
diminishment lawns. And he, nasa now just going to create the depth
for this box. And I'm just going to say
the boxes about this DP. And I don't know exactly how
these boxes at this stage. And we'll come to it as
we go further on through the list and how we actually go about creating perfect cubes. But I'm not going to worry too
much about that right now. So this is just a little bit of a rough estimate to
get the ball going. So again, keeping things
nice and informal here, got our box diminishing off into the
vanishing point here. It will start another
one now and will change colors as well, changes to red. Now, I might make
this second one a little bit longer, but again, do this first front
face of the box first nice horizontals
and verticals. They then go back to
your vanishing point and along the corners up and start creating some diminishing lines. You can start to see how quickly we can get these boxes down. And it's gonna be super
important to really practice these up even in
an informal way like this, just to get out months used to drawing with depth in mind. One of the big problems we usually face when
we stopped with perspective is that it can get
a little bit overwhelming. So starting with
things like this where it's just sort
of sketching, really. Getting out Bond
used to this stuff is going to alleviate
a little bit of that pressure when
we start to build on top of this in the
following videos, it's gonna become
apparent just how much more there is involved. So keeping it nice and
simple at this stage and having a little
bit of fun with it is always good place to start. Long boxes coming
together nicely now, nicely diminishing off into that one-point vanishing points. So let's do another one now. With drawing boxes heat, you
might be asking yourself, well, why are we
just drawing boxes? He shouldn't we also be doing cylinders and spheres
and things like that. Well, the box is kind of the default object when it
comes to perspective drawing. And that's because it's got
the most information for us. We've got these nice
sharp corners and not explain faeces to work
with an elliptical shapes. A bit more complicated
the Alyson in it of themselves and tend to throw up a bunch of
different challenges. So we'll look at that
in a future lesson. But for now we're just going to stay with the basics
here and we'll see as the lesson
progresses just why they are the
default option for us. It's just going to make
life a lot easier. I've got another stretched
out box here again, again with the noise sharp
corners at true horizontals, they are true verticals here. And again, just drawing
all the way through. It. Worth repeating that we want those nice horizontal
lines running with the horizon line and those nice verticals at
a 90 degree from that. We'll do one more box here. And we might do a slightly
total box this time, slightly thinner
and total books. Now, one-point perspective is a pretty great and versatile
perspective to work with. In fact, for the
longest time was really the only perspective
that artist's work with. It's only been really in last
couple of 100 years that sort of two-point perspective in three-point
perspective emerged. Got to have a nice toolbox, HIV. And again, going to take out diminishment lawns all the way
back to a vanishing point. And again, it's probably
just a little bit too many dark lines
here at the moment. So you'd want to drill this
stuff a little bit lighter, but for the purpose of this demonstration of
purposely used brushes, will pens in this
instance that are quite thick and quite
bright and they call up. Now, I'm working
digitally of course, but if you're
working practically, a couple of tools that
you'll probably need is, well obviously
you'll need a ruler, of course, a
transparent rule at, in particular is probably
a better option. But also what you'd
probably want to consider getting is a
set square as well. So a couple of triangles, one that's up forty five, forty five and ninety
degree triangle. And also a 306090 degree
triangle as well. And also consider getting
yourself a protractor as well. That's kind of come into play
a little bit more later on. But just as a heads up now, if you're looking to
actually do this on PIPA as opposed to working in
a digital spice way. There's usually an, a right of measurement tools
available to us, then you really
going to want to get the proper equipment
for yourself. Now if you're working digitally, you might have to shop around a little bit to find some tools that are equivalent
to what you'll find practically in real life. And that, that gets
pretty close to having those same tools is
one called sketchbook. It's got some pretty good rule at emperor attracted tools, but you might have to
have a little bit of a look around to see
what's out there. So these boxes are pretty
well done for now, just doing a little
bit of shading, he's really fill up an entire
page filled with these, say what kind of boxes you can
create and don't worry too much about getting things
right at this stage. So we'll leave these
boxes here for the moment and we'll
continue on with Alison.
6. Station Point: So let's do a recap with
good app picture plane, which is our imaginary pace of gloss moving off into infinity. We've got our horizon
line slash eye level, which are one and the same. We've got our center
of vision law, which runs down the
middle of view and intersects with the eye
level in horizon line. And we know that wherever
alveoli turns her head, these ideas are
going to fall out. We've also said
that the vanishing 0.1 perspective is the same as the cross-section
form between the center of vision line
and our horizon line. Finally, we said that in
one-point perspective we're going to have
three-dimensions represented. One that is a true vertical, one that's a true horizontal, and one that diminishes off
into the picture plane. Drawing a square is
pretty straightforward, as we know from school. If we draw a line at 45 degrees, we can work out how to draw
a square quite easily, but what if we want that
square lying a depth? Now what most of us do when we stop perspective drawing is that we simply take an
educated guess at that dip. We sketch in a lawn
and silo ourselves. Well, that's sort of
looks about right. And generally we
leave it at that. But if we need to be
more accurate than guessing is not gonna
be much good for us. So how do we ensure that this diminishing square plane on the ground is equal to the
square facing towards us. Hey, what we're going to do to help us is use something
called a station point. This is a little bit
of a tricky concept to wrap your head
around with at first, because it requires us to blend both a three-dimensional layout in a two-dimensional
layout together. By doing this, we're able to achieve accurate depth
in our drawings. To get a better understanding
of this 3D layout, let's first observe what
our viewer is saying. We've made our
view a transparent hate to give us an idea of what she's saying
and wiggling to stand directly behind her. The station point is best described as being
the position of the viewer relative to the
scene that she's observing. This position is right
between her eyes. If it were a camera, it would be right in the middle of the lens. But how does this help to
establish accurate depth? Well, from alveolus
observations, this doesn't help at all. If we're looking to create an accurate square lying
flat on the ground, then her viewpoint doesn't
actually help us much at all. So we need some type of
reference point within this environment in order to create that flat
square on the ground. This is where our
two-dimensional layout comes into plight. Two-dimensional layout is us
looking down upon L view up. So imagine we're
hovering over the top of our viewer looking
directly down upon her. Think of this flat 2D
lat as being almost like blueprints for a
building or vehicle design. The station point in this
two-dimensional layout directly relates to the station point
between alveolus eyes. We can see here that
we can't see through her observations is just how far away she's standing
from the picture plane. When we look through
our view as ours, we had no real clue as to how close or how far away she
was from that picture plane. But from this top-down
two-dimensional layout, we can tell just how
far away she is. This line from the
picture plane to the station point is
called the distance line. We can literally make
this any distance of measurement that we want. So in this instance, We got to say that
alveolus is standing approximately about ten feet
away from the picture plane, but that could be
2050 feet, 100 feet. It's completely up to us half-hour while
she's standing here. You've got these two
graphical viewpoints. Hey, let's figure out
how they work together.
7. Square Planes In Depth: Now this all seems pretty good, but you might be saying
to yourself, Well, there's two separate
graphics and they each do separate things to help establish what our
view is saying. But this seems a bit fiddly going back and forth
between the two. Well, you're right separately. Each viewpoint can
only do so much, but if we overlay
them with each other, then what getting the
best of both worlds? Hey, by combining
both viewpoints, we can now work at
exactly how far away from the picture
plane is standing, how far away things
are positioned, and what angle objects are in, all within one combined layout. Both layers sort of separate
but relating purposes. A measurement in one relates to the measurement in the other. A station points still exists out in front with
alveolar looking in 3D, but we are simply using its two-dimensional
flattened counterpart he as the reference to get dip. Essentially we have
one layer that controls the horizontal
and vertical measurements, and another that controls the depth and angle
measurements. So how do we go about creating
our square now in depth? Well, if we measure it from our flattened 2D station point and an angle of 45 degrees to our three-dimensional
horizon line. Then we've created a
reference point that we can now use to get accurate
depth measurements. If we connect this
age of airline, Hey, to our 45-degree
measuring point and then connect both edges back
to our vanishing point. What we're going to find is that the intersection
that happens here in the top right is going to give us the depth landmark
that we need. All we need to do is measure
across from that landmark. And just like that, we've got our perfect square
lying on the ground, and it's from those foundations, we can start to build cubes. If we go back to our original
graphic we started with, we can see we've got essentially a combination of what
our viewers sees, as well as the top-down
two-dimensional projection of this distance lawn is essentially swinging down
from three-dimensions and becoming flattened and meeting it's two-dimensional
counterpart. It's the exact same distance. Everything she sees
in depth can be directly related to this
flattened station point. If we were to simplify this, we can say this is a two-dimensional
representation of wherever viewer stance station points can move closer to or further
away from the picture plane. The distance is
entirely up to us. Whatever distance we might get
that station point will be swinging down and be equal to
it's flattened counterpart. This gives us the
ability to create illustrations with great
accuracy in depth.
8. Exercise 2 - 45° Measuring Point: All right, let's just do a
quick little demonstration to see how we go about setting up a lab to get those nice perfect
squares and cubes. So first thing we want
to do is measure up from our flattened 2D station
point at an angle of 45 degrees too out
3D horizon line. Remembering that we
are now combining out 3D layout and out to the
top-down lab together. So we've got out 45
degree measurement here now whether or not
you want to do both sides, have a 45-degree mark on either side of our
vanishing point. Well, that's going
to be up to you. It's sometimes a good
idea to have both, but you might end up only
ever really needing one. So put the second one
down when required. Now, if we don't
have a protractor, we simply just have to use the same distance from
our vanishing point to the station point
and put that along our horizon line to get out
45-degree landmark there. So it's a pretty easy setup. We've got our markets
in place now, let's get onto drawing
some squares and boxes.
9. Exercise 3 - Square Planes: Okay, let's start drawing
some squares in depth now. So get a ruler here in place and we're
just going to go Mike, things arbitrary at the moment. Not going to worry
too much about what the actual size of the
squares is going to be. So I've got out frontline
here and we've got to have our solid lines here just diminishing often
throughout vanishing point. He's so good at
foundations in place. Now, as we said
during the lecture, normally when we
get to this part, we just take an educated guess at the depth of S squared K, but we want something to be
a bit more accurate now. So we're going to use these 45-degree
measuring points on our horizon line here as
the reference for that. So before we start aligning things to these 45-degree
measuring points, Let's just do a little bit
of a top-down blueprint for us to get a better understanding of
what's actually happening here. So we've got our
flattened station point. Of course, we've got
our vanishing point. If we draw a line 45 degrees from this
station point here, well, that's going
to set us up to create a nice perfect square. If we remember our mathematics
classes from school, know that we can create perfect squares with
a 45-degree line. Essentially, we're creating a
right-angled triangle here. And if we stick to those
right-angled triangles together, well, we get ourselves a nice even square
all the way around. So this 45 is equal to this
45 on the a horizon line. And of course, this
station point here, well, this is the exact same station point that's down below here. These are equal to each other. So now we're going to use that 45-degree
measuring point on a horizon line as the basis for creating our perfect
squares and depth. So we want to align this right here at the corner
of this line here, and we want to draw all
the way up to that point. So we've got out
first guide in place. So just reiterating, we've got this 45-degree
measuring point here, which is equal to this top-down view as well
that we can see here. Now this intersection that's
happening right there. Well, that is the
landmark that we want to create
R-square in depth. What this means then is that this front lawn that
we initially put down in green now is equal to
this backlog shown in red. And all of a sudden we've got our perfect square and depth. So it's a pretty straightforward
way to start getting some nice even measurements all around in our
perspective drawing. So let's do another one now, and we'll put another one over
here and we're gonna do it a slightly different
color as well just to make things a lot clearer. So again, we're just
going to say this is a bad an inch
and a half wide. He, and again, putting these dimensioning lines all the way back to a vanishing point, I can show these are
nice and accurate. And again, we're going
to use a 45-degree heat, but I'm gonna use the other one now because it's a
little bit closer. So there are going to be
instances where you might find one of these landmarks
a little bit easier to use than the other. Just getting that in place. And again, going from the bottom-left corner
here all the way to this 45-degree
measuring point corner to corner is the why you
want to think of this. Again, we've got that
intersection that's happening. He, with that line that's
diminishing on the side here. And again, another line at the decade to get
our perfect square. Now so far so good. But what if we wanted
to put another square behind this that is
also the same size, that's diminishing
software vanishing point. Well, we want to
follow along with the exact same concept that
we've just started with. But instead of going from
our first line here, we're gonna go
from the backline, again measuring
that at 45 degrees, going from corner to corner and trying to get
that alignment right. So again, going from
corner to corner here, bottom left, all the
way up to 45 degree. And again, that
intersection is going to give us the same size square, but now it's receding back
towards the vanishing point. And we can keep going all
the way back in there. So again, going
from this backline here all the way to where
45-degree measuring point. Again, that intersection forms the basis for another
perfect square. So we've got a series of
square plants that are diminishing off towards our vanishing point
in the distance, all of which are the
exact same size. Now obviously we can keep going with this further
and further back into the picture plane until eventually it meets up
with the horizon line. But the beauty of that is that even if we want to do that, we know that all of these
square plans that we put down that receding
back into the distance will always be equal
to each other simply by using this 45 degree
measurement here. That's some flat
planes on the ground, but what about some
vertical ones? Okay, so let's do
some vertical squares now that are diminishing
off into the distance. Now, the most obvious thing
that we can do here is use these flattened squares that we have on the ground here as the reference point for
output equals squared. So if we're creating walls, we can essentially say this is the floor and we're going to use the length of this floor here and simply flip it
up No, actually degrees. And that will give us the
exact height that we need. And that's gonna give us
the landmark that we can use to create some
diminishment lines here. And of course we can use the
back of that flat square as well to use for the
back of our standing wall. That's great and
all, but we've got an alternate way that
we can do this too. In fact, we've got another
45 degree measuring point here that we haven't seen yet, and it's actually
L station point. So this is another
option for us for creating squares at an
outstanding vertically. So this is also acting as a 45-degree measuring point
for all vertical planes. If we flip this up and
ensuring that a hot is the same length
as the width here. So just put that in place. So we got to inch and a half. I've got that implies. So now what I want to do is go to our vanishing
point and create a, another diminishment law
in here all the way down to the bottom of
this frontline heap. And now what we're
gonna font if I put my ruler up the top of this
line here and measure down to the station point is that
it's going to intersect with the corner landmark that we created with our
flattened square earlier. So we can see here that
45-degree measurement now into six with that square
that we put down earlier, that station point all
of a sudden becomes a very useful tool
for us as well. Again, we can take l diminishment monetary
12 vanishing point and then just use
this intersection here and drew up a
nice straight line. And all of a sudden we've got L perfect square standing
nice and tall. So this is great. But let's just test
this out again just to prove this wasn't
some type of flu keys. So let's get another squid going to somewhere
completely random. It just got to choose an
arbitrary place here and not worry about the existing squares that are
flat on the ground. And so we've got our
nice vertical line. Hey, we're gonna
create a diminishment all the way to our
vanishing point. And if everything goes to plan, if I make a
measurement here from this station point all the way to the top of our line here, drawdown directly,
That's going to give us a 45 degrees and that
intersection again, going to create first a nice
perfect square in depth. So we've got a couple of options available to us for
L vertical squares, we can either use
squares that we've created on the
ground or we can use that station point as 45-degree reference point for
standing square pipelines. So we've got for us, so some pretty simple but
extraordinarily useful tools that we can use here to get some pretty accurate
measurements onto our page. So we've got a station
point which is gonna be 45-degree measurement
point rail vertical planes. And our 45 degree mark is on our horizon line for our
horizontal square planes. Some pretty useful tools here. Now, just one little
thing we'll do as well is that will
follow one from what we did with our flattened
square plants in the ground and start repeating
some of our walls here, get the exact same length of war dimensioning off
into the distance. And exactly like we did for our flattened
squares on the ground, we just want to go to a
corner to corner here. And that's going to ensure that all these walls that we
starting to see here up actually diminishing off to the distance at the
exact same size. So some pretty straightforward
stuff to begin with. Let's move on to
something a bit more complicated and start
doing some cubes.
10. Exercise 4 - Formal Boxes: Alright, let's get going and
start drawing some boxes. Now, you might very well be one step ahead of me
at the moment here, because drawing boxes is really just an extension of what we
went over in the last video. He, but we're gonna go
through it just to make sure we get these
nice strike corners. He, those true horizontals, that is true verticals foe
the front face of epoxy. And of course, diminishing lines off to our
vanishing point. So it's a good idea to
treat boxes like this as transparent because
it's going to give us a better
understanding of what's actually happening here. It's simply going
to help us draw three-dimensionally a lot
better on this flat 2D surface. I've got my a diminishment
lines and hago the front face avail box. Now, following on from our last exercise,
what do we want to do? Well, we simply want to take things go corner to corner here, line up without 45-degree
measuring point. Hey, Drew outline
all the way there. And of course there we
have our intersecting law. And so again, just like our
flattened to the plane, we can now create our 3D box
using that intersection. So I'll change to
a different color just to make things
nice and clean for us. Again, measuring that
backplane first, that back landmark,
getting that implies. And then we can create
the rest of our books without noise verticals
all the way up to these other
diminishment lawns. He all of a sudden we've got a nice even box
all the way around. So if we were decided that
front-facing plane that we drew at the stop was three-foot wide by
three foot higher, we know for certain now
because we're adhering to that 45-degree management that
it's also three-foot deep. Let's do another one now. And I'm going to put this one in the air
just to show that we don't actually need to be on
the ground as we do this, I'll create another
box in the air, get this front face of it right? Now in one-point perspective, we always going to see this
front side of the box seat. So make sure that
more just have to make sure we've got the exact
same measurements here. So no point using inches and centimeters
at the same time. So get that nice and even. But as I was saying, in
one-point perspective, this front face of the box is always going to be
flushed towards his here. So again, creating a
diminishment lines to our vanishing point
again and again, treating this like it's
a transparent box. If I end up repeating a few
things over and over again, it's because this is
all a little bit of a technical process compared
to other areas of art. So we want to get to a stage where we sort of
drill this into a head enough where we don't
necessarily have to always worry about these
measurement guides. I'm not going to
measure to this 45 here because it's in a little
bit of an awkward place. So I'm going to go to
this one instead so you can see the
benefit of having both here available to us. So again, aligning
this corner up to our 45 and drawing all
the way through. And of course then we have our landmark at the back there. As I was saying, it's
probably gonna be a little bit more
repetition here compared to other areas in net
simply because there's a little bit more
mathematics involved his, it's not always the
most fun topic to really introduce into a
creative process here. But once we get over
this initial hurdle, then it becomes a little
bit easier for us. Anything really, we have
to enjoy it a little bit of pine to get some
really good results. So we've got our
floating box here or nice and even
all the way around. Now I'm gonna do one
mole box and I'm gonna make it a little bit
larger than these other two. And there's gonna be
a specific reason why that's the case. Again, without front face here, remembering that we are
in one-point perspective, we want that front
face of the box really flush up against the imaginary picture applying
that we've got before us. We're gonna start to say
something interesting happened because of the size and the position that
this box is now in. Again, just getting that
front planning and in getting the diminishment
gods all the way back to the vanishing point. What's happening here is that
we've got a little bit of an interesting effect
that's happening that we can't actually
see in real life. And this is only something
that we can actually conceptualize on pipe up. The reason I'm bringing this to attention is because
we're going to have a natural
tendency when we start seeing this effect happen
to want to fix it. We're gonna have a
better look at this in the next part of the clause. So we've got our landmark
there for this larger box, measuring up one of those true horizontals and true verticals, of course, it was. Remember in one-point
perspective, we'll always going to have
a horizontal lines and outbox running parallel
with the horizon line. And lt vertical is running
90 degrees to that. So nice true verticals
and horizontals. Now, with this logic blocks, you might be seeing something
interesting happening, something that looks
a bit different compared to the other boxes. It looks like the
walls are a little bit more stretched out
compared to the other two. So what's actually
happening here? Well, let's finish this
off here for the moment, and we'll take a look
at what this effect is in the next
part of our class.
11. Cone of Vision: Let's expand upon a
half station point. Take a look at this series
of cubes and ask yourself, what about them is looking
a little bit strange? Well, if we take a look at
these boxes around the edges, you might notice
things are starting to look more and
more rectangular. So what's happening here? Well, let's first make
sure that these boxes are measuring 1245
degree measuring point. Well, everything
is checking out. Alright, so far with
the measurements we know for certain these
are perfect cubes. So why do these boxes in this area look far
more rectangular? Well, what's happening
here is that we have distortion taking place because these cubes at
the edge are sitting outside of an area called
the kind of vision. The vision extends from
our station point and covers an area spanning
approximately 60 degrees, 30 degrees are the side. This is by no means an exact measurement for
when distortion takes place, but more of a rough guideline. Again, if this
station point here is the 2D representation of
what alveolus season 3D. Then what this means then
is that this area of approximately 60 degrees is right in line with
how we see the world. Anything within this
area looks pretty normal and as we would expect
it to, however, once we start moving, things beyond this
boundary is when things in the environment stopped becoming
stretched and distorted. But no matter how much
we try to quickly dot our eyes around
or move our head, we are simply never
going to be able to see this distorted area because of the limitations
of our vision. So we're never going
to be actually able to see what's happening
outside of this boundary. But we are able to
conceptualize what it would look like on paper
using these tools, looking at our cubes once again, even though these cubes on the outside look far
more rectangular, we know for certain
because they had hates that 45
degree measurement, that they are still
perfect cubes. So nothing here is
actually wrong. It's just that we're not
used to seeing this. Now the question you're probably
asking yourself as well, do I just draw inside
this boundary? Well, that's simply
guide to come down to what your intentions are. There's nothing wrong with drawing outside of
the kind of vision. We just have to be aware
of what's happening here. Because when naturally
going to want to draw these more warped cubes to fit with how I'm months
think they should look, consider the kind
of vision as being something of a safety barrier. If we know where it is, we know roughly where
we need to draw to create understood and images. That said, moving
our station point is going to greatly
change how things look in a scene because
that distortion reacts to where the
station point is placed. If we look at these two saints, he we've got a room that
is the exact same size. The left St. has a
station point at 12 feet, whilst the right has it
positioned at 24 feet. Take note of how the
walls in the left saying look why more stretched than
the walls on the right. So that distortion
is going to shift depending on where we
place our station points.
12. Measuring Lines and Framing: So I know there's a lot
of things going on here, especially when we have a few of these ideas overlapping and
intersecting with each other. So I really encourage you to take your time with
the terminology. If I end up repeating some of these concepts of few times, it's entirely by
design because this is a far more technical process
and other areas of odd, there really aren't
any shortcuts that we can use for this. We have to really push through these initial pain in the end, however, it will be worth it. So once again, let's
just do a little recap. We've got our picture plying, we've got our online
slash horizon line. We've got out center
revision line, a station point, and
our cone of vision. We've got all this
stuff here which is following this whichever
way we turn our head. But what about the ground? You might be saying, well, the ground is its own plane
and like the picture plane is going to move off into
all directions to infinity. What do we need to know is
that everything we create in this environment will be
built upon this ground plane. What if inclines or declines, we create staircases, hills, halls, whatever it is, we all start with this
ground plane in mind. First, the ground plane intersects with
the picture plane. This intersection is what's
called the ground line. Weight. It use this intersecting line as the starting point for our
horizontal measurements. Now that unit of measurement
can be any unit we want, feet, yards, meters,
centimeters. It's entirely up to you. Once we've worked at what unit of measurement
is we need to ensure that al
vertical measurements also use that same unit. Now, what about those
vertical measurements? Well, this is going to
serve a couple of purposes. First, we want to
extend our center of vision line y up past
the horizon line. We're going to
call this new law. And he had the true hotline. And it's really going
to connect all the way down to our flattened
station point. In the same way
that our eye level overlaps with our horizon line. We've got a series
of overlapping lines here that are working together for this vertical measurement. Now the beauty of this
vertical measuring line is that it does two jobs for us. First, it gives us the
distance to the station point, how far away I'll
view is positioned. And second, it acts as the
heart of alveolus online. In other words, if
we say out view a station point is ten feet
away from the picture plane. She is standing at a
five-foot eye level. Then we use this vertical
measuring law to work out both. If we count five feet
down from L horizon line, we get the height of her
five-foot eye level. And it's at this point where
I picked your client and ground plane intersects to
create our ground lawn. That's L, vertical and horizontal measuring
sticks for us. Now, as you've
probably already seen, vanishing point
has been directly in the middle of images so far. Does it have to always be smack bang in the
middle every time? Well, if we're working
in television or film, the center of vision is going to be directly in the middle. There's no way to
divorce the camera here. But as artists, we're lucky because we can crop
in frame out imagery. That means we've got
a few more options up as slave that
filmmakers Dine. If we take a look at
our grassy field again, we can very much have the
vanishing point off sent out. Alveoli actually hasn't moved t. We've just
decided to focus on a particular area that she's singing were simply framing
and cropping the area. We can crop it to
such an extreme that the vanishing point is
white off the page. Everything is still in
one-point perspective. We've just decided to block
out everything we don't want. That's a rough breakdown
of the basics we need for drawing in
one-point perspective. There's a lot to
take in no doubt. And the truth is, there's a lot more we need to
cover beyond this, but to go any further right now is to simply overload
us with information. So we'll leave more
advanced concepts relate to listen and nail. Let's get started with
building something.
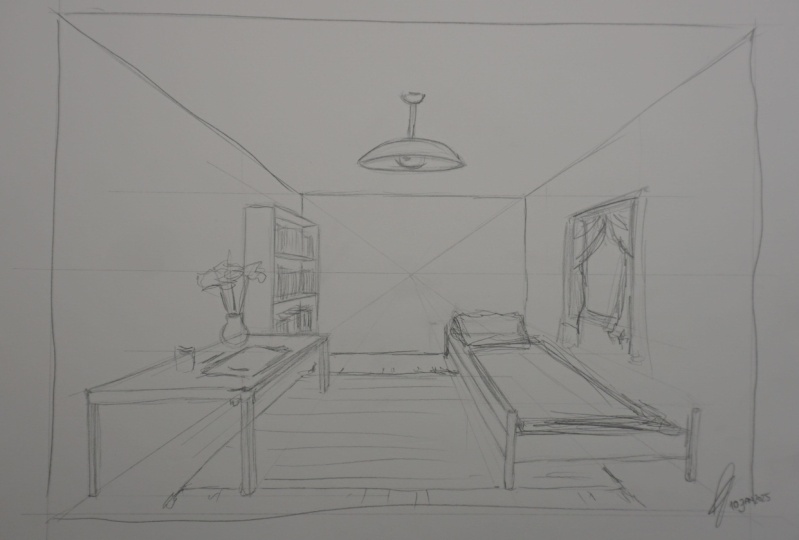
13. Exercise 5 - Room Foundations and Grid: Let's take everything that we've learned from
this lesson so far and do something a little
bit more sophisticated. So this is going to be part of the assignment for you
to complete afterwards. He, now we're going to create
the interior of a room. So the first thing we want to do is get some
measurements down. So I'm gonna use one centimeter
increments here all the way down to
our station point. So I'm going to say these units of measurement,
one-foot increments. So in total, that
means that we have a 12-foot station point
here all the way down. I'm just going to
mark that HE for myself and say that's 12 feet. What do we need to do next? Well, we need to take
that same measurement up beyond our horizon line
to our true hotline. So again, we want those same increments going
all the way up. And it's a pretty
good idea to actually make those increments
a lot higher than what you actually need
because you never quite know exactly how much you
might need to draw in. I always make things
a little bit longer. Now we said in the last video, this true hotline is going to represent the depth of our
image from the picture plane, but it's also going to double as the measurement
for our eye level. So I'm gonna say here
that are all level is going to be six feet
tall from the ground. I'm going to measure that
all the way down here. That's six units down this. I'm going to say that's where my ground line is going to go. A nice six-foot intersection
with Al picture plane there. So of course what we want now that we've got the
ground lot implies is that we need the same units of measurement going
horizontally as well. So just want to lawn
the ruler up here and ensure that we've got
the exact same width, the exact same increments as what's happening
vertically here. So again, like the
vertical line, it's always a good idea
to just stretch things at a little bit longer
than what we need it to. Just putting in these one
centimeter increments again, that's going to equal one
foot in this instance, we can use whatever unit
of measurement we want, made his feet, yards, if
you want to follow along. So you could use that
as well, I suppose so. Pick whichever
works best for you. But again, we just need
to remain consistent both horizontally
and vertically. So I've got these increments all equaling both
horizontally and vertically. So that's our ground line done. We've got our true hotline
as well in place now. Next up, I want to establish
the current division. So I've got my
protractor here and we want to measure 30
degrees ie the solder, this protractor to get
out kind of vision right? Now, if we don't
have a protractor, one thing we can do is
just do a little bit of an educated guess for
our kind of vision. So if we mock al 45-degree measuring
point that we saw earlier, and roughly half of it and just got a few millimeters
over from that, then we can generally get a rough estimate of way at that kind of vision
is in essence, we don't necessarily
need it to be a 100% accurate because there's no real definition as to where that distortion takes place. So it's all just really a
little bit of a guide for us. So I 30 degrees this side, the degrees on the ra2. So I'll just grab a compass here and make a nice even
circle all the way around. And that gets us
our cone of vision. The next thing I have to
do is figure out, well, how big do I actually
won't this room. So in this instance, I think that I'll make it tall
feet wide by 12 feet high, and diminishing 12 feet
into the picture plants. So I 12 by 12 by 12 room, nice and even all the way rent. And that's gonna make things
a lot simpler for us. At this stage 16, that's across the lift there and another six units to the right. And that's gonna get
us out 12 foot length. So now we can use that and
count 12 feet up to the top here and mark that as
the height prayer room. And from that we can start
to build the foundations. And so we'll get a
nice easy square if I sync flush towards. Because of course we are
in one-point perspective. We want everything to be flat towards us.
In this instance. I get these nice sharp
90 degree angles here for these lines. And just like that, we've got the initial size of our room, so this is great so far. So what do we need to do next? Well, we need to start adding
some diminishment lawns, get these corners of
the rooms to actually start moving towards
our vanishing points. So I'll just set this up
and going corner to corner. Now, we'll just extend these lines longer
than what we need to. And again, as I said, it's always a good
idea to just make things a little bit
longer in this instance. And we can always clean things up a little bit afterwards. Eso, all these
corners strike 12, vanishing point here and
down to this corner too. So again, we've got
these foundations in place. This is great so far. So what do we want
to do from here? Well, we need to follow
on from what we learned about our boxes and ask
wave planes originally, we need a 45-degree
measuring point. Now let's get at protractor out and we'll draw that
measurement point in. Now, I've got the
protractor here, get the ruler in place, and measure things
up to 45 degrees. Now, as we said
during the lecture, if we don't have a
protractor on hand, we just use the same length
on the vanishing point to the station point as the landmark on our horizon
line for our 45-degree. There we go. So we've got our 45-degree
measuring point there. So now what do we need? Well, we need to get
that six-foot debt. So what do we do again? We take our ruler and we take
it from corner to corner. And all the way to our 45-degree measuring point and
draw straight up there. And that gives us a landmark at the beck day for the depth
of our 12 foot room. So the intersection there, That's how mockup, Let's draw
straight across from that. And all of a sudden we've got a perfect ruin that
his nail 12 foot high, 12 foot in length, and 12 foot deep. Now, I just need to finish off the rest of the wall
here at the back, getting these true
horizontals in having that intersect with those diminishing
corners of the room. And then of course, putting in that last
horizontal line here, that true horizontal
going straight across. And just like that
we'd get a room. So just to do a little
bit of a recap, We've got a twelv foot by
12 foot by 12 foot room. We've got a station
point that is 12 feet away from
the picture plane, and we've got an eye level that is six foot from
the horizon line. So what do we need to do now? Well, what we're gonna
do is create a grid on the ground because we
want to put some furniture in here and having
some type of grid on the ground is going to make
life a lot easier for us. So what we want to do is take these ground line
measuring points and draw some guides
all the way back. What we're gonna do hate
is that we're going to create a twelv by
12 gridded floor. And obviously if we
are creating that, that means all the tiles in that grid are gonna be
equal to each other. Now, what do we do with that? Do we have to measure each of those tiles to that 45
degree measuring point? Well, that's just gonna
be a little bit tedious so we can actually
use a little bit of a shortcut to ensure
that each of those tours are the same length as I diminish off into
the picture plying. And we simply have to use the existing 45-degree
market that we lie down for our initial
ground foundation c. So we know for certain that these diminishing
lines are all equal to each other at
one foot apart as they move towards the
vanishing points. So let's start to sit
this grid up now. So what we're gonna do
is we're going to use this 45-degree line that we created for the
floor of our room. And everywhere where
that diagonal line intersects with those
diminishing lines that we've just created. Well, it turns out that that's
the exact landmark that we need to ensure our
measurements are correct. So all we have to do is draw horizontal lines now wherever
that intersection is. So that's one foot there if we go to the
next intersection and that's another
full and we just keep going back into spice they. Now the further we go back, the more the lines
are going to start to compress towards
each other here, even though the
spacing is getting smaller and smaller
between the lines, we know for certain
because everything is adhering to that 45-degree
measuring point, that all this is 100% accurate. So just a couple more to go. And all of a sudden,
just like that, we've got our perfectly
gridded room. You've got a twelv
by 12 by 12 room, and we've got a gridded
pattern on the floor here too. That's going to help us when
we start to finish things. So we've got our floor done. So let's put another grid, but this time on the wall, and we're essentially going
to do the same thing. So what we need
to do first is to actually get some
measurement increments. He first on the left-hand
side and making sure that we are again using the same units of measurement that
we started with. So one centimeter increments
in this instance. Now, do you have to put
a grid all throughout the room and the
answers that that is really you don't have to. You could go to the extra
length if you really wanted to, but we really only need
enough information here to help us with our
furnishing in the next class. So don't feel the need to put the entire room into a grid. We just need really
one floor grid and one of the walls
gridded as well. So again, repeating just what
we did on the floor here, lining everything
up and creating some diminishment loads going all the way to our
vanishing point. And you might be able to
guess what we do next, the vertical measurements
for this wall grid, we've got that as
pretty good landmarks that we've just put
down for our floor. And we're going to
use each of those as the landmarks for the
vertical measurements. So again, getting these
diminishment is happening here, each of them one foot apart. Now the pen I'm using
here is probably a bit too thick really for
this type of exercise, but it's certainly helps
for this instance, so we can clearly
see what's going on. But normally what
you would do is use something that's a lot
lighter and a lot shoppers. Well, in the next lesson, I'm going to redraw
everything he using a much lighter and much
thinner pencil to got the wall diminishment is happening now we just
need to line all avail verticals up with the horizontals that we've
placed down on the floor. So straight up here. And all we have to
do is follow this through all the way to
the back of a room. So that's our grids in place
now that's going to give us some great information to start putting some furniture
into our room. So I'm gonna finish this off
here and in the next video, I'll redraw everything
to be a lot lighter than what it
is here so we can get a better understanding
of how exactly we stopped putting some
furniture into this room. Alright, let's move
on to that next.
14. Exercise 6 - Drawing Furniture: Okay, So I've redrawn
everything to be a lot lighter and dinner just to Mike placing in the
furniture lot easier. Now, you don't
necessarily have to draw furniture if
you don't want to, if you want to keep
it simpler and just use blocks and boxes from now, that's perfectly fine,
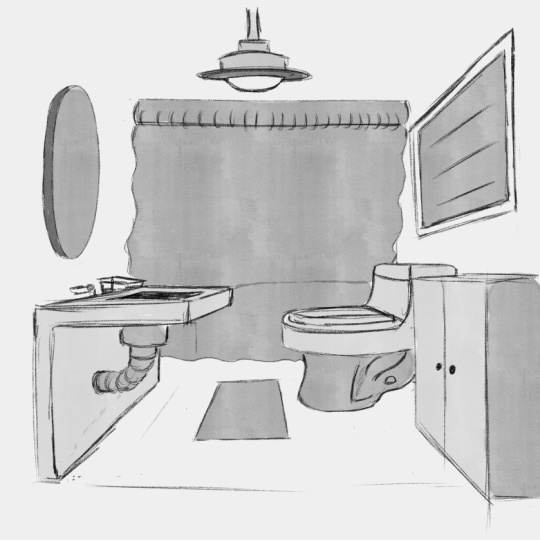
but I'm gonna start to draw in some furniture. I'm going to start with
a bookshelf first. So first thing we want
to do is figure out, well what dimensions do I
want this bookshelf to be? Now I'm going to say
to myself, well, I think I want my
bookshelf took me about two feet in length
and four feet deep. Now, I'll just get those
foundations in first and then I'll worry about how
tall I want it to be, just using the grid
on the ground here. And I can count 1234 back to get the depth four feet deep
and two feet wide here. So those are our foundations for the bookshelf. Pretty
simple so far. So now I think I'll make the bookshelf about
seven feet tall so we know that the eye level is six feet from the ground. So we just need to go
one unit up from that. And that's going to
give us seven fates. So if I draw a guide
line across here, well, that's gonna give me
my seven foot bookshop. So all of a sudden now I've got the exact
height that I need, so I can now can start to
construct this all in. Now I'm gonna do a little
bit of detail work here, but not too much just to give it an indication that it's
actually a bookshelf. But as I said, if
you don't want to go into any real detail, just keep it simple as
boxes for the moments. It now need to establish a bit more depth here
for this bookshelf. And drawing back to
a vanishing point up the top here and putting in a vertical here to
finish it all off. Now we need a shelf for
our books and I'm gonna put one that's directly in
the middle of the book. I said we could use the grid, of course to figure that out. But if we just crisscross over two diagonal lines on
this front-facing plane, he well, where that
intersection takes place, That's exactly in the middle
of that front-facing plane. I can use that now
as a landmark to actually create the
center of this bookshelf. So that's going to be where the books are
going to be applies. So whenever you criss-cross the corners like
that for a square, you're going to find
the exact center of it. So x marks the spot
really in this place. So let's try this again. I'm going to create
a little cupboard He, underneath these bookshelf. So again, criss crossing
over from corner to corner. This side plane where
the intersection is, that's going to give
us the exact middle. Now I can use that to create the space between our doors and all of a sudden out bookshelf
is starting to take shape. Just to reiterate everything. We've got a twelv
by 12 by 12 room. And now we've established
that we've got a bookshelf that
is two feet wide, it is four feet deep and
it is seven feet high. It will start to think about some other objects that
we can put in here. Now, first, I just
want to put in a little bit more
detail here to give it a bit more dimension. And I think that might
do for the moment. So let's figure
out something else that we can put
into this room now. And I'm thinking now that
maybe we put in a table. What size do we want
the table to beat? Well, I'm gonna say
in this instance that it's about 2.5 feet in width and it's about three feet in depth and three feet
in height as well. Now, I'm going to
place it somewhere a bit more arbitrary
in this instance. So I think I might
put it two feet back and on the left-hand
side of the wall here. So that's my first marker there. So want to 2.5 feet there. So that's roughly where I'm
measurements need to be. And we'll go for a
depth measurement now. So we need three feet back
into the distance here. So 123 is there. And we'll measure that in, get that ground plane in first. And from there we can start building up the
rest of the table. So you can quickly
see how useful this little grid is to start
getting things in place. And even though
we're only keeping things pretty simple
at the moment, we can still use
the same ideas for more complex objects
as we go forward. Everything is pretty
boxy at the moment, and that's entirely by design. So as was mentioned
earlier in the lesson, we want to avoid doing sort of rounded in elliptical
stuff at this stage because it brings its own set of challenges and frankly
headaches as well. So anything boxy is
really a good option for the moment because
ultimately it gives us the most information as well. When we start to curve
corners out, well, we start to lose a little bit of an idea of where things are
positioned in 3D space. So always starting with
things that I've got noise, sharp angles like this
first is always a good bit. You might have noticed
during this class that this is sort of
being presented in a very practical ways
if we're drawing on actual pebble using rulers
and protractors and whatnot. And no doubt, a lot of the digital artist and they're probably saying
to themselves, well, do I really need to know all this stuff when you've
got all the shortcuts, all the shortcut rule or tools
within our applications. And reality is, is that we also do have all of those shortcuts. It's gonna be super useful to actually understand
all this stuff. So don't discount it because
you might find yourself in a situation where you've
only got pencil on paper. It's good to have skills both
practically and digitally. I'm happy with this
table and they also, what else do we
want in this room? Well. I'm going to put in a couple
of windows, I think now. So we want some nice
big windows to let all that natural light into
L Bedroom slash study he is. So I think I'm going to
make them six by six, and I think I want to have it directly in the
middle of the wool. So we want to stop three feet in because
it's a 12-foot room. So 123456, that
gives us directly in the center this so that's six units across in
a twelv foot room. And having it directly in the middle of the room is actually gonna be a
little bit boring. So let's actually lift
it up a little bit. So we'll have it four feet above our horizon line and
two feet below it. So that gives us the position
for a six-by-six window. And we might put another one
probably in the back here. I think we'll look not so we'll just construct the
rest of this first. And we're not going to
worry too much about the depth of the actual window
itself in this instance. So I'm just going
to eyeball this, and that's perfectly okay to do sometimes eyeballing
it is just going to be as good result because we don't really
want this to get to mechanical even though we're
using lot of measurements, hay and a lot of sharp
angles at the moment. This is really just
about developing an understanding of
how perspective works. Once we get more skilled
than we can take a few shortcuts here and put the window we now
in the back here. So we'll just use the edges that follow on from our first window here
right at the back. And use that as a guide to draw some horizontal
lines across. And we'll use the grid
on the floor to figure out exactly that
six-foot width here. So 123 on the left, hey, 123 on the right, that gives us six
measure up from that. And that gives us a perfect
six by six windows. And at exactly the same
hot as alphas one. All of this measuring that
we've done in this lesson, we can get a little bit ridiculously accurate
if we really wanted to. And they're all gonna
be instances way. Well, we need exact measurements in place for what
it is we're doing. However, as we said at the
very start of the list, we don't want perspective to override our
compositional ideas. So if we're doing
sci-fi vehicles or some sort of fantasy costs
or something like that. We still want that to be the
main force that's driving things perspective has to work with that idea and not
the other way around. I'm going to put in something else now I'm going
to put in a rug. And I'm going to say, let's say it's about
five feet by five feet. It's going to arbitrarily
choose a spot here. So 12345 there, that's a length, and we'll go 12345
into the back there. So we've got a rug here, not going to worry
about a patent or anything at the moment, and it's something we can
think about later on. So things that are
coming together nicely. It's looking a little bit
at the back of the room. So I think maybe if we consider this sort of
Bedroom slash study, it's a good idea
to put a bit in. So let's figure out some
dimensions for our beds. So let's say, we'll say
maybe a seven foot bed. That's pretty good for an average size person though it's site
and we'll say it's full foot deep and we'll say it's about
2.5 feet in height. Now, again, 1234567
across there. We could have just
simply going one across from our center line. They of course, and 1234, that gives us the
foundations for our bed. I get that in place. A very big bed, probably
good enough for one person, single or something like that. And so we've got that
down and we want one to 2.5 here at the side. And we'll measure that across all the way
to the back day, get that measuring point there. And we use that as our God
for the height of a bed. Now we need to split
that of course, because we've got the
mattress and the base. Now I'm not gonna worry
really in this instance about how high that split
is between the two. So again, just kind
of eyeball things. And that's why you can start a little bit of fun actually, because again, we don't want to get too rigid with
all this stuff. We want to enjoy
art and we won't perspective to work
alongside our OT. So of course this has been all about one-point perspective. And generally speaking,
it is the easier of the perspectives to start with when we start
to shift to 2.3. Well, we've got a
whole new set of challenges there that
we have to figure out. Drawing boxes, for instance, nice even cubes is a
little bit different when we start shifting
to 2 perspective. That's something
that we can work up to over subsequent lessons. There's still an awful lot
that we need to cover here, things like inclines
and declines in getting objects nice and evenly
spaced apart as well. There's an awful lot to cover
with the subject matter. And you could literally
spend yeast trying to master it one step at a time and
slowly build our skills up. I think this bed is
well and truly done. So let's have a look and say,
well, what else can we do? Is there anything
else we can put in place and maybe what we need to just finish off some type of lighting
fixture on the roof. We want a lot that's directly in the center of the ceiling. So what can we do? Well, we just used
the same method that we use to get the
center of a bookshelf. Earlier on, will, chris
cross a couple of lines, one corner to one corner
diagonally across C. And to get the exact center of our
ceiling just like that. And that gives us
the exact landmark that we need for our
lighting fixture. So what size we're going
to make this, I think, will make this roughly
about a foot in width. If we measure all
the way back down to the grid on the
floor and just get that little measurement point
this so we know exactly where the loading
fixtures is going to be in relation to the floor. We want the fixture to
be about a foot wide, so we'll do half a foot either side is our
measuring garden. We'll just kind of eyeball
this again up at the top. That's roughly about
a foot in length. They will do a rounded fixture just to finish things off here. So it's not all squares and
angles in this instance. That's gonna do us
for our exercise. So just to reiterate, we've got a twelv by
12 by 12 foot room. We've got a station point positioned 12 feet away
from the picture plane. We've got our eye level positioned at six feet
from the ground line. We drew in a 12 by 12 gridded
floor and gridded wall to help us with all
the furniture that we've now placed in it. We'll finish this up here and we'll move on
to the assignment.
 JW Learning, Drawing the Body, Head and Hands